albums, bags & boxes #2 albums, bags & boxes #2 … · return works exactly like the enter...
TRANSCRIPT

For
use
with
/ U
tilis
er a
vec
ecl
ips™
ele
ctro
nic
die-
cutt
ing
mac
hine
For
use
with
/ U
tilis
er a
vec
Des
ign
Ca
rtri
dg
eC
arto
uch
e d
e C
on
cep
tio
n
ALB
UM
S, B
AG
S &
BO
XES
#2
Alb
ums,
Bag
s &
Box
es #
2A
lbum
s, S
acs
et C
adre
s #
2Á
lbum
s, B
olsa
s y
Caja
s #
2
Tab
le o
f C
on
ten
ts
2
Translations . . . . . . . . . . . . . . . . . . . . . . . . . . . . . . . . . . . 3TraductionsTraduccionesÜbersetzungen
Handheld Remote Control Features . . . . . . . . . . . . . . . . . . . 4Caractéristiques Télécommande Portable Funciones del Telemando de Mano Steuerungsfunktionen
Screen Features . . . . . . . . . . . . . . . . . . . . . . . . . . . . . . . . 6Caractéristiques Écran Funciones de la Pantalla Bildschirmfunktionen
Picture-in-Picture . . . . . . . . . . . . . . . . . . . . . . . . . . . . . . . 8Image dans l’Image Imagen en Imagen Bild-in-Bild
Scoring . . . . . . . . . . . . . . . . . . . . . . . . . . . . . . . . . . . . . .10RainageCaladoAnritzen
Defi nitions . . . . . . . . . . . . . . . . . . . . . . . . . . . . . . . . . . . .12Défi nitions Defi niciones Defi nitionen
Image Directory . . . . . . . . . . . . . . . . . . . . . . . . . . . . . . . .14Répertoire d’Images Guía de Imágenes Bildverzeichnis
Contact Information . . . . . . . . . . . . . . . . . . . . . . . . . . . .100Contacts Información de ContactoKontaktinformationen
Warranty Information . . . . . . . . . . . . . . . . . . . . . . . . . . .101Informations sur GarantieInformación de Garantía Garantie-Informationen

Tran
slat
ion
s
3
HANDHELD REMOTE CONTROL FEATURES ADD TO QUEUE: Ajouter à la fi le d’attente • Agregar a la cola • In die warteschlangeALT BLUE RECTANGLE: Rectangle bleu ALT • ALT-Rectángulo azul • ALT – Blaues quadratALT RED CIRCLE: Cercle rouge ALT • ALT – Círculo rojo • ALT – Rot kreisBLADE POSITIONER CONTROL: Contrôle de Lame Positionneur • Control de posicionader de hoja • Klinge Stellungsregler KontrolleCUT: Découpe • Cortar • Schnitt DELETE: Supprimer • Borrar • LöschenDISPLAY WINDOW: Fenêtre d’affi chage • Pantalla • AnzeigefensterESCAPE: Echap • Escape • EscapeFUNCTION KEYS: Touches fonctions • Teclas de función • FunktionstastenKEYPAD: Clavier • Teclado • TastaturMAIN DISPLAY: Affi chage principal • Panel Principal • HauptanzeigeOPTIONS MENU: Menu Options • Menú opciones • Menü Optionen POP-UP MENU: Menu éclair • Menú de ventana emergente • Pop-Up MenüQUEUE DISPLAY: Affi chage fi le d’attente • Panel de la cola • Anzeige der warteschlangeRETURN: Retour • Retorno • EingabetasteSCREEN NAVIGATOR CONTROL: Contrôle de Navigateur écran • Control de Navegador de Pantalla • Bildschirmnavigator KontrolleSELECTION DISPLAY: Affi chage sélection • Panel de selección • AuswahlanzeigeSHIFT: Majuscule • Mayúscula • UmschalttasteTOGGLE: Touche à bascule • Alternar • Toggle-taste
STYLES BORDER: Bordure • Borde • BordüreEMBELLISHMENTS: Embellissement • Decoración • DekorationORIGINAL: Original • Original • OriginalOUTLINE: Contour • Contorno • KonturPIECES: Pièces • Piezas • StückeSHADOW: Ombré • Sombreado • SchattiertSOLID: Uni • Sólido • Gefüllt

Han
dh
eld
Rem
ote
Co
ntr
ol F
eatu
res
4
BladePositionerControl
Delete Alt BlueRectangle
ScreenNavigatorControl
FunctionKeys
Add to QueueDisplay Window
Pop-Up Menu
ToggleEscape
ReturnAlt PinkCircle
Shift
Figure 1
Handheld Remote Control Features The Handheld Remote Control offers many robust features (see Figure 1). Toggle takes you to and from the Selection Display to the Options Menu. Add to Queue (+) adds items you have highlighted in Selection Display to Queue. The Pop-Up Menu reveals several advanced cutting functions. Escape allows you to go back to the previous screen. OK selects the highlighted item. Cut is used to either cut the shape highlighted in the Selection Display or cut all the objects in Queue. The up/down and left/right arrows work as expected; the Screen Navigator Control allows you to scroll and select throughout, while the Blade Positioner Control moves the blade over the material to be cut. Delete functions as your delete key, while Return works exactly like the Enter key on a standard computer keyboard.
Caractéristiques Télécommande Portable Le Télécommande Portable offre de multiples fonctions robustes (voir Schéma 1). La fonction bascule fait passer de le Affi chage sélection au menu Options. La fonction Ajouter à la fi le d’attente (+) ajoute les articles mis en surbrillance dans Affi chage sélection pour File d’attente. Le menu éclair révèle plusieurs fonctions de coupe avancées. Echap vous permet
Cut

Han
dh
eld
Rem
ote
Co
ntr
ol F
eatu
res
5
de revenir à l’écran précédent. Cliquez sur OK pour sélectionner l’article en surbrillance. La fonction Découpe est utilisée soit pour découper la forme en surbrillance dans le Affi chage sélection, soit pour découper tous les objets dans la File d’attente. La fonction des fl èches haut/bas et gauche/droite est implicite; la Contrôle de navigateur écran vous permet de faire défi ler et de sélectionner l’ensemble des éléments, tandis que la Contrôle de lame positionneur positionne la lame au-dessus du matériau à découper. La touche Supprimer sert de touche de suppression, tandis que le Retour fonctionne exactement comme la touche Entrée d’un clavier ordinaire.
Funciones del Télémando de ManoEl Télémando de Mano ofrece muchas funciones importantes (véase la fi gura 1). La función Alternar cambia entre el panel de selección y el menú opciones. La función Agregar a la cola (+) agrega los elementos que usted ha resaltado en el panel de selección a la cola. El menú de ventana emergente revela varias funciones de corte avanzadas. La función Escape le permite volver a la pantalla anterior. La función Aceptar (OK) selecciona el elemento resaltado. La función Cortar se utiliza para cortar la forma resaltada en el panel de selección o para cortar todos los objetos que están en la cola. Las fl echas arriba/abajo e izquierda/derecha le permiten moverse hacia las respectivas direcciones; control de navegador de pantalla le permite desplazarse y realizar selecciones y control de posicionador de hoja mueve la hoja por el material que se va a cortar. Borrar funciona como la tecla Suprimir, mientras que Retorno funciona exactamente como la tecla Intro en cualquier teclado de ordenador estándar.
SteuerungsfunktionenDie Steuerung bietet viele feststehende Funktionen (siehe Abbildung 1). Die Toggle-Taste dient zum Wechsel zwischen Auswahlanzeige und Menü Optionen. Die Taste „In die Warteschlange (+)“ reiht Elemente, die im Auswahlanzeige markiert wurden, in der Warteschlange ein. Das Pop-Up-Menü mehrere fortgeschrittene Schneidfunktionen angezeigt. Mit der „Escape“ – Taste können Sie zum vorherigen Bildschirm zurückkehren. OK wählt das markierte Element aus. „Schnitt“ wird verwendet, um entweder die im Auswahlanzeige markierte Form oder alle Objekte in der Warteschlange zu schneiden. Die Navigationstasten (Nach Oben/Nach Unten und Rechts/Links) bringen Sie an die gewünschte Stelle; mit der Bildschirmnavigator Kontrolle können Sie in der gesamten Anzeige den Bildlauf verwenden sowie Markierungen durchführen, und die Steuertasten zur Klinge Stellungsregler kontrollieren die Position der Klinge über dem zu schneidenden Material. Die Löschen funktioniert wie die Löschtaste und die Eingabetaste (Return) funktioniert genau wie die Eingabetaste auf einer Standard-Computertastatur.

Scre
en F
eatu
res
6
Starte
r an
d R
oc
kin’
Jan
ie
SPEED: 4PRESSURE: 2
12"x12"Cardstock L
OutlineShadowPieces
H: 2.25" W: 1.51" QTY: 1
MainDisplay
QueueDisplay
OptionsMenu
SelectionDisplay
Figure 2
Screen Features Once the cartridge has been inserted and the power has been turned on for the fi rst time, you will be prompted to set your defaults. Thereafter, you will notice many different options on your screen (see Figure 2 below). Each display feature easily guides you through the shape-cutting process (see page 4).

Scre
en F
eatu
res
7
Caractéristiques Écran Une fois la cartouche insérée et l’appareil sous tension en marche (sur ON) pour la première fois, vous êtes invité(e) à défi nir vos paramètres par défaut. Vous remarquerez de multiples options sur votre écran (voir Schéma 2 ci-dessous). Chaque fonction d’affi chage vous guide facilement au fi l de la procédure de découpage de forme (voir page 4).
Funciones de la PantallaUna vez insertado el cartucho y encendido por primera vez, el sistema le indicará cómo confi gurar los valores predeterminados. A partir de ahí, verá muchas opciones diferentes en su pantalla (véase la fi gura 2 a continuación). Cada función de la pantalla lo guía fácilmente en el proceso de troquelado (véase la página 4).
BildschirmfunktionenNach Einlegen der Kartusche und erstmaligem Einschalten des Netzstroms werden Sie zur Einstellung Ihrer Standardwerte aufgefordert. Danach sehen Sie viele verschiedene Optionen auf dem Bildschirm (siehe Abbildung 2 unten). Jede Anzeigefunktion führt Sie leicht durch den Formschnittprozess (siehe Seite 4).

8
Pict
ure
-in
-Pic
ture
Figure 3
Picture-in-PicturePIP (picture-in-picture) takes the shape you have selected and encloses it inside of a circle, square, fl ower, star or any number of shapes. To use this function, simply select PIP and scroll through the Selection Display on the Handheld Remote Control. Refer to Figure 3 below to see how you can take a simple dog shape and encircle it with a heart or a circle. For more information about the PIP feature, please refer to the eclips™ User’s Guide.
Image dans l’ImageLa fonction Image dans l’image prend la forme sélectionnée et l’enferme dans un cercle, un carré, une fl eur, une étoile, ou toute forme voulue. Pour utiliser cette fonction, il suffi t de sélectionner la fonction Image dans l’image et de faire défi ler le Affi chage sélection à partir de la télécommande portable. Se reporter au Schéma 3 ci-dessous pour voir comment prendre une forme de chien simple pour l’entourer d’un cœur ou un cercle. Pour plus d’informations sur la fonction Image dans l’image, se reporter au Guide de utilisateurs eclips™.

9
Pict
ure
-in
-Pic
ture
Imagen en ImagenPIP (imagen en imagen) toma la forma que ha seleccionado y la encierra en un círculo, cuadrado, fl or, estrella u otra forma. Para usar esta función, no tiene más que seleccionar PIP y desplazarse por el panel de selección del mando a distancia manual. Consulte la fi gura 3 a continuación para ver cómo puede tomar una sencilla forma de perro e incluirla en un corazón o un círculo. Para obtener más información sobre la función PIP, consulte la Guía del Usuario de eclips™.
Bild-in-BildBild-in-Bild (PIP, picture-in-picture) umschließt die ausgewählte Form in einem Kreis, Quadrat, einer Blume, einem Stern oder in den unterschiedlichsten Formen. Zur Verwendung dieser Funktion wählen Sie einfach PIP (Bild-in-Bild) und scrollen durch der Auswahlanzeige auf der Fernbedienung. Abbildung 3 unten zeigt, wie Sie eine einfache Hundeform mit einem Herzen oder Kreis umschließen. Nähere Informationen zur PIP-Funktion fi nden Sie in der eclips™ Benutzerhandbuch.

10
Sco
rin
gScoringThe Scoring feature makes folding simple by partially cutting through the material for a clean fold. Scoring lines are indicated on particular designs with a dotted line in the Display Window. Scoring depth can be adjusted under the Setup key on the keypad.
Scoring adjustment should be varied relative to the material being used. If the default setting is not scoring deeply enough for a clean fold, the depth should be increased to a higher number. If the material has been cut along the scoring lines, then the scoring depth should be set to a lower number. For more information, please refer to the eclips™ User’s Guide.
Scoring requires at least Version 2.0 of the Sizzix eclips Software, available at Sizzix.com/eclips.
RainageLa fonction de rainage simplifi e le pliage en coupant partiellement le matériau pour un pli net. Les lignes de rainage sont indiquées sur certains dessins avec une ligne pointillée dans la fenêtre d’affi chage. La profondeur du rainage peut être réglée avec la touche « Setup » du pavé numérique.
Le réglage du rainage devrait varier selon le matériau utilisé. Si le réglage par défaut ne permet pas de rainer assez profondément pour obtenir un pli net, la profondeur doit être augmentée à un nombre plus élevé. Si le matériau a été coupé le long des lignes de rainage, alors la profondeur de rainage devrait être réglée à un nombre inférieur. Pour plus d’informations, veuillez vous reporter au Guide de l’utilisateur d’« eclipsMC ».
Le rainage nécessite au moins la version 2.0 du logiciel « eclips » de Sizzix, offerte sur Sizzix.com/eclips.

Sco
rin
g
Calado
El Calado permite que se pueda doblar fácilmente cortando parcialmente el material para que se doble de manera prolija. Las líneas caladas se indican en diseños particulares con líneas punteadas en la ventana Display Window (Visor). La profundidad de Calado puede ser ajustada mediante la tecla Setup (confi guración) del teclado numérico
El ajuste del Calado varía según el material utilizado. Si la confi guración por defecto no cala con la sufi ciente profundidad para obtener un doblez prolijo, el índice de profundidad se debe incrementar a un número mayor. Si el material ha sido cortado a través de las líneas de calado, entonces la profundidad de calado se debe fi jar en un número más bajo. Para más información, consulte la Guía de Usuario eclips™.
El Calado requiere al menos la Versión 2.0 del Software Sizzix eclips, disponible en Sizzix.com/eclips.
AnritzenDie Funktion Anritzen erleichtert das Falten, indem das Material nur eingeschnitten wird, was einen sauberen Falz ergibt. Ritzlinien werden bei bestimmten Mustern im Anzeigefenster als gepunktete Linien angezeigt. Die Ritztiefe kann über die Taste Setup auf dem Tastenfeld eingestellt werden.
Die Einstellung des Anritzens sollte entsprechend des benutzten Materials verändert werden. Wenn die Standardeinstellung nicht tief genug einritzt, um eine gute Faltung zu erreichen, sollte die Tiefe auf eine höhere Nummer eingestellt werden. Wenn das Material entlang der Ritzlinien durchgeschnitten wurde, sollte die Ritztiefe auf eine tiefere Nummer eingestellt werden. Weitere Informationen befi nden sich im eclips™-Benutzerhandbuch.
Die Funktion Anritzen benötigt mindestens Version 2.0 der Sizzix eclips Software, erhältlich unter Sizzix.com/eclips.
11

Defi
nit
ion
s
12
Defi nitionsPlease note that all designs may not include every feature listed here.Border: Attached, repeated design in lengths of 6" (15.24cm), 12" (30.48cm), 18" (45.72cm) or 24" (60.96cm)Embellishment: Additional shape decorationsOriginal: Unembellished shape or fontOutline: A 2mm-wide outline of shape or font fi tting within edge of original Pieces: All parts that comprise shapeShadow: Cut extends 2mm over original shape or font with inside lines removedSolid: Silhouette of shape or font with inside lines removed
Défi nitionsRemarque : il est possible que tous les motifs ne présentent pas toutes les caractéristiques énumérées.Bordure: Motif joint et répété, disponible en 15,24 cm (6 pouces), 30,48 cm (12 pouces), 45,72 cm (18 pouces), 60,96 cm (24 pouces)Embellissement: Formes de décorations supplémentairesOriginal: Forme ou police sans ornementsContour: Contour de forme ou ajustement de police de 2 mm de large à l’intérieur de la bordure de l’original Pièces: Toutes les parties qui composent la formeOmbré: La découpe se prolonge de 2 mm sur la forme ou la police initiale, les lignes intérieures étant suppriméesUni: Silhouette de la forme ou police, lignes intérieures supprimées

13
Defi
nit
ion
s
Defi niciones Recuerde que algunos diseños pueden no incluir todas las funciones que se mencionan aquí.Borde: Diseño repetido, adjunto en longitudes de 15,24 cm (6"), 30,48cm (12"), 45,72 cm (18") o 60,96 cm (24")Decoración: Adornos adicionales para la formaOriginal: Fuente o forma sin decorarContorno: Contorno de 2 mm de ancho de la forma o la fuente que sigue el borde del original por su parte interiorPiezas: Todas las partes que componen la formaSombreado: La función Cortar extiende en 2 mm la fuente o forma original por el exterior y se eliminan las líneas interioresSólido: Silueta de la fuente o forma en la que se han eliminado las líneas interiores
Defi nitionenBitte beachten Sie, dass nicht alle Designs alle hier aufgeführten Merkmale enthalten.Bordüre: Angefügtes, wiederholtes Design in Längen von 15,24 cm(6"), 30,48 cm (12"), 45,72 cm (18") oder 60,96 cm (24") Dekoration: Weitere FormdekorationenOriginal: Nicht dekorierte Form oder SchriftartKontur: Eine 2 mm breite Kontur einer Form oder Schriftart, die in den Rand des Originals passtStücke: Alle Teile, die eine Form ausmachenSchattiert: Der Schnitt erstreckt sich 2 mm über die Originalform oder -schriftart, wobei die inneren Linien entfernt werdenGefüllt: Silhuette der Form oder Schriftart mit entfernten In-nenlinien

14
Albums . . . . . . . . . . . . . . . . . . . . . . . . . . . . . . . . . . 16AlbumsÁlbumsAlbums
Bags . . . . . . . . . . . . . . . . . . . . . . . . . . . . . . . . . . . . 32SacsBolsasTasches
Boxes . . . . . . . . . . . . . . . . . . . . . . . . . . . . . . . . . . . 48CadresCajasKastens
Use “Created at” size for optimum results. For smaller sizes, perform test cut.L’utilisation “Created at” à la taille pour des résultats optimaux. Pour de plus petites tailles, exécutez la coupe d’essai.El uso “Created at” el tamaño para los resultados óptimos. Para tamaños más pequeños, realice el corte de la prueba.Gebrauch „verursachte“ an der Größe für optimale Resultate. Für kleinere Größen führen Sie Testschnitt durch.
"Assembled" shows fi nished product. "Assembled" montre le produit assemblé. "Assembled muestra el producto armado. "Assembled" zeigt Erzeugnis zusammengebaut.
Imag
e D
irec
tory

15

Alb
um
s: A
lbu
m w
/Cir
cle
Tab
s
16
Assembled
Solid

Alb
um
s: A
lbu
m w
/Cir
cle
Tab
s
17
OriginalCreated at 5.25" x 6
Embellishments
Pieces

Created at 4" x 4.40"
Created at4" x 7.03"
Created at4" x 8.77"
Created at4" x 11.03"
Alb
um
s: B
aby
18
Assembled
Pieces

Created at 4" x 4.40"
Created at4" x 7.03"
Created at4" x 8.77"
Created at4" x 11.03"
Created at 4" x 4.40"
Created at4" x 7.03"
Created at4" x 8.77"
Created at4" x 11.03"
Alb
um
s: B
aby
19
Original
Embellishments

Alb
um
s: B
utt
erfl
y
Solid
20
Assembled

Alb
um
s: B
utt
erfl
y
21
Created at 5.25" x 6.25" Original
Embellishments
Pieces

Alb
um
s: F
ancy
22
Assembled
Solid

Alb
um
s: F
ancy
23
Embellishments
Pieces
OriginalCreated at 4.75" x 7.32"

Alb
um
s: F
ancy
Sca
llop
Rec
tan
gle
24
Assembled
Solid
Alb
um
s: F
ancy
Sca
llop
Rec
tan
gle
25
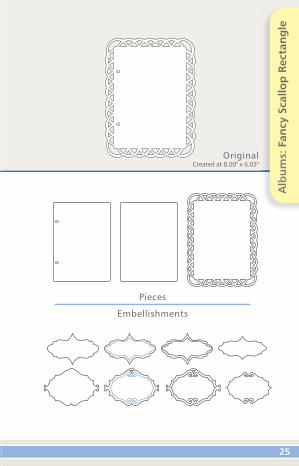
Embellishments
Pieces
OriginalCreated at 8.00" x 6.03"

Alb
um
s: L
ace
26
Assembled
Solid

Alb
um
s: L
ace
27
Embellishments
Pieces
OriginalCreated at 5.50" x 9.02"

Alb
um
s: L
ayer
ed R
ibb
on
Ban
ner
28
Assembled
Solid

Alb
um
s: L
ayer
ed R
ibb
on
Ban
ner
29
Embellishments
Pieces
OriginalCreated at 9.74" x 8.68"

Alb
um
s: P
ock
et
Solid
30
Assembled

Alb
um
s: P
ock
et
Embellishments
OriginalCreated at 11" x 8.50"
31

Bag
s: C
row
n
32
Assembled
1.84" x 2.83" x 1.01"
2.30" x 3.50" x 1.21"
3.75" x 5.50" x 2"
5.67" x 8.61" x 3.10"
2.80"
3.50"
5.50"
*8.60
5
6.15
10
15.23
Assembled Size(width x height x depth)
Assembled Height
EditHeight
* Requires use of 12 x 24 Cutting Mat.
Hei
gh
t
Width
Depth

Bag
s: C
row
n
Original
33
Ed
it H
eig
ht
Embellishments
Pieces

Bag
s: C
row
n
34

Bag
s: C
row
n
35

Bag
s: L
oo
py
Tag
36
Assembled
Assembled Size(width x height x depth)
1.28" x 2.13" x 0.75"
2.86" x 5" x 1.73"
5.43" x 9.41" x 3.25"
Assembled Height
2.13"
5"
*9.41"
EditHeight
5
11.70
22.32
* Requires use of 12 x 24 Cutting Mat.
Hei
gh
t
Width
Depth

Bag
s: L
oo
py
Tag
Original
37
Ed
it H
eig
ht
Embellishments
Pieces

Bag
s: L
oo
py
Tag
38

Bag
s: L
oo
py
Tag
39

Bag
s: P
urs
e
40
Assembled
Assembled Size(width x height x depth)
2.64" x 1.94" x 0.79"
3.99" x 3" x 1.23"
5.66" x 4" x 1.65"
8.53" x 5.98" x 2.53"
Assembled Height
1.94"
3"
4"
*5.98"
EditHeight
4
6.27
8.38
12.85
* Requires use of 12 x 24 Cutting Mat.
Hei
gh
t
WidthDepth

Bag
s: P
urs
e
Original
41
Ed
it H
eig
ht
Embellishments
Pieces

Bag
s: P
urs
e
42

Bag
s: P
urs
e
43

Bag
s: P
urs
e w
/Flo
wer
Cu
tou
t
44
Assembled
Assembled Size(width x height x depth)
2.86" x 2.71" x 1.78"
4.61" x 4" x 2.79"
7.71" x 6.82" x 4.72"
Assembled Height
2.71"
4"
*6.82"
EditHeight
5
6.97
12.8
* Requires use of 12 x 24 Cutting Mat.
Hei
gh
t
Width
Depth

Bag
s: P
urs
e w
/Flo
wer
Cu
tou
t
Original
45
Embellishments
Pieces
Ed
it H
eig
ht

Bag
s: P
urs
e w
/Flo
wer
Cu
tou
t
46

Bag
s: P
urs
e w
/Flo
wer
Cu
tou
t
47

Bo
xes:
Bo
x w
/Lid
48
Assembled
Assembled Size(width x height x depth)
2.14" x 0.48" x 1.43"
4.77" x 1" x 3.28"
8.36" x 1.80" x 5.69"
Assembled Height
0.48"
1"
1.80"
EditHeight
4
9.17
15.93
Hei
gh
t
Width
Depth

Bo
xes:
Bo
x w
/Lid
Embellishments
Original
49
Ed
it H
eig
ht

Bo
xes:
Bo
x w
/Lid
50

Bo
xes:
Bo
x w
/Lid
51

Bo
xes:
Bo
x w
/Lid
#2
52
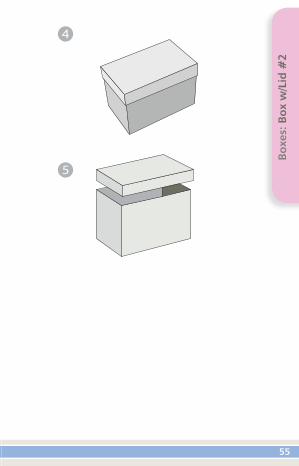
Assembled
Assembled Size(width x height x depth)
2.06" x 1.47" x 1.27"
2.88" x 2" x 1.73"
5.01" x 3.46" x 3.03"
Assembled Height
1.47"
2
*3.46
EditHeight
6
8.63
14.84
* Requires use of 12 x 24 Cutting Mat.
Hei
gh
t
WidthDepth

Bo
xes:
Bo
x w
/Lid
#2
Original
53
Embellishments
Pieces
Ed
it H
eig
ht

Bo
xes:
Bo
x w
/Lid
#2
54
Bo
xes:
Bo
x w
/Lid
#2
55

Bo
xes:
Bo
x w
/Sca
llop
Lid
56
Assembled
Assembled Size(width x height x depth)
1.27" x 1.64" x 1.27"
2.18" x 3" x 2.18"
3.02" x 4" x 3.02"
4.12" x 5.60" x 4.12"
Assembled Height
1.64"
3"
4"
5.60"
EditHeight
5
8.93
11.90
16.21
* Requires use of 12 x 24 Cutting Mat.
Hei
gh
t
WidthDepth

Bo
xes:
Bo
x w
/Sca
llop
Lid
Original
57
Ed
it H
eig
ht
Embellishments
Pieces

Bo
xes:
Bo
x w
/Sca
llop
Lid
58

Bo
xes:
Bo
x w
/Sca
llop
Lid
59

Bo
xes:
Bir
dh
ou
se
60
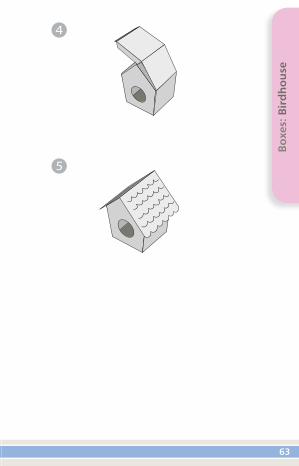
Assembled
Assembled Size(width x height x depth)
1.04" x 1.36" x 0.85"
1.46" x 2 x 1.22"
2.20" x 3" x 1.84"
3.27" x 4.39" x 2.65"
Assembled Height
1.36"
2"
3"
*4.39"
EditHeight
4
5.50
8.18
12.80
* Requires use of 12 x 24 Cutting Mat.
Hei
gh
t
WidthDepth

Bo
xes:
Bir
dh
ou
se
Original
61
Ed
it H
eig
ht
Embellishments
Pieces

Bo
xes:
Bir
dh
ou
se
62
Bo
xes:
Bir
dh
ou
se
63
Bo
xes:
Dre
ss
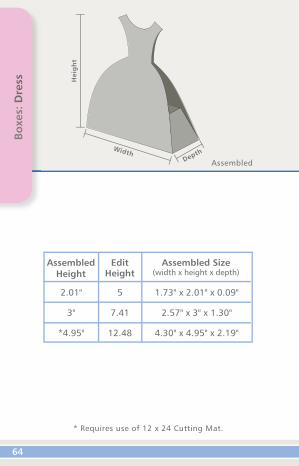
64
Assembled
Assembled Size(width x height x depth)
Assembled Height
2.01"
3"
*4.95"
5
7.41
12.48
1.73" x 2.01" x 0.09"
2.57" x 3" x 1.30"
4.30" x 4.95" x 2.19"
EditHeight
* Requires use of 12 x 24 Cutting Mat.
Hei
gh
t
WidthDepth

Bo
xes:
Dre
ss
Original
65
Ed
it H
eig
ht
Embellishments

Bo
xes:
Dre
ss
66

Bo
xes:
Dre
ss
67

Bo
xes:
Fre
nch
Fry
68
Assembled
* Requires use of 12 x 24 Cutting Mat.
Assembled Size(width x height x depth)
1.62" x 2.20" x 0.57"
2.94" x 4" x 0.98"
3.66" x 5" x 1.24"
4.35" x 6" x 1.61"
6.68" x 8.95" x 2.88"
Assembled Height
2.20"
4"
5"
6"
*8.95"
EditHeight
4
7.31
9.20
11
16.65
Hei
gh
t
Width
Depth

Bo
xes:
Fre
nch
Fry
Original
69
Embellishments
Ed
it H
eig
ht

Bo
xes:
Fre
nch
Fry
70

Bo
xes:
Fre
nch
Fry
71

Bo
xes:
Hex
ago
n
72
Assembled
* Requires use of 12 x 24 Cutting Mat.
Assembled Size(width x height x depth)
1.62" x 1.45" x 0.70"
2.26" x 2" x 0.95"
3.44" x 3" x 1.44"
4.16" x 3.75" x 1.80"
Assembled Height
1.62"
2"
3"
*3.75"
EditHeight
5
7
10.72
13.08
Hei
gh
t
Width
Dep
th

Bo
xes:
Hex
ago
n
Original
73
Ed
it H
eig
ht
Embellishments
Pieces

Bo
xes:
Hex
ago
n
74

Bo
xes:
Hex
ago
n
75

Bo
xes:
Lo
ng
Tri
ang
le
76
Assembled
* Requires use of 12 x 24 Cutting Mat.
Assembled Size(width x height x depth)
1" x 1" x 2.83"
2.02" x 2" x 5.71"
3.14" x 3.11" x 8.75"
Assembled Height
1"
2"
*3.11"
EditHeight
4
8.12
12.67
Hei
gh
t
Wid
th
Depth

Bo
xes:
Lo
ng
Tri
ang
le
Original
77
Ed
it H
eig
ht
Embellishments
Pieces

Bo
xes:
Lo
ng
Tri
ang
le
78

Bo
xes:
Lo
ng
Tri
ang
le
79

Bo
xes:
Ow
l
80
Assembled
* Requires use of 12 x 24 Cutting Mat.
Assembled Size(width x height x depth)
3.29" x 4.28" x 2.31"
3.93" x 5.20" x 2.76"
Assembled Height
*4.28"
*5.20"
EditHeight
12.50
14.90
Hei
gh
t
WidthDepth

Bo
xes:
Ow
l
Original
81
Ed
it H
eig
ht
Embellishments
Pieces

Bo
xes:
Ow
l
82

Bo
xes:
Ow
l
83

Bo
xes:
Pie
Slic
e
84
Assembled
* Requires use of 12 x 24 Cutting Mat.
Hei
gh
t
Depth
Width
Assembled Size(width x height x depth)
2.10" x 1.19" x 1.51"
3.50" x 2" x 2.42"
6.38" x 3.56" x 4.37"
Assembled Height
1.19"
2"
*3.56"
EditHeight
6
10.31
18.32

Bo
xes:
Pie
Slic
e
Original
85
Ed
it H
eig
ht
Embellishments
Pieces

Bo
xes:
Pie
Slic
e
86

Bo
xes:
Pie
Slic
e
87

Bo
xes:
Pill
ow
w/H
and
les
88
Assembled
* Requires use of 12 x 24 Cutting Mat.
Assembled Size(width x height x depth)
2.44" x 2.03" x 0.92"
3.50" x 3" x 1.32"
5.73" x 4.77" x 2.14"
Assembled Height
2.03"
3"
*4.77"
EditHeight
5
7.34
11.92
Hei
gh
t
Depth Width

Bo
xes:
Pill
ow
w/H
and
les
Original
89
Ed
it H
eig
ht
Embellishments

Bo
xes:
Pill
ow
w/H
and
les
90

Bo
xes:
Pill
ow
w/H
and
les
91

Bo
xes:
Str
awb
erry
92
Assembled
* Requires use of 12 x 24 Cutting Mat.
Hei
gh
t
Width
Assembled Size(width x height x depth)
2.45" x 2.45" x 1.91"
5.24" x 5.24" x 4.01"
Assembled Height
2.45"
*5.24"
EditHeight
6
12.47

Bo
xes:
Str
awb
erry
Original
93
Ed
it H
eig
ht
Embellishments
Pieces

Bo
xes:
Str
awb
erry
94

Bo
xes:
Str
awb
erry
95

Bo
xes:
Tea
po
t
96
Assembled
* Requires use of 12 x 24 Cutting Mat.
Assembled Size(width x height x depth)
3.34" x 4.73" x 3.34"
3.48" x 4.81" x 3.48"
Assembled Height
4.73"
*4.81"
EditHeight
11.75
12.28
Hei
gh
t
Width Depth

Bo
xes:
Tea
po
t
Original
97
Ed
it H
eig
ht
Embellishments
Pieces

Bo
xes:
Tea
po
t
98

Bo
xes:
Tea
po
t
99

Cu
sto
mer
Su
pp
ort
100
Contact InformationAssistance clientèle / ContactsAtención al Cliente / Información de ContactoKundenservice / Kontaktinformationen
NORTH AMERICAAMÉRIQUE DU NORD • AMÉRICA DEL NORTE • NORTH AMERICA
INTERNET: sizzix.com EMAIL: [email protected]
PHONE toll-free: 877-355-4766TÉLÉPHONE: Appel gratuit • TELÉFONO: gratuito • TELEFON: gebührenfrei
Outside USA: 949-598-8821En dehors des états-Unis: • Fuera de EE. UU.: • Außerhalb der USA:
ADDRESS: 25862 Commercentre Drive • Lake Forest, CA • 92630-8804ADRESSE: • DIRECCIÓN: • ADRESSE:
EUROPEEUROPE • EUROPA • EUROPA
INTERNET: sizzix.co.uk EMAIL: [email protected]
PHONE: 0871 499 8181TÉLÉPHONE: • TELÉFONO: • TELEFON:
Outside UK: +44 (0) 845 345 2277En dehors du Royaume-Uni: • Fuera del Reino Unido:: • Außerhalb von Großbritannien:
ADDRESS: Ellison Europe Ltd. Unit 3 • Whitegate Industrial Estate • Wrexham LL13 8UG, United KingdomADRESSE: • DIRECCIÓN: • ADRESSE:

War
ran
ty In
form
atio
n
101
Warranty InformationInformations sur GarantieInformación de GarantíaGarantie-Informationen
• 90-Day LIMITED WARRANTY. For details, please see eclips Electronic Shape-Cutting Machine and Handheld Remote Control User’s Guide or visit Sizzix.com/warranties.
• GARANTIE LIMITÉE de 90 jours. Pour des détails, s’il vous plaît voir le Guide de Utilisateurs de eclips Machine de Découpage Electronique et Télécommande Portable ou visiter Sizzix.com/warranties.
• GARANTÍA LIMITADA de 90 días. Para los detalles, por favor vea la Guía de Usuarios de eclips Máquina Corte Electrónica et Telemando de Mano o visita Sizzix.com/warranties.
• 90 Tagesbegrenzte GARANTIE. Für Details bitte sehen Sie Eclips elektronische Form-Ausschnitt Maschine und Steuerung Benutzerhandbuch oder besuchen Sizzix.com/warranties.

sizzix.com
©2011 Ellison A
ll Rights ReservedT11-0118
Printed in China