alan carter studio - honolulu woodturners -- homehonoluluwoodturners.org/16_tips/alan carter_split...
TRANSCRIPT

ALAN CARTER STUDIO 5332 RIVERVIEW DR., LISLE, IL 60532 630-971-0690 [email protected] www.alancarterstudio.com
SPLITTING THE DIFFERENCE
This is for all you slackers out there. Sometimes half measures work just as well as fully rounded efforts. I’ll show you how to cut your work in 2 and double your creativity. Split bowl turnings are an interesting and creative alternative to regular bowl turning. By cutting a traditional turning in two and joining the 2 halves together, you can create a unique distinctive work that will stand apart. The first step is to mount a round blank on the lathe. Remember that the finished work will be ½ the size of a conventional bowl so plan your design accordingly. One of the advantages of this kind of work is that you can use flat boards from the local lumberyard or hardwood dealer. You don’t have to necessarily use specialty turning blanks. If the board is too narrow for you, you can cut the board crosswise and join the 2 sections to double the diameter of the piece. Since each half is visible from just one side, you don’t have to worry too much about matching grain patterns. You do want to make sure the board has the same coloring across its width. If there is a pronounced variation in color from one side of the board to the other, or if the sapwood is on one side and heartwood on the other, the difference will be apparent at the seams of the piece. The following is a step by step process of how I make these split bowl turnings.
The blank has been mounted to the lathe. In this case, I’m using a solid piece of wood rather than gluing together 2 separate pieces. I’ve used double sided turners’ tape to attach the blank to a waste block. This allows me to use the entire thickness of the blank, in this case about 7/8”. Normally I use a waste
block around 1/3 diameter of the blank itself. It’s important to use double sided tape made for turning. Carpet tape will only work on small pieces where there’s not much chance of the blank flying off the lathe. If in doubt, err on the side of caution. Be aware, though, that this stuff holds really, really well and sometimes it takes a lot of patience to release the turning from the waste block, especially if it’s a little thin. Experience will show you how much tape to use.
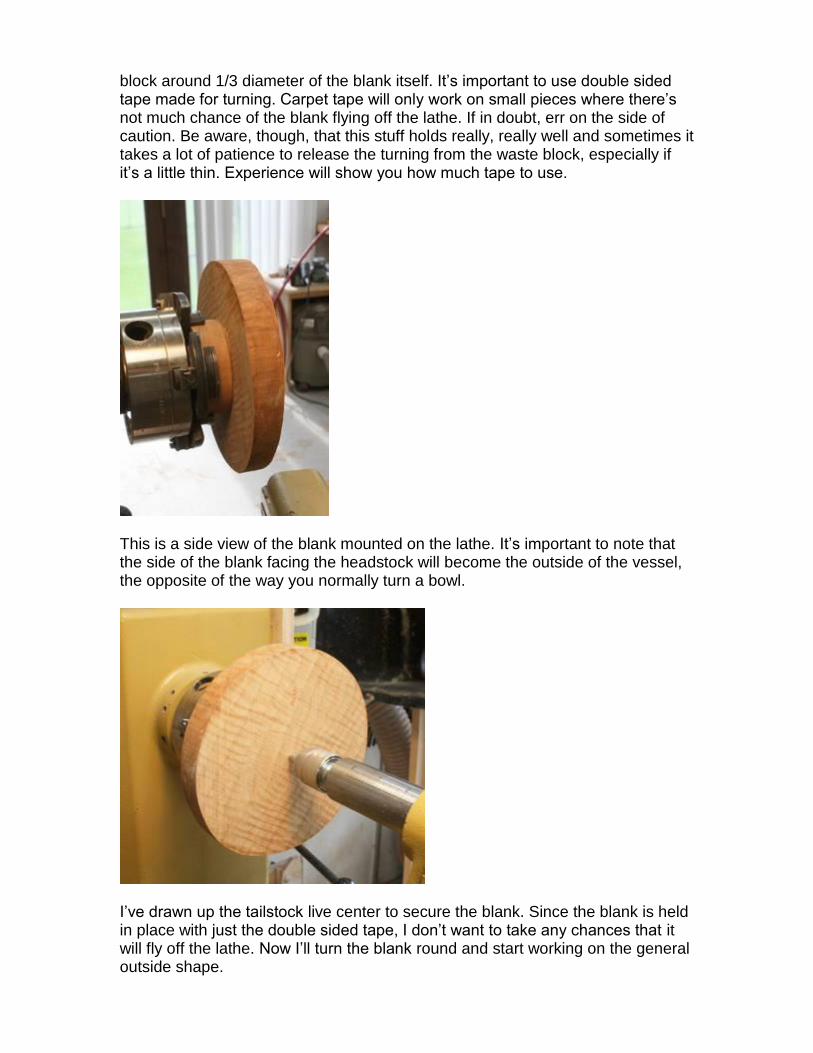
This is a side view of the blank mounted on the lathe. It’s important to note that the side of the blank facing the headstock will become the outside of the vessel, the opposite of the way you normally turn a bowl.
I’ve drawn up the tailstock live center to secure the blank. Since the blank is held in place with just the double sided tape, I don’t want to take any chances that it will fly off the lathe. Now I’ll turn the blank round and start working on the general outside shape.
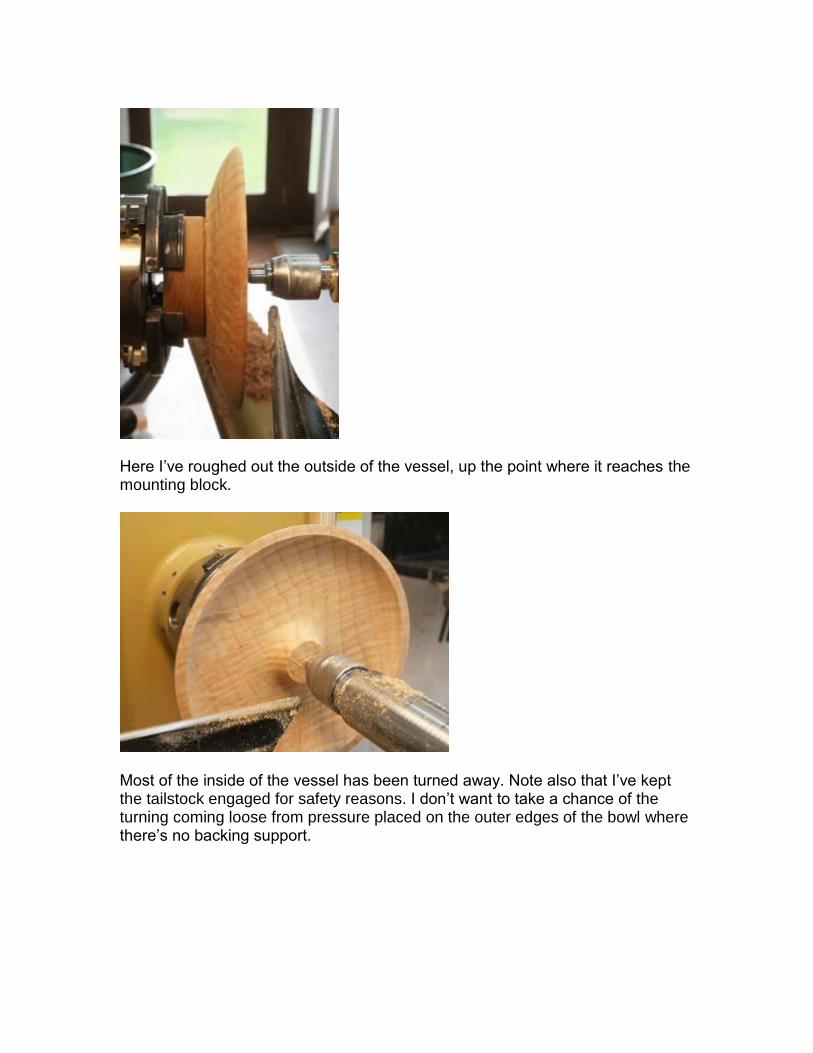
Here I’ve roughed out the outside of the vessel, up the point where it reaches the mounting block.
Most of the inside of the vessel has been turned away. Note also that I’ve kept the tailstock engaged for safety reasons. I don’t want to take a chance of the turning coming loose from pressure placed on the outer edges of the bowl where there’s no backing support.

The inside of the vessel has been turned with a wall thickness of around 3/16”. The thickness isn’t critical. It should be thin enough to resist cracking and give the finished piece a light feel but you don’t have to try to impress anyone with how thin you can make the walls. Since it’ll be covered completely when assembled, there’s no need to do any sanding. Note that the rim is fairly wide to provide an adequate gluing surface.
I’ve now reversed the blank and mounted it to a set of Coles jaws. This will allow me to finish turn the outer face without having to use an elaborate vacuum chucking system and I can leave the tailstock out of the way. You could also make a large jam chuck, but the Coles jaws are much simpler to set up.

The outside of the vessel has been turned to its final shape. The goal is to maintain an even curve around the bowl since it’ll be visible once the top is glued on.
I’ve added a set of grooves and lines. The grooves are an incised detail and the lines mark the area that’ll be textured. I use a parting tool ground down on the sides to make it very thin, around 1/32”, where it enters the wood. You can use a skew instead, but there’s less chance of the tool catching and skating along the surface with the thin parting tool.
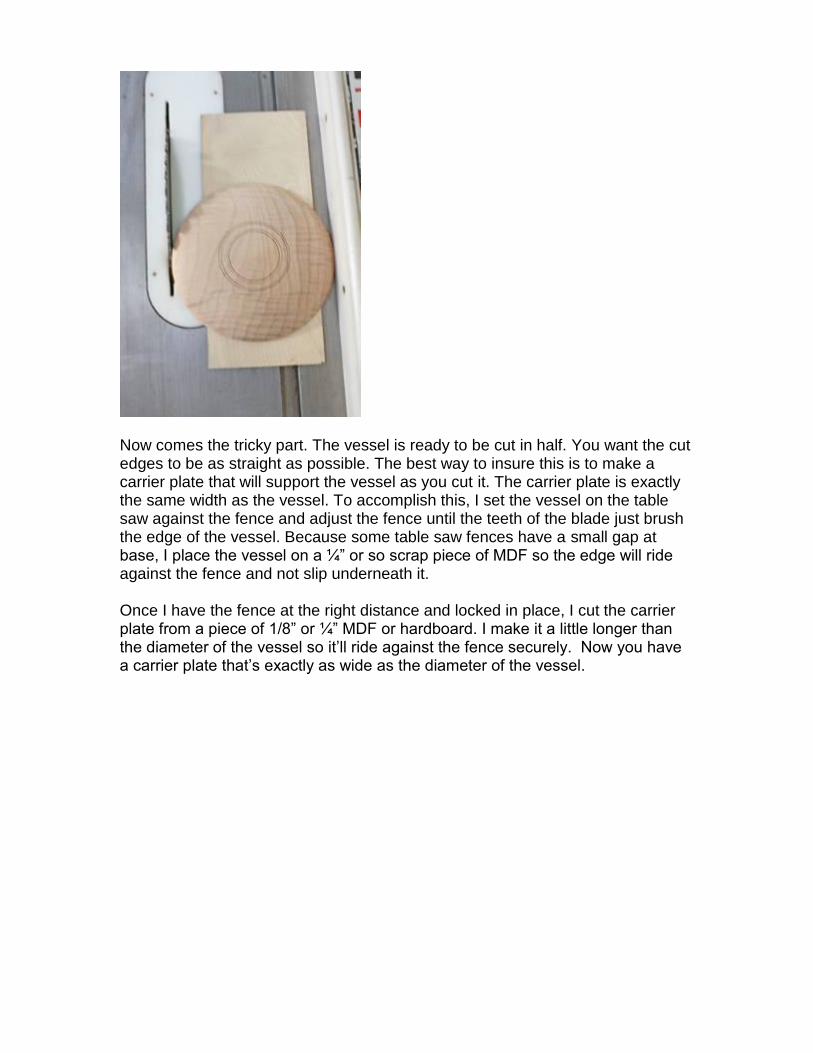
Now comes the tricky part. The vessel is ready to be cut in half. You want the cut edges to be as straight as possible. The best way to insure this is to make a carrier plate that will support the vessel as you cut it. The carrier plate is exactly the same width as the vessel. To accomplish this, I set the vessel on the table saw against the fence and adjust the fence until the teeth of the blade just brush the edge of the vessel. Because some table saw fences have a small gap at base, I place the vessel on a ¼” or so scrap piece of MDF so the edge will ride against the fence and not slip underneath it. Once I have the fence at the right distance and locked in place, I cut the carrier plate from a piece of 1/8” or ¼” MDF or hardboard. I make it a little longer than the diameter of the vessel so it’ll ride against the fence securely. Now you have a carrier plate that’s exactly as wide as the diameter of the vessel.

I then measure the width of the carrier plate, divide that number in half, and put a pencil mark at the halfway point. I find it easier to use a center zero ruler to find the center point than having to figure half of, say 7 5/32” for example. No math is necessary.
The vessel has been secured to the carrier with masking tape and is ready to go. This is a one-time operation so the masking tape will be more than sufficient to secure the vessel. Note that I’ve taped the area where the blade will cut. This will help control any chipout, especially at the back edge. Grain orientation is important here, and generally it’s better to have the grain running the same direction as the saw cut.

I then line it up with the saw blade so that the pencil mark visually splits the gullet of the blade in half. With just a 1/8” blade width, it’s pretty easy to center the line. In places where a table saw can’t be used, a bandsaw will work just as well. The thin kerf of the bandsaw blade makes it easy to align the pencil mark. Since a bandsaw won’t give as smooth a cut as a tablesaw, some sanding may be necessary after the 2 halves of the vessel are glued together.
The vessel has now been cut in half. It’s important to feed the carrier through the saw a steady rate to insure that the cut edges will be perfectly straight. If you change feed rates or stop partway through, you can get a slight dip in the cut edge. Or worse, you could get a nasty kickback. There’s no danger of kickback with a bandsaw, but it’s important to properly tune the saw to avoid blade drift. You want the cuts to be as centered and straight as possible.

This is a piece of black dyed veneer I cut to act as a detail strip where the 2 halves are joined. This strip also helps conceal the differences in grain pattern from one side to the other. On larger pieces, I’ll use either multiple layers of veneer or solid wood cut to 1/16” or so thickness.
Once the vessel is cut in half, I proceed with whatever detailing I want, in this case a design made of pierced little “squiggles”.
Once the detailing is done, I glue together the 2 halves with the divider strip in between. After I apply the glue, I hold the halves together, pressing down vertically on a flat surface to make sure the edges line up and then clamp the halves together until the glue sets. Lightly sand the edges on a piece of sandpaper mounted on a flat surface to insure that the edges and seams are perfectly aligned. Don’t use too much pressure during sanding as this may slightly cup the edges. It isn’t necessary to do any smoothing or finishing on the

inside since you can’t really see it once the top is on. I often paint the inside black so nothing shows, giving the interior a bit of mystery.
The outline of the top has been traced on the blank, here a 1/8” piece of wenge. I’ve drawn a line through the center, using marks I made where the center spline is located. I divided the line in half and marked where the center of the hole will be.
The hole for the top finial has been drilled. The measurements I took earlier will insure that the hole will be in the center of the finished top. Don’t make the hole wider than the distance between the 2 sides of the vessel at its center point.
The top has been glued to the vessel and the edges sanded smooth. It’s important to not sand too aggressively and sand away any details.

This is the completed vessel from the front, with the base and top completed.
This is an angle view showing the unique shape the split bowl technique offers.

I like to add little surprises, so I put a small finial on the underneath side of the top. The design possibilities are endless with this kind of vessel. You can make quarter round pieces or even narrower ones. They can be oriented in different directions and different size turnings can be combined to make unusual sculptural pieces. These are example of pieces I’ve made using this process.
