akrapovic slip-on sp series exhaust system for the yamaha ... 6 fazer install.pdf · *350115* nav -...
TRANSCRIPT

*350115*
NAV - 112 1
Installation instructions:
AKRAPOVIC SLIP-ON SP SERIES EXHAUST SYSTEM for the
YAMAHA FZ6 & FZ6 FAZER (2004) Congratulations on purchasing an Akrapovic exhaust system. Please read these installation instructions carefully. If you have any trouble installing the system please contact your authorized dealer! IMPORTANT INFORMATION Exclusion of Certain Liability
1. The manufacturer, importer or dealer shall not be liable for any incidental damage including personal injury or any other damages caused by improper installation or operation of the Akrapovic exhaust system. When installing the Akrapovic exhaust system be careful that the exhaust system does not touch other parts sensitive to high temperature.
2. Akrapovic makes no representation or warranties with regard to damage caused by the improper installation, use and
maintenance of the Akrapovic exhaust system. The warranty is limited to defects recognized by our technical department and to normal use, and excludes items subject to normal wear (gaskets and damping wool). The guarantee is void in case of accident, modification, improper or competition use.
3. Do not attempt to install the Akrapovic exhaust system on a motorcycle for which it was not made or tested by
Akrapovic.
4. When the exhaust system gets very hot during operation, be careful not to burn yourself on the exhaust system or parts which are in direct contact with it, even when the motor is not running. Also protect other people, especially children, from the injuries mentioned above.
5. In some cases Akrapovic exhaust system kits contain chemical products (ceramic anti-seizing grease; bolt sealant).
Handle with care, do not inhale or swallow. Avoid excessive contact with skin, eyes or mucous membranes. Keep out of reach of children.
6. Technical specifications of Akrapovic exhaust systems and related products subject to change without notice.
Trademarks
The Akrapovic Exhaust System Technology logo is a registered trademark of Akrapovic d.d. Akrapovic website
Information about Akrapovic exhaust systems and related products is available on the Akrapovic website at: http://www.akrapovic-exhaust.com/ Copyright
No part of the Akrapovic exhaust system or its documentation may be reproduced or distributed in any form or by any means without the prior written authorization of the Akrapovic company.
© Akrapovic d.d. All rights reserved.
Symbols The following symbols are used throughout these installation instructions:
! CAUTION OR WARNING INSTALLATION TIP

NAV - 112 2
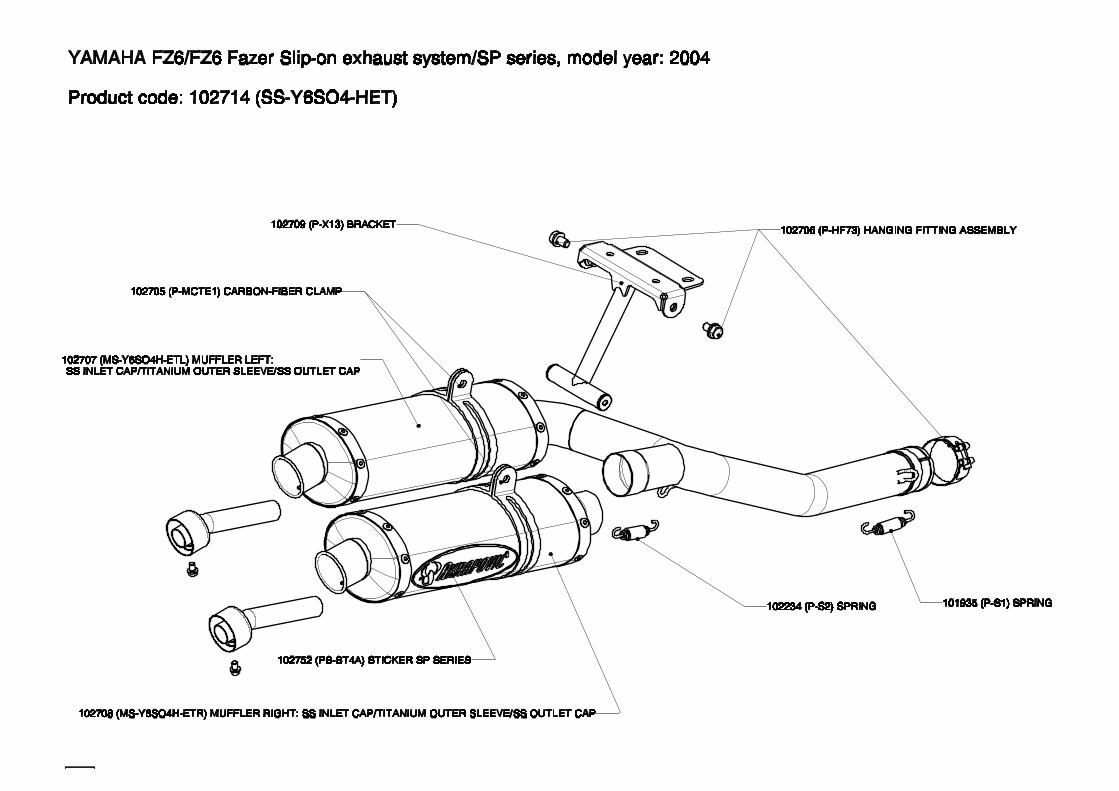
INSTALLATION INSTRUCTIONS BEFORE INSTALLING CHECK SCHEMATIC OF THE EXHAUST SYSTEM!
! IF ANY ITEMS IN THE AKRAPOVIC EXHAUST SYSTEM PACKAGE ARE MISSING PLEASE CONTACT YOUR AUTHORIZED DEALER. KEEP THE SCHEMATIC FOR FUTURE REFERENCE.
! THESE INSTALLATION INSTRUCTIONS MUST BE READ CAREFULLY IN ORDER TO ENSURE PROPER INSTALLATION AND OPERATION OF THE AKRAPOVIC EXHAUST SYSTEM.
! THE EXHAUST SYSTEM CAN BE EXTREMELY HOT. ALLOW THE MOTORCYCLE TO COOL DOWN BEFORE BEGINNING INSTALLATION.
WE ADVISE YOU TO LEAVE INSTALLATION TO A QUALIFIED SERVICEMAN. IMPROPER INSTALLATION MAY RESULT IN A SHORTER LIFETIME OF THE EXHAUST SYSTEM AND/OR DAMAGE TO THE MOTORCYCLE.
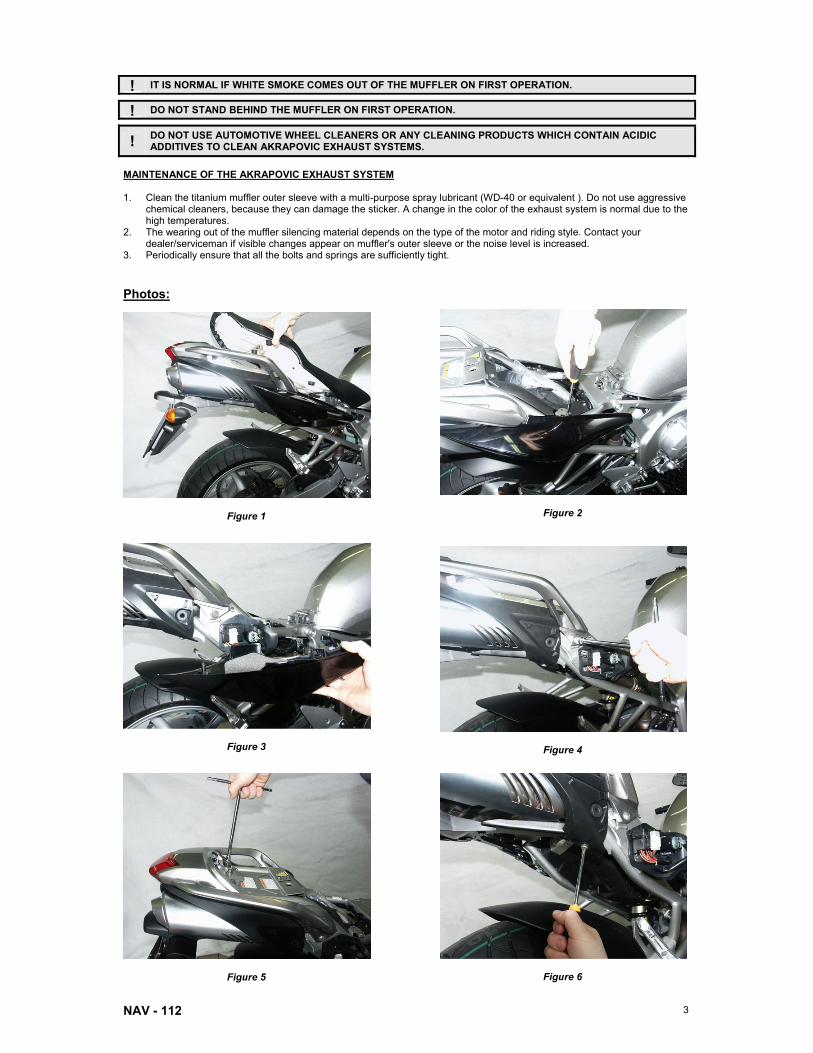
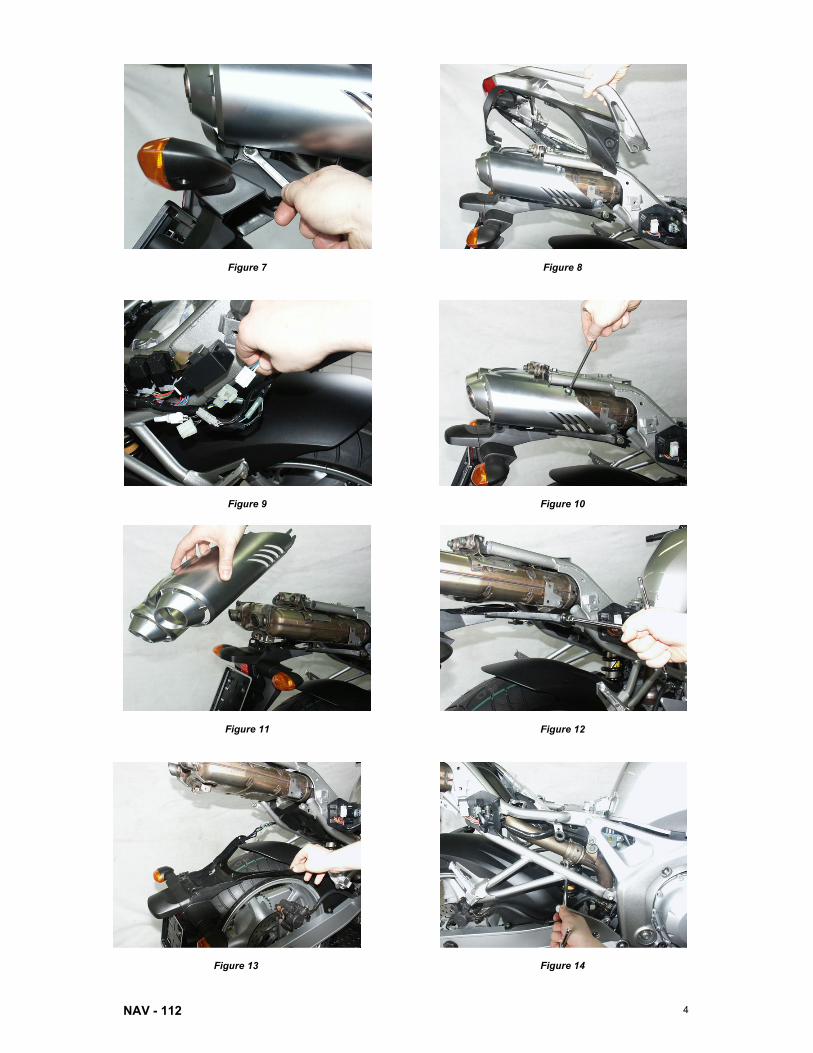
REMOVAL OF STOCK EXHAUST SYSTEM 1. put the motorcycle on a central stand 2. remove the seat (Figure 1) 3. unscrew the bolts from the rear side cowlings and remove the cowlings (Figure 2, 3) 4. unscrew the bolts and remove the rear central cowling together with the tail light (Figure 4, 5, 6, 7, 8) 5. unplug the electrical connector of the tail light wiring (Figure 9) 6. unscrew the bolts and remove the trim cowling from the muffler (Figure 10, 11) 7. unscrew the bolts on the chassis which hold the license plate holder and move away the licence plate holder (Figure 12,
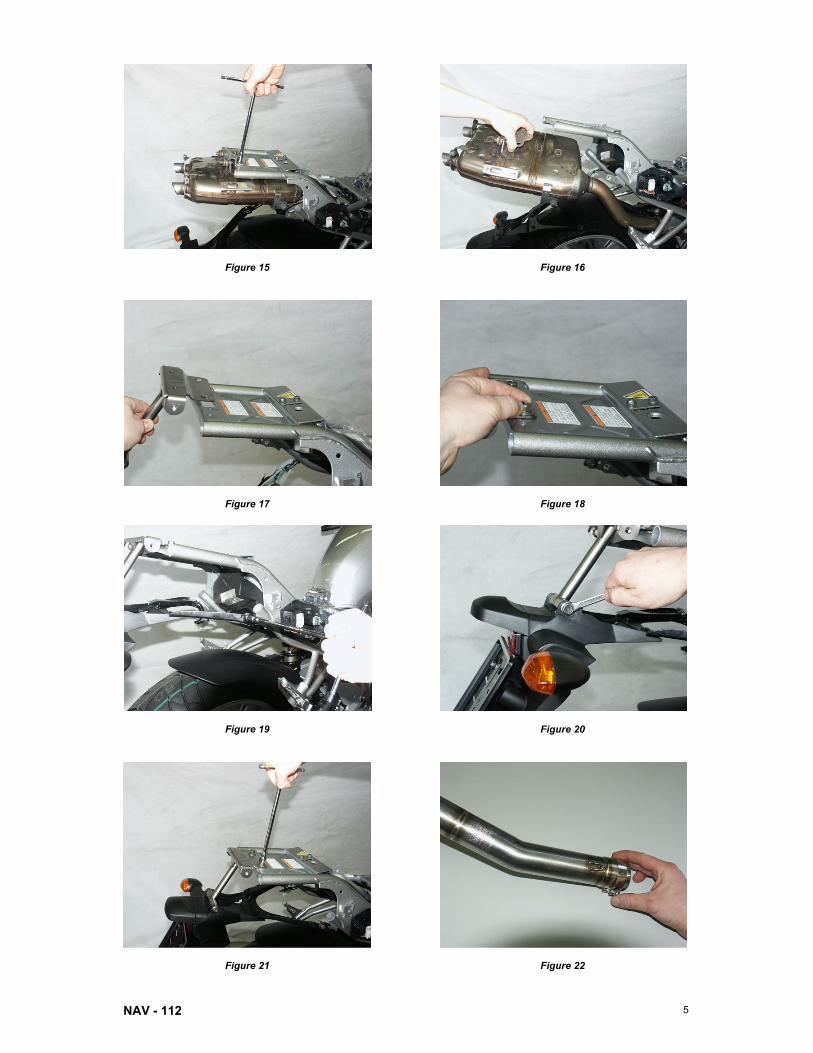
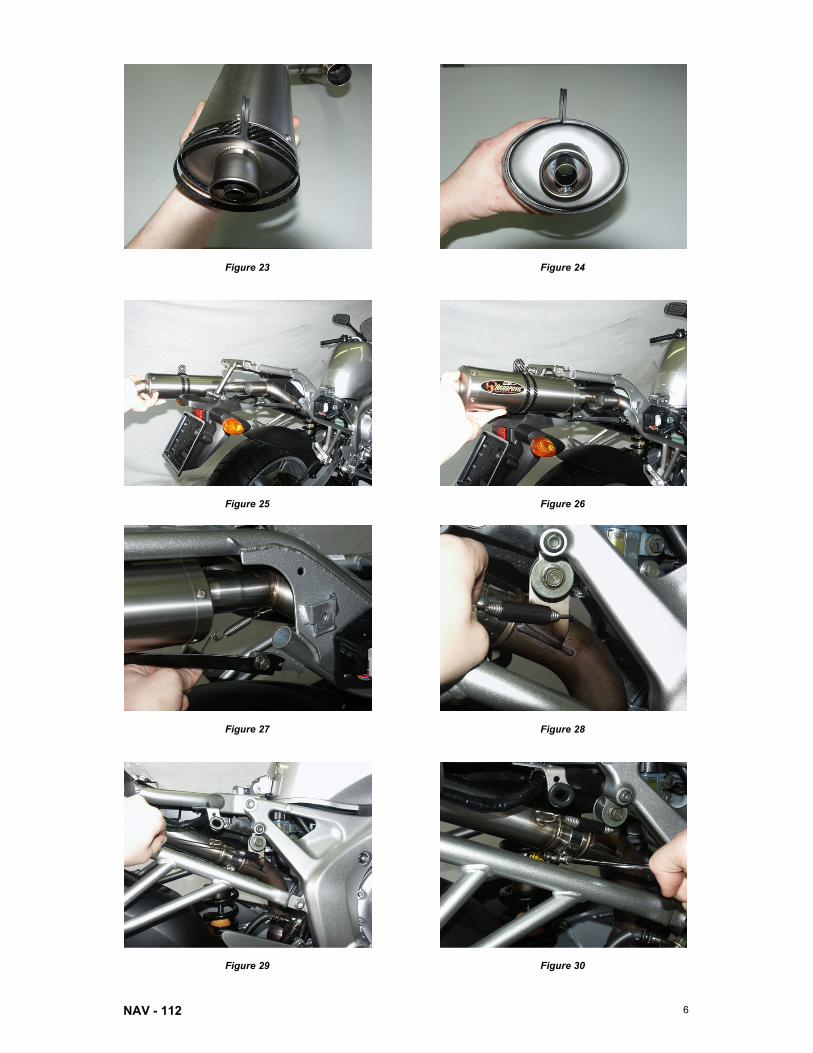
13) 8. unscrew the bolt from the link pipe metal clamp (muffler – link pipe connection) (Figure 14) 9. unscrew the bolt from the muffler hanging bracket and remove the muffler (Figure 15, 16) INSTALLATION OF THE AKRAPOVIC SLIP-ON SP SERIES EXHAUST SYSTEM installing the muffler with link pipe: 1. correctly position and install the Akrapovic metal hanging bracket; do not fully tighten (Figure 17, 18) 2. replace the license plate holder (Figure 19, 20) 3. tighten the Akrapovic metal hanging bracket (Figure 21) 4. install the metal clamp on the link pipe (Figure 22) 5. correctly position the carbon-fiber clamp and slide it onto the muffler - bear in mind the right offset for the left muffler
(Figure 23) and left offset for the right muffler of the carbon-fiber clamp viewed from the rear (Figure 24). WARNING: open the clamp to slightly wider than the diameter of the outer sleeve of the muffler – do not scrape it along the muffler outer sleeve!
6. position the left muffler correctly and slide it onto the outlet side of the stock link pipe (Akrapovic muffler and link pipe are welded together) (Figure 25)
7. position the right muffler correctly and slide it onto the outlet side of the Akrapovic link pipe and attach the spring (Figure 26, 27)
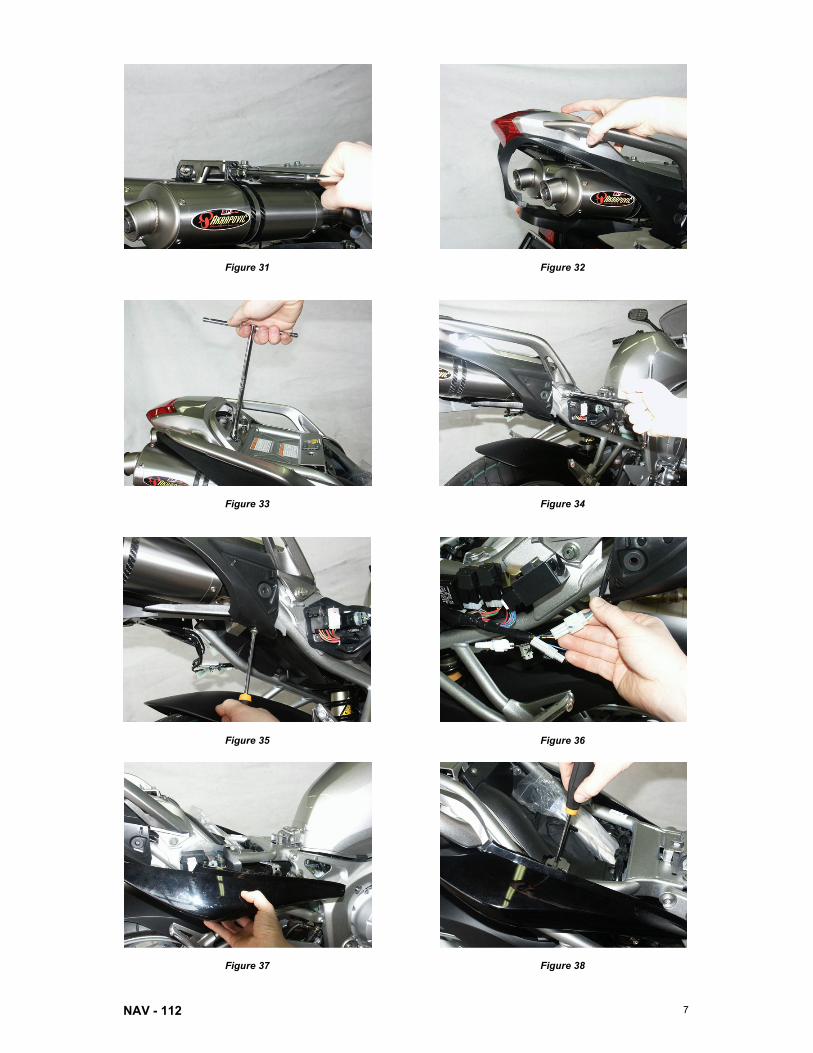
8. attach the spring at the Akrapovic link pipe - stock link pipe joint (Figure 28, 29) 9. tighten the metal clamp at the Akrapovic link pipe - stock link pipe joint (Figure 30) 10. tighten the muffler carbon-fiber clamps onto the Akrapovic metal hanging bracket on the frame (Figure 31) final installation: 1. tighten the bolts on all of the brackets and clamps to which the exhaust system and the other dismounted parts of the
motorcycle are attached 2. replace the rear central cowling together with the tail light and plug in the rear tail light wiring connector (Figure 32, 33, 34,
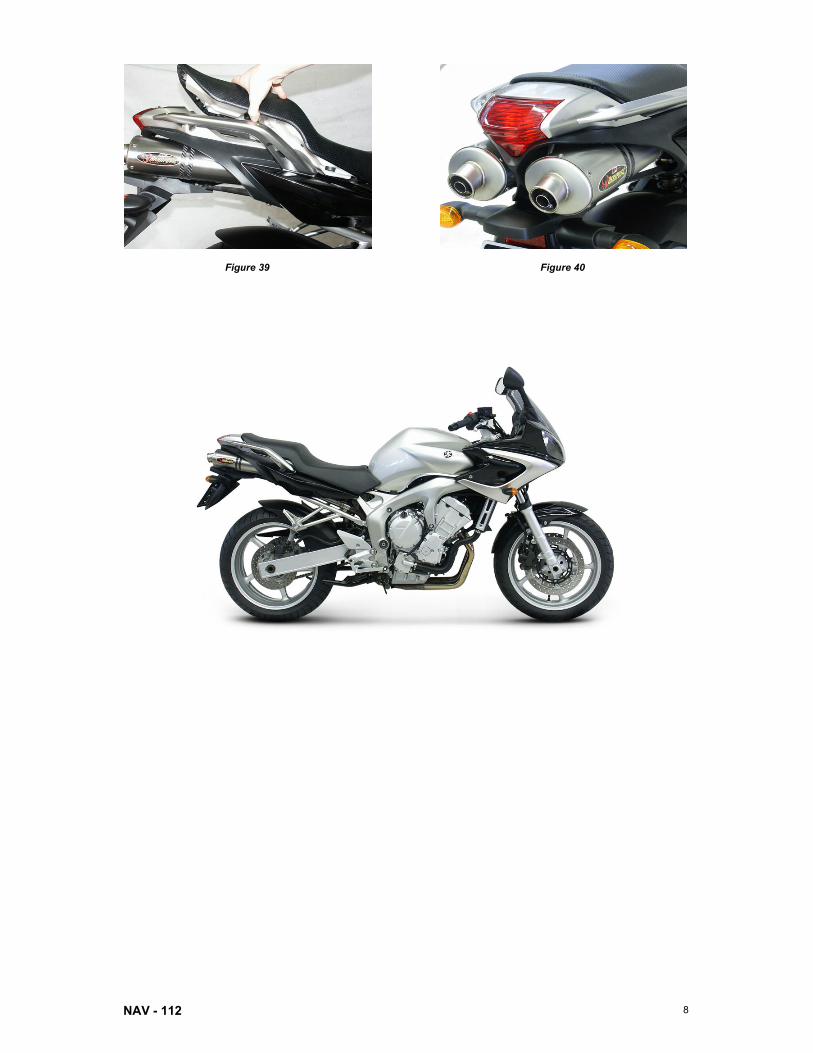
35, 36) 3. replace the rear side cowlings (Figure 37, 38) 4. make sure the mufflers are not touching other parts of the motorcycle 5. reattach the seat (Figure 39) 6. clean grease spots:
a. muffler – titanium outer sleeve: use a soft cloth sprayed with a multi-purpose spray lubricant (WD-40 or equivalent)
b. stainless steel link pipe: use a soft cloth sprayed with a contact cleaner, then wipe with a soft dry cloth Cleaning will prevent spots from burning onto the surface. Do not use aggressive chemical cleaners, because they can damage the sticker.
7. position of the installed Akrapovic Slip-on SP series system (Figure 40, 41) Check the operation of the brakes and suspension. Make sure all the bolts are sufficiently tightened. In case the exhaust system touches the cowling or other parts repeat the adjustment of the exhaust system or contact your authorized dealer.
NAV - 112 3
! IT IS NORMAL IF WHITE SMOKE COMES OUT OF THE MUFFLER ON FIRST OPERATION.
! DO NOT STAND BEHIND THE MUFFLER ON FIRST OPERATION.
! DO NOT USE AUTOMOTIVE WHEEL CLEANERS OR ANY CLEANING PRODUCTS WHICH CONTAIN ACIDIC ADDITIVES TO CLEAN AKRAPOVIC EXHAUST SYSTEMS.
MAINTENANCE OF THE AKRAPOVIC EXHAUST SYSTEM 1. Clean the titanium muffler outer sleeve with a multi-purpose spray lubricant (WD-40 or equivalent ). Do not use aggressive
chemical cleaners, because they can damage the sticker. A change in the color of the exhaust system is normal due to the high temperatures.
2. The wearing out of the muffler silencing material depends on the type of the motor and riding style. Contact your dealer/serviceman if visible changes appear on muffler's outer sleeve or the noise level is increased.
3. Periodically ensure that all the bolts and springs are sufficiently tight. Photos:
Figure 1 Figure 2
Figure 3 Figure 4
Figure 5 Figure 6
NAV - 112 4
Figure 7 Figure 8
Figure 9 Figure 10
Figure 11 Figure 12
Figure 13 Figure 14
NAV - 112 5
Figure 15 Figure 16
Figure 17 Figure 18
Figure 19 Figure 20
Figure 21 Figure 22
NAV - 112 6
Figure 24 Figure 23
Figure 25 Figure 26
Figure 27 Figure 28
Figure 29 Figure 30
NAV - 112 7
Figure 31 Figure 32
Figure 33 Figure 34
Figure 35 Figure 36
Figure 37 Figure 38
NAV - 112 8
Figure 41
Figure 39 Figure 40