airconditioner useandcaremanual - tlc- · pdf...
TRANSCRIPT

Use and Care Manual
FOR PAC-12000DB
AIR CONDITIONER

Introduction
Electrical Specifications
Thank you for choosing this air conditioner to provide you and your family withall of the "Home Comfort" requirements for your home, cottage or office. Theappliance can be moved from room to room within you home and set-up in justminutes.
It is a multi-functional room air exchanging, air-processing appliance, designedto offer you the functions of: Air Conditioning, Dehumidify, and Independent Fan.
This manual will provide you with valuable information necessary for the propercare and maintenance for you new appliance. Please take a few moments andread the instructions thoroughly. If properly maintained, your appliance will giveyou many years of trouble free operation.
1.All wiring must comply with local and national electrical codes and be installedby a qualified electrician If you have any questions regarding the followinginstructions, contact a qualified electrician.
2.Check available power supply and resolve any wiring problems before installationand operation of this unit.
3.For your safety and protection, this unit is grounded through the power cord plugwhen plugged into a matching wall outlet. If you are not sure whether the walloutlets in your home are properly grounded, please consult a electrician. Do notuse plug adapters or extension cords with this unit If it is necessary to use anextension cord with extension cord only. ( available at most local hardwarestores.)

Remove the plug from the Use only the correct power Do not operate the unit withsocket if the unit is not supplyAC220V-240V/50Hz damaged plug or loosebeing used for long period. socket point.
Do not wet the housing or Do not cover the air Do not a llow children to play withcontrol panel. outlet while in use. the controls or drop any objects
into the air outlet.
Do not place objects or let Always turn the unit off and Do notattempt to remove anyany person sit on top of remove the power plug from part of thecasing unless by athe unit. . The socket when cleaning. Authorised technician.
If the power cord on this unit is damaged it must be replaced by themanufacturer its service agent or qualified persons in order to avoida hazardThis appliance is not intended for use by children or other personswithout assistance or supervision if their physical, sensory or mentalcapabilities prevent them from using it safely. Children should besupervised to ensure that they do not play with the appliance.
﹐﹒
WARNING
Make sure that the back of the unit is at least 10cm or more from a wall.Do not place the unit in front of curtains or drapes incase they fall against theback air intake.
Improper handling can causeserious damagetotheappl iance.Readthismanualcareful ly beforeoperating the unit.
Warning

Identification of parts
Identification of parts
Mountingbrackets(with screws)......2
Spanner........................................2
Wall plugs(withscrews)..................4
Support belt with hook....................2
Frame for flexible connecting h o u s e 1
Protective cap for connector(M).......2(F).......2
Transparentcovertothecontrolpanel
Handlehole
Front panel
Caster
Air outlet
Screenfilter.
Power cordcompartment
Handlehole
Water drainage pipeand pipe plug.
Covertoumbil icalconnection.Alwayskeepcoveron.
Outdoorunit 'smounting screw.
Airintake.

Operation
Power Control
Warning Light
Mode Control
The power control turns the unit on and off.
Condensed water may accumulate in the unit. Ifthe internal tank becomes full, the Warning Lightwill shine and the unit will not operate until theunit has been drained.
The settings are adjusted with Mode Controlbutton. A light will indicate which setting iscurrently being used.
When cool mode is selected, the indicator lightwill shine green. During the cooling mode theair is cooled and hod air is exhausted to theoutside air through the exhaust tube.Adjust fanspeed air through the temperature to suit yourdesired comfort level.
When dehumidify mode is selected, the indicatorlight will shine orange. Air is dehumidified as itpasses through the unit, without being in fullcooling mode. The fan will operate inmed speed.Fan speed is not adjustable in dehumidify mode.
The Mode Control has three settings:
● ● ●Cool Dehumidify Fan
Cooling Mode
Dehumidify Mode
Note : The air exchange hoses must ventoutside the room when using cool mode.
Note : The air exchange hoses must vent insidethe room when using dehumidify mode.
●
●
The Fan Speed Control has 3 settings: High,Medium, and Low.
With machine in fan mode, press timer button toselect number of hours you would like the unit torun in air conditioning mode until it automaticallyshuts off.
With machine powered off , press timer button toselect number of hours until you would like the unitto automatically start running in air conditioning mode.
Used for adjusting the timer and thermostat.The default display is room temperature.In cooling mode, when " " or " " button is pressed,the set temperature is displayed and may be adjusted.After 15 seconds the display will revert back to roomtemperature. Temperature is only adjustable in coolmode. The time is adjustable between 1~12 hours.Note : By pressing both Timer / Temp set buttons at thesame time, the display will toggle between Celsius andFahrenheit.
Fan Speed Control
Timer
Timer / Temp set controls
Auto turn off :
Auto turn on :
●
●
●
●
Fan ModeWhen fan mode is selected the indicator light willshine yellow. Air is circulated throughout the roomwith no cooling.Note: unit does not need to be vented in Fan mode
▲ ▼
After switching the air conditioner off, you must wait 3 minutes before switching it b ack on again.
WarningLight
Power Control
Mode Control
Fan Speed Control
Timer On / OffDisplay
Timer / TempSet Controls

Operation(OPTION)
Remove the cover on the back of the remote control and insert the batteries with the( + ) and ( - ) poles pointing in the proper direction.Battery replacement :
CAUTIONUse only AAA or IEC R03 1.5V batteries.Remove the batteries if the remote control is not used for a month or longer.Do not attempt to recharge the supplied batteries.All batteries should be replaced at the same time, do not mix old battery .Do not dispose of the batteries in a fire as they may explode.
Timer / Temperature Keys
On/Of f
Inrunn ingmode:Auto switchoff
Instandby mode:Auto switchon
:LOW:HIGH :MED
●
●
●
Used for adjusting the timer andtemperature.The default display is room temperature.When " " or " " key is pressed,the set temperature is displayed andmay be adjusted. After 15 seconds thedisplay will revert back to roomtemperature.
: lamp is on whenincooling mode
: l amp isonwhen infan mode
: lamp is on whenindehumidification mode
Air Conditioner Remote ControlThe functions work the same as your air conditioner's touch controls.
● Timer setting is available from 1-12 hoursby pressing the key " "on " ".
-+
-+
ON/OFF
FanSpeed
Timer
Mode
Up
Down

Steps in connection
5.Remove the insulating foam aroundthe upper connector.
Upon turning off the air conditioner,leave it idle for at least 30 minutes;the disassembly can then beimplemented after the system hasbeen stabilized.
Make sure the tubes and connectorsare kept level while disconnectingto avoid coolant leaking.
2.Use a philips-head screw drivertoremove the cover.
3.Disconnect the electrical connectorby pressing clip holders.
4.Remove the metal holding brackets.When re-connecting the unit followthe above steps in reverse.
Use your fingers to connect thethreads and then tighten withspanners provided.
After connection please use soapsuds to check for leaks in the coolantpipe.
Please remember this procedure mustbe followed each time.
7.Screw the protective caps onto theends after disconnection of eachpipe.
8.Separate the clamping tie on theblack water pipe. Graduallyreleasethe water pipe and place your fingerover the end to prevent water in thetube coming out. Have a containerready to collect any excess waterfrom the tube.
6.Use the 2spanners provided todisconnect the 2 pipes.Steps in disassembly
1.Turn off the air conditioner, andremove the plug from thepowersuck.
Always remember to keep theconnecting pipes level with theconnecting point whenre-assembling.
Caution
Caution
Caution
This procedure should be carried out by a professionalperson to avoid expensive mistakes.
Remove and connectionof the quick connector

IMPORTANT: Do not have any sharp bends or twistingit the umbilical cord.
For permanent installation follow instructions.If you are not sure contact a service company.
The Indoor Unit
If you a re not sure or happy disconnectingand reconnecting the cord contact a localservice person.Remember to use soap suds to check forrefrigerant leaks after connection each time.
METHOD III :For fitting through a hole in the wall disconnect the umbilical cord as described on page 8a andpass! Cord through the hole from the outside. Use the plastic frame for theumbil icalcord when using method.
METHOD I :
Caution
The location of the indoor unit must have atlease10cmspaceat therearandawayfrom curtains/drapes.
Caution
When u sing the later use the plastic framesupplied. When the air conditioner is beingstored a way cap can be placed over theframetosea l theho leo f f .
METHOD II :The umbilical cord can pass through a hole in the window or the window frame were a gaphas been shaped out.
Caution
Installations
The umbilical cord can pass through partly open door or window.

Each time you bring the outdoor unit inside always turn the air conditioner off at the powersupply. If you do not and move the inside unit the dehumidified water in the container insidethe unit could activate the water pump and discard water from the tube on outdoor unit.
The Outdoor Unit
With this method we recommend in heavyrain storms and wind to tun the unit suitablycovered.Always use the belts on themounting brackets, do not tie belts onhandle.
METHOD III :For short-tem application, please use the enclosed belts to hang the outdoor unit outsidethe window.
METHOD I :The outdoor unit may be placed on outdoor patio or flower planer directly, thus itdoesnotrequire using the special mounting brackets.
Caution
Please make sure that the drainage pipe isnot pressed by the outdoor unit!
Caution
When u sing this method you can extendthe drainage tube and direct it towere youwish the water to discharge. You can liftthe outside unit off the brackets at any time.If you intend a permanent fitting for theoutside unit we recommend to make acover for it to prevent water getting insidein heavy rains.
METHOD II :The outdoor unit may be mounted on the wall by utilizing the enclosed accessories(mounting brackets, wall plug and the screws).
Caution
Warning

TroubleshootingAmajority of malfunctions are minute, andtriggered by problems that can easily be resolved;before calling for service, please refer to thefollowing table for sequential inspection.
PROBLEM CAUSES RESOLUTIONS
Air conditioner stopsoperating
Power failure.
The plug has not been pluggedin.The timer setting dial has notbeen set.The fan speed control dial hasnot been set.The warning light is on theinternal safety switch has beenactivated.
Wait for the power to comeback on.Insert the plug.
Set the timer setting dial toproper position.Set the fan speed control d ailto correct position.Turn all switches off andwai t5 mins and turn on again, ifstill not working contact placeof purchase.
Motorrunning soundwhen unit has turned off.
The waterpumpisempty ingexcess water from thecontainer inside the unit.
This will automatically stop ina few minutes.
Air conditioner stopsin the middle of theoperation.
The indoor t emperature hasreached the designatedtemperature.The designated operating timeis up.The warning light is on theunit's internal safety switchhas been activated.
Reset the temperature.
Reset the timer.
Contact the service center.
Air conditioner pauses onand off irregularly.
The outdoor unit's electricalconnector has not beenconnectedsecurely.Malfunction.
Disconnect power and takeumbilical cover off to checkif electrical connector is f irm.If thiskeepshappening callthe distributor.
Air conditioner functionsbut the room is not cooled.
Window or d oor is left open inthe room.Heat source in the room orexcessivenumberofpeople init.Saturated filter.Temperature setting too high.
Close all window and door.
Eliminate heat source.
Clean the filter.Lower the temperaturesetting.

Appliance maintenance Air filter maintenanceCut off the power supply
Turn off the appliancefirst before disconnectingfrom power supply
Wipe with a softant dry cloth.
Never use volatile substancesuch as gasoline or polishingpowder to clean the appliance.
Never sprinkle water onto themain unit.
It is necessary to clean the air filterafter using it for about 100 hours.Clean it as follows:
Stop the appliance andremove the air filter.
Clean and reinstall the air filter
If the dirt is conspicuous,wash it with a solution ofdetergent in lukewarm water.After cleaning, dry it in ashaded and cool place, thenreinstall it....
Clean the air filter every two weeksIf the air conditioner operates in anextremely dusty environment.
Dangerous!Electricshock!
Troubleshooting
Uselukewarm water(below 40 ) tocleanthe appliance is verydirty.
℃
Stop the appliancefirst, then pull backthe air filter.
Maintenance after using
1.If the appliance will not be used for a long time, be sure to Pull out the rubberplug of the drain port underside, in order to drain the water.
2.Keep the appliance running with fan only for a half day in a sunshiny day todry the appliance inside and prevent form going moldy .
3.Stop the appliance and pull out the power supply plug, then take out thebatteries of remote controller and keep it well.
4.Clean the air filter and reinstall it.5.Remove the air hoses and keep them well, and cover the hole tightly.
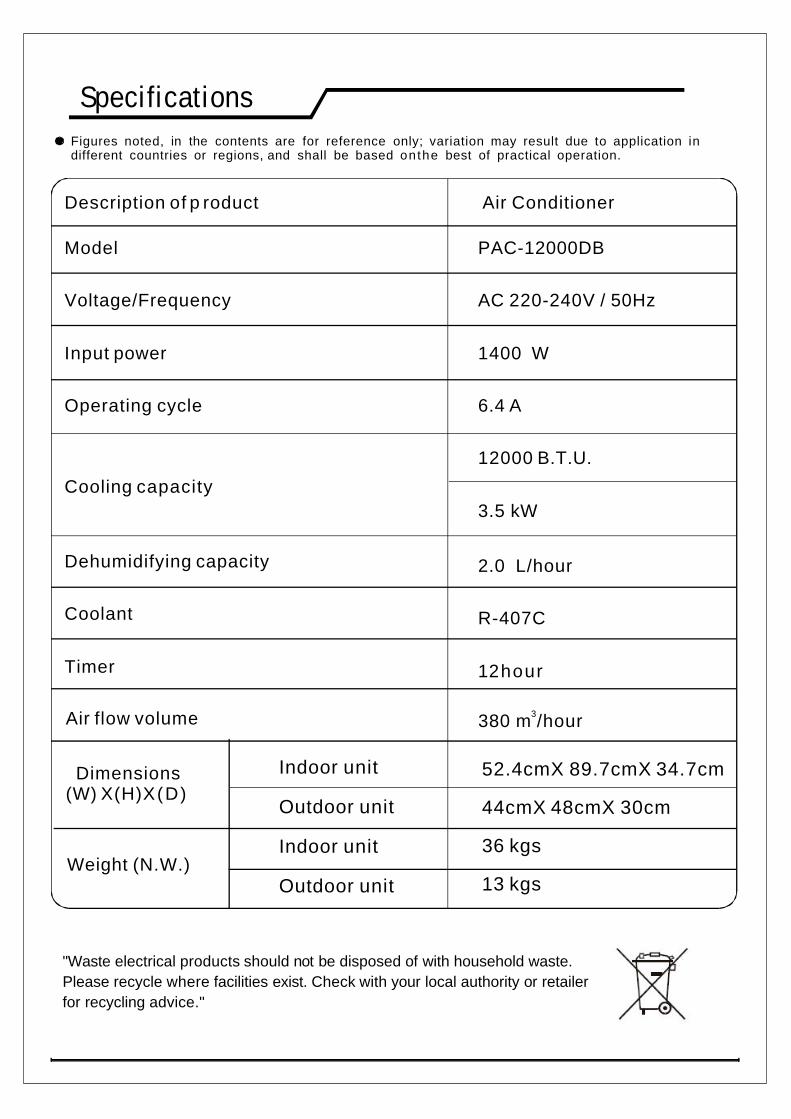
SpecificationsFigures noted, in the contents are for reference only; variation may result due to application indifferent countries or regions, and shall be based onthe best of practical operation.
Cooling capacity
Description of p roduct Air Conditioner
Dehumidifying capacity
Coolant
Timer
Model
Voltage/Frequency
Input power
Operating cycle
PAC-12000DB
AC 220-240V / 50Hz
1400 W
6.4 A
12000 B.T.U.
3.5 kW
2.0 L/hour
R-407C
12hour
Weight (N.W.)
Dimensions(W) X(H)X(D)
Air flow volume
"Waste electrical products should not be disposed of with household waste.Please recycle where facilities exist. Check with your local authority or retailerfor recycling advice."
Indoor unit
Outdoor unit
Indoor unit
Outdoor unit
52.4cmX 89.7cmX 34.7cm
44cmX 48cmX 30cm
36 kgs
13 kgs
380 m /hour3