aims & objectiveseg/realtime/notes.doc · web viewwilliam press and others, numerical recipes...
TRANSCRIPT

REAL TIME SYSTEMS DEVELOPMENT CSYS 3060
Revised August 1998

CONTENTS
Revised Module Template
Course Notes1 Data Acquisition2 Control & Display Outputs3 Peripheral Interfacing4 Serial Communications Techniques5 Sampled Data Systems6 Control Loops7 Digital Signal Processing8 Interrupts9 Operating Systems
Case Studies1 A 3-Dimensional Co-ordinate Measuring Machine2 Shower Controller3 A Skin Rheometer4 System Integrity5 Solutions to case Study Problems
Tutorial QuestionsA Simplified Tutorial Problem Sheet
Tutorial Sheet 1 Data AcquisitionTutorial Sheet 2 Output Devices and InterfacingTutorial Sheet 3 Control LoopsTutorial Sheet 4 Serial Communication TechniquesTutorial Sheet 5 Interrupts and Basic Operating SystemsTutorial Sheet 6 Digital Signal ProcessingTutorial Sheet 7 System IntegritySummary of Supplied Software Coursework Part 1 Frequency Determination and GenerationCoursework Part 2 PIC Processor SimulationPIC 16C5X Data SheetsIBM Asynchronous Coomunciations AdapterStepper Motor Data SheetElectronic Solution for CourseworkA PIC processor card

DRAFT MODULE TEMPLATE
AIMS & OBJECTIVES
1. Describe the characteristics of real time systems and explain the implications on the hardware and software requirements.
2. To introduce the concept of sampled data, and its’ implications for both software and hardware design.
3. Explain the benefits of multi-tasking, either by means of interrupts or real time executives.
4. To implement and understand the operation of a range of simple control algorithms
5. Describe the role of development tools within organisations dealing with implementing real time systems
6. Describe the facilities offered by such tools.
7. To introduce a range of programmable interface components.
8. To introduce a range of transducers and actuators, their use and purpose.
-------------------------------------------------------------------------------------------------------------------------
Teaching Programme
The following topics will be covered in the lectures.
1. Measurands and Transducers.
A range of transducers will be demonstrated and discussed. The role that transducers play in real time systems, in that they are used to measure parameters in the real world, and convert them into a form that can be input into a RTS.
Transmitters. 2,3 and 4 wire versions.
2 Analogue to Digital Converters
Different types of ADC will be will be presented and discussed. This will include Flash, Dual Slope, SAR and Sigma-Delta devices. Comparisons will be made with respect to cost, speed of conversion and noise immunity.
Students will learn how to determine the minimum sampling rates and conversion bits required for a specified RTS.
3 Control & Display Outputs
A range of actuators and output devices will be presented and discussed. This will include relays, solenoids, opto-couplers, and triacs. Digital to Analogue Converters will be presented, as well as Digital I/O and Pulsed Width Modulation techniques.
4. Control Loops
The concept of control loop will be discussed, that is the use of a RTS to measure events in the real world via transducers. Analysis of the input data thereby obtained. Taking decisions on how to change what is happening in the real world, by the use of actuators and other outputs.
The importance of Time Constants, the need for Sampled Data Systems, and Interrupts and Multi-Tasking.
A range of simple control algorithms will be presented. This will include the following -
ON/OFF control, Dead Bands and Hysteresis.

Proportional Control, Steady State Errors.Integral Control, Integral Windup, Integral Clamps, Integral ResetsDerivative Control.The mathematics of full PID control.Brief overview of Knowledge Based Control, using Inference Engines; feedforward and adaptive techniques.PLCs and SPC.
5. Digital Signal Processing
DSP as a concept, but only low pass filters, running means and smoothing algorithms will be covered in detail.
6. Interrupts.
What are interrupts and why are they needed. How to write interrupt routines. Data manipulation implications of using interrupts.
7. Real Time Executives
A range of simple RTS structures will be presented that are suitable for use in simple Microcontrollers. This will include task scheduling, variable repetition timing, and prioritising.
8. Data Structures
The implications of the use of interrupts, and real Time Executives when consideration is given to data handling and parameter passing.
9. Test and Debug
Hardware and software test tools will be introduced. To include Simulators, Emulators, Logic Analysers, Debuggers, In-Circuit-Emulators, etc. The partnership required between circuit designers and real time system programmers.
10. Communications
Intra Board Comms -Inter Integrated Circuit (IIC), Serial Peripheral Interface (SPI), and single wire communications techniques will be presented in some detail.
Inter Board Comms -CAN-BUS, RS485, RS422, will be presented in overview.
TEACHING AND LEARNING STRATEGIES
A number of practical demonstrations of genuine real time systems will be set up and presented as part of the teaching programme. This will include making available a range genuine components, such as transducers, actuators, single board computers etc.
A series of short tutorial questions will be used to reinforce the lecture content.
More detailed tutorial questions, using real scenarios, will be used to exercise the students ability to analyse complete problems, and develop rational overall solutions.
The course work will consist of two parts.
A detailed Real Time Problem that requires analysis, specification and solution. (75%)Use of a real simulation package (for the PIC family of microcontrollers), to be used to develop and test a programme. (25%)
INDICATIVE CONTENTS
1. Hardware requirements for real time systems.

2. Real time executives.Structure, operation and implementation.
3. Data handling and parameter passing between asynchronous functions.
4. Timing, sampling, interfacing, signal processing.
5. Use of advanced development tools.Logic analysers, ICE modules, simulators and debuggers.
6. Control LoopsPID, ON/OFF control, digital filtering. What they are, why they are used and how they are implemented.
7. InterruptsHandling unpredictable asynchronous events. Software implications.
POSSIBLE BOOKS
Please read these texts yourselves first, or get a library copy, before buying them!!!
J.E.Cooling Software Design For Real-Time Systems, Chapman & HallAvailable in paperback. A good introduction to software techniques for real time systems, written in a very readable manner.
Babu Joseph Real Time Personal Computing, Prentice and HallGood overview of most of the important topics.
William Press and others, Numerical recipes In C, The Art of Scientific Computing, Cambridge University Press.An excellent text for data analysis tools that can be easily implemented in C

INTRODUCTION
Welcome to the Real Time Systems module.
The first question that must be settled is what is a real time system (RTS)?A crude definition of an RTS is a computer based system, that responds in 'real time'. That is its’ response to external stimulations must occur within strict time frames. These time frames can vary from very fast, say 10 milli seconds, to slow systems which could be allowed as long as 1 second to respond.
The architecture of such systems is often very simple - you are unlikely to find 'mega fast' powerful computers operating in RTS modes; they do not have loads of memory, or peripherals. Some cannot even perform simple mathematical calculations.
A typical RTS is based around an 8 bit microprocessor or microcontroller. Examples of such devices are the Intel 8051, Motorola 68HC11 and PIC 1654.
What do they look like ? They are best described as 'little black boxes'. Where will you find them? Everywhere, in your domestic hi-fi or video recorder for example; the engine management unit of your car, domestic dishwashers and cookers, even the humble door chime is an RTS. Why are such units considered be RTS's? If your car’s engine management unit does not inject the petrol into the cylinder at PRECISELY THE RIGHT TIME, then your car will not work. The spark plugs must be fired at the optimum moment for best fuel efficiency. This work will be done by a computer buried in the engine compartment of your car. It is not a complex 32 bit processor, with a mouse and keyboard (how can you fit a keyboard into your car’s engine compartment?).. It will be a simple 8 bit microcontroller, operating in Real Time.
Let me set you a simple question -During lecture 1 I will show you the controller from a domestic gas cooker. What does such a controller do ? Below is a simple list -
1) Monitor 4 rotary dials for each hob burner. Each of which instructs the controller to turn that ring on, and it sets a desired gas flow rate.2) Monitor the oven control for 2 ovens. This includes converting the rotary position into a desired temperature setting (known as the SET POINT).3) Monitor a programmer input, used to preset cooking times, so that the oven can come on for a set period of time whilst you are out4) Monitor a grill control dial. This dials both turns the grill on and determines the gas flow rate.5) Ensure that the grill/hob/oven selections do not conflict6) Monitor the grill & oven doors. They must be shit for oven modes, and open for the grill mode.7) Control 7 separate gas valves, ensuring that they are all opened to the correct level, and are operating safely.8) Ensure that there is a flow of cool air around the external cavity of the oven (modern safety feature).9) Control the operation of a stir fan in the oven cavities. This fan must be switched off immediately if a door is opened.10) Ignite the gas burners, by controlling a piezo-electric spark. Then we must ensure that the burners stay lit. If they go out, they must be relit.11) Switch off the oven into a safe mode. This includes 'running on' the cooling fan for 5 minutes.12) Perform regular safety tests.13) Control the user outputs, e.g. Oven at temperature LED, or Grill running LED etc.14) All this must happen once every 0.5 secondsThis is not an exhaustive list. My questions to you are -1) How big is the programme ?2) How much data area is used by this programme3) How fast does the processor run ?

A Real Time System is a computer based tool that interacts with events in the real world.
To achieve this it first has to monitor what is happening in the real world. Data that are captured in this way are known as MEASURANDS. Examples are SPEED, HEIGHT, TEMPERATURE, PRESSURE Can you think of any more ?
Measurands are converted into electrical signals by tools known as TRANSDUCERS. Transducers convert one form of measurand into another form of measurand. A domestic thermometer converts temperature into height (the height of the mercury). A car's speedo converts velocity into angular position on the drivers dial.
A key feature of a transducer is that there is an exact and known relationship between the two measurands. The height of the mercury is directly proportional to the temperature. The reason for this is that ultimately we are trying to convert the measurand into an exact engineering unit, that is a number with units (degrees Celsius or km per hour).
Ultimately we must convert our measurand into an electrical signal that can be read be our computer. Electrical signals are turned into numbers by tools known as ANALOGUE TO DIGITAL CONVERTERS (ADC). It is these numbers that our computer uses.
Our programme then takes decisions as to how it might want to act on the outside world. If we are too hot, we turn down the heater; or if we are running too slow we open up the petrol valve.
The methods used to decide how these decisions are taken is known as CONTROL THEORY. Our control strategy decides what we must do to the external system, in order to either drive it to our desired state, or bring it back under control. Our desired state is known as the SET POINT.
We act on the external system by means of ACTUATORS. These are usually electromechanical devices, that move things around such as a piston, or change the position of a valve (for example in a fuel line).
So a complete RTS consists of external signals, or MEASURANDS. They are read into our computer using TRANSDUCERS and ADCs. The signals are the CONDITIONED using DIGITAL SIGNAL PROCESSING, for example to remove noise. We can feed our SETPOINT and MEASURED VARIABLE data into our CONTROL STRATEGY. The outputs from the controller are one or more CONTROL SIGNALS that act on the outside world via ACTUATORS. This whole operation is often called CLOSED LOOP CONTROL.
For the first half of this module you will be introduced to all of these subjects. We will not go into great technical detail, that is beyond the scope of what could be achieved in just onemodule.
The second part of the module will then examine a range of useful techniques that will help you to design, develop and test your own Real Time Systems.

1 DATA ACQUISITION
1.1 Transducers
In order for computers to be able to control events in the real world, or even just to display real events it is necessary for them to be able TO ACQUIRE DATA. Typical examples of real data that may need to be acquired are temperature, pressure, linear position, angular position, velocity, acceleration, mass, size, force, energy, time, potential difference and current.
These data items need to be MEASURED by some means, and are therefore often referred to collectively as MEASURANDS.
Human beings are equipped with a host of sensory apparatus that allows us to measure parameters such as temperature and pressure; computers however are not. So how do we arrange things so that computers can sense these sorts of measurands?
Well what do computers understand ? They can only really analyse data in terms of numbers, so we have to find some means of converting our measurands into numbers. This process is achieved with the use of a family of devices known as TRANSDUCERS.
The strict definition of a transducer is - A tool that can convert one type of measurand into another type of measurand, such that the second measurand varies in accordance with a defined relationship with respect to the first measurand.
Let us consider a simple example. A thermometer is a type of transducer. As the mercury in the bulb is heated up so it expands and is forced up through the tube. The height of the mercury is directly related to the temperature of the bulb. So we have transduced one type of measurement TEMPERATURE into another type of measurement POSITION.
Can you think of any other examples ?
A few are listed below -
A household barometer transduces atmospheric PRESSURE into ANGULAR ROTATION.A car's speedometer transduces VELOCITY into ANGULAR POSITION if the display is a dial, or LINEAR POSITION is the display is a moving bar.A clock converts TIME into the ANGULAR POSITION of the hands of a clock.A bathroom scales converts MASS into ANGULAR ROTATION.A tyre pressure gauge converts PRESSURE into LINEAR POSITION
Of interest is the fact that most transducers usually convert the original measurand into some form of linear or rotational displacement. This is because in the days before we used Instruments to measure variables in the real world, we were usually relying on our senses to perceive that variable, and what better sense than our own eyes. As an exercise this evening look around your house and count how many transducers you can find.
1.2 Electrical Outputs
In order to allow computers to interrogate external transducers it is necessary to convert the measurand into a form that the computer can read. This usually means that we need to convert the measurand into some form of Electrical Signal.
Some typical examples of transducers with electrical outputs are given below :-
1.2.1 Linear Displacement

A widely used sensor is the LVDT or linear voltage differential transformer. It is based on an electromagnetic principle as shown in the diagram below
FIGURE 1 LVDT SCHEMATIC
A full analysis of how an LVDT works is beyond the scope of this course, but in general an AC current is driven through coils 1 & 3, which induces another AC current in coil 2 via the ferrite core. It can be shown that for small movements of the core the change in AC voltage is directly proportional to the displacement.The AC voltage is then converted into a DC voltage with a rectifier or bridge circuit in the usual manner.
1.2.2 PRESSURE CELL
A picture of typical pressure cell is shown in schematic diagram given below. The best analogy for this type of transducer is a bellows, as more air is forced into the cell so it expands.
FIGURE 2 PRESSURE CELL SCHEMATIC
The basic cell converts pressure into linear displacement. So to obtain an electrical output all we need to do is to add an LVDT. However there is a more direct electrical characteristic that we can measure, the capacitance of the cell. A CAPACITOR is an electrical component that is capable of storing electrical charge; the more charge that it can store then the greater is its’ capacity. A capacitor consists of two metal plates, separated by a non-conducting material called the dielectric :-

FIGURE 3 CAPACITOR SCHEMATIC
If the bellows material is non-conducting then the pressure cell is itself an electrical capacitor. So it is now possible to transduce a pressure measurand into a capacitive measurand.
1.2.3 Level Measurement
The simplest sort of level gauge is a float attached via a linkage to a rotary potentiometer, as shown in the schematic given below :-
FIGURE 4 LEVEL GAUGE
As the float rises so the distance between terminal 1 & terminal 2 increases. The resistance between the 2 terminals is directly related to the actual level of the liquid in the tank.
1.2.4 Flow Rate Measurement
Flow rate can be measured in a variety of ways, but the simplest and commonest type of transducer is a turbine meter. It consists of a paddle wheel that is immersed in the moving fluid, so that the faster the rate of flow then the faster is the rotation rate of the paddle. If the vanes of the paddle are made of some sort of ferrite material then it is possible to sense the proximity of the paddle with an electromagnetic circuit; which usually relies on a phenomenon called the Hall Effect. A Hall Effect sensor outputs an electrical pulse whenever it senses the presence of the paddle blade , thereby giving us a stream of electrical pulses who's frequency is directly related to the flow rate of the fluid.

FIGURE 5 TURBINE METER SCHEMATIC
1.2.5 The Importance of An Electrical Output
THE OUTPUT FROM TRANSDUCERS MUST EVENTUALLY BE AN ELECTRICAL SIGNALTHAT WE CAN INTERFACE TO A COMPUTER USING AN ADC OR A PULSEDINPUT. THIS IS BECAUSE THE REAL WORLD MEASURAND MUST BE EXPRESSED ASA NUMBER IN AN ACCEPTED ENGINEERING UNIT.
All of the transducers described above convert one form of measurand into an electrical measurand of some sort. Typical electrical measurands that are used are Voltage, Current, Resistance, Capacitance, and Frequency. But why do it ?
If we are going to connect a transducer to a computer then we need to convert the original measurand into a format that the computer can understand. The commonest way this is done is by a family of devices known as ANALOGUE TO DIGITAL CONVERTERS, or simply ADC's. These are a family of devices that convert VOLTAGES to BINARY NUMBERS. All of the electrical measurands given above (except for frequency) can be converted into a voltage given the correct circuit.
So if we wish to measure, say, velocity, we need to do the following :-1 Select a Velocity Transducer that gives us an electrical output of some sort2 Add in the necessary electronic circuit that will convert that output to a voltage3 Add in an ADC that will convert the voltage to binary number that can be used by the computer
FIGURE 6 INTERFACING A VELOCITY SIGNAL TO A COMPUTER
The engineering process of connecting a signal from the real world to a computer is called INTERFACING.

1.3 Analogue to Digital Conversion
Now let us consider how to use an ADC, and how to write the programmes that operate them.
There are a number of different types of ADC, we will consider the following ones :-
1 DUAL SLOPE (OR INTEGRATING) ADC2 SUCCESSIVE APPROXIMATION ADC3 FLASH ADC4 SIGMA DELTA ADC
1.3.1 DUAL SLOPE ADC
A dual slope ADC is based on the principle of timing the period of time that it takes to charge up a capacitor to a known reference voltage. When a voltage is applied to one side of a capacitor then the voltage on the other side slowly rises up to match it. This phenomenon is used to create a simple ADC.
This process is described by the simple circuit shown below :-
FIGURE 7 A CAPACITIVE INTEGRATING CIRCUIT
If we time how long it takes for the output voltage to reach a preset threshold, then we have the basis for a simple ADC, the longer the time period then the smaller is the voltage. This method would use just a single slope. An alternative is to charge up the capacitor for a fixed period of time, and time how long it takes to discharge when a negative fixed voltage is applied. This is the basis for the Dual Slope ADC, which is widely used in industry.
One of the advantages of using an Integrating, or Dual Slope ADC, is that it smoothes out extraneous noise and interference, and they are usually cheap. Their great disadvantage is that they are slow, typically around 30 conversions per second and rarely more than 100 conversions per second.

1.3.2 Successive Approximation ADC
These devices are often called SAR type devices. The principle is quite simple, and is based on trying out different voltages, and seeing if it is greater than or less than the unknown voltage. If this is carried out systematically then it is possible to convert the signal to binary form extremely quickly.
The schematic below gives an example of a 3 bit SAR ADC. If we assume that the full scale voltage is 7 volts, then the top bit represents 4 volts, the middle bit represents 2 volts, and the bottom bit represents 1 volt. This gives us 8 possible levels from 0 through to 7 volts, in 1 volt steps.
FIGURE 8 3 BIT SAR ADC
First we try out the highest voltage, in this case 4 volts. If the output is less than our unknown voltage then leave that switch on, otherwise it is switched off. Then we move down to the next voltage, set to 2 volts, and try again. Finally we try out the last switch. Let us work through an example -
If the input voltage is 6.3 V, then when we turn on the first switch our output is only 4 volts, so we will leave that switch on. We then try the next switch, set to 2 volts, and our output rises to 6V, so that switch is also still left on. Finally we try the last switch set to 1V, which causes our output to

rise to 7V, which is greater than our unknown, so it is switched off again. The binary representation of our unknown voltage therefore is 110. Try some other examples for yourself.
3 bits is of course of little value to us. SAR type devices usually offer anything from 8 through to as many as 18 bits of resolution.
The advantage of SAR devices over integrating types are that they are much faster, with conversion rates of 10 to 100 microseconds. They are however more prone to noise on the signal, and they cost more.
1.3.3 Flash ADCs
Flash ADCs take the SAR concept to its’ ultimate conclusion. Instead of trying out all the different voltages sequentially, through a single comparator, the device contains a whole series of comparators all set to different voltages. Our unknown signal is tested by all these devices simultaneously, so that we can get a near immediate result.
Consider our 3 bit example again. To perform this operation with a Flash ADC we would need 8 comparators, set to the 8 different voltage levels required, from 1V to 8V. All the comparators that are set to less than our unknown will be ON, and all the comparators that are set to a voltage higher than our unknown will be off. Thus by finding the highest rated comparator that is on we know what the unknown voltage is.
Of course Flash ADCs are not packed with 100's of comparators, (an 8 bit flash ADC would need 256 comparators), but use sophisticated analogue electronic techniques to achieve the same result.
FLASH ADCs are, as their name suggests, the fastest type of ADC that can be bought, typically with conversion times of less than 1 microsecond. They are however very expensive.
1.3.4 Sigma Delta ADCs
These are a new type of device that are somewhat similar to an integrating type, but are faster and more accurate. A reference voltage is generated from an up/down counter and a DAC, and is compared to our unknown signal. If the output is too low then the counter counts UP; if the output is too high then the counter counts down. If this process is carried out very quickly, then the number held by the UP/DOWN counter is directly related to the input voltage.
They are becoming popular because they use very little power, so are useful for use in small battery operated measuring instruments. They are however slower than SAR types.
1.3.5 Selecting an ADC
So given the different types of ADC how do we choose one. First we must consider two essential parameters of our control system. One is the RESOLUTION and the other is the SAMPLING RATE.
What do we mean by these two terms.
The RESOLUTION of the ADC is smallest step change in the input voltage that it can measure. Remember that an ADC gives us a binary number as an output, the step change of the least significant digit defines the minimum voltage change that the ADC can RESOLVE. So if the full scale is 8V and we have a 3 bit ADC then resolution is only 1V. If however we have an 8 bit ADC the resolution is 8 / 256 or 0.03125V, and so forth.
The sampling rate is the speed at which we can obtain a new result from the ADC, and is usually expressed as a frequency.

The resolution, and the sampling rate required by a Real Time System depend upon what the system is trying to do. If it is just updating a display for an operator then a relatively slow sampling rate would normally suffice, say 10 Hz. If however we are controlling a machine tool then we will need a high sampling rate, such as a kHz or so. The resolution that we need would also need to be determined. Remember that resolution and accuracy are not the same thing; after we have converted the voltage to a number, we will then process that number mathematically. Each mathematical process itself degrades the accuracy because computers have finite word lengths, and input noise on the signal means that it is always less accurate than the original resolution.
The other factors that will affect the choice of ADC are the purely practical ones of price and ease of use.
To summarise; the key factors that will determine our choice of ADC are
1 RESOLUTION REQUIRED2 SAMPLING RATE3 PRICE4 EASE OF USE
The first two factors once determined are not negotiable, however there is always a trade off between ease of use and price.
1.4 PROGRAMMES THAT USE ADC AND OPERATE ADC's
All ADC's consist of two sections, ANALOGUE and DIGITAL. The ANALOGUE section has been described above, and is responsible for performing the actual conversions. The DIGITAL section however is that part of the device that we connect to the computer. It is beyond the scope of this presentation to discuss all the different types of ADC available on the market, but in general they all conform to one of two different types of digital layout, namely PARALLEL (OR BUS) architecture or a SERIAL architecture. We will consider both of these in turn.
1.4.1 Parallel Architectures
To illustrate this discussion let us assume that we intend to use a 12 bit ADC. When we connect an ADC to a computer it is usually wired up so that it looks like a memory location. When computers access a memory location they set up the desired ADDRESS on their ADDRESS BUS, this wakes up the required memory location; then they assert either their READ control line or their WRITE control line in order to inform the awakened memory location what it is supposed to do. Data is then transferred over the computers DATA BUS. This is shown in the schematic given below, which has assumed a 16 bit ADDRESS BUS and an 8 bit DATA BUS (e.g. an IBM 286 or AT type processor).

FIGURE 9 ADC TO COMPUTER PARALLEL INTERFACE SCHEMATIC
The purpose of the address decode logic is to assign a unique block of memory locations for the ADC digital interface. As a minimum 3 memory locations would be needed, though it is often simpler to assign a whole block of 256 bytes to an ADC in practice, as fractions of memory blocks less than 256 bytes are often of little use in a computer. Let us assume that we have assigned the memory block 8000H through to 80FFH for use by the ADC.
Note also that we have taken the two least significant address lines to the ADC as well. This is because there are 3 internal memory locations available to be read inside the ADC. These are defined in the table below
Location 0 Lower Byte of DataLocation 1 Upper Byte of DataLocation 2 Control Byte
The control byte will contain at least two status bits, one will be the Start of Conversion control bit, sometimes just called SOC, and the other will be the End of Conversion control bit, or EOC.
Let us assume that SOC is at bit position 0, and EOC is at bit position 1.
Before we can start a new conversion we must first make sure that the last conversion has finished, otherwise we will get a spurious result. REMEMBER THAT COMPUTERS OPERATE MUCH FASTER THAN ADC's, therefore the SOC and EOC control bits are used as a form HARDWARE HANDSHAKING to slow down the computer to the ADC's speed.
How do we ensure that the ADC has finished ? Quite simply we poll the EOC bit in the control byte, and wait for it to be set to a 1. When it is set we know that we can start a new conversion off.A typical section of code written in C would look like this
unsigned char *adc_low_byte ; // define an address for the low data byteunsigned char *adc_high_byte ; // define an address for the high data byteunsigned char *adc_control_byte ; // define an address for the control byteint adc_reading ; // define an integer to hold the resultadc_low_byte = 0x8000 ; // set adc low byte address pointer to 8000adchigh_byte = 0x8001 ; // set adc high byte address pointer to 8001adc_control_byte = 0x8002 ; // set adc control byte address pointer to 8002
while ((*adc_control_byte & 2) == 0); // wait here forever until EOC bit goes high*adc_control_byte = 1 ; // Assert SOC control bitadc_reading = *adc_high_byte ; // read the high byte first byte

adc_reading &= 0xf ; // but only keep the lower 4 bits, as it is a 12 bit ADCadc_reading <<= 8 ; // shift the 4 bits into the upper byte of the integeradc_reading |= *adc_low_byte ; // now get the lower 8 bits of the result
There will of course be variations on this depending upon the specific ADC architecture, but it principle they are all very similar.
1.4.2 SERIAL ARCHITECTURE
Serial devices operate in a similar way, except that they do not look like block of memory. Instead data is transmitted to and from these types of devices in a serial fashion, in a similar way as a serial communications port. They are intended for use with a range of devices known as MICROCONTROLLERS as opposed to the MICROPROCESSORS found in IBM PC's and simpler types of computers.
A typical interface would look like that shown in the following schematic.
FIGURE 10 ADC TO COMPUTER SERIAL INTERFACE SCHEMATIC
Microcontrollers always have at least 8 individual I/O (input/output) pins that can be written to and read from under programme control. The sequence of operations is identical to that for a parallel interface, except that the data has to be clocked out a bit at a time along the serial data lines.
1.4.3 Use of the EOC line from an ADC
The microcontroller must first monitor the EOC line. When it is TRUE then the SOC line can be asserted to start the next conversion. The EOC line will then go low to indicate that a conversion is underway. When the conversion is complete then the EOC line will be asserted again by the ADC and the result can be clocked out of the device into the microcontroller.
The EOC can be used in one of two ways, we can either POLL it or use it as an INTERRUPT. Let us consider POLLING first. The EOC line is connected to a digital input line. This means that we can read the state of the EOC line in our programme. Our data acquisition programme must first assert the SOC line, it then waits for the EOC line to become active.
An example in C -You can assume that the pointers have been set up in an initialisation programme somewhere else.
unsigned int get_adc(void) {

unsigned char *SOC ; // pointer to SOC line unsigned char *EOC ; // pointer to EOC line unsigned char *low_byte ; // pointer to low byte of ADC data unsigned char *high_byte ; // pointer to high byte of ADC data unsigned int result ; // result *SOC = 1 ; *SOC = 0 ; // output a pulse to SOC to start of the conversion while (EOC == 0) ; // wait for the EOC line to go high result = *high_byte << 8 ; // get high byte and shift it up result += *low_byte ; // add in the low byte return(result); }
This is the 'polling' method. We start of the conversion and then wait for it to complete. Whilst we are waiting we could do something else -
unsigned int get_adc(void) { unsigned char *SOC ; // pointer to SOC line unsigned char *EOC ; // pointer to EOC line unsigned char *low_byte ; // pointer to low byte of ADC data unsigned char *high_byte ; // pointer to high byte of ADC data unsigned int result ; // result *SOC = 1 ; *SOC = 0 ; // output a pulse to SOC to start of the conversion while (EOC == 0) // wait for the EOC line to go high
{do_func1() ; // do something else whilst waitingdo_func2() ;}
result = *high_byte << 8 ; // get high byte and shift it up result += *low_byte ; // add in the low byte return(result); }
When we POLL, the data extracted from the ADC can be read directly into our results register.
The other method is to use INTERRUPTS. We will discuss these later in more detail. The problem with polling is that the processor wastes time waiting for the EOC signal. Instead we can take the EOC to a processor INTERRUPT line. When the interrupt is asserted by the ADC the processor stops what it is doing, and executes a special interrupt routine; in effect this is parallel processing.
Use start ADC to just start of the conversion, then go away and do something else.void start_adc(void) { unsigned char *SOC ; // pointer to SOC line *SOC = 1 ; *SOC = 0 ; // output a pulse to SOC to start of the conversion }
This function is a stand alone routine. It can happen at any time, when it occurs the processor stops whatever it is doing, executes this function and returns to its' other tasks.
void INTERRUPT get_adc(void) { unsigned char *low_byte ; // pointer to low byte of ADC data unsigned char *high_byte ; // pointer to high byte of ADC data unsigned int result ; // result

result = *high_byte << 8 ; // get high byte and shift it up result+= *low_byte ; // add in the low byte }
To read the data our main programme (sometimes called the BACKGROUND) could just access the data area 'result'. But that data area belongs to the interrupt function, not to the main function. If we tried to read it, another interrupt could happen in the middle of our attempt to read it, and this would give us a corrupted result. We must never have two separate programme entities trying to access the same area of data memory.
So the main difference between POLLING and INTERRUPTS are as follows -
POLLING - The START_ADC and GET_ADC functions use the same data areas, and are part of the same programme. This means that we waste time waiting for the ADC to finish. Data handling is easier, but time is wasted.
INTERRUPTS - The START_ADC and GET_ADC functions are different programme entities, they cannot share the same data area. We must use special techniques to pass data between these separate programme entities, using SEMAPHORES. Data handling is therefore far more complex, but no time is wasted waiting for slow peripherals such as the ADC.
1.5 Pulsed Inputs
How do we interface to pulsed outputs, such as those that come from a turbine meter, or perhaps an external clock oscillator ? Computers are well placed to handle such signals as they always have an internal clock source against which external events can be timed. For example all IBM PC's have an internal 16 bit counter running at 4.196 MHz which you can read at any time with your programmes.
The interface must first convert the pulsed signal to a level that can be connected to one of the computers DIGITAL INPUT pins, which means it must be set to be TTL voltage levels (5V and 0V).
All that the programmer now needs to do is to monitor the state of that input line, and time the width of the pulses.
1.5.1 Quadrature & Shaft Encoders
Input capture techniques can determine the frequency of a digital signal, but what about its’ direction?
Consider a turbine wheel output -
We can count the number of pulses, and determine a total, or we can time them and determine a frequency. However we have no way of knowing if the wheel reverses direction. This is solved by having a second pulse stream that is 90 degrees out of phase with the first pulse stream.

If the pattern is moving from left to right the sequence is 00 10 11 01If the pattern is moving from right to left the sequence is 11 01 11 10
So we can now count or time pulses, and distinguish the direction as well. This is known as QUADRATURE ENCODING.
A shaft encoder is disk that is attached to shaft of a rotating motor. This disk consists of a series of light and dark bands, so that as the motor rotates an optical sensor will 'see' a series of pulses. To determine the total distance travelled we simply count the pulses using a computer digital input.
If we have two sensors that are 90 degrees out of phase then we have a QUADRATURE SHAFT ENCODER. This allows the computer to determine the direction of rotation as well.
1.6 TRANSDUCERS & TRANSMITTERS
Transmitters are a special class of transducer that are fitted with a means to transmit a digital, or analogue representation of the measurand over a cable to a remote computer or controller.
Typical communications media are Current Loops, RS232, IEEE488, RS485.
Taking each in turn briefly -
1.6.1 Current Loops
Current loops are very widely used in industry. Their principle of operation is very simple, instead of using a varying voltage to represent a signal level, they use a varying current instead. The more current that is drawn by the transmitter then the greater is the value of the measurand. A typical range for such an instrument is 0 to 20mA, where 0 mA represents the minimum measurand level and 20 mA represents the maximum measurand level.
A widely used ‘two wire’ technique is the 4-20mA current loop standard. The transmitter draws exactly 4 mA for its’ own use, and the analogue signal is amplitude modulated onto the remaining range of 4-20mA, so 4 mA = zero and 20mA = FULL SCALE.
1.6.2 RS232
You should all be familiar with RS232. It is a serial communications standard that uses switched voltage levels to represent digital information. You are more likely to come across RS232 in laboratories than in industry.
1.6.3 RS 422
RS 422 is widely used in industrial applications to provide a full duplex point-to-point serial communications link. Unlike RS232 it uses a balanced wire system. There are two wires for

each side of the link, set to a potential of +12V and -12. This means that the voltage difference between the pairs of wires is 24V, which is twice that of RS232. Such a system is far more immune to external noise and interference. In order to signal a bit, the transmitter reverses the potential on the two lines, thus switching the potential difference form +24V to -24V.
The wires are usually twisted pairs.
It is an asynchronous standard, and it all respects is identical to RS232
1.6.4 RS485
RS485 is a half duplex data communications standard that also uses switched voltage levels to represent digital data. Unlike RS232 that uses a single wire to transmit the information, RS485 uses a pair of twisted wires that are used to switch the state of a differential voltage. This arrangement gives far superior noise immunity than the single wire RS232 arrangement, so it is widely used in industry.
1.6.5 IEEE 488
This is also known as HPIB and GPIB. It is a parallel digital communications standard, which gives a much higher data rate than single wire systems. It also defines a protocol that allows you to put up to 32 different instruments onto the same cable, in a multi-drop arrangement. One of the instruments (typical the central control system itself) is defined as the CONTROLLER, and all the other instruments are given bus attributes such as TALKER and LISTENER. It is a complex LAN system, that is widely used.
GPIB was one of the first attempts to define a universal BUS PROTOCOL for industrial instrumentation. There are a range of more recent attempts, such as MODBUS, CANBUS and FIELDBUS, but regrettably all the different manufacturers of industrial equipment seem to be unable to agree on a single standard.
1.6.6 Wiring Arrangements
A transmitter would normally need 4 wires to operate. Two of them are for the power supply, and the other two are for the transmission link. Such an arrangement is known as a 4 wire transmitter. The advantage of this arrangement is that the data link is totally independent of the power supply, which means that it will be less prone to interference from power supply noise. The disadvantage is that we have 4 wires to worry about, each of which is a possible cause of mechanical failure, and requires maintenance. So whilst it is good for noise immunity it is bad for reliability, cost, and complexity.
A simpler system is to combine together the ground wires for the power and the signal. This will give us a 3 wire transmitter. This is a good compromise as we have separated the power supply delivery from the signal return.
Alternatively if we wish to minimise the cabling totally then we can use a 2 wire transmitter. In such an arrangement one wire is used for the power and signal ground, and the other is used to both deliver the power and to transmit back the signal. There are many ways to do this, the most common being a 4 to 20 mA current loop. The instrument itself draws a fixed current of 4 mA to make it operate. The remaining 16 mA is used to transmit an analogue signal back to the controller. The more current that the instrument draws then the larger is the amplitude of the measurand. Other less common arrangements are voltage loops, and digital signals modulated on top of the supply voltage.

2 CONTROL AND DISPLAY OUTPUTS
After a computer has input all the relevant information from the outside world, processed that data and decided what to make the Real Time System do next, it needs to have some means of OUTPUTING control signals to the system. How is this done ?
Well first we must consider what sort of things the computer would be trying to control. Typically they would be things such as variable position valves, actuators, motors and displays. Let us consider a few examples of these peripherals :-
2.1 Actuators
An actuator is a general term normally applied to some form of electromechanical tool that is turned ON or OFF by the computer. You can think of them simply as switches, except that they are usually switching on something slightly more exciting than a ceiling light.
Computers control actuators via digital output ports. These are single wires that can be set by the computer to be either a logic level 1 (= 5V) or a logic level 0 (=0V). They are usually memory mapped, so that the computer thinks it is just writing to any other memory location, but in practice it is really writing a voltage level to a wire that comes out of the computer into the real world.
Now 5V is rarely adequate to switch on anything reasonable in the outside world, so a range of devices are available that convert the TTL level switch signals to something a bit more useful. One such device is a relay :-
FIGURE 1 RELAY SCHEMATIC
Relays are electromagnetic circuits that allow low level voltages, such as TTL, to switch higher level signals such as mains or 24V DC plant supplies. The principle is very simple, when the TTL side of the relay is switched the electromagnet is enabled. This magnet then pulls the switch opposite it to a closed position, allowing the higher voltages to flow through to whatever we wanted to switch on.
Another type of actuator, that are very widely used, are solenoids. These also operate by means of electromagnets, but in a linear manner :-

FIGURE 2 SOLENOID
When the electromagnet is enabled the ferrite core is pulled through the coil, thereby giving us a linear movement. This movement could be directly used itself, for example to open a bolt, or alternatively it could be used to open an air valve. Many mechanical components in industry are moved around by pneumatics, not by motors; the simplest examples being air pistons. So if our solenoid is sprung loaded it can be used by our computer to switch on and off an air supply to a hefty piece of equipment.
2.2 Opto-Isolators & Opto-Couplers
These are two different names for effectively the same thing. They make use of two well-established semiconductor principles, one is the Light Emitting Diode or LED and the other is the Photo Transistor; rest assured we are not going to discuss the physics of these devices!!
LED's are made from a type of semiconducting material that emits visible or infrared light when a current is passed through it. In this respect they are very similar to a light bulb. They are however very useful in Real Time Control systems because they can be easily switched on and off by a computer’s digital output line as shown below :-
FIGURE 3 BASIC COMPUTER LED DRIVE CIRCUIT

Phototransistors use a similar phenomena but in reverse. A phototransistor only allows current to flow through it when light falls onto it, so it is effectively a voltage switch that is controlled by light. If we combine these two types of devices together then we can use them to allow a computer to switch on & off much higher voltages and currents that would normally be allowed by a TTL signal. Such a device is an opto-isolator, so called because the two sides of the device are electrically isolated from eachother, it is the light that does the work.
FIGURE 4 OPTO-ISOLATOR USED BY COMPUTER TO SWITCH A 24 VDC SUPPLY
The example above shows an opto-isolator switching a 24V DC supply. However a wide range of these devices exist, based on the same principle, that can switch on and off 240V AC mains supplies, as well as higher DC voltage levels.
2.3 Triacs
These are a family of handy little semiconductor type devices that can directly switch high voltages when triggered by a small voltage. Triacs can switch full wave AC voltages. They can be driven directly by a computer TTL output, but this is not very advisable, as if they were to fail in closed-circuit manner you may blow up your computer as it could be connected directly to the mains. They are therefore often driven via an opto-isolator -
FIGURE 5 TRIAC TYPE VOLTAGE SWITCHES
2.4 Summary of Digital Outputs
All of the items so far discussed are examples of DIGITAL OUTPUTS. That is they consist of a single output signal that can be set to either a logic level 1 or a logic level 0. The computer outputs TTL level signals which switch between 0 and 5V, which can be used to switch higher level AC & DC voltages and air supplies by means of a variety of devices as listed below :
SOLENOIDSRELAYS

OPTO-ISOLATORS (or COUPLERS)THYRISTORSTRIACS
2.5 Analogue Outputs
Digital outputs are fine for switching things on and off, but what if we want to set an electric motor to a specific speed, or open a valve to a specific position ? To achieve this we need to use analogue outputs. The family of devices that we use to achieve this are called DIGITAL TO ANALOGUE CONVERTERS or just simply DAC's.
These devices are wired up to the computer so that they look like a small block of memory. However when the computer writes some data into these memory locations (i.e. the digital information), that data is used by the device to generate an analogue output voltage.
You really do not need to know how they work, for the purpose of this module, but you must know how to use them and programme them.
A typical DAC schematic is given below :-
FIGURE 6 TYPICAL DAC SCHEMATIC
The DAC is connected to the computers 8 bit data bus just like any other memory location. The chip select input pin is used to assign the DAC a unique address in the memory space. At least one other address line (usually A0) would be needed if more than 1 memory location is required by the DAC.
Typical word lengths for DAC data are 8, 12 and 16. If it is an 8 bit DAC then only one byte of data needs to be written to the device. For 12 and 16 bit devices two bytes need to be written, one to the lower address and one to the upper address.
The voltage output is a fraction of the voltage reference, as determined by the digital word.
So if we take an 8 bit DAC as an example, the maximum number that we can write to it is 255, therefore if we write a number N to the DAC the output voltage is given by the simple formulae -
Vout = Vref * N / 255
For a 12 bit DAC the output would be -
Vout = Vref * N / 4095

And for a 16 bit DAC -
Vout = Vref * N / 65535
2.6 Frequency Outputs
Quite often it is necessary for a computer to provide a frequency output. A typical example would be the signal required to drive a stepper motor. These are a class of motors that use electromagnets to rotate a drive arm, as opposed to a more traditional DC motor.
A schematic of a stepper motor is given below -
FIGURE 7 STEPPER MOTOR SCHEMATIC
To spin the ferrite core around it is necessary to energise pairs of coils in sequence, e.g. 1&2 then 2&3 then 3&4 then 4&1. To do this we need 4 digital outputs, which have to be switched on & off in the correct sequence. The faster we switch the digital outputs so the faster our motor will rotate.
Computers are well placed to drive frequency outputs. All they need are some digital outputs, and an internal clock source to determine when to switch the signals over. All computers have some form of internal clock, which is usually running far faster than we would ever need.
A brief explanation of the differences between STEPPER MOTORS AND DC MOTORS
A DC motor is driven by a variable voltage. like a child's toy train set. The more volts that we apply then faster it rotates. So to use a DC motor we have to have a DIGITAL TO ANALOGUE CONVERTER or DAC in order to convert a desired speed into a variable voltage.
A STEPPER MOTOR is a magnetised shaft that is located in the middle of 4 separate electromagnets. BY turning each electromagnet on it in sequence the shaft will rotate. This means that we can turn a stepper using 4 ordinary computer digital outputs.
The other advantage of stepper motor from a programmers point of view is that we always knows is position, because we can keep count of how many 'steps' we have output to the electromagnets. But to keep track of a DC motor we need some sort of sensing device that feeds back the actual position to the computer. e.g. a shaft encoder.
2.7 Pulsed Width Modulation

A computer can only output a logic level 1 or a logic level 0. So something that it is controlling can only be FULL ON or FULL OFF.
PWM is way of getting around this restriction. For example let us assume that we have connected a light bulb to our computer output. If the output is HIGH for 1 second and then LOW for one second our eye will see the light bulb flashing on and then off. If we speed up the rate of flashing, then the ON and OFF periods become blurred, until we reach a speed that our eye can no longer detect. Instead we see the bulb is at half its' normal brightness. This is how PWM works. If we flash a signal on and off far faster than out system can respond, then instead of seeing the flash, we see a half way level. We can extend this idea. If our signal is on for 25% of the time and off for 75% of the time, then the light bulb is seen to glow at 25% brightness. Or we can increase the mark/space ratio and make it glow brighter.
The important rule is that the rate of change of the signal must be substantially faster than the response time.
A PWM signal has a fixed frequency, but with a variable Mark/Space ratio. A simple schematic is given below -
FIGURE 8 SOME TYPICAL PWM WAVEFORMS
PWM signals are generated using an internal timer and a single digital output line. They are widely used in industry for a variety of purposes, such as controlling dimmer lamps and positioning valves.
SO by using PWM we can turn a computer's ordinary HIGH or LOW output into a continuously moving analogue signal, simply by changing the mark/space ratio
2.8 Phase Modulation
Phase modulation is a technique that is used tin conjunction with a triac to vary the amount of power delivered to a system from the AC mains supply.
First some definitions. AC stands for ALTERNATING CURRENT. DC stands for DIRECT CURRENT
An AC supply is one that continuously changes its’ direction sinusoidally, as shown in figure 1.
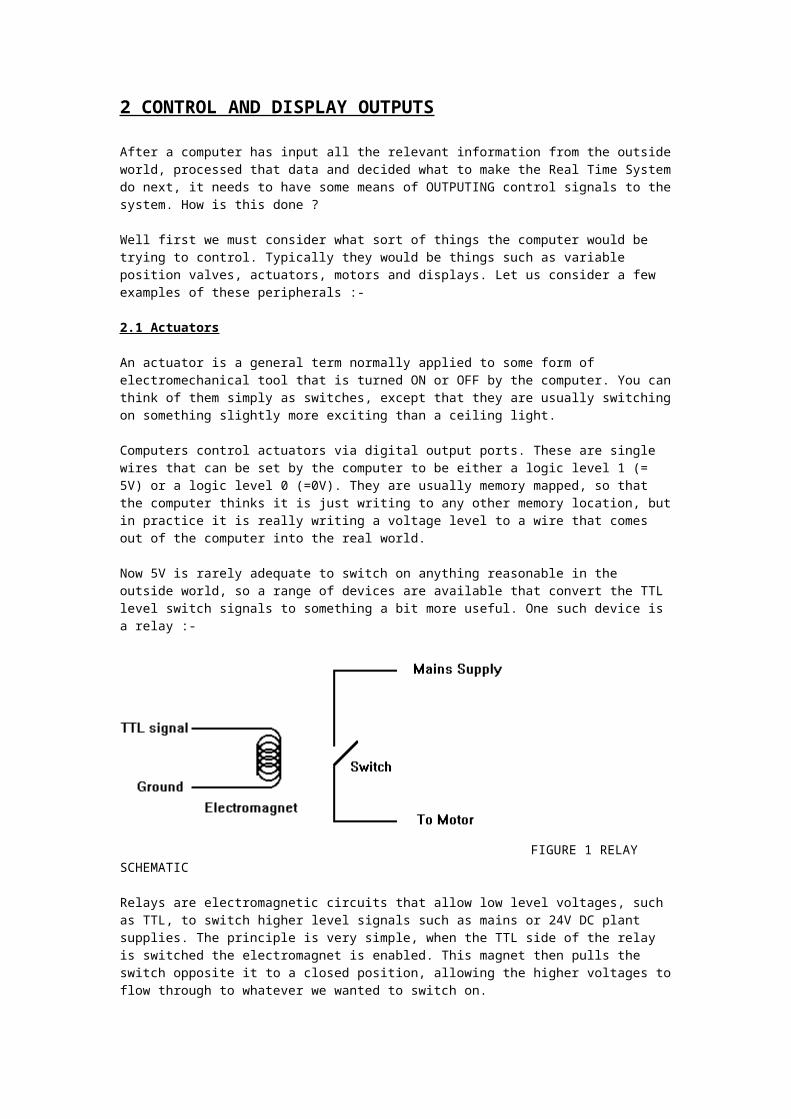
FIGURE 1 AC MAINS SUPPLY
This is how electricity is delivered into your house, and into factories, via the ‘mains supply’.
The frequency of oscillation is normally 50 Hz, but may be 60 Hz (for example in the USA).
This means that every 10 milliseconds (ms) the voltage passes through the zero volt position. The total power delivered is the average of the mains cycle.
A DC supply is one that is fixed at a constant level, as shown in figure 2.
FIGURE 2 DC SUPPLY
A triac is an electronic component that is used to control an AC supply. It allows voltages to flow across it in either direction when it is switched on. SO both the -ve half and the +ve half of the mains cycle can pass through it. It acts like a switch.
A triac can be switched on by a low level signal direct from a computers digital output. Once a triac is switched on, it can only be switched off when the mains voltage is switched off. So in order to switch it on we need only output a short pulse from the computer, because the triac stays on. Once every 10 ms the mains passes through the zero point and switches itself off again.
If we vary the point in the mains cycle where we switch the triac on we can control the amount of AC power that is allowed to pass through the triac.

FIGURE 3 USING A TRIAC TO SWITCH ON MAINS AT HALF POWER
In figure 3, the triac is switched half way through the mains cycle by the computers’ digital output pulse. This switches on the triac at the half way point, allowing half of the mains to power to pass. When the mains cycle passes back through the zero point the triac switches off again.
If we want very little power we can move the computer pulse to nearly the end of mains cycle.
FIGURE 4 SWITCHING ON A LITTLE BIT OF AC MAINS POWER
So by varying the point within the fixed frequency mains cycle where we turn the triac on, we can control the amount of power delivered into our system.
this process is called PHASE MODULATION, because the trigger point is varied with respect to the phase of the mains cycle.

2.9 Displays
Real Time Control systems often do not have any displays at all. If there are any then they are likely to be no more than some status lamps, possible a bar graph or a small text display. Grander systems may use an LCD graphics display, but you will probably have to write to it at pixel level.
LED's are very popular as status lamps, this is because they are small enough to be mountable directly onto a circuit card, and they are cheap and robust. Interfacing to an LED is also very simple, and some Microcontrollers can even drive them directly.
Alternatively a brighter status lamp can be obtained by using a neon or filament bulb. Options such as this would require more interface circuitry and would cost more.
There are a wide range of 7 segment and 16 segment type displays available. These are displays that consist of 7 or 16 independent lamps, laid out on a grid, such that you can create your own letters -
FIGURE 9 LAYOUT FOR 7 AND 16 SEGMENT DISPLAYS
These displays are usually implemented with LED's, but vacuum fluorescent and other types are also available for higher brightness. To drive them you just need 7 or 16 digital outputs suitably interfaced to provide the correct drive voltage for the display. Some small displays can be directly connected to the computer's TTL output lines.
Of more value are the wide range of LCD single and multiple line displays. These consist of an array of 7 or 16 segment type character positions but laid out onto strips of an LCD material. There are a wide range of drivers that can be used to control these displays, most of which can be configured to sit on a computer's data and address bus, and therefore just look like a block of memory.

3 REAL TIME SYSTEMS -- PERIPHERAL INTERFACING
Microcontrollers communicate with the outside via peripheral devices. These are electronic components that reside in the memory space of the processor, and can therefore be accessed by any valid memory read/write operation. However instead of simply behaving like memory, they are in fact connected electrically to more interesting devices, the INTERFACE the electronic world to the outside world.
We are going to consider a few of these devices, and how they are used -
* Parallel Interface Adapter* Serial Interface Adapter* Parallel I/O* Typical ADC* Typical DAC
3.1 Parallel Interface Adapter
You are already familiar with one use of such as device, as the ‘printer port’ of a PC is a parallel interface adapter, though they do have other uses as well as printing.
In order to understand how they work let us take a closer look at a PC’s Parallel interface.
Externally a parallel interface consists of 25 pins, designated as follows -
PIN NUMBER FUNCTION DIRECTION1 STROBE IN/OUT2 DATA BIT 0 OUT3 DATA BIT 1 OUT4 DATA BIT 2 OUT5 DATA BIT 3 OUT6 DATA BIT 4 OUT7 DATA BIT 5 OUT8 DATA BIT 6 OUT9 DATA BIT 7 OUT10 ACK IN11 BUSY IN12 FAULT IN13 SELECT IN14 AUTO FEED IN/OUT15 ERROR IN/OUT16 INITIALISE PRINTER OUT17 SELECT IN/OUT18-25 GROUND
It is evident from the names given to these pins that their primary use is to drive a printer. Typical operation is to put a data byte onto the data pins, and then to toggle the strobe output pin. The printer then uses this signal to latch in the data byte, print it, and signal back an ACK to the PC. The other pins are used for control and handshaking purposes.
However there is no reason why this device driver cannot be used for other purposes. There are a wide range of peripheral devices available that plug into PC ‘printer ports’. The bi-directional control pins can be used to speed up data transfers, and to implement DMA applications.
You can write your own drivers to the parallel port. I/O address 378 HEX accesses the data byte directly. A read from I/O address 379 HEX returns the state of the input pins, 15,13,12,10 and 11.I/O address 37A HEX addresses the bi-directional pins 1,14,16 and 17.
3.1.1 Bi-Directional Parallel Ports
In the above example even though some of the pins were bi-directional, the data byte was output only.

This means that communications can only be achieved in a simplex manner. This is OK for a printer, but most real time system applications require duplex communications. This is achieved with the use of bi-directional parallel ports.
To all intents and purposes the wiring is identical. The difference is that either side of the link can drive a signal high or low. Typically both ends should hold the line high, and the unit that wishes to talk pulls it low .
The most widely used parallel port is the Intel 8255, which has been widely copied by many other manufacturers. This device contains 4 internal registers, three of which are the ports themselves and the fourth is a control register.
If the base address of the device is BASE, then the address allocation is as follows -
Port A BASEPort B BASE + 1Port C BASE + 2Control BASE + 3
All of the ports can be initialised under software control to be either inputs or outputs. This means that Port A’s 8 bits can be set be either all inputs or all outputs. This is also true of Port B. Port C however can be split into two groups of 4, each of which can be inputs or outputs.
3.2 Timer Devices
As with the other devices it is Intel that set out the original industry standard, the 8253 programmable timer chip. This device also has 4 registers, 3 of them are independent 16 bit timers, and the fourth is the control register.
If the base address of the device is BASE, then the address allocation is as follows -
Timer 1 BASETimer 2 BASE + 1Timer 3 BASE + 2Control BASE + 3
These devices include an input pin and output pin for each timer. Every time a pulse is seen on the input pin the contents of the associated timer is decremented. When the counter reaches zero the output pin can be programmed to either change state, or to issue a pulse.
On reaching zero the timer will normally wrap around back to the maximum value of FF. However it can be programmed to automatic reload a constant.
These various options allow us to use the device to time or count external events; or to generate a ‘one-shot’ pulse, or to generate a fixed frequency.
3.2.1 Use of an 8253
An 8253 is a counting device. They contain 3 independent 16 bit counters. Each counter can be connected to a different clock source.
The counters can written and read by ordinary programmes. So you can read the count into a local variable, or load a number of your own choice into the counter (it will then count down from that number).
When a counter reaches zero it either automatically reloads the last number that was written to it, or it wraps around to FFFF. Your programme must tell it which of these options it must do.

Each counter has an output pin. When the count reaches zero the output will either issue a single pulse, or change state for 1->0 or 0->1. Again the programme must initialise the counter to one or other of these options.
A BAUD RATE SIGNAL
Load a number N into the 8253 that is HALF the desired period. Instruct the 8253 to auto-reload that number, and to toggle its' output pin. You will now get out a square wave at the desired baud rate to drive a serial communications link.
A TIMED SINGLE SHOTLoad a number N that represents the whole of the desired period. Instruct the 8253 to issue a single pulse when it reaches zero. After time period N a single shot pulse is issued. Switch the device off.
A FREQUENCY MEASUREMENTUse one counter to count the input pulses. Preset it to zero. Use another counter to give us a fixed time period of 1 second. Load that period N into the counter. When the timer reaches zero, read back the contents of the counter that is connected to the input pulses. Complement the result (65536 - contents), because it is counting down not up. The resultis the frequency. You could poll the counter, by either monitoring the output pin, orreading it back and waiting for zero. Or you could have set it to 'single shot' and connected it to an interrupt.
A PERIOD MEASUREMENTLoad the first counter with 1, and set it to single shot. Clear the second Counter, and connect to the processor clock. When a pulse arrives, counter 1 decrements, and issues a single shot. Use this pulse to trigger an interrupt, which repeats this process. The next time around the contents of the second counter is the period.
3.3 Serial I/O Device
The industry standard for these types of devices, or USARTs (Universal Synchronous/Asynchronous Receiver Transmitters), was set again by Intel with their 8251 device. However the National Semiconductors 8250 device is now dominant, as it is used in PC’s. They are very similar.
We will consider the 8250. You can use this information to write your own serial line driver for a PC.
An 8250 contains 10 internal registers, designated as follows -
BASE Receive/Transmit dataBASE + 1 Interrupt EnableBASE + 2 Interrupt IdentificationBASE + 3 Line ControlBASE + 4 Modem ControlBASE + 5 Line StatusBASE + 6 Modem StatusBASE + 7 UnusedBASE + DLAB Bit Rate Divisor LSBBASE + 1 + DLAB Bit Rate Divisor MSB
The attached data sheet is taken from the IBM hardware manual. It describes how to use the device in full detail.
3.4 Typical ADC
An ADC can have either a DATA BUS interface or a SERIAL interface. A bus interface consists of an 8-bit data bus, plus a number of associated interface control lines. These would typically be -
CHIP SELECT

READWRITEHIGH BYTE ENABLESTART OF CONVERSION SOCEND OF CONVERSION EOC
The chip select signal is used to ‘wake up’ the bus interface logic of the device. It is usual to connect this to an unused memory address in processor’s memory map. The read and write signals are connected directly to the processor’s memory read and write control lines. High byte enable is used to select between the lower 8 bits of the ADC result, and the upper 4 or 8 bits of the result; typically it is connected to address line 0.
The SOC and EOC lines are used to respectively start a conversion, and inform the processor when it has finished. SOC is usually connected to a single digital output port. In an interrupt driven system, EOC is taken to an external interrupt pin. In a polled system it would be taken to a single digital input port.
Some ADC devices make the SOC and EOC signals available as part of the data byte that is read back on the data bus. This allows the whole of the ADC operation to managed under memory mapped programme control. Clearly such a method could only be used in a polled system.
Serial devices adopt either one of the industry standards for inter integrated circuit communications - these are -
IIC Inter Integrated Circuit CommunicationsSPI Serial Peripheral InterfaceMicrowire
In all cases the concept is the same. One wire is used to provide a clock signal, and either one or two other wires are used to provide either a half duplex, or a full duplex serial link.
3.5 Typical DAC
These are very simple devices to talk to. They are either bus or serially orientated. Bus devices have an 8 bit data bus, a chip select, an address line and a write line. They are written to just like an ordinary memory location. Serial devices use one the industry standard techniques to load a pair of data bytes.
4 Switch Debounce
A major problem that occurs when reading in information from mechanical switches is the a phenomenon known as ‘switch bounce’. When a mechanical switch closes, it is virtually impossible to stop the contacts springing open momentarily on impact. This results in ‘switch bounce’ which is a period of time during which that state of the switch is in an unknown state. It can last as long as 100 ms, which in computer terms is a very long time.
To overcome this all computer programmes must perform an operation known as ‘debounce’ when reading the state of any digital input. As we do not know the original source of a digital input, even digital signals from other computers must be debounced, as they may have originated from a mechanical component.
The concept is very simple. Whenever a digital input changes state, it must be monitored for a set period of time (known as the debounce period) in order to ensure that it is stable. Only if it is stable for all of that time can we be sure that it has changed state.
A good example is a keypad. A typical debounce programme will monitor the state of an input signal every 5 or 10 ms. Only if it is stable for 60 to 100 ms (e.g. typically 10 samples) do we accept the new state.
Now consider how to interface a keypad to a computer. The figure below shows a 4x4 HEX keypad, a common arrangement, which is connected to a parallel I/O port.

How does it work?? Mechanically all the switches are ‘open circuit’, when you press one down it creates a short circuit between one of the scan line and one of sense lines. A much simplified description of how it operates is as follows - Your programme needs to assert each scan line in turn, and to read back the state of the sense lines. Therefore we will have 4 scans, each of which returns a 4 bit result. On completion of the scans we will have 16 bits of data, which is saved into an unsigned integer variable. If no keys are pressed then the result will be zero. If one key is pressed then a unique bit will be set that represents the position of that key. If 2 keys are pressed two bits are set. If more than 2 bits are pressed then the results can be indeterminate.
In general we only try to detect single key depressions.
Now we must ‘debounce’ the data. One method is to maintain an array with the last N samples, dropping off the oldest and adding in the latest. Only all entries in the array are the same do we accept that the keypad has stabilised. It is then a simple matter to use the contents of the integer variable to point to an entry an a look up table, that returns the value of the key that has been pressed.

4 REAL TIME SYSTEMS - SERIAL COMMUNICATIONS TECHNIQUES
4.1 Serial Peripheral Interface
Also known as just SPI. SPI is a 3 wire technique used to connect two independent integrated circuits to each other. The three wires are-
SCK SERIAL CLOCKSDO SERIAL DATA OUTSDI SERIAL DATA IN
One side of the link is designated the MASTER, and generates the clock and the data on SDO. The other side is a SLAVE device and generates data on the SDI line. Data is transferred on either the rising or falling edge of the clock line.
It is up to the programmer to ensure that the SPI link is operated with the correct clock.
Data is transferred in bytes.
Figure 1 shows the transfer between two devices using a falling edge clock.
Note that data is transferred simultaneously. It is therefore usual the data received on the SDI line is the reply to command sent out by the Master on SDO in the previous cycle.
One important variation on this simple structure is to ‘daisy chain’ groups of the Slave devices together, which are independently selected via Slave Select lines.
4.1.1 Some Sample Code
The programmer is required to implement two structures - The SPI link level code, and a command language that overlays the link level. SPI is a widely accepted standard, but any overlaying command structure will be device specific.
The code below implements an SPI link between a PIC microcontroller and a MAXIM DAC device.
The function write_dac is the link level SPI controller.The data byte to be transmitted is passed to this function in the W register.The variable DAC_LOOP is the bit counter, and is preset to 8 without using the W register.The variable dac_data is used to as a shift register to shift out the data onto SDO.Note that data is sent most significant bit first
; write_dac outputs the byte in w to the DACwrite_dac:
clrf dac_loopbsf dac_loop,3 ; set loop counter to 8movwf dac_data ; put data into register
w1:bcf porta,SDO ; take dac input bit lowbtfsc dac_data,7 ; test the MSB of databsf porta,SDO ; set it if neededbsf porta,dac_clkbcf porta,dac_clk ; clock the datarlf dac_data,f ; next sig bit of databcf dac_data,0 ; clear out bit 0btfsc porta,SDI ; test the input bitbsf dac_data,0 ; set the LS Bit if the input was truedecfsz dac_loop,fgoto w1 ; 8 bits to domovfw dac_datareturn ; with the input data in dac_data

This is the protocol required by the MAXIM device. Note the use of a slave select signal DAC_CS, which is active low. The protocol is very simple, when the chip is selected the next 3 bytes (24 bits in all) are used to drive two independent 12 bit DACs.
; dacout outputs the data in dacx_low and dacx_high to dac devicedacout:
bcf porta,dac_clk ; take the clock lowbcf porta,dac_cs ; then select the chipswapf dac0_high,w ; DAC 0 high byte firstandlw 0xf0 ; lower nibble into top nibble posmovwf dac_data ; temporary storeswapf dac0_low,w ; now get the middle nibbleandlw 0x0fiorwf dac_data,wcall write_dac ; output upper 8 bits of the 12 bit dataswapf dac0_low,w ; lowest nibble nowandlw 0xf0 ; but in top nibble posmovwf dac_datamovf dac1_high,w ; now get top nibble of DAC 1andlw 0xfiorwf dac_data,w ; combine nibbles togethercall write_dacmovfw dac1_low ; last byte, unshuffledcall write_dacbsf porta,dac_cs ; deselect the chipbsf porta,dac_clk ; take the clock highreturn
4.2 Inter Integrated Circuit
Also known as IIC (‘I squared C).
This is a two wire technique, providing a half duplex link that makes use of ‘three state’ logic. You will be familiar with two state logic, where a binary signal can be set to be either a logic level 1 or a logic level 0. The third state is known as ‘TRISTATE’, which means that both possible logic levels are switched off and the output pin ‘floats’ at an unknown level. When it is in this state an output pin is used as an input signal. An external device pulls the floating level either high or low. By using this technique we can employ a standard output pin as a bi-directional device under programme control.
IIC has two signals-
SCK SERIAL CLOCKSDA SERIAL DATA
By default the MASTER device outputs the clock, and always outputs the first bytes of data. The slave therefore always TRISTATES its’ SDA signal in order to receive the first byte of data.
There are 4 possible states that the two wires can be put into -
TRANSMIT LOGIC 0TRANSMIT LOGIC 1START TRANSFERSTOP TRANSFER
Consider first the transmit signals. Data can be changed whilst the clock signal is low, but must be stable for the duration of the clock signal when it is high.
So a transmit 1 looks like -

Note that the SDA line can change state when the clock is low but must be stable when the clock is high.
A transmit 0 looks like -
Given the rule that data cannot change when the clock is high, we can use two violations of this rule to create our frame delimiters START and STOP. A START is defined as a data signal going from HIGH to LOW whilst the SCK line is high. A STOP is defined as the data changing from LOW to HIGH whilst the SCK is high.
A START look like -
And as STOP looks like -
After the transfer of any byte the receiving device is required to acknowledge receipt of the byte, by pulling the SDA line low for 1 clock period.
IIC is intended for use in a single master, multi slave configuration. Therefore the first byte that is sent after a START condition must contain a slave address, which is normally 7 bits long. The eighth bit is used to signify whether or not he next operation is a READ or a WRITE operation.
Data is transmitted MS Bit first, READ is a logic level 1, and WRITE is a logic level 0.
So if we wish to write to SLAVE address 0x15 HEX the first byte must be

00101010
And a READ operation would be
00101011
So a complete write cycle would consist of
START 1 clockADDRESS (LS Bit = 0) 8 clocksACK (from SLAVE) 1 clockDATA (From MASTER) 8 clocksACK (From SLAVE) 1 clockSTOP 1 clock
And a READ cycle would look like
START 1 clockADDRESS (LS Bit = 0) 8 clocksACK (from SLAVE) 1 clockDATA (From SLAVE) 8 clocksACK (From MASTER) 1 clockSTOP 1 clock
4.3 Single Wire Techniques
Single wire techniques use I wire to transmit both a clock bit and a data bit. The wire normally idles HIGH, the master pulls the line low for one clock period, and then transmits one bit of data immediately after it. Given below are some typical waveforms -
Reception is achieved by the tristate method. The MASTER device outputs a clock, and tristates its’ output. The SLAVE then outputs wither a 1 or a zero onto the single wire.
Above this link level strategy a range of protocols can be developed.

5 SAMPLED DATA SYSTEMS
Computers operate by running programmes, executing commands a line at a time; therefore completing any operation takes a finite period of time. Real Time Systems must take account of this fundamental limitation of using a computer. The techniques used to overcome this limitation are known as Sampled Data Systems.
At the heart of any sampled Data System is a real time clock, that is used to time the execution of different programme functions, and to synchronise these functions to eachother in a logical manner.
let us consider a few such systems below -
5.1 Determining The Sampling Rate
An important parameter that must be determined is what is the optimum Sample Rate. If it is too slow the Real Time System will not respond fast enough to real time events. However if it is too fast then the processor will become overloaded.
In order to select a Sample Rate we must know precisely how our external components work, and what TIME CONSTANTS are associated with them. A TIME CONSTANT is the fastest period of time that a sensor or actuator needs to change its' state.
For example if we are controlling a valve that takes 10 seconds to change its' position then it is pointless to try and update its' control signal any faster than that.
A more realistic example would be a temperature controlled oven. The specification of our Real Time System would state to what accuracy we need to control the oven. A typical specification would state that the operating temperature is 300C to 1200C, which needs to be controlled to an accuracy of 2C. We also need to know the maximum rate of cooling and freezing of the oven, let us assume 10C per second. So to summarise
Operating Range 300 to 1200 CAccuracy 2 CMaximum Rate of Change 10C per second
This data is then used to define a range of system parameters. The time constant is given by the minimum resolution of 2 degrees C, and the maximum rate of change of 10 degrees C per second - which gives us a time constant of 200 milli seconds -
MINIMUM RESOLVED CHANGE 2TIME CONSTANT = ------------------------------------------------ = ---- = 200 milliseconds MAXIMUM RATE OF CHANGE 10
We can also derive the required resolution of our ADC that measures the temperature input. The overall range is 900C. We need to resolve down to 2C therefore we must resolve our input to a minimum of (900/2) = 1 part in 450.
It is essential to remember that the values that we derive from the specification are the minimum required for the system to work. That is simply not good enough. In the real world nothing is perfect, there are always disturbances to input signals, such as EMC and other sorts of noise interference. Accuracy is always lost in the computation of the outputs due to the finite world length of computers. Again our outputs cannot be assumed to be perfect. As for our time constants, we must always assume the worst, for example what happens if someone kicks the temperature sensor, or opens the oven doors. All such perturbations will affect the time constants of the system.

If we apply Nyquists formulae, then we must sample our input signals at least twice as fast as our fastest time constant. Even this assumes a perfect system. In practice you should aim to sample at least 10 times faster than the fastest time constant, and more if your computer is up to it.
5.2 Timed Loop
The simplest type of Sampled Data System is a timed loop. In order to describe the operation of such a system let us consider the key component functions of a Real Time System. These can be broken down to the following four basic functions -
1 Input data from transducers2 Calculate new control outputs3 Update control signals sent to actuators, etc.4 Update display outputs to lamps, serial line, etc.
Let us assume that we decide that we must update our control outputs at a rate of 10 times per second. If we have a simple timed loop, we set up one of the computer's timers to provide a TRIGGER every 100 ms. When we see the TRIGGER we execute our 4 functions.
Schematically we can describe the sequence of events as follows -
FIGURE 1 SCHEMATIC OF SIMPLE TIMED LOOP
As long as the total time taken to execute all of the functions is less than the Sample Rate then we will have no problems. Many simple Real Time Systems use such a structure. Its' advantages are that data items can be easily defined, and protected, and that the programme and data flows are clearly visible. Its' disadvantage is that it represents the least efficient use of processor time. Important functions such as sampling the data and controlling the actuators are given equal priority as less important functions such as updating a users display.
5.3 Real Time Interrupt Driven System
If we are running out of time to execute all of our functions then we must prioritise them in some way. Remember that the INPUT DATA function must run at a fixed frequency, otherwise we will misinterpret our input data due to aliasing. This function is always the most important function, due to the simple Real Time System Maxim ---
IF YOU PUT RUBBISH INTO THE SYSTEM YOU WILL GET RUBBISH OUT
So Inputting Data must be a high priority. Processing that data and driving the control signal outputs are also essential functions. Fortunately these are usually quite fast operations, such as a few multiplication’s & divisions and writing a word to a DAC. Updating a user display, logging results in memory, and driving a serial communications line, etc. are not so important. Notice that we are determining what is important by what our system needs, not what the human operators want. Viewing a slow display is very annoying, but it is still less important to update it quicker than it is to control our oven.

All reasonable computers have a means to INTERRUPT running processes, suspend their operation, and execute another independent function. When the INTERRUPT FUNCTION is complete then control can be returned to our running process, which is often called the BACKGROUND PROCESS. An INTERRUPT FUNCTION is often called a FOREGROUND PROCESS.
We can now divide down our real Time System functions into two groups. Those that will be placed in the BACKGROUND PROCESS, and those that will be placed in the INTERRUPT or FOREGROUND PROCESS.
In our example the split is as given below :-
INTERRUPT/FOREGROUND PROCESS1 Input data from transducers2 Calculate new control outputs3 Update control signals sent to actuators, etc.
BACKGROUND PROCESS4 Update display outputs to lamps, serial line, etc.
Background processes are in general slow, unimportant ones. For example, driving a pixel based LCD display is time consuming. As the human eye is usually quite content with an update rate of between 0.5s to 2s, such a process can be put to one side whenever necessary. Another good example would be the recalculation of a parameter with a slow time constant, such as the calorific value of North Sea Gas. Our programme structure now looks somewhat different, as we now have tow totally independent functions, to all intents and purposes running in parallel.
FIGURE 2 SCHEMATIC OF INTERRUPT BASED REAL TIME SYSTEM
In this structure the Interrupt function is no longer a continuous loop, but a single thread of essential functions. When the time trigger arrives the background process is suspended, and control is passed to the interrupt functions, which are executed to completion and control returned to the background process. The background process remains a continuous loop.

By this structure we ensure that all the important operations are executed to completion at a fixed frequency, which is the Sampling Rate of the system. Unimportant functions, buried inside in the background loop, are executed as and when possible. The great advantage of this structure is that we ensure that our real time system always get the processor time that it needs.
There are however two major problems with such a structure. The greatest danger is ensuring that common data items, shared by the interrupt & the background, are correctly passed between them. This is made extremely difficult because we have an interrupt function that can occur at any time, with respect to the current position within the background programme.
Consider a very simple example. Let us assume that we have a 16 ADC input, which is used by both the interrupt control output function and the user display function. If we are using an 8 bit processor, then to read the data we must perform two read operations from memory one for the lower byte and the other for the upper byte.
Let us look at the data structures.
The ADC result is memory mapped into two byte wide memory locations. The interrupt function reads this data into another pair of memory locations for its' use. This data must also be passed to the background for other uses, such as updating a user display.
The data structure is shown below -
FIGURE 3 DATA STRUCTURE FOR 16 BIT ADC INPUT
Both the foreground and the background functions need to read the ADC data. As the two reads will happen at different times, they both cannot control the ADC. If they did both try to control the ADC then a time would come when one of the functions requests that the ADC starts a conversion whilst the other function is in the middle of an identical request. The results in such a circumstance would be indeterminate. It is usual practice to allow only the interrupt function to access the ADC. In this case the data flow in the interrupt function is quite clear. In time the sequence would be -
1 INSTRUCT ADC TO START CONVERSION2 WAIT FOR END OF CONVERSION3 COPY LOW BYTE OF DAC RESULT INTO LOW BYTE OF INTERRUPT DATA AREA4 COPY HIGH BYTE OF DAC RESULT INTO HIGH BYTE OF INTERRUPT DATA AREA
You must take a copy of the data from the ADC because the value in the ADC itself may change for some reason, and you can define your own permanent storage for it inside the interrupt routine, that no other function can get to.

So we now have a secure means to get data out of the ADC into the interrupt. But what about the background function ?
What would happen if it tried to read the ADC directly ? It most cases this would be OK, but what happens if after we have transferred over the low byte, and are just about to get the high byte, and an interrupt occurs ? The ADC would start another conversion under interrupt control and update its’ registers. At the end of the interrupt control is returned to the background, so it now tries to finish its’ last operation and gets the high byte from the ADC. This data is now of course invalid.
The same would be true if it tried to read the interrupt functions data area too.
There are many solutions to this problem. One of the simplest is that the background REQUESTS a copy of the ADC data from the interrupt function by means of a FLAG, SEMAPHORE, or SIGNAL (these all mean the same thing in effect). To achieve this we define a common data area which is the FLAG byte. Normally it is set to OFF, in which case no actions occur. When the background wants a new item of data it writes to this location, and sets it to an ON state. The interrupt routine monitors the FLAG every time it is executed, and if it is set to ON then when it gets its’ next ADC update it copies the result into background routine's data area as well and then clears the flag. The background routine meanwhile simply waits for the flag to clear, and then it can proceed to use the data.
In the above example the FLAG was read by and written to by both the background and the interrupt functions. In simple systems this is OK, but for more complex functions it is advisable to adopt a more rigid approach. A simple variation is to provide two flags, one to request the data, and the other to signal that it is ready to use. The sequence of events is now as follows
1 BACKGROUND SETS REQUEST FLAG TO ON2 INTERRUPT ROUTINE UPDATES DATA AND SETS READY FLAG TO ON3 BACKGROUND ROUTINE CLEARS THE REQUEST FLAG4 INTERRUPT ROUTINE CLEARS THE READY FLAG
Both these examples however cause the background function to pause while it waits for the data to be updated. This can be overcome easily writing the background such that it goes off to do something else whilst waiting for the result to come back from the interrupt.
Another useful way of overcoming the delay is to use a flag to indicate if the data has been corrupted. Just before the background routine copies over the data from the interrupt routine it sets the flag to true. In the meantime whenever the interrupt routine updates its’ data area it always set the flag to false. The background routine checks the state of the flag after it has get the data, if it is still true then the data is OK. However if the flag is false then it means that the interrupt routine has updated it, so the result is invalid and a new reading must be taken.
The final example given is one that is very effective but must be used with great care. Whenever the background function needs to read some data from the interrupt routine then it suspends the operation of the interrupt, usually by DISABLING THE INTERRUPTS, it can then grab the data quite safely, and when it has finished it REENABLES INTERRUPTS to allow it o run again. If you are going to do this you must ensure that the suspension time is VERY VERY SMALL and certainly far less than the sampling rate.
5.4 Real Time Scheduler
Schedulers are far more appropriate for use in multitasking main frame systems, than in real time control systems. In a simplified form, that guarantees that the sampling rate is maintained, they can be of use.
A scheduler is a real time operating system, sometimes called a kernel, that shares the resources of a computer between all the different active tasks. This is achieved by swapping all the active tasks into and out of the processor, so that even though only one task is ever running at one time.
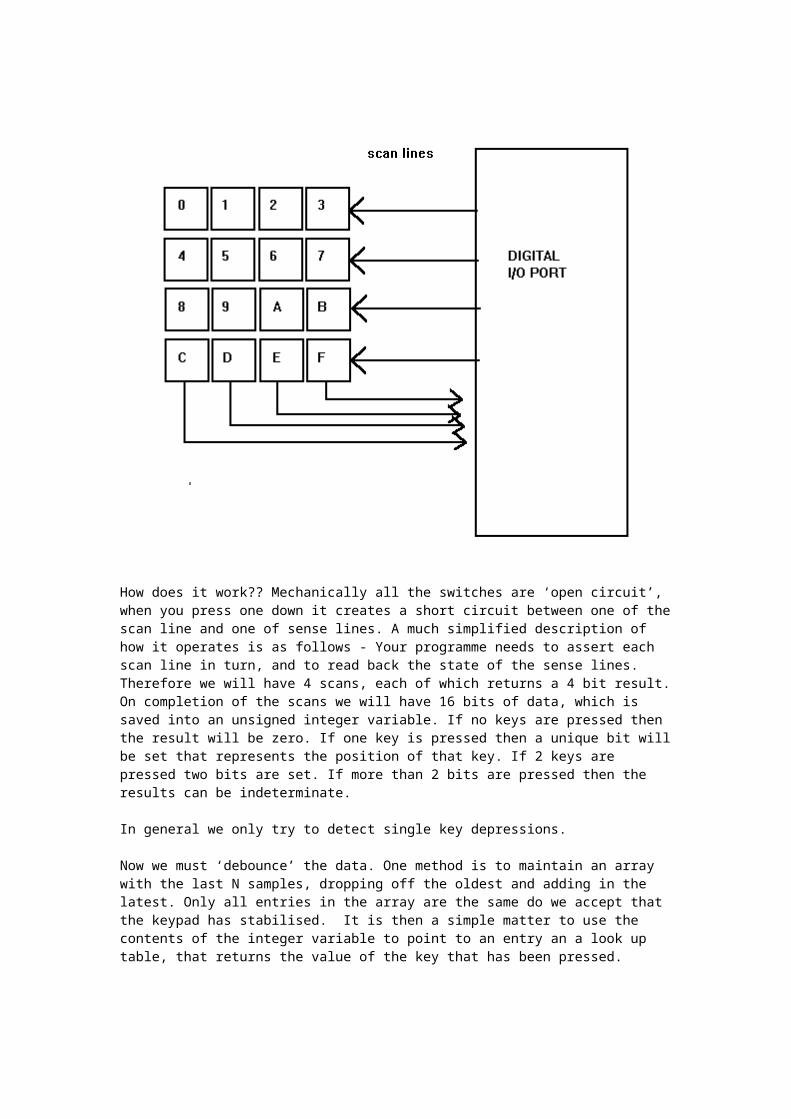
This gives the appearance of simultaneous processing. As long as the total amount of core processor time allocated to each individual task is sufficient for it to run to completion then the illusion is complete.
There are various approaches to scheduling tasks in a real time system. The simplest being to simply divide the available time into equal time slots, and to run each separate task within that given time. So let us assume that we have four tasks -
INPUT DATA FROM ADCCALCULATE CONTROL ACTIONOUTPUT DATA TO DACOUTPUT RESULTS TO USER DISPLAY
We have already determined that the sampling rate must be, for example, 10 Hz. So the scheduler must run at least 4 times that speed in order to complete all four tasks in the desired time.
A variation on this is theme would be to give more important tasks a higher priority over the others. So for example we could schedule the INPUT, CALCULATION and OUTPUT tasks to run every cycle, but only allow the user update to occur every 100 times round the.
In more complex systems we could set up a system of semaphores, such that tasks that require data from other tasks are suspended until such time as new data is available. A good example is a print spooler, as there is not point to scheduling a print driver to run if there is no data ready to print.
Finally, as a scheduler is most probably a real time interrupt in its’ own right, we could run a very slow unimportant background routine all the time, to mop up all unused processor time.

6 CONTROL LOOPS
A Real Time Control System is a process that requires us to continuously measure the outputs of a system, determine the deviation of these outputs from a desired setting, and then to adjust the inputs in order to remove those deviations.
This is best explained by example. In this case let us consider an oven temperature controller, such as you might have on a domestic cooker. On the front of the cooker there will be a control knob, which allows you to set up the required temperature that you want in the oven. The Real Time Control System, then takes over, continuously monitoring the temperature in the oven, and adjusting the gas inlet valve accordingly.
This process is described by the following schematic -
FIGURE 1 OVEN CONTROLLER LOOP SCHEMATIC
The output of the control dial is called the SET POINT, or just SP. It is the desired temperature that we wish to set the oven to. The temperature of the oven is measured by some means, probably by a thermocouple. The output of this sensor is called the MEASURED VARIABLE, or just MV. The difference between the SP and MV is the instantaneous error, as shown in the equation below :-
ERROR = SP - MV (1)
If the error is positive then we need to increase the flow of gas to the oven burner. If the error is negative then we need to reduce the flow of gas to the oven burner. It is the job of the controller to do the adjustment. Let us assume that the we have a simple linear system. This means that there is a direct relationship between the valve position and the amount of energy that will be released into the oven when the gas is burned.
Now let us consider some control strategies for the CONTROL box.
6.1 On/Off Control
The simplest type of control loop is an ON/OFF controller. It is a very crude concept. If the oven temperature is too high we just turn of the burners, and if the oven temperature is too low then we turn them back on again at full blast. Not very elegant but it will just about work.
There are however some problems with this approach. The main one being what happens if the temperature is just sitting at the Set Point. In this case we will find that the controller suddenly starts oscillating very fast as it keeps rapidly switching between the ON and OFF states.

This is cured by a simple process called HYSTERESIS. If we apply hysteresis to our set point, then this means that the actual value of the setpoint is adjusted slightly, depending upon whether or not the oven is currently on or off. This is shown in the following diagram -
FIGURE 2 HYSTERESIS SCHEMATIC
The central line is our desired set point, which has been surrounded by a HYSTERESIS BAND. To explain how it works consider what happens as our temperature rises up from point A through B, C & D, and then starts cooling down as we fall back down from D through E, F & G.
If we are in region A then the burners must be on. If we rise into region B we keep the burners on and allow the temperature to rise through the set point and the whole of region C. The burners are finally turned off only when we pass out of the hysteresis band in region D, when the burners must always be off.
As the temperature falls, we keep the burners off while the temperature falls through regions E & F, and we do not turn them on until it falls below the hysteresis band into region G.
What tends to happen with such a system is that the temperature will tend to oscillate within the hysteresis band, but at a much slower rate than if we had no band at all.
6.2 Proportional Control
A simple improvement on the above system would be to slowly turn off the valve as we approach the set point, eventually holding it at a steady state position such that the amount of gas burned generates just enough heat to balance out the amount of heat lost from the oven. Such a system is PROPORTIONAL CONTROL.
Under a proportional control strategy the amount of gas released to the burners is determined as a direct proportion of the error signal. So if the error is large we put more energy into the burner, and as the error decreases then we reduce the flow of gas. Remember that some energy is always lost in the system, so even if we overshoot the setpoint we still need to put some energy back into the oven, but again we must reduce this proportionally with respect to the overshoot.
Mathematically this process is define by the following equation -
Control Signal = P * ERROR (2)
Where P is a multiplicative factor, often referred to as the PROPORTIONAL TERM or the GAIN TERM.
What equation 2 means is that the greater the error the wider we need to open the gas inlet valve.
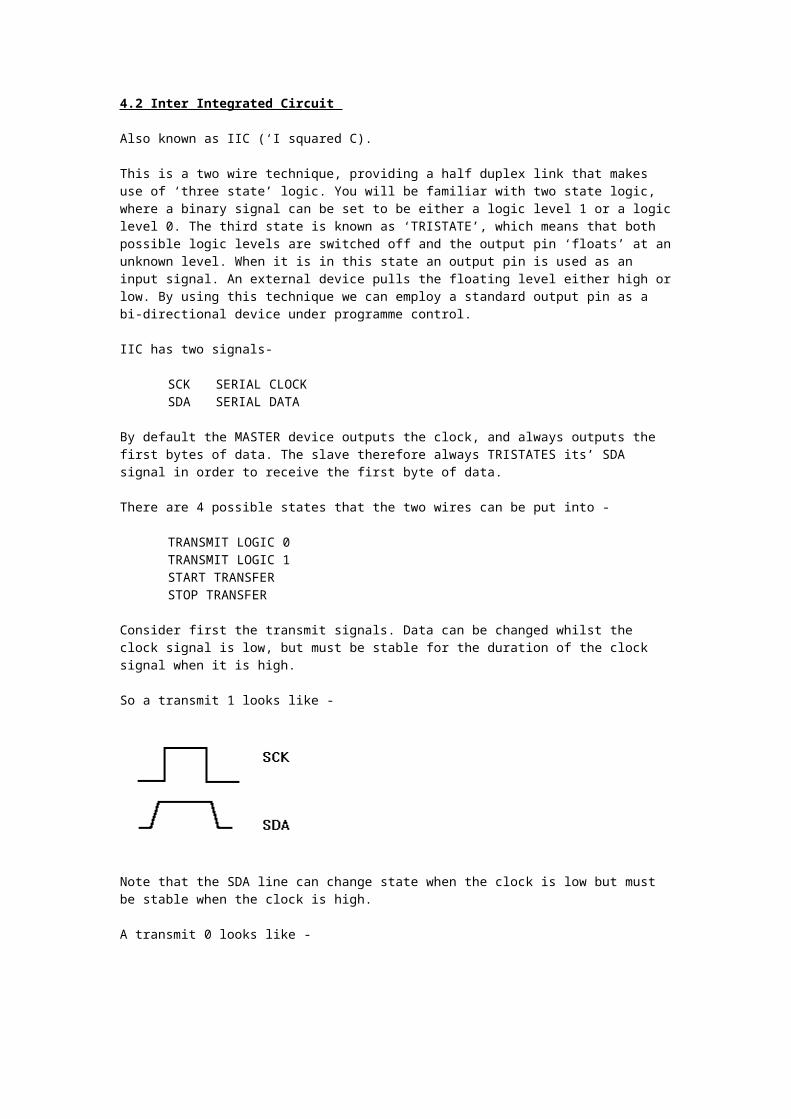
If we now substitute in equation (1) we obtain -
Control Signal = P * (SP - MV) (3)
If we set our P term to be absolutely correct then the real time response of such a system would look like the following -
FIGURE 3 IDEAL PROPORTIONAL CONTROL LOOP
The measured variable, MV, will initially generate a large error, probably resulting in the valve opening up full and creating a rapid increase in temperature. As the MV approaches the Set Point, SP, then the valve starts closing off, until we reach an equilibrium point when the MV = SP. The valve is then left slightly open to take account of energy losses in the system.
In practice this never happens. The MV will usually end up sitting either just below the SP or just above it. This gap is called the STEADY STATE ERROR, and is caused by a variety of factors, such as energy loss, time delays in taking decisions, or simply just getting the P term slightly wrong. However if this Steady State Error is tolerable then a Proportional Control system will be adequate.
6.3 Integral Control
If a steady state error is not acceptable to us then we can use a concept known as INTEGRAL CONTROL to attempt to drive it out of our system. In a traditional analogue controller the integral term was derived from a capacitor that is slowly charged up by the error signal - we will return to this fact later on.
In a digital controller, that is one driven by a computer, the integral term is derived by summing the error terms, thus it is an INTEGRAL of the error taken over a period of time.
Mathematically the integral term is define by the following equation -
INTEGRATED ERROR = SUM (SP - MV) (5)
Consider what happens to the value of the integral when we are in a steady state error condition, as discussed earlier. The longer we have a steady state, the bigger the integral term becomes. If we adjust our control signal with respect to this integral term, the measured variable will eventually be dragged up to the set point. When it has reached the set point the integrator stops summing as the error has finally reached zero.
So if we combine our proportional and integral terms together into a single equation we have a new control equation that looks like -

CONTROL SIGNAL = P*(SP-MV) + I*SUM (SP - MV) (6)
Where P is our original Proportional or Gain factor and I is our Integral factor
It is more usual to write this equation in the following way -
CONTROL SIGNAL = P* ((SP-MV) + I*SUM (SP - MV)) (6)
Where P is an overall Gain term for the sum of the proportional and integrated error, and I is the integral factor.
If the integral factor is correctly adjusted then the response characteristic of such a system is as shown below -
FIGURE 4 IDEAL PI CONTROL LOOP
The measured variable rises quickly to the set point, as for proportional control, but instead of stopping with a steady state error, the MV oscillates around the SP, slowly decaying to a point where it equals the SP. The existence of the oscillation is a direct result of having an integral term. Because it is a summation of all the historic errors, as the MV rises to the SP the I term grows and grows and so helps to pull us up closer to the SP. However when we overshoot the SP the I term, still has a +ve value, and carries on pulling us over the SP, until such time as the addition of the -ve errors (due to the overshoot) cancels out the +ve sum and starts pulling us back down again. As long as the Integral gain term is not too big then the overall effect, with respect to time, is that the MV will oscillate around the SP, with a decaying amplitude.
There are various techniques to stop this happening, the most important of which is to add DERIVATIVE action to the control loop.
6.4 Derivative Control
If we examine the ideal PI control loop response we will see that the MV will tend to overshoot the SP and then oscillate around the SP inside an envelope that decays exponentially. It would be nice to somehow 'put the breaks' on just as we approach the SP so that the MV glides nicely into place. This is achieved by the use of a technique called the derivative action. The way it works is quite simple, if the RATE OF CHANGE OF THE ERROR signal is seen to be too fast then control signal is reduced, in order to slow down the rate of change. Because the derivative action is used to slow down the response of the control loop it is sometimes called a DAMPING TERM.
Mathematically it is written as follows -
Differential Error = d(SP-MV) (7)

--------------- dt
If we include this term into our control equation we get -
CONTROL SIGNAL = P* ((SP-MV) + I*SUM (SP - MV) -D*(d(SP-MV)/dt) ) (8)
Where the derivative factor D is included inside the overall equation.
Equation 8 defines mathematically the operation of Proportional, Integral and Derivative Control, and is therefore known as a PID control loop.
6.5 Programming A PID Control Loop
The PID control algorithm was originally developed for use with traditional analogue electronics. The whole thing can be implemented with a difference amp, to derive the error signal; a couple of capacitors to generate the I & D terms, and finally an op-amp to give us the overall gain. This is shown schematically below. Knowledge of how this circuit works does not form part of this module.
Figure 10 CRUDE SCHEMATIC IF ANALOGUE PID CONTROL LOOP
The important factor to know is that analogue circuits operate CONTINUOUSLY. They are always connected to the signals, and apart from the time delays in the actual electronic components themselves, their response time is effectively IMMEDIATE, especially when compared to the time constants that would normally be found in the systems under control.
Computers DO NOT OPERATE CONTINUOUSLY. They can only do one thing at a time, even if we have parallel processing, each CPU can only execute one line of a programme at a time. So we have to develop a technique to approximate to the continuous control systems of tradition analogue computers. This takes us into the realms of SAMPLED DATA SYSTEMS.
In order to understand how to programme control loops we must first understand the principles of sampled data systems. However we can first rewrite our PID control equation in a form that is more appropriate to such a system, which will be explained in a subsequent presentation.
e(t) = SP(t) - MV (t) (9)

Error signal at time t
n = t I(t) = SUM E(n) (10) n = t - x
Integral signal at time = t, taken over x historic samples
d(t) = e(t) - e(t-1) (11)
Derivative signal at time = t
So our control signal; takes the final form
Control Signal = P*(e(t) + Ii(t) + Dd(t)) (12)
Where P,I & D are the respective Proportional, Integral, and Derivative factors.
6.6 Coping With Integral Wind Up
One of the main problems with having an integral term is that it is a continuous summation of all the discrete errors from the time that the system is switched on. This does not happen in traditional analogue systems because there is always a tendency for capacitors to discharge; however a digital sum cannot 'leak away' so the I term can in some circumstances just grow & grow.
This phenomenon causes a number of problems. Firstly it means that some of the information that we are using to control our system is very old, but the nature of a digital sum is that old data is given equal status to new data. Secondly it means that it some circumstances the I term can start to dominate the system, as it swings widely between a maximum and a minimum value, as our MV crosses the SP threshold. This is very common problem with PID & PI loops, and causes the systems to go unstable.
There are various ways of reducing instability due to integral wind up; low pass filtering (which is described in more detail in the section on Digital Signal Processing), integral clamps and integral resets.
Low pass filtering is a digital technique that has a similar effect to the sampled input data in the same way as an analogue filter. More weight is effectively given to recent data, as opposed to old data. By this means the integral term is more strongly tied to recent changes in the input signal, thus reducing the possibility of integral windup.
An integral clamp limits the I term to a maximum value -
if ( I > Imax) I = Imax
An integral reset sets the I term back to 0 whenever we cross the setpoint (i.e. the measured variable = the set point)
if (MV = SP) I = 0
Some typical responses are shown below -

FIGURE 6 VARIOUS TYPICAL RESPONSES
6.7 FEEDFORWARD CONTROL
The problem with feedback control is the time delay taken for a decision to be taken and the corrective action to affect the output. So an alternative approach is to use feedforward control. This technique involves using a mathematical model to try and predict what will happen in the future before it occurs, and therefore take the corrective action before the MV moves away from the SP.
A simple example is a shower control. With feedback control we measure the output temperature of the shower, and compare it to our set point. If the water is too hot we either increase the flow of water or turn down the heater. This will correct the problem, but will not stop you getting a burnt head !! Instead we can use feed forward control. If we measure the temperature of the water going into the shower we can calculate precisely how much energy needs to be put into the heaters to ensure the perfect output temperature.
So a feedforward technique should ensure that we never deviate from our SP, whereas a feedback control system measures the deviations and corrects them after they have occurred.
But the great danger with feedforward systems is that our mathematical model may be wrong, or it might change (for example one of your water heaters become less efficient with time). So a feedforward system should always include a ‘long term’ feedback analysis in order to check how good the model is. It should also be able dynamically adjust its’ model to take account of these changes - this is known as ADAPTIVE CONTROL.

6.8 PROGRAMMABLE LOGIC CONTROLLERS (PLC)
PLC’s are a modern version of an old technology. Before the advent of modern, low cost, computers manufacturing processes were controlled by banks of electromechanical components. Typical devices that were used were relays, switches, and timers.
It is possible to implement some basic logic functions, such as AND OR and NOT with relays. Add in some electromechanical timers, and the ability to compare input values from some transmitters to SET POINTS, we then have all that we need to implement a sequential control system. These systems are sometimes known as Sequence Controllers. The nearest computing analogy that I can give you is that they are State Machines.
Extremely complex systems can be built up in this manner. They used to be housed in large vertical cabinets, with a 24V power rail on one side of the cabinet, and a ground on the other side. All the relays, timers, control dials and analogue inputs were hard wired between the vertical power rails. The typical arrangement being that the first state would be at the top of the cabinet, and when it finished it would then trigger off the row of components below it. These systems vaguely resembled ladders, made up of lots of mechanical components. An early ‘programming language’ was developed in order to represent these state machines, which is still known today as LADDER LOGIC.
All this can now be implemented using a high speed industrial computer. However the old concept of using Ladder Logic has remained, and there are now a family of 4th generation application languages in use that are all variations of ladder logic. A PLC is a computer that supports a ‘block’ of real INPUTS (i.e. switch inputs) ; a block of real OUTPUTS (to drive relays and solenoids); and large numbers of ‘internal’ states. The internal states are just a block of single bits in memory, that have replaced the original relays. They are still programmed using ladder logic diagrams, which are usually developed using a graphical interface and are then compiled.
6.9 STATISTICAL PROCESS CONTROL (SPC)
SPC is not a real time control system at all, but a quality control technique. By regularly sampling the output of any system, it is possible to predict by a statistical means that the quality is likely to drop in the near future. To achieve this it is necessary to first build up a picture the normal range of quality of the product. The acceptance range o the product is known as the TOLERANCE. It is not possible to guarantee that everything that is made is identical, but as long as it falls within the tolerance band then it is OK. Prior to SPC actions were only taken to correct faults when products were produced that were ‘out of tolerance’. However if we plot the mean and standard deviation of the actual tolerance of the factory output, we should be able to predict a trend towards failure before it happens.
6.10 EXPERT SYSTEMS
All of the control systems so far outlined assume that the process can be modelled using a precise mathematical formula. However some systems are so complex, or so unpredictable no mathematical model can be generated. The alternative is to use an Expert System. An expert system applies a set of Rules to examine a given situation, each ruling resulting in an opinion of what is best to do next. The outcome of these rules may conflict, but if they are all either equally applied, or given a weighting factor, then it is possible for the system to come under control.
As an example consider a cement factory. At one end of the kiln we put in limestone (or chalk) which is carried on a conveyor belt through the kiln. What can we control - the speed of the belt, the amount of heat and the amount of limestone. No one knows what the mathematical model is, but there is a known set of rules that can be applied -
For example is not enough lime is turned into cement we can TURN UP THE HEAT’

or we can SPEED UP THE BELTor we INCREASE THE FUEL
However if the kiln is too hot we can REDUCE THE FUELor SLOW DOWN THE BELT
By letting these rules conflict, they will eventually resolve themselves and create a stable situation.
It is important to note that the outcome of the questions are not precise (e.g. a PID loop would give us an actual number to put into our control system). Instead we generate vague requests, such as TURN UP THE HEAT, or SLOW DOWN THE BELT. This is also important, because we do not know by how much we need to adjust the system, we just know in which direction it needs a little push. In time the rules will stabilise and stop pushing the system around

7 DIGITAL SIGNAL PROCESSING
Digital Signal Processing, or DSP, is a general term applied to the practice of using computational techniques to real time analogue signals that are varying in time. Simple examples of DSP include such things as low pass filters and running means. More complex examples are high Q band pass filters, and DTMF sensing as used in telecommunications equipment.
For this module we will only consider the simpler techniques required for the essential operations that a programme must carry out in order to successfully set up a PID control loop.
7.1 Low Pass Filters
Digital low pass filters can be implemented a number of ways, but the simplest and most widely used are a running mean, and single pole filter. We will consider each in turn.
It is essential that data is sampled at a fixed Sampling Rate for any DSP programme to work. We will therefore use the following definitions throughout this discussion.
I = input signalIn = Input signal sampled at time n e.g. In In-1 In-2 O = output signalOn = output signal at time n
The single pole filter programme example given below is the direct digital equivalent of an analogue electronic single pole filter that is implemented with a single capacitor and resistor pair. The output at time n is given by the sum of part of the input at time n plus part of the previous output at time n-1.
On = A*In + B*On-1 (1)
Where A+B = 1
Typical values could be A = 7/8 and B = 1/8
This could be implemented in C as follows
output = ((7 * input) + output) / 8 ;
This sort of filter gives a higher weighting to the most recent measurements, with the effect of historic data quickly fading away. The advantage of this sort of filter is that it is very easy to implement in software, uses very little memory and is quick. The disadvantages are that the result will never rise to final value, and that the effect of historic data is always present.
7.2 Running Means
An alternative to low pass filtering is to implement a running mean. This is achieved by simply adding together the last N inputs, and calculating the average value.
x = nOn = Sum(Ix) / N (2)
x = n-N

To implement this in software requires the use of a data array to hold the last N values. A typical piece of code looks like -
I[a] = In ; // load latest ADC value into arrayif (a == N) a == 0 ; // increment array pointer, ensuring that it wraps aroundsum = 0 ; // zero the sumfor ( i = 0 ; i < N ; i++) sum+= I[i] ; // add up all the array elementOn = sum / N ; // calculate the average value
7.3 Smoothing Algorithms
Noise is always present in signals that are sampled from any type of transducer, and as long as the level of noise is very small with respect to the signal (i.e. the Signal to Noise ratio) then we can use that information for our control loop.
There are a wide range of smoothing algorithms that can be used to try and reduce this noise. We will only deal with the simplest types here, most of which are just common sense.
The simplest approach is a statistical one. If we take lots of samples and average them to derive a mean value, then in theory the standard deviation of that mean will improve. The more samples that we take then the better will be 'goodness' of the result.
Averaging is very simple, but taking lots of samples does take time, and that is one commodity that we cannot waste in a real time system. Also if the time constant of our system is large with respect to our sampling time then the true signal will be changing anyway, regardless of the noise that is present. The solution to this is to use one of the low pass filter algorithms outlined above.
Low pass filters however can give too much weight to older data; a good example being the running mean approach. An alternative approach is to use a weighted filter, that gives more value to more recent data. The simplest example being -
(Value @ time n-1) + 2*(Value @ time n) + (Value @ time n+1)New Value @ Time N = -------------------------------------------------------------------------------------------
4
7.4 Least Squared Fits (LSF)
If we have a scatter of points that we know should be in a straight line, then we can use the LSF approach in order to determine the best straight line that is represented by our data. A straight line has the equation x = Ay + B.
If we take a guess as to the values of A and B, we can obtain a measure of how good this ‘fit’ is. This is achieved by dropping a perpendicular line from all of our points to the straight line, and calculating the sum of the squares of all of these distances. The size of this sum is a measure of how good our fit is. The smaller the number the better it is.
We then adjust the values of A and B in order to minimise this sum.
7.5 Regressions
Now take the LSF concept a little bit further. If we can determine the best fir for a straight line, we should also be able to determine the best fit to any function that can be expressed in the form of
x = FUNCTION(y)
as long as we know the nature of function. This is because x is itself linear.

For example consider a sine wave where x = A * SIN(y + B)
A and B are unknown.
First we take a guess for A and B, draw that function out, and calculate the degree of divergence of that function from our data points. We then adjust A and B in order to minimise this degree of divergence, in an iterative manner, and thus we determine the fit to our data points.
7.6 Fourier Transforms
Sometimes information about a real process can be better analysed if we know the frequency content of that data. For example it is known that the rate of reversals of a steering wheel in a car is a direct measure of the alertness of the driver; by measuring the frequency spectrum of steering wheel position it is possible to warn the driver that they are falling asleep at the wheel.
Another use of this technique is to isolate an event that occurs at a known frequency in amongst a lot of random noise.
It can be shown that a continuous function if the time domain F(t) can be represented as a continuous series of sine waves in the frequency domain G(f) such that
F(t) = SUM G(f) where f = -infinity to + infinity
This is known as a continuous Fourier Transform. It takes ages to calculate.
A more usable alternative is the Discrete Fourier Transform (DFT). Instead of trying to calculate the amplitude of every possible frequency element, we just calculate the values at discrete intervals, e.g. 10 Hz, 20 Hz, 30 Hz etc. This is quicker and easier to implement in software.
The Fast Fourier Transform (FFT) is a computational technique that can be applied to sampled data in order to determine its’ DFT. As long as we have a binary number of time domain samples (e.g. 4096 or 8192) that are equally spaced in time, they can be quickly converted into a DFT using this technique. FFTs can be easily implemented in a high level language, and are widely used to analyse the data captured in real time systems.

8 REAL TIME SYSTEMS -- INTERRUPTS
In an ideal world the occurrence of events, and the actions that need to be taken, can be planned for and scheduled into a nice clean multi-tasking multi-use operating system. However we all know that that is not the real world, and this is even more true when we are dealing with real time systems.
External events can, and will, occur whenever they want to, and the Real Time System must react to them within a specified time. For example we may have an electronic control unit (ECU) for a car, that measures road speed and updates the driver's speedometer. To achieve this the time of arrival of pulses from the road speed sensor must be logged almost immediately (depending upon the accuracy required) whatever the processor may be doing. So the processor must suspend its’ current operation, and pass control immediately over to the road speed sensor function. The processor is INTERRUPTED by the external event, which takes over control of the processor and all its’ resources.
When designing a Real Time System, consideration must be given to handling the system interrupts, and how data is passed from the interrupt functions to the main body of the programme for processing. Therefore it is necessary to analyse both the timing implications of the interrupts, and the data flow requirements. In addition the implementation must take account of the disruption an unscheduled interrupt can cause to the smooth operation of a structured programme.
8.1 Examples Of Interrupts
In the simplest of systems there will normally be at least two possible interrupt sources. One will be an EXTERNAL INTERRUPT, and the other will be a TIMER INTERRUPT.
8.1.1 External Interrupts
As its’ name implies an external interrupt, is a hard wired signal taken to the processor from an external source. This could be, for example, a pulsed input from an external frequency source, or a crash sensor on a car. This signal is usually digital in form, and the interrupt is triggered when that signal changes state. External interrupts can be either LEVEL SENSITIVE or EDGE SENSITIVE.
Edge sensitive signals detect a change of state, e.g. high to low or low to high. Level sensitive signals are sensitive to a high or a low level. Edge sensitivity is more commonly used as level sensitivity can cause multiple interrupts to occur from the same source.
External interrupts are also classified as MASKABLE or NON MASKABLE. A maskable interrupt is one that can be enabled and disabled by software, which means that the processor is capable of accidentally switching it off should there be a software error.
Maskable interrupts are usually used for processing expected external signals, such as limit switches, frequency signals, and peripheral requests for attention. In all these examples it is of advantage to the programmer to be able to disable the interrupt source, e.g. there is no point allowing an interrupt to occur during an initialisation or idle phase.
But what if the interrupt is an emergency warning signal, such as a crash sensor, or watchdog time-out. Fail safe procedures are degraded if it is possible for faulty software to switch off the alarm signals, therefore NON MASKABLE INTERRUPTS must be used for such signals.
TYPES OF EXTERNAL INTERRUPT
RISING EDGE SENSITIVEFALLING EDGE SENSITIVEHIGH LEVEL SENSITIVELOW LEVEL SENSITIVE
Any of which can be MASKABLE or NON MASKABLE
8.1.2 Timing Interrupts

Timing interrupts are generated internally by the processor itself. An independent digital divider circuit uses the processor clock as timing source. This divider is can be set up by the programmer to divide the main clock source down to give a slower timebase. Simple processors usually offer only a binary division (i.e. by 128 or 256 etc.), more expensive devices (i.e. £2 or more) offer a division register, typically 16 bits wide, but sometimes only 8 bits. When this register counts down to zero an interrupt is issued to the processor.
So for example if we are using a 4 MHz clock, and we need a 10 ms time base the divider register would be loaded with 40000. 4 MHz / 40000 = 100 Hz that is 10 ms.
One thing to look out for is whether or not the timer automatically reloads the division ratio. Some processors do this (e.g. INTEL 8051 FAMILY, but only 8 bit reload), most DO NOT, therefore the timer will need to be reloaded on every occurrence of the interrupt.
Another trap that is waiting for you is the fact that sometimes the divider COUNTS UP and not down, issuing the interrupt when the register rolls over from FFFF to 0000. In this instance you will need to preload the divider with the complement of the number that you wish to divide by, i.e. 65536 - DIVISION RATIO.
TYPES OF TIMING INTERRUPT
UP COUNTERDOWN COUNTER--------------------------------------------BINARY DIVISION8 BIT DIVISION16 BIT DIVISION--------------------------------------------AUTOMATIC RELOAD
8.1.3 Serial Interrupts
Most reasonable processors include at least one, and possible two serial communications devices on the chip. One will be an asynchronous port, for use with an RS232 or RS485 driver, and the other will be some form IIC/SPI driver.
As such links are often quite slow with respect to the processor, an interrupt is an essential requirement. When data is received by a serial device it will issue a RECEIVER FULL interrupt, and when it is ready to transmit data it will issue a TRANSMITTER EMPTY interrupt.
Normal software practice is to implement a cyclic buffer under interrupt control for both the receiver and transmitter sections. The background process can then examine the size of the RECEIVE BUFFER to see if any data has arrived, or put a character into the SEND BUFFER for interrupt processing.
The main dangers with this approach are as follows -
RECEIVER - the RECEIVE BUFFER must be polled, and emptied, by the background faster than data arrives, else the buffer will overrun.
TRANSMITTER - when there is no data left to send the TRANSMITTER EMPTY INTERRUPT must be disabled, otherwise it will hang up the processor forever.
8.1.4 Watchdog Interrupts
Watchdogs are used to provide system integrity. They are timing devices, often located externally to the processor, but sometimes they are included on the chip itself. They act like an alarm clock, as long as they are RESET by the processor at regular intervals they never time-out. If the processor dies, or gets lost in some obscure section of code that has been poorly designed, then the timer does times out, and it issues an interrupt.

Internal devices, as can be found on the PIC family, the Motorola 68HC11 family and some advanced 8051 type devices, use an internal interrupt or force a complete processor reset. External watchdog devices (available from many manufacturers - such as DALLAS and MAXIM) provide a digital output that the designer can either use to RESET the processor or cause an EXTERNAL interrupt.
The simplest method of using such a device is to set the ‘time-out’ to be longer than the complete programme cycle; then at the end of the cycle a signal is sent to the watchdog to RESET its’ timer back to zero. As long as the programme is operating correctly then the watchdog will never time out. This method however cannot be used for asynchronous programmes that use interrupt functions. It is necessary to ensure that each function independently ‘kicks’ the watchdog. This can be achieved by using flags. For example, an interrupt function can set a flag indicating that it has occurred, and the background routine can examine this flag, and only if it set will it then ‘kick’ the watchdog. In this way we have proven that both functions have been executed within the desired time.
8.1.5 Power Fail Interrupts
It would be helpful if the processor had advanced warning of an impending power failure, in order that it can gracefully close down all current operations and protect its’ memory. This is achieved by the use of power fail interrupts, which are to be found in a number of advanced microcontrollers. They work by monitoring the voltage level on the chip. If it falls below a minimum threshold it issues the interrupt call before the power falls too far for the device to operate - you then have a small amount of time do something to make everything safe and secure.
8.1.6 Adc Interrupts
Most microcontrollers include some useful peripheral devices on the chip, usually an ADC, but there may be other devices such as a PWM driver etc. ADC’s take time to perform a conversion, and it is pointless to have the processor waiting around for it to complete, so an interrupt is used to signal the end of conversion. The code is required to start the conversion in the normal manner, and then it can go off and do something else more useful. When the conversion is complete an interrupt is issued, and the results can be obtained.
8.1.7 Software Interrupts (Traps)
A total separate group of interrupts may also exist, that are designed to ‘trap’ illegal operations. For example sections of memory may be designated as protected, perhaps because it is designated as the stack, or we may try to perform a hardware divide by zero. Illegal operations such as these can cause an interrupt, so that some form of housekeeping software can be invoked to tidy up the mess.
8.2 Vectors & Saving The Processor Status
If we have so many different types of interrupt how can the processor distinguish between them ?
This is achieved by an INTERRUPT VECTOR TABLE. The vector table is located at a fixed location in the code space, typically at the bottom of code space (location 0000 to 00FF) or at the top of the code space (FF00 to FFFF). Each interrupt has a fixed location in the vector table for its’ own use, into which must be stored the starting address of its’ unique interrupt function.
When any interrupt occurs, the processor stops running whatever function is currently operating, and executes a SUBROUTINE CALL to the address stored in the vector. Therefore the minimal interrupt code must be a single RETURN instruction, so control will then return back to the interrupted function -
However to ensure that an interrupt cannot itself be interrupted, it is usual for all other interrupts to be disabled whilst any interrupt function is being executed. As the interrupt may wish to call subroutines, a special type of return is used that signals to the processor that interrupts can now be reenabled. In the INTEL family of devices this opcode is RETI, MOTOROLA uses the opcode RTI for the same purpose.

e.g. For an Intel 8051
code address 0000 reset vector0003 external interrupt (say 0100) >>>>>>>>>>>>>>>>>>>>>>000B timer 0 overflow interrupt |0013 external interrupt 1 |001B timer 1 overflow |0023 serial interrupt |
|||||||
0100 Start of EXT0 interrupt function <<<<<<<<<<<<<<<<<<<|RETI
We are also using the processors internal resources, and data that was resident in its’ registers must be saved before the interrupt code is executed, otherwise they may destroyed. This is achieved by pushing the contents of any registers used by the interrupt function onto the stack, and restoring them before executing the return operation. e.g.
0100 Start of EXT0 interrupt functionPUSH A ; SAVE REGISTER APUSH B ; SAVE REGISTER BPUSH DPH ; SAVE DATA POINTERPUSH DPL ; SAVE DATA POINTER
INTERRUPT CODE CAN NOW USE REGISTERS A/B/DPH AND DPL
POP DPLPOP DPHPOP BPOP ARETI
All this pushing and popping takes time, and interrupts must be quick, so only save the contents of registers that are used by the interrupt routine.
What about our processor status flags, these are not registers but represent the state of the machine at the time the interrupt occurred. For example what was the state of the ZERO and CARRY flags, if they are not correctly restore then any subsequent conditional branch operation in the interrupted routine will fail. These flags must be saved as well, and special instructions are always present to allow this to be done.
0100 Start of EXT0 interrupt functionPUSH PSW ; SAVE PROCESSOR STATUSPUSH A ; SAVE REGISTER APUSH B ; SAVE REGISTER BPUSH DPH ; SAVE DATA POINTERPUSH DPL ; SAVE DATA POINTER
INTERRUPT CODE CAN NOW USE REGISTERS A/B/DPH AND DPL
POP DPLPOP DPHPOP B

POP APOP PSWRETI
So to summarise an interrupt must cause the following to happen
* THE CURRENT PROGRAMME COUNTER ADDRESS MUST BE PUSHED ONTO THE STACK* THE START OF THE INTERRUPT FUNCTION MUST BE READ FROM THE INTERRUPT VECTOR TABLE* THE PROCESSOR STATUS WORD MUST BE SAVED ON THE STACK* THE CONTENTS OF ALL REGISTERS USED BY THE INTERRUPT MUST BE SAVED ON THE STACK* EXECUTE THE INTERRUPT CODE* RESTORE THE SAVED REGISTERS* RESTORE THE PROCESSOR STATUS WORD* REENABLE INTERRUPTS EXPLICITLY, OR IMPLICITLY WITH A SPECIAL RETURN* RETURN TO THE CALLING FUNCTION
8.3 Parameter Passing
Interrupts, by their very nature, are unpredictable events; therefore great care must be taken when considering the transfer of data to/from such a function.
Take a simple example, how can a background routine make use of a 16 data value from an ADC, if that ADC data is obtained by an interrupt routine.
Let us assume that we have created an integer variable ADC_RESULT, and the ADC has been memory mapped to location 1000H. Then our interrupt function will look something like this (for an Intel 8051) -
ADC_INTPUSH A ; save register APUSH B ; save register BPUSH PSW ; save processor statusPUSH DPH ; save high byte of data pointerPUSH DPL ; save low byte of data pointerMOV DPTR,#1000H ; point to low byte address of ADC results registerMOVX A,@DPTR ; read the low byteMOV B,A ; and store it in register BINC DPTR ; point to upper byte of the resultMOVX A,@DPTR ; load the high byte of the ADC resultMOV DPTR,#ADC_RESULT ; Load the data pointer with the address of the integer
; variable that will hold the resultMOVX @DPTR,A ; store the high byte, integers are usually stored high
byte; in lower address, and low byte in higher address ; (compiler dependant)
INC DPTR ; point to second part of the integer valueMOV A,B ; get back the low part of the integer resultMOVX @DPTR,A ; store it in memory, thereby creating an integer valuePOP DPLPOP DPHPOP PSWPOP BPOP A ; restore register statusRETI ; return from interrupt function
The background routine can now process the variable using a high level language, typically C. If the measurand is linear then all that is required is the application of a scaling factor and an offset.
process-adc(){input_value = (ADC_RESULT * scaling_factor) + offset ;

}
The obvious danger is that the background routine could in the middle of processing the ADC data, when the ADC interrupt occurs and changes that data. Most fatally we could have just loaded part of the integer into temporary variable, when the interrupt arrives and changes the other half of the integer value.
One crude, but valid, method of stopping this happening is to hold off the interrupt at the critical moment, by means of a disable interrupt operation -
process-adc(){disable_adc_interrupt();input_value = (ADC_RESULT * scaling_factor offset ;enable_adc_interrupt();}
This is not very elegant, but is acceptable in such a simple programme. The problem with it is that the interrupt can be held off for the duration of the time between ‘disable_adc_interupt’ and ‘enable_adc_interrupt’. This time delay, if it is large, can cause aliasing of the input data.
A slight improvement is to take a copy of the input data as quickly as is possible -
process-adc(){int my_adc_data ;disable_adc_interrupt();my_adc_data = ADC-RESULT ;enable_adc_interrupt();input_value = (ADC_RESULT * scaling_factor offset ;}
This is OK for a small amount of data; however if we are dealing with a large block of input data more sophisticated methods are required. All of these methods require the use of signals, and some form of ‘mail box’ via which the data is transferred from one task to another.
The data transfer is directional, so either task can ‘control’ the operation. The originating task can ‘post’ the data into the box and assert a signal indicating that new data is now present. The receiving function has to clear this flag when it empties the box, thereby signalling back to the originator that the data has been captured.
e.g. in this instance get_adc is the interrupt function and originator of the data, process_adc is the recipient.
int adc_result_mail_box ;int adc_data_posted ;get_adc()
{if (!adc_data_posted) ; do not overwrite last data item
{adc_result_mail_box = ADC-RESULT ;adc_data_posted = 1 ;}
}
int my_adc_data ;process_adc()
{if (adc_data_posted)
{my_adc_data = adc_result_mail_box ;adc_data_posted = 0 ;}
}

Note that the interrupt routine does not update the data area until the last data item is removed. This is OK if the scheduling and timing has been correctly worked out. In fact the get_adc() function would be scheduled such that it never sees adc_data_posted set to a 1, as this is an indication of an overload condition that will lead to errors.
If we accept that overloads will occur then we have to remove the signal whilst the data is updated.
int adc_data_posted ;get_adc()
{adc_data_posted = 0 ; remove data ready signaladc_result_mail_box = ADC-RESULT ;adc_data_posted = 1 ; ; resignal data ready now update is complete}
int my_adc_data ;process_adc()
{if (adc_data_posted)
{my_adc_data = adc_result_mail_box ;adc_data_posted = 0 ;}
}
The other approach is for the recipient to request int adc_data_posted ;
int request_adc_data ;int my_adc_data ;
process_adc(){request_adc_data = 1 ; /* request new data */while (request_adc_data) ; /* wait for it */my_adc_data = adc_result_mail_box ;}
get_adc(){if (request_adc_data) /* has data been requested ? */
{adc_result_mail_box = ADC-RESULT ;request_adc_data = 0 ; /* signal data transfer completed */}
}
There are numerous variants on this concept, but the guiding principles are as follows -
1) THE INTERRUPT AND BACKGROUND FUNCTION MUST HAVE THERE OWN EXCLUSIVE AREA FOR STORING THE DYNAMIC DATA.
2) A MAILBOX SYSTEM NEEDS TO BE SET-UP TO ALLOW PARAMETERS TO PASSED SAFELY BETWEEN THE FUNCTIONS.
8.3.1 Multi-Interrupt Data Processing
Now let us consider an even more complex problem. We have one interrupt that is collecting input data, and a timer interrupt that is used to ensure that this data is regularly sampled. However the processing of the data is so long it must be done in a background routine.
An example of this is a road speed sensor for a car. Distance pulses are generated by the wheel, every time it revolves, but to convert this data into a velocity it is necessary to gate this roadspeed data over fixed time periods. Processing of the data is complex (i.e. conversion from pulses per second to kilometres per hour etc.), so the timed data must be passed to the background routine for processing.
One solution is as follows -
Create a road speed distance interrupt by connecting the pulsed input to an EXTERNAL INTERRUPT. Create a timer interrupt that occurs every second.
The road speed sensor simply increments a counter :-
int road_speed_counter ;EXTERNAL_INT()
{road_speed_counter++ ;}
But this needs to be gated every second. Ideally we would create a signal from the 1 second interrupt to the external interrupt requesting the data, but the roadspeed sensor only runs when the wheel turns, so if we are decelerating the update rate for the speedo is unpredictable. We must use a different approach, and create a function that reads the road_speed_counter data and passes it to another variable -
GET_ROAD_SPEED_COUNTER{disable_external_interrupt();road_speed_counter1 = road_speed_counter ;enable_interrupts();}
The timer interrupt can use this function to extract the road speed data from the external interrupt, but it needs to transfer the data top a background routine for analysis. This can be done in a more elegant manner using a mail box .
unsigned char road_speed_data_ready ;TIMER_INTERRUPT()
{GET_ROAD_SPEED_COUNTER();/* get the road speed data from the external
interrupt */road_speed_data_ready = 1 ; /* signal to background the new data is available */}
The background routine can now simply poll the signal. If the flag is set it must then take a copy of the data before processing it -
int road_speed_counter2 ;BACKGROUND()
{if (road_speed_data_ready) /* if the flag is set */
{disable_interrupts() ; /* hold off timer and external interrupts */road_speed_counter2 = road_speed_counter1 ;road_speed_data_ready = 0 ;enable_interrupts();process_data() ;

}}
Note that the signal is cleared within the disable & enable interrupt(), if we did not do this we could accidentally clear the signal from the next timer interrupt instead of this one.
An alternative solution is for the timer interrupt to only update the data its’ data area when the background has processed the last block. The advantage of this approach is that there is no longer any need to disable the timer interrupt.
int road_speed_counter ;EXTERNAL_INT()
{road_speed_counter++ ;}
GET_ROAD_SPEED_COUNTER{disable_external_interrupt();road_speed_counter1 = road_speed_counter ;enable_interrupts();}
unsigned char road_speed_data_ready ;TIMER_INTERRUPT()
{if (!road_speed_data_ready) /* ensure that the last block has been processed */
{GET_ROAD_SPEED_COUNTER();/* get the road speed data from the external
interrupt */road_speed_data_ready = 1 ; /* signal to background the new data is
available */}
}
int road_speed_counter2 ;BACKGROUND()
{if (road_speed_data_ready) /* if the flag is set */
{road_speed_counter2 = road_speed_counter1 ;road_speed_data_ready = 0 ;process_data() ;}
}
8.4 Input Capture Interrupt
The image below shows the processors high speed clock being prescaled to generate a lower speed timing reference

The contents of the low speed timer can then be captured using an INPUT CAPTURE operation. On receipt of a rising edge on the input capture pin the contents of the 16 bit timer/counter register are copied into another memory location and an INTERRUPT is issued.

9 OPERATING SYSTEMS
Operating Systems are widely used by software engineers in order to provide a platform upon which to run multi-task systems, and guarantee the occurrence of time critical events. The uses of Operating Systems, in the sense that most of us would understand, are not as widely spread in realm of Real Time Systems.
This is due to two main reasons.
1) Most Real Time Systems are based around processors with very simple architectures, that simply are unable to host a complex, or commercially available operating system.
2) Real Time Systems is an engineering discipline that has mainly been influenced by electronic and control engineers, rather than pure software engineers.
This does not mean that operating systems are not used in Real Time Systems, the techniques are the same, but they are usually applied at a much lower level. Typically written in assembler, making use of complex hardwired interrupt structures, and minimal amounts of memory.
To give you an example, the Motorola MC68HC11A microcontroller, which is widely used in the automotive industry for such tasks as engine management, fuel injection and active suspension has the following on chip architecture -
CODE SPACE 8k BytesVOLATILE RAM 256 BytesNON VOLATILE RAM 64 BytesREGISTERS 2 8-bit registers, 2 16-bit index registers, 1 16-bit stack pointerINTERRUPTS 21 Independent sources
You are not going to get UNIX, MS-DOS or Windows running on an architecture such as this. Yet very complex Operating Systems are developed for such devices. Before we can examine them in more detail we need to consider the basis structure of a real time operating system.
9.1 Types Of Operating System - Sequential Loop
Consider a typical Real Time system, a nice simple one. Let us assume that we intend to develop a temperature sensor. The tool is required to take an ADC reading from a temperature transducer, linearise the input data, and then output a voltage reading on DAC.
So we have three functions that we need to perform - The code for this could look like the following -
DO FOREVER{READ ADCLINEARISE THE DATAOUTPUT RESULT TO DAC}
There are no timing considerations in such a simple structure, and it hardly merits the title of an Operating System - but that is what it is. Three independent tasks have been sequentially scheduled to run one after the other.
There are only two main points that must be addressed -1. Will the complete loop run fast enough to provide a suitable update rate for the output.2. How is the data passed from one function to the next.These are trivial issues that do not require further expansion here.
Now lets add another level of complexity. The above system took no account of time, but what if it essential that the output data is updated every 100 ms and then held constant for that period of period. This could be because it is transmitting the temperature reading to a remote closed loop control system that requires the data to be stable for a fixed period of time whilst it is read. Another

reason may be that it is considered unacceptable that an operator’s dial flickers at a rate of more than 100 ms. Whatever the reason we need to add a timing element.
9.2 Types Of Operating System - Timed Loop
A single timed loop can be implemented by adding a clock, when the clock reaches the desired time the functions are executed, until the clock comes around again.Such a structure can be implemented as follows -
DO FOREVER{WHILE (CLOCK != LOOP_TIME) DO_NOTHINGREAD ADCLINEARISE THE DATAOUTPUT RESULT TO DAC}
In a structure such as this the processor sits around doing nothing, whilst waiting for the clock to reach the desired time, it then executes the functions and goes back into a wait state.
We can improve on this by using a timer interrupt to provide the clock information and a SIGNAL to the functions.
All microcontrollers, and most computer systems, have the ability to implement a timer interrupt. This is usually achieved by pre-setting a 16 bit register with a number, which is decremented by the a fraction of processors XTAL timing signal. When the counter reaches zero (or it may increment and overflow) an interrupt is issued. When an interrupt occurs the current process is suspended and control is passed over to a specially written interrupt function.
Let us assume that we have a 4 MHz crystal, which is prescaled by 16. Prescalers are usually binary. The timing signal to the 16 bit timer register therefore will by 250 kHz. To obtain an interrupt rate of 100 ms (which is 10 Hz) the register needs to be preloaded with 25000. 4 MHz / (16 * 25000) = 10 Hz.

The structure could look something like this -
CALL INITIALISATIONDO FOREVER
{IF (TIMING SIGNAL) CALL PROGRAMME_LOOPELSE DO_NOTHING}
INITIALISATION{TIMER REGISTER = 25000ENABLE TIMER INTERRUPT}
PROGRAMME_LOOP{TIMER_SIGNAL = 0READ ADCLINEARISE THE DATAOUTPUT RESULT TO DAC}
TIMER_INTERRUPT{TIMER_REGISTER = 25000TIMER_SIGNAL = 1}
As we have discussed earlier, Real Time Systems are by their nature SAMPLED DATA SYSTEMS, which means that to avoid aliasing of the input data the ADC must be sampled at regular intervals. The above structure is the minimum that is required for a Real Time System.
What are the constraints of this structure? The most important one is the time taken to execute the block of timed code in ‘PROGRAMME_LOOP’, it must be less than the rate of occurrence of the timing signals. This is especially important, if instead of DO_NOTHING, we instead DID_SOMETHING_ELSE, for example updated an operator’s LCD display. If we never complete the timed operations in time, then the other functions will never have any processor time run themselves.
With the above structure we have to rely on the programmer’s ability to ensure that the total execution of the timer operations do not exceed the available time slot.
Let’s stick with this structure for now and grow it a bit more. In the above example we had only one operation waiting to be executed in the timed loop, but what if we require other functions to occur as well. We can achieve that with a simple scheduler.
9.3 Types Of Operating System - Simple Multi-Tasking Timed Loop
Let us retain our 100 ms timing signal, but instead of simply executing a single task called ‘PROGRAMME_LOOP’, we look down a list possible tasks to see if any of them are waiting to be run. This can be achieved by a very simple structure, each task will have associated with it a flag that is either ON or OFF. The scheduler can then look at each of these flags in turn, every 100 ms, and if the flag is ON then that task is executed.

The code could look something like this
CALL INITIALISATIONDO FOREVER
{DO_SOMETHING-ELSE}
INITIALISATION{TIMER REGISTER = 25000ENABLE TIMER INTERRUPT}
TIMER_INTERRUPT{TIMER_REGISTER = 25000IF (FUNCTION1_SIGNAL) CALL FUNCTION1IF (FUNCTION2_SIGNAL) CALL FUNCTION2IF (FUNCTION3_SIGNAL) CALL FUNCTION3}
FUNCTION1{READ ADCLINEARISE THE DATAOUTPUT RESULT TO DAC}
FUNCTION2{UPDATE_LCD}
FUNCTION3{TRANSMIT_RESULTS}
If the SIGNALS are global variables then any function can schedule any other function to run, they can also kill themselves off, or SUSPEND themsleves. Life is probably going to start in DO_SOMETHING_ELSE or the INITIALISATION.
There is still a major constraint with such a strategy, as it is possible for all the functions to be scheduled to run in a single time slot. So even though we have more control over what is going on, the total execution of all the functions must never exceed the size of the time slot.
Can we improve on this in any way?
9.4 Types Of Operating System - Simple Scheduler
The answer is of course yes. One way to improve this system is to have the functions executed outside of the timed loop, and just use the timed loop as the means to signal them to run.
To do this we need another set of flags, one set is used by the timed loop to determine whether or not the function is ACTIVE, and the other set are the SIGNAL flags as before, but instead these are used by the DO_SOMETHING_ELSE function in the background.
CALL INITIALISATIONDO FOREVER
{DO_SOMETHING-ELSE

}
INITIALISATION{TIMER REGISTER = 25000ENABLE TIMER INTERRUPT}
TIMER_INTERRUPT{TIMER_REGISTER = 25000IF (FUNCTION1_ACTIVE) FUNCTION1_SIGNAL = ONIF (FUNCTION2_ACTIVE) FUNCTION2_SIGNAL = ONIF (FUNCTION3_ACTIVE) FUNCTION3_SIGNAL = ON}
DO_SOMETHING_ELSE{IF (FUNCTION1_SIGNAL) CALL FUNCTION1IF (FUNCTION2_SIGNAL) CALL FUNCTION2IF (FUNCTION3_SIGNAL) CALL FUNCTION3}
FUNCTION1{FUNCTION1_SIGNAL = OFF ;READ ADCLINEARISE THE DATAOUTPUT RESULT TO DAC}
FUNCTION2{FUNCTION2_SIGNAL = OFF ;UPDATE_LCD}
FUNCTION3{FUNCTION3_SIGNAL = OFF ;TRANSMIT_RESULTS}
With this structure, any function can be switched ON or OFF by setting/clearing its FUNCTION_ACTIVE flag. If we make this flag GLOBAL then any function can signal any other function to be active or inactive. The use of the FUNCTION_SIGNAL flags ensures that each of these functions will only run once every time slot when they are active.
Now we no longer have the constraint that all the functions must have a total execution time that is less than the available time slot. This is because they are executed in the BACKGROUND function DO_SOMETHING_ELSE. If the system is not overloaded, then everything that is scheduled to run will be completed within the required time. As we move into an overload situation the system will simply ‘gracefully decay’, with all the functions being executed WITH EQUAL PRIORITY, but taking longer and longer to complete.
So now let us improve on this concept, by adding some more concepts. One of them is to allocate PRIORITIES to different functions, and the other is to allow functions to be executed at different times.
9.5 Types Of Operating System - Scheduler With Different Timings
There are many different ways to achieve this objective, this is just one example. The key to it is to add another variable that defines the repetition rate of any function; let us call it REPEATx. First

we need to increase our interrupt rate, to say 10 ms, now we can apply different repetition rates to our functions in multiples of 10 ms. So a 10 ms function will have REPEAT set to 1, a 100 ms function will have REPEAT set to 10, and a 1 second function will have REPEAT set to 100.

AN example is given below -
CALL INITIALISATIONDO FOREVER
{DO_SOMETHING-ELSE}
INITIALISATION{TIMER REGISTER = 25000ENABLE TIMER INTERRUPTREPEAT1 = 1 REPEAT2 = 10REPEAT3 = 100TIMER1 = REPEAT1TIMER2 = REPEAT2 TIMER3 = REPEAT3}
TIMER_INTERRUPT{TIMER_REGISTER = 25000IF (FUNCTION1_ACTIVE)
{IF (--TIMER1 == 0)
{TIMER1 = REPEAT1 FUNCTION1_SIGNAL = ON}
}IF (FUNCTION2_ACTIVE)
{IF (--TIMER2 == 0)
{TIMER2 = REPEAT2 FUNCTION2_SIGNAL = ON}
}IF (FUNCTION3_ACTIVE)
{IF (--TIMER3 == 0)
{TIMER3 = REPEAT3 FUNCTION3_SIGNAL = ON}
}
}

DO_SOMETHING_ELSE{IF (FUNCTION1_SIGNAL) CALL FUNCTION1IF (FUNCTION2_SIGNAL) CALL FUNCTION2IF (FUNCTION3_SIGNAL) CALL FUNCTION3}
FUNCTION1{FUNCTION1_SIGNAL = OFF ;READ ADCLINEARISE THE DATAOUTPUT RESULT TO DAC}
FUNCTION2{FUNCTION2_SIGNAL = OFF ;UPDATE_LCD}
FUNCTION3{FUNCTION3_SIGNAL = OFF ;TRANSMIT_RESULTS}
With this structure FUNCTION1 occurs every 10 ms, FUNCTION2 every 100 ms and FUNCTION3 every second.
Now let us add some priorities. This can be achieved by adding another variable called PRIORITY, which is used in DO_SOMETHING_ELSE. The concept is simple, each function is scheduled to run with a specific frequency, but when DO_SOMETHING_ELSE decides what to run, it gives first preference to HIGH PRIORITY functions. This can be achieved in a number of ways, this is just one example, in which the HIGH PRIORITY functions are scanned before the low priority functions ;
DO_SOMETHING_ELSE{
CHECK_FOR_HIGH_PRIORITYIF (PRIORITY1 == LOW)
{IF (FUNCTION1_SIGNAL) CALL FUNCTION1}
CHECK_FOR_HIGH_PRIORITYIF (PRIORITY2 == LOW)
{IF (FUNCTION2_SIGNAL) CALL FUNCTION2}
CHECK_FOR_HIGH_PRIORITYIF (PRIORITY3 == LOW)
{IF (FUNCTION3_SIGNAL) CALL FUNCTION3}
}
CHECK_FOR_HIGH_PRIORITY{IF (PRIORITY1 = HIGH)

{IF (FUNCTION1_SIGNAL) CALL FUNCTION1}
IF (PRIORITY2 = HIGH){IF (FUNCTION2_SIGNAL) CALL FUNCTION2}
IF (PRIORITY3 = HIGH){IF (FUNCTION3_SIGNAL) CALL FUNCTION3}
}
9.6 Complex Operating Systems Using Stack Frames
All of the above structures are representative of the simple, but effective operating system concepts that can be employed by microcontrollers. The overriding theme of all of them is that the functions are executed to completion. True multitasking environments operate differently, which is beyond the scope of this module. This is because they are inappropriate for use with the majority of microcontroller based Real Time Systems.
Tasks are scheduled to run in a similar manner to that described above, that is they are given repetition times, and priority levels. The main difference is that a finite time slot is allocated for each process to run, even if the process cannot possible finish within that time period. This is achieved with a STACK FRAME that is uniquely allocated to each function. This is a block of memory allocated to each function at run time, that is used only by that function as its’ operating stack. Data is ‘pushed’ and ‘popped’ from this stack in the usual manner, and it is also used for subroutine return addresses. At the end of the time slot the real time interrupt function causes an interrupt of the currently running process, thus a return address back to that function is stored in the top of its’ stack frame. The interrupt routine must then save all of the processor registers into that stack frame, and take a copy of the current stack pointer contents. The next task is then run by setting the stack pointer to a previously stored value obtained from the next function that needs to be run, data is then restored into the registers and a ‘return’ executed, which causes control to be handed over to the next function.
It is highly unlikely that you will ever have to implement a system such as this on a microcontroller based real time system. If you do require such a complex form of task swapping then you are well advised to first enquire as to whether or a proprietary operating system can be purchased for that device.

10 SYSTEM INTEGRITYThis is a summary of the self testing techniques used in Real Time Systems
10.1 ROM Checksum
At the end of a block of code a 16 bit number is inserted that is the numerical sum of the whole of the programme. It is determined by simply adding up the binary value of each of the op-codes. On start up the initialisation routine recalculates this checksum and compares it to the stored result. They must be the same, otherwise the memory has failed.
Some systems use Cyclic Redundancy Check (CRC) checksums, which are a more complex type of mathematics.
10.2 Ram Checksums
These are a similar concept to ROM checksums, but are performed regularly on blocks of data memory. Whenever critical data is stored or updated, a new RAM checksum is calculated. It can then be used at a later date to check the integrity of the stored data.
10.3 Ram Pattern Tests
These are carried out at initialisation in order to prove that the data memory has not failed. As a minimum two tests must be carried out, one to test the addressing, and the other to test the storage areas. To test the addressing, a simple method is write the address of each memory location into each memory store. Then check each location in turn to prove that it can be correctly addressed. The second test involves writing a pattern into each memory location in turn, and then reading it back in order to prove that it can be written into and read from; typical patterns used are AA and 55 HEX.
10.4 Watchdogs
In order to prove that a RTS has not crashed, an external component known as a watchdog is fitted to the processor’s RESET line. This device has a time-out, typically set to be less than one second. The RTS is required to clear this time-out back to zero on a regular basis; if it does not do so then the watchdog ‘times-out’ and restarts the RTS.

11 SYSTEM TESTING
Testing real time software requires the use of specialist tools, that can either operate in ‘Real Time’, or simulate the real time environment.
Examples of such tools are -
SimulatorsEmulatorsIn-Circuit-Emulators (ICE)Logic Analysers
Simulators and emulators are software oriented tools. ICE and logic analysers are hardware oriented tools.
A simulator is a programme that runs on a different machine to the target system. The programme simulates the operation of the target processor, but does not run in real time. The programme MPSIM is an example of such a tool. MPSIM simulates the operation of a simple device such as a PIC using a programme that runs on a PC. They are very good for testing out the logical flow of a programme, and examining how data is passed between functions. However they can never simulate genuine real time events. However, when used with good design practices, they are very effective.
An emulator is a programme that maps a simple computers structure onto a more complex computers architecture. For example a standard PC can emulate precisely the operation of Intel’s’ long established 8-bit 8085 microprocessor. This is because a PC contains far more internal registers than an 8085, so all of the 8085’s functions can be performed by a sub-set of a PC’s processor. They are rarely used today.
In-Circuit-Emulators are a hardware tool. The processor on the target system is replaced with an identical device known as a ‘bond-out-chip’. This device operates in the same way as a normal processor, but in addition a bundle of wires are attached to the device, which can be used to log contents of the processor's registers at any time. If these wires are attached to a high speed data logger it is possible to ‘capture’ the operation of a programme in true real time. The programmer can then examine the captured trace, and see how the programme ran, thereby finding any faults.
A logic analyser is a hardware tool that can be used to capture the activity on any digital signal line in real time. So if we capture all of the data and address bus, it is possible to make it operate like an ICE. In addition we can capture external events on incoming data lines, and capture output signals generated by the processor. You are unlikely to use such a device, as it is mainly used to test the computers circuit design rather than its’ programmes.

REAL TIME SYSTEMS - CASE STUDY 1 A 3-DIMENSIONAL CO-ORDINATE MEASURING MACHINE
3-D co-ordinate measuring machines are precision machine tools used to examine machined components. The measurement precision is usually up to 1 micron. The equipment consists of a highly sensitive touch probe, that is moved around in 3 dimensions, using 3 orthogonal motor drives. The equipment can vary in size from small desk top units, to machines that can fill a whole room.
The control problem is to position the probe in a precise 3-D co-ordinate position. Simple machines can use a set of ‘servo-motors’ which are given a position to move to, and the each axis then moves independently to their respective co-ordinate. Quality machines are far more elegant, the probe must move in a straight line between co-ordinates, which means that the axes must be controlled in such a way that they keep pace with eachother. Also the velocity of movement must be constant, regardless of the direction of movement. This means that each axis must move at a different speed.
Consider a single axis for now. The position is measured using a linear scale. These are usually optical sensors, consisting of a strip of material onto which are etched a series of lines exactly one micron apart. An optical pickup simply counts the lines, thus giving a readout of the current position of the axis. In order to derive an absolute position the axis must be moved through a known reference point, or DATUM POINT, every time it is switched on. Now that we know the absolute position of the axis, all that we need in order to move it to any position, is a closed loop position control system. A DC motor is attached to the axis drive, and is used to move the axis in either direction. The amount of drive power output to the drive is proportional to the difference between the desired position and the current position.
Thus a simple closed loop controller can move a single axis to any desired set point. Our first problem is that the velocity of movement will also be proportional to the error, but we require the velocity to be a constant. If we ensure that the error is always a constant, then the velocity should also be a constant.
This is achieved by a STEP and COUNT technique. Instead of applying the whole of the set point in order to determine the error, we reduce the initial error to a finite number of equal steps. These STEPS are then added to the setpoint COUNT number of times, in a precise timed loop. In effect we are incrementally changing the setpoint in time in order to ensure a constant velocity.
If we assume the following
V is the desired velocity in metres per secondD is the total distance we wish to moveT is the cycle time of programme loop
To move D metres at V m/s will take D/V seconds
Total travel time = D/V (1)
If the cycle time is T, then the total number of steps is the total travel time / the cycle time
COUNT = (D/V) / TorCOUNT = D/(V*T) (2)
The size of each step is the total distance travelled divided the number of steps
STEP = D / COUNT (3)
STEP = D / (D/(V*T)) = V * T (4)

So the STEP size is independent of the total distance to be travelled. It is the distance that will be travelled in the time slot, if the axis was moving at its' desired velocity. For any given velocity STEP is a constant.
In order to control the unit all that is required is to divide D by STEP to obtain COUNT.
The software must now have 2 independent blocks, one is used to maintain the setpoint, and the other is the closed loop control.
For example assume that we wish to move distance X at a velocity V, and we have defined a constant STEP.
int count ; /* total count of increment that are added to the setpoint */int setpoint; /* desired position */int position; /* current position */
do_move() { setpoint = position ; /* ensure that we have correct starting position */ count = X/STEP ; }
int error ;timer_interrupt() { if (count) /* do we need to change the current setpoint */ { setpoint += STEP ; /* increment the setpoint */ count-- ; } read_position(); /* read the current position from the linear scale */ error = setpoint - position ; /* calculate error */ output_dc_motor_drive(error * GAIN) ; /* output a control signal proportional to the error */ }
Reverse movements can be achieved by implementing -ve counts.
Your problem is to derive a similar method that will work over all three axes simultaneously.
REAL TIME SYSTEMS - CASE STUDY 1 SOLUTIONA 3-DIMENSIONAL CO-ORDINATE MEASURING MACHINE
The solution is that we have to implement a STEP and COUNT solution for each of the three axes, but instead of a constant STEP, it has to be resolved along the three axes.
Our starting position is X1,Y1,Z1 and we intend to move to X2,Y2,Z2. First we have to calculate the total distance travelled , which we will call R
R = square root( (X2-X1) ^ 2 + (Y2 - Y1) ^ 2 + (Z2 - Z1) ^2) )
Now we calculate the COUNT as before, as STEP is a constant.
COUNT = R / STEP
The easiest way to resolve the steps over the three axes is divide each individual step by COUNT.
STEPX = (X2 - X1) /STEPSTEPY = (Y2 - Y1) /STEPSTEPZ = (Z2 - Z1) /STEP
The code is as before, except that we have to handle 3 axes instead of one.
int count ; /* total count of increment that are added to the setpoint */int setpointx; /* desired position */int positionx; /* current position */int setpointx; /* desired position */int positionx; /* current position */int setpointx; /* desired position */int positionx; /* current position */int stepx; /* resolved step in the x direction */int stepy; /* resolved step in the y direction */int stepz; /* resolved step in the z direction */
do_move() { setpoint = position ; /* ensure that we have correct starting position R = sqrt( (X2-X1) ^ 2 + (Y2 - Y1) ^ 2 + (Z2 - Z1) ^2) ) ; count = R/STEP ; stepx = (X2 - X1) / count ; stepy = (Y2 - Y1) / count ; stepz = (Z2 - Z1) / count ; }
int errorx ;int errory ;int errorz ;timer_interrupt() { if (count) /* do we need to change the current setpoint */ { setpointx += stepx ; /* increment the setpoint */ setpointy += stepy ; /* increment the setpoint */ setpointz += stepz ; /* increment the setpoint */ count-- ; } read_position(); /* read the current position from the linear scale */ errorx = setpoint - position ; /* calculate error */ output_dc_motor_drivex(errorx * GAIN) ; /*output control signal proportional to the error */ errory = setpointy - positiony ; /* calculate error */ output_dc_motor_drivey(errory * GAIN) ; /*output control signal proportional to the error */

errorz = setpointz - positionz ; /* calculate error */ output_dc_motor_drivez(errorz * GAIN) ; /* output control signal proportional to the error */ }

REAL TIME SYSTEMS -- CASE STUDY 2 SHOWER CONTROL
An electric shower works by taking cold water from the household mains supply, and passing it through a heating element en-route to the shower rose. The problem therefore is how do we maintain a constant temperature in the delivered water, from a set point entered on a dial.
Your first task is to analyse the variables. These are as follows -
1) Water flow rate2) Initial temperature of the water3) Heating power of the heating elements4) Final temperature of the water.
Now what is it that we can control. There are two possibilities, one is the amount of heat put into the system by the heating element, the other is the rate of flow of the water through the heating element.
The classic closed loop control solution would be to monitor the final temperature of the water, and adjust the amount of energy put into the heating element. Regrettably this is not viable, the time constants taken by a low cost electric heating element are far too long. This means that the water temperature will oscillate slowly around the set point, alternately delivering water that is too hot and then too cold. You may have come across showers just like this, they are probably quite old in design!!
The only solution is to use feedforward predictive control. We know the heating ability of the electric heater. We also know both the initial starting temperature of the water, and the amount it has to be raised (often called ‘The Lift’ by heating Engineers). All that we need to control is the flow rate of the water.
Your task now is to propose a control solution that will deliver the correct temperature of water using the following input data -
1) Water Flow Rate2) Set Point of desired temperature3) Initial Temperature
Also how can the system cope with long term drift, and reduced heating coil efficiency ?

Case Study 2 An Electric Shower - The Solution
If the temperature of the water entering the shower unit is T1 and the setpoint is T2, then we need to ‘lift’ the temperature by T2 - T1.
Let us call the temperature lift required TT = T2 - T1 (1)
Heating elements are rated at fixed energy levels, e.g. 1 kW etc. This is a measure of the amount of energy that the heater can provide, measured in Joules per Second. 1 W = 1 Joule per second.Assume that the heating element can deliver energy at the rate of W Joules per second.
The flow rate of the water through the heating element is L litres per second.S is the specific heat of the water. Specific heat is the measure of how much energy in Joules is required to heat a unit mass of a material by 1 degree Celsius. So let us assume that S is the amount of energy in Joules required to raise 1 litre of water by 1 degree Celsius.
If we can deliver W joules per second from the heater & the flow rate is L litres per secondHow much is the temperature of the water raised ?
Temperature Lift T = W / (L * S) (2)
This is also an intuitive answer.The higher the energy output of the heater then the hotter the water will become.The greater the specific heat, then more energy is need to raise the water by 1 degree,The greater the flow rate then the cooler the water will be (as more water passes through the heating element).
Let us now rearrange equation 2
If T = W/(L * S)
thenL = W/(T * S) (3)
Which means that if we know the specific heat of water, the energy output of the heating element, and the desired temperature lift, we can calculate the precise flow rate of water required to achieve this.
Fortunately we do know all three variables on the right hand side of the equation. The energy output of the heating element is a known parameter, Specific Heat is a known physical constant, and the temperature lift required can be calculated.
The solution to our control problem therefore is to measure the input temperature of the water using the available temperature sensor. We then read off the setpoint from the users control dial and calculate the temperature lift (T) required. As W and S are constants we can create a look up table in the processor that will directly relate temperature lift to flow rate. The controller then has to implement a closed loop system to control the flow rate of the water through the heating element. This is usually achieved by a solenoid valve that blocks the flow of the water through the pipe work. This valve is positioned using PWM.
But what about long term drift?There is also a sensor that looks at the output temperature. This value needs to be compared to the setpoint over a long period of time. Typically we are talking about 10 minutes or more. This will give us a value for the ‘correctness’ of our look up table. If the heating element is dying, then we will detect a trend of the water always being too cold. If the heating element is new, and very efficient, then the long term trend will indicate that the water is always too hot. On a regular basis, say every 24 hours, the current ‘trend’ is used to provide an offset to the PWM value. So that if the water tends to be too cold, we reduce the flow rate a little bit.

REAL TIME SYSTEMS - CASE STUDY 3 A SKIN RHEOMETER
Rheometers are used to measure the elasticity of materials. The usual method is to attach a probe to the material under test, and to move the probe back and forth over a given distance. Whilst this is done the instantaneous force is logged. A plot of displacement versus force is an ellipse, with the in phase movement representing pure elastic movement, and the out of phase movement representing viscous movement.
A mechanical arrangement is set up consisting of a lead screw, driven by a rotary DC motor. When the motor turns, it rotates a threaded nut, which has the effect of moving a threaded rod in a linear direction.
The mechanical probe is attached to the lead screw via a load cell. Load cells are transducers that convert strain into electrical resistance. They are usually supplied with drive electronics that balances the load cell with a precision fixed resistor in a ‘bridge arrangement’. An excitation voltage is applied across one side of the bridge, and the differential voltage generated is measured across the other side. If the system is in balance then the output voltage is zero. As the strain changes, so the bridge becomes unbalanced, and a signal is generated that is more or less proportional to the measured strain. In this way we can measure the force acting on the material that is under test.
Attached to the lead screw is the ferrite core of a frictionless LVDT. This is used to measure the linear displacement.
A simple rheometer can now be created. Using a data logging computer, the lead screw is pushed back and forth, with a triangular waveform; whilst data pairs of force versus position are logged. Mathematical analysis of these data points can then be used to derive the elastic and viscous properties of the material. No control is required, we simply apply a preset voltage to the DC motor, and use the LVDT to sense the ‘endstop’, at which time we reverse the motor drive voltage.
However the particular application that we had to deal with required that the force applied to the test material varied sinusoidally, with a peak value of 3 grams, and cycle period of 3 Hz precisely.
Using the components already described - a load cell, an LVDT, and a lead screw, give me a solution.
As an added complication it was discovered that the lead screw requires a minimum drive voltage of 0.5V to move it from its’ rest position. This is known as MOTOR INERTIA. Another problem was that the test material was found to move (similar to the way a carpet rucks up when moving a vacuum cleaner over it), causing the probe to stick. Can you suggest some variations to the motor drive algorithm to overcome these two problems.

REAL TIME SYSTEMS - CASE STUDY 3 SOLUTIONA SKIN RHEOMETER
The only solution is to implement force feedback control, using the load cell as our feedback sensor. A cycle time of 1 kHz was chosen, which means that for a 3 Hz cycle we need to calculate at least 3000 points to profile the force cycle. Because there is a viscous content, which means that the displacement will lag behind the application of the force, we have to overrun the test in order to ensure that we capture a full displacement cycle. The overrun was set to 10%.
A 1 kHz real time interrupt triggers the control loop. On each interrupt we obtain the desired force setpoint from a preloaded look up table, and compare it to the measured set point read back from the load cell. The error signal is then used to control the lead screw. We also measure the instantaneous LVDT position, and store 3300 data pairs for later analysis.
The basic control loop is a proportional controller based on the error signal. Two other aspects are needed to overcome the additional problems outlined in the question. To overcome the motor inertia a minimum voltage is applied to the DC motor. If the drive voltage is +ve 0.5V is added to it, and is it is -ve 0.5V is subtracted.
Control Loop
int force[3300] ;int displacement[3300];int force_setpoint[3300] = {.........};int loop_counter ;int this_force;int this_displacement;int motor_drive ;
1kHz_interrupt(){int error ;this_force = read_load_cell();this_displacement = read_lvdt();force[loop_counter] = this_force ;displacement[loop_counter] = this_displacement ;error = force_setpoint[loop_counter] - this_force ;motor_drive = GAIN * error ;if (motor_drive > 0) motor_drive += 0.5 ;if (motor_drive < 0) motor_drive -= 0.5 ;output_to_DAC(motor_drive);loop_counter++ ;}
The sticking problem is over come by adding an integral term, using a running mean of the last 128 error values. This means that the time constant of the integral term is 128/3000 ~ 4.2% of the proportional term. Note the use of an integral reset to remove integral windup.
int error_array[128] ;int integral_point ;int integral ;1kHz_interrupt()
{

int error ;this_force = read_load_cell();this_displacement = read_lvdt();force[loop_counter] = this_force ;displacement[loop_counter] = this_displacement ;error = force_setpoint[loop_counter] - this_force ;integral_point++ ;integral_point &= 0x7f ;integral -= error_array[int_point] ;error_array[int_point] = error ;integral += error ;motor_drive = (GAIN * error ) + (INTEGRAL * integral / 128);if (motor_drive > 0) motor_drive += 0.5 ;if (motor_drive < 0) motor_drive -= 0.5 ;if (error >= 0)
{if (error < MINIMUM_ERROR) clear_error_array();}
if (error <= 0){if (error > -MINIMUM_ERROR) clear_error_array();}
output_to_DAC(motor_drive);}

REAL TIME SYSTEMS - CASE STUDY 4SYSTEM INTEGRITY
There are a range of techniques that are used to test system integrity. If we consider our tachograph system again, what techniques should we apply.
Consider the major failure modes.
Hardware DamagedCode CorruptedData CorruptedData Memory FaultyIncorrect code causes main programme loop to crashIncorrect code causes interrupt code to crashMultitask code, but independent functions executing in illogical manner
Watchdogs
The most important system failure mechanism is to include an independent ‘watchdog’ as part of the circuitry. Watchdogs are circuits that consist of a resetable timer and a reset signal. The processor is required to reset (or ‘kick’) the watchdog at regular intervals. If it fails to do so the watchdog times out and resets the processor.
These devices simultaneously test that the hardware is OK, and that the programme code is correctly operating. The time out period should be set to be slightly longer than the maximum programme loop time, in order to capture any deviation in code execution.
Some processors include an integral watchdog as standard. However many safety approval bodies will not accept this as a valid test, on the grounds that a processor should not ‘watch’ itself, and should use an independent circuit instead.
Checksums
Use of EPROM checksum is often mandatory for a real time system. When the programme is compiled, it should never change (dynamic reprogramming is never allowed). Therefore it is possible to calculate a numeric checksum of the programme code itself, treating the code as a series of bytes. The checksum can be a simple summation of the bytes, limited to 8 or 16 bits; or a complex CRC. The checksum is stored at a fixed location in the code memory space. On power up the processor should recalculate the checksum and compare it to the stored result, only if they match should processing continue.
Similar techniques should also be used dynamically to verify data blocks in RAM.
Correct Sequencing
This is a more tricky prospect. If we have developed a multi tasking system, simply kicking the watchdog once on each programme cycle may not be adequate. Consider a situation where we have 5 independent functions; how can we ensure that all 5 are executed, if the watchdog kick code is only in one of them ?
It is necessary to create a flag for each function, to indicate that each has been correctly executed. Only if all 5 flags are set will the main programme loop kick the watchdog. The rules for setting the ‘I AM OK’ flags can vary between the functions, depending upon how they operate.
As an exercise devise a system that not only ensures that all five functions are executed, but that are executed in order (i.e. FUNC1 then FUNC2 etc. ...).
Correct Signalling

Interrupts by their very nature are unpredictable. How can we ensure that both a background routine and an interrupt are both operating correctly, and are signalling to eachother, using only a single watchdog. Remember if the watchdog code is in the interrupt, then all that is tested is that the interrupt is working, the main body of the code may have crashed.
This can only be achieved by using a form of integrity signalling as an overlay on top of the normal code.
Each time the interrupt is executed, it sets a flag to say ‘INTERRUPT IS OK’, the background routine performs its’ usual tests, but before it kicks the watchdog it must also test the INTERRUPT IS OK signal, if that is set a s well then the it can kick the watchdog. It must also clear the signal.
Now consider another more complex problem. If we have a timer interrupt, that signals a background routine to run say once a second, how can develop a test to ensure that this is happening.
REAL TIME SYSTEMS - CASE STUDY 4SYSTEM INTEGRITY SOLUTIONS
One solution to the correct sequencing problem is to create a variable for each function, with each bit dedicated to a specific function. There must also be a global variable of the same form that is cleared at the start of each programme cycle.
When any function is executed, it sets its’ own bit in the global variable, and then copies that value into its’ own local variable. At the end of a complete cycle, these local variables can be interpreted to determine the order in which each function occurred, effectively time stamping them in chronological order. An independent check programme can examine this data and decide whether or not the order of execution was acceptable.
The interrupt problem can be solved by examining the signal set by the interrupt routine. In normal operation the signal flag is set by the interrupt once a second, and cleared by the background routine. If the system is working OK then when the interrupt routine comes round again the signal should be clear, if it is not then that means that the background routine has either been delayed, or has died. By keeping a count of the number of failures, we can set an alarm off if the delay exceeds a preset value

MPASM.EXE Assembler for PIC family of microcontrollers. Available freely from their bulletin board. To be used as part of coursework.
MPSIM.EXE Simulator for PIC family of microcontrollers. Available freely from their bulletin board. To be used as part of coursework.
CONTROL.EXE PID loop control response characteristic simulation.
To use control.exe enter CONTROL to the DOS prompt. You are then asked a series of questions about the system that you wish to simulate. A bi-directional system assumes that you have an actuator that can move in both directions (e.g. a DC motor). A non bi-directional system is one that you can only move in one direction (e.g. a heater). You are asked to enter a ‘loss’. All real systems loose some energy, or are perturbed in some way (e.g. a machine experiences ‘stiction’ when a bit of grease or rubbish accidentally falls onto a moving mechanical part); you must enter a loss in order to simulate real events such as this. If you do not enter a loss then you will see an ‘ideal’ response characteristic, which of course can never occur in real life. You can then enter the P, I and D terms of your choice. Finally you are asked to enter a ‘lag’. The purpose of the lag is to simulate the affect of time delays in the system. A lag of 0 is an ‘ideal’ system, which can never occur in real life.
CONTROL.C Source file for control.exe.SAMPLE.EXE Simulates the affect of sampling a real signal.
Run the programme by entering sample to the DOS prompt. Only option 5 is of use to us, but you are welcome to investigate the other options that demonstrate how a binary square wave is built up from a sum of sine waves (i.e. Fourier Analysis). Option 5 shows what happens when a sine wave with a nominal frequency of 0.02 is sampled at different sample rates. Whilst the sample rate is >> 0.02 the sine wave is recognisable. As the sample rate decreases, so the reconstructed sine wave deteriorates, to a point where a totally wrong sine wave can be reconstructed. This programme demonstrates the importance of sampling unknown data at a rate far in excess of the maximum rate of change of that signal.
FUSE.ASM Sample PIC programme. The PIC 16C74 controls an ADC and a DAC via an SPI serial link. Circuit diagrams have also been attached.PHOTON.EXE An example of using a mask filter to smooth out noisy data.
Run the programme in debug mode using the /d switch. The programme is used to capture a line scan of a diffraction pattern that is created by suspending a fibre in the path of a laser beam. The width between the first two peaks of the diffraction is inversely proportional to the width of the fibre. The cursor keys are used to invoke and move about two vertical cursors, and a horizontal cursor. To use them you must first grab a line scan by pressing F1. A previously stored diffraction pattern is now displayed; note the two main peaks to the right of the screen. Invoke a vertical cursor by pressing the UP arrow, and move it around using the LEFT & RIGHT arrows. Move it to the left hand side of the gap between the main peaks. Invoke the second cursor with the UP key, and move it to the right hand side of the gap. Now invoke the horizontal cursor. As you move this cursor up and down (use LEFT & RIGHT keys again) the vertical cursor ‘snap’ to the edge of the gap. This tool is used to analyse the trace in practice. If the system cannot find the gap, do to noise in the data making it indistinct, it applies a mask filter to improve the smoothness of the curve. You can see this happening. The unsmoothed curve is displayed in cyan, the smoothed data is displayed in red.
PHOTON.C Source code for PHOTON.EXE.EGAVGA.BGICGA.BGI Borland graphics library for use with photon.exe

SKINDSR.EXE Skin rheometer programme. Can be used to demonstrate regression.
Run the programme in debug mode with skindsr /k /c. Select ‘take measurement’ and obey instructions to obtain a dummy reading. An ellipse of ‘real’ data will appear on the screen, which will then be replaced by a pair of time traces, showing force and displacement independently plotted against time. Both traces are sinusoidal but noisy. A regression algorithm is then used to ‘fit’ a perfect sine wave to the available data.
SKINDSR.C Source code for skindsr.exe.COURB.FONHELVB.FON Font files used by Microsoft C compiler.CAL.DAT Calibration file essential for skindsr.exe to work.GRAPH.EXE Simple graph plotter, just follow the rules, enter ESC to draw graph.GRAPH.C Source code for graph.exe.

REAL TIME SYSTEMS TUTORIAL QUESTIONS SHEET 1
DATA ACQUISITION
1 Transducers (See course notes sections 1.1 to 1.2)
a) What is a measurand ?
b) What is a transducer ?
c) Why are transducers required by real time systems ?
d) The signal that is ultimately presented to a Real Time System from a transducer must be ‘an absolute representation of the measurand’. What do you understand by this statement ?
e) Transmitters are a special class of transducer. They are fitted with either 4 wires, 3 wires or 2 wires. For each option describe the purpose of the wires.
f) A 4-20mA current loop is the most common standard used in two wire transmitters. Can you explain how it works?
g) This evening, look around your home and try to find at least 5 transducers. Describe how they work, and email your findings to the rest of the class.
h) Describe a transducer that will measure each of the following -
Linear DisplacementFlow RateLevelPressureTemperature
2 Analogue To Digital Conversion (See course notes section 1.3)
a) Describe in detail the mode of operation of the following types of ADC
Successive ApproximationDual SlopeFlashSigma Delta
b) With reference to the following -
Speed of conversionCostNoise Immunity
Discuss the differences among the 4 types of ADC that you have described in section (a).
c) We are required to develop a real time system that will control the temperature of a gas fired oven to an accuracy of better than 0.5 degrees C in a range of 1000 degrees C. It is known that the maximum rate of change of temperature that can be achieved with the gas burners full on is 10 degrees C per second.
What is the minimum data acquisition time required for the ADC ?What is the minimum number of bits that are required for the ADC ?

d) Using just a single capacitor and a single resistor, propose how a crude ADC could be developed using a pair of digital I/O pins of a PIC microcontroller.
e) What are the purpose of the Start of Conversion and the End of Conversion signals that are found on an ADC ?
e) How can a bus orientated ADC be interfaced to a microcontroller is we intend to use -1) A polling method2) An interrupt method
f) For each of the methods outlined in question e discuss how data is passed from the ADC data acquisition routine to the main body of the programme.
3 Digital Inputs
a) A microcontroller is fitted with a 16 bit timer/counter register. The clock input for this timer/counter is a 1.024 MHz signal derived from the processor clock.
Describe how this timer/counter can be used to derive the input frequency of a square wave in each of the following circumstances -
1) The square wave input is connected to an ‘external interrupt’ pin (e.g. an 8051 microcontroller)2) The square wave input is connected to an ‘input capture’ pin (e.g. an MC68HC11
microcontroller3) An ordinary digital input pin (e.g. a PIC 16C54)
In your solution detail how data is passed from any interrupt routines that you create to a background programme.
b) What happens if the frequency input line breaks ? Suggest a remedy for any problems that might arise.

REAL TIME SYSTEMS TUTORIAL QUESTIONS SHEET 2
OUTPUT DEVICES AND INTERFACING
a) There is a requirement to use a microcontroller’s digital output to switch on a DC motor that operates at 24V
Name two different components that can achieve this requirement.
b) We also need to switch on a light that operates from the mains. Name two different components that can achieve this requirement.
c) Describe how a solenoid operates, and how it can be used to control an air supply to a pneumatic tool.
d) Pulsed Width Modulation is a technique that can be used to make a digital output signal appear like an analogue output signal. Describe how this is achieved.
With specific reference to a ‘butterfly valve’, how can PWM be used to control the amount of water that flows through a water pipe ?
e) Describe how a PWM waveform that is in phase with the AC mains' supplies can be used to control the temperature in a small cabinet that is heated by an ordinary household light bulb ?
f) What is a Digital to Analogue Converter ?
g) How can a DAC be interfaced to a microcontroller ?
h) We need to provide a voltage control signal to a DC motor. The maximum voltage is 24V, and it must be accurate to 0.1%. How many bits must the DAC have to achieve this ?
I) Stepper motors are widely used instead of DC motors. How does a stepper motor operate ?
j) Shaft encoders are one method of determining the absolute position of a DC motor. How do they work, and why are they not required by stepper motors ?
k) Describe in details the operation of an 8255 parallel port device.
l) How can an 8255 be used to interface a HEX (4x4) keypad to a microcontroller? In your answer state why the keypad must be debounced, and how this can be achieved.
m) Describe in detail the operation of an 8253 timer device.
n) How can an 8253 be used to provide the following -
1) A baud rate signal2) A timed single shot pulse3) A frequency measurement4) A period measurement

REAL TIME SYSTEMS TUTORIAL QUESTIONS SHEET 3
CONTROL LOOPS
a) What is meant by the term ON/OFF CONTROL.
b) Draw a graph showing the typical response characteristics of an ON/OFF controller.
c) HUNTING is the main cause of instability in an ON/OFF controller. Why does this occur, and how can the application of either HYSTERESIS or DEAD-BAND remove HUNTING ?
d) What is meant by the term PROPORTIONAL CONTROL. In your answer clearly define the terms SET POINT, MEASURED VARIABLE, INSTANTANEOUS ERROR and CONTROL OUTPUT. Write down the equation that relates these terms to eachother.
e) Draw a schematic that illustrates P control, identifying the MEASURED VARIABLE, SET POINT and INSTANTANEOUS ERROR.
f) Draw a graph that shows the typical response characteristics of a P controller.
g) P controllers exhibit a phenomenon called STEADY STATE ERROR. What is this, and why does it occur ?
h) The addition of an Integral (I) term is widely used to ‘drive’ the steady state error out of a control loop. Rewrite the equation that you gave as your answer in question (d) above, but this time include an I term. Describe how the I term works.
I) Draw a graph that shows the typical response characteristics of a PI control loop.
j) The main cause of instability in a PI control loop is caused by INTEGRAL WINDUP. What is integral windup, and how can it be removed by using either -
1) An integral Reset2) An integral clamp
k) Propose a modification to a PI control strategy that overcomes MOTOR INERTIA.
l) A DERIVATIVE (D) term is used to ‘dampen down’ the dynamic movements that can result from of PI control loop. How does this work, and write down the equation for a full PID loop.
m) What is meant by the term STATISTICAL PROCESS CONTROL ?
n) Briefly describe how a EXPERT SYSTEM can be used to replace a traditional PID controller.
o) What is a PROGRAMMABLE LOGICAL CONTROLLER ?

REAL TIME SYSTEMS TUTORIAL QUESTIONS SHEET 4
SERIAL COMMUNICATION TECHNIQUES
a) SPI is a full duplex communication standard that is used to provide a link between integrated circuits on the same PCB. It consists of a clock line SCK, data out from a master device SDO and data in from a slave device SDI.
Draw the waveforms that will show a single byte transfer between a master and a slave device using SPI.
b) We are using SPI to interrogate an ADC, and the command to request that data is the 8-bit binary pattern 01010101.
If the command 00000000 means NO COMMAND, draw the waveforms that would be generated when the master request that the ADC sends back its' latest 8 bit result.
c) IIC is a half duplex standard that provides a similar function. It uses only two lines, a clock line SCK and a bi-directional data line SDA. In addition to being able to transmit data bits (0 or 1), there are also defined a special START bit and a special END bit that are used to delimit frames of data.
Draw the waveforms that are used to transmit each of the following -1) DATA BIT 02) DATA BIT 13) START4) STOP
d) How does the active IIC transmitter indicate that the it is requesting a reply from the receiver.
e) How does the active IIC receiver ACKNOWLEDGE receipt of a data byte.
f) We are using IIC to interrogate an ADC, and the command to request that data is the 7 bit binary pattern 0000001.Draw the waveforms that would be generated when the master request that the ADC sends back its’ latest 8 bit result.
g) Describe how CAN-BUS operates. In your answer clearly define the meaning of the terms, TRANSMITTER, RECEIVER and CHANNEL.
h) RS485 is a widely used ‘multi-drop’ serial communications technique. Briefly outline how it operates, with emphasis on the role of the software that will drive the RS485 transceivers.

REAL TIME SYSTEMS TUTORIAL QUESTIONS SHEET 5
INTERRUPTS & BASIC OPERATING SYSTEMS
a) What is meant by the term ‘Interrupt’. In your answer describe what happens when an interrupt occurs, detailing the role of the following -
1) The Stack2) The Interrupt Vector Table
b) Data areas used by interrupt routines cannot be accessed by other programmes. Why is this ?
c) An ADC is interfaced to a microcontroller using an interrupt technique. Data is read from the ADC and stored in two data bytes declared by the interrupt routine (adc_low_byte and adc_high_byte). Using pseudo-code demonstrate how a background process can access these data bytes using the following methods -
a) A semaphore that is set by the interrupt routine and cleared by the background routine.
b) A semaphore that is set by the background routine and cleared by the interrupt routine.
c) By manipulating the Interrupt Enabled global flag.
d) A vehicle tachograph measures road speed velocity and distance travelled by gating the road speed sensor signal over fixed time period.
The road speed sensor is connected to an External Interrupt Pin. An internal timer is set to interrupt once every second. Show, using pseudo code, how a background routine is capable of totalising the distance travelled (i.e. the odometer) and indicating the velocity to the driver (i.e. the speedometer).
You must clearly indicate how data is passed between the two interrupt routines and the background routine.

e)
The above schematic illustrates a simple interrupt structure. A real time interrupt occurs every 10 ms. Inside this interrupt a divider is used to execute a ‘PID Loop’ every 10 ms, a ‘get data’ function every 100 ms, and a ‘scan keys’ function every 0.5 seconds.
If the PID loop take 1 ms to run, and the ‘get data’ function takes 2 ms to run, what is the maximum time that is allowed for the ‘scan keys’ function.
f) If the scan keys function (above) takes the maximum amount of time, what happens to the ‘update LCD’ function.
g) We have a real time interrupt occurring every 100 ms. The system is required to execute 3 functions F1, F2 and F3, each of which can be suspended by the main body of the programme. Show how this can be achieved using semaphores in the following circumstances -
1) F1 F2 & F3 are executed within the interrupt routine.2) F1 F2 & F3 are executed within the background routine.
h) Considering option 1) of question g) above, what restriction must be placed on the execution times of F1 F2 & F3 ?
I) Expanding on option 2) in question g) above. Show how this structure can be changed such that functions F1, F2 and F3 can be scheduled to run at different repetition rates where these rates are multiple of the basic 100 ms timing loop.
j) Explain the role of an Interrupt Pending Register and Interrupt Mask. How can the programmer use these registers to disable an interrupt, and then poll it from a background routine.
k) The serial interface peripheral of the Intel 8051 family of micrcontrollers issues an interrupt when a character is received by the receiver part of the device. Show how this facility can be used to implement a simple cyclical data input buffer. How can this data be accessed by a background routine.
l) The serial interface peripheral of the Intel 8051 family of micrcontrollers issues an interrupt when the transmitter is ready to transmit a character. Show how this feature can be used to provide a serial ‘spooler’ facility that transmits a buffer full of data as a ‘background’ task.

m) The bad news is that both these interrupts use the same interrupt vector. How can we arbitrate between the reception and the transmission of characters ?
n) What is the role of the following interrupt types, and what action needs to be taken (you are invited to invent an application of your choice for each of them).
ADC Conversion FinishedWatch Dog Timed OutExternal InterruptTimer OverflowPower FailNon MaskableSerial Data ReceivedSerial Transmitter ReadyReset

REAL TIME SYSTEMS TUTORIAL QUESTIONS SHEET 6
DIGITAL SIGNAL PROCESSING
a) How is a low pass filter implemented in software. In your answer write down the equation that defines a low pass filter, as well as the pseudo code.
b) How is a running mean implemented in software. In your answer write down the equation that defines a running mean, as well as the pseudo code.
c) The following data is grabbed from an ADC
20 -10 60 40 90 60 100 50 80 20 30 -20
Using a mask filter, determine what the waveform should be.
You may make use of the programme GRAPH.EXE which is a simple graph drawing programme, or use graph paper.
d) What is meant by the terms Least Squares Fit and Linear Regression ?
e) Run the programme SKINDSR.EXE under debug mode (>skindsr /k /t).Display a graph of skin elasticity data, and examine how the linear regression fits a sine wave to the data.
f) Run the programme PHOTON.EXE under debug mode (>photon /d). Capture a trace of the sample diffraction pattern, and using the cursor keys examine how the mask filter is used to smooth the data.
Note - more detailed instructions in the use PHOTON.EXE and SKINDSR.EXE will follow.
g) Briefly outline how the following analytical techniques work -
i) Least Squared Fitsii) Regressionsiii) Fast Fourier Transforms

REAL TIME SYSTEMS TUTORIAL QUESTIONS SHEET 7
System Integrity
a) All real Time Systems should include some form of system integrity test. The minimum requirements are often the following -
1) Use of a Watch Dog Timer2) ROM Checksum3) RAM pattern tests
Describe how each of these works.
b) A system has a real time interrupt routine and a background routine. There is only one watchdog timer. Devise a scheme that will test that both routines are running correctly. Your solution must take account of the fact the real time interrupt occurs once a second, but the background routine takes 5 seconds to complete.
c) A system consists of five functions F1, F2, F3, F4 and F5 that must be run consecutively. Devise a scheme that checks that these functions are called in the correct order.
d) RAM checksums are used to ensure the integrity of volatile data, and to ensure that data is correctly transmitted over communications links. Describe how they are used.

SHORTER LIST OF KEY TUTORIAL QUESTIONS
TUTORIAL SHEET 1----------------------------Key topicsWhat is a Measurand ?What is a transducer ?What is a transmitter ?What is an ADC ?How do the following ADC's work - Sigma-delta, SAR, Dual Slope, FlashCompare them with respect to cost, speed and error immunity
Questions 1A, 1B, 1H, 2A, 2B, 2C, 2E
TUTORIAL SHEET 2----------------------------
What is a Relay ?What is a Solenoid ?What is an Opto-Coupler ?What is a Triac ?What is meant by PWM ? How is it used to position a solenoid ?What phase modulation ? How is it used with a triac to control AC mains ?What is a DAC ?How does a stepper motor differ from a DC motor ?
Questions A,C,D,H,L,N
TUTORIAL SHEET 3----------------------------What is ON/OFF Control ?How does Hysteresis, and a Dead Band stop 'Hunting' ?What is Proportional Control ?What is a meant by 'Steady State Error'What is an Integral TermWhat is meant by Integral Wind Up, and how can it be controlled ?What is a Derivative Term ?What is the equation that defines PID control ?
Questions B, C, D, E, F, G, H, I
TUTORIAL SHEET 4----------------------------What is SPI ?What is IIC ?Briefly describe how they work, including the waveforms that must be generated by a programme that wishes to use these standards.What is CAN-BUS in overview only.
Questions A, C
TUTORIAL SHEET 5----------------------------What is an interrupt, and how is it handled by a processor ?How is data transferred between an interrupt function, and a background function ?An understanding of the timing consequences of handling interrupts.
Questions A, C, E

TUTORIAL SHEET 6----------------------------What is meant by Digital Signal Processing ?An understanding of some basic DSP techniques, such as Low Pass Filters, Running Means and Mask Filters.
Questions A, B
TUTORIAL SHEET 7----------------------------An appreciation that Real Time Systems must perform regular safety checks on themselves.An understanding of the simpler techniques, such as dynamic RAM tests, ROM checksums and watchdogs.
Question A

Real Time Systems Development -- Coursework
Prepared by Eric Goodyer Nov 1997
1) Frequency Determination and Generation
The speedo and associated electronics for a vehicle have been designed for a wheel diameter of 65 cm; but for rough terrains an alternative wheel with a diameter of 75 cm is used. This means that the road speed information derived from the road speed sensor is too slow. Why is it too slow, and how must the input frequency be adjusted to obtain the correct road speed data ?
A typical input frequency has a maximum value of 400 Hz. You are required to design a Real Time System that will accurately read the input frequency to a resolution of better than 1 Hz, calculate the new output frequency using the factor derived above, and to generate that output frequency.
To achieve this you will use a microcontroller (such as a MOTOROLA 68HC11 or an INTEL 8051). Both these devices have at least 2 programmable 16 bit timer counters, which use the processor clock (say 1 MHz) as their clock source. These timer/counters usually count up from 0000 to FFFF and then roll over back to 0; most importantly they can be set to issue an INTERRUPT when this occurs.
The input frequency signal can be taken to an 'INPUT CAPTURE PIN' such that it freezes one of the timer's count and issues an interrupt; alternatively it could be taken to an 'EXTERNAL INTERRUPT PIN' such that on the rising edge of the input signal an interrupt is issued.
The output frequency must be obtained from a 'DIGITAL OUTPUT PIN', driven directly by software e.g.
SETB P1.1 ; SET BIT 1 OF PORT 1 HIGH CLR P1.1 ; RESET BIT 1 OF PORT 1 LOW
The timing of the output frequency can be derived from the second timer/counter register; which can also be set to issue a different interrupt when it rolls over from FFFF to 0000.
The timer/counter registers are memory mapped, and can written to or read from in the same way as any other memory location.
OK that is most of the clues. Now derive a strategy to implement this requirement. In your answer you must clearly SPECIFY what you intend to do, why you wish to do it that way, and how it will be implemented.
Using some form of pseudo-code of your choosing write the outline of the programme that will achieve this objective. Clearly specify ALL DATA VARIABLES and how data is passed between the different functions. At least two of your functions will be INTERRUPT ROUTINES, therefore you will be developing CONCURRENT CODE; clearly detail how the system will handle the concurrent operations, outlining the dangers and how they are to be avoided.
This work is to handed in by the end of week 10 to the School Office.
2) PIC PROCESSOR SIMULATION
This is to give you a bit of relaxation (if that is at all possible in year 4).
The PIC Microcontroller is now one the most popular RISC (Reduced Instruction Set) processors now in use. There are only 32 instructions available on this so it is very easy to

learn how to use it. You will be supplied with a PC based Cross-Assembler and Simulation Package for this device, so please bring in a disk and them over.
Your task is to take them away, play with them, and familiarise yourself with both these tools and the device. As it is so widely used in Industry you may find this exercise of great advantage to you when start looking for work. Write a simple programme of your choice (e.g. monitor some input signals, and drive some output signals based upon the inputs. Use the simulation package to 'debug' the code.
Provide me with a brief write up (no more than 2 sides of A4) detailing what you have done.
Sample code
list R=DEC, P=16C57, F=INHX8M
#DEFINE MY_REG 0X10 ; DEFINE LOCATION 10HEX AS MY_REG
START: MOVLW 5 ; MOVE CONSTANT 5 INTO WORKING REGISTERMOVWFMY_REG ; MOVE CONTENTS OF W INTO MY_REG
LOOP: DECFZ MY_REG ; DECREMENT MY_REG AND SKIP WHEN ZEROGOTO LOOP ; SO LOOP HERE 5 TIMESBTFSS PORTB,0 ; TEST BIT 0 OF PORT BGOTO ISLOW ; IF HERE THEN THAT BIT WAS LOWGOTO ISHIGH ; IF WE SKIPPED TO HERE IT WAS HIGH
ISLOW: BSF PORTA,1 ; SET BIT 1 OF PORTA HIGHGOTO END ; FINISH
ISHIGH: BCF PORTA,1 ; SET BIT 1 OF PORTA LOWGOTO ENDC ; FINISH
ENDC: GOTO START ; START AGAIN
END
Attached to the notes are the circuit diagrams for a PIC based ADC and DAC PCB. The programme than operates this card is called FUSE.ASM.

Real Time Systems Development -- Coursework
Prepared by Eric Goodyer Nov 1997
Assessment Criteria for PART 1
Please take account of both the grid and the brief attached notes.
Engineering is the science of applying existing technology to solve existing problems. This is achieved through the process of SPECIFICATION of the problem, resulting in a detailed list of REQUIREMENTS, which are used to ENGINEER a solution. There is rarely a single correct solution to a requirement, but a range of possibilities.
I am therefore interested in seeing you put forward at least two options in order to solve the frequency conversion problem. You should then select a single preferred option selected with the reasons why you have selected it. 1/3 of the marks for this section will be given for a well-reasoned solution (regardless of whether or not I think that it is correct). I wish you to demonstrate that you have the ability to analyse a Real Time problem, and put forward a solution based upon a rational technical discussion of different options.
However offering only a single solution will still obtain a pass.
Your final script should therefore contain the following sections -
SPECIFICATION & REQUIREMENTSA full description of what the frequency conversion system is required to do. Restated in a format that then allows you to analyse possible solutions.
OPTIONSBriefly outline possible solutions to the problem. A detailed technical discussion or formal solution for all options IS NOT REQUIRED.Select one of your options. State why you have chosen it
SOLUTIONProduce a detailed technical solution with a programme description, and pseudo-code.
Marks will be distributed as follows -20% Specification & Requirements20% Options20% Solution20% Presentation including spelling grammar punctuation etc.20% PIC Simulation work


Criteria Grade F Grades D,D+ Grades C-C,C+
Grades B-,B,B+ Grades A-A,A+
SPECIFICATION &REQUIREMENTS
No Requirements Specification
Preparation of a minimal Requirements Specification. i.e. no more than a simple restatement in a paragraph.
The problem has been considered in some detail, with a minimal Requirements Specification prepared.
A well thought out and clearly presented Specification & Requirement. Suitable for immediate use as part of a Design and Engineering programme
Preparation of clear and concise Specification & Requirements document.Demonstrating a high professional content, suitable for immediate use by a design & development company.
Consideration of Technical options
No Technical solutions offered. No technical analysis of their suitability.
A single technical solution offered. But no alternatives put forward, and no technical analysis of the advantages or disadvantages of the selected solutions
Two brief alternatives put forward. A brief discussion of these alternatives with preferred solutions stated
Well thought out and presented solutions offered, with a brief analysis of the advantages & disadvantages of each. Preferred solution selected
At least two alternatives offered that could achieve the Requirement Specification. With a detailed technical analysis of the advantages and disadvantages of each. The selection of a preferred option with supporting technical analysis
Technical Feasibility
All the offered solutions are impractical, or incorrect
A minimal award, for offering at least one practical solution
The solutions offered are feasible
The selected option may not be the best, but the selection is well supported by the arguments put forward in the . Some consideration of possible failure modes, and run time problems.
The selected option offers the most cost effective, and practical solution to the problem. Detailed analysis of possible failure modes, and run time problems, together with solutions.
Presentation Poorly presented, including poor spelling, grammar and layout.
A barely acceptable report that is at least legible, with no clear structure or layout
A reasonable report with a clear structure. Needs attention to the layout (e.g. the layout is not suitable for the intended audience). Varies in attention to detail
A good presentation
An excellent report, well structured, with clear headings, sub-headings and layout. Representing a professional piece of work