ahpraelh - ia800704.us.archive.org
TRANSCRIPT


AHpraElH
/

ALL DRAWING STEMS FROM ONE OR MORE OF THESE FORMS
ROUND
SQUARE
CYLINDRICAL

The Fundamentals
Art is really having its chance. The urge to
draw seems to have taken hold of many more
thousands today than ever before. It has spread
across the nation. While many are interested in
art as a pastime or hobby, others would gladly
choose it as a means of livelihood if they were
convinced that their ability was sufficient to pro-
vide any real hope of success.
There will always be a certain amount of
confusion about what is talent or native ability
in drawing and what is knowledge of the craft.
Too often, knowledge is construed as talent. On
the other hand, drawing that lacks constructive
knowledge is seldom successful as drawing. The
truth is that we do not see the talent until the
means of bringing it forth has been developed.
That means is a reasonably accurate analysis and
understanding of the laws of nature as they ap-
ply to man's vision.
Drawing is vision on paper. More than that, it
is individual vision, tied up with individual per-
ception, interest, observation, character, philoso-
phy, and a host of other qualities all coming
from one source. It cannot, and to be successful
should not, be anything else. Drawing is very
closely related to the other creative arts, all of
which arc outcroppings of a desire to express
individual emotion, to make the other fellow
conscious of our inner feelings. We want him to
listen or look, and we want his appreciation of
what we have to offer. Perhaps we wish to re-
ceive admiration for our particular accomplish-
ments. Perhaps we have a message we deem
worthy of others' attention. Perhaps we see in
such an effort an enjoyable means of making
ourselves useful, or providing ourselves with the
livelihood that we must achieve in some way.
We who choose art as our medium of expres-
sion should realize that it has certain funda-
mentals from which we progress, just as there
arc fundamentals of literature, drama, or music.
Unfortunately, the fundamentals of an approach
to art have not usually been so clearly defined
for practical study as have those of some other
creative activities. Commercial art is a compara-
tively new profession. However, the leaders in
the field are beginning to contribute time and
thought to its teaching.
Success in the creative fields is always accom-
panied by distinctiveness, something that singles
one out as an individual and sets him apart from
the crowd. One artist can be as successful as
another in his use of basic knowledge, without
repeating another artist's performance. If there
is any way that one man in the craft can really
help another, it is by increasing his knowledge
of the craft itself, not in the particular qualities
of tile man's own work. The knowledge of our
craft must be pooled, as it is in the sciences and
other professions, each of us absorbing and in
turn contributing. It is difficult for a man to
teach without presenting his own work as an
example. But I am certain that in this book, for
example, there is much material which the stu-
dent can apply to his own work without refer-
ence to any particular style or technique of mine.
Suppose we have two drawings before us. One
appeals; the other does not. This one is good, the
other had. Why? I believe I can point out under-
lying reasons that are perfectly understandable.
Strangely enough, the reasons are usually not
found in art books or taught in classes. The re-
sponse to drawing is related to the emotions and
experience of the individual, and is wholcly
apart, so far as I know, from the teaching of art.
Yet I do not believe art can go very far unless
the artist has some sort of an understanding of
this response. An artist can go all his life with-
out realizing why his work does not appeal. Even
successful artists may not really know why their
work does appeal, though they thank heaven
it does.
11

THE FUNDAMENTALSTo understand why a drawing does or does
not appeal, we must recognize a certain ability
that is developed in every normal individual
from early childhood through adult life. The
term "intelligent perception" I think comes as
close as any to describing this faculty. Tt is vision
coordinated with the brain. It is a sense of tight-
ness developed by contact. At some time or other,
our brains accept certain effects or appearances
as truth, and abide by these decisions. We learn
to distinguish one appearance from another, in
size or proportion, in color, and in texture. All
the senses combine to give us intelligent percep-
tion. We have a sense of space or depth, even if
we know nothing of the science of perspective.
We are quickly aware of distortion or deformity,
since the appearance docs not coincide with
what experience has taught us is normal or truth-
ful. Form is registered in the mind, even if we
know nothing of anatomy and proportion, so
that we recognize a face immediately, though
we could not even give a good verbal description
of it. Our sense of proportion tells us that this is
a child and that a midget, or this a puppy and
that a small dog. Intelligent perception includes
a feeling for bulk and contour. We know a swan
from a goose, or a goose from a duck. This trait
is as well developed in those who look at art as it
is in artists. We all as individuals have sub-
consciously accepted certain effects of light Weknow when appearances are consistent with day-
light, artificial light, twilight, or bright sunlight.
Such perception is part of nature.
The minute the spectator sees change of pro-
portion, distortion, change of form, color, or tex-
ture, he realizes that something is wrong. The
cleverest imitation will not fool him. The dummyin the department store window is a dummy to
everyone. We know flesh from wax by the effects
that have previously been registered in our
minds.
We artists cannot ignore this intelligent per-
ception and expect to secure intelligent response.cep *P !Sp
or even favorable response, to our work. Make
up your mind that your audience will react to
your work just as it docs to life itself. Intelligent
perception finds only truth convincing. The lay-
man does not need to know anything of art to
know whether he likes your work or not. Wc can
use all the arguments, alibis, and defenses in the
world; we can explain ourselves hoarse; but we
cannot affect something so deeply imbedded in
human consciousness. If what WO say in paint is
untrue, in color values or effect, the spectator
feels it, and there is nothing we can do to con-
vince him otherwise.
Psychological response goes still further. Every
picture should have some reason for existence,
some purpose behind it. If we can make the
spectator feel that purpose we have succeeded
further in capturing his interest. Not only is
every man living among nature's effects, he is
also living experiences. Life is not only what he
sees but what he feels. Supplementing in our
drawing an emotion that is already within him
secures further response. You can feel emotion
only within yourself, and any emotion that is in
your work must come from vou. You can be sure
that most of the emotions you feel are also pres-
ent in others. That is why we live through a
movie or a play with the characters. To a con-
siderable degree! we like or dislike a performance
insofar as it has appealed to our individual emo-
tions. For the same reason we like or dislike a
piece of art.
When drawing is convincing to the intelligent
perception of the spectator because of its Tight-
ness of form, texture, space, and lighting, and at
the same lime appeals to bis emotions, the artist
can depend upon a favorable response.
Drawing should not be taught by teaching spe-
cialized or individual techniques. What should
be taught is the way to get the form, the con-
tours, and the values, regardless of mannerisms.
How Jim Jones handles a pencil has little to do
with your main problem. How he handles light
on form and contours is what to look for, in case
he interests you. However, if Jim Jones is good,
you can be quite certain he goes for his informa-
tion to the one best source — life itself. He has
12

THE FUNDAMENTALSprobably employed a model or used a camera
to secure intelligent information. lie keeps fak-
ing to a minimum, using his imagination onlv
when lie has no other way of getting a result.
There are certain basic elements of good draw-
ing without which no drawing can really l>e suc-
cessful. I believe these elements can be taught.
So far, I have been unable to find a textbook of
drawing which defines the relationship of pro-
portion and perspective to the study of light and
shadow. Since these elements are so thoroughly
interdependent, this book, which presents them
that way, should meet a real need.
For those who have an understanding of na-
ture's laws, plus vision, the greatest teacher is
nature itself. H the artist has the technique of
depicting the construction and contours of an
object set in space, plus the knowledge of how
light operates on the forms we consider basic,
he has acquired the springboard to his own in-
dividual expression, which, after all, is of greater
value than anything else.
Suppose we ask ourselves what a good draw-
ing is? Let OS think first of the qualities that
make up a good drawing; these point out the
departments of our craft. Anything we draw is
dimensional. It has height, breadth, and thick1
ness. There is a ratio between the three diir eli-
sions, which we call proportion. Then all the
parts within the subject have ratios to one
another, and if these arc correct they add up to
make the over-all dimensions correct. A drawing
cannot be good if it is not in proportion, so let
us call proportion the number one element.
Since the proportions exist in the thing wewish to draw even before we have drawn it, let
us consider how we shall place it within the
boundaries of our paper surface. Let us think of
the paper as representing open space, within
which we wish to place the subject. We want it
to settle nicely within the area in which it is
most pleasing and at the same time most con-
vincing. We look carefully at the subject to
select a viewpoint. We may cut a finder — a
rectangular opening in a card that is in propor-
tion to our drawing area — to sec just where the
subject should go. How big or small should it be,
how close or far away, and where? Let us call
this eiement placement.
When a viewpoint has been selected and a
placement decided upon, we start to draw. The
third clement pops up. We cannot draw an ob-
ject without perspective. Since perspective is the
first main problem that arises, it is the first thing
the artist should learn. An understanding of it
should precede or be a part of every art-school
training. No drawing is real drawing unless it is
related to an eye level or horizon, with the rela-
tionship understood by the artist. The subject of
perspective cannot be covered completely in
this book, but I shall attempt to give the stock-
in-trade knowledge of it that I believe is indis-
pensable. I suggest, however, thai you get other
books, and, while you are learning, learn as much
about it as possible, since it is one of the most
important elements of successful drawing.
Suppose we understand the perspective and
get it correct. What now? In order to set up con-
vincing form in the effect of light, halftone, and
shadow, we must separate the three into planes.
Through the effect of light on planes we arrive
at the solid appearance of the form. We look
first for areas or planes of full light, then, as the
form turns away from the light, we find the half-
tone areas or planes. Beyond the: halftone planes
we find the areas that are in shadow, the shadow
planes. Within the shadow we find reflected
light, which, though a part of the shadow, still
defines form.
After defining the planes, we come to another
element of good drawing, which we may call
pattern. When we deal with values, we become
involved in the tonal arrangement of a drawing.
Pattern is another aspect of composition. Place-
ment relates to composition in terms of line; pat-
tern relates to it in terms of tonal areas.
Here is where creativeness gets its first chance.
We can arrange the patterns of a subject, not
simply accept all patterns as the camera docs.
Nature's patterns may be good or bad in our
13

THE FUNDAMENTALSopinion and within our particular space limits.
Every drawing is an artist's problem in spacing
and arrangement of the patterns of tone.
Composition is an abstract element. Only a
little of composition can be taught. There are
books on the subject worthy of hard study. Add
some to vour library. However, composition
seems to be more or less instinctive. Most of us
would rather make our own arrangements than
be told how to make them.
The best way to arrive at pattern or composi-
tion is to make small sketches, which we call
thumbnail sketches. Make them up of three or
four tones, until you get the feel of the subject.
These may well precede any actual drawing.
Drawing is essentially design, and design is
drawing. One will always be the outgrowth of
the other.
Now, if you have not already noticed it, we
have listed five elements of good drawing, all
starting with the letter P. These are: proportion,
placement, perspective, planes, and pattern. Let
us call them the five P's.
But these are not the only considerations of
good drawing. A while back we were consider-
ing the emotional qualities which every good
drawing should have. If the subject is inanimate,
the emotional qualities will lie in the way it is
presented. If it is a landscape, it may be the
mood of the day, or the freshness and charm of
handling. In a still life it may be the appeal of
the subject matter, the beauty of the objects
themselves. In a figure subject, the emotion may
be revealed in the action or expression of the
figures, or in the story they tell.
Before beginning to draw, close your eyes and
try to sec the subject. Think of what would be
happening. Think of the basic idea or purpose
of the effort. All this may be called the concep-
tion of the subject. Again we need to make
thumbnail sketches, even scribbles, until our
subject begins to take shape.
Remembering that sense of rightness which
we may expect in those who will look at or judge
our efforts, we now need information in order to
do the thing convincingly. We have an idea, we
have made sketches, and we must now proceed
with our drawing. The next important element
is construction. Now we must collect photo-
graphs, make sketches and studies, hunt up clip-
pings, go to any available source for correct
information. If we can afford it, we got a model
for photographs or studies.
There is another element so closely related to
construction that it must be considered at the
same time, since wc cannot achieve the one
without the other. This is contour. Construction
is concerned with the bulk or the mass from the
inside out. Contour is the outer edge of the mass
in space. Construction is based on viewpoint and
perspective. The appearance of an object may
be different from every angle. Therefore we
must establish an eye level to which wc relate
all construction and contour. No subject can be
drawn correctly to more than one eye level. This
is because it is impossible to look at any object
front two positions at the same time. For this
reason, the information we have must be ad-
justed to fit the problem. Two clippings or two
photographs of the same subject will seldom
have the same eye level, or — and this is vitally
important - the same source or kind of light.
The ideal information, of course, is secured by
having all parts of the subject before you at
once, in the same lighting, from one viewpoint
of eye or camera. Beginners especially should
work this way. That is why still life, art-school
poses, and outdoor scenes arc the best subjects
from which to learn to see and to draw. But we
still need the fundamental information on how
to draw them. The student who goes to an art
class knowing something of proportion and per-
spective and how to achieve them will pass his
fellow students by leaps and hounds, and when
he leaves school his work will gain acceptance
much faster than theirs will.
Without a knowledge of perspective and the
lighting of the basic forms, or some idea of
measuring and proportion, the artist becomes
a slave to photostats, projectors, or any other
14

Think of your paper as representing open space, not as a
two-dimensional surface, but as if its edges were the boun-
daries of an open window. You look at all of life and nature
through this paper window.
Attempt either to set forms into this space that exists be-
fore you or to give a feeling of actuality to forms which you
create from a knowledge of the laws of nature. We study
nature for effects and set them down.
This involves dimension, contour, viewpoint (meaning per- r~- >^ *ft ^ ^>x/'spective), and lighting. Only through light, which pro- '^^^^^P^^t^^ Aduces all tone, color, and appearance, can we produce a ^^S? ",'
y^-^Z^K ^-Jtrue image of life. *
;itl ^ / •$£ &\
Really to draw, we cannot think only of any single aspect
of drawing, such as contour, without the other essentials,
but must seek to unify all aspects into a complete and
organized whole.
15

THUMBNAIL ROUGHS
The habit of setting down your mental concep- and try to visualize what is taking place, as it
tion of a subject in miniature roughs can play would be in life. You have no detail to go by, so
a most important part in your development just suggest the material. Think of some kind of
as an artist. The best way is to shut your eyes light. It will come.
16

THE FUNDAMENTALSmechanical means that will substitute for the
knowledge lie lacks. If he traces or projects pho-
tographs instead of drawing his subject, the
result will show Up in his work. Such an artist
will seldom reach the front rank, unless his work
has other qualities that somehow make it better
than the work of other photograph copyists. If a
drawing is to be individual and dynamic, the
artist must use the camera only to provide some-
thing to draw from, as he would draw from a
model. The camera docs not see in the same per-
spective or proportion as do the two human
eyes. Being a slave to the camera usually leaves
the stamp of the photographic on a man's work.
If you use photographs, square them off and
draw, but always draw, don't trace.
I once knew of an artist who was asked to do
a subject away from home, when all his copying
paraphernalia was back in his studio. For once
he was forced to draw. He went through torture
before he had finished. The drawing never was
good. He had never realized how much he de-
pended upon his crutches. He went back home
and started drawing in earnest. The slave to the
camera never really knows how bad he really is
or what his work lacks, until he can see the dif-
ference of real drawing on his own drawing
board. The way he works is a man's own busi-
ness, but it should be pounded into the novice
that his greatest hope lies in his own good free-
hand drawing.
When, by dint of hard effort, we succcd in
getting construction and contour, there is some-
thing else, closely related to both, which we
must be constantly thinking of. That is char-
acter. Character is the thing that distinguishes
one object or person from any other. Usage
brings character to an object; experience brings
it to man. Character is alway a singularity. Pic-
torially, character is a form that belongs to this
subject and no other. It is form in a particular
place, under particular lighting conditions, from
a particular viewpoint, with particular effect. It
is something immediate, caught as if at a glance
— the set of the features at that moment, the look
of the eyes, the mouth, the planes of the face
in that lighting, all having to do with circum-
stances then and there. Here is where the camera
can catch valuable information. But before the
camera clicks, the emotion and appearances all
must be present -felt within the artist and trans-
posed to the model, or existing in the model and
recognized and caught by the artist. Then,
through the whole effort, the artist feels the
thing he wants to express, the thing that makes
liim want to say something with his pencil or
lirnsh. Such feeling has a way of getting into the
technical expression, the handling of the me-
dium. Sometimes the artist is not even conscious
of it, but it still contributes to the success of the
work, simply because the feeling is also con-
veyed to the spectator.
The study of clothing and drapery does much
to add character, the hands, the shoes. The ges-
ture, in correct spacing and drawing, docs its
part. And yet gesture is really construction and
contour, planes and values. A portrait sketch is
about one hundred per cent character, which
means accurate spacing of features, planes, and
contour. Character cannot be achieved without
all the elements of good drawing. Real presen-
tation of character lifts the artist to the top of
his profession.
Finally we have the most important element
of all, which is consistency. Consistency cm-
braces much. Consistency is really truth, as rec-
ognized by that intelligent perception we all
have, artist and layman alike. Consistency, tech-
nically, means that lighting, proportion, perspec-
tive arc so handled that all elements belong to
one particular subject and no other. There is a
consistency of purpose, when all things press
home that purpose. There is a technical con-
sistency of treatment, so that all parts of the
subject seem to be done by the same hand, in
the same individual way. I do not mean that all
surfaces should be handled as if made of the
same material, or with the same kind of strokes,
but that all parts have a unity of approach and
vision which organizes the subject into a single
17

THE FIVE P'S
iPROPORTIONThe three dimensions
PLACEMENTA position in space
PERSPECTIVERelationship of viewpoint to subject
PLANESSurface appearance as defined by light and sha-
dow
PATTERNThe deliberate arrangement of the tones of the
subject
18
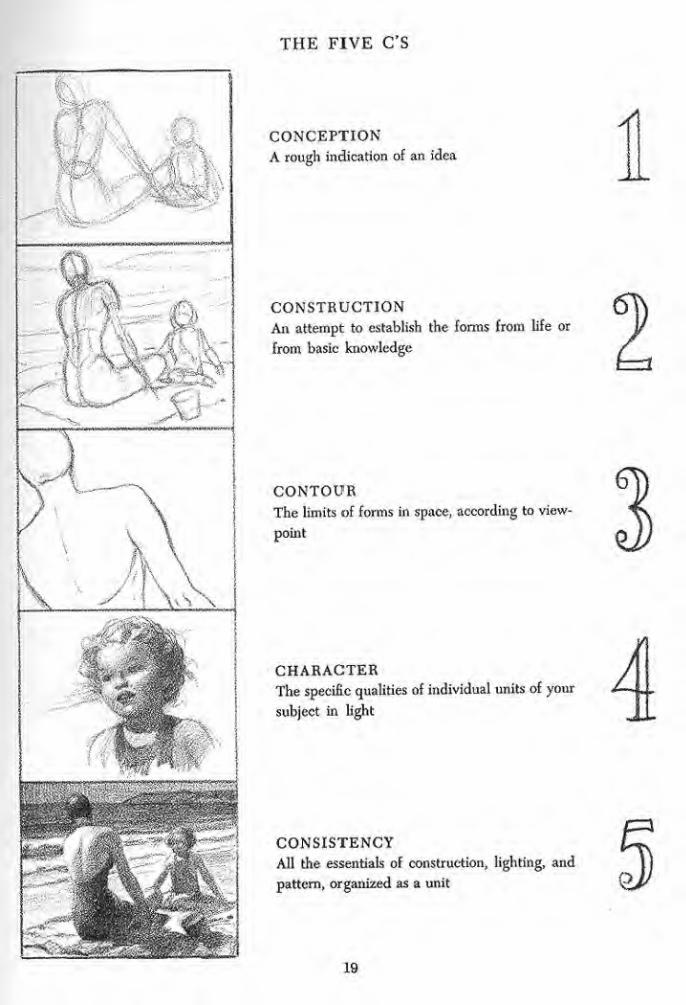
THE FIVE C*S
CONCEPTIONA rough indication of an idea
CONSTRUCTIONAn attempt to establish the forms from life or
from basic knowledge
CONTOURThe limits of forms in space, according to view-
point
CHARACTERThe specific qualities of individual units of your
subject in light
CONSISTENCYAll the essentials of construction, lighting, and
pattern, organized as a unit
19

THE FUNDexpression. I-el us see the artist himself coming
through his work - his feeling about it, his joy
in doing it. If this is achieved, the work will
never he considered imitation, for it is not an
imitation. When we think of consistency, then,
let us think of the unity of all the elements
brought together into one whole effort. The
artist won't go wrong when he can see the big
truths, or what he feels to he the big truths. Tf
he looks for the big planes, the big lights and
shadows, the big values and relationships, he
will do a better job. One can easily get lost in a
lot of little truths without seeing the big ones.
The leaf compared to the bulk and mass of the
tree itself is the difference between big truths
and little ones, or between big vision and eye-
sight.
Now let us take stock of all these elements.
You may have realized that we have now added
five more, all beginning with C this time. They
are conception, construction, contour, character,
and consistency. So we have five P's and five C s
— which should help you remember them. They
are illustrated on pages 18 and 19.
Repeat the names of these elements over and
over in your mind until you memorize them, for
they will always be the guiding lights to success-
ful drawing. We will not succeed with them all
every time, nor will every single drawing be
successful, but we can look at each drawing to
see in how many of these elements the work
qualifies. A drawing fails because of failure in
one or more of the elements; analyzing it to find
the source of failure points to our errors and
difficulties. Concentrating on these elements
keeps us on our toes, and little by little our work
improves. In our intelligent perception we have
a guide to visual right and wrong as good as
our sense of moral right or wrong - perhaps
better. We can be taken in much more easily
through our cars than through our eyes. Have
the courage to believe in what you see, as you
see it, and to draw it that way, even if Jim
Jones sees things another way. That is what
makes each of you an artist. Art is certainly a mat-
AMENTALSter of equal rights; nobody has a corner on it.
In organizing the material in the book, I have
placed perspective first, because I believe it is
easier to learn to handle line alone before get-
ting into the complications of planes and tones,
which are meaningless without dimension and
perspective;. In art schools, a subject is usually
set up before us, and we simply have to draw
what is there. But when we are out on our own,
the subject is usually not there. It is not too hard
to draw a cube that is set up before us. But what
we must learn is to draw an imaginary cube at
any eye level, to fit into any set of circumstances.
The ini[>ortaiice of this will be understood when
you know that almost any object may be drawn
in perspective from a cube or block, since that
represents the over-all three dimensions of any-
thing we draw. Even a sphere fits compactly into
the cube. The cube or block may be thought of
as the box that will fit around anything in the
universe. Knowing the proper way to draw the
block leads us right in at the front door of per-
spective. The building is the outside of the box.
The interior is the inside, and we must know
how to give it dimension and measurement,
when those are needed. They usually are needed,
if only to keep the figures on the floor, in propor-
tion to the walls, doors, and furnishings. When
buildings and figures occur in the same subject,
we need dimension and scale.
It is simple to place a figure at any given spot
on the floor or ground plane, in correct propor-
tion to other figures, but over and over even
high-ranking artists fail to achieve this, and the
result is a bad job. as even John Doe can see.
When different eye levels appear in a drawing,
the artist has probably failed to reconcile the in-
consistencies in the various pieces of copy from
which he is working, lie may not even be aware
of the inconsistency, but the people who see his
work will have an uneasy feeling that something
is wrong, though they do not know what. When
all is right the public really clucks over a thing.
When it is wrong they are usually just silent.
20

EVERY DRAWING HAS A HORIZON
Anything we draw, no matter what it is, is af-
fected by the eye level and viewpoint from
which we draw it. The eye level is the horizon
of the picture. It may be above or below the pic-
ture plane or may cross it at any point. We must
know how to relate all forms and their contours
to an eye level. In a photograph, everything is
related to the camera lens in the same way, but
the artist cannot depend upon the camera. He
must know perspective.
21

THE FUNDThe successful artist must keep them clucking.
T personally believe an artist can develop a
sound individuality in his work only if he knows
how perspective, light, and shadow truly affect
the basic forms. Then it is not too difficult to
perceive the relationship of all other forms to
the basic ones. The artist must know the differ-
ence in the quality of diffused light and direct
light and not mix the two within the same sub-
ject. So many artists get involved in tricky tech-
niques, which are well and good if all else is in
order but can cover up just so many sins and
no more, Technique alone will not satisfy that
intelligent perception of John Doe's, and if we
want him to write to the magazines and say that
he thinks our work is good, we can't depend on
technique. Form is form, and in any particular
lighting every plane in a picture must have its
relative value, or the whole fails to convince.
The wrong value means that the angle of the
plane is not what it should be, and therefore
the form is incorrect whether the contours are
right or not.
Let us consider for a moment what made the
great artists great. In almost every case they
were masters of form, which means that they
had to be masters of light on form. Light and
form were no different then. The artist of the
past had no clippings or cameras. They had to
find out from life. By observation and study they
learned truths which arc still staring us in the
face, hut which we do not know or see, because
we think an F.2 lens is going to take the whole
heavy business off our shoulders. We actually
have twenty times the opportunity to produce
masterpieces that they had. We arc not both-
ered with making materials, or sketches, or
studies from life. The truth is we are just not
bothered. We are neither craftsmen nor con-
tributors. The only legitimate excuse the artist
of today has — and it's worn thin — is lack of
time. But where is lack of time taking us?
To know is the surest way in the world to save
time. An error in perspective can use up more
time than any artist has. Bad planes and incor-
AMENTALSrect modeling can ruin a man's chances so fast
that the time saved may be spent pounding side-
walks. When a painting or drawing stands as a
great thing down through the years, with gen-
eration after generation of new spectators, T be-
lieve there is a positive reason, which means
more than the name signed on the canvas. Those
artists were great because they came so close to
the truth of vision, because they had great un-
derstanding of nature and her ways. To stand
before a Franz Mais is an experience. It is life,
brought down through the years to you. The
woman in the white cap and frilled collar is a
living character, and we see her before us just
as Hals saw her. She almost speaks. Through his
vision and mastery wc are living in a time before
we were born. There is nothing wc do not com-
prehend. No explanations are needed. We need
know nothing of art to feel and appreciate the
greatness of the work. I cannot believe that
Fran/ Mais will ever be outmoded. His works
will be masterpieces as long as there arc people
to sec them and the paint and canvas hold to-
gether.
No man can successfully draw or paint a head
until he can render the surface of a sphere in
light If he cannot feel the relationship of theorounded forms of the head to the sphere or egg,
the rendering will not have solidity. In the ma-
terial in this book wc apply the light on basic
forms to the figure and the head. For a little fun,
we even give solidity to comic drawings. It is
possible to make even a comic seem to exist in
light and shadow, with nothing but imagination
to work from.
The time that you spend practicing on essen-
tials will not he wasted. Suppose you were asked
to draw a series of columns, spaced 10 feet apart,
set on cubes measuring 5 feet each way, with
some figures standing at the second and fifth
columns, and the bases of eight columns going
back in the distance. This is very simple if you
know perspective. Which would take the most
lime, to hunt up such a building, take photo-
graphs, develop films, make prints, and set the

EVERY DRAWING IS A PROBLEM OF DIMENSIONS
H TO*
m idpoint- ffltc/d/epoitdof/eetp/d
OHc/coid/L /icax&afoca/ec/
povdof/k$te 6e£f&£.
$km dratovtavvm ufe^
findwhereflcesezvodffa//
o/t mode/or copy.
dJ&en alfpoctt/f c/tec/c oh your dratoittf,
you fc>toto ineprvporhons are correct.
23

SIDE-OF-THE-LEAD STROKES
fat, x<j~t^j&*y- /f^^^u^^-^^ Y^j***
'
.
,
:/*!
——:
•-
J-.fc&
• .
^v
24

assembly on a projector, or just to sit down and
draw it? Almost daily, lack of knowledge of sim-
ple perspective can hack away at an artist's time.
The amount of motion and time which you save
by knowing how to solve your problems far ex-
ceeds any saving by the projector. The more you
lean on your crutches, the more your strength
ebbs, and soon you cannot gel along without
them. No artist can ever save time by not being
able to do for himself the things his camera does
for him. Never let that camera get beyond being
a source of information. No lens in the world
is a real draftsman; that skill belongs to the
artist himself.
Line drawing and painting actually simplify
and stress the basic relationship of the forms.
The leg or torso is actually better as a cylindrical
shape, with just enough anatomy to make it con-
vincing, than as a photographic replica of every
hump and bump of the muscles on it. Wc must
learn to subordinate much of what the lens sees.
We arc really concerned more with light and
shadow and bulk or mass than with what the
camera can give us. ['holographs with several
light sources, which is the way most commercial
photographs are made, defy every principle of
good drawing. There is no authentic form in
them; it has been broken up in meaningless light
and shadow; and good drawing is essentially a
statement of form.
I should like the young artist, as he starts
working on the material in this book, to consider,
before discounting what nature has to offer,
what it would be like to be blind. Think what
light and form really mean to us. Things that
seem so commonplace are really things of beauty.
Strangely enough, when they arc well drawn
they seem even more beautiful, for they have
been set apart from the endless multiplicity of
nature. A good drawing of a thing can be more
interesting than the thing itself, for it concen-
trates attention on aspects winch the layman
probably would not see. Flowers in a vase are
beautiful, but seen with the painter's vision they
can be even more beautiful. A head is just an-
THE FUNDAMENTALSOther person to the layman until it is beautifully
drawn or painted.
We have no lack of material. Plus all the
things in nature, wc have all the man-made
things thai have become a part of modern life.
Wc have thousands and thousands of effects, so
many worth setting down, so many worthy of
study. The artists of today will all have had their
vesterdav before too lon«. Some of von students
will be in their places. You will be living in the
same sunlight they lived in, with all of nature
now yours instead of theirs. You will live among
new names and faces but with the same kinds
of people doing and thinking much the same
things. To appeal to those people you will have
to give them credit for intelligence, for aware-
ness of life and nature. Crudity and distortion
will not be any more appreciated fifty years
hence than they are now. If you can achieve
truth, no man can discredit you.
I cannot believe that art devoid of funda-
mentals, structural knowledge, and some sort of
beauty, can endure. Since we as human beings
cannot do otherwise than live with nature and
her laws, I wonder if art can do otherwise. I
believe that the artists of the future will know
much more about nature than we do, and that
the knowledge will lead to greater art. Increas-
ing understanding has led to the principles we
use now. I.ct us attack the material before us
with the feeling that additional knowledge can
bring only added power.
There is little about pencil technique that can
be taught. But it may be a help to the student to
understand sonic: of the things his pencil will
do. I have always favored a soft pencil and do
not like to use different grades or hardnesses
within the same drawing. I like a large lead,
sharpened to a long point, capable of standing
considerable pressure. The point may be laid
nearly flat on the paper by holding the pencil
under the hand and vising the arm and wrist
rather than the fingers for the stroke. The tip
of the point may be used for lines, such as out-
25

Lsooddram/caPef&tf aslilt a searclc
forsteeple banc forms.
w$A Ikebaucforw eslaklcsfted.coe
can IJte/ikucldok Utesurfaceforces.
ve> strtceotz/u /tc?k£ can.
deface form, ajemuslsludu
carefully conallkefloki
does asdlrareIsacross
f/ce surfaces, Ho&tt&lke
areascflio-fd, kalffoae
czttd skczdoco.
ffsHe fr#e lurns atoay from Ike UqklifproducesUzlfvotte czitd
sJuzc/oco. %e lu?ldtcess ordarknessofficekaf$oJcelrlkeresuHof
lkc& <z#&£offkeplastemc f&ftztoft zo Ike direcliott ofIke fdfd.Shadows occur otilu tokett Ike udkl'c&wa£'r&uc/c Ha?t>faue
.

THE FUND
lines or contours, and the flat side for shading or
grays. For the effect, see page 24. The drawings
in this book wore done with the Eagle Pencil
Company's Prismacolor Black 393 to obtain good
blacks for reproduction, since all dots on a line
cut must be black.
Different papers give different effects. The
paper used for these drawings was Coqnille
Board, a grainy paper meant for this kind of
reproduction.
There are also carbon pencils, crayons, char-
coal, anything you want. Drawing is drawing in
any medium; select the one you like best. You
can buy large pads of layout bond paper, which
is not too thin and transparent. Get a box of
kneaded rubber, or the plastic type of eraser.
The pencils I have used do not erase readily, so
for a while it might be best to stick to the regu-
lar graphite or lead pencils.
My only suggestion as to the technical use of
the pencil is to try to avoid scratchy, small, and
thin-lined strokes for your grays and blacks.
They persist in looking amateurish and fussy or
furry instead of suggesting an area of tone.
To do the perspective problems, you will need
a fairly wide drawing board, a T square, and a
triangle. You need not get a complete set of
drawing instruments unless you intend to ink in
your drawings. A pair of dividers and a pencil
?\MENTALScompass will suffice. Any ruler will do when
working to scale.
The problems of lighting on form can best be
solved by working from life. If you must work
at night, any artificial light on your subject will
give you the effect you want. However, keep the
light simple, using one source. Draw anything
you wish for practice — some old shoes, some
pottery, some vegetables, fruits, pots and pans,
bottles, bric-a-brac, toys, books, dolls, anything
at all. It is all form with light on it, and all pre-
sent interesting problems.
To keep your practice from getting too boring,
perhaps one evening at perspective can be fol-
lowed by an evening of drawing from life or
copying some of the drawings in this book. Try
once in a while to draw real people — some
member of your family will pose for you. Spend
an evening with comics — they are fun to do.
There is plenty of material all about you. Do not
try to make masterpieces, just sincere studies.
Save your work for later comparison.
To learn to draw is to draw and draw and
draw.
Note: If you wish to copy any of the drawings
shown here, for practice, you may do so. How-
ever, since the book is copyrighted, no part of it
may be copied for reproduction or sale.
27
:
•
/here is Jtiddeteperspective
lpc everymLKQikazcoecut/I
ewer draa;?/ar-ae orswta//
.
28

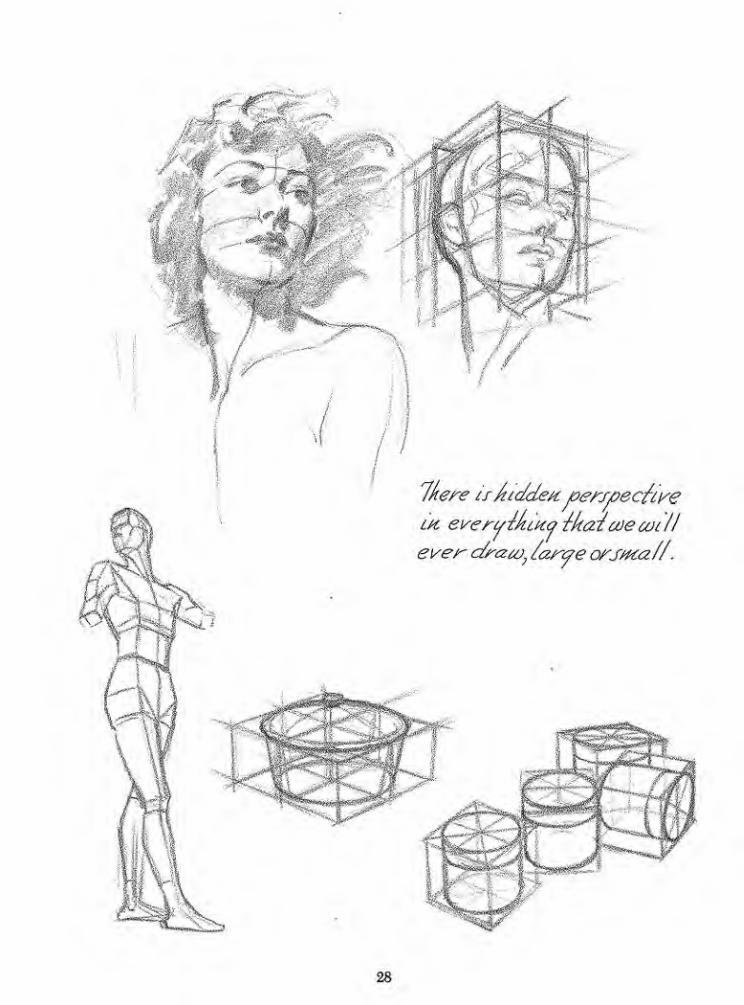
Perspective the Artist Should Know
The pages of this book that are devoted to
perspective should not be considered a side
issue by anyone who is seriously interested in
drawing. It may be hard to see the connection
between planes and vanishing points and the
kind of drawing you wish to do. But there is a
definite connection, for anything you draw is
related to a horizon and vanishing points, even
though it is not always necessary to draw mem.
If you intend to make a living at drawing, by all
means learn these things now, and do not have
them bothering you and your work for the rest
of yoxir life. Even if you are drawing only as a
hobby, the knowledge will enable you to do
much better work. Remember that anything can
be drawn within the cube or block. Even though
you don't draw the actual block, you must feel
the perspective relationship of the figure or ob-
ject as it would be within a block.
Experiment with real drawing by drawing a
thing first with blocks. See how much more real
construction you get into it. You will later see the
tie-up between lighting and perspective, which
arc much more closely related than the average
artist realizes.
Art students arc as prone to underestimate the
value of the study of perspective as music stu-
dents are to underestimate the need of practicing
scales. Both foundations are necessary. In draw-
ing, the eye is as important as is the ear in music.
Musicians who play only by ear are never as
accomplished as those who can also read music.
Similarly, an artist can draw by eye alone, but
he will never draw as well as one who knows
fundamental perspective. The handicap is un-
necessary in either case. Since the knowledge is
available, why try to struggle along without it?
The difficulties of not knowing are always much
greater than the effort of learning.
The problems in this section are not child s
play. They require considerable application. But
the time and effort required to digest this ma-
terial thoroughly will pay dividends throughout
your whole career. Although many of the im-
portant principles arc presented here, spaee ob-
viously does not permit complete coverage in a
book of this kind, and I cannot possibly answer
personal letters on problems of perspective. I
urge you, therefore, to supplement this book
with some good texts on perspective. A simple
one to understand is Perspective Mode Easy by
Ernest Norling; you will find others in book-
stores and art stores. No subject is more worthy
of the artist's study.

THE SQUARE AND THE CUBE
Let us start with the beginning of all good draw- can construct nearly all other forms in perspec-
ing, proportion and dimension. The square with tive. The square is a basic means of measure-
its equal dimensions is extremely important, as ment. We must first learn to divide the square.
the following pages show. From the square we
dk okerre Utai icuo dcaoosKz/r cai/t'focate && ^^d/e fcxtttofM&Sfctam.
%ck a. AonzortJa,/'artd' <zperpettc/icu/as' line td'ijee fan<eppifttofc^fS-
irtq wt/fdivide a square Coraju/ rec-daKf/e) ittto four eaua/rrzrtr from
t&is, /tazMXf ^Hfs &<//develop, first cue construct tke cu£>e fnm tteSfttOK.
HORIZON LINE. vpr
diaconauonthejquare; flat j-quare: the. divided cuSE
fiKceat/objecirwl//fit into* ^toeJKU.ft /chow £o«j to co*structft& ccd?e or t>/oc£
ul perspective. tko*-i*tf dice overaJto'txteHSiox.r ofany object, we. constructa t>ox
tokeck toouft/ tit around tt. 7/cen &e iul/d4ke object codtcin d. £v*K routtf'objects fi6
ttc£ cute or b/ocA. 7o c/nuu tie cube, coe #cc<st esbabf/s/c <z /contort forec/e/ere/Jcw/
loo vasccfkcuofowls fit/sides ofttoe ctif>es recede toYsurct ttazre vatuskctujpoi*h.
The drawing above shows the square laid flat on
the groxind. All ground plans begin with this.
We can now build the cube on the square. The
sides of the cube arc divided like the squares at
the top of the page, but now arc shown in per-
spective. In the drawing above there is some
distortion because the vanishing points had to be
placed a little too close in order to show them
both on the page. Try drawing some cubes cor-
rectly.
30

THE CIRCLE AND THE CYLINDER
By means of the divided square and the cube, ellipse quite accurately by using the divided
we can draw the circle and the cylinder. We use square drawn in perspective. This is valuable in
a compass to draw the circle. The circle in per- drawing all round or cylindrical forms,
spective becomes an ellipse. We can draw the
whose cor/ters io&ck $te xect/d/e o/Ace foarsic/es. S&jb&scocaa&Mteifa/Acvat/ &e£cveet< Atzw/B> coe castjudae ahocci cohere iJce arcof-^cecirc/eccczs across vke c/taaort&Js, coAcc/c Ace/jfS urw c/raa) ^Ue e/Z'ose.
HORIZON vpr
TO VANl^m NG Poiajt
THE CIRCLE IN PERSPECTIVE
THE CYLINDER I fsJ PER/PECUVE
To draw a circle in perspective, we first lay out
a divided square. We draw the arcs around the
four sides, making the arcs cut just short of the
halfway points between A and B. Now by draw-
ing ellipses on the top and bottom sides of a
cube or block, we construct a cylinder in per-
spective. The vanishing points for a small object
should be spaced wide apart. For large objects,
they can he spaced closer.
31

THE CIRCLE AND THE CONE
The cone is built on the circle In perspective, built with the cone as the basic form, such as
and the circle in perspective is of course con- the wine glass, horn, etc.
structed within the square. Many objects are
lkq points tftufl be locatedOK^ttas JtZHcs {reefy /ere/'korizost
.
Later you will draw freehand, but at first, when rect perspective. So get a T square and a triangle
you are learning the basic principles of drawing, and make all the lines true and straight. Careless
you will always need a straight-edge to get cor- drawing is the sure sign of the amateur.
32
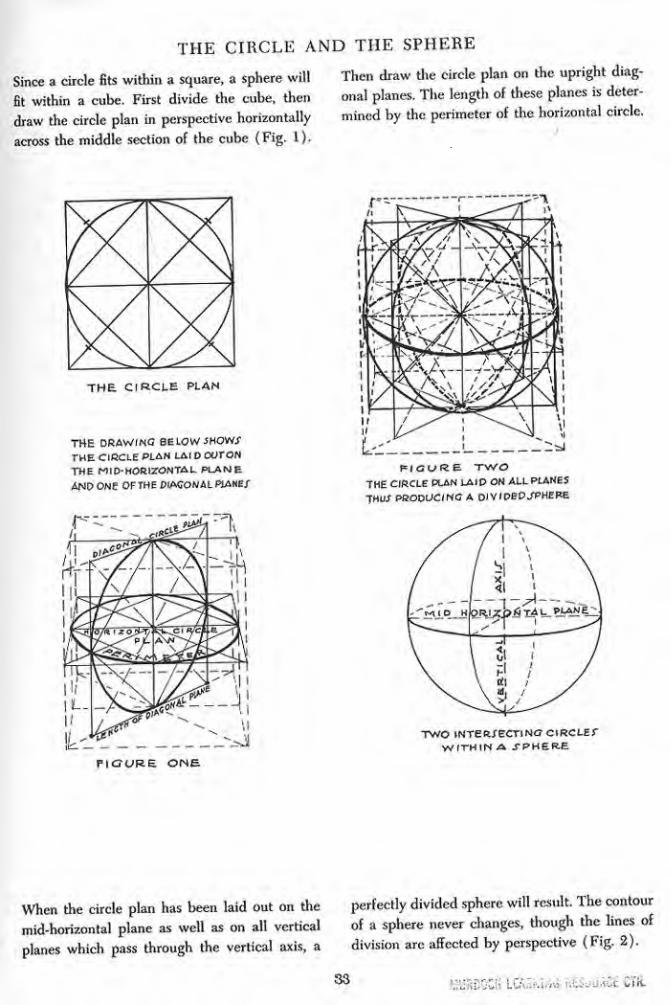
THE CIRCLE AND THE SPHERE
Since a circle fits within a square, a sphere will Then draw the circle plan on the upright diag-
fit within a cube. First divide the cube, then onal planes. The length of these planes is deter-
draw the circle plan in perspective horizontally mined by the perimeter of the horizontal circle,
across the middle section of the cube (Fig. 1).
THE CIRCLE PLAN
THE DRAWING BELOW SHOWSTHE CIRCLE PLAN LAI D COTON
THE MID-HORIZONTAL PLANEAND ONe OF THE DIAGONAL PLANE/
VIGURE. ONE
FIGURE TWOTHE CIRCLE PLAN LAID ON ALL PLANES
TMU/ PRODUCING A D'VipEDJVHERE
TWO iNTeRXeCTiNO CIRCLETWITMINA SPHERE
When the circle plan has been laid out on the perfectly divided sphere will result. The contour
mid-horizontal plane as well as on all vertical of a sphere never changes, though the lines of
planes which pass through the vertical axis, a division arc affected by perspective (Fig. 2).
33 KUR90CK LKr-ftiftu iffiSi/USCE CTfc
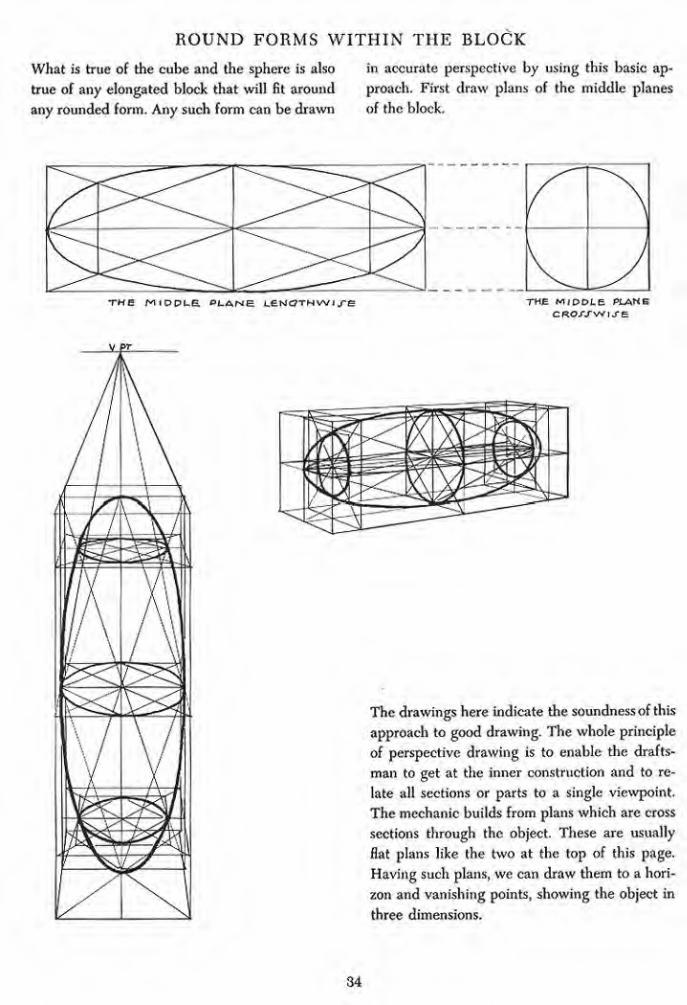
ROUND FORMS WITHIN THE BLOCK
What is true of the cube and the sphere is also in accurate perspective by using this basic ap-
true of any elongated block that will fit around proach. First draw plans of the middle planes
any rounded form. Any such form can be drawn of the block.
THB MlDPLE «>£-ANE L6NOTHWI/E THE MIDDLE PLANECRO//WUE
\>>\ \S"
kEx'-^
'/A i><r^-""" >*$sxTy
A ii
\ /
f^. v Si /#p^%i^
\2SJ
The drawings here indicate the soundness of this
approach to good drawing. The whole principle
of perspective drawing is to enable the drafts-
man to get at the inner construction and to re-
late all sections or parts to a single viewpoint.
The mechanic builds from plans which are cross
sections through the object. These are usually
flat plans like the two at the top of this page.
Having such plans, we can draw them to a hori-
zon and vanishing points, showing the object in
three dimensions.
34

THE BLOCK APPLIED TO ROUND OBJECTS
The circle and the block can be applied in any objccl in any position within your subject,
drawing many different objects. If you can draw Draw the block to equal the height, width, and
the block in perspective, you can draw almost depth of the form.
Jhzas Me e//cases -mgeAartJ
7Ae c/t's/r /sa f/a£ i/emort o/Mg> cy/ix-
afe/i Jttce /Y /tar /ua/ty uses?tfifive//
c/raw/t ib/t^any ol/ec/a/a/tfy/etr-
35

HOW TO CONSTRUCT THE BLOCK CORRECTLYIn case you are having trouble in drawing blocks
correctly, the drawings below will help you. Re-
member that ellipses narrow as they near the
eye level. Studying a real object will help you
approximate this. The perspective depth* of the
top side of the block determines the perspective
depth of the bottom side.
ftoaj to co/*sh'acfa.£>/oc£: ofe/ve/t
or c/estrec/ afaeeHf/otes
Wx^ Tsfuare axt/a feaxf/e.
ErraSus/t <z Aortzo/t or eye/ewp/.
Dtzzco aperpexc/icu/aj'G). &/aJ//j£
AetyAJ everfto/t/^A o/6/ocA ®o/e$eperpe/tdicu/ar. %sd?p$co/^ofike Topst</ewfersoeci/'ve ®iro/>-
Ilokq,/* /Jtraua/c mejeoctds es£tzt>-
/j£flt'K3s(3)0"d®/o &&ra/t/j-#M/v/*tz'
<z£or&. /faMdr/2t&&eo$cerukef&t$te
ortfervtrtazttx/.b/^ks/r ftC6Ht£>erj:
36

BLOCKS OF SPECIFIED DIMENSIONSceding page. In the one on the right, we estab-
lish a measuring line touching the near corner,
then carry the units to the base line.
Here are two ways of constructing blocks of
specified dimensions. In the drawing at the left,
the dimensions are laid out on the middle line
or axis, using the procedure shown on the pre-
MEA.TUR.IMCj LINELAV QUT IN UNlTj* AND PROJECT TO ©A/E LINE
UNIT/ ARE PftOJecrCQ TO THE FRONT
PLANE OP THE BLOCK
When you can produce a block of specified di-
mensions, you have the basis for drawing any
object accurately. You are urged to practice this
until you can do it, because it is a procedure that
you will use for the rest of your life. We pro-
gress from this to other methods 01 measurement
in perspective.
37
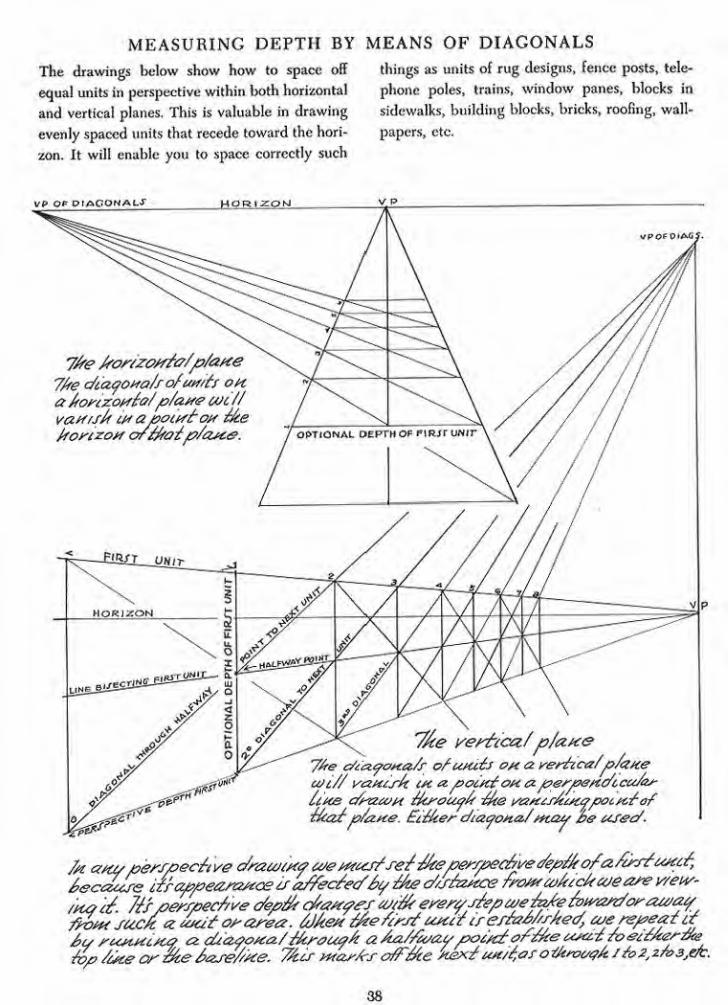
MEASURING DEPTH BY MEANS OF DIAGONALS
The drawings below show how to space off
equal units in perspective within both horizontal
and vertical planes. This is valuable in drawing
evenly spaced units that recede toward the hori-
zon. It will enable you to space correctly such
things as units of rug designs, fence posts, tele-
phone poles, trains, window panes, blocks in
sidewalks, building blocks, bricks, roofing, wall-
papers, etc.
Vf> OP DIAGONALS HOP U-ONJ VjP
7&e c/ttzfofttz/s ofunits oh a yerh'ca/f/GMewi// vatttj-k UC & &oifctott aper&e/tc/Lcu/a*-
zk<2£p/atte. Ei$cer c/iaaona/**tay Se usee/*
/h attuperspt
£>t/ rustxi/Z? & cL'aaona/'tttrauak a^/^^ypoi/d^Me^^^fo^Aerz^e
38

DRAWING TO SCALE
Every artist should know how to draw to a scale.
Scale drawings usually require the division of
vertical and horizontal planes into square feet or
square units. By the plan shown here, we can
quickly divide such planes into squares of any
dimension. Here we take a unit of 10 by 10
feet. We measure with this unit as far back as
2500 feet, which is as much as you will ever
need. This is very valuable to you.
//ce c/o&eo1 lines /ttd/ctzie o'taaotta/f ajtt/
ju&sefuex£ dfotriwtJ' ofMe /araerjpaces
3F*onBOP'
tie ttfearusjtee/ti
doubles n/Aettefer
a c/iaaoxa/is ex-
tended fromAfffroxafi eacA "B*
peint OH ttt£ tt-
sectit«f fine, to
fwe around'fine.
ffow fo scale a verticalattcfa fror-fzortfai &/<zjte
tOe&tusf first effaAfisf: a ^erfcafancfa Aowzontaf measurcrta un&}
foucAiru? eac/t ofAer- atrijAf cznaf&s, {pointzero). On i>ofA ti'neJ cue
ctzy Old /O eau<zfunits to represent/o feet. fne size of& uk.it is
optionaf fneHorizon ir tAen setatany desired'neioAt on fne yerficaf
Measuring /ate. &Je tAen esfv^fyA a t^ariisMina /oointanuwAere on fne
horizon.. ConnectpointsOtftandA foVP fstaMisfc optional'cfepfft or'fke
firstfoot 7Aen drawfinerfwnta//footuKifrtowardt/fi 2>iafonaJ offirst
/ooffOC) tnar/rs otf'verficai decisions offoofivufs andafro fne firstfo
ft. unitafpointC fiiayona/'A fnroafft B'fonfne ttiseetinf feke)JoD,#&*As
o/fzoff.Ofitffceffvuxdttne. HenAS2to£cs -40 -ft,andsoon fo infinity*
39

DIAGONALS IN SINGLE-POINT PERSPECTIVEIt is very important to understand what is meant perspective is shown below. Although we do
by a single-point perspective and two-point per- not need all the diagonals for purposes of meas-
spective and how the planes and their diagonals urement, we should know how to choose the
operate in each. The basic plan for single-point ones we need.
V.RO^DIAGS.
of vcrticalA plane;
7fte&asica>orfakap/aH o/ftKofe -poikt
r
petsoec/ive
ok -a
OiACS.^OFHOQlZOMTOLPIANRJ*
orCMACJ
— -C-*^- "V- -""Of HORIZONTAL* "
_. — "*" *• PLANE/
\V,\
\ "vl>
Single-point perspective exists when the \ \y 5
base lines of the objects or planes in the
picture are parallel to the horizon and at
right angles to the line of vision. This
means that the objects we are looking at
are straight in front of us, not at an oblique
angle. Obviously lines parallel to the hori-
zon cannot converge to a vanishing point
and therefore have none. In single-point
perspective there is only one main vanish-
v POF OtACS.
OFVERTICALPLANE/
ing point for all receding parallel planes.
It is usually located at or near the middle
of the horizon. However, since the diag-
onals of those planes are oblique lines,
they vanish in two points. Diagonals of
horizontal planes vanish on the horizon.
Diagonals of vertical planes vanish in a
vertical line drawn through the main van-
ishing point.
40
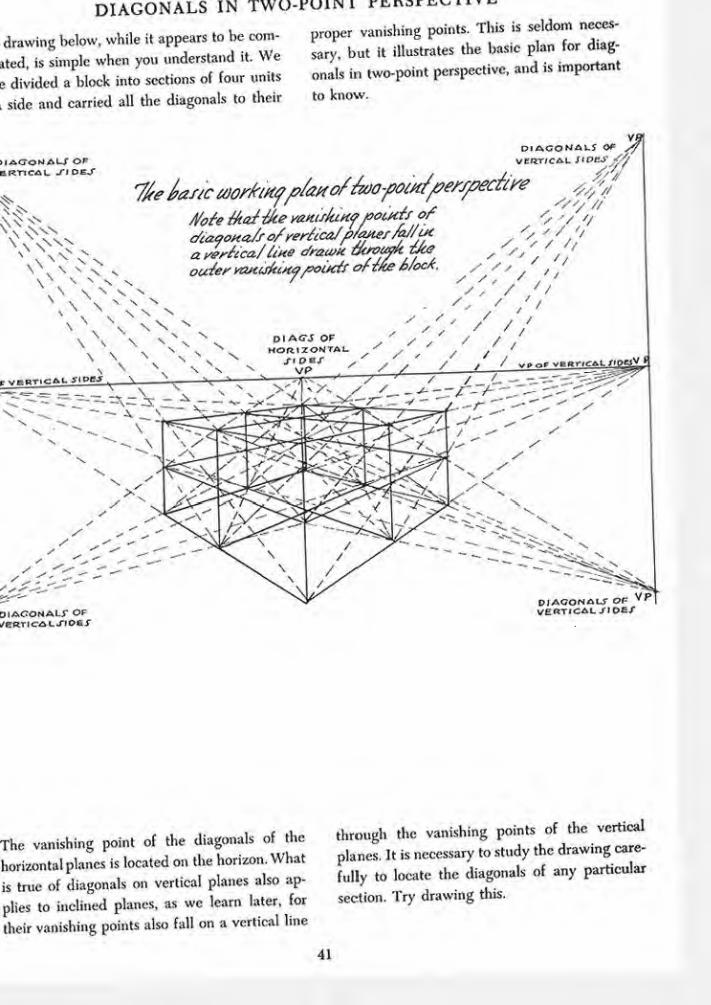
DIAGONALS IN TWU-JPU1WI ™«^'""drawing below, while i. appears to be com- proper vanishing points Tte is *"to ™"*
Z is Simple when yon understand it. We sary, bu, it illustrates the bas.c plan for dug
; dtided a blck inJ sections of four units onals in two-point perspective, and h .nvportant
. side and carried all the diagonals to their to know.
iiaconaU orBRflCAL S\ D6J"
\N V N N X
\ \ s N
rwiBTicai stars
diagonal; of
vcrt/cal $xon&jCty
7fo tasteworh^f/^/apto/^ofo^erjped^e ^^/Vote fad-ike yanvkiHf/^tnts ofJtaqoHo/s o/reriic^l/fJtef/<f//ut *, ' '.
'/
a v*rhca/ii** draw* &K>ffktfce , ">, ' / '/oftkeb/oc*. / // / / /older vzutifktKG/x>Mf
OIAOONALX OF/eRTICALJ-IOBf
VERTICAL .TIDE/
The vanishing point of the diagonals of the
horizontal planes is located on the horizon. What
is true of diagonals on vertical planes also ap-
plies to inclined planes, as we learn later, for
their vanishing points also fall on a vertical line
through the vanishing points of the vertical
planes. It is necessary to study the drawing care-
fully to locate the diagonals of any particular
section. Try drawing this.
41

EQUAL SPACING OF SOLIDS IN PERSPECTIVE
By the same method of measuring depth by row of objects that are constructed within equal
means of diagonals we can also repeat a solid blocks. Remember that all objects can be drawn
block, as shown below. This is valuable in draw- within blocks,
ing buildings of repeating dimensions or any
7/ou may use Ste c/iaooHaJf of ike wAo/e
side(AAAA), orJtaffofLt(BBAA),prodicc-
Ifta ike same resaJJ ecl/cer toau.
\^ \
\ \
N \ \ \ \
\ \
\ \\\\\
: d&aeoaa/ ofa*tu scJs of-ttte i/ocA tgatfje used'forrepeattttq Jeptk pneasurefKetcfj\ AS and CO ewe siat-
:l£r dcaaottaJj ottpas-affeIpian.es of ec?a<z/Size
,
VP Of DIAGJ"
OF WHOUG/IDE
42

UNEQUAL SPACING OF SOLIDS IN PERSPECTIVE
Measurement of unequal depths in perspective an angle can be attached to any object, thus
becomes very simple if we use a vertical and a setting up a scale of measurement for all van-
horizontal scale. The scale is a right angle at- able heights and widths,
tached to the near corner of the first block. Such
tfou) /o c/rato caters ofyarta^/e
C?weafurt*ra point ir e/~fa£//jke</
m orc/er- fopro/ecc **teofure»fetf/s
/ro**€ tke korexoKta/Jca/e to eke
tare //*te o/ike cuiits. ft skou/d"
£>ep/aced'near tke vertical'scale
QH tke Aofi. ZX>*€ <ZS skoH"W -
VP
\(au oatikesep^ra.ie co/dtkf of $ke oaccAr ott &t£sA<Jr/2rosi6a,/ Ii^fe.
Cfk/f is -ike kortzottlaf1
Jca/e)
//out lo draco varia/?/e jpaci#c?f coit/tcx asctta/e h/ac/r or ccttit
/atf out attd'jorajeci a//ttfearuretttett/s /r-o/K
A" Z£e n*ea~ruruta-poiwf care £>e-
ptace c/6> /ike r£f£rfor/ef/o/t/ee
_ yer£tca/scaje,&cc£ c/ose.
MOKIXOMTAL J'CAL.I
VP
.Measurements for all spaces may be set by They are then projected in perspective in the
choice or taken from a plan or scale elevation manner shown in this drawing.
and laid out on the vertical and horizontal scale.
43
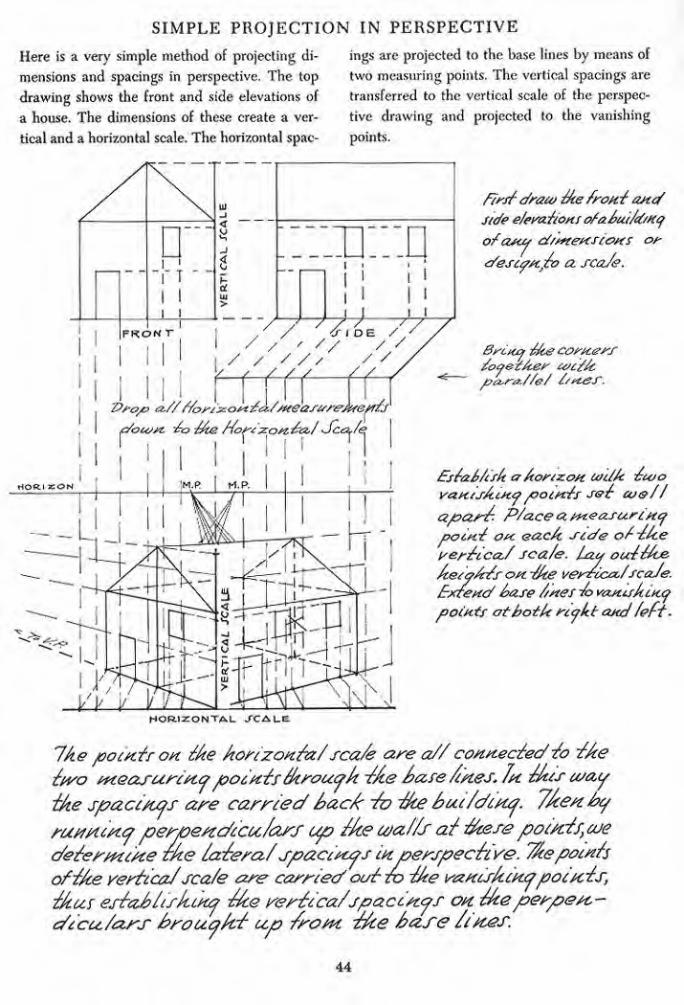
SIMPLE PROJECTION IN PERSPECTIVE
Here is a very simple method of projecting di-
mensions and spacings in perspective. The top
drawing shows the front and side elevations of
a house. The dimensions of these create a ver-
tical and a horizontal scale. The horizontal spac-
ings are projected to the base lines by means of
two measuring points. The vertical spacings are
transferred to the vertical scale of the perspec-
tive drawing and projected to the vanishing
points.
firjf draw $te front ajte/
Side elevations ofaAui/tt/ttq
ofaw d/wet*si&xsCMOS
c/escfsc/v a sca/e.
or
Brttuy $ce cornersfojetker wtf/c
Vroyo &////orixo**
1
£s/a£As/c aAomzoh coi/A fcoo
vapttsAinopoints s&r ate/f
aparr. Pfaceameasuringpoinf on eac/t side of-f/ce
yerficaf sca/e. lay oocti/ce
ketoArfs on. fke i/errcccc/sca/e.
Bxteno' Sase //nes ~A> vantsAtKO
points otbotk rcakt and /eft-
HORIZONTAL /CALI
7Ae powfron ike korizottfa/'sca/e are a//'connected'io ike
itvo measur/tcapocZeis /krouak ike Dase/mes. Ih tkts a/ay
ike spacirtqs are carried back io ike but/dirta. /kertba
rUrtHCrtq per-pestc/tccc/oKf up /Zee wa//s a/ ikese pot/iis, aje
cAeierm/rie ike iaiera,/jpacittas itzperspective, tfcepocxis
of/fee yerticaJsca/e are carried'oaf to ike ^ancskekapoirtis,
ikus esiab/ifkcka -/ke rertica/spacirzos ok tkeperpest.--
c/fcufars brouaki up /rom. ike hare iik&s.
44

PROJECTING THE VERTICAL SCALE
The vertical scale can be projected to any part comer of the steps, along the base line to the
of a drawing. In the drawing below it is more middle line, which has been projected down
practical to place the scale in front of the mid- from the front elevation to the measuring line
die of the building, so we move it from the front or horizontal scale.
Draw a/ro/tfattc/ascde
e/evasion afabuudtt
POINTV OF FRONT ELEVATIONHORIZONTAL JCALE.
points of /ide etevation(or. mea/urinc line)
45

ARCHITECTS' PERSPECTIVE
This is the way an architect renders ground
plans and elevations in perspective. This knowl-
edge makes it possible for an artist to draw any
building to scale. Both vertical and horizontal
spacing of units can be achieved with accuracy.
Note that another point, called the "station
point," has been employed here.
/?/#t a//&e spaces#f$te shziio/tpotxi
Draw hxes /ro#< /Ae j-£a£tt>ft
point to ike Aoriz~o*t so zAo6zAeu arepara//e//o /&.e sides
ofrAe around'plan. 7Aese/txes
wiiluta&e a ftafciaKf/a ad: tice
s/atcottpotH,tc&cdasi11locate/Ae yafusAutapoucfccoAere,
'
cross iAe Aorizott.
USJHujiieano-A'i<2#&/e
PQ I KIT
\/er£icaJmeasuretfteft/s ar-e
projectedfront e/era/tonsfo/Ae meaSur/tip /itte a^t^Aenfo $te irczM.£s/tttt£7 ryottt/s
7m sM/iottpom/ represents /Aeposi/io/t o//#e oSsertrer. $w£ eve
/au out'a aroundp/an andp/ace//a/^Aa/erer a/to/e coe c/toose
/o yieiv /Ae Acu/dina. u)e dropa yer/icaJ'/me c/otm rram //ce c/ose
comer.////AUs comer- a)€ a/so c/raio a/torizon/a/'/ine £?represent/
/Aepic/urep/ane. //Aonizort ca/cJ?e es/tz^/isJeec/'at'sz/cpJteccf/c/
a^o^e a areusee////€e, So/A cross//&? //te yer/ica/. mis yer&ca,/
^eco/^era^eava^6/{(?/^.Je/ash/ionpoirc//?e/ow -$ce tproit/^
/me. /tteesaiMinaa//kes/a&onpoint'are c/rawtt 7rv#? /kecfroayzc/
p/att/o^ep/ciurep/atfe. $//spax^j6pai/&eM&ro/ecz&Jwwe/?
46

ARCHITECTS' PERSPECTIVEIn this drawing we have a rather complicated this odd shape. We are concerned here with set-
ground plan. But remembering that "any form ting the ground plan on the ground plane, using
can be built within a box," we make use of this a single over-all height for the building,
truth to simplify the rendering in perspective of
EXTEN/ION FROM ©LOCK.
PICTURE PLA
//
i\ \\w\
ffN <?
V /O /
/. *-
\ <y .'*
fe
/ iI ft
1 I*'
1 > i*
m coMeo&cafetf exteriors Gr"£u4/%fatar>a/Z^arerions wasiie
exienofea1 io tee ^asetines, or i/te iinetto/ucn ranoudioike /too r&ntsAtnypoittis /ro*H i/te/roni corner oi-^te
6tu'/<dinf. M£f <z#eooj{6- /op/aana $ceAcaicf/namiAcna redan<pu/<zr £/oc/f. 76e a'/trirconpoinds <zre 6s&£es££
</oton fro*n inepcciureplane do dke&ase iinesikencornea?'6ac£ do line y&ntsAista poiftif. Siuc/u -i/ccs
.
JTATION'
POI N
47

SCALING YOUR PICTURE
This is an answer to perhaps the greatest puzzler
in perspective drawing. By this method the
base line of the picture may be set at any dis-
tance from the observer and an accurate scale
set up in square feet, or other units, for the
whole picture area. This gives both vertical and
horizontal scaling.
&TT
S*r
tf. v.p
/(2FT
FIO.I
THE PIAN THE PLAN IN PERSPECTIVE
siMillar cti&aonafwilleaaa/eackdt/t6K
From me aee/ftetricizfrrufft fcereskoaJXy we /earn tftat(oneAaff&epicfure area
ofAte qrouttdataxeistaken upbaat/isfaMceeaualfo ftp/ceffce/tefafefafme neHpasef.
BxatHp/e: $&e# yceaJitea fie Jtofizox'/row a/teiakt'ofsix'feet<CFffJ)> oneAa/ff^e
yerf/ca/ cftsfa/ece to f£exor/zo/{ ase/fbe fafrest up && me first fwetre feet
,
EXAMPLE OF //NGLE-POfNT PER/PECTI VE SCALING
SHOWING AGROUND PLANE VIEWED FROM A HEIGHT OF El CHI FEET
VPf'ANOVIEWPOINT?
Dra&oiHaHtay he i_
done tt€ reverse. ?Groundplan /stay 2be widetted and Jverticalplane <?# Stendea upward Jorprojectedtoone °
parioltkepicture, i
Picture area /nay &echosen wefk dili**c/ts
placedas desir-odoyer ikescale dra&i/ttf./Ill units rttatf bepro-jected orextendedjb&usi/to diaao/calf.
A-
MORI XQH
Scale o/ostewaJc/rausi/ctp cutf
GBoOnD UNIT/ ARE EXTENOE HORIZONTALLY FROM POINirONTHE ISAIt I INt
/ V V *7 T\ _HORIZONTAL /CALE
SinceMe vertical *
keiqkl selected <P j
isSff^iketuteAB, %.
a/kicJe crossestie u
verticalscale at J?
ikeAalfwaypomi ui
of4ft.t u/ilt in- <j
dica/e a deplk s
o/16/t on Mearourcdplaj«?.
fetect ke/fkt''/or c? wewpo'uct. Establish aftorizo/t zfirc/iiqkttte'v-iewpoutf. Coscstract
akorizoftfafoMdayerftcafsca/etbofkeaaaffofttefieieffofn^ /iferc
witfb tftefzartzost, a>6ffco#tptefeasquare. Mar/cofffeefloats oh bofft sc<z,fes.
Praaj ftce ftorizo/ifzfAB f/trouo/f ffie no/swaypoittt o/ yerficaJ'scafe. Cotttfect'
a//emits z4? tfee mmsfaxqpow.1'Oh t/tis case,fkeriewpoarfJ.Frecfperaexdtcidzr
cofcere llJteABcrosses baseaxe . deduce areas fo sauare feet be/ast/ta diayostaffs.
48

SCALING YOUR PICTUREScaling the ground plane for two-point perspec-
tive requires the usual two vanishing points set
wide apart. The horizontal scale is set on or be-
low the bottom line of the picture. The vertical
scale is practical when placed at the near corner
of the first square. The horizon can be set at any
height you choose.
TWO-POINT PERSPECTIVE
7ke vertical'fca/e ifusedonly
forMeafurtHQ upriqkffwikaiiAeqmilheinscale corfk tkeqrouxd'uHiis. Uniij'oMoi/t teaks
tttusiheequalio eacA offeeK
7/te veriical scaJe caJt &epro/ecie<Sto atutpotttl oh tke QrooHop/axe
OHIZONTAL /CAL£
Esfabtisk two Hieasurifitopoints,one on eack side ofike rerticaiscaie, eisex/u
spacedox t£ekonzoK,fap). frontpoint(
zero esiaMs/i baselines tohoikranis/c-
inapoints". Cox/tec?'£orfzo%fat'sca/e units io reack base/ines oh boi/i sides r>t/
linespointing az/fPJr. /Airmarks oli'uwtsiKperspective ohhoik baselines
Extendikese units zo hoik mHeskiKapoinis /liter uouftaye establishedsomesquares, uou can iocate ike vomishihopointor Ike diagonals oh i/teborizoH, ftfore
tfuares willbe markedoffasHw diagonals cross unit Uttes lb ike ratusfanapoints
.
49 George Fox College Liorary
Newberg, Oregon

SCALING THE INSIDE PLANES OF THE BLOCK
The vertical and horizontal scales can be used running in the other direction, for width or
to scale any plane. Once we have the unit lines depth as the case may be. All diagonals of sim-
running in one direction, the diagonal of any ilar squares or units will have the same vanish-
square in crossing these lines marks off the units ing point.
yiNCLE- POINT PER/PECTIVE
Any ansubdivided iteto
square w. /
//c tttedrawutf a&oyetteetot/omttvpr'ojbterfcirwor'tfro'oid.
Pmco a room /a£>y27t>&/zf£ atWWy^<?/( ajitA two
-fwures skHdixozsttapart; Us^fe-pointperspective,
fo/tdtoft; FstaitcsA a y-erttca/sca/eottateowzoxfa/sca/e
.
MaMtJcese offat foot'watt $>£e eaitatfm'ioik sca/es. Jetffce
AofivzoM afs/iaMty /errMatt6yertica/feet. Set vatcuAittf
poisttotintersection ofAonzonand'yerticaJ xcafe: Co/c-
xectJcorizoxtzfunits to it/? £rtat?//sk deptft offirstSfaaw
tootDraw dtkfoxa/to tforizox. %ts estabttf/tes i/Po/tke
diafona/s for atfrecettixa tmtts anc/o/so create? a. uteit
$>txs$tt. Repeat ffics emit wttk diaqoKafs as sAowrc.
50
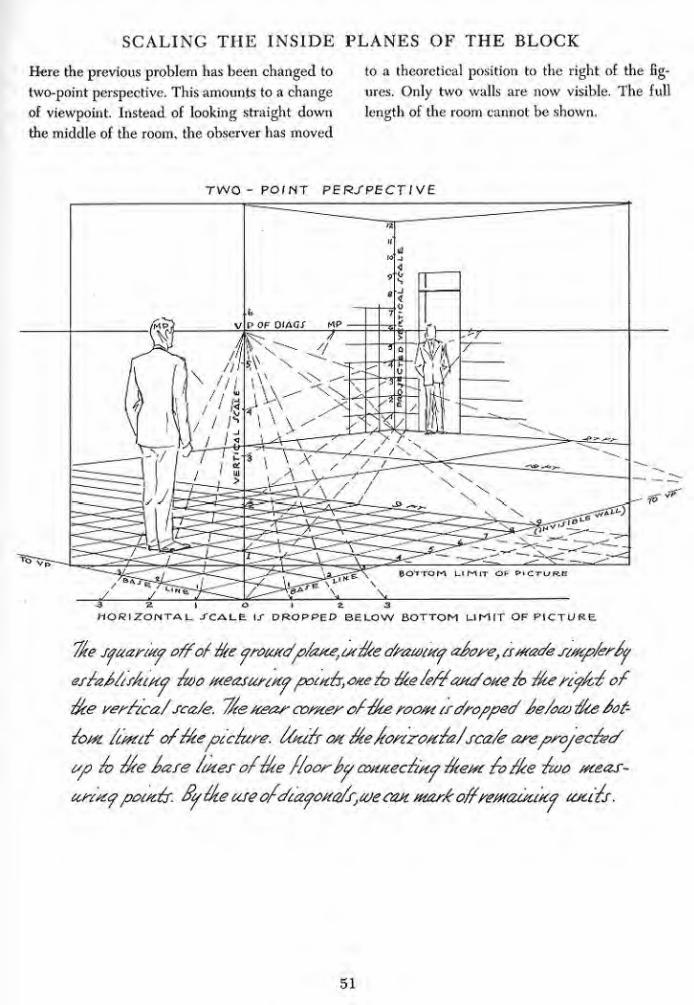
SCALING THE INSIDE PLANES OF THE BLOCK
Here the previous problem has been changed to to a theoretical position to the right of the fig-
two-point perspective. This amounts to a change ures. Only two walls are now visible. The full
of viewpoint. Instead of looking straight down length of the room cannot be shown,
the middle of the room, the observer has moved
TWO - PO/NT PERSPECTIVE
3 a 1 O I 2 3HORIZONTAL. /CALE 1j" DROPPED BELOW BOTTOM LIMIT OF PICTURE
7fee sauartw offof fie aroundpfane^ffce dramxa afeyet atxade swpferSv
effai/iffuHo two measurmf pottch>aze fz> ffte/efzf>mdot€eA> ffcenf/cf of
free verhcafscafe. f/te /tear cor/cer orzkeroom trdropped ^e/oa> dee vof-
fojtt. fcfttif of'fiepicture* fftafr o/c mexortro/traJ sca/e arepro/ecfed
co fo me &are fates offue ffoorby cott/ceefma ffteta rofke fwo taeas-
tcntfo*potttfr. ffumecaeofdca^o^(2fs,ajecarimarf:offremaat£fco totczs.
51
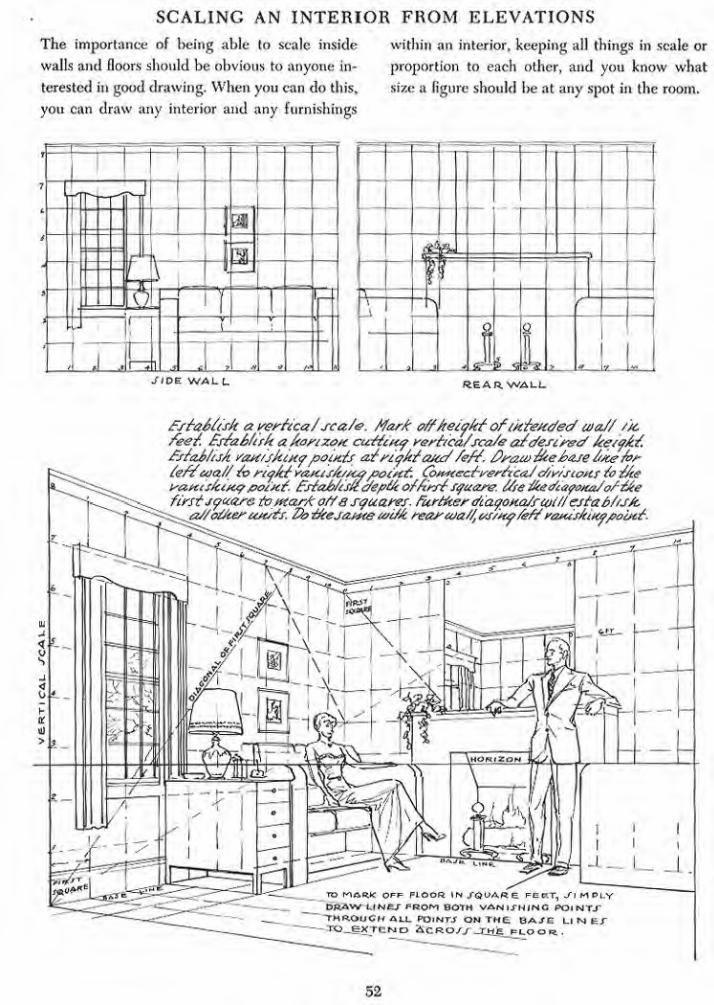
SCALING AN INTERIOR FROM ELEVATIONSThe importance of being able to scale inside within an interior, keeping all things in scale or
walls and floors should be obvious to anyone in- proportion to each other, and you know what
terested in good drawing. When you can do this, size a figure should be at any spot in the room,
you can draw any interior and any furnishings
N r*
J £ si* ISIDE WALL REAR.WALL
£r£a6tisk a vertical'sca/e. Mar/: aff/te{fkfoftkteKdedwa///'/t/ee/. Bsfa&fttk aAortzatt cuHitcf rerhca/sca/e atc/esiratf /sff/f/bi
frstab/tsA rax/s/uxfpoinds at'nq/tt'ascd'/e#. firaa>$tehose 6/cefar
tefttoaf/ &> rtqJct vatus/fattapairt£ G>x*<ec£i<'erticar/cf/y/sioKf& ^AeraxtsfctM? pot'xf. frsiah/isftaepUi o//t'rs£ square. &ewe&afaett/afmtfi'rsts?«<zre fomarA: offe squares, furfjfeer <fia$'otta/fwi fiestabf/s/c
a//o£fter uj€/fs. Zfo•&eejas*€e utfjm rearu/af/,Uf/M0feft yatusJuxofioi/c^.
52
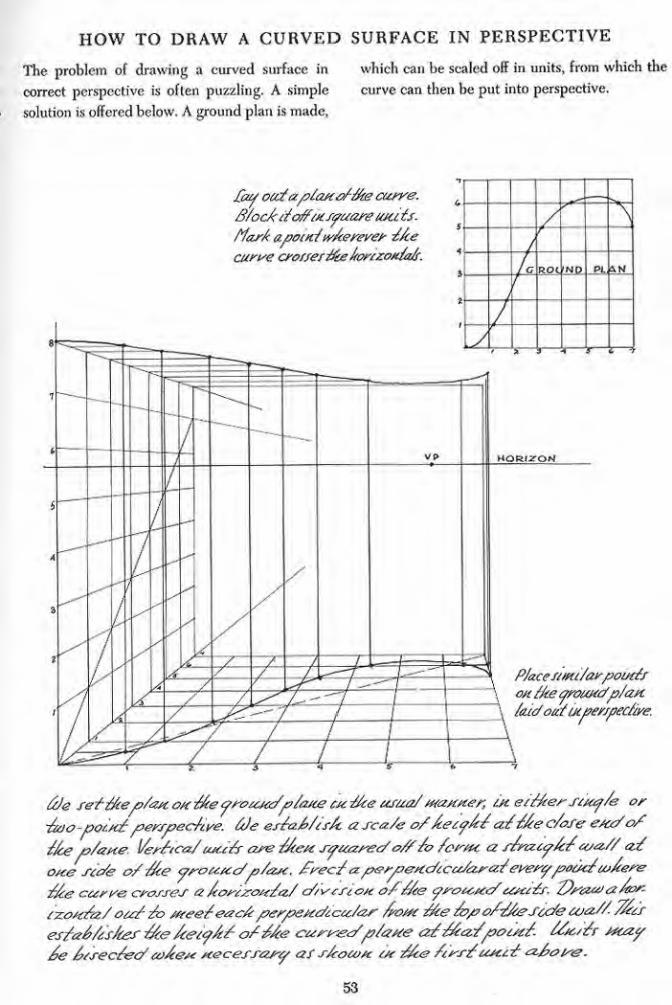
HOW TO DRAW A CURVED SURFACE IN PERSPECTIVE
The problem of drawing a curved surface in which can be scaled off in units, from which the
correct perspective is often puzzling. A simple curve can then be put into perspective,
solution is offered below. A ground plan is made,
£au o^aplafe^^ke curre.
B/ockrfo&tksfatzpe ux.1 is.
MarA a\B04xiivAerever vie
carve crofterflee J/ortzoKfa/r.
6
4
/t"**
r
(
a
ROt NO «, iU
/
//r
> 1 r
—
'
HORIZON
—^ P/acettMtt/arpoutfr
\ oftIkeefrowdp/att
/aid'out'utperrpedive.
£Ve ret&ep/woK&efrvt&G^p/afeecx&e urua/mveteer, ateeMerJMf/e or
-&O0 -pointperspective. &te est^a^/isA a sca/e o/Aetfit^ at*Me c/ose e/a/o/
JJce p/ane. i/er&ca/eua& are Men j-&Ufzn?c/e>//£? fcMft a srrzzc<p&r too-// <z£
one sccfe o/i&e jr*>u#c/p/as€. frec/ap&ra&nc/icu/a^aJer'et'ppovcjwAere
Me curve crosses a Jcorizweda/ c/ivescon o/'Mte fr-0£6tc</ct*£t£s. Ztfavtanor-
/'zo/t/a/oaJ- £> street*e*c£perpe#d6ctc/<zr /rotft jfartyteJZcte£va//-s%M
esfa6/es£efMeAeif££ o^Me cur-m</p/atte atMa.-/poi/tz1- Um/'A #azf
/?e &/secfe& tosbe/* necess-ary as s/coa>t£ tse M& /crsi'itstrf &&&&&.
53

SIMPLE PROJECTION
This is a simple but very valuable bit of working
knowledge. Any drawing or design can be
squared off and projected in perspective on ,
either a vertical or a horizontal plane. This is/
practical for such things as lettering in perspec-
tive, wall and floor designs, or placement of any
design in any flat plane of your subject.
^
s
/
TO LOCATE. POINT/ IMTME DEJMCN, LETT E.R THE
LINCJ" IN ONE DIRECTION AND NUMBER THEMIN THE OTHER. THUJE.3 I J" THE CENTER OF CIRCLE..
HORIZON
can &rqjec£ mepouitr of
drop•pctCf rke&ase /ixe </oojp£
54

REPEATING A DESIGN IN PERSPECTIVE
Any design can be repealed in perspective.
Simply square off the design. The squares serve
as guide lines for the points to be followed. By
laying out such points on the squares, you can
readily approximate the position of the points
on the divided rectangle in perspective. Draw
diagonals to repeat the blocks.
£>rtza> a jUock around'lAe cfes£0*t <zAto/J~a£>£/tMO/e //
z
u
Repeat #teh/ockok&tecyrowfc/p/atte wcik c/itzaofta/s ^
\HORIZON
KORI?OrSTAL PROJECTION
Lai/ ou^poiH.6 wkerwer&e desifH crosses £te division lines 0/ &eJtloc£. laycwisiltilalpoints ohIke division lines olIkebloc* inperspective asskocvn 6e/otV.
55

INCLINED PLANES IN PERSPECTIVE
The ground plane is always considered as a level plane, have their vanishing points on that hori-
plane stretching out to the horizon. All other zon. Inclined planes vanish above or below the
level planes, or planes parallel to the ground horizon.
A/CENDlNG PLANE/ DF-J"C£NOING PUN£/
7he vanishingpoints of
tKc/tttedp/atterdo notfa//
oh.fAe kor/xon office froeo&f
p/axe, &u£oHa p&rficaJ'i/tte
-ffwoctaft a roMtduKf/souei
ofaHonzottfafpfaHe. /it
t/a/ttf/uHopothf ofcue of-
cexdikap/atteajt/l &eaSore me futrizox, fftaJof
a c/escestc/iKap/atte is
j>efoa) fje&Aof-fzofc-
56

INCLINED PLANES IN PERSPECTIVE
Drawing roofs is a problem to one who does not
know perspective. A roof, being an inclined
plane with two edges parallel to the ground, has
two vanishing points. The edges parallel to the
ground plane vanish on the horizon at the van-
ishing point of the building. The inclined edges
vanish above or below the horizon on a vertical
line drawn through the vanishing point of the
building. Many artists do not know this.
fkw a>e k*V9 tkreebuildirtff. Mote Utat ffee rtc/oe of- t&e
roof- ofbcu/cttKO (Dif a/ rifJct attf/esio ike o&ter &vo.
Yro/x$efw*tcor/€e/'£fewf{6/eedf<?of&atv0f£t€c&«ej
toiraro''ourM. 7&ese/ore i£Hct&dya&tfA ik*£kephm*tt
Wtr&tifA See kfr raM£fkit€0 poc/ct of//ce &x£tc&Kfft&&
arrow). 7Ae vtsi'A/e stc/es of f/ce roofr of£ac/d//£ff(Z> ajtcf
(D are wcti'Meo*&W&Z?&e rtfArf, soMey vasusk ck. a,
yeritcaf'/itte draevtt- t&roufk -/Ae ri<fkl r<ZH£f/uf€0 pofxf.
&Je coxriefer flee /teas- or ir/st'A/e places of^Keroo/sas f/o/sitto t^wa.ro'axcttxefaror tM/r/stk/e/p/aaes <ZS
s/opiJto o'oM'tttirtz.rc/. TAertrfore Meformer vateesk a-
iore f&e Aortzox cu&//&e/a&er-£e/oa;,7S%3fi6f6&b*e
o/f&e Wlt££jJt£Map0£tdf &JC $te irerhca//tee ts ofer*?*--
MtS/Cffi^Jw ifoezjcf/e o/^ee£?/aJ€&. /f flatterroofWQ&Scf rattts/t rtear&r t&e AorVZ&JC'.
57

INCLINED PLANES IN PERSPECTIVE
The pyramid and similar forms are exceptions to the block inside which the form is constructed,
the general rule, in that they have no vanishing We must always build such forms from a block
points except those for the base lines. A conical in correct perspective, since there is no other
form has no vanishing points except those for way to relate them to the horizon.
/f//c/r&aJi4tfspe/owd&tt /rotftMe satftehuo yaMstf/aJcgfi&secs $£>&f/r-
/
'ortzoti
/ ji
7/ce pt/raxtidcut <fowtt
7ke Mat/sard'// a iuil£-ou£
frta/tfic/ar roof
e cotc&
Ctrcu/ar roo£r as-&
58

INCLINED PLANES IN PERSPECTIVE
We must understand that inclined planes do
not vanish at the eye level or on the picture hori-
zon. The horizon has only to do with level planes
and planes with edges parallel to the level
ground plane. This is confusing to the average
student. Ascending planes always vanish above
the horizon. Descending planes always vanish
below the horizon. Try to remember this.
fijAaJ-&> t/o aj/te/t&tejroaxJ^aste ti'/tot'/ere/
<r
^'---tSPv
w
%JM.^ J2*.
In the drawing above, the road descends and
then rises over a hillside. It then appears to drop
over a crest into a valley below. This is accom-
plished by drawing the road in sections, each
Wlith a different vanishing point. As the angle of
each section changes, the vanishing points are
raised, then dropped, to follow the contours of
the ground plane.
59

INCLINED PLANES IN PERSPECTIVE
The problem of drawing a downgrade in per- drawn through the vanishing point of the level
spcctive becomes simple once you know the planes. Note that there are two horizons. The
basic principle. A downgrade has its vanishing upper one is the "true horizon." The lower one,
point below the horizon in a perpendicular line not being an eye level, is a "false horizon."
Looking Downhill
Since the roofs and floors of buildings are built
on level planes, they vanish in a point on the
level horizon. The sloping planes vanish in a
"false horizon," above or below the ground level
The "true horizon" is always at eye level. Note
that figures on the hill have been scaled to the
lower horizon since they are affected by the
slope.
60

INCLINED PLANES IN PERSPECTIVE
For an upgrade view, the perspective principle vanishing point of the slope falls on a vertical
is the opposite of that for a downgrade, in that line drawn through the vanishing point on the
the false horizon is above the true horizon. The true horizon.
FAL/E HOR IZON
Looking Uphill
The roofs, floors, windows, base lines, and all
other level planes vanish in a point on the true
horizon. Any plane that is a part of the slope
vanishes in the point above on the false horizon.
As before, the figures are scaled to the horizon
of the slope since they are stationed on an in-
clined plane. Figures on level planes are always
scaled to the true horizon, as shown at A and Bwhere the figures are stationed on a level cross-
ing. Figures in windows or on balconies are
scaled the same way.
61

INCLINED PLANES IN PERSPECTIVEIt is important to know how to draw a stairway
in correct perspective and how to project figures
upon any step. This is not difficult to do. Theplane of the stairway locates all the points of the
risers. The treads all have the same vanishing
point on the horizon. Scale the height of the
risers to the figure, as shown in the drawing be-
low.
flitIreutfftua/ r/'jerx sAou/efHibeiufcwMtcse Ai/o f/st&f.~7&ca /oc&fa c<zcA. *f£ep.
VP
OF PLANSOF^TAIRWAV
62
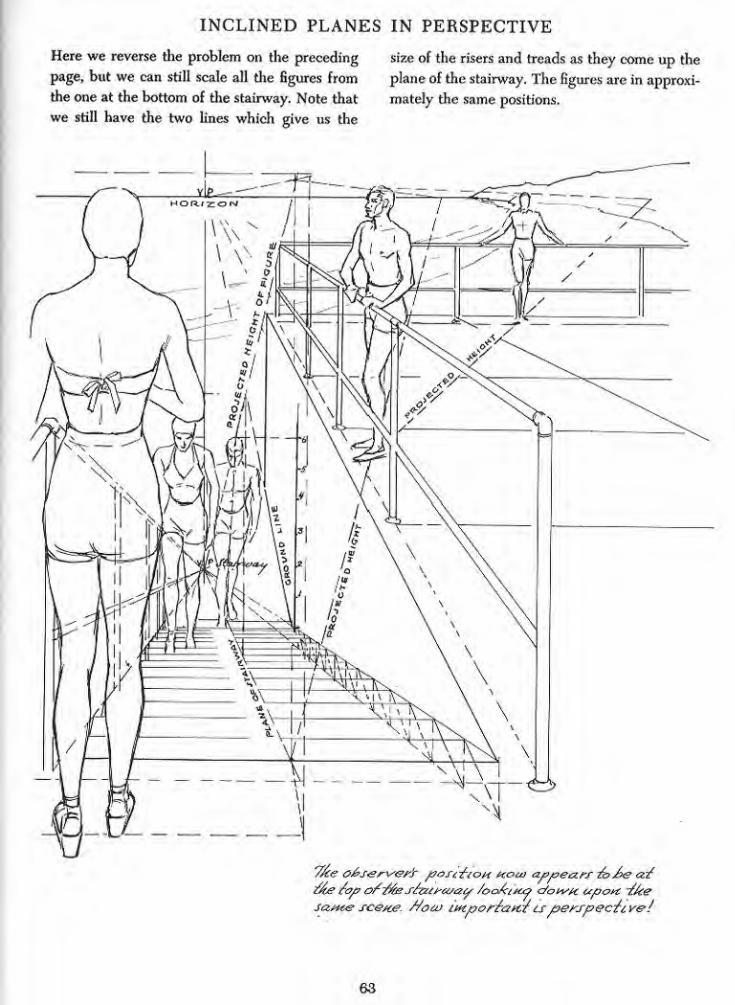
INCLINED PLANES IN PERSPECTIVE
Here we reverse the problem on the preceding
page, but we can still scale all the figures from
the one at the bottom of the stairway. Note that
we still have the two lines which give us the
size of the risers and treads as they come up the
plane of the stairway. The figures arc in approxi-
mately the same positions.
7&e 0&t&rv&*fr paftftoK how appears &£e <zt
zAe cop orTnesczztrcoGt/ /ooAi/te? doivtt upott ~c/ee
satKG sce/ce. //&&> imporfattz' isperspective!
63

INCLINED PLANES IN PERSPECTIVE
An artist may be faced with the problem of inclined plane, or for any reason not be in align-
drawing a tilted object. The object may be fall- ment with the horizon. There is a simple tech-
ing, blown over, a squared object resting on an nique for solving this problem.
ftfjfmffa&ftf/c & V<z/€/skc/£<fjsertxt o*t~fA& -frtte
AorizoK. 7Aroc/fA $r&£pO&*c£ c/r<z./& £Aeast(f/e
tzftvAtcA&e o6jec£'tsA>Ae A'/'Azc/. 7/cfs /txe
&>(// Ae ^AeAor/zotc cp/^Ae ftffe</oA/ec£ M>*v
fart* ^Ae <jrau/£Ka ezta/cfaaco <% *W&£- a/to^fe
<fau//c &&/*£ fAe xeaj Aorjzox. w/« 3»Wtfrtzty eutotAerffiaS arf#£&&£- <2t&?/es zz> escaA-
UfA <z fxzre ///re A>r& AfocA. Coatpfefa&e cte-
/tce/cr/o/cr ofzA& A/ocA toeffute uj/cccJ*. -^Ae
oA/ec/tffoAec//'<2.£o/< £/tp>erspecf/i>i? . flrez&j
#teoAjecf-focfsAortzoxas/Actwere ox& A*Mfff
p/a/te. */%& f£2setjAtfi€47 pot/*-f sAou./a' Ae <z~A
AAe voe'/tz1ofcrosstM& of fA& Auto Aoriz-o/cs
\
64

INCLINED PLANES IN PERSPECTIVE
It is important to know that any object which is
not parallel to the ground plane has its vanishing
point either above or below the horizon. The
drawing below shows an ascending airplane.
The angle of ascension starts below the horizon
and comes up through the ground plane and
through the center of the object.
Afoia: '7£eye£fsosH&d£F&>r£ic>tt
'OC0 TK6VO*€if/tif€f£H?iM&T0C'oXG ttcorderfojkotvcfGttl&epw*
OP AIR.PLAME
7/ce atrp/atte tfdpatOft £>a ratctlrleitea BO£tc£
i* ajao£H^£?H -&e Aortxost st/<ce $te//*&df&<S
65

PROJECTING A SOLID TO ANY POINT ON THE GROUND PLANESince any object can be constructed within a
block the method shown on this page will en-
able you to duplicate any object for placement
at any other spot on the ground plane. The pro-
portions will be correct according to position
and distance from the first object. The plan is to
draw the block first and then the object within
the block.
"OKIZON
{Fffa£//sk your hor/zott cz*oz£
fu>o aJufe/y jptzced'r&susktKO
p&ttfr. Pic£aspo-f(B)otc &ceff&uttd t/ajce attct'cfauo <z/r
optioita/ verticalAxe(AB).2>rau>your"fct<r£cuke (cc£(?j),
Dj*vij& &//*C& rrot*£3 JAr^t 3Z
/o aor/zott axe/6tzc£ 7^>A •
£rec£ atteto&eroexdtcu/tz*'
ctffS* 7ft6s#s£a/>//s/tes tSA&£.es.^/c£V*A3 <2£&azrtj'po£,
ft&uj C66&&. A/ouiprojec:/: /i/&?j
frostf a//'/-Ae cor/£&frfo/ctiJ?eI.
Draw «// cubes to &ce satiee riqA/axtf UtfVOMtfktKJ pO£lt(j(#OtJ&OUVKOK /faspOftf)'.
66

PROJECTION OF FIGURES
Any vertical measurement, including the height
of a figure, can be projected to any point in the
picture. If the measurement or figure is to be
shown on a plane higher than the ground plane,
it must be elevated to that plane. This is done
by projecting the measurement (A and 13) to a
spot against the elevation and lifting that meas-
urement to the elevated plane above. Use a pair
of dividers to lift the measurement.
/?is $te top pottct, B'the bottompoit&u.
Author $Note: Especial attention should be given
to this page, because the principles of projecting
measurements as applied here are of extreme
value to every illustrator or commercial artist.
The following page shows how the principles
apply to subjects in which the figures are at
different levels. Figures must be in correct pro-
portion to one another.
67

PROJECTION OF MEASUREMENTSEverything in a picture has a relative size ac-
cording to its position in perspective. In the
drawing below, the height of the boy ( 1 ) has
been projected to several positions. Although
this drawing was made without models or copy,
the relative sizes of figures and other units are
convincing because the perspective is correct.
Study this carefully.
Jtudu ca**i/i///y &> see Jtato
m

PERSPECTIVE IN THE FIGURE
No matter how much you know of anatomy and
the construction of the figure, you will not be
able to draw figures from imagination until you
can relate the different parts of the figure to a
horizon or eye level. Sometimes it is helpful to
think of the various forms as they would appear
as blocks — square instead of round. Then round
them out.
are drawn to tke /torizote£>&/oa/
Perspective will not ieacL
Cfoic kouj TO draco tke riaure,
but you care neverdraw ii
without perspective .
Perspective m ike rioure
ttteatts •&&£ at/parts arerelatedio ax. eye /eve/.
69

PROJECTION OF FIGURES
One of the simplest and yet least observed rules
of perspective is that all figures on the same
ground plane must be related in size. To be sure
of the correct relation, establish the height of a
"key" figure and scale all others from that height.
To do this, draw a line from the feet of one figure
under the feet of another to the horizon. Then
carry a line back to the first figure.
to &ui£s/£co. 7fa**ta A&a 7cacs-<? you cast0'a.cG
7rom £&e spot ckor&t /or afy&m, n&c a,/^e
FIGURE/MAYBE PROJCCrED ON LINEJ" (PARALLEL TO THE HORIZON
£>o£*£.t'ts«ajv/e
The Rule for Scaling Figures on the Ground Plane
All figures of the same height, when standing the horizon at the same vertical point on the
on the same ground plane, will be crossed by figure.
70
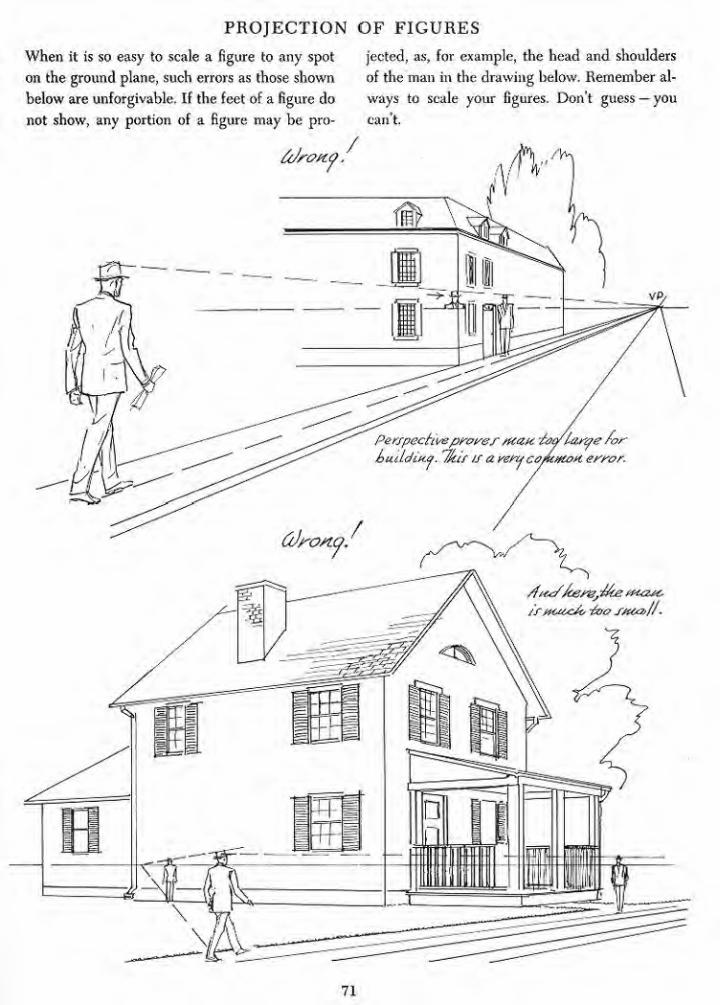
PROJECTION OF FIGURES
When it is so easy to scale a figure to any spot jected, as, for example, the head and shoulders
on the ground plane, such errors as those shown of the man in the drawing below. Remember al-
below are unforgivable. If the feet of a figure do ways to scale your figures. Don t guess — you
not show, any portion of a figure may be pro- can't.
71

FIGURES ON INCLINED PLANES
When we know that an inclined plane has a simpler. So long as the entire plane has the same
horizon and vanishing points which are used in slant, the perspective is worked out in the man-
the same manner as those of a level plane, seal- ner shown in the diagram below. The diagram
ing Hgures on an inclined plane becomes much shows all the necessary vanishing points.
VPQFPOOF HORIZON OF ffOOF
JAococho kow ike -ftaures ok
ike toofut ike dmtotttqbelow
were JCaled'utperspective
fzaures CSH &e rca/ed
otc any irtc/ttcedp/a*te
72

FIGURES ON INCLINED PLANES
The projection of figures on hillsides can be
very puzzling if the principle is not understood.
The drawing below offers a simple solution.
Whenever the plane changes as it goes around
the hill, we draw to a new horizon. To keep
only one horizon would continue the same plane
at the same incline to infinity.
%c tfes dratowo wekaveprojected
figures ok. d'compouko' ifitc/tKe",
cokick ttceatts &uz£ -flee LHC/£tt&
/s /*caae up ofseveral placesofdifferent a*Lj/es. Study tic/'-T-
73

REFLECTION
Many artists do not realize that a reflection does
not duplicate the perspective of the original.
The perspective of the reflection is that which
the actual object would have if it were inverted
and placed in the position of the image. Though
the proportions are duplicated, the actual draw-
ing is quite different.
WATER UN 6 OFMET
WATER LIMB OP CIQUR.B.
/tetalci'o/fo<?ureabois&natter
A reflection is not a reversed tracing of the thing
reflected, but is an image with its own perspec-
tive. If you turn the drawing around, the differ-
ence in the angle of view becomes apparent.
The figure and its image attach at the water line.
All points of the figure must be projected down
to a similar point on the image, which is directly
below. Both the figure and its reflection are
drawn to one vanishing point on the horizon.
Any movement of the water affects the reflection.
74

REFLECTION
The artist who is not skilled in perspective may
have difficulty in drawing a reflection in a mir-
ror. The drawing below makes the process
simple. With a fair knowledge of the figure a
reflection can be drawn without copy. Study
this drawing carefully to see how all parts of the
figure have been projected.
across. Kf<2 c£Lci&on.aJs &? t<*t&CLfc£y& dtstattce.
VAep/tute ofike H*tirror a/coays <z£»oectrr -fc> £ei&e Aalfu/<z<s /poch£&eeujee*t &e& re//<*c£ec££&£&&& aJccf^/certatore or o&jecfre/fecrec/.
75

COMMON ERRORS IN PERSPECTIVE
Distortion results from having both vanishing
points within the field of vision, or too close to
the object. If the object has a right angle at the
near corner, the base lines must make an angle
greater than a right angle on the drawing, since
a right angle can not be represented by anything
less than a right angle. The drawing below
shows this common error.
fcjrotta
</w
/
p/<z*tertftuf£
sojtte pointo/c &eja#tek<>r£X.OK..
re com Se o*c f<y o*t&
Hor/zox 4M t2scy *f&eg>As
picture, -/or /Zee /ior/zo/i
is 7%te eue or Gz#tem /eve/.
P/s/orltoK caufed&(/nuttshisiapewif&cmSefrfKucJc too c/ose.
/7/ittau* HtaAe sure -&ta-£a rco/cc'-tZM<j/& oh &teotlyect ij c/rawtt coMStcterezb/u u/i</er Meat a.
r&pAt-asto/e cM-£fac/>xut'&Mqifoavc>e<fdts£or£tot<.
VP
Antes/kws /oo syexec/e oA j^te sctfe
vr. 1
\S
$rosea./
7a&k/op sAotuf 6?oMiUCJl efoa&t f<?r&tf
position so c/ose
£ke /torizo/t
76
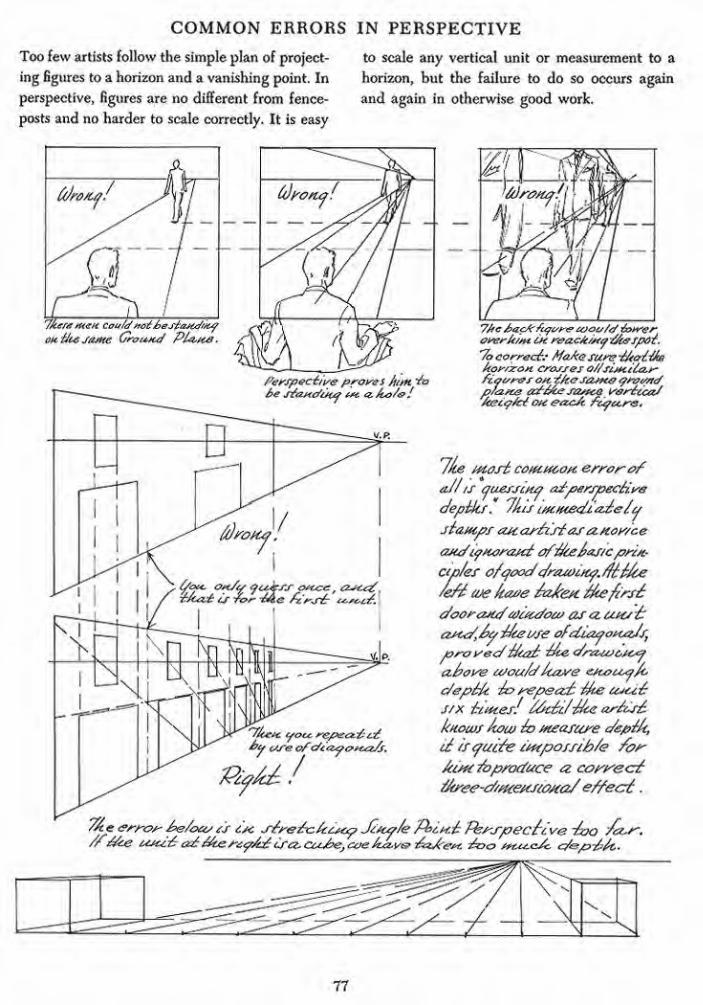
COMMON ERRORS IN PERSPECTIVE
Too few artists follow the simple plan of project-
ing figures to a horizon and a vanishing point. In
perspective, figures are no different from fence-
posts and no harder to scale correctly. It is easy
to scale any vertical unit or measurement to a
horizon, but the failure to do so occurs again
and again in otherwise good work.
it/amen Could'tfo£6eJia*tt/"trf
oh tice jojhb Ground Pltt/ea.
/'tfrSpoci/'ise pf-ores firm VO6e s^ezMo'/Jta t*c &,&*>/&!
&<f CWGofcf<(Z&<?tCJz/j*
PifJ&f
7/te £>acA f<qt/r<? wot//</ 6>*rer0MWM0H £* rvac/c/j<Q-i%efpoz.
7o corrects Mafcescirt?-&t&iiJt8/tor/zoH crosses o//simitar"fta&r+f oh. z^c sajMf/ grot/no";:'?'-> tztM&JZ&ttQ rertrica/keifp/ct ote e-acJc ^cetera.
Ike mos£ cotttttcort error*ofa/iis auerjiHo tz£-perspective
dep-hkr* /jut iftatiediade/ts
stamps ajtarhftastzttor/ce
OJuflo/corani offfaepa/icpri/c-
ap/es ofqooc/c/nuoiftf./fii/ce
/eff a/e kaoe /oJrest fAefirst
doorajtd'&c£u/ow as a.ukstartcf,oy&C£t/se ofdiaoopcaJs,
pro k-&c/$ta£ &&& </reZ40C*C*J
a.&ok'e tooafa1ftawe GJcotcq/t
dep£U tz>repeat Me U*ti£
j/x irises! t6c6i/-£ke artist
knows /tew do Measure etepttd
it isyuife etttpofsib/e for-
Ai^i lbproduce a correcttftree-of/ftfettstoxa/effect: .
Thc error- &efo£es fs ts< sfretc/ctt&p Mttf/e H*it€i Perspective -too 7o>
y/fce i<£^fra£ffar£t?A£tj'c&ctL&ei coeAj2,v& f<zfre*t f&o j*r^.a/c cf&pfitt.
'<^r-.
77

-'-;""

Light on the Basic Forms
When the artist leaves the study of line and
seeks to combine light and shadow, construction
and contour, ho steps into a new world. His
drawings begin to take on a quality of existence,
for through light and shadow we delineate form,
and all the visible world is only light on form.
But nature, until her ways and laws are un-
derstood, can seem so complex as to be almost
overpowering. Usually her forms are surfaced
with endless variations of texture, and the rela-
tionship of her forms, as well as of man-made
forms, to basic form is not always evident. So
some simple plan must be devised to help us
understand the complexities before us.
As an approach, we must simplify both light
and form. The basic forms start us on the way.
Since they do not have confusing surface irregu-
lurties or changes of color or texture. They are a
simple white, with a smooth surface, thus allow-
ing us to look at the effect of light uninfluenced
by other factors.
There is no better place to start than with the
sphere, which seems to be the basic form of the
universe. With the sun lighting our universe, the
spheres of all the planets are always half in light
and half in shadow, but because the planets arc
rotating on their axes, any single spot on these
spheres moves from light, into shadow, and back
into the light, ul the course of a single revolution.
Since the light on a sphere merges into the
shadow through gradually darkening halftone,
the rotation of the sphere of our earth produces
the gradual darkening of the daylight which we
know as twilight and evening. At night we have
reached the shadow side where the parallel rays
of the sun can no longer reach us. At noon wc
are in the middle of the lighted area, and at mid-
night we arc in the middle of the shadow area.
These facts arc the basis of all the light and
shadow that we shall ever draw. On a lighted
sphere there is a highest point of light, where
the surface is nearly flat or at right angles to the
source of light. That part collects more light rays
than any other. This we call the highlight. It is
alwavs at the shortest distance from the surface
of the form to the light source. As the surface
turns away from the source, it collects fewer
rays and this causes halftone. The edge of the
shadow then begins where the light rays are at a
tangent to the surface of the sphere. Therefore,
if wc have an established direction of the source
of light, we can approximate where the shadow
begins on any rounded or spherical form. It is
always at the halfway mark around the form.
The first basic law of light then is: The light
from any single source must travel in a straight
line, and therefore cannot reach more than half-
way around any round form.
The next law follows from the first: Any sur-
face is lighted according to the angle of its
surface in relation to the direction of the light
source. The brightest planes then are cither flat
or at right angles to the light. With every in-
crease in the curve away from the perpendicular
to the light source, the value of the plane darkens
until it reaches the maximum darkness, which is
at and just beyond the edge of the shadow.
The next law follows in orderly sequence:
Only a fltit plane can he evenly lighted in the
same value, since curving and rounded planes
always produce the effect of graduated tones of
halftone. Here then lies the secret of rendering
light on form. The flat areas are flat in tone or
value. The rounded areas are modeled in gradu-
ated tones. The way we treat the area shows the
observer roundness or flatness, and thus estab-
lishes the identity of the form.
The sphere or egg is the only form without
flatness. The cube or block is without roundness.
Therefore the sphere or like forms can he ren-
dered only in graduated tones, and the cube or
block only in flat tones. All forms are composed
79

LIGHT ON THEeither of flat planes or rounded surfaces, or a
combination of the two.
Now let us think of shadow. When a surface
dips so that a ruler laid on the plane cannot
point at the light source, that area must be indi-
cated as in shadow. That is why there can be
shadows between lighted areas, as in the folds of
drapery. In fact, any depression or indentation
identifies itself with halftone or shadow. Any
protuberance on the surface has lighter value on
the sides facing the light and halftone on the
other sides, and, if it is high enough, casts a
shadow on the surface.
Getting back to the sphere, let us look care-
fully at the shadow side. We find that the dark-
est part of the shadow occurs near the edge of
the light. The shadow can be a flat tone only if
there is no reflected light. This is the way we see
the half-moon. There is nothing to light up the
shadow. However, since everything in the light
also reflects it, the shadows we see have usually
taken on some of the reflected light of lighted
planes nearby, and therefore the tones within
the shadow are somewhat lighter than its edges.
This darker edge of a shadow on a rounded
form is what illustrators call "the hump." Being
darker, it tends to accentuate the brilliancy of
the lighted areas next to it, and also to give
airiness and luminosity to the shadow areas.
This "hump" occurs only when the initial light
has been reflected back on the object. Unless the
reflected light is thrown directly back at the light
source, this darker edge disappears, since it is
caused bv the fact that neither the light nor the
reflected light can fall on the angle of the plane
or surface at that point. To get this beautiful
effect photographically, the fill-in light should be
pointed directly at the main light source, and be
of not more than half its intensity. This is the
secret of preparing good photographic copy
from which to draw.
Since any object may be moved about in re-
lation to the light source, and we may look at the
object from any viewpoint, we can sec light and
shadow in any proportion on the object. If wc
BASIC FORMSare looking at the light source, wc sec any object
between us and the source in full shadow, for
we are on the shadow side. If the light source is
directlv behind us or between us and the object,
we sec the object in full light without shadow.
This is the effect we get in photographs with a
flash bulb at the camera. A drawing under those
conditions would be composed only of light and
halftone, with the darkest darks at the edges or
contours. If the object is placed at right angles
to our position and to the light source, it is seen
as half in light and half in shadow. If placed in
one of the quarter positions it is either three-
quarters in light and one-quarter in shadow, or
the reverse.
Understanding these facts, we can draw a
sphere as if it were lighted from any direction
we choose. By turning the drawing on end we
can get the effect of the light source being above
or below the spheres. Incidentally, the quarter
lightings are usually more satisfactory pictori-
ally than half light and half shadow. Having
either light or shadow dominate is more effective
than an equal division between them. The full-
front lighting is very good for simple or postery
effects. It is used a great deal by Norman Bock-
well, among others.
The use of two light sources tends to break
down the solidity of the form. Crisscross light-
ing — light sources at both the right and the left
of the artist — is especially bad because it breaks
up everything into small lights and shadows.
Outdoor sunlight or daylight is the perfect light
for drawing or painting.
The sphere in light and its cast shadow on the
ground plane arc shown on page 81. The central
ray of light is a line passing through the center
of the sphere from the light source. The point at
which this line hits the ground plane is the cen-
ter of the east shadow, which is always seen as
an ellipse.
Spheres A and B on page 82 show the very
important difference between the effects of di-
rect liclit with its cast shadow and of diffused
light with its diffused shadow. In sphere A, the
SO

LIGHT ON THE SPHERE
7Utttk of'/Ae ra/tuesasoccure'HQittkattc/r.
A/o^e fye &artdo/c/ar£ers/tao/ow$za'£appearsSetween flte Jta/ffoae o/j/ee iiq/ctatccf-me re-
r/ecred'{torn: coirAm £ke sAadow . 7Aecaffs6a</-
o£o ottflte orouttc/p/axe s&ar&6v#t $cu hatcc/
81

SHADOW FROM A SPHERE IN PERSPECTIVE
82

LIGHT ON THE BASIC FORMS
light and shadow are sharply defined and posi-
tive. On sphere B, the modeling is very gradual
With no sharp definition. The lighting on A is
characteristic of sunlight or direct artificial light;
that on B of light from the sky without direct
sunlight on the object, or of the popular indirect
or diffused lighting.
The difference in these effects must be taken
into consideration bv the artist. The whole pic-
ture should have the effect of one or the other.
If one tiling casts a shadow, all things must cast
shadows. If one shadow is soft and diffused, all
other shadows must receive the same treatment.
Otherwise consistency is lost. When the effect of
a drawing is bad this may be the reason.
Figure 1 on page 82 shows the ellipses of the
form shadow and the cast shadow on the ground
plane. Note the central ray through the middle
of the ball to the middle of the east shadow. The
ellipses are drawn in perspective. Figure 2 shows
how a shadow may be projected to the ground
plane when a sphere is in midair.
Cast shadows of course require perspective,
which many artists fail to state correctly. With
any cast shadow we have tluee things to con-
sider: first, the position of the light source; sec-
ond, the angle of light; and, third, the vanishing
point of the shadow on the horizon. If the light
source is behind us, we get the angle of light
from a point placed below the horizon on a
perpendicular line dropped down through the
vanishing point of the shadows. From this point
we bring lines up through the ground plane to
the: object. The shadow is then located on the
ground plane by drawing lines from the object
to the vanishing point of the shadows. (Sec Fig.
4, page 84.) When the light source is in front of
the object (Fig. 5, page 84), we establish a
position of the light source, and, on the horizon
directly beneath, a vanishing point for tin* shad-
ows. We then draw- linos from the light source*
down through the top corners of the cube. Then
from the vanishing point of the shadows we
draw lines through the bottom corners of the
cube:. The crossing of these two sets of lines in-
dicates the limits of the shadow on the ground
plane. (Sec also page 85).
The shadow from a coue is simple to execute.
Draw the line of the direction of the light
through the center of the base. Then divide the
ellipse of the base accordingly. From the apex
of the cone draw the angle e)f light to the ground
plane. The point at which it meets the line of the
elirection of light is the: point of the shadow.
Connect this to the base of the cone at the half-
way points of the ellipse (see Fig. 1, page 84).
Figures 2 and 3 show the lighting worked out
with a different dircctiem shown in Fig. 3.
The effect of looking into the light source
with these plane* we>rked out is shown on page
86. Page 87 shows the oppe>site effect — shaelows
receding, with the light source at the artist's
back. The e:ffcct of a suspcnelcd artificial light is
shown on page 88. Here: the: perspective prin-
ciple is reversed, since the shadows vanish at a
point on the grounel plane directly under the
light source. Theoretically they spread out to
infinity and have little to do with the picture
horizon, This is really a radiating point to give
direction to the shadow contours. However, we
still have the throe necessary points of the tri-
angle formed by the light source, the angle of
light, and the direction of the light.
Remember:
When tjou ore looking into the light—
The angle of light is the nearest point of the
three and is located on the ground plane.
The vanishing point of shadows is on the hori-
zon, directly under the light source.
When the light is behind you—The: angle of light is located below the horizon
directly beneath die vanishing point of shadows.
The: direction of light is the line from the
vanishing point of the shadows to the object.
The source, not being visible, is not shown, but
the angle is used to point backward to the ob-
ject, and ne>t beyond it.
All points arouud a contour register as a cast
shadow, and you draw those contours on the
ground plane within a rectangle (sec page 87).
83

PERSPECTIVE OF SHADOWS
Rq 1 Fiq 2
/' (bottom drawing)
7'
V
Fiq 5
84

PERSPECTIVE OF SHADOWS
.('Flight
.
'''y, l
/ /s /
VP OF
SHAOOWS
Looking into the Light Source
Note that all shadows recede to the same van- source. By connecting any spot on the ground
ishing point. The vanishing point of shadows plane to the light source wc gel the angle of
falls on the horizon directly below the light light at that particular point.
85
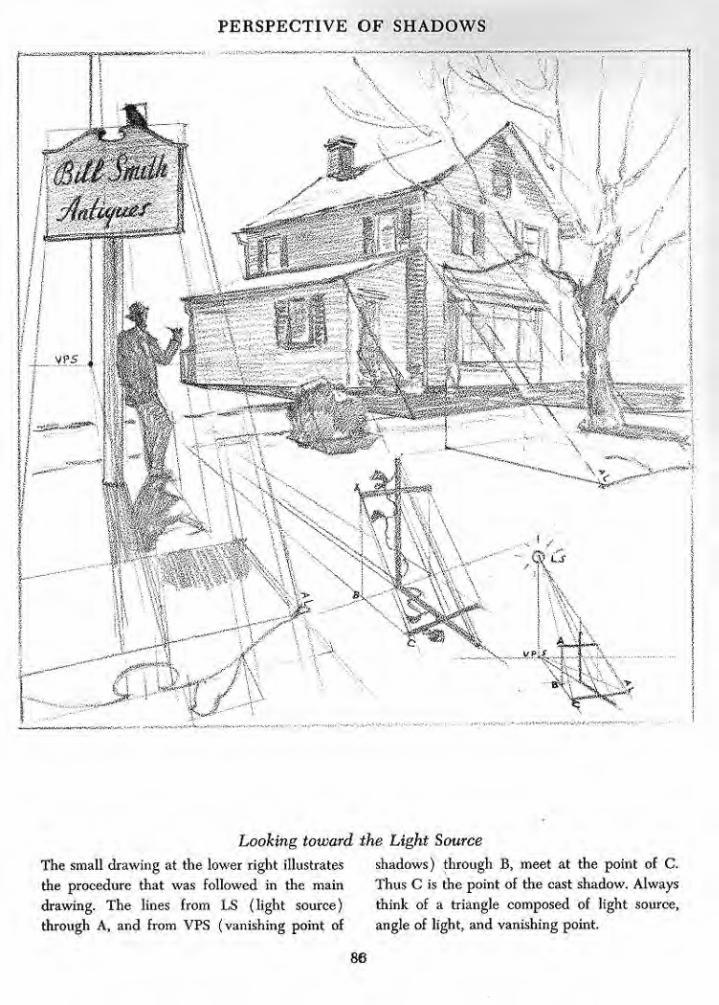
PERSPECTIVE OF SHADOWS- ,-,±—.: • V.^-"..V
Looking toward the Light Source
The small drawing at the lower right illustrates shadows) through B, meet at the point of C.
the procedure that was followed in the main Thus C is the point of the cast shadow. Always
drawing. The lines from LS (light source) think of a triangle composed of light source,
through A, and from VPS ( vanishing point of angle of light, and vanishing point.

PERSPECTIVE OF SHADOWS
Looking away from the Light Source
The angle of light is determined by lines drawn the ground plane. If yon consider the tree as a
to a point placed directly below the vanishing flat design in a squarcd-off block, the contours
point of shadows. Any object may be squared of the tree are projected to the ground plane,
off in the way shown in the picture of the tree These define the shadow,
at the right above and the squares projected to
87

PERSPECTIVE OF SHADOWS
Shadows from an Artificial Light Source
Note that the shadows all radiate from a point horizon. Such shadows do not diminish as they
on the ground plane directly beneath the light recede toward the horizon. Their length on the
source. This is called the vanishing point of ground plane is determined by the angle of light
shadows (VPS), even though it is not on the
88

Complex Forms in Light
To the layman the rendering of form with
light on it seems little short of miraculous. He is
likely to talk about your great talent and how
lucky you are to have been born with it. The
truth is that he is unable to distinguish talent
from plain observation and knowledge. lie has
never really analyzed the way light works on
form, though he has learned to recognize and
accept the proper effect. When we point out that
an indentation causes halftone and shadow, lie
may shake his head. But let there be the slightest
dent in a fender after Junior has used the car,
and he will sec it as a dent as far as he can see.
Any disturbance of a smooth tone is either a
smudge of foreign material or a change of some
sort in the character of the surface. How quickly
a spot on the wall or a fabric is evident! The
same sort of thing happens in a drawing.
If we put in a tone of dark where it should
not be, the effect is that of a smudge. A light
where it does not belong is just as evident. It
seems strange to me that some art students will
not draw objects as they really look, for the)' can
see the difference between lights and darks as
well as anyone else can. The chances are that
they arc not even looking for the effects of lights,
grays, and darks-, they must simply feel that they
have to fill the space inside the outlines with
strokes of some sort. They have seen that draw-
ings arc full of strokes, so strokes are their real
concern, without much thought of what the
strokes are supposed to be accomplishing or
representing. The whites on the subjects have no
strokes, since we are really leaving the whites as
white. The grays have delicate strokes to leave a
grav where we see it as gray, and then the darks
are put in with gusto and pressure to set off the
grays and whites.
The darks and accents really make the draw-
ing, because they are most easily seen. They
carry the punch. Any drawing can be reduced to
a rendering of halftones and darks only, since
the whites are already present in the white of
the paper. So the practice of good drawing, be-
vond outline construction or contour, is first
looking for the areas of light, then seeing the
halftones and darks which surround them.
Drawing is really difficult only to those who
do not know what to look for. The placement of
contours is measurement and nothing else. To
find the planes of an object is to watch the angle
of the surface form as it changes, and then to
record the tone or value caused by that change
or angle. The drawings on page 90 show how
easilv the effect of form and surface and even
of the material itself is defined by simply putting
down the grays and darks as they appear. In
these drawings we are hardly conscious of pencil
strokes or mannerisms, only of the use of a pencil
to render the effect as seen.
After awhile you learn to recognize character-
istic effects, and they become much easier to set
down. The student should start by setting up a
subject in a good light and studying the effects.
Begin with things that are simple in form and
not too complex in texture. Take a piece of
broken stone and try to draw it. Take some
dishes or pottery, a ball, or a lx>x, or any simple
object, and draw for the effects of lights, grays,
and darks. Later, try something that has drapery
— even the youngster's doll. Or drape a piece of
material over something and try to draw the
folds. Crumpled paper is the best example of
planes in light, halftone, and shadow.
Outlines should not be dark and heavy all
around, but light where the inside tone is light
and dark where the darks are. In fact, in some
of the best drawings we arc hardly conscious of
outlines at all, the stress being laid on the tones
and shapes inside the outlines. Almost every
light area has a definite shape, then the half-
tones have shapes, and finally the darks have
shapes. They must be fitted together. Some
shapes have defined edges, others have soft edges.
89

COMPLEX FORMS IN LIGHT
-THE HUtfP
CGbiVZ.%
Careful study of this page will reveal the fact
that any type of surface form can be rendered
by duplicating the effect of light and shadow as
they occur across that form. Every material or
surface has a characteristic effect at any given
moment. Every effect is made up of light, half-
tone, and shadow. If we study the subject and
can define those elements clearly and can then fit
them properly within the contours, we will have
re-created the form and also the effect of the
material of which it is composed. In the draw-
ings above, arrows indicate the direction of the
light. Set up a number of subjects composed of
a variety of materials and render the effects.
90

PLANES
_^v ..::-.-.,:.r-:n.::'-. -•.::. ....
V v
/4I
K: ._.
.... < r
91

PLANES
i.i.UOH!L _H -- H£t-PTON£5 * fiHAOOW
KEY DRAWING
._«&..
rr~-~~"
•s .
. i
Changing Light on Complex Planes
A subject like the one shown above cannot be
drawn or painted convincingly without a study
of the light on its planes. The camera can give
only the intricate superficial effects. Wc must
always search for the broader planes upon which
this confusing detail lies. Since light changes so
rapidly, it is often practical to make a quick key
drawing like the one at the top of the page, to
record the main planes of light, halftone, and
shadow. This gives a basis for building the solid
effects later,
92

PLANES
T+*6w HONtPT oft
ED<J£ OF ^5H^0OW
REFieCT&O t-
.HlOHt-itfHT ONKfCH&ST B^RT
NEAREST »Oi*T
r-^'S /'
AMBLES *©«K
OAST ^HAPO^V
J>RP#|Jh CAUSING HALFTONE
/?face ifcfracoM. or ajty o^Aersurface cs c/ratc>sc&afo/focoixG tJce anf/ej o/"£Jtesurface attc/wM eacA.
c/tattae ofp/atte, HOTZH& cfce cftatfae: ofts<zfu&.
HALFTONE
MtfHT
teFLecmo L\G
"hump
7/ee{*tef/to<f£S^/(eja#te.
93
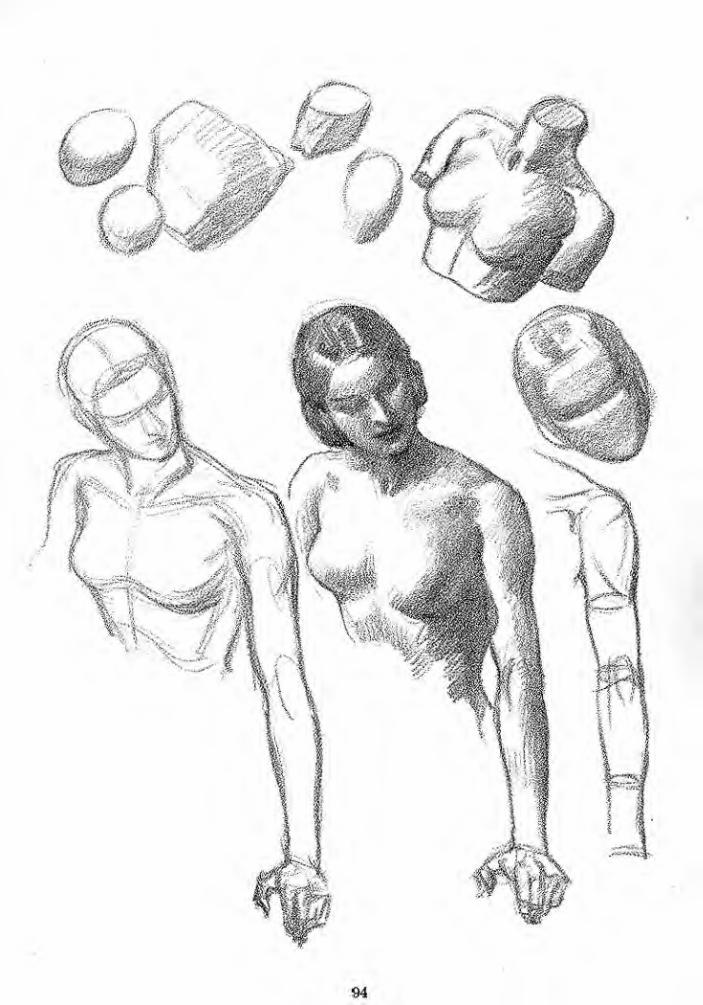
94
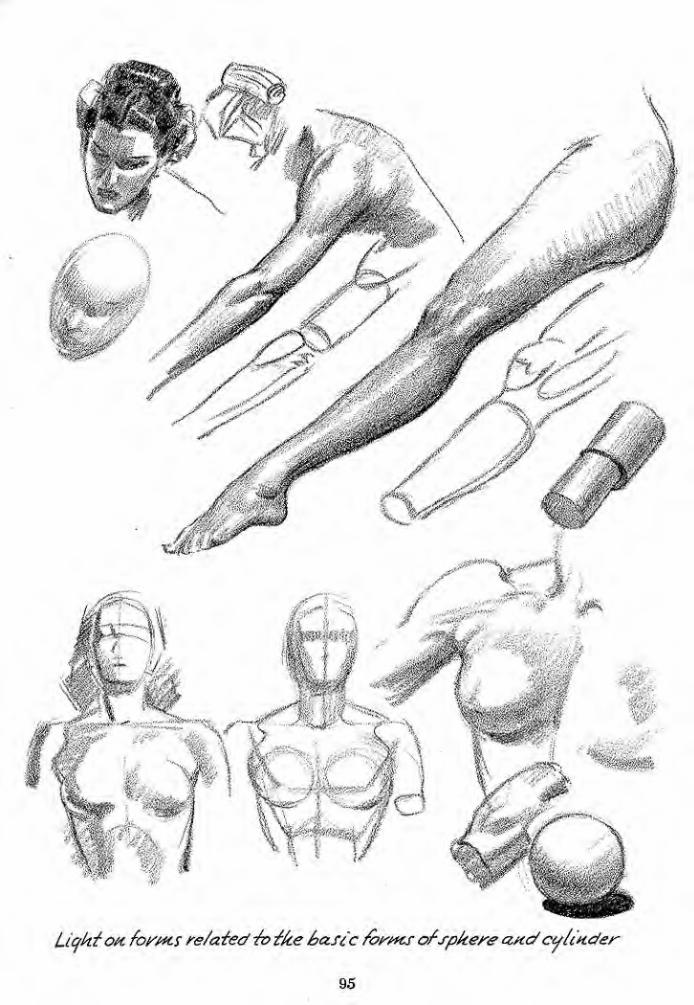
Liqktoti foyttts re/aied io ike hascc /or&trofspkereandcylinder
95

&&
7ke studu orsh'/f/ifea one ofikehestways
of/eamiHf Jo draw. Lj/rf-ike objects fr&Mt
one source- 7ru Joseparateaffme areasof
ti<?kt} ka/ftotte attds/tadoeom everytAiftf
tsou draa). Sometimes Jkese areas are yery
werqedaxdde/t'cafe, so Htatci co///Jestyear
observation ands/af/Jo define Jke#t.
96

fi
97

Applying Light on Form to Comics
If you are interested in comics, here is where
you can have a lot of fun. Once you get the
"feel" of light on form, and learn the way light
operates, you can add light and realism to your
humorous drawings.
Suppose you have drawn a sphere in its nor-
mal effect of light and shadow. Now begin to
add forms to the surface of the sphere. You do
not have to finish the sphere first, but for a
change draw some bumps on it. This principle
was presented in my earlier book. Fun With a
Pencil, but in line only. Here we attempt to add
the living qualities of light and shadow.
Light can be handled just as seriously on
comic forms as on any other, for form is form,
and light defines it. The sphere in the left-hand
upper corner of page 99 and the drawing next
to it show the plan of drawing such forms at-
tached to the ball. Invent your forms as you
wish, so long as you duplicate them on each
side of the face. You can gain a lot of experience
in lighting form if you get some modeler's clay
or plasticine and build up some of these forms
on a ball. Then set the model up in light, and
draw the light and shadow as they appear. This
will help you achieve a very convincing solidity
in your drawings, and also develop your struc-
tural sense. Any competent artist should be able
to model forms that he has drawn often, for
drawing and modeling have such an affinity that
to be able to do the one almost assures the abil-
ity to do the other.
In the deeply rounded forms, like the nose, or
the smiling cheek, we are pretty sure to have
some reflected light which causes the "hump"
at the edge of the shadow. Note that the darks
come in the depressions— the deeper, the darker.
We watch for the largest and brightest areas of
light on the forehead — on a bald head, on the
cranium. A big nose catches a lot of light, and
fat cheeks do also. The chin, if protruding, will
catch its share in most lightings. We can make
a chin come forward or recede by the way it is
lighted, especially in a front view.
On pages 100 and 101 I have given you the
outline construction of some characters I have
drawn. You can go on building such heads in-
definitely, arriving at different personalities by
varying the forms you attach to the ball. I per-
sonally enjoy doing these things, and it is amaz-
ing how such fooling around helps you in
seriously drawing heads. The lighting principle
may be applied to the whole figure as shown on
pages 103 to 105.
Comic drawing is a field in itself. Most comic
artists stick to outline only, for the sake of sim-
plicity. However, these artists also may never
have studied the possibilities of lighting on the
figxircs. Of course, when the drawings are to be
reproduced in small size, there are difficulties in-
volved. But if a grainy board and a very black
pencil are used it is not necessary to use half-
tone reproduction. On such board the pencil
may also be used in combination with pen line.
For relaxation and real fun, there is nothing in
drawing to compare with this type of creative-
ness. The little wooden or plastic manikins avail-
able at most art dealers can help out a great deal
for poses and action.
In comic drawing the construction and pro-
portion will be mostly your own. Sometimes the
more incorrect they appear, the funnier it makes
the drawing. If the wrinkles in the clothes are a
problem, get up and look at yourself in a mirror.
Make a mental note of what happens in a sleeve
or trouser leg.
98

99
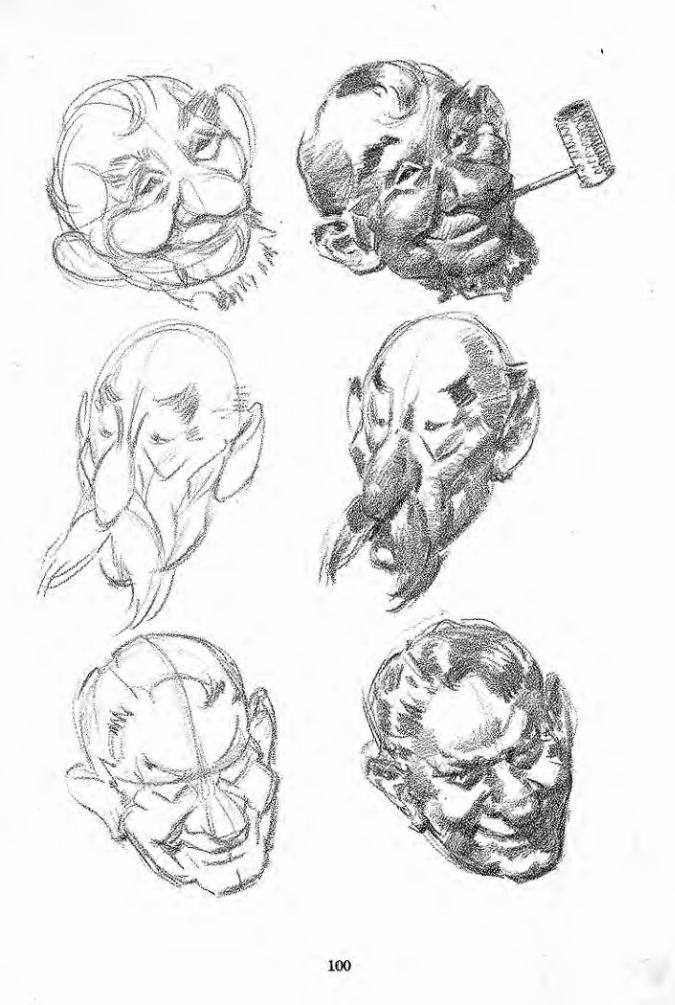
100

t;*> a#*

—•»..._,-
dStfJf
>»«#
102

103

104
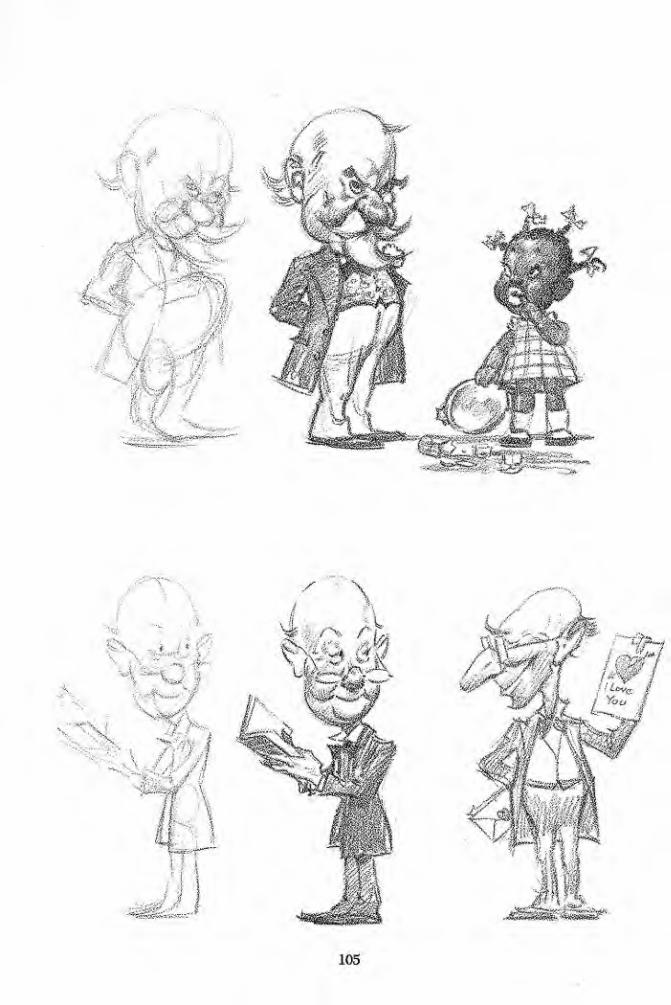
-;':'.
105

Using a Manikin for the Study of Anatomy
The best way to study anatomy is to set up a
book of anatomical diagrams before you, and
set up an art-store manikin alongside it. Draw
the action from the manikin and the muscles
from the book. You can also make rough sketches
of the manikin itself for general bulk and action
only.
Just copying anatomical diagrams docs not
seem very helpful to most students. The muscles
must somehow be built upon a frame or figure in
order to get their proportion and relationship to
the figure as a whole. The joints of the manikin
are usually balls of some kind, and of course such
joints must eventually be covered up. For this
reason it is well to concentrate on the muscles
of the shoulders, and those of the thighs, espe-
cially at the hips. Then study the chest, waist,
and buttocks. Next get the back, then the arms
and the whole leg. To balance the manikin on
its feet requires about the same arrangement of
limbs and torso that the human needs to hold
its balance.
The manikin is intended for line only, not for
the study of the figure in light and shadow. The
lighting on these simplified forms is not enough
like that on live models. We consider later the
figure in light and shadow.
Work in the life class should be done with
the anatomy book open. It is difficult to start
drawing the figure from life without any pre-
vious preparation. Upon entering a life class the
student should have a fairly accurate idea of the
proportions of the figure in heads, and in sixths,
as illustrated on page 107. I have tried to cover
most of the problems of figure drawing in a
previous volume. Figure Drawing for All It's
Worth.
Some instructors object to the use of the
wooden manikin, since the action is only an ap-
proximation at best, and there is no actual play
of muscle to go by. This objection is sound,
provided the person studying drawing has life
classes available, the time for them, and the
funds to pay for them. I gladly agree that any
young person who intends to make a living at
art should by all moans attend life classes. How-
ever, I believe that the manikin has an important
use for the study of action, since a live model
cannot hold an action pose for any length of
time. Working from the manikin tends to loosen
up the student's figure drawing. When an artist
gets out into the active practice of his art, he can
seldom draw a figure posed as it would be posed
in a life class for twenty to twenty-five minutes
at a time. The static poses of the art class should
be much more for the study of light on form,
values, and color.
To get figures in action the artist is almost
forced to use the camera, and many present-day
artists have high-speed cameras for this purpose.
However, for an action picture, the artist should
have a wcll-dcvclopcd knowledge of the figure
under the drapery. It does no harm to make the
figure do something besides stand or sit, or per-
haps hold a rod or pole. The pose or gesture of
the figure docs much to make it tell a story. If
you intend to be an illustrator, you must have
action in your work, or it will not be very suc-
cessful.
The manikin helps particularly in making pre-
liminary sketches or developing rough ideas
which hardly warrant the expense of a model.
A model can be hired for the last stage of the
work or for the material from which the final
work will be drawn.
The student should of course use his own
judgment. If he finds that the manikin helps,
let him use it.
106

DRAWING FROM THE MANIKIN
Manikins are a great help in developing action
in figure drawing, in that they can be put into
"still" poses no live model could hold. They can
be purchased at most art dealers. Their approxi-
mate construction is shown by the figure at the
right. For comparison, the figure at the left
shows the ideal proportions of the male human
figure. The line at the extreme left shows divi-
sions of the height of the figure of ideal propor-
tions. One side of the line is divided into sixths
and the other side into eighths. These two sets
of divisions indicate the important points of the
figure. Memorize these scales.
107

108

109

no
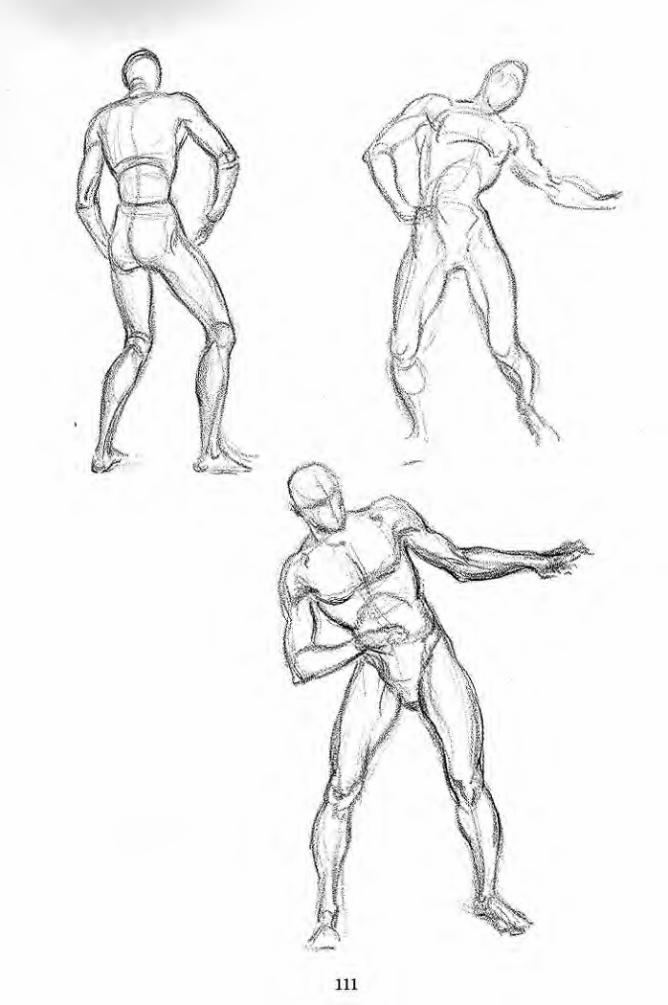
Ill

The Figure in Light
For some reason many students seem to have
their greatest difficulty in what they call "shad-
ing." Tin's is probably because there is no such
thing as "shading," in the sense they mean. Theterm "modeling" is more accurate. The student
wants to add tone to outline, so he is likely to
put in a lot of meaningless grays and darks be-
tween the outlines.
What he must do with tone is the same thing
the sculptor docs. The shadow is a tone that is
governed in the first place by the value in the
light. Things have what wc call local values,
which means the material or substance is light,
gray (or a color darker than white), or dark.
Put them in any light and (lie values keep their
relationship to one another. A dark suit, for ex-
ample, would never be as bright in value as
flesh, if both were rendered truly.
When working with pencil we seldom attempt
to get all the values in scale as we would with
paint. When there is bright light and strong
shadow we take some leeway, but we suggest
some tone in the lighted areas of dark materials,
making the shadow quite dark. For flesh, which
usually is fairly light in value, we leave the
lights as white paper, for the pencil does not
give 08 quite the range of tones from light to
dark that paint does. So in pencil drawing the
best effects come from keeping the strongly
lighted areas very delicate in modeling. Getting
effects in die lighted areas too dark makes draw-
ings appear muddy or heavy.
When working in pencil, I try to think of
about four tones, starting just beyond white, or
as light as you can state a gray, then a gray, a
dark gray, and a black. Thus the whites are ex-
treme lights, the delicate grays give some form
to the lighted areas, the grays become the half-
tones, and the dark grays and blacks are reserved
for the shadows.
There can be no formula, because every sub-
ject has its own particular values, determined
by the light, its direction, its brilliance, and its
particular effect upon the local values. But die
student can gain much understanding of light
very quickly if he can learn to distinguish the
differences between areas of light, halftone, andshadow, and set them down. Even if the values
in a drawing are not true, the correct separation
will give solidity to the drawing. Instead of try-
ing to match all the grays of a photograph whichyou are using as copy, just look for the shapes of
light, halftone, and shadow. Sometimes there
are tones within a shadow where light is re-
flected; you must draw these also, even though
they are submerged in a lower all-over tone.
It is foolish to try to fake the lighting on a
seriously drawn figure. Lighting is much too
complicated and subtle to guess at. Either have
a figure to draw from or get some good photo-
graphic material. It may be helpful to work from
copy first, and from life later. The ideal thing is
to enter a class in life drawing. Most classes
work in charcoal, which is even more flexible
than pencil as a material, for it can be easily
erased. If you are studying the figure at home,get some charcoal, charcoal paper, plastic or
kneaded rubber. You will also need a drawingboard. Hemembcr to keep darks and blacks out
of the lighted areas, except where you find ac-
cents of shadow within or alongside of these
areas. Keep a long point on your pencil or char-
coal so that you can use the tip for line and the
sides for tones.
Get some good books on figure drawing, andsome on anatomy. If you practice a good deal
on still-life drawing, too, you will draw the fig-
ure much better. Light is light no matter what
it falls upon, and it always follows the form with
light, halftone, and shadow.
112

:'.':
'
::., :-.:; ,'"';
:•.':.«
?i .
.
-
W: \
«*'
-fm ,;
..
:
113

'
1
114

-,»^****55e*j,
--«.,.
JAesertructura/-formsare wore
ttnportani f/tatt £tesvtaJ/<**<*
efetieu/#d sur/ace forfttf.
115

116

$p*\
117

118

rfsfudyatdiffurcdlijki
"\«*.

119

'-*«"£-**;
4studyit* direct iiqki
121

Depicting Character by Means of Light on Form
The only way to capture the character of a
head successfully is to understand the forms
which make up the particular individual. No
two arc alike, so there can be no formula, except
for construction, proportion, and lighting.
True enough, we can make caricatures with
line only, but even in these the forms must l>e
seen, understood, and expressed. The whole
head is the result of the forms which combined
make up its bulk or mass. It is possible to exag-
gerate the forms somewhat, which is what car-
icaturists do. but, make no mistake, these fellows
can do that only because they have a keen sense
of form. I have exaggerated some of the forms
in the heads on the following pages. By stressing
the shapes that are peculiarly characteristic,
we often get more than photographic likeness.
Just as in the figure, we look for the big forms
first - the shape of the skull and the face, and
the placement of the features. Then we take just
enough of the incidental to bring out the char-
acter. This is not a matter of tracing down con-
tours, for most of the importance lies in the
forms within the contours; to make these forms
exist, establish the effect of light on them.
Some of the heads shown here may not be fa-
miliar to the younger generation, but they arc,
or were, all characters. They include Einstein,
John D. Rockefeller, Hiram Maxim, Von ilin-
denburg. Will Rogers, Churchill, and Adolph
Menjou. To us as artists, these men, aside from
their deeds and accomplishments, are so much
proportion, spacing, a combination of forms in
light and shadow. If we were to shift one feature
of any of these faces, such as putting the nose of
one on the face of another, the whole effect
would be lost. If we can see the forms but can-
not draw them in combination with everything
else, we might as well start selling apples, as far
as drawing successful heads of individuals is
concerned. The old masters, who had no cam-
eras, took measurements of faces and features
with calipers. Some, like Sargent, succeeded in
training their eyes to measure proportions with
a profound degree of accuracy. Some students
get everything too wide for its height; others
make the opposite error. Even the best artists
must continually adjust proportions in their
drawings, when drawing from life. But the abil-
ity to do so docs eventually come with prac-
tice.
A much easier and Surer way of seeing the
forms is by looking at the lights, halftones, and
shadows. These reveal the form though it differs
in every lighting. Hence the importance of se-
lecting a simple and easily decipherable lighting.
We should know the direction of the light source
on every inch of the surface. The minute light
from more than one source strikes the same sur-
face, it upsets the sequence of the operation of
light as we know it.
Studio photographic portraits are not too good
to work from unless the photographer has really
clinched the form. The trouble is usually too
many lights and crisscross effects, which are
most difficult to reproduce in a drawing. Clip-
pings from motion-picture magazines are nearly
always bad. Such photographs are also copy-
righted and may not be used for anything but
practice. Naturally a drawing of any public fig-
ure must bo made from copy of some kind. It is
best to gather as many clippings as possible and
build the character from all the information you
have. You have a right to draw your version of
any public character, even in caricature or ear-
toon.
The best practice is secured by having people
sit for you, though it is not an easy way to work.
Study them for individual characteristics, and
stress these. A sharp face can be a little sharper,
a round one a little rounder, and so on. Eye-
sockets arc more important than irises. Only the
bones of the face keep the fles.h in the shapes we
see.
122

123
.
>
£verv AeezefAaSitsocott cotnbtK'Z'fioft
124
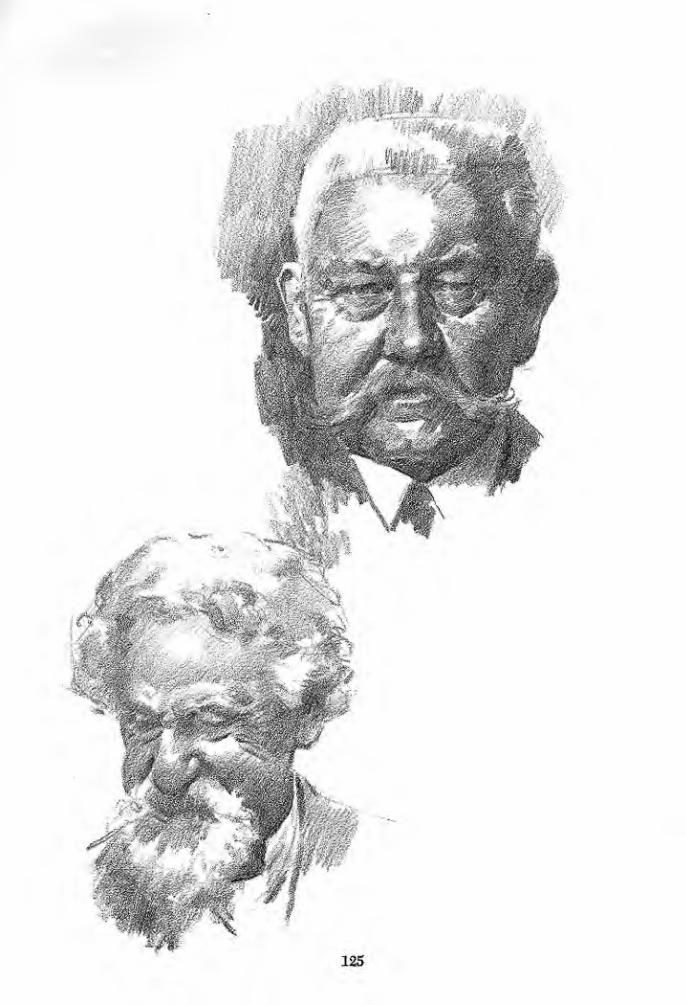

126

127

ere ts mo better way -£& JTUtfy
£kax. &>prachce a//iupes cute/
ckezracters. //eads kaye a//f4x0
ma/orprohietarofrealdrawing.
128

Fxaoaerattott of-£kefor#t

I
'(.S .
--, , .: d v
fkotouaj t#e construe
AohoHkep/anefandike e/fectofiiyktiMj
.....
Drautitta Jke Aead tot$tow£mode/or copy
130

Siucfif ike sku//forms
2/oar s£(7/.itt draweef Aeacfr depends upott your a£>i/tzu to uMc/&r~
sta/tc/ fAe forms and$ten to space fkem itt correct'proportion.
131

•.
Tone
Ttce/fit va/uah/e t-ratttino {offtake tttascypra,c£tc
studies oft/cefeatures; sinyixf&tore f>r£fteeffects
offoste -fftatefifte. /Jus if a. sound'approacftfor
paU&'xf. Jane afor**, fine is G/eftAtiiiotc*
132

7/ce success o/'Ulustrafors ut tftttercca. seettif fa depend iarqe/y
on ^Aetr ajbiiify &> c/raco a cve//-cotts£rt/c^ed'Aea.c/. JiSudty/
133

Drawing the Figure in Costume
Most of the preparation a commercial artist
goes through is to learn to draw figures in cos-
tume with all the elements right. When a man
takes up art as a hobby he is free to do what
interests him most. But if it is his vocation, the
costumed figure is his chief stock in trade, the
thing he depends upon most.
The effort put upon the study of light on form
is brought into play. His knowledge of perspec-
tive in the figure and its environment is called
upon. Light falls on the costume too, the same
light that falls on the head. The clothes should
not only drape naturally and with folds char-
acteristic of the material, but they should sug-
gest the underlying form of the figure upon
which they are draped.
In the drawings that follow, I have chosen
costumes that are not present-day styles, since
styles change so fast that even before die book
is published the clothes may be wrong for the
prevailing modes. Unless he is drawing a sub-
ject of an earlier period, the artist will have to
keep up with styles, in order to keep his figures
smart and up to date. So I have chosen costumes
which are not limited as to material or style, but
which present the same problems of folds and
draping. As period costumes these will be used
indefinitely. For practice you can make pencil
drawings of prevailing styles from the multitude
of photographs in the fashion magazines and
advertisements. The important thing is to prac-
tice drawing garments on the figure, watching
the lighting, the forms, and the perspective of
the forms. In this kind of study I suggest elim-
inating most of the background, as in my studies,
to keep the problem from becoming too compli-
cated. There is enough in a good figure and
costume in itself to make an attractive drawing.
Sometimes a bit of shadow can be added effec-
tively.
After you have made a number of costume
studies, I suggest you find illustrations in maga-
zines which show figures in a room, with some
furniture or other accessories. Copying these is
valuable practice, because they require perspec-
tive and proportion. If you have a camera, try
taking subjects of your own for practice.
I should like to call attention to the infinite
patience that Norman Rockwell shows in getting
all parts of his pictures related and correct. Few
artists will ever exhibit his fidelity to minutest
details. There may be argument as to artistic
approach, but the warm popularity of his work
stands year in and year out as proof of what I
have discussed as the intelligent perception of
the public. I cannot believe that such work will
not continue to be appreciated, no matter who
the artist is. Work based on truth will live just
as truth itself lives, all arguments to the contrary.
I wish also to mention the work of John
Gannum. Here again is fidelity, expressed differ-
ently from Rockwell's, but no less sincere. Here
is color, along with all the other elements of
successful work, including the very important
one, consistency. In the work of these two men
so many important elements are always in evi-
dence that every subject is one for study and
appreciation. The layman says much when he
looks at the work and says, "It is good; it looks
real." He has no idea of the information needed
and the ability required to make it look "real.'
The artistic expression is only possible after the
means of expression have been perfected. It is
not a matter of technique, but of seeing things in
relationship in plane, in tone and color, in pro-
portion and perspective, and in light. How we
put these things down does not matter so long
as the results are right. Variations in technique
come from individual ways of seeing and execut-
ing, but the problem itself is the same for all
who ever hold a pencil or a brush. Real tech-
nique develops itself.
134

135

136

137

138

139

140

-"
141

•., t. 1
142

143

A Gallery of Drawings
145

Every artist'j'koaJa'subscribe
fa ihefaskcoit magazines. 7key
are$ce hesipossih/e sources
forpracticemzmriak ntzke
same ~iciHe ifou are leartti/ta
dracocica attd va/ues, yonare
foMciiiarizctcg yourselfcodk
ike vert/ itptportapeie/efflettfy
ofjfy/e ofkeck marA zfae eraofco/ticki/oKrastMiatSeapaff.
;'.:':.:.
: r .
:'
146

147

I
148

149

150

\ ^»1 '
1
100:
«*, r.
r<.
w'.""'* "'•j;
;i".
frMSVTO." AW,
K3i$#aW'5*

:: -.•-.
152
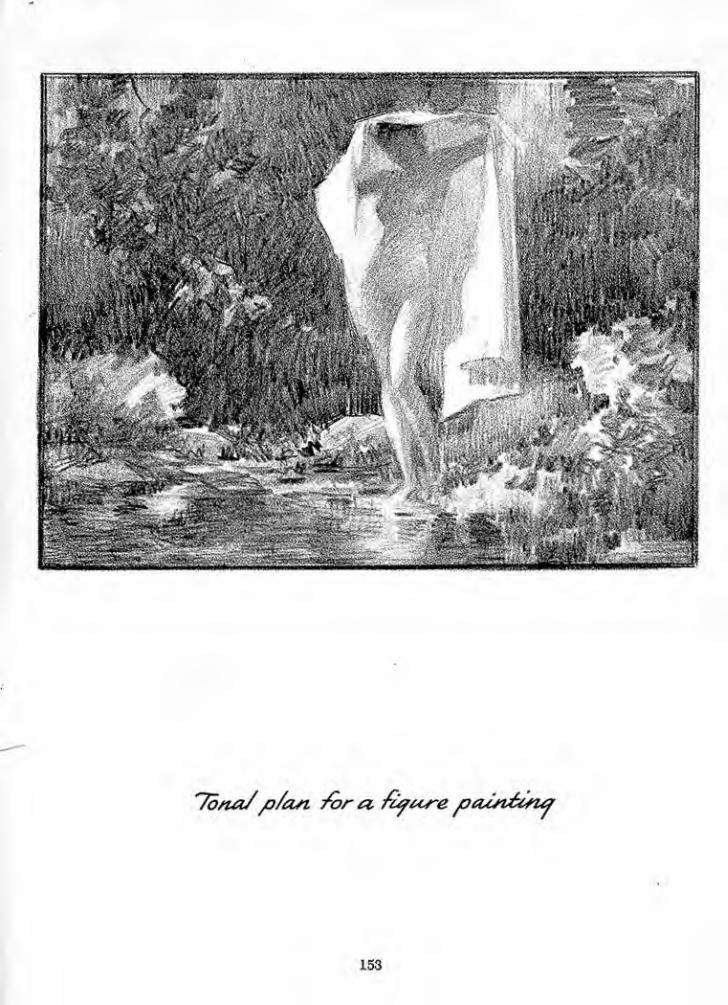
*7ona/p/an /or ct fi^ccre ptzinizna
153

154

ft-'
--:"' liters. '-
.; '-:
. K*mKb
155

\
V
.
*:
156

157
Some Parting Words
In leaving the reader of tin's book I wish to
present a plea for sound draftsmanship, plus in-
dividualism, in art. Sound draftsmanship can
hardly be associated with anything but a real-
istic approach. To my mind a realistic approach
does not limit creative imagination, which I
thoroughly agree is a part of all good art.
There are those who take the stand that real-
ism in art curtails the full expression of the
individual, that it is merely imitation rather than
creative expression. If realistic art were limited
to the camera and the duplication of its effects,
this might be true, but it must not l>e so limited.
In thinking of realism, let us not confuse it
with literalism. Let us think of life as a great
source of material from which to draw, selecting
only what is pertinent to the things we have to
say. We cannot use it all, or say it all. Let us
re-create, as does the good writer of fiction, the
poignant truths of life in so far as we are capable
of discerning them and employing them for a
purpose. Literalism devoid of purpose can be
most boring. Detail must have purpose, or there
is no reason for it. To be interesting, it must con-
tribute conviction to a thought which in itself
is interesting. The creative thought is the deli-
cate balancing point between good and bad in
art.
There is a vast difference between an unin-
spired and literal rendering of life and what we
may call "applied realism." Rather than to pro-
ject realism for its own sake, our real purpose is
to add realism to a creative idea of basic interest
We depend upon realism, then, to embellish or
to fortify our creative thoughts. The idea, within
itself, may be totally abstract or pure fiction. But
so that the idea will not remain abstract, we
strive to make it convincing and plausible by
giving it all the feeling of actuality that is pos-
sible. This is applied realism.
Realism in art does not stand in the way of
no
son
individual expression but becomes an important
bridge between artist and spectator. We can
take it for granted that the spectator's interest is
t in how accurately we can sec, but in the per-
al experience he has in looking at our picture.
Our vision may not differ greatly from his own,
but our presentation and the thoughts behind it
may give him a new experience. Crealiveness
may lie in giving reality to invention, fact to
fiction, tangibility to the intangible, and convic-
tion and power to things more felt than seen.
In the good art of today, we sense a stripping
of the foldcrols to get down to essentials, elim-
inating all elements that distract from a forceful
presentation of the idea. The background of a
picture is no longer a matter of space-filling; it
is eliminated unless it contributes to the main
thought. But since life moves against a back-
ground, its portrayal cannot always be left
dangling in space. When the background lends
force and reality to your subject, it should not
be cast away unthinkingly because of fads or
prevailing mannerisms.
Realism can have simplicity and function, re-
sulting in greater beauty, instead of merely re-
producing the haphazard multiplicity of nature.
There can be dramatic and dynamic interpre-
tation of the obvious, if we have the ability to
perceive and portray it SO.
Let as admit that much of the realistic art
produced today is mediocre. This is not the fault
of art or its principles, but is due to the inade-
quacy of the artists. Their failure does not in-
validate the principle of realism; life does not
cease to be a force merely because some in-
dividuals never learn to live.
The reason so much realistic art today is
mediocre is that good art must come the hard
way. We dabble and daub in freedom of ex-
pression and in paint. We know too little to
make good use of cither. We may thank God
159
for the freedom man has fought for and attained,
bnl we must use our intelligence to understand
the real greatness of freedom of individual ex-
pression. We must work to produce art just as
we must work for the right to live in a free na-
tion. Work in art is not so many labor hours, for
time lias nothing to do with it. To one, under-
standing may come at the age of twenty; to an-
other, at fifty. Some will never comprehend the
laws of form, color, and life. Life is the -source,
the only available source, and art lies therein.
But how about individuality? No two of us
will come away from nature with the same facts,
for no two people have the same comprehension
of her truths. We differ in personality and tal-
ents, and therefore no one can actually dupli-
cate another's performance. Successful drawing
is intelligent drawing with independent think-
ing. Knowledge in art is a combination of in-
dividuality and whatever facts the artist has
assimilated. It is like an equation between the
things we feel and the things we hear and see.
Without the artist's individuality, drawing is not
art, but only a statement of fact, yet the artist
cannot get along without some facts. Working
knowledge is the sum total of a thousand and
one small personal decisions. It results from trial
and error, comparisons and final acceptance of
one way as against another: this must be so be-
cause that is so; this appears to be this way
SOME PARTING WOKDSbecause that is that way; I draw this point be-
cause it is under that point; this seems brilliant
since that appears dull; and so it goes.
Relatively few positive assertions can be made
about art instruction that will fit all circum-
stances. Since all things arc relative, we can
speak of unity, but the specific relationships
must be discovered in the actual problem. Many
students search despairingly for an exact formula
that will steer them to a definite and certain goal,
when actually each problem demands its own
solution and each result is an individual an-
swer.
There is no way to produce, except to gather
all possible facts and work with them as you
will. Be assured that most of your knowledge
will come from contact with life, both within
yourself and from the outside world. It is the
artist who is limited, not the source. Ix:t him go
to art with respect and reverence for the great-
ness of this thing we call reality, grateful for
being a part of it, and for the freedom of doing
and saying his bit about it. Let him rejoice that
he may trust his own feelings, giving only his
own version of truth and beauty; if his effort is
worthy, it will be appreciated with warmth and
enthusiasm. Life and the individual's feeling
about it are the only real sources of creative in-
spiration in art. Art can do no more for him than
he can do for art.
160