agile advantage 2006 - oracle...agile import 2006 viii user guide creating agile objects with the...
TRANSCRIPT

Agile Import™ 2006for Agile Advantage™
User Guide

Copyrights and TrademarksCopyright © 1995-2006 Agile Software Corporation. All rights reserved. You shall not create any derivative works of this publication nor shall any part of this publication be copied, reproduced, distributed, published, licensed, sold, stored in a retrieval system or transmitted in any form or by any means: electronic, mechanical, photocopying, or otherwise, without the prior written consent of Agile Software Corporation, 6373 San Ignacio Avenue, San Jose, California 95119-1200 U.S.A.; Telephone 408.284.4000, Facsimile 408.284.4002, or http://sme.agile.com.
The material in this manual is for information only and is subject to change without notice. While reasonable efforts have been made in the preparation of this manual to assure its accuracy, Agile Software Corporation assumes no liability resulting from errors or omissions in this manual, or from the use of the information contained herein.
Agile Software Corporation reserves the right to make changes in the product design without reservation and without notification to its users.
Agile Software is a registered trademark of Agile Software Corporation.
The Agile logo, Agile Administrator, Agile Advantage, Agile Anywhere, Agile Application Server, Agile Product Record Management, Agile Program Management, Agile Product Compliance Management, Agile Standards & Compliance Management, Agile Document Management & Control, Agile Quality Management, Agile Product Sourcing, Agile Design Collaboration, Agile View & Markup, Agile Engineering Integration, Agile Enterprise Integration, Agile ChangeCAST, Agile Content Service, Agile Advantage eHub, Agile Export, Agile eXpress, Agile Advantage iFS, Agile Import, Agile Integration Server, Agile Document Scanning & Processing, AgileScript, Agile ADK, Agile Sourcing Intelligence, Agile Supplier, Agile Unwired, Agile Viewer, and MyAgile.com are trademarks of Agile Software Corporation.
Microsoft, Microsoft Windows, Microsoft Word, Microsoft Excel, and Internet Explorer are registered trademarks of Microsoft Corporation.
Oracle and Oracle 10g are registered trademarks of Oracle Corporation.
Engineering Data eXchange (EDX) for SolidWorks, Engineering Data eXchange (EDX) for Pro/ENGINEER, and Sarbanes-Oxley Compliance Pack are trademarks of Syncronus Corporation.
All other product names are trademarks, registered trademarks, or trade names of their respective owners.
Part No. TP-SBS-EN1013-2006A
April 26, 2006
CONTENTS
Preface
Welcome to Agile Import 2006 . . . . . . . . . . . . . . . . . . . . . . . . . . . . . . . . . . . . . . . . . . . . .xiUsing this Manual. . . . . . . . . . . . . . . . . . . . . . . . . . . . . . . . . . . . . . . . . . . . . . . . . . . . . . . .xiAgile Documentation . . . . . . . . . . . . . . . . . . . . . . . . . . . . . . . . . . . . . . . . . . . . . . . . . . . . xii
Documentation in PDF Format . . . . . . . . . . . . . . . . . . . . . . . . . . . . . . . . . . . . . . xiiiDocumentation Roadmap . . . . . . . . . . . . . . . . . . . . . . . . . . . . . . . . . . . . . . . . . . . xiiiReadme File . . . . . . . . . . . . . . . . . . . . . . . . . . . . . . . . . . . . . . . . . . . . . . . . . . . . . . . xiii
Other Information Sources . . . . . . . . . . . . . . . . . . . . . . . . . . . . . . . . . . . . . . . . . . . . . . xiiiAgile Online Support . . . . . . . . . . . . . . . . . . . . . . . . . . . . . . . . . . . . . . . . . . . . . . . xiiiAgile Advantage Training . . . . . . . . . . . . . . . . . . . . . . . . . . . . . . . . . . . . . . . . . . . . .xiv
Manual Conventions . . . . . . . . . . . . . . . . . . . . . . . . . . . . . . . . . . . . . . . . . . . . . . . . . . . .xiv
Chapter 1 Getting Started
What You Can Do with Agile Import 2006 . . . . . . . . . . . . . . . . . . . . . . . . . . . . . . . . . 1-1Before You Use Agile Import 2006 . . . . . . . . . . . . . . . . . . . . . . . . . . . . . . . . . . . . . . . . 1-3
Scheduling Import Sessions . . . . . . . . . . . . . . . . . . . . . . . . . . . . . . . . . . . . . . . . . . 1-5Privileges Required to Use Agile Import . . . . . . . . . . . . . . . . . . . . . . . . . . . . . . . . 1-5Applying Modify Privileges to Selected Attributes. . . . . . . . . . . . . . . . . . . . . . . 1-11
Starting Agile Import . . . . . . . . . . . . . . . . . . . . . . . . . . . . . . . . . . . . . . . . . . . . . . . . . . 1-12Using Microsoft Excel While Agile Import is Running . . . . . . . . . . . . . . . . . . . 1-13
Recommended Sequence for Importing Data . . . . . . . . . . . . . . . . . . . . . . . . . . . . . . 1-13How Agile Import Handles Imported Data . . . . . . . . . . . . . . . . . . . . . . . . . . . . . . . . 1-14
Parts, Documents, Suppliers, Manufacturers, and Manufacturer Parts . . . . . 1-14BOMs . . . . . . . . . . . . . . . . . . . . . . . . . . . . . . . . . . . . . . . . . . . . . . . . . . . . . . . . . . . 1-14AMLs . . . . . . . . . . . . . . . . . . . . . . . . . . . . . . . . . . . . . . . . . . . . . . . . . . . . . . . . . . . 1-15Prices . . . . . . . . . . . . . . . . . . . . . . . . . . . . . . . . . . . . . . . . . . . . . . . . . . . . . . . . . . . 1-15Problem Reports . . . . . . . . . . . . . . . . . . . . . . . . . . . . . . . . . . . . . . . . . . . . . . . . . . 1-15
Chapter 2 Proper Import Formats
Supported Agile Import File Formats. . . . . . . . . . . . . . . . . . . . . . . . . . . . . . . . . . . . . . 2-1Structuring Data for Import . . . . . . . . . . . . . . . . . . . . . . . . . . . . . . . . . . . . . . . . . . . . . 2-3
File Structure Guidelines . . . . . . . . . . . . . . . . . . . . . . . . . . . . . . . . . . . . . . . . . . . . 2-3
iii
Agile Import 2006
Reference Designators. . . . . . . . . . . . . . . . . . . . . . . . . . . . . . . . . . . . . . . . . . . . . . . 2-5Reference Designators in Excel Files . . . . . . . . . . . . . . . . . . . . . . . . . . . . . . . 2-6Removing Extra Spaces from Reference Designators. . . . . . . . . . . . . . . . . . 2-7Reference Designator Ranges . . . . . . . . . . . . . . . . . . . . . . . . . . . . . . . . . . . . . 2-7Using Leading Zeros in Reference Designator Ranges . . . . . . . . . . . . . . . . . 2-8Reference Designator Validation . . . . . . . . . . . . . . . . . . . . . . . . . . . . . . . . . . 2-8
Required Mapped Fields. . . . . . . . . . . . . . . . . . . . . . . . . . . . . . . . . . . . . . . . . . . . . 2-9Including Subclass Fields in the Import Data . . . . . . . . . . . . . . . . . . . . . . . . . . . . . . 2-10Reformatting Files for Import . . . . . . . . . . . . . . . . . . . . . . . . . . . . . . . . . . . . . . . . . . . 2-13Checking Your File Before Importing. . . . . . . . . . . . . . . . . . . . . . . . . . . . . . . . . . . . . 2-13How Agile Advantage Assigns Default Values to New Objects . . . . . . . . . . . . . . . . . 2-14Modifying an Import File and Reimporting . . . . . . . . . . . . . . . . . . . . . . . . . . . . . . . 2-14Checklist for Import Data . . . . . . . . . . . . . . . . . . . . . . . . . . . . . . . . . . . . . . . . . . . . . . 2-15
Chapter 3 Working with PDX Packages
About PDX Packages . . . . . . . . . . . . . . . . . . . . . . . . . . . . . . . . . . . . . . . . . . . . . . . . . . . 3-1Transferring Data from One Agile Advantage eHub to Another . . . . . . . . . . . . . . . . 3-2
Types of Data You Can Import from a PDX Package . . . . . . . . . . . . . . . . . . . . . 3-3Viewing a PDX Package in Agile eXpress . . . . . . . . . . . . . . . . . . . . . . . . . . . . . . . . . . . 3-4Handling Multiple Item Revisions . . . . . . . . . . . . . . . . . . . . . . . . . . . . . . . . . . . . . . . . 3-5Dates and Times in W3C Format . . . . . . . . . . . . . . . . . . . . . . . . . . . . . . . . . . . . . . . . . 3-5
Specifying the Time Zone for PDX 0.7 Packages . . . . . . . . . . . . . . . . . . . . . . . . . 3-6Setting MultiList Delimiters for PDX Packages . . . . . . . . . . . . . . . . . . . . . . . . . . . . . . 3-6Typical Workflow for Importing Data from a PDX Package . . . . . . . . . . . . . . . . . . . 3-6Using an Import Transformation Table . . . . . . . . . . . . . . . . . . . . . . . . . . . . . . . . . . . . 3-8
Using ITT Files Created for Agile Import 6.1, 6.7, or 7.0 . . . . . . . . . . . . . . . . . . 3-8Supported ITT File Formats . . . . . . . . . . . . . . . . . . . . . . . . . . . . . . . . . . . . . . . . . 3-9Sample ITT Files . . . . . . . . . . . . . . . . . . . . . . . . . . . . . . . . . . . . . . . . . . . . . . . . . . . 3-9Required ITT Columns and Column Names . . . . . . . . . . . . . . . . . . . . . . . . . . . 3-10Specifying PDX Objects . . . . . . . . . . . . . . . . . . . . . . . . . . . . . . . . . . . . . . . . . . . . 3-11Specifying PDX Attributes . . . . . . . . . . . . . . . . . . . . . . . . . . . . . . . . . . . . . . . . . . 3-11ITT Transformation Order. . . . . . . . . . . . . . . . . . . . . . . . . . . . . . . . . . . . . . . . . . 3-14Transforming Different Types of Data . . . . . . . . . . . . . . . . . . . . . . . . . . . . . . . . 3-14
Transforming Item Numbers . . . . . . . . . . . . . . . . . . . . . . . . . . . . . . . . . . . . 3-14Transforming Categories . . . . . . . . . . . . . . . . . . . . . . . . . . . . . . . . . . . . . . . 3-15Transforming Manufacturer Names . . . . . . . . . . . . . . . . . . . . . . . . . . . . . . 3-16Transforming AML Data . . . . . . . . . . . . . . . . . . . . . . . . . . . . . . . . . . . . . . . 3-16Transforming Product Lines. . . . . . . . . . . . . . . . . . . . . . . . . . . . . . . . . . . . . 3-17
Transforming Page Two and Page Three Fields . . . . . . . . . . . . . . . . . . . . . . . . . 3-17Blanking Out a Field Value. . . . . . . . . . . . . . . . . . . . . . . . . . . . . . . . . . . . . . . . . . 3-17
iv User Guide
Contents
Setting a Default Value . . . . . . . . . . . . . . . . . . . . . . . . . . . . . . . . . . . . . . . . . 3-18Extracting Data from a PDX Package to Create an ITT . . . . . . . . . . . . . . . . . . 3-18
Using Agile eXpress to Extract Data from a PDX Package . . . . . . . . . . . . 3-18Using Agile Import to Extract Part Information from a PDX Package . . 3-19
Printing PDX Reports in Agile eXpress. . . . . . . . . . . . . . . . . . . . . . . . . . . . . . . . 3-20Selecting an Import Transformation Table. . . . . . . . . . . . . . . . . . . . . . . . . . . . . 3-21Checking the Transform.log File . . . . . . . . . . . . . . . . . . . . . . . . . . . . . . . . . . . . . 3-21
Mapping PDX Attributes to Agile Fields . . . . . . . . . . . . . . . . . . . . . . . . . . . . . . . . . . 3-21Mapping PDX Attributes for Parts and Documents . . . . . . . . . . . . . . . . . . . . . 3-22Mapping PDX Attributes for Manufacturers . . . . . . . . . . . . . . . . . . . . . . . . . . . 3-22Mapping PDX Attributes for Manufacturer Parts . . . . . . . . . . . . . . . . . . . . . . . 3-23Mapping PDX Attributes for BOMs . . . . . . . . . . . . . . . . . . . . . . . . . . . . . . . . . . 3-23Mapping PDX Attributes for AMLs . . . . . . . . . . . . . . . . . . . . . . . . . . . . . . . . . . 3-24Mapping PDX Attributes for Attachments . . . . . . . . . . . . . . . . . . . . . . . . . . . . . 3-26
Limitations for Importing Data from PDX Packages . . . . . . . . . . . . . . . . . . . . . . . . 3-27
Chapter 4 Importing Items, Manufacturers, and Manufacturer Parts
Steps for Importing Parts, Documents, Manufacturers, and Manufacturer Parts . . 4-2Selecting the Type of Import . . . . . . . . . . . . . . . . . . . . . . . . . . . . . . . . . . . . . . . . . . . . . 4-2Selecting the Import File . . . . . . . . . . . . . . . . . . . . . . . . . . . . . . . . . . . . . . . . . . . . . . . . 4-2
Specifying Settings for Excel Files . . . . . . . . . . . . . . . . . . . . . . . . . . . . . . . . . . . . . 4-3Specifying Settings for Text Files . . . . . . . . . . . . . . . . . . . . . . . . . . . . . . . . . . . . . . 4-4Specifying Settings for PDX Packages . . . . . . . . . . . . . . . . . . . . . . . . . . . . . . . . . . 4-6
Specifying a Change Order for New Items . . . . . . . . . . . . . . . . . . . . . . . . . . . . . . . . . . 4-7Selecting Objects to Import . . . . . . . . . . . . . . . . . . . . . . . . . . . . . . . . . . . . . . . . . . . . . . 4-7Mapping Import Fields to Agile Fields . . . . . . . . . . . . . . . . . . . . . . . . . . . . . . . . . . . . . 4-8
Creating a New Mapping File . . . . . . . . . . . . . . . . . . . . . . . . . . . . . . . . . . . . . . . . 4-8Using the Mapping Window . . . . . . . . . . . . . . . . . . . . . . . . . . . . . . . . . . . . . . . . . 4-9Mapping Subclass Fields. . . . . . . . . . . . . . . . . . . . . . . . . . . . . . . . . . . . . . . . . . . . 4-11Modifying a Mapping File . . . . . . . . . . . . . . . . . . . . . . . . . . . . . . . . . . . . . . . . . . 4-11Mapping PDX Packages . . . . . . . . . . . . . . . . . . . . . . . . . . . . . . . . . . . . . . . . . . . . 4-12
Creating Agile Objects with the Imported Data . . . . . . . . . . . . . . . . . . . . . . . . . . . . 4-12Importing the Data. . . . . . . . . . . . . . . . . . . . . . . . . . . . . . . . . . . . . . . . . . . . . . . . . . . . 4-14Returning to Step 1 or Exiting Agile Import . . . . . . . . . . . . . . . . . . . . . . . . . . . . . . . 4-15
Chapter 5 Importing BOMs from Excel or Text Files
Steps for Importing BOMs from Excel or Text Files . . . . . . . . . . . . . . . . . . . . . . . . . . 5-2Appending Data to a BOM . . . . . . . . . . . . . . . . . . . . . . . . . . . . . . . . . . . . . . . . . . . . . . 5-2
v

Agile Import 2006
Replacing a BOM . . . . . . . . . . . . . . . . . . . . . . . . . . . . . . . . . . . . . . . . . . . . . . . . . . . . . . 5-3Selecting the Type of Import . . . . . . . . . . . . . . . . . . . . . . . . . . . . . . . . . . . . . . . . . . . . . 5-6Specifying a Change Order for New Items . . . . . . . . . . . . . . . . . . . . . . . . . . . . . . . . . . 5-6Specifying BOM Assemblies to Import . . . . . . . . . . . . . . . . . . . . . . . . . . . . . . . . . . . . 5-7
Using the Assembly Editor . . . . . . . . . . . . . . . . . . . . . . . . . . . . . . . . . . . . . . . . . . . 5-9Assembly Editor Fields . . . . . . . . . . . . . . . . . . . . . . . . . . . . . . . . . . . . . . . . . . 5-9Assembly Editor Buttons . . . . . . . . . . . . . . . . . . . . . . . . . . . . . . . . . . . . . . . 5-11
Creating Multiple Import Files and Mapping Files . . . . . . . . . . . . . . . . . . . . . . 5-11Mapping Import Fields to Agile Fields . . . . . . . . . . . . . . . . . . . . . . . . . . . . . . . . 5-12
A Note about Mapping BOM Part Descriptions . . . . . . . . . . . . . . . . . . . . 5-13Additional Information about Mapping . . . . . . . . . . . . . . . . . . . . . . . . . . . 5-14
Handling Duplicate Item Numbers, Find Numbers, and Reference Designators. . 5-14Creating Agile Items with the Imported Data . . . . . . . . . . . . . . . . . . . . . . . . . . . . . . 5-14Importing the BOM Data . . . . . . . . . . . . . . . . . . . . . . . . . . . . . . . . . . . . . . . . . . . . . . 5-16
Importing Different BOMs for Multiple Item Revisions . . . . . . . . . . . . . . . . . 5-17Redlining a BOM . . . . . . . . . . . . . . . . . . . . . . . . . . . . . . . . . . . . . . . . . . . . . . . . . . . . . 5-17
Redlining Partial BOM Rows . . . . . . . . . . . . . . . . . . . . . . . . . . . . . . . . . . . . . . . . 5-18Redlining the Item Number and Find Num Fields . . . . . . . . . . . . . . . . . . . . . . 5-18
Reviewing Redlines, Returning to Step 1, or Exiting Agile Import . . . . . . . . . . . . . 5-19BOM Rollbacks . . . . . . . . . . . . . . . . . . . . . . . . . . . . . . . . . . . . . . . . . . . . . . . . . . . . . . . 5-20
Chapter 6 Importing BOMs from PDX Packages
Steps for Importing BOMs from a PDX Package . . . . . . . . . . . . . . . . . . . . . . . . . . . . 6-2Setting Reference Designator Defaults before Importing BOMs . . . . . . . . . . . . . . . . 6-2Selecting the Type of Import . . . . . . . . . . . . . . . . . . . . . . . . . . . . . . . . . . . . . . . . . . . . . 6-3Selecting the PDX Package. . . . . . . . . . . . . . . . . . . . . . . . . . . . . . . . . . . . . . . . . . . . . . . 6-3Specifying a Change Order for New Items . . . . . . . . . . . . . . . . . . . . . . . . . . . . . . . . . . 6-3Selecting Items to Import . . . . . . . . . . . . . . . . . . . . . . . . . . . . . . . . . . . . . . . . . . . . . . . 6-4Mapping Import Fields to Agile Fields . . . . . . . . . . . . . . . . . . . . . . . . . . . . . . . . . . . . . 6-5
A Note about Mapping BOM Part Descriptions . . . . . . . . . . . . . . . . . . . . . . . . . 6-5Additional Information about Mapping. . . . . . . . . . . . . . . . . . . . . . . . . . . . . . . . 6-5
Specifying Change Orders for Assemblies . . . . . . . . . . . . . . . . . . . . . . . . . . . . . . . . . . 6-6Modifying the Assembly Specification . . . . . . . . . . . . . . . . . . . . . . . . . . . . . . . . . . . . . 6-8Handling Duplicate Item Numbers, Find Numbers, and Reference Designators. . 6-10Creating Agile Items with the Imported Data . . . . . . . . . . . . . . . . . . . . . . . . . . . . . . 6-10Importing the BOM Data . . . . . . . . . . . . . . . . . . . . . . . . . . . . . . . . . . . . . . . . . . . . . . 6-11
Redlining a BOM . . . . . . . . . . . . . . . . . . . . . . . . . . . . . . . . . . . . . . . . . . . . . . . . . 6-12Reviewing Redlines, Returning to Step 1, or Exiting Agile Import . . . . . . . . . . . . . 6-12BOM Rollbacks . . . . . . . . . . . . . . . . . . . . . . . . . . . . . . . . . . . . . . . . . . . . . . . . . . . . . . . 6-13
vi User Guide
Contents
Chapter 7 Importing Approved Manufacturers
Steps for Importing Approved Manufacturers. . . . . . . . . . . . . . . . . . . . . . . . . . . . . . . 7-1Selecting the Type of Import . . . . . . . . . . . . . . . . . . . . . . . . . . . . . . . . . . . . . . . . . . . . . 7-2Selecting the Import File . . . . . . . . . . . . . . . . . . . . . . . . . . . . . . . . . . . . . . . . . . . . . . . . 7-2Specifying a Change Order for New Items . . . . . . . . . . . . . . . . . . . . . . . . . . . . . . . . . . 7-3Selecting Items to Import (for PDX Import Only) . . . . . . . . . . . . . . . . . . . . . . . . . . . 7-4Mapping Import Fields to Agile Fields . . . . . . . . . . . . . . . . . . . . . . . . . . . . . . . . . . . . . 7-5
Additional Information about Mapping. . . . . . . . . . . . . . . . . . . . . . . . . . . . . . . . 7-5Creating Agile Objects with the Imported Data . . . . . . . . . . . . . . . . . . . . . . . . . . . . . 7-6Specifying Change Orders to Import Approved Manufacturers . . . . . . . . . . . . . . . . 7-7Importing the AML Data. . . . . . . . . . . . . . . . . . . . . . . . . . . . . . . . . . . . . . . . . . . . . . . 7-10Redlining an AML . . . . . . . . . . . . . . . . . . . . . . . . . . . . . . . . . . . . . . . . . . . . . . . . . . . . 7-10
Appending Data to an AML. . . . . . . . . . . . . . . . . . . . . . . . . . . . . . . . . . . . . . . . . 7-11Replacing an AML. . . . . . . . . . . . . . . . . . . . . . . . . . . . . . . . . . . . . . . . . . . . . . . . . 7-12Redlining Partial AML Rows . . . . . . . . . . . . . . . . . . . . . . . . . . . . . . . . . . . . . . . . 7-16How Agile Import Compares Source and Target AMLs . . . . . . . . . . . . . . . . . . 7-16AML Bouncing . . . . . . . . . . . . . . . . . . . . . . . . . . . . . . . . . . . . . . . . . . . . . . . . . . . 7-22
Returning to Step 1 or Exiting Agile Import . . . . . . . . . . . . . . . . . . . . . . . . . . . . . . . 7-24AML Rollbacks . . . . . . . . . . . . . . . . . . . . . . . . . . . . . . . . . . . . . . . . . . . . . . . . . . . . . . . 7-24
Chapter 8 Importing Suppliers
Steps for Importing Suppliers . . . . . . . . . . . . . . . . . . . . . . . . . . . . . . . . . . . . . . . . . . . . 8-1Selecting the Type of Import . . . . . . . . . . . . . . . . . . . . . . . . . . . . . . . . . . . . . . . . . . . . . 8-2Selecting the Import File . . . . . . . . . . . . . . . . . . . . . . . . . . . . . . . . . . . . . . . . . . . . . . . . 8-2Mapping Import Fields to Agile Fields . . . . . . . . . . . . . . . . . . . . . . . . . . . . . . . . . . . . . 8-3
Additional Information about Mapping. . . . . . . . . . . . . . . . . . . . . . . . . . . . . . . . 8-4Creating Agile Objects with the Imported Data . . . . . . . . . . . . . . . . . . . . . . . . . . . . . 8-4Importing the Supplier Data . . . . . . . . . . . . . . . . . . . . . . . . . . . . . . . . . . . . . . . . . . . . . 8-5Returning to Step 1 or Exiting Agile Import . . . . . . . . . . . . . . . . . . . . . . . . . . . . . . . . 8-6
Chapter 9 Importing Prices
Steps for Importing Prices . . . . . . . . . . . . . . . . . . . . . . . . . . . . . . . . . . . . . . . . . . . . . . . 9-1Selecting the Type of Import . . . . . . . . . . . . . . . . . . . . . . . . . . . . . . . . . . . . . . . . . . . . . 9-2Selecting the Import File . . . . . . . . . . . . . . . . . . . . . . . . . . . . . . . . . . . . . . . . . . . . . . . . 9-2Mapping Import Fields to Agile Fields . . . . . . . . . . . . . . . . . . . . . . . . . . . . . . . . . . . . . 9-3
Additional Information about Mapping. . . . . . . . . . . . . . . . . . . . . . . . . . . . . . . . 9-4Specifying a Supplier for New Supplier Parts. . . . . . . . . . . . . . . . . . . . . . . . . . . . . . . . 9-4
vii

Agile Import 2006
Creating Agile Objects with the Imported Data . . . . . . . . . . . . . . . . . . . . . . . . . . . . . 9-4Importing the Price Data . . . . . . . . . . . . . . . . . . . . . . . . . . . . . . . . . . . . . . . . . . . . . . . . 9-6Returning to Step 1 or Exiting Agile Import . . . . . . . . . . . . . . . . . . . . . . . . . . . . . . . . 9-6
Chapter 10 Importing Attachments from PDX Packages
What Is Imported . . . . . . . . . . . . . . . . . . . . . . . . . . . . . . . . . . . . . . . . . . . . . . . . . . . . . 10-1Steps for Importing Attachments from a PDX Package . . . . . . . . . . . . . . . . . . . . . . 10-2Agile Import Attachment Strategies . . . . . . . . . . . . . . . . . . . . . . . . . . . . . . . . . . . . . . 10-2Selecting the Type of Import . . . . . . . . . . . . . . . . . . . . . . . . . . . . . . . . . . . . . . . . . . . . 10-3Selecting the PDX Package. . . . . . . . . . . . . . . . . . . . . . . . . . . . . . . . . . . . . . . . . . . . . . 10-3Selecting Revisions to Attach To . . . . . . . . . . . . . . . . . . . . . . . . . . . . . . . . . . . . . . . . . 10-4Mapping Import Fields to Agile Fields . . . . . . . . . . . . . . . . . . . . . . . . . . . . . . . . . . . . 10-5
Additional Information about Mapping. . . . . . . . . . . . . . . . . . . . . . . . . . . . . . . 10-7Creating Agile Objects with the Imported Data . . . . . . . . . . . . . . . . . . . . . . . . . . . . 10-7Importing the Attachments . . . . . . . . . . . . . . . . . . . . . . . . . . . . . . . . . . . . . . . . . . . . . 10-8Returning to Step 1, or Exiting Agile Import . . . . . . . . . . . . . . . . . . . . . . . . . . . . . . . 10-8Importing Multiple-file (Folder) Attachments . . . . . . . . . . . . . . . . . . . . . . . . . . . . . 10-9
Chapter 11 Importing Problem Reports
Steps for Importing Problem Reports. . . . . . . . . . . . . . . . . . . . . . . . . . . . . . . . . . . . . 11-1Selecting the Type of Import . . . . . . . . . . . . . . . . . . . . . . . . . . . . . . . . . . . . . . . . . . . . 11-2Selecting the Import File . . . . . . . . . . . . . . . . . . . . . . . . . . . . . . . . . . . . . . . . . . . . . . . 11-2
Specifying Settings for Excel Files . . . . . . . . . . . . . . . . . . . . . . . . . . . . . . . . . . . . 11-3Specifying Settings for Text Files . . . . . . . . . . . . . . . . . . . . . . . . . . . . . . . . . . . . . 11-3
Mapping Import Fields to Agile Fields . . . . . . . . . . . . . . . . . . . . . . . . . . . . . . . . . . . . 11-3Creating a New Mapping File . . . . . . . . . . . . . . . . . . . . . . . . . . . . . . . . . . . . . . . 11-4Mapping Subclass Fields. . . . . . . . . . . . . . . . . . . . . . . . . . . . . . . . . . . . . . . . . . . . 11-5
Creating the Problem Reports to Receive Imported Data. . . . . . . . . . . . . . . . . . . . . 11-5Importing the Data. . . . . . . . . . . . . . . . . . . . . . . . . . . . . . . . . . . . . . . . . . . . . . . . . . . . 11-6Returning to Step 1 or Exiting Agile Import . . . . . . . . . . . . . . . . . . . . . . . . . . . . . . . 11-6
Chapter 12 Validating Import Data
Item Revision Validation . . . . . . . . . . . . . . . . . . . . . . . . . . . . . . . . . . . . . . . . . . . . . . . 12-1New Object Validation . . . . . . . . . . . . . . . . . . . . . . . . . . . . . . . . . . . . . . . . . . . . . . . . . 12-2PDX Packages and Agile Key Field Information . . . . . . . . . . . . . . . . . . . . . . . . . . . . 12-4Data Validation . . . . . . . . . . . . . . . . . . . . . . . . . . . . . . . . . . . . . . . . . . . . . . . . . . . . . . . 12-4SmartRules Validation . . . . . . . . . . . . . . . . . . . . . . . . . . . . . . . . . . . . . . . . . . . . . . . . . 12-8
viii User Guide

Contents
BOM Validation . . . . . . . . . . . . . . . . . . . . . . . . . . . . . . . . . . . . . . . . . . . . . . . . . . . . . 12-11AML Validation. . . . . . . . . . . . . . . . . . . . . . . . . . . . . . . . . . . . . . . . . . . . . . . . . . . . . . 12-12Unsecure Attachment Files . . . . . . . . . . . . . . . . . . . . . . . . . . . . . . . . . . . . . . . . . . . . 12-13Log Files. . . . . . . . . . . . . . . . . . . . . . . . . . . . . . . . . . . . . . . . . . . . . . . . . . . . . . . . . . . . 12-13
Convert.log File . . . . . . . . . . . . . . . . . . . . . . . . . . . . . . . . . . . . . . . . . . . . . . . . . . 12-17Transform.log File. . . . . . . . . . . . . . . . . . . . . . . . . . . . . . . . . . . . . . . . . . . . . . . . 12-17Conflicts.log File . . . . . . . . . . . . . . . . . . . . . . . . . . . . . . . . . . . . . . . . . . . . . . . . . 12-17Create.log File . . . . . . . . . . . . . . . . . . . . . . . . . . . . . . . . . . . . . . . . . . . . . . . . . . . 12-18Autopopulate.log File . . . . . . . . . . . . . . . . . . . . . . . . . . . . . . . . . . . . . . . . . . . . . 12-19Import.log File . . . . . . . . . . . . . . . . . . . . . . . . . . . . . . . . . . . . . . . . . . . . . . . . . . 12-19
Chapter 13 Setting Preferences
Displaying Agile Import Preferences. . . . . . . . . . . . . . . . . . . . . . . . . . . . . . . . . . . . . . 13-1When Agile Import Preferences Take Effect . . . . . . . . . . . . . . . . . . . . . . . . . . . . . . . . 13-2Setting General Preferences . . . . . . . . . . . . . . . . . . . . . . . . . . . . . . . . . . . . . . . . . . . . . 13-3
Setting the Icon Motif. . . . . . . . . . . . . . . . . . . . . . . . . . . . . . . . . . . . . . . . . . . . . . 13-3Setting MultiList Delimiters. . . . . . . . . . . . . . . . . . . . . . . . . . . . . . . . . . . . . . . . . 13-4Setting a Preference for Overwriting Values . . . . . . . . . . . . . . . . . . . . . . . . . . . . 13-4Handling Spaces . . . . . . . . . . . . . . . . . . . . . . . . . . . . . . . . . . . . . . . . . . . . . . . . . . 13-5
Setting File Preferences. . . . . . . . . . . . . . . . . . . . . . . . . . . . . . . . . . . . . . . . . . . . . . . . . 13-6Setting Excel File Defaults . . . . . . . . . . . . . . . . . . . . . . . . . . . . . . . . . . . . . . . . . . 13-6Setting a Preference for Opening Import Files . . . . . . . . . . . . . . . . . . . . . . . . . . 13-6Setting Text File Defaults . . . . . . . . . . . . . . . . . . . . . . . . . . . . . . . . . . . . . . . . . . . 13-7Specifying Text Qualifiers to Use with Import Files . . . . . . . . . . . . . . . . . . . . . 13-7
Avoiding Mismatched Text Qualifiers . . . . . . . . . . . . . . . . . . . . . . . . . . . . . 13-8Setting Warning Preferences . . . . . . . . . . . . . . . . . . . . . . . . . . . . . . . . . . . . . . . . . . . . 13-8
Handling Length Warnings . . . . . . . . . . . . . . . . . . . . . . . . . . . . . . . . . . . . . . . . . 13-8Handling Quantity Mismatch Warnings . . . . . . . . . . . . . . . . . . . . . . . . . . . . . . 13-9Handling SmartRules Warnings . . . . . . . . . . . . . . . . . . . . . . . . . . . . . . . . . . . . 13-10
BOM SmartRule Example . . . . . . . . . . . . . . . . . . . . . . . . . . . . . . . . . . . . . 13-11AML SmartRule Example . . . . . . . . . . . . . . . . . . . . . . . . . . . . . . . . . . . . . . 13-13
Setting BOM and AML Preferences . . . . . . . . . . . . . . . . . . . . . . . . . . . . . . . . . . . . . 13-15Pausing After Each Assembly for BOM Import . . . . . . . . . . . . . . . . . . . . . . . . 13-15Setting the Import Mode for Preliminary AMLs . . . . . . . . . . . . . . . . . . . . . . . 13-15Setting the Import Mode for Preliminary BOMs. . . . . . . . . . . . . . . . . . . . . . . 13-16Setting Reference Designator Defaults . . . . . . . . . . . . . . . . . . . . . . . . . . . . . . . 13-16Setting Preferences for Temporary Objects Created for Redlining. . . . . . . . . 13-17
Avoiding Collisions with Existing and Future Item Numbers. . . . . . . . . 13-18Validating Temporary Item Numbers . . . . . . . . . . . . . . . . . . . . . . . . . . . . 13-18
ix

Agile Import 2006
Deleting Temporary Objects . . . . . . . . . . . . . . . . . . . . . . . . . . . . . . . . . . . 13-18Setting Attachment Preferences. . . . . . . . . . . . . . . . . . . . . . . . . . . . . . . . . . . . . . . . . 13-18
Attachment Revision Mode . . . . . . . . . . . . . . . . . . . . . . . . . . . . . . . . . . . . . . . . 13-19 Load Attachments to Incorporated Items . . . . . . . . . . . . . . . . . . . . . . . . . . . . 13-20
Index
x User Guide

PREFACE
Welcome to Agile Import 2006Agile Import 2006 is a Windows client application included with the Agile Advantage product suite. It lets you import Parts, Documents, Manufacturers, Manufacturer Parts, Bills of Material (BOMs), Approved Manufacturers List (AMLs) data, file attachments, and problem reports to the Agile Advantage database.
Using this ManualThe Agile Import 2006 User Guide provides information about Agile Import. The chapters are organized as follows:
Table 1: What’s in this manual
Chapter/Appendix Description
Preface This section includes information about Agile Advantage documentation, technical support, and system requirements.
Chapter 1,“Getting Started”
This chapter briefly describes the features of Agile Import, including what’s new in this release; explains what needs to be in place before you can use Agile Import; discusses the import process; and covers how to start Agile Import.
Chapter 2,“Proper Import Formats”
This chapter explains how data must be formatted to be imported successfully.
Chapter 3,“Working with PDX Packages”
This chapter explains PDX packages and the types of data that you can import from them, how to use transformation tables to ensure that data from one eHub is correct for another eHub, and how to print PDX reports in Agile eXpress.
Chapter 4, “Importing Items, Manufacturers, and Manufacturer Parts”
This chapter explains how to import Items, Manufacturers, and Manufacturer Parts from text files, Excel files, PDX packages, and CSV files.
xi

Agile Import 2006
Agile DocumentationThe Agile documentation includes Adobe® Acrobat® PDF files available online. Also, ask your Agile administrator if there is a Documentation folder available on your network, from which you can access the Agile documentation (PDF) files.
Note To read the PDF files, use the free Adobe® Acrobat® Reader™. For more information about Adobe Acrobat Reader, visit www.adobe.com.
Chapter 5, “Importing BOMs from Excel or Text Files”
This chapter explains how to import BOMs from text files and Excel files, including how to replace a BOM or append data to it. This chapter also covers BOM redlines and rollbacks.
Chapter 6, “Importing BOMs from PDX Packages”
This chapter explains how to import BOMs from PDX packages. It covers reference designator defaults, redlining, and BOM rollbacks.
Chapter 7, “Importing Approved Manufacturers”
This chapter explains how to import AMLs (Approved Manufacturer Lists) from text files, Excel files, and PDX packages. This chapter also covers AML redlines and AML bouncing and rollbacks.
Chapter 8, “Importing Suppliers”
This chapter explains how to import Suppliers from text files and Excel files.
Chapter 9, “Importing Prices”
This chapter explains how to import Prices from text files and Excel files.
Chapter 10, “Importing Attachments from PDX Packages”
This chapter explains how to import file attachments from PDX packages.
Chapter 11, “Importing Problem Reports”
This chapter explains how to import problem reports from text or Excel files.
Chapter 12, “Validating Import Data”
This chapter covers validation of Agile objects, data, SmartRules, BOMs, and AMLs. It also explains the log files generated by Agile Import.
Chapter 13, “Setting Preferences”
This chapter covers the preferences that you can set in Agile Import, including general preferences and preferences for files, warnings (how to handle them), BOMs, and AMLs.
Table 1: What’s in this manual
Chapter/Appendix Description
xii User Guide

Preface
Documentation in PDF Format
The primary documentation for Agile Advantage is the online Help system. This manual is the source for the conceptual and task Help and is provided in PDF format for your convenience when performing text searches and printing.
Documentation Roadmap
You can find a complete list of all Agile documentation from the Help menu, or by visiting the Support area of the Agile Web site athttp://sme.agile.com/support.
Readme File
The Agile Advantage readme file contains up-to-date information that may be useful to you in configuring Agile Advantage. You can view the readme file from the main Agile Installation folder.
Other Information SourcesYou can get additional help in a number of ways.
Agile Online Support
For product support or information about Agile products and services, visit the Agile Web site at http://sme.agile.com.
Customers with a current Agile Support agreement (existing account required or request an account by e-mail to [email protected]) can log in to this site to access the following online services for Agile Software® products:
❑ Problem status and reporting
❑ Alerts
❑ Frequently asked questions (FAQs)
❑ Documentation
xiii

Agile Import 2006
Agile Advantage Training
Agile and our certified solution providers offer a variety of training programs for Agile Advantage. These programs include onsite training, classroom training, and web-based training.
Agile Administrators are recommended to attend either onsite or classroom training for both the User and Administrator course work.
Agile users are recommended to use the web based training or attend classroom or onsite training for the User course work.
To schedule Agile training, contact your account executive.
Manual ConventionsThe following table lists conventions used in the Agile documentation, and gives an example of how each convention is applied.
Table 2: Conventions used in this manual
Convention Example
Text from the user interface (for example, field names, nodes, and menus and commands) are shown in a sans serif bold font.
Select the SmartRules node.
Click OK.
Text you need to type is shown in Courier.
Type the username Administrator.
Placeholders for variable text are shown in Italic.
Set the directory to <drive>:\Agile\Qadmin\.
A vertical bar is used to separate a menu name from its menu command; and to indicate the expansion of nodes and subnodes.
You can generate Agile Administrator reports from the Tools | Reports menu.Expand the Change Orders | Attributes | Cover Page node.
Right-click means to press and release the right mouse button.
Right-click to see the shortcut menu.
Shift+click means to press and hold the Shift key while clicking the mouse button
Shift+click to select a block of items in the list.
Ctrl+click means to press and hold the Ctrl key while clicking the mouse button.
Ctrl+click to select non-contiguous items in the list.
xiv User Guide

Preface
A plus sign (+) means to hold down one key while pressing another.
To open the File menu, press Alt+F.
The term “computer” generically refers to hardware for a server or workstation.
Import the Agile database file to replicate the database on another computer.
Table 2: Conventions used in this manual
Convention Example
xv

Agile Import 2006
xvi User Guide

CHAPTER 1Getting Started
This chapter describes what you need to do to get started using Agile Import 2006. It includes these topics:❑ What You Can Do with Agile Import 2006❑ Before You Use Agile Import 2006❑ Starting Agile Import❑ Recommended Sequence for Importing Data❑ How Agile Import Handles Imported Data
Note For Agile Import 2006 system requirements and installation instructions, see the Agile Advantage 2006 Installation and Maintenance Guide.
What You Can Do with Agile Import 2006Agile Import 2006 allows you to import Parts, Documents, Manufacturers, Manufacturer Parts, BOMs, AMLs, Suppliers, Prices, file attachments, and problem reports. You can import BOMs and AMLs to released Items—using Import’s advanced redlining capabilities—and to unreleased Items. In addition, multiple multilevel BOMs can be imported from PDX packages in a single pass. All of these advanced capabilities allow collaborative manufacturing companies to easily exchange new and updated product content in Internet time.
1-1

Agile Import 2006
Agile Import 2006 lets you:
❑ Simultaneously import a BOM, create a new Item for each Item on the imported BOM (and each parent Item of the BOM), and add the imported Items to the BOM table of an Item, with or without redlining.
❑ Simultaneously import product data and create new Items, Suppliers, Prices, Manufacturers, and Manufacturer Parts. The fields for new Items, Manufacturers, and Manufacturer Parts are automatically filled in with the imported data.
❑ Update existing Items, Manufacturers, and Manufacturer Parts by importing information for the existing objects. Using the new Overwrite Mode preference setting, you can overwrite all mapped fields or only those fields that are currently blank.
❑ Import Approved Manufacturers to the Manufacturers tab of newly created Items and Items that existed prior to the import session, with or without redlining. You can update the Manufacturers tab with newly created Manufacturers and Manufacturer Parts.
❑ Import Parts and Documents, Manufacturers, Manufacturer Parts, BOMs (including multilevel BOMs), AMLs, and file attachments from PDX packages.
❑ Import Compliance attributes to Items and Manufacturer Parts from CSV, XLS and TXT files.
❑ Place newly created Items on a Change (ECO or MCO) for easy releasing.
❑ Import problem reports from text or Excel files.
Agile Import 2006 supports PDX packages in the format PDX DTD Revision 1.0. This expands PDX import capabilities, allowing you to import:
❑ Manufacturers
❑ Manufacturer Parts
❑ File attachments from Items, Manufacturers and Manufacturer Parts
❑ Page Two and Page Three attributes to Items, Manufacturers, and Manufacturer Parts
❑ BOM and AML custom fields
PDX import also supports these following processes:
1-2 User Guide

Chapter 1 Getting Started
❑ Items created during import of Items, BOMs, or AMLs can be placed on a Change automatically so that they can be released easily.
❑ Intelligent validation of lists means that entries for List and MultiList fields are no longer case-sensitive or space-sensitive.
❑ For imported attachments associated with released Parts or Documents, you can have the file attached to the latest released revision of the Part or Document (the default behavior), or you can have the file attached to a different revision using the Attachment Revision Mode preference.
Note This option is available only for importing attachments.
❑ PDX import of file attachments includes error logging.
❑ You can import BOM rows along with attributes for BOM child objects in one import pass. Parent Items are also created with just the primary key attribute. Other attributes of BOM parent Items are imported only when those parent Items are also child Items of another BOM parent in the package.
❑ You can import AML rows along with attributes for AML parent and child objects in one import pass.
❑ PDX 1.0 packages can contain multiple revisions of an Item. When you import Items, Agile Import lets you choose which revision of each Item to import. During BOM import, PDX packages that contain multiple revisions of an Item are rejected.
Note The PDX standards organization has made changes to PDX object and attribute names since the earlier PDX 0.7 standard. If you have Import Transformation Tables that you used with previous versions of Agile Import, you will need to update them to reflect the new PDX object and attribute names. See Chapter 3, “Working with PDX Packages,” for a list of PDX attributes and the corresponding Agile fields.
❑ You can import problem reports if your company has a license to use the Product Quality and Customer Response features.
❑ The Agile Import wizard now indicates the target eHub in the title bar.
Before You Use Agile Import 2006 Before you use Agile Import 2006, make sure you have the necessary software and privileges:
1-3

Agile Import 2006
❑ You must have the appropriate user license to use Agile Import. To import problem reports, your company must be licensed to use the Agile Quality Management features. If you are unable to run Agile Import because you have not been assigned the necessary Agile Advantage licenses or user privileges, please see your Agile administrator.
❑ To run Agile Import, you must have installed Microsoft Internet Explorer version 6.0 with Service Pack 1 or later.
❑ To run Agile Import, the operating system user must have Administrator privileges on the computer where Agile Import will be run.
❑ To import product data to the Agile database, you must have the appropriate Agile privileges. For more information, see “Privileges Required to Use Agile Import” on page 1-5.
❑ If you want to import product data from a Microsoft Excel spreadsheet, Excel must be installed on the computer running Agile Import and must be registered in the Windows profile of the Agile Import user. Agile Import supports Microsoft Excel 2000 or Microsoft Excel 2003. Open office Excel support for Agile Import requires you to open excel application select the Tools menu at the top of your worksheet and click Options. Select the General tab on the Dialog box that displays on your screen. Find the checkbox next to Ignore Other Applications and click to clear it. Click OK and close the dialog box.You should now be able to open your Excel workbooks by selecting and double-clicking them from within Windows Explorer.Then import will work with open Office Excel.
❑ To start Agile’s Windows client from Agile Import to view redline BOMs, you must have the Agile Advantage 2006 Windows client installed on the computer running Agile Import 2006.
❑ To import data for Page Two or Page Three fields, the fields must be set to Visible in Agile Administrator and you must have write privileges to them. If you cannot view the necessary fields from Agile, see your Agile administrator or the Agile Administrator 2006 User Guide before importing.
❑ You can create PDX packages using Agile eXpress 2006 Professional. You can view PDX packages using Agile eXpress 2006.
1-4 User Guide

Chapter 1 Getting Started
Scheduling Import Sessions
Because Agile Import 2006 supports PDX packages, it is easier to create and import large amounts of data. For example, you could import hundreds of Items from a PDX package, and each Item could have several hundred BOM rows.
To import large data files, you may require additional hardware resources. Please contact Agile Technical Support for more information. Available memory (RAM), processor speed, and available hard-disk space have a significant effect on Agile Import performance. For large data files, an import session can run longer than an hour.
Note If you are running Agile Import, and if you want to import a file with more than 1000 rows, reboot the computer before starting the process.
If you are importing considerable amounts of data, you should schedule import sessions during non-business hours—on evenings or during the weekend—when Agile Advantage eHub usage is low. One advantage to importing data when other users are not connected is that you avoid object locking problems. If a user has an object locked, you cannot import data to it.
When importing large data files, you may be unable to attend the entire session, particularly if it runs longer than an hour. For unattended import sessions, make sure you specify a default action for the following Agile Import 2006 preferences:
❑ SmartRules warnings
❑ Quantity Mismatch warnings
❑ Length warnings
If you do not specify a default action for these preferences, an import session could be interrupted by a warning message, which requires user interaction. For information about how to set preferences, see Chapter 13, “Setting Preferences.”
Note You can run only one instance of Agile Import on a single Agile Advantage client computer at one time. You can run multiple Import sessions simultaneously from different client computers.
Privileges Required to Use Agile Import
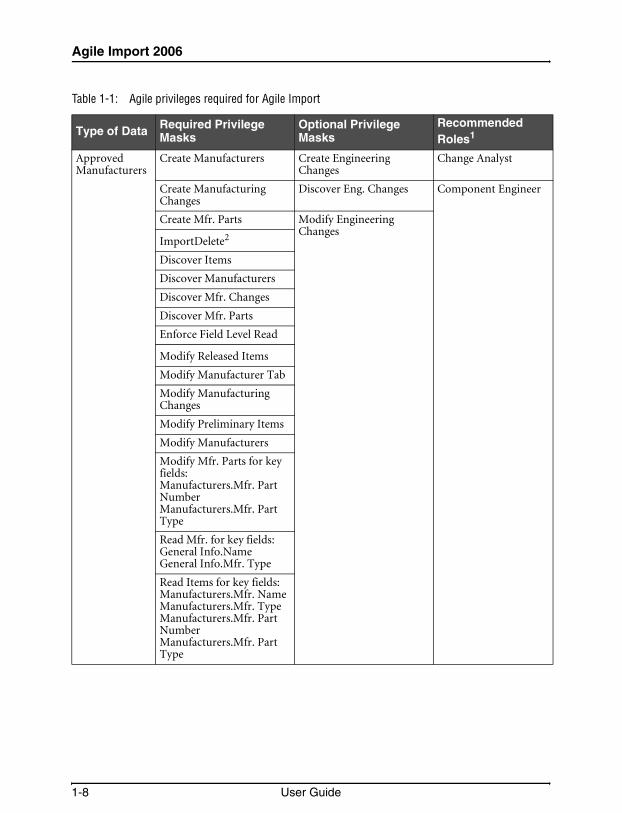
Table 1-1 lists the Agile Advantage privileges required for each type of import data.
1-5

Agile Import 2006
Note Agile Advantage includes field-level Read privileges. These privileges can affect Import operations. The following table includes specific information about which field-level Read privileges are necessary, in addition to general privileges. If you have questions about field-level Read privileges, contact your Agile administrator or refer to the Agile Administrator 2006 User Guide.
Table 1-1: Agile privileges required for Agile Import
Type of Data Required Privilege Masks
Optional Privilege Masks
Recommended Roles1
Parts and Documents
Create Items None Change Analyst
Discover Items Compliance Manager
Enforce Field Level Read
Modify Preliminary Items
Modify Released Items
Read Items for key fields:Title Block.NumberTitle Block.Item Type
Manufacturers Create Manufacturers None Component Engineer
Discover Manufacturers
Enforce Field Level Read
Modify Manufacturers
Read Mfr. for key fields:General Info.NameGeneral Info.Mfr. Type
Manufacturer Parts
Create Mfr. Parts None Component Engineer
Discover Mfr. Parts Compliance Manager
Enforce Field Level Read
Modify Mfr. Parts
Read Mfr. Parts for key fields:General Info.Manufacturer NameGeneral Info.Manufacturer Part NumberGeneral Info.Mfr. Part Type
1-6 User Guide

Chapter 1 Getting Started
Suppliers Create Suppliers Class None Supplier Administrator
Discover Suppliers Class
Enforce Field Level Read
Modify Suppliers Class
Discover Items
Read Suppliers for Number, Supplier Name, Supplier Type
Prices Create Supplier None Supplier Administrator
Create Manufacturer Component Engineer
Create Manufacturer Part
Discover Suppliers Class
Discover Manufacturer Class
Discover Manufacturer Part Class
Enforce Field Level Read
Modify Supplier Manufacturer Parts Tab
Modify Supplier Type, Number, Name
Modify Manufacturers Type, Name
Modify Manufacturer Part Mfr part Type, Mfr Name, Mfr Part Number
Read Manufacturers Type, Name
Read Manufacturer Part Mfr part Type, Mfr Name, Mfr Part Number
Read Supplier Type, Number, Name
Table 1-1: Agile privileges required for Agile Import
Type of Data Required Privilege Masks
Optional Privilege Masks
Recommended Roles1
1-7
Agile Import 2006
Approved Manufacturers
Create Manufacturers Create Engineering Changes
Change Analyst
Create Manufacturing Changes
Discover Eng. Changes Component Engineer
Create Mfr. Parts Modify Engineering Changes
ImportDelete2
Discover Items
Discover Manufacturers
Discover Mfr. Changes
Discover Mfr. Parts
Enforce Field Level Read
Modify Released Items
Modify Manufacturer Tab
Modify Manufacturing Changes
Modify Preliminary Items
Modify Manufacturers
Modify Mfr. Parts for key fields:Manufacturers.Mfr. Part NumberManufacturers.Mfr. Part Type
Read Mfr. for key fields:General Info.NameGeneral Info.Mfr. Type
Read Items for key fields:Manufacturers.Mfr. NameManufacturers.Mfr. TypeManufacturers.Mfr. Part NumberManufacturers.Mfr. Part Type
Table 1-1: Agile privileges required for Agile Import
Type of Data Required Privilege Masks
Optional Privilege Masks
Recommended Roles1
1-8 User Guide

Chapter 1 Getting Started
BOMs Create Engineering Changes
None Change Analyst
Create Items
ImportDelete2
Discover Eng. Changes
Discover Items
Enforce Field Level Read
Modify Engineering Changes
Modify Preliminary Items
Modify Redlined BOM
Modify Released Items
Read Items for key fields:Title Block.NumberTitle Block.Item TypeBOM.Item Number
Attachments Read Items for key field:Attachments.File NamePending Changes.Date OriginatedPending Changes.NumberPending Changes.Proposed RevPending Changes.TypeRead Mfr. for key field:Attachments.File NameRead Mfr. Parts for key field:Attachments.File Name
Change AnalystComponent Engineer
Table 1-1: Agile privileges required for Agile Import
Type of Data Required Privilege Masks
Optional Privilege Masks
Recommended Roles1
1-9
Agile Import 2006
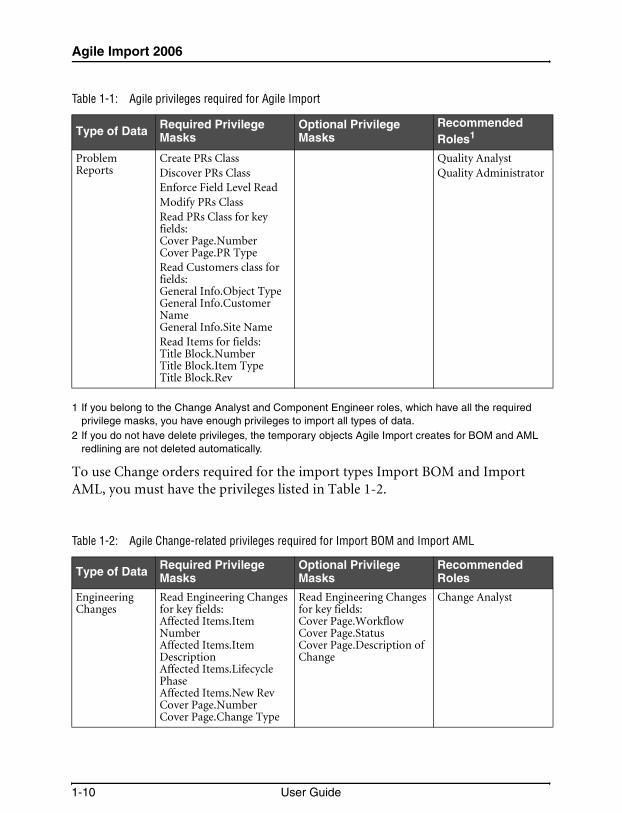
1 If you belong to the Change Analyst and Component Engineer roles, which have all the required privilege masks, you have enough privileges to import all types of data.
2 If you do not have delete privileges, the temporary objects Agile Import creates for BOM and AML redlining are not deleted automatically.
To use Change orders required for the import types Import BOM and Import AML, you must have the privileges listed in Table 1-2.
Problem Reports
Create PRs ClassDiscover PRs ClassEnforce Field Level ReadModify PRs ClassRead PRs Class for key fields:Cover Page.NumberCover Page.PR TypeRead Customers class for fields:General Info.Object TypeGeneral Info.Customer NameGeneral Info.Site NameRead Items for fields:Title Block.NumberTitle Block.Item TypeTitle Block.Rev
Quality AnalystQuality Administrator
Table 1-2: Agile Change-related privileges required for Import BOM and Import AML
Type of Data Required Privilege Masks
Optional Privilege Masks
Recommended Roles
Engineering Changes
Read Engineering Changes for key fields:Affected Items.Item NumberAffected Items.Item DescriptionAffected Items.Lifecycle PhaseAffected Items.New RevCover Page.NumberCover Page.Change Type
Read Engineering Changes for key fields:Cover Page.WorkflowCover Page.StatusCover Page.Description of Change
Change Analyst
Table 1-1: Agile privileges required for Agile Import
Type of Data Required Privilege Masks
Optional Privilege Masks
Recommended Roles1
1-10 User Guide

Chapter 1 Getting Started
Applying Modify Privileges to Selected Attributes
Privilege masks for modifying objects, such as Modify Released Items, are designed to enable users to modify the attributes on a particular tab, such as the Cover Page, Title Block, or General Information tab. Before using Agile Import, make sure the modify privilege masks for your Agile Advantage roles apply to all attributes for which you want to import data.
For example, make sure the Modify Released Items privilege mask applies to Page Two and Page Three attributes. If you do not apply the modify privilege mask to a particular attribute, it will be a read-only field in Agile Advantage.
Note You cannot import data to read-only fields.
If you have administrator rights to Agile Advantage, you can change your privileges. Otherwise, ask the Agile administrator to apply modify privileges to all attributes for which you plan to import data.
To apply modify privileges to selected Agile Advantage attributes:
1 Start Agile Administrator.
2 Expand the Roles and Privileges node, and select the role to modify (for example, Change Analyst).
3 Select a modify privilege mask (for example, Modify Released Items).
4 Double-click the Applied To property in the property view. The Privilege Mask Applied To dialog box appears.
Manufacturing Changes
Read Manufacturing Changes for key fields:Affected Items.Item NumberAffected Items.Item DescriptionAffected Items.Lifecycle PhaseCover Page.NumberCover Page.Change Type
Read Manufacturing Changes for key fields:Cover Page.WorkflowCover Page.StatusCover Page.Description
Component Engineer
Table 1-2: Agile Change-related privileges required for Import BOM and Import AML
Type of Data Required Privilege Masks
Optional Privilege Masks
Recommended Roles
1-11

Agile Import 2006
Figure 1-1: Privilege Mask Applied To Dialog Box
5 Select attributes in the Remaining Attributes list, click to add them to the Applied to Attributes list, and then click OK.
For more information about Agile Advantage roles and privileges, see the Agile Administrator 2006 User Guide.
Starting Agile ImportTo begin the Import process, start Agile Import and log in. The import options that are available depend on the Agile Advantage products you are licensed to use.
To start Agile Import:
1 From the Start menu, choose Programs | Agile Advantage 2006 | Agile Import 2006 or double-click the Agile Import 2006 desktop icon. The Welcome to Agile Import dialog box appears.
Note If Agile Import does not start and you see an error message about OLE32.DLL, make sure you have installed Microsoft Internet Explorer 6.0 with Service Pack 1 or Service Pack 2.
2 Enter your Agile Advantage Username and Password, then click OK.
Note Your password is case-sensitive. If your login password or your approval password change is overdue, you will be prompted to update it.
After you log in, the Agile Import wizard appears.
If your company is not licensed to use Manufacturer Management capabilities, the options for importing Manufacturers, Manufacturer Parts, and Approved Manufacturers are unavailable.
1-12 User Guide
Chapter 1 Getting Started
The wizard has several steps. The steps differ slightly depending on the type of data you are importing, so they are covered in each chapter that discusses importing a specific type of data.
Note If you log in to the computer with a username other than that which was used to install Agile Import, or if the Microsoft Office installation is not complete for a user, the Microsoft Office installer may appear. The installer starts in order to perform an auto-configuration. Let Microsoft Office perform the auto-configuration; do not click Cancel. You may be prompted to insert the Microsoft Office installation CD.
Using Microsoft Excel While Agile Import is Running
If Agile Import is running and you try to open an Excel file by double-clicking the file name in Windows Explorer, you may see an error message. Try opening the file using the Excel File | Open command.
Recommended Sequence for Importing DataStep 1 of the Agile Import wizard identifies the recommended sequence for importing data. The wizard arranges the types of data you can import in order of complexity, with the simplest type of import data, Parts and Documents, listed first:
1 Import Parts and Documents
2 Import Manufacturers
3 Import Manufacturer Parts
4 Import Bills of Material
5 Import Approved Manufacturers
6 Import Attachments from PDX
7 Import Problem Reports
8 Import Suppliers
9 Import Prices
1-13

Agile Import 2006
When you import data following this recommended sequence, parent Items as well as Manufacturers and Manufacturer Parts will already exist and be populated with data when you reach steps 4, 5, and 6 in the preceding list. If you do not follow the recommended sequence, Agile Import may prompt you to create objects referenced in the import data. You can go back to a previous step in the sequence (for example, importing Parts and Documents) to import data to objects you created with Agile Import.
Note In the case of attachment import, you must first import the associated objects. You cannot first import the attachments and then later import the associated objects.
How Agile Import Handles Imported DataAgile Import handles data differently depending on:
❑ The type of object being imported
❑ Whether the object is unreleased or released, or has a pending change
❑ The import mode preference selected for preliminary BOMs and AMLs
Parts, Documents, Suppliers, Manufacturers, and Manufacturer Parts
For an existing object, Agile Import overwrites the data based on the setting for the Overwrite Mode preference. If the Overwrite Mode preference is Update All (the default), then all mapped fields are updated. If the Overwrite Mode preference is set to Update on Blank Only, then only mapped fields that are currently blank on the target eHub are updated. For more information about the Overwrite Mode preference, see “Setting a Preference for Overwriting Values” on page 13-4.
For a new object, Agile Import fills in the blank fields of the newly created object.
BOMs
For an existing assembly, Agile Import either appends imported BOM rows or replaces existing rows and redlines the changes. For more information about when BOM redlining occurs, see “Redlining a BOM” on page 5-17.
For a new assembly, the imported components are added to the BOM. Agile Import creates new BOM components as needed and fills in their mapped attributes.
1-14 User Guide

Chapter 1 Getting Started
AMLs
For an existing Item, Agile Import either appends imported AML rows or replaces existing rows and redlines the changes. For more information about when AML redlining occurs, see “Redlining an AML” on page 7-10.
For a new Item, the imported Manufacturer Parts are added to the AML. Agile Import creates new Manufacturers and Manufacturer Parts as needed and fills in their mapped attributes.
Prices
For existing prices (rows in the Supplier Manufacturer Parts table), Agile Import overwrites attributes for the existing prices independent of the OverwriteMode preference.
For new prices, Agile Import creates new price rows on the Supplier Manufacturer Parts tab.
Note New suppliers can be created using the Import Prices dialog and any non-existent manufacturers and manufacturer parts can be created during the import process.
Problem Reports
For an existing problem report, Agile Import overwrites the data based on the setting for the Overwrite Mode preference. If the Overwrite Mode preference is Update All (the default), then all mapped fields are updated. If the Overwrite Mode preference is set to Update on Blank Only, then only mapped fields that are currently blank on the target eHub are updated. For more information about the Overwrite Mode preference, see “Setting a Preference for Overwriting Values” on page 13-4.
For a new problem report, Agile Import fills in the blank fields of the newly created object.
If your import file includes customer information, it must include columns for both customer name and customer site.
Customer information in an import file must already exist in the target database. If a problem report in the import file includes data about a customer and site that do not already exist in the target database (or are spelled differently), the customer name and site for that problem report will not be imported.
1-15

Agile Import 2006
1-16 User Guide

CHAPTER 2Proper Import Formats
To import data successfully, it is important to make sure the file you are importing is formatted correctly. This chapter includes these topics:❑ Supported Agile Import File Formats❑ Structuring Data for Import❑ Including Subclass Fields in the Import Data❑ Reformatting Files for Import❑ Checking Your File Before Importing❑ Modifying an Import File and Reimporting❑ Checklist for Import Data
Supported Agile Import File FormatsTable 2-1 lists supported file formats for Agile Import.
Table 2-1: Supported Agile Import file formats
File Type Description
Microsoft Excel (*.xls) Microsoft Excel worksheet files.
Text file (*.txt) Fixed-width text file, or text file containing fields separated by any delimiter character.
CSV (comma-delimited) (*.csv)
Text file containing fields separated by commas.
2-1

Agile Import 2006
These file types must be properly formatted. For example, Microsoft Excel files and text files must have a header row.
You can use Microsoft Excel as a tool to reformat files of other formats. For example, you can reformat CAD, database, and spreadsheet files for import by using Microsoft Excel as an intermediary. See “Reformatting Files for Import” on page 2-13.
This chapter sets out the necessary tasks for a successful data import, step by step, as shown in the following figure.
Figure 2-1: Tasks to complete for a successful import
PDX (*.pdx)
(Product Data eXchange)
An archive format containing files describing a product’s content, including an XML file that conforms to the Product Data Exchange standard designed for thee-supply chain. The PDX package can contain BOMs, AMLs, drawings, ECRs, ECOs, and Deviations. You can use Agile eXpress or the Agile Web client to create PDX packages. Use Agile eXpress to view PDX packages.
PDX is a supported file type for importing Parts and Documents, Manufacturers, Manufacturer Parts, BOMs, AMLs, and attachments.
The embedded XML file contained in a PDX package must be well formed and meet the structural requirements specified by PDX DTD Revision 1.0. (Files of the format PDX DTD Revision 0.7 are automatically converted.) In addition, the PDX package must contain values for attributes that correspond to Agile key fields (see “PDX Packages and Agile Key Field Information” on page 12-4).
Table 2-1: Supported Agile Import file formats
File Type Description
Structure the data file Format the data Confirm that file
meets criteria Ready to import
2-2 User Guide

Chapter 2 Proper Import Formats
Structuring Data for ImportBefore you can import data from either a Microsoft Excel file or an ASCII text file into the Agile Advantage database, you must properly structure the data in the file. This section provides guidelines for import file structure, field lengths, reference designators, required mapped fields, and subclass names.
File Structure Guidelines
To prepare a Microsoft Excel or ASCII text file to import data into the Agile Advantage database, ensure that it conforms to the guidelines in this section.
Note PDX packages also must contain data that adheres to the following guidelines. Agile Import parses PDX packages into temporary text files before it imports the data to a target eHub. You can use an Import Transformation Table (ITT) to modify values in a PDX package before importing them. For more information about ITT files, see “Using an Import Transformation Table” on page 3-8.
❑ The first row of import data (which is not necessarily the first row in an Excel file) must be the “header” row, which contains field names.
❑ Each field name in the header row must be unique. Duplicate field names may result in data that is not imported.
❑ None of the column headers can be blank. For example, in a comma-delimited file the following header row would be invalid due to the blank header between Number and Description:
Number,,Description,Product Lines,Category
❑ The rows following the header row must contain data. There should not be empty rows between rows of data.
❑ Your import data must conform to the maximum lengths specified for each Agile Advantage field. For example, the maximum length for the Title Block.Description field is 100 characters by default.
❑ The maximum length of individual reference designators is 19 characters.
2-3
Agile Import 2006
❑ The value in the Quantity field of a BOM row should equal the number of reference designators. If the Quantity value does not match the sum of reference designators, Agile Import displays a warning message. To set a preference for how to handle quantity mismatch warnings, see “Handling Quantity Mismatch Warnings” on page 13-9.
❑ In delimited text files, non-numeric data (text) that contains a field delimiter character (by default, a comma) must be placed within text qualifier characters (by default, quotation marks). If this is not done, then Agile Import breaks the data at the delimiter character. For example, reference designators should be placed inside quotation marks:
"R45,R50,R51"
If you remove the quotation marks from the string, Agile Import treats the three reference designators as separate fields.
❑ An entry for a MultiList field (for example the Product Line(s) field on the Title Block tab) must delimit separate list values with a semicolon (;) or another valid delimiter character. For example,
Scorpio;Taurus;Capricorn
For information about setting preferences for MultiList delimiters, see “Setting MultiList Delimiters” on page 13-4.
❑ Any rows of data that you do not want imported into the Agile Advantage database must be removed.
❑ There is no mandatory field order; it is necessary only that the required fields are included, see “Required Mapped Fields” on page 2-9.
❑ The file can include a column identifying the Item subclass; see “Including Subclass Fields in the Import Data” on page 2-10.
Formatting of import data in the source application or Excel is usually easier than editing a text file. It is recommended that you perform these edits before you reformat as ASCII text, if that is your target format.
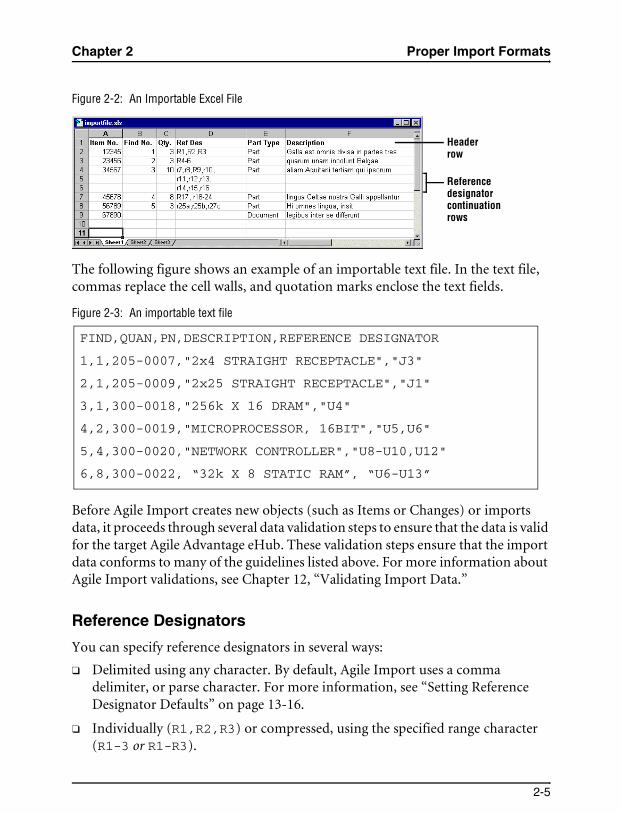
Figure 2-2 shows an example of an importable Microsoft Excel file.
2-4 User Guide
Chapter 2 Proper Import Formats
Figure 2-2: An Importable Excel File
The following figure shows an example of an importable text file. In the text file, commas replace the cell walls, and quotation marks enclose the text fields.
Figure 2-3: An importable text file
Before Agile Import creates new objects (such as Items or Changes) or imports data, it proceeds through several data validation steps to ensure that the data is valid for the target Agile Advantage eHub. These validation steps ensure that the import data conforms to many of the guidelines listed above. For more information about Agile Import validations, see Chapter 12, “Validating Import Data.”
Reference Designators
You can specify reference designators in several ways:
❑ Delimited using any character. By default, Agile Import uses a comma delimiter, or parse character. For more information, see “Setting Reference Designator Defaults” on page 13-16.
❑ Individually (R1,R2,R3) or compressed, using the specified range character (R1-3 or R1-R3).
Referencedesignator continuation rows
Header row
FIND,QUAN,PN,DESCRIPTION,REFERENCE DESIGNATOR
1,1,205-0007,"2x4 STRAIGHT RECEPTACLE","J3"
2,1,205-0009,"2x25 STRAIGHT RECEPTACLE","J1"
3,1,300-0018,"256k X 16 DRAM","U4"
4,2,300-0019,"MICROPROCESSOR, 16BIT","U5,U6"
5,4,300-0020,"NETWORK CONTROLLER","U8-U10,U12"
6,8,300-0022, “32k X 8 STATIC RAM”, “U6-U13”
2-5

Agile Import 2006
❑ Uppercase, lowercase, or mixed case (they will be converted to whatever format is specified in Agile Administrator).
❑ Using continuation rows if there are too many reference designators to fit in one cell. All other cells must be left empty in these rows (see Figure 2-2).
If you have few reference designators, you can enter them one by one (for example, R1,R2,R3).
To add groups of reference designators that begin with different letters, separate each group with a parse character, usually a comma. For example, to enter the 10 designators A1, A2, A3, B4, B5, B6, B7, C8, C9 and C10 you would type:
A1-3,B4-7,C8-10
Depending on how your Agile Advantage database has been configured, the Agile Windows client may automatically contract ranges of reference designators. If you enter 1,2,3,4,5, when you press Tab, the Ref Des field shows 1-5.
Agile’s Windows client automatically sorts reference designators. For example, if you enter r1,r77,r24,r38, when you press Tab, the Ref Des field shows r1, r24, r38, r77.
If you import a large number of reference designators, you may find the performance of Agile Import slower because of the additional processing required.
Reference Designators in Excel Files
Note that rows 5 and 6 in Figure 2-2 have mostly empty cells. This is because the reference designators belonging to Item #34567 overflow when they exceed the size of the cell (in this case, taking up three cells, or two additional rows). For those reference designators to be assigned to the correct Item number, all other cells in those rows must be empty.
Do not be concerned if an Item’s reference designators take up more than one cell. If an Item has multiple cells of reference designators, they are combined into one field when the table is imported into the Agile Advantage database. In the example in Figure 2-2, the reference designator cells in rows 4–6 belong to one Item, and are combined into one reference designator field in the Agile Advantage database.
If your Agile database has been configured to expand reference designators, then reference designators connected by hyphens (or another specified range character) are expanded when they are imported into the Agile Advantage database. For example, R1-5 becomes R1,R2,R3,R4,R5.
2-6 User Guide
Chapter 2 Proper Import Formats
Reference designators that end in a letter (for example, R1a,R2a,R3a) must be entered individually. For more information about how Agile Import handles reference designator ranges, see “Reference Designator Ranges” on page 2-7.
Removing Extra Spaces from Reference Designators
Make sure the import file does not have extra spaces before or after each reference designator parse character (by default, a comma). The extra space may cause Agile Import to miscount the number of reference designators and therefore display a Quantity Mismatch warning message.
For example, the following BOM row has a comma and a space after the CR1 reference designator. The space may cause the following reference designator range to be counted as one unexpanded reference designator, CR3-CR5.
100-1194-02,P5005-06,"LED, T1 GREEN",230,3,"CR1, CR3-CR5"
To prevent miscounting of reference designators, you should remove any spaces that appear after a reference designator parse character.
100-1194-02,P5005-06,"LED, T1 GREEN",230,3,"CR1,CR3-CR5"
Reference Designator Ranges
The following rules determine how ranges of reference designators are treated by Agile Import. If a reference designator does not qualify for expansion, Agile Import treats the range as one reference designator.
❑ The two reference designators in a range statement must end in a numeric character to qualify for expansion. If the last value in a reference designator string is a text character, it does not qualify for expansion.
Examples:A202-A210 qualifies for expansion.A202-A210a does not qualify for expansion.A202a-A210a does not qualify for expansion.
❑ If two reference designators in a range statement have prefixes, they must have the same prefix to qualify for expansion. Prefixes must be in <CHAR> format.
Examples:RB202-RB210 qualifies for expansion.RB202-RC210 does not qualify for expansion.
2-7

Agile Import 2006
❑ If only the first reference designator in a range statement has a prefix, then the range qualifies for expansion.
Example:RB202-210 qualifies for expansion.
❑ If neither reference designator in a range statement has a prefix, then the range qualifies for expansion.
Example:202-210 qualifies for expansion.
Using Leading Zeros in Reference Designator Ranges
If your Agile Advantage database has been configured to remove leading zeros in the numeric portion of reference designators, you should avoid using leading zeros in reference designator ranges in your import file. For example, Agile may parse R0203-R0225 as R203-R225, removing the leading zeros.
Agile Administrator has an AllowRangeExpandCollapse preference setting that governs whether Agile Advantage allows reference designators to be expanded and collapsed. To locate the preference, open the Preferences | Reference Designators node. If this preference is set to No, all reference designator range behavior is turned off. This prevents leading zeros from being removed from reference designators, but it also causes each reference designator range, such as R0203-R0225, to be treated as one reference designator. In this case, to enter reference designators with leading zeros, you must enter them individually and not as ranges.
Note For information about how to change the AllowRangeExpandCollapse preference setting in Agile Administrator, contact Agile Technical Support.
Reference Designator Validation
When you import BOM data, reference designators are subject to validation before they can be imported. If a reference designator cannot be legally expanded, it will be treated as a single reference designator and imported as such. If a reference designator field fails normal import data validation (for example, the field is too long), then it will not be imported. For more information about Agile Import validations, see Chapter 12, “Validating Import Data.”
2-8 User Guide

Chapter 2 Proper Import Formats
Required Mapped Fields
When you import data into the Agile Advantage database, you must indicate where to put the data. You do this in Agile Import by mapping the associations between the fields in your import file to the Agile Advantage fields. For example, Part Number in your Excel file may need to go into the Item Number field on the Title Block tab.
Note If you want to map PCT (Product Compliance Tracking), you must set PCT visible in Agile Administrator.
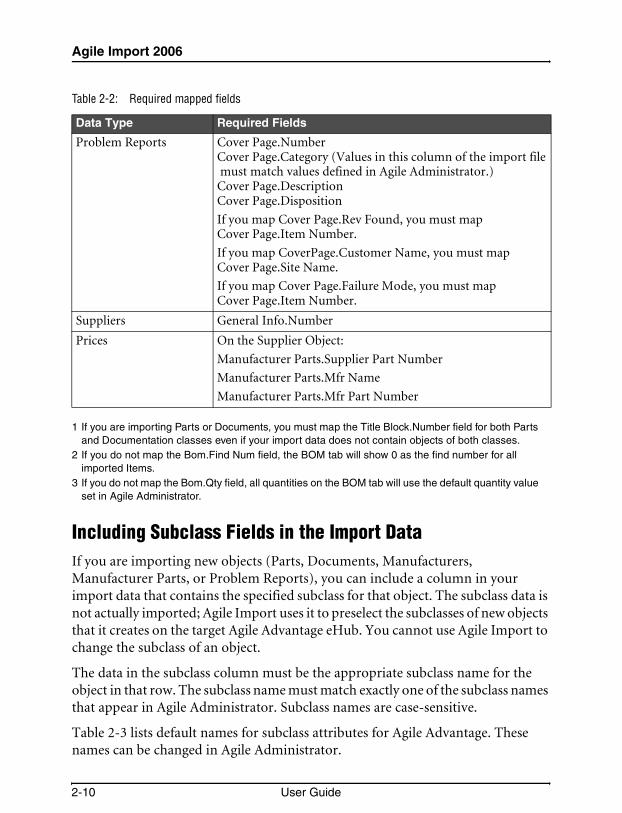
Certain fields are required and therefore must be mapped. Table 2-2 shows required fields for each type of data.
Table 2-2: Required mapped fields
Data Type Required Fields
Parts and Documents Title Block.Number1
Manufacturers General Info.Name
Manufacturer Parts General Info.Manufacturer Part NumberGeneral Info.Manufacturer Name
BOMs Minimum:Bom.Item Number
Recommended:
Bom.Find Num2
Bom.Qty3
Approved Manufacturers
Title Block.NumberManufacturers.Mfr. NameManufacturers.Mfr. Part Number
Attachments Title Block.NumberAttachments.File NameGeneral Info.NameGeneral Info.Manufacturer NameGeneral Info.Manufacturer Part Number
2-9
Agile Import 2006
1 If you are importing Parts or Documents, you must map the Title Block.Number field for both Parts and Documentation classes even if your import data does not contain objects of both classes.
2 If you do not map the Bom.Find Num field, the BOM tab will show 0 as the find number for all imported Items.
3 If you do not map the Bom.Qty field, all quantities on the BOM tab will use the default quantity value set in Agile Administrator.
Including Subclass Fields in the Import DataIf you are importing new objects (Parts, Documents, Manufacturers, Manufacturer Parts, or Problem Reports), you can include a column in your import data that contains the specified subclass for that object. The subclass data is not actually imported; Agile Import uses it to preselect the subclasses of new objects that it creates on the target Agile Advantage eHub. You cannot use Agile Import to change the subclass of an object.
The data in the subclass column must be the appropriate subclass name for the object in that row. The subclass name must match exactly one of the subclass names that appear in Agile Administrator. Subclass names are case-sensitive.
Table 2-3 lists default names for subclass attributes for Agile Advantage. These names can be changed in Agile Administrator.
Problem Reports Cover Page.NumberCover Page.Category (Values in this column of the import file must match values defined in Agile Administrator.)Cover Page.DescriptionCover Page.Disposition
If you map Cover Page.Rev Found, you must mapCover Page.Item Number.
If you map CoverPage.Customer Name, you must mapCover Page.Site Name.
If you map Cover Page.Failure Mode, you must mapCover Page.Item Number.
Suppliers General Info.Number
Prices On the Supplier Object:
Manufacturer Parts.Supplier Part Number
Manufacturer Parts.Mfr Name
Manufacturer Parts.Mfr Part Number
Table 2-2: Required mapped fields
Data Type Required Fields
2-10 User Guide

Chapter 2 Proper Import Formats
The subclass field allows you to map a new object to an existing Agile Advantage subclass. The values in the subclass field must be valid subclass names for the target eHub (that is, subclass names that exist on the target eHub). If you specify an invalid subclass name, Agile Import does not create a new subclass for you. In the Agile Import wizard step that lets you create objects, you must select a valid subclass value.
The following figure shows sample import data that contains a Subclass field (column A) for Parts and Documents.
Figure 2-4: Import data with a Subclass field
When you map the import data to Agile fields, you should map the Subclass field to one of the available subclass attributes for the object(s) you are importing. In this example, you should map the Subclass field to Title Block.Part Type (for Parts) and Title Block.Document Type (for Documents), as shown in the following figure.
Table 2-3: Default names for subclass attributes
Class Subclass Attribute Name
Documentation Class Document Type
Manufacturer Parts Class Mfr Part Type
Manufacturers Class Mfr Type
Parts Class Part Type
Problem Reports Class Problem Report Type
Suppliers Class Supplier Type
2-11

Agile Import 2006
Figure 2-5: Mapping the Subclass Field
Note Parts or Manufacturer Parts in PDX packages may have been assigned a subclass that is not available on the target Agile Advantage eHub. If the file that you are importing has new subclasses (and you want to create new items with these new subclasses), you must first use Agile Administrator to create the subclasses on the target eHub, so that you can choose them during the import process. If you don’t first create the subclasses, you must choose one of the existing subclasses when you import these new items.
After you map the Subclass field, the next Agile Import wizard step lets you create new objects. If you mapped the Subclass field correctly in the previous wizard step, the Subclass column, shown in the following figure, will be filled with values.
Map the Subclass field to the appropriate Agile subclass field.
2-12 User Guide

Chapter 2 Proper Import Formats
Figure 2-6: Selecting the Subclass for New Objects
Reformatting Files for ImportMicrosoft Excel can be used to reformat non-Excel files as needed for import. For example, CAD files, legacy data, and other file types can be imported into Excel, reformatted, then imported into the Agile Advantage database using Agile Import.
When you open some non-Excel files in Microsoft Excel, the Excel Text Import wizard starts, to help guide you through the conversion process. For more information about the Microsoft Excel Text Import wizard, please consult your Microsoft Excel documentation.
Checking Your File Before ImportingTo ensure a smooth import process, check your file to see that it is properly formatted. Do not skip this step! The little time spent here will save you far more in the end.
To check a PDX package before importing data from it, you must open the file in Agile eXpress. For more information, see “Viewing a PDX Package in Agile eXpress” on page 3-4.
Subclass values taken from the import file
2-13

Agile Import 2006
How Agile Advantage Assigns Default Values to New ObjectsWhen you import a new object, such as an Item, it is created on the target eHub. At the moment the object is created, Agile Advantage fills any fields that have been assigned default values in Agile Administrator.
A good example of an Agile Advantage field with a default value is the BOM.Qty field. When Agile Advantage is first installed, the BOM.Qty field has a default value of 1 in Agile Administrator, as shown in the following figure.
Figure 2-7: DefaultValue Property for the BOM.Qty Attribute in Agile Administrator
When you import a BOM that contains parts that do not exist on the target eHub, Agile Import creates the new parts. If you have not mapped an import field to the BOM.Qty field, the quantity value for each BOM row is automatically 1, the default value.
Modifying an Import File and ReimportingIf your import file is improperly formatted, Agile Import may be unable to import the data. The Import.log file records any problems encountered during the import process. If the log file indicates that some fields could not be imported, you can correct the import file and reimport the data. To modify an import file and reimport data:
1 Exit from Agile Import.
2 Modify and save the import file.
2-14 User Guide

Chapter 2 Proper Import Formats
3 Start Agile Import again.
4 Reselect the import file.
Note If you modify an import file during an Agile Import session, you may also need to update the mapping file you selected earlier.
Checklist for Import DataBefore importing data to the Agile Advantage database, use the following checklist to make sure your data is structured and formatted correctly:
❑ Does the header row contain field names?
❑ Do the remaining rows contain data?
❑ Are there no empty rows between rows of data?
❑ Do the values in the Quantity fields equal the total number of reference designators (for each Item with reference designators)?
❑ Does the spelling match for all List and MultiList entries? (The case does not need to match, and extra spaces are ignored.)
❑ Have all rows that you do not want imported into the Agile Advantage database been removed from the file?
❑ For delimited text files, have all fields of non-numeric data been enclosed in quotation marks or other text qualifiers? At minimum, make sure that all fields that contain the field delimiter character (for example, a comma) are enclosed in quotation marks.
2-15
Agile Import 2006
2-16 User Guide
CHAPTER 3Working with PDX
PackagesThis chapter discusses how to import PDX packages created with Agile eXpress Professional into the Agile Advantage eHub. It includes the following topics:❑ About PDX Packages❑ Viewing a PDX Package in Agile eXpress❑ Transferring Data from One Agile Advantage eHub to Another❑ Dates and Times in W3C Format❑ Setting MultiList Delimiters for PDX Packages❑ Typical Workflow for Importing Data from a PDX Package❑ Using an Import Transformation Table❑ Mapping PDX Attributes to Agile Fields❑ Limitations for Importing Data from PDX Packages
About PDX PackagesProduct Data Exchange (PDX) is an open, XML-based standard designed to allow collaborative manufacturing companies to easily exchange product content across a distributed manufacturing network. PDX allows collaborative manufacturing partners to streamline their new product introduction and product change processes, thereby delivering new products to market and changing existing
3-1

Agile Import 2006
products already in the market in Internet time. Since the standard is based on XML, it provides a simple yet powerful and flexible way to encode structured data into a format that is both human- and machine-readable. PDX provides an open standard for describing product content, including parts, documents, manufacturers, manufacturer parts, BOMs, and AMLs, and Changes (ECOs, MCOs, ECRs, Deviations, and Stop Ships), as well as their associated attachments, such as schematics, assembly drawings, and spec sheets. Agile Import does not import Changes or Agile Packages.
You can create PDX packages in Agile eXpress Professional that lets you create and view PDX packages. You must connect to an Agile Advantage eHub in order to create a PDX package. A PDX package contains a comprehensive package of product content information. You must have the Create PDX privilege to create PDX packages.
Agile Import supports PDX packages that contain an embedded XML file that is well formed, meets the structural requirements specified by PDX DTD Revision 1.0, and contains values for attributes that correspond to Agile key fields (see “PDX Packages and Agile Key Field Information” on page 12-4). Agile Import also supports PDX DTD Revision 0.7 files, giving you the choice to keep them as 0.7 files or to save them as 1.0 files.
For more information about the PDX standard, visit the PDX organization Web site at http://www.pdxstandard.org.
Transferring Data from One Agile Advantage eHub to AnotherUsing Agile Import, you can import product content from your Agile-enabled supply-chain-partners into your Agile Import system. If your partner publishes a PDX package, you can import Parts, Documents, Manufacturers, Manufacturer Parts, BOMs, AMLs, and attachments from the partner’s Agile Advantage eHub into your eHub. The following figure illustrates the process of importing data from a PDX package.
3-2 User Guide
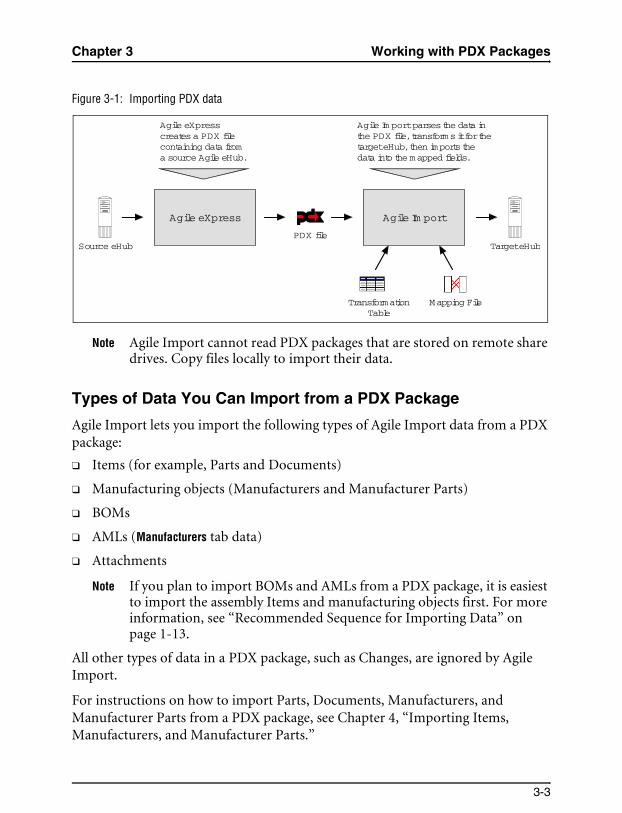
Chapter 3 Working with PDX Packages
Figure 3-1: Importing PDX data
Note Agile Import cannot read PDX packages that are stored on remote share drives. Copy files locally to import their data.
Types of Data You Can Import from a PDX Package
Agile Import lets you import the following types of Agile Import data from a PDX package:
❑ Items (for example, Parts and Documents)
❑ Manufacturing objects (Manufacturers and Manufacturer Parts)
❑ BOMs
❑ AMLs (Manufacturers tab data)
❑ Attachments
Note If you plan to import BOMs and AMLs from a PDX package, it is easiest to import the assembly Items and manufacturing objects first. For more information, see “Recommended Sequence for Importing Data” on page 1-13.
All other types of data in a PDX package, such as Changes, are ignored by Agile Import.
For instructions on how to import Parts, Documents, Manufacturers, and Manufacturer Parts from a PDX package, see Chapter 4, “Importing Items, Manufacturers, and Manufacturer Parts.”
Source eHubPDX file
TransformationTable
Target eHub
Agile eXpresscreates a PDX filecontaining data froma source Agile eHub.
Agile Im port parses the data inthe PDX file, transforms it for thetarget eHub, then imports thedata into the mapped fields.
Agile eXpress Agile Im port
Mapping File
3-3

Agile Import 2006
For instructions on how to import BOMs from a PDX package, see Chapter 6, “Importing BOMs from PDX Packages.”
For instructions on how to import AMLs (Manufacturers tab data) from a PDX package, see Chapter 7, “Importing Approved Manufacturers.”
For instructions on how to import attachments from a PDX package, see Chapter 10, “Importing Attachments from PDX Packages.”
Viewing a PDX Package in Agile eXpressAgile eXpress Professional allows Agile-enabled companies to publish product content to supply-chain partners, whether or not the partners have Agile software. An Agile-enabled partner can use Agile eXpress to extract product content information from their Agile Advantage eHub and “package” it for publication to supply-chain-partners. Anyone who receives a PDX package can use Agile eXpress or Agile eXpress Professional to view the file or extract data from it. You can also use Agile Import to import data from a PDX package to an Agile Advantage eHub.
Figure 3-2: A Package in Agile eXpress
To read more about Agile eXpress, visit our Web site: http://sbs.agile.com/.
For instructions on how to open and view a PDX package in Agile eXpress, see the Agile eXpress online documentation. Please note that the PDX filename extension is also used for Adobe Acrobat index files.
3-4 User Guide
Chapter 3 Working with PDX Packages
Note To run Agile eXpress, you must install Sun’s Java Runtime Environment (JRE) 1.3.1 or later. When you install Agile eXpress, the registration process guides you through installation of the JRE if you don’t already have it.
Handling Multiple Item RevisionsPDX 1.0 packages can contain multiple revisions of an Item. You can import only one revision at a time. Agile Import detects multiple revisions and lets you choose the one you want to import.
Dates and Times in W3C FormatPDX packages can contain dates and times in W3C format, which eHubs do not accept. (W3C stands for World Wide Web Consortium, www.w3.org.) This is the format for a full W3C date and time:
YYYY-MM-DDThh:mm:ss.sTZD
where TZD stands for Time Zone Designator, an equation that represents the different between Coordinated Universal Time (UTC, the same as Greenwich Mean Time, GMT) and the local time. The following sample W3C formats include placeholders for the TZD:
❑ YYYY-MM-DDThh:mm:ss.s+hh:mm, for example2001-03-22T18:32:53.36+11:00
❑ YYYY-MM-DDThh:mm:ss.s-hh:mm, for example2001-03-22T18:32:53.36-10:00
A Z in the place of the TZD (YYYY-MM-DDThh:mm:ss.sZ) indicates that the time is UTC/GMT. The following two examples represent the same instant in time:
2001-03-22T18:32:53.36-05:00 (March 22, 2001, 6:32:53.36 p.m. Eastern Standard Time)
2001-03-22T23:32:53.36Z (When it is 6:32:53.36 p.m. Eastern Standard Time, as above, it is 11:32:53.36 p.m. UTC/GMT.)
If Agile Import encounters a date and time in W3C format (including the T character), it transforms the date into an acceptable format for the target eHub. Agile Import also converts the time to GMT if it is not already in GMT.
3-5

Agile Import 2006
For example, if the source date is 2001-03-22T18:32:53+11:00, Agile Import transforms it into 2001-03-22 7:32:53. This date and time are represented on the local machine as 3/22/01 7:32:53 AM. The local machine time setting will then be imported to the target eHub.
If Import does not detect a W3C date format on a source PDX package, it tries to import the date as an exact string (not transformed). The target eHub then accepts or rejects that date.
Specifying the Time Zone for PDX 0.7 Packages
When you choose to import a PDX 0.7 package, you are prompted to choose a Time Zone Designator (TZD) in the format +hh:mm or -hh:mm. The TZD represents the difference between Greenwich Mean Time (GMT) and the time zone where the PDX package was created. For example, if the PDX package was created in the Pacific Standard time zone, you would specify -8:00, because Pacific Standard Time is eight hours earlier than GMT.
For the hh value, enter a number between 00 and 12. The mm value must be 00.
Setting MultiList Delimiters for PDX PackagesA MultiList attribute in the Agile Import system is one that lets you select multiple items. In a PDX package, Item | proprietaryProductFamily (Product Line) is a MultiList attribute. Each Item can belong to multiple product lines.
Agile eXpress Professional uses a comma to delimit MultiList values. Before you can import MultiList values (such as Title Block.Product Line(s)) from a PDX package, make sure that comma is specified as a MultiList delimiter so that Agile Import recognizes it. A comma is the default MultiList delimiter in Agile Import. For more information, see “Setting MultiList Delimiters” on page 13-4.
Typical Workflow for Importing Data from a PDX PackageThere are several steps to importing data from a PDX package. To ensure that the data imported from a PDX package is compatible with the target eHub, the import process may require several iterations, particularly if you are using an import transformation table to modify the data before importing it. The following figure shows the typical workflow involved in importing data from a PDX package.
3-6 User Guide

Chapter 3 Working with PDX Packages
Figure 3-3: Workflow for importing data from a PDX package
Receive a PDX file
Open the PDX file inAgile eXpress
Does the PDXdata need
transformation?
Start Agile Import
No
Yes
Create/modify an ImportTransformation Table (ITT)
Select the PDX file
Select an ITT file(if necessary)
Import data fromthe PDX file
W as the dataimportedcorrectly?
No
Yes
Exam ine Changes, other objects,and prelim inary BO Ms and AMLs forthe im ported data. Look at affectedItem s, redline BO Ms, and redline
AMLs.
Select a mapping file
Release Changes
Reuse the ITT (if applicable)to import other PDX files
created from the same eHub
Check the Agile Importlog files for errors
3-7

Agile Import 2006
Using an Import Transformation TableA PDX package originating from a partner’s Agile Advantage eHub can contain incompatible data. That is, the data may be invalid or inconsistent with your company’s eHub. Before you can import data from a PDX package, you may need to change the PDX data to make it compatible with your eHub configuration.
Before importing data from different eHubs, try to eliminate as many data inconsistencies as you can by creating an ITT file. After you obtain a PDX package from a partner, attempt to import it. If you encounter any errors during import, check the Import.log file. The errors reported in the log file help you identify and correct data inconsistencies in the eHubs.
PDX data can be incompatible in the following ways:
❑ Item numbers may use a different numbering convention, including different number prefixes and suffixes.
❑ Item numbers may be longer than the maximum length allowed for the field on the target eHub.
❑ Manufacturer names, List values, and MultiList values may be inconsistent with the target eHub.
Unless you have access to the source eHub and specific privileges to modify a PDX package, it is for viewing purposes only. Generally, you cannot change values in a PDX package.
To transform PDX data before importing it to an eHub, you can create an import transformation table, or ITT. Agile Import uses this substitution table to process the import data in a PDX package and transform specific attribute values into new values that are compatible with the target eHub.
You can create a transformation table using Microsoft Excel or any text editor. The table contains a set of required fields needed to transform PDX data.
Using ITT Files Created for Agile Import 6.1, 6.7, or 7.0
Before you can use an ITT file created for a previous version of Agile Import, you must edit the PDX object and attribute names to make the file compliant with PDX 1.0. For a list of the names, see Table 3-2 on page 3-11.
3-8 User Guide

Chapter 3 Working with PDX Packages
Supported ITT File Formats
The ITT can be an Excel file (*.xls) or a delimited text file (*.txt or *.csv).
Sample ITT Files
Table 3-1 lists sample ITT files that are installed with Agile Import in the Agile Import install folder. You can use these sample files as templates for creating a new ITT.
Figure 3-4 shows ittsample.xls as it appears in Microsoft Excel. The optional Comments column describes the attributes and transformations in the file. To use the file as a template, copy a row for a particular attribute (such as the Item | itemIdentifier PDX attribute), then replace the values in columns C and D (Source Value and Transformed Value, respectively). For each PDX attribute, you can transform multiple values.
Table 3-1: ITT sample files
File Description
ittsample.xls Microsoft Excel ITT file
ittsample.csv Comma-separated values ITT file
3-9

Agile Import 2006
Figure 3-4: ittsample.xls
Required ITT Columns and Column Names
The ITT must have the following four columns:
❑ Object
❑ Attribute
❑ Source Value
❑ Transformed Value
You can add an optional fifth column called Comment to document the file.
You cannot change the column names. They must match the specified names exactly, otherwise Agile Import considers the table invalid.
You can change the order of columns as long as you also change the respective column name. For example, you can make column A the Source Value column.
The header row (that is, the row with column names) must be the first row in the file. There should be no blank columns to the left of the first data column. For example, in an Excel file, the table should start at column A.
3-10 User Guide
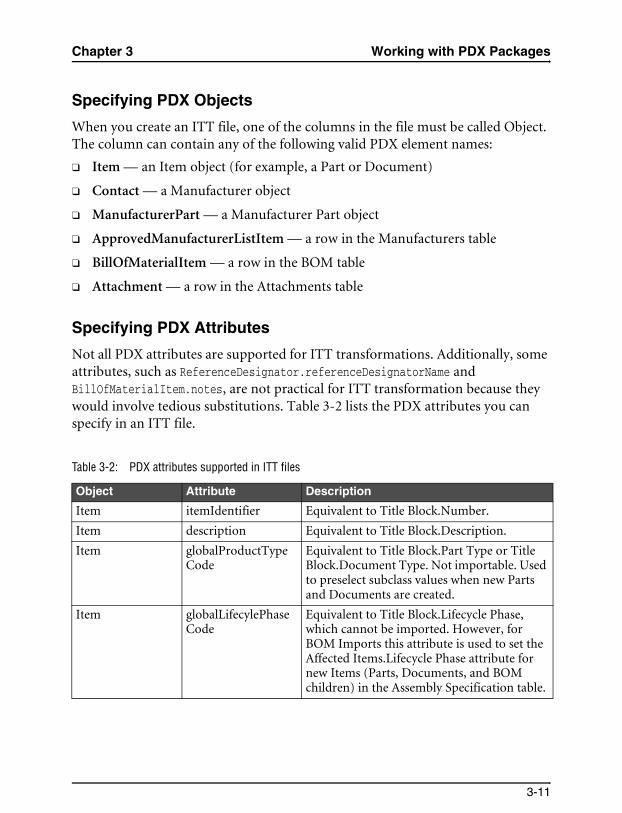
Chapter 3 Working with PDX Packages
Specifying PDX Objects
When you create an ITT file, one of the columns in the file must be called Object. The column can contain any of the following valid PDX element names:
❑ Item — an Item object (for example, a Part or Document)
❑ Contact — a Manufacturer object
❑ ManufacturerPart — a Manufacturer Part object
❑ ApprovedManufacturerListItem — a row in the Manufacturers table
❑ BillOfMaterialItem — a row in the BOM table
❑ Attachment — a row in the Attachments table
Specifying PDX Attributes
Not all PDX attributes are supported for ITT transformations. Additionally, some attributes, such as ReferenceDesignator.referenceDesignatorName and BillOfMaterialItem.notes, are not practical for ITT transformation because they would involve tedious substitutions. Table 3-2 lists the PDX attributes you can specify in an ITT file.
Table 3-2: PDX attributes supported in ITT files
Object Attribute Description
Item itemIdentifier Equivalent to Title Block.Number.
Item description Equivalent to Title Block.Description.
Item globalProductTypeCode
Equivalent to Title Block.Part Type or Title Block.Document Type. Not importable. Used to preselect subclass values when new Parts and Documents are created.
Item globalLifecylePhaseCode
Equivalent to Title Block.Lifecycle Phase, which cannot be imported. However, for BOM Imports this attribute is used to set the Affected Items.Lifecycle Phase attribute for new Items (Parts, Documents, and BOM children) in the Assembly Specification table.
3-11

Agile Import 2006
Item proprietaryProductFamily
Equivalent to Title Block.Product Lines. The ITT transforms only entire strings, not individual MultiList values, which makes product line transformations problematic. For more information, see “Transforming Product Lines” on page 3-17.
Item revisionIdentifier Equivalent to Title Block.Rev, which cannot be imported. However, for BOM import this attribute is used to set the Affected Items.New Rev attribute for new Items (Parts, Documents, and BOM children) in the Assembly Specification table.
Item category Equivalent to Title Block.Category.
Item Agile.Size Equivalent to Title Block.Size.
Contact businessName Equivalent to General Info.Name.
Contact contactName Equivalent to General Info.Contact.
Contact addressLine1 Equivalent to General Info.Address.
Contact cityName Equivalent to General Info.City.
Contact regionName Equivalent to General Info.State.
Contact Agile.Country Equivalent to General Info.Country.
Contact nationalPostalCode Equivalent to General Info.Postal Code.
Contact telephoneNumber Equivalent to General Info.Phone.
Contact facsimileNumber Equivalent to General Info.Fax.
Contact department Can be imported to Page Two or Page Three fields.
Contact emailAddress Equivalent to General Info.Email.
Contact universalResourceIdentifier
Equivalent to General Info.URL.
Contact globalPartnerSubClassificationCode
Equivalent to General Info.Mfr Type.
Contact contactStatus Equivalent to General Info.Lifecycle Phase.
ManufacturerPart manufacturerPartIdentifier
Equivalent to General Info.Manufacturer Part Number.
ManufacturerPart manufacturerName Equivalent to General Info.Manufacturer Name.
Table 3-2: PDX attributes supported in ITT files (continued)
Object Attribute Description
3-12 User Guide

Chapter 3 Working with PDX Packages
ManufacturerPart globalManufacturerPartStatusCode
Equivalent to General Info.Lifecycle Phase.
ManufacturerPart manufacturerPartType
Equivalent to General Info.Mfr Part Type.
ManufacturerPart description Equivalent to General Info.Description.
BillOfMaterialItem billOfMateriaItemIdentifier
Equivalent to BOM.Item Number.
BillOfMaterialItem description Equivalent to Title Block.Description for a BOM component and BOM.Part Description for an assembly’s corresponding BOM row.
BillOfMaterialItem proprietarySequenceIdentifier
Equivalent to BOM.Find Num.
BillOfMaterialItem itemQuantity Equivalent to BOM.Qty.
BillOfMaterialItem notes Equivalent to BOM.BOM Notes. You can transform one entire Notes string only with another, making it impractical to use for ITT transformations.
ReferenceDesignators
referenceDesignatorName
Equivalent to BOM.Ref Des. You can transform one entire Ref Des string only with another, making it impractical to use for ITT transformations.
ApprovedManu-facturerListItem
manufacturedBy Equivalent to Manufacturers.Mfr. Name.
ApprovedManu-facturerListItem
manufacturerPartIdentifier
Equivalent to Manufacturers.Mfr. Part Number.
ApprovedManu-facturerListItem
globalPreferredStatusCode
Equivalent to Manufacturers.Preferred Status.
ApprovedManu-facturerListItem
globalManufacturerPartStatusCode
Equivalent to Manufacturers.Mfr. Part Lifecycle Phase.
Attachment universalResourceIdentifier
Equivalent to Attachments.File Name.
Attachment description Equivalent to Attachments.File Description.
Table 3-2: PDX attributes supported in ITT files (continued)
Object Attribute Description
3-13

Agile Import 2006
ITT Transformation Order
ITT transformations occur in sequential order from top to bottom in the table. Therefore, if you specify multiple transformations for one source value, the last specified transformation is used. For example, if the following two rows appear in the ITT, the BillOfMaterialItem | itemQuantity value of 1 will be transformed to 3, not 2.
BillOfMaterialItem,itemQuantity,1,2,"Change the quantity to 2"
BillOfMaterialItem,itemQuantity,1,3,"Change the quantity to 3"
Transforming Different Types of Data
Depending on the fields you are trying to transform and their data types, there are different ITT considerations. This section describes issues involved in transforming Item numbers, manufacturer names, and product lines. It also shows how to use the ITT to blank out values and set default values.
Transforming Item Numbers
In the Agile Advantage system, an Item number uniquely identifies an Item (Part or Document), a separate object in the database. The BOM table, which lists component parts contained within an assembly, also identifies parts by Item number. Therefore, the same Item number can be used in two different fields for the Item: the Title Block.Number field and the BOM.Item Number field.
If you are importing BOM data from a PDX package, and you are using the ITT to transform the Item | itemIdentifier attribute, you should also transform the same Item number values for the BillOfMaterialItem | billOfMaterialItemIdentifier attribute.
When you use the ITT to transform Item numbers, do not specify a blank value in the Transformed Value column. Item numbers should never be blank. Blank values in the Item Number field could cause problems importing the data, particularly for BOMs.
The following figure shows an example of an ITT that transforms three different Item number values for both the Item | itemIdentifier and BillOfMaterialItem | billOfMaterialItemIdentifier attributes.
3-14 User Guide

Chapter 3 Working with PDX Packages
Figure 3-5: Transforming Item numbers
Note If you specify an Item number prefix (in Step 2 of the Agile Import wizard) to use for a PDX package, the prefix is applied to Item numbers before any Item number transformations specified in an ITT. If you use the ITT to transform Item | itemIdentifier or BillOfMaterialItem | billOfMaterialItemIdentifier values, the source values that you specify in the ITT should include the prefix that you specify in the wizard. Otherwise, no Item number values are transformed for that PDX package (because no source values—which now include the prefixes you assigned—will match the source values in the ITT). For more information about specifying Item number prefixes, see “Specifying Settings for PDX Packages” on page 4-6.
Transforming Categories
The Item | category PDX attribute is equivalent to Title Block.Category, a list field. It is likely that category values within one company’s PDX package will not be valid for another company’s eHub. The slightest error in spelling or case causes a category value to be invalid. The following figure shows some simple transformations of category values.
Figure 3-6: Transforming categories
3-15

Agile Import 2006
Transforming Manufacturer Names
If you are importing AML, Manufacturer, or Manufacturer Part information from a PDX package, it is likely that the manufacturer names in the PDX package do not match exactly the names on the target eHub. Any differences, however slight, should be corrected in an ITT file. If you do not transform invalid manufacturer names to ones that are compatible with the target eHub, you may end up with multiple objects representing the same Manufacturer, such as FLEX and Flextronics.
Figure 3-7 shows an ITT file that transforms the manufacturer name values in a PDX AML file. There are six different manufacturer names in the source eHub: CPQ, DELL, FLEX, MARSHALL, SLCTRN, and TI. The ITT specifies the six replacement values for these names.
Figure 3-7: Transforming manufacturer names
Transforming AML Data
If you are importing AML data from a PDX package, and you are using an ITT, you must populate the ITT with rows for all related attributes from objects (ApprovedManufacturerListItem, Contact, ManufacturerPart) so that the corresponding attributes for AML rows, Manufacturers, and Manufacturer Parts will have the same values. See the following figure.
Figure 3-8: Transforming AML data
3-16 User Guide

Chapter 3 Working with PDX Packages
Transforming Product Lines
To transform product line values, you need to specify source and target values for all permutations of values in the Product Lines MultiList field. That is, you must transform every combination of values in their arranged order. For eHubs with more than three product line values, specifying transformations for the Product Lines field could be problematic and time-consuming. For such cases, we recommend that you do not transform product line values and, in fact, do not map the Product Lines field.
If you transform product line values in an ITT file, make sure both the source and transformed values have no leading or trailing spaces around the comma delimiters, like the following text:
Item,proprietaryProductFamily,"BPR,Neo,Zig","C-BPR,C-Neo,C-Zig"
Transforming Page Two and Page Three Fields
To transform Page Two or Page Three custom fields, you must include the groupLabel value of the <AdditionalAttributes> element as a prefix in the Atttribute column of the ITT. In the following figure, the groupLabel is Agile.PageTwo.PageTwo.
Figure 3-9: ITT row that transforms a Page Two field
Blanking Out a Field Value
You can use the ITT to blank out certain fields. For example, if a certain Category value is not valid for your eHub, rather than replace it with a different value, you could simply blank out the value. To blank it out, leave the Transformed Value field blank, as shown in the following figure.
Figure 3-10: ITT row that blanks out a field
3-17
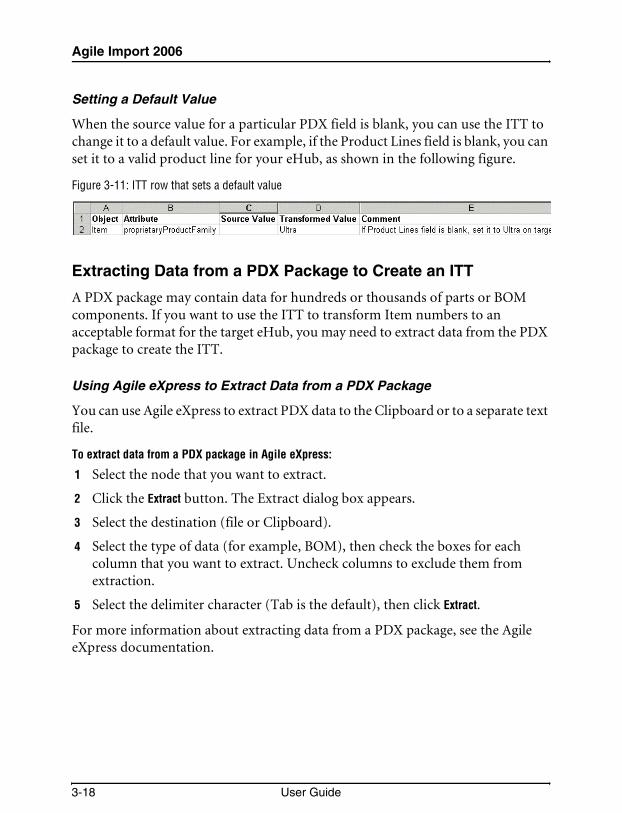
Agile Import 2006
Setting a Default Value
When the source value for a particular PDX field is blank, you can use the ITT to change it to a default value. For example, if the Product Lines field is blank, you can set it to a valid product line for your eHub, as shown in the following figure.
Figure 3-11: ITT row that sets a default value
Extracting Data from a PDX Package to Create an ITT
A PDX package may contain data for hundreds or thousands of parts or BOM components. If you want to use the ITT to transform Item numbers to an acceptable format for the target eHub, you may need to extract data from the PDX package to create the ITT.
Using Agile eXpress to Extract Data from a PDX Package
You can use Agile eXpress to extract PDX data to the Clipboard or to a separate text file.
To extract data from a PDX package in Agile eXpress:
1 Select the node that you want to extract.
2 Click the Extract button. The Extract dialog box appears.
3 Select the destination (file or Clipboard).
4 Select the type of data (for example, BOM), then check the boxes for each column that you want to extract. Uncheck columns to exclude them from extraction.
5 Select the delimiter character (Tab is the default), then click Extract.
For more information about extracting data from a PDX package, see the Agile eXpress documentation.
3-18 User Guide

Chapter 3 Working with PDX Packages
Using Agile Import to Extract Part Information from a PDX Package
A BOM assembly can list hundreds of components. If BOM components are not also listed in the root node of the PDX package, you cannot use Agile eXpress to extract their part information. This section describes how to use the XML parsing feature of Agile Import to extract part information from a PDX package.
To extract Part information for BOMs from a PDX package:
1 Start Agile Import and log in.
2 In Step 1 of the wizard, select Import Parts and Documents.
3 In Step 2 of the wizard, click the Browse button to locate a PDX package. Select the file, then click Open.
4 Click Next to proceed to the next wizard step.
At this point, Agile Import has scanned and parsed the PDX package and created a text file in the same folder. The text file has the same filename as the PDX package, but it has a TXT extension. It includes all part information for the PDX package.
5 Click Back twice to move back to Step 1 of the wizard.
6 Start Microsoft Excel and open the text file mentioned in step 4.
7 Copy part information from the text file to a separate ITT file.
8 Import BOMs from the PDX package following procedures described in Chapter 6, “Importing BOMs from PDX Packages.”
The following figure shows an example of part information extracted from a PDX package by Agile Import.
3-19

Agile Import 2006
Figure 3-12: Part information extracted from a PDX package
Printing PDX Reports in Agile eXpress
Agile eXpress lets you print reports of PDX data. These reports may help you to create an ITT file, especially if you print a report of the entire package.
To print data from a PDX package in Agile eXpress:
1 Select the node you want in the left pane.
If you select the Package node, the entire Package will be printed.
2 Click the Print button . The Print Preview dialog box appears.
3 From the Print Preview dialog box, click the Print button . The Print dialog box appears.
4 Select the Printer, Print Range, and Number of Copies, then click OK.
For more information about printing data from a PDX package, see the Agile eXpress documentation.
3-20 User Guide
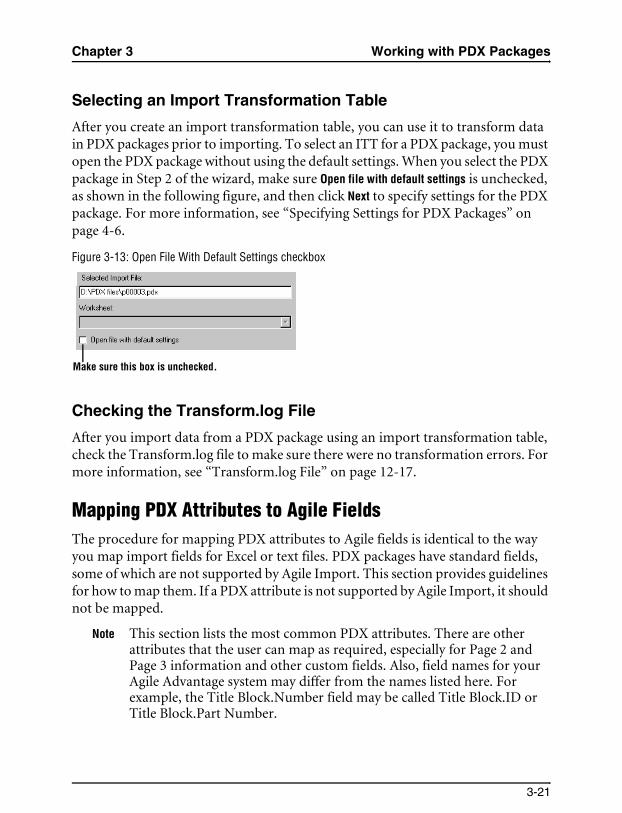
Chapter 3 Working with PDX Packages
Selecting an Import Transformation Table
After you create an import transformation table, you can use it to transform data in PDX packages prior to importing. To select an ITT for a PDX package, you must open the PDX package without using the default settings. When you select the PDX package in Step 2 of the wizard, make sure Open file with default settings is unchecked, as shown in the following figure, and then click Next to specify settings for the PDX package. For more information, see “Specifying Settings for PDX Packages” on page 4-6.
Figure 3-13: Open File With Default Settings checkbox
Checking the Transform.log File
After you import data from a PDX package using an import transformation table, check the Transform.log file to make sure there were no transformation errors. For more information, see “Transform.log File” on page 12-17.
Mapping PDX Attributes to Agile FieldsThe procedure for mapping PDX attributes to Agile fields is identical to the way you map import fields for Excel or text files. PDX packages have standard fields, some of which are not supported by Agile Import. This section provides guidelines for how to map them. If a PDX attribute is not supported by Agile Import, it should not be mapped.
Note This section lists the most common PDX attributes. There are other attributes that the user can map as required, especially for Page 2 and Page 3 information and other custom fields. Also, field names for your Agile Advantage system may differ from the names listed here. For example, the Title Block.Number field may be called Title Block.ID or Title Block.Part Number.
Make sure this box is unchecked.
3-21

Agile Import 2006
Mapping PDX Attributes for Parts and Documents
Table 3-3 lists the Agile Advantage field that corresponds with each PDX attribute for Parts and Documents.
Note For eHubs with more than three product line values, we recommend that you do not map the Product Lines field.
Mapping PDX Attributes for Manufacturers
The following table lists Agile Advantage fields that correspond with PDX attributes for Manufacturers. Fields other than those in the table map logically by name.
Table 3-3: PDX to Agile mappings for Parts and Documents
PDX Attribute Agile Classes Agile Tab Corresponding Agile Field
itemIdentifier Parts, Documentation Title Block Number
description Parts, Documentation Title Block Description
proprietaryProductFamily
Parts, Documentation Title Block Product Line(s)
globalProductTypeCode
Parts Title Block Part Type
globalProductTypeCode
Documentation Title Block Document Type
category Parts Title Block Part Category
category Documentation Title Block Document Category
Table 3-4: PDX to Agile mappings for Manufacturers
PDX Attribute Agile Class Agile Tab Corresponding Agile Field
businessName Manufacturer General Info Name
contactName Manufacturer General Info Contact
contactStatus Manufacturer General Info Lifecycle Phase
globalPartnerSubClassificationCode
Manufacturer General Info Mfr Type
3-22 User Guide
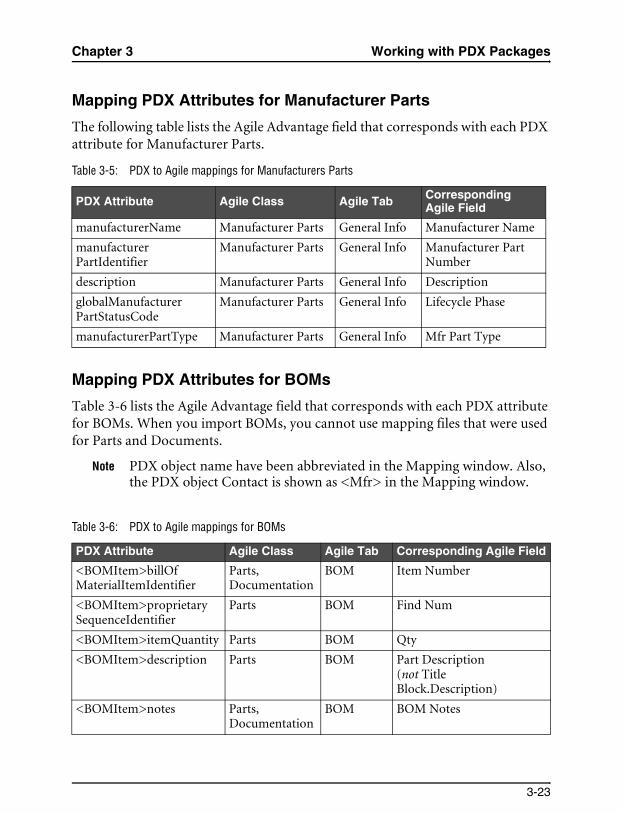
Chapter 3 Working with PDX Packages
Mapping PDX Attributes for Manufacturer Parts
The following table lists the Agile Advantage field that corresponds with each PDX attribute for Manufacturer Parts.
Mapping PDX Attributes for BOMs
Table 3-6 lists the Agile Advantage field that corresponds with each PDX attribute for BOMs. When you import BOMs, you cannot use mapping files that were used for Parts and Documents.
Note PDX object name have been abbreviated in the Mapping window. Also, the PDX object Contact is shown as <Mfr> in the Mapping window.
Table 3-5: PDX to Agile mappings for Manufacturers Parts
PDX Attribute Agile Class Agile Tab Corresponding Agile Field
manufacturerName Manufacturer Parts General Info Manufacturer Name
manufacturerPartIdentifier
Manufacturer Parts General Info Manufacturer Part Number
description Manufacturer Parts General Info Description
globalManufacturerPartStatusCode
Manufacturer Parts General Info Lifecycle Phase
manufacturerPartType Manufacturer Parts General Info Mfr Part Type
Table 3-6: PDX to Agile mappings for BOMs
PDX Attribute Agile Class Agile Tab Corresponding Agile Field
<BOMItem>billOfMaterialItemIdentifier
Parts, Documentation
BOM Item Number
<BOMItem>proprietarySequenceIdentifier
Parts BOM Find Num
<BOMItem>itemQuantity Parts BOM Qty
<BOMItem>description Parts BOM Part Description(not Title Block.Description)
<BOMItem>notes Parts, Documentation
BOM BOM Notes
3-23

Agile Import 2006
Mapping PDX Attributes for AMLs
Table 3-7 lists the Agile Advantage field that corresponds with each PDX attribute for AMLs.
Note PDX object name have been abbreviated in the Mapping window. Also, the PDX object Contact is shown as <Mfr> in the Mapping window.
Some PDX attributes have equivalent values from different sources, for example, <AMLItem>description and <MfrPart>description. You can map only one of the attributes to a given Agile field (in this example, Manufacturer Parts.General Info.Description). In general, Agile recommends that you do the following:
❑ Map all <AMLItem> attributes to the Manufacturers tab of Items.
❑ Map all <Item> attributes to Parts or Documentation class attributes of Items.
❑ Map all <Mfr> attributes to the General Info tab of Manufacturers.
❑ Map all <MfrPart> attributes to the General Info tab of Manufacturer Parts.
<ReferenceDesignator>referenceDesignatorName
Parts BOM RefDes
<Item>itemIdentifier Not mapped.
<Item>description Parts, Documentation
Title Block Description
<Item>proprietaryProductFamily
Parts, Documentation
Title Block Product Line(s)
<Item>globalProductTypeCode
Parts Title Block Part Type
<Item>globalProductTypeCode
Documentation Title Block Document Type
Table 3-6: PDX to Agile mappings for BOMs
PDX Attribute Agile Class Agile Tab Corresponding Agile Field
3-24 User Guide

Chapter 3 Working with PDX Packages
It is possible to map <AMLItem> attributes to Item, Manufacturer, or Manufacturer Parts classes. This may be necessary when the PDX package does not include Manufacturer and Manufacturer Part objects.
Table 3-7: PDX to Agile mappings for AMLs
PDX Attribute Agile Class Agile Tab Corresponding Agile Field
<AMLItem>manufacturedBy
Parts, Documentation
Manufacturers Mfr. Name
<AMLItem>manufacturerPartIdentifier
Parts, Documentation
Manufacturers Mfr. Part Number
<AMLItem>globalPreferredStatusCode
Parts, Documentation
Manufacturers Preferred Status
<AMLItem>globalManufacturerPartStatusCodeOther
Manufacturer Parts
General Info Lifecycle Phase
<AMLItem>description Manufacturer Parts
General Info Description
<MfrPart>globalManufacturerPartStatusCode
ManufacturerParts
General Info Lifecycle Phase
<MfrPart>manufacturerPartType
ManufacturerParts
General Info Mfr Part Type
<MfrPart>description ManufacturerParts
General Info Description
<Mfr>contactName Manufacturers General Info Contact
<Mfr>contactStatus Manufacturers General Info Lifecycle Phase
<Mfr>globalPartnerSubClassificationCode
Manufacturers General Info Mfr Type
<Mfr>contactIdentifier Not mapped.
<Item>itemIdentifier Parts,Documentation
Title Block Number
<Item>globalProductTypeCode
Parts Title Block Part Type
<Item>globalProductTypeCode
Documentation Title Block Document Type
<Item>description Parts,Documentation
Title Block Description
3-25

Agile Import 2006
Mapping PDX Attributes for Attachments
Table 3-8 lists the Agile Advantage field that corresponds with each PDX attribute for attachments.
<Item>proprietaryProductFamily
Parts,Documentation
Title Block Product Line(s)
<Item>category Parts Title Block Part Category
<Item>category Documentation Title Block Document Category
Table 3-8: PDX to Agile mappings for attachments
PDX Attribute Agile Class Agile Tab Corresponding Agile Field
itemIdentifier Parts, Documentation
Title Block Number
manufacturerName Manufacturers General Info Name
manufacturerName Manufacturer Parts General Info Manufacturer Name
manufacturerPartIdentifier
Manufacturer Parts General Info Manufacturer Part Number
Type Parts Title Block Part Type
Type Manufacturers General Info Mfr Type
Type Manufacturer Parts General Info Mfr Part Type
description Parts, Documentation, Manufacturers, Manufacturer Parts
Attachments File Description
universalResourceIdentifier
Parts, Documentation, Manufacturers, Manufacturer Parts
Attachments File Name
Table 3-7: PDX to Agile mappings for AMLs
PDX Attribute Agile Class Agile Tab Corresponding Agile Field
3-26 User Guide

Chapter 3 Working with PDX Packages
Limitations for Importing Data from PDX PackagesAlthough the PDX standard accurately encodes product content information from an Agile Advantage eHub, there are currently some limitations in using Agile Import to import data from PDX packages:
❑ PDX packages are read-only. Unless you have access to the source eHub and specific privileges to modify a package, a PDX package is for viewing purposes only. Generally, you cannot change values in a PDX package. If a PDX package has a problem, you may need to ask the supplier of the PDX package to correct the data on the source eHub and then regenerate the package.
❑ You can import attachments only through the Import Attachments from PDX option. You cannot import attachments in the same pass as importing Items, manufacturing objects, or AML or BOM data. Also, attachment redlines are not imported.
❑ Only one revision of an Item can be imported in one pass. If the PDX package that you’re importing contains multiple revisions of the same Item, you must choose the revision that you want to import.
❑ Agile Import rejects PDX packages with two or more revisions of the same assembly (BOM parent) or component (BOM child). If you try to import such a file, Agile Import will not proceed until you choose a different file.
❑ Agile Import does not validate PDX packages for 100% compliance with the DTD.
❑ Change objects are not supported. Although PDX packages can contain Change objects, such as ECOs, ECRs, and MCOs, Agile Import does not let you import them. However, Agile Import does let you specify a Change, either new or existing, to import data to a released Item. Import also gives you the option of placing newly created Items on a Change, simplifying the release process.
❑ Approved Vendor List (AVL) information is not supported.
3-27

Agile Import 2006
3-28 User Guide

CHAPTER 4Importing Items,
Manufacturers, andManufacturer Parts
This chapter discusses how to import Items (Parts and Documents), Manufacturers, and Manufacturer Parts. It includes these topics:❑ Steps for Importing Parts, Documents, Manufacturers, and Manufacturer
Parts❑ Selecting the Type of Import❑ Selecting the Import File❑ Specifying a Change Order for New Items❑ Selecting Objects to Import❑ Mapping Import Fields to Agile Fields❑ Creating Agile Objects with the Imported Data❑ Importing the Data❑ Returning to Step 1 or Exiting Agile Import
4-1
Agile Import 2006
Steps for Importing Parts, Documents, Manufacturers, and Manufacturer PartsTo use Agile Import to import Parts, Documents, Manufacturers, or Manufacturer Parts, follow the steps described in the following sections:
❑ “Selecting the Type of Import” on this page
❑ “Selecting the Import File” on this page
❑ “Specifying a Change Order for New Items” on page 4-7
❑ “Selecting Objects to Import” on page 4-7
❑ “Mapping Import Fields to Agile Fields” on page 4-8
❑ “Creating Agile Objects with the Imported Data” on page 4-12
❑ “Importing the Data” on page 4-14
❑ “Returning to Step 1 or Exiting Agile Import” on page 4-15
Selecting the Type of ImportIn Step 1 of the Agile Import wizard, you select the type of information you will import.
Note Before you begin importing data, check to see if you have the appropriate Agile Advantage privileges. For the complete list of privilege masks required for Agile Import, see Table 1-1 on page 1-6.
To select the type of import:
1 After starting Agile Import, select one of the following import options: Import Parts and Documents, Import Manufacturers, or Import Manufacturer Parts.
2 Click Next to proceed to the next wizard step.
Selecting the Import FileIn Step 2, you select the type and location of the source data. The file must be one of the following types:
❑ Text (*.txt)
❑ Microsoft Excel (*.xls)
❑ CSV (comma-delimited) (*.csv)
4-2 User Guide
Chapter 4 Importing Items, Manufacturers, and Manufacturer Parts
❑ PDX (*.pdx)
To select the import file:
1 Select the file you want to import from the list, or click the Browse button to locate a file.
2 If you are importing a Microsoft Excel file, select a worksheet from the drop-down list. When you are not importing BOMs, you can import only one worksheet at a time.
Note Once you add an Excel file or a text file to the list at the top of the Step 2 window, you can select it and click View File to open the file in its associated application—usually Microsoft Excel or Notepad. The View File button is disabled when a PDX package is selected.
3 If you specified preferences for how to open import files, make sure Open File with Default Settings is checked, then click Next to proceed to Step 3 of the wizard. For more information, see Chapter 13, “Setting Preferences.”
If you unchecked Open File with Default Settings, click Next to specify settings used to open the file. The settings vary depending on the type of file you are opening.
Specifying Settings for Excel Files
If the import file is an Excel file, a file preview screen appears. Specify the worksheet, start row (the row where the header is located), and start and end columns for the file, as shown in the following figure. Click Next to proceed to the next wizard step.
4-3

Agile Import 2006
Figure 4-1: Excel File Preview
For information about setting preferences for Excel files, see Chapter 13, “Setting Preferences.”
Specifying Settings for Text Files
If the import file is a text file, a file preview screen appears. Specify whether the file has delimited or fixed width data, and specify the start row (the row where the header is located), as shown in the following figure.
4-4 User Guide

Chapter 4 Importing Items, Manufacturers, and Manufacturer Parts
Figure 4-2: First Text File Preview Screen
When you click Next, a second preview screen lets you select the field delimiter and text qualifier, as shown in the following figure.
Figure 4-3: Second Text File Preview Screen
4-5
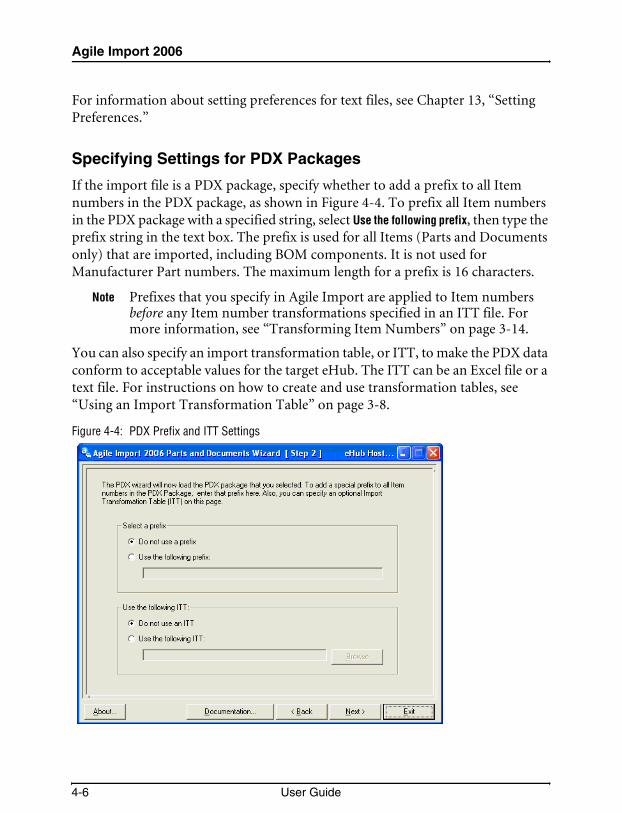
Agile Import 2006
For information about setting preferences for text files, see Chapter 13, “Setting Preferences.”
Specifying Settings for PDX Packages
If the import file is a PDX package, specify whether to add a prefix to all Item numbers in the PDX package, as shown in Figure 4-4. To prefix all Item numbers in the PDX package with a specified string, select Use the following prefix, then type the prefix string in the text box. The prefix is used for all Items (Parts and Documents only) that are imported, including BOM components. It is not used for Manufacturer Part numbers. The maximum length for a prefix is 16 characters.
Note Prefixes that you specify in Agile Import are applied to Item numbers before any Item number transformations specified in an ITT file. For more information, see “Transforming Item Numbers” on page 3-14.
You can also specify an import transformation table, or ITT, to make the PDX data conform to acceptable values for the target eHub. The ITT can be an Excel file or a text file. For instructions on how to create and use transformation tables, see “Using an Import Transformation Table” on page 3-8.
Figure 4-4: PDX Prefix and ITT Settings
4-6 User Guide
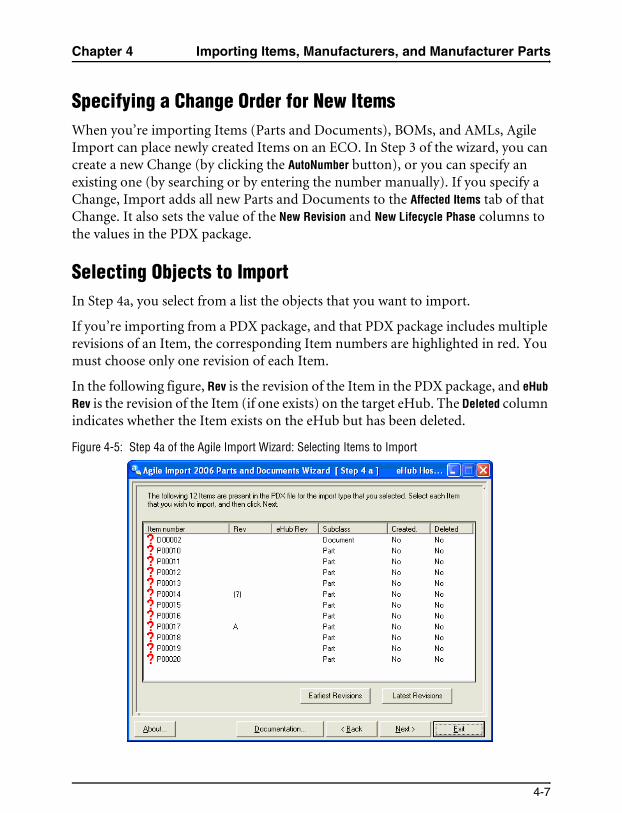
Chapter 4 Importing Items, Manufacturers, and Manufacturer Parts
Specifying a Change Order for New ItemsWhen you’re importing Items (Parts and Documents), BOMs, and AMLs, Agile Import can place newly created Items on an ECO. In Step 3 of the wizard, you can create a new Change (by clicking the AutoNumber button), or you can specify an existing one (by searching or by entering the number manually). If you specify a Change, Import adds all new Parts and Documents to the Affected Items tab of that Change. It also sets the value of the New Revision and New Lifecycle Phase columns to the values in the PDX package.
Selecting Objects to ImportIn Step 4a, you select from a list the objects that you want to import.
If you’re importing from a PDX package, and that PDX package includes multiple revisions of an Item, the corresponding Item numbers are highlighted in red. You must choose only one revision of each Item.
In the following figure, Rev is the revision of the Item in the PDX package, and eHub Rev is the revision of the Item (if one exists) on the target eHub. The Deleted column indicates whether the Item exists on the eHub but has been deleted.
Figure 4-5: Step 4a of the Agile Import Wizard: Selecting Items to Import
4-7

Agile Import 2006
To select the earliest revision of all Items (according to the value of the Item | RevReleasedDate PDX attribute), click Earliest Revisions. To select the latest (most recent) revision, click Latest Revision. Clicking either one of these buttons selects all Items that have only one revision.
Note If you are importing from a PDX package, and the source date and time are not in W3C format (see “Dates and Times in W3C Format” on page 3-5), the Earliest Revisions and Latest Revisions buttons are disabled.
If you select multiple revisions of an Item and then click Next, Agile Import generates a conflicts.log file. This file lists all revision conflicts. You cannot proceed to the next import step until you resolve revision conflicts.
Mapping Import Fields to Agile FieldsIn Step 4b, you map the fields you are importing to fields in Agile Advantage subclasses, such as Parts, Documents, Manufacturers, and Manufacturer Parts. You can select a mapping file to use as is, modify an existing file, or create a new one.
Note You must map all required fields. For example, the Agile Advantage field Title Block.Number is a required field for Parts and Documents. If you do not map to this field, Agile Import cannot import the data. For a table of required fields, see “Required Mapped Fields” on page 2-9.
If you have already created one or more mapping files, Step 4 of the Import wizard offers a list of files to use. Once you create a mapping file, you can reuse it for other import files that have the same attributes (columns of data).
You can do any one of the following:
❑ Select a file to use unmodified and click Next.
❑ Click New to create a new mapping file.
❑ Select a file to edit and click Modify.
❑ Browse to a mapping file not on the list and click Next.
To remove a file from the list, Click Remove. To remove all files from the list, click Clear List.
Creating a New Mapping File
If you are working with a new import file and have not mapped its columns of data to Agile fields, you should create a new mapping file.
4-8 User Guide
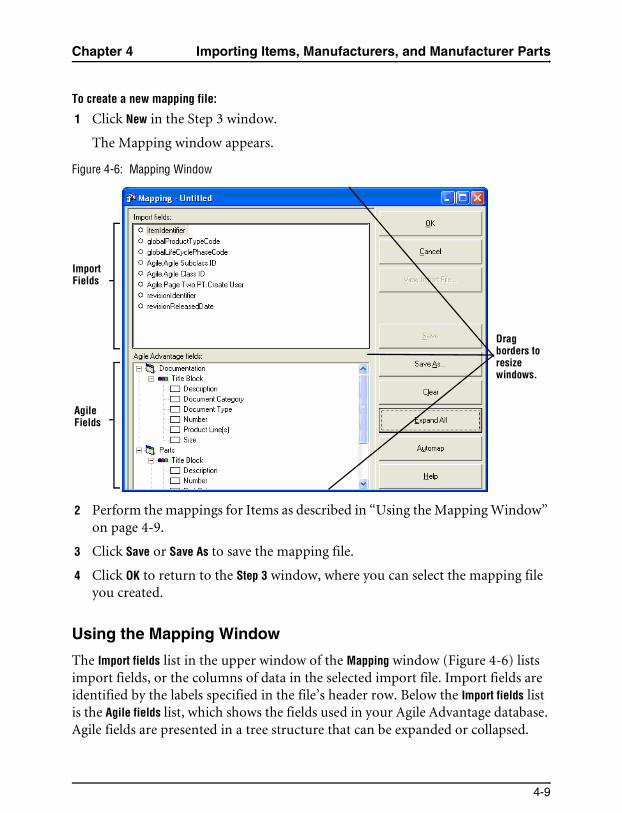
Chapter 4 Importing Items, Manufacturers, and Manufacturer Parts
To create a new mapping file:
1 Click New in the Step 3 window.
The Mapping window appears.
Figure 4-6: Mapping Window
2 Perform the mappings for Items as described in “Using the Mapping Window” on page 4-9.
3 Click Save or Save As to save the mapping file.
4 Click OK to return to the Step 3 window, where you can select the mapping file you created.
Using the Mapping Window
The Import fields list in the upper window of the Mapping window (Figure 4-6) lists import fields, or the columns of data in the selected import file. Import fields are identified by the labels specified in the file’s header row. Below the Import fields list is the Agile fields list, which shows the fields used in your Agile Advantage database. Agile fields are presented in a tree structure that can be expanded or collapsed.
Agile Fields
Import Fields
Drag borders to resize windows.
4-9

Agile Import 2006
Use the Mapping window to indicate which Agile Advantage fields should receive data from the import fields. As you map fields from the import file, they are marked with a solid (green) circle. Open circles mark the unmapped fields. In the Agile fields list, arrows mark the fields that are mapped, and the name of the associated import field appears to their right (see Figure 4-6).
Note If your import fields are improperly listed in the Mapping window, then there is a problem with your file’s formatting, or you may need to adjust your Agile Import preference settings. For example, the file’s header row may not be the start row specified for Excel files or text files in Agile Import preferences (see “Setting Excel File Defaults” on page 13-6 and “Setting Text File Defaults” on page 13-7), or you may have accidentally specified a blank worksheet in an Excel file. See “Importing Items, Manufacturers, and Manufacturer Parts” on page 4-1 for assistance in troubleshooting.
Table 4-1 describes buttons in the Mapping window.
To map the import fields to Agile fields:
1 Click a field in the Import fields list to select it.
If you are not sure what the field name refers to, click View Import File to open the file.
2 Select the corresponding Agile Advantage field in the Agile fields list.
Table 4-1: Buttons in the Mapping window
Button Action
OK Accepts all settings and returns to Step 3 of the Agile Import wizard.
Cancel Closes the Mapping window without making any changes.
View Import File Displays the selected import file in the application associated with it.
Save Saves the current mapping settings under the current mapping file name.
Save As Saves the current mapping settings to a new file.
Clear Clears all existing mappings.
Expand All Expands all nodes in the Agile fields list.
Automap Automatically maps Import fields and Agile Advantage fields that have identical, case-sensitive names. Field names must match exactly to be mapped.
4-10 User Guide
Chapter 4 Importing Items, Manufacturers, and Manufacturer Parts
Click the plus sign (+) next to each node to expand it and see its contents. To expand all nodes, click Expand All.
3 Map fields using one or more of these methods:
• Click Automap to automatically map Import fields and Agile fields that have identical, case-sensitive names.
• Drag the field from the Import fields list to the corresponding Agile field.
• Right-click an Agile Advantage field, and choose Map from the shortcut menu to establish a mapping with the currently selected import field.
4 Repeat steps 1 through 3 for all import fields you want to map.
Caution! Data in any unmapped fields are not imported.
5 Click Save to save the mapping file. If you are saving a new mapping file, click Save As and specify the filename.
6 After saving your changes, click OK to return to the Agile Import wizard.
To remove a field mapping:
1 Right-click the Agile Advantage field.
2 Choose Delete.
Mapping Subclass Fields
If you are importing new objects, your import data can include a Subclass column. You can then map the Subclass column to Agile Advantage subclass fields (such as Title Block.Part Type for Parts and Title Block.Document Type for Documents). Agile Import does not actually import the subclass data. It refers to the field to determine the subclass of new objects. For more information about mapping subclass fields, see “Including Subclass Fields in the Import Data” on page 2-10.
Modifying a Mapping File
If an import file has been modified (for example, new columns of data have been added), you need to modify its associated mapping file. Otherwise, the mapping file could be invalid for the revised data.
4-11
Agile Import 2006
To modify an existing mapping file:
1 In Step 3 of the Agile Import wizard, select the mapping file to modify.
2 Click Modify.
The Mapping window appears (Figure 4-6).
3 Follow the instructions in “Using the Mapping Window” on page 4-9.
Mapping PDX Packages
PDX packages have standard fields, some of which are not supported by Agile Import. For information about how to map PDX attributes to Agile Advantage fields, see “Mapping PDX Attributes to Agile Fields” on page 3-21.
Creating Agile Objects with the Imported DataAfter Step 4 of the wizard, Agile Import polls the database to see if the data being imported represents Agile Advantage objects that already exist. When the polling is completed, Agile Import presents Step 5 of the wizard. The Step 5 window shows those objects that do not already exist in the Agile Advantage database. When you import Manufacturers and Manufacturer Parts, you may see several Step 5 screens, one for each type of object that does not already exist.
Note If all the data being imported represents Agile Items that already exist, Agile Import skips this step of the wizard.
Before you create an object, click Select Subclass to specify its subclass if the subclass has not already been mapped. To select multiple items, Shift+click or Ctrl+click, and then set the subclass for all selected rows in one operation.
Note Parts or Manufacturer Parts in PDX packages may have been assigned a subclass that is not available on the target Agile Advantage eHub. If the file that you are importing has new subclasses (and you want to create new items with these new subclasses), you must first use Agile Administrator to create the subclasses on the target eHub, so that you can choose them during the import process. If you don’t first create the subclasses, you must choose one of the existing subclasses when you import these new items.
After you specify the subclass for an object, either click Create All to create all objects in the list, or click Create Selected to create only selected objects.
4-12 User Guide

Chapter 4 Importing Items, Manufacturers, and Manufacturer Parts
Figure 4-7 shows Step 5 for the Import Parts and Documents wizard. Subclasses have been selected, but none of the objects has been created, as indicated by the question mark in the left column.
Figure 4-7: Items That Do Not Exist
After an object is created, an icon for the Agile Advantage object appears in the first column, and the Created column changes to Yes for the object.
4-13
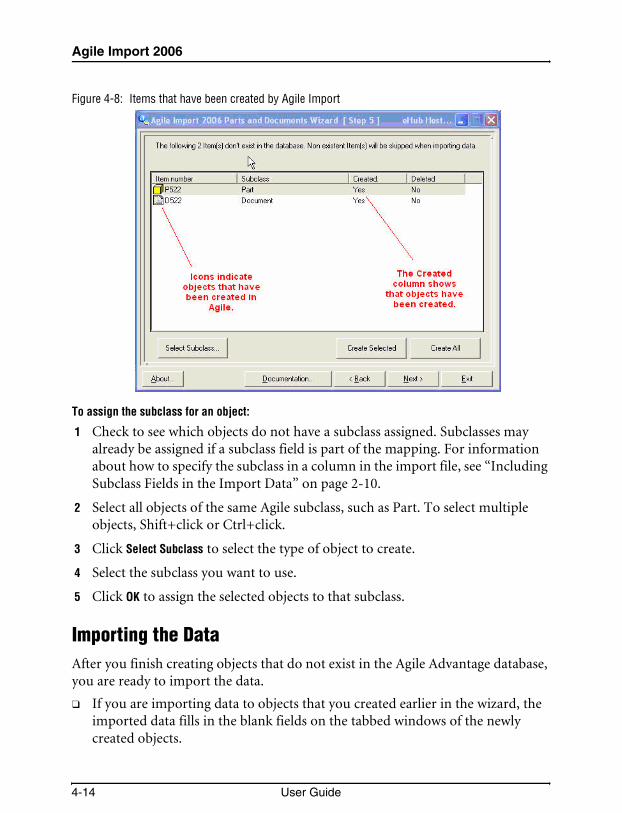
Agile Import 2006
Figure 4-8: Items that have been created by Agile Import
To assign the subclass for an object:
1 Check to see which objects do not have a subclass assigned. Subclasses may already be assigned if a subclass field is part of the mapping. For information about how to specify the subclass in a column in the import file, see “Including Subclass Fields in the Import Data” on page 2-10.
2 Select all objects of the same Agile subclass, such as Part. To select multiple objects, Shift+click or Ctrl+click.
3 Click Select Subclass to select the type of object to create.
4 Select the subclass you want to use.
5 Click OK to assign the selected objects to that subclass.
Importing the DataAfter you finish creating objects that do not exist in the Agile Advantage database, you are ready to import the data.
❑ If you are importing data to objects that you created earlier in the wizard, the imported data fills in the blank fields on the tabbed windows of the newly created objects.
4-14 User Guide

Chapter 4 Importing Items, Manufacturers, and Manufacturer Parts
❑ If you are importing data to objects that already exist in the Agile Advantage database, the imported data overwrites the current values in the fields on the tabs of existing objects. The revision affected depends on whether the Item in the Agile Advantage database has been released:
• For released Items in the target database, Agile Import overwrites values in the latest released revision. For example, a PDX package may contain revisions A and B, and the target database may contain A, B, and C, where C is the latest released revision. Upon importing, the revision that you choose to import (A or B) will overwrite revision C.
• For unreleased Items in the target database, Agile Import overwrites values in the latest (unreleased) revision. Using the preceding example, if the target database also includes an unreleased revision that is later than revision C, the imported revision overwrites that unreleased revision. This behavior applies even if you selected a different PDX source revision of the Item in Step 4a of the wizard.
You can use the Overwrite Mode preference to have Agile Import overwrite all fields or just the fields that are blank. For more information, see “Setting a Preference for Overwriting Values” on page 13-4.
Step 6 of the wizard lets you confirm that you want to import the specified file.
Click Import to import the data from the selected file and proceed to the next wizard step. After the import process starts, you can click Cancel in the progress message box to stop it.
Returning to Step 1 or Exiting Agile ImportOn the final step of the Agile Import wizard, you can repeat the cycle to import more data, or finish the process.
Choose one of the following actions:
❑ To view the Import.log file, click View Log File. For more information about log files, see “Log Files” on page 12-13.
❑ To import another file, click Step 1.
❑ To exit Agile Import, click Exit.
4-15

Agile Import 2006
4-16 User Guide
CHAPTER 5Importing BOMs from
Excel or Text FilesThis chapter discusses how to import BOMs from Microsoft Excel or text files. If you are importing BOMs from a PDX package, see Chapter 6, “Importing BOMs from PDX Packages.”The chapter includes these topics:❑ Steps for Importing BOMs from Excel or Text Files❑ Appending Data to a BOM❑ Replacing a BOM❑ Selecting the Type of Import❑ Specifying a Change Order for New Items❑ Specifying BOM Assemblies to Import❑ Handling Duplicate Item Numbers, Find Numbers, and Reference
Designators❑ Creating Agile Items with the Imported Data❑ Importing the BOM Data❑ Redlining a BOM❑ Reviewing Redlines, Returning to Step 1, or Exiting Agile Import❑ BOM Rollbacks
5-1

Agile Import 2006
Steps for Importing BOMs from Excel or Text FilesTo use Agile Import to import BOMs, follow the steps described in the following sections:
❑ “Selecting the Type of Import” on page 5-6
❑ “Specifying a Change Order for New Items” on page 5-6
❑ “Specifying BOM Assemblies to Import” on page 5-7
❑ “Creating Agile Items with the Imported Data” on page 5-14
❑ “Importing the BOM Data” on page 5-16
❑ “Reviewing Redlines, Returning to Step 1, or Exiting Agile Import” on page 5-19
Note Before you begin importing BOM data, check to see if you have the appropriate Agile Import privileges. For the complete list of privilege masks required for Agile Import, see Table 1-1 on page 1-6.
Appending Data to a BOMAgile Import either appends imported BOM rows or replaces existing rows and redlines the changes. For unreleased Items without pending changes, you can use Agile Import to append Items to an existing BOM. This means you can import the records of two or more Microsoft Excel files or worksheets into one Agile BOM. For example, after you import the records of Excel file 111.xls to Agile Item 1000A, you can import Excel file 222.xls and add (append) the records from that file to the BOM of Agile Item 1000A.
The following figure shows two Excel files imported to one Agile Item.
5-2 User Guide
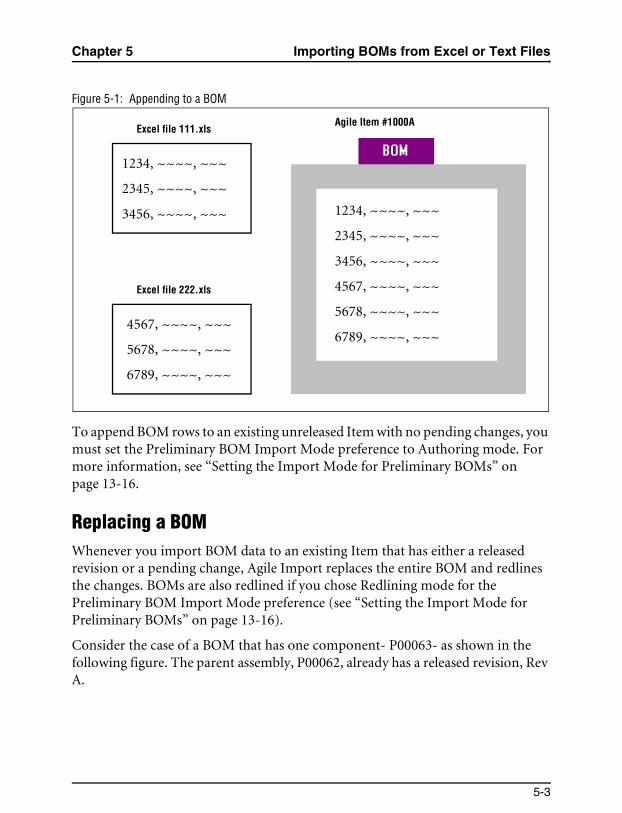
Chapter 5 Importing BOMs from Excel or Text Files
Figure 5-1: Appending to a BOM
To append BOM rows to an existing unreleased Item with no pending changes, you must set the Preliminary BOM Import Mode preference to Authoring mode. For more information, see “Setting the Import Mode for Preliminary BOMs” on page 13-16.
Replacing a BOMWhenever you import BOM data to an existing Item that has either a released revision or a pending change, Agile Import replaces the entire BOM and redlines the changes. BOMs are also redlined if you chose Redlining mode for the Preliminary BOM Import Mode preference (see “Setting the Import Mode for Preliminary BOMs” on page 13-16).
Consider the case of a BOM that has one component- P00063- as shown in the following figure. The parent assembly, P00062, already has a released revision, Rev A.
1234, ~~~~, ~~~
2345, ~~~~, ~~~
3456, ~~~~, ~~~
4567, ~~~~, ~~~
5678, ~~~~, ~~~
6789, ~~~~, ~~~
1234, ~~~~, ~~~
2345, ~~~~, ~~~
3456, ~~~~, ~~~
4567, ~~~~, ~~~
5678, ~~~~, ~~~
6789, ~~~~, ~~~
Excel file 111.xls
Excel file 222.xls
Agile Item #1000A
5-3
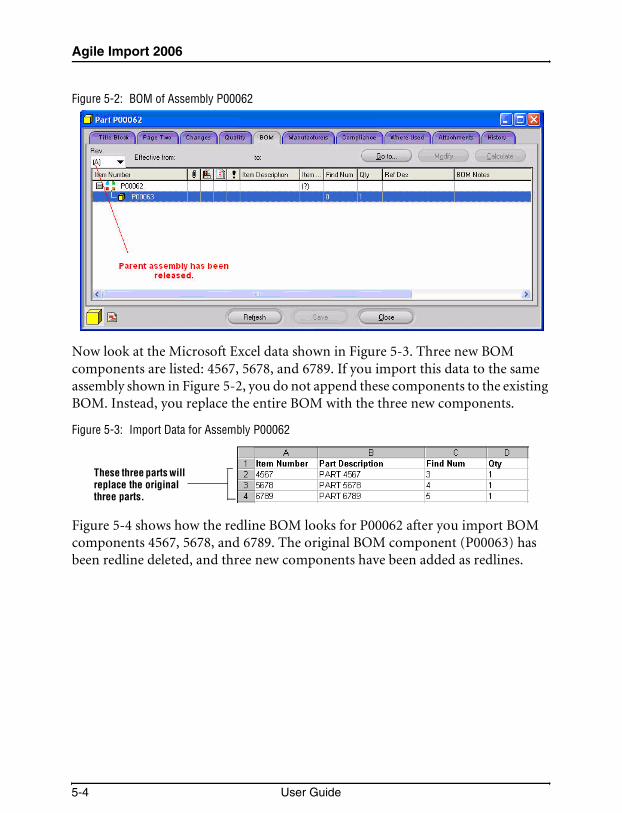
Agile Import 2006
Figure 5-2: BOM of Assembly P00062
Now look at the Microsoft Excel data shown in Figure 5-3. Three new BOM components are listed: 4567, 5678, and 6789. If you import this data to the same assembly shown in Figure 5-2, you do not append these components to the existing BOM. Instead, you replace the entire BOM with the three new components.
Figure 5-3: Import Data for Assembly P00062
Figure 5-4 shows how the redline BOM looks for P00062 after you import BOM components 4567, 5678, and 6789. The original BOM component (P00063) has been redline deleted, and three new components have been added as redlines.
These three parts will replace the original three parts.
5-4 User Guide

Chapter 5 Importing BOMs from Excel or Text Files
Figure 5-4: Redline BOM of Assembly P0100 After New Components Are Imported
If you want to append data to a BOM after the parent assembly has been released or has a pending change, the import data must include all existing components on the BOM as well as any new components. For example, to append components 4567, 5678, and 6789 to assembly P00062, the import data should look like the data in the following figure.
Figure 5-5: Import Data For Assembly P00062 With Duplicated Components
Figure 5-6 shows the redline BOM for P00062 after you import the import data shown in Figure 5-5. The first three components are unchanged, and three new components have been added.
Original components are replaced by imported components
Existing BOM components included
5-5
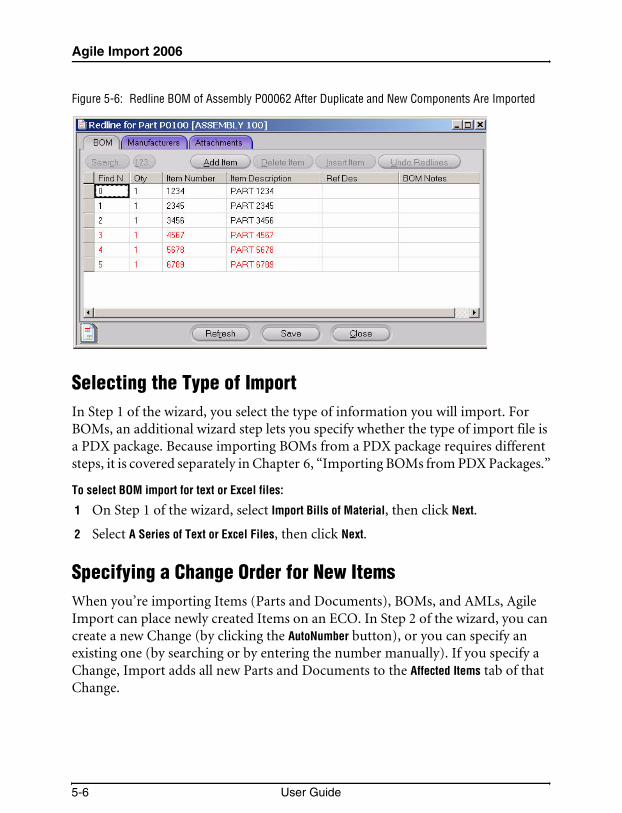
Agile Import 2006
Figure 5-6: Redline BOM of Assembly P00062 After Duplicate and New Components Are Imported
Selecting the Type of ImportIn Step 1 of the wizard, you select the type of information you will import. For BOMs, an additional wizard step lets you specify whether the type of import file is a PDX package. Because importing BOMs from a PDX package requires different steps, it is covered separately in Chapter 6, “Importing BOMs from PDX Packages.”
To select BOM import for text or Excel files:
1 On Step 1 of the wizard, select Import Bills of Material, then click Next.
2 Select A Series of Text or Excel Files, then click Next.
Specifying a Change Order for New ItemsWhen you’re importing Items (Parts and Documents), BOMs, and AMLs, Agile Import can place newly created Items on an ECO. In Step 2 of the wizard, you can create a new Change (by clicking the AutoNumber button), or you can specify an existing one (by searching or by entering the number manually). If you specify a Change, Import adds all new Parts and Documents to the Affected Items tab of that Change.
5-6 User Guide
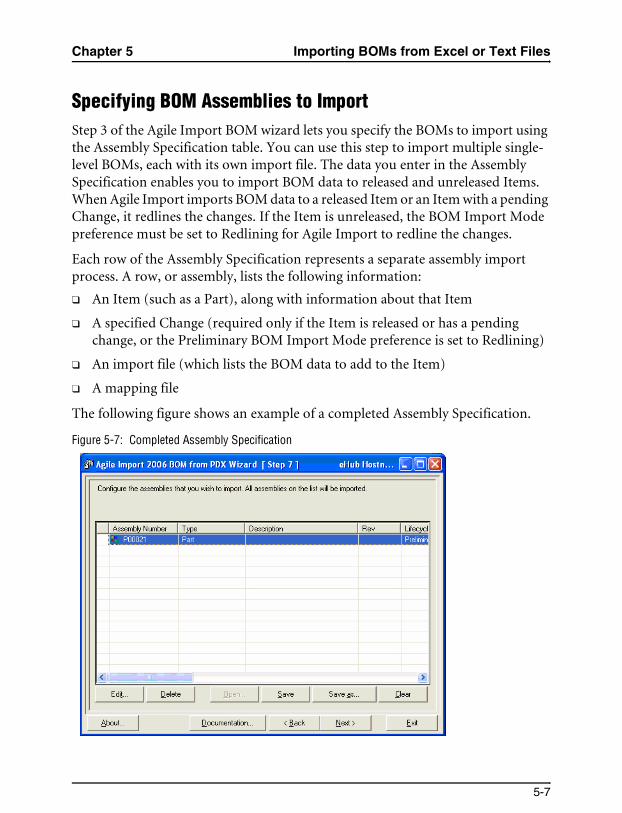
Chapter 5 Importing BOMs from Excel or Text Files
Specifying BOM Assemblies to ImportStep 3 of the Agile Import BOM wizard lets you specify the BOMs to import using the Assembly Specification table. You can use this step to import multiple single-level BOMs, each with its own import file. The data you enter in the Assembly Specification enables you to import BOM data to released and unreleased Items. When Agile Import imports BOM data to a released Item or an Item with a pending Change, it redlines the changes. If the Item is unreleased, the BOM Import Mode preference must be set to Redlining for Agile Import to redline the changes.
Each row of the Assembly Specification represents a separate assembly import process. A row, or assembly, lists the following information:
❑ An Item (such as a Part), along with information about that Item
❑ A specified Change (required only if the Item is released or has a pending change, or the Preliminary BOM Import Mode preference is set to Redlining)
❑ An import file (which lists the BOM data to add to the Item)
❑ A mapping file
The following figure shows an example of a completed Assembly Specification.
Figure 5-7: Completed Assembly Specification
5-7

Agile Import 2006
You can use the Assembly Specification to import multiple BOMs specified in separate import data files. Because Agile Import supports BOM redlining, you can import BOM data to Items that have already been released.
After you finish making changes to the Assembly Specification, click Next. Agile Import proceeds to the next wizard step.
Table 5-1 describes buttons available for the Assembly Specification table.
To edit an Assembly Specification:
1 Select a row of the Assembly Specification table.
2 Click Edit.
3 Change the data in the Assembly Editor window. For example, you can specify a different assembly number, an associated Change number, an import file, and the mapping file.
4 When you finish editing the assembly, save your changes by clicking one of the following buttons:
• Insert — inserts a new assembly above the current row.
• Add — adds a new assembly to the end of the Assembly Specification table.
• Overwrite — replaces the current row of the Assembly Specification table with the new data.
To open an existing Assembly Specification:
1 From the Assembly Specification table, click Open.
2 Select an Assembly file, then click Open.
Table 5-1: Assembly Specification table buttons
Button Description
Edit Lets you create a new row of assembly information or modify the selected row.
Delete Removes the selected rows from the Assembly Specification.
Open Opens a previously saved file. Assembly Specification filenames have an IAS extension.
Save Saves the current Assembly Specification.
Save as Saves the current Assembly Specification to another file.
Clear Deletes all rows in the current Assembly Specification.
5-8 User Guide

Chapter 5 Importing BOMs from Excel or Text Files
Note Assembly files have an IAS filename extension.
After you finish making changes to the Assembly Specification, save the table by clicking Save. If you are saving for the first time, the Save and Save As buttons both let you specify a new assembly specification (IAS) file.
To delete an Assembly Specification:
1 Select the row in the Assembly Specification table.
2 Click Delete.
To clear the entire Assembly Specification, click the Clear button.
Using the Assembly Editor
The Assembly Editor lets you add and edit individual rows of the Assembly Specification. Each row of the Assembly Specification specifies an Item, an optional Change order (required if the Item is released or has a pending change, or if the Preliminary BOM Import Mode preference is set to Redlining), an import data file, and a mapping file.
Assembly Editor Fields
Table 5-2 describes the fields in the Assembly Editor window.
Table 5-2: Assembly Editor fields
Field Description
Assembly Number The assembly number. Type the number of an existing Agile assembly, or click Search to search for one. To create a new item, click Create. This is a required field.
Type Type of assembly, for example, Part or Document. This is a read-only field.
Description Description of the current assembly number. This is a read-only field.
Rev The current revision number of the assembly. This is a read-only field.
Lifecycle The Lifecycle of the assembly number, for example, Preliminary or Released. This is a read-only field.
5-9

Agile Import 2006
Change Number Number of the change associated with the item. Type the number of an existing change order, or click Search to search for one. To create a new change, click Create.
A change order is needed to make redline changes to the BOM of a released Item or an Item with other pending changes.
If the Item is unreleased and has no pending changes, a change order is required only if the Preliminary BOM Import Mode preference is set to Redlining.
A change order is optional for unreleased Items without pending changes if the Preliminary BOM Import Mode preference is set to Authoring. If you specify a change order in this case, the BOM rows are imported to the Item first, and then the Item is attached to the Affected Items tab of the change second. Consequently, the BOM will be appended to the Item with no redlines.
Type Type of change, for example ECO. This is a read-only field.
Description Description of the change. This is a read-only field.
Status Current status of the change, for example, Pending or Released. This is a read-only field.
New Rev New revision number of the Item. You can enter a value in this optional field only if you specified a value in the Change Number field.
New Lifecycle New lifecycle for the Item, for example, Production or Prototype. You can enter a value in this optional field if you specified a value in the Change Number field.
Pending Changes Whether the item has pending changes (Yes or No). This is a read-only field.
Filename The import filename. Type the full path of the import file, or click Search to select a file. This is a required field.
Worksheet If the file is a Microsoft Excel file, select the worksheet. Otherwise, this field is unavailable.
Mapping file The mapping file used with the specified import file. Type the full path of the mapping file, or click Search to select a file. To create a new mapping file, click Create. To edit the mapping file, click Modify. This is a required field.
Table 5-2: Assembly Editor fields (continued)
Field Description
5-10 User Guide

Chapter 5 Importing BOMs from Excel or Text Files
Assembly Editor Buttons
Table 5-3 describes the Assembly Editor buttons. The field that is currently selected determines which buttons are available. To select a field, click in the corresponding edit box.
Creating Multiple Import Files and Mapping Files
Each assembly listed on the Assembly Specification requires an import file. Therefore, if you are importing 10 assemblies you need to create 10 separate import files or an Excel file with 10 worksheets.
Note A PDX package can contain data for hundreds of assemblies, making the import of multiple BOMs relatively easy. For more information about importing BOMs from PDX packages, see Chapter 6, “Importing BOMs from PDX Packages.”
Mapping files can be shared between the different assemblies listed on an Assembly Specification. For example, if your import files are all structured the same way and contain the same fields, you can use one mapping file for all your BOM import files, as shown in the following figure.
Table 5-3: Assembly Editor buttons
Button Description
Search Lets you search for assemblies, change orders, import files, or mapping files. For other Assembly Editor fields, Search is unavailable.
Create Lets you create assemblies, change orders, or mapping files.
Modify Opens the specified mapping file so that you can edit it. This button is visible only when the Mapping File field is selected.
Clear Clears all fields in the Assembly Editor.
Add Adds the assembly as a new row at the end of the Assembly Specification table.
Insert Inserts the assembly as a new row above the current row in the Assembly Specification table.
Overwrite Replaces the current row in the Assembly Specification table with data from the Assembly Editor.
Close Closes the Assembly Editor and returns to the Assembly Specification table.
5-11

Agile Import 2006
Figure 5-8: Assembly Specification files
Mapping Import Fields to Agile Fields
If you select the Mapping File field in the Assembly Editor, you can specify a mapping file using one of the following options:
❑ Click Search to select an existing mapping file.
❑ Click Create to create a new mapping file.
❑ Click Modify to edit the specified file.
If you click Create or Modify, the Mapping window appears. Use the Mapping window to map the fields from the BOM that you are importing to fields of Agile Items. The Mapping window for a BOM import is shown in the following figure.
Assembly Number
P1000-01
P1000-02
P1000-03
P1000-04
P1000-05
Import Filename
P1000-01.csv
P1000-02.csv
P1000-03.csv
P1000-04.csv
P1000-05.csv
Mapping Filename
bom.map
5-12 User Guide

Chapter 5 Importing BOMs from Excel or Text Files
Figure 5-9: Mapping Window for BOM Import
You must map an import field to the BOM. Item Number field. It is recommended, however, that you also map import fields to BOM.Find Num and BOM.Qty. If you do not map the BOM.Find Num and BOM.Qty fields, they will be filled with default values.
A Note about Mapping BOM Part Descriptions
To map Part descriptions when importing a BOM, map the Import (source) field Part Description to the Agile field BOM.Part Description.
Caution! If you map two different Import (source) fields to the Agile fields BOM.Part Description and Title Block.Description, the Import field mapped to BOM.Part Description is imported, and the Import field mapped to Title Block.Description is ignored.
5-13

Agile Import 2006
Additional Information about Mapping
Table 5-4 lists additional information available in this User’s Guide about how to map Agile fields.
Handling Duplicate Item Numbers, Find Numbers, and Reference DesignatorsWhen you click Next on the Assembly Specification, Agile Import checks the table for duplicate item numbers, find numbers, and reference designators. Depending on your Agile Administrator SmartRule settings, you may see warnings or errors if duplicates are found. If you click No from the warning message, Agile Import returns to the Assembly Specification, where you can correct the problem.
Creating Agile Items with the Imported DataAfter you finish setting up the Assembly Specification, Agile Import checks the database to see if the components on the BOMs being imported represent Agile Items that already exist. When the polling is completed, Agile Import continues with Step 4 of the wizard, as shown in the following figure. The Step 4 window shows those Items that do not already exist in the Agile database.
If all the data being imported represents Agile Items that already exist, Agile Import skips this step of the wizard.
Table 5-4: Additional information about mapping
For information about... See this topic
Which import fields must be mapped to Agile fields
See “Required Mapped Fields” on page 2-9.
The concept of mapping See “Mapping Import Fields to Agile Fields” on page 4-8.
How to create a new mapping file See “Creating a New Mapping File” on page 4-8.
How to use the Mapping window See “Using the Mapping Window” on page 4-9.
How to map subclass fields See “Mapping Subclass Fields” on page 4-11.
How to modify an existing mapping file
See “Modifying a Mapping File” on page 4-11.
5-14 User Guide

Chapter 5 Importing BOMs from Excel or Text Files
Figure 5-10: Step 4 of the Agile Import BOM Wizard
Agile Import can create an Agile Item for every component on the imported BOM that does not already have a corresponding Agile Item. An Item must be created to import BOM data into it. Any Items that are not created when you click Next are skipped during importing, and all parent assemblies that contain an uncreated component will be rolled back.
After you create Items, Step 3 of the wizard shows the Items that have been created, as shown in the following figure.
5-15
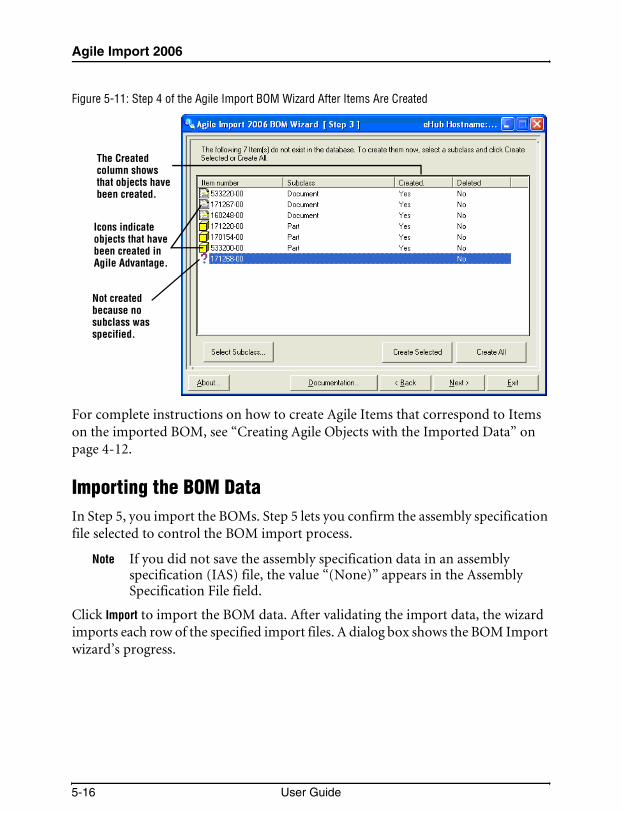
Agile Import 2006
Figure 5-11: Step 4 of the Agile Import BOM Wizard After Items Are Created
For complete instructions on how to create Agile Items that correspond to Items on the imported BOM, see “Creating Agile Objects with the Imported Data” on page 4-12.
Importing the BOM DataIn Step 5, you import the BOMs. Step 5 lets you confirm the assembly specification file selected to control the BOM import process.
Note If you did not save the assembly specification data in an assembly specification (IAS) file, the value “(None)” appears in the Assembly Specification File field.
Click Import to import the BOM data. After validating the import data, the wizard imports each row of the specified import files. A dialog box shows the BOM Import wizard’s progress.
The Created column shows that objects have been created.
Icons indicate objects that have been created in Agile Advantage.
Not created because no subclass was specified.
5-16 User Guide

Chapter 5 Importing BOMs from Excel or Text Files
Importing Different BOMs for Multiple Item Revisions
To import different BOMs for multiple revisions of an Item, you must set a preference to pause Import after each assembly has been imported. The pause allows you to start the Agile Windows client, release the Change for the revision you just imported, go back to Import, and click OK to import the next assembly. For more information, see “Pausing After Each Assembly for BOM Import” on page 13-15.
Redlining a BOMRedlining is a feature of Agile that highlights, in red, changes made to an object. Whether an imported BOM is redlined depends on two things:
❑ Current state of the assembly — if the assembly is released or has a pending change, the imported BOM is redlined. If the assembly is unreleased and does not have a pending change, the imported BOM is handled according to the Preliminary BOM Import Mode preference setting.
❑ Preliminary BOM Import Mode preference setting — if this preference is set to Redlining mode (the default), BOM rows imported to unreleased Items without pending changes replace the existing BOM. Any modifications to the BOM are redlined.
If the Preliminary BOM Import Mode preference is set to Authoring mode, BOM rows imported to unreleased Items without pending changes are appended to the existing BOM.
For more information about the Preliminary BOM Import Mode preference setting, see “Setting the Import Mode for Preliminary BOMs” on page 13-16.
To view the redline changes for a BOM in Agile:
1 Open a specified Change.
2 Click the Affected Items tab.
3 Select an Item.
4 Click the Redline button.
5 Select the BOM tab.
5-17

Agile Import 2006
Redlining Partial BOM Rows
When you import BOM data, entire rows or partial rows can be redlined, as shown in Figure 5-12. Sometimes, only a few BOM fields need to be updated instead of the entire row. Agile Import redlines individual BOM fields when the primary key fields for that row have not changed. For BOMs, the primary key fields are BOM.Item Number and BOM.Find Num. For example, if you import a different value for the BOM.Ref Des field for a BOM row but do not change the values for either BOM.Item Number and BOM.Find Num, then only the Ref Des field is redlined.
Figure 5-12: BOM with partially redlined rows
Redlining the Item Number and Find Num Fields
Values for Item Number and Find Num cannot be individually redlined. Agile Import treats these two fields as one combined field. If you change either the Item Number or Find Num for a BOM component that is released or has a pending change, the original component is redline deleted, and a new component is added. Figures 5-13 through 5-15 illustrate this process.
Figure 5-13 shows the first two components of a BOM with their Find numbers.
Figure 5-13: Two components on a BOM
Figure 5-14 shows a portion of BOM import data. Notice that the Find Num value for 4343-01 has been changed from 1 to 2.
Partially redlined rows
5-18 User Guide

Chapter 5 Importing BOMs from Excel or Text Files
Figure 5-14: BOM import data with a modified Find Num value
When you import the data, the original 4343-01 component is redline deleted, and a new component with a Find Num equal to 2 is added. Figure 5-15 shows the redline BOM for Item 4343-01 after the data is imported.
Figure 5-15: Redline BOM after importing
Reviewing Redlines, Returning to Step 1, or Exiting Agile ImportWhen the BOM import is complete, Step 6 of the Agile Import BOM wizard is displayed. You can review redlines (if any redline changes have been made), view the Import.log file, go back to Step 1 of the wizard, or exit Agile Import.
Find Num has been changed.
Find Num could not be individually redlined.
5-19

Agile Import 2006
Figure 5-16: Step 6 of the Agile Import BOM wizard
❑ To review redline changes for an assembly in Agile, select an assembly row, then click Review Redlines. This starts the Agile Windows client and displays either the relevant Change or the assembly.
Note To start the Agile Windows client, you must have it installed on the computer running Agile Import.
❑ To view the Import.log file, click View Log File. For more information about log files, see “Log Files” on page 12-13.
❑ To import another file, click Step 1.
❑ To close Agile Import, click Exit.
BOM RollbacksIf a BOM component cannot be imported, Agile Import reports the error in the Import.log file and continues processing the BOM. As it finishes processing each BOM, Agile Import checks for errors. If there were none, Agile Import commits the data to the eHub. Otherwise, Agile Import rolls back the entire BOM to its original state prior to the import process. This rollback feature ensures that only full and accurate BOMs are imported.
A green checkmark indicates that no errors occurred during import.
A red cross indicates that errors occurred during import.
A red cross indicates that errors occurred during import.
5-20 User Guide
Chapter 5 Importing BOMs from Excel or Text Files
The Import.log file is a valuable tool for troubleshooting when BOM rollbacks occur. It clearly indicates which BOM components failed and why. You can use the log file as a worksheet to fix problems in the source data.
Note Agile Import rolls back BOM data only when there are errors pertaining to the core BOM data. It does not roll back BOM data if the warnings or errors pertain only to associated objects, such as associated Item attributes. Also, Agile Import may report that some values on Page 2 and Page 3 were skipped, but this does not cause a rollback.
For an example that illustrates a BOM rollback, see “BOM SmartRule Example” on page 13-11.
For more information about the types of validation that Agile Import performs on BOM data, see “BOM Validation” on page 12-11.
5-21

Agile Import 2006
5-22 User Guide
CHAPTER 6Importing BOMs from PDX
PackagesIf you are importing BOMs from Excel or text files, see Chapter 5, “Importing BOMs from Excel or Text Files.” This chapter includes these topics:❑ Steps for Importing BOMs from a PDX Package❑ Setting Reference Designator Defaults before Importing BOMs❑ Selecting the Type of Import❑ Selecting the PDX Package❑ Specifying a Change Order for New Items❑ Selecting Items to Import❑ Mapping Import Fields to Agile Fields❑ Specifying Change Orders for Assemblies❑ Modifying the Assembly Specification❑ Handling Duplicate Item Numbers, Find Numbers, and Reference
Designators❑ Creating Agile Items with the Imported Data❑ Importing the BOM Data❑ Reviewing Redlines, Returning to Step 1, or Exiting Agile Import❑ BOM Rollbacks
6-1
Agile Import 2006
Steps for Importing BOMs from a PDX PackageTo use Agile Import to import multiple BOMs from a PDX package, follow the steps described in the following sections:
❑ “Selecting the Type of Import” on page 6-3
❑ “Selecting the PDX Package” on page 6-3
❑ “Specifying a Change Order for New Items” on page 6-3
❑ “Selecting Items to Import” on page 6-4
❑ “Mapping Import Fields to Agile Fields” on page 6-5
❑ “Specifying Change Orders for Assemblies” on page 6-6
❑ “Modifying the Assembly Specification” on page 6-8
❑ “Creating Agile Items with the Imported Data” on page 6-10
❑ “Importing the BOM Data” on page 6-11
❑ “Reviewing Redlines, Returning to Step 1, or Exiting Agile Import” on page 6-12
Note Before you begin importing BOM data, check to see if you have the appropriate Agile Advantage privileges. For the complete list of privilege masks required for Agile Import, see Table 1-1 on page 1-6. If you have questions about your privileges, contact your Agile Administrator.
Setting Reference Designator Defaults before Importing BOMsTo ensure that reference designator fields in PDX packages are parsed correctly by Agile Import, make sure that you set the following reference designator preference settings:
❑ Parse Character: comma (,)
❑ Range Character: hyphen (-)
For more information about reference designator defaults, see “Setting Reference Designator Defaults” on page 13-16.
6-2 User Guide

Chapter 6 Importing BOMs from PDX Packages
Selecting the Type of ImportIn Step 1, you select the type of information you will import. For BOMs, an additional wizard step lets you specify whether the type of import file is a PDX package.
To select BOM import for PDX packages:
1 On Step 1 of the wizard, select Import Bills of Material, then click Next.
2 Select A PDX Package, then click Next.
Selecting the PDX PackageIn Step 2, you select the PDX package to import.
To select a PDX package:
1 Select the PDX package you want to import from the list, or click the Browse button and locate a PDX package.
2 If you do not want to modify PDX values before importing them, make sure Open File with Default Settings is checked, then click Next to proceed to Step 3 of the wizard.
If you want to modify PDX values before importing them, make sure Open File with Default Settings is unchecked, then click Next to specify settings used to open the PDX package. For more information about PDX settings, see “Specifying Settings for PDX Packages” on page 4-6.
After you finish specifying settings used to open the PDX package, click Next.
Note When you’re importing BOMs from a PDX package, Agile Import rejects PDX packages that contain two or more revisions of the same assembly (BOM parent) or component (BOM child). You can then select a different PDX package to import.
Specifying a Change Order for New ItemsWhen you’re importing Items (Parts and Documents), BOMs, and AMLs, Agile Import can place newly created Items on an ECO. In Step 3 of the wizard, you can create a new Change (by clicking the AutoNumber button), or you can specify an existing one (by searching or by entering the number manually). If you specify a Change, Import adds all new Parts and Documents to the Affected Items tab of that Change.
6-3
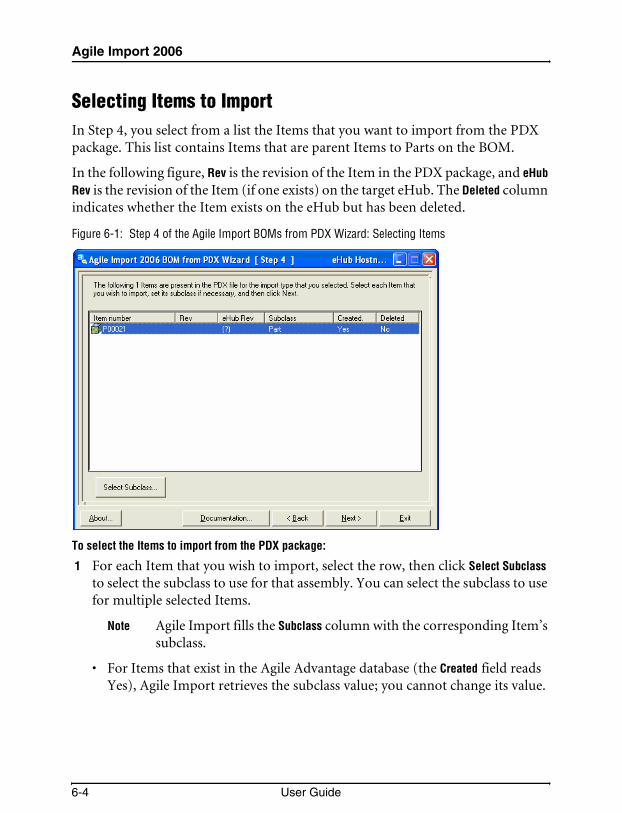
Agile Import 2006
Selecting Items to ImportIn Step 4, you select from a list the Items that you want to import from the PDX package. This list contains Items that are parent Items to Parts on the BOM.
In the following figure, Rev is the revision of the Item in the PDX package, and eHub Rev is the revision of the Item (if one exists) on the target eHub. The Deleted column indicates whether the Item exists on the eHub but has been deleted.
Figure 6-1: Step 4 of the Agile Import BOMs from PDX Wizard: Selecting Items
To select the Items to import from the PDX package:
1 For each Item that you wish to import, select the row, then click Select Subclass to select the subclass to use for that assembly. You can select the subclass to use for multiple selected Items.
Note Agile Import fills the Subclass column with the corresponding Item’s subclass.
• For Items that exist in the Agile Advantage database (the Created field reads Yes), Agile Import retrieves the subclass value; you cannot change its value.
6-4 User Guide

Chapter 6 Importing BOMs from PDX Packages
• For Items that do not exist in the Agile database, Agile Import retrieves the subclass value from the PDX package. If the subclass from the PDX package does not match one of the available subclasses in the Agile Advantage database, Agile Import displays a warning. In this case, you must click Select Subclass to specify a subclass for the Item.
2 Make sure the Items that you wish to import are selected, then click Next.
Mapping Import Fields to Agile FieldsIn Step 5 of the wizard, you map the PDX fields you are importing to fields in Agile Advantage subclasses. For example, billOfMaterialItemIdentifier in your PDX package should be mapped to the Item Number field on the BOM tab. For information about mapping fields, see “Mapping Import Fields to Agile Fields” on page 4-8.
Note When importing data, you must map all required fields. For example, the Agile Advantage field BOM.Item Number is a required field for BOMs. If you do not map to this field, Agile Import cannot import the data.
A Note about Mapping BOM Part Descriptions
To map Part descriptions when importing a BOM from a PDX package, map the Import (source) field description to the Agile Advantage field BOM.Part Description.
If you map two different Import (source) fields to the Agile Advantage fields BOM.Part Description and Title Block.Description, the Import field mapped to BOM.Part Description is imported, and the Import field mapped to Title Block.Description is ignored.
Additional Information about Mapping
Table 6-1 lists additional information available in this User Guide about how to map Agile Advantage fields.
Table 6-1: Additional information about mapping
For information about... See this topic
Which import fields must be mapped to Agile fields
See “Required Mapped Fields” on page 2-9.
6-5

Agile Import 2006
Specifying Change Orders for AssembliesWhen you import BOMs from a PDX package, the Agile Import wizard lets you specify the change orders needed to import data to the assembly Items, as shown in Figure 6-2. You must specify an Engineering Change Order (ECO) to use for released and unreleased Items. You can use the same change order for both. Agile Import adds the assembly Items to the Affected Items tab of the specified ECOs.
Change orders are optional for preliminary Items that have no pending changes against them if the Preliminary BOM Import Mode preference is set to Authoring.
Note The change orders specified in this step are different from the optional change order for new Items that you may have specified in Step 2 of the wizard. If you are importing a new assembly (BOM parent) and you specify a change order here for unreleased Items with no pending changes, the new assembly is placed on the Affected Items tabs of two separate change orders. The New Rev and New Lifecycle Phase are set on the change order specified in this step—the change order for redlining or authoring.
Change orders are required for released Items and unreleased Items that have a pending change. Change orders are required for any preliminary Item if the Preliminary BOM Import Mode preference is set to Redlining. The use of the change order depends on the state of each Item and on the setting of the Preliminary BOM Import Mode preference.
The change order specified for released Items are always used to redline released assemblies.
The concept of mapping See “Mapping Import Fields to Agile Fields” on page 4-8.
How to create a new mapping file See “Creating a New Mapping File” on page 4-8.
How to use the Mapping window See “Using the Mapping Window” on page 4-9.
How to map subclass fields See “Mapping Subclass Fields” on page 4-11.
How to modify an existing mapping file
See “Modifying a Mapping File” on page 4-11.
How to map PDX attributes to Agile fields
See “Mapping PDX Attributes to Agile Fields” on page 3-21.
Table 6-1: Additional information about mapping
For information about... See this topic
6-6 User Guide

Chapter 6 Importing BOMs from PDX Packages
The change order specified for unreleased Items may or may not be used to redline unreleased assemblies:
❑ For unreleased Items with pending changes, the “unreleased” change order is used to redline the assemblies.
❑ For unreleased Items without pending changes, the “unreleased” change order (if you specify one) is used to redline the assemblies if the Preliminary BOM Import Mode preference is set to Redlining. If the Preliminary BOM Import Mode preference is set to Authoring, BOM rows are appended to all unreleased Items that have no pending changes, and the Items are attached to the Affected Items tab of the “unreleased” change order after the append operation.
If you do not want unreleased Items without pending changes to be placed on the Affected Items tab of a change order, you can open the change order in Agile and delete Items from the Affected Items tab.
Figure 6-2: Step 6 of the Agile Import BOM from PDX Wizard
6-7

Agile Import 2006
To specify change orders used to import BOMs from a PDX package:
1 If you want to specify a change order for unreleased Items without pending changes, uncheck Don’t use a change in this case and specify the number of an ECO in the top field. If the Preliminary BOM Import Mode preference is set to Redlining, you must specify a change order in this field.
You can click to search for an Agile change order, or click to create a new change order.
2 Specify the number of an ECO in the last two fields. The second field is for the change order used for unreleased Items with pending Changes. The bottom field is for released Items.
The bottom two fields are required. You cannot leave either one blank. If you prefer, you can use the same number for all three fields.
Note Change order numbers are case-sensitive. If you type a change order number in either of the two fields, make sure you use the correct case. For example, C1000 is a different number from c1000.
3 To proceed to the next wizard step, click Next.
Modifying the Assembly SpecificationWhen you proceed from Step 6 to Step 7 of the Agile Import BOM from PDX wizard, the wizard uses the information specified in previous steps to build an Assembly Specification table for the assemblies that you have chosen to import. Agile Import displays a progress dialog box while it constructs the Assembly Specification table.
If Agile Import encounters any errors when it builds the Assembly Specification, it records them in a log file called Autopopulate.log and prompts you whether to display the file. If you choose not to view the log file, you can view it later by opening the file in a text editor such as Notepad.
After the Assembly Specification appears, you can use this step to make changes to it. For example, you can update the mappings used for each assembly, or assign new change order numbers.
6-8 User Guide
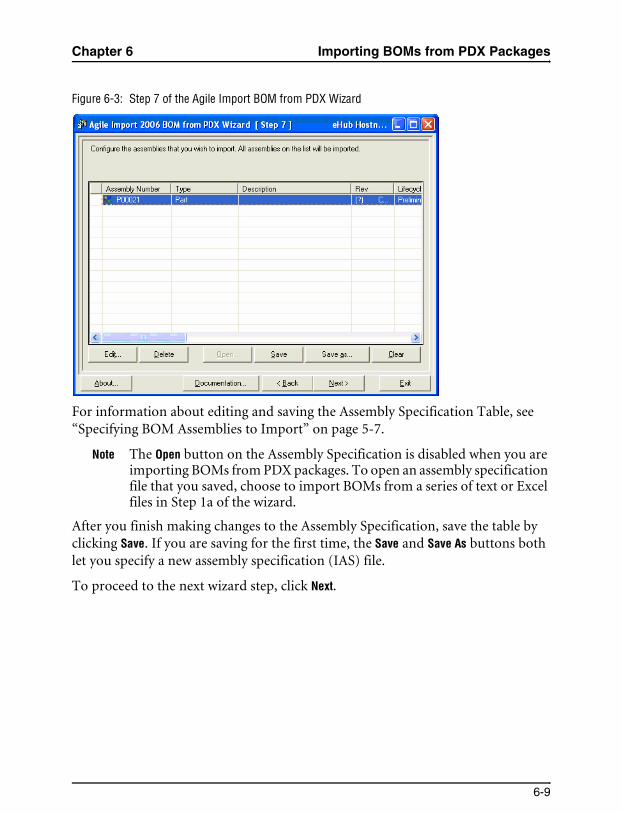
Chapter 6 Importing BOMs from PDX Packages
Figure 6-3: Step 7 of the Agile Import BOM from PDX Wizard
For information about editing and saving the Assembly Specification Table, see “Specifying BOM Assemblies to Import” on page 5-7.
Note The Open button on the Assembly Specification is disabled when you are importing BOMs from PDX packages. To open an assembly specification file that you saved, choose to import BOMs from a series of text or Excel files in Step 1a of the wizard.
After you finish making changes to the Assembly Specification, save the table by clicking Save. If you are saving for the first time, the Save and Save As buttons both let you specify a new assembly specification (IAS) file.
To proceed to the next wizard step, click Next.
6-9

Agile Import 2006
Handling Duplicate Item Numbers, Find Numbers, and Reference DesignatorsWhen you click Next on the Assembly Specification table, Agile Import checks the table for duplicate Item numbers, find numbers, and reference designators. Depending on your Agile Administrator SmartRule settings, you may see warnings or errors if duplicates are found. If you click No from the warning message, Agile Import returns to the Assembly Specification table, where you can correct the problem.
Creating Agile Items with the Imported DataAfter you finish setting up the Assembly Specification, Agile Import checks the database to see if the components on the BOMs being imported represent Agile Items that already exist. When the polling is completed, Agile Import continues with Step 8 of the wizard, as shown in Figure 6-4. The Step 8 window shows the Items that do not already exist in the Agile Advantage database.
If all the data being imported represents Agile Items that already exist, Agile Import skips this step of the wizard.
Figure 6-4: Step 8 of the Agile Import BOM from PDX wizard
The blank Created column shows that objects have not been created yet.
Question marks indicate objects that do not exist yet in Agile Advantage.
6-10 User Guide

Chapter 6 Importing BOMs from PDX Packages
Agile Import can create an Agile Item for every component on the imported BOM that does not already have a corresponding Agile Item. An Item must be created to import BOM data into it. Any Items that are not created when you click Next are skipped during importing, and all parent assemblies that contain an uncreated component are rolled back.
After you create Items, the Step 8 window shows the Items that have been created, as shown in Figure 6-5.
Figure 6-5: Step 8 of the Agile Import BOM from PDX Wizard After Items Are Created
For complete instructions on how to create Agile Items that correspond to Items on the imported BOM, see “Creating Agile Objects with the Imported Data” on page 4-12.
Importing the BOM DataIn Step 9, you import the BOMs. The items on the imported BOMs are added to the BOM tab of each assembly listed in the Assembly Specification table.
Click Import to import the BOM data. After validating the import data, the wizard imports each row of the specified import files. A dialog box shows the BOM Import wizard’s progress.
Not created because no subclass specified
6-11
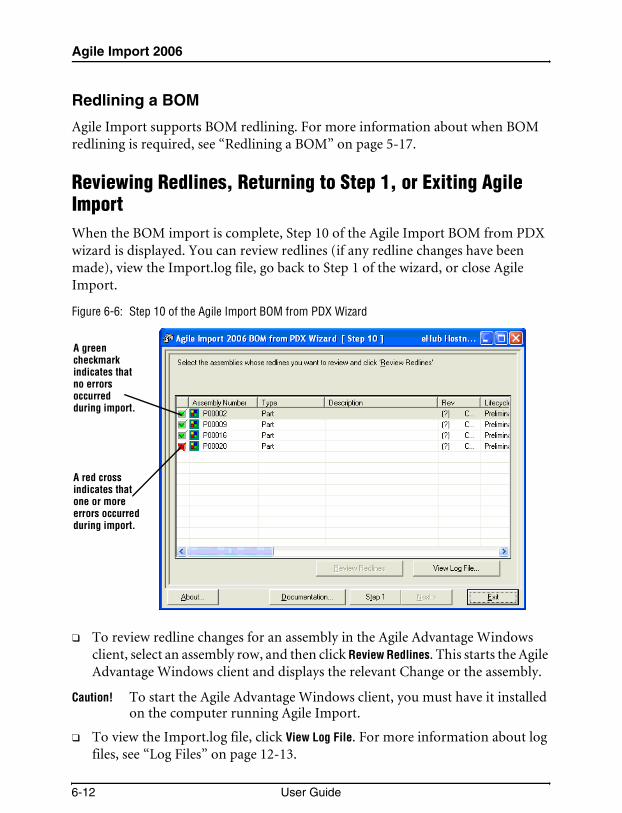
Agile Import 2006
Redlining a BOM
Agile Import supports BOM redlining. For more information about when BOM redlining is required, see “Redlining a BOM” on page 5-17.
Reviewing Redlines, Returning to Step 1, or Exiting Agile ImportWhen the BOM import is complete, Step 10 of the Agile Import BOM from PDX wizard is displayed. You can review redlines (if any redline changes have been made), view the Import.log file, go back to Step 1 of the wizard, or close Agile Import.
Figure 6-6: Step 10 of the Agile Import BOM from PDX Wizard
❑ To review redline changes for an assembly in the Agile Advantage Windows client, select an assembly row, and then click Review Redlines. This starts the Agile Advantage Windows client and displays the relevant Change or the assembly.
Caution! To start the Agile Advantage Windows client, you must have it installed on the computer running Agile Import.
❑ To view the Import.log file, click View Log File. For more information about log files, see “Log Files” on page 12-13.
A green checkmark indicates that no errors occurred during import.
A red cross indicates that one or more errors occurred during import.
6-12 User Guide

Chapter 6 Importing BOMs from PDX Packages
❑ To import another file, click Step 1.
❑ To close Agile Import, click Exit.
BOM RollbacksIf a BOM component cannot be imported, Agile Import reports the error in the Import.log file and continues processing the BOM. After Agile Import finishes processing a BOM with one or more errors, it rolls back the BOM to its original state prior to the import process. For more information about BOM rollbacks, see “BOM Rollbacks” on page 5-20.
Note Agile Import rolls back data BOM only when there are errors pertaining to the core BOM data. It does not roll back BOM data if the warnings or errors pertain only to associated objects, such as associated Item attributes. Also, Agile Import may report that some values on Page 2 and Page 3 were skipped, but this does not cause a rollback.
If there are errors in the BOM data, you may be unable correct the source PDX package. Unless you have access to the source eHub and specific privileges to modify a PDX package, it is read-only. However, when you attempt to import BOMs from a PDX package, Agile Import parses the PDX data and creates a separate text file for each BOM assembly in the same folder as the PDX package. You can edit these text files to fix any errors. To import the edited text files, specify importing BOMs from the text files instead of from a PDX package in Step 1a of the wizard.
6-13

Agile Import 2006
6-14 User Guide

CHAPTER 7Importing Approved
ManufacturersThis chapter discusses how to import Approved Manufacturers, or AMLs. It includes these topics:❑ Steps for Importing Approved Manufacturers❑ Selecting the Type of Import❑ Selecting the Import File❑ Specifying a Change Order for New Items❑ Selecting Items to Import (for PDX Import Only)❑ Mapping Import Fields to Agile Fields❑ Creating Agile Objects with the Imported Data❑ Specifying Change Orders to Import Approved Manufacturers❑ Importing the AML Data❑ Redlining an AML❑ Returning to Step 1 or Exiting Agile Import❑ AML Rollbacks
Steps for Importing Approved ManufacturersTo use Agile Import to import approved manufacturers, follow the steps described in the following sections:
7-1

Agile Import 2006
❑ “Selecting the Type of Import” on this page
❑ “Selecting the Import File” on this page
❑ “Specifying a Change Order for New Items” on page 7-3
❑ “Selecting Items to Import (for PDX Import Only)” on page 7-4 (for PDX packages only)
❑ “Mapping Import Fields to Agile Fields” on page 7-5
❑ “Creating Agile Objects with the Imported Data” on page 7-6
❑ “Specifying Change Orders to Import Approved Manufacturers” on page 7-7
❑ “Importing the AML Data” on page 7-10
❑ “Returning to Step 1 or Exiting Agile Import” on page 7-24
Selecting the Type of ImportIn Step 1, you select the type of information you will import.
To select AML import:
1 On Step 1 of the wizard, select Import Approved Manufacturers.
2 Click Next to proceed to the next wizard step.
Note Before you begin importing data, check to see if you have the appropriate Agile Advantage privileges. For the complete list of privilege masks required for Agile Import, see Table 1-1 on page 1-6.
Selecting the Import FileIn Step 2, you select the type and location of the source data, as shown below. The file must be one of the following types:
❑ Text (*.txt)
❑ Microsoft Excel (*.xls)
❑ CSV (comma-delimited) (*.csv)
❑ PDX (*.pdx)
7-2 User Guide

Chapter 7 Importing Approved Manufacturers
To select the import file:
1 Select the file you want to import from the list, or click the Browse button to locate a file.
2 If you are importing a Microsoft Excel file, select a worksheet in the drop-down list. When you are importing AMLs, you can import only one worksheet at a time.
Note Once you add an Excel file or a text file to the list at the top of the Step 2 window, you can select it and click View File to open the file in its associated application—usually Microsoft Excel or Notepad. The View File button is disabled when a PDX package is selected.
3 If you specified preferences for how to open import files, make sure Open File with Default Settings is checked, then click Next to proceed to Step 3 of the wizard. For more information, see Chapter 13, “Setting Preferences.”
If you unchecked Open File with Default Settings, click Next to specify settings used to open the file. The settings vary depending on the type of file you are opening. Refer to Table 7-1 for more information about how to specify file settings.
Specifying a Change Order for New ItemsWhen you’re importing Items (Parts and Documents), BOMs, and AMLs, Agile Import can place newly created Items on an ECO. In Step 3 of the wizard, you can create a new ECO (by clicking the AutoNumber button), or you can specify an existing one (by searching or by entering the number manually). If you specify an ECO, Import adds all new Parts and Documents to the Affected Items tab of that ECO.
Table 7-1: More information about file settings
Type of File For Information about Specifying File Settings
Excel See “Specifying Settings for Excel Files” on page 4-3.
Text See “Specifying Settings for Text Files” on page 4-4.
PDX See “Specifying Settings for PDX Packages” on page 4-6.
7-3
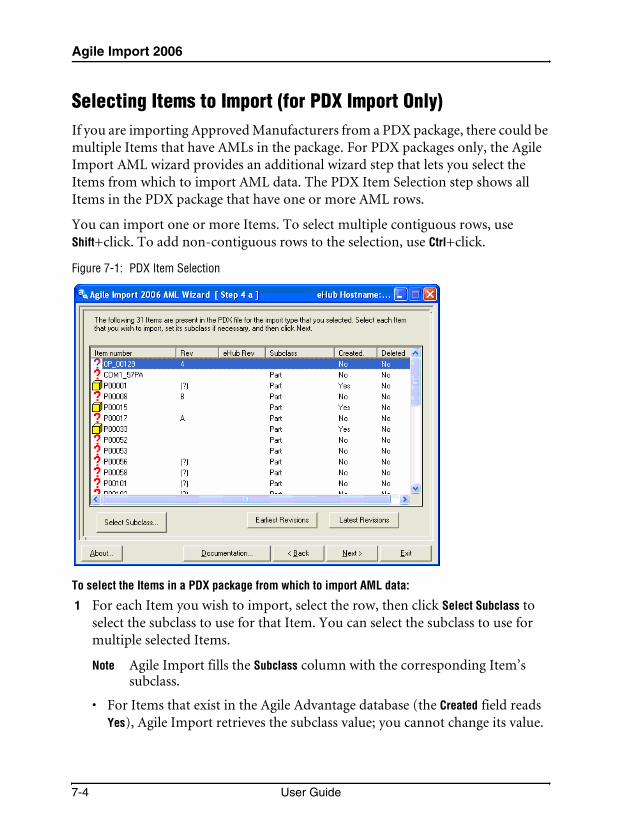
Agile Import 2006
Selecting Items to Import (for PDX Import Only)If you are importing Approved Manufacturers from a PDX package, there could be multiple Items that have AMLs in the package. For PDX packages only, the Agile Import AML wizard provides an additional wizard step that lets you select the Items from which to import AML data. The PDX Item Selection step shows all Items in the PDX package that have one or more AML rows.
You can import one or more Items. To select multiple contiguous rows, use Shift+click. To add non-contiguous rows to the selection, use Ctrl+click.
Figure 7-1: PDX Item Selection
To select the Items in a PDX package from which to import AML data:
1 For each Item you wish to import, select the row, then click Select Subclass to select the subclass to use for that Item. You can select the subclass to use for multiple selected Items.
Note Agile Import fills the Subclass column with the corresponding Item’s subclass.
• For Items that exist in the Agile Advantage database (the Created field reads Yes), Agile Import retrieves the subclass value; you cannot change its value.
7-4 User Guide

Chapter 7 Importing Approved Manufacturers
• For Items that do not exist in the Agile Advantage database, Agile Import retrieves the subclass value from the PDX package. If the subclass from the PDX package does not match one of the available subclasses in the Agile Advantage database, Agile Import displays a warning. In this case, you must click Select Subclass to specify a subclass for the Item.
2 Make sure the Items you wish to import are selected, then click Next.
Mapping Import Fields to Agile FieldsIn Step 4b, you map the fields you are importing to Agile Advantage fields. For example, a field named Manufacturer Name in your Excel file may need to be mapped to Mfr. Name field on the Manufacturers tab. For information about mapping fields, see “Mapping Import Fields to Agile Fields” on page 4-8.
Note When importing data, you must map all required fields. For example, the Agile Advantage fields Title Block.Number, Manufacturers.Mfr. Name, and Manufacturers.Mfr. Part Number are all required to be mapped for AMLs. If you do not map these fields, Agile Import cannot import the data.
Additional Information about Mapping
Table 7-2 lists additional information available in this User Guide about how to map Agile fields.
Table 7-2: Additional information about mapping
For information about... See this topic
Which import fields must be mapped to Agile fields
See “Required Mapped Fields” on page 2-9.
The concept of mapping See “Mapping Import Fields to Agile Fields” on page 4-8.
How to create a new mapping file See “Creating a New Mapping File” on page 4-8.
How to use the Mapping window See “Using the Mapping Window” on page 4-9.
How to map subclass fields See “Mapping Subclass Fields” on page 4-11.
How to modify an existing mapping file
See “Modifying a Mapping File” on page 4-11.
How to map PDX attributes to Agile fields
See “Mapping PDX Attributes to Agile Fields” on page 3-21.
7-5

Agile Import 2006
Creating Agile Objects with the Imported DataAfter Step 4 of the wizard, Agile Import polls the database to see if the data being imported represents Agile Advantage objects that already exist. When the polling is completed, if Agile Import discovers objects in the import file that don’t exist in the target Agile database, Agile Import presents Step 5 of the wizard. Step 5 includes three possible windows: The Step 5a window presents Items that don’t exist in the Agile database; Step 5b presents Manufacturers that don’t exist in the database; and Step 5c presents Manufacturer Parts that don’t exist in the database.
Note If all the data being imported represents Agile Items that already exist, Agile Import skips these steps of the wizard.
Before you create an object, click Select Subclass to specify its subclass if the subclass has not already been mapped. To select multiple objects, Shift+click or Ctrl+click, and then set the subclass for all selected rows in one operation.
After you specify the subclass for an object, either click Create All to create all objects in the list, or click Create Selected to create only selected objects.
Figure 7-2 shows Step 5a of the Import AML wizard. Subclasses have been selected, and three of the Items have been created, as indicated by the cubes in the left column. The value in the Created column for these three Items is Yes.
7-6 User Guide

Chapter 7 Importing Approved Manufacturers
Figure 7-2: Existent and Nonexistent Items
To assign the subclass for an object:
1 Check to see which objects do not have a subclass assigned. Subclasses may already be assigned if a subclass field has been mapped. For information about how to specify the subclass in a column in the import file, see “Including Subclass Fields in the Import Data” on page 2-10.
2 Select all objects of the same Agile Advantage subclass, such as Part. To select multiple objects, Shift+click or Ctrl+click.
3 Click Select Subclass to select the type of object to create.
4 Select the subclass you want to use.
5 Click OK to assign the selected objects to that subclass.
Specifying Change Orders to Import Approved ManufacturersIn Step 6, you specify the change orders needed to import Approved Manufacturers to unreleased or released Items, as shown in the following figure. The Items are placed on the Affected Items tab for the specified change orders.
Question marks indicate objects that have not been created in Agile Advantage.
Icons indicate objects that have been created inAgile Advantage.
7-7

Agile Import 2006
Figure 7-3: Step 6 of the Agile Import AML Wizard
Change orders are optional for preliminary Items that have no pending changes against them when the Preliminary AML Import Mode preference is set to Authoring.
Change orders are required for released Items and unreleased Items that have a pending change. Change orders are required for any unreleased Item if the Preliminary AML Import Mode preference is set to Redlining. The use of the change order depends on the state of each Item and on the setting of the Preliminary AML Import Mode preference.
The change order specified for released Items will always be used to redline released assemblies.
The change order specified for unreleased Items may or may not be used to redline unreleased assemblies:
❑ For unreleased Items with pending changes, the “unreleased” change order is used to redline the Manufacturers tab.
7-8 User Guide

Chapter 7 Importing Approved Manufacturers
❑ For unreleased Items without pending changes, the “unreleased” change order is used to redline the Manufacturers tab if the Preliminary AML Import Mode preference is set to Redlining. If the Preliminary AML Import Mode preference is set to Authoring, AML rows will be appended to all unreleased Items that have no pending changes, and the Items are attached to the Affected Items tab of the “unreleased” change order after the append operation.
If Preliminary AML Import Mode is set to Redlining, but you do not want unreleased Items without pending changes to be placed on the Affected Items tab of a change order, you can open the change order in Agile Advantage and delete Items from the Affected Items tab.
Note An important difference between MCOs and ECOs is that MCOs do not roll the Rev of the parent assembly. To maintain the current revision of an Item when you import AMLs, specify MCOs in the fields on Step 6 of the Agile Import wizard.
To specify Change orders used to import Approved Manufacturers:
1 If you want to specify a change order for unreleased Items without pending changes, clear the Don’t use a change in this case checkbox and specify the number of an ECO in the top field.
You can click to search for an Agile change order, or click to create a new change order.
2 In the second field of Step 6 of the Import AML wizard, specify the change number used for unreleased Items with pending Changes.
3 In the bottom field, specify the change number used for released items.
The bottom two fields are required. You cannot leave them blank. However, you can type the same change number in all three change fields.
4 To proceed to the next wizard step, click Next.
Note If the Agile Advantage RedlineManufacturersOnChangeOrder SmartRule is set to Disallow, you can enter only MCOs in the two change order fields. If RedlineManufacturersOnChangeOrder is set to Allow, you can enter ECOs or MCOs in the two change order fields. You cannot use ECRs, Deviations, or Stop Ships to change Approved Manufacturers.
7-9

Agile Import 2006
Importing the AML DataIn Step 7, you import the AMLs. Step 7 of the wizard lists the file that was selected to be imported.
Click Import to import the data from the selected file and proceed to the next wizard step. After the import process starts, you can click Cancel in the progress box tostop it.
Redlining an AMLRedlining is a feature of Agile Advantage that highlights in red the changes made to an object. Whether Agile Import redlines an AML depends on two things:
❑ Current state of the Item — if the Item is released or has a pending change, the imported AML is redlined. If the Item is unreleased and does not have a pending change, the imported AML is handled according to the Preliminary AML Import Mode preference setting.
❑ Preliminary AML Import Mode preference setting — If this preference is set to Redlining mode (the default), AML rows imported to unreleased Items without pending changes replace the existing AML. Any modifications to the AML are redlined.
If the Preliminary AML Import Mode preference is set to Authoring mode, AML rows imported to unreleased Items without pending changes are appended to the existing AML. The Item is placed on the ECO or MCO specified during the import session after the AML rows have been added.
Note You might not have specified an ECO or MCO. Change orders are optional for unreleased Items without pending changes when Preliminary AML Import Mode is set to Authoring.
For more information about this preference setting, see “Setting the Import Mode for Preliminary AMLs” on page 13-15.
To view the redline changes for an AML in Agile:
1 Open a specified Change.
2 Click the Affected Items tab.
3 Select an Item.
4 Click the Redline button.
7-10 User Guide

Chapter 7 Importing Approved Manufacturers
5 Select the Manufacturers tab.
Appending Data to an AML
For unreleased Items without pending changes, you can use Agile Import to append Manufacturers data to the Manufacturers tab. To append Manufacturers data, the Preliminary AML Import Mode preference must be set to Authoring. See “Setting the Import Mode for Preliminary AMLs” on page 13-15.
Consider the case of an existing Item that has an AML with one Manufacturer, as shown in the following figure. The parent assembly, P00020, does not have a released revision or any pending changes.
Figure 7-4: AML of Assembly P00020
Now look at the Microsoft Excel data shown in the following figure. Three new Manufacturer Parts are listed. If you import this data to the same assembly shown in the previous figure, you append these rows to the AML.
Figure 7-5: Import data for assembly P00020
The following figure shows how the AML looks for P00020 after the Manufacturers data is imported.
7-11

Agile Import 2006
Figure 7-6: AML of Assembly P00020 After Manufacturers Data is Appended
When you use Agile Import to import AML data to an Item, you are required to specify a change order (MCO or ECO) for released Items and for unreleased Items if the Preliminary AML Import Mode is set to Redlining or there are pending changes against the Item. In Authoring mode, the unreleased Item is placed on the Affected Items tab of the specified change after the data is imported. Once an Item has a pending change, you can no longer append data to its AML. However, you can replace the AML by importing the data in Redlining mode.
Note Change orders are not required when the Item is unreleased, there are no pending changes against it, and Preliminary AML Import Mode is set to Authoring.
Replacing an AML
Whenever you import Manufacturers data to an existing Item that has either a released revision or a pending change, Agile Import replaces the entire AML and redlines the changes. AMLs are also redlined if you specified Redlining mode for the Preliminary AML Import Mode preference.
Consider the case of an existing Item that has an AML with one Manufacturer, as shown in the following figure. The parent assembly, P00021, has a released revision, Rev A.
7-12 User Guide

Chapter 7 Importing Approved Manufacturers
Figure 7-7: AML of Assembly P00021
Now look at the Microsoft Excel data shown in the following figure. If you import this data to the same assembly shown in Figure 7-7, you replace the current AML data and redline the changes.
Figure 7-8: Import Data for Assembly P00021
The following figure shows how the redline Manufacturers data looks for P00021. The original AML row, CLAROSTAT, has been redline deleted, and three new rows have been added.
7-13

Agile Import 2006
Figure 7-9: Redline Manufacturers Data of Assembly P00021 After AML Data Is Imported
The following figure shows how the AML looks for P00021 after the Manufacturers data has been imported.
Figure 7-10: AML of Assembly P00021 After Manufacturers Data Is Replaced
7-14 User Guide

Chapter 7 Importing Approved Manufacturers
If you want to add Manufacturers data after the parent assembly has been released or has a pending change, the import data must include existing AML rows, not just the rows you intend to modify. For example, Figure 7-11 has a revised part number for the DELEVAN manufacturer. The current Mfr. Part Number for DELEVAN, as shown in Figure 7-9, is 1210-152K. The revised Mfr. Part Number is 1211-155K.
Figure 7-11: Revised import data for assembly P00021
Figure 7-12 shows how the redline Manufacturers data looks for P00021 after you import the data shown in Figure 7-11. The original DELEVAN manufacturer data has been redline deleted, and a new DELEVAN row has been added. The other AML rows are unchanged.
Figure 7-12: Redline Manufacturers data of assembly P00021 after a Mfr. Part Number is revised
7-15

Agile Import 2006
Redlining Partial AML Rows
When you import AML data, entire rows or partial rows can be redlined, as shown in Figure 7-13. Sometimes, only a few AML fields need to be updated instead of the entire row. Agile Import redlines individual AML fields when the primary key fields for that row have not changed. For AMLs, the primary key fields are Manufacturers.Mfr. Name and Manufacturers.Mfr. Part Number. For example, if you import a different value for the Manufacturers.Preferred Status field for an AML row but do not change the values for either Manufacturers.Mfr. Name or Manufacturers.Mfr. Part Number, then only the Preferred Status field is redlined.
Figure 7-13: AML With Partially Redlined Rows
How Agile Import Compares Source and Target AMLs
When you import AMLs, Agile Import compares the source data against the target AMLs and identifies:
❑ Unchanged AML rows
❑ Added AML rows
❑ Deleted AML rows
❑ Changed AML rows
It then imports the data and redlines the changes. For released items, Agile Import redlines changes based on the AML of the latest released revision. For unreleased Items, it redlines changes based on the unreleased AML.
Partially Redlined Rows
7-16 User Guide

Chapter 7 Importing Approved Manufacturers
Figure 7-14: How Agile Import compares source and target AMLs
M fr. Nam e M fr. Part # Pref Status
Com pany A A10 Preferred
Com pany B B10 Preferred
Com pany B B30 Alternate
Com pany C C10 Preferred
Source AM L Data
Target AM L Data
M fr. Nam e M fr. Part # Pref Status
Company A A10 Preferred
Company B B10 Alternate
Company B B20 Alternate
M fr. Nam e M fr. Part # Pref Status
Com pany A A10 Preferred
Unchanged AM L Row s
Com pare the Source AML Datawith the Target AM L Data
Identify Unchanged AML Rows
How Agile Im port Com pares Source and Target AM Ls
M fr. Nam e M fr. Part # Pref Status
Company B B30 Alternate
Com pany C C10 Preferred
Added AM L Row s
Identify Added AML Rows
Import Data and RedlineChanges Based on the AM L of
the Last Revision
M fr. Nam e M fr. Part # Pref Status
Com pany A A10 Preferrred
Com pany B B10 Alternate Preferred
Com pany B B20 Alternate
Com pany B B30 Alternate
Com pany C C10 Preferred
Redlined Data
M fr. Nam e M fr. Part # Pref Status
Com pany B B20 Altermate
Deleted AM L Row s
Identify Deleted AML Rows
M fr. Nam e M fr. Part # Pref Status
Com pany B B10 Preferred
Changed AM L Row s
Identify Changed AM L Rows
7-17

Agile Import 2006
The following series of figures steps through a sequence of AML imports for one Item, illustrating how source and target AMLs are compared and then redlined. The following figure shows the initial AML data to import.
Figure 7-15: AML data for Part 100038-0002 (first revision)
Figure 7-16 shows the Manufacturers tab for the Item after the data has been imported. The question mark in the Rev field indicates that the Item has a pending ECO without a proposed Rev.
Figure 7-16: Manufacturers Data for Part 100038-0002 (First Revision)
The following figure shows the redline Manufacturers data for the Item. One row has been redline added to the table.
7-18 User Guide

Chapter 7 Importing Approved Manufacturers
Figure 7-17: Redline Manufacturers Data for Part 100038-0002 (First Revision)
Now, let us assume that the pending ECO for Part 100038-0002 is released and the part is now at Rev A, as shown in the following figure.
Figure 7-18: Manufacturers Data for Part 100038-0002 (Rev A)
Figure 7-19 shows updated import data. Another row has been added.
Figure 7-19: AML data for Part 100038-0002 (second revision)
7-19

Agile Import 2006
When you import the revised data, specify an MCO (M00024) to use for both released and unreleased items. After importing, you should see a pending MCO listed on the Changes tab, as shown in the following figure.
Figure 7-20: Changes for Part 100038-0002 After Two Imports
In Figure 7-21, the redline Manufacturers data for the most recent ECO shows that the new row has been added as a redline. This is because the AML data is compared to the AML of the latest released revision, in this case, Rev A.
Figure 7-21: Redline Manufacturers Data For Part 100038-0002 (Second Revision)
7-20 User Guide

Chapter 7 Importing Approved Manufacturers
The following figure shows another update to the AML import data. Two alternate Manufacturer Parts have been added.
Figure 7-22: AML Data For Part 100038-0002 (Third Revision)
When you import the revised data, specify a new MCO (M00025) to use for both released and unreleased items. After importing, you should see two pending MCOs as well as the released ECO for Rev A listed on the Changes tab, as shown in the following figure.
Figure 7-23: Pending Changes for Part 100038-0002 After Three Imports
In Figure 7-24, the redline Manufacturers data for the most recent MCO, M00025, shows that three AML rows are redlined even though only two rows (the alternate parts) were just added. Once again, this is because the AML is redlined against the AML of the latest released revision, Rev A.
7-21

Agile Import 2006
Figure 7-24: Redline Manufacturers Data for Part 100038-0002 (Third Revision)
The following figure shows the updated Manufacturers tab with both preferred and alternate parts. The Rev selected is the pending revision for MCO M00025.
Figure 7-25: Final Manufacturers Tab for Part 100038-0002 After Three Revisions
AML Bouncing
Agile Import removes duplicate AMLs from the import process. If an Item specified in the import file has AML data that is identical to its corresponding AML on the target eHub, the AML is not imported, and the Item is not placed on the Affected Items tab for the specified change order. If you routinely import AML data from customers, you can be sure that only Items with modified AMLs are affected.
7-22 User Guide
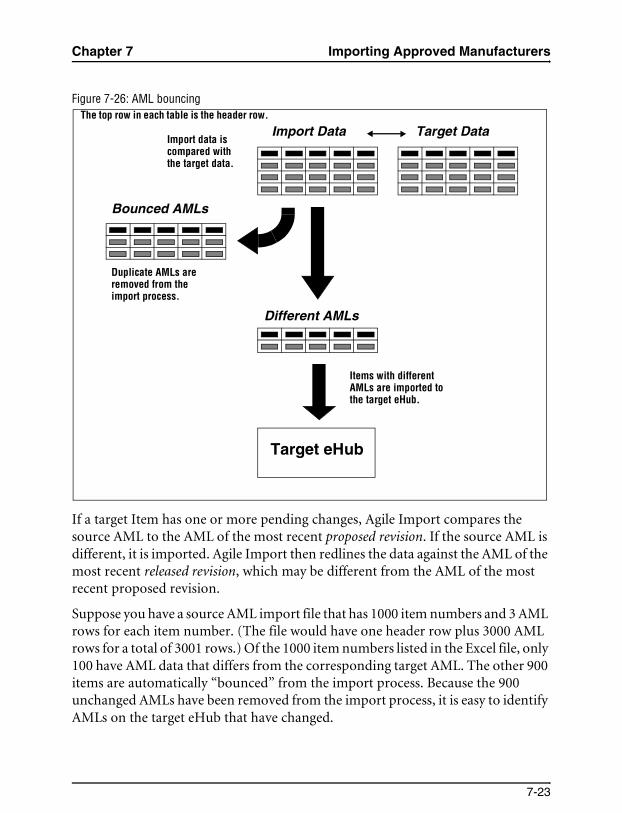
Chapter 7 Importing Approved Manufacturers
Figure 7-26: AML bouncing
If a target Item has one or more pending changes, Agile Import compares the source AML to the AML of the most recent proposed revision. If the source AML is different, it is imported. Agile Import then redlines the data against the AML of the most recent released revision, which may be different from the AML of the most recent proposed revision.
Suppose you have a source AML import file that has 1000 item numbers and 3 AML rows for each item number. (The file would have one header row plus 3000 AML rows for a total of 3001 rows.) Of the 1000 item numbers listed in the Excel file, only 100 have AML data that differs from the corresponding target AML. The other 900 items are automatically “bounced” from the import process. Because the 900 unchanged AMLs have been removed from the import process, it is easy to identify AMLs on the target eHub that have changed.
Import Data
Bounced AMLs
Different AMLs
Items with different AMLs are imported to the target eHub.
Duplicate AMLs are removed from the import process.
Target eHub
Target DataImport data is compared with the target data.
The top row in each table is the header row.
7-23

Agile Import 2006
Returning to Step 1 or Exiting Agile ImportIn the final step of the Agile Import wizard, you can repeat the cycle to import more data, or finish the process.
Choose one of the following actions:
❑ To view a log file that reports the success of the import, click View Log File. For more information about log files, see “Log Files” on page 12-13.
❑ To import another file, click Step 1.
❑ To exit Agile Import, click Exit.
AML RollbacksIf a row of an AML cannot be imported, Agile Import reports the error in the Import.log file and continues processing the AML. As it finishes processing each AML, Agile Import checks whether there were errors. If there were none, Agile Import commits the data to the eHub. Otherwise, Agile Import rolls back the entire AML for the Item to its original state prior to the import process. This rollback feature ensures that only full and accurate AMLs are imported.
The Import.log file is a valuable tool for troubleshooting when AML rollbacks occur. It clearly indicates which AML rows failed and why. You can use the log file as a worksheet to fix problems in the source data.
Note Agile Import rolls back AML data only when there are errors pertaining to the core AML data. It does not roll back AML data if the warnings or errors pertain only to associated objects, such as associated Item attributes, Manufacturer attributes, or Manufacturer Part attributes. Also, Agile Import may report that some values on Page 2 and Page 3 were skipped, but this does not cause a rollback.
If you notice an AML rollback when importing AMLs from a PDX package, you may be unable to correct errors in the PDX package. Unless you have access to the source eHub and specific privileges to modify a PDX package, it is read-only. However, when you attempt to import AMLs from a PDX package, Agile Import parses the PDX data and creates a text file in the same folder. The text file has the same filename as the PDX package, but it has a TXT extension. For example, if the PDX package is named amlpackage.pdx, the generated text file is named amlpackage.txt. You can edit this text file to fix any errors, then import it instead of the PDX package.
7-24 User Guide

Chapter 7 Importing Approved Manufacturers
You may be able to solve data incompatibility problems by using an ITT. See “Using an Import Transformation Table” on page 3-8 for details.
For an example that illustrates an AML rollback, see “AML SmartRule Example” on page 13-13.
For more information about the types of validation that Agile Import performs on AML data, see “AML Validation” on page 12-12.
7-25

Agile Import 2006
7-26 User Guide

CHAPTER 8Importing Suppliers
This chapter discusses how to import Suppliers and Prices. It includes these topics:❑ Steps for Importing Suppliers❑ Selecting the Type of Import❑ Selecting the Import File❑ Mapping Import Fields to Agile Fields❑ Creating Agile Objects with the Imported Data❑ Importing the Supplier Data❑ Returning to Step 1 or Exiting Agile Import
Steps for Importing SuppliersTo use Agile Import to import suppliers, follow the steps described in the following sections:
❑ “Selecting the Type of Import” on this page
❑ “Selecting the Import File” on this page
❑ “Mapping Import Fields to Agile Fields” on page 8-3
❑ “Creating Agile Objects with the Imported Data” on page 8-4
❑ “Returning to Step 1 or Exiting Agile Import” on page 8-6
8-1

Agile Import 2006
Selecting the Type of ImportIn Step 1, you select the type of information you will import.
To select Import Suppliers:
1 On Step 1 of the wizard, select Import Suppliers.
2 Click Next to proceed to the next wizard step.
Note Before you begin importing data, check to see if you have the appropriate Agile Advantage privileges. For the complete list of privilege masks required for Agile Import, see Table 1-1 on page 1-6.
Selecting the Import FileIn Step 2, you select the type and location of the source data, as shown below. The file must be one of the following types:
❑ Text (*.txt)
❑ Microsoft Excel (*.xls)
❑ CSV (comma-delimited) (*.csv)
To select the import file:
1 Select the file you want to import from the list, or click the Browse button to locate a file.
2 If you are importing a Microsoft Excel file, select a worksheet in the drop-down list. When you are importing Suppliers, you can import only one worksheet at a time.
Note Once you add an Excel file or a text file to the list at the top of the Step 2 window, you can select it and click View File to open the file in its associated application—usually Microsoft Excel or Notepad.
3 If you specified preferences for how to open import files, make sure Open File with Default Settings is checked, then click Next to proceed to Step 3 of the wizard. For more information, see Chapter 13, “Setting Preferences.”
If you unchecked Open File with Default Settings, click Next to specify settings used to open the file. The settings vary depending on the type of file you are opening. Refer to Table 8-1 for more information about how to specify file settings.
8-2 User Guide

Chapter 8 Importing Suppliers
Mapping Import Fields to Agile FieldsIn Step 3, you map the fields you are importing to Agile Advantage fields. For example, a field named Supplier Name in your Excel file may need to be mapped to the Supplier.Name field on the Supplier General Info tab.
You also map the fields that you are importing to fields in the Agile Advantage Supplier subclasses such as Broker, Distributor, Component Manufacturer, Contract Manufacturer, and Manufacturer Representative.
You can select a mapping file to use as is, modify an existing file, or create a new mapping file. If you have already created one or more mapping files, Step 3 of the Import wizard offers a list of files to use. Once you create a mapping file, you can reuse it to import other files that have the same attributes.
You can do any one of the following:
1 Select a file to be unmodified and click Next.
2 Click New to create a new mapping file.
3 Select a file to edit and click Modify.
4 Browse to a mapping file not on the list and click Next.
To remove a file from the list, click Remove. To remove all files from the list, click Clear List.
Note When importing data, you must map all required fields. For example, the Agile Advantage fields General Info.Number and General Info.Supplier Name are required to be mapped for Suppliers. If you do not map these fields, Agile Import cannot import the data.
Table 8-1: More information about file settings
Type of File For Information about Specifying File Settings
Excel See “Specifying Settings for Excel Files” on page 4-3.
Text See “Specifying Settings for Text Files” on page 4-4.
8-3

Agile Import 2006
Additional Information about Mapping
Table 8-2 lists additional information available in this User Guide about how to map Agile fields.
Creating Agile Objects with the Imported DataAfter Step 3 of the wizard, Agile Import polls the database to see if the data being imported represents Agile Advantage objects that already exist. When the polling is completed, if Agile Import discovers objects in the import file that don’t exist in the target Agile Advantage database, Agile Import presents Step 5 of the wizard. Step 5 presents Suppliers that don’t exist in the Agile Advantage database; Step 5b presents Manufacturers that don’t exist in the database.
Note If all the data being imported represents Agile Suppliers that already exist, Agile Import skips these steps of the wizard.
Before you create an object, click Select Subclass to specify its subclass if the subclass has not already been mapped. To select multiple objects, Shift+click or Ctrl+click, and then set the subclass for all selected rows in one operation.
After you specify the subclass for an object, either click Create All to create all objects in the list, or click Create Selected to create only selected objects.
Figure 8-1 shows Step 5 of the Import Suppliers wizard. Subclasses have been selected, and three of the Suppliers have been created, as indicated by the Supplier icons in the left column. The value in the Created column for these three Items is Yes.
Table 8-2: Additional information about mapping
For information about... See this topic
Which import fields must be mapped to Agile fields
See “Required Mapped Fields” on page 2-9.
The concept of mapping See “Mapping Import Fields to Agile Fields” on page 4-8.
How to create a new mapping file See “Creating a New Mapping File” on page 4-8.
How to use the Mapping window See “Using the Mapping Window” on page 4-9.
How to map subclass fields See “Mapping Subclass Fields” on page 4-11.
How to modify an existing mapping file
See “Modifying a Mapping File” on page 4-11.
8-4 User Guide

Chapter 8 Importing Suppliers
Figure 8-1: Existent and Nonexistent Suppliers
To assign the subclass for an object:
1 Check to see which objects do not have a subclass assigned. Subclasses may already be assigned if a subclass field has been mapped. For information about how to specify the subclass in a column in the import file, see “Including Subclass Fields in the Import Data” on page 2-10.
2 Select all objects of the same Agile Advantage subclass, such as Supplier. To select multiple objects, Shift+click or Ctrl+click.
3 Click Select Subclass to select the type of object to create.
4 Select the subclass you want to use.
5 Click OK to assign the selected objects to that subclass.
Importing the Supplier DataIn Step 6, you import the Suppliers. Step 6 of the wizard lists the file that was selected to be imported.
Click Import to import the data from the selected file and proceed to the next wizard step. After the import process starts, you can click Cancel in the progress box tostop it.
Question marks indicate objects that have not been created in Agile Advantage.
Icons indicate objects that have been created inAgile Advantage.
8-5

Agile Import 2006
Returning to Step 1 or Exiting Agile ImportIn the final step of the Agile Import wizard, you can repeat the cycle to import more data, or finish the process.
Choose one of the following actions:
❑ To view a log file that reports the success of the import, click View Log File. For more information about log files, see “Log Files” on page 12-13.
❑ To import another file, click Step 1.
❑ To exit Agile Import, click Exit.
8-6 User Guide

CHAPTER 9Importing Prices
This chapter discusses how to import Prices. It includes these topics:❑ Steps for Importing Prices❑ Selecting the Type of Import❑ Selecting the Import File❑ Mapping Import Fields to Agile Fields❑ Creating Agile Objects with the Imported Data❑ Importing the Price Data❑ Returning to Step 1 or Exiting Agile Import
Steps for Importing PricesTo use Agile Import to import prices, follow the steps described in the following sections:
❑ “Selecting the Type of Import” on page 9-2
❑ “Selecting the Import File” on page 9-2
❑ “Mapping Import Fields to Agile Fields” on page 9-3
❑ “Creating Agile Objects with the Imported Data” on page 9-4
❑ “Importing the Price Data” on page 9-6
❑ “Returning to Step 1 or Exiting Agile Import” on page 9-6
9-1

Agile Import 2006
Selecting the Type of ImportIn Step 1, you select the type of information you will import.
To select Import Prices:
1 On Step 1 of the wizard, select Import Prices.
2 Click Next to proceed to the next wizard step.
Note Before you begin importing data, check to see if you have the appropriate Agile Advantage privileges. For the complete list of privilege masks required for Agile Import, see Table 1-1 on page 1-6.
Selecting the Import FileIn Step 2, you select the type and location of the source data, as shown below. The file must be one of the following types:
❑ Text (*.txt)
❑ Microsoft Excel (*.xls)
❑ CSV (comma-delimited) (*.csv)
To select the import file:
1 Select the file you want to import from the list, or click the Browse button to locate a file.
2 If you are importing a Microsoft Excel file, select a worksheet in the drop-down list. When you are importing Prices, you can import only one worksheet at a time.
Note Once you add an Excel file or a text file to the list at the top of the Step 2 window, you can select it and click View File to open the file in its associated application—usually Microsoft Excel or Notepad.
3 If you specified preferences for how to open import files, make sure Open File with Default Settings is checked, then click Next to proceed to Step 3 of the wizard. For more information, see Chapter 13, “Setting Preferences.”
If you unchecked Open File with Default Settings, click Next to specify settings used to open the file. The settings vary depending on the type of file you are opening. Refer to Table 9-1 for more information about how to specify file settings.
9-2 User Guide
Chapter 9 Importing Prices
Mapping Import Fields to Agile FieldsIn Step 3, you map the fields you are importing to Agile Advantage fields. For example, a field named Supplier Part Number in your Excel file may need to be mapped to the Supplier Part Number field on the Supplier Manufacturer Parts tab.
You also map the fields that you are importing to fields in the Agile Advantage Supplier subclasses such as Broker, Distributor, Component Manufacturer, Contract Manufacturer, and Manufacturer Representative.
You can select a mapping file to use as is, modify an existing file, or create a new mapping file. If you have already created one or more mapping files, Step 3 of the Import wizard offers a list of files to use. Once you create a mapping file, you can reuse it to import other files that have the same attributes.
Note When importing data, you must map all required fields. For example, the Agile Advantage fields Suppliers.Manufacturer Parts.Supplier Part Number, Suppliers.Manufacturer Parts.Mfr Name, Suppliers.Manufacturer Parts.Mfr Part Number are all required to be mapped for Import Prices. If you do not map these fields, Agile Import cannot import the Price data.
You can do any one of the following:
1 Select a file to be unmodified and click Next.
2 Click New to create a new mapping file.
3 Select a file to edit and click Modify.
4 Browse to a mapping file not on the list and click Next.
To remove a file from the list, click Remove. To remove all files from the list, click Clear List.
Table 9-1: More information about file settings
Type of File For Information about Specifying File Settings
Excel See “Specifying Settings for Excel Files” on page 4-3.
Text See “Specifying Settings for Text Files” on page 4-4.
9-3

Agile Import 2006
Additional Information about Mapping
Table 9-2 lists additional information available in this User Guide about how to map Agile Advantage fields.
Specifying a Supplier for New Supplier PartsWhen you are importing Prices, Agile Import can place new supplier parts on a Supplier. In Step 4 of the wizard, you can create a new Supplier (by clicking the AutoNumber button), or you can specify an existing Supplier (by searching). If you specify a Supplier, Import adds all new Supplier Parts to the Manufacturer Parts tab of the selected Supplier.
Creating Agile Objects with the Imported DataAfter Step 4 of the wizard, Agile Import polls the database to see if the data being imported represents Agile objects that already exist. When the polling is completed, if Agile Import discovers objects in the import file that don’t exist in the target Agile database, Agile Import presents Step 5 of the wizard. Step 5 includes two possible windows: Step 5a window presents Manufacturer(s) that do not exist in the Agile database; and Step 5b presents Manufacturer Part(s) that do not exist in the Agile database.
Note If all the data being imported represents Agile Prices that already exist, Agile Import skips these steps of the wizard.
Table 9-2: Additional information about mapping
For information about... See this topic
Which import fields must be mapped to Agile fields
See “Required Mapped Fields” on page 2-9.
The concept of mapping See “Mapping Import Fields to Agile Fields” on page 4-8.
How to create a new mapping file See “Creating a New Mapping File” on page 4-8.
How to use the Mapping window See “Using the Mapping Window” on page 4-9.
How to map subclass fields See “Mapping Subclass Fields” on page 4-11.
How to modify an existing mapping file
See “Modifying a Mapping File” on page 4-11.
9-4 User Guide

Chapter 9 Importing Prices
Before you create an object, click Select Subclass to specify its subclass if the subclass has not already been mapped. To select multiple objects, Shift+click or Ctrl+click, and then set the subclass for all selected rows in one operation.
After you specify the subclass for an object, either click Create All to create all objects in the list, or click Create Selected to create only selected objects.
Figure 9-1 shows Step 5a of the Import Prices wizard. Subclasses have been selected, and three of the Manufacturers have been created, as indicated by the Manufacturer icon in the left column. The value in the Created column for these three Manufacturers is Yes.
Figure 9-1: Existent and Nonexistent Objects
To assign the subclass for an object:
1 Check to see which objects do not have a subclass assigned. Subclasses may already be assigned if a subclass field has been mapped. For information about how to specify the subclass in a column in the import file, see “Including Subclass Fields in the Import Data” on page 2-10.
2 Select all objects of the same Agile subclass, such as Manufacturer. To select multiple objects, Shift+click or Ctrl+click.
3 Click Select Subclass to select the type of object to create.
4 Select the subclass you want to use.
Question marks indicate objects that have not been created in Agile Advantage.
Icons indicate objects that have been created.
9-5

Agile Import 2006
5 Click OK to assign the selected objects to that subclass.
Importing the Price DataIn Step 6, you import the Price data. Step 6 of the wizard lists the file that was selected to be imported.
Click Import to import the data from the selected file and proceed to the next wizard step. After the import process starts, you can click Cancel in the progress box to stop it.
Returning to Step 1 or Exiting Agile ImportIn the final step of the Agile Import wizard, you can repeat the cycle to import more data, or finish the process.
Choose one of the following actions:
❑ To view a log file that reports the success of the import, click View Log File. For more information about log files, see “Log Files” on page 12-13.
❑ To import another file, click Step 1.
❑ To exit Agile Import, click Exit.
9-6 User Guide

CHAPTER 10Importing Attachments
from PDX PackagesThis chapter discusses how to import Attachments from a PDX package. The chapter includes these topics:❑ What Is Imported❑ Steps for Importing Attachments from a PDX Package❑ Agile Import Attachment Strategies❑ Selecting the Type of Import❑ Selecting the PDX Package❑ Selecting Revisions to Attach To❑ Mapping Import Fields to Agile Fields❑ Creating Agile Objects with the Imported Data❑ Importing the Attachments❑ Returning to Step 1, or Exiting Agile Import❑ Importing Multiple-file (Folder) Attachments
What Is ImportedThe Import Attachments from PDX option imports files attached to Items, Manufacturers, and Manufacturer Parts.
10-1

Agile Import Advantage 2006
You cannot import attachments with any other Agile Import options; you must use Import Attachments from PDX. Also, you can import attachments only from PDX packages. PDX 1.0 does not support custom fields on the Attachments tab. Also, attachment redlines are not imported.
Note Agile Import recognizes URLs as attachments when the URL specified begins with the following syntax: www, http, https, ftp, or gopher.
Steps for Importing Attachments from a PDX PackageTo use Agile Import to import multiple attachments from a PDX package, follow the steps described in the following sections:
❑ “Selecting the Type of Import” on this page
❑ “Selecting the PDX Package” on page 10-3
❑ “Selecting Revisions to Attach To” on page 10-4
❑ “Mapping Import Fields to Agile Fields” on page 10-5
❑ “Creating Agile Objects with the Imported Data” on page 10-7
❑ “Importing the Attachments” on page 10-8
❑ “Returning to Step 1, or Exiting Agile Import” on page 10-8
Note Before you begin importing attachments, check to see if you have the appropriate Agile Advantage privileges. For the complete list of privilege masks required for Agile Import, see Table 1-1 on page 1-6.
Agile Import Attachment StrategiesAgile Import attaches files to Agile Advantage objects according to these rules:
❑ If the file is associated with unreleased Parts and Documents, it is attached directly to the Part or Document.
❑ If the file is associated with released Parts or Documents, by default, it is attached to the latest released revision of the Part or Document. If you want to change this behavior to have the file attached to a different revision, adjust the Attachment Revision Mode preference. For details, see “Attachment Revision Mode” on page 13-19.
Note This option is available only for importing attachments.
10-2 User Guide

Chapter 10 Importing Attachments from PDX Packages
❑ If the file is associated with a Manufacturer or Manufacturer Part, it is attached directly to the Manufacturer or Manufacturer Part.
❑ If the source PDX package contains attachment files with the same names as files on the target eHub, the files are duplicated on the target eHub and stored as separate versions. For example, suppose that Part01 in the PDX package has an attachment called Image.gif, and Part01 on the target eHub also has an attachment called Image.gif. After you import the PDX package, Part01 on the target eHub will have two attachments called Image.gif.
Selecting the Type of ImportIn Step 1, you select the type of information you will import.
To select attachment import:
1 On Step 1 of the wizard, select Import Attachments from PDX.
2 Click Next to proceed to the next wizard step.
Note Before you begin importing data, check to see if you have the appropriate Agile Advantage privileges. For the complete list of privilege masks required for Agile Import, see Table 1-1 on page 1-6.
Selecting the PDX PackageIn Step 2, you select the PDX package to import.
To select a PDX package:
1 Do either one of the following:
• Select the PDX package that you want to import from the list.
• Click the Browse button to locate a PDX package. A Browse window appears where you can locate the file you want to import.
2 If you do not want to modify PDX values before importing them, make sure Open File with Default Settings is checked, then click Next to proceed to Step 3 of the wizard.
If you want to modify PDX values before importing them, make sure Open File with Default Settings is unchecked, then click Next to specify settings used to open the PDX package. For more information about PDX settings, see “Specifying Settings for PDX Packages” on page 4-6.
10-3
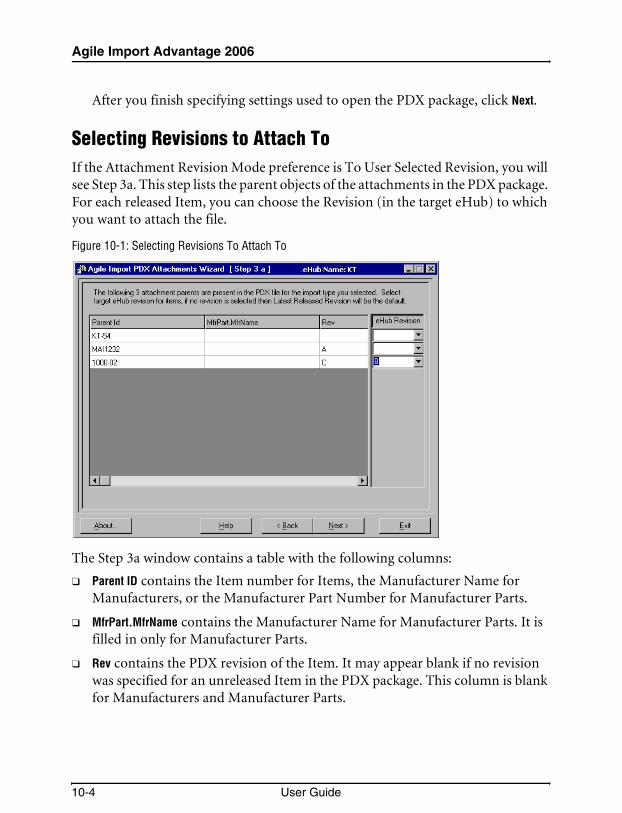
Agile Import Advantage 2006
After you finish specifying settings used to open the PDX package, click Next.
Selecting Revisions to Attach ToIf the Attachment Revision Mode preference is To User Selected Revision, you will see Step 3a. This step lists the parent objects of the attachments in the PDX package. For each released Item, you can choose the Revision (in the target eHub) to which you want to attach the file.
Figure 10-1: Selecting Revisions To Attach To
The Step 3a window contains a table with the following columns:
❑ Parent ID contains the Item number for Items, the Manufacturer Name for Manufacturers, or the Manufacturer Part Number for Manufacturer Parts.
❑ MfrPart.MfrName contains the Manufacturer Name for Manufacturer Parts. It is filled in only for Manufacturer Parts.
❑ Rev contains the PDX revision of the Item. It may appear blank if no revision was specified for an unreleased Item in the PDX package. This column is blank for Manufacturers and Manufacturer Parts.
10-4 User Guide

Chapter 10 Importing Attachments from PDX Packages
❑ Subclass contains the Type of the object. If the object already exists in the target Agile database, this column reflects the subclass of the existing object. If the object does not exist in the Agile database, this column reflects the subclass of the object in the PDX package.
❑ Class contains the class of the object—Item, Manufacturer, or Manufacturer Part.
❑ eHub Revision contains one drop-down, read-only list for each object in the table. For released Items, you can choose from all available revisions of the Item in the target Agile Advantage database. For unreleased Items, the drop-down lists are available only if the Attachment Revision Mode preference is set to User-selected Revision. For manufacturing objects, the drop-down lists are unavailable.
To select revisions for released Items:
1 Select an Item in the list.
2 In the eHub Revision column, open the drop-down list that corresponds to the selected Item.
3 Select the revision to which you want to attach the files.
If you don’t specify a revision, the file is attached to the latest released revision.
Mapping Import Fields to Agile FieldsIn Step 3b, you map the PDX fields you are importing to fields in Agile Advantage subclasses. For example, description in your PDX package should be mapped to the File Description field on the Attachments tab.
Note When importing data, you must map all required fields. For example, the Agile Advantage field Attachment.File Name is a required field for attachments. If you do not map to this field, Agile Import cannot import the data.
You can select a mapping file to use as is, modify an existing file, or create a new one. If you have already created one or more mapping files, Step 3b of the Import wizard offers a list of files to use.
You can do one of the following:
❑ Select a file to use unmodified and click Next.
❑ Click New to create a new mapping file.
10-5

Agile Import Advantage 2006
❑ Select a file to edit and click Modify.
Click Remove to remove a file from the list. To remove all files from the list, click Clear List.
If you click Create or Modify, the Mapping window appears. Use the Mapping window to map the fields from the attachments you are importing to fields of Agile Items.
Figure 10-2: The Mapping Window for Importing Attachments
10-6 User Guide
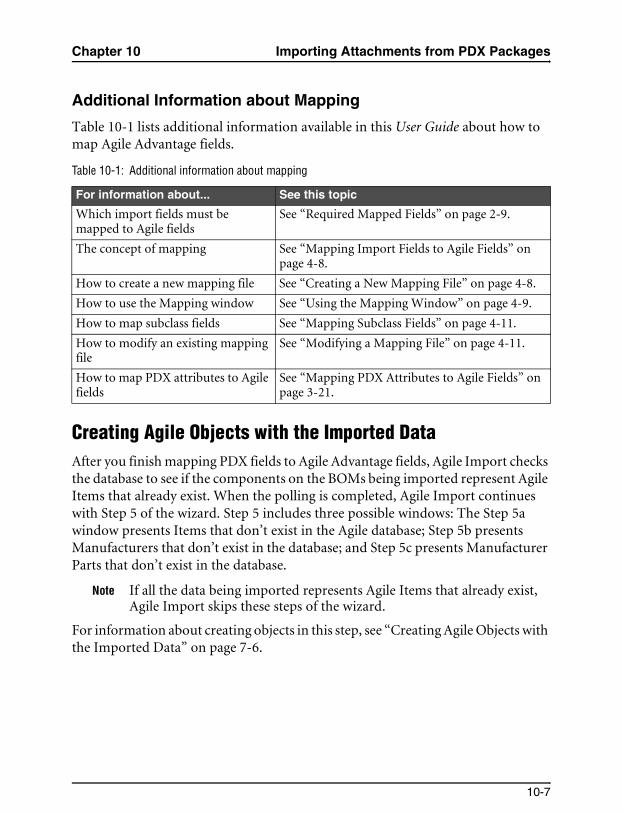
Chapter 10 Importing Attachments from PDX Packages
Additional Information about Mapping
Table 10-1 lists additional information available in this User Guide about how to map Agile Advantage fields.
Creating Agile Objects with the Imported DataAfter you finish mapping PDX fields to Agile Advantage fields, Agile Import checks the database to see if the components on the BOMs being imported represent Agile Items that already exist. When the polling is completed, Agile Import continues with Step 5 of the wizard. Step 5 includes three possible windows: The Step 5a window presents Items that don’t exist in the Agile database; Step 5b presents Manufacturers that don’t exist in the database; and Step 5c presents Manufacturer Parts that don’t exist in the database.
Note If all the data being imported represents Agile Items that already exist, Agile Import skips these steps of the wizard.
For information about creating objects in this step, see “Creating Agile Objects with the Imported Data” on page 7-6.
Table 10-1: Additional information about mapping
For information about... See this topic
Which import fields must be mapped to Agile fields
See “Required Mapped Fields” on page 2-9.
The concept of mapping See “Mapping Import Fields to Agile Fields” on page 4-8.
How to create a new mapping file See “Creating a New Mapping File” on page 4-8.
How to use the Mapping window See “Using the Mapping Window” on page 4-9.
How to map subclass fields See “Mapping Subclass Fields” on page 4-11.
How to modify an existing mapping file
See “Modifying a Mapping File” on page 4-11.
How to map PDX attributes to Agile fields
See “Mapping PDX Attributes to Agile Fields” on page 3-21.
10-7

Agile Import Advantage 2006
Figure 10-3: Step 5 of the Agile Import Attachments From PDX Wizard
Importing the AttachmentsIn Step 6, you import the attachments. Step 6 of the wizard lists the file that was selected to be imported.
Click Import to import the attachment data from the selected file and proceed to the next wizard step. After validating the import data, the wizard proceeds to import each row of the specified import file. A dialog box shows the Attachment Import wizard’s progress. After the import process starts, you can click Cancel in the progress box to stop it.
Returning to Step 1, or Exiting Agile ImportWhen the attachments import is complete, the last step of the Agile Import Attachments from PDX wizard is displayed. You can view the Import.log file, go back to Step 1 of the wizard, or exit Agile Import.
❑ To view the Import.log file, click View Log File. For more information about log files, see “Log Files” on page 12-13.
❑ To import another file, click Step 1.
❑ To exit Agile Import, click Exit.
10-8 User Guide
Chapter 10 Importing Attachments from PDX Packages
If there are errors in the attachments data, you may be unable to correct the source PDX package. Unless you have access to the source eHub and specific privileges to modify a PDX package, it is read-only. However, when you attempt to import attachments from a PDX package, Agile Import parses the PDX data and creates a text file in the same folder. The text file has the same filename as the PDX package, but it has a TXT extension. For example, if the PDX package is named attachmentpkg.pdx, the generated text file is named attachmentpkg.txt. You can edit this text file to fix any errors, then import it instead of the PDX package.
You may be able to solve data incompatibility problems by using an ITT. See “Using an Import Transformation Table” on page 3-8 for details.
Importing Multiple-file (Folder) AttachmentsHere’s how Agile Import handles multiple-file, or folder, attachments (single attachments consisting of more than one file):
❑ If the PDX package was created with Agile eXpress 7.5, Agile eXpress 8, or the Agile Product Collaboration 8.x Web client, all files that are part of a folder attachment are put into a folder on the target eHub according to the folder name.
Note If the import file contains two or more folder attachments with the same name as on the target eHub, the attachments are be combined into one folder on the target eHub. If the target and source folders contain files with the same name, the files are duplicated in the target folder as separate versions.
❑ If the PDX package was not created with Agile eXpress 7.5, Agile eXpress 8, or the Agile Product Collaboration 8.x Web client, all files are imported as single attachments.
10-9

Agile Import Advantage 2006
10-10 User Guide
CHAPTER 11Importing Problem
ReportsThis chapter covers how to import problem reports from text and Excel files using Agile Import. It has the following sections:❑ Steps for Importing Problem Reports❑ Selecting the Type of Import❑ Selecting the Import File❑ Mapping Import Fields to Agile Fields❑ Creating the Problem Reports to Receive Imported Data❑ Importing the Data❑ Returning to Step 1 or Exiting Agile Import
Steps for Importing Problem ReportsTo use Agile Import to import problem reports, follow the steps described in the following sections:
❑ “Selecting the Type of Import” on page 11-2
❑ “Selecting the Import File” on page 11-2
❑ “Mapping Import Fields to Agile Fields” on page 11-3
❑ “Creating the Problem Reports to Receive Imported Data” on page 11-5
❑ “Importing the Data” on page 11-6
❑ “Returning to Step 1 or Exiting Agile Import” on page 11-6
11-1

Agile Import 2006
Selecting the Type of ImportIn Step 1 of the Agile Import wizard, you select the type of information that you will import.
Note Before you begin importing data, check to see if you have the appropriate Agile Advantage privileges. For the complete list of privilege masks required for Agile Import, see Table 1-1 on page 1-6.
To select the type of import:
1 After starting Agile Import, select the import option Import Problem Reports.
2 Click Next to proceed to the next wizard step.
Selecting the Import FileIn Step 2, you select the type and location of the source data. The file must be one of the following types:
❑ Text (*.txt)
❑ Microsoft Excel (*.xls)
❑ CSV (comma-delimited) (*.csv)
To select the import file:
1 Select the file you want to import from the list, or click the Browse button to locate a file.
2 If you are importing a Microsoft Excel file, select a worksheet from the drop-down list. You can import only one worksheet at a time.
Note Once you add an Excel file or a text file to the list at the top of the Step 2 window, you can select it and click View File to open the file in its associated application—usually Microsoft Excel or Notepad.
3 If you specified preferences for how to open import files, make sure Open File with Default Settings is checked, then click Next to proceed to Step 3 of the wizard. For more information about Import preferences, see Chapter 13, “Setting Preferences.”
If you unchecked Open File with Default Settings, click Next to specify settings used to open the file. The settings vary depending on the type of file you are opening.
11-2 User Guide

Chapter 11 Importing Problem Reports
Specifying Settings for Excel Files
If the import file is an Excel file, a file preview screen appears. Specify the worksheet, start row (the row where the header is located), and start and end columns for the file. Click Next to proceed to the next wizard step.
For information about setting preferences for Excel files, see Chapter 13, “Setting Preferences.”
Specifying Settings for Text Files
If the import file is a text file, a file preview screen appears. Specify whether the file has delimited or fixed width data, and specify the start row (the row where the header is located).
When you click Next, a second preview screen lets you select the field delimiter and text qualifier.
For information about setting preferences for text files, see Chapter 13, “Setting Preferences.”
Mapping Import Fields to Agile FieldsIn Step 3, you map the fields you are importing to fields in Agile. You can select a mapping file to use as is, modify an existing file, or create a new one.
You must map the following fields for problem reports: Cover Page.Number, Cover Page.Category, Cover Page.Description, and Cover Page.Disposition. In addition, if you map customer information, you must map to two fields: Cover Page.Customer Name and Cover Page.Site Name.
If you have already created one or more mapping files, Step 3 of the Import wizard offers a list of files to use. Once you create a mapping file, you can reuse it for other import files that have the same attributes (columns of data).
You can do any one of the following:
❑ Select a file to use unmodified, and click Next.
❑ Click New to create a new mapping file.
❑ Select a file to edit, and click Modify.
❑ Browse to a mapping file not on the list, and click Next.
11-3

Agile Import 2006
To remove a file from the list, click Remove. To remove all files from the list, click Clear List.
Creating a New Mapping File
If you are working with a new import file and have not mapped its columns of data to Agile Advantage fields, you should create a new mapping file.
To create a new mapping file:
1 Click New in the Step 3 window.The Mapping window appears.
Figure 11-1: Mapping Window
2 Perform the mappings for problem reports. To map a field, you can drag an Import field to the corresponding Agile Advantage field. For more instructions for using the Mapping window, see “Using the Mapping Window” on page 4-9.
11-4 User Guide

Chapter 11 Importing Problem Reports
3 Click Save or Save As to save the mapping file.
4 Click OK to return to the window where you select the mapping file you created.
Note Rev Found corresponds to released revisions for the item included in the problem report.
Mapping Subclass Fields
If you are importing new problem reports, your import data can include a subclass column. You can then map the subclass column to Agile Advantage subclass fields. Agile Import does not actually import the subclass data. It refers to the field to determine the subclass of new problem reports. For more information about mapping subclass fields, see “Mapping Subclass Fields” on page 4-11.
Creating the Problem Reports to Receive Imported DataAfter Step 3 of the wizard, Agile Import polls the database to see if the data being imported applies to problem reports that already exist. When the polling is completed, the next step of the wizard shows those problem reports that do not already exist in the target database.
Note If all the data being imported applies to problem reports that already exist, Agile Import skips this step of the wizard.
Before you create a problem report, make sure that a subclass has been assigned to it.
To assign the subclass for an object:
1 Check to see which problem reports do not have a subclass assigned. Subclasses may already be assigned if a subclass field is part of the mapping.
2 Select all problem reports of the same subclass, such as Problem Report. (Problem Report is the Agile-supplied user-defined subclass; your Agile administrator may have added additional subclasses to the Problem Reports class.) To select multiple problem reports, Shift+click or Ctrl+click.
3 Click Select Subclass to select the type of problem report to create.
4 Select the subclass that you want to use.
5 Click OK to assign the selected problem reports to that subclass.
11-5

Agile Import 2006
After you specify the subclass for a problem report, either click Create All to create all problem reports in the list, or click Create Selected to create only selected problem reports.
Importing the DataAfter you finish creating problem reports that do not exist in the Agile database, you are ready to import the data. The next step of the wizard lets you confirm that you want to import the specified file.
❑ If you are importing data to problem reports that you created earlier in the wizard, the imported data fills in the blank fields on the tabbed windows of the newly created problem reports.
❑ If you are importing data to problem reports that already exist in the Agile database, the imported data overwrites the current values in the fields on the tabs of existing problem reports. Agile Import does not overwrite data in problem reports that have been released.
Note Customer information in an import file must reflect information that already exists in the target database. If a problem report in the import file includes data about a customer and site that do not already exist in the target database, the customer data for that problem report will not be imported. Values in Import fields mapped to the Item Number field are validated when the problem report is submitted.
You can use the Overwrite Mode preference to have Agile Import overwrite either all fields or just the fields that are blank. For more information about preferences, see Chapter 13, “Setting Preferences.”
Click Import to import the data from the selected file and proceed to the next wizard step. After the import process starts, you can click Cancel in the progress message box to stop it.
Returning to Step 1 or Exiting Agile ImportOn the final step of the Agile Import wizard, you can repeat the cycle to import more data, or finish the process.
Choose one of the following actions:
❑ To view the Import.log file, click View Log File. For more information about log files, see “Log Files” on page 12-13.
11-6 User Guide

Chapter 11 Importing Problem Reports
❑ To import another file, click Step 1.
❑ To exit Agile Import, click Exit.
11-7
Agile Import 2006
11-8 User Guide
CHAPTER 12Validating Import Data
This chapter describes the validation steps that Agile Import performs before importing data to an Agile Advantage eHub. It also lists and describes the different log files produced during an import session. The chapter includes these topics:❑ Item Revision Validation❑ New Object Validation❑ PDX Packages and Agile Key Field Information❑ Data Validation❑ SmartRules Validation❑ BOM Validation❑ AML Validation❑ Unsecure Attachment Files❑ Log Files
Item Revision ValidationWhen you import Items (Parts and Documents) from a PDX package, the PDX package may contain multiple revisions of the same Item. Agile Import can import only one revision of each Item in a single pass.
12-1

Agile Import 2006
After you select the file to import, Agile Import checks the file for multiple revisions of Items. If it detects any, those Items are highlighted in red in the list of Items that appears. You must select one revision to import. If you select multiple revisions, Agile Import detects the conflict and logs it in the Conflicts.log file, stored in the same folder as Agile Import. You must correct the conflict for Agile Import to proceed to the next step.
New Object ValidationDuring an import process, Agile Import may need to create new objects on the Agile Advantage eHub, such as Items, Manufacturers, and Manufacturer Parts. Before it creates an object, Agile Import ensures that the primary key is valid. A primary key is an Agile attribute that uniquely identifies an Agile object. Table 12-1 shows the primary keys for each import type.
When Agile Import encounters a primary key field (such as Title Block.Number), it performs the following validations:
Table 12-1: Primary keys for import types
Import Type Primary Agile Keys PDX Attribute Name
Parts and Documents Title Block.Number Item.itemIdentifier
Manufacturers General Info.Manufacturer Name Contact.businessName
Manufacturer Parts General Info.Manufacturer Name
General Info.Manufacturer Part Number
ManufacturerPart.manufacturerNameManufacturerPart.manufacturerPartIdentifier
BOM BOM.Item Number
BOM.Find Num
BillOfMaterialItem.billOfMaterialItemIdentifierBillOfMaterialItem.proprietarySequenceIdentifier
AML Title Block.NumberGeneral Info.Manufacturer Name
General Info.Manufacturer Part Number
Item.itemIdentifierManufacturerPart.manufacturerNameManufacturerPart.manufacturerPartIdentifier
Attachments Attachments.File Name Attachment.universalResourceIdentifier
12-2 User Guide

Chapter 12 Validating Import Data
❑ Length Validation — Agile Import checks the length of the value and makes sure it does not exceed the MaxLength setting for the field in Agile Administrator. If the value exceeds the maximum length, the attachment is no longer associated with the Item, and Agile Import logs an error in Import.log.
❑ Case Validation — Agile Import checks the case of the value and makes sure it corresponds to the Case setting for the field in Agile Administrator. If necessary, Agile Import converts the value to the proper case and notes it in the Import.log file.
❑ Allow Spaces Validation — Agile Import checks whether the field allows spaces. If it does not, and the value has one or more spaces, Agile Import handles the value based on the Space Handling preference; see “Handling Spaces” on page 13-5. The following characters are treated as a space: linefeed, newline, tab, and space.
❑ Format Validation — Agile Import uses the following rules to check whether the value is a valid format for the field:
• If the field is alpha format, and the value contains non-alpha characters, Agile Import does not create the object.
• If the field is a numeric format, and the value contains non-numeric characters, Agile Import does not create the object.
• If the field is alphanumeric, and the value contains non-alphanumeric characters, Agile Import does not create the object.
• Numeric characters are 0 – 9. Period (.) and comma (,) are also valid characters.
• Alpha characters are A – Z and a – z. Underscore (_) is also a valid character.
• Alphanumeric characters are the union of numeric and alpha characters.
• If the field is set to All formats in Agile Administrator, Agile Import accepts all values.
.
12-3

Agile Import 2006
PDX Packages and Agile Key Field InformationFor a PDX package to be usable by Agile Import, the file must include attributes that correspond to Agile key fields. Some PDX packages, even though they comply with the PDX DTD, do not include some of the attributes that Agile Import requires. (This is because these attributes are #IMPLIED rather than #REQUIRED in the PDX DTD.) Agile Import rejects valid PDX packages that do not include the following #IMPLIED attributes:
❑ For importing BOMs: <BillOfMaterialItem>billOfMaterialItemIdentifier
❑ For importing Manufacturers: <Contact>businessName
❑ For importing Manufacturer Parts: <ManufacturerPart>manufacturerPartIdentifier
❑ For importing AMLs: <ApprovedManufacturerListItem>manufacturedBy
Data ValidationAs your data is imported, Agile Import checks the values in each import field against Agile Administrator’s list of valid values for that field. If a value is invalid, it may not be imported, it may be transformed if necessary (for example, it may be converted to uppercase), or it may be left blank, depending on the type of field and your preferred action. Any errors are noted in the Import.log file for later cleanup and reimport. Table 12-2 lists the formatting errors that Agile Import checks for when an import file is validated.
Table 12-2: Formatting errors detected in import data during validation
Type of Attribute Validations Performed
Date Date Validation (on PDX packages only)
List List Validation
MultiList MultiList Validation
MultiText Case Validation
Length Validation
Text Allow Spaces Validation
Case Validation
Format Validation
Length Validation
12-4 User Guide

Chapter 12 Validating Import Data
The following list describes each validation:
❑ Allow Spaces Validation — Agile Import checks whether the field allows spaces. If it does not and the value has one or more spaces, Agile Import handles the value based on the Space Handling preference; see “Handling Spaces” on page 13-5. The following characters are treated as a space: linefeed, newline, tab, and space.
❑ Case Validation — Agile Import checks the case of a Text or MultiText field against the Case setting for the field in Agile Administrator. If necessary, Agile Import converts values to their proper case. Such case conversions occur automatically, without response from the user, and are reported in the Import.log file.
❑ PDX Date Validation — Dates in PDX packages are validated by the target eHub using the following rules:
• Acceptable formats for dates and date/time values depend on the language of the operating system where the target eHub is located. For a list of acceptable formats, see Table 12-3. Bracketed fields are optional.
Note Agile Import also accepts dates in W3C format in PDX packages and converts them as appropriate. See “Dates and Times in W3C Format” on page 3-5 for more information.
Notes Case Validation
Length Validation
Table 12-3: Supported date and time formats
Operating System Language Supported Date Formats Date/Time Value Format
English mm/dd/yy, mm/dd/yyyy,mm-dd/yy, mm-dd-yyyy
date [time] [am/pm]
French dd/mm/yy, dd/mm/yyyy,dd-mm/yy, dd-mm-yyyy
date [time]
German dd.mm.yy, dd.mm.yyyy,dd-mm/yy, dd-mm-yyyy
date [time]
Japanese yy/mm/dd, yyyy/mm/dd,yy-mm/dd, yyyy-mm-dd
date [am/pm] [time]
Table 12-2: Formatting errors detected in import data during validation
Type of Attribute Validations Performed
12-5

Agile Import 2006
• The TIME must be the following format: hh:mm:ss.
• The items mm, dd, yy, yyyy, hh, mm, and ss cannot be empty strings.
• The month item (mm) can be a number between 1 and 12. For English operating systems, it can also be any of the following case-insensitive strings: Jan, Feb, Mar, Apr, May, Jun, Jul, Aug, Sep, Oct, Nov, or Dec.
• The items dd, yy, yyyy, hh, mm, and ss must not contain non-numeric characters (except valid strings for mm; see above).
• The day item (dd) must be a number between 1 and 31.
• The year item (yy, yyyy) must be a number between 0 and 9999. The numbers 0, 00, 000, 0000, and 2000 are interpreted as the year 2000.
• The hour item (hh) must be a number between 0 and 23.
• The minute item (mm) must be a number between 0 and 59.
• The second item (ss) must be an integer between 0 and 59.
• The AM/PM item must be one of the following case-insensitive strings: AM or PM.
• The AM/PM item must not appear if the hour item (hh) is greater than 11.
If a value is not a valid date format, Agile Import skips it and writes a message to the Import.log file.
❑ Date validation in text, Microsoft Excel, and CSV (comma-delimited) import files — Here are the validation rules for text, Excel, and CSV files:
• Import can handle dates in the following formats: yy/MM/dd, yyyy/MM/dd, dd/MM/yy, dd/MM/yyyy, MM/dd/yy, MM/dd/yyyy. The values for month, day, and year must be numbers.
Chinese (traditional) yy/mm/dd, yyyy/mm/dd,yy-mm/dd, yyyy-mm-dd
date [am/pm] [time]
Hebrew dd/mm/yy, dd/mm/yyyy,dd-mm/yy, dd-mm-yyyy
[time] date
Table 12-3: Supported date and time formats
Operating System Language Supported Date Formats Date/Time Value Format
12-6 User Guide

Chapter 12 Validating Import Data
• Import uses the short date format set in the regional settings of the computer being used to perform the import. For import dates in short date format, Import assumes that the date field in the import file is going to be in the format as that specified in the regional settings of the computer.
For example, if the short date format on the user's system is set to MM/dd/yy, the date field in the import file must be in the same format: 05/21/02. Otherwise, Import cannot import this field, and will write an error to the log file.
• Import can handle times in the format hh:mm:ss aa, as in 10:00:00 AM.
• For times, if the number is between 0 and 9, you must add the leading zero.
• Examples of acceptable time values are: 08:00:12 AM, 12:25:55 PM, 14:59.
If a value is not a valid date format, Agile Import skips it and writes a message to the Import.log file.
❑ Format Validation — The following rules are used by the target eHub to check whether the value is a valid format for the field:
• If the target field is alpha format, and the value contains non-alpha characters, Agile Import does not update the field.
• If the target field is a numeric format, and the value contains non-numeric characters, Agile Import does not update the field.
• If the target field is alphanumeric, and the value contains non-alphanumeric characters, Agile Import does not update the field.
• Numeric characters are 0 – 9. Period (.) and comma (,) are also valid characters.
• Alpha characters are A – Z and a – z. Underscore (_) is also a valid character.
• Alphanumeric characters are the union of numeric and alpha characters.
• If the field is set to All formats in Agile Administrator, Agile Import accepts all values.
❑ Length Validation — Agile Import checks the length of the value and makes sure it does not exceed the MaxLength setting for the field in Agile Administrator. If the value exceeds the maximum length, Agile Import handles the data based on settings for the Length Warnings preference; see “Handling Length Warnings” on page 13-8.
12-7

Agile Import 2006
The Length Warnings preference can be set to display a warning message. From the warning message you can click Truncate to truncate the value to import it or Skip Value to skip the value. Either button you click results in an appropriate entry in the Import.log file.
❑ List and MultiList Validation — Agile Import checks each value against the field’s List setting in Agile Administrator. The spelling of each value in the import data must match exactly one of the field’s List values. If a value does not match, Agile Import skips the value and adds an entry to the Import.log file.
For MultiList fields, such as Title Block.Product Line(s), you can have multiple list values specified. For example, a Product Lines value in the import file could be “Cogniti, Bahama, Tungsten.” If the first value, Cogniti, is invalid, the other two product line values are still imported, assuming they are valid. In the Import.log file, the following message would appear:
List value “Cogniti” not a valid selection for attribute “Product Line(s).” Value was skipped.
Note List and MultiList values are no longer case-sensitive or space-sensitive.
SmartRules ValidationAgile Import checks import data against Agile Administrator’s list of applicable SmartRules. SmartRules (set in Agile Administrator) let Agile Advantage administrators choose how to manage aspects of the change control process on a particular Agile Advantage eHub. Certain SmartRules control the type of data you can add to BOMs and AMLs. When you import BOMs or AMLs, Agile Import may stop the import or display a warning message if it encounters data that violates a SmartRule. The action that Agile Import takes depends on how the eHub SmartRules and Agile Import Preferences (especially the SmartRules Warnings preference) have been configured. Table 12-4 on page 12-9 lists the SmartRules that affect Agile Import.
Note There are other SmartRules besides those listed in Table 12-4, but they do not affect Agile Import.
12-8 User Guide

Chapter 12 Validating Import Data
Table 12-4: How SmartRules affect Agile Import
SmartRule Description Type of Import Affected Setting Action Taken
by Agile Import
ComplianceCheck Controls whether a user can release a change with a BOM or AML that is out of compliance or not.
Bills of Material and Approved Manufacturers
Allow Continues importing the BOM.
Disallow Stops importing the BOM or the Manufacturer Part and displays an error message. The offending BOM is rolled back, and remaining BOMs are subsequently processed.
Warning Displays a warning message and prompts user.
DuplicateFindNumbers Controls the use of duplicate Find numbers when you add Items to a BOM.
Bills of Material Allow Continues importing the BOM.
Disallow Stops importing the BOM and displays an error message. The offending BOM is rolled back, and remaining BOMs are subsequently processed.
Warning Displays a warning message and prompts user.
12-9

Agile Import 2006
DuplicateItemNumbers Controls the use of duplicate Item numbers when you add Items to a BOM.
Bills of Material Allow Continues importing the BOM.
Disallow Stops importing the BOM and displays an error message. The offending BOM is rolled back, and remaining BOMs are subsequently processed.
Warning Displays a warning message and prompts user.
DuplicateRefDes Controls whether duplicate Reference Designators can be used on a BOM.
Bills of Material Allow Continues importing the BOM.
Disallow Stops importing the BOM and displays an error message. The offending BOM is rolled back, and remaining BOMs are subsequently processed.
Warning Displays a warning message and prompts user.
Table 12-4: How SmartRules affect Agile Import (continued)
SmartRule Description Type of Import Affected Setting Action Taken
by Agile Import
12-10 User Guide

Chapter 12 Validating Import Data
You can set a preference in Agile Import for how to handle SmartRules warnings. For example, if you would rather not be bothered with SmartRules warnings, you can set a preference for Agile Import to respond to them with a Yes or a No. For more information, see “Handling SmartRules Warnings” on page 13-10.
BOM ValidationAgile Import subjects BOMs to stringent validations that guarantee the complete accuracy of the entire imported BOM.
MultipleItems-PerManufPart
Controls whether a single Manufacturer Part can have multiple Item parents.
Approved Manufacturers
Allow Allows multiple Items per Manufacturer Part.
Disallow Prevents AML imports from beginning and displays an error message.
Warning Displays a warning message and prompts user.
RedlineManufacturers-OnChangeOrder
Controls whether users are allowed to redline the Manufacturers tab from an ECO. If disallowed, only MCOs can be used to redline the Manufacturers tab.
Approved Manufacturers
Allow Allows both MCOs and ECOs to be specified.
Disallow Allows only MCOs to be specified.
Table 12-4: How SmartRules affect Agile Import (continued)
SmartRule Description Type of Import Affected Setting Action Taken
by Agile Import
12-11

Agile Import 2006
Note If any BOM rows cannot be imported, the entire BOM is not imported. This feature is called BOM rollback. For more information about BOM rollback, see “BOM Rollbacks” on page 5-20.
The following validation errors cause an entire BOM to fail to be imported:
❑ A BOM component does not exist, and the user has chosen not to create it.
❑ A BOM component does not exist, and the user has attempted to create it, but the operation has failed because the Item Number is invalid.
❑ The Item Number and Find Num pair for a BOM component fails validation.
❑ A BOM component has violated a SmartRule that has been set to Disallow.
❑ A BOM component has violated a SmartRule that has been set to Warning, and the user has responded to the warning message by skipping the value, or by choosing not to continue.
❑ The Item Number is an empty string.
❑ The PDX package from which you are importing a BOM contains two or more revisions of the same assembly (BOM parent) or component (BOM child).
Agile Import performs the following validations for new objects created during BOM import:
❑ When a new Item is created during import, the Title Block.Number field is validated against the properties of the Item’s respective class.
❑ When a BOM row is imported, the BOM.Item Number field is validated against the properties of the parent Item’s class.
AML ValidationSimilar to BOM validations, AML validations are stringent, to guarantee the complete accuracy of the entire imported AML.
Note If any AML rows cannot be imported, the entire AML is not imported. This feature is called AML rollback. For more information about AML rollback, see “AML Rollbacks” on page 7-24.
The following validation errors cause an entire AML to fail to be imported:
❑ A Manufacturer or Manufacturer Part on the AML does not exist, and the user has chosen not to create it.
12-12 User Guide

Chapter 12 Validating Import Data
❑ A Manufacturer or Manufacturer Part on the AML does not exist, and the user has attempted to create it, but the operation has failed because the Manufacturer Name and Manufacturer Part Number are invalid.
❑ The Manufacturer Name or Manufacturer Part Number for an AML row fails validation.
❑ An AML row has violated a SmartRule that has been set to Disallow.
❑ An AML row has violated a SmartRule that has been set to Warning, and the user has responded to the warning message by skipping the value or by choosing not to continue.
❑ A Manufacturer or Manufacturer Part for an AML row is an empty string.
❑ A Manufacturer or Manufacturer Part for an AML row cannot be added to the AML table of the parent Item for any reason.
Agile Import performs the following validations for new objects created during AML import:
❑ When a new Manufacturer is created during import, the General Info.Name field is validated against the properties of the Manufacturers class.
❑ When a new Manufacturer Part is created during import, the General Info.Manufacturer Name field and the General Info.Manufacturer Part Number are validated against the properties of the Manufacturer Parts class.
❑ When an AML row is imported, the Manufacturers.Mfr. Name field and the Manufacturers.Mfr. Part Number field are validated against the properties of the parent Item’s class.
Unsecure Attachment FilesIf the Agile Administrator preference Allow Unsecure Files is set to No, unsecure URL attachments that are included in the PDX package are not imported.
Log FilesEach time you import data, Agile Import creates several log files. The log files are overwritten by new files the next time you import data. To keep an import log file for future reference, rename it before starting another import process. All Agile Import log files are stored in the folder where Agile Import is installed.
12-13

Agile Import 2006
Agile Import creates log files based on the type of data you are importing and the file type. Some log files are generated only for specific file types, such as PDX packages. Table 12-5 describes when and for which file types Agile Import creates log files.
The log files record many different types of messages. Table 12-6 lists each log file and the types of messages it contains.
Table 12-5: When Agile Import creates log files
Log File When Agile Import Creates the File
Supported Import Types
Supported File Types
Convert.log When you open a PDX package of revision PDX DTD 0.7, and you allow it to be converted to revision 1.0
All types PDX 0.7
Transform.log When you open a PDX package using an ITT file to transform its values
All types PDX
Conflicts.log When you try to import a PDX package that contains multiple revisions of Items
All types PDX
Create.log When Agile Import creates Items, Manufacturers, or Manufacturer Parts
All types All types (text, Excel, CSV, and PDX)
Autopopulate.log When Agile Import populates the Assembly Specification Table
Bills of Material PDX
Import.log When you click the Import button to begin importing data
All types All types (text, Excel, CSV, and PDX)
12-14 User Guide

Chapter 12 Validating Import Data
Table 12-6: Messages in Agile Import log files
Log File Types of Messages
Convert.log Whether package was successfully converted
Whether the source file is a PDX 0.7 package
Whether the source package conforms to the PDX DTD
Whether the source package could be found
Whether the source file could be opened
Whether there were errors pertaining to the associated XML files
Transform.log Name of ITT file used
Prefix changes to item numbers
Value transformations specified in the ITT file
Conflicts.log Whether multiple revisions of Items were selected to be imported
Create.log Whether Agile Import could not create an object because the value for a primary key field exceeded the maximum length
Whether Agile Import corrected the case of a value for a primary key field
Whether a value for a primary key field had spaces that Agile Import either replaced or removed, or Agile Import did not create the object
Whether Agile Import could not create an object because the value for a primary key field had an invalid format
Whether Agile Import could not create an object because an object with that number exists already even though it has been soft-deleted on the eHub
Autopopulate.log An assembly item was inserted onto the Assembly Specification table
An assembly item could not be inserted onto the Assembly Specification table
There was no New Rev field or New Lifecycle field supplied in the PDX package
The New Lifecycle field in the PDX package is not valid
The New Rev field in the PDX package is not valid (for example, if the New Rev value is already in the target Item’s revision list)
12-15

Agile Import 2006
Import.log Import type
Import filename
Import file type
Mapping filename
Space replacement mode
Space replacement character
Overwrite mode
MultiList delimiters
Default text qualifiers
Temporary AML/BOM assembly seed
Preliminary AML/BOM Import mode
Whether a value had spaces that Agile Import either replaced or removed, or Agile Import did not import the invalid value
Whether Agile Import corrected the case of a value
Whether Agile Import skipped an invalid date value
Whether Agile Import could not import a value with an invalid format
Whether Agile Import truncated or skipped a value that exceeded the maximum length for a field
Whether a List or MultiList value was invalid and could not be imported
Whether a BOM row was imported successfully
Whether a BOM was committed or rolled back due to errors with one or more rows
Whether an AML row was imported successfully
Whether an AML was committed or rolled back due to errors with one or more rows
Whether temporary objects were deleted at the end of the import session
Table 12-6: Messages in Agile Import log files
Log File Types of Messages
12-16 User Guide

Chapter 12 Validating Import Data
Convert.log File
The Convert.log file records conversions of files from PDX DTD Revision 0.7 to Revision 1.0. If you experience problems with conversion, check this file. A list of Convert.log messages is included in Table 12-6.
Transform.log File
The Transform.log file records any data transformations that Agile Import performs on PDX data as a result of using an import transformation table. These transformations occur when Agile Import opens the PDX package. Any transformation errors are recorded in the file.
Here are some errors that you may encounter in a transformation table:
❑ The transformed value exceeds the maximum length specified for the field.
❑ An attribute name in the transformation table does not exist in the PDX package.
If there are errors in transforming the data, use one of the following methods to correct the error:
❑ Open the transformation table and correct it.
❑ Change the configuration of the target eHub using Agile Administrator.
❑ Ask the supplier of the PDX package to correct the data in the source eHub, then repackage the data into a new PDX package.
Conflicts.log File
The Conflicts.log file records conflicts between multiple revisions of Items when you import data from a PDX package. If you select multiple revisions of the same Item to import, you see an error message. You cannot proceed until the error is corrected.
12-17

Agile Import 2006
Create.log File
The Create.log file records the objects created during an import process. For example, if an Item listed on a BOM does not exist, Agile Import attempts to create it. Before it can create an object, Agile Import ensures that the primary key for the object (for example, Title Block.Number for an Item) is valid. If an error occurs, the wizard asks you whether to display the Create.log file.
Figure 12-1 shows an example of a Create.log file. Several objects could not be created because of primary key violations. It is evident from the log file that the Item Number field for the eHub used to generate this log file is alphanumeric and uppercase and has a maximum length of 10 characters. Several Item Numbers violate those restrictions.
Figure 12-1: Create.log File
12-18 User Guide

Chapter 12 Validating Import Data
Autopopulate.log File
When you import BOMs from a PDX package, the Autopopulate.log file records any errors encountered when Agile Import populates the Assembly Specification table. If errors are reported, you may need to modify the Assembly Specification table.
Import.log File
The Import.log file records how the data files were processed during an import session. You can view the Import.log file by clicking View Log File in the last step of the Agile Import wizard, or by navigating to the folder containing the Agile Import application and opening the log file in Notepad or WordPad.
The Import.log file also records validation errors found in the import data. The log file indicates when the case of a value has been adjusted (for example, from mixed case to uppercase), when the value has been truncated because it exceeds the maximum length for a field, and when a value is skipped due to its invalid format. The following figure shows a log file that lists several formatting errors found when you import Parts and Documents.
12-19
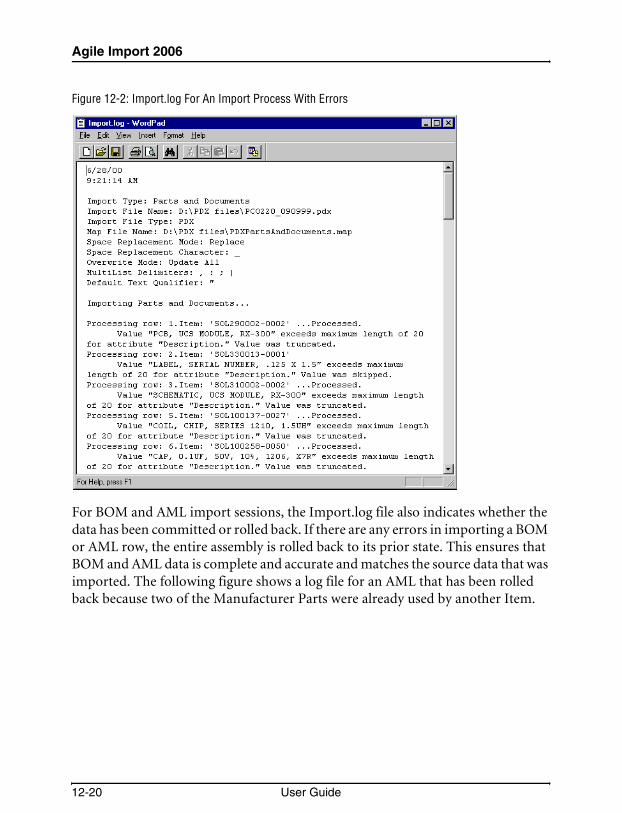
Agile Import 2006
Figure 12-2: Import.log For An Import Process With Errors
For BOM and AML import sessions, the Import.log file also indicates whether the data has been committed or rolled back. If there are any errors in importing a BOM or AML row, the entire assembly is rolled back to its prior state. This ensures that BOM and AML data is complete and accurate and matches the source data that was imported. The following figure shows a log file for an AML that has been rolled back because two of the Manufacturer Parts were already used by another Item.
12-20 User Guide
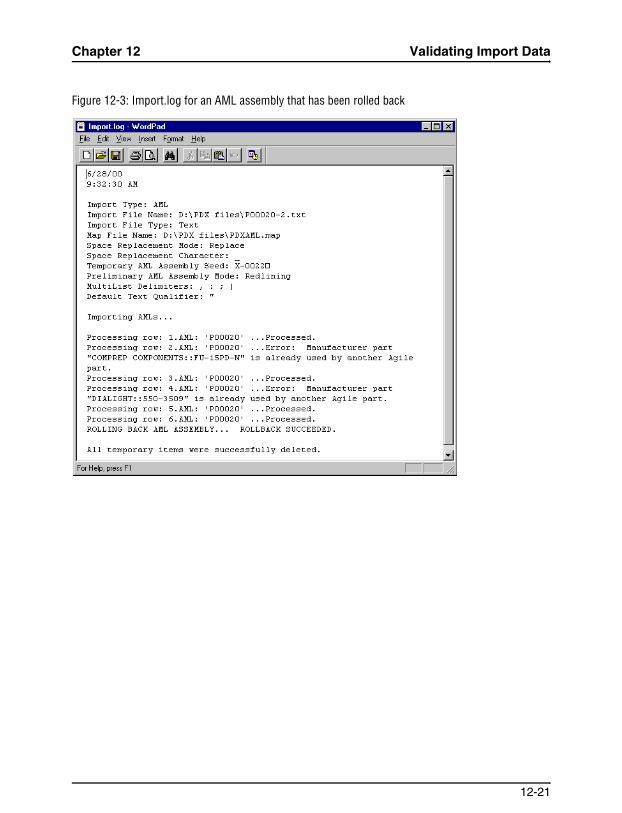
Chapter 12 Validating Import Data
Figure 12-3: Import.log for an AML assembly that has been rolled back
12-21

Agile Import 2006
12-22 User Guide

CHAPTER 13Setting Preferences
You can configure Agile Import by setting preferences. This chapter includes these topics:❑ Displaying Agile Import Preferences❑ When Agile Import Preferences Take Effect❑ Setting General Preferences❑ Setting File Preferences❑ Setting Warning Preferences❑ Setting BOM and AML Preferences❑ Setting Attachment Preferences
Displaying Agile Import PreferencesTo display Agile Import Preferences, click Preferences from Step 1 of the wizard. Preference options are listed on the left. When you select a preference, its properties are listed on the right, as shown in the following figure.
13-1

Agile Import 2006
Figure 13-1: Agile Import Preferences
If you make changes to preferences, click Save to save your changes.
To close the Preferences Settings window and return to Step 1 of the wizard, click Close.
When Agile Import Preferences Take EffectSome Agile Import preferences take effect immediately when you save them. Others take effect after you restart Agile Import.
The following preferences take effect when you click Save in the Preferences Settings window:
❑ Excel Files Defaults
❑ Pause After Each Assembly for BOM Import
❑ Quantity Mismatch Warnings
❑ SmartRules Warnings
❑ Temporary Object for Redlining
❑ Text Files Defaults
❑ Text Qualifiers
13-2 User Guide

Chapter 13 Setting Preferences
❑ Attachment Revision Mode
❑ Load Attachments to Incorporated Items
The following preferences take effect after you exit and restart Agile Import:
❑ Icon Motif
❑ Import File Opening
❑ Length Warnings
❑ MultiList Delimiters
❑ Overwrite Mode
❑ Preliminary AML Import Mode
❑ Preliminary BOM Import Mode
❑ Reference Designator Defaults
❑ Space Handling
Setting General PreferencesAgile Import provides the following general preferences:
❑ Icon Motif
❑ MultiList Delimiters
❑ Overwrite Mode
❑ Space Handling
Setting the Icon Motif
You can select the icons used to identify Agile objects. Three icon motifs are available: Generic (the default), Electrical, and Mechanical. Generally, you should select the same icon motif used by your Agile Advantage eHub.
The icon motif for your eHub is set in Agile Administrator by selecting the following node: Preferences | General | IconMotif.
13-3
Agile Import 2006
To set the icon motif:
1 In the Preferences Settings window, select the Icon Motif preference.
2 Select the icon motif field in the right pane, then click to display a drop-down list.
3 Select an icon motif from the list.
Setting MultiList Delimiters
A MultiList field is a list that allows you to select multiple items. The Product Line(s) field in Agile Advantage is an example of a MultiList field. Each Item can belong to multiple product lines. If your import file contains data mapped to a MultiList field in Agile Advantage, you must separate the MultiList items with a delimiting character, such as a comma (,) or semicolon (;).
Agile eXpress and the Agile Advantage Web client use a comma to delimit MultiList values. To successfully import MultiList values from a PDX package created with Agile eXpress or the Agile Advantage Web client, make sure that comma is one of the specified MultiList delimiters.
To specify the delimiters used for MultiList data:
1 In the Preferences Settings window, select the MultiList Delimiters preference.
2 In the List field, select a delimiter character. If no delimiters are listed, enter a new one. For example, type a comma or semicolon.
Note All MultiList delimiter characters in the list can be used in a single import file.
Setting a Preference for Overwriting Values
If you are importing data to an existing object—for example, a Part—you may not want to overwrite a field that currently has a value. By default, Agile Import updates all fields that have been mapped, overwriting any data that had previously been in those fields. To choose whether to overwrite all mapped fields or only those that are currently blank, set the Overwrite Mode preference.
13-4 User Guide
Chapter 13 Setting Preferences
The Overwrite Mode preference applies only to Parts, Documents, Suppliers, Manufacturers, and Manufacturer Parts. It does not apply to Prices. When you import BOM and AML rows, Agile Import always overwrites data. Even when you import BOMs and AMLs, this preference applies to the BOM components and AML parent objects.
To set the overwrite mode preference:
1 In the Preferences Settings window, select the Overwrite Mode preference.
2 Select the field in the right pane, then click to display a drop-down list.
3 Select Update All (the default) or Update On Blank Only.
Note If a field has been set up in Agile Administrator to have a default value, and you selected Update On Blank Only for the Overwrite Mode preference, you will not be able to update the field with Agile Import.
Handling Spaces
If you try to import a value that contains spaces for a field that does not allow spaces (the attribute’s Allow Spaces property is set to No), Agile Import must handle the invalid spaces. By default, it replaces invalid spaces with an underscore character before importing the value. You can choose alternative ways to handle invalid spaces by setting the Space Handling preference.
Agile Import treats the following characters as a space: linefeed, newline, tab, and space.
To set a space handling preference:
1 In the Preferences Settings window, select the Space Handling preference.
2 In the Space Handling Mode field, select a value. Table 13-1 describes the possible selections.
Table 13-1: Space handling modes
Space Handling Mode Description
Replace The default setting. Replaces each space in fields that do not allow spaces with the specified replacement character.
Remove Removes all spaces from fields that do not allow spaces.
Fail Fails to import data containing spaces to fields that do not allow spaces. An error is logged in the Import.log file.
13-5

Agile Import 2006
3 If you select Replace for Space Handling Mode, specify a space replacement character. The default replacement character is an underscore (_).
Setting File PreferencesAgile Import provides the following preferences for import files:
❑ Excel File Defaults
❑ Import File Opening
❑ Text File Defaults
❑ Text Qualifiers
Setting Excel File Defaults
When you specify a Microsoft Excel import file in the Agile Import wizard, you can open the file using the default options. To set these options, you set the Excel Files Defaults preference.
To set Excel file defaults:
1 In the Preferences Settings window, select the Excel Files Defaults preference.
2 In the First Column field, specify the column in which data starts. The default is column A.
3 In the Header Starts on Row field, type the number of the row on which the header starts. The default is row 1.
Setting a Preference for Opening Import Files
When you use Agile Import, you are required to specify an import file containing the source data to move to the Agile Advantage database. You can open the file using default settings for that file type, or you can preview the file from within the Agile Import wizard.
To set the preference to preview the import file:
1 In the Preferences Settings window, select the Import File Opening preference.
2 Select the By Default field, then click to display a drop-down list.
3 Select Display File Preview from the list.
13-6 User Guide
Chapter 13 Setting Preferences
Note When Display File Preview is selected, the Open File With Default Settings checkbox on Step 2 of the wizard is unchecked, which allows you to preview the import file within the wizard.
Setting Text File Defaults
When you specify a text import file in the Agile Import wizard, you can open the file using the default options. To set these options, you set the Text Files Defaults preference.
To set text file defaults:
1 In the Preferences Settings window, select the Text Files Defaults preference.
2 In the File Type field, select the default file type for text files (Fixed Width or Delimited).
3 If you selected Fixed Width for the file type in step 2, specify the field width.
4 If you selected Delimited for the file type in step 2, specify a field delimiter character used to identify each field. For example, each field may be separated by a semicolon. To specify a tab or space delimiter, type the special values <TAB> or <SPACE>, respectively, in the delimiter list. (Include the angle brackets.)
5 If you selected Delimited for the file type in step 2, in the Treat consecutive delimiters as one list, select Yes or No.
6 In the Header starts on row field, select the default start row for your import data.
Specifying Text Qualifiers to Use with Import Files
A text qualifier is the start and end character used to identify individual string values in a text import file. For example, if the text qualifier is a quotation mark ("), the following text represents three separate string values:
"500", "PCB, Locally Assembled", "100 Hardware"
To specify the text qualifier characters:
1 In the Preferences Settings window, select the Text Qualifiers preference.
2 In the List field, select text qualifier characters.
• Enter additional text qualifiers, one to a line.
13-7

Agile Import 2006
• If the start character and end character are the same, type it only once. For example, type only one double quotation mark (").
Note Agile Import uses only the first text qualifier in the list when you import text files. This is different from the MultiList Delimiters preference, which uses the full list of specified characters.
Avoiding Mismatched Text Qualifiers
Avoid mismatched qualifiers, which cause import errors. Remember, text qualifiers are used in pairs. The following string has a mismatched qualifier due to a quotation mark that appears within the string. The quotation mark is treated as another text qualifier.
"3.5" DISKETTE"
To fix the mismatched text qualifier, you can replace the quotation mark after 3.5 with the word INCH.
"3.5 INCH DISKETTE"
You can also use a different text qualifier, such as the pipe character (|).
|3.5" DISKETTE|
Setting Warning PreferencesAgile Import provides the following preferences for warning messages:
❑ Length warnings
❑ Quantity mismatch warnings
❑ SmartRules warnings
Handling Length Warnings
By default, Agile Import displays a warning for any value that exceeds the maximum length of the target field. For example, if you try to import a value for the Title Block.Description field for a Part, and the value exceeds the default maximum length of 100 characters, a warning message appears. You can set a preference for how to handle length warnings.
13-8 User Guide

Chapter 13 Setting Preferences
To set a preference for length warnings:
1 In the Preferences Settings window, select the Length Warnings preference.
2 In the Default Type field, select a value. Table 13-2 describes the possible selections.
3 If you selected Default To Truncate or Default To Skip Value in step 2, select the Default Mode field, then click to display a drop-down list. Select “Don’t even display message. Default immediately” or “Default after given seconds” from the list.
If you select “Default after given seconds,” you are prompted for each value that exceeds the maximum length for a field. If you ignore the prompt, the default action will be taken after the specified number of seconds.
4 If you selected “Default after given seconds” for the Default Mode, specify the seconds (from 1 to 10) after which the default action will be taken. The default is 1 second.
Handling Quantity Mismatch Warnings
A quantity mismatch occurs when the sum of reference designators does not match the specified Quantity value for a BOM row. For example, if the Quantity value is 1 and the Ref Des value is R1-R3 (which expands to three reference designators—R1,R2,R3), there is a mismatch. You can set a preference for how to handle quantity mismatch warnings.
Table 13-2: Length Warnings preference
Default Type Description
Don’t default. Wait for answer from user.
Prompts you each time Agile Import encounters import data that exceeds the maximum length for a field.
Default to Truncate Fixes the length of a value by removing any characters that exceed the maximum length.
Default to Skip Value Skips all values that exceed the maximum length for a field.
13-9
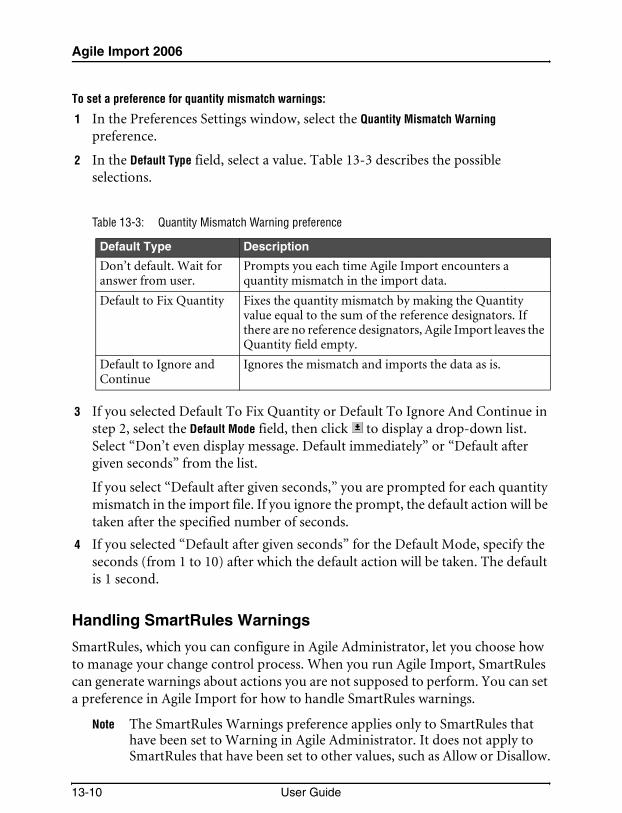
Agile Import 2006
To set a preference for quantity mismatch warnings:
1 In the Preferences Settings window, select the Quantity Mismatch Warning preference.
2 In the Default Type field, select a value. Table 13-3 describes the possible selections.
3 If you selected Default To Fix Quantity or Default To Ignore And Continue in step 2, select the Default Mode field, then click to display a drop-down list. Select “Don’t even display message. Default immediately” or “Default after given seconds” from the list.
If you select “Default after given seconds,” you are prompted for each quantity mismatch in the import file. If you ignore the prompt, the default action will be taken after the specified number of seconds.
4 If you selected “Default after given seconds” for the Default Mode, specify the seconds (from 1 to 10) after which the default action will be taken. The default is 1 second.
Handling SmartRules Warnings
SmartRules, which you can configure in Agile Administrator, let you choose how to manage your change control process. When you run Agile Import, SmartRules can generate warnings about actions you are not supposed to perform. You can set a preference in Agile Import for how to handle SmartRules warnings.
Note The SmartRules Warnings preference applies only to SmartRules that have been set to Warning in Agile Administrator. It does not apply to SmartRules that have been set to other values, such as Allow or Disallow.
Table 13-3: Quantity Mismatch Warning preference
Default Type Description
Don’t default. Wait for answer from user.
Prompts you each time Agile Import encounters a quantity mismatch in the import data.
Default to Fix Quantity Fixes the quantity mismatch by making the Quantity value equal to the sum of the reference designators. If there are no reference designators, Agile Import leaves the Quantity field empty.
Default to Ignore and Continue
Ignores the mismatch and imports the data as is.
13-10 User Guide
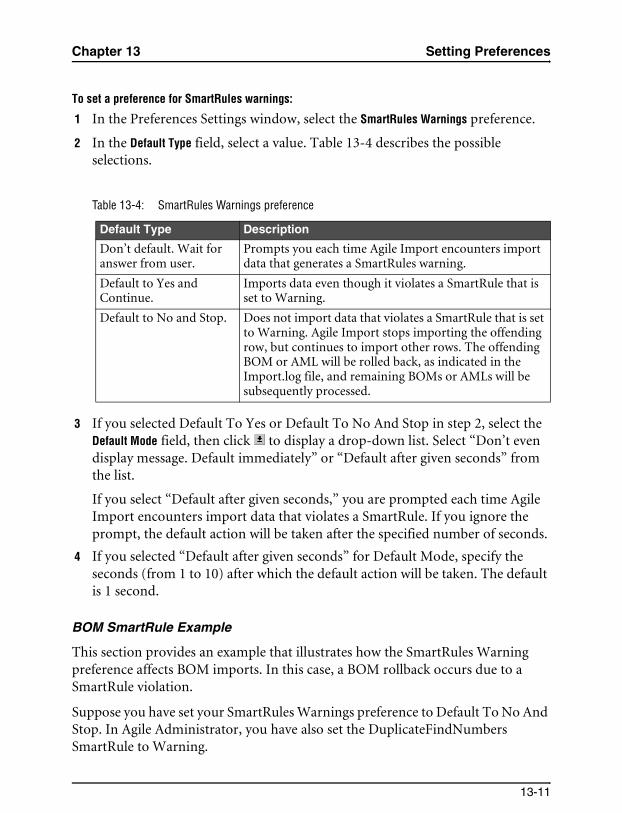
Chapter 13 Setting Preferences
To set a preference for SmartRules warnings:
1 In the Preferences Settings window, select the SmartRules Warnings preference.
2 In the Default Type field, select a value. Table 13-4 describes the possible selections.
3 If you selected Default To Yes or Default To No And Stop in step 2, select the Default Mode field, then click to display a drop-down list. Select “Don’t even display message. Default immediately” or “Default after given seconds” from the list.
If you select “Default after given seconds,” you are prompted each time Agile Import encounters import data that violates a SmartRule. If you ignore the prompt, the default action will be taken after the specified number of seconds.
4 If you selected “Default after given seconds” for Default Mode, specify the seconds (from 1 to 10) after which the default action will be taken. The default is 1 second.
BOM SmartRule Example
This section provides an example that illustrates how the SmartRules Warning preference affects BOM imports. In this case, a BOM rollback occurs due to a SmartRule violation.
Suppose you have set your SmartRules Warnings preference to Default To No And Stop. In Agile Administrator, you have also set the DuplicateFindNumbers SmartRule to Warning.
Table 13-4: SmartRules Warnings preference
Default Type Description
Don’t default. Wait for answer from user.
Prompts you each time Agile Import encounters import data that generates a SmartRules warning.
Default to Yes and Continue.
Imports data even though it violates a SmartRule that is set to Warning.
Default to No and Stop. Does not import data that violates a SmartRule that is set to Warning. Agile Import stops importing the offending row, but continues to import other rows. The offending BOM or AML will be rolled back, as indicated in the Import.log file, and remaining BOMs or AMLs will be subsequently processed.
13-11

Agile Import 2006
Next, you attempt to use Agile Import to import three separate BOM assemblies. The first assembly has a BOM row with a find number that is a duplicate of another find number on the same BOM. When you click Next from the Assembly Specification step of the wizard, a warning message appears.
Click Yes on the warning message to continue. In Step 5 of the wizard, click Import to begin importing. When the import process finishes, Step 6 of the wizard shows a list of the assemblies that have been imported. The first assembly has a red X in the checkbox at the left, indicating that it was not successfully imported, as shown in the following figure.
Figure 13-2: BOM Import That Partially Failed
When you click View Log File to view the Import.log file, it looks like Figure 13-3. The first assembly failed on the SmartRule violation for the duplicate find numbers, and was later rolled back to its original state. The other two assemblies were imported successfully.
An X indicates that this assembly was not imported.
13-12 User Guide

Chapter 13 Setting Preferences
Figure 13-3: Import.log file showing a BOM rollback
Note If you are importing BOMs from a PDX package and one or more BOM assemblies have been rolled back, you can correct the BOM data in the text files generated by Agile Import. For more information, see “BOM Rollbacks” on page 6-13.
AML SmartRule Example
This section provides an example that illustrates how the SmartRules Warning preference affects AML imports. In this case, an AML rollback occurs due to a SmartRule violation.
Suppose you have set your SmartRules Warnings preference to “Don’t default. Wait for answer from user.” In Agile Administrator, you have also set the MultipleItemsPerManufPart SmartRule to Warning.
Next, try to import AML data that contains a row with a Manufacturer Part that already is being used by another Item. The warning message shown in the following figure appears.
13-13

Agile Import 2006
Figure 13-4: Warning message for MultipleItemsPerManufPart SmartRule
Click No in the message dialog box. The offending AML row is not imported, and the import process continues. When the import process is finished, the Import.log file, shown in Figure 13-5, shows the error that occurred in row 1 of the AML: the specified Manufacturer Part is already in use by another Item. The log also shows that rows 2 through 4 of the AML were processed successfully. However, because of the error on row 1, the entire AML was rolled back to its prior state.
Figure 13-5: Import.log File For An AML Rollback Due To A SmartRule Violation
Note If you are importing AMLs from a PDX package and one or more AML assemblies have been rolled back, you can correct the AML data in the text file generated by Agile Import. For more information, see “AML Rollbacks” on page 7-24.
13-14 User Guide

Chapter 13 Setting Preferences
Setting BOM and AML PreferencesAgile Import provides the following preferences for BOMs and AMLs:
❑ Pause After Each Assembly for BOM Import
❑ Preliminary AML Import Mode
❑ Preliminary BOM Import Mode
❑ Reference Designator Defaults
❑ Temporary Object for Redlining
Pausing After Each Assembly for BOM Import
If you are importing BOMs, you may want to import different BOMs for multiple revisions of an Item. To do this, you must pause Import after each assembly has been imported. The pause allows you to start the Agile Windows client, release the Change for the revision you just imported, then go back to Import and click OK to import the next assembly.
Note If you don’t pause after each assembly to release its associated Change, the last BOM imported for an Item is used for all the revisions listed on the Assembly Specification table.
To pause Agile Import after importing each BOM assembly:
1 In the Preferences Settings window, select the Pause After Each Assembly for BOM Import preference.
2 If a field in the right pane is No, select the field, then select Yes from its drop-down list.
Setting the Import Mode for Preliminary AMLs
When you import data to the AMLs of unreleased Items, you can import in one of two modes: Authoring or Redlining.
In Authoring mode, Agile Import appends AML rows to all unreleased Items that do not have a pending change. In this mode, you do not need to specify a change order to import approved manufacturers to unreleased Items without pending changes (Step 6 of the wizard).
13-15
Agile Import 2006
In Redlining mode, Agile Import replaces AML rows in the unreleased AML assemblies using the redlining process. In this case, a change order is required to import all approved manufacturers.
To set the import mode for preliminary AMLs:
1 In the Preferences Settings window, select the Preliminary AML Import Mode preference.
2 Select the field in the right pane, then click to display a drop-down list.
3 Select Authoring or Redlining (the default).
Setting the Import Mode for Preliminary BOMs
When you import data to the BOMs of unreleased Items, you can import in one of two modes: Authoring or Redlining.
In Authoring mode, Agile Import appends BOM rows to all unreleased BOM assemblies that do not have a pending change. In this mode, you do not need to specify a change order to import assemblies to unreleased Items without pending changes (Step 6 of the wizard).
In Redlining mode, Agile Import replaces BOM rows in the unreleased BOM assemblies using the redlining process. In this case, a change order is required to import all BOMs.
To set the import mode for preliminary BOMs:
1 In the Preferences Settings window, select the Preliminary BOM Import Mode preference.
2 Select the field in the right pane, then click to display a drop-down list.
3 Select Authoring or Redlining (the default).
Setting Reference Designator Defaults
Reference designators are commonly used in the electronics industry as a labeling system to refer to components. You can list reference designators for components in the BOM table. When you are importing BOM data to Agile Advantage, you need to specify how Agile Import should parse reference designators.
13-16 User Guide

Chapter 13 Setting Preferences
To set reference designator defaults:
1 In the Preferences Settings window, select the Reference Designator Defaults preference.
2 Specify a value in the Parse Character field. The parse character, usually a comma, separates reference designator values that don’t need expansion, for example: R1,R2,R3.
Note If you are importing BOMs from a PDX package, make sure the specified parse character is a comma.
3 Specify a value in the Range Character field. The range character, usually a hyphen, separates reference designator values that expand to a sequence of values. For example, R4-R6 expands to R4,R5,R6. See “Reference Designators” on page 2-5 for details about expanded and collapsed reference designator ranges.
Note If you are importing BOMs from a PDX package, make sure the specified range character is a hyphen.
The Output Delimiter field, which is read-only, shows the delimiter character used to separate each expanded reference designator value. For example, if the output delimiter is a comma, then R4-R6 is expanded to R4,R5,R6.
Note You can enter the special values <TAB> and <SPACE> (including angle brackets) for either the Parse Character or Range Character values.
Setting Preferences for Temporary Objects Created for Redlining
When you import BOM or AML data into a released Item, Agile Import redlines the changes. To maintain the original data, Agile Import creates a temporary object that is deleted after redlining is finished. You can set a preference for the number prefix and seed value for temporary objects that Agile Import creates.
To set the number prefix and seed value for temporary objects:
1 In the Preferences Settings window, select the Temporary Object for Redlining preference.
2 Specify a value in the Prefix field. X- is an example of a two-character prefix.
3 Specify a value in the Seed field that is at least four digits long (for example, 0001). The seed value is increased each time Agile Import creates an additional temporary object.
13-17

Agile Import 2006
Avoiding Collisions with Existing and Future Item Numbers
When you specify prefix and seed values, make sure you avoid collisions with existing and future item numbers on the eHub. For example, if your company already uses or plans to use the prefix X- for a series of items, do not use that prefix for temporary objects.
Validating Temporary Item Numbers
Make sure the temporary Item number (the combined prefix and seed values) that you specify for the Temporary Object for Redlining preference complies with settings for the Title Block.Number field for Parts and the Title Block.Number field for Documents. The temporary Item number is validated during the import process to make sure that it does not violate the following properties of the fields:
❑ MaxLength — the maximum number of characters allowed in the field
❑ Format — numeric, alpha, alphanumeric, or all
❑ Allow Spaces — whether spaces are allowed in the field
If the Item number for a temporary object is invalid, you will not be able to import BOMs or AMLs. For more information about how Agile Import validates data before importing it, see “Data Validation” on page 12-4.
Deleting Temporary Objects
Make sure you have delete privileges before importing BOMs or AMLs. If you do not have delete privileges, the temporary objects created by Agile Import will not be deleted automatically at the end of the import process.
Note The Import.log file indicates whether all temporary objects were successfully deleted. For more information about Import.log, see “Import.log File” on page 12-19.
Setting Attachment PreferencesAgile Import provides the following preferences for attachments:
❑ Attachment Revision Mode
❑ Load Attachments to Incorporated Items
13-18 User Guide
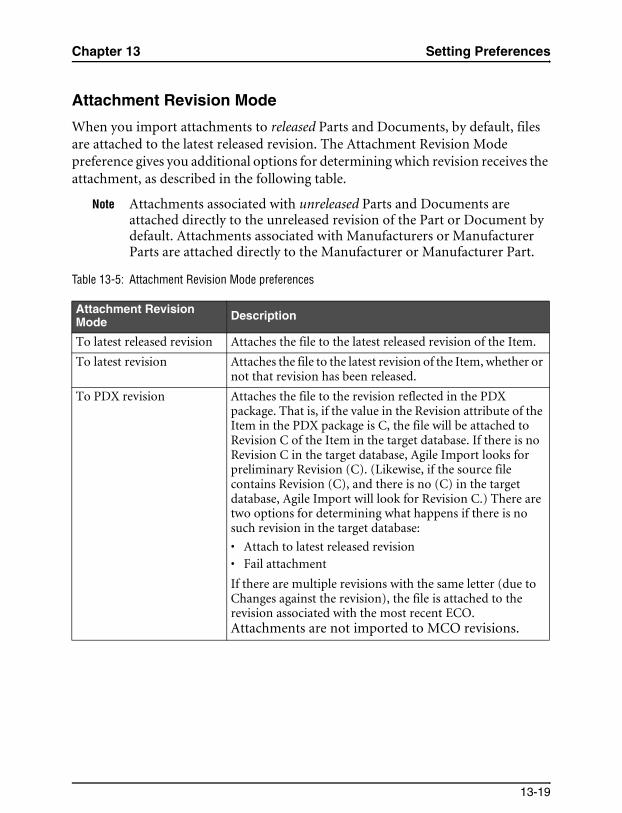
Chapter 13 Setting Preferences
Attachment Revision Mode
When you import attachments to released Parts and Documents, by default, files are attached to the latest released revision. The Attachment Revision Mode preference gives you additional options for determining which revision receives the attachment, as described in the following table.
Note Attachments associated with unreleased Parts and Documents are attached directly to the unreleased revision of the Part or Document by default. Attachments associated with Manufacturers or Manufacturer Parts are attached directly to the Manufacturer or Manufacturer Part.
Table 13-5: Attachment Revision Mode preferences
Attachment Revision Mode Description
To latest released revision Attaches the file to the latest released revision of the Item.
To latest revision Attaches the file to the latest revision of the Item, whether or not that revision has been released.
To PDX revision Attaches the file to the revision reflected in the PDX package. That is, if the value in the Revision attribute of the Item in the PDX package is C, the file will be attached to Revision C of the Item in the target database. If there is no Revision C in the target database, Agile Import looks for preliminary Revision (C). (Likewise, if the source file contains Revision (C), and there is no (C) in the target database, Agile Import will look for Revision C.) There are two options for determining what happens if there is no such revision in the target database:
• Attach to latest released revision• Fail attachment
If there are multiple revisions with the same letter (due to Changes against the revision), the file is attached to the revision associated with the most recent ECO. Attachments are not imported to MCO revisions.
13-19

Agile Import 2006
To set the Attachment Revision Mode preference:
1 In the Preferences Settings window, select the Attachment Revision Mode preference.
2 Select the field in the right pane, then click to display a drop-down list.
3 Select one of the options.
4 If you chose To PDX Revision, specify a default action for nonexistent PDX revisions.
Load Attachments to Incorporated Items
Note You must have the appropriate incorporation privileges to have Agile Import attach files to incorporated Items (Parts and Documents). If you have questions about your privileges, contact your Agile administrator.
You can set a preference that determines whether Agile Import can import attachments to incorporated Items.
To set this preference:
1 In the Preferences Settings window, select the Load Attachments to Incorporated Items preference.
2 Select the field in the right pane, then click to display a drop-down list.
To user selected revision Attaches the file to the revision that the user selects during the import process. If the user does not select a revision, the file is attached to the latest released revision.
If the source PDX package contains duplicate revisions of the same Item, only one of those revisions is listed by Agile Import.
All attachments of an Item revision are imported to the target revision selected. Additionally, if the source PDX package contains, for example, Part 725 revision A and Part 725 revision (A), all attachments from both revisions are imported to the target revision selected. This can create duplicate files on the target eHub, stored as separate versions.
Attachments are not imported to MCO revisions, so the eHub Revision list includes ECO revisions but not MCO revisions.
Attachment Revision Mode Description
13-20 User Guide

Chapter 13 Setting Preferences
3 Select No or Yes.
If you select No, Agile Import rejects file attachments to incorporated Items. If you select Yes, incorporated Items are unincorporated, files are attached, and the Items are incorporated again.
13-21

Agile Import 2006
13-22 User Guide

INDEX
AaddressLine1 PDX attribute 3-12Adobe Acrobat Reader xiiAgile Administrator
AllowRangeExpandCollapse preference 2-8
Agile eHubsdata conformation (transformation
tables) 4-6incompatibilities between 3-8transferring data between 3-2validating data 12-1–12-21
Agile eXpress 1-4, 3-4extracting data from PDX packages
3-18printing PDX reports 3-20Web site 3-4
Agile Import 1-4data handling 1-14exiting 6-13prerequisites 1-3starting 1-12
Agile objectscreating 7-6, 8-4, 9-4icon motif 13-3
Agile privileges 1-4applying to selected attributes 1-11recommended for importing 1-5
Agile Quality Management features 1-4Agile Web clientAgile Windows client, starting 1-4Agile.size PDX attribute 3-12Allow Spaces validation 12-3, 12-5
Space Handling preference 13-5AllowRangeExpandCollapse preference
2-8
alpha characters 12-3, 12-7alphanumeric characters 12-3, 12-7AML. See Approved Manufacturersappending to a BOM 5-2appending to an AML 7-11Approved Manufacturer Lists
appending data 7-11Authoring vs. Redlining mode 13-15bouncing 7-22duplicates 7-22importing, deleting temporary objects
13-18preferences 13-15primary key 12-2redlining partial rows 7-16replacing 7-12rollbacks 7-24, 12-20, 13-13source vs. target 7-16
Approved Manufacturers 4-2bouncing 7-22data handling 1-15errors 12-12importing 7-1–7-25, 8-1–??, 9-1–??
PDX Items 7-4specifying Change Orders 7-7
mapping PDX attributes 3-24redlining 7-10
SmartRule 12-11validation 12-12
ApprovedManufacturerListItem PDX object 3-11
ASCII files, See text filesassemblies. See BOMsAssembly Editor
buttons 5-11fields 5-9
Index-1

Agile Import 2006
Assembly Editor window 5-9buttons 5-11fields 5-9
Assembly Specification 5-7, 6-8buttons 5-8clearing 5-9deleting 5-9editing 5-8modifying 6-8opening 5-8saving 5-9
assembly specification files (IAS) 6-9Attachment PDX object 3-11Attachment Revision Mode preference
13-19attachments 3-27
custom fields 10-2folder 10-9importing
from PDX packages 10-1–10-9loading to incorporated Items 13-20mapping fields 10-5mapping PDX attributes 3-26multiple-file 10-9preferences 13-18redlines 10-2selecting revisions to attach to 10-4
attributesmapping PDX 3-21PDX 3-11transforming values 3-8
Authoring mode 7-10, 13-15, 13-16Automap button 4-10, 4-11Autopopulate.log file 6-8, 12-14, 12-15,
12-19
BBillofMaterialItem PDX object 3-11billofMaterialItemIdentifier PDX attribute
3-13blank column headers 2-3blanking out field values 3-17
BOMs 5-1, 6-1, 6-13, 10-1appending to 5-2Authoring vs. Redlining mode 13-16Autopopulate.log 12-14, 12-15, 12-19data handling 1-14different for multiple revisions 13-15errors 12-12extracting part information 3-19importing
deleting temporary objects 13-18from PDX packages 6-1–6-13from text or Microsoft Excel files
5-1–5-21mapping PDX attributes 3-23preferences 13-15primary key 12-2redlining 5-17
reviewing 5-19replacing 5-3rollbacks 5-20, 6-13, 12-20, 13-11validations 12-11
bouncing Approved Manufacturer Lists 7-22
browser 1-4businessName PDX attribute 3-12
CCAD files 2-2, 2-13case sensitivity 1-3case validation 12-3, 12-5categories, transforming 3-15category PDX attribute 3-12Change objects 3-27Change Orders
specifying for assemblies 6-6specifying for importing Approved
Manufacturers 7-7characters
formats 12-3, 12-7linefeed 13-5maximum length 12-3, 12-7newline 13-5
Index-2 User Guide

Index
Space Handling preference 13-5tab 13-5
checklist for import data 2-15cityName PDX attribute 3-12closing Agile Import 4-15collisions, avoiding with Item numbers
13-18columns
headersblank 2-3
comma-delimited files 2-1configuring Agile Import 13-1–13-21
displaying preferences 13-1Conflicts.log 12-14, 12-17Conflicts.log file 12-15Contact PDX object 3-11contactName PDX attribute 3-12contactStatus PDX attribute 3-12continuation rows 2-6Convert.log file 12-14, 12-15Create.log file 12-14, 12-15, 12-18creating
Agile objects 7-6, 8-4, 9-4Items 4-12, 7-6, 8-4, 9-4mapping files 4-9
.csv files 2-1custom fields
attachments 10-2customer data, problem report import 1-15customer support xiii
Ddata
appending to a BOM 5-2appending to an Approved
Manufacturer 7-11compatibility, transformation tables
3-8, 4-6extracting from PDX packages 3-18formatting errors 12-4invalid 3-8modifying 2-14
proper formats 2-1–2-15structuring for import 2-3transferring between Agile eHubs 3-2validation 12-1–12-21
Approved Manufacturers Lists 12-12
BOMs 12-11fields 12-4log files 12-13–12-21new objects 12-2reference designators 2-8SmartRules 12-8troubleshooting 12-13–12-21
data handling 1-14database files 2-2date validation 12-5default field values, setting 3-18default values of new objects 2-14defaults, Microsoft Excel file 13-6deleting
field mappings 4-11temporary objects 13-18
delimitersMultiList fields 3-6, 13-4reference designators 13-17text files 13-7
department PDX attribute 3-12Description field, maximum length 2-3description PDX attribute (Attachment)
3-13description PDX attribute
(BillofMaterialItem) 3-13description PDX attribute (Item) 3-11description PDX attribute
(ManufacturerPart) 3-13documentation i-xiiDocuments 4-2
data handling 1-14mapping PDX attributes 3-22primary key 12-2
duplicate reference designators 6-10DuplicateFindNumbers SmartRule 12-9
Index-3
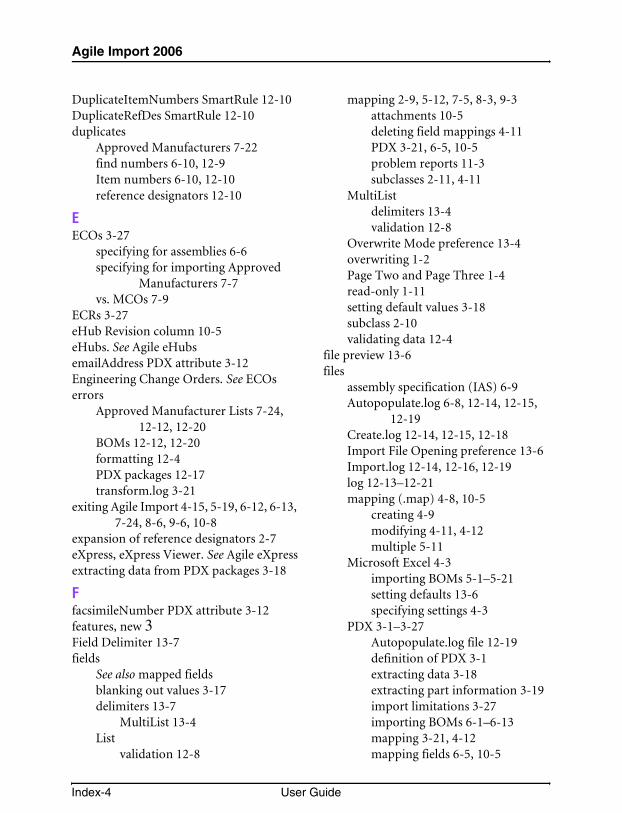
Agile Import 2006
DuplicateItemNumbers SmartRule 12-10DuplicateRefDes SmartRule 12-10duplicates
Approved Manufacturers 7-22find numbers 6-10, 12-9Item numbers 6-10, 12-10reference designators 12-10
EECOs 3-27
specifying for assemblies 6-6specifying for importing Approved
Manufacturers 7-7vs. MCOs 7-9
ECRs 3-27eHub Revision column 10-5eHubs. See Agile eHubsemailAddress PDX attribute 3-12Engineering Change Orders. See ECOserrors
Approved Manufacturer Lists 7-24, 12-12, 12-20
BOMs 12-12, 12-20formatting 12-4PDX packages 12-17transform.log 3-21
exiting Agile Import 4-15, 5-19, 6-12, 6-13, 7-24, 8-6, 9-6, 10-8
expansion of reference designators 2-7eXpress, eXpress Viewer. See Agile eXpressextracting data from PDX packages 3-18
FfacsimileNumber PDX attribute 3-12features, new 3Field Delimiter 13-7fields
See also mapped fieldsblanking out values 3-17delimiters 13-7
MultiList 13-4List
validation 12-8
mapping 2-9, 5-12, 7-5, 8-3, 9-3attachments 10-5deleting field mappings 4-11PDX 3-21, 6-5, 10-5problem reports 11-3subclasses 2-11, 4-11
MultiListdelimiters 13-4validation 12-8
Overwrite Mode preference 13-4overwriting 1-2Page Two and Page Three 1-4read-only 1-11setting default values 3-18subclass 2-10validating data 12-4
file preview 13-6files
assembly specification (IAS) 6-9Autopopulate.log 6-8, 12-14, 12-15,
12-19Create.log 12-14, 12-15, 12-18Import File Opening preference 13-6Import.log 12-14, 12-16, 12-19log 12-13–12-21mapping (.map) 4-8, 10-5
creating 4-9modifying 4-11, 4-12multiple 5-11
Microsoft Excel 4-3importing BOMs 5-1–5-21setting defaults 13-6specifying settings 4-3
PDX 3-1–3-27Autopopulate.log file 12-19definition of PDX 3-1extracting data 3-18extracting part information 3-19import limitations 3-27importing BOMs 6-1–6-13mapping 3-21, 4-12mapping fields 6-5, 10-5
Index-4 User Guide
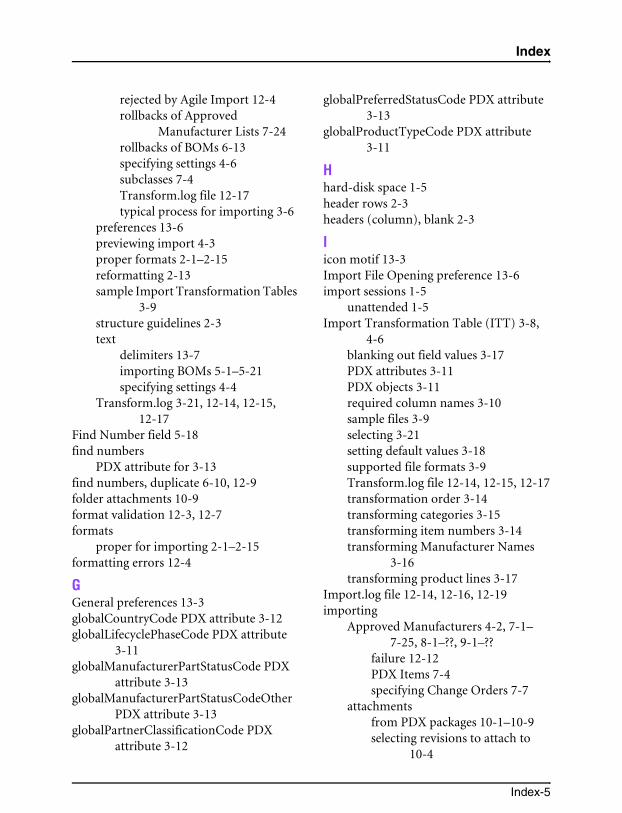
Index
rejected by Agile Import 12-4rollbacks of Approved
Manufacturer Lists 7-24rollbacks of BOMs 6-13specifying settings 4-6subclasses 7-4Transform.log file 12-17typical process for importing 3-6
preferences 13-6previewing import 4-3proper formats 2-1–2-15reformatting 2-13sample Import Transformation Tables
3-9structure guidelines 2-3text
delimiters 13-7importing BOMs 5-1–5-21specifying settings 4-4
Transform.log 3-21, 12-14, 12-15, 12-17
Find Number field 5-18find numbers
PDX attribute for 3-13find numbers, duplicate 6-10, 12-9folder attachments 10-9format validation 12-3, 12-7formats
proper for importing 2-1–2-15formatting errors 12-4
GGeneral preferences 13-3globalCountryCode PDX attribute 3-12globalLifecyclePhaseCode PDX attribute
3-11globalManufacturerPartStatusCode PDX
attribute 3-13globalManufacturerPartStatusCodeOther
PDX attribute 3-13globalPartnerClassificationCode PDX
attribute 3-12
globalPreferredStatusCode PDX attribute 3-13
globalProductTypeCode PDX attribute 3-11
Hhard-disk space 1-5header rows 2-3headers (column), blank 2-3
Iicon motif 13-3Import File Opening preference 13-6import sessions 1-5
unattended 1-5Import Transformation Table (ITT) 3-8,
4-6blanking out field values 3-17PDX attributes 3-11PDX objects 3-11required column names 3-10sample files 3-9selecting 3-21setting default values 3-18supported file formats 3-9Transform.log file 12-14, 12-15, 12-17transformation order 3-14transforming categories 3-15transforming item numbers 3-14transforming Manufacturer Names
3-16transforming product lines 3-17
Import.log file 12-14, 12-16, 12-19importing
Approved Manufacturers 4-2, 7-1–7-25, 8-1–??, 9-1–??
failure 12-12PDX Items 7-4specifying Change Orders 7-7
attachmentsfrom PDX packages 10-1–10-9selecting revisions to attach to
10-4
Index-5

Agile Import 2006
BOMs 5-1failure 12-12from PDX packages 6-1, 6-1–
6-13, 10-1from text or Microsoft Excel files
5-1–5-21checklist for 2-15creating Agile objects 7-6, 8-4, 9-4diagram of process 2-2Documents 4-2formatting errors 12-4large data files 1-5Manufacturers and Manufacturer
Parts 4-2Microsoft Excel files
specifying settings 4-3new objects, default values 2-14Parts 4-2PDX packages 3-1–3-27
limitations 3-27process diagram 3-3specifying settings 4-6typical process 3-6
preferences for import 13-1–13-21proper file formats for 2-1–2-15reimporting 2-14structuring data 2-3subclass fields 2-10subclasses 7-4text files, specifying settings 4-4validating data 12-1–12-21
Approved Manufacturers Lists 12-12
BOMs 12-11fields 12-4new objects 12-2SmartRules 12-8
Incorporated Items, importing attachments 13-20
installing. See the Installation and Maintenance Guide
interruptions 1-5
Item Number field 5-18Item number prefix 4-6Item numbers
avoiding collisions 13-18duplicate 6-10, 12-10prefixes 3-15transforming 3-14
Item PDX object 3-11itemIdentifier PDX attribute 3-11itemQuantity PDX attribute 3-13Items
creating 4-12, 7-6, 8-4, 9-4revisions, rolling 7-9
ITT. See Import Transformation Tableittsample.csv 3-9ittsample.xls 3-9
Kkeys (primary) 12-2
Create.log file 12-15, 12-18
Llarge data files, importing 1-5launching Agile Import 1-12leading zeros 2-8length validation 12-3, 12-7Length Warnings preference 12-8, 13-8license requirements 1-4linefeed characters 13-5List fields
case-insensitive 1-3List validation 12-8list values, delimiters 2-4Load Attachments to Incorporated Items
preference 13-20locking (object) 1-5log files 12-13–12-21
Autopopulate.log 6-8, 12-19Create.log 12-18Import.log 12-19Transform.log 3-21, 12-17
logging in to Agile Import 1-12lowercase (case validation) 12-3, 12-5
Index-6 User Guide

Index
MmanufacturedBy PDX attribute 3-13Manufacturer names
transforming 3-16Manufacturer Parts 4-2
data handling 1-14mapping PDX attributes 3-23multiple item parents 12-11primary key 12-2
manufacturerName PDX attribute 3-12ManufacturerPart PDX object 3-11manufacturerPartIdentifier PDX attribute
3-12, 3-13manufacturerPartType PDX attribute 3-13Manufacturers 4-2
data handling 1-14duplicate 7-22importing 7-1–7-25, 8-1–??, 9-1–??mapping PDX attributes 3-22primary key 12-2redlining 7-12
partial rows 7-16SmartRule 12-11
replacing 7-12Manufacturing Change Orders. See MCOsmapping
problem report fields 11-3mapping (.map) files 4-8, 10-5
modifying 4-11multiple 5-11
mapping fields 2-9, 5-12, 7-5, 8-3, 9-3adding 4-10attachments 10-5Part descriptions on BOM 5-13, 6-5PDX 4-12, 6-5, 10-5PDX attributes 3-21removing 4-11required 2-9subclasses 2-11, 4-11
mapping files (.map) 4-8creating 4-9modifying 4-12
Mapping window 4-9matching fields. See mapping fieldsmaximum length
Description field 2-3reference designators 2-3
MaxLength warnings 13-8MCOs 3-27
vs. ECOs 7-9memory 1-5MfrPart.MfrName column 10-4Microsoft Excel 1-4, 2-1, 2-3, 4-3
example of importable file 2-4Excel Text Import wizard 2-13file defaults 13-6importing BOMs 5-1–5-21problems running 1-13reference designators 2-6specifying settings 4-3
Microsoft Internet Explorer 1-4Microsoft Office Installer 1-13modify privileges, applying to selected
attributes 1-11modifying, and reimporting 2-14MultiList fields
case-insensitive 1-3delimiters 2-4, 3-6, 13-4
MultiList validation 12-8multiple-file attachments 10-9MultipleItemsPerManufPart SmartRule
12-11
NnationalPostalCode PDX attribute 3-12new features 3new objects, default values 2-14newline characters 13-5notes PDX attribute (BillofMaterialItem)
3-13numeric characters 12-3, 12-7
Oobjects
Change 3-27
Index-7

Agile Import 2006
locking 1-5PDX 3-11temporary 1-10validation 12-2
OLE32.DLL 1-12online support xiiiOutput Delimiter 13-17Overwrite mode 1-2, 13-4
Ppackages
PDXextracting data 3-18
packages, PDX. See PDX filespackaging content for non-Agile partners
3-4Page Two and Page Three 1-4Parent ID column 10-4Parse Character 13-17Part descriptions (BOM), mapping 5-13,
6-5part information, extracting from PDX
packages 3-19Parts 4-2
data handling 1-14mapping PDX attributes 3-22primary key 12-2
password 1-12Pause After Each Assembly for BOM
Import preference 13-15pausing BOM import 13-15PDX attributes 3-11PDX element names 3-11PDX objects 3-11PDX packages 2-2, 2-3, 3-1–3-27
Approved Manufacturers 7-4Autopopulate.log file 12-19errors 12-17extracting data 3-18extracting part information 3-19import limitations 3-27importing
attachments 10-1–10-9BOMs 6-1–6-13process diagram for 3-3
mapping fields 3-21, 4-12, 6-5, 10-5printing 3-20rejected by Agile Import 12-4rollbacks of Approved Manufacturer
Lists 7-24rollbacks of BOMs 6-13specifying settings 4-6stored on remote share drives 3-3subclasses 7-4Transform.log file 12-17viewing 3-4
PDX web site 3-2PDX, defined 3-1performance 1-5, 2-6populating Assembly Specification
(Autopopulate.log) 12-14, 12-15, 12-19
preferences 13-1–13-21Approved Manufacturer Lists 13-15Attachment Revision Mode 13-19BOM 13-15displaying 13-1file 13-6General 13-3Icon Motif 13-3Import File Opening 13-6Length Warnings 12-8, 13-8Loading Attachments to Incorporated
Items 13-20Microsoft Excel File Defaults 13-6MultiList Delimiters 13-4Overwrite Mode 13-4Pause After Each Assembly for BOM
Import 13-15Preliminary AML Import Mode 13-15Preliminary BOM Import Mode 13-16Quantity Mismatch Warning 13-9Reference Designator Defaults 13-16saving 13-2
Index-8 User Guide
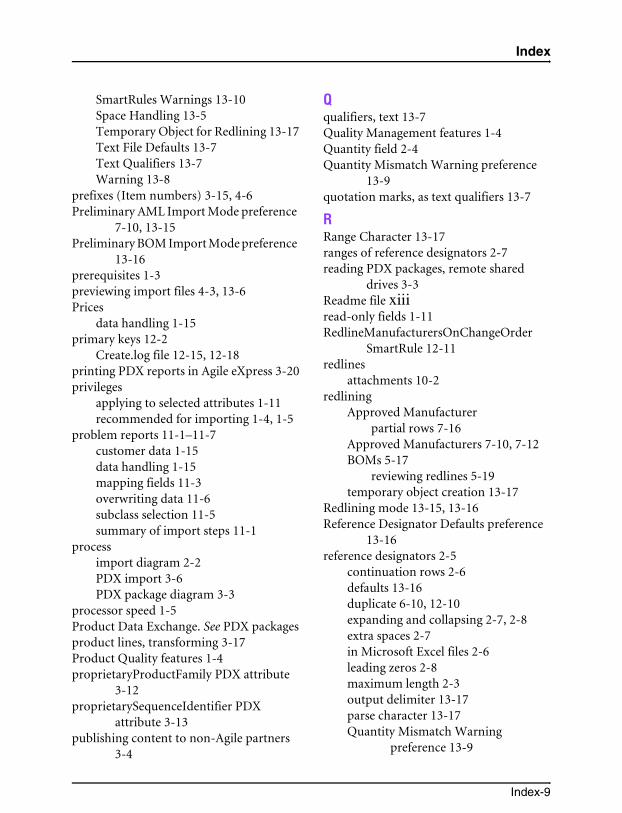
Index
SmartRules Warnings 13-10Space Handling 13-5Temporary Object for Redlining 13-17Text File Defaults 13-7Text Qualifiers 13-7Warning 13-8
prefixes (Item numbers) 3-15, 4-6Preliminary AML Import Mode preference
7-10, 13-15Preliminary BOM Import Mode preference
13-16prerequisites 1-3previewing import files 4-3, 13-6Prices
data handling 1-15primary keys 12-2
Create.log file 12-15, 12-18printing PDX reports in Agile eXpress 3-20privileges
applying to selected attributes 1-11recommended for importing 1-4, 1-5
problem reports 11-1–11-7customer data 1-15data handling 1-15mapping fields 11-3overwriting data 11-6subclass selection 11-5summary of import steps 11-1
processimport diagram 2-2PDX import 3-6PDX package diagram 3-3
processor speed 1-5Product Data Exchange. See PDX packagesproduct lines, transforming 3-17Product Quality features 1-4proprietaryProductFamily PDX attribute
3-12proprietarySequenceIdentifier PDX
attribute 3-13publishing content to non-Agile partners
3-4
Qqualifiers, text 13-7Quality Management features 1-4Quantity field 2-4Quantity Mismatch Warning preference
13-9quotation marks, as text qualifiers 13-7
RRange Character 13-17ranges of reference designators 2-7reading PDX packages, remote shared
drives 3-3Readme file xiiiread-only fields 1-11RedlineManufacturersOnChangeOrder
SmartRule 12-11redlines
attachments 10-2redlining
Approved Manufacturerpartial rows 7-16
Approved Manufacturers 7-10, 7-12BOMs 5-17
reviewing redlines 5-19temporary object creation 13-17
Redlining mode 13-15, 13-16Reference Designator Defaults preference
13-16reference designators 2-5
continuation rows 2-6defaults 13-16duplicate 6-10, 12-10expanding and collapsing 2-7, 2-8extra spaces 2-7in Microsoft Excel files 2-6leading zeros 2-8maximum length 2-3output delimiter 13-17parse character 13-17Quantity Mismatch Warning
preference 13-9
Index-9

Agile Import 2006
range character 13-17ranges 2-7setting defaults 6-2validation 2-8
referenceDesignatorName PDX attribute 3-13
reformatting files 2-13regionName PDX attribute 3-12reimporting 2-14reinitializing an import file 2-14rejected PDX packages 12-4release notes xiiiremoving field mappings 4-11replacing a BOM 5-3replacing Approved Manufacturer Lists
7-12reports (PDX), printing 3-20required fields 2-9Rev column, selecting revisions to attach to
10-4Review Redlines button 5-20, 6-12reviewing BOM redlines 5-19revisionIdentifier PDX attribute 3-12revisions
importing different BOMs 13-15rolling 7-9selecting for attachments 10-4, 13-19
roadmap, documentation xiiiroles, recommended for importing 1-6rollbacks
Approved Manufacturer Lists 7-24, 12-20, 13-13
BOMs 5-20, 6-13, 12-20, 13-11
SSamples folder 3-9scheduling import sessions 1-5size (Agile.size PDX attribute) 3-12SmartRules validation 12-8SmartRules warnings 6-10SmartRules Warnings preference 13-10spaces
Allow Spaces validation 12-3, 12-5handling 13-5in reference designators 2-7
spreadsheet files 2-2starting Agile Import 1-12structuring data for import 2-3subclass selection
problem reports 11-5subclasses 2-10, 7-4
assigning 4-14, 7-7, 8-5, 9-5mapping 2-11, 4-11selecting 2-12
substitution table. See transformation tableSuppliers
data handling 1-14support xiiisystem requirements. See the Installation
and Maintenance Guide
Ttab characters 13-5telephoneNumber PDX attribute 3-12Temporary Object for Redlining
preference 13-17temporary objects 1-10, 13-17
deleting 13-18Text File Defaults preference 13-7text files 2-1, 2-3
delimiters 13-7importing BOMs 5-1–5-21sample importable file 2-5setting defaults 13-7
text files, specifying settings 4-4text qualifiers 2-4Text Qualifiers preference 13-7time validation 12-5Time Zone Designator (TZD) 3-6Time Zone Selection dialog box 3-6training classes xivTransform.log file 3-21, 12-14, 12-15,
12-17transformation table 3-8, 4-6
Index-10 User Guide

Index
blanking out field values 3-17PDX attributes 3-11PDX objects 3-11required column names 3-10sample files 3-9selecting 3-21setting default values 3-18supported file formats 3-9Transform.log file 12-14, 12-17transformation order 3-14transforming categories 3-15transforming item numbers 3-14transforming Manufacturer Names
3-16transforming product lines 3-17
troubleshootingAgile Import prerequisites 1-3AMLs 7-24attachments import 10-9BOMs 6-13log files 12-13–12-21opening Excel files 1-13PDX packages 12-17
truncating 12-8.txt files 2-1type of import, selecting 4-2TZD (Time Zone Designator) 3-6
Uunattended import sessions 1-5universalResource Identifier PDX attribute
(Attachment) 3-13universalResourceIdentifier PDX attribute
(Contact) 3-12uppercase (case validation) 12-3, 12-5username 1-12
Vvalidations 12-1–12-21
Allow Spaces 12-3, 12-5Approved Manufacturers 12-12BOMs 12-11case 12-3, 12-5
data, fields 12-4date and time 12-5format 12-3, 12-7length 12-3, 12-7List and MultiList 12-8log files 12-13–12-21new objects 12-2reference designators 2-8rejected PDX packages 12-4SmartRules 12-8troubleshooting 12-13–12-21
viewing file to import 13-6viewing PDX packages 3-4visible fields 1-4
Wwarnings 1-5
handling SmartRules 12-11Length Warnings preference 13-8preferences 13-8Quantity Mismatch Warning
preference 13-9SmartRules Warnings preference
13-10Web browser 1-4Web client See Agile Web clientWelcome dialog box 1-12worksheets 4-3, 7-3, 8-2, 9-2
X.xls files 2-1XML 3-1
parsing 3-19
Zzeros, leading 2-8
Index-11

Agile Import 2006
Index-12 User Guide