advisortrac 4.0 user guide - introduction to...
TRANSCRIPT
AdvisorTrac 4.0
User Guide
Lansing Community College Last Revised: March 2011

AdvisorTrac 4.0 | Page 1
1. GETTING STARTED 2
1.1. LOGGING ON 2
1.2. SETTING PREFERENCES 2
1.3. REVIEW OF MAIN MENU ITEMS 3
1.4. ADVISORTRAC MAIN MENU 4
2. SETTING CONSULTANT AVAILABILITIES 4
2.1. CREATING AVAILABILITIES 4
2.2. EDITING AVAILABILITIES 6
BLOCKING AVAILABILITIES 7
2.3. DELETING AVAILABILITIES 8
3. STUDENTS 9
3.1. SEARCHING FOR STUDENTS 9
3.2. CREATING A NEW STUDENT (FOR PROSPECTIVE STUDENTS) 10
4. APPOINTMENTS 11
4.1. CREATING APPOINTMENTS 11
4.2. APPOINTMENT ENTRY 13
5. STUDENT LOGIN & LOGOUT / VISIT RECORDS 16
5.1. LOG A STUDENT VISIT 16
5.2. TERMINATE VISIT 20
6. MANAGING RESOURCES 20
6.1. CREATING RESOURCES 21
6.2. CHECKING IN/OUT AND RESERVING RESOURCES 21
TECHNICAL SUPPORT AND ASSISTANCE 22

AdvisorTrac 4.0 | Page 2
1. GETTING STARTED
1.1 LOGGING ON
AdvisorTrac is a web-based scheduling system, which means that it will be hosted on the Web. Once the IT
Department at LCC has a live version of AdvisorTrac ready for use, they will distribute the web address.
Until then, we will be working from the test site at http://eos/
Always use your LCC Technology User ID (TUID) and password to login to AdvisorTrac. If you are unable
to login, contact your department administrator for AdvisorTrac. If you are unsure who to contact in your
department, email your AdvisorTrac instructor through Angel and he or she will send you the correct
contact.
1.2 SETTING PREFERENCES
Once you log into AdvisorTrac for the first time, you will need to set your preferences. This controls what
you see on your Main Menu. Click on the dropdown arrow by the TracMan (see below) in the Trac
Navigator. Select My Prefs.
Choose the items that you would like to have showing on your Main Menu. It is suggested that you start
with Calendar and Quick Visit; Mini Log List if you log in multiple students during the day. Save Prefs, then
go back to the TracMan dropdown menu and select Main Menu. You only have to do this the first time you
log in, but do have the option of going back and changing your preferences.
TracMan

AdvisorTrac 4.0 | Page 3
1.3 REVIEW OF MAIN MENU ITEMS
If you click on the TracMan drop down in the Trac Navigation box, you will view the following drop-down
menu:
SCHEDULE: a calendar feature for scheduled appointments with students
MY PREFS: an area to change the looks of your Main Menu items
LOG LISTING: a feature for checking students in through front desk center staff
CONFIRM BIO: an area to fix your personal information in the system
EXIT: logs you out of the AdvisorTrac system
You may have more or fewer items in your Trac Navigation menu than the ones listed above. This is based on your
permissions level, and is determined by your department administrator.
If you select the magnifying glass in the Trac Navigation, which is a search feature, you will see a drop
down menu with the following options:
STUDENTS
Search for students by clicking on Students and it will open another window of search information for you
(you can also search for students by typing in their last name or Banner ID into the Trac Navigation Bar and
pressing Enter.
VISITS
Search for student visit information.
REGISTRATIONS
The information here depends on what is gathered from LCC’s import script; may show the student’s
current courses and past courses. The checkbox shows if the student is currently enrolled in the course or
not. Terms vary from 20048 to 502 to 105 (2010Sum).
APPOINTMENTS
You can search for Available Time Slots by entering the search criteria and clicking Search. By entering a
Banner ID you can book an appointment for a student. To see the appointment just made, go to Main Menu
> Schedule.
AdvisorTrac 4.0 | Page 4
1.4 ADVISORTRAC MAIN MENU
On the Main Menu, in the Center Screen you will see the Welcome message. If you select the next tab,
Center Status, you will see the stats for each centers’ visits for the day. If you click on the next tab,
Utilization, you will see who came into the Center. The final tab, Schedule, displays a calendar. If this
feature were utilized and you had student appointments created, they would be listed in this area.
2. SETTING CONSULTANT AVAILABILITIES
2.1 CREATING AVAILABILITIES
AdvisorTrac requires that there first be an available time slot before student appointments can be made
with a consultant. So, when a consultant sets availability, he or she will create blocks of time during which
appointments may be scheduled.
To set availability, click on the TracMan icon on the upper left of the Main Menu page, and select
―Schedule‖ from the drop-down menu. This should direct you to your respective service center calendar. On
the left-hand side of the page, under the ―Personnel‖ sub-heading, select the consultant whose availability
you would like to set. The calendar will refresh and show only the weekly schedule of the consultant you
selected. To create a block of availability, click and drag your mouse over a time slot on the calendar (do
not worry about selecting the exact times you are available—you will have opportunity to edit the start and
end time in the next step).
When the Drop-In Availability window pops up, you can set your preferences for this availability time slot.

AdvisorTrac 4.0 | Page 5
Center Appears in a pull-down menu. If a consultant takes appointments in more than one
center, the center should be selected that reflects the location of this specific
availability
Subject Used exclusively to identify group appointments that are associated with a specific
subject or course (i.e. Nursing, EDP)
Location Populates with the location listed in the advisor record (if any) by default
Reason Determines the type of appointment that may be made during this duration
Max Availabilities may be created for individual students or groups of students to have an
appointment with a consultant. Set the maximum number of students that may sign
up for this time slot. AdvisorTrac will restrict the appointment beyond the max
number.
Date The date of availability. It may be changed to another date.
Start Time Enter the time that the availability will begin. To enter a time, click on the hour or
minute slot, and use the left and right keyboard arrows to move the cursor, and the
up and down arrows adjust the value. X closes the window.
Duration Number of hours the availability lasts. Multiple appointments may break up the total
duration (i.e. a five-hour duration may be filled by five one-hour appointments).
Days AdvisorTrac offers the option of setting availability that reoccurs on multiple days of
the week. To use this function, just select the days you want to reflect this block of
availability (the day highlights in green to indicate that you have selected it).
Remember when setting reoccurring availability that the ―To‖ date needs to be far
enough away to include that day.

AdvisorTrac 4.0 | Page 6
Dividing into Slots When settling a block of availability where multiple appointments should occur, divide
the block of time into slots to reflect the duration of each student appointment.
Autobook Defaults to ―None.‖ Only select another option if appointments in this availability block
should be auto-booked follow-up appointments into your future calendar.
Allow Student to This field should remain unchecked.
Book Weekly
When this form is complete, select ―Save‖ and wait for the window to refresh. You will now be able to
schedule appointments during that availability block.
Editing availabilities can be confusing and if there are appointments during the time slot, then the procedure
may become complicated. Always be careful when editing existing availabilities. The following are a few
scenarios to edit existing availabilities.
2.2 EDITING AVAILABILITIES
The following availability was set from 12:00 p.m. to 3:00 p.m. and divided into one-hour slots. Then
appointments were booked with students. Let’s now say that the consultant needs to remove the 1:00 p.m.
–2:00 p.m. time slot from their availability.
To edit availabilities, the user must have the ability to edit the schedule. To edit availability that has not
been booked by a student, first go back to the time that was set as available and modify it to exclude the
1:00 p.m. – 2:00 p.m. time slot.
In this case, our availability has appointments booked before and after the time we need to remove, so we
need to isolate the block of time we need to remove. Click on the appointment just after the block of time
we would like to remove (Joseph Yang, 2:00p). In the appointment screen, edit the start time to begin at
AdvisorTrac 4.0 | Page 7
2:00 p .m. and end at 3:00 p.m. and be sure to change the duration to one hour. Also pay attention to the
recurring options so that you are not editing future appointment availability blocks unintentionally. Click
Save to complete the changes to the availability.
Click the red X in the corner of the window to return to the Calendar. The 1:00 – 2:00 p.m. block of time has
been removed from the consultant’s schedule for this day. The existing appointments and other
availabilities have not been changed or modified.
Block the Availability
To block availabilities, access must be given to users by the administrative user account.
Click on the TracMan icon on the Main Menu to access the schedule for all of the advisors for the
day. Just like setting availability, once you have selected the consultant you wish to block time for,
click and drag your mouse on the calendar near the time you wish to block. When the Availability
window pops up, uncheck the ―is Availability?‖ option, and the window will change to ―Availability
Block.‖ First, enter the date range of the block, then enter the start and end times. Select a reason
for the block (i.e. Meeting). Click Save, and the click the red X in the upper-right corner of the screen
to return to the Schedule.

AdvisorTrac 4.0 | Page 8
2.3 DELETE AVAILABILITIES
Deleting availabilities may become necessary when making adjustments to a consultant’s schedule. Always
be careful when deleting availabilities as there is not an undo option.
If an available slot is booked with a student appointment and a consultant wishes to cancel that
appointment and delete the availability, go to the Schedule page, open the appointment, and for the Status
select ―Cancelled‖ from the pull-down menu. Add any notes pertaining to the cancellation in the ―Notes‖
section and click Save.
In most cases, the center staff will handle cancellations and consultants will just need to notify them of the
change in availability. Make sure you know and abide by your department’s procedure for cancellations.
To delete available time slots that are not booked with appointments, simply click on the X in the upper-
right side of the time slot. You will need to confirm your decision to delete this time slot. If this is part of a
recurring series, you will be prompted to either delete the single time slot, the series, or to cancel the
deletion.
AdvisorTrac 4.0 | Page 9
3. STUDENTS
3.1 SEARCHING FOR STUDENTS
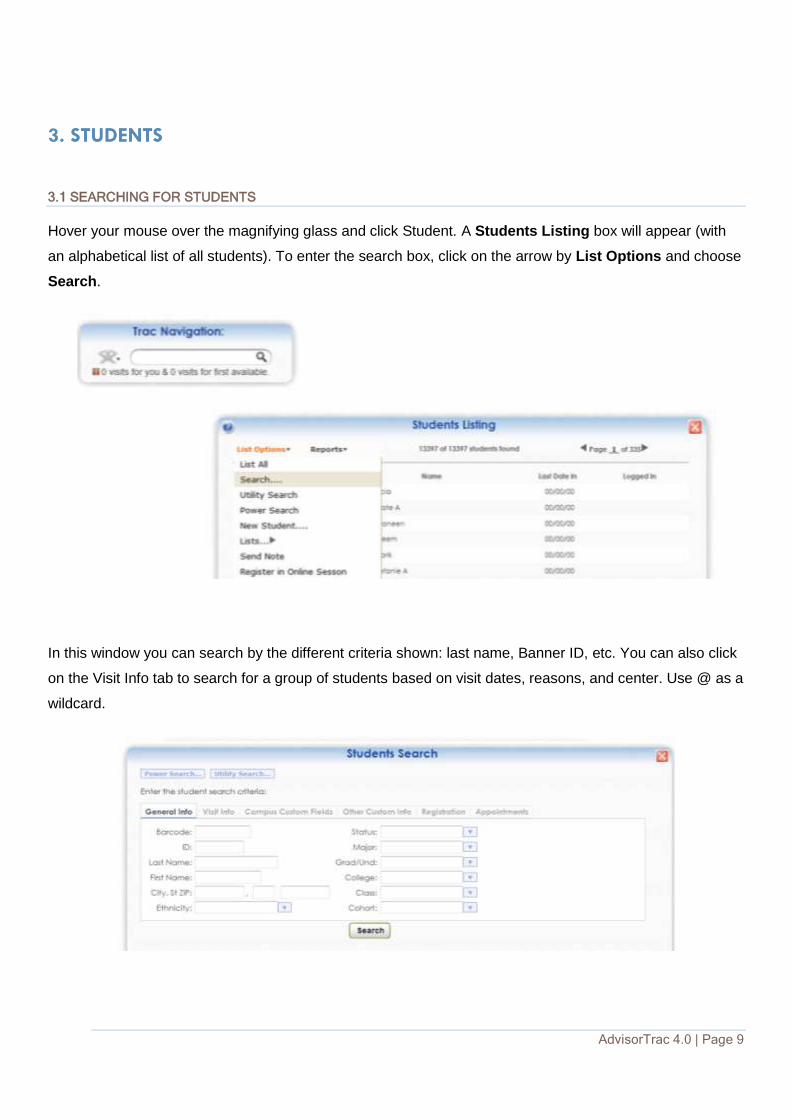
Hover your mouse over the magnifying glass and click Student. A Students Listing box will appear (with
an alphabetical list of all students). To enter the search box, click on the arrow by List Options and choose
Search.
In this window you can search by the different criteria shown: last name, Banner ID, etc. You can also click
on the Visit Info tab to search for a group of students based on visit dates, reasons, and center. Use @ as a
wildcard.

AdvisorTrac 4.0 | Page 10
Another option is to enter the student’s last name or Banner ID in the Trac Navigation.
A filtering records box will appear with the name of the students that meet your criteria. You can narrow
your search by adding the first initial (or name) of the student. You can select the name directly from this
box if it appears. Clicking on the Banner ID will take you to the student’s record.
REMEMBER: The Trac Navigation is not a tool to search the entire database. It will remember the screen
list that you most recently visited. If you type a name in it while in the Log List, it will search only the Log
List. To refresh to the student list, you can click on MAIN MENU from the TracMan, and then do the search.
When you find the correct student, click on the Banner ID link. This will take you to the Student entry screen
where you will find tabbed pages that list all of the student’s information.
3.2 CREATING A NEW STUDENT (FOR PROSPECTIVE STUDENTS)
On the main menu screen, under Log Student, type in the student’s last name and first initial and press
enter. (This will allow AdvisorTrac to search the database to make sure the student does not already have
a record.) In this box you can type the Banner Number or last name with first initial. If the individual is a
former student, you can call the Registrar’s Office to see if the student has a Banner number.
After you hit enter, AdvisorTrac will search for the student. If the student’s record does not exist, click
Create Student.
AdvisorTrac 4.0 | Page 11
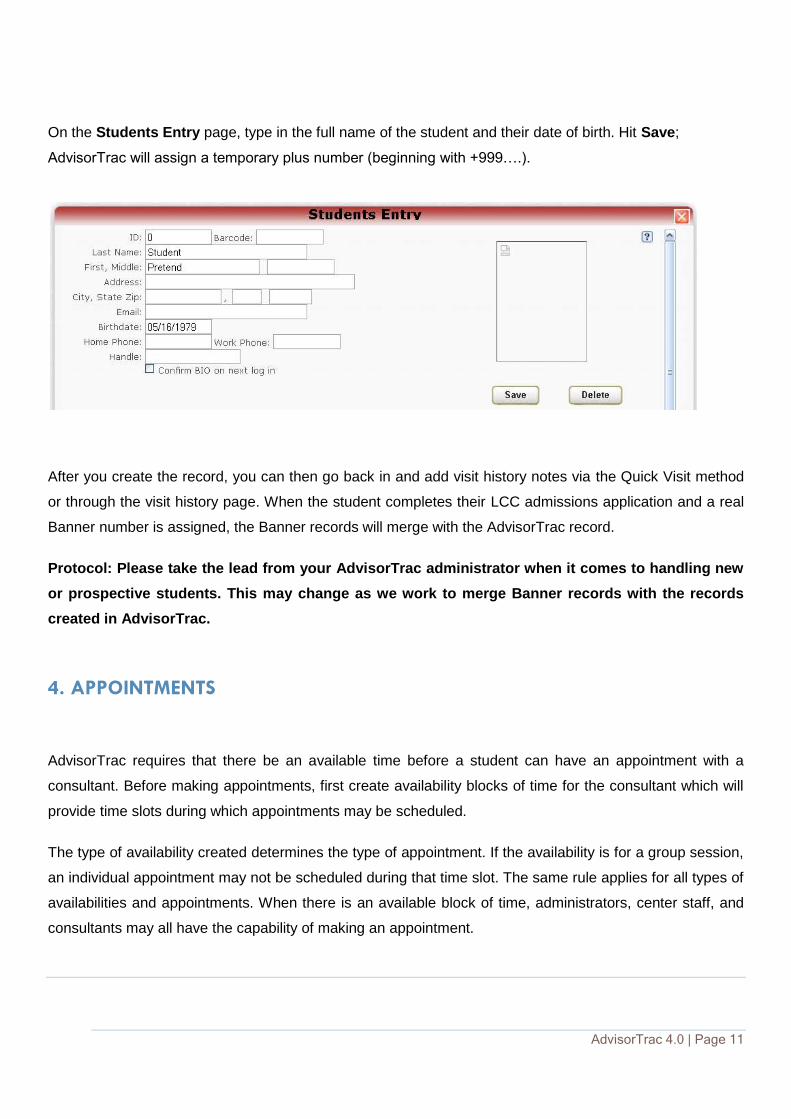
On the Students Entry page, type in the full name of the student and their date of birth. Hit Save;
AdvisorTrac will assign a temporary plus number (beginning with +999….).
After you create the record, you can then go back in and add visit history notes via the Quick Visit method
or through the visit history page. When the student completes their LCC admissions application and a real
Banner number is assigned, the Banner records will merge with the AdvisorTrac record.
Protocol: Please take the lead from your AdvisorTrac administrator when it comes to handling new
or prospective students. This may change as we work to merge Banner records with the records
created in AdvisorTrac.
4. APPOINTMENTS
AdvisorTrac requires that there be an available time before a student can have an appointment with a
consultant. Before making appointments, first create availability blocks of time for the consultant which will
provide time slots during which appointments may be scheduled.
The type of availability created determines the type of appointment. If the availability is for a group session,
an individual appointment may not be scheduled during that time slot. The same rule applies for all types of
availabilities and appointments. When there is an available block of time, administrators, center staff, and
consultants may all have the capability of making an appointment.
AdvisorTrac 4.0 | Page 12
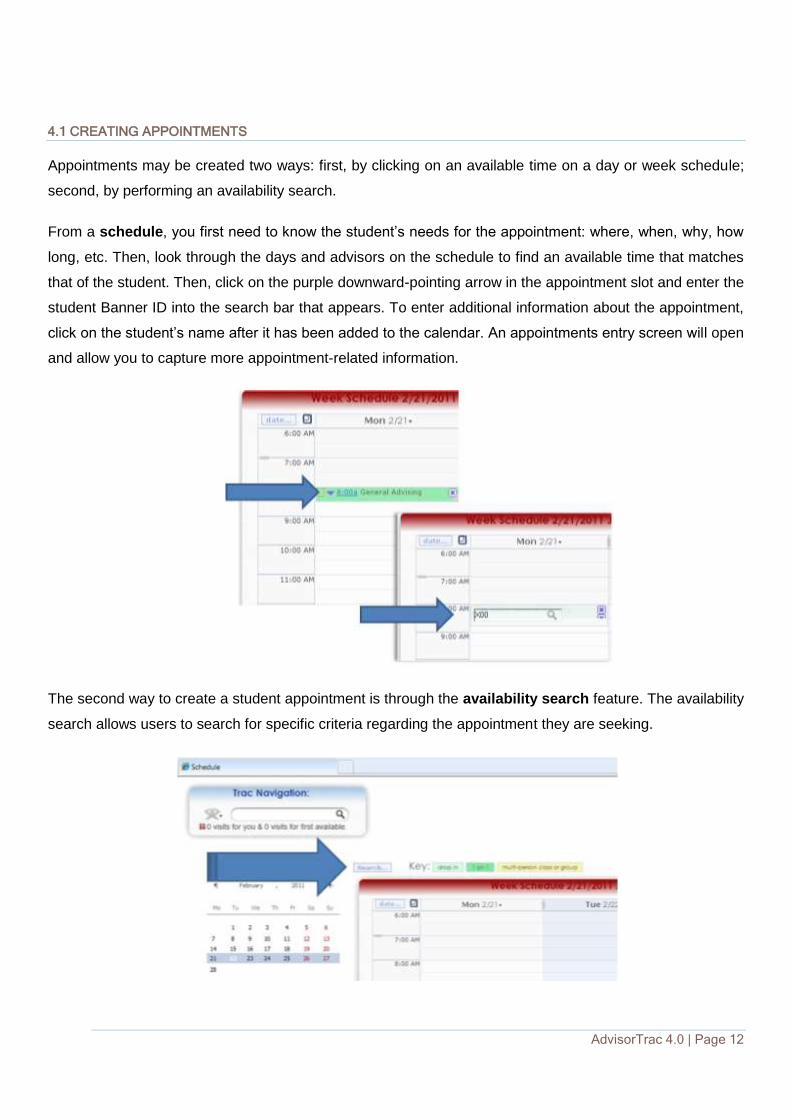
4.1 CREATING APPOINTMENTS
Appointments may be created two ways: first, by clicking on an available time on a day or week schedule;
second, by performing an availability search.
From a schedule, you first need to know the student’s needs for the appointment: where, when, why, how
long, etc. Then, look through the days and advisors on the schedule to find an available time that matches
that of the student. Then, click on the purple downward-pointing arrow in the appointment slot and enter the
student Banner ID into the search bar that appears. To enter additional information about the appointment,
click on the student’s name after it has been added to the calendar. An appointments entry screen will open
and allow you to capture more appointment-related information.
The second way to create a student appointment is through the availability search feature. The availability
search allows users to search for specific criteria regarding the appointment they are seeking.
AdvisorTrac 4.0 | Page 13
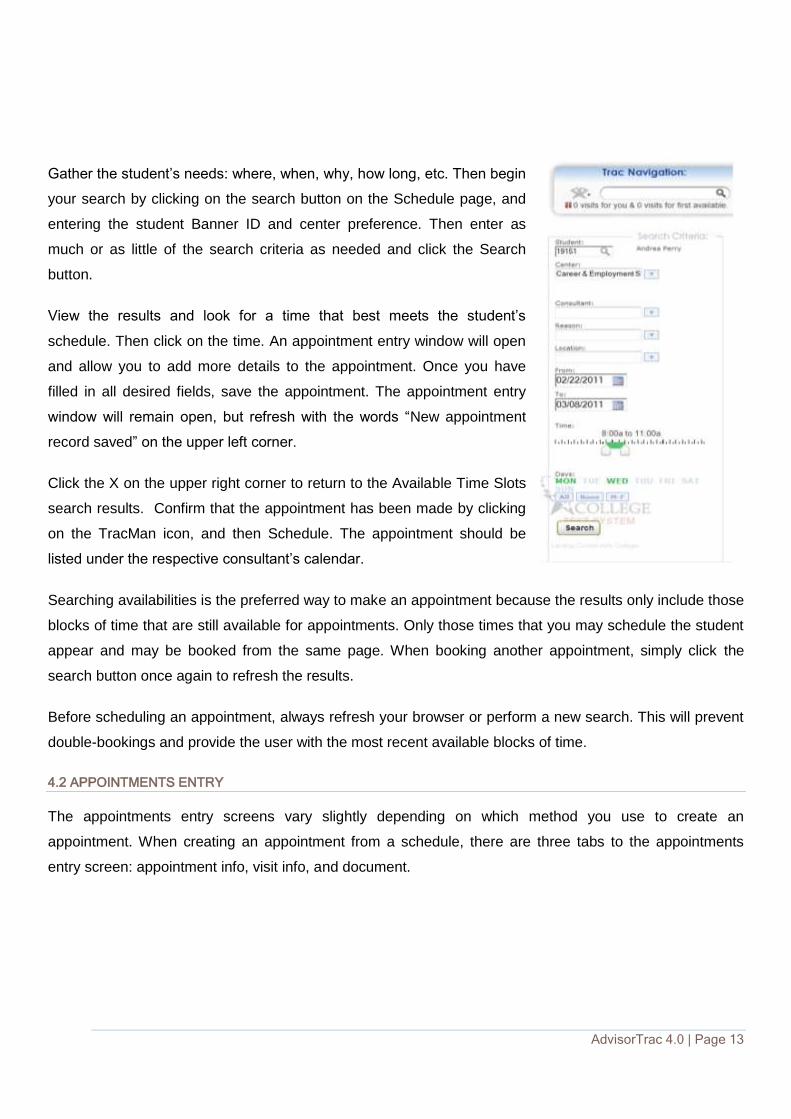
Gather the student’s needs: where, when, why, how long, etc. Then begin
your search by clicking on the search button on the Schedule page, and
entering the student Banner ID and center preference. Then enter as
much or as little of the search criteria as needed and click the Search
button.
View the results and look for a time that best meets the student’s
schedule. Then click on the time. An appointment entry window will open
and allow you to add more details to the appointment. Once you have
filled in all desired fields, save the appointment. The appointment entry
window will remain open, but refresh with the words ―New appointment
record saved‖ on the upper left corner.
Click the X on the upper right corner to return to the Available Time Slots
search results. Confirm that the appointment has been made by clicking
on the TracMan icon, and then Schedule. The appointment should be
listed under the respective consultant’s calendar.
Searching availabilities is the preferred way to make an appointment because the results only include those
blocks of time that are still available for appointments. Only those times that you may schedule the student
appear and may be booked from the same page. When booking another appointment, simply click the
search button once again to refresh the results.
Before scheduling an appointment, always refresh your browser or perform a new search. This will prevent
double-bookings and provide the user with the most recent available blocks of time.
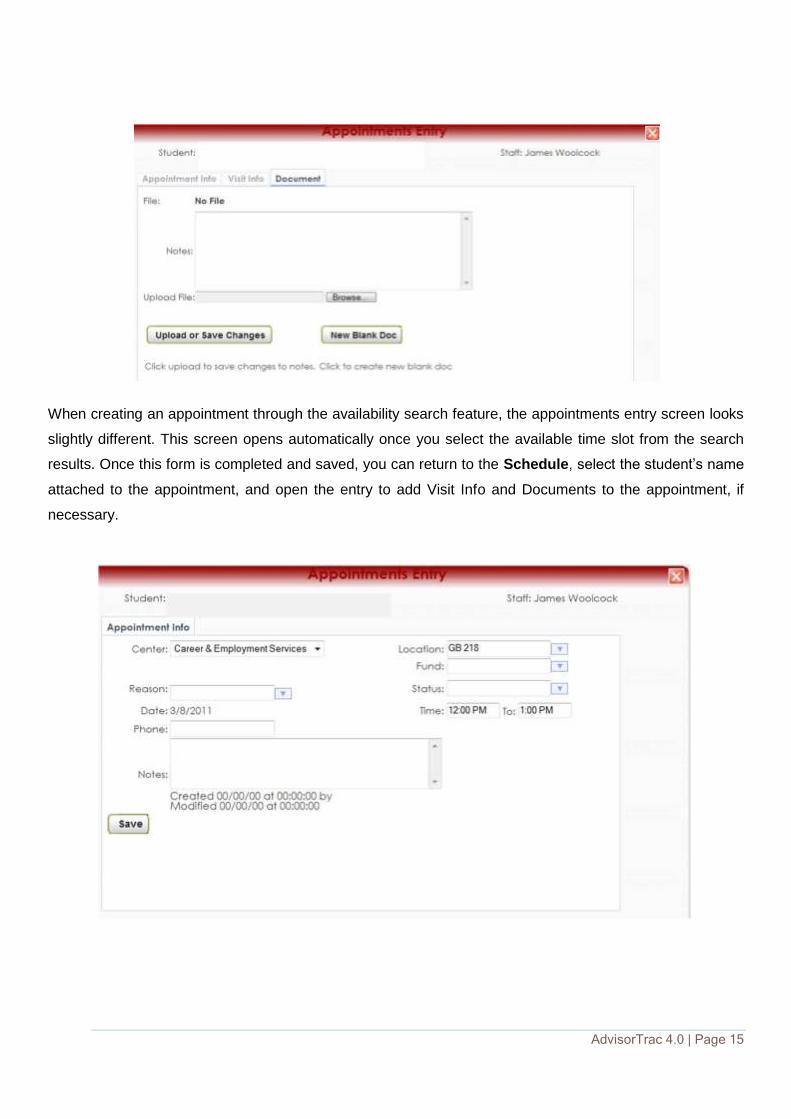
4.2 APPOINTMENTS ENTRY
The appointments entry screens vary slightly depending on which method you use to create an
appointment. When creating an appointment from a schedule, there are three tabs to the appointments
entry screen: appointment info, visit info, and document.

AdvisorTrac 4.0 | Page 14
In the Appointment Info tab, you can enter information pertinent to the appointment, including any notes.
Visit Info will record data that is gathered as students are logged in and out of a center and may include
some or all of the following fields: the date of the appointment, the check-in and check-out times, the
center, and the reason for the appointment, and any notes left by the center staff or consultant.
The Document tab allows for the uploading of documents to the appointment entry.
AdvisorTrac 4.0 | Page 15
When creating an appointment through the availability search feature, the appointments entry screen looks
slightly different. This screen opens automatically once you select the available time slot from the search
results. Once this form is completed and saved, you can return to the Schedule, select the student’s name
attached to the appointment, and open the entry to add Visit Info and Documents to the appointment, if
necessary.
AdvisorTrac 4.0 | Page 16
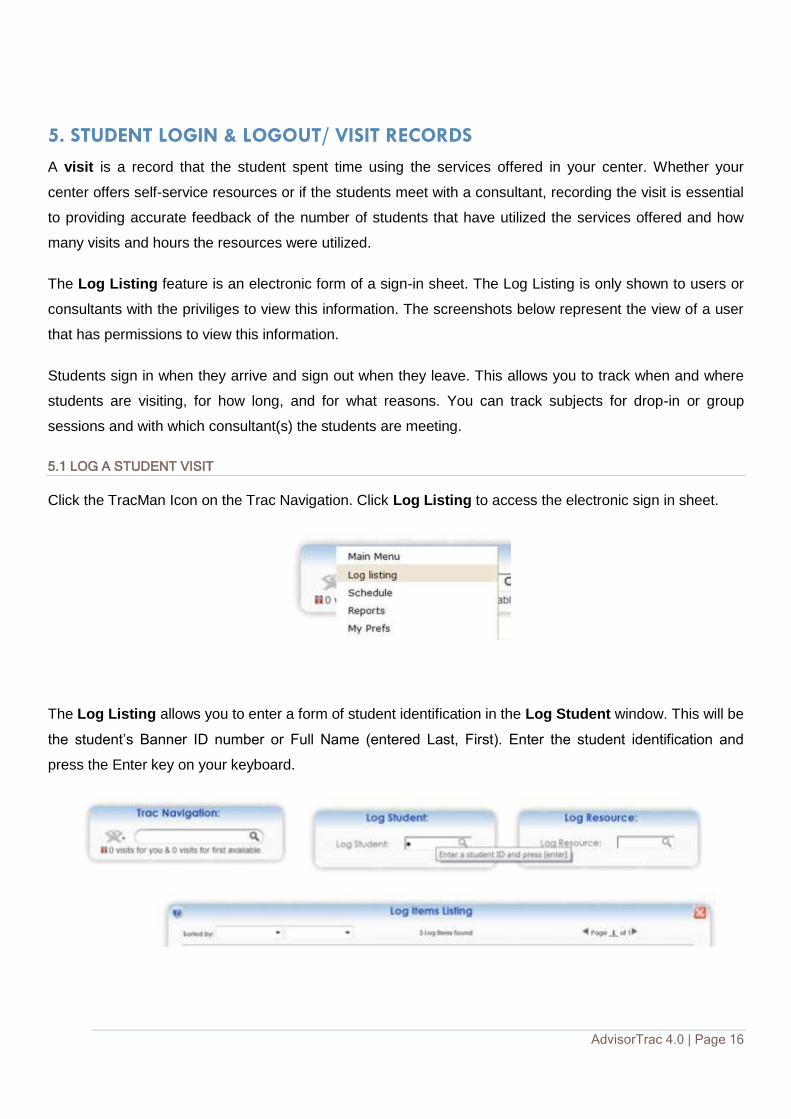
5. STUDENT LOGIN & LOGOUT/ VISIT RECORDS
A visit is a record that the student spent time using the services offered in your center. Whether your
center offers self-service resources or if the students meet with a consultant, recording the visit is essential
to providing accurate feedback of the number of students that have utilized the services offered and how
many visits and hours the resources were utilized.
The Log Listing feature is an electronic form of a sign-in sheet. The Log Listing is only shown to users or
consultants with the priviliges to view this information. The screenshots below represent the view of a user
that has permissions to view this information.
Students sign in when they arrive and sign out when they leave. This allows you to track when and where
students are visiting, for how long, and for what reasons. You can track subjects for drop-in or group
sessions and with which consultant(s) the students are meeting.
5.1 LOG A STUDENT VISIT
Click the TracMan Icon on the Trac Navigation. Click Log Listing to access the electronic sign in sheet.
The Log Listing allows you to enter a form of student identification in the Log Student window. This will be
the student’s Banner ID number or Full Name (entered Last, First). Enter the student identification and
press the Enter key on your keyboard.
AdvisorTrac 4.0 | Page 17
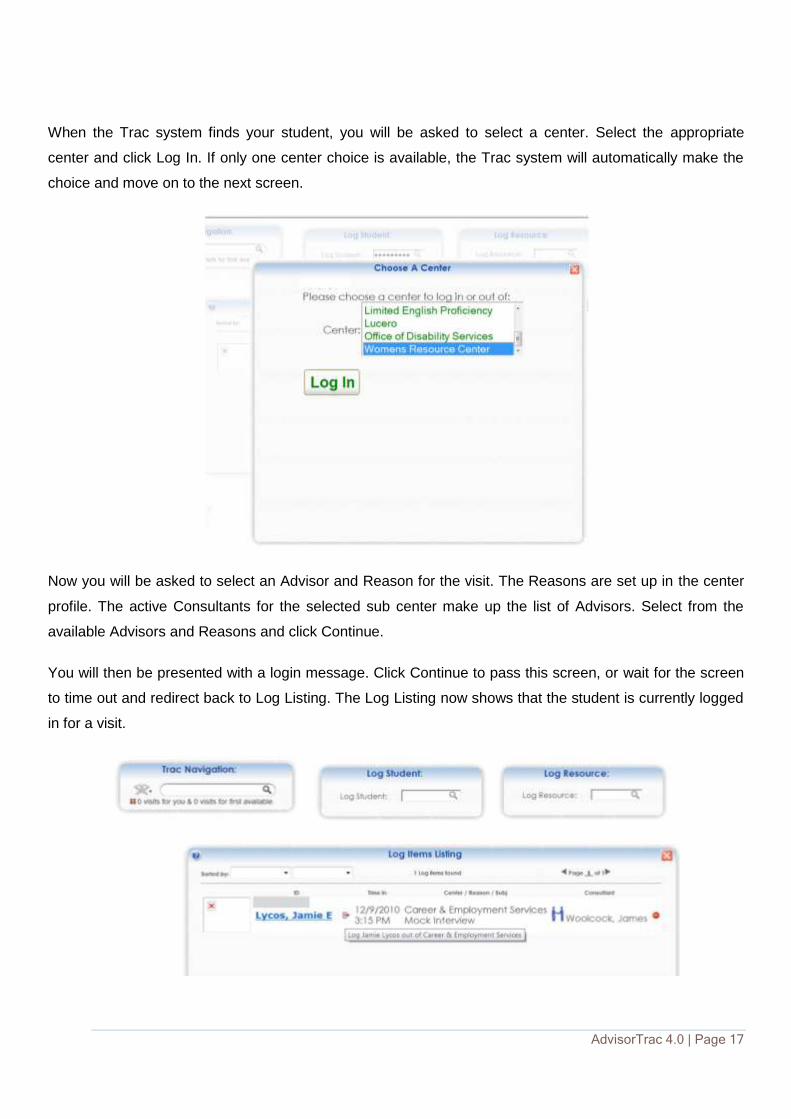
When the Trac system finds your student, you will be asked to select a center. Select the appropriate
center and click Log In. If only one center choice is available, the Trac system will automatically make the
choice and move on to the next screen.
Now you will be asked to select an Advisor and Reason for the visit. The Reasons are set up in the center
profile. The active Consultants for the selected sub center make up the list of Advisors. Select from the
available Advisors and Reasons and click Continue.
You will then be presented with a login message. Click Continue to pass this screen, or wait for the screen
to time out and redirect back to Log Listing. The Log Listing now shows that the student is currently logged
in for a visit.

AdvisorTrac 4.0 | Page 18
When students are signed in for a drop-in visit, they are added to the Log Listing as a Waiting student. The
Log Listing is also displayed to the Consultants (Advisors/Counselors) so they can see when a student has
signed in to visit with them. When an advisor is ready to work with a student, they will pick them from the
waiting list.
The previous instructions are aimed toward the center staff, but from here on it is the responsibility
of the consultant to sign the student in and out of a session. To remove the students from the waiting
list and identify them as ―being seen by‖ an advisor, click the image of the sitting student.
The consultant will then click on the image of the consultant and student shaking hands on the right side of
the Log Listing to sign the student out of the session.
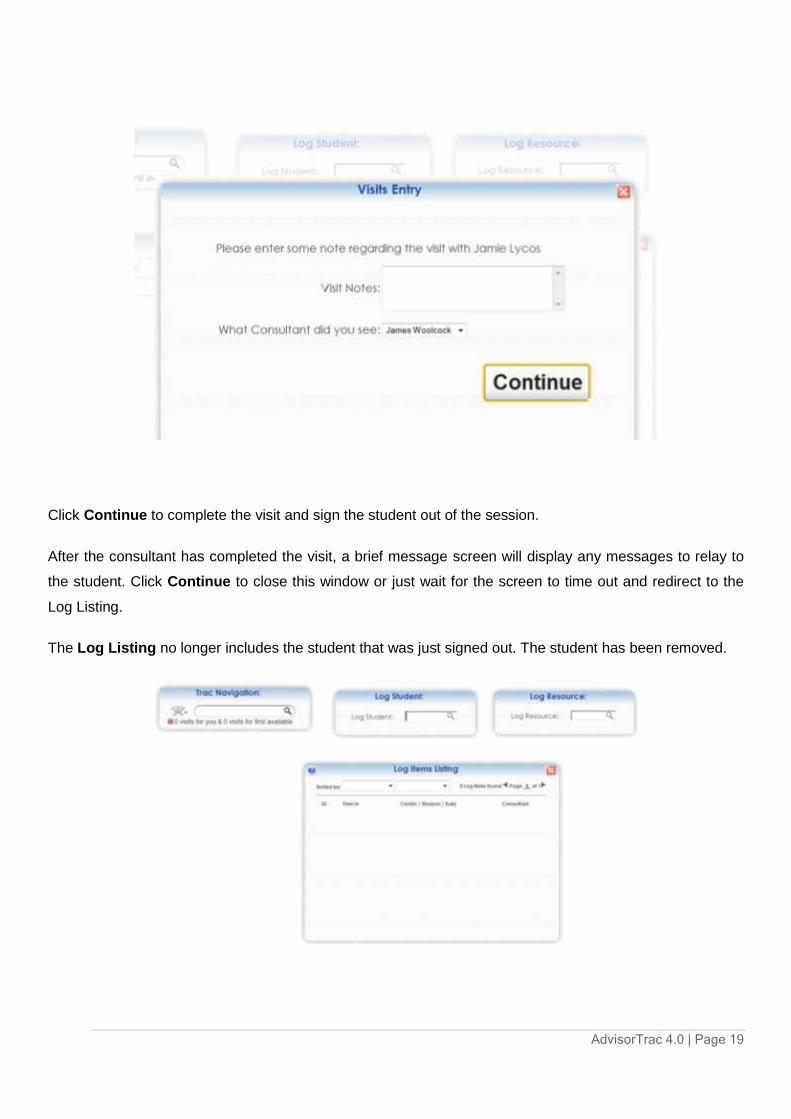
The consultants can enter their notes about the visit with the student. These notes will be stored with the
student visit history and can be referenced when working with the student.
AdvisorTrac 4.0 | Page 19
Click Continue to complete the visit and sign the student out of the session.
After the consultant has completed the visit, a brief message screen will display any messages to relay to
the student. Click Continue to close this window or just wait for the screen to time out and redirect to the
Log Listing.
The Log Listing no longer includes the student that was just signed out. The student has been removed.
AdvisorTrac 4.0 | Page 20
5.2 TERMINATE VISIT
There are times when a consultant may forget to sign students out of their sessions. To prevent the
students from receiving extra long visits, their visit can be terminated. A terminated visit simply ends the
visit with a designated amount of time. The time is set up in the Center Profile Prefs.
To terminate a visit when the student has not been signed out, click on the Terminate icon on the right side
of the Log Listing.
You are presented with a dialog box to confirm that you would like to terminate the visit. Click Terminate to
end the visit. The student’s visit is ended and the student is removed from Log Listing.
There is also a process that you can set up to run the terminate process automatically at a specific time of
day. This auto-terminate process would complete the visits for all students that are signed in, so the auto-
terminate process will typically be set to run overnight when there should be no current visits.
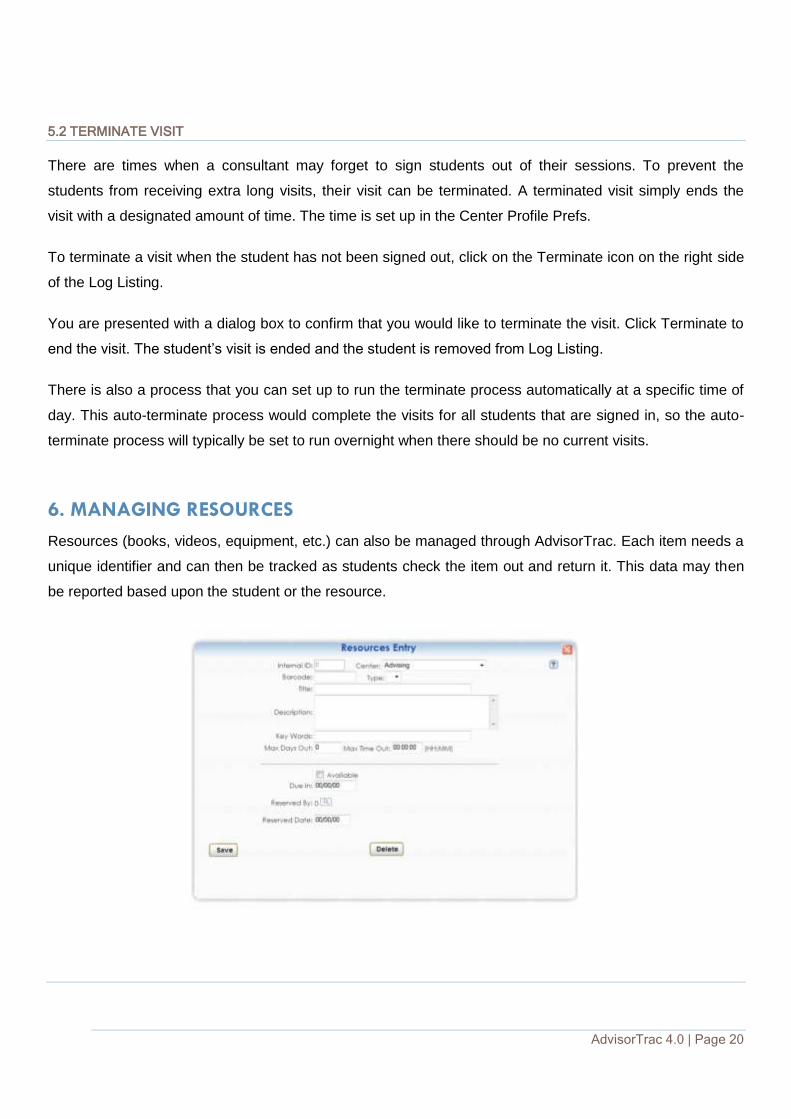
6. MANAGING RESOURCES
Resources (books, videos, equipment, etc.) can also be managed through AdvisorTrac. Each item needs a
unique identifier and can then be tracked as students check the item out and return it. This data may then
be reported based upon the student or the resource.
AdvisorTrac 4.0 | Page 21
6.1 CREATING RESOURCES
Only administrators can create resources. Before creating a new resource record, first check to see if the
record has already been created to avoid duplicate records. To create a new resource record: From the
Main Menu, select Resources. When the Resource Listing screen opens, click on the ―List Options‖ link
and select New Resource…. Fill in the information, and Save.
Return for the Resource Listing page and search for the resource by title and barcode to make sure that it
saved correctly, and that you have not created a duplicate.
6.2 CHECKING IN/OUT AND RESERVING RESOURCES
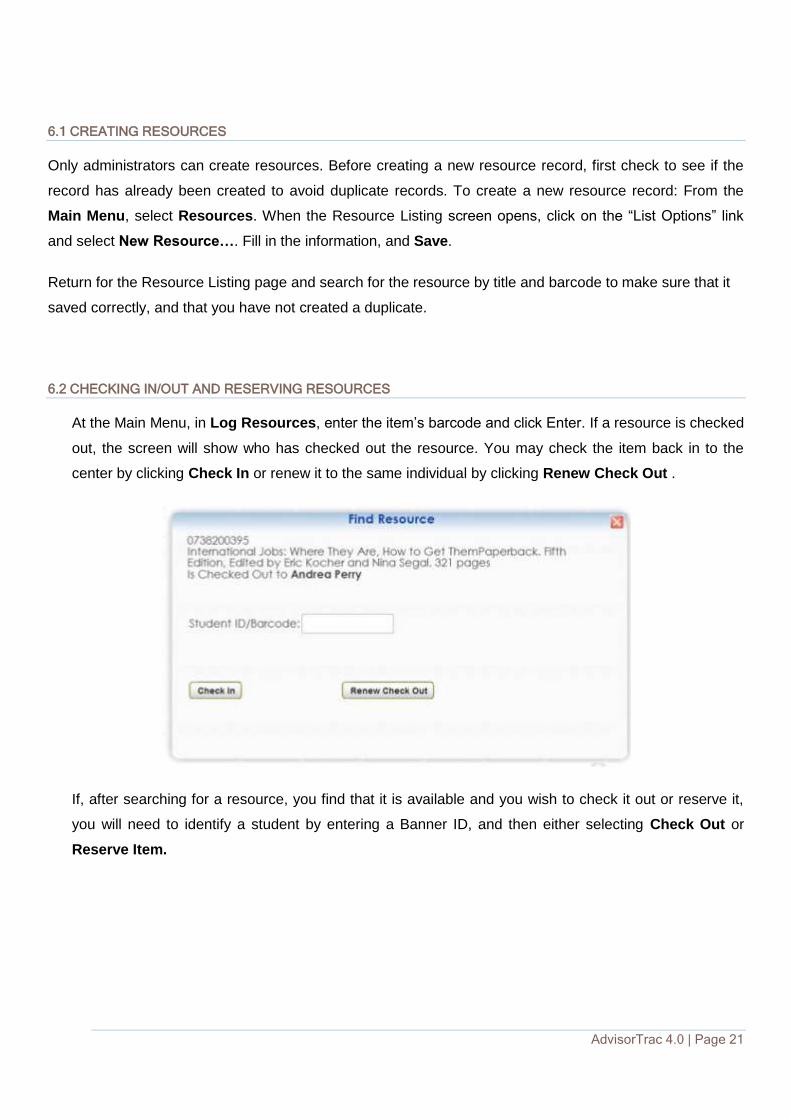
At the Main Menu, in Log Resources, enter the item’s barcode and click Enter. If a resource is checked
out, the screen will show who has checked out the resource. You may check the item back in to the
center by clicking Check In or renew it to the same individual by clicking Renew Check Out .
If, after searching for a resource, you find that it is available and you wish to check it out or reserve it,
you will need to identify a student by entering a Banner ID, and then either selecting Check Out or
Reserve Item.

AdvisorTrac 4.0 | Page 22
After checking out or reserving the resource, a confirmation screen will appear identifying the resource, the
student, and the return date.
TECHNICAL SUPPORT AND ASSISTANCE
In order to receive the quickest possible assistance, please follow these guidelines for help with your
AdvisorTrac system.
1. Consult this User Guide. These pages can answer most of the basic set up and application
questions.
2. Consult the Redrock Wiki or the Wimba discussion forum on the Intro to AdvisorTrac course under
the Communication tab. Available at http://wiki.go-redrock.com, the Redrock Wiki site provides
information for AdvisorTrac.
3. Contact the AdvisorTrac administrator in your department (LCC implementation team members are
listed on the Angel course under Home > Course > Lessons > Orientation: Begin Here > Introducing
LCC’s AdvisorTrac Implementation Team.
4. If the AdvisorTrac administrator needs assistance, they should contact Technical Support at
Redrock Software, email at [email protected].