advanced webmapping with svg
DESCRIPTION
SVG Open 2003 – WorkshopAdvanced webmapping with SVGGeorg Held, Olaf Schnabel , Andreas Neumann 14th July 2003G. Held, O. Schnabel, A. NeumannWorkshop "Advanced Webmapping with SVG"2003____________________________________________________________________________________________________Content1 PREFACE..................................................................................................................... 3 1.1 1.2 2 2.1 2.2 INTRODUCTION .................................TRANSCRIPT
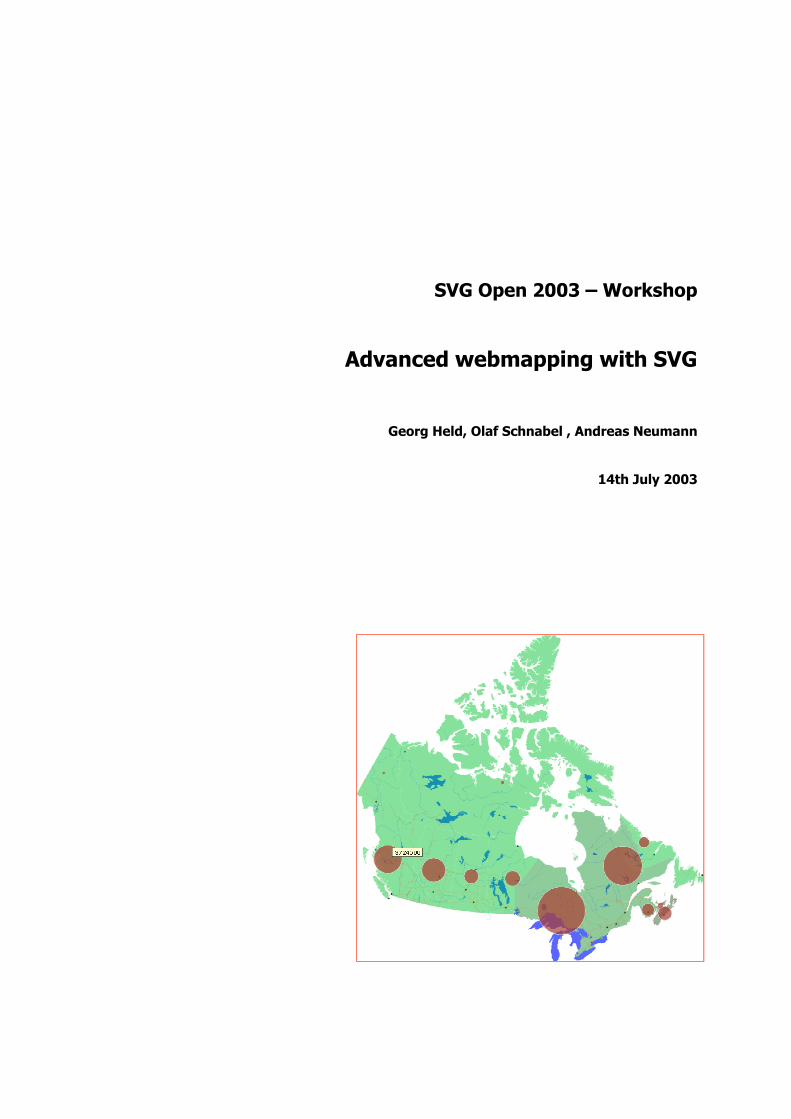
SVG Open 2003 – Workshop
Advanced webmapping with SVG
Georg Held, Olaf Schnabel , Andreas Neumann
14th July 2003

G. Held, O. Schnabel, A. Neumann Workshop "Advanced Webmapping with SVG" 2003
____________________________________________________________________________________________________
____________________________________________________________________________________________________
- 2 -
Content
1 PREFACE..................................................................................................................... 3
1.1 INTRODUCTION.............................................................................................................31.2 A BRIEF SUMMARY OF REQUIRED KNOWLEDGE ........................................................................3
2 ADVANCED CLIENTSIDE TECHNIQUES ...................................................................... 5
2.1 LAYER CONTROL............................................................................................................5Exercise 01 ......................................................................................................................5
2.2 MAP NAVIGATION ..........................................................................................................62.2.1 Panning..............................................................................................................6Exercise 02 ......................................................................................................................72.2.2 Zooming.............................................................................................................8Exercise 03 ......................................................................................................................9
2.3 INTERACTIVE OVERVIEW MAP ............................................................................................9Exercise 04 ....................................................................................................................10
3 CONCEPTS OF SERVING MAPS WITH PHP............................................................... 11
3.1 INTRODUCTION TO PHP ................................................................................................113.1.1 What is PHP? ....................................................................................................113.1.2 Why is it so useful/popular? ...............................................................................113.1.3 How does PHP work?.........................................................................................113.1.4 Basics...............................................................................................................11
3.2 ADVANCED PHP..........................................................................................................153.2.1 Work with arrays ...............................................................................................153.2.2 Work with HTML forms and PHP .........................................................................173.2.3 SVG creation with PHP .......................................................................................17Exercise 05 ....................................................................................................................18
4 CLIENT-SERVER COMMUNICATION......................................................................... 19
4.1 GETTING DATA ON THE CLIENT ........................................................................................194.1.1 Request from SVG Client ....................................................................................194.1.2 Response to SVG Client......................................................................................20Exercise 06 ....................................................................................................................20
4.2 GETTING DATA ON THE SERVER........................................................................................224.2.1 Files .................................................................................................................224.2.2 Databases.........................................................................................................23Exercise 07 ....................................................................................................................25
5 DYNAMIC MAP CREATION WITH PHP AND MYSQL ................................................. 26
5.1 LOADING ADDITIONAL DATA AND CREATION OF THEMATIC LAYERS..............................................265.1.1 Parameter transfer ............................................................................................265.1.2 Dynamic creation of a choropleth layer (Exercise 08)............................................265.1.3 Dynamic creation of a new layer with circles (Exercise 09) ....................................27
6 LINKS ....................................................................................................................... 29

G. Held, O. Schnabel, A. Neumann Workshop "Advanced Webmapping with SVG" 2003
____________________________________________________________________________________________________
____________________________________________________________________________________________________
- 3 -
1 Preface
1.1 Introduction
Who we are?Originally, we were students of Cartography/Geography. As time and particularly technologypassed, we specialized on webmapping.We are Georg Held (freelancer, <[email protected]>), Olaf Schnabel and Andreas Neumann (bothInstitute of Cartography, ETH Zurich, <[schnabel, neumann]@karto.baug.ethz.ch>).
What we will do today?The intention of this course is to deepen everyone's knowledge of developing SVG content. Basedon your background of creating maps with SVG, we will present you a number of techniques whichare necessary to develop webmapping environments. In order to achieve that goal, each courseparticipant will create a highly interactive map. In addition, the application will be integrated into aweb server environment (Apache and PHP) with the connection to a database (MySQL). Weprepared a couple of exercises, that will be alternated by short theory sessions. All practical partsare done with a text editor.So, we don't want to waste time, let's start immediately!
1.2 A brief summary of required knowledge
First of all, some terms and issues you should be aware of. In order to generate proper code, weshould follow standards e.g. ECMA262 as good as possible. Using proprietary methods like plug-inspecific ones are not best style.Nevertheless the exercises are based on the Adobe SVG Viewer 3 (ASV3), which is currently themost advanced SVG viewer. We were forced to use ASV3, because of implementation problems orlimitations within other viewers. For further information we put together a list of links at the end ofthis paper.In order to give you an idea about the concepts used within our exercises, we put together someimportant notes:Based on one single SVG file (map.svg), the map will be extended with functionality time by time.First of all, you should be aware of the DOM of this file and how the GUI will look like:
G. Held, O. Schnabel, A. Neumann Workshop "Advanced Webmapping with SVG" 2003
____________________________________________________________________________________________________
____________________________________________________________________________________________________
- 4 -
During the next step we change the ASV 3 context menu by doing the following steps:- Add the new menu as a child of the <defs> element
<menu id="myCustomMenu"><header>Custom Menu</header><item action="Find">&Find...</item><item action="FindAgain">Find &Again</item><separator/><item action="CopySVG">&Copy SVG</item><item action="ViewSource">View Sourc&e...</item><item action="SaveSnapshotAs">Sa&ve Current State...</item><separator/><item action="Help">&Help...</item><item action="About">About SVG Viewer...</item>
</menu>
- Parse the new context menu and replace the old with the new. This is done by adding thefollowing lines of code as globals (see globals.js):var newMenuRoot = parseXML(
printNode(document.getElementById("myCustomMenu") ), contextMenu );contextMenu.replaceChild( newMenuRoot, contextMenu.firstChild );
The new menu enables debugging especially with the item SaveSnapshotAs. Using this action, thecurrent state of the SVGDom can be saved. This means, that errors within JavaScript and PHP canbe better located. For additional information about customizing the context menu, see the SVGWiki (http://www.svg.org/wiki/ow.asp?CustomizingContextMenu).In order to separate the different JavaScript Routines, each exercise is created within oneJavaScript file. First, we provide you with globals.js. It includes the necessary global variables likethe SVGDoc and operations for modifying the context menu.For a first exercise open map.svg with the text editor and find the prepared <g> element whichcontains title and subtitle. Add the author name and save the file.
G. Held, O. Schnabel, A. Neumann Workshop "Advanced Webmapping with SVG" 2003
____________________________________________________________________________________________________
____________________________________________________________________________________________________
- 5 -
2 Advanced clientside techniques
2.1 Layer control
In order to manipulate the base map, a layer control is necessary. This simple interactive controlmakes it possible to turn layers on and off; this means, to show or hide them.The concept of map layers is realized by using a container element like <g>. In order to show/hideelements, SVG offers two attributes, visibility and display. Due to the specification, theseattributes are different in the following ways:display:none is not rendered directly whereas visibility:hidden is. This means that using thedisplay attribute saves performance and is suitable in our case. However, there are restrictionswith the use of display, which are mainly affecting boundingBox calculations and receiving events.By default, the attribute display is set to "inline". Because of that, the layer is visible. To turn alayer off it has to be changed to none. Within our sample map, the following layers are reasonable:
- Provinces- Water (Rivers and Lakes)- Roads- Cities
To turn them on/off simple checkboxes are used.
Exercise 01Create a short JavaScript function, which is adding functionality to the prepared checkBox SVGimplementation, using the display attribute to show/hide the map layers. To store the function,create a separate file called layerControl.js and reference it within your SVG.
Some additional details about the checkbox implementation:The checkbox is created by instantiating a pattern to highlight the box. This can be done by usingthe fill attribute on a rectangle.
<rect ... fill="url(#checkBoxFill)"/>
In order to use an "onclick" event, the attribute onclick and its value have to be added to therectangle:
<rect ... onclick="mapLayerControl(evt,'Provinces')"/>
By clicking on the rectangle, the function mapLayerControl() is called. Two parameters are passed.First evt, which is nothing else than a plug-in specific event object. Among others, it can be usedto access the element which triggered the event, the "target"-node. Second, the correspondinglayer has to be specified. For that purpose, the layer name has to be passed. The name must beequal to the corresponding layer-ID within the SVGMap element, e.g. "map_Provinces".
Some extra hints for developing proper JavaScript:
As described before, the target which triggered the event has to be accessed. This can be done byusing the DOM2 target property.In order to know whether a box is checked or not, a simple if statement can be used. It shouldcheck if the rectangle is filled by the pattern or stays white.
G. Held, O. Schnabel, A. Neumann Workshop "Advanced Webmapping with SVG" 2003
____________________________________________________________________________________________________
____________________________________________________________________________________________________
- 6 -
A function containing the if statement could look like this sample code:function mapLayerControl(evt,layer){
var checkBox = evt.target;var checkBoxFill = checkBox.getAttribute("fill");var SVGLayer = SVGDoc.getElementById("map_"+layer);if (checkBoxFill == "url(#checkBoxFill)"){
// turn checkbox off by setting attribute fill to white// hide layer by setting attribute display to "none"
}else{
// highlight checkbox by referencing to pattern// make layer visible by setting display to "initial"
}}
To get the content of an element’s attribute, you can use the getAttribute() method.To access a certain map layer, the second parameter which is passed to the function, is the key.Its name is layer and can be used within this function like a variable. To access an element, DOM2offers the getElementById() method. setAttribute() provides a possibility to set a node’sAttribute. This is necessary e.g. for changing the display or fill attribute. This line is setting thefill Attribute to a pattern called "checkBoxFill":
... .setAttribute("fill","url(#checkBoxFill)");
2.2 Map navigation
Due to the restrictions of small screens, map navigation is one of the most important functionalityof a web - respectively screen map. Navigation covers mainly zoom and pan. This session will giveyou an idea, how a navigation concept can be realized.As the term "Scalable Vector Graphics" reveals, SVG is "pan and zoomable". You are probablyaware of the possibilities the Adobe SVG Viewer is providing for navigation (e.g. key-shortcuts orcontext menu). In addition ASV has some specific properties, which can be used within JavaScriptto add navigation functionality to SVG. Especially properties like currentScale or currentTranslateare offering values which are making programming live much more easier. Although these arereally handy in some cases, we have chosen a different approach.With our approach (nested <svg> in <svg>), only the map should be scalable; the GUI must stayimmune to zoom and pan. Therefore, the default zoomAndPan functionality of the Plug-In has tobe replaced by own concepts of map navigation. This can be done by setting zoomAndPan todisable. To add such a navigation concept, one has to use more-or-less complicated scripting. Asyou probably know, SVG offers a possibility to change the view of a figure – the viewBox attribute.Our approach to map navigation makes use of this method.
2.2.1 PanningIn order to scroll through a map, panning is very helpful. Usually, panning functionality is added bydefining buttons or pan controls beside the map. The direction is defined in intuitive ways. Forexample, a pan control on top of a map is used for scrolling the map. To save space on the screen,these pan controls are usually hidden. As soon as the mouse pointer is over the sensitive area of apan control, it will appear and is clickable for pan.

G. Held, O. Schnabel, A. Neumann Workshop "Advanced Webmapping with SVG" 2003
____________________________________________________________________________________________________
____________________________________________________________________________________________________
- 7 -
To add pan functionality to our sample map, we mainly have to do some viewBox calculation. It isnecessary to have some background on this rather complicated attribute. In this figure you see thescreen coordinate system and a rectangle symbolizing a possible viewBox setting.
The viewBox attribute is containing four values which are separatedby whitespaces or commas:
”-x –y width height”
In order to pan a map, the values for width and height are constant- x and y are the variables. If one wants to move a map to the right,the pan control at the left has to be clicked. For such a pan event
the viewBox has to be moved to the left. So, the x value has to decrease by a certain value.For additional information about the viewBox attribute, see the SVG Specifiaction(http://www.w3.org/TR/SVG11/coords.html#ViewBoxAttribute) or Peter Schonefeld’s tutorial(http://www.digitalcraft.com.au/svg/tutorials/viewingSVG.asp).
Exercise 02Add the prepared pan controls (panel.xml) to your SVG document. First, develop a short JavaScriptfunction (mouseOverPanel()) which is achieving the mouseover effect of the pan control. In order toreduce code, make use of the evt parameter and its properties type and target. To catch whattype of event was triggered, create an if statement like below:if (evt.type == "mouseover"){
// show pan control by using the opacity attribute}if (evt.type == "mouseout"){
// hide pan control by using the opacity attribute}
Second, create a JavaScript function within this file called pan() to add pan functionality. Theexample contains eight pan controls which are achieving different movements:
Location and ID of the Pan controls Calculation
Top x: constanty: viewBoxOldY - panFactor
TopRight x: viewBoxOldX + panFactory: viewBoxOldY - panFactor
Right x: viewBoxOldX + panFactory: constant
BottomRight x: viewBoxOldX + panFactory: viewBoxOldY + panFactor
Bottom x: constanty: viewBoxOldY + panFactor
BottomLeft x: viewBoxOldX - panFactory: viewBoxOldY + panFactor
Left x: viewBoxOldX - panFactory: constant
TopLeft x: viewBoxOldX - panFactory: viewBoxOldY - panFactor
The id attribute of the SVG pan control groups contain information which movement is achieved byclicking on this specific pan control. To switch between these cases, use the switch statement.

G. Held, O. Schnabel, A. Neumann Workshop "Advanced Webmapping with SVG" 2003
____________________________________________________________________________________________________
____________________________________________________________________________________________________
- 8 -
var panType = evt.target.getAttribute("id");switch(panType){
case "Top":{
//break;
}case "TopRight":{..}......default: alert("panType not available!")break;
}
To calculate the new viewBox you have to know the old values. To do so, get the viewBox attributeof the SVGMap and split its values by using JavaScript’s split() function. As its value, use theseparator – in this case, a blank. The next figure shows, how to use the split() method in contextwith the viewBox attribute of the map.
var vBox = SVGMap.getAttribute("viewBox").split(" ");
As described before, only the first two values of the viewBox attribute are important for panning.To avoid wrong automatic typing and in consequence of that misleading calculations, useparseFloat(string). This JavaScript method is converting a string to a number and therefore,calculations will be done right. split() is returning an indexed array which begins by "0". The nextcode snippet shows how to access a split value – here the first one - and converts it to a number.
… parseFloat(vBox[0]) …
Sum up or subtract the old values with a constant pan factor (call it panFactor); for the calculationuse the formulas in the table above. You can either use different constants for x and y, or a globalpan factor for both directions. An approximate value for this example is about 300000. In order toapply the new viewBox, use the setAttribute("viewBox",newViewBox) method.Finally, we have to modify the rectangle within the overview which is symbolizing the current mapextend. To do so, you have to set the x, y, width and height attributes of the rectangle. Therefore,just add the following line to your pan() function:var SVGRect = SVGDoc.getElementById("OverViewRect");with(SVGRect){
setAttribute("x",viewBoxNewX);setAttribute("y",viewBoxNewY);setAttribute("width",viewBoxNewWidth);setAttribute("height",viewBoxNewHeight);
}
Later on we will have to modify the pan() function in order to consider the scaleFactor (nextexercise). This is necessary to recalculate the panFactor for different zoom levels.
2.2.2 ZoomingZooming is one of the most popular functionality of a state-of-the-art webmapping application. Theuser benefits from zooming a lot. A map with zooming functionality offers an overview of a regionas well as the exploration of details. As explained before, the zoom concept is based oncalculations with the viewBox attribute as well. For that, some more-or-less complicated scripting isnecessary. Most important for dealing with a zoom navigation concept, is a global scaleFactor. Ifthe event is zoom-in, its value is decreasing for example by 0.5. Because zoom is an action
G. Held, O. Schnabel, A. Neumann Workshop "Advanced Webmapping with SVG" 2003
____________________________________________________________________________________________________
____________________________________________________________________________________________________
- 9 -
referring to the center of the map, its current coordinates are very important. Furthermore, thevalues of the default viewbox are necessary as well.
Exercise 03First, copy the magnifier buttons of the magnifier.svg into the SVG file. These are alreadycontaining the onclick events which are calling a function named zoom(). Next, create a newfunction within a file called zoom.js. In order to know, which zoom event was triggered, thevalues of the id’s of the button groups are named in appropriate ways. Like in the exercise before,a simple if statement can distinguish between the following cases:
- plus: decrease scaleFactor by 0.5- minus: increase scaleFactor by 0.5- defaultView: scaleFactor = 10
The global scaleFactor is predefined within global.js and is set to "10". In addition, the defaultviewbox values are important as well. These are already defined within the same file.Furthermore, get the current viewbox like within the exercise before and calculate the center ofthe map. The mapCenterX is calculated by summing up the x and the half of the width attribute ofthe viewbox. The result of summing up the y and half of the height attribute is mapCenterY. Thesecalculations could look like this sample code:var vBox = SVGMap.getAttribute("viewBox").split(" ");
var mapCenterX = parseFloat(vBox[0]) + vBox[2] / 2;var mapCenterY = parseFloat(vBox[1]) + vBox[3] / 2;
Make use of the parseFloat() method, due to the fact that automatic typing can mislead toincorrect results, especially by summing up a couple of values.To calculate the newViewBoxWidth and newViewBoxHeight, just multiply the corresponding defaultvalues by the new scaleFactor divided by ten. To calculate the newViewBoxX and newViewBoxY,divide the newViewBoxWidth respectively newViewBoxHeight by two and subtract them from thecurrent mapCenter coordinates. Apply the new value like this:
SVGMap.setAttribute("viewBox",newViewBoxX+" "+newViewBoxY+" "+newViewBoxWidth+" "+newViewBoxHeight);
To modify the current map extent, just set the overViewRectangle like in the exercise before.Because the panFactor remains the same within the different levels, it should be multiplied with thescaleFactor. To do so, open pan.js and change the panFactor calculation as follows:
var myPanFactor = 300000 * scaleFactor / 10;
Finally, check any kind of functionality!
2.3 Interactive overview map
In order to navigate through a map properly, an interactive overview map is a popular solution. Itshows the whole map extent and therefore it is useful for an overall orientation as well. As yousee, the overview map in the example contains a semi-transparent rectangle (ligthred-filled), whichrepresents the corresponding view in the main map. If an overview gets interactive, draggingfunctionality has to be added to it. In this approach the passive lightred-filled rectangle willbecome a control by adding mouse events. One is able to trigger a mousedown event to get the
G. Held, O. Schnabel, A. Neumann Workshop "Advanced Webmapping with SVG" 2003
____________________________________________________________________________________________________
____________________________________________________________________________________________________
- 10 -
current translation. If the user holds down the button and moves the rectangle around, amousemove event is triggered. As soon as a mouseup event is called, the rectangle stays and themain map is navigating to this new extent.
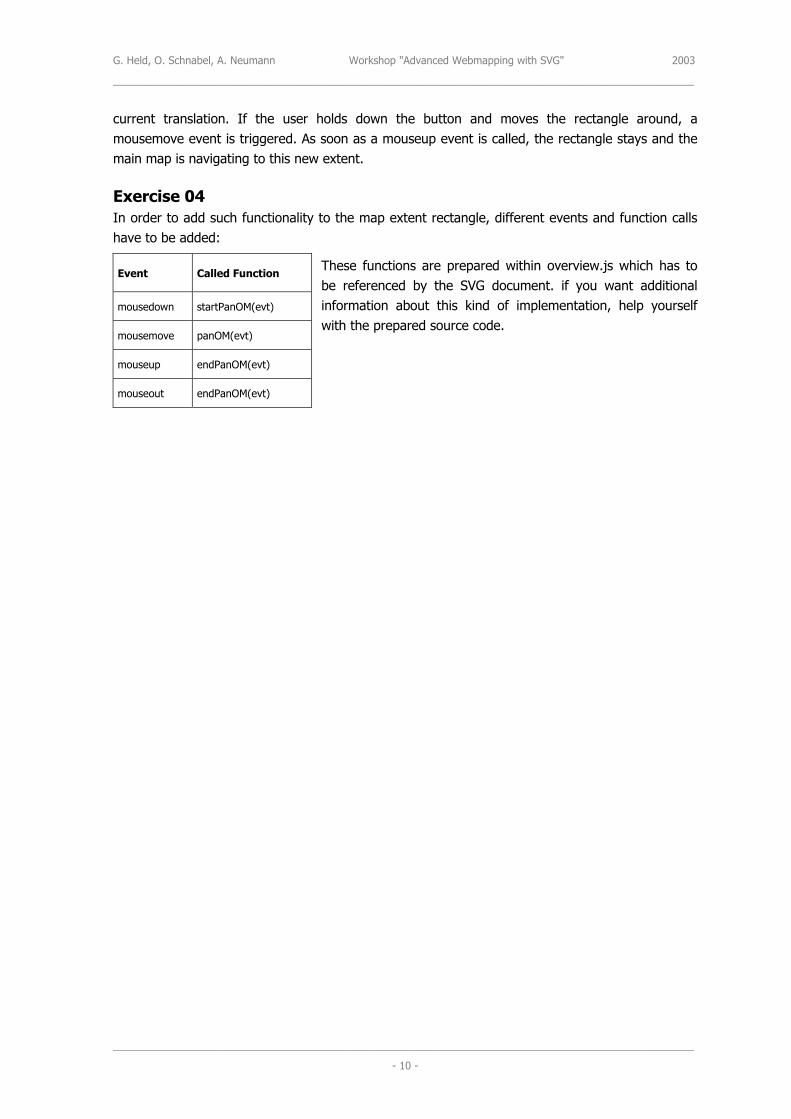
Exercise 04In order to add such functionality to the map extent rectangle, different events and function callshave to be added:
These functions are prepared within overview.js which has tobe referenced by the SVG document. if you want additionalinformation about this kind of implementation, help yourselfwith the prepared source code.
Event Called Function
mousedown startPanOM(evt)
mousemove panOM(evt)
mouseup endPanOM(evt)
mouseout endPanOM(evt)
G. Held, O. Schnabel, A. Neumann Workshop "Advanced Webmapping with SVG" 2003
____________________________________________________________________________________________________
____________________________________________________________________________________________________
- 11 -
3 Concepts of serving maps with PHP
3.1 Introduction to PHP
3.1.1 What is PHP?PHP (PHP Hypertext Preprocessor) is an open source scripting language for creating content on awebserver.
3.1.2 Why is it so useful/popular?PHP is very intensively used. It is free, easy to learn, very stable and available for a lot of platforms(in contrast to ASP which only works on Microsoft servers). PHP was especially developed forcreating dynamic web content and allows easy-to-use database requests and file access.
3.1.3 How does PHP work?To run PHP in a server-client environment, PHP needs to be available on a server (e.g. Apache).The PHP code can be embedded in HTML and SVG code or used as a stand alone file.
3.1.4 Basics
Declaration of the PHP codePHP code is interpreted within the following tags:<?php // PHP code ?>
Each command has to be completed by a semicolon.
Standard outputThe output command for strings is echo(), alternatively print() can be used. There is nodifference between the two output functions.
SVG or HTML/XHTML code can be combined with PHP code. Each command line outside of thePHP declaration will not be interpreted. The output of the echo() function is a simple string. Thisstring will be sent to the browser. The browser checks the code and interprets the generated SVGor HTML tags.<?php
echo "PHP is";?><h3>really</h3><?php
echo "<h2><br />groovy</h2>";?>
Result:
PHP is <h3>really</h3><h2><br />groovy</h2>
Pay attention to the quotes! In some cases (e.g. for SVG code) it is necessary to output doublequotes in the echo command. Then single quotes should be used for the echo command. Thefollowing code gives two examples:<?php
echo '<svg id="surf">';echo 'var test=\'<svg id="fun">\' ';
G. Held, O. Schnabel, A. Neumann Workshop "Advanced Webmapping with SVG" 2003
____________________________________________________________________________________________________
____________________________________________________________________________________________________
- 12 -
Result:
<svg id="surf">var test='<svg id="fun">';
Comments3 possibilities of using comments are available:<?php
// a single-line comment# a second single-line comment/* a multiline
comment */?>
VariablesIn PHP there are integers, floating numbers, strings, arrays and objects. Variable types do notneed to be defined. It is done automatically in PHP (automatic typing). However, it is possible tomodify the type of the variable in a PHP script. The variable name starts with a $ sign. Payattention to the case sensitivity. The name has to begin with a character or an underscore. Toallocate a value to a variable, use a "=" (equals sign).Pay attention that the variables are not overwritten by mistake.<?php
$test = 3; // number$test2 = "hello world"; // string$test2 = 25; // now the variables type has changed
?>
Standard variables are only valid within the function, they were defined. This means that outside ofthe function the variable does not exist. However, it is possible to define a global variable in afunction which can be used outside of the function.<?php
function worldwide(){
global $var;$var = 5;
}
worldwide();echo $var;
?>
Result:
5
Concatenation of stringsIn other programming languages usually "+" can be used to concate variables. Within PHP,concatenation can be accomplished using a "." notation.<?php
$city = "vancouver";$var = " is a city in ";$canada = "canada";echo $city . $var . $canada;echo 'a smurf called '.$canada.' is blue';
?>
Result:
vancouver is a city in canadaa smurf called canada is blue
G. Held, O. Schnabel, A. Neumann Workshop "Advanced Webmapping with SVG" 2003
____________________________________________________________________________________________________
____________________________________________________________________________________________________
- 13 -
Operators / Control structuresThe calculation operators, logical operators, comparison operators and most of the controlstructures and loops are the same like in Javascript.
The following control structures can be used:- if (condition) {commands;} elseif {commands;} else {commands;}- switch (value) {case "case1": commands; break; default: commands; break;}- while (condition) {commands;}- do {commands;} while (condition);- foreach (array as value) {commands;}
FunctionsFor better structuring of the PHP commands, functions can be used. The code in the function willnot be executed until the function is called.<?php
function lawandorder(){
echo "now we have a peaceful country.";}
lawandorder();?>
Result:
now we have a peaceful country
A function can have parameters. The input parameters are within the round brackets. To sendback the function's result, a "return" is needed.<?php
function lawandorder($sex, $crime) // 2 parameters{
$life = $sex + $crime;return $life;
}
$x = lawandorder(5,7);echo "life is $x";
?>
Result:
life is 12
Rounding and mathematical functionsUseful mathematical functions are rounding functions. ceil(float number) rounds a value up,floor(float number) rounds it off. An automatic rounding function is called round(). Othermathematical functions are sqrt(), sin(), cos(), tan() and pi().
Data typesPHP detects and allocates automatically the used data type of a variable (automatic typing). PHPknows String, Integer and Double. A boolean value does not exist.<?php
$string = "a text"; // quotation marks!$integer1 = 15;$integer2 = -15;$double = 2.46;
?>
Modification of data typesIt is possible to change a data type of an existing variable automatically or by hand (gettype(),settype()). If letters will be changed from string to integer or double, zero will be assignedautomatically.

G. Held, O. Schnabel, A. Neumann Workshop "Advanced Webmapping with SVG" 2003
____________________________________________________________________________________________________
____________________________________________________________________________________________________
- 14 -
<?php// automatically$var = "text";echo $var + 7; // the variable will be changed into an integer
// by hand$var = "20";echo gettype($var);settype($var, "integer");echo gettype($var);
?>
Result:7stringinteger
The data type can also be checked with the following functions: is_string(), is_integer(),
is_double().The function empty() checks the existence of a value of a variable. If the variable is empty orcontains the value zero, the function gives the value "1" back.A further function isset() checks the existence of a variable. If the variable exists, the functiongives the value "1" back.<?php
if (empty($x)) // $x does not exist{
echo "variable is empty!";}
$x = 4;echo isset($x);?>
Result:
variable is empty!1
Outsourcing of PHP codeTo outsource parts of the code the function include() can be used. It includes outsourced files (inPHP marked with the file extension ".inc". The code in the include-file also needs a codedeclaration.extern.inc:<?php
function fun(){
echo "Caramba";}
?>
include.php:<?php
include ("extern.inc");fun();
?>
Result:
Caramba
G. Held, O. Schnabel, A. Neumann Workshop "Advanced Webmapping with SVG" 2003
____________________________________________________________________________________________________
____________________________________________________________________________________________________
- 15 -
3.2 Advanced PHP
3.2.1 Work with arrays
Definition of arraysValues can be stored in an array (a kind of list). An incremental index will be created to get accessto the values, starting with zero. We distinguish between one-dimensional (like a list), two-dimensional (like a table) or multi-dimensional arrays. If the index number is not known, an emptybracket can be used to add a value.<?php
$a[0] = "canada"; // 1-dimensional array$a[1] = 15; // each data type can be stored$a[0][0] = -15; // 2-dimensional array$a[0][1] = "vancouver";$a[] = 2.6;
?>
Index and pass through an arrayIt is possible to initialize an array with array(). An operator => will be used to index its values. Toloop through an array, the foreach loop can be used. Each value will be called once. The firstparameter in the brackets is the array name, the second the output variable.<?php
$data = array(1=>"car", 2=>24, "value3"=>56.78); // initializingforeach ($data as $var)
{echo $var."<br>";
}?>
Result:car2456.78
Analyze an arrayThe functions array_keys() and array_values() can be used to analyze an array and get the fieldnames and the field values.<?php
$data = array(1=>"car", 2=>24, "value3"=>56.78);$return1 = array_keys($data);foreach ($return1 as $var)
{echo "field name: $var <br />";
}
$return2 = array_values($data);foreach ($return2 as $var)
{echo "field value: $var <br />";
}?>
Result:
field name: 1 <br />field name: 2 <br />field name: value3 <br />field value: car <br />field value: 24 <br />field value: 56.78 <br />
Searching in an arrayWith in_array() a value can be searched. The first parameter is the search string, the secondparameter is the array which will be searched.<?php
$fruits = array("apple", "peach", "cherry");if (in_array("cherry", $fruits))
{echo "value exists!";
}?>

G. Held, O. Schnabel, A. Neumann Workshop "Advanced Webmapping with SVG" 2003
____________________________________________________________________________________________________
____________________________________________________________________________________________________
- 16 -
Result:
value exists!
Count array elementsThe function count() counts the number of elements of an array.<?php
$fruits = array("apple", "peach", "cherry");echo "The array contains ".count($fruits)." elements.";
?>
Result:
The array contains 3 elements.
Merge arraysTo merge several arrays together, the function array_merge() can be used.<?php
$fruit1 = array("apple", "peach", "cherry");$fruit2 = array("plum", "strawberry", "orange");$fruit3 = array_merge($fruit1, $fruit2);foreach ($fruit3 as $var)
{echo $var . ", ";
}?>
Result:
apple, peach, cherry, plum, strawberry, orange,
Sort an arrayAn array can be sorted alphanumerical with the functions arsort() (descending order) and asort()(ascending order). Further functions also exist.<?php
$cars = array("Opel", "Ford", "BMW", "VW");arsort ($cars);foreach ($cars as $var)
{echo $var . ", ";
}?>
Result:
VW, Opel, Ford, BMW,
G. Held, O. Schnabel, A. Neumann Workshop "Advanced Webmapping with SVG" 2003
____________________________________________________________________________________________________
____________________________________________________________________________________________________
- 17 -
3.2.2 Work with HTML forms and PHP
The combination of HTML forms and PHP is frequently used to process data. The advantage is thatthe names of the form elements can be treated as PHP variables.form.html:<html>
<head /><body>
<form action="form.php" method=post><input name="field" /><input type="submit" />
</form></body>
</html>
"Dagobert Duck" will be inserted into the text field. After the click on the submit button the formsends the data to the PHP script form.php.
form.php:<?php
echo "content: $field";?>
Result:
content: Dagobert Duck
3.2.3 SVG creation with PHP
Two possibilities exist to combine SVG with PHP code. The first embeds some PHP code in the SVGcode, and replaces the PHP code with the generated content. The second creates a new SVGdocument with PHP code. Important is the declaration of the content-type.method 1:<?php
header ("Content-type: image/svg+xml");
function calc_sum ($a, $b){
return $a + $b;}
$a = 20;$b = 10;
?>
<!DOCTYPE svg PUBLIC "-//W3C//DTD SVG 20010904//EN" "http://www.w3.org/TR/2001/REC-SVG-20010904/DTD/svg10.dtd"><svg width="100%" height="100%" xmlns="http://www.w3.org/2000/svg">
<title>SVG with PHP</title><text x="25" y="100">calculation: <?php echo $a; ?> + <?php echo $b; ?> =<?php echo calc_sum ($a, $b); ?></text>
</svg>
G. Held, O. Schnabel, A. Neumann Workshop "Advanced Webmapping with SVG" 2003
____________________________________________________________________________________________________
____________________________________________________________________________________________________
- 18 -
method 2:<?php
function calc_sum($a,$b){
return $a + $b;}
$a = 20;$b = 10;
header("Content-type: image/svg+xml");echo '<svg width="100%" height="100%">';echo '<title>SVG with PHP</title>';echo '<text x="25" y="100">calculation: ' . $a . ' + ' . $b . ' = '. calc_sum($a, $b) . '</text>';echo '</svg>';
?>
Exercise 05Write a PHP file called myfirst.php. The file should contain a function square() with 2 inputparameters width and height. In the function the area of the square should be calculated. Theresult should be a SVG file with a drawn square and the area as text below the square.
G. Held, O. Schnabel, A. Neumann Workshop "Advanced Webmapping with SVG" 2003
____________________________________________________________________________________________________
_
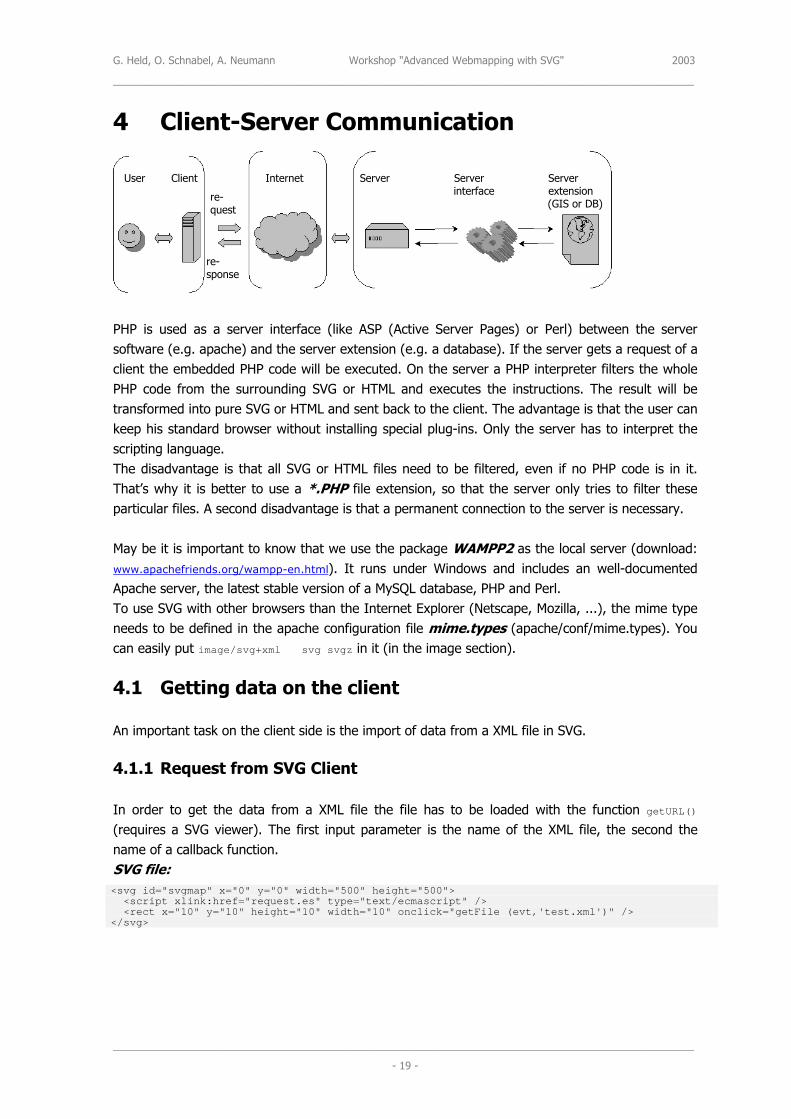
4 Client-Server Communication
PscPtksTTp
Mw
ATnc
4
A
4
I(nS<
<
User Client Internet Server Server Serverinterface extension
(GIS or DB)re-
______________
HP is used aoftware (e.g. lient the embHP code fromransformed ineep his standcripting languhe disadvanthat’s why it iarticular files.
ay be it is imww.apachefrie
pache server,o use SVG wieeds to be dean easily put
.1 Gett
n important t
.1.1 Requ
n order to gerequires a SVame of a callbVG file:svg id="svgma<script xlin<rect x="10"
/svg>
quest
re-sponse
_____________________________________________________________________________________
- 19 -
s a server interface (like ASP (Active Server Pages) or Perl) between the serverapache) and the server extension (e.g. a database). If the server gets a request of aedded PHP code will be executed. On the server a PHP interpreter filters the whole the surrounding SVG or HTML and executes the instructions. The result will be
to pure SVG or HTML and sent back to the client. The advantage is that the user canard browser without installing special plug-ins. Only the server has to interpret theage.age is that all SVG or HTML files need to be filtered, even if no PHP code is in it.s better to use a *.PHP file extension, so that the server only tries to filter these A second disadvantage is that a permanent connection to the server is necessary.
portant to know that we use the package WAMPP2 as the local server (download:nds.org/wampp-en.html). It runs under Windows and includes an well-documented the latest stable version of a MySQL database, PHP and Perl.th other browsers than the Internet Explorer (Netscape, Mozilla, ...), the mime typefined in the apache configuration file mime.types (apache/conf/mime.types). Youimage/svg+xml svg svgz in it (in the image section).
ing data on the client
ask on the client side is the import of data from a XML file in SVG.
est from SVG Client
t the data from a XML file the file has to be loaded with the function getURL()G viewer). The first input parameter is the name of the XML file, the second theack function.
p" x="0" y="0" width="500" height="500">k:href="request.es" type="text/ecmascript" />y="10" height="10" width="10" onclick="getFile (evt,'test.xml')" />
G. Held, O. Schnabel, A. Neumann Workshop "Advanced Webmapping with SVG" 2003
____________________________________________________________________________________________________
____________________________________________________________________________________________________
- 20 -
ECMAScript file request.es:var svgdoc;var svgmap;
function getFile (evt,url){
svgdoc = evt.getTarget().getOwnerDocument();svgmap = svgdoc.getElementById("svgmap");getURL (url, parseFile);
}
4.1.2 Response to SVG Client
After receiving the data from the file, the content of the file needs to be processed by the functionparseXML() (currently non-standardized). The first input parameter is the content of the filereceived from the getURL() function, the second is the SVG document. If the object "group" wouldbe appended to the SVG document "svgdoc", it would be appended outside of the SVG tags. Thatis why we use an id for the SVG root element and append it there.
Ecmascript file request.es:function parseFile (object)
{if (object.success)
{var xmldoc = parseXML (object.content, svgdoc);var nodes = xmldoc.childNodes; // get nodeList of documentfor (var i = 0; i < nodes.length; i++)
{var group = nodes.item(i);svgmap.appendChild(group); // append the data to the SVG document
}}
else{
alert("loading data failed");}
}
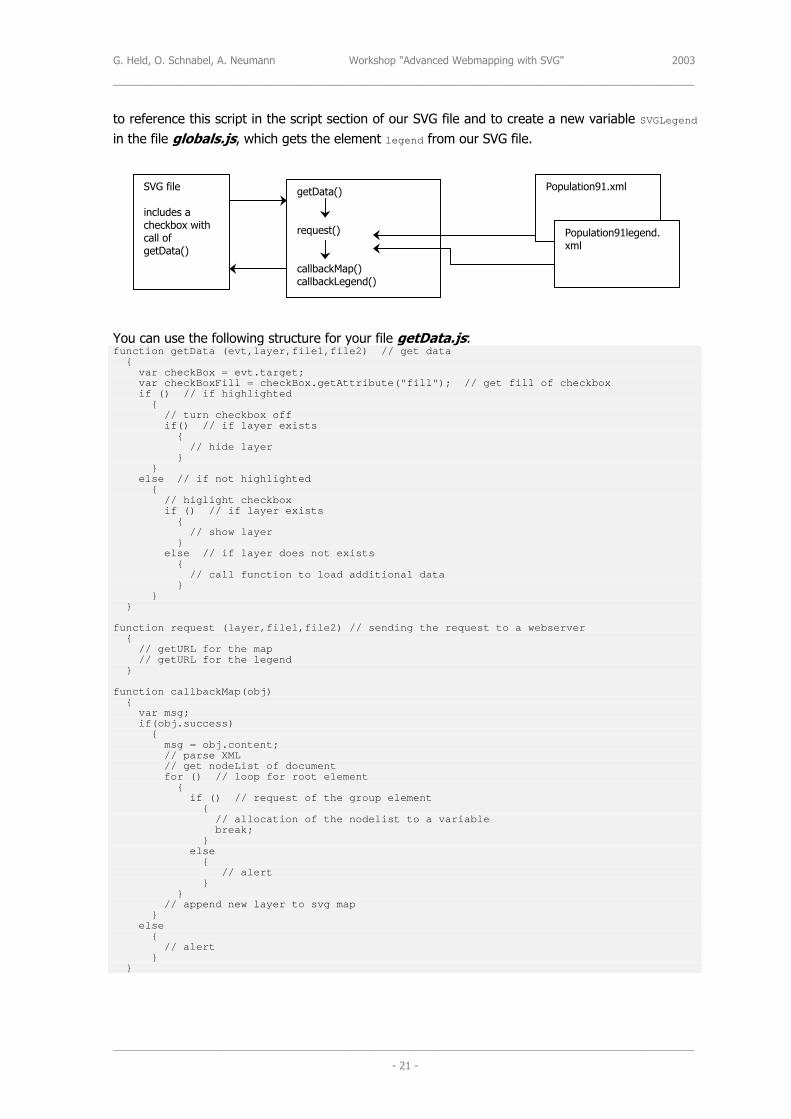
Exercise 06To get used to getURL() and parseXML(), the XML content of a the files Population91.xml andPopulation91legend.xml should be loaded and displayed as circles in our SVG map respective inour SVG legend. Also basic interactivity like the layer control and a tooltip displaying the number ofinhabitants should be implemented. The two files should exist in our work folder and contain agroup Population91 with the circle definition, style attributes and the call of the toolTip()function respective the circle for the legend. To handle the tooltips a complete JavaScripttoolTip.js exists in our folder. You must reference this script in the script section of our SVG file.Furthermore a file called tooltip.xml exists in your folder. Copy the content of this file at the endof our SVG file to enable the tooltips.At first we have to create a new group of checkboxes for the thematic layer control. We can copythe one from the base map layer control and fit it to our needs. After a click on one of these newcheckboxes in our SVG file, a JavaScript function getData() should now be executed with thefollowing input parameters: mouse event (evt), name of the corresponding group (layer), file nameof the file for the map (file1) and file name of the file for the legend (file2). The function getData()should open a new function request() which handles the loading of the XML files with getURL()and calls the two callback functions callbackMap() and callbackLegend(). These functions parsethe XML content of the files with parseXML() and append it with appendChild() to the SVG maprespective the SVG legend. These functions can be written in a new file getData.js. Don't forget
G. Held, O. Schnabel, A. Neumann Workshop "Advanced Webmapping with SVG" 2003
____________________________________________________________________________________________________
____________________________________________________________________________________________________
- 21 -
to reference this script in the script section of our SVG file and to create a new variable SVGLegendin the file globals.js, which gets the element legend from our SVG file.
You can use the following structure for your file getData.js:function getData (evt,layer,file1,file2) // get data
{var checkBox = evt.target;var checkBoxFill = checkBox.getAttribute("fill"); // get fill of checkboxif () // if highlighted
{// turn checkbox offif() // if layer exists
{// hide layer
}}
else // if not highlighted{
// higlight checkboxif () // if layer exists
{// show layer
}else // if layer does not exists
{// call function to load additional data
}}
}
function request (layer,file1,file2) // sending the request to a webserver{
// getURL for the map// getURL for the legend
}
function callbackMap(obj){
var msg;if(obj.success)
{msg = obj.content;// parse XML// get nodeList of documentfor () // loop for root element
{if () // request of the group element
{// allocation of the nodelist to a variablebreak;
}else
{// alert
}}
// append new layer to svg map}
else{
// alert}
}
SVG file
includes acheckbox withcall ofgetData()
getData()
request()
callbackMap()callbackLegend()
Population91.xml
Population91legend.xml
G. Held, O. Schnabel, A. Neumann Workshop "Advanced Webmapping with SVG" 2003
____________________________________________________________________________________________________
____________________________________________________________________________________________________
- 22 -
function callbackLegend(obj){
// same content like callbackMap, but appending of the layer to svg legend "legend"}
4.2 Getting data on the server
4.2.1 Files
An important task of PHP is the work with files, because often a database is not installed oravailable. On the other hand, with an increasing number of files the overview get lost.
Open a fileTo open a file, the file name, the complete file path and the mode of opening is used. The functionis called fopen().
mode descriptionr read a filer+ read and write a filew read a file (if the file does not exist, it will created; existing data will overwrited)w+ read and write a file (if the file does not exist, it will created; existing data will overwrited)a write a file (new data will be added at the end of the file; if the file does not exist, it will
created)a+ read and write a file (new data will be added at the end of the file; if the file does not exist, it
will created)
<?php$open = fopen ("/test/test.dat", "w+");$open2 = fopen ("http://www.test.dat", "r");
?>
Read a fileTo create a new file, the mode needs to be set to "w+".To read a file line by line, the function fgets() is used. The first parameter in the brackets is thepointer to the open file, the second is the length of still to be read signs in byte.<?php
$read = fgets ($open, 1028);?>
A special function fgetcsv() was created to read a csv file. It's result is an array with the data.
Write a fileTo write a file, it has to be opened in the correct mode. The function fwrite() can be used to writedata in a file at the pointer position. The first parameter in the brackets is the pointer to the openfile, the second is the string to be written.<?php
$text = "this is a text.";$write = fwrite ($open, $text);
?>
Close a fileAfter the file operations the file needs to be closed. The function fclose() can be used.<?php
$close = fclose ($open);?>
G. Held, O. Schnabel, A. Neumann Workshop "Advanced Webmapping with SVG" 2003
____________________________________________________________________________________________________
____________________________________________________________________________________________________
- 23 -
End of file and check of file existenceAnother useful function is feof(). If the end of the file is reached, it returns the value "true" (inPHP: 1). A further function is file_exists() for control structures. Other functions exist for thework with directories.
4.2.2 Databases
If the data needs to be well structured and a lot of data needs to be inserted and constantlyupdated, a database is the right choice. If the database Microsoft Access should be used, you arelimited to MS Windows. Then all applications in the system get access to the database with ODBC(Open database connectivity). ODBC is an database interface.If the database MySQL should be used, it is not necessary to choose a specific platform. MySQL isopen source, free and intensively used. It has a high performance and is available for a lot ofplatforms. MySQL was originally developed to handle very large databases much faster thanexisting solutions and has been successfully used in highly demanding production environments forseveral years. Though under constant development, MySQL today offers a rich and very useful setof functions. The connectivity, speed, and security make MySQL highly suitable for accessingdatabases on the Internet.To get access to the data and communicate with the database, the standard language SQL(Structured Query Language) is used (implemented in almost all databases).
Introduction in SQLSQL are usally written in capital letters and completed with a semicolon. An important command isthe SELECT command, which selects in the following examples all data from a table in a database:SELECT * FROM table_name;
This command can also be used:SELECT column_name_1, column_name_2, ... FROM table_name;
Often a condition is used to limit the output:SELECT * FROM table_name WHERE condition;
Another condition compares the database content with a search string ('% and %' are necessary):SELECT * FROM table_name WHERE column_name LIKE '%search_string%';
We can advance a request with "OR" and "AND":SELECT * FROM table_name WHERE column_name_1 = content_1 OR column_name_2 LIKE'%search_string%';
It is also possible to sort the data:SELECT * FROM table_name ORDER BY column_name_1;
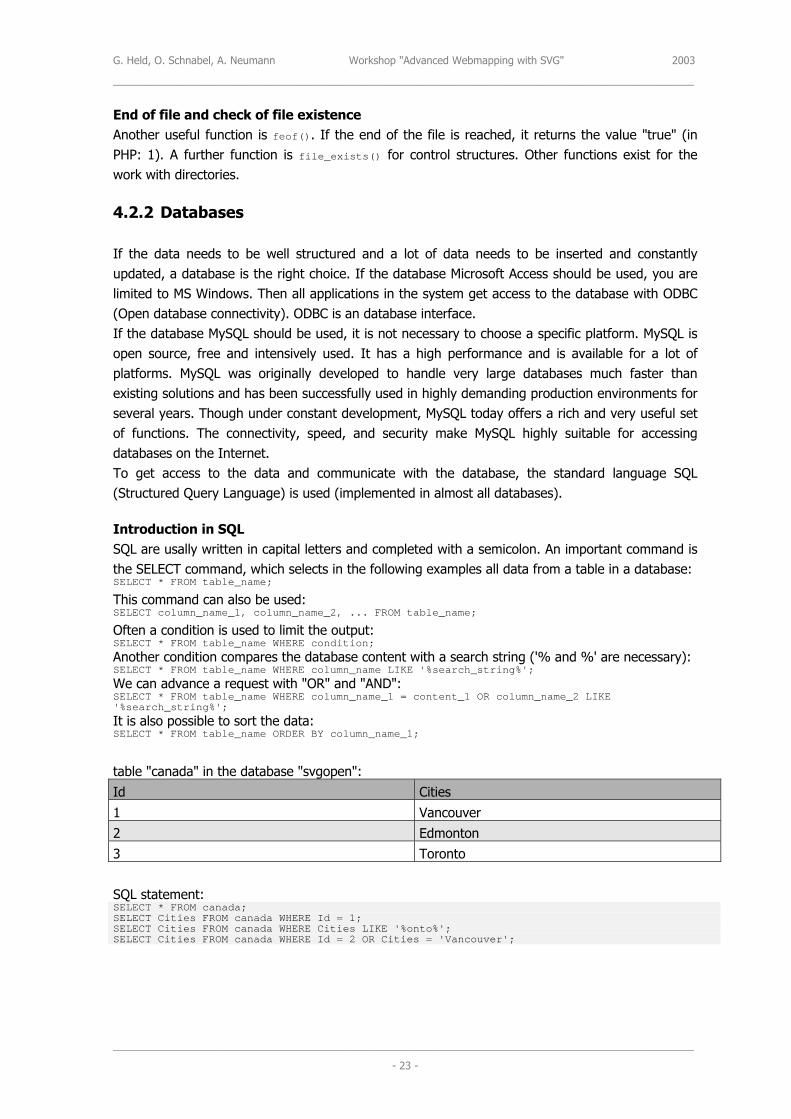
table "canada" in the database "svgopen":Id Cities1 Vancouver2 Edmonton3 Toronto
SQL statement:SELECT * FROM canada;SELECT Cities FROM canada WHERE Id = 1;SELECT Cities FROM canada WHERE Cities LIKE '%onto%';SELECT Cities FROM canada WHERE Id = 2 OR Cities = 'Vancouver';
G. Held, O. Schnabel, A. Neumann Workshop "Advanced Webmapping with SVG" 2003
____________________________________________________________________________________________________
____________________________________________________________________________________________________
- 24 -
Result:all dataVancouverEdmonton, TorontoEdmonton, Vancouver
SQL syntax and PHP code can be combined (this is often necessary).<?php
$search = "vanco";$query = "Cities";$page = 3;$sql = "SELECT ".$query." FROM canada WHERE Id = $page;";$sql2 = "SELECT ".$query." FROM canada WHERE Cities LIKE '%".$search."%';";
?>
Result:
TorontoVancouver
Connection to a MySQL databaseTo connect a MySQL database with PHP, the server name or ip address, the user name and thepassword (empty, if they do not exist) are necessary. The function mysql_connect() creates aconnection from this parameters. A second function mysql_select_db() contains the name of thedatabase and the data of the mysql_connect() function.<?php
$server = "localhost";$user = "";$password = "";$connection = mysql_connect ($server, $user, $password);mysql_select_db ("canada", $connection);
?>
The connection can be checked with an if-statement.<?php
if (!connection){
echo "no connection possible";exit;
}?>
SQL requestFurthermore a SQL request needs to be posed.<?php
$sql = "SELECT Cities FROM svgopen";?>
Execution of a request to a MySQL databaseThe function mysql_query() executes the request after building the connection to the database.The result will be written to an array and can now be used for further processing.<?php
$result = mysql_query ($sql, $connection);?>
Free memory and close connection to MySQL databaseThe function mysql_free_result() clears the memory of the variable $result, and mysql_close()closes the database connection. Of course these commands should be used after the processing ofthe results.<?php
mysql_free_result ($result);mysql_close ($connection);
?>

G. Held, O. Schnabel, A. Neumann Workshop "Advanced Webmapping with SVG" 2003
____________________________________________________________________________________________________
____________________________________________________________________________________________________
- 25 -
Processing of the resultThe often used function mysql_fetch_array() reads out one dataset from the result and stores it inan array. So a loop is needed to read out all datasets. As index of the resulting array the name ofthe column can be used.<?php
while ($cities = mysql_fetch_array ($result)){
echo $cities['name'];}
?>
Another function is mysql_fetch_row(). It reads out one record at the time likemysql_fetch_array() and stores it in an indexed array (the values can only activated with the keyof the array, not with the name of the column).<?php
while ($cities = mysql_fetch_row ($result)){
echo $cities[0];}
?>
The number of the resulting datasets can be queried with mysql_num_rows(). The argument is theresult of mysql_query (in this case: $result).<?php
echo mysql_num_rows($result);?>
Exercise 07Create a PHP file, which reads out the names of the provinces in the table population of theMySQL database canada. The result should be ordered by the id, stored in an array and printedout on screen.In this figure you can see the table:
G. Held, O. Schnabel, A. Neumann Workshop "Advanced Webmapping with SVG" 2003
____________________________________________________________________________________________________
____________________________________________________________________________________________________
- 26 -
5 Dynamic map creation with PHP and MySQL
5.1 Loading additional data and creation of thematic layers
5.1.1 Parameter transfer
It is often necessary to transfer parameters between SVG or HTML and PHP or between two PHPfiles. PHP offers an easy way to do this:
test.php?var1=1
An "&" is needed to separate two or more parameters:
test.php?var1=1&var2=text
After the transfer the parameters exist as a variable in the target file and can be used like usualvariables ($var1; $var2). You do not need to define the variable in the target PHP file.If the parameters will be called in a SVG file the abbreviation & instead of & should be usedbecause XML can't handle this sign.
5.1.2 Dynamic creation of a choropleth layer (Exercise 08)
This exercise deals with the loading of a population density theme of the provinces in 1996 to ourSVG map. We realize it with using a choropleth layer which should contain 3 different classes.These classes should be explained in the legend. Also a tooltip event should be embedded.The loading of the data happens with the same workflow like in the former exercise (loading of aXML file). Therefore, we can use an onclick-event on a checkbox as an activating event and theJavaScript function getData(). Compared to the former exercise, the thematic layer will be createddynamically with a PHP script. Therefore the third and fourth parameter which are passed to thefunction are different. These are no longer the name of prepared XML Files. Now they containURL's of the corresponding PHP Routines. Such a function call with the new parameters could looklike the following lines:onclick="getData(evt,'Popdens96','popdens96.php?border1=15&border2=5','popdens96legend.php?border1=15&border2=5')
The first parameter is assigning the event, the second one the name of the layer (Popdens96). APHP function with its own parameters border1, border2, color1, color2 and color3 is the thirdparameter which is assigned to getData(). The last one is another PHP function with its own butsimilar parameters.First create one PHP file called popdens96.php. Develop routines which are fetching thepopulation density (1996) – column called popdens1996 (see figure of the table before) - of thetable population within the database canada. To classify the values you can use three SQLstatements with different conditions like within these lines:SELECT * FROM population WHERE popdens1996 > $border1;SELECT * FROM population WHERE popdens1996 <= $border1 AND popdens1996 >= $border2;SELECT * FROM population WHERE popdens1996 < $border2;

G. Held, O. Schnabel, A. Neumann Workshop "Advanced Webmapping with SVG" 2003
____________________________________________________________________________________________________
____________________________________________________________________________________________________
- 27 -
Save the results to three variables called result1, result2 and result3. Now, PHP can begin towrite SVG content. This content has nearly the same structure as the XML file before(Population91.xml). Create the XML header and the root element (which is <g>) by using theecho command:
echo '<?xml version="1.0" encoding="iso-8859-1"?>';echo '<g id="Popdens96" onmouseout="toolTip(evt)">';
The value of the attribut id of the root element has the same name like the assigned layer(Popdens96). In order to handle the tooltip the onmouseout-event was added.To distinguish between the certain classes one can use PHP's while statement andmysql_fetch_array function. For each result one while statement is necessary.To create the SVG choropleth map, each province has to be instantiated by a <use> element andcolored according to the corresponding value. PHP should create these instances with theappropriate color, the xlink:href reference and a onmousemove-event. This event calls thetoolTip() function with the following parameters: the event and the value of the populationdensity 1996. One created SVG use-element could look like this:
<use xlink:href="#24" fill="rgb(0,100,0)" onmousemove ="toolTip(evt,7138795)"/>
Don't forget to close the <g> Element, otherwise the created layer can not be handled.For dynamically creating a simple legend (like Population91legend.xml), create another PHP filenamed popdens96legend.php. Here it is not necessary to connect to the database because allparameters will be assigned by the getData() function call. Rectangles filled with the three colorsof the choropleth map and corresponding text descriptions should be created. Use theabbreviations for the special signs like "<" (<) and ">" (>).
5.1.3 Dynamic creation of a new layer with circles (Exercise 09)
This exercise deals with the loading and visualizing of the number of inhabitants 1996 to our SVGmap. We implement it using proportional circles. The color of the circles should be explained in thelegend.The loading of the data happens with the same workflow like in the former exercise with thechoropleth layer. We use the onclick event to start the call of the function getData() with the fourparameters (event, layer name Pop96, PHP file for the map, PHP file for the legend). There is aneed to create two PHP files pop96.php and pop96legend.php and assign in this case only oneparameter color4. The PHP file pop96.php should contain a database connection with a SQLstatement, which selects all data from the table population. Save the results to the variable calledresult4. After that the SVG content should be written out. This content has the same structure asthe PHP file popdens96.php before. Create the XML header and the root element (which is <g>)by using the echo command. The value of the attribut id of the root element has the same namelike the assigned layer (Pop96). Also the tooltip should be added like in the PHP filepopdens96.php before.As a next step the result needs to be processed like in the exercise before. To calculate the radii ofthe circles, use the following commands:
$radius = round(sqrt(($var['pop1996'])/pi())*300);

G. Held, O. Schnabel, A. Neumann Workshop "Advanced Webmapping with SVG" 2003
____________________________________________________________________________________________________
____________________________________________________________________________________________________
- 28 -
This is the same calculation used to calculate the radii of the XML file Population91.xml.Now the SVG circles should be created with the appropriate color, the calculated radius and thevalue of the population 1996 in the toolTip() function. We also need the cx and cy attributes toplace the circles at the correct position in the map. In the database (see figure of the table before)we can find the two columns centerx and centery, which give us the position of the circles in themap. One created SVG circle could look like this:
<circle cx="8307270" cy="6235947" r="452229" onmousemove="toolTip(evt,7138795)"fill="rgb(150,50,50)" />
Don't forget to close the <g> Element, otherwise the created layer can not be handled.For the simple legend, create another PHP file named pop96legend.php. In this case it is notnecessary to connect to the database because all parameters will be assigned by the getData()function call. Create one circle with the appropriate color.
Our dynamically created thematic SVG map is now ready.

G. Held, O. Schnabel, A. Neumann Workshop "Advanced Webmapping with SVG" 2003
____________________________________________________________________________________________________
____________________________________________________________________________________________________
- 29 -
6 Links
ECMA262 Standard http://www.ecma-international.org/publications/files/ecma-st/Ecma-262.pdfSVG @ w3.org http://www.w3.org/Graphics/SVG/Overview.htm8SVG @ Adobe http://www.adobe.com/svg/viewer/install/main.htmlwampp http://www.apachefriends.org/wampp-en.htmlcarto.net http://www.carto.netSVG wiki http://www.svg.org/wiki/SVG developers http://groups.yahoo.com/group/svg-developers/PHP net http://www.php.netMySQL com http://www.mysql.com