advanced troubleshooting -...
TRANSCRIPT

Advanced troubleshooting
Paper handling
Maintenance
Troubleshooting
Administration
Index
1Printing
www.lexmark.com
Lexmark E320/E322 Printer
If you contact the Lexmark Customer Support Center to help you resolve a printing problem, they may guide you through an advanced troubleshooting mode to change a default setting (for example, turning on the PPDS Activated setting if your job application uses the PPDS datastream).
To set or change specific printer functions in the advanced troubleshooting mode, download the Lexmark E320/E322 Setup Utility from the Lexmark Web site (www.lexmark.com).
The following settings can be selected in troubleshooting mode:
• Parallel Port Settings
– Enable Port– NPA Mode– Protocol– Mode 1– Mode 2– Strobe Adjust
• PPDS Activated
• USB Settings
– Enable Port– NPA Mode
• Auto LFCR after CRLF

Advanced troubleshooting
Paper handling
Maintenance
Troubleshooting
Administration
Index
2Printing
www.lexmark.com
Lexmark E320/E322 Printer
To enter this advanced troubleshooting mode, you must be in the Special Function Menu:
1 Turn off the printer.
2 Open the top cover.
3 Turn the printer back on.
4 When the Error light comes on, indicating the top cover is open, press the operator panel button with a double button press.
5 When the Error light and Press Button light blink, close the cover.
6 Press and release the operator panel button twice quickly (double-button press) until the Load Paper light comes on and the two bottom lights blink.
Advanced troubleshooting
Paper handling
Maintenance
Troubleshooting
Administration
Index
3Printing
www.lexmark.com
Lexmark E320/E322 Printer
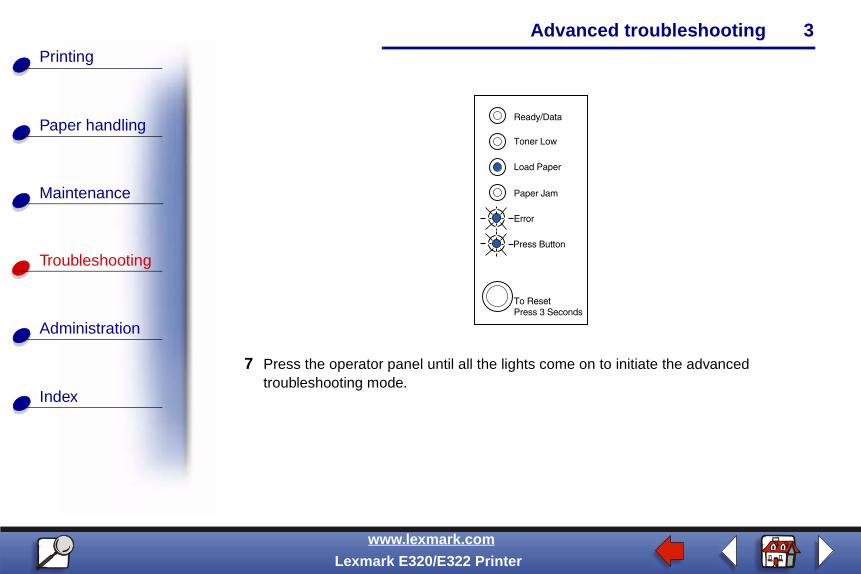
7 Press the operator panel until all the lights come on to initiate the advanced troubleshooting mode.

Advanced troubleshooting
Paper handling
Maintenance
Troubleshooting
Administration
Index
4Printing
www.lexmark.com
Lexmark E320/E322 Printer
When the printer is in the advanced troubleshooting mode, the operator panel lights take on new meanings based on their function. This illustration represents the operator panel settings in the advanced troubleshooting mode when an operator panel light is on.

Advanced troubleshooting
Paper handling
Maintenance
Troubleshooting
Administration
Index
5Printing
www.lexmark.com
Lexmark E320/E322 Printer
This illustration represents the operator panel settings in advanced troubleshooting mode when an operator panel light is blinking.
The following tables describe the function of each of these settings in advanced troubleshooting mode.

Advanced troubleshooting
Paper handling
Maintenance
Troubleshooting
Administration
Index
6Printing
www.lexmark.com
Lexmark E320/E322 Printer
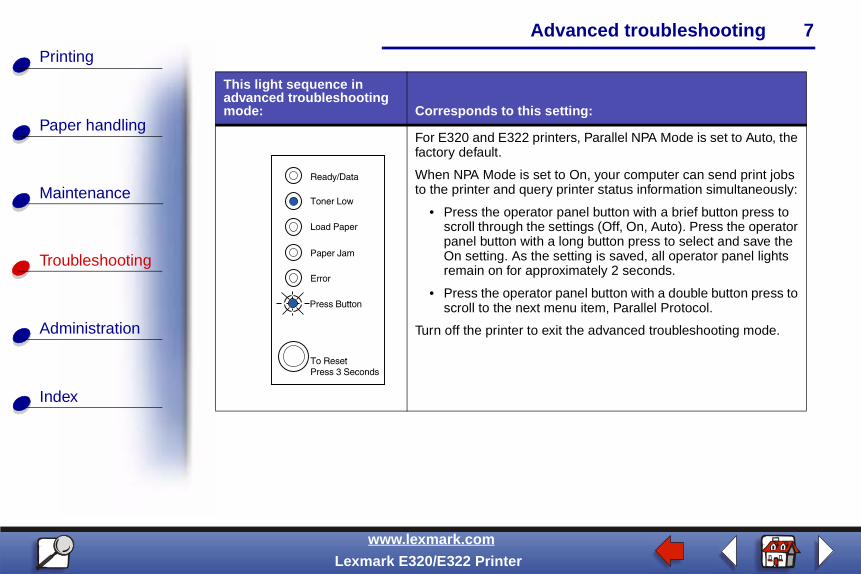
This light sequence in advanced troubleshooting mode: Corresponds to this setting:
For E320 and E322 printers, Parallel Port Enabled is set to Auto, the factory default.
If your printer encounters a memory shortage when trying to print a job and you are not using the parallel port, turn off Parallel Port Enabled to free up memory:
• Press the operator panel button with a brief button press to scroll through the settings (Off, On, Auto). Press the operator panel button with a long button press to select and save the Off setting. As the setting is saved, all operator panel lights remain on for approximately 2 seconds.
• To scroll to the next menu item, NPA Mode (Parallel), press the operator panel button with a double button press.
Turn off the printer to exit the advanced troubleshooting mode.
Advanced troubleshooting
Paper handling
Maintenance
Troubleshooting
Administration
Index
7Printing
www.lexmark.com
Lexmark E320/E322 Printer
For E320 and E322 printers, Parallel NPA Mode is set to Auto, the factory default.
When NPA Mode is set to On, your computer can send print jobs to the printer and query printer status information simultaneously:
• Press the operator panel button with a brief button press to scroll through the settings (Off, On, Auto). Press the operator panel button with a long button press to select and save the On setting. As the setting is saved, all operator panel lights remain on for approximately 2 seconds.
• Press the operator panel button with a double button press to scroll to the next menu item, Parallel Protocol.
Turn off the printer to exit the advanced troubleshooting mode.
This light sequence in advanced troubleshooting mode: Corresponds to this setting:

Advanced troubleshooting
Paper handling
Maintenance
Troubleshooting
Administration
Index
8Printing
www.lexmark.com
Lexmark E320/E322 Printer
For E320 and E322 printers, Parallel Protocol is set to Fastbytes, the factory default.
When the protocol is set to Fastbytes, the printer receives information at a much faster transmission rate, provided the host computer supports Fastbytes.
When the protocol is set to Standard, the printer receives transmission at a normal transmission rate.
• Press the operator panel button with a brief button press to scroll through the settings (Fastbytes, Standard). To change the setting to Standard, press the operator panel button with a long button press to select and save the Standard setting. As the setting is saved, all operator panel lights remain on for approximately 2 seconds.
• To scroll to the next menu item, NPA Mode (Parallel), press the operator panel button with a double button press.
Turn off the printer to exit the advanced troubleshooting mode.
This light sequence in advanced troubleshooting mode: Corresponds to this setting:

Advanced troubleshooting
Paper handling
Maintenance
Troubleshooting
Administration
Index
9Printing
www.lexmark.com
Lexmark E320/E322 Printer
This light sequence in advanced troubleshooting mode: Corresponds to this setting:
For E320 and E322 printers, Parallel Mode 1 is set to On, the factory default.
This setting disables the pull-up resistors on the parallel port signals. It is useful for computers that have open collector outputs on the parallel port signals.
• Press the operator panel button with a double button press to scroll to the next menu item, Parallel Mode 2.
• Turn off the printer to exit the advanced troubleshooting mode.

Advanced troubleshooting
Paper handling
Maintenance
Troubleshooting
Administration
Index
10Printing
www.lexmark.com
Lexmark E320/E322 Printer
For E320 and E322 printers, Parallel Mode 2 is set to On, the factory default.
This setting determines if the parallel port data is sampled on the leading or trailing edge of strobe. If Parallel Mode 2 is set to On, the parallel port data is sampled on the leading edge of strobe. The parallel port data is sampled on the trailing edge of strobe if Parallel Mode 2 is set to Off.
• Press the operator panel button with a brief button press to scroll through the settings (On, Off). To turn off this setting, press the operator panel button with a long button press to select and save the Off setting. As the setting is saved, all operator panel lights remain on for approximately 2 seconds
• Press the operator panel button with a double button press to scroll to the next menu item, Parallel Strobe Adjust.
Turn off the printer to exit the advanced troubleshooting mode.
This light sequence in advanced troubleshooting mode: Corresponds to this setting:
Advanced troubleshooting
Paper handling
Maintenance
Troubleshooting
Administration
Index
11Printing
www.lexmark.com
Lexmark E320/E322 Printer
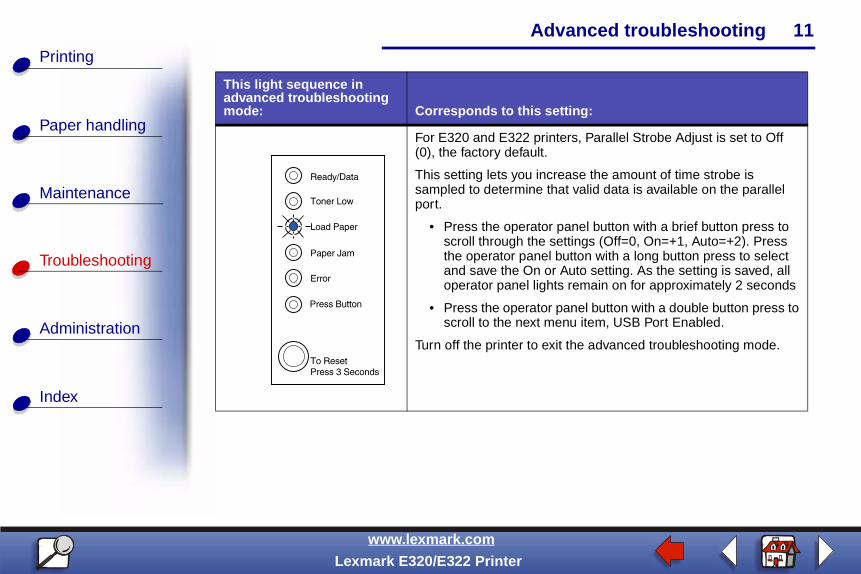
For E320 and E322 printers, Parallel Strobe Adjust is set to Off (0), the factory default.
This setting lets you increase the amount of time strobe is sampled to determine that valid data is available on the parallel port.
• Press the operator panel button with a brief button press to scroll through the settings (Off=0, On=+1, Auto=+2). Press the operator panel button with a long button press to select and save the On or Auto setting. As the setting is saved, all operator panel lights remain on for approximately 2 seconds
• Press the operator panel button with a double button press to scroll to the next menu item, USB Port Enabled.
Turn off the printer to exit the advanced troubleshooting mode.
This light sequence in advanced troubleshooting mode: Corresponds to this setting:
Advanced troubleshooting
Paper handling
Maintenance
Troubleshooting
Administration
Index
12Printing
www.lexmark.com
Lexmark E320/E322 Printer
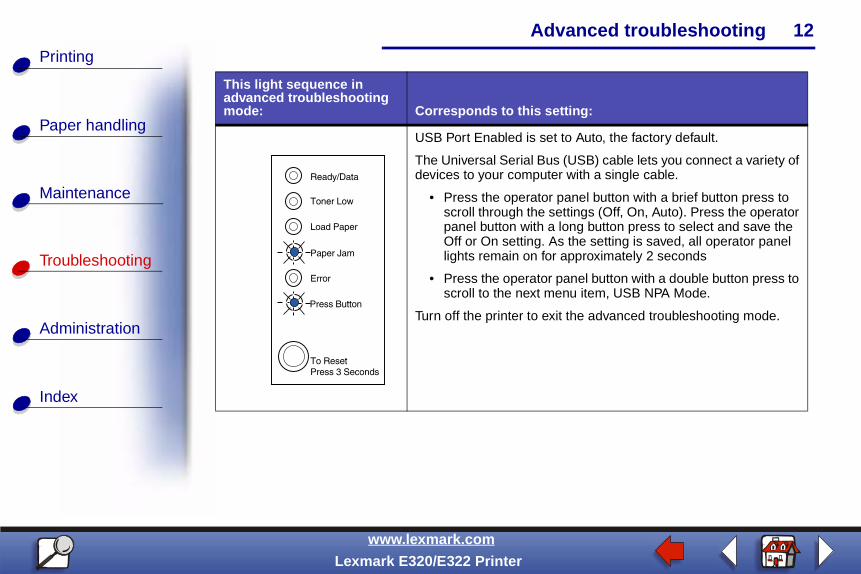
USB Port Enabled is set to Auto, the factory default.
The Universal Serial Bus (USB) cable lets you connect a variety of devices to your computer with a single cable.
• Press the operator panel button with a brief button press to scroll through the settings (Off, On, Auto). Press the operator panel button with a long button press to select and save the Off or On setting. As the setting is saved, all operator panel lights remain on for approximately 2 seconds
• Press the operator panel button with a double button press to scroll to the next menu item, USB NPA Mode.
Turn off the printer to exit the advanced troubleshooting mode.
This light sequence in advanced troubleshooting mode: Corresponds to this setting:

Advanced troubleshooting
Paper handling
Maintenance
Troubleshooting
Administration
Index
13Printing
www.lexmark.com
Lexmark E320/E322 Printer
USB NPA Mode is set to Auto, the factory default.
When USB NPA Mode is set to On, your computer can send print jobs to the printer and query printer status information simultaneously.
• Press the operator panel button with a brief button press to scroll through the settings (Off, On, Auto). Press the operator panel button with a long button press to select and save the Off or On setting. As the setting is saved, all operator panel lights remain on for approximately 2 seconds
• Press the operator panel button with a double button press to scroll back to the first menu item, Parallel Port Enabled.
Turn off the printer to exit the advanced troubleshooting mode.
This light sequence in advanced troubleshooting mode: Corresponds to this setting:

Advanced troubleshooting
Paper handling
Maintenance
Troubleshooting
Administration
Index
14Printing
www.lexmark.com
Lexmark E320/E322 Printer
For E322 and E322n printers, PPDS Activated is set to Off, the factory default.
Turn PPDS Activated on when working in applications using the PPDS datastream:
• Press the operator panel button with a brief button press to scroll through the settings (On, Off). Press the operator panel button with a long button press to select and save the On setting. As the setting is saved, all operator panel lights remain on for approximately 2 seconds.
• Press the operator panel button with a double button press to scroll to the next menu item, Auto CRLF/LFCR.
Turn off the printer to exit the advanced troubleshooting mode.
This light sequence in advanced troubleshooting mode: Corresponds to this setting:

Advanced troubleshooting
Paper handling
Maintenance
Troubleshooting
Administration
Index
15Printing
www.lexmark.com
Lexmark E320/E322 Printer
�
Auto CRLF/LFCR is set to Off, the factory default.
How the printer formats the end of a line depends on the computer system being used. Use this setting to select whether or not the printer automatically performs a carriage return (CR) after a line feed (LF) or a line feed after a carriage return.
• If the Press Button light is off, Auto CR after LF is Off and Auto LF after CR is Off.
• If the Press Button light is on, Auto CR after LF is On and Auto LF after CR is Off.
• If the Press Button light is blinking, Auto CR after LF is Off and Auto LF after CR is On.
• Press the operator panel button with a brief button press to scroll through the settings.
• Press the operator panel button with a double button press to scroll to the next menu item, Parallel Mode 1.
Turn off the printer to exit the advanced troubleshooting mode.
This light sequence in advanced troubleshooting mode: Corresponds to this setting: