advanced shooting chapter - ricoh imaging · note • when the flash fires, the flash lamp (red)...
TRANSCRIPT

ChapterADVANCED SHOOTING 3Changing Flash Modes ........................................ 54
Changing the flash mode ............................... 55Setting the Exposure Compensation.................. 57
Setting the Exposure Compensation ............ 57Changing the White Balance Mode..................... 59
Changing the White Balance Mode ............... 59Special Shooting Functions ................................ 61
Using the Self-Timer ....................................... 61Focus Lock Shooting ...................................... 62Focus Mode Shooting ..................................... 63Date Imprint Mode ........................................... 65Redeye Reduction Mode ................................ 66Monochrome Mode (Black & White) Sepia ... 67Interval (Time lapse) Shooting Mode ............ 68Using SOFT Mode ........................................... 70S Mode (Shutter Speed) .................................. 71Using Auto Bracket ......................................... 72Macro Shooting (Close-up Shooting) ........... 73
54
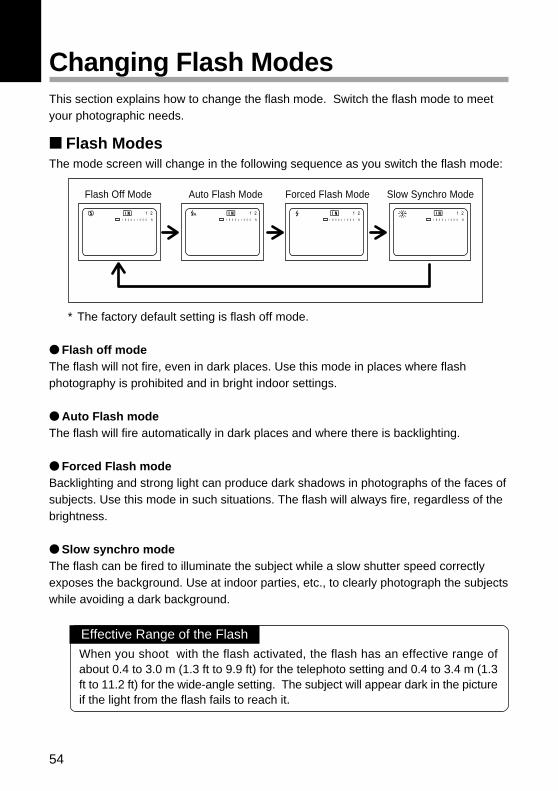
Changing Flash ModesThis section explains how to change the flash mode. Switch the flash mode to meetyour photographic needs.
■ Flash ModesThe mode screen will change in the following sequence as you switch the flash mode:
* The factory default setting is flash off mode.
● Flash off modeThe flash will not fire, even in dark places. Use this mode in places where flashphotography is prohibited and in bright indoor settings.
● Auto Flash modeThe flash will fire automatically in dark places and where there is backlighting.
● Forced Flash modeBacklighting and strong light can produce dark shadows in photographs of the faces ofsubjects. Use this mode in such situations. The flash will always fire, regardless of thebrightness.
● Slow synchro modeThe flash can be fired to illuminate the subject while a slow shutter speed correctlyexposes the background. Use at indoor parties, etc., to clearly photograph the subjectswhile avoiding a dark background.
Effective Range of the FlashWhen you shoot with the flash activated, the flash has an effective range ofabout 0.4 to 3.0 m (1.3 ft to 9.9 ft) for the telephoto setting and 0.4 to 3.4 m (1.3ft to 11.2 ft) for the wide-angle setting. The subject will appear dark in the pictureif the light from the flash fails to reach it.
Flash Off Mode Auto Flash Mode Forced Flash Mode Slow Synchro Mode
1 21 8 0 0 x 1 2 0 0 N
1 21 8 0 0 x 1 2 0 0 N
1 21 8 0 0 x 1 2 0 0 N
1 21 8 0 0 x 1 2 0 0 N

55
Ad
vanced
Sh
oo
ting
3
Changing the flash mode
q Set the Mode dial to [ ].
w Press the Flash button to select the flashmode ( • • Light • Blink).The flash mode will change each time the Flashmode button is pressed.
The flash mode will be displayed on the LCDpanel and LCD monitor. In the Auto Flash mode,however, the mark will be displayed only onthe LCD monitor. This mark will not be displayedon the LCD panel.
e Press the release button to take thephotograph.
Note • When the flash fires, the flash lamp (red)will light when the release button ispressed lightly.
• When the flash is being recharged, theflash lamp will flash and the display willdisappear from the LCD monitor.Photographs cannot be taken at thistime.
How to Cancel a modePress the Flash button and switch to another mode.
�
12�1800×1200 N�

56
ImportantNote • When using the flash for nearby subjects (approx. 0.4m (16 inches) or
less), the light from the flash may appear to be reddish in some cases.This also causes overexposure so the subject may appear whitish in thephotograph. At such times, select the No Flash mode.
• The shutter speed will automatically become slower in dark places. Insuch cases, either grip the camera firmly or mount the camera on a tripodto prevent hand jitter. Exercise special care when using Tele .
Note Using external flashRecommended product: TOCAD COMPANY LIMITED
“SUNPAK Auto 544 (USA)”“SUNPAK G4500 (Europe and Asia)”
Usage and connection cautions• Exposure is determined by the external flash setting. Camera exposure
compensation settings have no effect.• Flash output is determined by the external flash setting. Photographed
images can be checked using the LCD monitor. If exposure is incorrect,adjust the F value of the external flash and re-photograph.
• When the external flash is on, it will fire regardless of the flash mode towhich the camera is set.
• When the Quick shooting mode is used, continuous photography may notbe possible when the flash is charging and under certain photographicconditions.
• It is recommended that the camera flash be used for close-up photography.• Clip-on type flashes cannot be connected. Use a flash that can be attached
using the tripod socket. Do not apply excessive force when connecting.• When connecting an external flash, adjust the end of the sync plug so that it
can be firmly connected.

57
Ad
vanced
Sh
oo
ting
3
Setting the Exposure CompensationAs long as the subject is centered in the shooting range, you can take the picturenormally as the camera will automatically adjust the exposure compensation forbacklighting. If there is a significant difference in brightness between the backgroundand subject, however, the subject tends to be under- or over-exposed. Exposurecompensation is useful in this situation. You can also use exposure compensation toproduce intentionally under- or over-exposed images.
● Exposure Compensation Range±2.0 EV (in 0.5 EV steps)
● Shooting Against the LightThe bright background will make the subject appear under-exposed. Set the exposurecompensation level to a positive value to adjust the exposure.
ImportantNote • If the subject is not centered in the shooting range when taking a picture
against the light, the camera will not assume that the subject is in a backlitstate. Exposure compensation is required in this situation.
● Shooting a White ImageIf you shoot an image that appears generally white, the shot will be under-exposed asa whole, with people appearing dark and white objects appearing gray. Set theexposure compensation level to a positive (+) value to adjust the exposure.
● Shooting a Black ImageIf you shoot an image that appears generally black, the shot will be over-exposed as awhole, with people appearing white and black objects appearing gray. Set theexposure compensation level to a negative (–) value to adjust the exposure. Followthe same procedure when shooting a person under a spotlight, for example.
Setting the Exposure Compensation
Set the exposure compensation level.
q Set the mode dial to [ ] and press theMENU button.The record menu will be displayed.
Note • To cancel the operation, press theMENU button.

58
w Press the ▼ or ▲ button to select +/–[Exposure Compensation] and press theENTER button.The exposure compensation settings menu willbe displayed.
Note • To cancel the operation and return to therecord menu, press the MENU button.
e Press the ▼ or ▲ button to change thecompensation level.Pressing the ▲ ( ) button increments thenumber of frames. Pressing the ▼ ( ) buttondecrements the number of frames. Keep thebutton depressed to quickly scroll through theframes.
r Press the shutter release button to shootthe subject.When you press the shutter release buttonlightly (halfway), the LCD monitor switches to anormal display. Press down the shutter releasebutton fully to shoot the subject.When the shooting ends, the setup menu isdisplayed again on the LCD monitor. To acceptthe new adjustment level, press the ENTERbutton; to cancel it, press the MENU button toreturn to the record menu. Then, press themenu button once again to exit the recordmenu.
Note • To save the exposure compensation setting, set Keep Setting mode. See“Keep Settings”. (p.104)
• Three frames will be exposed continuously: one at the exposurecompensation value, one at -0.5EV and one at +0.5EV. This function isconvenient for checking the exposure compensation value setting. See“Using Auto Bracket”. (p.72)
1 21 8 0 0 x 1 2 0 0 N
EV+0.5
How To Cancel the Exposure Compensation SettingFollow the above procedures and set the compensation level to [±0.0] in step e.
MENU [RECORD]RECORDING MODE :WHITE BALANCE :AUTO+/– :OFFFOCUS :AUTODATE IMPRINT :OFFREDEYE REDUCTION:OFFMONOCHROME :OFFINTERVAL MODE :OFF
BACK:MENU SEL.:ENTER
+/–
+2.0
–2.0EV+0.0BACK:MENU SEL.:ENTER

59
Ad
vanced
Sh
oo
ting
3
Changing the White Balance ModeThe white balance mode adjusts the white balance so that you can capture yoursubject in its natural colors regardless of the light source. The auto mode will suffice inmost situations.The auto mode automatically adjusts the white balance based on the white areas,ensuring that white is reproduced as white regardless of the light source.Consequently, a subject that lacks in white tones as a whole or that is dominated bydark tones may not achieve an appropriate white balance. Change the white balancemode to shoot such subjects.
■ Switching White Balance ModesThe mode screen will change in the following sequence as you switch the whitebalance mode:
* The factory default setting is auto mode.
Changing the White Balance Mode
q Set the mode dial to [ ] and press theMENU button.The record menu will be displayed.
Note • To cancel the operation, press theMENU button.
太陽モード�オートモード(表示なし)�
白熱灯モード�蛍光灯モード�
曇天モード�
12�1800×1200 N�
12�1800×1200 N�
12�1800×1200 N�
12�1800×1200 N�
12�1800×1200 N�
Auto Mode (no display) Daylight Mode Cloudy Mode (Overcast Mode)
Fluorescent Light Mode Tungsten Light Mode
Subjects Difficult to Correct in Auto Mode• Monochrome objects• Objects lit by multiple light sources

60
w Press the ▼ or ▲ button to select[WHITE BALANCE] and press the ENTERbutton.The setup menu will be displayed.
Note • To cancel the operation, press theMENU button to return to the recordmenu.
e Press the ▼ and ▲ buttons to select thewhite balance mode ( ).
r Press the release button to take thephotograph.When the release button is pressed halfway, thenormal display will appear. Fully press therelease button to take the photograph.When picture taking is completed, the setupmenu will return.To check the mode setting, press the ENTERbutton to end operation. To cancel, press theMENU button to return to the recording menuand then press the MENU button again to exitthe recording menu.
ImportantNote • Even with the same subject, colors may vary due to the weather
conditions and light source.
Note • In auto mode, subjects lacking in white tones may not achieve an appropriatewhite balance. When shooting such subjects, add a white object to thecomposition.
• White balance modes can only be set in recording mode and not in playbackmode.
• The flash will not fire in the following white balance modes: daylight,fluorescent light, tungsten light and cloudy (overcast) mode.
• Enable the keep settings mode to save the white balance mode setting.See “Keep Settings” (p.104).
MENU [RECORD]RECORDING MODE :WHITE BALANCE :AUTO+/– :OFFFOCUS :AUTODATE IMPRINT :OFFREDEYE REDUCTION:OFFMONOCHROME :OFFINTERVAL MODE :OFF
BACK:MENU SEL.:ENTER
How to cancel the modePerform the same operations and use step e to select Auto white balance.
WHITE BALANCE
AUTO
CANCEL:MENU SEL.:ENTER
1 21 8 0 0 x 1 2 0 0 N

61
Ad
vanced
Sh
oo
ting
3
Special Shooting FunctionsThis digital camera offers a variety of shooting techniques in addition to basicphotography.
Using the Self-Timer
The self-timer offers a convenient way to take group pictures with the photographerincluded. Mount the camera on a tripod or a flat, secure surface to shoot pictures withthe self-timer.
q Set the mode dial to [ ] and press theself timer button.The self timer is now set.
The self timer will be displayed on the LCDmonitor or on the LCD panel.
How to cancel the modeEither press the selftimer button again or slidethe power switch.
w Decide the composition of the picture,position the camera securely, and pressthe shutter release button.The self timer LED will start flashing and theshutter will be released with an approximatedelay of 10 seconds. The self timer LED willstay lit for about 2 seconds before the shutter isreleased and the beep sound will be heard.The self-timer mode ends automatically whenthe shutter is released.
Note • If the flash is charging, the self-timer will start when charging is completed.• When the release button is pressed, the focus is locked.
�
12�1800×1200 N�

62
Tips Remote Control
To operate the camera from a remote position or when the camera isfixed in one spot, use the optional remote control unit.
Focus Lock Shooting
Usually, the auto focus function focuses the camera on the subject that appears in theautofocus field on the LCD monitor or on the viewfinder. If the subject is locatedoutside the autofocus field, it may appear blurred in the resulting shot. Use the focuslock to ensure accurate focusing on the subject.
See “How to View Images on the LCD Monitor” (p.47)
■ When to Use the Focus LockIf the subject is not positioned inside theautofocus field on the LCD monitor, a blurredimage will result, since the background, not thesubject, is in focus.
If an object other than the subject occupies amajor portion of the autofocus field, the camerawill focus on the background, producing ablurred image of the people.
■ How to Use the Focus Lock
q Press the ▼ ( ) or ▲ ( ) button toset the size of your subject.
1800x1200 N 1800x1200 N
12

63
Ad
vanced
Sh
oo
ting
3
w Bring the subject on which you wish tofocus into the autofocus field.
e Press the shutter release button lightlyand hold it.The focus will be locked at this point.The focus lamp (green) will light.
r Decide the composition of the shot bymoving the camera with the shutterrelease button held, and then press theshutter release button down fully.
Note • You can also use the manual focus to focus on the subject. See “FocusMode Shooting” (p.63).
Focus Mode Shooting
This camera is capable of three types of focus (AF, MF, SP ). Focusing can thus beperformed for snapshots, landscapes, etc., in accordance with the photographicconditions.AF: Focusing is performed automatically.MF: Focusing is performed manually.SP : Used to photograph subjects at larger than life size with normal macro
photography using wideangle (in-focus (subject) distance = approx. 4.0cm -40cm).
1800x1200 N 1800x1200 N
12
1800x1200 N 1800x1200 N
12

64
MENU [RECORD]RECORDING MODE :WHITE BALANCE :AUTO+/– :OFFFOCUS :MFDATE IMPRINT :OFFREDEYE REDUCTION:OFFMONOCHROME :OFFINTERVAL MODE :OFF
BACK:MENU SEL.:ENTER
MF 1800x1200 N MF 1800x1200 N
12
q Set the MODE dial to [ ] and then pressthe MENU button.The Recording menu will appear.
Note • Press the MENU button to cancel theoperation.
w Press the up ▲ or down ▼ button toselect FOCUS.
e Press the ENTER button to select thetype of focus (MF, SP ( )) and thenpress the MENU button.
r To make the subject appear larger, pressthe up ▲ ( ) or down ▼ ( ) button. Inthe case of MF, press the release button
lightly. (Use is not possible with SP ( )).
t Press the release button to take thepicture.In the case of MF, infi, use the up ▲ or down ▼button to focus and then press the release buttonto take the picture.
How To Cancel Focus ModesFollow the above procedures and select AF in step e.
Note • Enable the keep settings to save the Focus mode setting. See Keep Settings.• When the AF focusing mode is used to photograph in dark locations, the
auto focus lamp and focus display (SP ( )) on the LCD monitor will blinkand focus will be locked in the blinking mode. Either use the scale to set thedistance to the subject or focus manually.
MENU [RECORD]RECORDING MODE :WHITE BALANCE :AUTO+/– :±0.0FOCUS :AUTODATE IMPRINT :OFFREDEYE REDUCTION:OFFMONOTONE MODE :OFFINTERVAL MODE :OFF
BACK:MENU SEL.:ENTER

65
Ad
vanced
Sh
oo
ting
3
Date Imprint Mode
Use this mode to record images imprinted with the date.
Note • If the date is not set in the setup menu, this function is not available. Thedate is displayed in the format that has been selected with the DATESETTING option in the setup menu. See “Setting the Date and Time” (p.35).
q Set the mode dial to [ ] and press theMENU button.The record menu is displayed.
Note • To cancel the operation, press theMENU button.
w Press the ▼ or ▲ button to select [DATEIMPRINT].
e Press the ENTER button to selectbetween [DATE] and [DATE/TIME]. Andthen press the MENU button.The date (1999/5/15) is displayed if you havechosen [DATE], or the date and time (1999/5/1510:12) is displayed if you have chosen [DATE/TIME].
r Press the shutter release button to shootthe subject.
Note • Enable the save mode to save the date imprinting mode setting. See“Keep Settings” (p.104).
�
12�1800×1200 N�
1999/ 5/15�
How To Cancel Date Imprinting ModeFollow the above procedures and select [OFF] in step e.
MENU [RECORD]RECORDING MODE :WHITE BALANCE :AUTO+/– :OFFFOCUS :AFDATE IMPRINT :OFFREDEYE REDUCTION:OFFMONOCHROME :OFFINTERVAL MODE :OFF
BACK:MENU SEL.:ENTER
MENU [RECORD]RECORDING MODE :WHITE BALANCE :AUTO+/– :OFFFOCUS :AUTODATE IMPRINT :DATEREDEYE REDUCTION:OFFMONOCHROME :OFFINTERVAL MODE :OFF
BACK:MENU SEL.:ENTER

66
Redeye Reduction Mode
If you shoot a subject, with the flash activated, in a dark place, the eyes of the subjectmay appear red in the resultant picture. In redeye reduction mode, the flash will fireseveral times before the shutter releases to lessen the redeye phenomenon.
q Set the mode dial to [ ] and press theMENU button.The record menu is displayed.
Note • To cancel the operation, press theMENU button.
w Press the ▼ or ▲ button to select“REDEYE REDUCTION”.
e Press the ENTER button to select [ON]and press the MENU button.
r Press the shutter release button to shootthe subject.When you press the shutter release button, theflash will fire several times in successionpreliminarily before firing last when the shutterreleases.
ImportantNote • The shutter takes about 1 second to release after you press the shutter
release button. Hold the camera steady meanwhile to shoot.
MENU [RECORD]RECORDING MODE :WHITE BALANCE :AUTO+/– :OFFFOCUS :AUTODATE IMPRINT :OFFREDEYE REDUCTION:OFFMONOCHROME :OFFINTERVAL MODE :OFF
BACK:MENU SEL.:ENTER
MENU [RECORD]RECORDING MODE :WHITE BALANCE :AUTO+/– :OFFFOCUS :AUTODATE IMPRINT :OFFREDEYE REDUCTION:ONMONOCHROME :OFFINTERVAL MODE :OFF
BACK:MENU SEL.:ENTER
1 21 8 0 0 x 1 2 0 0 N

67
Ad
vanced
Sh
oo
ting
3
Note • Red-eye reduction mode does not work when the flash is disabled from firing.
Monochrome Mode (Black & White) SepiaShoots subjects in black & white or sepia images.
q Set the mode dial to [ ] and press theMENU button.The record menu is displayed.
Note • To cancel the operation, press theMENU button.
w Press the ▼ or ▲ button to select[MONOCHROME].
e Press the ENTER button to selectbetween [B&W] and [SEPIA] and pressthe MENU button.Select [B&W] to shoot in black & white images or[SEPIA] to shoot in sepia images. Themonochrome mode is now set.
r Press the shutter relesase button toshoot the subject.
Note When you choose monochrome mode,the white balance mode does notfunction.
How To Cancel Red-eye Reduction ModeFollow the procedures on the previous page and select [OFF] in step e.
1 2B W1 8 0 0 x 1 2 0 0 N
How To Cancel Monotone ModeFollow the above procedures and select [OFF] in step e.
MENU [RECORD]RECORDING MODE :WHITE BALANCE :AUTO+/– :OFFFOCUS :AUTODATE IMPRINT :OFFREDEYE REDUCTION:OFFMONOCHROME :OFFINTERVAL MODE :OFF
BACK:MENU SEL.:ENTER
MENU [RECORD]RECORDING MODE :WHITE BALANCE :AUTO+/– :OFFFOCUS :AUTODATE IMPRINT :OFFREDEYE REDUCTION:OFFMONOCHROME :B&WINTERVAL MODE :OFF
BACK:MENU SEL.:ENTER

68
Interval (Time lapse) Shooting Mode
The camera can be set to take pictures automatically at preset times. The times canbe set in steps of 30 seconds from 30 seconds to 3 hours. For example, if you set atime of 1 hour, the camera will release the shutter every hour, taking picturescontinuously until the SmartMedia memory card runs out of available memory.
• Check the remaining number of pictures that can be stored on theSmartMedia memory card and the internal memory card before startinginterval (time lapse) shooting.
• The auto power off will be activated after 24 hours.
q Set the mode dial to [ ] and press theMENU button.The record menu will be displayed.
Note • To cancel the operation, press theMENU button.
w Press the ▼ or ▲ button to select[INTERVAL MODE] and press the ENTERbutton.The interval timer (time lapse) settings menu willbe displayed.
Note • To cancel the operation, press theMENU button. The screen returns torecord menu.
e Press the ENTER button until the digityou want to set starts to flash.
Note • Each time you press the ENTERbutton, the flashing digit will change,from the hour to the minute to thesecond.
MENU [RECORD]RECORDING MODE :WHITE BALANCE :AUTO+/– :OFFFOCUS :AUTODATE IMPRINT :OFFREDEYE REDUCTION:OFFMONOCHROME :OFFINTERVAL MODE :OFF
BACK:MENU SEL.:ENTER
MENU [INTERVAL]
BACK:MENU SEL.:ENTER
0:00:00
ImportantNote

69
Ad
vanced
Sh
oo
ting
3
r Press the ▼ or ▲ button to change thevalue of the digit that is flashing.Pressing the ▲ ( ) button increments thenumeral. Pressing the ▼ ( ) buttondecrements the numeral. Keep pressing thebutton changes the numerals fast. Follow theprocedures e and r above to perform thesettings. The times can be set in steps of 30seconds.
t Press the ENTER button again aftersetting the digit of second.The interval timer (time lapse) function is nowenabled and the record menu is displayed.
y Press the MENU button.The record menu will close and exit to thenormal display, and the “INTERVAL” messagewill appear on the LCD monitor.
u Press the release button.The first photograph will be taken and thenadditional photographs will be taken at the settime interval. When picture taking starts, thefocus will be locked so do not move the camerafrom that location.The message “Interval” will blink during intervalphotography. Picture taking will end when thesmart media or internal memory is full.
Note • Normal picture taking is possible during interval photography by pressingthe shutter release. The set time interval will not change.
• The time interval may become longer than the set interval, depending onthe image quality mode and flash mode.
• When the battery is used, it is possible for the battery to becomeexhausted during interval photography. It is recommended that the ACadapter be used.
MENU [RECORD]RECORDING MODE :WHITE BALANCE :AUTO+/– :OFFFOCUS :AUTODATE IMPRINT :OFFREDEYE REDUCTION:OFFMONOCHROME :OFFINTERVAL MODE :ON
BACK:MENU SEL.:ENTER
1800x1200 N
START:RELEASE
1800x1200 N
START:RELEASE
12
INTERVAL
12
INTERVAL
1800x1200 N 1800x1200 N 1800x1200 N
12
INTERVAL
12
INTERVAL
MENU [INTERVAL]
BACK:MENU SEL.:ENTER
1:30:00

70
MENU [RECORD]SOFT MODE :OFFS MODE :ONAUTO BRACKET :ON
BACK:MENU SEL.:ENTER
How To Cancel Interval ShootingIf the “INTERVAL” message lights up on the LCD monitor, take the followingprocedures:• Follow the procedures on the previous page and set the interval (time lapse)
timer to [0:00:00].• Slide the power switch off.• Set the mode dial to switch to another mode.
How To Cancel ShootingThe “INTERVAL” message flashes on the LCD monitor while interval (time lapse)shooting is in progress. To cancel shooting while in progress, take the followingprocedures:• Slide the power switch off.• Set the mode dial to switch to another mode.
Using SOFT Mode
Smoothes the contours when photographing flat objects such as people, faces, walls,etc.
q Set the MODE dial to [ ] and then pressthe MENU button.The Recording menu will appear.
Note • Press the MENU button to cancel theoperation.
w Press the up ▼ or down ▲ button toselect SOFT MODE on the secondscreen.
e Press the ENTER button to select ONand then press the MENU button.
r Press the release button to take thepicture.
MENU [RECORD]SOFT MODE :ONS MODE :OFFAUTO BRACKET :ON
BACK:MENU SEL.:ENTER
How To Cancel SOFT ModeFollow the above procedures and select OFF in step e.

71
Ad
vanced
Sh
oo
ting
3
Note • Enable the keep settings to save the SOFT Mode setting. See KeepSettings. (p.104)
S Mode (Shutter Speed)
Using S mode, the shutter is released faster to make low light shots possible. If the“SLOW SHUTTER” message appears on the LCD monitor when you point the cameraat a dark subject and press the shutter release button lightly, S mode will help reducecamera shake that tends to occur in this situation.
ImportantNote • Pictures taken in S mode may occasionally have some noise.
q Set the mode dial to [ ] and press theMENU button.The record menu will be displayed.
Note • To cancel the operation, press theMENU button.
w Press the ▼ or ▲ button to select[S MODE].
e Press the ENTER button to select [ON]and press the MENU button.The S mode is now set.
r Press the shutter release button to takethe picture.The camera will automatically determine whetherto shoot in S mode or not according to thebrightness of the subject. If the “SLOWSHUTTER” message appears on the LCDmonitor when you press the shutter releasebutton lightly, the shot will be taken in S mode.
1800x1200 N S MODE SLOW SHUTTER
12
MENU [RECORD]SOFT MODE :OFFS MODE :OFFAUTO BRACKET :OFF
BACK:MENU SEL.:ENTER
MENU [RECORD]SOFT MODE :ONS MODE :ONAUTO BRACKET :OFF
BACK:MENU SEL.:ENTER

72
Note • Moving the camera before the beep sounds, after pressing the shutterrelease button, could result in a blurred image.
Note • S mode works only when the flash is disabled from firing.• Enable the keep settings to save the S mode setting. See “Keep
Settings” (p.104).
Using Auto Bracket
This function takes three continuous frames: one each at the set exposure and at -0.5EV and +0.5EV. This feature makes it possible to obtain correct exposure underdifficult conditions.Mount the camera on a tripod or level surface to prevent the camera from moving.
q Set the MODE dial to [ ] and then pressthe MENU button.The Recording menu will appear.
Note • Press the MENU button to cancel theoperation.
w Press the up ▼ or down ▲ button toturn AUTO BRACKET to ON.Press the ENTER button to select ON when inOFF and then press the MENU button.
e Press the release button to take thepicture.When the release button is pressed, threeframes will be taken at the set exposure of –0.5EV, 0, + 0.5EV.
How To Cancel Auto BracketFollow the above procedures and select OFF in step e.
How To Cancel the S ModeFollow the above procedures and select [OFF] in step e.
SOFT MODE :OFFS MODE :OFFAUTO BRACKET :ON
BACK:MENU SEL.:ENTER

73
Ad
vanced
Sh
oo
ting
3
Note • The flash will not fire when Auto Bracket is used.• Enable the keep settings to save the Auto Bracket. See Keep Settings.
(p.104)• The digital zoom function is not available when Auto Bracket is used.• The continuous mode cannot be set when Auto Bracket is used.
Macro Shooting (Close-up Shooting)
Macro photography allows you to take a closeup picture of a subject. Macro photography upto about 4 cm (1.5 inches) away is made possible by setting the lens to the widest angleposition. With the lens set at another position, macro photography as close as about 40 cm(15.8 inches) is possible.
q Set the mode dial to [ ].
w Bring the camera close to the subjectand decide the composition of thepicture. Press the shutter release lightlyto set the focus.
e Gently press the shutter release buttondown fully to take the picture.
ImportantNote • The focusing range is so small in macro mode that the focus can be lost if
the camera is moved. Make sure the camera is firmly positioned bymounting it on a tripod, for example, to keep it steady when shooting.
• Light from the flash may appear red in shots taken in flash mode. Thesubject may also appear white in the resultant shot due to over-exposure.
• Since the field of view throught the viewfinder and the shooting range areshifted by a wide margin, take pictures by confirming the shooting rangethrough the LCD or with the camera connected to a TV monitor.

74
Focal Range for Macro ShootingThe macro range is when the subject is located at a distance between4.0cm and 40cm (wideangle).
Shutter Release ButtonThe optional remote control unit is convenient to use when the camerais mounted on a tripod or similar device and the shutter release buttonis difficult to press.
Note • To photograph a subject at larger than life size, set SUPER MACRO ( )and move close to the subject when taking the picture.
Tips