advanced organizational management - knowasap
TRANSCRIPT

I n t
e r
n a
l
U s
e
S A
P
P a
r t
n e
r
O n
l y I n
t e r n a l U
s e S A
P P
a r t n e r O
n l y
HR506Advanced Organizational
ManagementmySAP Human Resources
Date
Training Center
Instructors
Education Website
Participant HandbookCourse Version: 2005 Q2Course Duration: 2 Day(s)Material Number: 50072149
An SAP course - use it to learn, reference it for work
I n t
e r
n a
l
U s
e
S A
P
P a
r t
n e
r
O n
l y I n
t e r n a l U
s e S A
P P
a r t n e r O
n l y
Copyright
Copyright © 2005 SAP AG. All rights reserved.
No part of this publication may be reproduced or transmitted in any form or for any purpose without theexpress permission of SAP AG. The information contained herein may be changed without prior notice.
Some software products marketed by SAP AG and its distributors contain proprietary softwarecomponents of other software vendors.
Trademarks
� Microsoft®, WINDOWS®, NT®, EXCEL®, Word®, PowerPoint® and SQL Server® areregistered trademarks of Microsoft Corporation.
� IBM®, DB2®, OS/2®, DB2/6000®, Parallel Sysplex®, MVS/ESA®, RS/6000®, AIX®, S/390®,AS/400®, OS/390®, and OS/400® are registered trademarks of IBM Corporation.
� ORACLE® is a registered trademark of ORACLE Corporation.� INFORMIX®-OnLine for SAP and INFORMIX® Dynamic ServerTM are registered trademarks
of Informix Software Incorporated.� UNIX®, X/Open®, OSF/1®, and Motif® are registered trademarks of the Open Group.� Citrix®, the Citrix logo, ICA®, Program Neighborhood®, MetaFrame®, WinFrame®,
VideoFrame®, MultiWin® and other Citrix product names referenced herein are trademarks ofCitrix Systems, Inc.
� HTML, DHTML, XML, XHTML are trademarks or registered trademarks of W3C®, World WideWeb Consortium, Massachusetts Institute of Technology.
� JAVA® is a registered trademark of Sun Microsystems, Inc.� JAVASCRIPT® is a registered trademark of Sun Microsystems, Inc., used under license for
technology invented and implemented by Netscape.� SAP, SAP Logo, R/2, RIVA, R/3, SAP ArchiveLink, SAP Business Workflow, WebFlow, SAP
EarlyWatch, BAPI, SAPPHIRE, Management Cockpit, mySAP.com Logo and mySAP.com aretrademarks or registered trademarks of SAP AG in Germany and in several other countries allover the world. All other products mentioned are trademarks or registered trademarks of theirrespective companies.
Disclaimer
THESE MATERIALS ARE PROVIDED BY SAP ON AN "AS IS" BASIS, AND SAP EXPRESSLYDISCLAIMS ANY AND ALL WARRANTIES, EXPRESS OR APPLIED, INCLUDING WITHOUTLIMITATION WARRANTIES OF MERCHANTABILITY AND FITNESS FOR A PARTICULARPURPOSE, WITH RESPECT TO THESE MATERIALS AND THE SERVICE, INFORMATION, TEXT,GRAPHICS, LINKS, OR ANY OTHER MATERIALS AND PRODUCTS CONTAINED HEREIN. INNO EVENT SHALL SAP BE LIABLE FOR ANY DIRECT, INDIRECT, SPECIAL, INCIDENTAL,CONSEQUENTIAL, OR PUNITIVE DAMAGES OF ANY KIND WHATSOEVER, INCLUDINGWITHOUT LIMITATION LOST REVENUES OR LOST PROFITS, WHICH MAY RESULT FROMTHE USE OF THESE MATERIALS OR INCLUDED SOFTWARE COMPONENTS.

I n t
e r
n a
l
U s
e
S A
P
P a
r t
n e
r
O n
l y I n
t e r n a l U
s e S A
P P
a r t n e r O
n l y
About This HandbookThis handbook is intended to complement the instructor-led presentation of thiscourse, and serve as a source of reference. It is not suitable for self-study.
Typographic ConventionsAmerican English is the standard used in this handbook. The following typographicconventions are also used.
Type Style Description
Example text Words or characters that appear on the screen. Theseinclude field names, screen titles, pushbuttons as well asmenu names, paths, and options.
Also used for cross-references to other documentationboth internal (in this documentation) and external (inother locations, such as SAPNet).
Example text Emphasized words or phrases in body text, titles ofgraphics, and tables
EXAMPLE TEXT Names of elements in the system. These include reportnames, program names, transaction codes, table names,and individual key words of a programming language,when surrounded by body text, for example SELECTand INCLUDE.
Example text Screen output. This includes file and directory namesand their paths, messages, names of variables andparameters, and passages of the source text of a program.
Example text Exact user entry. These are words and characters thatyou enter in the system exactly as they appear in thedocumentation.
<Example text> Variable user entry. Pointed brackets indicate that youreplace these words and characters with appropriateentries.
2005/Q2 © 2005 SAP AG. All rights reserved. iii
I n t
e r
n a
l
U s
e
S A
P
P a
r t
n e
r
O n
l y I n
t e r n a l U
s e S A
P P
a r t n e r O
n l y
About This Handbook HR506
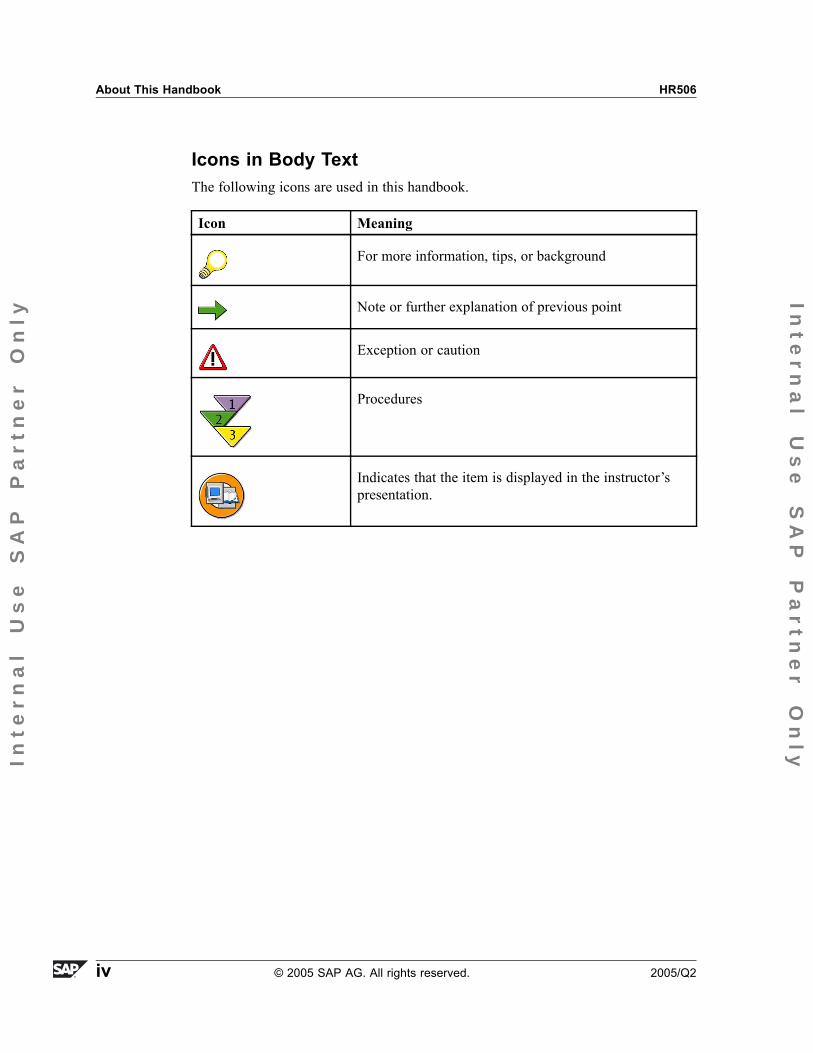
Icons in Body TextThe following icons are used in this handbook.
Icon Meaning
For more information, tips, or background
Note or further explanation of previous point
Exception or caution
Procedures
Indicates that the item is displayed in the instructor�spresentation.
iv © 2005 SAP AG. All rights reserved. 2005/Q2
I n t
e r
n a
l
U s
e
S A
P
P a
r t
n e
r
O n
l y I n
t e r n a l U
s e S A
P P
a r t n e r O
n l y
ContentsCourse Overview ...... . . . . . . . . . . . . . . . . . . . . . . . . . . . . . . . . . . . . . . . . . . . . . . . . . . . . . . . . . . . . . . . . . . . . . . . vii
Course Goals.. . . . . . . . . . . . . . . . . . . . . . . . . . . . . . . . . . . . . . . . . . . . . . . . . . . . . . . . . . . . . . . . . . . . . . . . . . . . . . . .viiCourse Objectives .. . . . . . . . . . . . . . . . . . . . . . . . . . . . . . . . . . . . . . . . . . . . . . . . . . . . . . . . . . . . . . . . . . . . . . . . . .vii
Unit 1: Enhancing the Data Model ..... . . . . . . . . . . . . . . . . . . . . . . . . . . . . . . . . . . . . . . . . . . . . . . . . . . . . .1Enhancing the Data Model .. . . . . . . . . . . . . . . . . . . . . . . . . . . . . . . . . . . . . . . . . . . . . . . . . . . . . . . . . . . . . . . . .2
Unit 2: Customizing the Hierarchy Framework ..... . . . . . . . . . . . . . . . . . . . . . . . . . . . . . . . . . . . 19Customizing the Object Manager... . . . . . . . . . . . . . . . . . . . . . . . . . . . . . . . . . . . . . . . . . . . . . . . . . . . . . . 20Customizing the Structural Overview Objects .. . . . . . . . . . . . . . . . . . . . . . . . . . . . . . . . . . . . . . . . . 33
Unit 3: Customizing Manager�s Desktop..... . . . . . . . . . . . . . . . . . . . . . . . . . . . . . . . . . . . . . . . . . . . 45Customizing Manager's Desktop ... . . . . . . . . . . . . . . . . . . . . . . . . . . . . . . . . . . . . . . . . . . . . . . . . . . . . . . 46
Unit 4: Workflow and Organizational Management.... . . . . . . . . . . . . . . . . . . . . . . . . . . . . . . . 63Workflow and Organizational Management .. . . . . . . . . . . . . . . . . . . . . . . . . . . . . . . . . . . . . . . . . . . . 64
Unit 5: Appendix ..... . . . . . . . . . . . . . . . . . . . . . . . . . . . . . . . . . . . . . . . . . . . . . . . . . . . . . . . . . . . . . . . . . . . . . . . . . 89Transports in Organizational Management... . . . . . . . . . . . . . . . . . . . . . . . . . . . . . . . . . . . . . . . . . . . 90
Appendix 1: Paths for HR506 ..... . . . . . . . . . . . . . . . . . . . . . . . . . . . . . . . . . . . . . . . . . . . . . . . . . . . . .107
Index ..... . . . . . . . . . . . . . . . . . . . . . . . . . . . . . . . . . . . . . . . . . . . . . . . . . . . . . . . . . . . . . . . . . . . . . . . . . . . . . . . . . . . . . . .117
2005/Q2 © 2005 SAP AG. All rights reserved. v

I n t
e r
n a
l
U s
e
S A
P
P a
r t
n e
r
O n
l y I n
t e r n a l U
s e S A
P P
a r t n e r O
n l y
Contents HR506
vi © 2005 SAP AG. All rights reserved. 2005/Q2

I n t
e r
n a
l
U s
e
S A
P
P a
r t
n e
r
O n
l y I n
t e r n a l U
s e S A
P P
a r t n e r O
n l y
Course OverviewCourse HR506 Advanced Organizational Management provides experiencedOrganizational Management Consultants with the possibility of expanding theirknowledge in Data Model Customizing, Organization interface, Staffing andManager�s Desktop. The course also gives light to the relationship between Workflowand Organizational Management. In addition, depending on time and interest, thesubject of Transports in Organizational Management can also be dealt with withthe participants.
Target AudienceThis course is intended for the following audiences:
� Human Resources Project Team Members� Human Resources Consultants
Course PrerequisitesRequired Knowledge
� SAP HR mySAP HR Solution Overview� HR100 Essentials of Human Resources� HR120 Essentials of Personnel Development� HR505 Organizational Management
Recommended Knowledge
� HR305 Configuration Master Data
Course GoalsThis course will prepare you to:
� Enhance the Organizational Management data model� Customize the Organization and Staffing and Manager�s Desktop interfaces� Understand Workflow in Organizational Management.
Course ObjectivesAfter completing this course, you will be able to:
2005/Q2 © 2005 SAP AG. All rights reserved. vii

I n t
e r
n a
l
U s
e
S A
P
P a
r t
n e
r
O n
l y I n
t e r n a l U
s e S A
P P
a r t n e r O
n l y
Course Overview HR506
� Add customer object types and relationships to the Organizational Managementdata model,
� Customize Manager�s Desktop and the Organization and Staffing interface andadd new object types and relationships to them,
� Set up and understand Workflow in Organizational Management
SAP Software Component InformationThe information in this course pertains to the following SAP Software Componentsand releases:
viii © 2005 SAP AG. All rights reserved. 2005/Q2

I n t
e r
n a
l
U s
e
S A
P
P a
r t
n e
r
O n
l y I n
t e r n a l U
s e S A
P P
a r t n e r O
n l y
Unit 1Enhancing the Data Model
Unit OverviewThe unit Expansion of the Data Model is concerned with the creation of own objecttypes and their relationships for the business processes of Human Capital Managementin the SAP System. Participants will also create evaluation paths using knowledgefrom the course HR505.
Unit ObjectivesAfter completing this unit, you will be able to:
� Customize your own object types and their relationships� Create the basic infotypes for these object types� Maintain the new object types in expert mode and on the General Structures
interface.
Unit ContentsLesson: Enhancing the Data Model . . . . . . . . . . . . . . . . . . . . . . . . . . . . . . . . . . . . . . . . . . . . . . . . .2
Exercise 1: Enhancing the Data Model. .. . . . . . . . . . . . . . . . . . . . . . . . . . . . . . . . . . . . . 11
2005/Q2 © 2005 SAP AG. All rights reserved. 1

I n t
e r
n a
l
U s
e
S A
P
P a
r t
n e
r
O n
l y I n
t e r n a l U
s e S A
P P
a r t n e r O
n l y
Unit 1: Enhancing the Data Model HR506
Lesson: Enhancing the Data Model
Lesson Overview� Adding Customer Object Types to the Data Model� Creating the Most Important Infotypes for the New Object Type� Adding Customer Relationships to the Data Model� Maintaining the New Object Types and Relationships in Organizational
Management
Lesson ObjectivesAfter completing this lesson, you will be able to:
� Customize your own object types and their relationships� Create the basic infotypes for these object types� Maintain the new object types in expert mode and on the General Structures
interface.
Business ExampleYour enterprise has implemented SAP Human Resources with all components, and hasnoticed that the standard object types and relationships in Organizational Managementare not sufficient to depict your personnel development concept with training groups.You have, therefore, decided to depict the concept in Organizational Management bycreating a new object type and your own relationship.
2 © 2005 SAP AG. All rights reserved. 2005/Q2

I n t
e r
n a
l
U s
e
S A
P
P a
r t
n e
r
O n
l y I n
t e r n a l U
s e S A
P P
a r t n e r O
n l y
HR506 Lesson: Enhancing the Data Model
Figure 1: Organizational Management Data Model
The basic Personnel Planning object types, their infotypes and relationships wereintroduced in the Organizational Management course. All object types in thePersonnel Planning data model are defined in table T778O. Each organizational objectis restricted by the allowed relationships of its object type.
You can use object-oriented design like building blocks to depict your organizationalplan in the system with the common object types and their relationships. Sometimes,however, the standard is not sufficient to meet the business requirements of anenterprise. In that case you can enhance the existing data model.
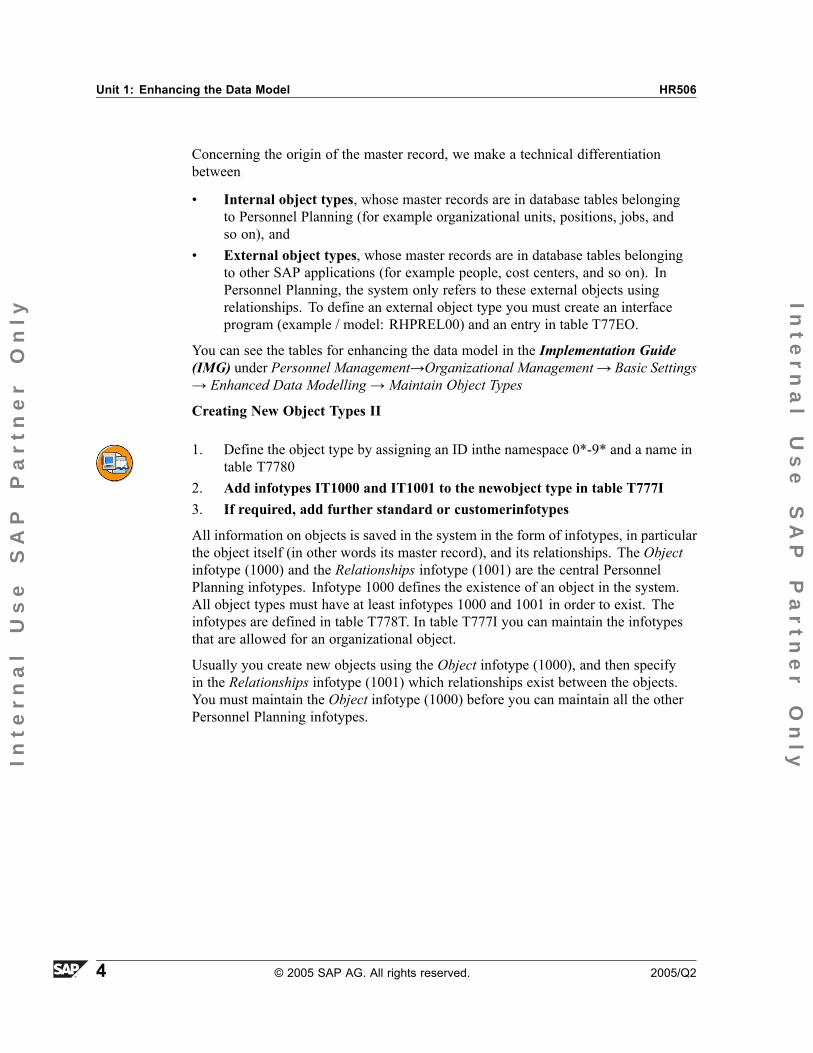
Creating New Object Types I
1. Define the object type by assigning an ID inthe namespace 0*-9* and aname in table T7780
2. Add infotypes IT1000 and IT1001 to the newobject type in table T777I3. If required, add further standard or customerinfotypes
In the same way as these organizational object types were delivered to you with alltheir characteristics, you can create your own object types, give them characteristics inthe form of infotypes, and link them to each other and/or to existing object types withyour own relationships.
Object types are defined in table T778O by a two-character CHAR string.
The namespace A* - Z* is reserved for SAP; 0* - 9* is for customers.
2005/Q2 © 2005 SAP AG. All rights reserved. 3
I n t
e r
n a
l
U s
e
S A
P
P a
r t
n e
r
O n
l y I n
t e r n a l U
s e S A
P P
a r t n e r O
n l y
Unit 1: Enhancing the Data Model HR506
Concerning the origin of the master record, we make a technical differentiationbetween
� Internal object types, whose master records are in database tables belongingto Personnel Planning (for example organizational units, positions, jobs, andso on), and
� External object types, whose master records are in database tables belongingto other SAP applications (for example people, cost centers, and so on). InPersonnel Planning, the system only refers to these external objects usingrelationships. To define an external object type you must create an interfaceprogram (example / model: RHPREL00) and an entry in table T77EO.
You can see the tables for enhancing the data model in the Implementation Guide(IMG) under Personnel Management→Organizational Management→ Basic Settings→ Enhanced Data Modelling→ Maintain Object Types
Creating New Object Types II
1. Define the object type by assigning an ID inthe namespace 0*-9* and a name intable T7780
2. Add infotypes IT1000 and IT1001 to the newobject type in table T777I3. If required, add further standard or customerinfotypes
All information on objects is saved in the system in the form of infotypes, in particularthe object itself (in other words its master record), and its relationships. The Objectinfotype (1000) and the Relationships infotype (1001) are the central PersonnelPlanning infotypes. Infotype 1000 defines the existence of an object in the system.All object types must have at least infotypes 1000 and 1001 in order to exist. Theinfotypes are defined in table T778T. In table T777I you can maintain the infotypesthat are allowed for an organizational object.
Usually you create new objects using the Object infotype (1000), and then specifyin the Relationships infotype (1001) which relationships exist between the objects.You must maintain the Object infotype (1000) before you can maintain all the otherPersonnel Planning infotypes.
4 © 2005 SAP AG. All rights reserved. 2005/Q2

I n t
e r
n a
l
U s
e
S A
P
P a
r t
n e
r
O n
l y I n
t e r n a l U
s e S A
P P
a r t n e r O
n l y
HR506 Lesson: Enhancing the Data Model
Figure 2: Creating New Relationships
Using relationships you can define links between the individual object types in thesystem.
Relationships are defined in table T778V by a three-character CHAR string.
In table TRESC the namespace is delimited as follows:
� SAP: �000� - �999�� Customer 'A**' - 'Z**'
Relationships are generally defined in two directions: A = bottom up and B = topdown. However, this convention is simply a non-obligatory �suggestion� when youset up the relationship. What is important is that once you have assigned the directionsA and B, you do not swap or change them later.
After this step, you define time constraints for the relationships.
Then you continue maintaining the relationships in table T777V (names for directions)and T777E (allowed relationships).
Using these relationships you can also create new evaluation paths.
2005/Q2 © 2005 SAP AG. All rights reserved. 5

I n t
e r
n a
l
U s
e
S A
P
P a
r t
n e
r
O n
l y I n
t e r n a l U
s e S A
P P
a r t n e r O
n l y
Unit 1: Enhancing the Data Model HR506
Figure 3: Evaluation Paths
Evaluation paths define the relationships with which a structure is created. Objectsmay have several relationships. Consequently, not all an object's relationships aredisplayed in one view.
Example: To display the staff assignment along the organizational structure(evaluation path O-S-P), you start with the organizational unit and determine therelationships to the positions. Starting from these positions, you then determine theholders of the positions. After this cycle is complete, you progress to a subordinateorganizational unit where you start the cycle again. Cost centers and their relationshipsto organizational units are not displayed for this evaluation path.
6 © 2005 SAP AG. All rights reserved. 2005/Q2

I n t
e r
n a
l
U s
e
S A
P
P a
r t
n e
r
O n
l y I n
t e r n a l U
s e S A
P P
a r t n e r O
n l y
HR506 Lesson: Enhancing the Data Model
Figure 4: Finding Evaluation Paths
To help you choose the correct evaluation path, the General Structures interfaceallows you to use the F4 help to specify up to three object types that exist in theevaluation path as selection criteria.
Enter the objects you want to find in the evaluation path as the selection criteria.
When you access the General Structures interface, you can also generate temporaryevaluation paths.
2005/Q2 © 2005 SAP AG. All rights reserved. 7

I n t
e r
n a
l
U s
e
S A
P
P a
r t
n e
r
O n
l y I n
t e r n a l U
s e S A
P P
a r t n e r O
n l y
Unit 1: Enhancing the Data Model HR506
Figure 5: Creating Evaluation Paths
You can create evaluation paths in Customizing for Organizational Managementunder Basic Settings.
One or more relationships form the navigation paths for an evaluation. They allowstructure information (for example, organizational plan or reporting structure) tobe evaluated.
In the Skip field in individual maintenance you can specify that a particular navigationpath should be evaluated, but that the result should not be displayed.
You can create alphanumeric evaluation paths with a maximum of eight characters.The first letter should be Z.
Do not change any existing evaluation paths unless it is an evaluation pathyou have created yourself. These changes affect all programs and reports thatperhaps use the evaluation path that you have changed in the background. Anychanges you make could lead to system problems.
Should you prefer not to use a standard SAP evaluation path for reports that use aninternal evaluation path, you can specify the alternative evaluation path in the ValueAbbr. column.
8 © 2005 SAP AG. All rights reserved. 2005/Q2

I n t
e r
n a
l
U s
e
S A
P
P a
r t
n e
r
O n
l y I n
t e r n a l U
s e S A
P P
a r t n e r O
n l y
HR506 Lesson: Enhancing the Data Model
Important Customizing Tables for Personnel Planning� T778O/T777O Object Types� T77EO External Object Types� T778V/T777V Relationships� T777E Allowed Relationships� T77AR Additional Data on Relationships� T777Z Infotype Time Constraint� T778T/T777T Infotypes� T777I Infotypes per Object Type� T778U/T777U Subtypes� T77ZR Definition of Time Constraint
Depending on Target Object Type
You can access the individual tables via the following path in the ImplementationGuide:
� Personnel Management→ Organizational Management→ Basic Settings→Data Model Enhancement
Consistency Check in the Data Model
⇒ The report RHCHECK0 checks Customizing consistencyin the PersonnelPlanning data model
Infotypes / additional data
� Object type assignment� Time constraint� Structures� Database tablesRelationships
� Allowed relationships� Time constraintIntegration
� Active or inactive� Active plan version
2005/Q2 © 2005 SAP AG. All rights reserved. 9

I n t
e r
n a
l
U s
e
S A
P
P a
r t
n e
r
O n
l y I n
t e r n a l U
s e S A
P P
a r t n e r O
n l y
Unit 1: Enhancing the Data Model HR506
10 © 2005 SAP AG. All rights reserved. 2005/Q2

I n t
e r
n a
l
U s
e
S A
P
P a
r t
n e
r
O n
l y I n
t e r n a l U
s e S A
P P
a r t n e r O
n l y
HR506 Lesson: Enhancing the Data Model
Exercise 1: Enhancing the Data Model
Exercise ObjectivesAfter completing this exercise, you will be able to:� Create new object types and relationships in Customizing
Business ExampleYou want to add new object types and relationships to the object-oriented modelin Personnel Planning.
Task:In your enterprise you have divided the employees into training groups, and you wantto promote the development of these groups using different personnel developmentmeasures. You also want to maintain and manage the groups in OrganizationalManagement.
1. To do this, create a new object type with the object type abbreviation �##� andthe name �Training Group ##�. ## is your two-digit group number. To displaythe object type in the system you can use the ICON_PARTNER.
2. It should be possible to maintain relationships and descriptions for objects ofthis type.
3. Create a new relationship that tells you which person is assigned to whichtraining group. Create a relationship with the abbreviation �Q##� and the names�belongs to training group (##)� and �includes person (##)�.
A person can only ever belong to one training group. Maintain the timeconstraints accordingly.
4. Based on the evaluation path SBESX, create your own evaluation path ZBES##that displays the organizational structure including positions, persons, and thepersons� assignment to training groups. Also depict the reverse direction inyour own evaluation path Z_##PSOO.
5. In the Organizational Management menu, choose Expert Mode→ General andaccess the General Structures interface. Create objects for your new objecttype and link them to people using your new relationship. Select persons fromthe Organizational Units HR Training Group Training→International→Executive Board→ ##Executive Board.
2005/Q2 © 2005 SAP AG. All rights reserved. 11

I n t
e r
n a
l
U s
e
S A
P
P a
r t
n e
r
O n
l y I n
t e r n a l U
s e S A
P P
a r t n e r O
n l y
Unit 1: Enhancing the Data Model HR506
Solution 1: Enhancing the Data ModelTask:In your enterprise you have divided the employees into training groups, and you wantto promote the development of these groups using different personnel developmentmeasures. You also want to maintain and manage the groups in OrganizationalManagement.
1. To do this, create a new object type with the object type abbreviation �##� andthe name �Training Group ##�. ## is your two-digit group number. To displaythe object type in the system you can use the ICON_PARTNER.
a) Call the SAP Implementation Guide (IMG) over the menu path SAPEasy Access→Tools→ AcceleratedSAP→ Customizing→ ProjectManagement→ SAP Reference IMG .
Select in IMG → Personnel Management → OrganizationalManagement→ Basic Settings→ Enhanced Data Modelling →Maintain Object Types.
Choose New Entries to create a new object type with the object typeabbreviation �##� and the name �Training Group ##�. ## is your two-digitgroup number. Under Icon Name, enter the name ICON_PARTNER.
2. It should be possible to maintain relationships and descriptions for objects ofthis type.
a) Choose the IMG activity→ Maintain Infotypes→Maintain Infotypes.Add your new object type to the infotypes 1000, 1001, and 1002.
To do this select the appropriate info type and double click on Info Typesper Object Type.
Then go to New Entries and make an entry for your Object type andyour Infotype.
Repeat this procedure for all object types.
3. Create a new relationship that tells you which person is assigned to whichtraining group. Create a relationship with the abbreviation �Q##� and the names�belongs to training group (##)� and �includes person (##)�.
A person can only ever belong to one training group. Maintain the timeconstraints accordingly.
Continued on next page
12 © 2005 SAP AG. All rights reserved. 2005/Q2

I n t
e r
n a
l
U s
e
S A
P
P a
r t
n e
r
O n
l y I n
t e r n a l U
s e S A
P P
a r t n e r O
n l y
HR506 Lesson: Enhancing the Data Model
a) Choose the IMG activity→ Relationship Maintenance→ MaintainRelationships. Create a relationship with the abbreviation �Q##� and thenames �belongs to training group (##)� and �includes person (##)�.
Relationship Bottom uprelationship
Top downrelationship
Q## belongs to (##) includes person (##)
In the Allowed Relationships step, enter the two directions of your newrelationship to or from the object type Person.
OT Objecttext
A/B Rel Relation-ship de-scription
Rel type O. N. main-tainable
## b q## pp a q## ##
Choose the IMG activity→ Infotype Maintenance→Maintain Subtypesand enter the new subtypes AQ## and BQ## with their correspondingtexts for infotype 1001.
Infotype Infotypedescription
Subtype Subtype text
1001 aq## belongs to (##)1001 bq## includes person
(##)
For your new object type ##, infotype 1001, and subtype BQ##, enter timeconstraint 3. For the object type P (person), infotype 1001, and subtypeAQ##, enter time constraint 2.
Select the entry
Infotype 1001 Relationships aq## belongs to (##)
And double-click on Time Constraint. Select New entries in the Applicationmenu bar. Maintain the following data in the table:
Continued on next page
2005/Q2 © 2005 SAP AG. All rights reserved. 13

I n t
e r
n a
l
U s
e
S A
P
P a
r t
n e
r
O n
l y I n
t e r n a l U
s e S A
P P
a r t n e r O
n l y
Unit 1: Enhancing the Data Model HR506
Object Type P PersonInfotype 1001 RelationshipsSubtype AQ## belongs to (00)Time constraint 2Object condition
Repeat the procedure and maintain your second new entry according tothe following table:
Object Type ##Infotype 1001Subtype bq##Time Constraint 3Object Condition
4. Based on the evaluation path SBESX, create your own evaluation path ZBES##that displays the organizational structure including positions, persons, and thepersons� assignment to training groups. Also depict the reverse direction inyour own evaluation path Z_##PSOO.
a) Select in IMG → Personnel Management → OrganizationalManagement→ Basic Settings→ Enhanced Data Modelling →Evaluation paths.
Choose New Entries and maintain an evaluation path ZBES## with thename Training Group in Org. Structure (##) with the following data:
Continued on next page
14 © 2005 SAP AG. All rights reserved. 2005/Q2

I n t
e r
n a
l
U s
e
S A
P
P a
r t
n e
r
O n
l y I n
t e r n a l U
s e S A
P P
a r t n e r O
n l y
HR506 Lesson: Enhancing the Data Model
No. ObjectType
A/B Rela-tionship
Relationshipdescription
Pri-ority
TypeRel.Object
10 O B 002 DeterminesSystem
* O
20 O B 003 DeterminesSystem
* S
30 S A 008 DeterminesSystem
* P
40 P A Q## DeterminesSystem
* ##
Maintain the inverse direction Z_##PSOO�Training Trip with Persons�as follows:
No. ObjectType
A/B Rela-tion-ship
Relationshipdescription
Pri-ority
Type Rel.Object
10 ## B Q## DeterminesSystem
* P
20 P B 008 DeterminesSystem
* S
30 S A 003 DeterminesSystem
* O
40 O A 002 DeterminesSystem
* O
5. In the Organizational Management menu, choose Expert Mode→ General andaccess the General Structures interface. Create objects for your new objecttype and link them to people using your new relationship. Select persons fromthe Organizational Units HR Training Group Training→International→Executive Board→ ##Executive Board.
a) Call Expert Mode→ general (Transaction PP01) using the path SAPEasy Access→ Human Resources→ Organizational Management andmaintain general structures→ (transaction PPSM) with your newlydefined evaluation path. As the object type, enter ##. Create assignmentsfrom training groups to people and the other way around.
2005/Q2 © 2005 SAP AG. All rights reserved. 15

I n t
e r
n a
l
U s
e
S A
P
P a
r t
n e
r
O n
l y I n
t e r n a l U
s e S A
P P
a r t n e r O
n l y
Unit 1: Enhancing the Data Model HR506
Lesson Summary
You should now be able to:� Customize your own object types and their relationships� Create the basic infotypes for these object types� Maintain the new object types in expert mode and on the General Structures
interface.
16 © 2005 SAP AG. All rights reserved. 2005/Q2

I n t
e r
n a
l
U s
e
S A
P
P a
r t
n e
r
O n
l y I n
t e r n a l U
s e S A
P P
a r t n e r O
n l y
HR506 Unit Summary
Unit SummaryYou should now be able to:� Customize your own object types and their relationships� Create the basic infotypes for these object types� Maintain the new object types in expert mode and on the General Structures
interface.
2005/Q2 © 2005 SAP AG. All rights reserved. 17

I n t
e r
n a
l
U s
e
S A
P
P a
r t
n e
r
O n
l y I n
t e r n a l U
s e S A
P P
a r t n e r O
n l y
Unit Summary HR506
18 © 2005 SAP AG. All rights reserved. 2005/Q2

I n t
e r
n a
l
U s
e
S A
P
P a
r t
n e
r
O n
l y I n
t e r n a l U
s e S A
P P
a r t n e r O
n l y
Unit 2Customizing the Hierarchy Framework
Unit OverviewThe unit Customizing the Hierarchy Framework provides a detailed overview ofthe Customizing options of the Organization and Staffing interface. The functionspresented are synoyms for all interfaces based on the hierarchy framework besidesthis interface.
In the lesson Customizing the Object Manager, you will learn how to adapt this tool.This lesson will also detail how to adapt the column framework.
In the lesson Customizing the Structural Overview Object, we will turn to the WorkArea and customize the overview area and the detail area
Unit ObjectivesAfter completing this unit, you will be able to:
� Integrate further object types in the Organization and Staffing interface, and dothe following for those object types
� Add search nodes to the search area� Adjust the overview area accordingly� Add new tab pages to the detail area.
Unit ContentsLesson: Customizing the Object Manager.. . . . . . . . . . . . . . . . . . . . . . . . . . . . . . . . . . . . . . . 20
Exercise 2: Customizing the Object Manager ... . . . . . . . . . . . . . . . . . . . . . . . . . . . . 27Lesson: Customizing the Structural Overview Objects ... . . . . . . . . . . . . . . . . . . . . . . 33
Exercise 3: Customizing the Structural Overview Objects ... . . . . . . . . . . . . . . 37
2005/Q2 © 2005 SAP AG. All rights reserved. 19

I n t
e r
n a
l
U s
e
S A
P
P a
r t
n e
r
O n
l y I n
t e r n a l U
s e S A
P P
a r t n e r O
n l y
Unit 2: Customizing the Hierarchy Framework HR506
Lesson: Customizing the Object Manager
Lesson OverviewIn this lesson you will customize the object manager. In doing so, you will also addyour new object types and links there. At the same time you will learn how to adaptthe column framework.
Lesson ObjectivesAfter completing this lesson, you will be able to:
� Integrate further object types in the Organization and Staffing interface, and dothe following for those object types
� Add search nodes to the search area
Business ExampleYour company has decided that the new personnel development concept withtraining groups should be represented on the Organization and Staffing interface inthe hierarchy framework. This will allow a clearer overview of the assignments ofemployees to training groups.
Figure 6: What Is the Hierarchy Framework?
20 © 2005 SAP AG. All rights reserved. 2005/Q2

I n t
e r
n a
l
U s
e
S A
P
P a
r t
n e
r
O n
l y I n
t e r n a l U
s e S A
P P
a r t n e r O
n l y
HR506 Lesson: Customizing the Object Manager
The SAP hierarchy framework (HFW) is a basis development that helps you toprogram applications for visualizing and modifying hierarchical structures andobjects. It provides a framework for displaying hierarchical structures like the onesyou create in Organizational Management.
The interface layout of an application created using the hierarchy framework - like theOrganization and Staffing interface - is divided into two screen areas. Above them arethe menu bar and the application toolbar.
The area on the left is called the object manager and always consists of a searcharea and a selection area.
The area on the right of the screen is called the work area. It is built up in a specificway for each application, and can be further divided. In the case of the Organizationand Staffing interface, it is divided into the overview area and the detail area.
If you want to display the basic technical names of the individual areas, you mustmaintain user parameters:
� OM_OBJM_SCEN_DISPLAY → Object Manager Scenario� OM_FRAM_SCEN_DISPLAY → Framework Scenario� OM_ARRAYTYPE_DISPLAY → Column Framework� OM_TABTYPE_DISPLAY → Technical Tab Card Key
Figure 7: Customizing Steps
2005/Q2 © 2005 SAP AG. All rights reserved. 21

I n t
e r
n a
l
U s
e
S A
P
P a
r t
n e
r
O n
l y I n
t e r n a l U
s e S A
P P
a r t n e r O
n l y
Unit 2: Customizing the Hierarchy Framework HR506
When maintaining the hierarchy framework on the Organization and Staffinginterface, you begin by:
1. Adjusting the object manager,2. Defining and adjusting the services in the overview area,3. You then specify the interaction between the object manager and the services by
defining requests, and4. Finally you can control the way the tab pages are displayed in the detail area.
Figure 8: Customizing Steps in the Implementation Guide (IMG)
To make it easier to adjust the hierarchy framework in Organizational Management,we have added the most important table entries for maintenance to the ImplementationGuide (IMG) as IMG nodes.
You must perform some of the IMG steps for your customer-specific adjustments.
22 © 2005 SAP AG. All rights reserved. 2005/Q2

I n t
e r
n a
l
U s
e
S A
P
P a
r t
n e
r
O n
l y I n
t e r n a l U
s e S A
P P
a r t n e r O
n l y
HR506 Lesson: Customizing the Object Manager
Add Search Nodes to Object Manager
� Define your own search nodes for the object type� Adjust the search area
� Add further nodes to the search area or change the sequence of the searchnodes
� Exclude search nodes� Adjust search nodes, and while doing so, assign search tools to your own
search node� Exclude search tools from a search node
The object manager offers a range of configuration options. For example, you canspecify the object types that are available for searches, define search tools, or specifywhich additional information should be displayed with the hit list in the selection area.A specific objectmanager configuration is represented by an object manager scenario.
Figure 9: Defining a Search Node
You use table T77FSEAN to control how a search node is displayed. The search nodeitself is a group of search tools in the search area of the object manager.
A search node can be based on an object type in table T778O (for example the basisobject types you know from Organizational Management), or it can be independent ofobject types. For example, it is possible to create a search node Search for Last-UsedObjects with appropriate search tools. A search node can refer to an object type, ithas a name, and an icon. The name and the icon are displayed in the search area ofthe object manager. If the search node refers to an object type, and if you do not
2005/Q2 © 2005 SAP AG. All rights reserved. 23

I n t
e r
n a
l
U s
e
S A
P
P a
r t
n e
r
O n
l y I n
t e r n a l U
s e S A
P P
a r t n e r O
n l y
Unit 2: Customizing the Hierarchy Framework HR506
enter another name or icon in the table for defining search nodes (T77FSEAN), theobject manager uses the name and the icon of the object type from table T778Owhen displaying the search node.
If the user parameter OM_OBJM_SCEN_DISPLAY is set, the search area displaysthe object manager scenario that is active in a transaction.
Figure 10: Adjusting the Selection Area
For the new object manager scenario you want to create, you defined your own searchnode in the previous step. Now you must specify how the object manager shoulddisplay this search node. To do this, you first specify the corresponding search tools.
The search tools you select determine how the system searches forparticular objects. Search tools you already know are the searchfor a search term (CL_HROM_SEARCHTOOL_ORGP), the freesearch (CL_HR_ST_ADHOC_SELECTION), and the structure search(CL_HR_OM_SEAT_STRUCTUAL_SEARCH). In the standard, they are used forvarious object types in the object manager on the Organization and Staffing interface.
You name your search tool and specify its horizontal position - in other words, itsposition in the sequence with the other search tools.
In this Customizing activity you specify the type of interaction tool. In other words,you specify which actions a user can perform for the search hits displayed in theselection area, and what the result of these actions is, or how the system reacts to theuser actions. Actions can be: double-click, context menu, Drag&Drop, and so on.
Search tools and interaction tools are implemented as an ABAP object class.
24 © 2005 SAP AG. All rights reserved. 2005/Q2

I n t
e r
n a
l
U s
e
S A
P
P a
r t
n e
r
O n
l y I n
t e r n a l U
s e S A
P P
a r t n e r O
n l y
HR506 Lesson: Customizing the Object Manager
Figure 11: Structure Search in the Object Manager
For each structure search - in the object manager as well as in input help - you needan evaluation path. The system determines the evaluation path from table T77OS. Youcan store an existing evaluation path there, or create a new one in advance.
For the free search, you need an InfoSet that contains the data fields and objecttype you require. If you want to enhance the data model by adding your own objecttypes and relationships, you must first generate this InfoSet. You define InfoSetsin transaction SQ02. You can store this InfoSet for your free search using IMG→Personnel Management→ Organizational Management→ Hierarchy Framework→Assign Object Types to InfoSets.
2005/Q2 © 2005 SAP AG. All rights reserved. 25

I n t
e r
n a
l
U s
e
S A
P
P a
r t
n e
r
O n
l y I n
t e r n a l U
s e S A
P P
a r t n e r O
n l y
Unit 2: Customizing the Hierarchy Framework HR506
Figure 12: Adjusting the Column Framework
You can adjust the column framework to a certain extent while adjusting the objectmanager. Further options are under the IMG node Column Framework.
A column group defines the initial visibility and the initial display sequence of thecolumns assigned to it. In addition, you can create a coherence relationship betweentwo or more of the columns in a column group, so that they are only displayed orhidden together.
If the user parameter OM_ARRAYTYPE_DISPLAY is set, you can find out whichcolumn group is currently being displayed in a structure or list display, and whichcolumns are assigned to that column group, by choosing Technical Info. The systemdisplays a dialog box for column configuration in the selection area of the objectmanager.
For search tools that generate a column group at runtime, you must set the DynamicColumn Group flag. An example of such a tool is the free search. There, the usercan choose any columns in the hit list.
If you want to make more complex adjustments, you must make them using theColumn Framework node. Here, you can completely redefine column groups, addseveral columns to a column group (by creating hierarchical column groups, you canalso group column groups together), and in doing so also control the visibility optionsfor those columns. Of course you can also do this for existing columns, by simplyredefining them. To do this, you maintain entries in table T77ACOLC.
26 © 2005 SAP AG. All rights reserved. 2005/Q2

I n t
e r
n a
l
U s
e
S A
P
P a
r t
n e
r
O n
l y I n
t e r n a l U
s e S A
P P
a r t n e r O
n l y
HR506 Lesson: Customizing the Object Manager
Exercise 2: Customizing the Object Manager
Exercise ObjectivesAfter completing this exercise, you will be able to:� Incorporate new object types in the object manager
Business ExampleYour Personnel and Organization department wants to be able to maintain the newlycreated object type, �training group�, on the Organization and Staffing interface.
Task:In your enterprise you have divided the employees into training groups, and you wantto promote the development of these groups using different personnel developmentmeasures. You also want to maintain and manage the groups in OrganizationalManagement. The normal working interface for your Personnel and Organizationdepartment is the Organization and Staffing interface. For that reason you would liketo be to able to maintain the object type there too.
1. Add the object type ## to the object manager.
2. Use the key Training Group ## and the Icon_Partner.
3. Work in the scenario OMEOO0 with your group number ## to position yourentry. You can use the column group NF_STO.
For your search node, use the search tools search term and structure search.Assign the names Training Group ## Search Term and Training Groups ## inOrg. Structure.
4. On the Organization and Staffing interface, check your object managersettings.
5. Optional
For comparison purposes, use one of the other column groups with theabbreviation NF_ST* instead of NF_STO.
6. Optional
Navigate through the other Customizing steps in the object manager.
2005/Q2 © 2005 SAP AG. All rights reserved. 27

I n t
e r
n a
l
U s
e
S A
P
P a
r t
n e
r
O n
l y I n
t e r n a l U
s e S A
P P
a r t n e r O
n l y
Unit 2: Customizing the Hierarchy Framework HR506
Solution 2: Customizing the Object ManagerTask:In your enterprise you have divided the employees into training groups, and you wantto promote the development of these groups using different personnel developmentmeasures. You also want to maintain and manage the groups in OrganizationalManagement. The normal working interface for your Personnel and Organizationdepartment is the Organization and Staffing interface. For that reason you would liketo be to able to maintain the object type there too.
1. Add the object type ## to the object manager.
a) Call up the SAP Implementation Guide (IMG) using the menu pathTools→Customizing→IMG→Project Management→ SAP ReferenceIMG.
In the IMG→, choose→Personnel Management→OrganizationalManagement→Hierarchy Framework→Object Manager
2. Use the key Training Group ## and the Icon_Partner.
a) Use the function Define Your Own Search Node→ Definition of SearchNode→New Entries to create a search node for your object type ##.
Make the following entries:
Field Name or Data Type ValuesSearch Node Key Z_##TrGrpName ##-Training GroupsObject Type ##Icon Name ICON_PARTNER
Save you data and exist the Customizing view entirely.
3. Work in the scenario OMEOO0 with your group number ## to position yourentry. You can use the column group NF_STO.
For your search node, use the search tools search term and structure search.Assign the names Training Group ## Search Term and Training Groups ## inOrg. Structure.
Continued on next page
28 © 2005 SAP AG. All rights reserved. 2005/Q2

I n t
e r
n a
l
U s
e
S A
P
P a
r t
n e
r
O n
l y I n
t e r n a l U
s e S A
P P
a r t n e r O
n l y
HR506 Lesson: Customizing the Object Manager
a) Choose Adjust Search Area Add Additional Node to Search Area→New Entries to specify the object manager scenario for which your newsearch node is valid.
Make the following entries:
Field Name or Data Type ValuesObject Manager Scenario OMEOO0
Search Node Key Z_##TrGrp
Name ##-Training GroupSearch Term
Position ##
Column Group NF_STO
Column Header Type ORGSTRUC
Save your entries.
Edit your search node further under Adjust Search Area→ Adjust SearchNode→ New Entries.
Make the following entries:
Field Name or Data Type ValuesObject Manager Scenario OMEOO0
Search Node Key Z_##TrGrp
Search Tool CL_HR_OM_SEARCH-TOOL_ORGP
Name Training Group ##Search Term
Interaction Tool CL_HR_OM_IAT_ORGP.
Position 2
Standard Search Tool X
Column Group NF_STO
Header Type ORGSTRUC
Continued on next page
2005/Q2 © 2005 SAP AG. All rights reserved. 29

I n t
e r
n a
l
U s
e
S A
P
P a
r t
n e
r
O n
l y I n
t e r n a l U
s e S A
P P
a r t n e r O
n l y
Unit 2: Customizing the Hierarchy Framework HR506
Make similar entries for the search tool CL_HR_OM_SEAT_STRUC-TUAL_SEARCH. Give it position 1.
Enter the data in the following table here:
Field Name or DataType
Value
Object Manager Scenario OMEOO0Search Node Key Z_##FOKRSSearch Tool CL_HR_OM_SEAT_STRUC-
TURAL_SEARCHName Structural search ## Training groupInteraction Tool CL_HR_OM_IAT_ORGPPosition 1Column Group NF_STRUC_SEARCHDynamic column group XHeader Type ORGSTRUC
Hint: Before you can use the structure search as a search tool, youmust store an evaluation path for the structure search with yourobject type.
Select IMG→ Personnel Management→ Organizational Management→Basic Settings→ Data Model Enhancement→ Maintain Object Types.
Select your object type ##.
Double click on the entry Structrual Search and open the view Changestructural search: Overview
Eval.Path
Evaluation Path Text StatusVector
KeyDate
No Ovw.
ZBES## 1
Continued on next page
30 © 2005 SAP AG. All rights reserved. 2005/Q2
I n t
e r
n a
l
U s
e
S A
P
P a
r t
n e
r
O n
l y I n
t e r n a l U
s e S A
P P
a r t n e r O
n l y
HR506 Lesson: Customizing the Object Manager
4. On the Organization and Staffing interface, check your object managersettings.
a) On the Organization and Staffing interface, check your object managersettings by calling the transaction PPOME using SAP Easy Access→→Human Resources→ Organizational Management→ OrganizationalPlan→ Organization and Staffing→Change.
5. Optional
For comparison purposes, use one of the other column groups with theabbreviation NF_ST* instead of NF_STO.
a) The solution is the same as the exercise text.
For comparison purposes, use one of the other column groups with theabbreviation NF_ST* instead of NF_STO.
6. Optional
Navigate through the other Customizing steps in the object manager.
a) The solution is the same as the exercise text.
Navigate through the other Customizing steps in the object manager.
2005/Q2 © 2005 SAP AG. All rights reserved. 31

I n t
e r
n a
l
U s
e
S A
P
P a
r t
n e
r
O n
l y I n
t e r n a l U
s e S A
P P
a r t n e r O
n l y
Unit 2: Customizing the Hierarchy Framework HR506
Lesson Summary
You should now be able to:� Integrate further object types in the Organization and Staffing interface, and do
the following for those object types� Add search nodes to the search area
32 © 2005 SAP AG. All rights reserved. 2005/Q2

I n t
e r
n a
l
U s
e
S A
P
P a
r t
n e
r
O n
l y I n
t e r n a l U
s e S A
P P
a r t n e r O
n l y
HR506 Lesson: Customizing the Structural Overview Objects
Lesson: Customizing the Structural Overview Objects
Lesson OverviewThe lesson "Customizing the Structural Overview Objects" is concerned with thedesign of the structural area of the Organization and Staffing transaction. Thisconstituent part of the framwork reflects the structures looked at using evaluationpaths. It enables you to integrate new object types and relationships.
The lesson also looks options for adjusting the detail area using tab pages.
Lesson ObjectivesAfter completing this lesson, you will be able to:
� Adjust the overview area accordingly� Add new tab pages to the detail area.
Business ExampleYour company has decided that the new personnel development concept withtraining groups should be represented on the Organization and Staffing interface inthe hierarchy framework. This will allow a clearer overview of the assignments ofemployees to training groups.
Display Object Type in Structural Overview Object
� Defining the service of the overview area� Specifying the properties of this service / this �"view"�
� Specify the valid object type in each case� for the selection options� Specify the evaluation path with technical depth� Specify the column framework for the overview area.
In table T77OBJSER is defined which service an overview or detail object offers. Forthat reason, you must first define a service for the overview area in table T77OBJSER,and assign a service to it. To do that, enter a meaningful name / key for the service inthe Service field of the interface object. In the Object Key field, enter the key of thestructure overview object: GOWD (general overview with detail).
2005/Q2 © 2005 SAP AG. All rights reserved. 33

I n t
e r
n a
l
U s
e
S A
P
P a
r t
n e
r
O n
l y I n
t e r n a l U
s e S A
P P
a r t n e r O
n l y
Unit 2: Customizing the Hierarchy Framework HR506
Then you must specify the attributes of the new service. In the Object Type field, enterthe new object type for which the service is to be valid. In the Selection field, specifythe selection type (single or multiple selection). In the structure overview object,you can use Drag&Drop to change the displayed structure. Here, the selection typedetermines whether you can select only one or several objects.
In the Evaluation Path field, enter your newly defined evaluation path. The systemuses the evaluation path to define a structure tree, which then displays the structureoverview object. To keep system response times to a minimum, the structure treeis not displayed in its fully expanded format. Instead, only the first "n" levels ofthe structure tree are visible. You define "n", in other words the level to which thestructure tree is initially displayed, in the Technical Depth field.
In the Column Group field, enter a column group (see column framework). A columngroup delivered by SAP that you can use generically is NF_GEN_OV.
In the Header field, you can enter a header type that redefines the column headersof the column group. This is optional.
Figure 13: Requests
The services of an overview or detail object are not called directly. They are availableindirectly to all interface objects via Requests. These requests therefore control whichoverview and detail objects are displayed in a hierarchy framework scenario at aparticular time. First of all, you must therefore set up this control.
34 © 2005 SAP AG. All rights reserved. 2005/Q2

I n t
e r
n a
l
U s
e
S A
P
P a
r t
n e
r
O n
l y I n
t e r n a l U
s e S A
P P
a r t n e r O
n l y
HR506 Lesson: Customizing the Structural Overview Objects
To do this, you first define a new request. Start by entering the Scenario of thehierarchy framework into which you want to integrate the new object type. Inthe Hierarchy Framework Request field, you then enter a technical key (that ismeaningful to you) for the new request, and a descriptive name. This name isdisplayed in the context menu, for example, and should describe the structure that isdisplayed by the structure overview object service that you will enter in the next field.
In the Service for First Interface Object field, enter the newly defined service forthe structure overview object.
In the Service for Second Interface Object field, enter the service #DETAIL(GENERAL). This service is assigned to the detail object on the Organization andStaffing interface. The detail object displays all tab pages for the new object type.
In the Tab Page field, you can enter a tab page that you want the detail object todisplay when you call the request. This is optional. If you do not enter anything here(this is the usual case), the detail object determines which tab page is displayed first.
To identify the scenario used in the framework, you can use the set-get parameterOM_FRAM_SCEN_DISPLAY to display the scenario name in the title bar.
Figure 14: Adjusting Tab Pages
You can display simple customer infotypes on a tab page in the detail area. Werecommend that you do this on an infotype-specific tab page (only one infotype).
For the display, the system uses the subscreen generated for the infotype intransaction PPCI (screen number 7000).
2005/Q2 © 2005 SAP AG. All rights reserved. 35

I n t
e r
n a
l
U s
e
S A
P
P a
r t
n e
r
O n
l y I n
t e r n a l U
s e S A
P P
a r t n e r O
n l y
Unit 2: Customizing the Hierarchy Framework HR506
The procedure is as follows:
� Enter the infotype number in the entry field and choose Create. On the nextscreen, choose Create Subscreen from the Infotype menu.
� This generates subscreen 7000. Since this is an SAP program, a messageappears, which in this case you can ignore.
� In table T77ID, under Subscreen, you enter subscreen 7000 for the infotype.� Then you can add the infotype as a tab page in the detail area (IMG -> Personnel
Management -> Organizational Management -> Hierarchy Framework ->Integrate New Infotype). This happens in two steps: first of all Define own tabpage (or table T77OMTABS; for example IT1000 -> IT1503) and secondly AddYour Own Tab Pages to an Existing Tab Page Group (table T77OMTABUS),in other words you assign the new tab page to an object type and a scenario.
In this way you can integrate simple infotypes in the detail object display. Forinfotypes with their own tab pages or their own subscreens, there is as yet noinstrument for integrating them into the detail area.
36 © 2005 SAP AG. All rights reserved. 2005/Q2

I n t
e r
n a
l
U s
e
S A
P
P a
r t
n e
r
O n
l y I n
t e r n a l U
s e S A
P P
a r t n e r O
n l y
HR506 Lesson: Customizing the Structural Overview Objects
Exercise 3: Customizing the StructuralOverview Objects
Exercise ObjectivesAfter completing this exercise, you will be able to:� Incorporate new object types in the overview area
Business ExampleYour Personnel and Organization department wants to be able to maintain the newlycreated object type, �training group�, on the Organization and Staffing interface.
Task 1:
1. Add your new object type ## to the overview and detail areas too.
2. Define your own service for the structural overview object with the keyZ_Employees in Training Group (##). As the object key, use GOWD (GeneralOverview with Detail).
3. Then specify the attributes for your service.
Use the object type ##, your new evaluation path Z_##PSOO, and the columngroup NF_GEN_OV (General Overview).
4. Define your own request for the scenario OME0 scenario with the keyZ_Request for P in TrainingGroup## and the name Training Groups with People(##). Use your service as the Service for the First Interface Object, and theservice DETAIL (GENERAL) as the Service for the Second Interface Object.
5. Specify the object type for which your request is valid.
6. Check your Customizing settings on the interface, by displaying yourassignments of people to training groups and assigning new people. In thiscontext, test Drag&Drop, and maintain a Description for your training groups.
Create future relationships between employees and training groups.
Task 2:
1. Perform the steps again in the same order for another structural overview object.Continued on next page
2005/Q2 © 2005 SAP AG. All rights reserved. 37

I n t
e r
n a
l
U s
e
S A
P
P a
r t
n e
r
O n
l y I n
t e r n a l U
s e S A
P P
a r t n e r O
n l y
Unit 2: Customizing the Hierarchy Framework HR506
Here, use the evaluation path Z_OOSP##, so that starting from an organizationalunit, you eventually display all assigned positions, people, and their traininggroup.
Assign the object type O for the request defined here.
Naming convention suggestion:
Service name: Z_##-TrGrpStructure;
Name: Training Groups in Org. Structure (00)
Request Z_REQUEST FOR ## IN ORG;
Name: Request Training Groups in Org. Structure (00)
38 © 2005 SAP AG. All rights reserved. 2005/Q2

I n t
e r
n a
l
U s
e
S A
P
P a
r t
n e
r
O n
l y I n
t e r n a l U
s e S A
P P
a r t n e r O
n l y
HR506 Lesson: Customizing the Structural Overview Objects
Solution 3: Customizing the StructuralOverview ObjectsTask 1:
1. Add your new object type ## to the overview and detail areas too.
a) Call up the SAP Implementation Guide (IMG) using the menu pathTools→Accelerated SAP→Customizing→ Project Management→ SAPReference IMG. In the IMG, choose → Personnel Management→Organizational Management→ Hierarchy Framework→ Integrate NewObject Type→ Display Object Type in Structural Overview Object.
2. Define your own service for the structural overview object with the keyZ_Employees in Training Group (##). As the object key, use GOWD (GeneralOverview with Detail).
a) Choose Define Your Own Service for a Structure Overview Object→Definition Service→ New Entries. Define your own service with thefollowing entries:
Field Name or Data Type ValuesService for Interface Object Z_Person in Training
Group (##)
Object Key GOWD
(General Overview with Detail)
Save your entries.
3. Then specify the attributes for your service.
Continued on next page
2005/Q2 © 2005 SAP AG. All rights reserved. 39

I n t
e r
n a
l
U s
e
S A
P
P a
r t
n e
r
O n
l y I n
t e r n a l U
s e S A
P P
a r t n e r O
n l y
Unit 2: Customizing the Hierarchy Framework HR506
Use the object type ##, your new evaluation path Z_##PSOO, and the columngroup NF_GEN_OV (General Overview).
a) Choose Attribute Services→ New Entries and specify the attributes of yourservice by making the following entries:
Field Name or Data Type ValuesService for Interface Object Z_Person in Training
Group (##)
Object Type ##
Selection Multiple Selection
Evaluation Path Z_##PSOO
Technical Depth 3
Column Group NF_GEN_OV
(General Overview)Header Type ORGSTRUC
Save your entries.
Continued on next page
40 © 2005 SAP AG. All rights reserved. 2005/Q2

I n t
e r
n a
l
U s
e
S A
P
P a
r t
n e
r
O n
l y I n
t e r n a l U
s e S A
P P
a r t n e r O
n l y
HR506 Lesson: Customizing the Structural Overview Objects
4. Define your own request for the scenario OME0 scenario with the keyZ_Request for P in TrainingGroup## and the name Training Groups with People(##). Use your service as the Service for the First Interface Object, and theservice DETAIL (GENERAL) as the Service for the Second Interface Object.
a) Select the scenarion OME0, and choose Request Definition→ New Entries.
Make the following entries:
Field Name or Data Type ValuesScenario OME0
Request Z_Request for P inTrGrp##
Name Training groups withpeople (##)
Service for First Interface Object Z_Person in TrainingGroup (##)
Service for Second Interface Object Detail (General)
Tab Page <leave blank>
Save your entries.
5. Specify the object type for which your request is valid.
a) ChooseAssign Your Own Request to an Object Type→ New Entries.
Field Name or Data Type ValueScenario OME0Request Z_Request for P in TrGrp##Object Type ##Standard request X
Save your entries.
6. Check your Customizing settings on the interface, by displaying yourassignments of people to training groups and assigning new people. In thiscontext, test Drag&Drop, and maintain a Description for your training groups.
Continued on next page
2005/Q2 © 2005 SAP AG. All rights reserved. 41

I n t
e r
n a
l
U s
e
S A
P
P a
r t
n e
r
O n
l y I n
t e r n a l U
s e S A
P P
a r t n e r O
n l y
Unit 2: Customizing the Hierarchy Framework HR506
Create future relationships between employees and training groups.
a) You already know these maintenance steps.
Task 2:
1. Perform the steps again in the same order for another structural overview object.
Here, use the evaluation path Z_OOSP##, so that starting from an organizationalunit, you eventually display all assigned positions, people, and their traininggroup.
Assign the object type O for the request defined here.
Naming convention suggestion:
Service name: Z_##-TrGrpStructure;
Name: Training Groups in Org. Structure (00)
Request Z_REQUEST FOR ## IN ORG;
Name: Request Training Groups in Org. Structure (00)
a) Perform the steps again in the same order for another structural overviewobject. Here, use the evaluation path Z_OOSP##, so that starting from anorganizational unit, you eventually display all assigned positions, people,and their training group. Assign the object type O for the request definedhere.
42 © 2005 SAP AG. All rights reserved. 2005/Q2

I n t
e r
n a
l
U s
e
S A
P
P a
r t
n e
r
O n
l y I n
t e r n a l U
s e S A
P P
a r t n e r O
n l y
HR506 Lesson: Customizing the Structural Overview Objects
Lesson Summary
You should now be able to:� Adjust the overview area accordingly� Add new tab pages to the detail area.
2005/Q2 © 2005 SAP AG. All rights reserved. 43

I n t
e r
n a
l
U s
e
S A
P
P a
r t
n e
r
O n
l y I n
t e r n a l U
s e S A
P P
a r t n e r O
n l y
Unit Summary HR506
Unit SummaryYou should now be able to:� Integrate further object types in the Organization and Staffing interface, and do
the following for those object types� Add search nodes to the search area� Adjust the overview area accordingly� Add new tab pages to the detail area.
44 © 2005 SAP AG. All rights reserved. 2005/Q2

I n t
e r
n a
l
U s
e
S A
P
P a
r t
n e
r
O n
l y I n
t e r n a l U
s e S A
P P
a r t n e r O
n l y
Unit 3Customizing Manager�s Desktop
Unit Overview
Unit ObjectivesAfter completing this unit, you will be able to:
� Adjusting the Manager's Desktop� Include your own function codes� Redefine SAP standard scenarios
Unit ContentsLesson: Customizing Manager's Desktop .. .. . . . . . . . . . . . . . . . . . . . . . . . . . . . . . . . . . . . . 46
Exercise 4: Customizing Manager's Desktop.. . . . . . . . . . . . . . . . . . . . . . . . . . . . . . . 53
2005/Q2 © 2005 SAP AG. All rights reserved. 45

I n t
e r
n a
l
U s
e
S A
P
P a
r t
n e
r
O n
l y I n
t e r n a l U
s e S A
P P
a r t n e r O
n l y
Unit 3: Customizing Manager�s Desktop HR506
Lesson: Customizing Manager's Desktop
Lesson OverviewIn the Customizing unit of Manager's desktop, you learn how to set up the Manager�sDesktop starting from scratch. You will set up your own scenario and then add yourown tab pages and functions. In doing so, you will refer to SAP scenarios and thenmake customer-specific settings based on these.
Lesson ObjectivesAfter completing this lesson, you will be able to:
� Adjusting the Manager's Desktop� Include your own function codes� Redefine SAP standard scenarios
Business ExampleYou want to implement Manager's Desktop in your enterprise as a tool for yourmanagers. However, the standard version delivered by SAP is too extensive insome areas. Other functions are not available. You would therefore like to removesome function codes from Manager's Desktop. At the same time you want to allowmanagers in your enterprise to sort your employees into the different training groups.
Figure 15: What is Manager's Desktop?
46 © 2005 SAP AG. All rights reserved. 2005/Q2

I n t
e r
n a
l
U s
e
S A
P
P a
r t
n e
r
O n
l y I n
t e r n a l U
s e S A
P P
a r t n e r O
n l y
HR506 Lesson: Customizing Manager's Desktop
Manager's Desktop supports line managers in the administrative, organizational, andstrategic tasks in their organizational area of responsibility.
In Manager's Desktop we differentiate between the organizational objects subordinateto the manager, which are displayed on the right of the screen, and the functions themanager can perform for those objects, which are are on the left of the screen.
Organizational objects are all objects that you can read in Organizational Managementvia evaluation paths, for example organizational units, jobs, positions, people, users,tasks, and work centers, but also cost centers, company codes, or requests. In thiscontext, functions are reports, transactions, and function modules.
Seen from a technical point of view, the Manager's Desktop framework is a basisdevelopment that helps you to visualize and modify hierarchical structures and objects.
Executable functions with related content are grouped together. Each group is knownas a theme category. The standard scenario delivered by SAP includes, among others,the theme categories Employee, Organization and Costs and Budget, which aredisplayed on the initial screen.
Figure 16: Customer-Specific Adjustments
Manager's Desktop standard settings include a wide range of functions. Not allcustomers use the full range. For this reason, there are numerous ways of makingcustomer-specific adjustments in Manager's Desktop.
For example, it is very simple to store a customer-specific logo and backgroundpicture.
2005/Q2 © 2005 SAP AG. All rights reserved. 47

I n t
e r
n a
l
U s
e
S A
P
P a
r t
n e
r
O n
l y I n
t e r n a l U
s e S A
P P
a r t n e r O
n l y
Unit 3: Customizing Manager�s Desktop HR506
But it is also possible to make changes such as adjusting the function list by hidingSAP standard function codes and adding your own function codes, or storingcustomer-specific evaluation paths.
Here, you must consider carefully whether changing the standard is enough toincorporate all the particularities of your enterprise. Or is it perhaps even better tocreate your own scenario? Usually, adjusting the standard is enough to cover allthe features specific to your enterprise.
Figure 17: Working with Different Scenarios
In Customizing for Manager's Desktop, as well as adjusting a standard scenario,you can also define an entire scenario yourself. One way to do this is by copyingan existing scenario under a new name and making changes to the new scenario.Take into account, however, the logic of the underlying tables: to make MDT run,you must also copy the corresponding evaluation paths, categories, and functioncode hierarchy to your scenario.
Depending on how you want to use the new scenario, it can be more effective tocreate a new scenario as described below. You can create a reference from a newlycreated scenario to an existing scenario. If you do that, the system automatically usesthe reference scenario's settings for the evaluation paths (views) in table T77MWBD,the corresponding categories (table T77MWBK), and the function code hierarchy(table T77MBWFCH). In this way you can create several new scenarios on the basisof an existing one, with a sort of �inheritance� relationship between them. You canthen enhance the new scenarios.
48 © 2005 SAP AG. All rights reserved. 2005/Q2

I n t
e r
n a
l
U s
e
S A
P
P a
r t
n e
r
O n
l y I n
t e r n a l U
s e S A
P P
a r t n e r O
n l y
HR506 Lesson: Customizing Manager's Desktop
Your scenario assignments work according to the following logic:
� In the code for the transaction PPMDT (RHMWB004), the system calls thescenario MWB1 by default.
� In table T77S0, with the switchMDT SCEN and the entry for a scenario as avalue, you can store another scenario as a default scenario.
� In addition, using the user parameterMWB_SCEN, you can assign alternativescenarios to different users. You can also create groups of managers for whomyou can provide the same range of functions.
Hint: NOTE: When you assign scenarios via user parameters, bear in mindthat the value (scenario abbreviation) is case sensitive.
Figure 18: Defining Evaluation Paths
As well as tailoring the functions in the function tree, you can change the display ofyour area of responsibility to suit your requirements. You can do this by definingyour own views/evaluation paths.
In Customizing, you specify evaluation paths in order to define the different views ofthe user's organizational area of responsibility. The system displays these views on tabpages on the right of the screen. To define the views you need an initial evaluationpath and a subsequent evaluation path that builds on it. First, the initial evaluation path
2005/Q2 © 2005 SAP AG. All rights reserved. 49

I n t
e r
n a
l
U s
e
S A
P
P a
r t
n e
r
O n
l y I n
t e r n a l U
s e S A
P P
a r t n e r O
n l y
Unit 3: Customizing Manager�s Desktop HR506
determines the start objects for the tab page in question. Starting from the start objects,the system takes a subsequent evaluation path to build up a set of objects in the form ofa hierarchical structure. You can also determine start objects over a function module.
After determining the start objects for the tab pages, you enter the subsequentevaluation path to specify the set of objects for the corresponding hierarchicalstructure. You do this under Determine Views per Category→ Redefine Views(Evaluation Paths). By making this entry (T77MWBK), you remove the standardentries in the category and have the option of saving your own evaluation paths. Eachtab page corresponds to exactly one table entry in this step. You can display up to12 evaluation paths for each scenario.
When you define the tab pages (subsequent evaluation paths), you can also store withthe �"Standard Initial Evaluation Path"� (table T77MWBS) alternative methods fordetermining the start objects You can use other initial evaluation paths (Start ObjectsEvaluation Path) or a function module (Start Objects Function).
Figure 19: Inserting Theme Categories and Function Codes I
You can adjust, hide, regroup, or redefine the theme categories (type Home), thesubcategories (type Node), or the functions themselves. However, the system canonly display a maximum of eight theme categories (function codes of the highesthierarchical level) on the initial screen of a scenario.
You do this in Customizing under the IMG node Enhancement of Function Codes.Here you find all the settings for adjusting function codes to suit your requirementsand, if necessary, for redefining them.
50 © 2005 SAP AG. All rights reserved. 2005/Q2

I n t
e r
n a
l
U s
e
S A
P
P a
r t
n e
r
O n
l y I n
t e r n a l U
s e S A
P P
a r t n e r O
n l y
HR506 Lesson: Customizing Manager's Desktop
In the Define function codes step you specify the function codes that you need foryour application scenario in addition to the existing ones. The corresponding tableis not scenario-dependent, and therefore includes all possible functions. We usefunction codes to give give unique technical names to the nodes in the function treeon the left of the screen.
Figure 20: Inserting Theme Categories and Function Codes II
The functions can be of different types - depending on the technology used in thefunction you call up. Function codes serve as keys that uniquely describe the functions(start report, function module, or transaction, follow URL, display Workflow inbox)that a user can choose.
When you call up reports that use the HR logical databases (PNP, PCH, and PAP),the system automatically supplies the objects you select. When that happens, thesystem skips the selection screen.
Example: You have added new fields to the Personal Data infotype and written areport based on logical database PNP to evaluate those fields. You can make thisreport available as a function in the Manager's Desktop. In staff assignments inManager's Desktop, the user chooses the people for whom he or she wants to start thereport. The system does not display the report's selection screen.
There are also function codes that are needed for grouping functions and do not triggera system activity. These entries, of type HOME and NODE, serve only to structurethe menu tree. For that purpose, in the Define Structure of Function Codes step,you group together a subset of all functions into a hierarchical structure to form aparticular Manager's Desktop application scenario.
2005/Q2 © 2005 SAP AG. All rights reserved. 51

I n t
e r
n a
l
U s
e
S A
P
P a
r t
n e
r
O n
l y I n
t e r n a l U
s e S A
P P
a r t n e r O
n l y
Unit 3: Customizing Manager�s Desktop HR506
Wizard for Defining Function Codes
� Features:
� Creating categories� Creating and assigning subcategories� Creating and assigning executable functions
When defining function codes you can use theWizard for Defining Function Codes,which takes you through the required procedures. The wizard can create new functioncodes and position them in the hierarchy. However, it cannot hide or move existingentries.
You can only do that in the second step, Define Function Codes.
Important MDT Customizing TablesTable Short NameT77MWBD Evaluation Paths in Manager's Desktop FrameworkT77MWBDTC Customer-Specific Texts for Evaluation Paths in MDTT77MWBFCC Customer-Specific Override for MDT Function CodesT77MWBFCD Function Codes for Manager's DesktopT77MWBFCH Function Code Hierarchies for Manager's DesktopT77MWBFCO Object Type-Dependent Function Codes for Manager's
DesktopT77MWBFHC Customer-Specific Arrangement of Function Codes
in MDTT77MWBFTC Customer-Specific Text for MDT Function CodesT77MWBK Customer-Specific Evaluation Paths per Category in
MDTT77MWBKS Evaluation Paths for Each Category in Manager's
DesktopT77MWBS Manager's Desktop ScenariosT77MWBSC Manager's Desktop: Scenario-Specific SettingsT77MWBBWS BW System Data for Manager's Desktop
52 © 2005 SAP AG. All rights reserved. 2005/Q2

I n t
e r
n a
l
U s
e
S A
P
P a
r t
n e
r
O n
l y I n
t e r n a l U
s e S A
P P
a r t n e r O
n l y
HR506 Lesson: Customizing Manager's Desktop
Exercise 4: Customizing Manager's Desktop
Exercise ObjectivesAfter completing this exercise, you will be able to:� Understand Customizing of Manager's Desktop� Create a new Manager's Desktop scenario� Create tab pages with new evaluation paths� Define function codes for your new scenario
Business ExampleYour Personnel and Organization department wants to integrate the newly createdobject type��Training Group��, into the Manager�s Desktop interface. This wouldoffer managers an easy tool with information about the assignments of the variousemployees.
At the same time they are considering whether it would be better to provide differentscenarios for different groups of managers in the enterprise. It is your task to testManager�s Desktop in a new scenario, as a pilot project.
Task 1:
1. Create a new Manager�s Desktop scenario with the categories Employeesand Organization. Use the Manager�s Desktop standard scenario MWB1 as atemplate.
2. Use the key ZM## for your scenario.
3. Copy tab page All Subordinate Employees with evaluation path MDTSBESXand tab page Directly Subordinate Employees with evaluation path MDTSBES.Define your own tab page with your evaluation path ZBES## from the previousunits. Name the tab page Training Group ## and use MDT_ORGS as the columngroup.
4. For your scenario, define your own function code hierarchy for the categoriesEmployee (Standard) and Organization (Info). You can base this on thehierarchy of the scenario MWB1. Use the following function codes:
Continued on next page
2005/Q2 © 2005 SAP AG. All rights reserved. 53

I n t
e r
n a
l
U s
e
S A
P
P a
r t
n e
r
O n
l y I n
t e r n a l U
s e S A
P P
a r t n e r O
n l y
Unit 3: Customizing Manager�s Desktop HR506
Sce-
nario
Superordinate FCode No Function Code Function Module
MWB1 1 STANDARDFUNCTION
MWB1 2 INFO
MWB1 HIS 1 HR_HIS_READ
MWB1 INFO 0 ORG_IPA_NODE
MWB1 ORG_IPA_NODE 5 POSITIONMODIFY
MWB1 ORG_IPA_NODE 10 RHFILLPOS
MWB1 ORG_IPA_NODE 15 ORGCHANGEUNDO
MWB1 ORG_IPA_NODE 20 ACROSS_BORDER_MOVE
MWB1 ORG_IPA_ NODE 25 REORG
MWB1 PA_PD_AP 10 APPRAISAL_DISPLAY
MWB1 PA_PD_AP 20 APPRAISAL_CREATE
MWB1 PA_PD_QR 10 ORG_QUALI_OVERVIEW
MWB1 PA_PD_QR 15 ORG_QUALI_MAINTAINED
MWB1 PA_PD_QR 20 PERS_PROFILE
MWB1 PA_PD_QR 30 POS_PROFILE
MWB1 PA_PD_QR 40 PERS_PROFILE_MATCHUP
MWB1 REORG 1 SET_DRAG_SOURCES
MWB1 REORG 2 SET_DROP_TARGET
MWB1 STANDARDFUNCTION 1 ADHOC
MWB1 STANDARDFUNCTION 2 HIS
MWB1 STANDARDFUNCTION 4 PA_PD_AP
MWB1 STANDARDFUNCTION 5 PA_PD_QR
5. Check your Customizing in Manager�s Desktop. To do this, you must storeyour scenario in the User Settings under the parameter MWB_SCEN, and restartManager�s Desktop.
Caution: The values in the user parameters are case sensitive.
Continued on next page
54 © 2005 SAP AG. All rights reserved. 2005/Q2

I n t
e r
n a
l
U s
e
S A
P
P a
r t
n e
r
O n
l y I n
t e r n a l U
s e S A
P P
a r t n e r O
n l y
HR506 Lesson: Customizing Manager's Desktop
Task 2:Maintaining a Scenario
1. Hide one of the function codes in your scenario.
2. Add the tab pages Directly Reporting Employees, Cost Centers, and DirectlySubordinate Employees to your scenario.
Reduce the number of views in the Employees category so that only DirectlySubordinate Employees remains. In the Organization category, however, allviews should remain displayed.
3. Create a Theme Category with the name of your enterprise and enhance thefunction codes by adding your enterprise�s homepage. To do this, use theWizardfor Defining Function Codes.
2005/Q2 © 2005 SAP AG. All rights reserved. 55

I n t
e r
n a
l
U s
e
S A
P
P a
r t
n e
r
O n
l y I n
t e r n a l U
s e S A
P P
a r t n e r O
n l y
Unit 3: Customizing Manager�s Desktop HR506
Solution 4: Customizing Manager's DesktopTask 1:
1. Create a new Manager�s Desktop scenario with the categories Employeesand Organization. Use the Manager�s Desktop standard scenario MWB1 as atemplate.
a) Call up the SAP Implementatiion Guide using the menu path
Tools→ AcceleratedSAP→ Customizing→ Project Management→ SAPReference IMG. Select in IMG→ Personnel Management→ Manager'sDesktop
2. Use the key ZM## for your scenario.
a) Creating a new scenario sleect and navigate via Customer Adjustment→Specify Scenario-Specific Settings→ Define Application Scenarios to thescreen Change Manager's Desktop Scenarios: Overview
By Copying the standard scenario MWB1, create your own scenario.Name it ZM##.
3. Copy tab page All Subordinate Employees with evaluation path MDTSBESXand tab page Directly Subordinate Employees with evaluation path MDTSBES.Define your own tab page with your evaluation path ZBES## from the previousunits. Name the tab page Training Group ## and use MDT_ORGS as the columngroup.
a) Creating the tab pages for the new scenario
To create tab pages for the new scenario, select Customer Adjustment→Define Views of Organizational Structure Determine Views (EvaluationPaths). The Change Evaluation Paths for Manager�s Desktop: Overviewscreen appears. To copy the entries from MWB1 for your own scenarioZM## (for example All Subordinate Employees with the evaluation pathMDTSBESX). Choose New Entries to define a new tab page with yourevaluation path ZBES## from the previous unit. Name the tab pageTraining Group ## and keep the column group MDT_ORGS.
4. For your scenario, define your own function code hierarchy for the categoriesEmployee (Standard) and Organization (Info). You can base this on thehierarchy of the scenario MWB1. Use the following function codes:
Continued on next page
56 © 2005 SAP AG. All rights reserved. 2005/Q2

I n t
e r
n a
l
U s
e
S A
P
P a
r t
n e
r
O n
l y I n
t e r n a l U
s e S A
P P
a r t n e r O
n l y
HR506 Lesson: Customizing Manager's Desktop
Sce-
nario
Superordinate FCode No Function Code Function Module
MWB1 1 STANDARDFUNCTION
MWB1 2 INFO
MWB1 HIS 1 HR_HIS_READ
MWB1 INFO 0 ORG_IPA_NODE
MWB1 ORG_IPA_NODE 5 POSITIONMODIFY
MWB1 ORG_IPA_NODE 10 RHFILLPOS
MWB1 ORG_IPA_NODE 15 ORGCHANGEUNDO
MWB1 ORG_IPA_NODE 20 ACROSS_BORDER_MOVE
MWB1 ORG_IPA_ NODE 25 REORG
MWB1 PA_PD_AP 10 APPRAISAL_DISPLAY
MWB1 PA_PD_AP 20 APPRAISAL_CREATE
MWB1 PA_PD_QR 10 ORG_QUALI_OVERVIEW
MWB1 PA_PD_QR 15 ORG_QUALI_MAINTAINED
MWB1 PA_PD_QR 20 PERS_PROFILE
MWB1 PA_PD_QR 30 POS_PROFILE
MWB1 PA_PD_QR 40 PERS_PROFILE_MATCHUP
MWB1 REORG 1 SET_DRAG_SOURCES
MWB1 REORG 2 SET_DROP_TARGET
MWB1 STANDARDFUNCTION 1 ADHOC
MWB1 STANDARDFUNCTION 2 HIS
MWB1 STANDARDFUNCTION 4 PA_PD_AP
MWB1 STANDARDFUNCTION 5 PA_PD_QR
a) Choose Enhancement of Function Codes→ Define Structure of FunctionCodes→Define Function Code Hierarchies→. The Change View�Function Code Hierarchies for Manager�s Desktop: Overview� screenappears.
Select the function codes and nodes listed in the following table. Use theCopy function to include these function codes in your scenario.
Continued on next page
2005/Q2 © 2005 SAP AG. All rights reserved. 57

I n t
e r
n a
l
U s
e
S A
P
P a
r t
n e
r
O n
l y I n
t e r n a l U
s e S A
P P
a r t n e r O
n l y
Unit 3: Customizing Manager�s Desktop HR506
Sce-
nario
Superordinate FCode No Function Code Function Module
ZM## 1 STANDARDFUNCTION
ZM## 2 INFO
ZM## HIS 1 HR_HIS_READ
ZM## INFO 0 ORG_IPA_NODE
ZM## ORG_IPA_NODE 5 POSITIONMODIFY
ZM## ORG_IPA_NODE 10 RHFILLPOS
ZM## ORG_IPA_NODE 15 ORGCHANGEUNDO
ZM## ORG_IPA_NODE 20 ACROSS_BORDER_MOVE
ZM## ORG_IPA_NODE 25 REORG
ZM## PA_PD_AP 10 APPRAISAL_DISPLAY
ZM## PA_PD_AP 20 APPRAISAL_CREATE
ZM## PA_PD_QR 10 ORG_QUALI_OVERVIEW
ZM## PA_PD_QR 15 ORG_QUALI_MAIN-TAINED
ZM## PA_PD_QR 20 PERS_PROFILE
ZM## PA_PD_QR 30 POS_PROFILE
ZM## PA_PD_QR 40 PERS_PRO-
FILE_MATCHUP
ZM## REORG 1 SET_DRAG_SOURCES
ZM## REORG 2 SET_DROP_TARGET
ZM## STANDARDFUNCTION 1 ADHOC
ZM## STANDARDFUNCTION 2 HIS
ZM## STANDARDFUNCTION 4 PA_PD_AP
ZM## STANDARDFUNCTION 5 PA_PD_QR
5. Check your Customizing in Manager�s Desktop. To do this, you must storeyour scenario in the User Settings under the parameter MWB_SCEN, and restartManager�s Desktop.
Continued on next page
58 © 2005 SAP AG. All rights reserved. 2005/Q2

I n t
e r
n a
l
U s
e
S A
P
P a
r t
n e
r
O n
l y I n
t e r n a l U
s e S A
P P
a r t n e r O
n l y
HR506 Lesson: Customizing Manager's Desktop
Caution: The values in the user parameters are case sensitive.
a) Check your Customizing in the SAP Easy Access Menu. In your usersettings, store the parameter MWB_SCEN with the value ZM##, and startManager�s Desktop. If you have not made any mistakes up to now, youreach your new MDT scenario.
Task 2:Maintaining a Scenario
1. Hide one of the function codes in your scenario.
a) Go back to Manager�s Desktop Customizing and choose Enhancementof Function Codes→ Define Structure of Function Codes→→ChangeArrangement of Function Codes→. The Customer-Specific Arrangement ofFunction Codes in MDT: Detail screen appears. Here, you select a functioncode that belongs to your scenario, and choose Function Code Hidden.
Hint: In this way you can quickly eliminate unnecessary functioncodes from existing Manager�s Desktop scenarios.
Check your setting in Manager�s Desktop.
2. Add the tab pages Directly Reporting Employees, Cost Centers, and DirectlySubordinate Employees to your scenario.
Reduce the number of views in the Employees category so that only DirectlySubordinate Employees remains. In the Organization category, however, allviews should remain displayed.
a) Add more tab pages to your scenario by choosing Customer Adjustment→ Define Views of the Organizational Structure→ Determine Views(Evaluation Paths) to get to the Change Manager�s Desktop: Overviewscreen, and copying more entries from MWB1.
For the category Employees, reduce the number of views. Do this bychoosing Determine Views per Category→ Redefine Views (EvaluationPaths) and→storing an evaluation path specific to your scenario. Theothers are no longer displayed in this category.
Continued on next page
2005/Q2 © 2005 SAP AG. All rights reserved. 59

I n t
e r
n a
l
U s
e
S A
P
P a
r t
n e
r
O n
l y I n
t e r n a l U
s e S A
P P
a r t n e r O
n l y
Unit 3: Customizing Manager�s Desktop HR506
3. Create a Theme Category with the name of your enterprise and enhance thefunction codes by adding your enterprise�s homepage. To do this, use theWizardfor Defining Function Codes.
a) To create new function codes, choose Enhancement of Function CodesWizard for Defining Function Codes. Read the introduction and chooseContinue. Choose Executable Function, and in the next wizard step chooseyour scenario ZM##. Give the new function code a meaningful technicalkey and a descriptive name. In the next step, specify the position of yournew function code. Do this by choosing a Theme Category and a SuperiorCategory.
Then you specify the type of function. Choose www Address withNavigation and store the homepage of your enterprise.
Choose Continue, Save Entries to Database, and on the next screen chooseComplete.
60 © 2005 SAP AG. All rights reserved. 2005/Q2

I n t
e r
n a
l
U s
e
S A
P
P a
r t
n e
r
O n
l y I n
t e r n a l U
s e S A
P P
a r t n e r O
n l y
HR506 Lesson: Customizing Manager's Desktop
Lesson Summary
You should now be able to:� Adjusting the Manager's Desktop� Include your own function codes� Redefine SAP standard scenarios
2005/Q2 © 2005 SAP AG. All rights reserved. 61

I n t
e r
n a
l
U s
e
S A
P
P a
r t
n e
r
O n
l y I n
t e r n a l U
s e S A
P P
a r t n e r O
n l y
Unit Summary HR506
Unit SummaryYou should now be able to:� Adjusting the Manager's Desktop� Include your own function codes� Redefine SAP standard scenarios
62 © 2005 SAP AG. All rights reserved. 2005/Q2

I n t
e r
n a
l
U s
e
S A
P
P a
r t
n e
r
O n
l y I n
t e r n a l U
s e S A
P P
a r t n e r O
n l y
Unit 4Workflow and Organizational
Management
Unit OverviewThis unit is concerned with the relationship betweeen Organizational Managementand Workflow. This provides an overview of how the two components work togethertechnically. The workflows in Organizational Managment serve as an example for this
Unit ObjectivesAfter completing this unit, you will be able to:
� Understand how workflows work� Explain the workflows delivered with Organizational Management and� Set up the workflow for organizational changes.
Unit ContentsLesson: Workflow and Organizational Management ... . . . . . . . . . . . . . . . . . . . . . . . . . 64
Exercise 5: Workflow and Organizational Management .. . . . . . . . . . . . . . . . . . 75
2005/Q2 © 2005 SAP AG. All rights reserved. 63

I n t
e r
n a
l
U s
e
S A
P
P a
r t
n e
r
O n
l y I n
t e r n a l U
s e S A
P P
a r t n e r O
n l y
Unit 4: Workflow and Organizational Management HR506
Lesson: Workflow and Organizational Management
Lesson Overview� Workflow: design and sequence of events� Workflows delivered with Organizational Management� Other aspects of integration
Lesson ObjectivesAfter completing this lesson, you will be able to:
� Understand how workflows work� Explain the workflows delivered with Organizational Management and� Set up the workflow for organizational changes.
Business ExampleYour company would like to integrate personnel administration and organizationalmanagement better. Workflow components of SAP Netweaver are to be used forthis purpose.
This enables tasks to be relayed automatically between users and processes to beintegrated better.
Figure 21: Workflow in One Sentence
64 © 2005 SAP AG. All rights reserved. 2005/Q2

I n t
e r
n a
l
U s
e
S A
P
P a
r t
n e
r
O n
l y I n
t e r n a l U
s e S A
P P
a r t n e r O
n l y
HR506 Lesson: Workflow and Organizational Management
In SAP Business Workflow the four process dimensions
� Organizational Plan (Who?)� Sequence organization (When? In what order? Under what conditions?)� Function (What?)� Information (With what data?)
are related to each other so that business processes can run as efficiently as possible.
With the help of a graphical definition tool, you store the process you want to defineas a workflow in the form of parameters in the system. At runtime, theWorkflowManager, in other words the SAP system, performs all the tasks that you thought upwhen defining the process. This frees the user from avoidable organizational tasks,and he or she can concentrate on the content of his or her work.
Figure 22: Workflow Management Architecture
SAP Business Workflow has a three-level architecture. Modulizing the componentsinvolved in this way allows a high level of flexibility.
At the lowest level is the Business Object Repository. In it are defined all thebusiness objects that can be used in workflow definitions, along with their methods,attributes, and events. R/3 functions such as hiring an employee are available throughbusiness objects.
2005/Q2 © 2005 SAP AG. All rights reserved. 65

I n t
e r
n a
l
U s
e
S A
P
P a
r t
n e
r
O n
l y I n
t e r n a l U
s e S A
P P
a r t n e r O
n l y
Unit 4: Workflow and Organizational Management HR506
At the process level, the sequence in which tasks should be performed, and the rulesgoverning the tasks are defined. Each task is represented by a workflow step. Objectdata, and information added during the process is passed on from step to step, or isavailable to the agents during the entire workflow. Process control enables you toexecute steps sequentially, in parallel, as alternatives, or in a nested hierarchy.
The organizational level provides information about responsibilities and the personnelstructure of the enterprise, so that tasks are forwarded to the correct agent at runtime.
Figure 23: Workflow: Design and Sequence of Events I
The business process is stored in the workflow definition. Information is displayed bythe Event-Driven Process Chain (EPK).Basic elements in the Workflow Definition aresingle-step tasks.
Single-step tasks
� Represent SAP functionality from a business point of view� Each use exactly one method
66 © 2005 SAP AG. All rights reserved. 2005/Q2

I n t
e r
n a
l
U s
e
S A
P
P a
r t
n e
r
O n
l y I n
t e r n a l U
s e S A
P P
a r t n e r O
n l y
HR506 Lesson: Workflow and Organizational Management
The foundation of SAP Business Workflow is object-oriented design. Objects aredefined in the object repository, which is delivered by SAP. Object methods:
� represent SAP functionality from the point of view of the business object
(technical view, e.g. create, delete, change)
� offer a uniform, transparent interface with SAP functionality
(transactions, functinon module, report, ...)
� Allow you to encapsulate functionality
The agents responsible for an activity in workflow are defined either by an assignmentto an object in the organizational plan, or with the help of a rule. Rules are used todetermine responsible agents dynamically, in other words depending on informationthat is not available until runtime.
Figure 24: Workflow: Design and Sequence of Events II
Workflows are usually started by a triggering event. Events are used to make it knownwhen the status of objects in the system changes. Like methods, events are definedin the object repository for each object type. Events are triggered in the individualapplications.
2005/Q2 © 2005 SAP AG. All rights reserved. 67

I n t
e r
n a
l
U s
e
S A
P
P a
r t
n e
r
O n
l y I n
t e r n a l U
s e S A
P P
a r t n e r O
n l y
Unit 4: Workflow and Organizational Management HR506
Example: theWorkflow for Organizational Change (WS01000014) is startedlike this: when you save an organizational change and enter an action, the eventDesignation for Organizational Change with object type ORGCHEARM istriggered by an entry in table T77INT.
Work items are the representation at runtime of a single-step task. The workflowmanager passes them to the responsible agents.
If an agent accepts a work item for processing, it disappears from the inboxes of theother agents.
When the system executes a work item, it calls the corresponding object method (inthe above example, this is the personnel action Organizational Change).
Figure 25: 1. Standard Workflows: Workflow for Organizational Changes
Using this workflow template you can execute a designated personnel action (forexample, an �organizational change�). If event linkage is activated for the eventORGCHEARM.CREATED, the system automatically starts the workflow templatewhen you designate the corresponding personnel action (in table T77INT).
This is the case, for example, inManager's Desktop (MDT) and on theOrganizationand Staffing interface, if you move an organizational object under a new object, andone or more employees (people) are affected.
68 © 2005 SAP AG. All rights reserved. 2005/Q2

I n t
e r
n a
l
U s
e
S A
P
P a
r t
n e
r
O n
l y I n
t e r n a l U
s e S A
P P
a r t n e r O
n l y
HR506 Lesson: Workflow and Organizational Management
The authorizations functionality in MDT means that the user cannot see the newtarget position of the employee he or she is reassigning. For this reason, the systemfirst requires the user to enter the new organizational unit, or the head of the neworganizational unit. The head of the organizational unit then receives a work item forspecifying the new position in his or her area of responsibility.
Figure 26: 2. Standard Workflows: Workflow for Organizational Changes II
The work item regarding the decision on how to proceed with the action (execute,change, or cancel it) is sent to the inbox of the personnel administrator responsible forthe employee. For this to work, an administrator must be entered in the HR masterdata of the employee in question. In addition, the administrator must be assigned to anR/3 user in infotype 0105, and this user must be maintained in table T526.
The personnel administrator responsible can change the action as long as the personnelnumber of the employee being reassigned is entered in table T77INT.
When the action has been executed, both the employee affected and the personneladministrator are informed by mail. For this to work, the employee affected must beassigned via infotype 0105 to an R/3 user in HR master data.
If the administrator responsible wants to cancel the action, and an automaticcancellation is not possible, the administrator is informed by mail. If that is the case,the already-executed employee transfer must be undone by hand in Organizational
2005/Q2 © 2005 SAP AG. All rights reserved. 69

I n t
e r
n a
l
U s
e
S A
P
P a
r t
n e
r
O n
l y I n
t e r n a l U
s e S A
P P
a r t n e r O
n l y
Unit 4: Workflow and Organizational Management HR506
Management or Manager's Desktop. Relevant information is contained in the mailto the personnel administrator. If an automatic cancellation results in an error, thepersonnel administrator is also informed.
Set up the WorkflowWS 01000014 andWS01000077 (execute designated personnelaction) in Customizing under IMG→ Personnel Management→ OrganizationalManagement→ Integration→ Integration with Personnel Administration→Workflow for Organizational Change (WS01000014) or under IMG→ PersonnelManagement→ Manager's Desktop→ Organisational Changes→ Workflow forOrganizational Change (WS01000014).
Figure 27: Standard Workflows: Workflow for New Employee
Set up the WorkflowWS 01200136 (message about new employee) in Customizingunder IMG→ Personnel Management→ Organizational Management→ Integration→ Integration with Personnel Administration→ Workflow Message about NewEmployee (WS01200136) or under Personnel Management→ Manager's Desktop→Organizational Changes→ Workflow Message about New Employee (WS01200136).
In the mail generated for this workflow, you can save your own text in which youinform the new manager of the required actions. The text saved in the standardis as follows: �On MM.DD.YYYY, the employee NAME will start work in yourdepartment. Please consider all the required activities on this date.�
70 © 2005 SAP AG. All rights reserved. 2005/Q2

I n t
e r
n a
l
U s
e
S A
P
P a
r t
n e
r
O n
l y I n
t e r n a l U
s e S A
P P
a r t n e r O
n l y
HR506 Lesson: Workflow and Organizational Management
Figure 28: Standard Workflows: Create Vacancy, Delimit Vacancy
With the entry PPVAC PPVAC with value 1 in table T77S0 you can specify whethera position is only considered to be vacant if a Vacancy infotype (1007) exists for it,or whether all unoccupied positions are considered vacant. If the system evaluatesinfotype 1007, it activates integration with Recruitment at the same time. If youcreate an infotype 1007 for a position, the system creates a record in table T750X inPersonnel Administration. This creates the interface with Recruitment.
The workflowsWS 01000040 (Create Vacancy for Position) andWS 01000041(Delimit Vacancy for Position) are activated by the entry PPVAC VACWF. If you setthis switch to X, no dialog box appears for creating a vacancy when you change thestaffing percentage of a position - for example when maintaining the organizationalplan. Instead, the system generates an event, which - combined with appropriateCustomizing - starts a workflow.
� According to this workflow (WS 01000040) the head of the organizational unitto which the position in question is assigned receives the decision on creating avacancy.
� If switch is set to 'X', this means that this head receives a workflow
(WS 01000041) regarding the decision about delimiting a vacancy.
You can find the Customizing activity in the implementation guide underPersonnel Management→ Organization Management→ Infotype settings →Activate/Deactivate "Vacancy" Infotype.
2005/Q2 © 2005 SAP AG. All rights reserved. 71

I n t
e r
n a
l
U s
e
S A
P
P a
r t
n e
r
O n
l y I n
t e r n a l U
s e S A
P P
a r t n e r O
n l y
Unit 4: Workflow and Organizational Management HR506
Figure 29: Workflow: Generating Events while Updating Infotypes
Workflow: Generating Events Dynamically
Events that announce status changes to HR infotypes are generated in the infotypeupdate task.
The prerequisite for this is that event generation is activated in the control table T77S0(entry WORKF ACTIV = X).
In table T779W (SAP) or T779X (customer) is the information about which eventshould be generated. Table T777IBO contains the assignment of business object typeto HR object type, infotype, and subtype.
By entering a function module, you can have the system perform extra checks beforeit generates an event. Here, the triggering event can be specified dynamically.
You can maintain the tables mentioned within activities in the Implementation Guide.You can find these activities under IMG→ Personnel Management→ PersonnelAdministration→ Tools→ Business Workflow Events
72 © 2005 SAP AG. All rights reserved. 2005/Q2

I n t
e r
n a
l
U s
e
S A
P
P a
r t
n e
r
O n
l y I n
t e r n a l U
s e S A
P P
a r t n e r O
n l y
HR506 Lesson: Workflow and Organizational Management
Figure 30: Workflow: Generating Events Dynamically
You can control event generation dynamically - in other words, at runtime - if, insteadof an event, you store a function module programmed by you in table T779X. Theupdate task calls this function module, which executes additional checks and returnsthe triggering event to the update task.
SAP delivers a function module template for Personnel Administration infotypes, andone for Personnel Planning infotypes. Copy this template to your namespace, and inthe new function module, save the checks that you want to execute.
Over the interface of the function module, you receive the parameters�BEFORE_IMAGE� and �AFTER_IMAGE�, which contain the infotype data beforeand after the user processed it in infotype maintenance. By executing a comparisonof these two parameters you can, for example, specify that the system should onlygenerate an event if the content of a particular field has changed.
2005/Q2 © 2005 SAP AG. All rights reserved. 73

I n t
e r
n a
l
U s
e
S A
P
P a
r t
n e
r
O n
l y I n
t e r n a l U
s e S A
P P
a r t n e r O
n l y
Unit 4: Workflow and Organizational Management HR506
74 © 2005 SAP AG. All rights reserved. 2005/Q2

I n t
e r
n a
l
U s
e
S A
P
P a
r t
n e
r
O n
l y I n
t e r n a l U
s e S A
P P
a r t n e r O
n l y
HR506 Lesson: Workflow and Organizational Management
Exercise 5: Workflow and OrganizationalManagement
Exercise ObjectivesAfter completing this exercise, you will be able to:� Set up and understand the workflow for organizational changes.
Business ExampleYou want to set up the workflow for organizational changes, so that when a linemanager transfers one of his or her employees to another department using Manager�sDesktop, the process is automated as far as possible. The four people who participatein a transfer in your enterprise are: the employee being transferred, his or herpersonnel administrator, the current manager, and the new manager.
For these exercises and solutions, training course participants are divided into threegroups, each of which takes on a different function. The three functions are: Manager1, Manager 2, and Administrator. The individual functions and their tasks aredescribed in the following. Each task is divided into a Customizing and an applicationpart. You start with the Customizing part.
Task 1:Instructions for Manager 1
Description of activities of manager 1:
Manager 1 is the line manager of the employee being transferred, and uses Manager�sDesktop to transfer the employee to Manager 2�s department. To do this, he or shechooses the Transfer Outside function in the Organization theme category.
1. On the Organization and Staffing interface, relate your user HR506-## to thechief position of your organizational unit ## Executive Board. Save your entries.
2. In Infotype 0001 (Organizational Assignment), in the Administrator section,assign all your employees to Group CABB field, and to Group ## (the grouptaking the role of the personnel administrator in this exercise) in the PersAdminfield.
3. When you have completed these preparations, help the Administrator andManager 2 with their preparations. You cannot start to execute the workflowuntil all three teams have finished their preparations.
Continued on next page
2005/Q2 © 2005 SAP AG. All rights reserved. 75

I n t
e r
n a
l
U s
e
S A
P
P a
r t
n e
r
O n
l y I n
t e r n a l U
s e S A
P P
a r t n e r O
n l y
Unit 4: Workflow and Organizational Management HR506
Task 2:Instructions for Manager 2
Description of activities of manager 2:
Manager 2 is the new line manager of the employee being transferred, and assigns thenew position to the employee.
1. On the Organization and Staffing interface, relate your user HR506-## to thechief position of your organizational unit ## Executive Board. Save your entries.
2. Enter your user HR506-## as the system user name for employee Jose Vega(personnel number 540997##)540997##) in Group ## for Manager1 in infotype 0105. Use Subtype 0001 System User Name SAP System(SY-UNAME).
Save your entries.
3. In the IMG, set up yourself as agent for the standard task, Specify Position in NewDepartment, in the Workflow for Organizational Change (WS01000014). Youdo this under IMG→ Personnel Management→ Organizational Management→ Integration→ Integration with Personnel Administration→ Workflowfor Organizational Change (WS01000014)→ execute on the Overview: TaskAssignment Screen. There, you perform the activity Assign Agents to Tasks. Inthe View menu, display the keys, in other words the object IDs. As agent type,use the type User, and enter your user name HR506-##. Then, choose theappropriate button on the application function bar to generate an Index.
Use the opportunity to check whether event linkage is activated for the workflow.
4. Check the settings for the switches PLOGI EVENB Enhanced Integration andPLOGI EVCRE Generate Event with Entry T77INT (Action Designated) inOrganizational Management Customizing. Ensure that the settings are activated.
5. When you have completed these preparations, help the Administrator andManager 1 with their preparations. You cannot start to execute the workflowuntil all three teams have finished their preparations.
Continued on next page
76 © 2005 SAP AG. All rights reserved. 2005/Q2

I n t
e r
n a
l
U s
e
S A
P
P a
r t
n e
r
O n
l y I n
t e r n a l U
s e S A
P P
a r t n e r O
n l y
HR506 Lesson: Workflow and Organizational Management
Task 3:Instructions for administrator
Descriptions of activities of administrator:
The Administrator is the agent in the personnel department who is responsible for theemployee being transferred. He or she executes the designated action, changes it, orcancels it. Only then is the transfer effective in Organizational Management and inPersonnel Administration.
1. Set up yourself as the agent for all standard tasks of the workflow templateWS01000077 Execute Designated Personnel Action. You do this under IMG→ Personnel Management→ Organizational Management→ Integration→Integration with Personnel Administration→ Workflow for OrganizationalChange (WS01000014)→ execute on the Overview: Task Assignment screen.There, you perform the activity Assign Agents to Tasks. In the Viewmenu, displaythe keys, in other words the object IDs. Go to the sub-workflow WS01000077Execute Designated Personnel Action. As agent type, use the type User, andenter your user name HR506-##. When you have made these changes, choosethe appropriate button on the application function bar to generate an Index.
2. Check in table T526 whether your group ## and user are entered as a personneladministrator there.
3. Check whether all employees belonging to the organizational unit of yourManager 1�s group are assigned to the group CABB in the Administrator fieldof Infotype 0001 Organizational Assignment. Make sure that your group isentered as the Personnel Administrator.
Task 4:When you have set up and checked the Customizing together, you can execute theworkflow. Any Customizing errors will now come to light. If your transfer viaworkflow does not work on the first try, check your Customizing together with theother two groups. There can often be problems due to missing user assignments.Check these first.
In Manager 1�s organizational unit there are several employees for whom you canrun the transfer.
1. Instructions for Manager 1
Instructions for Manager 1By Drag&Relate, transfer the employee Jose Vega(personnel number 540997##) on the first of the next month from your positionForeman to the organizational unit ## Executive Board of group ##, which is
Continued on next page
2005/Q2 © 2005 SAP AG. All rights reserved. 77

I n t
e r
n a
l
U s
e
S A
P
P a
r t
n e
r
O n
l y I n
t e r n a l U
s e S A
P P
a r t n e r O
n l y
Unit 4: Workflow and Organizational Management HR506
headed by Manager 2. In the dialog box Transfer Across Areas of Responsibility,use Action 02 and User of New Manager HR506-## to assign Jose Vega to hisnew department. When you have made those entries, save the transfer.
Manager 2 should now have a work item in his or her inbox.
When the entire workflow has been executed, you receive a mail for JoseVega in your Business Workplace Inbox as an Unread Document.
2. Instructions for Manager 2
When Manager 1 has transferred the person Jose Vega (personnel number540997##) to you, you will find in your Manager�s Desktop, in theWorkflowInbox theme category, the notification Enter New Position for Employee540997##. Execute the work item and assign your occupied position ## Foremanto the person Jose Vega. Save your entries and end the work item.
The work item is no longer visible in your inbox and is forwarded to thepersonnel administrator. The administrator must now process the workitem.
If you cannot execute the work item immediately, you must refresh theorganizational environment. To do this choose Settings→ Workflow Settings→ Refresh Organizational Environment.
3. Instructions for administrator:
Instructions for the AdministratorWhen Manager 2 has assigned the person JoseVega (personnel number 540997##) to a new position, you receive the work itemDecision on Designated Action for Person 540997## on 01.mm.yyyy. Processthe work item and execute the designated action. In the personnel action that thesystem now calls up, accept the default values for IT0000 Actions and IT0001Organizational Assignment. In infotype 0001, assign the employee 100 percentto the new position. End the work item.
The work item is no longer visible in your inbox. You and the employee inquestion receive an Unread Document in your inbox.
If you cannot execute the work item immediately, you must refresh theorganizational environment. To do this choose Settings→ Workflow Settings→ Refresh Organizational Environment.
78 © 2005 SAP AG. All rights reserved. 2005/Q2

I n t
e r
n a
l
U s
e
S A
P
P a
r t
n e
r
O n
l y I n
t e r n a l U
s e S A
P P
a r t n e r O
n l y
HR506 Lesson: Workflow and Organizational Management
Solution 5: Workflow and OrganizationalManagementTask 1:Instructions for Manager 1
Description of activities of manager 1:
Manager 1 is the line manager of the employee being transferred, and uses Manager�sDesktop to transfer the employee to Manager 2�s department. To do this, he or shechooses the Transfer Outside function in the Organization theme category.
1. On the Organization and Staffing interface, relate your user HR506-## to thechief position of your organizational unit ## Executive Board. Save your entries.
a) Choose SAP Easy Access→ Human Resources→ OrganizationalManagement→ Organizational Plan→ Organization and Staffing andrelate your user HR506-## to the chief position of your organizationalunit ## Executive Board. You do this by double-clicking on the positionin the overview area, and choosing the Assign button to relate the userHR506-## to the position. Save your entries.
2. In Infotype 0001 (Organizational Assignment), in the Administrator section,assign all your employees to Group CABB field, and to Group ## (the grouptaking the role of the personnel administrator in this exercise) in the PersAdminfield.
a) In Infotype 0001 Organizational Assignment, in the Administratorfield, assign all your employees to the CABB group. To see Infotype0001 Organizational Assignment, choose SAP Easy Access→ HumanResources→ Personnel Management→ Administration→ HR MasterData→ Maintain. In the object manager, call up the employees in yourorganizational unit and choose an employee by double-clicking. SelectInfotype 0001 Organizational Assignment and choose the Change buttonin the application function bar. Under Personnel Administrator, use inputhelp to choose Group ## (the group that has taken on the Administratorfunction in the exercises).
Continued on next page
2005/Q2 © 2005 SAP AG. All rights reserved. 79

I n t
e r
n a
l
U s
e
S A
P
P a
r t
n e
r
O n
l y I n
t e r n a l U
s e S A
P P
a r t n e r O
n l y
Unit 4: Workflow and Organizational Management HR506
3. When you have completed these preparations, help the Administrator andManager 2 with their preparations. You cannot start to execute the workflowuntil all three teams have finished their preparations.
a) When you have completed these preparations, help the Administratorand Manager 2 with their preparations. You cannot start to execute theworkflow until all three teams have finished their preparations.
Task 2:Instructions for Manager 2
Description of activities of manager 2:
Manager 2 is the new line manager of the employee being transferred, and assigns thenew position to the employee.
1. On the Organization and Staffing interface, relate your user HR506-## to thechief position of your organizational unit ## Executive Board. Save your entries.
a) Choose SAP Easy Access→ Human Resources → OrganizationalManagement→ Organizational Plan→ Organization and Staffing andrelate your user HR506-## to the chief position of your organizational unit## Executive Board. You do this by double-clicking on the position in theoverview area, and choosing the Assign button to relate the userHR506-##to the position. Save your entries.
2. Enter your user HR506-## as the system user name for employee Jose Vega(personnel number 540997##)540997##) in Group ## for Manager1 in infotype 0105. Use Subtype 0001 System User Name SAP System(SY-UNAME).
Save your entries.
a) Enter your user HR506-## as the system user name for employee JoseVega (personnel number 540997##) for the Group of yourManager 1 in infotype 0105 as system user name. To see Infotype 0105,choose SAP Easy Access→ Human Resources→ Personnel Management→ Administration→ HR Master Data→Maintain. In the object manager,call up the employees in Manager 1�s organizational unit and chooseJose Vega by double-clicking. In the Direct Selection field, enter theinfotype number 0105 and create the infotype anew. Use Subtype0001 System User Name SAP System (SY-UNAME) and enter youruser HR506-## there.
Save your entries.
Continued on next page
80 © 2005 SAP AG. All rights reserved. 2005/Q2

I n t
e r
n a
l
U s
e
S A
P
P a
r t
n e
r
O n
l y I n
t e r n a l U
s e S A
P P
a r t n e r O
n l y
HR506 Lesson: Workflow and Organizational Management
3. In the IMG, set up yourself as agent for the standard task, Specify Position in NewDepartment, in the Workflow for Organizational Change (WS01000014). Youdo this under IMG→ Personnel Management→ Organizational Management→ Integration→ Integration with Personnel Administration→ Workflowfor Organizational Change (WS01000014)→ execute on the Overview: TaskAssignment Screen. There, you perform the activity Assign Agents to Tasks. Inthe View menu, display the keys, in other words the object IDs. As agent type,use the type User, and enter your user name HR506-##. Then, choose theappropriate button on the application function bar to generate an Index.
Use the opportunity to check whether event linkage is activated for the workflow.
a) You do this under IMG→ Personnel Management→ OrganizationalManagement→ Integration→ Integration with Personnel Administration→ Workflow for Organizational Change (WS01000014)→ execute onthe Overview: Task Assignment screen. There, you perform the activityAssign Agents to Tasks. In the task group Execute Designated PersonnelAction, in the workflow template Execute Designated Personnel Action,assign yourself as an agent for the standard task Specify Position in NewDepartment. To do this, select the standard task and choose Create AgentAssignment. As agent type, use the type User, and enter your user nameHR506-##. Then, choose the appropriate button on the application functionbar to generate an Index.
Use the opportunity to check whether event linkage is activated for theworkflow.
4. Check the settings for the switches PLOGI EVENB Enhanced Integration andPLOGI EVCRE Generate Event with Entry T77INT (Action Designated) inOrganizational Management Customizing. Ensure that the settings are activated.
a) Choose IMG→ Personnel Management→ Organizational Management→ Integration→ Integration with Personnel Administration→ Set UpIntegration with Personnel Administration, and then choose Basic Settings.The Change View ��HR Master Data Integration�: Overview screenappears. Check the settings for the switches PLOGI EVENB EnhancedIntegration and PLOGI EVCRE Generate Event with Entry T77INT (ActionDesignated). Both must be activated with a value X.
Continued on next page
2005/Q2 © 2005 SAP AG. All rights reserved. 81

I n t
e r
n a
l
U s
e
S A
P
P a
r t
n e
r
O n
l y I n
t e r n a l U
s e S A
P P
a r t n e r O
n l y
Unit 4: Workflow and Organizational Management HR506
5. When you have completed these preparations, help the Administrator andManager 1 with their preparations. You cannot start to execute the workflowuntil all three teams have finished their preparations.
a) When you have completed these preparations, help the Administratorand Manager 1 with their preparations. You cannot start to execute theworkflow until all three teams have finished their preparations.
Task 3:Instructions for administrator
Descriptions of activities of administrator:
The Administrator is the agent in the personnel department who is responsible for theemployee being transferred. He or she executes the designated action, changes it, orcancels it. Only then is the transfer effective in Organizational Management and inPersonnel Administration.
1. Set up yourself as the agent for all standard tasks of the workflow templateWS01000077 Execute Designated Personnel Action. You do this under IMG→ Personnel Management→ Organizational Management→ Integration→Integration with Personnel Administration→ Workflow for OrganizationalChange (WS01000014)→ execute on the Overview: Task Assignment screen.There, you perform the activity Assign Agents to Tasks. In the Viewmenu, displaythe keys, in other words the object IDs. Go to the sub-workflow WS01000077Execute Designated Personnel Action. As agent type, use the type User, andenter your user name HR506-##. When you have made these changes, choosethe appropriate button on the application function bar to generate an Index.
a) You do this under IMG→ Personnel Management→ OrganizationalManagement→ Integration→ Integration with Personnel Administration→ Workflow for Organizational Change (WS01000014)→ execute onthe Overview: Task Assignment screen. There, you perform the activityAssign Agents to Tasks. In the View menu, display the keys, in other wordsthe object IDs. In the task group ExecuteDesignated Personnel Action,in the workflow template Execute Designated Personnel Action, assignyourself as an agent for all the standard tasks displayed. To do this, selecteach standard task for your user by placing the cursor over the standardtask in question and choose Create Agent Assignment in the applicationfunction bar. As agent type, use the type User, and enter your user nameHR506-##. When you have made these changes, choose the appropriatebutton on the application function bar to generate an Index.
Continued on next page
82 © 2005 SAP AG. All rights reserved. 2005/Q2
I n t
e r
n a
l
U s
e
S A
P
P a
r t
n e
r
O n
l y I n
t e r n a l U
s e S A
P P
a r t n e r O
n l y
HR506 Lesson: Workflow and Organizational Management
2. Check in table T526 whether your group ## and user are entered as a personneladministrator there.
a) Check table T526 from the System menu, by choosing System→ Services→ Table Maintenance→ Enhanced Table Maintenance. In EnhancedTable Maintenance, enter T526 in the entry field and choose Display.Here, you should see an entry for your user with the name Group ##.
3. Check whether all employees belonging to the organizational unit of yourManager 1�s group are assigned to the group CABB in the Administrator fieldof Infotype 0001 Organizational Assignment. Make sure that your group isentered as the Personnel Administrator.
a) Check whether all employees belonging to the organizational unit of yourManager 1�s group are assigned to the group CABB in the Administratorfield of Infotype 0001 Organizational Assignment. Make sure that yourgroup is entered as the Personnel Administrator. To see Infotype 0001Organizational Assignment, choose SAP Easy Access→ Human Resources→ Personnel Management→ Administration→ HR Master Data→Maintain.
Task 4:When you have set up and checked the Customizing together, you can execute theworkflow. Any Customizing errors will now come to light. If your transfer viaworkflow does not work on the first try, check your Customizing together with theother two groups. There can often be problems due to missing user assignments.Check these first.
In Manager 1�s organizational unit there are several employees for whom you canrun the transfer.
1. Instructions for Manager 1
Instructions for Manager 1By Drag&Relate, transfer the employee Jose Vega(personnel number 540997##) on the first of the next month from your positionForeman to the organizational unit ## Executive Board of group ##, which isheaded by Manager 2. In the dialog box Transfer Across Areas of Responsibility,use Action 02 and User of New Manager HR506-## to assign Jose Vega to hisnew department. When you have made those entries, save the transfer.
Manager 2 should now have a work item in his or her inbox.
Continued on next page
2005/Q2 © 2005 SAP AG. All rights reserved. 83

I n t
e r
n a
l
U s
e
S A
P
P a
r t
n e
r
O n
l y I n
t e r n a l U
s e S A
P P
a r t n e r O
n l y
Unit 4: Workflow and Organizational Management HR506
When the entire workflow has been executed, you receive a mail for JoseVega in your Business Workplace Inbox as an Unread Document.
a) Instructions for Manager 1
Instructions for Manager 1, transfer the employee Jose Vega (personnelnumber 540997##) on the first of the next month from your positionForeman to the organizational unit ## Executive Board of group ##, whichis headed by Manager 2. To do this, call Manager�s Desktop and the themecategory Organization, and drag the employee Jose Vega to the TransferOutside function. In the dialog box Transfer Across Areas of Responsibility,use Action 02 and User of New Manager HR506-## to assign Jose Vega tohis new department. When you have made those entries, save the transfer.
Manager 2 should now have a work item in his or her inbox.
When the entire workflow has been executed, you will receive a mail forJose Vega in your Business Workplace Inbox as an Unread Document.
2. Instructions for Manager 2
When Manager 1 has transferred the person Jose Vega (personnel number540997##) to you, you will find in your Manager�s Desktop, in theWorkflowInbox theme category, the notification Enter New Position for Employee540997##. Execute the work item and assign your occupied position ## Foremanto the person Jose Vega. Save your entries and end the work item.
The work item is no longer visible in your inbox and is forwarded to thepersonnel administrator. The administrator must now process the workitem.
Continued on next page
84 © 2005 SAP AG. All rights reserved. 2005/Q2

I n t
e r
n a
l
U s
e
S A
P
P a
r t
n e
r
O n
l y I n
t e r n a l U
s e S A
P P
a r t n e r O
n l y
HR506 Lesson: Workflow and Organizational Management
If you cannot execute the work item immediately, you must refresh theorganizational environment. To do this choose Settings→ Workflow Settings→ Refresh Organizational Environment.
a) Instructions for Manager 2
When Manager 1 has transferred the person Jose Vega (personnel number540997##) to you, you will find in your Manager�s Desktop, in theWorkflow Inbox theme category, the notification Enter New Position forEmployee 540997##. Execute the work item and assign your occupiedposition ## Foreman to the person Jose Vega. Save your entries and chooseBack to go to yourWorkflow Inbox. A dialog box for the work item appears.In the box, complete the work item by choosing Complete Work Item.
The work item is no longer visible in your inbox and is forwarded tothe personnel administrator. The administrator must now processthe work item.
If you cannot execute the work item immediately, you must refresh theorganizational environment. To do this choose Settings→ WorkflowSettings→ Refresh Organizational Environment.
3. Instructions for administrator:
Instructions for the AdministratorWhen Manager 2 has assigned the person JoseVega (personnel number 540997##) to a new position, you receive the work itemDecision on Designated Action for Person 540997## on 01.mm.yyyy. Processthe work item and execute the designated action. In the personnel action that thesystem now calls up, accept the default values for IT0000 Actions and IT0001Organizational Assignment. In infotype 0001, assign the employee 100 percentto the new position. End the work item.
The work item is no longer visible in your inbox. You and the employee inquestion receive an Unread Document in your inbox.
Continued on next page
2005/Q2 © 2005 SAP AG. All rights reserved. 85

I n t
e r
n a
l
U s
e
S A
P
P a
r t
n e
r
O n
l y I n
t e r n a l U
s e S A
P P
a r t n e r O
n l y
Unit 4: Workflow and Organizational Management HR506
If you cannot execute the work item immediately, you must refresh theorganizational environment. To do this choose Settings→ Workflow Settings→ Refresh Organizational Environment.
a) Instructions for administrator:
Instructions for the AdministratorWhen Manager 2 has assigned the personJose Vega (personnel number 540997##) to a new position, you receivethe work item Decision on Designated Action for Person 540997## on01.mm.yyyy. Double-click on the item to open it for processing. Executethe designated action. In the personnel action that the system now calls up,accept the default values for IT0000 Actions and IT0001 OrganizationalAssignment. In infotype 0001, assign the employee 100 percent to the newposition. You can cancel processing of the Planned Working Time andBasic Pay infotypes. Since the new position is already occupied, the systemdisplays several messages asking you to confirm the working time and thestaffing percentage. Confirm these by choosing Enter.
When the action is completed, the system displays the Workflow Inboxagain. A dialog box for the work item appears. In the box, complete thework item by choosing Complete Work Item.
The work item is no longer visible in your inbox. You and the employeein question receive an Unread Document in your inbox.
If you cannot execute the work item immediately, you must refresh theorganizational environment. To do this choose Settings→ WorkflowSettings→ Refresh Organizational Environment.
86 © 2005 SAP AG. All rights reserved. 2005/Q2

I n t
e r
n a
l
U s
e
S A
P
P a
r t
n e
r
O n
l y I n
t e r n a l U
s e S A
P P
a r t n e r O
n l y
HR506 Lesson: Workflow and Organizational Management
Lesson Summary
You should now be able to:� Understand how workflows work� Explain the workflows delivered with Organizational Management and� Set up the workflow for organizational changes.
2005/Q2 © 2005 SAP AG. All rights reserved. 87

I n t
e r
n a
l
U s
e
S A
P
P a
r t
n e
r
O n
l y I n
t e r n a l U
s e S A
P P
a r t n e r O
n l y
Unit Summary HR506
Unit SummaryYou should now be able to:� Understand how workflows work� Explain the workflows delivered with Organizational Management and� Set up the workflow for organizational changes.
88 © 2005 SAP AG. All rights reserved. 2005/Q2

I n t
e r
n a
l
U s
e
S A
P
P a
r t
n e
r
O n
l y I n
t e r n a l U
s e S A
P P
a r t n e r O
n l y
Unit 5Appendix
Unit OverviewThe appendix of this course contains additional material on the subject Transportsin Organizational Management and an overview of all paths and transactions usedin this course.
All corresponding paths and transactions belonging to a unit serve as navigationaids and reference works. In some cases, you may demonstrate other transactions /Customizing settings in the system. No guarantee can therefore be given that allthese settings are included here.
Unit ObjectivesAfter completing this unit, you will be able to:
� Set up the transport connection for organizational objects� Understand the principle underlying the transport� Use reports to create a transport request for organizational objects
Unit ContentsLesson: Transports in Organizational Management ... . . . . . . . . . . . . . . . . . . . . . . . . . 90
Exercise 6: Transports in Organizational Management ... . . . . . . . . . . . . . . . . . 99
2005/Q2 © 2005 SAP AG. All rights reserved. 89

I n t
e r
n a
l
U s
e
S A
P
P a
r t
n e
r
O n
l y I n
t e r n a l U
s e S A
P P
a r t n e r O
n l y
Unit 5: Appendix HR506
Lesson: Transports in Organizational Management
Lesson OverviewThis lesson gives an overview of configuring the transport connection for objects oforganizational management and gives a vivid presentation of the bases / principlesfor the transport of organizational objects. Reports for the transport of organizationalobjects are also discussed.
Lesson ObjectivesAfter completing this lesson, you will be able to:
� Set up the transport connection for organizational objects� Understand the principle underlying the transport� Use reports to create a transport request for organizational objects
Business ExampleYou maintain your organizational plan in your development system, and want totransport changes to organizational objects from your development system to yourproductive system. To do this, you first gain an overview of the different ways ofwriting organizational objects to a transport request.
Figure 31: Transport Logic
90 © 2005 SAP AG. All rights reserved. 2005/Q2

I n t
e r
n a
l
U s
e
S A
P
P a
r t
n e
r
O n
l y I n
t e r n a l U
s e S A
P P
a r t n e r O
n l y
HR506 Lesson: Transports in Organizational Management
Regardless of the type of transport connection, the transport is always by object.In other words, the system always writes all infotype records of the object beingtransported and they are all transported.
So, if you transport an object, the system also transports all its infotype to the targetsystem, and replaces any existing object that has the same ID. Of course the object'sinfotype records are also replaced. If the object does not already exist in the targetsystem, the system creates it immediately with all transported infotypes. In otherwords, the system also creates all the object's relationships with other objects. Thesystem warns you if objects to which your object is related do not exist.
Figure 32: Import Lock
The most misunderstandings arise because if you transport an object type withoutrelationships (often used for activity groups / roles), the system deletes all therelationships in the target system - for example to agents. Here, the system is justworking according to �"system logic", in other words it replaces all objects with thecorresponding transported object - as described above. However, the transportedobject had no relationships. Therefore, all existing relationships were replaced byno relationships.
For that reason, you can use an import lock in the target system to prevent the systemoverwriting certain infotypes with transported infotype records when that is not whatyou want. This is done using an entry in table T77TR, where you fill the Object Type,
2005/Q2 © 2005 SAP AG. All rights reserved. 91

I n t
e r
n a
l
U s
e
S A
P
P a
r t
n e
r
O n
l y I n
t e r n a l U
s e S A
P P
a r t n e r O
n l y
Unit 5: Appendix HR506
Infotype, and Subtype fields. In the example above, you would enter object type T,infotype 1001, and subtype A007. If you lock infotype 1000 of an object type againstimport, the import lock affects all infotypes of that object type.
Caution: If you maintain objects without relationships - that is, the objectshave several infotypes but no IT1001 - in a test system, and you then transportthe objects to the productive system, you must first protect the relationships inthe productive system against import, otherwise they will be overwritten.
This could mean that you overwrite your organizational plan!
Figure 33: Transport Connection for Organizational Management Objects
Transport connection means the ways of transporting between different R/3 systems.When you transport Organizational Management objects (OM objects), the systemtransports copies of table entries, which are activated in the target system by automaticsubsequent processing. The activation in the target system uses the plan version .:never use . The reason for this is that the plan version names for the active planversion in the source and the target system do not necessarily have to be the same. Inthe target system, the freshly transported entries are activated in the plan version thatis set to active there, in other words the integration plan version.
When transporting Organizational Management objects with their attributes, youhave three options:
� Automatic transport� Manual transport� Transport Over Object Lock
92 © 2005 SAP AG. All rights reserved. 2005/Q2

I n t
e r
n a
l
U s
e
S A
P
P a
r t
n e
r
O n
l y I n
t e r n a l U
s e S A
P P
a r t n e r O
n l y
HR506 Lesson: Transports in Organizational Management
External object types in Organizational Management, such as people or cost centers,are not transported. The system only creates relationships from OM object types tothese objects in the target system if the objects exist in the target system too.
You select a transport connection in Customizing. IMG path: Personnel management→ Organizational management→ Transport.
Figure 34: Automatic Transport Connection
A prerequisite for the automatic transport connection is that the automatic recordingrequirement in table T000 is activated in the source client.
Process:
� When you save planning objects in the active plan version, the systemautomatically displays a dialog box in which you enter a change request towhich you want to assign the objects. If you do not assign the objects to achange request, you cannot save.
� In the Transport Organizer (transaction SE10 or SE09) you release the changerequest.
� The system transports all objects on the change request to the target system.
If you want to use this transport method, you must select Automatic TransportConnection Active in the Customizing activity Set Up Transport Connection.
To do this, enter the value ' ' (SPACE) (TRSP CORR = ' ').
2005/Q2 © 2005 SAP AG. All rights reserved. 93

I n t
e r
n a
l
U s
e
S A
P
P a
r t
n e
r
O n
l y I n
t e r n a l U
s e S A
P P
a r t n e r O
n l y
Unit 5: Appendix HR506
This type of transport connection is not recommended if you are building up a systemfrom the start, as the system query regarding transport requests would constantly�hinder� users in their work.
Figure 35: Manual Transport Connection
You edit planning objects, but the system does not ask for a change request whenyou save.
You start report RHMOVE30 (= manual transport) and select all the objects that youwant to transport. You assign these objects to a change request. This report, and allreport variants, only transports PD objects.
In the Transport Organizer (SE10 or SE09), you then release the change request, andthe system imports all the objects on the change request into the target system.
If you want to use this transport method, you must select No Automatic TransportConnection in the Customizing activity Set Up Transport Connection.
To do this, enter the value 'X' (TRSP CORR = X). We recommend this type oftransport connection if you are building up a system.
You can either start the report RHMOVE30 (manual transport) directly, or byperforming the customizing activity Manual Transport.
Note the following: when you generate a request with the report RHMOVE30, youshould immediately release it in transaction SE10, to avoid the danger of in-betweenchanges due to the lack of recording requirement.
94 © 2005 SAP AG. All rights reserved. 2005/Q2

I n t
e r
n a
l
U s
e
S A
P
P a
r t
n e
r
O n
l y I n
t e r n a l U
s e S A
P P
a r t n e r O
n l y
HR506 Lesson: Transports in Organizational Management
Using the parameter DEL you can specify that the system should delete the selectedobjects in both the target and the source system. The parameter REPL replaces theselected people with users and transports them as users to the target system.
Figure 36: Transport Over Object Lock
Process:
1. You edit planning objects, but the system does not ask for a change request whenyou save. Instead, in the table PLOG or PLOGI_DEL (in the case of deletingoperations), the system selects the Repair field for the changed object.
2. You start the report RHMOVE50 (= Transport Over Object Lock).3. You choose a change request. All objects that you changed or deleted (in other
words, all objects for which the system set the repair flag in table PLOGI orPLOGI_DEL) are written to this request. At the same time, the system resets therepair flag in the tables PLOGI and PLOGI_DEL.
4. In the Transport Organizer (transaction SE10 or SE09) you release the changerequest.
5. The system transports all objects on the change request to the target system.
If you want to use this transport method, you must select Transport over Object Lockin the Customizing activity Set Up Transport Connection .
To do this, enter the value 'T' (TRSP CORR = T).
2005/Q2 © 2005 SAP AG. All rights reserved. 95

I n t
e r
n a
l
U s
e
S A
P
P a
r t
n e
r
O n
l y I n
t e r n a l U
s e S A
P P
a r t n e r O
n l y
Unit 5: Appendix HR506
Figure 37: Further Transport
If you want to transport objects across several systems, you can use the reportTransport Planning Objects (RHMOVE60). With this report you can move allobjects from an �incoming request� to an �outgoing� request.
Process:
On the input template, you enter the old request number and then the new numberthat you want to use.
Figure 38: Consistency Check After Data Transfer and Transport
96 © 2005 SAP AG. All rights reserved. 2005/Q2

I n t
e r
n a
l
U s
e
S A
P
P a
r t
n e
r
O n
l y I n
t e r n a l U
s e S A
P P
a r t n e r O
n l y
HR506 Lesson: Transports in Organizational Management
After you have performed a data transfer or transport, you can use the followingreports to check consistency:
The report RHCHECK1 checks the consistency of the planning data records:
� Infotype validity within object validity� Infotype status versus object status� Existence of the inverse relationship
You can create missing inverse relationships using the report RHCHECKV.
The report RHCHECKP performs the following checks:
� Consistency and uniqueness checks for table and additional data pointers� Number range checks: if the system displays inconsistencies during the number
range check, you must update the number range status.
In addition, you can start the following reports to check consistency:
� RHCHECKV checks whether inverse relationships are complete� RHCTIMCO checks the consistency of time constraints� RHCHECKRELATIONS deletes relationships for which no object exists.
Figure 39: Update Number Range Status
A data transfer or transport can lead to inconsistencies in the number range status.In other words, object IDs exist that are higher than the current number range statusof an internal number range. In that case, you must update the current number rangestatus in the affected ranges manually.
You update a number range status in the Customizing activity Maintain NumberRanges (Implementation guide: Personnel Management → OrganizationalManagement→ Basic Settings→ Maintaining Number Ranges).
2005/Q2 © 2005 SAP AG. All rights reserved. 97

I n t
e r
n a
l
U s
e
S A
P
P a
r t
n e
r
O n
l y I n
t e r n a l U
s e S A
P P
a r t n e r O
n l y
Unit 5: Appendix HR506
98 © 2005 SAP AG. All rights reserved. 2005/Q2

I n t
e r
n a
l
U s
e
S A
P
P a
r t
n e
r
O n
l y I n
t e r n a l U
s e S A
P P
a r t n e r O
n l y
HR506 Lesson: Transports in Organizational Management
Exercise 6: Transports in OrganizationalManagement
Exercise ObjectivesAfter completing this exercise, you will be able to:� work with the manual transport connection� work with transports using the object lock
Business ExampleYou want to transport the organizational structure from one SAP system to another.
Task:
1. Create a transport request for the following example structure in plan version 01using a manual transport connection.
� Plan Version = �01�� Object Type = �O�� Object ID = �00000001�� Display Depth = �2�
Hint: Check the request in transaction SE10 Transport Organizer.
2. Create an additional transport request for your organizational unit ## ExecutiveBoard using a transport over object lock. What value must the transport switchin transaction OOCR Set Up Transport Connection have in this case? In yourorganizational unit, create an additional organizational unit and two subordinatepositions. Here too, check the request in transaction SE10 Transport Organizer.If necessary, check for your objects in requests belonging to other groups.
2005/Q2 © 2005 SAP AG. All rights reserved. 99

I n t
e r
n a
l
U s
e
S A
P
P a
r t
n e
r
O n
l y I n
t e r n a l U
s e S A
P P
a r t n e r O
n l y
Unit 5: Appendix HR506
Solution 6: Transports in OrganizationalManagementTask:
1. Create a transport request for the following example structure in plan version 01using a manual transport connection.
Continued on next page
100 © 2005 SAP AG. All rights reserved. 2005/Q2

I n t
e r
n a
l
U s
e
S A
P
P a
r t
n e
r
O n
l y I n
t e r n a l U
s e S A
P P
a r t n e r O
n l y
HR506 Lesson: Transports in Organizational Management
� Plan Version = �01�� Object Type = �O�� Object ID = �00000001�� Display Depth = �2�
Hint: Check the request in transaction SE10 Transport Organizer.
a) Start the report RHMOVE30 for the following structure, by choosing IMG→ Personnel Management→ Organizational Management→ Transport→ Manual Transport→.
� Plan Version = �01�
� Object Type = �O�� Object ID = �00000001�
� Evaluation Path = �ORGEH�� Display Depth = �2�
� Test = � �
In RHMOVE30, in the Task field, create a Customizing request andactivate the Transport Objects setting.
Check the request in transaction SE10 Transport Organizer. You can alsoaccess the transport organizer by choosing SAP Easy Access→ Tools→Administration→ Transports→ Transport Organizer. In the transportorganizer, display your transport request and check the infotypes you wantto transport in the tree structure.
2. Create an additional transport request for your organizational unit ## ExecutiveBoard using a transport over object lock. What value must the transport switchin transaction OOCR Set Up Transport Connection have in this case? In your
Continued on next page
2005/Q2 © 2005 SAP AG. All rights reserved. 101

I n t
e r
n a
l
U s
e
S A
P
P a
r t
n e
r
O n
l y I n
t e r n a l U
s e S A
P P
a r t n e r O
n l y
Unit 5: Appendix HR506
organizational unit, create an additional organizational unit and two subordinatepositions. Here too, check the request in transaction SE10 Transport Organizer.If necessary, check for your objects in requests belonging to other groups.
a) To execute the transport over object lock, you must set the valueof the transport switch in transaction OOCR(IMG →PersonnelManagement→Organizational Management→ Transport→Set UpTransport Connection) to �T�.
When you have created the example structure in plan version 01, start thereport RHMOVE50 with the parameter Test = � � by choosing→System→ Services→ Reporting. Depending on when each group finishedmaintaining its structure and started report RHMOVE50, the objects of onegroup can appear on requests belonging to other groups. Search for yourorganizational objects using transaction SE10, Transport Organizer.
102 © 2005 SAP AG. All rights reserved. 2005/Q2

I n t
e r
n a
l
U s
e
S A
P
P a
r t
n e
r
O n
l y I n
t e r n a l U
s e S A
P P
a r t n e r O
n l y
HR506 Lesson: Transports in Organizational Management
Lesson Summary
You should now be able to:� Set up the transport connection for organizational objects� Understand the principle underlying the transport� Use reports to create a transport request for organizational objects
2005/Q2 © 2005 SAP AG. All rights reserved. 103

I n t
e r
n a
l
U s
e
S A
P
P a
r t
n e
r
O n
l y I n
t e r n a l U
s e S A
P P
a r t n e r O
n l y
Unit Summary HR506
Unit SummaryYou should now be able to:� Set up the transport connection for organizational objects� Understand the principle underlying the transport� Use reports to create a transport request for organizational objects
104 © 2005 SAP AG. All rights reserved. 2005/Q2

I n t
e r
n a
l
U s
e
S A
P
P a
r t
n e
r
O n
l y I n
t e r n a l U
s e S A
P P
a r t n e r O
n l y
HR506 Course Summary
Course SummaryYou should now be able to:
� Add customer object types and relationships to the Organizational Managementdata model,
� Customize Manager�s Desktop and the Organization and Staffing interface andadd new object types and relationships to them,
� Set up and understand Workflow in Organizational Management
2005/Q2 © 2005 SAP AG. All rights reserved. 105

I n t
e r
n a
l
U s
e
S A
P
P a
r t
n e
r
O n
l y I n
t e r n a l U
s e S A
P P
a r t n e r O
n l y
Course Summary HR506
106 © 2005 SAP AG. All rights reserved. 2005/Q2

I n t
e r
n a
l
U s
e
S A
P
P a
r t
n e
r
O n
l y I n
t e r n a l U
s e S A
P P
a r t n e r O
n l y
Appendix 1Paths for HR506
Unit 2 Enhancing the Data ModelTopic (Transaction) PathPath to IMG (SPRO) SAP Easy Access→ Tools→ Customizing→ IMG
→ Project Managment→ SAP Reference IMGCreating new object types(OOOT)
IMG→ Personnel Management→ OrganizationalManagement→ Basic Settings→ Data ModelEnhancement→ Maintain Object Types.
Assigning infotypes to newobject types (OOIT)
IMG→ Personnel Management→ OrganizationalManagement→ Basic Settings→ Data ModelEnhancement → Infotype → Maintenance →Maintain Info Types.
Defining new relationshipsand maintaining timeconstraints and allowedobject types (OOVK)
IMG→ Personnel Management→ OrganizationalManagement→ Basic Settings→ Data ModelEnhancement→ Relationship Maintenance→Maintain Relationships.
2005/Q2 © 2005 SAP AG. All rights reserved. 107

I n t
e r
n a
l
U s
e
S A
P
P a
r t
n e
r
O n
l y I n
t e r n a l U
s e S A
P P
a r t n e r O
n l y
Appendix 1: Paths for HR506 HR506
Topic (Transaction) PathMaintaining subtypes(OOSU)
IMG→ Personnel Management→ OrganizationalManagement → Basic Settings → Data ModelEnhancement→ Infotype Maintenance→ MaintainSubtypes.
Maintain evaluation paths(OOAW)
IMG→ Personnel Management→ OrganizationalManagement → Basic Settings → MaintainEvaluation Paths
Checking consistency of thedata model - RHCHECK0
SAP menu→ System -> Services -> Reporting(SA38); enter RHCHECK0 and choose Execute; or:IMG -> Personnel Management -> OrganizationalManagement -> Basic Settings -> Data ModelEnhancement -> Check Consistency of Installation→ Execute.
Unit 3 Customizing the Hierarchy FrameworkTopic (Transaction) PathDisplaying technicalinformation in the hierarchyframework (SU03)
SAP menu→ System→ User Profile→ Own data→ Parameters→
Displaying the objectmanager scenario
Enter OM_OBJM_SCEN_DISPLAY + save this
Identify column groups forcolumn framework Enter OM_ARRAYTYPE_DISPLAY + save this;
Use the Column Group icon and the TechnicalInformation button.
Displaying the frameworkused in the work area
Enter OM_FRAM_SCEN_DISPLAY and save
Displaying the technicalname on the tab page in thedetail area
Enter OM_TABTYPE_DISPLAY + save.
Customizing the objectmanager (SPRO)
IMG→ Personnel Management→ OrganizationalManagement→ Hierarchy Framework→ ObjectManager
108 © 2005 SAP AG. All rights reserved. 2005/Q2

I n t
e r
n a
l
U s
e
S A
P
P a
r t
n e
r
O n
l y I n
t e r n a l U
s e S A
P P
a r t n e r O
n l y
HR506 Appendix 1: Paths for HR506
Topic (Transaction) PathCreate your own searchnodes in Object Manager(Scenario for Organizationand Staffing = OMEOO0)
IMG→ Personnel Management→ OrganizationalManagement→ Hierarchy Framework→ ObjectManager→ Define Own Search Nodes→ SearchNodes Definition→ New Entries
Adjusting the search area→adding your own search nodeto the scenario
IMG→ Personnel Management→ OrganizationalManagement→ Hierarchy Framework→ ObjectManager→ Adjust Search Area→ Add AdditionalNode to Search Area→ New Entries (as columngroup, you can use NF_STO here)
Customizing search nodes IMG→ Personnel Management→ OrganizationalManagement→ Hierarchy Framework→ ObjectManager→ Adjust Search Area→ Adjust SearchNode → New Entries (Standard interactiontool for the Organization and Staffing interfaceCL_HR_OM_IAT_ORGP)
For structure search:
Maintain evaluation paths(OOAW)
IMG→ Personnel Management→ OrganizationalManagement → Basic Settings → MaintainEvaluation Paths
For structure search:specifying an evaluationpath for an object type(OOOT)
IMG→ Personnel Management→ OrganizationalManagement → Basic Settings → Data ModelEnhancement→Maintain Object Types→ StructureSearch.
Changing the columnframework
IMG→ Personnel Management→ OrganizationalManagement→ Hierarchy Framework→ ColumnFramework .....
Defining a new service in theoverview area
IMG→ Personnel Management→ OrganizationalManagement→ Hierarchy Framework→ IntegrateNew Object Type → Display Object Type inStructural Overview Object→ Define Your OwnService for Structural Overview Object→ DefinitionService→ New Entries (for the hierarchy frameworkuse the object key GOWD - general overview withdetail)
2005/Q2 © 2005 SAP AG. All rights reserved. 109

I n t
e r
n a
l
U s
e
S A
P
P a
r t
n e
r
O n
l y I n
t e r n a l U
s e S A
P P
a r t n e r O
n l y
Appendix 1: Paths for HR506 HR506
Topic (Transaction) PathDefining the attributes of thenew service
IMG→ Personnel Management→ OrganizationalManagement → Hierarchy Framework →Integrate New Object Type → Display ObjectType in Structural Overview Object → DefineAttributes of Structural Overview Object for YourOwn Service Select the service under DefinitionService→ New Entries ; (use the column groupNF_GEN_OV (general overview) and the headertype ORGSTRUC).
Defining the request overwhich the system calls theoverview object
IMG→ Personnel Management→ OrganizationalManagement→ Hierarchy Framework→ IntegrateNew Object Type → Display Object Type inStructural Overview Object→ Define Your OwnRequest → Select the scenario under ScenarioDefinition→ New Entries. Define your own requestfor the scenario OME0 with the service DETAIL(GENERAL) as the Service for the Second InterfaceObject.
Specifying which object typeuses which request
IMG→ Personnel Management→ OrganizationalManagement→ Hierarchy Framework→ IntegrateNew Object Type → Display Object Type inStructural Overview Object→ Assign Your OwnRequest to an Object Type→ New Entries.
Adjusting tab pages IMG→ Personnel Management→ OrganizationalManagement→ Hierarchy Framework→ IntegrateNew Object type→ Display Object Type in DetailedArea→ Define Own Tab Pages→
110 © 2005 SAP AG. All rights reserved. 2005/Q2

I n t
e r
n a
l
U s
e
S A
P
P a
r t
n e
r
O n
l y I n
t e r n a l U
s e S A
P P
a r t n e r O
n l y
HR506 Appendix 1: Paths for HR506
Topic (Transaction) PathGenerating a subscreen withscreen 7000 (PPCI)
Call transaction PPCI→ Enter Infotype→ Create;Menu Infotype→ Create Subscreen→ Confirmprompt.
Entering a subscreen for aninfotype
Menu System→ Services→ Table Maintenance→Extended Table Maintenance (SM30); Enter T77IDand choose→ Change; select each IT and enter7000 under Subscreen;
Adding an infotype as a tabpage IMG→ Personnel Management→ Organizational
Management→ Hierarchy Framework→ IntegrateNew Infotype
1. Define Your Own Tab Page2. Add Your Own Tab Pages to an Existing Tab
Page Group
Unit 4: Customizing Manager�s DesktopTopic (Transaction) PathPath to IMG (SPRO) SAP Easy Access→ Tools→ Customizing→ IMG
→ Project Managment→ SAP Reference IMGNew logo, new backgroundimage
IMG→ Personnel Management→ Manager�sDesktop→ Customer Adjustment→ Adapt InitialScreen→ Execute→ Binary Data→ ICON Search→ No Entries → Execute→ on the SAP WEBrepository screen choose→ Create→ Enter ObjectNames and Description (Customer namespace Z...)→ Import
Creating a new scenario IMG→ Personnel Management→ Manager�sDesktop → Customer Adjustment → SpecifyScenario-Specific Settings→ Specify ApplicationScenarios→ Choose and make entries (customernamespace Z...)
Defining tab pages(subsequent evaluationpaths)
IMG→ Personnel Management→ Manager�sDesktop→ Customer Adjustment→ DetermineViews of the Organizational Structure→ DetermineViews (Evaluation Paths).
2005/Q2 © 2005 SAP AG. All rights reserved. 111

I n t
e r
n a
l
U s
e
S A
P
P a
r t
n e
r
O n
l y I n
t e r n a l U
s e S A
P P
a r t n e r O
n l y
Appendix 1: Paths for HR506 HR506
Topic (Transaction) PathCreating new function codes(fastest way; all necessaryactions are called up inorder, otherwise also manualexecution using the next twotable entries)
IMG → Personnel Management→ Manager�sDesktop→ Enhancement of Function Codes→Wizard for Defining Function Codes → WorkThrough Wizard
Creating new function codes(by hand)
Step 1
IMG → Personnel Management → ManageŕsDesktop→ Enhancement of Function Codes→Define Function Codes→ Execute→ New Entries→ Enter
Step 2
Embedding the function codein a structure
IMG → Personnel Management→ Manager�sDesktop→ Enhancement of Function Codes→Define Structure of Function Codes → DefineFunction Code Hierarchies→ New Entries.
Hiding existing functioncodes (slimming downscenarios) / changing theorder of function codes
IMG → Personnel Management→ Manager�sDesktop→ Enhancement of Function Codes→Define Structure of Function Codes→ ChangeArrangement of Function Codes→ Choose andmake entries.
Unit 5 Workflow and Organizational ManagementTopic (Transaction) PathPath to IMG (SPRO) SAP Easy Access → Tools→ AcceleratedSAP
→ Customizing→ Project Managment→ SAPReference IMG
Business Workflow (general) SAP Easy Access→ Tools→ Business WorkflowBusiness objects (SWO1) SAP Easy Access→ Tools→ Business Workflow
→ Development→ Definition Tools→ BusinessObject Builder
Process level workflowbuilder (SWDD)
SAP Easy Access→ Tools→ Business Workflow→ Development→ Definition Tools→ WorkflowBuilder→ Workflow Builder→ Workflow Builder
Process level; displaysingle-step tasks, workflowtemplate, and so on(PFTC_DIS)
SAP Easy Access→ Tools→ Business Workflow→Development→ Definition Tools→ Tasks / TaskGroups→ Display
112 © 2005 SAP AG. All rights reserved. 2005/Q2

I n t
e r
n a
l
U s
e
S A
P
P a
r t
n e
r
O n
l y I n
t e r n a l U
s e S A
P P
a r t n e r O
n l y
HR506 Appendix 1: Paths for HR506
Topic (Transaction) PathCalling table T77INT Transaction SE16
Agent Assignment for theWorkflow for OrganizationalChange:
Assign manager 2
IMG→ Personnel Management→ OrganizationalManagement → Integration → Integrationwith Personnel Administration→ Workflow forOrganizational Change (WS01000014) AssignAgents to Tasks→ Execute Designated PersonnelAction→ Specify Position in New Department.Assign all potential users (managers) to the standardtasks, and generate an index.
Agent Assignment for theWorkflow for OrganizationalChange:
Assign agent from Tab.T526
IMG→ Personnel Management→ OrganizationalManagement → Integration → Integrationwith Personnel Administration→ Workflow forOrganizational Change (WS01000014) AssignAgents to Tasks→ Execute Designated PersonnelAction→ Specify Position in New Department.Assign all potential users (managers) to the standardtasks, and generate an index.
Event linkage for theWorkflow for OrganizationalChange
IMG→ Personnel Management→ OrganizationalManagement → Integration → Integrationwith Personnel Management → Workflow forOrganizational Change (WS01000014)→ ActivateEvent Linkage → Execute Designated Action→ Expand; Create Designated Org. Change→Activate.
Activate event linkage in tab.T77INT Manager�s Desktop (PPMDT)
Organization and Staffing (PPOME)
2005/Q2 © 2005 SAP AG. All rights reserved. 113

I n t
e r
n a
l
U s
e
S A
P
P a
r t
n e
r
O n
l y I n
t e r n a l U
s e S A
P P
a r t n e r O
n l y
Appendix 1: Paths for HR506 HR506
Topic (Transaction) PathTransferring an employee inOrganizational Managementusing an action
Personnel Management → OrganizationalManagement → Infotype Settings →Activate/Deactivate "Vacancy" Infotype.
Workflow Create / DelimitVacancy
IMG→ Personal Management→ OrganizationManagement→ Integration→ Integration withPersonnel Administration→ Workflow Messageabout New Employee (WS01200136) or underPersonnel Management→ Manager�s Desktop→Organizational Changes→ Workflow Messageabout New Employee (WS01200136)
Generating events duringinfotype updating in PA
IMG→ Personnel Administration→ Tools→Business Workflow Events
Unit 6 Transports in Organizational ManagementTopic (Transaction) PathPath to IMG (SPRO) SAP Easy Access→ Tools→ Customizing→ IMG
→ Project Managment→ SAP Reference IMGImport lock (tab. T77TR IMG→ Personnel Management→ Organizational
Management→ Transport→ Lock Infotypes forImport
Setting up a transportconnection (OOCR)
IMG→ Personnel Management→ OrganizationalManagement→ Transport→ Set Up TransportConnection; Values: X = no automatic transport, T= transport over object lock; (empty)= automatictransport.
Manual transport connection(RHMOVE30)
IMG→ Personnel Management→ OrganizationalManagement→ Transport→ Manual Transport→ execute
Transport Organizer (SE10) SAP Easy Access→ Tools→ Administration→Transports→ Transport Organizer
114 © 2005 SAP AG. All rights reserved. 2005/Q2

I n t
e r
n a
l
U s
e
S A
P
P a
r t
n e
r
O n
l y I n
t e r n a l U
s e S A
P P
a r t n e r O
n l y
HR506 Appendix 1: Paths for HR506
Topic (Transaction) PathTransport over object lock(RHMOVE50)
SAP Easy Access → System → Services →Reporting → Enter RHMOVE50 and chooseExecute.
Further transport(RHMOVE60)
SAP Easy Access → System → Services →Reporting → Enter RHMOVE60 and chooseExecute.
Updating number ranges IMG→ Personnel Management→ OrganizationalManagement→ Basic Settings→ Number RangeMaintenance→ Maintain Number Ranges
Important R/3 Notes on Transporting Organizational Objects:R/3 Note Number Short Text Component
0048964 from 01/29/2000 PD integration andtransport connection
BC-BTM-OM,OrganizationalManagement
Content: Differences in post-transport processing for achieving consistencybetween OM and PD before and after release 4.5a. Key words: RHINE10,RHINTE30, RHWFAKTI.0138411 from 30.01.03 Composite note:
transports inOrganizationalManagement
BC-CTS Change andTransport System
Content: General information on transporting PD objects; recommendations fortransporting PD objects.
2005/Q2 © 2005 SAP AG. All rights reserved. 115

I n t
e r
n a
l
U s
e
S A
P
P a
r t
n e
r
O n
l y I n
t e r n a l U
s e S A
P P
a r t n e r O
n l y
Appendix 1: Paths for HR506 HR506
116 © 2005 SAP AG. All rights reserved. 2005/Q2

I n t
e r
n a
l
U s
e
S A
P
P a
r t
n e
r
O n
l y I n
t e r n a l U
s e S A
P P
a r t n e r O
n l y
IndexAAdd Search Nodes to ObjectManager, 23
Adjust Tab Pages in DetailArea, 22
Adjust the Search Area, 109Adjusting Tab Pages, 35Adjusting the Object Manager,22
Agent, 66Area of Responsibility, 69Assign Search Tools, 23Assigning own request to objecttype, 110
Attributes of New Service, 34Automatic Transport, 92Automatic TransportConnection, 93
BBusiness Object Builder, 112Business Object Repository, 65Business Workflow Events, 114By Object, 91CChange Arrangement ofFunction Codes, 112
Change Request, 91Checking Consistency ofInstallation, 108
Coherence Relationship, 26Column Framework, 26, 109Column Group, 26, 34Consistency of Customizing, 9Create Subscreen, 36, 111
Create Vacancy for Position, 71Creating, 3Creating Evaluation Paths, 8DData Model for PersonnelPlanning, 3
Define Function Codes, 51, 112Define own request, 110Define own tab pages, 110Define Views (EvaluationPaths), 111
Defining Hierarchy of FunctionCode, 112
Defining Object Type, 3Definition and Adjustment, 22Definition of Requests, 22Definition Service, 109Delimit Vacancy for Position,71
Detail Area, 21Dynamic Column Group, 26Dynamic Result Generation,72�73
EEnhancement of FunctionCodes, 50
Enhancing the Data Model, 4Evaluation Path, 34Evaluation Paths, 5Event, 67Exclude Search Nodes, 23External Object Types, 4, 93FFree Search, 25
2005/Q2 © 2005 SAP AG. All rights reserved. 117

I n t
e r
n a
l
U s
e
S A
P
P a
r t
n e
r
O n
l y I n
t e r n a l U
s e S A
P P
a r t n e r O
n l y
Index HR506
Free Search (CL_HR_ST_AD-HOC_SELECTION), 24
Free Search Tool, 26Function Codes, 51Function Module, 49Function Tree, 51Further Transport, 96GGenerating Events whileUpdating Infotypes, 72
GOWD (General Overviewwith Detail), 33
HHeader Type, 34Hierarchy Framework Request,35
IImport Lock, 91Info Type, 36Info types 0105, 69InfoSet, 25Infotype Update, 72Infotypes, 4Infotypes 1000, 4Infotypes 1001, 4Initial Evaluation Path, 49Integration with Recruitment,71
Interface General Structures, 7Internal Object Types, 4IT1000, 3IT1001, 3LLock Infotypes for Import, 114MMaintain Evaluation Paths,108�109
Maintain Infotypes, 107Maintain Number Ranges., 115
Maintain Object Types, 107Maintain Relationships, 107Maintain Subtypes, 108Manual Transport, 92, 114Manual Transport Connection,94
Method, 66NNew Employee, 114New Employee in Department,70
NF_GEN_OV, 34Number Range Checks, 97Number Range Status, 97OObject Manager, 21, 23, 108Object Manager Scenario, 23Object Managers, 23Object Method, 68Object Orientated Design, 3, 67Object Types I, 3of Structural Overview Object,33
OM_ARRAYTYPE_DISPLAY,21, 108
OM_FRAM_SCEN_DISPLAY,21, 35, 108
OM_OBJM_SCEN_DISPLAY,21, 108
OM_TABTYPE_DISPLAY, 21,108
OMEOO0, 109OOAW, 108�109OOCR, 114OOIT, 107OOOT, 107, 109OOSU, 108OOVK, 107Organizational Level, 66ORGCHEARM, 68Overview Area, 21�22
118 © 2005 SAP AG. All rights reserved. 2005/Q2

I n t
e r
n a
l
U s
e
S A
P
P a
r t
n e
r
O n
l y I n
t e r n a l U
s e S A
P P
a r t n e r O
n l y
HR506 Index
Own Object Types, 3Own Tab Page, 111Ppermitted, 4Permitted Relationships, 3Personnel Master Data, 69PFTC_DIS, 112Plan Versions .: Never Use, 92PPCI, 111PPMDT, 113PPOME, 113PPVAC PPVAC, 71Process Level, 66RReport RHCHECK1, 97Report RHCHECKP, 97Report RHMOVE30, 94Report RHMOVE50, 95Reports, 51, 97Request, 35Requests, 34RHCHECK0, 9, 108RHCHECKRELATIONS, 97RHCHECKV, 97RHCTIMCO, 97RHMOVE30, 94, 114(RHMOVE60), 96Rule, 67SSearch Area, 21Search Nodes Definition, 109Search Term(CL_HROM_SEARCH-TOOL_ORGP), 24
Search Tools, 24Selection Area, 21Service, 33Service DETAIL (GENERAL),35
Service for First InterfaceObject, 35
Service for Second InterfaceObject, 35
Set up Transport Connection,114
Single-Step Tasks, 66Skip Field, 8Specifying Views per Category,50
SPRO, 107�108Staffing Assignment alongOrganizational Structure, 6
Start Objects, 49Start Objects Evaluation Path,50
Start Objects Function, 50Structural Search, 25Structural Search(CL_HR_OM_SEAT_STRUC-TUAL_SEARCH), 24
Structure Search, 109SU03, 108Subcategories (Node Type), 50Subscreen 7000, 36Subsequent Evaluation Path, 49SWDD, 112SWO1, 112TT777E, 5T778O, 3T77INT, 69(T77MWBK), 50T77OBJSER, 33T77S0, 49, 72Tab Page, 35Tab. T526, 113Tab. T77INT, 113(Tab. T77MBWFCH), 48Tab. T77MWBD, 48(Tab. T77MWBK), 48(Tab. T77MWBS), 50Tab. T77TR, 114Table T526, 69
2005/Q2 © 2005 SAP AG. All rights reserved. 119

I n t
e r
n a
l
U s
e
S A
P
P a
r t
n e
r
O n
l y I n
t e r n a l U
s e S A
P P
a r t n e r O
n l y
Index HR506
Table T750X, 71Table T777i, 4Table T777I, 3Table T777IBO, 72Table T777V, 5Table T778O, 3, 23, 36Table T778OS, 25Table T778T, 4Table T778V, 5Table T77EO, 4Table T77FSEAN, 23Table T77INT, 68Table T77OMTABS, 36Table T77OMTABUS, 36Table T77S0, 71Table T77TR, 91Table TRESC, 5Target System, 91Tasks / Task Groups, 112Temporary Evaluation Paths, 7Theme Categories (Home type),50
Time Constraints, 5Transaction PPCI, 35Transport Connection, 91Transport Organizer, 114
Transport Over Object Lock,92, 95
Transport Over Object Lock(RHMOVE50), 115
TRSP CORR, 93�95UUpdating Number Ranges, 115User Parameter OM_ARRAY-TYPE_DISPLAY, 26
User ParameterOM_OBJM_SCEN_DIS-PLAY, 24
User Parameters MWB_SCEN,49
V"Vacancy" Infotype, 114WWizard for Defining FunctionCodes, 52, 112
Workflow Builder, 112Workflow Definition, 66Workflow for OrganizationalChange, 68, 113
Workflow Manager, 65
120 © 2005 SAP AG. All rights reserved. 2005/Q2

I n t
e r
n a
l
U s
e
S A
P
P a
r t
n e
r
O n
l y I n
t e r n a l U
s e S A
P P
a r t n e r O
n l y
FeedbackSAP AG has made every effort in the preparation of this course to ensure the accuracyand completeness of the materials. If you have any corrections or suggestions forimprovement, please record them in the appropriate place in the course evaluation.
2005/Q2 © 2005 SAP AG. All rights reserved. 121