advance xcede professional accounting myob accountants ... · the migration of ledgers from myob ao...
TRANSCRIPT

APS® 2009
Advance®
Xcede Professional Accounting
MYOB Accountants Office
Conversion Process

Page 2 of 57 APS® 2009 AO Conversion Process
AO conversion Process APS® 2009 Page 3 of 57
Disclaimer Every effort has been made to ensure the accuracy and completeness of this manual. However,
Advanced Professional Solutions Limited and Advance Professional Solutions Pty Ltd, its
employees and agents cannot be held liable for any errors or omissions. This document should
not be relied on as a detailed specification of the system. In addition, Advanced Professional
Solutions Limited reserves the right to issue revisions, enhancements and improvements to
Advance software at any time without notice. Every effort will be made to ensure that the
manual is updated concurrently and that the user is not inconvenienced as a result of any change.

Page 4 of 57 APS® 2009 AO Conversion Process
Index
MYOB Accountants Office GL conversions to Advance® XPA ......................................... 7
Process Overview ................................................................................................................. 7
Pre Requisites ...................................................................................................................... 8
SECTION 1: Preparation for Conversions ....................................................................... 9
Review the XPA Master Chart ............................................................................................ 9
Review the APS Standard Templates .................................................................................. 9
Assess the coding consistency across your AO Client ledgers ............................................. 10
Review the Financial Reporting Fields in XPA .................................................................... 11
Review the XPA Jobstreams ............................................................................................ 11
Review the Xcede Financial Reports ................................................................................. 12
Assets ............................................................................................................................ 12
SECTION 2: Create mapping templates........................................................................ 14
Step1: Create comprehensive AO Master Templates for each entity type............................ 14
Step 2: Create comprehensive XPA Master Templates for each entity type ......................... 14
SECTION 3: Creating Practice Template Maps ............................................................. 15
Step 1: Open the Chart Mapping Toolbox. ........................................................................ 15
Step 2: Import the Advance XPA Master Chart .................................................................. 15
Step 3: Import the MYOB Master Template Chart(s) ......................................................... 17
Step 4: Mapping the Charts ............................................................................................. 20
SECTION 4: Converting Client Ledgers ........................................................................ 23
Step 1: Pre-conversion – While still in MYOB Accountants Office ........................................ 23
Step 2: Create the XPA Ledger ........................................................................................ 24
Step 3: Add the XPA GST Rates ....................................................................................... 27
Step 4: Import the Client MYOB Chart .............................................................................. 28
Step 5: Creating the Client Ledger Map ............................................................................ 30
Step 6: Importing the accounts from AO to XPA ............................................................... 33
Step 7: Importing the Client Ledger’s Balances & Entries .................................................. 35
Step 8: Importing the Assets and Asset Balances .............................................................. 37
SECTION 5: Verifying the Converted Data ................................................................... 39
Step 1: View the Trial Balance ......................................................................................... 39
SECTION 6: Integrating the Assets .............................................................................. 40
Step 1: Reverse any Current Year Asset Entries ................................................................ 40
Step 2: Setting up Asset Group General Ledger codes ....................................................... 41
Step 3: Integrate Assets.................................................................................................. 45
Step 4: Asset Reconciliation............................................................................................. 46
Step 5: Asset Code to GL Code Match .............................................................................. 47
SECTION 7: Completing Ledger Setup ......................................................................... 48
Chart Maintenance ............................................................................................................. 48
Multiple Period Livestock/Stock Ledgers ............................................................................... 48
Livestock Groups ................................................................................................................ 49
Adding Livestock Groups ................................................................................................. 49
Stock Groups ..................................................................................................................... 51
Adding Stock Groups ....................................................................................................... 51
Financial Reporting Fields ................................................................................................... 52

AO conversion Process APS® 2009 Page 5 of 57
Running the Financial Statements ........................................................................................53
APPENDIX 1: ................................................................................................................. 54
Creating an ODBC Connection .............................................................................................54

Page 6 of 57 APS® 2009 AO Conversion Process

AO conversion Process APS® 2009 Page 7 of 57
MYOB Accountants Office GL conversions to Advance® XPA
Process Overview
• Chart Mapping is used to create a “Master Map” from the MYOB Chart of Accounts to the XPA
Chart of Accounts.
• The Map defines the translation from each MYOB account code to the XPA account code.
• The Master map is then applied to each ledger as it is converted. Accounts that have been
mapped at Master level will be copied onto the client mapping. Only those accounts on the
client ledger that were not present on the MYOB Master Chart will need to be manually
updated.
• All accounts must be mapped to be imported; if the accounts are not mapped they will not be
imported.
• All Accounts from the client ledger are imported into the XPA ledger, then the Balances /
Transactions, and finally the Assets are imported.
• All historical balance history plus current and future year balance and transactional data plus
asset data is imported.
• All transactional data will be imported as “Posted” entries.
• Assets are imported into XPA but not integrated into the General Ledger. The asset groups
are then integrated by Tax or Book ledger at the accountant’s discretion.
• Current year asset transactions (depreciation expense, Profit / Loss and Capital Gain / Loss on
sale of fixed assets) will need to be reversed out to the asset suspense account as XPA
calculates and posts depreciation during the asset integration process.

Page 8 of 57 APS® 2009 AO Conversion Process
Please note the following before continuing:
Asset Balances in the GL may contain cents but the Asset balances may not, therefore there may
be a small balance remaining for these accounts in the comparative year.
Opening balances are brought in from the Accounts Office file, therefore when a “Check File” is
performed within XPA you may note that there are some opening balance errors (i.e. opening
balance differs from prior year closing balance), this will usually be due to comparatives or
opening balances being edited in MYOB.
There is no Accumulated Private Use depreciation stored in Accountants Office; therefore
asset maintenance will be required to input this into XPA.
Divisions can’t be globally mapped; all codes must be mapped individually.
“Cash/Non Cash Distinction” information in MYOB is not imported into XPA:
Balances are brought in without Cash or Funds flags
Transactions are brought in based on the Import options flag
The GST rates must be added to the XPA Ledger before importing the Accounts.
Pre Requisites
A System DSN must be created before any mappings or conversions can be done.
The DSN Name must be “AO Ledger”.
See Appendix 1

AO conversion Process APS® 2009 Page 9 of 57
SECTION 1: Preparation for Conversions
Review the XPA Master Chart
Prior to commencing the conversion to Xcede Professional Accounting a review of the XPA Master
Chart should be performed. Changes to the master chart should be made to reflect the
requirements of the Practice, and may include such things as the addition of an account or
amendment of an account description.
The file Advance XPA Master Chart.xpa is the New Zealand XPA Master Chart of accounts. Before
making changes directly to this file it is advisable to first make a copy (using FILE\SAVE AS) and
rename the file as the Practice Master Chart – keeping the original APS chart intact. This will
ensure that if APS supply an updated master template in the future your changes will not be lost.
The master chart generally contains a full Chart of Accounts, Asset Groups, Stock Groups and
Livestock Groups, Financial Reporting Fields, User Defined Fields and Jobstreams.
Customisation of the default (master) template jobstreams can be performed at a later stage,
once ledgers have been converted. A review of the financial statements is a separate process.
Review the APS Standard Templates
Templates are used to develop consistency and standards within client ledgers. Templates
facilitate the quick creation of ledgers and enable specialised ledgers and financial statements to
be easily produced. Templates generally contain a cut down version of the Advance XPA Master
Chart, leaving only those codes that are required for a small entity. Additional accounts are then
added at ledger level from the Master Chart as required.
The following templates are supplied with Xcede Professional Accounting:
Advance XPA Master Chart
Advance XPA Company Standard
Advance XPA Divisional
Advance XPA Partnership
Advance XPA Sole Trader
Advance XPA Trust
Advance XPA Rental Properties
Please note that although no entity templates exist specifically for farming, the livestock groups
and codes are held on the Livestock Groups template and these can be added to the ledgers as
required. Farming expenses and other income are held on the Master Chart.
These templates should be reviewed and where Practice specific amendments are required the
relevant templates should be copied and renamed. It is recommended that the XPA standard

Page 10 of 57 APS® 2009 AO Conversion Process
templates should not be modified as changes made may be overwritten with future releases of
the templates.
Assess the coding consistency across your AO Client ledgers
Consistency in coding refers to the Account code and title being the same across the majority of
client ledgers. Consistency of account coding may be an issue from ledger to ledger. Every
Practice will come across this problem of 'coding inconsistency' from ledger to ledger, depending
upon how strict the Practice has been when setting up new client ledgers or opening new
accounts on existing ledgers.
It is common for many different accounts to be used across the Practice for the same income or
expense or balance sheet account.
There may have been a valid reason for the inconsistency of account coding but there also may
be account balance inconsistency within a ledger. For example, an account code was used in
prior years, but due to a change in disclosure or reporting requirements, a new account was
opened and used in the current year. In this case, a balance for the same account is stored in
different accounts over the history of the ledger.
The migration of ledgers from MYOB AO to Xcede Professional Accounting is an ideal opportunity
to ensure each ledger has a uniform chart of accounts.
There are a number of advantages from having uniformly coded ledgers:
� It encourages a consistency in the financial statements, printed across the Practice
� Report writing and variation or customisation and consolidation are far more straightforward
� Quality control is easier
To ensure consistency, we recommend that prior to conversion each MYOB AO Client Trial
Balance is compared to your current MYOB AO Master Chart to determine any inconsistencies.
For the reports to generate correctly, the overriding factor is that the codes used falls within the
appropriate range in the chart so that it is brought through into its correct location on the final
accounts.
For detailed coding instructions please refer to the document; Advance® XPA Coding Instructions.

AO conversion Process APS® 2009 Page 11 of 57
Review the Financial Reporting Fields in XPA
Financial Reporting Fields allow you to specify ledger specific information that is referenced from,
and printed on financial statements. The information includes company details such as those
relating to the Directory, if it is the first year of trading, as well as Notes to the Financial
Statements.
Financial Reporting Fields can also be defined in templates. This means that where the value of a
field is often common to a number of ledgers you can enter that value in a template. For each
ledger you then simply select to use the template value rather than entering a value in the ledger.
All fields defined in the ledger's default template are automatically made available to the ledger.
If you select a new default template for the ledger then the reporting fields defined in that new
template are not made available to the ledger.
For more information on the financial reporting fields, please refer to the document; Advance®
XPA Financial Reporting Fields. There is an extensive range of reporting fields as detailed in this
document. It is vital that this document is worked through, and any Practice wide defaults set up.
Notes
There are reporting options available where you can select to print some report areas in summary
(in which case a note will be triggered) or in detail on the report itself (note will NOT be triggered.
Please familiarise yourself with these in the reporting fields. However, there is an over riding field
available to stop the note printing at all even if it normally would have been triggered to print.
User definable notes are available should extra disclosure be required.
Policies
An Accounting Policies sheet is provide with default policy statements set up. However, if these
policy statements don’t read as you require them, they each have an associated reporting field in
which you can enter the statement you prefer and this will over ride the default. These are all
detailed clearly in the Financial Reporting Fields document, and any changes should be made at
the master level prior to commencing the translation procedures.
Company and Trust Minutes
A default set of Company Minutes, General Disclosures and Trust minutes are supplied. There are
some fields provided which, if completed, will over ride the defaults on the sheets themselves. If
the customisation is more extensive than this, your consultant can discuss the requirements and
quote you on the work accordingly.
Review the XPA Jobstreams
Xcede Professional Accounting is designed to allow for the easy production and printing of
financial statements. It also provides the flexibility required to change the parameters associated
with a statement, such as the period number or rounding, from one instance to the next.
Individual financial statements are referred to as sheets or spreadsheets since they are Excel
spreadsheets. You can choose to generate a single financial statement or a jobstream of many
statements. A jobstream is a list of financial statements which are generated in a specified order.
The jobstream also details the parameter to be used for each statement, such as which balances
to use for the comparative figures and to what precision you want figures displayed.

Page 12 of 57 APS® 2009 AO Conversion Process
Included with the XPA Master Chart is a jobstreams that prints a range of financial reports.
Prior to the Practice ‘going live’ the master jobstream should be reviewed and amended to create
jobstreams that are used by the majority of your ledgers. Ledger specific jobstreams can also be
created.
Review the Xcede Financial Reports
The type of financial reports required to be generated and printed for any group of ledgers in the
Practice is an important consideration.
The XPA master chart jobstream prints a cover page, directory, disclaimer, annual report, financial
performance, equity statement, financial position, advance accounts, depreciation schedule,
supporting notes and an index. Company Minutes, General Disclosures and Trust minutes are
also supplied.
Assets
The Asset Register can be fully integrated with the general ledger or the asset register can be
maintained un-integrated and kept separate to the general ledger. The Asset Register maintains
both ‘book’ and ‘tax’ ledgers for all assets where required. Where an integrated Asset Register is
kept all the journal entries are posted to the general ledger automatically.
Asset Groups
All assets must be allocated to an Asset Group. An asset group specifies the general ledger
accounts that are required to be open on the general ledger. You can also set up the defaults for
each individual asset added to an asset group such as the method of depreciation, the rate and
the calculation basis.
Both ‘book’ and ‘tax’ ledgers can be maintained and the integration method is specified in the
Asset Group. Please note that once an asset group has been allocated an integration method and
assets have been added to that group, the integration method cannot be altered.
Asset groups can be copied from a template or an existing ledger. The asset groups maintained
on each of the entity templates should be reviewed to ensure consistency across the Practice.
The XPA Chart of accounts allows for up to 30 Asset Groups to be used. Asset groups in the Sol6
ledger must be reviewed prior to conversion.
Pooled Assets
In XPA, to enable the correct calculation of depreciation of an asset pool, only one asset is
created to maintain the balance of the pool. Every transaction (or movement) into the pool is
made through the asset maintenance area. We recommend that where a pool is being used, then
an asset group specifically for the pool be created in the asset register. This means there is
consistency between those ledgers that have a low value pool.

AO conversion Process APS® 2009 Page 13 of 57
The difference between the low value pool being a separate asset group or being included in an
existing asset group is the disclosure of fixed assets on the financial reports. The financial reports
display each asset group separately, as each asset group is a general ledger code.
Private Use % of an Asset
A private use % for an asset is only maintained for a tax-integrated asset.
Converting Assets
Asset cost, accumulated depreciation and private use accumulated depreciation codes should be
mapped to the Asset Suspense code in XPA. The depreciation expense, and any profit or loss on
sale codes, is mapped to their corresponding code in the XPA P&L – but any current year
transactions to these codes must be reversed against the asset suspense account after
conversion, but before asset integration. When the asset ledger is ‘integrated’ following the
conversion, these balances will be set up correctly and calculation of depreciation by the asset
ledger will reinstate the current year P&L account entries. However, if there is no Asset Ledger
maintained, or it is not an integrated asset ledger, the asset codes must be mapped to their
correct GL codes.
Asset Group Code Matching
The MYOB AO group codes are retained on the converted XPA ledger after all asset groups have
been integrated. Accordingly there may be some variations between the MYOB AO group codes
and those asset group codes used in XPA.
In order to align these codes a special Administration Tool utility is available to match the asset
group code to the general ledger asset cost account. It is important that the Asset Group Code
aligns with the General Ledger Code and therefore we recommend that this utility be run across
every converted ledger.

Page 14 of 57 APS® 2009 AO Conversion Process
SECTION 2: Create mapping templates
Step1: Create comprehensive AO Master Templates for each entity type.
As you will learn, your current MYOB AO Entity template ledger(s) will be used during the
conversion process to create “maps”, where the account codes in your AO template(s) will be
linked to their equivalent codes in the XPA Master Chart. Unmapped accounts that exist on client
ledgers that were not present in the Templates will have to be mapped manually during the
conversion process.
The conversion process is much faster and easier if a comprehensive AO Template is constructed
beforehand which contains all of the account codes and sub-codes from your Master Chart that
may be in use on your client ledgers, including all of the accounts that may be in use throughout
the Ownership area of the chart. This will allow these files to be mapped once at Master level,
rather than having to be manually mapped during each client ledger conversion.
An example of this is the Current Account area. Your AO Company Template ledger may be set up
with accounts for only two different shareholders using only 10 drawings accounts. But in reality
your Client ledgers may have 5 to 10 shareholders on most ledgers and use up to 30 different
drawings accounts. The AO Company Template Ledger(s) should be expanded to contain all of
the accounts and sub-accounts for these additional shareholders prior to beginning the conversion
phase.
Step 2: Create comprehensive XPA Master Templates for each entity type
This step is usually performed by your XPA Consultant.
During the conversion process we will be mapping the AO chart of Accounts to their XPA
equivalent codes. You cannot map and AO account to an XPA code that does not exist in the XPA
Chart you are mapping to. For this reason it is important that all of the XPA account codes and
sub accounts that will be required have been set up prior to the mapping process. The
conversion process does NOT create new accounts
Again, the best example of this is in the Ownership area of the chart. All of the necessary
Contribution and Drawings accounts must be set up for as many
Shareholders/Beneficiaries/Partners that may exist on any AO ledger that is to be converted. So if
your largest Company Client has 20 Shareholders Current Accounts, the XPA Template must have
accounts all of the accounts and sub accounts set up on it ready to receive the converted data.
As the coding for these entity types is different in XPA, it is recommended that a separate
conversion master template is set up for each entity type.

AO conversion Process APS® 2009 Page 15 of 57
SECTION 3: Creating Practice Template Maps At a practice level, create Maps for each template, mapping the MYOB entity chart of accounts to
the XPA master / entity chart of accounts.
Step 1: Open the Chart Mapping Toolbox.
Open the Chart Mapping Toolbox by selecting Chart Mapping from the Xcede Professional
Accounting section of the Central Login menu.
Step 2: Import the Advance XPA Master Chart
1. Select the Charts tab on the Chart Mapping Toolbox
2. Select the Maintenance menu, New option to display the ‘New Chart’ form.

Page 16 of 57 APS® 2009 AO Conversion Process
3. Enter an identifying chart name in the ‘Name’ field; select XPA Chart from the Type drop-
down list and then click on the “Source” file browse button.
4. This will open the XPA Ledger List. Select the “Template” tab and then highlight the Advance
XPA Master Template and click OK.
5. You will be returned to the New Chart form. The ‘Source’ field will be populated with the
network location of the selected XPA file. Ensure all fields in the ‘New Chart’ form are correct
and then click on the Import button. XPA will now retrieve the chart of accounts from the
selected XPA template.
6. Once the import is completed the Advance XPA Master chart will display in the ‘Charts’ list.

AO conversion Process APS® 2009 Page 17 of 57
Step 3: Import the MYOB Master Template Chart(s)
1. Select the Charts tab on the Chart Mapping Toolbox
2. Select the Maintenance menu, New option to display the ‘New Chart’ form.
3. Enter an identifying chart name in the ‘Name’ field. Select AO Ledger in the type field and
click on the “Source” field selector button to locate the MYOB Data Folder.

Page 18 of 57 APS® 2009 AO Conversion Process
4. The Folder viewed defaults to the GLMan sub folder of the MYOB Data store. Select the AO
template folder you wish to Import.
5. Select the gl_acct.DBF file within that folder and click “Open” to populate the ‘Source’ field
with the selected MYOB chart.
6. Ensure all fields in the ‘New Chart’ form are correct and then click on the Import button.

AO conversion Process APS® 2009 Page 19 of 57
7. Once the import is completed, the MYOB chart will display in the ‘Charts’ list.

Page 20 of 57 APS® 2009 AO Conversion Process
Step 4: Mapping the Charts
Once both the XPA Ledger and the MYOB charts of accounts have been imported they must be
mapped together.
1. From the ‘Charts’ tab, right mouse click on the MYOB Chart and select the option From
Mapping File. The name of that chart will then populate the ‘Map From’ field at the bottom
of the form.
2. Right mouse click on the XPA template chart and select the option To Mapping File. The
name of the XPA chart will then populate the ‘Map To’ field at the bottom of the form.
3. Once both the ‘Map From’ and ‘Map To’ fields have been populated, click on the Map
Accounts button to open the ‘Chart Mapping’ form.

AO conversion Process APS® 2009 Page 21 of 57
4. The left panel of the ‘Chart Mapping’ form displays the ‘Map From’ accounts and the right
panel displays the ‘Map To’ accounts (this must always be the XPA ledger).
The mapping is set up by allocating an XPA chart code from the listing in the panel on the
right side of the form to the corresponding code, To Code, on the left side of the form.
Account Codes can be assigned from the right panel to the left panel by the following methods:
• Highlight the code in the right panel and drag and drop it into the ‘To Code’ field in the left
panel.
• Highlight the blank ‘To Code’ field in the left panel and double click on the required ‘XPA
Code’ in the right panel.
• Type the relevant code directly into the ‘To Code’ field in the left panel. Any code previously
entered into the field will need to be manually deleted before entering the new code.
• Note: Asset cost and accumulated depreciation codes must be mapped to an asset suspense
account (usually 998).
Tips and Tricks
Did you know that you can sort the mapping screen by clicking on the column
header that you want to sort by? Clicking on the column header multiple times
will alternate between ascending and descending sorting options.
NOTE: Only those account codes that are displayed in the right hand panel can
be mapped to. If an account does not exist you will get an “Invalid Code” error.
If the code you have entered is a valid XPA account but does not appear on the
RH side of the screen, you must exit out of the Chart Mapping Toolbox and enter
it into the Chart of Accounts of the XPA Template you are mapping to.

Page 22 of 57 APS® 2009 AO Conversion Process
Mapping the GST Rate codes
The ‘Tax’ tab on the ‘Chart Mapping’ form is used to map the Tax Rate codes of the ‘From’ chart
of accounts to the Tax Rate Codes of the XPA ledger (the ‘To’ chart).
As the tax rate data from 3rd party applications cannot be extracted automatically, the tax code
data is typed into the map manually. Enter the source software tax rate codes in the ‘From Code’
column on the left of the form and then enter the corresponding XPA tax codes in the ‘To Code’
column on the right of the form.
Double click on the first ‘From Code’ cell and then enter the relevant code.
These template maps can then be used for the client ledger import. They are copied and
customised on a ledger by ledger basis.

AO conversion Process APS® 2009 Page 23 of 57
SECTION 4: Converting Client Ledgers
Step 1: Pre-conversion – While still in MYOB Accountants Office
1. Open the Client file in AO and note down the following information:
• Client Name
• Balance Date
• Periods enabled
• GST enabled
• Shareholder/Partner/Beneficiary details
• Directory the MYOB Ledger is stored in
2. Use the utility in MYOB to delete the unused Accounts from the chart.
Note 1: Do not select the option; “Allow deletion of accounts where current year and
previous year are zero; but there are non-zero values in prior years”.
Note 2: This utility will not delete accounts that are flagged as “Mandatory” in the AO
Ledger Chart of Accounts. This flag can be removed manually, but there is no way of mass
updating this setting on the entire chart.
3. Print out the Trial Balance from Accountants Office.

Page 24 of 57 APS® 2009 AO Conversion Process
Step 2: Create the XPA Ledger
1. Open XPA from the Central Login Menu.
2. Select the File menu, and choose the ‘New’ option (or use the icon on the toolbar instead).
This will open the New Ledger Form.
3. Enter a Filename (using your Practice naming convention) and Description for this Client
Ledger. Do not source an XPA Template at this time. Select the ‘OK’ button to
continue.

AO conversion Process APS® 2009 Page 25 of 57
4. This will open the Ledger Details form. Complete the clients’ information:
• Enter the Organisation Name
• Set the Year end date (Balance Date) as per the AO information you collected earlier.
• Set the Number of Periods as per the AO information you collected earlier.
• Set the Entity type
• Country
• Enable or disable GST
• Check that a Default Template has been selected for this ledger. If not, highlight the
Advance XPA Master Template (or Practice equivalent).
5. Select the Accounts button and check the account ranges are correct. Select OK.

Page 26 of 57 APS® 2009 AO Conversion Process
6. Select Ownership button. This screen will differ for each Entity Type. If the entity is a
company then you do not need to set up any of the shareholders at this point, but the system
will force you to create at least one Beneficiary or Partner. Select OK to confirm the details.
7. You will be returned to the Ledger Details screen. Select OK to close this form.
8. A message will appear asking if you want to finalise the ledger at this point. Select NO to
this message. If you do not ‘Finalise’ the ledger, most of the File Details can be edited if
you find them to be incorrect before importing the Balances and Transactions. When Balances
and Transactions are imported the ledger will automatically be finalised.
9. The ledger has now been created.

AO conversion Process APS® 2009 Page 27 of 57
Step 3: Add the XPA GST Rates
The GST rates must be added to the XPA Ledger before importing the data from the MYOB
Accountants Office file.
1. Select GST Rates from the GST menu and click on the show button. This will populate the
top half of the GST form with the GST rates in the default (master) template.
2. Click on the All button to transfer the GST rate from the template into the ledger.
3. Select the Close button to save and exit.

Page 28 of 57 APS® 2009 AO Conversion Process
Step 4: Import the Client MYOB Chart
Import the Client MYOB Chart using the same that was used to imports the MYOB Template
Chart(s). Refer to page 17 for a refresher on the process.
1. Select the Charts tab on the Chart Mapping Toolbox
2. Select the Maintenance menu, New option to display the ‘New Chart’ form.
3. Enter an identifying chart name in the ‘Name’ field. Select AO Ledger in the type field and
click on the “Source” field selector button to locate the MYOB Client Data Folder.

AO conversion Process APS® 2009 Page 29 of 57
4. The Folder viewed defaults to the GLMan sub folder of the MYOB Data store. Select the AO
Client Data folder you wish to Import.
5. Select the gl_acct.DBF file within that folder and click “Open” to populate the ‘Source’ field
with the selected MYOB chart.
6. Ensure all fields in the ‘New Chart’ form are correct and then click on the Import button.

Page 30 of 57 APS® 2009 AO Conversion Process
7. Once the import is completed, the MYOB Client chart will be added to the ‘Charts’ list.
Step 5: Creating the Client Ledger Map
Once the MYOB client chart has been imported a mapping must be created.
1. From the ‘Charts’ tab, right mouse click on the MYOB client chart and select the option
From Mapping File.
2. Right mouse click on the Advance XPA Master template chart that you are mapping to
and select the option To Mapping File. (This will be the file that the AO Master Template
was mapped to in Section 2)
3. Once both the ‘Map From’ and ‘Map To’ fields have been populated, the template map can
copied and customised for the client ledger.

AO conversion Process APS® 2009 Page 31 of 57
4. Click on the Mappings tab. You will see the Master Map(s) that were created in Section 2.
Select the appropriate master map for the entity type of this client. RH click your mouse. A
pop up Menu will appear. Select the Copy Map option.
The Copy option available from the ‘Mappings’ tab; right click menu is used to create copies of
existing maps. An existing map can be copied to the selected ‘Map From’ and ‘Map To’ charts
and edited as required.
5. A message will display giving details of the map that is being copied and confirming the
charts where the map is being copied.
Press Yes to proceed and the Chart Mapping form will open with the selected ‘Map From’ and
‘Map To’ charts listed and the mappings from the copied chart.
Note:
An individual mapping will only be copied where the mapped account is present in the ‘Map To’
chart of accounts.
Where an existing map is being copied over another existing map, the copy function does not
overwrite any existing ‘Map To’ codes.

Page 32 of 57 APS® 2009 AO Conversion Process
6. The Client Map will open. As we have copied the master map into this client map, most of
the ‘To Code’ fields should have been automatically populated at this point. Customise the
map for the client ledger by populating the blank To Code field.
• All accounts must be mapped to be imported; if the accounts are not
mapped they will not be imported.
• You cannot map to a code that is not listed on the RH side of the
screen. If the code is not there it needs to be added onto the XPA
template and the Chart refreshed.
• The “Suspense Account” field on this screen is not used during this
process.
• If you are will be maintaining an integrated asset ledger the Asset
Cost, Accumulated Depreciation, and Private Use Portion codes
should all be mapped to the XPA Asset Suspense account (998). If
not, map them to the appropriate GL codes.
• Depreciation for the current year should be mapped to the
appropriate Depreciation Expense account in the P&L (295).
• There will be a message on the bottom of the screen that “Account
Mappings have errors”. This is because the XPA Client ledger does
not have any accounts in the chart as yet. Ignore this at this point.
• The ‘To Accounts’ may be red. This is because the XPA Client ledger
does not have any accounts in the chart as yet. Ignore this at this
point.
7. When the mapping is complete select the ‘Close’ button.

AO conversion Process APS® 2009 Page 33 of 57
Step 6: Importing the accounts from AO to XPA
1. Confirm that you have the client mapping selected.
2. Select the ‘Import’ tab to display the Import options form.
• The XPA File field will be populated with the XPA client ledger name
• The Import Type field will be disabled and based on the mapping will be displaying AO
Ledger.
3. Select the Transaction Source File field and browse to the location of the MYOB AO client
file. The Folder viewed defaults to the GLMan sub folder, double click the MYOB AO client file
folder, select Open to populate the ‘Source’ field.

Page 34 of 57 APS® 2009 AO Conversion Process
4. Select the Action menu and Import Accounts.
The MYOB client chart will be translated to the XPA codes and imported into the XPA client
ledger.
Select OK to continue.

AO conversion Process APS® 2009 Page 35 of 57
Step 7: Importing the Client Ledger’s Balances & Entries
1. On the Import tab select the Import button to display the form used to import the account
balances, entries and assets.
2. The ‘Importing Entries, Balances and Assets form will open.

Page 36 of 57 APS® 2009 AO Conversion Process
3. Select the Import Balances and Entries button and complete the verification process to
import the account balances and transactions from the MYOB client ledger.
• All historical balances plus current and future year balances are
imported.
• Current and future year’s transactional data is imported.
• Balances are brought in without Cash or Funds flags
• Transactions are brought in based on the Import options flag
4. The following message will appear once the balances have been imported.
Select OK to continue importing the current year transactions.
When importing the transactions the following message may appear:
Select the appropriate option.
On completion of the entries import, the following message will appear.
Select OK.

AO conversion Process APS® 2009 Page 37 of 57
Step 8: Importing the Assets and Asset Balances
The Asset Import routine will allow users to select which Accountants Office Asset Schedule data
is imported into which XPA Asset Ledger (Tax and Book).
Additionally, you can select how to treat Pooled assets where they were pooled in Accountants
Office. These can be imported into XPA as either an Asset Pool or as individual assets.
1. Select the Import Assets button to import the assets from the MYOB client ledger.
2. The new “Asset Ledger Selection” form is displayed:
This allows the user to select which data is to be populated into the XPA ledger, options are
as follows:
• Depn Schedule – Imports data offered by the AO “Depn Schedule” as specified on
the “Fixed Assets”, “Other” tab.
• Schedule 1 – Imports data offered by the AO “Schedule 1” as specified on the “Fixed
Assets”, “Other” tab.
• Schedule 2 – Imports data offered by the AO “Schedule 2” as specified on the “Fixed
Assets”, “Other” tab.

Page 38 of 57 APS® 2009 AO Conversion Process
• Schedule 3 – Imports data offered by the AO “Schedule 3” as specified on the “Fixed
Assets”, “Other” tab.
• Accts Schedule – Imports data offered by the AO “Accts Schedule” as specified on
the “Fixed Assets”, “Other” tab.
• Asset Ledger Disabled – disables the XPA Asset ledger.
• Assets Imported without Values – Imports the assets details without any values.
Import AO Pools into Tax Ledger
When checked, this imports the assets pooled in Accountants Office into Asset Pools within
XPA for the Tax Ledger. When not checked the assets that were pooled in Accountants Office
are imported as individual assets into XPA for the Tax Ledger. This is enabled by default.
Import AO Pools into Book Ledger
When checked this imports the assets pooled in Accountants Office into Asset Pools within
XPA for the Book Ledger, when not checked the assets that were pooled in Accountants
Office are imported as individual assets into XPA for the Book Ledger. This is disabled by
default.
The assets are imported as non-integrated assets with the MYOB asset group codes. The asset
must be integrated to complete the asset import process.
3. Select OK
The import of the MYOB client data is complete, close out of the chart mapping form to
continue with the ledger setup process.

AO conversion Process APS® 2009 Page 39 of 57
SECTION 5: Verifying the Converted Data
Step 1: View the Trial Balance
1. If you have converted a periodic ledger, ensure that you are in period 12 via the Period drop-
down.
2. Select Trial Balance from the chart menu or use the toolbar icon to launch the report
selector.
3. Confirm that the Trial Balance is in Balance in both the current and the comparative year.
4. Confirm that the Profit figures are correct for the current and comparative year.
5. Confirm that there are no balances in any of the Asset Cost codes or Asset Accumulated
Depreciation codes. The total Written Down Value of the Assets will be coded to Asset
Suspense at this point.

Page 40 of 57 APS® 2009 AO Conversion Process
SECTION 6: Integrating the Assets The import process will take on the asset balances into the asset ledger and set up asset group
codes as per the MYOB ledger. However the General Ledger codes need to be set up on these
asset groups in order for the integration to be established.
If the Asset Ledger is NOT to be integrated then the mappings for asset codes to General Ledger
asset codes in XPA should have been used – and this next step is not necessary.
• You may want to take a copy of the ledger at this point via the
File > Save As option before continuing.
Step 1: Reverse any Current Year Asset Entries
Asset movements in the current year (Depreciation Expense, Gains/Losses on sale) will be
processed again by XPA when the assets are integrated and will therefore the current year entries
that may have been imported from AO will need to be reversed.
1. From the Data Entry menu, select the Journals option.
2. Select the Data Period. For Periodic ledgers you should also start in Period 1. The data entry
form will open.
3. Any entries to Depreciation Expense, Profit/Loss on Sale will need to be recoded to Asset
Suspense. Locate the entry you need to edit and double-click on it to bring it into edit mode.
4. Change the account to the Asset Suspense code (998) and save the posting.
5. On a single period ledger there may be numerous postings for depreciation that need to re-
coded. On a Periodic ledger there will an entry in each of the periods.

AO conversion Process APS® 2009 Page 41 of 57
Tips and Tricks
• The data entry screen can be sorted by the Date, Reference and Account
columns. Click on the column heading you wish to sort by. Multiple
clicks will sort by ascending and descending. Sorting by account will
group all of the depreciation entries together making them easier to
find and recode.
• If you are in the data entry screen and you need to change periods,
select the ‘Other’ menu and then choose the “Setup” option. The
period field will allow you to scroll up and down to a new period.
6. Continue until all entries have been recoded. Close out of Data Entry screen.
7. As you were editing the entries they were reset as uncoded entries. Post all entries using the
Post Entries button on the Toolbar. The Post Entries form will open.
8. Change the periods on the Post Entries to include all periods in the current year and then
select the “Post” button.
9. View the Trial Balance and ensure that the Depreciation Expense and Profit/Loss on Sale
codes have been cleared out of the current year.
Step 2: Setting up Asset Group General Ledger codes
1. From the Assets menu select Asset Groups.

Page 42 of 57 APS® 2009 AO Conversion Process
2. Delete any unused asset groups by highlighting the asset group in the ledger list and select
the Delete button.
Select Yes to delete the asset group.
3. Select the “Show” button to view the Asset Groups as per the XPA Master Template. Look for
the Group in the template section that best matches the description of the AO group you are
about to set up the accounts for. If there is no suitable group, look for the next spare group
in the listing.

AO conversion Process APS® 2009 Page 43 of 57
4. Double click on the asset group in the ledger list and select the Accounts button.
5. Enter the General Ledger Cost Control account code that applies to this group. If unsure click
on the Show button on the asset groups form to display the template groups in the top half
of the form – this will need to be done prior to selecting the accounts button.
If this group exists on the default template attached to this ledger, a ‘Template’ button will be
displayed next to the ‘Find’ button. Select this button to load the rest of the group codes
associated to that Cost Control account.
Select Yes to load the asset account codes from the ledger’s default template.
If account codes already have balances e.g. the Depreciation Charge code, an alert will warn you.
Select Yes to continue

Page 44 of 57 APS® 2009 AO Conversion Process
6. The completed screen should be populated as below.
Note:
• The Asset Realisation field is available but not populated as all asset sales pass through the
nominated asset suspense account.
• The PU Depreciation Charge field can hold a code to which private use depreciation expense
is to be posted if you want it separated from the Depreciation Charge. This should be set
prior to integrating the assets.
Select OK to continue.
SAVE the group changes.
Select YES to validate Integration Account Codes.
The above process must be completed for all asset groups.

AO conversion Process APS® 2009 Page 45 of 57
Step 3: Integrate Assets
Once the groups have been set up, they must be individually integrated via the Asset Group
window (if the ledger is running an integrated asset ledger).
1. Highlight the group on the Asset Group screen.
2. Select the Integrate button.
Select YES to the prompt to continue.
3. Confirm the correct Contra Account is going to be used for integration, and the process will
complete.
The above process must be completed for all asset groups.
4. The assets will now be integrated to the General Ledger. Close the Asset Groups form and
view the Trial Balance to ensure that the Asset Suspense accounts is now clear.

Page 46 of 57 APS® 2009 AO Conversion Process
Step 4: Asset Reconciliation
During the integration of the Assets into XPA the depreciation for the current year is recalculated.
There may be a variation in the amount of depreciation calculated in XPA when compared to the
value from AO. This may be due to differences in rounding. This variance in depreciation will
cause a change in the profit value and will need to be adjusted prior to Balancing Forward the
ledger.
The first step is to reconcile the asset schedules to identify which assets have changed.
If the Asset Integration has cleared the Asset Suspense account to nil but the amount in
depreciation expense is incorrect then a manual correction is required. When making any manual
adjustments it is important to remember that the Asset Ledger must remain in sync with the
General Ledger, so you should not edit the current year’s Accumulated Depreciation values or
Private Use values directly.
• Enter a journal to correct the Depreciation Expense value in the current year. Contra this
amount to account 999 (Suspense). This will correct the profit value.
• Once the ledger has been balanced forward, open the Asset Comparatives screen and
adjust the depreciation of the appropriate assets. The system will contra this amount to
999, clearing the balance, and will also update the current years’ opening depreciation to
reflect the change.
If there is still a balance in Asset Suspense after the integration process there are some common
areas to check:
• Confirm that all of the AO depreciation entries were reversed out of the Depreciation
expense account.
• Check that any of the AO entries for Profit or Loss on Sale for assets sold in the current
year was also reversed.
• Check that the correct depreciation method is set in XPA for the affected assets (Daily vs.
Periodic). If this is incorrect, simply change the selection and recalculate the depreciation
for the year.
• Check that any Private Use depreciation has posted to the correct account.
Sometimes there may be a small balance left in Asset Suspense after integration due to a
difference in rounding between AO and XPA. This amount can be manually journalled out to a
nominated account in the Balance Sheet area such as drawings (so as not to affect the profit
value).

AO conversion Process APS® 2009 Page 47 of 57
Step 5: Asset Code to GL Code Match
In XPA the standard is for the Asset Cost Code in the General Ledger to be the same as the Asset
Group Code in the Asset Ledger. However converted ledgers will retain the original MYOB Asset
Ledger Group code. A utility in the Administration Tool ‘Asset Code Match’ can be run against the
converted XPA ledger to recode the asset ledger codes to match the GL Cost codes.
1. Close out of the XPA Ledger.
2. Select Administration Tool from the Advance main application menu
The administration tool will display a list of all the client ledgers and templates which have been
setup in the system.
3. Locate the converted ledger in the ledger list.
4. Right mouse click on the converted client ledger and select the Asset Group ���� GL Code
match function to match the asset group code to the asset cost code in the general ledger.

Page 48 of 57 APS® 2009 AO Conversion Process
SECTION 7: Completing Ledger Setup
Chart Maintenance
In the Chart Menu / Chart:
• Update the account code titles. To be completely consistent with the APS Master Chart
of Accounts you may want to update each of your account codes to match the APS
account code titles as per the XPA Master Template.
• Make sure bank account titles are using the alternate ‘~’ symbol correctly. These should
read ‘[Bank Account Name] Overdraft~ [Bank Account Name]’ i.e. the title to be used if
there is a CREDIT balance comes before the ~ and the title to be used if it is a DEBIT
balance comes afterwards.
• Refresh the user defined fields (expense categories) by selecting the “Show” button to
populate the top half of the form with the XPA Master Chart of accounts. Then select
the ‘All User Fields” button to refresh the ledger’s user defined fields from the XPA
Master Template.
• Check that the ‘Close To’ accounts are correctly set up in the Chart. Pay particular
attention to the ownership/equity accounts.
• Refresh the Glossary by going to the Reporting menu>Glossary. Source the XPA Master
Template chart by clicking on the “Show” button to populate the top half of the form.
Select the ‘All” button to transfer the glossary fields to the ledger.
Multiple Period Livestock/Stock Ledgers XPA only allows opening stock to be posted to a ledger in the first period. For multiple period
ledgers the conversion routine brings in four years balances and current year transactions so
balances may already be present in periods other than period 1 for any year. In these
circumstances livestock/stock groups cannot be added to a ledger.
To overcome this issue where livestock groups are required, we suggest that you either:
• Only convert your assets and perform a trial balance take-on of account balances. Your
opening stock balances at each period end would need to be reviewed, so that opening stock for the year is posted to period 1 only and the movements in closing stock are posted for
each period.
OR
• Change the ledger from having multiple periods to a single period. Add the stock groups and
change back to the required number of periods. This method means that for this current year
only your comparative values are whole of year balances.

AO conversion Process APS® 2009 Page 49 of 57
Livestock Groups In XPA Livestock Groups are used to assist in managing stock entries and reporting.
Adding Livestock Groups
Livestock groups are added to your converted XPA ledger by selecting Livestock Groups from
the Livestock menu.
Select the Show button if the ledgers default template has livestock groups’ setup.
Alternatively select the Template button then select the livestock template by double clicking on
it.
This will populate the top half of the screen.
To copy a livestock groups to the converted ledger, simply double click on the livestock groups
you require in the top half of the screen.
Adding a livestock group allows the appropriate accounts to be opened on the ledger if they are
not opened during the conversion process.

Page 50 of 57 APS® 2009 AO Conversion Process
Livestock group accounts
The Livestock Accounts window is used to specify the livestock accounts which make up the
group. Each account can be either a main or a sub-account.
NOTE: If you are adding a valuation method group, you must also add the generic
group.

AO conversion Process APS® 2009 Page 51 of 57
Stock Groups Stock groups provide the facility to establish links between Opening Stock, Closing Stock and
Stock on Hand.
Where stock groups are added to a ledger a journal is automatically posted at year-end roll
forward to transfer the stock on hand value to opening stock. Additionally a second journal posts
the same value to closing stock and stock on hand.
Note: Opening stock can only be posted to period 1. The movement in closing stock only is
posted at the end of any period.
Adding Stock Groups
Stock groups are added to your converted XPA ledger by selecting Stock Groups from the Chart
menu.
Select the Show button if the ledgers default template has Stock groups’ setup.
Alternatively select the Template button then select the relevant template by double clicking on
it.
This will populate the top half of the screen.
Double click the group(s) required and they will be copied onto the ledger. Alter the description if
necessary.
Adding a stock group allows the appropriate accounts to be opened on the ledger if they have not
been opened during the conversion process.
Page 52 of 57 APS® 2009 AO Conversion Process
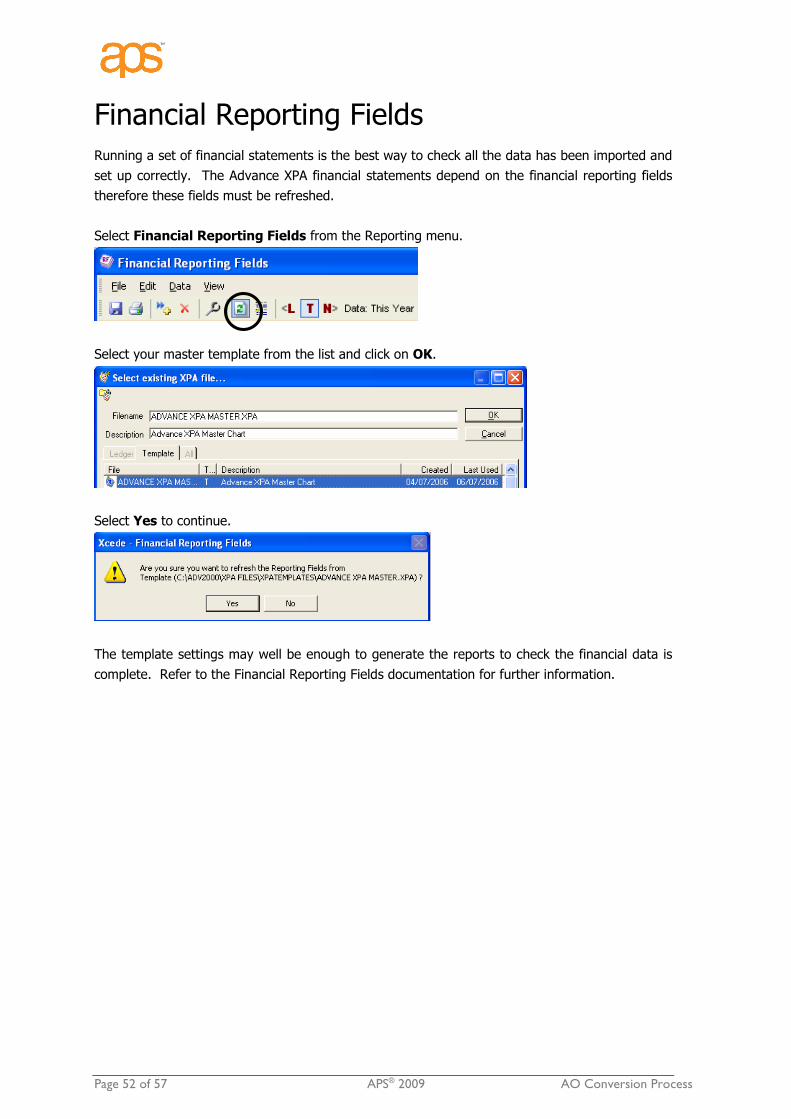
Financial Reporting Fields Running a set of financial statements is the best way to check all the data has been imported and
set up correctly. The Advance XPA financial statements depend on the financial reporting fields
therefore these fields must be refreshed.
Select Financial Reporting Fields from the Reporting menu.
Select your master template from the list and click on OK.
Select Yes to continue.
The template settings may well be enough to generate the reports to check the financial data is
complete. Refer to the Financial Reporting Fields documentation for further information.

AO conversion Process APS® 2009 Page 53 of 57
Running the Financial Statements Before progressing any further it is important to make sure the ledger has been set up correctly
and all steps completed. Running a set of financial statements is the best way to check all the
data has been imported and set up correctly – comparing to the statements printed from the
MYOB AO file. The figures should be the same, or a difference should have an explanation.
Financial Reports are generated from ‘Job Streams’ set up from the Reporting, Xcede menu.
The job stream should be sourced from the Template, double click on the required jobstream and
select RUN.
The default options on the job stream should be sufficient, and you can change these ‘on the fly’
at this stage, but these changes are not retained. E.g. you may decide not to run the Notes – so
these can be un-checked at this stage. Select OK and Xcede Reporting will generate the financial
statements for this ledger.
Compare the output to the MYOB AO reports to ensure all data has been brought across.

Page 54 of 57 APS® 2009 AO Conversion Process
APPENDIX 1:
Creating an ODBC Connection
Pre Requisites
Microsoft Visual Foxpro ODBC Driver version 6.00.8167.00 must be installed.
Note: Microsoft Windows XP ships the ODBC driver version 1.00.02.00.
To upgrade this copy (assuming there is nothing else that uses this Visual Fox Pro ODBC) copy
the new file replacing the existing file in your c:\windows\system32 folder (your consultant will
supply you with a copy of the new file).

AO conversion Process APS® 2009 Page 55 of 57
Creating the ODBC Connection
Go to the Start menu, select Settings and the Control Panel
Select Administrative Tools
Select Data Sources (ODBC)
Click on the System DSN tab
Click on the Add button
Page 56 of 57 APS® 2009 AO Conversion Process
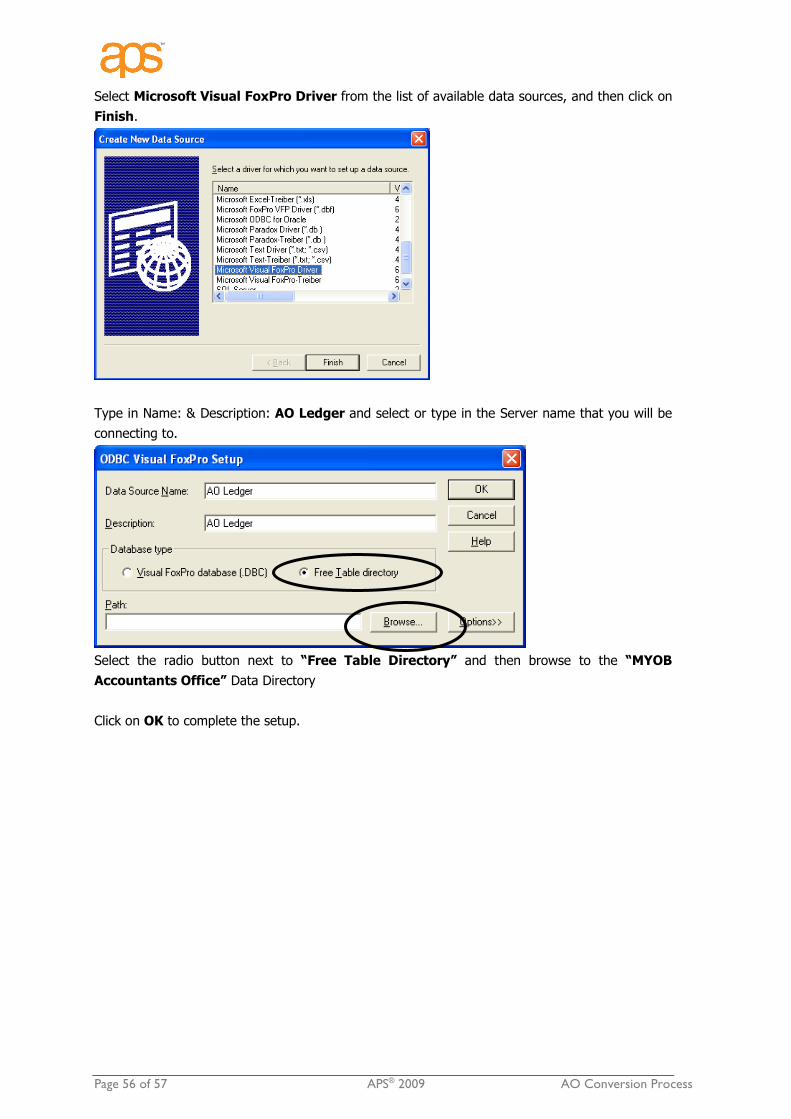
Select Microsoft Visual FoxPro Driver from the list of available data sources, and then click on
Finish.
Type in Name: & Description: AO Ledger and select or type in the Server name that you will be
connecting to.
Select the radio button next to “Free Table Directory” and then browse to the “MYOB
Accountants Office” Data Directory
Click on OK to complete the setup.

AO conversion Process APS® 2009 Page 57 of 57
The Data Source should now show in the list, click on OK.