advance unit user's guide -...
TRANSCRIPT

Advance Unit User's Guide
Preface Thank you for your purchase of a Vixen Advance Unit for the STAR BOOK TEN controller. This manual describes the functions of the Advance Unit. Read throughout this manual before use. You should refer to the instruction manuals for your equipment such as the equatorial mount together with this manual as occasion demands. The Advance Unit is an expansion unit designed for the STAR BOOK TEN controller. The installation of the Advance Unit in the STAR BOOK TEN controller enhances your autoguiding capabilities. With this unit installed you can view an image from a CCD-based imaging camera, record to or play back from a SD/SDHC card and adjust the shutter exposure controls of a DSLR camera. Be sure to confirm with play back that images and/or data captured by the Advance Unit are stored in the SD/SDHC card properly. Vixen takes no responsibility for losses of captured images and/or data caused by misuse and malfunction of the Advance Unit and SD/SDHC card. Handling and Storage - Do not leave the product inside a car in the sun or, in front of any heat sources, particularly radiators of high temperature. - When cleaning, do not use organic solvents such as paint thinners or similar cleaners. - Prevent the product from being exposed to rain, water droplets, heavy dew, mud or sand. In the event that the product becomes dirty, wipe it thoroughly with a soft cloth dry out and dry it completely. Caution - Do not use the product while transporting or walking, where injuries could arise from collision with objects or stumbling or falling. - Avoid using the product near areas where water splashes. Do not handle the product with wet hands. This could result in damage to the product or electrical shock. - Do not turn on the power switch of the product when internal condensation is suspected on the equipment. This could damage to the product. - Do not attempt to disassemble or alter any part of the equipment that is not expressly described in this manual. This could result in damage to the equipment, electrical shock or other injury. - Do not forcedly unplug the power cord. This could result in disconnection or malfunction. - The Advance Unit can’t be used independently. Be sure to use it together with the STAR BOOK TEN controller. - You may need other equipment that is appropriate to your situation for some functions. - SD/SDHC cards are not included in the unit. Use a commercially available SD/SDHC card as the need arises. The SD and SDHC logos are trademarks of SD Card Association. - The USB port on the Advance Unit is only applicable to equipment less than 500mA of electricity consumption. - The contents of this manual are current as of March 2012.

2
Table of Contents Page Page
Preface 1 3. Video Guide 18
Handling and Storage Flow of Operation
Caution 1. Setting up the Video Guide Autoguider 20
Setting up the Telescope
Table of Contents 2 Polar Aligning the Equatorial Mount
2. Focusing the Guide Scope 21
Checking the Package Contents 3 Displaying Video Image
Adjusting Focus of the Guide Scope
Components Guide 3 3. Entering an Object into the Viewfinder 24
of the DSLR Camera
Installing / Removing the Advance Unit 4 Focusing the DSLR Camera
Requirement Determine the Orientation of the
Procedure Camera’s Frame
Removing the Advance Unit 4. Guide Star 26 5. Guide Area 28
Inserting / Removing an SD/SDHC Memory Card 6 6. Calibration Routine 28
Manual Calibration Setting
Using the Advance Unit 8 7. Starting the Video Guide 31
Checking the Program Version of your 8. Shooting 32
STAR BOOK TEN 9. Various Settings 32
Expansion Functions Aggressiveness
Displaying the “Expansion Function Threshold Level
Dialog Box Guide Speed
Initializing the SD/SDHC Memory Card Wait Time
1. SD Card 10 Average Times
Playing Back File Data 4. Remote Shutter Release 36 Still Image File Format Procedure
Video Image File Format Exposure Time
Deleting File Data Interval Time
Displaying Still Image in the “Go-To” Number of Times
Dialog Box Mirror Up
2. Video Signal Input 13 Start Exposure
Connecting to a CCD Video Camera Example of Remote Shutter Release
Displaying the Image Settings
VGA 5. USB 41
QVGA
Digital Zoom SPECIFICATIONS 42
Recording Video Image

3
Checking the Package Contents (1) Advance Unit (3) Spare screws; fix the cover in place (2) RCA-mini plug conversion cable; (4) Wire hook; used when taking the Advance used to convert a 3.5mm mini-jack Unit off input into a RCA female plug. (5) Instruction manual
Components Guide Advance Unit STAR BOOK TEN (1) USB Port (4) Hook Lever (1) Expansion Slot Cover (2) SD Card Slot (inside) (5) Video IN Terminal (2) Expansion Slot (inside) (3) Slot Cover (6) Shutter Release Terminal
(1) (2)(3) (4) (5) (6) (1), (2)
4
Installing / Removing the Advance Unit You need the following items for installing the Advance Unit. Do not power up the STAR BOOK TEN during this installation work. Do not connect cables to the STAR BOOK TEN no to the Advance Unit. Requirements - Advance Unit - Phillips head screwdriver (supplied with the mount) - STAR BOOK TEN controller - Wire hook Procedure Installing the Advance Unit 1. Remove the expansion slot cover on the bottom of the STAR BOOK TEN by removing the two screws with a Phillips head screwdriver. If it is hard to remove the expansion slot cover put the wire hook through the screw hole and remove it.
2. Insert the Advance Unit into the expansion slot until it clicks into place. Make sure that the hook lever is in the retracted position.
3. Fix the Advance Unit securely with the two screws.
5
Installing / Removing the Advance Unit 4. The installation is completed.
Removing the Advance Unit 1. Remove the two screws on the expansion slot cover with the Phillips head screwdriver.
2. Pull up the hook lever with the supplied wire hook.
3. Pulling up the hook lever will unlock the Advance Unit and it raises up a little. Pull out the Advance Unit.

6
Installing / Removing the Advance Unit The heading “USB” will appear on the initial configuration screen if the advance unit is connected.
Inserting / Removing an SD/SDHC Memory Card The advance unit has an SD card slot for commercially available SD/SDHC memory cards (up to 32GB). 1. Open the slit cover by lifting up the corner of the slit cover as shown.
2. Insert the SD/SDHC memory card so that the contact on the SD/SDHC memory card is on the underside until it locks into place with a click. Be sure the memory card is oriented correctly.
To remove the memory card, pushing it in to release the lock and remove it.

7
Inserting / Removing an SD/SDHC Memory Card 3. Close the slit cover in place.
As soon as the SD/SDHC memory card is set in place, the icon will be displayed at the lower right corner of the screen on the STAR BOOK TEN.

8
Using the Advance Unit Checking the Program Version of your STAR BOOK TEN The Advance Unit works on the STAR BOOK TEN controllers from version 3.00 and later. Be sure to update your STAR BOOK TEN to version 3.0 or the latest version before using the Advance Unit. The program version can be checked on the “About Star Book TEN” dialog box from the “Initial Configuration” menu that appears on the screen when you plug in the STAR BOOK TEN.
Information of the latest update program for the STAR BOOK TEN is released on Vixen’s website. Visit Vixen’s website at http://www.vixen.co.jp or read the instruction manual for your Vixen equatorial mount to get the information on how to obtain the latest program version. Expansion Functions The following expansion functions are available as of March 2012 if the Advance Unit is set on the STAR BOOK TEN controller. No. Function Description ---- ----------------- ------------------------------------- 1 SD Card Views still images (photos) and video images stored in a SD/ SDHC memory card. *1,*2,*3 2 Video Signal Input Images input by analog video signal are displayed. It is possible to record the video images displayed on the screen. *2, *3 3 Video Guide Autoguider function provided with the Advance Unit. 4 Remote Shutter Release Controls shutter exposures of a DSLR camera from the STAR BOOK TEN. 5 USB Applicable to commercially available USB devices which are rated under 500mA electricity consumption. *1: The images must be saved in JPEG or BMP format to view on the monitor screen of the STAR BOOK TEN. It is not possible to record still images (photos) with the STAR BOOK TEN. *2: The play back of video images is only possible if the images have been recorded with the STAR BOOK TEN. *3: When you set the SD/SDHC memory card, be sure to check in advance if it works correctly on the STAR BOOK TEN.

9
Using the Advance Unit The following instructions are based on the correct installation of the Advance Unit and memory in the STAR BOOK TEN. Displaying the “Expansion Function” Dialog Box Press the 0 MENU key in either SCOPE MODE or CHART MODE to call up “System Menu”. Choose “Expansion Function” with the ↑ or ↓ direction key (or zoom key) and press the ENTER key (or the → key).
System Menu In the “Expansion Function” dialog box, choose your desired option with the ↑ or ↓ direction key. (or zoom key) and press the ENTER key (or the → key).
“Expansion Function” dialog box Initializing the SD/SDHC Memory Card The SD/SDHC memory card in the STAR BOOK TEN (Advance Unit) can be initialized in the “Expansion Function” dialog box. Press the 0 MENU key in the “Expansion Function” dialog box and the dialog box appears to confirm if you want to format the SD/SDHC memory card. If you initialize the SD/SDHC memory card, choose “OK” with the ↑ or ↓ direction key and press the ENTER key (or the → key). Note: All of stored data in the SD/SDHC memory card are erased and cannot be restored if you initialize the format. Be sure to check the contents and transfer the data to a PC or memory storage if necessary, before you carry out the format.

10
Using the Advance Unit To stop, shift the cursor to “Cancel” with the ↑ or ↓ direction key (or zoom key) and press the ENTER key (or the → key). The entry dialog box disappears to and returns to previous “Expansion Function” menu.
“Format SD card?” dialog box The dialog box tells that the initialization is completed. 1. SD Card This allows playing back or deleting the stored data (still images and animated images) as a file in the SD/SDHC memory card installed into the Advance Unit. To confirm the contents recorded in the SD/SDHC memory card, in the “Expansion Function” dialog box, shift the cursor to “SD Card” with the ↑ or ↓ direction key (or zoom key) and press the ENTER key (or the → key). The “SD Card” dialog box appears.
“Expansion Function” dialog box “SD Card” dialog box Playing Back File Data In the “SD Card” dialog box, shift the cursor to your desired file with the ↑ or ↓ direction key (or zoom key) and press the ENTER key (or the → key).

11
Using the Advance Unit Still Image File Format JPEG data files (uncompressed 24 bit color format only) less than 1MB (1,048,320 bytes) are usable. Not applicable to progressive JPEG format. BMP format data files of less than 1MB (1,048,320 bytes) are usable. - Only still images (photos) taken with an external recoding device can be used. The STAR BOOK TEN has no option to take photos by itself. - It will take time before the image is displayed if the data size is large.
Play back of the still image shown. Video Image File Format Data files of video images in AVI format (Motion-JPEG, VGA, 15 frames per second) are usable.
Play back of the video image shown. To discontinue the play back, shift the cursor to “OK” with the ↑ or ↓ direction key and press the ENTER key (or the → key). The “SD Card” dialog box appears. - Only video images taken with the STAR BOOK TEN can be used only. - As soon as the play back is completed, the display automatically returns to the “SD Card” dialog box.

12
Using the Advance Unit Deleting File Data In the “SD Card” dialog box, press 0 MENU key to access the deletion dialog box. Shift the cursor to a file you want to delete with the ↑ or ↓ direction key and choose “OK”. Press the ENTER key. To stop, shift the cursor to “Cancel” with the ↑ or ↓ direction key and press the ENTER key (or the → key). The “SD Card” dialog box appears. Note: The deleted files cannot be restored if you complete this option. Be sure to confirm the contents of your data before you carry out the deletion and transfer the data to a PC or memory storage if necessary.
Displaying Still Image in the “Go-To” Dialog Box Label file name (in JPEG format) in the SD/SDHC memory card identical to the name in the Messier, NGC and IC object catalogs. This allows you to display the still image in the “Go To” dialog box. (The file name is compiled using a PC.)
Only JPEG Image files (uncompressed 24 bit color format only) of less than 1MB (1,048,320 bytes) are usable. Not applicable to progressive JPEG format.
13
Using the Advance Unit Available Celestial Objects and File Names (Examples) - Messier objects, NGC, IC objects, and named objects (single-space alphabetic characters and numbers) Example: Orion Nebula → M42.JPG - The sun, moon, planets, fixed stars, comets, artificial satellites and user defined objects (single-space alphabetic characters and numbers, up to 8 letters except an extension) Example: Betelgeuse → Betelgeu.JPG - Constellations (abbreviated name in single-space alphabetic characters and numbers) Example: Andromeda → And.JPG The abbreviated name of constellations can be displayed on the star chart by choosing “Const. Abbr.” option in the “Chart Setting” menu from System Menu. Note: - Only data files of JPG format are displayed in the” Go To” dialog box. Data files of BMP format are not displayed. - Images are not displayed if the registration is different between the file names and the object names for the database. - Only single-space alphabetic characters and numbers are used for the file names. File names written in full-size characters are not displayed. - The stored data in the SD/SDHC memory card takes precedence over the registered data in the STAR BOOK TEN. - Images may not appear if the file names are longer than 8 letters. - When you store the data files in the SD/SDHC memory card, never make a folder to put them in. The data files stored in the holder folder are not displayed. - The more the data files and the larger they are in size, the longer it takes until the dialog box is displayed. - Data files larger than 1M (1,048,320 bytes) in size are not displayed. 2. Video Signal Input Real time images can be displayed on the screen of the STAR BOOK TEN by inputting video signals from a CCD-based imaging camera. The video images can be recorded in the SD/SDHC memory card. Connecting to a CCD Video Camera The Advance unit comes equipped with a video IN terminal (for NTSC composite signals). Connection between the video OUT terminal of the CCD video camera (Vixen C0014-3M CCD video camera is shown here) and the video IN terminal of the STAR BOOK TEN’s Advance Unit with a commercially available AV cable. The Advance Unit has a mini jack of 3.5mm in diameter. It can be converted to a terminal for the RCA plug with the use of the supplied RCA-mini conversion cable.
14
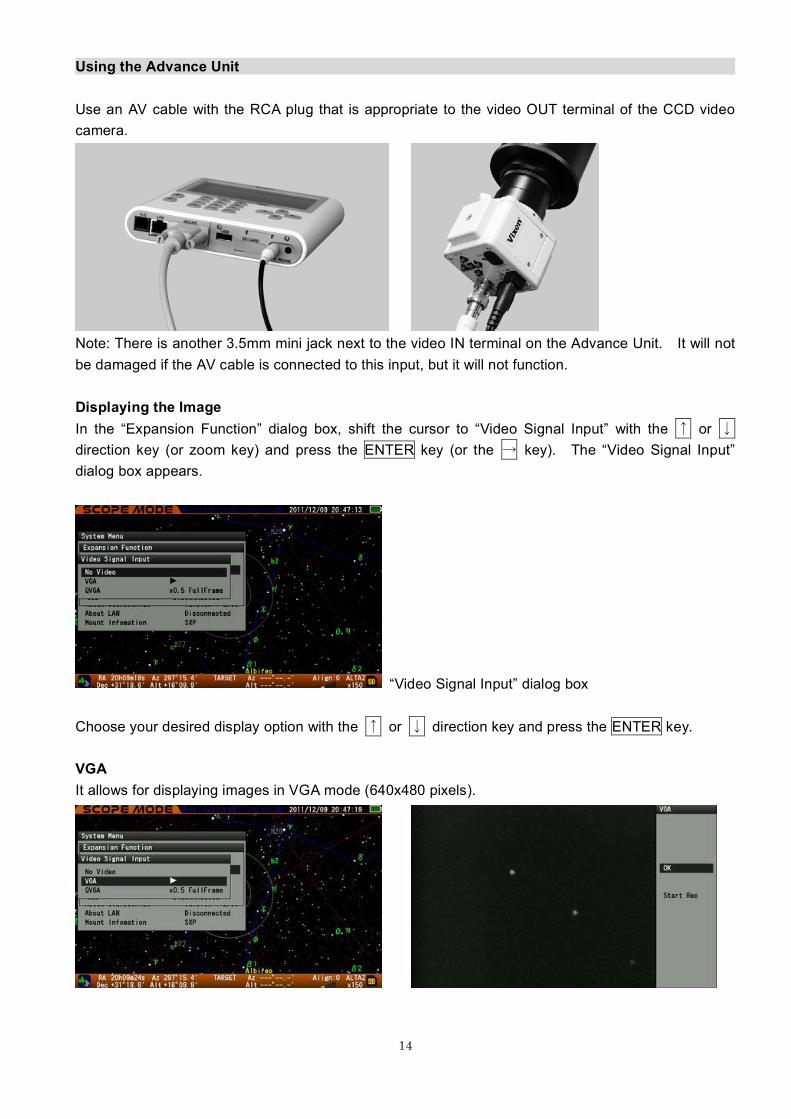
Using the Advance Unit Use an AV cable with the RCA plug that is appropriate to the video OUT terminal of the CCD video camera.
Note: There is another 3.5mm mini jack next to the video IN terminal on the Advance Unit. It will not be damaged if the AV cable is connected to this input, but it will not function. Displaying the Image In the “Expansion Function” dialog box, shift the cursor to “Video Signal Input” with the ↑ or ↓ direction key (or zoom key) and press the ENTER key (or the → key). The “Video Signal Input” dialog box appears.
“Video Signal Input” dialog box Choose your desired display option with the ↑ or ↓ direction key and press the ENTER key. VGA It allows for displaying images in VGA mode (640x480 pixels).

15
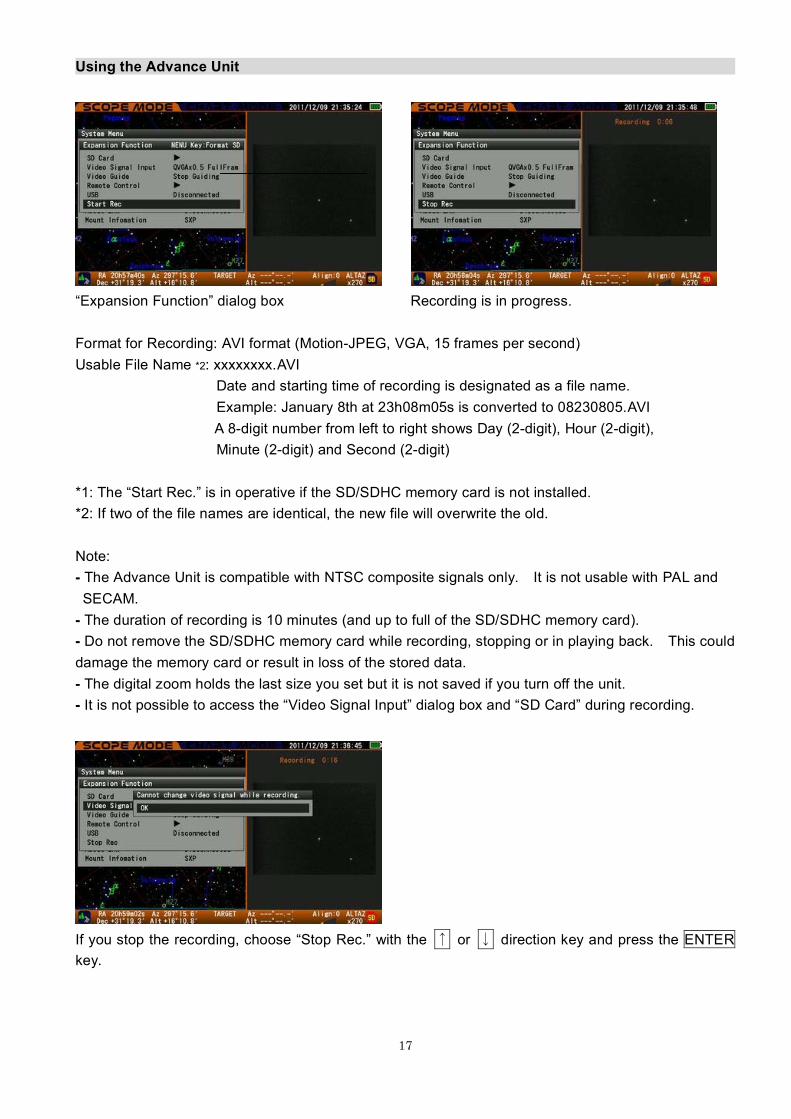
Using the Advance Unit During the display in VGA mode, choose “Start Rec.” with the ↑ or ↓ direction key*1 and press the ENTER key will allow for recording the displayed images.
Choose “Start Rec.” shown. Recording is in progress. Format for Recording: AVI format (Motion-JPEG, VGA, 15 frames per second) Usable File Name *2: xxxxxxxx.AVI Date and starting time of recording is designated as a file name. Example: January 8th at 23h08m05s is converted to 08230805.AVI A 8-digit number from left to right shows Day (2-digit), Hour (2-digit), Minute (2-digit) and Second (2-digit) *1: The “Start Rec.” is inoperative if the SD/SDHC memory card is not installed. *2: A new file for record will overwrite the stored data if two file names are identical. Note: - The Advance Unit is compatible with NTSC composite signals only. It is not available with PAL and SECAM. - The duration of recording is 10 minutes at the longest (and up to full of the SD/SDHC memory card). - Do not remove the SD/SDHC memory card while recoding, during playback or in the middle of the process. This could damage the memory card or result in loss of the stored data. If you stop the recording, press the ENTER key. If you go back to the “Video Signal Input” dialog box, choose “OK” with the ↑ or ↓ direction key and press the ENTER key (or the → key). You cannot return to the “Video Signal Input” screen directly without stopping the recording.

16
Using the Advance Unit QVGA It allows for displaying images in QVGA mode (320x240 pixels).
Full screen in QVGA mode (Square in the dialog box is a video area.) Default Option: x0.5 Full Frame video area (The area is the same as that in the VGA mode.) Digital Zoom The video area can be zoomed in 5 steps ( x0.5, x1, x2, x3 and x4) if the monitor screen is set in QVGA mode. The video area at 0.5x is equal to that in the VGA mode at an angle of viewing. Zooming in or out on the video area can be done with the ↑ or ↓ zoom key.
Zoomed in on the video area (Smaller square in the center) at 0.5x Full Frame screen in QVGA mode If the digital zoom is set at x1 or over, the video area becomes movable in the dialog box screen. Press the ENTER key if you go back to the previous screen (“Video Signal Input” dialog box). Recording Video Image Return to the “ Expansion Function” dialog box with the ← direction key to start recording the QVGA screen. The “Start Rec.” will be added to the “Expansion Function” dialog box if the screen is in QVGA mode.*1 Choose “Start Rec.” with the ↑ or ↓ direction key (or zoom keys) and press the ENTER key. The recoding starts at once.
17
Using the Advance Unit
“Expansion Function” dialog box Recording is in progress. Format for Recording: AVI format (Motion-JPEG, VGA, 15 frames per second) Usable File Name *2: xxxxxxxx.AVI Date and starting time of recording is designated as a file name. Example: January 8th at 23h08m05s is converted to 08230805.AVI A 8-digit number from left to right shows Day (2-digit), Hour (2-digit), Minute (2-digit) and Second (2-digit) *1: The “Start Rec.” is in operative if the SD/SDHC memory card is not installed. *2: If two of the file names are identical, the new file will overwrite the old. Note: - The Advance Unit is compatible with NTSC composite signals only. It is not usable with PAL and SECAM. - The duration of recording is 10 minutes (and up to full of the SD/SDHC memory card). - Do not remove the SD/SDHC memory card while recording, stopping or in playing back. This could damage the memory card or result in loss of the stored data. - The digital zoom holds the last size you set but it is not saved if you turn off the unit. - It is not possible to access the “Video Signal Input” dialog box and “SD Card” during recording.
If you stop the recording, choose “Stop Rec.” with the ↑ or ↓ direction key and press the ENTER key.

18
Using the Advance Unit 3. Video Guide If you have a telescope and a DSLR camera connected to it, you can take astro-photographs (prime focus astrophotography) of faint deep-sky objects such as nebulae. You will need to apply long exposure time for astrophotography. The longer the focal length of the telescope, the larger the atmospheric refraction of stars appears. As a result, the inherent periodic motions*1 of the telescope’s mount make it difficult to keep tracking your telescope with the star’s diurnal motion. To achieve a better tracking, observe the drift motion of a guide star using a guide scope and shift the telescope in the same orientation. The use of a CCD video camera and an autoguider allows you to guide the star automatically. There are two modes of autoguiding with the STAR BOOK TEN. One is the Advance Unit and another is using a commercially available external autoguider.*2 The autoguider port is equipped with the STAR BOOK TEN for this purpose. The CCD video camera attached to the guide scope is pointed to the guide star. The signals from the CCD video camera make the autoguider work to automatically correct the drifting star. Highly accurate tracking is achieved and you are able to perform long period exposure astrophotography. To distinguish the above two modes of autoguiding with the STAR BOOK TEN, the former is called “Video Guide” here by Vixen. In general you require an external autoguider, a monitor for watching the guide star and a PC for setting up a complete autoguiding system. Thus, cables for connecting to each other are rather complicated. The video autoguiding with the STAR BOOK TEN is so smart and comfortable that you can set up the system for autoguiding without tangled cables. *1: Although the equatorial mount (with tracking motors) is designed to follow the motion of celestial objects accurately, if you magnify a star extraordinarily, for instance, the star may show reciprocating motion very slowly in the direction of the tracking at a constant cycle. It is caused by transition of the rotation torque by the motor gears and such motion is mechanically inherent in the mount. This phenomenon is called periodic motion. *2: For use with the external autoguider, refer to instruction manuals for your mount and the external autoguider. The example below shows how to set up the telescope for video autoguiding. As for the setting up and usage of the mount, CCD video camera, imaging camera and others, refer to each instruction manuals provided with them.

19
Using the Advance Unit Example of a Video Guide Autoguider System
In the video guide autoguider system, a guide scope with a guide mount and a CCD video camera are required to have the STAR BOOK TEN (Advance Unit) follow the guide star precisely. Flow of Operation 1. Setting up the Video Guide Autoguider: Mount the telescope optical tube and guide scope on the equatorial mount to create an autoguiding system. Polar align the equatorial mount accurately. 2. Focusing the Guide Scope: Slew the telescope to a proper bright star to center it in the guide scope’s field of view. Focus the guide scope on the bright star so that it appears on the monitor screen of the STAR BOOK TEN clearly. 3. Entering a Target into the Viewfinder of a DSLR Camera: Enter your celestial target into the field of view of the telescope equipped with the DSLR camera. Focus the camera on the celestial target and determine the orientation of the viewfinder’s frame. 4. Guide Star: Adjust the direction of the guide scope so that a star near by the celestial target is brought into the field of view of the guide scope. Look for the guide star on the monitor screen of the STAR BOOK TEN to center it in the video area.
20
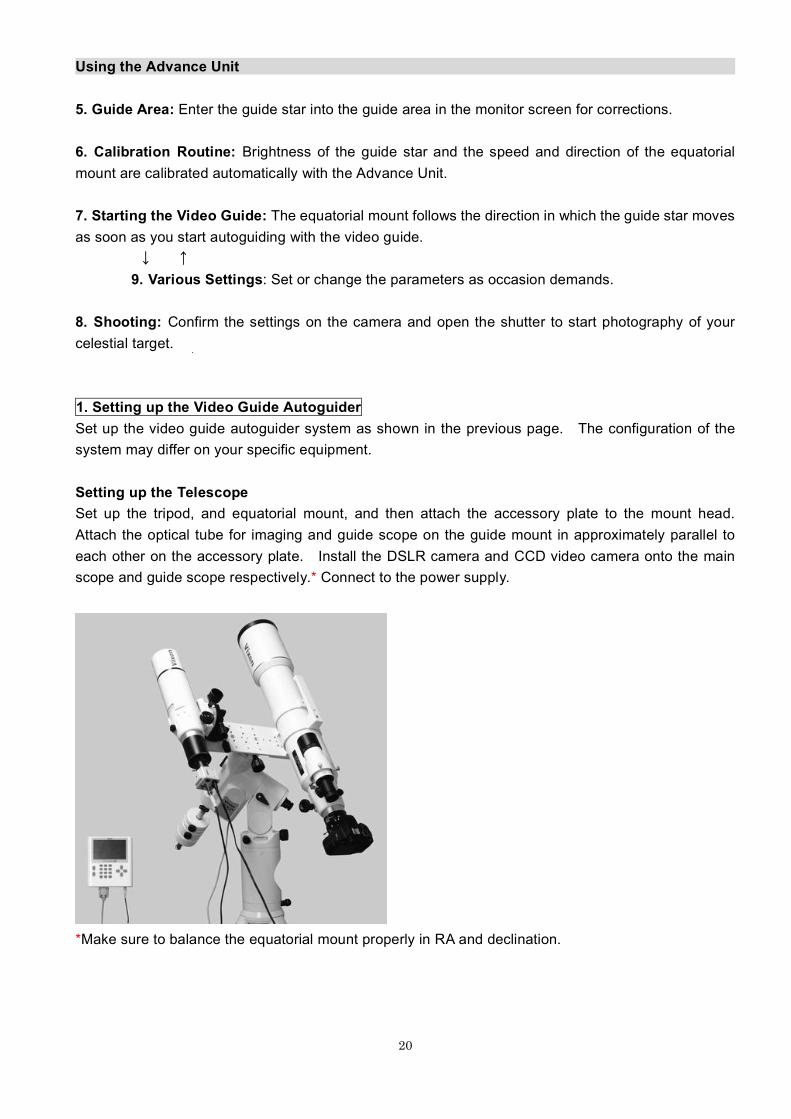
Using the Advance Unit 5. Guide Area: Enter the guide star into the guide area in the monitor screen for corrections. 6. Calibration Routine: Brightness of the guide star and the speed and direction of the equatorial mount are calibrated automatically with the Advance Unit. 7. Starting the Video Guide: The equatorial mount follows the direction in which the guide star moves as soon as you start autoguiding with the video guide. ↓ ↑ 9. Various Settings: Set or change the parameters as occasion demands. 8. Shooting: Confirm the settings on the camera and open the shutter to start photography of your celestial target. 1. Setting up the Video Guide Autoguider Set up the video guide autoguider system as shown in the previous page. The configuration of the system may differ on your specific equipment. Setting up the Telescope Set up the tripod, and equatorial mount, and then attach the accessory plate to the mount head. Attach the optical tube for imaging and guide scope on the guide mount in approximately parallel to each other on the accessory plate. Install the DSLR camera and CCD video camera onto the main scope and guide scope respectively.* Connect to the power supply.
*Make sure to balance the equatorial mount properly in RA and declination.

21
Using the Advance Unit Connect the video OUT terminal on the CCD video camera (Vixen C0014-3M shown) and the video IN terminal on the Advance Unit of the STAR BOOK TEN with a commercially available AV cable. The video IN terminal is a mini jack of 3.5mm in diameter. The supplied RCA-mini plug conversion cable enables you to use the standard RCA plug cable.
Note: - There are two 3.5mm mini jack terminals nearby to each other on the Advance Unit. It will not be damaged if the AV cable is connected to the incorrect input but it won’t work. - In a CCD video camera with a frame accumulation mode, if you choose the frame accumulation of long duration, it can result in unstable autoguiding as a renewal of the accumulation and timing for feedback from the autoguider may not synchronize. Always turn OFF the frame accumulation mode if you use the CCD video camera for video autoguiding. Polar Aligning the Equatorial Mount Align the equatorial mount as precisely as possible using the built-in polar axis scope on the mount. Refer to instruction manuals for your Vixen equatorial mount on how to use it. Accurate polar alignment is essential for successful long exposure astrophotography of deep sky objects with the equatorial mount. 2. Focusing the Guide Scope Move the telescope to a bright star and enter it into the guide scope’s field of view. Then, bring the guide scope into focus. You can skip the above procedure if you find a proper guide star near the sight of your shooting target. However, you often may not find suitable guide stars within the guide scope’s field of view. In addition, if the guide scope is not focused, you may have little chance of perceiving the star images taken by the CCD vide camera. After all, focusing with the bright star helps you to get a proper guide star easier. Displaying Video Image This is to send video signals to the monitor screen of the STAR BOOK TEN from the CCD video camera to display. In the “Expansion Function” dialog box, shift the cursor to “Video Guide” with the ↑ or ↓ direction key (or zoom key) and press the ENTER key (or the → key). The “Video Guide” dialog box appears and the video images are displayed in QVGA mode*1.

22
Using the Advance Unit
“Expansion Function” dialog box “Video Guide” dialog box The digital zoom is set at x0.5 Full Frame as default option to display the video images at its widest angle of view on the monitor screen. It is convenient for entering a bright star into the guide scope’s field of view. If it is not set, choose x0.5 with the ↓ zoom key to enter. The “Video Guide” dialog box disappears by pressing the CLEAR key.*2.
The “Video Guide” dialog box disappears. *1: You can display the image in the QVGA mode from the “Video Signal Input” dialog box also. *2: The dialog box will disappear on the screen also if you press the ← key three times after the ENTER key. Adjusting Focus of the Guide Scope Switch the screen of the STAR BOOK TEN to “SCOPE MODE” if it remains in “CHART MODE”. With the ↑ , ↓ , ← or → direction keys, move the guide scope so that a star of a moderate brightness enters into the guide scope’s field of view (sight of the STAR BOOK TEN screen through the CCD video camera) and focus on it Hint 1. If the CCD video camera is not focused, you may notice the stars are seen as tiny disks (bright stars) or nothing (dim stars) can be seen on the screen. Focus the screen on the stars by slowly turning the focus knobs of the guide scope to back and forth. It is recommended to use bright stars for this purpose as it makes your focus adjustment quicker and easier.
23
Using the Advance Unit
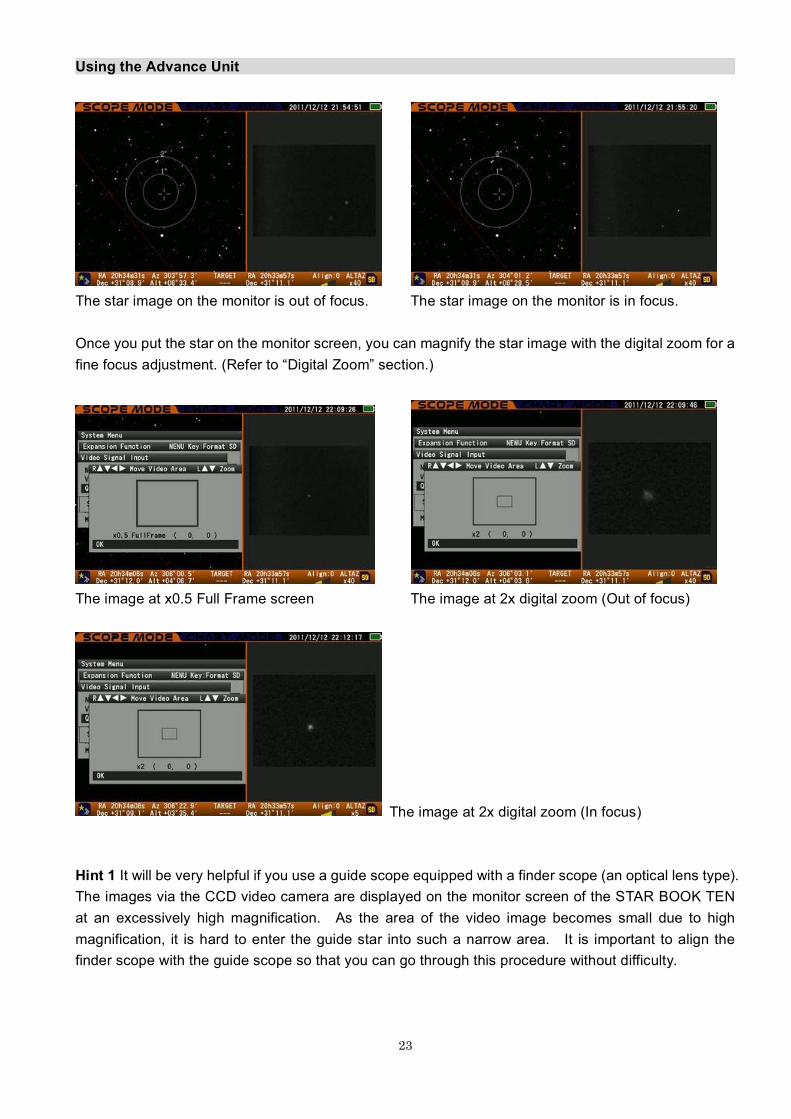
The star image on the monitor is out of focus. The star image on the monitor is in focus. Once you put the star on the monitor screen, you can magnify the star image with the digital zoom for a fine focus adjustment. (Refer to “Digital Zoom” section.)
The image at x0.5 Full Frame screen The image at 2x digital zoom (Out of focus)
The image at 2x digital zoom (In focus) Hint 1 It will be very helpful if you use a guide scope equipped with a finder scope (an optical lens type). The images via the CCD video camera are displayed on the monitor screen of the STAR BOOK TEN at an excessively high magnification. As the area of the video image becomes small due to high magnification, it is hard to enter the guide star into such a narrow area. It is important to align the finder scope with the guide scope so that you can go through this procedure without difficulty.

24
Using the Advance Unit 3. Entering a Celestial Object into the Viewfinder of the DSLR Camera
Focusing the DSLR Camera Before you locate a celestial object you want to shoot with your telescope equipped with the DSLR camera, you need to focus the camera precisely. Hint 2, Hint3. First of all, bring a bright star into the viewfinder of your DSLR camera for the purpose of a focus adjustment. It is rather difficult to look for dim stars and faint objects like nebulae in the camera’s viewfinder to focus. Moreover, in most cases, the telescope equipped with the camera is out of focus at this stage and only the bight stars can be seen in the camera’s viewfinder if they are happen to be within the viewfinder. It is highly recommended to start with a bright star to focus the camera before you look for your celestial object. --------------------------------------------------------------------------------------------------------------------------------------- Hint 2 An equatorial mounted telescope with the Go-To function enables you to place a bight star into the camera’s viewfinder easily. Align the telescope and set the STAR BOOK TEN to use the mount with the “equatorial with polar setting”. For the alignment method, refer to the instruction manuals for your equatorial mount. --------------------------------------------------------------------------------------------------------------------------------------- Focus the DSLR camera taking the following two steps. 1. Focus the camera on a bright star for the first time. 2. Then, bring a relatively dim star into the camera’s viewfinder to focus the camera precisely. If the telescope equipped with a DSLR camera is out of focus, stars are not seen as pin points through the camera’s viewfinder. As a result, the stars are seen as small disks having an area. The light of the stars are defused on the disk and the stars are seen dimmer in brightness. If the stars are dim, nothing could be seen through the camera’s viewfinder. As you focus the camera on them, however, the stars may appear on the screen as pin points. On the contrary the bright stars are seen as they have a range of in focus. It may be difficult for you to determine where the sharpest image point is in that range, if you attempt to use the bright star only to focus the camera. So, it is important to use the dim star also to perfect the focus of your imaging object. Hint3

25
Using the Advance Unit
--------------------------------------------------------------------------------------------------------------------------------------- Hint 3 Using a DSLR camera with “live focus” function is recommended. The “live focus” allows you to magnify a part of the viewfinder screen so that you can more easily make a fine focus adjustment.
--------------------------------------------------------------------------------------------------------------------------------------- Determine the Orientation of the Camera’s Frame Bring a celestial object you want to shoot into the viewfinder of your DSLR camera and determine the orientation of the camera’s frame for imaging by rotating the camera or adjusting the direction of the telescope. Hint 4, Hint5. --------------------------------------------------------------------------------------------------------------------------------------- Hint 4 Using a star map, a photographic collection of celestial objects and a simulation of planetarium software are ways to determine the orientation of the camera’s frame. If faint objects such as nebulae are hard to view though the viewfinder of the camera, you may use a recognizable star pattern near your celestial target to determine the frame for imaging. Hint 5 When you have a DSLR camera to use, you can take some trail shots with a high ISO sensitivity to determine the orientation of the camera’s frame. The higher the sensitivity, the shorter the exposure times of the camera to get an illuminated image of stars. The drawback is that the images deteriorate due to increased electronic noise. Don’t forget to return the ISO setting to your desired value. ---------------------------------------------------------------------------------------------------------------------------------------

26
Using the Advance Unit 4. Guide Star Enter a relatively bright guide star into the field of view of the guide scope. Use the guide star that is located adjacent to your celestial target*. This is to introduce the guide star into the monitor screen of the STAR BOOK TEN in the QVGA mode.
*Avoid using planets and celestial objects that are seen a large area. This could result in guiding errors. Confirm if a relatively bright star is on the monitor screen of the STAR BOOK TEN. If not, look for a proper star by slowly moving the direction of the guide scope. The directions of the guide scope must be adjusted in relation to the by the guide mount. Turn the fine adjustment knobs of the guide mount so that the guide star comes toward the center of the monitor screen. Hint 2
Note: Never touch the ↑, ↓, ← or → direction keys on the STAR BOOK TEN to adjust the direction of the guide scope as the target for shooting will be away from the camera’s frame. Be sure to use slow motion controls of the guide mount to shift the guide scope. Refer to the instruction manual for your guide scope on how to use it.
The guide star is displayed.
27
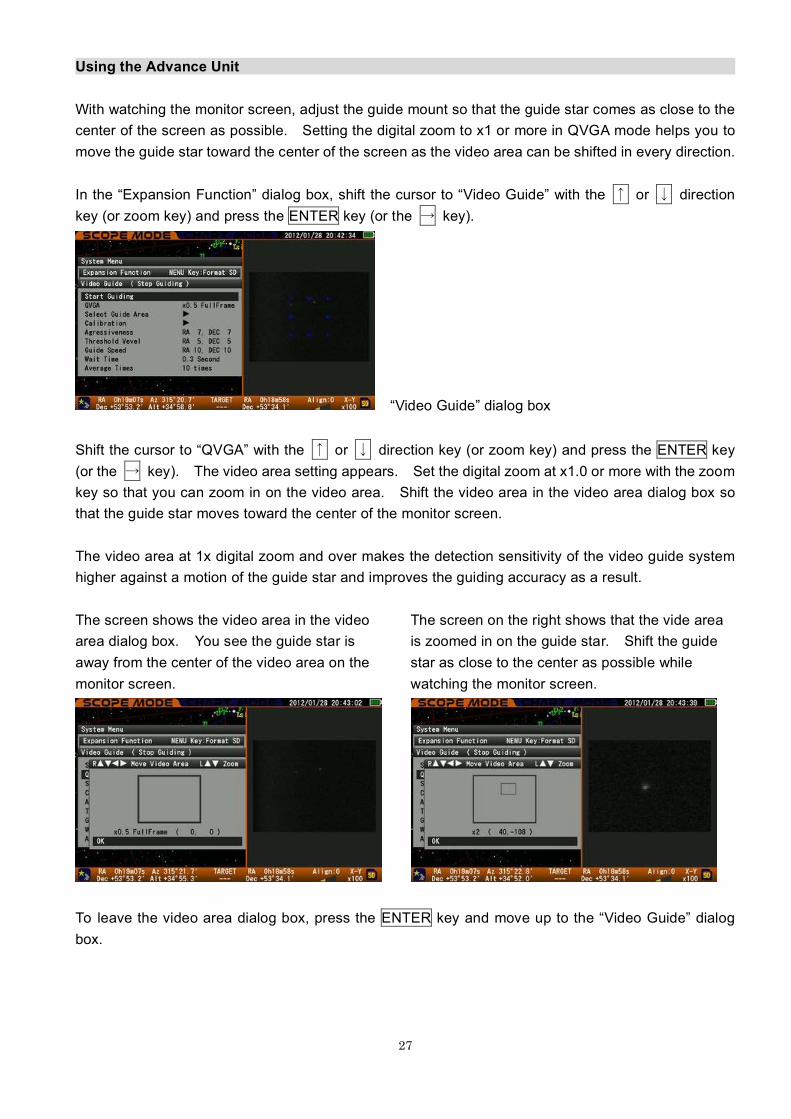
Using the Advance Unit With watching the monitor screen, adjust the guide mount so that the guide star comes as close to the center of the screen as possible. Setting the digital zoom to x1 or more in QVGA mode helps you to move the guide star toward the center of the screen as the video area can be shifted in every direction. In the “Expansion Function” dialog box, shift the cursor to “Video Guide” with the ↑ or ↓ direction key (or zoom key) and press the ENTER key (or the → key).
“Video Guide” dialog box Shift the cursor to “QVGA” with the ↑ or ↓ direction key (or zoom key) and press the ENTER key (or the → key). The video area setting appears. Set the digital zoom at x1.0 or more with the zoom key so that you can zoom in on the video area. Shift the video area in the video area dialog box so that the guide star moves toward the center of the monitor screen. The video area at 1x digital zoom and over makes the detection sensitivity of the video guide system higher against a motion of the guide star and improves the guiding accuracy as a result. The screen shows the video area in the video The screen on the right shows that the vide area area dialog box. You see the guide star is is zoomed in on the guide star. Shift the guide away from the center of the video area on the star as close to the center as possible while monitor screen. watching the monitor screen.
To leave the video area dialog box, press the ENTER key and move up to the “Video Guide” dialog box.
28
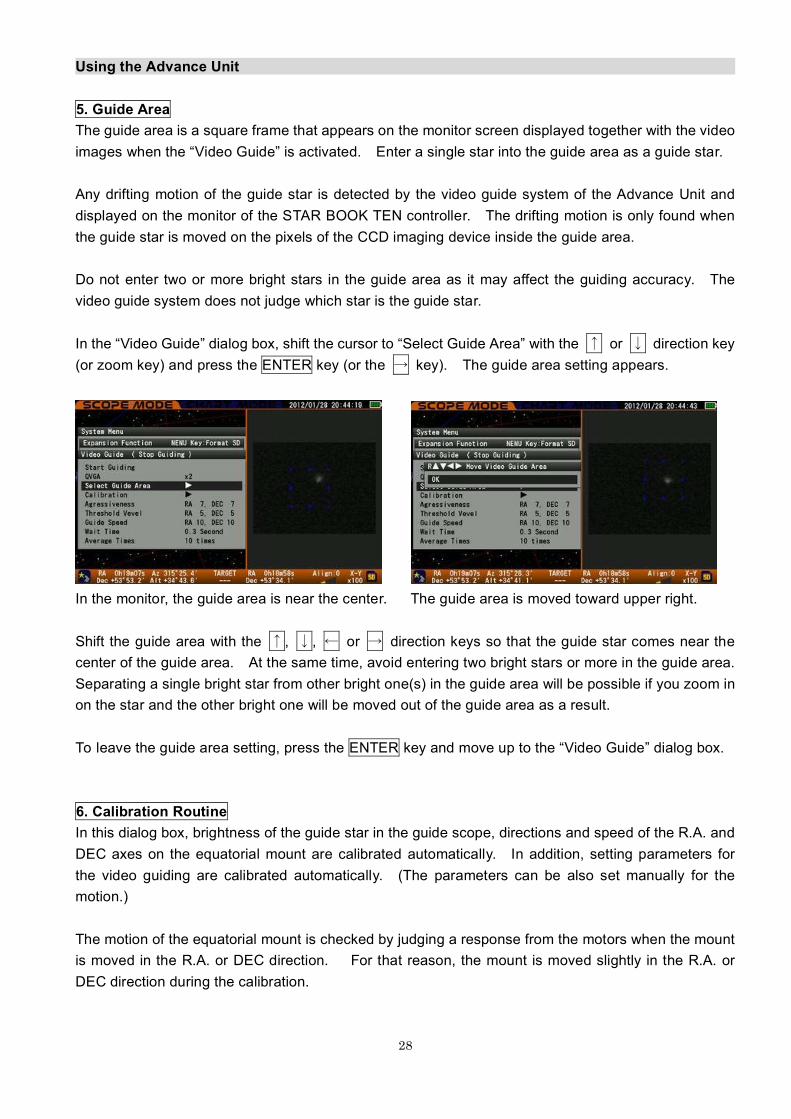
Using the Advance Unit 5. Guide Area The guide area is a square frame that appears on the monitor screen displayed together with the video images when the “Video Guide” is activated. Enter a single star into the guide area as a guide star. Any drifting motion of the guide star is detected by the video guide system of the Advance Unit and displayed on the monitor of the STAR BOOK TEN controller. The drifting motion is only found when the guide star is moved on the pixels of the CCD imaging device inside the guide area. Do not enter two or more bright stars in the guide area as it may affect the guiding accuracy. The video guide system does not judge which star is the guide star. In the “Video Guide” dialog box, shift the cursor to “Select Guide Area” with the ↑ or ↓ direction key (or zoom key) and press the ENTER key (or the → key). The guide area setting appears.
In the monitor, the guide area is near the center. The guide area is moved toward upper right. Shift the guide area with the ↑, ↓, ← or → direction keys so that the guide star comes near the center of the guide area. At the same time, avoid entering two bright stars or more in the guide area. Separating a single bright star from other bright one(s) in the guide area will be possible if you zoom in on the star and the other bright one will be moved out of the guide area as a result. To leave the guide area setting, press the ENTER key and move up to the “Video Guide” dialog box. 6. Calibration Routine In this dialog box, brightness of the guide star in the guide scope, directions and speed of the R.A. and DEC axes on the equatorial mount are calibrated automatically. In addition, setting parameters for the video guiding are calibrated automatically. (The parameters can be also set manually for the motion.) The motion of the equatorial mount is checked by judging a response from the motors when the mount is moved in the R.A. or DEC direction. For that reason, the mount is moved slightly in the R.A. or DEC direction during the calibration.

29
Using the Advance Unit In the “Video Guide” dialog box, shift the cursor to “Calibration” with the ↑ or ↓ direction key (or zoom key) and press the ENTER key (or the → key). The “Calibration” setting appears.
Select “Calibration” in the dialog box. “Calibration” dialog box appears. The white cross lines in the calibration dialog box show vertical and horizontal directions of the video area. The black lines show vectors of the latest calibration result (showing traces of a star shifting in the calibration)*. The length of the vector is a relative amount of the motion of the mount (movement of the video signals). The angle increases a clockwise direction beginning from the right horizontal line. * You will see the default is set at 100 as the vector with no history of calibration. In the “Calibration” dialog box, choose “OK” with the ↑ or ↓ direction key (or zoom key) and press the ENTER key. The “Calibration” begins on the guide star. It may take a little time to complete the calibration (between 30 sec. and 180 sec. approximately according the circumstances).
The electronic buzzer sounds and the calibration finishes. Bright: Brightness of the guide star (Maximum 100) H Err: Guide errors in the horizontal direction by video signals (pixels) V Err: Guide errors in the vertical direction by video signals (pixels)

30
Using the Advance Unit If you fail in the calibration, revise the guide area (and/or change the zoom rate) and restart the calibration.
Manual Calibration Setting The setting parameters for the calibration can be entered manually. In the “Calibration” dialog box, move the cursor to the given parameters with the ↑ or ↓ direction key (or zoom key) and press the ENTER key (or the → key). The “Change Parameter” dialog box appears. Move the cursor to an available entry space with the ← or → direction key (or zoom key) and change the value to your desired option. Using the zoom key will increase or decrease by 10 within the range.
Press the ENTER key twice to save and complete the manual calibration setting. To discontinue the manual calibration setting, choose the CANCEL key with the ↑, ↓, ← or → direction key and press the ENTER key. Or, press the ← key one, two or three times depending on the situation to close the dialog box. Available Range for Vector Setting Hint 6 Angle: 0 degree to 359 degrees (Increase in 1 degree increment) Length: 1 to 999 (Increase in 1 increment) Hint 6 It is recommended that you enter the values while you perform learn to use the video guide. It helps you determine effectively what suitable values are as you can figure out a necessary amount for corrections on the spot. The numerical keys are available to directly enter the values.

31
Using the Advance Unit 7. Starting the Video Guide Now you can start the video guide. In the “Video Guide” dialog box, shift the cursor to the “Start Guiding” with the ↑ or ↓ direction key (or zoom key) and press the ENTER key (or the → key) to lock on the autoguider to the guide star. The video guide starts and the mount will follow the motion of the celestial objects.
Select “Start Guiding” in the dialog box. The video guide is in operation. Bright: Brightness of the guide star (Maximum 100) H Err: Guide errors in the horizontal direction by video signals (pixels) V Err: Guide errors in the vertical direction by video signals (pixels) If the guide star is away from the guide area, the video guide will be discontinued as it is recognized to be an error. The equatorial mount returns to the normal sidereal rate tracking.
Please confirm the followings as they can cause guide errors. - The guide star is diminished in brightness by cloud or is covered with the clouds. - The clamp levers of the guide scope are slack. - Excess of digital zooming. - Dew condensation on the lens of the guide scope or the CCD video camera. - The cables are not long enough to move the telescope around. If there is any stress on the cables, it may affect the video guide. - Power source of unstable electricity. It will result in a malfunction and avoid using a generator. - Insufficient power supply. It will result in a malfunction. - Keep away from an electronic device that emits noise. It will cause a malfunction.

32
Using the Advance Unit - The video guide system seems not to be sensitive to light from the guide star. If this happens, relocating a position of the guide star or guide area can recover the video guide system from guide errors. - The guide star is not bright enough or not a single object. 8. Shooting Confirm the frame and focus of the camera once again. Then, release the shutter of the camera to start imaging your celestial target. If you use a DSLR camera, it is recommended to use a high ISO setting for testing exposure. It increases the number of dark fainter stars within a short exposure and it makes you reconfirm the frame and focus relatively easier. 9. Various Settings You can set aggressiveness of calibration, threshold of guide error correction, correction speed, readout wait time and frame averaging for sharper image. By entering proper values for these parameters, you will be able to enhance the accuracy of the video guide and make the tracking steadier. It is recommended that you experiment with the settings of the parameters during the performance of your video guide. Aggressiveness (Compensation for Calibration) It reduces amounts of the calibrated guide errors in the direction of R.A. and DEC if necessary. Use this setting to compensate automatic calibrations and further diminish the guide errors. Default: RA: 7, DEC: 7 In the “Video Guide” dialog box, shift the cursor to the “Aggressiveness” with the ↑ or ↓ direction key (or zoom key) and press the ENTER key (or the → key). The “Aggressiveness” entry box appears. Move the cursor to an available entry space with the ← or → direction key (or zoom key) and change the value to your desired option with the ↑ or ↓ direction key. Using the zoom keys will increase or decrease the number 10 each within the range. The numerical keys can also be used.
Select “Aggressiveness” in the dialog box. The “Aggressiveness” entry box appears.

33
Using the Advance Unit Press the ENTER key twice to save and complete the aggressiveness setting. To discontinue the aggressiveness setting, choose the CANCEL key with the ↑, ↓, ← or → direction key and press the ENTER key. Or, press the ← key one, two or three times depending on the situation to close the dialog box. The aggressiveness can be set between 1 and 99 separately in R.A. and DEC. When the setting is 80, it means that corrections are effective by 80% against the calibrations. Threshold Level It may happen that the locked position of a guide star is shifted momentarily when the stars are oscillated in the video guide due to scintillation. If the video guide is designated to correct such a subtle error, the tracking goes unstable because of excessive compensations. With use of the threshold level, you can interrupt the excessive corrections by cutting compensation signals lower than your designated values. Default: RA: 5, DEC: 5 In the “Video Guide” dialog box, shift the cursor to the “Threshold Level” with the ↑ or ↓ direction key (or zoom key) and press the ENTER key (or the → key). The “Threshold Level” entry box appears. Move the cursor to an available entry space with the ← or → direction key (or zoom key) and change the value to your desired option with the ↑ or ↓ direction key. Using the zoom keys will increase or decrease the number 10 each within the range. The numerical keys are available, too.
Select “Threshold level” in the dialog box. The “Threshold Level” entry box appears. Press the ENTER key twice to save and complete the threshold level setting. To discontinue the threshold level setting, choose the CANCEL key with the ↑ , ↓ , ← or → direction key and press the ENTER key. Or, press the ← key one, two or three times depending on the situation to close the dialog box. The threshold level can be set between 1 and 99 separately in R.A. and DEC. When the setting is 5, it means that guide errors of less than a half of the pixel are ignored.
34
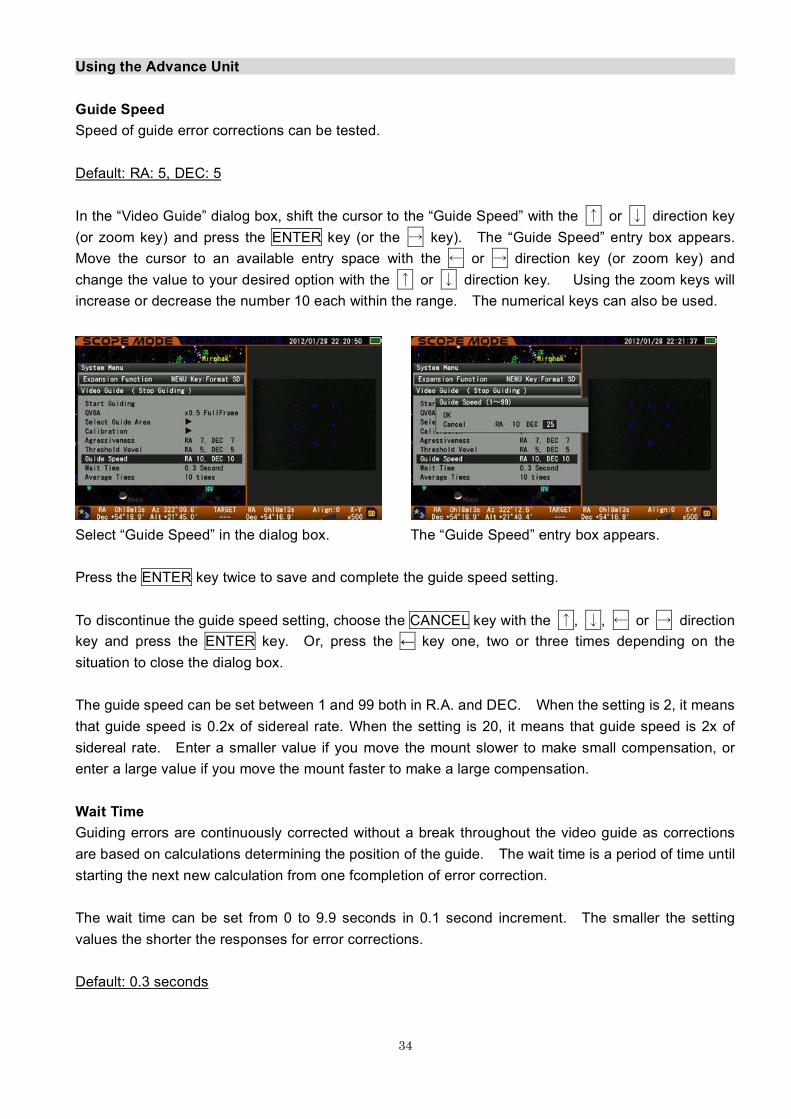
Using the Advance Unit Guide Speed Speed of guide error corrections can be tested. Default: RA: 5, DEC: 5 In the “Video Guide” dialog box, shift the cursor to the “Guide Speed” with the ↑ or ↓ direction key (or zoom key) and press the ENTER key (or the → key). The “Guide Speed” entry box appears. Move the cursor to an available entry space with the ← or → direction key (or zoom key) and change the value to your desired option with the ↑ or ↓ direction key. Using the zoom keys will increase or decrease the number 10 each within the range. The numerical keys can also be used.
Select “Guide Speed” in the dialog box. The “Guide Speed” entry box appears. Press the ENTER key twice to save and complete the guide speed setting. To discontinue the guide speed setting, choose the CANCEL key with the ↑, ↓, ← or → direction key and press the ENTER key. Or, press the ← key one, two or three times depending on the situation to close the dialog box. The guide speed can be set between 1 and 99 both in R.A. and DEC. When the setting is 2, it means that guide speed is 0.2x of sidereal rate. When the setting is 20, it means that guide speed is 2x of sidereal rate. Enter a smaller value if you move the mount slower to make small compensation, or enter a large value if you move the mount faster to make a large compensation. Wait Time Guiding errors are continuously corrected without a break throughout the video guide as corrections are based on calculations determining the position of the guide. The wait time is a period of time until starting the next new calculation from one fcompletion of error correction. The wait time can be set from 0 to 9.9 seconds in 0.1 second increment. The smaller the setting values the shorter the responses for error corrections. Default: 0.3 seconds
35
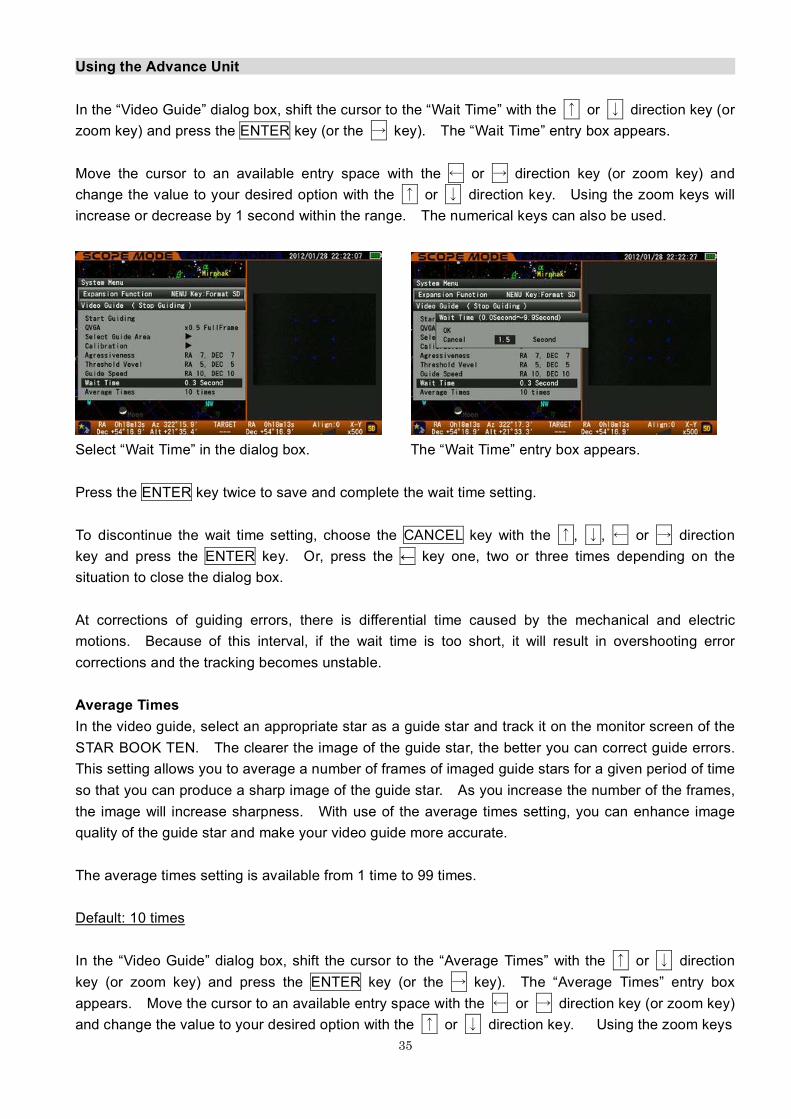
Using the Advance Unit In the “Video Guide” dialog box, shift the cursor to the “Wait Time” with the ↑ or ↓ direction key (or zoom key) and press the ENTER key (or the → key). The “Wait Time” entry box appears. Move the cursor to an available entry space with the ← or → direction key (or zoom key) and change the value to your desired option with the ↑ or ↓ direction key. Using the zoom keys will increase or decrease by 1 second within the range. The numerical keys can also be used.
Select “Wait Time” in the dialog box. The “Wait Time” entry box appears. Press the ENTER key twice to save and complete the wait time setting. To discontinue the wait time setting, choose the CANCEL key with the ↑, ↓, ← or → direction key and press the ENTER key. Or, press the ← key one, two or three times depending on the situation to close the dialog box. At corrections of guiding errors, there is differential time caused by the mechanical and electric motions. Because of this interval, if the wait time is too short, it will result in overshooting error corrections and the tracking becomes unstable. Average Times In the video guide, select an appropriate star as a guide star and track it on the monitor screen of the STAR BOOK TEN. The clearer the image of the guide star, the better you can correct guide errors. This setting allows you to average a number of frames of imaged guide stars for a given period of time so that you can produce a sharp image of the guide star. As you increase the number of the frames, the image will increase sharpness. With use of the average times setting, you can enhance image quality of the guide star and make your video guide more accurate. The average times setting is available from 1 time to 99 times. Default: 10 times In the “Video Guide” dialog box, shift the cursor to the “Average Times” with the ↑ or ↓ direction key (or zoom key) and press the ENTER key (or the → key). The “Average Times” entry box appears. Move the cursor to an available entry space with the ← or → direction key (or zoom key) and change the value to your desired option with the ↑ or ↓ direction key. Using the zoom keys

36
Using the Advance Unit will increase or decrease the number 10 each within the range. The numerical keys can also be used.
Select “Average Times” in the dialog box. The “Average Times” entry box appears. Press the ENTER key twice to save and complete the average times setting. To discontinue the average times setting, choose the CANCEL key with the ↑ , ↓ , ← or → direction key and press the ENTER key. Or, press the ← key one, two or three times depending on the situation to close the dialog box. When you enter a large number in the average times setting, it will lengthen computing time and response to guide error corrections will be slow. 4. Remote Shutter Release This function will allow you to control shutter release duration, interval times, exposure times and mirror lockup of your DSLR camera if you connect the Advance Unit to your DSLR camera with a suitable cable*. Note: - Use cameras with the bulb setting. The remote shutter release is not available for cameras with no bulb mode. - You may not connect a commercially available cable nor utilize the remote shutter release if the shutter release terminal of your camera has a specific configuration. - The remote shutter release or its part of the functions may be inoperative depending on a camera used even if the cable can be connected to it. *The shutter release terminal of the Advance Unit is a 3.5mm stereo mini jack. You need a 3.5mm stereo mini plug cable to use. You may need a cable adapter sold separately to fit the 3.5mm mini plug cable to the remote shutter terminal of the camera. Procedure (1) Turn off your DSLR camera and connect it to the shutter release terminal on the Advance Unit (STAR BOOK TEN) with a proper cable. The Canon Rebel T3i (EOS Kiss X5) is shown here as example.
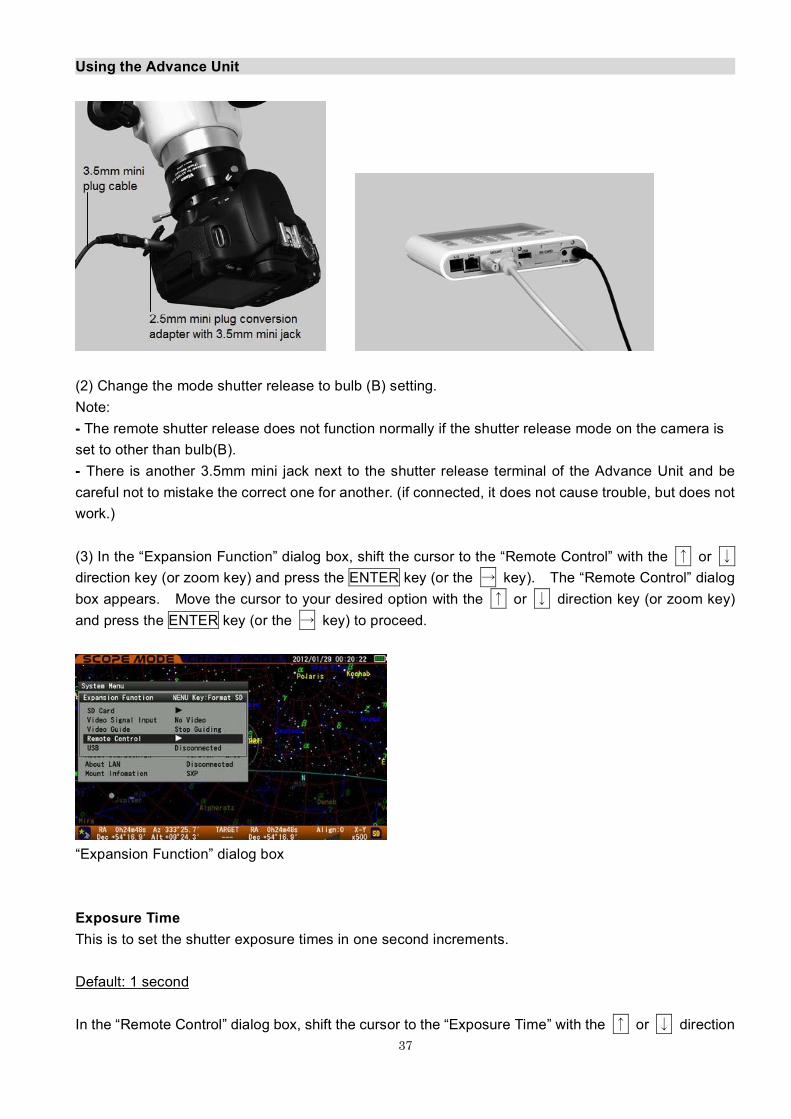
37
Using the Advance Unit
(2) Change the mode shutter release to bulb (B) setting. Note: - The remote shutter release does not function normally if the shutter release mode on the camera is set to other than bulb(B). - There is another 3.5mm mini jack next to the shutter release terminal of the Advance Unit and be careful not to mistake the correct one for another. (if connected, it does not cause trouble, but does not work.) (3) In the “Expansion Function” dialog box, shift the cursor to the “Remote Control” with the ↑ or ↓ direction key (or zoom key) and press the ENTER key (or the → key). The “Remote Control” dialog box appears. Move the cursor to your desired option with the ↑ or ↓ direction key (or zoom key) and press the ENTER key (or the → key) to proceed.
“Expansion Function” dialog box Exposure Time This is to set the shutter exposure times in one second increments. Default: 1 second In the “Remote Control” dialog box, shift the cursor to the “Exposure Time” with the ↑ or ↓ direction

38
Using the Advance Unit key (or zoom key) and press the ENTER key (or the → key). The “Exposure Time” entry box appears. Move the cursor to an available entry space with the ← or → direction key (or zoom key) and enter your desired exposure time with the ↑ or ↓ direction key. (Setting range: from 1 sec. to 3600 sec.) Using the zoom keys will increase or decrease the number 10 each within the range. The numerical keys can also be used.
“Remote Control” dialog box Enter your desired exposure time. Press the ENTER key twice to save and complete the exposure time setting. To discontinue the exposure time setting, choose the CANCEL key with the ↑, ↓, ← or → direction key and press the ENTER key. Or, press the ← key one, two or three times depending on the situation to close the dialog box. Interval Time When taking shots in succession, you can set an interval time between the completion of the last shot and beginning of the next shot. This is used to take images successively in a given interval time. Default: 1 second In the “Remote Control” dialog box, shift the cursor to the “Interval Time” with the ↑ or ↓ direction key (or zoom key) and press the ENTER key (or the → key). The “Interval Time” entry box appears. Move the cursor to an available entry space with the ← or → direction key (or zoom key) and enter your desired interval time with the ↑ or ↓ direction key. (Setting range: from 1 sec. to 3600 sec.) Using the zoom keys will increase or decrease the number 10 each within the range. The numerical keys can also be used.
“Remote Control” dialog box Enter your desired interval time.
39
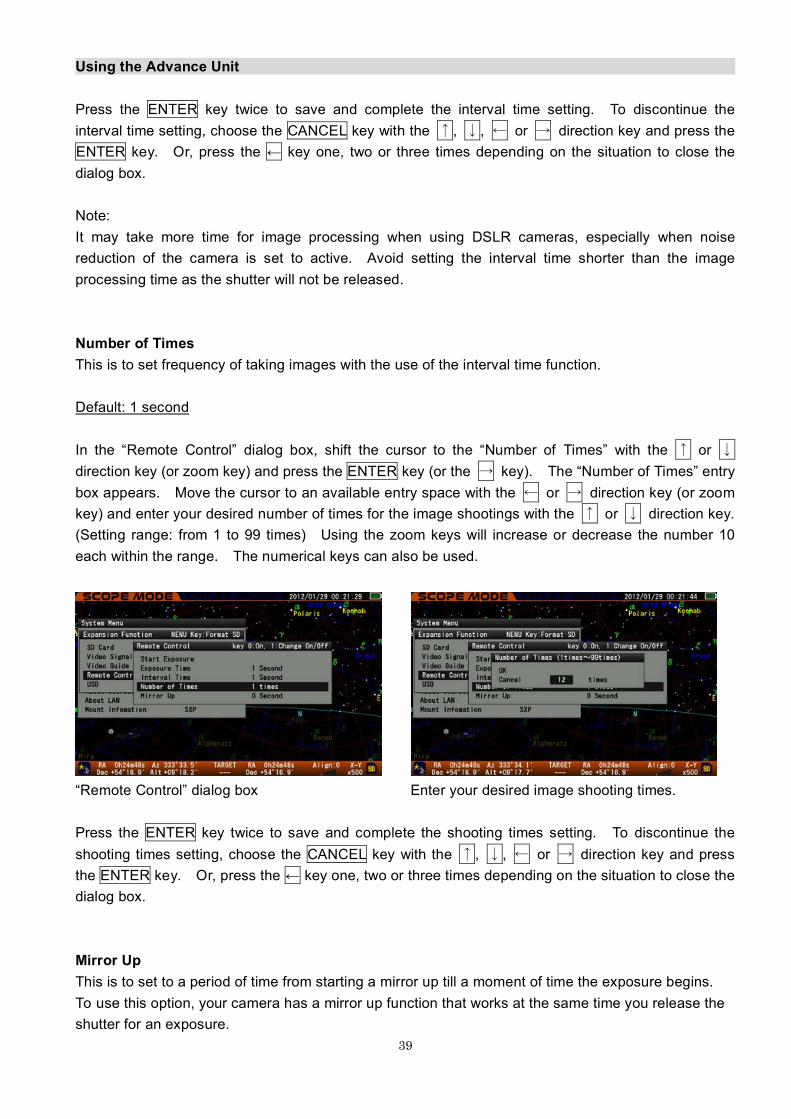
Using the Advance Unit Press the ENTER key twice to save and complete the interval time setting. To discontinue the interval time setting, choose the CANCEL key with the ↑, ↓, ← or → direction key and press the ENTER key. Or, press the ← key one, two or three times depending on the situation to close the dialog box. Note: It may take more time for image processing when using DSLR cameras, especially when noise reduction of the camera is set to active. Avoid setting the interval time shorter than the image processing time as the shutter will not be released. Number of Times This is to set frequency of taking images with the use of the interval time function. Default: 1 second In the “Remote Control” dialog box, shift the cursor to the “Number of Times” with the ↑ or ↓ direction key (or zoom key) and press the ENTER key (or the → key). The “Number of Times” entry box appears. Move the cursor to an available entry space with the ← or → direction key (or zoom key) and enter your desired number of times for the image shootings with the ↑ or ↓ direction key. (Setting range: from 1 to 99 times) Using the zoom keys will increase or decrease the number 10 each within the range. The numerical keys can also be used.
“Remote Control” dialog box Enter your desired image shooting times. Press the ENTER key twice to save and complete the shooting times setting. To discontinue the shooting times setting, choose the CANCEL key with the ↑, ↓, ← or → direction key and press the ENTER key. Or, press the ← key one, two or three times depending on the situation to close the dialog box. Mirror Up This is to set to a period of time from starting a mirror up till a moment of time the exposure begins. To use this option, your camera has a mirror up function that works at the same time you release the shutter for an exposure.
40
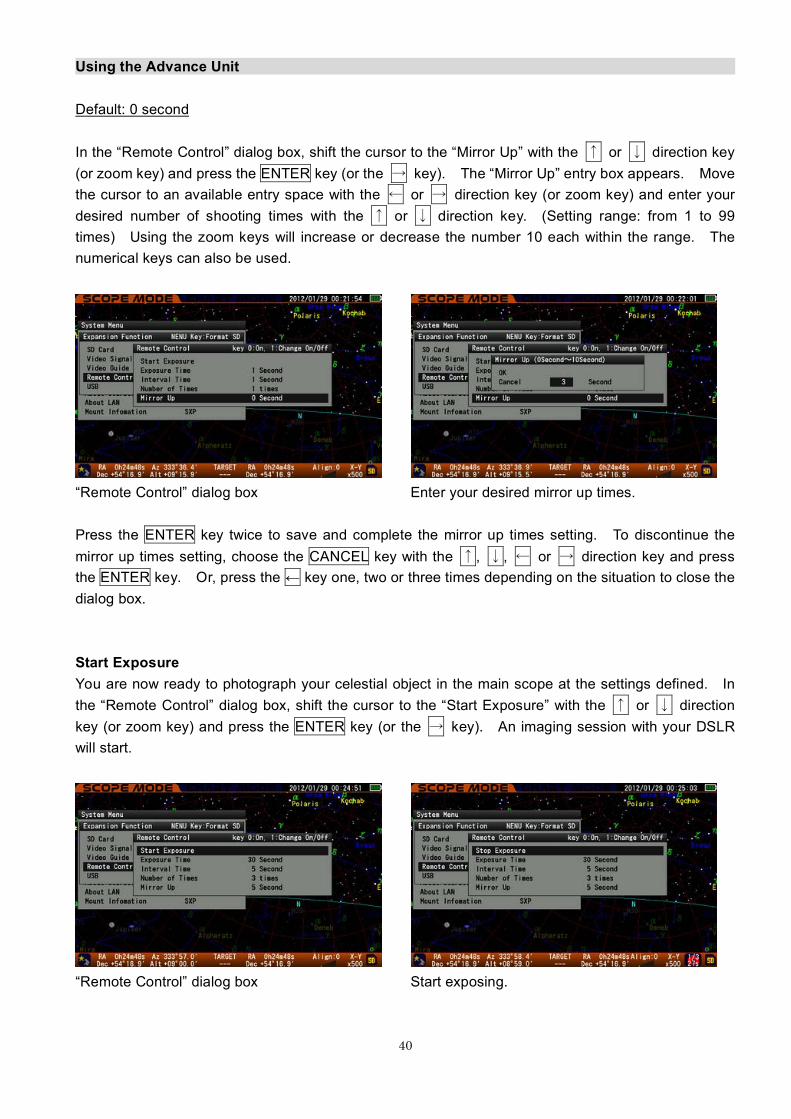
Using the Advance Unit Default: 0 second In the “Remote Control” dialog box, shift the cursor to the “Mirror Up” with the ↑ or ↓ direction key (or zoom key) and press the ENTER key (or the → key). The “Mirror Up” entry box appears. Move the cursor to an available entry space with the ← or → direction key (or zoom key) and enter your desired number of shooting times with the ↑ or ↓ direction key. (Setting range: from 1 to 99 times) Using the zoom keys will increase or decrease the number 10 each within the range. The numerical keys can also be used.
“Remote Control” dialog box Enter your desired mirror up times. Press the ENTER key twice to save and complete the mirror up times setting. To discontinue the mirror up times setting, choose the CANCEL key with the ↑, ↓, ← or → direction key and press the ENTER key. Or, press the ← key one, two or three times depending on the situation to close the dialog box. Start Exposure You are now ready to photograph your celestial object in the main scope at the settings defined. In the “Remote Control” dialog box, shift the cursor to the “Start Exposure” with the ↑ or ↓ direction key (or zoom key) and press the ENTER key (or the → key). An imaging session with your DSLR will start.
“Remote Control” dialog box Start exposing.

41
Using the Advance Unit During exposures the red icon is displayed at the right corner of the information bar on the bottom of the screen, where the remaining time of exposure and number of shooting images are counted. If the mirror up function is set at 1 second or more, the green icon will appear to count down mirror up time and the icon will turn to red as soon as the mirror up time has elapsed. To discontinue the exposure, confirm the cursor remains on the “Stop Exposure” in the dialog box and then press the ENTER key. Use as a Remote Shutter On the “Remote Control” dialog box screen, the MENU/0 key works as a “Bulb” shutter and the SOLAR/1 key works as a “Time” shutter. - The shutter is opened while the MENU/0 key is pressed and closed when you release the pressed key. - The shutter is opened or closed in succession each time you press the SOLAR/1 key. The shutter can be closed to press the MENU/0 key, too. Example of Remote Shutter Release Settings Mirror Up: 5 seconds Exposure: 360 seconds x 10 times (10 Shots) Interval: 10 seconds
5. USB This is to apply to commercially available USB devices which are rated under 500mA electricity consumption. There is no optional USB device that is available for the Advance Unit as of March 2012.
42
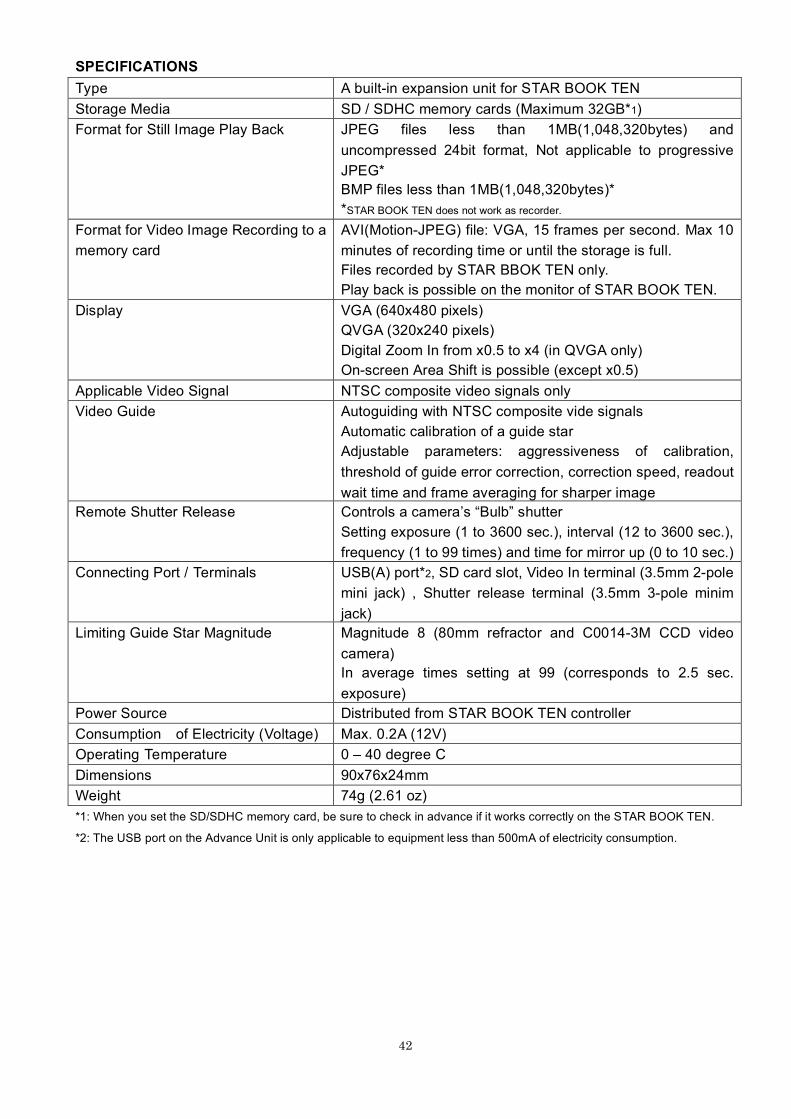
SPECIFICATIONS Type A built-in expansion unit for STAR BOOK TEN Storage Media SD / SDHC memory cards (Maximum 32GB*1) Format for Still Image Play Back JPEG files less than 1MB(1,048,320bytes) and
uncompressed 24bit format, Not applicable to progressive JPEG* BMP files less than 1MB(1,048,320bytes)* *STAR BOOK TEN does not work as recorder.
Format for Video Image Recording to a memory card
AVI(Motion-JPEG) file: VGA, 15 frames per second. Max 10 minutes of recording time or until the storage is full. Files recorded by STAR BBOK TEN only. Play back is possible on the monitor of STAR BOOK TEN.
Display VGA (640x480 pixels) QVGA (320x240 pixels) Digital Zoom In from x0.5 to x4 (in QVGA only) On-screen Area Shift is possible (except x0.5)
Applicable Video Signal NTSC composite video signals only Video Guide Autoguiding with NTSC composite vide signals
Automatic calibration of a guide star Adjustable parameters: aggressiveness of calibration, threshold of guide error correction, correction speed, readout wait time and frame averaging for sharper image
Remote Shutter Release Controls a camera’s “Bulb” shutter Setting exposure (1 to 3600 sec.), interval (12 to 3600 sec.), frequency (1 to 99 times) and time for mirror up (0 to 10 sec.)
Connecting Port / Terminals USB(A) port*2, SD card slot, Video In terminal (3.5mm 2-pole mini jack) , Shutter release terminal (3.5mm 3-pole minim jack)
Limiting Guide Star Magnitude Magnitude 8 (80mm refractor and C0014-3M CCD video camera) In average times setting at 99 (corresponds to 2.5 sec. exposure)
Power Source Distributed from STAR BOOK TEN controller Consumption of Electricity (Voltage) Max. 0.2A (12V) Operating Temperature 0 – 40 degree C Dimensions 90x76x24mm Weight 74g (2.61 oz) *1: When you set the SD/SDHC memory card, be sure to check in advance if it works correctly on the STAR BOOK TEN.
*2: The USB port on the Advance Unit is only applicable to equipment less than 500mA of electricity consumption.

5-17-3 H igash itokorozawa,Tokorozawa, Sai tama 359-0021, JapanP h o n e +81-4-2944-4141(International)F a x +81-4-2944-9722(International)http://www.vixen.co.j p