adrien poupa tp040869 to web programming/assignements/web...web programming individual assessment...
TRANSCRIPT

TP040869
Adrien Poupa
Web Programming Individual Assessment Adrien Poupa TP040869
2
Table of Contents
Gantt chart Page 3
Introduction and objectives Page 4
System design
Storyboards Page 5
Flowcharts Page 8
Implementation
Design Page 10
PHP Page 11
MySQL Database Page 11
PDO Page 12
Authentication Page 13
Tables Page 14
Permissions Page 15
Main Section Page 16
References Page 25

Web Programming Individual Assessment Adrien Poupa TP040869
3
Gantt chart
The whole development took seven weeks to complete.
Task / Week 28/03 04/04 11/04 18/04 25/04 02/05 09/05
Choose a subject
Define functionalities
Select a template
Create database and queries
Authentication system
Students CRUD
Responsibles CRUD
Professors CRUD
Intakes CRUD
Modules CRUD
Grades CRUD
Profile
Change password
Permission system
Report card
Polishing interface
Security
Web Programming Individual Assessment Adrien Poupa TP040869
4
Introduction and objectives
When the individual Web Programming Individual Assessment was first introduced, I
knew that I wanted to create a website that could be useful and reused. My first idea was a
blogging and news platform, but eventually I found that WordPress and many content
management systems such as Dotclear or Joomla! already did this so well that I could not even
start to create something that would be matching their standards.
Then I have been thinking about the extranet used both at Efrei and APU: Moodle. I
realized that nobody really enjoyed using it because of its heaviness and poor user interface,
hence my idea to create a simple and light platform to manage a university, APU in this case.
Let me be clear: I do not have the pretention to do better than Moodle in a few weeks,
I simply wanted to see if I could code a website having some of its features without being so
much heavy.
Now that it is finished (although a website is never “finished”), I can say that I am quite
pleased with the result.
Three roles are defined: the Administrator is allowed to do everything. He can add
Students and Professors, who can login after their creation. Each user can change its password
and basic information about himself such as contact details. A student can review his report
card while a professor can add grades for the students following his classes.
Intakes are defined to group students following the same classes, designed are
“modules”. Only the administrator can create, update and delete intakes and modules.
If you want to take a look at the code, you can visit the GitHub repository where I have
uploaded the code:
https://github.com/AdrienPoupa/apu-webspace

Web Programming Individual Assessment Adrien Poupa TP040869
5
System design
Storyboards
Login page:
Admin index:

Web Programming Individual Assessment Adrien Poupa TP040869
6
Student list:
Add a student:
The form continues with the other fields to be filled.
The other pages are similar (tables and forms) and do not need a specific storyboard.

Web Programming Individual Assessment Adrien Poupa TP040869
7
Student index:
Report card:

Web Programming Individual Assessment Adrien Poupa TP040869
8
Professor index:
Flowcharts
Login

Web Programming Individual Assessment Adrien Poupa TP040869
9
Change password
Add new student (same goes for professor, intake, modules, responsibles, grades)
Web Programming Individual Assessment Adrien Poupa TP040869
10
Implementation
I have a chosen a very simple a clean design, which makes the website easy to understand and
use. It is based on Bootstrap 3, making it easy to modify and responsive for a proper display
on cellphones and tablets. Since the audience targeted is mostly students keen on technology,
the website had to be modern and responsive, if the students wanted to check their grades
using their cellphones for example. The color scheme had to be neutral like Facebook, Twitter
or LinkedIn in order to be pleasant and comfortable: professors and administrator would use
it for a long period when entering grades into the database.
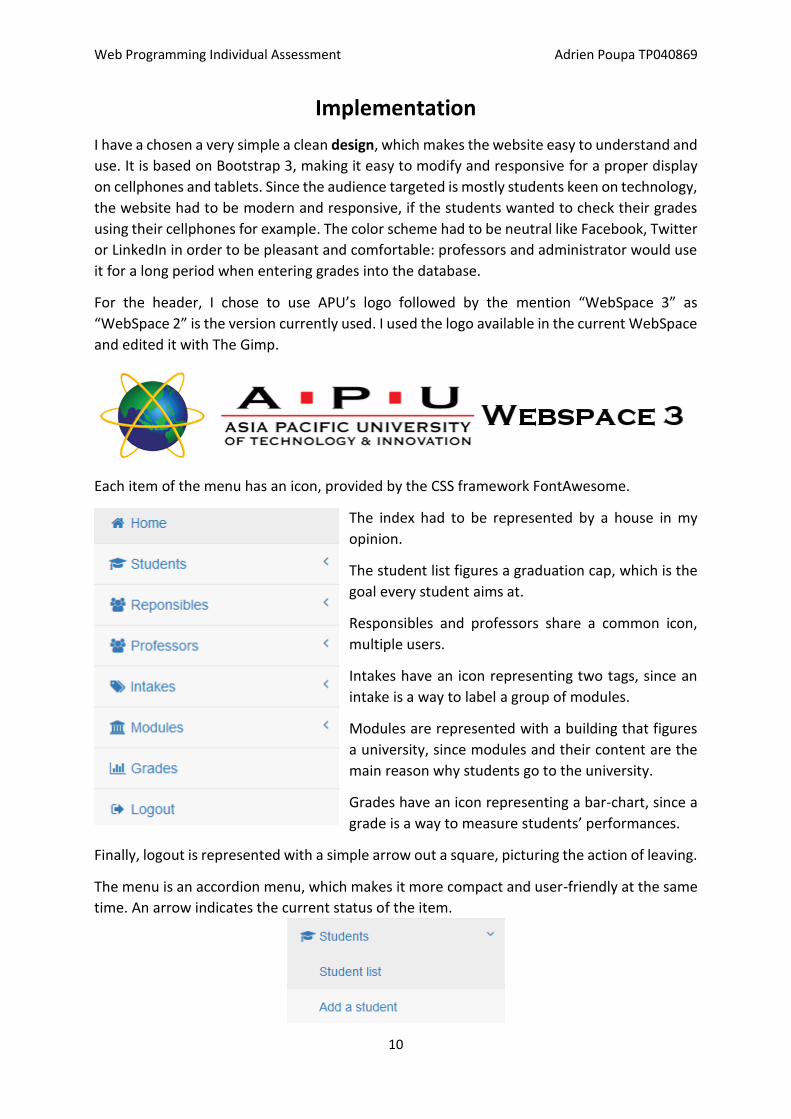
For the header, I chose to use APU’s logo followed by the mention “WebSpace 3” as
“WebSpace 2” is the version currently used. I used the logo available in the current WebSpace
and edited it with The Gimp.
Each item of the menu has an icon, provided by the CSS framework FontAwesome.
The index had to be represented by a house in my
opinion.
The student list figures a graduation cap, which is the
goal every student aims at.
Responsibles and professors share a common icon,
multiple users.
Intakes have an icon representing two tags, since an
intake is a way to label a group of modules.
Modules are represented with a building that figures
a university, since modules and their content are the
main reason why students go to the university.
Grades have an icon representing a bar-chart, since a
grade is a way to measure students’ performances.
Finally, logout is represented with a simple arrow out a square, picturing the action of leaving.
The menu is an accordion menu, which makes it more compact and user-friendly at the same
time. An arrow indicates the current status of the item.
Web Programming Individual Assessment Adrien Poupa TP040869
11
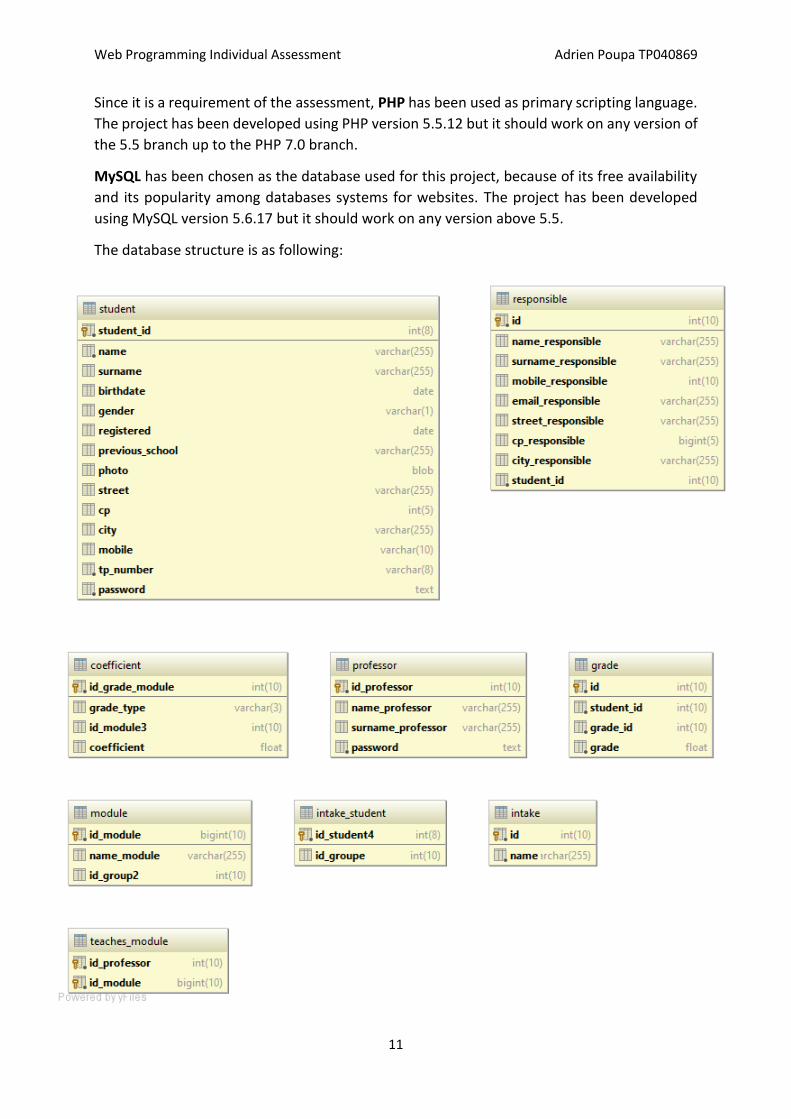
Since it is a requirement of the assessment, PHP has been used as primary scripting language.
The project has been developed using PHP version 5.5.12 but it should work on any version of
the 5.5 branch up to the PHP 7.0 branch.
MySQL has been chosen as the database used for this project, because of its free availability
and its popularity among databases systems for websites. The project has been developed
using MySQL version 5.6.17 but it should work on any version above 5.5.
The database structure is as following:

Web Programming Individual Assessment Adrien Poupa TP040869
12
To connect to the database using PHP, the PDO driver has been chosen over the deprecated
mysql_* and mysqli_* extensions, providing a better security and an object-oriented interface
to create queries with named parameters.
To prevent MySQL injections, the statements are prepared as following:
$query = $db->prepare("SELECT id_student4 FROM intake_student WHERE
id_groupe=:id");
$query->bindParam(':id', $_GET['id']);
$query->execute();
Using the bindParam method and the id named parameter, we can safely use the superglobal
$_GET within the query without minding if is $_GET[‘id’] is a valid ID or a bad character such
as a quote, which would result in a failed query and a vulnerability.
Transactions are also used in order to revert any modifications done to the database, should
the query fail. A try/catch block is used to do this: if any error is detected during the execution
of the code located within the try block, the catch block is executed right after.
try {
$db->setAttribute(PDO::ATTR_ERRMODE, PDO::ERRMODE_EXCEPTION);
$db->beginTransaction();
$query = $db->prepare('INSERT INTO intake (name) VALUES (:name)');
$query->bindParam(':name', $_POST['name']);
$query->execute(); // Add the query to the queue
$db->commit(); // Execute to the queue
} catch (Exception $e) {
$db->rollBack(); // Revert any modifications done to the database
}
The design has been splitted in three different files within the “include” folder:
- head.php contains the HTML headers
- navigation.php contains the main menu
- footer.php closes all the balises opened above
Each publicly accessible PHP file of the project includes the three files named above as well as
the functions.php file located in the same folder. It contains all the functions used throughout
the project, such as the database connection, the redirection to another page, the validation
of a form or the redirection to the login page if the page requested is not available for the
current user.
This file includes config.php located in the same folder, which contains an array defining the
required information to connect to the database: host (usually localhost), database name,
database user and its password, making it easy to migrate on a different installation.
Moreover, it contains the administrator’s password.

Web Programming Individual Assessment Adrien Poupa TP040869
13
The authentication system is built with sessions. They have been chosen over cookies because
of their reliability: sessions are safer than cookies because the actual values are hidden from
the client.
The sessions are started in the functions.php file, just after the database connection. As a
result, they are started in every page of the application since functions.php is included in every
PHP file:
// Connect to DB
$db = connection();
// Start a session, needed for authentication
session_start();
Once the sessions are started, the authentication can be checked using the $_SESSION
superglobal. This superglobal behaves like an array shared by all the documents of the
website. It is initially filed right after the login, and the application uses three elements:
- “student_id” or “id_prof” to register the unique ID of a student or a professor
- “user”, string to be displayed in the “Welcome XXX” message
- “role”, string used to specify the role played by the user in the application: admin,
student and prof are the possible values
The login process is quite simple: first, we make sure all the fields are correctly field (ie: there
is no empty field), then we check which role the user is trying to login to. Once it is done, we
query the proper database (student or professor) to get the password and the ID of the user
the guest wants to login to.
In order to protect users’ data, their password is encrypted in database using the BCRYPT
algorithm. It creates a unique and one-way hash, making it very safe to use to encrypt
passwords.
As a result, we have to check the validity of the password entered by the guest using
password_verify. It takes two parameters: the hash stored in the database and the clear
password entered by the guest.
// Return true if the password entered matches the hashed one (2nd arg)
password_verify($_POST['password'], $student['password'])
If the functions return true, we can finally fill the $_SESSION array with the proper data
extracted from the database above and redirect the user to the homepage.
$_SESSION['id_prof'] = $prof['id_professor'];
$_SESSION['user'] = $prof['surname_professor'].' '.$prof['name_professor'];
$_SESSION['role'] = 'prof';
redirect('index');

Web Programming Individual Assessment Adrien Poupa TP040869
14
All lists (students, responsibles, professors, intakes, modules and grades) are displayed in a
table. It seemed to be the most efficient way to fit a lot of information in the minimal amount
of space possible.
In order to provide a better user experience, the javascript plugin for jQuery DataTables has
been added. It adds a search form, pagination, column ordering and a filter, without reloading
the page thanks to JavaScript. A few lines are enough to transform a table:
<script src="js/datatables/media/js/jquery.dataTables.min.js"></script>
<script>
$(document).ready(function() {
$('#jsTable').DataTable({
responsive: true
});
});
</script>
Of course, the tables must have the ID specified above (jsTable, see below).
All the pages to add an entity (students, responsibles, professors, intakes, modules and
grades) are similar and prefixed with “add-“. They consist of inputs and dropdowns, that have
to be field. The validation is taken care of by the checkForm function, taking an array of input’s
name in argument:
// Required field names
$required = array('student', 'grade');
$error = checkForm($required);
The function itself return an array, empty or not depending of the content of the fields:
function checkForm($required) {
if (isset($_POST['form_sent'])) {
foreach($required as $field) {
if (!isset($_POST[$field]) || empty($_POST[$field])) {
$error[] = 'Please fill all the fields';
return $error;
}
}
}
}
Finally, the database transactions are done if $error is empty only.
The edition of an existing entity works almost exactly the same way, the only differences being
the filename prefixed by “edit-“, the inputs pre-filled with existing data and an UPDATE query
instead of an INSERT INTO.
Finally, the deletion happens in the edit files described above. If the argument delete is passed
along with the ID to delete, a DELETE FROM query is run in order to delete the entity.
Web Programming Individual Assessment Adrien Poupa TP040869
15
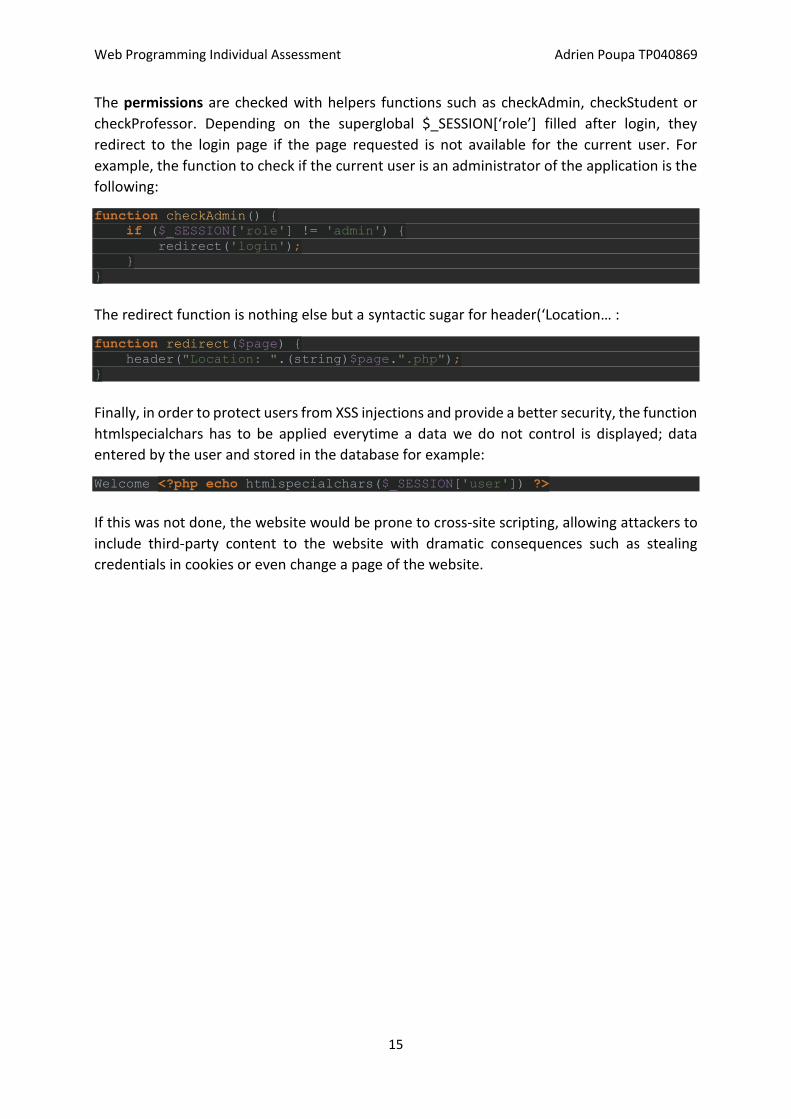
The permissions are checked with helpers functions such as checkAdmin, checkStudent or
checkProfessor. Depending on the superglobal $_SESSION[‘role’] filled after login, they
redirect to the login page if the page requested is not available for the current user. For
example, the function to check if the current user is an administrator of the application is the
following:
function checkAdmin() {
if ($_SESSION['role'] != 'admin') {
redirect('login');
}
}
The redirect function is nothing else but a syntactic sugar for header(‘Location… :
function redirect($page) {
header("Location: ".(string)$page.".php");
}
Finally, in order to protect users from XSS injections and provide a better security, the function
htmlspecialchars has to be applied everytime a data we do not control is displayed; data
entered by the user and stored in the database for example:
Welcome <?php echo htmlspecialchars($_SESSION['user']) ?>
If this was not done, the website would be prone to cross-site scripting, allowing attackers to
include third-party content to the website with dramatic consequences such as stealing
credentials in cookies or even change a page of the website.
Web Programming Individual Assessment Adrien Poupa TP040869
16
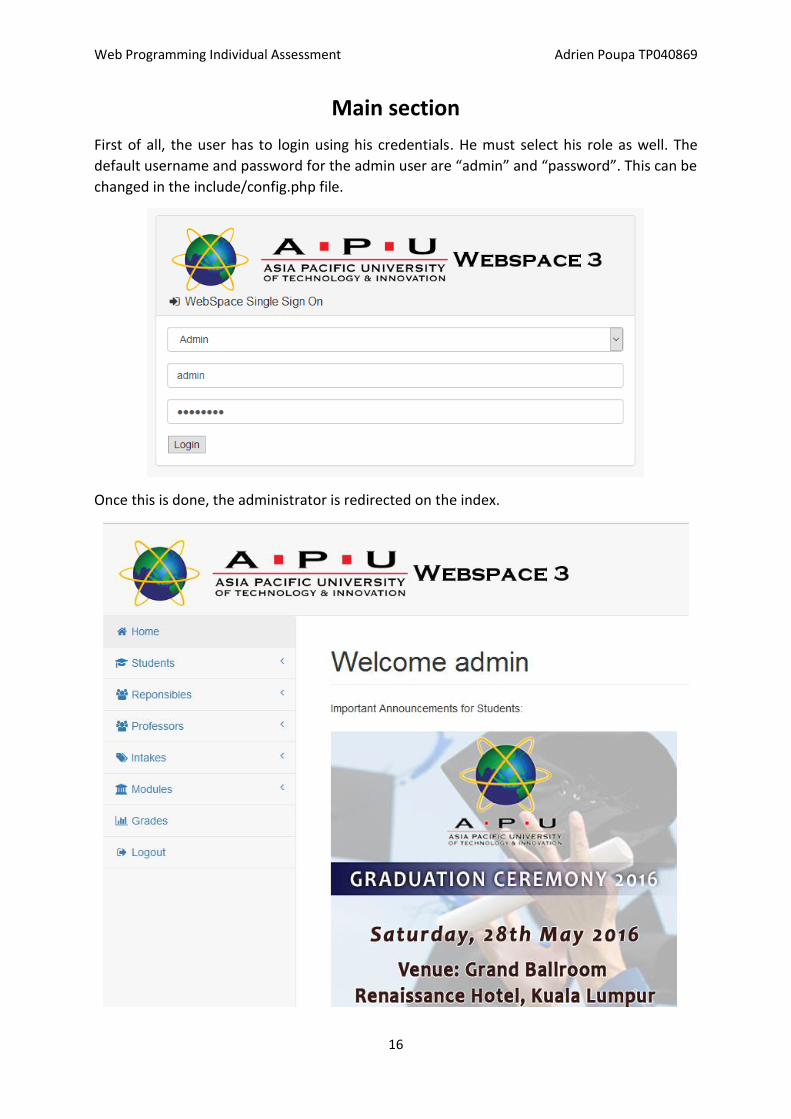
Main section
First of all, the user has to login using his credentials. He must select his role as well. The
default username and password for the admin user are “admin” and “password”. This can be
changed in the include/config.php file.
Once this is done, the administrator is redirected on the index.
Web Programming Individual Assessment Adrien Poupa TP040869
17
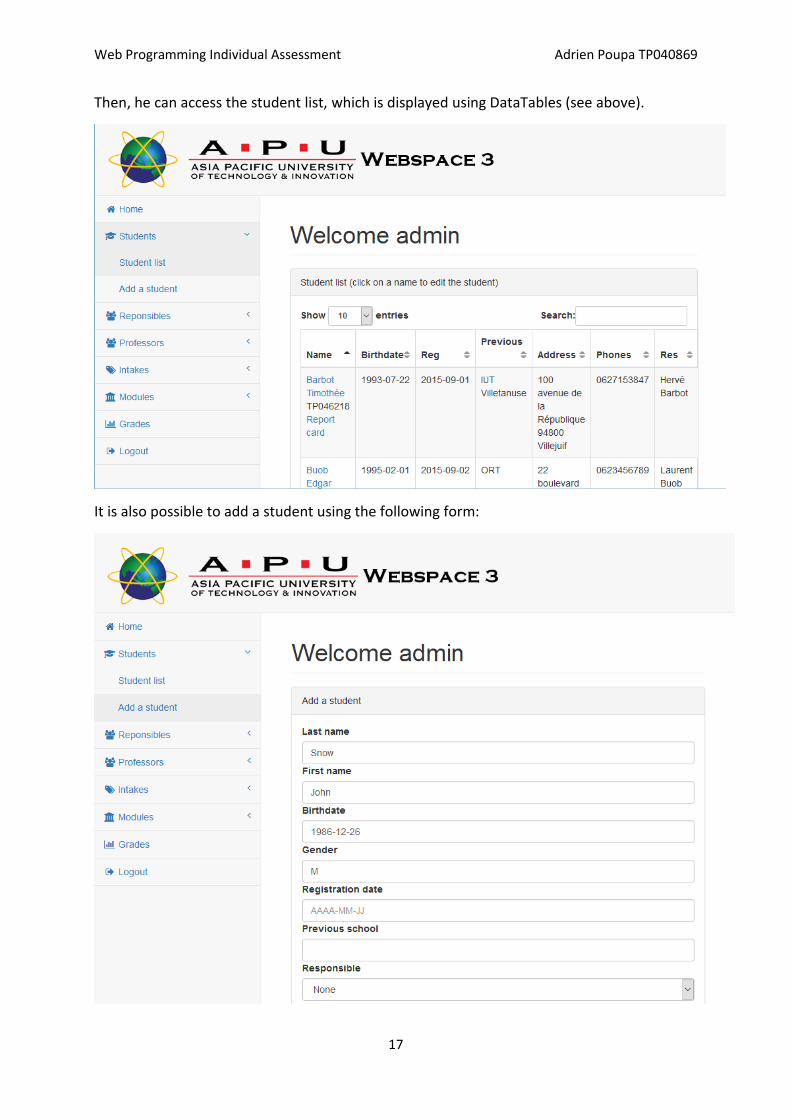
Then, he can access the student list, which is displayed using DataTables (see above).
It is also possible to add a student using the following form:
Web Programming Individual Assessment Adrien Poupa TP040869
18
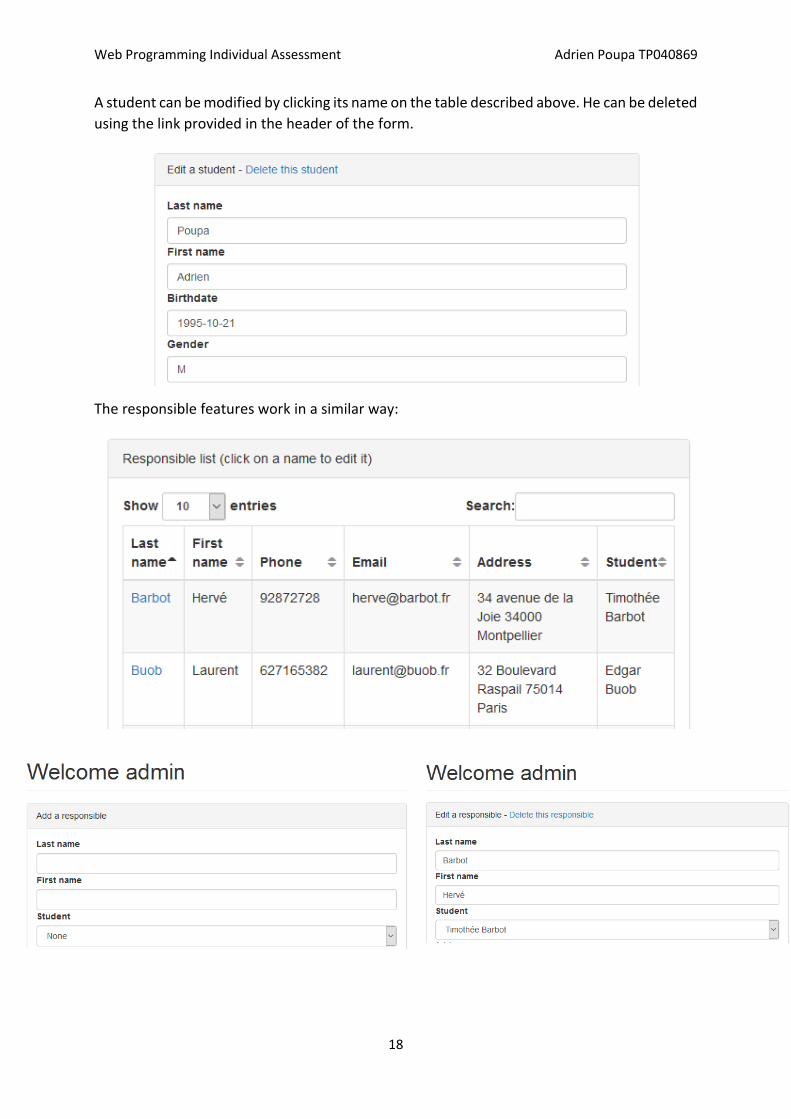
A student can be modified by clicking its name on the table described above. He can be deleted
using the link provided in the header of the form.
The responsible features work in a similar way:

Web Programming Individual Assessment Adrien Poupa TP040869
19
Same goes for the professors.
As all DataTables, the search form works without reloading the page:
Web Programming Individual Assessment Adrien Poupa TP040869
20
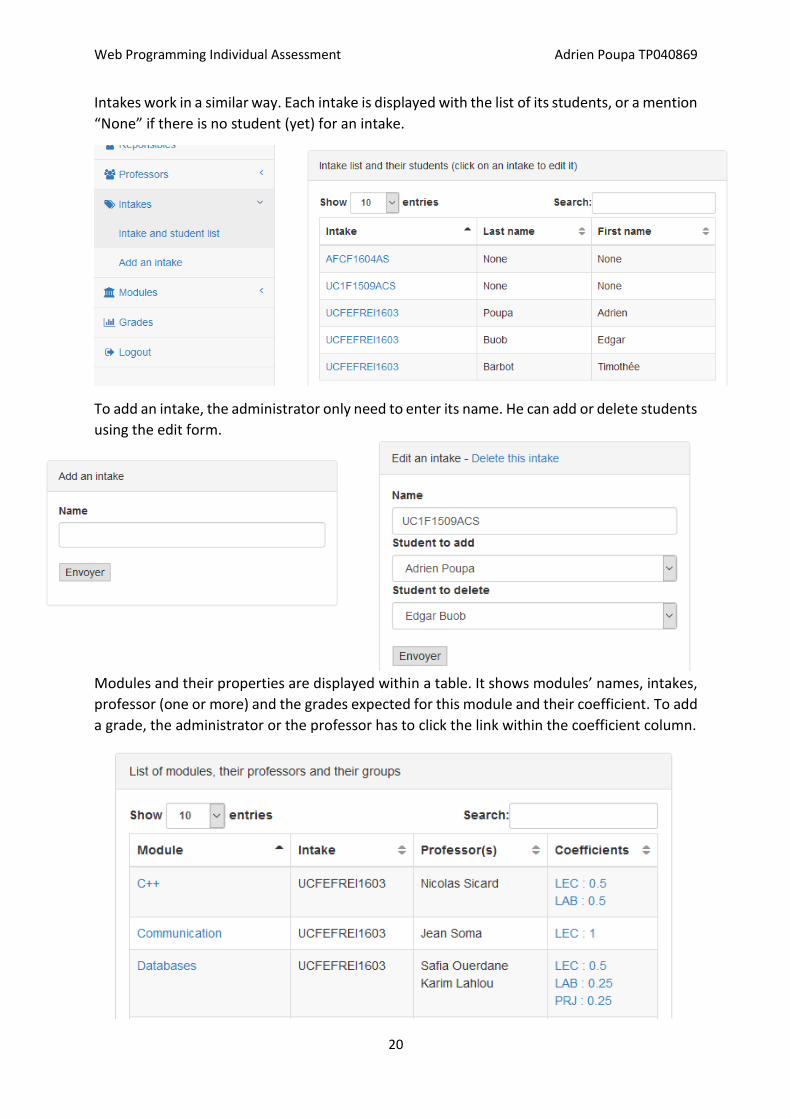
Intakes work in a similar way. Each intake is displayed with the list of its students, or a mention
“None” if there is no student (yet) for an intake.
To add an intake, the administrator only need to enter its name. He can add or delete students
using the edit form.
Modules and their properties are displayed within a table. It shows modules’ names, intakes,
professor (one or more) and the grades expected for this module and their coefficient. To add
a grade, the administrator or the professor has to click the link within the coefficient column.

Web Programming Individual Assessment Adrien Poupa TP040869
21
To add a module, the administrator has to specify its name, its professors and the grades
expected. Each grade must have a coefficient and be one of the following type:
- LEC for lecture
- LAB for work in lab
- PRJ if it is a project
Of course, the sum of all coefficients must be equal to 1. Each module can have up to 5
professors and 5 grades.

Web Programming Individual Assessment Adrien Poupa TP040869
22
All the grades are displayed in a table showing the student, the module and the coefficient of
the grade.
The addition and deletion of a grade is similar to all the other features:
Web Programming Individual Assessment Adrien Poupa TP040869
23
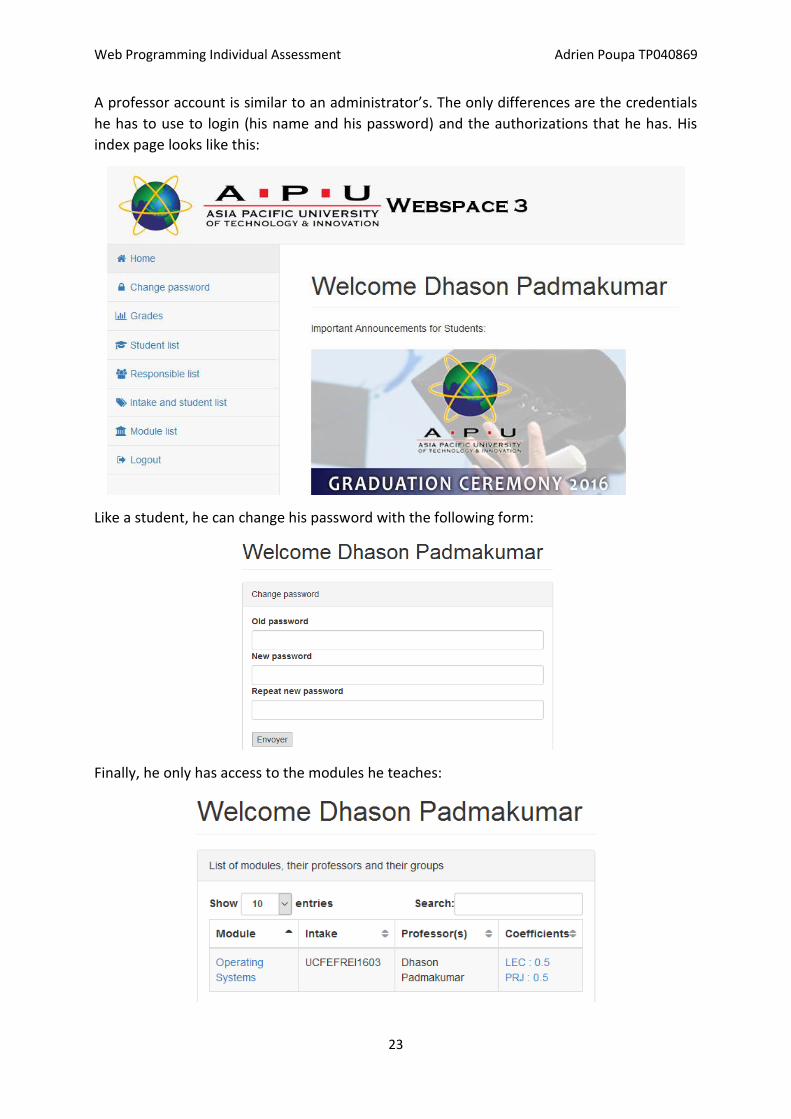
A professor account is similar to an administrator’s. The only differences are the credentials
he has to use to login (his name and his password) and the authorizations that he has. His
index page looks like this:
Like a student, he can change his password with the following form:
Finally, he only has access to the modules he teaches:

Web Programming Individual Assessment Adrien Poupa TP040869
24
A student logins using his TP number and the password provided by the admin – or the
password he changed in the interface. His index page looks like this:
Unlike an administrator or a professor, he has access to his own profile where he can change
his personal information:
Finally, he can review his report card with the grades entered by his professor. A text indicates
if he passed the module or not with the grade letter:

Web Programming Individual Assessment Adrien Poupa TP040869
25
References
Mark Otto, Jacob Thornton, and Bootstrap contributors. 2016. Bootstrap · The world's most
popular mobile-first and responsive front-end framework. [ONLINE] Available at:
http://getbootstrap.com/. [Accessed 16 May 2016].
StartBootstrap. 2016. SB Admin 2 - Free Bootstrap Admin Theme - Start Bootstrap. [ONLINE]
Available at: http://startbootstrap.com/template-overviews/sb-admin-2/. [Accessed 16 May
2016].
Dave Gandy. 2016. Font Awesome, the iconic font and CSS toolkit. [ONLINE] Available at:
http://fontawesome.io/. [Accessed 16 May 2016].
Wikipedia. 2016. Gantt chart - Wikipedia, the free encyclopedia. [ONLINE] Available at:
https://en.wikipedia.org/wiki/Gantt_chart. [Accessed 16 May 2016].
Flowchart Maker & Online Diagram Software. 2016. Flowchart Maker & Online Diagram
Software. [ONLINE] Available at: https://www.draw.io/. [Accessed 16 May 2016].
Website Storyboarding | Examples, How To and Sitemap. 2016. Website Storyboarding |
Examples, How To and Sitemap. [ONLINE] Available at:
http://www.webhostdesignpost.com/website/websitestoryboarding.html. [Accessed 16 May
2016].
Creately Blog | Diagramming Articles and Tips on How to Draw Diagrams. 2016. Flowchart
Guide (Complete Flowchart Tutorial with Examples) Creately Blog | Diagramming Articles and
Tips on How to Draw Diagrams. [ONLINE] Available at:
http://creately.com/blog/diagrams/flowchart-guide-flowchart-tutorial/. [Accessed 16 May
2016].
php - Cookie VS Session - Stack Overflow. 2016. php - Cookie VS Session - Stack Overflow.
[ONLINE] Available at: http://stackoverflow.com/questions/6253633/cookie-vs-session.
[Accessed 16 May 2016].
Code Envato Tuts+. 2016. PDO vs. MySQLi: Which Should You Use?. [ONLINE] Available at:
http://code.tutsplus.com/tutorials/pdo-vs-mysqli-which-should-you-use--net-24059.
[Accessed 16 May 2016].
DataTables | Table plug-in for jQuery. 2016. DataTables | Table plug-in for jQuery. [ONLINE]
Available at: https://datatables.net/. [Accessed 16 May 2016].
Webspace 2. 2016. Webspace 2. [ONLINE] Available at: http://webspace.apiit.edu.my/.
[Accessed 16 May 2016].