adobe premiere pro cc tutorial - syracuse...
TRANSCRIPT

Adobe Premiere Pro CC TutorialCC 2015 - Updated 08.30.2016
A tutorial by Jason Kohlbrenner and Lenny Christopher
This guide is designed to give a basic overview of starting a video editing project and seeing it through to a completed video in a short period of time. It is a companion to the hands-on training you will receive during the week. You can also use it as a refresher when you are home working in Premiere Pro.
There are many things this guide does not cover, so we have included helpful resources at the end.
Editing is fun, and this program allows you to tap into your creativity without bogging you down with technical processes. Whether you are new to video production, or a veteran who has worked with a variety of NLEs, you can have a good time learning and using Premiere Pro.
There is a learning curve to the program, and it’s not without its flaws and quirks, but no video editor available is perfect. If you’re having a problem, don’t assume it is your fault. If you have any questions, don’t hesitate to ask. Video production is all about collaboration.
If you begin by getting organized, with a detailed folder structure on your external hard drive, it will make a big difference in your success all the way through your project.
Editing is like painting a house -- you need to have all the prep and organizational work done before you can start doing the colorful work.
Have fun! Take chances! Think creatively!

The Workflow SummaryStep 1: Organize assets
Step 2: Create a new project
Step 3: Import media
Step 4: Assemble a sequence
Step 5: Craft the audio
Step 6: Add effects, transitions and titles
Step 7: Export / Share completed sequence
Glossary of Video Editing Terminology
This tutorial assumes you are using a Mac. Keystrokes for a PC will be in [brackets].
Helpful Tip: Undoing changes
Command (CMD) + Z [CTL + Z for PC’s] will undo the most recent edit you have made. Continuing to hit CMD + Z will back up through your edits.
Premiere Pro workspace Premiere allows almost endless ways to configure the layout to suit your work style and the type of project you’re working on. For the sake of class consistency, let’s all start with the same setup.
Before you begin, check that you are looking at the default workspace. Choose Window > Workspace > Editing. Then, to reset the Editing workspace, choose Window > Workspace > Reset Current Workspace. Click ‘Yes’ in the confirmation dialog.
� / �2 29

Standard workspace layout
� / �3 29

Step 1: Organize assets
Create project folder and subfolders
1. Create a master project folder and subfolders on your external hard drive, where you will store your assets for the project. Use the following structure:
Main Folder: Project Name_Last Name
Sub Folders: AudioOutputScratch DisksStillsVideo
Here is a sample of how your folder structure should look.
Organize your media
Create a subfolder for each day’s media.
Before copying the media from your card files to your hard drive, under the correct content type folder, make a new folder, naming it according to the date and card number that you are about to copy over (i.e.. 2014-04-07- Card 1).
Note: Never use Slashes (/) when naming files or folders.
� / �4 29
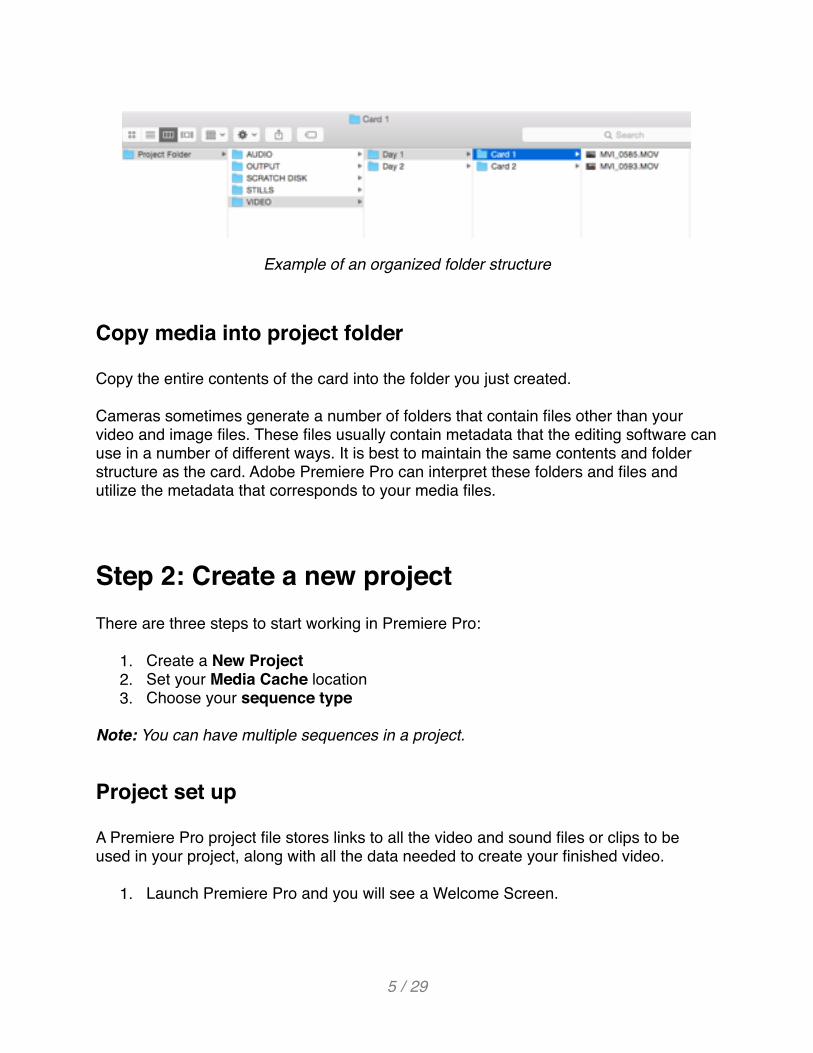
Example of an organized folder structure
Copy media into project folder
Copy the entire contents of the card into the folder you just created.
Cameras sometimes generate a number of folders that contain files other than your video and image files. These files usually contain metadata that the editing software can use in a number of different ways. It is best to maintain the same contents and folder structure as the card. Adobe Premiere Pro can interpret these folders and files and utilize the metadata that corresponds to your media files.
Step 2: Create a new projectThere are three steps to start working in Premiere Pro:
1. Create a New Project2. Set your Media Cache location3. Choose your sequence type
Note: You can have multiple sequences in a project.
Project set up A Premiere Pro project file stores links to all the video and sound files or clips to be used in your project, along with all the data needed to create your finished video.
1. Launch Premiere Pro and you will see a Welcome Screen.
� / �5 29

2. Select ‘New Project,’ or if you have already have begun a project, choose ‘Open existing project.’
3. Choose the location where your project will be stored. This should in be your master Project Folder.
4. Name your project.
5. Set the scratch disks. Choose the SCRATCH DISK folder that you created in your folder structure, and select this for each the settings in the list.
General Settings Panel Scratch Disk Settings Window
If you crash, and if you have organized your files well, you can easily find the Auto-Save file that Premiere cleverly tucks away in a folder for you. This can save you a lot of agony.
Remember to regularly save your project by hitting CMD + S [CTL + S].
Media Cache set up
One of the most overlooked settings are the Media Cache Files and Media Cache Database location. By default, these are set to a location on your computer’s hard drive. The problem with this is that the files that generate in your Media Cache, can generate quickly and take up a lot of space. When you are working on many projects, this can cause your computer’s hard drive to fill up quicker than expected.
� / �6 29

1. On a Mac, under the Premiere Pro CC menu choose Preferences > Media. On a PC, select Edit > Preferences > Media
2. Under Media Cache Files, click Browse… Choose the SCRATCH DISK folder.
3. Under Media Cache Database, click Browse… Choose the SCRATCH DISK folder.
4. A message will pop up asking you what you would like to do with the existing database, choose Move.
5. Click OK to complete the set up.
Make sure to always check these settings after you have opened a project to make sure they are set to the correct project location. If you forget to do this, any cache files will need to be recreated which can take an extended amount of time on long projects.
Sequence set up
In each project file you will have at least one sequence. A sequence is a series of clips that play one after another, with special effects, titles and sound assembled together to create a completed video.
It’s helpful to know the technical specs of the type of video and audio your camera records, because your sequence settings will usually be based on your original source clips. To make it easier for you to choose the right sequence settings, Adobe Premiere Pro presets are named after various camera recording formats. If you know which video
� / �7 29
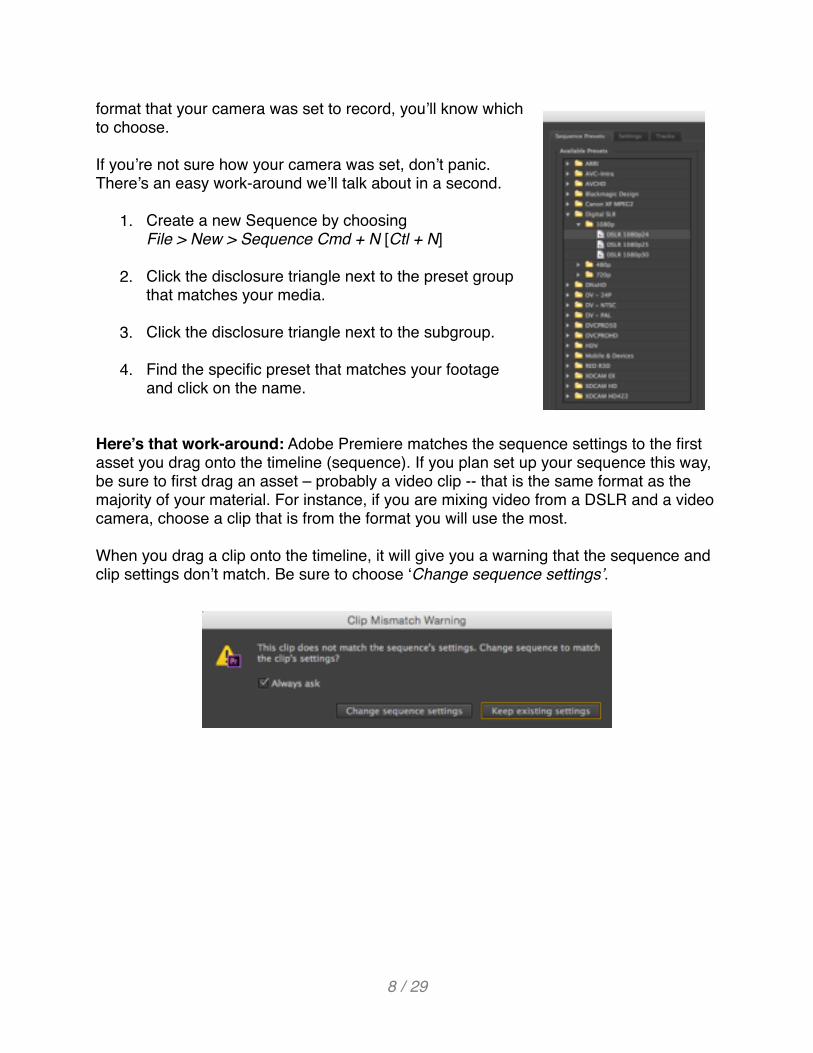
format that your camera was set to record, you’ll know which to choose.
If you’re not sure how your camera was set, don’t panic. There’s an easy work-around we’ll talk about in a second.
1. Create a new Sequence by choosing File > New > Sequence Cmd + N [Ctl + N]
2. Click the disclosure triangle next to the preset group that matches your media.
3. Click the disclosure triangle next to the subgroup.
4. Find the specific preset that matches your footage and click on the name.
Here’s that work-around: Adobe Premiere matches the sequence settings to the first asset you drag onto the timeline (sequence). If you plan set up your sequence this way, be sure to first drag an asset – probably a video clip -- that is the same format as the majority of your material. For instance, if you are mixing video from a DSLR and a video camera, choose a clip that is from the format you will use the most.
When you drag a clip onto the timeline, it will give you a warning that the sequence and clip settings don’t match. Be sure to choose ‘Change sequence settings’.
� / �8 29

Step 3: Import mediaThere are two main ways to import files.
Import using Media Browser
Some files will perform better in Premiere if you import using the Media Browser. The Media Browser in Adobe Premiere Pro allows you to easily browse for files on your computer, then import them – and all their related files -- into Premiere. It can also stay open all the time, giving you an immediate and optimized to locate and import footage.
This is the preferred way to import many camera-formatted files, which often use complex folder structures with separate files for audio and video.
The media browser is like a directory browser, with forward and back buttons for easy navigation.
To import from the Media Browser, simply select a clip and drag it into your project panel.
� / �9 29

Import by choosing File > Import
This is the straightforward version of importing and is very similar to the way other applications import files. The keyboard shortcut for this is Cmd + I [Ctl + I], which opens the standard Import dialog.
Organization
If you spend a few minutes at the start of your project organizing all your assets, it can save you hours later looking for specific clips.
The Project Panel: Anything you import into Premiere will appear in the Project Panel. Along with many tools for browsing your clips and metadata, the Project Panel has folders called bins, which you use to organize everything.
� / �10 29
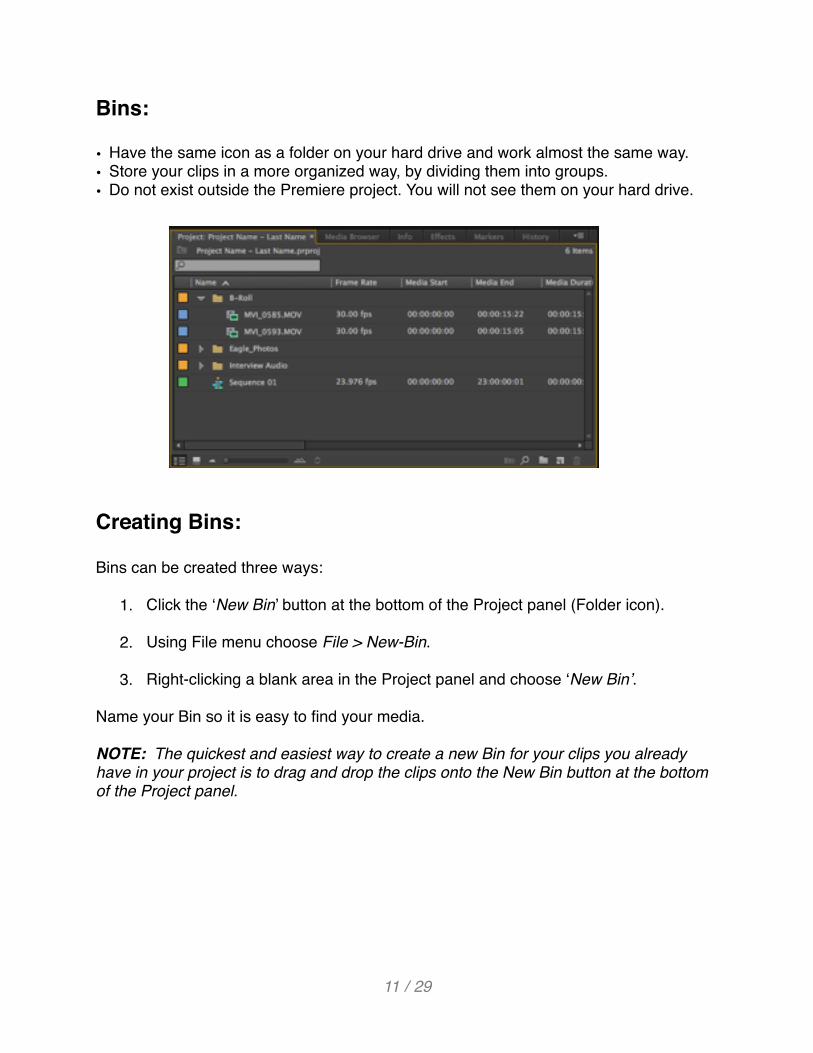
Bins:
• Have the same icon as a folder on your hard drive and work almost the same way. • Store your clips in a more organized way, by dividing them into groups. • Do not exist outside the Premiere project. You will not see them on your hard drive.
Creating Bins: Bins can be created three ways:
1. Click the ‘New Bin’ button at the bottom of the Project panel (Folder icon).
2. Using File menu choose File > New-Bin.
3. Right-clicking a blank area in the Project panel and choose ‘New Bin’.
Name your Bin so it is easy to find your media.
NOTE: The quickest and easiest way to create a new Bin for your clips you already have in your project is to drag and drop the clips onto the New Bin button at the bottom of the Project panel.
� / �11 29

Step 4: Assemble a sequence
Typical workflow to build a story on a sequence
1. Once you have all your media inside your project, you should take time to look through your media and start to structure your story. Take notes. It seems slow, but it will save time and strengthen your story in the long run.
2. Start editing by putting your main storytelling clips on your timeline. This is typically pieces of an interview, or strong natural sound sections. Refine your story structure on the timeline for pacing and length.
3. Add B-roll and other visual elements.
4. Polish it. Set audio levels, add titles and effects.
Understanding tracks
Much in the way that railway tracks keep trains inline, sequences have video and audio tracks that constrain the positions of clips you add to them. The simplest form of a sequence would have just one video track and perhaps one audio track. You add clips to tracks, one after another, from left to right, and they play in the order you position them.
Sequences can have additional video and audio tracks. These become layers of video and additional audio channels. Since the higher video tracks appear in front of lower ones, you can use them to creditably produce layered compositions.
You might use an upper video track to add titles to a sequence or to blend multiple layers of video using special effects.
You might use multiple audio tracks to create a complete audio composition for your sequence, with original source dialogue, music, spot audio effects like gun shots or fireworks, atmospheric sound and voice-over.
� / �12 29

Navigating the timeline
If the project panel is the shelving for your project, then the Timeline panel is the canvas. The Timeline is where you will add clips to your sequences, make editorial changes to them, add visuals and audio special effects, mix soundtracks and add titles and graphics.
Select media to go into your timeline
1. Open clip in the Source Monitor
2. Set In and Out Points
3. Drag into Timeline (or use insert and overwrite buttons)
� / �13 29

Changing in and out points, ripple deletes
You can change the In point or the Out point of a clip in the timeline by using the Selection tool. Place your cursor over either end of a clip until it changes into a red bracket with a double arrow through it. This is your Trim Tool (Trim-in or Trim-out, depending on whether your at the beginning or end of a clip), also known informally as the Red Bracket Tool.
Click and drag in either direction to shorten or lengthen the clip. Right-click in the gap between clips and choose ‘Ripple Delete’ to close any gaps made between clips. All clips to the right of the gap will move left.
Moving the playhead in the timeline
You can drag the playhead to a desired location by clicking and dragging it. Hold down the Shift key while clicking to snap to heads and tails of clips in the timeline. You can also use the Go to Previous/Next Edit Point buttons to place the playhead to the first and last frames of the sequence.
Reordering clips
Once clips are in the timeline, you can use the Selection Tool to click and drag them to a different position in time or to a different track. By default, this is an Overlay edit: if you move a clip forward in time it will write over the existing clip for the duration of the clip you are moving. You can use an Insert edit by holding down the Command [CTL] key. When you drag the clip to a different time, it will push other clips back to its tail end and not write over any part of the previous clip. Experiment to see the difference in moving clips with and without the Command key modifier.
Unlinking and relinking clips
To unlink audio and video clips from each other completely, right click on the clip, and select Unlink. You can now manipulate audio and video separately.
To relink the audio and video portions of the clip, hold the SHIFT key, click each portion, right click and choose Link.
� / �14 29

Snapping
The small magnet icon on the top left of your timeline turns Snapping on and off. With Snapping on, your clips will "snap" into place next to each other. With Snapping off, you can leave small gaps between your clips. Most of the time, you'll want to leave snapping on.
Adding additional video or audio tracks
If you need more tracks to layer additional audio or video clips in the Timeline, go to Sequence > Add Tracks…
The type into the boxes the number of additional audio or video tracks you want.
Lock tracks To lock a track and prevent files from being added or moved, click the blank spot next to the word "Video" or "Audio" on your track, and a lock will appear. Diagonal lines will run across the locked track.
Solo tracks
You can choose which audio channels you hear, very useful when editing multiple tracks to isolate interviews, ambient sounds or music.
Mute tracks To hide a video track, click the eye icon. To mute an audio track, click the speaker icon.
� / �15 29

Tools Each icon in this panel represents a tool that performs a specific function, typically a type of edit in a sequence. When you select a tool, the pointer changes shape according to the selection. Understanding the shortcuts to these tools will save time editing.
• Selection Tool: This is the default Timeline tool and your main tool, shortcut V.
• Track Select Tool: If you want to select every clip on a track, keyboard shortcut A.
• Ripple Edit: Adjust an edit point and move other clips in the timeline to compensate, shortcut B.
• Rolling Edit Tool: Adjust an edit point between two clips without affecting the rest of the timeline, keyboard shortcut N.
• Rate Stretch Tool: Change the duration of a clip while simultaneously changing the speed to compensate, shortcut X.
• Razor Tool: Cut a clip (or multiple clips) into two clips, shortcut C. You can also use CMD K [CTL K] to razor cut at the playhead.
• Slip Tool: Move a clip’s in and out points by the same amount simultaneously, so the rest of the timeline is not affected, shortcut Y.
� / �16 29
• Slide Tool: Move a clip back and forth in the timeline, while simultaneously adjusting adjacent clips to compensate, shortcut U.
• Pen Tool: Create control (anchor points), shortcut P.
• Hand Tool: Drag the timeline view left and right, shortcut H.
• Zoom Tool: Click in the timeline to magnify the view, or drag and select a rectangular area to zoom into, keyboard shortcut Z.
Step 5: Finesse the audioAudio can make or break your project. Clear sound will keep the viewer engaged. Low audio levels, fluctuations, pops or extraneous noises can be distracting, causing the viewer to lose focus interest in the story.
First, make sure you can see both waveforms and your levels control. Click on the wrench icon on the timeline and a dropdown menu will pop up.
Make sure both “Show Audio Waveform” and “Show Audio Keyframes” are selected.
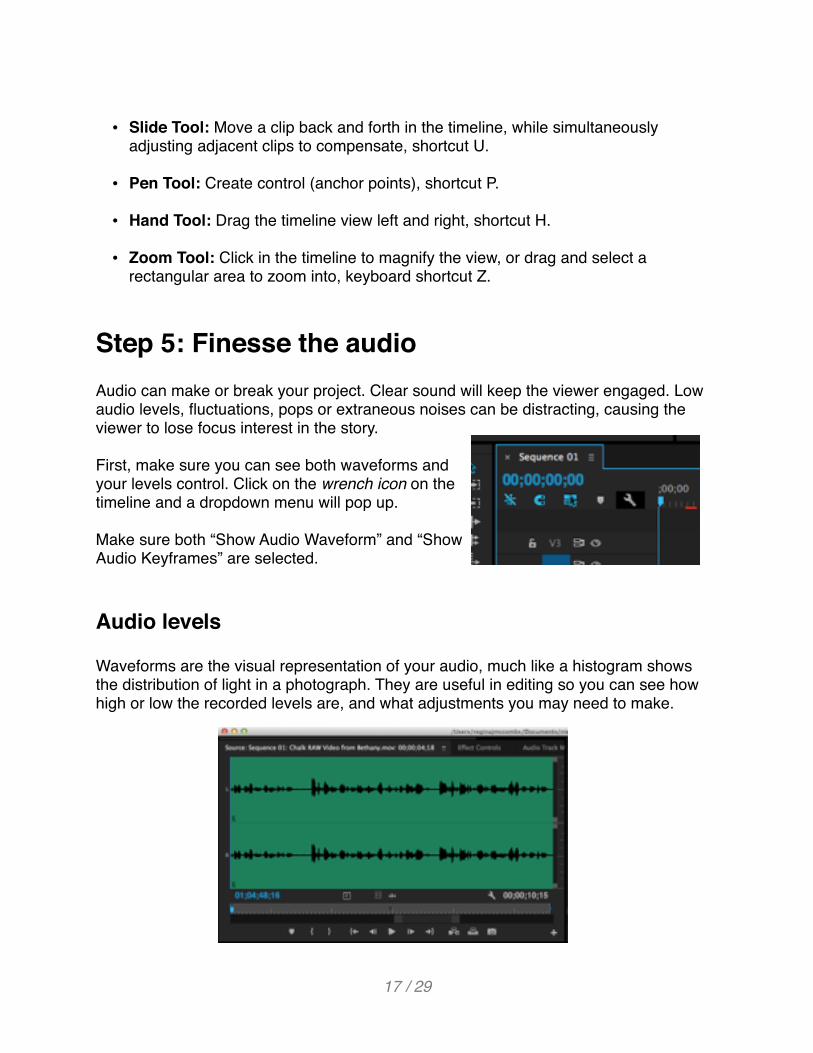
Audio levels
Waveforms are the visual representation of your audio, much like a histogram shows the distribution of light in a photograph. They are useful in editing so you can see how high or low the recorded levels are, and what adjustments you may need to make.
� / �17 29

Audio meters are another representation of levels, measured in decibels (dB). Audio peaks at 0 dB. You never want to see red at the top of your meter, which is 0db. The ideal levels bounce between -6 and -12.
Adjusting audio volume
When you change the volume in Premiere Pro, it is nondestructive -- that is, nothing is changed in your original media file. As with everything in PP, there are at least three ways to do what you want to do. For the sake of clarity, we’ll just talk about one, but as you learn more, you may find other ways that work better for your style of editing.
Adjust audio levels in a sequence
Use the rubber-band controls to change the volume of each clip in a sequence. This changes the volume of the entire clip. As you drag the level up and down, you will see the amount of the change in decibels.
Add keyframes
For precise audio editing, such as creating fades and crescendos in your tracks, you create keyframes in your audio clip using the Pen Tool.
Select the Pen Tool by clicking on the icon looks like the tip of an ink pen on the Tool Palette (or press the P key on your keyboard). Your cursor will change to a pen-like icon when you move it over the horizontal grey audio level line.
You create keyframes by clicking the horizontal audio level line at the points where you want the audio to begin to change. Then move the Pen Tool over a keyframe, click, hold down your mouse button and drag the keyframe point higher to increase the audio, or drag it lower to decrease the audio at that point. Notice that the line will slope up or down to the other keyframes you've created with your Pen Tool, so the audio will fade in or out between the keyframes.
� / �18 29
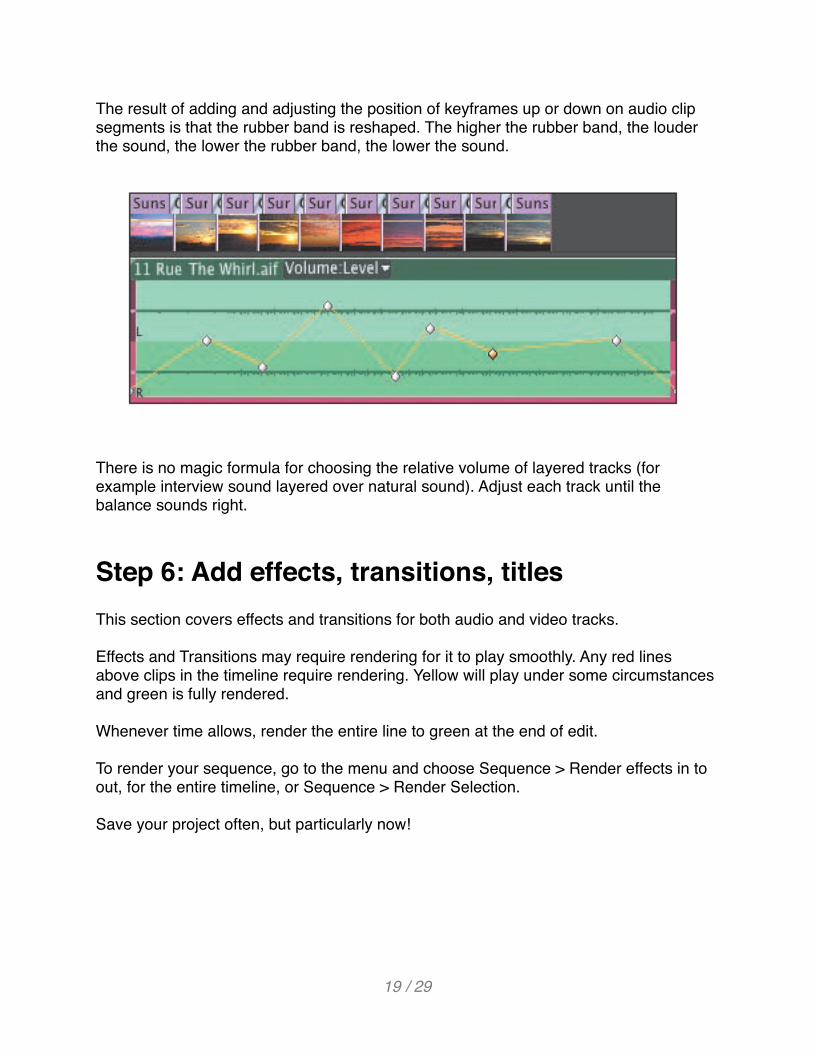
The result of adding and adjusting the position of keyframes up or down on audio clip segments is that the rubber band is reshaped. The higher the rubber band, the louder the sound, the lower the rubber band, the lower the sound.
There is no magic formula for choosing the relative volume of layered tracks (for example interview sound layered over natural sound). Adjust each track until the balance sounds right.
Step 6: Add effects, transitions, titles This section covers effects and transitions for both audio and video tracks.
Effects and Transitions may require rendering for it to play smoothly. Any red lines above clips in the timeline require rendering. Yellow will play under some circumstances and green is fully rendered.
Whenever time allows, render the entire line to green at the end of edit.
To render your sequence, go to the menu and choose Sequence > Render effects in to out, for the entire timeline, or Sequence > Render Selection.
Save your project often, but particularly now!
� / �19 29
The Effects Browser
Adobe Premiere Pro features more than 100 video effects. Most effects come with an array of parameters, all of which you can animate -- have them change over time -- by using precise keyframe controls.
Video effects can be used for many purposes. Often, effects can solve problems with image quality (such as exposure or color balance). They can also be used (carefully) for stylistic purposes, such as animating the size and position of a clip within the frame.
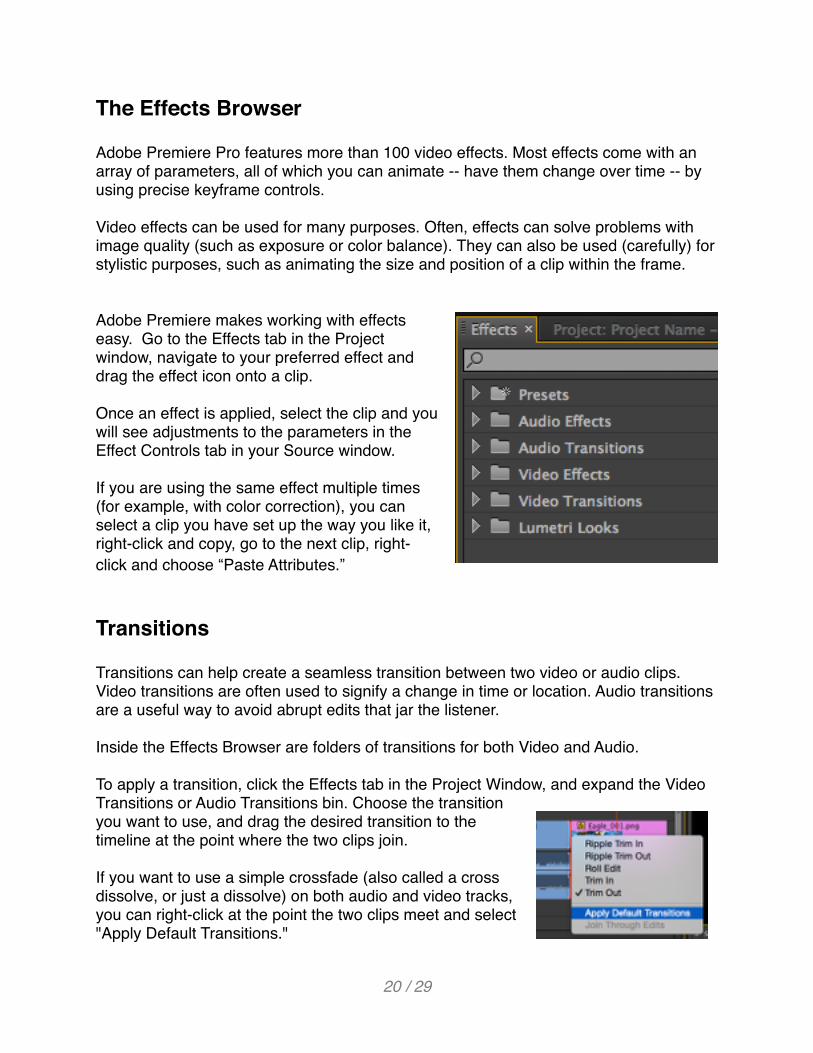
Adobe Premiere makes working with effects easy. Go to the Effects tab in the Project window, navigate to your preferred effect and drag the effect icon onto a clip.
Once an effect is applied, select the clip and you will see adjustments to the parameters in the Effect Controls tab in your Source window.
If you are using the same effect multiple times (for example, with color correction), you can select a clip you have set up the way you like it, right-click and copy, go to the next clip, right-click and choose “Paste Attributes.”
Transitions
Transitions can help create a seamless transition between two video or audio clips. Video transitions are often used to signify a change in time or location. Audio transitions are a useful way to avoid abrupt edits that jar the listener.
Inside the Effects Browser are folders of transitions for both Video and Audio.
To apply a transition, click the Effects tab in the Project Window, and expand the Video Transitions or Audio Transitions bin. Choose the transition you want to use, and drag the desired transition to the timeline at the point where the two clips join.
If you want to use a simple crossfade (also called a cross dissolve, or just a dissolve) on both audio and video tracks, you can right-click at the point the two clips meet and select "Apply Default Transitions."
� / �20 29

Audio transitions The use of audio transitions can improve a sequence’s soundtrack by removing unwanted audio pops or abrupt edits. The use of a crossfade transition at the end of (or between) audio clips is a fast way to fade-in, fade-out, or fade between your audio clips.
Generally, you will use the Constant Power crossfade.
Apply audio transitions
Just as with video, you simply drag and drop a transition where two clips join.
You can also use the Default Transition, which is a crossfade, by right-clicking at the point where the two clips meet and select the “Apply Default Transition.” NOTE: If your audio and video are linked, you will also get a dissolve on the video track, so you may find it easier to drag the audio transition into place.
Adding Titles
Text is very effective when you need to convey information quickly to your audience. For example, you can identify a speaker by superimposing their name and title during the interview; often called a lower-third. You can also use text to identify sections of a long video (often called bumpers) or to acknowledge the last and crew with credits.
In Premiere the Titler panel will appear in upper left corner of the screen. The center section is transparent and will display the video on the timeline under the scrubber. Just move the scrubber over the relevant video and you can easily locate type where it is most legible. Type must be large enough to be readable in the player or on a mobile device. Don’t assume every viewer is going to watch it full screen on a desktop monitor.
Since the stories you will be producing will have strong visuals, it is important to think of type as being supplementary. Text has to be on screen long enough for people to read it, but shouldn’t be so jarring or garish that it disrupts the visual flow of the piece.
The rule of thumb for type is that it has to be on screen long enough for a person familiar with the text to be able to quickly read it out loud twice. Shorter than that is frustrating to slow readers, longer is boring and obtrusive.
The Titler panel has two box outlines. These designate areas that are “title safe.” That means that a person watching a full screen video on a television is assured of seeing
� / �21 29

everything inside the title safe box. You can ignore the title safe areas if viewers are only going to see your video in a player on a web page. If there is a full screen option, viewing gets trickier. Most laptops and mobile devices will display all of the video. Less expensive desktop monitors and television monitors tend to encroach a bit on the image. The safest thing to do is to use the larger title safe box as a guide and ensure your type will be visible on almost any device.
Title panel
• Title Tools panel: These tools define text boundaries, set text paths, and select geometric shapes.
• Title Designer panel: This is where you build and view text and graphics.
• Title Properties panel: Here you’ll find text and graphic options such as font characteristics and effects.
• Title Styles panel: Here you’ll find preset styles. You can choose from several libraries of styles.
Creating titles
� / �22 29

When you create a title, you will need to make some choices as to how the text is organized on the screen.
1. Start by opening doing one of the following:
A. Choose File > New > Title> Default Still
B. Choose Title > New Title>Default Still
C. In the Project panel, press the ‘New Item button’, and choose ‘Title’.
2. Specify a name for the title and click OK.
3. Use the text and shape tool to create a file or to customize a template
4. Close the Titler or save project to save the title.
Note: Titles are added to the Project panel automatically and are saved as part of the project file. They behave like video files on the timeline, with a transparent background and vector type. They should be placed at the top of the video stack where they are to appear on the timeline.
Note: Unless there is a strong artistic reason to use rolling or crawling titles, still titles are preferred for video produced for use on the Web. The compression used to optimize video for the Web will make rolling or crawling titles stutter, appear blurry or both. The preview you get viewing the video in Premiere is not indicative of what the moving type will look like online.
Lower thirds
Lower thirds are a type of text used for identifying a person on screen. The type is generally located in the bottom third of the video image (hence the name) and includes two lines of type. The first line is the person’s full name. The second line contains a descriptive element that lets the viewer know something important about that person. The first (name) line is larger (start at 72 point on a 1920x1080 HD template), the second line smaller type that is bold-faced to give it more readability (start at 36 pt. bold on a 1920x1080 template). This creates hierarchy so the viewer can quickly read the information without being overly distracted from the visual on screen. Here is an example using a standard typeface like, Myriad Pro Condensed:
� / �23 29

Mortimer SnerdVideo journalist
Opening title and credits
Use the same typeface that was used for the lower thirds, Myriad Pro Condensed. Use a type size that is large enough to be read in a player or on a mobile device. 72 point type is a good place to start. Try not to use type smaller than 36 point in a 1920x1080 HD frame.
Step 7: Exporting a project Whether you have just finished your project or are exporting a cut for review, we will need to get the project out of Adobe Premiere Pro. To do this we will be using the Share menu to create two versions of your story: a Master copy and a compressed version for viewing on the web, mobile devices and personal computers.
The first step is to make sure you know the frame rate you used to shoot the video. If you shot 23.97/24 fps and are working in a 23.97/24 fps timeline, then export at that frame rate. If you shot at 29.97/30 fps (NTSC) then export at that frame rate. If you shot at 25 fps (PAL) then convert to 29.97 seconds on export. Changing frame rates significantly lengthens export time.
� / �24 29
Creating a Master File (H.264)
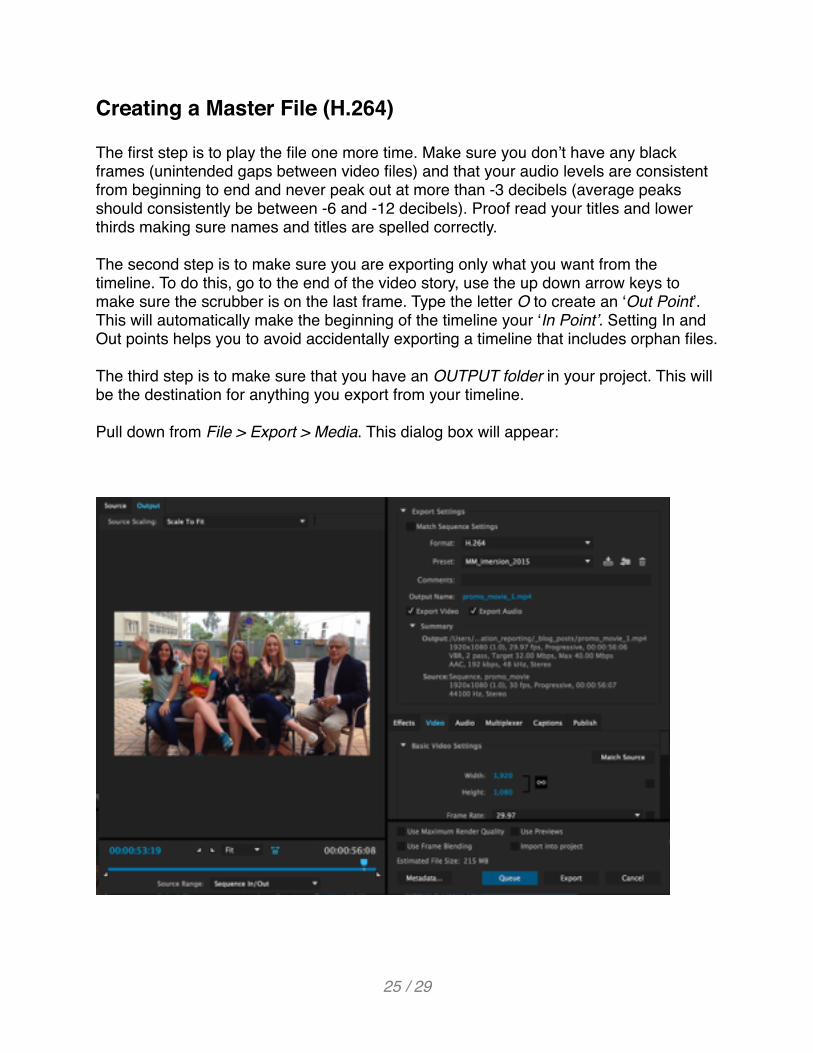
The first step is to play the file one more time. Make sure you don’t have any black frames (unintended gaps between video files) and that your audio levels are consistent from beginning to end and never peak out at more than -3 decibels (average peaks should consistently be between -6 and -12 decibels). Proof read your titles and lower thirds making sure names and titles are spelled correctly.
The second step is to make sure you are exporting only what you want from the timeline. To do this, go to the end of the video story, use the up down arrow keys to make sure the scrubber is on the last frame. Type the letter O to create an ‘Out Point’. This will automatically make the beginning of the timeline your ‘In Point’. Setting In and Out points helps you to avoid accidentally exporting a timeline that includes orphan files.
The third step is to make sure that you have an OUTPUT folder in your project. This will be the destination for anything you export from your timeline.
Pull down from File > Export > Media. This dialog box will appear:
�
� / �25 29

Export Settings
1. Export Settings Panel (Right Side)
Format: H.264Preset: Match Source - High bitrate Output Name: YourLastName_StoryName_Master
Remember to navigate to the OUTPUT folder in your project folder
2. Video Tab (Right Side)
Frame Rate: Set this to match your sequence settings
3. Output Tab (Left Side)
On the left side under the video display choose the drop-down ‘Sequence In/Out’. You can use the scrubber to make sure your video starts and stops where you expect it to.
4. Click Export
Exporting the Vimeo (or Youtube) file:
Format: H.264Preset: Vimeo 720p HD (or Youtube 720p HD)Output Name: YourLastName_StoryName_Vimeo
Remember to navigate to the OUTPUT folder in your project folder
5. Video Tab (Right Side)
Frame Rate: Set this to match your sequence settings
6. Output Tab (Left Side)
On the left side under the video display choose the drop-down ‘Sequence In/Out’. You can use the scrubber to make sure your video starts and stops where you expect it to.
7. Click Export
� / �26 29
Using shortcuts
Using keyboard shortcuts will greatly speed up your editing. You'll find a list of the most common shortcuts throughout this tutorial.
If you are a FinalCut Pro or Avid user, it's easy to change the Premiere Pro shortcuts to the system you're used to by going to Premiere Pro > Keyboard Shortcuts and choosing your former editing system from the drop down menu at the top.
� / �27 29

Video editing terminology The following list of video editing terms will help you become familiar with some of the basic concepts in video editing to help you get started with your video project.
Bins: Folders within your project used for organizing media.
Clip: A media file containing audio, video, graphics or photographs.
DV: Digital video, typically defined as 720 x 480 pixels. The frame shape is usually 4 x 3. If you see DV (anamorphic), the frame shape is 16 x 9.
Frames: the series of still images that make up video. Video consists of a series of still frames that generate the illusion of motion. We talk about video in "frames per second," typically 24 or 30 (29.97) in the US.
HDV: High-definition digital video. Typically 1920 x 1080. Larger frame and file size than DV. The frame shape is 16 x 9.
In/Out points: Marks at the beginning and end of media that will be used in a sequence; they specify the exact frames to be moved to the Timeline. These can be set in the Monitor.
Keyframe: a point set to indicate a change point in the audio or an effect. A series of keyframes is used to create a change -- for instance, a fading up of audio, or motion on a photograph You can add and edit keyframes for effects using the Clip menu or on the timeline itself.
NTSC: A video standard for the US, Mexico, and many other countries. NTSC isn’t compatible with PAL, a format that’s used in Europe. NTSC is technically 29.97 frames per second, but may also be listed at 30 fps. The newest cameras, including DSLRs, may shoot 29.97 or 30 fps. Be sure you know what rate your material is recorded at.
Project: A Premiere file that stores references to all of your media clips and information about how you arranged and edited the clips. Everything used in your project will be accessible and organized in the Project Window. The file extension is .prproj.
Sub clip: a portion of a clip defined by In and Out points.
Target track: the media track you want to edit. Select your target track by single clicking it in the Timeline.
� / �28 29

Timecode: time display that allows you find specific frames and navigate easily within video clips. The standard timecode is {Hours: Minutes: Seconds; Frames}. In NTSC (standard) format, 30 frames/second. You may also see NTSC described at 29.97 frames/second. Be sure you know how your recorder handles frames. This is different in Europe and Asia than North and South America.
Timeline: the window where you visually lay out and set the order and duration of your media clips.
Transition: an effect used between two clips. The most common transition is a cross dissolve.
More resources for learning Premiere Pro:
Adobe's Web site is a treasure trove of video and text tutorials: helpx.adobe.com/premiere-pro/
Lynda.com, online step-by-step training. You can buy it on a month-to-month basis or an annual subscription.
YouTube: Google your problem, and odds are that someone has created a tutorial on how to fix it.
The book Adobe Premiere Pro CC-Classroom in a book from Adobe Systems, was referenced regularly while creating this guide.
Thanks to:
� / �29 29
jason kohlbrenneremail: [email protected]: @thisbluehippo
Software trainer and video editorSyracuse UniversityS.I. Newhouse School of Public Communications
Lenny Christopher email: [email protected]: @LennyCPhoto
Freelance photo/video productions
Curt Chandleremail: [email protected]: @webcurtpsu
Senior Lecturer/MultimediaPenn State University