adobe photoshop 7(2)
DESCRIPTION
Filters, Quick Review Software : Photoshop 6.0 Level : Beginner Amount : 10 Blur Method : Spin Quality : Good No. of Levels : 8 Edge Simplicity : 1 Edge Fidelity : 2 Filters > Blur > Radial blur Filters > Artistic > Cut Out Amount : 16% Distribution : Uniform Monochromatic Direction Balance : 50 Stroke Length : 3 Sharpness : 3 Amount : 100% Size : Medium Filters > Brush Strokes > Angled Strokes Filters > Noise > Add Noise Filters > Distort > RippleTRANSCRIPT
ADOBE PHOTOSHOP 7.0 HELPFilters, Quick ReviewSoftware : Photoshop 6.0Level : Beginner
FiltersIt adds spice to Photoshop. It can fulfill the need of beginner as well as professionals. The first time user of Photoshop can just open an image and apply filters with single click. Professional will be more serious and can create wonders out of it. Let us see the art, science and philosophy behind the filters. Before we proceed further it is necessary to mention that we are going to observe the features of the filters provided by Photoshop only. Third party filters is another vast subject need separate attention.
So, what is filter?Filters are the ready-made effects grouped under filter menu of Photoshop can be applied with single clicked either on the entire image or a selection. Photoshop 6.0 come up with rich variety of filters starting from artistic to digimark. In general filters are used to add special effects to image. It can be used for photo retouching. It is used to create realistic textures, stunning text effects. It can entirely change the environment of an image. Generally filters come up with the dialog box, which consist of small preview window and preview check box. Preview window will show the immediate effect of the filter on the image without actually applying on it. With the help of preview check box it can be seen applied on the original image also. Preview window provides another good facility. It pans an image so that you can see any part of the image and judge the effect of the filter on that particular part. Let us check out some main filters.
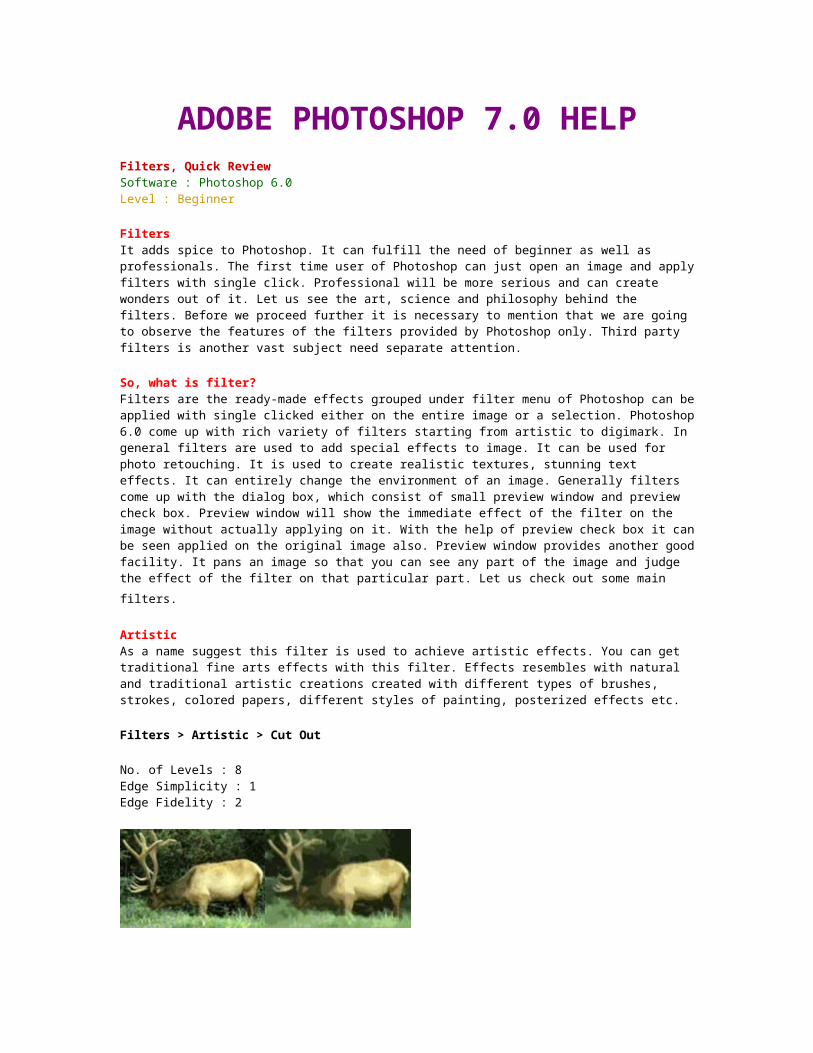
ArtisticAs a name suggest this filter is used to achieve artistic effects. You can get traditional fine arts effects with this filter. Effects resembles with natural and traditional artistic creations created with different types of brushes, strokes, colored papers, different styles of painting, posterized effects etc.
Filters > Artistic > Cut Out
No. of Levels : 8Edge Simplicity : 1Edge Fidelity : 2
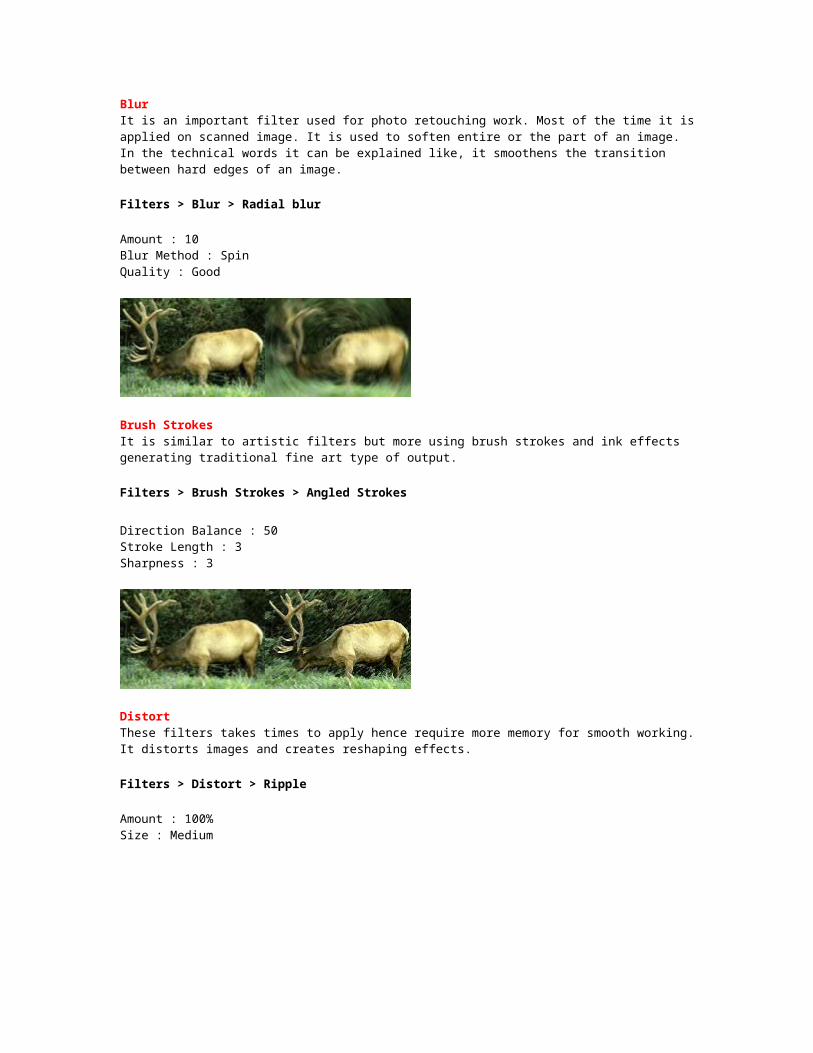
BlurIt is an important filter used for photo retouching work. Most of the time it is applied on scanned image. It is used to soften entire or the part of an image. In the technical words it can be explained like, it smoothens the transition between hard edges of an image.
Filters > Blur > Radial blur
Amount : 10Blur Method : SpinQuality : Good
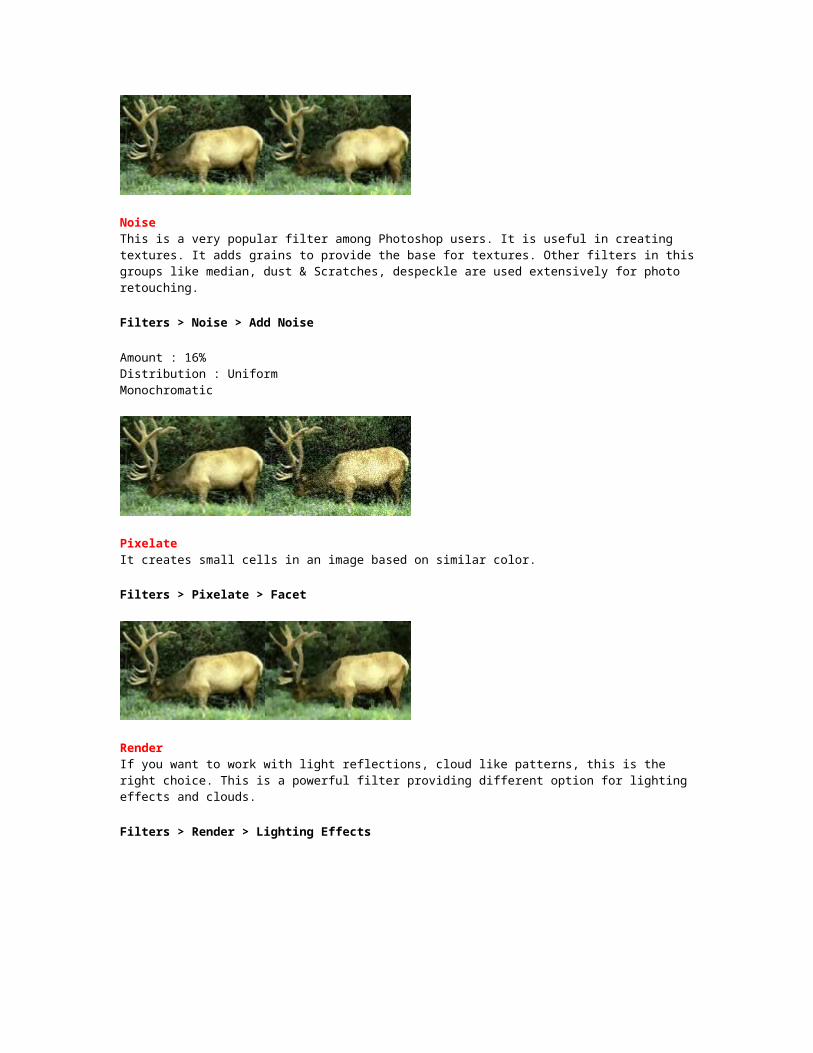
Brush StrokesIt is similar to artistic filters but more using brush strokes and ink effects generating traditional fine art type of output.
Filters > Brush Strokes > Angled Strokes
Direction Balance : 50Stroke Length : 3Sharpness : 3
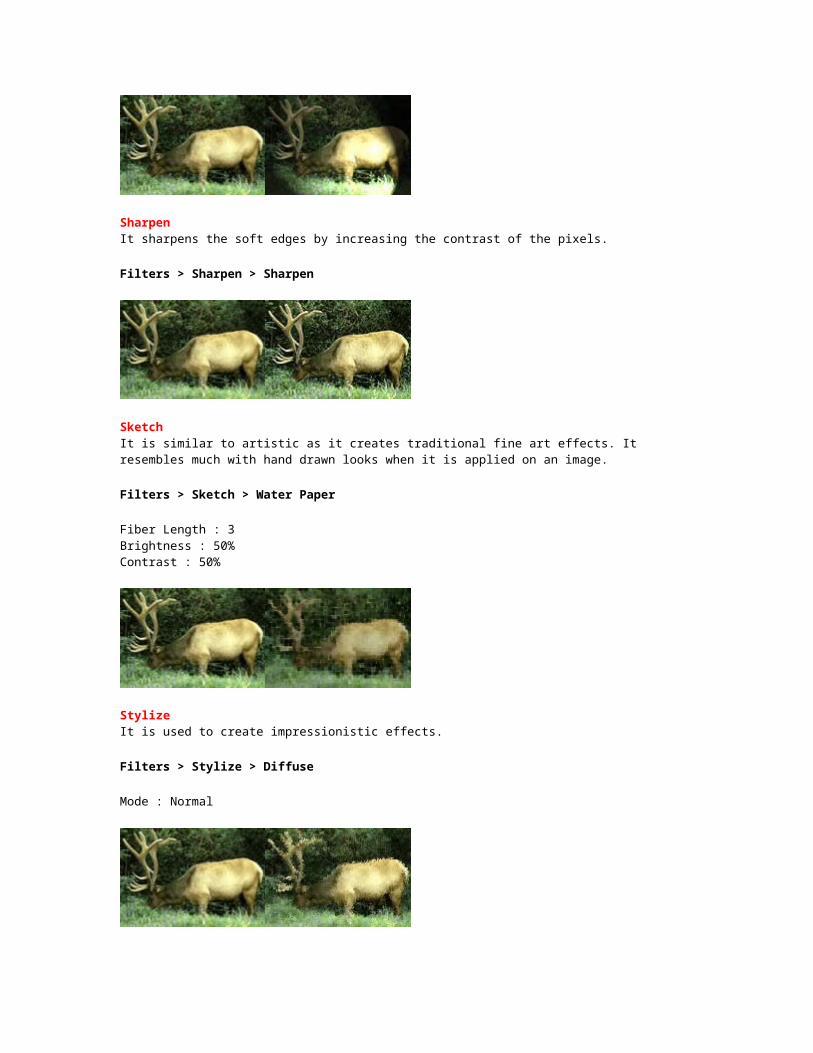
DistortThese filters takes times to apply hence require more memory for smooth working. It distorts images and creates reshaping effects.
Filters > Distort > Ripple
Amount : 100%Size : Medium
NoiseThis is a very popular filter among Photoshop users. It is useful in creating textures. It adds grains to provide the base for textures. Other filters in this groups like median, dust & Scratches, despeckle are used extensively for photo retouching.
Filters > Noise > Add Noise
Amount : 16%Distribution : UniformMonochromatic
PixelateIt creates small cells in an image based on similar color.
Filters > Pixelate > Facet
RenderIf you want to work with light reflections, cloud like patterns, this is the right choice. This is a powerful filter providing different option for lighting effects and clouds.
Filters > Render > Lighting Effects
SharpenIt sharpens the soft edges by increasing the contrast of the pixels.
Filters > Sharpen > Sharpen
SketchIt is similar to artistic as it creates traditional fine art effects. It resembles much with hand drawn looks when it is applied on an image.
Filters > Sketch > Water Paper
Fiber Length : 3Brightness : 50%Contrast : 50%
StylizeIt is used to create impressionistic effects.
Filters > Stylize > Diffuse
Mode : Normal
TextureIt is used to create textures. It gives realistic look like sand, paper etc. to an image.
Filters > Texture > Texturizer
Texture : SandstoneScaling : 100%Relief : 4Light Direction : Top
VideoIt is used to smoothen the images captured on videos.
OtherThis is used to create your own filters
DigimarkIt is used to add digital watermark to an image which is essential for copyright information
Using Liquify FilterSoftware : Photoshop 7.0 Level : Intermediate
1. Open Photoshop. Open an image to apply Liquify filter.

2. Filter > Liquify
3. This will open the Liquify dialogue box.
4. By default, the Warp Tool is selected if not, select the following Warp Tool at the top left of the dialogue box.
5. Input 25 for brush size and 70 for brush pressure
6. Place the cursor on the Toe of the left shoe and drag it slightly towards right.
7. Place the cursor on the Toe of the right shoe and drag it slightly towards left.
8. Click OK and save the image.

Using Pattern MakerSoftware : Photoshop 7.0 Level : Intermediate
1. Open Photoshop. You need to open an image from which you will be creating pattern.
2. Filter > Pattern Maker
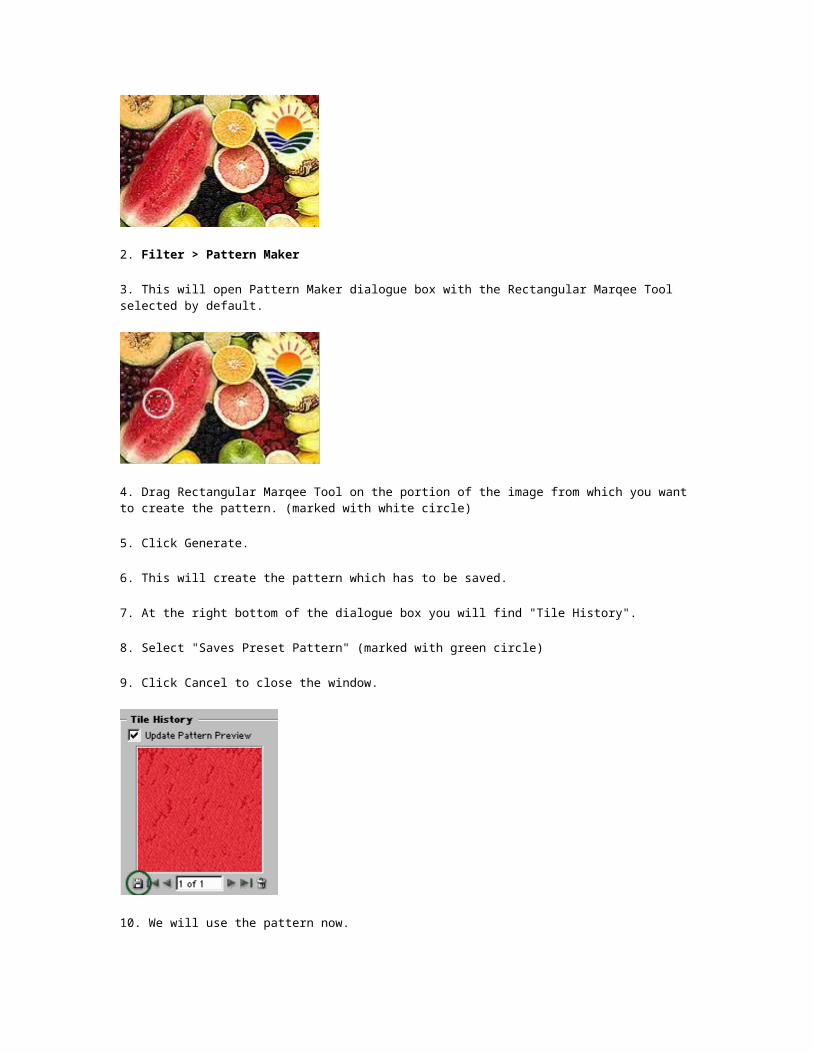
3. This will open Pattern Maker dialogue box with the Rectangular Marqee Tool selected by default.
4. Drag Rectangular Marqee Tool on the portion of the image from which you want to create the pattern. (marked with white circle)
5. Click Generate.
6. This will create the pattern which has to be saved.
7. At the right bottom of the dialogue box you will find "Tile History".
8. Select "Saves Preset Pattern" (marked with green circle)
9. Click Cancel to close the window.
10. We will use the pattern now.
File > New
Go for any size of the file with RGB mode on.
11. Edit > Fill > Use (Pattern)
Open newly created pattern from the custom pattern flyout menu. Click OK.
This will fill canvas with the pattern.
Examples of patterns created from the above image using Pattern Maker
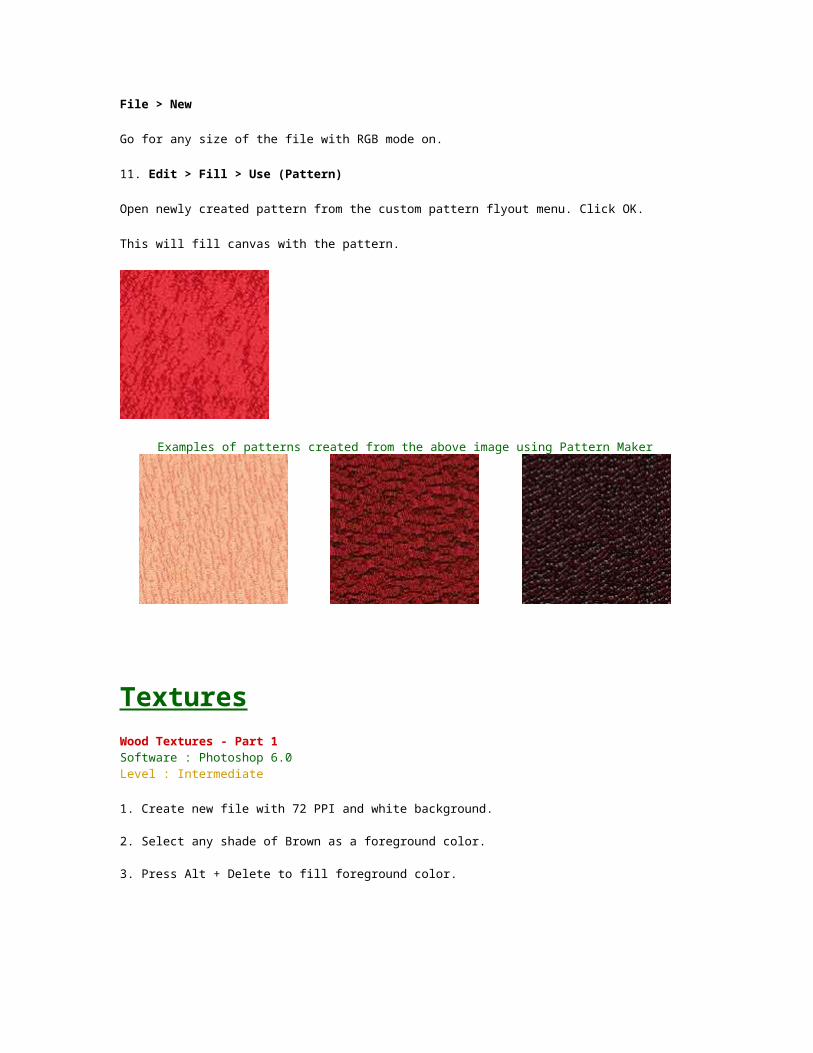
TexturesWood Textures - Part 1Software : Photoshop 6.0Level : Intermediate
1. Create new file with 72 PPI and white background.
2. Select any shade of Brown as a foreground color.
3. Press Alt + Delete to fill foreground color.
4. Filter > Add Noise (Uniform, Monochromatic, 27)
5. Filter > Motion Blur (angle 0, distance 450 or experiment with more)
Wood Textures - Part 2Software : Photoshop 6.0Level : Intermediate
1. Make it more effective and real
2. Open the Wood Texture with motion Blur
3. Select Ellipse tool and draw small horizontal ellipse somewhere in the middle.
4. Filter > Distort > Twirl (Angle 150)
5. Press Ctrl +D to deselect
Wood Textures - Part 3Software : Photoshop 6.0Level : Intermediate
1. Create new file with 72 PPI and white background.
2. Select any shade of Brown as a foreground color.
3. Press Alt + Delete to fill foreground color.
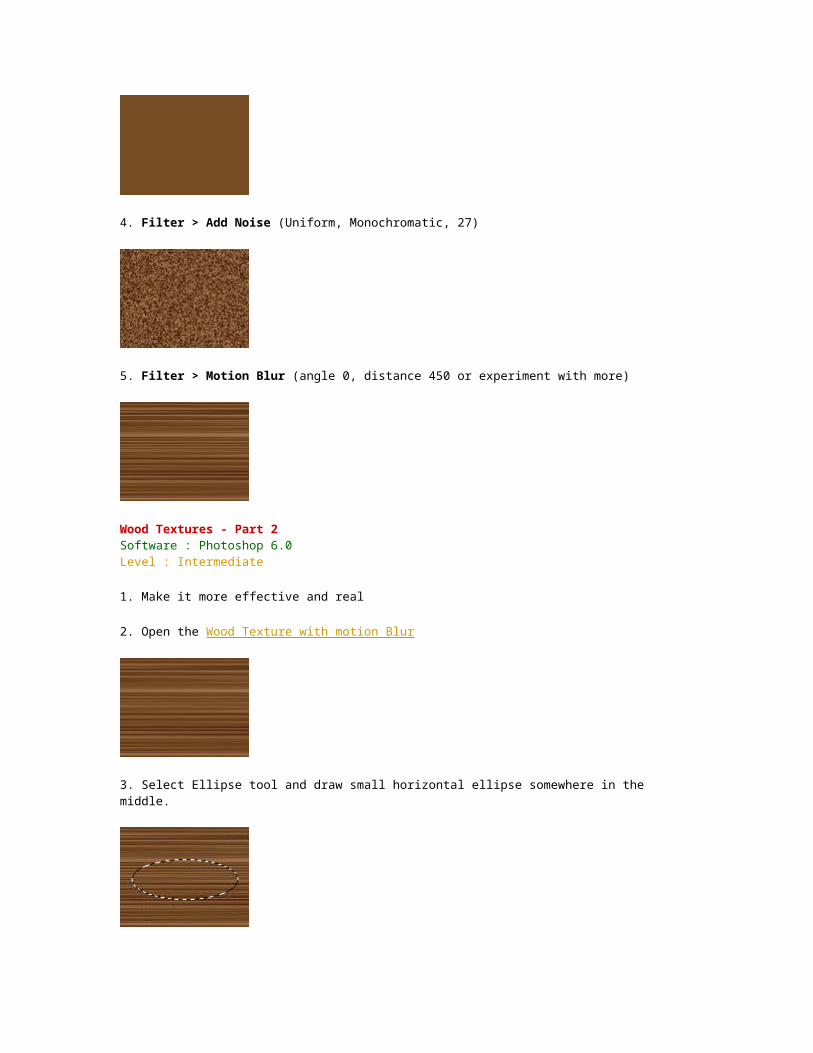
4. Filter > Add Noise (Uniform, Monochromatic, 16)
5. Filter > Pixelate > Crystallize (amount 7)
6. Filter > Brush Strokes > Angled Strokes
Direction Balance : 34Stroke Length : 50Sharpness : 10
Wood Textures - Part 4Software : Photoshop 6.0Level : Intermediate

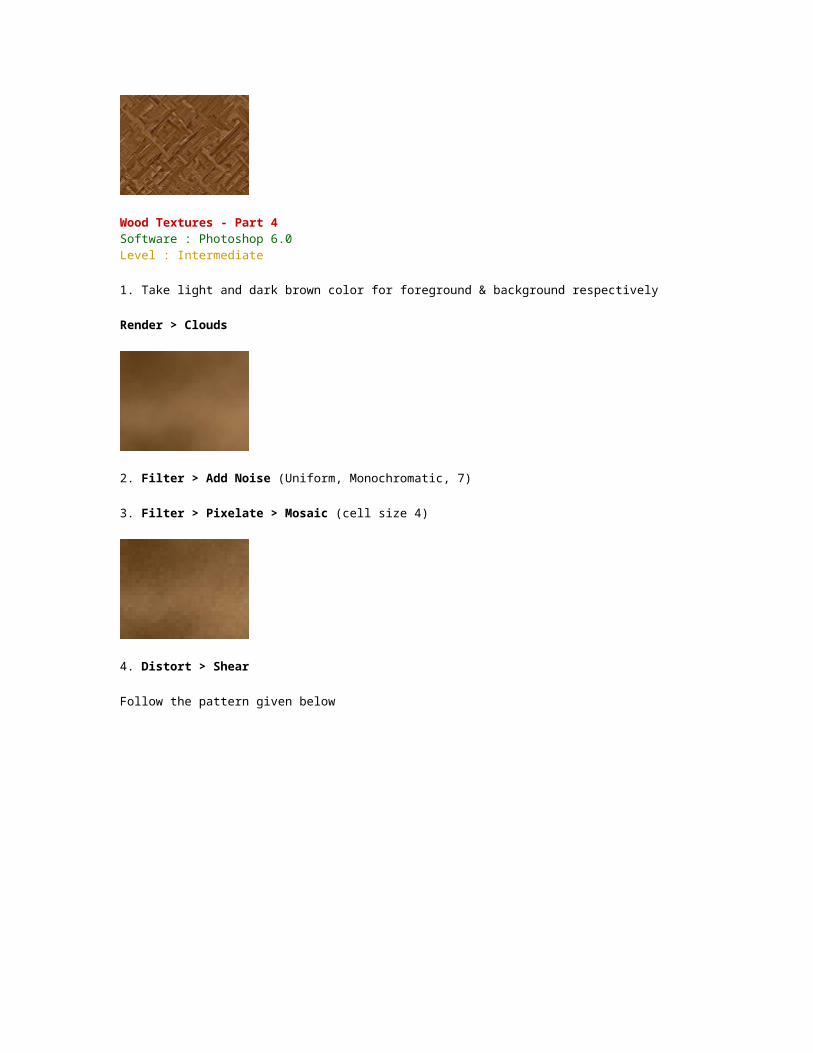
1. Take light and dark brown color for foreground & background respectively
Render > Clouds
2. Filter > Add Noise (Uniform, Monochromatic, 7)
3. Filter > Pixelate > Mosaic (cell size 4)
4. Distort > Shear
Follow the pattern given below
Rust TextureSoftware : Photoshop 6.0Level : Intermediate
1. Create new file with 72 PPI and white background.
2. Select proper color from Swatches
(we have selected 7 row 2nd col) as a foreground color.
3. Press Alt + Delete to fill foreground color.
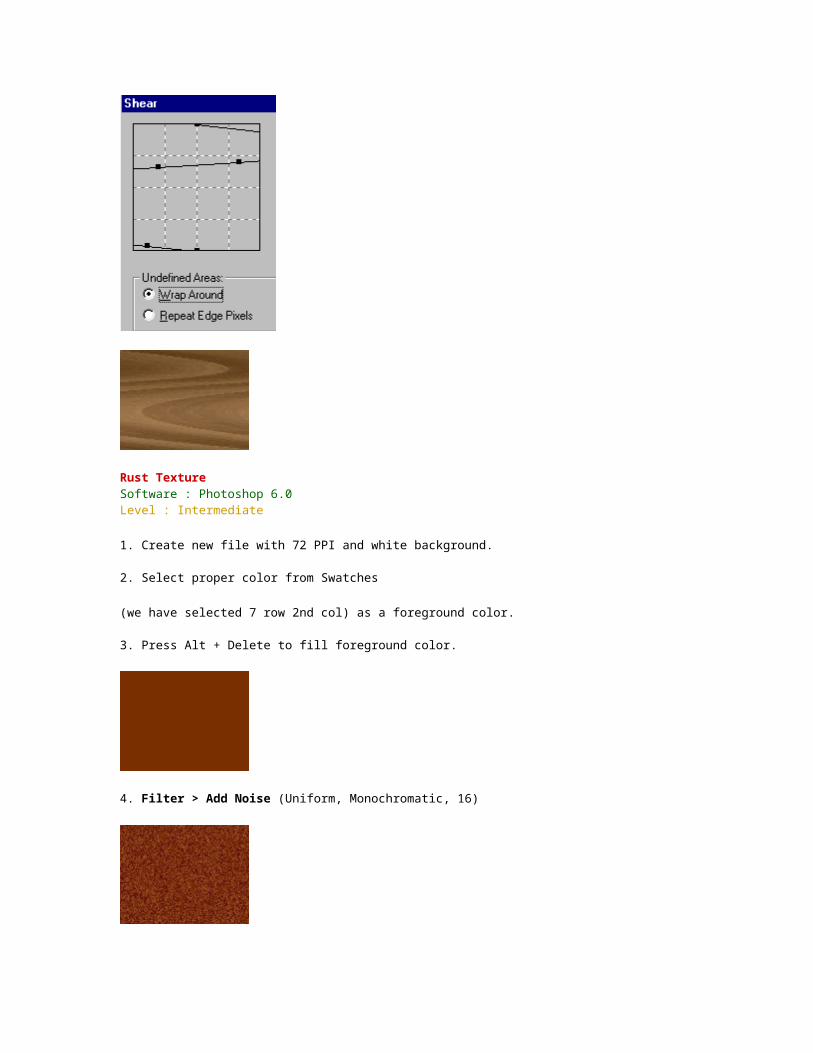
4. Filter > Add Noise (Uniform, Monochromatic, 16)
5. Filter > Artistic > Underpainting
brush size 6
texture coverage 16
Texture canvas
scaling 100%
Relief 4
light direction Top
Stone Texture Software : Photoshop 6.0Level : Intermediate
1. This effect is sometimes called Rocky Texture. Create new file with 72 PPI and white background.
2. Select light gray for foreground and dark gray (near to black) for background.
Filter > Render > Clouds
3. Image > Adjust > Auto Levels
4. Filter > Stylize > Emboss
5. Image > Adjust > Auto Levels
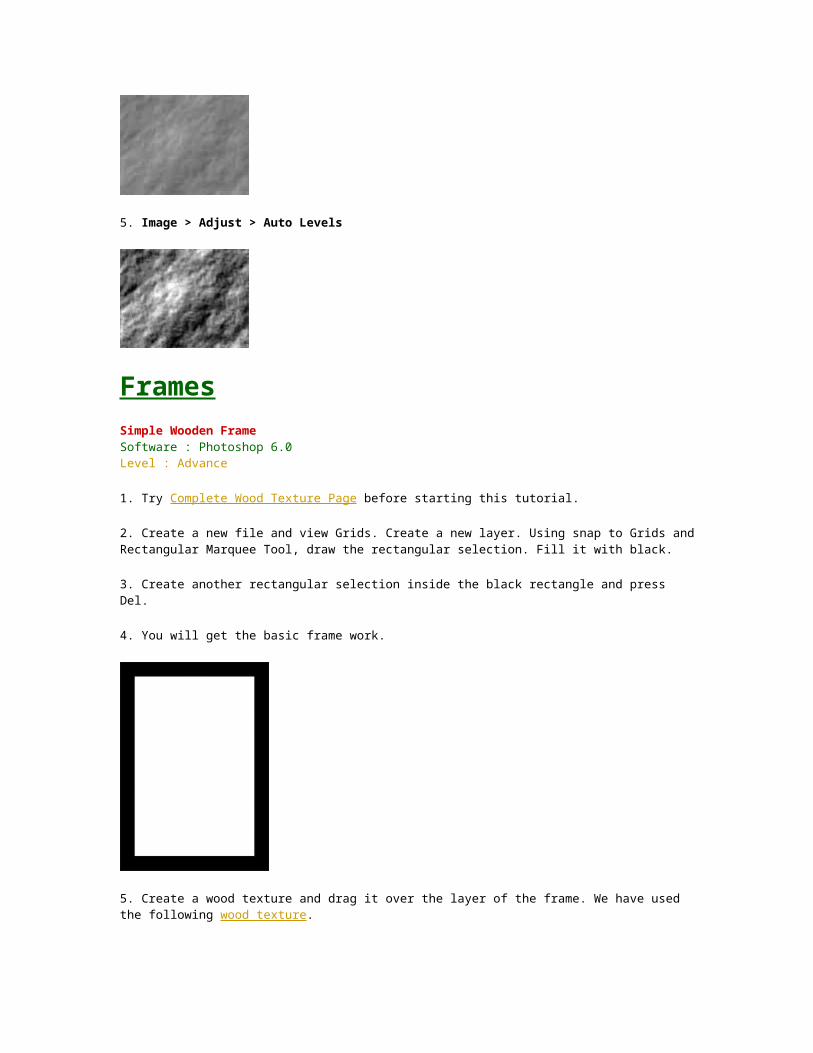
FramesSimple Wooden Frame Software : Photoshop 6.0Level : Advance
1. Try Complete Wood Texture Page before starting this tutorial.
2. Create a new file and view Grids. Create a new layer. Using snap to Grids and Rectangular Marquee Tool, draw the rectangular selection. Fill it with black.
3. Create another rectangular selection inside the black rectangle and press Del.
4. You will get the basic frame work.

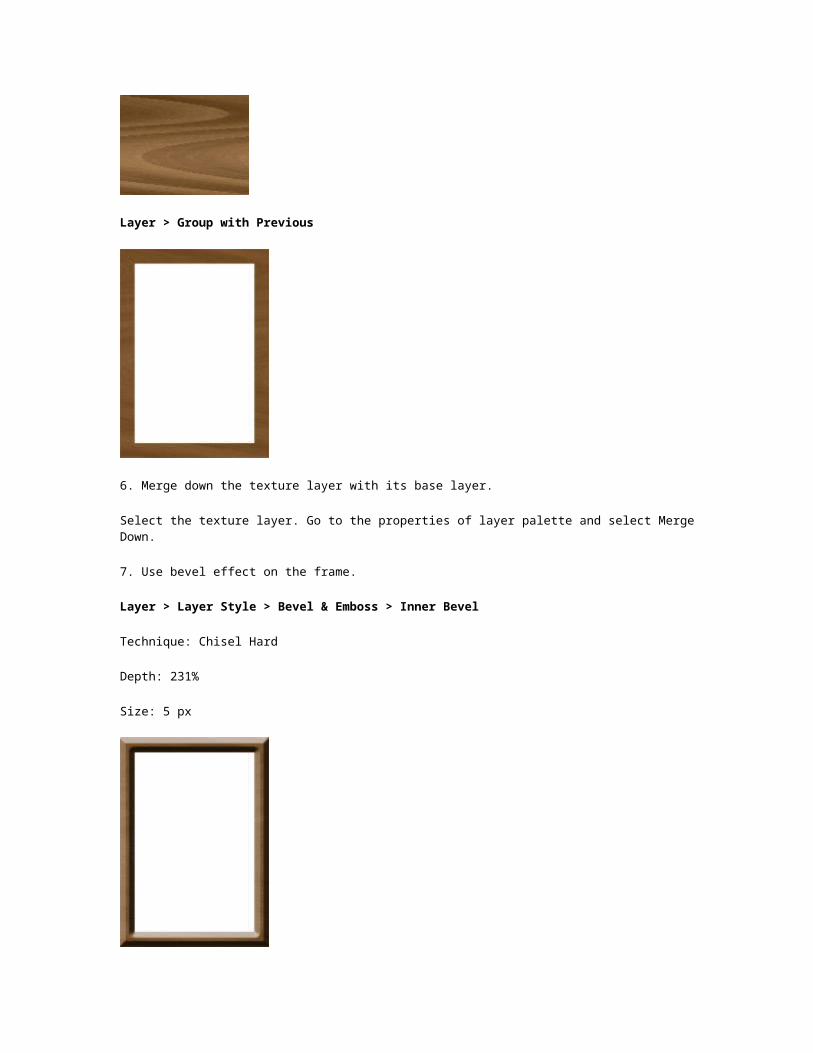
5. Create a wood texture and drag it over the layer of the frame. We have used the following wood texture.
Layer > Group with Previous
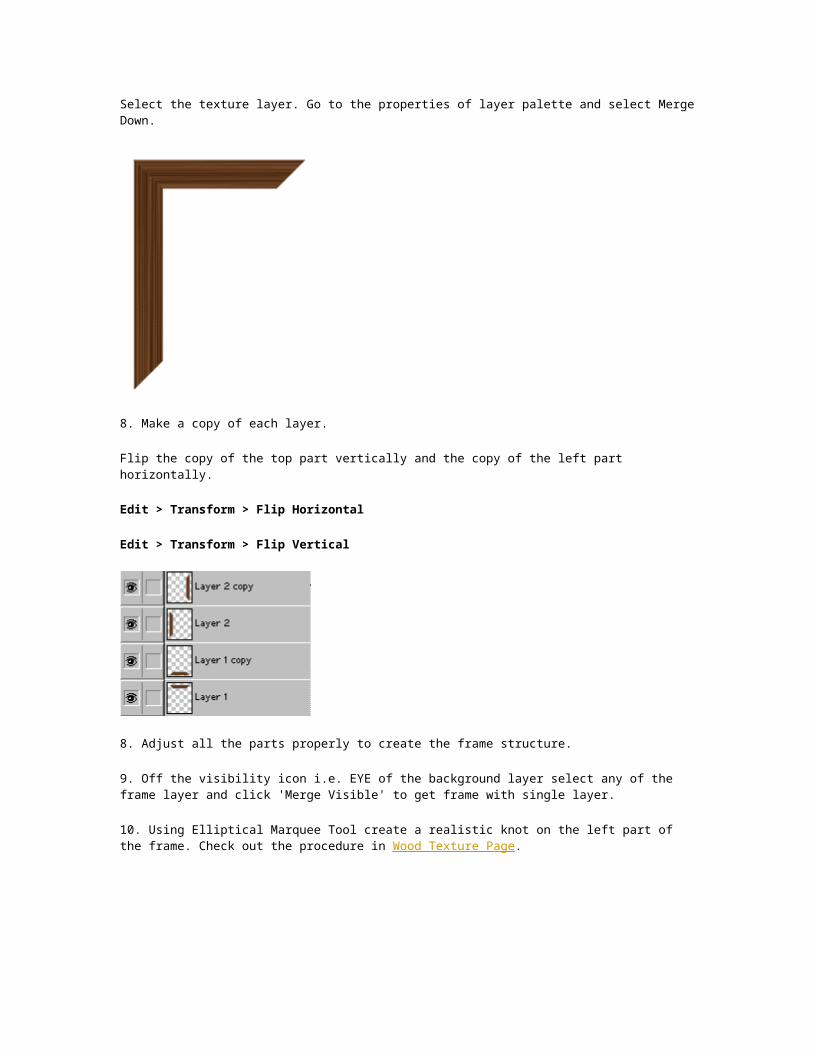
6. Merge down the texture layer with its base layer.
Select the texture layer. Go to the properties of layer palette and select Merge Down.
7. Use bevel effect on the frame.
Layer > Layer Style > Bevel & Emboss > Inner Bevel
Technique: Chisel Hard
Depth: 231%
Size: 5 px
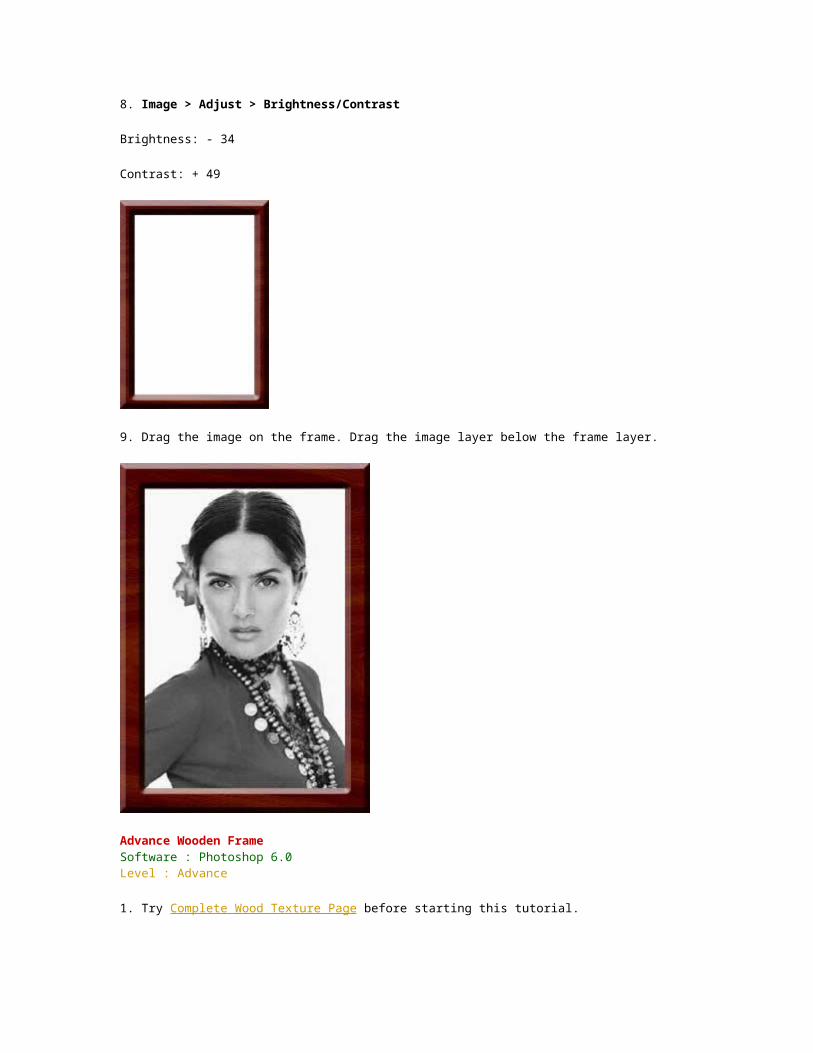
8. Image > Adjust > Brightness/Contrast
Brightness: - 34
Contrast: + 49
9. Drag the image on the frame. Drag the image layer below the frame layer.
Advance Wooden Frame Software : Photoshop 6.0Level : Advance
1. Try Complete Wood Texture Page before starting this tutorial.
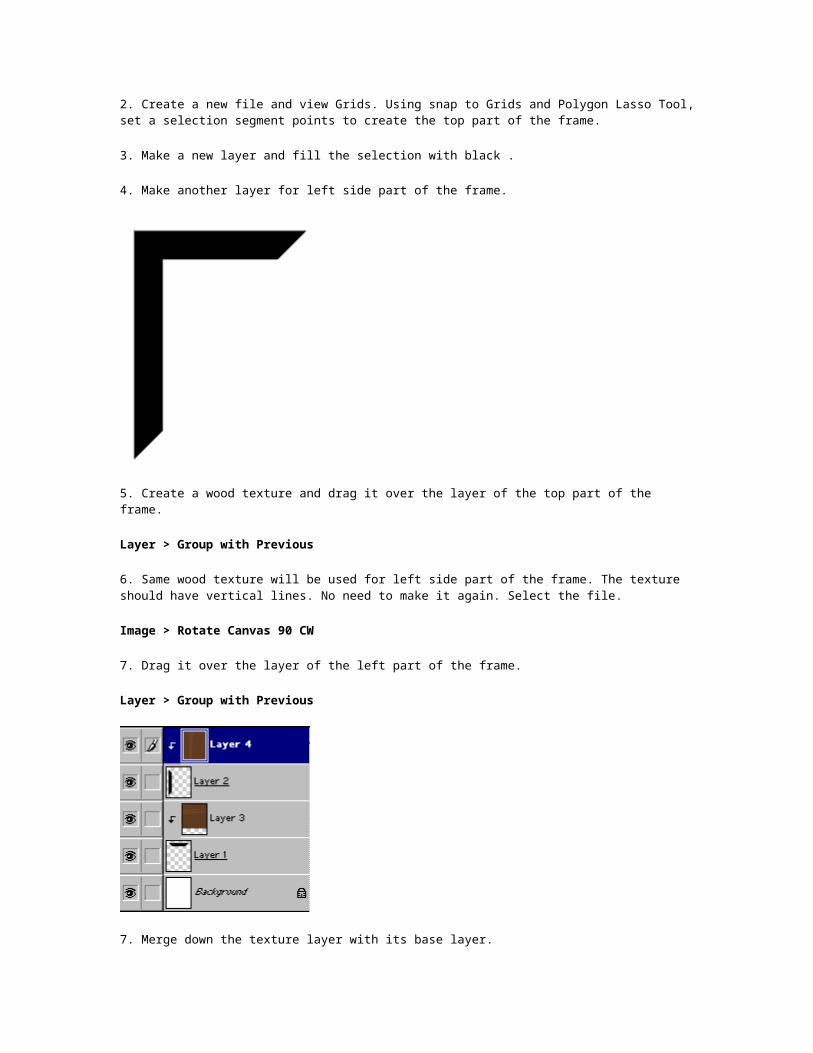
2. Create a new file and view Grids. Using snap to Grids and Polygon Lasso Tool, set a selection segment points to create the top part of the frame.
3. Make a new layer and fill the selection with black .
4. Make another layer for left side part of the frame.
5. Create a wood texture and drag it over the layer of the top part of the frame.
Layer > Group with Previous
6. Same wood texture will be used for left side part of the frame. The texture should have vertical lines. No need to make it again. Select the file.
Image > Rotate Canvas 90 CW
7. Drag it over the layer of the left part of the frame.
Layer > Group with Previous
7. Merge down the texture layer with its base layer.
Select the texture layer. Go to the properties of layer palette and select Merge Down.
8. Make a copy of each layer.
Flip the copy of the top part vertically and the copy of the left part horizontally.
Edit > Transform > Flip Horizontal
Edit > Transform > Flip Vertical
8. Adjust all the parts properly to create the frame structure.
9. Off the visibility icon i.e. EYE of the background layer select any of the frame layer and click 'Merge Visible' to get frame with single layer.
10. Using Elliptical Marquee Tool create a realistic knot on the left part of the frame. Check out the procedure in Wood Texture Page.
11. To make the frame more realistic use bevel effect on the frame.
Layer > Layer Style > Bevel & Emboss > Inner Bevel
12. Drag the image on the frame. Drag the image layer below the frame layer.
Complex Wooden Frame Software : Photoshop 6.0Level : Advance
1. Try Complete Wood Texture Page before starting this tutorial.
2. Create a new file and view Grids. Create a new layer. Using snap to Grids and Rectangular Marquee Tool, draw the rectangular selection. Fill it with any color.
3. Create another rectangular selection inside the black rectangle and press Del.
4. You will get the outer frame work.
5. Create another layer and repeat the same procedure to get one more frame inside the outer frame.

6. Create a wood texture and drag it over the first and then second layer of the frame. We have used the following wood texture.
Layer > Group with Previous
7. Merge down the texture layer with its respective base layer.
Select the texture layer. Go to the properties of layer palette and select Merge Down.
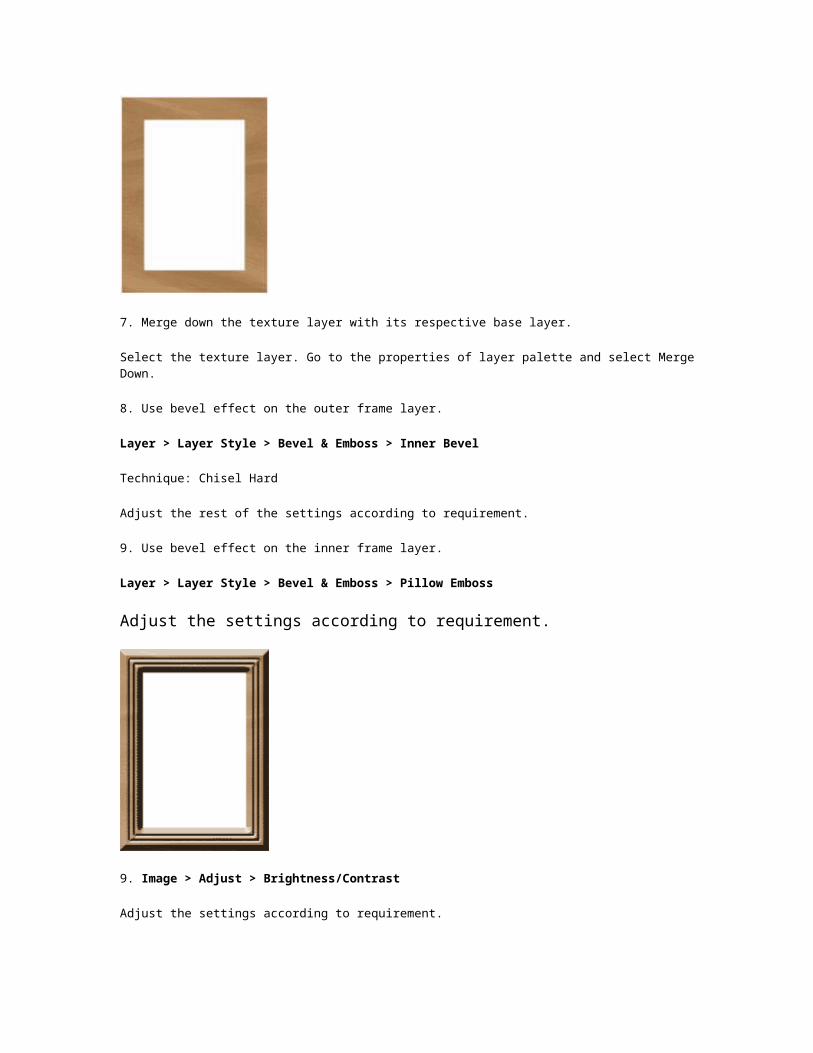
8. Use bevel effect on the outer frame layer.
Layer > Layer Style > Bevel & Emboss > Inner Bevel
Technique: Chisel Hard
Adjust the rest of the settings according to requirement.
9. Use bevel effect on the inner frame layer.

Layer > Layer Style > Bevel & Emboss > Pillow Emboss
Adjust the settings according to requirement.
9. Image > Adjust > Brightness/Contrast
Adjust the settings according to requirement.
10. Drag the image on the frame. Drag the image layer below the frame layers.
Text EffectsFlame Effect Software : Photoshop 6.0Level : Advance
1. Create new file with 72 PPI and white background. The mode has to be Grayscale. Type the text with thick font.
2. Layer > Flatten Image
3. Filter > Stylize > Diffuse (mode "Darken Only")

4. Blur > Gaussian Blur (Radius 1.0)
5. Distort > Ripple
6. Image > Mode > Index Color
7. Image > Mode > Table Color
(Choose "Black Body ")
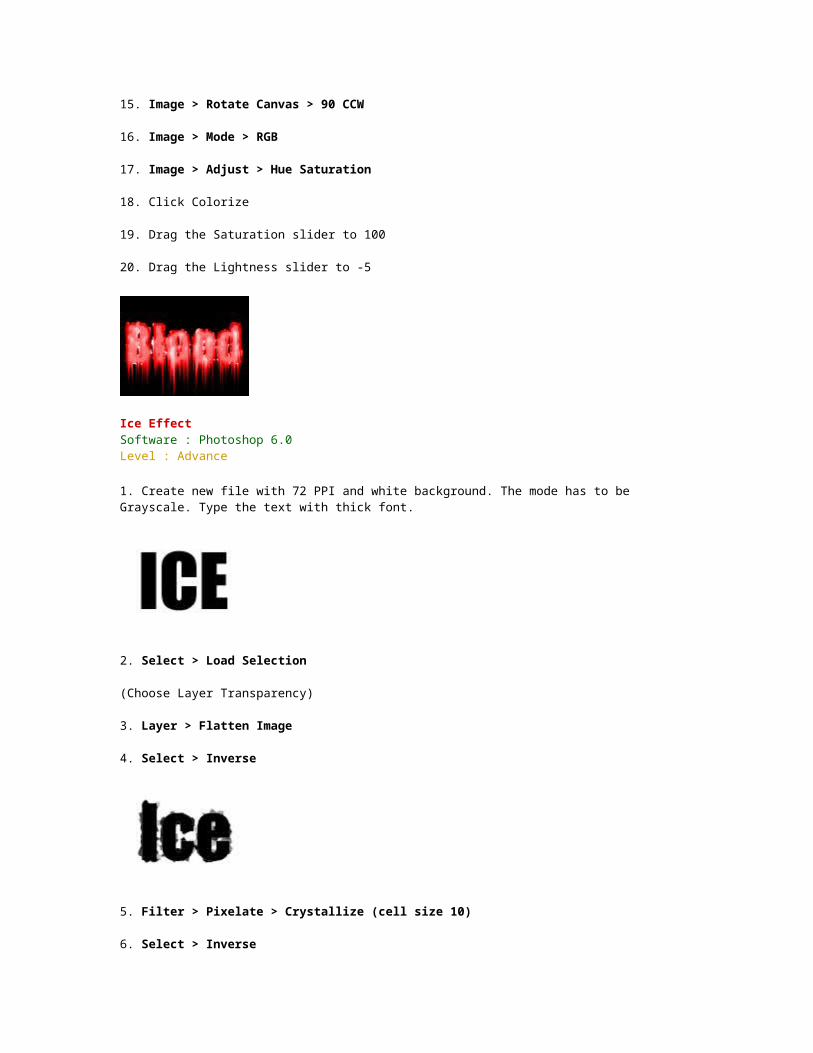
Blood Effect Software : Photoshop 6.0Level : Advance
1. Create new file with 72 PPI and white background. The mode has to be Grayscale. Type the text with thick font.
2. Select > Load Selection
(Choose Layer Transparency)
3. Layer > Flatten Image
4. Select > Inverse

5. Filter > Pixelate > Crystallize (cell size 4)
6. Select > Inverse
7. Noise > Add Noise
(Guassian, Monochromatic, Amount. 70)
8. Blur > Guassian blur (Radius 2.0)
9. Image > Adjust > Curve (make the curve as shown in fig.)

10. Press Ctrl + D to deselect
11. Image > Adjust > Invert
12. Image > Rotate Canvas > 90 CW
13. Filter > Stylize > Wind
14. Method : Wind Direction : From the Right
15. Image > Rotate Canvas > 90 CCW
16. Image > Mode > RGB
17. Image > Adjust > Hue Saturation
18. Click Colorize
19. Drag the Saturation slider to 100
20. Drag the Lightness slider to -5
Ice Effect Software : Photoshop 6.0Level : Advance
1. Create new file with 72 PPI and white background. The mode has to be Grayscale. Type the text with thick font.

2. Select > Load Selection
(Choose Layer Transparency)
3. Layer > Flatten Image
4. Select > Inverse
5. Filter > Pixelate > Crystallize (cell size 10)
6. Select > Inverse
7. Noise > Add Noise
(Uniform, Monochromatic, Amount 70)
8. Blur > Guassian blur (Radius 2.0)
9. Press Ctrl + D to deselect
10. Image > Adjust > Invert
11. Image > Mode > RGB
12. Image > Adjust > Hue Saturation
13. Click Colorize
14. Drag the Hue slider to 210
Pic-In-TextSoftware : Photoshop 6.0Level : Advance
1. Create new file with desired size, 72 PPI and white background.
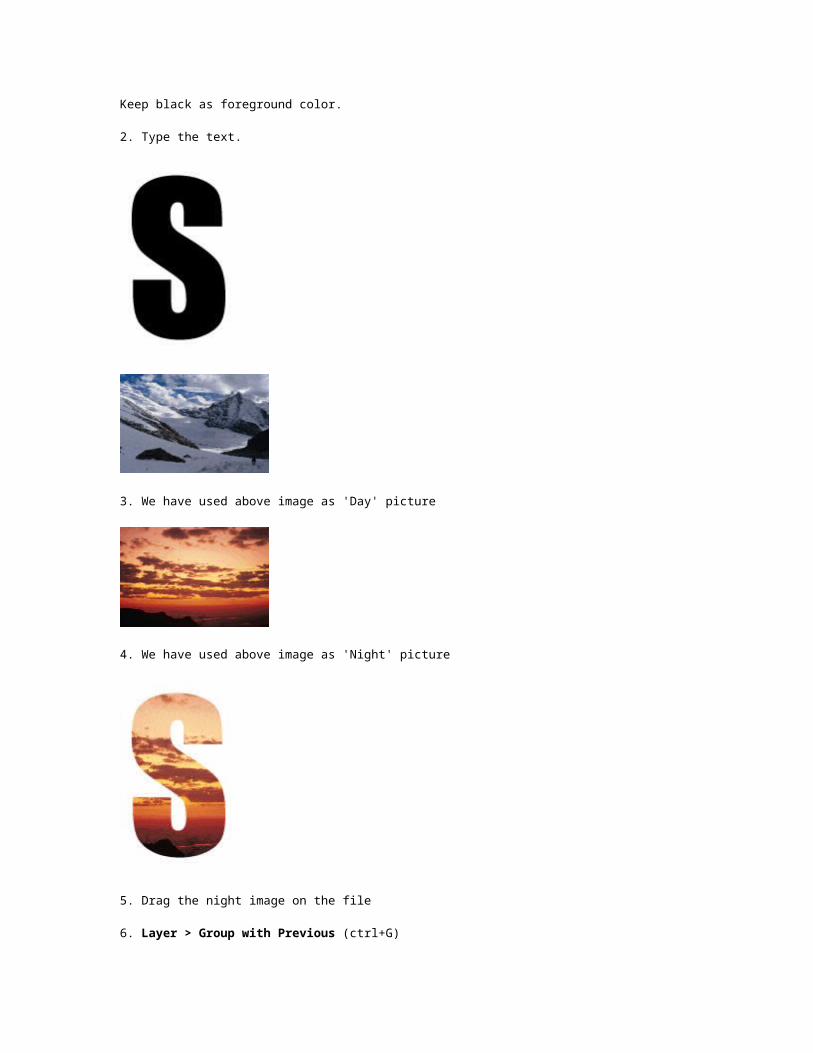
Keep black as foreground color.
2. Type the text.

3. We have used above image as 'Day' picture
4. We have used above image as 'Night' picture
5. Drag the night image on the file
6. Layer > Group with Previous (ctrl+G)
7. The Layer Palette will look like this. Name the layer 'Night'
8. Drag the day image on the file. Name the layer 'Day'
9. The Layer Palette will look like this
10. Drag the day below the night layer
11. Select night layer. Select eraser tool. Choose soft round brush (we used 65)
12. Erase the upper half of the night layer
13. Layer > Layer Style > Bevel & Emboss (outer bevel) + Drop Shadow
Glow or Neon Effect Software : Photoshop 6.0Level : Advance
1. Create new file with 72 PPI and white background. Type the text using black color with thin font.

2. Layer > Flatten Image
3. Image > Adjust > Invert
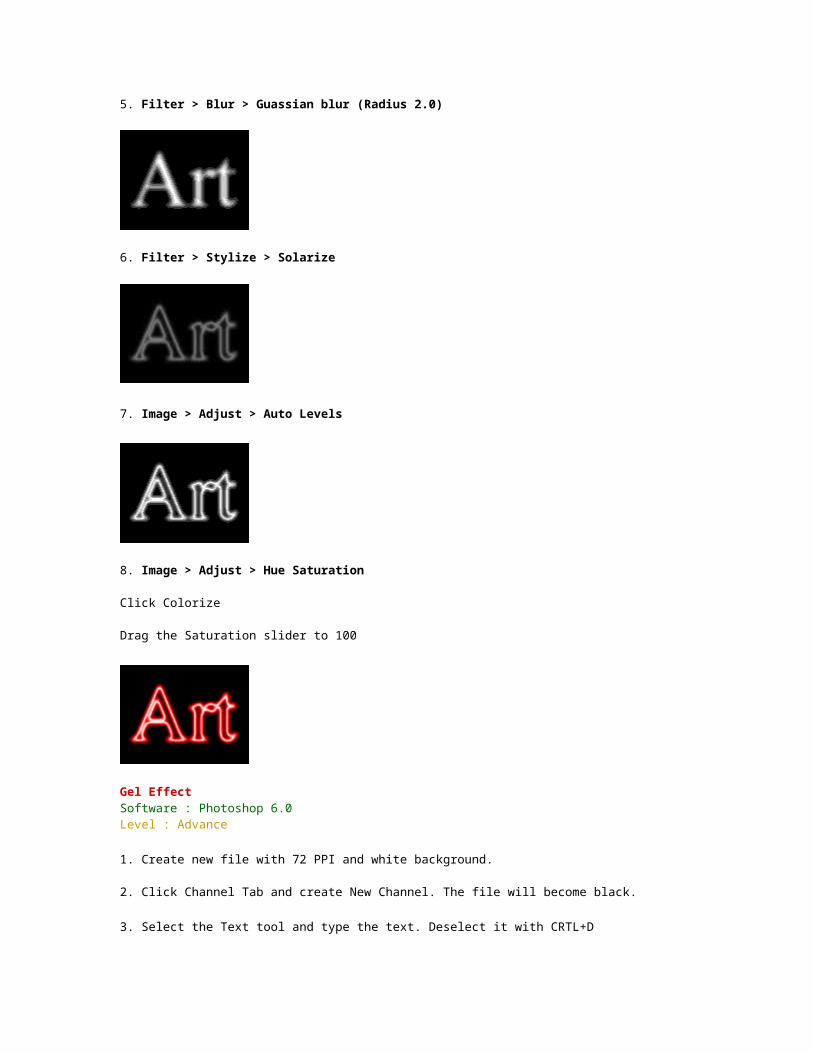
5. Filter > Blur > Guassian blur (Radius 2.0)
6. Filter > Stylize > Solarize
7. Image > Adjust > Auto Levels
8. Image > Adjust > Hue Saturation
Click Colorize
Drag the Saturation slider to 100

Gel Effect Software : Photoshop 6.0Level : Advance
1. Create new file with 72 PPI and white background.
2. Click Channel Tab and create New Channel. The file will become black.
3. Select the Text tool and type the text. Deselect it with CRTL+D
4. Select paintbrush with hard edge and create some drops to add more spice or keep as it is.
5. Filter > Sketch > Plaster
Image Balance: 25Smoothness: 2Light Direction: Right
6. Channel palette will look like this.
7. Click Layer Tab and Select the Background layer.
8. Select > Load Selection > Alpha1
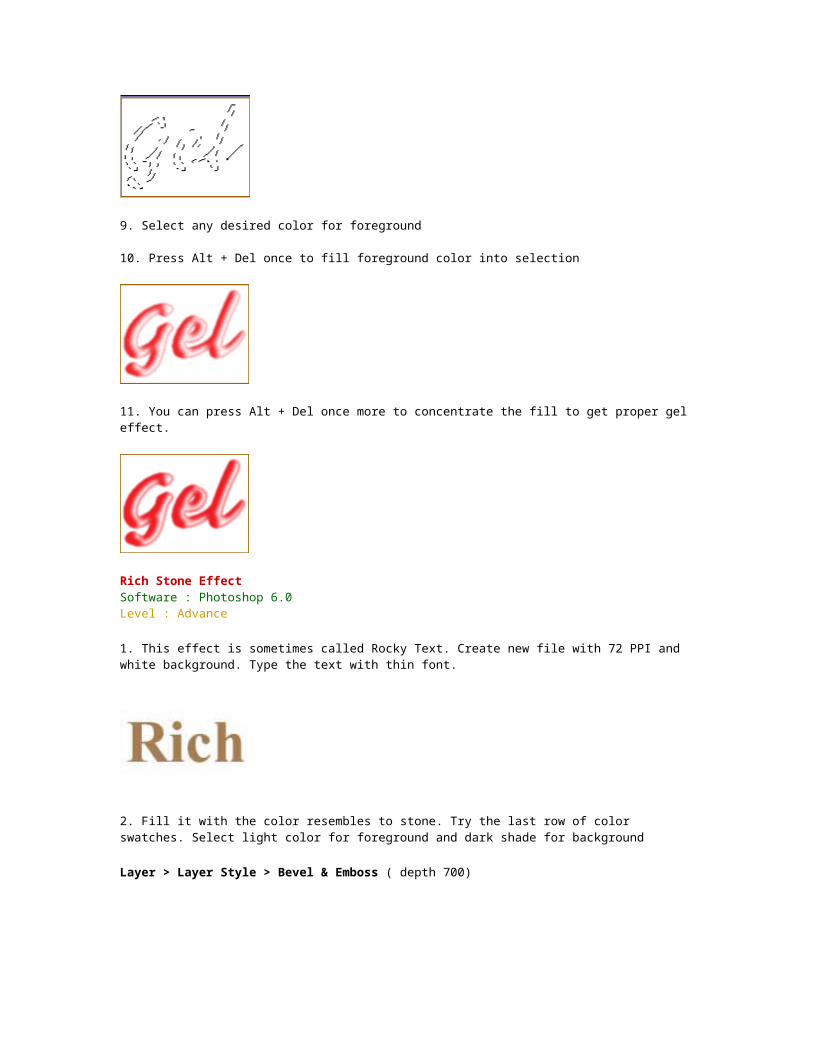
9. Select any desired color for foreground
10. Press Alt + Del once to fill foreground color into selection
11. You can press Alt + Del once more to concentrate the fill to get proper gel effect.
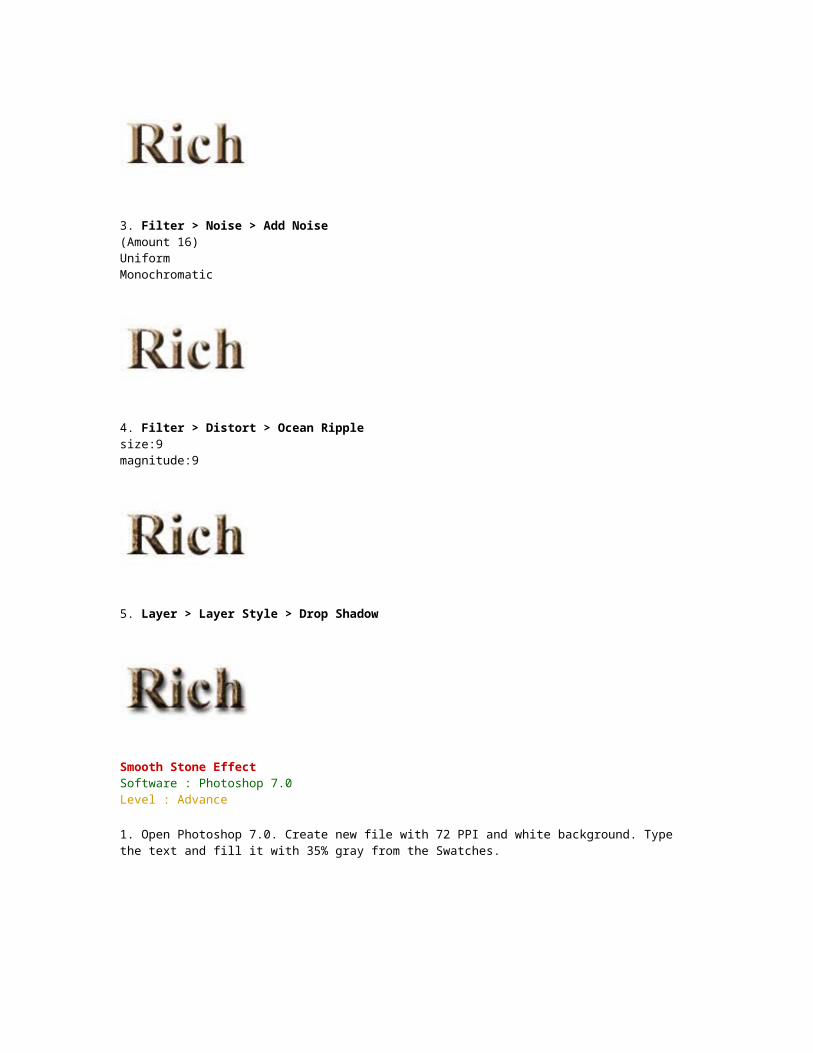
Rich Stone Effect Software : Photoshop 6.0Level : Advance
1. This effect is sometimes called Rocky Text. Create new file with 72 PPI and white background. Type the text with thin font.

2. Fill it with the color resembles to stone. Try the last row of color swatches. Select light color for foreground and dark shade for background
Layer > Layer Style > Bevel & Emboss ( depth 700)
3. Filter > Noise > Add Noise (Amount 16) UniformMonochromatic
4. Filter > Distort > Ocean Ripple size:9 magnitude:9
5. Layer > Layer Style > Drop Shadow
Smooth Stone Effect Software : Photoshop 7.0Level : Advance
1. Open Photoshop 7.0. Create new file with 72 PPI and white background. Type the text and fill it with 35% gray from the Swatches.
2. Filter > Noise > Add NoiseRasterize the text when asked for.(Amount 16 - Gaussian - Monochromatic )
3. Layer > Layer Style > Bevel & Emboss ( Chisel Hard - depth 400 size 25 )Select Drop Shadow under Bevel & Emboss styles
4. Decorate the effect by adding dark background.
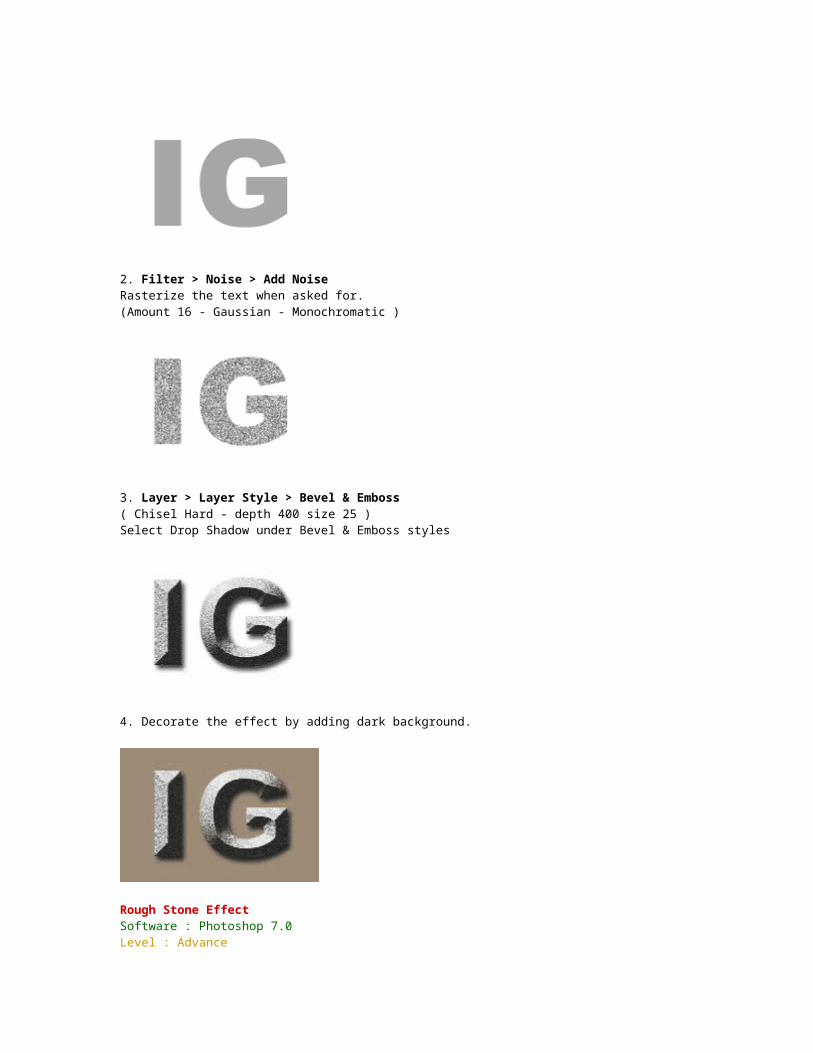
Rough Stone Effect Software : Photoshop 7.0Level : Advance
1. Open Photoshop 7.0. Create new file with 72 PPI and white background. Type the text and fill it with 35% gray from the Swatches.
2. Filter > Noise > Add NoiseRasterize the text when asked for.(Amount 16 - Gaussian - Monochromatic )
3. Layer > Layer Style > Bevel & Emboss ( Chisel Hard - depth 400 size 7 )Select Drop Shadow and Texture under Bevel & Emboss styles
4. Decorate the effect by adding dark background.
Wood Text Part 1Software : Photoshop 7.0Level : Intermediate
1. Open Photoshop 7.0. Type the text.
2. Layer > Layer Style > Bevel and Emboss
3. Depth 400
4. Select Drop Shadow
5. Select Pattern Overlay. From the pattern, select Wood Texture ( forth in the first row )
6. Add background color to decorate the text.
Wood Text Part 2Software : Photoshop 7.0Level : Intermediate
1. Open Photoshop 7.0. Type the text.

2. Create texture using wood texture tutorial.
3. Select Move tool and drag the texture file over text.
4. Layer > Group with Previous
5. Select Text layer in the layer palette.
6. Layer > Layer Style > Bevel and Emboss( depth 400 )
7. Select Drop Shadow
8. Add background color to decorate the text.

RetouchingImage ResolutionSoftware : Photoshop 7.0 Level : Intermediate
ConceptImage is generally saved at 72 PPI resolution because monitor displays the image with actual size on the screen at 72 PPI. The monitor resolution is considered 72 DPI in general. If the image is scanned at 144 PPI, it will be displayed with double size because 72 x 72 pixels will fit in 1 inch. Rest of the 72 x 72 pixels will occupy double space. The result is obvious, the double size of the original image.
1. Open Photoshop. Open an image with 72 PPI resolution.
2. Open the image size dialogue box to check the image settings.
Image > Image Size

3. Save the image
File > Save for Web
We have saved it with JPEG Medium 30 Quality. It is of 5.546 KB.
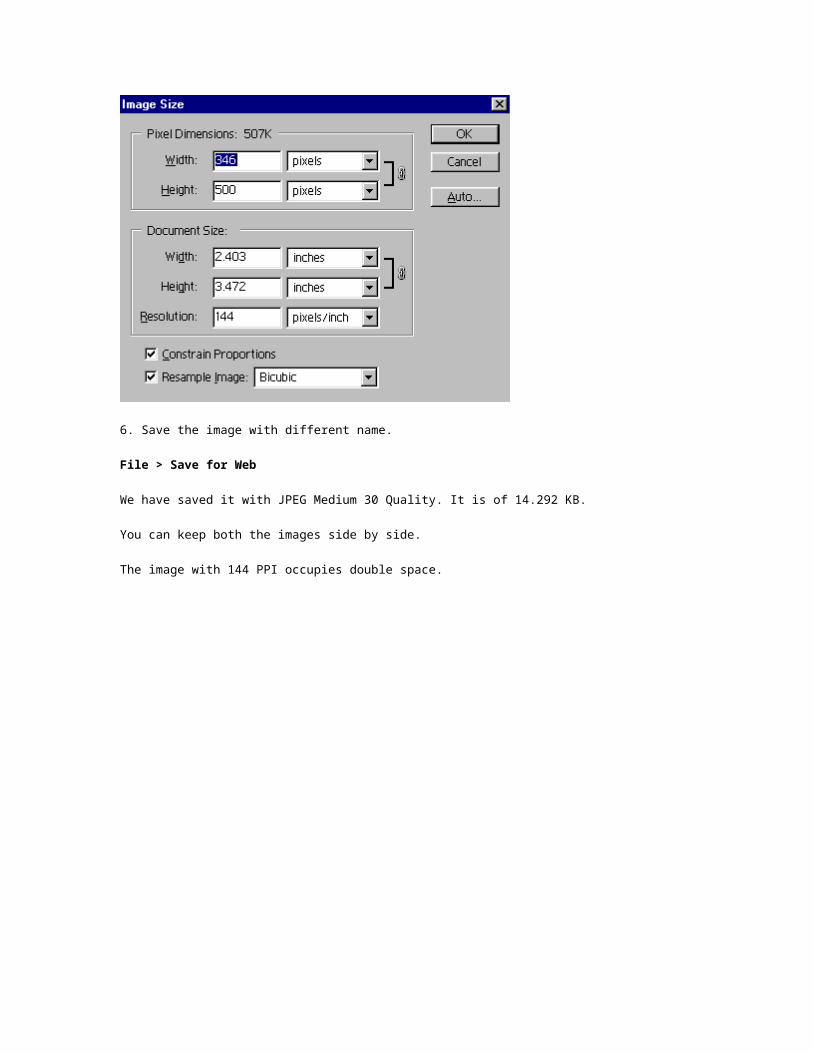
4. Open the image size dialogue box again to change the image settings.
Image > Image Size
Change the resolution to 144 PPI
5. You will notice that width and the height changes automatically into double figure.

6. Save the image with different name.
File > Save for Web
We have saved it with JPEG Medium 30 Quality. It is of 14.292 KB.
You can keep both the images side by side.
The image with 144 PPI occupies double space.

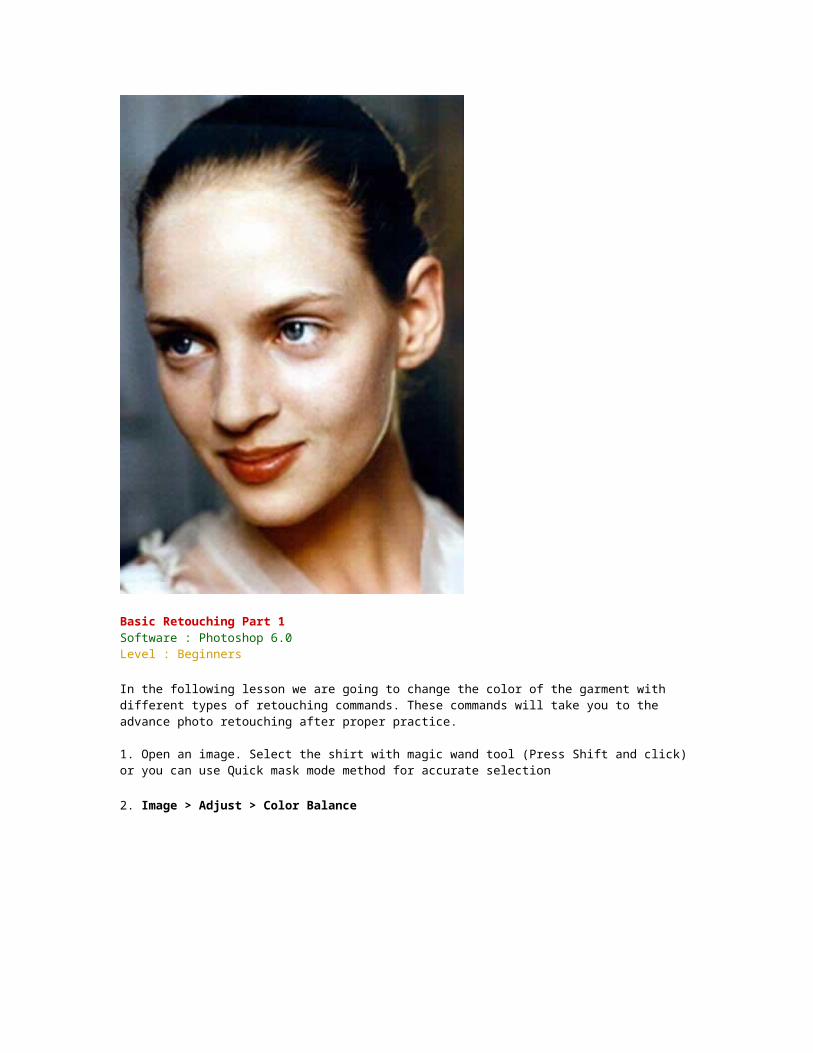
Basic Retouching Part 1Software : Photoshop 6.0 Level : Beginners
In the following lesson we are going to change the color of the garment with different types of retouching commands. These commands will take you to the advance photo retouching after proper practice.
1. Open an image. Select the shirt with magic wand tool (Press Shift and click) or you can use Quick mask mode method for accurate selection
2. Image > Adjust > Color Balance
Original Image Color Levels : 100 -100 0
Tone Balance : Midtone
Color Levels : 100 0 0 Tone Balance : Midtone
Color Levels : 100 0 0 Tone Balance : Midtone
3. Image > Adjust > Hue Saturation (Click Colorize)
HSL : 0 94 -44 HSL : 124 19 0
4. Image > Adjust > Brightness/contrast
B : 70 C : 0 B : 37 C :10
5. Image > Adjust > Variations
Midtones More Yellow Midtones More Blue
Basic Retouching Part 2Software : Photoshop 7.0 Level : Intermediate
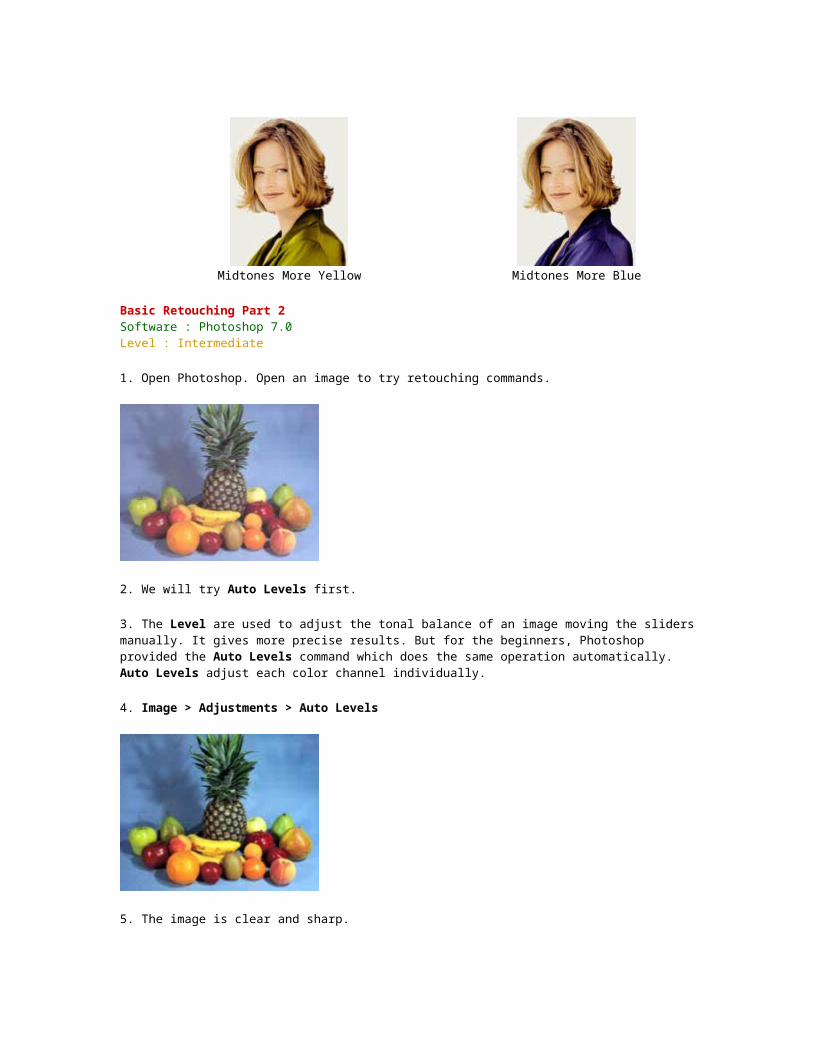
1. Open Photoshop. Open an image to try retouching commands.
2. We will try Auto Levels first.
3. The Level are used to adjust the tonal balance of an image moving the sliders manually. It gives more precise results. But for the beginners, Photoshop provided the Auto Levels command which does the same operation automatically. Auto Levels adjust each color channel individually.
4. Image > Adjustments > Auto Levels
5. The image is clear and sharp.
6. Make a duplicate of the original image by right clicking on the blue title of an image and select Duplicate.
7. We will try Auto Contrast now.

8. Auto Contrast does not adjust the channels individually like Auto Levels. It detects the lightest and darkest pixels in an image, setting them to white and black making highlights appear lighter and shadows appear darker.
9. Image > Adjustments > Auto Contrast
10. Make another duplicate of the original image by right clicking on the blue title of an image and select Duplicate.
11. We will try Auto Color this time.
12. Auto Color is the quick way to remove color cast throughout an image.
13. Image > Adjustments > Auto Color
14. Keep all the images side by side to make out the difference between these commands.
Basic Retouching Part 3Software : Photoshop 7.0 Level : Intermediate
1. Open Photoshop. Open an image to try retouching commands.
2. Drag the background layer on the red marked icon of the layer palette, which says "Create a New Layer"
3. Background layer is duplicated.
4. Change the properties of background copy layer. Change the blend mode to Overlay and opacity 63%
5. The image is retouched. It is clear and sharp.
Basic Retouching Part 4Software : Photoshop 7.0 Level : Intermediate

1. Open Photoshop. Open an image to try retouching commands.
2. Drag the background layer on the icon of the layer palette, which says "Create a New Layer"
3. Background layer is duplicated. Keep the copy selected.
4. Filter > Blur > Gaussian Blur (Radius 3 pixels)
5. Change the properties of background copy layer. Change the blend mode to Overlay.

6. The image is retouched. It is enhanced and smooth.
Lines & GridLine EffectSoftware : Photoshop 7.0 Level : Intermediate
1. Open Photoshop. Open an image to apply line effect.
2. Desaturate the image by Image > Adjustments > Desaturate
3. Create New file with 1 pixel width, 2 pixel height and transparent background.
4. Keep Black as a foreground color. Fill the top 1 X 1 pixel of transparent background using Pencil Tool.

5. Select All using CTRL + A
6. Create a pattern by Edit > Define Pattern. Name the pattern.
7. Close the Pattern file and go back to image file.
8. Edit > Fill(Choose "Pattern" from "Use" drop down menu and again in "Custom Pattern" you will find newly created pattern)
9. Select newly created pattern and fill the image.
Using GridsSoftware : Photoshop 7.0 Level : Intermediate
1. Open Photoshop. Open an image to apply grid effect.
2. Create New file with 10 pixel width, 10 pixel height and transparent background.

3. Keep Black as a foreground color. Fill the top and left 1 pixel area of transparent background with black color using Pencil Tool.
4. Select All using CTRL + A
5. Create a pattern by Edit > Define Pattern. Name the pattern.
6. Close the Pattern file and go back to image file. Create new layer. Keep it selected.
7. Edit > Fill(Choose "Pattern" from "Use" drop down menu and again in "Custom Pattern" you will find newly created pattern)
8. Select newly created pattern and fill the layer. Change the layer mode to "Overlay"
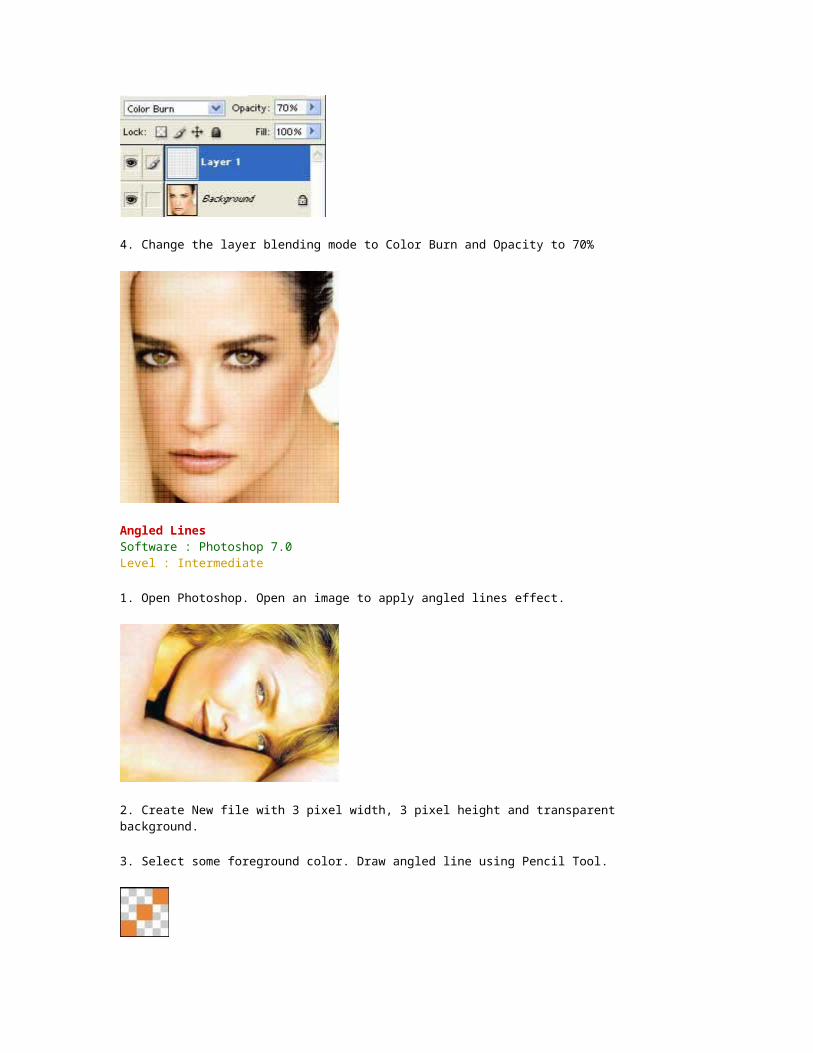
Patchwork GridsSoftware : Photoshop 7.0 Level : Intermediate
1. Open Photoshop. Open an image to apply patchwork grid effect.

2. Create a new layer in the layer palette and fill it with white color. Keep the layer selected.
3. Filter > Texture > Patchwork
Square Size - 1 Relief - 0
4. Change the layer blending mode to Color Burn and Opacity to 70%
Angled LinesSoftware : Photoshop 7.0 Level : Intermediate
1. Open Photoshop. Open an image to apply angled lines effect.

2. Create New file with 3 pixel width, 3 pixel height and transparent background.
3. Select some foreground color. Draw angled line using Pencil Tool.
4. Select All using CTRL + A
5. Create a pattern by Edit > Define Pattern. Name the pattern.
6. Close the Pattern file and go back to image file. Create new layer. Keep it selected.
7. Edit > Fill(Choose "Pattern" from "Use" drop down menu and again in "Custom Pattern" you will find newly created pattern)
8. Select newly created pattern and fill the layer. Change the layer mode to "Multiply"
Vertical LinesSoftware : Photoshop 7.0 Level : Intermediate
1. Open Photoshop. Open an image to apply vertical lines effect.

2. Create New file with 3 pixel width, 3 pixel height and transparent background.
3. Select black as a foreground color. Draw vertical line using Pencil Tool.
4. Select All using CTRL + A
5. Create a pattern by Edit > Define Pattern. Name the pattern.
6. Close the Pattern file and go back to image file. Create new layer. Keep it selected.
7. Edit > Fill(Choose "Pattern" from "Use" drop down menu and again in "Custom Pattern" you will find newly created pattern)
8. Select newly created pattern and fill the layer. Change the layer mode to "Soft Light"
Web ButtonsSimple ButtonsSoftware : Photoshop 6.0Level : Beginner
1. Create new file with 72 PPI and white background.
2. Select Elliptical Marquee tool. Place the cursor in the center of the image approximately.
3. Press Shift+Alt and draw perfect circle.
4. Select foreground and background color.
5. Select Gradient tool.
6. Drag from top left to bottom right.
7. With the image selected,
Select > Modify > Contract
8. Input the value 7.

9. Click the Gradient tool again and drag over the image from bottom right to top left.
10. Press Ctrl +D to deselect.
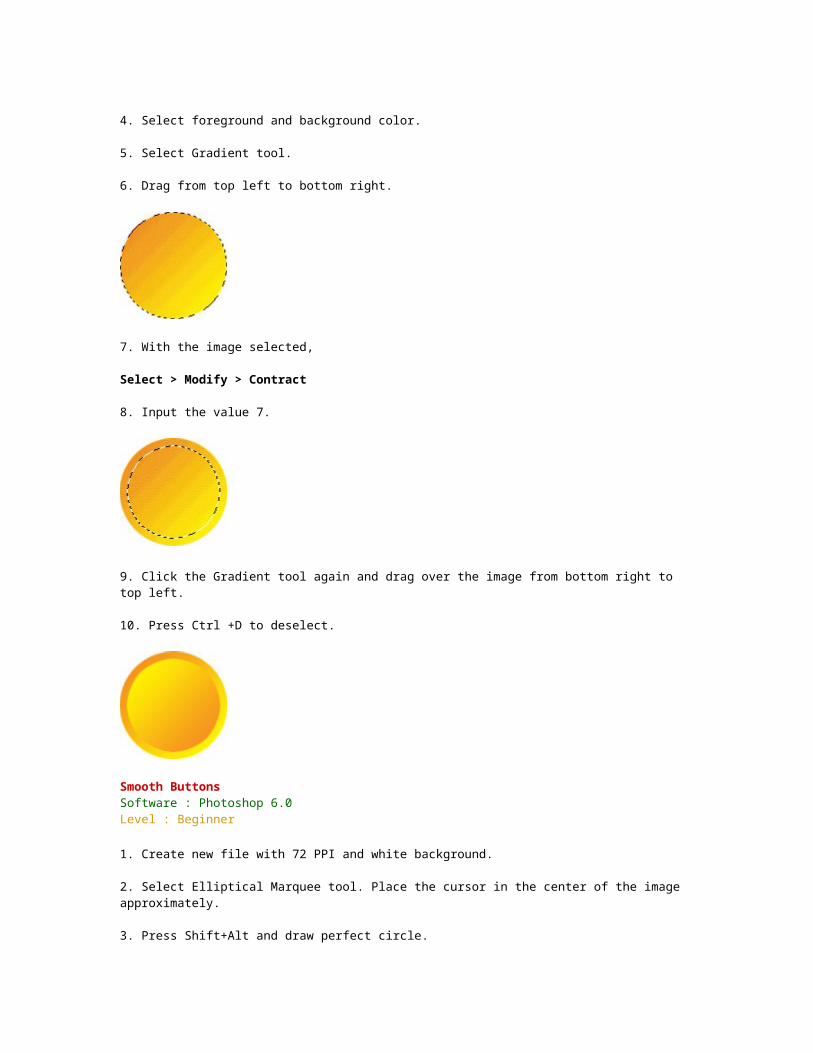
Smooth ButtonsSoftware : Photoshop 6.0Level : Beginner
1. Create new file with 72 PPI and white background.
2. Select Elliptical Marquee tool. Place the cursor in the center of the image approximately.
3. Press Shift+Alt and draw perfect circle.
4. Select foreground and background color.
5. Select Gradient tool.
6. Drag from top left to bottom right.
7. With the image selected,
Select > Modify > Contract
8. Input the value 7.
9. Select > Feather
10. Input 3 as a feather value
11. Click the Gradient tool again and drag over the image from bottom right to top left.
12. Press Ctrl +D to deselect.
Fancy ButtonsSoftware : Photoshop 6.0Level : Beginner
1. Create new file with 72 PPI and white background.
2. Select Elliptical Marquee tool. Place the cursor in the center of the image approximately.
3. Press Shift+Alt and draw perfect circle.
4. Select foreground and background color.
5. Select Gradient tool.
6. Drag from top left to bottom right.
7. With the image selected,
Select > Modify > Contract
8. Input the value 7.
9. Select > Feather
10. Input 3 as a feather value
11. Click the Gradient tool again and drag over the image from bottom right to top left.
12. Select > Modify > Contract
13. Input the value 7.
14. Click the Gradient tool again and drag over the image from top left to bottom right.
15. Press Ctrl +D to deselect
Texture ButtonsSoftware : Photoshop 6.0Level : Intermediate
1. Create new file with 72 PPI and white background. Create a new Layer. Name it as "Base".
2. Select Ellipse Marquee tool. Drag it on the file. Fill the selection on the new layer with black.
3. Open the desired texture file. Select Move tool. Drag the image on the button file and adjust so that black ellipse will get properly covered with texture. In the layer palette you will get texture layer. Keep this layer selected.
4. Layer > Group with Previous (ctrl+G)

5. Merge the texture layer with the base layer. For this, select texture layer. Go to fly out menu of layer palette and click "Merge Down".
6. Layer > Layer Style > Bevel & Emboss + Drop Shadow
7. You can try out different types of textures as well as base shapes to create different effects.
8. Trim the button to remove unwanted space with Image > Trim
Theme ButtonsSoftware : Photoshop 6.0Level : Intermediate
1. Create a new file with 72 PPI and white background. Create a new layer.
2. Select Elliptical Marquee tool. Place the cursor in the center of the file using grids.
3. Draw a circle. Fill it with any color. Create a second layer. Select it. Place the cursor in the center and draw second circle of smaller diameter. Fill it with the color. Deselect all.
4. Select the bottom layer with big circle.Layer > Layer Style > Bevel & EmbossTry to experiment with the values.
5. Select the top layer with small circle.Layer > Layer Style > Bevel & Emboss(style - Pillow Emboss)Try to experiment with the values.Trim the button to remove unwanted space with Image > Trim

6. Open the desired image file which is suitable to your theme. Select Move tool. Drag the image on the button file and adjust so that the whole button will get properly covered. In the layer palette you will get image layer. Keep this layer selected.
7. Duplicate the image layer and drag it down to bring it on the top of the big circle layer. Select the image layer.
8. Layer > Group with Previous (ctrl+G). Repeat the procedure for the top image layer also. The layer position will be as follows.
9. Save the file.

Filter Buttons Software : Photoshop 6.0Level : Beginner
1. Create New file. Draw the rectangle. Create new layer and keep the new layer selected. Fill the rectangle with dark color.
2. Layer > Layer Style > Bevel & Emboss. Keep the selection intact.
3. Select > Modify > Contract (by 7 pixels)
4. Click Gradient tool. Select lighter color as background. Linear gradient should be on. Drag the tool over the rectangle from left to right.
5. Select > Modify > Contract (by 1 pixels)
6. Drag the tool over the rectangle from right to left.

7. Select > Modify > Contract (by 1 pixels)
8. Fill the dark color in the image by pressing Alt+Delete
9. Filter > Noise > Add Noise (Monochromatic, Uniform)
10. Image > Trim
11. Filter > Artistic > Colored Pencil
12. Filter > Blur > Motion Blur (Angle 0, distance 9)
13. Filter > Brush Strokes> Angled Strokes