administrator tools using workbench - ibmmedia.kenexa.com/training/workbench/manual/... ·...
TRANSCRIPT

IBM Training User Guide
Administrator Tools Using Workbench
Release Date: May 2020
Power User

Administrator Tools Using Workbench
© Copyright IBM Corp. 2020 Page 2
Course materials may not be reproduced in whole or in part without the prior written permission of IBM.
Welcome to Administrator’s Tools Using Workbench
About This Course This course and workbook provide participants with the knowledge to become certified Administrators of IBM® Kenexa® BrassRing® on Cloud through the use of Workbench, the BrassRing configuration tool. A Workbench Administrator thoroughly understands the function and capabilities of BrassRing and is prepared to make configuration changes that impact BrassRing users within the organization and candidates applying through Gateways.
About BrassRing Training
We encourage you to take advantage of the online help available within BrassRing, and pursue
additional training opportunities. BrassRing offers a number of tools, including instructor-led and
self-study courses, which will help support your company’s specific learning needs.
Administrator Tools Using Workbench
© Copyright IBM Corp. 2020 Page 3
Course materials may not be reproduced in whole or in part without the prior written permission of IBM.
TABLE OF CONTENTS
Chapter 1: Getting Started 14 Accessing and Logging into Workbench 15 Accessing Workbench 15
Logging into Workbench 16
Forgot Your Password? 16
Preparing to Use Workbench 17
Workbench Browser Support 17
Navigating within Workbench 17
The Workbench Welcome Screen 17
Workbench Navigation 18
Environment 18
Audit Trail 19
Accessing Help within Workbench 20
BrassRing Support Community 20
BrassRing Support Community & Request for Enhancements (RFE) 20
Changing Your Password 20
Manage Security Question 21
Period of Inactivity 21
Workbench Application Icons 22
Overview of BrassRing Administrator Roles 23 The BrassRing Administrator/Super User Role 23
Workbench Administrator Role 23
BrassRing Admin+ vs. Workbench 23
What you CANNOT do as a Workbench Administrator 24
Chapter Summary 25
Check Your Skills 26
Chapter 2: Managing Your Database 27 Overview of the BrassRing Database 28 Form Structure 28
Elements of Form Structure 28
Relational Database 29
Elements of the Relational Database 30
Search Engine 30
Search Engine and Indexing 30
Elements of the Search Engine 31
Important Form Configuration Considerations 32

Administrator Tools Using Workbench
© Copyright IBM Corp. 2020 Page 4
Course materials may not be reproduced in whole or in part without the prior written permission of IBM.
Elements of Important Form Configuration Considerations 32
Chapter Summary 33
Check Your Skills 34
Chapter 3: Defining User Types 35 User Type Privileges 36 Elements of User Type Privileges 36
Editing User Type Privileges 37
Save User Type as New 39
Viewing Users and Type Details 39
Viewing Users and User Type Details 39
Export Master Privilege List to Excel 40
Export Master Privilege list to Excel 40
User Type Access – Export to Excel 41
User Type Access – Export to Excel 41
Administer BrassRing Users 42
Restrict Talent Record 42
Talent Record Interface 44
Enabling the User Interface Talent Record Display 44
Chapter Summary 45
Check Your Skills 46
Chapter 4: Candidate Forms 47 Overview of Candidate Forms 48 Elements of Candidate Forms and Candidate-Req Forms 48
Types of Forms 49
Candidate Form Attributes 49
Adding a Form 50
Elements of Candidate Form Attributes 50
Editing Form Attributes 55
Translating Form Names 56
Candidate Form Fields 56
Elements of Form Fields 56
Form Field Types 57
Managing Candidate Form Fields 60
Adding a Form Field 60
Editing Field Attributes 63
Translating Form Fields 64
Translating Field Help Text 65

Administrator Tools Using Workbench
© Copyright IBM Corp. 2020 Page 5
Course materials may not be reproduced in whole or in part without the prior written permission of IBM.
Inactivating Form Fields 65
Field Options 66
Elements of Form Fields Options 66
Managing Field Options 67
Adding Field Options 67
Adding Multiple Field Options 68
Editing Field Options 68
Translating Field Options 69
Inactivating Field Options 70
Export To Excel 70
Configuration Report 70
Approval Routing for Candidate Forms 71
Adding Approval Groups 71
Editing Approval Groups 74
Translating Approval Groups 75
Field Filtering 75
Elements of Field Filtering: 75
Configuring Field Filtering 76
Delete a Field Filter 77
View Field Filters 77
Enhanced Layout 77
Enhanced Layout 77
Sections 82
Sections Heading Area 83
Creating a New Section 84
Split Section at Headings 84
Collapsed Sections 84
Drag-and-Drop Function 85
Placement/Order 85
Highlighting Multiple Fields 85
New / Activated Fields 85
Document Subsidiary Form 86
Adding Document Subsidiary Form 86
Editing Form Attributes 88
Adding fields to Document Subsidiary Form 88
Editing Field Attributes 89
Translating Form Fields 89
Inactivating Form Fields 90
Configuring Enhanced Form Layout 90

Administrator Tools Using Workbench
© Copyright IBM Corp. 2020 Page 6
Course materials may not be reproduced in whole or in part without the prior written permission of IBM.
Chapter Summary 91
Check Your Skills 92
Chapter 5: Req Forms 93 Overview of Req Forms 94
Elements of Req Forms 94
Adding a Req Form 95
Adding a Req Form 95
Elements of Req Form Attributes 95
Editing Req Form Attributes 98
Standard Req Fields 99
Standard Required Req Fields 100
Standard Optional Req Fields 100
Editing Standard Req Field Attributes 101
Standard Req Field Attributes 102
Translating Standard Req Fields 104
Adding Standard Req Field Options 105
Editing Standard Req Field Options 106
Translating Standard Req Form Field Options 107
Inactivating Standard Req Form Field Options 108
Custom Req Fields 108
Elements of Custom Req Fields 109
Defining Custom Req Fields 109
Selecting Custom Req Fields 112
Editing Standard Req Field Attributes 113
Editing Custom Req Field Attributes 114
Preventing the Editing of Custom Req Fields 114
Enable Formatting In Req Custom Text Area Fields 115
Translating Custom Req Fields 115
Inactivating Custom Req Fields 116
Removing Custom Req Fields 116
Adding Custom Req Field Options 117
Editing Custom Req Field Options 118
Translating Custom Req Form Field Options 118
Inactivating Custom Req Field Options 119
Form Layout 119
Form Layout 119
Inactivate Req Form 122
Delete Req Form 123
Administrator Tools Using Workbench
© Copyright IBM Corp. 2020 Page 7
Course materials may not be reproduced in whole or in part without the prior written permission of IBM.
List Filtering for Reqs 123
List Filtering 123
Approval Groups 124
Elements of Approval Groups 125
Adding Approval Groups 125
Editing Approval Groups 127
Translating Approval Groups 128
Req Subsidiary Form 129
Adding a Req Subsidiary Form 129
Adding a Req Subsidiary Form 129
Elements of Req Subsidiary Form Attributes 129
Adding a Form Field 130
Adding Field Options 131
Chapter Summary 132
Check Your Skills 133
Chapter 6: HR Statuses 134 HR Status 135
Elements of HR Status: 135
Adding an HR Status 136
View HR Status 139
Edit HR Status 139
Translate Status Names 139
Set HR Status Actions 139
Inactivate an HR Status 140
Export to PDF 140
Export to Excel 140
HR Status Categories 140
Chapter Summary 142
Check Your Skills 143
Chapter 7 – Data Export and Import 144 Overview of Exports and Imports 145
Export Form Field Options 145
Import Form Field Options 145
Import Candidate Field Association (CFA) and Req Field Association (RFA) 147
Elements of CFAs and RFAs 147
Export and Import Candidate Field Association (CFA) 147
Export and Import Req Field Association (RFA) 149
Chapter Summary 151

Administrator Tools Using Workbench
© Copyright IBM Corp. 2020 Page 8
Course materials may not be reproduced in whole or in part without the prior written permission of IBM.
Check Your Skills 152
Chapter 8: Working with Talent Gateways 153 Overview of Talent Gateways and Pre-qualifying Questions 154
Elements of Talent Gateway Forms and Pre-Qualifying Questions 154
Managing Talent Gateway Form Fields 155
Adding a Pre-Qualifying Question 155
Form Field Types 156
Editing Field Attributes 157
Translating Form Fields 157
Inactivating Form Fields 157
Synchronizing Changes with Talent Gateways 158
Synchronizing Changes with Talent Gateways 158
Adding a Talent Gateway 159
Adding a Talent Gateway 159
Save Talent Gateway as New 160
Launch Talent Gateway 160
Preview XML Talent Gateway Integration 160
Adding a Global Talent Gateway 161
Ungroup a Global Talent Gateway 161
Customizing Talent Gateway Messaging 161
Customizable Text – Reset to Defaults 162
Formatting Date valid with TG responsive 162
Formatting Date 162
Responsive Talent Gateway 163
Responsive Layout Column 163
Responsive Layout for Talent Gateway 164
Steps to Configure Responsive Talent Gateway 169
Set Talent Gateway Search Layout Settings 169
Set Talent Gateway Details Settings 169
Synchronize Changes with Talent Gateway 170
Launch Visual Branding Tool (VBT) for Talent Gateway 170
Visual Branding Tool (VBT) Configuration 171
Chapter Summary 175
Check Your Skills 176
Chapter 9: Gateway Questionnaires 177 Overview of Gateway Questionnaires 178
Responsive apply requires that you create and use a responsive Gateway Questionnaire (GQ).
Responsive GQs have the following features: 178
Administrator Tools Using Workbench
© Copyright IBM Corp. 2020 Page 9
Course materials may not be reproduced in whole or in part without the prior written permission of IBM.
- One column layout – The layout for a responsive GQ is one column. Headers and footers
dynamically adjust based on the device viewing them. 178
- Improved Preview – The Gateway Questionnaire Preview function has been improved to show
the responsive layout and allows for candidates to click directly into the section they would like to
edit before submitting. 178
Adding a Responsive Gateway Questionnaire 178
Responsive Gateway Questionnaires Section & Page List 179
The four new standard sections of Responsive Gateway Questionnaires are: 179
Responsive Gateway Questionnaires Widgets 180
Widgets within the pages are now all in a single column to accommodate responsive screens of
smaller devices without horizontal scrolling. 180
Things to consider when using Responsive Gateway Questionnaires (GQs): 181
Branching Configuration 182
Branching Question Rules 182
Moving to Responsive Gateway Questionnaires (GQs) 183
Update Existing Questionnaire Associations 184
Adding a new Section to the Standard Section of a Gateway Questionnaire 184
Add a page to a section 185
Administer widgets 185
Save Gateway Questionnaire as new 187
Preview a Gateway Questionnaire 188
Translate Gateway Questionnaire names 188
Activate a Gateway Questionnaire 188
Update Gateway Questionnaire Associations 189
Inactivate a Gateway Questionnaire 189
Delete a Draft Gateway Questionnaire 190
Chapter Summary 190
Check Your Skills 191
Chapter 10: Automation 192 Overview of Automation Manager 193
Trigger Types 193
Things to consider when using Automation Manager: 194
Adding a new Automation Manager trigger: 195
Configuring the Trigger Attributes Tab 195
Configuring the Notification Tab 196
Configure Notification Scheduler Tab 197
Activating an Automation Manager Trigger that is a Draft 199
Clone an Existing Automation Manager Trigger (Save As New) 199
View Automation Manager Trigger Details 199

Administrator Tools Using Workbench
© Copyright IBM Corp. 2020 Page 10
Course materials may not be reproduced in whole or in part without the prior written permission of IBM.
Edit an Automation Manager Trigger 200
Inactivating an Automation Manager Trigger 200
Deleting an Automation Manager Trigger 200
Rules Automation Manager (RAM) 201
Things to consider when using Rules Automation Manager (RAM): 202
Adding a RAM trigger: 202
Creating Rules 209
Sequencing Rules 209
Conditions 209
Category 210
Name and Field 212
Operation 212
Select Values 213
Compare Value 213
Define Value 214
Multiple Form Instances 214
Existing Conditions 215
Actions 216
Action Type 216
Existing Actions 220
Activating RAM Triggers 220
Editing Active Triggers 220
Save RAM as new 222
Inactivating RAM Triggers 223
Deleting RAM Triggers in Draft 223
Deleting Previous RAM Trigger Versions 224
RAM/AM Reports 224
RAM / AM Log 227
Elements of a RAM / AM Log 227
Running a RAM / AM Log 227
RAM / AM Log Trigger Results 228
RAM / AM Log – View Details 228
Chapter Summary 230
Check Your Skills 231
Chapter 11: User Interface 232 Configure HR Status Aging 233
Map HR Status Aging to the My Tasks Tab 233
Req Diversity Visualization 234
Chapter Summary 237

Administrator Tools Using Workbench
© Copyright IBM Corp. 2020 Page 11
Course materials may not be reproduced in whole or in part without the prior written permission of IBM.
Check Your Skills 238
Chapter 12: Managing Integrations 239 Overview of Integrations 240
Administer Integrations 240
Integration Tools 242
Types of Integrations 243
Mapping Tool Overview 245
Chapter Summary 250
Check Your Skills 251
Chapter 13: Managing Settings 252 Manage Settings 253
Defining Candidate Types 253
Adding a New Candidate Type 253
Editing a Candidate Type 254
Candidate Tiering 255
Candidate Tiering 255
Attachment Categories 257
Elements of Attachment Categories 257
Adding a New Attachment Category 257
Blurb Categories 258
Adding a Blurb Category 258
Translate a Blurb Category 258
Edit a Blurb Category 258
Email Types Configuration 259
Configure Email Type 259
Job Code Instructions 260
Setting Job Code Instructions 260
eLink Respond Instructions 261
Setting eLink Respond Instructions 261
Add Candidate 261
Setting Instructions for Add Candidate 261
Session Expiry Instructions 262
Setting Session Expiry Instructions 262
Setting Search Reasons 263
Adding a Search Reason 263
Editing a Search Reason 263
Deactivating a Search Reason 263

Administrator Tools Using Workbench
© Copyright IBM Corp. 2020 Page 12
Course materials may not be reproduced in whole or in part without the prior written permission of IBM.
Bulk Print Admin 264
Bulk Print Admin 264
Talent Record Print Page Header 264
Setting up the Print Page Header 264
BrassRing UI Colors 265
BrassRing Home page 265
Home page Administration – Configuration 266
Client Welcome Message 266
Set Default Configuration 266
Standard Reporting Settings 269
Shared Settings 270
Chapter Summary 275
Check Your Skills 276
Appendix A 277 Managing Short Messaging Service (SMS) for Responsive Talent Gateway (TG) 277
SMS Workflow 277
Enable SMS Function 278
Appendix B 286 Candidate Forms – Custom Field Validation 286
Appendix C 295 Configure Interview Manager 295
Interview Manager Privileges 295
Interviews Tab 295
Interview To-do List 297
Interview Manager Calendar Integration 297
Check Your Skills Answer Key 298 Chapter 1 - Getting Started 298
Chapter 2 - Managing Your Database 298
Chapter 3 - Defining User Types 298
Chapter 4 - Candidate Forms 298
Chapter 5 - Req Forms 298
Chapter 6 – HR Statuses 298
Chapter 7 – Data Export and Import 298
Chapter 8 - Managing Talent Gateways 298
Chapter 9 – Gateway Questionnaire 299
Chapter 10 – Automation 299
Chapter 11 – User Interface 299
Chapter 12 – Managing Integrations 299

Administrator Tools Using Workbench
© Copyright IBM Corp. 2020 Page 13
Course materials may not be reproduced in whole or in part without the prior written permission of IBM.
Chapter 13 – Managing Settings 299

Administrator Tools Using Workbench
© Copyright IBM Corp. 2020 Page 14
Course materials may not be reproduced in whole or in part without the prior written permission of IBM.
Chapter 1: Getting Started
Chapter Overview
We begin by learning more about how Workbench works. Before making changes to the forms or editing the user types of BrassRing, we need to make sure our computers are set up for optimal use of Workbench. This chapter focuses on accessing, logging in, and basic navigation.
Chapter Objectives At the end of this chapter, you will be able to:
• Access and log in to Workbench
• Navigate through Workbench
• Change your Workbench password
• Manage your Security Question

Administrator Tools Using Workbench
© Copyright IBM Corp. 2020 Page 15
Course materials may not be reproduced in whole or in part without the prior written permission of IBM.
Accessing and Logging into Workbench To log in to Workbench, you enter the URL into the web address window of your browser, and the browser takes you to the Login page.
Accessing Workbench
To access Workbench: 1. Open your Internet browser. 2. Type in the following web address as indicated in Figure 1- 1.
https://workbench.brassring.com 3. Press Enter. This takes you to the Workbench login page. See Figure 1- 2.
Figure 1- 1 : Typing the address for Workbench
Figure 1- 2 : Logging into Workbench
PASSWORDS FOR WORKBENCH HAVE THE SAME REQUIREMENTS AS FOR BRASSRING.

Administrator Tools Using Workbench
© Copyright IBM Corp. 2020 Page 16
Course materials may not be reproduced in whole or in part without the prior written permission of IBM.
BRASSRING AND WORKBENCH USER ACCOUNTS THAT DO NOT HAVE ANY ACTIVITY IN THE LAST 180 WILL BE DEACTIVATED. SIMILARLY, NEWLY CREATED BRASSRING AND WORKBENCH USER ACCOUNTS THAT DO NOT HAVE ANY USER ACTIVITY CONSECUTIVELY FOR 14 DAYS ARE ALSO INACTIVATED.
Logging into Workbench
To log in to Workbench:
1. Type your Username. 2. Type your unique client identifier. 3. Type your Password, and click Login.
YOU WILL RECEIVE YOUR COMPANY-SPECIFIC LOGIN INFORMATION WHEN YOU HAVE EARNED YOUR
WORKBENCH CERTIFICATION.
Forgot Your Password? If you forget your password, you can reset it through a link on the Workbench login page. To create a new password:
1. Click Forgot your password? from the log on page. See Figure 1- 2. 2. Enter your username and client identifier to receive an email with information about
resetting your password. 3. Click Forgot your password? An email will be sent to the email address associated with
your username. 4. The email will contain a hyperlink. By clicking the hyperlink, a screen will appear, asking
you to answer a security question. See Figure 1- 3.
Figure 1- 3: Security Question

Administrator Tools Using Workbench
© Copyright IBM Corp. 2020 Page 17
Course materials may not be reproduced in whole or in part without the prior written permission of IBM.
5. After answering the security question correctly, you will be able to reset your password. ** Managing your security question is detailed later in the chapter.
IBM CANNOT PROVIDE USERNAMES OR PASSWORDS TO USERS. USE FORGOT YOUR PASSWORD. CLIENTS CAN REQUEST TO CONFIGURE TWO FACTOR AUTHENTICATION TO THE WORKBENCH
ADMINISTRATORS SELF-SERVICE ACCESS. WHEN TWO FACTOR AUTHENTICATION IS ENABLED, THE
WORKBENCH USERS ARE REQUIRED TO ANSWER SECURITY QUESTIONS AFTER THEIR PASSWORD IS AUTHENTICATED TO LOGIN TO WORKBENCH.
Preparing to Use Workbench
To obtain the maximum advantages of Workbench, it is important to ensure that your web browser is configured with the appropriate browser requirements.
Workbench Browser Support
Web browsers should be configured to accept cookies and allow popups, with browser security settings set to medium or lower. Alternatively, the applications can be added to the trusted sites list for the browser.
Full Support Limited Support No Support
IE11 IE9 Firefox 38ESR+/47+
Chrome 52+ Safari 5-6
Mobile Devices
If you have difficulties with your computer and logging in to Workbench, review these requirements with your company’s IS department to be sure that you are set up correctly.
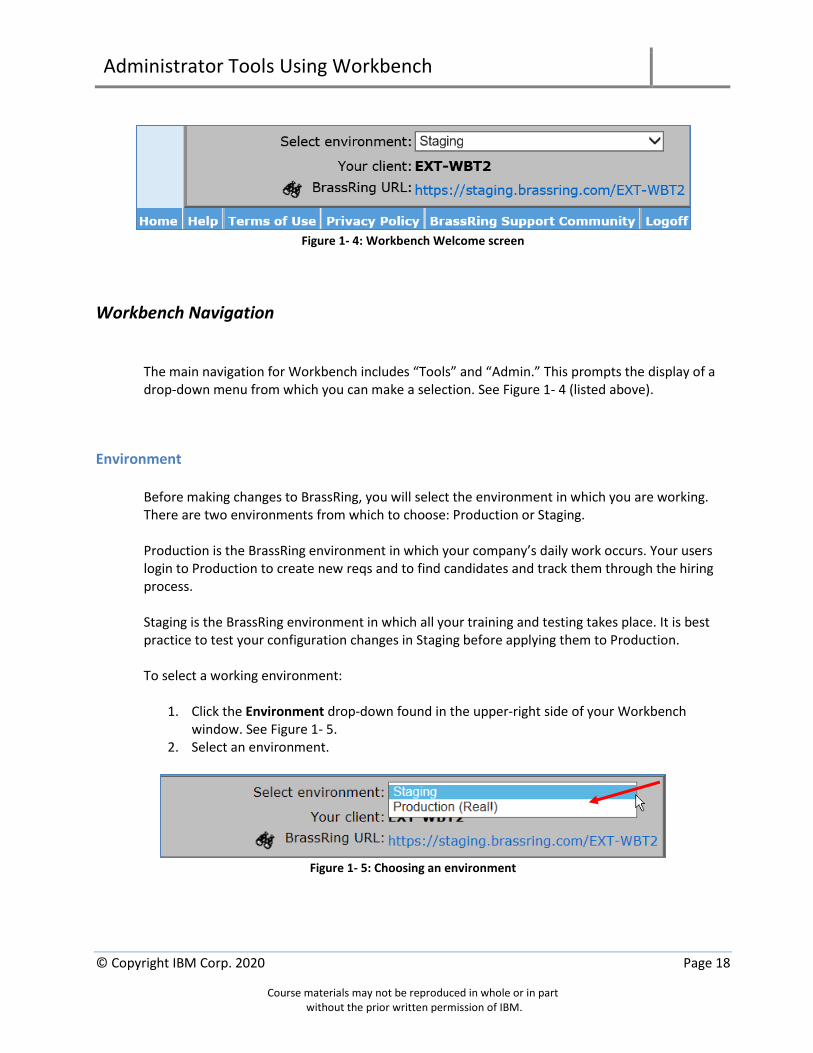
Navigating within Workbench Now that you are logged in, we will get more familiar with the layout of Workbench.
The Workbench Welcome Screen
When you log in to Workbench, the first page is the Welcome screen, as seen in Figure 1- 4. You can always return to the Welcome screen by clicking Home on the main navigation bar.
Administrator Tools Using Workbench
© Copyright IBM Corp. 2020 Page 18
Course materials may not be reproduced in whole or in part without the prior written permission of IBM.
Figure 1- 4: Workbench Welcome screen
Workbench Navigation
The main navigation for Workbench includes “Tools” and “Admin.” This prompts the display of a drop-down menu from which you can make a selection. See Figure 1- 4 (listed above).
Environment
Before making changes to BrassRing, you will select the environment in which you are working. There are two environments from which to choose: Production or Staging. Production is the BrassRing environment in which your company’s daily work occurs. Your users login to Production to create new reqs and to find candidates and track them through the hiring process. Staging is the BrassRing environment in which all your training and testing takes place. It is best practice to test your configuration changes in Staging before applying them to Production. To select a working environment:
1. Click the Environment drop-down found in the upper-right side of your Workbench window. See Figure 1- 5.
2. Select an environment.
Figure 1- 5: Choosing an environment

Administrator Tools Using Workbench
© Copyright IBM Corp. 2020 Page 19
Course materials may not be reproduced in whole or in part without the prior written permission of IBM.
Audit Trail There might be times in Workbench that you notice a change to BrassRing has been made by someone other than yourself. The Audit trail logs modifications made within a particular page of Workbench. The Audit trail links allow users to view which user made changes to the component and when the change occurred. If the Audit trail is available for a specific feature, the screen will display an Audit trail link in the upper-right corner, as is seen in Figure 1-6. Displayed are the date of change; the record and action modified; and the name of the user making the change. It will also list if the change was made by your organization (Self-Service) or by IBM (Workbench). Refer to Figure 1- 7.
Figure 1- 6: Audit trail link
Figure 1- 7: Audit trail
To view the Audit trail:
1. Click the link marked Audit trail in the upper-right corner of the screen to display the change history.
2. When finished viewing, click Close.
ALL TIMES LISTED IN THE AUDIT TRAIL ARE LISTED IN EASTERN STANDARD TIME (EST).

Administrator Tools Using Workbench
© Copyright IBM Corp. 2020 Page 20
Course materials may not be reproduced in whole or in part without the prior written permission of IBM.
Accessing Help within Workbench The Help link provides users with access to the IBM Knowledge Center (KC) with detailed information on the features and function in Workbench. To access Help in Workbench, click Help in the upper-right corner of any Workbench window.
BrassRing Support Community
As a Workbench Administrator, you might need to enter a support incident if there is an issue with BrassRing. To submit a support incident, click BrassRing Support Community in the upper-right corner of any Workbench window.
BrassRing Support Community & Request for Enhancements (RFE)
BrassRing users can access the BrassRing Support Community from within BrassRing, and Workbench Administrators can access the BrassRing Support Community from within Workbench. As a Workbench Administrator, you might need to submit a request for enhancement (RFE). An RFE allows a user to submit a feature or function suggestion for BrassRing or Workbench to IBM. To submit an RFE:
1. Click the BrassRing Support Community link in the upper-right corner of your Workbench window. See Figure 2-8.
2. The BrassRing Support Community launches; click Request for Enhancement (RFE) Community and follow the instructions to submit an RFE.
Figure 1- 8: Accessing the BrassRing Support Community
Changing Your Password
Once you have received your IBM assigned username and password, IBM recommends that you change your password for increased security. To change your password:
1. Click Admin > Edit Profile. 2. Scroll to the Change Password section 3. Enter your current password, enter a new password and confirm your new password 4. Click Save.

Administrator Tools Using Workbench
© Copyright IBM Corp. 2020 Page 21
Course materials may not be reproduced in whole or in part without the prior written permission of IBM.
Manage Security Question
You can manage the security question that appears when you reset your password from the Forgot Your Password link on the login page. There are five questions to choose from. You can select a security question and identify the answer. Refer to Figure 1- 9.
Figure 1- 9: Manage security question
Period of Inactivity If you are inactive in Workbench for 30 minutes or more, you will be logged off. After 29 minutes of inactivity, a pop-up window will appear, notifying you that your session has expired due to inactivity. This window of inactivity cannot be modified.
Figure 1- 10: Expired session

Administrator Tools Using Workbench
© Copyright IBM Corp. 2020 Page 22
Course materials may not be reproduced in whole or in part without the prior written permission of IBM.
YOUR WORKBENCH SESSION WILL AUTOMATICALLY EXPIRE AFTER 30 MINUTES OF INACTIVITY.
Workbench Application Icons
While using Workbench, you will come across various icons. The table below includes the icons, along with a brief description of each.
Icon Function
Add object to database
Translate requirements
View object details
Edit object details
Preview object
Delete object from database
Inactivate object
Activate object
Save object as new object
Export values to Microsoft Excel; export field associations
Import values from Microsoft Excel
Launch Talent Gateway in a new window for user to preview
Synchronize changes made with Talent Gateways

Administrator Tools Using Workbench
© Copyright IBM Corp. 2020 Page 23
Course materials may not be reproduced in whole or in part without the prior written permission of IBM.
Overview of BrassRing Administrator Roles There are different roles in BrassRing administration. We will explore them below.
The BrassRing Administrator/Super User Role
BrassRing Administrators (or Super Users) are responsible for managing the day-to-day operations of BrassRing. Their typical responsibilities might include, but are not limited to:
• Administering users of BrassRing (Note: Does not apply to clients with Talent Suite)
• Maintaining codes tables
• Running reports
Most of these functions can be found within BrassRing, from the Admin+ menu.
Workbench Administrator Role Workbench Administrators are responsible for maintaining the BrassRing configuration in keeping with the changing needs of your company’s hiring process and requirements. Greater changes can be made by the Workbench Admin and with more complex results. These modifications can largely impact data integrity and system usability. For that reason, there are typically fewer Workbench Admins than Super Users at your company. Typical responsibilities include, but not limited to:
• Defining User Type permissions
• Administering forms, form fields, and the options for those form fields
• Configuring triggers within Automation Manager
• Creating and managing Talent Gateways
The tasks mentioned above are completed using Workbench, a web-based application separate from BrassRing. To use Workbench, the Workbench Admin must first earn a Workbench Administration Certification from IBM. With each new BrassRing release, Workbench users can be increasingly trained and certified to access the new function.
BrassRing Admin+ vs. Workbench
When determining which modification you would like to make to your BrassRing system, you need to establish if those changes are made within BrassRing itself from the Admin+ menu or in Workbench. Table 1-1 below helps you determine which site to use when making changes to BrassRing.

Administrator Tools Using Workbench
© Copyright IBM Corp. 2020 Page 24
Course materials may not be reproduced in whole or in part without the prior written permission of IBM.
Topic Admin+ Workbench
Users - Add / Edit / Activate / Inactivate users - Add/Edit/Delete Organizational groups
- Add / Edit / Activate / Inactivate users (Note: Does not apply to clients with Talent Suite)
- Edit user type permissions - Export master privilege list - Edit user access to forms - Create / Edit / Delete approval group
Codes - Add /Edit / Inactivate new codes - Export code lists to MS Excel
- Add / Edit / Inactivate new codes - Export code lists.
Forms - Add form field options - Edit form field options - Inactivate/Activate form field list options
- Add form - Edit user access to forms - Add new form fields - Edit custom form fields - Inactivate / Activate custom form fields - Edit form attributes - Add/Edit field options (including translated
language options) - Inactivate / Activate field options - Add translated form names - Designate fields as searchable/outputable - Synchronize form changes with Talent
Gateways
Talent Gateways None - Add Talent Gateways - Synchronize form changes with Talent
Gateways - Set up questions as default questions - Add / Edit / Inactivate new form fields on the
Job Response form - Add / Edit / Inactivate field options on the Job
Response form - Edit Talent Gateway messaging- except for the
Disclaimer invitation - Add / Edit Privacy Policy
Communications - Add / Edit / Delete E-mail templates - Add / Edit / Delete Letter templates - Add / Edit / Delete Document templates
None
Misc. Settings - Add / Edit / Delete Org Groups - Add / Edit Candidate Types - Set default search and output fields
Set Instructions None - Add / Edit session expiry instructions - Add / Edit/Delete Blurbs
Table 1-1: Admin+ and Workbench options
What you CANNOT do as a Workbench Administrator
There are many things you can do as Workbench Administrators, there are also some things you cannot do as Workbench Administrators. Below lists some of the things you are not able to do as a Workbench Administrator. Your BrassRing representative will have the ability to perform the below tasks:

Administrator Tools Using Workbench
© Copyright IBM Corp. 2020 Page 25
Course materials may not be reproduced in whole or in part without the prior written permission of IBM.
1. Set general default client settings for the BrassRing system
(i.e., timeout period, password reset, etc.) 2. Activate Rules Automation Manager (RAM) triggers in Production
Chapter Summary
• To log in to Workbench, you need the username, client identifier, and password that are provided upon earning the Workbench Admin Certification.
• It is best practice to test configuration changes in your Staging environment before
implementing them in your Production environment.
• After 29 minutes of inactivity, a pop-up window will appear, notifying you that your session will expire due to inactivity. To avoid automatic logoff, you must click OK.

Administrator Tools Using Workbench
© Copyright IBM Corp. 2020 Page 26
Course materials may not be reproduced in whole or in part without the prior written permission of IBM.
Check Your Skills
Answer these True or False questions:
1. Main navigation for Workbench is through the options “Tools” and “Admin.” 2. Workbench Administrators access Workbench through a common URL, not one that is
unique to their respective organizations. 3. IBM recommends making changes in the Staging environment before doing so in
Production. 4. Workbench is compatible with all Internet browsers. 5. Changes made by a Workbench Administrator are typically more complex than those
made by a BrassRing Super User. 6. As a Workbench Administrator, you do not have the ability to add a new form.
Select the best answers:
7. You need the following items to log in to Workbench: a. Username and password b. Client identifier c. Workbench URL d. All of the above
8. The two environments of BrassRing in which changes can be made are:
a. Training and Production b. Official and Unofficial c. Practice and Serious d. Staging and Production

Administrator Tools Using Workbench
© Copyright IBM Corp. 2020 Page 27
Course materials may not be reproduced in whole or in part without the prior written permission of IBM.
Chapter 2: Managing Your Database
Chapter Overview
During implementation, your company provides IBM with the specifications for all the forms that will be used with your BrassRing site. These typically include the req form, interview form, offer form, etc. With Workbench, you have access to create and modify forms, form fields, and form field options. BrassRing is supported by a shared data structure known as a relational database. Modifying your forms can adversely affect your existing data, and your ability to use historical data in the future. This is why only a select handful of individuals have this ability as certified Workbench users. In this chapter, we will focus on the data structure of BrassRing, and the effects of configuration changes to the data within it.
Chapter Objectives
At the end of this chapter, you will be able to:
• Recognize the data structure of BrassRing
• Describe the search engine
• Identify the benefits and the risks associated with configuration changes to your BrassRing forms made in Workbench

Administrator Tools Using Workbench
© Copyright IBM Corp. 2020 Page 28
Course materials may not be reproduced in whole or in part without the prior written permission of IBM.
Overview of the BrassRing Database
To recognize the implications of form changes made through Workbench, it is important to first understand the database structure of BrassRing. As previously mentioned, BrassRing is supported by a shared data structure, also referred to as a relational database. In addition, BrassRing use a search engine to retrieve data from the database. Queries conducted by your users, such as candidate searches, are also affected by your form configuration changes. We will look at form structure, the nature of relational databases, and the search engine.
Form Structure
The BrassRing data structure is built to allow for the dynamic creation of forms and their respective form fields, both of which are unique to a client’s specific configuration requirements. This is accomplished by defining the configurable parts of BrassRing within the data itself.
Elements of Form Structure Here are some points to consider when thinking about BrassRing form structure:
− Each IBM client has a set of forms available within BrassRing. Each of these forms contains a list of fields, and most fields have an option. The form field and form field options are all unique to the client.
− The list of forms and the list of fields are stored in tables within the database. We will discuss tables in the next section, as it pertains to relational databases.
− BrassRing is designed to query these tables to obtain the specific information that is pertinent to the user when it is requested through BrassRing. BrassRing uses data elements within these tables to decide how and when to display the appropriate data. For example:
o Bob Smith at Global Incorporated initiates the action in BrassRing to “add a form” to a candidate. BrassRing loads the next screen by querying the table that holds the form structure’s data. The information displayed will include a list of forms with Global Inc.’s unique client ID, for which Bob Smith’s User Type (example: “Recruiter”) has privileges.
− This type of architecture enables IBM to easily add new forms for a given client’s needs within the existing database structure. This is accomplished by using the tools Workbench provides to add form definitions to the data tables that are already in place.

Administrator Tools Using Workbench
© Copyright IBM Corp. 2020 Page 29
Course materials may not be reproduced in whole or in part without the prior written permission of IBM.
Relational Database
BrassRing is supported by a shared data structure. Changes made in the database can have long-reaching effects on your BrassRing site because of this structure.
Relational Database
Behind the scenes, BrassRing is supported by a series of data tables. These tables act as “buckets” of categorized data. See Figure 2- 1. These tables rely on a shared data structure, or a relational database. Any form, form field, and option can be created and be used in many data tables.
Figure 2- 1: Form creation from tables
For example, when a req form field is created, such as “Cost Center,” that field data can be shared on a candidate-per-req form such as Interview Evaluation form, Phone Screen form, and Offer form. BrassRing is configured to point to this field in several places. If the form is attached to a candidate, the data can be accessed with the rest of the candidate information. To further illustrate use of the database tables, we will go back to our previous example of Bob Smith and Global Inc. Bob selects the Interview Evaluation form to add to the candidate. BrassRing queries the table in the database that houses the questions, or form fields, for all the forms, looking specifically for the questions that are associated with the table ID number that is tied to the Interview Evaluation form for Global Inc. When these questions are identified, the attributes of each question, such as the question type (single-select, drop-down list; text box; check box), whether or not the question is required, etc., will drive the way that BrassRing displays the question. Using this type of architecture, IBM is able to provide software with a great deal of flexibility around the data elements that each client is able to capture, without rebuilding or adding to the database structure itself when new requirements arise. THE CODING WITHIN BRASSRING USES STANDARD SQL FOR ACCESSING AND MANIPULATING STORED DATA. TALENT GATEWAYS OPERATE SEPARATELY USING A FREESTANDING XML DATASTORE TO HOLD AND QUERY
DATA. THEY DO NOT RELY DIRECTLY ON THE BRASSRING DATABASE TO PULL INFORMATION. WE WILL
ADDRESS THIS IN GREATER DETAIL IN CHAPTER 4: CANDIDATE FORMS.
BrassRing
Reqs

Administrator Tools Using Workbench
© Copyright IBM Corp. 2020 Page 30
Course materials may not be reproduced in whole or in part without the prior written permission of IBM.
Elements of the Relational Database
Here are some important facts about the relational database:
− Each data element is automatically assigned a unique number in the data table. For example, a company is assigned a client ID of “45,” their Offer form is assigned “355,” and the “Recruiter” field is assigned “1011.”
− The data number assignments enable the information to be shared easily between tables. Using the previous example, field number 1011 (Recruiter) exists in the req form, Interview Evaluation form, and Offer form. All these forms are configured to point to the same data element, “1011,” within the database. Changes made to the unique identifier of a form field and/or form field options will update the corresponding label in the database affecting any occurrence of the field in your system. As an example, you opt to change an option from “Payroll” to “Compensation.” If any previously completed forms have “Payroll” selected for that field, the option will “hide,” because the data is no longer a match to the new label. The form field will now appear to be incomplete. For this reason, we do not allow changes to the database field names or the option codes.
Search Engine
IBM relies on a search engine to offer the most advanced search capabilities. It enables users to search on information stored in the data tables, without going through the time-consuming exercise of searching across several tables to find the appropriate information.
Search Engine and Indexing
The search engine is able to offer the best in search capabilities because of indexing technology, similar in concept to an index found in a book. It holds a small amount of consolidated information for each candidate. When a user searches for a specific value, the search engine uses these indices to come up with the location of the data. The appropriate information is accessed in the database quickly and efficiently. With the use of the search engine, searching performed within BrassRing is possible on candidate resume or CV fields, such as “Position held” (Job title) and “Country,” and on certain form fields. This enables users to search the database using fields, such as “How many years of sales experience do you have?”

Administrator Tools Using Workbench
© Copyright IBM Corp. 2020 Page 31
Course materials may not be reproduced in whole or in part without the prior written permission of IBM.
Elements of the Search Engine
Here are some important points to keep in mind concerning the search engine:
− The search engine allows for each client to store a total of 625 candidate form fields and 625 req form fields within its search engine. This is a structural limitation within the search engine technology and cannot be changed. However, IBM has found it more than sufficient to meet the needs of most clients.
− For each candidate and req form, your company is permitted a limited number of fields to designate as “Searchable” and “Outputable.” Workbench makes it easy to track how many fields you have remaining when adding or editing forms. We will discuss that in more detail in the next chapter.
− Terms to Know: Searchable: enables a field to be searched when looking for candidates of a certain type Outputable: enables a field to be seen on the candidate search results screen after a search has been conducted
Searchable/Outputable
Fields from… Text fields* Numeric fields Date fields
Candidate forms 500 50 75
Req forms 500 50 75
❖ The above chart provides the number of Searchable/Outputable fields per site (Staging
site and Production site).
❖ This includes items that are selected from drop-down lists, radio buttons, check boxes, and text boxes.
− When fields are selected for Search and/or Output within the database, they are mapped to the search engine. This means the mapped field will be included in the candidate data indexing process that occurs as new profiles are added to the system.
− New candidate profiles submitted to the database are indexed to include these new fields.
ONCE A FIELD IS MAPPED TO THE SEARCH ENGINE, THE MAPPING CANNOT BE UNDONE
WITHOUT AN IBM ENGINEERING EFFORT. ENGINEERING CHARGES WOULD APPLY.

Administrator Tools Using Workbench
© Copyright IBM Corp. 2020 Page 32
Course materials may not be reproduced in whole or in part without the prior written permission of IBM.
Important Form Configuration Considerations
Now that we have discussed the structure of the BrassRing database, we need to take a look at some considerations when making configuration changes to forms. Carefully weigh your options before making any modifications to BrassRing.
Elements of Important Form Configuration Considerations
Here are some important points to keep in mind regarding form configuration:
− Changes to form field options can impact your previously stored data. As an example, you change a Location field option on the req form from “High Street” to “Winter Street.” This change will cause any previously saved records containing the selection “High Street” to now display “Winter Street,” with no historical reference of “High Street”.
− Workbench does not enable you to delete any form fields. Deleting a form field would delete it from the entire database, resulting in all historical data being lost.
− Once a field is mapped to the search engine, the mapping cannot be undone without an IBM Engineering effort. Engineering charges would apply.

Administrator Tools Using Workbench
© Copyright IBM Corp. 2020 Page 33
Course materials may not be reproduced in whole or in part without the prior written permission of IBM.
Chapter Summary
• BrassRing is supported by a shared data structure known as a relational database.
• The search engine provides users with advanced search capabilities.
• Using Workbench, form fields can be designated as Searchable and/or Outputable.
• Configuration changes can have far-reaching implications, including loss of historical data
and alteration of the candidate indexing process.

Administrator Tools Using Workbench
© Copyright IBM Corp. 2020 Page 34
Course materials may not be reproduced in whole or in part without the prior written permission of IBM.
Check Your Skills Answer these True or False questions:
1. The BrassRing database is composed of a series of tables.
2. Req and candidate form tables are the only tables that are relational.
3. Clients have an unlimited number of Searchable/Outputable fields.
4. The impact of form configuration changes on your historical data is minimal.
Answer the following questions:
5. What is the benefit of the BrassRing search engine?
6. Each client can designate up to ______ text fields from candidate forms as Searchable/Outputable.
7. Provide an example of how BrassRing uses relational data.
8. Name one consequence for editing the configuration of a form.

Administrator Tools Using Workbench
© Copyright IBM Corp. 2020 Page 35
Course materials may not be reproduced in whole or in part without the prior written permission of IBM.
Chapter 3: Defining User Types
Chapter Overview
BrassRing users are assigned a specific level of access to function through their User Type. In Workbench, you will have the ability to manage the privileges and permissions for each of your company’s User Types. For example, you can pick and choose the BrassRing tasks to which your Recruiters have access, such as “Add new req” and “Post to Talent Gateways.” By not selecting other items, you can limit their ability to certain functions, such as “Erase candidate.” In this chapter, we explore defining User Types.
Chapter Objectives
At the end of this chapter, you will be able to:
• Recognize User Type privileges
• Define your own User Types
• Export the master privilege list to Microsoft Excel
• Export the user type access to Microsoft Excel

Administrator Tools Using Workbench
© Copyright IBM Corp. 2020 Page 36
Course materials may not be reproduced in whole or in part without the prior written permission of IBM.
User Type Privileges During implementation, your company provided IBM with the specifications for all of its User Types. IBM then created the User Types and defined them based on these specifications. With access to Workbench, you will have the ability to maintain these privileges on an ongoing basis. For example, you might want to have Hiring Managers search for candidates in the BrassRing database. You would need to edit the Hiring Manager User Type permissions to include candidate searching.
Elements of User Type Privileges Here are some things to consider when editing User Type privileges:
• Changes to user privileges should be communicated to the users before being moved into Production.
• User Type permissions are divided into groupings called Functions. These Functions drill down further into each specific BrassRing task, labeled as privileges. Each privilege provides access to a particular piece of function. Table 3- 1 provides a list of the Functions with a description of the privileges within that Function:
FUNCTION DESCRIPTION OF THE PRIVILEGES WITHIN THE FUNCTION Admin Enables users to manage their own account through “Admin” in
BrassRing
Admin+ Provides access to administrative features, such as Add user and Edit codes (typically reserved for Super Users)
Analytics Provides access to report across the organization and to drill down to detailed views of data using Business Intelligence (BI) tools
Candidate Actions Candidate Actions 2 Candidate Actions 3
Enables users to take a selection of actions on a candidate
Candidate Categorization Provides users with access to folders and folder actions, excluding
actions associated with candidate movement or filing
Communications Provides access to BrassRing communications features, such as batch letters and sending communications
Data Insight Tool Provide users with access to the Data Insight Tool
Integration Integration 2
Tied to the integration of IBM partners or external data sources. If you do not currently use integration, these options will not make any changes in your system
Interview Manager Restricts and/or expands the access to Interview Manager.
My Reqs My Reqs 2
Provides access to features specific to My reqs. My reqs is defined as those reqs that the user created or is selected as Recruiter, Hiring Manager, or Req team member
Notifications Enables users see real-time onscreen alerts.

Administrator Tools Using Workbench
© Copyright IBM Corp. 2020 Page 37
Course materials may not be reproduced in whole or in part without the prior written permission of IBM.
Outlook Enables user to send interview requests to potential interviewers by using Microsoft Outlook calendar invitations.
Purge Enables users manage purge criteria sets, schedule purge reports, schedule purge operations.
Reports Reports 2
Provide access to the functionalities related to the Reports module. This would also include access to any BrassRing custom reports
Reqs Reqs 2
Provides access to all req-related functions, excluding posting to Talent Gateways. Note that the term ‘All’ refers to “all reqs in BrassRing” (i.e., every req)
Search Enables users to take specified actions in the Search module
Talent Gateway Enables users to use Talent Gateways
Table 3- 1: Functions
Defining User Types
During Implementation, IBM defined your User Types and permissions. As a Workbench Admin, you edit User Type privileges, and add / inactivate User Types.
Editing User Type Privileges
To edit User Type permissions:
1. Click Tools > Users > User Types.
2. Click the Edit type permissions icon for the User Type you want to edit. Refer to Figure 3-1.
3. If necessary, modify the name in the User Type name text box. 4. If necessary, select a different Persona Group. Based on the persona group, users now
have a home page that is mobile responsive which displays cards, grids, visualizations, and welcome messages. The Persona Group of ‘Default’ is automatically assigned and represents a Recruiter’s view of the home page. The list of Persona Groups includes:
a. Default b. Recruiter c. Hiring Manager d. Administrator e. HR User f. Reporting/Analytics
Note: Currently, the Persona Groups of Administrator, HR User, and Reporting/Analytics represent a Recruiter’s view of the home page. However, future builds will include the design of the home page specific to these Persona Groups.
5. Click the Set privileges icon for the Function area you want to edit. See Figure 3- 2. 6. Click the box for the privileges that you want to add or remove for this User Type. See
Figure 3- 3. 7. Click the Done button.

Administrator Tools Using Workbench
© Copyright IBM Corp. 2020 Page 38
Course materials may not be reproduced in whole or in part without the prior written permission of IBM.
8. You will be returned to the Set name and function window. From there, you can edit an additional Function.
9. When finished, click the Save button.
Figure 3- 1: Edit user type permissions
A COMPLETE LIST OF PRIVILEGES AND THEIR DESCRIPTIONS ARE AVAILABLE IN THE ONLINE USER GUIDE. THE
ONLINE USER GUIDE IS ACCESSIBLE FROM THE HELP OPTION.
Figure 3- 2: Set name and function
Figure 3- 3 : Set privilege options
ONCE A FUNCTION AREA HAS PRIVILEGES SET, A BLACK CHECKMARK WILL APPEAR TO THE LEFT OF THE
FUNCTION NAME. WHEN THE FUNCTION IS MODIFIED, THE CHECKMARK TURNS RED UNTIL YOU SAVE YOUR
TYPE PERMISSIONS CHANGES. CLICK AUDIT TRAIL IN THE UPPER-RIGHT CORNER OF THE SCREEN TO SEE THE CHANGE HISTORY FOR THAT
PARTICULAR TOPIC.

Administrator Tools Using Workbench
© Copyright IBM Corp. 2020 Page 39
Course materials may not be reproduced in whole or in part without the prior written permission of IBM.
Adding new User Type
To add a new User Type:
1. Click Tools > Users > User Types. 2. Under Actions, select Add new user type. 3. Add the User Type Name. 4. Select a Persona Group.
5. Click icon to set privileges for specific functions as appropriate. 6. Click the Save button.
Save User Type as New
To copy an existing User Type:
1. Click Tools > Users > User Types. 2. Select the user type you want to copy. 3. Click Action Save user type as new. 4. Add the User Type Name. 5. Select a Persona Group.
6. Click icon to set privileges for specific functions. 7. Click the Save button.
Viewing Users and Type Details
As a Workbench Admin, you can view a list of privileges assigned to a User Type for each functional area: candidates actions, requisitions, searching, reports, Welcome Page panel mappings, and so forth. You can also view a list of users belonging to the User Type.
Viewing Users and User Type Details
To view the users and User Type Details:
1. Click Tools > Users > User Types.
2. Click the View Users and Type Details icon for the User Type whose privileges you would like to view. Refer to Figure 3- 4.

Administrator Tools Using Workbench
© Copyright IBM Corp. 2020 Page 40
Course materials may not be reproduced in whole or in part without the prior written permission of IBM.
Figure 3- 4: Viewing Users and Type Details
THE PRINT BUTTON IS AVAILABLE AT THE BOTTOM OF THE SCREEN.
Export Master Privilege List to Excel This allows you to get an export in Excel of all the user type privileges that are available. This is helpful in locating which Function a user type privilege is located under.
Export Master Privilege list to Excel To export the master privilege list to Excel:
1. Click Tools > Users > User Types. 2. Click Export master privilege list to Excel on the Actions toolbar. Microsoft Excel will
launch and the master privilege list will open. See Figure 3- 5.

Administrator Tools Using Workbench
© Copyright IBM Corp. 2020 Page 41
Course materials may not be reproduced in whole or in part without the prior written permission of IBM.
Figure 3- 5: Export Master Privilege List to Excel
User Type Access – Export to Excel
Workbench Administrators have the ability to export user type privileges and access settings for HR Statuses, Req form fields, Candidate forms, Candidate form fields, Panel mappings, Screen defaults, and so on. The Master privilege list is an exhaustive list of all available User Type Function areas and privileges. Workbench enables you to create a CSV (comma separated value) list of privileges that you can open and save to Microsoft Excel. This function might prove useful when preparing to make changes to User Type responsibilities.
User Type Access – Export to Excel
To export the user type privileges to Excel:
3. Click Tools > Users > User Types. 4. Click User type access – Export to Excel on the Actions toolbar. The export is added to
Task Manager. 5. Navigate to the Task Manager’s Queue (Tools > Task Manager > View) 6. Click the binoculars icon for the User type access – Export to Excel file. The excel file will
appear. Be sure to select the User Type Access tab within the Excel Spreadsheet. See Figure 3- 6.

Administrator Tools Using Workbench
© Copyright IBM Corp. 2020 Page 42
Course materials may not be reproduced in whole or in part without the prior written permission of IBM.
Figure 3- 6: User Type Access – Export to Excel
Administer BrassRing Users
BrassRing Users can be administered in BrassRing. As a Workbench Administrator, you can now also manage BrassRing users in Workbench under Tools > Users > Administer BrassRing Users. Use the Actions to add new users, inactivate selected users, export users, and view user access for a selected user. Note: Clients on Talent Suite will manage their users in Talent Suite User Management and not through Workbench.
Restrict Talent Record
Restrict Talent Record is a privilege that enables you to limit user access to specific internal candidate information. The privilege is listed under the “Candidate Actions” Function. Before selecting this User Type setting, consider the following details regarding its use, and then plan to speak with your BrassRing representative regarding best practices in implementing this setting at your company.
If Restrict Talent Record is selected, the User Type affected can only access internal candidate data that is:
• Associated with those reqs to which the user is selected as Recruiter, Hiring Manager, or Req team member
• Associated with those working folders in which the user is an owner or member
• Associated with that user’s BrassRing Inbox
• Not associated with any reqs
The user is restricted from the following data that is associated with other reqs, working folders, and Inboxes to which they do not belong:
− Resume or CV and cover letter − Candidate/req forms
− Communications history − eLink history
− Codes − HR Status and HR Status history

Administrator Tools Using Workbench
© Copyright IBM Corp. 2020 Page 43
Course materials may not be reproduced in whole or in part without the prior written permission of IBM.
Best Practices for Implementing Restrict Talent Record
As with any configuration change, test this feature first in the Staging environment to get a feel for how it works before enabling in Production.
The following User Type settings should be turned off to gain full benefit of the Restrict Talent Record feature:
Candidate Actions: − Attachments – View all - Attachments – Delete all
− Candidate type – Update - Export – ASCII or Excel
− Candidates – Erase - HR Status – Add/update in all folders
− Import candidate forms - Export form template
- Import candidate forms – Import candidate form data
− Notes – All privileges
Search:
- Search Employees - Security access group – Override resume security codes
− Subscribe to others’ saved searches
Reqs:
View All privileges (select ‘My reqs’ privileges instead)
Considerations for the Restrict Talent Record Setting The following points should be taken into consideration when determining whether or not to implement Restrict Talent Record:
• The Quick Start User Type should not be restricted. This would mean eLinks might not display the necessary information
• Restricted users can review full candidate information if it is “forwarded via email” to them
• There are limitations to the restricting of a user’s access to an internal candidate. A user might still access an internal candidate through the following areas:
− Reports − Importing/exporting data
− File attachments − Assessments
− Icon display − Candidate overview
− “Last codes” display

Administrator Tools Using Workbench
© Copyright IBM Corp. 2020 Page 44
Course materials may not be reproduced in whole or in part without the prior written permission of IBM.
Talent Record Interface
The Talent Record has a configurable “ribbon” section and the Action Log. These features provide convenience and efficiency. As a Workbench Administrator you will be able to:
• Configure the Talent Record interface
• Configure the panels displayed in the “ribbon” header
• Identify the default section screen for the Talent Record
Enabling the User Interface Talent Record Display To enable the Talent Record display:
1. Select Tools > Users > User Types. 2. Select the User Type you would like to make changes to and click Screen Display Defaults in the
Actions list.
Figure 3- 9: Action - Screen display defaults
3. The Edit screen display defaults page appears.
Figure 3- 10: Edit screen display defaults page

Administrator Tools Using Workbench
© Copyright IBM Corp. 2020 Page 45
Course materials may not be reproduced in whole or in part without the prior written permission of IBM.
4. To edit the Talent Record display defaults, expand the Talent Record section by clicking the plus
sign. 5. To allow users to edit their display, check the box (it is checked by default). You can also change
the defaults for the following display characteristics: Ribbon
• Re-order the panes by changing the pane number in the drop-down. Note: pane numbers must be unique
• Add up to 25 panes (Add Pane) or delete panes (Delete Pane)
• Change the order of fields displayed within a pane (no more than 4 fields can be configured in one pane) by clicking the up or down arrow in the Actions column
• Change the fields displayed by clicking Select field Resume or CV
• Suppress the display of tabs by unchecking the Display check box
• Change the default tab by unchecking the current default and select another
• Use the Show me links in each section to preview the Talent Record in a pop-up window
• Use Apply this configuration to other User Types section to quickly update other User Types. This applies only to the configuration and NOT to activating the new Talent Record
6. When finished, click Save, or, at any time, click Reset to default to return to the default settings.
Chapter Summary
• BrassRing typically has five standard User Types. Your company might have implemented additional User Types to best meet you organization’s needs
• If the User Type of “QuickStart” is not enabled to view candidate forms or reqs, the recipients will not be able to access these features through an eLink
• You can edit your existing User Type names and permissions
• There are Function areas within each User Type. Privileges can be set within each Function
• You can export a Master list of privileges into MS Excel
• Configure the Talent Record interface
• Configure the panels displayed in the “ribbon” header
• Identify the default section screen for the Talent Record

Administrator Tools Using Workbench
© Copyright IBM Corp. 2020 Page 46
Course materials may not be reproduced in whole or in part without the prior written permission of IBM.
Check Your Skills
Select the best answer:
1. User Type privileges are divided into groupings called:
A. Privileges
B. Functions
C. Divisions
D. Segments
Answer the True or False question
2. During implementation, IBM created and set up your User Types. Any additional User Types are created by you, the Workbench Administrator.
Answer the short answer question
3. Describe the steps you would take to determine the privileges activated for a specific User Type.
Perform these hands-on exercises in Workbench:
NOTE: Before you perform the below exercises, click HOME. When performing the below exercises, use the HR Staff User Type that corresponds to your Training ID.
4. Your business has decided that users who have the HR Staff User Type should not be
able to add candidate notes. Remove this responsibility/privilege.
5. Due to a change in business processes, your company has decided that all users of
BrassRing assigned to the HR Staff User Type should no longer be able to delete
communication templates.
6. Add the Privilege you removed in #4.
7. Export the Master privilege list to Excel.

Administrator Tools Using Workbench
© Copyright IBM Corp. 2020 Page 47
Course materials may not be reproduced in whole or in part without the prior written permission of IBM.
Chapter 4: Candidate Forms
Chapter Overview
Your company has made many decisions regarding the design and configuration of your BrassRing system, including the defining of all its forms. In BrassRing, forms include candidate forms, candidate-req forms, Talent Gateway forms, and requisition forms. IBM created and configured the forms and their options according to your company’s specifications. This chapter will focus on administering candidate forms using Workbench.
Chapter Objectives
At the end of this chapter, you will be able to:
• Describe candidate and candidate-req form types
• Add forms
• Edit form attributes
• Add/Administer/Translate/Inactivate form fields
• Edit form field attributes
• Add/Administer/Translate/Inactivate form field options
• Position the form fields

Administrator Tools Using Workbench
© Copyright IBM Corp. 2020 Page 48
Course materials may not be reproduced in whole or in part without the prior written permission of IBM.
Overview of Candidate Forms
BrassRing assists your company in managing candidates with the use of forms. These forms might include a Resume or CV Screen, Interview Evaluation, Offer, etc. Each company creates forms specific to their hiring process. Workbench enables you to create new forms and make modifications to your existing forms. For example, you might want to add a new field to your Interview Evaluation form. Or, perhaps you need to create a new form due to a change in your company process. We will get started by discussing the types of candidate forms in BrassRing (we will discuss Req forms in Chapter 5):
• Candidate forms
• Candidate-req forms
• Talent Gateway forms
Elements of Candidate Forms and Candidate-Req Forms
− Candidate and candidate-req forms collect and store all types of information about candidates.
− As we learned in Chapter 2, a form is composed of different components called fields and field options, although not all fields will have options.
− Candidate forms are designated as Single or Multi-candidate forms during implementation
− Fields on candidate forms can automatically be completed with candidate information (such as name, address, education institution, etc.).
− A form can also contain fields that pull information previously gathered on another candidate form (such as data from the Offer Request form onto a New Hire form).
− There is some additional function tied to each candidate form type. See Table 4-1.
Candidate Form Candidate-Req Form
Can be attached to candidates in any folder type
Can only be attached to those candidates filed in req folders
Is only linked to the candidate Associates the req number with the candidate form
Can display auto-filled, req information (such as Job Title, Job Location, Salary Grade, etc.)
Table 4-1 : Candidate forms vs. candidate-req forms

Administrator Tools Using Workbench
© Copyright IBM Corp. 2020 Page 49
Course materials may not be reproduced in whole or in part without the prior written permission of IBM.
Types of Forms
During Implementation, each form is designated as one of the below: Single Candidate: A form that can only be filled out one time for a candidate and is linked only to the candidate record. Example: EEO Form. Multi Candidate: A form that allows multiple instances attached to the same candidate record and is linked only to the candidate record. Example: Resume or CV Review. Single Candidate/Req: A form that can only be filled out one time for each req to which a candidate is filed. The form can only be completed from within a req folder and is linked to both the candidate and the req for reporting purposes. Example: Disposition Form, Offer Form. Multi Candidate/Req: A form that allows multiple versions of the same form within the req to which a candidate is filed. The form can only be completed from within a req folder and is linked to both the candidate and the req for reporting purposes. Example: Interview Evaluation Form.
Candidate Form Attributes Form attributes are defined as the characteristics of a form. These characteristics include specific information, such as the form name (and name translations); user access to search or display output by designated form fields; and user access to view or modify the form data once it is completed. There might be times when you need to edit a form’s attributes to include access for an additional User Type. Or, perhaps you need to edit the disclaimer message or translate it into an additional language. We will discuss the steps for editing form attributes using Workbench. ONCE A FORM HAS BEEN CREATED AND SAVED, THERE ARE FORM ATTRIBUTES THAT WILL BE VIEWABLE. IBM
WILL HAVE THE PRIVILEGE TO EDIT THE FORM ATTRIBUTES. THESE FORM ATTRIBUTES ARE IDENTIFIED IN THE
NEXT SECTION.

Administrator Tools Using Workbench
© Copyright IBM Corp. 2020 Page 50
Course materials may not be reproduced in whole or in part without the prior written permission of IBM.
Adding a Form
Forms are established during implementation; however you can add additional forms in Workbench. To add a form:
1. Click Tools > Forms > Candidate forms. 2. Click Add new form from the Actions list. 3. A screen appears with a list of the form field attributes.
Figure 4-2 : Edit form attributes
Elements of Candidate Form Attributes
Candidate form attributes are the characteristics of a candidate form. When adding a new form, once the form attributes are saved, some of them will display as viewable and can only be edited by IBM.
Database Title Database Title is the title of the form as it appears in the database tables. Spaces in the field are accepted.
YOU MIGHT SEE THE DATABASE FIELD NAME IN BRASSRING WHEN VIEWING DIT EXPORTS OR SETTING UP LETTER
COMMUNICATIONS.

Administrator Tools Using Workbench
© Copyright IBM Corp. 2020 Page 51
Course materials may not be reproduced in whole or in part without the prior written permission of IBM.
Title − Title is the name that appears on the form and in form lists in BrassRing
− The field limit is 255 characters (including spaces)
− The field defaults to display in English (US). The translation option is available if using additional languages
− Once a translation has been added as a form name, the language toggle will appear on the form in BrassRing
Disclaimer − A disclaimer can be added to the bottom of the form (i.e., data privacy disclaimer)
− The field limit is 7,500 characters
− The field defaults to English (US). The translation option is available if using additional languages
− HTML coding is accepted for formatting and embedding URL links
Form Image − Controls branding on candidate forms added/edited/viewed in BrassRing, and eLink
− Options are: no image (which is the default), the client image, or a form image
− You are able to upload an image and remove the uploaded image
− File types: gif, jpg, jpeg, bmp
− Maximum file size: 1.5MB
− Maximum image size: 130 x 130 pixels
Image alignment − Determines the placement of the form image on the candidate form
− Image alignment of left, center, or right
− The image will always be at the top of the form, above any language toggles and to the left of the Help hyperlink
Search/Output − Search: Choose the User Types that can search for this form as candidate search criteria
− Output: Choose the User Types that can output information from this form into candidate search results
− If you intend to make any fields searchable and/or outputable, you must designate the User Type access to both of these options in the form attributes
E-mail No longer used.

Administrator Tools Using Workbench
© Copyright IBM Corp. 2020 Page 52
Course materials may not be reproduced in whole or in part without the prior written permission of IBM.
Approval Process This indicates if this form (i.e., Offer form) requires an approval process. Once the approval process is saved, the field can only be changed by an IBM representative.
No: No approval process will be used. Parallel: All of the approvers will receive the approval email at the same time. Sequential: Each approver receives the approval email in a chronological order. Rules-Based: Smart Approval is the designated approval process URL: Associated with rules-based approval process. IBM will populate the URL field if this option is used
Cascade Approver Messages For approvers (not rules-based), check Cascade Approver Messages to include all previous approver messages in the approval request, so the next approver can view them.
Form Multiples As discussed earlier in this chapter, a form can either be entered once per candidate or multiple occasions per candidate. Once the Form Multiples field is saved, the field is grayed out.
Send existing form in edit mode
This specifies that when eLinking the form or sending it by using the Send Communication or Automation Manager features, the recipient can edit the responses, if needed. For example, if a Hiring Manager completes an Interview form, specifies the wrong location, and eLinks the form to the Recruiter, the Recruiter can edit the form to show the correct location. This attribute applies to One per candidate or Single per candidate/req combination.
Gateway Candidate Integration Form This is used if you are integrating with another vendor. Selecting Yes indicates this form is a TG candidate integration form.
Create Form from TG Designates whether or not a form is to be created if left blank on the Talent Gateway:
− IGNORE = this is the default; each submission will create a form whether or not any fields are completed
− EVERY = a form will be created only if all fields identified with “Required for form creation” are filled out
− ANY = a form will not be created unless at least one of the “Required for form creation” fields is completed

Administrator Tools Using Workbench
© Copyright IBM Corp. 2020 Page 53
Course materials may not be reproduced in whole or in part without the prior written permission of IBM.
Erase with Candidate Global companies must comply with national laws regarding data privacy. Candidate data, such as name, contact information, education, and work experience, can be deleted from BrassRing.
− If selecting Yes, the candidate data collected on this form will be irrevocably erased when the user erases the candidate
− If selecting No, the form data will remain in BrassRing when the user erases the candidate
Form Field Alignment Select the alignment for the form’s fields. Options are Default and Left. Selecting left aligns the fields to the left, whereas the Default option keeps them aligned in the center.
Form Layout − Indicates if this form has the enhanced layout enabled. Defaults to classic
− This setting is gray and disabled if an enhanced layout is not saved for the form
− Configuring the enhanced layout is described later in the chapter
Enable Language Toggle Select to display a language link (the user’s base language) in the top right of the form when the form is in a language different from the user’s. Clicking the link while viewing the candidate form in BrassRing displays a translated version of the form in the user’s base language. Only fields that are translated are displayed; that is, the form template must be translated in the user’s base language. Text responses are displayed as entered by the candidate. If this setting is unchecked, no link is displayed.
Include Common Service Vendor results This field is enabled when IBM enables the appropriate client setting. An example of a Common Service vendor is a Background Check vendor. When the field is set to “Yes,” the form will only be available in the custom candidate form for vendor results.
Event Manager Internal Event Form − Used with Event Manager. This form is not visible to the candidate.
− Used to either collect candidate registration information for integrations or applied to forms that are completed by assessors during/after the event (i.e., Interview Evaluation forms.
− Select “Yes” adds four form fields automatically to the form: candidate name, event name, event date, and time slot start time. Only the form field labels for these fields can be edited in Workbench.
Event Manager Candidate Facing Registration Form − Used with Event Manager
− Used to collect candidate registration information specific to the event (i.e., phone numbers for phone screens, dietary restrictions for events with food, etc.). The form is completed by the candidate when he/she registers for an event.

Administrator Tools Using Workbench
© Copyright IBM Corp. 2020 Page 54
Course materials may not be reproduced in whole or in part without the prior written permission of IBM.
− Selecting “Yes” adds two form fields to the form that are automatically populated from the database fields EM_Phone_Number and EM_Alternate_Phone in the candidate’s record
Create Candidate Signature Field (for use in Gateway Questionnaires only with Classic TG)
− This only apply to Classic Gateway Questionnaires.
− Used with Candidate Signature Capture feature (feature requires the use of Gateway Questionnaires)
− Designates the text field as the field in which to store the signature image
View Form History as PDF − Users with appropriate privileges have the option of viewing history of candidate forms.
− BrassRing saves a new version of the candidate form each time a user saves it. This list can be viewed and each version can be saved as a PDF from the new Form History screen.
− A new column History is now available in the Forms tab on candidates’ BrassRing Talent Record.
Enforce Calculation upon Form Save − Any candidate form that has calculated fields configured will have an automatic recalculation each
time the form is saved by a BrassRing user.
− A message ‘Fields will be recalculated as per form level configuration’ is displayed to the users when they save the form after making changes in calculated fields.
Add/View/Modify My − Use this field to provide users with access (by User Type) to forms that they have submitted
− If their User Type is selected, users will be able to add, view, and modify forms they attach to candidates in BrassRing. This privilege also allows users to eLink blank forms
Delete My - Allows the selected user types to delete candidate forms which they created. This will help users
by allowing them to delete forms they have created in error without having to reach out to the System Administrator.
View - My Reqs − Only users who have a ‘my relationship’ to the form’s req ID can view the form
− If the User Type has the “View – my reqs” privilege but is NOT the req creator, Recruiter, Hiring Manager, or on the req team, then the user will not be able to launch the form to view
− This attribute applies to single/candidate or multiple/candidate req forms
View All − Selecting a User Type in this field will allow the user to view all instances of this form in BrassRing,
even if he/she did not originate the form

Administrator Tools Using Workbench
© Copyright IBM Corp. 2020 Page 55
Course materials may not be reproduced in whole or in part without the prior written permission of IBM.
Modify – My Reqs − Use this field to enable users to modify the form for the reqs they are associated with
− If their User Type is selected, users will be able modify all instances of the form for those reqs they are associated with in BrassRing, even if he/she did not originate the form
− This attribute applies to single/candidate or multiple/candidate req forms
Modify All − Selecting a User Type in this field will allow the user to modify all instances of this form in
BrassRing even if he/she did not originate the form
Draft – Save/Modify/Delete − Selecting a User Type in this field will allow the user to save, modify, and delete forms he/she has
added in a “draft” mode
Delete – My Reqs - This field is used to indicate which User Types can delete candidate forms associated to the reqs
the user has a ‘my req’ relationship. - This gives the user in that user type the ability to delete any form they have a My relationship with
regardless if the created the form or not.
Delete All − This field is used to indicate which User Types can delete any instance of this form in BrassRing.
This is typically a Super User function
− If you give a User Type this privilege, it is a good idea to also give them “View All” and “Modify All” TO SELECT MULTIPLE USER TYPES, HOLD DOWN THE CTRL KEY WHILE SELECTING
Editing Form Attributes There might be a time when you need to edit a Form Attribute. For example, a process change might result in all Hiring Managers viewing all Interview Evaluation forms. This can be done within Workbench. To edit form attributes:
1. Click Tools > Forms > Candidate forms.
2. From the list of forms, click the Edit form attributes icon for the form to be modified. 3. Edit fields as necessary. 4. Click Save.

Administrator Tools Using Workbench
© Copyright IBM Corp. 2020 Page 56
Course materials may not be reproduced in whole or in part without the prior written permission of IBM.
SOME OF THE FORM ATTRIBUTES FOR AN EXISTING CANDIDATE FORM DISPLAY AS VIEWABLE AND CAN ONLY
BE EDITED BY IBM.
Translating Form Names
Form names can be translated individually through the Form Attributes screen. You can also translate form names quickly through the Translate Form Name action item. To translate a form name:
1. Click Tools > Forms > Candidate forms. 2. Click Translate form names from the Actions list. 3. A screen appears with the names of the candidate forms in the English Language. 4. Click the drop-down arrow at the top of the screen to select the language for which you
would like to translate the form names. 5. Translate the names of the forms. 6. Click the Save button.
Candidate Form Fields
Form fields are used to capture data within a form’s composition. Form fields gather information that can be searched, reported, and integrated with other systems that might be using the data. For example, your New Hire form might be integrated with your HRIS solution.
Elements of Form Fields
Here are some points to keep in mind when working with form fields in Workbench:
− You can add new fields to forms.
− Field name is limited to 2500 characters (this includes spaces).
− Form fields can be designated as Searchable and/or Outputable. Fields do not need to be designated as Searchable to be exported through the DIT.
− You can inactivate fields, enabling you to keep historical data.
− If you are using multiple languages, you can translate your form fields.
− Modifications to Talent Gateway forms, fields or options will only be reflected for new reqs posted moving forward. Reqs previously posted will not adopt the new attributes.
− Candidate Field Association (CFA) has the ability to filter lists of options based on the selection of an option from another field on the form.
− Fields have an enhanced layout option, enabling you to change the field arrangement on the form.

Administrator Tools Using Workbench
© Copyright IBM Corp. 2020 Page 57
Course materials may not be reproduced in whole or in part without the prior written permission of IBM.
Form Field Types Table 4-3 lists the field types that you can manage in Workbench, along with descriptions of the fields and an example for each one.
Field Type Description Searchable Outputable Option Configuration
Text Allows user to enter up to 255 characters of text into a small box.
Set field length: Default and maximum is 255 characters
Text Area Allows user to enter up to 4,000 characters of text in paragraph format in a large box.
Set field length: Default and maximum is 4,000 characters
Single-Select List
A field associated with a drop-down list. Only one option might be selected at a time.
Set field length: Default and maximum is 255 characters
Option Source: Maintain Custom or Pull From List
Multi-Select List
A field that allows the user to select multiple options simultaneously. The Ctrl and Shift keys are used to select multiple options.
Set field length: Default and maximum is 255 characters
Option Source: Maintain Custom or Pull From List
Search-Select List using the List button
Appears when more than 200 options are available. Users can type in a portion of the word or phrase they are looking for, and click List>> to display all of the options.
Single- and Multi-Select
Single-Select only
Set field length: Default and maximum is 255 characters
Option Source: Maintain Custom or Pull From List

Administrator Tools Using Workbench
© Copyright IBM Corp. 2020 Page 58
Course materials may not be reproduced in whole or in part without the prior written permission of IBM.
Field Type Description Searchable Outputable Option Configuration
Radio Button A field in which a relatively small number of options is displayed, allowing the user to choose only one of the options. Example: yes/no, male/female.
Set field length: Default and maximum is 255 characters Option Source: Maintain Custom or Pull From List
Check Box Similar to a radio button, except the user can select more than one option in the same group. Advised for no more than 3 - 5 short options.
Set field length: Default and maximum is 255 characters
Option Source: Maintain Custom or Pull From List
Numeric This field allows users to enter integer-only characters (no leading zeros). No special characters like "," or "$" are accepted.
Min: Enter number of minimum digits. If any number will be accepted, indicate 1
Max: Enter number of maximum digits. If any number will be accepted, indicate 9999999999
Label Field text appears in a shaded text area with no response accepted. Typically used to divide a form into sections and/or to provide additional information or instruction to users.
None

Administrator Tools Using Workbench
© Copyright IBM Corp. 2020 Page 59
Course materials may not be reproduced in whole or in part without the prior written permission of IBM.
Field Type Description Searchable Outputable Option Configuration
Date Users enter a specific date using either Day/Month/Year drop-down lists or a calendar icon.
Note: Double validation can be enabled.
Enter number for “Up” years (from current year). For example, up years of 2 will include 2017, 2018, and 2019. Enter number for “Down” years (from current year). For example, down years of 2 will include 2017, 2016, 2015
Auto-Fill Field data populates with information from another form field in the system. Note: To auto-fill from the req, the form type must be a Candidate/Req form type.
Choose the field from which to auto-fill. To auto-fill from a req, the form MUST be a single- or multi-per req form
SSN A field that is formatted to only accept US Social Security Numbers (XXX-XX- XXXX).
Note: Double validation can be enabled.
None
Email This field is formatted to only accept email addresses, and they must contain "@" and "."
Set field length: Default and maximum is 255 characters
Table 4-3: List of field types
YOU HAVE THE ABILITY TO AUTO-FILL DATA FROM THE TALENT RECORD TO YOUR AUTO-FILL CANDIDATE
FORM FIELD. THIS INCLUDES UP TO 5 SETS OF EMPLOYMENT HISTORY, UP TO 3 SETS OF EDUCATION HISTORY, AND 2 FIELDS FOR START AND END YEARS OF THE MOST RECENT EMPLOYMENT EXPERIENCE LISTED ON THE
RESUME OR CV. YOU MUST CONFIGURE EACH AUTO-FILL FIELD SEPARATELY FOR EACH CANDIDATE FORM
THAT YOU WANT TO HAVE POPULATED AUTOMATICALLY FROM DATA IN THE TALENT RECORD.

Administrator Tools Using Workbench
© Copyright IBM Corp. 2020 Page 60
Course materials may not be reproduced in whole or in part without the prior written permission of IBM.
Managing Candidate Form Fields
We will discuss how to add, edit, translate, and inactivate form fields.
Adding a Form Field
Form fields are established at implementation, and you can add new form fields as your hiring process or user needs change. To add a field to a form:
1. Click Tools > Forms > Candidate forms.
2. From the list of forms, click the Administer form fields icon for the form. Refer to Figure 4- 4.
Figure 4- 4 : Candidate forms
3. Click Add new field in the Actions list. See Figure 4- 5.
Figure 4- 5: Edit form fields

Administrator Tools Using Workbench
© Copyright IBM Corp. 2020 Page 61
Course materials may not be reproduced in whole or in part without the prior written permission of IBM.
4. For Placement, select the numerical placement for the field on the specified form. It defaults to the next available placement number. See Figure 4- 6.
5. Type a Database field name. The name is limited to 20 characters. A space between words cannot be used; instead of a space, use underscore(_) or dash (-).
UNDERSCORE (_) OR DASH (-) ARE THE ONLY NON-ALPHA CHARACTER ACCEPTED FOR THE DATABASE FIELD
NAME.
6. Type a Field name. The character limit is 4,000. This will be the field label that appears to your users in BrassRing. Be sure to check your spelling.
7. For Type, select the field type. This will identify the setup of the field and the options. Refer to Table 5-2 for field type definitions. You can edit this field if no data is saved to the field.
8. If available, the Field help text field allows you to add information that will help your users get a better understanding of the field (i.e., describe the field’s intention, expected data surrounding the process, etc.). Maximum length of this field is 4,000 characters.
9. The Custom report field is used for custom reports created by IBM. 10. For Font Size, select the text size of the form field. It will default to medium.
Figure 4- 6: Add new field
11. For Encrypted, click Yes or No. Yes will designate the field to be encrypted. To enable, you
must have field-level encryption activated by IBM.
12. For Hide for these user types, select the User Types that will not need to view the field, if
any.
13. For Non-editable for these user types, select the User Types that will not be able to edit
this field. The field will be in a view-only format.
14. For Required for these user types, select the User Types for which the field is mandatory.
This will place an asterisk next to the field in BrassRing. The form cannot be submitted
without completing the field.

Administrator Tools Using Workbench
© Copyright IBM Corp. 2020 Page 62
Course materials may not be reproduced in whole or in part without the prior written permission of IBM.
15. For Hide in these languages, select the languages that will not need to view the field.
16. For Required in these languages, select the languages for which the field is mandatory.
This will place an asterisk next to the field in BrassRing. The form cannot be submitted
without completing the field.
17. The Question Branching field determines if the field will be hidden/shown based upon the
value of another field. If Yes is selected, the select button for the Show question when
field response is: becomes enabled.
18. For Database field name, select the field that should identify when it will display. (You can
only select one field. The fields that display in this list are single-select, multi-select, check
box, and radio button. Auto-fill will display only if the source field is single-select or radio
button. Fields containing options will not display if the options are pull options from
existing list of all recruiters, all managers, all active enterprise users, all active users, all
reqs, and all open reqs).
19. For Selected Values, select the options that will determine when the field will display.
Click Save and continue.
20. The Field length field will default to the field type's defined character limit. See Table 4-3.
If less is needed, indicate the amount in text field.
21. The Integrated URL field will appear if creating a text field type. The field will default to
No. Selecting Yes allows you to mask this field with a “Click here” link, and creates special
handling in the background, on candidate import and form import, to integrate with an
external system. When the field is imported, additional parameters are sent upon import,
which then have the effect of constructing a special URL in the background, which, when
clicked, initiates a web service call to the external system. (Requires third-party vendor to
import data by using candidate import or form import, also a Professional Services project,
and host set-up by IBM Support.)
22. The Input Validation field controls format validation of data entered for a text field only.
(For example, you can validate the format of a phone number, national insurance
information, or postal code data entered by candidates.) You can configure your own
validation for text and numeric fields in the candidate forms by selecting one of the
custom validation formats of alphanumeric and numeric. You can also select one of the
available validation templates.
23. Purge field data via partial purge, select yes, if the field will contain sensitive data that
must be purged after a certain period of time. Notify your IBM rep to ensure the purge
function is enabled.
24. The Required for form creation from TG field identifies if the field will be used to
determine if a form is completed. See Figure 4-7. This field directly correlates with the
Create form from TG field in the form attributes screen.
25. For Publish for use as autofill, select Yes if you would like this field to automatically fill
another field on a form. See Figure 4-7.

Administrator Tools Using Workbench
© Copyright IBM Corp. 2020 Page 63
Course materials may not be reproduced in whole or in part without the prior written permission of IBM.
26. You might be able to designate fields as Searchable and/or Outputable. This enables your
BrassRing users to search by the form response and/or use it as an output field.
If no, click No for Searchable, and click No for Outputable. Proceed to Step 23.
If yes, click Yes for Searchable and/or Outputable. Continue to next step.
ONCE YOU SELECT ‘YES’ FOR SEARCHABLE AND/OR OUTPUTABLE AND CLICK ‘SAVE’ IN STEP 24, YOU HAVE
MAPPED THE SEARCH/OUTPUT FIELDS TO THE SEARCH ENGINE. ONCE MAPPED, THE MAPPING CANNOT BE
UNDONE WITHOUT AN IBM ENGINEERING EFFORT. ENGINEERING CHARGES WOULD APPLY.
27. Note your remaining search engine space for that field type. Click the Enable Search/Output check box. Refer to Figure 4- 7.
Figure 4- 7: Search/Output
28. If no options are required for this field type, continue to Step 23.
If options are required, you will see the Options source area. See Table 4-3 for more
configuration details sorted by Field type.
29. Use the Confirmation Setting to enable double validation for Date and SSN fields. The
same information must be provided in two fields to ensure that correct information was
provided. Select ‘Yes’ to enable a confirmation field. Enter the title of the confirmation
field in the Confirmation field prefix label. When the data entered in the fields on the
Candidate form does not match, an error message is displayed.
30. Click Save. You will receive a confirmation message and the choice to add an additional
new field or to administer form options for the field which you just added, if applicable.
Note: At this point, you will have the opportunity to create a list of options for this field if
you selected Maintain custom list.
Editing Field Attributes
From time to time, you might need to alter an existing field’s attributes. For example, you might want to change the form label or change a field from not being required to being required. To edit form field attributes:
1. Click Tools > Forms > Candidate forms.

Administrator Tools Using Workbench
© Copyright IBM Corp. 2020 Page 64
Course materials may not be reproduced in whole or in part without the prior written permission of IBM.
2. From the list of forms, click the Administer form fields icon for the form to be edited.
3. From the list of form fields, click the Edit field attributes icon for the field to be changed.
4. Make changes as necessary. 5. Click Save and continue. 6. Make additional modifications as needed. 7. Click Save.
Translating Form Fields
If your company uses multiple languages in BrassRing, you might want to translate your form fields all at the same time, instead of editing field attributes for each field. To translate form fields:
1. Click Tools > Forms > Candidate forms.
2. From the list of forms, click the Administer form fields icon for the form. 3. Click Translate fields in the Actions list. 4. The first language displayed defaults to English (US). 5. Select the language to which you want to translate your field names. Refer to Figure 4- 8. 6. Type the translations into the fields. Be sure to check your spelling. 7. When you are finished with one language, use the Language drop-down to go to the next
language option. 8. Click Save when finished. 9. Close the confirmation window.
Figure 4- 8: Translate form fields
WHILE ENTERING YOUR FORM FIELD TRANSLATIONS, YOU CAN ALSO ALTER THE HIDE AND REQUIRED
FOR THIS LANGUAGE OPTIONS. CLICK THE RADIO BUTTONS FOR THE OPTION THAT SUITS YOUR NEEDS.
Administrator Tools Using Workbench
© Copyright IBM Corp. 2020 Page 65
Course materials may not be reproduced in whole or in part without the prior written permission of IBM.
Translating Field Help Text If your company uses multiple languages in BrassRing, you might want to translate the help text for fields that have it. To translate field help text:
1. Click Tools > Forms > Candidate forms.
2. From the list of forms, click the Administer form fields icon for the form. 3. Click Translate field help text in the Actions list. 4. The first language displayed defaults to English (US). All the fields on the form will display.
Those fields containing field help text will have the verbiage. 5. Select the language to which you want to translate the field help text. 6. Type the translations into the fields. Be sure to check your spelling. 7. When you are finished with one language, use the Language drop-down to go to the next
language option. 8. Click Save when finished. 9. Close the confirmation window.
Inactivating Form Fields
When a form field needs to be retired, it is a good idea to inactivate the field. Inactivating enables you to maintain the historical data associated with the field yet remove it from users’ view. To inactivate a form field:
1. Click Tools > Forms > Candidate forms.
2. From the list of forms, click the Administer form fields icon for the form. 3. Select the field you want to deactivate.
4. Click Inactivate in the Actions list. 5. Click Inactivate. See Figure 4- 9. 6. Click OK.

Administrator Tools Using Workbench
© Copyright IBM Corp. 2020 Page 66
Course materials may not be reproduced in whole or in part without the prior written permission of IBM.
Figure 4- 9: Inactivate form field
Field Options Field options contain the available responses to radio button, check box, single-select, and multi-select form fields. For example, options for the form field “Are you willing to travel?” might be radio buttons “Yes” and “No.” Like form fields, many field options are loaded into BrassRing during implementation. Also like form fields, the previously loaded field options can be edited or inactivated, and new options can be added. We will discuss field options in greater detail.
Elements of Form Fields Options
Here are some important facts to keep in mind when working with form field options:
− There is a 255 character limit for field options. However, options for single-select and multi-select should be kept to 40 characters or fewer, so that they will easily appear in the space allowed for the drop-down menu. If options are, in fact, cut off within the drop-down, the user can click Selection Details to view the entire text.
− If integrating with an HRIS system, options should be designed in BrassRing to map the other system. This will help prevent compatibility issues.
− Options can be translated into the additional languages your company might be using.
− If additional languages are being used, all options must be translated. Even if you choose not to translate an option for a particular language, the company default language should be repeated by copying and pasting the default language in that language’s option field. This will prevent blank spaces from displaying in BrassRing.
− Modifications to Talent Gateway forms, fields, and/or options will only be reflected for new reqs posted moving forward. Reqs previously posted will not adopt the new attributes.

Administrator Tools Using Workbench
© Copyright IBM Corp. 2020 Page 67
Course materials may not be reproduced in whole or in part without the prior written permission of IBM.
− Limit the number of non-alpha and non-numeric characters, such as the ampersand (&) and punctuation (commas, periods, etc.), to improve data integrity and make searching easier.
− By default, options are sorted in numerical order, then in alphabetical order. Sort order can also be designated. If a numeric value is entered, the order in which options are to appear is designated. Numbers less than 10 should begin with a zero (0), such as 03.
− Fields can pull option lists from: ➢ Other options lists on forms or reqs that already exist ➢ Code tables ➢ User lists (All active users, All BrassRing users, All Recruiters, All Managers) ➢ Req lists (All reqs, All open reqs, All pending reqs, All posted reqs) ➢ Location or Country lists (managed by IBM)
TO LIMIT USER CONFUSION WITH FIELD RESPONSES, BE AS DESCRIPTIVE AS POSSIBLE.
Managing Field Options
Field options can be added, edited, translated, and inactivated.
Adding Field Options
To add an option to an existing field:
1. Click Tools > Forms > Candidate forms.
2. From the list of forms, click the Administer form fields icon for the form.
3. From the list of fields, click the Administer field options icon for the field. 4. Click Add new option in the Actions list. 5. Type in a Code. This is the unique identifier for this option in the data table. Character
limit is 255. 6. Type the Description. The Description is the label that appears on the form in BrassRing.
The label cannot exceed 255 characters. To translate this option, click the plus sign +. Type in the translations for each language.
7. Enter the Sort order. By default, options are sorted in numerical order, and then alphabetical order. If a numeric value is entered, the order in which options are to appear is designated. Numbers less than 10 should begin with a zero (0), such as 03.
8. In the Icon / text color of option section, identify if the option appears in a certain text color or icon when it appears on the panels and the candidate output grids.
9. Click Save. KEEP OPTIONS FOR SINGLE-SELECT AND MULTI-SELECT FIELDS TO 40 CHARACTERS OR LESS, SO THAT THEY
WILL EASILY APPEAR IN A DROP-DOWN MENU.

Administrator Tools Using Workbench
© Copyright IBM Corp. 2020 Page 68
Course materials may not be reproduced in whole or in part without the prior written permission of IBM.
AS A BEST PRACTICE, WHEN SORTING BY DESIGNATED SORT ORDER, NUMBER OPTIONS SO THAT THEY WILL
APPEAR IN SORT ORDER. CONSIDER PICKING NUMBERS IN AN INTERVAL, SUCH AS 05, 10, 15, ETC. TO ALLOW
FOR CHANGES.
WHEN USING MULTIPLE LANGUAGES, ALL OPTIONS MUST BE TRANSLATED. IF YOU CHOOSE NOT TO
TRANSLATE AN OPTION FOR A PARTICULAR LANGUAGE, COPY AND PASTE THE BASE LANGUAGE IN THAT
LANGUAGE’S BLANK OPTION FIELD. TO CHANGE THE TYPE OF SORT FOR YOUR OPTIONS LIST, CLICK THE RADIO BUTTON NEXT TO EITHER SORT
ALPHABETICALLY OR SORT BY DESIGNATED SORT ORDER.
Adding Multiple Field Options To add multiple field options:
1. Click Tools > Forms > Candidate forms.
2. From the list of forms, click the Administer form fields icon for the form.
3. From the list of fields, click the Administer field options icon for the field. 4. Click Add multiple options in the Actions list. 5. Type in an Option Code. This is the unique identifier for this option in the data table.
Character limit is 255. 6. Type the Option Description. The Description is the label that appears on the form in
BrassRing. The label cannot exceed 255 characters. 7. Enter the Sort order. By default, options are sorted in numerical order, and then
alphabetical order. If a numeric value is entered, the order in which options are to appear is designated. Numbers less than 10 should begin with a zero (0), such as 03.
WHEN ADDING OPTIONS USING THE “ADD MULTIPLE OPTIONS” FUNCTION, THE OPTION MUST BE
TRANSLATED USING “TRANSLATE OPTIONS” LOCATED IN THE ACTIONS LIST.
Editing Field Options
To edit an option:
1. Click Tools > Forms > Candidate forms.
2. From the list of forms, click the Administer form fields icon for the form.
3. From the list of fields, click the Administer field options icon for the field.
4. From the list of options, click the Edit icon. 5. Make edits as needed. 6. Click Save.

Administrator Tools Using Workbench
© Copyright IBM Corp. 2020 Page 69
Course materials may not be reproduced in whole or in part without the prior written permission of IBM.
A CODE CANNOT BE EDITED AS IT ALREADY EXISTS IN THE OPTIONS DATA TABLE.
Translating Field Options
As we discovered when adding or editing an option, individual options can be translated. Now we take a look at translating all field options at one time. To translate field options:
1. Click Tools > Forms > Candidate forms.
2. From the list of forms, click the Administer form fields icon for the form.
3. From the list of fields, click the Administer field options icon for the field. 4. Click Translate options in the Actions list. The first language displayed defaults to English
(US). 5. Select the language for your field option translation. Refer to Figure 4- 10. 6. Type the translations into the fields. Be sure to check your spelling. 7. When you are finished with one language, use the Language drop-down to select the next
language translation option. 8. Click Save when finished.
Figure 4- 10: Translate field options
WHEN TRANSLATING INTO MULTIPLE LANGUAGES, ALL OPTIONS MUST BE TRANSLATED. EVEN IF YOU CHOOSE
NOT TO TRANSLATE AN OPTION FOR A PARTICULAR LANGUAGE, THE COMPANY DEFAULT LANGUAGE SHOULD
BE REPEATED. COPY AND PASTE THE DEFAULT LANGUAGE OPTION LABEL INTO THE OTHER LANGUAGE’S
OPTION FIELD. THIS WILL PREVENT BLANK FIELDS FROM DISPLAYING IN BRASSRING.

Administrator Tools Using Workbench
© Copyright IBM Corp. 2020 Page 70
Course materials may not be reproduced in whole or in part without the prior written permission of IBM.
Inactivating Field Options
When a field option needs to be retired, it is a good idea to inactivate the option. Inactivating enables you to maintain the historical data associated with the option yet remove it from user view. To inactivate a field option:
1. Click Tools > Forms > Candidate forms.
2. From the list of forms, click the Administer form fields icon for the form.
3. From the list of fields, click the Administer field options icon for the field.
4. From the list of options, click the Inactivate icon for the option. 5. Click Inactivate. 6. The confirmation window will automatically close.
Export To Excel To export the fields on the Candidate form into an Excel spreadsheet:
1. Click Tools > Forms > Candidate forms.
2. From the list of forms, click the Administer form fields icon for the form. 3. Click Export to Excel in the Actions list. 4. The Launch Export screen appears. Enter the name of the file, and click the Launch button
at the bottom of the screen. 5. To access the Excel file, click Tools>Task Manager. The Task Queue screen appears.
6. From within the Task Queue screen, click the icon for the document you would like to view.
Configuration Report
Workbench users can export to Microsoft Excel all candidate form settings, including form details, field details, and field associations. This is particularly useful for quickly reviewing and comparing the form settings.
Initiating the Export
1. Navigate to Tools >Forms > Candidate forms.

Administrator Tools Using Workbench
© Copyright IBM Corp. 2020 Page 71
Course materials may not be reproduced in whole or in part without the prior written permission of IBM.
Figure 4- 11: Action – Configuration report
2. To queue the export, select a form and select Configuration Report.
3. A confirmation that the form export has been queued in Task Manager briefly displays. The confirmation includes the form’s database name.
4. Go to Tools>Task Manager to view download and view the report.
Approval Routing for Candidate Forms
Approval Routing is configurable for One per candidate and Single per candidate/req forms on an individual basis to be used in the candidate form approvals process. The approval process is determined during the form’s creation on the Candidate Form Attribute screen. The process uses the same approval lists set up for req approvals.
• Parallel: Forms are sent to all approvers at the same time
• Sequential: Approvers receive the candidate form in a configured, sequential order. For sequential form approvals, BrassRing users with privileges to view a candidate form can resend the eLink requesting form approval to the next pending approver when necessary (for example, if the original eLink is accidentally deleted or not responded to for some reason).
• Rules-based: Rules for the approval process are configurable. Once configured, they are enforced by BrassRing
Adding Approval Groups
New processes or recently added candidate forms might necessitate a new approval group. Once an approval group is created, it is available for use on any candidate req forms.

Administrator Tools Using Workbench
© Copyright IBM Corp. 2020 Page 72
Course materials may not be reproduced in whole or in part without the prior written permission of IBM.
To add an approval group:
1. Click Tools > Forms > Approvals. 2. Click Add new Approval group from the Actions list. 3. Type an approval group Title. The title has a character limit of 50. Refer to Figure 4- 12. 4. Select the Approvers. You must select one of the following:
Any Manager: This list is identical to the standard required req field of Manager. Names that occupy this list have the Manager field checked on their user profile in BrassRing, which is managed through Admin+ Any Recruiters: This list is identical to the standard required req field of Recruiter. Names that occupy this list have the Recruiter field checked on their user profile in BrassRing, which is managed through Admin+ Specific users: You can select the individual names of any BrassRing users from this list
5. Click Enable Approval Bypass if this level of approver is not required for every position. 6. Click Enable Approval by Non-User to allow users to enter the email address of an
approver who is not in the approver list and, therefore, not a BrassRing user. This feature helps to reduce the number of users that need to be managed in BrassRing.
7. Enable abridged Req view will not apply to candidate forms. This field displays a shortened view of the req to approvers when viewed an eLink during the approval workflow. This field will be discussed in greater detail in Chapter 5.
8. Click Save. 9. Next steps will be to add the new approval group to the candidate form. Continue on to
the next section on Editing Form Approvals.
Figure 4- 12: Add new approval group
After adding a new approval group, you will need to edit the placement on each candidate form to activate it. As a default, the group will not appear on the candidate form until activated.

Administrator Tools Using Workbench
© Copyright IBM Corp. 2020 Page 73
Course materials may not be reproduced in whole or in part without the prior written permission of IBM.
EACH APPROVAL LEVEL IS AUTOMATICALLY REQUIRED FOR REQ CREATORS. THEREFORE, CONSIDER HAVING
“BYPASS” AS AN OPTION FOR EACH APPROVAL LEVEL. IBM RECOMMENDS USING THE NON-USER FEATURE IF YOU ARE CONCERNED ABOUT MAINTAINING A VERY
LARGE USER LIST IN BRASSRING.
Editing Form Approvals
After creating a new approval group, you will need to activate the approval group for the candidate forms. You can also edit the order in which the approval routing will flow. To edit the form approvals:
1. Click Tools > Forms > Candidate forms.
2. Click the Edit Form Approvals icon. 3. The Edit form approvals screen appears. See figure 4- 13.
Figure 4- 13: Edit form approvals

Administrator Tools Using Workbench
© Copyright IBM Corp. 2020 Page 74
Course materials may not be reproduced in whole or in part without the prior written permission of IBM.
4. For Approve/Decline text area field label, edit the field label for the text area the approver completes when approving or declining the form. HTML is accepted. For example, if your organization requires you to enter a reason only when you decline to approve a candidate form, you might customize the label to “Reason for declining this form.”
5. For Approve/Decline text area field input value is, select when the approver is required to complete the field.
6. To send standard, non-customizable notifications to system users and/or users selected in the req form once all approvals are secured, set Send approval notification to Yes. Once it is enabled, you must check at least one of the check boxes: Users selected in req/form or Specific system user. These settings determine which notification fields display in BrassRing forms.
7. For Send decline notification, select Yes to send an email notifying prior approvers and the form creator when an approval is declined. Otherwise, select No.
8. Bypass re-routing for new approval on form approval changes? – Select Yes to allow users to change approvals without having to reroute the approvals through all approval levels again.
9. For Re-approval Routing (excluding form approval section), determine what will happen when editing a candidate form in BrassRing after it has been sent for approvals/approved. After a changes is made, when the user clicks the Save button, the system will reset the current approval statuses and send for new approvals based on your selection: Never: A change to any field will not reset approvals Change to any field: A change to any field will reset approvals; this is the default
Change to a specified fields: Only a change to a specified field will prompt for re-approval. Selecting this option will make the Select button available. Click the Select button to identify the fields that will prompt the form for re-approval if edited. You can select any active fields on the form except:
• Label
• Text Area
• Autofill with a source of Text area 10. For Approval routing instructions, add instructional text that will appear at the
top of the approval routing pages in BrassRing. 11. Select Communication Template which allows the user when sending a candidate form
for approval to edit the communication. Depending on the communication template, attachments, resumes or CVs, and other additional information can be included.
12. For Routing order, designate a number for each of the approval groups. The routing order is sequential.
IF AN APPROVAL GROUP IS NOT TO BE INCLUDED, THE SORT ORDER SHOULD REMAIN BLANK.
Editing Approval Groups As your company evolves, it might become necessary to modify the settings of the approvers. You might need to remove a Bypass option or your approval options are growing, and you want to enable the Non-User function.

Administrator Tools Using Workbench
© Copyright IBM Corp. 2020 Page 75
Course materials may not be reproduced in whole or in part without the prior written permission of IBM.
To edit an approval group:
1. Click Tools > Forms > Approvals.
2. From the list of approval groups, click the Edit icon. Make changes as necessary. 3. Click Save.
Translating Approval Groups
For each of the languages available for your company, you can enter translations for approval groups. To translate approval groups:
1. Click Tools > Forms > Approvals. 2. Click Translate approval groups in the Actions list. 3. Select the language to which you want to translate your field options. The first language
displayed defaults to English (US). 4. Type the translations into the fields. Be sure to check your spelling. 5. When you are finished with one language, use the Language drop-down to select the next
language. 6. Click Save, and then close the confirmation window.
Field Filtering Field filtering allows the values on a form to be filtered by HR status and/or Req template.
Elements of Field Filtering: - Field filtering can only be applied to a single per candidate/req or multiple candidate/req
forms. - This feature allows form field values and a default value to be associated with an HR
status and/or req template. - The fields with filtering configured will filter the overall list based on the configuration. - The field default is also based on configuration.
When field filtering is configured for a field, the Recruiter or Hiring Manager sees only a list of appropriate options on a form. The HR status filtering will apply to only the current HR status of the candidate at the time of creating or editing the form. The req template filtering will apply to the req template that the candidate is currently filed in when creating or editing the form.
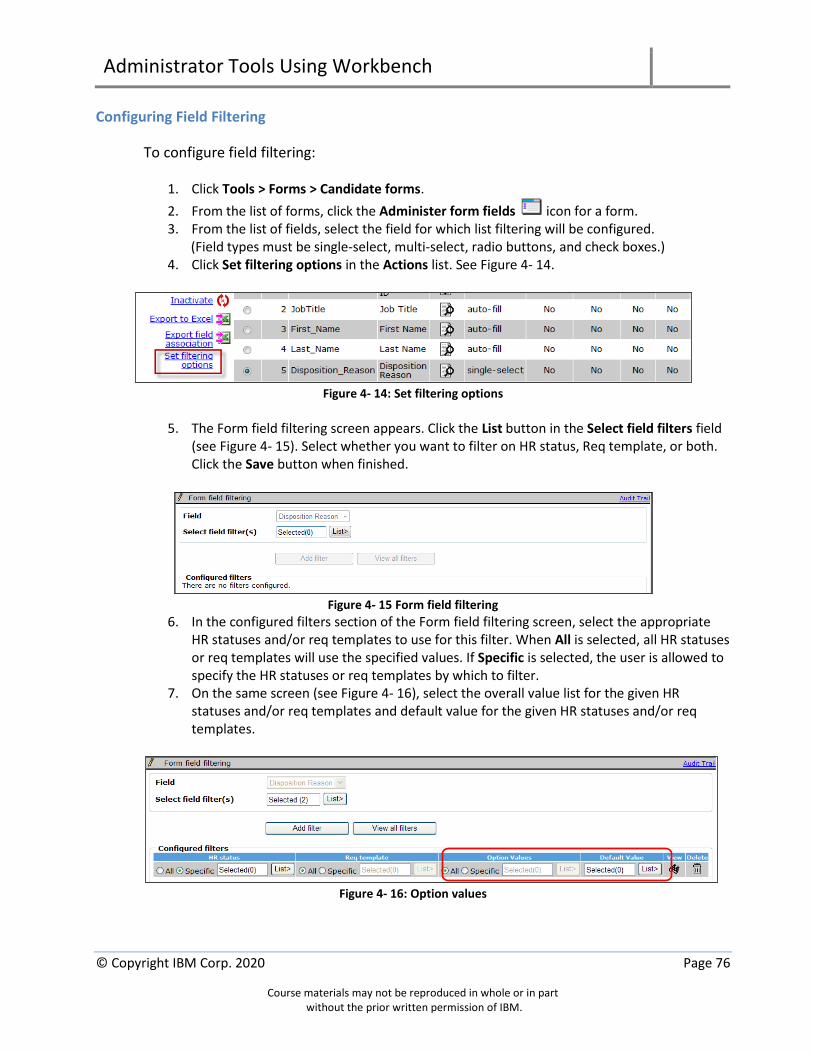
Administrator Tools Using Workbench
© Copyright IBM Corp. 2020 Page 76
Course materials may not be reproduced in whole or in part without the prior written permission of IBM.
Configuring Field Filtering
To configure field filtering:
1. Click Tools > Forms > Candidate forms.
2. From the list of forms, click the Administer form fields icon for a form. 3. From the list of fields, select the field for which list filtering will be configured. (Field types must be single-select, multi-select, radio buttons, and check boxes.) 4. Click Set filtering options in the Actions list. See Figure 4- 14.
Figure 4- 14: Set filtering options
5. The Form field filtering screen appears. Click the List button in the Select field filters field
(see Figure 4- 15). Select whether you want to filter on HR status, Req template, or both. Click the Save button when finished.
Figure 4- 15 Form field filtering
6. In the configured filters section of the Form field filtering screen, select the appropriate HR statuses and/or req templates to use for this filter. When All is selected, all HR statuses or req templates will use the specified values. If Specific is selected, the user is allowed to specify the HR statuses or req templates by which to filter.
7. On the same screen (see Figure 4- 16), select the overall value list for the given HR statuses and/or req templates and default value for the given HR statuses and/or req templates.
Figure 4- 16: Option values

Administrator Tools Using Workbench
© Copyright IBM Corp. 2020 Page 77
Course materials may not be reproduced in whole or in part without the prior written permission of IBM.
• Option Values: When All is selected, all values will be displayed on the form. When Specific is selected, the user will specify which values this filter pertains to and will appear on the form. Option Values can be used in more than one filter. Option Values cannot be removed here if they are the default option.
• Default Value: This will automatically be populated for the field on the form. For all multi-select fields (including check boxes), multiple default options might be selected. For single-select fields, only 1 default selection is allowed. A default selection is not required.
8. Click Save when finished.
Delete a Field Filter To delete a field filter:
From the Form field filtering screen, click the Delete icon.
View Field Filters To view all the field filters:
From the Form field filtering screen, click the View all filters button. To view a field filter for a particular field:
From the Form field filtering screen, click the binoculars icon (under the view column) for that particular filter.
Enhanced Layout The Enhanced Layout allows clients to control the form layout: fields, labels, and their display pattern by configuration. The ability to organize and format fields and labels on a candidate form will enhance the user experience, as the form will have a better look and feel. Sectioning horizontally and vertically will reduce the form length to make it more user-friendly and easier to complete.
Enhanced Layout
To configure the enhanced layout:
1. Click Tools > Forms > Candidate forms. 2. The Form layout modification screen can be opened using the plus icon under the
Form Layout column. See Figure 4- 17. (The pencil icon indicates an enhanced layout has been configured for the form).
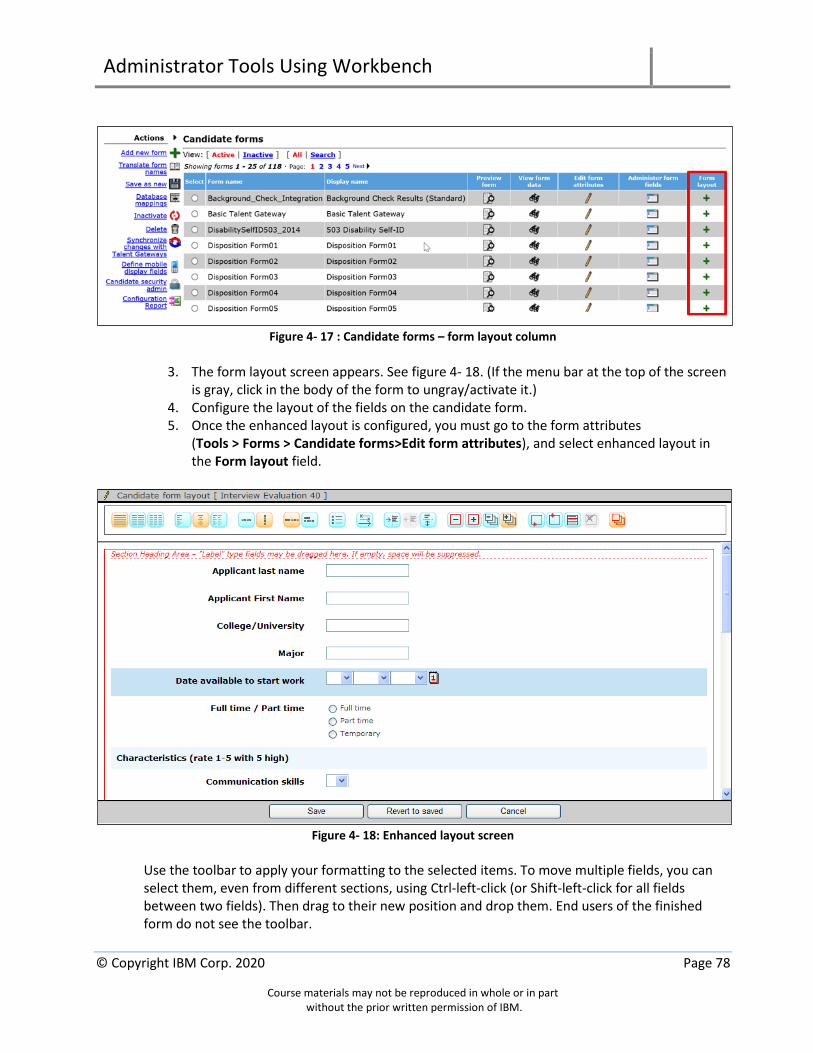
Administrator Tools Using Workbench
© Copyright IBM Corp. 2020 Page 78
Course materials may not be reproduced in whole or in part without the prior written permission of IBM.
Figure 4- 17 : Candidate forms – form layout column
3. The form layout screen appears. See figure 4- 18. (If the menu bar at the top of the screen
is gray, click in the body of the form to ungray/activate it.) 4. Configure the layout of the fields on the candidate form. 5. Once the enhanced layout is configured, you must go to the form attributes
(Tools > Forms > Candidate forms>Edit form attributes), and select enhanced layout in the Form layout field.
Figure 4- 18: Enhanced layout screen
Use the toolbar to apply your formatting to the selected items. To move multiple fields, you can select them, even from different sections, using Ctrl-left-click (or Shift-left-click for all fields between two fields). Then drag to their new position and drop them. End users of the finished form do not see the toolbar.

Administrator Tools Using Workbench
© Copyright IBM Corp. 2020 Page 79
Course materials may not be reproduced in whole or in part without the prior written permission of IBM.
Each set of layout options in the toolbar is described below. Each set also uses color as an indicator, as shown here for columns:
Grey indicates no section is selected. Yellow indicates the option in force. Blue indicates the options in the set that you can apply to the selection.
Columns
Choose the option bearing the number of columns you want to use, then drag the fields into place. When you apply the column choice, notice the Section heading area continues across all the columns. It’s still a part of the section, but a heading area. Only label fields can be dragged into this area – use the dotted horizontal line as a target for dragging/dropping.
One Two Three
You can configure sections within the same req with different number of columns, as at right.
Alignment
Section Heading Area will always be Aligned left, regardless of the toolbar button setting for the rest of the section>
Align left Center Align left with options center
Response Option Orientation
BrassRing Add Req Page
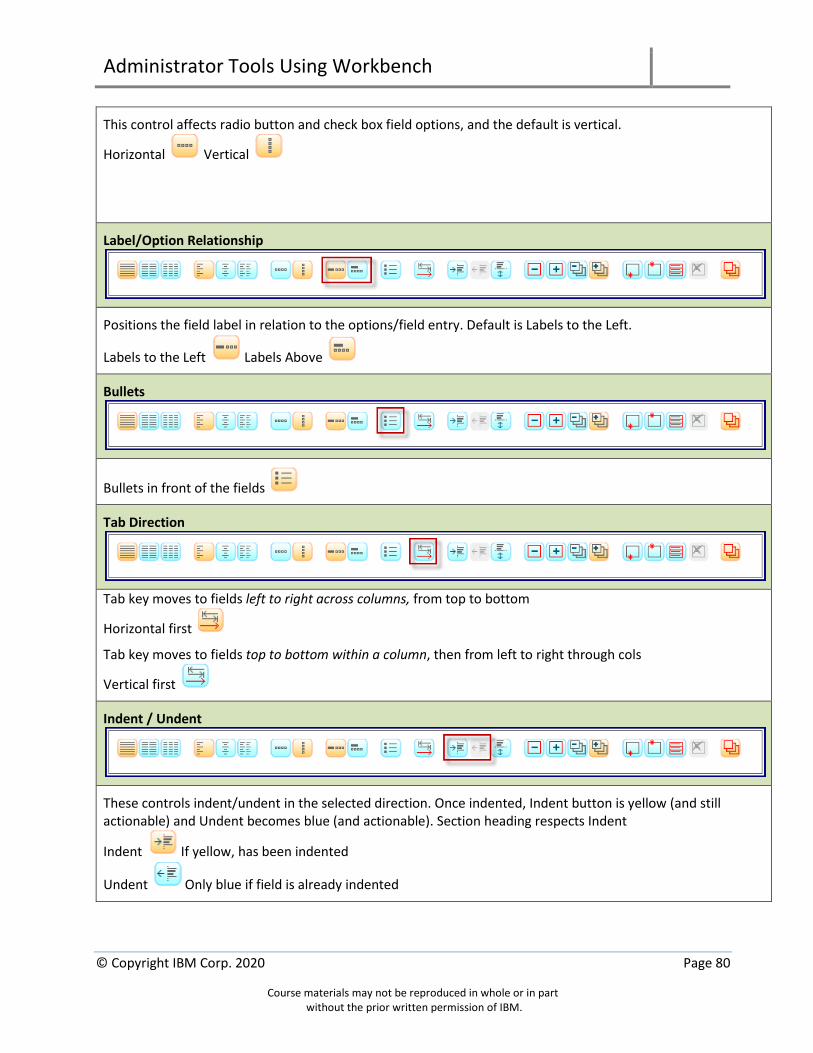
Administrator Tools Using Workbench
© Copyright IBM Corp. 2020 Page 80
Course materials may not be reproduced in whole or in part without the prior written permission of IBM.
This control affects radio button and check box field options, and the default is vertical.
Horizontal Vertical
Label/Option Relationship
Positions the field label in relation to the options/field entry. Default is Labels to the Left.
Labels to the Left Labels Above
Bullets
Bullets in front of the fields
Tab Direction
Tab key moves to fields left to right across columns, from top to bottom
Horizontal first
Tab key moves to fields top to bottom within a column, then from left to right through cols
Vertical first
Indent / Undent
These controls indent/undent in the selected direction. Once indented, Indent button is yellow (and still actionable) and Undent becomes blue (and actionable). Section heading respects Indent
Indent If yellow, has been indented
Undent Only blue if field is already indented
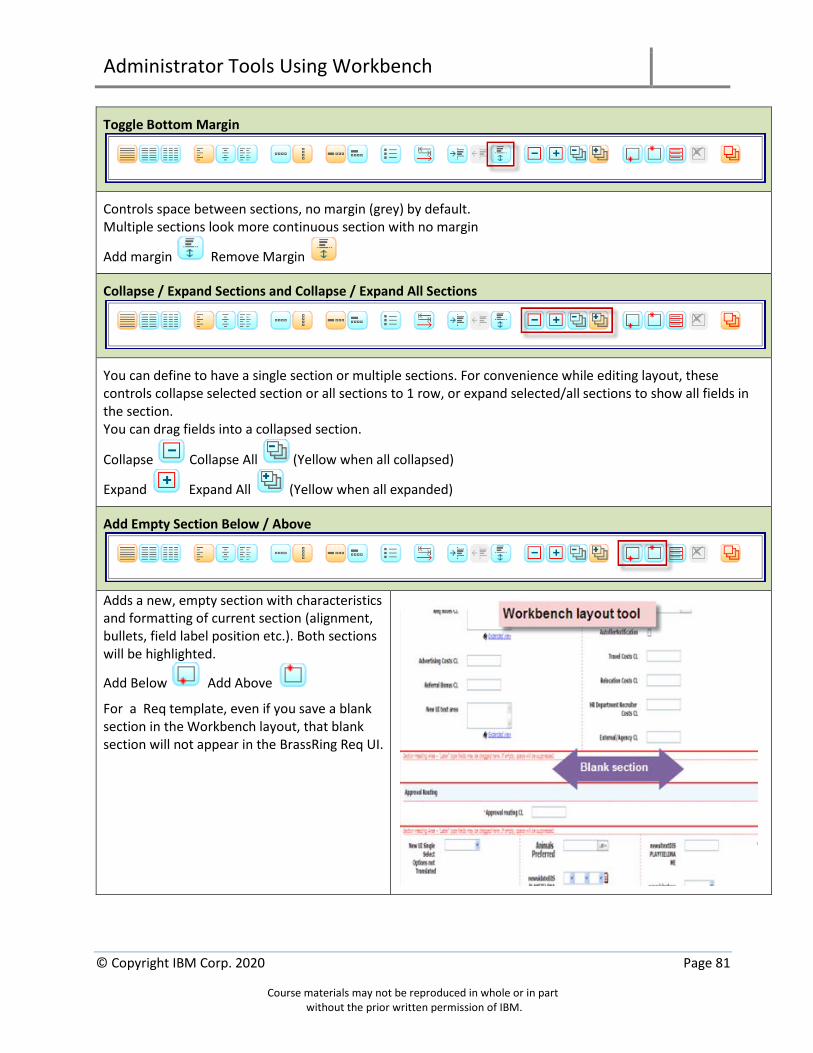
Administrator Tools Using Workbench
© Copyright IBM Corp. 2020 Page 81
Course materials may not be reproduced in whole or in part without the prior written permission of IBM.
Toggle Bottom Margin
Controls space between sections, no margin (grey) by default. Multiple sections look more continuous section with no margin
Add margin Remove Margin
Collapse / Expand Sections and Collapse / Expand All Sections
You can define to have a single section or multiple sections. For convenience while editing layout, these controls collapse selected section or all sections to 1 row, or expand selected/all sections to show all fields in the section. You can drag fields into a collapsed section.
Collapse Collapse All (Yellow when all collapsed)
Expand Expand All (Yellow when all expanded)
Add Empty Section Below / Above
Adds a new, empty section with characteristics and formatting of current section (alignment, bullets, field label position etc.). Both sections will be highlighted.
Add Below Add Above
For a Req template, even if you save a blank section in the Workbench layout, that blank section will not appear in the BrassRing Req UI.

Administrator Tools Using Workbench
© Copyright IBM Corp. 2020 Page 82
Course materials may not be reproduced in whole or in part without the prior written permission of IBM.
Split Sections at Headings
At each LABEL field type in a single-column section, creates a new section with all the successive fields up to the next LABEL field type included in the new section. Button is only available if your currently highlighted section is in one column. Recommended when initially enhancing layout if you use Label fields to section your forms. System creates a new section at each Label, putting each label field and all the fields below it, up to the next label field, into its own section. System also puts the labels into the section heading area. Multiple adjacent labels are kept in the same section.
Split current section at field types = Label
Remove Empty Sections
Only empty sections (containing no fields) can be deleted or removed.
Remove Empty Section (empty of fields)
Select All Sections
Select All Sections
Saving and Activating the New Layout
To save the enhanced layout when finished, click Save. Set the Form layout attribute to Enhanced (Form layout (Tools > Forms > Candidate Forms > Edit form attributes [for selected form]) when ready to have users see and use it.
A NEWLY-CREATED FIELD AND/OR ACTIVATED FIELD THAT HAS NOT APPEARED IN THE ENHANCED LAYOUT PREVIOUSLY WILL APPEAR AS THE LAST FIELD IN THE LAST COLUMN OF THE LAST SECTION.
Sections Sections are areas of a form containing custom candidate form fields. Formatting, such as label orientation (left or above field inputs), response option orientation (check box/radio button options vertical or horizontal), bullets, indenting/outdenting, will apply to all the fields in the section, not just individual fields. Forms will be more uniform if certain design and formatting elements are universal across the fields.

Administrator Tools Using Workbench
© Copyright IBM Corp. 2020 Page 83
Course materials may not be reproduced in whole or in part without the prior written permission of IBM.
• Sections not currently selected have a gray dotted border
• Sections currently selected have a solid red border
• Sections are highlighted by clicking in the white space of a section or by selecting a field within that section
• Empty sections are sections that have no fields. Only empty sections can be deleted or removed
• Fields can be moved into or out of a section
• Sections cannot be moved as an entity (with or without fields) above or below other sections
• Section can have 1, 2, or 3 columns. If fields need to be oriented in 2 columns, then into 3 columns, two sections are needed
• Borders of sections will ONLY be seen in Workbench. The border exists for design purposes only. The grey, dotted or red, solid border lines will not be displayed in the form seen by end users (in BrassRing, eLinks, on Talent Gateways, etc.)
• Any ‘extra’ space that might be visible during the designing of the enhanced layout due to sections will be suppressed when the form is seen by end users (in BrassRing, eLinks, on Talent Gateways, etc.)
Sections Heading Area • All sections have a section heading area. This is separated by a dotted line going
horizontally across the whole section. If the section is in 2 or 3 columns, the section heading area would be 1 column across all the columns
• Formatting, such as bullets and alignment, do not apply to the section heading area
• If the section is currently selected, the section heading area will be denoted in a dotted red line, and the red text “Section Heading Area – “Label” type fields may be dragged here. If empty, space will be suppressed.” will display
• If the section is currently NOT selected, the section heading will be denoted in a gray dotted line, and the gray text “Section Heading Area – “Label” type fields may be dragged here. If empty, space will be suppressed.” will display
• If there is nothing in the section heading area:
o The section heading area will be only slightly taller than the text (Section Heading Area – “Label” type fields may be dragged here. If empty, space will be suppressed.). This will provide a target for moving fields into the section heading area
o The space will be suppressed when the form is seen by end users (in BrassRing, eLinks, on Talent Gateways, etc.)
• Only Label type fields can be dragged into the Section heading area
o Several Label type fields can be dragged into the Section heading area simultaneously
o If a field with a type of anything other than Label is attempted to be dragged into the section, the system will simply return the field to its original location
Administrator Tools Using Workbench
© Copyright IBM Corp. 2020 Page 84
Course materials may not be reproduced in whole or in part without the prior written permission of IBM.
Creating a New Section • When the Layout Manager is first launched, all fields are included in 1 section
• A new section can be created above or below the currently selected section by clicking the
appropriate icon. or
• When creating a section above or below the currently selected sections, the new section will take on the formatting characteristics of the currently selected section
Split Section at Headings • The button Split section at headings will take the fields in the current section and split
them at each Label field type. A new section is created with the Label fields in the section heading area and all the successive fields included in the main part of the new section. All other fields of any other field type will be in the new section up to the next Label field type
• The label fields will be placed in the Section heading area
• If there are multiple Label field types in sequential placement, it will split the section on the first of the Label fields and group the following Label fields in the section heading area, and the following field will be in the main part of the section.
• If no section is highlighted OR the highlighted section is in 2 or 3 columns, the button is gray and disabled
Collapsed Sections • When a section is collapsed, it will show a small rectangle across the form. The rectangle
will be a solid, red border (if currently selected) or a gray, dotted border (if currently not selected)
o Fields can be dragged/dropped/moved into a collapsed section. The collapsed section is a rectangle (verses a line or +) to provide a target for the fields to be moved into the collapsed section
• Inside the rectangle will be smaller blue rectangles, indicating how many columns the section is currently configured to have
o Fields can be dragged/dropped/moved into a specific column in a collapsed section. The smaller, blue rectangles provide a target for the fields to be moved into a specific column in the collapsed section
• If the section is currently selected, the section heading area will be denoted in a dotted, red line, and the red text “Section Heading Area – “Label” type fields may be dragged here. If empty, space will be suppressed.” will display
• If the section is currently NOT selected, the section heading will be denoted in a gray, dotted line, and the grey text “Section Heading Area – “Label” type fields may be dragged here. If empty, space will be suppressed.” will display
• When a field is dragged into a collapsed section, the field will be placed in the last position in the destination column

Administrator Tools Using Workbench
© Copyright IBM Corp. 2020 Page 85
Course materials may not be reproduced in whole or in part without the prior written permission of IBM.
Drag-and-Drop Function • Users can select a field by clicking the field label, the field input, or, even, the white space
immediately around the field o When one field is highlighted, the section it is in will become highlighted o If multiple fields are highlighted in different sections, the section containing the
first highlighted field will be highlighted/selected
• Users can highlight one or multiple fields and drag them to a new position in the current column, another column, within the current section, or another section
• When the fields is selected to be moved, the entire field label and field input will be highlighted with a blue background
• As the selected fields is hovered over another field for a second or more, the field on the form should move down vertically in the column and show the potential new location of the selected field. If the selected field is not ‘dropped’ and moved to hover over another field, the field on the form will resume its previous location in the column
• Once the selected field is ‘dropped,’ it will remain highlighted until another fields is selected
• Scrolling form: If the position of a field is not in the viewable area, if you drag up or down, the form should scroll
• Sections will expand vertically and be as tall as the fields need them to be
Placement/Order In the enhanced layout, the field attribute of Placement/Order only has influence when an enhanced layout is first created. Once a field is moved around in the enhanced layout, the placement/order attribute no longer controls the placement of a field relative to other fields on the form. Likewise, when a field is moved on the form in the enhanced layout, the placement/order is not updated to reflect its new position relative to other fields on the form.
Highlighting Multiple Fields
• To highlight multiple fields, click a field label
• Holding the Control key on the keyboard while LEFT-clicking the mouse allows you to select multiple fields simultaneously
• Holding the Shift key on the keyboard while LEFT-clicking the mouse allows you to select one field, and then another, and the system will select the first, last, and all fields in between
New / Activated Fields
Newly created fields and/or activated fields that have not appeared in the enhanced layout previously will appear as the last field in the last column of the last section. The enhanced layout only honors the placement/order number in the field attributes when a new layout is created.

Administrator Tools Using Workbench
© Copyright IBM Corp. 2020 Page 86
Course materials may not be reproduced in whole or in part without the prior written permission of IBM.
However, if the field had a placement in the layout, was inactivated, and then reactivated, the field will also be placed as the last field in the last column of the last section.
IF THE FORM DISCLAIMER HAS BEEN CONFIGURED ON THE FORM, IT SHOULD BE SHOWN IN THE
ENHANCED LAYOUT MANAGER DURING ENHANCED LAYOUT CONFIGURATION.
AN ENHANCED PREVIEW ICON WILL APPEAR IF THERE IS A SAVED ENHANCED LAYOUT AND IF THE
FORM ATTRIBUTE OF FORMS LAYOUT IS ENHANCED. IT IS THE VISUAL INDICATION THAT THE FORM NOT
ONLY HAS AN ENHANCED LAYOUT, BUT THE BRASSRING SYSTEM IS USING THE ENHANCED LAYOUT
CORRECTLY.
Document Subsidiary Form
Document subsidiary forms are configurable, like candidate forms. A document subsidiary form template is always used with a document and is identified in the document template. A good example is an offer document template that has an offer response (document subsidiary form) defined. The actual offer response can be created only by an action on the Candidate Zone/Portal, by the candidate in responding with an acceptance or rejection of the offer. That completed document subsidiary form (offer response) is associated 1:1 with the candidate document (candidate offer).
Adding Document Subsidiary Form
Forms are established at implementation, but you can add additional forms through Workbench:
1. Click Tools > Forms > Document Subsidiary forms. 2. Click Add new form in the Actions list. 3. A new screen will appear with the field attributes. 4. Click Save.
Elements of Document Subsidiary Form Attributes
Database Title Database Title is the title of the form as it appears in the database tables. There should be no spaces; use the underscore (_) or dash (-) as a space replacement.
Title − Title is the name that appears on the form and in form lists in BrassRing
− The field limit is 255 characters (including spaces)

Administrator Tools Using Workbench
© Copyright IBM Corp. 2020 Page 87
Course materials may not be reproduced in whole or in part without the prior written permission of IBM.
− The field defaults to display in English (US). The translation option is available if using additional languages
Disclaimer − A disclaimer can be added to the bottom of the form (i.e., data privacy disclaimer)
− The field limit is 7,500 characters
− The field defaults to English (US). Translation option is available if using additional languages
− HTML coding is accepted for formatting and embedding URL links
Search/Output − Search: Select the User Types that can search for this form as candidate search criteria
− Output: Select the User Types that can output information from this form into candidate search results
Notify Users Upon Form Creation No longer in use.
Form Field Alignment
Select the alignment for the form's fields. Options are Default and Left. Selecting Left aligns the fields to the left, while the Default option keeps them aligned in the center.
Form Layout − Indicates if this form has the enhanced layout enabled
− Defaults to classic
− This setting is gray and disabled if an enhanced layout is not saved for the form
− Configuring the enhanced layout was described earlier in this chapter
View All − Selecting a User Type in this field will allow the user to view all instances of this form in
BrassRing, even if he/she did not originate the form
Modify All
− Selecting a User Type in this field will allow the user to modify all instances of this form in BrassRing, even if he/she did not originate the form
Delete All − This field is used to indicate which User Types can delete any instance of this form in
BrassRing. This is typically a Super User function
− If you give a User Type this privilege, it is a good idea to also give them “View All” and “Modify All”

Administrator Tools Using Workbench
© Copyright IBM Corp. 2020 Page 88
Course materials may not be reproduced in whole or in part without the prior written permission of IBM.
Editing Form Attributes
To edit form attributes:
1. Click Tools > Forms > Document Subsidiary forms.
2. From the list of forms, click the Edit form attributes icon for the form to be modified. 3. Edit fields as necessary. 4. Click Save.
Adding fields to Document Subsidiary Form Adding fields to a document subsidiary form is much like adding fields to a candidate form.
1. Select Tools > Forms > Document subsidiary forms.
2. From the list of forms, click the Administer form fields icon for the form.
3. Click Add new field in the Actions list.
4. For Placement, select the numerical placement for the field on the specified form. It
defaults to the next available placement number.
5. Type a Database field name. The name is limited to 20 characters. A space between
words cannot be used; use underscore(_) or dash (-) instead of a space.
6. Type a Field name. The character limit is 4,000. This will be the field label that appears to
your users in BrassRing. Be sure to check your spelling.
7. For Type, select the field type. This will identify the setup of the field and the options.
Refer to Chapter 4 for a list of the field types with a description.
8. Enter any necessary Field help text, which allows you to add information that will help
your users get a better understanding of the field (i.e., describe the field’s intention,
expected data surrounding the process, etc.).
9. The Custom Report Field is used and completed by an IBM representative. The field
cannot be edited by a Workbench Administrator.
10. For Font Size, select the text size of the form field. It will default to medium.
11. For Encrypted, click Yes or No. Yes will designate the field to be encrypted. To enable, you
must have field-level encryption activated by IBM.
12. For Hide for these user types, select the User Types that will not need to view the field, if
any.
13. For Non-editable for these user-types, select the User Types that will not need to edit the
field, if any.
14. For Required for these user types, select the User Types for which the field is mandatory.
This will place an asterisk next to the field in BrassRing when viewed by the User Type. The
form cannot be submitted without completing the field.

Administrator Tools Using Workbench
© Copyright IBM Corp. 2020 Page 89
Course materials may not be reproduced in whole or in part without the prior written permission of IBM.
15. For Hide in these languages, select the languages that will not need to view the field.
16. For Required in these languages, select the languages for which the field is mandatory.
This will place an asterisk next to the field in BrassRing. The form cannot be submitted
without completing the field.
17. For Question Branching, select whether or not the field will be hidden/shown based upon
the value of another field. If Yes is selected, the select button for the Show question when
field response is: becomes enabled.
For Database field name, select the field that should identify when it will display. (You can
only select one field. The fields that display in this list are single-select, multi-select, check
box, and radio button. Auto-fill will display only if the source field is a single-select or radio
button. Fields containing options will not display if the options are: pull options from
existing list of all recruiters, all managers, all active enterprise users, all active users, all
reqs, or all open reqs.)
For Selected Values, select the options that will determine when the field will display.
18. Click Save and continue.
Editing Field Attributes
From time to time, you might need to alter an existing field’s attributes. As an example, you might want to change the form label or change a field from not being required to being required. To edit form field attributes:
1. Click Tools > Forms > Document subsidiary forms.
2. From the list of forms, click the Administer form fields icon for the form to be edited.
3. From the list of form fields, click the Edit field attributes icon for the field to be changed.
4. Make changes as necessary. 5. Click Save and continue. 6. Make additional modifications as needed. 7. Click Save.
Translating Form Fields If your company uses multiple languages in BrassRing, you might want to translate your form fields all at the same time, instead of editing field attributes for each field.

Administrator Tools Using Workbench
© Copyright IBM Corp. 2020 Page 90
Course materials may not be reproduced in whole or in part without the prior written permission of IBM.
To translate form fields:
1. Click Tools > Forms > Document subsidiary forms.
2. From the list of forms, click the Administer form fields icon for the form. 3. Click Translate fields in the Actions list. 4. Translate the fields. 5. Click Save when finished. 6. Close the confirmation window.
Inactivating Form Fields
When a form field needs to be retired, it is a good idea to inactivate the field. Inactivating enables you to maintain the historical data associated with the field, yet remove it from users’ view. To inactivate a form field:
1. Click Tools > Forms > Document subsidiary forms.
2. From the list of forms, click the Administer form fields icon for the form. 3. Select the field you want to deactivate.
4. Click Inactivate in the Actions list. 5. Click Inactivate. 6. Click OK.
Configuring Enhanced Form Layout
The Enhanced Layout allows clients to control the form layout. This was detailed in Chapter 4. To configure the enhanced layout:
1. Click Tools > Forms > Document subsidiary forms. 2. The Form layout modification screen can be opened using the plus icon under the
Form Layout column. The form layout screen appears. A detailed description of the icons in the form layout toolbar are listed earlier in this chapter (Chapter 4) under the enhanced layout section.
3. Configure the layout of the fields on the document subsidiary form. 4. Once the enhanced layout is configured, you must go to the form attributes
(Tools > Forms > Document Subsidiary forms>Edit form attributes), and select enhanced layout in the Form layout field.
AN ENHANCED PREVIEW ICON WILL APPEAR IF THERE IS A SAVED ENHANCED LAYOUT AND IF THE
FORM ATTRIBUTE OF FORMS LAYOUT IS ENHANCED. IT IS THE VISUAL INDICATION THAT THE FORM NOT
ONLY HAS AN ENHANCED LAYOUT, BUT THE BRASSRING SYSTEM IS USING THE ENHANCED LAYOUT
CORRECTLY.

Administrator Tools Using Workbench
© Copyright IBM Corp. 2020 Page 91
Course materials may not be reproduced in whole or in part without the prior written permission of IBM.
Chapter Summary
• Candidate forms, Candidate-Req forms, and Talent Gateway forms are each administered using Workbench.
• Inactivating form fields and options enables you to maintain historical data.
• Forms and form fields can be designated as searchable and/or outputable.
• Field filtering allows the values on a form to be filtered by HR status and/or req template.

Administrator Tools Using Workbench
© Copyright IBM Corp. 2020 Page 92
Course materials may not be reproduced in whole or in part without the prior written permission of IBM.
Check Your Skills
Answer these True or False questions:
1) Field filtering allows the values on a form to be filtered by HR status and/or req template.
2) Limiting options for single- and multi-select fields to 40 characters improves visibility.
3) Option lists are managed exclusively through Workbench.
4) Through Workbench, you can edit form fields but not add new ones.
Answer these short answer questions:
5) What should be considered when adding new form fields?
Perform these hands-on exercises in Workbench:
6) Hiring Managers, who are users of BrassRing, need to be able to add and view the Phone Screen Form you created. Make sure that they will be able to view this form (remember to select your version of the form).
7) Add a single-select field for Hiring Manager to your Phone Screen form. For field options, pull from the user list that contain all users marked as “Active managers.” Position the field at the bottom of the form.
8) Add another field to your Phone Screen form. The Field Name is Overall evaluation. The field options are Recommend for hire, Consider for another position, Candidate changed mind, and Not interested. Position this new field at the bottom of the form. Save your field. Which field type did you use?

Administrator Tools Using Workbench
© Copyright IBM Corp. 2020 Page 93
Course materials may not be reproduced in whole or in part without the prior written permission of IBM.
Chapter 5: Req Forms
Chapter Overview
The BrassRing req module streamlines your organization’s talent management efforts. Reqs can be created, approved, shared for viewing, and posted to your Talent Gateways. Using Standard reports and the Data Insight Tool, you can also arm yourself with the metrics that are vital for making workforce and business-planning decisions. To enable you to keep up with the changing needs of your organization, you can make changes to the req form and approval groups in Workbench. In this chapter, we will explore your options for using Workbench to facilitate these changes.
Chapter Objectives
At the end of this chapter, you will be able to:
• Describe elements of the req form
• Recognize req form attributes
• Identify the differences and similarities between standard and custom req fields
• Add a new req form
• Inactivate a req form
• Delete a new req form
• Edit req field and option attributes
• Add custom req fields and options
• Edit form, field, and option labels
• Translate form, field, and option labels
• Inactivate form fields and options
• Add a new approval group • Edit approval groups
• Translate approval groups
• Manage lists per req template

Administrator Tools Using Workbench
© Copyright IBM Corp. 2020 Page 94
Course materials may not be reproduced in whole or in part without the prior written permission of IBM.
Overview of Req Forms
Among other reasons, your organization most likely uses BrassRing to track open positions. Reqs can be routed electronically to gather approvals before beginning the recruiting process. Elements of the req form can be posted to your organization’s website and/or intranet by using the BrassRing Talent Gateways. With Workbench, you can make changes to your req form. For example, you might have a new or renamed division and need to update the Division field’s options. Or, perhaps you have decided to add a field to the req to capture a new piece of information. You will be able to make these changes and more with Workbench. We will discuss some important facts about req forms.
Elements of Req Forms
Here are some important points to keep in mind when working with req forms:
− Req forms are made up of standard and custom fields used for data collection
− Fields on a req form (required or optional) to process the req in BrassRing.
− Standard req fields: To process a req in BrassRing, certain Standard fields on the req form are required to be completed. Data is tied to other BrassRing features, such as Standard reports and Talent Relationship Management (TRM) Dashboard reports.
− Custom req fields: Configurable fields that you can add to the req form
− The order of appearance of the fields can be set for each req template
− The Edit field attributes page is available for standard fields at the req template level
− Your company might have one or more req forms, and each req form can have a unique approval routing workflow
− Req form access is managed through the use of Organizational (Org) groups. Org group membership is managed in BrassRing’s Admin+ menu
− Custom req fields are stored in one single library of custom fields. Custom req fields can be used in any combination on each req form. Before adding a new field to a req, it must first be added to the custom req field master list
− Standard req field labels and options can be modified
Administrator Tools Using Workbench
© Copyright IBM Corp. 2020 Page 95
Course materials may not be reproduced in whole or in part without the prior written permission of IBM.
Adding a Req Form Forms are established during implementation; however, you can add additional forms through Workbench.
Adding a Req Form
1. Click Tools > Forms > Reqs > Req Forms. 2. Click Add new form in the Actions list. 3. A screen appears with the list of form field attributes.
As we learned in Chapter 4, form attributes are the characteristics of a form. For req forms, these characteristics include information like the req form display title and access by Org groups. When adding a new form, once the form attributes are saved, some of them will display as viewable and can only be edited by IBM.
Elements of Req Form Attributes
You have several options when editing form attributes. However, some of the fields can only be changed by IBM.
Database Title Database Title is the title of the form as it appears in the database tables. The database title can be a maximum of 30 characters.
Display Title The Display Title is the name of the field that will display in BrassRing. The display title can be a maximum of 255 characters. The translation option is available if additional languages are being used.
Req URL This specifies if the req form is accessed as a freestanding URL outside the system or requested by email (i.e., by Hiring Managers). This field is grayed out once it is saved.
Restrict access by IP address
This specifies if access to the req form is restricted by the user’s IP address. Once the restrict IP address is saved, it is grayed out. IBM is able to edit the field.

Administrator Tools Using Workbench
© Copyright IBM Corp. 2020 Page 96
Course materials may not be reproduced in whole or in part without the prior written permission of IBM.
Authorized IP Addresses This field might contain a list of IP addresses that are authorized to access the freestanding URL or the request by email URL. Once this is saved, it is grayed out. IBM is able to edit the field.
Approval Process - The Approval Process field is used to designate if this req form will be using approval routing:
Yes: This indicates a sequential approval process No: This indicates an approval process will not be enabled for this req template Rules-Based: This indicates that Smart Approval (Custom Approval Workflow) is the designated approval process URL: This is associated with rules-based approval process. IBM will populate the URL field if this option is used
- The sequential approval process will be discussed at the end of the chapter - Once the approval process is saved, it is grayed out. IBM is able to edit the field
Cascade Approver Messages For approvers (not rules-based), check Cascade Approver Messages to include all previous approver messages in the approval request, so the next approver can view them. When the setting Cascade approver message is enabled, the Req detail page in BrassRing also contains the full history of approver “Reasons for selection” in the approver order. (“Bypassed” approvers are not included in the tracking.)
Org Groups with Access You will use this field to select the org groups that have access to the req template. Org group membership is managed in BrassRing Admin+.
Proximity Coordinates − Candidates are able to search for positions within a certain distance globally on the Talent
Gateways
− By selecting Yes, a section called Proximity Coordinates will appear on the req template
− Check the Required field box to make the fields under the Proximity Coordinates section required on the req template
Enforce Final HR Status − This field works in conjunction with the auto-close functionality
− Selecting Yes will force all candidates not selected for the position to be dispositioned; this includes candidates at a”0-filed” HR status
− Selecting No will allow auto-close to function as it normally does; candidates not selected for the position at an HR status beyond “0-filed” must be dispositioned.
Display Notes Tab Selecting “Yes” will display the Notes tab on the req form.
- Notes on the req notes tab are reportable on the Data insight Tool.

Administrator Tools Using Workbench
© Copyright IBM Corp. 2020 Page 97
Course materials may not be reproduced in whole or in part without the prior written permission of IBM.
Autofiler Notification Determines how the “turn off autofiler notification” field will display on the req form in BrassRing. On – field appears with no checkmark and the field can be edited. Off – “turn off autofiler notification” is automatically checked and greyed out on the req form. A privilege is available under All Reqs and My Reqs which allows user types with the privilege enabled to edit the field.
Expand sections with Required Fields by default
Select Yes or No to Expand sections with Required Fields by default. By default, this setting is set to No. When it is set to Yes, all sections that have at least one mandatory field appear as expanded on the req form in BrassRing.
Display Attachment Tab and Attachment Column Icons Select Yes so that the Attachment tab appears on the req form.
No of Attachments
Set the number of attachments a user is able to add to the req form.
Max Size per Attachment Set the maximum size of each attachment.
Attachment Categories Determine which Attachment Categories will display in the list of options. The available categories to choose from are the same categories used for Candidate Attachments. REQ ATTACHMENTS WORK SIMILARLY TO CANDIDATE ATTACHMENTS, EXCEPT THE ATTACHMENTS
ARE ASSOCIATED WITH REQUSITIONS RATHER THAN A CANDIDATE.
Select Restricted Attachment Types Determine which attachment types will be restricted when uploading.
Tiering Initiation Period Start Event
Identify the moving of candidates into tiers should be initiated once a req is open or once it is posted to a talent gateway.
Tiering Initiation Period (Hours) Identify how much time (in hours) should pass before candidates in Tier 2 appear in the req folder. This is explained in greater detail in Chapter 13: Managing Settings.
Tiering Selection Identify which Tiers will be associated with this req and the order they will display. This is explained in greater detail in Chapter 13: Managing Settings.

Administrator Tools Using Workbench
© Copyright IBM Corp. 2020 Page 98
Course materials may not be reproduced in whole or in part without the prior written permission of IBM.
Additional Time Zones for Posting Options
Identify which additional time zone options user will see on the Req posting pages while posting those reqs that are created using the configured templates. The configured time zones are displayed in addition to the five US time zones that are currently being displayed in the drop down menu: Alaska, Pacific Time (US & Canada), Mountain Time (US & Canada), Central Time (US & Canada), Eastern Time (US & Canada).
Automatically File Candidate to Req Folder by HR Status Through Insta-file Candidates are filed (by using insta-file or autofile) to a req folder according to the HR status selected in this field.
Manually File Candidate to Req Folder by HR Status This defines the starting status when “restricted” users manually file, copy, or move candidates to a folder. Restricted users are those with the Candidate Action 3 privilege Restrict start HR status when filing to Req. BrassRing files the candidate to the HR status selected or to 0-Filed if you select value = None. When a restricted BrassRing user performs a Move or Copy to Req action, BrassRing presents the same radio button options that unrestricted users have, to retain or not retain HR status data.
Auto-send e-mail to candidates in req folder Candidates are filed (by using insta-file or autofile) to a req folder according to the HR status selected in this field.
Auto-send e-mail to candidates in req folder by HR Status Email to candidates is sent when specific HR Status is assigned.
Editing Req Form Attributes
Like your candidate forms, req forms were initially set up during the BrassRing implementation process. However, you can edit certain elements of these forms in Workbench. To edit req form attributes:
1. Click Tools > Forms > Reqs > Req forms.
2. From the list of req forms, click the Edit form attributes icon for the req you want to edit. Refer to Figure 5- 1. Edit fields as necessary.
3. Click Save.

Administrator Tools Using Workbench
© Copyright IBM Corp. 2020 Page 99
Course materials may not be reproduced in whole or in part without the prior written permission of IBM.
Figure 5- 1 : Req forms
Standard Req Fields
The req form is comprised of two types of fields: standard and custom. BrassRing requires a minimum amount of information to process a req and have data available for Standard reports and other standard displays, such as req lists in BrassRing. When users complete the required standard fields on the req form, they have performed the minimum work required to submit a req, from a processing standpoint. Standard fields are broken down into two types: required and optional. See Table 5-1.
Standard Field Type Description
Standard required fields Required standard fields are predefined as part of the BrassRing application and cannot be removed. However, the field order can be changed, and the field names can be modified to incorporate terms specific to your organization. See Table 5-2.
Standard optional fields IBM provides a number of optional standard fields to enhance your BrassRing reporting capabilities. Any number of the optional standard fields can be used and any that are not in use can be hidden or removed. As with required fields, the field order can be changed, and the labels might be modified to incorporate terms specific to your organization. See Table 5-3.
Table 5-1 : Standard req field types
IT IS BEST PRACTICE TO USE AS MANY OPTIONAL FIELDS AS POSSIBLE TO MAXIMIZE STANDARD REPORTS.

Administrator Tools Using Workbench
© Copyright IBM Corp. 2020 Page 100
Course materials may not be reproduced in whole or in part without the prior written permission of IBM.
Standard Required Req Fields
Below lists some of the standard req fields that are required by IBM. The field label and options can be modified.
Field Description
Job Title Open text field. Used for standard reports.
Job Description Open text area into which the user can type or paste job description information.
Requisition ID By default, BrassRing will automatically generate a system req ID number. In
addition, the Requisition ID field might be used to track an HRIS position number,
if applicable.
Recruiter Single-select drop-down list populated from the BrassRing user list of those
designated as Recruiter. Used in Standard reports.
Manager Single-select, drop-down list populated from the BrassRing user list of those
designated as Manager. Used in Standard reports.
No. of Positions Numeric field to indicate the number of vacancies. The default value is 1. This
field can be non-editable for specific user types.
Requisition
Team
Multi-select list pulling all system users on the BrassRing user list. Individuals
selected in this field are automatically notified when the req is opened and have
access to the req under View my reqs. Note: Client setting can be enabled to
automatically remove req creator from req team.
Table 5- 2 : Standard required req fields
Standard Optional Req Fields
Below are some of the Standard req fields that are optional. Any number of optional fields can be used and can be hidden by User Type or complete removed from a req form. Field labels and options can be modified.
Field Description
Location/Division Can be an open text field or single-select list. Used in Standard reports.
Department Can be an open text field or single-select, drop-down list. Used in
Standard reports.
Req Type Radio buttons consisting of the following options that cannot be
modified: N/A, Exempt, Non-Exempt.

Administrator Tools Using Workbench
© Copyright IBM Corp. 2020 Page 101
Course materials may not be reproduced in whole or in part without the prior written permission of IBM.
College Radio buttons consisting of the following options that cannot be
modified: N/A, Yes, No.
Position Radio buttons consisting of the following options that cannot be
modified: N/A, Addition, Replacement.
Requisition Notes Text area to capture any notes related to the req, justification for
opening, or any other comments. Changes to this field while approving
will not trigger approval re-route.
Cost Fields Advertising costs, Travel costs, Relocation costs, HR Dept. Recruiter
Costs, External/Agency, and Referral bonus. Numeric fields used to
calculate cost per hire.
Add Type Radio button that tracks the type of hire after the req has been filled.
Consists of the following options that cannot be modified: Internal,
External.
Employee Name Text field to enter name of person who filled the position.
Start Date Date field to enter the date the person will start work.
Table 5- 3: Standard optional req fields
Editing Standard Req Field Attributes
You have more options available when editing Standard optional req fields than with Standard required req fields. We will take a look at how to edit your Standard req field attributes. To edit Standard req field attributes:
1. Click Tools > Forms > Reqs > Req forms. 2. Click Define standard req fields. See Figure 5- 2
3. From the list of Standard req fields, click the Edit field attributes icon. 4. Make edits as necessary. See Figure 5- 3. Req field type determines which attributes
can be changed. Click Save and continue. 5. Click OK to close the confirmation window. Be sure to synchronize any changes with
the Talent Gateways. YOU CAN ALSO EDIT STANDARD REQ FIELD ATTRIBUTES FROM WITHIN A REQ FORM. THIS IS DESCRIBED LATER
IN THE CHAPTER.

Administrator Tools Using Workbench
© Copyright IBM Corp. 2020 Page 102
Course materials may not be reproduced in whole or in part without the prior written permission of IBM.
Figure 5- 2 : List of Standard req fields
Figure 5- 3 : Edit Standard req fields attributes
Standard Req Field Attributes
Table 5- 4 below shows a list of Standard req field attributes, indicating which fields might be modified based on Standard field type.

Administrator Tools Using Workbench
© Copyright IBM Corp. 2020 Page 103
Course materials may not be reproduced in whole or in part without the prior written permission of IBM.
Attribute
Description
Editable for fields:
Standard
required?
Standard
optional?
Placement Value for form field placement The placement can be changed from the Administer Req fields screen on a req form. This is explained later in the chapter
No No
Default Label Database field label No No
Custom Label Field label viewed on BrassRing and Talent Gateways Yes Yes
Field Type Setup of the field and the options. Established during implementation No No
Field help text (Applies to
Enhanced Layout only)
Allows you to add information that will help your users get a better understanding of the field. (i.e. describe the field’s intention, expected data surrounding the process, etc.)
Yes Yes
Posting Interface Mapping Enables the req data for this field to be posted to the BrassRing Talent
Gateway. Determined in implementation
No No
Font Size Setting for font size displayed in BrassRing. Default is medium Yes Yes
Enable Formatting Enables the formatting for the selected Text Area, similar to
formatting available in Word
Yes Yes
Enable Spell Check Enables the spell check for the selected Text and Text Area Yes Yes
Hide for These User Types The field will not be displayed for users of the selected User Types No Yes
Non-Editable for these User
Types
The field value is viewable; however, users of the selected User Type
cannot edit it. Note: “extend to add req” is not applicable with
Approval Routing or Job Code”
Yes Yes
Hide in These Languages The field will not be displayed for users of the selected language No Yes
Required for These User
Types
The field becomes mandatory for users of the selected User Types No Yes
Require in These Languages The field becomes mandatory in the selected languages No Yes
Exclude from Save as new for
these user types
When a req is created using the Save as New option from an existing
req, the new req receives the field responses from the existing req.
This attribute controls the user type that cannot view the field
responses from the existing req.
Yes Yes
Table 5- 4 : Editable Standard req fields

Administrator Tools Using Workbench
© Copyright IBM Corp. 2020 Page 104
Course materials may not be reproduced in whole or in part without the prior written permission of IBM.
Translating Standard Req Fields
In Workbench, there are two ways to translate a field. The first way is to edit each field separately. The second and most convenient way is to have fields display in multiple languages is to translate all fields at the same time. To translate all Standard req field custom labels:
1. Click Tools > Forms > Reqs > Req forms. 2. Click Define standard req fields. 3. Click Translate fields in the Actions list. 4. Select the language to which you want to translate your field names. The first
language displayed defaults to English (US). Refer to Figure 5- 4. 5. Type translations into the text boxes. Be sure to check your spelling. 6. When you are finished with one language, use the Language drop-down to go to the
next language. 7. Click Save when finished. Be sure to synchronize any changes with the Talent
Gateways.
Figure 5- 4 : Mass translating of Standard req fields

Administrator Tools Using Workbench
© Copyright IBM Corp. 2020 Page 105
Course materials may not be reproduced in whole or in part without the prior written permission of IBM.
Adding Standard Req Field Options You might need to add an option to a standard req field from time to time. For example, your organization might acquire a new location. Options are the responses that appear to a user when completing a form. The only standard req fields with editable options are Department and Location/Division. To add a Standard req field option:
1. Click Tools > Forms > Reqs > Req forms. 2. Click Define standard req fields.
3. From the list of fields, click the Administer field options icon. 4. Click Add new option in the Actions list. 5. Type in a Code. This is the unique identifier for this option in the data table. Once
added, the code cannot be changed. The code is limited to 50 characters. A space between words cannot be used; use the underscore (_) as a space instead. See Figure 6-6.
6. Type the Description. The Description is the text that appears on the form in BrassRing. This cannot exceed 255 characters.
7. Type in Sort order. By default, options are sorted in numeric then alphabetical order. If a numeric value is entered, the order in which options are to appear is designated numerically. Numbers less than 10 should begin with a zero (0). For example, 03.
8. Click Save. AS BEST PRACTICE, RETIRE OLD OPTIONS BY INACTIVATING THEM. ADD A NEW OPTION TO REFLECT THE NEW
DATA TO BE CAPTURED. TO ENTER A TRANSLATED STANDARD REQ FIELD OPTION DESCRIPTION, CLICK THE PLUS SIGN + NEXT TO
DESCRIPTION. TYPE YOUR TRANSLATION INTO THE APPROPRIATE TEXT FIELD. MODIFICATIONS TO STANDARD REQ FIELDS AND FIELD OPTIONS WILL AUTOMATICALLY TAKE EFFECT IN ALL
REQ FORMS. ANY CHANGES TO GATEWAY-RELATED FORMS NEED TO BE SYNCHRONIZED WITH THE TALENT GATEWAY. SEE
SYNCHRONIZE CHANGES TO TALENT GATEWAY AT THE END OF CHAPTER 8 FOR DETAILS.

Administrator Tools Using Workbench
© Copyright IBM Corp. 2020 Page 106
Course materials may not be reproduced in whole or in part without the prior written permission of IBM.
Figure 5- 5 : Adding a Standard req field option
Editing Standard Req Field Options Standard req field options can also be edited through Workbench. As an example, there might be a time that the name of a division or location needs to be changed. The only standard req fields with editable options are Department and Location/Division. To edit a standard req field option:
1. Click Tools > Forms > Reqs > Req forms. 2. Click Define standard req fields.
3. From the list of fields, click the Administer field options icon for the options list to be edited.
4. From the list of fields options, click the Edit icon for the option to be changed. Refer to Figure 5-6.
5. Make changes as necessary. See Figure 5- 7. 6. Click Save and continue. 7. Make additional modifications as needed. 8. Click Save. Be sure to synchronize any changes with the Talent Gateways.
Figure 5- 6 : Standard req field options list

Administrator Tools Using Workbench
© Copyright IBM Corp. 2020 Page 107
Course materials may not be reproduced in whole or in part without the prior written permission of IBM.
Figure 5- 7 : Edit standard req field options
LATER IN THIS CHAPTER, YOU WILL LEARN HOW YOU CAN USE OPTION LIST FILTERING PER REQ TEMPLATE TO
SUIT YOUR BUSINESS NEEDS.
Translating Standard Req Form Field Options
As we discovered when adding or editing an option, individual options can be translated. Now let us take a look at translating all standard req field option descriptions at one time. To translate standard req field options:
1. Click Tools > Forms > Reqs > Req forms. 2. Click Define standard req fields.
3. From the list of fields, click the Administer field options icon for the options list to be translated.
4. Click Translate options in the Actions list. 5. Select the language to which you want to translate your field options. The first language
displayed defaults to English (US). Refer to Figure 5- 8. 6. Type the translations into the fields. Be sure to check your spelling. 7. When you are finished with one language, use the Language drop-down to select the next
language. 8. Click Save when finished, and close the confirmation window. Be sure to synchronize any
changes with the Talent Gateways. WHEN TRANSLATING INTO MULTIPLE LANGUAGES, ALL OPTIONS MUST BE TRANSLATED. EVEN IF YOU CHOOSE
NOT TO TRANSLATE AN OPTION FOR A PARTICULAR LANGUAGE, THE COMPANY DEFAULT LANGUAGE SHOULD
BE REPEATED. COPY AND PASTE THE DESCRIPTION FROM THE DEFAULT LANGUAGE INTO THE OTHER
LANGUAGE’S OPTION FIELD. THIS WILL PREVENT BLANK SPACES FROM DISPLAYING IN BRASSRING.

Administrator Tools Using Workbench
© Copyright IBM Corp. 2020 Page 108
Course materials may not be reproduced in whole or in part without the prior written permission of IBM.
Figure 5- 8 : Translate standard req field options
Inactivating Standard Req Form Field Options
When a field option needs to be retired, it is best practice to inactivate the option. Inactivating allows you to maintain the historical data associated with the option, yet remove it for future use. To inactivate a field option:
1. Click Tools > Forms > Reqs > Req forms. 2. Click Define Standard req fields. From the list of fields, click the Administer field options
icon.
3. From the list of options, click the Inactivate icon for the option to be inactivated. 4. Click Inactivate. A confirmation window will automatically close.
Custom Req Fields Custom req fields are those fields added to the req forms to better tailor it for your organization’s specific needs. These fields can be used to gather information not captured by the standard req fields. Your organization provided IBM with a list of custom fields during implementation. Through Workbench, you can add more custom fields to your master list and distribute them, as needed, to your req forms. While there is no limit to the number of fields that can be added, caution should be used. Try to keep the number of fields on the req form to a minimum to allow your users to complete the form in a timely manner.

Administrator Tools Using Workbench
© Copyright IBM Corp. 2020 Page 109
Course materials may not be reproduced in whole or in part without the prior written permission of IBM.
Elements of Custom Req Fields Keep these points in mind when working with custom req fields:
− When using custom fields, field attributes and options can be defined, much like those for candidate forms discussed in Chapter 4
− These fields can be required or optional, and you can set the order of their appearance on the req template
− Custom req fields are stored in one master list of custom fields that can be used in any combination on each req form
− Selected User Types can be restricted from editing specific custom fields
− Custom fields can be required on one req and not required on another and can appear on one form and not another
− Custom req fields can be made non-editable when a BrassRing user is editing a req form or adding a req form
− To maintain data integrity, consider using drop-down lists instead of open text boxes. Limiting users’ choices produces more standardized information, thus improving your reporting capabilities
Figure 5- 9 : Custom field example
Defining Custom Req Fields
Custom req fields are established during implementation, but you can add new custom req fields as your hiring or user needs change. To define a custom req field:
1. Click Tools > Forms > Reqs > Req forms.
2. Click Define custom req fields. See Figure 5- 10.

Administrator Tools Using Workbench
© Copyright IBM Corp. 2020 Page 110
Course materials may not be reproduced in whole or in part without the prior written permission of IBM.
Figure 5- 10 : Define custom req fields
3. Click Define new req field in the Actions list. For Placement, select the numerical
placement for your field on the specified form. It defaults to the next available placement
number. Refer to Figure 5- 11.
Figure 5- 11 : Placement option in a custom req field
4. Type a Database field name. The name is limited to 20 characters. There should be no
spaces; use underscore (_) or dash (-) as a space replacement.
5. Type a Field name. The character limit is 4,000. This will be the field label that displays to your users in BrassRing. Be sure to check your spelling.
6. For Type, select the field type. This will identify the setup of the field and the options.
Refer to Table 4-3 in Chapter 4: Candidate Forms for field type definitions.

Administrator Tools Using Workbench
© Copyright IBM Corp. 2020 Page 111
Course materials may not be reproduced in whole or in part without the prior written permission of IBM.
7. For Field Help Text (Applies to Enhanced Layout Only), field allows you to add information that will help your users get a better understanding of the field. (i.e. describe the field’s intention, expected data surrounding the process, etc.).
8. Custom report field. IBM manages mapping for your custom reports.
9. Posting interface mapping. If the field is to be used in a posting interface, select the field it should map to. It’s used for job aggregators to post req to posting partners. You map the req field to the board value.
10. Instruction type, select None or Attachments. Specific instructions can be created for individual reqs, informing the candidate of the types of attachments that should be included with the submission. To customize the text, per req, displayed to candidates for the attachment upload, a new drop- down box field, “Instruction type,” has been added to the Define new custom req field screen in Tools > Forms > Req forms. When the field is set to “Attachments,” the “Type” field must be set to “Text” or “Text area.” The procedure adds a new field on the req form where the user can enter attachment instructions.
11. For Font, select the text size of the form field. It will default to medium.
12. For Encrypted, click Yes or No. Yes will designate the field to be encrypted. To enable, you
must have field-level encryption activated by IBM.
13. HR Status restrictions indicates if this field is part of the HR status restriction function. This field is associated with a client setting that must be turned on by an IBM Rep. The field is grayed out if it is not being used.
14. Click Save and continue.
15. Field length will default to the field type's defined character limit. If less is needed, indicate the amount in text field.
16. Searchable/Outputable - You might be able to designate the field as searchable and/or
outputable. This enables your BrassRing users to search by the field response and/or use it as an output field. If you would like to make the field searchable and outputable click Yes for each field. Then click the Enable Search/Output check box.
Figure 5- 12 : Search/Output

Administrator Tools Using Workbench
© Copyright IBM Corp. 2020 Page 112
Course materials may not be reproduced in whole or in part without the prior written permission of IBM.
Once you click the Save and continue button, you have mapped the search/output fields to the search engine. Once mapped, this action cannot be undone. Your company is permitted 500 Text fields, 50 Numeric fields, and 75 Date fields to designate as Searchable and Outputable. Used search engine spaces cannot be recovered, even if the field is inactivated.
17. If no options are required for this field type, continue to the next step. If options are required, you will see the Options source area. See Table 4- 3 in Chapter 4 for more configuration details sorted by field type. Options are discussed later in the chapter.
18. Click Save. You will receive a confirmation message and the choice to add an additional new field or to administer options for the field which you just added, if applicable. Note: At this point, you will have the opportunity to create a list of options for this field if you selected Maintain custom list.
THE DATABASE FIELD NAME WILL APPEAR WHEN SELECTING CUSTOM FIELDS FOR YOUR REQS. MAKE THE
NAME MEANINGFUL, SO YOU WILL RECOGNIZE IT EASILY. ONCE A FIELD IS MAPPED, THE SPACE IS TAKEN PERMANENTLY. BE SURE YOU WANT TO MAP THE FIELD WHEN
MAKING THE SELECTION OF SEARCHABLE/OUTPUTABLE.
Selecting Custom Req Fields
Once the new custom req field has been added to the master list, it is available to be selected for a req form. To select a custom req field for a req form:
1. Click Tools > Forms > Reqs > Req forms.
2. From the list of req forms, click the Administer req fields icon. 3. Click Select req fields. See Figure 5- 13. A new window launches. 4. From the Select req fields window, highlight the field in the Available fields column that
you would like to include on the req form. Refer to Figure 5- 14. The fields are displayed by their database field name.
5. Click Add. The highlighted field moves to the Selected fields column. Note: The field will appear at the end of the list of field in the Selected fields column. It is not necessary to change its location to reflect where it should appear in the req as this particular step is completed in the Form Layout discussed later in this chapter. Click Remove. Removes a custom req field from the Selected fields column.
6. Click Save. Be sure to synchronize any changes with the Talent Gateways.

Administrator Tools Using Workbench
© Copyright IBM Corp. 2020 Page 113
Course materials may not be reproduced in whole or in part without the prior written permission of IBM.
Figure 5- 13 : Select req fields
Figure 5- 14 : Select custom req fields
Once you have added a custom req field to a req form, you will need to edit the field attributes to make decisions, such as if the field is required or hidden for a certain Language and if the formatting options and/or spell check are enabled. ONCE YOU ADD A CUSTOM FIELD TO A REQ, YOU NEED TO EDIT THE FIELD’S ATTRIBUTES TO DETERMINE
WHETHER OR NOT THE FIELD IS REQUIRED OR HIDDEN. TO PREVIEW YOUR REQ FORM CHANGES, CLICK PREVIEW FORM IN THE ACTIONS LIST.
Editing Standard Req Field Attributes
You can edit the attributes for the standard req fields. For example, a situation might arise in which you want standard req fields viewable for specific User Types on certain req templates but hidden on other req templates.

Administrator Tools Using Workbench
© Copyright IBM Corp. 2020 Page 114
Course materials may not be reproduced in whole or in part without the prior written permission of IBM.
To edit standard req field attributes:
1. Click Tools > Forms > Reqs > Req forms.
2. From the list of req forms, click the Administer req fields icon.
3. From the list of form fields, click the Edit field attributes icon. 4. Make changes as necessary. 5. Click Save and continue. 6. Make additional modifications as needed.
Editing Custom Req Field Attributes
You can also edit the attributes for custom req fields. For example, you might want to make some fields only required for the French version of the req. To edit custom req field attributes:
1. Click Tools > Forms > Reqs > Req forms.
2. From the list of req forms, click the Administer req fields icon.
3. From the list of form fields, click the Edit field attributes icon. 4. Make changes as necessary. 5. Click Save and continue. 6. Make additional modifications as needed. 7. Click Save.
Preventing the Editing of Custom Req Fields
By default, BrassRing users can edit custom req fields, along with other editable fields, during the add req and edit req processes. You might extend this function to make custom fields not editable on a field-by-field basis, during the edit req process. You might also extend this non-edit function to the add req process. To make a custom field non-editable on the Edit req page:
1. Select Tools > Forms > Reqs > Req forms. The Req forms page appears.
2. From the list of req forms, click the Administer req fields icon.
3. From the list of form fields, click the Edit field attributes icon. 4. Scroll down to the Non-editable for these user types field. Select one or more User
Types who will not be allowed to change this custom field during the edit req process. To extend the restriction on editing to the Add req page, check the field Extend to add req to make this particular custom req field fully non-editable/read-only for the selected User Types when they are adding/editing a req.
5. Click Save.

Administrator Tools Using Workbench
© Copyright IBM Corp. 2020 Page 115
Course materials may not be reproduced in whole or in part without the prior written permission of IBM.
WHEN EXTEND TO ADD REQ IS SELECTED, IT APPLIES TO THE FOLLOWING REQ CREATION METHODS: SAVE AS
NEW, ELINK BLANK REQ, EXTERNAL REQ URL, AND CREATING A REQ FROM AN EMAIL REQUEST. IT DOES NOT
APPLY TO REQUISITIONS COMING INTO THE SYSTEM THROUGH REQ IMPORT OR INTEGRATION.
Enable Formatting In Req Custom Text Area Fields
To enable formatting for custom text area fields in requisitions:
1. Select Tools > Forms > Reqs > Req forms.
2. From the list of req forms, click the Administer req fields icon.
3. From the list of form fields, click the Edit field attributes icon. 4. On the Edit field attributes page, click the Save and Continue button. On the Edit field
attributes page for that field, select Yes for the Enable formatting option. The Text editor toolbar displays above the text area box for which you have enabled formatting. The Text editor tool bar includes icons for: Font, Size, Bold, Italicize, Underline, Cut, Copy, Paste, Numbered lists, Bulleted lists, Decrease indent, Increase indent, Align left, Center, Align right, Font color, and Background color. Refer to Figure 5- 15.
5. Click Save.
Figure 5- 15: Enable Text Area Formatting
Translating Custom Req Fields
Custom req field names are translated in the master list of custom fields and by editing each req form’s custom req field attribute. You can translate them in mass, as opposed to one at a time when editing field attributes. To translate custom req field names:
1. Locate the list of custom req fields you want to translate.

Administrator Tools Using Workbench
© Copyright IBM Corp. 2020 Page 116
Course materials may not be reproduced in whole or in part without the prior written permission of IBM.
2. Click Translate fields in the Actions list. 3. Select the language to which you want to translate your field names. The first language
displayed defaults to English (US). 4. Type translations into the text boxes. Be sure to check your spelling. 5. When you are finished with one language, use the Language drop-down to go to the next
language. 6. Click Save when finished, and close the confirmation window. Be sure to synchronize any
changes with the Talent Gateways.
Inactivating Custom Req Fields
When a form field needs to be retired, it is a good idea to inactivate the field. Inactivating enables you to maintain the historical data associated with the field yet remove it from users’ view. To inactivate a form field:
1. Click Tools > Forms > Reqs > Req Forms.
2. From the list of req forms, click the Administer req fields icon for the form. 3. Select the custom field you want to deactivate.
NOTE: If you try to inactivate a standard field, you will receive an error message.
4. Click Inactivate in the Actions list. 5. Click Inactivate. 6. Click OK.
Removing Custom Req Fields When considering removing a custom field from a req, keep the following things in mind:
− Custom req fields can be removed from a single or from multiple reqs by administering the chosen reqs’ form fields
− To inactivate a custom req field from all req forms and permanently retire it, you must remove the field from each req form before inactivating the field in the master custom req fields list
To remove a custom req field on a single req form:
1. Click Tools > Forms > Reqs > Req forms.
2. From the list of req forms, click the Administer req fields icon. 3. Click Select req fields. A new window launches. 4. Highlight the field from the Selected fields column that you would like to remove from the
req form. The fields are displayed by their database field name. 5. Click Remove. The highlighted field moves to the Available fields column. 6. Click Save. Be sure to synchronize any changes with the Talent Gateways.
To inactivate a field from being used at all, be sure to inactivate it by going to Define custom req fields.

Administrator Tools Using Workbench
© Copyright IBM Corp. 2020 Page 117
Course materials may not be reproduced in whole or in part without the prior written permission of IBM.
Adding Custom Req Field Options
You can easily add custom field options in Workbench. For example, you might have a field called Areas of interest and need to add a new area based on some candidate feedback. You can only make modifications to custom field options in the master custom field list while in Workbench.
To add a new custom req field option:
1. Click Tools > Forms > Reqs > Req forms. 2. Click Define Custom req fields.
3. From the list of req fields, click the Administer field options icon. 4. Click Add new option in the Actions list. 5. Type in a Code. This is the unique identifier for this option in the data table. Once added,
the code cannot be changed. The code is limited to 255 characters. See Figure 5- 16. 6. Type the Description. This is the text that appears on the form. This cannot exceed 255
characters. 7. Type in the Sort order. By default, options are sorted in numeric, then alphabetical order.
If a numeric value is entered, the order in which options are to appear is designated. Numbers less than 10 should begin with a zero (0). For example, 03.
8. Ignore blocked HR status period identifies if the HR status will be blocked when the req is not posted for a defined period of time. This field is associated with a client setting that must be turned on by IBM. The field is grayed out if it is not turned on.
9. Click Save.
Figure 5- 16: Adding a custom req field option

Administrator Tools Using Workbench
© Copyright IBM Corp. 2020 Page 118
Course materials may not be reproduced in whole or in part without the prior written permission of IBM.
Editing Custom Req Field Options
Ongoing maintenance of your options list enables you to capture the most accurate and timely data possible. To edit custom req field options:
1. Click Tools > Forms > Reqs > Req forms. 2. Click Define Custom req fields.
3. From the list of req fields, click the Administer field options icon.
4. From the list of fields options, click the Edit icon. Refer to Figure 5- 17. 5. Make changes as necessary. 6. Click Save and continue. 7. Make additional modifications as needed. 8. Click Save. Be sure to synchronize any changes with the Talent Gateways.
Figure 5- 17: Administer custom req field options
Translating Custom Req Form Field Options As we discovered when adding or editing an option, individual options can be translated. Now we take a look at translating all custom req field option descriptions at one time.
To translate standard req field options:
1. Click Tools > Forms > Reqs > Req forms. 2. Click Define custom req fields.
3. From the list of fields, click the Administer field options icon for the options list to be translated.
4. Click Translate options in the Actions list. 5. Select the language to which you want to translate your field options. The first language
displayed defaults to English (US). 6. Type the translations into the fields. Be sure to check your spelling. 7. When you are finished with one language, use the Language drop-down to select the next
language. 8. Click Save when finished, and close the confirmation window. Be sure to synchronize any
changes with the Talent Gateways.

Administrator Tools Using Workbench
© Copyright IBM Corp. 2020 Page 119
Course materials may not be reproduced in whole or in part without the prior written permission of IBM.
Inactivating Custom Req Field Options When a custom req field option needs to be retired, it is a good idea to inactivate the option. Inactivating enables you to maintain the historical data associated with the option yet remove it from user view. To inactivate a field option:
1. Click Tools > Forms > Reqs > Req forms. 2. Click Define Custom req fields.
3. From the list of fields, click the Administer field options icon.
4. From the list of options, click the Inactivate icon. 5. Click Inactivate. 6. The confirmation window will automatically close. Be sure to synchronize any changes
with the Talent Gateways.
TO VIEW YOUR INACTIVE FIELDS OPTIONS, CLICK THE INACTIVE TOGGLE AT THE TOP OF THE EDIT FIELD
OPTIONS SCREEN. TO REACTIVATE AN OPTION, CLICK THE ACTIVATE ICON.
Form Layout The form layout allows req templates to be shorter and easier for users to view and complete with features like auto-complete listings and checkboxes for multi-select values. You can display all the Req fields in a single section or segregate and display relevant fields under multiple expand/collapse sections.
Form Layout
To configure form layout:
1. Click Tools > Forms > Reqs > Req forms. 2. The Form layout modification screen can be opened using the plus icon under the
Form Layout column. See Figure 5- 22. (The pencil icon indicates an enhanced layout has been configured for the form.)

Administrator Tools Using Workbench
© Copyright IBM Corp. 2020 Page 120
Course materials may not be reproduced in whole or in part without the prior written permission of IBM.
Figure 5- 22: Req Forms – Form Layout Column
3. The form layout screen appears. See figure 5- 23. (If the menu bar at the top of the screen
is gray, click in the body of the form to ungray/activate it.) Configure the layout of the fields on the Req form.
Figure 5- 23: Form Layout Screen
DETAILS ON EACH ICON IN THE TOOLBAR ARE AVAILABLE IN CHAPTER 4 UNDER “ENHANCED LAYOUT”
Things to keep in mind when configuring the Form Layout:
• Initial field order is the same as the Placement order from the field attributes. When you move fields around (drag and drop) on the form layout, the field attribute placement order will thereafter be ignored, and not adjusted or updated. Actions performed using “Move Up” and “Move down” buttons on the “Select req fields” window will not be considered.
• Proximity and Approval Routing are “grouped fields” that, when placed first in a section, automatically apply their own section headings (Set proximity coordinates and the custom approval routing label, respectively). If you want to label the section differently, put a different field first in the section. Figure 5- 24 below is a sample of how the grouped fields would look to the end users adding a req.

Administrator Tools Using Workbench
© Copyright IBM Corp. 2020 Page 121
Course materials may not be reproduced in whole or in part without the prior written permission of IBM.
Figure 5- 24: Form Layout Screen
• Best Practice: If additional labels will be needed as section headings, add these fields to the template (Tools > Forms > Reqs > Req forms > Define custom req fields) before going into the form layout tool.
• The fields within the section “To be Completed after the Req has been filled” ("Add type", "Employee Name," and "Start Date") will not be displayed in the layout tool, so you cannot move their position. In BrassRing, this section will be displayed at the bottom of the new Req form, but the display will vary depending on whether the layout has one or more sections.
• The Keyword and Date req was posted fields will not be displayed in the layout tool, since in BrassRing, these fields are not displayed in the UI.
• The AutoReqID also will not display in the tool. In BrassRing it is always shown in the left navigation pane.
Figure 5- 25 below shows a sample ‘Add a req screen’ for a multi-section req on first page load. Each section laid out becomes a collapsible section for the end user adding or viewing the req.

Administrator Tools Using Workbench
© Copyright IBM Corp. 2020 Page 122
Course materials may not be reproduced in whole or in part without the prior written permission of IBM.
Figure 5- 25: Add Req screen
NOTE: Any select field (single, multi, query select) within the Add / edit req page, that contains more than 200 options appears as an auto complete text box. See Figure 5- 26 below.
Figure 5- 26: Select field within the Add / Edit req page
Inactivate Req Form
If you need to inactivate a req form:
1. Go to Tools > Forms > Reqs > Req Forms. 2. Select the Req Form you need to inactivate. 3. Click Inactivate under the Actions. Note: A req form cannot be inactivated if it has any form of dependency (i.e. Automation Manager).

Administrator Tools Using Workbench
© Copyright IBM Corp. 2020 Page 123
Course materials may not be reproduced in whole or in part without the prior written permission of IBM.
Delete Req Form
If you need to delete a req form because you created it in error:
1. Go to Tools > Forms > Reqs > Req Forms. 2. Select the Req Form you need to delete. 3. Click Delete under the Actions. Note: A req form cannot be deleted if it was already created in BrassRing. You need to inactivate the form instead.
List Filtering for Reqs
You can manage option lists on your req templates to display only the relevant values pertinent to that template and the specific languages of the req template. This level of organizational change can improve the workflow across multiple divisions and languages. These are important points to consider when using list filtering:
− List filtering can be applied to any field with options, including job code, req team, and approval notification
− Lists can be configured differently across languages
− Both standard and custom req fields can have option lists filtered
List Filtering New processes, multiple divisions, or recently added languages might create the need to filter lists on a req template. To filter lists for req templates:
1. Click Tools > Forms > Req > Req forms.
2. From the list of forms, click the Administer req fields icon for the req form you want to filter.
3. From the list of fields, click Select field options. 4. Select the field name from the drop-down menu. See Figure 5 -27.
a. STD: Prefix for standard fields b. CUST: Prefix for custom fields c. APPROVAL 1, APPROVAL 2, etc.: Prefix for approvals based on the order selected
for the req template d. No prefix for Notify upon approval completion
5. Select the language for which you are filtering. Only the languages into which the req template title has been translated are displayed.
6. Check Show me options in the base language to display options in the original language. 7. Select the approvers. You must select one of the following:

Administrator Tools Using Workbench
© Copyright IBM Corp. 2020 Page 124
Course materials may not be reproduced in whole or in part without the prior written permission of IBM.
a. All options: When selected, no list filtering occurs. All options for the field are displayed
b. Selected options: After selecting this option, click the List button. A new window will open displaying Available and Selected options. Select the options to appear for this field. The options selected will appear for fields across ALL languages. When finished making selections, click Save Note: If selected, any new options added to the master options lists will not appear on this req unless manually configured by list filtering
c. Apply “All languages” selections: This selection applies the All languages setting. When All languages is configured for a field, this setting is activated for each individual language for that field
8. Click Save.
TO RESET INDIVIDUAL LANGUAGE SELECTIONS, THE USER MUST MANUALLY OVERRIDE THE APPLY ALL
LANGUAGES SETTING FOR THOSE LANGUAGES. THE APPLY “ALL LANGUAGES” SELECTIONS OPTION IS DISABLED IF ALL LANGUAGES IS CHOSEN IN THE
LANGUAGE FIELD. TO ENABLE THIS FIELD, YOU MUST CHOOSE A SPECIFIC LANGUAGE FROM THE LANGUAGE
DROP-DOWN MENU.
Figure 5- 27: Filtering lists
Approval Groups
Approval routing streamlines your req approval process through the use of eLinks. By using Workbench, you can manage your existing approval groups or create new ones.

Administrator Tools Using Workbench
© Copyright IBM Corp. 2020 Page 125
Course materials may not be reproduced in whole or in part without the prior written permission of IBM.
Your organization can create as many approval groups, or levels, as needed. Keep in mind that many approval groups per req might hinder usability and might introduce more opportunities for stalling.
Elements of Approval Groups These are important points to consider when working with approval groups:
− Each approval group name has a character limit of 50.
− You can enter translations for approval group names for the languages your company uses.
− The Bypass and/or Non-system user options can be added to each level.
− Each approval group assigned to a req is automatically required; therefore, an approval level that is not necessary for every req should have Bypass enabled.
− Adding a new approval group is a two-step process. First, the approval group is created, and then, second, it needs to be activated for the req form.
− The approvers, order of approvers, and instructions can be unique for each req form.
EVEN IF ALL LEVELS ARE NOT NEEDED FOR EVERY REQ, SELECTING BYPASS ADDS TO THE TIME IT TAKES TO
COMPLETE THE REQ.
Adding Approval Groups
New processes or recently added req forms might necessitate a new approval group. Once an approval group is created, it is available for use on any of your req forms. To add an approval group:
1. Click Tools > Forms > Approvals. 2. Click Add new Approval group in the Actions list. 3. Type the approval group Title. The title has a character limit of 50. Refer to Figure 5- 28. 4. Select the approvers. You must select one of the following:
Any Managers: This list is identical to the standard required req field of Manager. Names that occupy this list have the Manager field checked on their user profile in BrassRing, which is managed through Admin+. Any Recruiters: This list is identical to the standard required req field of Recruiter. Names that occupy this list have the Recruiter field checked on their user profile in BrassRing, which is managed through Admin+. Specific users: You can select individual names from this specified list of any BrassRing users.
5. Click Enable Approval Bypass if this level of approver is not required for every position.

Administrator Tools Using Workbench
© Copyright IBM Corp. 2020 Page 126
Course materials may not be reproduced in whole or in part without the prior written permission of IBM.
6. Click Enable Approval by Non-User to allow users to enter the email address of an approver who is not in the approver list and, therefore, not a BrassRing user. This feature helps to reduce the number of users that need to be managed in BrassRing.
7. Click Enable abridged Req view to display a shorter view of the req to approvers when viewed by using an eLink during the approval workflow.
8. Click Save. 9. The next step is to add the new approval group to the req form). Continue on to the next
section on Editing Form Approvals.
Figure 5- 28: Add a new approval group
After adding a new approval group, you will need to edit the placement on each req form to activate it. As a default, the group will not appear on the req form until activated.
TO ENTER A TRANSLATED APPROVAL GROUP TITLE, CLICK THE PLUS SIGN + NEXT TO TITLE. TYPE YOUR
TRANSLATION INTO THE APPROPRIATE TEXT FIELD. EACH APPROVAL LEVEL IS AUTOMATICALLY REQUIRED FOR REQ CREATORS. THEREFORE, CONSIDER HAVING BYPASS
AS AN OPTION FOR EACH APPROVAL LEVEL. IBM RECOMMENDS USING THE NON-USER FEATURE IF YOU ARE CONCERNED ABOUT MAINTAINING A VERY LARGE
USER LIST IN BRASSRING.
Editing Form Approvals When you have created a new approval group, you will need to activate the approval group for the req forms. You can also edit the order in which the approval routing will flow, and the instructions that are sent with the req for approval. To edit form approvals:
1. Click Tools > Forms > Reqs > Req forms.

Administrator Tools Using Workbench
© Copyright IBM Corp. 2020 Page 127
Course materials may not be reproduced in whole or in part without the prior written permission of IBM.
2. From the list of forms, click the Edit form approvals icon for the req form approvals you want to modify.
3. Type or edit the Approval routing instructions. HTML tags are accepted. Refer to Figure 6-25.
4. Enforce approval re-route on req edits. Select Yes to ensure that users are not editing the req during the approval process without the proper approvers reviewing the changes before the req opens. If a user edits a req that is in Pending (approval) status, the following alert message will be displayed: The edits made to this req requires a re-route for approval. Click OK to proceed or Cancel to undo your changes.
5. For the Approval routing order, click the drop-downs for each approver to select the order number. See Figure 5- 29. If no number is selected, that field will not appear on the req. The routing order can differ among each of your req forms.
6. Click Save, and then click Close.
Figure 5- 29: Editing form approvals – need to add new screen capture
TO ENTER TRANSLATED APPROVAL ROUTING INSTRUCTIONS, CLICK THE PLUS SIGN + NEXT TO APPROVAL
ROUTING INSTRUCTIONS. TYPE YOUR TRANSLATION INTO THE APPROPRIATE TEXT FIELD. TO REMOVE AN APPROVAL GROUP FROM A REQ FORM, REMOVE THE NUMERIC ORDERING BY SETTING THE
DROP-DOWN LIST TO THE BLANK OPTION.
Editing Approval Groups

Administrator Tools Using Workbench
© Copyright IBM Corp. 2020 Page 128
Course materials may not be reproduced in whole or in part without the prior written permission of IBM.
As your company evolves, it might become necessary to modify the settings of the approvers. You might need to remove a Bypass option or, perhaps, your approval options are growing, and you want to enable the Non-User function. To edit an approval group:
1. Click Tools > Forms > Approvals. 2. From the list of approval groups, click the Edit icon. 3. Make changes as necessary. 4. Click Save.
Translating Approval Groups
For each of the languages available for your company, you can enter translations for approval groups. To translate approval groups:
1. Click Tools > Forms > Approvals. 2. Click Translate approval groups in the Actions list. 3. Select the language to which you want to translate your field options. The first language
displayed defaults to English (US). 4. Type the translations into the fields. Be sure to check your spelling. 5. When you are finished with one language, use the Language drop-down to select the next
language. 6. Click Save when finished, and close the confirmation window.
Define Approval Abridged View
This provides the ability to display a shorter view of the req sent by using eLinks for approval and displayed on customary browser or mobile devices. This feature applies to sequential approval routing of reqs with custom fields.
• Customary (non-mobile) browsers show all standard req fields, and the custom fields configured to display for the abridged view
• Mobile devices show the standard fields configured for the mobile display, and any custom fields configured for both mobile display and req approval abridged view.
To define the approval abridged view:
1. Click Tools > Forms > Reqs > Req forms.
2. Click the Administer req fields icon for the req form for which you would like to define the abridged view.

Administrator Tools Using Workbench
© Copyright IBM Corp. 2020 Page 129
Course materials may not be reproduced in whole or in part without the prior written permission of IBM.
3. From the list of req fields, click Define approval abridged view in the Actions list on the left. A new window launches.
4. Select the fields you would like to appear in the abridged view from the Available fields box.
5. Click the Add button. The selected fields will move to the Selected fields box. 6. Click Save.
Req Subsidiary Form Req subsidiary forms are forms available as attachments to requisitions. To access them, select Tools > Forms > Reqs > Req subsidiary forms.
Adding a Req Subsidiary Form Forms are established during implementation; however, you can add additional forms in Workbench.
Adding a Req Subsidiary Form
1. Click Tools > Forms > Reqs > Req Subsidiary Forms. 2. Click Add new form in the Actions list. 3. A screen appears with a list of the form field attributes.
Elements of Req Subsidiary Form Attributes You have several options when editing form attributes. Some of the fields, however, can only be changed by IBM.
Database Title Database Title is the title of the form as it appears in the database tables. There should be no spaces; use the underscore (_) or dash (-) as a space replacement.
YOU MIGHT SEE THE DATABASE FIELD NAME IN BRASSRING WHEN VIEWING DIT EXPORTS OR SETTING UP LETTER
COMMUNICATIONS.
Title The Title is the name of the field that will display in BrassRing. The Title field can be a maximum of 255 characters. The translation option is available if additional languages are being used.

Administrator Tools Using Workbench
© Copyright IBM Corp. 2020 Page 130
Course materials may not be reproduced in whole or in part without the prior written permission of IBM.
Disclaimer
− A disclaimer can be added to the bottom of the form (i.e., data privacy disclaimer)
− The field limit is 7,500 characters
− The field defaults to English (US). The translation option is available if using additional languages
− HTML coding is accepted for formatting and embedding URL links
− The disclaimer appears at the bottom of a form
E-mail The email addresses listed here will receive a notification whenever this form is first submitted. Modifications made to the form after initial submittal will not re-send the form.
Approval Process This indicates if this form requires an approval process (i.e., Offer Form). Once the approval process is saved, it is grayed out. However, IBM is able to edit the field.
Form Multiples As discussed earlier in this chapter, a form can either be entered once per candidate or multiple occasions per candidate. Once the Form Multiples field is saved, it is grayed out. However, IBM is able to edit the field.
Form Field Alignment Select the alignment for the form's questions. Options are Default and Left. Selecting Left aligns the form's questions to the left, whereas the Default option keeps them aligned in the center.
Adding a Form Field
Form fields are established at implementation, and you can add new form fields as your hiring process or user needs change. Adding a field to a Req Subsidiary form is very similar to adding fields to a Candidate Form. To add a field to a form:
1. Click Tools > Forms > Reqs > Req Subsidiary Forms.
2. From the list of forms, click the Administer form fields icon for the form. 3. Click Add new field in the Actions list. 4. For Placement, select the numerical placement for the field on the specified form. It
defaults to the next available placement number. 5. Type a Database field name. The name is limited to 20 alphanumeric characters (abc123).
A space between words cannot be used; use underscore(_) or dash (-) instead of a space.

Administrator Tools Using Workbench
© Copyright IBM Corp. 2020 Page 131
Course materials may not be reproduced in whole or in part without the prior written permission of IBM.
UNDERSCORE (_) OR DASH (-) ARE THE ONLY NON-ALPHA CHARACTER ACCEPTED FOR THE DATABASE FIELD
NAME.
6. Type a Field name. The character limit is 4,000 (this includes alphanumeric characters and spaces). This will be the field label that appears to your users in BrassRing. Be sure to check your spelling.
7. For Type, select the field type. This will identify the setup of the field and the options. Refer to the Table 4-2 in chapter 4 for field type definitions.
8. For Font Size, select the text size of the form field. It will default to medium. 9. For Encrypted, click Yes or No. Yes will designate the field to be encrypted. To enable, you
must have field-level encryption activated by IBM. 10. For Hide for these User Types, select the User Types that will not need to view the field, if
any. 11. For Hide in these Languages, select the languages that will not need to view the field. 12. For Required in these Languages, select the languages for which the field is mandatory.
This will place an asterisk next to the field in BrassRing. The form cannot be submitted without completing the field.
13. Click Save and continue. 14. Field length will default to the field type's defined character limit. You can edit this field. 15. If no options are required for this field type, continue to Step 16. If options are required,
you will see the Options source area. 16. Click Save. You will receive a confirmation message and the choice to add an additional
new field or to administer form options for the field which you just added, if applicable. Note: At this point, you will have the opportunity to create a list of options for this field if you selected Maintain custom list.
Adding Field Options
To add an option: 1. Click Tools > Forms > Reqs > Req Subsidiary Forms. 2. View Chapter 5: Managing Options.

Administrator Tools Using Workbench
© Copyright IBM Corp. 2020 Page 132
Course materials may not be reproduced in whole or in part without the prior written permission of IBM.
Chapter Summary
• Req forms have two types of fields, standard and custom. Custom fields can be added through Workbench.
• Standard req field labels and options can be modified.
• Any changes made to your req forms need to be synchronized with your Talent Gateways.
• Standard and custom req field labels and option labels can be translated.
• Custom req fields are initially added to a master list of custom fields. Each field can then be added to a designated req form.
• When permanently retiring a custom field, it is necessary to first remove the field from each req form before inactivating it through Define custom req fields.
• New approval groups can be added and activated on each req form.
• Approvers, order of approvers, and approval instructions can be unique for each req form.
• Option list filtering per req template enables you to display only the relevant values pertinent to that template and the specific languages of the req template.

Administrator Tools Using Workbench
© Copyright IBM Corp. 2020 Page 133
Course materials may not be reproduced in whole or in part without the prior written permission of IBM.
Check Your Skills
Answer these True or False questions:
1. Standard req fields cannot be modified.
2. When you add a custom req field, it is automatically added to your req forms.
3. List filtering can only be done with custom req field options.
4. You can only modify existing approval groups. IBM must add new ones. Select the best answers:
5. The following statements are true regarding approval groups, EXCEPT: a. Approver order can be altered for each req b. Once a new group is added, it automatically appears on each req form c. Bypass and/or Non-User can be added to each group d. All of the above
6. The following standard required req attributes can be edited: a. Default label b. Font size c. All of the above d. None of the above
Perform these hands-on exercises in Workbench:
7. You have been asked to add a field to your req. Add a field of your choosing. Position the field after Job Title. The field is a text field. Additionally, Hiring Manager users should not have access to edit this field.
8. There has been a process change for req approvals for your company. VPs are now required to approve all reqs. Create the VP approval level, and add it to your req. This approval level cannot be bypassed but can be approved by a non-system user. (Choose anyone from the system-user approvers list.)
9. The field you added in #7 needs to be required in all languages.
10. Inactivate the new field you created in #7.

Administrator Tools Using Workbench
© Copyright IBM Corp. 2020 Page 134
Course materials may not be reproduced in whole or in part without the prior written permission of IBM.
Chapter 6: HR Statuses
Chapter Overview
Tracking Logic is the BrassRing function used to move candidates through the pipeline. Each milestone is referred to as an “HR Status”. In this chapter you will learn the function around HR Status which involves creating, editing, viewing and masking HR Status.
Chapter Objectives
At the end of this chapter you will be able to:
− Add an HR Status
− Edit and View an HR Status
− Restrict Actions on an HR Status

Administrator Tools Using Workbench
© Copyright IBM Corp. 2020 Page 135
Course materials may not be reproduced in whole or in part without the prior written permission of IBM.
HR Status
Tracking Logic is the BrassRing function used to move candidates through the pipeline. Each milestone is referred to as an “HR Status”. Tracking Logic is unique by customer and can be as simple or as complex as needed. You have the ability to either force all candidates to go through a specific step before another; this is known as a “Closed” tracking logic. Or you have the ability to move candidates to any status in each step from 0-filed to Hired; this is known as an “Open” Tracking Logic. A closed tracking logic is used by most organizations because it helps determine a consistent workflow and process. Terms to Know: Tracking Logic: Method used by BrassRing to replicate a specific sequence of hiring steps in the hiring process. HR Action: Process of moving candidates through the hiring process using a named HR Status that is part of the tracking logic. HR Status: Result of an HR action and the named step of the tracking logic to which a candidate is assigned.
Elements of HR Status:
− Tracking Logic is defined at the client level, not user type or req template level.
− Clients can hide candidates in specific HR Statuses and/or allow users to update HR Status from eLinks.
− You can setup an HR Status to launch a candidate form along the process.
− HR Statuses can appear in the eLink dropdown options. User privileges determine whether the selected HR Status is a suggestion or an update within BrassRing.
− An auto email to the candidate can be generated upon moving a candidate to a certain HR status or when filed into a req.
− HR Status updates can assist with other automated features: o Filter access to candidates by HR status o Form pop-up o E-mail Notification o Candidate type update o Block HR Status update if candidate forms are missing o Initiate Interview Builder o Initiate Background Check o Initiate Onboarding
An HR Status can either be a Start, Intermediate, or Final status. HR Status names can have up to 70 characters and be translated into any supported language. You can see a description of the types of statuses in the following table.

Administrator Tools Using Workbench
© Copyright IBM Corp. 2020 Page 136
Course materials may not be reproduced in whole or in part without the prior written permission of IBM.
Different Types of Statuses:
0 –filed The standard status of 0-filed will be included as a choice when a candidate’s status is updated for the first time.
Start Candidates will have a start status of “none” until they are actively updated and/or moved into a folder. A start status will appear when the candidate’s status is updated for the first time from “none” to “0-filed”. No other HR Statuses can come before this type.
Intermediate The most common status which includes all of the steps between the first and last steps. Next steps and preceding steps can be determined for this type.
Final The last step in the process, this type can have preceding steps only. This status can be linked to other triggers in BrassRing such as auto-countdown, close req change candidate type and other automation manager triggers.
Table 6- 1: Types of HR Statuses
Adding an HR Status
To add an HR Status:
1. Click Tools > HR Statuses 2. Select the Type of HR Status: Start, Intermediate, Final 3. Identify the placement of the HR Status. This determines where the HR Status will appear
in the list of HR statuses. 4. Select a Category from the list of Categories. The category allows you to mask the HR
Status on the Talent Gateway when your candidate checks his/her job status. Also, the category is needed for visualization of candidate funnel within the BrassRing home page. Note: The initial HR status of 0-Field is auto-mapped to the initial category of Applied.
5. Enter the name of the HR Status in the HR Status Name field. The plus symbol allows the entering of translations.
6. The Valid After section identifies when the HR Status will appear; after which HR Statuses. 7. The Next Status section identifies which HR Statuses will appear directly after the Start
Status. 8. Click Save and Continue 9. The Edit Applied screen appears. Configure the settings for each category listed on the
left. The fields within the category are listed in the chart.
Actions: this category includes items that occur if the HR status is updated: pop up forms, Interview Builder options, Event Manager settings, Onboarding, etc.
Popup Form Select the candidate form that will appear when a candidate is updated to that HR Status. If you do not want a form to appear do not select anything. Select Make popup form required to set the selected form as required to be completed before the HR Status is changed for the candidate.
Include in ‘Respond to elink’ list of HR status
If you want the HR Status to appear in the list of statuses located in an elink next to the ‘respond to elink’ section, add a checkmark. This will allow the recipient of the elink to select this HR Status as an option when he/she is responding to the elink.

Administrator Tools Using Workbench
© Copyright IBM Corp. 2020 Page 137
Course materials may not be reproduced in whole or in part without the prior written permission of IBM.
Email Email addresses listed here will receive a notification whenever a candidate is updated to this HR Status. The notification indicates the candidate is on the HR Status.
Convert Candidate Type
Designate a candidate type for the final status to flip to when the candidate is updated.
Count Down Positions Select this field if you would like the number of positions to decrease by 1, when a candidate is updated to this status.
Automatically close filled requisitions
Select this field if you would like the req to automatically close once a candidate is updated to this status.
HR Status Aging When HR Status aging ranges are configured, visual indicators enhance the Days in Status display within the “My Tasks” panel (not currently available with new UI) in BrassRing by showing whether the time the candidate has remained in that status is acceptable (green), cautionary (yellow), or unacceptable (red).
Interview Builder The items within this section will indicate what occurs in Interview Builder if the HR status is updated. Interview Builder must be enabled by an IBM rep for these fields to become active.
Event Manager If the Event Manager product is enabled, you can pass the resume key through to that manager.
Civil Service Manager This section is applicable for United States government clients
Onboarding The items within this section will indicate what occurs in Onboarding if the HR status is updated. Onboarding must be enabled by an IBM rep for these fields to become active.
Other Actions Using this HR Status
This section identifies other settings/actions that are affected by an HR Status update. This section is a view only.
Table 6- 2: Types of Actions when assigning HR Status
Restrictions: When the HR Status is updated, this category identifies actions that should not take place.
Hide candidates in HR Status in req folders for these user types
Select user types that cannot see candidates in this HR status.
User types that cannot UPDATE candidates to this HR Status
Select user types that should not be able to update candidates to this HR status.
User types that cannot UNDO candidates in this HR Status
Select user types that should not be able to undo candidates in this HR status.
Block HR Status update – Forms not attached
The circumstances that block an HR Status from being updated if a form is not created or approved.
Block actions – Requisitions related settings
Identifies other actions that should not happen if the HR Status is updated.
Table 6- 3: Types of Restrictions when assigning HR Status

Administrator Tools Using Workbench
© Copyright IBM Corp. 2020 Page 138
Course materials may not be reproduced in whole or in part without the prior written permission of IBM.
Talent Gateway & Agency Manager settings: select the fields in this category to set HR Status settings that affect the TGs and Agency Managers.
Agency Manager Masks (labels that convey candidate’s general status without exposing detailed status/steps in hiring process)
Talent Gateway Classic TG ONLY - Allows the status to appear on the submission check on the Talent gateway. Identifies where the candidate is in the process. You can mask this HR Status (does not apply to Responsive TG). Identify Withdraw and Reactivate buttons.
Table 6- 3: Talent Gateway & Agency Manager settings
Delay HR Status Update Display
• A delay can be configured between when a final HR Status update in BrassRing happens and when
is it going to be visible on the Application Details page in a candidate's Talent Gateway profile.
• This feature is available only for Final HR status categories.
• A candidate logs in to their Talent Gateway profile, and goes to the Application Details section, if a
delay is configured, the previous HR status category is displayed.
• After the delay period is elapsed, the updated HR Status Category is displayed based on current
HR Status.
• Withdrawal of application is allowed based on the HR Status that is displayed only if the displayed
HR status allows withdrawal.
• When a candidate withdraws application, the withdrawal status is displayed immediately. A delay
cannot be configured in this case.
• Reactivation of an application is allowed based on the HR status that is displayed on the Talent
Gateway.
To enable the delay:
1. Select Tools > HR Statuses.
2. Select the Edit status pencil icon for the HR status to configure the delay for.
3. Select the Talent Gateway & Agency Manager settings tab.
4. Insert a number of hours to delay the HR status update in the Delay update to this HR
status for candidates by section.
a. The maximum number of hours to delay the HR status update is 120.
b. 0 hours means that there is no delay in the update.

Administrator Tools Using Workbench
© Copyright IBM Corp. 2020 Page 139
Course materials may not be reproduced in whole or in part without the prior written permission of IBM.
Figure 6-1: Delay HR status update display
FOR ORGANIZATIONS THAT OFTEN SEND DOCUMENTS/FORMS TO CANDIDATES WITHOUT PROFILES FROM THE
CANDIDATE ZONE, THE CANDIDATE WILL NOT BE ABLE TO ACCESS THIS INFORMATION UNLESS THE HR STATUS
THEY ARE CURRENTLY IN HAS THE APPROPRIATE STATUS SETTING ENABLED. THE SETTING REQUIRED TO BE
ENABLED IS “DISPLAY JOB/REFERRAL STATUS INFORMATION” AND CAN BE ENABLED IN WORKBENCH > TOOLS >
HR STATUS > EDIT THE APPROPRIATE STATUS > TALENT GATEWAY & AGENCY SETTINGS TAB. IT IS HIGHLY
RECOMMENDED TO REVIEW YOUR HR STATUSES TO DETERMINE WHICH STATUS YOUR CANDIDATES MIGHT BE IN
WHEN POSTING TO THE CANDIDATE PORTAL.
View HR Status
To view the HR Status:
1. Click Tools > HR Statuses 2. Click the hyperlink name of the HR Status
Edit HR Status
To view the HR Status:
1. Click Tools > HR Statuses 2. Click the pencil icon for the HR Status you would like to edit
Translate Status Names
To translate status names:
1. Click Tools > HR Statuses 2. Click Translate Status Names from the Actions list on the left. 3. A screen appears with a list of all of the HR Statuses. Select the language for which you
would like to translate the HR Statuses, from the drop down list at the top of the screen. 4. Translate the HR Statuses 5. Click the Save button at the bottom of the screen when done.
Set HR Status Actions
To set HR status actions:
1. Click Tools > HR Statuses 2. Click Set HR Status Actions from the Actions list on the left. 3. In the Set job submission withdrawal final status field, select the final HR Status a
candidate will have when he/she withdraws from a position on the Talent Gateway. 4. In the field Set final status whose “Action date” will initiate the trigger for “Hired”
referral status, select the appropriate HR Status. 5. In the field Set days from “Action date” for the “Hired” referral status trigger to occur (0-
365) enter the number of days.

Administrator Tools Using Workbench
© Copyright IBM Corp. 2020 Page 140
Course materials may not be reproduced in whole or in part without the prior written permission of IBM.
6. Click the Save button at the bottom of the screen when done.
Inactivate an HR Status
To Inactivate an HR status:
1. Click Tools > HR Statuses 2. Select the HR Status you would like to Inactivate. 3. Click Inactivate from the Actions list on the left. 4. Click the Inactivate button at the bottom of the screen when done.
Export to PDF
Allows you to export to PDF HR statuses from Task Manager as a listing of the HR statuses with their configured “Next statuses”.
To Export to PDF:
1. Click Tools > HR Statuses 2. Click Export to PDF from the Actions list on the left. 3. Enter a name in the Job Name field. 4. Click the Run button at the bottom of the screen when done. 5. Click Tools > Task Manager to access the report.
Export to Excel
Allows you to export to Excel HR statuses from Task Manager as a listing of the HR statuses with their configured “Next statuses” and all other settings.
To Export to Excel:
1. Click Tools > HR Statuses 2. Click Export to Excel from the Actions list on the left. 3. Enter a name in the Job Name field. 4. Click the Run button at the bottom of the screen when done. 5. Click Tools > Task Manager to access the report.
HR Status Categories
Allows you to categorize all your organization’s HR statuses into one of the available HR Status categories. You can rename the labels of the categories and add translations and descriptions to each category. To access the HR Status categories:
1. Click Tools > HR Statuses

Administrator Tools Using Workbench
© Copyright IBM Corp. 2020 Page 141
Course materials may not be reproduced in whole or in part without the prior written permission of IBM.
2. Click HR Status Categories from the Actions list on the left. 3. Select the Edit category icon for the HR Status Category you would like to edit.
While editing the category, you can select the HR Statuses to be aligned under each category.
4. Once you have made the edits, click the Save button at the bottom of the screen.
Delay HR Status Update Display
• The delay HR status update display is available only for final HR status categories.
• It can be configured between when a final HR Status update in BrassRing happens and when it is going to be visible on the Application Details page in a candidate’s Talent Gateway profile.
• A candidate logs in to their Talent Gateway profile, and goes to the Application Details section,
if a delay is configured, the previous HR status category is displayed.
• After the delay period is elapsed, the updated HR Status Category is displayed based on
current HR Status.
• Withdrawal of application is allowed based on the HR Status that is displayed only if the
displayed HR status allows withdrawal.
• When a candidate withdraws application, the withdrawal status is displayed immediately. A
delay cannot be configured in this case.
• Reactivation of an application is allowed based on the HR status that is displayed on the Talent
Gateway.
To set-up the delay HR status update display:
1. Select Tools > HR Statuses.
2. Select the Edit status pencil icon for the HR status to configure the delay for.
3. Select the Talent Gateway & Agency Manager settings tab.
4. Insert a number of hours to delay the HR status update in the Delay update to
this HR status for candidates by section.
a. The maximum number of hours to delay the HR status update is 120.
b. 0 hours means that there is no delay in the update.
5. Select Save.
6. Select Close.
Figure 6- 1: Delay HR Status Update

Administrator Tools Using Workbench
© Copyright IBM Corp. 2020 Page 142
Course materials may not be reproduced in whole or in part without the prior written permission of IBM.
Chapter Summary
• The HR status is the result of an HR action and the named step of the tracking logic to which a candidate is assigned.
• You are now able to add, edit, and view an HR Status.
• You can restrict Actions on an HR Status

Administrator Tools Using Workbench
© Copyright IBM Corp. 2020 Page 143
Course materials may not be reproduced in whole or in part without the prior written permission of IBM.
Check Your Skills
Answer these True or False questions:
1. You can hide the ‘Undo HR Status’ function by User Type.
2. An HR Status can be deleted. 3. A ‘Closed’ tracking logic allows the user to assign any HR Status to the candidate regardless at
what step of the hiring process.
4. You can hide candidates in specific HR Statuses by user types.

Administrator Tools Using Workbench
© Copyright IBM Corp. 2020 Page 144
Course materials may not be reproduced in whole or in part without the prior written permission of IBM.
Chapter 7 – Data Export and Import
Chapter Overview
Data might by imported to BrassRing and exported from BrassRing in Workbench. This chapter will provide you with the tools to successfully complete an export and an import.
Chapter Objectives
At the end of this chapter you will be able to:
− Define the Export Data process
− Define the Import Data process
− Add Candidate Field Association (CFA)
− Add Req Field Association (RFA)
− Disable CFA or RFA

Administrator Tools Using Workbench
© Copyright IBM Corp. 2020 Page 145
Course materials may not be reproduced in whole or in part without the prior written permission of IBM.
Overview of Exports and Imports With Workbench certification, you are able to export data from BrassRing and import data into BrassRing in Workbench. During the implementation phase of the system, your IBM representative imports data for you such as candidate form fields, candidate form field options, req form fields, req form field options, users, etc. After your ‘go live’ date, should you require to add a long list of form field options to an existing form field for example, you can use the export and import feature to perform this action efficiently and in a timely manner. Should you have an existing list of options, best practice is:
- Export your list of options. - Amend the list by adding or inactivating options. - Import the new list of options.
Export Form Field Options
To export an existing list of form field options into an Excel spreadsheet:
1. Click Tools > Forms > Candidate forms.
2. From the list of forms, click the Administer form fields icon for the candidate form.
3. From the list of fields, click the Administer field options icon of the form field from which you want to export the options.
4. Click Export to Excel in the Actions list. 5. The Launch Export screen appears. Enter the name of the export and click the Launch
button at the bottom of the screen. 6. To access the Excel file, click Tools > Task Manager. The Task Queue screen appears.
7. From within the Task Queue screen, click the icon for the file you would like to view. 8. Click the Open button which allows you to open the file in Excel. 9. Save the file as an Excel 97-2003 Workbook (.xls). Currently, there is a limitation in
Workbench that does not allow using a newer version of Excel.
Import Form Field Options
To import a list of form field options, you need to amend the export file and must create a profile to upload the data.
1. Follow steps 1-9 above. 2. The excel file (xls) will have two sheets:
a. Properties (incl. Client Name, Form Name, Field Name, etc.) b. Options (incl. the list of options with Code, Description, Status, etc.)
3. You want to delete all rows from the Properties sheet, except for Client, Form, and Field. 4. On the Options sheet:

Administrator Tools Using Workbench
© Copyright IBM Corp. 2020 Page 146
Course materials may not be reproduced in whole or in part without the prior written permission of IBM.
a. If you are adding new options then delete all rows, and add your new options to the sheet.
b. If you are changing existing options, make the changes to the existing options.
5. Save the changes to the Excel file. 6. Click Tools > Imports > Profiles. 7. Select Actions Add new profile. 8. In the Profile Name field enter the name. 9. Add a description (optional) to the description field. 10. The check box for “Make profile available to other users” allows you to share a profile
with others. 11. Select the appropriate Import Type.
Here is a list of some of the Import Types available in Workbench: ▪ Users ▪ Codes ▪ Fields (Candidate) ▪ Fields (Req template) ▪ Fields (Req custom) ▪ Field association (Req forms) ▪ Options (Candidate) ▪ Field association (Candidate forms and Doc Subsidiary forms)
12. To upload your Excel file, click Upload your file under the Header file and click the Browse button.
13. Click the Next button. 14. The Map Import Profile appears which shows you the columns from the import file.
Note: If your columns on the import file are not lined-up properly, the import will fail. Use the overwrite feature only if you are changing a description of an option or inactivating an option.
15. Click Finish. 16. Click Launch. 17. If your import file is a list of options, you will need to select the appropriate Form and the
Form field on the Launch screen. 18. Add your import file again by clicking the Browse button. 19. Click Launch. 20. Go to Tools > Task Manager to monitor the import. Once the import has completed, click
the for details on what data was imported.
YOU NEED TO HAVE AT LEAST ONE PROFILE PER IMPORT, SO THAT YOU CAN RE-USE THIS PROFILE FOR ANY
NEW IMPORTS OF THAT IMPORT TYPE IN THE FUTURE.

Administrator Tools Using Workbench
© Copyright IBM Corp. 2020 Page 147
Course materials may not be reproduced in whole or in part without the prior written permission of IBM.
Import Candidate Field Association (CFA) and Req Field Association (RFA) CFAs and RFAs create a relationship between fields, so that users can only choose valid values on candidate form fields or req form fields. Once a selection is made in one field, users do not need to scroll through a whole list of options in another field that are no longer relevant. Typically, the configuration, maintenance, and initial import of CFA or RFA during implementation is completed by your IBM Representative. You are able to export the child associations for each parent candidate form field into an Excel spreadsheet. The import feature allows you to import new CFAs or RFAs and edit existing ones. As a Workbench Administrator, you have the access to add and edit CFAs and/or RFAs.
Elements of CFAs and RFAs These are important points to consider when working with Field Associations:
− If applicable, create an export file of current data to be used as the import file after making appropriate changes to it.
− Import File must be version 97-2003
− Validate all imports in Staging first, before importing to Production
− Check all tabs of a successful import file.
− If you are re-using an import profile, remember to select the upload new file option.
− Field association can only have one parent field.
− Parent fields can have multiple children fields.
− Parent field can also be a child field.
Export and Import Candidate Field Association (CFA)
If you have existing CFAs, and you need to add to them, you first export the existing CFA data as follows: 1. Go to Tools > Forms > Candidate Forms.
2. Click the Administer form field icon for the candidate form that includes CFAs. 3. Click Export field association from the Actions list.
Figure 7- 1: Candidate Field Association (CFA) Launch Export Screen.
4. Add the Name of the CFA export. 5. Select the parent field from the drop-down window. 6. Click the Launch button. 7. The export file will be available under Task Manager. 8. Go to Tools > Task Manager.
9. From within the Task Queue screen, click the icon to open the file in Excel.
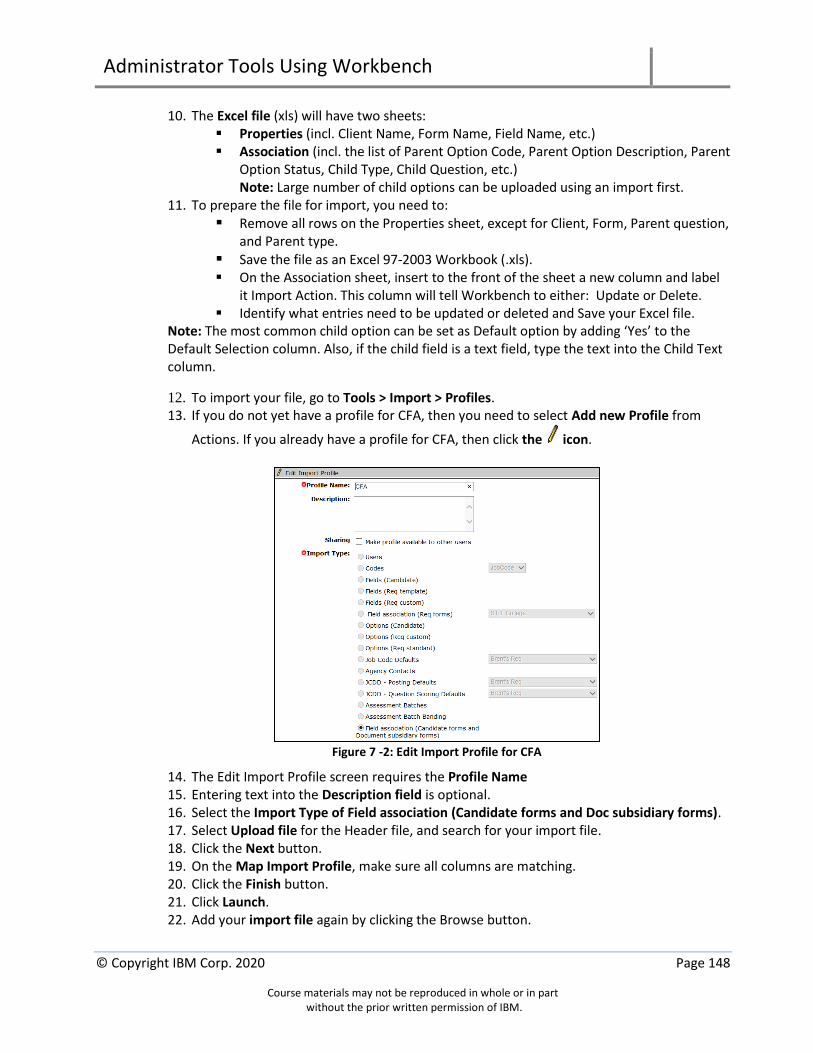
Administrator Tools Using Workbench
© Copyright IBM Corp. 2020 Page 148
Course materials may not be reproduced in whole or in part without the prior written permission of IBM.
10. The Excel file (xls) will have two sheets: ▪ Properties (incl. Client Name, Form Name, Field Name, etc.) ▪ Association (incl. the list of Parent Option Code, Parent Option Description, Parent
Option Status, Child Type, Child Question, etc.) Note: Large number of child options can be uploaded using an import first.
11. To prepare the file for import, you need to: ▪ Remove all rows on the Properties sheet, except for Client, Form, Parent question,
and Parent type. ▪ Save the file as an Excel 97-2003 Workbook (.xls). ▪ On the Association sheet, insert to the front of the sheet a new column and label
it Import Action. This column will tell Workbench to either: Update or Delete. ▪ Identify what entries need to be updated or deleted and Save your Excel file.
Note: The most common child option can be set as Default option by adding ‘Yes’ to the Default Selection column. Also, if the child field is a text field, type the text into the Child Text column.
12. To import your file, go to Tools > Import > Profiles. 13. If you do not yet have a profile for CFA, then you need to select Add new Profile from
Actions. If you already have a profile for CFA, then click the icon.
Figure 7 -2: Edit Import Profile for CFA
14. The Edit Import Profile screen requires the Profile Name 15. Entering text into the Description field is optional. 16. Select the Import Type of Field association (Candidate forms and Doc subsidiary forms). 17. Select Upload file for the Header file, and search for your import file. 18. Click the Next button. 19. On the Map Import Profile, make sure all columns are matching. 20. Click the Finish button. 21. Click Launch. 22. Add your import file again by clicking the Browse button.

Administrator Tools Using Workbench
© Copyright IBM Corp. 2020 Page 149
Course materials may not be reproduced in whole or in part without the prior written permission of IBM.
23. Click Launch. 24. Go to Tools >> Task Manager to monitor the import. Once the import has completed, click
the for details on what data was imported.
Export and Import Req Field Association (RFA) If you have existing RFAs, and you need to add to them, you first export the existing RFA data as follows:
1. Go to Tools > Forms > Reqs > Req Forms. 2. For custom req fields, click the Define custom req field button. For standard req fields,
click the Define standard req fields button. 3. Click Export field association from the Actions list.
Figure 7- 3: Req Field Association (RFA) Launch Export Screen.
4. Add the Name. 5. Click the Launch button. 6. The export file will be available under Task Manager. Go to Tools > Task Manager.
7. From within the Task Queue screen, click the icon to open the file in Excel. The Excel file (xls) will have two sheets:
▪ Properties (incl. Client Name, Form Name, Field Name, etc.) ▪ Options (incl. the list of options with Code, Description, Status, etc.)
Note: Follow the steps 11-24 from the import CFA process previously, except for Step 16. Step 16 – Select the Import Type of Field associations (Req forms), and choose the Appropriate custom or standard field for the RFA (Figure 7-4) below.
Figure 7- 4: Edit Import Profile for RFA.

Administrator Tools Using Workbench
© Copyright IBM Corp. 2020 Page 150
Course materials may not be reproduced in whole or in part without the prior written permission of IBM.
New CFA and RFA Clients that are currently not using CFAs or RFAs, but would like to add them, must first identify
the parent and child relationship of the fields. See Figure 7-5. CFA Example:
1. Go to Tools >> Forms >> Candidate Form. From the list of forms, select Administer form
fields for the form. Then click the Edit field attribute icon for the form field. 2. Click the Save and Continue button. 3. Enable either Parent or Child field under the Field Associations section. The Import will
create the association between the Parent and Child fields.
Figure 7- 5: Enable association.
Disable CFA or RFA
To disable a CFA or RFA, you must remove the field association from the Parent field as well as the Child field. To remove the field association from the Parent field and Child field:
1. Go to Tools >> Forms >> Candidate Form. From the list of forms, select Administer form
field icon for the form. Click the Edit field attribute icon for the form field. 2. Click the Save and Continue button. 3. Under the Field associations section, deselect the checkmark for Parent. 4. Then click the Show Children button. 5. Select the child(ren), and click the Remove selected associations button.
Figure 7-6: Disable associations.

Administrator Tools Using Workbench
© Copyright IBM Corp. 2020 Page 151
Course materials may not be reproduced in whole or in part without the prior written permission of IBM.
6. Click Close, Save, and then OK. Note: You can choose whether or not to remove the association from the Parent field or the Child field.
Chapter Summary
• You are able to use the Export Data process to export data from BrassRing in Workbench.
• You are able to use the Import Data process to import data into BrassRing in Workbench.
• You are able to Import Candidate Field Association (CFA).
• You are able to Import Req Field Association (RFA).
• You are able to disable CFA or RFA.

Administrator Tools Using Workbench
© Copyright IBM Corp. 2020 Page 152
Course materials may not be reproduced in whole or in part without the prior written permission of IBM.
Check Your Skills
Answer these True or False questions:
1. The import feature allows you to only import new CFAs or RFAs. 2. For an import file, you can use any Excel version. 3. Agency contact is an Import Type. 4. On the import file for CFA or RFA, you can set the most common child option as Default
option by adding ‘Yes’ to the Default Selection column.

Administrator Tools Using Workbench
© Copyright IBM Corp. 2020 Page 153
Course materials may not be reproduced in whole or in part without the prior written permission of IBM.
Chapter 8: Working with Talent Gateways
Chapter Overview
During implementation, your company provided IBM with all the specifications for a candidate’s new experience while on your corporate careers site. This is now powered in Talent Gateways. With a Workbench certification, you can add a Talent Gateway and manage the look and feel of your company’s Talent Gateways on an ongoing basis. This chapter focuses on the configuration options for Talent Gateways that are available through Workbench.
Chapter Objectives
At the end of this chapter you will be able to:
• Add a Talent Gateway
• Activate/Inactivate a Talent Gateway
• Manage pre-qualifying questions in a Talent Gateway form
• Edit Talent Gateway messaging
• Edit your company’s privacy policy
• Modify the Talent Gateway localization settings
• Synchronize changes with the Talent Gateways
• Responsive Talent Gateway
• Visual Branding Tool (VBT)

Administrator Tools Using Workbench
© Copyright IBM Corp. 2020 Page 154
Course materials may not be reproduced in whole or in part without the prior written permission of IBM.
Overview of Talent Gateways and Pre-qualifying Questions
With Workbench certification, you can create and configure a Talent Gateway. This includes messaging and notifications with candidates, disclaimers, and your privacy policy, and questions that your candidates are asked to complete during the resume or CV submission process. First, we will discuss Site Questions (also referred to as pre-qualifying questions or job response questions), one of the basic elements behind the configuration of your Talent Gateways.
Elements of Talent Gateway Forms and Pre-Qualifying Questions
In addition to collecting candidate data through a Talent Gateway pertaining to contact, employment, and educational background, there are pre-qualifying questions that might be presented to the candidate to gather additional information. These job response questions are actually fields on the Talent-Gateway form which is technically, a candidate form. Here are some elements to keep in mind regarding the Talent-Gateway form and Pre-Qualifying Questions:
− For Workbench purposes, consider the Talent Gateway pre-qualifying questions as fields on a candidate form.
− For a job specific question to be selectable by the recruiter at the time of posting the req, the question, or field must first exist on the Talent Gateway form.
− Questions that you would like to add to the Gateway Questionnaire (covered in Chapter 9) can live on the Talent-Gateway form or on another form in your system.
− Regardless of the number of your Talent Gateways, we recommend labeling sections of questions by relevance for ease of use when viewing the list of questions contained within it. For example, section the form using label fields such as “Campus Recruiting,” “Employee Referral,” “Internal Hire,” etc.
− The Talent Gateway form is managed the same way as other candidate forms with attributes, fields, and field options.
− You are able to manage the default Talent Gateway questions through the Talent Gateway Administration screen within Workbench. If you want these default questions to show on the Gateway Questionnaire, the Job Specific Questions (JSQ) widget must be added. This is discussed later in the chapter.
− Form fields on the Talent Gateway form can be designated as searchable or outputable and will count towards your company’s limited number of searchable and outputable fields.
− Modifications to Talent Gateway forms, fields, and/or options used as JSQs will only be reflected for new reqs posted moving forward. Reqs previously posted will not adopt any of these new attributes.

Administrator Tools Using Workbench
© Copyright IBM Corp. 2020 Page 155
Course materials may not be reproduced in whole or in part without the prior written permission of IBM.
MODIFICATIONS TO TALENT GATEWAY FORMS, FIELDS, AND/OR OPTIONS WILL ONLY BE ACTIVATED FOR
NEW REQS THAT ARE POSTED MOVING FORWARD. CHANGES ARE NOT RETROACTIVE. IF YOU WOULD LIKE
CHANGES TO BE REFLECTED ON THE CURRENTLY POSTED JOBS, USERS HAVE TO MANUALLY EDIT THE JOB
POSTING, ADD/REMOVE THE FIELDS AND REFRESH THE POSTING. DETAILS ON CREATING GATEWAY QUESTIONNAIRES IS AVAILABLE IN CHAPTER 9.
Managing Talent Gateway Form Fields
Adding, editing, translating, and inactivating form fields on the Talent Gateway form is the same as with other candidate forms as described in Chapter 4.
Adding a Pre-Qualifying Question
As you know, your company provided a list of pre-qualifying questions to IBM during implementation, and you can add questions on an ongoing basis as needs change. To add a question to the Talent Gateway form:
1. Click Tools > Forms > Candidate forms.
2. From the list of forms, click the Administer form fields icon for the Talent Gateway form.
3. Click Add new field in the Actions list. This defaults to the next available placement number.
FIELDS ALLOWING MULTIPLE OPTIONS TO BE SELECTED (e.g., MULTI-SELECT LISTS, CHECK BOXES, ETC.)
CANNOT BE ENABLED AS OUTPUTABLE AND CANNOT BE SELECTED FOR MERGING INTO A LETTER TEMPLATE.
4. For Placement, select the numerical placement for the field as it will appear when users are selecting questions in BrassRing. It defaults to the next available placement number.
5. Type a Database field name. The name is limited to 20 characters. A space between words cannot be used; use underscore (_) or dash (-) instead of a space.
6. Type a Field name. The character limit is 255. This will be the field label that appears to your candidates and users in BrassRing. Be sure to check your spelling.
7. For Type, select the field type. This will identify the setup of the field and the options. Refer to Chapter 4, Table 4- 3 for field type definitions.
8. For Font, select the text size of the form field. It will default to medium. 9. For Encrypted, click Yes or No. Yes will designate the field to be encrypted. To enable, you
must have field-level encryption activated by IBM.
Administrator Tools Using Workbench
© Copyright IBM Corp. 2020 Page 156
Course materials may not be reproduced in whole or in part without the prior written permission of IBM.
10. For Hide for these User Types, select the User Types that will not need to view the field in BrassRing, if any.
11. For Non-editable for these user types, select the User Types that will not be able to edit
this field. The field will be in a view-only format.
12. For Required for these user types, select the User Types for which the field is mandatory.
This will place an asterisk next to the field in BrassRing. The form cannot be submitted
without completing the field.
13. For Hide in these Languages, select the languages that will not need to view the field. 14. For Required in these Languages, select the languages for which the field is mandatory for
candidates to complete. This will place an asterisk next to the field on the Talent Gateway. 15. Click Save and continue. 16. Field length will default to the field type's defined character limit. If less is needed,
indicate the amount in the text field. 17. You might be able to designate the field as searchable and/or outputable. This enables
your BrassRing users to search by the form response and/or use it as an output field. If no, click No for Searchable, and click No for Outputable. Proceed to Step 19. If yes, click Yes for Searchable and/or Outputable. Continue to next step.
18. Note your remaining search engine space for that field type. Click the Enable Search/Output check box. Note: Once you click Save in Step 18, you have now mapped the Search/Output fields to the search engine. Your company is permitted 500 Text fields, 50 Numeric fields, and 75 Date fields to designate as searchable and outputable. Once mapped to the search engine, the field cannot be “unmapped” without an IBM engineering effort. Engineering charges would apply.
19. If no options are required for this field type, continue to Step 20. If options are required, you will see the Options source area.
20. Click Save. You will receive a confirmation message and the choice to add an additional new field or to administer form options for the field you just added, if applicable.
ANY CHANGES TO TALENT GATEWAY-RELATED FORMS NEED TO BE SYNCHRONIZED WITH THE TALENT
GATEWAY ITSELF. SEE SYNCHRONIZE CHANGES TO TALENT GATEWAY AT THE END OF THIS CHAPTER FOR
DETAILS.
Form Field Types In Chapter 4, refer to Table 4- 2, which lists the field types that you can add in Workbench with descriptions of the fields and an example for each one.
THE GRID FORM FIELD TYPE IS ONLY AVAILABLE ON THE TALENT GATEWAY FORM.
Administrator Tools Using Workbench
© Copyright IBM Corp. 2020 Page 157
Course materials may not be reproduced in whole or in part without the prior written permission of IBM.
Editing Field Attributes
From time to time you might need to alter an existing field’s attributes. As an example, you might want to change the form label or change a question from being required to not being required. To edit form field attributes on the Talent Gateway Form:
1. Click Tools > Forms > Candidate forms.
2. From the list of forms, click the Administer form fields icon for the Talent Gateway Form.
3. From the list of form fields, click the Edit field attributes con for the field to be changed. 4. Make changes as necessary. 5. Click Save and continue. 6. Make additional modifications as needed. 7. Click Save.
Translating Form Fields
If your company has Talent Gateways available in multiple languages, you might want to translate your form fields all at the same time, instead of editing field attributes for each field. To translate form fields:
1. Click Tools > Forms > Candidate forms.
2. From the list of forms, click the Administer form fields icon for the Talent-Gateway form.
3. Click Translate fields in the Actions list. 4. The first language displayed defaults to English (US). 5. Select the language to which you want to translate your field names. 6. Type the translations into the fields. Be sure to check your spelling. 7. When you are finished with one language, use the Language drop-down to go to the next
language option. 8. Click Save when finished. 9. Close the confirmation window.
WHILE ENTERING YOUR FORM FIELD TRANSLATIONS, YOU CAN ALSO ALTER THE HIDE AND REQUIRED FOR
THIS LANGUAGE OPTIONS. CLICK THE RADIO BUTTONS FOR THE OPTION THAT SUITS YOUR NEEDS.
Inactivating Form Fields
When a form field needs to be retired, it is a good idea to inactivate the field. Inactivating enables you to maintain the historical data associated with the field yet remove it from users’ view.

Administrator Tools Using Workbench
© Copyright IBM Corp. 2020 Page 158
Course materials may not be reproduced in whole or in part without the prior written permission of IBM.
To inactivate a form field:
1. Click Tools > Forms > Candidate forms.
2. From the list of forms, click the Administer form fields icon for the Talent Gateway form.
3. Select the field you want to deactivate. 4. Click Inactivate in the Actions list. 5. Click Inactivate, and then click OK.
Field Options
Field options contain the available responses to radio button, check box, single-select, and multi-select form fields. For example, options for the question “Are you willing to travel?” might be radio buttons Yes and No. Like form fields, many field options are loaded into BrassRing during implementation. Also, like form fields, the previously loaded field options can be edited or inactivated and new options can be added. Refer to Chapter 4: Candidate Forms for information about field options, including adding, editing, translating, and inactivating.
Synchronizing Changes with Talent Gateways
In Chapter 2: Managing Your Database, we learned the BrassRing Talent Gateway’s data structure operates separately from the BrassRing database. The Talent Gateways rely on XML files that store candidate and req information, forms, and the Talent Gateway setup (your candidates’ experience). A Data Subscription Tool propagates Talent Gateway data to BrassRing. The Talent Gateways will update every two hours with any changes you make in Workbench. However, after each modification, it is best practice to synchronize these changes. For example, you might have added a required field to your Talent Gateway form. You want this new field posted as soon as possible for any new reqs.
Synchronizing Changes with Talent Gateways When edits have been made to a Talent Gateway form or a Talent Gateway, it is necessary to sync those changes with your Talent Gateways. To synchronize changes with Talent Gateways:
1. Click Tools > Forms > Candidate forms. 2. Click Synchronize changes with Talent Gateways in the Actions list. 3. The updated information is sent to your Talent Gateways. 4. Click OK to close the confirmation window.

Administrator Tools Using Workbench
© Copyright IBM Corp. 2020 Page 159
Course materials may not be reproduced in whole or in part without the prior written permission of IBM.
Adding a Talent Gateway
Adding a Talent Gateway
As you might already know, a Talent Gateway is a job site hosted by IBM that is dedicated to helping organizations simplify their job posting process and accelerate their online recruiting efforts. With access to Workbench, you will be able to add your own Talent Gateway. To add a Talent Gateway:
1. Navigate to Tools >Talent Gateways. The Talent Gateway Administration page appears. 2. Click Add New Talent Gateway in the Actions list. Refer to Figure 8- 1.
Figure 8- 1: Talent Gateway Administration
3. Enter the Talent Gateway name. 4. Select the Gateway Type.
Full: This allows candidates to search and view open positions, and manage a profile history. Global: This links multiple full gateways of varying locales so data can be shared among them. This is explained in greater detail later in the chapter.
5. Once the Talent Gateway name and the Gateway type have been selected, click the Save and continue button at the bottom of the screen.
6. The Talent Gateway details page appears. Enter the details of the Talent Gateway. Click the Save button at the bottom of the screen when done.
REQS CAN BE AUTOMATICALLY POSTED TO GOOGLE. THIS INCREASES THE POSSIBILITY OF CANDIDATES
FINDING CLIENTS’ JOBS THROUGH GOOGLE SEARCH, AND ULTIMATELY RESULTS IN AN INCREASED NUMBER OF JOB APPLICATION.

Administrator Tools Using Workbench
© Copyright IBM Corp. 2020 Page 160
Course materials may not be reproduced in whole or in part without the prior written permission of IBM.
Save Talent Gateway as New
Occasionally, it might be necessary to create additional Talent Gateway sites, which might be similar to sites already created. Workbench offers the ability to create these new sites based on already active sites by using the save as new function. Save as new creates a new Talent Gateway with all the aspects of the site on which it is based.
Note: Save as New can no longer be selected on classic Talent Gateways and Activate can no longer be selected on inactive classic Talent Gateways.
To save a Talent Gateway as new:
1. Navigate to Tools > Talent Gateways. 2. Select the Talent Gateway. 3. From the Actions list, select Save as new. 4. The Talent Gateway details screen appears with the details of the selected Talent
Gateway. 5. In the Talent Gateway name field, enter the name of the new Talent Gateway. 6. Click the Save button. 7. A confirmation statement appears, indicating that the Talent Gateway has been saved. 8. Click OK.
Launch Talent Gateway
You can view the Talent Gateway using the Launch Talent Gateway function. To launch a Talent Gateway:
1. Navigate to Tools > Talent Gateway.
2. Select the Launch icon for the Talent Gateway. 3. A new page appears, displaying the Talent Gateway as it would appear to the end user.
IF YOU RECEIVE AN ERROR WHEN TRYING TO LAUNCH A NEW TALENT GATEWAY, YOU WILL NEED TO
SYNCHRONIZE THE TALENT GATEWAYS. SYNCHRONIZING THE TALENT GATEWAYS WAS COVERED PREVIOUSLY
IN THIS CHAPTER.
Preview XML Talent Gateway Integration
Preview XML Talent Gateway integration is used when the SSO function is enabled on a full Talent Gateway.

Administrator Tools Using Workbench
© Copyright IBM Corp. 2020 Page 161
Course materials may not be reproduced in whole or in part without the prior written permission of IBM.
Adding a Global Talent Gateway A global Talent Gateway links multiple gateways so data can be shared among them. Global Talent Gateways are useful for organizations that have multiple gateways in different languages. To add a Global Talent Gateway:
1. Navigate to Tools >Talent Gateways. The Talent Gateway Administration page appears. 2. Click Add New Talent Gateway in the Actions list. 3. Enter the Talent Gateway name. 4. Select Global as the Gateway Type. 5. The Global Talent Gateway details screen appears. Select the Select Gateway check box
for each gateway that will be included in the global gateway. 6. Specify the gateway configuration options. To ungray the fields, click the pencil icon to edit the
details of that particular gateway. 7. Click the Save button. 8. Synchronize the changes; select the Global Site ID radio button for the gateway. Click Synchronize
Changes with Gateways in the Actions list.
Ungroup a Global Talent Gateway
Use the Ungroup action to delete a Global Talent Gateway and return its member gateways to a Full Talent Gateway type. To ungroup:
1. Go to Tools > Talent Gateways. 2. Select a Global Talent Gateway. 3. Click Action: Ungroup.
Customizing Talent Gateway Messaging
Increased control over your Talent Gateway messaging allows you to better communicate your company’s hiring practices and requirements for job applications. To edit the displayed text or email that is sent to candidates:
1. Navigate to Tools > Talent Gateways.
2. Click the Text Customization icon icon for the Talent Gateway whose text you want to edit.
3. Click the tab containing the text you want to edit. For example, if you want to edit text displayed on the Search openings page, click the Search openings tab, and modify the text in the various available fields.
4. For each message you want to customize, navigate to the corresponding text box and enter the text you want to display on the Talent Gateway.

Administrator Tools Using Workbench
© Copyright IBM Corp. 2020 Page 162
Course materials may not be reproduced in whole or in part without the prior written permission of IBM.
5. To preview the text, click the Show me link. 6. Click the Save button when you are finished modifying text. 7. Once you have made the changes, click the Synchronize changes with Talent Gateway
link to propagate the changes to the Talent Gateway. TO VIEW YOUR INACTIVE FORM FIELDS, CLICK THE INACTIVE TOGGLE AT THE TOP OF THE EDIT FORM FIELDS
SCREEN. TO REACTIVATE, SELECT THE FIELD, AND CLICK ACTIVATE.
Customizable Text – Reset to Defaults
This action resets all the customizable text that has defaults back to text of the current locale/language.
1. Got to Tools > Talent Gateways. 2. Select the Talent Gateway to be reset. 3. Click the Action Customizable text – reset to default. 4. Click OK. 5. Click Close on the confirmation screen.
Formatting Date valid with TG responsive
As a Workbench administrator, you can format the date used on Talent Gateways which will improve the experience for your candidates when using the Talent Gateways.
Formatting Date
To format the date on a Talent Gateway:
1. Navigate to Tools >Talent Gateways. 2. Select the Talent Gateway. 3. From the Actions list, select Format: date, name, address. 4. A screen appears with the date, name, and address format options. Refer to Figure 8- 2.
Date settings: From the drop-down, select the format to display dates. This configuration affects all pages on a Talent Gateway that display a date. Note: Name settings and Address settings are not applicable with Responsive Talent Gateway.
5. Click Save. 6. Once you have made the changes, click the Synchronize changes with Talent Gateway
link to propagate the changes to the Talent Gateway.

Administrator Tools Using Workbench
© Copyright IBM Corp. 2020 Page 163
Course materials may not be reproduced in whole or in part without the prior written permission of IBM.
Figure 8- 2 : Edit Talent Gateway format
MODIFICATIONS TO TALENT GATEWAY FORMS, FIELDS, AND/OR OPTIONS WILL ONLY BE REFLECTED FOR NEW
REQS POSTED MOVING FORWARD. REQS PREVIOUSLY POSTED WILL NOT ADOPT THE NEW ATTRIBUTES.
Responsive Talent Gateway Responsive Talent Gateway search enables job seekers to search for jobs with a modern, simple search approach, see streamlined job details screens, or sign in to access the candidate zone. After a job seeker selects Apply, they go to responsive apply screens. Job search and apply is device agnostic, which means it works smoothly across a variety of devices and browsers, with information automatically displayed in an appropriate layout. If a user changes the browser window size (or switches to a device with a different browser or screen size), then the interface elements dynamically readjust to optimize the user's experience on the new device. For example, the responsive apply progress bar appears wider on a big screen and narrower on a smaller screen, so candidates never have to scroll to see the full progress bar. Function is the same on any device.
Responsive Layout Column The Responsive Talent Gateway Screen layout is set and configured per gateway, with settings for
screen components such as header/footer, links, text, filters, and fields. For Global Talent Gateways (GTG), there will be one Responsive Layout page that applies to all Talent Gateways included.
• Add icon (green +) indicates a responsive layout does not yet exist – click to launch and configure
responsive layout. • Edit icon (pencil) indicates a responsive layout has been saved but is not active – click to edit the
responsive layout.
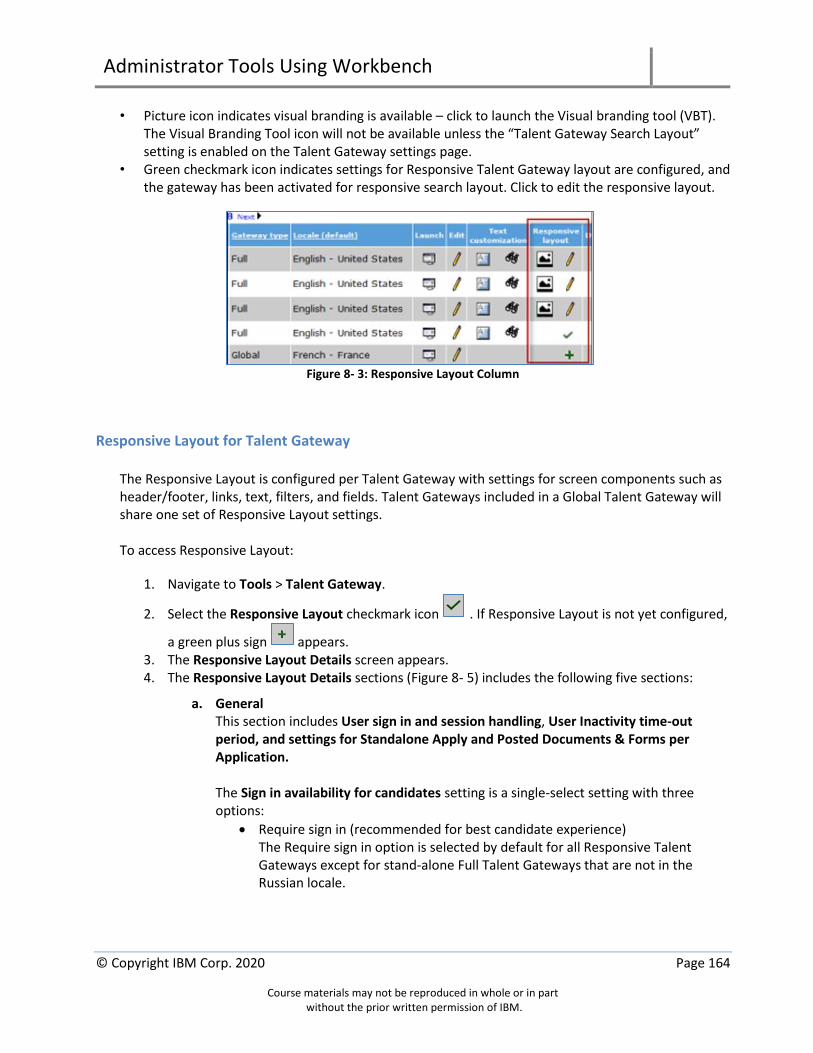
Administrator Tools Using Workbench
© Copyright IBM Corp. 2020 Page 164
Course materials may not be reproduced in whole or in part without the prior written permission of IBM.
• Picture icon indicates visual branding is available – click to launch the Visual branding tool (VBT). The Visual Branding Tool icon will not be available unless the “Talent Gateway Search Layout” setting is enabled on the Talent Gateway settings page.
• Green checkmark icon indicates settings for Responsive Talent Gateway layout are configured, and the gateway has been activated for responsive search layout. Click to edit the responsive layout.
Figure 8- 3: Responsive Layout Column
Responsive Layout for Talent Gateway
The Responsive Layout is configured per Talent Gateway with settings for screen components such as header/footer, links, text, filters, and fields. Talent Gateways included in a Global Talent Gateway will share one set of Responsive Layout settings.
To access Responsive Layout:
1. Navigate to Tools > Talent Gateway.
2. Select the Responsive Layout checkmark icon . If Responsive Layout is not yet configured,
a green plus sign appears. 3. The Responsive Layout Details screen appears. 4. The Responsive Layout Details sections (Figure 8- 5) includes the following five sections:
a. General This section includes User sign in and session handling, User Inactivity time-out period, and settings for Standalone Apply and Posted Documents & Forms per Application. The Sign in availability for candidates setting is a single-select setting with three options:
• Require sign in (recommended for best candidate experience) The Require sign in option is selected by default for all Responsive Talent Gateways except for stand-alone Full Talent Gateways that are not in the Russian locale.

Administrator Tools Using Workbench
© Copyright IBM Corp. 2020 Page 165
Course materials may not be reproduced in whole or in part without the prior written permission of IBM.
• Allow to skip sign in (still allows sign in / create account & sign in related features). Candidates can skip the account creation process and instead, apply directly to jobs. Benefits:
▪ Reduces clicks and speeds up the application process ▪ Candidates can still create a profile after applying or later by using an
automated email (not configurable) that includes a hyperlink that takes the candidates to the account creation page. This allows candidates to check their application status.
Note:
• New Skip Sign-in button appears on login page with the ability to login or create a profile.
▪ If the candidate skips the sign-in, the candidate will not see: o Regular links with options to sign-in, sign-out, Candidate Zone,
etc. o Options to save the application as draft or save the job to
apply later. ▪ The Inactivity timeout setting should be configured to a short duration
(60 or 90 seconds) to ensure data security and privacy of the candidates. Messages upon session timeout due to inactivity are displayed accordingly.
▪ If configured, a privacy policy message is displayed to the candidate before applying. This message is not repeated to the candidates if they choose to create an account after submitting the application.
• Disable sign in (disables all sign in related features for this TG) When a Workbench Administrator updates this setting to Disable sign in, the following caution message appears: Are you sure you want to disable sign in and all related sign-in features? This would provide the least favorable candidate experience and is strongly discouraged unless required by law. See Figure 8-4.
Figure 8- 4: Responsive Layout Column
DISABLING THE SIGN IN OPTION REMOVES A NUMBER OF FEATURES THAT ARE CRITICAL TO
ACHIEVING A POSITIVE CANDIDATE EXPERIENCE (SEARCH AGENT, JOB CART, SAVE AS DRAFT,

Administrator Tools Using Workbench
© Copyright IBM Corp. 2020 Page 166
Course materials may not be reproduced in whole or in part without the prior written permission of IBM.
CANDIDATE ZONE, ETC.). IT IS RECOMMENDED TO KEEP THE SIGN IN OPTION AVAILABLE ON THE
RESPONSIVE TALENT GATEWAY UNLESS A SPECIFIC BUSINESS OR LEGAL NEED MUST BE ADDRESSED.
IF THE REQUISITION HAS ASSESSMENTS ATTACHED FOR THE CANDIDATE TO COMPLETE, THEY ARE
DISPLAYED IMMEDIATELY AFTER THE CANDIDATE COMPLETES THE APPLICATION. WE HIGHLY
RECOMMEND THAT CLIENTS USING THIS FEATURE CONFIGURE ASSESSMENT EMAIL NOTIFICATIONS. IF THE CANDIDATE SKIPS THE SIGN IN, AND THE JOB APPLIED TO HAS AN ASSESSMENT, THE
CANDIDATE MUST COMPLETE THE ASSESSMENT BEFORE CLOSING THE BROWSER OF THE SESSION. IF
THE CANDIDATE CREATES AN ACCOUNT AFTER SUBMITTING THE APPLICATION, HE/SHE CAN
COMPLETE THE ASSESSMENT AT A LATER TIME BY SIGNING INTO THE ACCOUNT AND GOING TO
CANDIDATE ZONE >> PENDING ASSESSMENTS.
The User Inactivity time-out period (in seconds) improves the security for our candidates and their data. The maximum time-out option is 1,800 seconds (30 minutes), and the minimum time-out option is 60 seconds (1 minute).
Note:
• Affects Classic and Responsive Talent Gateways.
• When this setting is updated for a Global TG, all the member TGs will be updated.
• While updating this setting, if the value entered is not between 60-1,800 seconds, the following error message is displayed: User inactivity time-out period (in seconds) must be an integer 60 – 1800; this is required for data privacy & security.
• This field cannot be left blank.
• The setting Time-out period in seconds continues to be available in the Talent Gateway Text Customizations page. This setting will not be removed to support Classic Talent Gateways. However, the timeout minimum and maximum criteria and all other changes of the new setting apply to this setting.
• For new TGs and Global TGs, the default timeout value is 300 seconds (5 minutes).
The Standalone Apply enables you to direct a candidate imported directly into BrassRing Recruiter Experience to complete a full Responsive application on a Standalone Gateway Questionnaire. Business Cases:
• Candidates exported to Avnet due to Russian Data Privacy laws and imported by using Candidate Import to req in BrassRing.
• Agency Manager Submissions.
• Candidates submitted by using Add Candidate Gateway or Candidate Import and added manually to requisition.
The Use as standalone Gateway Questionnaire single-select drop down option defaults to No.

Administrator Tools Using Workbench
© Copyright IBM Corp. 2020 Page 167
Course materials may not be reproduced in whole or in part without the prior written permission of IBM.
The Embed TG in other sites feature ensures security when embedding Responsive Talent Gateways in another website.
• BrassRing Responsive Talent Gateways can be embedded into frames of websites outside of IBM.
• This allows clients to host the content in the frame and then pull the TG in for the candidate search/application process. This results in a potential vulnerability where the TG might be embedded in a malicious website and thereby candidate actions like mouse clicks can be misdirected within such websites.
• To overcome this vulnerability, users can select Allow only these URLs and list the URLs of the websites that need to be white-listed for embedded TGs in the text box that is displayed.
• Existing Responsive Talent Gateways are by default configured to Always Allow.
The Posted Documents & Forms per Application (i.e., “responsive candidate portal”) subsection can be used to insert the client-specific terminology for the following:
• Notification text – You have received a document with subsidiary form (e.g., offer) for this job. The default value is: You have received an offer for this job.
• Linked text – Review document with subsidiary form (e.g., offer). Default value is: Review offer.
b. Header / Footer The Header / Footer section allows you to add links to both the header and footer on the Responsive Talent Gateway. These links can send candidates to external pages hosted by your organization such as your About Us, Company Locations, or Contact Us sites.
c. Welcome / Search The Welcome / Search section allows you to customize text and button labels candidates will see on the search page of your Responsive Talent Gateway. It also lets you define what fields will be taken into consideration when candidates use the keyword and location search boxes. In addition, you can define the fields candidates see when they access the Advanced search page, and dictate what, if anything, is shown in the Highlighted Jobs section.
d. Search Results / Job Listing This section allows you to determine what fields and their location will show on the Search Results / Job Listing section that appears when candidates complete a search.
e. Job Details The job details section allows you to select the fields that will appear under job details page. It is highly recommended that the fields selected in the

Administrator Tools Using Workbench
© Copyright IBM Corp. 2020 Page 168
Course materials may not be reproduced in whole or in part without the prior written permission of IBM.
search results page are also selected in the job details page. Field labels can be customized. Note: While Workbench Administrator saves a new Talent Gateway the following default values are added to the Job Details page: Department and Location/Division.
f. Communications The SMS Messaging Configuration section will be available for configuration if your organization has enabled the SMS (Short Messaging Service) function. Once enabled, candidates can choose to opt in/out (turn on/off text messaging) from the Account Settings section of their Candidate Zone, or when they apply to a requisition. The SMS messaging – candidate consent pop-up message field typically contains the legal/disclaimer text that displays to the candidate when the information icon is selected. HTML is not allowed in this field. The Vendor specific set-up instructions field is an on-screen message to the candidates that typically instructs candidates on how to complete the double opt in step, if required. The [#BRUID#] token is the only merge token allowed in this field, but it is recommended that clients also include their Client ID and the Vendor Short Code, as the candidate might need all three to complete the opt in process. Note: To send a candidate a text message from within BrassRing, the following user privilege must be enabled: Candidate Action 2 >> Candidates – send candidate SMS message.
g. Status Categories (for Submitted Applications) The HR Status Categories provide progress visualization on the Candidate Zone. The category description allows you to tailor the message that provides the candidate with the meaning of the HR Status and where in the recruitment process the candidate falls.
Figure 8- 5 : Edit Responsive Layout details.
To expand (or collapse an open section), click anywhere in its blue title rectangle. Only one section remains open at a time (opening a new section, collapses the one previously opened). You can configure or edit in any order. Within each section, numbered configuration items correspond to numbers (in yellow boxes) shown on a static sample image to illustrate the page feature that you are configuring and its relative placement.

Administrator Tools Using Workbench
© Copyright IBM Corp. 2020 Page 169
Course materials may not be reproduced in whole or in part without the prior written permission of IBM.
Steps to Configure Responsive Talent Gateway
- Create the Talent Gateway responsive layout. - Set Talent Gateway Search Layout setting to Responsive. - Set Talent Gateway details settings. - Synchronize changes with Talent Gateway.
Set Talent Gateway Search Layout Settings
To set the Talent Gateway Search Layout to Responsive, you edit the Talent Gateway details from the Talent Gateway Administration page.
To access the Talent Gateway:
1. Navigate to Tools > Talent Gateway.
2. Select the Edit Talent Gateway icon . 3. Select the Responsive option for the Talent Gateway Search Layout field.
Set Talent Gateway Details Settings
Continue on the Talent Gateway details page to set the Talent Gateway Details settings for Responsive. The table below provides you with the details of what settings to select.
Required Settings Advised Settings
Site general job submission type – Responsive GQ option must not be selected.
Special Configurations: Remove general job submission link from candidate landing page – Since the interface for general job submission is not currently responsive, you can check if you do not want candidates to have to “pinch and zoom” when on a mobile device.
Special Configurations: Candidate remains logged on – must be checked, otherwise, automatically logs candidates out on completion of the job application, as in a kiosk scenario. Currently, responsive Apply forces candidates to remain logged in, regardless of this setting.
Social Media Integration – Select which social media sites to use for candidate authentication (Facebook, LinkedIn, Twitter) and profile import (Facebook, LinkedIn). Requires prior configuration of social media site client settings. Social media integration – enable login – Check Yes (recommended – this controls login only, not import profile).

Administrator Tools Using Workbench
© Copyright IBM Corp. 2020 Page 170
Course materials may not be reproduced in whole or in part without the prior written permission of IBM.
Special Configurations: No account creation/no log-in – Must not be checked.
Enable job/referral status check – Check to enable job status check (required for Review my status link on Gateway Questionnaire, which is on by default). Choose the fields to be displayed when candidates check the status from the list of Available fields in Job/referral status display. Setting requires configuration of Log req status change and Log HR status change client settings.
Special Configurations: Saved drafts – must be checked (required for responsive apply to work, since saving and returning is a main feature).
Special Configurations: Disable progress bar – Check so that classic pages that are not yet responsive look more consistent with the responsive pages, which have no progress bar.
Synchronize Changes with Talent Gateway
When edits have been made to a Talent Gateway form or a Talent Gateway, it is necessary to sync those changes with your Talent Gateways. To synchronize changes with Talent Gateways:
5. Click Tools > Forms > Candidate forms. 6. Click Synchronize changes with Talent Gateways in the Actions list. 7. The updated information is sent to your Talent Gateways. 8. Click OK to close the confirmation window.
Launch Visual Branding Tool (VBT) for Talent Gateway
The Visual Branding Tools (VBT) controls the branding of the responsive Talent Gateway and Gateway Questionnaire: screen fonts, colors, and images. Gateways must be Full or Global, have saved responsive layout (indicated by pencil or checkmark icons), and be synchronized if new or responsive layout was recently configured. To launch the Visual Branding Tool (VBT):
4. Navigate to Tools > Talent Gateway.
5. Select the Launch icon for the Visual Branding Tool in the Responsive Layout column.
6. A new page appears displaying the Talent Gateway as it would appear to the candidate.

Administrator Tools Using Workbench
© Copyright IBM Corp. 2020 Page 171
Course materials may not be reproduced in whole or in part without the prior written permission of IBM.
Figure 8- 6: Visual Branding Tool (VBT)
Note: Alternatively, you can click the responsive layout checkmark icon for the Talent Gateway, expand the Branding: Fonts/Colors/Images section, and click the Launch the visual branding tool button.
7. To manage the Branding, right click elements for configuration options such as Font Color,
Font Size, Font, Background Color, Foreground Color, etc. 1 – Logo will appear in the header. Must be URL and HTTPS hosted. Height 50px, Width130px, 50kb. 2 – Branded Image – Must be a URL and HTTPS hosted. Height 400px, Width 1100px, Size 600kb. 3 – Header Link Color
4 – Foreground Color
5 – Background Color
6 – Base Font Size – 16px default
7 – Base Font Color
8 – Base Font Style: Helvetica Neue/Arial, Verdana, Times New Roman, Tahoma
9 – Page Link Color
10 – Button Background Color
Visual Branding Tool (VBT) Configuration Primary Header Logo, Tag line or Secondary Logo, Background image
• For Header Main Logo, Tag Line or Secondary Logo, and Background Image, right-click shows: o Images already uploaded by BrassRing staff

Administrator Tools Using Workbench
© Copyright IBM Corp. 2020 Page 172
Course materials may not be reproduced in whole or in part without the prior written permission of IBM.
o Images uploaded through Workbench Talent Gateway Details for selected TG or Global TG member (Client Logo and/or Mobile Logo)
o Text box allowing user to enter a secure URL where the client logo (gif, jpg, jpeg, png) exists and is not behind firewall.
o Recommended: Size < 50k | Height 50px | Width 130px | Aspect Ratio Width:Height < 6:1 if no secondary or tag line, otherwise < 3:1. Tag line or Secondary Logo size should be < 25k | Height 25px | Width 50px. Background image size should be < 175k | Height = 400px | Width = 1100px.
Header Background Color and Header Link Color • For Header Background Color and Header Link Color, color palette is derived from header main
logo colors. (Footer background color and text/link colors can be branded separately.) • Header Background Color is configurable and defaults to 1) TG site color for Mobile Header, or
2) #FFFFFF, or 3) #0088BF • Header text and link color is configurable and defaults to 1) TG site color for Mobile Header text,
or 2) primary logo’s dominant dark color, or 3) #FFFFFF. Base Font, Base Font Color, Base Font Size
• Base font color is the color of most text throughout the responsive pages. Base Font is configurable and defaults to 1) Talent Gateway details: Font or 2) Helvetica Neue/Ariel.
• Base Font Color is configurable and defaults to 1) Talent Gateway site colors: Mobile main text, or 2) Font label color, or 3) # 333333 (black). Base Font Size is configurable and defaults to 16 px, with options ranging from 8 ps to 20 px. Some font sizes intentionally vary relative to the base font size in certain places. For example: the Job Title will be a percentage larger than the Base Font size of the responsive pages.
Background Color, Foreground Color, Button Background Color • Background Color is configurable and options are accessed with right-click in the left/right
margins and between areas such as the search box or the Highlighted jobs area. It defaults to 1) Mobile Background color or 2) # FFFFFF.
• Foreground Color appears behind the search keyword and location fields on the search openings page, and on Search drop- down (on smaller format screens) and search area (on large format screens) on Resarch results and screens. It is configurable and defaults to 1) TG site color: Dominant Dark, or 2) Primary Logo: dominant color, or 3) # 003F69 .
• Button Background Color is the color of active buttons on the responsive site pages. It is configurable and defaults to 1) TG site color: Mobile Action, or 2) Primary logo secondary color, or 3) #0067A2 .
Additional Configurable Colors • Link Color is color of linked text (other than that appearing on a foreground color). It is
configurable and defaults to 1) Talent Gateway site colors: Mobile Top Action. or 2) Primary Logo: dominant color, or 3) hex# 00648D
Best Practice Recommendations: Use good design principles and accessibility guidelines when choosing the color palette for your Talent Gateway site. Color choices can result in cases where the font color and the color that is behind the text are too close in color range and therefore not accessible for color-impaired viewers. The system attempts to guard against font colors that do not contrast enough with the

Administrator Tools Using Workbench
© Copyright IBM Corp. 2020 Page 173
Course materials may not be reproduced in whole or in part without the prior written permission of IBM.
color that it is behind it. For example, Foreground Font Color, Foreground Link Color and Button Font Color (all non-configurable) default to the Base Font Color, but if that is too close to the background color of that element (foreground color or button background color), then these font colors automatically switch to use [page] Background Color. However, not all scenarios can be resolved programmatically; in the preceding example, the system cannot resolve the contrast issue if the user has chosen a Foreground Color or Button Background Color that is too close to both Base Font Color and [page] Background Color. Non-configurable Colors - The following colors are not directly configurable through the VBT:
• Button Font Color is the color of text on active buttons on the responsive site pages. The system initially uses the Base Font Color, but if too close contrast-wise with the Button Background Color, then it uses same color as Background Color.
• Foreground Font Color is color of label text that precedes the keyword and location fields. The system initially uses the Base Font Color, but if too close contrast-wise with the Foreground Color, then it uses same color as Background Color.
• Foreground Link Color is color of any links that are on foreground colors. For search openings and other quick search criteria areas, this is the Advanced search link. The system initially uses the Base Font Color, but if too close contrast-wise with the Foreground Color, then it uses same color as Background Color.
• Accent Background Color is the color of accent backgrounds (highlighted jobs, search results filters (large formats), applied filters background, etc.). The system blends the Background Color with a tint of the Base Font Color.
Advanced / CSS At a very high level, CSS (Cascading Style Sheets) replaces the formatting of certain HTML tags in page content; you might make a special icon appear for any use of the <li> bullet tag, or you can control the colors of certain elements universally. CSS normally can be used in page or as a separate HTML document called for each page. To learn more about CSS, you can access this online source.
The Advanced / CSS feature (Figure 8-7) in the visual branding tool was created to allow clients granular control over branding through the direct input of CSS code. Advanced CSS allows you to add CSS scripts to change the look and feel of the responsively designed pages.
Figure 8- 7: Advanced / CSS Screen

Administrator Tools Using Workbench
© Copyright IBM Corp. 2020 Page 174
Course materials may not be reproduced in whole or in part without the prior written permission of IBM.
The Advanced CSS feature is very powerful, and as you manipulate the CSS on a page, you might negatively affect the responsiveness or the accessibility of the application pages, therefore, make sure the CSS script entered is done by someone with deep expertise in CSS. The candidate experience has been coded to adhere to numerous global standards and to accommodate virtually all devices through responsive design. In addition to solid knowledge of CSS, the Advanced CSS option of the visual branding tool requires great care to avoid adversely affecting all of the following:
• Responsive breakpoints
• General usability
• Accessibility
The tool is not intended to rewrite the entire CSS, its intended use is for specific changes that need to be made. What Advanced CSS Can Do The Advanced CSS option can control the presentation of every element in the user interface: header, footer, and main body. Such as:
• Control colors and fonts
• Hide content
• Resize content
• Reposition content
• Add background images
• Add and remove scroll bars
• Add some content (text, icons, images, etc.) within limitations
• Show content that was otherwise hidden
• Change the number of columns displayed (with some limitations, exclude IE < 10 and Opera Mini)•
What Advanced CSS Cannot Do
• It cannot always single out a single element in the user interface to restyle without affecting similar elements.
• It generally cannot divide content or make any changes that require changes to markup.
• It generally cannot control user interaction or make any changes that require changes to script.
Note: Additional information on Advanced CSS and examples are available on BrasRing Support Community >> Tech Notes.
Administrator Tools Using Workbench
© Copyright IBM Corp. 2020 Page 175
Course materials may not be reproduced in whole or in part without the prior written permission of IBM.
Chapter Summary
• The Talent Gateway form is configured as a candidate form when administered in Workbench. Pre-qualifying questions are configured as form fields.
• With access to Workbench, you will be able to add your own Talent Gateway
• Save as new creates a new Talent Gateway with all the aspects of the site on which it is based.
• Adding a Responsive Talent Gateway allows job seekers to search and apply for jobs in a modern and simple search approach, using a variety of devices and browsers.
• The Visual Branding Tool (VBT) controls the branding of screen fonts, colors, and images for the Responsive Talent Gateway and Gateway Questionnaire.
• By customizing Talent Gateway text, you can better communicate your company’s hiring practices and requirements.
• Changing the localization settings of your Talent Gateway might improve the overall candidate experience.
• Any changes to Talent Gateway forms need to be synchronized with your Talent Gateways using Workbench.

Administrator Tools Using Workbench
© Copyright IBM Corp. 2020 Page 176
Course materials may not be reproduced in whole or in part without the prior written permission of IBM.
Check Your Skills
Answer these True or False questions:
1. It is best practice to synchronize changes with Talent Gateways after making any configuration changes in Workbench.
2. The Talent Gateway form is configured like a req form in Workbench. 3. The Talent Gateway form is basically a single candidate form.

Administrator Tools Using Workbench
© Copyright IBM Corp. 2020 Page 177
Course materials may not be reproduced in whole or in part without the prior written permission of IBM.
Chapter 9: Gateway Questionnaires
Chapter Overview
You can use Gateway Questionnaires to set up fully customizable, job-specific application processes for each requisition on each talent gateway. You can build Gateway Questionnaires that are as simple or as detailed as you want, so you can use them even for candidates with minimal computer experience who do not typically have resumes. Gateway Questionnaires serve as online applications that allow you to configure questions that branch or disqualify candidates depending on how they answer these questions. In this chapter, we will explore Gateway Questionnaires.
Chapter Objectives
At the end of this chapter, you will be able to:
• Add a Gateway Questionnaire
• Add a section to a Gateway Questionnaire
• Add a page to a Gateway Questionnaire
• Administer Widgets
• Save a Gateway Questionnaire as new
• Preview a Gateway Questionnaire
• Translate Gateway Questionnaire Titles
• Activate a Gateway Questionnaire
• Delete a Gateway Questionnaire

Administrator Tools Using Workbench
© Copyright IBM Corp. 2020 Page 178
Course materials may not be reproduced in whole or in part without the prior written permission of IBM.
Overview of Gateway Questionnaires Gateway Questionnaires are online applications that support question branching and knockout questions. They consist of sections and pages that determine how questions are sequenced and grouped. They are required with the Responsive Talent Gateway. Branching makes it possible to display a subsequent question or section based on a candidate’s response to a question. Knockout questions end the application process if candidates provide unfavorable answers. Candidates complete the questionnaire on a Talent Gateway which starts after the candidate clicks the apply button. The questionnaire can include the Talent Gateway default questions (through the JSQ widget), additional form questions, basic profile information, etc.
Responsive apply requires that you create and use a responsive Gateway Questionnaire (GQ). Responsive GQs have the following features:
- One column layout – The layout for a responsive GQ is one column. Headers and footers dynamically adjust based on the device viewing them.
- Improved Preview – The Gateway Questionnaire Preview function has been improved to show the responsive layout and allows for candidates to click directly into the section they would like to edit before submitting.
- New Sections/Pages – Saving a classic questionnaire as new or creating a new responsive GQ adds four new standard sections and three visible text widgets. The new sections and widgets are required for all responsive questionnaires, and cannot be removed or deleted.
- In-page branching – Unlike classic Gateway Questionnaires, responsive Gateway Questionnaires include in-page branching, where questions will dynamically show or not show based on the selection of a previous question.
- Responsive Gateway Questionnaires are differentiated from Classic Gateway Questionnaires by
the responsive icon next to the GQ name in Workbench
Adding a Responsive Gateway Questionnaire To add a new responsive Gateway Questionnaire:
1. Navigate to Tools > Gateway Questionnaires. 2. Click Add new Gateway Questionnaire in the Actions list. 3. The Gateway Questionnaire properties screen opens. 4. On the General tab, complete the following fields:
Gateway Questionnaire name: The name of the Gateway Questionnaire must be unique.
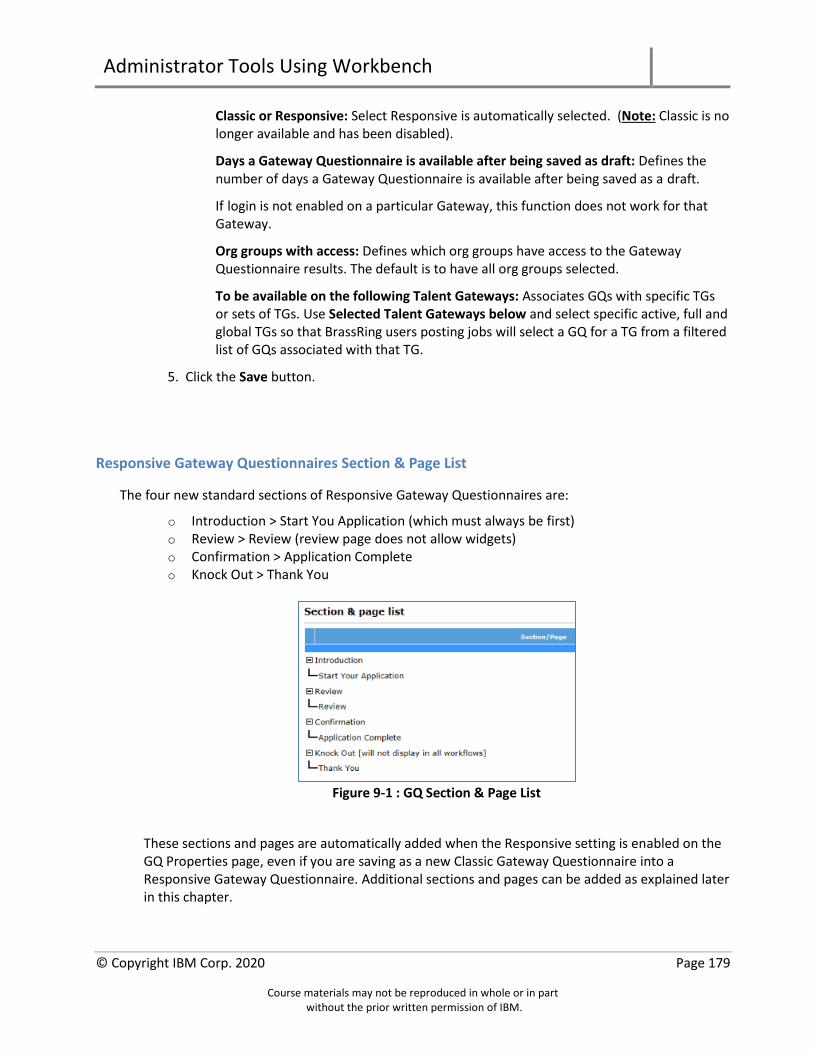
Administrator Tools Using Workbench
© Copyright IBM Corp. 2020 Page 179
Course materials may not be reproduced in whole or in part without the prior written permission of IBM.
Classic or Responsive: Select Responsive is automatically selected. (Note: Classic is no longer available and has been disabled).
Days a Gateway Questionnaire is available after being saved as draft: Defines the number of days a Gateway Questionnaire is available after being saved as a draft.
If login is not enabled on a particular Gateway, this function does not work for that Gateway.
Org groups with access: Defines which org groups have access to the Gateway Questionnaire results. The default is to have all org groups selected.
To be available on the following Talent Gateways: Associates GQs with specific TGs or sets of TGs. Use Selected Talent Gateways below and select specific active, full and global TGs so that BrassRing users posting jobs will select a GQ for a TG from a filtered list of GQs associated with that TG.
5. Click the Save button.
Responsive Gateway Questionnaires Section & Page List
The four new standard sections of Responsive Gateway Questionnaires are:
o Introduction > Start You Application (which must always be first) o Review > Review (review page does not allow widgets) o Confirmation > Application Complete
o Knock Out > Thank You
Figure 9-1 : GQ Section & Page List
These sections and pages are automatically added when the Responsive setting is enabled on the GQ Properties page, even if you are saving as a new Classic Gateway Questionnaire into a Responsive Gateway Questionnaire. Additional sections and pages can be added as explained later in this chapter.
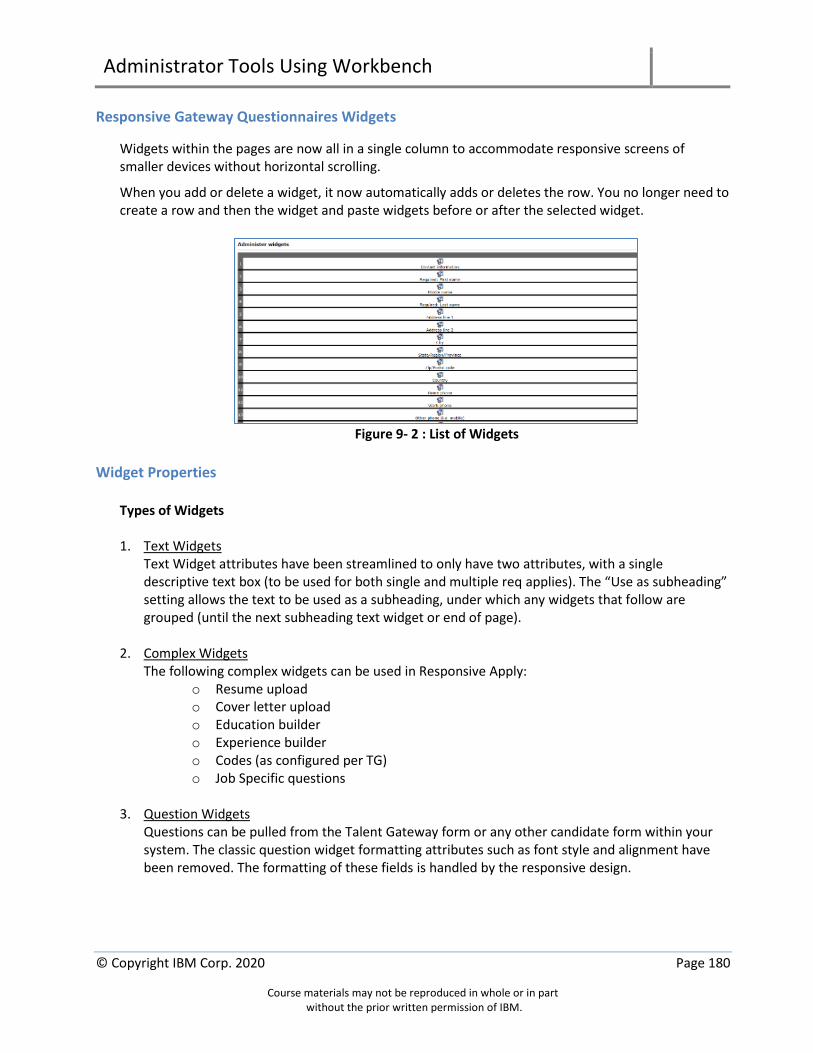
Administrator Tools Using Workbench
© Copyright IBM Corp. 2020 Page 180
Course materials may not be reproduced in whole or in part without the prior written permission of IBM.
Responsive Gateway Questionnaires Widgets
Widgets within the pages are now all in a single column to accommodate responsive screens of smaller devices without horizontal scrolling.
When you add or delete a widget, it now automatically adds or deletes the row. You no longer need to create a row and then the widget and paste widgets before or after the selected widget.
Figure 9- 2 : List of Widgets
Widget Properties
Types of Widgets 1. Text Widgets
Text Widget attributes have been streamlined to only have two attributes, with a single descriptive text box (to be used for both single and multiple req applies). The “Use as subheading” setting allows the text to be used as a subheading, under which any widgets that follow are grouped (until the next subheading text widget or end of page).
2. Complex Widgets The following complex widgets can be used in Responsive Apply:
o Resume upload o Cover letter upload o Education builder o Experience builder o Codes (as configured per TG) o Job Specific questions
3. Question Widgets
Questions can be pulled from the Talent Gateway form or any other candidate form within your system. The classic question widget formatting attributes such as font style and alignment have been removed. The formatting of these fields is handled by the responsive design.

Administrator Tools Using Workbench
© Copyright IBM Corp. 2020 Page 181
Course materials may not be reproduced in whole or in part without the prior written permission of IBM.
4. Attachment Widgets The attachment widget can now be added to the responsive apply gateway questionnaire to allow candidates to upload and attach documents to their application. Only one attachment widget is allowed per page, but you can configure multiple categories within an attachment widget and can have multiple Attachment Widgets per Gateway Questionnaire.
Additional Widget Settings
The scoring, knockout, and branching function are all configured on the Widget properties page for the Question widgets. The Disable pre-fill setting is hidden for candidate contact field. In classic GQs, you might disable the pre-filling of fields with responses from prior applications for any question widget, including contact fields. In Responsive Apply, you can disable pre-filling for candidate form questions only. This restriction improves the candidate experience by pre-filling more of the candidate’s information from their current application.
Things to consider when using Responsive Gateway Questionnaires (GQs):
• Standard sections/pages can have different names. Since BrassRing users only see the section titles, and candidates only see page titles in the candidate experience; keep the names the same to minimize confusion.
• The “Introduction/Start Your Application” section/page MUST be the first section/page of the Responsive Gateway Questionnaire.
• The “Estimate time to complete” field on the “Start Your Application” page sets the time estimate that the candidate sees before they start filling out their application. Leave this field blank to have the system calculate the estimate time using an advanced algorithm based on the number and type of questions and widgets in the application. You can also enter your own estimate manually, should you prefer that method.
• The Review page is where the candidate can edit and review their responses before submitting their application. There is no configuration needed on this page.
• The Application Complete page:
o Is the confirmation page that lets the candidates know their application has been successfully submitted.
o The text on this page can be customized. o Select the “show TG HR Status link (“View your status”)” setting if you want your
candidates to be able to go directly to the submission check page. o Select the “show TG Search link (“Start a new search”)” setting if you want your
candidates to be able to return to the Welcome/Search page to start a new job search.
• Responsive Gateway Questionnaires are limited to one knockout page/message for the entire GQ.

Administrator Tools Using Workbench
© Copyright IBM Corp. 2020 Page 182
Course materials may not be reproduced in whole or in part without the prior written permission of IBM.
Branching Configuration 1. Add all questions that might be branching questions or questions that will need to be shown as a
result of a selection to the page.
2. In the widget properties page for the ‘parent’ question choose the fields that will show based on the option selected. Select “Branch” for the option you want to show the branched fields, then under the “Show branched fields” section select the fields you want to be visible if the option is selected. Note: The ‘child’ fields must follow the ‘parent’ field on page to show in the branched fields section. The Show branched fields section will auto-complete as you type. Fields shown are the database field names, therefore, it is important to know which field you are selecting.
Figure 9- 3 : Edit Widget Properties
Branching Question Rules • You can branch only from question to question – you cannot branch to a text widget. However, to
display variable text, you can create a label for that text in the candidate form, and branch to that label – and the corresponding text.
• Branching must be linear. You cannot branch to a widget that precedes the question widget in the widget order. Thus, if you select the first widget on the page, you can choose to branch to any of the following fields on the page. If you select the last widget on the page, no fields will be available to branch to.
• A child field cannot be re-used on the same page as the branched-to field is being used on the page already for a different widget.
• You can branch across forms, as long as the fields are pulled on to one GQ page. • Classic GQ page-level branching is not inherited when you create a responsive GQ. Branching must
be re-configured. • To remove branches, select the X in the branch label tag.

Administrator Tools Using Workbench
© Copyright IBM Corp. 2020 Page 183
Course materials may not be reproduced in whole or in part without the prior written permission of IBM.
Figure 9- 4 : GQ Question Branching
Moving to Responsive Gateway Questionnaires (GQs)
The following consideration steps should be followed when your organization is new to using responsive GQs function: 1. Determine how many Responsive GQs you will need. This might be based on:
a. The number of Responsive Talent Gateways you have. (One GQ per TG) b. The number of different application workflows you have. (One GQ per Job
Family/Position) c. The number of countries your organization operates in. (One GQ per country.)
2. Map out your application process/flow. Most organizations that have not used GQs in the past will typically implement one GQ per TG. Examples: Internal, External.
3. In Workbench, go to Tools > Gateway Questionnaires > Add new Gateway Questionnaire > Name your GQ (we recommend you use versioning such as “External v1”) > Set your other GQ properties > Save.
4. The four standard responsive sections will automatically be visible. Next, add the Sections, Pages, and Widgets that will make up your application process.
5. Activate the Responsive Gateway Questionnaire. 6. While posting your requisitions to the Responsive Talent Gateway, be sure to select your
Responsive Gateway Questionnaire. To make sure a Gateway Questionnaire is selected at the time of posting the req, your organization might want to enable the Talent Gateway setting of “Do not allow posting without GQ selected”. To do this, go to Tools > Talent Gateway > Edit the Talent Gateway (for which you would like to enable the setting), then scroll to the bottom and enable the setting “Do not allow posting without GQ selected”, click Save.
The following consideration steps should be followed if your organization is already using the GQs: 1. In Workbench, go to Tools > Gateway Questionnaires > Click the Active tab > Select the Classic GQ
you’d like to turn into a responsive GQ > “Save Gateway Questionnaire as New” > Name your GQ and make sure the “Responsive” setting is selected > Click OK
2. The four standard responsive sections will automatically be added to your existing GQ sections. Some reconfiguration might be required to ensure your application process flows properly.
3. Pages have been updated to the 1 column format which might require you to re-configure the order of your questions.
4. Branching and knock-out questions will have to be reconfigured.

Administrator Tools Using Workbench
© Copyright IBM Corp. 2020 Page 184
Course materials may not be reproduced in whole or in part without the prior written permission of IBM.
5. Text throughout the Gateway Questionnaire should be re-reviewed. 6. Activate the Responsive Gateway Questionnaire 7. Select your existing Classic Gateway Questionnaire > Click “Update Gateway Questionnaire
associations” > Select your new Responsive Gateway Questionnaire > Inactivate the old/classic GQ.
Update Existing Questionnaire Associations
After you activate a Gateway Questionnaire, you must explicitly select your newly activated GQ as a replacement GQ, and associate it with past submissions. To update Gateway Questionnaire associations:
1. Activate GQ you created from the Draft Gateway Questionnaire page. Once activated, it is
listed on the Active Gateway Questionnaire page. 2. On the Active Gateway Questionnaire page, click Update Gateway Questionnaire
associations. 3. In the Update Gateway Questionnaire associations window, select the new/updated GQ in
the Replacement drop-down list. That list includes active GQs with the same translations (or active “Create forms only” GQs if you are associating a GQ of that special type, which requires custom configuration).
4. Click Save. The GQ associations are updated (as long as no error condition exists).
Adding a new Section to the Standard Section of a Gateway Questionnaire
Gateway Questionnaires are divided into sections. Each section should be a logical breakout of the type of information requested from and/or given to the candidate. Sections contain pages. Each section has a plus (+) sign or minus (-) sign next to it. When clicked, the plus (+) sign expands the sections view, showing the pages it contains. Clicking the minus (-) sign hides the pages a section contains.
To add a section to a Gateway Questionnaire:
1. Navigate to Tools > Gateway Questionnaires. 2. Click the Administer section/pages icon for the Gateway Questionnaire you want to
administer. 3. The Section and page list screen appears. 4. Click the Add new section link in the Actions list. 5. The General tab of the section screen appears. Enter the name of the section in the
Section name field. 6. Click the Save button. Click Close. 7. Repeat steps 1-6 for as additional sections you might need to add to the Gateway
Questionnaire.

Administrator Tools Using Workbench
© Copyright IBM Corp. 2020 Page 185
Course materials may not be reproduced in whole or in part without the prior written permission of IBM.
Add a page to a section
After you have added a section to your Gateway Questionnaire, you can add pages to the section. To add a page to a section: 1. Navigate to Tools > Gateway Questionnaires. 2. Click the Administer section/pages icon for the GQ you want to administer. 3. The Section and page list screen appears. 4. In the Section/Page column, highlight the section you are adding a page to. 5. Click Add new page in the Actions list. Note: If pages already exist in that section and you
click a page and then click Add new page, the new page will be added after the highlighted page.
6. On the Page Properties page, enter a Page name. 7. If applicable, click the plus (+) sign to add translations of the Page name. 8. Click the Save button. Click Close.
Administer widgets
After you have added pages to your sections, you can add widgets to your pages.
To administer widgets (questions) on a page:
1. Navigate to Tools > Gateway Questionnaires. 2. Click the Administer section/pages icon for the Gateway Questionnaire you want to
administer. 3. The Section and page list screen appears. 4. Click the Administer widgets icon for the page you want to add widgets to. 5. The Administer widgets screen appears with one row. To add a new widget, click the
Add new widget button from the Actions list. 6. In the Widget properties screen, select the type of widget you want to add: Question,
Text, Attachments, or Complex Widget. The following table details all the possible fields for each type of widget. Note: The fields that display for each widget depends on the question selected.
Widget type Field Function details
Question Question Source A drop-down list to select from where to pull the question. Choices include Gateway form questions (default, the Talent Gateway candidate form), Contact information fields and candidate forms.
Question Question A drop-down list shows the questions to select. If Contact information fields is selected, the name of the field is Field.

Administrator Tools Using Workbench
© Copyright IBM Corp. 2020 Page 186
Course materials may not be reproduced in whole or in part without the prior written permission of IBM.
Question Custom Label Add the custom label here or click the Load labels from source button for the name of the question/field that appears blow the Question field. This field is optional.
Question Inherited / Required A radio button to select the type of question:
- Inherited: the question is only required if the underlying question is required on the candidate for you are pulling it from. This is the default.
- Required: The candidate must answer this question to continue regardless if it is required on the candidate form or not.
Question Scoring/Branching Table
This table only displays if the question can be scored (i.e., for single-select, multi-select, radio button, or check box question types). In this case, the Option and Score columns appear. If it is a branching question, then the Branch destination column also appears. In either case, there is a row for each field option.
The Option column lists each possible option (answers to the question).
The Score column lets the user define the score of the question, from 0-100. Notification thresholds are defined in BrassRing not at the Gateway Questionnaire level.
Question Option This controls the relative position of the label and the control and the orientation of radio buttons and check boxes. The options change depending on what type of question is asked.
Question Hide on GQ Select any options to be hidden on GQ.
Question Score Define the score of the question from 0-100.
Question Knockout Select Knockout, if based on the candidates response, he/she needs to be directed to a section that provides an explanation of why the application process ended.
Question Branch Select Branch for the option that will show the branched field.
Question Show branched fields (otherwise hidden)
Select the fields that will be visible for the option selected.
Question Disable pre-fill response
You can disable pre-filling responses for candidate form questions only.
Text Descriptive Text Add the text that needs to appear. If applicable, click the plus (+) sign to add translations
Text Use as subheading Select the checkbox if the text needs to appear as a subheading.

Administrator Tools Using Workbench
© Copyright IBM Corp. 2020 Page 187
Course materials may not be reproduced in whole or in part without the prior written permission of IBM.
Attachments Label Text Add the text to provide instructions when candidate adds attachments. If making changes to the default text, change the translation provided accordingly.
Attachments Categories Select the appropriate categories the candidate can assign for attachments.
Attachments Optional / Required Determine if uploading attachments is optional or required.
Complex Widget Label Text Enter instructions for the documents that need to be added. If changing the default text, make appropriate changes to the translation.
Complex Widget Type - Resume Upload - Cover letter Upload - Education builder
o Hide Graduation Year o Hide GPA
- Experience builder o Display Skills as Optional o Display Skills as Required o Hide Skills
- Codes (as configured in TG) o Instead of displaying a source code
question from a candidate form, use this widget to pull your source code table.
o The sources selected by the candidate are recorded in the Talent Record with other code details specific to the application.
- Job specific questions
Complex Widget Optional / Required Determine if Complex Widget is optional or required.
7. Click Save when you have added the widget. 8. Repeat the previous steps to add additional widgets to the page. 9. To edit an existing widget, either double-click the widget row or select the widget row
and click the Edit widget button in the Actions list. 10. You can use the Cut widget and Paste widget buttons in the Actions list to cut and
paste widgets you have already created. The Delete widget button deletes the selected widget.
11. When you completed adding widgets to the page, click the Preview page button in the Actions list to preview what the page will look like.
Save Gateway Questionnaire as new
To save an existing Gateway Questionnaire as a new Gateway Questionnaire:
1. Navigate to Tools > Gateway Questionnaires.
Administrator Tools Using Workbench
© Copyright IBM Corp. 2020 Page 188
Course materials may not be reproduced in whole or in part without the prior written permission of IBM.
2. The Gateway Questionnaires screen appears. 3. Select the radio button for the existing Gateway Questionnaire you want to copy. 4. Click Save Gateway Questionnaire as new in the Actions list. 5. In the pop-up, enter the name of the new Gateway Questionnaire. 6. Click OK.
Preview a Gateway Questionnaire
To preview a Gateway Questionnaire:
1. Navigate to Tools > Gateway Questionnaires. 2. The Gateway Questionnaires screen appears. 3. Click the Preview Gateway Questionnaire icon for the Gateway Questionnaire you want
to preview. 4. Select the Locale of the Gateway Questionnaire. 5. Click the Preview button.
Translate Gateway Questionnaire names
To translate Gateway Questionnaire names:
1. Navigate to Tools > Gateway Questionnaires. 2. The Gateway Questionnaires screen appears. 3. Click Translate Gateway Questionnaire names in the Actions list. 4. The Translate Gateway Questionnaire names screen appears. 5. Select the language in the drop-down that you want to enter translations for. 6. For each Gateway Questionnaire, enter in the translated name. 7. Repeat for as many languages as necessary. 8. When finished, click the Save button.
Activate a Gateway Questionnaire
To activate a Gateway Questionnaire:
1. Navigate to Tools > Gateway Questionnaires. 2. The Gateway Questionnaires screen appears. 3. Select the Gateway Questionnaires to activate. 4. Click Activate Gateway Questionnaire in the Actions list. 5. The pop-up displays, running the activation process for the Gateway Questionnaire,
periodically refreshing its status. 6. When the Gateway Questionnaire has been activated, click Close.

Administrator Tools Using Workbench
© Copyright IBM Corp. 2020 Page 189
Course materials may not be reproduced in whole or in part without the prior written permission of IBM.
If more than 5,000 widgets are added to a Gateways Questionnaire a warning displays stating: This Gateway Questionnaire contains more than 500 widgets. Activation of such GQs might be delayed or may even fail. If in case you encounter any issues, please consider reducing the number of widgets or reach out to your IBM support personnel. If more than 50,000 options are added to a Widget on a Gateway Questionnaire a warning displays stating: This Gateway Questionnaire has at least one widget with more than 50K options. Activation of such GQs might be delayed or may even fail. If in case you encounter any issues, please consider reducing the number of options on the widgets or reach out to your IBM support personnel.
Update Gateway Questionnaire Associations
If you created a new version of a Gateway Questionnaire, and after you activate this Gateway Questionnaire, you must explicitly select your newly activated Gateway Questionnaire as a replacement Gateway Questionnaire and associate it with past submission. To update Gateway Questionnaire associations:
1. Activate the GQ that you created from the Draft Gateway Questionnaire page. After activation, it is listed on the Active Gateway Questionnaire page.
2. On the Active Gateway Questionnaire page, click Update Gateway Questionnaire associations.
3. In the Update Gateway Questionnaire associations window, select the new/updated GQ from the Replacement list. The replacement list includes activate GQs with the same translations (or activate Create forms only GQs if you are associating a GQ of that special type, which requires custom configuration).
4. Click Save. The GQ associations are updated (if no error condition exists).
Inactivate a Gateway Questionnaire
To inactivate a Gateway Questionnaire:
1. Navigate to Tools > Gateway Questionnaires. 2. The Gateway Questionnaires screen appears. 3. Click the Active link above the list of Gateway Questionnaires. 4. Select the Gateway Questionnaire to inactivate. 5. From the Actions list, click Inactivate Gateway Questionnaires.

Administrator Tools Using Workbench
© Copyright IBM Corp. 2020 Page 190
Course materials may not be reproduced in whole or in part without the prior written permission of IBM.
Delete a Draft Gateway Questionnaire
To delete a Draft Gateway Questionnaire:
1. Navigate to Tools > Gateway Questionnaires. 2. The Gateway Questionnaires screen appears. 3. Select the draft Gateway Questionnaires to delete. 4. Click Delete Gateway Questionnaire in the Actions list. 5. Click OK to delete the Gateway Questionnaire.
YOU DO NOT HAVE THE ABILITY TO EDIT AN ACTIVE GQ. YOU MUST SAVE THE GQ AS NEW AND THEN MAKE
CHANGES. BEST PRACTICE IS TO USE VERSIONS IN THE NAME OF THE GQ TO IDENTIFY WHICH IS THE MOST
CURRENT ONE. AFTER YOU SAVE THE NEW VERSION OF THE GQ, INACTIVATE THE OLDER VERSION.
Chapter Summary
• Gateway Questionnaires are online applications that support question branching and knockout questions. They consist of sections and pages that determine how questions are sequenced and grouped.
• As a Workbench Administrator you can add and activate Gateway Questionnaires.
• You can add a section to a Gateway Questionnaire.
• You can add a page to a Gateway Questionnaire.
• After you have added pages to your sections, you can add widgets to your pages.
• You can copy a Gateway Questionnaire by using the ‘Save as new’ functionality.
• While you create new Gateway Questionnaires, you can preview a Gateway Questionnaire within Workbench.
• You can translate Gateway Questionnaire Titles.
• You can delete a Gateway Questionnaire in draft mode.

Administrator Tools Using Workbench
© Copyright IBM Corp. 2020 Page 191
Course materials may not be reproduced in whole or in part without the prior written permission of IBM.
Check Your Skills
Answer these True or False questions:
1. Once you create a Gateway Questionnaire, it is automatically active.
2. You can delete an active Gateway Questionnaires. 3. You can edit active Gateway Questionnaires. 4. Cover letter upload is a complex widget.

Administrator Tools Using Workbench
© Copyright IBM Corp. 2020 Page 192
Course materials may not be reproduced in whole or in part without the prior written permission of IBM.
Chapter 10: Automation
Chapter Overview
Automation Manager is a self-service utility for triggering the automatic polling of the system for different types of req and candidate activity, compiling the information, and sending automatic notifications to a designated list of recipients.
Chapter Objectives
At the end of this chapter, you should be able to:
• Configure Automation Manager triggers
• Configure Rules Automation (RAM) triggers
• Administer the triggers
• Understand all trigger types

Administrator Tools Using Workbench
© Copyright IBM Corp. 2020 Page 193
Course materials may not be reproduced in whole or in part without the prior written permission of IBM.
Overview of Automation Manager You can automate the timely gathering of data on HR and req statuses and other events, such as posting expirations and Talent Records sent and viewed, and send that data automatically to a list of recipients, representing a significant gain in efficiency.
Trigger Types
Table 10- 1 below is a list of active trigger types and a description of each:
Trigger Type Description
Evergreen Req – Candidate Archive
This trigger will move candidates meeting the selection criteria from the requisition folder into the associated archive folder.
Gateway Posting Expire
This notification trigger sends the designated internal users an email message to notify of expiring Gateway postings. This trigger applies to Open requisitions only and for BrassRing Gateways including Agency and Global gateways. External postings through the Community Gateway or posting partners are not monitored with this trigger. This trigger runs once daily, sending notices at 6:00 a.m. EST.
RAM A RAM (Rules Automation Manager) trigger allows you to evaluate complex conditions and perform actions based on those conditions as candidates either enter an HR status or when a candidate form is either inserted or updated. (Refer to Rules Automation Manager section which can be found later in this chapter).
Table 10- 1: Trigger types and description
Table 10- 2 below is a list of retired trigger types and a description of each:
Trigger Type Description
Candidate HR Status – Send Talent Record (Retired)
This notification trigger sends a candidate’s Talent Record to designated internal users based on a change to a configured HR status. The trigger uses existing eLink function and can be configured to include forms to view or complete. This trigger runs daily at regular intervals throughout the day, at least once/hour.

Administrator Tools Using Workbench
© Copyright IBM Corp. 2020 Page 194
Course materials may not be reproduced in whole or in part without the prior written permission of IBM.
Trigger Type Description
Candidate HR Status Aging (Retired)
This notification trigger sends the designated internal users an email message to notify of candidates sitting idle in a starting or intermediate HR status. The merge fields for this trigger are configured within Automation Manager and appear in an HTML table below the configured email template’s message. The trigger can be configured for various aging periods, applies to candidates in req folders for Open or On Hold requisitions, and runs once daily, sending notices at 6:00 a.m. EST.
HR Status Update – Notify Candidate (Retired)
This notification trigger sends the candidate an email message based on changes to his/her HR status within a req folder. This trigger’s notification is configured within the BrassRing email template module with all existing email merge fields available. This trigger runs daily at regular intervals throughout the day, at least once/hour.
Req Aging (Retired)
This notification trigger sends the designated internal users an email message to notify of requisitions that are over the designated time periods. The merge fields for this trigger are configured within Automation Manager and appear in an HTML table below the configured email template’s message. The trigger can be configured for various aging periods and should be configured for time periods outside the normal requisition age. This trigger runs once daily, sending notices at 6:00 a.m. EST.
Talent Record Viewed – Update HR Status (Retired)
This automation trigger updates a candidate’s HR status to a designated start status when the Talent Record is viewed/opened. This trigger runs daily at regular intervals throughout the day, at least once/hour and applies to requisitions that are Open or On Hold.
Table 10- 2: Trigger types and description
Things to consider when using Automation Manager:
- Determine which triggers would work best with your business processes. - Make sure email templates are configured for use as templates for automated
notifications. - Automation Manager triggers take effect on new reqs going forward.

Administrator Tools Using Workbench
© Copyright IBM Corp. 2020 Page 195
Course materials may not be reproduced in whole or in part without the prior written permission of IBM.
Adding a new Automation Manager trigger:
To add a new trigger:
1. Select Tools > Automation Manager > Admin. 2. Click Add new trigger in the Actions list. 3. The Add Automation Trigger window appears displays with the Trigger type tab as the
only tab being displayed. 4. Enter an informative name in the Trigger Name field. The trigger name can be up to 255
characters. The Trigger name should be unique with respect to all pre-existing triggers (active, drafts, inactive).
5. Select the Trigger Type for the trigger you are adding. (For instructions on adding a RAM trigger type, please refer to the Rules Automation Manager section which can be found later in this chapter).
6. Click Save and continue. 7. The Add Automation Trigger window redisplays with additional tabs appropriate to the
Trigger type you are configuring. 8. Configure the settings on each tab. Each of the tabs is listed below. The fields within each
tab are listed in the chart, along with a screen capture of the tab.
A TRIGGER IS SET UP AS A DRAFT FIRST, THEN THE TRIGGER MUST BE ACTIVATED.
Configuring the Trigger Attributes Tab
- The below figure is a screen capture of the Trigger attributes tab for one of the trigger types. It does not display every field that will appear on the Trigger Attributes tab.
Figure 10- 3 : Configuring the trigger attribute

Administrator Tools Using Workbench
© Copyright IBM Corp. 2020 Page 196
Course materials may not be reproduced in whole or in part without the prior written permission of IBM.
THE BELOW CHART DISPLAYS ALL THE FIELDS THAT WILL DISPLAY ON THE TRIGGER
ATTRIBUTES TAB.
Field Description
Select Candidate Type Select the specific candidate types to apply the trigger to. You can select one or more specific candidate types from the list of active types. When you select All, the system associates all the client’s active candidate types to the trigger, excluding the “Erased” Candidate type.
Select Gateway Select one or more Talent Gateways for this trigger to poll. All selects all your organization’s Talent Gateways. The inactive Gateways are at the bottom of the list following all active agencies and Gateways (they are labeled Inactive).
Set Trigger for Req Templates: Select the req templates which are used for the notifications generated by this automated trigger. The default is All, which applies the trigger to all req templates. The inactive templates are at the bottom of the multi-select list.
Configuring the Notification Tab
- The Configure Notification tab determines the languages, email template, recipient list, and the aging time period.
- The below figure is a screen capture of the Configure Notification tab for one of the trigger types. It does not display every field that will appear on the tab.
Figure 10- 4 : Configuring notifications
THE FOLLOWING CHART DISPLAYS ALL THE FIELDS THAT WILL DISPLAY ON THE CONFIGURE NOTIFICATION TAB.

Administrator Tools Using Workbench
© Copyright IBM Corp. 2020 Page 197
Course materials may not be reproduced in whole or in part without the prior written permission of IBM.
Field Description
Select Notification Template
Select the templates created specifically for notifications for your base language and/or for each purchased locale. Templates available from each drop-down list were configured in BrassRing as Auto Send or Auto & Manual send. Note: If this tab contains the field Select merge fields for notification message, it means you cannot use email templates containing merge tokens/fields with the automation trigger type. If the field Select merge fields for notification message is not listed on the Configure Notification tab, you are able to select an email template containing merge tokens/fields. To see the template for a language, click the associated Preview button.
Select Merge Fields for Notification Template
This field is required. Use this field to add merge tokens into your notification message for this trigger type. Select up to seven (7) merge fields for the notification message. The req merge fields selected here are converted to the appropriate content when the notification is generated. Their rendered content displays below your organization’s custom message configured in the email template for this notification. The req tokens available for selection are all req field tokens across all templates, except for those associated with encrypted fields and text area fields. Note: If a selected req token’s field type is changed to encrypted or text area after the trigger is configured, the token will no longer display a value in the notification messages.
Select designated HR Status
Select the HR Status that needs to be assigned once talent record was viewed.
Action to be taken for HR Status with an associated pop up form
Indicate what action to take with the pop up form associated with HR Status by selecting on of the following options: Ignore pop up form or Send to user in an elink.
Select Days Before Expiration
Select how many days before the expiration of posting that the notification should be sent out. 0 to 10 days (no option is selected by default.) Example: If you select 0, the notification is sent on the day the posting expires.
Configure Notification Scheduler Tab
- The Notification Scheduler tab determines how often the trigger will run and check for instances that have met the defined gaining parameters
- The below figure is a screen capture of the Notification Scheduler tab. It does not display every field that will appear on the tab

Administrator Tools Using Workbench
© Copyright IBM Corp. 2020 Page 198
Course materials may not be reproduced in whole or in part without the prior written permission of IBM.
Figure 10- 5 : Configuring Notification Scheduler
THE BELOW CHART DISPLAYS ALL THE FIELDS THAT WILL DISPLAY ON THE NOTIFICATION SCHEDULER TAB.
Fields Description
Run Trigger Recurrence
Identifies the schedule of when the notification will be sent to the list of recipients. It also determines how often the trigger is checked by the system.
Weekly: Run trigger check every [1, 2, 3, 4] week s on the days selected. You can select multiple days in any combination. When the trigger runs, it sends notifications on the selected days. It includes all req aging information since the last time the trigger ran.
Monthly: Run trigger check every day [1 – 31] or the [First, Second, Third, or Fourth, Last] or [Sunday, Monday, Tuesday, Wednesday, Thursday, Friday, Saturday, Day, Weekday, Weekend day] in the months selected. If you select day 29, 30, or 31 as the day to run the trigger, Automation Manager defaults to the last day of the month for months without that many days in them (February, April, June, November, Leap year, and so forth). When a trigger runs monthly, it sends notifications on the selected days/months and includes all req aging information since the last time the trigger ran.
WHEN CREATING A TRIGGER, THE TRIGGER IS SETUP AS A DRAFT FIRST. THEN, THE TRIGGER MUST BE
ACTIVATED.

Administrator Tools Using Workbench
© Copyright IBM Corp. 2020 Page 199
Course materials may not be reproduced in whole or in part without the prior written permission of IBM.
Activating an Automation Manager Trigger that is a Draft
To activate a trigger that is currently a draft:
1. Select Tools > Automation Manager > Admin. 2. The Triggers page displays. 3. Locate view on the Triggers page (Hint: View is next to the green plus sign). Select the
Draft triggers option. 4. The Triggers page updates, and a list of the triggers in draft version appear. Select the
trigger you would like to activate. 5. Click Activate trigger in the Actions list.
Clone an Existing Automation Manager Trigger (Save As New)
By using the Save trigger as new action, you can easily clone an existing trigger that has configured attributes that are similar to the new trigger you want to create. Automation Manager opens the Edit window for the trigger you are cloning. As with all triggers, you must enter a unique name for the cloned trigger. You can also change the configuration for other attributes of the trigger. To clone an existing trigger:
1. Select Tools > Automation Manager > Admin. 2. The Triggers page displays. 3. Select the trigger in the Triggers grid that you want to clone (make a copy of and edit). 4. Click Save trigger as new in the Actions list. 5. The Edit Automation Trigger window displays with all tabs for the existing trigger you are
saving as new. 6. Enter an informative name for the new trigger. 7. Click Save and continue. 8. The Trigger type tab in the Add Automation Trigger window redisplays with the new
trigger name. Each remaining tab is populated with the settings from the trigger you are cloning.
9. Configure the settings on each tab. 10. Click Save when you are finished configuring settings for the tab. 11. The new automated trigger is added to the Trigger grid on the Triggers page.
View Automation Manager Trigger Details
To view the details for a trigger:
1. Select Tools > Automation Manager > Admin. 2. Locate the trigger that you want to view details for on the Active triggers, Draft triggers, or
Inactive triggers view pages. 3. Select the trigger’s radio button.

Administrator Tools Using Workbench
© Copyright IBM Corp. 2020 Page 200
Course materials may not be reproduced in whole or in part without the prior written permission of IBM.
4. Click View trigger details in the Actions list. 5. The View trigger details window opens for that trigger. 6. When you are finished viewing the trigger details, click Close. You return to the Triggers
page.
Edit an Automation Manager Trigger
To edit an existing trigger:
1. Select Tools > Automation Manager > Admin. 2. The Triggers page displays. 3. Select the trigger in the Triggers grid that you want to edit. 4. Click Edit trigger in the Actions list. 5. The Edit Automation Trigger window displays with all tabs for the existing trigger you are
editing. 6. Edit the settings. 7. Click Save when you are finished editing settings for each tab. 8. To restore the settings saved most recently, click Reset to saved. 9. To exit without saving your changes, click Cancel.
Inactivating an Automation Manager Trigger To inactivate a trigger:
1. Select Tools > Automation Manager > Admin. 2. The Triggers page displays. 3. Locate the trigger on the Triggers page (Active view), and click Inactivate. 4. The Triggers page updates. The de-activated trigger is removed from the Active triggers
page view and added to the list of inactive triggers on the Inactive triggers page.
Deleting an Automation Manager Trigger
This option is available only for triggers in Draft status. You might delete a trigger in Draft status if it is no longer needed. However, it is recommended inactivating rather than deleting the trigger. Consult with your IBM Representative if you have any questions.
To delete a trigger:
1. Select Tools > Automation Manager > Admin. 2. Locate the trigger on the Triggers page (Draft view), and click Delete trigger under the
Actions menu. 3. A confirmation message will appear asking you to confirm if you would like to delete the
trigger. 4. Click OK.

Administrator Tools Using Workbench
© Copyright IBM Corp. 2020 Page 201
Course materials may not be reproduced in whole or in part without the prior written permission of IBM.
Rules Automation Manager (RAM)
Rules Automation Manager (RAM) is quite flexible and can solve many business problems. RAM manages rules associated to an HR status update or form insert/update. Rules contain sets of conditions from which to check data and perform various actions based on the conditions being met. Actions include populating candidate form, req form, or Talent Record fields. They also include updating to a different HR status and/or sending communications. An example of a RAM trigger is the offer approval update, where the candidate’s HR status is automatically updated once the offer was approved. Components of a RAM trigger:
• Trigger (Triggering Mechanism, Trigger Event, Timing Mechanism, and Trigger Timing)
• Context
• Rules
• Conditions
• Actions
THE BELOW TABLE PROVIDES A DESCRIPTION OF EACH OF THE COMPONENTS OF A RAM.
Component Description
Triggering Mechanism
The event in BrassRing that will trigger the RAM to run. Examples include HR Status, Candidate Form insert or update, and Candidate Form Approval.
Trigger Event The Trigger Event is the specific HR status or form.
Timing Mechanism The Timing Mechanism allows you to configure the delay. You can select from three different types: Delayed Processing, Delayed Triggering & Aging will allow numeric values to be entered in hours. Delayed Processing (Field Value) will allow picking the delay in number of days from a numeric or single-select field.
Trigger Timing (hrs) A Trigger Timing can be set up for a trigger. The delay is applied to the entire trigger. When the trigger event occurs (ie., HR status is updated for candidate), a delay places the RAM trigger on hold for the specified duration. After the delay has elapsed, the trigger runs. At this time, the conditions are evaluated and actions are performed if the conditions are met. The value should be entered in hours (max. 4560). Decimal places are allowed.
Context The Trigger Context extends the scope of the trigger. There are four options: None/NA, Run Trigger Across Reqs, Run Trigger Across Candidates and Run Trigger to Pull Candidates. These are described in greater detail later in this chapter.
Rules A rule is composed of conditions and actions.
Conditions Conditions evaluate data in the system to produce a true/false result.
Actions Actions perform automation in the system when the conditions within the same rule are true.
Table 10-6: RAM Trigger Components Descriptions

Administrator Tools Using Workbench
© Copyright IBM Corp. 2020 Page 202
Course materials may not be reproduced in whole or in part without the prior written permission of IBM.
Things to consider when using Rules Automation Manager (RAM):
• Once you have configured your Rules Automation Manager (RAM) trigger, and it is ready to be tested, it can only be activated by your IBM Representative.
• Only one RAM trigger is allowed per triggering event. Different scenarios based on the same triggering event should be handled within the rules themselves. For example, if you require multiple actions to take place when a candidate is updated to a certain HR status, you must capture all of those actions within the same RAM trigger by using rules and conditions.
• RAM triggers run every minute. However, this is largely based on load at the time. Results will vary.
• Any HR status can be selected for actions. If selecting an HR status that does not follow the Closed tracking logic, then the action fails (ie. candidate is not updated). You can also choose to disobey Closed tracking logic in RAM. This is a client setting called “RAM Disobey Closed Tracking Logic”. When turned on, this allows the candidate to get updated to the HR status even when the HR status is outside of the Closed tracking logic setup. Consult with your IBM Representative regarding this setting.
• When you use the trigger for Req Edit followed by rules with conditions evaluating Req Form Fields Modified, configure a trigger timing of at least 30 minutes. This allows enough time for the data to be processed to evaluate both the old and new values.
• The list of conditions and actions available is driven based on the trigger mechanism, trigger event, and trigger context. Sometimes, req or candidate information cannot be used since the above configured items do not have req or candidate context. As an example, the Talent Gateway form is a multiple per candidate form not tied to a req. When using this form as the trigger, req conditions and actions are not allowed since the req is not in context. In addition, actions such as updating an HR status are not allowed, since the HR status update occurs within a req. Instead the trigger context attribute can be used, but it might produce undesired results.
Adding a RAM trigger:
1. Select Tools > Automation Manager > Admin. 2. Click Add new trigger in the Actions list. 3. Enter an informative name in the Trigger Name field. The trigger name can be up to 255
characters and should be unique with respect to all pre-existing triggers (active, drafts, inactive).
4. Select RAM Trigger for the list of Trigger Types. This will display a red alert message which will require you select I agree.
5. Click Save and continue. 6. Confirm the name of your RAM trigger, and select your triggering mechanism. The following
are the mechanisms currently available: a. Candidate Form Approval - When the candidate form is approved, this trigger runs. b. Candidate Form Insert - When the candidate form is first created, this trigger runs.

Administrator Tools Using Workbench
© Copyright IBM Corp. 2020 Page 203
Course materials may not be reproduced in whole or in part without the prior written permission of IBM.
c. Candidate Form Insert OR Update - When the candidate form is either first created OR updated at any time, this trigger runs. This option cannot be used in conjunction with the individual form insert or form update for the same form.
d. Candidate Form Update - When the candidate form is updated at any time, this trigger runs.
e. Document Subsidiary Form Insert - When the document subsidiary form is first created, this trigger runs.
f. Document Subsidiary Form Insert OR Update - When the document subsidiary form is either first created OR updated at any time, this trigger runs. This option cannot be used in conjunction with the individual form insert or form update for the same form.
g. Document Subsidiary Form Update - When the document subsidiary form is updated at any time, this trigger runs.
h. HR Status - When the candidate is assigned to specific HR status, this trigger runs. i. HR Status Req Options –
o When one candidate is updated to specific HR status, the trigger runs and allows rules to run on the entire req folder (all candidates within the req). This is used in conjunction with the Trigger Context selection of “Run trigger across candidates”, mostly for dispositioning candidates in the req.
o When using this trigger to disposition candidates, the client setting of “RAM – Allow HR status update for closed reqs in HR status req options trigger” should be enabled. This ensures that all candidates who meet the condition are dispositioned.
o The same HR status can be used for this trigger mechanism and the standard HR status trigger.
o The standard HR status trigger for a single candidate always precedes this new HR Status Req Options trigger.
o The candidate record that triggered this mechanism is excluded from the rules. To perform actions on the candidate record that triggered it, use the standard HR Status trigger mechanism.
j. Job Post – o When this mechanism is selected, the trigger event field will display all active req
templates. Users can select multiple req templates – maximum select allowed is 10. There is only one context ‘NA’. The trigger will have only req context.
k. Job Repost – o When this mechanism is selected, the trigger event field displays all active req
templates. Clients can select multiple req templates – maximum selection allowed is 10. There is only one context ‘NA’. The trigger will have only req context.
l. Job Unpost - o When the job is unposted from any Talent Gateway (excluding external job
boards), the trigger runs. This is used mainly in conjunction with the Trigger Context of Run trigger across candidates, which has the effect of running for all candidates within the req.
o To target a specific TG, a condition can be used to determine whether the job is still posted on that specific TG.
o If Trigger Context is None, then only req data is available for conditions and actions.

Administrator Tools Using Workbench
© Copyright IBM Corp. 2020 Page 204
Course materials may not be reproduced in whole or in part without the prior written permission of IBM.
o If Trigger Context is Run trigger across candidates, then all condition and action categories are available.
m. Lead Campaign Status – o When a Lead has been updated to a Status in a campaign, the trigger runs.
n. Lead Creation – o When a new Lead is created, the trigger runs.
o. Req Approved – o When a req is approved (meaning the final approver approved the req), the
trigger runs. This is mainly used to populate other req fields or send a communication.
o If Trigger Context is None, then only req data is available for conditions and actions.
o If Trigger Context is Run trigger across candidates, then all condition and action categories are available.
p. Req Cancelled – o When a req is cancelled, the trigger runs. This is mainly used to send a
communication. o If Trigger Context is None, then only req data is available for conditions and
actions. o If Trigger Context is Run trigger across candidates, then all condition and action
categories are available. q. Req Closed –
o When a req is closed, the trigger runs. This is mainly used to send a communication.
o If Trigger Context is None, then only req data is available for conditions and actions.
o If Trigger Context is Run trigger across candidates, then all condition and action categories are available. Note: limited function is available for req and candidates when the req is in a closed state.
r. Req Create – o When the req is saved for the first time, the trigger runs. This is mainly used to
populate other req fields or send a communication. o If Trigger Context is None, then only req data is available for conditions and
actions. o If Trigger Context is Run trigger across candidates, then all condition and action
categories are available. s. Req Declined -
o When a req is declined (meaning an approver declines approval), the trigger runs. This is mainly used to populate other req fields or send a communication.
o If Trigger Context is None, then only req data is available for conditions and actions.
o If Trigger Context is Run trigger across candidates, then all condition and action categories are available.
t. Req Deleted –
Administrator Tools Using Workbench
© Copyright IBM Corp. 2020 Page 205
Course materials may not be reproduced in whole or in part without the prior written permission of IBM.
o When a req is deleted, the trigger runs. This is mainly used to send a communication.
o If Trigger Context is None, then only req data is available for conditions and actions.
o If Trigger Context is Run trigger across candidates, then all condition and action categories are available.
u. Req Edit – o When the req is edited at any time, the trigger runs. Status updates are not
considered an edit. Only modifications to fields on the req are considered an edit. This is mainly used to populate other req fields or send a communication.
o If Trigger Context is None, then only req data is available for conditions and actions.
o If Trigger Context is Run trigger across candidates, then all condition and action categories are available.
v. Req Form Approval – o Identifies the user with whom the approval is pending and sends them an email
communication after a preset delay. o A req form approval link is added in the communication that is sent to the system
user whose approval is pending. w. Req on Hold –
o When a req is placed on hold, the trigger runs. This is mainly used to send a communication.
o If Trigger Context is None, then only req data is available for conditions and actions.
o If Trigger Context is Run trigger across candidates, then all condition and action categories are available.
x. Req Open – o When a req is opened, the trigger runs. This is mainly used to send a
communication or used in req disbursement pull scenarios. o If Trigger Context is None, then only req data is available for conditions and
actions. o If Trigger Context is Run trigger across candidates, then all condition and action
categories are available. o If Trigger Context is Run trigger to pull candidates, then all condition and action
categories are available. Note: See additional section in Other Notes in RAM User Guide.
y. Req Pending – o When a req is moved to pending, the trigger will run.
z. Req Subsidiary Form Approval – o When the req sub form is approved, the trigger runs. o If Trigger Context is None, then only req data is available for conditions and
actions. o If Trigger Context is Run trigger across candidates, then all condition and action
categories are available. aa. Req Subsidiary Form Insert –
o When the req sub form is first created, this trigger runs.

Administrator Tools Using Workbench
© Copyright IBM Corp. 2020 Page 206
Course materials may not be reproduced in whole or in part without the prior written permission of IBM.
o If Trigger Context is None, then only req data is available for conditions and actions.
o If Trigger Context is Run trigger across candidates, then all condition and action categories are available.
bb. Req Subsidiary Form Insert or Update – o When the req sub form is either first created OR updated at any time, this trigger
runs. This option cannot be used in conjunction with the individual form insert or form update for the same form.
o If Trigger Context is None, then only req data is available for conditions and actions.
o If Trigger Context is Run trigger across candidates, then all condition and action categories are available.
cc. Req Subsidiary Form Update – o When the req sub form is updated at any time, this trigger runs. o If Trigger Context is None, then only req data is available for conditions and
actions. o If Trigger Context is Run trigger across candidates, then all condition and action
categories are available. dd. Talent Record Viewed –
o When this triggering mechanism is selected, the Trigger Event field displays all of the active req templates. Workbench Admins can select multiple req templates.
o When saved and activated, this trigger picks up the events from a backend database each time a candidate’s BrassRing Talent Record is viewed from any of the selected req templates.
o Note that the req must be in an Open or On hold status for the trigger to fire. This is an implicit check performed by RAM and does not require a condition to be built into the trigger.
o Since req and candidate context is available, all conditions and actions are available for this trigger mechanism. The Timing Mechanisms that are supported by this trigger are: Delayed Triggering and Aging.
Figure 10- 7 : Adding a RAM Trigger

Administrator Tools Using Workbench
© Copyright IBM Corp. 2020 Page 207
Course materials may not be reproduced in whole or in part without the prior written permission of IBM.
7. Select the Trigger Event. 8. Select the Timing Mechanism.
a. Delayed Processing This mechanism is used commonly for triggers where there is no delay period required and if the action has to be taken instantly. With this mechanism the trigger is fired and queued up for processing after the delay time has elapsed. It can accept a delay; however, it is suggested to use this mechanism only if the delay period is less than 1 hour as it accepts decimal values. The maximum delay value accepted is 190 days or 4560 hours. Multiple triggers cannot be configured triggering event/item. Example: Send a communication when a candidate’s HR status is updated to “Interview Scheduled”.
b. Delayed Triggering This mechanism should be used when there is a delay required for action. With this timing mechanism, RAM will wait for the delay time to elapse after the event has occurred and then fires the trigger. Thus, the trigger will be fired and executed at the same time. It accepts minimum delay of 1 hour (integer values only and no decimals are accepted) and there is no maximum limit of the delay period. Multiple triggers can be setup using the same trigger event, but different values for “Trigger timing (hrs)” is required. The benefit of this triggering mechanism is that it can be stopped by inactivating the trigger when processing delay will still process the triggers that have been fired. It will also be retro-active as it will fire based on an event that happened in the past. This will also prevent having triggers in the RAM search log with the 'In progress trigger” status. Example: Send a survey communication 3 months after candidate accepted an offer.
c. Aging This mechanism is commonly used for reminders or aging actions. With this mechanism, RAM will check if the triggering event is the same after the delay period has expired. It will only fire on candidates (or reqs) that are still in a specific HR Status (or stage). This means that instead of having a trigger run for all candidates, it will only run for the candidates who need to be reminded. This will help reduce the number of inefficient triggers that run (success with no action). It will accept the minimum delay of 1 hour (integer value only & no decimals accepted) and there is no maximum limit of delay period. Multiple triggers can be setup using the same trigger event, but different values for “Trigger timin (hrs)” is required. Example: Send an assessment reminder notification after 15 days once the HR status is updated to “Assessment Pending”.
d. Delayed Processing (Field Value) The delayed processing (field value) is similar to delayed processing where instead of a static delay the trigger's delay is based on a form field from the following forms: req forms, candidate forms, and req sub form. The RAM trigger will be fired and it will be processed after the delay has elapsed. Only numeric or single-select field types can be used. The numeric value only supports whole numbers which represent amount of days (NOT hours). The maximum value allowed is 190 days. Example: Send a disposition notification to candidate after X days. Here the value X is selected from the disposition form of the candidate.
9. Indicate the Trigger Timing (in hours). The default is 0.

Administrator Tools Using Workbench
© Copyright IBM Corp. 2020 Page 208
Course materials may not be reproduced in whole or in part without the prior written permission of IBM.
10. Select the Trigger Context (Figure 10-5). The options available are dependent on the triggering mechanism and/or Trigger Event that you selected. The four options are:
a. None/NA o These options mean the Trigger Context is either not available for the Trigger
Mechanism used, or the scope of the trigger does not need to be expanded beyond the simple trigger mechanism that occurred. For example, if Req Edit is used as the Trigger Mechanism, and the goal is to send a communication to the Recruiter on the req, then no additional Trigger Context is needed, since the conditions and actions only need req data. No candidate actions are needed.
b. Run Trigger Across Reqs o This option is available to handle circumstances when a single/candidate or
multiple/candidate form is selected as the Trigger Event. When these types of forms are selected, a req is not in context. Therefore, req related conditions and actions cannot be used.
o In the case where req data is still needed, the setting runs the trigger across all reqs in which the candidate is filed to get req context. This might result in multiple actions being taken and produces undesirable results. Example: When you configure an action to send communication when a single/candidate form is created, and this setting is used, a communication is sent out for each req to which the candidate is filed. If the candidate is currently in three reqs, three communications are sent.
o In most cases, this setting should not be used. This setting is disabled if the Trigger Event is not a single/candidate or multiple/candidate form.
c. Run Trigger Across Candidates o This option is available to handle triggers where the trigger should be run across
all candidates within the req. A common example is dispositioning of all candidates. It is used in conjunction with the Trigger Mechanism of HR Status Req Options, Job Unpost, Req Create, Req Edit, and Req Subsidiary Form Approval/Insert/Update.
d. Run Trigger to Pull Candidates o This option is available only for trigger mechanisms of Req Open and is strictly
used in Evergreen req scenarios to pull candidates from Evergreen reqs.
Figure 10- 8: Trigger Context
11. Click Add Rules to begin building your rules (conditions and actions). When you are finished,
click Save.

Administrator Tools Using Workbench
© Copyright IBM Corp. 2020 Page 209
Course materials may not be reproduced in whole or in part without the prior written permission of IBM.
Creating Rules
For a given trigger, an unlimited number of rules can be configured. The intention is to allow for different logic to run in each rule, producing a different set of actions and result. However, if you plan on creating more than 50 rules or 50 actions within a rule, please follow up with your IBM Representative prior to trigger creation to ensure your configuration is appropriate. If you ignore this threshold, and the trigger causes performance problems, the trigger will be automatically disabled. A warning message will appear when adding a new trigger.
Click the Add Rule button to add new rules to the trigger.
Existing rules configured are displayed in row format. Each rule can be edited and deleted. Furthermore, click the rule name to view the logic currently defined for the rule.
Figure 10- 9 : Creating Rules
Sequencing Rules
The rules run in sequence. Depending on the logic needed within the trigger, the sequencing might or might not be important. In most cases, however, the order is important to produce the business logic within the trigger. To change the order in which the rules run, use the black positioning arrows on the screen to move them up or down. Should a given rule execute an action of HR status update, the entire trigger exits and no additional rules are run. Keep this in mind while configuring and sequencing rules.
Conditions
A rule is composed of conditions and actions. Conditions evaluate data in the system to produce a true/false result. Actions perform automation in the system when those conditions are true. When clicking Add Rule or Edit for an existing rule, the following screen displays. The Conditions tab displays by default.

Administrator Tools Using Workbench
© Copyright IBM Corp. 2020 Page 210
Course materials may not be reproduced in whole or in part without the prior written permission of IBM.
Figure 10- 10 : Configure Conditions
Category
To create a new condition, select a category. There are many condition categories to choose from. Selection of the category refines additional selections needed to specify the condition. Keep in mind that the list of categories might change depending on the Trigger Mechanism and Trigger Context selected. In cases where there is no candidate in context, all candidate conditions are hidden. In cases where there is no req in context, all req conditions are hidden. The available categories and general use are as follows:
1. Candidate forms
• Allows selection of candidate form fields. 2. Candidate proximity
• Allows evaluating a candidate’s proximity to the req.
• Compares the candidate zip or city with the req proximity zip or city.
• Operations used are Within and Not Within. Example: Within 50 miles, perform an action.
3. Candidate tier visible
• This option allows evaluating whether or not the candidate was in a tier that was visible for the req. All child options are disabled when this category is selected, except for the Select value button. Clicking this button presents two options: Yes and No.
• This new condition category is hidden when the trigger does not have req context. 4. Count # candidates in HR status for this req
• Selection of the specific HR status subsequently occurs.
• Gives a count of the number of candidates at the specified HR status at the time the trigger runs.
• Uses the req that is in context for this event.
• Example: If req has less than 10 candidates at this status, then perform an action. 5. Count # active reqs the candidate is in

Administrator Tools Using Workbench
© Copyright IBM Corp. 2020 Page 211
Course materials may not be reproduced in whole or in part without the prior written permission of IBM.
• Allows counting the number of reqs the candidate is in.
• Does not include final statuses. 6. Document subsidiary form fields
• Allows selection of document subsidiary form fields. 7. Form existence
• Simply evaluates whether a form exists or not.
• If the form selected is a single per candidate per req form, then the req in context is used to determine if this form exists for this req.
• Form existence options that are available o Match any form version for this req. o Match any form version across reqs.
8. HR status
• Allows a basic selection of HR status. Example: HR status equals “First status”.
• This is used to determine if the candidate is presently at that status when the trigger runs.
9. Link to existing rules
• Allows linking this rule to another existing rule which precedes it.
• Selection specifies whether the true OR false scenario.
• Used in rule branching scenarios. Example: Rule 2 only runs when rule 1 conditions are true.
10. Positions filled
• This is only available when the trigger mechanism is HR Status Req Options.
• When this condition is used, it determines if the positions for the req have been filled (# remaining positions = 0) when the candidate in context gets to the selected HR status.
• The condition takes into account the candidate in context. 11. Req form fields
• Allows selection of req form fields. 12. Req form fields modified
• This category allows selection of req fields to identify whether those fields have changed. This is used with the trigger mechanism of Req Edit. And also used with the action of sending a communication when the communication checkbox for “Include old and new values…” is checked.
• When selected, the only Operation available is Has Changed. 13. Req status
• Evaluates the req status.
• This selection does not trigger the RAM to run. It only evaluates the req status based on some other event that has been triggered.
• This is only available when the trigger has a req in context. 14. Req subsidiary form fields
• This option allows evaluating req sub form fields. 15. Req templates
• Allows a basic selection of req template. Example: Req template equals “Stores”.

Administrator Tools Using Workbench
© Copyright IBM Corp. 2020 Page 212
Course materials may not be reproduced in whole or in part without the prior written permission of IBM.
16. Talent record
• Allows selection of candidate fields.
• Candidate type is contained within this selection. 17. Talent gateways
• Allows evaluating data associated with postings. Example: Job is not posted.
Name and Field
The Name selection is presented when the category is selected (if applicable). The Field selection is presented when the Name is selected (if applicable).
Figure 10- 11 : Configure Category
Operation The Operation selection is presented when the Field is selected (if applicable). Operations determine how to evaluate the field or category selected. The available operations are dependent on the field type selected. The following is a list of operations based on field type.
1. Single select, multi select, query select, radio, checkbox
• Equals
• Not Equals
• Is Blank
• Is Not Blank 2. Date
• Equals
• Not Equals
• Greater Than
• Less Than
• Is Blank
• Is Not Blank
• Greater Than (# days) o Using this operation takes the Define Value input for this condition and adds it to
today’s date, producing Date X. The date field selected (say Date Y) here is then compared to Date X. If Date Y is greater than Date X, then this condition is true.
o Negative values can be input into the Define Value box. o Within scenario – use Greater Than (# days) with negative value.
• Less Than (# days) o Using this operation takes the Define Value input for this condition and adds it to
today’s date, producing Date X. The date field selected (Date Y) is then compared to Date X. If Date Y is less than Date X, then this condition is true.
o Negative values can be input into the Define Value box.

Administrator Tools Using Workbench
© Copyright IBM Corp. 2020 Page 213
Course materials may not be reproduced in whole or in part without the prior written permission of IBM.
o Not Within scenario – use Less Than (# days) with negative value. o If date on the form considered is an actual expiration date – use Less Than (# days)
with 0. 3. Numeric
• Equals
• Not Equals
• Greater Than
• Less Than
• Is Blank
• Is Not Blank 4. Text
• Contains
• Not Contains
• Is Blank
• Is Not Blank
• Equals
• Not Equals
Select Values
When the field or category selected has a finite list of options to choose from (i.e. single-select), then the select values option is available. This allows selection of the specific value to evaluate. It is evaluated based on the operation selected.
Figure 10- 12 : Configure Operation – Select Values
Compare Value
When the field or category selected will be compared, the Compare value option is shown in addition to the Select values option. This allows comparing one field to another field. When you use this option, it allows selecting the second field to be used in the comparison. The comparison logic uses the Operation defined. Date and Numeric field types can only be compared to fields of the same type. All other field types can be interchanged for comparisons among each other. If comparing a text field with an options list (i.e. single-select), then the comparison uses the Code of the options list to compare. It does not compare the Description.
Multi-selects are always treated as an OR scenario when performing the comparison logic. Example: If a text field is selected, and the comparison is to a multi-select field with 2 options
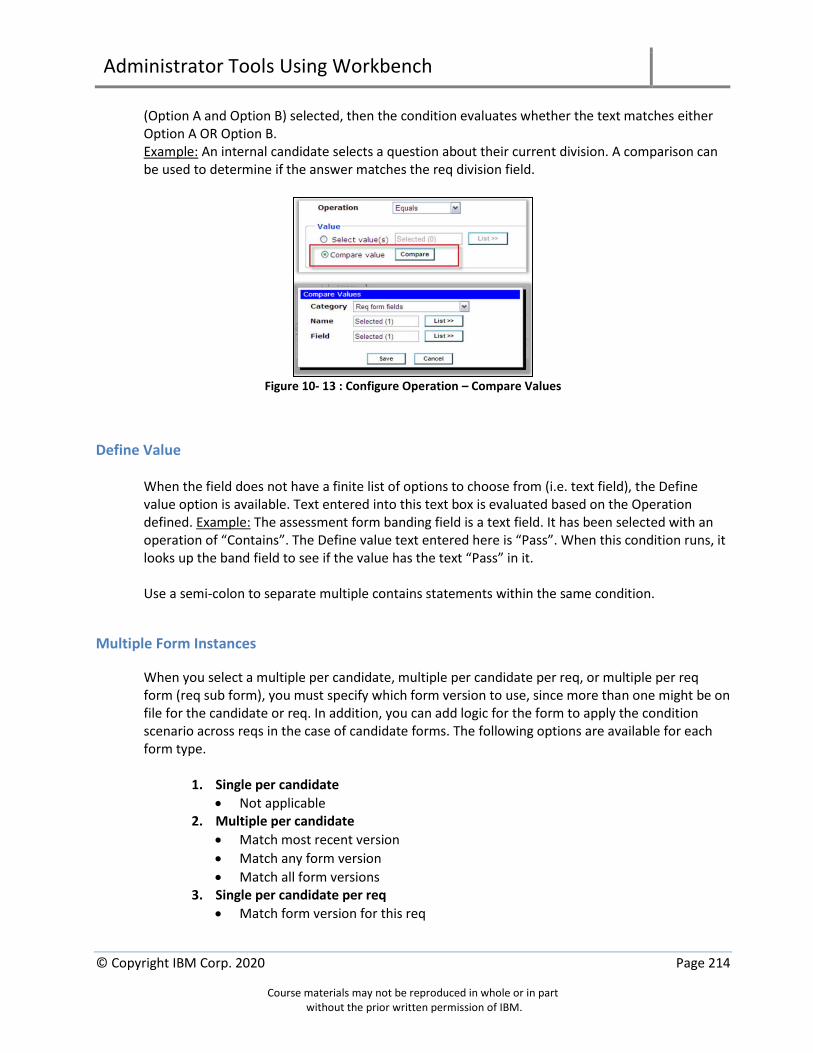
Administrator Tools Using Workbench
© Copyright IBM Corp. 2020 Page 214
Course materials may not be reproduced in whole or in part without the prior written permission of IBM.
(Option A and Option B) selected, then the condition evaluates whether the text matches either Option A OR Option B. Example: An internal candidate selects a question about their current division. A comparison can be used to determine if the answer matches the req division field.
Figure 10- 13 : Configure Operation – Compare Values
Define Value
When the field does not have a finite list of options to choose from (i.e. text field), the Define value option is available. Text entered into this text box is evaluated based on the Operation defined. Example: The assessment form banding field is a text field. It has been selected with an operation of “Contains”. The Define value text entered here is “Pass”. When this condition runs, it looks up the band field to see if the value has the text “Pass” in it.
Use a semi-colon to separate multiple contains statements within the same condition.
Multiple Form Instances
When you select a multiple per candidate, multiple per candidate per req, or multiple per req form (req sub form), you must specify which form version to use, since more than one might be on file for the candidate or req. In addition, you can add logic for the form to apply the condition scenario across reqs in the case of candidate forms. The following options are available for each form type.
1. Single per candidate
• Not applicable 2. Multiple per candidate
• Match most recent version
• Match any form version
• Match all form versions 3. Single per candidate per req
• Match form version for this req

Administrator Tools Using Workbench
© Copyright IBM Corp. 2020 Page 215
Course materials may not be reproduced in whole or in part without the prior written permission of IBM.
• Match most recent version across reqs
• Match any form version across reqs
• Match all form versions across reqs 4. Multiple per candidate per req
• Match most recent version for this req
• Match any form version for this req
• Match all form versions for this req
• Match most recent version across reqs
• Match any form version across reqs
• Match all form versions across reqs 5. Multiple per req (Req subsidiary form)
• Match most recent version
• Match any form version
• Match all form versions
Figure 10- 14 : Configure Existing Conditions
Existing Conditions
Once you save a condition, it displays in the existing conditions section at the bottom of the rule screen. To edit the existing condition, click Edit for the specific condition. To delete the existing condition, click Delete for the specific condition.
When more than one condition exists in a rule, the conditions are bound together using AND logic. For example, condition 1 has field X equal to Yes. Condition 2 has field Y equal to Yes. In order for the overall rule conditions to be true (and subsequently take action) field X and field Y both need to be Yes. You can achieve OR statements by creating another rule with a different set of conditions, or by using the Link to existing rule condition where branching of rules can occur.
Multiple existing conditions that are using different fields on the same form are grouped together, and thus evaluated together for multiple form instances.
Figure 10- 15: Existing Conditions Grouped Together

Administrator Tools Using Workbench
© Copyright IBM Corp. 2020 Page 216
Course materials may not be reproduced in whole or in part without the prior written permission of IBM.
Actions
A rule is composed of conditions and actions. Conditions evaluate data in the system to produce a true/false result. Actions perform automation in the system when those conditions are true.
When you click Add Rule or Edit for an existing rule, the following screen displays. You can then select the Actions.
Figure 10- 16: Configure Actions
Action Type
To create a new action, first select an action type. Selection of the type presents additional selections needed to specify the action. The available categories and general use are as follows. Keep in mind that the list of categories might change depending on the Trigger Mechanism and Trigger Context selected. In cases where there is no candidate in context, all candidate actions are hidden. In cases where there is no req in context, all req actions are hidden.
1. Call Event batch
• The Call Event Batch action allows users to trigger an event invitation to be sent to candidates who meet the business rule conditions. The Event Batch configured in Event Manager determines what invitation message is sent to the candidate, to what event or events the candidate is invited, and other settings around automated confirmation messages, automated reminder messages, invitation expiration, etc. The Event Batch is assigned to reqs through both req postings and a custom field on the req form. Event Batches assigned to req postings apply to candidates who apply to those req postings directly. This allows clients to configure different event batches for internal vs. external candidates. Event Batches assigned directly to the req form through the custom req field apply to candidates who are moved, copied, or filed to the req outside of a Talent Gateway.
• Here is an example of a typical flow: Joe Candidate applies to Req 123BR through a Talent Gateway. That req posting for 123BR is assigned to an event batch configured to trigger an

Administrator Tools Using Workbench
© Copyright IBM Corp. 2020 Page 217
Course materials may not be reproduced in whole or in part without the prior written permission of IBM.
invitation to Phone Screen events when candidates are assigned to the HR Status called Initial Screen. A RAM Trigger is configured for the HR Status called Initial Screen with a business rule containing the action to Call Event Batch. If Joe Candidate is set to the HR Status of Initial Screen within Req 123BR, then he automatically receives an invitation to register for a Phone Screen event. With that invitation, Joe Candidate can self-schedule for a Phone Screen event either through the Event Manager page on the Talent Gateway or through a link provided in the invitation message itself.
2. Copy Assessment Results
• This action copies any valid, required assessment results into the requisition in context.
• The system automatically copies a candidate’s existing, valid assessment results into any receiving reqs with all subsequent submissions.
3. Copy/Move to Req
• Also includes initial filing to req
• Supports automated function for what is available manually today
• Used for Evergreen req scenarios - see additional detail in RAM User Guide for more information.
4. Exit
• When performed, this action causes the trigger to exit and also skips the running of any subsequent rules.
5. Populate Field Values
• Automates the form create and update process
• Can specify which values to insert or update on forms
• Req form fields, candidate form fields, req subsidiary form fields, and Talent record fields are supported
• Talent record selection contains Candidate type, which can be updated.
• Auto-fill fields on forms need to be explicitly added within the action in order for them to appear on the form. Select the auto-fill field and click Save Action. No value selection is necessary in this case.
• Support for dynamically populating fields based on other fields is allowed by using the Use existing field selection where a source field can be specified. This is also allowed for auto-fill fields, where it overrides the standard auto-fill configuration.
• More details are available in the RAM User Guide on the IBM Knowledge Center. 6. Post Documents to Candidate Portal
• This action posts documents to the Candidate Zone.
• The documents created and belonging to a specific req can only be posted using this feature.
7. Post Form to Candidate Portal
• This action posts candidate forms to Candidate Zone when a candidate’s HR status reaches the pre-defined HR status selected during trigger configuration.
8. Preconfigured Integration
• This action is used to configure the mappings for WOTC & Social source.
• WOTC Templates display only when client setting of “Work Opportunity Tax Credit Integration” is Yes.
• CRM template displays only when client setting of “Integration Candidate Relationship Management (CRM)” is used with “First Advantage” selected.

Administrator Tools Using Workbench
© Copyright IBM Corp. 2020 Page 218
Course materials may not be reproduced in whole or in part without the prior written permission of IBM.
• Once the template is selected, the fields to be mapped for that vendor are displayed under the ‘Map Template Fields’.
• No field mapping needed for BrassRing Candidate Relationship Manager (CRM). 9. Run Another [trigger] Instance
• This action is placed after ‘Update HR Status’ in a rule. This is a final action in a rule where the trigger exits once all actions in the rule are processed.
• This action can be configured only once per rule. Once a ‘Run another instance’ action is saved, the user does not see this action category in the drop-down for the same rule.
• The user can choose only one option between “Use exiting date / numeric field” and “Select run frequency”.
10. Run Another Trigger
• This action is placed after ‘Run another instance’ in a rule. This is a final action in a rule where the trigger exits once this action is processed.
• This action can be configured only once per rule. Once a ‘Run another trigger’ action is saved, the user does not see this action category in the drop-down for the same rule.
• This new action is visible only for the following combinations: o Req based triggers (except Req Edit) with context ‘Across Candidates’ o Candidate based triggers with context ‘Across Reqs’ o HR Status
11. Send Communication
• Allows automated communication to be sent
• Selection of language and email template occurs
• Selection of recipient list occurs. Recipients available is based on whether the candidate and/or req is in context. For example, a Req Edit trigger mechanism with a Trigger Context of None means the candidate is not in context. Therefore, the talent record email address is not listed as a recipient.
• A checkbox is available to “Include old and new values…” for req form fields modified. This is used with the Condition of Req form fields modified. When checked, it appends the fields selected in the condition at the bottom of the email communication. Note: only fields contained within the condition are evaluated. And if the fields selected in the condition have not changed, they are not included in the email communication.
12. Undo HR Status
• Performs an Undo of the HR status for the candidate, returning candidate to the previous status.
• Behaves the same way as an Undo in the BrassRing user interface. 13. Unpost and Close Req
• This action allows unposting and subsequently closing of the req.
• Selecting this action category unposts the req from all gateways and job boards and closes the req. No other selections are necessary with this category.
• Standard prerequisites for closing the req apply here.
• When you use this action, it is recommended to disable the auto-close user interface popup on the HR status.
14. Unpost Req
• This action only allows unposting the req.

Administrator Tools Using Workbench
© Copyright IBM Corp. 2020 Page 219
Course materials may not be reproduced in whole or in part without the prior written permission of IBM.
• Selecting this action category unposts the req from all gateways and job boards. No other selections are necessary with this category.
15. Update Candidate Tier
• This action updates the candidate tier.
• Automates the same action that can be performed in the BrassRing UI for updating a candidate’s tier. Usually, this is done in exception scenarios.
• It is hidden if there is no req context for the trigger.
• If the selected tier is not part of the req template when the trigger runs, the action does not complete.
16. Update HR Status
• Updates the candidate’s HR status.
• Can disobey closed tracking logic rules if client setting is turned on for “Disobey Closed Tracking Logic in RAM”. Otherwise, the HR status updates only if it is an available next step in the configured workflow. Additional options include the following checkboxes. Please note that selecting a checkbox is optional. If you want to update for the req in context, do not check any of the following checkboxes.
o Only update in other reqs (all active req templates) – checking the box for this option means that this HR status update action occurs only in other reqs and not the req in context. Scenarios include the ability to update the candidate’s status in one req, and then reflect that same status update in all other reqs they presently reside in. For example, a candidate is updated to “Hire” in one req (this acts as the trigger mechanism). The candidate is then moved to a status called “Hired in other req” in other reqs (this is the rule action with only this checkbox setting checked). This option does not update candidates if they are in a final HR status. This option updates across all req templates.
o Only update in other reqs (this req template) – checking the box for this option means that this HR status update action occurs only in other reqs and not the req in context. Scenarios include the ability to update the candidate’s status in one req, and then reflect that same status update in all other reqs they presently reside in. For example, a candidate is updated to “Hire” in one req (this acts as the trigger mechanism). The candidate is then moved to a status called “Hired in other req” in other reqs (this is the rule action with only this checkbox setting checked). This option does not update candidates if they are in a final HR status. This option updates across all reqs that have the same req template as the req in context.
o Update across all active reqs in all req templates – checking the box for this option means that this HR status update action occurs in both this req and other reqs. Scenarios include the ability to disposition a candidate in one req, and reflect that same disposition status in other reqs. For example, a candidate has failed a drug screen and is updated to “Failed Drug Screen” final status. The candidate is moved to this status for all reqs. This option updates across all req templates.
o Update across all active reqs in this req template – checking the box for this option means that this HR status update action occurs in both this req and other reqs. Scenarios include the ability to disposition a candidate in one req,

Administrator Tools Using Workbench
© Copyright IBM Corp. 2020 Page 220
Course materials may not be reproduced in whole or in part without the prior written permission of IBM.
and reflect that same disposition status in other reqs. For example, a candidate has failed a drug screen and is updated to “Failed Drug Screen” final status. The candidate is moved to this status for all reqs. This option updates across all reqs that have the same req template as the req in context.
17. Update Req Tier
• This action updates the currently visible req tier.
• Automates the same action that can be performed in the BrassRing UI for updating the visible req tier. Usually, this is done in exception scenarios.
• It is hidden if there is no req context for the trigger.
Existing Actions
Multiple existing actions that are populating different fields on the same form are grouped together and thus populated together for multiple form instances.
Figure 10- 17: Existing Actions Grouped Together
Activating RAM Triggers
By default, RAM triggers are placed in a draft status during initial creation. This allows configuration to occur as needed before testing. Once a trigger is ready for use, it must be activated.
1. Select the RAM trigger that needs to be activated. 2. From the Actions list, click Activate Trigger. 3. Click the Activate button to activate the trigger.
Note: In your Production site, this action is completed by your IBM Representative.
Editing Active Triggers
If edits are needed for an existing trigger, select the appropriate trigger and click Edit trigger. Note: Be careful when making modifications to active triggers. When you click Edit trigger for the first time, an option is presented to either use versioning or make the change immediate once activated again. Make the selection carefully based on desired result.
Option: Versioning If the option for versioning is chosen, then the trigger is put in draft status immediately. Once the

Administrator Tools Using Workbench
© Copyright IBM Corp. 2020 Page 221
Course materials may not be reproduced in whole or in part without the prior written permission of IBM.
changes were made, and the trigger is activated again, it applies the changes only to reqs opened after the changes. This allows all candidates within a req to follow the same trigger logic. While saving the changes in the new version, you must specify a different trigger name. It is recommended to append “v2”, “v3”, etc. onto the name. Once activated, only one trigger is seen under this new name.
Option: Make change immediately If you choose the option to make the change immediately across all reqs, then the trigger is immediately placed in draft status. You can then make changes and activate the trigger again. The new trigger logic takes effect immediately. Therefore, you might see a mixture of trigger logic for candidates within a req. This is recommended when you test triggers, debug triggers, and fix triggers, or if you change the business logic for all reqs (even ones that are already opened).
Figure 10- 18: Editing Existing Trigger
In either scenario above, the trigger is placed into draft status while the changes are being made. Once edits are finished, your IBM Representative must activate the trigger again. While the trigger is in draft status, all trigger events that occur during the time the trigger was placed into draft status are held until the trigger is activated again. Once active, the events that occurred during the time the trigger was in draft status are processed.
If a trigger was initially selected for versioning, it only allows any additional changes to use versioning as well. Therefore, choose your edit selection carefully when attempting to edit a trigger. View different versions by using the View trigger details menu option. Links are available for all previous versions.

Administrator Tools Using Workbench
© Copyright IBM Corp. 2020 Page 222
Course materials may not be reproduced in whole or in part without the prior written permission of IBM.
Figure 10- 19: Trigger Details Menu
Save RAM as new Triggers can be ‘Saved as new’ from all trigger types: active, draft, and inactive. This feature can save you time is you need to create a new RAM trigger similar to an existing one.
Note: Trigger mechanism, event, and context cannot be edited. To use the ‘Save as new’ feature: 1. Select Tools > Automation Manager > Admin. 2. Locate the trigger on the Active, Draft, or Inactive Triggers page, and click Save trigger as new
under the Actions menu. 3. The RAM trigger – Save trigger as new window appears. (Figure 10-20).
a. Add the Trigger Name. b. Select a Mechanism. c. Add Trigger Timing (hrs), if required.
4. Click the Save & Continue button. The new trigger was created and placed in draft status. (Figure 10-21).
5. Continue to edit the trigger. 6. Save the trigger when edits are completed.
Figure 10- 20: RAM – Save trigger as new screen

Administrator Tools Using Workbench
© Copyright IBM Corp. 2020 Page 223
Course materials may not be reproduced in whole or in part without the prior written permission of IBM.
Figure 10- 21: RAM – RAM trigger is draft status to be edited
Inactivating RAM Triggers
Triggers no longer needed, can be inactivated. When a trigger is inactivated, triggering events are no longer processed or held. A trigger can be activated again once it has been inactivated. However, it is treated as if this is the first time the trigger was activated. If an HR status or form is still selected for a trigger that is inactive, it is not available for selection as a trigger event.
To inactivate a trigger: 1. Select Tools > Automation Manager > Admin. 2. Locate the trigger on the Triggers page (Active view), and click Inactivate trigger under the
Actions menu. 3. A preview of the trigger configuration opens. At the bottom of that screen, click Inactivate.
The trigger is now inactive and can be found under the Inactive triggers within Workbench.
Deleting RAM Triggers in Draft
This option is available only for triggers in Draft status. If a trigger is no longer needed, it can be deleted. However, it is recommend inactivating rather than deleting a trigger. Consult with your IBM Representative if you have any questions.
To delete a trigger:
1. Select Tools > Automation Manager > Admin. 2. Locate the trigger on the Triggers page (Draft view), and click Delete trigger under the
Actions menu.
Administrator Tools Using Workbench
© Copyright IBM Corp. 2020 Page 224
Course materials may not be reproduced in whole or in part without the prior written permission of IBM.
3. A confirmation message will appear asking you to confirm if you would like to delete the trigger. Click OK.
Deleting Previous RAM Trigger Versions
This option is available for triggers in Active and Inactive status. The option deletes all previous trigger versions. Going forward, any new trigger events use the configuration as defined in the most recent trigger version. When such triggers are edited the next time, the user is presented with the option to use versioning or continue without using versioning. For Active triggers, no events are missed when the delete versioning is processed.
To delete previous trigger versions:
1. Select Tools > Automation Manager > Admin. 2. Locate the trigger on the Triggers page (either Active or Inactive view), and click Delete
previous trigger versions under the Actions menu. 3. A confirmation message will appear asking you to confirm if you would like to delete all
the previous versions of the trigger. Click OK.
RAM/AM Reports
Workbench administrators can run the following RAM/AM reports: - RAM Export Report - RAM trigger by Rules by Status (max one week) - RAM trigger by Rules (max one week) - RAM trigger by Status - RAM/AM trigger by trigger type by Year - RAM/AM Report by triggers - RAM ROI Report
RAM export report - provides a two-dimensional view of RAM triggers and can be extracted to Excel. The tabs included in the RAM Export Report are:
- Trigger Details: Includes the overall trigger details (trigger name, mechanism, event, timing mechanism, date created, etc.)
- Summary: Breaks down each of the triggers to show details about the rules, conditions, actions, and a summary.
- Dependency: Displays all the dependent configuration areas such as forms, fields, communication templates based on the RAM rules built.
To run a RAM export report:
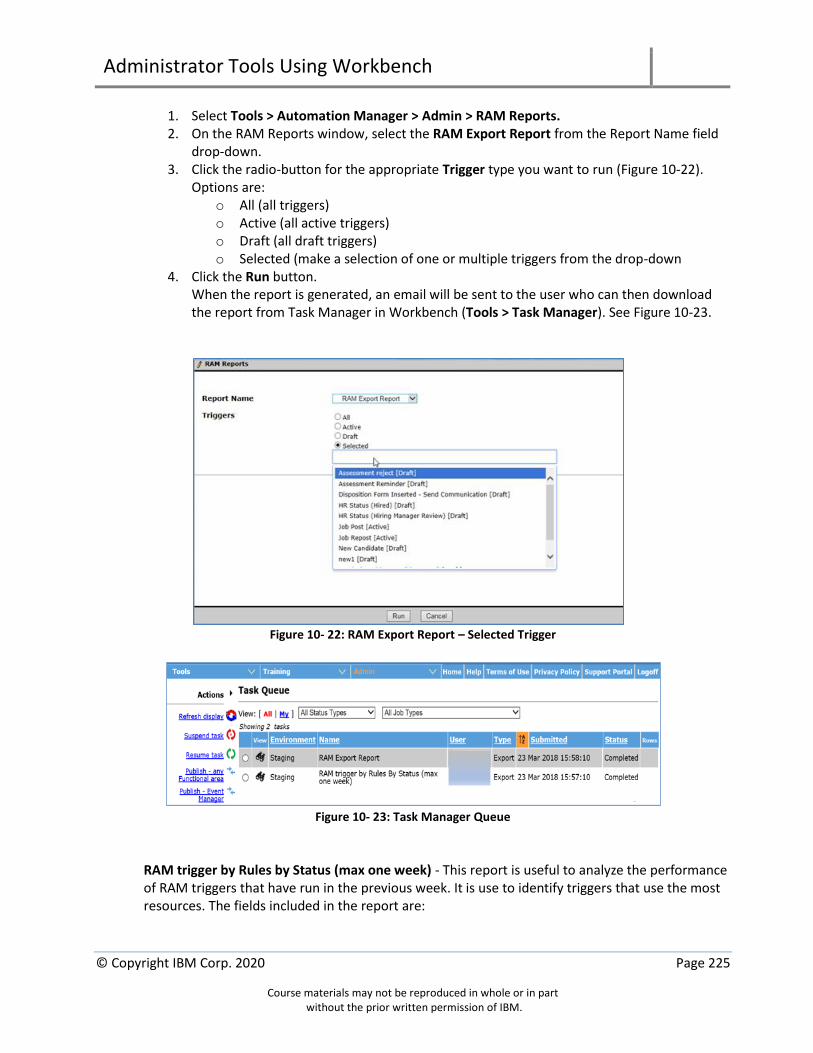
Administrator Tools Using Workbench
© Copyright IBM Corp. 2020 Page 225
Course materials may not be reproduced in whole or in part without the prior written permission of IBM.
1. Select Tools > Automation Manager > Admin > RAM Reports. 2. On the RAM Reports window, select the RAM Export Report from the Report Name field
drop-down. 3. Click the radio-button for the appropriate Trigger type you want to run (Figure 10-22).
Options are: o All (all triggers) o Active (all active triggers) o Draft (all draft triggers) o Selected (make a selection of one or multiple triggers from the drop-down
4. Click the Run button. When the report is generated, an email will be sent to the user who can then download the report from Task Manager in Workbench (Tools > Task Manager). See Figure 10-23.
Figure 10- 22: RAM Export Report – Selected Trigger
Figure 10- 23: Task Manager Queue
RAM trigger by Rules by Status (max one week) - This report is useful to analyze the performance of RAM triggers that have run in the previous week. It is use to identify triggers that use the most resources. The fields included in the report are:

Administrator Tools Using Workbench
© Copyright IBM Corp. 2020 Page 226
Course materials may not be reproduced in whole or in part without the prior written permission of IBM.
- Client Includes the overall trigger details (trigger name, mechanism, event, delay - Trigger Name - Last Rule Number - Number of Triggers - Total in seconds
RAM trigger by Rules (max one week) – This report is useful to analyze the rules that have been processed in the previous week. It is used to identify rules that are never true to edit or remove those rules. It can only run based on the last week. The fields included in this report are:
- Client - Trigger Name - Last Rule Number - Last Run Date
RAM trigger by Status – This report groups triggers by their statuses and is used to identify common trigger errors. The fields included on the report are:
- Client - Trigger Name - Trigger Status - Trigger Type - Number of Triggers - Last Run Date
RAM/AM trigger by trigger type per year – This report outputs the volume of usage of RAM/AM triggers. It is used to identify RAM triggers with high or low volume, or triggers that are never used. The field included on this report are:
- Client - Trigger Name - Trigger Type - Number of Triggers - Last Run Date
Take the following actions on triggers that are included in this report:
- High Volume triggers – Review and optimize these triggers - Low Volume triggers – Possibly inactivate or combine the triggers with other triggers to
reduce the number of triggers. - Triggers never used – Should be inactivated.
RAM/ROI Report – This report describes the number of triggers and rules that are processed within a set time period, up to a maximum of one year. To run this report, the time period and parameters must be configured. The report can be configured to include information about a trigger, candidate information, requisition information, or a combination of the three. The RAM/ROI fields in the report are:
- Trigger Name - Trigger (Active)

Administrator Tools Using Workbench
© Copyright IBM Corp. 2020 Page 227
Course materials may not be reproduced in whole or in part without the prior written permission of IBM.
- Trigger processed - Rules - Rules processed - Time saved (seconds) - Time saved (days) - Time saved (weeks/business working days) - Full-time Employee Time Saved
Note: Additional RAM reports can be run by IBM team members to analyze client’s RAM triggers, and factor into RAM ROI calculations. These reports are not available for clients to run as they require an IBM email address on the Workbench user profile.
RAM / AM Log
As a Workbench Administrator, you have the ability to review and analyze log files for specific candidates. A RAM / AM log allows you to run a search on a particular candidate; thereby, providing you with a list of all RAM / AM triggers that have run for that candidate.
Elements of a RAM / AM Log
• A search page is provided for searching by candidate and date.
• The results will be displayed in a grid with the results sorted by the most recent trigger run time.
• Results for the last 30 days can be analyzed to see the list of conditions and actions by clicking View details.
• Logs are available for the last two years, but only the details will be shown for the last 30 days.
• If a rule is not run, then the state entries would be blank for the rule, conditions, and actions.
• In case of any action resulting in an error, a brief error message is displayed along with any pending retries.
Running a RAM / AM Log
To run a RAM / AM log:
1. Select Tools > Automation Manager > RAM / AM log. 2. The Retrieve Log Search Page appears. 3. Enter the search information.
o Searching is available by Trigger or Candidate or Req Information o A given time period can be used to more easily target specific triggers

Administrator Tools Using Workbench
© Copyright IBM Corp. 2020 Page 228
Course materials may not be reproduced in whole or in part without the prior written permission of IBM.
4. Click the Search button. 5. Your trigger results appear.
RAM / AM Log Trigger Results
Results are shown in a grid, sorted by the most recent trigger run time. Results will display in the grid for the last two years. However, only the last 30 days will display an option to View details.
8. Click the “View Raw Log” binoculars icon next to the result you would like to see the log details for (see Figure 10- 24):
Figure 10- 24: Log Details
1. Click any of the above trigger names or rules (seen as blue or green hyperlinks) to view more details (see Figure 10- 25):
Figure 10- 25: Trigger or Rule Details
RAM / AM Log – View Details
Clicking the View details link for a given trigger instance will display more specific details of what occurred with that trigger when it ran. Rule, condition, and action statuses are shown. Below is a list of the various rule, condition, and action statuses. This will assist in identifying what exactly happened with the candidate when the RAM / AM trigger ran.
Rules

Administrator Tools Using Workbench
© Copyright IBM Corp. 2020 Page 229
Course materials may not be reproduced in whole or in part without the prior written permission of IBM.
• True o All conditions were true
AND o Actions were performed without error
• False o One or more conditions were false, resulting in no actions being performed
• Error o One or more of the actions resulted in an error
OR o One or more of the conditions resulted in an error
• Not Run o The rule was not run, meaning that a prior rule updated the HR status of the
candidate and the trigger exited, or there was an error in a prior rule and the trigger never got to this point
Conditions
• True o The condition was true
• False o The condition was false
• Error o The condition resulted in an error
• Not Run
o The condition was not run, meaning the rule in general never ran, or a prior
condition had an error
Actions
• Success o Action was performed successfully
• Error o Action resulted in an error o The error will be followed by a description and any applicable retry logic
pending
• Not Run o The action was not run, meaning the rule in general never ran, the conditions
were not true, or a prior action had an error. o If the action was a web service call, then the action will have an additional
link to click to view the outgoing and incoming XML messages.

Administrator Tools Using Workbench
© Copyright IBM Corp. 2020 Page 230
Course materials may not be reproduced in whole or in part without the prior written permission of IBM.
Chapter Summary
• You can automate the timely gathering of data on HR and req statuses and other events, such as posting expirations and Talent records send and viewed. The data can be sent automatically to a list of recipients.
• Before you create automation manager or rules automation manager triggers, you need to make sure that you first configure the email templates in BrassRing for triggered notifications.
• You can administer exiting automation triggers
• You can create new and administer existing rules automation manager triggers.
• After you create a new rules automation manager trigger, you will have to work with your IBM representative to have it activated.
• To make changes to an existing rules automation manager trigger, you first create a new trigger by using the ‘Save as new’ function, and add a version number in the trigger name. You will need to inactivate the ‘old’ trigger, and have the IBM representative activate the ‘new’ trigger.

Administrator Tools Using Workbench
© Copyright IBM Corp. 2020 Page 231
Course materials may not be reproduced in whole or in part without the prior written permission of IBM.
Check Your Skills
Answer these True or False questions:
1. An Automation Manager (AM) trigger is set-up as draft first, before it can be activated.
2. Rules Automation Manager (RAM) triggers are activated automatically.
Perform these hands-on exercises in Workbench:
Your organization requires you to create a new Automation Manager Trigger for ‘Candidate HR Status - Send Talent Record’. Note: Add your initials to the name.
− The trigger needs to be set-up so that it sends out the Talent Record to Hiring Manager when the HR Status of the Candidate is changed to HM Review.
− It will apply to all candidate types and reqs.
− The Talent Record will not include any forms to be completed nor viewed.

Administrator Tools Using Workbench
© Copyright IBM Corp. 2020 Page 232
Course materials may not be reproduced in whole or in part without the prior written permission of IBM.
Chapter 11: User Interface
Chapter Overview
• BrassRing users have a User Interface home page that is mobile responsive.
• The home page is a persona-based user interface that displays cards, grids, visualizations, and welcome messages.
• Based on configuration and appropriate user type privileges, users see Quick Links options on the home page. Users can customize the options as needed.
Chapter Objectives At the end of this chapter, you will be able to:
• Configure HR Status Aging Panel and map the HR Status Aging per HR Status to My Task tab
• Enable View Candidate Diversity visualization

Administrator Tools Using Workbench
© Copyright IBM Corp. 2020 Page 233
Course materials may not be reproduced in whole or in part without the prior written permission of IBM.
The My Task tab on the Home page provides users access to reqs and/or candidate forms that are awaiting approval from the user. In addition, it can provide users a view to their HR Status Aging, if configured. In order for the HR Status Aging option to appear on the My Tasks tab, the user must complete two steps:
1. Configure the HR Status Aging setting on the HR Statuses. 2. Map the HR Status Aging feature to the My Tasks tab.
Configure HR Status Aging The HR Status Aging feature lets the user identify the number of days acceptable, cautionary, or unacceptable that a Candidate is assigned to an HR Status. To configure the HR Status Aging setting:
1. Click Tools > HR Statuses. 2. Select Edit status of the HR Status for which you want to configure the HR Status Aging
feature. 3. Click the Actions section > Enter the number of days From: and To: for acceptable,
cautionary, and inacceptable, and select the checkbox Trigger for My Tasks Panel for each.
4. Click Save. 5. Click Close.
Figure 11-1: HR Status Aging Setting
Map HR Status Aging to the My Tasks Tab
To map the HR Status Aging feature to the My Task Tab:
1. Tools > Users > User Types. 2. Select the User Type to which to map the HR Status Aging feature.
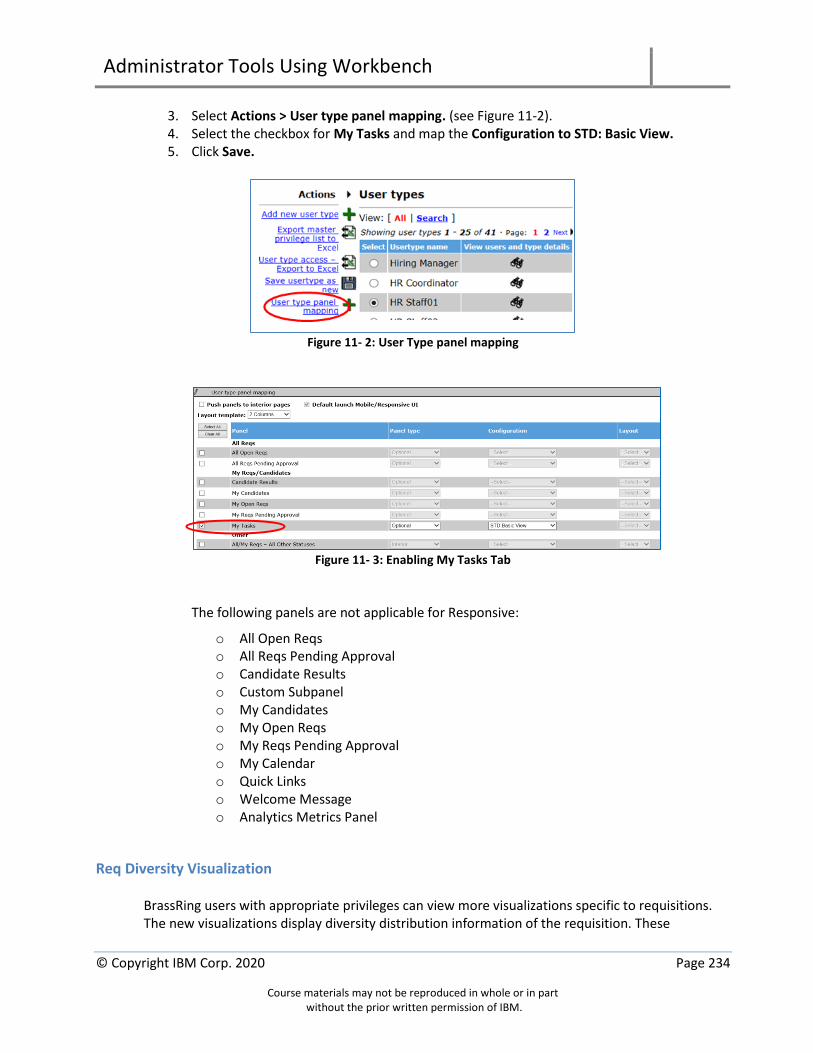
Administrator Tools Using Workbench
© Copyright IBM Corp. 2020 Page 234
Course materials may not be reproduced in whole or in part without the prior written permission of IBM.
3. Select Actions > User type panel mapping. (see Figure 11-2). 4. Select the checkbox for My Tasks and map the Configuration to STD: Basic View. 5. Click Save.
Figure 11- 2: User Type panel mapping
Figure 11- 3: Enabling My Tasks Tab
The following panels are not applicable for Responsive:
o All Open Reqs o All Reqs Pending Approval o Candidate Results o Custom Subpanel o My Candidates o My Open Reqs o My Reqs Pending Approval o My Calendar o Quick Links o Welcome Message o Analytics Metrics Panel
Req Diversity Visualization
BrassRing users with appropriate privileges can view more visualizations specific to requisitions. The new visualizations display diversity distribution information of the requisition. These

Administrator Tools Using Workbench
© Copyright IBM Corp. 2020 Page 235
Course materials may not be reproduced in whole or in part without the prior written permission of IBM.
visualizations do not have any actions and they provide overall distribution about gender and race diversity in two different charts. In order for users to view the visualizations:
1. The user type privilege BrassRing Home page – View Candidate Diversity Distribution muse be enabled. This privilege is added in Workbench: Tools > Users > User types > Edit type permissions > Reports 2.
Figure 11- 4: User Privilege BrassRing Home page - View Candidate Diversity Distribution
A new drop-down option Candidate Diversity Distribution is added in the visualization section within the candidate results grid (Figure 11-5). When a user selects this option, the gender and race diversity visualization pie charts are displayed.
Figure 11- 5: BrassRing View Drop-down Candidate Diversity Distribution

Administrator Tools Using Workbench
© Copyright IBM Corp. 2020 Page 236
Course materials may not be reproduced in whole or in part without the prior written permission of IBM.
Figure 11- 6: Gender and Race Visualization Pie Chart in BrassRing
2. Gender and Race need to be configured in the existing standard reports configuration.
o For Gender, go to Tool > Settings > Reports > Diversity Hire > Diversity breakdown > Gender.
o For Race, go to Tools > Settings > Reports > Diversity Hire > Diversity breakdown > Race.
Workbench administrators can configure any candidate form field (both per req and single/multiple per candidate forms) that is Single-select or radio ONLY (query select, autofill or multi-select are not available).
FOR MORE DETAILS ABOUT HOW TO CONFIGURE DIVERSITY DISTRIBUTION AVAILABLE HERE ON THE IBM
KNOWLEDGE CENTER CLICK here.

Administrator Tools Using Workbench
© Copyright IBM Corp. 2020 Page 237
Course materials may not be reproduced in whole or in part without the prior written permission of IBM.
Chapter Summary
• BrassRing users have a User Interface home page that is mobile responsive.
• You can configure HR Status Aging and map it to the My Tasks tab.
• Req diversity visualization can viewed by users with appropriate privileges.

Administrator Tools Using Workbench
© Copyright IBM Corp. 2020 Page 238
Course materials may not be reproduced in whole or in part without the prior written permission of IBM.
Check Your Skills
Answer these True or False questions:
1. For the HR Status Aging option to appear on the My Tasks tab, the tab must be mapped under User Type Panel Mapping.
Perform these hands-on exercises in Workbench:
Map the My Tasks tab so that HR Status Aging is available as an option on the tab.

Administrator Tools Using Workbench
© Copyright IBM Corp. 2020 Page 239
Course materials may not be reproduced in whole or in part without the prior written permission of IBM.
Chapter 12: Managing Integrations
Chapter Overview
BrassRing can interact with several other systems, sending data to/from other systems as needed. This chapter will discuss the type of integrations, and how they are managed within Workbench.
Chapter Objectives
At the end of this chapter you will be able to:
3. Define custom integrations vs. pre-configured integrations 4. View, edit, and administer subscription information 5. Use the Integration Tools 6. Understand the different types of Integrations 7. Use the Mapping Tool

Administrator Tools Using Workbench
© Copyright IBM Corp. 2020 Page 240
Course materials may not be reproduced in whole or in part without the prior written permission of IBM.
Overview of Integrations
BrassRing can interact with several other systems, sending data to/from other systems as needed. Integrations are typically set-up during the BrassRing implementation process. Should your organization require integration after ‘go live’ date, you will work with IBM to design, configure, and implement most integration. Subscriptions are set-up for the management of the data transfer, wherein the vendor or host, schema, and transfer properties are defined. This chapter provides you with an overview of how to manage already existing integrations. There are two types of integrations: Custom and Pre-configured.
Standard Integration Pre-configured Integration
Point-to-point integration connects vendor system to BrassRing by using the respective IBM integration interface.
Partnership with various vendors allows for standard integrations through a Common Services model.
Administer Integrations
Integration administrations allows you to view, edit, or administer the subscription information related to different integrations you might have, such as Pre-Configured Background Check integration, Foundation, RFA, Form Imports, etc. To administer an existing integration:
1. Click Tools > Integrations > Administration.
Figure 12- 1: Integration type administration
2. To view the settings, click the View settings icon of one of the integration types. The view
settings screen provides you with a summary specific to an integration type.
3. To access the Subscription Admin screen, click the icon for Subscription admin of one of
the Integration types from the Integration Type administration screen.

Administrator Tools Using Workbench
© Copyright IBM Corp. 2020 Page 241
Course materials may not be reproduced in whole or in part without the prior written permission of IBM.
Figure 12- 2: Subscription Administration for Candidate Export.
On the subscription administration screen for a specific integration type you can view the settings and/or preview the XML path for each subscription enabled for your organization. Once IBM provides you access to edit an existing subscription, the edit subscription column also appears.
4. From the Subscription Administration screen for a specific integration type, click the Edit
Settings (Subscription) icon to see a list of subscriptions that was integrated for your organization.
a. View and edit the settings and preview XML / XML path. b. Click the Edit settings icon to access the settings. The following three tabs appear:
1. Subscription: Provides you with the details of the subscription such as Properties and Trigger Types.
2. Subscriber: Provides you with the details of the Subscriber.
3. Mapping: Shows you a list of fields that are included in the integration.
Figure 12- 3: Edit Subscription window

Administrator Tools Using Workbench
© Copyright IBM Corp. 2020 Page 242
Course materials may not be reproduced in whole or in part without the prior written permission of IBM.
Figure 12- 4: Edit Subscription window
Integration Tools Integration tools help you pull integration logs or posts which can assist you with trouble-shooting an integration issue.
1. Click Tools >> Integrations >> Integration Tools The screen will default to the list of Integration Summaries. You can select the following integration tools from the list of Actions (Figure 12-5):
▪ Integration summary ▪ Retrieve client post ▪ Get last post ▪ Get last successful post ▪ Get last failed post ▪ Get top 50 posted today ▪ Pull form fields ▪ Post XML directly ▪ Define system logs ▪ Retrieve system logs

Administrator Tools Using Workbench
© Copyright IBM Corp. 2020 Page 243
Course materials may not be reproduced in whole or in part without the prior written permission of IBM.
Figure 12- 5: Integration Tools List of Actions
VIEW ACCESS TO INTEGRATION ADMINISTRATION IS AUTOMATICALLY GRANTED WITH POWER USER WORKBENCH
ACCESS; HOWEVER, EDIT ACCESS NEEDS TO BE GRANTED IN CLIENT SETTINGS.
Types of Integrations BrassRing XML integration offerings allow IBM to work with our clients to configure multi-level, robust integration relationships between BrassRing and any system that can send and receive XML. Examples of these systems include HRIS (i.e. SAP, Oracle, etc.) and systems that perform HR related services like background checks, assessments, or compensation analysis. The table below provides the name and description of the different integration types:
Foundation Import Integration
Example: Departments, Site Locations, Cost Centers Available Field Options: Candidate form field options, Standard Req field options, Custom Req field options Available Question Types: Multi-select, Single-select, Query-select
Keeps your BrassRing field options in sync with your ever changing HRIS field options. - One XML file per foundation field - XML contains code, description, and status - Sent via HTTPS POST or web services - Real-time (synchronous) integration
Job Code Default Data (JCDD) Import Integration
Example: Job Code, Job Description, Department, Grade, Location/Division, Cost Center
Associates certain Req fields to a Job Code. Once associated the field data will always appear when creating a Req with that Job Code. - One XML file per Req template - All field types can be sent - Send via HTTP POST or web services - Real time (synchronous) integration

Administrator Tools Using Workbench
© Copyright IBM Corp. 2020 Page 244
Course materials may not be reproduced in whole or in part without the prior written permission of IBM.
Requisition Import Integration
Creates and/or edits Requisitions directly from your HRIS system. - Required fields must be sent - All field types can be sent - Sent via HTTP POST or web services - Real-time (synchronous) integration
HR Status Update Import Integration
Updates a candidate HR status from an outside source. - Required fields must be sent
▪ Candidate first name, last name and email or home phone OR Candidate reference number
▪ Status (must be an active status) ▪ Action Date
- Integration service will follow tracking logic rules that are set-up via BrassRing with respect to start, intermediate, and final status
- Service does not support final HR status updates such as “Hired” that will either auto-close a requisition or count-down positions on a req
- Sent via HTTP POST or web services - Real-time (synchronous) integration
Form (iLoad) Import Integration
Example: Background Check Results, Assessment Results, Interview Forms
Adds or updates data into a pre-existing candidate form - A candidate must exist in BrassRing before a
form can be attached to the candidate’s record
- The form must be already defined in BrassRing
- Sent via HTTP POST or web Services - Real-Time (Synchronous) Integration
User Import Integration
Required fields: First name, last name, employee ID, user name (unique ID), password, email address, BrassRing user – Y/N, manager – Y/N, recruiter – Y/N, user type, status, user group, org group
Adds, edits, and inactivates BrassRing user profile information. - Sent via HTTP POST or web services - Real-time (synchronous) integration

Administrator Tools Using Workbench
© Copyright IBM Corp. 2020 Page 245
Course materials may not be reproduced in whole or in part without the prior written permission of IBM.
Candidate Import Integration
Example fields: Name, address, education. Adds or updates candidate profile data within BrassRing. - Up to 5 candidate experience entries - Up to 3 candidate education entries - Sent via HTTP POST or web services - Offline (asynchronous) integration
Field Association Import Integration
Example field associations: - Parent = Country / Child = State - Parent = State / Child = City - Parent = City / Child = Zip Code
Creates and maintains field associations within your reqs. Field associations allow the selection of an option in a parent field to determine the options that are available in one or more subsequent child field on a requisition form or Talent Gateway form search page. - One XML field per parent - Field association rules apply (i.e. a child
cannot have more than one parent) - Sent via HTTP POST or web services - Offline (asynchronous) integration
Candidate Export Integration
Example: New hire, Background screening, WOTC Transfers candidate & requisition data into your HRIS or 3rd party system. - Types of candidate export:
▪ BrassRing Schema – incl. candidate profile and form only
▪ BrassRing Schema with Req – incl. candidate profile, all candidate forms and req form fields
- HR Status trigger - Requires post URL be provided to IBM - Real-time (synchronous) integration.
Table 12-1: Types of Integrations
Mapping Tool Overview
The BrassRing Mapping Tool offers you the ability to configure flexible, secure XML integration with minimal assistance from the IBM Professional Services (PSE) team. Below are a few additional highlights:
• No special training required. • Once an integration is configured in the Mapping Tool, changes can be made by your team
at any time. • Use of versioning tracks changes that are made. • The Mapping Tool can be used by any team member with access, however, we highly
recommend a technical resource completes or assists with the completion of the configuration.

Administrator Tools Using Workbench
© Copyright IBM Corp. 2020 Page 246
Course materials may not be reproduced in whole or in part without the prior written permission of IBM.
Mapping Tool Limitations The Mapping Tool does not support the following:
• Mapping Tool cannot be used for Non-XML Integrations (FTP). • XML does not support full/initial Loads. Complete these in Workbench Import before
turning on your integration. Mapping Tool Resources Additional information about the Mapping Tool can be found:
• Tools > Integrations > Mapping Tool • Click the Resource link on the top right side of the screen. The screen (Figure 12-6) informs
about: o XML Test Harness o IBM IP Addresses o Integration Post URLs o Mapping Tool Offerings
Figure 12- 6: Mapping Tool Resources
• Click the icon to access the Mapping Tool online help guide. Configure Integration by using Mapping Tool
To configure a secure XML integration using the mapping tool go to Tools > Integrations > Mapping Tool and follow the steps below:
1. You must first create a Project for your organization. Each project contains one or more integration types. From the Mapping Tool – XML Integration screen, click the Add Project button. The Creating a Project page displays with the Project Details and Integration Instance Details.
• Complete the Project Details section: o Integration Project Name o Optional Fields:
▪ Service Incident ▪ Kenexa Support Team

Administrator Tools Using Workbench
© Copyright IBM Corp. 2020 Page 247
Course materials may not be reproduced in whole or in part without the prior written permission of IBM.
▪ Integration Consultant ▪ Project Sponsor ▪ Project Coordinator ▪ IT Contact
o Select the Integration Type (see Figure 12-7).
Figure 12- 7: Integration Instance Details – Select Integration Type
• Click the Add button.
• Complete the fields on the Instance Details section: o Name o ClientSystem o ClientSystem Version
• Choose the Instance Properties.
• Click the Save button.
Figure 12- 8: Project Details
2. Create a Draft and Map the fields.
• Saving a new project automatically creates a Draft version in Mapping Draft Details area. Note: The initial draft version of a project does not have a version number.

Administrator Tools Using Workbench
© Copyright IBM Corp. 2020 Page 248
Course materials may not be reproduced in whole or in part without the prior written permission of IBM.
• Select the Project under the Mapping Draft Details section, and the Map Draft and Delete Draft buttons appear.
Figure 12- 9: Mapping Draft Details –Map Draft
Note: A Project can only be deleted when the selected project does not have any configured versions.
• Click the Map Draft button, and the Mapping page appears (Figure 12-10). Ensure that you have the integration mapping information collected for this project. This information specifies the order in which you should perform mapping tasks and provides detailed mapping content. Your goal is to perform mapping between BrassRing fields and your organization’s other systems’ fields.
Figure 12- 10 Mapping Page
• Select the Integration Type for which you will perform mapping.
• Select the Integration Instance for the selected Integration Type.
• Under the Select Sources, select the mapped field and click the Add to Mapped Fields button. Note: The newly mapped field now appears in the Mapped fields section where you can select, edit, or remove the field from the mapping (Figure 12-11)

Administrator Tools Using Workbench
© Copyright IBM Corp. 2020 Page 249
Course materials may not be reproduced in whole or in part without the prior written permission of IBM.
Figure 12- 11: Mapping Page
o The Preview Map button allows you to view the mapping fields at any time. o The Sample XML button displays the XML that is generated for the field once
mapped.
• Once all fields are mapped, click the Save button.
• The Approval button now appears. To continue, click the Approval button.
• On the Projects Approval screen, you can now create a version and export the data (Figure 12-12).
• Select the Project, and click the Make Version button.
• By clicking the Export button, you can download mapping data into Excel to share with your integration team.
Figure 12- 12: Project Approvals
3. The next step is to configure the Integration. Click the Configure button (Figure 12-13).
Figure 12- 13: Mapping Tool Integration Configuration

Administrator Tools Using Workbench
© Copyright IBM Corp. 2020 Page 250
Course materials may not be reproduced in whole or in part without the prior written permission of IBM.
• Select each integration and activate the project by clicking the icon.
• Once all the testing has been completed in staging, you can now publish the integration to Production. Select the Instance Name and click the Publish to Production button.
• After publishing the Integrations to Production, you need to configure and activate each one.
• Additional testing will be required in Production.
Chapter Summary
• Use the Integration Administration to view, edit, and administer your integration subscriptions.
• The logs and reports you can run from Integration Tools will assist you in troubleshooting any integration issues.
• Understand the different types of integrations.
• Administer the Mapping Tool.

Administrator Tools Using Workbench
© Copyright IBM Corp. 2020 Page 251
Course materials may not be reproduced in whole or in part without the prior written permission of IBM.
Check Your Skills
Answer these True or False questions:
1. A pre-configured integration is a point-to-point integration that connects vendor systems to BrassRing by usin the respective IBM integration interface.
2. Requisition Import Integration is an Offline (asynchronous) integration.
3. When you configure an integration using the Mapping Tool, you must first create a Project.

Administrator Tools Using Workbench
© Copyright IBM Corp. 2020 Page 252
Course materials may not be reproduced in whole or in part without the prior written permission of IBM.
Chapter 13: Managing Settings
Chapter Overview
With Workbench, you are in control of additional settings that can improve usability and allow for your company’s unique needs. This chapter reviews these settings.
Chapter Objectives
At the end of this chapter you will be able to:
− Define custom candidate types
− Define Candidate Tiering
− Create and manage attachment categories
− Create and manage blurb categories
− Create and manage email types
− Set instructions for adding candidates
− Set instructions for adding job codes with default data
− Set instructions for session expiry
− Set instructions for responding to eLinks
− Set search reasons
− Design headers when printing Talent Records from BrassRing
− Home page administration

Administrator Tools Using Workbench
© Copyright IBM Corp. 2020 Page 253
Course materials may not be reproduced in whole or in part without the prior written permission of IBM.
Manage Settings
In the sections ahead, we will explore how, using Workbench, you can create custom text messaging and labels for BrassRing or the Talent Gateways, setting clear instructions for adding new reqs or new job codes with default data. These features allow you to be true to your company’s unique process and incorporate its specific terms.
Defining Candidate Types
You can create candidate types tailored to your organization’s needs. Perhaps you consistently hire interns or support staff to the degree that warrants a special category candidate type.
Adding a New Candidate Type
Custom candidate types must have a unique name within the languages of your company’s BrassRing locales. To add a new candidate type:
5. Click Tools > Settings > Candidate types. 6. Click Add new candidate type in the Actions list. 7. Enter a Candidate type name. See Figure 13-1. There is a maximum of 75 characters. If
your organization has purchased multiple languages, click the plus sign to enter translations for the candidate type name.
8. For the Associate with these user types field, select the BrassRing User Types that will have search privileges associated with the candidate type.
9. For the Associate with these source codes field, enter any source codes that should be associated with the User Type. If you need to add multiple source codes, click the List button, and select them in the pop-up.
10. For the Allow this Candidate type to be changed by new Talent Gateway and Candidate Import submissions field, identify if this candidate type will be changed when the candidate applies for a req through a Talent Gateway or through Candidate Import Submissions.
11. Click Save. STANDARD CANDIDATE TYPE NAMES CANNOT BE MODIFIED, INACTIVATED, OR DELETED. CONFIGURABLE CANDIDATE TYPES CANNOT BE INACTIVATED OR DELETED, ONLY MODIFIED. THERE IS CURRENTLY NO LIMIT TO THE NUMBER OF CONFIGURABLE CANDIDATE TYPES, BUT IT IS
RECOMMENDED THAT THE NUMBER NOT EXCEED 200.

Administrator Tools Using Workbench
© Copyright IBM Corp. 2020 Page 254
Course materials may not be reproduced in whole or in part without the prior written permission of IBM.
Figure 13- 1: Add new candidate type
Editing a Candidate Type
Custom candidate types must have a unique name within the languages of your company’s BrassRing locales. To edit a candidate type:
1. Click Tools > Settings > Candidate types.
2. Click the Edit icon for the candidate type to be edited. Refer to Figure 13- 2. 3. Click Save.
Figure 13- 2: Add new candidate type

Administrator Tools Using Workbench
© Copyright IBM Corp. 2020 Page 255
Course materials may not be reproduced in whole or in part without the prior written permission of IBM.
Candidate Tiering
Candidate Tiering
Candidate Tiering allows for managing high volumes of candidates within a given req folder. It divides up the applicant pool based on certain criteria (i.e., Proximity, Assessment result band, and Award positions). Candidate tiering tiers the candidates who are to be visible at one time in the req folder. The req initially displays all candidates with no specified tier, and candidates in tier 1. After the initiation period setting, candidates in tier 2 will show only if all tier 1 candidates are in a final non-hire status (# of positions is 1). This logic continues for all additional tiers after the previous tier candidates are all dispositioned. The user with the appropriate privileges can update the visible tier for the req at any time (this privilege should be an exception, not a rule). As a Workbench Administrator, you have the ability to:
o Define the tiers (the number of tiers is unlimited) o Add tiering to the appropriate req templates
Your IBM Rep must set up the criteria for the tier. For example, the criteria for tier 1 is based on candidates who are within a 20-mile radius of the location for the req.
To define candidate tiering:
1. Click Tools > Settings > Candidate tiering. The Candidate Tiering Administration screen appears.
2. Click Add new tier. The Add/Edit Tier screen appears. 3. Enter the tier information:
Tier display name: The display name can be up to 255 characters, HTML is supported, and will appear in BrassRing on the candidate grid, Talent Record grid, and pop-ups for editing the candidate and req tier. Examples of tier names are: Tier 1, Tier 2, Tier 3, etc. or Tier A, Tier B, Tier C, etc. Tier reporting name: The reporting name is displayed within DIT reporting, cannot contain HTML, and can be up to 255 characters. This is an optional field.
4. Click Save. To set up the candidate tiering for the appropriate req form:
1. Click Tools > Forms > Reqs > Req Forms.
2. Click Edit form attributes for the req form which will have candidate tiering. 3. Define the fields:
Tiering initiation period (hours): Identify how much time (in hours) should pass before candidates in tier 2 appear in the req folder.

Administrator Tools Using Workbench
© Copyright IBM Corp. 2020 Page 256
Course materials may not be reproduced in whole or in part without the prior written permission of IBM.
Tiering Selection: Identify which tiers will be associated with this req and the order the Tiers will display.
4. Click Save
From a BrassRing perspective (once candidate tiering is configured; see Figures 13- 3 and 13- 4):
– The Candidate Tier column displays the candidate tier. Note: Candidate Tier needs to be a column in the output grid
– With the appropriate permissions, click link to update the tier (used in exception process) – It is the same view for all User Types
Figure 13- 3: List of candidates in a req folder
Figure 13- 4: Update candidate tier
Administrator Tools Using Workbench
© Copyright IBM Corp. 2020 Page 257
Course materials may not be reproduced in whole or in part without the prior written permission of IBM.
Attachment Categories
With the use of Talent Gateways, your company might have elected to use the attachments feature. There are multiple Workbench functions related to the overall management of attachments. You might have identified one function earlier, when we discussed User Type privileges in Chapter 3. In this section, we will learn how to create Attachment Categories. Attachment categories are the categories candidates will select before uploading attachments to their Talent Records. Attachment categories are also the categories users will select when adding attachments to req forms.
Elements of Attachment Categories
Here are some details to keep in mind regarding candidate attachment categories:
- Candidates can upload their own attachments when they submit their record through a Talent Gateway
- You can designate attachment categories to specific Talent Gateways, req folders, and document templates
- Categories can be translated and modified - Attachment categories can be deleted if the category is not mapped to a Talent Gateway,
req folder, and/or document template
Adding a New Attachment Category
Attachment categories must have a unique name within the language of your company’s BrassRing locale. To add an attachment category:
1. Click Tools > Settings > Attachment categories. 2. Click Add new category in the Actions list. 3. Enter the Attachment Category name. To enter translations of the attachment category,
click the plus sign icon, and enter each translation for each language. 4. Select an option for the Sensitive attachment Category. When an attachment category is
designated as sensitive, users can see the attachments in this category when they have the Attachments – view “Sensitive attachments in my req” privilege checked for their User Type.
5. Click Save.

Administrator Tools Using Workbench
© Copyright IBM Corp. 2020 Page 258
Course materials may not be reproduced in whole or in part without the prior written permission of IBM.
Blurb Categories
While in the course of creating a document or an email, users might select blurbs to include in the document or email. Blurbs that are selectable by users during document or email creation must have a blurb category assigned to them. Blurbs that are not selectable by users during document and email creation do not need to have a blurb category assigned to them. To make a blurb selectable by the user during document or email creation, you must set the setting Allow blurb selection during document/email creation? to Yes. See sections in the BrassRing Admin Tools Manual on email template and document template creation for more information.
Adding a Blurb Category
To add a blurb category: 1. Select Tools > Settings > Blurb categories. The Blurb categories administration window opens. 2. Click Add new blurb category in the Actions list. The Add new blurb category window pops
up. On this page you can create and translate new blurb categories.
Translate a Blurb Category To translate blurb categories in one location:
1. Select Tools > Settings > Blurb categories > Translate blurb category. The Translate blurb category window pops up.
2. Select the locale from the drop-down list. The list refreshes and displays the blurb categories and associated translations (if they exist).
3. Enter or change the translated value for each blurb category. You must have a value for the base locale.
4. Click Save. Otherwise, click Reset to saved to restore the last saved configuration, or click Cancel to close the window without saving any changes.
5. The translation confirmation window pops up. Click Close.
Edit a Blurb Category
To edit a blurb category:
1. Select Tools > Settings > Blurb categories. 2. On the Blurb categories administration page, find the blurb category you want to change,
and click the Edit icon in its row. The Edit blurb category details window pops up.

Administrator Tools Using Workbench
© Copyright IBM Corp. 2020 Page 259
Course materials may not be reproduced in whole or in part without the prior written permission of IBM.
Email Types Configuration
An eLink sent by a BrassRing user who does not provide any message text is more likely to be filtered out as spam than one with message text. Your organization can choose to provide default text for the message section of eLinks to reduce the possiblility of being filtered out.
The Email types configuration setting provides a means to configure default text for different locale/eLink type combinations. The setting associates the combination with a system email template for which default text has been defined. The system email templates is created in BrassRing from Admin> Communications>System e-mail templates. The default text is automatically appended to the Your message field when BrassRing users send an eLink.
The eLink types eligible for mapping include:
• Candidate – eLink Blank Form (Click eLink Blank Form in the Talent Record > Forms tab)
• Candidate – eLink Form (Click the eLink icon in the Talent Record > Forms > eLink icon in the list of available forms)
• Candidate – eLink Talent Record (Click eLink in the Action menu in any candidate listing page, panel, or Talent Record)
• Req Approval (The eLink the approver receives)
Configure Email Type
To configure an email type:
1. Navigate to Tools > Settings > Email types configuration.
2. Click the edit icon for the email type you would like to configure. The Email Type Configuration screen appears.
3. Select the System e-mail template from the drop-down list for the client locale. Note: The system email templates is created in BrassRing from Admin> Communications>System e-mail templates.
4. Click the Preview button to view the email selected in the drop-down list. 5. Click Save.
Figure 13- 5: Edit email type configuration

Administrator Tools Using Workbench
© Copyright IBM Corp. 2020 Page 260
Course materials may not be reproduced in whole or in part without the prior written permission of IBM.
Job Code Instructions You can create custom instructions for your Super Users to follow when adding new job codes to BrassRing. You can assign default data associated with job codes. When a particular job code is selected when creating a req, the default information associated with that job code will auto-populate on the req form. Setting instructions can help your Super Users. For example, there might be a new division rolling out BrassRing that needs additional job codes specific to their hiring needs. Detailed instructions can help guide the way for your Super Users entering in the new codes.
Setting Job Code Instructions These instructions are viewable by anyone who has access to add a job code with default data. To set job code instructions:
1. Click Tools > Settings > Instructions > Job code instructions. 2. Type your guidelines in the Enter Instructions text box. See Figure 13- 6. HTML tags are
accepted. The character limit is 4,000. 3. Click Preview to preview the new instructions in BrassRing. 4. Click Set to default to restore the default job code instructions. 5. Click Save.
Figure 13- 6: Setting job code instructions
THE INSTRUCTIONS ONLY APPEAR IF USING JOB CODES WITH DEFAULT DATA IS ENABLED. TO ENTER TRANSLATED JOB CODE INSTRUCTIONS, CLICK THE PLUS SIGN + NEXT TO ENTER INSTRUCTIONS.
TYPE YOUR TRANSLATION INTO THE TEXT FIELD. NEW JOB CODES ARE ADDED TO BRASSRING THROUGH ADMIN+.

Administrator Tools Using Workbench
© Copyright IBM Corp. 2020 Page 261
Course materials may not be reproduced in whole or in part without the prior written permission of IBM.
eLink Respond Instructions BrassRing users will use eLinks to share candidate information with other users and non-system users. When received, an eLink allows the recipient to send a response back to the original sender by using a Respond button. Workbench users are able to modify the instructions that appear with the Respond button. See Figure 13- 7.
Setting eLink Respond Instructions
Figure 13- 7: Location of the Respond Instructions in an eLink
SETTINGS CAN BE ENABLED BY YOUR IBM REPRESENTATIVE, SO THAT ALL RESPONSES SENT FROM ELINKS ARE
CAPTURED WITH THE CANDIDATE’S TALENT RECORD.
1. Click Tools > Settings >Instructions > eLink respond instructions. 2. On the eLink Respond Instructions page, enter your customized text in the Respond
Instructions text box. The default text is, “Click to send your feedback on this candidate.” (You might click Preview to see how the text will appear to users.)
3. Click Save to save your changes. (Cancel closes the window without saving your changes. Revert to saved will go back to the previously saved version if you have not yet saved your new changes.)
Add Candidate
Setting Instructions for Add Candidate
To set instructions to appear at the top of the page for Add Candidate:
1. Click Tools > Settings> Instructions > Add Candidate/Contact list page instructions. 2. Enter instructions to the user in the Add Candidate TG list page instruction text area. 3. Click Save.
Note: The Add Contact process is no longer available.

Administrator Tools Using Workbench
© Copyright IBM Corp. 2020 Page 262
Course materials may not be reproduced in whole or in part without the prior written permission of IBM.
Session Expiry Instructions
You can add customized text to the session expiration pop-up window that indicates an impending timeout. If their session expires due to inactivity, users see the session expiry warning with the appropriate custom instruction text. When they click OK for the warning, they are redirected to their point of entry. For multi-language sites, instructions display by default in the user’s login language. If that is not available, instructions display in your organization’s base language. If the base language cannot be determined, then no instructions are displayed. Both are for system users and users logging in from normal login. Note: For clients allowing access to BrassRing by using the usual BrassRing login page and by using a link on an authenticated Portal site configured with Single Sign-On (SSO), IBM must configure the custom login for your organization before you make these customizations. To append custom instructions to the Session expiry warning:
Setting Session Expiry Instructions
To set session expiry instructions:
1. Click Tools > Settings> Instructions > Session expiry instructions. 2. Enter custom instructions for either or both types of login. You can enter up to 4,000
characters (including HTML tags). Click Preview to see how the message will look to your BrassRing users.
3. The configured text (if any) will be appended to the existing standard text when the session expiration warning pops up. See Figure 13- 8.
4. Click Save.
Figure 13- 8: Session Expiry Instructions

Administrator Tools Using Workbench
© Copyright IBM Corp. 2020 Page 263
Course materials may not be reproduced in whole or in part without the prior written permission of IBM.
Setting Search Reasons
This feature is associated with the OFCCP field. If enabled, the OFCCP field allows users who are running a candidate search to identify the reason for the search. Doing so saves the search information, including the req association or reason for the search. If the No associated req field is configured with a list of search reasons to choose from, as a Workbench Administrator, you can maintain the list of reasons. Note: Configuring the No associated req field with a list of search reasons to choose from must be done by an IBM Rep.
Adding a Search Reason
To create search reasons:
1. Click Tools > Settings > Fields > Search reasons. The Search reasons administration page appears. Click Add new search reason in the Actions list. In the Add new search reason window, enter the Search reason in the text box, and click Save.
Editing a Search Reason
To edit a search reason:
1. Click Tools > Settings > Fields > Search reasons. The Search reasons administration page appears.
2. Find the Search reason you want to edit, and click the Edit icon. 3. On the Edit search reason page, make the changes you want and click Save
Click Save.
Deactivating a Search Reason
To deactivate a search reason:
4. Click Tools > Settings > Fields > Search reasons. The Search reasons administration page appears.
5. Find the Search reason you want to deactivate, and click the deactivate icon. 6. Click Save.

Administrator Tools Using Workbench
© Copyright IBM Corp. 2020 Page 264
Course materials may not be reproduced in whole or in part without the prior written permission of IBM.
Bulk Print Admin
As a Workbench Administrator, you can configure the message that appears as the body text on the file delivery email for the candidate overview within a candidate’s Talent Record, a resume or CV, an attachment, and specific letter templates.
Bulk Print Admin To set up bulk print admin:
1. Select Tools > Settings > Bulk print admin. 2. Enter the message in the message text field. The field can contain a maximum of 4,000
characters. 3. For Files included in print request, identify which files the message will be applied to.
Talent Record Print Page Header
You can choose to configure a page header that is specific to printing the resume or CV from within the Talent Record. The page header can contain a maximum of 4,000 characters, and can be left-, center-, or right-aligned. This field accepts HTML. The Page header field can be translated into all client-purchased BrassRing locales. You can add statements relating to privacy and so forth to every page of the Talent Record. Your organization must decide if they want customized text on its Talent Record pages and what it should say.
Setting up the Print Page Header
To set up the print page header:
1. Select Tools > Settings > Printing page header. The Printing page header page displays. 2. Select the alignment for the header: Left aligned, Center aligned (default), or Right
aligned. 3. Enter the page header text and HTML into the Page header text box. 4. Click Preview to see what it will look like. 5. Click Save to save your changes. Click Cancel to close the page without making changes.
THE PAGE HEADER CAN CONTAIN A MAXIMUM OF 4,000 CHARACTERS, INCLUDING HTML TAGS, AND CAN BE
LEFT-, CENTER-, OR RIGHT-ALIGNED. BEST PRACTICE RECOMMENDATION: USE STANDARD HTML TAGS AND PREVIEW THE HEADER BEFORE
PUBLISHING IT.

Administrator Tools Using Workbench
© Copyright IBM Corp. 2020 Page 265
Course materials may not be reproduced in whole or in part without the prior written permission of IBM.
BrassRing UI Colors
Additional branding options are available for stand-alone BrassRing clients and their new UI Home page. Previously, the text and icons on the home page banner were in white and there was no option to change. Workbench users can now make branding related updates to the color of the home page banner text and icons.
To make any branding related updates:
1. Select Tools > Settings > BrassRing UI Colors. 2. On the BrassRing UI Colors page, select Responsive Recruiter Branding and click Launch. 3. Right click your mouse on the home page banner and select Header Text Color. The
following text and icons are impacted by this change: ▪ Main Navigation (hamburger) icon color ▪ Hiring text color ▪ Home icon color ▪ Log-off icon color
BrassRing Home page
The Home page is designed to displays cards, grids, visualizations, and welcome messages specific to five different personas:
- Recruiter - Hiring Manager - Administrator - HR User - Reporting / Analytics
The BrassRing user experience is based on persona designation. Each persona will provide the user with the view of the data that works best for them. Users can personalize the view of the home page depending on their day to day tasks and needs. Note: The HR Status Categories must be mapped in order for visualizations to work on the Home page. The persona group of Default is automatically assigned if a selection is not made by the client from the list of five personas. The overall view defaults to My Reqs and the Card View by personas are as follows:
- Recruiter – Req #, Job Title, Location, Department, Posting icon, New, and Total Candidates.
- Hiring Manager – Req #, Job Title, Location, Department, Recruiter, New, and Total Candidates.
Note: The Recruiter persona is used for the remainder personas which will be updated with person-specific configuration in future Releases.
Administrator Tools Using Workbench
© Copyright IBM Corp. 2020 Page 266
Course materials may not be reproduced in whole or in part without the prior written permission of IBM.
Home page Administration – Configuration
Client Welcome Message Home page administration allows you to configure the client messages and associate each message with one or multiple personas. For example, if a client wanted to the recruiters to take a specific action, they might configure the message and have that message only display for the recruiter personas. To access the Home page Administration:
1. Select Tools > Settings > Home page Administration. 2. The list of personas appears. Select the Edit icon for a persona. 3. Title – If applicable, edit the title field of the person to change its name. Title field can
contain up to 150 alphanumeric characters. The field does not accept HTML. 4. Text – The text field is the message body. The Text field can contain up to 350
alphanumeric characters. HTML is accepted but is included in the character limitation. 5. Display Client Welcome Message Administrators – must select Yes or No. If ‘Yes’ is
selected, the client message is visible to the persona. 6. Display BrassRing Highlights Administrators – must select Yes or No. If ‘Yes’ is selected, a
message from BrassRing to clients is visible. Note: When users read the message and select X to close the message, the message is dismissed and no longer displays. If the BrassRing highlights message is updated the next time the BrassRing user logs-into BrassRing, the new BrassRing highlight message displays.
7. Also, apply this configuration to the selected personas Administrator – select other personas that should also be able to view the message.
8. Select Save.
Set Default Configuration To dictate what new users see when logging into BrassRing for the first time, Workbench Administrators can now set default configurations for each persona for the My Open Reqs card and grid views, and the My Candidates grid views. This ensures that Workbench Administrators can regulate what new users are seeing; allowing users to start working in the system quickly with company standard settings. The following items can have defaults configured:
• Grid fields
• Card fields
• Quick links (including folder name)
• Tab view and order (first tab is set as the default tab) BrassRing Home page tabs available to be added (or removed) are:

Administrator Tools Using Workbench
© Copyright IBM Corp. 2020 Page 267
Course materials may not be reproduced in whole or in part without the prior written permission of IBM.
- My Open Reqs – details about open reqs for which the user has a My relationship. o The My Open reqs tab can be filtered by selecting Filters>> and selecting the filter
as needed. o The number of filters applied is shown in the Filters link. o When a filter is saved in a specific view of a tab, that filter is not available in a
different view or a different tab. o The filter set do not persist in the internal grids. o If a user selects a specific filter criteria and logs out of BrassRing without saving
the filter, the filter criteria selection is retained when the user logs back into BrassRing.
- My Candidates – details about candidates who applied to My Open Reqs. - My Tasks – pending approvals of req or candidate form; users open the tasks tab to
complete their tasks right from the home page. Select Task Type: HR Status Aging to see the HR Status Aging information in the My Tasks page.
- My Reqs Pending Approval – details about pending reqs for which the user has a ‘My’ relationship. Users have this tab available if their user type has the privilege to view Pending Reqs. New users have this tab automatically on their homepage if their user type has the ability to view their Pending Reqs, existing users can add this tab.
o Users have an Approve action available on the Grid view of the tab; which displays if the req is pending the user’s approval. The approval action is valid for the standard approval functionality and not for Custom Approval Workflow (Smart Approval).
o Default Card View (Personas: Administrator, HR User, Recruiter, Reporting/Analytics and Default)
▪ Auto Req ID ▪ Job Title ▪ Date Created ▪ Location/Division (Req standard field) ▪ Manager ▪ Next Approver
o Default Card View (Persona affected: Manager) ▪ Auto Req ID ▪ Job Title ▪ Date Created ▪ Location/Division (Req standard field) ▪ Recruiter ▪ Next Approver
- My Approved Reqs – Users see the My Approved Reqs tab only if the user type has the privilege to view their Approved requisitions. Administrators cannot add the tab automatically for existing users. New users see this tab automatically on their Home page if the user type has the privilege to view their reqs in Approved status. The My Approved tab has the following details:
o Default Card View and Grid View (Personas: Administrator, HR User, Recruiter, Reporting/Analytics, and Default)
▪ Auto req ID ▪ Job Title
Administrator Tools Using Workbench
© Copyright IBM Corp. 2020 Page 268
Course materials may not be reproduced in whole or in part without the prior written permission of IBM.
▪ Date Created ▪ Location/Division (Req standard field0 ▪ Department ▪ Manager
o Default Card View and Grid View (Persona affected: Manager) ▪ Auto req ID ▪ Job Title ▪ Date Created ▪ Location/Division (Req standard field) ▪ Department ▪ Recruiter
- All Open Reqs – Provides visibility to all Open reqs in your organization. Users see the All Open Reqs tab only if the user type has the privilege to view all open reqs.
o New Users automatically have this tab on their Home page if they have the privilege to view All Open Reqs. Existing users can add the tab by selecting Edit tabs. Administrators cannot add the tab automatically for existing users.
o The All Open Reqs tab can be filtered by selecting Filters>> and selecting the filter as needed.
o The number of filters applied is shown in the Filters link. o When a filter is saved in a specific view of a tab, that filter is not available in a
different view or a different tab. o The filters set do not persist to the internal grids. o If a user selects a specific filter criteria and logs out of BrassRing without saving
the filter, the filter criteria selection is retained when the user logs back into BrassRing.
- Interviews – Provides visibility to Interviews in your organization. New Users automatically have this tab on their home page if it has been configured. Existing users can add the tab by selecting Edit tabs. Administrators cannot add the tab automatically for existing users.
o The tab can display a grid view or card view of interview fields. o The grid view can be customized to display Interview Standard fields, Candidate
Standard fields, and Req Standard fields by selecting the Configure Display icon.
To configure the BrassRing Home page:
1. Select Tools > Settings > Home page administration. 2. Click the Administer Home page icon for the persona you are configuring (Figure 13-11).
The Administer Persona page appears.
Example of how to configure My Open Reqs:
1. Click the My Open Reqs link.
2. Select the Configure Display icon to add or remove columns. Note: You might display up to 20 fields.
3. Click Submit.

Administrator Tools Using Workbench
© Copyright IBM Corp. 2020 Page 269
Course materials may not be reproduced in whole or in part without the prior written permission of IBM.
4. Before closing the screen, you must click the Save button to save your configuration changes. Any new user with the persona you configured who logs-on to BrassRing for the first time will see the new display for My Open Reqs for the Grid and Card.
Figure 13- 11: Setting default output fields
Example of how to configure Quick Links:
1. Click the Quick Links icon . 2. On the Quick Links page, click Add Quick Link. 3. You can now add the Name and URL of a link to appear in Quick Links. 4. Optional – The New Folder hyperlink allows you to add folders to be used when
categorizing your links in Quick Links. 5. Click Save. 6. Once you click the Save button on the Administer Home page screen, the links and/or
folders you added in Quick Links will automatically appear for any new user with the persona you configured who logs-in to BrassRing for the first time.
FIELDS THAT CANNOT BE CONFIGURED INCLUDE REQ FILTER SELECTION AND SORTING ON GRIDS AND CARDS. MORE DETAILS ON THE HR STATUS AGING OPTION IN THE MY TASKS TAB IS AVAILABLE IN CHAPTER 11.
Standard Reporting Settings
The Standard Reporting settings allow the Workbench Administrator to configure the following:
o Shared Settings
o Source Settings
o Diversity Settings
o Dashboard Settings
o Talent Comparison Settings

Administrator Tools Using Workbench
© Copyright IBM Corp. 2020 Page 270
Course materials may not be reproduced in whole or in part without the prior written permission of IBM.
To access the Standard Reporting Settings:
Select Tools > Settings > Reports.
Shared Settings The Shared Settings tab contains settings that are shared across all standard reports.
1. Hired statuses section: o Select the HR Status to be considered as the hired status across all standard
reports. o Multiple HR Statuses can be selected. Example: select Hired in the Available HR
statuses column and select Add. 2. Not interested statuses section:
o Select the HR Status to be considered as the disposition status across all standard reports.
o Multiple HR Statuses can be selected. Example: select Candidate Not Interested and Company Not Interested.
3. Start date section: o Select Select form field. o Select the candidate form field to be used to indicate the start date for your
organization’s new hires. o Only Date fields from per req candidate forms show in this list. Example: Start
Date from the Offer form. 4. Custom requisition fields section:
o This section allows you to pick up to four req fields that users are able to choose from when filtering their standard reports.
o Filter fields can vary between specific standard reports and you are able to update the reporting label in the languages your organization has enabled for the BrassRing UI.
o Select the report name by using the pull-down menu. This refreshes the fields that are selected in the Configured fields section to display the fields chosen for the selected report. If needed, select different fields to be used as filters for that report.
o Select View configuration to view the req fields to be chosen as filters for each report.
o Instead of updating each standard report separately, use the Apply configuration to field to apply the filter fields to reports of your choosing.
o The default filter fields are: ▪ Department = Standard Department field. ▪ Location/Division = Standard Location or Division field. ▪ Hiring manager = Standard Manager field. ▪ Recruiter = Standard Recruiter field.

Administrator Tools Using Workbench
© Copyright IBM Corp. 2020 Page 271
Course materials may not be reproduced in whole or in part without the prior written permission of IBM.
Figure 13- 12: Custom Requisition Fields
Source Settings
The Source settings tab allows your organization to determine what field should be used to indicate candidate source in the standard reports.
• Select either Pull source from code type or Pull source from form. Only one can be selected.
o If Pull source from code type is selected: ▪ Select the code type. Example: Source Code ▪ Select the instance. Example: Most Recent
Note: Codes are stored in the Codes (Last Codes) section of the candidate’s Talent Record.
o If Pull source from form is selected: ▪ Select Select form field. ▪ Select the appropriate field that stores the candidate’s source from the
req and candidate form fields. Only one can be selected.
Diversity Settings
The Diversity settings tab allows you to determine what fields and options indicate diverse groups for candidates in your organization. Only single per candidate or single per candidate per req forms can be used in this configuration.
1. Diversity hires section: This section is used to identify what a diverse candidate or new hire means to your organization.
• Select Select form fields.

Administrator Tools Using Workbench
© Copyright IBM Corp. 2020 Page 272
Course materials may not be reproduced in whole or in part without the prior written permission of IBM.
o Choose the fields that indicate a diverse candidate hire within your organization.
o Multiple fields can be selected. It is recommended that you consult with your legal team to determine which fields or options that should be used for this configuration. Example: Gender and Race or Ethnicity fields from the EEO Form. Selection field from the 503 Disability Self-ID form. Selection field from the VEVRAA Post-Offer form.
• Select each field separately from the Selected fields pull-down menu. o Upon selecting each field, you can choose which field options indicate
that the candidate is a diverse hire. Example: Women from the Gender field of the EEO Form. The Yes, I have a disability option from the 503 Disability Self-ID form.
• Select Candidate type instance of Current, Previous, or Original to determine which candidate type the Diversity report looks at for the calculation.
• Select the Candidate types that are represented in the graph.
Figure 13- 13: Diversity Hires
2. Diversity breakdown section: This section is used to map your req form field options and candidate form field options for both the Diversity standard report and the Diversity visualization.
• Job category section: o Select a requisition field in the Select question pull-down menu. Example:
EEO1 Category o Select List> for each category to map your req form field option to the
designated job category option. Example: Exec/Sr Level Officials and Managers = Exec/Sr Level Officials and Managers option in the req form field. More than one field option can be mapped to each category configuration if wanted.
• Gender Section:

Administrator Tools Using Workbench
© Copyright IBM Corp. 2020 Page 273
Course materials may not be reproduced in whole or in part without the prior written permission of IBM.
o Select Select form fields to choose which field to use in the mapping. Example: Gender field from the EEO Form.
o Select the field options that to designate as the Male and Female options for the gender configuration.
• Race section: o Select Select form fields to choose which field to use in the mapping. Example:
The Please select the race/ethnicity that best applies to you field from the EEO Form.
o Select the field options that to designate as the various race options for the race configuration.
Figure 13- 14: Diversity Settings: Race
Dashboard Settings
The Dashboard settings tab allows you to edit settings for the standard reports: Source Yield, Talent Pipeline, and Time to Fill.
1. Source yield section: o Displays the Source location or field that was selected in the Source settings tab.
Select Select options to select up to five sources. Select View configuration to view the sources currently configured.
2. Talent pipeline statuses section: o Select the HR Statuses to include in the pipeline. A maximum of five statues can
be selected. Statuses can also be ordered by using the Move Up or Move Down options. Example: Applied, Hiring Manager Review, First Interview, Offer Accepted, Hired.
3. Time to fill goal section: o Define your organization’s target Time to Fill goals by entering values into the
Minimum days (#) and Maximum days (#) fields.

Administrator Tools Using Workbench
© Copyright IBM Corp. 2020 Page 274
Course materials may not be reproduced in whole or in part without the prior written permission of IBM.
Figure 13- 15: Setting default output fields
Talent comparison settings
The Talent Comparison tab allows you to configure the Talent Comparison report. The Talent Comparison report is found in BrassRing by accessing a req folder, selecting 2 - 5 candidates, and selecting Actions > Talent Comparison.
• From the Select report type field, select either the Client-level criteria selection or the User-level criteria selection option.
• If Client-level criteria selection is selected: o Select Add field to configure. o From the Select field type field, select either Applicant Master Form or Candidate
Form Fields. o The previous selection determines what fields show in the Select field pull-down
menu. Choose the field to include in the comparison report. o To add more fields to the configuration, repeat these steps. A maximum of 10
fields can be selected for the Talent Comparison Summary. • If User-level criteria selection is selected:
o Select Select form fields. o Select the appropriate fields to be included in the comparison.

Administrator Tools Using Workbench
© Copyright IBM Corp. 2020 Page 275
Course materials may not be reproduced in whole or in part without the prior written permission of IBM.
Chapter Summary
• You can create candidate types tailored to your organization’s needs
• Attachment categories are selected by candidates when uploading their attachments through a Talent Gateway. Company-specific categories can be designated per Talent Gateway
• Instructions can be created to aid users when adding a job code. Each function must be enabled with default data to be customized
• Default search and output fields can be defined for new users

Administrator Tools Using Workbench
© Copyright IBM Corp. 2020 Page 276
Course materials may not be reproduced in whole or in part without the prior written permission of IBM.
Check Your Skills
Answer these True or False Questions:
1. IBM recommends that clients create no more than 50 custom candidate types.
2. Attachment categories can be inactivated but not deleted.
3. Instructions can be created to aid users when adding a job code.
4. A printing page header can contain a maximum of 4,000 characters.
5. You must contact your IBM representative to customize the text for the expiry session pop-up message.
6. An unlimited number of characters can be used when setting up the Talent Record page
header. Perform these hands-on exercises in Workbench:
7. Select a new search field and a new output field as defaults.
8. Create a new attachment category.
9. Delete the attachment category created.

Administrator Tools Using Workbench
© Copyright IBM Corp. 2020 Page 277
Course materials may not be reproduced in whole or in part without the prior written permission of IBM.
Appendix A
Managing Short Messaging Service (SMS) for Responsive Talent Gateway (TG)
As a Workbench Administrator, you can manage the SMS function available with Responsive Talent Gateway (TG). This feature enables the candidates to receive notifications by using SMS text messaging. The candidates can choose to opt for the service either from the Account Settings section of their Candidate Zone or when they apply to a requisition. BrassRing users can send SMS text messages to one or multiple candidates from within Req or Working folders, the user’s Inbox, the candidate’s Talent Record, or from the Candidate Results page. History and content of the SMS text message is stored in the candidate’s Talent Record Action log and within communication. To send a candidate a text message from within BrassRing, the user privilege Candidates – send candidate SMS message from the function Candidate Action 2 must be enabled.
BrassRing currently integrates with three SMS aggregation vendors:
• Clickatell (https://www.clickatell.com)
• mGage (https://www.mgage.com)
• Whispir (http://www.whispir.com)
For mGage and Whispir, clients can contract with through IBM and work with their IBM representative or they can contract directly with the vendor.
SMS Workflow BrassRing supports multiple workflows to meet the regulatory and legal requirements of different jurisdictions:
• No explicit opt-in required: In some countries and jurisdictions, there are no regulatory requirements to obtain consent and have the candidate opt-in explicitly to receive text messages.
• Single opt-in required: Some countries and jurisdictions require that the candidate consent once to receive text messages in addition to providing their mobile phone number and mobile phone country.
• Double opt-in required: This is the workflow that US, Canada, UK, and other EU countries use (see more details below).
Double-opt in Workflow In order for the BrassRing users to be able to send text messages to candidates, the candidates must first provide their mobile phone number and mobile phone country and their double consent to receive text messages.
First opt-in step: o Candidate opts-in/gives consent on the Responsive Talent Gateway, either from
the Account Setting page or from within the apply process.

Administrator Tools Using Workbench
© Copyright IBM Corp. 2020 Page 278
Course materials may not be reproduced in whole or in part without the prior written permission of IBM.
▪ Each time a candidate chooses to opt-in to receive SMS messages, an email is sent to the candidate to confirm that he/she opted to receive SMS regarding jobs.
▪ The email message can also contain information on how to opt-out if the candidate no longer wants to receive SMS text messages in the future. The standard text that is included in the email reads: Please keep these instructions for your records, in case you want to change your SMS preferences at a later time. The verbiage following the standard text is configurable in Workbench.
o Candidate provides his/her mobile phone number in the ‘other phone’ field. o Candidate provides his/her mobile phone country. This will automatically add the
country code to the beginning of the number provided in the ‘other phone’ field.
Second opt-in step:
o Candidate must send a text message containing a client-specific keyword (typically the BRUID + Client ID) to the vendor’s short code number.
Enable SMS Function After IBM activates the feature in Client Settings, enable or configure the following function in Workbench and BrassRing as described below: 1. Enable User Type Privilege of SMS – aggregation vendors.
- Select Tools > Users > User Types > Edit type permissions > Integration 2. - Select the privilege of SMS – aggregation vendors. This privilege allows users to configure
SMS Aggregation Vendor information in BrassRing. It is recommended that only BrassRing Administrators have access to this function.
2. In BrassRing, configure the aggregation vendors. - Select Hiring > Admin > Communications > SMS aggregation vendors. - Click Add. Then select the vendor and complete all required fields. See Figure A-1.

Administrator Tools Using Workbench
© Copyright IBM Corp. 2020 Page 279
Course materials may not be reproduced in whole or in part without the prior written permission of IBM.
Figure A-1: Add new SMS aggregation vendor
DEPENDING ON THE VENDOR, THE FIELDS ON THE SCREEN MIGHT CHANGE. INFORMATION NEEDED TO
COMPLETE THESE FIELDS WILL BE PROVIDED BY THE VENDOR. NOT HAVING THE ‘OPT-IN THROUGH MOBILE DEVICE REQUIRED’ CHECKBOX MARKED WILL NOT REQUIRE
THE CANDIDATE TO OPT-IN. YOU CAN ONLY CONFIGURE ONE SMS VENDOR PER COUNTRY, PER CLIENT SITE.
Clickatell and mGage Required Fields (see Figure A-2 and A-3):
• Countries
• API ID
• Username
• Password
• From (If opt-in through mobile device checkbox is selected)
Whispir Required Fields (see Figure A-4):
• Countries
• API ID
• Username
• Password
• From (If opt-in through mobile device checkbox is selected)
• Workspace
• Message template

Administrator Tools Using Workbench
© Copyright IBM Corp. 2020 Page 280
Course materials may not be reproduced in whole or in part without the prior written permission of IBM.
Figure A-2: Add Clickatell aggregation vendor
Figure A-3: Add mGage aggregation vendor

Administrator Tools Using Workbench
© Copyright IBM Corp. 2020 Page 281
Course materials may not be reproduced in whole or in part without the prior written permission of IBM.
Figure A-4: Add Whispir aggregation vendor
3. Add instructional text to the Responsive Talent Gateways.
- Select Tools > Talent Gateways > Edit Responsive layout > Communications. - The default text for the field SMS messaging – candidate consent pop-up message
appears. Optional – edit the default text. See Figure A-5. o This field contains the legal/disclaimer text that needs to be displayed to the
candidate when the information icon is selected in the Text Messaging section of the Account Settings page or while the candidate is applying to a requisition.
o HTML is not allowed in this field. o This setting is disabled if the candidate communication preference does not
include SMS.

Administrator Tools Using Workbench
© Copyright IBM Corp. 2020 Page 282
Course materials may not be reproduced in whole or in part without the prior written permission of IBM.
Figure A-5: SMS messaging – candidate consent pop-up message
- Enter the instructions to the Vendor specific setup instructions field. See Figure A-6.
o If the Vendor specific set-up instructions field is blank, no email will be sent to the candidate.
o Restricted HTML tags can be used as long as the client setting Allow restricted HTML in approved fields is enabled.
o The field has a 4,000 character limit. o It’s a read-only field if the candidate communication preference does not include
SMS. o The [#BRUID#] token is allowed in this text area field, and if used, will display the
candidate’s BRUID value to the candidate. (This token is case-sensitive.) o Clients should also consider adding their Client ID (unique per client for their
BrassRing system) and the Vendor Short Code (provided by the SMS vendor) to this field as the candidate might need all three pieces of information to finish the opt-in process.

Administrator Tools Using Workbench
© Copyright IBM Corp. 2020 Page 283
Course materials may not be reproduced in whole or in part without the prior written permission of IBM.
Figure A-6: Vendor specific setup instructions
Example of Vendor specific instructions:
Subscribers must complete specific tasks to opt in to the SMS messaging program.<br><br> <b>CLIENT NAME Messaging Program</b> Alerts<br><br> Number of messages varies per subscriber.<br><br> Message and Data Rates Might Apply. Account holder authorizes charges to appear on wireless bill or be deducted from prepaid balance.<br><br> List of Supported Carriers: AT&T, Metro PCS, Sprint Nextel, T-Mobile USA (includes Suncom), U.S. Cellular, Verizon Wireless, and more.<br><br> Complete these steps to fully opt-in to SMS messaging:<br> 1. Select Yes if you consent to receive SMS text messages.<br> 2. Enter your mobile phone number into the Other Phone field. <br> 3. Select your Mobile phone country or region.<br> 4. Click Submit after completing all other required fields.<br> 5. To complete the opt-in process, text BRINS CLIENT CODE [#BRUID#] to VENDOR SHORT CODE
from your mobile phone.<br><br> To opt out at any time, text BROUTS CLIENT CODE [#BRUID#] to VENDOR SHORT CODE.<br> To receive more information, send HELP to VENDOR SHORT CODE.<br> By consenting to SMS messages you agree to the <a href=“VENDOR SPECIFIC URL"target=blank>Terms and Conditions</a> (which can be found at VENDOR SPECIFIC URL).

Administrator Tools Using Workbench
© Copyright IBM Corp. 2020 Page 284
Course materials may not be reproduced in whole or in part without the prior written permission of IBM.
Configure Client Code, BRUID, and Vendor Short Code: Client Code You IBM representative will be able to provide the client code for you. BRUID (unique per candidate) The [#BRUID#] token should be added to the Vendor specific setup instructions field on the Responsive Layout page. This will display the BRUID for the candidate he/she must text to complete the double opt in process. Vendor Short Code (unique per vendor) This should be provided by the vendor and added into the Vendor specific setup instructions field on the Responsive Layout page so the candidate can complete the double opt in process. 4. Enable User Type Privilege of Candidates – Send candidate SMS message.
- Select Tools > Users > User Types > Edit type permissions > Candidate Actions 2. - Select the privilege of Candidates – Send candidate SMS message.
This privilege allows users of this user type to send text messages to candidates from within BrassRing.
5. In BrassRing, Add SMS template to existing Communication templates. See Figure A-7.
- Select Hiring > Admin > Communications > Communication templates. Users with access to edit the communication templates can also add text for an SMS message. This will be sent to the candidates if they consent to receiving texts and if a user selects to send this particular communication template to the candidate.
Figure A-7: Add SMS template
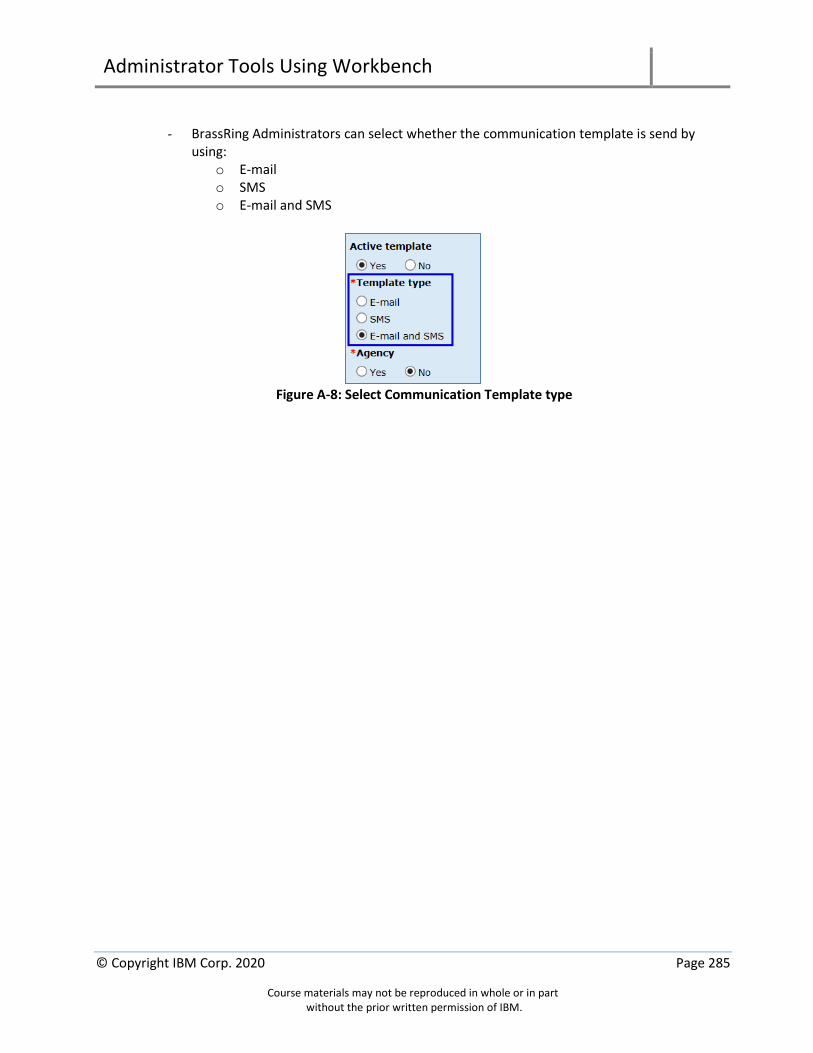
Administrator Tools Using Workbench
© Copyright IBM Corp. 2020 Page 285
Course materials may not be reproduced in whole or in part without the prior written permission of IBM.
- BrassRing Administrators can select whether the communication template is send by
using: o E-mail o SMS o E-mail and SMS
Figure A-8: Select Communication Template type

Administrator Tools Using Workbench
© Copyright IBM Corp. 2020 Page 286
Course materials may not be reproduced in whole or in part without the prior written permission of IBM.
Appendix B
Candidate Forms – Custom Field Validation As a Workbench Administrator, you can manage custom field validation on candidate forms.
To access the custom validation feature: 1. Go to Tools > Forms > Candidate Forms. 2. For a specific candidate form, select Administrator Form Fields. 3. For a specific candidate form field, select Edit Field attributes > Save and Continue (see Figure
B-1).
Figure B-1: Define field attributes – Input Validation field
4. Select for the Input validation field and click the Configure button. 5. Users can create Alphanumeric and/or Numeric validation formats and can select Validation
Templates.

Administrator Tools Using Workbench
© Copyright IBM Corp. 2020 Page 287
Course materials may not be reproduced in whole or in part without the prior written permission of IBM.
Alphanumeric:
Figure B-2: Alphanumeric Patterns
o User Input must: Match a custom sequence of characters selection allows users
to define the character type and count of the characters that need to match.
Figure B-3: Match a custom sequence of characters
Figure B-4: Count and Validation for each character type must be satisfied

Administrator Tools Using Workbench
© Copyright IBM Corp. 2020 Page 288
Course materials may not be reproduced in whole or in part without the prior written permission of IBM.
o For User Input must: Match a custom sequence of characters selection, users can define their custom string by:
▪ Select the character from the dropdown list. ▪ Define how many characters of the selected type should exist in the
validation. ▪ Users can add further characters by clicking ‘Insert’. ▪ Users can remove a certain character validation by clicking ‘Remove’. ▪ The Sequence section will auto-populate based on user selection. ▪ Users can provide a description for the validation in the ‘Input Validation
Description’ field. ▪ The ‘Try it out’ field allows users to test their validation before saving it. If
the string matches the validation, then the text box will be highlighted in green. If it does not match the validation, it will be highlighted in red.
o User Input must: Only include characters from a whitelist selection allows users to select the character types (multiple selections allowed); and if all the character types exist then validation is passed.
Figure B-5: Only include characters from a whitelist
Figure B-6: Validation for each character type must be satisfied
o For User Input must: Only include characters from a whitelist selection, users can define their custom string by:
▪ Select the allowable characters from the multi-select list. ▪ Users can provide a description for the validation in the ‘Input Validation
Description’ field.

Administrator Tools Using Workbench
© Copyright IBM Corp. 2020 Page 289
Course materials may not be reproduced in whole or in part without the prior written permission of IBM.
▪ The ‘Try it out’ field allows users to test their validation before saving it. If the string matches the validation, then the text box will be highlighted in green. If it does not match the validation, it will be highlighted in red.
Users will need to select the Enable Rule checkbox and the button for Save Alphanumeric Pattern.
B-7: Enable Rule and Save Alphanumeric Patterns
Numeric
Figure B-8: Numbers Only
o User Input must be: selection allows users to define their own custom numeric
validation from one of three options: Any number, a number with X digits, and a number from 0 to X.
▪ Any number – this option allows users to define a validation that the field should contain only numerals.

Administrator Tools Using Workbench
© Copyright IBM Corp. 2020 Page 290
Course materials may not be reproduced in whole or in part without the prior written permission of IBM.
Figure B-9: User Input must be selection - Any number
▪ A number with X digits – this option allows users to define how many digits should be entered into the field.
Figure B-10: User Input must be selection – A number with X digits
▪ A number from 0 to X– this option allows users to define a range from 0 to a selected number. Only when the input is within this range will the validation be successful.
Figure B-11: User Input must be selection – A number from 0 to X
o Under the Other Requirement section, users can define additional requirements
that need to be part of the validation display or text entry: ▪ Automatically include commas when a user or candidate enters a numeric
value. ▪ Requiring a decimal. ▪ Requiring a specific symbol (e.g. currency symbol $). ▪ Users can provide a description for the validation in the Input Validation
Description field. ▪ The Try it out field allows users to test their validation. ▪ If the string matches the validation, the text box will be highlighted in
green. If it does not match the validation, it will be highlighted in red.
Users will need to select the Enable Rule checkbox and the button for Save Numbers Only.

Administrator Tools Using Workbench
© Copyright IBM Corp. 2020 Page 291
Course materials may not be reproduced in whole or in part without the prior written permission of IBM.
Figure B-12: Enable Rule and Save Numbers Only
Validation Templates
o Users can select from one of four pre-defined validation templates from the Standard option:
▪ US Phone Number
Figure B-13: US Phone Number Validation Template
▪ Basic Social Security Number
Figure B-14: Basic Social Security Number Validation Template

Administrator Tools Using Workbench
© Copyright IBM Corp. 2020 Page 292
Course materials may not be reproduced in whole or in part without the prior written permission of IBM.
▪ Advanced SSN (Full SSA specification)
Figure B-15: Advanced SSN Validation Template
Figure B-16: Email Validation Template
o The custom template type is currently not implemented and not available.
o Upon selection of a validation template, the input validation description and the validation rule will be auto-populated. The user will not be able to create any further customization.
o Users need to select the Enable Rule checkbox and the Save Validation Templates button to successfully save and enable the custom validation.
Users will need to select the Enable Rule checkbox and the button for Save Validation Templates to successfully save and enable the custom validation.

Administrator Tools Using Workbench
© Copyright IBM Corp. 2020 Page 293
Course materials may not be reproduced in whole or in part without the prior written permission of IBM.
Figure B-12: Enable Rule and Save Validation Templates
How to read Custom Validation Rules

Administrator Tools Using Workbench
© Copyright IBM Corp. 2020 Page 294
Course materials may not be reproduced in whole or in part without the prior written permission of IBM.
^[$]\d{1,3}(,\d{3}) *(\.\d{2})$ This validation: is any number/digit, requires commas (for thousands), a decimal (with 2 digits after it), and a $ symbol at the front. Example use: Salary field Valid Entry Example: $30,000.00 ^\d{7}$ This validation: is any number/digit, requiring 7 digits. Example use: 7 digit employee ID Valid Entry Example: 5228475 ^([\d]){1} ([A-Z]){1}([\d]){4}$ This validation: looks for the pattern of one digit, one upper case letter, and four digits. Example use: IBM Employee ID format Valid Entry Example:1G5521 ^[a-zA-Z]+$ This validation: allows any letter. Example use: Any field that the client wants letters only, no special characters, such as an availability field. Valid Entry Example: Monday and Friday

Administrator Tools Using Workbench
© Copyright IBM Corp. 2020 Page 295
Course materials may not be reproduced in whole or in part without the prior written permission of IBM.
Appendix C
Configure Interview Manager As a Workbench Administrator, you can configure the following parts of Interview Manager:
- Interview Manager Privileges
- Interviews Tab
- Interview To-do Lists
- Interview Manager Calendar Integration
Interview Manager Privileges
By default, users can view, edit, manage, and cancel interviews where they are the creator or coordinator. This default privilege cannot be altered. Only the creator or coordinator can Cancel an Interview. Below is a list of the privileges available under the Interview Manager user type function.
Restrict Interview Creation Enabling this privilege disables the users who have access to My Reqs the ability to create interviews. The default state of this privilege is not selected. This means there is no restriction to create My Req Interviews.
Restrict Manage Interviews for “My Reqs” Enabling this privilege disables the users who have access to My Reqs the ability to edit or manage interviews. The default state of this privilege is not selected. This means there is no restriction to edit or manage My Req Interviews.
View – “All Reqs” Interviews Enabling this privilege gives the user type access to view interviews that are part of All Reqs that the User has access to. The defaults state of this privilege is not selected. This means that the user type cannot view ALL REQ interviews.
Interviews Tab
• An Interviews tab is available for the BrassRing home page.
• The interviews tab can be configured to display a card view or grid view. The grid view can be customized to display fields such as Interview Style, Interview Description, Candidate Language, and Req Title.
• Existing users can add the tab by selecting Edit tabs on the home page. Administrators cannot add the tab automatically for existing users.
• The tab is configured for each persona individually.

Administrator Tools Using Workbench
© Copyright IBM Corp. 2020 Page 296
Course materials may not be reproduced in whole or in part without the prior written permission of IBM.
Figure C-1: Interviews Tab – Card View
To configure the Interviews tab:
1. Go to Tools > Settings > Home page Administration.
2. Select the Administer Homepage pencil icon for the persona.
a. To configure the tab to appear by default for new users with that persona:
i. Select Edit Tabs.
ii. Select Interviews in the Available Tabs and drag it to the Selected Tabs section.
iii. Select Submit.
iv. Repeat this process for all personas as needed.
b. To configure the tab display, select the Interviews tab.
i. Select the Card view or Grid view icon to set that view as default for users.
ii. To configure the fields that display in the card view select the
Configure Display icon. Users can display up to six fields in the card view and up to 20 fields in the grid view.
iii. Drag the fields to display from the Available Columns to Selected
Columns. Available Columns can be searched by using the Search bar. The field order can be rearranged by dragging the fields into the order as needed.
iv. Select Submit to save the changes.
c. Select Save.

Administrator Tools Using Workbench
© Copyright IBM Corp. 2020 Page 297
Course materials may not be reproduced in whole or in part without the prior written permission of IBM.
Interview To-do List
The interview to-do list assists users in managing their interviews. The Workbench Administrator can manage the list in Workbench.
To manage the Interview to-do list: 1. Go to Tools > Interview Manager > Manage To-Dos.
2. The Manage To-Dos window opens.
Figure C-2: Manage To-Dos
3. To add a To-Do item, select Add new. Insert the To-Do description and select Save.
4. To edit a To-Do item, select the Edit icon for a To-Do item. Update the To-Do description and select Save.
5. To delete a To-Do item, select the Delete icon for a To-Do item.
Interview Manager Calendar Integration
For details about the calendar integration with Interview Manager, please click here to access the documentation on the IBM Knowledge Center.

Administrator Tools Using Workbench
© Copyright IBM Corp. 2020 Page 298
Course materials may not be reproduced in whole or in part without the prior written permission of IBM.
Check Your Skills Answer Key
Chapter 1 - Getting Started 1. T 5. T 2. T 6. F 3. T 7. D 4. F 8. D
Chapter 2 - Managing Your Database 1. T 4. F 7. Form can pull fields from different buckets. 2. F 5. Indexing Technology 8. Lose historial data. 3. F 6. 500 Text Fields
Chapter 3 - Defining User Types 1. B 2. True
3. Launch BrassRing from Workbench. Click Tools Users. Locate the user and click the View user details icon.
Chapter 4 - Candidate Forms 1. T 4. F 2. T 5. See Page 56 3. F
Chapter 5 - Req Forms 1. F 4. F 2. F 5. B 3. F 6. B
Chapter 6 – HR Statuses 1. T 4. T 2. F 3. F
Chapter 7 – Data Export and Import 1. F 4. T 2. F 3. T
Chapter 8 - Managing Talent Gateways 1. T 2. F 3. T

Administrator Tools Using Workbench
© Copyright IBM Corp. 2020 Page 299
Course materials may not be reproduced in whole or in part without the prior written permission of IBM.
Chapter 9 – Gateway Questionnaire 1. F 4. T 2. F 3. F
Chapter 10 – Automation 1. T 2. F
Chapter 11 – User Interface 1. T
Chapter 12 – Managing Integrations 1. F 2. F 3. T
Chapter 13 – Managing Settings 1. F 2. F 3. T 4. T 5. F 6. F