administering oracle integration · 2019-12-09 · administering oracle integration describes how...
TRANSCRIPT

Oracle® CloudAdministering Oracle Integration
E96094-26December 2019

Oracle Cloud Administering Oracle Integration,
E96094-26
Copyright © 2017, 2019, Oracle and/or its affiliates. All rights reserved.
Primary Author: Oracle Corporation
This software and related documentation are provided under a license agreement containing restrictions onuse and disclosure and are protected by intellectual property laws. Except as expressly permitted in yourlicense agreement or allowed by law, you may not use, copy, reproduce, translate, broadcast, modify,license, transmit, distribute, exhibit, perform, publish, or display any part, in any form, or by any means.Reverse engineering, disassembly, or decompilation of this software, unless required by law forinteroperability, is prohibited.
The information contained herein is subject to change without notice and is not warranted to be error-free. Ifyou find any errors, please report them to us in writing.
If this is software or related documentation that is delivered to the U.S. Government or anyone licensing it onbehalf of the U.S. Government, then the following notice is applicable:
U.S. GOVERNMENT END USERS: Oracle programs, including any operating system, integrated software,any programs installed on the hardware, and/or documentation, delivered to U.S. Government end users are"commercial computer software" pursuant to the applicable Federal Acquisition Regulation and agency-specific supplemental regulations. As such, use, duplication, disclosure, modification, and adaptation of theprograms, including any operating system, integrated software, any programs installed on the hardware,and/or documentation, shall be subject to license terms and license restrictions applicable to the programs.No other rights are granted to the U.S. Government.
This software or hardware is developed for general use in a variety of information management applications.It is not developed or intended for use in any inherently dangerous applications, including applications thatmay create a risk of personal injury. If you use this software or hardware in dangerous applications, then youshall be responsible to take all appropriate fail-safe, backup, redundancy, and other measures to ensure itssafe use. Oracle Corporation and its affiliates disclaim any liability for any damages caused by use of thissoftware or hardware in dangerous applications.
Oracle and Java are registered trademarks of Oracle and/or its affiliates. Other names may be trademarks oftheir respective owners.
Intel and Intel Xeon are trademarks or registered trademarks of Intel Corporation. All SPARC trademarks areused under license and are trademarks or registered trademarks of SPARC International, Inc. AMD, Opteron,the AMD logo, and the AMD Opteron logo are trademarks or registered trademarks of Advanced MicroDevices. UNIX is a registered trademark of The Open Group.
This software or hardware and documentation may provide access to or information about content, products,and services from third parties. Oracle Corporation and its affiliates are not responsible for and expresslydisclaim all warranties of any kind with respect to third-party content, products, and services unless otherwiseset forth in an applicable agreement between you and Oracle. Oracle Corporation and its affiliates will not beresponsible for any loss, costs, or damages incurred due to your access to or use of third-party content,products, or services, except as set forth in an applicable agreement between you and Oracle.

Contents
Preface
Audience viii
Documentation Accessibility viii
Related Resources ix
Conventions ix
1 Welcome to Oracle Integration
Learn About Oracle Integration 1-1
Explore All You Can Do with Oracle Integration 1-2
Assign Roles to Control Access 1-3
Oracle Integration Editions 1-4
Browse Oracle Help Center for Tutorials, Videos, and More 1-4
2 Grant Access and Manage Security
Oracle Integration Roles and Privileges 2-1
Oracle Integration Roles 2-1
WebLogic Server Roles for Oracle Integration 2-3
What Users Can Do in the Navigation Pane by Role 2-4
What Users Can Do on the Home Page by Role 2-5
What Users Can Do in Integrations by Role 2-6
What Users Can Do in Processes by Role 2-10
What Users Can Do in Visual Builder by Role 2-11
What Users Can Do in Integration Insight and Stream Analytics by Role 2-12
Add a User 2-13
Assign Roles to a User 2-14
Add a Group 2-15
Add Users to a Group 2-15
Assign Roles to a Group 2-16
Use the Service Integration Account with No Password Expiration 2-17
Use OAuth Authentication for REST APIs 2-27
iii

Trigger Integrations Using OAuth Authentication 2-27
3 Ready, Set Up, and Go
Accessing Oracle Integration 3-1
Access Oracle Integration from the Oracle Cloud Infrastructure Console 3-1
Access Oracle Integration from the Oracle Cloud Infrastructure Classic Console3-2
Assign the Correct User Roles to Create an Instance 3-2
Create an Oracle Integration Instance 3-3
Quickly Create an Instance 3-3
Create a Custom Instance 3-4
About the User Interfaces of the Oracle Integration Oracle Cloud InfrastructureConsole 3-6
Explore the Oracle Cloud Infrastructure Console 3-6
Explore the Oracle Cloud Infrastructure Console Activity Page 3-8
Explore the Oracle Cloud Infrastructure Console Instance Overview Page 3-10
Oracle Integration for Oracle SaaS 3-11
Differences between Oracle Integration and Oracle Integration for Oracle SaaS 3-11
Create an Oracle Integration for Oracle SaaS Instance 3-12
View Message Consumption for Oracle Integration for Oracle SaaS 3-15
4 Navigate and Explore
Sign In to Oracle Integration 4-1
What You Can Do on the Home Page 4-1
Navigate Anywhere 4-3
View and Drill Down by Status 4-5
Open Recently Worked on Items 4-6
Start Process Applications as a User 4-7
Start Developing by Feature 4-7
Monitor Health and Drill Down to Troubleshoot 4-8
Use Features Together 4-9
Use Integrations in Process Applications 4-9
Use Process Applications in Integrations 4-9
Use Processes in Visual Builder Applications 4-9
Map Integrations to Insight Milestones 4-10
5 Move Design-Time Metadata Between Environments
Export and Import Oracle Integration Design-Time Metadata Between Instances 5-1
Migrate Process Design-Time Metadata into Oracle Integration 5-5
iv

Import Process Design-Time Metadata 5-5
Import Using the Import Command Line Utility 5-6
6 Manage Oracle Integration
Scale an Oracle Integration Instance 6-2
Start or Stop an Oracle Integration Instance 6-3
Manage Integrations and Errors 6-4
Manage SSL Certifications 6-4
Manage Instance History 6-4
Configure Settings for Error Logs 6-5
Delete an Oracle Integration Instance 6-6
Change the BYOL Metering Option of an Existing Instance 6-7
7 Troubleshoot Oracle Integration
Resume Use of a Suspended Oracle Integration for Oracle SaaS Account 7-1
Part I Administer Oracle Integration Classic (User-Managed)
8 Ready, Set Up, Go in Oracle Integration Classic (User-Managed)
Assign the Correct User Roles to Create an Instance 8-1
Provision Oracle Integration Classic (User-Managed) on an IP Network 8-2
Create an Oracle Integration Classic (User-Managed) Instance 8-10
Create a Complete Production Instance 8-10
Create a Complete Production Instance that Automatically Creates YourDatabase 8-11
Create a Complete Production Instance that Uses Your Existing Database 8-16
Perform Post-Provisioning Tasks for Integration Analytics Instances 8-21
Register an Integration Analytics Instance to Connect Integration Insight toIntegrations 8-21
Post-Provisioning Tasks for Stream Analytics 8-23
Enable Direct Access to Stream Analytics 8-23
Add Access Rules 8-24
Configure Yarn Resource Manager 8-24
Identify Kafka and Yarn Resource URLs 8-25
Configure System Settings in Stream Analytics 8-26
About the User Interfaces of the Oracle Cloud Infrastructure Console for OracleIntegration Classic (User-Managed) 8-28
Explore the Oracle Cloud Infrastructure Console 8-28
Explore the Oracle Cloud Infrastructure Console Instance Overview Page 8-30
v

Explore the Oracle Cloud Infrastructure Console Activity Page 8-35
Explore the Oracle Cloud Infrastructure Console SSH Access Page 8-37
Explore the IP Reservations Page 8-38
Support the Minimum Version of Oracle Integration Classic (User-Managed) 8-38
9 Manage Oracle Integration Classic (User-Managed)
Unsupported Tasks 9-2
Patch and Upgrade Oracle Integration Classic (User-Managed) 9-3
About Patching an Oracle Integration Classic (User-Managed) Instance 9-3
Typical Workflow for Patching an Oracle Integration Classic (User-Managed)Instance 9-4
Quick Tour of the Patching Page 9-4
View Details About the Available Patches 9-5
Perform Prechecks Before Applying a Patch 9-5
Complete Prerequisites Before Applying a Patch 9-6
Apply a Patch 9-10
Stop and Start Oracle Integration Classic (User-Managed) Instances and Nodes 9-11
About Stopping and Starting Instances and Nodes 9-11
Stop and Start Your Instance 9-12
Stop and Start the Nodes in Your Instance 9-13
Scale an Oracle Integration Classic (User-Managed) Instance 9-13
About Scaling Your Instance 9-14
Overview of Scaling Tasks for Your Instance 9-15
Scale Out an Oracle Integration Classic (User-Managed) Instance 9-15
Scale In an Oracle Integration Classic (User-Managed) Instance 9-16
Check Status of Scaling Requests 9-16
Manage Database Issues 9-17
Update the Database Schema Password in Oracle Integration Classic 9-17
Change the Database Schema Password 9-18
Managing Alerts 9-19
Back Up and Restore an Oracle Integration Classic (User-Managed) Instance 9-19
About Backing Up and Restoring an Oracle Integration Classic (User-Managed)Instance 9-19
Typical Workflow for Backing Up and Restoring an Oracle Integration Classic(User-Managed) Instance 9-22
Quick Tour of the Backup Page 9-22
Configure an Automatic Backup 9-26
Initiate an On-Demand Backup 9-28
Disable or Enable Backups 9-29
Restore a Backup 9-30
Delete a Backup 9-32
vi

Manage Integrations and Errors 9-32
Manage SSL Certifications 9-33
Manage Instance History 9-33
Configure Settings for Error Logs 9-33
Use SSH to Sign In to Oracle Integration Classic (User-Managed) 9-35
Diagnose Oracle Integration Classic (User-Managed) Problems 9-35
Access and View Diagnostic Logs 9-35
Use WebLogic Server Logs 9-35
Use Java Flight Recorder Performance Profiles 9-36
Use Oracle Integration Report Incidents 9-38
Export Suite-Generated Artifacts 9-38
Collect Database Statistics 9-38
View System Health 9-38
Delete an Oracle Integration Classic (User-Managed) Instance 9-38
10
Troubleshoot Oracle Integration Classic (User-Managed)
Provision an Instance Without the Correct User Roles Causes Failure 10-1
Provision Oracle Integration Classic (User-Managed) 10-2
504 Gateway Timeout Error May Require Editing an Instance's Load BalancerAccess Rules Manually to Add a New IP Address 10-2
Troubleshoot cURL Command Issues When Configuring an IP Network 10-3
Database Backups May Use Up Disk Space and Cause Oracle Integration ClassicServers to Shut Down 10-3
Troubleshoot Backup and Restore Issues 10-3
Troubleshoot Patching Issues 10-4
Oracle Integration Classic (User-Managed) Fails to Connect to the DatabaseInstance 10-6
vii

Preface
Administering Oracle Integration describes how to use Oracle Integration to integrateyour applications and processes.
Note:
The information in this guide applies to all of your Oracle Integrationinstances. It doesn’t matter which edition you’re using, what features youhave, or who manages your cloud environment. You’ll find what you needhere, including notes about any differences between the various flavors ofOracle Integration when necessary.
Topics:
• Audience
• Documentation Accessibility
• Related Resources
• Conventions
AudienceAdministering Oracle Integration is intended for users who want to create, activate,and monitor integrations and processes.
Documentation AccessibilityFor information about Oracle's commitment to accessibility, visit the OracleAccessibility Program website at http://www.oracle.com/pls/topic/lookup?ctx=acc&id=docacc.
Access to Oracle Support
Oracle customers that have purchased support have access to electronic supportthrough My Oracle Support. For information, visit http://www.oracle.com/pls/topic/lookup?ctx=acc&id=info or visit http://www.oracle.com/pls/topic/lookup?ctx=acc&id=trs if you are hearing impaired.
Preface
viii

Related ResourcesFor more information, see these Oracle resources:
• Oracle Integration documentation in the Oracle Cloud Library on the Oracle HelpCenter.
• Oracle Cloud at http://cloud.oracle.com.
ConventionsThe following text conventions are used in this document:
Convention Meaning
boldface Boldface type indicates graphical user interface elements associatedwith an action, or terms defined in text or the glossary.
italic Italic type indicates book titles, emphasis, or placeholder variables forwhich you supply particular values.
monospace Monospace type indicates commands within a paragraph, URLs, codein examples, text that appears on the screen, or text that you enter.
Preface
ix

1Welcome to Oracle Integration
Oracle Integration combines business process automation, application integration,web and mobile application development, and integrated analytics into one unifiedproduct.
Topics:
• Learn About Oracle Integration
• Explore All You Can Do with Oracle Integration
• Assign Roles to Control Access
• Oracle Integration Editions
• Browse Oracle Help Center for Tutorials, Videos, and More
Learn About Oracle IntegrationOracle Integration is a unified platform where you can integrate your applications,automate processes, and create applications.
Specifically, with Oracle Integration, you can:
• Use integrations to design, monitor, and manage connections between yourapplications
• Create process applications to automate and manage your business work flows
• Build custom web and mobile applications
Critical business processes, such as those related to human capital management(HCM), customer experience (CX), and enterprise resource planning (ERP), arefrequently slow and inflexible. For example, a multi-step process such as Lead toOpportunity to Quote to Order can involve four or more applications and requirehuman exception management at every step of the process. In this scenario, the lackof integration between departments as well as the delays caused by human-basedproblem resolution can result in lost revenue, frustrated customers, and high costs.
Oracle Integration changes all that. It empowers you to:
• Establish connectivity between the many applications and people that are part ofthe entire business process life cycle.
• Assemble existing technologies into new business services to better align with thechanging pace of new business demands.
• Deliver new business innovations faster by rapidly connecting diverse applicationsand key business roles.
1-1

Explore All You Can Do with Oracle IntegrationWith Oracle Integration, you have the power to automate business processes, connectyour cloud and on-premises applications, build great web and mobile applications,collect advanced metrics about your business, and get real-time analytics. The featureset for your Oracle Integration depends on two factors: which edition you’re using(Enterprise or Standard) and who’s managing your cloud environment (you or Oracle).Let’s explore all the features that may be available to you.
Processes: Automate Business Processes
Use Processes to rapidly design, automate, and manage business processes in thecloud.
You begin by creating a process application from scratch, by using a QuickStart App,or by importing a file. Next, you model your process flow, including the requests,approvals, decision paths, and roles for each task. Depending on the businessprocess, you may need to create web forms, add decision models, and interact withweb services to send and receive data.
At any point when you’re designing your process application, you can play yourprocess step-by-step to test each possible scenario. When you’re ready, activate theprocess application to make it available, and assign roles to grant users access to yourapplication.
Integrations: Connect Applications
Use Integrations to connect your applications into a continuous business flow. You canquickly develop and activate integrations between both your applications that live inthe cloud and your applications that still live on premises.
• Identify the applications that you want to integrate, and configure the connectiondetails for each application. You can also select from our portfolio of 50+ pre-builtadapters to connect with Oracle and third-party applications, such as Oracle SalesCloud, Oracle Service Cloud, Google Calendar, Salesforce, and SAP.
• Use browser-based visual tools to create integrations, and then map the databetween your applications. Mappings can range from simple data assignments tocomplex expressions.
• Activate your integration when you’re ready.
• Monitor the dashboard to check the status and processing statistics for anintegration. The dashboard also measures and tracks the performance of yourtransactions by capturing and reporting key information.
Visual Builder: Develop Applications
With Visual Builder, you can build great web and mobile applications yourself. There isno coding, no setup, and no IT resources required.
Just use the visual drag-and-drop designer and the full palette of user interfacecomponents to build applications as simple or as intricate as you need. The built-inpage templates implement best practices in design. In addition, the user interfaceadjusts to the native look and feel of your iOS or Android operating system so buildingapplications optimized for mobile devices is easy as well.
Chapter 1Explore All You Can Do with Oracle Integration
1-2

Visual Builder provides all the necessary tools for building and publishing a modernweb application as well as providing the infrastructure for securing access to yourapplication, data, and the Oracle Cloud services that your application consumes.
Integration Insight: Collect Advanced Metrics
Note:
Integration Insight is available in Oracle Integration Classic (user-managed)only.
Integration Insight dramatically simplifies the process of modeling and extractingmeaningful business metrics.
You can quickly collect advanced metrics and gain insight into your existing processesand integrations in three steps:
• Define your most important milestones and metrics.
• Map your milestones to appropriate components in your applications. The simpleweb-based tools make this task easy.
• Activate Insight.
You can view the dashboards that are available immediately after you activateIntegration Insight and monitor your business in real time, using charts and tables. Youcan search for business data that matters to you, create new customized dashboardson the fly, and drill down to see what makes your business tick.
Stream Analytics: Get Real-Time Analytics
Stream Analytics allows for the creation of custom operational dashboards that providereal-time monitoring and analyses of event streams. You can identify events ofinterest, execute queries against those event streams in real-time, and driveoperational dashboards or raise alerts based on that analysis. The streaming data canoriginate from many different data sources including web applications, log files,internet of things (IoT) sensors, point-of-sale devices, automated teller machines(ATMs), and social media.
Note:
Stream Analytics is available in Oracle Integration Classic (user-managed)only.
Assign Roles to Control AccessOracle Integration is designed to be used by any of the people involved in an end-to-end business process regardless of their skill level or job title. You control access toOracle Integration by assigning roles to each user.
Chapter 1Assign Roles to Control Access
1-3

A role includes privileges that allow users to perform various tasks and to accesscertain features. Users can hold multiple roles depending on their responsibilities. See Oracle Integration Roles and Privileges.
Oracle Integration EditionsOracle Integration is available in two editions: Standard and Enterprise.
Either edition gives you the power to integrate your Software as a Service (SaaS)applications and your on‑premises applications. Enterprise edition enables you to alsodesign, automate, and manage your business processes in the cloud.
Regardless of which edition you choose, Oracle handles cloud and databasemanagement, backup, restore, and other administrative tasks for you.
Here’s a side-by-side comparison of what’s included in each edition.
What You Get
Oracle Integration
StandardEdition
EnterpriseEdition
Integration using SaaS adapters, technology adapters,and on-premises agent X X
Integration using On-premises Enterprise Applicationadapters (EBS, JDE, SAP, Siebel, and more) X
Scheduled file transfers and batch processing X X
Rich monitoring, exception, and error management X X
Zero-code design tools for integrations and web/mobileapplication development X X
Zero-code design tools for process automation X
Human workflow approval, case management, anddecision modeling X
Cloud and database management, backup, and restorehandled by Oracle X X
Message throughput: up to 5000 messages per hour permessage pack selected X
Message throughput: up to 12 concurrent process usersor 5000 messages per hour per message pack selected X
Browse Oracle Help Center for Tutorials, Videos, and MoreThere are several other resources that you can use to learn about Oracle Integration:
• A series of tutorials that will guide you through hands-on exercises using OracleIntegration is available at Oracle Integration Tutorials.
• A growing library of videos for Oracle Integration is available at Oracle IntegrationVideos.
• The complete documentation set for Oracle Integration is available on the OracleHelp Center. All getting started, using, and administering guides are available inHTML and PDF formats. Documentation for REST APIs and JavaScripts isavailable in HTML format.
Chapter 1Oracle Integration Editions
1-4

2Grant Access and Manage Security
Add users and grant roles to enable them to access, administer, and use feature setsof Oracle Integration.
Topics:
• Oracle Integration Roles and Privileges
• Add a User
• Assign Roles to a User
• Add a Group
• Add Users to a Group
• Assign Roles to a Group
• Use the Service Integration Account with No Password Expiration
• Use OAuth Authentication for REST APIs
• Trigger Integrations Using OAuth Authentication
Oracle Integration Roles and PrivilegesRoles define the privileges available to users and the tasks that they can perform. Youcan assign predefined roles to users to allow them to work with feature sets of OracleIntegration.
• Oracle Integration Roles
• WebLogic Server Roles for Oracle Integration (applies only to Oracle IntegrationClassic (user-managed)
• What Users Can Do in the Navigation Pane by Role
• What Users Can Do on the Home Page by Role
• What Users Can Do in Integrations by Role
• What Users Can Do in Processes by Role
• What Users Can Do in Visual Builder by Role
• What Users Can Do in Integration Insight and Stream Analytics by Role (appliesonly to Oracle Integration Classic (user-managed)
Oracle Integration RolesOracle Integration predefined roles govern access to various Oracle Integrationfeatures.
You can assign one or more of these predefined roles to Oracle Integration users andgroups: ServiceAdministrator, ServiceDeveloper, ServiceMonitor, ServiceDeployer,
2-1

ServiceUser, ServiceInvoker, and ServiceViewer. The following table lists thepredefined roles available in Oracle Integration, and the general tasks that usersassigned the roles can perform.
Oracle Integration Description
ServiceAdministrator A user with the ServiceAdministrator role is a super user who canmanage and administer the features provisioned in an OracleIntegration instance.
ServiceDeveloper A user with the ServiceDeveloper role can develop the artifactsspecific to the features provisioned in an Oracle Integrationinstance. For example, in Integrations the user can createintegrations, and in Processes the user can create processapplications and decision models.
ServiceMonitor A user with the ServiceMonitor role can monitor the featuresprovisioned in an Oracle Integration instance. For example, the usercan view instances and metrics, find out response times, and trackwhether instance creation completed successfully or failed.
This role provides privileges for users with limited knowledge ofOracle Integration, but with high-level knowledge of monitoringit. This user role does not grant permissions to change anything.
ServiceDeployer A user with the ServiceDeployer role can publish the artifactsdeveloped in a feature. In Stream Analytics the user can publishdraft pipelines (applies only to Oracle Integration Classic (user-managed).
This role is not applicable for the Integrations feature.
ServiceUser A user with the ServiceUser role has privileges to utilize only thebasic functionality of a feature such as access to the staged andpublished applications.
For example, in Integrations the user can navigate to resourcepages (such as integrations and connections) and view details, butcan’t edit or modify anything. The user can also run integrations andstart process applications.
ServiceInvoker A user with the ServiceInvoker role can invoke any integration flowin an Oracle Integration instance that is exposed through SOAP/REST APIs or a scheduled integration. See Run an IntegrationFlow. A user with ServiceInvoker role cannot:• Navigate to the Oracle Integration user interface or perform any
administrative actions in the user interface.• Invoke any of the documented Oracle Integration REST APIs.
See About the REST APIs.
ServiceViewer A user with the ServiceViewer role can navigate to all Integrationresource pages (for example, integrations, connections, lookups,libraries, and so on) and view details. The user cannot edit anyresources or navigate to the administrative setting pages.
In Oracle Integration, when you assign a role to a user, the user is granted that role forall Oracle Integration features provisioned on an instance. For example, when youassign the ServiceDeveloper role to a user for an instance provisioned with theIntegrations, Processes, and Visual Builder feature set, the user gets developerpermissions on each of these features. Further, each role grants different privileges fordifferent features to the same user. Depending on the feature the user is accessing,the user can perform different tasks. For example, a user assigned theServiceDeveloper role can develop process applications in Processes, whereas thesame user can design integrations in Integrations. Note that not all Oracle Integration
Chapter 2Oracle Integration Roles and Privileges
2-2

predefined roles are available in all features. For example, the ServiceMonitor role isnot available in Visual Builder.
Note:
Applies only to Oracle Integration Classic (user-managed).
If a user is granted access to multiple service instances provisioned inthe Oracle Integration environment, it is a best practice to grant the samerole to the user in all the instances. For example, suppose you haveprovisioned Integrations and Integration Insight as two separate instances inyour Oracle Integration environment. If you assign the ServiceAdministratorrole to a user in the Integrations instance, then assign the same role to theuser in the Integration Insight instance too.
WebLogic Server Roles for Oracle IntegrationOracle Integration is a PaaS-layered service. There are predefined roles for the PaaSlayer that govern access to WebLogic Server.
Applies only to Oracle Integration Classic (user-managed).
The following table lists the predefined WebLogic Server roles available for OracleIntegration.
Oracle Integration Description
Administrators A user with the Administrators role can:
• View the server configuration, including the encrypted value ofsome encrypted attributes
• Modify the entire server configuration• Deploy Enterprise Applications and Web application, EJB, Java
EE Connector, and Web Service modules• Start, resume, and stop servers
Deployers A user with the Deployers role can:
• View the server configuration, including some encryptedattributes related to deployment activities
• Change startup and shutdown classes, Web applications,JDBC data pool connections, EJB, Java EE Connector, WebService, and WebLogic Tuxedo Connector components. Ifapplicable, edit deployment descriptors.
• Access deployment operations in the Java EE DeploymentImplementation (JSR-88)
Monitors A user with the Monitors role can:
• View the server configuration, except for encrypted attributes• Get read-only access to WebLogic Server Administration
Console, WLST, and MBean APIs
Operators A user with the Operators role can:
• View the server configuration, except for encrypted attributes• Start, resume, and stop servers
Chapter 2Oracle Integration Roles and Privileges
2-3

What Users Can Do in the Navigation Pane by RoleThe following table lists the options in the Integration navigation pane and indicateswhich options you can access based on your assigned role.
Option ServiceAdministrator
ServiceDeveloper
ServiceDeployer
ServiceMonitor
ServiceUser
ServiceInvoker
ServiceViewer
Welcome Yes Yes Yes Yes Yes No Yes
Home Yes Yes Yes Yes Yes No Yes
My Tasks Yes Yes Yes Yes Yes No No
Processes Yes Yes Yes No No No No
Integrations Yes Yes No
Can’t useanyMonitoring,Designer,orSettingsoptions.Note:User canclickIntegrations, butreceives a“notauthorized”message.
Yes
Can useallMonitoring options.Can’t useanyDesignerorSettingsoptions.
Yes
Can useallMonitoring andDesigneroptions.Can’t useanySettingsoptions.
No Yes
Visual Builder Yes Yes Yes No No No No
Insight* Yes Yes Yes No
Can’taccessanyInsightfeatures.Note:User canclickInsight,butreceives a“notauthorized”message.
Yes No No
Streams* Yes Yes Yes Yes Yes No No
Registration* Yes No No No No No No
Settings Yes No No No No No No
Chapter 2Oracle Integration Roles and Privileges
2-4

* (applies only to Oracle Integration Classic (user-managed)
What Users Can Do on the Home Page by RoleThe following table lists the tiles, sections, and buttons on the Oracle Integration Homepage and indicates what you can access based on your assigned role.
Home PageElement
ServiceAdministrator
ServiceDeveloper
ServiceDeployer
ServiceMonitor
ServiceUser
My Tasks Yes Yes Yes Yes Yes
Integrations Yes Yes No Yes No
Connections Yes Yes No Yes No
Visual Applications Yes Yes Yes No No
Insight* Yes Yes Yes No Yes
Recents Yes Yes Yes No No
Actions Yes Yes Yes Yes Yes
Processes: CreateApplications
Yes Yes Yes No No
Processes: UseQuickstart
Yes Yes Yes No No
Integrations: CreateConnections
Yes Yes No No No
Integrations: CreateIntegrations
Yes Yes No No No
Insight: ViewDashboards*
Yes Yes No
Note: User canclick ViewDashboards,but receives a“not authorized”error message.
No Yes
Insight: Create aModel*
Yes Yes Yes No No
Streams: Go toCatalog*
Yes Yes Yes Yes Yes
Insight Models* Yes Yes Yes No Yes
Monitor CurrentTasks
Yes Yes Yes No No
Monitor ProcessHealth: Tracking
Yes Yes Yes No No
Monitor ProcessHealth: Dashboard
Yes No No No No
Monitor IntegrationsHealth
Yes Yes No Yes No
* (applies only to Oracle Integration Classic (user-managed)
Chapter 2Oracle Integration Roles and Privileges
2-5

What Users Can Do in Integrations by RoleThe following tables list Oracle Integration predefined roles available in theIntegrations feature, and the tasks users granted those roles can perform.
Note:
The ServiceDeployer role is not applicable in Integrations.
• Administration
• Connections
• Integrations
• Lookups
• Mappings
• Packages
• Monitoring
Administration
Action ServiceAdministrator
ServiceDeveloper
ServiceMonitor
ServiceUser
ServiceInvoker
ServiceViewer
Sendservicefailurealerts,systemstatusreports, andintegrationerror reports
Yes No No No No No
Set logginglevels
Yes No No No No No
Uploadcertificates
Yes No No No No No
Managedatabasespace
Yes No No No No No
Managedatabasepurge
Yes No No No No No
Recommend fields tomap whendesigninganintegration
Yes No No No No No
Chapter 2Oracle Integration Roles and Privileges
2-6

Action ServiceAdministrator
ServiceDeveloper
ServiceMonitor
ServiceUser
ServiceInvoker
ServiceViewer
Enabletracing onall orindividualintegrations
Yes No No No No No
Connections
Action ServiceAdministrator
ServiceDeveloper
ServiceMonitor
ServiceUser
ServiceInvoker
ServiceViewer
Create Yes Yes No No No No
Edit Yes Yes No No No No
Delete Yes Yes No No No No
View Yes Yes No Yes No Yes
Test Yes Yes No No No No
Clone Yes Yes No No No No
Configureadapterproperties
Yes Yes No No No No
Createagents
Yes Yes No No No No
Downloadagent
Yes No No No No No
Integrations
Action ServiceAdministrator
ServiceDeveloper
ServiceMonitor
ServiceUser
ServiceInvoker
ServiceViewer
Create Yes Yes No No No No
Create newversion
Yes Yes No No No No
View Yes Yes No Yes No Yes
Edit Yes Yes No No No No
Delete Yes Yes No No No No
Activate Yes Yes No No No No
Deactivate Yes Yes No No No No
Clone Yes Yes No No No No
DownloadArtifacts
Yes Yes No Yes No No
ManageTracing
Yes No No No No No
Run Yes Yes No Yes Yes No
Monitor Yes Yes Yes No No Yes
Chapter 2Oracle Integration Roles and Privileges
2-7

Action ServiceAdministrator
ServiceDeveloper
ServiceMonitor
ServiceUser
ServiceInvoker
ServiceViewer
ViewMetrics
Yes Yes Yes No No Yes
Import Yes Yes No No No No
Export Yes Yes No Yes No No
Regenerateendpoints
Yes Yes No No No No
Publish toAPIPlatformCloudService
Yes No No No No No
Registerlibraries
Yes Yes No No No No
Lookups
Action ServiceAdministrator
ServiceDeveloper
ServiceMonitor
ServiceUser
ServiceInvoker
ServiceViewer
Create Yes Yes No No No No
View Yes Yes No Yes No Yes
Edit Yes Yes No No No No
Clone Yes Yes No No No No
Delete Yes Yes No No No No
Export Yes Yes No No No No
Import Yes Yes No No No No
ViewMetrics
Yes Yes Yes No No Yes
Mappings
Action ServiceAdministrator
ServiceDeveloper
ServiceMonitor
ServiceUser
ServiceInvoker
ServiceViewer
Create Yes Yes No No No No
View Yes Yes No Yes No Yes
Edit Yes Yes No No No No
Delete Yes Yes No No No No
Import Yes Yes No No No No
Packages
Action ServiceAdministrator
ServiceDeveloper
ServiceMonitor
ServiceUser
ServiceInvoker
ServiceViewer
View Yes Yes No Yes No Yes
Chapter 2Oracle Integration Roles and Privileges
2-8

Action ServiceAdministrator
ServiceDeveloper
ServiceMonitor
ServiceUser
ServiceInvoker
ServiceViewer
Import Yes Yes No No No No
Export Yes Yes No No No No
Update Yes Yes No No No No
Delete Yes Yes No No No No
Monitoring
Action ServiceAdministrator
ServiceDeveloper
ServiceMonitor
ServiceUser
ServiceInvoker
ServiceViewer
Downloaddiagnosticlogs
Yes Yes No No No No
Viewspecificerror details
Yes Yes Yes No No Yes
Resubmitfailedmessages
Yes Yes Yes No No No
Discarderrors
Yes Yes Yes No No No
Viewmessagerecoverystatus
Yes No Yes No No Yes
Viewintegrationinstanceaudit trails
Yes No Yes No No Yes
Viewintegrationinstancebusinessidentifiers
Yes Yes Yes No No Yes
Viewintegrationinstancemessagepayloads
Yes Yes Yes No No Yes
Viewscheduledintegrationruns
Yes No Yes No No Yes
Viewintegrationhealth(successful,total, failedmessages)
Yes Yes Yes No No Yes
Chapter 2Oracle Integration Roles and Privileges
2-9

Action ServiceAdministrator
ServiceDeveloper
ServiceMonitor
ServiceUser
ServiceInvoker
ServiceViewer
View theactivitystream
Yes Yes Yes No No Yes
Downloadthe activitystream
Yes Yes Yes No No No
Downloadincidentreports
Yes Yes Yes No No No
View overallsystemhealthstatus
Yes Yes Yes No No Yes
Downloaddatabasepurge log
Yes Yes Yes No No No
View filesystemcapacity
Yes Yes Yes No No Yes
View purgestatus
Yes Yes Yes No No Yes
Viewdatabasespaceusage
Yes Yes Yes No No Yes
Viewdesign-timemetrics(totalintegrations,connections, lookups,etc.)
Yes Yes Yes No No Yes
Monitorintegrationstatus
Yes Yes Yes No No Yes
Monitoragent status
Yes Yes Yes No No Yes
What Users Can Do in Processes by RoleThe following table lists the Oracle Integration predefined roles available in Processes,and the tasks users granted those roles can perform. Note that in Processes, theServiceMonitor role and the ServiceUser role have the same privileges. In addition tothese predefined roles, there is a set of roles defined for each process application.Service administrators are responsible for assigning process-specific roles to users.
Chapter 2Oracle Integration Roles and Privileges
2-10

Option Actions ServiceAdministrator
ServiceDeveloper
ServiceDeployer
ServiceMonitorand ServiceUser
My Tasks Access Workspace (runtime),initiate requests (startapplications), work on yourassigned tasks, and track thestatus of processes
Yes Yes Yes Yes
My Tasks Monitor dashboards Yes Yes Yes Yes
Applications Perform all actions to develop andmanage process applications andtheir components, exceptrestrictions on activating
Yes Yes Yes No
Applications Activate process applications to atest partition
Yes Yes Yes No
Applications Activate process applications to aproduction partition
Yes No No No
Spaces View your spaces and the spacesshared with you, and create, edit,share, and delete your spaces
Yes Yes Yes No
Spaces Administer any space (checkstatus, control permissions, anddelete)
Yes No No No
Management Manage process applications(activate to production partition,retire, deactivate, shut down, andmanage web services)
Yes No No No
Administration(runtime)
Configure connections to otherservices, configure processruntime and logger settings,schedule archive and purge,configure UI custom settings,assign and manage roles specificto process applications, managecredentials and certificates, andview notification logs
Yes No No No
Settings(design-time)
Administer any space (checkstatus, control permissions,delete), administer any processapplication (delete, unlock), deleteQuickStart Apps from the gallery,enable the application player, anduse the Import utility
Yes No No No
What Users Can Do in Visual Builder by RoleThe following table lists Oracle Integration predefined roles available in Visual Builder,and the tasks that users granted those roles can perform.
Chapter 2Oracle Integration Roles and Privileges
2-11

Oracle Integration Role Tasks Users Can Perform in Visual Builder
ServiceAdministrator A user with the ServiceAdministrator role can:
• Use the visual design tool• Create, manage, and change the owners of applications• Create associations with other services• Configure security options for applications in an instance• Specify error messages for Access Denied pages
ServiceDeveloper A user with the ServiceDeveloper role can:
• Use the visual design tool• Create, manage, secure, and publish web and mobile
applications• Design pages, work with business objects, build and test
applications
ServiceMonitor The ServiceMonitor role is not applicable in Visual Builder.
ServiceDeployer The ServiceDeployer role is not applicable in Visual Builder.
ServiceUser A user with the role of ServiceUser can only access staged andpublished applications. The default permission is enforced onlywhen the service administrator adjusts security settings for theentire service instance to restrict all access to runtime applicationsto the users granted the ServiceUser role.
What Users Can Do in Integration Insight and Stream Analytics byRole
Applies only to Oracle Integration Classic (user-managed).
The following table lists the privileges provided by Oracle Integration predefined rolesin Integration Insight and Stream Analytics.
Oracle Integration PredefinedRole
Tasks Users Can Perform inIntegration Insight
Tasks Users Can Perform in StreamAnalytics
ServiceAdministrator A user with the ServiceAdministratorrole can:
• Create models, and has access toall other models
• Create connectionsto other OracleIntegration features
• Import and export modelsAdditionally, the user can perform allthe tasks that users with theServiceDeveloper, ServiceDeployer,and ServiceUser roles can perform.
A user with the ServiceAdministratorrole can:
• Configure Spark and Kafka forStream Analytics
• Create Kafka and databaseconnections
ServiceMonitor The ServiceMonitor role is notapplicable in Integration Insight.
The ServiceMonitor role is notapplicable in Stream Analytics.
Chapter 2Oracle Integration Roles and Privileges
2-12

Oracle Integration PredefinedRole
Tasks Users Can Perform inIntegration Insight
Tasks Users Can Perform in StreamAnalytics
ServiceDeveloper A user with the ServiceDeveloper rolecan:
• Create, import, and export models• Create milestones and indicators
using business language• Define mapping of milestones to
the appropriate location inimplementation and extraction ofindicators
• Use the Events REST API
A user with the ServiceDeveloper rolecan:
• Create streams using Kafkaconnections
• Create references using databaseconnections
• Create manual GeoFencesor database-based GeoFences
• Create draft pipelines
ServiceDeployer A user with the ServiceDeployer rolecan:
• Export models• Create milestones and indicators
using business language• Define mapping of the milestones
to the appropriate location inimplementation and extraction ofindicators
• Use the Events REST API
A user with ServiceDeployer role can:
• Publish draft pipelines to theSpark cluster
ServiceUser A user with the ServiceUser role hasaccess to dashboards, and haspermissions to create, view, and editdashboards. The user can also use theEvents REST API.
A user with the ServiceUser role canview connections, streams,applications, targets, references,GeoFences, patterns, and all otherresources.
These users can’t create, edit, ordelete resources.
Add a UserAdd the users who need to use your Oracle Integration instance.
You can create and manage user accounts only if you are a cloud accountadministrator, an identity domain administrator, or have the user administrator rolethrough delegated administration.
1. Sign in to the Oracle Cloud Infrastructure Console.
2. Click in the top left corner of the Oracle Cloud Infrastructure Console.
3. Select Platform Services, then Integration.
The Oracle Integration Instances page is displayed.
4. Click Users in the upper right corner.
5. On the Users tab of the User Management page, click Add.
6. On the Add User page, enter the following information:
• Your first name and last name.
• Your email address, alternate email address, and mobile phone number. Notethat your email address and alternate email address must be different.
Chapter 2Add a User
2-13

• Your work information such as your title and work phone number.
7. Click Next, and then select roles to assign to the new user. You can also assignroles later.
8. Click Finish.
Assign Roles to a UserYou can assign roles to users to specify the tasks they can perform in OracleIntegration. You can assign multiple roles to a user.
To assign roles to users, you must be a cloud account administrator, an identitydomain administrator, or have the user administrator role through delegatedadministration. See Oracle Integration Roles and Privileges for a description of thevarious predefined roles available in Oracle Integration.
1. Click in the top left corner of the Oracle Cloud Infrastructure Console.
2. Click Platform Services, then Integration.
The Oracle Integration Instances page is displayed.
3. Click Users in the top corner.
4. On the Users list page, click the user for which you want to assign roles.
5. Click the Roles tab.
6. Optionally, use the Filter by Service box to search for specific services, if required.By default, the Roles page displays all services in your cloud account. If you wantto assign roles for a specific service and its instances, delete All Services fromthe Filter by Service box, then select your service from the list or enter the servicename.
7. From the Show drop-down list, select one of the following:
• Only Services: Lists all services. Select this if you want to assign roles to theuser to be able to provision and administer cloud services in the Oracle CloudInfrastructure Console.
• Only Instances: Lists all instances. Select this if you want to give access tothe user for specific instances.
• Both Services and Instances: Lists all services and instances. If youselected a specific service in the Filter by Service box, it lists that service andall its instances.
8. In the search result, go to the service or instance for which you want to assignroles to the user.
9. For your service or instance, click the text box and select the required role.
For example, to assign the ServiceAdministrator role for an instance, selectOnly Instances from the Show drop-down list. Then in the search result, go toyour instance, click the text box below the instance name and select theServiceAdministrator (Service instance administrator role) role.
Chapter 2Assign Roles to a User
2-14

Add a GroupInstead of assigning roles to each user individually, you can create groups and addusers to groups to make it easier to assign roles. Each time you add a user to a group,the user automatically gets the roles defined for the group.
You can create and manage groups only if you are a cloud account administrator, anidentity domain administrator, or have the user administrator role through delegatedadministration.
1. Click in the top left corner of the Oracle Cloud Infrastructure Console.
2. Select Platform Services, then Integration.
The Oracle Integration Instances page is displayed.
3. Click Users in the top right corner, and then click Groups.
4. In the Groups list page, click Add.
5. Provide a name and description for your group.
6. Click Add.
The group is created and you can now add users to the newly created group.
Add Users to a GroupAdd users to a group so that they automatically get the permissions defined for thegroup. You can add users to a group either from the Groups page or the Users page.
To add users to a group from the Groups page:
1. Sign in to the Oracle Cloud Infrastructure Console.
2. Click in the top left corner of the Oracle Cloud Infrastructure Console.
3. Select Platform Services, then Integration.
The Oracle Integration Instances page is displayed.
4. Click Users in the top right corner, and then click Groups.
5. On the Groups list page, click the name of the group.
Or, from the Action menu, click Edit.
6. On the Group Details page, select the Users tab.
7. Click Add to Group.
8. In the Add to Group dialog, select the users you want to add to the group.
9. Click Add.
The selected users are added to the group. You can now assign roles to all the usersin the group, if required. Use the Roles tab to batch assign roles.
Chapter 2Add a Group
2-15

Assign Roles to a GroupAfter you create groups and add users to groups, you can assign roles and provideaccess to services and instances to all the members of the group at once.
Note that this action assigns the selected roles to all the users in the group in a batch.You can’t assign roles individually if you select the group role assignment.
See Oracle Integration Roles and Privileges for a description of the various predefinedroles available in Oracle Integration.
1. Sign in to the Oracle Cloud Infrastructure Console.
2. Click in the top left corner of the Oracle Cloud Infrastructure Console.
3. Click Platform Services, then Integration.
The Oracle Integration Console is displayed.
4. Click Users in the top corner. Select the Groups tab.
5. On the Groups list page, click the group for which you want to assign roles.
6. Click the Roles tab.
7. Optionally, use the Filter by Service box to search for specific services, if required.By default, the Roles page displays all services in your cloud account. If you wantto assign roles for a specific service and its instances, delete All Services fromthe Filter by Service box, then select your service from the list or enter the servicename.
8. From the Show drop-down list, select one of the following:
• Only Services: Lists all services. Select this if you want to assign roles togroup members to be able to provision and administer cloud services in theOracle Cloud Infrastructure Console.
• Only Instances: Lists all instances. Select this if you want to give access togroup member for specific instances.
• Both Services and Instances: Lists all services and instances. If youselected a specific service in the Filter by Service box, it lists that service andall its instances.
9. In the search result, go to the service or instance for which you want to assignroles to group members.
10. For your service or instance, click the text box and select the required role fromthe drop-down list.
For example, to assign the ServiceUser role for an instance, select OnlyInstances from the Show drop-down list. Then in the search result, go to yourinstance, click the text box below the instance name and select the ServiceUser(Service instance user role) role.
Chapter 2Assign Roles to a Group
2-16

Use the Service Integration Account with No PasswordExpiration
Oracle Integration provides a service integration account in which the password doesnot expire. The service integration account consists of a generic application rolecreated with specific predefined rules. Use this account when you need to invokeintegrations and require that the account password not expire.
User credentials are typically used with the Basic Authentication security policy.Continuous use of this security policy by clients increases the performance load on theauthentication service (Oracle Identity Cloud Service) because it must keep validatingthe same credentials repeatedly. The increased performance load is dependent on twofactors.
• Repeated requests to the Oracle Identity Cloud Service server for passwordauthenticator/asserter for the same basic authentication credentials.
• The Oracle Identity Cloud Service password policy requires accessing the ID storefor each of the requests.
To reduce the performance load caused by repeated requests, you can use theservice integration account without password expiration.
For Basic Authentication, you can use generic credentials: the client ID (that ends with_BASICAUTH) and the associated client secret. This section describes on how to createthese credentials.
Obtain the PaaS Application Oracle Identity Cloud Service Application ID
1. Click in the top left corner of the Oracle Cloud Infrastructure Console. AnyOracle Integration user can do this.
2. Click Platform Services, then Integration.
3. In the upper right corner, click Users.
4. On the User Management page, click Identity Console.
5. In the upper left corner, click
.
6. Select Applications.
7. Navigate to the Oracle Integration application.
8. Note the value in the Application ID field (for this example, referred to as ${OIC_APP_ID}).
Configure the Service Administrator Application
1. Click Add and select Confidential Application to create a confidential applicationin Oracle Identity Cloud Service. This task must be performed by an OracleIdentity Cloud Service administrator.
Chapter 2Use the Service Integration Account with No Password Expiration
2-17

The Add Confidential Application wizard is displayed.
2. Configure the confidential application.
a. On the Details page, enter an application name.
b. On the Client page, enable Client Credentials and Refresh Token.
c. At the bottom of the Client page, click Add and select the Identity DomainAdministrator role.
3. Click Add, then click Next until you reach the final page.
Chapter 2Use the Service Integration Account with No Password Expiration
2-18

4. Click Finish. The Application Added dialog is displayed.
a. Note the application ID, client ID, client secret for the confidential application(for this example, referred to as ${SA_APP_ID}, ${SA_CLIENT_ID}, and ${SA_CLIENT_SECRET}), then click Close.
Configure the Service Integration Application
1. Create the service integration application.
a. Get an access token to create an application (for this example, referred to as ${SA_ACCESS_TOKEN}).
• Get access token request:
curl -X POST https://${IDCS_HOST}/oauth2/v1/token -u ${SA_CLIENT_ID}:${SA_CLIENT_SECRET} -d 'grant_type=client_credentials&scope=urn%3Aopc%3Aidm%3A__myscopes__'
• Get access token response:
{ "access_token": "eyJ4NXQjUzI1NiI6IlVFQ1RyX25Ram9XYk9........................XV-2ei4pAUYV9aw66k_qL3b842qHw", "token_type": "Bearer", "expires_in": 3600}
b. Create an application with the _BASICAUTH suffix using the above accesstoken.
• Create an application request:
curl -X POST https://${IDCS_HOST}/admin/v1/Apps -H 'Authorization: Bearer ${SA_ACCESS_TOKEN}' -H 'Content-Type: application/json' -d '{ "active": true, "allUrlSchemesAllowed": false, "allowAccessControl": false, "allowedGrants": ["client_credentials", "urn:ietf:params:oauth:grant-type:jwt-bearer"], "attrRenderingMetadata": [{ "name": "aliasApps", "visible": false }], "basedOnTemplate": { "value": "CustomWebAppTemplateId" }, "clientType": "confidential", "displayName": "OICTEST_BASICAUTH", "editableAttributes": [ { "name": "allowedGrants" }, { "name": "protectableSecondaryAudiences" }, { "name": "asOPCService" }, { "name": "accessTokenExpiry" }, { "name": "linkingCallbackUrl" }, { "name": "isOAuthResource" }, { "name": "appIcon" }, { "name": "clientType" }, { "name": "refreshTokenExpiry" }, { "name": "trustScope" }, { "name": "landingPageUrl" }, { "name": "audience" }, { "name": "samlServiceProvider" }, { "name": "isLoginTarget" }, { "name": "redirectUris" },
Chapter 2Use the Service Integration Account with No Password Expiration
2-19

{ "name": "allowedScopes" }, { "name": "tags" }, { "name": "logoutUri" }, { "name": "allowedOperations" }, { "name": "termsOfUse" }, { "name": "serviceParams" }, { "name": "certificates" }, { "name": "aliasApps" }, { "name": "schemas" }, { "name": "isWebTierPolicy" }, { "name": "trustPolicies" }, { "name": "logoutPageUrl" }, { "name": "secondaryAudiences" }, { "name": "displayName" }, { "name": "serviceTypeURN" }, { "name": "icon" }, { "name": "description" }, { "name": "isOAuthClient" }, { "name": "allowedTags" }, { "name": "showInMyApps" }, { "name": "isObligationCapable" }, { "name": "isMobileTarget" }, { "name": "allowOffline" }, { "name": "idpPolicy" }, { "name": "appSignonPolicy" }, { "name": "postLogoutRedirectUris" }, { "name": "isFormFill" }, { "name": "loginMechanism" }, { "name": "serviceTypeVersion" }, { "name": "errorPageUrl" }, { "name": "signonPolicy" }, { "name": "identityProviders" }, { "name": "isSamlServiceProvider" }, { "name": "appThumbnail" }, { "name": "loginPageUrl" }, { "name": "scopes" }, { "name": "allowAccessControl" }, { "name": "isKerberosRealm" }, { "name": "allUrlSchemesAllowed" }, { "name": "urn:ietf:params:scim:schemas:oracle:idcs:extension:samlServiceProvider:App:encryptionAlgorithm" }, { "name": "urn:ietf:params:scim:schemas:oracle:idcs:extension:samlServiceProvider:App:groupAssertionAttributes" }, { "name": "urn:ietf:params:scim:schemas:oracle:idcs:extension:samlServiceProvider:App:includeSigningCertInSignature" }, { "name": "urn:ietf:params:scim:schemas:oracle:idcs:extension:samlServiceProvider:App:signResponseOrAssertion" }, { "name": "urn:ietf:params:scim:schemas:oracle:idcs:extension:samlServiceProvider:App:assertionConsumerUrl" }, { "name": "urn:ietf:params:scim:schemas:oracle:idcs:extension:samlServiceProvider:App:nameIdUserstoreAttribute" }, { "name": "urn:ietf:params:scim:schemas:oracle:idcs:extension:samlServiceProvider:App:logoutResponseUrl" }, { "name": "urn:ietf:params:scim:schemas:oracle:idcs:extension:samlServiceProvider:App:succinctId" }, { "name": "urn:ietf:params:scim:schemas:oracle:idcs:extension:samlServiceProvider:App:logoutRequestUrl" }, { "name": "urn:ietf:params:scim:schemas:oracle:idcs:extension:samlServiceProvider:App:partnerProviderId" }, { "name": "urn:ietf:params:scim:schemas:oracle:idcs:extension:samlServiceProvider:App:nameIdFormat" }, { "name": "urn:ietf:params:
Chapter 2Use the Service Integration Account with No Password Expiration
2-20

scim:schemas:oracle:idcs:extension:samlServiceProvider:App:logoutBinding" }, { "name": "urn:ietf:params:scim:schemas:oracle:idcs:extension:samlServiceProvider:App:userAssertionAttributes" }, { "name": "urn:ietf:params:scim:schemas:oracle:idcs:extension:samlServiceProvider:App:signatureHashAlgorithm" }, { "name": "urn:ietf:params:scim:schemas:oracle:idcs:extension:samlServiceProvider:App:metadata" }, { "name": "urn:ietf:params:scim:schemas:oracle:idcs:extension:samlServiceProvider:App:encryptAssertion" }, { "name": "urn:ietf:params:scim:schemas:oracle:idcs:extension:samlServiceProvider:App:logoutEnabled" }, { "name": "urn:ietf:params:scim:schemas:oracle:idcs:extension:samlServiceProvider:App:encryptionCertificate" }, { "name": "urn:ietf:params:scim:schemas:oracle:idcs:extension:samlServiceProvider:App:signingCertificate" }, { "name": "urn:ietf:params:scim:schemas:oracle:idcs:extension:samlServiceProvider:App:federationProtocol" }, { "name": "urn:ietf:params:scim:schemas:oracle:idcs:extension:webTierPolicy:App:webTierPolicyJson" }, {"name": "urn:ietf:params:scim:schemas:oracle:idcs:extension:managedapp:App:bundleConfigurationProperties" }, {"name": "urn:ietf:params:scim:schemas:oracle:idcs:extension:managedapp:App:isAuthoritative" }, { "name": "urn:ietf:params:scim:schemas:oracle:idcs:extension:managedapp:App:enableSync" }, { "name": "urn:ietf:params:scim:schemas:oracle:idcs:extension:managedapp:App:adminConsentGranted" }, { "name": "urn:ietf:params:scim:schemas:oracle:idcs:extension:managedapp:App:connected" }, { "name": "urn:ietf:params:scim:schemas:oracle:idcs:extension:managedapp:App:flatFileBundleConfigurationProperties" }, { "name": "urn:ietf:params:scim:schemas:oracle:idcs:extension:managedapp:App:threeLeggedOAuthCredential" }, { "name": "urn:ietf:params:scim:schemas:oracle:idcs:extension:managedapp:App:bundlePoolConfiguration" }, { "name": "urn:ietf:params:scim:schemas:oracle:idcs:extension:managedapp:App:flatFileConnectorBundle" }, { "name": "urn:ietf:params:scim:schemas:oracle:idcs:extension:formFillAppTemplate:AppTemplate:revealPasswordOnForm" }, { "name": "urn:ietf:params:scim:schemas:oracle:idcs:extension:formFillAppTemplate:AppTemplate:userNameFormTemplate" }, { "name": "urn:ietf:params:scim:schemas:oracle:idcs:extension:formFillAppTemplate:AppTemplate:userNameFormExpression" },
Chapter 2Use the Service Integration Account with No Password Expiration
2-21

{ "name": "urn:ietf:params:scim:schemas:oracle:idcs:extension:formFillAppTemplate:AppTemplate:formCredentialSharingGroupID" }, { "name": "urn:ietf:params:scim:schemas:oracle:idcs:extension:formFillAppTemplate:AppTemplate:formCredMethod" }, { "name": "urn:ietf:params:scim:schemas:oracle:idcs:extension:formFillAppTemplate:AppTemplate:syncFromTemplate" }, { "name": "urn:ietf:params:scim:schemas:oracle:idcs:extension:formFillAppTemplate:AppTemplate:configuration" }, { "name": "urn:ietf:params:scim:schemas:oracle:idcs:extension:formFillAppTemplate:AppTemplate:formFillUrlMatch" }, { "name": "urn:ietf:params:scim:schemas:oracle:idcs:extension:formFillAppTemplate:AppTemplate:formType" }, { "name": "urn:ietf:params:scim:schemas:oracle:idcs:extension:kerberosRealm:App:masterKey" }, { "name": "urn:ietf:params:scim:schemas:oracle:idcs:extension:kerberosRealm:App:maxRenewableAge" }, { "name": "urn:ietf:params:scim:schemas:oracle:idcs:extension:kerberosRealm:App:maxTicketLife" }, { "name": "urn:ietf:params:scim:schemas:oracle:idcs:extension:kerberosRealm:App:supportedEncryptionSaltTypes" }, { "name": "urn:ietf:params:scim:schemas:oracle:idcs:extension:kerberosRealm:App:realmName" }, { "name": "urn:ietf:params:scim:schemas:oracle:idcs:extension:kerberosRealm:App:ticketFlags" }, { "name": "urn:ietf:params:scim:schemas:oracle:idcs:extension:kerberosRealm:App:defaultEncryptionSaltType" }, { "name": "urn:ietf:params:scim:schemas:oracle:idcs:extension:requestable:App:requestable" }, { "name": "urn:ietf:params:scim:schemas:oracle:idcs:extension:formFillApp:App:revealPasswordOnForm" }, { "name": "urn:ietf:params:scim:schemas:oracle:idcs:extension:formFillApp:App:userNameFormExpression" }, { "name": "urn:ietf:params:scim:schemas:oracle:idcs:extension:formFillApp:App:formType" }, { "name": "urn:ietf:params:scim:schemas:oracle:idcs:extension:formFillApp:App:formCredMethod" }, { "name": "urn:ietf:params:scim:schemas:oracle:idcs:extension:formFillApp:App:configuration" }, { "name": "urn:ietf:params:scim:schemas:oracle:idcs:extension:formFillApp:
Chapter 2Use the Service Integration Account with No Password Expiration
2-22

App:formFillUrlMatch" }, { "name": "urn:ietf:params:scim:schemas:oracle:idcs:extension:formFillApp:App:formCredentialSharingGroupID" }, { "name": "urn:ietf:params:scim:schemas:oracle:idcs:extension:formFillApp:App:userNameFormTemplate" }, { "name": "urn:ietf:params:scim:schemas:oracle:idcs:extension:dbcs:App:domainApp" }, { "name": "active" }, { "name": "grantedAppRoles" }, { "name": "userRoles" }, { "name": "adminRoles" }, { "name": "clientSecret" } ], "infrastructure": false, "isAliasApp": false, "isManagedApp": false, "isMobileTarget": false, "isOAuthClient": true, "isOAuthResource": false, "isOPCService": false, "isSamlServiceProvider": false, "isUnmanagedApp": false, "isWebTierPolicy": false, "loginMechanism": "OIDC", "migrated": false, "name": "OICTEST_BASICAUTH", "showInMyApps": false, "trustScope": "Explicit", "urn:ietf:params:scim:schemas:oracle:idcs:extension:requestable:App": { "requestable": false }, "schemas": ["urn:ietf:params:scim:schemas:oracle:idcs:App", "urn:ietf:params:scim:schemas:oracle:idcs:extension:requestable:App"] }'
• Create an application response:
{ "clientType": "confidential", "isAliasApp": false, "meta": { "created": "2019-04-01T07:51:47.025Z", "lastModified": "2019-04-01T07:51:47.025Z", "resourceType": "App", "location": "https://${IDCS_HOST}/admin/v1/Apps/0c228094b0f5456289b928f979800308" }, "active": true, "isLoginTarget": true, "idcsCreatedBy": { "display": "OIC_SI_TEST", "type": "App", "value": "5debb165fc6946708e2c1f27264fafb1", "$ref": "https://${IDCS_HOST}/admin/v1/Apps/5debb165fc6946708e2c1f27264fafb1" }, "displayName": "OICTEST_BASICAUTH", "showInMyApps": false, "isMobileTarget": false, "allowOffline": false, "isUnmanagedApp": false, "idcsLastModifiedBy": { "display": "OIC_SI_TEST", "type": "App", "value": "5debb165fc6946708e2c1f27264fafb1", "$ref": "https://${IDCS_HOST}/admin/v1/Apps/5debb165fc6946708e2c1f27264fafb1" }, "isOPCService": false, "name": "OICTEST_BASICAUTH", "isOAuthClient": true, "isManagedApp": false, "isSamlServiceProvider": false, "infrastructure": false,
Chapter 2Use the Service Integration Account with No Password Expiration
2-23

"allUrlSchemesAllowed": false, "trustScope": "Explicit", "id": "0c228094b0f5456289b928f979800308", "isWebTierPolicy": false, "loginMechanism": "OIDC", "allowAccessControl": false, "isOAuthResource": false, "migrated": false, "isKerberosRealm": false, "allowedGrants": [ "client_credentials", "urn:ietf:params:oauth:grant-type:jwt-bearer" ], "attrRenderingMetadata": [ { "name": "aliasApps", "visible": false } ], "basedOnTemplate": { "value": "CustomWebAppTemplateId", "lastModified": "2018-05-31T22:35:08Z", "$ref": "https://${IDCS_HOST}/admin/v1/AppTemplates/CustomWebAppTemplateId" }, "schemas": [ "urn:ietf:params:scim:schemas:oracle:idcs:App" ], "clientSecret": "91ac1189-b2ca-4ccb-a049-bbc635927646" }
c. Note the application ID, client ID, and client secret from the response (for thisexample, referred to as ${SI_APP_ID}, ${SI_CLIENT_ID}, and ${SI_CLIENT_SECRET}).
d. Activate the application using the above access token.
• Activate the application request:
curl -X PUT https://${IDCS_HOST}/admin/v1/AppStatusChanger/${SI_APP_ID} -H 'Authorization: Bearer ${SA_ACCESS_TOKEN}' -H 'Content-Type: application/json' -d '{"schemas":["urn:ietf:params:scim:schemas:oracle:idcs:AppStatusChanger"],"id":"${SI_APP_ID}","active":true}'
2. Associate the service integration application.
a. Identify the AppRoleID to be granted for the Oracle Integration application. TheServiceUser role is assigned to the created application. Therefore, a search isperformed for that role (for this example, referred to as ${OIC_APP_ROLE_ID}).
• Get the application role ID request:
curl -X GET 'https://${IDCS_HOST}/admin/v1/AppRoles?attributes=groups,urn:ietf:params:scim:schemas:oracle:idcs:extension:user:User:appRoles&filter=displayName+co+%22ServiceUser%22+and+app.value+eq+%22${OIC_APP_ID}%22' -H 'Authorization: Bearer ${SA_ACCESS_TOKEN}'
• Get the application role ID response:
{ "schemas": [ "urn:ietf:params:scim:api:messages:2.0:ListResponse"
Chapter 2Use the Service Integration Account with No Password Expiration
2-24

], "totalResults": 1, "Resources": [ { "displayName": "ServiceUser", "id": "20e22fd1eb2e43ac8645e105abcab201", "app": { "value": "e0eea2c9fadb42c09d33035ff41e8f57", "display": "OICSSA_oiccafdev7" } } ], "startIndex": 1, "itemsPerPage": 50}
b. Grant the service integration application with the above role.
• Grant the role request:
curl -X POST https://${IDCS_HOST}/admin/v1/Grants -H 'Authorization: Bearer ${SA_ACCESS_TOKEN}' -H 'Content-Type: application/json' -d '{ "app": { "value": "${OIC_APP_ID}" }, "entitlement": { "attributeName": "appRoles", "attributeValue": "${OIC_APP_ROLE_ID}" }, "grantMechanism": "ADMINISTRATOR_TO_APP", "grantee": { "value": "${SI_APP_ID}", "type": "App" }, "schemas": ["urn:ietf:params:scim:schemas:oracle:idcs:Grant"]}'
• Grant the role response:
{ "app": { "value": "${OIC_APP_ID}", "$ref": "https://${IDCS_HOST}/admin/v1/Apps/${OIC_APP_ID}" }, "entitlement": { "attributeName": "appRoles", "attributeValue": "${OIC_APP_ROLE_ID}" }, "grantMechanism": "ADMINISTRATOR_TO_APP", "grantee": { "value": "${SI_APP_ID}", "type": "App", "$ref": "https://${IDCS_HOST}/admin/v1/Apps/$
Chapter 2Use the Service Integration Account with No Password Expiration
2-25

{SI_APP_ID}" }, "schemas": [ "urn:ietf:params:scim:schemas:oracle:idcs:Grant" ], "id": "6832316983c545baa01e9a9488022fa7", "isFulfilled": true, "grantor": { "type": "App", "value": "${SA_APP_ID}", "$ref": "https://${IDCS_HOST}/admin/v1/Apps/${SA_APP_ID}" }, "meta": { "created": "2019-04-01T08:00:33.277Z", "lastModified": "2019-04-01T08:00:33.277Z", "resourceType": "Grant", "location": "https://${IDCS_HOST}/admin/v1/Grants/6832316983c545baa01e9a9488022fa7" }, "idcsCreatedBy": { "value": "${SA_APP_ID}", "type": "App", "display": "OIC_SI_TEST", "$ref": "https://${IDCS_HOST}/admin/v1/Apps/${SA_APP_ID}" }, "idcsLastModifiedBy": { "value": "${SA_APP_ID}", "type": "App", "display": "OIC_SI_TEST", "$ref": "https://${IDCS_HOST}/admin/v1/Apps/${SA_APP_ID}" }}
Using the Service Integration Credentials
Once setup is complete, the credentials ${SI_CLIENT_ID} and ${SI_CLIENT_SECRET} can be used as the user name and password forauthentication to an Oracle Integration endpoint as shown below.
Oracle Integration SOAP endpoint request sample:
curl -X POST https://${OIC_HOST}/ic/ws/integration/v1/flows/soap/FLOW/1.0/ -u ${SI_CLIENT_ID}:${SI_CLIENT_SECRET} -H 'Content-Type: text/xml;charset=UTF-8' -H 'SOAPAction: process' -d '<soapenv:Envelope xmlns:rp="http://xmlns.oracle.com/rp_WS_Basic_Authentication_APP/rp_WS_Basic_Authentication/rp_Basic_Authentication_WS" xmlns:soapenv="http://schemas.xmlsoap.org/soap/envelope/"> <soapenv:Header> <wsse:Security soapenv:mustUnderstand="1" xmlns:wsse="http://
Chapter 2Use the Service Integration Account with No Password Expiration
2-26

docs.oasis-open.org/wss/2004/01/oasis-200401-wss-wssecurity-secext-1.0.xsd" xmlns:wsu="http://docs.oasis-open.org/wss/2004/01/oasis-200401-wss-wssecurity-utility-1.0.xsd"> <wsu:Timestamp wsu:Id="TS-0BC1DE3F9C8F739DB815541392855881"> <wsu:Created>2019-04-01T00:00:00.000Z</wsu:Created> <wsu:Expires>2019-04-02T00:00:00.000Z</wsu:Expires> </wsu:Timestamp> </wsse:Security> </soapenv:Header> <soapenv:Body> <rp:process> <rp:input>OICTEST</rp:input> </rp:process> </soapenv:Body></soapenv:Envelope>'
Use OAuth Authentication for REST APIsAuthentication and authorization in Oracle Integration is managed by Oracle IdentityCloud Service. Oracle Integration REST APIs as well as REST endpoints exposed inintegrations are protected using the OAuth token-based authentication. OAuth is anauthorization framework that enables an application or service to obtain limited accessto a protected HTTP resource.
To use REST APIs with OAuth in Oracle Integration, you need to register your OracleIntegration instance as a trusted application in Oracle Identity Cloud Service. See Security, Authentication, and Authorization in REST API for Oracle Integration.
Trigger Integrations Using OAuth AuthenticationOracle Integration REST endpoints are OAuth-protected and can be triggered from aclient using OAuth 2.0. You must perform several configuration steps for a client (inthis example, postman) to successfully trigger an Oracle Integration REST-basedintegration.
See this blog.
Chapter 2Use OAuth Authentication for REST APIs
2-27

3Ready, Set Up, and Go
You use the Oracle Cloud Infrastructure Console to install instances of OracleIntegration.
Topics:
• Access Oracle Integration from the Oracle Cloud Infrastructure Console
• Assign the Correct User Roles to Create an Instance
• Create an Oracle Integration Instance
• About the User Interfaces of the Oracle Integration Oracle Cloud InfrastructureConsole
Accessing Oracle IntegrationDepending on how you signed up for Oracle Cloud, you’ll be directed to either theOracle Cloud Infrastructure Console or the Infrastructure Classic Console.
Topics:
• Access Oracle Integration from the Oracle Cloud Infrastructure Console
• Access Oracle Integration from the Oracle Cloud Infrastructure Classic Console
Access Oracle Integration from the Oracle Cloud InfrastructureConsole
You access Oracle Integration through a web console.
1. Sign in to your Oracle Cloud account.
If you received a welcome email, use it to identify the URL, your user name, andyour temporary password. After signing in, you are prompted to change yourpassword.
2. Click in the top left corner of the Oracle Cloud Infrastructure Console.
3. Click Platform Services > Integration.
The Oracle Integration Console is displayed.
4. From the Oracle Integration page, you can quickly create a service instance byclicking QuickStarts at the top of the page. See Quickly Create an Instance.
3-1

Access Oracle Integration from the Oracle Cloud Infrastructure ClassicConsole
On some older Oracle Cloud accounts, you access the Oracle Integration Consolefrom the Oracle Cloud Infrastructure Classic Console.
1. Sign in to your Oracle Cloud account.
If you received a welcome email, use it to identify the URL, your user name, andyour temporary password. After signing in, you are prompted to change yourpassword.
2. Click in the top left corner of the Oracle Cloud Infrastructure Classic Console.
3. Click Platform Services > Integration Classic.
The Oracle Cloud Infrastructure Classic Console is displayed.
4. From the Oracle Integration page, you can quickly create a service instance byclicking QuickStarts at the top of the page. See Quickly Create an Instance.
Assign the Correct User Roles to Create an InstanceIf you are the user that initially signed up and purchased universal credits for OracleCloud, you automatically have the necessary service entitlement roles to create OracleIntegration instances. Otherwise, the correct roles must be explicitly assigned to youruser account to create Oracle Integration instances. Without the necessary roles,instance creation fails.
To successfully create Oracle Integration instances, ensure that your user account isassigned the following role for these services:
• Integration:
Service Entitlement: AUTONOMOUS_INTEGRATION:CLOUD_ENTITLEMENT_ADMINISTRATOR (Autonomous Integration Cloudentitlement administrator role)
To know how to add new users and assign roles, see Add a User and Assign Roles toa User.
Note:
The Identity Cloud - Service Entitlement (Identity Domain Administrator) rolehas super user privileges for the identity domain. Users with this role canmanage users, groups, applications, and system configuration settings. Theycan also perform delegated administration by assigning users to differentadministrative roles.
Chapter 3Assign the Correct User Roles to Create an Instance
3-2

Create an Oracle Integration InstanceYou can create the following types of Oracle Integration instances. Oracle managesyour instance, including performing database management, performing backups,upgrading your instance to the next version, installing patches, and more.
• Quickly Create an Instance
• Create a Custom Instance
Both instances are created on the Oracle Cloud Infrastructure, which combines theelasticity and utility of public cloud with the granular control, security, and predictabilityof on-premises infrastructure to deliver high-performance, high availability, and cost-effective infrastructure services.
Quickly Create an InstanceYou can create a quick start instance of Oracle Integration with a single click.
Capabilities of This Instance
You have two quick start options.
• Oracle Integration - Enterprise: Installs the Integration and Process feature set.This option enables you to integrate SaaS and on-premises applications andautomate business processes.
• Oracle Integration - Standard: Installs the Integration feature set. This optionenables you to integrate SaaS and on-premises applications.
Prerequisites
Ensure that you have the required user roles to create an instance. See Assign theCorrect User Roles to Create an Instance.
Creating an Instance
To create a quick start instance:
1. Sign in to your Oracle Cloud account.
2. Click in the top left corner of the Oracle Cloud Infrastructure Console.
3. Click Platform Services > Integration.
4. In the upper right corner, click QuickStarts.The QuickStarts page is displayed.
5. Review the quick start instance details. See Oracle Integration Editions.
Chapter 3Create an Oracle Integration Instance
3-3

Note:
The Custom button in the upper right corner of the page launches thecustom installer for installing Oracle Integration.
6. Note that below the QuickStarts header is a link for bringing over an existingOracle Fusion Middleware license to the cloud for use with Oracle Integration.
7. If you do not want to use an existing license, select Click here.
8. In the Instance Name field, enter a name.
9. Click Create.
10. Wait for installation to complete.
Create a Custom InstanceYou can create a custom instance in which you can specify the feature pack(Integrations only or Integrations and Processes) and the number of message packsper hour to use.
Capabilities of This Instance
This option enables you to complete a brief template that provides you with a pre-provisioned instance of Oracle Integration that enables you to get started quickly.
This option also enables you to specify a special, Oracle-provided tag for easy on-boarding of pre-approved, proof of concept instances for paid and large message packcustomers. You can also use this feature for other special use cases in which yourequire a pre-approved instance. You specify a special, Oracle-provided tag for the
Chapter 3Create an Oracle Integration Instance
3-4

instance on the Details page during creation. If you have a need for this feature, workwith your Oracle representative.
Prerequisites
Ensure that you have the required user roles to create an instance. See Assign theCorrect User Roles to Create an Instance.
Creating an Instance
To create an instance:
1. Sign in to your Oracle Cloud account.
2. Click in the top left corner of the Oracle Cloud Infrastructure Console.
3. Click Platform Services > Integration.
4. Click Create Instance.The Instance page is displayed.
5. Specify the following details:
Field Description
Instance Name Enter an instance name that is unique within the tenant domain.The name cannot have more than 30 characters, must start with aletter, and can contain only letters and numbers.
Description Enter a description to identify this new service. The description isused only in the instance list display.
Notification Email Enter an email address at which to be notified of instanceprovisioning progress (for example, when provisioning completes).
Region Select the compute region from which to perform the installation.Otherwise, select No Preference.
Tags Select available tags for assignment or click the icon to define newtags and assign to the service instance. You can use tags to searchfor and categorize your instances.
Identity Domain Select the identity domain to identify users and resourcesassociated with the provisioned service instance.
License Type Select an option:
• Select to bring an existing Oracle Fusion Middleware license tothe cloud for use with Oracle Integration.
• Select to create a new Oracle Integration license.
6. When complete, click Next.
7. Specify the following details:
Chapter 3Create an Oracle Integration Instance
3-5

Note:
The options for selecting the number of 20k message and 5k messagepacks per hour on this page are mutually exclusive. The 5k messagepacks per hour option is for users who are not bringing a license overfrom Oracle Fusion Middleware. The 20k message packs per hour optionis for users who are bringing a license over from Oracle FusionMiddleware.
Field Description
Feature Set Displays the available feature sets. Visual Builder is automaticallyinstalled with each set.• Integration: Installs the Integrations feature set.• Integration and Process: Installs the Integrations and
Processes feature sets.
I have specialinstructions fromOracle
Select only if you received a special tag from Oracle for creatingthis instance, then enter the tag in the Special Tag field whenprompted.
Number of 5kMessages Per HourPacks
Enter a value between 1 and 12. A single pack enables you to sendup to 5000 messages per hour. This option is displayed if youselected to subscribe to a new Oracle Integration software license.
Number of 20kMessages Per HourPacks
Enter a value between 1 and 3. A single pack enables you to sendup to 20,000 messages per hour. This option is displayed if youselected to bring an existing Oracle Middleware software license toOracle Integration.
8. When complete, click Next.
9. Confirm your selections, then click Confirm.
10. Wait for installation to complete.
About the User Interfaces of the Oracle Integration OracleCloud Infrastructure Console
You can perform life cycle management tasks from the Oracle Integration OracleCloud Infrastructure Console.
Topics:
• Explore the Oracle Cloud Infrastructure Console
• Explore the Oracle Cloud Infrastructure Console Activity Page
• Explore the Oracle Cloud Infrastructure Console Instance Overview Page
Explore the Oracle Cloud Infrastructure ConsoleYou can use the Oracle Cloud Infrastructure Console to view all existing OracleIntegration instances.
Chapter 3About the User Interfaces of the Oracle Integration Oracle Cloud Infrastructure Console
3-6

The following table describes the key information shown in the Oracle CloudInfrastructure Console.
Element Description
(Next to the word ORACLE in theupper left corner of the page)
Click and select an option from the menu to open the service console for one ofthe Oracle Services to which you are subscribed.
QuickStarts Click to access the page for creating a quick start instance.
Welcome! Click to display the Oracle Integration Welcome page.
Click to sign in to the services to which you are subscribed.
Instances (Summary panel) Number of instances and message packs in the identity domain.
Search by instance name ortags
Enter a full or partial service instance name or tags to filter the list of serviceinstances to include. You can create a tag of a service instance when installingOracle Integration with the stack templates.
Create Instance Create a new service instance. This option lets you customize the number ofmessage packs and select the region from which to provision your instance.
Service instance icon for a created instance. Click this icon to view moredetails.
Status icon indicating that the instance is being created.
Status icon indicating the service instance is undergoing maintenance orterminating.
Chapter 3About the User Interfaces of the Oracle Integration Oracle Cloud Infrastructure Console
3-7

Element Description
Status icon indicating that the service instance has failed to be created. Thisicon can also indicate that the service instance has stopped. See the Activitypage.
service-name Name of the service instance. Click the name to view more details.
Created On When provisioning is complete, the date and time in UTC at which the instancewas created.
Message Packs The number of message packs available with the instance.
Click to select one of the following options:• Open Oracle Integration Home Page• Start• Stop• Add Tags• Scale Instance• Change License Type• Delete
Instance Create and DeleteHistory
Shows details about created or deleted service instances.
• Range—Specifies a range for which you are interested in viewing createdand failed service instances.
• Show only failed attempts—Check this box if you want to see failedattempts only.
• Details—Displays system messages logged during the creation or deletionprocess. Messages include information about auto-retry attempts.
Explore the Oracle Cloud Infrastructure Console Activity PageYou can use the Activity page to search for and review cloud service activities thathave occurred in your identity domain. To access this page, click the Activity tab.
The Activity page is divided into the following sections:
• The Search Activity Log section, from which you can specify search details thatdetermine which services you see. These details include:
– Date and time range
– Operation status
Chapter 3About the User Interfaces of the Oracle Integration Oracle Cloud Infrastructure Console
3-8

– Instance name and service type
– Operation type
• The Results pane, which shows the results of the search operation. You can limitthe number of results to return, per page, to 5, 10, 50, or 100.
The following table describes the key information shown on the Activity page.
Element Description
Start Time Range Filters activity results to include only operations started within a specified timerange. The range defaults to the previous 24 hours.
Operation Status Filters operations by status of the operation:• All (default value)• Scheduled• Running• Succeeded• FailedYou can select any subset of status types.
Instance Name Filters the activity results to include operations only for the specified serviceinstance. You can enter a full or partial service instance name.
Service Type Filters the activity results to include operations only for instances of thespecified service type. The default value is the current cloud service.
Operation Filters the activity results to include selected types of operations. You can selectany subset of the given operations. The default value is All.
Search Searches for activities by applying the filters specified by the Start Time Range,Status, Service Name, Service Type, and Operation fields, and displays activityresults in the table.
Reset Clears the Start Time Range and Service Name fields, and returns the Statusand Operation fields to their default values.
Results per page Specifies the number of results you want to view per page. The default value is10. You can sort the columns in ascending or descending order.
Operation Shows the type of operation performed on the service instance.
Instance Name Shows the name of the service instance and its identity domain:
service_instance:identity_domain
Service Type Shows the type of cloud service for this instance.
Operation Status Shows the status of the operation performed on the service instance.
Start Time Shows the time the operation started.
End Time Shows the time the operation ended, if the operation is complete.
Initiated By Shows the user that initiated the operation. The user can be any user in theidentity domain who initiated the operation or, for certain operations such asautomated backup, the system.
Chapter 3About the User Interfaces of the Oracle Integration Oracle Cloud Infrastructure Console
3-9

Explore the Oracle Cloud Infrastructure Console Instance OverviewPage
You can use view overview information for a specific instance. To access this page,click an instance name or icon in the Oracle Cloud Infrastructure Console.
Instance Overview
The following table describes the key information shown on the Overview page.
Element Description
Manage this instance (adjacent to the service
instance name)
Click to select one of the following options:
• Open Oracle Integration Home Page• Start• Stop• Add Tags• Scale Instance• Change License Type• Delete
Chapter 3About the User Interfaces of the Oracle Integration Oracle Cloud Infrastructure Console
3-10

Element Description
Overview tab The Instance Overview tile displays overview information about the serviceinstance.
• Status: The service instance’s status (for example, ready).• Active: Status of the instance.• Messages Packs: Displays the number of message packs available with
this instance.• Service Identifier: The unique identifier of the service instance.• License: The type of cloud license (for example, bring your own license
(BYOL)).• Version: The version of Oracle Integration.• Feature Set: The provisioned feature set (for example, Integration or
Integration and Process).• Oracle Integration Edition: The topology you selected when you
provisioned the service instance (either Enterprise Edition or StandardEdition).
• IDCS Application: Click the link to open the Oracle Identity Cloud ServiceConsole to add users and assign roles. See Grant Access and ManageSecurity.
Refresh Click to refresh the page. The date and time the page was last refreshed aredisplayed adjacent to this button.
Oracle Integration for Oracle SaaSOracle Integration for Oracle SaaS, a streamlined version of Oracle Integration, givesyou the features and benefits of Oracle Integration with a focus on SaaS.
Topics:
• Differences between Oracle Integration and Oracle Integration for Oracle SaaS
• Create an Oracle Integration for Oracle SaaS Instance
• View Message Consumption for Oracle Integration for Oracle SaaS
Differences between Oracle Integration and Oracle Integration forOracle SaaS
Oracle Integration for Oracle SaaS, a streamlined version of Oracle Integration, givesyou the features and benefits of Oracle Integration with a focus on SaaS. Here are thekey differences:
• Purpose-built for connecting and extending Oracle SaaS. Specifically, everyintegration you create has an endpoint in an Oracle Cloud SaaS application, everyVisual Builder application you create uses at least one business object or API callfrom an Oracle Cloud SaaS application, and every process application you createincludes at least one business object or API call from an Oracle Cloud SaaSapplication.
• Flexibility for hourly bursting. Oracle Integration for Oracle SaaS is offered as amonthly subscription in packs of one million messages per month, which keepscosts predictable even when you have unpredictable hourly volumes. Usage isreported monthly instead of hourly.
Chapter 3Oracle Integration for Oracle SaaS
3-11

• Provisioning. Creating an instance for Oracle Integration for Oracle SaaS isslightly different from creating an instance for Oracle Integration, and Bring YourOwn License (BYOL) is not available in Oracle Integration for Oracle SaaS. Formore details, see Create an Oracle Integration for Oracle SaaS Instance.
Other than those differences, the product functionality, graphical user interface, anddocumentation are the same.
Create an Oracle Integration for Oracle SaaS InstanceYou can create Standard and Enterprise editions of Oracle Integration for Oracle SaaSinstances. Oracle manages your instance, including performing databasemanagement, performing backups, upgrading your instance to the next version,installing patches, and more.
Prerequisites:
• Ensure that you have the required user roles to create an instance. See Assign theCorrect User Roles to Create an Instance.
• If you are planning to create both Standard and Enterprise instances of OracleIntegration for Oracle SaaS, you will need to create and use separate accounts.
Note:
You cannot create Standard and Enterprise instances under the sameaccount.
When you create an instance, you have two options:
• Integration and Process: Installs Oracle Integration for Oracle SaaS Enterpriseedition. This option installs the Integration and Process feature set enabling you tointegrate SaaS and on-premises applications and automate business processes.
• Integration: Installs Oracle Integration for Oracle SaaS Standard edition. Thisoption install the Integration feature enabling you to integrate SaaS and on-premises applications.
For additional details on the differences between Standard and Enterprise editions,see Oracle Integration Editions.
To create an instance:
1. Sign in to your Oracle Cloud account.
2. Click in the top left corner of the Oracle Cloud Infrastructure Console.
3. Click Services > Integration for Oracle SaaS.
4. Click Create Instance.
Chapter 3Oracle Integration for Oracle SaaS
3-12

5. In the Create Instance page, specify instance details and click Next.
Specify an instance name that is unique within the tenant domain and the computeregion from which to perform the installation. It's also useful to provide your emailaddress to be notified of instance provisioning progress.
6. In the Create Instance Details page, specify the feature set for which you aresubscribed and the number of packs of 1 million messages per month that yourequire.
Chapter 3Oracle Integration for Oracle SaaS
3-13
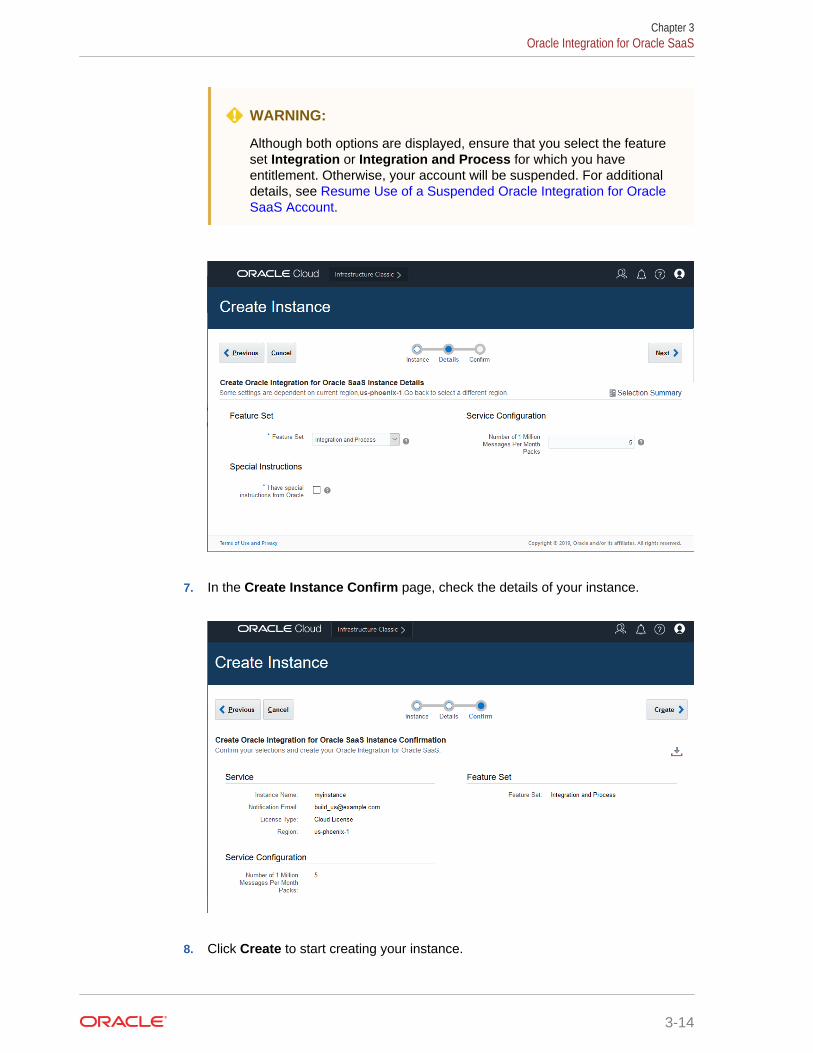
WARNING:
Although both options are displayed, ensure that you select the featureset Integration or Integration and Process for which you haveentitlement. Otherwise, your account will be suspended. For additionaldetails, see Resume Use of a Suspended Oracle Integration for OracleSaaS Account.
7. In the Create Instance Confirm page, check the details of your instance.
8. Click Create to start creating your instance.
Chapter 3Oracle Integration for Oracle SaaS
3-14

When instance creation completes, Sign in to Oracle Integration for Oracle SaaS. See Sign In to Oracle Integration.
To view your message pack information, see View Message Consumption for OracleIntegration for Oracle SaaS .
View Message Consumption for Oracle Integration for Oracle SaaSIn the Resource Quotas page, you can view the number message packs you have andhow many are remaining.
1. Sign in to your Oracle Cloud account.
2. Click in the top left corner of the Oracle Cloud Infrastructure Console.
3. Click Dashboards > Infrastructure Classic.
4. Click Integration for Oracle SaaS in the graph to display information about yourinstance.
5. Select the Resource Quotas tab to view how many message packs you have,how many you have used, and how many are remaining.
Chapter 3Oracle Integration for Oracle SaaS
3-15

Chapter 3Oracle Integration for Oracle SaaS
3-16

4Navigate and Explore
After your system is provisioned and user roles are assigned, begin exploring the richfeatures of Oracle Integration.
Topics:
• Sign In to Oracle Integration
• What You Can Do on the Home Page
• Use Features Together
Sign In to Oracle IntegrationBefore you can sign in, you must have a user account that defines your user name,password, and identity domain, and access rights to the service. You also need theweb address (URL) for your instance.
When a service is activated, it sends the sign-in credentials and URL to the designatedadministrators. An administrator then creates an account for each user who needsaccess to the service. Check your email or contact your administrator for your accountcredentials and service URL.
Tip:
New to administering Oracle Cloud Services? See Get Started with YourCloud Services in Getting Started with Oracle Cloud.
To sign in:
1. Open your web browser and go to the service URL given to you either in an emailor by your administrator. The Sign In page opens.
2. Enter your identity domain, user name (user ID), and password.
3. Click Sign In.
If you’re signing in for the first time, you’re prompted to create a new password forsecurity reasons. Follow the instructions on the screen to complete this task.
After you sign in, the Welcome page opens. Select any item on this page to learnmore about Oracle Integration and its features.
4. Click Home.
What You Can Do on the Home PageUse the Home page as your launch pad and high-level dashboard. Return to it at anypoint, and depending on your assigned role, launch features, return to previous work,monitor instances, and drill down to troubleshoot as needed.
4-1

The Home page includes two main areas: the navigation pane and the adjacent mainpane that displays tiles for viewing, developing, performing actions, and monitoring.
What you see on the Home page depends on:
• Your assigned role
For example, users assigned the ServiceAdministrator role are superusers thatsee all available options on the Home page. Users assigned the ServiceDeveloperrole see options to develop for all features but not administer. See Grant Accessand Manage Security.
• The features available for your instance
For example, your instance might include the Integrations and Visual Builderfeatures, or it might include the Integrations, Processes, and Visual Builderfeatures. If you’re using Oracle Integration Classic (user-managed), your instancemight include the Integrations, Processes, and Visual Builder features, and beregistered with an analytics instance that includes the Integration Insight feature.See Register an Integration Analytics Instance to Connect Integration Insight toIntegrations.
Use the Home page to:
• Navigate Anywhere
• View and Drill Down by Status
• Open Recently Worked on Items
• Start Process Applications as a User
• Start Developing by Feature
• Monitor Health and Drill Down to Troubleshoot
Chapter 4What You Can Do on the Home Page
4-2

Navigate AnywhereUse the navigation pane to launch features or drill down to specific options.
The links in the navigation pane change, depending on your location in OracleIntegration.
• When the Home page is displayed, the navigation pane lists all the featuresavailable to you. (Administrators use the Registration link to register additionalfeatures.)
Chapter 4What You Can Do on the Home Page
4-3

• When you select a feature link, the navigation pane changes to list availableoptions for the feature. For example, after you click Processes in the navigation
pane, process-specific links display in the pane. Click Home to return to theHome page.
Depending on your assigned role and available features, the following links maydisplay on the Home page.
Links Description
WelcomeLearn about Oracle Integration’s features.
HomeAccess the launch pad and high-level dashboard for Oracle Integration. Youcan return to the Home page at any time.
Chapter 4What You Can Do on the Home Page
4-4

Links Description
My TasksLaunch the runtime environment for process tasks. Start process applications,work on tasks as a user, view dashboards, and perform runtime administrationsuch as mapping process roles.
See Quick Tour of the Tasks Page in Using Processes in Oracle Integration.
ProcessesLaunch the design-time environment for process applications. Create processapplications from scratch or by using QuickStart Apps. Model processes in theprocess editor, and create web forms and decisions. Perform design-timeadministration such as playing, testing, and deploying applications.
See Quick Tour of the Processes Page in Using Processes in OracleIntegration.
IntegrationsLaunch the design-time environment for integrations. Create and activateintegrations, as well as their connections and orchestrations. Work withlookups, packages, agents, and adapters.
See Getting Started with Integrations in Using Integrations in OracleIntegration.
Visual BuilderCreate and publish web and mobile applications.
See Getting Started with Visual Builder in Using Oracle Visual Builder -Classic Applications.
InsightCreate models of your business processes. Create connections to otherOracle Integration features. Activate models to start collecting data. Viewmetrics for your business processes in preconfigured and custom dashboards.
This link may display if you’re using Oracle Integration Classic (user-managed).
See Introduction to Integration Insight in Using Integration Insight in OracleIntegration Classic.
StreamsCreate real-time analytics applications. Work with streams, references,connections, and targets. Get up to speed quickly using patterns.
This link may display if you’re using Oracle Integration Classic (user-managed).
See Getting Started with Stream Analytics in Using Stream Analytics in OracleIntegration Classic .
RegistrationLink features and data in other pods to your current instance.
See Register an Integration Analytics Instance to Connect Integration Insightto Integrations.
SettingsChange logging levels and download logs for Oracle Integration.
See Configure Settings for Error Logs.
View and Drill Down by StatusStatus tiles provide a quick view of key artifacts. Click any item for more information.
• My Tasks: See which process tasks are in progress. If needed, drill down to tasks.
– Overdue: Includes tasks whose due date has passed.
– Open: Includes tasks that are assigned.
– On Track: Includes tasks due in more than two days and those without a duedate.
– Due: Includes tasks due within the next two days.
Chapter 4What You Can Do on the Home Page
4-5

• Integrations: See the number of active integrations and drill down to scheduledintegrations.
• Connections: See the number of active connections used in integrations and drilldown if needed.
• Visual Applications: See the number of developed, staged, and publishedapplications and drill down if needed.
• Insight: See the number of active models and drill down if needed. This tile maydisplay if you’re using Oracle Integration Classic in a user-managed environment.
Status tiles display to all users.
Open Recently Worked on ItemsThe Recents tile lists feature artifacts created or edited recently. For example, select arecent integration to quickly begin editing it. From the tabs, select a feature, thenselect a recent item.
The display of the Recents tile depends on the role assigned to you.
Chapter 4What You Can Do on the Home Page
4-6

Start Process Applications as a UserThe Actions tile lists process applications ready to start. This tile provides one ofseveral ways for end users to start process applications, and also allows developers totry out process applications after activating them. (Users can also click My Tasks inthe navigation pane and then click Initiate Request to start an application.)
The Actions tile displays to all users. To display in the Actions tile, the processapplication must be activated and its roles must be mapped.
Start Developing by FeatureThe Develop tile lets you quickly get started creating artifacts for selected features.
• Processes: Create an application from scratch or select from the QuickStartgallery of completed applications that you can customize or activate as is.
• Integrations: Create connections and an integration that uses them or activate aready-to-use sample integration.
• Insight: View dashboards to see metrics for activated models or create a newmodel. This feature may display if you’re using Oracle Integration Classic (user-managed).
• Streams: View or create resources used to build your streaming data pipelines.This feature may display if you’re using Oracle Integration Classic (user-managed).
The Develop tile is displayed depending on the roles assigned to you.
Chapter 4What You Can Do on the Home Page
4-7

Monitor Health and Drill Down to TroubleshootThe Monitor tiles provide quick access to dashboard and monitoring information.
• Process Health displays the number of processes that are suspended,recoverable, and alerted. Click Tracking to view specific instances. ClickDashboard to view process instance health or create your own dashboards.
• Integrations Health displays details about the overall system health ofintegrations, where green indicates that system health is acceptable and redindicates that errors are occurring that can impact your active integrations. Thetotal numbers of received messages, processed messages, successful messages,and failed messages are also provided. Click Monitoring to drill down totroubleshoot.
• Insight Models displays the number of active and completed business processinstances for the last five days for each model. Hover over a grouping to viewmore details. Click the Insight Model's title to view the model's console.
The Insight Models pane is available only when you’re using Oracle IntegrationClassic (user-managed).
The Monitor tiles that are displayed depend on your assigned roles.
Chapter 4What You Can Do on the Home Page
4-8

Use Features TogetherYou can use Oracle Integration features together in a number of ways.
• Use Integrations in Process Applications
• Use Process Applications in Integrations
• Use Processes in Visual Builder Applications
• Map Integrations to Insight Milestones
Use Integrations in Process ApplicationsYou can incorporate integrations into processes directly from the process editor. Dragand drop an integration element from the palette to the process flow, and select theactive integration to call.
See Configuring Integrations in Using Processes in Oracle Integration.
Use Process Applications in IntegrationsYou can invoke a process from an orchestrated integration. When you drag theprocess node into an integration, the Select Process wizard prompts you to select anapplication, process, and operation to invoke.
See Connecting to Processes in Using Integrations in Oracle Integration.
Use Processes in Visual Builder ApplicationsYou can use processes in Visual Builder applications to automate task assignmentand create task lists. After you associate a Visual Builder custom business object witha process, you can add triggers, UI actions, and UI components to pages to startprocesses and enable user tasks to be completed.
Chapter 4Use Features Together
4-9

See Creating Processes for Business Objects in Using Oracle Visual Builder - ClassicApplications.
Map Integrations to Insight MilestonesIf you’re using Oracle Integration Classic (user-managed), you can map milestones toan integration to indicate where significant business events transpire.
When an action mapped to a milestone is passed, identifier and indicator informationis extracted from the message payload and the milestone is considered passed.Integration Insight collects this information and displays it on relevant dashboards inthe model’s console.
See Map Milestones to Integrations in Using Integration Insight in Oracle IntegrationClassic.
Chapter 4Use Features Together
4-10

5Move Design-Time Metadata BetweenEnvironments
Use automated tools to bring metadata from other instances to Oracle Integration.
Topics:
• Export and Import Oracle Integration Design-Time Metadata Between Instances
• Migrate Process Design-Time Metadata into Oracle Integration
Oracle encourages you to migrate your existing instances of Oracle Integration CloudService, Oracle Process Cloud Service, and Oracle Integration Classic to OracleIntegration on Oracle Cloud Infrastructure. You can gain several advantages by doingso.
• Migrate Oracle Integration Cloud Service and Process Cloud Service to OracleCloud Infrastructure
• Migrate Oracle Integration Classic Instances to Oracle Cloud Infrastructure
Export and Import Oracle Integration Design-Time MetadataBetween Instances
You can export an Oracle Integration instance to another Oracle Integration instance(for example, when moving from a test or development environment to a productionenvironment).
Export Oracle Integration Design-time Metadata from One Instance
Perform the following command to export Oracle Integration design-time metadata toan archive.
1. To export the Integrations design-time metadata to another Oracle Integrationinstance, invoke the REST API. This action asynchronously creates an archivethat includes all above-mentioned objects.
HeadersAuthorization : BasicContent-Type : application/jsonpayload{ "storageInfo": { "storageUrl": "https://swiftobjectstorage.us-region-1.oraclecloud.com/v1/paasdevoic/cloneRepo", "storageUser":"[email protected]", "storagePassword":"generated_token"
5-1

}}
For example, use a postman or curl (as shown below) command to export allIntegrations design time metadata to an Oracle Storage Cloud Service instancethat you specify:
curl -k -v -H "Content-Type: application/json" -X POST -d '{"storageInfo":{"storageUrl":" https://swiftobjectstorage.us-region-1.oraclecloud.com/v1/paasdevoic/cloneRepo","storageUser":"[email protected]","storagePassword":"generated_token"}}' -u admin:passwordhttps://host/ic/api/common/v1/exportServiceInstanceArchive
where:
• storageInfo: Is the URL of the storage container.
• storageUser: Is the storage user name.
• storagePassword: Is the storage password.
Possible sample output from this command is as follows:
{ "archiveFilename": "archive_Local_Suite_Instance-d1e4295f-e17a-498a-a96e-44dcb417dfb4.zip", "jobID": "d1e4295f-e17a-498a-a96e-44dcb417dfb4", "location": "https://swiftobjectstorage.us-region-1.oraclecloud.com/v1/paasdevoic/cloneRepo", "status": "Starting"
2. Check the status of the export operation using a postman or curl (as shownbelow) command:
curl -k -v -X GET -u admin:password https://host/ic/api/common/v1/exportServiceInstanceArchive/{jobId}
Possible sample output from this command is as follows:
{ "status": "COMPLETED"}
The archive is created in the Oracle Storage Cloud Service instance of OracleIntegration.
3. If the status is completed, you are now ready to import the archive.
Import the Design-Time Metadata into Another Oracle Integration Instance
After exporting Integrations design-time metadata to a zip archive file, import the file toanother Oracle Integration instance.
Chapter 5Export and Import Oracle Integration Design-Time Metadata Between Instances
5-2

When imported into Oracle Integration, the archive is referenced in the payload.
{ "archiveFile": "archive_file_name", "importActivateMode": "ImportActivate", // options are "ImportOnly" || "ActivateOnly" || "ImportActivate" "storageInfo": { // storageUrl points to the storage container "storageUrl":"https://swiftobjectstorage.us-region-1.oraclecloud.com/v1/paasdevoic/cloneRepo", "storageUser":"[email protected]", "storagePassword":"generated_token" }}
1. To import the archive, go to the Oracle Integration instance and invoke the RESTAPI. This action retrieves the archive from the Oracle Storage Cloud Serviceinstance where the archive was created.
HeadersAuthorization : BasicContent-Type : application/jsonpayload{ "archiveFile": "archive_Local_Suite_Instance-67e7358b-077b-420f-9e04-e9b9e8374b68.zip", "importActivateMode": "ImportActivate", // options are "ImportOnly" || "ActivateOnly" || "ImportActivate" "storageInfo": { "storageUrl":"https://swiftobjectstorage.us-region-1.oraclecloud.com/v1/paasdevoic/cloneRepo", "storageUser":"[email protected]", "storagePassword":"generated_token" }}
For example, use a postman or curl (as shown below) command to import thearchive of design time objects into Oracle Integration. You can setimportActivateMode to the following values:
• ImportOnly: Imports, but does not activate, integrations.
• ActivateOnly: Activates previously imported integrations. This enables you toupdate connection parameters before activating integrations.
• ImportActivate: Imports and activates integrations.
curl -k -v -H "Content-Type: application/json" -X POST -d '{"archiveFile": "archive_Local_Suite_Instance-67e7358b-077b-420f-9e04-e9b9e8374b68.zip", "importActivateMode": "ImportOnly", "storageInfo": { "storageUrl":"https://
Chapter 5Export and Import Oracle Integration Design-Time Metadata Between Instances
5-3

swiftobjectstorage.us-region-1.oraclecloud.com/v1/paasdevoic/cloneRepo","storageUser":"[email protected]", "storagePassword":"generated_token"}}' -u admin:passwordhttps://host/ic/api/common/v1/importServiceInstanceArchive
Possible sample output from this command is as follows:
{"jobId":"554","status":"NOT_STARTED"}
2. Check the status of the import operation using a postman or curl (as shownbelow) command:
curl -k -v -X GET -u admin:password https://host/ic/api/common/v1/importServiceInstanceArchive/554
Possible sample output from this command is as follows. Other potential outputincludes RUNNING , COMPLETED, and FAILED.
{ "jobId":"5108", "overallStatus":"RUNNING", "componentStatus":[ { "component":"Integration", "status":"RUNNING" } ]}{ "jobId":"5108", "overall Status":"COMPLETED", "componentStatus":[ { "component":"Integration", "status":"COMPLETED", "percentage":100 } ]}
3. Log in to your Oracle Integration instance.
4. Browse the pages and note that the design-time metadata you exported from yourOracle Integration Classic instance are now visible. For example, for Integrations,look for integrations, connections, lookups, and more.
Chapter 5Export and Import Oracle Integration Design-Time Metadata Between Instances
5-4

Migrate Process Design-Time Metadata into OracleIntegration
As an administrator, you can import your Process design-time metadata (processapplications and decision models) into Oracle Integration. The import tool providesmigration flexibility: choose to migrate the entire instance, a selected space, orindividual items.
• Import Process Design-Time Metadata
• Import Using the Import Command Line Utility
Import Process Design-Time MetadataUse the Process import tool to automatically move Process and decision design-timemetadata from one instance to another. The tool moves process applications andactive decision models from a selected source (an Oracle Process Cloud Service orOracle Integration instance) to a selected Oracle Integration destination, and activatesthe decision models.
Note:
Run the import tool once only for a specified scope. (Running the toolmultiple times for a scope can cause unpredictable results.) Avoid refreshingor closing the tool during the import.
1. On the Oracle Integration Home page, click Processes in the navigation pane.
2. Click Settings in the navigation pane, then Import from the top options on theAdministration page.
3. On the Import Administration page, specify a source for the import.
a. In the Identify the instance to import from fields, specify whether to importfrom an Oracle Process Cloud Service instance or another Oracle Integrationinstance.
b. In the Host Name field, enter the host, using the format https://host:port.
c. Enter a user name and password to sign in to the instance as anadministrator.
4. Identify a destination for the import.
• To import to your current instance, skip the Import to the current OracleIntegration instance field.
• To import to another Oracle Integration instance than your current instance,click Edit and complete the host, user name, and password fields for theinstance you want to import to.
• To select importing to the current instance, click Reset.
5. In the Scope field, identify what you want to import.
Chapter 5Migrate Process Design-Time Metadata into Oracle Integration
5-5

• Choose Entire Instance to import all process applications and decisionmodels from all spaces located on the instance.
• Choose Space to import a selected source only. Select the space in theSource Space field that displays.
• Choose Process Application or Decision Model to import a selectedapplication or decision model only. In the additional fields that display, selectthe source space, process application or decision model to import, and thedestination space.
6. Click Import.
7. Review the import log.
Note:
You MUST check the logs and make sure there are no errors beforeproceeding with post migration steps.
Click Download Import Log in the import dialog to download a zip file containingthe import log. It lists any errors that might have occurred along with a summary ofthe number of spaces or items (process applications or decision models) imported.
8. In Oracle Integration, change space settings as needed.
Return to the design-time Administration screen, and share the space(s) youmigrated to Oracle Integration and change their permissions.
Import Using the Import Command Line UtilityOptionally use an import command line to move Process and decision design-timemetadata from one instance to another. (Using the import tool, however, is stronglyrecommended.) The utility moves process applications and active decision modelsfrom a selected source (an Oracle Process Cloud Service or Oracle Integrationinstance) to a Oracle Integration destination, and activates decision models.
Note:
Run the import utility once only for a specified scope. (Running the utilitymultiple times for a scope can cause unpredictable results.)
Note:
The import utility requires Java version 8 or later. In addition, both the sourceand target instances must return a ping response.
1. On the Oracle Integration Home page, click Processes in the navigation pane.
2. Click Settings in the navigation pane, then Import on the Administration page.
3. Click the Download Utility button and save it to a selected location.
Chapter 5Migrate Process Design-Time Metadata into Oracle Integration
5-6

4. Sign in to the Oracle Process Cloud Service (source system) and OracleIntegration (target) environments.
5. Run the ImportTool utility from the command line. Use arguments to import anentire Oracle Process Cloud Service instance, one or more of its spaces, or one ormore process applications or decision models.
Format
$java -jar ImportTool.jar srcType=PCS srcHost=http://host:portsrcUser=user srcPass=password oicHost=http://host:port oicUser=useroicPass=password scope=scope
Example: Import the entire Oracle Process Cloud Service instance
$java -jar ImportTool.jar srcType=PCS srcHost=http://abc01xyz.example.com:7001 srcUser=user1 srcPass=password1oicHost=http://def02uvw.example.com:7001 oicUser=user1oicPass=password1 scope=SPACE srcSpace="123456789"
Example: Import process applications (delimit items by pipe line)
$java -jar ImportTool.jar srcType=PCS srcHost=http://abc01xyz.example.com:7001 srcUser=user1 srcPass=password1oicHost=http://def02uvw.example.com:7001 oicUser=user1oicPass=password1 scope=PROJECT srcSpace="132457689” srcProject="LoanApplication|Travel Application" oicSpace=”123456789”
6. Review the import log.
Note:
You MUST check the logs and make sure there are no errors beforeproceeding with post migration steps.
A zip file containing the import log is created in the SRC_TO_OIC folder. It listsany errors that might have occurred along with a summary of the number ofspaces or items (process applications or decision models) imported.
7. In Oracle Integration, change space settings as needed.
Return to the design-time Administration screen, and share the space(s) youmigrated to Oracle Integration and change their permissions.
Chapter 5Migrate Process Design-Time Metadata into Oracle Integration
5-7

6Manage Oracle Integration
Oracle is responsible for maintaining the infrastructure on which Oracle Integration isbuilt.
An administrator can increase or decrease the number of message packs for aninstance, delete an instance, view activity for an instance and can export diagnosticinformation if problems occur in Oracle Integration.
Note:
Life cycle management tasks such as starting an instance, stopping aninstance, and so on may fail if the host is being upgraded or backed up.Retry the life cycle management tasks in two hours. Any ongoing design-time/runtime functionality is not impacted.
Topics:
• Scale an Oracle Integration Instance
• Start or Stop an Oracle Integration Instance
• Manage Integrations and Errors
• Manage SSL Certifications
• Manage Instance History
• Configure Settings for Error Logs
• Delete an Oracle Integration Instance
• Change the BYOL Metering Option of an Existing Instance
6-1

Note:
Oracle Integration takes regular internal backups on your managed instanceto restore it in the event of a failure of underlying infrastructure resources.You cannot request an explicit backup checkpoint or restore an instance to aprior state. Oracle recommends that you use the integration level exportcommands to take periodic copies of your design-time metadata andconfiguration and use the corresponding import APIs to restore.You can also use resource level APIs to perform the same tasks dependingon whether you want to use storage or source control for backups, need toback up specific/critical resources, and so on.
See:
• Export and Import Oracle Integration Design-Time Metadata BetweenInstances
• REST API for Oracle Integration
• Import and Export Integrations
• Manage Packages
Scale an Oracle Integration InstanceYou can increase or decrease the number of message packs for your instance basedon the demand. The maximum number of message packs for an instance is based onyour license type. For a bring your own license type (BYOL), the instance can have amaximum of 3 message packs and each message pack adds 20K Messages per HourPack to your instance. If you don’t have a BYOL license type, the instance can have amaximum of 12 message packs and each message pack adds 5K Messages per HourPack to your instance.
To increase or decrease the message pack:
1. Sign in to the Oracle Cloud Infrastructure Console.
2. Click in the top left corner of the Oracle Cloud Infrastructure Console.
3. Select Platform Services, then Integration.
4. In the Oracle Integration console, identify the name of your Oracle Integrationinstance.
5. Click adjacent to the instance name and select Scale Instance.
The Scale Instance dialog opens.
6. In the Scale Instance dialog, specify the following options:
• Type of change, increase or decrease: Select Increase capacity to addmessage pack to your instance or select Decrease capacity to remove themessage pack from your instance.
• Enter the number of 20K Messages Per Hour Packs: Enter a number ofmessage packs that you want to increase or decrease. This is an example ofBYOL license and thus shows 20K Messages Per Hour Packs.
Chapter 6Scale an Oracle Integration Instance
6-2

7. Click Scale Instance.
For a successful scaling request, you’ll see the following message in the ServiceOverview page:
Your scaling request was accepted.
8. After a few moments, click Refresh to update the page.
You might need to click the icon more than once to see any change to the page.
9. Note the change in the number of message packs in the Overview page haschanged as per your scaling request.
Start or Stop an Oracle Integration InstanceYou can start or stop all nodes in an Oracle Integration instance cluster. Billing isstopped for the duration that the instance is stopped.
To start or stop all nodes in an instance cluster:
1. Sign in to the Oracle Cloud Infrastructure Console.
2. Click in the top left corner of the Oracle Cloud Infrastructure Console.
3. Select Platform Services, then Integration.
4. Identify the instance to start or stop.
To start all nodes in an instance cluster:
a. From the menu to the right of the instance name, select Start.
b. Click Yes when prompted to confirm your selection.
To stop all nodes in an instance cluster:
a. From the menu to the right of the instance name, select Stop.
b. Click Yes when prompted to confirm your selection.
This action causes the following:
• Billing is stopped for the duration that the instance is stopped.
• Integration endpoints are quiesced.
• Process instances are quiesced.
Chapter 6Start or Stop an Oracle Integration Instance
6-3

• Runtime is quiesced.
• Scheduled integrations do not execute.
• Database purging continues to run.
• REST APIs are available for use.
• Design time is available for use.
Manage Integrations and ErrorsYou can manage integration and process errors in Oracle Integration.
Activate the service in Oracle Integration when the integration is ready to go live andyou can deactivate an active Integration. You can modify or clone the integration.Delete an integration that is no longer needed. See Managing Integrations in UsingIntegrations in Oracle Integration.
You can manage errors from the Errors pages in Oracle Integration at the integrationlevel, connection level, or specific integration instance level. See Managing Errors inUsing Integrations in Oracle Integration.
Manage SSL CertificationsYou can upload and update security certificates in Oracle Integration to validateexternal connections.
Certificates are used to validate outbound SSL connections. If you make an SSLconnection in which the root certificate does not exist in Oracle Integration, anexception is thrown. In that case, you must upload the appropriate certificate. Acertificate enables Oracle Integration to connect with external services. If the externalendpoint requires a specific certificate, request the certificate and then upload it intoOracle Integration. You can update or delete certificates you uploaded into OracleIntegration.
For more information about managing SSL certificates in Integrations, see ManagingSecurity Certificates in Using Integrations in Oracle Integration.
For more information about managing SSL certificates in Processes, see ManageSecurity Certificates during Runtime and Manage Security Certificates during DesignTime in Using Processes in Oracle Integration.
Manage Instance HistoryYou can determine when to purge the data in your database. You can also view thenotification and quiesced thresholds for your database and the percentage of thedatabase that has been used.
Instance history is automatically purged periodically, based on settings in OracleIntegration. See Archive and Purge Data in Using Processes in Oracle Integration.
Chapter 6Manage Integrations and Errors
6-4

Configure Settings for Error LogsNeed to troubleshoot errors? As an administrator, you can change logging levels anddownload logs for Oracle Integration.
Use caution when changing logging levels because increasing them can affectperformance. Reset logging levels back to default settings after troubleshooting.
1. From the Home page, select Settings, then Logging.
The Logging screen is displayed. By default, loggers are contained within foldercontainers, and the number of loggers contained (collapsed) within the folder islisted after the folder name.
2. Filter and sort the logging list.
You can filter in several ways:
• Show Only: Select one or more options to limit the list. Note that loggers orfolders must meet all selected options to be listed.
– Oracle Integration Cloud: Displays loggers related to Oracle Integrationcomponents.
– Top Containers: Displays the two top levels of folder containers.
– Unsaved Changes: Displays loggers whose levels you have changed but
haven’t saved, as indicated by an Unsaved icon.
• Filters Menu: Select Open Filters Menu to view loggers by their status (atdefault, or increased or decreased) or by their selected logging level. Filtersettings display below the search field as you specify search criteria.
3. Search for logs.
In the Search field, enter a logger name (or partial name) and press Enter.Searching is case sensitive. For example, enter oracle.bpm to list all loggers thatbegin with those characters. Note that searching is performed within the filtered
Chapter 6Configure Settings for Error Logs
6-5

list. For example, if the Top Containers filter is selected, only the top containersare searched.
4. Change logging levels as needed.
• Use the up and down icons in the Logging Level column to change a loggerlevel. As you increase or decrease, an unsaved icon displays adjacent to thenew logging level to indicate unsaved changes. The Status column indicateswhether you increased or decreased the level and lists the default level.
• When a logging level lists Inherited, this indicates that its own current level isinherited from its parent package because it doesn’t have a default level set.Children packages may have a different level. Changing a package level willautomatically change the logging level of its children if they inherit from it (ifthey don’t have a specific logging level set).
• To return to previous settings, click Revert and revert to either the last savedconfiguration or set all levels back to their default level.
5. Save your changes. Download logs as needed.
Click Download Logs and save the entire logging file to a zip file.
Delete an Oracle Integration InstanceYou can delete an Oracle Integration instance. To do so, you must delete the stack ofwhich the instance is a part.
When an Oracle Integration instance is deleted, the Oracle Database Cloud Servicedatabase deployment is deleted.
If you want to delete an instance in an Oracle Integration Classic (user-managed)environment, see Delete an Oracle Integration Classic (User-Managed) Instance.
To delete an instance:
1. Sign in to the Oracle Cloud Infrastructure Console.
2. Click in the top left corner of the Oracle Cloud Infrastructure Console.
3. Select Platform Services, then Integration.
4. In the Oracle Integration Instances console, identify the instance you want todelete.
5. Click adjacent to the instance name and select Delete.
6. In the Delete dialog that opens, select the Force service deletion check box, ifyou want the service instance to be deleted even if the database deploymentcannot be reached to delete the database schemas.
7. Click Delete.
Chapter 6Delete an Oracle Integration Instance
6-6

Change the BYOL Metering Option of an Existing InstanceThe bring your own license (BYOL) metering option enables you to bring your existingOracle Fusion Middleware license to use with Oracle Integration or other cloudservices. You can change the BYOL metering option of an already existing instance,as necessary.
This feature is useful for the following scenarios:
• You selected the wrong option when creating a new Oracle Integration instanceand need to change it.
• You need to shift the location of an on-premises license in the cloud. For example,you need to move the license from one Oracle Integration instance to another oreven to a different type of cloud service instance such as Oracle SOA CloudService.
1. Sign in to the Oracle Cloud Infrastructure Console.
2. Click in the top left corner of the Oracle Cloud Infrastructure Console.
3. Select Platform Services, then Integration or Integration Classic.
4. Click adjacent to the instance you want to change and select Change LicenseType.
5. Select the option required for your environment.
• The first option enables you to select to bring an existing Oracle FusionMiddleware license to the cloud for use with Oracle Integration.
• The second option enables you to select the regular billing rate (non-BYOL),which is a regular cloud subscription as if you did not own any on-premiseslicenses.
In this example, which may have been metering as BYOL, the license is nowswitched to non-BYOL (the regular subscription rate). This action eliminates theneed to recreate and upgrade your data to a new instance for a simple changesuch as the billing rate. In your next hourly metering report, this instance reflectsthe new billing rate. If you toggle back and forth within an hour, you most likely donot see any change because it is only reported once per hour.
Chapter 6Change the BYOL Metering Option of an Existing Instance
6-7

7Troubleshoot Oracle Integration
Topics:
• Resume Use of a Suspended Oracle Integration for Oracle SaaS Account
Resume Use of a Suspended Oracle Integration for OracleSaaS Account
Your Oracle Integration for Oracle SaaS account can be suspended under thefollowing scenarios:
• When you create an instance using an Oracle Integration for Oracle SaaSaccount, you see options for Integration (Standard Edition) and Integration andProcess (Enterprise Edition). If you create the instance without the correspondingentitlement, the account is suspended.
• Nothing prevents you from creating instances or scaling instances to increasecapacity that exceeds your account quota limit. When this occurs, your account issuspended.
If your account get suspended, here are some procedures to follow to resume use ofyour account.
• If you create an instance that is not entitled (for example, you created anIntegration and Process instance when using a Standard Oracle Integration forOracle SaaS account, you can delete the instance and wait for an hour or so torefresh your billing metrics, at which time the account is resumed.
• If your account has the correct entitlement, but uses more resources than thequota limit, you can:
– Order more resources to expand the account.
– Stop some instances so that the total number of message packs in the runninginstances in the account stay within account quota. After an hour or so, theaccount can be resumed. Then, scale an instance to decrease capacity untilthe total usage is no more than the account quota. Then, start the previouslystopped instance, as needed.
– Delete an instance that is no longer needed to bring usage below the quotalimit.
7-1

Part IAdminister Oracle Integration Classic(User-Managed)
This part describes tasks that are unique to provisioning, administering, andtroubleshooting in Oracle Integration Classic (user-managed).
Topics:
• Ready, Set Up, Go in Oracle Integration Classic (User-Managed)
• Manage Oracle Integration Classic (User-Managed)
• Troubleshoot Oracle Integration Classic (User-Managed)

8Ready, Set Up, Go in Oracle IntegrationClassic (User-Managed)
You use the Oracle Cloud Infrastructure Console to install instances of OracleIntegration Classic (user-managed).
Topics:
• Assign the Correct User Roles to Create an Instance
• Provision Oracle Integration Classic (User-Managed) on an IP Network
• Create an Oracle Integration Classic (User-Managed) Instance
• Perform Post-Provisioning Tasks for Integration Analytics Instances
• About the User Interfaces of the Oracle Cloud Infrastructure Console for OracleIntegration Classic (User-Managed)
• Support the Minimum Version of Oracle Integration Classic (User-Managed)
Assign the Correct User Roles to Create an InstanceIf you are the user that initially signed up and purchased universal credits for OracleCloud, you automatically have the necessary service entitlement roles to create OracleIntegration Classic (user-managed) instances. Otherwise, the correct roles must beexplicitly assigned to your user account to create Oracle Integration Classic instances.Without the necessary roles, creation fails.
To successfully create Oracle Integration Classic instances, ensure that your useraccount is assigned the following roles for these services:
• Compute Classic - Service Entitlement (Compute.Compute_Operations)
• Container Classic - Service Entitlement (OCCS_ADMINISTRATOR) (Unlesssomeone else with this role initializes the replication policy.)
• Database - Service Entitlement (DBaaS_Administrator)
• Database Backup - Service Entitlement (DatabaseBackup_Administrator)
• IntegrationCloud - Service Entitlement(INTEGRATIONCLOUD_ENTITLEMENT_ADMINISTRATOR)
• Load Balancer Classic - Service Entitlement (LBAAS_ADMINISTRATOR)
To know how to add new users and assign roles, see Add a User and Assign Roles toa User.
8-1

Note:
The Identity Cloud - Service Entitlement (Identity Domain Administrator) rolehas super user privileges for the identity domain. Users with this role canmanage users, groups, applications, and system configuration settings. Theycan also perform delegated administration by assigning users to differentadministrative roles.
Provision Oracle Integration Classic (User-Managed) on anIP Network
If you want to provision Oracle Integration Classic (user-managed) on an IP network,follow the steps described in this section.
Note:
There is support for only one public, dedicated, virtual Oracle Load Balanceras a Service at a time. You cannot create multiple services at a time.
Prerequisites
• Start the Oracle Integration Classic provisioning wizard and check the value in theIP Network drop-down list. See Create a Complete Production Instance that UsesYour Existing Database. If the Region and IP Network lists are not visible, contactOracle Support Services. This value is required when creating the JSON file usedto create the virtual Oracle Load Balancer as a Service.
• Obtain the compute site value. This value is required when creating the JSON fileused to create the virtual Oracle Load Balancer as a Service.
1. On the Dashboard page, select Open Service Console from the hamburgermenu in the Compute Classic tile.
2. Click the Sites value at the top of the page.
3. Copy the value in the Site field.
Chapter 8Provision Oracle Integration Classic (User-Managed) on an IP Network
8-2

• Obtain the tenant name value. This value is required when creating the virtualOracle Load Balancer as a Service.
1. On the Dashboard page, click the Identity Cloud tile.
2. In the Additional Information section, copy the value from the IdentityService Id field.
Create an IP Network
To complete this task, you must have the Compute_Operations role. If you do nothave this role, ask your system administrator to assign you this role. See ModifyingUser Roles in Managing and Monitoring Oracle Cloud.
1. Sign in to the Compute Classic Console. If your domain spans multiple sites,select the appropriate site. To change the site, click the Site menu near the top ofthe page.
2. Click the Network tab.
3. In the Network drop-down list, expand IP Network, then click IP Networks.
Chapter 8Provision Oracle Integration Classic (User-Managed) on an IP Network
8-3

4. Click Create IP Network.
5. Select or enter the required information:
Element Description
Name Enter a name for the IP network.
Chapter 8Provision Oracle Integration Classic (User-Managed) on an IP Network
8-4

Element Description
IP Address Prefix Enter the IP address prefix for this IPnetwork, in CIDR format. When you createinstances, you can associate a vNIC on theinstance with an IP network. That vNIC onthe instance is then allocated an IP addressfrom the specified IP network.
Select the IP address prefix for your IPnetworks carefully. Consider the number ofinstances that you may want to add to thenetwork. This helps determine the size ofthe subnet required.
If you create multiple IP networks and youmay want to add these IP networks to thesame IP network exchange, then ensurethat you do not allocate overlapping addressranges to these IP networks.
Similarly, if you plan to connect to your IPnetworks using VPN, ensure that theaddresses you specify for your IP networksdo not overlap with each other or the IPaddresses used in your on-premisesnetwork.
Note: RFC 6598 addresses are notsupported.
IP Exchange Specify the IP network exchange to whichyou want to add this IP network. An IPnetwork can belong to only one IP networkexchange. Before you specify an IP networkexchange for an IP network, ensure that theIP addresses in this IP network do notoverlap with the IP addresses in any othernetwork in the same IP network exchange. Ifyou do not specify an IP network exchangewhile creating an IP network, you can do solater by updating an IP network.
If you want to connect IP networks using anIP network exchange, do this beforecreating instances with an interface on thoseIP networks. This ensures that routes areappropriately configured on instances by theDHCP client during instance initialization.
Description Enter a meaningful description for your IPnetwork, if required.
Tags Enter a list of the tags that you want toassociate with your IP network, if required.
6. Click Create
The IP network is created and added to the specified IP network exchange.
Find the Oracle Load Balancer as a Service URL for Your Account
You must identify the Oracle Load Balancer as a Service URL.
1. Activate your account after receiving your welcome email. When you log in toOracle Cloud Infrastructure Console, you must reset the password.
Chapter 8Provision Oracle Integration Classic (User-Managed) on an IP Network
8-5

2. Go to the Dashboard.
3. In the upper right corner, click Customize Dashboard.
4. Find Load Balancer Classic, and click Show.
5. Close the Customize Dashboard dialog.
This enables Load Balancer Classic to be displayed in your Dashboard.
6. Click Load Balancer Classic.
7. In the Additional Information section, find the REST Endpoint field.
8. Copy the value in the REST Endpoint field.
You need this REST endpoint value to run the REST API that creates the publicand private virtual Oracle Load Balancer as a Service.
Create the Public Virtual Oracle Load Balancer as a Service
1. Create a JSON file (for this example, named creatdvlbr.json) with contentsimilar to the following. You specify this file when creating the virtual loadbalancer.
{ "name": "public-explicit-oic", "disabled": "false", "scheme": "INTERNET_FACING", "compute_site": "uscom-central-1", "ip_network_name": "/Compute-99999999/[email protected]/IPNetworkOIC",}
where:
• name: Specify any name you want to use.
• disabled: Set to false.
• scheme: Specify INTERNET_FACING.
• compute_site: Specify the value you copied in Prerequisites.
• ip_network_name: Specify the name of the IP network you copied in Prerequisites. The name conforms to the following format:
compartment_name/user_name/subnet_name
For example:
/Compute-99999999/[email protected]/IPNetworkOIC-IPN
2. Create the virtual Oracle Load Balancer as a Service from the command prompton your on-premises host.
curl -i -X POST -u "username:password" -d @creatdvlbr.json -H "Content-type:application/vnd.com.oracle.oracloud.lbaas.VLBR+json" -H "X-ID-TENANT-NAME:idcs-xxxxxxxxxxxxxxxx" "https://lbaas-1xxxxxxxxxxxxx.balancer.oraclecloud.com/vlbrs"
Chapter 8Provision Oracle Integration Classic (User-Managed) on an IP Network
8-6

where:
• -u: Specify the account username and password you received in the welcomemail. You changed the password upon initial login.
• -d: Specify the payload file name you created in Step 1. For this example,named creatdvlbr.json, but this name can be any name you choose.
• -H (first one): Specify Content-type:application/vnd.com.oracle.oracloud.lbaas.VLBR+json.
• -H (second one): Specify your unique TENANT-NAME value you copied in Prerequisites and the REST endpoint value you copied in Find the OracleLoad Balancer as a Service URL for Your Account. The REST endpoint valuemust have /vlbrs appended to the end.
See Troubleshoot cURL Command Issues When Configuring an IP Network.
3. Get the status for the virtual Oracle Load Balancer as a Service. This commandshould result in a HEALTHY state response for a successful creation.
curl -i -X GET -u "username:password" -H "Content-type:application/vnd.com.oracle.oracloud.lbaas.VLBR+json" -H "X-ID-TENANT-NAME:idcs-xxxxxxxxxxxxxxxx" "https://lbaas-1xxxxxxxxxxxxx.balancer.oraclecloud.com/vlbrs/uscom-central-1/public-explicit-oic"
Note that the region (for this example, uscom-central-1) and load balancer name(for this example, public-explicit-oic) are appended to the end of the RESTendpoint URL.
You can also check that the status is healthy from the Oracle Cloud InfrastructureConsole.
4. From the hamburger menu in the upper left corner, select Platform Services >Compute Classic.
5. Click the Network tab.
6. In the left navigation pane, click the Load Balancers arrow, then select LoadBalancers.
The table shows the created load balancer. If it is in a healthy state, the icon onthe left appears as follows.
7. Click the name to display specific details about the load balancer.
Chapter 8Provision Oracle Integration Classic (User-Managed) on an IP Network
8-7

Provision Oracle Database Cloud Service
You must provision Oracle Database Cloud Service before using the provisioningwizard to create an Oracle Integration Classic instance.
Note:
When you provision Oracle Database Cloud Service, specify the same IPnetwork value that you created in Create an IP Network.
Provision an Instance
1. Follow the steps in Create a Complete Production Instance that Uses YourExisting Database to invoke the Oracle Integration Classic provisioning wizard.
2. In the IP Network field, specify the IP network you created in Create an IPNetwork.
3. Understand the following details about IP networks:
• Oracle Database Cloud Service Behavior:
– When you do not choose Region/IP Network in the provisioning wizardpages, the Oracle Integration Classic provisioning screens allow you tochoose Oracle Database Cloud Service instances that are not in the IPnetwork. This is equivalent to non-IP network functionality.
– When you choose the Regions/IP Network option in Oracle IntegrationClassic provisioning screens:
* The Oracle Integration Classic provisioning wizard pages list allOracle Database Cloud Service entries from all IP networks.
* The Oracle Integration Classic provisioning wizard pages list OracleDatabase Cloud Service entries from the same subnet.
* The provisioning wizard pages do not list Oracle Database CloudService entries from non-IP networks.
* Ensure that you use an Oracle Database Cloud Service instance froman IP network with which your Oracle Integration Classic instance canexchange packets. In other words, Oracle Integration Classic andDBaaS should be in the same IP network or in IP networks that areconnected with an IP exchange.
* Internal IP addresses from the IP network subnet are assigned to VMswhen provisioning completes.
• Updating IP Networks:
– When you update IP networks:
* Ensure that you do not change the IP address of a subnet, onlychange the IP prefix.
* Change the IP prefix to expand the current IP network (for example, tochange the prefix from /27 to /8 to expand the network).
Chapter 8Provision Oracle Integration Classic (User-Managed) on an IP Network
8-8

* Restart VMs from the Oracle Integration Classic Oracle CloudInfrastructure Console as soon as you update an IP network prefix.Failing to restart the VMs causes console URLs not to work properlyduring backup.
• Deleting IP Networks:
– If you plan to delete the IP network/IP exchange, make sure all VMs andinstances are deleted.
– Instances are no longer functional when the IP networks are deleted.Therefore, the Oracle Enterprise Manager Fusion Middleware Control,Oracle WebLogic Administration Server, and other consoles are notaccessible.
– To re-enable instances, you can recreate the IP networks/IP exchangewith the exact same name and IP subnet (with a similar prefix).
– Every time an instance is deleted, the private IP address is reclaimed bythe subnet.
Support for Multiple IP Networks Using Only One Created Oracle Virtual LoadBalancer as a Service
If you attempt to create more than one Oracle Virtual Load Balancer as a Service(either public or private) with different IP networks, the REST API request is rejectedwith the following warnings:
Only 1 VLBRs can be created with the scheme INTERNAL in a non Oracle Managed Service https://lbaas-****" (for private vlbr creation)
and
"Only 1 VLBRs can be created with the scheme INTERNET_FACING in a non Oracle Managed Service https://lbaas-****
If you want to create multiple IP networks that use only one virtual Oracle LoadBalancer as a Service, you must create an IP exchange connecting multiple IPnetworks.
1. Create IPNetwork1.
2. Create a virtual Load Balancer as a Service with IPNetwork1.
3. Create IPNetwork2.
4. Create an IP exchange.
5. Add IPNetwork1 and IPNetwork2 into the IP exchange.
6. Provision an Oracle Integration Classic instance with IPNetwork2. The provisionsucceeds through with IPNetwork2.
Chapter 8Provision Oracle Integration Classic (User-Managed) on an IP Network
8-9

Create an Oracle Integration Classic (User-Managed)Instance
You can create the following type of Oracle Integration Classic (user-managed)instance.
• Create a Complete Production Instance
Recommended Minimum Values for Creating an Instance
The recommended minimum values for creating service instances that includeIntegrations, Processes, and Integration Analytics are as follows:
• Managed servers: Two (for high availability)
• Enterprise Edition Database:
– Shape: 1 OCPU (OC1M) for each pair of managed servers. Therefore, OC1Mfor up to two managed servers, OC2M for up to four managed servers, OC3Mfor up to six managed servers, and so on.
– Usable Database Storage: 125 GB per managed server
• Cloud storage: 1 TB
Note:
Oracle Integration Classic does not support the use of an Oracle RealApplication Clusters (RAC) database.
Create a Complete Production InstanceYou can create a complete production environment instance that providesIntegrations, Processes, Integration Analytics, and Visual Builder. There are twooptions. The option to select is based on whether you want Oracle to create adatabase for you or you have an existing database that you want to use.
Topics:
• Create a Complete Production Instance that Automatically Creates Your Database
• Create a Complete Production Instance that Uses Your Existing Database
Chapter 8Create an Oracle Integration Classic (User-Managed) Instance
8-10

Create a Complete Production Instance that Automatically Creates YourDatabase
You can create an Oracle Integration Classic (user-managed) instance thatautomatically creates an Oracle Database Cloud Service instance with the OracleCloud Stack template.
What are the Capabilities of this Instance
This option enables you to complete a template that automatically provisions therequired set of services together (Oracle Integration Classic, preconfigured OracleDatabase Cloud Service, and Oracle Cloud Infrastructure Object Storage Classiccontainer). A stack is an actual provisioned instance of a template.
The template provides two options for provisioning an instance:
• Use the Oracle-provided template directly without modifications. This optioncreates an Oracle Cloud Infrastructure Object Storage Classic container andOracle Database Cloud Service instance with default settings.
• Create your own customized template by exporting an existing template,customizing the database and storage container settings, and importing it backinto the Oracle Cloud Stack. You can configure specific details such as the shape(number of nodes), number of CPUs, amount of memory, database version,database edition (standard (SE) or enterprise (EE), database administratorpassword, and more.
See Oracle Cloud Stack Manager.
Prerequisites
An Oracle Cloud Infrastructure Object Storage Classic account name is automaticallycreated for you when you purchase your universal credits. You must copy this storageaccount name from within the Storage Classic tile of your Dashboard page beforeprovisioning Oracle Integration Classic.
1. Click the menu on the Storage Classic tile.
2. Select View Details.
3. On the Overview tab, scroll to the Additional Information section at the bottomand copy the entire storage account name URL value from the REST Endpointfield. You enter this value when creating an instance with the stack template.
Chapter 8Create an Oracle Integration Classic (User-Managed) Instance
8-11

Note:
• The template does not permit you to reuse databases.
• The template provides a restricted set of databases, unlike the optionsprovided by provisioning Oracle Database Cloud Service separately.
Creating an Instance
1. Sign in to your Oracle Cloud account.
2. In the Oracle Cloud Infrastructure Console, click in the top left corner of thepage.
3. Click Platform Services > Cloud Stack.
4. Click the Templates tab.
5. Find the Oracle Integration Classic template named Oracle-IntegrationCloud-CM-Template in the list. You can also search for the name.
There are two types of templates available. The template icon identifies the type oftemplate:
• : Template was created and automatically provided by Oracle.
• : Template was created by a user and imported into the Oracle CloudStack. For example, you exported the Oracle-provided template, customizedthe database and storage container settings, and imported it back into theOracle Cloud Stack.
6. To view a graphical representation of the components in a template (for example,Oracle Integration Classic, Oracle Database Cloud Service, and Oracle CloudInfrastructure Object Storage Classic), click the template icon or the templatename. You can perform the following tasks from the graphic:
a. Click the Template tab to view the contents of the template in YAML format.This is the stack template file used to create your instance. This templateprovides configuration information such as backup and recovery, databasebackup container, backup container, and database details.
Chapter 8Create an Oracle Integration Classic (User-Managed) Instance
8-12

b. If you want to export the file for customizing, click Export. When customizingis complete, click Import on the Templates page to import the file back intothe Oracle Cloud Stack.
Tutorial
c. Click Done when complete.
7. To create a stack from an Oracle-provided or custom template, click the icon atthe far right of the template to use. This example describes how to edit the Oracle-provided template.
In the Provision New Oracle Cloud Stack page, the template is prepopulated withinformation for automatically provisioning Oracle Database Cloud Service and theOracle Cloud Infrastructure Object Storage Classic container during stacktemplate provisioning.
Chapter 8Create an Oracle Integration Classic (User-Managed) Instance
8-13

8. Specify the following details:
Field Description
Stack Details • Service Name: Enter a stack name. Upon Oracle IntegrationClassic creation, the stack name points to all instances createdand the database created.
• Description: Enter a description.• Template: Displays the template used to create the stack. This
field cannot be edited.• Notification Email: Enter an email address at which to be
notified of instance provisioning progress (for example, whenprovisioning completes).
• Tags: Select available tags for assignment or click the icon todefine new tags and assign to the service instance. You canuse tags to search for and categorize your instances.
• On Failure Retain Resources: Select to retain all services,even if a failure occurs during provisioning. For example, ifselected and Oracle Database Cloud Service was successfullyprovisioned, but the Oracle Cloud Infrastructure ObjectStorage Classic container was not, both are retained. Thisaction enables you to debug service failures. If not selected, noservices are retained if a failure occurs, even those servicesthat were provisioned successfully.
Chapter 8Create an Oracle Integration Classic (User-Managed) Instance
8-14

Field Description
Backup andRecoveryConfiguration
Enter the following details to automatically create an Oracle CloudInfrastructure Object Storage Classic container instance for backupand recovery.
• Cloud Storage Account Name: Enter the storage accountname URL value (for example, https://storage_url/Storage-bjones) that you copied from the REST Endpointfield of the Overview tab. This storage account name URL isautomatically created when you purchase your universalcredits. Do not enter the actual storage container namebecause the storage container is automatically created duringstack template provisioning.
Note: See the Prerequisites section to copy the automatically-created storage account name from the Storage Classic tile ofyour Oracle Cloud Infrastructure Console page.
• Cloud Storage User Name: Enter the storage container username.
• Cloud Storage User Password: Enter the password for theuser name.
ConfigurationParameters
Select the compute region.
Service • SSH Public Key: Create a new key or upload an existing key.• Feature Set: Select the feature set that you want to provision.
Visual Builder is automatically installed with each feature set.– Integration: Provisions only the Integrations feature of
Oracle Integration Classic.– Integration and Process: Provisions the Integrations and
Processes features of Oracle Integration.– Integration and Process + Integration Analytics:
Provisions the Integrations, Processes, and IntegrationAnalytics features of Oracle Integration Classic. Thisselection creates two Oracle Integration Classic services,each having many nodes. Each node shares the samedatabase.
Note: When provisioning is complete, you must link thesetwo instances together in the Registration page of OracleIntegration Classic. See Register an Integration AnalyticsInstance to Connect Integration Insight to Integrations.
• Bring Your Own License: Select to bring an existing OracleFusion Middleware license to the cloud for use with OracleIntegration Classic.
• Initial Number of Nodes: Enter the number of nodes. You canadd nodes (scale out) and remove nodes (scale in) later in theOracle Integration Classic Oracle Cloud InfrastructureConsole.
DatabaseAdministratorPassword
• Database Administrative Password: Enter the password toadminister the database. The password must be between 8and 30 characters with at least one lower case letter, oneupper case letter, one number, and one special character(_,#). For example, Ach1z0#d.
• Confirm Database Administrative Password: Enter thesame password again.
9. When complete, click Next.
Chapter 8Create an Oracle Integration Classic (User-Managed) Instance
8-15

10. Confirm your selections, then click Confirm. If you used the Oracle-providedtemplate instead of a custom template, a database with the following defaultsettings is automatically created.
• Service name: db
• Database Edition: Enterprise Edition
• Subscription type: Hourly
• SID: ORCL
• Failover database enabled: No
• Disaster Recovery enabled: No
• RAC enabled: No
Note:
You must change the default database password listed in the YAMLfile for the SYS administrator after provisioning completes.
When provisioning completes, a stack is displayed, a new database isdisplayed, and one or two new Oracle Integration Classic instances aredisplayed, each in their own respective Oracle Cloud Infrastructure Console.You must go to these consoles to perform life cycle management operationssuch as scaling out, scaling in, and other tasks.
Note:
To delete the stack, you must use the Oracle Cloud Stack OracleCloud Infrastructure Console to delete all of the related services. Forexample, if you delete a stack, the Oracle Database Cloud Service,Oracle Cloud Infrastructure Object Storage Classic container, andOracle Integration Classic instances are all deleted. These instancescannot be deleted individually.
Create a Complete Production Instance that Uses Your Existing DatabaseYou can create an Oracle Integration Classic (user-managed) instance that uses yourexisting database with the provisioning wizard.
What are the Capabilities of this Instance?
This option provides a simple wizard in which to specify Oracle Database CloudService, Oracle Cloud Infrastructure Object Storage Classic, and other details.
This option requires that you first provision Oracle Database Cloud Service beforeusing the wizard. An Oracle Cloud Infrastructure Object Storage Classic subscriptionand storage account are needed. A storage container can be provisioned before orduring use of the provisioning wizard.
Chapter 8Create an Oracle Integration Classic (User-Managed) Instance
8-16

Prerequisites
You must complete certain prerequisites before using the provisioning wizard.
Prerequisite Description For MoreInformation...
Create an Oracle Database Cloud Serviceinstance.
This is because during Oracle IntegrationClassic creation, you are prompted to specifythe Oracle Database Cloud Service logincredentials and service name.
All Oracle Database Cloud Serviceconfigurations are possible.
Tutorial
Obtain the Oracle Cloud InfrastructureObject Storage Classic account name.
An Oracle Cloud Infrastructure ObjectStorage Classic account name isautomatically created for you when youpurchase your universal credits. You mustcopy this storage account name from withinthe Storage Classic tile of your Dashboardpage before provisioning Oracle IntegrationClassic. You then specify the Oracle CloudInfrastructure Object Storage Classicaccount name when prompted in theprovisioning wizard. This actionautomatically creates an Oracle CloudInfrastructure Object Storage Classicinstance for you.
1. Click the menu on the StorageClassic tile.
2. Select View Details.
3. On the Overview tab, scroll to theAdditional Information section at thebottom and copy the entire storageaccount name URL value from theREST Endpoint field. You enter thisvalue when creating an instance in theprovisioning wizard.
Note: If you want, you can also separatelyprovision the Oracle Cloud InfrastructureObject Storage Classic container beforeprovisioning Oracle Integration Classic. Inthis case, you specify the existing accountand storage container details whenprompted in the provisioning wizard.
See Oracle StorageCloud Service.
Creating an Instance
• Create a Service Instance
• Specify Service Instance Information
• Specify the Feature Set and Database and Storage Details
• Confirm Your Selections
Chapter 8Create an Oracle Integration Classic (User-Managed) Instance
8-17

Create a Service InstanceStart the provisioning process by creating a new instance:
1. Sign in to your Oracle Cloud account.
2. In the Oracle Cloud Infrastructure Console, click in the top left corner of thepage.
3. Click Platform Services > Integration Classic.
The Oracle Integration Oracle Cloud Infrastructure Console page is displayed.
4. Click Create Instance.
The Instance page appears.
Specify Service Instance InformationProvide basic information about your new Oracle Integration instance.
Field Description
Instance Name Specify a name to identify the new service instance. The name mustbe unique within the tenant domain. You cannot have two instanceswith the same name at the same time; one instance must be deleted.The service name must meet the following conditions:
• Must start with a letter [a-zA-Z][a-zA-Z0-9].• Cannot be longer than 30 characters.
Description Optionally add a description to help identify the purpose of this newservice. The description is only used during service list display.
Notification Email Enter an email address at which to be notified of instance provisioningprogress (for example, when provisioning completes).
Region Select the region in which to provision your instance. Otherwise, selectNo Preference.
Tags Select available tags for assignment or click + to create new tags toassign to the service instance. You use tags to search for andcategorize your instances.
SSH Public Key Select an option for accessing service host access. This key is usedfor authentication when connecting to the instance using a secure shell(SSH) client. The same public key is used for all VMs configured forthis service instance.
• Browse for the file containing the VM public key file.• Provide a value for an existing VM public key.• Create a new private/public key pair. A new key is generated for
you. When prompted, save the key as a file on your hard drive.
License Type Select an option:
• Select to bring an existing Oracle Fusion Middleware license tothe cloud for use with Oracle Integration.
• Select to create a new Oracle Integration license.
Specify the Feature Set and Database and Storage DetailsSpecify the Oracle Integration feature set, Oracle Database Cloud Service details, andOracle Cloud Infrastructure Object Storage Classic container details.
Chapter 8Create an Oracle Integration Classic (User-Managed) Instance
8-18

Field Description
Feature Set Select the feature set:
• Integration: Installs the Standard Edition of Oracle Integration.This feature set includes Integrations and Visual Builder. Thisselection uses Standard Edition pricing.
• Integration and Process: Installs the Enterprise Edition of OracleIntegration. This feature set includes Integrations, Processes, andVisual Builder. This selection uses Enterprise Edition pricing.
• Integration Analytics: Installs Integration Analytics, whichincludes Stream Analytics and Integration Insight.
Node Configuration Select the number of nodes to configure.
Backup andRecoveryConfiguration
Specify the Oracle Cloud Infrastructure Object Storage Classiccontainer in which to store backups. You can specify an existingstorage container or automatically create a new storage containerduring this Oracle Integration provisioning session.
• Cloud Storage Container: Specify the container name using thefollowing format:
Storage-storage_account_name/container_name
For example:
Storage-jsmith/JaasBackup
where:– Storage-storage_account_name: Storage container
account name. This account is automatically created whenyou purchase your universal credits.
Note: See the Prerequisites section to copy the automatically-created storage account name from the Storage Classic tileof your Oracle Cloud Infrastructure Console.
– container_name: Storage container name of an existingstorage container or the name to use to create a new storagecontainer.
• Cloud Storage User Name: Specify the username.• Cloud Storage User Password: Specify the password.• Create Cloud Storage Container: Select this check box to
automatically create a storage container during Oracle Integrationprovisioning. If you have already provisioned an Oracle CloudInfrastructure Object Storage Classic container, leave this checkbox deselected.
Chapter 8Create an Oracle Integration Classic (User-Managed) Instance
8-19

Field Description
DatabaseConfiguration
Specify Oracle Database Cloud Service details.
Note: You must provision Oracle Database Cloud Service before youcan use this wizard. Otherwise, no databases are available forselection from the Service Name list and you cannot proceed withOracle Integration provisioning.
• Service Name: Select the service name of the database you wantto use. Only the service name is displayed. The type of databaseis not displayed (for example, data guard). For specific detailsabout the database, go to the Oracle Database Cloud ServiceOracle Cloud Infrastructure Console and look for the servicename.
• Pluggable Database Service name: Optionally specify theservice name of the pluggable database (PDB). This field is onlyfor version 12c databases. A PDB is a multitenant containerdatabase (CDB) consisting of a portable collection of schemas,schema objects, and nonschema objects that appear to an OracleNet client as a non-multitenant container database (CDB). A non-CDB is a traditional Oracle database that cannot contain PDBs.
• Database Administrator User Name: Specify the user name.This value must be set to a database user with SYSDBA systemprivileges. You can use the default user SYS or any user that hasbeen granted the SYSDBA privilege.
• Database Administrator User Password: Specify the passwordfor the administration user. The administrator password wasspecified when the Oracle Database Cloud Service instance wascreated.
Note: Do not specify a password that includes a hyphen.
InstanceAdministratorResponsibilityAcknowledgment
Click to acknowledge that you are responsible for provisioning andadministering your own instance, including:
• Patching• Starting stopping instances and individual VMs• Starting/stopping Oracle WebLogic Server• Scaling in/scaling out• Backups• Database management• Operating system management, including ensuring that you have
enough swap spaceSee Manage Oracle Integration.
Confirm Your SelectionsThe confirmation page displays the configuration values you selected in theprovisioning wizard.
Review the service details and make a copy or a screen capture. If you need tochange the service details, use the navigation bar or Previous button at the top of thewizard to step back through the pages in the wizard. Click Cancel to cancel out of thewizard without creating a new service instance. If you are satisfied with your choiceson the Confirmation page, click Create.
Chapter 8Create an Oracle Integration Classic (User-Managed) Instance
8-20

Note:
You are notified by email when your Oracle Integration instance has beencreated.
Perform Post-Provisioning Tasks for Integration AnalyticsInstances
After creating an Integration Analytics instance of Oracle Integration Classic, you mayneed to complete the following post-provisioning tasks. The features you want to usedetermine the tasks you need to complete.
You do not have to perform these tasks if you’ve only created instances with theIntegrations and Process feature set.
Topics:
• Register an Integration Analytics Instance to Connect Integration Insight toIntegrations
• Post-Provisioning Tasks for Stream Analytics
Register an Integration Analytics Instance to Connect IntegrationInsight to Integrations
Use Registration to link more Oracle Integration features to your current instance. Forexample, you might receive another URL for an Integration Analytics instance with theInsight and Streams features. You can register it with your current server containingVisual Builder, Processes, and Integrations to see all of their content together.
Integration Analytics instances include Integration Insight and Streams. If want to useIntegration Insight to collect and monitor business-level metrics from an Integrationsinstance, you must register the Integration Analytics instance to the Integrationsinstance and vice versa. Registration is not required to use Streams.
Only users assigned the ServiceAdministrator role can access registration.
1. On the Home page, click Registration in the navigation pane.
The Registration page opens. The Current Instance section lists the featuresavailable in your instance.
2. Click Register.
3. In the Register Integration Instance dialog, enter the URL and administratorcredentials of the instance you want to register with your current instance, andclick Discover.
The dialog displays information about features discovered.
Chapter 8Perform Post-Provisioning Tasks for Integration Analytics Instances
8-21

4. In the Name field, enter a name for the discovered instance, and click Register.
• The URLs are linked and the newly registered features display on theRegistration page.
• The navigation pane reflects the newly registered features.
• The Home page now displays tiles for the newly registered features.
5. Repeat steps 1–4 on the other server, so that features are registered on eachserver.
You must perform registration on both servers to see all content on both servers.
Chapter 8Perform Post-Provisioning Tasks for Integration Analytics Instances
8-22

Post-Provisioning Tasks for Stream AnalyticsYou must complete the following tasks, in sequence, to use the Stream Analyticsfeature after creating an Integration Analytics instance of Oracle Integration Classic.
You don’t have to complete these tasks if you have not created any IntegrationAnalytics or if you are not using Stream Analytics.
Topics:
• Enable Direct Access to Stream Analytics
• Add Access Rules
• Configure Yarn Resource Manager
• Identify Kafka and Yarn Resource URLs
• Configure System Settings in Stream Analytics
Enable Direct Access to Stream AnalyticsStream Analytics is included with Integration Analytics. You can bypass the loadbalancer to access Stream Analytics by disabling redirection to the load balancer URLand providing access rules to access the port listening to the managed server onwhich Stream Analytics is deployed.
Configure the Frontend Host and HTTPS Port
1. Log in to the Oracle WebLogic Server Administration Console. You can accessthis console from the Oracle Cloud Infrastructure Console. See Explore the OracleCloud Infrastructure Console.
2. In the navigation pane, select Environment > Clusters > cluster_name > HTTP.
3. Click Lock and Edit.
4. Leave the Frontend Host field blank.
5. Enter 0 in the Frontend HTTPS Port field.
6. Click View changes and restarts.
7. Click Restart Checklist.
8. Select Server Restart Checklist.
9. Click Restart.
10. Log out of Oracle WebLogic Server Administration Console.
Access Stream Analytics Directly with the Oracle WebLogic Server Public IPAddress
1. Access Stream Analytics with the direct public IP and port: WLS_Public_IP:8002/ic/streams.
2. Log in using the Oracle Identity Cloud Service (IDCS) user name.
Chapter 8Perform Post-Provisioning Tasks for Integration Analytics Instances
8-23

Add Access RulesThe access rules allow you to access Stream Analytics. You can use access rules tocontrol network access to service components.
To add access rules:
1. Log in to the PaaS Service Manager Console.
2. Click Manage this service and select Access Rules.
3. Launch the Oracle Big Data Cloud Service application.
4. Select Access Rules under Stream BDCSE within Platform Services.
5. Click Create Rule and fill in all the required details.
You can see the rule you have added in the list of access rules.
Configure Yarn Resource ManagerUpdate and modify the configuration variables in BDCSCE Cluster (Spark + Hadoop)to complete the Yarn Resource Manager configuration.
To configure Yarn Resource Manager:
Chapter 8Perform Post-Provisioning Tasks for Integration Analytics Instances
8-24

1. Launch the Ambari application. Enter the URL of the application in the browser inthe form: http://active-bdcsce-MASTER-1-node-ipaddress:8080. This is the IPAddress of the master node of Spark.
2. Click YARN in the left pane.
3. Go to the Configs tab.
4. Go to the Advanced tab.
5. Choose the relevant category.
6. Add, update, or delete the required properties.
7. Click Save.
While saving, restart all the affected components when prompted.
Identify Kafka and Yarn Resource URLsYou need to identify and obtain Kafka and Yarn resourcemanager URLs.
One of the BDCS instances will be running Yarn resourcemanager user interface onport 8088. There is no definite way to find which instance is running this user interface,so you must adopt a trial and error strategy by providing BDCS instance IP:8088.Click the configuration to open the XML page that has address for the Yarnresourcemanager.
Look for the yarn.resourcemanager.address property to get the YARNresourcemanager URL. This property contains the instance and port details.
Chapter 8Perform Post-Provisioning Tasks for Integration Analytics Instances
8-25

Configure System Settings in Stream AnalyticsAfter you provision Stream Analytics, configuring system settings is another importantstep to complete before you can start using Stream Analytics.
To configure system settings:
1. Launch Stream Analytics. See Enable Direct Access to Stream Analytics.
2. Log in to the application.
3. Click the User Name in the top-right corner and select System Settings.
The System Settings are not auto-configured. You can get these details from theBDCS and OEHPCS instances.
Chapter 8Perform Post-Provisioning Tasks for Integration Analytics Instances
8-26

4. Enter Kafka Zookeeper Connection details.
The IP address is the public IP used for OEHCS. Obtain the port from the AccessRules screen by looking for the zookeeper port entry in the list.
a. Configure Kafka Zookeeper in Access Rules page.
b. Configure Kafka Broker in Access Rules page.
5. Select the Runtime Server. Select either Yarn or Spark Standalone based onyour requirement.
If you select Yarn as the server, specify the following parameters:
a. Enter YARN Resource Manager URL.
One of the BDCS instances will be running Yarn resourcemanager userinterface on port 8088. There is no definite way to find which instance isrunning this user interface, so you must adopt a trial and error strategy byproviding BDCS instance IP:8088. Click the configuration to open the XMLpage that has address for the Yarn resourcemanager. Look for the propertyyarn.resourcemanager.address to get the YARN resourcemanager URL.
b. Enter the Storage details.
Try the BDCS instance public IP with port 50070 to get the web hdfs explorer.The named node marked as active can be configured for storage.
c. Enter the Path.
• WebHDFS: IP_Address:50070/directory_name
• HDFS: IP_Address/directory_name
d. Select the Hadoop Authentication mode and enter the required credentials.
e. Set the HA Namenodes.
If you select Spark Standalone as the server, you need to specify the followingparameters:
a. Enter the Spark REST URL.
b. Select the applicable Storage. NFS is the default option for Spark Standalone.
c. Specify the Path for the storage.
6. Click Save.
Chapter 8Perform Post-Provisioning Tasks for Integration Analytics Instances
8-27

About the User Interfaces of the Oracle Cloud InfrastructureConsole for Oracle Integration Classic (User-Managed)
You can perform life cycle management tasks from the Oracle Integration Classic(user-managed) Oracle Cloud Infrastructure Console.
Topics:
• Explore the Oracle Cloud Infrastructure Console
• Explore the Oracle Cloud Infrastructure Console Instance Overview Page
• Explore the Oracle Cloud Infrastructure Console Activity Page
• Explore the Oracle Cloud Infrastructure Console SSH Access Page
• Explore the IP Reservations Page
Explore the Oracle Cloud Infrastructure ConsoleYou can use the Oracle Cloud Infrastructure Console to view all existing OracleIntegration Classic (user-managed) instances and to create and delete instances.
The following table describes the key information shown in the Oracle IntegrationClassic Oracle Cloud Infrastructure Console.
Chapter 8About the User Interfaces of the Oracle Cloud Infrastructure Console for Oracle Integration Classic (User-Managed)
8-28

Element Description
(Next to the word ORACLE in theupper left corner of the page)
Click and select an option from the menu to open the service console for one ofthe Oracle Cloud Services to which you are subscribed.
Click to sign in to the services to which you are subscribed.
Welcome! Click to display the Oracle Integration Classic Welcome page.
Instances (Summary panel) Number of instances in the identity domain.
OCPUs (Summary panel) Total number of Oracle Compute Units (OCPUs) allocated across all instances.
Memory (Summary panel) Total amount of memory in GBs allocated across all instances.
Storage (Summary panel) Total amount of block storage in GBs allocated across all instances.
Public IPs (Summary panel) Total number of IP reservations allocated across all instances.
Instances (heading) All instances in the identity domain.
Enter a full or partial service instance name to filter the list of service instancesto include only the services that contain the string in their service name.
Create Instance Create a new service instance. See Create a Service Instance.
Service instance icon for a created instance. Click this icon to view more detailssuch as patch availability and backup status.
Status icon indicating that the instance is being created.
Status icon indicating the instance is undergoing maintenance or terminating.
Status icon indicating that the instance has failed to be created. This icon canalso indicate that the service instance has stopped. See the Activity page.
service-name Name of the instance. Click the name to view more details.
Version Version of Oracle WebLogic Server configured for the instance.
Nodes Number of nodes allocated for the instance.
Created On When provisioning is complete, the date and time in UTC at which the instancewas created.
OCPUs Number of OCPUs allocated for the instance.
Memory Amount of memory in GBs allocated for the instance.
Storage Amount of storage in GBs allocated for the instance.
Chapter 8About the User Interfaces of the Oracle Cloud Infrastructure Console for Oracle Integration Classic (User-Managed)
8-29

Element Description
Manage this service Click to select one of the following options based on the service types you haveprovisioned:
• Open WebLogic Server Administration Console• Open Fusion Middleware Control Console• Open Integration Home Page• Start— Start Oracle Integration Classic.• Stop— Stop Oracle Integration Classic.• Access Rules—Open the Access Rules page, which enables you to
create and manage access rules for selected sources and destinations.• SSH Access—Add public SSH keys to the VMs that make up this service
instance.• Delete—Delete the service instance. In the Delete Service dialog box that
opens, set the following options and click Delete:– Force service deletion—(Optional) Select this checkbox if you want
the service instance to be deleted even if the database deploymentcannot be reached to delete the database schemas. If enabled, youmay need to delete the associated database schemas manually on thedatabase deployment if they are not deleted as part of the serviceinstance delete operation.
– Database Administrator User Name—Enter the name of thedatabase administrator user that was specified when the databasedeployment was created. This user owns the instance’s repository andschemas. If you have specified two databases, specify the name of theadministrator for the database deployment for the Oracle requiredschema.
– Database Administrator User Password—Enter the databaseadministrator user password for the database deployment thatcontains the Oracle required schema.
• Skip Backup—Select to skip the backup of the terminated instance.
Instance Create and DeleteHistory
Shows details about created or deleted service instances.
• Range—Specifies a range of days for which you are interested in viewingcreated and failed service instances.
• Show only failed attempts—Check this box if you want to see failedattempts only.
• Details—Displays system messages logged during the creation or deletionprocess. Messages include information about auto-retry attempts.
Explore the Oracle Cloud Infrastructure Console Instance OverviewPage
You can use view overview information for a specific instance. To access this page,click an instance name or icon in the Oracle Cloud Infrastructure Console.
The instance overview page consists of the following sections:
• Overview Tile
• Administration Tile — Backup Tab
• Administration Tile — Patching Tab
Overview Tile
Chapter 8About the User Interfaces of the Oracle Cloud Infrastructure Console for Oracle Integration Classic (User-Managed)
8-30

The following table describes the key information shown on the Instance Overview tile.
Element Description
The Overview tile displays information about the service instance. It containsthe following four sections:• Service Overview — Overview information about the service instance• Oracle Load Balancer — Information about the Oracle Load Balancer• Associations — Information about the Oracle Database Cloud Service
database deployment used by the service instance
• Expand the turner icon to expose the following information about theservice instance:
– Location– Description– Service Level– Edition– Metering Frequency– Identity Domain– Created By– Created On– Entitlement ID
• Click the text Oracle Integration Classic to return to the main OracleCloud Infrastructure Console page.
• Lists the name of the selected service instance.
Chapter 8About the User Interfaces of the Oracle Cloud Infrastructure Console for Oracle Integration Classic (User-Managed)
8-31

Element Description
Manage this service (adjacent to the service instancename)
Click to select one of the following options based on the service types you haveprovisioned:
• Open WebLogic Server Administration Console — Open the OracleWebLogic Server Administration Console to administer your applicationenvironment.
• Open Fusion Middleware Control Console — Open Fusion MiddlewareControl to administer your application environment.
• Open Oracle Integration Home Page — Open the Oracle Integrationhome page.
• Start — Start the Oracle Integration instance.• Stop — Stop the Oracle Integration instance.• Scale in — Remove nodes from the Oracle Integration instance.• Scale out — Add nodes to the Oracle Integration instance.• Access Rules — Opens the Access Rules page, which enables you to
create and manage access rules for selected sources and destinations.• SSH Access—Add public SSH keys to the VMs that make up this service
instance.• View Activity—View activities that have occurred in your identity domain.
Click the start/stop/scale/monitor icons to:• Start the VMs for the administration server, managed servers, and load
balancer.• Stop the VMs for the administration server, managed servers, and load
balancer.• Add a node.• Display monitoring data:
– Date and time each node was last started.– For each server, the percent of heap space used as compared to the
total heap space in GBs available. If you click the percentage number,the heap usage graph is displayed.
Refresh Click to refresh the page. The date and time the page was last refreshed aredisplayed adjacent to this button.
Instance Overview section Overview information about the instance.• Nodes: Total number of Oracle CPUs allocated for the instance.• OCPUs: Total number of Oracle Compute Units (OCPUs) allocated across
all instances.• Memory: Total amount of memory in GBs allocated for the instance.• Storage: Total amount of block storage in GBs allocated for the instance.
Other overview information • Status — The service instance’s status (for example, ready).• Content Endpoint — The endpoint address.• Integration Edition — The topology you selected when you provisioned the
service instance.• Service Identifier — Service identifier.• Version — The version of Oracle WebLogic Server configured for the
instance.• Feature Set — The provisioned feature set.• JDK — The supported Java Developer Kit version.• IDCS Application — Click the link to open the Oracle Identity Cloud Service
Console to add users and assign roles. See Grant Access and ManageSecurity.
Chapter 8About the User Interfaces of the Oracle Cloud Infrastructure Console for Oracle Integration Classic (User-Managed)
8-32

Element Description
Resources
Information about the administration server or managed server(s):• Host Name• Public IP address• Instance name (managed server)• Instance name (administration server)• Number of Oracle CPUs allocated (OCPU)• The amount of memory allocated to the node• The amount of storage available to the node
Manage this service Displays operations such as Remove Node, Start, Stop, and Restart.
Load Balancer Information about the Oracle Load Balancer URL and type.
Associations section Information about the Oracle Database Cloud Service database deploymentused by the instance. If the instance is based on two database deployments(one for the Oracle required schema and the second for the applicationschema), information for both database deployments is displayed.
• Service Name — The name of the Oracle Database Cloud Servicedatabase deployments used by the instance. The name was specifiedduring the process of creating the instance.
• Service Type— Specifies the connect string for the database deployment.• Type — The only available value is Oracle Database Cloud Service.• Status — The status of the database deployment.
Administration Tile — Backup Tab
You can use the Backup tab of the Administration tile on the Instance page to viewthe backup status and access backup configuration tasks for a specific instance. TheBackup tab provides the following details.
Chapter 8About the User Interfaces of the Oracle Cloud Infrastructure Console for Oracle Integration Classic (User-Managed)
8-33

The following table describes the key information shown on the Backup tab of theAdministration tile.
Element Description
Click the Administration tile to back up an instance. See Back Up and Restorean Oracle Integration Classic (User-Managed) Instance.
Incremental Backups Displays the time at which incremental backups occur. For example:
Daily at 11:40:00 AM UTC
The amount of MB backed up to Oracle Cloud Infrastructure Object StorageClassic is displayed.
Full Backups Displays the time at which the full backup occurs. For example:
Every Saturday at 11:40:00 AM UTC
The volume of backup space used is also displayed.
Last Successful Backup The time at which the last successful backup occurred. For example:
Tuesday at 11:40:00 AM UTC
The percentage of the backup volume used is also displayed.
Most Recent Backup Displays the time of the last backup. If a red icon is displayed, click it for backupfailure details.
Available Backups Click Manage backups on this service to display the following options:• Backup Now• Configure Backups• Disable BackupsSee Back Up and Restore an Oracle Integration Classic (User-Managed)Instance.
Restore History The restoration operations history for this service instance.
Administration Tile — Patching Tab
You can use the Patching tab of the Administration tile on the Instance page to viewpatching information and install patches for a specific instance.
Chapter 8About the User Interfaces of the Oracle Cloud Infrastructure Console for Oracle Integration Classic (User-Managed)
8-34

The following table describes the key information shown on the Patching tab of theAdministration tile.
Element Description
Available Patches Displays details about any available patches:
• Patch name• Patch release date• Whether patch installation requires a restart• Readme link that displays information about the patchSee Patch and Upgrade Oracle Integration Classic (User-Managed).
Patch and RollbackHistory
Displays the history of patch installation and rollback.
Explore the Oracle Cloud Infrastructure Console Activity PageYou can use the Activity page to search for and review cloud service activities thathave occurred in your identity domain. To access this page, click the Activity tab in theOracle Cloud Infrastructure Console.
Chapter 8About the User Interfaces of the Oracle Cloud Infrastructure Console for Oracle Integration Classic (User-Managed)
8-35

The Activity page is divided into the following sections:
• The Search Activity Log section, from which you can specify search details thatdetermine which services you see. These details include:
– Date and time range
– Operation status
– Instance name
– Service type
– Operation
• The Results pane, which shows the results of the search operation. You can limitthe number of results to return, per page, to 5, 10, 50, or 100.
The following table describes the key information shown on the Activity page.
Element Description
Start Time Range Filters activity results to include only operations started within a specified timerange. The range defaults to the previous 24 hours.
Operation Status Filters operations by status of the operation:• All (default value)• Scheduled• Running• Succeeded• FailedYou can select any subset of status types.
Instance Name Filters the activity results to include operations only for the specified serviceinstance. You can enter a full or partial service instance name.
Service Type Filters the activity results to include operations only for instances of thespecified service type. The default value is the current cloud service.
Operation Filters the activity results to include selected types of operations. You can selectany subset of the given operations. The default value is All.
Chapter 8About the User Interfaces of the Oracle Cloud Infrastructure Console for Oracle Integration Classic (User-Managed)
8-36

Element Description
Search Searches for activities by applying the filters specified by the Start Time Range,Status, Service Name, Service Type, and Operation fields, and displays activityresults in the table.
Reset Clears the Start Time Range and Service Name fields, and returns the Statusand Operation fields to their default values.
Results per page Specifies the number of results you want to view per page. The default value is10. You can sort the columns in ascending or descending order.
Operation Shows the type of operation performed on the service instance.
Instance Name Shows the name of the service instance and its identity domain:
service_instance:identity_domain
Service Type Shows the type of cloud service for this instance.
Operation Status Shows the status of the operation performed on the service instance.
Start Time Shows the time the operation started.
End Time Shows the time the operation ended, if the operation is complete.
Initiated By Shows the user that initiated the operation. The user can be any user in theidentity domain who initiated the operation or, for certain operations such asautomated backup, the system.
Explore the Oracle Cloud Infrastructure Console SSH Access PageYou can use the SSH Access page to view and manage public SSH keys from theOracle Integration Classic Oracle Cloud Infrastructure Console.
The SSH Access page is divided into the following two sections:
• The Search Activity pane, from which you can specify the service name andservice type when you want to see SSH information for a specific service or groupof services.
• The Results pane, which shows the results of the search operation. You can limitthe number of results to return, per page, to 5, 10, 50, or 100.
The following table describes the key information shown on the SSH Key Accesspage.
Element Description
Click to sign in to the services to which you are subscribed.
Instances tab Click to return to the Oracle Cloud Infrastructure Console.
Activity tab Click to navigate to the Oracle Cloud Infrastructure Console Activity page. See Explore the Oracle Cloud Infrastructure Console Activity Page.
Instance Name Filters the results to include SSH keys only for the specified service instance.You can enter a full or partial service instance name.
Search Searches for SSH keys by applying the filters specified by the Service Nameand Service Type fields, and displays the results in the table.
Service Type Filters the results to include SSH keys only for instances of the specified servicetype. The default value is the current cloud service.
Chapter 8About the User Interfaces of the Oracle Cloud Infrastructure Console for Oracle Integration Classic (User-Managed)
8-37

Element Description
Results per page Specifies the number of results you want to view per page. The default value is10.
Expand Displays a description of an item in the results table. Clicking the resultingdownward arrow hides the description.
Instance Name Shows the name of the service instance.
Service Type Shows the type of cloud service for this instance.
Last Update Shows the most recent time the SSH keys for this instance were updated.When the credential update is in progress, an hourglass icon is displayedbefore the date/time, indicating that the service instance is in maintenancemode.
Actions Click the Add New Key button to add a new SSH public key to this instance.This button is grayed out when the key is in the process of being added.
Explore the IP Reservations PageIf your identity domain is enabled for regions, you can reserve IP addresses. After youcreate an IP reservation, you can use it when provisioning Oracle Integration Classic.
The following table describes the key information shown in the Oracle IntegrationClassic IP Reservations page.
Element Description
Create Click to access the page for creating an IP reservation.
Welcome! Click to display the Oracle Integration Classic Welcome page.
• Region: Displays the region.• Status: Displays whether the IP reservation is currently in use.• Service Entitlement ID: Displays the service entitlement ID.• IP Address: Displays the IP address.• Created On: Displays the creation date.
Support the Minimum Version of Oracle Integration Classic(User-Managed)
Oracle Integration Classic (user-managed) only provides maintenance fixes on top ofthe latest software release. Therefore, when a software upgrade is available at thebeginning of a month, it is your responsibility to manually upgrade any existing OracleIntegration Classic instances to the latest release by applying software upgradepatches. If you are not on the latest release, you must patch your instance to be at thelatest software release before you can apply any additional maintenance fixes. Forexample, if you provisioned Oracle Integration Classic 17.4.1, and there have beenseveral software upgrades since then, you must first upgrade to the latest softwarerelease before you can apply any additional maintenance fixes. Note that the latestsoftware release patch always includes the previous software releases. Therefore, youonly need to apply that single patch to be upgraded to the latest release.
This situation does not apply to newly provisioned instances. For Oracle IntegrationClassic instances that are provisioned after the maintenance fixes are announced and
Chapter 8Support the Minimum Version of Oracle Integration Classic (User-Managed)
8-38

available, they are automatically applied and available in the newly provisionedinstance.
For information about applying patches from the Oracle Integration Classic OracleCloud Infrastructure Console, see Patch and Upgrade Oracle Integration Classic(User-Managed).
Chapter 8Support the Minimum Version of Oracle Integration Classic (User-Managed)
8-39

9Manage Oracle Integration Classic (User-Managed)
In Oracle Integration Classic (user-managed), an administrator is responsible formaintaining the infrastructure on which Oracle Integration Classic is built.
An administrator can apply a patch, initiate on-demand backups, schedule automatedbackups, add or remove nodes for increased or reduced load on an Oracle IntegrationClassic instance. In addition, an administrator can monitor the instance and exportdiagnostic information to resolve problems.
Note:
Oracle does not possess the credentials for consoles such as EnterpriseManager (EM), WebLogic Server console, and Service Bus console.Therefore, a user is not blocked from performing tasks from these consoles.However, Oracle highly recommends that users DO NOT use theseconsoles.
See Unsupported Tasks.
Topics:
• Unsupported Tasks
• Patch and Upgrade Oracle Integration Classic (User-Managed)
• Stop and Start Oracle Integration Classic (User-Managed) Instances and Nodes
• Scale an Oracle Integration Classic (User-Managed) Instance
• Manage Database Issues
• Back Up and Restore an Oracle Integration Classic (User-Managed) Instance
• Manage Integrations and Errors
• Manage SSL Certifications
• Manage Instance History
• Configure Settings for Error Logs
• Use SSH to Sign In to Oracle Integration Classic (User-Managed)
• Diagnose Oracle Integration Classic (User-Managed) Problems
• Delete an Oracle Integration Classic (User-Managed) Instance
9-1

Unsupported TasksOracle does not possess the credentials for consoles such as WebLogic Server orEnterprise Manager. Therefore, a user is not blocked from performing tasks from theseconsoles. However, Oracle highly recommends that users DO NOT use theseconsoles.
The following lists some of the tasks that are not supported in Oracle IntegrationClassic (user-managed). DO NOT perform these tasks unless recommended byOracle.
• Changing load balancer (LBaaS) settings
• Changing or removing CloudGate policies through Oracle Identity Cloud ServiceREST API
• Changing WebLogic Server topology, including adding or deleting managedservers
• Configuring SOA engine properties
• Configuring SOA MBean settings
• Changing the WebLogic JVM settings
• Configuring WebLogic resources including data sources, connection pools, JMSservers, work managers, and partitions
• Configuring WebLogic MBean settings
• Deploying composites or service bus projects
• Deleting files including temporary files
• Deploying new Java EE applications to WebLogic
• Installing or uninstalling Linux programs
• Modifying date and metadata using SQL
• Modifying or deleting the Oracle Identity Cloud Service Applications, ApplicationID, and roles that are created by default in Oracle Identity Cloud Serviceadministration console.
• Modifying firewall rules (iptables)
• Modifying Linux operating system privileges
• Modifying MDS metadata
• Modifying OPSS permissions
• Modifying SSH keys
• Patching Oracle Linux with unsupported updates
• Restarting WebLogic Server, Managed Server, or Node Managers throughWebLogic Server Console.
• Tuning Linux operating system settings
• Using compute console to modify security rules or reserve IP address
• Viewing, modifying, or deleting suite-generated composites, service bus projects,and folders.
Chapter 9Unsupported Tasks
9-2

Patch and Upgrade Oracle Integration Classic (User-Managed)
In Oracle Integration Classic (User-Managed), you can apply a patch to an OracleIntegration Classic instance.
Topics:
• About Patching an Oracle Integration Classic (User-Managed) Instance
• Typical Workflow for Patching an Oracle Integration Classic (User-Managed)Instance
• Quick Tour of the Patching Page
• View Details About the Available Patches
• Perform Prechecks Before Applying a Patch
• Complete Prerequisites Before Applying a Patch
• Apply a Patch
About Patching an Oracle Integration Classic (User-Managed)Instance
You can quickly and easily apply patches to an Oracle Integration Classic (user-managed) instance, without any command-line intervention.
Once you navigate to the Patching page in the Oracle Integration Classic userinterface, applying a patch to service instance is a one-click operation.
When to Apply Patches?
New approved patches are available and displayed on the Patching page. Apply themost recent patches promptly to ensure new features and fixes are available.
What Happens to the Service During Patching?
Patching operations are rolling operations, so the service functions with very littleinterruption during the patch process. The patching operation shuts down one virtualmachine at a time and the patching operation continues patching the servers on onevirtual machine at a time until all servers are patched. Patching restarts virtualmachines. For example, if you have a two-node, each node exists on a separatemachine, and one node keeps running while the other is being patched.
The user sessions that are running on a specific node can be lost during patchingoperation. We recommend you to plan your patching operation during a time whenthere are minimal user changes happening.
During patching, request for any administration task using REST API will be denied,and administrative requests will not be accessible from the Integration Console.
What Happens When Patching is Not Fully Successful or Fails?
If the patching operation fails, then the patch is automatically reverted back.
Chapter 9Patch and Upgrade Oracle Integration Classic (User-Managed)
9-3

Typical Workflow for Patching an Oracle Integration Classic (User-Managed) Instance
Consider the typical workflow for patching an Oracle Integration Classic (user-managed) instance, as described in the following table.
Task Description More Information
Learn about approved patches View approved patches displayed onthe Patching page periodically.
View Details About the AvailablePatches
Perform optional prechecks Learn about problems that wouldcause patching to fail, so you canaddress those problems before you tryto apply a patch.
Perform Prechecks Before Applying aPatch
Apply a patch Initiate a patching operation. Apply a Patch
Quick Tour of the Patching PageYou can use the Patching page to view the available patch, initiate a patching process.
To access the Patching page, click the Administration tile on the Service Overviewpage, then click the Patching tab.
The following table describes the key information shown on the Patching page.
Element Description
Scheduled Patches Displays details about any scheduled patches. Oracle handles all patchinstallations:
• Patch name• Status• Patched By• Notes• Readme link that displays information about the patch
Represents an available patch.
This menu has two choices:
• Precheck—Performs prechecks without attempting to patch, and reportsany errors found so that you can address them before you patch.
• Patch—Performs prechecks, then patches the Oracle Integration Classic(user-managed) instance with the selected patch.
Represents a successful patching precheck operation.
Represents a failed patching precheck operation.
Represents a patching operation in progress.
Patch and Roll Back History Displays the history of patch installation.
Chapter 9Patch and Upgrade Oracle Integration Classic (User-Managed)
9-4

Element Description
Indicates a successful patching operation. Appears in the Patch History section.Click this icon to obtain more information about the patching operation.
Displayed on a tools patch, indicates that the patch version for your existingOracle Integration Classic (user-managed) instance is older than the currentversion. You will also see a warning stating that the service is on a deprecatedtools version. To address this issue, apply the latest tools patch to your OracleIntegration Classic instance.
View Details About the Available PatchesYou can use the Patching page to view the information about the available patchesand service patch history.
To view details of available patches:
1. Sign in to the Oracle Cloud Infrastructure Console.
2. In the Oracle Integration Classic (user-managed) console, click the name of yourOracle Integration Classic instance.
3. In the Service Overview page, check the Administration tile to see the number ofavailable patches, and the date and time of the previous backup.
4. If patches are available, click the Administration tile, then click the Patching tab.
5. On the Patching page, check the information in the Available Patches section.
Perform Prechecks Before Applying a PatchThe patching process performs prechecks before applying a patch, but you canperform an optional precheck operation before patching to identify and remedy issuesfirst.
Prechecks occur automatically once you make a selection from the menu, thenproduce messages letting you know the results.Prechecks check for the following conditions:
• Disk space shortage
Chapter 9Patch and Upgrade Oracle Integration Classic (User-Managed)
9-5

• Missing database connectivity
• Servers not running
• Storage access failure
Prechecks do not check whether another administration task (backup, restoration, orscaling) is in progress, which prevents patching.
If prechecks pass or you address all the issues identified by prechecks, you can run apatching operation that will not encounter these issues.
You can only request prechecks for an approved patch that is listed on the patchingpage.
1. Navigate to the Patching page.
2. On the Patching page, click to the right of the patch you want to check andselect Precheck.
A message appears beneath the patch name: Prechecks in progress.
3. Click Refresh to check whether prechecks are done.
When prechecks are done, a link appears: Precheck results.
• If prechecks pass, a green check mark icon appears.
• If prechecks fail, a red exclamation mark icon appears.
4. Click the Precheck results link.
The Patch Precheck Results dialog appears.
• If the prechecks succeed, the following message appears in the dialog:Precheck succeeded for patch patch_name_and_version ondate_and_time. No conflicts found.
• If the prechecks fail, the following message appears in the dialog: Precheckfailed for patch patch_name_and_version on date_and_time.
Error messages appears in the dialog as well. If there are precheck failures,check the error messages to learn about the problems that you need toaddress.
The Precheck results link remains after prechecks complete.
Complete Prerequisites Before Applying a PatchEvery patch in an Oracle Integration Classic (user-managed) instance has a Readme,which provides information required to apply the patch. Be sure to read the instructionscarefully and contact Oracle Support for any questions before applying the patch.
Chapter 9Patch and Upgrade Oracle Integration Classic (User-Managed)
9-6

Note:
These prerequisite steps are required only if you are upgrading a 17.4.1 or“new” 17.4.5 Oracle Integration instance to 18.1.x. They are not required ifyou previously upgraded a 17.4.1 instance to 17.4.5 and are now upgradingto 18.1.x, or if you already have an 18.1.x instance provisioned.
To view the history of your patch, see the Patch and Rollback History
section in the Patching page. indicates a successful patching operation.
Expand the to read the instructions.
If required (see Note above), complete the following one-time prerequisites for eachOracle Integration instance:
1. Access the Oracle Integration Oracle Cloud Infrastructure Console Overview pageusing your browser and make a note of the administration server IP address.
See Explore the Oracle Cloud Infrastructure Console Instance Overview Page.
Chapter 9Patch and Upgrade Oracle Integration Classic (User-Managed)
9-7

2. Use an SSH client to connect to the Oracle Integration instance:
ssh -i private_key_file opc@admin_ip_addresswhere admin_ip_address is the IP address of the administration server.
3. Switch to the user oracle:
sudo su oracle
4. Delete the rexDataBag.json file, if it exists:
rm /u01/data/domains/rexDataBag.json
5. Access the Oracle Integration Oracle Cloud Infrastructure Console Overview pageusing your browser and make a note of the database server details.
See Explore the Oracle Cloud Infrastructure Console Instance Overview Page.
Chapter 9Patch and Upgrade Oracle Integration Classic (User-Managed)
9-8

6. Connect to the database as a DBaaS Database Administrator.
See Connecting Remotely to the Database by Using Oracle SQL Developer and Connecting Remotely to the Database by Using Oracle Net Services inAdministering Oracle Database Cloud Service.
7. After you connect to the database, execute the following query to list all owners inyour current installation.
SELECT OWNER from "SYSTEM"."SCHEMA_VERSION_REGISTRY" where COMP_ID ='SOAINFRA';
A list of owners that are currently created in the database is displayed. Here is thesample output and you’ll find one entry for each Oracle Integration instance.
8. For each owner listed in the database (see step 7), execute the followingcommand to set the status to VALID:
UPDATE "SYSTEM"."SCHEMA_VERSION_REGISTRY" SET STATUS = 'VALID' whereSTATUS='INVALID' and OWNER='OWNER';
where OWNER is the name of the owner or schema user.
For example, UPDATE "SYSTEM"."SCHEMA_VERSION_REGISTRY" SET STATUS ='VALID' where STATUS='INVALID' and OWNER='SP670824491_SOAINFRA';
Chapter 9Patch and Upgrade Oracle Integration Classic (User-Managed)
9-9

Note:
If a schema is INVALID, it is set to VALID and the following outputappears:
1 rows updated.
9. For each owner listed in the database (see step 7) execute the following commandto grant the SELECT and UPDATE permissions to the database table:
GRANT SELECT,UPDATE on "SYSTEM"."SCHEMA_VERSION_REGISTRY$" to OWNER;
For example, GRANT SELECT,UPDATE on "SYSTEM"."SCHEMA_VERSION_REGISTRY$"to 'SP670824491_SOAINFRA';
10. For each owner listed in the database (see step 7) execute the following commandto grant the SELECT and UPDATE permissions to the database view:
GRANT SELECT,UPDATE on "SYSTEM"."SCHEMA_VERSION_REGISTRY" to OWNER;
For example, GRANT SELECT,UPDATE on "SYSTEM"."SCHEMA_VERSION_REGISTRY"to 'SP670824491_SOAINFRA';
11. For each owner listed in the database (see step 7) execute the following commandto provide access to DBA_TABLESPACE_USAGE_METRICS:
GRANT SELECT ON sys.DBA_TABLESPACE_USAGE_METRICS to OWNER;For example, GRANT SELECT ON sys.DBA_TABLESPACE_USAGE_METRICS toSP670824491_SOAINFRA;
Apply a PatchYou can use the Patching page to apply a patch of an Oracle Integration Classic (user-managed) instance.
To apply a patch:
1. Navigate to the Patching page.
2. In the Available Patches section, click to the right of the patch you want to applyand select Patch.
3. In the Patch Service dialog, enter the following information:
• Additional Note (optional): Type notes pertaining to the patch.
• Database Schema Password: You can either leave the field blank or enterthe correct database schema password only if you've changed the passwordsince the last time a patch was applied.
Note:
If you've not changed the database schema password, leave theDatabase Schema Password field blank.
4. In the Patch Service dialog, click Patch.
Chapter 9Patch and Upgrade Oracle Integration Classic (User-Managed)
9-10

Stop and Start Oracle Integration Classic (User-Managed)Instances and Nodes
In Oracle Integration Classic (user-managed), you can stop and start an OracleIntegration Classic instance and, when the instance is running, start, stop, and restartindividual nodes.
Topics:
• About Stopping and Starting Instances and Nodes
• Stop and Start Your Instance
• Stop and Start the Nodes in Your Instance
About Stopping and Starting Instances and NodesYou can stop and start an Oracle Integration Classic (user-managed) instance andstop, start and restart virtual machines (nodes) when the instance is running.
Why Stop an Oracle Integration Classic (User-Managed) Instance?
Stopping an Oracle Integration Classic instance frees up compute resources used bythe instance’s nodes. Metering for those resources stops.
Storage volumes remain intact when the instance is stopped, and are reattached whenyour start the instance. IP address reservations are retained when the instance isstopped, so the nodes will have the same public IP addresses as before when youstart the instance.
What Happens When an Oracle Integration Classic (User-Managed) Instance isStopped or Started?
Stopping and starting an Oracle Integration Classic instance has the following results:
• Stopping the instance: The nodes on which the Administration Server andManaged Servers are running are stopped.
• Starting the instance: All nodes on which the Administration Server andManaged Server are running are started. You can restart the Managed Serversindividually.
Why Stop, Start, or Restart Managed Server?
If an Oracle Integration Classic (user-managed) instance is running:
• You can restart the nodes on which the Managed Server are running if you areexperiencing problems with the server that would warrant a reboot.
• You can stop the nodes on which the Managed Server is running to free upresources and stop metering those resources. You might also want to stop theinstance instead of scaling, keeping the server ready for a later time.
• You can start a Managed Server if it is stopped and you want to use it again.Metering begins again.
Chapter 9Stop and Start Oracle Integration Classic (User-Managed) Instances and Nodes
9-11

How Do I Monitor the Stop, Start, or Restart Operation?
You can monitor progress of a stop, start, or restart operation on the Activity page.
What Happens When an Instance Is Stuck in Maintenance Mode While Stopping?
When you try to stop an Oracle Integration Classic (user-managed) instance, on rareoccasions it might become stuck in maintenance mode due to some problem with theinstance.
For six hours, the software will continue to attempt to stop the instance, then changethe instance status from maintenance state to error state. At this point, you can debugthe problem causing the error and attempt to stop the instance again.
Stop and Start Your InstanceYou can stop and start an Oracle Integration Classic (user-managed) instance usingthe Oracle Cloud Infrastructure Console.
To stop or start an Oracle Integration Classic instance:
1. Sign in to the Oracle Cloud Infrastructure Console.
2. Click in the top left corner of the Oracle Cloud Infrastructure Console.
3. Select Platform Services, then Integration Classic.
The Oracle Integration Classic Instances page is displayed.
4. In the Oracle Integration Classic console, identify the name of your OracleIntegration Classic instance.
5. Complete one of the following actions:
• Click adjacent to the service name and select Start or Stop.
• Click Start Instance or Stop Instance .
Note:
The Start and Stop options remain active while the operation is inprogress so that, if the operation gets stuck, you can try to start or stopagain.
A confirmation dialog opens.
6. Click OK in the confirmation dialog.
A yellow status icon appears adjacent to the service instance icon while theservice instance is in the process of stopping or starting.
When the operation completes, the Oracle Integration Classic instance stops orstops. A red icon displays when the service instance is stopped. On the Activitypage, the entry for the service shows that the stop or start operation has ended.
Chapter 9Stop and Start Oracle Integration Classic (User-Managed) Instances and Nodes
9-12

Stop and Start the Nodes in Your InstanceYou can stop, start, and restart a node in an Oracle Integration Classic (user-managed) instance.
To stop, start, or restart a node:
1. Sign in to the Oracle Cloud Infrastructure Console.
2. In the Oracle Integration Classic console, click the name of your Oracle IntegrationClassic instance.
3. On the page, click Manage this node to the right of the node and selectStop, Start, or Restart.
4. Click OK in the confirmation dialog.
The node stops, starts, or restarts.
Scale an Oracle Integration Classic (User-Managed)Instance
In Oracle Integration Classic (user-managed), scaling lets you add or removeresources for an Oracle Integration Classic instance on demand in response tochanges in load on the instance.
Topics:
• About Scaling Your Instance
• Overview of Scaling Tasks for Your Instance
• Scale Out an Oracle Integration Classic (User-Managed) Instance
• Scale In an Oracle Integration Classic (User-Managed) Instance
• Check Status of Scaling Requests
Chapter 9Scale an Oracle Integration Classic (User-Managed) Instance
9-13

About Scaling Your InstanceYou can scale an Oracle Integration Classic (user-managed) instance by scaling acluster, a node in the instance.
About Scaling Out an Oracle Integration Classic (User-Managed) Cluster
Scaling out an Oracle Integration Classic cluster adds one node to the cluster.
Before scaling out an Oracle Integration Classic cluster, ensure that all theseconditions are met:
• You have the Oracle Identity Cloud Service Administrator role.
• The instance is not under maintenance, such as during patching or backing up.
If any of these conditions is not met, the scaling operation fails and Oracle IntegrationClassic logs an error message.
Oracle Integration Classic logs a message when scaling out is started or completed, orwhen a failure is detected.
If an attempt to scale out a cluster fails, Oracle Integration Classic does the following:
• Logs any diagnostic information.
• Sets the status of the instance to RUNNING to allow other operations to continue.
• Returns the instance to its original shape.
• Deletes the node that it created to run the additional Managed Server instance.
About Scaling In an Oracle Integration Classic (User-Managed) Cluster
Scaling in an Oracle Integration Classic cluster removes the selected node from thecluster.
Before scaling in an Oracle Integration Classic cluster, ensure that the cluster containsat least one Managed Server node in addition to the node for the AdministrationServer and first Managed Server. You cannot scale in a cluster that contains only thenode for the Administration Server and first Managed Server. If you no longer requirethat node, you must delete the entire instance.
By default, Oracle Integration Classic scales in a cluster gracefully by shutting downthe Managed Server instance before removing the Managed Server instance from thecluster and terminating its node. To ensure that the node is removed even if theManaged Server instance is unresponsive, you can choose to forcibly scale in acluster.
If an attempt to scale in a cluster fails, Oracle Integration Classic does the following:
• Logs any diagnostic information.
• Sets the status of the instance to RUNNING to allow other operations to continue.
• Cleans up any stale resources.
Chapter 9Scale an Oracle Integration Classic (User-Managed) Instance
9-14

Overview of Scaling Tasks for Your InstanceYou perform scaling tasks for an Oracle Integration Classic (user-managed) instanceas required.
The following table provides information about how to perform each task by using theweb-browser-based Oracle Integration Classic administration console.
Task Description More Information
Scale out an Oracle IntegrationClassic cluster
Scale out an Oracle IntegrationClassic cluster to add one node tothe cluster.
Scale Out an Oracle IntegrationClassic (User-Managed) Instance
Scale in an Oracle IntegrationClassic instance cluster
Scale in an Oracle IntegrationClassic cluster to remove a selectednode from the cluster.
Scale In an Oracle Integration Classic(User-Managed) Instance
View scaling requests View scaling requests to check thestatus of ongoing scaling requests,and the success or failure ofprevious requests.
Check Status of Scaling Requests
Scale Out an Oracle Integration Classic (User-Managed) InstanceYou can scale out an Oracle Integration Classic (user-managed) instance to add onenode to the cluster. When you scale out, Oracle Integration Classic instance creates anew node running a WebLogic Server Managed Server instance.
Note:
Oracle Integration Classic allocates two threads per server to processscheduled integrations. You can scale out Oracle Integration Classic (addnodes) to increase the number of scheduled integrations that can run inparallel in a user-managed environment.
To scale out an Oracle Integration Classic instance cluster:
1. Sign in to the Oracle Cloud Infrastructure Console.
2. In the Oracle Integration Classic console, click the name of your Oracle IntegrationClassic instance.
3. Click or click Manage this service and select Scale Out.
The Scale Out dialog opens.
4. To confirm you want to scale out the cluster, click Scale Out.
5. After a few moments, click Refresh to update the page.
You might need to click the icon more than once to see any change to the page.
After a few moments of processing, the new node appears on the Overview page. TheOverview tile shows the number of nodes increased by one.
Chapter 9Scale an Oracle Integration Classic (User-Managed) Instance
9-15

Note:
At any time during the scaling process, click Manage this service next tothe instance name and select View Activity. The Activity page opens andyou can see the scale-out status in the activity table.
Scale In an Oracle Integration Classic (User-Managed) InstanceYou can scale in an Oracle Integration Classic (user-managed) instance to remove aselected node from the cluster. When you scale in, Oracle Integration Classic removesthe selected WebLogic Server Managed Server instance and the virtual machine that itis running on.
1. Sign in to the Oracle Cloud Infrastructure Console.
2. In the Oracle Integration Classic Console, click the name of your OracleIntegration Classic instance.
3. In the Oracle Cloud Infrastructure Console, click Manage this node for thenode you want to remove and select Remove node.
The Remove Node dialog box opens.
4. In the Remove Node dialog box, click Remove Node.
5. After a few moments, click Refresh to update the page.
You might need to click the icon more than once to see any change to the page.
After a few moments of processing, the node is removed from the Overview page. TheOverview tile will show the number of nodes decreased by one.
Note:
At any time during the scaling process, click Manage this service nextto the instance name and select View Activity. The Activity page will openand you can see the scale-in status in the activity table.
Check Status of Scaling Requests You can view scaling requests to check the status of ongoing Oracle IntegrationClassic (user-managed) scaling requests, and the success or failure of previousrequests.
To view ongoing or past scaling requests:
1. Sign in to the Oracle Cloud Infrastructure Console.
2. Click in the top left corner of the Oracle Cloud Infrastructure Console.
3. Select Platform Services > Integration Classic.
4. Click the name of your Oracle Integration Classic instance.
Chapter 9Scale an Oracle Integration Classic (User-Managed) Instance
9-16

5. On the page, click Manage this service at the top of the page and selectView Activity.
The Activity page of the Platform Services Console opens.
6. In the Search Activity Log panel, enter the necessary search criteria:
Option Description
Start Time Range The date and time range within which you want to seescaling activity.
Operation Status The status of the scaling activity you want to view. Thisoption will filter out all scaling activity not in this status. Tosee all status, select All.
Instance Name The name of the service instance for which you want to seescaling activity.
Service Type This should be Oracle Integration.
Operation The operation for which you want to see activity. In the caseof scaling, select any or all of these options:• Scale Application• Scale In• Scale Out• Scale Up/Down
7. Click Search.
All scaling activity that meets the search criteria appears in the results table. TheStatus column will indicate whether the scaling operation succeeded or failed. Tosee more details about a specific operation, click its drop-down control.
Manage Database IssuesA service administrator can manage passwords for database schemas, set alertsbased on performance metrics, and peform other database-related monitoring andmanagement tasks.
Topics:
• Update the Database Schema Password in Oracle Integration Classic
• Managing Alerts
Update the Database Schema Password in Oracle Integration ClassicWhen you create an instance in Oracle Integration Classic, relevant databaseschemas are created in the associated Oracle Database Cloud Service (DBaaS)instance. These database schemas are required for Oracle Integration Classic tofunction properly.
Some of these database schemas are associated with:
• The core Oracle Integration Classic functionality (such as Integration, Process,Visual Builder, and Insight),
• The non-Oracle Integration Classic-specific functionality such as OPSS and othercritical services that Oracle Integration Classic depends on.
Chapter 9Manage Database Issues
9-17

These database schemas are used within the data sources defined for the OracleIntegration Classic instance.
For security reasons, the password for the database schemas expires after 180 days.If the password expires, it disrupts the functionality of the Oracle Integration Classicinstance and potentially leads to system downtime. It is highly recommended that youupdate the database schema password within 180 days of the instance creation asdescribed below in this section.
We strongly recommend that you note the new password. It will be required forsubsequent instance patching attempts.
Note:
If you actively use Visual Builder, file a service request to get help fromOracle Support to complete the standard operating procedures required forthe Visual Builder specific schemas.
Change the Database Schema Password
This topic does not apply to Oracle Cloud at Customer.
Use Oracle Java Cloud Service to change the Oracle schema password in thedatabase deployment, and to also update your service instance to use the newpassword.
1. Access your service console.
2. Click the name of the service instance whose schema password you want tochange.
3. At the bottom of the Overview page, expand Associations.
4. From the list of associations for this service instance, identity the association withthese characteristics:
• Service Type - Oracle Database Cloud Service
• Type - Depends On
5. Click Manage Association for this association, and then select UpdateDatabase Credentials.
6. Complete the following input fields:
Field Description
Database AdministratorUsername
Enter the name of the system administrator for the selected databasedeployment.
Database AdministratorPassword
Enter the password for the database administrator.
New Schema Password Enter a new password for the Oracle schemas in the selected databasedeployment.
7. Click Update.
Chapter 9Manage Database Issues
9-18

You can monitor the operation’s progress from this page or from the Activity page.
Managing Alerts
Service administrators can configure rules to generate alerts when metrics exceed orare under specified thresholds for a specific time period. Service administrators willreceive the alert notifications. See Setting an Alert for a Performance Metric ofManaging and Monitoring Oracle Cloud.
To monitor and manage the Oracle database deployed on Oracle Database CloudService, you can use the standard management tool provided with the version of thedatabase. See Monitoring and Managing Oracle Database on Database Cloud Serviceof Administering Oracle Database Cloud Service.
Back Up and Restore an Oracle Integration Classic (User-Managed) Instance
In Oracle Integration Classic (user-managed), you can back up and restore yourOracle Integration Classic instances to return their software and data to a particularstate.
Topics:
• About Backing Up and Restoring an Oracle Integration Classic (User-Managed)Instance
• Typical Workflow for Backing Up and Restoring an Oracle Integration Classic(User-Managed) Instance
• Quick Tour of the Backup Page
• Configure an Automatic Backup
• Initiate an On-Demand Backup
• Delete a Backup
• Disable or Enable Backups
• Restore a Backup
About Backing Up and Restoring an Oracle Integration Classic (User-Managed) Instance
By backing up your Oracle Integration Classic (user-managed) instances, you canpreserve them in a particular state..
When you create an Oracle Integration Classic instance, you can choose whether ornot to enable backups. These backups are recorded to local node storage as well asto an Oracle Cloud Infrastructure Object Storage Classic container.
What a Backup Contains
The contents of a backup depend on whether it is a full backup or an incrementalbackup.
Chapter 9Back Up and Restore an Oracle Integration Classic (User-Managed) Instance
9-19

A full backup contains all the runtime artifacts required to restore the instance’sconfiguration data. An incremental backup contains changes to configuration data onall nodes since the last scheduled full backup.
Note:
All incremental backups are automated scheduled backups. You cannotcreate an incremental backup on demand.
Contents of a Database Backup
A database backup contains Oracle database instance Oracle Fusion Middlewarecomponent schemas, and application data for an Oracle Integration Classic instance.
Note:
Only scheduled automated backups of an Oracle Integration Classic back upthe database instance. On-Demand backups do not perform a databasebackup. Alternatively, you can back up your database using the associatedOracle Database Cloud Service database used by the instance. See BackingUp and Restoring Databases on Database Cloud Service in AdministeringOracle Database Cloud Service.
Where Backups Are Stored
Oracle Integration Classic stores all backups in an Oracle Cloud Infrastructure ObjectStorage Classic container. To speed up restorations from recent backups, OracleIntegration Classic also keeps a local copy of any backup it has recently created.
Note:
Do not attempt to download the backup files generated by Oracle IntegrationClassic. These files are encrypted and not accessible offline. You must useOracle Integration Classic to restore an instance from a backup.
By default, Oracle Integration Classic stores backups in the container that wasspecified when the instance was created.
Oracle Integration Classic automatically deletes a backup when the retention periodfor the backup has elapsed.
How Local Copies of Backups Are Stored
Oracle Integration Classic stores local copies in a dedicated volume mounted on theblock storage attached to the node where the Administration Server is running.
• For an incremental backup, Oracle Integration Classic stores the local copy forseven days before deleting it.
Chapter 9Back Up and Restore an Oracle Integration Classic (User-Managed) Instance
9-20

• For a full backup, Oracle Integration Classic stores the local copy for seven days,or as long as the local copy of its last related incremental backups was stored,whichever is longer.
How Backups and Local Copies Are Deleted Automatically
After completing the day’s scheduled backup, Oracle Integration Classic deletes anybackups or local copies that are due to be deleted that day. If the scheduled backupfails because of insufficient space, backups and local copies that are due to be deletedwill still be deleted.
Note:
When an Oracle Integration Classic instance is deleted, all its backups aredeleted.
What Happens During a Backup
During a backup of an Oracle Integration Classic instance, the instance continues torun and all applications deployed to the instance remain available.To prevent configuration changes during a backup, Oracle Integration Classic locksthe Oracle WebLogic Server domain if the administration server is running. Afterlocking the domain, Oracle Integration Classic backs up files on each node.
While the backup is in progress, you cannot start any other management operation onthe instance. Similarly, if the administration server is not running at the time a backupis started, do not attempt to start this server until the backup completes.
When the backup is complete, Oracle Integration Classic unlocks the OracleWebLogic Server domain. If the backup is a scheduled backup, Oracle IntegrationClassic also cleans up older backups as follows:
• From local storage it deletes all backups old enough to be stored only in theOracle Integration Classic container.
• From all storage locations it deletes any remaining copies of backups whoseretention period has elapsed. The default is 30 days.
What Happens When an Instance Is Restored
When restoration of an instance is initiated, Oracle Integration Classic shuts down theservers in the instance. After the restoration is complete, Oracle Integration Classicrestarts these servers.
If the instance contains any managed server nodes that are not in the backup, OracleIntegration Classic warns you that it cannot restore these nodes.
Before trying to restore again, you can scale in the instance to delete these nodes.
If you choose to continue without scaling in the instance, Oracle Integration Classicasks you to confirm that you understand that the instance will be scaled inautomatically.
If the backup contains any managed server nodes that are not currently in theinstance, Oracle Integration Classic does not attempt to remove these managedservers from the Oracle WebLogic Server domain. You must use the WebLogic Server
Chapter 9Back Up and Restore an Oracle Integration Classic (User-Managed) Instance
9-21

to manually remove these managed servers from the domain configuration afterrestoring the instance.
Oracle Integration Classic does not automatically remove any existing OracleWebLogic Server transaction records after restoring an instance from a backup.
Typical Workflow for Backing Up and Restoring an Oracle IntegrationClassic (User-Managed) Instance
To back up and restore an Oracle Integration Classic (user-managed) instance,consider this typical workflow.
Task Description More Information
Configure backups for an OracleIntegration Classic instance
Customize the following properties ofbackups for a service instance:
• When automated backups areperformed
• Where backups are stored• How long new backups are
retained
Configure an Automatic Backup
Initiate an on-demand backup of anOracle Integration Classic instance
Create a backup immediately withouthaving to wait for the next scheduledbackup.
Initiate an On-Demand Backup
Delete a backup Delete a backup that you no longerrequire to release storage or preventan Oracle Integration Classicinstance from being restored fromthe backup.
Delete a Backup
Restore an Oracle IntegrationClassic instance from a backup
Undo configuration changes youdon’t want by returning an OracleIntegration Classic instance to aparticular state.
Restore a Backup
Quick Tour of the Backup PageYou can use the Backup page to back up and restore an Oracle Integration Classic(user-managed) instance, and to manage backups for the service instance.
Element Description
Backups on Cloud Storage The total amount of space, in megabytes or gigabytes, that backupsare occupying in the Oracle Cloud Infrastructure Object StorageClassic container for storing backups. This amount includes spacethat is occupied by backups that have been manually uploaded tothe container, if any, in addition to the space occupied by backupsthat Oracle Integration Classic has moved there.
Backup Volume Used The total amount of space, in megabytes or gigabytes, that localcopies of backups are occupying in the backup volume on the blockstorage of the node where the Administration Server is running.
Backup Volume Used (%) The percentage of the available space that backups are occupyingin the backup volume on the block storage of the node where theAdministration Server is running.
Chapter 9Back Up and Restore an Oracle Integration Classic (User-Managed) Instance
9-22

Element Description
Incremental Backups Indicates the schedule for running incremental backups.
Full Backups Indicates the schedule for running full backups.
Most Recent Backup Indicates that the most recent backup failed and the time of itsfailure.
Last Successful Backup Indicates the time of the last successful backup.
Backup Now Click this button to create an on-demand backup of the OracleIntegration Classic instance.
Configure Backups Click this button to update the backup schedule and where backupsare stored.
Disable Backups or Enable Backups Click this toggle button to disable/enable automated and on-demandbackups.
Available Backups List of available backups. By default, only backups for the last sevendays are listed. Use the search field to specify a range of dates forwhich you want backups returned.
Enter the start date of the period for which you want to filter the listof available backups or the restoration history. By default, the startdate is set to seven days before the current date.
Enter the date in the format mm/dd/yyyy.
• mm is a one-digit or two-digit month number, for example, 2 forFebruary or 10 for October.
• dd is a number in the range 1–31 for the day of the month.• yyyy is a four-digit year number, for example, 2104.Alternatively, click the calendar icon to select the date from acalendar.
Enter the end date of the period for which you want to filter the list ofavailable backups or the restoration history. Enter the date in theformat mm/dd/yyyy.
• mm is a one-digit or two-digit month number, for example, 2 forFebruary or 10 for October.
• dd is a number in the range 1–31 for the day of the month.• yyyy is a four-digit year number, for example, 2104.Alternatively, click the calendar icon to select the date from acalendar.
Note:
The end date must not be earlier thanthe start date.
Click to filter the list of available backups or the restoration history toshow only backups or restorations from within the period specifiedby the Search from Date field and the Search to Date field.
Chapter 9Back Up and Restore an Oracle Integration Classic (User-Managed) Instance
9-23

Element Description
In-progress backup for the Oracle Integration Classic instance. Thebackup will not be available for use in restoring the service instanceuntil it is completed.
The backup is identified by the date and time when the backupoperation was started, which is displayed adjacent to icon thatrepresents the backup.
Click the icon to see additional information about the backup.
Completed backup for the Oracle Integration Classic instance. Thebackup is available for use in restoring the service instance.
The backup is identified by the date and time when the backup wascreated, which is displayed adjacent to icon that represents thebackup.
Click the icon to see additional information about the backup,including its start date, complete date, expiration date and size. If adatabase backup is included, its tag or timestamp is also displayed.
Completed backup with a warning message. Oracle IntegrationClassic instance tried but failed to move or delete one or more olderbackups. For information about when and why Oracle IntegrationClassic instance moves or deletes older backups. The backup is stillavailable for use in restoring the service instance.
To find out why Oracle Integration Classic instance could not moveor remove the older backup, place the cursor over the icon.
The presence of the older backup may cause future backups to failbecause of insufficient space.
The backup is identified by the date and time when the backup wascreated, which is displayed adjacent to icon that represents thebackup.
Click the icon to see additional information about the backup.
The backup is in the process of being deleted.
Click the icon to see additional information about the backup.
Type A comma-separated pair of words that describes the type of thebackup.
The first word in the pair describes the extent of the backup:
• Full—The backup contains all the runtime artifacts required torestore the service instance’s configuration data.
• Incremental—The backup contains changes to configurationdata on all nodes since the last scheduled full backup.
The second word in the pair indicates how the backup was initiated:
• If the backup was initiated automatically at the scheduled time,the text “scheduled" is displayed.
• If the backup was initiated by a user, the user name of the userwho initiated the backup is displayed.
• If the backup was initiated in response to another managementoperation by a user, the name of the user is displayed.
Available Until The date and time until which the backup will be retained.
Chapter 9Back Up and Restore an Oracle Integration Classic (User-Managed) Instance
9-24

Element Description
Contains A row of up to two icons that indicates the content of the backup:•
—Indicates that the backup contains configuration files.•
—Indicates that the backup contains database files. Placeyour mouse over this icon for additional database information.
Notes Click the link to display the notes that were provided when thebackup was created or the restoration was performed.
Click to select the following options:
• Restore—Restore the Oracle Integration Classic instance fromthe backup.
• Delete—Delete the backup.
Restore History (Last 7 Days) Click the triangle adjacent to this label to display a list of all therestoration operations on this service instance. By default, onlyrestoration operations for the last seven days are listed. Use thesearch field to specify a range of dates for which you wantrestoration operations returned.
Click Select to include unsuccessful restore attempts to includethe unsuccessful restoration operations in the list.
Completed restoration operation for the Oracle Integration Classicinstance.
The restoration operation is identified by the date and time when itwas started, which is displayed adjacent to icon that represents therestoration operation.
Click the icon to see additional information about the restorationoperation.
In-progress restoration operation for the Oracle Integration Classicinstance.
The restoration operation is identified by the date and time when itwas started, which is displayed adjacent to icon that represents therestoration operation.
Click the icon to see additional information about the restorationoperation.
Unsuccessful restoration attempt for the Oracle Integration Classicinstance.
The restoration attempt is identified by the date and time when itwas started, which is displayed adjacent to icon that represents therestoration attempt.
Click the icon to see additional information about the restorationattempt.
From Backup The date and time when the backup from which the service instancewas restored was created.
Status The status of the restoration operation:
• Completed• In-Progress• FailedClick the text to see detailed status messages for the operation.
Chapter 9Back Up and Restore an Oracle Integration Classic (User-Managed) Instance
9-25

Element Description
Contains A row of up to two icons that indicates the items that were restored:
•—Indicates that binary files were restored.
•—Indicates that configuration files were restored.
Configure an Automatic BackupYou can configure backups for an instance to customize when the Oracle IntegrationClassic (user-managed) instance is automatically backed up and how backups arestored.
Because the changes affect only one service instance, you can configure differentvalues for these properties for each of your service instances. Specifically, you cancustomize the following properties of the service instance:
To configure automated backups for an Oracle Integration Classic instance:
1. Sign in to the Oracle Cloud Infrastructure Console.
2. Click in the top left corner of the Oracle Cloud Infrastructure Console.
3. Select Platform Services, then Integration Classic.
The Oracle Integration Classic Instances page is displayed.
4. In the Oracle Integration Classic console, click the name of your Oracle IntegrationClassic instance.
5. In the Service Overview page, click the Administration tile.
6. Click the Backup tab.
The Backup page opens.
Chapter 9Back Up and Restore an Oracle Integration Classic (User-Managed) Instance
9-26

7. Click Manage backups on this service next to Available Backups and selectConfigure Backups.
8. In the Configure Backups dialog, set the options to configure automated backupsfor the service instance.
a. In the Schedule section, set options to configure when automated backups areperformed:
Note:
All times must be for the Coordinated Universal Time (UTC) timezone, not your local time zone.
Option Description
Full Backup From the drop-down lists, select the day of the week and thetime of day UTC when you want full backups to be performed.
IncrementalBackup
From the drop-down list, select the time of day UTC when youwant incremental backups to be performed.
b. In the Set new retention period to field, enter the number of days that youwant new incremental backups and full on-demand backups to be retained.
Chapter 9Back Up and Restore an Oracle Integration Classic (User-Managed) Instance
9-27

Note:
If you decrease the retention period, any existing backups that areolder than this period will automatically be deleted during the nextscheduled backup.
Full scheduled backups are retained until their last linked incremental backupis no longer available. The additional retention period for full scheduledbackups is fixed and you cannot change it.
9. Click Save.
Initiate an On-Demand BackupYou can create a full backup immediately without having to wait for the next scheduledautomatic backup.
Create a backup when making major changes to your Oracle Integration Classic (user-managed) instance, for example, in these situations:
• Before any configuration changes that you may need to undo
• Before deploying an application
• After deploying an application
Note:
Do not attempt to start the administration server while a backup is inprogress.
To initiate an on-demand backup of an Oracle Integration Classic instance:
1. Sign in to the Oracle Cloud Infrastructure Console.
2. In the Oracle Integration Classic console, click the name of your Oracle IntegrationClassic instance.
3. In the Service Overview page, click the Administration tile.
4. Click the Backup tab.
The Backup page opens.
Chapter 9Back Up and Restore an Oracle Integration Classic (User-Managed) Instance
9-28

5. Click Manage backups on this service next to Available Backups and selectBack Up Now.
6. In the Back Up Now dialog, enter the notes up to 255 characters of free-form textto provide additional information about the backup.
This text is displayed in the Notes field for the backup in the list of availablebackups.
7. Click Back Up.
The Backup page is updated to show that the backup is in progress.While the backup is in progress, you cannot start any other management operation onthe service instance.
When the backup is complete, it is added to the list of available backups on theBackup page.
Disable or Enable BackupsBackups in an Oracle Integration Classic (user-managed) instance are enabled bydefault on a new service instance but you can disable and enable this feature asrequired.
After disabling backups for a service instance:
• Scheduled backups will not run.
• Automated backups will not run prior to patching or scaling operations.
• You cannot take an on-demand backup.
Disabling backups for a service instance does not affect any backups that were takenpreviously.
Chapter 9Back Up and Restore an Oracle Integration Classic (User-Managed) Instance
9-29

1. Sign in to the Oracle Cloud Infrastructure Console.
2. In the Oracle Integration Classic console, click the name of your Oracle IntegrationClassic instance.
3. In the Service Overview page, click the Administration tile.
4. Click the Backup tab.
5. Click Manage backups on this service next to Available Backups and selectDisable Backups.
6. When prompted for confirmation click Disable Backups.
7. To enable backups again at a later time, return to the Backup page and clickEnable Backups.
Restore a BackupYou can restore an Oracle Integration Classic (user-managed) instance from a backupto return the service instance to a particular state or recover the service instance aftera loss of data.
Note:
If you restore a service instance's configuration files from a backup in whichthe hosts do not match the hosts in the service instance, Oracle IntegrationClassic handles the mismatch as follows:
• If the service instance contains any managed server hosts that are not inthe backup, Oracle Integration Classic warns you that it cannot restorethe managed server hosts that are not part of the backup.
Before trying to restore again, you can scale in the service instance todelete the nodes that correspond to these managed server hosts. See Scale In an Oracle Integration Classic (User-Managed) Instance
If you choose to continue without scaling in the service instance, OracleIntegration Classic asks you to confirm that you understand that theservice instance will be scaled in automatically.
• If the backup contains any hosts that are not in the service instance,Oracle Integration Classic does not attempt to remove the managedservers on these hosts from the administration server configuration. Youmust use Oracle WebLogic Server to remove the managed servers onthese hosts from the administration server configuration.
After you restore a service instance's configuration files from a backup thatdoes not match the service instance, you might need to modify the restoredservice instance to return it to the state you require.
You can restore a service instance from an incremental backup without the need torestore the full backup to which the incremental backup is linked. In this situation, youare responsible for ensuring that the service instance is in a consistent state after theservice instance is restored.
Chapter 9Back Up and Restore an Oracle Integration Classic (User-Managed) Instance
9-30

Restoration from a backup that is stored on block storage is faster than restorationfrom a backup that is stored in an Oracle Cloud Infrastructure Object Storage Classiccontainer.
Before restoring an Oracle Integration Classic instance from a backup, you mustdisable the load balancer for the service instance.
The applications deployed to your instance will be unavailable during the restorationprocess.
To restore an Oracle Integration Classic instance from a backup:
1. Sign in to the Oracle Cloud Infrastructure Console.
2. In the Oracle Integration Classic console, click the name of your Oracle IntegrationClassic instance.
3. In the Service Overview page, click the Administration tile.
4. Click the Backup tab.
5. Click Manage backups on this service next to Available Backups and selectRestore.
You can restore an instance from an incremental backup without the need torestore the full backup to which the incremental backup is linked. OracleIntegration Classic instance restores all the data from the linked full backuprequired for a complete restoration of the instance.
Note:
If you choose to restore from an incremental backup, you areresponsible for ensuring that the service instance is in a consistent stateafter the service instance is restored.
6. Enter Notes up to 255 characters of free-form text to provide additional informationabout the restoration, such as why you are restoring the instance.
7. Click Restore.
The Backup page is updated to show that the restoration is in progress. While therestoration is in progress, you cannot start any other management operation onthe instance.
When the restoration is complete, it is added to the restoration history in theBackup page.
Chapter 9Back Up and Restore an Oracle Integration Classic (User-Managed) Instance
9-31

Delete a BackupYou can delete a backup that you no longer require to release storage or prevent anOracle Integration Classic (user-managed) instance from being restored from thebackup.
Note:
You can’t delete a full backup with linked incremental backups withoutdeleting the incremental backups. If the backup you’re deleting has linkedincremental backups, Oracle Java Cloud Service asks if you want to deleteboth the full backup and its linked incremental backups.
To delete a backup:
1. Sign in to the Oracle Cloud Infrastructure Console.
2. Click in the top left corner of the Oracle Cloud Infrastructure Console.
3. Select Platform Services, then Integration Classic.
4. In the Oracle Integration Classic console, click the name of your Oracle IntegrationClassic instance.
5. In the Service Overview page, click the Administration tile.
6. Click the Backup tab.
The Backup page is displayed.
7. Click Manage backups on this service next to Available Backups and selectDelete.
8. When prompted, confirm that you want to delete the backup.
If the backup you’re deleting has linked incremental backups, Oracle IntegrationClassic asks if you want to delete both the full backup and its linked incrementalbackups.
Manage Integrations and ErrorsYou can manage integration and process errors in Oracle Integration Classic (user-managed).
Activate the service in Oracle Integration Classic when the integration is ready to golive and you can deactivate an active Integration. You can modify or clone theintegration. Delete an integration that is no longer needed. See Managing Integrationsin Using Integrations in Oracle Integration.
You can manage errors from the Errors pages in Oracle Integration Classic at theintegration level, connection level, or specific integration instance level. See ManagingErrors in Using Integrations in Oracle Integration.
Chapter 9Manage Integrations and Errors
9-32

Manage SSL CertificationsYou can upload and update security certificates in Oracle Integration Classic (user-managed) to validate external connections.
Certificates are used to validate outbound SSL connections. If you make an SSLconnection in which the root certificate does not exist in Oracle Integration Classic, anexception is thrown. In that case, you must upload the appropriate certificate. Acertificate enables Oracle Integration Classic to connect with external services. If theexternal endpoint requires a specific certificate, request the certificate and then uploadit into Oracle Integration Classic. You can update or delete certificates you uploadedinto Oracle Integration Classic.
For more information about managing SSL certificates in Integrations, see ManagingSecurity Certificates in Using Integrations in Oracle Integration.
For more information about managing SSL certificates in Processes, see ManageSecurity Certificates during Runtime and Manage Security Certificates during DesignTime in Using Processes in Oracle Integration.
Manage Instance HistoryYou can determine when to purge the data in your database. You can also view thenotification and quiesced thresholds for your database and the percentage of thedatabase that has been used.
Instance history is automatically purged periodically, based on settings in OracleIntegration Classic (user-managed). See Archive and Purge Data in Using Processesin Oracle Integration.
Configure Settings for Error LogsNeed to troubleshoot errors? As an administrator, you can change logging levels anddownload logs for Oracle Integration Classic (user-managed).
Use caution when changing logging levels because increasing them can affectperformance. Reset logging levels back to default settings after troubleshooting.
1. From the Home page, select Settings, then Logging.
The Logging screen is displayed. By default, loggers are contained within foldercontainers, and the number of loggers contained (collapsed) within the folder islisted after the folder name.
Chapter 9Manage SSL Certifications
9-33

2. Filter and sort the logging list.
You can filter in several ways:
• Show Only: Select one or more options to limit the list. Note that loggers orfolders must meet all selected options to be listed.
– Oracle Integration: Displays loggers related to Oracle Integration Classiccomponents.
– Top Containers: Displays the two top levels of folder containers.
– Unsaved Changes: Displays loggers whose levels you have changed but
haven’t saved, as indicated by an Unsaved icon.
• Filters Menu: Select Open Filters Menu to view loggers by their status (atdefault, or increased or decreased) or by their selected logging level. Filtersettings display below the search field as you specify search criteria.
3. Search for logs.
In the Search field, enter a logger name (or partial name) and press Enter.Searching is case sensitive. For example, enter oracle.bpm to list all loggers thatbegin with those characters. Note that searching is performed within the filteredlist. For example, if the Top Containers filter is selected, only the top containersare searched.
4. Change logging levels as needed.
• Use the up and down icons in the Logging Level column to change a loggerlevel. As you increase or decrease, an unsaved icon displays adjacent to thenew logging level to indicate unsaved changes. The Status column indicateswhether you increased or decreased the level and lists the default level.
• When a logging level lists Inherited, this indicates that its own current level isinherited from its parent package because it doesn’t have a default level set.Children packages may have a different level. Changing a package level willautomatically change the logging level of its children if they inherit from it (ifthey don’t have a specific logging level set).
Chapter 9Configure Settings for Error Logs
9-34

• To return to previous settings, click Revert and revert to either the last savedconfiguration or set all levels back to their default level.
5. Save your changes. Download logs as needed.
Click Download Logs and save the entire logging file to a zip file.
Use SSH to Sign In to Oracle Integration Classic (User-Managed)
You must specify the opc username when using SSH to log in to the Oracle IntegrationClassic virtual machine with a private key.
Diagnose Oracle Integration Classic (User-Managed)Problems
Oracle Integration Classic (user-managed) provides log files containing reports of anevent, errors, warning messages. You can diagnose problems using these log files.
Topics:
• Access and View Diagnostic Logs
• Export Suite-Generated Artifacts
• Collect Database Statistics
• View System Health
Access and View Diagnostic LogsUse log files such as WebLogic Server log files or Java Flight Recorder to diagnoseproblems, and report incidents in Oracle Integration Classic (user-managed).
Topics:
• Use WebLogic Server Logs
• Use Java Flight Recorder Performance Profiles
• Use Oracle Integration Report Incidents
Use WebLogic Server LogsUse WebLogic Server Administration Console logs to diagnose errors.
To find the log files in WebLogic Server Administration Console:
1. Sign in to the Oracle Cloud Infrastructure Console.
2. Click Manage this service and select Open WebLogic Server Console.
A new browser opens and you are redirected to the login page.
3. Enter the user name and password you provided when you created the serviceinstance.
Chapter 9Use SSH to Sign In to Oracle Integration Classic (User-Managed)
9-35

4. In the Domain Structure area, expand Diagnostics.
5. Click Log Files.
The Log Files table appears.
6. Select the option to the left of the log file you want to view.
7. Click View.
The log file you selected appears in the table.
Note:
If you do not find the information you are looking for, click the Customizethis table link above the log file and select the Time Interval or use theother filter options available.
Use Java Flight Recorder Performance ProfilesYou can use Oracle’s commercial profiling tools, Java Flight Recorder and JavaMission Control, to analyze the performance of applications deployed on Oracle JavaCloud Service.
Java Flight Recorder (JFR) and Java Mission Control (JMC) collect detailed runtimeinformation so that you can analyze incidents after they occur. JFR, available in OracleHotSpot JVM, is a performance monitoring and profiling tool that records diagnosticinformation on a continuous basis, making it always available, even in the wake ofcatastrophic failure such as a system crash. JMC enables you to monitor and manageJava applications without introducing the performance overhead normally associatedwith these types of tools. It includes the JFR user interface, which allows users whoare running a Java Flight Recorder-compliant version of Oracle HotSpot to view JVMrecordings, current recording settings, and runtime parameters. The JFR interfaceincludes the Events Type View, which gives you direct access to event information thathas been recorded in the .jfr file, such as event producers and types, event loggingand graphing, event by thread, event stack traces, and event histograms.
Basic Workflow for Profiling Applications with JFR
Monitoring applications with JFR comprises these steps:
1. Enable JFR in your WebLogic Server instance.
2. Obtain the flight recording by generating a diagnostic image capture.
3. Analyze the recording with the Flight Recorder UI.
Enable JFR in Your WebLogic Server Instance
Because it is a commercial feature, if WebLogic Server is configured with OracleHotSpot, Java Flight Recorder is, by default, disabled. To enable it, use the followingJVM commands in the startup script for the WebLogic Server instance in which theJVM runs:
-XX:+UnlockCommercialFeatures -XX:+FlightRecorder
Chapter 9Diagnose Oracle Integration Classic (User-Managed) Problems
9-36

Note:
The sequence of these commands is critical: +UnlockCommercialFeaturescommand advises the JVM to recognize the command +FlightRecorder.The commands must be entered in that order or the JVM will not start.
For example:
java -XX:+UnlockCommercialFeatures -XX:+FlightRecorder -XX:FlightRecorderOptions=defaultrecording=true,maxage=20m MyApp
You can also enter the +UnlockCommercialFeatures and +FlightRecorder commandsin the WebLogic Server configuration file’s JAVA_OPTIONS (or equivalent) variable.
For more detailed information on enabling JFR, see Running Java Flight Recorder inthe Java Platform, Standard Edition Java Flight Recorder Runtime Guide.
Obtain the Flight Recording by Generating a Diagnostic Image Capture
The diagnostic image capture itself is a single JFR file that contains individual imagesproduced by the different server subsystems. If the JFR file is available, it is includedin the diagnostic image as the file FlightRecording.jfr.
You can generate a diagnostic image capture on-demand — for example, from theWebLogic Server Administration Console, Fusion Middleware Control, WLST, or aJMX application — or as the result of an image action. To generate a diagnostic imagecaptures and configure the location in which they are created, see Configuring andCapturing Diagnostic Images in Oracle® Fusion Middleware Configuring and Using theDiagnostics Framework for Oracle WebLogic Server.
Analyze the Recording with the Flight Recorder UI
Once you’ve obtained the recording, you can then view and analyze it by using theFlight Recorder user interface, a JMC component. Assuming you are running a JavaFlight Recorder-compliant version of Oracle HotSpot, the JFRUI allows you to viewJVM recordings, current recording settings, and runtime parameters. The JFRinterface includes the Events Type View, which gives you direct access to eventinformation that has been recorded in the JFR file, such as event producers and types,event logging and graphing, event by thread, event stack traces, and eventhistograms. Some of the activity you can monitor on the JFR UI includes:
• Display Event Data for a Product Subcomponent
• View the Event Log to Display Details
• Track Execution Flow by Analyzing an Operative Set
• Expand the Operative Set and View Correlated Diagnostic Data
Use of the JFR UI for these tasks and more is described in greater detail in AnalyzingJava Flight Recorder Data in Oracle® Fusion Middleware Configuring and Using theDiagnostics Framework for Oracle WebLogic Server.
Chapter 9Diagnose Oracle Integration Classic (User-Managed) Problems
9-37

Use Oracle Integration Report IncidentsYou can report incidents for problematic issues that occur during design time in OracleIntegration (for example, being unable to open an integration, the failure of connectiontesting, or the failure of artifact regeneration).
To report incidents in Oracle Integration, see Report Incidents in Using Integrations inOracle Integration.
Export Suite-Generated ArtifactsDownload artifacts of an integration to view and diagnose problems.
You can download artifacts as a zip file using the Download Artifacts option in OracleIntegration, see Downloading Generated Artifacts for an Integration in UsingIntegrations in Oracle Integration.
Collect Database StatisticsCollect database statistics to diagnose performance problems by comparing statisticscaptured in a baseline to those captured during a period of poor performance.
See Gathering Database Statistics in the Oracle Database Performance Tuning Guide.
View System HealthYou can view information about the system health of Oracle Integration components.As you navigate around Oracle Integration, you receive a system health state that isnot older then five minutes. The only exception is the Messaging Service state, whichmay take longer than five minutes to update.
The state of system health is viewable from multiple locations in Oracle Integrationinstance:
• From the main banner of pages
• From the Integrations, Connections, and Lookups pages
• From the mapper or expression builder
• From the System Health page under the Monitoring tab
See Viewing System Health in Using Integrations in Oracle Integration.
Delete an Oracle Integration Classic (User-Managed)Instance
When you no longer require an Oracle Integration Classic (user-managed) instance,you can delete it.
Oracle Integration Classic can be running or stopped before you attempt to delete it. Ifthe instance is stopped, you must check Force Delete on the Delete Service dialog forproper schema cleanup.
Chapter 9Delete an Oracle Integration Classic (User-Managed) Instance
9-38

When you delete an Oracle Integration Classic instance:
• Resources such as IP addresses are removed.
• The Oracle Database Cloud Service database deployment is not deleted whenyou delete the Oracle Integration Classic instance.
• The object storage container is not deleted when you delete the Oracle IntegrationClassic instance.
To delete an Oracle Integration Classic instance:
1. Sign in to the Oracle Cloud Infrastructure Console.
2. In the Oracle Integration Classic console, find the instance you want to delete.
3. From the menu, select Delete.
4. In the Delete Service dialog box that opens, set the following options:
• Force Delete—(Optional): Select this check box if you want the serviceinstance to be deleted even if the database deployment cannot be reached todelete the database schemas. If enabled, you may need to delete theassociated database schemas manually on the database deployment if theyare not deleted as part of the service instance delete operation.
• Database Administrator User Name: Enter the name of the databaseadministrator user that was specified when the database deployment wascreated. This user owns the instance’s repository and schemas. If you havespecified two databases, specify the name of the administrator for thedatabase deployment for the Oracle required schema.
• Database Administrator User Password: Enter the database administratoruser password for the database deployment that contains the Oracle requiredschema.
• Skip Backup: Select to skip the backup of the terminated instance.
5. Click Delete.
Once deleted, the Oracle Integration Classic instance is removed from the list ofservice instances displayed on the Oracle Integration Classic instance Console.
Chapter 9Delete an Oracle Integration Classic (User-Managed) Instance
9-39

10Troubleshoot Oracle Integration Classic(User-Managed)
Topics:
• Provision an Instance Without the Correct User Roles Causes Failure
• Provision Oracle Integration Classic (User-Managed)
• 504 Gateway Timeout Error May Require Editing an Instance's Load BalancerAccess Rules Manually to Add a New IP Address
• Troubleshoot cURL Command Issues When Configuring an IP Network
• Database Backups May Use Up Disk Space and Cause Oracle Integration ClassicServers to Shut Down
• Troubleshoot Backup and Restore Issues
• Troubleshoot Patching Issues
• Oracle Integration Classic (User-Managed) Fails to Connect to the DatabaseInstance
Provision an Instance Without the Correct User RolesCauses Failure
If you attempt to provision Oracle Integration Classic (user-managed) without therequired set of user roles, you receive errors. For example, the following erroroccurred because the user account did not possess the correct role for provisioning anOracle Database Cloud Service instance.
Mar 7, 2018 7:41:57 PM UTC Service creation request accepted.Mar 7, 2018 7:41:57 PM UTC Initializing OIC7786QSMar 7, 2018 7:42:34 PM UTC Failed to create Compute resources for Database Server...[Compute Error: Unable to authenticate]Mar 7, 2018 7:42:34 PM UTC Initiating Database Service Termination...
To successfully provision Oracle Integration Classic, ensure that your user account isassigned the correct roles. See Assign the Correct User Roles to Create an Instance.
10-1

Provision Oracle Integration Classic (User-Managed)Ensure that you satisfy the following prerequisites before provisioning OracleIntegration Classic (user-managed). Not doing so prevents you from successfullyprovisioning Oracle Integration Classic.
• Know the Oracle Cloud Infrastructure Object Storage Classic account name whenyou start to provision Oracle Integration Classic. This account name isautomatically created when you purchase your universal credits. You specify theaccount name when provisioning Oracle Integration Classic with the provisioningwizard or with the Oracle Cloud Stack templates. See Create an Oracle IntegrationClassic (User-Managed) Instance for instructions on how to obtain the accountname.
• Review the minimum system requirements. See Create an Oracle IntegrationClassic (User-Managed) Instance.
• If you want to provision Oracle Integration Classic with the provisioning wizard,ensure that you first provision Oracle Database Cloud Service. This is becausewhen using the provisioning wizard, you are prompted to specify the OracleDatabase Cloud Service login credentials and service name. If you provisionOracle Integration Classic with the Oracle Cloud Stack templates, this is not arequirement because the Oracle Database Cloud Service instance is automaticallyprovisioned for you.
504 Gateway Timeout Error May Require Editing anInstance's Load Balancer Access Rules Manually to Add aNew IP Address
If an Oracle Integration Classic (user-managed) instance is provisioned when thevirtual load balancer has temporarily switched from, for example, three IP addressesto one IP address due to a load situation, the instance’s four load balancer accessrules are created with only that one IP address even though the virtual load balancerhas multiple IP addresses. The access rule ideally should have all load balancer IPaddresses in comma-separated fashion.
The missing two IP addresses mean that when the Oracle Integration Classic instancerequests are routed through all load balancer IP addresses to the Oracle IntegrationClassic instance, the requests coming from the unknown two IP addresses time out(504 Gateway Timeout errors). Only requests routed from the registered IP addressroute successfully.
To resolve this situation, manually disable (from the Oracle Platform Service Managerconsole) the four load balancer access rules (ora_lb2admin_7001_1,ora_lb2ms_7001_1, ora_lb2admin_8001_1, and ora_lb2ms_8001_1) and add aduplicate set of four rules (with different names) with all load balancer IP addressesincluded.
Chapter 10Provision Oracle Integration Classic (User-Managed)
10-2

Troubleshoot cURL Command Issues When Configuring anIP Network
Note the following potential issues when executing curl commands to create thevirtual Oracle Load Balancer as a Service.
• If you see the following exception while executing curl commands, use the -koption in the command (for example, curl -i -k -X POST).
curl: (60) SSL certificate problem: unable to get local issuer certificateMore details here: https://curl.haxx.se/docs/sslcerts.html
curl failed to verify the legitimacy of the server and therefore could not establish a secure connection to it. To learn more about this situation and how to fix it, please visit the web page mentioned above.
• When you receive an HTTP 500 Internal Server error, your JSON file content islikely not correct. Check for special characters such as ”.
• When you submit a request and the curl command does not respond and printany output, ensure the Oracle Load Balancer as a Service URL is accessible froma browser and you are not behind a firewall/inside a corporate network.
Database Backups May Use Up Disk Space and CauseOracle Integration Classic Servers to Shut Down
If you cannot restart your managed server (it enters a failed state) and you receive thefollowing error, this may be due to excessive disk space usage on the database virtualmachine (for example, the backup mount is at 75% for /u01).
Received exception while creating connection for pool "SOALocalTxDataSource":ORA-00257: Archiver error. Connect AS SYSDBA only until resolved.
This can result in archiving issues and the Oracle WebLogic Servers can only connectto the database as SYSDBA.
To resolve this issue, increase the mount space. This enables the database to runagain. If no issues are found in the archive logs, clean up the files occasionally toavoid similar issues in the future.
See Back Up and Restore an Oracle Integration Classic (User-Managed) Instance.
Troubleshoot Backup and Restore IssuesAfter a backup. if you scale in or out a managed server and then attempt to restore thebackup, additional managed servers are created during backup restoration. You need
Chapter 10Troubleshoot cURL Command Issues When Configuring an IP Network
10-3

to manually delete the additional managed servers for Oracle Integration Classic(user-managed) Home page to display properly.
To delete additional managed servers:
1. Sign in to the Oracle Cloud Infrastructure Console.
2. In the Oracle Integration Classic console, click the name of your Oracle IntegrationClassic instance.
3. On the page, click and choose Open WebLogic Server Console to open theWebLogic Server Console.
A new browser opens and you are redirected to the WebLogic Server console’slogin page.
4. Sign in to Oracle WebLogic Server Administration Console.
5. In the Domain Structure pane, select Environment, then select Servers.
6. In the Change Center pane, click Lock & Edit.
7. Select the additional managed servers and click Delete. Click OK to confirm.
8. In the Change Center pane, click Activate Changes.
Troubleshoot Patching IssuesPatching Precheck fails if the current user session is locked. You need to unlock theuser session before performing prechecks for patching Oracle Integration Classic(user-managed).
To unlock the user session:
1. Sign in to the Oracle Cloud Infrastructure Console.
2. In the Oracle Integration Classic console, click the name of your Oracle IntegrationClassic instance.
3. On the page, click and choose Open WebLogic Server Console to open theOracle WebLogic Server Administration Console.
Alternatively, you can use the following URL format to access the console:
https://example.com/console
A new browser opens and you are redirected to the Oracle WebLogic ServerAdministration Console login page.
4. Sign in to Oracle WebLogic Server Administration Console as a WebLogic serveradministrator.
5. In the Domain Structure pane, select Environment, then select Servers.
Chapter 10Troubleshoot Patching Issues
10-4

6. In the Configuration tab, verify the state of all the managed servers. Ensure thatthe state for all the managed servers is displayed as Running.
7. In the Change Center pane, click View Changes and restarts.
8. On the Change and Restarts page, click the Other Edit Sessions tab and ensurethat there is only one row by default listed under the Current Edit Sessions table.
If the Owned By column in the Current Edit Sessions table is set toJaaS_System_WLS_Admin, click Lock & Edit. Now you’ll see the logged-in userID in the Owned By column.
9. Click the Change List tab and verify if the Pending Changes table has no itemsto display.
Chapter 10Troubleshoot Patching Issues
10-5

10. In the Change Center pane, click Release Configuration.
Oracle Integration Classic (User-Managed) Fails to Connectto the Database Instance
If Oracle Integration Classic (user-managed) fails to connect to the database instancefor a period of four hours or more, you should restart your Oracle Integration Classicinstance.
By default, the maximum amount of time that an Oracle Integration Classic instancetries to recover from a database connection failure without any intervention is fourhours. After this period of time, manually restart the Oracle Integration Classicinstance if the connectivity issue is not resolved.
Chapter 10Oracle Integration Classic (User-Managed) Fails to Connect to the Database Instance
10-6