additional aix security tools on - ibm redbooks
TRANSCRIPT

ibm.com/redbooks
Additional AIX Security Tools onIBM pSeries,IBM RS/6000, and SP/Cluster
Abbas FarazdelMarc Genty
Bruno KerouantonChune Keat Khor
Customize the security of your pSeries systems
Explore IBM, non-IBM, and freeware security tools
Learn new approaches to security


Additional AIX Security Tools onIBM ^ pSeries,IBM RS/6000, and SP/Cluster
December 2000
SG24-5971-00
International Technical Support Organization

© Copyright International Business Machines Corporation 2000. All rights reserved.Note to U.S Government Users – Documentation related to restricted rights – Use, duplication or disclosure is subject torestrictions set forth in GSA ADP Schedule Contract with IBM Corp.
First Edition (December 2000)
This edition applies to AIX 4.3.3.
Comments may be addressed to:
IBM Corporation, International Technical Support OrganizationDept. JN9B Mail Station P0992455 South RoadPoughkeepsie, NY 12601-5400
When you send information to IBM, you grant IBM a non-exclusive right to use or distribute theinformation in any way it believes appropriate without incurring any obligation to you.
Before using this information and the product it supports, be sure to read the general information inAppendix D, “Special notices” on page 211.
Take Note!

Contents
Preface . . . . . . . . . . . . . . . . . . . . . . . . . . . . . . . . . . . . . . . . . . . . . . . . . . . viiThe team that wrote this redbook. . . . . . . . . . . . . . . . . . . . . . . . . . . . . . . . . . . viiiComments welcome. . . . . . . . . . . . . . . . . . . . . . . . . . . . . . . . . . . . . . . . . . . . . . ix
Chapter 1. Introduction . . . . . . . . . . . . . . . . . . . . . . . . . . . . . . . . . . . . . . 11.1 Security framework - Overview . . . . . . . . . . . . . . . . . . . . . . . . . . . . . . . 11.2 Security framework - Planning . . . . . . . . . . . . . . . . . . . . . . . . . . . . . . . 31.3 Security framework - Architecture. . . . . . . . . . . . . . . . . . . . . . . . . . . . . 61.4 Security framework - Implementation . . . . . . . . . . . . . . . . . . . . . . . . . . 71.5 Security framework - Monitoring . . . . . . . . . . . . . . . . . . . . . . . . . . . . . . 81.6 Security framework - Incident response . . . . . . . . . . . . . . . . . . . . . . . 101.7 Next steps . . . . . . . . . . . . . . . . . . . . . . . . . . . . . . . . . . . . . . . . . . . . . 12
Chapter 2. Firewalls . . . . . . . . . . . . . . . . . . . . . . . . . . . . . . . . . . . . . . . . 132.1 Misconceptions about firewalls . . . . . . . . . . . . . . . . . . . . . . . . . . . . . . 132.2 Types of firewalls . . . . . . . . . . . . . . . . . . . . . . . . . . . . . . . . . . . . . . . . 15
2.2.1 Static packet filter firewalls . . . . . . . . . . . . . . . . . . . . . . . . . . . . . 152.2.2 Circuit level firewalls . . . . . . . . . . . . . . . . . . . . . . . . . . . . . . . . . . 152.2.3 Application layer (proxy) firewalls . . . . . . . . . . . . . . . . . . . . . . . . 162.2.4 Dynamic packet filter firewalls . . . . . . . . . . . . . . . . . . . . . . . . . . 162.2.5 Comparison between the different types . . . . . . . . . . . . . . . . . . . 16
2.3 Firewall designs . . . . . . . . . . . . . . . . . . . . . . . . . . . . . . . . . . . . . . . . . 172.3.1 Basic firewall design . . . . . . . . . . . . . . . . . . . . . . . . . . . . . . . . . . 172.3.2 Firewalls with demilitarized zone (DMZ) . . . . . . . . . . . . . . . . . . . 182.3.3 Compartmentalized firewall environment design . . . . . . . . . . . . . 21
2.4 Securing firewalls . . . . . . . . . . . . . . . . . . . . . . . . . . . . . . . . . . . . . . . . 242.5 Firewalls on AIX . . . . . . . . . . . . . . . . . . . . . . . . . . . . . . . . . . . . . . . . . 24
Chapter 3. Check Point FireWall-1 . . . . . . . . . . . . . . . . . . . . . . . . . . . . . 253.1 FireWall-1 features . . . . . . . . . . . . . . . . . . . . . . . . . . . . . . . . . . . . . . . 253.2 Complementary software for FireWall-1 . . . . . . . . . . . . . . . . . . . . . . . 263.3 Securing FireWall-1 . . . . . . . . . . . . . . . . . . . . . . . . . . . . . . . . . . . . . . 27
3.3.1 Closing vulnerabilities during system startup . . . . . . . . . . . . . . . 283.3.2 Managing FireWall-1 logs . . . . . . . . . . . . . . . . . . . . . . . . . . . . . . 293.3.3 Securing FireWall-1 default configurations . . . . . . . . . . . . . . . . . 293.3.4 Creating a useful rulebase . . . . . . . . . . . . . . . . . . . . . . . . . . . . . 343.3.5 Viewing connections . . . . . . . . . . . . . . . . . . . . . . . . . . . . . . . . . . 363.3.6 Enabling other defense mechanisms . . . . . . . . . . . . . . . . . . . . . 37
3.4 List of ports that Check Point FireWall-1 uses . . . . . . . . . . . . . . . . . . 43
© Copyright IBM Corp. 2000 iii

Chapter 4. IBM Secureway Firewall . . . . . . . . . . . . . . . . . . . . . . . . . . . . 474.1 IBM Secureway Firewall features . . . . . . . . . . . . . . . . . . . . . . . . . . . . 474.2 Complimentary software for IBM Secureway Firewall . . . . . . . . . . . . . 484.3 Firewall hardening . . . . . . . . . . . . . . . . . . . . . . . . . . . . . . . . . . . . . . . 494.4 Network Security Auditor (NSA) . . . . . . . . . . . . . . . . . . . . . . . . . . . . . 49
4.4.1 Installing NSA. . . . . . . . . . . . . . . . . . . . . . . . . . . . . . . . . . . . . . . 494.4.2 Using NSA . . . . . . . . . . . . . . . . . . . . . . . . . . . . . . . . . . . . . . . . . 504.4.3 Interpreting NSA output . . . . . . . . . . . . . . . . . . . . . . . . . . . . . . . 51
Chapter 5. Secure remote access . . . . . . . . . . . . . . . . . . . . . . . . . . . . . 595.1 Secure Shell (ssh) . . . . . . . . . . . . . . . . . . . . . . . . . . . . . . . . . . . . . . . 59
5.1.1 Obtaining SSH . . . . . . . . . . . . . . . . . . . . . . . . . . . . . . . . . . . . . . 615.1.2 Difference between SSH1 and SSH2 . . . . . . . . . . . . . . . . . . . . . 625.1.3 Key concepts of SSH . . . . . . . . . . . . . . . . . . . . . . . . . . . . . . . . . 625.1.4 Installing OpenSSH on AIX. . . . . . . . . . . . . . . . . . . . . . . . . . . . . 655.1.5 OpenSSH using SSH1 . . . . . . . . . . . . . . . . . . . . . . . . . . . . . . . . 685.1.6 OpenSSH using SSH2 . . . . . . . . . . . . . . . . . . . . . . . . . . . . . . . . 715.1.7 Other interesting SSH daemon configuration options . . . . . . . . . 755.1.8 SSH2 interoperability between OpenSSH and SSH.Com . . . . . . 765.1.9 SSH clients for the PC . . . . . . . . . . . . . . . . . . . . . . . . . . . . . . . . 765.1.10 Implications of having SSH . . . . . . . . . . . . . . . . . . . . . . . . . . . . 775.1.11 Alternatives to SSH . . . . . . . . . . . . . . . . . . . . . . . . . . . . . . . . . 77
5.2 TCP Wrapper . . . . . . . . . . . . . . . . . . . . . . . . . . . . . . . . . . . . . . . . . . . 775.2.1 Obtaining and installing TCP Wrapper . . . . . . . . . . . . . . . . . . . . 785.2.2 Configuring TCP Wrapper. . . . . . . . . . . . . . . . . . . . . . . . . . . . . . 795.2.3 Additional TCP Wrapper security features . . . . . . . . . . . . . . . . . 82
Chapter 6. Port and network scanning . . . . . . . . . . . . . . . . . . . . . . . . . 836.1 fping . . . . . . . . . . . . . . . . . . . . . . . . . . . . . . . . . . . . . . . . . . . . . . . . . . 84
6.1.1 Obtaining and installing fping . . . . . . . . . . . . . . . . . . . . . . . . . . . 856.1.2 Using fping . . . . . . . . . . . . . . . . . . . . . . . . . . . . . . . . . . . . . . . . . 866.1.3 Protection against ping sweeps . . . . . . . . . . . . . . . . . . . . . . . . . 88
6.2 Network Mapper (NMAP) . . . . . . . . . . . . . . . . . . . . . . . . . . . . . . . . . . 896.2.1 Obtaining and installing nmap. . . . . . . . . . . . . . . . . . . . . . . . . . . 906.2.2 Nmap usage . . . . . . . . . . . . . . . . . . . . . . . . . . . . . . . . . . . . . . . . 926.2.3 Protection against port scanners . . . . . . . . . . . . . . . . . . . . . . . . 94
6.3 Security Administrator's Integrated Network Tool (SAINT) . . . . . . . . . 946.3.1 Obtaining and installing SAINT . . . . . . . . . . . . . . . . . . . . . . . . . . 956.3.2 Using SAINT. . . . . . . . . . . . . . . . . . . . . . . . . . . . . . . . . . . . . . . . 98
6.4 PortSentry . . . . . . . . . . . . . . . . . . . . . . . . . . . . . . . . . . . . . . . . . . . . . 986.4.1 Obtaining and installing PortSentry. . . . . . . . . . . . . . . . . . . . . . . 996.4.2 Defense provided by PortSentry . . . . . . . . . . . . . . . . . . . . . . . . 103
6.5 List Open Files (lsof) . . . . . . . . . . . . . . . . . . . . . . . . . . . . . . . . . . . . 103
iv Additional Security Tools for AIX Systems

6.5.1 Installing lsof . . . . . . . . . . . . . . . . . . . . . . . . . . . . . . . . . . . . . . 1046.5.2 Using lsof . . . . . . . . . . . . . . . . . . . . . . . . . . . . . . . . . . . . . . . . . 105
6.6 Intrusion detection . . . . . . . . . . . . . . . . . . . . . . . . . . . . . . . . . . . . . . 106
Chapter 7. System and data integrity . . . . . . . . . . . . . . . . . . . . . . . . . 1097.1 Tripwire . . . . . . . . . . . . . . . . . . . . . . . . . . . . . . . . . . . . . . . . . . . . . . 110
7.1.1 Obtaining and installing Tripwire. . . . . . . . . . . . . . . . . . . . . . . . 1117.1.2 Configuring and using Tripwire . . . . . . . . . . . . . . . . . . . . . . . . . 1127.1.3 Configuring Tripwire . . . . . . . . . . . . . . . . . . . . . . . . . . . . . . . . . 1147.1.4 Comments on configuration . . . . . . . . . . . . . . . . . . . . . . . . . . . 1187.1.5 When should Tripwire be run . . . . . . . . . . . . . . . . . . . . . . . . . . 1187.1.6 Alternatives to Tripwire . . . . . . . . . . . . . . . . . . . . . . . . . . . . . . . 119
7.2 John the Ripper . . . . . . . . . . . . . . . . . . . . . . . . . . . . . . . . . . . . . . . . 1197.2.1 Obtaining and installing John the Ripper . . . . . . . . . . . . . . . . . 1207.2.2 Configuring John the Ripper . . . . . . . . . . . . . . . . . . . . . . . . . . . 1217.2.3 Using John the Ripper . . . . . . . . . . . . . . . . . . . . . . . . . . . . . . . 122
7.3 Pretty Good Privacy (PGP). . . . . . . . . . . . . . . . . . . . . . . . . . . . . . . . 1247.3.1 PGP basics . . . . . . . . . . . . . . . . . . . . . . . . . . . . . . . . . . . . . . . 1247.3.2 Obtaining and installing PGP . . . . . . . . . . . . . . . . . . . . . . . . . . 1267.3.3 Using PGP . . . . . . . . . . . . . . . . . . . . . . . . . . . . . . . . . . . . . . . . 1277.3.4 Protecting your private key . . . . . . . . . . . . . . . . . . . . . . . . . . . . 134
7.4 MD5 . . . . . . . . . . . . . . . . . . . . . . . . . . . . . . . . . . . . . . . . . . . . . . . . . 1347.4.1 Ensuring the integrity of downloads . . . . . . . . . . . . . . . . . . . . . 136
Chapter 8. Securing AIX. . . . . . . . . . . . . . . . . . . . . . . . . . . . . . . . . . . . 1398.1 Overview . . . . . . . . . . . . . . . . . . . . . . . . . . . . . . . . . . . . . . . . . . . . . 1408.2 Step 1: Remove unnecessary services . . . . . . . . . . . . . . . . . . . . . . . 141
8.2.1 Removing entries from /etc/inittab . . . . . . . . . . . . . . . . . . . . . . 1428.2.2 Removing entries from /etc/rc.tcpip . . . . . . . . . . . . . . . . . . . . . 1448.2.3 Removing entries from /etc/inetd.conf. . . . . . . . . . . . . . . . . . . . 148
8.3 Step 2: Tighten configurations of remaining services . . . . . . . . . . . . 1538.3.1 Domain Name System (DNS) . . . . . . . . . . . . . . . . . . . . . . . . . . 1538.3.2 Network File System and Network Information Service . . . . . . . 1688.3.3 Simple Mail Transfer Protocol (SMTP) . . . . . . . . . . . . . . . . . . . 1758.3.4 Simple Network Management Protocol (SNMP) . . . . . . . . . . . . 1808.3.5 Trivial File Transfer Protocol (TFTP). . . . . . . . . . . . . . . . . . . . . 1818.3.6 Securing X11 . . . . . . . . . . . . . . . . . . . . . . . . . . . . . . . . . . . . . . 1828.3.7 File Transfer Protocol (ftp) . . . . . . . . . . . . . . . . . . . . . . . . . . . . 1848.3.8 Protecting TCP services using SOCKS. . . . . . . . . . . . . . . . . . . 186
8.4 Step 3: Set proper network (no) options . . . . . . . . . . . . . . . . . . . . . . 1868.4.1 SYN attack protection . . . . . . . . . . . . . . . . . . . . . . . . . . . . . . . . 1878.4.2 Broadcast protection. . . . . . . . . . . . . . . . . . . . . . . . . . . . . . . . . 1878.4.3 IP routing options . . . . . . . . . . . . . . . . . . . . . . . . . . . . . . . . . . . 188
v

8.5 Step 4: Tighten up user accounts . . . . . . . . . . . . . . . . . . . . . . . . . . . 1898.5.1 Removing unnecessary default accounts . . . . . . . . . . . . . . . . . 1898.5.2 Setting user attributes . . . . . . . . . . . . . . . . . . . . . . . . . . . . . . . 1908.5.3 Securing root . . . . . . . . . . . . . . . . . . . . . . . . . . . . . . . . . . . . . . 1928.5.4 Other attributes . . . . . . . . . . . . . . . . . . . . . . . . . . . . . . . . . . . . 193
8.6 Step 5: Set up strong password policy . . . . . . . . . . . . . . . . . . . . . . . 1948.6.1 Modifying user password attributes. . . . . . . . . . . . . . . . . . . . . . 1948.6.2 Password cracker utility . . . . . . . . . . . . . . . . . . . . . . . . . . . . . . 197
8.7 Step 6: Install additional security tools . . . . . . . . . . . . . . . . . . . . . . . 1978.8 Step 7: Monitor logs, audit trails, and system behavior . . . . . . . . . . . 200
8.8.1 Monitor system logs . . . . . . . . . . . . . . . . . . . . . . . . . . . . . . . . . 2018.8.2 Enable auditing. . . . . . . . . . . . . . . . . . . . . . . . . . . . . . . . . . . . . 2018.8.3 Monitor files and directories . . . . . . . . . . . . . . . . . . . . . . . . . . . 2028.8.4 Monitor cron and at jobs . . . . . . . . . . . . . . . . . . . . . . . . . . . . . . 203
Appendix A. NSA Scan Options. . . . . . . . . . . . . . . . . . . . . . . . . . . . . . . . 205
Appendix B. Script used to scan a network with fping . . . . . . . . . . . . 207
Appendix C. Script to merge the AIX passwd files . . . . . . . . . . . . . . . . 209
Appendix D. Special notices . . . . . . . . . . . . . . . . . . . . . . . . . . . . . . . . . . 211
Appendix E. Related publications . . . . . . . . . . . . . . . . . . . . . . . . . . . . . . 215E.1 IBM Redbooks . . . . . . . . . . . . . . . . . . . . . . . . . . . . . . . . . . . . . . . . . . . . 215E.2 IBM Redbooks collections. . . . . . . . . . . . . . . . . . . . . . . . . . . . . . . . . . . . 215E.3 Other resources . . . . . . . . . . . . . . . . . . . . . . . . . . . . . . . . . . . . . . . . . . . 216E.4 Referenced Web sites. . . . . . . . . . . . . . . . . . . . . . . . . . . . . . . . . . . . . . . 216
How to get IBM Redbooks . . . . . . . . . . . . . . . . . . . . . . . . . . . . . . . . . . 221IBM Redbooks fax order form . . . . . . . . . . . . . . . . . . . . . . . . . . . . . . . . . . . . 222
Index . . . . . . . . . . . . . . . . . . . . . . . . . . . . . . . . . . . . . . . . . . . . . . . . . . . 223
IBM Redbooks review . . . . . . . . . . . . . . . . . . . . . . . . . . . . . . . . . . . . . . 243
vi Additional Security Tools for AIX Systems

Preface
Information is one of your most important assets in the digital economy.Whether in an online store or a complex Internet-based commodity exchange,the viability of e-commerce is critically dependent on the secure flow ofinformation.
From firewalls to operating system hardening, this redbook illustratesadditional tools and techniques that you can use to enhance the securityenvironment of your IBM RS/6000 and IBM ^ pSeries. The approachtaken is from outside to inside and top to bottom. We move from the serverson the far reaches of your network that are visible to the outside world tothose on the innermost recesses of your intranet that contain your mostconfidential data. As we move through these servers, we work from theapplication layer at the top to the network layer at the bottom. Along the way,we cover third-party software that is readily available, modifications to thestandard software that comes with AIX and PSSP, and assorted techniquesthat can all be used to provide enhanced security in your environment.
This redbook is the third in the security redbook trilogy:
• AIX 4.3 Elements of Security Effective and Efficient Implementation,SG24-5962
• Exploiting RS/6000 SP Security: Keeping It Safe, SG24-5521
• This redbook
Like the others, this book is primarily aimed at Information Technology (IT)professionals responsible for managing and securing their serverenvironment, be it all RS/6000 SP, all RS/6000 standalone, or a mixture ofboth. We assume, at a minimum, that you are familiar with AIX and, in an SPenvironment, PSSP.
Subjects covered in this redbook include:
• Firewalls
• Secure Remote Access
• Network Mapping and Port Scanning
• System Integrity
• Securing AIX
© Copyright IBM Corp. 2000 vii

The team that wrote this redbook
This redbook was produced by a team of specialists from around the worldworking at the International Technical Support Organization, Austin Center.
Abbas Farazdel is an SP System Strategist, Technical Consultant, andSenior Project Manager at the International Technical Support Organization,Poughkeepsie Center. Before joining the ITSO in 1998, Dr. Farazdel workedin the Global Business Intelligence Solutions (GBIS) group at IBM Dallas asan Implementation Manager for Data Warehousing and Data Mining Solutionsand in the Scientific and Technical Systems and Solutions (STSS) group atthe IBM Thomas J. Watson Research Center as a High PerformanceComputing Specialist. Dr. Farazdel holds a Ph.D. in Computational QuantumChemistry and an M.Sc. in Computational Physics from the University ofMassachusetts.
Marc Genty is a Systems Management Integration Professional working forIBM Global Services at the Western Geoplex Service Delivery Center inBoulder, Colorado. He has worked in UNIX environments for 10 years and isan RS/6000 Certified Advanced Technical Expert (CATE). He holds a BSdegree in Manufacturing from Colorado State University. His areas ofexpertise include UNIX, AIX, RS/6000 SP, HACMP, and DCE/DFS. He iscurrently the Global Web Architecture (GWA) AIX Architecture Team Lead inBoulder. He was also a contributing author of the book, Exploiting RS/6000SP Security: Keeping It Safe, SG24-5521.
Bruno Kerouanton is a System and Security Engineer working for Sysicomin France. He has four years of experience with AIX and RS/6000 SP systemadministration and support. Bruno is an RS/6000 Certified AdvancedTechnical Expert (CATE). He also holds CCSA and CCSE certifications forCheckPoint Firewall-1/VPN. His areas of expertise include network andsystem security including penetration tests and architecture design.
Chune Keat Khor is an IT Availability Specialist from IBM Singapore. Hejoined IBM in 1998 after graduating from National University of Singaporewith a bachelor's degree in Electrical Engineering. He is an AIX CertifiedAdvanced Technical Expert and has received Check Point CCSA and CCSEcertifications.
Thanks to the following people for their invaluable contributions to this project:
IBM BoulderTom Kleespies, Jeff Quaintance
viii Additional Security Tools for AIX Systems

IBM PoughkeepsieChris Derobertis, Larry Parker
Comments welcome
Your comments are important to us!
We want our Redbooks to be as helpful as possible. Please send us yourcomments about this or other Redbooks in one of the following ways:
• Fax the evaluation form found in “IBM Redbooks review” on page 243 tothe fax number shown on the form.
• Use the online evaluation form found at ibm.com/redbooks
• Send your comments in an Internet note to [email protected]
ix

x Additional Security Tools for AIX Systems

Chapter 1. Introduction
"More than any other single factor, the potential of e-commerce hinges onpeople's confidence that the network can keep confidential transactionsconfidential, and private records private."
IBM Chairman, Lou Gerstner, December 1996 Internet World
Information is one of your most important assets in the digital economy.Whether we are talking about an online store or a complex, Internet-basedcommodity exchange, the viability of e-commerce is critically dependent onthe secure flow of information.
IBM has always been serious about security and has unparalleled experiencedesigning and implementing secure systems. By using this knowledge andleveraging services based on open standards, the IBM RS/6000 and the newIBM ^ pSeries servers deliver a complete security package that youcan count on from one end of your enterprise system to the other in a flexible,easy-to-manage manner.
The security infrastructure shipped with AIX 4.3 is covered in the redbook:
• AIX 4.3 Elements of Security Effective and Efficient Implementation,SG24-5962
and that of PSSP 3.2 in the redbook:
• Exploiting RS/6000 SP Security: Keeping It Safe, SG24-5521
The purpose of this redbook is to provide you with information aboutadditional security tools (both IBM and non-IBM) and techniques that can beused to further enhance the security of your AIX 4.3 and/or PSSP 3.2environments. Many of the tools described here are available for downloadfrom the Internet.
1.1 Security framework - Overview
This book begins by describing a framework for security. Your environmentwill only be as secure as your weakest link. For this reason, it is criticallyimportant to take a holistic view of security, from planning to architecture toimplementation to ongoing support.
Once the security framework has been described, we go on to cover some ofthe tools and techniques you can use to implement it. The framework
© Copyright IBM Corp. 2000 1

provides both the context and the direction for which tools and techniquesyou use and how you use them.
The security approach we take is top-down. The topology of a typicaleBusiness environment is structured something like the following (as viewedfrom the Internet side):
• Boundary routers
• External firewalls
• Public servers in the demilitarized zone (DMZ)
• Private network in the DMZ
• Internal firewalls
• Private internal servers
• Private internal network
Also, viewing each of the servers top-down, we see:
• Application software
• Operating system
• Network (hardware and software)
• Physical server and network media
Each element in the environment and each layer of each element needs to betaken into account when building your security framework.
The steps to building a security framework and filling in the structure are asfollows:
1. Planning - This is where you define your overall security policies andgoals. In many organizations, this step is performed at the corporate leveland, likely, has already been completed.
2. Architecture - This is where you design your environment to meet therequirements defined in the Planning phase.
3. Implementation - This is where the rubber meets the road, and you buildwhat you designed in the Architecture phase.
4. Monitoring - Once your environment is operational, you need tocontinuously monitor it for vulnerabilities and suspected attacks. Thisphase forms the feedback loop for all of the previous phases. A problemdiscovered here should pass through some, if not all, of the previousphases on its way toward resolution.
2 Additional Security Tools for AIX Systems

5. Incident response - This is the phase that you hope you will never have togo into. However, if the worst should happen, you will want to be wellprepared. The absolute worst time to begin working on this phase is afteran attack has already occurred. Time spent in the beginning consideringhow you would respond to a real attack will pay for itself many times over ifyou ever find yourself confronted with the real thing. Think of this as the“peace of mind” phase.
In this chapter, we cover all of the phases and give you ideas on things toconsider when you work through them for your organization. There are manygood books on the subject of security planning and architecture. The focus ofthis book is primarily on security implementation, monitoring, and,tangentially, incident response. Keep in mind as you read it that it is meant asa companion to the other two security redbooks mentioned at the start of thischapter. Throughout the book, we refer you to those other two books whenappropriate so as not to duplicate detailed information contained there.
1.2 Security framework - Planning
The purpose of this phase is to define the overall security goals and policiesfor your organization. Some of the questions that should be answered duringthis phase are:
• How much security do you need?
• How much security can you afford?
• What is the nature of the enemy?
The first two questions are interdependent. In general, the more security youneed, the more it will cost. This is another place where the 80/20 rule holds.There is a lot that you can do in terms of security for not a great deal ofmoney (80 percent security - 20 percent money), but if you need very highsecurity, you should expect to pay a premium for it (additional 20 percentsecurity - additional 80 percent money).
You must also weigh the value of the assets you are trying to protect with theamount of money you are allocating for security. For example, a server in aDMZ that can be easily reconstructed should something happen to it typicallydoes not warrant the same level of security that you would give to an internaldatabase server housing confidential information.
However, there are also intangibles that you need to take into account. Eventhough a public Web server does not contain confidential information, thedamage done to the reputation of your organization should it be compromised
Chapter 1. Introduction 3

can be huge. Reputations take a very long time to establish and a very shorttime to destroy.
Finally, you need to be realistic in your planning. Having elaborate securitygoals and policies is all well and good, but you must also back them with thefunding for the staff to support them. System and network administratorstypically have their hands full just trying to keep the systems running andmaintained. Depending on your needs, you may want to consider staffing aseparate security team. At the very least, consider having a security leadwithin the ranks of your system and/or network administration team.
"If you know the enemy and know yourself, you need not fear the result of ahundred battles"
Sun Tzu, The Art of War
A big part of security planning is threat assessment. Even though attacksfrom the outside are what we hear about most often, attacks from the insideare far more common, but, for obvious reasons, rarely publicized. Yourplanning should take into account both groups.
A good starting point for learning how to understand your enemy is detailed inthe book Hacking Exposed: Network Security Secrets and Solutions. Throughdetailed, real-world examples, this book teaches you how to think like anattacker. In it, the authors outline the typical methodology used by would-beattackers to size up their targets. The steps of that methodology are asfollows:
1. Target acquisition and information gathering
2. Initial access
3. Privilege escalation
4. Covering tracks
5. Planting back doors
A brief explanation of each step is given here. For a more thoroughexplanation, refer to the book (Hacking Exposed).
Target acquisition and information gathering
This step can be broken into three phases:
• The first phase is footprinting, where the attacker attempts to find out asmuch as possible about your environment. Your IP address range(s) andDNS information are prime targets during this phase.
4 Additional Security Tools for AIX Systems

• The second phase is scanning. Having acquired your IP address range(s)and/or DNS information, the attacker now starts probing your systemslooking for active ports. Tools, such as NSA, SAINT, fping, and nmap,which are all covered in this redbook, are commonly used during thisphase.
• The third phase is enumeration. This phase is much more intrusive thanthe previous one. Having narrowed the target to specific systems, theattacker now attempts to find a hole that will enable initial access into oneor more of your systems. Banners, default users, and poorly-configurednetwork resources are all prime targets during this phase. Operatingsystem hardening and strong password policy (both covered in thisredbook) are two of the most effective defenses against this phase.
Initial access
The attacker next attempts to penetrate the system. The initial access istypically not root access, but no worry, that will come next. In this step, theattacker uses things, such as social engineering, password guessing,password cracking, or buffer overflow techniques, to gain the first toehold intoyour systems. There are many tools and techniques described in this redbookto help you prevent this from happening. We also cover additional tools andtechniques that can act as an early warning device to suspicious activitiesand alert you prior to the attacker moving to the next step.
Privilege escalation
Once root is compromised, all is compromised (at least on this system). Thisis every system administrator’s worst nightmare. Many of the sametechniques used in the previous step apply here, but now the attacker has theluxury of actually being on the system, which makes the job considerablyeasier. In addition to the tools and techniques for protecting normal useraccounts, there are additional considerations and steps for root. They too arecovered in this redbook.
Covering tracks
Having gone through all the work in the previous steps to gain access to thesystem, the last thing the attacker wants is to be discovered and have all thatwork go for naught. Altering log files, configuration files, and mimickingnormal system user behavior are but some of the tricks the attacker uses tonot be detected. Your first defense here is to know what “normal systembehavior” looks like. There are many monitoring tools (system-provided andthird-party) to help you with this. In addition, tools, such as Tripwire, provide abaseline snapshot of your critical system directories and files for you to
Chapter 1. Introduction 5

compare things against. We cover both system monitoring and Tripwire laterin this redbook.
Planting back doors
The attacker knows full well that the door used to enter the system may notbe there when needed again. Like any good burglar, the attacker wants tomake sure that there are multiple points of entry available should the needarise to again visit the scene of the crime (and, in the case of the attacker, theneed almost always arises again). To this end, the attacker plants backdoorsand Trojan horses, not only to secure future access, but to also, hopefully,gain enough additional information to be able to launch successful attacks onother systems in your environment. The defense tools covered in theprevious step also apply here, especially tools like Tripwire.
Of course, internal attackers typically have the advantage of being able tohide under the cover of a normal user account. Beyond that, though, theirmethods are quite similar to their external counterparts, even though theirmotives probably are not.
Once you have defined your overall security goals and policies, bothdefensive and offensive, you are ready to move on to laying out your securityarchitecture. It is important to remember that time invested in the earlyphases (such as planning and architecture) pays off by orders of magnitudein the later phases.
1.3 Security framework - Architecture
In general, security requirements differ across environments. Securityrequirements for an isolated lab environment are quite different from those fora large eCommerce site. The primary focus for the first is on physical accesscontrols, whereas the primary focus for the second is on preventing attacks.
In the architecture phase, you examine your environment and plan yourhigh-level defenses. Some of the questions to consider are:
• What are the weakest points in your environment?
• What type of attacks are you expecting?
• From where do you anticipate the attacks to originate?
• Do you concentrate most of your effort and resources on the perimeter, ordo you set up rings of defense, with the perimeter being the outermostring?
6 Additional Security Tools for AIX Systems

The specific questions (and answers) depend not only on the type ofenvironment you have, but also on whether or not it is a new or existingenvironment. For example, fortifying a DMZ is a much different task thancreating one. Additionally, when planning your architecture, don’t forget totake into account attacks from the inside as well as those from the outside.Think of this phase as a chess match:
• How do you plan to protect the king?
• What strategy do you plan to use to out-fox your opponent?
• How will you recover if your initial defenses falter?
• Should you use subterfuge to try and throw him off?
• What will you do if your opponent does not use the strategy that you areexpecting?
As you lay out your architecture, it is very important to keep in mind fundingand support considerations. You need to build something that can besupported in terms of cost, effort, and expertise. Architecting anunsupportable security environment is, in some ways, worse than having nosecurity environment at all. You are lulled into a false sense of security byyour paper architecture, which bears no resemblance to what is actually inplace. Above all else, be realistic when developing your security architecture,and, if possible, include input from the people who will ultimately have tosupport your design.
Two excellent books to consult during this phase, especially whenconsidering strategy, are The Art of War, ISBN 0-1950-1476-6, by Sun Tzu,and Information Warfare and Security, ISBN 0-2014-3303-6, by Dorothy E.Denning. In addition, the tools and techniques covered in this redbook can beused to provide some of the “bricks and mortar” for your design.
1.4 Security framework - Implementation
This phase also depends on whether or not you are working with a new orexisting infrastructure. Retrofitting security to an existing environment ismuch more complicated than building it from scratch. You have to take intoaccount existing production services and plan your changes in such a manneras to not disrupt these services. Tools, such as IPSec, TCP Wrapper, and,especially, PortSentry, are tricky to configure properly on the first attempt. Youshould test them thoroughly before implementation and monitor them closelyafterwards to be certain that you have not inadvertently denied access tolegitimate clients.
Chapter 1. Introduction 7

A methodical approach to this phase will serve you well. Here are somepossibilities:
• Start with servers on the perimeter of your network and work your wayback to the servers on your internal networks, or vice versa.
• Implement by server type. For example, all firewalls, then all Web servers,then all mail servers, and so on.
• Start with a specific security package, such as IPSec or TCP Wrapper,and implement that on all designated servers; then, move on to the nextsecurity package.
• Work from the bottom to the top. Start with the physical layer (physicalsecurity); then, move to the network layer, then the operating system layer,and, finally, the application layer.
Which ever methodology you pick, stick with it throughout yourimplementation phase, and document the configuration as you go. It is a verygood idea to keep a complete set of your system and security documentation,such as listings of configuration files and filter rules) stored offline. In theevent of a breach, this documentation becomes invaluable for damage controland postmortem activities.
One of the primary goals of this redbook is to provide you with the informationyou need to successfully implement your security environment with some orall of the tools and techniques covered here. It is important to understand thatthis phase, in particular, is iterative. Security implementation is not a one timething. Discovery of new vulnerabilities in software and hardware requires thatyou routinely revisit your implementation to apply new patches, updateconfiguration files and lists, and, at times, replace ineffective tools.
1.5 Security framework - Monitoring
So, now that you have your security environment set up and operational, thenext phase involves adding a feedback loop to the previous phases. In thisphase, you implement system and security monitoring. Both automated andmanual monitoring should be considered here. The goal is to develop areliable system that provides you with early warnings of suspected attacks.There is, however, a very fine line between too little information and too muchinformation when it comes to this type of monitoring. With too littleinformation, you run the risk of missing suspicious activities early enough totake the necessary preventative action. With too much information, you alsorun the risk of missing something important, but, this time, it is because it gets
8 Additional Security Tools for AIX Systems

lost in all of the detail and background noise. It takes time and experiencewith the data to find the balance that works best for you.
Here are some of the areas to consider for monitoring:
• Application logs (httpd_logs, access_logs, firewall logs, and so on)
• Special logs provided by the additional security tools you have installed
• Audit logs
• System logs (syslog, sulog, wtmp, lastlog, failedlogin, and so on)
• System errors (errpt)
• System performance statistics (vmstat, iostat, topas, and so on)
• Network performance statistics (netstat, netpmon, and so on)
• Physical access records
• Critical system file and directory permissions and ownership
Even though it is possible to automate the entire monitoring process, it is,generally, not a good idea. A combination of automated and manualmonitoring is a better solution. Here are some of the reasons why:
• It is too easy to take fully-automated monitoring for granted and, over time,become complacent.
• Fully-automated monitoring follows the set logic pattern that is built intothe scripts.
• Manual monitoring requires you to think about security on a daily basis.Performing a system health check every morning (at least on a randomsubset of your systems) keeps security in the forefront of your mind.
• Manual monitoring helps you develop a feel for the normal performance ofyour systems and environment. This empirical data often proves to be afar more useful early warning indicator than any of the data coming out ofthe automated processes.
• With manual monitoring, you can follow an infinite number of paths andmake unexpected linkages that would be impossible with automatedmonitoring. A great illustration of this point can be found in The Cuckoo’sEgg: Tracking a Spy Through the Maze of Computer Espionage, ISBN0-6717-2688-9, by Clifford Stoll.
Do both, automated and manual. Also, consider using multiple tools andmultiple data sources to cross-check the information provided by each of thetools and logs. Like a good newspaper reporter, verify your sources. Tools arenot perfect, and individual logs do not capture everything; each has its own
Chapter 1. Introduction 9

strengths and weaknesses. What you are striving for is an overall picture andfeel for the health of your environment.
It is also a good idea to take a snapshot of each of your systems periodicallyand store the information on a different system and/or offline. Be sure to keepseveral historical copies of the snapshots as well, so that you have more thanone baseline to use as a reference when investigating system anomalies.
One final note to close of the discussion of these first four phases. If you donot feel comfortable tackling these processes alone, there are a number ofprofessional services companies (IBM being just one) that can help youthrough the process. They will even be there for you should the worst happen,and you find that you have to move on to the next phase (for real). To find outmore about the IBM Emergency Response Service, visit:
http://www.ers.ibm.com/
1.6 Security framework - Incident response
Nobody likes to think about this phase. It is every system administrator’sworst nightmare, but that is exactly why it should be thought about, plannedfor, and regularly rehearsed.
The absolute worst time to figure out how you will respond to a securityincident is after one has already occurred. The goal of this phase is to be in aposition such that, if the worst happens, you know exactly what to do and howto do it. In other words, your incident response team springs into action like awell-oiled machine.
So, the first step in the process is to identify your incident response team.Even if you have contracted out your emergency response services (ERS), oreven if your organization has a corporate-level ERS team, you should stilldesignate a small team of people who have a thorough knowledge of theincident response policies and procedures and can take control of thesituation when a breach is discovered. Like any professional team, theyshould practice, practice, practice. Consider implementing quarterly dry-runs,where a simulated breach is identified and dealt with. It is also extremelyimportant for everyone in your organization to understand that this team is intotal control in the case of a breach or suspected breach, and they should alllook to this team for all command and control decisions. Additionally, yourincident response team should have one single leader who has the final sayon all investigative activities.
10 Additional Security Tools for AIX Systems

Think of responding to an incident in terms of a crime scene investigation.You need to gather forensic evidence in such a way as to not contaminate thescene. In the case of incident response, you have the added challenge of notknowing if the attacker has fled the scene of the crime. You have to assumethat the attacker is still present. So, you must attempt to conduct yourinvestigation in a manner that will not alert the attacker to your activities. Thisis extraordinarily difficult to do, especially on an emotional level. Your firstinstinct is to shut everything down so that the attacker cannot get back in.This, however, fundamentally changes the crime scene, and may destroy anychance of actually identifying and catching the attacker. This is why it is avery good idea to have a neutral third-party in charge of the incident responseteam. Typically, the people responsible for the day-to-day administration ofthe systems are too close to the situation emotionally and do not have theperspective necessary to make the calm, rational decisions needed in asituation like this. That, however, is not to say that their expertise is notneeded. The investigation cannot occur without it.
Incident response should follow a systematic approach similar to thefollowing:
1. Identify the suspected scope of the breach.
2. Start by outlining what is known.
3. Work methodically through the environment, either from outside in(external attack) or inside out (internal attack).
4. Work methodically through each system. Start with the application layerand work down, or start with the network layer and work up.
5. Have a predefined list of items to look at on each system. Additional itemscan be inspected as needed, but, at a minimum, inspect each item on thelist in the order identified on the list. The list should include things likesystem logs, system configuration files, directory and file permissions,audit logs, application logs, output from system commands, source codefiles, system error reports, and so on.
6. Document everything as you go, and update your outline of what is known.
7. Validate assumptions with facts and data. Speculation is fine, but do notbe too quick to jump to conclusions, and make sure that the conclusionscan be backed up with hard evidence.
8. Do not wait too long before calling in additional experts to help. Rememberthat it does not take long for the tail of evidence to grow cold in a crimescene investigation.
Chapter 1. Introduction 11

Keep this final phase in mind as you read through the remainder of thisredbook. For each of the tools and techniques, think about what would be ofvalue to you during the investigation of a security incident.
Additional information about incident response in the form of step-by-stepguides is available (for a fee) from:
http://www.sanstore.org/
1.7 Next steps
The remainder of this redbook covers additional tools and techniques you canuse to build or enhance your security environment. The material is roughlyorganized from an outside-in, top-down perspective. It begins with adiscussion of firewalls and ends with a discussion of operating systemhardening.
Many of the tools covered in this book are available for AIX in installp formatfrom the Bull site at:
http://www-frec.bull.fr/
If you have never visited this site before, we encourage you to go there andbrowse. In addition to the security tools, it contains a wealth of other softwarefor AIX.
12 Additional Security Tools for AIX Systems

Chapter 2. Firewalls
A firewall is a system designed to prevent unauthorized access to or from aprivate internal network. It is typically set up at the periphery of a network,whether it is between the internal and external networks or between differentsegments of the internal network (for example, between departmental LANs).You may liken a firewall to the security post at the entrance of a high-securityarea where the guards will allow only vehicles with appropriate passes topass through.
For firewalls to properly do their job, all network traffic must be routed throughthem. Having alternate network paths defeats the purpose of having afirewall. Dial-up connections within the network to independent ISPs is anexample of an alternate network path. The total security of a networkdepends on its weakest link. Having alternate paths may weaken the securityposture and create an element of the unknown because of the additionalvulnerabilities opened up through the alternate path. In general, elements ofuncertainty should be eliminated or at least minimized in a secureenvironment.
Firewalls can protect against most known forms of direct attack. Since newexploits are developed or discovered constantly, keeping up to date with thelatest attack methods as well as product patch or release levels is a goodidea. It is impossible to predict all possible attacks that may be attempted.However, properly-configured firewalls (together with properly-configuredrouters, switches, and Internet servers) go a long way in providing goodprotection against most forms of attack.
Firewalls can be implemented as hardware or software solutions. Hardwaresolutions are simpler and, typically, not as sophisticated as their softwarecounterparts. In general, hardware solutions usually have superiorperformance. In this book, we will focus on the software solutions.
2.1 Misconceptions about firewalls
A big misconception is that firewalls provide all the protection required for anetwork. This is untrue. Firewalls can be the primary security enforcer, butmust be used in conjunction with other security elements. For example, if youhave a badly-configured Web server that has security problems, having afirewall will not be sufficient. Attackers will be able to capitalize on thevulnerabilities of the Web server using legitimate commands from theirremote client through the firewall to the Web server.
© Copyright IBM Corp. 2000 13

A firewall does not provide protection in server exploits where a legitimateclient accesses a legitimate server on a legitimate port. Vulnerabilities on theservers themselves may be exploited by attackers to gain unauthorizedaccess to the servers themselves. As such, it is important to stay current withsecurity patches (operating system patches and application patches) andmaintain rigorous control of the system configurations on the serversthemselves.
Some firewalls, such as Check Point FireWall-1, provide protection from Javaand ActiveX exploits by giving the option to filter out all Java and ActiveXcode through the firewall. Since Java and ActiveX exploits are based onprogramming problems, firewalls cannot reliably decide which code is good orbad. By filtering all Java and ActiveX code, all programs written in theselanguages, be they well written or poorly written, will not be allowed throughthe firewall.
Another common error is to leave firewalls in their default configurations.Default configurations are typically insufficient and may leave certain knownvulnerabilities open. For example, Java and ActiveX filters are not enabled bydefault in Check Point FireWall-1. Therefore, it is important to stay up to datewith new vulnerabilities (through firewall vendor Web sites, mailing lists,CERT advisories at www.cert.org, and so on), and close them in a timelymanner.
Firewalls do not provide protection for password breaches. If an attackersteals a password or guesses it correctly, the firewall will be unable to blocksuch an attacker. As long as someone has the password (by whatevermeans), firewalls have difficulty determining which user is authentic andwhich is not. With this in mind, it is important to implement strong passwordson AIX (see Section 8.6, "Step 5: Set up strong password policy" on page194, for more information on how to implement strong passwords).
Another area where there is typically a lack of focus is logging. Many systemadministrators do not bother with logging because either they do not realizeits importance or they are under the misconception that it is unnecessary.Logging becomes critical when a security breach occurs. Hackers willtypically test the site for weak spots prior to launching an attack. They willprobe and scan the network looking for potential weaknesses. Oftentimes, itis possible to detect such activity by carefully watching the logs. Additionally,if a break-in attempt does occur, the logs can prove invaluable to the securityexperts doing the analysis and tracking. With this in mind, it is important tokeep all logs (system and firewall) in a safe and trusted location and tomaintain regular offline backup copies of them as well.
14 Additional Security Tools for AIX Systems

2.2 Types of firewalls
There are four architectural models for firewalls:
• Static packet filter firewalls
• Circuit level firewalls
• Application layer (proxy) firewalls
• Dynamic packet filter firewalls
Each is briefly described in the following sections.
2.2.1 Static packet filter firewallsStatic packet filter firewalls control traffic by examining the packet headerinformation passing between service ports. For example, if you have anInternet Web server set up for your business, you have to configure the staticpacket filter firewall to allow traffic from all external users (Internet) to yourWeb server (port 80, typically). The level of filtering is simple and has noembedded logic to handle the more sophisticated attacks.
This type of firewall inspects packets at the network layer and is not capableof processing state information in the application-layer protocols, such asftp/http/telnet. The security level is the lowest and is not considered secure.Static packet filter firewalls are the fastest of the four types. They arestateless, support network address translation, and can be implemented inhardware.
AIX 4.3.x provides static packet filtering through the IPSec facility(bos.net.ipsec.rte fileset), and static packet filtering is also native to manyrouters. Routers, in particular, are very important companions for other typesof firewalls. Although the router cannot by itself be the primary securityenforcer, a properly-configured router is essential to the overall security of thenetwork. Routers with well-designed and maintained filter sets go a long waytowards fending off hackers because these filters provide the first line ofdefense in many internet attacks (denial of service, network mapping).
2.2.2 Circuit level firewallsCircuit level firewalls operate at the transport layer. They support TCPprotocol only (no UDP). This type of firewall validates that a packet is either aconnection request or a data packet belonging to a connection or a virtualcircuit between two peer transport layers. The firewall forms a type of statetable to monitor the handshake of each new connection. After thehandshakes are complete, the firewall inspects the packets to determine if the
Chapter 2. Firewalls 15

packets are to be allowed through or not, based on a ruleset. Once allowed,all network packets associated with this connection are allowed withoutfurther checks.
Circuit level firewalls are generally faster than application layer firewallsbecause less computation is done on the packets. They also support networkaddress translation.
2.2.3 Application layer (proxy) firewallsApplication layer firewalls act as a proxy between internal and external users.No direct connections are made between the internal clients and the externalserver. The advantage of proxy firewalls is that the firewall has better controlover what access to grant. For example, an FTP proxy can be used to restrictcommands, for example, allowing get but disallowing put commands.
The disadvantage of proxy firewalls is that they are tied to specific protocols.An FTP proxy is different from a HTTP proxy and so on. Each specificprotocol requires its own specific proxy, and when new protocols come out,new proxies have to be developed by the firewall vendors.
A proxy firewall sits transparently between an end-user and a serviceprovider; both sides are unaware of the proxy in the middle. Proxy firewallsare slow in comparison to the other types of firewalls. They support networkaddress translation and provide very good auditing and logging facilities.
2.2.4 Dynamic packet filter firewallsDynamic packet filter firewalls provide additional protection for the UDPtransport protocol by associating the UDP packets with a virtual connectiontable within the firewall. This connection table keeps track of the connectionat both sides of the firewall. So, for example, if an attacker attempts tosimulate a reply to a request from an internal host, it will fail. The dynamicpacket filter firewall will know that the internal host did not initiate the request,and, therefore, will not allow the simulated reply in. A static packet filterfirewall would not be able to detect that the reply was simulated and couldpotentially allow it to pass to the internal host and inflict its intended damage.
2.2.5 Comparison between the different typesStatic packet filter firewalls are considered outdated and the least secure.They should not be used as the sole enforcer of security because of theirlimitations. However, when implemented on routers at the edge of yournetwork, they form the first line of defense in good firewall design bypreventing certain traffic from reaching your network.
16 Additional Security Tools for AIX Systems

Circuit level, proxy, and dynamic packet filter firewalls have their strengthsand weaknesses. Good firewalls are hybrids, with characteristics of each ofthese types of firewalls incorporated into one product.
For more information on firewall evolution and types, visit:
www.cisco.com/univercd/cc/td/doc/product/iaabu/centri4/user/scf4ch3.htm
2.3 Firewall designs
Having covered firewall architecture, we now turn our attention to firewalldesign. The complexity of your network and the nature of your business willinfluence and shape the decisions you make here. These designs arepresented merely as a starting point for your design work.
2.3.1 Basic firewall designThe most basic firewall system is one that separates two IP networks, suchas the Internet and the company intranet. All traffic between the two securityzones must pass through the firewall system for it to be effective. Theconfiguration of the firewall specifies which connections are allowed andwhich are denied. The basic firewall design is shown in Figure 1.
Figure 1. Basic firewall design
Different technologies can be used to control the traffic flow between thenetworks. Packet filtering checks individual IP packets, and proxies work onthe level of connections and application byte streams. In modern firewallproducts, these techniques are often combined in a hybrid design that
Firewall
External NetworkInternal Network
Public Server 1172.16.30.1
Public Server 2172.16.30.2
Public Server 3172.16.30.3
Router to ISP
Public Server 4172.16.30.4
Chapter 2. Firewalls 17

supports both techniques as discussed in Section 2.3, “Firewall designs” onpage 17.
It is important to keep in mind that a firewall is only able to check the trafficbetween the different attached networks. It cannot prohibit unwantedconnections within one security zone. This fact can lead to major securityrisks. For example, if the company's public Web server is placed within theinternal network, the firewall needs to be configured to allow HTTPconnections to this system so that everyone can get to the Web pages. If theWeb server contains security holes (due to software bugs, configurationerrors, insecure dynamic content, or any one of many other possible causes),an attacker can gain full access to the Web server system. The firewall cannotprevent the attacker from leveraging this to access other systems within onesecurity zone (in other words, the internal network). Placing important serversoutside the firewall in the external network is not recommended either, since,then, they cannot be protected by the firewall against attacks.
Experience shows that it is not realistic to expect complex server software,such as Web servers, to be free of security holes. Major companies andgovernment institutions have frequently been victims of these kinds ofattacks. Every day, new security holes are found and shared in theunderground by hackers. It takes time for this information to reach publicInternet sites and security mailing lists and even more time for softwarecompanies to develop and test patches to fix the vulnerabilities. Knowledge isyour best defense, and, to that end, it is prudent to keep up to date with thelatest information by reading security-related Web sites, joining mailing lists,and learning to think as the hackers do.
2.3.2 Firewalls with demilitarized zone (DMZ)More security can be gained by introducing a perimeter network within whichpublic servers can be placed. This zone, known as the DMZ, is considered tobe semi-secure. Secure because a firewall is protecting it, and not securebecause it is accessible directly from the Internet. Servers that are to bevisible from the Internet should be placed in the DMZ. All other servers,including infrastructure support servers to the DMZ, should be separatedfrom the DMZ by another firewall. Thus, the classic DMZ setup has twofirewalls and a DMZ server network in-between as shown in Figure 2.
18 Additional Security Tools for AIX Systems

Figure 2. Firewall with DMZ
The advantage of this setup is that the publicly-accessible servers are nowprotected from the external network and separated from the internal network.No direct connection is allowed from the Internet to the internal servers, andtwo firewalls must be compromised for attackers to gain access. You may alsowant to consider using different firewall technologies on the two firewalls; thatway, vulnerabilities in one firewall may not be used to breach the secondfirewall. The obvious disadvantage of this setup is that you need two firewalls,which increases the complexity and the administrative overhead, especially ifdifferent technologies are used for the two firewalls.
Further protection is still necessary for the public servers on the DMZnetwork. In a worst case scenario, when Public Server 1 is broken into, moresecurity is lost than necessary. For example:
1. The intruder that broke into Public Server 1 can now freely attack PublicServer 2 because there is nothing between them.
2. The intruder on Public Server 1 can easily monitor all network traffic(including company e-mail and other potentially sensitive information whencollected systematically) that leaves both firewalls on the DMZ network side.This technique is known as network sniffing. Analyzing who is talking towhom is called traffic analysis (even encrypted mail typically has plain textFrom: and To: mail addresses information that allows some insight intopossibly confidential transactions).
E xte rn a l F ire w a ll
E x te rn a l N e tw o rkD M Z N e tw o rk
P u b lic S e rve r 11 72 .16 .30 .1
P ub lic S e rve r 217 2 .1 6 .3 0 .2
R o u te r to IS P
In te rn a l F ire w a ll
In te rn a l N e tw o rk
P u b lic S e rve r 31 72 .16 .30 .3
In te rna l S e rve r 11 0 .1 6 .30 .1
In te rna l S e rve r 21 0 .1 6 .30 .2In te rna l S e rve r 31 0 .1 6 .30 .3
P ub lic S e rve r 41 72 .1 6 .3 0 .4
Chapter 2. Firewalls 19

One common way of closing this vulnerability is to use manageable switchesbetween the servers in the DMZ network. Another possibility is to use staticpacket filter routers with filters set to prevent certain traffic or certain routes.Using the routing table, you may also segregate subnets within the DMZnetwork. A third option is to use the IPSec facility under AIX 4.3.x toimplement static packet filtering directly on the public servers.
Switches are a good choice since they do not employ a shared medium. Forexample, on a shared medium, account logins from one server to another arevisible to all servers sharing that same medium. Services, such as telnet andftp, transmit account IDs and passwords in the clear across the network.Suppose Servers A, B, and C are all on the shared medium, and supposefurther that an attacker has compromised Server C. The account information(ID and password) passed between Server A and Server B when a userestablishes a telnet or ftp session is visible (through sniffing) to the attackeron Server C. With switches, the medium is no longer shared but, rather,point-to-point, which makes the kind of sniffing outlined in this scenario muchmore difficult. A properly-configured switch will have a limited number ofpaths from the source to the destination, and access to multiple destinationsis controlled entirely within the switch.
However, since active network devices, switches, and routers are designedwith performance, speed, and convenience as their primary objectives.Security is somewhat of an afterthought. Experience shows that they are,therefore, not dependable as your only means of defense. In addition tomissing emphasis on security in development, they usually cannot properlyfilter even common protocols, such as FTP, due to very limited filteringcapabilities. Also, configuring filter sets is somewhat counter-intuitive,cumbersome, and error prone, and ongoing maintenance provides additionalchallenges.
Switches and routers have even been known to contain hardwired backdoorpasswords allowing easy reconfiguration by a knowledgeable attacker. Inaddition, switches and routers are usually configured by sending plain text(not encrypted) passwords over the network. These passwords can be easilycaptured, or even guessed, and are reusable.
So, to summarize, switches and routers can be used to provide additionalfiltering and alarming but should never be relied on as a primary anddependable means of providing security to the business. They can be aformidable partner to firewalls if properly configured and, just as importantly,properly administered. Often, the people who set up the switches and routersand those who administer them are in different groups and have vastlydifferent sets of skills. Typically, administrators have to maintain all sorts of
20 Additional Security Tools for AIX Systems

equipment, from switches to routers to servers to PCs to whatever else theircompany has sitting on the network, which makes it very difficult, if notimpossible, to be experts in and keep current with each.
More information on classic firewall designs can be found in:
• Building Internet Firewalls, ISBN 1-5659-2124-0, by D. Brent Chapman,Elizabeth D. Zwicky, and Deborah Russell
• Firewalls and Internet Security: Repelling the Wily Hacker, ISBN0-201-63357-4
2.3.3 Compartmentalized firewall environment designA more secure and flexible approach suitable for complex environments is thecompartmentalized firewall environment in which a single firewall system isequipped with more than two network interfaces and which can, therefore,mutually protect several different compartments, such as DMZs or securityzones, from each other.
Compartments are a new name for security zones that are protected fromeach other by one firewall. We use it to differentiate this approach from thesingle, two-firewall DMZ or Secure Server Network. The design that hasemerged in recent years, and may be considered state of the art, lookssimilar to what is shown in Figure 3 on page 22.
Chapter 2. Firewalls 21

Figure 3. Compartmentalized firewall
The different compartments (External Network, DMZ Network 1, DMZNetwork 2, Internal Network) each have their own physical networkconnected to the firewall through dedicated network cards. The firewall is nowable to control all the traffic between these compartments. IP sniffing isalmost useless to an attacker because they are able to see only the trafficwithin the one compartment they have broken into. Since the compartmentsare independent, a security breach in one of the attached systems (forexample, Public Server 1) does not lead to a total compromise of theenvironment. The damage is restricted to the compartment where thecompromised server is located. Careful planning of the compartments isrequired so that a partial security breach does not turn into a total securitybreach. You should strive to keep the compartments homogeneous. A Webserver breach should not entitle the attacker to go after your mail servers. Ifpossible, each type should be in separate compartments.
A properly-configured firewall should generate an alert if the intruder tries toleverage more access from the attacked system, for example, by having theWeb server try to access the mail server. One of the main functions of afirewall is to generate alarms when suspicious activity is detected (forexample, the Web server connecting to the mail server) because no security
Firewall
External NetworkDMZ Network 1Public Server 1172.16.30.1
Public Server 2172.16.30.2
Router to ISP
Intern al Ne tw
ork
InternalServer
110.16.30.1InternalS
erver2
10.16.30.2InternalS
erver3
10.16.30.3
Pub
licS
erve
r4
172.
17.3
0.2
Pub
licS
erve
r3
172.
17.3
0.1
DM
ZN
etw
ork
2
22 Additional Security Tools for AIX Systems

device will ever be able to protect you against all possible threats. It shouldalert you when you are under attack and, therefore, enable you to react. Beaware that the attackers are always one step ahead since they have theability to plan and launch many possible attacks, and only one has to besuccessful whereas the defender has to defend against an infinite number ofpossible attacks. Obviously, the defender can only hope to detect asuccessful attack early and initiate reconnaissance and countermeasures.
The compartmentalized approach entails somewhat higher complexity (morenetwork cards in the firewall and more routing issues), but the additionalsecurity is well worth the cost. The real problem in this setup (as well as allother firewall designs) is that if the firewall is broken into, all security is lost.Therefore, it is extremely important to make the firewall as secure aspossible. The operating system should be hardened and always up-to-date,and maintenance procedures should be well documented and alwaysfollowed. Operating system insecurities due to low integrity, quality,incomplete hardening, and human error have been major factors in manysecurity breaches.
Plan ahead carefully before installing additional software on a firewall system.Only software that was explicitly designed, tested, and audited for use in afirewall environment should be considered for use. The firewall should servethe single-purpose of being a firewall. Application software belongs onapplication servers, not firewalls. Also, it is a good idea to physicallydisconnect the firewall from the external network prior to starting anymaintenance activities. A recent successful attack was launched while afirewall was down for maintenance activities.
Always keep the worst-case scenario in mind. A single bug in the softwareusually enables the attacker to execute arbitrary commands and ultimatelygain full control of the system. A security breach of this nature is very badwhen it occurs on a server that is isolated in a compartment, but it isdisastrous when it occurs on the main firewall system.
The firewall system shown in Figure 3 on page 22 should perform networktraffic control and nothing else. Either IP filtering or secure proxies or anycombination of both can be used for that purpose. Both have their ownadvantages. IP filtering makes it very difficult to break into the firewall systembecause only IP packets are processed, and that task is carried out by kernelmodules designed exclusively for that task. Proxies that are designedexclusively for firewall use can protect against certain rare network-levelattacks because new IP packets are generated by the operating systeminstead of forwarding the original (and potentially harmful) IP packets. Inaddition, the number of TCP or UDP server programs on the firewall should
Chapter 2. Firewalls 23

be kept to an absolute minimum because these kinds of programs are usuallythe weak points taken advantage of by potential intruders.
2.4 Securing firewalls
Think of a firewall as an application. To secure the firewall, you need to firstsecure the operating system (discussed in Chapter 8, “Securing AIX” on page139); then, secure the firewall software. A firewall is a security enforcer and,as such, it must be very secure. It holds the keys to your kingdom, and, onceit is compromised, the battle is, generally, lost.
The default option settings in firewalls are usually not sufficient to provide asecure environment, and additional configuration is typically required. Manyof the common attack methods are not covered by the default settings, andnew attack methods are being invented almost daily; so, firewall configurationshould be viewed as an ongoing activity rather than just a one-time setup.Filter rules should be kept simple and short. Complicated rules may leaveunanticipated holes in the rulebase. Constant auditing and log monitoring iscrucial for early detection of a potential (or real) security breach.
Some firewalls have default ports on which they listen. For example, CheckPoint FireWall-1 listens on ports 256, 257, and 258 by default. To identify aCheck Point FireWall-1, an attacker can use a port scanner to scan thoseports to see if they are active. Therefore, to prevent easy detection, you maywant to add filter rules to your routers to prevent any external network trafficto those ports.
2.5 Firewalls on AIX
Two common firewalls that run on IBM RS/6000 and the new IBM ^
pSeries hardware are Check Point FireWall-1 and IBM Secureway Firewall.Both products are hybrid firewalls that incorporate characteristics of bothdynamic packet filter firewalls and application layer (proxy) firewalls. CheckPoint FireWall-1 is covered in Chapter 3, “Check Point FireWall-1” on page25, and IBM Secureway Firewall is covered in Chapter 4, “IBM SecurewayFirewall” on page 47.
A good source for comparing firewall products from different vendors is:
www.icsa.net/html/communities/firewalls/certification/vendors/index.shtml
24 Additional Security Tools for AIX Systems

Chapter 3. Check Point FireWall-1
Check Point FireWall-1 is the industry leader for firewalls. Utilizing CheckPoint’s patented Stateful Inspection Technology and Open Platform forSecure Enterprise Connectivity (OPSEC), FireWall-1 integrates and centrallymanages all aspects of network security.
With its position as market leader, a lot of other companies have integratedtheir products with FireWall-1. There are a number of products thatcomplement FireWall-1, both from Check Point and their business partners.OPSEC is the binding platform that provides for this integration.
The Check Point homepage can be found at:
www.checkpoint.com
A good Web site for Check Point FireWall-1 troubleshooting information,automation scripts, and answers to general questions is:
www.phoneboy.com/fw1
3.1 FireWall-1 features
The strength of FireWall-1 is its ease of use in terms of the user interface forconfiguration, management, and logging. This makes the product intuitive toset up and use. The documentation is good, and there is additional supportavailable on the Internet. Add-on software is also available to turn FireWall-1into a total security solution.
FireWall-1 provides a central management console facility that enables you toadminister a number of firewalls remotely. A central management consoleincreases manageability by having a central location from which to implementsecurity policies across multiple network entry points. Traffic to and from themanagement console is encrypted.
FireWall-1 supports multiple authentication schemes, including SecureID andRADIUS through internal or external authentication servers. Other userauthentication schemes include operating system password, FireWall-1password, S/Key and digital certificates. It also has built-in support for LDAPdirectory services to centralize user management.
Encryption can be used for VPN with support for Internet standards (IKE,IPSec, DES, 3DES, RSA, Diffie-Hellman, and so on). SecureRemote can be
© Copyright IBM Corp. 2000 25

used to provide IPSec compliant encryption and key management to extendVPN to remote users.
There are three security servers in FireWall-1 that provide for contentsecurity:
• HTTP Security Server protects Web servers against malicious Java andActiveX applications as well as undesirable URLs.
• FTP Security Server protects FTP servers by controlling access to get
and put commands.
• SMTP Security Server protects Mail servers by removing certainsendmail header fields.
Check Point FireWall-1 is available in several different configurations:
• Basic firewall (includes management module and firewall module)
• Firewall with VPN support (includes VPN for multiple site setup)
• Firewall with VPN and DES encryption - may be subject to US exportregulations based on key strength
• Firewall engine (no management console; requires a separatemanagement console)
Check Point FireWall-1 requires licenses to be installed for it to work properly.Licensing is based on the number of internal hosts to be protected (25, 50,250, or unlimited). Ensure that the correct license package is obtained.
A license is also required to use the Motif GUI to connect to the FireWall-1management console. This license is not required with the Windows GUI. TheMotif license needs to be installed on the management console, and it shouldbe tied to the management console's hostname or IP address as appropriate.In FireWall-1 4.0 and earlier, this license is free and can be requested off theWeb. In FireWall-1 4.1, you will need to pay extra for it, and it should beordered with the FireWall 4.1 product.
For performance, built-in server load balancing (five different algorithms) maybe used to transparently load balance servers behind the firewall. FireWall-1also has network address translation (NAT) using many-to-one andone-to-one configurations.
3.2 Complementary software for FireWall-1
Other products can be used with FireWall-1 to provide a total enterprisesecurity solution. Bandwitdth management (Floodgate), compression, and
26 Additional Security Tools for AIX Systems

hardware-based VPN-based acceleration are used to provide betterperformance, which is increasingly important in today’s Web environment.
For high availability, products, such as Stonebeat, can be used for automatingfailover. With firewalls being a crucial component of the network, Stonebeatincreases the availability of the server by having a standby machineautomatically take over for the primary firewall after a system or networkinterface failure. This product is built on top of FireWall-1 and, as such, istailored to this firewall. Other generic high availability software, such asHACMP, may also be used with FireWall-1 or IBM Secureway Firewall.However, the strength of Stonebeat is that it was created specifically withFireWall-1 in mind. It is easily installed and configured and provides fullfunctionality for the firewall.
3.3 Securing FireWall-1
Check Point FireWall-1 installation does not include operating systemhardening; so, you will need to do this yourself. This is an important stepbecause the firewall software sits on top of the operating system, and yoursecurity is only as strong as its weakest link. For more information onoperating system hardening, refer to Chapter 8, “Securing AIX” on page 139.
In this book, we do not cover how to install and initially configure Check PointFireWall-1. That subject is well covered on the Check Point Web site(www.checkpoint.com/support/technical/documents/index.html). This site ispassword protected, but the password is provided to both customers andresellers. Additional information can be found in the redbook, Check PointFireWall-1 on AIX, A Cookbook for Stand-Alone and High Availability,SG24-5492.
However, we do cover additional procedures for tightening Check PointFireWall-1 security. Specifically, we cover:
• Closing vulnerabilities during system start up
• Managing FireWall-1 logs
• Securing FireWall-1 default configurations
• Creating a useful rulebase
• Viewing connections
• Enabling other defense mechanisms
Chapter 3. Check Point FireWall-1 27

3.3.1 Closing vulnerabilities during system startupThere is a period of time during AIX start up where the network protected bythe firewall is vulnerable. It occurs at the point in AIX start up when thenetwork is available and the firewall policies have not yet been loaded. Duringthis short time, attackers can attack the network by routing their packetsthrough the firewall since no security policy is loaded. To protect yournetwork, disable IP forwarding (no -o ipforwarding=0) on the firewall duringthis period to prevent any connections from going through. Once the firewallpolicies have loaded, IP forwarding can be enabled again.
IP forwarding (ipforwarding) is an AIX network option (no) that specifieswhether or not packets will be forwarded from one network interface toanother. In other words, should the AIX server act as a gateway. During thenormal operation of a firewall, IP forwarding must be allowed since it is agateway. So, as already mentioned, you need to turn IP forwarding off duringthe vulnerable period and on during normal operation. At system start up, thedefault value of IP forwarding is 0 (disabled). After the firewall policies haveloaded, turn it on by changing it to 1 (enabled).
For example, you can have a script, such as the following, executed out of/etc/inittab. Be sure to comment out the start up of FireWall-1 in/etc/rc.net, and make certain that ipforwarding has not been changed fromits default of 0 (disabled) in /etc/rc.net or any of the other start up files, suchas /etc/rc.tcpip or /etc/rc.local.
Also, as a side note, the portmap service is started by /etc/rc.tcpip duringsystem start up. You may have already disabled portmapper as part of youroperating system hardening. However, if you plan to use the Motif GUI, youwill need to reenable portmapper because Motif relies on the portmap servicefor port allocations.
#/bin/ksh
LOG=/tmp/log/consoleFWDIR=/usr/lpp/FireWall-1/export FWDIR
/usr/lpp/FireWall-1/bin/fwstart > $LOG 2>&1
/usr/sbin/no -o ipforwarding=1echo "Enabling IP forwarding" >> $LOG 2>&1/usr/sbin/no -a | grep ipforwarding >> $LOG 2>&1
exit 0
28 Additional Security Tools for AIX Systems

3.3.2 Managing FireWall-1 logsWhen setting up FireWall-1, it is a good idea to create a separate filesystemfor the logging directory, such as $FWDIR/log or /usr/lpp/FireWall-1/log. Thisseparate filesystem prevents the /usr filesystem from filling up because offirewall logging activity, and it eases the management of the log directory. Thesize of this filesystem depends on the amount of traffic that goes through thefirewall, the level of verbosity you have configured for the firewall loggingactivity, and the amount of historical logging data you want to keep.
Log file maintenance is best controlled through crontab. FireWall-1 provides alog switching option (fw logswitch), which should be run periodically to ensurethat the logs do not grow too large. For example, to switch logs daily at 2:00a.m., the following entry can be added to root’s crontab:
0 2 * * * /usr/lpp/FireWall-1/bin/fw logswitch > /dev/null 2>&1
3.3.3 Securing FireWall-1 default configurationsThe FireWall-1 default options make it quick and easy to install and use theproduct. However, you may want to further tighten security by removing thedefaults and creating rules especially for the things you really need. To turnon functionality, you can either enable the option in the Properties Setupmenu or create a rule for it. In general, if you enable an option from the menu,it does not enable logging for that option. If, instead, you create a rule for it, itwill give you the option to turn on logging. Therefore, better control isachieved through the latter, rather than the former.
For example, by default, you can ping the firewall from anywhere. In mostcases, you do not want to allow that; so, you disable the default ICMP option.You then create a new rule (with logging turned on) for this in which youspecify the trusted hosts that are allowed to ping the firewall. All other hostsare forbidden. This flexibility gives you a high granularity of control over thesecurity level on the firewal, and the logging facility gives you an audit trail foreach of the rules.
Upon installation, there are a number of services that are allowed by default,independent of rulebase. They are found in the Properties Setup menu (fromthe main menu bar, click Policy, and then select Properties).
We recommend that you enable the following two options only:
Accepting UDP Replies
The Accepting UDP Replies option enables replies for two-way UDPcommunications. This is necessary if you want the firewall to track UDP
Chapter 3. Check Point FireWall-1 29

communications. Having Check Point track the state of UDP communicationsis a good idea. It adds state to an otherwise stateless connection. The otheroption is to create separate rules for UDP replies, but this does not providethe advantage of state.
Accepting Outgoing Packets
The Accepting Outgoing Packets option is used to enable outgoing packetsinitiated from the firewall or routed from the firewall to leave the firewall. Theassumption here is that all packets that come from the firewall are trusted.
Figure 4 shows the Properties Setup menu with the Accepting UDP Repliesand Accepting Outgoing Packets options turned on.
Figure 4. Security Policy tab in Properties Setup
We recommend that you disable the remaining options for better security:
Accept FireWall-1 Control Connections
The Accept FireWall-1 Control Connections option needs to be enabled if youdo remote firewall management. If the management console and the firewalldaemons are on the same machine, you may disable this option. However, ifthey are on separate machines, this option needs to be enabled (or
30 Additional Security Tools for AIX Systems

equivalent rules need to be created in the rulebase). Disabling this featuredisables access to ports 256, 257, and 258.
Enable Decryption on Accept
The Enable Decryption on Accept option will decrypt incoming encryptedpackets even if there is no encryption rule. This option should be disabledunless you are using encryption.
Accept RIP
RIP (Routing Information Protocol) is the protocol used by the routed daemonfor dynamic routing. The other commonly used dynamic routing protocol isOSPF (Open Shortest Path First). The Accept RIP option should be enabledonly if you are using RIP (not OSPF). Dynamic routing has its insecurities andshould be disabled unless you are certain it is properly configured.
Accept Domain Name Queries (UDP)
The Accept Domain Name Queries (UDP) option is used to enable or disableDNS queries. Rather than enabling this option, you should create a separaterule for it. A rule gives you better control and lets you turn on logging.
Accept Domain Name Download (TCP)
The Accept Domain Name Download (TCP) option pertains to DNSnameserver zone transfers. Rather than enable this globally, you shouldcreate individual rules for the DNS servers that need to do zone transfers.
Accept ICMP
The Accept ICMP option is used to enable or disable ICMP protocol (things,such as ping and traceroute). If you want to take advantage of statefulinspection on ICMP, you have to turn this option on. (Refer to the
www.phoneboy.com/fw1 FAQ for more information on stateful inspection).
There are various ICMP types, and you should allow only the types you need,such as echo request (8), echo reply (0), destination unreachable (3), andtime exceeded (11). Some other types, such as timestamp request (13),address mask request (17), and redirect (5), may be dangerous and notnecessary when initiated from the Internet. For more information about theICMP types, refer to the redbook, TCP/IP Tutorial and Technical Overview,GG24-3376.
Chapter 3. Check Point FireWall-1 31

Additional options that need to be configured are under the Services tab ofthe Properties Setup menu. We recommend that you disable all four options:
Enable FTP PORT Data Connections
The FTP protocol uses two connections, one for control (port 21) and one fordata (port 20). When you enable the FTP services in the rulebase, it onlyenables control port (21) access. To enable commands, such as ls, get, put,and so on, to run on the data port (20), you need to enable the Enable FTPPORT Data Connections option.
Enable FTP PASV Connections
The Enable FTP PASV Connections option is used for passive FTP. See****section X**** on passive FTP to decide if you need this. A large number ofFTP servers on the Internet require passive connection; so, you need toenable this option if you want to allow FTP.
Enable RSH/REXEC Reverse stderr Connections
The Enable RSH/REXEC Reverse stderr Connections option is used to allowrsh and rexec protocols to open a reverse connection for errors. It should bedisabled if you are not allowing rsh and rexec protocol (see Chapter 8,“Securing AIX” on page 139, for information about OS hardening)
Enable RPC Control
The Enable RPC Control option is used for RPC dynamic port allocation andshould be disabled unless required. RPC should not be allowed when facingthe Internet as it has many security problems (see Chapter 8, “Securing AIX”on page 139, for information about OS hardening).
Figure 5 on page 33 shows the Services tab of the Properties Setup menuwith the Enable FTP PORT Data Connections, Enable FTP PASVConnections, Enable RSH/REXEC Reverse stderr Connections, and EnableRPC Control options turned off.
32 Additional Security Tools for AIX Systems

Figure 5. Services tab in Properties Setup
Lastly, there is an option under the Log and Alert tab of the Properties Setupmenu that needs to be configured.
Set the IP Options Drop Track option to either Alert or Log. By default,FireWall-1 drops IP packets with IP options. These packets are frequentlyused by attackers; so, we recommend that you select Alert as an earlywarning mechanism for potential attacks.
Figure 6 on page 34 shows the Log and Alert tab of the Properties Setupmenu with the IP Options Drop Track set to Alert.
Chapter 3. Check Point FireWall-1 33

Figure 6. Log and Alert tab in Properties Setup
3.3.4 Creating a useful rulebaseOur example rulebase (shown in Figure 7 on page 36) is for a rather simplesetup and is only meant to illustrate some principles. There are nine rules,processed sequentially from top to bottom, in our rulebase. We explain themin order of importance:
• Rule 9: The first rule you should set up is actually the last rule in theruleset and is considered the cleanup rule. It is used to drop all packetswhich have not been accepted by any of the other rules. Check PointFireWall-1 has an implicit drop rule that, essentially, does the same thingas the cleanup rule. The difference between the cleanup rule and theimplicit drop rule is that with the cleanup rule, you can log all traffic that isdropped. This logging serves as an important early warning device in thatit can alert you to a potential attacker snooping around your network.
34 Additional Security Tools for AIX Systems

• Rule 5: This is considered the stealth rule because it drops all connectionsthat have the firewall as the destination. This rule prevents attackers fromconnecting to the firewall or even pinging the firewall. Notice that youshould log this rule as well as drop the packets, but do not select rejectbecause it will send an RST back to the originator.
• Rule 4: Set up this rule to prevent excessive logging. NetBIOS (NBT)consists of nbname, nbsession, and nbdatagram service traffic, which maybe dropped (and not logged) since it is voluminous and does not pose asecurity risk.
• Rule 1: Add this rule to allow an admin client to remotely connect to thefirewall for administrative purposes. That client can also ping the firewalland vice versa for network debugging purposes. You may removeecho-reply service and just allow echo-request service if you only want theclient to ping the firewall and not the other way around. Alternatively, youcan enable the Accept ICMP option as discussed (this is notrecommended).
• Rules 6,7, and 8: These rules are for Web and mail servers. You will needto modify them for your specific environment. For compartmentalizedfirewalls that have connections to the internal network as well as the DMZand the Internet, you should include rules to prevent traffic from the DMZor the Internet from reaching the internal network. All such attemptsshould be logged because they may be an indication of attemptedspoofing. Remember also that the DMZ is considered semi-secure andshould not be trusted completely. Only applications that need to connect tointernal servers should have such connectivity allowed in the rulebase.
• Rule 2: Set up this rule if the firewall is also a DNS server that serves theInternet. Some exploits have been known to use the UDP port 53 (DNSport). Therefore, enable it only if it is absolutely required. If the DNS serverserves only internal users, you should change the Source to DMZ orInternal, or, better yet, move the DNS server off of the firewall. Notice thatthis rule must come before the stealth rule.
• Rule 3: Only set this rule up if you have a secondary DNS server thatneeds to do zone transfers.
Figure 7 on page 36 shows a useful rulebase.
Chapter 3. Check Point FireWall-1 35

Figure 7. Useful rulebase
Options chosen in the Properties Setup menu are already part of therulebase. To view the complete list of rules, including those from theProperties Setup menu, click View, and then select Pseudo-rules. As shownin Figure 7, pseudo-rules have no numbers and appear in yellow.
3.3.5 Viewing connectionsTo view the current connection table, you can use the FireWall-1 command:
There is a PERL script available from www.enteract.com/~lspitz/fwtable.txt
that lists the current connection table in a much more usable format:
#fw tab -t connections -u
36 Additional Security Tools for AIX Systems

3.3.6 Enabling other defense mechanismsThere are a number of ways to make Check Point FireWall-1 more secure. Werecommend that you enable SYNDefender and IP spoofing protection, but donot use Fast Mode TCP. We also recommend that you consider implementingIntrusion Detection. Each of these is described in the following sections.
3.3.6.1 SYNDefenderThe SYN attack falls under the category of denial of service attack. Beforegoing into the details of the SYN attack, we need to cover how a typical TCPconnection is established as follows:
1. A client attempting to connect to a server sends a SYN packet (TCPpacket with the SYN bit set) to the server.
2. The server replies with a SYN/ACK packet.
3. The client receives the SYN/ACK packet from the server and sends anACK packet back.
This is known as a 3-way handshake, and, upon successful completion, theconnection is considered established. (Note that with stateful inspection, thefirewall will monitor this handshake process as an active onlooker.)
Here is how the SYN attack works:
1. The attacker uses a forged and non-reachable IP address and sendsseveral SYN packets to the server.
2. The server responds with the appropriate SYN/ACK packets, but, sincethe sender’s IP is a non-reachable address, the 3-way handshake cannotcomplete.
3. The connections remain pending and will not be cleared for the duration ofthe TCP timeout (unless the clear_partial_conns network option is set at
# perl ./fwtable.pl
---- FW-1 CONNECTIONS TABLE ---
Src_IP Src_Prt Dst_IP Dst_Prt IP_prot Kbuf Type Flags Timeout
9.12.0.50 32782 9.12.0.50 53 6 0 16385 ffff0400 3176/36009.12.0.50 32780 9.12.0.18 23 6 0 16385 ffff0600 2440/36009.12.0.50 846 9.12.0.50 755 6 0 16385 ffff0600 3433/36009.12.0.50 784 9.12.0.50 755 6 0 16385 ffff0600 3484/36009.12.2.168 1971 9.12.0.50 23 6 0 16385 ffffff00 3600/3600
Chapter 3. Check Point FireWall-1 37

the OS level), which effectively prevents legitimate clients from connectingto the server on that service port.
The key to the SYN attack is that the source IP must not be reachable. If it is,the server sending the SYN/ACK will get an RST packet in return. This isbecause the legitimate client (whose IP address has been stolen) will detectthat the SYN/ACK packet is not in response to a SYN packet that it had sent,and will reply with an RST packet to reset the server connection (whichdefeats the attack). For an in-depth description of the attack, go towww.fc.net/phrack/files/p48/p48-13.html.
Check Point FireWall-1 has two built-in defenses against SYN attacks. Theyare the SYNDefender Gateway and the SYNDefender Passive Gateway. Youcan set them on the SYNDefender tab of the Properties Setup menu (seeFigure 8 on page 39). For the following explanations, assume the server isbehind the firewall, and the client is in front of it.
SYNDefender Gateway Mode works as follows:
1. The client sends the SYN packet to the server.
2. The server sends the SYN/ACK packet back to the client.
3. FireWall-1 sends the ACK packet to the server on behalf of the client.
4. The client sends the ACK packet to the server, but it is absorbed byFireWall-1.
5. The connection between client and server is established.
6. If the client does not send the ACK packet (event 4) within the timeoutperiod configured in FireWall-1 (Figure 8), the firewall sends an RSTpacket to the server to tear down the connection. This is therecommended method to protect against SYN attacks.
SYNDefender Passive SYN Gateway works as follows:
1. The client sends the SYN packet to the server.
2. The server sends the SYN/ACK packet back to the client, but it isintercepted by FireWall-1.
3. FireWall-1 resends the SYN/ACK packet to client.
4. The client sends the ACK packet back to server.
5. The connection between the client and server is established.
6. If the client does not send the ACK packet (event 4) to the server withinthe timeout period configured in FireWall-1 (see Figure 8 on page 39), thefirewall sends an RST packet to the server to close its pending connection.
38 Additional Security Tools for AIX Systems
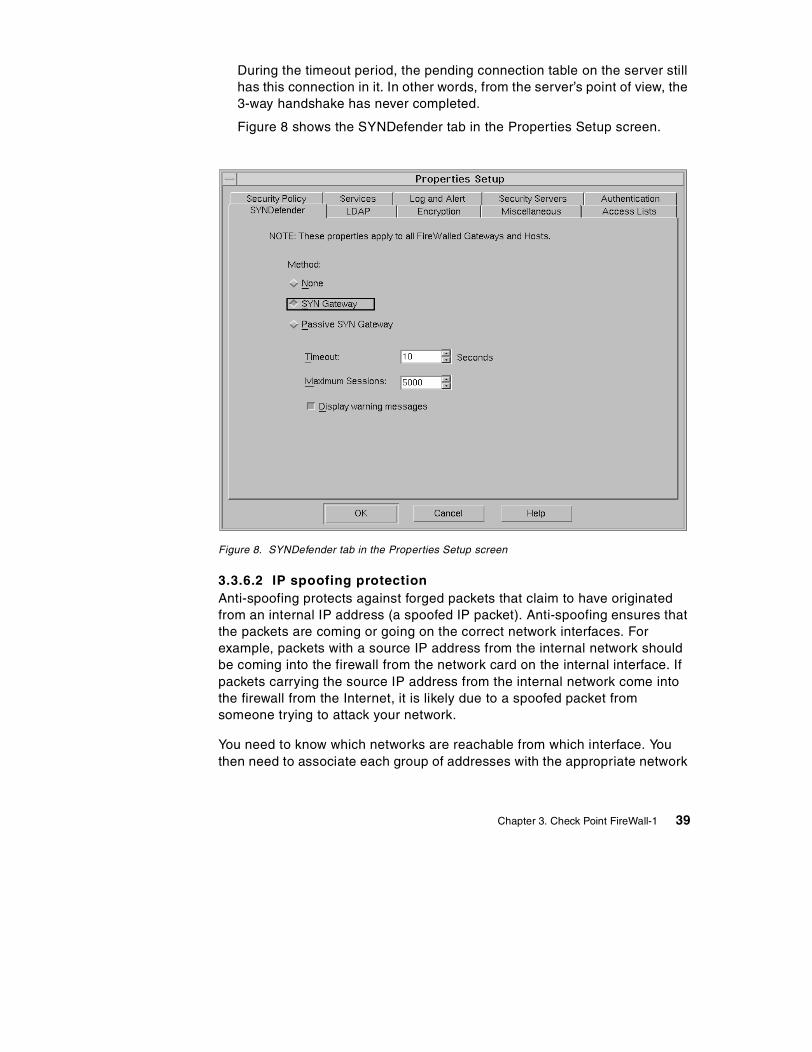
During the timeout period, the pending connection table on the server stillhas this connection in it. In other words, from the server’s point of view, the3-way handshake has never completed.
Figure 8 shows the SYNDefender tab in the Properties Setup screen.
Figure 8. SYNDefender tab in the Properties Setup screen
3.3.6.2 IP spoofing protectionAnti-spoofing protects against forged packets that claim to have originatedfrom an internal IP address (a spoofed IP packet). Anti-spoofing ensures thatthe packets are coming or going on the correct network interfaces. Forexample, packets with a source IP address from the internal network shouldbe coming into the firewall from the network card on the internal interface. Ifpackets carrying the source IP address from the internal network come intothe firewall from the Internet, it is likely due to a spoofed packet fromsomeone trying to attack your network.
You need to know which networks are reachable from which interface. Youthen need to associate each group of addresses with the appropriate network
Chapter 3. Check Point FireWall-1 39

interface. Perform the following steps to set up IP spoofing protection inFireWall-1 (refer to Figure 9 on page 40):
1. From Network Objects, select firewall.
2. Select the Interfaces tab.
3. Select an interface (in our case, the tr0 interface is the external interface).
4. From Spoof tracking, select Log or Alert.
5. From Valid Addresses, select This net, Others, or Specific, depending onhow your network is configured, as shown in Figure 9. (More informationfollows.)
Figure 9. Setting up IP spoofing
The Valid Addresses selection specifies which addresses are allowed to beon the chosen interface. In other words, IP addresses that are not consideredto be spoofed. The option you choose depends on whether or not you areusing network address translation (NAT) at the firewall.
40 Additional Security Tools for AIX Systems

If you are not using NAT, use the following for your Valid Addresses selectionsas shown in Table 1.
Table 1. Valid Addresses without NAT
If you are using NAT, use the following for your Valid Addresses selections asshown in Table 2.
Table 2. Valid Addresses with NAT
In the case of NAT and an Internal Interface, you have to specify a group ofaddresses for Specific. For the servers on the internal network, use the IPaddress for the internal network, and the NAT IP addresses for the servers onthat network. For example, Figure 10 on page 42 illustrates a with NATenabled for Web Server 1 (Public Server 1), Web Server 2 (Public Server 2),and Mail Server (Public Server 3). The real IP address (configured on thenetwork card on the server) and the NAT IP address (publicly known IPaddress) are listed in the figure. When using NAT, the group for Specificconsists of the internal network address (172.16.30.0) and the public IPaddresses 203.12.12.1, 203.12.12.2, and 203.12.12.3.
Interface Valid addresses
External (facing Internet) Others
Internal This net
Interface Valid addresses
External (facing Internet) Others
Internal Specific
Chapter 3. Check Point FireWall-1 41

Figure 10. Illustrating IP spoofing with NAT
3.3.6.3 Fast Mode TCPFor faster throughput, the Fast Mode TCP option can be used. We do notrecommend that you do this. Fast Mode works by allowing allnon-SYN/NO-ACK packets through the firewall. The firewall assumes that allsuch packets are part of an established TCP connection and does no furtherchecks on them. The assumption is that if these packets are not part of anestablished TCP connection, the end servers will drop the packets anywaybecause they are out of sequence. SYN packets are still checked with therulebase, but successful connections are not logged into the connectionstable (removing the stateful inspection). This reduces the security awarenessof the firewall and should not be used.
To check the Fast Mode setting, from the main menu bar, select Manage,then, under Services, select TCP (as shown in Figure 11 on page 43). Noticethat Fast Mode only applies to the TCP protocol.
Real IP NAT IP
Web Server 1 172.16.30.1 203.12.12.1Web Server 2 172.16.30.2 203.12.12.2
Mail Server 172.16.30.3 203.12.12.3
Firewall
External NetworkInternal Network
Public Server 1172.16.30.1Public Server 2172.16.30.2
Public Server 3172.16.30.3
Router to ISP
Public Server 4172.16.30.4
42 Additional Security Tools for AIX Systems

Figure 11. Fast Mode TCP
3.3.6.4 Intrusion detection on Check Point FireWall-1There is a very good article on how to implement intrusion detection onCheck Point FireWall-1 at www.enteract.com/~lspitz/intrusion.htm. We will notbe discussing it further here.
3.4 List of ports that Check Point FireWall-1 uses
Check Point FireWall-1 has a list of ports that it uses by default. If there areports that you are not using, you can disable them (just as you would normalTCP/IP ports in the /etc/inetd.conf file).
To disable authentication related services, modify the appropriate entries inthe $FWDIR/conf/fwauthd.conf file or in the $FWDIR/conf/fwopsec.conf file.The latter file applies only to the SAM and LEA services (described later).Ports 256, 257, and 258 are controlled from the Properties Setup menu withthe Accept FireWall-1 Control Connections option discussed in Section 3.3.3,"Securing FireWall-1 default configurations" on page 29.
Chapter 3. Check Point FireWall-1 43

To view all active ports on your system, use:
# netstat -af inet
If you are not sure which application is bound to a particular port, try usingthe lsof tool instead (see Section 6.5, "List Open Files (lsof)" on page 103, formore information). Among other things, this tool can tell you whichapplications are bound to which ports. From that information, you can thendetermine which ports to leave active and which ports to disable.
The following is the list of ports that the firewall uses. (Note: This informationis taken verbatim directly from the www.phoneboy.com/fw1/ Web site.)
• TCP Port 256 is used for three important things:
a. Exchange of CA and DH keys in FWZ and SKIP encryption betweentwo FireWall-1 Management Consoles.
b. SecuRemote build 4005 and earlier uses this port to fetch the networktopology and encryption keys from a FireWall-1 Management Console.
c. When installing a policy, the management console uses this port topush the policy to the remote firewall.
• TCP Port 257 is used by a remote firewall module to send logs to amanagement console.
• TCP Port 258 is used by the fwpolicy remote GUI.
• TCP Port 259 is used for Client Authentication.
• UDP Port 259 is used in FWZ encryption to manage the encryptedsession (SecuRemote and FireWall-1 to FireWall-1 VPNs).
• UDP Port 260 and UDP Port 161 are used for the SNMP daemon thatCheck Point FireWall-1 provides.
• TCP Port 264 is used for Secure Client (SecuRemote) build 4100 andlater to fetch network topology and encryption keys from a FireWall-1Management Console.
• TCP Port 265, according to the 4.1SP1 objects.C, is labeled "Check PointVPN-1 Public Key Transfer Protocol." It is probably used by FireWall-1 toexchange public keys with other hosts.
• UDP Port 500 is used for ISAKMP key exchange between firewalls orbetween a firewall and a host running Secure Client.
• TCP Port 900 is used by FireWall-1's HTTP Client Authenticationmechanism.
44 Additional Security Tools for AIX Systems

• TCP Ports above 1024 are generally any Security Servers that are active.The actual ports used by these servers will vary.
• TCP Port 18181 is used for CVP (Content Vectoring Protocol, foranti-virus scanning).
• TCP Port 18182 is used for UFP (URL Filtering Protocol, for WebSenseand the like).
• TCP Port 18183 is used for SAM (Suspicious Activity Monitoring, forintrusion detection).
• TCP Port 18184 is used for Log Export API (LEA).
Chapter 3. Check Point FireWall-1 45

46 Additional Security Tools for AIX Systems

Chapter 4. IBM Secureway Firewall
IBM Secureway Firewall has been protecting IBM for more than 10 years. It isa hybrid of three firewall architectures: Filtering, proxy, and circuit-level andincludes a built-in Web proxy server and a SOCKS server. In 1999, Infoworldnamed it as their product of the year:
www.infoworld.com/supplements/99poy_win/99poy_s.html
Online information about IBM Secureway Firewall can be found at:
•http://www-3.ibm.com/security/
•http://www-4.ibm.com/software/security/firewall/
4.1 IBM Secureway Firewall features
IBM Secureway Firewall is comprised of a suite of tools that can be usedindividually or in combination depending on your needs and environment. Abrief overview is given here.
IBM Secureway Firewall ships with a tool called Network Security Auditor(NSA). NSA can be used to proactively scan any hosts on the network(including the firewall) for potential security vulnerabilities. It is an excellenttool for identifying potential problems before they become breaches. The NSAtool alone provides reason enough for purchasing the IBM SecurewayFirewall. Installation and configuration of NSA is covered in Section 4.4,"Network Security Auditor (NSA)" on page 49.
IBM Secureway Firewall comes with an embedded Web proxy server (via theenhanced version of Web Traffic Express). The proxy server includes addedsupport for industry-standard reporting utitlities, support for persistent Websessions of HTTP 1.1, and support for URL blocking. This means that the fullHTTP proxy functionality is within the firewall itself with no need for additionalsoftware.
IBM Secureway Firewall includes Virtual Private Network (VPN) supportbased on the IPSec standards. VPNs enable you to create secure tunnelsbetween remote locations across the Internet. This reduces the need forexpensive leased lines.
IBM Secureway Firewall comes with a two-user license Security DynamicsACE Server (SecurID Protected) that is used for secure authentication.
© Copyright IBM Corp. 2000 47

The firewall has built-in support for email and pager notifications keyed off ofspecific, configurable events. This feature enables administrators to benotified of suspicious activities and to take action in the early stages of anattack.
Administration of multiple firewalls is simplified through a centralizedadministration facility. Real-time performance statistics and log monitoring arealso provided.
The installation of the firewall hardens the operating system automatically.Non-important users and groups are removed, and non-essential services aredisabled to reduce potential vulnerabilities. The firewall offers advanced emailprotection to help block unwanted email and prevent mail spoofing.
SOCKS Version 5 (V5) support is included for both TCP and UDPapplications. Network address translation (NAT) support using many-to-oneand one-to-one configurations is included as well.
4.2 Complimentary software for IBM Secureway Firewall
As with Check Point FireWall-1, IBM Secureway Firewall also has a list ofproducts to complement it. IBM Secureway Network Dispatcher can be usedfor scalability, load-balancing, and failover of the firewall(s). Since usersconnect through the firewall, network dispatcher can be used to enhanceperformance by transparently splitting the load across multiple firewalls. Moreinformation can be found at:
www-4.ibm.com/software/network/dispatcher/
Another complimentary product is MIMEsweeper, an SMTP, HTTP, and FTPcontent security and management solution. MIMEsweeper examinesapplication content and provides protection against malicious code andviruses. It is transparent to users and provides logging for further analysis.More information can be found at:
www.mimesweeper.integralis.com
Another useful product is Telemate.Net, which is used to translate large,abstract firewall log files into meaningful business reports. You can easilycustomize the reports and distribute them through email or translate theminto HTML for publication on the intranet. Telemate.Net runs on Windows 95or Windows NT and collects IBM Secureway Firewall log files. The firewallperiodically FTPs the logs to the Telemate.Net server sitting behind thefirewall. More information can be found at:
48 Additional Security Tools for AIX Systems

www.telemate.net
4.3 Firewall hardening
The IBM Secureway Firewall installation procedure includes a section onhardening. The hardening is an automated procedure that happens duringfirewall installation. This is in contrast to Check Point FireWall-1, whichrequires OS hardening as a manual step. To make sure that this automatichardening is sufficient for your needs, refer to Section 2.3.2 of the redbook, ASecure Way to Protect Your Network: IBM SecureWay Firewall for AIX V4.1,SG24-5855, for the complete list of steps that IBM Secureway Firewall takesto harden itself. Also, Chapter 8, “Securing AIX” on page 139 of this book,discusses in detail the manual procedures you can use to harden theoperating system.
4.4 Network Security Auditor (NSA)
NSA is an extremely good tool for auditing your servers (AIX and others) forpotential security vulnerabilities in the services that are running. The outputfrom the NSA scan of your environment gives you insight into an attacker’sperspective of your network. Review the results of the scan and plug thesecurity holes proactively before an attacker strikes.
The NSA tool is essentially a port scanner, but it incorporates additional teststo look for vulnerabilities within the ports it scans. A single nsa commandprovides the entire output, thus, making it an easy tool to use.
For more information on NSA, see:
http://www-4.ibm.com/software/security/firewall/about/
4.4.1 Installing NSAThe required NSA fileset is nsaauditor.base. The NSA version may vary,depending on the version of IBM Secureway Firewall that you purchase. NSAVersion 2.1.2 comes with IBM Secureway Firewall Version 4.1.
To install NSA:
TYPE smitty installp
SELECT Install and Update from ALL Available Software
TYPE /dev/cd0 [ESC+4 or F4 to select the CD ROM drive]
TYPE F4 or ESC+4 to list
Chapter 4. IBM Secureway Firewall 49

SELECT find nsaauditor.base (F7 or ESC+7 to select the fileset)
PRESS Enter three times to install
Ensure that the fileset is properly installed as follows:
4.4.2 Using NSAVarious scan methods are defined in the file /etc/nsa/scannerdefs file. Thetypes of scan are default, baseline, medium, standard, fulltcp, complete, andfirewall. The extent of the port scans and tests varies depending on whichtype you choose. Details of each type are in the scannerdefs file and inAppendix A. The firewall type provides the most extensive scan, and is thetype used in this book. The redbook, A Secure Way to Protect Your Network:IBM SecureWay Firewall for AIX V4.1, SG24-5855, is also a good source ofinformation about the NSA tool.
The NSA documentation is located in the /usr/lpp/nsauditor/doc/ directory.You will be unable to scan until you obtain valid licenses. Once obtained,these licenses must be located in the password-proctected/etc/nsa/license.nsa file.
To scan a server, use:
# nsa scan -d /tmp/<output_file> --scantype=firewall <host_to_scan>
To view the output of the scan, use:
# nsa report -d /tmp/<output_file>
The report can also be output in HTML format for viewing with a Webbrowser.
# lppchk -v# lslpp -l nsauditor.baseFileset Level State Description----------------------------------------------------------------------------
Path: /usr/lib/objreposnsauditor.base 2.1.2.0 COMMITTED Network Security Auditor
Some companies have strict restrictions against doing such scanning.Ensure that you have the necessary authorization prior to running thesescans. Also, you may want to play it safe by ensuring that backups are doneprior to scanning, as crashes may occur as a result of the scans.
Important
50 Additional Security Tools for AIX Systems

4.4.3 Interpreting NSA outputAn NSA scan produces considerable output. The report can be divided intothese categories:
• Configuration settings
• Potential vulnerabilities
• Dangerous services
• Information leaks
For each of these categories, a description of the potential security loopholesis given. This is very helpful for administrators trying to fix these potentialloopholes and minimize the security risks.
With a list of services running, you can decide if you need those services.Default installations will have some services enabled by default (for exampleSNMP). It is better to turn on only those services that you are certain that youneed, and turn the rest off. For those services that you need, ensure that theyare at their most secure configuration and latest security patch level. SeeChapter 8, “Securing AIX” on page 139, for more information.
The problem is that, sometimes, administrators are unaware of such servicesrunning on the server, for example, when someone installs a new applicationthat adds new, active ports. Whatever the case, it is a good idea to audit yourservers regularly to ensure that the security levels remain the same and toalert you if any changes are made.
The following screen contains a sample of an NSA scan that was run on thecontrol workstation of an SP complex.
Chapter 4. IBM Secureway Firewall 51

Network Services Audit Report
Network Services Audit Report
Report Date: Friday, September 01, 2000 17:24
o Name: sp5cw0
Operating System: UNIX IBM AIX 4.3Audit Date: F̀riday, September 01, 2000 16:59'Auditor: r̀oot@arthur'
Security Audit Summary
o Configuration Settings - 7o Potential Vulnerabilities - 2o Dangerous Servers and Services - 6o Information Leaks - 9
Security Audit Breakdown
Configuration Settings - 7
o Access Control Configuration - 5o Network File Sharing Configuration - 3
Potential Vulnerabilities - 2
o NFS server vulnerabilities - 2
Dangerous Servers and Services - 6
o Dangerous Network Servers - 6o Dangerous Sun RPC servers - 2o Other - 4
Information Leaks - 9
o Information About User Accounts - 3o Information About System Resources - 6
Security Audit Findingso Configuration Settings
o Access Control Configurationo Network File Sharing Configuration
o /̀spdata/sys1/install/pssplpp' is shared to everyone viaNFS.
o /̀usr/sys/inst.images' is shared to everyone via NFS.o /̀spdata/sys1/install/aix433/lppsource' is shared toeveryone via NFS.
o SNMP at UDP port 161 read community string is `public'.o [177/UDP] XDMCP server accepts all management requests.
o [SMTP at port 25] EXPN command is enabled.o [SMTP at port 25] VRFY command is enabled.
52 Additional Security Tools for AIX Systems
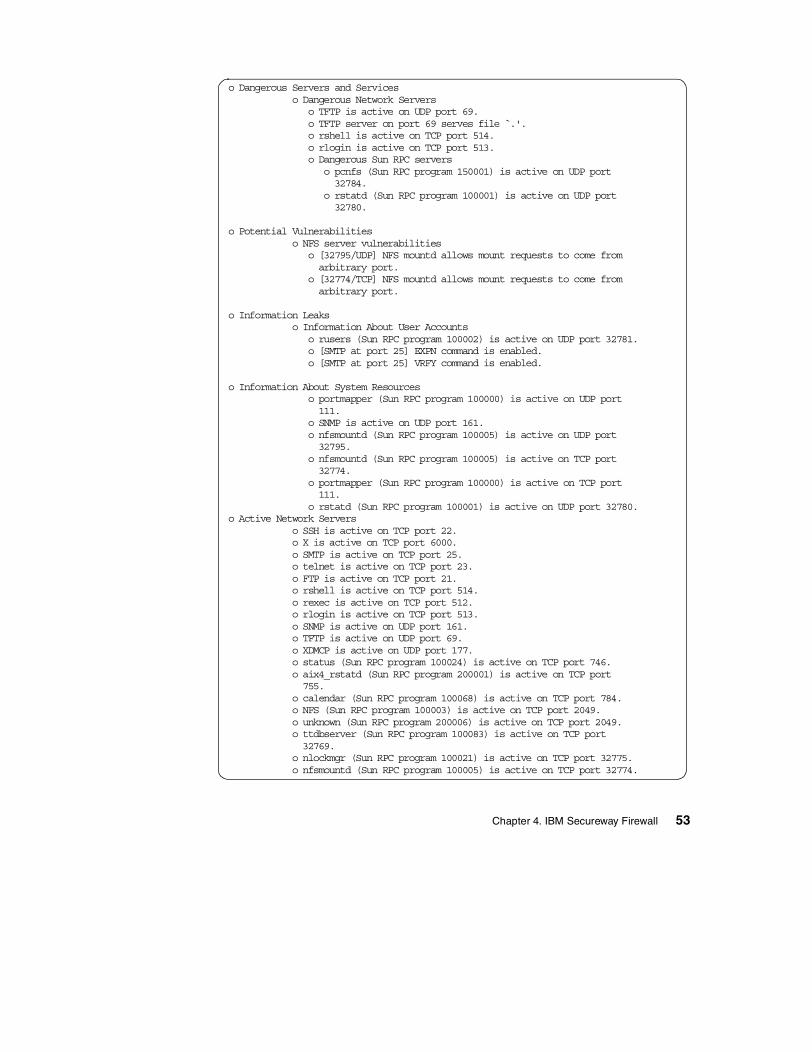
o Dangerous Servers and Serviceso Dangerous Network Servers
o TFTP is active on UDP port 69.o TFTP server on port 69 serves file .̀'.o rshell is active on TCP port 514.o rlogin is active on TCP port 513.o Dangerous Sun RPC servers
o pcnfs (Sun RPC program 150001) is active on UDP port32784.
o rstatd (Sun RPC program 100001) is active on UDP port32780.
o Potential Vulnerabilitieso NFS server vulnerabilities
o [32795/UDP] NFS mountd allows mount requests to come fromarbitrary port.
o [32774/TCP] NFS mountd allows mount requests to come fromarbitrary port.
o Information Leakso Information About User Accounts
o rusers (Sun RPC program 100002) is active on UDP port 32781.o [SMTP at port 25] EXPN command is enabled.o [SMTP at port 25] VRFY command is enabled.
o Information About System Resourceso portmapper (Sun RPC program 100000) is active on UDP port111.
o SNMP is active on UDP port 161.o nfsmountd (Sun RPC program 100005) is active on UDP port32795.
o nfsmountd (Sun RPC program 100005) is active on TCP port32774.
o portmapper (Sun RPC program 100000) is active on TCP port111.
o rstatd (Sun RPC program 100001) is active on UDP port 32780.o Active Network Servers
o SSH is active on TCP port 22.o X is active on TCP port 6000.o SMTP is active on TCP port 25.o telnet is active on TCP port 23.o FTP is active on TCP port 21.o rshell is active on TCP port 514.o rexec is active on TCP port 512.o rlogin is active on TCP port 513.o SNMP is active on UDP port 161.o TFTP is active on UDP port 69.o XDMCP is active on UDP port 177.o status (Sun RPC program 100024) is active on TCP port 746.o aix4_rstatd (Sun RPC program 200001) is active on TCP port755.
o calendar (Sun RPC program 100068) is active on TCP port 784.o NFS (Sun RPC program 100003) is active on TCP port 2049.o unknown (Sun RPC program 200006) is active on TCP port 2049.o ttdbserver (Sun RPC program 100083) is active on TCP port32769.
o nlockmgr (Sun RPC program 100021) is active on TCP port 32775.o nfsmountd (Sun RPC program 100005) is active on TCP port 32774.
Chapter 4. IBM Secureway Firewall 53

o portmapper (Sun RPC program 100000) is active on TCP port 111.o unknown (Sun RPC program 300667) is active on TCP port 32770.o portmapper (Sun RPC program 100000) is active on UDP port 111.o calendar (Sun RPC program 100068) is active on UDP port 32785.o status (Sun RPC program 100024) is active on UDP port 746.o aix4_rstatd (Sun RPC program 200001) is active on UDP port755.
o nlockmgr (Sun RPC program 100021) is active on UDP port 32818.o NFS (Sun RPC program 100003) is active on UDP port 2049.o nfsmountd (Sun RPC program 100005) is active on UDP port 32795.o autofs (Sun RPC program 100099) is active on UDP port 32839.o spray (Sun RPC program 100012) is active on UDP port 32783.o pcnfs (Sun RPC program 150001) is active on UDP port 32784.o rwall (Sun RPC program 100008) is active on UDP port 32782.o rusers (Sun RPC program 100002) is active on UDP port 32781.o rstatd (Sun RPC program 100001) is active on UDP port 32780.
o Available Network Serviceso Unauthenticated File Service
o TFTP server on port 69 serves file .̀'.
o Shared File Systemso /̀spdata/sys1/install/pssplpp' is shared to everyone viaNFS.
o /̀usr/sys/inst.images' is shared to everyone via NFS.o /̀spdata/sys1/install/aix433/lppsource' is shared toeveryone via NFS.
o User Login Serviceso SSH is active on TCP port 22.o XDMCP is active on UDP port 177.o telnet is active on TCP port 23.o FTP is active on TCP port 21.o rshell is active on TCP port 514.o rexec is active on TCP port 512.o rlogin is active on TCP port 513.
o Operating system is `UNIX IBM AIX 4.3'.o Server Version Strings
o [22/TCP] SSH server version is `Protocol 1.99; ServerOpenSSH_2.1.1'.
o [25/TCP] SMTP server version is `Sendmail AIX4.3/8.9.3'.o [21/TCP] FTP server version is `4.1 Sun Jul 9 18:28:14 CDT2000'.
o SNMP at UDP port 161 read community string is `public'.o Network Transport Information
o IP Transport Informationo Host responded to ICMP Echo Request.
o Port Scan Informationo TCP Port Scan Data
o The following TCP ports were scanned:21-23, 25, 109-111, 139, 143, 512-514, 746, 755, 784, 2049,6000, 32769-32770, 32774-32775, 37661, 49690
o The following TCP ports were visible:21-23, 25, 109-111, 139, 143, 512-514, 746, 755, 784, 2049,
54 Additional Security Tools for AIX Systems

6000, 32769-32770, 32774-32775, 37661, 49690o The following TCP ports were active:21-23, 25, 111, 512-514, 746, 755, 784, 2049, 6000,32769-32770, 32774-32775, 49690
o The servers on these TCP ports could not be identified:49690
o The servers on these TCP ports terminated immediately:None
o UDP Port Scan Datao The following UDP ports were scanned:69, 111, 137, 161, 177, 746, 755, 2049, 32780-32785, 32795,32818, 32839
o The following UDP ports were visible:69, 111, 137, 161, 177, 746, 755, 2049, 32780-32785, 32795,32818, 32839
o The following UDP ports were active:69, 111, 161, 177, 746, 755, 2049, 32780-32785, 32795,32818, 32839
o The following UDP ports did not respond:None
o The servers on these UDP ports could not be identified:None
o Sun RPC Registrationso Sun RPC program 100000 (portmapper) is registered on TCPport 111.
o Sun RPC program 100083 (ttdbserver) is registered on TCPport 32769.
o Sun RPC program 300667 (unknown) is registered on TCP port32770.
o Sun RPC program 100003 (NFS) is registered on TCP port 2049.o Sun RPC program 200006 (unknown) is registered on TCP port2049.
o Sun RPC program 100005 (nfsmount) is registered on TCP port32774.
o Sun RPC program 100024 (status) is registered on TCP port746.
o Sun RPC program 200001 (aix4_rstatd) is registered on TCPport 755.
o Sun RPC program 100021 (nlockmgr) is registered on TCP port32775.
o Sun RPC program 1342177279 (unknown) is registered on TCPport 37661.
o Sun RPC program 1342177280 (unknown) is registered on TCPport 49690.
o Sun RPC program 100068 (calendar) is registered on TCP port784.
o Sun RPC program 100000 (portmapper) is registered on UDPport 111.
o Sun RPC program 100001 (rstatd) is registered on UDP port32780.o Sun RPC program 100002 (rusers) is registered on UDP port32781.
o Sun RPC program 100008 (rwall) is registered on UDP port32782.
Chapter 4. IBM Secureway Firewall 55

o Sun RPC program 100012 (spray) is registered on UDP port32783.
o Sun RPC program 150001 (pcnfs) is registered on UDP port32784.
o Sun RPC program 100068 (calendar) is registered on UDP port32785.
o Sun RPC program 100003 (NFS) is registered on UDP port 2049.o Sun RPC program 200006 (unknown) is registered on UDP port2049.
o Sun RPC program 100005 (nfsmount) is registered on UDP port32795.
o Sun RPC program 100024 (status) is registered on UDP port746.
o Sun RPC program 200001 (aix4_rstatd) is registered on UDPport 755.
o Sun RPC program 100021 (nlockmgr) is registered on UDP port32818.
o Sun RPC program 100099 (autofs) is registered on UDP port32839.
o SNMP Variables Retrievedo SNMP/161 variable sysDescr value is `RISC System/6000Architecture\nMachine Type: 0x0100 Processor id:000509306700\nBase Operating System Runtime AIX version:04.03.0003.0000\nTCP/IP Client Support version:04.03.0003.0000'.
o SNMP/161 variable sysObjectID value is`1.3.6.1.4.1.2.3.1.2.1.1.3'.
o SNMP/161 variable sysName value is s̀p5en0'.
o Active Userso rusers/32781 shows the following users logged on:
root <-root <- tot75root <- :0.0root <- tot75root <- :0.0root <- :0.0root <-root <-root <-root <-
o Server Bannerso [22/TCP] SSH server banner -
SSH-1.99-OpenSSH_2.1.1
o [25/TCP] SMTP server banner -
220 sp5en0.msc.itso.ibm.com ESMTP Sendmail AIX4.3/8.9.3/8.9.3;Fri, 1 Sep 2000 16:59:24 -0400
56 Additional Security Tools for AIX Systems

o [23/TCP] telnet server banner -
telnet (sp5en0)
AIX Version 4(C) Copyrights by IBM and by others 1982, 1996.login:
o [21/TCP] FTP server banner -
220 sp5en0 FTP server (Version 4.1 Sun Jul 9 18:28:14 CDT 2000) ready.
Chapter 4. IBM Secureway Firewall 57

58 Additional Security Tools for AIX Systems

Chapter 5. Secure remote access
In this chapter, we discuss how to implement security measures for remoteaccess. Remote access is typical in UNIX environments. Over the years,security has become more of an issue, thus, introducing the need toimplement secure remote access. The goal is to provide assurance that thecommunication channels between two hosts remain private, particularly insituations where access to the remote host is through the Internet.
Secure shell (ssh) is a protocol that can be used to provide a secure channelbetween two hosts. It uses encryption and authentication while ensuring dataintegrity. Encryption, authentication, and data integrity are all required toensure security and are discussed at length in this chapter.
Certain services under the control of the inetd daemon (such as ftp or telnet)should also be protected. TCP Wrapper is a tool that provides this protection.All requests for the protected services pass through TCP Wrapper first andare checked against access control lists. Only the requests from trusted hosts(as specified in the access control lists) are then allowed onto the protectedservices. TCP Wrapper can also be configured to log all connection attemptsto the protected services.
5.1 Secure Shell (ssh)
SSH is a client-server application that allows secure login or secure executionof commands on a remote computer. The ssh daemon typically listens to port22.
To ensure security, you need to:
• Ensure that users are who they say they are
• Protect the communication channel such that anyone sniffing the networkwill not be able to read the communication
• Ensure that the information sent is not altered in transit
SSH is a protocol that can achieve these requirements by providing strongauthentication, encryption, and data integrity.
SSH is intended to replace the traditional BSD “r” commands (rlogin, rsh, rcp,and so on). These commands have various security vulnerabilities. Forexample, when authentication is required, passwords are not encrypted.Instead, they are sent as clear-text across the wire. However, in many cases,passwords are bypassed entirely. That is because the more common
© Copyright IBM Corp. 2000 59

configuration is to have these commands authenticate based on hostname orIP address (contained in the .rhosts or /etc/hosts.equiv files). Any user withaccess to a host listed in one of these files on the remote host mayautomatically be granted access to that host. Worse still is the scenariowhere an attacker steals a legitimate IP address from a host listed in one ofthese files and configures an imposter host with the stolen IP address. Theimposter host then has the same access to the target host as the host whoseIP address was stolen. In the case of the root user, the consequences aredisastrous.
SSH provides the same functionality as the BSD “r” commands, but withadded security. SSH is flexible in its setup. It supports either public-privatekey pairs or .rhosts files for authentication and has various encryption anddata integrity schemes. These will covered soon.
SSH protects against IP spoofing (where a remote host commandeers the IPaddress of an internal trusted host). SSH also protects against DNS spoofingwhere the attacker forges DNS entries. Protection is accomplished by way ofthe private key, public key pair. The public key of a client must be physicallylocated on the server for the client to be able to open an SSH connection tothe server. That connection is authenticated through a combination of theclient’s private key on the client and the client’s public key on the server. Afake host claiming to have the IP address or DNS name of the client will notbe able to establish the SSH connection without also having access to theclient’s private key. (It goes without saying that private keys need to berigorously protected and never sent across unencrypted networkconnections.)
SSH also protects against password sniffing, listening X authentication dataattacks, and manipulation of data by intermediary hosts. Encryption channelsensure this protection.
SSH supports two modes: Interactive, and non-interactive. In the interactivemode, SSH is used to establish a session on a remote server. Innon-interactive mode, SSH is used to execute a command on a remote serverand return the results to the local client.
The following Web site is an excellent source of information for SSH:
www.onsight.com/faq/ssh/ssh-faq.html
60 Additional Security Tools for AIX Systems

5.1.1 Obtaining SSHThere are two versions of SSH covered in this book:
1. The original version from SSH Communications Security, which we willrefer to as SSH.Com.
2. The version developed by the OpenBSD project (OpenSSH)
The first, SSH.Com, requires that you have access to a C compiler, whereasthe second, OpenSSH, is available in installp format. OpenSSH andSSH.Com differ slightly in their implementations, especially in theirconfiguration files. Compatibility between the two versions is covered inSection 5.1.8, "SSH2 interoperability between OpenSSH and SSH.Com" onpage 76.
SSH.Com is available from numerous sources. The main site isftp://ftp.ssh.com/pub/ssh/. A list of mirror sites can be found inhttp://www.ssh.com/ssh/download.html.
The homepage for OpenSSH is http://www.openssh.com. The installp versionis available from http://www-frec.bull.fr.
There are two different protocol versions of SSH: SSH1 and SSH2. SSH.Comand OpenSSH support both SSH1 and SSH2. We cover both versions in thisbook. For more information on the differences between the two protocols, seeSection 5.1.2, "Difference between SSH1 and SSH2" on page 62.
Commercial versions can be obtained from SSH Communication Security,F-Secure, and Van Dyke Software:
• SSH from SSH Communication is available from http://www.ssh.com/ssh.The commercial version includes clients for Windows, Linux, Solaris,HP-UX, and AIX. The UNIX versions include a limited server that allows upto two simultaneous connections. A full server version is also available forUNIX.
If you plan to use SSH as a key component in your security environment,couple it with a tool, such as Tripwire. One very common insidious attackinvolves patching the SSH client executable such that it logs all account IDsand passwords used within the SSH sessions. Without a tool, such asTripwire, in place, it is very difficult to discover that this attack has occurred.
Important
Chapter 5. Secure remote access 61

• F-Secure SSH is available at http://www.f-secure.com/products/ssh/. Bothclient and server versions of SSH are available, and SSH1 and SSH2protocols are supported. It runs on UNIX, Windows, and Macintoshoperating systems.
• SecureCRT from Van Dyke Software is available athttp://www.vandyke.com/products/securecrt/. This SSH client runs onWindows platforms and supports the SSH1 and SSH2 protocols. Alsoavailable is SecureFX, a file transfer product that does FTP tunneling overSSH2.
5.1.2 Difference between SSH1 and SSH2SSH1 and SSH2 are entirely different protocols. For all practical purposes,SSH2 is a complete rewrite of SSH1. The key differences with SSH2 are:
• It has better security, performance, and portability than SSH1.
• It supports DSA and other public key algorithms for encryption andauthentication. (SSH1 supports RSA.)
• It has built-in support for both SOCKS and secure file transfer protocol(sftp).
The bulk of the new development effort is going into SSH2. However, atpresent, SSH1 has support for more platforms and more authenticationschemes (Kerberos, AFS, .rhosts). It has been around much longer and, thus,has a much larger installed base. Because of this, SSH1 will continue to beimportant for some time.
5.1.3 Key concepts of SSHSSH provides authentication, encryption, and data integrity. Anunderstanding of these concepts is key to an understanding of how SSH fitsinto a total security solution.
5.1.3.1 AuthenticationAuthentication is the process of identifying an individual and ensuring that theperson is who he or she claims to be. Authentication is important becauseaccess rights are usually granted based on user ID, thus, the need to ensurethat the person logging in with a specific user ID is indeed that person.
In AIX, the most common means of authentication is through passwords.Protocols, such as telnet, ftp, and rsh, transmit these passwords in clear textacross the network. This means that they are easily picked up by anyonesniffing the network. Also, in AIX, passwords have a practical length limit ofeight characters (characters after the eighth are ignored).
62 Additional Security Tools for AIX Systems

SSH improves security by encrypting any traffic used during authentication.Passwords are not transferred in the clear. A more significant benefit is theuse of public-key, private-key pairs to authenticate instead of the traditionalUNIX user ID and password scheme. This form of authentication issignificantly harder to break than the more conventional methods. As hasalready been mentioned, SSH does support other authentication methods.
To understand public-key, private-key authentication, you first need to befamiliar with the types of cryptography. There are two types of cryptographyalgorithm: Symmetric and asymmetric.
In symmetric key cryptography, the same key is used to encrypt and decryptthe data. This is the older of the two. The advantage of this method is that it isvery fast with both encryption and decryption of the data. However, thedrawback is key management. How do we distribute the keys safely fromsender to recipient? This is the big limitation of symmetric key cryptographythat resulted in the development of asymmetric key cryptography.
In asymmetric key cryptography, keys exists in pairs: Public and private.These two keys form a pair and are generated at the same time. Althoughmathematically related, deriving the private key from the public key is anextremely difficult task that takes more resources than are commonlyavailable. The longer the key length, the harder this is to do. Longer keylengths translate into better security.
To use SSH, you must have a public-key, private-key pair. A single programgenerates both keys. The public key must be copied to the SSH servers towhich you want access. The private key remains on the local SSH client andmust be kept safe. When the keys are generated, you are given theopportunity to protect the private key with a passphrase. A good passphraseis one that is 10-30 characters long, is almost impossible to guess and has ahidden meaning only for the person generating it. Notice that a passphrasecan be much more secure than a standard UNIX password by virtue of itsincreased length.
Here is an example of how this works:
• User A wants to connect to SSH Server B via SSH.
• User A first copies their public key to SSH Server B.
• User A then requests a log in on SSH Server B via SSH.
• SSH Server B checks its set of public keys looking for the one belonging toUser A (which it finds).
Chapter 5. Secure remote access 63

• SSH Server B challenges User A for the matching private key. Since theprivate key is protected by a passphrase, only User A can use it.
• If the challenge is successful, access is granted.
SSH uses strong cryptography, which means it is very impracticable todecode encrypted data without the right key or passphrase. SSH incorporatestwo different and incompatible cryptographic algorithms for authentication:RSA, and DSA. SSH1 uses RSA keys; SSH2 uses DSA keys.
Depending on the version being used and how it is configured, SSH canauthenticate by the following methods:
• Password (/etc/passwd or /etc/shadow in UNIX)
• Public-key (RSA in SSH1, DSA in SSH2)
• Kerberos (SSH1 only)
• Host-based (.rhosts or /etc/hosts.equiv in SSH1, public key in SSH2)
The methods vary according to implementation. Refer to the documentationfor your implementation to see if all are available. The public-key method isthe one that is most commonly used, and it is the only one that we cover inthis book.
5.1.3.2 EncryptionEncryption is the translation of data into a secret code that should not bedecipherable to anyone other than the intended recipient. With encryption,even if someone is sniffing the network, the data will not be decipherable.Thus, a secure channel is established, and can be used even over theInternet to provide a virtual private network, reducing the need for expensivededicated lease lines.
The ciphers or cryptographic algorithm used for encryption depend on theversion of SSH that is running. SSH1 uses DES, 3DES, IDEA, or Blowfishwhile SSH2 uses 3DES, Blowfish, Twofish, Arcfour, or Cast128. Thesemethods are used to provide the secure and encrypted channel to transferdata. Each of them has its own strengths and weaknesses, but they all servethe same functionality. Notice that conventional symmetric ciphers are usedto encrypt communication channels.
This, however, does not mean that the encryption cannot be broken. Strongencryption just means that it is impractical to do so because it takes too longor it takes more computational power than is commonly available.
64 Additional Security Tools for AIX Systems

5.1.3.3 Data integrityData integrity helps give assurance that the received data matches the senddata and has not been tampered with. SSH does not protect against datatampering as such; instead it just merely informs you of when such activityhas taken place, either intentionally or by accident. In the case of SSH, nonews is good news. If the data is clean, SSH is silent.
To understand how SSH makes this determination, an understanding ofhashing functions is necessary. Hashing functions are mathematical innature. A hash function takes an input of any length and calculates a fixedlength output (where the length depends on the specific hashing algorithm).Any change to the input will result in a totally different output (though thelength will still be the same). The sending machine calculates the hash on theinput data and sends both the data and the hash to the receiving machine.The receiving machine recalculates the hash on the data and compares it tothe received hash. If the data has not been tampered with, both hashes willbe identical. If they are not, SSH warns you about it.
5.1.4 Installing OpenSSH on AIXWe now show you how to install the freeware.openssh.rte version of SSH.This version of SSH supports both SSH1 and SSH2. It is available fordownload in installp format from http://www-frec.bull.fr. It has the followingprerequisite filesets: freeware.egd.rte, freeware.zlib.rte, andfreeware.openssl.rte. The fileset versions we used during the production ofthis book are shown in Table 3.
Table 3. Freeware OpenSSH filesets
Once you have downloaded the software distribution, ensure that is has notbeen tampered with. See Section 7.4.1, "Ensuring the integrity of downloads"on page 136, for more information on how to do this.
Fileset Version
freeware.openssh.rte 2.1.1.4
freeware.egd.rte 0.8.0.0
freeware.openssl.rte 0.9.5.1
freeware.zlib.rte 1.1.3.2
Chapter 5. Secure remote access 65

You will need to install the freeware.egd.rte fileset first because it creates thelocal socket, /dev/entropy, which must be present for the remaininginstallation of SSH to work properly. Inflate egd-0_8_0_0.exe to obtain theinstallp-format, egd-0.8.0.0.bff file:
Install the fileset either through SMIT or at the command line. The followinginstallp command will apply, commit, and automatically install prerequisitefilesets:
You now need to create and load the local socket file. This file must be inplace prior to running the remainder of the OpenSSH installation so that theinstallation process can create all of the necessary DSA keys automatically.Without this file, that creation process will fail with a “Couldn't connect to EGD
socket "/dev/entropy": Connection refused” message, and will need to bedone manually afterwards.
Run the following command to create the /dev/entropy local socket file:
#ls -ltotal 7152-rwx------ 1 root system 104740 Aug 18 17:40 egd-0_8_0_0.exe-rwx------ 1 root system 532553 Aug 18 17:40 openssh-2.1.1.4.exe-rwx------ 1 root system 2878322 Aug 18 17:40 openssl-0.9.5.1.exe-rwx------ 1 root system 137279 Aug 18 17:40 zlib-1_1_3_2.exe
# chmod u+x ./egd-0_8_0_0.exe# ./egd-0_8_0_0.exeUnZipSFX 5.32 of 3 November 1997, by Info-ZIP ([email protected]).inflating: egd-0.8.0.0.bff
#
#installp -acgX -d . freeware.egd.rte
Installation Summary--------------------Name Level Part Event Result-------------------------------------------------------------------------------freeware.egd.rte 0.8.0.0 USR COMMITT SUCCESS
#/usr/bin/perl -w /usr/opt/perl5/bin/egd.pl /dev/entropy
66 Additional Security Tools for AIX Systems

Inflate the other three filesets, and verify that the files are properly inflated.You need to have the openssh-2.1.1.4.bff, openssl-0.9.5.1.bff, andzlib-1.1.3.2.bff filesets. The files with extensions .asc are the PGP signaturesas will be discussed in Section 7.4.1, "Ensuring the integrity of downloads"on page 136.
Use the following installp command to install the freeware.openssh.rtefileset. This will also install the freeware.openssl.rte and freeware.zlib.rtefilesets automatically (because of the -g flag).
Verify that all of the filesets are properly installed:
This command was also added to /etc/rc.tcpip by the installation of thefreeware.egd.rte fileset.
Note
#rm .toc
#ls -ltotal 29192-rwxr--r-- 1 root system 153600 Jul 06 03:39 egd-0.8.0.0.bff-rwx------ 1 root system 104740 Aug 18 17:40 egd-0_8_0_0.exe-rw-r--r-- 1 root system 1433600 Aug 03 07:51 openssh-2.1.1.4.bff-rw-r--r-- 1 root system 2599 Aug 03 07:58 openssh-2.1.1.4.bff.asc-rwx------ 1 root system 532553 Aug 18 17:40 openssh-2.1.1.4.exe-rw-r--r-- 1 root system 9420800 Jul 28 10:39 openssl-0.9.5.1.bff-rw-r--r-- 1 root system 2599 Aug 01 04:26 openssl-0.9.5.1.bff.asc-rwx------ 1 root system 2878322 Aug 18 17:40 openssl-0.9.5.1.exe-rw-r--r-- 1 root system 256000 Mar 20 12:13 zlib-1.1.3.2.bff-rw-r--r-- 1 root system 2571 Mar 20 12:14 zlib-1.1.3.2.bff.asc-rwx------ 1 root system 137279 Aug 18 17:40 zlib-1_1_3_2.exe
# installp -acgX -d . freeware.openssh.rte
Installation Summary--------------------Name Level Part Event Result-------------------------------------------------------------------------------freeware.openssl.rte 0.9.5.1 USR APPLY SUCCESSfreeware.openssl.rte 0.9.5.1 ROOT APPLY SUCCESSfreeware.zlib.rte 1.1.3.2 USR APPLY SUCCESSfreeware.openssh.rte 2.1.1.4 USR APPLY SUCCESSfreeware.openssh.rte 2.1.1.4 ROOT APPLY SUCCESS
Chapter 5. Secure remote access 67

After installation, you may want to include environment variablesMANPATH=/usr/local/man and PATH=/usr/local/bin into /etc/profile to simplifyaccess to the man pages and tools.
In addition to ssh, OpenSSH comes with the scp tool. It is functionally similarto rcp, but it has the added security of ssh. It can also be used as areplacement for ftp. Unfortunately, the current version of OpenSSH does notship with the sftp tool, which is available in the SSH2 version of SSH fromSSH Communications Security. This tool may be added in future versions ofOpenSSH. To check, run:
#lslpp -f freeware.openssh.rte | grep sftp
5.1.5 OpenSSH using SSH1By default, the OpenSSH installation sets the SSH daemon to SSH1, and anentry is added to /etc/rc.tcpip to automatically start the SSH daemon onsystem startup. When a user connects to the OpenSS1 server, there are foursupported methods of authentication:
1. The first is based on the /etc/hosts.equiv (or /etc/shosts.equiv) file or the.rhosts (or .shosts) file on the remote machine. This method carries theinherent security weaknesses of the traditional BSD rsh and rlogincommands (such as clear-text passwords) and should be disabled. Bydefault, this authentication method is disabled in the/etc/openssh/sshd_config file (RhostsAuthentication no).
2. The second method is based on the first method combined withRSA-based host authentication. This means that on top of thehosts.equiv/shosts.equiv/.rhosts/.shosts files, the server verifies theclient’s host key in /etc/ssh/known_hosts and $HOME/.ssh/known_hostsfiles. This method also has security weaknesses since it still requires theuse of hosts.equiv/shosts.equiv/.rhosts/.shosts files. By default, thisauthentication method is enabled in the /etc/openssh/sshd_config file(RhostsRSAAuthentication yes). The set up for this method is the same asthat for the first. The known_hosts file is updated automatically by the SSHserver. The SSH server prompts you whenever a new connection is addedor modified.
# lppchk -v...# lslpp -l | grep freeware.openssh.rte...#
68 Additional Security Tools for AIX Systems

3. The third method is based on user passwords as per normal telnet logins.The difference is that this authentication method uses encryption for theexchanges, so passwords are not sent in clear text as they are withstandard protocols, such as telnet, ftp, rsh, and rlogin. This method isused when all other authentication methods fail.
4. The fourth method is based on RSA authentication. The$HOME/.ssh/authorized_keys file on the SSH server contains copies ofthe public keys for the remote clients that are allowed to log in under thataccount. When you generate a key-pair, the public key is stored in the$HOME/.ssh/identity.pub file, and the private key is stored in the$HOME/.ssh/identity file. You then copy the public key to the SSH server,storing it in your $HOME/.ssh/ directory under the new name ofauthorized_keys. By default, this authentication method is enabled in the/etc/openssh/sshd_config file (RSAAuthentication yes). This is the methodwe recommend and the one we cover in detail in this book.
Configuring and using SSH1By default, the SSH daemon listens on port 22. To find out which version ofSSH (SSH1 or SSH2) you are running, telnet to localhost (0) on sshd port(22). Notice that the SSH version is 1.99.
The SSH installation adds /etc/rc.openssh to /etc/inittab so that the SSHdaemon will automatically start during system startup.
To manually start the SSH daemon (using /etc/openssh/sshd_config as theconfig file and /etc/openssh/ssh_host_key as the RSA host key file):
#/usr/local/bin/opensshd -f /etc/openssh/sshd_config -h/etc/openssh/ssh_host_key
To manually stop the SSH daemon:
#kill `cat /var/openssh/sshd.pid`
To refresh the daemon:
#kill -1 `cat /var/openssh/sshd.pid`
# tn 0 22Trying...Connected to 0.Escape character is '^T'.SSH-1.99-OpenSSH_2.1.1
Chapter 5. Secure remote access 69

Configuration changes will take effect once the daemon has been refreshed.
To generate a public-key, private-key pair:
#ssh-keygen
By default, this will generate an SSH1 RSA key pair each with length of 1024bits. It is also possible to generate the SSH1 RSA key pair each with length of2048 bits by using the “-b 2048” flag.
During the creation process, you will be asked to enter a passphrase. A goodpassphrase is one that is 10-30 characters long, is almost impossible toguess, and has a hidden meaning only for the person generating it.
By default, the private key will be stored in the $HOME/.ssh/identity file, andthe public key will be stored in the $HOME/.ssh/identity.pub file on the SSHclient. You can specify a different name for the location of the keys, but youwill also need to add an IdentifyFile <filename> option line in thecorresponding client configuration file. System-wide options are specified inthe /etc/openssh/ssh_config file, and per-user options are specified in the$HOME/.ssh/config file in each user’s home directory.
Next, you need to send the public key ($HOME/.ssh/identity.pub) to the SSHserver. (You may first want to rename the public key to identify the user andhost from which the key was generated.) The public key needs to be stored(via rename or append) in the $HOME/.ssh/authorized_keys file on the SSHserver. In this implementation, the file authorized_keys stores the actual keysthemselves rather than just the file name(s) of where the keys are stored.
The use of $HOME/.rhosts, $HOME/.shosts, /etc/hosts.equiv, or/etc/shosts.equiv is not recommended. The use of these files will not bediscussed further. For more information on their use, see the appropriateSSH man pages.
sp5en05 /home/khorck # ssh-keygen -b 2048Generating RSA keys:........................................................................................................................oooO.oooOKey generation complete.Enter file in which to save the key (/home/khorck/.ssh/identity):Enter passphrase (empty for no passphrase):Enter same passphrase again:Your identification has been saved in /home/khorck/.ssh/identity.Your public key has been saved in /home/khorck/.ssh/identity.pub.The key fingerprint is:8e:f3:19:84:25:91:49:d3:fa:47:de:77:29:f0:15:5e khorck@sp5en05.
70 Additional Security Tools for AIX Systems

For applications, such as HACMP and PSSP, which require automatic remotelogin without prompting for password or passphrase, generate the keyswithout passphrase protection (using the -N ‘’ flag):
#ssh-keygen -b 2048 -N ‘’
Use of this method requires further safeguards to ensure that the private keyfile is kept secure. You may want to use software, such as PGP (refer toSection 7.3.3, "Using PGP" on page 127), to protect the key by encrypting itwhen it is not in use. Be sure, however, to decrypt the key before you try touse it.
5.1.6 OpenSSH using SSH2When someone attempts to connect to an OpenSSH server using SSH2, twodifferent authentication methods are tried. The first method tried is public keyauthentication. If that method fails, the second method, passwordauthentication, is tried.
To review, public key authentication uses an asymmetric scheme where eachuser has a pair of keys, one known as the public key and the other the privatekey. Public keys are public and can be distributed freely. Private keys areprivate and must be kept secure. The keys are related mathematically but it iscomputationally impracticable to derive the private key from the public key.Longer keys (more bits) are cryptographically stronger, and it is much harderto break them, but there is no such thing as a free lunch. You will pay aperformance penalty for using longer keys. They are more computationallyintensive, both to initially create them and to use them for data encryption anddecryption.
SSH2 uses DSA authentication instead of the RSA authentication used bySSH1. The client uses the private key (which is a DSA key for SSH2) to sign asession identifier and sends the output to the SSH server. On receiving thedata, the SSH server checks for a matching public key locally. If a matchingkey is found and the signature is correct, access is granted.
The client’s private key is located in the $HOME/.ssh/id_dsa file on the clientmachine, and the client’s public key is located in the$HOME/.ssh/authorized_keys file on the server machine.
If public key authentication fails, password authentication is tried. Thismethod is similar to normal password authentication except that thepasswords are encrypted rather than being transmitted in the clear. Atpresent, this implementation of SSH does not support Kerberos or S/Keyauthentication.
Chapter 5. Secure remote access 71

Once authenticated, several encryption schemes are available to ensure thesecurity of the data. The available schemes are 3DES (default), Blowfish,CAST128, or Arcfour. To further enhance security, data integrity is assuredusing hmac-sha1 or hmac-md5.
As part of the authentication process, SSH automatically checks to see if thehost that the client is connecting to has been connected to previously. Anyhost that has been connected to in the past will be remembered. DSA hostkeys are stored in the $HOME/.ssh/known_hosts2 file on the client. Whenconnecting to any new host (DSA host key not found in the known_hosts2file), you will be informed and asked to accept or reject the connection. If youaccept, the host DSA key will be automatically added into your known_hosts2file and will be reused in future connections.
Configuring and using SSH2To run SSH2, both client and server need to be configured for this version ofthe protocol. By default, the OpenSSH client is configured to support bothSSH1 and SSH2. However, by default, the OpenSSH server daemon (sshd) isconfigured only for SSH1. To reconfigure the OpenSSH server daemon (sshd)for SSH2, follow these steps:
1. Remove or rename the /etc/openssh/ssh_host_key and/etc/openssh/ssh_host_key.pub files.
2. Uncomment ‘Protocol 2,1’ in /etc/openssh/sshd_config
3. Restart the SSH server
By default, the SSH daemon listens on port 22. To find out which version ofSSH (SSH1 or SSH2) you are running, telnet to localhost (0) on sshd port(22). Notice that the SSH version is now 2.0.
The SSH installation adds /etc/rc.openssh to /etc/inittab so that the SSHdaemon will automatically start during system startup.
The default command in rc.openssh to start the SSH daemon is:
#/usr/local/bin/opensshd -f /etc/openssh/sshd_config -h/etc/openssh/ssh_host_key
# tn 0 22Trying...Connected to 0.Escape character is '^T'.ssh-2.0-OpenSSH_2.1.1
72 Additional Security Tools for AIX Systems

The -h flag is used to specify the RSA host key file. This will fail because weremoved that file as part of the reconfiguration for SSH2. This failure triggersthe SSH daemon to look for the ssh_host_dsa_key file instead and, if found,start the daemon with SSH2 support rather than SSH1. You can append the-Q flag to the end of the command to suppress the messages generatedbecause of the missing /etc/openssh/ssh_host_key file.
To manually start the SSH daemon with SSH2 support (using/etc/openssh/sshd_config as the config file and suppress warning messagesbecause of the missing /etc/openssh/ssh_host_key file):
#/usr/local/bin/opensshd -f /etc/openssh/sshd_config -Q
To manually stop the SSH daemon:
#kill `cat /var/openssh/sshd.pid`
To refresh the daemon:
#kill -1 `cat /var/openssh/sshd.pid`
Configuration changes will take effect once the daemon has been refreshed.
Because SSH2 uses DSA keys rather than RSA keys, you will need togenerate a new public-key, private-key pair for SSH2:
#ssh-keygen -d
Notice the addition of the -d flag. This flag instructs ssh-keygen to generateDSA keys rather than RSA ones. By default, this will generate an SSH2 DSAkey pair each with length of 1024 bits. It is also possible to generate the SSH2DSA key pair each with length of 2048 bits by using the “-b 2048” flag or 3072bits by using the “-b 3072” flag.
During the creation process, you will be asked to enter a passphrase. A goodpassphrase is one that is 10-30 characters long, is almost impossible toguess, and has a hidden meaning only for the person generating it.
Chapter 5. Secure remote access 73

Refer to the man pages for more detail on the options.
By default, the private key will be stored in the $HOME/.ssh/id_dsa file, andthe public key will be stored in the $HOME/.ssh/id_dsa.pub file on the SSHclient. You can specify a different name for the location of the keys, but youwill also need to add an IdentifyFile2 <filename> option line in thecorresponding client configuration file. System-wide options are specified inthe /etc/openssh/ssh_config file, and per-user options are specified in the$HOME/.ssh/config file in each user’s home directory.
You next need to send the public key ($HOME/.ssh/id_dsa.pub) to the SSHserver. (You may first want to rename the public key to identify the user andhost from which the key was generated.) The public key needs to be stored(via rename or append) in the $HOME/.ssh/authorized_keys2 file on the SSHserver. In this implementation, the file authorized_keys2 stores the actualkeys themselves rather than just the file name(s) of where the keys arestored.
To ssh to the SSH server:
$/usr/local/bin/ssh-keygen -dGenerating DSA parameter and key.Enter file in which to save the key (/home/ali/.ssh/id_dsa):Created directory '/home/ali/.ssh'.Enter passphrase (empty for no passphrase):Enter same passphrase again:Your identification has been saved in /home/ali/.ssh/id_dsa.Your public key has been saved in /home/ali/.ssh/id_dsa.pub.The key fingerprint is:96:66:f5:5e:83:83:51:8e:f5:90:7c:90:a7:cc:39:3b ali@sp5en05
sp5en01 /home/khorck # ssh sp5en05Enter passphrase for DSA key '/home/khorck/.ssh/id_dsa':******************************************************************************** ** ** Welcome to AIX Version 4.3! ** ** ** Please see the README file in /usr/lpp/bos for information pertinent to ** this release of the AIX Operating System. ** ** ********************************************************************************Last login: Thu Aug 17 10:47:17 2000 on ssh from sp5en01sp5en05 /home/khorck #
74 Additional Security Tools for AIX Systems

If public key method of authentication fails because the passphrase is wrongor the required files are not set up properly, the SSH server prompts for apassword instead.
For applications, such as HACMP and PSSP, which require automatic remotelogin without prompting for password or passphrase, generate the keyswithout passphrase protection (using the -N ‘’ flag):
#ssh-keygen -d -b 2048 -N ‘’
Use of this method requires further safeguards to ensure that the private keyfile is kept secure. You may want to use software, such as PGP (refer toSection 7.3.3, "Using PGP" on page 127), to protect the key by encrypting itwhen not in use. Be sure, however, to decrypt the key before you try to use it.
5.1.7 Other interesting SSH daemon configuration optionsThe following options can be set for the SSH daemon on the SSH server.They are applicable to both SSH1 and SSH2.
• The StrictHostKeyChecking option can be set to ensure that SSH will notautomatically add host keys to the known_hosts(2) file. Connections tohosts with keys not in the known_hosts(2) file, or those whose keys havechanged will be refused, and any changes to the known_hosts(2) file willneed to be done manually. This protects against Trojan horse attacks. Bydefault, this option is set to “no”.
• The AllowUsers, AllowGroups, DenyUsers, or DenyGroups options can beset to allow only certain users and/or (primary) groups to connect to theSSH server. The default is to allow connections from any user and/orgroup.
• The Ports option is used to define the port on which the SSH daemonlistens. By default, it is port 22, but you may want to change it tosomething else for security reasons.
• The ListenAddress option is used to control the network interfaces (IPaddresses) on which SSH listens. The default is to listen on all availableinterfaces. Note that this option must not come before the Port option inthe config file.
• The PermitRootLogin option is an option that can be used to furthercontrol root access. The arguments must be yes, no, or without-password.The default is “yes”. For security reasons, you may not want root users tolog in remotely. If so, in addition to this option, you should also disableremote access for things, such as telnet, ftp, rsh, and rlogin.
Chapter 5. Secure remote access 75

• The SyslogFacility option can be used to control the type of logging forsshd related messages. The values are DAEMON, USER, AUTH,LOCAL1, LOCAL2, LOCAL3, LOCAL4, LOCAL5, LOCAL6, and LOCAL7.The default is AUTH. This option is useful for debugging and audit trails.
• The LogLevel option controls the amount of logging done by sshd. Thevalues are QUIET, FATAL, ERROR, INFO, VERBOSE, and DEBUG. Thedefault is INFO. According to the man pages, DEBUG violates the privacyof users and is not recommended.
• The X11Forwarding option is used to control the forwarding of X11 traffic.The default is “no”. Use this option to protect X11 communications.
5.1.8 SSH2 interoperability between OpenSSH and SSH.ComAccording to the OpenSSH README file, readme.openssh2, interoperabilitybetween OpenSSH and SSH from SSH Communications Security is possible.Users on a host running SSH2 from OpenSSH can connect to another hostrunning SSH2 from SSH.Com. The steps are as follows:
1. On the OpenSSH host, run ssh-keygen as follows:
$ssh-keygen -f /key/from/ssh.com -X >> $HOME/.ssh/authorized
2. On the OpenSSH host, again run ssh-keygen, this time to generate apublic key (mykey.pub in this example):
$ssh-keygen -f /privatekey/from/openssh -x > mykey.pub
3. Transfer the public key (mykey.pub) to the SSH.Com host, and update theauthorization file:
$echo Key mykey.pub >> $HOME/.ssh2/authorization
5.1.9 SSH clients for the PCAn SSH client for PCs can be obtained from SSH Communications Securityat:
http://www.ssh.com
The latest version at the time of this writing is SSHWin 2.2. It may be freelyused by non-commercial users or used for a 30 day trial period by commercialusers (after which time, it must be purchased). This version of the SSH clientruns on Windows 95, 98, and NT, and can connect to an SSH daemonrunning either SSH1 or SSH2 protocol. A very interesting feature in thisversion of the SSH client is secure file transfer (sftp). The sftp tool enables filetransfers to occur over an encrypted channel, thus, providing enhancedsecurity.
76 Additional Security Tools for AIX Systems

Another tool worth looking at is teraterm. It is a terminal emulator that runsover SSH. It currently has support for SSH1 only and is available from:
http://www.zip.com.au/~roca/ttssh.html
5.1.10 Implications of having SSHWith SSH installed, you can securely communicate between hosts withencryption, authentication, and data integrity. Non-secure services, such asftp, telnet, and rsh, can then be disabled or removed and replaced with SSH.
For added security, consider using some of the additional SSH configurationoptions described in Section 5.1.7, "Other interesting SSH daemonconfiguration options" on page 75. Specifically, the AllowUsers, AllowGroups,DenyUsers, DenyGroups, and PermitRootLogin options can help you controlwho has remote access to the SSH server, and the ListenAddress option letsyou limit SSH traffic to specific network interfaces (IP addresses).
5.1.11 Alternatives to SSHThere are alternatives to SSH. The IP Security (IPSec) facility of AIX 4.3.xenables you to define firewall-like filter sets for network interfaces as well ascreate virtual private networks (VPNs) between hosts. IPSec comes standardwith AIX 4.3.x, and is contained in the bos.net.ipsec fileset. The IPSec manpages are a good source of information. Additional detailed information onhow to set up IPSec can be found in Section 7.3 of the redbook, AIX 4.3Elements of Security Effective and Efficient Implementation, SG24-5962, andChapter 9 of the redbook, A Comprehensive Guide to Virtual PrivateNetworks, Volume III, SG24-5309.
5.2 TCP Wrapper
TCP Wrapper protects the inetd daemon by defining access controls toservices provided by the daemon. When a connection comes in for a serviceand port combination, inetd first runs the TCP Wrapper program (tcpd). Thetcpd program then checks the incoming connection request against theaccess controls to ensure that it is a legal request for the requested serviceand port combination. If it is, tcpd runs the requested server program tosatisfy the original request. TCP Wrapper logs all connection requests tomaintain an audit trail of both successful and unsuccessful connectionattempts.
From the standpoint of inetd, the entire tcpd process is transparent. The onlychange to inetd that is required is to the /etc/inetd.conf file. It needs to be
Chapter 5. Secure remote access 77

modified to start tcpd instead of the requested server program. (The tcpdprogram will take care of starting the requested server program.) TCPWrapper can be used to protect telnet, finger, ftp, exec, rsh, rlogin, tftp, talk,comsat, and other services that have a one-to-one mapping with anexecutable server program.
This tool is really useful on networks where you want to specify which hostsare allowed to connect to a particular service on a particular port and whichhosts are not. For example, you may want to allow only certain hosts toconnect to your FTP server while disallowing all others.
5.2.1 Obtaining and installing TCP WrapperYou can obtain TCP Wrapper (and other tools, such as SATAN and POSTFIX,from the same author) from:
ftp://ftp.porcupine.org/pub/security/index.html
TCP Wrapper is also available from the Bull site in installp format. Theversion we installed and tested for this book is Version 7.6. Oncedownloaded, ensure the distribution has not been tampered with. Refer toSection 7.4.1, "Ensuring the integrity of downloads" on page 136, for moreinformation on how to do this.
Inflate the distribution and ensure the filesets are all there and have thecorrect sizes:
Install the product, and verify that the installation completed successfully:
# ./tcp_wrappers-7.6.1.0.exeUnZipSFX 5.32 of 3 November 1997, by Info-ZIP ([email protected]).inflating: tcp_wrappers-7.6.1.0.bffinflating: tcp_wrappers-7.6.1.0.bff.asc
# ls -ltotal 1032-rw-r--r-- 1 root system 358400 Jul 06 11:27 tcp_wrappers-7.6.1.0.bff-rw-r--r-- 1 root system 2643 Jul 06 11:28 tcp_wrappers-7.6.1.0.bff.asc-rwx------ 1 root system 162727 Aug 18 10:49 tcp_wrappers-7.6.1.0.exe
78 Additional Security Tools for AIX Systems
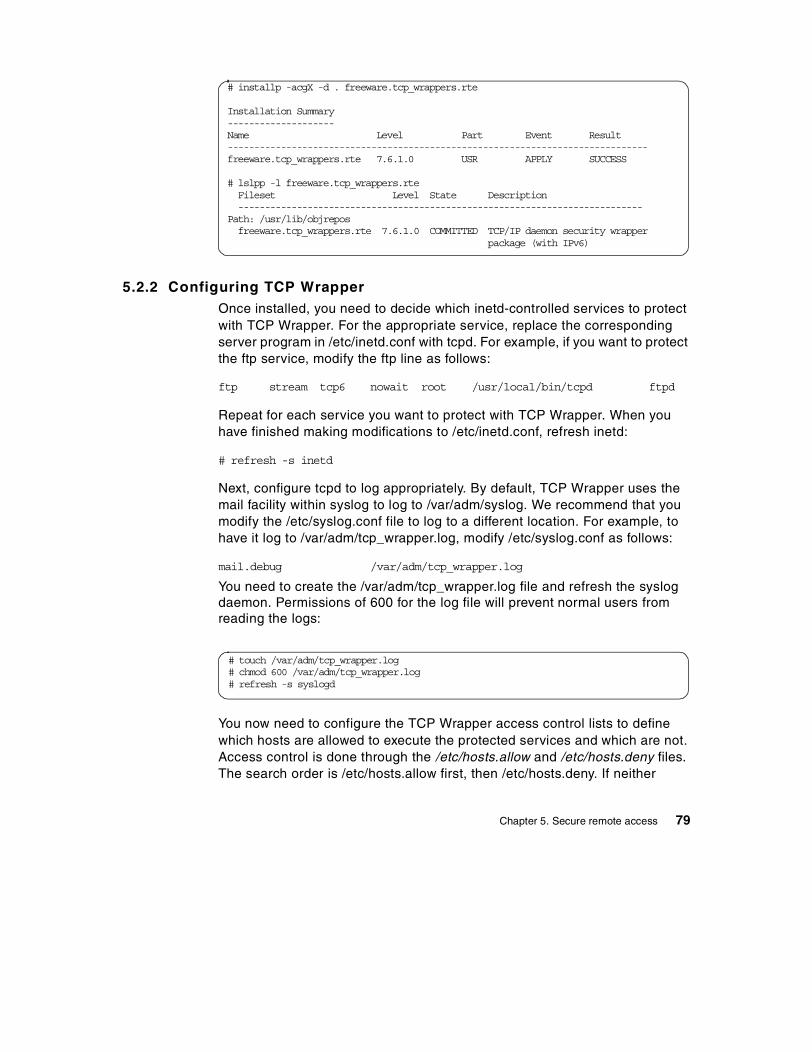
5.2.2 Configuring TCP WrapperOnce installed, you need to decide which inetd-controlled services to protectwith TCP Wrapper. For the appropriate service, replace the correspondingserver program in /etc/inetd.conf with tcpd. For example, if you want to protectthe ftp service, modify the ftp line as follows:
ftp stream tcp6 nowait root /usr/local/bin/tcpd ftpd
Repeat for each service you want to protect with TCP Wrapper. When youhave finished making modifications to /etc/inetd.conf, refresh inetd:
# refresh -s inetd
Next, configure tcpd to log appropriately. By default, TCP Wrapper uses themail facility within syslog to log to /var/adm/syslog. We recommend that youmodify the /etc/syslog.conf file to log to a different location. For example, tohave it log to /var/adm/tcp_wrapper.log, modify /etc/syslog.conf as follows:
mail.debug /var/adm/tcp_wrapper.log
You need to create the /var/adm/tcp_wrapper.log file and refresh the syslogdaemon. Permissions of 600 for the log file will prevent normal users fromreading the logs:
You now need to configure the TCP Wrapper access control lists to definewhich hosts are allowed to execute the protected services and which are not.Access control is done through the /etc/hosts.allow and /etc/hosts.deny files.The search order is /etc/hosts.allow first, then /etc/hosts.deny. If neither
# installp -acgX -d . freeware.tcp_wrappers.rte
Installation Summary--------------------Name Level Part Event Result-------------------------------------------------------------------------------freeware.tcp_wrappers.rte 7.6.1.0 USR APPLY SUCCESS
# lslpp -l freeware.tcp_wrappers.rteFileset Level State Description----------------------------------------------------------------------------
Path: /usr/lib/objreposfreeware.tcp_wrappers.rte 7.6.1.0 COMMITTED TCP/IP daemon security wrapper
package (with IPv6)
# touch /var/adm/tcp_wrapper.log# chmod 600 /var/adm/tcp_wrapper.log# refresh -s syslogd
Chapter 5. Secure remote access 79

contains the match, access is granted. For additional access control options,see the man pages hosts_options and hosts_access.5.
Here is how we configured TCP Wrapper for our lab environment. Our serveris merlin.itso.ibm.com. We set up TCP Wrapper to protect the telnet and ftpservices. For telnet, all servers in the itso.ibm.com domain, with the exceptionof sp5cw0, are allowed to use the service. For ftp, arthur is the only server inthe itso.ibm.com domain allowed to use the service. Access to either servicefrom outside the itso.ibm.com domain is denied.
To enable this functionality, we first had to modify the telnet and ftp lines in/etc/inetd.conf to run /usr/local/bin/tcpd instead of telnetd and ftpd. We thencreated the /etc/hosts.allow and /etc/hosts.deny files with the required accesscontrol for these services. (Note that you can use IP addresses, host names,domain names, or a combination of all of them in these files. When specifyingdomain names, be sure to include the leading period in the name, as in.itso.ibm.com, and when specifying networks, be sure to include the netmask,as in 9.12.0.0/255.255.255.0). Lastly, we verified the access controls with thetcpdchk -v command:
80 Additional Security Tools for AIX Systems

To test this setup, we used the tcpdmatch command. We first simulated atelnet test from sp5cw0.itso.ibm.com, followed by a telnet test fromarthur.itso.ibm.com. As expected, access was denied on the first test butgranted on the second:
# cat /etc/inetd.conf
...ftp stream tcp6 nowait root /usr/local/bin/tcpd ftpdtelnet stream tcp6 nowait root /usr/local/bin/tcpd telnetd -a...
# cat /etc/hosts.allowtelnetd: .itso.ibm.com except sp5cw0.itso.ibm.com : allowftpd: arthur.itso.ibm.com: allow
# cat /etc/hosts.denyftpd: 9.12.0.0/255.255.255.0 : denyALL: ALL: deny
# tcpdchk -vUsing network configuration file: /etc/inetd.conf
>>> Rule /etc/hosts.allow line 1:daemons: telnetdclients: .itso.ibm.com except sp5cw0.itso.ibm.comcommand: allowaccess: granted
>>> Rule /etc/hosts.allow line 2:daemons: ftpdclients: arthur.itso.ibm.comcommand: allowaccess: granted
>>> Rule /etc/hosts.deny line 1:daemons: ftpdclients: 9.12.0.0/255.255.255.0command: denyaccess: denied
>>> Rule /etc/hosts.deny line 2:daemons: ALLclients: ALLcommand: denyaccess: denied
Chapter 5. Secure remote access 81
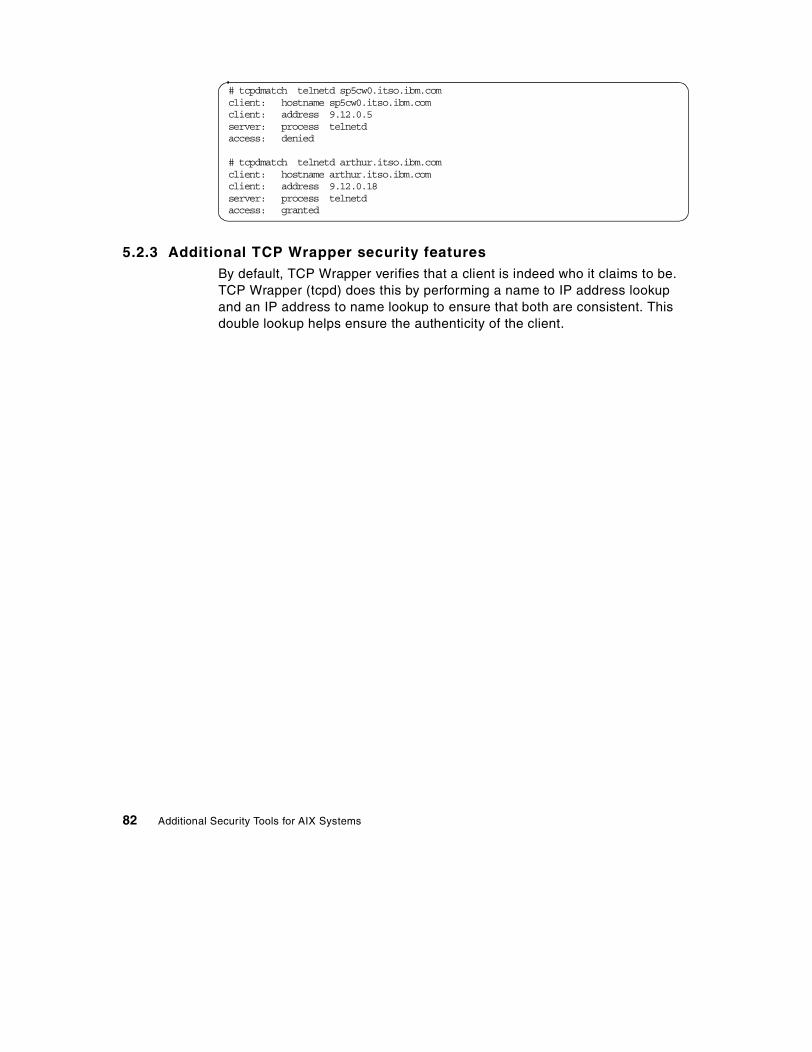
5.2.3 Additional TCP Wrapper security featuresBy default, TCP Wrapper verifies that a client is indeed who it claims to be.TCP Wrapper (tcpd) does this by performing a name to IP address lookupand an IP address to name lookup to ensure that both are consistent. Thisdouble lookup helps ensure the authenticity of the client.
# tcpdmatch telnetd sp5cw0.itso.ibm.comclient: hostname sp5cw0.itso.ibm.comclient: address 9.12.0.5server: process telnetdaccess: denied
# tcpdmatch telnetd arthur.itso.ibm.comclient: hostname arthur.itso.ibm.comclient: address 9.12.0.18server: process telnetdaccess: granted
82 Additional Security Tools for AIX Systems

Chapter 6. Port and network scanning
Network and port scanners are tools typically used by attackers to findvulnerabilities in systems. They are used to map out your network and lookfor potential security weaknesses. Port scanners scan systems looking foropen ports and known vulnerabilities. For example, if there is a newvulnerability for named (BIND), attackers may scan to see if that port is active,and, if so, attempt to exploit the new vulnerability.
Learning these tools gives you two advantages:
• You learn how these tools can be used against your network and whatinformation can be gathered. You can then build defense mechanismsaround this information.
• You use this knowledge to proactively scan your own network to findpossible loopholes before an attacker discovers it.
In this chapter, we discuss fping and nmap which are network and portscanners. The fping tool is a useful for quickly mapping out the network bysending ICMP echo requests to the entire network or to an IP range. Thistechnique is also called the ping sweep. With this tool, you can quickly scanthe network and determine which hosts are alive, ensure that no new hostshave been introduced without your knowledge, and look for potential weakpoints.
The nmap tool is a premier port scanner. A port scanner connects to TCP orUDP ports on a machine to determine which ports are active and in LISTENstate (as can be seen with the netstat -an command). The nmap tool usesvarious scan techniques to determine if a port is active. The default scan is aTCP connect() scan that uses the standard TCP handshake (explained inSection 3.3.6.1, "SYNDefender" on page 37). The tool also includes manyother types of scans, some of which are more subtle (like stealth scans) toprevent detection.
In this chapter, we also discuss other types of tools, such as SAINT,PortSentry, and lsof. These tools are not port or network scanners per se but
Even though this is considered ethical hacking, many organizationshave very strick policies against it. Be sure to get the properpermissions in writing before using these tools on a production network.
Important
© Copyright IBM Corp. 2000 83
are included here because they are complimentary tools to port and networkscanners, and can significantly help to secure your environment.
SAINT (Security Administrator's Integrated Network Tool) is a tool similar tothe NSA tool discussed in Section 4.4, "Network Security Auditor (NSA)" onpage 49. SAINT is an enhanced and updated version of SATAN. SAINTchecks remote machines for a list of known vulnerabilities. To run SAINT, youfirst provide it with a list of target machines to scan. SAINT then checks thetarget machines for the vulnerabilities and reports its findings in aneasy-to-read format. It also gives you recommendations on how to solve thevulnerabilities that it found.
It is also a good idea to have a tool to defend against port scans. PortSentryis just such a tool. It alerts you when it detects a port scan (both UDP andTCP), and can be configured to drop those connections. This tool is veryuseful as an early warning mechanism for suspected attacks, and, whenconfigured to drop the connections, can help to thwart the attacker(s).
The last tool covered in this chapter is lsof. It is a good tool to help youidentify ports which are unknown to you. When you see that your server hasan active port, and you are unsure which application owns it, lsof can helpyou determine the owner. Note that the lsof tool is not really a security tool.You can think of it more as a very enhanced version of the netstat -an
command.
6.1 fping
The fping tool is a ping sweep utility that can help map the network topologyby sending ICMP echo requests to the entire network or to a range of IPaddresses. The fping tool is similar to the ping tool except that it sends outICMP echo request packets in a round-robin fashion. When executed, fpingtakes in a list of IP addresses to be scanned as arguments, and sends out theICMP packets to each address without waiting for a response. This featureenables fping to be a quick tool for scanning an entire network.
The IP addresses passed to fping can be in several forms:
• They can be specified in a list on the command line.
• They can be specified in a list in a file.
• They can be specified in ranges either on the command line or in the file.
These options are covered in detail in Section 6.1.2, "Using fping" on page86.
84 Additional Security Tools for AIX Systems

With fping, you can quickly determine which hosts are alive on the networkand ensure that no new hosts have been introduced on the network withoutyour knowledge. Keep in mind, however, that there may be machines on thenetwork that have been configured specifically not to respond to pingrequests. For example, firewalls are typically configured this way. In othercases, you may get a response back indicating that a machine is down. Thismay be a false positive caused by a slow network or an overloaded machine.
The fping tool is also very useful for verifying that the network is configuredthe way you think it is configured. Over time, things change, anddocumentation rapidly goes out of date. You can use fping routinely as anaudit tool against your network documentation. This is especially importantfor early identification of potential loopholes in your security. For example,suppose a new machine with multiple network cards is introduced on thenetwork with out your knowledge. The danger here is that this machine, byvirtue of its multiple network cards, could easily provide an alternate path intoyour network, a path that enables an attacker to circumvent a firewall.
Another good use of fping is to determine if broadcast addresses areconfigured to respond to pings. Denial of service attacks have beensuccessfully launched against the broadcast addresses (both .0 and .255).For this reason, it is a good idea to ensure that your broadcast addresses arenot configured to respond to ping requests.
More information about denial of service attacks and how to prevent them canbe found at:
www.pentics.net/denial-of-service/white-papers/smurf.cgil
6.1.1 Obtaining and installing fpingThe fping tool is available for download from:
http://www-frec.bull.fr (installp format)http://www.mirror.ac.uk/sites/ftp.kernel.org/pub/software/admin/mon/
http://www.svn.net/datamonk/outline.shtml
For this redbook, we used fping version 2.2 from the Bull site.
Once downloaded, ensure that the distribution has not been tampered with.Refer to Section 7.4.1, "Ensuring the integrity of downloads" on page 136, formore information on how to do this.
Then, inflate the distribution:
Chapter 6. Port and network scanning 85

Verify that it was inflated properly:
Now, install the fileset freeware.fping.rte, and verify that the installationcompleted successfully:
6.1.2 Using fpingThe fping tool scans a large number of hosts quickly. The list of hosts to scancan be specified on the command line or through scripts. Scripts to automatethe generation of the host list are available for download on the Web. Also, asample script that will scan an entire Class C network (or any network withnetmask 255.255.255.0) is given in Appendix B, “Script used to scan anetwork with fping” on page 207. Three examples of using fping are given inthis section.
The first example shows how to run fping with the host list provided on thecommand line:
In this example, fping is used to scan three address: 192.168.5.1,192.168.5.3, and 192.168.5.5. The three addresses are used by fping as its
# ./fping-2.2.1.0.exeUnZipSFX 5.31 of 31 May 1997, by Info-ZIP ([email protected]).inflating: fping-2.2.1.0.bff
# ls -ltotal 384-rw-r--r-- 1 root system 102400 Jan 14 1998 fping-2.2.1.0.bff-rwx------ 1 root system 92765 Aug 18 10:48 fping-2.2.1.0.exe
# installp -acqX -d . freeware.fping.rte
Installation Summary--------------------Name Level Part Event Result-------------------------------------------------------------------------------freeware.fping.rte 2.2.1.0 USR APPLY SUCCESS
# /usr/local/bin/fping 192.168.5.1 192.168.5.3 192.168.5.5192.168.5.1 is alive192.168.5.5 is alive192.168.5.3 is unreachable#
86 Additional Security Tools for AIX Systems

host list. It sends ICMP echo requests to each in round-robin fashion. Noticethat the address, 192.168.5.3, did not respond after a timeout.
By default, fping uses:
• A retry count of three, excluding the initial ping (controlled by the -r flag)
• A 25ms minimum time between sending packets (controlled by the -i flag)
• A factor of 1.5 for increased retry wait times (controlled by the -B flag)
The second example shows how to run fping with the /etc/hosts file as input:
You can use this method as a quick way to ensure that all hosts in the hoststable are alive.
The third example shows how to run fping with the script found in Appendix B,“Script used to scan a network with fping” on page 207. In this example, weare scanning the 192.168.5.0 network (addresses 192.168.5.0 through192.168.5.255, inclusive). Since 192.168.5.0 and 192.168.5.255 can act asbroadcast addresses, we also want them scanned to ensure that they do notrespond to ping requests because of the vulnerability to denial of serviceattacks.
# cat /etc/hosts | fping127.0.0.1 is alive192.168.5.150 is alive9.12.0.5 is alive192.168.5.1 is alive192.168.5.5 is alive192.168.5.9 is alive192.168.5.13 is alive192.168.15.5 is alive192.168.15.9 is alive192.168.15.13 is alive9.12.2.168 is unreachable
# /tmp/fping.script 192.168.5.0Please enter filename to output results/tmp/fping.outOutput file is /tmp/fping.out
Obtaining list of hosts to scan and storing the list into /tmp/fping.data
Scanning hosts now. Please wait for prompt to return.View output file /tmp/fping.out for results
Chapter 6. Port and network scanning 87

The entire scan took less than a minute to run (including generating the list ofhosts to be scanned). The output file contains the following results:
As you can see, the broadcast addresses, 192.168.5.0 and 192.168.5.255,had responses from 192.168.5.5 and 192.167.5.13. A check of these twoservers reveals that they are configured with the bcastping no option set to on(1). Refer to Section 8.4.2, "Broadcast protection" on page 187 for moreinformation about this no option.
6.1.3 Protection against ping sweepsIn general, you can use intrusion detection software to protect your networkfrom ping sweeps. This software implements a form of network sniffer thatmonitors the network traffic looking for this type of event. Keep in mind,however, that some port scanners (like nmap) can do a really slow scan (-TParanoid flag) that may be missed by the intrusion detection software.
You can also protect your network by disabling ICMP requests from theInternet on your routers. There is also software available for download on the
# cat /tmp/fping.out192.168.5.0 : duplicate for [0], 84 bytes, 2.40 ms [<- 192.168.5.5]192.168.5.255 : duplicate for [0], 84 bytes, 1.71 ms [<- 192.168.5.5]192.168.5.0 is alive [<- 192.168.5.13]192.168.5.1 is alive192.168.5.5 is alive192.168.5.9 is alive192.168.5.13 is alive192.168.5.150 is alive192.168.5.255 is alive [<- 192.168.5.13]192.168.5.2 is unreachable192.168.5.3 is unreachable192.168.5.4 is unreachable...192.168.5.253 is unreachable192.168.5.254 is unreachable
256 targets7 alive
249 unreachable0 unknown addresses
996 timeouts (waiting for response)1003 ICMP Echos sent
9 ICMP Echo Replies received0 other ICMP received
0.41 ms (min round trip time)1.41 ms (avg round trip time)2.40 ms (max round trip time)
35.173 sec (elapsed real time)
88 Additional Security Tools for AIX Systems

Web that provides protection against port scanning. However, you shouldthoroughly test these packages prior to putting them in production todetermine how sensitive they are to scans. Remember that some portscanners can be very subtle (in stealth mode) and use a number of differenttechniques to prevent detection.
To minimize your exposure, you should harden your operating system (referto Chapter 8, “Securing AIX” on page 139) by removing unnecessaryservices. This reduces the number of potential targets that attackers have.
As always, your best defense is knowing how to think like an attacker. Youshould stay current with the latest techniques by reading articles posted onsecurity sites and subscribing to security-related mailing lists. Learn how toview your network from both the defensive and offensive positions.
6.2 Network Mapper (NMAP)
The nmap tool was written by Fyodor and is well accepted as a premier toolfor port scanning. It is very flexible, supports many scanning techniques, andenables you to do port scanning of hosts or entire networks. A port scannerconnects to the TCP or UDP ports on a machine to determine which ports areactive and in LISTEN state (as can be seen in the output of the netstat -an
command).
To check for vulnerabilities on a system, run an nmap port scan on the systemto see which services are running and exploitable. The nmap tool supportsvarious scan techniques to determine if a port is active. The default scan is aTCP connect() scan which uses the standard TCP handshake (explained inSection 3.3.6.1, "SYNDefender" on page 37). If logging is enabled to trackport scanning, this type of scanning will surely be logged. It is also visible inthe output of the netstat command.
The nmap tool supports more subtle scans like SYN stealth (half open)scanning that may escape some logging facilities. Other techniques like TCPFIN, Xmas, or NULL (stealth) scanning, TCP ftp proxy (bounce attack)scanning, and UDP port scanning can also be used.
Other nmap features include ping scanning to determine the hosts that arerunning, remote OS identification to “guess” the remote operating system,and reverse ident scanning to determine the owner of the remote process ifident protocol is running.
Included in the package is the /usr/local/lib/nmap-2.53/nmap.deprecated.txt
file that explains the various scan techniques and their use. Read that file for
Chapter 6. Port and network scanning 89

a better understanding on what nmap can do. Alternatively, you can visithttp://www.insecure.org/nmap for a more detailed description of thetechniques and features supported by nmap.
6.2.1 Obtaining and installing nmapThe nmap tool in installp format can be downloaded fromhttp://www-frec.bull.fr/. For this redbook, we used nmap version 2.53 fromthe Bull site. The nmap tool can also be obtained from its homepage athttp://www.insecure.org/nmap.
For nmap on AIX, you also need the /usr/bin/lex and /usr/bin/yacc utilities.You can find these in the bos.adt.utils fileset. If lex and yacc are not alreadyinstalled, you will need to install them before installing nmap. To determine ifthe bos.adt.utils fileset is installed:
Once you have downloaded nmap, make sure the distribution has not beentampered with. Refer to Section 7.4.1, "Ensuring the integrity of downloads"on page 136 for more information on how to do this.
Next, unpack the distribution, and install the nmap tool. (Notice that nmaprequires libpcap as a prerequisite):
$ lslpp -l bos.adt.utilsFileset Level State Description----------------------------------------------------------------------------
Path: /usr/lib/objreposbos.adt.utils 4.3.3.0 COMMITTED Base Application Development
Utilities - lex and yacc
90 Additional Security Tools for AIX Systems

Once installed, enable the pse drivers. If you do not enable the pse drivers,you will get messages like this one:
To enable the drivers, edit the /etc/pse.conf file, uncomment the appropriateentry for your type of network adapter (such as Ethernet or token ring), andadd an entry for the loopback adapter:
Now, activate the drivers:
# ./nmap-2_53_0_0.exeUnZipSFX 5.32 of 3 November 1997, by Info-ZIP ([email protected]).inflating: nmap-2.53.0.0.bffinflating: nmap-2.53.0.0.bff.asc
# ./libpcap-0_5_0_0.exeUnZipSFX 5.41 of 16 April 2000, by Info-ZIP ([email protected]).inflating: libpcap-0.5.0.0.bffinflating: libpcap-0.5.0.0.bff.asc
# installp -acgX -d . freeware.nmap.rte
Installation Summary--------------------Name Level Part Event Result-------------------------------------------------------------------------------freeware.libpcap.rte 0.5.0.0 USR APPLY SUCCESSfreeware.nmap.rte 2.53.0.0 USR APPLY SUCCESS
# nmap -sS -O -P0 -v merlin > /tmp/merlin.nmap.sSpcap_open_live: /dev/dlpi/tr0: No such file or directoryThere are several possible reasons for this, depending on your operating system:LINUX: If you are getting Socket type not supported, try modprobe af_packet or recompilyour kernel with SOCK_PACKET enabled.*BSD: If you are getting device not configured, you need to recompile your kernel withBerkeley Packet Filter support. If you are getting No such file or directory, try creathe device (eg cd /dev; MAKEDEV <device>; or use mknod).SOLARIS: If you are trying to scan localhost and getting '/dev/lo0: No such file ordirectory', complain to Sun. I don't think Solaris can support advanced localhost scanYou can probably use "-P0 -sT localhost" though.
#d+ dlpi en /dev/dlpi/en # streams dlpi ethernet driver#d+ dlpi et /dev/dlpi/et # streams dlpi 802.3 driverd+ dlpi lo /dev/dlpi/lo # streams dlpi loopback driverd+ dlpi tr /dev/dlpi/tr # streams dlpi token ring driver#d+ dlpi fi /dev/dlpi/fi # streams dlpi FDDI driver
There seems to be some nmap functionality in the release that we used forthis redbook that does not work properly with the token ring interface.
Note
Chapter 6. Port and network scanning 91

You are now ready to use nmap. Check out the/usr/local/lib/nmap-2.53/nmap.deprecated.txt file for highlights of the manydifferent scanning techniques available and suggestions on when you mightwant to use them as well as the different types of information they provide.
By default, the permission of nmap is 755. In all likelihood, you probably donot want normal users scanning your network. We recommend that youchange the permission to 500.
6.2.2 Nmap usageThe nmap tool reports one of three states for each port scanned. The statesare:
• Open - The target machine will accept() connections on that port.
• Filtered - A device, such as a firewall, is protecting the port and preventingconnection.
• Unfiltered - The port is unprotected.
The following screen contains some examples of nmap usage along with thecorresponding output.
# strload -f /etc/pse.confstrload: cannot initialize stddev: Do not specify an existing file.strload: cannot initialize stddev: Do not specify an existing file.strload: 'spx' already loadedstrload: 'sc' already loadedstrload: 'stdmod' already loadedstrload: cannot initialize dlpi: Do not specify an existing file.strload: cannot initialize dlpi: Do not specify an existing file.strload: cannot initialize xtiso: Do not specify an existing file.strload: cannot initialize xtiso: Do not specify an existing file.strload: cannot initialize xtiso: Do not specify an existing file.strload: cannot initialize xtiso: Do not specify an existing file.strload: cannot initialize xtiso: Do not specify an existing file.strload: cannot initialize xtiso: Do not specify an existing file.strload: 'timod' already loadedstrload: 'tirdwr' already loaded# ls -l /dev/dlpitotal 0crw-rw-rw- 1 root system 11, 42 Sep 03 22:13 encrw-rw-rw- 1 root system 11, 43 Sep 03 22:14 lo
Some organizations have strict policies against network scanning byunauthorized personnel. Be sure to get the proper approval in writingbefore running tools, such as nmap, on a production network.
Important
92 Additional Security Tools for AIX Systems

# nmap -P0 -p23 -sT 172.16.30.0/24Starting nmap V. 2.53 by [email protected] ( www.insecure.org/nmap/ )Strange error from connect (13):Permission deniedThe 1 scanned port on (172.16.30.0) is: closedInteresting ports on (172.16.30.1):Port State Service23/tcp filtered telnet......# nmap -P0 -p23,514,513 172.16.30.50Starting nmap V. 2.53 by [email protected] ( www.insecure.org/nmap/ )Interesting ports on merlinen0 (172.16.30.50):(The 2 ports scanned but not shown below are in state: closed)Port State Service23/tcp open telnet
# nmap -P0 -v 172.16.30.50Starting nmap V. 2.53 by [email protected] ( www.insecure.org/nmap/ )No tcp,udp, or ICMP scantype specified, assuming vanilla tcp connect() scan. Use -sPif you really don't want to portscan(and just want to see what hosts are up).Initiating TCP connect() scan against merlinen0 (172.16.30.50)Adding TCP port 23 (state open).Adding TCP port 111 (state open).Adding TCP port 21 (state open).Adding TCP port 53 (state open).Adding TCP port 684 (state open).Adding TCP port 683 (state open).Adding TCP port 6000 (state open).The TCP connect scan took 0 seconds to scan 1523 ports.Interesting ports on merlinen0 (172.16.30.50):(The 1516 ports scanned but not shown below are in state: closed)Port State Service21/tcp open ftp23/tcp open telnet53/tcp open domain111/tcp open sunrpc683/tcp open unknown684/tcp open unknown6000/tcp open X11Nmap run completed -- 1 IP address (1 host up) scanned in 0 seconds
# nmap -sS -P0 -O sp5en01Starting nmap V. 2.53 by [email protected] ( www.insecure.org/nmap/ )Interesting ports on sp5en01 (192.168.5.1):(The 1502 ports scanned but not shown below are in state: closed)Port State Service7/tcp open echo9/tcp open discard13/tcp open daytime19/tcp open chargen21/tcp open ftp2770/tcp open sometimes-rpc332771/tcp open sometimes-rpc5TCP Sequence Prediction: Class=truly random
Difficulty=9999999 (Good luck!)Remote operating system guess: IBM AIX v3.2.5 - 4Nmap run completed -- 1 IP address (1 host up) scanned in 3 seconds
Chapter 6. Port and network scanning 93

Read the man pages and review the/usr/local/lib/nmap-2.53/nmap.deprecated.txt file to get a good overview ofthe nmap tool and its capabilities. There are numerous scan techniques thatcan be used under many different circumstances in different environments.The best way to get familiar with nmap is to play around with it in a labenvironment. As you do, remember to also view what you see from the eyesof a potential attacker. We think you will be amazed at what you see.
6.2.3 Protection against port scannersIn general, you can use intrusion detection software to protect your networkfrom port scanners. This software implements a form of network sniffer thatmonitors the network traffic looking for this type of event. Keep in mind,however, that some port scanners, such as nmap, can do a really slow scan(-T Paranoid flag) that may be missed by the intrusion detection software.
There is software available for download on the Web that provides protectionagainst port scanning. However, you should thoroughly test these packagesprior to putting them in production to determine how sensitive they are toscans. Remember that some port scanners can be very subtle (in stealthmode) and use a number of different techniques to prevent detection.
To minimize your exposure, you should harden your operating system (referto Chapter 8, “Securing AIX” on page 139) by removing unnecessaryservices. This reduces the number of potential targets that attackers have.
As always, your best defense is knowing how to think like an attacker. Youshould stay current with the latest techniques by reading articles posted onsecurity sites and subscribing to security-related mailing lists. Learn how toview your network from both the defensive and offensive positions.
6.3 Security Administrator's Integrated Network Tool (SAINT)
SAINT is a useful scanning tool for system vulnerabilities. It is an enhancedand updated version of SATAN, and is similar to the NSA tool discussed inSection 4.4, "Network Security Auditor (NSA)" on page 49. Even if you haveother similar tools, it is always a good idea to have multiple tools so that youcan cross-verify the results from each.
SAINT has many built-in tests for known vulnerabilities. Seehttp://www.wwdsi.com/cgi-bin/vulns.pl for the full list of vulnerabilities knownto SAINT. Note, however, that the list of vulnerabilities changes with eachrelease of the tool. That is why it is important to make sure you are running
94 Additional Security Tools for AIX Systems

the latest version of the software (similar to what you are probably alreadydoing with virus-protection software).
SAINT can be run from the command line or from a browser. The browserinterface is nice in that it enables you to run the tool and view the results allwithin the browser. The online documentation is plentiful and providesexplanations of how to use the tool. It even gives recommended proceduresfor solving the vulnerabilities it finds.
The SAINT homepage is at:
http://www.wwdsi.com/saint/index.html
This site provides a lot of detailed information about the tool. It also has avery cool demo/tutorial of the product.
6.3.1 Obtaining and installing SAINTSAINT is only available in source-code form. Download it fromhttp://www.wwdsi.com/saint/index.html. You will then need to compile it with aC compiler. At the time of this writing, the current version is SAINT 2.2.
To install the package, you will need to the gzip utility (available for downloadfrom the Bull site), a copy of PERL, and a C compiler. We used the version4.4 C compiler for AIX under AIX 4.3.3.
Download the package, and install it as shown in the following screen.
For security reasons, it is not a good idea to have a C compiler loaded on aproduction system. Compile the program on a non-production system, andonly move the executable program to the production system. Be sure alsoto set the permissions as tightly as possible.
Important
Chapter 6. Port and network scanning 95

Additional installation information is available in the README file that comeswith the product.
To run SAINT, you can either use the command line (saint -h) or a browser. Ifyou are going to use the browser interface, you need to ensure that your X11environment is set up correctly to display the browser. The default browserwas set automatically when you ran perl reconfig during the installationprocess.
Invoke the SAINT browser interface, shown in Figure 12 on page 97, bytyping saint.
# ls -ltotal 1352-rw-r----- 1 root system 687209 Sep 11 14:57 saint-2.2.tar.gz# gzip -d saint-2.2.tar.gz# tar -xvf saint-2.2.tar......# perl reconfigReconfiguring...Checking to make sure all the targets are here...Trying to find Perl...
Perl is in /bin/perl......Changing paths in config/paths.sh...
# makeUsage: make system-type. Known types are:aix osf freebsd openbsd bsdi dgux irix4 irixhpux9 hpux10 hpux11 linux-old linux-newsolaris sunos4 sunos5 sysv4 tru64 unixware7-udkmake: 1254-004 The error code from the last command is 1.
Stop.# make CC=cc aix
cd src/misc; make "LIBS=" "XFLAGS=-DAUTH_GID_T=in......cc -o ../../bin/ddos_scan dds.o
96 Additional Security Tools for AIX Systems

Figure 12. SAINT main page
Chapter 6. Port and network scanning 97

6.3.2 Using SAINT
The steps for configuring SAINT, running a scan, and viewing the results areas follows:
1. Click the Data Mgmt. and Config Mgmt. buttons to configure SAINT foryour requirements.
2. Click the Target Selection button to select the target systems to scan.
3. Select the scan method, then click the Start the scan button.
4. Click the Data Analysis button, then click the By Approximate DangerLevel button to analyze the results. Select each item in the list for furtherdetails.
5. Click the Documentation button for access to the full productdocumentation for SAINT.
6.4 PortSentry
PortSentry from Psionic is a port scan detector. Since port scanning is acommon part of an attacker’s routine, having a defense against it will helpsecure your environment. When PortSentry detects a port scan, it can reactby adding the IP address of the attacking host into the TCP Wrapper,/etc/hosts.deny file so that further connection attempts to protected servicesare denied. It can also kill off the route from the attacking machine. Whenused in conjunction with the LogCheck utility (also from Psionic), PortSentrycan notify you through email when it detects a possible attack. (Without thisadded feature, you will need to regularly check the PortSentry logs yourself.)
The PortSentry homepage is can be found at the following address:
http://www.psionic.com/abacus/
Some companies have strict restrictions against doing such scanning.Ensure that you have the necessary authorization prior to running thesescans. Also, you may want to play safe by ensuring that backups are doneprior to scanning since crashes may occur under some severe conditions.
Important
98 Additional Security Tools for AIX Systems

6.4.1 Obtaining and installing PortSentryPortSentry is only available in source code form. Download it fromhttp://www.psionic.com/abacus/portsentry/. Ensure the integrity of yourdownload by verifying your signature posted on the site. Refer to Section7.4.1, "Ensuring the integrity of downloads" on page 136.
To install the package, you need the gzip utility (available for download fromthe Bull site) and a C compiler. We used the version 4.4 C compiler for AIXunder AIX 4.3.3.
Download the package, and unpack it as follows.
Be sure to thoroughly test your PortSentry rules and thresholds beforeputting them into production. It is amazingly easy to lock out legitimateclients. Also, once you have implemented PortSentry, continue to monitor itto ensure that it is really doing what you expected it to do.
Important
[/usr/local] # ls -ltotal 408drwxr-xr-x 2 bin bin 512 Sep 12 14:52 bindrwxr-xr-x 3 root system 512 Aug 30 19:04 includedrwxr-xr-x 13 root system 512 Sep 12 14:52 libdrwxr-xr-x 6 root system 512 Aug 30 19:04 man-rw-r----- 1 root system 184320 Sep 12 15:36 portsentry-1.0.tar.Zdrwxr-xr-x 4 root system 512 Sep 12 14:52 sharedrwxr-xr-x 6 root system 3584 Sep 12 16:00 src[/usr/local] # gzip -d portsentry-1.0.tar.gz[/usr/local] # tar -xvf portsentry-1.0.tarx portsentry-1.0x portsentry-1.0/CHANGES, 6729 bytes, 14 media blocks.x portsentry-1.0/CREDITS, 6133 bytes, 12 media blocks.x portsentry-1.0/LICENSE, 2215 bytes, 5 media blocks.x portsentry-1.0/Makefile, 5519 bytes, 11 media blocks.x portsentry-1.0/README.COMPAT, 334 bytes, 1 media blocks.x portsentry-1.0/README.install, 20191 bytes, 40 media blocks.x portsentry-1.0/README.methods, 5475 bytes, 11 media blocks.x portsentry-1.0/README.stealth, 7728 bytes, 16 media blocks.x portsentry-1.0/ignore.csh, 2715 bytes, 6 media blocks.x portsentry-1.0/portsentry.c, 52759 bytes, 104 media blocks.x portsentry-1.0/portsentry.conf, 10403 bytes, 21 media blocks.x portsentry-1.0/portsentry.h, 3896 bytes, 8 media blocks.x portsentry-1.0/portsentry.ignore, 236 bytes, 1 media blocks.x portsentry-1.0/portsentry_config.h, 2438 bytes, 5 media blocks.x portsentry-1.0/portsentry_io.c, 19871 bytes, 39 media blocks.x portsentry-1.0/portsentry_io.h, 2912 bytes, 6 media blocks.x portsentry-1.0/portsentry_tcpip.h, 4688 bytes, 10 media blocks.x portsentry-1.0/portsentry_util.c, 4160 bytes, 9 media blocks.x portsentry-1.0/portsentry_util.h, 2325 bytes, 5 media blocks.
Chapter 6. Port and network scanning 99
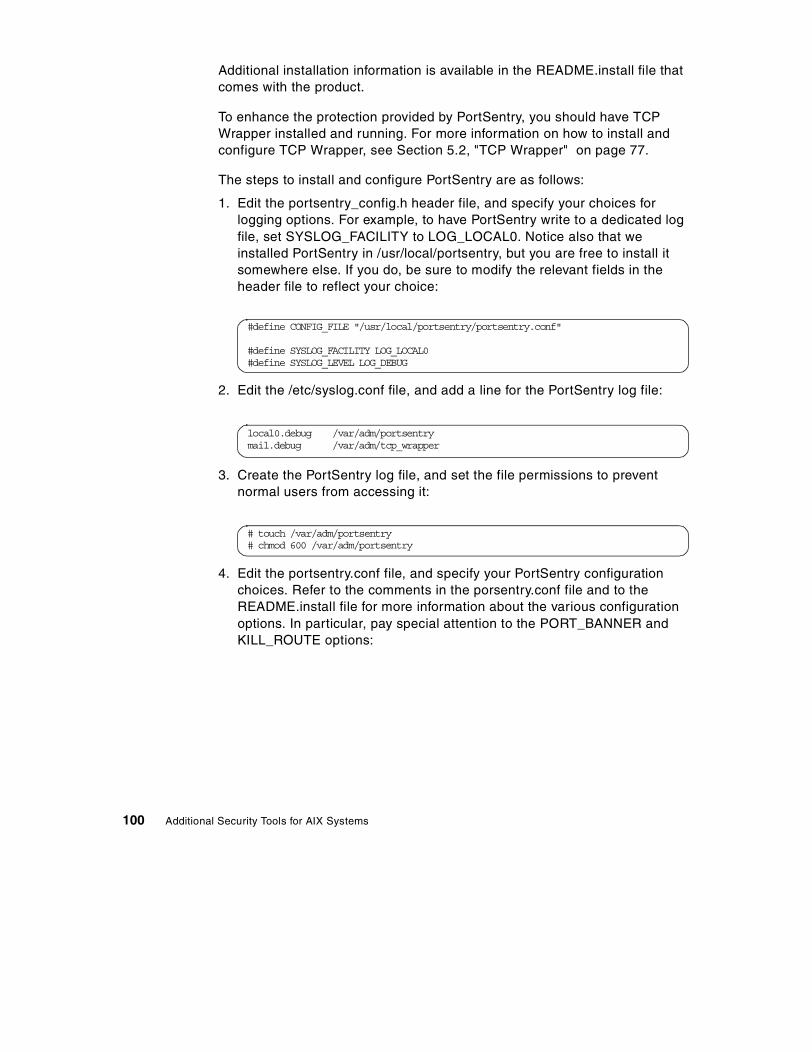
Additional installation information is available in the README.install file thatcomes with the product.
To enhance the protection provided by PortSentry, you should have TCPWrapper installed and running. For more information on how to install andconfigure TCP Wrapper, see Section 5.2, "TCP Wrapper" on page 77.
The steps to install and configure PortSentry are as follows:
1. Edit the portsentry_config.h header file, and specify your choices forlogging options. For example, to have PortSentry write to a dedicated logfile, set SYSLOG_FACILITY to LOG_LOCAL0. Notice also that weinstalled PortSentry in /usr/local/portsentry, but you are free to install itsomewhere else. If you do, be sure to modify the relevant fields in theheader file to reflect your choice:
2. Edit the /etc/syslog.conf file, and add a line for the PortSentry log file:
3. Create the PortSentry log file, and set the file permissions to preventnormal users from accessing it:
4. Edit the portsentry.conf file, and specify your PortSentry configurationchoices. Refer to the comments in the porsentry.conf file and to theREADME.install file for more information about the various configurationoptions. In particular, pay special attention to the PORT_BANNER andKILL_ROUTE options:
#define CONFIG_FILE "/usr/local/portsentry/portsentry.conf"
#define SYSLOG_FACILITY LOG_LOCAL0#define SYSLOG_LEVEL LOG_DEBUG
local0.debug /var/adm/portsentrymail.debug /var/adm/tcp_wrapper
# touch /var/adm/portsentry# chmod 600 /var/adm/portsentry
100 Additional Security Tools for AIX Systems
5. Edit the portsentry.ignore file, and add the IP addresses of your localinterfaces.
6. Edit the Makefile, remove the -Wall flag, and modify CFLAGS,INSTALLDIR, and CHILDDIR lines as follows:
7. Run make, make aix, and make install. In our case, the install directory is/usr/local/portsentry. This is where the portsentry executable will belocated:
# Un-comment these if you are really anal:TCP_PORTS="1,7,9,11,15,70,79,80,109,110,111,119,138,139,143,512,513,514,515,540,635,1080,1524,2000,2001,4000,4001,5742,6000,6001,6667,12345,12346,20034,30303,32771,32772,32773,32774,31337,40421,40425,49724,54320"UDP_PORTS="1,7,9,66,67,68,69,111,137,138,161,162,474,513,517,518,635,640,641,666,700,2049,32770,32771,32772,32773,32774,31337,54321"## Use these if you just want to be aware:#TCP_PORTS="1,11,15,79,111,119,143,540,635,1080,1524,2000,5742,6667,12345,12346,20034,31337,32771,32772,32773,32774,40421,49724,54320"#UDP_PORTS="1,7,9,69,161,162,513,635,640,641,700,32770,32771,32772,32773,32774,31337,54321"......IGNORE_FILE="/usr/local/portsentry/portsentry.ignore"# Hosts that have been denied (running history)HISTORY_FILE="/usr/local/portsentry/portsentry.history"# Hosts that have been denied this session only (temporary until next restart)BLOCKED_FILE="/usr/local/portsentry/portsentry.blocked"......# Generic#KILL_ROUTE="/sbin/route add $TARGET$ 333.444.555.666"KILL_ROUTE="/usr/sbin/route add $TARGET$ 127.0.0.1
CFLAGS = -O
INSTALLDIR = /usr/localCHILDDIR=/portsentry
Chapter 6. Port and network scanning 101

8. Start PortSentry in either TCP or UDP mode.
[/usr/local/portsentry-1.0] # makeUsage: make <systype><systype> is one of: linux, bsd, solaris, hpux, hpux-gcc,freebsd, openbsd, netbsd, bsdi, aix, osf, generic
This code requires snprintf()/vsnprintf() system callsto work. If you run a modern OS it should work onyour system with 'make generic'. If you get it towork on an unlisted OS please write me with thechanges.
Install: make install
NOTE: This will install the package in thisdirectory: /usr/local
Edit the makefile if you wish to change these paths.Any existing files will be overwritten.
[/usr/local/portsentry-1.0] # make aixSYSTYPE=aix
Makingcc -O -o ./portsentry ./portsentry.c ./portsentry_io.c ./portsentry_util.c
...
.../portsentry_util.c:
[/usr/local/portsentry-1.0]# make installCreating psionic directory /usr/localSetting directory permissions
chmod 700 /usr/localCreating portsentry directory /usr/local/portsentrySetting directory permissions
chmod 700 /usr/local/portsentryCopying files
cp ./portsentry.conf /usr/local/portsentrycp ./portsentry.ignore /usr/local/portsentrycp ./portsentry /usr/local/portsentry
Setting permissionschmod 600 /usr/local/portsentry/portsentry.ignorechmod 600 /usr/local/portsentry/portsentry.confchmod 700 /usr/local/portsentry/portsentry
Edit /usr/local/portsentry/portsentry.conf and changeyour settings if you haven't already. (route, etc)
WARNING: This version and above now use a newdirectory structure for storing the programand config files (/usr/local/portsentry).Please make sure you delete the old files whenthe testing of this install is complete.
102 Additional Security Tools for AIX Systems

9. Test until you are satisfied that the tool is properly configured. (Note thatKILL_ROUTE will only add routes to remote systems on differentnetworks.)
10.For email alerts and better log management, you can download theLogCheck tool (http://www.psionic.com/abacus/logcheck/), or write yourown scripts to do something similar.
6.4.2 Defense provided by PortSentryPortSentry provides two major forms of defense:
• The first is based on TCP Wrapper. You enable this method with theWRAPPER_HOSTS_DENY option in the portsentry_config.h header file.Once enabled, IP addresses of suspected attack hosts will automaticallybe added to the TCP Wrapper access control file /etc/hosts.deny. To usethis method, you must already have TCP Wrapper configured and runningon the server. (For more information about installing and configuring TCPWrapper, see Section 5.2.2, "Configuring TCP Wrapper" on page 79.)This method may, by itself, not provide sufficient defense against portscanning. Recall that TCP Wrapper only protects services started by inetdand then only the ones that you have wrapped with TCP Wrapper. Inaddition, you must make sure that the ports that you have wrapped in/etc/inetd.conf match what you have listed in the portsentry.conf file.
• The second is based on the loopback adapter. You enable this methodwith the KILL_ROUTE option in the portsentry.conf file. Once enabled,PortSentry will automatically add routes through the loopback adapter onyour server to the IP addresses of the suspected attack hosts. This newroute will effectively block a lot of normal port scans. Unfortunately, theAIX version of the tool that we tested did not have support for detectingand blocking stealth scans.
We recommend that you enable both methods.
6.5 List Open Files (lsof)
The lsof tool is quite literally used to list open files. Remember that in UNIX(and AIX) most things appear as files, including network sockets. If you findan unknown port with the netstat command, you can use lsof to get moreinformation about it, such as ownership. The tool is available via anonymousftp from ftp://vic.cc.purdue.edu/pub/tools/unix/lsof. It is also available in
[/usr/local/portsentry]# portsentry -tcp[/usr/local/portsentry]# portsentry -udp
Chapter 6. Port and network scanning 103

installp format from the Bull site. The version we used during the writing ofthis redbook was version 4.50 from the Bull site.
6.5.1 Installing lsofDownload the package and ensure that it has not been tampered with. SeeSection 7.4.1, "Ensuring the integrity of downloads" on page 136, for moreinformation on how to do this.
Once you have verified the integrity of the package, inflate it, and install it witheither the installp command or SMIT:
Alternatively, you can use SMIT to install the fileset:
1. Type smitty installp
2. Select Install and Update from ALL Available Software
3. Type . (dot) and press Enter
4. Type F4 or ESC+4 to list filesets
5. Select Find freeware.lsof (F7 or ESC+7 to select the fileset)
6. Press Enter three times to install
If the installation failed with a fileset not found message, try exiting SMIT,removing the .toc file (#rm .toc), and retrying the installation again.
Either way (installp or SMIT), verify that the installation completedsuccessfully:
# chmod u+x lsof_aix432-4.50.0.0.exe# ./lsof_aix432-4.50.0.0.exeUnZipSFX 5.32 of 3 November 1997, by Info-ZIP ([email protected]).inflating: lsof-4.50.0.0.bffinflating: lsof-4.50.0.0.bff.asc
# ls -ltotal 2640-rw-r--r-- 1 root system 972800 Jul 04 04:55 lsof-4.50.0.0.bff-rw-r--r-- 1 root system 2580 Jul 04 10:38 lsof-4.50.0.0.bff.asc-rwx------ 1 root system 369866 Sep 01 14:48 lsof_aix432-4.50.0.0.exe# rm .toc# installp -acgX -d . freeware.lsof.rte
104 Additional Security Tools for AIX Systems
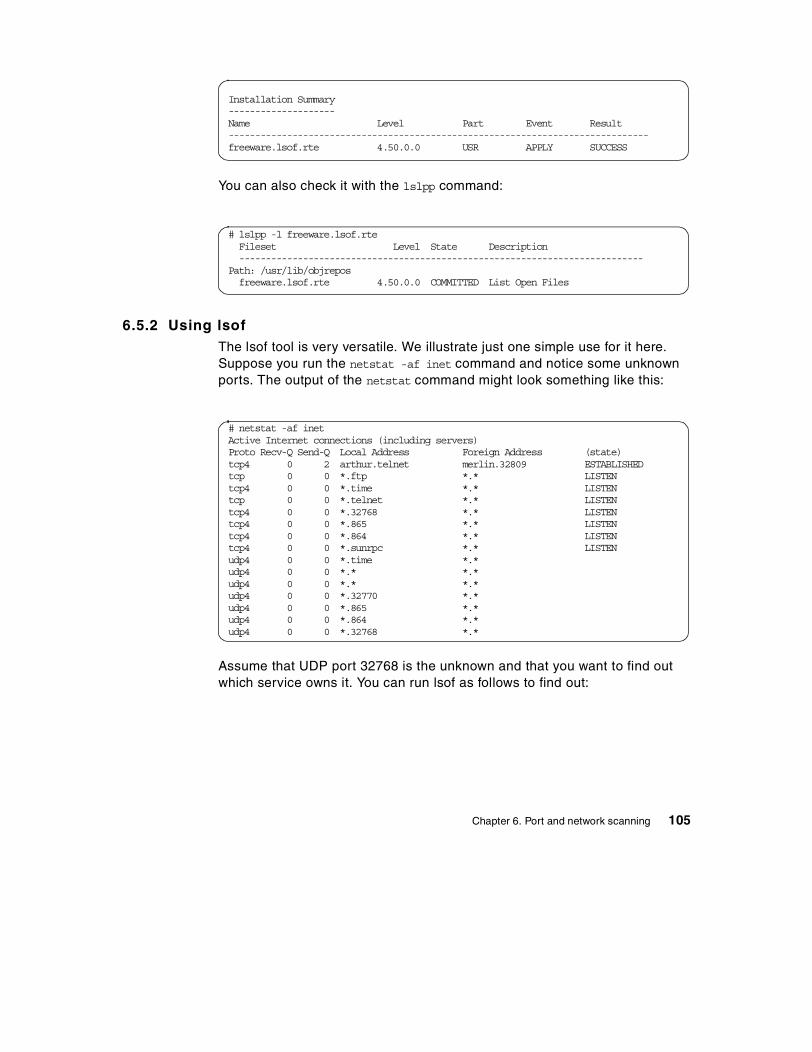
You can also check it with the lslpp command:
6.5.2 Using lsofThe lsof tool is very versatile. We illustrate just one simple use for it here.Suppose you run the netstat -af inet command and notice some unknownports. The output of the netstat command might look something like this:
Assume that UDP port 32768 is the unknown and that you want to find outwhich service owns it. You can run lsof as follows to find out:
Installation Summary--------------------Name Level Part Event Result-------------------------------------------------------------------------------freeware.lsof.rte 4.50.0.0 USR APPLY SUCCESS
# lslpp -l freeware.lsof.rteFileset Level State Description----------------------------------------------------------------------------
Path: /usr/lib/objreposfreeware.lsof.rte 4.50.0.0 COMMITTED List Open Files
# netstat -af inetActive Internet connections (including servers)Proto Recv-Q Send-Q Local Address Foreign Address (state)tcp4 0 2 arthur.telnet merlin.32809 ESTABLISHEDtcp 0 0 *.ftp *.* LISTENtcp4 0 0 *.time *.* LISTENtcp 0 0 *.telnet *.* LISTENtcp4 0 0 *.32768 *.* LISTENtcp4 0 0 *.865 *.* LISTENtcp4 0 0 *.864 *.* LISTENtcp4 0 0 *.sunrpc *.* LISTENudp4 0 0 *.time *.*udp4 0 0 *.* *.*udp4 0 0 *.* *.*udp4 0 0 *.32770 *.*udp4 0 0 *.865 *.*udp4 0 0 *.864 *.*udp4 0 0 *.32768 *.*
Chapter 6. Port and network scanning 105
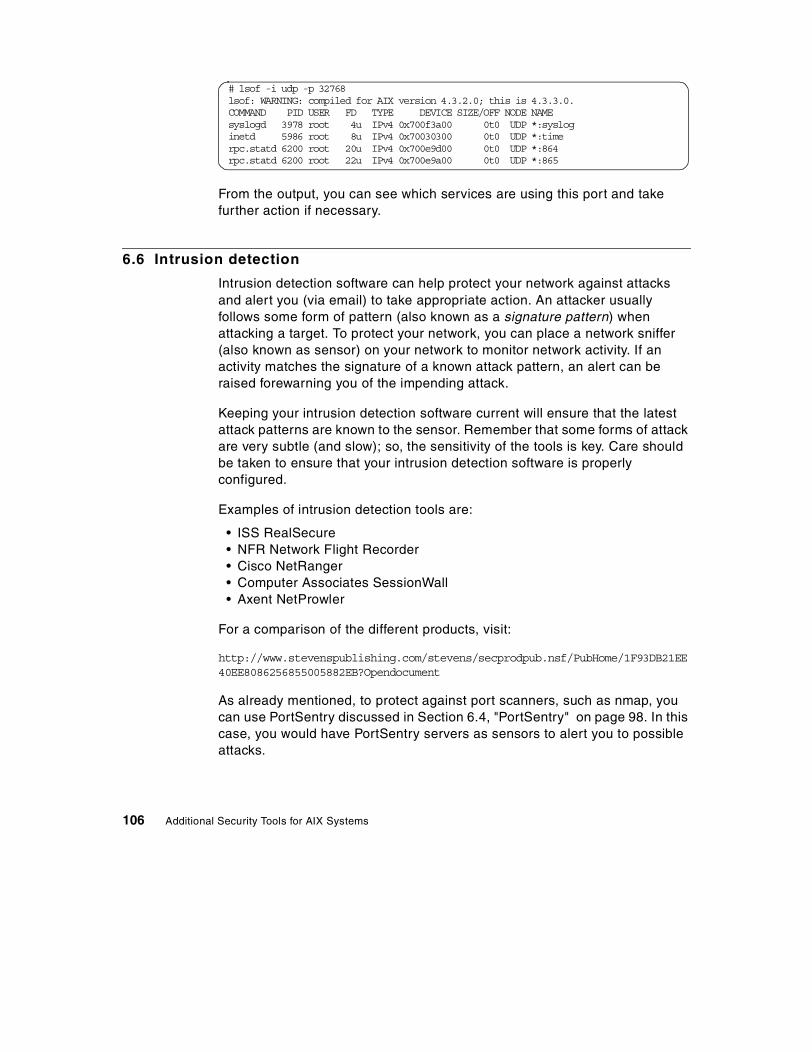
From the output, you can see which services are using this port and takefurther action if necessary.
6.6 Intrusion detection
Intrusion detection software can help protect your network against attacksand alert you (via email) to take appropriate action. An attacker usuallyfollows some form of pattern (also known as a signature pattern) whenattacking a target. To protect your network, you can place a network sniffer(also known as sensor) on your network to monitor network activity. If anactivity matches the signature of a known attack pattern, an alert can beraised forewarning you of the impending attack.
Keeping your intrusion detection software current will ensure that the latestattack patterns are known to the sensor. Remember that some forms of attackare very subtle (and slow); so, the sensitivity of the tools is key. Care shouldbe taken to ensure that your intrusion detection software is properlyconfigured.
Examples of intrusion detection tools are:
• ISS RealSecure• NFR Network Flight Recorder• Cisco NetRanger• Computer Associates SessionWall• Axent NetProwler
For a comparison of the different products, visit:
http://www.stevenspublishing.com/stevens/secprodpub.nsf/PubHome/1F93DB21EE40EE8086256855005882EB?Opendocument
As already mentioned, to protect against port scanners, such as nmap, youcan use PortSentry discussed in Section 6.4, "PortSentry" on page 98. In thiscase, you would have PortSentry servers as sensors to alert you to possibleattacks.
# lsof -i udp -p 32768lsof: WARNING: compiled for AIX version 4.3.2.0; this is 4.3.3.0.COMMAND PID USER FD TYPE DEVICE SIZE/OFF NODE NAMEsyslogd 3978 root 4u IPv4 0x700f3a00 0t0 UDP *:sysloginetd 5986 root 8u IPv4 0x70030300 0t0 UDP *:timerpc.statd 6200 root 20u IPv4 0x700e9d00 0t0 UDP *:864rpc.statd 6200 root 22u IPv4 0x700e9a00 0t0 UDP *:865
106 Additional Security Tools for AIX Systems

As another intrusion detection option, you may want to consider hiring anoutside company with security experts to provide 24x7 watch over yournetwork. In addition to intrusion detection support, these companies can alsodo an evaluation of your current security posture and recommend variousways to improve it. The biggest advantage to outsourcing this support is thatin the unfortunate event of an attack and/or break-in, you have at yourdisposal security experts to help with the defense and postmortem activities.For more information, visit: http://www.ers.ibm.com
Chapter 6. Port and network scanning 107

108 Additional Security Tools for AIX Systems
Chapter 7. System and data integrity
System and data integrity are important aspects of security. You need to besure that files, be they system or data files, are not tampered with oraccessed illegally. Once an attacker has penetrated the system, a commonbehavior is to leave backdoors and Trojan-horse programs in the system.System programs are replaced with modified versions that enable theattacker to gain easy access into the system again or that provide additionalinformation to the attacker for future attacks on this or connected systems.Therefore, you need to have a security tool in place to give you assurancethat your system files are intact.
System integrity also covers the area of password policy. Passwords shouldbe very difficult to guess, expire regularly, be non-reusable after expiration,and never be shared. In general, shared accounts are a bad idea because ofthe loss of accountability, but, when they are necessary (such as with root),they should be configured to not allow direct logins. Instead, they should beconfigured to require the use of the su command. Password integrity is criticalbecause it is almost impossible to differentiate between a valid user and anattacker who has purloined a user’s password. Some scan programs (such asNSA) will check for obvious passwords, such as root for root, but to ensurepassword integrity, you really should have a program specifically designed forcracking bad passwords.
The privacy of your users also needs to be protected. Sensitive files need tobe secured from unauthorized access. Standard UNIX file and directorypermissions provide some measure of protection. However, the root user canstill bypass these permissions and access the files. A better solution is toprovide the users with encryption tools that they can use to protect theirsensitive information (even from root).
Internet downloads are another area of concern when it comes to system anddata integrity. Downloads are common in today’s environment, and you needto provide a way for system users to ensure the integrity of their downloads.In other words, they need to be sure that what is downloaded is really whatthey expected and not something that has been tampered with by a would-beattacker.
In this chapter, we cover the following tools:
• Tripwire• John the Ripper• Pretty Good Privacy (PGP)• MD5
© Copyright IBM Corp. 2000 109

Tripwire is a tool that provides assurance that systems and configuration fileshave not been modified. Put simply, Tripwire creates a database with thechecksums of system binaries and configuration files. This database shouldbe created on a known, clean system, such as one that has just beeninstalled and has not yet been connected to an external network. Tripwirecomputes two (or more) checksums of the system files, stores them in thedatabase, and uses them to periodically compare against the current copiesof those files. If any of the files have been replaced or tampered with, Tripwirealerts you to this condition.
John the Ripper is a password cracker program. Ensuring strong passwordsshould be part of the security guidelines of any organization. AIX provides anumber of facilities for implementing strong password policies. However,these only go so far in forcing users to pick good passwords. A tool, such asthis one, will go the extra step and help you to uncover (and correct) weakpasswords before an attacker does.
Pretty Good Privacy (PGP) is a popular encryption tool that you can makeavailable for users to use to protect their sensitive files. It can also be used tosecurely communicate with remote users via encrypted email. PGP is a verypopular tool due, in no small part, to its ease of use.
MD5 is a tool for ensuring the integrity of files downloaded from the Internet.MD5 computes a unique checksum against a file, and the algorithm that MD5uses is very sensitive to even the slightest changes to the file. In order for thistool to be effective, the site from which you are downloading the file needs tohave published the MD5 checksum. Once you have downloaded the file, runMD5 against it and compare the output with the published value. If the valuesare different, do not unpack and/or execute the file. Delete it, and notify theowners of the site.
7.1 Tripwire
Tripwire is a public domain tool that helps you ensure (with a high degree ofcertainty) that a list of system or configuration files has not been modified. Anormal part of an attacker’s routine is to install a backdoor into the system toallow for an easy return. This is achieved in part by replacing some systemfiles with modified versions, such as Trojan horse programs. Tripwire is a toolto help you detect and correct this sort of thing.
During Tripwire configuration, a database is created to store all relevantsecurity information about important files (as defined in the tw.config file).This database provides the security baseline for those files. Tripwire should
110 Additional Security Tools for AIX Systems

then be run regularly to check each of these system files to ensure that theyhave not been modified inappropriately. Tripwire checks the files listed in theconfiguration file against its database and reports any discrepancies found.To escape detection, an attacker would have to replace a system file with anidentical file (size, checksums, timestamp, and so on), which is extremelydifficult to do. (The reason this is so difficult is that Tripwire uses two differentchecksum algorithms to compute the checksums. Creating a modified systemfile to match both original checksums is no small task.)
For maximum protection, the database, the configuration file, and the Tripwireexecutable should be stored securely offline. They should only be restored tothe system when you are ready to run Tripwire again. If any of the Tripwirecomponents are compromised, Tripwire becomes worse than useless. Forexample, if attackers got hold of the Tripwire database, they could modify thechecksums to match the altered system files that they have loaded on thesystem. Then, when you next run Tripwire, it appears that all is well.
Ideally, Tripwire should be run just after system installation is complete, whilestill in single-user mode and not connected to an external network. Thisensures that you have a “known good” copy of the database. Tripwire shouldalso be run just before and just after any changes are made to the systemthat alter the system files, for example, O/S upgrades, PTFs, APARs, and soon.
7.1.1 Obtaining and installing TripwireTripwire was initially developed at Purdue University in 1992. In 1998, PurdueUniversity transferred management of Tripwire to Tripwire Security Solutions,Inc. (TSS). The TSS Web site is located at http://www.tripwiresecurity.com/.They offer open-source and for-purchase versions of Tripwire. Thefor-purchase version has additional functionality that you may find useful. Seehttp://www.tripwiresecurity.com/products/index.cfml for a comparison of thetwo different versions.
A version of Tripwire in installp format is available from the Bull site athttp://www.bull.de/pub/out/. The version we downloaded for this redbookwas Tripwire 1.2. Newer versions are available from TSS, but they are not ininstallp format. In other words, they will need to be compiled for AIX andmanually installed.
After you download the package, ensure it has not been tampered with beforeinstalling it. Refer to Section 7.4.1, "Ensuring the integrity of downloads" onpage 136, for more information about how to do this.
Chapter 7. System and data integrity 111

Inflate the package, and verify that it inflated properly:
Install the fileset (with installp or SMIT), and verify that it was successfullyinstalled:
You can also use the lslpp -l freeware.tripwire.tripwire_bin command toverify the installation.
7.1.2 Configuring and using TripwireThe important files for Tripwire are:
• The program file: /usr/security/bin/tripwire
• The configuration file: /usr/adm/tcheck/tw.config
• The database: /usr/adm/tcheck/databases/tw.db_<hostname>
The program file is the executable that should be run periodically to checksystem integrity. The configuration file contains the list of system files that youwant to protect. This file needs to be created prior to the initial run of Tripwire,which uses it to populate the database. The database stores the followinginformation about the files and directories listed in the configuration file:
• Permission and file mode bits
• Access timestamp
• Inode number
• Modification timestamp
# ./tripwire-1.2.1.0.exeArchive: ./tripwire-1.2.1.0.exeinflating: tripwire-1.2.1.0.bff
# ls -ltotal 1480-rw-r--r-- 1 root system 412672 Aug 09 1996 tripwire-1.2.1.0.bff-rwx------ 1 root system 336614 Aug 16 13:58 tripwire-1.2.1.0.exe
# installp -acqX -d . freeware.tripwire.tripwire_bin
Installation Summary--------------------Name Level Part Event Result-------------------------------------------------------------------------------freeware.tripwire.tripwire_ 1.2.1.0 USR APPLY SUCCESS
112 Additional Security Tools for AIX Systems

• Number of links (ref count)
• Inode creation timestamp
• User ID of owner
• Group ID of owner
• Size of file
• Signature 1 (MD5 by default)
• Signature 2 (Snefru by default)
It is the combination of the two different signatures coupled with the file sizethat makes it extremely difficult to create another file with the samecharacteristics. Note that the default configuration file was created for AIX4.1.5; so, you will most likely need to modify it for your systems.
Tripwire runs in one of four modes:
• Database Generation
• Database Update
• Integrity Checking
• Interactive Update
In Database Generation mode, Tripwire creates the database(/usr/adm/tcheck/databases/tw.db_<hostname>) based on the configurationfile. To initialize the database:
In Database Update mode, the database is updated with the currentconfiguration information. This is required when legitimate changes are madeto the system, such as changes to the system files or application of operatingsystem patches:
# cd /usr/adm/tcheck
# /usr/security/bin/tripwire -initialize
Be sure that your current working directory is set to /usr/adm/tcheck beforeinitializing the database. Tripwire creates the databases subdirectory in thecurrent working directory and then creates the database under thedatabases directory.
Important
Chapter 7. System and data integrity 113

In Integrity Checking mode, Tripwire generates a report of added, deleted, orchanged files. This is done by comparing the current configurationinformation against that which is stored in the database(/usr/adm/tcheck/databases/tw.db_<hostname>):
In Interactive Update mode, rather than just reporting things that havechanged, Tripwire also prompts you to apply these changes to its database:
7.1.3 Configuring TripwireThe most important step in the configuration of Tripwire is creating anaccurate and complete configuration file. The configuration file should containthe list of system files and directories that you want to have Tripwire protect.You can either start with the supplied Tripwire configuration file, which wascreated for AIX 4.1.5, or create your own from scratch. We used the formertechnique:
1. Use /etc/security/sysck.cfg to create an initial delta file for the Tripwireconfiguration file:
2. Modify the tripwire.list.sort file with additional files and directories thatyou deem important. We added the following:
# /usr/security/bin/tripwire -update <path_of_changed_file_or_directory>
# /usr/security/bin/tripwire | tee /tmp/tripwire.out
# /usr/security/bin/tripwire -interactive
# cat /etc/security/sysck.cfg | grep ":" | sed s/://g | \>sort > tripwire.list.sort
# chmod 600 tripwire.list.sort
114 Additional Security Tools for AIX Systems

3. Merge the contents of this file with tw.config file that came with theTripwire package.
4. Verify the configuration file with the Tripwire CheckConfig script. (See the/usr/local/lib/tripwire-1.2/README.CheckConfig file for more informationabout how to use this script.):
5. Based on the output of the CheckConfig script, you may need to makeadditional changes to the tw.config file and run CheckConfig again.
6. Once you are satisfied with the output of CheckConfig, initialize thedatabase:
/.kshrc R # may not exist/usr/lib/boot/unix_mp R/usr/lib/boot/unix_up R/usr/lib/boot/unix_kdb R/usr/lib/boot/unix_mp_kdb R/unix R/etc/security/limits R/etc/security/login.cfg R/usr/lib/objrepos L # files frequently modified/etc/objrepos L/usr/bin/whoami R/usr/bin/sh R/usr/bin/Rsh R/usr/bin/tsh R/usr/bin/bsh R/usr/bin/ls R/usr/adm/wtmp L## protect other binaries you installed in your system, Eg security tools/usr/local/bin/nmap R/usr/local/bin/ssh R/usr/local/bin/pgp R/usr/local/bin/lsof R
# /usr/local/lib/tripwire-1.2/CheckConfig -v /usr/adm/tcheck/tw.config/: directory/.rhosts: file/.netrc: not found/.profile: file/.cshrc: not found/.login: not found/.kshrc: file/usr/lib/boot/unix_mp: file/usr/lib/boot/unix_up: not found/usr/lib/boot/unix_kdb: not found/usr/lib/boot/unix_mp_kdb: file/unix: symlink/dev: directory/sbin: directory/usr/local: directory/usr: directory
Chapter 7. System and data integrity 115

7. When you first initialize the Tripwire database, it reports what it thinks areinconsistencies. Update the configuration file with the requested changes,and then reinitialize the database. (As long as your system is still off thenetwork, you can be sure that these changes are a byproduct of normalsystem behavior.):
[/usr/adm/tcheck] # /usr/security/bin/tripwire -initialize### Phase 1: Reading configuration file### Phase 2: Generating file list### Phase 3: Creating file information database###### Warning: Database file placed in ./databases/tw.db_sp5en01.###### Make sure to move this file file and the configuration### to secure media!###### (Tripwire expects to find it in '/usr/adm/tcheck/databases'
116 Additional Security Tools for AIX Systems

8. Repeat this process as many times as needed until Tripwire reports thatthe changes remaining are zero:
[/usr/adm/tcheck] # /usr/security/bin/tripwire### Phase 1: Reading configuration file### Phase 2: Generating file list### Phase 3: Creating file information database### Phase 4: Searching for inconsistencies###### Total files scanned: 6667### Files added: 0### Files deleted: 0### Files changed: 6111###### After applying rules:### Changes discarded: 6108### Changes remaining: 5###changed: -rwxrwxr-- root 27029 Jul 20 14:16:31 1999 /sbin/rc.bootchanged: -rw-r--r-- root 1826 Sep 11 18:54:53 2000 /etc/inittabchanged: -rw-r----- root 1412 Sep 11 18:55:36 2000 /etc/security/lastlogchanged: -rw------- root 0 Sep 11 18:55:26 2000 /etc/pmd_lock2changed: -rw------- root 0 Sep 11 18:55:26 2000 /etc/pmd_lock### Phase 5: Generating observed/expected pairs for changed files###### Attr Observed (what it is) Expected (what it should be)### =========== ============================= =============================
/sbin/rc.bootst_ctime: Mon Sep 11 18:53:50 2000 Sun Sep 10 23:15:04 2000
/etc/inittabst_ino: 403 405
/etc/security/lastlogst_mtime: Mon Sep 11 18:55:36 2000 Mon Sep 11 17:45:35 2000st_ctime: Mon Sep 11 18:55:36 2000 Mon Sep 11 17:45:35 2000
md5 (sig1): 2noet1FpnqVIw1XwfZEL9f 25zTiUps0WezoeLB7nJUkisnefru (sig2): 2egxLZbqhjIm6g64gpYOSR 2jbnbYfhkSkdJWLppnIFf.
/etc/pmd_lock2st_ino: 409 476
/etc/pmd_lockst_ino: 476 477
Chapter 7. System and data integrity 117

9. Once the Tripwire database has been successfully initialized, store thedatabase, the configuration file, and the tripwire executable in a safe area,such as on another secure machine, on read-only media, or on the localmachine encrypted with PGP. To run Tripwire again, you will need to putthe database back in /usr/adm/tcheck/databases/.
7.1.4 Comments on configurationA good deal of thought and planning need to go into the creation of theTripwire configuration file (tw.config). Just one key system file missing fromthe configuration file could open the door for an attacker. Important systemfiles should be explicitly called out in the tw.config file, rather than assumingthey will be picked up by a directory specification, such as /sbin or /usr/sbin.
The goal is to minimize the Tripwire report of changed files to only those thatchange because of normal day-to-day activities. This makes it much easier tospot suspicious activities called out within the report. Be forewarned that thisis an iterative process. You need to spend time running Tripwire, examiningthe report, modifying the configuration file, and running Tripwire again. Ittakes some time to refine it into a tool that works well in your environment. Besure to safely store the configuration file, the database, and the executableprogram after each iteration. The strength of Tripwire depends solely on theintegrity of these files.
7.1.5 When should Tripwire be runIdeally, Tripwire should be initialized immediately after system installation andconfiguration while still in single-user mode and not connected to an externalnetwork.
[/usr/adm/tcheck]# /usr/security/bin/tripwire### Phase 1: Reading configuration file### Phase 2: Generating file list### Phase 3: Creating file information database### Phase 4: Searching for inconsistencies###### Total files scanned: 6667### Files added: 0### Files deleted: 0### Files changed: 6010###### After applying rules:### Changes discarded: 6010### Changes remaining: 0###
118 Additional Security Tools for AIX Systems

Run Tripwire periodically to ensure that no unauthorized changes have beenmade to important system files or directories. Also, run it just before and justafter any changes to the system for things, such as operating systemupgrades, PTFs, APARs, new software installs, and so on. As always, be sureto secure the modified copies of the Tripwire configuration file and database.
7.1.6 Alternatives to TripwireOther alternatives to Tripwire are:
• Trusted Computing Base (TCB)• COPS• Tamu’s Tiger
Trusted Computing Base (TCB) is a feature that comes with AIX. There are anumber of drawbacks with TCB, not the least of which is that it can only beenabled during AIX installation (not after). For more information about TCB,see Chapter 6 of AIX 4.3 Elements of Security Effective and EfficientImplementation, SG24-5962.
For details on COPS and Tamu’s Tiger, see Chapter 7 of Exploiting RS/6000SP Security: Keeping it safe, SG24-5521.
7.2 John the Ripper
John the Ripper is a tool for password cracking. Weak passwords are one ofthe most common ways in which attackers gain unauthorized access tosystems. This is one of the most insidious forms of attack, because it is verydifficult to differentiate between a valid user and an attacker who haspurloined a valid user’s password. Having John the Ripper proactively scanthe password file is one way to ensure that passwords are sufficiently strong.
Your first step in ensuring strong passwords is to educate the users of yoursystem on what constitutes a strong password. Here are some guidelinestaken from the AIX 4.3 Elements of Security redbook:
• Do not use your user ID or any permutation of it.
• If you use the same password on more than one system, be extra carefulwith it. Never use the same root password on multiple systems.
• Do not use any person’s name.
• Do not use words that can be found in the online spelling-check dictionary,especially for a networked or larger multi-user system.
• Do not use passwords shorter than five or six characters.
Chapter 7. System and data integrity 119

• Do not use swear words or obscene words; these are among the firstwords tried when guessing passwords.
• Do use passwords that you can remember. Do not write down yourpassword.
• Do consider passwords that consist of letters and numbers.
• Do use passwords that you can type quickly.
• Two words, with a number in between, make a good password.
• A word (with at least six characters), with a numeric digit inserted in theword, is an excellent password. But do not form the digit by changing an “l”to “1” or an “o” to “0.” A word with an internal digit is a better passwordthan a word with a leading or trailing digit.
• A pronounceable password is easier to remember.
• AIX checks only the first eight characters of the password; however theword can be longer than eight characters.
• A good scheme is to memorize a sentence and use the first letter of eachword for the password. For example, “the cat sat on the mat” = tcsotm.
Note that some of these guidelines can be enforced through facilitiesprovided by AIX, but many of them still require good education and ongoingenforcement. John the Ripper is a very good tool to help you with theenforcement piece.
7.2.1 Obtaining and installing John the RipperThe main site for of John the Ripper is http://www.openwall.com/john/. Youcan download the tool from this site in source-code format, or can download itin installp format from the Bull site. The version that we used for this redbookwas version 1.6 from the Bull site.
Download the package and ensure that it has not been tampered with beforeinstalling it. Refer to Section 7.4.1, "Ensuring the integrity of downloads" onpage 136 for more information on how to do this.
Inflate the package, and install it (via installp or SMIT):
120 Additional Security Tools for AIX Systems

Once the fileset has successfully been installed, change the ownership andpermissions on the executable (/usr/local/bin/john) such that root is the onlyone allowed to run it.
7.2.2 Configuring John the RipperThere are three modes that John the Ripper uses to crack passwords:
• Single Crack• Wordlist• Incremental
The Single Crack mode is the fastest. It uses the login/GECOS informationfrom the /etc/password file as input.
The Wordlist mode takes as input a file containing one word per line. Awordlist file (/usr/local/bin/john-1.6/password.lst) is provided with thepackage. It is a rather short list, so you should augment it with additionalwords. For example, you can merge it with the /usr/share/dict/words file fromthe bos.data fileset (found on the AIX Installation CD), as follows:
# ls -ltotal 1048-rwx------ 1 root system 535904 Sep 12 09:54 john-1.6.0.0.exe
# ./john-1.6.0.0.exeUnZipSFX 5.32 of 3 November 1997, by Info-ZIP ([email protected]).inflating: john-1.6.0.0.bff
# installp -acgX -d . freeware.john.rteInstallation Summary--------------------Name Level Part Event Result-------------------------------------------------------------------------------freeware.john.rte 1.6.0.0 USR APPLY SUCCESS
# lslpp -l freeware.john.rteFileset Level State Description----------------------------------------------------------------------------
Path: /usr/lib/objreposfreeware.john.rte 1.6.0.0 COMMITTED John the Ripper Password
Cracker
Many organizations have very strict policies against unauthorized use oftools like John the Ripper. Make sure you have the proper writtenauthorization in place before running this tool.
Important
Chapter 7. System and data integrity 121

Once merged, edit the Wordfile entry in the john.ini configuration file to reflectthe new filename (/usr/local/lib/john-1.6/words.list.sort).
The Incremental mode is the most powerful. It uses all possible charactercombinations to ultimately crack all passwords. However, because of thelength of time it needs to do this, it is generally not practical to have it run thisway without modification. You can set parameters in the $JOHNDIR/john.ini fileto control this mode of operation and turn it into something more realistic andpractical.
7.2.3 Using John the Ripper
John the Ripper requires that the password file be a single file. Since AIXimplements a shadow password file, you need to merge the /etc/passwd and/etc/security/passwd files into a single file. Appendix C, “Script to merge theAIX passwd files” on page 209 provides a listing of the shadmrg.aix script(obtained from the Crack package) to merge these two files. (Alternatively,you can manually merge the contents of the two files by replacing the “|” markin the /etc/passwd file with the encrypted password in the/etc/security/passwd file.):
This command runs the shadmgr.aix script to create the merged password file(/tmp/password). Use the egrep command to filter out the users you do not
#export JOHNDIR=/usr/local/lib/john-1.6
#cp /usr/share/dict/words $JOHNDIR
#cat $JOHNDIR/password.lst >> $JOHNDIR/words
#/usr/bin/tr A-Z a-z < $JOHNDIR/words | \sort -u > $JOHNDIR/words.list.sort
As has already been mentioned, ensure that you have the necessarywritten authorization in place before attempting to use John the Ripper.
Important
# ./shadmgr.zix > /tmp/password# chmod 600 /tmp/password- OR -
# ./shadmgr.aix | egrep -v "useridA|useridB|useridC" > /tmp/password# chmod 600 /tmp/password
122 Additional Security Tools for AIX Systems

want to scan. Also, be sure to change the file permissions for the/tmp/password file so that only root has access to it.
Run John the Ripper as follows:
By default, John the Ripper uses the three modes (Single Crack, Wordlist,and Incremental, respectively) to attempt to crack the passwords. Successfulattempts are sent to the screen and saved in the $JOHNDIR/john.pot file. If youwant to see them again, re-run John the Ripper with the -show option:
Here is an example that illustrates the difference in time it takes to crack apassword with a digit on the end versus one with a digit in the middle:
The passwords for root (password rootroot) and khorck (password merlin1)are cracked in 3 seconds. Now, lets change khorck’s password from merlin1to merl1n, and re-run John the Ripper to see what happens:
Important
After installation, change the file permissions of the John the Ripperexecutable (/usr/local/bin/john) so that only root has access to it. The samegoes for the merged password file (/tmp/password).
# /usr/local/bin/john /tmp/password
# /usr/local/bin/john -show /tmp/password
# /usr/local/bin/john /tmp/password
Loaded 2 passwords with 2 different salts (Standard DES [32/32 BS])
rootroot (root)
merlin1 (khorck)
guesses: 2 time: 0:00:00:03 100% (2) c/s: 22715 trying: menu1 - meter1
Chapter 7. System and data integrity 123

Notice that Jack the Ripper now took 28.5 minutes to crack the new khorckpassword. This illustrates that having numbers in the middle of passwords,rather than on either end, makes them significantly harder to crack.
Additional methods, such as secondary authentication or two-person login,are available to make authentication more difficult to crack. For moreinformation, refer to AIX 4.3 Elements of Security Effective and EfficientImplementation, SG24-5962.
7.3 Pretty Good Privacy (PGP)
PGP is a popular tool used to communicate between two parties securely.This security is achieved by strong encryption and authentication. PGP is ade facto standard used in email to quickly and easily enable securecommunications. It runs on various operating systems, including UNIX, Linux,and Windows, and it has plug-ins available for email programs, such as LotusNotes, Eudora, and Outlook Express.
For more information about supported configurations, see the PGP FAQ at:
http://www.pgpi.org/doc/faq/pgpi/en/#International
7.3.1 PGP basicsPGP is based on public key cryptography (see Section 5.1.3, "Key conceptsof SSH" on page 62). In a nutshell, files encrypted with the public key
# /usr/local/bin/john /tmp/password
Loaded 2 passwords with 2 different salts (Standard DES [32/32 BS])
rootroot (root)
merl1n (khorck)
guesses: 2 time: 0:00:28:24 100% (3) c/s: 23710 trying: Booms2 - hilsuh
A strong password is a good defense against brute force cracking methods.However, even the strongest password is vulnerable to network sniffingwith protocols, such as telnet, ftp, rsh, and so on. Refer to Chapter 5,“Secure remote access” on page 59, for ways to protect against this type ofattack.
Note
124 Additional Security Tools for AIX Systems

(asymmetric cryptography) can only be decrypted by the matching private keyand vice-versa.
By definition, a public key is “public” and can be freely distributed to the otherindividuals you want to communicate with using PGP. The private key is“private” and should be kept secure and private. The private key can befurther protected with the use of a pass phrase.
Straight public-key encryption is much slower (sometimes by as much as afactor of 1000) than conventional single-key encryption (symmetriccryptography). It is for this reason that PGP uses a hybrid of both symmetricand asymmetric cryptography.
With PGP, messages are encrypted using conventional symmetriccryptography (the same key is used to encrypt and decrypt the message).However, this key is a random one-time key (session key) that is used for thissession only. Now, the main weakness of symmetric cryptography is in how toshare the same key securely. PGP overcomes this weakness by usingasymmetric cryptography.
Here is how PGP does it:
1. Jack wants to communicate securely with Jill using PGP.
2. Jill sends Jack her public key.
3. Jack encrypts the data with the session key (symmetric cryptography),then uses Jill’s public key to encrypt the session key (asymmetriccryptography). Once encrypted, Jack sends both the session key and thedata to Jill.
4. Jill uses her private key to decrypt the session key (asymmetriccryptography) and then uses the session key to decrypt the data(symmetric cryptography).
5. From now on, Jack and Jill will just use the session key to encrypt anddecrypt the data flowing back and forth between them.
In this case, both symmetric and asymmetric algorithms are used, thesymmetric algorithm used to encrypt the data itself and the asymmetricalgorithm used to securely transfer the encryption key. With this hybridmethod, both speed and security are achieved.
PGP supports three symmetric ciphers: CAST (default), Triple DES, andIDEA. It also supports either DSS/DH keys or RSA (IDEA only) keys. Acomparison of each can be found in the PGP man pages (man pgp-intro).
Chapter 7. System and data integrity 125

PGP also uses digital signatures for message authentication. Digitalsignatures serve the same function as that of real signatures, but in the digitalworld. A digital signature is created by encrypting the message digest (astrong one-way hash function of the message) with the sender’s private key.The digital signature is sent together with the message. To verify the digitalsignature, the recipient uses the sender’s public key to decrypt and obtain themessage digest. Then, the recipient executes a one-way hash function on themessage to obtain a message digest and compares this output with that sentby the sender (the output decrypted with the senders’ public key). Both mustbe the same to ensure data integrity. At the same time, the author of themessage is verified because the message was signed with the private key ofthe sender (thus the importance of protecting the private key). For moreinformation on this process, see the PGP man pages (man pgp-intro).
7.3.2 Obtaining and installing PGPPGP was created by Phil Zimmermann and is available from NetworkAssociates (http://www.pgp.com). In addition to PGP, Network Associates hasa host of other security-related products, ranging from firewalls to intrusiondetection software to consultancy services. PGP is available in bothcommercial and non-commercial packages. See the Network Associates sitefor more details on the licensing agreements.
PGP is available for download in source-code form from the PGPInternational site (http://www.pgpi.com). Commercial licenses are availablefrom http://www.nai.com (US or Canada only) or fromhttp://www.pgpinternational.com (everywhere else).
PGP is also available in installp format from http://www-frec.bull.fr. Theversion we used for this redbook was version 5.0 from the Bull site.
Download the package and ensure that it has not been tampered with beforeinstalling it. Refer to Section 7.4.1, "Ensuring the integrity of downloads" onpage 136, for more information on how to do this.
Inflate the package, install it (via installp or SMIT), and verify that it issuccessfully installed:
126 Additional Security Tools for AIX Systems

You may also want to update the MANPATH environment variable to include/usr/local/man and the PATH environment variable to include /usr/local/bin in/etc/profile.
7.3.3 Using PGPThe first step to using PGP is to generate a public-private key pair. Like SSH,PGP can be used by anyone, not just root. Each user will have their own setof key files and configuration files.
Generate your public-private key pair with the pgpk -g command:
# ./pgp-5.0.0.0.exeUnZipSFX 5.31 of 31 May 1997, by Info-ZIP ([email protected]).inflating: pgp-5.0.0.0.bff
# rm .toc# ls -ltotal 11776-rw-r--r-- 1 root system 4403200 Mar 06 1998 pgp-5.0.0.0.bff-rwx------ 1 root system 1622544 Aug 24 14:49 pgp-5.0.0.0.exe# rm .toc# installp -acgX -d . freeware.pgp.rte...Installation Summary--------------------Name Level Part Event Result-------------------------------------------------------------------------------freeware.pgp.rte 5.0.0.0 USR APPLY SUCCESS
# lslpp -l freeware.pgp.rteFileset Level State Description----------------------------------------------------------------------------
Path: /usr/lib/objreposfreeware.pgp.rte 5.0.0.0 COMMITTED Pretty Good Pricacy E-mail
system
Chapter 7. System and data integrity 127

/ # pgpk -gCreating /.pgp...complete.No randseed file found.Cannot open configuration file /.pgp/pgp.cfgChoose the type of your public key:1) DSS/Diffie-Hellman - New algorithm for 5.0 (default)2) RSA
Choose 1 or 2: 1
Pick your public/private keypair key size:(Sizes are Diffie-Hellman/DSS; Read the user's guide for more information)1) 768/768 bits- Commercial grade, probably not currently breakable2) 1024/1024 bits- High commercial grade, secure for many years3) 2048/1024 bits- "Military" grade, secure for forseeable future(default)4) 3072/1024 bits- Archival grade, slow, highest securityChoose 1, 2, 3 or 4, or enter desired number of Diffie-Hellman bits(768 - 4096): 2
You need a user ID for your public key. The desired form for thisuser ID is your FULL name, followed by your E-mail address enclosed in<angle brackets>, if you have an E-mail address. For example:Joe Smith <[email protected]>
If you violate this standard, you will lose much of the benefits ofPGP 5.0's keyserver and email integration.
Enter a user ID for your public key: root <[email protected]>
Enter the validity period of your key in days from 0 - 9990 is forever (and the default):
You need a pass phrase to protect your private key(s).Your pass phrase can be any sentence or phrase and may have manywords, spaces, punctuation, or any other printable characters.Enter pass phrase:Enter again, for confirmation:Enter pass phrase:Collecting randomness for key...
We need to generate 571 random bits. This is done by measuring thetime intervals between your keystrokes. Please enter some random texton your keyboard until you hear the beep:
0 * -Enough, thank you..******* '[o.........................******* .........................................................*******.................................................................................*******Keypair created successfully.
If you wish to send this new key to a server, enter the URL of the server,below. If not, enter nothing./ # cd .pgp/.pgp # ls -ltotal 24-rw------- 1 root system 0 Sep 05 11:50 pubring.bak-rw------- 1 root system 889 Sep 05 11:51 pubring.pkr-rw-r--r-- 1 root system 512 Sep 05 11:53 randseed.bin-rw------- 1 root system 0 Sep 05 11:50 secring.bak-rw------- 1 root system 976 Sep 05 11:51 secring.skr
128 Additional Security Tools for AIX Systems

The important files to note are the $HOME/.pgp/pubring.prk file and the$HOME/.pgp/secring.skr file, which contain the public and private keyrings,respectively. These are the default names and locations for these files, butyou can configure PGP to use different names and locations if desired.
You can view the contents of your keyring using the pgpk -l command, andyou can use the pgpk -x <userid> command to extract your public key to a filefor distribution:
In this example, root’s public key is extracted to a file named publickeyfile.The publickeyfile can then be distributed to other users with whom you needto communicate securely.
To distribute the public key, you can:
/.pgp # pgpk -lCannot open configuration file /.pgp/pgp.cfgType Bits KeyID Created Expires Algorithm Usesec+ 1024 0x0592C6DE 2000-09-05 ---------- DSS Sign & Encryptsub 1025 0x76580B38 2000-09-05 ---------- Diffie-Hellmanuid root <[email protected]>
1 matching key found
/.pgp # pgpk -x root > publickeyfileCannot open configuration file /.pgp/pgp.cfg
/.pgp # more publickeyfile-----BEGIN PGP PUBLIC KEY BLOCK-----Version: PGPfreeware 5.0i for non-commercial use
mQGiBDm1FoQRBAD8KcZ/FCH+QtQQRauJpBHLK2Ciwve1D7Zts8zqhsiGz+ywZxibLmsg1opAW1w/IzpMLET0g4JhSSNnAi1H02KmBKrNCY4b2gB3UCX0bIxahamyTKU1aDSFwthos5+PLbKSDB1WjVohLSei1W1uPWSrO6B7sM0fOl+K0pYx8HrCEwCg/+aOSDTzQp+BM2kBTYM6CKgbThMEAM+eE70adaiAm50KZRefSThuDgbvWpYkCZZs+i0XL5KBRsnw26z1MF8xFPw+KTf8N+TGn6td+qOxL1b5x2jOxoHA1Y2yp0yG6ExJfxN7Ni6YcVrUHQbPbsOE9cJTlXgsugbwACQRtq0F/LkFquXOlBguA1tiPH4FC87QEA0uAuTLBADBrviGRVzVtsvYcb1hKBY4bRnEZwswvIhc0s7l0ZJGi54zH5RgvwTmsmd4OgPBwZSaAuoaI5j3U4nHbihJE4le/sWS+FO7Bgy6dFZ8qK/e5ibmB2nW29N6R9ZN+E2KkWr7JNzbJNlvJAorJIYIyQgO9qfMXEKekGmLXCMk2r1Cv7Qicm9vdCA8cm9vdEBhcnRodXIuYWxpYmFiYS5pYm0uY29tPokASwQQEQIACwUCObUWhAQLAwECAAoJEHOk2qQFksbeL8wAoO1E50QLVmdpEFGCC3MUsSzLbZ0SAJ9TWFX0a4V9qIbHKYWutP+813BqnrkBDgQ5tRaREAQBAQEYVycxln++/zRqA2eQoNr4IrrHluZvHwyhhINo6cCy+oANKzUjmXJajGIMCwT6wbO+koVSa8kYPzlSG5QpdEE9+2XjJaaB/csBMvN8jvOjBBXrnGjEfAIwosAU1cvvmLwJPhGvh00cSbSX9ELj/iD0hqXABW6SlpdnRoRaARlPAAICA/98YOZxJl87uGlxdKhn4PDdECtEdMOqVE1oq3pECtQQgLa8WYZmfiirEPGvT7eBG1O1at2FrSDT0ac+Fd0LAAbRCw/0XRibPIoMbYE3ENUrX16tuCOQtT6GEXRe2OxLS2wKcG/QyXyPH3TbF9gH/IyKqxUnCsfI552Xcda4WjgF64kAPwMFGDm1FpFzpNqkBZLG3hECWDYAoLco/XRRLjAlqKQR9yUQsyAdwCcZAKCwXGoKTfAuuYuZDGnXLJJxybmxEA===hX2t
Chapter 7. System and data integrity 129

• Make the file to which you extracted the public key available to those whoneed it.
• Include the public key as attached text within an email message, and sendit to those who need it.
• Distribute the public key through a public key server (details available inthe PGP man pages).
To add a public key (khor.asc in this case) to your keyring, use the pgpk -a
command:
You can use the pgpk -ll command to obtain detailed information of the keyson your keyring. The important information is the key length, the KeyID, andthe Fingerprint. You can use this information to verify with the key owner (byphone or other means) that you are using the correct version of their publickey:
# pgpk -a /home/khorck/.pgp/khor.ascCannot open configuration file /.pgp/pgp.cfg
Adding keys:
Key ring: '/home/khorck/.pgp/khor.asc'Type Bits KeyID Created Expires Algorithm Usepub 1024 0xF409CB5B 2000-09-05 ---------- DSS Sign & Encryptsub 1024 0xDC8183A1 2000-09-05 ---------- Diffie-Hellmanuid khor chune keat
1 matching key found
Add these keys to your keyring? [Y/n] y
Keys added successfully.
/.pgp # pgpk -lCannot open configuration file /.pgp/pgp.cfgType Bits KeyID Created Expires Algorithm Usepub 1024 0xF409CB5B 2000-09-05 ---------- DSS Sign & Encryptsub 1024 0xDC8183A1 2000-09-05 ---------- Diffie-Hellmanuid khor chune keat
sec+ 1024 0x0592C6DE 2000-09-05 ---------- DSS Sign & Encryptsub 1025 0x76580B38 2000-09-05 ---------- Diffie-Hellmanuid root <[email protected]>
2 matching keys found
130 Additional Security Tools for AIX Systems

You can display even more information about the keys in your keyring (suchas Trust level) with the pgpk -c command:
Notice that the Trust value for root’s public key is untrusted. That simplymeans that the public key that you imported for root did not come from atrusted source, such as a Certificate Authority. When this is the case, it is avery good idea to use the pgpk -ll command and verify the key length, KeyID,and Fingerprint with the public key owner to ensure that you have the correctkey.
# pgpk -llCannot open configuration file /.pgp/pgp.cfgType Bits KeyID Created Expires Algorithm Usepub 1024 0xF409CB5B 2000-09-05 ---------- DSS Sign & Encryptf20 Fingerprint20 = 2334 815A FC8B ABEC 4AEF 8D3C 5284 2B3B F409 CB5Bsub 1024 0xDC8183A1 2000-09-05 ---------- Diffie-Hellmanf20 Fingerprint20 = 135C F183 BFC8 2B1A C9CC 9BB8 618C 33E1 DC81 83A1uid khor chune keatsig 0xF409CB5B 2000-09-05 khor chune keat
sec+ 1024 0x0592C6DE 2000-09-05 ---------- DSS Sign & Encryptf20 Fingerprint20 = A594 B67E 5DFA BBEC 9FDE A59A 73A4 DAA4 0592 C6DEsub 1025 0x76580B38 2000-09-05 ---------- Diffie-Hellmanf20 Fingerprint20 = 83E2 8BC0 991F AC40 FB0E BE10 4183 8C47 7658 0B38uid root <[email protected]>SIG 0x0592C6DE 2000-09-05 root <[email protected]>
2 matching keys found
$ pgpk -cCannot open configuration file /home/khorck/.pgp/pgp.cfgType Bits KeyID Created Expires Algorithm Usesec+ 1024 0xF409CB5B 2000-09-05 ---------- DSS Sign & Encryptsub 1024 0xDC8183A1 2000-09-05 ---------- Diffie-Hellmanuid khor chune keatSIG! 0xF409CB5B 2000-09-05 khor chune keat
pub 1024 0x0592C6DE 2000-09-05 ---------- DSS Sign & Encryptsub 1025 0x76580B38 2000-09-05 ---------- Diffie-Hellmanuid root <[email protected]>sig! 0x0592C6DE 2000-09-05 root <[email protected]>
KeyID Trust Validity User ID* 0xF409CB5B ultimate complete khor chune keat
khor chune keat0x0592C6DE untrusted invalid root <[email protected]>
root <[email protected]>
Chapter 7. System and data integrity 131

Once both parties have each other’s public keys, they can communicatesecurely using PGP:
• The sender encrypts the message with the receiver’s public key, thensends the message.
• The receiver uses their private key to decrypt the message, then reversesthe process to send the reply.
To encrypt a file, you need to know the recipient’s name. PGP then uses thecorresponding public key to encrypt the file:
In this case, the pgpe -r “recipient name” -sat /tmp/secretfile commandencrypts and signs (-s flag) the /tmp/secretfile file. Since the message issigned with your private key, you also need to enter the pass phrase. The -at
flags cause the output of the command to be in text format for portabilitybetween different operating systems. The /tmp/secretfile.asc output file isautomatically created. This file contains the encrypted contents which yousend to the recipient. The warning message simply means that the public keywas not obtained from a trusted source, such as a Certificate Authority.
Note that signing and encrypting are independent events; so, you can sign afile without encrypting it, and you can encrypt a file without signing it. (Usethe pgps command if you want to sign a file).
Once the recipient receives the encrypted file, they can decrypt it with thepgpv command:
# pgpe -r "khor chune keat" -sat /tmp/secretfileCannot open configuration file /.pgp/pgp.cfgA private key is required to make a signature.Need a pass phrase to decrypt private key:1024 bits, Key ID 0592C6DE, Created 2000-09-05"root <[email protected]>"
Enter pass phrase:Pass phrase is good.1024 bits, Key ID F409CB5B, Created 2000-09-05"khor chune keat"
WARNING: The above key is not trusted to belong to:khor chune keat
Do you want to use the key with this name? [y/N] y
Creating output file /tmp/secretfile.asc
132 Additional Security Tools for AIX Systems

Notice the prompt for the pass phrase. Because the file was encrypted withthe recipient’s public key, it must be decrypted with their private key, and useof the private key requires a pass phrase. Notice also the Good signature line,which is very important for ensuring the integrity of the message. The warningmessage simply means that the public key was not obtained from a trustedsource, such as a Certificate Authority.
PGP can also be used to encrypt sensitive files for secure storage (locally orremotely). To use PGP to encrypt a file for yourself, simply encrypt it with youas the designated recipient:
Note that there is no reason to save the /tmp/secretfile file since what youreally wanted was the signed, encrypted /tmp/secretfile.asc file.
PGP is widely used on the Internet to provide assurance (through digitalsignatures) that downloadable files have not been tampered with. Forexample, packages from the Bull site often include a file with a .asc
$ pgpv /tmp/secretfile.ascCannot open configuration file /home/khorck/.pgp/pgp.cfgMessage is encrypted.Need a pass phrase to decrypt private key:1024 bits, Key ID DC8183A1, Created 2000-09-05
Enter pass phrase:Pass phrase is good.Opening file "/tmp/aaa" type text.Good signature made 2000-09-05 18:15 GMT by key:1024 bits, Key ID 0592C6DE, Created 2000-09-05"root <[email protected]>"
WARNING: The signing key is not trusted to belong to:root <[email protected]>
# pgpe -r "root" -sat /tmp/secretfileCannot open configuration file /.pgp/pgp.cfgA private key is required to make a signature.Need a pass phrase to decrypt private key:1024 bits, Key ID 0592C6DE, Created 2000-09-05"root <[email protected]>"
Enter pass phrase:Pass phrase is good.1024 bits, Key ID 0592C6DE, Created 2000-09-05"root <[email protected]>"
Creating output file /tmp/secretfile.asc
# rm /tmp/secretfile
Chapter 7. System and data integrity 133

extension. Read this file for further instructions on how to verify the integrityof the download prior to installation of the fileset(s).
A downloaded signature file can contain the signature and the message in asingle file, or just the signature without the message. In the latter case, youneed to have the message file available (through a separate download) forPGP to be able to verify the signature. Most Internet sites provide thesignature and message in separate files.
In the case of the Bull site, the signature file (.asc) and the message file (.bff)are included together in the same package, but the signature file does notcontain the message file. To verify the message file (.bff), first, obtain thepublic key of the file’s creator and add it to your keyring; then, run the pgpv
command against the signature file (.asc) to verify the integrity of thedownload. Additional information on ensuring the integrity of downloads canbe found in Section 7.4.1, "Ensuring the integrity of downloads" on page 136.
7.3.4 Protecting your private keyAs you can see, private keys are the key to security within PGP (and allpublic-private key encryption schemes, for that matter). Private keys must bekept private and secure at all times. Just as important as the physical securityof your private key is the choice of a good pass phrase. Pass phrases shouldbe 10-30 characters in length, extremely difficult to guess, and have meaningonly for you. The PGP man pages (man pgp-intro) contain additionalsuggestions on ways to protect your keys.
7.4 MD5
MD5 is a tool used to produce a unique checksum, known as the MD5checksum. It is a strong, one-way hash function. Recall that a hash functiontakes an input of arbitrary length and produces an output of fixed length. Anychange to the input will result in a totally different output (though of the samelength). It is one way because you cannot reproduce the original input if giventhe hashed output. A detailed description of MD5 can be found in RFC 1321,which is included in the package.
The MD5 package is available in source-code form from Purdue University:
ftp://ftp.cerias.purdue.edu/pub/tools/unix/crypto/md5/
The site also contains a digital signature so that you can verify the integrity ofthe package. In addition to the package, you will need access to a C compiler.In our case, we used version 4.4 of the C compiler for AIX under AIX 4.3.3.
134 Additional Security Tools for AIX Systems
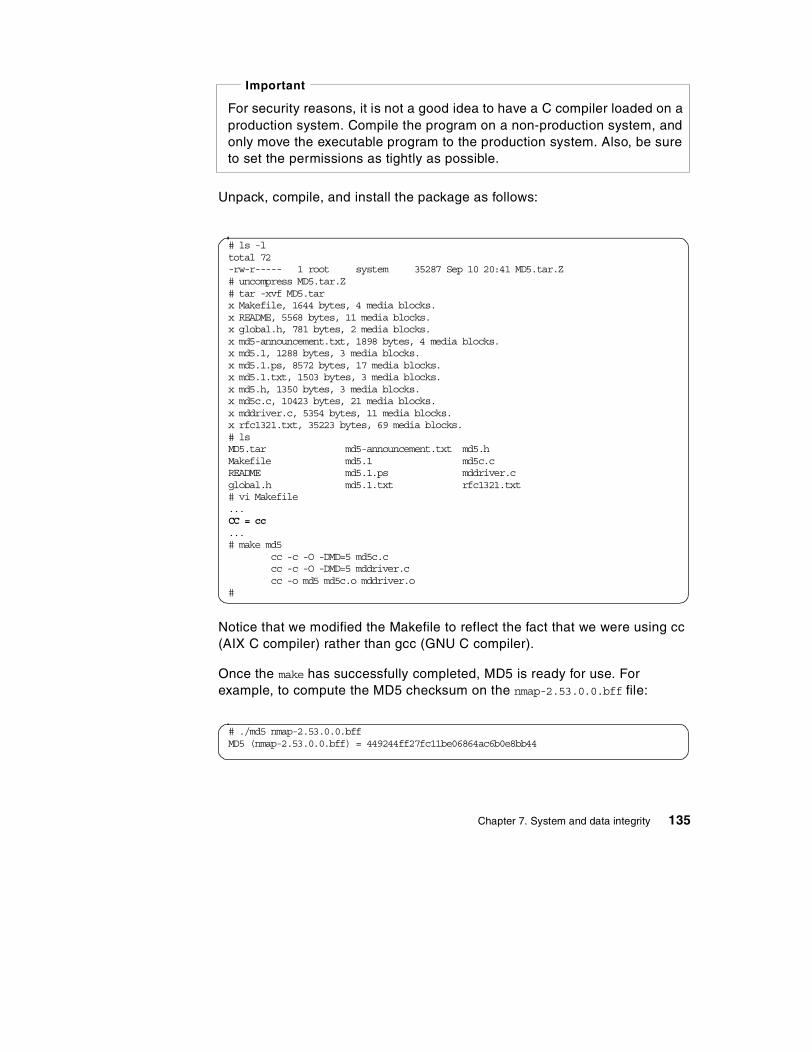
Unpack, compile, and install the package as follows:
Notice that we modified the Makefile to reflect the fact that we were using cc(AIX C compiler) rather than gcc (GNU C compiler).
Once the make has successfully completed, MD5 is ready for use. Forexample, to compute the MD5 checksum on the nmap-2.53.0.0.bff file:
For security reasons, it is not a good idea to have a C compiler loaded on aproduction system. Compile the program on a non-production system, andonly move the executable program to the production system. Also, be sureto set the permissions as tightly as possible.
Important
# ls -ltotal 72-rw-r----- 1 root system 35287 Sep 10 20:41 MD5.tar.Z# uncompress MD5.tar.Z# tar -xvf MD5.tarx Makefile, 1644 bytes, 4 media blocks.x README, 5568 bytes, 11 media blocks.x global.h, 781 bytes, 2 media blocks.x md5-announcement.txt, 1898 bytes, 4 media blocks.x md5.1, 1288 bytes, 3 media blocks.x md5.1.ps, 8572 bytes, 17 media blocks.x md5.1.txt, 1503 bytes, 3 media blocks.x md5.h, 1350 bytes, 3 media blocks.x md5c.c, 10423 bytes, 21 media blocks.x mddriver.c, 5354 bytes, 11 media blocks.x rfc1321.txt, 35223 bytes, 69 media blocks.# lsMD5.tar md5-announcement.txt md5.hMakefile md5.1 md5c.cREADME md5.1.ps mddriver.cglobal.h md5.1.txt rfc1321.txt# vi Makefile...CC = cc...# make md5
cc -c -O -DMD=5 md5c.ccc -c -O -DMD=5 mddriver.ccc -o md5 md5c.o mddriver.o
#
# ./md5 nmap-2.53.0.0.bffMD5 (nmap-2.53.0.0.bff) = 449244ff27fc11be06864ac6b0e8bb44
Chapter 7. System and data integrity 135

When downloading files from the Internet, execute the MD5 checksum on thedownloaded files, and then verify the MD5 checksums with the MD5checksums published on the Web site. If the checksums are identical, youknow that what you downloaded matches what was put on the site. If they arenot, delete the file(s), and notify the site owner. MD5 is also a good tool to usewhen sending files to a remote location across the network.
MD5 is but one of a number of available checksum tools. It is, however, alsoone of the most popular and widely-used ones.
7.4.1 Ensuring the integrity of downloadsBefore downloading anything from the Internet, you first need to decide if youtrust the site. If you do, you next need to ensure that the copy of the file(s) youdownload match the original version of the file(s) placed on the site by theowner. There are several ways you can do this, depending on what isavailable from the site.
Some sites will include a digital signature from the author for your verification.For example, the Bull site includes digital signatures for some of its filesets.An example package that contains a digital signature is the nmap-2.53_0_0.exe
package. Once you inflate this package, you will find an nmap-2.53_0_0.asc
(digital signature) file along with the installable nmap-2.53_0_0.bff file. Toverify the signature, you need to download the public key of the author andrun the pgpv command against the nmap-2.53_0_0.asc file. A good signatureindicates that the package has not been tampered with. For additionalinstructions, see the .asc file.
Some sites may not have all these files packaged together. When that is thecase, you will need to download each of the files separately.
# ./nmap-2_53_0_0.exeUnZipSFX 5.32 of 3 November 1997, by Info-ZIP ([email protected]).inflating: nmap-2.53.0.0.bffinflating: nmap-2.53.0.0.bff.asc
# pgpv nmap-2.53.0.0.bff.asc -o nmap-2.53.0.0.bffCannot open configuration file /.pgp/pgp.cfgOpening file "/dev/null" type text.This signature applies to another messageFile to check signature against [nmap-2.53.0.0.bff]:Good signature made 2000-07-24 15:32 GMT by key:1024 bits, Key ID 22F02AED, Created 1999-03-15"Ciaran Deignan <[email protected]>"
WARNING: The signing key is not trusted to belong to:Ciaran Deignan <[email protected]>
136 Additional Security Tools for AIX Systems

Other sites may not use PGP signatures at all. Instead, they publish the MD5checksums for their downloadable files. Once you have downloaded thefile(s), you use MD5 to generate the checksum(s), and then compare yourresults with those published on the site. If they are different, delete the file(s)and notify the owner of the site.
Finally, some sites just post information about the security measures in placeon their site. After reviewing this information, you can decide whether or notyou feel comfortable proceeding with the download.
Chapter 7. System and data integrity 137

138 Additional Security Tools for AIX Systems

Chapter 8. Securing AIX
Once AIX is installed on a server, there are a number of additionalconfiguration changes that you can make to further tighten down security onthe box. This chapter illustrates how to turn off unnecessary services andmodify the configuration of the remaining services to make them even moresecure. AIX supports a multitude of applications (each with their own uniquerequirements) in any number of conceivable environments making itimpossible to create a single, default security environment that applies to all.Thus, the security level you set up in AIX needs to be tailored to the customerand application environment where the server is deployed. For example, anInternet Web server will most likely have different security requirements thana software development server located in a lab.
A common entry point for attackers is through vulnerabilities in networkservices. New exploits are discovered almost daily; so, what is secure todaymay not be secure tomorrow. The best rule of thumb is to turn off all servicesthat are not needed. The best time to do this is before the server is inproduction. Begin by turning off as much as possible. If in doubt, turn it off.Then, selectively turn services back on only when there is proof that they areneeded. It is far easier to turn on what is needed before going into productionthan it is to try and figure out what can be turned off once the server is live.You can then focus your security efforts toward making configuration changesand applying the latest security patches on the remaining services.
To secure a building, all entry points around the perimeter must be secure.The same holds true for securing a server. Take, for example, a Web server.Among other things, this server consists of the network, the operatingsystem, and the Web server software (application). If you focus only onsecuring the Web server software piece, you leave the operating system andthe network doors vulnerable. An entry gained through any door is an entrygained. For example, suppose the attacker takes advantage of an rpc.statdvulnerability to gain root access. At that point, the battle is lost. Not only hasthe OS been compromised, but everything else along with it. Worse yet,suppose that rpc.statd was a service not required for the proper functioning ofthe server. Unneeded doors should be removed and bricked over, and theremaining doors should be reinforced with the strongest materials at yourdisposal.
Securing AIX is not a one-time process. Even though you have taken steps toturn off unnecessary services and protect the remaining ones, you still needto maintain constant vigilance. New exploits are being invented almost daily,and changes to the system, such as software upgrades, potentially open new
© Copyright IBM Corp. 2000 139

holes. Apply security fixes to your system as soon as it is practicable, andstrive to know the normal behavior of the system so that you can easily spotanomalies if they occur.
8.1 Overview
As mentioned earlier, there are two types of attackers: Those who are on theinside and those who are on the outside. Both can cause harm, but they eachhave slightly different profiles in the way they attack. For example, internalattackers may already have legitimate user accounts on the systems. Ingeneral, they do not, typically, have root access. However, having a normal,non-privileged account still gives them the freedom to snoop around lookingfor possible configuration errors and system vulnerabilities.
External attackers need to spend more time doing reconnaissance againsttheir potential targets. For example, using tools, such as nmap (with the -Oflag), external attackers attempt to find out which operating system runs ontheir target. They then use tools, such as SAINT or nmap, to attempt todetermine which network service ports are open. With this information inhand, they next use a tool, such as netcat (nc), to attempt to grab bannerinformation to determine which version of the service is running on each port.
If the attacker finds that you are running a certain version of a service, andthere are known problems with this level of code, the attacker can then useknown attack methods to penetrate the system. The importance of keepingyour systems up-to-date with the latest security patches and configuring yoursystems to not leak any unnecessary information cannot be understated. Onehas simply to look at recent news headlines to understand that the threat isvery real and that the reputation of the organization may very well hinge onthe security of the systems you have been entrusted to protect.
The general steps to harden AIX (which are explained in detail in theremainder of this chapter) are as follows:
1. Remove unnecessary services.
2. Tighten configurations of remaining services.
3. Set proper network (no) options.
4. Tighten up user accounts.
5. Set up a strong password policy.
6. Install additional security tools (such as the ones mentioned in previouschapters).
140 Additional Security Tools for AIX Systems

7. Monitor logs, audit trails, and system behavior.
In the examples that follow, we assume a newly-installed system. Ourenvironment (AIX 4.3.3 on an RS/6000 F50) is meant to simply illustrate whatis possible. Your environment is almost certainly different and more complex;so, you will need to take this information and tailor it to your unique needs.
8.2 Step 1: Remove unnecessary services
You can see which services have active listening ports on your system withthe netstat -af inet command. Alternatively, you can do this with scanningtools, such as NSA, SAINT, or nmap. The advantage to using scanning toolsare threefold:
• You can run them against a multitude of servers from a single location.With netstat, you need to run it on a server-by-server basis.
• Tools, such as NSA (Section 4.4, "Network Security Auditor (NSA)" onpage 49) and SAINT (Section 6.3, "Security Administrator's IntegratedNetwork Tool (SAINT)" on page 94), have a list of known vulnerabilitiesthat they use to test against.
• Attackers use similar tools to scan your network. By knowing what theyknow and seeing what they see, you can devise strategies to defendagainst such scans and minimize the amount of information that isavailable to would-be attackers. The less information they have to workwith, the harder it is to penetrate your network.
Prior to making any change to a production system, be certain that youhave a known-good backup just in case the change does not work the wayyou expect.
Note
Many organizations have very strict policies in place against runningcertain types of tools, such as sniffers and scanners, on a productionnetwork. Make sure you have the proper written authorization in place priorto running any of these tools on your systems.
Important
Chapter 8. Securing AIX 141

It is also possible to permanently remove a service by uninstalling theappropriate filesets. This is not required and should only be undertaken bysomeone with sufficient AIX skills since there is a high risk involved withremoving system-level filesets. We recommend disabling services, ratherthan removing them.
8.2.1 Removing entries from /etc/inittab
The /etc/inittab file varies from system to system depending on theapplications that are installed on the server. Verify that the entries in/etc/inittab reflect the software that is installed on the server. Applications,such as TSM, Oracle, HACMP, and so on, typically have entries in/etc/inittab. If the software is no longer used on the server, remove the/etc/inittab entries.
The following default entries in /etc/inittab are candidates for removal sincethey are usually not required:
Many organizations have very strict policies in place against runningcertain types of tools, such as sniffers and scanners, on a productionnetwork. Make sure you have the proper written authorization in place priorto running any of these tools on your systems.
Additionally, in rare cases, scanning tools, such as NSA, can cause systemcrashes. Ensure that you have current known-good backups, that you havefully tested the scanning tool on a non-production server and network, andthat you have informed the relevant parties before launching a scan on theproduction network.
Important
Prior to making any changes to /etc/inittab, be sure to make a backup copyof it. It is also a good idea to have a known-good system backup.
Important
142 Additional Security Tools for AIX Systems

If you decide to remove these entries, you can do so with the rmitab
command as follows:
Removing the entries from /etc/inittab will disable them from automaticallystarting. Reboot the server after the modification to test the change andensure that everything else still properly starts. You may also want to alter thepermissions (chmod 0000 <filename>) on the executables to further disable theservice. You can even go so far as to uninstall the filesets (particularly the Dtfilesets used for CDE), but great care must be taken when doing this.
The following sections provide detailed descriptions of the default/etc/inittab entries. This information is provided to help you determinewhether or not these entries are needed on your systems.
8.2.1.1 The piobe and qdaemon entriesThe qdaemon program is used to schedule jobs for printing. The piobeprogram is the spooler backend program called by the qdaemon program. Itprocesses the print job and serves as the print job manager. These twoentries are required if the server is set up for printing.
8.2.1.2 The httpdlite, imnss, and imqss entriesThe httpdlite program is the default Web server for the docsearch engine andis installed by default. For docsearch to function properly, a Web server isrequired, and httpdlite is the version that comes with theIMNSearch.rte.httpdlite fileset. If you have another Web server, you canremove httpdlite, and configure docsearch to use your installed Web server.For more information on how to do this, see:
www.rs6000.ibm.com/doc_link/en_US/a_doc_lib/aixgen/topnav/topnav.htm
piobe:2:wait:/usr/lib/lpd/pio/etc/pioinit >/dev/null 2>&1 # pb cleanupqdaemon:2:wait:/usr/bin/startsrc -sqdaemonwritesrv:2:wait:/usr/bin/startsrc -swritesrvuprintfd:2:respawn:/usr/sbin/uprintfdhttpdlite:2:once:/usr/IMNSearch/httpdlite/httpdlite -r /etc/IMNSearch/httpdlite/httpdlite.conf & >/dev/console 2>&1dt:2:wait:/etc/rc.dtimnss:2:once:/usr/IMNSearch/bin/imnss -start imnhelp >/dev/console 2>&1imqss:2:once:/usr/IMNSearch/bin/imq_start >/dev/console 2>&1
# for i in piobe qdaemon writesrv uprintfd httpdlite df imnss imqss \>do \>rmitab $i \>done
Chapter 8. Securing AIX 143

In most cases, the man pages are sufficient, and docsearch is not reallyrequired. Storing local copies of man pages is rarely an issue with the disksizes today, and the man pages provide much faster access to informationthan does the docsearch engine. The one advantage that docsearch providesover the man pages is its search capabilities.
8.2.1.3 The dt entryThe /etc/rc.dt script is used to start Common Desktop Environment (CDE).Unless absolutely essential, CDE should not be run on servers because ofthe security issues inherent in it as well as the X window system on which itsits. Remove the /etc/rc.dt entry, and use a tool, such as Tripwire, to ensurethat it is not put back in. Uninstalling CDE (Dt) filesets is another option.
8.2.1.4 The writesrv entryThe writesrv daemon enables users to communicate back and forth betweensystems by means of the write command. In order for this communication towork, the receiving system(s) must have the writesrv daemon running.
The writesrv daemon receives incoming requests from a write command andcreates a server process to handle the request. This server processcommunicates with the client process (write) and provides whatever servicesare requested. Removing the writesrv entry prevents use of the write
command between systems but does not effect its use between users on thelocal system.
8.2.1.5 The uprintfd entryThe uprintfd daemon retrieves, converts, formats, and writes kernelmessages to the controlling terminals of processes. Kernel messages aresubmitted through the NLuprintf and uprintf kernel services. This daemon isgenerally not required.
8.2.2 Removing entries from /etc/rc.tcpipThe /etc/rc.tcpip script starts the TCP/IP daemons. By default, the syslog,sendmail, portmap, inetd, snmpd, and dpid2 daemons are started. You maynot need some of these (especially dpid2). For the ones that you do need, besure to modify their configuration files to further tighten down security, andalways keep them up-to-date with the latest patch levels.
To determine which TCP/IP services are actively listening on the system, usethe netstat -af inet command. If you find a service listening on an unknownport, you can use tools, such as lsof (see Section 6.5, "List Open Files (lsof)"on page 103), to help determine the ownership.
144 Additional Security Tools for AIX Systems

To prevent a service from starting in /etc/rc.tcpip, either comment it out (adda # at the beginning of the line) or delete the entry from the file. We suggestthe latter because it is all too easy for another administrator to uncommentthe line during a problem determination session and unknowingly open apotential and unnecessary security vulnerability.
To stop the unwanted TCP/IP daemons, you can either wait for amaintenance reboot of the system, or you can run the /etc/tcp.clean script tostop all TCP/IP daemons, then run /etc/rc.tcpip to restart only those that arestill uncommented in the file. Note that all TCP/IP connections will be severedwhen you run /etc/tcp.clean. This is very disruptive and should not be doneon a production server outside of a maintenance window. In addition, ensurethat you are locally connected to the system because all telnet connectionswill be dropped as well.
In most cases, the following daemons do not need to be started:
Chapter 8. Securing AIX 145
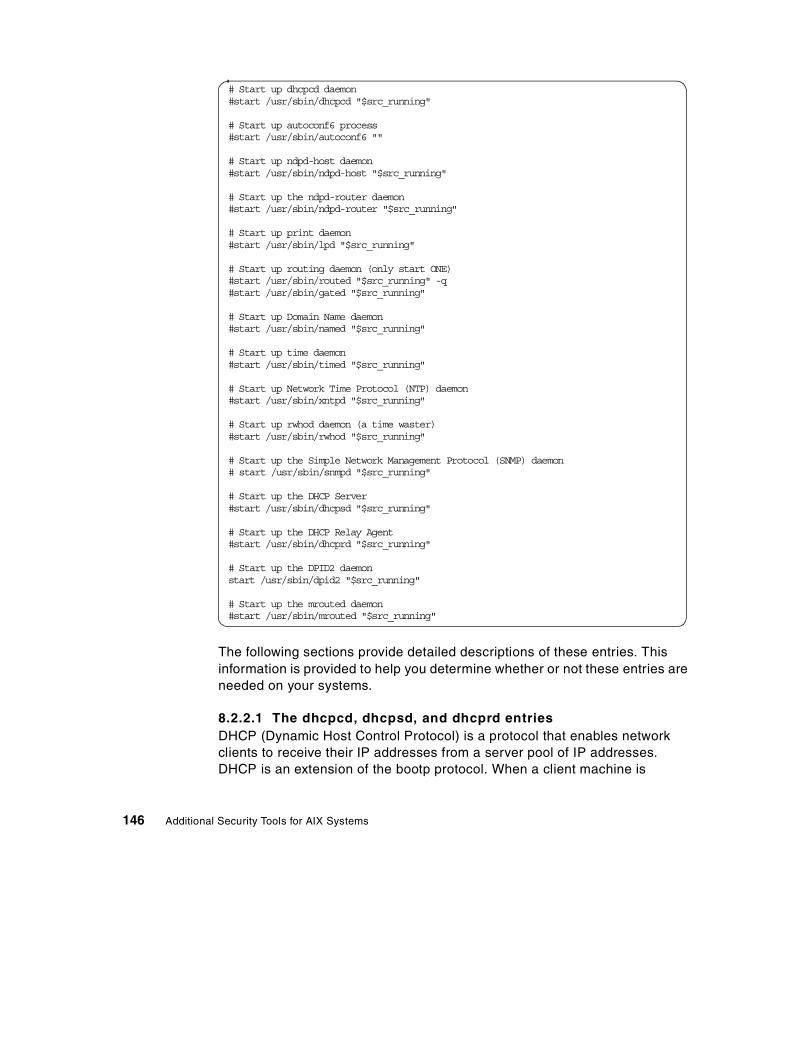
The following sections provide detailed descriptions of these entries. Thisinformation is provided to help you determine whether or not these entries areneeded on your systems.
8.2.2.1 The dhcpcd, dhcpsd, and dhcprd entriesDHCP (Dynamic Host Control Protocol) is a protocol that enables networkclients to receive their IP addresses from a server pool of IP addresses.DHCP is an extension of the bootp protocol. When a client machine is
# Start up dhcpcd daemon#start /usr/sbin/dhcpcd "$src_running"
# Start up autoconf6 process#start /usr/sbin/autoconf6 ""
# Start up ndpd-host daemon#start /usr/sbin/ndpd-host "$src_running"
# Start up the ndpd-router daemon#start /usr/sbin/ndpd-router "$src_running"
# Start up print daemon#start /usr/sbin/lpd "$src_running"
# Start up routing daemon (only start ONE)#start /usr/sbin/routed "$src_running" -q#start /usr/sbin/gated "$src_running"
# Start up Domain Name daemon#start /usr/sbin/named "$src_running"
# Start up time daemon#start /usr/sbin/timed "$src_running"
# Start up Network Time Protocol (NTP) daemon#start /usr/sbin/xntpd "$src_running"
# Start up rwhod daemon (a time waster)#start /usr/sbin/rwhod "$src_running"
# Start up the Simple Network Management Protocol (SNMP) daemon# start /usr/sbin/snmpd "$src_running"
# Start up the DHCP Server#start /usr/sbin/dhcpsd "$src_running"
# Start up the DHCP Relay Agent#start /usr/sbin/dhcprd "$src_running"
# Start up the DPID2 daemonstart /usr/sbin/dpid2 "$src_running"
# Start up the mrouted daemon#start /usr/sbin/mrouted "$src_running"
146 Additional Security Tools for AIX Systems

configured to use DHCP boots, it sends out a request for an IP address to aDHCP server. The DHCP server responds with an IP address assigned fromits pool of addresses. The client then uses this assigned IP address toconfigure the remainder of its network services and finish booting.
The entries correspond to the client, server, and relay components of theprotocol. If you do not use DHCP with your AIX servers, leave these entriescommented.
8.2.2.2 The autoconf6, ndpd-host, and ndnpd-router entriesThe autoconf6 process is run at boot time to configure the IPv6 networkinterfaces and to add necessary routes. The ndp entries are also for IPv6 andare not yet commonly used.
If you are not using IPv6, leave these entries commented.
8.2.2.3 The lpd entryThe lpd daemon is required if this machine acts as a print server to othermachines. In other words, this machine has an attached printer that is usedby remote machines for printing.
8.2.2.4 The routed and gated entriesRouted and gated are two daemons used to implement dynamic routing. Youcan run either routed or gated but not both. Generally, in a secureenvironment, you want to keep things deterministic. So, instead of usingdynamic routing, you define static routes to the system. When this is thecase, leave the entries commented, and be sure to set the network (no)options accordingly. For more information on the no options, see Section 8.4,"Step 3: Set proper network (no) options" on page 186.
8.2.2.5 The named entryThe named daemon is used when the local server acts as a Domain NameSystem (DNS) server providing name resolution services to other machineson the network. For more information on DNS, see Section 8.3.1, "DomainName System (DNS)" on page 153.
8.2.2.6 The timed and xntpd entriesTimed and xntpd are two different time synchronization daemons. They areused by servers to synchronize their time with a reliable clock source. Thesedaemons are typically used in time-sensitive environments, such asDCE/DFS cells, SP complexes (NTP is used by default), and some firewalls(to synchronize connection tables).
Chapter 8. Securing AIX 147

8.2.2.7 The rwhod entryThis daemon is used to provide remote users with information about who islogged in to the server. It is a very big security exposure, and should not beused.
8.2.2.8 The snmpd entrySNMP is used for network administration. It has security vulnerabilities andshould be removed if not needed. If it is needed, at a minimum, you shouldchange the community names to unique, hard-to-guess names. For moreinformation on configuring SNMP, see Section 8.3.4, "Simple NetworkManagement Protocol (SNMP)" on page 180.
8.2.2.9 The dpid2 entryDPID is a legacy SNMP daemon. It is rarely used, is a security exposure, andshould be removed. Delete the entry from /etc/rc.tcpip, and modify thepermissions of the executable (chmod 0000 /usr/sbin/dpid2).
8.2.2.10 The mrouted entryMrouted is used to forward multicast datagrams. If you are not usingmulticasting, leave it commented.
8.2.3 Removing entries from /etc/inetd.confThe inetd daemon acts as a master server that invokes other daemons(specified in the /etc/inetd.conf configuration file) as needed. This design ismeant to reduce system load. Each new daemon started by inetd results inanother active port being available for remote client connection. This alsomeans additional opportunities for attack.
Unneeded services should be commented out. In some cases, you may alsobe able to remove services that are normally considered necessary. Forexample, you can replace telnet, rsh, rlogin, and ftp with SSH equivalents(ssh, scp, sftp), which are more secure. (For more information about SSH,see Section 5.1, "Secure Shell (ssh)" on page 59.) If you decide to go withSSH, comment out the telnet, rsh, and ftp services in /etc/inetd.conf. Youmight also consider replacing the ftp, ftpd, telnet, telnetd, rsh, rshd, rlogin,and rlogind executables with their SSH equivalents. The only drawback to thisapproach is that they will almost certainly be overwritten by OS upgrades andpatches requiring you to redo the replacements each time.
For those services that are required, consider protecting them with TCPWrapper. (For detailed information about how to set up TCP Wrapper, seeSection 5.2, "TCP Wrapper" on page 77.) TCP Wrapper protects theseservices through access control and logging. Unfortunately, there is still a
148 Additional Security Tools for AIX Systems
problem with many of these services exchanging authentication information inclear text across the network. TCP Wrapper does nothing to solve this; so,again, only enable those services that are absolutely required.
In an SP environment, kshell, klogin, bootps, and tftp are required. However,you can selectively turn them off when they are not required and reenablethem when they are.
For our basic setup, we removed the following services from the/etc/inetd.conf file. This is not meant to be a definitive list. You need todecide which services to run and which to remove based on yourenvironment. A lot of these services are nice to have but may present asecurity problem.
To prevent inetd from starting a service, comment it out in the /etc/inetd.conf
configuration file, and then refresh inetd (refresh -s inetd).
Chapter 8. Securing AIX 149

The following sections provide detailed descriptions of these entries. Thisinformation is provided to help you determine whether or not these entries areneeded on your systems.
#shell stream tcp6 nowait root /usr/sbin/rshd rshd#kshell stream tcp nowait root /usr/sbin/krshd krshd#login stream tcp6 nowait root /usr/sbin/rlogind rlogind#klogin stream tcp nowait root /usr/sbin/krlogind krlogind#exec stream tcp6 nowait root /usr/sbin/rexecd rexecd#comsat dgram udp wait root /usr/sbin/comsat comsat#uucp stream tcp nowait root /usr/sbin/uucpd uucpd#bootps dgram udp wait root /usr/sbin/bootpd bootpd /etc/bootptab#finger stream tcp nowait nobody /usr/sbin/fingerd fingerd#systat stream tcp nowait nobody /usr/bin/ps ps -ef#netstat stream tcp nowait nobody /usr/bin/netstat netstat -f inet##tftp dgram udp6 SRC nobody /usr/sbin/tftpd tftpd -n#talk dgram udp wait root /usr/sbin/talkd talkd#ntalk dgram udp wait root /usr/sbin/talkd talkd#rquotad sunrpc_udp udp wait root /usr/sbin/rpc.rquotad rquota00011 1#rexd sunrpc_tcp tcp wait root /usr/sbin/rpc.rexd rexd 100017 1#rstatd sunrpc_udp udp wait root /usr/sbin/rpc.rstatd rstatd 100001 1-3#rusersd sunrpc_udp udp wait root /usr/lib/netsvc/rusers/rpc.rusersd rusersd 100002 1-2#rwalld sunrpc_udp udp wait root /usr/lib/netsvc/rwall/rpc.rwalldrwalld 100008 1#sprayd sunrpc_udp udp wait root /usr/lib/netsvc/spray/rpc.spraydsprayd 100012 1#pcnfsd sunrpc_udp udp wait root /usr/sbin/rpc.pcnfsd pcnfsd 150001 1-2#echo stream tcp nowait root internal#discard stream tcp nowait root internal#chargen stream tcp nowait root internal#daytime stream tcp nowait root internal#time stream tcp nowait root internal#echo dgram udp wait root internal#discard dgram udp wait root internal#chargen dgram udp wait root internal#daytime dgram udp wait root internal#time dgram udp wait root internal#instsrv stream tcp nowait netinst /u/netinst/bin/instsrv instsrv -r /tmp/netinstalllog /u/netinst/scripts#ttdbserver sunrpc_tcp tcp wait root /usr/dt/bin/rpc.ttdbserver rpc.ttdbserver 100083 1#dtspc stream tcp nowait root /usr/dt/bin/dtspcd /usr/dt/bin/dtspcd#cmsd sunrpc_udp udp wait root /usr/dt/bin/rpc.cmsd cmsd 1000682-5#imap2 stream tcp nowait root /usr/sbin/imapd imapd#pop3 stream tcp nowait root /usr/sbin/pop3d pop3d#ssalld sunrpc_tcp tcp wait root /usr/sbin/rpc.ssalld rpc.ssalld300667 1#kfcli stream tcp nowait root /usr/lpp/ssp/install/bin/kfserver kfserver#xmquery dgram udp wait root /usr/bin/xmservd xmservd -p3
150 Additional Security Tools for AIX Systems

8.2.3.1 The shell (rshd) and login (rlogind) entriesThese entries are for rsh, rlogin, and rcp command functionality and shouldbe disabled for security reasons. See Section 5.1, "Secure Shell (ssh)" onpage 59, for more information. The rshd daemon uses TCP port 514, and therlogind daemon uses TCP port 513.
8.2.3.2 The kshell (krshd) and klogin (krlogind) entriesThese entries are similar to the shell and login services but are used whenKerberos authentication is used. They are typically required in SPenvironments. It is important to note that in an SP environment, even thoughthe sessions are authenticated, data from commands, such as rsh and rcp,are transferred in the open without encryption. The krshd daemon uses TCPport 544, and the krlogind daemon uses TCP port 543.
8.2.3.3 The exec, rstatd, ruserd, rwalld, and rquotad entriesThe exec (rexecd) entry is for rexec command functionality, which is used forremote command execution support. As with other “r” services, it should bedisabled. The rexecd daemon uses TCP port 512. The other daemons listedhere use rpc (portmap) for their port allocation.
8.2.3.4 The comsat entryThe comsat daemon is the server that receives reports of incoming mail andnotifies those users who have enabled this service (with the biff command)accordingly. The comsat daemon uses UDP port 512.
8.2.3.5 The uucp (uucpd) entryThe uucp command is a Basic Networking Utilities (BNU) command. It is usedto copy one or more source files from one system to one or more destinationfiles on another UNIX system. The uucpd daemon uses TCP port 540.
8.2.3.6 The bootps (bootpd) and tftp (tftpd) entriesThe bootpd daemon implements an Internet Boot Protocol server to enableremote boot of clients. The tftp command uses trivial file transfer protocol totransfer files from one system to another. These services are required in anSP when installing or network-booting an SP node. The tftp service, inparticular, has a number of security issues that you need to be aware of if youplan to leave it enabled. For more information, see Section 8.3.7, "FileTransfer Protocol (ftp)" on page 184. The bootpd daemon uses UDP port 67,and the tftpd daemon uses UDP port 69.
8.2.3.7 The finger (fingerd) entryThe finger command displays information about the users currently logged into a system (either local or remote). It should be disabled, as it is commonly
Chapter 8. Securing AIX 151

used for social-engineering attacks and buffer-overflow attacks. The fingerddaemon uses TCP port 79.
8.2.3.8 The systat (ps) entryThe systat entry provides support for the ps command. It uses TCP port 11.
8.2.3.9 The netstat entryThe netstat entry provides support for the netstat command. It uses TCP port15.
8.2.3.10 The talk (talkd) and ntalk (talkd) entriesThe talk command allows two users on the same system or on differentsystems to have an interactive conversation. The talkd daemon uses TCPport 518.
8.2.3.11 The rexd entryWith the rexd daemon running, any program emulating the on command canobtain shell access, which, in turn, provides access to files on the remotesystem including things, such as the password file. Because of the securityrisks, it should be disabled. The rexd daemon uses rpc (portmap) for its portallocation.
8.2.3.12 The sprayd entryThe sprayd daemon provides support for the spray command. Because thespray command can be used for both buffer overflow and denial of serviceattacks, this entry should be disabled. The sprayd daemon uses rpc(portmap) for its port allocation.
8.2.3.13 The pcnfsd entryThe pcnfsd daemon provides NFS service to PC clients. It has a history ofattackers using untrapped-meta-character vulnerabilities to executeunauthorized commands on remote systems. For this reason, it should bedisabled. The pcnfsd daemon uses rpc (portmap) for its port allocation.
8.2.3.14 The echo, chargen, time, and daytime entriesAll these services can be spoofed into sending data from one service on onesystem to another service on another system resulting in an infinite loop andcreating a denial of service attack. The port usage is as follows: echo usesTCP and UDP port 7, chargen uses TCP and UDP port 19, time uses TCPand UDP port 37, and daytime uses TCP and UDP port 13.
152 Additional Security Tools for AIX Systems

8.2.3.15 The discard entryAs its name implies, discard discards whatever is sent to it by a client. In alllikelihood, you do not need it. It uses TCP and UDP port 9.
8.2.3.16 The ttdbserver, dtspc, and cmsd entriesThese entries are used for the CDE environment. CDE should not be used ona server unless absolutely required. If you are disabling CDE, disable theseentries also. All of these services use rpc (portmap) for their port allocation.
8.2.3.17 The imap2 (imapd) and pop3 (pop3d) entriesBoth of these daemons are used to retrieve mail. Each has had bufferoverflow problems in the past. If this system is not serving as an imap or pop3server, disable these entries. The imapd daemon uses TCP and UDP port143 for imap2, and the pop3d daemon uses TCP port 110.
8.3 Step 2: Tighten configurations of remaining services
No doubt, some services will still be required to support the normalproduction activities of the server. These services typically include things,such as DNS, NFS, SMTP, and SNMP. For any remaining active services, youshould adjust the default configurations to further tighten their security. Theextent of the configuration changes will depend on the security level that youare trying to achieve.
8.3.1 Domain Name System (DNS)DNS is used to map a host name to an IP address and vice-versa. Basically, itis a host name to IP lookup protocol. Other means of host name resolutioninclude the local host table (/etc/hosts) and NIS. The local host table solutiondoes not scale well, and NIS has a number of well-known security issues. Forthese reasons, DNS is the most commonly used solution.
On AIX, DNS is managed by BIND (the Berkeley Internet Name Daemon).DNS and BIND are so closely related that the terms are interchangeable.
Two different BIND versions (BIND4 and BIND8) are in common use. BIND4is the older protocol, and support for it has been dropped. BIND8 is the newerprotocol, which includes more capabilities, built-in security, and support forbug fixes.
The BIND homepage is:
http://www.isc.org/products/BIND/
Chapter 8. Securing AIX 153

8.3.1.1 DNS principlesWhen asked to resolve a host name to IP address (for example,sales.west.france.acme.com.), the DNS name server tries to answer thefollowing three questions:
1. Is the answer in the my local DNS cache?
2. If not, does this name belong to my DNS domain?
3. If not, to which other DNS name server should I escalate this request?
Escalating the request and receiving the answer can be quite timeconsuming. Assuming the worst case scenario, let us say that your DNSname server belongs to a completely different DNS domain (for example,abc.xyz.fr.). The following domain name servers will be queried in sequence(assuming no cache hits along the way):
1. . (“dot”, this is the top of the DNS tree)
2. com.
3. acme.com.
4. france.acme.com.
5. west.france.acme.com.
To reduce both network load and delays, each DNS name server manages alocal cache of the answers to its most recent queries. Once your name serverfinally gets the IP address for west.france.acme.com., it will not have to makethe preceding queries again until the information in its cache expires.
The use of DNS cache typically speeds up name resolution by anywhere fromone to three orders of magnitude. However, with the volatile nature of theInternet, the question of how to keep DNS cache up-to-date with thethousands of address changes that occur every day remains. (If the addressassociated with a host name changes but the local DNS cache still has theold information, host name resolution will be hindered by the cache ratherthan helped.) We will return to the question of DNS cache consistencyshortly.
8.3.1.2 DNS spoofingAccording to www.dictionary.com, spoofing means: Nonsense; a hoax; agentle satirical imitation; a light parody.
A client knows its DNS name server by IP address only. This IP address canbe faked by an attacking machine on the LAN (for instance, a portablecomputer). If that false name server answers faster than the real name server,
154 Additional Security Tools for AIX Systems

it can misdirect the querying client to other hostile computers. However, thistechnique has the following drawbacks from the point of view of the attacker:
• It requires a machine to be connected to the LAN.
• Success is not guaranteed. Even if it is faster, the false name server willonly fool the clients that are querying DNS as they boot. The other clientson the LAN already have the MAC address for the real DNS name serverin their ARP cache.
• A single IP address associated with two different MAC addresses is easyto detect by system and network administrators because it generallycauses additional problems on the network.
For these reasons, attackers designed a new and improved version of DNSspoofing.
8.3.1.3 The new and improved DNS spoofingWe saw in Section 8.3.1.1, "DNS principles" on page 154, that cachedaddresses need to be updated whenever they change. The whole idea behindDNS spoofing is to send counterfeit update requests to a DNS name server.By definition, the DNS name server sending the update requests does notbelong to the same DNS domain as the local DNS name server. In otherwords, the remote DNS name server is not a trusted host, and, in principle,the update should not be allowed. Prior to BIND 8.2, there was no way toprevent this.
How the DNS spoofing exploit works
Here is an example of how the DNS spoofing exploit works:
The attacker starts by sending a bogus update to a DNS name server. Theupdate changes the IP address of a fully-qualified host name in the DNSname server cache. Since it appears as nothing more than a routine updateof the IP address associated with a given host name, everything seems fine,and since it is an update to a fully-qualified host name, there is no need todisturb anything further up the DNS hierarchy.
Now, imagine that the IP address that was updated was the IP address to aWeb site that provides secure content. Suppose further that the attackershave managed to duplicate the home page of that site on the host whose IPaddress they substituted for the legitimate one. To you, it looks and feels justlike the real site, and you unknowingly attempt to log in with your accountnumber and password.
Chapter 8. Securing AIX 155

The attackers now employ a technique known as blackholing. Blackholingmeans intentionally giving no answer to a request. This technique is intendedto consume time from the requester and is used both by attackers againsttheir victims and by system administrators against suspected attackers. So,the attackers blackhole you, then put up some fake message (such as “sitebusy” or “requested page not found”) and ask you to try again later. While youare waiting for all of this to happen, they turn around and use your identityand password to access the legitimate site. By the time you realize what hashappened, they will be long gone. Worse yet, because they accessed the sitewith your legitimate account number and password, the site will probably notaccept any responsibility for any damage done to you.
Protection against the DNS spoofing exploit
One form of protection against DNS spoofing involves a software modificationto do an extra DNS lookup for each request. After translating the incomingrequest from an IP address to a host name, a second translation from hostname back to IP address is performed. If the two IP addresses do not match,the request is denied and a warning message issued. (Faking an address in adirect access table is easy, but inserting a fake address at the correct locationin a sequential, reverse access table is much more difficult.)
To address the growing problem of DNS (and IP) spoofing, RFC 2065 definesthe DNS Security Extensions (DNSSEC). These security extensions enableDNS resolvers and DNS name servers to cryptographically authenticate thesource and, through digital signatures, guarantee the integrity of the DNSqueries and responses. They are incorporated into BIND 8.2.1, which isincluded in AIX 4.3.3.
DNS spoofing compared to IP spoofing
To illustrate the difference between DNS spoofing and IP spoofing, we use atelephone system analogy:
With IP spoofing, a skilled technician takes over the phone number (IPaddress) of the destination. From then on, calls (requests) made to thatnumber (IP address) go to the technician (bogus server), rather than to thelegitimate destination (real server).
DNS spoofing is more subtle. With DNS spoofing, the skilled technician keepstheir original phone number (IP address) unchanged. Instead, the technicianmodifies a phone book (DNS server) somewhere in the system andsubstitutes their phone number (IP address) in place of a legitimate one.Then, when someone looks up the name for that entry, they get the phone
156 Additional Security Tools for AIX Systems
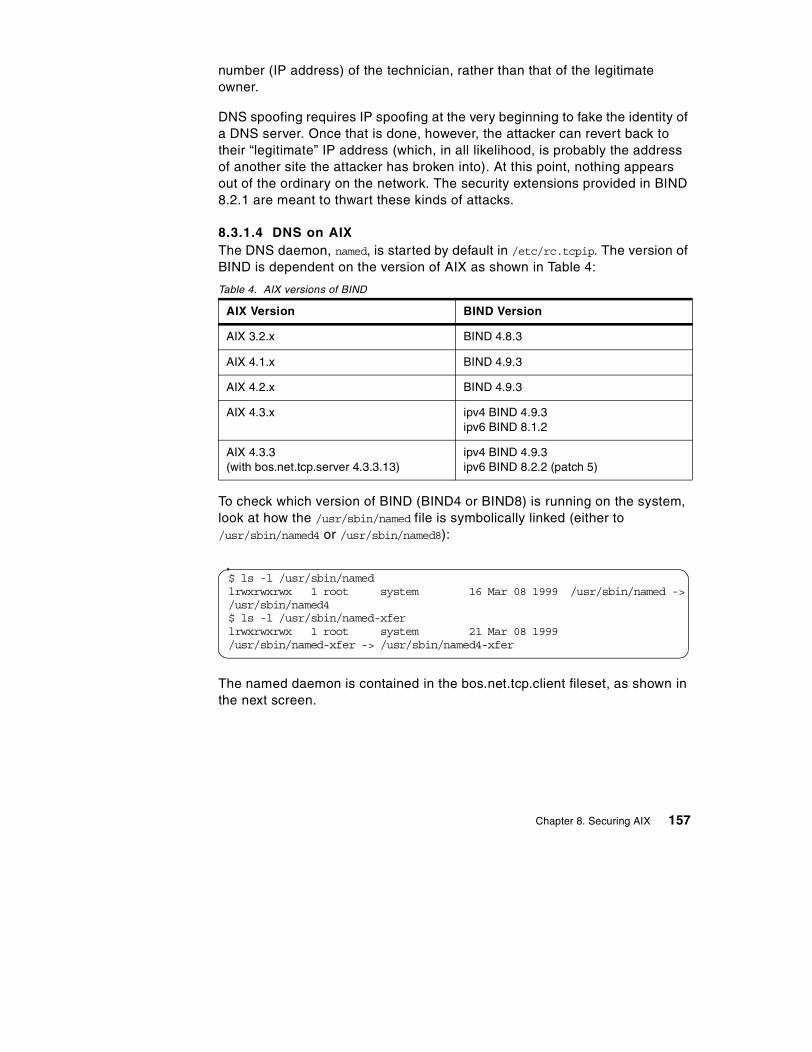
number (IP address) of the technician, rather than that of the legitimateowner.
DNS spoofing requires IP spoofing at the very beginning to fake the identity ofa DNS server. Once that is done, however, the attacker can revert back totheir “legitimate” IP address (which, in all likelihood, is probably the addressof another site the attacker has broken into). At this point, nothing appearsout of the ordinary on the network. The security extensions provided in BIND8.2.1 are meant to thwart these kinds of attacks.
8.3.1.4 DNS on AIXThe DNS daemon, named, is started by default in /etc/rc.tcpip. The version ofBIND is dependent on the version of AIX as shown in Table 4:
Table 4. AIX versions of BIND
To check which version of BIND (BIND4 or BIND8) is running on the system,look at how the /usr/sbin/named file is symbolically linked (either to/usr/sbin/named4 or /usr/sbin/named8):
The named daemon is contained in the bos.net.tcp.client fileset, as shown inthe next screen.
AIX Version BIND Version
AIX 3.2.x BIND 4.8.3
AIX 4.1.x BIND 4.9.3
AIX 4.2.x BIND 4.9.3
AIX 4.3.x ipv4 BIND 4.9.3ipv6 BIND 8.1.2
AIX 4.3.3(with bos.net.tcp.server 4.3.3.13)
ipv4 BIND 4.9.3ipv6 BIND 8.2.2 (patch 5)
$ ls -l /usr/sbin/namedlrwxrwxrwx 1 root system 16 Mar 08 1999 /usr/sbin/named ->/usr/sbin/named4$ ls -l /usr/sbin/named-xferlrwxrwxrwx 1 root system 21 Mar 08 1999/usr/sbin/named-xfer -> /usr/sbin/named4-xfer
Chapter 8. Securing AIX 157

Converting from BIND4 to BIND8 is fairly straightforward. First, stop named.Then, convert the BIND4 configuration file (/etc/named.boot) into the BIND8configuration file (/etc/named.conf). The easiest way to do this is with the/usr/samples/tcpip/named-booconf.pl PERL script. Next, relink the named,named-xfer, and nsupdate files. Finally, restart named:
If you are setting up BIND8 on a system that previously just used /etc/hosts
for name resolution, you can use the h2n PERL script to convert the/etc/hosts file into the appropriate named files. The h2n PERL script isavailable via anonymous FTP from:
ftp://ftp.uu.net/published/oreilly/nutshell/dnsbind/dns.tar.Z
$ type named4named4 is /usr/sbin/named4
$ lslpp -w /usr/sbin/named4File Fileset Type----------------------------------------------------------------------------/usr/sbin/named4 bos.net.tcp.server File
$ lslpp -f bos.net.tcp.server|moreFileset File----------------------------------------------------------------------------
Path: /usr/lib/objreposbos.net.tcp.server 4.3.3.0
/usr/sbin/trpt/usr/sbin/named8-xfer/usr/samples/snmpd/view.my/usr/sbin/rsvpd/usr/sbin/XNSquery/usr/samples/snmpd/unix.my/usr/sbin/mosy/usr/samples/tcpip/named.hosts/usr/sbin/named -> /usr/sbin/named4...
# stopsrc -s named0513-044 The named Subsystem was requested to stop.# cd /usr/samples/tcpip# chmod u+x named-bootconf.pl# ./named-bootconf.pl /etc/named.boot > /etc/named.conf#rm /usr/sbin/named#rm /usr/sbin/named-xfer#rm /usr/sbin/nsupdate#cd /usr/sbin#ln -s named8 named#ln -s named8-xfer named-xfer#ln -s nsupdate8 nsupdate#startsrc -s named0513-059 The named Subsystem has been started. Subsystem PID is 12346.
158 Additional Security Tools for AIX Systems
8.3.1.5 Securing DNS on AIXThe following configuration changes will help make DNS more secure on AIX:
Restrict zone transfers
Restricting zone transfers enables you to control which servers (trustedservers) may request and receive zone transfers from your DNS server. Theinformation provided by a DNS zone transfer is of great value to a would-beattacker. It provides information about things, such as mail servers, Webservers, server aliases, and network mapping. This option is available withBIND 4.9 and later.
Any user on a remote system that is able to query the zone data of your DNSname server is only able to look up data (such as IP addresses) for hostswhose domain names they already know, and, then, only one at a time. Anyuser on a remote system that is able to request and receive zone transfersfrom your DNS name server is able to see all of the DNS data for all of thehosts in your zone(s). More information about querying DNS name serverswith the nslookup tool can be found in Section 8.3.1.6, "Nslookup" on page165.
The allow-transfer substatement in BIND 8 and the xfrnets directive in BIND4.9 enables you to apply access lists to zone transfers. The allow-transfersubstatement can be used as a zone substatement to restrict transfers of aparticular zone, or it can be used as an options substatement to restrict allzone transfers. It takes as its argument a list of addresses to match against.
For example, suppose the DNS slave servers for your acmebw.com zonehave IP addresses 192.168.0.1 and 192.168.1.1. The following zonestatement (in /etc/named.conf) allow only those slave servers to transferacmebw.com from the primary master name server:
The ls subcommand of nslookup is implemented as a zone transfer.
Note
Be sure to restrict zone transfer access on both your primary and slaveDNS server.
Important
Chapter 8. Securing AIX 159

Note that since the default in BIND 8 is to allow any IP address (includingones belonging to attackers) to transfer zones, you should also have a zonestatement, such as the following, on your DNS slave servers:
With BIND 8, you can also establish a global access list for zone transfers.This list applies only to those zones that do not already have explicit accesslists defined (via zone substatements).
For example, suppose you want to limit all zone transfers to hosts on yourinternal network (192.168.0.0):
With BIND 4.9, the xfrnets directive may have arguments that are thenetworks or IP addresses that are allowed to do zone transfers from yourprimary master DNS name server. Networks are specified in dotted-octetformat (in /etc/named.boot), for example, allowing only hosts on the Class Anetwork 15.0.0.0 and the Class B network 128.32.0.0 to do zone transfers:
Unlike secure zones, this restriction applies to any zones for which the serveris authoritative.
If you want to specify just a part of the network down to a single IP address,you can add a network mask. The syntax for including a network mask is
zone "acmebw.com" {type master;file "db.acmebw";allow-transfer { 192.168.0.1; 192.168.1.1; };
};
zone "acmebw.com" {type slave;masters { 192.168.0.4; };allow-transfer { none; };
};
options {allow-transfer { 192.168/16; };
};
xfrnets 15.0.0.0 128.32.0.0
160 Additional Security Tools for AIX Systems

network&netmask. Note that no spaces are allowed either between the networkand the ampersand or between the ampersand and the netmask.
Suppose you want to pare down the addresses allowed to transfer zones inthe previous example to just the IP address 15.255.152.4 and the subnet128.32.1.0:
For a primary master name server accessible from the Internet, you willprobably want to limit zone transfers to just your slave name servers. For aprimary master name server on your internal network (behind a firewall), youwill probably only want to limit zone transfers to your slave name servers ifyou are concerned about your own people listing your zone data.
Restrict dynamic updates
Dynamic DNS is a protocol extension to DNS. It defines a lightweightmechanism that allows for zone data modifications (low overhead) without theneed for a complete reloading of zone data. The update can theoreticallyoriginate from a remote host.
Only BIND 8 has the dynamic update capability. By default, it does not allowdynamic updates. To enable dynamic updates, you must add the allow-updatesubstatement to the name server configuration file (/etc/named.conf):
If authentication is not being used, dynamic updates should either not beenabled or enabled only to localhost. In some cases, dynamic updates arenecessary, for example, with DHCP servers.
Restrict recursion
Recursion is where DNS servers contact other DNS servers on your behalfand relay the final answer back to you. This is different from giving a referral,where one DNS server refers you to the next DNS server and so on. Theadvantage to recursion is that the servers along the way cache the answers,potentially speeding up the response time for future queries.
xfrnets 15.255.152.4&255.255.255.255 128.32.1.0&255.255.255.0
zone "acmebw.com" {type master;file "db.acmebw"allow-update { localhost; };
};
Chapter 8. Securing AIX 161

With recursion disabled, DNS reverts to referrals. When queried about anunknown host, the DNS server attempts to answer the query. If it is not able toanswer it, the DNS server sends back a referral to a more authoritative DNSserver. The DNS client then contacts this next server in the chain, and theprocess repeats. The disadvantage is that this may slow down response time,but the advantage is that it makes it much more difficult to spoof.
Accepting recursive queries from the Internet makes you DNS name serversusceptible to DNS spoofing. Suppose an attacker has gained (temporary)control over some remote DNS zones. The attacker then queries your nameserver for information about those zones. With recursion on, your nameserver queries the information on your behalf from the commandeered nameserver. The response from the query contains bogus data that is then storedin the cache of your name server, and the DNS spoof is complete. Theattacker can now relinquish control of the commandeered name server sinceyour name server is now set up to route requests to their servers instead ofthe legitimate ones.
If it is not practical for you to turn recursion off, you should:
• Restrict the addresses to which your name server responds
• Restrict the addresses to which your name server responds to recursivequeries
The method for turning off recursion is version-dependent.
For BIND 4.9:
For BIND 8:
Restricting queries
The purpose of a DNS name server is to answer questions about the zonesfor which it is authoritative. For an internal DNS server (one sitting on yourinternal network behind the firewall), it is a good idea to configure your nameserver to only respond to queries originating from within your internalnetwork. In other words, your DNS name server should be configured to
options no-recursion
options {recursion no;
};
162 Additional Security Tools for AIX Systems

respond to only those queries originating from within the same zones forwhich it is authoritative. In BIND 8, this is done with the allow-querysubstatement inside the zone statement.
For example, suppose acmebw.com is on the 192.168.0 network. To restrictqueries to your name server from only those hosts on the 192.168.0 network:
In BIND 4, restricting queries is accomplished with the secure_zone record. Itlimits access to both individual resource records and zone transfers. (In BIND8, the two are done separately.) With BIND 4, this option only works for thosezones for which the DNS name server is authoritative.
To use secure zones, include one or more special TXT (txt) records in thezone data on the primary master name server. The records are automaticallytransferred to the slave servers:
Restrict DNS cache update
The DNS feature that allows for address updates within cache is known asglue fetching. It is an open door for DNS spoofing and should be turned off(fetch-glue no). This slows the performance of your DNS server (since nocache is built), but it helps you avoid many potential problems, such asspoofing.
The method for turning off glue fetching is version-dependent.
For BIND 4.9:
For BIND 8:
zone "acmebw.com" {type slave;allow-query { 192.168.0/24; };
};
This option can also be set at a global level rather than at the zone level.
Note
secure_zone IN TXT "192.249.249.0:255.255.255.0"
options no-fetch-glue
Chapter 8. Securing AIX 163

Split DNS configuration
Consider having two kinds of name servers:
• Advertising name servers that are open to the world and non-recursive.
• Internal resolution name servers that can only be queried by knownresolvers (internal and secure). If desired, glue fetching and recursivequeries can also be allowed on these servers.
Configuration examples for each type are as follows:
Advertising name server
Internal resolution name server
options {fetch-glue no;
};
acl slaves { 207.69.231.3; 209.86.147.1; };
options {directory /var/named;recursion no;fetch-glue no;allow-query { any; }; // the default
};
zone "acmebw.com" {type master;file "db.acmebw.com";allow-transfer { slaves; };
};
164 Additional Security Tools for AIX Systems

8.3.1.6 NslookupThe nslookup tool is used to query DNS name servers for information abouthosts or domains. On AIX, it is packaged in the bos.net.tcp.client fileset.Nslookup can be used two ways: Interactively and non-interactively (batch). Itis commonly used to query a DNS server to obtain the IP address of a server,but it has far more functionality than that.
As a simple example, suppose you want to find the IP address ofwww.redbooks.com:
Conversely, suppose you want to find the name associated with IP address198.245.191.153:
acl internal { 192.168.0/24; };
options {directory "/var/named";recursion yes; // the defaultallow-query { internal; };
};
zone "." {type hint;file "db.cache";
};
zone "acmebw.com" {type slave;masters { 207.69.231.2; };file "bak.acmebw.com";allow-transfer { internal; };
};
#nslookup www.redbooks.comServer: joyce.sg.ibm.comAddress: 9.184.8.1
Non-authoritative answer:Name: www.redbooks.comAddress: 198.245.191.153
Chapter 8. Securing AIX 165

Notice the listing of name servers that are authoritative for the site. You canuse that information to query each for more information.
You can also use nslookup to query DNS name servers specific kinds of DNSrecords. For example, to query for the Start Of Authority (SOA) record fromyahoo.com:
You can also use nslookup to query for the DNS name servers that serve aspecific domain. For example, to find the DNS name servers serving theyahoo.com domain:
#nslookup -type=ptr 198.245.191.153Server: joyce.sg.ibm.comAddress: 9.184.8.1
Non-authoritative answer:153.191.245.198.in-addr.arpa name = redbooks.com
Authoritative answers can be found from:191.245.198.in-addr.arpa nameserver = nis.ans.net191.245.198.in-addr.arpa nameserver = ns.ans.netnis.ans.net internet address = 147.225.1.2ns.ans.net internet address = 192.103.63.100
#nslookup -type=SOA yahoo.comServer: joyce.sg.ibm.comAddress: 9.184.8.1
Non-authoritative answer:yahoo.com
origin = ns0.corp.yahoo.commail address = hostmaster.yahoo-inc.comserial = 2000080812refresh = 1800 (30 mins)retry = 900 (15 mins)expire = 1209600 (14 days)minimum ttl = 9 (9 secs)
Authoritative answers can be found from:yahoo.com nameserver = ns1.yahoo.comyahoo.com nameserver = ns3.europe.yahoo.comyahoo.com nameserver = ns5.dcx.yahoo.comns1.yahoo.com internet address = 204.71.200.33ns3.europe.yahoo.com internet address = 194.237.108.51ns5.dcx.yahoo.com internet address = 216.32.74.10
166 Additional Security Tools for AIX Systems

You can also use nslookup to list all servers in a given DNS domain. Start byconnecting to the DNS server (in interactive mode) with the server
subcommand in nslookup:
> server <DNS server IP address>
Then, use the ls subcommand of nslookup to list the servers in the domain:
> ls <domain name>
Recall that the ls subcommand of nslookup does a zone transfer; so, zonetransfers must be allowed in order for the ls subcommand to work.
Notice that the first time the ls alibaba.ibm.com command was issued, itfailed. That is because we had zone transfers disabled. We then enabledzone transfers and reissued the ls alibaba.ibm.com command. As you cansee, the entire domain listing was returned this time.
# nslookup -type=NS yahoo.comServer: joyce.sg.ibm.comAddress: 9.184.8.1
Non-authoritative answer:yahoo.com nameserver = ns3.europe.yahoo.comyahoo.com nameserver = ns5.dcx.yahoo.comyahoo.com nameserver = ns1.yahoo.com
Authoritative answers can be found from:ns3.europe.yahoo.com internet address = 194.237.108.51ns5.dcx.yahoo.com internet address = 216.32.74.10ns1.yahoo.com internet address = 204.71.200.33
# nslookupDefault Server: LOCALHOST.0.0.127.in-addr.arpaAddress: 127.0.0.1>server 9.12.0.5Default Server: sp5cw0.itso.ibm.comAddress: 9.12.0.5> ls alibaba.ibm.com[merlin.itso.ibm.com]*** Can’t list domain alibaba.ibm.com:Unspecified error> ls alibaba.ibm.com[merlin.itso.ibm.com]
10M IN NS merlinmerlin 10M IN A 9.12.0.50aixfw 10M IN A 172.1.1.4arthur 10M IN A 9.12.0.18loopback 10M IN A 127.0.0.1cws 10M IN A 9.12.0.5Success
Chapter 8. Securing AIX 167

In addition to general-purpose DNS debugging, nslookup is also very usefulfor ensuring that your DNS is properly configured to not give out any moreinformation than is necessary. For example, if you have a DNS name serverthat is accessible to hosts on the Internet, you should check to make sure thatonly those servers that need to be visible outside of your DMZ show up andall others are hidden.
8.3.2 Network File System and Network Information ServiceThe Network File System (NFS) provides local access to remote file systems;The Network Information Service (NIS) provides central administration of keysystem files, such as /etc/passwd and /etc/hosts. Both protocols have a tighthistory with each other. However, NIS will not be covered in detail here.Instead, we refer you to Section 7.6 of AIX 4.3 Elements of Security Effectiveand Efficient Implementation, SG24-5962, or the Network Information Service(NIS) Overview for System Management in AIX Version 4.3 NetworkInformation Services (NIS and NIS+) Guide for detailed information on NISand its derivatives.
NFS and NIS both use Sun’s Remote Procedure Call (RPC) protocol, whichuses portmapper to allocate ports. The portmap daemon converts RPCprogram numbers to Internet port numbers. By querying portmapper(TCP/UDP port 111) with the rpcinfo program, you can determine on whichport an RPC service is listening. Applications do the same thing to locate theport for a given service. Historically, the portmap daemon has been subject tobuffer overflow attacks. Be sure to keep it at the latest security patch level, ordisable it if it is not needed.
The RPC protocol supports several authentication methods. The one used byNFS and NIS is AUTH_UNIX or, sometimes, AUTH_SYS. With AUTH_UNIX,the client sends user ID and group ID information along with the request. Theserver assumes this is legitimate information from the client and grants ordenies access based on the access control list stored on the server. In thecase of NFS, the access control list is the /etc/exports file.
You can use the rpcinfo command to query the portmap daemon on a remotesystem to determine if NFS is active. Notice that any user can use rpcinfo toquery the portmap daemon on a remote system to determine which RPCservices are active. If your server is not using any of these RPC services,disable the portmap daemon. Knowing that no RPC services are active on aserver still provides useful information to a would-be attacker. It gives theminformation about what not to attack.
Suppose you want to see which RPC services are active on host, sp5cw0:
168 Additional Security Tools for AIX Systems

$ rpcinfo -p sp5cw0
program vers proto port service100000 4 tcp 111 portmapper100000 3 tcp 111 portmapper100000 2 tcp 111 portmapper100000 4 udp 111 portmapper100000 3 udp 111 portmapper100000 2 udp 111 portmapper100001 1 udp 32780 rstatd100001 2 udp 32780 rstatd100001 3 udp 32780 rstatd100002 1 udp 32781 rusersd100002 2 udp 32781 rusersd100008 1 udp 32782 walld100012 1 udp 32783 sprayd150001 1 udp 32784 pcnfsd150001 2 udp 32784 pcnfsd100083 1 tcp 32769 ttdbserver100068 2 udp 32785 cmsd100068 3 udp 32785 cmsd100068 4 udp 32785 cmsd100068 5 udp 32785 cmsd300667 1 tcp 32770100003 2 udp 2049 nfs100003 3 udp 2049 nfs100003 2 tcp 2049 nfs100003 3 tcp 2049 nfs200006 1 udp 2049200006 1 tcp 2049100005 1 udp 32795 mountd100005 2 udp 32795 mountd100005 3 udp 32795 mountd100005 1 tcp 32774 mountd100005 2 tcp 32774 mountd100005 3 tcp 32774 mountd100024 1 udp 746 status100024 1 tcp 746 status200001 1 udp 755200001 1 tcp 755200001 2 tcp 755100021 1 udp 32818 nlockmgr100021 2 udp 32818 nlockmgr100021 3 udp 32818 nlockmgr100021 4 udp 32818 nlockmgr100021 1 tcp 32775 nlockmgr100021 2 tcp 32775 nlockmgr100021 3 tcp 32775 nlockmgr100021 4 tcp 32775 nlockmgr100099 1 udp 32839 autofs
1342177279 4 tcp 376611342177279 1 tcp 376611342177280 4 tcp 496901342177280 1 tcp 49690
Chapter 8. Securing AIX 169

From the output, you can see that NFS (port 2049) is active on the targetsystem.
Knowing that NFS is active, you can now use the showmount command to seewhich filesystems are exported from host sp5cw0:
Notice that any user can use the showmount command to find out whichdirectories are exported from a remote server, and, depending on how theexports are set up, they may also be able to find out the individual servernames for the servers that are allowed access to the exported directories. Allof this is useful information for a would-be attacker.
There is a very useful NFS client utility (nfs) available from:
ftp://ftp.cs.vu.nl/pub/leendert/nfsshell.tar.gz
The nfs utility has an ftp-like interface. With it, you can easily see the dangersof exporting a file system with root access.
You need access to both the gzip utility (available from the Bull site) and a Ccompiler. In our case, we used the version 4.4 C compiler (/usr/vac/bin/cc)on AIX 4.3.3. Download the package, uncompress it, and verify that it has notbeen tampered with (see Section 7.4.1, "Ensuring the integrity of downloads"on page 136). You also need to modify the Makefile by commenting out theSolaris section, uncommenting the AIX section, and specifying theappropriate C compiler. Finally, run make to compile the nfs utility:
$ showmount -e sp5cw0
export list for sp5cw0:/spdata/sys1/install/pssplpp (everyone)/usr/sys/inst.images (everyone)/spdata/sys1/install/aix433/lppsource (everyone)
170 Additional Security Tools for AIX Systems

# ls -ltotal 96-rw-r----- 1 root system 29393 Aug 29 09:52 nfsshell.tar.gz# /usr/local/bin/gzip -d nfsshell.tar.gz# tar -xvf nfsshell.tarx nfsx nfs/Makefile, 1935 bytes, 4 media blocks.x nfs/mount.h, 4144 bytes, 9 media blocks.x nfs/mount.x, 3088 bytes, 7 media blocks.x nfs/nfs.c, 53673 bytes, 105 media blocks.x nfs/nfs_prot.x, 6405 bytes, 13 media blocks.x nfs/steal.c, 7750 bytes, 16 media blocks.x nfs/mount_xdr.c, 2259 bytes, 5 media blocks.x nfs/mount_clnt.c, 2579 bytes, 6 media blocks.x nfs/mount_svc.c, 5744 bytes, 12 media blocks.x nfs/READ_ME, 828 bytes, 2 media blocks.x nfs/mailx nfs/mail/Friedrichs, 1687 bytes, 4 media blocks.x nfs/nfs_prot_xdr.c, 12153 bytes, 24 media blocks.x nfs/nfs_prot.h, 12107 bytes, 24 media blocks.x nfs/nfs_prot_clnt.c, 6358 bytes, 13 media blocks.x nfs/nfs_prot_svc.c, 8287 bytes, 17 media blocks.# cd nfs# lsMakefile mount.x nfs.c nfs_prot_svc.cREAD_ME mount_clnt.c nfs_prot.h nfs_prot_xdr.cmail mount_svc.c nfs_prot.x steal.cmount.h mount_xdr.c nfs_prot_clnt.c# vi Makefile# uncomment the following 4 lines for Solaris 2.x#CC = gcc#CFLAGS = -DSYSV -DREADLINE -I/usr/local/include#LIBS = -lsocket -L/usr/ucblib -R/usr/ucblib -lrpcsoc -lnsl \
-L/usr/local/lib -lreadline -lhistory -ltermlib
# uncomment the following 3 lines for AIXCC = ccCFLAGS = -DAIXLIBS =# make nfs
cc -DAIX -c mount_clnt.ccc -DAIX -c mount_xdr.ccc -DAIX -c nfs_prot_clnt.ccc -DAIX -c nfs_prot_xdr.ccc -DAIX -c nfs.ccc -g -o nfs mount_clnt.o mount_xdr.o nfs_prot_clnt.o nfs_prot_xdr
.o nfs.o
Chapter 8. Securing AIX 171
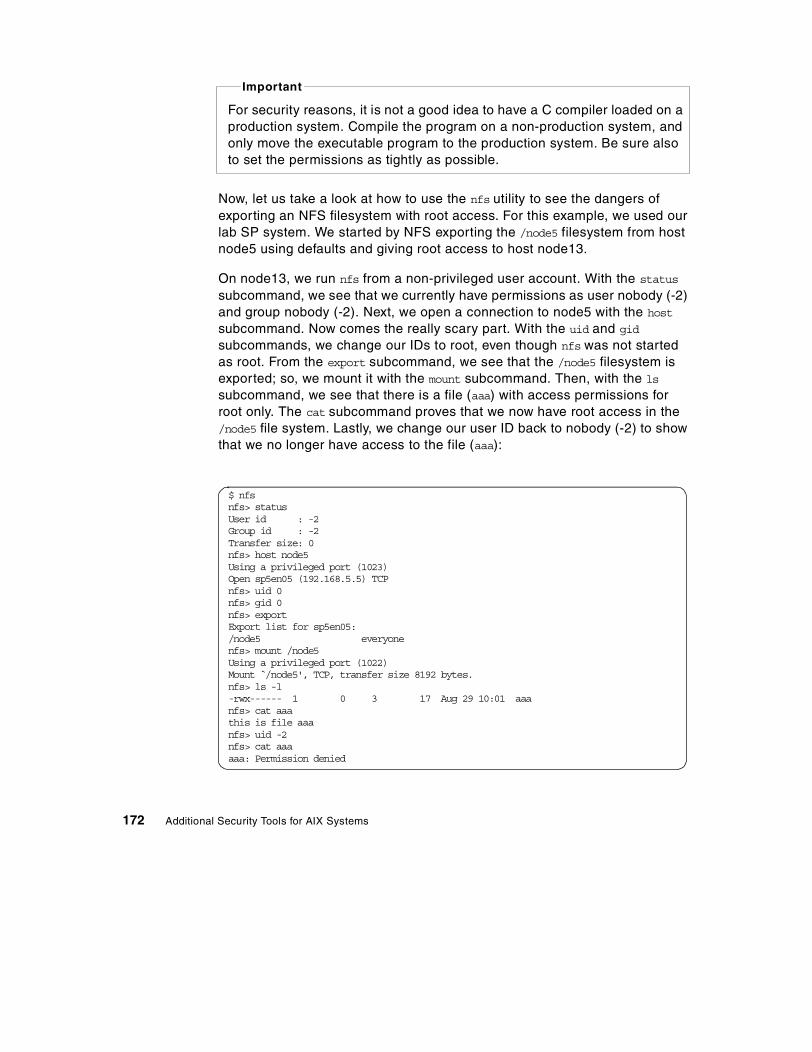
Now, let us take a look at how to use the nfs utility to see the dangers ofexporting an NFS filesystem with root access. For this example, we used ourlab SP system. We started by NFS exporting the /node5 filesystem from hostnode5 using defaults and giving root access to host node13.
On node13, we run nfs from a non-privileged user account. With the status
subcommand, we see that we currently have permissions as user nobody (-2)and group nobody (-2). Next, we open a connection to node5 with the host
subcommand. Now comes the really scary part. With the uid and gid
subcommands, we change our IDs to root, even though nfs was not startedas root. From the export subcommand, we see that the /node5 filesystem isexported; so, we mount it with the mount subcommand. Then, with the ls
subcommand, we see that there is a file (aaa) with access permissions forroot only. The cat subcommand proves that we now have root access in the/node5 file system. Lastly, we change our user ID back to nobody (-2) to showthat we no longer have access to the file (aaa):
For security reasons, it is not a good idea to have a C compiler loaded on aproduction system. Compile the program on a non-production system, andonly move the executable program to the production system. Be sure alsoto set the permissions as tightly as possible.
Important
$ nfsnfs> statusUser id : -2Group id : -2Transfer size: 0nfs> host node5Using a privileged port (1023)Open sp5en05 (192.168.5.5) TCPnfs> uid 0nfs> gid 0nfs> exportExport list for sp5en05:/node5 everyonenfs> mount /node5Using a privileged port (1022)Mount /̀node5', TCP, transfer size 8192 bytes.nfs> ls -l-rwx------ 1 0 3 17 Aug 29 10:01 aaanfs> cat aaathis is file aaanfs> uid -2nfs> cat aaaaaa: Permission denied
172 Additional Security Tools for AIX Systems

If the /node5 file system had not been exported with root access, we would nothave been able to view the file (aaa) with the nfs utility. There are two lessonshere. First, do not export file systems with root access unless absolutelynecessary. Second, if you load the nfs utility, make sure you set thepermissions so that only root can run it. For more information about using thenfs utility, run the help subcommand.
In an SP environment, PSSP uses NFS during node installation andcustomization. In most SP environments, NFS is also used for normalday-to-day support activities (automounted home directories, nightly mksysbbackups to the control workstation, and so on). If you are dependent uponhaving NFS active within the SP environment, be sure to limit it to only theinternal SP networks (administrative Ethernet and switch) by being veryexplicit in your export list. Also, in an SP environment, avoid using NIS foruser management because of the security exposure. More securealternatives include: supper, DCE user management, and NIS+. Both supperand DCE user management are supported directly by PSSP.
Newer alternatives to NFS and NIS are Secure NFS and NIS+. Secure NFSand NIS+ use Sun’s RPC protocol, just as NFS and NIS do, but they differ inthe authentication protocol used. NFS and NIS use the AUTH_UNIX method;Secure NFS and NIS+ use the more secure AUTH_DES method.
The AUTH_DES protocol used by Secure RPC employs DES-based,public-key, private-key encryption. This ensures proper authentication for allrequests and, therefore, provides a secure way of sharing data (Secure NFS)and performing user management (NIS+). To use Secure RPC, you need toset up the public and private keys and create principals for all users. Themost straightforward way of doing this is with NIS+, but its setup is not trivial.NIS+ is included with AIX 4.3.3.
For more information about Secure NFS, see Section 7.5.4 of AIX 4.3Elements of Security Effective and Efficient Implementation, SG24-5962. Formore information about setting up and administering NIS+, see the systemmanual, Network Information Service (NIS) Overview for SystemManagement in AIX Version 4.3 Network Information Services (NIS andNIS+) Guide.
Protecting NFS
With NFS, the most common security mistake is exporting directories withexcessive privileges. By default, the NFS export on AIX gives read-writeaccess to all hosts. Where possible, change this to read-only, and explicitlyspecify only those hosts who need access to the directories on a directory by
Chapter 8. Securing AIX 173

directory basis. Export only the needed directories, and specify the exportsas low in the directory as possible. For example, on an SP controlworkstation, the /spdata/sys1/install/pssplpp directory is exported to thenodes instead of the top-level /spdata directory. You should also keep an eyeon the content in the directories that are NFS exported to ensure that nosensitive data is inadvertently exposed.
To provide further protection, consider blocking the portmap port (port 111) atthe firewall. You may still want to allow internal users to have portmap (andNFS) access while preventing it for external users. Since attackers can stillferret out the fact that you are using portmap (and NFS) by scanningnon-privileged ports (above 1023), you should also set up protection againstport scanning. For more information about how to protect against portscanning attacks, see Chapter 6, “Port and network scanning” on page 83.
By default, NFS is started on system startup with the /etc/rc.nfs script out of/etc/inittab. NFS is comprised of five separate daemons: biod, nfsd,rpc.mountd, rpc.statd, rpc.lockd. Each are briefly described here:
• Biod - The biod daemon handles client requests and runs on the NFSclient (and usually also the NFS server). When a user (client) wantsaccess to a file on an NFS-mounted file system, biod sends the request toNFS server.
• Nfsd - The nfsd daemon services requests from clients for file systemoperations.
• Rpc.mountd - The rpc.mound daemon answers requests from clients forfile system mounts. It is required when you mount an NFS file system.
• Rpc.statd - The rpc.statd daemon provides crash recovery functions forthe NFS locking services (provided by the rpc.lockd daemon).
• Rpc.lockd - The rpc.lockd daemon processes lock requests for concurrentaccess to files.
NFS supports the UNIX advisory locking functions with the rpc.lockd andrpc.statd daemon. If you are not running applications that require this lockingfunctionality, disable rpc.lockd and rpc.statd. (It is also possible to disablerpc.mountd after all client mounts have successfully completed, but this ismuch harder to do and runs the risk of causing additional problems for clientsthat need to remount the file systems.) These daemons have beensuccessfully exploited through buffer overflow attacks to gain root access onthe system. If you do need them, ensure that you are at the latest patch levelfor fileset bos.net.nfs.client.
174 Additional Security Tools for AIX Systems

To disable rpc.lockd and rpc.statd, comment out their entries in /etc/rc.nfs,and stop the daemons (in the order shown):
To unexport a single directory, use the exportfs -u <directory> command. Tounexport all directories in the /etc/exports file, use the exportfs -au
command.
8.3.3 Simple Mail Transfer Protocol (SMTP)In AIX, the default SMTP server software is sendmail. Sendmail has gotten abad reputation for having had many security vulnerabilities in the past. Forthat reason, you should have as current a version as possible, and alwayskeep it at the latest patch level. A wealth of information about sendmail canbe found at the sendmail homepage:
http://www.sendmail.org
With AIX, the sendmail version you receive depends on the AIX version asshown in Table 5.
Table 5. AIX versions of sendmail
The sendmail configuration file is /etc/sendmail.cf. One of the most commonsecurity mistakes made with the configuration file is to allow the use of theVRFY and EXPN built-in commands. These should be disabled by adding thefollowing line in the /etc/sendmail.cf file:
AIX version Sendmail version
AIX 3.2.5 Sendmail 5.6.4
AIX 4.1.4 Sendmail 5.6.4
AIX 4.1.5 Sendmail 5.6.4
AIX 4.2.0 Sendmail 8.7
AIX 4.2.1 Sendmail 8.7
AIX 4.3.0 Sendmail 8.7
AIX 4.3.1 Sendmail 8.8
AIX 4.3.2 Sendmail 8.8
AIX 4.3.3 Sendmail 8.9
# stopsrc -s rpc.lockd; stopsrc -s rpc.statd;
Chapter 8. Securing AIX 175

O PrivacyOptions=noexpn,novrfy
VRFY is used to verify names of valid users, and EXPN is used to obtain theactual delivery addresses. Not only do these commands expose sensitiveinformation to would-be attackers, but they can sometimes also be used bythe attacker to forge mail from the server. This is such a common securitymistake that scan programs, such as NSA (Section 4.4, "Network SecurityAuditor (NSA)" on page 49), have built-in tests for it.
There a couple of other security-related options that you might want toconsider adding to the sendmail PrivacyOptions line:
• restrictmailq restricts ordinary users from viewing the status of all queuedmail.
• restrictqrun restricts ordinary users from causing sendmail to process itsqueue.
• goaway restricts SMTP status queries. Note: This option takes care ofsetting novrfy, noexpn, authwarnings, needmailhelo, needexpnhelo, andneedvrfyhelo.
To include all of the above options in addition to the novrfy and noexpn options,add the following line to the /etc/sendmail.cf file (instead of the one shownearlier):
O PrivacyOptions=goaway,restrictmailq,restrictqrun
In the following example, we show both the VRFY and the EXPN commands.Sendmail listens on TCP port 25. To connect to the local sendmail daemon,we simply telnet to port 25 on localhost (0):
Notice also how much information is provided by the Sendmail banner. Itgives the version of AIX (4.3) as well as the version of sendmail (8.9.3). Thisis a wealth of information for would-be attackers. They now know theoperating system type (AIX), the operating system version (4.3) that sendmailis running on this server, the sendmail version (8.9.3), and the timezone
# tn 0 25Trying...Connected to 0.Escape character is ' T̂'.220 sp5en0.msc.itso.ibm.com ESMTP Sendmail AIX4.3/8.9.3/8.9.3; Tue, 29 Aug 2000 17:08:15-0500vrfy khorck250 <[email protected]>expn khorck250 <[email protected]>
176 Additional Security Tools for AIX Systems

where the server is located. Taken individually, each of these pieces ofinformation is damaging enough, but taken together, the damage can bemuch worse. The would-be attacker can now perform a simple search on theWeb to find all known exploits for this version of sendmail running on thisversion of the operating system. For that reason, you should turn off thebanner information.
To remove it, edit /etc/sendmail.cf, and look for the SMTPGreetingMessage line:
O SmtpGreetingMessage=$j Sendmail $v/$Z; $b
The $v is AIX version, the $Z is sendmail version, and the $b shows the timeand date (unless you have defined the macro). Remove the fields as required,and then refresh the sendmail daemon for the changes to take effect.
Beginning with version 8.8, sendmail supports the option to run as a userother than root. This can reduce the impact of an attacker using a remoteexploit to gain access to the local system through a sendmail vulnerability.However, this option should only be used on systems that are eitherdedicated sendmail servers or bastion hosts in a DMZ.
This option is ideal for sendmail relays or hubs but does not work very well forservers with normal user accounts and access. For the latter type of server,the unprivileged ID used by sendmail needs read access to the .forward and:include: files owned by the normal users. In general, the problems involvedwith opening access to these files for the unprivileged sendmail ID outweighthe benefits.
Note that sendmail in daemon mode still runs as root so that it is able listenon TCP port 25. However, when a connection is opened, the child forked bythe sendmail daemon to process the request runs with the unprivileged ID.
To set this up, we recommend that you create a special unprivileged user IDof either postman or mailnull and a matching group for the exclusive use ofsendmail. Lets assume that you use postman for the user ID and group ID.Once these are created, add the following two lines to your /etc/sendmail.cffile:
O RunAsUser=postman:postman
O DefaultUser=postman:postman
The DefaultUser option is used by sendmail when it is unable to run as rootand has no other choices. (This option should be set even if you do not planto use the RunAsUser option.) By default, sendmail will always try to not run as
Chapter 8. Securing AIX 177

root unless needed. For example, it does not need root to write to$HOME/.deadletter.
Additionally, with the RunAsUser option, you need to give the unprivilegedsendmail id access to the sendmail queue:
Note that the commercial version of sendmail, Sendmail Switch(http://www.sendmail.com), automatically configures sendmail to run as anunprivileged user.
As has already been mentioned, you probably do not want to use thesendmail RunAsUser option on a server that has normal user account access.However, you can still remove the root SUID from the sendmail executable:
1. Create an unprivileged user account, such as mailnull, that is not allowedlogin privileges on the system.
2. Change ownership of the sendmail files:
3. Redo the SUID to the unprivileged sendmail ID:
If you are running sendmail on a server where users have shell access,consider setting the O SafeFileEnvironment option in /etc/sendmail.cf. Onetype of denial of service attack involves symbolically linking bogus files tosystem configuration files or system device files and then getting sendmail tooverwrite them. The SafeFileEnvironment option, among other things, ensuresthat the file being written to is a plain file (as opposed to a symbolic link ordevice file). Consider setting this option as follows in the /etc/sendmail.cf file:
# chown postman /var/spool/mqueue
Do not run sendmail from the command line with the RunAsUser optionbecause it may cause sendmail to lose its root authority.
Important
# chown mailnull /usr/sbin/sendmail# chown mailnull /etc/sendmail.cf# chown mailnull /etc/sendmail.st# chown mailnull /var/spool/mqueue
# chmod 4511 /usr/sbin/sendmail
178 Additional Security Tools for AIX Systems
O SafeFileEnvironment=/
This causes sendmail to do the extra level of checking on the files but doesnot go so far as to require that all files to which it appends exist in a chrooteddirectory tree set up specifically for sendmail. For more information aboutsetting up a chrooted environment for sendmail, see Sendmail, ISBN1-5659-2222-0 (aka “The Bat Book”).
Another security option that you can use with sendmail is the sendmailrestricted shell (smrsh). With this special shell, you can restrict sendmail to aspecific directory tree from which it can execute programs. This enables youto control the programs that sendmail can execute, such as those that arespecified in the .forward files of normal users. This also seriously hinders thedamage that a would-be attacker can cause by exploiting a hole in sendmail.Without it, the attacker can execute arbitrary programs and issue commandsas root on the system. You can get more information about how to set up anduse smrsh by downloading the latest sendmail source tree fromftp.sendmail.org. After expanding the distribution, look for the README file inthe smrsh subdirectory.
It is also possible to run sendmail in a chrooted environment, which limitssendmail to a specific directory tree. This is similar to smrsh but takes thingsa step further by completely disallowing sendmail any access outside of itsown (chrooted) directory tree. There are numerous articles on the Internetabout how to set this up. In addition, there are tools, such as the FirewallToolkit (http://www.tis.com/research/software/fwtk_over.html), that can set itup for you.
Whenever you make sendmail configuration changes, always verify themwith:
Running this will alert you to any permissions errors on the files anddirectories needed by sendmail.
AIX 4.3.3 has various sendmail enhancements, which are covered in Section7.27 of AIX Version 4.3 Differences Guide, SG24-2014. You should also visitthe sendmail homepage to get the latest security information as well asadditional methods for securing sendmail. Two special points of interest arethe sendmail FAQ, at http://www.sendmail.org/faq, and the information abouthow to set up anti-spam measures, at http://www.sendmail.org/antispam.html.
# sendmail -v -bi
Chapter 8. Securing AIX 179

You may also want to consider restricting access to SMTP TCP port 25.There are a number of ways of doing this. You can control direct access to theport by blocking it at the firewall, or you can block access to it at the serverlevel with IPSec, which is included in the AIX 4.3 bos.net.ipsec fileset. Formore information on IPSec, refer to Section 7.3 of AIX 4.3 Elements ofSecurity Effective and Efficient Implementation, SG24-5962, and Chapter 9 ofA Comprehensive Guide to Virtual Private Networks, Volume III, SG24-5309.
A slightly different approach is to protect access to sendmail rather than justSMTP TCP port 25. One way to do this is by placing sendmail under thecontrol of inetd, and protecting it with TCP Wrapper. For more information onhow to do this, see Section 7.4.4 of Exploiting RS/6000 SP Security: Keepingit Safe, SG24-5521.
It is also possible to just replace sendmail. One alternative is a product knownas Postfix. Postfix is essentially a re-architecture of sendmail that was donewith both security and speed in mind. The developer of Postfix, WietseVenema, is also the developer of TCP Wrapper and SATAN. For moreinformation about Postfix, see Section 7.4.4 of Exploiting RS/6000 SPSecurity: Keeping it Safe, SG24-5521.
Postfix is available from:
ftp://ftp.porcupine.org/pub/security/index.html
(At one time, Postfix was know as IBM Secure Mailer; so, you may findadditional information about Postfix under that name as well.)
8.3.4 Simple Network Management Protocol (SNMP)AIX ships with SNMPv1. The only security mechanism supported by SNMPv1is through the use of community names (see the /etc/snmpd.conf file). AnSNMP community consists of one or more hosts grouped under a communityname. The community name is used for authentication in the SNMP requestpacket. When a request is received, the SNMP agent verifies that the IPaddress of the host making the requests matches one of the hosts belongingto the community name. If the requesting host is a member of the community,the SNMP agent then determines if the requesting host is authorized for therequested access to the specified MIB.
By default, AIX actively listens for SNMP requests on TCP and UDP port 161.Therefore, to further secure SNMP, you should change the community namesfrom their defaults (such as public) to names that are harder to guess. Youshould also disable MIB read and write permissions as much as possible.
180 Additional Security Tools for AIX Systems

8.3.5 Trivial File Transfer Protocol (TFTP)TFTP is typically used to boot diskless workstations and network devices. It isbasically a stripped-down version of FTP and has very little built-in security.TFTP uses UDP port 69. On SP systems, both tftp and bootps are requiredfor node installation and customization activities.
The following screen shows an example of tftp use within our labenvironment. (Server sp5cw0 is the control workstation for the SP, and serverarthur is a standalone server.):
TFTP access control is provided through the /etc/tftpaccess.ctl file. Thedefault TFTP access control for an SP system allows access to the /tftpboot
directory, the /usr/lpp/ssp directory, the /etc/SDR_dest_info file, the/etc/krb.conf file, and the /etc/krb.realms file. Notice that from arthur, astandalone server that is completely unrelated to the SP system, that wewere able to grab a copy of the /etc/krb.conf file without having to provide anyauthentication information whatsoever.
[sp5cw0] $ cat /etc/tftpacces.ctl# PSSP and NIM access for network bootallow:/tftpbootallow:/usr/lpp/sspallow:/etc/SDR_dest_infoallow:/etc/krb.confallow:/etc/krb.realms
tn arthur
...
[arthur] $ tftp sp5cw0tftp> ?Commands may be abbreviated. Commands are:
connect Connect to remote tftpmode Set file transfer modeput Send fileget Receive filequit Exit tftpverbose Toggle verbose modetrace Toggle packet tracingstatus Show current statusbinary Set mode to octetascii Set mode to netasciitimeout Set total retransmission timeout? Print help information
tftp> get /etc/krb.confReceived 36 bytes in 0.1 secondstftp> quit
Chapter 8. Securing AIX 181

You may want to consider enabling tftp on the SP system only when it isneeded for node installations or customizations. Of particular interest to awould-be attacker is the /tftpboot directory, which contains information aboutthe nodes in the SP system. It is also a good idea to make sure that tftpaccess is blocked at your firewalls as well.
8.3.6 Securing X11If you are running X11, you need to be especially concerned about security.An insecure X11 poses a major security risk. If access control is improperlyset, attackers with simple programs (built on the X libraries) can capturekeystrokes (such as account name, password, and other sensitive data), takecontrol of the X windows display, and monitor the applications that are run.There are utilities available on the Internet that scan networks looking foractive X servers, and, once found, attempt to connect to them for the solepurpose of monitoring and capturing keystrokes. In fact, utilities, such as xwd
and xwud (found in the X11.apps.clients fileset), can be used to silentlymonitor a remote X server:
X provides two forms of access control:
• xhost - provides access control through IP address and/or host name
• xauth - provides access control through cookies
A comparison of the two can be found at:
http://www.finnigan.de/products/icisnotes/xsecurity.htm
Of the two, xhost is the more commonly used method for access control.Running xhost with out parameters lists the hosts that have been grantedaccess to the X server. A fairly common user mistake is to issue the xhost +
command. This disables all access control for the X server, which means thatany host (even one belonging to an attacker) anywhere can connect to it.Once connected, programs, such as xwd, xwud, or worse, can easily be run togather sensitive information and monitor activities. Some port scanners areable to detect that access control is turned off for an X server. For example,when NSA detects this, it reports it as follows:
# xwd -root -display <server to be snooped>:0.0 > /tmp/tempfile
# xwud -in /tmp/tempfile
o X server has no access control [port 6000].
182 Additional Security Tools for AIX Systems

If you want to secure the X server, start by running the xhost - command toturn on access control. You can safely run this command even if you are notsure if access control is already enabled. Running this command will notremove any existing connections, it will only prevent new, unauthorizedconnections from occurring. You can then augment your access control list byiteratively running the xhost + <hostname> for each additional host that is tohave access to the X server. For example:
You can obtain a finer grain of access control with xauth. For information onhow to set this up, see The X Windows System Administrator’s Guide, Volume8, ISBN 0-9371-7583-8.
Unattended workstations should always have their screens locked. This notonly applies to PCs but also to workstations running X. The xlock commandprovides a password protected screen lock, and the xss command enablesyou to automatically activate the screen lock after some period of inactivity.These features are also built in to the CDE desktop.
The X server uses TCP port 6000. This port should either be blocked at thefirewall or filtered on the server with the IPSec facility (included in the AIX 4.3bos.net.ipsec fileset). For more information on IPSec, refer to Section 7.3 ofAIX 4.3 Elements of Security Effective and Efficient Implementation,SG24-5962, and Chapter 9 of A Comprehensive Guide to Virtual PrivateNetworks, Volume III, SG24-5309.
Terminal emulators are another area of concern for security and X. Whenusing xterm (or other similar terminal emulators), use the secure keyboardoption activated from the main menu. To activate the main menu, place themouse pointer in the terminal window, then hold down the control key andmouse pointer button simultaneously. Once activated, the secure keyboard
# xhost -
access control enabled, only authorized clients can connect
# xhostaccess control enabled, only authorized clients can connectINET:loopbackINET:merlinen0INET:firewallLOCAL:
# xhost +sp5cw0sp5cw0 being added to access control list
# xhost -sp5cw0sp5cw0 being removed from access control list
Chapter 8. Securing AIX 183

option directs all keyboard inputs to the xterm command only, thus, preventingkeystroke snooping. When secure keyboard is activated, the xterm foregroundand background colors are interchanged to provide a visual reminder that theoption is in force. Be aware that only one X client at a time can use thisoption, so you will need to enable and disable it as you move from X client toX client. For more information on the secure keyboard option, see the xtermman page. Also, note that the secure keyboard option does not protectagainst network sniffing since user ids and passwords are still transferred inthe open. To protect against this, you can run X over SSH. For moreinformation on SSH, see Section 5.1, "Secure Shell (ssh)" on page 59.
8.3.7 File Transfer Protocol (ftp)The ftp protocol is used for transferring files between two hosts. Asmentioned in Section 5.1, "Secure Shell (ssh)" on page 59, ftp transferspasswords (for authentication) in the open without encryption and is, thus,susceptible to spoofing. As such, running ftp over the Internet poses a hugesecurity risk. Your first, best option is to replace ftp with a more securevariant. If that is not possible, steps should be taken to further secure ftp.
If possible, consider using sftp or scp from the SSH package to replace ftp.SSH is based on a public-key, private-key authentication scheme andprovides encryption for secure communication channels. Refer to Section 5.1,"Secure Shell (ssh)" on page 59 for more details.
Another option is to protect ftp with TCP Wrapper. TCP Wrapper providesaccess control to services (such as ftpd) controlled by the inetd daemon(/etc/inetd.conf). Refer to Section 5.2, "TCP Wrapper" on page 77, for moredetails.
By default, the ftp command displays a banner of information when run:
Of particular interest to would-be attackers is the ftp version information. Listsof vulnerabilities are readily available on the Internet. With the bannerinformation in hand, the attacker can then tailor the attack to that specificversion of ftp, saving many hours of trial and error. You can remove thebanner as follows:
# ftp sp5cw0Connected to sp5en0.220 sp5en0 FTP server (Version 4.1 Sun Jul 9 18:28:14 CDT 2000) ready.Name (sp5cw0:root):
184 Additional Security Tools for AIX Systems

Here is how it looks after the banner replacement:
There are two modes of ftp: active and passive. Some organizations requirethat only passive ftp be allowed. For any file transfer, ftp uses two channels,one for control and one for data. In active ftp, the server initiates the datachannel. In passive ftp, the client initiates the data channel. With active ftp, itis possible for a malicious ftp server on the Internet to open a data port on aninternal server for attack purposes. Passive ftp prevents this from happening.
Passive ftp is the mode which is supported by most Web browsers and manyGUI-based ftp clients. For passive ftp to work, both ftp server and ftp clientmust support it. The ftp server code in AIX supports both active and passivemodes, as does the AIX 4.3.3 ftp client code (via the passive subcommand).Active ftp is the default in AIX.
For more information on the differences between active and passive ftp, visit:
http://www.geek-speak.net/ftp/ftp1.html
Another alternative for ftp is to use SOCKS (see Section 2.2.2, "Circuit levelfirewalls" on page 15) as a security measure. There are two different ways inwhich SOCKS can be implemented to further secure ftp. Either the TCP stackcan be socksified, or the ftp client can be socksified. Socksified clients are themore common solution. You can obtain a socksified ftp client (rftp) from
# dspcat -g /usr/lib/nls/msg/en_US/ftpd.cat > /tmp/ftpd.msg
# vi /tmp/ftpd.msg
$delset 1$set 1$quote "......"signal: %m"9 "%s FTP server ready."...
# gencat /tmp/ftpd.cat /tmp/ftpd.msg
# cp -p /tmp/ftpd.cat /usr/lib/nls/msg/en_US/ftpd.cat
# ftp sp5cw0Connected to sp5en0.220 sp5en0 FTP server ready.Name (sp5cw0:root):
Chapter 8. Securing AIX 185

ftp://isscftp.raleigh.ibm.com/IBM/socks/AIX/bin/. There are also socksifiedftp clients incorporated in Web browsers, such as Netscape or InternetExplorer. To socksify the entire TCP stack, refer to the following, Section8.3.8, "Protecting TCP services using SOCKS".
8.3.8 Protecting TCP services using SOCKSSOCKS is a common means for clients behind a firewall to connect to serverson the Internet. Among other things, SOCKS protects the clients by hidingtheir IP addresses from the servers on the Internet. Only the Internet-facingIP address of the firewall is exposed to the servers. SOCKS also enables youto define your own IP address ranges (such as 192.168.130.0) for machinesbehind the firewall, since these IP addresses do not need to be registeredexternally.
SOCKS servers are similar to proxy servers. The main difference is that aSOCKS server identifies the user and redirects the application through to theserver, whereas a proxy server actually performs the functionality on behalf ofthe client. SOCKS is also more generalized with little limitation on thesupported protocols (dependent, of course, on the specific SOCKSimplementation).
To use SOCKS, you either need a socksified client or a socksified TCP stack.There are a number of socksified clients available for AIX, such as rftp forftp, rtelnet for telnet, and rtn for tn. To use these clients, you will also needaccess to a SOCKS server. (There are AIX versions available for downloadfrom the Bull site.) The advantage of a socksified TCP stack is that you do notneed to replace your clients. They automatically and transparently make useof the SOCKS support provided in the TCP stack. AIX 4.3.3 contains supportfor automatic socksification (SOCKS v5). Configuration can be found in theAIX Version 4.3 Differences Guide, SG24-2014. Even with a socksified TCPstack, you will still need access to a SOCKS server.
8.4 Step 3: Set proper network (no) options
Network options control how TCP, UDP, and ICMP behave on an AIXmachine. Default settings are insufficient for the Internet world. You use the no
command to configure network attributes. Some of the default settings needto be changed in order to further tighten security on the machine. Thechanges you make are dependent on the level of security required for yourenvironment. The options along with their default settings (for AIX 4.3.3) areexplained here to help you make those choices.
186 Additional Security Tools for AIX Systems

8.4.1 SYN attack protectionThe clean_partial_conns option is used to avoid SYN attacks. In a legitimate3-way TCP/IP handshake, the client sends a SYN packet (TCP packet withSYN bit set) to the server. The server replies with a SYN/ACK packet. Finally,the client acknowledges the SYN/ACK packet with an ACK packet. Thiscompletes the 3-way handshake.
In a SYN attack, a client with a spoofed IP address sends many repeatedSYN packets to the server. For this attack to work, the spoofed IP addressmust not be reachable by the server. When the server receives the SYNpackets, it responds by sending the SYN/ACK packets back to the spoofed IPaddress. Since the spoofed IP address is unreachable, the server neverreceives the corresponding ACK packets in return, and the pendingconnection table on the server eventually fills up. This is a denial of serviceattack because once the connection table is full, the server is unable toservice legitimate requests.
Setting clean_partial_conns to 1 (the default is 0) causes the server toperiodically clear incomplete 3-way handshake connections, thus, reducingthe likelihood of a successful SYN attack and allowing legitimate clientconnections to proceed.
8.4.2 Broadcast protectionThe bcastping option is used to control the response to ICMP echo packetsdirected at the broadcast address. Systems are vulnerable to smurf attackswhen bcastping is enabled. Smurf attacks occur when a client sends hugeamounts of spoofed ICMP traffic to the broadcast addresses. With broadcastaddress ping allowed, each host on the network will respond with an ICMPecho reply. This worthless network traffic wastes bandwidth causing normaloperations to slow or, in extreme cases, to halt. Smurf attacks are anotherform of denial of service attacks.
More information on smurf attacks can be found at:
http://www.pentics.net/denial-of-service/white-papers/smurf.cgil
Setting bcastping to 0 (the default is 0) causes the hosts to not respond tobroadcast ping requests. However, smurf attack are more effectively dealtwith by routers. The routers should be configured to not allow ICMP echopackets from the Internet to reach the broadcast addresses.
Chapter 8. Securing AIX 187

Similarly, directed_broadcast should be set to 0 (the default is 1) to preventdirected packets from reaching the broadcast address of a remote networkthrough a gateway.
Note that for SP systems, the hats topology daemon requires bcastping to beset to 1 unless APAR IX86922 has been installed throughout the SP system.This solution also requires the Topology Services daemon to prepare anall-known-IP list for netmonAdapterHealth.
8.4.3 IP routing optionsThe ipignoreredirects option is used to control ICMP redirects. When serversor routers find a more efficient way of routing packets, they send back ICMPredirect packets to the originating host informing it of the more efficient route.This opens a potential security loophole because it can be used to alter alegitimate route to redirect traffic to an unintended destination. Therecommended alternative is to set ipignoreredirects to 1 (the default is 0) andadd static routes.
Similarly, the following no options should be set to prevent illegal accessthrough source routing:
• Set ipsendredirects to 0 (the default is 1).
• Set ipsrcroutesend to 0 (the default is 1).
• Set ipsrcrouterecv to 0 (the default is 0).
• Set ipsrcrouteforward to 0 (the default is 1).
• Set ip6srcrouteforward to 0 (the default is 1).
• Set icmpaddressmask to 0 (the default is 0).
• Set nolocsrcroute to 0 (the default is 0).
• Set tcp_pmtu_discover to 0(the default is 0).
• Set udp_pmtu_discover to 0 (the default is 0).
Source routing attempts to control the path through the network to thedestination. It can be manipulated such that the source is directed to reachthe destination through an insecure interface rather than a secure one.Setting the no options as outlined prevents source routing control fromexternal sources. For maximum security, add only static routes and do notallow routes to be dynamically set by dynamic routing daemons (that can beabused).
Lastly, you should set ipforwarding to 0 (the default is 0) unless the server isacting as a gateway. For example, the control workstation for a large SP
188 Additional Security Tools for AIX Systems

system with multiple administrative Ethernet segments will typically haveipforwarding set to 1 so that traffic can pass from segment to segment. Thissetting is used to allow packets to pass from one interface to another in adual-homed server. It is a very big security concern on servers attached totwo different networks (such as in a DMZ). Not only should ipforwarding beturned off (set to 0), but you should also have some form of monitoring orauditing to ensure that it does not get inadvertently turned back on (set to 1).
8.5 Step 4: Tighten up user accounts
Remove unnecessary default accounts, and tighten the default attributes forthe remaining ones. Unneeded default accounts are an open invitation towould-be attackers, and insecure normal user accounts pose one of the mostinsidious threats to security on a system. An attacker who hascommandeered a legitimate user account is a very difficult animal to trackand capture. Much better to have and enforce strong account policies so thatthe attacker never gains this toehold in the first place.
In this step we give recommendations about default accounts that canpossibly be removed and account options that can be tightened up.Remember that even though your server may not contain sensitive data, oncecompromised, it can certainly serve as an launch point for attacks on otherservers.
8.5.1 Removing unnecessary default accountsBy default, several users and groups are created on the system duringinstallation. They are usually not required and can be safely removed.
The default users that can be removed are:
• uucp and nuucp - for use by the uucp protocol
• lpd - for use by the printing subsystem
• imnadm - for use by the IMN search engine
• guest - for use by users without accounts on the system
The default groups that can be removed are:
• uucp - for use with the uucp and nuucp accounts
• printq - for use with the lpd account
• imnadm - for use with the imnadm account
You can remove these users and groups as follows:
Chapter 8. Securing AIX 189

Once you have removed these users and groups, verify the correctness of theuser, group, and password files:
These commands should be run on a regular basis to ensure consistency anddetect problems.
8.5.2 Setting user attributesUser attributes are set in the /etc/security/user file. They can either be setglobally or on an individual user basis. This file is in stanza format, and thedefault stanza contains the global settings. A setting in an individual userstanza overrides the corresponding setting in the default stanza. The userattributes along with the recommended and default settings are listed in Table6.
Table 6. AIX account attributes
Descriptions of each of the attributes follows:
loginretries
This attribute controls the number of invalid login attempts before the accountis locked. The possible values are positive integers or 0 to disable it. Once thenumber of retries is exceeded, the account is locked. To be usable again, the
Attribute Recommended value Default value
loginretries 3 0
registry files
rlogin false (for root) true
tpath on nosak
ttys tty0 (for root) ALL
umask 077 022
# for u in uucp nuucp lpd imnadm guest; do rmuser -p $u; done# for g in uucp printq imnadm; do rmgroup $g; done
# usrck -y ALL# grpck -y ALL# pwdck -y ALL
190 Additional Security Tools for AIX Systems

account will need to be unlocked by the system administrator (smittyfailed_logins).
registry
This attribute controls where the account is administered. A value of filesmeans that the account will be administered with local files rather thanremotely with something, such as NIS.
rlogin
This attribute controls whether or not the account can be accessed by remotelogins. The rlogin and telnet commands support this attribute. The possiblevalues are true and false. The value should be set to false for root, thus,requiring users to use the su command from their normal user accounts togain root access. Not only is this more secure, but it also provides an audittrail with the /var/adm/sulog file.
tpath
This attribute defines the trusted path characteristics for the account. Thepossible values are:
• nosak - The Secure Attention Key (SAK) key (^X^R) has no effect.
• notsh - The SAK key logs you out. You can never be on the trusted path.
• always - When you log in you are always on the trusted path.
• on - The trusted path is entered when the SAK key is hit.
ttys
This attribute controls which terminals can be used by this account. Terminalscan either be explicitly allowed (tty0) or explicitly denied (!tty0 - notice theexclamation point preceding the terminal name). Consider setting thisattribute to tty0 (console) for root.
umask
This attribute only takes effect if the sak_enabled attribute (in the/etc/security/login.cfg file) is set true for the port you are logging into.
Note
Chapter 8. Securing AIX 191

This attribute defines the default umask for this account. It is specified as athree-digit octal mask. For tight security, a value of 077 is recommended. Thisoption is critically-important for securing permissions within the file systems.
Two additional account attributes to consider are:
expires
This attribute defines the expiration time for the account. It is useful insituations, such as classes or schools, where the account should expire at aknown point in time in the future.
logintimes
This attribute defines the times when the account may be used. It is useful forlimiting the times when normal user activity can occur on the system. Forexample, you could use it to prevent normal users from logging in duringregularly-scheduled maintenance windows.
8.5.3 Securing rootThe root account requires special attention. The first step is to limit access toas few people as possible; the fewer the better. Because AIX accountssupport the function of roles, it is possible to allow selected accounts toexecute certain administrative commands without having to have access toroot. Examples include managing accounts, performing backups, andrebooting the system. This functionality is covered in detail in Chapter 3 ofAIX 4.3 Elements of Security Effective and Efficient Implementation,SG24-5962.
A good way to protect root is by disabling remote login for the account. Thisforces the authorized users to first log in with their normal user accounts andthen use the su command to gain root access. This provides accountabilitythrough the audit trail in the /var/adm/sulog file (which, itself, should beprotected with some tool, such as Tripwire).
In addition to the recommendations for securing normal user accounts,consider these additional recommendations for securing root:
For SP node installation and customization, ensure that the umask is set to022 (at least temporarily during the process).
Note
192 Additional Security Tools for AIX Systems

1. Set up exceptionally strong passwords (see Section 8.6, "Step 5: Set upstrong password policy" on page 194), and change them regularly.
2. Allow direct root login from tty0 (console) only.
3. Disable remote root login (rlogin option set false in /etc/security/user).
4. Use roles extensively to limit the number of accounts requiring rootaccess.
8.5.4 Other attributesThe login herald should be modified to provide only the information neededfor the actual sign on of the account. The login herald is specified in thedefault stanza of the /etc/security/login.cfg file. Remember, the goal is toprovide as little useful information to would-be attackers as possible.
By default, the AIX herald proclaims the system to be running AIX Version 4,as can be seen in the following telnet session:
You should remove the operating system type and version from the heraldand replace it with something like the following:
herald = "\n\n\n\n\n\n\n\n\n\n\n\n\n\n\n\n\nUnauthorized Access Prohibited.\n\r\rlogin: "
The new herald can now be seen in the following telnet session:
Escape character is '̂ T'.
telnet (sp5en0)
AIX Version 4(C) Copyrights by IBM and by others 1982, 1996.login:
Chapter 8. Securing AIX 193

Notice how little useful information is revealed in the new herald.
Lastly, the TMOUT and TIMEOUT environment variables should be set in the/etc/profile file. These variables control how long the account can remainidle with no activity before being automatically logged off.
For example, to set these timeouts to 10 minutes (600 seconds), include thefollowing line in the /etc/profile file:
8.6 Step 5: Set up strong password policy
AIX provides a set of attributes that enable you to implement strong passwordpolicy on the systems. Among other things, you can use these attributes toforce users (including root) to choose passwords that are difficult to guessand are not available in the standard UNIX dictionary. However, use of theseattributes does not alleviate the need to run cracking tools, such as John theRipper (see Section 7.2, "John the Ripper" on page 119). The AIX attributesare listed in Table 7 on page 195 and discussed in the next section.
8.6.1 Modifying user password attributesThe AIX attributes used to define strong password policy are contained in the/etc/security/user file. Attributes specified for the default stanza applyglobally but can be overridden for individual user accounts. the attribute
Escape character is '̂ T'.
telnet (merlin)
Unauthorized Access Prohibited.login:
TMOUT=600 ; TIMEOUT=600 ; export readonly TMOUT TIMEOUT
194 Additional Security Tools for AIX Systems

name, the recommended value, the default value, and the max value for theAIX attributes are shown in Table 7.
Table 7. Recommended values for password settings
Descriptions of each of the attributes follows:
dictionlist
This attribute ensures that passwords are not words from the standard UNIXdictionary (under AIX, this is the /usr/shared/dict/words file, which is part ofthe bos.data fileset). When passwords are changed, the dictionary file ischecked to make sure that the chosen password is not contained in thedictionary. As root, you can add or delete words from this file to tailor for yourenvironment (for example, by adding common computer terms, such ashostname).
In addition to the bos.data fileset, you will also need the bos.txt.spell fileset(required for text processing), neither of which get installed by default.
histexpire
This attribute specifies the number of weeks before a user is allowed to reusea password.
Attribute Recommended value Default value Max value
dictionlist /usr/share/dict/words
histexpire 26 0 260
histsize 8 0 50
minage 0 0 52
maxage 12 (5 for root user) 0 52
maxexpired 4 -1 (no limit) 52
minalpha 4 0 8
minother 1 0 8
minlen 6 (8 for root user) 0 8
mindiff 3 0 8
maxrepeats 3 8 8
pwdwarntime 14 0 0
Chapter 8. Securing AIX 195

histsize
This attribute specifies the number of password iterations required before auser is allowed to reuse a password.
minage
This attribute specifies the minimum number of weeks that must pass beforea password can be changed. Since it is common for there to be situationswhere a password must be changed immediately (for example, to prevent theaccount from being compromised), we recommend that you do not use thisattribute.
maxage
This attribute specifies the maximum number of weeks that can pass before apassword must be changed. Consider using smaller values for privilegedusers, such as root and members of the system group. A smaller value limitsthe amount of time that an exposed or disclosed password can be used.
There is debate about whether or not a rigid password expiration policy is agood thing. A user suddenly confronted with an expired password does nothave the luxury of considering their choice for a new one at length. More oftenthan not, they will either pick something that is very close to the expiredpassword or, worse yet, something trivial just so that they can get logged in tothe system to do their work. The pwdwarntime attribute (described later)causes AIX to start warning the user shortly before the password is set toexpire. This permits the user the time needed to consider a strongreplacement for their current password.
maxexpired
This attribute specifies the maximum number of weeks beyond maxage inwhich a password can be changed (after which administrative action will berequired to effect the change). The root password is exempt.
minalpha
This attribute specifies the minimum number of alphabetic characters that thepassword must contain.
minother
This attribute specifies the minimum number of non-alphabetic charactersthat the password must contain. These (other) characters are defined as any
196 Additional Security Tools for AIX Systems

ASCII printable characters that are non-alphabetic and not national languagecode points.
minlen
This attribute specifies the minimum number of characters that the passwordmust contain.
mindiff
This attribute specifies the minimum number of characters in the newpassword that must be different from the characters in the old password.
maxrepeats
This attribute specifies the maximum number of times a character can appearin the password.
pwdwarntime
This attribute (specified in days) causes AIX to start warning the user thattheir password is about to expire.
8.6.2 Password cracker utilityThere are a number of good tools available that enable you to test thestrength of passwords. One such tool is John the Ripper, which is covered indetail in Section 7.2, "John the Ripper" on page 119.
8.7 Step 6: Install additional security tools
Throughout this book, we cover a number of third-party security tools. Ourintent is to give you a representative sample of the tools that are available tohelp you with the various areas of security. To recap, the tools covered in thisbook are:
• Check Point FireWall-1
The minimum length of a password is determined either by minlen or by thesum of ‘minalpha + minother', whichever is greater. The sum of 'minalpha +minother' should never be greater than 8. If it is, then minother is reduced to'8 - minalpha'.
Note
Chapter 8. Securing AIX 197

• IBM Secureway Firewall
• SSH
• TCP Wrapper
• fping
• nmap
• SAINT
• PortSentry
• Tripwire
• PGP
• MD5
• John the Ripper
A brief summary of each is given here:
Firewalls are an essential security enforcement mechanism. Together withrouters, they provide the first line of defense against attacks. In addition toprotecting the network, they also log illegal access attempts, thus, providing ameans of early warning for potential attacks. Only those services that areessential to the proper functioning of the organization should be allowed tocross the firewall. All others should be blocked.
SSH and TCP Wrapper are used to secure remote access. SSH is a securereplacement for less secure protocols, such as rsh. It provides encryption,authentication, and data integrity to ensure that remote hosts cancommunicate securely (even across the Internet). Different implementationsof SSH provide different sets of tools. For example, some provide tools, suchas sftp and scp, which are secure replacements for ftp and rcp. TCP Wrapperprovides access control protection to the services that are under the controlof the inetd daemon. This includes things, such as the ftpd and telnetddaemons, but can even include things, such as sendmail. There are twodifferent TCP Wrapper access control lists. In one, you specify which serversare allowed access to which services. In the other, you specify which servers
A number of these tools are licensed products even though they areavailable for download on a “try before you buy” basis. If you plan to usethem beyond the evaluation period, ensure that you have the properlicenses in place.
Note
198 Additional Security Tools for AIX Systems

are denied access to which services. Typically, you start by denying access toall services from all servers, and then grant access to individual services on aserver-by-server basis. TCP Wrapper also provides logging of bothsuccessful and unsuccessful connection attempts.
The fping and nmap tools are network and port scanners. The fping tool doesa ping sweep of an entire network or range of IP addresses by quicklysending out ICMP echo requests and tracking the return responses. It is agood tool for verifying that the topology of your network is what you think it isand that hosts that should respond to these types of requests actually dorespond. The nmap tool is a port scanner. It is used to scan a large number ofhosts looking for active services. It supports many different scan techniques,including stealth scan, which quietly scans a server in a way that makes itvery hard to detect. These tools are invaluable for providing you with insightinto what a would-be attacker sees when probing your network.
The PortSentry tool provides protection against port scanners, such as nmap.PortSentry can automatically add the IP address of the suspected attacker tothe TCP Wrapper /etc/hosts.deny file, thus, preventing access to any inetdcontrolled services that are protected by TCP Wrapper. PortSentry can alsobe configured to kill the route (by aliasing it against the loopback adapter) tothe suspected attack server. Unfortunately, the AIX version of the tool doesnot currently support protection against stealth scans.
The SAINT tool is another port scanner. It is an enhanced version of theSATAN tool. In addition to scanning for active services, it also tests thoseservices against a list of known vulnerabilities. SAINT produces a report ofthe potential vulnerabilities it found along with recommendations for fixingthem. A similar, commercial tool is NSA, which comes with IBM SecurewayFirewall. NSA provides much more additional functionality, but requires avalid license from IBM to run it. Both are comprehensive tools for overallsecurity auditing.
It is helpful to view the collection of fping, nmap, SAINT, and NSA as a suiteof tools for proactively verifying the security of your network. Each tool bringswith it its own set of strengths and weaknesses, but the sum of the tools usedtogether is much greater than the individual parts. Run in concert with each
Many organizations have very strict policies in place against runningcertain types of tools, such as sniffers and scanners, on a productionnetwork. Make sure you have the proper written authorization in placebefore running any of these tools on your systems.
Important
Chapter 8. Securing AIX 199

other, these tools can cross-verify the results from the others. Be sure to keepthe tools current with the latest versions, patches, and vulnerability lists.
Tripwire provides a means of verifying with a high degree of certainty thatessential system files and directories have not been tampered with. It is a toolfor assuring that system integrity has not been compromised. Attackersusually leave backdoors and Trojan horses after compromising a system sothat they can return to it in the future. Tripwire protects against this threat bymeans of a secure database containing a snapshot of the systemconfiguration. Without a tool, such as Tripwire, it is extremely difficult, tedious,and often impossible to ferret out the holes left behind by attackers.
PGP provides encryption services for users of your systems. It enables themto secure sensitive information from others (including root) and tocommunicate securely with others, locally or remotely. It is commonly usedwith email systems to provide secure authentication and data integrity forsensitive messages or files. Many Internet Web sites support it as a means ofverifying that files downloaded from their site have not been tampered with.
MD5 is a tool for verifying data integrity. Like PGP, it is a commonly usedmethod for ensuring that files downloaded from an Internet Web site have notbeen tampered with. This subject is further discussed in Section 7.4.1,"Ensuring the integrity of downloads" on page 136.
John the Ripper is a password cracking tool. Having a strong password policyis one of the most important defenses you can have within your network. WithAIX, you can create and enforce strong password policy, such as requiringpasswords to meet certain criteria, forcing passwords to be changed on aregular basis, and ensuring that passwords are not chosen from wordsavailable in the dictionary. However, even with a policy like this in place, it isstill a good idea to use a tool, such as John the Ripper, to proactively searchfor weak passwords. Remember that an attacker who has gained access to alegitimate user account is very hard to distinguish from the real user. Findingand correcting weak passwords is one good way to combat against this.
8.8 Step 7: Monitor logs, audit trails, and system behavior
Routine and regular system monitoring is another important aspect ofsecurity. Through it, you are able to discover system breaches and attemptedsystem breaches. The various elements of this type of monitoring can beroughly categorized as follows:
• Monitor system logs
• Enable auditing
200 Additional Security Tools for AIX Systems

• Monitor files and directories
• Monitor cron and at jobs
In addition to monitoring, you should also consider running regular scans withthe security auditing tools described in the previous section. These tools helpyou ensure that your security posture remains unchanged. Often, a oncesecure network becomes insecure because someone introduces a changethat inadvertently and unknowingly opens a security vulnerability. Runningregular security audits greatly reduces the risks posed by such activities.
8.8.1 Monitor system logsRegularly monitor the following logs for evidence of breaches or attemptedbreaches:
/var/adm/sulog
This file logs the use of the su command. It identifies the account that initiatedthe command, the account that was the target of the command, whether thecommand was successful or not, and the time and date when the commandwas run. This file is especially important if you have disabled remote login forroot because it tracks the accounts that are being used to gain (or attempt togain) root access along with the time when the access was performed.
/var/adm/wtmp
This file stores information about current and previous system logins andlogouts. You access this file with the last command. The information is kept inthis file only until the acctcon1 and acctcon2 commands are run.
/etc/security/failedlogin
This file captures all failed login attempts. You can access the information inthis file by running: who /etc/security/failedlogin | more
/etc/utmp
This file stores information about the users who are currently logged in to thesystem. You can access the information in this file by running the who
command.
8.8.2 Enable auditingYou can also set up system auditing to monitor security-related activities. Alist of pre-defined audit events can be found in the /etc/security/audit/events
Chapter 8. Securing AIX 201

file. To streamline the audit and limit the amount of generated data, definejust the events of interest to you. Once auditing is turned on, system activitiesare monitored and logs generated for the events that you have defined. Scanthese logs regularly for evidence of any suspicious activities. For moreinformation about setting up auditing, see "Setting up Auditing" in the AIXVersion 4.3 System Management Guide: Operating System and Devices.
8.8.3 Monitor files and directoriesFirst, begin by cleaning up unneeded files, which pose their own form ofsecurity risk. The skulker utility enables you to easily remove unwanted orobsolete files. It is typically run from crontab on a daily basis. Examples ofcandidate files include:
• files in the /tmp directory
• files older than a specified age
• a.out files
• core files
• ed.hup files
Next, set up routine monitoring and clean up of the following types of files(and directories):
Executable files owned by root that have the SUID and/or SGID bit set canpose a serious threat to security. These files execute with root authorityregardless of who executes them. Unless the code is rock solid, it is possibleto break out of it and run arbitrary commands as root. That is why it is soimportant to routinely monitor for these types of files. There are, however, AIXsystem programs that require the SUID and/or SGID bits to be set, and this isnormal. Be sure to get a baseline listing of these files on a newly-installedsystem so that you know which files have a legitimate need for these settings.
To find files owned by root with either the SUID or SGID bit set:
You may also want to remove files with no owner, which are typically causedby removing an account without removing the files belonging to that account.In addition, you may also want to remove .rhosts files because they enableunauthenticated system access and .netrc files because they expose userIDs and passwords in plain text.
# find / -perm -4000 -user 0 -ls# find / -perm -2000 -user 0 -ls
202 Additional Security Tools for AIX Systems

To find files with no user:
To find .rhosts files:
To find .netrc files:
World-writable directories and files are also another potential area of securityexposure. Again, you should get a baseline listing on a newly-installedsystem so that you can know which directories and files are normally requiredto be this way for the proper functioning of the system.
To find world-writable directories (monitor this list):
To find world-writable files:
8.8.4 Monitor cron and at jobsBoth cron and at are favorite hunting grounds for attackers. These commandsenable attackers to plant time bombs on the systems and be long gone well
Under some HACMP configurations, /.rhosts files are required for theproper functioning of an HACMP cluster on AIX. In those situations, do notremove the /.rhosts files, but, instead, ensure that the ownership isroot.system and that the permissions are set to 600.
Important
# find / -nouser -ls
# find / -name .rhosts -ls
# find / -name .netrc -ls
# find / -perm -0007 -type d -ls
# find / -perm -2 -type f -ls
Chapter 8. Securing AIX 203

before they explode. For this reason, you should be familiar with all of the jobsthat are scheduled on your systems with cron or at.
To monitor all cron jobs:
To monitor all at jobs:
# cronadm cron -l
# cronadm at -l
204 Additional Security Tools for AIX Systems

Appendix A. NSA Scan Options
There are a number of scan options available in NSA (as documented in the/etc/nsa/scannerdefs file):
define defaulttcpports 21,22,23,25,109,110,111,139,143,512-514,6000udpports 69,111,137,161,177rpcsvcs *options no-user-login
end
define baselinetcpports 21,22,23,25,53,79,80,109,110,111,139,143,512-514,6000udpports 53,69,111,137,161,177rpcsvcs *options ftp-walk-treeoptions no-user-login
end
define mediumtcpports 21,22,23,25,53,79,80,109,110,111,139,143,1080,6000udpports 53,69,111,137,161,177rpcsvcs *options tcp-seq-numoptions ftp-walk-treeoptions smtp-require-reject, smtp-mail-from, smtp-mail-rcptoptions nntp-no-post
end
define standardtcpports 1-1023,6000-6063udpports 1-1023rpcsvcs *options tcp-seq-numoptions ftp-walk-treeoptions smtp-no-relayoptions smtp-require-reject, smtp-mail-from, smtp-mail-rcptoptions nntp-no-post
end
define fulltcptcpports 1-65535udpports 53,69,111,137,161,177rpcsvcs *options tcp-seq-numoptions ftp-walk-treeoptions smtp-no-relayoptions smtp-require-reject, smtp-mail-from, smtp-mail-rcptoptions nntp-no-post
end
© Copyright IBM Corp. 2000 205

define completetcpports 1-65535udpports 1-65535rpcsvcs *options tcp-seq-numoptions ftp-walk-tree, ftp-no-wdir, ftp-no-mkdiroptions smtp-mail-from, smtp-mail-rcptoptions nntp-no-postoptions smtp-no-relay
end
define firewalltcpports 1-65535udpports 1-65535rpcsvcs *options ip-source-route, tcp-seq-num, ip-optionsoptions ftp-walk-tree, ftp-no-wdir, ftp-no-mkdiroptions smtp-require-reject, smtp-mail-from, smtp-mail-rcptoptions smtp-no-relayoptions nntp-no-post
end
206 Additional Security Tools for AIX Systems

Appendix B. Script used to scan a network with fping
This script can be used with the fping tool to scan a whole network withnetmask 255.255.255.0 as mentioned in Section 6.1.2, "Using fping" on page86.
© Copyright IBM Corp. 2000 207

#!/bin/ksh## To scan a network with ffffff00 netmask## Declare datafile to store list of hosts to scandatafile=/tmp/fping.data
tput clear; echoif [ $# -ne 1 ]; then
echo "Usage : $0 {Network address}"echo "Example : $0 172.16.30.0\n"exit 0
fi
ID1=̀ echo $1 | awk -F . '{print $1}'̀ID2=̀ echo $1 | awk -F . '{print $2}'̀ID3=̀ echo $1 | awk -F . '{print $3}'̀ID4=̀ echo $1 | awk -F . '{print $4}'̀
# If last octet is the null string or 0, scan 255 addressesif [[ $ID4 = "" ]] || [[ $ID4 -eq 0 ]]; then
tput clearecho "Please enter filename to output results"read outfileecho "Output file is $outfile\n"# Remove $datafile if it already exists.if [ -f $datafile ]; then
echo "The default file to store list of hosts to scan is $datafile"echo "There is already a file named $datafile"echo "Do you want to remove it?[y(es)/n(o)]"read removeoutfile
case "$removeoutfile" in y* | Y*)echo "Removing file\n"rm $datafile;;*)echo "\nRerun program after renaming/removing that
exit 0;;esac
fiecho "Obtaining list of hosts to scan and storing the list into $datafile"y=0while [ "$y" -le 255 ]; do
echo "$ID1.$ID2.$ID3.$y" >> $datafiley=`expr $y + 1`
doneecho "\nScanning hosts now. Please wait for prompt to return."cat $datafile | /usr/local/bin/fping -sA > $outfile 2>&1echo "View output file $outfile for results"
else# If last octet is a host IP, then scan the host only/usr/local/bin/fping -sA $1
fiexit 0
208 Additional Security Tools for AIX Systems

Appendix C. Script to merge the AIX passwd files
This script merges the /etc/passwd and /etc/security/passwd files. It wasobtained from the Crack package (available at the Bull site). The John theRipper tool requires a single password file, as mentioned in Section 7.2,"John the Ripper" on page 119.
#!/bin/sh#### This program was written by and is copyright Alec Muffett 1991,# 1992, 1993, 1994, 1995, and 1996, and is provided as part of the# Crack v5.0 Password Cracking package.## The copyright holder disclaims all responsibility or liability with# respect to its usage or its effect upon hardware or computer# systems, and maintains copyright as set out in the "LICENCE"# document which accompanies distributions of Crack v5.0 and upwards.###
SHADOW=/etc/security/passwdPASSWD=/etc/passwd
(awk '
/̂ [a-zA-Z0-9]+:/ {curruser = $1;next;
}$1 == "password" {
print "STAG:" curruser $3;}' < $SHADOW
sed -e 's/̂ /PTAG:/' < $PASSWD) |awk -F: 'BEGIN {
OFS=":";}$1 == "STAG" {
pw[$2] = $3;next;
}$1 == "PTAG"{
$3 = pw[$2];print $0;
}' |sed -e 's/̂ PTAG://'
© Copyright IBM Corp. 2000 209

210 Additional Security Tools for AIX Systems

Appendix D. Special notices
This publication is intended to help an RS/6000 AIX or SP/Cluster Specialistwho wants to implement additional security tools other than those provides byIBM AIX 4.3.3 or PSSP 3.2. The information in this publication is not intendedas the specification of any programming interfaces that are provided by IBMAIX and PSSP software products. See the PUBLICATIONS section of the IBMProgramming Announcement for IBM products mentioned in this redbook formore information about what publications are considered to be productdocumentation.
References in this publication to IBM products, programs or services do notimply that IBM intends to make these available in all countries in which IBMoperates. Any reference to an IBM product, program, or service is notintended to state or imply that only IBM's product, program, or service may beused. Any functionally equivalent program that does not infringe any of IBM'sintellectual property rights may be used instead of the IBM product, programor service.
Information in this book was developed in conjunction with use of theequipment specified, and is limited in application to those specific hardwareand software products and levels.
IBM may have patents or pending patent applications covering subject matterin this document. The furnishing of this document does not give you anylicense to these patents. You can send license inquiries, in writing, to the IBMDirector of Licensing, IBM Corporation, North Castle Drive, Armonk, NY10504-1785.
Licensees of this program who wish to have information about it for thepurpose of enabling: (i) the exchange of information between independentlycreated programs and other programs (including this one) and (ii) the mutualuse of the information which has been exchanged, should contact IBMCorporation, Dept. 600A, Mail Drop 1329, Somers, NY 10589 USA.
Such information may be available, subject to appropriate terms andconditions, including in some cases, payment of a fee.
The information contained in this document has not been submitted to anyformal IBM test and is distributed AS IS. The use of this information or theimplementation of any of these techniques is a customer responsibility anddepends on the customer's ability to evaluate and integrate them into thecustomer's operational environment. While each item may have beenreviewed by IBM for accuracy in a specific situation, there is no guarantee
© Copyright IBM Corp. 2000 211

that the same or similar results will be obtained elsewhere. Customersattempting to adapt these techniques to their own environments do so at theirown risk.
Any pointers in this publication to external Web sites are provided forconvenience only and do not in any manner serve as an endorsement ofthese Web sites.
The following terms are trademarks of the International Business MachinesCorporation in the United States and/or other countries:
The following terms are trademarks of other companies:
Tivoli, Manage. Anything. Anywhere.,The Power To Manage., Anything.Anywhere.,TME, NetView, Cross-Site, Tivoli Ready, Tivoli Certified, PlanetTivoli, and Tivoli Enterprise are trademarks or registered trademarks of TivoliSystems Inc., an IBM company, in the United States, other countries, or both.In Denmark, Tivoli is a trademark licensed from Kjøbenhavns Sommer - TivoliA/S.
C-bus is a trademark of Corollary, Inc. in the United States and/or othercountries.
Java and all Java-based trademarks and logos are trademarks or registeredtrademarks of Sun Microsystems, Inc. in the United States and/or othercountries.
Microsoft, Windows, Windows NT, and the Windows logo are trademarks ofMicrosoft Corporation in the United States and/or other countries.
PC Direct is a trademark of Ziff Communications Company in the UnitedStates and/or other countries and is used by IBM Corporation under license.
ActionMedia, LANDesk, MMX, Pentium and ProShare are trademarks of IntelCorporation in the United States and/or other countries.
UNIX is a registered trademark in the United States and other countries
e (logo)® IBMNetfinity RedbooksRedbooks Logo RISC System/6000RS/6000 SAASecureWay SPSP1 System/390TCS
212 Additional Security Tools for AIX Systems

licensed exclusively through The Open Group.
SET, SET Secure Electronic Transaction, and the SET Logo are trademarksowned by SET Secure Electronic Transaction LLC.
Lotus Notes is a registered trademark of Lotus Development Corporation
Other company, product, and service names may be trademarks or servicemarks of others.
Appendix D. Special notices 213

214 Additional Security Tools for AIX Systems

Appendix E. Related publications
The publications listed in this section are considered particularly suitable for amore detailed discussion of the topics covered in this redbook.
E.1 IBM Redbooks
For information on ordering these publications see “How to get IBMRedbooks” on page 221.
• A Comprehensive Guide to Virtual Private Networks, Volume III,SG24-5309
• A Secure Way to Protect Your Network: IBM SecureWay Firewall for AIXV4.1, SG24-5855
• AIX Version 4.3 Differences Guide, SG24-2014
• AIX 4.3 Elements of Security Effective and Efficient Implementation,SG24-5962
• Exploiting RS/6000 SP Security: Keeping It Safe, SG24-5521
• Safe Surfing: How to Build a Secure WWW Connection, SG24-4564
• TCP/IP Tutorial and Technical Overview, GG24-3376
E.2 IBM Redbooks collections
Redbooks are also available on the following CD-ROMs. Click the CD-ROMsbutton at ibm.com/redbooks for information about all the CD-ROMs offered,updates and formats.
CD-ROM Title Collection KitNumber
IBM System/390 Redbooks Collection SK2T-2177IBM Networking Redbooks Collection SK2T-6022IBM Transaction Processing and Data Management Redbooks Collection SK2T-8038IBM Lotus Redbooks Collection SK2T-8039Tivoli Redbooks Collection SK2T-8044IBM AS/400 Redbooks Collection SK2T-2849IBM Netfinity Hardware and Software Redbooks Collection SK2T-8046IBM RS/6000 Redbooks Collection SK2T-8043IBM Application Development Redbooks Collection SK2T-8037IBM Enterprise Storage and Systems Management Solutions SK3T-3694
© Copyright IBM Corp. 2000 215

E.3 Other resources
These publications are also relevant as further information sources:
• Building Internet Firewalls, ISBN 1-5659-2124-0, by D. Brent Chapman,Elizabeth D. Zwicky, and Deborah Russell
• Firewalls and Internet Security: Repelling the Wily Hacker, ISBN0-2016-3357-4
• Hacking Exposed: Network Security Secrets and Solutions, ISBN0-0721-2748-1
• Information Warfare and Security, ISBN 0-2014-3303-6, by Dorothy E.Denning
• Masters of Deception: The Gang That Ruled Cyberspace, ISBN0-0609-2694-5, by Michele Slatalla and Joshua Quittner,
• Practial Unix and Internet Security, ISBN 1-5659-2148-8, by SimsonGarfinkel and Gene Spafford
• Sendmail, ISBN 1-5659-2222-0
• The Art of War, ISBN 0-3852-9216-3, by Sun Tzu
• The Cuckoo’s Egg: Tracking a Spy Through the Maze of ComputerEspionag, ISBN 0-6717-2688-9, by Clifford Stoll
• The X Windows System Administrator’s Guide, Volume 8, ISBN0-9371-7583-8
• Www.security How to Build a Secure World Wide Web Connection, ISBN0-1361-2409-7
E.4 Referenced Web sites
The following Web sites are also relevant as further information sources:
• http://www.ssh.org
• http://www.bull.com
• http://www.postfix.org
• http://www.cerias.purdue.edu/coast/satan.html
• http://www.ssh.org
• http://all.net
• http://wuarchive.wustl.edu/packages/security/TAMU/
• http://www.faqs.org/faqs/kerberos-faq/general/
216 Additional Security Tools for AIX Systems

• IBM Redbooks:http://www.redbooks.ibm.com/
• Designing an Authentication System: a Dialogue in Four Scenes:http://web.mit.edu/kerberos/www/dialogue.html/
• Trusted Computing System Evaluation Criteria (TCSEC) Rainbow SeriesLibrary:http://www.radium.ncsc.mil/tprep/library/rainbow/index.html/
• Information Technology Security Evaluation Criteria (ITSEC) AssuranceLevel Criteria:http://www.itsec.gov.uk/
• Wietse Venema’s (author of tcp_wrapper) tools and papers:http://sneezy.ice.ntnu.edu.tw/os/unix/security/
• The Admin guide to cracking by Dan Farmer and Wietse Venema:http://www.cerias.purdue.edu/coast/satan-html/docs/admin_guide_to_crack
ing.html/
• The Internet Assigned Numbers Authority:http://www.iana.org/
• Large archive of SMIT installable freeware:http://www.bull.de/pub
• Secure Shell hompage:http://www.ssh.org
• Computer Emergency Response Team:http://www.cert.org
• IBM emergency response team:http://www.ers.ibm.com
• Postfix homepage, replacement for sendmail:http://www.postfix.org
• Fred Cohen’s page, programmer of the Deception Toolkit:http://all.net
• Chaos Computer Club (partly German):http://www.ccc.de
• Security information, large download area with hacker tools and securitytools:http://packetstorm.securify.com
• This is a security site, not a hacker site:http://www.attrition.org
Appendix E. Related publications 217

• Top 50 security sites:http://www.cyberarmy.com/t-50/index.shtml
• http://www.ers.ibm.com/
• http://www.sanstore.org/
• www.cisco.com/univercd/cc/td/doc/product/iaabu/centri4/user/scf4ch3.htm
• www.checkpoint.com
• www.phoneboy.com/fw1
• www.checkpoint.com/support/technical/documents/index.html
• www.enteract.com/~lspitz/fwtable.txt
• www.fc.net/phrack/files/p48/p48-13.html
• www.enteract.com/~lspitz/intrusion.htm
• www.infoworld.com/supplements/99poy_win/99poy_s.html
• http://www-3.ibm.com/security/
• http://www-4.ibm.com/software/security/firewall/
• www-4.ibm.com/software/network/dispatcher/
• www.mimesweeper.integralis.com
• www.telemate.net
• http://www-4.ibm.com/software/security/firewall/about/
• www.onsight.com/faq/ssh/ssh-faq.html
• ftp://ftp.ssh.com/pub/ssh/
• http://www.ssh.com/ssh/download.html.
• http://www.openssh.com
• http://www-frec.bull.fr
• http://www.f-secure.com/products/ssh/
• http://www.vandyke.com/products/securecrt/
• http://www.zip.com.au/~roca/ttssh.html
• ftp://ftp.porcupine.org/pub/security/index.html
• http://www.insecure.org/nmap
• http://www.wwdsi.com/saint/index.html
• http://www.psionic.com/abacus/
• http://www.psionic.com/abacus/portsentry/
218 Additional Security Tools for AIX Systems

• http://www.psionic.com/abacus/logcheck/
• http://www.tripwiresecurity.com/
• http://www.tripwiresecurity.com/products/index.cfml
• http://www.bull.de/pub/out/
• http://www.pgpi.org/doc/faq/pgpi/en/#International
• http://www.pgp.com
• http://www.pgpi.com
• http://www.nai.com
• http://www.pgpinternational.com
• www.rs6000.ibm.com/doc_link/en_US/a_doc_lib/aixgen/topnav/topnav.htm
• http://www.isc.org/products/BIND/
• www.dictionary.com
• http://www.sendmail.org
• http://www.sendmail.com
• http://www.sendmail.org/faq
• http://www.sendmail.org/antispam.html
Appendix E. Related publications 219

220 Additional Security Tools for AIX Systems

How to get IBM Redbooks
This section explains how both customers and IBM employees can find out about IBM Redbooks,redpieces, and CD-ROMs. A form for ordering books and CD-ROMs by fax or e-mail is also provided.
• Redbooks Web Site ibm.com/redbooks
Search for, view, download, or order hardcopy/CD-ROM Redbooks from the Redbooks Web site.Also read redpieces and download additional materials (code samples or diskette/CD-ROM images)from this Redbooks site.
Redpieces are Redbooks in progress; not all Redbooks become redpieces and sometimes just a fewchapters will be published this way. The intent is to get the information out much quicker than theformal publishing process allows.
• E-mail Orders
Send orders by e-mail including information from the IBM Redbooks fax order form to:
• Telephone Orders
• Fax Orders
This information was current at the time of publication, but is continually subject to change. The latestinformation may be found at the Redbooks Web site.
In United States or CanadaOutside North America
e-mail [email protected] information is in the “How to Order” section at this site:http://www.elink.ibmlink.ibm.com/pbl/pbl
United States (toll free)Canada (toll free)Outside North America
1-800-879-27551-800-IBM-4YOUCountry coordinator phone number is in the “How to Order”section at this site:http://www.elink.ibmlink.ibm.com/pbl/pbl
United States (toll free)CanadaOutside North America
1-800-445-92691-403-267-4455Fax phone number is in the “How to Order” section at this site:http://www.elink.ibmlink.ibm.com/pbl/pbl
IBM employees may register for information on workshops, residencies, and Redbooks by accessingthe IBM Intranet Web site at http://w3.itso.ibm.com/ and clicking the ITSO Mailing List button.Look in the Materials repository for workshops, presentations, papers, and Web pages developedand written by the ITSO technical professionals; click the Additional Materials button. Employees mayaccess MyNews at http://w3.ibm.com/ for redbook, residency, and workshop announcements.
IBM Intranet for Employees
© Copyright IBM Corp. 2000 221

IBM Redbooks fax order form
Please send me the following:
We accept American Express, Diners, Eurocard, Master Card, and Visa. Payment by credit card notavailable in all countries. Signature mandatory for credit card payment.
Title Order Number Quantity
First name Last name
Company
Address
City Postal code
Telephone number Telefax number VAT number
Invoice to customer number
Country
Credit card number
Credit card expiration date SignatureCard issued to
222 Additional Security Tools for AIX Systems

Index
Symbols!tty0 191# 145$FWDIR/conf/fwauthd.conf 43$FWDIR/conf/fwopsec.conf 43$FWDIR/log 29$HOME/.deadletter 178$HOME/.pgp/pubring.prk 129$HOME/.pgp/secring.skr 129$HOME/.rhosts 70$HOME/.shosts 70$HOME/.ssh/authorized_keys 70, 71$HOME/.ssh/authorized_keys2 74$HOME/.ssh/config 70$HOME/.ssh/id_dsa 71, 74$HOME/.ssh/id_dsa.pub 74$HOME/.ssh/identity 70$HOME/.ssh/known_hosts 68$HOME/.ssh/known_hosts2 72$JOHNDIR/john.ini 122$JOHNDIR/john.pot 123(^X^R) 191.deadletter 178.forward 177.forward files 179.netrc 202.rhosts 60, 202.shosts 68/.rhosts 203/etc/exports 168, 175/etc/hosts 153, 168/etc/hosts.allow 79/etc/hosts.deny 79, 199/etc/hosts.equiv 60, 70/etc/inetd.conf 43, 148/etc/inittab 28, 69, 142, 174/etc/krb.conf 181/etc/krb.realms 181/etc/named.boot (BIND4) 158, 160/etc/named.conf (BIND8) 158, 159, 161/etc/nsa/license.nsa 50/etc/nsa/scannerdefs 50/etc/openssh/ssh_host_key 69/etc/openssh/ssh_host_key.pub 72/etc/openssh/sshd_config 68, 69, 72/etc/passwd 122, 168
© Copyright IBM Corp. 2000
/etc/profile 68, 194/etc/rc.dt 144/etc/rc.dt, protecting with Tripwire 144/etc/rc.local 28/etc/rc.net 28/etc/rc.nfs 174, 175/etc/rc.openssh 69/etc/rc.tcpip 28, 68, 144, 157/etc/SDR_dest_info 181/etc/security/audit/events 201/etc/security/failedlogin 201/etc/security/login.cfg 191, 193/etc/security/sysck.cfg 114/etc/security/user 190, 193, 194/etc/sendmail.cf 175, 177, 178/etc/sendmail.st 178/etc/shosts.equiv 68, 70/etc/snmpd.conf 180/etc/ssh/known_hosts 68/etc/tcp.clean 145/etc/tftpaccess.ctl 181/etc/utmp 201/spdata 174/spdata/sys1/install/pssplpp 174/tftpboot 181/tmp 202/usr/adm/tcheck/databases/ 118/usr/adm/tcheck/databases/tw.db_ 112/usr/adm/tcheck/tw.config 112/usr/local/bin 68/usr/local/bin/john 121/usr/local/bin/john-1.6/password.lst 121/usr/local/lib/john-1.6/words.list.sort 122/usr/local/lib/tripwire-1.2/README.CheckConfig115/usr/local/man 68/usr/lpp/FireWall-1/log 29/usr/lpp/nsauditor/doc/ 50/usr/lpp/ssp 181/usr/samples/tcpip/named-booconf.pl 158/usr/sbin/named 157/usr/sbin/named4 157/usr/sbin/named8 157/usr/sbin/sendmail 178/usr/security/bin/tripwire 112/usr/share/dict/words 121/usr/shared/dict/words 195
223

/usr/vac/bin/cc 170/var/adm/sulog 191, 192, 201/var/adm/wtmp 201/var/spool/mqueue 178
Numerics022 192077 1923DES 64, 723-way TCP/IP handshake 18780/20 rule 3
Aa.out 202access control, TFTP 181access control, X11 182account expiration time, defining 192account login times, defining 192account policies, strong 189ACK packet 187active ftp 185additional security tools, installing 197ADSM
See TSMADSTAR Distributed Storage Manager (ADSM)
See TSMadvertising name servers 164advisory locking in UNIX 174AIX
/etc/inittab 142network services 141securing 139
AIX 3.2.x 157AIX 4.1.x 157AIX 4.2.x 157AIX 4.3.3 (with bos.net.tcp.server 4.3.3.13) 157AIX 4.3.x 157AIX account attributes
expires 192loginretries 190logintimes 192rlogin 190, 191tpath 190, 191ttys 190, 191umask 190, 191
AIX account atttibutesregistry 190, 191
AIX account roles 192
AIX herald, disabling 193AIX password settings
dictionlist 195histexpire 195histsize 195, 196maxage 195, 196maxexpired 195, 196maxrepeats 195, 197minage 195, 196minalpha 195, 196mindiff 195, 197minlen 195, 197minother 195, 196pwdwarntime 195, 197
AIX versions of sendmail 175AIX, DNS versions 157all-known-IP list 188AllowGroups 75allow-query substatement 163allow-query, example 163allow-transfer substatement 159allow-transfer, master example 160allow-transfer, options example 160allow-transfer, slave example 160allow-update substatement 161allow-update, example 161AllowUsers 75alternatives to disabling DNS recursion 162alternatives to SSH 77always 191anonymous FTP site for h2n 158APAR IX86922 188application layer (proxy) firewalls 15, 16architecture of security framework 6assessment, threat 4at 201, 203attack, SYN 37, 38attacks
buffer overflow 153attacks, buffer overflow 152attacks, denial of service 152attacks, smurf 187attributes, other 193audit logs 200AUTH_DES 173AUTH_SYS 168AUTH_UNIX 168, 173authentication 62, 71authentication methods, RPC 168
224 Additional Security Tools for AIX Systems

authoritative 163authwarnings 176autoconf6 147automatic socksification support in AIX 4.3.3 186automounted home directories 173
Bbanner replacement, ftp 184banner, ftp 184banner, sendmail 176Basic Networking Utilities
See BNUbastion hosts 177bcastping 187Berkeley Internet Name Daemon
See BINDbiff 151BIND 147, 153
4.8.3 1574.9 1594.9 xfrnets directive 1594.9.3, ipv4 1578.1.2, ipv6 1578.2 1558.2.1 1568.2.2 (patch 5), ipv6 157homepage 153symbolic link 157
BIND4 153, 157BIND8 conversion script 158configuration file 158converting to BIND8 158no longer supported 153options no-fetch-glue 163options no-recursion 162secure_zone record 163
BIND8 153, 157allow-transfer substatement 159allow-update substatement 161configuration file 158converting to from /etc/hosts 158dynamic update capability 161options fetch-glue no 163options recursion no 162
biod 174biod, defined 174blackholing, defined 156Blowfish 64
BNU 151bogus DNS update 155bootp 146bootp protocol, DHCP extension 146bootpd 151bootps 149, 151, 181bos.data 195bos.net.ipsec 180, 183bos.net.ipsec.rte 15bos.net.nfs.client 174bos.net.tcp.client 157, 165bos.net.tcp.server 4.3.3.13 157bos.txt.spell 195boundary routers 2broadcast protection 187buffer overflow attacks 152, 153, 174building a security framework 2
Ccache update, restricting 163cache, DNS 154CAST 125CDE 144, 153CDE and Tripwire 144CDE desktop 183CDE startup, disabling 144CDE, uninstalling 144chargen 152Check Point FireWall-1 14, 24, 25, 26, 37, 38, 49,197chmod 0000 /usr/sbin/dpid2 148chmod 4511 /usr/sbin/sendmail 178chrooted 179circuit level firewalls 15clean_partial_conns 187cleanup rule 34clear text 149clock source, reliable 147closing vulnerabilities during system startup 28cluster, HACMP 203cmsd 153Command
lslpp 68opensshd 72
Commandsat 201, 203biff 151bootps 149
225

chmod 0000 /usr/sbin/dpid2 148chmod 4511 /usr/sbin/sendmail 178cron 201, 203cronadm at -l 204cronadm cron -l 204delset 1 185dspcat -g 185egrep 122exportfs -au 175exportfs -u 175ftp 148fw 36gencat 185grpck 190kloginl 149kshell 149last 201lsof 144make 170netstat 44, 152netstat -af inet 144no 28, 186nsa 50nslookup 159, 165on 152opensshd 69pgpe 132pgpk 127ps 152pwdck 190rcp 151refresh -s inetd 149rftp 185, 186rlogin 148, 151rpcinfo 168rsh 148, 151rtelnet 186rtn 186scp 148sendmail -v -bi 179sftp 148showmount 170smitty failed_logins 191spray 152ssh 148ssh-keygen 71, 73, 76su 201talk 152tcp.clean 145
tcpdchk 80tcpdmatch 81telnet 148tftp 149usrck 190who 201who /etc/security/failedlogin | more 201write 144xauth 182xhost 182xhost + 182, 183xlock 183xterm 183
commands to find root SUID/SGID files 202commands to remove default users and groups189comment out vs. delete 145commercial version of sendmail 178Commnads
xhost - 183Common Desktop Environment
See CDEcommunications daemons, disabling 144community names, SNMP 180community names, unique SNMP 148compartmentalized approach 23compartmentalized firewall environment design 21compartmentalized firewalls 35Compartments 21complementary software for FireWall-1 26complimentarysoftware for IBM Secureway Firewall48comstat 151configuration file for BIND4 158configuration file for BIND8 158configuring and using SSH1 69configuring and using SSH2 72configuring and using Tripwire 112configuring DNS 153configuring John the Ripper 121configuring remaining services 153configuring TCP Wrapper 79configuring Tripwire 112, 114connections, viewing 36converting from /etc/hosts to BIND8 158converting from BIND4 to BIND8 158COPS 119core 202counterfeit update requests 155
226 Additional Security Tools for AIX Systems

covering tracks 5crack 197crack utility 197cracking tools 194creating a useful rulebase 34cron 201, 203cronadm at -l 204cronadm cron -l 204cross-verify 200cryptographic authentication in DNS 156
Ddaemons 144
autoconf6 147biod 174bootpd 151communication 144comstat 151DHCP 146dhcpd 146dhcprd 146dhcpsd 146DNS 147dpid2 144, 148email 153fingerd 151ftpd 148, 184gated 147hats 188httpdlite 143imapd 153imnss 143imqss 143inetd 144, 148, 184, 198info search 143IPv6 147krlogind 151krshd 151lpd 147mrouted 148multicasting 148named 147, 157ndnpd-router 147ndpd-host 147network management 148nfsd 174pcnfsd 152piobe 143
pop3d 153portmap 144, 168print 143, 147qdaemon 143rexd 152rexecd 151rlogind 148, 151routed 147routing 147rpc.lockd 174rpc.mountd 174rpc.statd 174rshd 148, 151rstatd 151ruserd 151rwalld 151rwhod 148sendmail 144, 175, 176snmpd 144, 148sprayd 152syslog 144talkd 152telnetd 148tftpd 151time 147time synchronization 147timed 147uprintfd 144uucpd 151writesrv 144xntpd 147
daemons started by default in /etc/rc.tcpipdpid2 144inetd 144portmap 144sendmail 144snmpd 144syslog 144
data integrity 65database managers started in /etc/inittab 142database, Tripwire 200daytime 152DCE 147DCE user management 173DCE/DFS 147default accounts 189default accounts, removing unnecessary ones 189default daemons started by TCP/IP 144default groups
227

imnadm 189printq 189uucp 189
default stanza 190, 193, 194default users
guest 189imnadm 189lpd 189nuucp 189uucp 189
default webserver 143DefaultUser 177defining account expiration time 192defining account login times 192delete vs. comment out 145delset 1 185demilitarized zone
See DMZdenial of service attack 37denial of service attacks 152, 187DenyUsers 75DES 64DES-based, public-key, private-key encryption 173description of entries in /etc/inetd.conf 150DFS 147DHCP 146, 161DHCP client daemon, dhcpcd 147DHCP daemons, disabling 146DHCP relay daemon, dhcprd 147DHCP server daemon, dhcpsd 147DHCP, extension of bootp protocol 146dhcpd 146dhcprd 146dhcpsd 146dictionary, standard UNIX 194, 195dictionlist 195difference between SSH1 and SSH2 62digital signatures 156directed_broadcast 188directories, world-writable 203disabling CDE startup 144disabling communications daemons 144disabling DHCP daemons 146disabling DNS daemons 147disabling info search daemons 143disabling IPv6 daemons 147disabling multicasting daemons 148disabling network management daemons 148disabling print daemons 143, 147
disabling routing daemons 147disabling rpc.lockd & rpc.statd 175disabling services
dt 144httpdlite 143imnss 143imqss 143piobe 143qdaemon 143uprintfd 144writesrv 144
disabling TCP/IP daemonsautoconf6 147dhcpd 146dhcprd 146dhcpsd 146dpid2 148gated 147lpd 147mrouted 148named 147ndnpd-router 147ndpd-host 147routed 147rwhod 148snmpd 148timed 147xntpd 147
disabling the AIX herald 193disabling time daemons 147disabling VRFY & EXPN 175discard 153Distributed Computing Environment
See DCEDistributed File System
See DFSDMZ 3, 7, 19, 20, 35, 168, 177, 189
public servers inDMZ, private network in 2DNS 147, 153
advertising name servers 164allow-query substatement 163alternatives to disabling recursion 162cache 154cache update, restricting 163checking version 157configuring 153cryptographically authenticated name servers156
228 Additional Security Tools for AIX Systems

daemons, disabling 147debugging with nslookup 168determining version 157DNS spoofing compared to IP spoofing 156double lookup 156dynamic updates, restricting 161fetch-glue no option 163finding version 157glue fetching, defined 163internal resolution name servers 164IP address resolution steps 154IP spoofing compared to DNS spoofing 156nslookup 165principles 154protecting against spoofing exploit 156queries, restricting 162recursion disabled 162recursion, alternatives to disabling 162recursion, defined 161recursion, restricting 161referrals 162resolvers 156restrict cache update 163restrict dynamic updates 161restrict recursion 161restrict zone transfers 159restricting queries 162securing on AIX 159Security Extensions (DNSSEC), RFC 2065 156split configuration 164spoofing 154, 155spoofing exploit, explained 155spoofing exploit, protecting against 156spoofing, new and improved 155spoofing, old and tired 154Start Of Authority (SOA) record 166TXT (txt) records 163update, bogus 155versions on AIX 157with recursion disabled 162zone transfers, restricting 159
docsearch engine 143Domain Name System
See DNSdpid2 144, 148dpid2 security exposure 148DSA 62, 64dspcat -g 185dt 144
dt entry in /etc/inittab 144dtspc 153dynamic DNS, protocol extension 161Dynamic Host Control Protocol
See DHCPdynamic IP address assignment 146dynamic packet filter firewalls 15, 16dynamic routes 188dynamic routing 147dynamic routing daemons 188dynamic update capability in BIND8 161dynamic updates, restricting 161dynamic vs. static routes 147, 188
Eecho 152echo packets, ICMP 187ed.hup 202egrep 122elements of security monitoring 200email daemons 153emergency response services (ERS) 10enable auditing 200, 201enabling other defense mechanisms 37encryption 64engine, docsearch 143entries in /etc/inetd.conf 150enumeration 5environment variable TIMEOUT 194environment variable TMOUT 194etc/security/passwd 122exec 151expires 192EXPN 175EXPN, defined 176exportfs -au 175exportfs -u 175external firewalls 2external network 19
FFast Mode TCP 42favorite haunting ground 203fetch-glue no (BIND8) option 163fetch-glue no option in DNS 163File Transfer Protocol
See FTPFiles
229

$FWDIR/conf/fwauthd.conf 43$FWDIR/conf/fwopsec.conf 43$HOME/.deadletter 178$HOME/.pgp/pubring.prk 129$HOME/.pgp/secring.skr 129$HOME/.rhosts 70$HOME/.shosts 70$HOME/.ssh/authorized_keys 70, 71$HOME/.ssh/authorized_keys2 74$HOME/.ssh/config 70$HOME/.ssh/id_dsa 71, 74$HOME/.ssh/id_dsa.pub 74$HOME/.ssh/identity 70$HOME/.ssh/known_hosts 68$HOME/.ssh/known_hosts2 72$JOHNDIR/john.ini 122$JOHNDIR/john.pot 123.deadletter 178.forward 177, 179.netrc 202.rhosts 60, 202.shosts 68/.rhosts 203/etc/exports 168, 175/etc/hosts 153, 168/etc/hosts.allow 79/etc/hosts.deny 79, 199/etc/hosts.equiv 60, 70/etc/inetd.conf 43, 148/etc/inittab 28, 69, 142, 174/etc/named.boot (BIND4) 158, 160/etc/named.conf (BIND8) 158, 159, 161/etc/nsa/license.nsa 50/etc/nsa/scannerdefs 50/etc/openssh/ssh_host_key 69/etc/openssh/ssh_host_key.pub 72/etc/openssh/sshd_config 68, 69, 72/etc/passwd 122, 168/etc/profile 194/etc/rc.dt 144/etc/rc.local 28/etc/rc.net 28/etc/rc.nfs 174, 175/etc/rc.openssh 69/etc/rc.tcpip 28, 68, 144, 157/etc/security/audit/events 201/etc/security/failedlogin 201/etc/security/login.cfg 191, 193/etc/security/sysck.cfg 114
/etc/security/user 190, 193, 194/etc/sendmail.cf 175, 177, 178/etc/sendmail.st 178/etc/shosts.equiv 68, 70/etc/snmpd.conf 180/etc/ssh/known_hosts 68/etc/tcp.clean 145/etc/tftpaccess.ctl 181/etc/utmp 201/usr/adm/tcheck/databases/* 118/usr/adm/tcheck/databases/tw.db_ 112/usr/adm/tcheck/tw.config 112/usr/local/bin/john-1.6/password.lst 121/usr/local/lib/john-1.6/words.list.sort 122/usr/local/lib/tripwire-1.2/README.CheckCon-fig 115/usr/lpp/FireWall-1/log/* 29/usr/lpp/nsauditor/doc/ * 50/usr/samples/tcpip/named-booconf.pl 158/usr/sbin/named 157/usr/sbin/named4 157/usr/sbin/named8 157/usr/sbin/sendmail 178/usr/security/bin/tripwire 112/usr/share/dict/words 121/usr/shared/dict/words 195/usr/vac/bin/cc 170/var/adm/sulog 191, 192, 201/var/adm/wtmp 201/var/spool/mqueue 178a.out 202cc 170core 202ed.hup 202etc/security/passwd 122events 201exports 168, 175failedlogin 201h2n (BIND8) 158hosts 153, 168hosts.deny 199include 177inetd.conf 148inittab 142, 174login.cfg 191, 193mqueue 178named 157named.boot (BIND4) 158, 160named.conf (BIND8) 158, 159, 161
230 Additional Security Tools for AIX Systems

named4 157named8 157named-booconf.pl 158named-xfer 158nslookup 159, 165nsupdate 158passwd 168profile 194rc.dt 144rc.nfs 174, 175rc.tcpip 157sendmail 178sendmail.cf 175, 177, 178sendmail.st 178snmpd.conf 180sulog 191, 192, 201tcp.clean 145tftpaccess.ctl 181tripwire.list.sort 114tw.config 115user 190, 193, 194utmp 201words 195wtmp 201
files, world-writable 203filesets
bos.data 195bos.net.ipsec 180, 183bos.net.ipsec.rte 15bos.net.nfs.client 174bos.net.tcp.client 157, 165bos.net.tcp.server 4.3.3.13 157bos.txt.spell 195freeware.egd.rte 65freeware.openssl.rte 65freeware.zlib.rte 65IMNSearch.rte.httpdlite 143nsaauditor.base 49X11.apps.clients 182
finding .netrc files 203finding .rhosts files 203finding files with no user 203finding root SUID/SGID files 202finding world-writable directories 203finding world-writable files 203finger 151fingerd 151firewall
design 17
firewall design 17firewall hardening 49Firewall Toolkit 179FireWall-1 197FireWall-1 features 25FireWall-1, managing logs 29FireWall-1, securing default configurations 29firewalls 13, 198
application layer (proxy) 15, 16circuit level 15comparison between different types 16compartmentalized 35compartmentalized environment design 21default configurations 14dynamic packet filter 15, 16misconceptions 13on AIX 24securing 24static packet filter 15types 15
firewalls on AIX 24firewalls, external 2firewalls, internal 2firewalls, misconceptions 13firewalls, securing 24firewalls,compartmentalized 35footprinting 4fping 198, 199framework, security 1freeware.egd.rte 65freeware.openssl.rte 65freeware.zlib.rte 65F-Secure SSH 62FTP 184ftp 148, 198
//ftp.porcupine.org/pub/security/index.html 78//ftp.ssh.com/pub/ssh/ 61
ftp banner 184ftp banner replacement 184ftp client, socksified 185ftp protocol 184ftp, active 185ftp, passive 185ftpd 148, 184fw 36
Ggated 147
231
gencat 185gentle satirical imitation 154glue fetching 164glue fetching, defined 163glue fetching, turning it off 163goaway 176grpck 190guest 189gzip 170
Hh2n (BIND8) 158h2n, anonymous FTP site for 158HACMP 142, 203HACMP and /.rhosts 203handshake, TCP 3-way 187hardening, firewalls 49hats topology daemon 188herald 193High Availability Cluster MultiProcessing
See HACMPhistexpire 195histsize 195, 196hoax 154homepages
BIND 153sendmail 175
host name resolution 153host table, local 153http
//www.bull.de/pub/out/ 111//www.ers.ibm.com 10//www.f-secure.com/products/ssh/ 62//www.nai.com 126//www.openssh.com 61//www.openwall.com/john/ 120//www.pgp.com 126//www.pgpi.com 126//www.pgpi.org/doc/faq/pgpi/en/#International124//www.pgpinternational.com 126//www.sanstore.org 12//www.ssh.com 76//www.ssh.com/ssh 61//www.ssh.com/ssh/download.html 61//www.tripwiresecurity.com/ 111//www.tripwiresecurity.com/products/in-dex.cfml 111
//www.vandyke.com/products/securecrt/ 62//www-3.ibm.com/security/ 47//www-4.ibm.com/software/security/firewall/ 47//www-4.ibm.com/software/security/fire-wall/about/ 49//www-frec.bull 65//www-frec.bull.fr 12, 61, 126
httpdlite 143
IIBM Secure Mailer
See PostfixIBM Secureway Firewall 47, 49, 198, 199IBM Secureway Firewall features 47IBM Secureway Network Despatcher 48ICMP 29, 186ICMP echo packets 187ICMP echo requests 199icmpaddressmask 188IDEA 64imap2 153imapd 153IMN search engine 189imnadm 189IMNSearch.rte.httpdlite fileset 143imnss 143implementation of security framework 7implications of having SSH 77implicit drop rule 34imqss 143include 177incoming mail 151inetd 144inetd daemon 148, 184, 198inetd entry
bootpd 151bootps 151chargen 152cmsd 153comstat 151daytime 152discard 153dtspc 153echo 152exec 151finger 151fingerd 151imap2 153
232 Additional Security Tools for AIX Systems

imapd 153klogin 151krlogind 151krshd 151kshell 151login 151netstat 152ntalk 152pcnfsd 152pop3 153pop3d 153ps 152rexd 152rexecd 151rlogind 151rshd 151rstatd 151ruserd 151rwalld 151shell 151sparyd 152systat 152talk 152talkd 152tftp 151tftpd 151time 152ttdbserver 153uucp 151uucpd 151
inetd.conf 148infinite loop 152info search daemons, disabling 143InfoExplorer 143initial access 5inittab 142install additional security tools 197installing John the Ripper 120installing NSA 49installing OpenSSH on AIX 65installing TCP Wrapper 78installing Tripwire 111integrity, system and data 109internal firewalls 2internal network 19internal network, private 2internal resolution name servers 164internal servers, private 2Internet Boot Protocol server 151
Internet downloads, verifying 200Internet Explorer 186Internet Protocol (IP) version 6
See IPv6interoperability between OpenSSH and SSH.Com76interpreting NSA output 51intrusion detection on Check Point FireWall-1 43IP address resolution steps in DNS 154IP address, dynamic assignment 146IP forwarding 28IP routing options 188IP spoofing compared to DNS spoofing 156IP spoofing protection 39ip6srcrouteforward 188ipforwarding 28, 188ipforwarding on SP control workstation 188ipignoreredirects 188IPSec 7, 8, 15, 26, 180, 183ipsendredirects 188ipsrcrouteforward 188ipsrcrouterecv 188ipsrcroutesend 188ipv4 BIND 4.9.3 157IPv6 147ipv6 BIND 8.1.2 157ipv6 BIND 8.2.2 (patch 5) 157IPv6 daemons, disabling 147
JJohn 109John the Ripper 109, 110, 119, 194, 197, 198, 200John the Ripper, configuring 121John the Ripper, installing 120John the Ripper, obtaining 120John the Ripper, using 122
KKerberos 151kernel messages 144kernel services, NLuprintf 144kernel services, uprintf 144key concepts of SSH 62klogin 149, 151krlogind 151krshd 151kshell 149, 151
233

Llast 201legacy SNMP daemon, dpid2 148licensed products 198light parody 154list of known vulnerabilities 199List of ports that Check Point FireWall-1 uses 43ListenAddress 75local host table 153login 151loginretries 190logintimes 192LogLevel 76loop, infinite 152loopback alias 199lpd 147, 189ls subcommand in nslookup 159, 167lslpp 68lsof 144
Mmail, incoming 151mailnull 177, 178make 170man pages 143managing FireWall-1 logs 29MANPATH 68, 127maxage 195, 196maxexpired 195, 196maxrepeats 195, 197MD5 109, 110, 198, 200messages, kernel 144MIB 180MIMEsweeper 48minage 195, 196minalpha 195, 196mindiff 195, 197minlen 195, 197minother 195, 196modifying startup files 142modifying user password attributes 194monitor cron and at jobs 201, 203monitor files and directories 201, 202monitor logs, audit trails, and system behavior 200monitor system logs 200, 201monitoring all at jobs 204monitoring all cron jobs 204monitoring security framework 8
monitoring, elements of 200mrouted 148multicasting daemons, disabling 148
Nname resolution 153name resolution services 147named 147, 157named daemon in bos.net.tcp.client 157, 165named, relinking 158named, restarting 158named, symbolic link 157named-xfer, relinking 158NAT 41national language code points 197ndnpd-router 147ndpd-host 147needexpnhelo 176needmailhelo 176needvrfyhelo 176netmonAdapterHealth 188Netscape 186netstat 44, 152netstat -af inet 144network address translation (NAT) 40Network Information System
See NISnetwork management daemons, disabling 148network options 186network scanners 199Network Security Auditor
See NSANetwork Security Auditor (NSA) 47, 49network services 141Network Time Protocol
See NTPnetwork topology verification 199network&netmask 161network, external 19network, internal 19network-booting an SP node 151NFS 153
biod, defined 174configuring 168daemons in bos.net.nfs.client fileset 174daemons, biod 174daemons, nfsd 174daemons, rpc.lockd 174
234 Additional Security Tools for AIX Systems

daemons, rpc.mountd 174daemons, rpc.statd 174disabling rpc.lockd 175disabling rpc.statd 175most common security mistake 173nfsd, defined 174PC clients 152protecting 173rpc.lockd, defined 174rpc.mountd, defined 174rpc.statd, defined 174
NFS (port 2049) 170nfs client tool 170nfsd 174nfsd, defined 174NIS 153, 191
configuring 168NIS+ 168, 173NLuprintf 144nmap 198, 199no 28, 186no options 186
bcastping 187clean_partial_conns 187directed_broadcast 188icmpaddressmask 188ip6srcrouteforward 188ipforwarding 188ipignoreredirects 188ipsendredirects 188ipsrcrouteforward 188ipsrcrouterecv 188ipsrcroutesend 188nolocsrcroute 188tcp_pmtu_discover 188udp_pmtu_discover 188
nobody (-2) 172node customization 181node installation 181noexpn 176no-fetch-glue (BIND4) option 163nolocsrcroute 188non-privileged ports (above 1023) 174nonsense 154no-recursion (BIND4) option 162nosak 191notsh 191novrfy 176NSA 141, 176, 182, 199
nsa 50NSA output, interpreting 51NSA, installing 49NSA, interpreting its output 51NSA, using 50nsaauditor.base 49nslookup 159, 165
DNS debugging 168listing all servers in a domain 167ls subcommand 167querying for name servers in a domain 166querying specific types of records 166querying Start Of Authority (SOA) record 166server subcommand 167zone transfers with ls subcommand 159, 167
nsupdate, relinking 158ntalk 152NTP 147nuucp 189
Oobtaining and installing John the Ripper 120obtaining and installing PGP 126obtaining and installing TCP Wrapper 78obtaining and installing Tripwire 111obtaining John the Ripper 120obtaining PGP 126obtaining SSH 61obtaining TCP Wrapper 78obtaining Tripwire 111octal mask 192on 152, 191Open Platform for Secure Enterprise Connectivity(OPSEC) 25OpenSSH 61, 68OpenSSH using SSH1 68OpenSSH using SSH2 71OpenSSH, installing on AIX 65OpenSSH, interoperability with SSH.Com 76opensshd 69, 72options fetch-glue no (BIND8) 163options no-fetch-glue (BIND4) 163options no-recursion (BIND4) 162options recursion no (BIND8) 162Oracle 142other attributes 193
235

Ppacket, ACK 187packet, SYN 187packet, SYN/ACK 187packets, ICMP echo 187passive ftp 185password cracker utility 197password minimum length determination 197password policy, strong 194PATH 68, 127PC clients, NFS 152PC, SSH clients for 76pcnfsd 152PERL script to convert /etc/hosts to BIND8 158PERL script to convert BIND4 to BIND8 158PermitRootLogin 75PGP 198, 200PGP basics 124PGP, installing 126PGP, obtaining 126PGP, using 127pgpe 132pgpk 127Phil Zimmermann 126ping sweep 199piobe 143planning security framework 3planting back door 6pop3 153pop3d 153port allocation via rpc (portmap) 151, 152, 153port scanners 199portmap 144portmap daemon 168portmapper 168Ports 75ports
port 11 (TCP), systat 152port 110 (TCP), pop3d 153port 111 (TCP & UDP), portmapper 168, 174port 13 (TCP & UDP), daytime 152port 143 (TCP & UDP), imapd (imap2) 153port 15 (TCP), netstat 152port 161 (TCP & UDP), snmpd 180port 19 (TCP & UDP), chargen 152port 25 (TCP), SMTP (sendmail) 176, 177port 37 (TCP & UDP), time 152port 512 (TCP), rexecd 151port 512 (UDP), comstat 151
port 513 (TCP), rlogind 151port 514 (TCP), rshd 151port 518 (TCP), talkd 152port 540 (TCP), uucpd 151port 543 (TCP), krlogind 151port 544 (TCP), krshd 151port 6000 (TCP), X 183port 67 (UDP), bootpd 151port 69 (UD), tftpd 181port 69 (UDP), tftpd 151port 7 (TCP & UDP), echo 152port 79 (TCP), fingerd 152port 9 (TCP & UDP), discard 153
PortSentry 198, 199PortSentry and /etc/hosts.deny 199PortSentry and loopback aliases 199POSTFIX 78Postfix 180postman 177Pretty Good Privacy (PGP) 109, 110, 124principles, DNS 154print daemons, disabling 143, 147printq 189PrivacyOptions 176
authwarnings 176goaway 176needexpnhelo 176needmailhelo 176needvrfyhelo 176noexpn 176novrfy 176restrictmailq 176restrictqrun 176
private internal network 2private internal servers 2private key, protecting 134private network in DMZ 2private-key 63privilege escalation 5proper network options 186protecting /etc/rc.dt with Tripwire 144protecting NFS 173protecting sendmail with TCP Wrapper 180protecting TCP services using SOCKS 186protecting your private key 134protection, broadcast 187protection, IP spoofing 39protocol, ftp 184proxy servers, SOCKS 186
236 Additional Security Tools for AIX Systems

ps 152PSSP 173public key 71public servers in DMZpublic-key 63public-key, private-key authentication scheme 184pwdck 190pwdwarntime 195, 196, 197
Qqdaemon 143Quaintance, Jeff 176queries, restricting 162
RRADIUS 25rc.dt 144rc.tcpip 144, 157rcp 151, 198recommendations for fixing vulnerabilities 199recursion no (BIND8) option 162recursion, restricting 161recursive queries 164referrals, DNS 162refresh -s inetd 149refresh the sendmail daemon 177registry 190, 191reliable clock source 147remote access, secure 59Remote Procedure Call
See RPCremoving entries from /etc/inetd.conf 148removing entries from /etc/inittab 142removing entries from /etc/rc.tcpip 144removing sendmail banner 177removing unnecessary default accounts 189removing unnecessary services 141resolvers, DNS 156restarting named 158restrict cache update 163restrict dynamic updates 161restrict queries 162restrict recursion 161restrict zone transfers 159restrictmailq 176restrictqrun 176rexd 152rexecd 151
RFC 2065 156rftp 185, 186rlogin 148, 151, 190, 191rlogind 148, 151roles, AIX account 192root SUID on sendmail 178root, securing 192root, steps for securing 192routed 147routers, boundary 2routes, dynamic vs. static 147routes, static vs. dynamic 147routing daemons, disabling 147routing, dynamic 147RPC 168rpc (portmap) 151, 152, 153RPC authentication methods 168rpc.lockd 174rpc.lockd, defined 174rpc.mountd 174rpc.mountd, defined 174rpc.statd 174rpc.statd, defined 174rpcinfo 168rpcinfo, example 169RS/6000 SP 147, 149, 151, 173, 174, 181, 188RS/6000 SP and ipforwarding 188RS/6000 SP umask 022 192RSA 62, 64RSA authentication 69, 71rsh 148, 151rshd 148, 151rstatd 151rtelnet 186rtn 186rule, cleanup 34rule, implicit drop 34rule, stealth 35RunAsUser 177, 178ruserd 151rwalld 151rwhod 148rwhod security exposure 148
SSafeFileEnvironment 178, 179SAINT 141, 198, 199SAINT, enhanced SATAN 199
237

SAK key (^X^R) 191sak_enabled attribute 191SATAN 78, 180, 199scanning 5scp 148, 184, 198search engine, IMN 189Secure Attention Key (SAK) 191Secure NFS 173secure remote access 59, 198Secure RPC 173Secure Shell 59secure shell (ssh) 59secure_zone record, BIND4 163secure_zone, example 163SecureCRT 62SecureID 25Secureway Firewall 47, 49, 198Secureway Firewall features 47Secureway Network Despatche 48securing AIX 139securing DNS on AIX 159securing FireWall-1 27securing FireWall-1 default configurations 29securing firewalls 24securing root 192securing X11 182security exposure with /tftpboot directory 182security exposure, dpid2 148security exposure, rwhod 148security framework 1
architecture 6implementation 7incident response 10monitoring 8planning 3
security framework, architecture 6security framework, building 2security framework, implementation 7security framework, incident response 10security framework, monitoring 8security framework, planning 3security tool suite 199security tools, third-party 197sendmail 144, 175, 198sendmail banner 176sendmail banner, removing 177sendmail built-in commands 175sendmail configuration file 175sendmail daemon 176
sendmail homepage 175sendmail in daemon mode 177sendmail not running as root 177sendmail replacement 180sendmail restricted shell
See smrshSendmail Switch 178sendmail -v -bi 179sendmail version 8.8 177sendmail, .deadletter 178sendmail, .forward files 177sendmail, AIX versions 175sendmail, DefaultUser 177sendmail, include files 177sendmail, PrivacyOptions 176sendmail, root SUID 178sendmail, RunAsUser 177, 178sendmail, SafeFileEnvironment 178, 179services
network 141services configurations, tightenning 153services, name resolution 147services, removing unnecessary 141set up strong password policy 194setting user attributes 190sftp 148, 184, 198SGID 202shadmgr.aix script 122shell 151showmount 170signatures, digital 156Simple Mail Transfer Protocol
See SMTPSimple Network Management Protocol
See SNMPsmitty failed_logins 191smrsh 179SMTP 153, 175SMTP TCP port 25 180SMTPGreetingMessage 177smurf attacks 187SNMP 148, 153, 180SNMP community names 180SNMP community names, unique 148snmpd 144, 148SNMPv1 180SOCKS 185, 186SOCKS support in AIX 4.3.3 186SOCKS to protect TCP services 186
238 Additional Security Tools for AIX Systems

SOCKS v5 186socksified ftp client 185socksified TCP stack 186source routing control 188SP 147, 149, 151, 173, 174, 181, 188SP administrative Ethernet 173SP and ipforwarding 188SP nightly mksysb backups 173SP node customization 192SP node installation 192SP required services
bootps 149klogin 149kshell 149tftp 149
SP switch 173SP umask 022 192split configuration, DNS 164spoofed ICMP traffic 187spoofing 184spoofing, comparison between DNS and IP 156spoofing, defined 154spoofing, DNS 154, 155spray 152sprayd 152SSH 59, 148, 184, 198ssh 148SSH clients for the PC 76SSH daemon configuration options 75SSH scp 184SSH sftp 184SSH with X 184SSH, alternatives to 77SSH, F-Secure 62SSH, implications of having 77SSH, key concepts 62SSH, obtaining 61SSH.Com, interoperability with OpenSSH 76SSH1 61SSH1, configuring and using 69SSH1, difference with SSH2 62SSH2 61, 71SSH2, configuring and using 72SSH2, difference with SSH1 62SSH2, used by OpenSSH 71ssh-keygen 71, 73, 76standard UNIX dictionary 194, 195stanza format 190Start Of Authority (SOA) record 166
startupAIX 142HACMP 142Oracle 142system 142UNIX 142
starupTCP/IP daemons 144
static packet filter firewalls 15static routes 188static vs. dynamic routes 147, 188stealth rule 35stealth scan 199stealth scans 199steps for securing root 192stopping TCP/IP 145StrictHostKeyChecking 75strong account policies 189strong password policy 194su 201SUID 202suite, security tool 199Sun’s Remote Procedure Call
See RPCsymbolic link, BIND 157symbolic link, named 157symmetric key cryptography 63SYN attack 37, 38SYN attack defined 187SYN attack protection 187SYN packet 187SYN/ACK packet 187SYNDefender 37syslog 144SyslogFacility 76systat 152system and data integrity 109system behavior 200system logs 200system logs to monitor
/etc/security/failedlogin 201/etc/utmp 201/var/adm/sulog 201/var/adm/wtmp 201
system startup 142
Ttalk 152
239

talkd 152Tamu’s Tiger 119target acquisition and information gathering 4TCP 186
port 11, systat 152port 110, pop3d 153port 15, netstat 152port 25, SMTP (sendmail) 176, 177port 512, rexecd 151port 513, rlogind 151port 514, rshd 151port 518, talkd 152port 540, uucpd 151port 543, krlogind 151port 544, krshd 151port 6000, X 183port 79, fingerd 152
TCP & UDPport 111, portmapper 168, 174port 13, daytime 152port 143, imapd (imap2) 153port 19, chargen 152port 37, time 152port 7, echo 152port 9, discard 153
TCP &UDPport 161, snmpd 180
TCP stack, socksified 186TCP Wrapper 7, 8, 77, 148, 180, 198TCP Wrapper /etc/hosts.deny 199TCP Wrapper access control lists 198TCP Wrapper security features 82TCP Wrapper, configuring 79TCP Wrapper, installing 78TCP Wrapper, obtaining 78TCP Wrapper, protecting ftp with 184TCP Wrapper, protecting sendmail with 180TCP/IP
stopping 145TCP/IP daemon startup 144TCP/IP daemons started by default 144tcp_pmtu_discover 188tcpdchk 80tcpdmatch 81telephone system analogy 156telnet 148telnet to port 25 on localhost (0) 176telnetd 148terminal emulators 183
TFTP 181tftp 149, 151, 181TFTP access control 181tftpd 151The Bat Book 179The X Windows System Administrator’s Guide, Vol-ume 8 183, 216third-party security tools 197threat assessment 4three-digit octal mask 192tighten remaining services configurations 153tighten up user accounts 189time 152time bombs 203time daemons, disabling 147time synchronization daemons 147timed 147TIMEOUT 194Tivoli Storage Manager
See TSMTMOUT 194Tools
gzip 170lsof 144nfs 170NSA 141nslookup 159, 165rftp 185, 186rtelnet 186rtn 186SAINT 141scp 184sftp 184xwd 182xwud 182
Topology Services daemon 188tpath 190, 191tpath always 191tpath nosak 191tpath notsh 191tpath on 191Tripwire 109, 110, 192, 198, 200Tripwire and CDE 144Tripwire CheckConfig script 115Tripwire secure database 200Tripwire, alternatives to 119Tripwire, comments on configuration 118Tripwire, configuring 112, 114Tripwire, installing 111
240 Additional Security Tools for AIX Systems

Tripwire, obtaining 111Tripwire, using 112Tripwire, when should be run 118tripwire.list.sort 114Trivial File Transfer Protocol
See TFTPTrusted Computing Base (TCB) 119try before you buy 198TSM 142ttdbserver 153tty0 191tty0 (console) 191ttys 190, 191turning off glue fetching 163tw.config 115TXT (txt) records, DNS 163types of firewalls 15
UUDP 186
port 512, comstat 151port 67, bootpd 151port 69 181port 69, tftpd 151
udp_pmtu_discover 188umask 190, 191umask 022 192umask 077 192uninstalling CDE 144unique SNMP community names 148UNIX advisory locking 174untrapped-meta-character vulnerabilities 152update requests, counterfeit 155uprintf 144uprintfd 144user account cleanup 189user attributes, setting 190user password attributes, modifying 194using John the Ripper 122using NSA 50using PGP 127using Tripwire 112usrck 190uucp 151, 189uucpd 151
VVenema, Wietse 180
verifying Internet downloads 200viewing connections 36VRFY 175VRFY, defined 176vulnerabilities, untrapped-meta-character 152
Wwebserver, default 143who 201who /etc/security/failedlogin | more 201Wietse Venema 180world-writable directories 203world-writable files 203Wrapper, TCP 148write 144writesrv 144www.checkpoint.com 25www.checkpoint.com/support/technical/docu-ments/index.html 27www.cisco.com/univercd/cc/td/doc/product/iaa-bu/centri4/user/scf4ch3.htm 17www.enteract.com/~lspitz/fwtable.txt 36www.enteract.com/~lspitz/intrusion.htm 43www.fc.net/phrack/files/p48/p48-13.html 38www.icsa.net/html/communities/firewalls/certifica-tion/vendors/index.shtml 24www.infoworld.com/supple-ments/99poy_win/99poy_s.html 47www.mimesweeper.integralis.com 48www.onsight.com/faq/ssh/ssh-faq.html 60www.phoneboy.com/fw1 25www.phoneboy.com/fw1/ 44www.telemate.net 49www-4.ibm.com/software/network/dispatcher/ 48
XX client 184X libraries 182X over SSH 184X server 183X window system 144X xterm 183X11 access control 182X11 xauth 182X11 xhost 182X11 xhost - 183X11 xhost + 182, 183X11 xlock 183
241

X11 xwd 182X11 xwud 182X11, securing 182X11.apps.clients fileset 182X11Forwarding 76xauth 182xfrnets directive 159xfrnets, example 160xfrnets, more restrictive example 161xhost 182xhost - 183xhost + 182, 183xlock 183xntpd 147xterm 183xwd 182xwud 182
YYellow Pages (YP)
See NIS
Zzone substatements 160zone transfers with nslookup 159, 167zone transfers, restricting 159
242 Additional Security Tools for AIX Systems

© Copyright IBM Corp. 2000 243
IBM Redbooks review
Your feedback is valued by the Redbook authors. In particular we are interested in situations where aRedbook "made the difference" in a task or problem you encountered. Using one of the followingmethods, please review the Redbook, addressing value, subject matter, structure, depth andquality as appropriate.
• Use the online Contact us review redbook form found at ibm.com/redbooks• Fax this form to: USA International Access Code + 1 845 432 8264• Send your comments in an Internet note to [email protected]
Document NumberRedbook Title
SG24-5971-00Additional AIX Security Tools on IBM ^ pSeries, IBMRS/6000, and SP/Cluster
Review
What other subjects would youlike to see IBM Redbooksaddress?
Please rate your overallsatisfaction:
O Very Good O Good O Average O Poor
Please identify yourself asbelonging to one of thefollowing groups:
O Customer O Business Partner O Solution DeveloperO IBM, Lotus or Tivoli EmployeeO None of the above
Your email address:The data you provide here maybe used to provide you withinformation from IBM or ourbusiness partners about ourproducts, services or activities.
O Please do not use the information collected here for futuremarketing or promotional contacts or other communications beyondthe scope of this transaction.
Questions about IBM’s privacypolicy?
The following link explains how we protect your personal information.ibm.com/privacy/yourprivacy/


Additional AIX Security Tools on IBM ̂pSeries, IBM
RS/6000, and SP/Cluster


®
SG24-5971-00 ISBN 0738418382
INTERNATIONAL TECHNICALSUPPORTORGANIZATION
BUILDING TECHNICALINFORMATION BASED ONPRACTICAL EXPERIENCE
IBM Redbooks are developed by the IBM International Technical Support Organization. Experts from IBM, Customers and Partners from around the world create timely technical information based on realistic scenarios. Specific recommendations are provided to help you implement IT solutions more effectively in your environment.
For more information:ibm.com/redbooks
Additional AIX Security Tools onIBM pSeries,IBM RS/6000, and SP/Cluster
Customize the security of yourpSeries systems
Explore IBM, non-IBM, and freeware security tools
Learn new approaches to security
From firewalls to operating system hardening, this redbook illustrates additional tools and techniques that you can use to enhance the security environment of your pSeries, RS/6000 workstation, SP, or Cluster. The approach taken is from outside to inside and from top to bottom. We move from the servers on the far reaches of your network that are visible to the outside world to those in the innermost recesses of your intranet containing your most confidential data. As we move through these servers, we work from the application layer at the top to the network layer at the bottom. Along the way, we cover third-party software that is readily available, modifications to the standard software that comes with AIX and PSSP, and assorted techniques that can all be used to provide enhanced security in your environment.
Subjects covered in this redbook include:- Firewalls- Secure Remote Access- Network Mapping and Port Scanning- System Integrity- Securing AIX