adderview catx - 42u42u.com/pdf/manual_adder_catx_catx-ip_4000_v1-1b.pdf · the reminder banner ......
TRANSCRIPT

AdderView CATxUser Guide
�
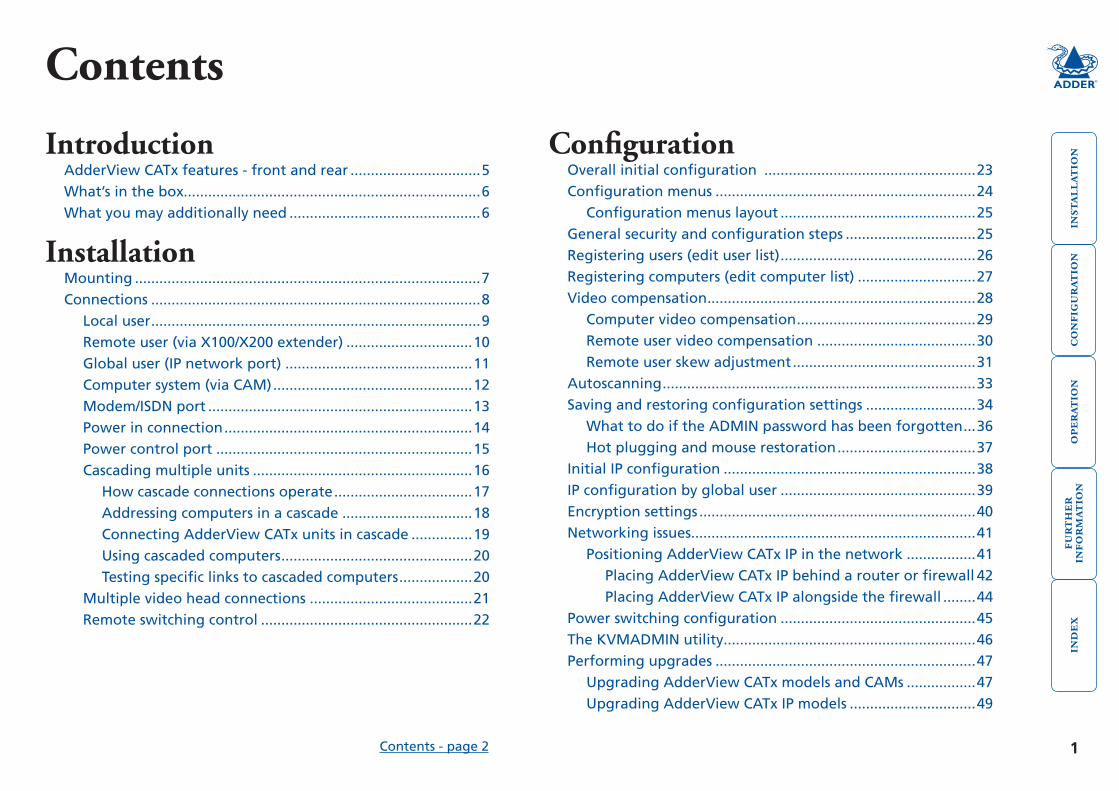
Contents
IntroductionAdderView CATx features - front and rear ................................5
What’s in the box.........................................................................6
What you may additionally need ...............................................6
InstallationMounting .....................................................................................7
Connections .................................................................................8
Local user .................................................................................9
Remote user (via X100/X200 extender) ...............................10
Global user (IP network port) ..............................................11
Computer system (via CAM) .................................................12
Modem/ISDN port .................................................................13
Power in connection .............................................................14
Power control port ...............................................................15
Cascading multiple units ......................................................16
How cascade connections operate ..................................17
Addressing computers in a cascade ................................18
Connecting AdderView CATx units in cascade ...............19
Using cascaded computers ...............................................20
Testing specific links to cascaded computers ..................20
Multiple video head connections ........................................21
Remote switching control ....................................................22
ConfigurationOverall initial configuration ....................................................23
Configuration menus ................................................................24
Configuration menus layout ................................................25
General security and configuration steps ................................25
Registering users (edit user list) ................................................26
Registering computers (edit computer list) .............................27
Video compensation ..................................................................28
Computer video compensation ............................................29
Remote user video compensation .......................................30
Remote user skew adjustment .............................................31
Autoscanning .............................................................................33
Saving and restoring configuration settings ...........................34
What to do if the ADMIN password has been forgotten ...36
Hot plugging and mouse restoration ..................................37
Initial IP configuration ..............................................................38
IP configuration by global user ................................................39
Encryption settings ....................................................................40
Networking issues......................................................................41
Positioning AdderView CATx IP in the network .................41
Placing AdderView CATx IP behind a router or firewall 42
Placing AdderView CATx IP alongside the firewall ........44
Power switching configuration ................................................45
The KVMADMIN utility..............................................................46
Performing upgrades ................................................................47
Upgrading AdderView CATx models and CAMs .................47
Upgrading AdderView CATx IP models ...............................49
Contents - page 2

�
OperationThe front panel controls ...........................................................50
AdderView CATx models ..................................................50
AdderView CATx IP models ..............................................50
Accessing the AdderView CATx ................................................50
Local and remote user access ....................................................51
Selecting a computer ............................................................51
Logging in and out ...............................................................54
Selecting cascaded computers .............................................54
The confirmation box ...........................................................54
The reminder banner ............................................................55
Routing status .......................................................................55
Power switching (via configuration menu) .........................56
User preferences and functions ...........................................56
Global user access ......................................................................57
Global user access via VNC viewer .......................................58
Global user access via web browser .....................................59
Using the viewer window ....................................................60
The menu bar ...................................................................60
When using the viewer window .....................................60
Mouse pointers .................................................................61
Configure ..........................................................................61
Auto calibrate ....................................................................62
Re-synchronise mouse . ......................................................62
Access mode - shared/private .........................................62
Power switching (via viewer) ...........................................62
Controls .............................................................................63
Access via dial up (modem or ISDN) link .........................66
If you need to enter a port number ................................66
Viewer encryption settings ..............................................67
Supported web browsers .................................................67
Further informationGetting assistance ......................................................................68
Troubleshooting ........................................................................68
Appendix 1 – Configuration menus .........................................69
Functions ...............................................................................70
User Preferences ...................................................................71
Global Preferences ................................................................72
Setup Options .......................................................................74
Advanced Options ................................................................76
Configure IP port ..................................................................78
Unit Configuration ...........................................................79
Network Configuration ...................................................80
Modem Configuration .....................................................81
Reset Configuration .........................................................82
Clearing IP access control .....................................................82
Appendix 2 - Configuration pages via viewer .........................83
User accounts ........................................................................84
Unit configuration ................................................................85
Advanced unit configuration ..........................................86
Time & date configuration ...................................................87
Network configuration .........................................................88
Setting IP access control ...................................................89
Serial port configuration ......................................................90
Host configuration ................................................................91
Adder Port Direct ..................................................................92
Logging and status ...............................................................93
HT
Contents - page 3

�
Appendix 3 - VNC viewer connection options .........................94
Colour/Encoding ...................................................................94
Inputs .....................................................................................95
Scaling ...................................................................................96
Misc ........................................................................................96
Identities ................................................................................97
Load / Save ............................................................................97
Appendix 4 - VNC viewer window options ..............................98
Appendix 5 - Browser viewer options ......................................99
Encoding and colour level ....................................................99
Inputs .....................................................................................99
Security ..................................................................................99
Misc ........................................................................................99
Appendix 6 – Addresses, masks and ports .............................100
IP addresses .........................................................................100
Net masks ............................................................................100
Net masks - the binary explanation ..............................101
Calculating the mask for IP access control ....................102
Ports .....................................................................................103
Security issues with ports ...............................................103
HT
Appendix 7 – Cable and connector specifications .................104
RS232 serial mouse to PS/2 converter cable .....................104
AdderView CATx to power switch cable ..........................104
Power switch to power switch daisy chain cable ..............104
Multi-head synchronisation cable .................................105
Appendix 8 – Hotkey sequence codes ....................................106
Permissible key presses .......................................................106
Creating macro sequences .................................................106
Appendix 9 – Supported video modes ...................................107
Warranty ..................................................................................108
Safety information ..................................................................108
End user licence agreement ....................................................109
Radio Frequency Energy..........................................................110
Index

�
IntroductionThank.you.for.choosing.the.AdderView.CATx.series.from.Adder.Technology..Each.of.the.four.models.have.been.designed.to.take.full.advantage.of.CATx.structured.cabling.(where x means category 5, 5e or 6).to.provide.high.quality.linking.plus.ultimate.flexibility.for.installers.and.operators.alike.
At.its.heart.the.AdderView.CATx.is.a.tried.and.trusted.digital.KVM.+.audio.switch.with.16.or.24.ports..In.its.simplest.form,.the.AdderView.CATx.allows.up.to.four.users.to.maintain.full.control.over.multiple.host.systems..
This.description,.however,.is.far.from.sufficient.to.tell.you.that.those.four.users.can.easily.be.situated.up.to.300m.(980.feet).from.the.unit,.using.Adder.X100.or.X200.extenders..It.also.does.not.tell.you.that,.thanks.to.our.unique.Adder.CAM.(Computer.Access.Module).technology,.the.host.systems.can.themselves.be.up.to.50m.(160.feet).from.the.unit..In.both.cases.CATx.structured.cabling.provides.neat,.easy-to-manage.and.cost.effective.linking..The.16-.or.24-.ports.of.the.standard.units.are.by.no.means.the.limit..By.cascading.one.or.more.AdderView.CATx.units.you.can.easily.control.up.to.512.host.computers.
The.AdderView.CATx.IP.variants.introduce.true.global.control.for.the.multiple.host.systems..Up.to.four.global.users.can.share.access.to.a.computer.from.anywhere.via.an.IP.network/internet.connection.using.a.Real.VNC.client.application..A.modem/ISDN.port.provides.an.alternative.backup.connection.should.the.network.link.suffer.a.failure..Optional.power.switch.control.allows.you.to.remotely.perform.a.hard.reset.on.any.host.system,.no.matter.how.badly.it.has.locked.up..Finally,.to.ensure.that.only.authorised.operators.are.given.such.power,.the.AdderView.CATx.IP.units.feature.enterprise.grade.security.
X100X200X200
IP network/Internet
Power switch
Modemor ISDN
Modemor ISDN
X100
CAM CAM CAM CAM CAM CAM
}
COMPUTER USERAdderView
www.adder.com
PWR
AUX
1
VNC
2
100
3
DAT
4
LNK
Many computersAdderView.CATx.units.can.directly.support.either.16.or.24.computer.systems..Multiple.AdderView.CATx.units.can.also.be.cascaded.to.support.a.maximum.of.512.computers..
Each.system.is.linked.using.a.Computer.Access.Module.(CAM).and.category.5,.5e.or.6.cabling.to.a.maximum.distance.of.50m.(160.ft).from.the.AdderView.CATx.unit...
Optional power controlThe.IP.models.provide.the.opportunity.to.attach.one.or.more.power.switches..These.control.the.supply.to.the.system(s).and.allow.the.global.user.to.hard.reset.any.system.that.has.suffered.a.failure..
Local userOne.user.can.be.connected.directly.to.the.AdderView.CATx......
Modem/ISDN portThis.port.offers.a.connection.option.that.can.be.used.alongside,.or.instead.of,.the.IP.network.link..It.also.offers.a.backup.route.should.the.network.fail..
Global usersThe.IP.models.can.support.up.to.four.global.users.at.any.one.time..All.of.these.may.be.connected.via.the.IP.network.port.or.one.may.be.linked.via.the.modem/ISDN.channel.....
Remote usersUp.to.four*.users.can.be.linked,.via.Adder.X100/X200.extenders.and.category.5,.5e.or.6.cabling,.to.a.maximum.distance.of.300m.(980.ft)....*.The.IP.models.allow.two.remote.(extended).users.....
CAM formatsThe.CAMs.are.available.in.different.formats.to.support.all.common.types.of.systems,.which.can.easily.be.mixed.within.a.multi-format.configuration..
Represents.KVM.&.audio.connections

�
AdderView CATx features - front and rearThe.AdderView.CATx.units.pack.a.great.deal.of.functionality.into.a.compact.space..All.models.occupy.a.single.1U.rack.space.and.provide.most.of.their.connectors.at.the.rear.face..The.smart.front.face.features.the.IP.network.port.and.the.operation.indicators.
Power control portOptionally.use.this.port.to.control.one.or.more.power.switches..These.allow.the.remote.user.to.take.full.control.of.the.computer.system(s).
Local user portConnect.a.keyboard.and.mouse.(either.PS/2-style.or.USB),.plus.a.video.monitor.and.optional.speakers.to.these.connectors..These.allow.you.to.perform.the.initial.configuration.of.the.AdderView.CATx..Additionally,.you.can.use.these.to.locally.control.the.connected.computer(s)..
Computer portsEach.computer.connects.to.one.of.these.ports.via.standard.category.5,.5e.or.6.cabling..At.the.other.end.of.the.cabling.a.CAM.(Computer.Access.Module).is.used.to.provide.the.necessary.keyboard,.video,.mouse.and.optional.speaker.connections..
Modem port (IP models only)Optionally.use.this.port.to.attach.either.a.standard.modem.or.an.ISDN.adapter..This.feature.provides.an.alternative,.direct-dial,.remote.link.into.the.AdderView.CATx.IP.models.....
Dual power inputsThe.primary.and.optional.auxiliary.power.supplies.connect.here.
Remote user portsUp.to.four.remote.users.can.be.connected,.using.optional.Adder.X100/X200.extenders.and.standard.category.5,.5e.or.6.cabling,.a.maximum.distance.of.300m.(1000ft).from.the.AdderView.CATx.unit..CATx.IP.models.provide.two.remote.user.ports..
IP network port (CATx IP only)The.port.by.which.global.users.are.linked.to.the.AdderView.CATx.unit..This.intelligent.Ethernet.port.can.automatically.sense.whether.it.is.attached.to.a.10Mb.or.100Mb.network..
Upgrade portThis.port.is.used.to.update.(when.necessary).the.internal.firmware.of.the.AdderView.CATx.unit.and.optionally.to.control.port.switching..
Created through partnershipThe.AdderView.CATx.IP.model.is.the.result.of.a.creative.partnership.between.two.companies.that.are.leaders.in.their.respective.markets:
Adder.Technology.Limited.are.renowned.worldwide.for.their.professional.KVM.switching.hardware.
RealVNC.are.creators.of.remote.control.software.for.a.wide.variety.of.computer.systems..Speed,.simplicity.and.security.are.their.particular.strengths...
IndicatorsThe.front.panel.indicators.clearly.show.key.aspects.of.operation.(CATx.and.CATx.IP.models.differ):
•. VNC.Indicates.that.a.global.user.is.connected.and.active.
•. �00..Indicates.the.Ethernet.network.speed.(10/100Mbs).
•. DAT.Network.activity.indication.
•. LNK.Network.link.present.
•. PWR.Power.input.indicator.
•. AUX.Auxiliary.power.input.indicator.
•. �-�.Indicates.activity.on.the.four.user.ports..
Note: The VNC, 100, DAT & LNK indicators are present on AdderView CATx IP models only.
On non-IP models each user port has an upper (mouse activity) and lower (keyboard activity) indicator.
Front panel buttonsThe.COMPUTER.and.USER.buttons.allow.the.local.user.to.select.the.required.combination..Adjacent.numeric.displays.show.the.current.selection..Keyboard,.mouse.and.menu-based.switching.techniques.are.also.available....

�
What’s in the box
AdderView CATx or
AdderView CATx IP
�0W power adapter and country- specific power lead
What you may additionally need
CD-ROM
Slave power switches for connection to AdderView CATx IP or master power switch Part.number:.EPS-S8.(not.available.in.North.America)
Master power switch for connection to AdderView CATx IP or standalone Ethernet operation Part.number:.EPS-M8.(not.available.in.North.America)
Adder X�00/X�00 extendersOne.extender.required.per.remote.user..X200.units.are.similar.to.X100.except.that.they.can.accommodate.a.second.link.to.another.switch.or.computer..X200.units.also.have.USB.connections.rather.than.PS/2-style.keyboard.and.mouse.ports..Three.different.variants.are.available.for.each.X100.or.X200.unit.-.AS/R.variants.have.audio.and.video.skew.circuitry.to.overcome.extreme.video.degradation.problems..A/R.variants.lack.the.skew.circuitry.and.R.variants.do.not.have.skew.circuitry.or.audio..Each.module.is.supplied.with.its.own.power.adapter.and.country-specific.power.lead..
Adder X�00/R Connectors: Analog video, PS/2-style keyboard and PS/2-style mouse.Part.number:.X100R
Adder X�00A/R Connectors: Analog video, PS/2-style keyboard, PS/2-style mouse and 3.5mm audio jack.Part.number:.X100A/R
Adder X�00AS/R Connectors: Analog video, PS/2-style keyboard, PS/2-style mouse and 3.5mm audio jack. Includes additional skew compensation features.Part.number:.X100AS/R
.Two �9” rack-mount brackets and four screws
Four self-adhesive rubber feet
Computer Access Modules One.required.per.connected.computer..There.are.five.different.formats,.depending.on.the.required.computer.connections:
PS/�-style Connectors:Analog video, PS/2-style keyboard and PS/2-style mouse.Part.number:.CATX-PS2
PS/�-style with audio Connectors:Analog video, PS/2-style keyboard, PS/2-style mouse and 3.5mm audio jack.Part.number:.CATX-PS2A
USB Connectors:Analog video and USB keyboard/mouse. Part.number:.CATX-USB
USB with audio Connectors:Analog video, USB keyboard/mouse and 3.5mm audio jack.Part.number:.CATX-USBA
Sun with audio Connectors:Analog video, Sun keyboard/mouse and 3.5mm audio jack.Part.number:.CATX-SUNA
.
Optional auxiliary power adapter (supplied.with.country-specific.power.lead)Part.number:.PSU-IEC-5V6A
AdderView CATxAVX4016.–.16.computer.connections,.1.local.console.connection,.4.remote.user.connectionsAVX4024.–.24.computer.connections,.1.local.console.connection,.4.remote.user.connections
AdderView CATx IPAVX4016IP.–.16.computer.connections,.1.local.console.connection,.1.IP.connection,.2.remote.user.connectionsAVX4024IP.–.24.computer.connections,.1.local.console.connection,.1.IP.connection,.2.remote.user.connections
REMOTE
ADDER®
PWR
TOLOCAL 1
TOLOCAL 2
Adder X�00/R Connectors: Analog video, USB keyboard and USB mouse.Part.number:.X200R
Adder X�00A/R Connectors: Analog video, USB keyboard, USB mouse and 3.5mm audio jack.Part.number:.X200A/R
Adder X�00AS/R Connectors: Analog video, USB keyboard, USB mouse and 3.5mm audio jack. Includes additional skew compensation features.Part.number:.X200AS/R
Serial upgrade cable

�
InstallationMounting
The.AdderView.CATx.units.offer.two.main.mounting.methods:
•. Supplied.four.self-adhesive.rubber.feet
•. Supplied.rack.brackets
Connections
Rack bracketsThe.two.supplied.brackets.(plus.four.screws),.allow.the.AdderView.CATx.unit.to.be.secured.within.a.standard.1U.rack.slot..Note: Both the AdderView CATx and its
power supply generate heat when in operation and will become warm to the touch. Do not enclose them or place them in locations where air cannot circulate to cool the equipment. Do not operate the equipment in ambient temperatures exceeding 40 degrees Centigrade. Do not place the products in contact with equipment whose surface temperature exceeds 40 degrees Centigrade. .
HT

�
ConnectionsThe.AdderView.CATx.and.CATx.IP.units.provide.a.great.deal.of.flexibility.in.their.configurations..This.chapter.details.the.various.connections.that.can.be.made.to.achieve.the.required.installation.
Global user (IP network port)
page 11
Remote user (via X100 extender)
page 10
Local user
page 9
Modem/ISDN port
page 13
Power in
page 14
Computer power control switching
page 15
Computer system (via CAM)
page 12
Connections.do.not.need.to.be.carried.out.in.the.order.given.within.this.guide,.however,.where.possible.connect.the.power in.as.a.final.step.
X100
MODEM/ISDN
POWERIN
IP
CAM
Cascading multiple units
page 16
REMOTEUSER
X100
HOSTCOMPUTER
CAM CAM
REMOTEUSER
X100
Multiple video head connections
page 21
REMOTECONTROL
Remote switching control
page 22

9
Local userA.locally.connected.video.monitor,.keyboard.(and.mouse).are.required.during.the.initial.configuration..These.are.also.useful.during.normal.use.to.allow.quick.local.control.of.any.connected.computer.systems..The.AdderView.CATx.unit.can.directly.support.either.PS/2.or.USB.style.keyboards.and.mice..An.audio.port.is.also.provided.for.locally.connected.speakers,.if.required...
From PS/�-style mouse
From PS/�-style keyboard
From video monitor
From speakers
From USB keyboard and mouse
To connect the local user port1. Position.a.suitable.video.monitor,.keyboard,.mouse.(and.speakers,.if.
required).in.the.vicinity.of.the.AdderView.CATx.unit.such.that.their.cables.will.easily.reach.
2. Attach.the.video.monitor,.keyboard,.mouse.(and.speaker).connectors.to.the.sockets,.collectively.labelled.as.USER PORT 1,.at.the.rear.of.the.AdderView.CATx.unit.
AdderView CATx rear panel
. Note: The keyboard and mouse can be either PS/2-style or USB respectively, as required. The two different connection types can even be mixed. Recognition of the type used is automatic and requires no extra settings to be made..

�0
Remote user (via X100/X200 extender)Up.to.four.users.can.be.placed.a.maximum.of.300.metres.(980.feet).from.the.AdderView.CATx.unit..Remote.users.are.connected.via.an.Adder.X100.or.X200.extender.module.and.suitable.category.5,.5e.or.6.cabling.(with.no.crossover)..The.AdderView.CATx.IP.models.provide.two.remote.user.ports.
Cable lengths for remote user locationsThe.maximum.length.of.cable.between.a.remote.user.and.the.AdderView.CATx.unit.can.be.up.to.300.metres.(980.feet)..However,.bear.in.mind.that.the.overall.distance.between.any.remote.user.and.any.computer.system.must.not.exceed.300.metres.(980.feet)..
In.situations.where.any.computer.system.will.be.placed.a.significant.distance.from.the.AdderView.CATx.unit,.ensure.that.the.distance.to.any.remote.user.is.similarly.less.than.300.metres.(980.feet).....
To connect a remote user1. Place.an.Adder.X100.or.X200.extender.unit.adjacent.to.the.remote.user.
location..
2. Attach.the.video.monitor,.keyboard,.mouse,.power.adapter.(and.speaker).connectors.to.the.sockets.of.the.Adder.X100.or.X200.module.
3. Lay.a.suitable.length.of.category.5,.5e.or.6.cabling.between.the.Adder.X100/X200.module.and.the.AdderView.CATx.unit..Please.refer.to.the.section.Cable lengths for remote user locations.opposite.
4. Attach.the.connector.of.the.cable.run.to.the.socket.of.the.Adder.X100/X200.
5. At.the.other.end.of.the.cable.run,.attach.the.cable.connector.to.one.of.the.sockets.labelled.CATx USER PORTS.on.the.rear.panel.of.the.AdderView.CATx.unit..
From mouse
From keyboard
From video monitor
From power adapter
Category �, �e or � cable leading to
AdderView CATx unit
Category �, �e or � cable from Adder X�00/X�00
module
6. Where.necessary,.use.the.in-built.video.compensation.feature.of.the.Adder.X100/X200.module.to.eliminate.any.effects.caused.by.the.cable.run..However,.ensure.that.the.links.between.the.computers.and.the.AdderView.CATx.have.been.compensated.first..See.remote user video compensation.for.details....
Adder X�00/X�00 module
Adder X�00/X�00 module
AdderView CATx rear panel
Note: The AdderView CATx model shown here is a non-IP version. The IP-version provides only remote user ports 3 and 4.

��
Global user (IP network port)The.AdderView.CATx.IP.models.provide.an.autosensing.Ethernet.IP.port.that.can.operate.at.10.or.100Mbps,.according.to.the.network.speed..The.AdderView.CATx.IP.models.are.designed.to.reside.quite.easily.at.any.part.of.your.network:.
•. They.can.be.placed.within.the.local.network,.behind.any.firewall/router.connections.to.the.Internet,.or
•. They.can.be.placed.externally.to.the.local.network,.on.a.separate.sub-network.or.with.an.open.Internet.connection....
Wherever.in.the.network.an.AdderView.CATx.IP.is.situated,.you.will.need.to.determine.certain.configuration.issues.such.as.address.allocation.and/or.firewall.adjustment.to.allow.correct.operation..Please.refer.to.Networking issues.within.the.Configuration.chapter.for.more.details..
IMPORTANT: When an AdderView CATx IP is accessible from the public Internet or dial up connection, you must ensure that sufficient security measures are employed.
IP network link
To connect the Global user (IP network) port1. Depending.upon.where.in.the.network.the.AdderView.CATx.IP.is.being.
connected,.run.a.category.5,.5e.or.6.link.cable.from.the.appropriate.hub.or.router.to.the.AdderView.CATx.IP.unit.
2. Connect.the.plug.of.the.link.cable.into.the.IP.port.on.the.front.panel.of.the.AdderView.CATx.IP.unit.
3. Configure.the.network.settings.as.appropriate.to.the.position.of.the.AdderView.CATx.IP.within.the.network.-.see.Networking issues.for.details..
��
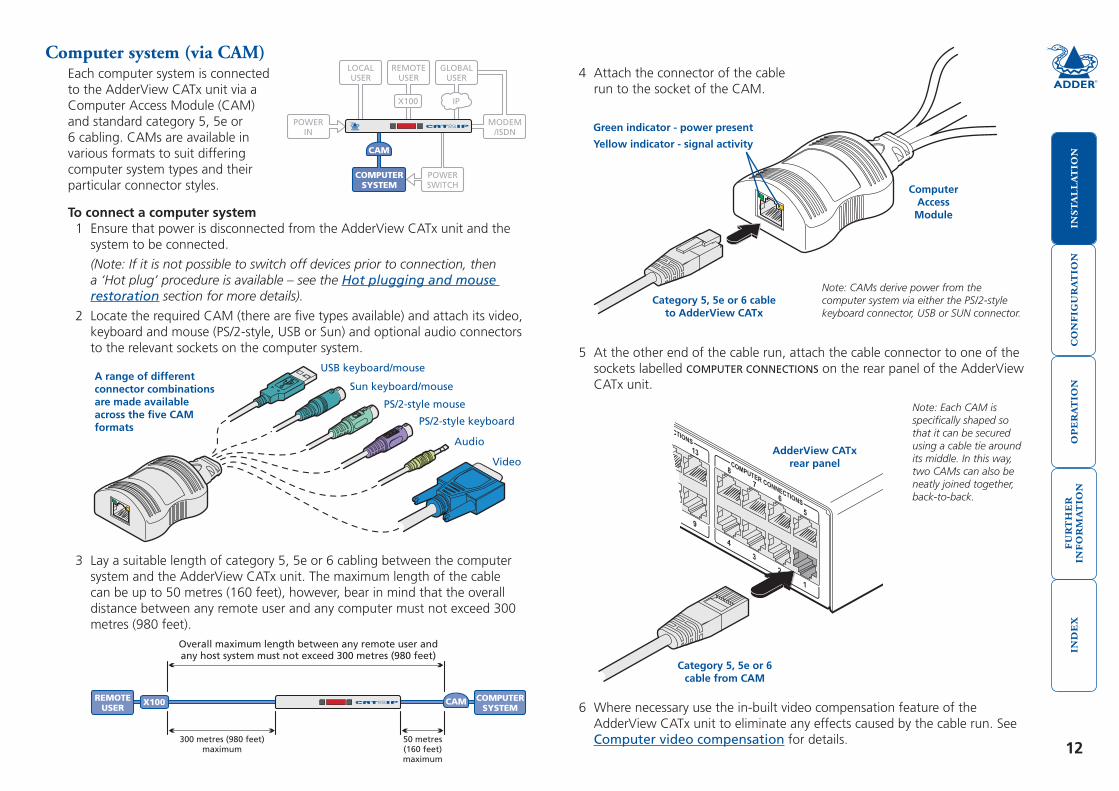
Computer system (via CAM)Each.computer.system.is.connected.to.the.AdderView.CATx.unit.via.a.Computer.Access.Module.(CAM).and.standard.category.5,.5e.or.6.cabling..CAMs.are.available.in.various.formats.to.suit.differing.computer.system.types.and.their.particular.connector.styles.
To connect a computer system1. Ensure.that.power.is.disconnected.from.the.AdderView.CATx.unit.and.the.
system.to.be.connected..
(Note: If it is not possible to switch off devices prior to connection, then a ‘Hot plug’ procedure is available – see the Hot plugging and mouse restoration section for more details).
2. Locate.the.required.CAM.(there.are.five.types.available).and.attach.its.video,.keyboard.and.mouse.(PS/2-style,.USB.or.Sun).and.optional.audio.connectors.to.the.relevant.sockets.on.the.computer.system..
3. Lay.a.suitable.length.of.category.5,.5e.or.6.cabling.between.the.computer.system.and.the.AdderView.CATx.unit..The.maximum.length.of.the.cable.can.be.up.to.50.metres.(160.feet),.however,.bear.in.mind.that.the.overall.distance.between.any.remote.user.and.any.computer.must.not.exceed.300.metres.(980.feet).
4. Attach.the.connector.of.the.cable.run.to.the.socket.of.the.CAM.
5. At.the.other.end.of.the.cable.run,.attach.the.cable.connector.to.one.of.the.sockets.labelled.COMPUTER CONNECTIONS.on.the.rear.panel.of.the.AdderView.CATx.unit...
Video
PS/2-style mouse
PS/2-style keyboard
Audio
USB keyboard/mouse
Sun keyboard/mouseA range of different connector combinations are made available across the five CAM formats
Computer Access
Module
Category �, �e or � cable from CAM
Category �, �e or � cable to AdderView CATx
AdderView CATx rear panel
Green indicator - power present
Yellow indicator - signal activity
Note: CAMs derive power from the computer system via either the PS/2-style keyboard connector, USB or SUN connector.
6. Where.necessary.use.the.in-built.video.compensation.feature.of.the.AdderView.CATx.unit.to.eliminate.any.effects.caused.by.the.cable.run..See.Computer video compensation.for.details....
Note: Each CAM is specifically shaped so that it can be secured using a cable tie around its middle. In this way, two CAMs can also be neatly joined together, back-to-back..

��
Modem/ISDN portThe.AdderView.CATx.IP.models.provide.a.serial.port.to.allow.you.to.connect.either.a.modem.or.ISDN.terminal.adapter..This.can.be.used.as.a.primary,.secondary.or.backup.access.port.for.global.users,.as.best.suits.your.overall.configuration.
IMPORTANT: When the AdderView CATx IP is accessible from the public Internet or dial up connection, you must ensure that sufficient security measures are employed.
Note: On non-IP models, the COM2/MODEM port is reserved for the support of future features.
To connect a modem or ISDN adapter1. If.possible,.disconnect.power.from.the.AdderView.CATx.IP.and.the.modem.
or.ISDN.adapter.
2. Connect.a.suitable.serial.modem.(non-crossover).cable.to.the.serial.port.on.the.modem/ISDN.adapter.
3. Connect.the.other.end.of.the.serial.cable.to.the.port.labelled.COM2.at.the.rear.of.the.AdderView.CATx.IP.
Note: The default serial port speed is 115200 and a standard Hayes-compatible auto-answer string is sent during startup. The default startup string is ‘ATZS0=1’. Both the serial port speed and startup string settings can easily be altered during configuration - see Initial IP configuration for more details. The other serial settings are fixed at: No parity, 8 bit word and 1 stop bit.
Cable from modem or ISDN adapter
AdderView CATx rear panel

��
Power in connectionThe.AdderView.CATx.unit.is.supplied.with.a.single.30W.power.adapter.which.is.sufficient.to.supply.any.configuration.of.the.unit..The.AdderView.CATx.IP.unit.has.two.power.input.sockets.to.allow.an.auxiliary.(redundant).power.adapter.to.be.connected..There.is.no.on/off.switch.on.the.unit,.so.operation.begins.as.soon.as.a.power.adapter.is.connected.
Note: AdderView CATx units require a heavy duty power adapter at either or both power input connectors. Use only the adapter supplied with the unit or available under Adder part number: PSU-IEC-5V6A. Do not use the standard 10W adapters that are supplied with other Adder products, such as the X100.
To connect the power supply1. Attach.the.output.lead.from.the.power.adapter.to.the.MAIN PWR IN.socket.
on.the.rear.panel.of.the.AdderView.CATx.
2. Connect.the.IEC.connector.of.the.supplied.country-specific.power.lead.to.the.socket.of.the.power.adapter.
3. Connect.the.power.lead.to.a.nearby.main.supply.socket.
4. Repeat.steps.1.to.3.for.the.auxiliary.power.adapter.(using.the.AUX PWR IN.socket),.if.a.backup.supply.is.required.
Note: Both the AdderView CATx and its power supply generate heat when in operation and will become warm to the touch. Do not enclose them or place them locations where air cannot circulate to cool the equipment. Do not operate the equipment in ambient temperatures exceeding 40 degrees Centigrade. Do not place the products in contact with equipment whose surface temperature exceeds 40 degrees Centigrade. Using two power supplies will ensure that each power supply takes less load and run at a correspondingly cooler temperature.
AdderView CATx rear panel
output lead from power adapter

��
Power control portThe.AdderView.CATx.IP.models.provide.a.serial.port.for.connection.to.one.or.more.optional.power.control.units..This.allows.you.to.control.the.mains.power.being.supplied.to.the.connected.computer(s).so.that.an.authorised.user.can,.if.necessary,.perform.a.complete.remote.cold.reboot.on.a.failed.system.
The.control.connector.of.the.first.power.switch.is.attached,.via.serial.cable,.to.the.rear.panel.of.the.AdderView.CATx.IP..Any.additional.power.switches.are.then.attached.via.a.‘daisy-chain’.arrangement.to.the.first.power.switch..Each.power.switch.box.is.then.given.a.unique.address.and.access.to.each.power.port.(8.ports.on.each.power.switch.box).is.gained.using.a.combination.of.the.switch.box.address.and.the.port.number..
To connect and address the switch boxesNote: The AdderView CATx IP unit can be powered on during this procedure, however, the switch boxes should be switched off.
1. Mount.up.to.four.switch.boxes.in.positions.where.they.are.close.to.the.computer.systems.that.they.will.control.and.not.too.distant.from.the.AdderView.CATx.IP.unit.(preferably.within.2.5.metres).
2. Use.a.serial.cable.with.an.RJ9.and.a.9-pin.D-type.connector.(see.Appendix 7.for.specification)..Attach.the.RJ9.plug.to.the.socket.marked.IN.on.the.first.switch.box..Attach.the.other.end.to.the.socket.marked.POWER CONTROL.on.the.AdderView.CATx.IP.
Power to computerBox �, port � - address: ��
Box �
Box �
Box �
Box �
Power switch boxes
‘Daisy-chain’ control connections
The.power.ports.are.connected.to.the.power.inputs.of.each.computer.system.and.the.power.switch.box(es).are.then.connected.to.a.mains.power.supply.
IMPORTANT: Power switching devices have a maximum current rating. It is essential to ensure that the total current drawn by the equipment connected to the power switching device does not exceed the current rating of the power switching device. You must also ensure that the current drawn from any mains socket does not exceed the current rating of the mains socket.
Setting.up,.configuring.and.using.power.switching.requires.three.main.steps:
•. Connect.and.address.the.switch.boxes.•. Configure the power strings
•. Operate.power.switching.via configuration menu.or.via viewer
3. For.each.of.the.remaining.switch.boxes.(if.used),.use.a.serial.cable.with.RJ9.connectors.at.both.ends.(see.Appendix 7.for.specification)..Attach.one.end.to.the.socket.marked.OUT.of.the.previous.box.and.the.other.end.to.the.socket.marked.IN.of.the.next.box..
4. Set.the.addressing.switches.on.each.switch.box.using.the.two.micro.switches.marked.‘Slct’.on.the.front.panel..The.box.connected.directly.to.the.AdderView.CATx.IP.is.Box.1.and.so.on,.down.the.daisy-chain.line.to.Box.4.at.the.end.
5. Attach.IEC.to.IEC.power.leads.between.each.port.and.the.power.input.socket.of.each.computer.system.that.requires.power.switching..Carefully.note.to.which.power.ports,.on.which.boxes,.each.computer.system.is.connected..If.computer.systems.have.multiple.power.inputs,.then.each.input.must.be.connected.via.separate.ports,.which.can.be.on.the.same,.or.different.boxes.
6. Connect.each.box.to.a.suitable.mains.power.input..
Now.proceed.to.the.configuration.stage.covered.in.the.Power switching configuration.section.within.the.Configuration.chapter.
Box Switch � Switch �.
. 1... Off. Off
. 2. On. Off
. 3. Off. On
. 4. On. On
Off = switch upwardsOn = switch downwardsSwitch � is on the left side
AdderView CATx rear panel
Serial cable to first power switch box

��
Cascading multiple unitsThe.AdderView.CATx.(IP).units.support.up.to.sixteen.or.twenty.four.directly.connected.computer.systems,.however,.this.is.by.no.means.the.limit..Thanks.to.an.intelligent.communication.system,.called.Adder Port Direct,.many.more.computer.systems.can.be.controlled.by.connecting.other.AdderView.CATx.units..The.combination.of.units.can.be.arranged.up.to.three.levels.deep.forming.a.tree,.or.cascade.arrangement,.with.computer.systems.situated.at.any.level.within.that.cascade.tree.
The.maximum.number.of.computer.systems.that.can.be.controlled.within.a.cascade.installation.depends.upon.the.AdderView.CATx.unit.placed.at.the.top.level..If.the.top.level.unit.is.a.non-IP.version,.a.maximum.of.512.computer.systems.can.be.controlled..However,.if.the.top.level.unit.is.an.AdderView.CATx.IP,.the.maximum.number.of.computers.drops.to.128..This.is.due.to.the.extra.burden.placed.on.the.unit’s.memory.of.administering.global.(IP).users..
X100
MODEM/ISDN
POWERIN
IP
CAM
The cascade treeThe.diagram.shows.how.multiple.AdderView.CATx.units.can.be.cascaded.up.to.three.levels..Computer.systems.can.be.connected.at.any.level..Up.to.four.users.(local,.remote.or.global).can.simultaneously.access.computer.systems.situated.around.the.cascade.tree...
See also•. How cascade connections operate
•. Addressing computers in a cascade
•. Connecting AdderView CATx units in cascade
•. Testing specific links to cascaded computers

��
How cascade connections operateThe.method.for.cascading.AdderView.CATx.units.is.straightforward.and.requires.no.hardware.settings.or.lengthy.configuration.process..This.is.due.to.the.Adder Port Direct.communication.system.that.allows.them.to.locate.each.other.and.share.information.
The.method.of.linking.AdderView.CATx.units.is.the.same.regardless.of.the.cascade.level,.or.number.of.devices.attached..Put.simply:.
• A single cascade link is made by connecting a computer
connections socket of one unit to a cAtx user ports socket of the unit below it.
Such.a.single.link.would.allow.just.one.user.from.the.higher.AdderView.CATx.unit.to.access.any.of.the.computer.systems.attached.to.the.lower.one..However,.a.single.link.can.cause.a.bottleneck.for.multi-user.systems.so.you.are.strongly.recommended.to.use.a.minimum.of.two.or.three.links..Ideally.quad.links.should.be.used.wherever.possible.as.these.allow.four.users.to.simultaneously.access.computer.systems.situated.anywhere.within.the.cascade.tree..
When.cascade.links.are.made.between.units,.each.AdderView.CATx.will.automatically.recognise.the.links.and.treat.them.accordingly..The.connections.within.dual,.triple.or.quad.cascade.links.will.then.be.allocated.to.users.according.to.their.general.availability.in.that.group,.not.as.specific.individual.lines..The.diagram.here.summarises.the.groups.into.which.the.ports.are.arranged.When.connecting.links,.ensure.that.you.use.the.lowest.numbered.ports.in.each.group..For.example,.to.create.a.triple.cascade.link.in.group.A,.use.ports.1,.2.and.3;.for.a.double.cascade.link.in.group.B,.use.ports.5.and.6,.etc..Unused.ports.in.a.group.can.be.utilised.to.connect.directly.to.normal.computers..The.Adder.Port.Direct.system.will.automatically.distinguish.between.the.different.types.of.connections.
The.central.purpose.of.the.link.group.system.is.that.each.user.can.use.a.unique.address.to.locate.a.particular.computer..However,.as.with.the.Internet,.the.route.to.get.there.could.be.slightly.different.each.time..This.avoids.any.route.blocking.that.could.easily.be.caused.by.other.users.occupying.any.specific.link.lines.
Note: Single, dual, triple and quad link groups may be mixed on one unit providing the differing link groups lie within the appropriate group boundaries shown opposite - see Tips for successful cascading for more details.
20 12 419 11 318 10 217 9 1
24 16 823 15 722 14 621 13 5COM2 / MODEM
KM
COMPUTER CONNECTIONS COMPUTER CONNECTIONS COMPUTER CONNECTIONS
GROUP AGROUP CGROUP E
GROUP F GROUP D GROUP B
Port groups for cascade links (sixteen port models use groups A to D only)
See also•. Addressing computers in a cascade
•. Connecting AdderView CATx units in cascade
•. Testing specific links to cascaded computers

��
CAMCAMCAMCAM
Group Cat cascadelevel 1
Group Aat cascadelevel 2
Port atcascade level 2
01
Group B atcascade level 1
The unique addressof this host is:
The unique addressof this host is:
Portat cascadelevel 3
02
CA02
CA02
B01
B01
CAMCAMCAMCAM
AdderView CATx or AdderView CATx IP
AdderView CATxAdderView CATx
AdderView CATx
User1
User2
User3
User4
Addressing computers in a cascadeThe.addressing.format.used.by.the.AdderView.CATx.units.incorporates.the.various.group letters.along.with.a.final.specific.port.number.to.which.a.required.computer.is.attached..In.the.diagram.given.here,.a.portion.of.the.previous.cascade.diagram.indicates.how.the.routes.to.particular.computers.are.formed.and.addressed....
Each.cascade.level.requires.a.group.letter.followed.by.a.two.figure.final.port.number,.hence.the.computer.marked.in.red.requires.a.longer.address.it.is.at.cascade.level.3,.compared.to.the.blue.computer.at.level.2.with.its.shorter.unique.address..A.computer.connected.directly.to.the.AdderView.CATx.at.the.top.level.would.simply.have.a.two.digit.port.number.
The.group.at.level.2.is.lettered.‘A’.because.it.is.connected.to.ports.1,.2,.3.and.4.on.the.AdderView.CATx..If.it.was.connected.to.ports.5,.6,.7.and.8,.then.the.group.letter.would.be.‘B’.and.the.overall.address.for.the.red.computer.would.be.CB02.
The.first.time.that.you.make.a.connection.between.two.AdderView.CATx.units,.the.master.unit.will.detect.this.and.ask.(via.the.on.screen.menu).if.you.want.to.automatically.add.computers..If.you.choose.‘Yes’.then.the.ports.on.the.cascade.will.be.automatically.added.to.the.on.screen.menu.
See also•. Connecting AdderView CATx units in cascade
•. Testing specific links to cascaded computers

�9
3. Connect.the.other.end.of.the.cascade.link.cable.to.one.of.the.CATx USER PORTS.sockets.on.the.rear.panel.of.the.lower.unit..Due.to.the.way.in.which.ports.within.a.link.group.are.dynamically.allocated,.it.is.not.usually.important.exactly.which.user.port.is.connected.to.each.computer.port.of.the.upper.unit.
4. Repeat.steps.2.and.3.for.each.of.the.links.within.the.group,.adhering.to.the.Group numbering diagram.for.the.correct.link.group.boundaries.on.the.COMPUTER
CONNECTIONS.ports.of.the.upper.switch.
Once.the.AdderView.CATx.units.and.computers.have.been.connected,.you.can.edit.their.names.to.make.it.much.easier.to.locate.them..See.the.To create/edit computer names.section.in.the.Configuration.chapter.for.more.details.
Connecting AdderView CATx units in cascadePlease.consider.the.following.when.making.cascade.connections.between.AdderView.CATx.units.
Tips for successful cascading
•. The.maximum.number.of.levels.for.a.cascade.is.three.
•. The.maximum.number.of.computer.systems.that.can.be.controlled.within.a.cascade.installation.depends.upon.the.AdderView.CATx.unit.placed.at.the.top.level..If.the.top.level.unit.is.a.non-IP.version,.a.maximum.of.512.computer.systems.can.be.controlled..However,.if.the.top.level.unit.is.an.AdderView.CATx.IP,.the.maximum.number.of.computers.drops.to.128..This.is.due.to.the.extra.burden.placed.on.the.unit’s.memory.of.administering.global.(IP).users..
•. The.number.of.links.between.units.determines.the.number.of.users.that.can.simultaneously.access.the.computers.situated.further.down.the.tree..Link.groups.of.one.and.two.links.should.be.discouraged.
•. Ensure.that.cascade.links.(within.a.group).between.units.are.approximately.the.same.length.
•. Triple.and.quad.link.groups.may.be.mixed.on.one.unit.providing.the.links.lie.within.the.appropriate.port.boundaries.designated.in.the.Group numbering diagram.
•. AdderView.CATx.IP.models.should.only.be.used.at.the.top.level.of.the.cascade.tree.because.they.have.only.two.CATx USER PORTS.sockets..
•. For.each.cascade.link,.use.a.standard.category.5,.5e.or.6.twisted-pair.cable,.terminated.at.each.end.with.an.RJ45.connector..There.must.be.no.crossover.connections.within.the.cable,.i.e..do.not.use.patch.cables..The.cascade.link.cables.can.be.up.to.50m.(160.feet).in.length..However,.remember.that.the.overall.length.between.any.remote.user.(via.an.X100.extender).and.any.computer.(via.a.CAM).must.not.exceed.300m.(980.feet).-.that.figure.includes.the.cascade.link.cables..Ensure.that.each.of.the.links.within.a.cascade.group.all.conform.to.the.same.length.
•. The.procedure.given.opposite.may.be.carried.out.in.any.order.but.for.clarity.the.instruction.will.begin.at.the.higher.level.AdderView.CATx.unit.(here.called.the.upper unit),.i.e..the.one.that.is.being.fed.into.by.a.unit.at.the.cascade.level.below.(here.called.the.lower unit)..The.procedure.remains.the.same.regardless.of.exactly.which.cascade.levels.are.being.connected..The.basic.rule.is.that.each.link.is.made.by.connecting.a.COMPUTER CONNECTIONS.port.of.the.upper.switch.to.a.CATx USER PORTS.of.the.lower.switch.
To connect units in cascade1. Ensure.that.power.is.disconnected.from.the.AdderView.CATx.and.all.other.
units.to.be.connected....
2. Connect.one.end.of.each.cascade.link.cable.to.an.appropriate.COMPUTER
CONNECTIONS.port.on.the.rear.panel.of.the.upper.unit..Refer.to.the.Group numbering diagram.for.the.correct.link.group.boundaries.
See also•. Testing specific links to cascaded computers

�0
Using cascaded computersIn.use,.cascaded.computers.can.be.accessed.using.exactly.the.same.methods.as.for.those.connected.directly.to.the.AdderView.CATx..However,.by.far.the.easiest.way.is.to.use.the.on.screen.menu..This.is.because.it.displays.the.computer.names.and.does.not.require.any.knowledge.of.port.addresses,.some.of.which.(as.discussed.above).can.be.up.to.six.characters.long..See.the.Selecting cascaded computers.section.in.the.Operation.chapter.for.more.details.
Testing specific links to cascaded computersAs.mentioned.previously,.the.best.and.most.efficient.way.to.access.cascaded.computers.is.by.using.the.on.screen.menu.and.via.non-specific.routes.through.the.link.groups..However,.during.configuration.or.troubleshooting,.it.may.be.useful.to.test.specific.routes.to.computers.in.order.to.verify.the.various.strands.of.each.link.group..By.using.specific.port.addresses.for.each.unit,.rather.than.link.group.numbers,.you.can.precisely.navigate.a.route.through.any.part.of.the.system.
To test a specific link1. Simultaneously.press.and.hold. .and. .
Note: and are the standard hotkeys and can be altered to avoid clashes with other devices or software. If you change the hotkeys, remember to use the new ones in place of and when following these instructions.
2. While.still.holding. .and. ,.in.sequence,.press.and.release.the.full.address.of.the.required.computer.–.remember.to.use.specific.port.numbers,.not.link.group.addresses,.e.g..061802,.not.BE02.
3. When.the.last.digit.has.been.entered,.release.all.keys.

��
Slave AdderView CATx
Master AdderView CATx
Master monitorSlave monitor
Computers fitted with dual video heads
Serial synchronisation
cable
Multiple video head connectionsTwo.or.more.AdderView.CATx.units.can.be.connected.together.so.that.they.operate.in.a.synchronised.manner..Synchronised.operation.is.useful.for.applications.that.require.multiple.video.signals.to.be.switched.together..This.type.of.operation.is.usually.required.where.each.computer.is.fitted.with.multiple.video.cards.or.video.cards.with.multiple.video.heads..Whenever.a.AdderView.CATx.channel.is.switched,.it.sends.an.RS232.command.out.on.its.serial.interface.(marked.COM1/UPGRADE.on.the.rear.panel)..An.AdderView.CATx.will.switch.its.channel.if.it.receives.the.same.command.on.its.serial.interface..Consequently,.by.linking.the.serial.interfaces,.a.master.unit.may.be.made.to.automatically.switch.one.or.more.slave.units.as.shown.in.the.diagram.
It.should.be.noted.that.the.synchronisation.cable.deliberately.does.not.have.the.transmit.pin.of.the.Slave.End.connector.linked.to.the.receive.pin.of.the.Master.End.connector..To.do.so.would.cause.the.Slave.unit.to.be.able.to.switch.the.Master.unit..This.would.setup.an.endless.cyclical.switching.sequence.that.would.prevent.the.AdderView.CATx.devices.from.operating.correctly..For.more.details.about.the.serial.synchronisation.cables,.see.Appendix 7.....
The local user ports can also be used to view multiple video head installations.
Notes
It is recommended that the second CAM in each pair is a USB-type and that it is plugged to a vacant USB port on the host computer to derive its power.
Pairs of CAMs can be strapped back-to-back with cable ties to create a tidy installation...
..

��
Remote switching controlThe.port.switching.functions.of.the.AdderView.CATx.and.AdderView.CATx.IP.units.can.be.remotely.controlled.by.an.RS232.link.to.the.serial.communication.port.on.the.rear.panel,.labelled.as.COM�/Upgrade.
The.sending.device.must.use.the.following.RS232.communication.settings:.
Baud.rate:.. 19200.bps.Data.bits:. 8.Parity:. None.Stop.bits:. 1
No.handshaking.is.implemented,.however,.valid.command.characters.will.be.echoed.back.to.the.sending.device.
The.value.of.the.byte.received.via.the.serial.link.determines.which.of.the.four.user.ports.should.be.linked.through.to.the.24.host.computer.ports..Each.user.port.can.be.individually.switched.to.required.ports..The.table.given.here.summarises.the.valid.control.codes:.
REMOTECONTROL
. � � � � � � � � 9 �0 �� �� �� �� �� �� �� �� �9 �0 �� �� �� �� 0.
User �. 10. 11. 12. 13. 14. 15. 16. 17. 18. 19. 1A. 1B. 1C. 1D. 1E. 1F. 60. 61. 62. 63. 64. 65. 66. 67. 71.
User �. 20. 21. 22. 23. 24. 25. 26. 27. 28. 29. 2A. 2B. 2C. 2D. 2E. 2F. 68. 69. 6A. 6B. 6C. 6D. 6E. 6F. 72
User �. 30. 31. 32. 33. 34. 35. 36. 37. 38. 39. 3A. 3B. 3C. 3D. 3E. 3F. 80. 81. 82. 83. 84. 85. 86. 87. 73
User �. 40. 41. 42. 43. 44. 45. 46. 47. 48. 49. 4A. 4B. 4C. 4D. 4E. 4F. 88. 89. 8A. 8B. 8C. 8D. 8E. 8F. 74.
Host computer port/channel
(video.off)
1
2019
3
2
2423
4
POWER CONTROLCOM1 / UPGRADE
COM2 / MODEM
KM
USER PORT 1
CATx USER PORTS
COMPUTE
Cable from serial control device
AdderView CATx rear panel
��
ConfigurationAlmost.all.configuration.and.operational.aspects.of.the.AdderView.CATx.units.are.controlled.via.on-screen menu.displays..
Overall initial configuration When.setting.up.a.new.installation,.the.following.stages.are.recommended:
1. Enable the general ‘Security’ option.
With security disabled (default setting), all users attached to the AdderView CATx have full and unrestricted access to all computers and all AdderView CATx settings. In larger installations, you are strongly recommended to enable security and set up individual user accounts with access privileges.
2. Create an ADMIN (administration) password.
All AdderView CATx units have a fixed user account that cannot be deleted, named ADMIN. This user account is the only one that is able to make important system changes. If you intend to use security, then it is important to allocate a password to the ADMIN account.
3. Create user accounts and allocate access rights.
Use the ADMIN account to add user profiles, passwords and access rights for each of the system users.
4. Provide names for computers.
When numerous computers are attached, you are strongly advised to provide names for each, to assist with recognition.
5. Compensate video signals to account for link cable lengths
The long cable links that are possible between the AdderView CATx unit and the computers and also to the remote users can affect the quality of the video images displayed. Use the in-built compensation features to eliminate any potential video image degradation.
6. Configure.the.required.‘Setup Options’.and.‘Global Preferences’
Use the ADMIN account to determine key AdderView CATx settings and timing characteristics.
7. Configure the IP settings
AdderView CATx IP models only. IP models possess a further collection of IP-related configuration options and encryption features that protect the installation from unauthorised global users - ensure that the IP security features are enabled before connecting the AdderView CATx IP unit to the network. The IP settings use the standard ADMIN password.
HT

��
ADDERVIEW CATx IPComputer PortComputer 1 01Computer 2 02Computer 3 03Computer 4 04Computer 5 05Computer 6 06Computer 7 07Computer 8 08User port 1 StatusADMIN SHARED USEF1-More menus F3-FindF2-Adj.Video F4-Logout
Configuration menusThe.configuration.menus.allow.you.to.determine.many.aspects.of.the.AdderView.CATx.capabilities..From.here.you.can:
• Create.individual.user.accounts.and.determine.access.rights,
• Provide.names.for.all.connected.computers.to.allow.quick.recognition,.
• Set.individual.and.global.settings.for.users,.
• Run.various.functions,.such.as.mouse.restore.operation,
• Save.and.load.AdderView.CATx.configuration.settings,.and.more.
To access the configuration menu (local and remote users)1. If.the.main.menu.is.not.already.displayed,.press.and.hold. . .and.then.
press. .using.a.keyboard.attached.to.a.AdderView.CATx.user.port..
The.main.menu.will.be.displayed:
3. Use.the. .and. .keys.to.highlight.an.option,.then.press. .to.select.
ADDERVIEW CATx IPConfiguration MenuFunctionsRouting statusUser PreferencesGlobal PreferencesSetup OptionsEdit Computer ListEdit User ListEdit Autoscan List
Enter-SelectF1-More menus
Esc-QuitFirmware Version 3.03
Default names for each computer port
Assistance for keypress options
Your Login name
Connection status of this user port
Identification of this user port
Port numbers
2. Press. .To.display.the.Configuration.Menu:. .
HotkeysNote: and are the standard hotkeys and can be altered to avoid clashes with other devices or software. If you change the hotkeys, remember to use the new ones in place of and when following the instructions in this guide.
SecurityNote: If the security option has been enabled, you will be asked for a valid user name and password before the main menu can be displayed.
IMPORTANT: When supplied, AdderView CATx units have their security features disabled, which means that any attached users have access to all connected computers and all AdderView CATx settings. You are strongly recommended to enable the ‘Security’ feature and set an access password for the ADMIN account.
ADDERVIEW CATx IPUser Name:
Password:Port 1 login Esc-Scr Save
To access the configuration menu (global users)Once.the.IP.settings.have.been.made.(and.the.AdderView.CATx.IP.unit.is.network.connected),.global.users.can.access.the.configuration.menu.using.a.different.method.
1. Use.either.the.VNC.viewer.or.a.standard.web.browser.to.make.remote.contact.with.the.AdderView.CATx.IP.–.see.Global user access.for.more.details.
2. If.the.username.entry.is.not.blanked.out,.enter.‘admin’.or.another.login.username..Then.enter.the.admin.password.(if.no.password.is.set,.then.just.press. )..Once.logged.in,.the.AdderView.CATx.IP.will.show.the.video.output.from.the.host.system.(if.one.is.connected),.or.otherwise.a.‘No.Signal’.message.
3. Click.the.‘Controls’.button.and.select.the.‘KVM.Switch.menu’.option..All.options.appropriate.to.the.entered.username.will.be.displayed..
Availability of each computer: Green - availableRed - unavailable

��
Configuration menus layoutThe.menu.options.are.arranged.as.shown.here:
For.a.description.of.each.option.within.the.Configuration.menus,.see..Appendix 1.for.more.details.
Configuration Menu Functions
(F1) Advanced Options
User Preferences
Routing status
Global Preferences
Setup Options
Edit Computer List
Edit User List
Edit Autoscan List
Restore Standard MouseRestore IntellimousePower ControlClear UTP Extender PasswordReset to Factory DefaultsSend Data to RS232 portRead Data from RS232 portConfigure IP port
DDC OptionsPower ControlUSB Country CodeSetup Options 2 Force Mode
OSD ColourReminder BannerReminder ColourScreen Saver TypeConfirmation Box
Unit ConfigurationNetwork ConfigurationModem ConfigurationReset Configuration
Mouse SwitchingScreen SaverAutoscan ModeAutoscan PeriodOSD Dwell TimeUser TimeoutRS232 Mouse TypeMouse Type
SecurityLanguageHotkeysKeypad ControlsExclusive UseAutomatic LogoutAudioAdd Computers
AdderView CATx IP only
General security and configuration stepsTo enable general security
1. Display.the.Configuration menu.
2. Highlight.‘Setup.Options’.and.press. .
3. Highlight.‘Security’.and.press. .to.select.‘ENABLED’.
4. Now.create.a.new.password.for.the.ADMIN.user.account.
To set an ADMIN password1. Display.the.Configuration menu.
2. Highlight.‘Edit.User.List’.and.press. .
3. Highlight.‘ADMIN’.and.press. ..Press. .again.to.accept.the.name.‘ADMIN’.without.change.
4. Enter.an.appropriate.password.for.the.ADMIN.user.account.with.regard.to.the.following:.
•. The.password.can.be.up.to.12.characters.long..
•. The.password.can.use.letters,.numerals.and/or.certain.punctuation.marks..
•. The.password.is.not.case.sensitive.
5. Press. ..The.‘Edit.Access.Rights’.menu.will.be.displayed..However,.as.the.ADMIN.account.always.has.access.to.all.computers,.press. .again.to.save.the.new.password.
What to do if the ADMIN password has been forgotten.
To change the hotkeysAdderView.CATx.units.use and. as.their.standard.hotkeys..These.can.be.changed.if.they.clash.with.other.software.or.hardware.within.the.installation..
1. Display.the.Configuration menu.
2. Highlight.‘Setup.Options’.and.press. .
3. Highlight.‘Hotkeys’.and.press. .to.select.the.required.hotkey.combination..The.options.are:.CRTL+ALT, CTRL+SHIFT, ALT+SHIFT, ALT GR, LEFT ALT+RIGHT ALT, LEFT CTRL+LEFT ALT, RIGHT CTRL+RIGHT ALT or DISABLED.
4 Press. .to.return.to.the.‘Configuration.Menu’.

��
Registering users (edit user list)To create/edit user accounts
1. Display.the.Configuration menu..Note: You must be logged-in as the ADMIN user.
2. Highlight.‘Edit.User.List’.and.press. .
5. Press. .to.display.the.‘Edit.Access.Rights’.menu..
3. Either:
•. Create a new account.-.Press. ,.enter.a.new.user.name.and.press. ,.or.
•. Edit an existing account.-.Highlight.the.required.user.name.and.press.Edit.the.name,.if.appropriate,.and/or.press. .
4. Enter.or.edit.the.password.with.regard.to.the.following:
•. The.password.can.be.up.to.12.characters.long..
•. The.password.can.use.letters,.numerals.and/or.certain.punctuation.marks..
•. The.password.field.can.remain.blank.to.allow.open.access.to.this.account..
. Here.you.can.determine.which.of.the.connected.computers.can.be.accessed.by.the.selected.user.account..Only.computers.that.show.the.‘+’.marker.to.the.right.of.the.menu.box.will.be.accessible.to.the.user.account..
Note: The Adder Port Direct feature (which allows interconnected switching units to talk to one another) ensures that users without access rights to particular computers cannot move sideways to those computers via other computers.
Note: Access rights for user accounts to particular computers can also be controlled from the ‘Edit Computer List’ menu.
6. Select.and.deselect.computers.as.follows:
•. Individual computer.-.Highlight.a.computer.name,.then.press. .to.apply,.or.remove,.a.‘+’.marker.
•. Access to all computers.–.Press.
•. Access to no computers.–.Press.
7. When.all.settings.have.been.made,.press. .to.save.and.exit..Press. .to.return.to.the.‘Configuration.Menu’...
Cross markers indicate which computers will be accessible to the currently selected user. To change the permission state: Highlight a computer and press the space bar.
��
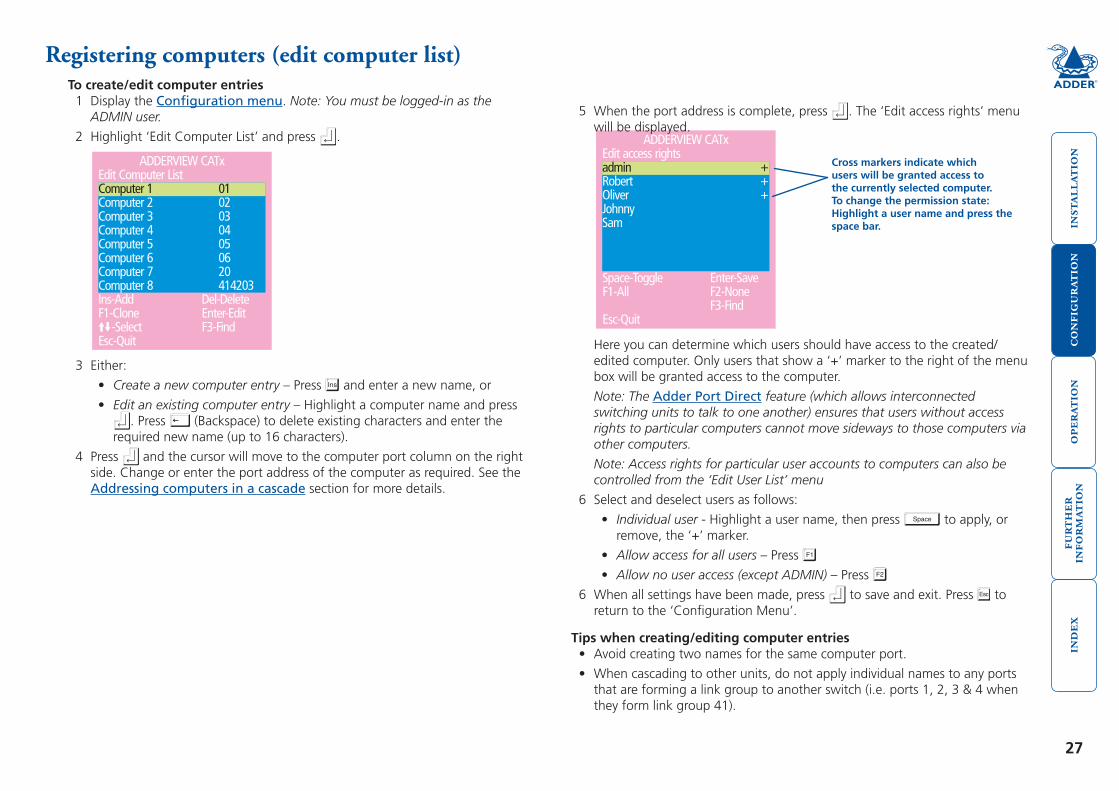
Registering computers (edit computer list)To create/edit computer entries
1. Display.the.Configuration menu..Note: You must be logged-in as the ADMIN user.
2. Highlight.‘Edit.Computer.List’.and.press. .
3. Either:
•. Create a new computer entry.–.Press. .and.enter.a.new.name,.or
•. Edit an existing computer entry.–.Highlight.a.computer.name.and.press...Press. .(Backspace).to.delete.existing.characters.and.enter.the.
required.new.name.(up.to.16.characters).
4. Press. .and.the.cursor.will.move.to.the.computer.port.column.on.the.right.side..Change.or.enter.the.port.address.of.the.computer.as.required..See.the.Addressing computers in a cascade.section.for.more.details..
5. When.the.port.address.is.complete,.press. ..The.‘Edit.access.rights’.menu.will.be.displayed..
. Here.you.can.determine.which.users.should.have.access.to.the.created/edited.computer..Only.users.that.show.a.‘+’.marker.to.the.right.of.the.menu.box.will.be.granted.access.to.the.computer.
Note: The Adder Port Direct feature (which allows interconnected switching units to talk to one another) ensures that users without access rights to particular computers cannot move sideways to those computers via other computers.
Note: Access rights for particular user accounts to computers can also be controlled from the ‘Edit User List’ menu
6. Select.and.deselect.users.as.follows:
•. Individual user.-.Highlight.a.user.name,.then.press. .to.apply,.or.remove,.the.‘+’.marker.
•. Allow access for all users.–.Press.
•. Allow no user access (except ADMIN).–.Press.
6. When.all.settings.have.been.made,.press. .to.save.and.exit..Press. .to.return.to.the.‘Configuration.Menu’.
Tips when creating/editing computer entries •. Avoid.creating.two.names.for.the.same.computer.port.
•. When.cascading.to.other.units,.do.not.apply.individual.names.to.any.ports.that.are.forming.a.link.group.to.another.switch.(i.e..ports.1,.2,.3.&.4.when.they.form.link.group.41).
Cross markers indicate which users will be granted access to the currently selected computer. To change the permission state: Highlight a user name and press the space bar.

��
Video compensationThe.AdderView.CATx.units.allow.computer.systems.to.be.placed.up.to.50m.(160.feet).away.and.remote.users.to.be.extended.by.a.maximum.of.300m.(980.feet)..Such.long.cable.lengths.can.affect.video.signals,.especially.when.higher.screen.resolutions.are.used..In.order.to.eliminate.any.video.signal.degradation,.all.AdderView.CATx.units.and.accompanying.Adder.X100.and.X200.extenders.provide.effective.software-based.video.compensation.features..
Two.main.types.of.video.compensation.are.provided.within.the.AdderView.CATx.installation,.these.are:
•. Computer video compensation.-.operates.on.video.signals.between.each.computer.system.and.the.AdderView.CATx.unit..See.Computer video compensation.
•. Remote user video compensation.-.operates.on.video.signals.between.each.remote.user(s).and.the.AdderView.CATx.unit..See.Remote user video compensation.for.details.
It.is.important.to.note.that,.providing.the.cabling.arrangements.do.not.change,.the.various.video.compensations.need.to.be.applied.only.once.to.each.computer.or.remote.user.link..During.operation,.control.of.video.compensation.is.fully.automatic..Please.take.into.account.the.following.when.configuring.links:
•. The.AdderView.CATx.stores.a.video.compensation.setting.for.each.computer.which.defines.the.level.of.compensation.that.is.applied.whenever.the.computer.is.selected..This.“computer.video.compensation”.setting.is.to.correct.for.any.video.clarity.loss.due.to.the.CATx.cable.between.the.AdderView.CATx.unit.and.the.computer’s.CAM..
•. CATx.cables.below.10m.give.very.little.loss.and.so.it.is.not.normally.necessary.to.be.concerned.about.setting.any.computer.video.compensation.if.short.CATx.cables.are.being.used.between.the.AdderView.CATx.and.the.CAM.for.each.computer..
•. “Computer.video.compensation”.may.be.setup.by.typing.in.the.cable.distance.in.the.OSD.or,.if.very.fine.video.adjustment.is.desired,.by.observing.the.video.picture.on.the.local.(user.1).port.whilst.making.adjustments..
•. If.a.cascade.of.switches.is.being.used,.computer.video.compensation.only.needs.to.be.applied.at.the.master.AdderView.CATx..
•. “Remote.user.video.compensation”.compensates.for.any.CATx.cable.losses.introduced.by.the.cable.between.the.X100/X200.and.the.AdderView.CATx..The.required.video.compensation.setting.does.not.vary.as.any.“computer.video.compensation”.is.automatically.added.as.different.computers.are.selected..This.only.needs.to.be.setup.once.during.installation..
Note: For installations where both computers and remote users require video compensation, always ensure that the computers are compensated first.
•. A.third.type.of.video.compensation.is.provided.by.Adder.X100AS/R.and.Adder.X200AS/R.extender.modules.only..This.type.of.compensation.is.called.Skew.adjustment.and.combats.the.effect.of.uneven.twisted.pairs.within.link.cables...See.Remote user skew adjustment.for.details...

�9
Computer video compensationThe.video.compensation.for.connected.computers.is.achieved.using.the.main.menu..Although.the.compensation.can.be.applied.from.any.local,.remote.or.global.user.port,.it.is.best.achieved.using.the.local.user.port.because.this.provides.the.most.direct.view.of.the.computer.output..The.compensation.is.achieved.simply.by.registering.the.link.cable.length,.however,.different.cables.can.vary.in.their.characteristics.so.it.is.often.useful.to.‘fine.tune’.the.compensation.by.eye.
Note: CATx cables below 10m give very little loss and so it is not normally necessary to be concerned about setting any computer video compensation if short CATx cables are being used between the AdderView CATx and the CAM for each computer..
To apply computer video compensation1. Place.a.computer.(connected.via.its.CAM.and.category.5,.5e.or.6.cable).into.
the.highest.resolution.video.mode.at.which.it.will.be.used.
2. If.possible,.use.a.monitor.and.keyboard.connected.to.the.AdderView.CATx.local.user.port..
3. Display.the.AdderView.CATx.main.menu.and.use.it.to.select.the.appropriate.computer.
Note: You must highlight the computer name and press to select it.......
4. Display.the.AdderView.CATx.main.menu.again.
5. Press. .to.access.the.compensation.feature:
Ensure that the appropriate computer is marked by the arrow - if it is not marked, the computer is not correctly selected and the compensation will not be applied.
The value in the green area indicates the currently selected cable length.
6. Use. .and. .to.increase.or.decrease.the.stated.cable.length,.as.required.
. Note: As you adjust the Length value, check the video image for signs of under- or over- compensation, especially to the right hand side of any hard vertical edges of images.
7. When.the.correct.compensation.has.been.applied,.press. .to.quit.the.screen.and.save.the.settings...

�0
To apply remote user video compensation1. Ensure.that.the.video.image.from.the.computer.to.be.used.has.been.
correctly.compensated..See.Computer video compensation.for.details..
2. On.the.remote.user.keyboard.(connected.to.an.Adder.X100/X200.extender),.simultaneously,.press.the.hotkeys.(by.default,. .and. ).along.with. .to.enter.configuration.mode.
The three keyboard indicators (‘Num Lock’, ‘Caps Lock’ and ‘Scroll Lock’) will now begin to flash in sequence. The speed of the sequence indicates the level of the sharpness adjustment currently applied: the slower the rate, the lower the level of sharpness being applied.
3. While.viewing.the.displayed.screen.image,.use.the.following.keys.to.adjust.the.controls:
Sharpness:. . .for.fine.adjustment,. . .for.coarse.adjustment.
There.are.255.sharpness.levels.(one.coarse.step.jumps.10.levels).
To autoset sharpness:.Press. . . .to.make.the.module.calculate.and.apply.an.automatic.compensation.level.-.you.can.use.this.as.a.starting.point.for.your.fine.tuning.
Note: If the monitor goes blank and switches off (due to oversetting the sharpness adjustment) press the Home key to restore.
Brightness:. . .for.adjustment..There.are.255.brightness.levels....
Sharpnessincrease (coarse)
Sharpnessdecrease (coarse)
Sharpnessincrease (fine)
Sharpnessdecrease (fine)
Brightnessincrease
Brightnessdecrease
Restore default sharpness and brightnesssettings
Exit image controls and save settings
If the image controls cannot provide a crisp imageIf,.after.adjusting.the.image.controls,.one.or.more.screen.images.remain.fuzzy.or.have.coloured.shadows.you.may.need.to.use.the.Skew.adjustment.feature..Please.see.Remote user skew adjustment.for.details.(Adder.X100AS/R.or.X200AS/R.modules.only).
Remote user video compensationVideo.compensation.for.each.remote.user.is.provided.by.their.Adder.X100.or.X200.modules,.not.by.the.AdderView.CATx.unit.itself..Using.the.Adder.X100/X200.controls.you.can.adjust.the.picture.sharpness.and.brightness.to.improve.the.remote.picture.quality..
Note: Accurate remote user compensation relies upon visual feedback from the screen image. It is therefore vital to ensure that the video images being sent out from the AdderView CATx are as ‘true’ as possible. Ensure, using the local user port, that the video images received from the computers are correctly compensated BEFORE attempting to adjust the remote user(s).
Video.compensation.is.best.carried.out.when.viewing.high.contrast.images.with.vertical.edges,.such.as.black.lines.on.a.white.background..When.doing.so,.if.you.notice.that.the.screen.image.is.‘fuzzy’.or.‘dark’.then.the.image.controls.may.not.be.able.to.solve.this.condition..
Note: If the high contrast images exhibit shadows with separate colours, then there may be a skew problem which requires a different image adjustment (provided only by Adder X100AS/R and X200AS/R modules) - see the Remote user skew adjustment section for details.
To display a suitable high contrast imageThe.best.way.to.clearly.view.the.effect.of.sharpness.and.brightness.adjustments.is.to.display.a.high.contrast.image,.with.vertical.edges,.on.the.screen..
•. Open.a.word.processor,.type.the.capital.letter.‘H’,.or.‘M’.and.increase.the.point.size.to.72.or.higher..For.best.results,.the.background.should.be.white.and.the.character.should.be.black..
•. A.BLACK.shadow.on.the.right.of.the.character.indicates.UNDER.compensation.
•. A.WHITE.shadow.on.the.right.of.the.character.indicates.OVER.compensation..
Note: The Word processor method is accurate and quick. However, for the very finest video compensation, use the latest Adder “skew” test pattern program which shows both the skew pattern and a section of mixed size Hs (black on white and white on black).
High contrast black character on white background
Black or bright white shadow on the right indicates the need for sharpness adjustment
4. When.no.shadows.are.visible.and.the.displayed.images.have.crisp.edges,.press. .to.exit.configuration.mode.and.permanently.save.all.settings.
. The.new.compensation.settings.will.be.stored,.even.when.power.is.removed.or.if.a.complete.reset.is.initiated..These.settings.should.not.require.further.changes.unless.the.cabling.arrangements.are.altered..

��
Remote user skew adjustmentThe.category.5,.5e.and.6.cabling.supported.by.the.AdderView.CATx.consists.of.four.pairs.of.wires.per.cable..Three.of.these.pairs.are.used.to.convey.red,.green.and.blue.video.signals.to.the.remote.video.monitor..Due.to.the.slight.difference.in.twist.rate.between.these.three.pairs,.the.red,.green.and.blue.video.signals.may.not.arrive.at.precisely.the.same.time..This.is.visible.as.separate.colour.shadows.on.high.contrast.screen.images.and.is.particularly.apparent.when.using.higher.screen.resolutions.and.some.types.of.category.5e.cables.
To.alleviate.this.situation,.the.Adder.X100AS/R.and.X200AS/R.modules.provide.internal.skew.adjustment.that.can.help.to.rectify.the.situation..The.skew.adjustment.works.by.delaying.or.advancing.the.timing.of.any.of.the.red,.green.or.blue.colour.signals.so.that.they.are.all.delivered.to.the.monitor.at.precisely.the.same.time..For.best.results,.the.“skew”.program.supplied.on.the.disk.or.downloadable.from.www.adder.com.or.www.adder.info.is.the.most.accurate.way.of.setting.skew.as.the.red,.green.and.blue.lines.are.rendered.exactly.on.the.screen.as.single.pixel.wide.lines..The.skew.bmp.test.pattern.can.also.be.used.but.it.is.less.accurate..Alternatively,.you.can.create.your.own.skew.pattern.using.a.standard.image.creation.package,.as.detailed.opposite.
Convergence test pattern showing the RGB crosses. In this case, the green signal can be seen out of line with the other two colours.
1 2 3 4 5 6 7 8
8
6
5
2
8
6
5
2
Data signal
Redvideo signal
Greenvideo signal
Bluevideo signal
7
3
4
1
7
3
4
1
To use skew adjustment1. Display.a.skew.pattern.on.the.appropriate.computer..You.can.either.use.the.
supplied.skew.pattern.or.create.your.own:
Using the supplied skew patterni. Insert.the.supplied.Adder.Installation.CD-ROM.into.the.CD.player.of.the.
computer.
ii. Within.Windows,.use.the.My Computer.option.(usually.available.as.a.desktop.icon.or.within.the.Start.menu).to.view.the.contents.of.the.CD-ROM..Double-click.the.Skew.entry.to.display.the.standard.test.pattern..If.necessary,.maximise.the.application.window.so.that.the.image.fills.the.screen......
. The.screen.will.show.a.series.of.fine.red,.green.and.blue.crosses.which.should.all.be.in.line,.vertically.and.horizontally..Skew.affects.the.horizontal.placement.of.the.colours.and.using.this.pattern.it.is.much.easier.to.discover.which,.if.any,.colours.are.being.adversely.affected.by.the.cable.link...
Creating a skew test pattern i. Run.any.image.creation/editing.application,.such.as.the.Paint.program.
supplied.with.Windows.
ii. Using.the.image.application.create.three.stacked.horizontal.rectangles.(one.red,.one.green.and.one.blue).that.fill.the.width.of.the.screen.
iii. Draw.a.vertical.black.line.down.across.the.coloured.bars.and.then.repeat.this.vertical.line.at.intervals.along.the.width.of.the.coloured.bars..These.lines.create.breaks.across.the.colours.and.give.you.more.opportunities.to.view.the.horizontal.position.of.each.colour.relative.to.the.others..
2. On.the.remote.user.keyboard.(connected.to.an.Adder.X100AS/R.extender),.simultaneously,.press.the.hotkeys.(by.default,. .and. ).along.with. .to.enter.configuration.mode.
The three keyboard indicators (‘Num Lock’, ‘Caps Lock’ and ‘Scroll Lock’) will now begin to flash in sequence.

��
3. As.appropriate,.press.either.the.R,.G.or.B.keyboard.keys.to.select.the.appropriate.colour.channel..Corresponding.keyboard.indicators.will.flash.rapidly.to.show.which.channel.is.currently.selected.for.adjustment:.Num.Lock.for.Red,.Caps.Lock.for.Green.and.Scroll.Lock.for.Blue.
Advance colour timing
Retard colour timing
Restoredefault skewsettings
Exit image controls and save settings
NumLock
CapsLock
Scroll
Lock
NumLock
CapsLock
Scroll
Lock
NumLock
CapsLock
Scroll
Lock
4. Press.the. .and. .keys.to.retard.or.advance.the.timing.of.the.selected.colour.channel.respectively..On.screen.you.will.see.a.change.in.the.position.of.the.selected.colour.crosses.(or.colour.bars).in.relation.to.the.other.two..
5. When.the.selected.colour.crosses.(or.colour.bars).are.correctly.positioned,.press. .to.exit.that.colour.channel..The.keyboard.indicators.will.return.to.flashing.in.sequence.
6. If.required,.repeat.steps.3.to.5.to.select.and.adjust.any.colour.channel.until.the.vertical.lines.of.the.red,.green.and.blue.crosses.are.all.aligned.
7. When.all.colours.are.correctly.aligned.on.all.video.channels,.press. .to.exit.configuration.mode.and.permanently.save.all.settings.
Note: Once you have made the skew adjustments, it may be necessary to re-adjust the image controls to attain optimum screen images.
��
AutoscanningThe.AdderView.CATx.provides.an.autoscan.mode.that.switches.between.the.connected.computers.in.sequence..This.mode.is.useful.to.allow.users.and.administrators.to.sample.activity.among.the.connected.machines..Three.scanning.modes.are.provided:
•. Scan list.–.Only.computers.declared.within.an.autoscan.list.will.be.viewed..Computers.connected.to.cascaded.switches.can.be.included.in.the.autoscan.list.
•. Active PCs.–.Only.computer.ports.where.an.active.computer.is.detected.will.be.viewed..This.mode.avoids.blank.screens.from.being.displayed.and.helps.to.prevent.the.viewing.monitor.from.entering.a.power-down.state.on.every.scan.cycle..Computers.connected.to.cascaded.switches.will.not.be.viewed.in.this.mode.
•. All PCs.–.This.mode.visits,.in.turn,.each.computer.that.is.connected.directly.to.the.AdderView.CATx..This.mode.should.be.used.with.care.due.to.the.reasons.given.in.the.warning.below..Computers.connected.to.cascaded.switches.will.not.be.viewed.in.this.mode.
The.scanning.mode.is.a.global.setting.and.hence.will.be.the.one.viewed.by.any.user.who.selects. . . .on.their.keyboard..Note,.however,.that.users.will.only.see.the.scanned.computers.to.which.they.have.access.rights..Hence,.if.two.users.(with.various.access.rights).simultaneously.view.an.autoscan,.they.will.see.differing.results.depending.upon.their.respective.permissions.
WARNING: Many monitors are fitted with automatic power saving relays that switch off after a few seconds when connected to an inactive computer. If you are using such a monitor, do not set the AdderView CATx to the scan ‘ALL PCs’ mode. Continual switching on and off of the monitor’s relay will eventually damage the monitor. If using such a monitor in conjunction with the ‘Scan List’ option, ensure that all selected computers are active.
There.are.up.to.three.steps.that.need.to.be.configured.to.use.autoscanning.•. Select the autoscan mode:.Scan.List,.Active.PCs.or.All.PCs.
•. Select the autoscan period..This.is.the.time.that.is.spent.viewing.each.computer..This.step.also.enables.and.disables.the.autoscan.feature.
•. Define the autoscan list..This.step.is.only.required.when.the.Scan.List.option.is.selected.and.allows.you.to.select.which.computers.will.be.scanned.
To select an autoscan mode1. Display.the.Configuration menu..Note: You must be logged-in as the
ADMIN user.
2. Highlight.‘Global.Preferences’.and.press. .
3. Highlight.‘Autoscan.Mode’.and.press. .until.the.required.option.is.displayed:.SCAN.LIST,.ACTIVE.PCs.or.ALL.PCs..
To select an autoscan period1. Display.the.Configuration menu..Note: You must be logged-in as the
ADMIN user.
2. Highlight.‘Global.Preferences’.and.press. .
3. Highlight.‘Autoscan.Period’.and..press. .until.the.required.time.to.view.each.computer.is.displayed,.ranging.from.2.seconds.to.5.minutes.
To define an autoscan listNote: This stage is required only when the ‘Scan List’ autoscan mode is selected.
1. Display.the.Configuration menu..Note: You must be logged-in as the ADMIN user.
2. Highlight.‘Edit.Autoscan.List’.and.press. ..A.list.of.all.connected.computers.will.be.displayed..Only.computers.that.show.a.‘+’.marker.to.the.right.of.the.menu.box.will.be.autoscanned.
3. Select.and.deselect.computers.to.scan.as.follows:
•. Individual.computer.-.Highlight.a.computer.name,.then.press. .to.apply,.or.remove,.the.‘+’.marker.
•. Mark.all.computers.for.scanning.–.Press. .
•. Unmark.all.computers.–.Press. .
4. When.all.settings.have.been.made,.press. .to.save.and.exit..Press. .to.return.to.the.‘Configuration.Menu’.
To view autoscan•. At.one.of.the.user.ports,.press. . . ..
Note: and are the standard hotkeys and can be altered to avoid clashes with other devices or software. If you change the hotkeys, remember to use the new ones in place of and when following these instructions.

��
Saving and restoring configuration settingsThe.AdderView.CATx.can.store.up.to.512.computer.names.and.16.sets.of.user.access.rights.(AdderView.CATx.IP.models.support.a.maximum.of.128.computers)..Particularly.in.cascaded.configurations,.manually.re-entering.all.computer.names,.port.numbers.and.access.rights.can.be.a.lengthy.process..Therefore,.the.AdderView.CATx.provides.a.method.to.save.and,.if.required,.restore.configuration.settings.using.one.of.its.serial.ports..Further.to.this,.the.saved.file.can.be.opened.and.edited.within.a.text.editor.or.spreadsheet.and.then.restored.back.to.the.AdderView.CATx.–.a.useful.way.to.make.multiple.setup.changes..
Note: You must be logged-in as the ADMIN user for this procedure..
Preparations for configuration save/load • Download.the.Adder.Data.Transfer.utility.-.contact.Adder.Technical.Support.
for.details.
• Connect.the.serial.port.on.the.rear.panel.of.the.AdderView.CATx,.labelled.COM1/UPGRADE,.to.a.serial.port.on.your.computer.using.the.supplied.serial.flash.upgrade.cable..See.Appendix 7.for.pin-out.specifications..
To transfer configuration settings1. Run.the.Adder.Data.Transfer.utility.on.the.computer.that.is.connected.to.the.
AdderView.CATx’s.serial.port..The.utility.has.a.single.window:.
1
2019
3
2
2423
4
POWER CONTROLCOM1 / UPGRADE
COM2 / MODEM
KM
USER PORT 1
CATx USER PORTS
COMPUTE
2. Click.the.Configuration.button.and.ensure.that.the.appropriate.serial.port.of.the.computer.is.selected.
3. Click.the.Browse....button.to.locate.or.create.a.text.file.that.will.either.provide.or.receive.the.AdderView.CATx.data.
4. Choose.the.direction.of.data.flow:
•. Click.the.Unit.to.File.button.to.download.the.existing.AdderView.CATx.configuration.to.the.selected.text.file,.or
•. Click.the.File.to.Unit.button.to.upload.the.contents.of.the.file.to.the.AdderView.CATx.unit.
. A.pop-up.dialog.box.will.request.you.to.set-up.the.unit.to.either.send.or.receive.RS232.data.
5. Using.the.local.port.of.the.AdderView.CATx.unit,.display.the.Configuration menu..Note: You must be logged-in as the ADMIN user.
6. Select.the.‘Functions’.option.
7. Select.either.‘Send.Data.to.RS232.port’.(if.you.chose.the.Unit.to.File.button).or.‘Read.Data.from.RS232.port’.(if.you.chose.the.File.to.Unit.button)..
8. On.the.computer,.click.the.OK.button.of.the.pop-up.dialog.box.to.begin.downloading.or.uploading..The.process.will.end.automatically.when.all.data.have.been.transferred....
Note: For AdderView CATx IP models, the usernames and passwords are not retrieved by the Adder Data Transfer utility due to security reasons...
continued

��
To edit the configuration settingsThe.saved.text.file.can.be.opened.using.either.a.basic.text.editor.or.a.spreadsheet.program..The.format.of.a.typical.file.is.shown.opposite..
Each.entry.within.the.Users.section.relates.to.a.corresponding.entry.within.the.Passwords.section.and.also.a.column.within.each.row.of.the.Computers.section...
Hints for editing•. To.grant.a.user.access.to.a.computer,.enter.the.value.‘1’.in.the.column.of.
the.Computers.section.that.relates.to.the.position.of.the.user’s.name.entry,.e.g..third.name.down.in.the.User.section.=.third.column.along.after.the.computer’s.port.address.(in.the.Computers.section).
•. To.deny.a.user.access.to.a.computer,.remove.the.value.‘1’.from.the.column.of.the.Computers.section.that.relates.to.the.position.of.the.user’s.name.entry..
•. The.ADMIN.user.will.always.be.granted.access.to.all.computers.regardless.of.the.values.entered.
ADDER.TECHNOLOGY.DATA.TRANSFER.FILE.
Users.[ADMIN. ][SAM. ][ROGER. ][PETE. ][............. ][............. ][............. ][............. ][............. ][............. ][............. ][............. ][............. ][............. ][............. ][............. ]
Passwords.[admin. ][letmein. ][roger1. ][sue2. ][............. ][............. ][............. ][............. ][............. ][............. ][............. ][............. ][............. ][............. ][............. ][............. ]
Computers.[Main. ].00000001.,1.,.. ,1.,1.,. ,. ,.. ,. ,. ,. ,. ,. ,. ,. ,. ,.[Sales. ].00000002.,1.,1.,1.,1.,.. ,.. ,1.,.. ,.. ,.. ,.. ,.. ,.. ,.. ,.. ,.[Technical. ].00000011.,1.,. ,1.,1.,.. ,.. ,1.,.. ,.. ,.. ,.. ,.. ,.. ,.. ,.. ,.[Email. ].00000012.,1.,1.,1.,1.,.. ,.. ,1.,.. ,.. ,.. ,.. ,.. ,.. ,.. ,.. ,.[Backup. ].00000010.,1.,.. ,1.,.. ,1.,1.,1.,.. ,.. ,.. ,.. ,.. ,.. ,.. ,.. ,.[server-6. ].00000016.,1.,.. ,1.,.. ,1.,1.,1.,.. ,.. ,.. ,.. ,.. ,.. ,.. ,.. ,.[server-7. ].00000004.,1.,1.,1.,1.,1.,1.,1.,1.,1.,1.,1.,1.,1.,1.,1.,1[server-8. ].00000015.,1.,1.,1.,1.,1.,1.,1.,1.,1.,1.,1.,1.,1.,1.,1.,1[server-9. ].00000014.,1.,.. ,1.,.. ,.. ,.. ,1.,1.,.. ,.. ,.. ,.. ,.. ,.. ,.. ,.[server-10. ].00000005.,1.,.. ,1.,1.,.. ,1.,1.,1.,.. ,.. ,.. ,.. ,.. ,.. ,.. ,.[server-11. ].00000009.,1.,.. ,1.,.. ,.. ,.. ,.. ,1.,1.,1.,.. ,.. ,.. ,.. ,.. ,.[server-12. ].00000013.,1.,1.,1.,.. ,.. ,1.,1.,.. ,.. ,.. ,.. ,.. ,.. ,.. ,.. ,.[server-13. ].00000017.,1.,.. ,1.,.. ,.. ,1.,1.,.. ,.. ,.. ,.. ,.. ,.. ,.. ,.. ,.[server-14. ].00000008.,1.,1.,.. ,.. ,.. ,1.,.. ,.. ,.. ,.. ,.. ,.. ,.. ,.. ,.. ,.[server-15. ].00000003.,1.,.. ,1.,.. ,.. ,1.,1.,1.,.. ,.. ,.. ,.. ,.. ,.. ,.. ,.[server-16. ].00000006.,1.,.. ,1.,.. ,.. ,1.,1.,1.,.. ,.. ,.. ,.. ,.. ,.. ,.. ,.[server-17. ].00000007.,1.,1.,.. ,.. ,.. ,1.,.. ,.. ,.. ,.. ,.. ,.. ,.. ,.. ,.. ,.
End.of.Data.
User names (will.be.blank.for.AdderView.CATx.IP.models)
Passwords for each user(will.be.blank.for.AdderView.CATx.IP.models)
Computer names and access details
Computers.[Main ] 00000001 ,1 , ,1 ,1 , , , , , , , , , , , ,
Computer name
Computer port number
User access rightsAdmin,.Roger.and.Pete.are.permitted.to.access.this.computer.-.where.there.is.not.a.‘1’,.the.corresponding.user.is.not.permitted.to.access.this.computer..

��
What to do if the ADMIN password has been forgottenIf.the.ADMIN.password.becomes.mislaid.or.forgotten,.you.will.not.be.able.to.access.the.AdderView.CATx.to.add.or.edit.users.and.computer.names..This.situation.may.be.resolved.by.performing.a.complete.reset.to.return.the.AdderView.CATx..or.CATx.IP.to.its.factory.default.state..
IMPORTANT: A complete reset erases all the user names and computer names that you have setup.
Slightly.different.procedures.are.used.to.reset.the.AdderView.CATx.and.the.AdderView.CATx.IP,.as.detailed.here...
To reset AdderView CATx models1. Remove.all.power.inputs.from.the.AdderView.CATx.unit.
2. Move.switch.�.on.the.rear.panel.down.to.the.ON.position.
3. Press.and.hold.the.front.panel.USER.and.COMPUTER.buttons.while.you.re-apply.power..On.the.local.user.port,.a.screen.menu.will.indicate.that.the.unit.has.been.reset.and.will.prompt.you.to.power.down.and.return.the.switch.to.its.normal.position.
4. As.directed,.remove.power.and.move.switch.�.up.to.its.OFF.position.
5. Power.up.and.configure.the.unit.in.the.normal.manner.
To reset the AdderView CATx ip models1. Remove.all.power.inputs.from.the.AdderView.CATx.IP.unit.
2. Move.switch.�.on.the.rear.panel.down.to.the.ON.position.
3. Re-apply.power.to.the.unit..On.the.local.user.port,.a.screen.menu.will.provide.two.options..
4. Using.the.local.keyboard.or.mouse,.select.the.‘Reset.Configuration’.option..A.warning.screen.will.be.displayed,.select.the.RESET.option.and.press. ..The.unit.will.reset.and.then.prompt.you.to.work.through.the.initial IP configuration screens.
5. After.you.have.completed.the.initial.IP.configuration,.remove.power.and.move.switch.�.up.to.its.OFF.position.....

��
Hot plugging and mouse restorationIt.is.strongly.recommended.that.you.switch.off.a.computer.before.attempting.to.connect.it.to.the.AdderView.CATx..However,.if.this.is.not.possible.then.you.need.to.‘hot.plug’.the.computer.while.it.is.still.running..There.is.not.normally.a.danger.of.damage.to.the.computer,.however,.when.mouse.communications.are.interrupted,.often.they.fail.to.re-initialise.when.reconnected..The.AdderView.CATx.provides.a.feature.to.reinstate.mouse.communications.once.the.necessary.connections.have.been.made.
There.are.two.main.types.of.data.formats.used.by.current.PC.mice,.these.are.the.older.‘PS/2’.or.‘standard.mouse’.format.and.the.more.recent.‘IntelliMouse®’.format.introduced.by.Microsoft..These.use.slightly.different.data.arrangements.and.it.is.important.to.know.which.type.was.being.used.before.you.hot-plugged.the.computer.to.the.AdderView.CATx..The.previous.setting.depends.both.on.the.type.of.mouse.and.the.type.of.driver,.as.various.combinations.of.PS/2.and.IntelliMouse.are.possible..Using.the.incorrect.restore.function.may.produce.unpredictable.results.and.require.the.computer.to.be.re-booted.
Which restore setting do I use?The.general.rule.is.that.unless.both.the.mouse.and.the.driver.are.both.IntelliMouse.compatible.then.you.need.to.restore.the.mouse.as.‘PS/2’..An.IntelliMouse.can.operate.in.either.mode,.whereas.a.PS/2.mouse.cannot.
Recognising an IntelliMouse-style mouseThe.IntelliMouse.format.was.introduced.to.support,.among.other.features,.the.scroll.wheel.function..If.the.mouse.has.a.scroll.wheel,.then.it.is.likely.to.support.the.IntelliMouse.format..If.it.is.a.Microsoft-branded.mouse,.then.it.will.usually.state.that.it.is.an.IntelliMouse.on.its.underside.label..
Recognising an IntelliMouse driverBefore.hot.plugging.to.the.AdderView.CATx.(or.afterwards.using.only.keyboard.control),.access.the.Windows.Control.Panel.of.the.computer.and.select.either.the.Mouse.option.(on.Windows.NT,.2000.and.XP).or.the.System.option.(on.Windows.95,.98,.ME)..Look.for.the.name.of.the.driver,.which.will.usually.include.the.words.PS/2.or.IntelliMouse..
To restore mouse operation when hot plugging:1. Using.a.suitable.CAM.(Computer.Access.Module).and.category.5,.5e.or.6.
link.cabling,.carefully.make.the.connections.between.the.keyboard,.monitor,.mouse.(and.audio).sockets.of.the.computer.and.the.required.AdderView.CATx.port.
2. Select the port.of.the.newly.connected.computer.and.then.display.the.Configuration menu.
3. Highlight.‘Functions’.and.press. .
4. As.appropriate,.highlight.one.of.the.following.options:
•. Restore Standard Mouse.–.if.PS/2.mode.is.required,.or...
•. Restore IntelliMouse.–.if.IntelliMouse.mode.is.required.
. Then.press. .
5. Move.the.mouse.a.short.distance.and.check.for.appropriate.on-screen.cursor.movement..If.the.mouse.cursor.darts.erratically.around.the.screen,.then.cease.moving.the.mouse..This.is.an.indication.that.the.chosen.restore.function.is.incorrect..Try.again.using.the.other.restore.function.
Note: The restore functions predict the likely mouse resolution settings but may not restore the exact speed or sensitivity settings that were originally set.
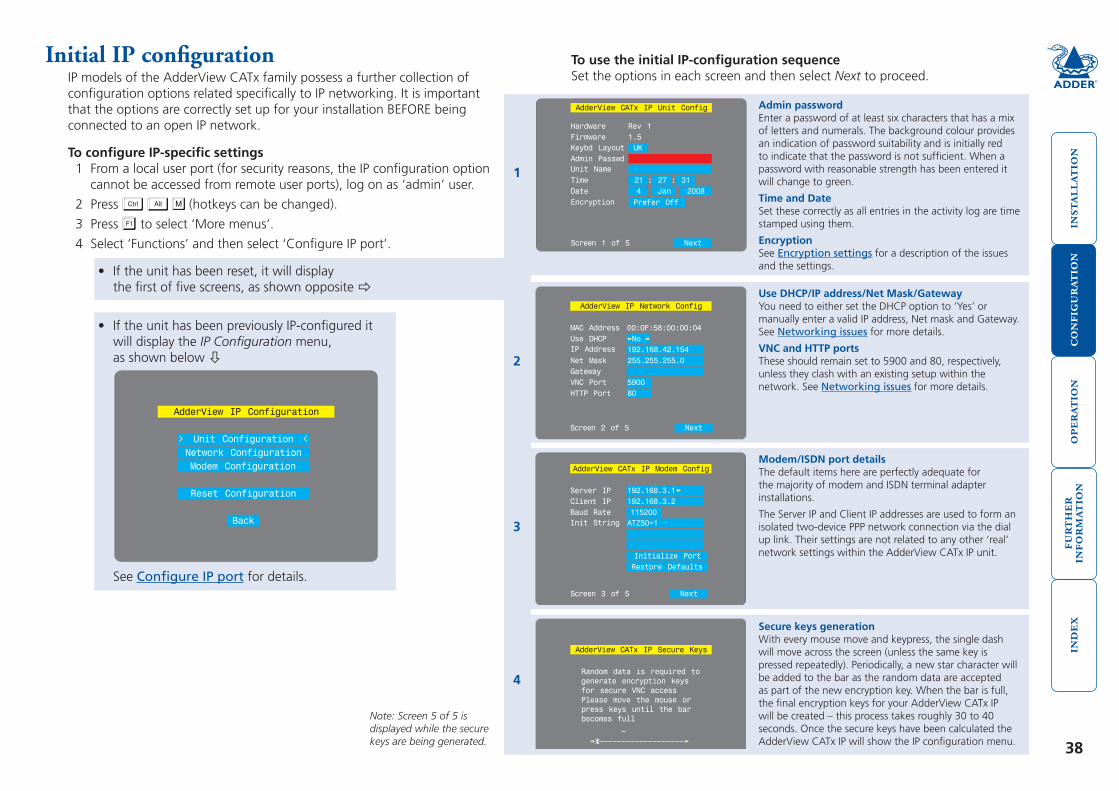
��
Next
AdderView CATx IP Modem Config
ATZS0=1
192.168.3.1192.168.3.2115200
Initialize PortRestore Defaults
Init StringBaud Rate
Server IPClient IP
Screen 3 of 5
Next
AdderView IP Network Config
Net Mask 255.255.255.0192.168.42.154No
GatewayVNC PortHTTP Port
590080
IP Address
00:0F:58:00:00:04Use DHCPMAC Address
Screen 2 of 5
Initial IP configurationIP.models.of.the.AdderView.CATx.family.possess.a.further.collection.of.configuration.options.related.specifically.to.IP.networking..It.is.important.that.the.options.are.correctly.set.up.for.your.installation.BEFORE.being.connected.to.an.open.IP.network.
To configure IP-specific settings1. From.a.local.user.port.(for.security.reasons,.the.IP.configuration.option.
cannot.be.accessed.from.remote.user.ports),.log.on.as.‘admin’.user.
2. Press. . . .(hotkeys.can.be.changed).
3. Press. .to.select.‘More.menus’.
4. Select.‘Functions’.and.then.select.‘Configure.IP.port’.
•. If.the.unit.has.been.reset,.it.will.display..the.first.of.five.screens,.as.shown.opposite.
•. If.the.unit.has.been.previously.IP-configured.it..will.display.the.IP Configuration.menu,..as.shown.below.
. See.Configure IP port.for.details.
To use the initial IP-configuration sequenceSet.the.options.in.each.screen.and.then.select.Next.to.proceed.
Admin passwordEnter.a.password.of.at.least.six.characters.that.has.a.mix.of.letters.and.numerals..The.background.colour.provides.an.indication.of.password.suitability.and.is.initially.red.to.indicate.that.the.password.is.not.sufficient..When.a.password.with.reasonable.strength.has.been.entered.it.will.change.to.green..
Time and DateSet.these.correctly.as.all.entries.in.the.activity.log.are.time.stamped.using.them.
EncryptionSee.Encryption settings.for.a.description.of.the.issues.and.the.settings.
Use DHCP/IP address/Net Mask/GatewayYou.need.to.either.set.the.DHCP.option.to.‘Yes’.or.manually.enter.a.valid.IP.address,.Net.mask.and.Gateway..See.Networking issues.for.more.details.
VNC and HTTP portsThese.should.remain.set.to.5900.and.80,.respectively,.unless.they.clash.with.an.existing.setup.within.the.network..See.Networking issues.for.more.details.
Modem/ISDN port detailsThe.default.items.here.are.perfectly.adequate.for.the.majority.of.modem.and.ISDN.terminal.adapter.installations.
The.Server.IP.and.Client.IP.addresses.are.used.to.form.an.isolated.two-device.PPP.network.connection.via.the.dial.up.link..Their.settings.are.not.related.to.any.other.‘real’.network.settings.within.the.AdderView.CATx.IP.unit..
Secure keys generationWith.every.mouse.move.and.keypress,.the.single.dash.will.move.across.the.screen.(unless.the.same.key.is.pressed.repeatedly)..Periodically,.a.new.star.character.will.be.added.to.the.bar.as.the.random.data.are.accepted.as.part.of.the.new.encryption.key..When.the.bar.is.full,.the.final.encryption.keys.for.your.AdderView.CATx.IP.will.be.created.–.this.process.takes.roughly.30.to.40.seconds..Once.the.secure.keys.have.been.calculated.the.AdderView.CATx.IP.will.show.the.IP.configuration.menu.
�
�
�
�
Note: Screen 5 of 5 is displayed while the secure keys are being generated.
AdderView IP Configuration
Reset Configuration
Back
Modem ConfigurationNetwork ConfigurationUnit Configuration
AdderView CATx IP Unit Config
Time
EncryptionDate
21
Prefer Off4
27Jan
312008
Next
: :Unit Name
UKAdmin Passwd
Firmware 1.5Keybd Layout
Hardware Rev 1
Screen 1 of 5
AdderView CATx IP Secure Keys
Random data is required togenerate encryption keysfor secure VNC accessPlease move the mouse orpress keys until the barbecomes full
Screen 4 of 5

�9
..To configure IP details from a global user location1. Use.either.the.VNC.viewer.or.a.standard.web.browser.to.make.remote.
contact.with.the.AdderView.CATx.IP.–.see.Global user connections.for.more.details.
2. If.the.username.entry.is.not.blanked.out,.enter.‘admin’..Then.enter.the.admin.password.(if.no.password.is.set,.then.just.press. )..Once.logged.in,.the.AdderView.CATx.IP.will.show.the.video.output.from.the.host.system.(if.one.is.connected),.or.otherwise.a.‘No.Signal’.message.
3. Click.the.Configure.button.in.the.top.right.hand.corner.of.the.window.to.display.the.main.configuration.page.
. User Accounts
Allows.you.to.create.and.manage.up.to.sixteen.separate.user.accounts,.each.with.separate.access.permissions.
Unit ConfigurationAllows.you.to.alter.both.basic.and.fundamental..
settings.within.the.AdderView.CATx.IP.
Time & Date ConfigurationAllows.you.to.configure.all.aspects.relating.to.time.keeping.
within.the.AdderView.CATx.IP.unit.
Network ConfigurationHere.you.can.alter.any.of.the.existing.network.settings.plus.you.can.take.advantage.of.the.IP.access.control.feature.that.lets.you.to.specifically.include.or.exclude.certain.addresses.or.networks.
Serial Port ConfigurationLets.you.setup.or.alter.the.details.concerning..
the.modem.and.power.control.serial.ports.
Host ConfigurationAllows.you.to.configure.user.access,.hot.key.switching.and.
power.control.codes.for.up.to.128.host.systems.that.may.be.connected.to.the.AdderView.CATx.IP.via.other.cascaded.units.
Logging and StatusProvides.various.details.about.the.user..
activity.on.the.AdderView.CATx.IP.For.more.information.about.each.page,.please.see.Appendix 2 - Configuration pages via viewer.in.the.‘Further.information’.chapter.
Shaded.items.signify.options.that.are.not..available.via.the.standard.configuration.menus.
IP configuration by global userOnce.the.basic.IP-related.features.have.been.configured.using.the.AdderView.CATx.IP.configuration.menus,.further.changes.can.be.made.by.authorised.global.users.via.the.VNC.interface..There.are.two.main.ways.to.use.the.VNC.interface.to.access.the.AdderView.CATx.IP.unit:.
•. The VNC viewer.–.a.small.application.supplied.on.the.CD-ROM.or.downloadable.from.the.Adder.and.RealVNC.websites.or.even.downloadable.from.the.AdderView.CATx.IP.itself.
or.
•. A standard browser that supports Java.–.When.a.web.browser.makes.contact,.the.AdderView.CATx.IP.provides.the.option.to.download.a.Java.application.to.it..This.allows.a.viewer.window.to.be.opened.and.operation.to.commence.just.as.it.would.with.the.VNC.viewer.application.

�0
Encryption settingsThe.AdderView.CATx.IP.offers.a.great.deal.of.flexibility.in.its.configuration.and.this.extends.equally.to.its.encryption.settings.that.are.used.to.prevent.unauthorised.interception.of.signals..Due.to.the.variety.of.situations.in.which.the.AdderView.CATx.IP.might.be.used.and.the.range.of.viewer.applications.that.need.to.view.it,.a.number.of.settings.are.available..The.encryption.settings.to.use.depend.upon.how.the.potential.global.users.will.operate.
Important.factors.to.consider.when.setting.these.options.might.be:
•. Do.all.global.user.connections.and.operations.require.encryption?
•. Will.some.global.users.be.using.older.VNC.viewer.versions?
AdderView CATx IP encryption settingsThe.AdderView.CATx.IP.configuration.menu.offers.three.encryption.settings:
•. Always on.-.This.setting.will.force.all.viewers.to.use.encryption..Note: This setting will preclude any VNC viewer versions that do not support encryption..
•. Prefer off.-.This.setting.does.not.enforce.encryption.unless.a.viewer.specifically.requests.it..If.a.viewer.has.its.‘Let.server.choose’.setting,.then.an.un-encrypted.link.will.be.set.up.
•. Prefer on.-.This.setting.generally.enforces.encryption.unless.an.earlier.viewer.version.is.unable.to.support.it,.in.which.case.the.link.will.be.un-encrypted..If.a.viewer.has.its.‘Let.server.choose’.setting,.then.the.link.will.be.encrypted.
Viewer encryption settingsThe.web.browser.viewers.and.VNC.viewers.(of.level.4.0b5S.or.higher).offer.four.encryption.settings:
•. Always on.-.This.setting.will.ensure.that.the.link.is.encrypted,.regardless.of.the.AdderView.CATx.IP.encryption.setting.
•. Let server choose.-.This.setting.will.follow.the.configuration.of.the.AdderView.CATx.IP..If.the.AdderView.CATx.IP.has.‘Always.on’.or.‘Prefer.on’.set,.then.the.link.will.be.encrypted..If.the.‘Prefer.off’.setting.is.selected.at.the.AdderView.CATx.IP,.then.the.link.will.not.be.encrypted.
•. Prefer off.-.This.setting.will.configure.an.un-encrypted.link.if.the.AdderView.CATx.IP.will.allow.it,.otherwise.it.will.be.encrypted.
•. Prefer on.-.If.the.AdderView.CATx.IP.allows.it,.this.setting.will.configure.an.encrypted.link,.otherwise.it.will.be.un-encrypted..
...

��
Networking issuesThanks.to.its.robust.security.the.AdderView.CATx.IP.offers.you.great.flexibility.in.how.it.integrates.into.an.existing.network.structure..The.AdderView.CATx.IP.is.designed.to.reside.either.on.an.internal.network,.behind.a.firewall/router.or.alternatively.with.its.own.direct.Internet.connection..
AdderView CATx IP situated behind the firewall
CATx.link.to.host.computer
Firewall/router
AdderView CATx IP situated alongside the firewall
Firewall/router
Local.network.connection
Local.network.connection
IMPORTANT: When the AdderView CATx IP is accessible from the public Internet or dial up connection, you must ensure that sufficient security measures are employed.
Positioning AdderView CATx IP in the networkEvery.network.setup.is.different.and.great.care.needs.to.be.taken.when.introducing.a.powerful.device.such.as.the.AdderView.CATx.IP.into.an.existing.configuration..A.common.cause.of.potential.problems.can.be.in.clashes.with.firewall.configurations..For.this.reason.the.AdderView.CATx.IP.is.designed.to.be.intelligent,.flexible.and.secure..With.the.minimum.of.effort.it.can.reside.either.behind.the.firewall.or.alongside.with.its.own.separate.Internet.connection.
CATx.link.to.host.computer
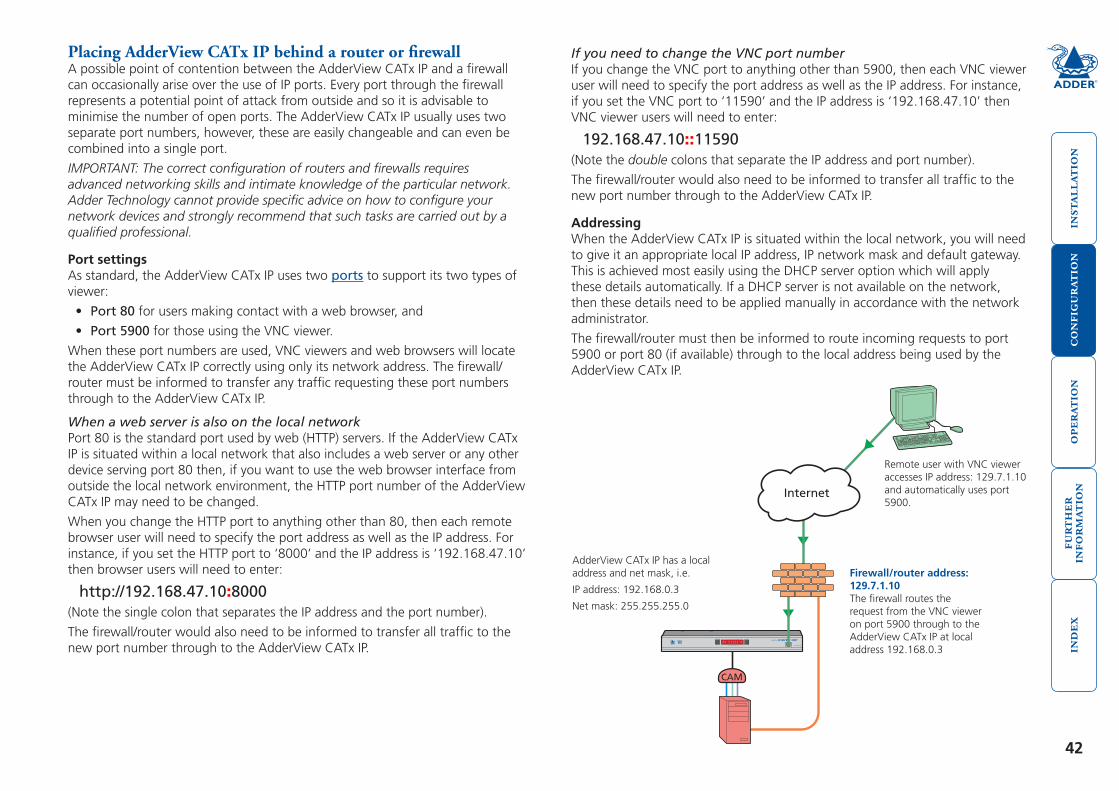
��
Placing AdderView CATx IP behind a router or firewallA.possible.point.of.contention.between.the.AdderView.CATx.IP.and.a.firewall.can.occasionally.arise.over.the.use.of.IP.ports..Every.port.through.the.firewall.represents.a.potential.point.of.attack.from.outside.and.so.it.is.advisable.to.minimise.the.number.of.open.ports..The.AdderView.CATx.IP.usually.uses.two.separate.port.numbers,.however,.these.are.easily.changeable.and.can.even.be.combined.into.a.single.port.
IMPORTANT: The correct configuration of routers and firewalls requires advanced networking skills and intimate knowledge of the particular network. Adder Technology cannot provide specific advice on how to configure your network devices and strongly recommend that such tasks are carried out by a qualified professional.
Port settingsAs.standard,.the.AdderView.CATx.IP.uses.two.ports.to.support.its.two.types.of.viewer:.
•. Port 80.for.users.making.contact.with.a.web.browser,.and.
•. Port 5900.for.those.using.the.VNC.viewer.
When.these.port.numbers.are.used,.VNC.viewers.and.web.browsers.will.locate.the.AdderView.CATx.IP.correctly.using.only.its.network.address..The.firewall/router.must.be.informed.to.transfer.any.traffic.requesting.these.port.numbers.through.to.the.AdderView.CATx.IP..
When a web server is also on the local networkPort.80.is.the.standard.port.used.by.web.(HTTP).servers..If.the.AdderView.CATx.IP.is.situated.within.a.local.network.that.also.includes.a.web.server.or.any.other.device.serving.port.80.then,.if.you.want.to.use.the.web.browser.interface.from.outside.the.local.network.environment,.the.HTTP.port.number.of.the.AdderView.CATx.IP.may.need.to.be.changed.
When.you.change.the.HTTP.port.to.anything.other.than.80,.then.each.remote.browser.user.will.need.to.specify.the.port.address.as.well.as.the.IP.address..For.instance,.if.you.set.the.HTTP.port.to.‘8000’.and.the.IP.address.is.‘192.168.47.10’.then.browser.users.will.need.to.enter:.
http://192.168.47.10:8000.
(Note.the.single.colon.that.separates.the.IP.address.and.the.port.number)..
The.firewall/router.would.also.need.to.be.informed.to.transfer.all.traffic.to.the.new.port.number.through.to.the.AdderView.CATx.IP.
If you need to change the VNC port numberIf.you.change.the.VNC.port.to.anything.other.than.5900,.then.each.VNC.viewer.user.will.need.to.specify.the.port.address.as.well.as.the.IP.address..For.instance,.if.you.set.the.VNC.port.to.‘11590’.and.the.IP.address.is.‘192.168.47.10’.then.VNC.viewer.users.will.need.to.enter:.
192.168.47.10::11590(Note.the.double.colons.that.separate.the.IP.address.and.port.number)..
The.firewall/router.would.also.need.to.be.informed.to.transfer.all.traffic.to.the.new.port.number.through.to.the.AdderView.CATx.IP.
AddressingWhen.the.AdderView.CATx.IP.is.situated.within.the.local.network,.you.will.need.to.give.it.an.appropriate.local.IP.address,.IP.network.mask.and.default.gateway..This.is.achieved.most.easily.using.the.DHCP.server.option.which.will.apply.these.details.automatically..If.a.DHCP.server.is.not.available.on.the.network,.then.these.details.need.to.be.applied.manually.in.accordance.with.the.network.administrator.
The.firewall/router.must.then.be.informed.to.route.incoming.requests.to.port.5900.or.port.80.(if.available).through.to.the.local.address.being.used.by.the.AdderView.CATx.IP...
AdderView.CATx.IP.has.a.local.address.and.net.mask,.i.e..
IP.address:.192.168.0.3
Net.mask:.255.255.255.0
Remote.user.with.VNC.viewer.accesses.IP.address:.129.7.1.10.and.automatically.uses.port.5900..
Firewall/router address:��9.�.�.�0The.firewall.routes.the.request.from.the.VNC.viewer.on.port.5900.through.to.the.AdderView.CATx.IP.at.local.address.192.168.0.3
.

��
To discover a DHCP-allocated IP addressOnce.a.DHCP.server.has.allocated.an.IP.address,.you.will.need.to.know.it.in.order.to.access.the.AdderView.CATx.IP.via.a.network.connection..To.discover.the.allocated.IP.address:
1. In.network.section.of.either.the.standard configuration menus.or.the.configuration pages via viewer,.set.the.‘Use.DHCP’.option.to.‘Yes’.and.select.‘Save’..Once.the.page.is.saved,.the.AdderView.CATx.IP.will.contact.the.DHCP.server.and.obtain.a.new.address.
2. Re-enter.the.same.‘Network.configuration’.screen.where.the.new.IP.address.and.network.mask.should.be.displayed..
DNS addressingAs.with.any.other.network.device,.you.can.arrange.for.your.AdderView.CATx.IP.to.be.accessible.using.a.name,.rather.than.an.IP.address..This.can.be.achieved.in.two.main.ways:
•. For.small.networks.that.do.not.have.a.DNS.(Domain.Name.System).server,.edit.the.‘hosts’.files.on.the.appropriate.remote.systems..Using.the.hosts.file,.you.can.manually.link.the.AdderView.CATx.IP.address.to.the.required.name.
•. For.larger.networks,.declare.the.IP.address.and.required.name.to.the.DNS.server.of.your.local.network..
The.actual.steps.required.to.achieve.either.of.these.options.are.beyond.the.scope.of.this.document.... ...

��
Placing AdderView CATx IP alongside the firewallAdderView.CATx.IP.is.built.from.the.ground-up.to.be.secure..It.employs.a.sophisticated.128bit.public/private.key.system.that.has.been.rigorously.analysed.and.found.to.be.highly.secure.(a.security.white.paper.is.available.upon.request.from.Adder.Technology.Ltd)..Therefore,.you.can.position.the.AdderView.CATx.IP.alongside.the.firewall.and.control.hosts.that.are.also.IP.connected.within.the.local.network.
IMPORTANT: If you make the AdderView CATx IP accessible from the public Internet or from a modem, care should be taken to ensure that the maximum security available is activated. You are strongly advised to enable encryption and use a strong password. Security may be further improved by restricting client IP addresses, using a non-standard port number for access or limiting remote access to dial up connections only...
Ensuring sufficient securityThe.security.capabilities.offered.by.the.AdderView.CATx.IP.are.only.truly.effective.when.they.are.correctly.used..An.open.or.weak.password.or.unencrypted.link.can.cause.security.loopholes.and.opportunities.for.potential.intruders..For.network.links.in.general.and.direct.Internet.connections.in.particular,.you.should.carefully.consider.and.implement.the.following:
•. Ensure.that.encryption.is.enabled...By.standard configuration menu.or.by.configuration page via viewer.
•. Ensure.that.you.have.selected.secure.passwords.with.at.least.8.characters.and.a.mixture.of.upper.and.lower.case.and.numeric.characters..By.configuration page via viewer..
•. Reserve.the.admin.password.for.administration.use.only.and.use.a.non-admin.user.profile.for.day-to-day.access...
•. Use.the.latest.Secure.VNC.viewer.(this.has.more.in-built.security.than.is.available.with.the.Java.viewer)..To.download the viewer.
•. Use.non-standard.port numbers..
•. Restrict.the.range.of.IP.addresses.that.are.allowed.to.access.the.AdderView.CATx.IP.to.only.those.that.you.will.need.to.use..To.restrict IP access.
•. Do.NOT.Force.VNC.protocol.3.3..Configuration page via viewer.
•. Add.a.further.level.of.inherent.security.by.restricting.access.only.via.modem.or.ISDN.dialup.
•. Ensure.that.the.computer.accessing.the.AdderView.CATx.IP.is.clean.of.viruses.and.spyware.and.has.up-to-date.firewall.and.anti-virus.software.loaded.that.is.appropriately.configured..
•. Avoid.accessing.the.AdderView.CATx.IP.from.public.computers.
Security.can.be.further.improved.by.using.the.following.suggestions:
•. Place.the.AdderView.CATx.IP.behind.a.firewall.and.use.the.port.numbers.to.route.the.VNC.network.traffic.to.an.internal.IP.address.
•. Review.the.activity.log.from.time.to.time.to.check.for.unauthorised.use..
•. Lock.your.server.consoles.after.they.have.been.used...
A.security.white.paper.that.gives.further.details.is.available.upon.request.from.Adder.Technology.Limited..
Ports In.this.configuration.there.should.be.no.constraints.on.the.port.numbers.because.the.AdderView.CATx.IP.will.probably.be.the.only.device.at.that.IP.address..Therefore,.maintain.the.HTTP.port.as.80.and.the.VNC.port.as.5900.
AddressingWhen.the.AdderView.CATx.IP.is.situated.alongside.the.firewall,.it.will.require.a.public.static.IP.address.(i.e..one.provided.by.your.Internet.service.provider).
More.addressing.information:
Discover DHCP-allocated addresses
DNS addressing.

��
Power switching configurationPower.switch.configuration.comprises.two.main.steps:
•. Configure.the.POWER CONTROL.serial.port.to.the.same.speed.as.used.by.the.power.switch.box(es),.either.via configuration menu.or.via configuration page..
•. Configure.power.ON.and.OFF.strings.for.each.relevant.host.computer.
For.each.power.port.there.needs.to.be.a.valid.‘Power.ON.string’.and.similarly.an.appropriate.‘Power.OFF.string’..In.each.case,.the.strings.are.a.short.sequence.of.characters.that.combine.a.port.address.and.a.power.on.or.off.value..
If.a.particular.computer.has.more.than.one.power.input.(and.thus.requires.an.equivalent.number.of.power.ports.to.control.them),.collections.of.strings.can.be.combined.to.switch.all.of.the.required.ports.together.as.a.group.
To configure the power sequences for each host computer1. Using.VNC.viewer.or.a.browser,.log.on.as.the.‘admin’.user.
2. Click.the.‘Configure’.button.in.the.top.right.corner.
3. Click.the.‘Host.configuration’.option.
4. Click.a.host.entry.to.display.a.Host.configuration.dialog:
Power control sequencesNote: The settings given below are for the EPS-S8 power switch - other power switches may require different settings. Please refer to your power switch documentation for details about codes required by other power switches.
The.structure.of.each.power.sequence.(OFF.and.ON).is.as.follows:
Pxy=z\0D. Where:.
x.is.the.switch.box.number,
y.is.the.power.port.number,..
z.is.‘0’.for.OFF.or.‘1’.for.ON,.and
\0D.represents.Enter.(or.Carriage.return).
Example 1 To.switch.ON.port.5.of.switch.box.2,.the.code.would.be.as.follows:
•. Power.sequence:.. P25=1\0D
Example 2 To.switch.OFF.port.8.of.switch.box.3,.the.code.would.be.as.follows:
•. Power.sequence:.. P38=0\0D
For.details.about.operating.this.feature,.see.Power switching (via configuration menu).or.Power switching (via viewer).within.the..Operation.chapter.
To control two or more ports simultaneouslyYou.can.control.up.to.four.power.ports.using.a.single.sequence..This.is.done.using.the.same.command.structure.as.shown.above,.plus.a.delay.command,.for.each.port..Immediately.following.a.port.command,.insert.the.characters.‘\*’.before.the.next.port.command,.and.so.on.up.to.four.ports..For.instance,.to.switch.on.ports.1.and.2.in.the.first.power.switch,.the.command.line.would.be:
. P11=1\0D\*P12=1\0D
5. If.necessary,.configure.other.parameters.(Name,.Users,.Hot.Keys.-.MORE).
6. Enter.the.Power control sequences.in.the.Power.On.and.Power.Off.fields.7. Click.OK.to.close.the.dialog.and.then.click.the.Save.button.in.the.main.Host.
Configuration.window.to.store.the.details.

��
The KVMADMIN utilityParticularly.useful.for.complex.AdderView.CATx.IP.configurations.and.the.control.of.remote.installations,.KVMADMIN.is.a.powerful.administration.tool.
KVMADMIN.is.based.upon.the.successful.VNC.viewer.and.uses.the.same.security.system..Rather.than.a.graphical.interface.such.as.the.standard.viewer,.KVMADMIN.uses.command.line.control.to.provide.the.following.administration.facilities:
•. Discover.and.adjust.the.AdderView.CATx.IP.configuration,.including.host.systems,
•. Save.and.restore.the.AdderView.CATx.IP.configuration,
•. Set.user.names.and.passwords,
•. Download.the.event.log,
•. Set.custom.video.modes.
The.use.of.KVMADMIN.is.strictly.limited.to.the.‘admin’.user.and.for.security.purposes.it.is.not.possible.to.retrieve.user.names.or.passwords.from.the.AdderView.CATx.IP.
To.use.KVMADMIN.you.require.the.IP.address.and.admin.password.of.the.AdderView.CATx.IP.unit..The.command.line.is.as.follows:
kvmadmin <command> <ip address> [<parameters>]
where.<command>.is.one.of.the.following:
•. -setconfig.<config-file>
•. -getconfig.<config-file>
•. -setusers.<csv-file>
•. -getlog.<log-file>
•. -gethosts.<csv-file>
•. -sethosts.<csv-file>
•. -setmodes.<csv-file>.
For.instance,.the.command.line:
kvmadmin -getconfig kvm1.cfg 192.168.2.1
....downloads.the.current.configuration.from.the.AdderView.CATx.IP.unit.at.the.given.address.and.stores.it.in.the.local.file.kvm1.cfg.
Whereas.the.command.line:
kvmadmin -setusers users.csv 192.168.2.1
....configures.the.usernames.and.passwords.for.the.same.unit.from.the.local.file users.csv.
For.more.information.about.KVMADMIN,.please.refer.to.the.user.notes.supplied.with.the.utility......

��
Performing upgradesThe.AdderView.CATx.and.CATx.IP.units.are.fully.reconfigurable.via.flash.upgrades,.as.are.the.individual.Computer.Access.Modules.that.are.used.to.link.all.host.computers..The.AdderView.CATx.IP.models.operate.in.a.slightly.different.manner.to.the.non-IP.models.and.so.are.upgraded.differently:
•. AdderView.CATx.models.and.Computer.Access.Modules.require.a.Windows-based.computer.system.to.be.linked.via.the.COM1/UPGRADE.port..
•. AdderView CATx IP models.are.upgraded.via.IP.link.and.require.a.network-connected.Windows-based.computer.system.
Upgrading AdderView CATx models and CAMsThe.KVM.Firmware.Uploader.utility.is.available.from.the.Adder.Technology.website.(www.adder.com).and.allows.you.to.check.the.current.revision.of.the.AdderView.CATx.unit.firmware.as.well.as.every.Computer.Access.Module.connected.to.it.
Items required to use the upgrade utility •. Supplied.serial.upgrade.cable.(see.Appendix 7.for.pin-out.specifications).
•. A.Windows-based.upgrade.computer.with.an.RS232.serial.port.
•. The.latest.version.of.the.KVM.Firmware.Uploader.and.firmware.files.for.the.AdderView.CATx.-.available.from.the.Technical Support > Firmware Updates.section.of.the.Adder.Technology.website.(www.adder.com)..
To use the KVM Firmware Uploader utility
1 - Obtain and run the KVM Firmware Uploader.. Download.the.latest.AdderView.CATx.KVM.Firmware.Uploader.from.the.
Adder.Technology.website.and.install.it.on.a.Windows-based.upgrade.computer.that.will.be.connected.to.the.AdderView.CATx.unit..The.files.are.supplied.as.a.compressed.ZIP.file..Decompress.the.ZIP.file.with.an.appropriate.tool.such.as.WinZip.(www.winzip.com).and.copy.all.contained.files.to.the.same.folder.on.the.upgrade.computer..
2 - Power off the AdderView CATx and select flash upgrade mode. Remove.the.power.supply.plug(s).from.the.rear.panel.of.the.AdderView.
CATx.and.move.option.switch.1.on.the.back.of.the.AdderView.CATx.to.the.ON.position.(down)..
3 - Connect the upgrade computer to the AdderView CATx. Connect.the.upgrade.computer.to.the.COM1/UPGRADE.port.on.the.rear.panel.
of.the.AdderView.CATx.unit.using.the.supplied.upgrade.cable..You.do.not.need.to.set.the.serial.baud.rate.and.protocol.because.the.upgrade.program.will.do.this.automatically.
4 - Power on the AdderView CATx. Attach.the.power.adapter.to.the.AdderView.CATx..The.USER.display.should.
now.show. .which.indicates.that.the.AdderView.CATx.is.ready.to.be.upgraded.
5 - Run the KVM Firmware Uploader utility. From.that.folder,.select.the.KVMUploader.icon.to.run.the.upgrade.utility..
The.KVM.Firmware.Uploader.dialog.will.be.displayed:
6 - Query the AdderView CATx unit. Click.the.Query Unit.button.to.confirm.that.communication.is.possible.with.
the.AdderView.CATx.and.to.establish.the.firmware.details.of.the.main.unit.and.all.connected.CAMs.
. Note: The computer to which each CAM is connected must be powered before the respective CAM can be accessed.
Note: AdderView CATx units in lower levels of cascade links (and their respective CAMs) cannot be queried or upgraded while remaining in the cascade arrangement.
If.the.application.cannot.contact.the.AdderView.CATx,.re-check.the.connection.cable.and.click.the.Advanced....button.to.check.that.the.correct.serial.port.is.being.used..Change.the.serial.port.within.the.Advanced.section,.if.necessary...
continued

��
9 - Commence the upgrade. To.begin.the.upgrade.process,.click.the.Upload Now.button..The.progress.
will.be.shown.within.the.dialog..Should.you.decide.not.to.continue.with.the.upload.at.any.stage,.click.the.Abort.button;.response.to.this.is.usually.immediate,.however,.during.an.erase.command,.the.upload.will.not.be.aborted.until.the.erase.is.complete.(this.may.take.a.few.seconds).
10 - Change option switch 1 to the OFF position and cycle the power. Click.switch.1.on.the.rear.of.the.AdderView.CATx.to.the.OFF.position.and.
disconnect.the.power..When.the.power.is.re-applied.the.AdderView.CATx.will.operate.using.the.new.firmware.
Issues to consider when performing flash upgradesThe.upgrade.program.rewrites.the.AdderView.CATx.firmware.code..If.the.upgrade.process.is.interrupted.then.the.AdderView.CATx.will.have.invalid.code.and.will.not.be.able.to.operate..It.is.therefore.good.practice.to.ensure.that.the.upgrade.process.is.always.fully.completed..A.partial.or.failed.upgrade.may.be.rectified.by.performing.another.upgrade..If.the.upgrade.process.is.interrupted.accidentally.then.you.should.immediately.repeat.the.upgrade.process.without.moving.switch.1.from.the.upgrade.(ON).position..Switch.1.forces.the.AdderView.CATx.into.flash.upgrade.mode.and.prevents.the.upgraded.code.from.being.run..Running.faulty.or.partially.upgraded.code.may.have.unpredictable.results.and.may.damage.your.AdderView.CATx.or.computing.equipment..
WARNING: Running faulty or partially upgraded code may have unpredictable results and may damage your AdderView CATx or computing equipment.
. The.results.of.the.unit.query.will.be.displayed.in.the.Device/Dongle.Selection.dialog:..
. The.type.and.firmware.revision.of.each.discovered.CAM.will.be.displayed.alongside.the.port.number.to.which.it.is.connected.
7 - Select the items to be upgraded. Using.the.Device/Dongle.Selection.dialog.you.can.determine.which.items.
should.receive.a.firmware.upgrade:
•. Use.the.Program / Verify Main Unit.option.to.include.or.exclude.the.AdderView.CATx.unit.itself.
•. Use.the.Select All CAMs.option.to.upgrade.every.discovered.CAM.
•. Use.the.Select All USB / PS2 / Sun CAMs.options.to.upgrade.only.CAMs.of.a.certain.type.
•. Use.the.individual.port.options.to.select.particular.CAM.devices.to.upgrade.
. When.the.required.options.have.been.selected,.click.OK.
. Note: Approximate upgrade times are: AdderView CATx unit = 4½ minutes; each selected CAM = 20 seconds.
8 - Select the upgrade file to be used. From.the.main.KVM.Firmware.Uploader.dialog,.click.the.Browse....button.
and.select.the.upgrade.file.that.is.appropriate.to.your.AdderView.CATx.unit:
. AdderView.CATx.16.port:.. AD_CAT16.TXT
. AdderView.CATx.IP.16.port:.. AD_IP16.TXT
. AdderView.CATx.24.port:.. AD_CAT24.TXT.
. AdderView.CATx.IP.24.port:.. AD_IP24.TXT
. .The.upgrade.file.details.will.be.displayed.within.the.dialog.
. IMPORTANT: Check that the ‘Intended Target Units’ field matches the ‘Unit Connected’ field. If these fields do not match then you may have an incorrect upgrade file, check with Adder Technology Ltd before proceeding. Check also that the ‘New firmware version’ is greater than the ‘Current firmware version’.
Check that the ‘Intended Target Units’ field matches the ‘Unit Connected’ field.
Check also that the ‘New firmware version’ is greater than the ‘Current firmware version’.

�9
Upgrading AdderView CATx IP modelsThe.AdderView.CATx.IP.models.are.upgraded.via.global.connection.(through.the.IP.network.port)..Upgrades.are.digitally.signed.by.Adder.using.a.secure.key..This.prevents.unauthorised.or.altered.firmware.images.being.downloaded.into.the.AdderView.CATx.IP.
To upgrade AdderView CATx IP models1. Download.the.latest.firmware.revision.for.the.AdderView.CATx.IP.from.the.
Adder.website.and.decompress.the.download.file..View.the.decompressed.files.and.make.a.note.of.the.name.and.location.of.the..bin.file.that.was.part.of.the.download.file.collection..
2. Make.a.global connection.to.the.AdderView.CATx.IP.unit.and.login.as.the.admin.user..
2. Once.logged.in,.click.the.Configure.button.in.the.top.right.corner.of.the.window.
3. Click.the.Unit Configuration.button.
4. Click.the.Advanced Unit Configuration.button.
5. Click.the.Upgrade Firmware.button..The.following.dialog.will.be.displayed:
6. Click.OK..The.AdderView.CATx.IP.is.now.ready.to.accept.the.upgrade.files..Open.your.browser.and.log.into.the.AdderView.CATx.IP.using.the.IP.address.that.was.confirmed.in.the.dialog..Once.connected,.the.AdderView.CATx.IP.will.offer.the.following.screen:
7. Click.the.Browse.button.and.locate.the..bin.upgrade.file.that.you.downloaded.earlier..The.AdderView.CATx.IP.will.show.the.following.screen:
8. Select.which.portion.of.the.AdderView.CATx.IP.that.you.wish.to.upgrade..Tick.both.options.to.upgrade.the.complete.unit..When.ready,.click.the.Perform upgrade.button.
. The.upgrade.will.take.place.and.its.progress.will.be.shown.on.screen..

�0
OperationThe front panel controls
AdderView CATx models COMPUTER button and numeric indicatorThese.items.allow.you.to.select.any.one.of.the.AdderView.CATx.computer.ports..As.you.press.the.COMPUTER.button,.the.adjacent.number.will.increment.to.the.next.available.computer.channel..The.computer.port.selected.will.then.be.connected.to.the.current.user.port.
USER button and numeric indicatorThese.items.allow.you.to.select.any.one.of.the.AdderView.CATx.user.ports..As.you.press.the.USER.button,.the.adjacent.number.will.increment.to.the.next.available.user.port..At.the.same.time,.as.each.user.port.number.is.displayed,.the.computer.channel.that.is.currently.associated.with.that.port.will.be.indicated.by.the.COMPUTER.indicator..
Accessing the AdderView CATxThe.AdderView.CATx.and.CATx.IP.offer.three.main.ways.to.gain.access:.
•. Local user access,
•. Remote user access.via.an.X100/X200.extender,.or
•. Global user access.via.IP.network.link.or.direct.dial.up.
AdderView CATx IP models
HT
Computer button and numeric indicator
User button and numeric indicator
User port activity indicators
Power indicator
Indicators•. VNC.Indicates.that.a.global.user.is.connected.and.active.
•. �00..Indicates.the.Ethernet.network.speed.(10/100Mbs).
•. DAT.Network.activity.indication.
•. LNK.Network.link.present.
•. AUX.Auxiliary.power.input.indicator..
Computer button and numeric indicator
User button and numeric indicator
User port mouse activity indicators
Power indicator
User port keyboard
activity indicators
Auxiliary power
indicator

��
ADDERVIEW CATx IPUser Name:
Password:Port 1 login Esc-Scr Save
ADDERVIEW CATx IPComputer PortComputer 1 01Computer 2 02Computer 3 03Computer 4 04Computer 5 05Computer 6 06Computer 7 07Computer 8 08User port 1 StatusADMIN SHARED USEF1-More menus F3-FindF2-Adj.Video F4-Logout
This column shows the AdderView CATx address for each computer. If you wanted to select ports using the hotkey method, these are addresses that you would enter.
Default names for each computer port
Your Login name Link status of your user port
Identification of your user port
Enter your Login name here
Selecting a computerThere.are.four.main.ways.for.local.and.remote.users.to.select.a.specific.computer.channel:
• Using the front panel controls.(discussed.below).–.this.is.a.straightforward.method,.if.the.AdderView.CATx.is.nearby.
• Using hotkeys.–.this.is.a.good.method.if.you.continually.access.a.small.number.of.computers.
• Using the on-screen menu.–.this.is.the.best.method.when.there.are.many.connected.computers.
• Using mouse buttons.–.this.is.a.good.method.for.cycling.between.a.small.number.of.computers.
For.all.methods.(if.the.confirmation box option.is.enabled),.when.the.required.port.is.selected,.a.pop.up.message.will.be.displayed.to.confirm.the.computer.name.or.number,.and.its.status..Alternatively,.an.error.message.explaining.why.a.connection.is.not.possible.(press. .to.cancel.the.latter.type.of.message).
To avoid the ‘hall of mirrors’ effect
IMPORTANT: Never configure a system so that your viewer is viewing itself.
When.controlling.a.host.computer.via.the.local.user.port.or.a.remote.user.port,.if.the.host.computer.is.networked.it.is.possible.to.make.the.VNC.viewer.or.a.browser.to.create.a.link.back.to.itself.via.the.global.(IP).capabilities.of.the.unit..This.will.set.up.a.‘hall.of.mirrors’.effect,.where.the.computer.is.viewing.itself..into.infinity.
While.technically.possible,.the.AdderView.CATx.IP.unit.is.not.designed.to.withstand.this.treatment.and.could.sustain.damage......
To select a computer using the front panel controlsNote: It is possible for the front panel controls to be limited to selecting only the on screen menu or a blank screen. If this is the case please use a different switching method or contact your system administrator for details.
1. Press.the.USER.button.until.the.adjacent.numeric.indicator.displays.the.port.number.to.which.you.are.connected.
2. Press.the.COMPUTER.button.until.the.adjacent.numeric.indicator.shows.the.required.computer.channel.number..
Note: If security has been enabled then only computer channels to which the current user port has permission will be displayed.
As.well.as.the.16.(or.24).standard.computer.ports,.there.are.also.two.additional.special.ports.that.appear.after.the.last.port,.either.16.or.24:
. This.port.provides.no.video.signal.so.that.a.connected.power.saving.monitor.will.be.prompted.to.enter.into.its.power.saving.mode.
. This.port.connects.the.current.user.port.to.the.on-screen.menu..
If the above login prompt is not displayed, you are either already logged in to the AdderView CATx unit, or the security features have not been implemented. In such cases see ‘To view this menu at any time’ below.
Local and remote user accessLocal.users.(directly.connected).and.remote.users.(via.an.Adder.X100/X200.extender).gain.access.to.the.AdderView.CATx.unit.in.exactly.the.same.way..Global users,.linking.via.a.special.viewer,.are.handled.in.a.different.manner..
To gain access as a local or remote user:1. From.a.local.or.remote.keyboard,.press.any.key.to.display.the.login.prompt:
2. Enter.your.username.and.password..Providing.you.have.the.correct.permissions,.the.screen.will.display.the.main.menu,.showing.you.a.list.of.computers.for.which.you.have.permission.to.access:.
To.view.this.menu.at.any.time:.Press.and.hold.the.hotkeys.(usually. .and. ),.then.press. .and.finally.release.all.three.keys.
Note: The and keys when pressed in combination are called ‘hotkeys’ and they signal to the AdderView CATx that you wish to control it, rather than the host computer. However, if these particular hotkeys clash with another device or program, then your administrator may change them to a different combination. If the . . combination fails to work, then please contact your system administrator for details.
These indicators show which systems are currently accessible (green) or inaccessible (red).

��
To select a computer using hotkeys1. Simultaneously.press.and.hold. .and. .
Note: The and keys when pressed in combination are called ‘hotkeys’ and they signal to the AdderView CATx that you wish to control it, rather than the computer. However, if these particular hotkeys clash with another device or program, then your administrator may change them to a different combination. If the combination fails to work, then please contact the system administrator for details.
2. While.still.holding. .and. ,.press.the.first.numeral.of.the.required.port.address,.then:.
•. If.the.port.address.is.a.single.character,.release.all.of.the.keys.
•. If.the.port.address.is.two.or.more.characters,.release.the.first.numeral.key.and.press.the.second.–.repeat.this.procedure.until.all.of.the.port.address.numerals.have.been.entered,.then.release. .and. ...
Note: The numbers on your keyboard’s numeric keypad are not valid, use only the numeral keys above the QWERTY section.
Note: If your user port does not have authorisation to view the selected port then an ‘Insufficient user rights’ messages will be displayed.
Standard hotkeysThe.range.of.hotkey.combinations.are.as.follows:
Note: If your hotkeys have been changed, substitute them for and in the examples given here.
. . . Selects.port.1
. . . Selects.port.2
•. •
•. •
. . .then. . Selects.port.10
•. •
. . .then. . Selects.port.24
. Note: When entering multiple digit addresses as above or for even longer cascaded computers, keep and pressed down until all other numbers have been entered.
. . . Selects.the.next.available.port
. . . Selects.autoscan.mode.where.each.(authorised).port.is.displayed.for.a.period.determined.by.the.administrator..To.cancel.autoscan.mode,.simply.select.any.fixed.channel.using.any.of.the.suggested.methods.
. . . Switches.off.the.video.signal.–.this.will.cause.a.power.saving.monitor.to.enter.its.standby.mode..To.awaken.the.monitor,.simply.select.any.fixed.channel.using.any.of.the.suggested.methods.
. . . Logs.out.the.current.user.(if.security.is.enabled).or.selects.port.0.to.disable.the.video.signal.(if.security.is.disabled).
. .&. ,. ,. .or. .. Moves.the.currently.displayed.on-screen.menu.around.the.screen..
��
To select a computer using the on-screen menu1. Select.the.on-screen.menu.in.one.of.three.ways:.
•. By.simultaneously.pressing.and.then.releasing. . . ..
•. By.pressing.the.middle.and.right.buttons.of.a.three.button.mouse,.or
Note: The mouse switching option is usable only if the ‘Mouse Switching’ option is enabled. See Global preferences for more details.
•. By.selecting.port. .using.the.front.panel.buttons.(see.previous)...
At.this.point,.depending.on.the.security.settings.and.the.current.log.in.situation,.one.of.two.things.will.be.displayed,.either.the.login.screen,.or.the.Selection.menu:
. The login screen.-.here.you.enter.a.valid.User.Name.and.Password.–.see.Logging in and out.for.more.details..When.you.do.so,.the.AdderView.CATx.selection.menu.will.be.displayed:.
. The Selection Menu.–.here.you.can.select.computers.by.name.
2. Use.the. .and. .keys.(or.the.scroll.wheel.of.an.IntelliMouse).to.highlight.the.required.computer.name..Alternatively.(for.large.configurations),.press.
.to.perform.an.alphabetical.search.for.a.particular.port.name.
Note: If security has been enabled then only computers to which the current user port has permission will be displayed.
3. Select.the.highlighted.port.in.one.of.three.ways:
•. Shared use.-.press. .-.This.standard.method.allows.other.users.to.view.the.same.computer.port..Control.of.the.port.is.given.to.one.user.at.a.time,.on.a.first-come,.first-served.basis.and.is.relinquished.after.a.certain.period.of.inactivity.
•. Exclusive use.-.press. . .–.This.mode.prevents.any.other.user.from.viewing.or.controlling.the.computer.port.until.you.either.select.another.computer.or.log.off..This.mode.should.be.used.with.care.–.it.can.also.be.blocked.as.an.option.by.the.administrator.
•. Video Only.-.press. . .–.This.mode.displays.the.video.picture.of.the.port,.but.prevents.keyboard.or.mouse.activity.from.controlling.the.computer.
To select a computer using mouse buttonsNote: This procedure works only with three-button or IntelliMouse devices and only if the ‘Mouse Switching’ option has been enabled by your administrator.
1. Hold.down.the.middle.button.(or.scroll.wheel).of.the.mouse.
2. Click.the.left.mouse.button.to.select.the.next.computer.port..When.the.correct.port.is.reached,.release.the.middle.button..
Note: If security has been enabled then only computers to which you have permission will be displayed.
To select a computer using mouse buttons – Advanced method 1. Select.the.on-screen.menu.by.pressing.the.middle.and.right.buttons.of.a.
three.button.mouse.
2. Use.the.scroll.wheel.to.highlight.the.required.computer.port.
3. Then,.select.either:
•. Shared Use.-.press.the.left.mouse.button.-.This.standard.method.allows.other.users.to.view.the.same.computer.port..Control.of.the.port.is.given.to.one.user.at.a.time,.on.a.first-come,.first-served.basis.and.is.relinquished.after.a.certain.period.of.inactivity.
•. Exclusive Use.-.press. .and.the.left.mouse.button.–.This.mode.prevents.any.other.user.from.viewing.or.controlling.the.computer.port.until.you.either.select.another.computer.or.log.off..This.mode.should.be.used.with.care.–.it.can.also.be.blocked.as.an.option.by.the.administrator.
•. Video Only.-.press. .and.the.left.mouse.button.–.This.mode.displays.the.video.picture.of.the.port,.but.prevents.keyboard.or.mouse.activity.from.controlling.the.computer.
•. Escape without selecting a port.–.press.the.right.mouse.button.

��
Logging in and outThe.AdderView.CATx.features.a.straightforward.security.system.that.helps.to.prevent.unauthorised.access.to.some,.or.all.connected.computers..
If.the.security.option.has.been.selected.by.your.administrator.then.you.will.be.asked.to.enter.a.User Name.and.Password.when.you.first.access.a.user.port..When.you.have.finished.using.the.computer,.it.is.then.good.practice.to.logout,.forcing.any.other.users.to.authenticate.themselves.prior.to.use.
Note: If the security option has not been enabled then no login is required.
To log in to the AdderView CATx1. If.it.is.not.already.displayed,.move.the.mouse.or.press.any.key.to.display.the.
log.in.screen.
Selecting cascaded computersThe.AdderView.CATx.is.not.limited.to.sharing.just.sixteen.or.twenty.four.computers..By.joining.numerous.AdderView.CATx.products.together.in.a.tree-like.or.cascade.arrangement,.it.is.possible.for.each.user.port.to.view.many.more.computers..Although.you.can.use.exactly.the.same.selection.methods.to.choose.any.computer,.you.are.strongly.recommended.to.use.the.on.screen.menu.method.for.the.following.reasons:
•. The.on screen menu.–.this.method.displays.the.names.of.each.computer.in.alphabetical.order.and.also.allows.you.to.search.for.them.by.name,.press.–.a.useful.feature.in.a.long.list..This.really.is.the.best.way.to.access.a.large.number.of.computers..
•. The.mouse method.–.this.method.is.fine.for.small.numbers.of.computers.but.can.take.too.long.to.reach.the.required.computer.in.an.extensive.configuration.
•. The.hotkey method.–.depending.on.their.position.within.the.connection.structure,.each.computer.can.have.an.address.up.to.six.digits.long.which.can.be.difficult.to.remember.and.laborious.to.type.
The confirmation boxThe.AdderView.CATx.provides.the.option.of.a.confirmation.box.that.is.displayed.on.screen.for.three.seconds.after.a.computer.is.selected..The.confirmation.box.indicates.the.current.user.port.and.your.user.name,.the.selected.computer.and.the.connection.status..You.can.enable.or.disable.the.confirmation.box,.as.required.
To enable/disable the confirmation box 1. Select.the.on-screen.menu.in.one.of.three.ways:.
•. By.simultaneously.pressing.and.then.releasing. . . ..
•. By.pressing.the.middle.and.right.buttons.of.a.three.button.mouse,.or
•. By.selecting.port. .using.the.front.panel.buttons.
If.you.are.not.already.logged.in.(see.left),.do.so.now.
2. Press. .to.select.‘More.menus’.
3. Highlight.the.‘User.Preferences’.option.and.press. .to.select..
4. Highlight.the.‘Confirmation.Box’.option.and.press. .to.select.‘ENABLED’.or.‘DISABLED’,.as.required.
5. Press. .to.save.the.settings..Press. .twice.more.to.return.to.the.computer.port.and.view.your.changes.
ADDERVIEW CATx IPUser Name:
Password:Port 1 login Esc-Scr Save
2. Enter.your.designated.User Name.and.press. .
3. Enter.your.designated.Password.and.press. ..If.both.entries.are.correct.then.the.selected.port.will.be.displayed.
Note: If either the User Name or Password are incorrect, the entries will be cleared to allow another attempt.
To log out from the AdderView CATxEither:
•. Press. . .and. .at.any.time.to.log.out.
or
1. Select.the.on-screen.menu.in.one.of.three.ways:.
•. By.simultaneously.pressing.and.then.releasing. . . ..
Note: The and hotkeys may have been changed. If the combination fails to work, then please contact the system administrator for details.
•. By.pressing.the.middle.and.right.buttons.of.a.three.button.mouse,.or
•. By.selecting.port. .using.the.front.panel.buttons
2. Press. ..You.will.be.logged.out.and.the.login.window.will.be.re-displayed..

��
The reminder bannerAs.many.computer.screen.layouts.can.appear.very.similar,.the.AdderView.CATx.provides.a.reminder.banner.option.that.indicates.which.computer.port.you.are.currently.viewing..The.banner.is.usually.displayed.at.the.top.of.the.screen,.using.blue.lettering.and.transparent.background..You.can:
•. Move.the.banner
•. Change.the.banner.colours,.and/or
•. Disable.the.banner.
To move the reminder banner1. While.viewing.a.computer.port,.press.and.hold. .and. .
Note: The and hotkeys may have been changed. If the combination fails to work, then please contact the system administrator for details.
2. Press.the. ,. ,. .and. .keys.to.move.the.banner.to.the.required.position.
To change banner colours or disable the banner1. Select.the.on-screen.menu.in.one.of.three.ways:.
•. By.simultaneously.pressing.and.then.releasing. . . ..
•. By.pressing.the.middle.and.right.buttons.of.a.three.button.mouse,.or
•. By.selecting.port. .using.the.front.panel.buttons.
If.you.are.not.already.logged in,.do.so.now.
2. Press. .to.select.‘More.menus’.
3. Highlight.the.‘User.Preferences’.option.and.press. .to.select..
4. Select.the.required.option:
•. To.disable.the.banner.–.highlight.‘Reminder.Banner’.and.press. .until.‘DISABLED’.is.shown.
•. To.change.colours.–.highlight.‘Reminder.Colour’.and.press. .until.the.desired.colour.combination.is.displayed.
5. Press. .to.save.the.settings..Press. .twice.more.to.return.to.the.computer.port.and.view.your.changes.
Routing statusOn.occasions.it.may.be.useful.to.know.which.computers.are.being.accessed,.in.which.modes.and.by.whom..The.most.common.reason.for.this.would.be.if.you.were.denied.access.to.a.computer.port.and.needed.to.find.out.if.another.user.has.selected.‘Exclusive’.access..For.this.purpose.the.AdderView.CATx.provides.the.very.handy.Routing.status.feature.which.provides.an.‘at.a.glance’.view.of.all.current.user.connections..
To use the Routing status feature1. Select.the.on-screen.menu.in.one.of.three.ways:.
•. By.simultaneously.pressing.and.then.releasing. . . ..
Note: The and hotkeys may have been changed. If the combination fails to work, then please contact the system administrator for details.
•. By.pressing.the.middle.and.right.buttons.of.a.three.button.mouse,.or
•. By.selecting.port. .using.the.front.panel.buttons.
If.you.are.not.already.logged in,.do.so.now.
2. Press. .to.select.‘More.menus’.
3. Use. .or.your.mouse.scroll.wheel.to.highlight.the.‘Routing.status’.option..
4. Press. .or.the.left.mouse.button.to.select..The.Routing.status.screen.will.be.displayed:.
. Here.you.can.instantly.see.which.computer.ports.are.being.accessed.and.by.whom..The.screen.will.be.displayed.for.ten.seconds.

��
Power switching (via configuration menu)When.used.in.conjunction.with.optional.power.switch.boxes,.the.AdderView.CATx.allows.you.complete.remote.control.over.the.connected.computers..The.primary.function.of.the.power.switching.option.is.to.remotely.power.down.and.reset.computers.that.are.failing.to.respond.
To switch a computer on or off1. Select.the.on-screen.menu.in.one.of.three.ways:.
•. By.simultaneously.pressing.and.then.releasing. . . ..
Note: The and hotkeys may have been changed. If the combination fails to work, then please contact the system administrator for details.
•. By.pressing.the.middle.and.right.buttons.of.a.three.button.mouse,.or
•. By.selecting.port. .using.the.front.panel.buttons.
If.you.are.not.already.logged in,.do.so.now.
2. Switch.to.the.computer.port.that.needs.to.be.switched.on.or.off.
Note: If the computer is still responding, try to shut it down normally before attempting a power switch operation.
3. Display.again.the.on.screen.menu.and.press. .to.select.‘More.menus’.
4. The.‘Functions’.option.should.be.highlighted,.press. .
5. Highlight.‘Power.Control’.and.press. .
6. Highlight.either.‘Switch.Computer.ON’.or.‘Switch.Computer.OFF’.as.necessary.and.press. ..A.warning.message.with.two.options.will.be.displayed:
7. Press. .to.confirm.or. .to.confirm.and.exit..The.latter.option.clears.the.menu.so.that,.if.required,.you.can.be.ready.to.enter.any.escape.sequences.that.are.needed.by.the.computer.(to.access.its.BIOS.setup.area),.during.the.bootup.sequence.
User preferences and functionsIn.addition.to.customising.the.reminder.banner.as.described.earlier,.you.can.also:.
•. Change.the.colour.of.the.on.screen.menu,.
•. Select.the.screen.saver.style,.
•. Restore.mouse.operation,.or.
•. Perform.power.control.functions..
All.of.these.options.are.discussed.within.Appendix 1.

��
Global user accessGlobal.users.access.the.AdderView.CATx.IP.using.a.viewer.and.a.link..There.are.two.types.of.viewer.and.two.types.of.link,.which.can.be.used.in.any.combination.
VNC viewer Network
link
Web browser viewer
Dial up link

��
IMPORTANT:.During.login,.if.you.see.a.warning.message.similar.to.the.one.shown.here,.then.stop.and.do.not.proceed.
Global user access via VNC viewerThe.VNC.viewer.is.a.compact.application.that.runs.on.your.IP-connected.‘global’.system.and.allows.you.to.view.and.use.the.AdderView.CATx.and.its.host.computer(s)..VNC.viewer.is.readily.available.from.a.number.of.different.sources:
•. from.the.AdderView.CATx.installation.CD
•. from.the.AdderView.CATx.itself
•. from.the.RealVNC website
To access via the VNC viewer1. Locate.and.select.the.VNC.viewer.icon..
•. If you are using a dial up link.
. A.connection.details.dialog.will.be.displayed:
2. In.the.‘Server:’.entry,.type.the.address.of.the.AdderView.CATx.as.follows:
v.w.x.y.
. where.v.w.x.y.is.the.IP.network.address,.for.example.192.168.0.3
•. If you have been asked to also enter a port number.
3. Click.the.OK.button..Depending.on.the.options.selected,.you.may.need.to.confirm.certain.items..A.connection.attempt.will.be.made.and.if.successful,.an.authentication.dialog.will.be.displayed:
4. Enter.your.username.and.password..The.viewer window.should.now.open.and.show.the.current.host.computer..Note: If the Username entry is blanked out then only admin user account is currently defined and only a password is required.
Options buttonProvides.a.range.of.viewer.and.connection.settings.-.MORE [+]
Enter the AdderView CATx address here and click OK
If required, select the encryption mode - MORE [+]
Downloading VNC viewer from the AdderView CATx IPThe.AdderView.CATx.has.the.ability.to.distribute.its.own.VNC.viewer.application..
To download the VNC viewer1. Open.your.Web.browser.
2. Enter.the.network.address.where.the.AdderView.CATx.is.situated.(in.the.form:.http://192.168.0.3).and.make.the.link.
3. In.the.opening.AdderView.CATx.screen,.click.the.link.that.offers.to.download.the.secure.VNC.viewer.‘from.the.unit’.
4. Save.the.download.file.(vncviewer.exe).to.your.system.
5. Select.and.run.the.downloaded.file.and.then.connect.to.the.AdderView.CATx.using.the.VNC.viewer.application.
This.message.is.displayed.if.an.AdderView.CATx.IP.unit,.that.your.viewer.has.previously.visited,.has.had.a.change.of.security.keys..This.is.not.uncommon.if.a.unit.is.reset.for.some.reason..However,.it.could.also.mean.that.your.trusted.unit.is.being.spoofed.and.you.may.not.be.connecting.to.the.system.that.you.think.you.are..
Do.not.click.the.Yes.button.until.you.have.checked.with.your.administrator.that.the.trusted.AdderView.CATx.IP.unit.has.been.recently.reset.for.some.reason....

�9
Global user access via web browserYou.can.use.a.standard.Web.browser.(supported versions).to.gain.access.to.the.AdderView.CATx.IP.and.its.host.computer(s)..As.soon.as.you.make.contact.with.the.AdderView.CATx.IP.it.will.begin.downloading.a.small.Java.application.to.your.browser,.which.will.be.used.only.for.the.duration.of.your.connection.
To access via your web browser1. Launch.your.standard.Web.browser.as.usual.
•. If you are using a dial up link.
2. In.the.Address.section,.type.the.address.of.the.AdderView.CATx.IP.as.follows:
http://v.w.x.y.
. where.v.w.x.y.is.the.IP.network.address,.for.example.192.168.0.3
•. If you have been asked to also enter a port number.
3. Press. ..A.connection.attempt.will.be.made..
4. In.the.browser.window,.select.the.‘Connect.using.built-in.Java.VNC.viewer’.option.to.download.a.small.application.that.will.temporarily.empower.your.browser.(on.slow.connections.the.application.download.can.take.several.tens.of.seconds.to.complete)..Once.complete,.a.connection.details.dialog.will.be.displayed:
The previously entered AdderView CATx IP address will be shown here
Options buttonProvides.a.range.of.viewer.and.connection.settings.-.MORE [+]
5. Make.any.necessary.option/encryption.changes.and.click.the.OK.button.to.proceed..Depending.on.the.options.selected,.you.may.need.to.confirm.certain.items....
6. A.second.connection.attempt.will.be.made.and.if.successful,.an.authentication.dialog.will.be.displayed:
7. Enter.your.username.and.password..The.viewer window.should.now.open.and.show.the.current.host.computer..Note: If the Username entry is blanked out then only admin user account is currently defined and only a password is required....
If required, select the encryption mode - MORE [+]
IMPORTANT:.During.login,.if.you.see.a.warning.message.similar.to.the.one.shown.here,.then.stop.and.do.not.proceed.
This.message.is.displayed.if.an.AdderView.CATx.IP.unit,.that.your.viewer.has.previously.visited,.has.had.a.change.of.security.keys..This.is.not.uncommon.if.a.unit.is.reset.for.some.reason..However,.it.could.also.mean.that.your.trusted.unit.is.being.spoofed.and.you.may.not.be.connecting.to.the.system.that.you.think.you.are..
Do.not.click.the.Yes.button.until.you.have.checked.with.your.administrator.that.the.trusted.AdderView.CATx.IP.unit.has.been.recently.reset.for.some.reason....

�0
Using the viewer windowThe.viewer.window.gives.you.the.ability.to.view.and.control.the.AdderView.CATx.IP.and.its.host.computer(s)..Its.operation.is.almost.identical.regardless.of.whether.you.used.the.VNC.viewer.or.your.Web.browser.to.display.it.
The menu barThe.viewer.window.presents.a.menu.bar.similar.to.that.shown.below..Certain.items.within.the.toolbar.are.displayed.depending.upon.your.access.permissions.and/or.the.AdderView.CATx.IP.configuration.
Re-sync mouseEnsures.that.the.mouse.pointer.which.you.move.and.the.mouse.pointer.on.the.host.system.are.correctly.synchronised..
Auto calibrateDetermines.the.optimum.video.and/or.mouse.settings.for.the.currently.selected.host.computer..This.button.will.flash.red.when.a.new.host.screen.is.encountered..Click.this.button.when.you.first.visit.a.new.screen.
ControlsDisplays.a.menu.of.options.concerning.keyboard,.video.and.mouse.operation.
Access modeAllows.you.to.choose.between.Shared.and.Private.access.modes.
Dialogue areaIndicates.your.username.and.the.host.system.that.you.are.currently.viewing..This.area.can.also.display.other.messages.
ConfigureThis.option.is.only.available.to.the.admin.user.and.provides.access.to.the.main.configuration.menus.
Viewer options(VNC.viewer.only).Click.the.VNC.icon.to.view.the.viewer.window.options.
PowerClick.to.access.the.power.on/off.options.for.the.current.host.computer..
HostsClick.to.display.a.list.of.computers..Choose.an.entry.to.connect.to.that.host.computer.
When using the viewer windowWhat is the best screen resolution to use?The.best.resolution.for.your.computer.is.one.that.is.larger.than.the.screen.of.the.host.computer.that.you.are.viewing..This.will.allow.you.to.see.everything.without.scrolling.around..Alternatively,.the.VNC.viewer.can.be.set.to.scale.the.image.to.fit.your.screen,.but.remember.that.some.pixel.dithering.effect.will.be.seen.when.scaling.is.used..
How do I navigate around a larger screen?If.the.screen.that.you.are.viewing.has.a.larger.resolution.than.your.viewing.window.you.will.need.to.scroll.around.to.see.all.items..The.viewer.window.allows.you.to.‘bump.scroll’.(only.in.full.screen.mode)..This.means.that.when.your.mouse.cursor.bumps.against.the.edge.of.the.screen,.the.screen.image.will.scroll.across.automatically...
How do I escape from full screen mode?Press.the.F8.button..This.button.is.changeable.but.is.most.often.set.to.F8...
Why is the button flashing red?This.happens.when.a.new.host.screen.is.viewed.(that.has.not.been.viewed.before)..Click.the. .button.to.perform.an.auto.calibration.for.the.screen.and.the.mouse..See.Auto calibrate.for.important.information.about.this.feature.
How do I change between host computers?The.best.way.to.change.between.host.computers.is.to.click.the.‘Hosts’.button.and.then.select.the.required.computer.by.name..See.Host selection.
How do I remove traces of moved items from the screen?When.you.move.an.item.or.window.across.the.screen,.sometimes.it.can.leave.unsightly.trails..These.are.called.artifacts.and.can.be.particularly.prevalent.when.the.connection.speed.is.low..To.remove.artifacts,.click.the.‘Controls’.button.and.select.the.‘Refresh.screen’.option..See.Controls.
How do I make the most of a slow connection?The.VNC.viewer.is.slightly.better.suited.to.slower.connections.than.the.browser.viewer.because.it.offers.more.options..Click.the.Options.button.of.the.VNC.viewer.when.entering.the.AdderView.CATx.IP.address.during.log.on...
Adjust the Threshold settingEnsure.that.the.video.Threshold setting.is.set.higher.than.the.automatic.setting.suggests..Tweak.this.setting.manually.to.ensure.the.best.setting...
Fewer coloursSelect.the.Low (64 colours).mode..The.Very.low.option.offers.hardly.any.improvement.and.looks.a.lot.worse.
Rate limit mouse eventsWhen.selected,.this.mode.greatly.reduces.the.mouse.movement.data.that.are.sent.to.the.host.computer..When.you.move.the.local.mouse,.the.remote.cursor.will.catch.up.roughly.once.per.second..
Ctrl Alt DelSends.the.Ctrl.Alt.Del.sequence.to.the.current.host.computer.

��
Host selectionThe.Hosts.button.on.the.menu.bar.provides.the.quickest.and.most.efficient.way.to.switch.between.host.computers..This.is.because.the.button.is.close.at.hand,.but.also.because.the.screen.calibration.details.for.each.host.are.reused.when.this.method.of.switching.is.used..The.alternative.is.to.use.hotkey combinations.or.the.AdderView.CATx.IP.on-screen menu.
Note: The Hosts button is displayed only when the switching details for two or more computers have been declared within the configuration section by the admin user.
To select a host1. Click.the.Hosts.button.to.display.a.list.of.computers.
2. Click.the.required.computer.name.to.view.and.control.it.
See.Appendix 2 - Host configuration.for.details.about.programming.new.hosts.into.the.AdderView.CATx.IP.(‘admin’.user.status.required).
ConfigureThis.option.is.displayed.only.when.you.are.logged.on.as.the.‘admin’.user..When.selected.it.provides.access.to.a.wide.range.of.AdderView.CATx.IP.settings.
See.Appendix 2 - Configuration pages via viewer.for.more.details.
Mouse pointersBoth.viewers.provide.a.double.mouse.cursor.to.help.overcome.any.delays.caused.by.slow.connections..When.you.move.your.mouse.you.will.see.two.mouse.cursors,.a.local.one.that.responds.immediately.to.your.movements.and.a.second,.slower.moving,.cursor.that.represents.the.current.mouse.position.at.the.host.
For.the.browser.viewer,.the.local.cursor.is.a.typical.arrow:
For.the.VNC.viewer,.the.local.cursor.is.a.dot:
Local dot cursor
Remote host cursor
Local cursor
Remote host cursor
Additionally,.for.fast.network.connections,.the.VNC.viewer.also.provides.a.single.mouse.mode..See.Controls - Single Mouse.for.details...
Single local cursor

��
Access mode - shared/private Up.to.five.users.can.be.simultaneously.logged-on.(four.global.users.plus.one.local.or.remote.user).and.during.normal.operation,.all.are.able.to.see.the.same.view.of.the.currently.selected.host..If.you.need.to.perform.a.sensitive.task.that.should.not.be.viewed.by.other.users,.you.can.change.the.access.mode.to.Private..This.action.blanks.the.viewer.window.for.all.other.logged.on.users.
Note: For the courtesy of other users, this mode should be used sparingly. The admin user has the ability to overrule the private setting.
To change the access mode1. Click.one.of.the.arrow.buttons.adjacent.to.the.
Shared/Private.indicator....
Power switching (via viewer)When.configured.(and.where.you.have.access.rights).this.option.allows.you.to.control.the.mains.power.input.to.the.currently.selected.host.computer.
Note: This option is generally used to power cycle remote systems that have failed to respond. Before switching a system off, ensure that all attempts have first been made to power it down through normal means.
To switch a system on or off 1. Use.the.Hosts.button.to.select.the.required.computer.
2. Click.the.Power.button.and.then.select.the.Switch.on.or.Switch.off.option,.as.appropriate.
Auto calibrate When.you.visit.a.host.computer.for.the.very.first.time,.your.viewer.needs.to.determine.the.optimum.video.and.mouse.settings.for.that.particular.computer..The.button.will.remind.you.to.click.it.by.flashing.red.when.a.new.computer.screen.is.encountered..Performing.this.step.is.important.because.it.can.help.to.decrease.unnecessary.video.information.being.sent.across.the.link,.thus.improving.overall.performance.
Once.this.has.been.done,.providing.you.use.the.‘Hosts’.button.to.switch.between.host.computers,.the.video.settings.for.each.machine.will.be.re-used.
Note: When performing an auto calibration, ensure that the screen image is static (no moving images) and also try to remove any on-screen displays generated by KVM switches (such as host names or menus). This is because they can affect the calibration process and result in a lower overall performance level. For mouse calibration, ensure that there are no application windows located around the upper left corner of the screen. This is because as the mouse calibration takes place, the cursor may change (to match the application as it skims across the window) and this may confuse the calculation. Also ensure that the host computer does not have the mouse cursor trails option enabled.
To auto calibrate the screen and/or mouse1. Use.the.Hosts.button.to.select.the.required.computer.
2. Click.the. .button.to.display.the.Calibrate.options.dialog:
3. Click.the.required.action.
. A.progress.indicator.will.be.displayed.while.the.necessary.calculations.are.made..
. Upon.completion.an.information.dialog.will.explain.the.results:...
Re-synchronise mouse .If.you.find.that.your.local.mouse.pointer.and.that.of.the.host.are.not.correctly.synchronised,.use.this.feature.to.re-align.their.movements..This.operation.is.also.selectable.from.the.Controls.menu.
To re-synchronise the mouse1. Use.the.Hosts.button.to.select.the.required.computer.
2. Click.the. .button.and.then.click.OK.in.the.subsequent.pop-up.message.
Note: If you find that this doesn’t work, you may need to perform a mouse calibration again.

��
Mouse ControlThis.option.displays.a.mouse.control.dialog.and.is.useful.when.the.remote.cursor.is.failing.to.respond.correctly.to.your.mouse.movements,.even.after.using.the.Resync.mouse.option..
The.mouse.control.dialog.allows.you.to.control.the.remote.mouse.cursor.using.a.selection.of.buttons.that.you.click.with.your.local.mouse..
ControlsWhen.clicked,.this.button.reveals.a.menu.of.options.concerned.with.keyboard,.video.and.mouse.operation.
Single Mouse ModeThis.mode.is.for.fast.network.connections.where.the.cursor.response.is.sufficient.to.provide.instant.visual.feedback.on.the.remote.screen..When.enabled,.the.cursor.is.‘captured’.within.the.viewer.window.until.you.use.the.‘escape’.hot.keys.
To.quit.from.single.mouse.mode,.press.F8.and.then.P..Alternatively,.enable.and.use.the.mouse.button.escape.sequences.-.see.Advanced unit configuration.for.details...
The.single.mouse.mode.does.not.require.calibration..
Resync MouseThis.option.has.the.same.effect.as.the. .button.on.the.menu.bar.and.re-synchronises.the.local.and.remote.mouse.pointers..
Refresh ScreenThis.option.refreshes.the.whole.screen.image.to.remove.any.artifacts.from.moved.screen.items..This.is.useful.when.using.very.low.refresh.rates.on.slow.speed.communication.links.
Click to move the remote mouse cursor up, down, left or right Click to calibrate the
remote mouse
Click to produce a single mouse click for the left, centre or right mouse buttons
Click to produce a continuous mouse click and hold for the left, centre or right mouse buttons

��
Click to send the code
Enter the code here
Keyboard ControlThis.option.displays.a.keyboard.control.dialog.and.is.useful.for.sending.keyboard.combinations.(to.the.host).that.are.needed.regularly.or.that.are.trapped.by.the.AdderView.CATx.IP.
When entering codes: +.. means.press.down.the.key.that.follows
–.. means.release.the.key.that.follows
+–..means.press.down.and.release.the.key.that.follows
*.. means.wait.250ms.(note:.if.a.number.immediately.follows.the.asterisk,.then...the.delay.will.equal.the.number,.in.milliseconds)
It.is.automatically.assumed.that.all.keys.specified.will.be.released.at.the.end,.so.there.is.need.to.specify.-Ctrl.or.-Alt.if.these.keys.are.to.be.released.together.
See.Appendix 8.for.a.list.of.key.sequence.codes.that.can.be.used.
Examples:
‘Ctrl.+.Alt.12’.would.be.expressed.as:.+Ctrl+.Alt+1–1+2
+N.means.press.the.‘N’.key
+Scroll.means.press.the.Scroll.lock.key
+Space.means.press.the.space.key.
Video Settingssee next page
InfoWhen.selected,.this.option.displays.an.information.dialog.showing.the.current.logged.on.users,.the.current.host,.its.video.mode.and.its.mouse.motion.details.
KVM switch menuThis.option.displays.the.AdderView.CATx.main.menu.and.provides.access.to.the.same.options.presented.to.local.and.remote.users..The.only.option.that.cannot.be.accessed.is.Configure IP port..For.details.of.the.other.options.available,.please.refer.to.Appendix 1 - Configuration menus.
Click to send the contents of the clipboard to the host

��
Video SettingsThis.dialog.provides.access.to.all.of.the.key.video.settings.that.determine.image.quality.and.link.performance.
ThresholdThe.threshold.is.effectively.a.noise.filter.that.differentiates.between.valid.video.signals.and.background.noise.or.interference..This.has.the.effect.of.reducing.unnecessary.video.signals.between.the.AdderView.CATx.and.the.remote.system,.thus.improving.performance..
PhaseThe.phase.setting.adjusts.the.alignment.of.the.host.video.output.and.the.remote.system.video.display.to.achieve.the.sharpest.image.
Horizontal PositionDetermines.the.horizontal.position.of.the.host.screen.image.within.the.viewer.window.
Vertical PositionDetermines.the.vertical.position.of.the.host.screen.image.within.the.viewer.window.
Brightness & ContrastThe.red,.green.and.blue.constituents.of.the.brightness.and.contrast.can.be.set.individually..Alternatively,.use.the.Auto.button.on.the.right.side.to.automatically.optimise.these.for.the.current.host.and.connection.speed.
Calibrate AllClick.to.determine.the.optimum.settings.for.all.aspects.of.video.the.video.connection.from.the.host.system.
Display activityIndicates.the.level.of.video.activity.currently.in.progress.
Using automatic configurations •. Every.setting.can.be.individually.subjected.to.an.automatic.configuration.
(click.the.appropriate.‘Auto’.button).or.can.also.be.manually.adjusted.
•. Use.the.‘Calibrate.All’.button.to.automatically.determine.the.optimum.settings.for.all.items...
Note: Before using the ‘Calibrate All’ option, if possible, remove on-screen display (OSD) elements generated by the AdderView CATx IP or any other connected KVM switches (such as a host name label or menu). These OSD elements use different video rates to those of the host system(s) and can affect the setting of the automatic threshold value. AdderView CATx IP uses an improved calculation procedure to filter out the effect of these elements. However, best results are obtained when the screen contains only host system information.
Note: To maximise performance, the threshold level is automatically increased by 50% when a slow link is detected.
Note: When the AdderView CATx IP is used with one or more other switches, the threshold needs to be higher than 32 due to the significant amounts of ‘noise’ that these switches introduce. The AdderView CATx IP configuration should detect such noise and adjust the threshold accordingly. .
Setting the Threshold manuallyOccasionally.it.can.be.useful.to.manually.adjust.the.Threshold.setting,.in.order.to.achieve.a.setting.that.best.suits.your.particular.requirements..
1. Use.the.‘Calibrate.All’.function.to.ensure.that.all.other.settings.are.optimised.
2. Click.the.Threshold.left.arrow.button.to.decrement.the.setting.by.one.and.observe.the.‘Display.Activity’.indicator..
3. Repeat.step.2.until.the.Display.Activity.indicator.suddenly.rises.to.a.much.higher.level.(i.e..50%)..This.will.mean.that.you.have.reached.the.noise.boundary..At.this.point,.increment.the.Threshold.value.by.2.or.3.points.to.achieve.an.optimum.setting.

��
If you need to enter a port numberUsually,.when.you.make.a.network.connection.to.the.AdderView.CATx.IP.(either.using.the.VNC.viewer.or.a.Web.browser).you.simply.enter.the.IP.address,.i.e..192.168.0.3..However,.if.a.special.configuration.is.necessary,.then.you.may.be.asked.to.specify.a.port.number.as.well.as.the.IP.address.
What is a port?
To enter a port number in a Web browser1. Enter.the.required.IP.address.in.the.usual.Address.box,..
i.e..http://192.168.0.3
2. At.the.end.of.the.IP.address,.add.a.single.colon.(:).and.then.enter.the.port.number.(in.this.example,.the.required.port.number.is.8000),.i.e..http://192.168.0.3:8000
3. Continue.with.the.standard.Web browser instructions..
To enter a port number in VNC viewer 1. Enter.the.required.IP.address.in.the.usual.‘Server’.box,..
i.e..http://192.168.0.3
2. At.the.end.of.the.IP.address,.add.two.colons.(::).and.then.enter.the.port.number.(in.this.example,.the.required.port.number.is.8000),.i.e..http://192.168.0.3::8000
3. Continue.with.the.standard.VNC viewer instructions.
Access via dial up (modem or ISDN) linkWhen.you.gain.access.via.modem.or.ISDN.link,.the.AdderView.CATx.IP.uses.standard.network.protocols.to.create.a.private.two-device.network..This.approach.ensures.consistency.and.allows.you.to.use.exactly.the.same.VNC.viewer.or.browser.to.view.the.host.computers..This.is.achieved.using.PPP.(Point.to.Point.Protocol).and.means.that.you.need.to.use.a.dial-up.networking.method.to.initiate.the.connection..Such.software.is.standard.with.operating.systems.such.as.Windows,.Linux.and.Mac.OS.
To initiate a dial up link1. Using.a.system.that.has.a.modem.or.ISDN.adapter.installed,.locate.the.
dial-up.networking.option.on.your.system..Please.refer.to.your.system.documentation.for.more.information...
2. Using.the.dial-up.networking.option,.enter.the.telephone/ISDN.number.where.the.AdderView.CATx.IP.can.be.contacted.
3. Initiate.the.call.and.when.the.link.is.made,.continue.with.either.the.standard.VNC viewer.or.browser connection..
Note: For the viewer network connection address, you must use the IP address that the admin user has set as the Server address (or PPP server IP address) within the Modem configuration screen.

��
Viewer encryption settingsThe.web.browser.viewers.and.VNC.viewers.(of.level.4.0b5S.or.higher).offer.four.encryption.options..The.resulting.actions.of.certain.options.depend.upon.how.the.AdderView.CATx.IP.to.which.you.are.connecting.is.configured:.
•. Always on.-.This.setting.will.ensure.that.the.link.is.encrypted,.regardless.of.the.AdderView.CATx.IP.encryption.setting.
•. Let server choose.-.This.setting.will.follow.the.configuration.of.the.AdderView.CATx.IP..If.the.AdderView.CATx.IP.has.a.preference.to.encrypt.the.link,.then.it.will.be.so,.otherwise.the.link.will.not.be.encrypted.
•. Prefer off.-.This.setting.will.configure.an.un-encrypted.link.if.the.AdderView.CATx.IP.will.allow.it,.otherwise.it.will.be.encrypted.
•. Prefer on.-.If.the.AdderView.CATx.IP.allows.it,.this.setting.will.configure.an.encrypted.link,.otherwise.it.will.be.un-encrypted..
Whenever.encryption.does.take.place,.the.viewer.will.first.need.to.create.the.necessary.secure.key.before.the.connection.process.can.continue.
Supported web browsersThe.following.web.browsers.have.been.tested.and.found.to.work.correctly.with.AdderView.CATx..
Windows•. Internet.Explorer.5.50.and.above,.
with.Microsoft.[Java].Virtual.Machine.(release.5.50).
with.Java.Runtime.Environment.1.3.or.above.
Linux•. Netscape.4.61.and.above,
with.Java.Runtime.Environment.1.1.or.above.
•. Opera,.
with.Java.Runtime.Environment.1.1.or.above.

��
Further informationThis.chapter.contains.a.variety.of.information,.including.the.following:
•. Getting.assistance.-.see.below
•. Troubleshooting.-.see.right
•. Appendices
•. Appendix.1.-.Configuration menus
•. Appendix.2.-.Configuration pages via viewer
•. Appendix.3.-.VNC viewer connection options
•. Appendix.4.-.VNC viewer window options
•. Appendix.5.-.Browser viewer options
•. Appendix.6.-.Addresses, masks and ports
•. Appendix.7.-.Cable specifications
•. Appendix.8.-.Hotkey sequence codes
•. Appendix.9.-.Supported video modes
•. Safety information
•. Warranty
• End user licence agreement
•. Radio frequency energy statements
Getting assistanceIf.you.are.still.experiencing.problems.after.checking.the.list.of.solutions.in.the.Troubleshooting.section.then.we.provide.a.number.of.other.solutions:
•. Adder Technology website.–.www.adder.com
. Check.the.Support.section.of.our.website.for.the.latest.solutions.and.driver.files.
•. Email.–[email protected]
•. Fax. in.the.UK:. 0�9�� ��00��
. . in.the.US:. +� ��� ��� ����
•. Phone. in.the.UK:. 0�9�� ��00��
. . in.the.US:. +� ��� 9�� ����
TroubleshootingGlobal network users are unable to contact the AdderView CATx IP
•. Check.that.the.correct.address.is.being.used.by.the.remote.users.
•. Check.the.network settings..Check.that.the.users.network.address.has.not.been.excluded.in.the.IP access control section.
•. If.the.AdderView.CATx.IP.is.situated.behind.a.firewall,.check.that.the.relevant.ports.are.being.allowed.through the firewall.and.are.being.correctly.routed.
•. Check.the.front panel indicators,.the.LNK.indicator.should.be.on..If.the.network.link.is.a.100Mbps.connection,.the.100.indicator.should.also.be.on.
The remote cursor is not correctly responding to my mouse movements•. Recalibrate the mouse..When.doing.so,.ensure.that.the.host.system.does.
not.have.mouse.cursor.trails.enabled.and.that.the.top.left.corner.of.the.screen.is.clear.of.application.windows.
When logging on using VNC viewer, I cannot enter a username•. Either,.the.VNC.viewer.is.an.old.version.(download a new one).or.only.the.
admin.user.has.been.configured.on.the.AdderView.CATx.IP..
HT

�9
Appendix 1 – Configuration menusThe.AdderView.CATx.configuration.menus.allow.a.range.of.settings.to.be.made.both.to.the.installation.as.a.whole.and.to.parts.of.the.system.accessed.by.each.user..
To access the configuration menus1. Select.the.on-screen.main.menu.in.one.of.three.ways:.
•. By.simultaneously.pressing.and.then.releasing. . . ..
•. By.pressing.the.middle.and.right.buttons.of.a.three.button.mouse,.or
•. By.selecting.COMPUTER. .using.the.front.panel.buttons..
. If.you.are.not.already.logged.in,.do.so.now..What to do if the ADMIN password has been forgotten.
2. Press. .to.select.‘More.menus’.
3. Use.the.following.keys:.
.and. .to.highlight.required.options.
.to.change.option.values..
.to.quit.and.save.the.changes.
. The.full.set.of.options.are.only.available.to.the.Admin.user..All.other.users.will.see.a.subset.of.these..
ADDERVIEW CATx IPConfiguration MenuFunctionsRouting statusUser PreferencesGlobal PreferencesSetup OptionsEdit Computer ListEdit User ListEdit Autoscan List
Enter-SelectF1-More menus
Esc-QuitFirmware Version 3.03
The.following.items.and.menus.are.available.in.the.Configuration.menu:
•. Functions.
•. Routing status
•. User Preferences
•. Global Preferences
•. Setup Options
•. Edit Computer List
•. Edit User List
•. Edit Autoscan List
•. Advanced Options.(F1-More.menus)
Additionally,.a.further.important.menu.is.located.as.an.option.within.the.Functions.menu.of.AdderView.CATx.IP.models:.
•. Configure IP port

�0
FunctionsThe.Functions.menu.contains.a.collection.of.procedures.that.affect.various.aspects.of.AdderView.CATx.operation..Only.the.Admin.user.is.granted.access.to.all.functions,.other.users.are.offered.only.the.following.options:
•. Restore Standard Mouse,.
•. Restore Intellimouse,
•. Power control.-.only.computers.to.which.a.user.has.access.rights.can.be.switched...
Power ControlThe.options.within.this.section.are.usable.only.when.the.AdderView.CATx.is.used.in.conjunction.with.one.or.more.external.power.switch.units..For.more.details.see:.power.switching.connections,.configuration,.operation (via menu).or.operation (via viewer)
Switch Computer ONSelect.this.option.to.power.on.one.or.more.computers.
Switch Computer OFFSelect.this.option.to.power.off.one.or.more.computers.
Edit Power ON StringSelect.this.option.to.alter.the.special.codes.that.are.sent.from.the.AdderView.CATx.to.the.connected.power.switch(es).in.order.to.switch.computers.on.
Edit Power OFF StringSelect.this.option.to.alter.the.special.codes.that.are.sent.from.the.AdderView.CATx.to.the.connected.power.switch(es).in.order.to.switch.computers.off.
Send Data to RS��� portThis.option.is.used.to.save.AdderView.CATx.configuration.information.to.a.specially.connected.computer..A.temporary.link.must.be.made.using.the.COM1/UPGRADE.port.at.the.rear.of.the.AdderView.CATx.and.the.computer.must.run.a.custom.routine.available.from.Adder.Technology.Limited..The.resulting.download.file.can.be.optionally.edited.(using.a.text.editor.or.spreadsheet).and/or.reloaded.into.the.AdderView.CATx..This.option.is.especially.useful.in.complex.cascade.arrangements.where.many.computers.are.attached..See.Saving and restoring configuration settings.for.more.details......
Read Data from RS��� portThis.option.is.used.to.reload.configuration.information.into.the.AdderView.CATx.from.a.specially.connected.computer..See.above.for.more.details.
Configure IP port AdderView.CATx.IP.models.only..Displays.a.sub.menu.containing.options.related.specifically.to.IP.network.and.modem/ISDN.port.features..See.Configure IP port.for.details.
ADDERVIEW CATx IPFunctionsRestore Standard MouseRestore IntellimousePower ControlClear UTP Extender PasswordReset to Factory DefaultsSend Data to RS232 portRead Data from RS232 portConfigure IP port
Enter-Run Function-Up -Down Esc-QuitTo get here
1. From.a.local,.remote.or.global.keyboard,.log.on.as.a.standard.(limited.options).or.‘admin’.user.
2. Press. . . .(hotkeys.can.change).
3. Press. .to.select.‘More.menus’.
4. Select.‘Functions’..
Restore Standard MouseThis.option.is.used.to.resume.standard.mouse.operation.if.it.has.ceased.to.operate,.for.instance,.if.it.has.been.connected.without.rebooting.the.AdderView.CATx..See.Hot plugging and mouse restoration.for.more.details.
Restore IntellimouseThis.option.is.used.to.resume.Microsoft.Intellimouse.operation.if.it.has.ceased.to.operate,.for.instance,.if.it.has.been.connected.without.rebooting.the.AdderView.CATx..See.Hot plugging and mouse restoration.for.more.details.
Clear UTP Extender Password Available.only.at.the.local.console.connection,.this.option.places.any.X100.or.X200.extender.that.is.locked.in.password.mode.into.configuration.mode..The.extended.user.can.then.clear.or.re-enter.the.password,.as.required.
Reset to Factory DefaultsReturns.all.key.settings.within.the.AdderView.CATx.to.their.original.states..
WARNING: This function will clear all computer and user lists that are stored within the AdderView CATx.
When.this.option.is.selected,.you.must.press. .to.confirm.the.action..The.internal.data.will.be.rewritten.and.a.completion.message.displayed.after.a.short.period.

��
User PreferencesThe.User.Preferences.are.system.operating.parameters.that.are.independently.selectable.for.each.user.and.affect.only.their.screen..
Screen Saver TypeSettings: BLANK, MOVING DOT
You.may.select.the.type.of.screen.saver..If.you.select.BLANK.then.the.screen.will.blank.completely..If.you.select.MOVING.DOT.then.a.moving.dot.will.be.displayed.on.a.blank.background..The.dot.regularly.changes.colour.and.bounces.off.the.sides.of.the.screen.in.a.zigzag.pattern.
Confirmation BoxSettings: DISABLED, ENABLED
When.enabled,.a.confirmation.box.is.displayed.on.screen.for.three.seconds.after.a.computer.is.selected..The.confirmation.box.indicates.the.current.user.port.and.user.name,.the.selected.computer.and.the.connection.status.
ADDERVIEW CATx IPUser PreferencesOSD Colour : SCHEME 1Reminder Banner : ENABLEDReminder Colour :Screen Saver type :Confirmation Box :
BLUE/TRANSMOVING DOTENABLED
Space-Toggle-Up -Down Esc-Quit
To get here1. From.a.local,.remote.or.global.keyboard,.
log.on.as.a.standard.or.‘admin’.user.
2. Press. . . .(hotkeys.can.change).
3. Press. .to.select.‘More.menus’.
4. Select.‘User.Preferences’..
OSD ColourSettings: SCHEME 1, SCHEME 2, SCHEME 3
As.you.toggle.between.these.options.you.will.see.the.colour.of.the.menu.change.to.show.the.selected.scheme..The.menu.schemes.have.been.specially.chosen.to.provide.a.high.contrast.with.the.colours.that.you.would.normally.see.on.a.computer.screen.
Reminder BannerSettings: ENABLED, DISABLED
When.the.reminder.banner.is.enabled,.the.name.of.the.currently.selected.computer.will.appear.in.a.small.reminder.banner..This.is.normally.located.at.the.top.of.the.screen.in.a.central.position.but.may.be.moved.as.required.(see.To move the reminder banner).
Reminder ColourSettings: BLUE/TRANS, PINK/TRANS, BLUE/WHITE, WHITE/RED
You.may.select.the.colour.of.the.reminder.banner..The.BLUE/TRANS.and.PINK/TRANS.select.blue.or.pink.text.with.a.transparent.background..The.BLUE/WHITE.and.WHITE/RED.settings.select.blue.and.white.text.on.solid.white.and.red.backgrounds.

��
Global PreferencesGlobal.preferences.are.available.only.to.the.Admin.user.and.allow.settings.to.be.made.that.affect.all.users.attached.to.the.AdderView.CATx.
Autoscan ModeSettings: SCAN LIST, ACTIVE PCs, ALL PCs
The.AdderView.CATx.supports.an.autoscan.mode.that.automatically.scans.between.the.connected.computers.in.sequence..There.are.three.autoscan.modes..In.the.first.mode.the.AdderView.CATx.will.scan.all.the.named.computers.that.are.defined.in.the.autoscan.list.(SCAN.LIST)..The.computers.defined.in.the.scan.list.may.be.connected.to.cascaded.AdderView.CATx.units..If.you.wish.to.scan.the.ports.on.the.current.AdderView.CATx.then.you.may.select.ALL.the.available.computers.or.just.the.available.computers.that.are.currently.powered.on.(the.ACTIVE.computers)..Scanning.just.the.active.computers.avoids.blank.screens.from.being.displayed.and.stops.the.monitor.from.going.into.a.power.down.state.on.every.scan.cycle.
WARNING - Many modern monitors are fitted with automatic power save relays and will switch off after a few seconds if connected to an inactive PC. If you are using such a monitor you must not set the AdderView CATx to scan ALL ports. Constant switching on and off of your monitor’s relay will eventually damage your monitor. If you are using the SCAN LIST option then you should ensure that all the computers are active if you are using one of these monitors.
If.you.choose.to.use.the.SCAN.LIST.option.then.you.may.define.the.computers.to.be.scanned.in.the.following.manner.
To define the autoscan listNote: Ensure that you are logged in as the ADMIN user.
1. From.the.main.on-screen.menu.press.F1.for.MORE.MENUS.
2. Select.EDIT.AUTOSCAN.LIST.from.the.menu..A.list.of.defined.computers.will.appear..Computers.affixed.with.a.‘+’.will.be.autoscanned.during.the.autoscan.cycle..To.add/remove.a.computer.to/from.the.autoscan.list,.move.the.selection.bar.over.the.computer.name.and.press.SPACE.BAR..To.add.all.named.computers.press.F1..To.remove.all.named.computers.press.F2.
3. When.all.the.computers.that.you.wish.to.scan.are.affixed.with.a.‘+’,.press.RETURN.or.ENTER.to.save.the.selections..The.selected.computers.will.be.autoscanned.in.alphabetical.order.when.you.activate.autoscan.mode.(when.the.SCAN.LIST.option.is.selected).
Autoscan PeriodSettings: DISABLED; 2, 5, 7, 15, 30 SECONDS, 1, 5 MINUTES..
The.autoscan.time.defines.the.length.of.time.that.the.AdderView.CATx.will.display.video.(and.play.audio).from.an.autoscanned.computer.before.changing.to.the.next.computer..If.the.DISABLED.setting.is.chosen.then.no.autoscan.functions.will.be.available.
continued
ADDERVIEW CATx IPGlobal PreferencesMouse Switching : ENABLEDScreen Saver : DISABLEDAutoscan Mode : SCAN LISTAutoscan Period : 5 SECONDSOSD Dwell Time : 2 SECONDSUser Timeout : 2 SECONDSRS232 Mouse Type : INTELLIMSEMouse Type : LOGITECH
Space-Toggle-Up -Down Esc-Quit
To get here1. From.a.local,.remote.or.global.keyboard,.
log.on.as.‘admin’.user.
2. Press. . . .(hotkeys.can.change).
3. Press. .to.select.‘More.menus’.
4. Select.‘Global.Preferences’..
Mouse SwitchingSettings: ENABLED, DISABLED
The.computer.channel.can.be.switched.using.a.three.button.mouse.or.IntelliMouse..Pressing.the.central.button.or.wheel.button.together.with.the.left.hand.mouse.button.will.cause.the.AdderView.CATx.to.switch.to.the.next.available.computer..When.mouse.switching.is.enabled.the.central.mouse.button.or.wheel.mouse.button.is.allocated.to.control.the.AdderView.CATx.and.is.not.therefore.available.for.use.by.computer.applications..If.you.want.to.use.the.central.mouse.button.within.your.applications.you.will.need.to.disable.mouse.switching..The.rotation.action.of.an.IntelliMouse.wheel.is.not.affected.and.is.always.available.to.the.computer.application.
Screen SaverSettings: DISABLED; 2, 5, 7, 10,15, 20 & 30 MINUTES
To.avoid.burning.out.the.phosphor.on.CRT.monitor.screens,.the.AdderView.CATx.can.be.set.to.blank.the.screen.after.no.keyboard.or.mouse.activity.has.been.detected.for.a.selected.timeout.period..If.preferred,.the.user.can.blank.the.screen.manually.by.selecting.channel.‘0’.using.the.keyboard.hotkeys.or.by.pressing.ESC.from.the.login.screen.

��
Global Preferences (continued)
OSD Dwell TimeSettings: 1, 2, 3, 5, 10 SECONDS
After.a.successful.computer.channel.change.the.AdderView.CATx.will.display.a.confirmation.message.for.a.few.seconds..The.length.of.time.that.this.confirmation.message.dwells.on.the.screen.may.be.changed.
User TimeoutSettings: 1, 2, 5, 10, 30 SECONDS, 1, 5, 10 MINUTES
When.two.users.are.connected.to.the.same.computer.only.one.can.have.access.at.any.one.time..When.no.keyboard.or.mouse.data.has.been.received.from.the.active.user.port.for.the.user.timeout.period,.the.AdderView.CATx.will.allow.other.users.to.access.the.computer..The.new.port.then.becomes.the.active.port.until.it.too.times.out..To.avoid.confusion.between.users.it.is.desirable.to.set.the.timeout.period.to.be.sufficiently.long.so.that.user’s.work.is.not.needlessly.interrupted.by.other.users.and.sufficiently.short.to.ensure.good.overall.system.efficiency..The.user.timeout.value.also.controls.the.timeout.between.the.local.port.and.remote.(extended).user.port.1.
RS��� Mouse TypeSettings: INTELLIMOUSE, 2 BUTTON, 3 BUTTON
This.setting.controls.the.type.of.RS232.mouse.that.the.AdderView.CATx.reports.to.computers..All.the.necessary.conversions.are.dealt.with.automatically.by.the.AdderView.CATx..The.IntelliMouse.setting.sends.four.byte.mouse.reports.to.the.computers.and.is.therefore.very.slightly.more.sluggish.than.the.others.that.send.three.byte.mouse.reports..RS232.mice.are.almost.always.more.sluggish.than.PS/2.types.because.the.data.rate.is.much.slower.
Mouse TypeSettings: LOGITECH, MICROSOFT
This.setting.determines.how.the.mouse.type.is.reported.to.each.connected.PC..Some.Logitech.mouse.drivers.are.unable.to.handle.the.more.advanced.features.of.Microsoft.Intellimouse.Explorer.type.mice,.so.the.LOGITECH.setting.here.reports.a.more.basic.mouse.type.

��
Setup OptionsSetup.options.are.available.only.to.the.Admin.user.and.consist.of.key.settings.that.are.normally.made.only.during.the.initial.installation.stage.
HotkeysSettings: CRTL+ALT, CTRL+SHIFT, ALT+SHIFT, ALT GR, L+R ALT, L CTRL+ALT, R CTRL+ALT, DISABLED
The.keyboard.hotkeys.are.special.combinations.of.keys.that,.when.used.together.with.certain.keyboard.“command.keys”,.perform.special.AdderView.CATx.functions..For.example,.pressing.the.hotkeys.together.with.the.“M”.key.will.cause.the.on-screen.menu.to.be.displayed.on.your.monitor..Other.hotkey.combinations.allow.you.to.query.which.computer.you.are.connected.to.and.to.move.the.on-screen.menu.around.the.screen..You.can.also.use.the.hotkeys.together.with.the.port.number.to.select.a.particular.connected.computer.
Keypad ControlsSettings: ENABLED, DISABLED
The.key.controls.on.the.front.of.the.AdderView.CATx.may.be.disabled.so.that.it.is.only.possible.to.select.the.special.channels.“o”.(on-screen.menu).and.“0”.(no.computer.channels.selected).
Exclusive UseSettings: ALLOWED, DISABLED
In.normal.operation,.the.AdderView.CATx.will.allow.two.or.more.users.to.share.access.to.a.computer..In.this.mode,.the.computer’s.video.picture.will.be.displayed.on.all.the.users’.monitors.but.only.one.user.may.have.active.control.of.the.computer’s.keyboard.and.mouse.at.any.one.time..The.AdderView.CATx.detects.an.active.user.by.checking.for.keyboard.and.mouse.data..
A.user.becomes.inactive.if.no.keyboard.or.mouse.data.has.been.received.by.the.AdderView.CATx.for.a.specified.timeout.period..Whilst.one.user.is.active.all.the.other.users.that.are.connected.to.the.same.computer.will.see.a.“video.only”.message.displayed.on.their.screen..There.may.be.situations.where.particular.users.wish.to.control.and.view.a.computer.in.private.with.exclusive.use..The.AdderView.CATx.has.the.facility.to.allow.users.to.select.exclusive.use.of.computers,.however,.this.facility.should.be.used.with.care...
Users.that.have.selected.exclusive.access.are.never.timed.out.by.the.AdderView.CATx.and.so.all.other.users.are.effectively.“locked.out”.until.the.exclusive.user.switches.to.another.computer.or.logs.out..This.could.potentially.be.very.irritating.if.a.user.has.selected.exclusive.use.and.has.then.left.their.desk.without.logging.out..This.would.prevent.other.users.from.working.on.the.computer.until.they.came.back..Consequently.the.system.administrator.can.disable.all.exclusive.use.so.that.all.connections.are.shared.
continued
ADDERVIEW CATx IPSetup OptionsSecurity : ENABLEDLanguage : ENGLISHHotkeys : CTRL+ALTKeypad Controls : ENABLEDExclusive Use :
Audio :
ALLOWED
ENABLEDAutomatic Logout :
Add Computers :
DISABLED
AUTO
Space-Toggle-Up -Down Esc-Quit
To get here1. From.a.local,.remote.or.global.keyboard,.
log.on.as.‘admin’.user.
2. Press. . . .(hotkeys.can.change).
3. Press. .to.select.‘More.menus’.
4. Select.‘Setup.Options’..
SecuritySettings: DISABLED, ENABLED
With.security.disabled.there.is.no.requirement.for.users.to.log-in.to.the.system..All.users.have.full.access.to.all.the.connected.computers.and.full.administration.rights..With.security.enabled,.users.are.required.to.log-in.to.the.AdderView.CATx..Each.user.is.allocated.access.rights.to.computers.by.the.system.administrator.and.they.are.only.able.to.see.the.computers.that.they.have.access.to.on.their.on-screen.menu.
LanguageSettings: ENGLISH, FRENCH, GERMAN, SWEDISH
This.option.specifies.the.language.that.is.used.for.the.on-screen.menu.and.the.keyboard.layout.that.is.assumed.for.the.keyboard..When.the.French.option.is.selected.the.keyboard.is.assumed.to.have.an.AZERTY.format..When.the.English,.German.and.Swedish.options.are.selected.the.keyboard.is.assumed.to.have.a.QWERTY.format..The.new.language.settings.are.enabled.when.you.quit.from.the.SETUP.OPTIONS.menu..The.language.option.only.affects.the.way.that.the.AdderView.CATx.interprets.the.keyboard.keys,.it.does.not.affect.the.way.that.the.computers.interpret.the.keyboard..It.is.advisable.to.avoid.setting.a.language.that.you.do.not.understand.as.all.the.menus.will.change.to.use.the.new.language.and.you.may.have.difficulty.reselecting.your.original.language.

��
Setup Options (continued)
Automatic LogoutSettings: DISABLED, ENABLED
The.AdderView.CATx.enables.you.to.restrict.access.to.your.computers.on.a.login.basis..If.a.user.forgets.to.logout.when.they.have.finished.accessing.the.AdderView.CATx.then.the.user.console.may.unintentionally.be.left.with.full.access.to.all.the.computers..The.AdderView.CATx.can.be.set.to.automatically.logout.unattended.user.consoles.when.the.screen.saver.kicks.in..This.reduces.the.risk.of.security.problems.by.preventing.user.consoles.remaining.in.a.permanent.“logged-in”.state.when.there.is.no.keyboard.or.mouse.activity..The.automatic.logout.feature.is.only.enabled.when.the.screen.saver.feature.is.active.(i.e..not.disabled).
AudioSettings: ENABLED, DISABLED
Allows.you.to.enable.and.disable.the.audio.capabilities.of.the.AdderView.CATx.unit..
Add ComputersSettings: AUTO, MANUAL
Each.time.the.master.switch.within.a.KVM.cascade.is.power.cycled,.it.checks.for.newly.added.computers..This.option.allows.you.to.determine.whether.such.new.computers.are.automatically.added.to.the.computer.list.or.whether.you.would.prefer.to.update.the.list.manually..
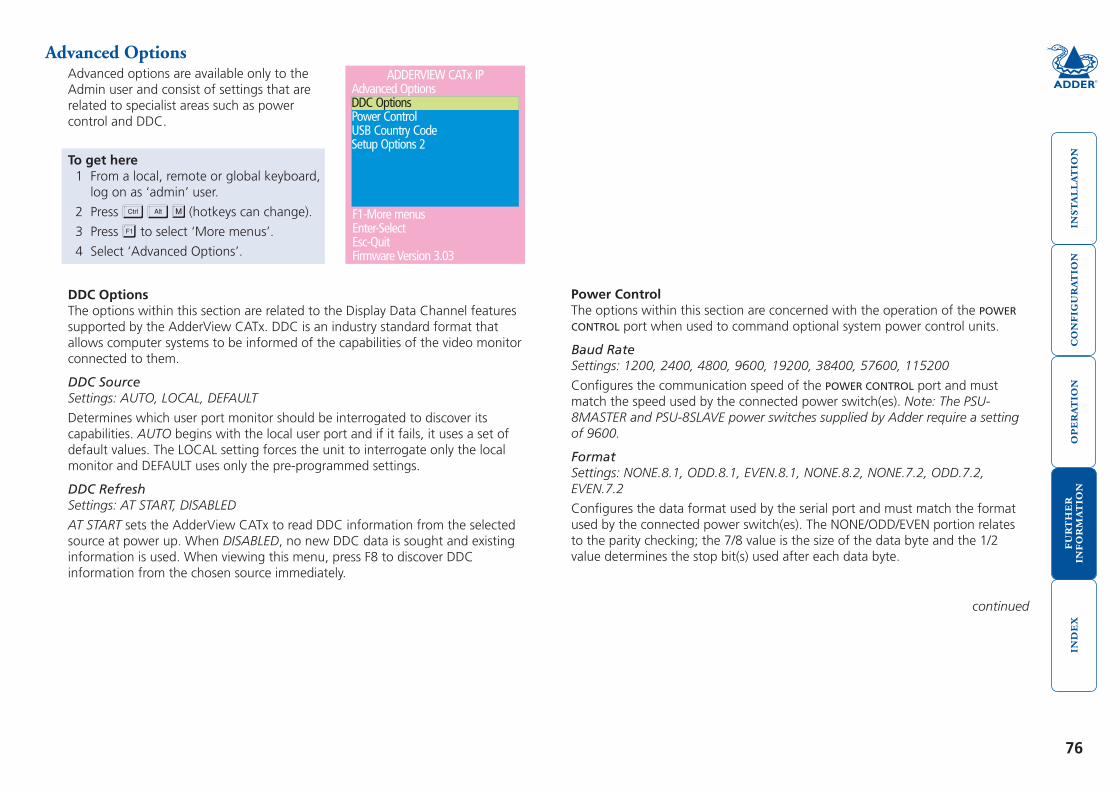
��
Advanced OptionsAdvanced.options.are.available.only.to.the.Admin.user.and.consist.of.settings.that.are.related.to.specialist.areas.such.as.power.control.and.DDC.
Power ControlThe.options.within.this.section.are.concerned.with.the.operation.of.the.POWER
CONTROL.port.when.used.to.command.optional.system.power.control.units...
Baud RateSettings: 1200, 2400, 4800, 9600, 19200, 38400, 57600, 115200
Configures.the.communication.speed.of.the.POWER CONTROL.port.and.must.match.the.speed.used.by.the.connected.power.switch(es)..Note: The PSU-8MASTER and PSU-8SLAVE power switches supplied by Adder require a setting of 9600.
FormatSettings: NONE.8.1, ODD.8.1, EVEN.8.1, NONE.8.2, NONE.7.2, ODD.7.2, EVEN.7.2
Configures.the.data.format.used.by.the.serial.port.and.must.match.the.format.used.by.the.connected.power.switch(es)..The.NONE/ODD/EVEN.portion.relates.to.the.parity.checking;.the.7/8.value.is.the.size.of.the.data.byte.and.the.1/2.value.determines.the.stop.bit(s).used.after.each.data.byte.
continued
ADDERVIEW CATx IPAdvanced OptionsDDC OptionsPower Control
Setup Options 2USB Country Code
Enter-SelectF1-More menus
Esc-QuitFirmware Version 3.03
DDC OptionsThe.options.within.this.section.are.related.to.the.Display.Data.Channel.features.supported.by.the.AdderView.CATx..DDC.is.an.industry.standard.format.that.allows.computer.systems.to.be.informed.of.the.capabilities.of.the.video.monitor.connected.to.them.
DDC SourceSettings: AUTO, LOCAL, DEFAULT
Determines.which.user.port.monitor.should.be.interrogated.to.discover.its.capabilities..AUTO.begins.with.the.local.user.port.and.if.it.fails,.it.uses.a.set.of.default.values..The.LOCAL.setting.forces.the.unit.to.interrogate.only.the.local.monitor.and.DEFAULT.uses.only.the.pre-programmed.settings.
DDC RefreshSettings: AT START, DISABLED
AT START.sets.the.AdderView.CATx.to.read.DDC.information.from.the.selected.source.at.power.up..When.DISABLED,.no.new.DDC.data.is.sought.and.existing.information.is.used..When.viewing.this.menu,.press.F8.to.discover.DDC.information.from.the.chosen.source.immediately..
To get here1. From.a.local,.remote.or.global.keyboard,.
log.on.as.‘admin’.user.
2. Press. . . .(hotkeys.can.change).
3. Press. .to.select.‘More.menus’.
4. Select.‘Advanced.Options’..

��
USB Country Code
Some.computers.query.the.keyboard.to.find.out.its.country.code.and.key.layout..These.computers.use.this.information.to.configure.the.way.that.they.interpret.the.data.coming.from.the.keyboard.and.so.it.is.important.for.the.correct.country.information.to.be.supplied..Not.all.keyboards.report.country.information.and.two.different.styles.of.keyboard.may.be.connected.to.the.AdderView.CATx..
Country CodeSettings: AUTO, MANUAL, DISABLED
In.AUTO.mode.the.AdderView.CATx.will.at-tempt.to.query.the.keyboard.attached.to.the.local.port.to.ascertain.a.country.code..If.a.country.code.is.not.found.then.the.AdderView.CATx.will.use.the.current.value.of.the.Default.Country.option..In.MANUAL.mode,.the.connected.local.keyboard.is.not.queried.for.country.infor-mation.and.instead.the.Default.Country.value.is.reported.to.all.computers.that.request.country.information..In.DISABLED.mode,.no.country.information.is.sup-plied.to.computers.requesting.country.information.
Default CountryThe.codes.that.may.be.used.within.this.option.are.as.follows:
Country Code Country CodeArabic. 01.. Persian.(Farsi).. 20.Belgian.. 02.. Poland.. 21.Canadian-Bilingual. 03.. Portugese.. 22.Canadian-French.. 04.. Russian.. 23.Czech.Republic.. 05.. Slovakian.. 24.Danish.. 06.. Spanish.. 25.Finnish.. 07.. Swedish.. 26.French.. 08.. Swiss/French.. 27.German.. 09.. Swiss/German.. 28.Greek.. 10.. Switzerland.. 29.Hebrew.. 11.. Taiwan.. 30.Hungary.. 12.. Turkish-Q.. 31.International.(ISO).. 13.. UK.. 32.Italian.. 14.. US.. 33.Japan.(Katakana).. 15.. Yugoslavia.. 34.Korean.. 16.. Turkish-F.. 35.Latin.American.. 17.. Reserved.. 36-255.Netherlands.. 18.. Not.supported.. 00.Norwegian.. 19
ADDERVIEW CATx IPUSB Country CodeCountry Code AUTODefault Country 32
Space-Toggle-Up -Down Esc-Quit
Setup Options �
Force ModeSettings: DISABLED, ENABLED
Available.only.on.non-IP.CATx.units..Force.Mode.allows.an.ADMIN.user.on.port.1.to.select.which.computers.the.other.user.ports.should.be.switched.to..When.enabled,.the.ADMIN.user.(on.port.1).can.press.the.TAB.key.to.show.what.user.2.is.currently.viewing..The.ADMIN.user.can.then.select.an.alternative.computer.for.user.2..Once.set,.the.ADMIN.user.can.press.the.TAB.key.again.to.move.to.the.next.user.port.and.so.on.
Alternatively,.the.ADMIN.user.(on.port.1).can.press.CTRL.and.either.1,.2,.3.or.4.to.show.the.current.video.display.on.any.port.
To.end.Force.mode,.the.ADMIN.user.can,.either:.
•. Press.the.ESC.key
•. Press.TAB.until.user.1.is.shown
•. Press.CTRL.+1

��
Configure IP portAvailable.only.on.AdderView.CATx.IP.models,.the.IP.port.configuration.menu.allows.you.to.determine.settings.that.relate.directly.to.the.global.(IP).user.aspects.of.the.unit:
•. Unit Configuration IP admin password, encryption settings, etc..
•. Network Configuration IP address, net mask, VNC port, etc.
•. Modem Configuration Baud rate, initialisation string, etc...
•. Reset Configuration..Completely resets the IP portion of the AdderView CATx IP unit.
To get here1. From.a.local.or.remote.(not.accessible.from.a.global.keyboard),.log.on.as..
the.‘admin’.user.
2. Press. . . .(hotkeys.can.change).
3. Press. .to.select.‘More.menus’.
4. Select.‘Functions’.
5. Select.‘Configure.IP.port’..
AdderView IP Configuration
Reset Configuration
Back
Modem ConfigurationNetwork ConfigurationUnit Configuration

�9
Unit ConfigurationThis.page.provides.access.to.a.selection.of.both.basic.and.fundamental.settings.for.the.AdderView.CATx.IP..
Keybd LayoutUse.the.arrow.buttons.to.match.the.keyboard.layout.expected.by.the.host.system.
Admin PasswdEnter.the.password.that.will.be.used.to.gain.administrator.access.to.the.AdderView.CATx.IP..There.can.only.be.one.admin.user.and.only.that.user.is.given.access.to.the.configuration.menus..The.admin.password.background.will.be.red.until.a.reasonably.secure.password.has.been.entered,.although.this.is.only.advisory.as.any.password.or.no.password.may.be.entered.
Unit NameThe.name.entered.here.will.be.displayed.on.the.local.menus.and.the.remote.VNC/browser.windows.
Time and DateUse.the.left.and.right.arrow.keys.to.select.the.correct.time.and.date..The.time.entry.uses.the.24.hour.clock.notation..The.internal.real.time.clock.will.continue.to.run.for.roughly.one.week.without.power.to.the.unit,.after.that.it.will.be.lost.and.require.resetting..Use.the.up.and.down.arrow.keys.to.move.between.each.of.the.sections.within.the.time.and.date.entries.
EncryptionThree.options.are.available:.Always.on,.prefer.off,.prefer.on..The.one.to.choose.depends.on.the.specific.details.of.your.installation.-.see.Encryption settings.for.details..The.use.of.encryption.imposes.a.slight.performance.overhead.of.roughly.10%.but.is.highly.secure.against.third.party.intrusion.
AdderView CATx IP Unit Config
Time
EncryptionDate
21
Prefer Off4
27Jan
312008
CancelSave
: :Unit Name
UKAdmin Passwd
Firmware Version 1.5Keybd Layout
Hardware Rev 1
To get here1. From.a.local.or.remote.(not.accessible.from.a.global.keyboard),.log.on.as..
the.‘admin’.user.
2. Press. . . .(hotkeys.can.change).
3. Press. .to.select.‘More.menus’.
4. Select.‘Functions’.
5. Select.‘Configure.IP.port’..
6. Select.‘Unit.Configuration’.

�0
VNC PortThis.is.the.logical.link.through.which.communications.with.a.remote.VNC.viewer.will.be.channelled.(see.What is a port?)..The.default.setting.is.5900.which.is.a.widely.recognised.port.number.for.use.by.VNC.software..However,.in.certain.circumstances.it.may.be.advantageous.to.alter.this.number.-.see.Security issues with ports.for.more.details..
Note: The VNC port and HTTP port can be set to the same port number in order to simplify router and firewall configuration. If this is done then the AdderView CATx IP will “listen” for both types of traffic on the single port.
HTTP PortThis.is.the.logical.link.through.which.communications.with.a.remote.web.browser.will.be.channelled..The.default.setting.of.80.is.an.established.standard.for.web.(HTTP.–.HyperText.Transfer.Protocol).traffic.though.this.can.be.changed.to.suit.your.local.network.requirements.
Clear IP Access ControlThis.option.removes.all.entries.from.the.IP.access.control.feature.within.the.AdderView.CATx.IP..The.IP.access.control.feature.(configurable.by.a.global.admin.user).allows.certain.network.address.ranges.to.be.denied.access.to.the.AdderView.CATx.IP..If.set.incorrectly,.it.is.possible.to.exclude.all.network.users.and.so.this.option.provides.an.emergency.recovery.point...
Network ConfigurationThis.page.allows.you.to.configure.the.various.aspects.of.the.IP.port.and.its.relationship.with.the.local.network.
MAC AddressMedia.Access.Control.address.–.this.is.the.unique.and.unchangeable.code.that.was.hard.coded.within.your.AdderView.CATx.IP.unit.when.it.was.built..It.consists.of.six.2-digit.hexadecimal.(base.16).numbers.separated.by.colons..A.section.of.the.MAC.address.identifies..the.manufacturer,.while.the.remainder.is.effectively.the.unique.electronic.serial.number.of.your.particular.unit...
Use DHCPDHCP.is.an.acronym.for.‘Dynamic.Host.Configuration.Protocol’..Its.function.is.particularly.useful.when.connecting.to.medium.size.or.larger.networks,.such.as.the.Internet..When.this.option.is.selected,.your.AdderView.CATx.IP.will.attempt.to.locate.a.DHCP.server.on.the.network..If.such.a.server.is.located,.it.will.supply.three.things.to.the.AdderView.CATx.IP:.an.IP.address,.an.IP.network.mask.(also.known.as.a.Subnet.mask).and.a.Gateway.address..These.are.not.usually.granted.permanently,.but.on.a.‘lease’.basis.for.a.fixed.amount.of.time.or.for.as.long.as.the.AdderView.CATx.IP.remains.connected.and.switched.on..Discover allocations.
IP AddressThis.is.the.identity.of.the.AdderView.CATx.IP.within.a.network..The.IP.address.can.be.thought.of.as.the.telephone.number.of.the.AdderView.CATx.IP..Unlike.the.MAC.address,.the.IP.address.can.be.altered.to.suit.the.network.to.which.it.is.connected..It.can.either.be.entered.manually.or.configured.automatically.using.the.DHCP.option..When.the.DHCP.option.is.enabled,.this.entry.is.unavailable..See.IP addresses.
Net MaskAlso.often.called.the.‘subnet-mask’,.this.value.is.used.alongside.the.IP.address.to.help.define.a.smaller.collection.(or.subnet).of.devices.on.a.network..In.this.way.a.distinction.is.made.between.locally.connected.devices.and.ones.that.are.reachable.elsewhere,.such.as.on.the.wider.Internet..This.process.helps.to.reduce.overall.traffic.on.the.network.and.hence.speed.up.connections.in.general..See.Net masks.
GatewayThis.is.the.address.of.the.device.that.links.the.local.network.(to.which.the.AdderView.CATx.IP.is.connected).to.another.network.such.as.the.Internet..Usually.this.is.a.network.switch.or.router.and.it.will.be.used.whenever.a.device.to.be.contacted.lies.outside.the.local.network...
AdderView IP Network Config
Net Mask 255.255.255.0192.168.42.154No
GatewayVNC PortHTTP Port
590080
Clear IP Access Control
CancelSave
IP Address
00:0F:58:00:00:04Use DHCPMAC Address

��
Modem ConfigurationThis.page.allows.you.to.configure.the.COM1.serial.port.located.at.the.rear.of.the.AdderView.CATx.IP.
Server IP / Client IPWhen.a.user.dials.into.the.AdderView.CATx.IP.via.a.modem.or.ISDN.adapter,.the.AdderView.CATx.IP.sets.up.a.temporary.two-device.network.using.PPP.(Point.to.Point.Protocol)..For.this.purpose,.both.devices.must.have.‘dummy’.IP.addresses.so.that.they.can.communicate.correctly..These.two.addresses.can.be.almost.anything.expressed.in.the.quad.octet.format.(i.e..192.168.3.1.)..However,.it.is.advisable.not.to.make.them.the.same.as.the.real.IP.addresses.used.by.either.the.remote.system.or.the.AdderView.CATx..
Baud RateThis.option.configures.the.speed.of.the.serial.connection.between.the.AdderView.CATx.IP.and.a.connected.modem.or.ISDN.terminal.adapter..The.default.setting.is.115200..The.other.communication.settings.are.fixed.as:.No.parity,.8.bit.word,.1.stop.bit.
Init StringThe.codes.entered.here.are.used.to.prepare.the.connected.modem.or.ISDN.terminal.adapter.for.use.with.the.AdderView.CATx.IP..The.default.code.is.a.Hayes-compatible.string.to.configure.auto.answer.mode.and.would.be.understood.by.the.vast.majority.of.modem/ISDN.devices..The.code.is.sent.when.the.AdderView.CATx.IP.is.first.switched.on.or.whenever.the.Initialize.button.is.clicked.
Initialize PortWhen.selected,.this.option.sends.the.characters.entered.in.the.‘Init.string’.field.to.the.connected.modem.or.ISDN.terminal.adapter.
Restore DefaultsWhen.selected,.this.option.resets.the.‘Baud.rate’.and.‘Init.string’.values.to.their.original.default.settings.
AdderView CATx IP Modem Config
ATZS0=1
192.168.3.2192.168.3.1
115200
Initialize PortRestore Defaults
CancelSave
Init StringBaud RateClient IPServer IP
To get here1. From.a.local.or.remote.(not.accessible.from.a.global.keyboard),.log.on.as..
the.‘admin’.user.
2. Press. . . .(hotkeys.can.change).
3. Press. .to.select.‘More.menus’.
4. Select.‘Functions’.
5. Select.‘Configure.IP.port’..
6. Select.‘Modem.Configuration’.

��
Clearing IP access controlThis.option.removes.all.entries.from.the.IP.access.control.feature.within.the.AdderView.CATx.IP.
What is IP access control?The.IP.access.control.feature.(configurable.by.a.remote.admin.user).allows.certain.network.address.ranges.to.be.denied.access.to.the.AdderView.CATx.IP..If.set.incorrectly,.it.is.possible.to.exclude.all.network.users.and.so.this.option.provides.an.emergency.recovery.point.
To clear IP access control1. From.a.local.or.remote.(not.accessible.from.a.global.keyboard),.log.on.as.the.
‘admin’.user.
2. Press. . . .(hotkeys.can.change).
3. Press. .to.select.‘More.menus’.
4. Select.‘Functions’.
5. Select.‘Configure.IP.port’.
6. Select.‘Network.Configuration’.
Reset ConfigurationThis.option.allows.you.to.completely.reset.the.IP.portion.of.the.AdderView.CATx.IP.unit..
WARNING: This process will remove all network and modem/ISDN settings and return the unit to use its original state. A complete reconfiguration will be required before the IP features of the unit can be used.
To reset the AdderView CATx IP configuration1. From.a.local.or.remote.(not.accessible.from.a.global.keyboard),.log.on.as.the.
‘admin’.user.
2. Press. . . .(hotkeys.can.change).
3. Press. .to.select.‘More.menus’.
4. Select.‘Functions’.
5. Select.‘Configure.IP.port’.
AdderView CATx IP Reset Config
DO YOU WISH TO CONTINUE?
CancelRESET
WARNING: Continuing will causeyour existing configuration tobe erased.
The unit will then reset andrequire re-configuring beforeit can be used.
6. Select.‘Reset.Configuration’.
7. Highlight.the.‘RESET’.option.and.press. .
8. Access.the.‘Configure.IP.Port’.option.to.view.the.initial.IP.configuration.screens..See.Initial IP configuration.for.details.
AdderView IP Network Config
Net Mask 255.255.255.0192.168.42.154No
GatewayVNC PortHTTP Port
590080
Clear IP Access Control
CancelSave
IP Address
00:0F:58:00:00:04Use DHCPMAC Address
7. Highlight.the.‘Clear.IP.Access.Control’.option.and.press. .

��
Appendix 2 - Configuration pages via viewerThis.section.covers.the.configuration.pages.that.are.available.to.global.admin.users,.using.either.the.VNC.viewer.or.the.browser.methods.of.access.
To access the remote configuration pages1. Make.a.global connection.to.the.
AdderView.CATx.IP.unit.and.login.as.the.admin.user..
2. Once.logged.in,.click.the.Configure.button.in.the.top.right.corner.of.the.window..
Logged on usersIndicates.the.current.users.irrespective.of.whether.they.are.connected.locally,.remotely,.by.modem/ISDN.or.via.a.network...
Main configuration page
Click.the.required.option
•. User Accounts
•. Unit Configuration
•. Time & Date Configuration
•. Network Configuration
•. Serial Port Configuration
•. Host Configuration
•. Logging and Status

��
User accountsThis.page.allows.you.to.manage.up.to.sixteen.separate.accounts..
The.first.of.the.sixteen.accounts.is.the.admin.account.and.is.the.only.account.with.access.rights.to.the.configuration.menus..The.user.name.and.access.rights.are.fixed.for.the.admin.account,.the.only.change.possible.for.this.account.is.the.password.
There.are.fifteen.user.account.positions..
To create a new account1..Enter.the.required.User.Name.to.activate.that.position.(the.Password.and.
access.tick.box.positions.will.become.editable).
2..Optionally.enter.a.password.for.the.user.account.
3..Tick/untick.the.Local,.Modem,.Remote.and.Power.options.that.are.appropriate.to.the.user.
4. Click.the.Save.button.to.register.your.changes..
User Name All.user.names.must.consist.of.lower.case.characters.or.numbers.only..No.symbols.or.upper.case.characters.are.permissible..The.user.name.can.be.between.1.and.16.characters.in.length.
PasswordPasswords.are.case.sensitive.and.can.include.certain.keyboard.symbols..The.password.can.be.between.1.and.16.characters.in.length..It.is.important.to.note,.however,.that.the.password.background.remains.shaded.in.amber.while.the.AdderView.CATx.IP.considers.your.entered.password.to.be.too.easy.to.guess..A.suitable.password.is.best.constructed.using.a.mixture.of.more.than.6.letters,.numbers.and.punctuation.characters.
LocalWhen.ticked,.the.selected.user.can.gain.access.using.the.local.KVM.console.directly.connected.to.the.AdderView.CATx.IP.unit.
ModemWhen.ticked,.the.selected.user.can.gain.access.via.a.modem.or.ISDN.link.(requires.external.modem/ISDN.equipment.to.be.connected.to.the.AdderView.CATx.IP.unit).
RemoteWhen.ticked,.the.selected.user.can.gain.access.via.an.IP.network.link,.such.as.a.local.intranet.or.the.wider.Internet.(depending.on.how.the.AdderView.CATx.IP.is.connected).
PowerWhen.ticked,.the.selected.user.will.be.permitted.to.control.the.power.input.to.host.systems.(requires.optional.power.control.switch.unit(s).to.be.fitted).
To get here1. Using.VNC.viewer.or.a.browser,.log.on.as.the.‘admin’.user.
2. Click.the.‘Configure’.button.in.the.top.right.corner.
3. Click.the.‘User.Accounts’.option.

��
Unit configurationThis.page.provides.access.to.a.selection.of.both.basic.and.advanced.settings.for.the.AdderView.CATx.IP..Many.of.the.settings.displayed.here.are.also.accessible.through.the.on-screen.menu.
Unit NameThe.name.entered.here.will.be.displayed.on.the.local.menus.and.the.remote.VNC.viewer/browser.windows.
EncryptionThree.options.are.available:.Always.on,.prefer.off,.prefer.on..The.one.to.choose.depends.on.the.specific.details.of.your.installation.-.see.Encryption settings.for.details..The.use.of.encryption.imposes.a.slight.performance.overhead.of.roughly.10%.but.is.highly.secure.against.third.party.intrusion.
Advanced Unit Configuration
Hardware VersionIndicates.the.version.of.the.electronic.circuitry.within.the.AdderView.CATx.IP.unit.
Firmware VersionIndicates.the.version.of.the.hardwired.software.within.the.AdderView.CATx.IP.flash.memory..This.may.be.updated.using.the.flash upgrade procedure..
Host Keyboard LayoutUse.the.arrow.buttons.to.match.the.keyboard.layout.expected.by.the.host.system.
Admin PasswordEnter.the.password.that.will.be.used.to.gain.administrator.access.to.the.AdderView.CATx.IP..There.can.only.be.one.admin.user.and.only.that.user.is.given.access.to.the.configuration.menus.
To get here1. Using.VNC.viewer.or.a.browser,.log.on.as.the.‘admin’.user.
2. Click.the.‘Configure’.button.in.the.top.right.corner.
3. Click.the.‘Unit.configuration’.option.

��
Advanced unit configurationClick.this.button.to.display.advanced.options.that.do.not.normally.require.alteration. Mouse Latency Allowance
This.option.is.used.during.calibration.to.account.for.latency.delays.(caused.as.signals.pass.through.a.device).introduced.by.some.KVM.switches.from.alternative.manufacturers..
During.calibration,.the.AdderView.CATx.waits.for.40ms.after.each.mouse.movement.before.sampling.the.next..If.a.KVM.device.adds.a.significant.delay.to.the.flow.of.data,.the.calibration.process.can.be.lengthened.or.may.fail.entirely..The.value.entered.here.is.added.to.(or.subtracted.from).the.default.40ms.sampling.time.
Note: You can enter negative values (down to -40) in order to speed up the calibration process when using fast KVM switches. Use this option with caution as it can adversely affect the calibration process.
Mouse RateDefines.the.rate.at.which.mouse.movement.data.are.transmitted.to.the.system..The.default.option.is.20ms,.which.equates.to.50.mouse.events.per.second..This.default.rate.can.prove.too.fast.when.passed.through.certain.connected.KVM.switches.from.alternative.manufacturers..In.such.cases,.data.are.discarded.causing.the.local.and.remote.mouse.pointers.to.drift.apart..If.this.effect.is.encountered,.increase.the.mouse.rate.to.around.30ms.(data.are.then.sent.at.a.slower.rate.of.33.times.per.second).....
Background Refresh Rate
Use.the.arrow.keys.to.alter.the.refresh.rate.for.screen.images.via.remote.links..This.allows.you.to.tailor.the.screen.refresh.to.suit.the.network.or.modem.connection.speeds..The.options.are:.Slow,.Medium,.Fast.or.Disabled..When.the.disabled.option.is.selected,.the.remote.users.will.need.to.manually.refresh.the.screen.
Note: When a low connection speed is detected, the background refresh is automatically disabled, regardless of the settings of this option.
Single Mouse Mode Mouse SwitchAllows.you.to.select.the.mouse.button.combination.that.can.be.used.to.exit.from.single.mouse.mode.(when.active)..
Behaviour for admin connections when limit reachedDetermines.what.should.occur.when.four.global.connections.already.exist.and.a.fifth,.administrator.connection.attempt.is.made..Options.are:.Replace oldest connection,.Replace newest connection.and.Don’t replace..Only.non-administrator.connections.can.be.terminated.in.this.way.
Use VESA GTFWhen.ticked,.the.VESA.Generalized.Timing.Formula.will.be.used.to.help.determine.the.correct.input.video.resolution.and.timing.details..See.Appendix 9.for.a.list.of.all.supported.video.modes.
Upgrade firmwarePlaces.the.unit.into.upgrade.mode..See.Upgrading AdderView CATx IP models......
To get here1. Using.VNC.viewer.or.a.browser,.log.on.as.the.‘admin’.user.
2. Click.the.‘Configure’.button.in.the.top.right.corner.
3. Click.the.‘Unit.configuration’.option.
4. Click.the.‘Advanced.unit.configuration’.option.
Force VNC Protocol �.�IMPORTANT:.The.use.of.this.option.is.not.recommended..Protocol.3.3.is.a.legacy.version.that.does.not.offer.any.encryption.
Idle TimeoutDetermines.the.period.of.inactivity.on.a.global.connection.before.the.user.is.logged.out..The.idle.timeout.period.can.be.set.to.any.time.span,.expressed.in.minutes..Note: The Screensaver option serves a similar purpose for local connections.
Protocol TimeoutSets.the.time.period.by.which.responses.should.have.been.received.to.outgoing.data.packets..If.the.stated.period.is.exceeded,.then.a.connection.is.considered.lost.and.terminated.

��
Time & date configurationThis.page.allows.you.to.configure.all.aspects.relating.to.time.and.date.within.the.AdderView.CATx.IP.unit.
Timezone specifierOptionally.enter.a.recognised.timezone.specifier.related.to.the.current.position.of.the.AdderView.CATx.IP.unit..When.an.NTP.server.is.used,.the.specifier.will.be.used.to.provide.the.correct.real.time.
The.timezone.specifier.takes.the.following.form:.
.....std.offset.dst.[offset],start[/time],end[/time]The.std.and.offset.specify.the.standard.time.zone,.such.as.GMT.and.0,.or.CET.and.-1,.or.EST.and.5,.respectively..
The.dst.string.and.[offset].specify.the.name.and.offset.for.the.corresponding.
Daylight.Saving.Time.zone;.if.the.offset.is.omitted,.it.defaults.to.one.hour.ahead.of.standard.time..
The.remainder.of.the.specification.describes.when.Daylight.Saving.Time.is.in.
effect..The.start.field.is.when.Daylight.Saving.Time.goes.into.effect.and.the.
end.field.is.when.the.change.is.made.back.to.standard.time..The.most.common.
format.used.for.the.daylight.saving.time.is:.Mm.w.d.
Where:.m specifies the month.and.must.be.between.1.and.12..The.day.d.
must.be.between.0.(Sunday).and.6..The.week.w.must.be.between.1.and.5;.
week.1.is.the.first.week.in.which.day.d.occurs,.and.week.5.specifies.the.last.d.day.in.the.month..
The.time.fields.specify.when,.in.the.local.time.currently.in.effect,.the.change.to.the.other.time.occurs..If.omitted,.the.default.is.02:00:00..
Typical.examples.are:
UK:.. . . . GMT0BST,M3.5.0/1,M10.5.0/2
Central.Europe:... . CET-1CEST,M3.5.0/2,M10.5.0/3
US.Eastern:.. . . EST5EDT,M3.2.0/2,M11.1.0/2
US.Pacific:.. . . PST5PDT,M3.2.0/2,M11.1.0/2
For further details•. For.details.of.timezone.specifier.formats,.please.refer.to:.
http://www.gnu.org/software/libc/manual/html_node/TZ-Variable.html
•. For.details.of.the.Network.Time.Protocol.(main.RFC.number:.1305;.the.SNTP.subset.used.as.the.basis.for.the.AdderView.CATx.IP:.4330).http://www.ietf.org/rfc.html. .
Time and DateUse.the.arrow.buttons.to.set.the.correct.current.time.
Use NTPWhen.this.option.is.selected,.the.AdderView.CATx.will.synchronise.its.internal.clocks.using.information.from.the.(Network.Time.Protocol).server.listed.in.the.NTP Server IP address.field..
NTP Server IP addressOptionally.enter.the.IP.address.for.a.known.Network.Time.Protocol.server...
Set Time from NTP ServerClick.to.immediately.use.the.time.and.date.information.from.the.listed.NTP.server..

��
Network configurationThis.page.allows.you.to.configure.the.various.aspects.of.the.IP.port.and.its.relationship.with.the.local.network.
MAC addressMedia.Access.Control.address.–.this.is.the.unique.and.unchangeable.code.that.was.hard.coded.within.your.AdderView.CATx.IP.unit.when.it.was.built..It.consists.of.six.2-digit.hexadecimal.(base.16).numbers.separated.by.colons..A.section.of.the.MAC.address.identifies.the.manufacturer,.while.the.remainder.is.effectively.the.unique.electronic.serial.number.of.your.particular.unit...
Use DHCPDHCP.is.an.acronym.for.‘Dynamic.Host.Configuration.Protocol’..Its.function.is.particularly.useful.when.connecting.to.medium.size.or.larger.networks,.such.as.the.Internet..When.this.option.is.selected,.your.AdderView.CATx.IP.will.attempt.to.locate.a.DHCP.server.on.the.network..If.such.a.server.is.located,.it.will.supply.three.things.to.the.AdderView.CATx.IP:.an.IP.address,.an.IP.network.mask.(also.known.as.a.Subnet.mask).and.a.Gateway.address..These.are.not.usually.granted.permanently,.but.on.a.‘lease’.basis.for.a.fixed.amount.of.time.or.for.as.long.as.the.AdderView.CATx.IP.remains.connected.and.switched.on..Discover allocations.
IP AddressThis.is.the.identity.of.the.AdderView.CATx.IP.within.a.network..The.IP address.can.be.thought.of.as.the.telephone.number.of.the.AdderView.CATx.IP..Unlike.the.MAC.address,.the.IP.address.can.be.altered.to.suit.the.network.to.which.it.is.connected..It.can.either.be.entered.manually.or.configured.automatically.using.the.DHCP.option..When.the.DHCP.option.is.enabled,.this.entry.is.greyed.out.
IP Network MaskAlso.often.called.the.subnet-mask,.this.value.is.used.alongside.the.IP.address.to.help.define.a.smaller.collection.(or.subnet).of.devices.on.a.network..In.this.way.a.distinction.is.made.between.locally.connected.devices.and.ones.that.are.reachable.elsewhere,.such.as.on.the.wider.Internet..This.process.helps.to.reduce.overall.traffic.on.the.network.and.hence.speed.up.connections.in.general.
IP GatewayThis.is.the.address.of.the.device.that.links.the.local.network.(to.which.the.AdderView.CATx.IP.is.connected).to.another.network.such.as.the.wider.Internet..Usually.the.actual.gateway.is.a.network.switch.or.router.and.it.will.be.used.whenever.a.required.address.lies.outside.the.current.network...
VNC PortThis.is.the.logical.link.through.which.communications.with.a.remote.VNC.viewer.will.be.channelled.(see.What is a port?)..The.default.setting.is.5900.which.is.a.widely.recognised.port.number.for.use.by.VNC.software..However,.in.certain.circumstances.it.may.be.advantageous.to.alter.this.number.-.see.‘Security.issues.with.ports’.for.more.details...
HTTP PortThis.is.the.logical.link.through.which.communications.with.a.remote.web.browser.will.be.channelled.(see.What is a port?)..The.default.setting.of.80.is.an.established.standard.for.web.(HTTP.–.HyperText.Transfer.Protocol).traffic.though.this.can.be.changed.to.suit.your.local.network.requirements.
IP Access ControlThis.section.allows.you.to.optionally.specify.ranges.of.addresses.which.will.or.won’t.be.granted.access.to.the.AdderView.CATx.IP..If.this.option.is.left.unchanged,.then.the.default.entry.of.‘+0.0.0.0/0.0.0.0’.ensures.that.access.from.all.IP.addresses.will.be.permitted..See.Setting IP access control.for.details..
To get here1. Using.VNC.viewer.or.a.browser,.log.on.as.the.‘admin’.user.
2. Click.the.‘Configure’.button.in.the.top.right.corner.
3. Click.the.‘Network.configuration’.option.

�9
Setting IP access controlThe.golden.rule.with.this.feature.is.‘Include.before.you.exclude’.or.to.put.it.another.way.‘Arrange.allowed.addresses.in.the.list.before.the.denied.addresses’..
This.is.because.the.positions.of.entries.in.the.list.are.vitally.important..Once.a.range.of.addresses.is.denied.access,.it.is.not.possible.to.make.exceptions.for.particular.addresses.within.that.range..For.instance,.if.the.range.of.addresses.from.A.to.F.are.denied.access.first,.then.the.address.C.could.not.be.granted.access.lower.down.the.list..Address.C.needs.to.be.placed.in.the.list.before.the.denied.range.
IMPORTANT: This feature should be configured with extreme caution as it is possible to deny access to everyone. If such an error occurs, see Clearing IP access control for details about how to regain access.
To define a new IP access control entry1. Click.the.Add.button.to.display.a.popup.dialog:
2. Enter.the.base.network address,.the.mask.and.select.the.appropriate.access.setting.
3. Click.the.OK.button.
To reorder access control entriesIMPORTANT: When reordering, ensure that any specific allowed addresses are listed higher in the list than any denied addresses. Take care not to invoke any deny access settings that would exclude valid users.
1. In.the.access.control.list,.click.on.the.entry.to.be.moved.
2. Click.the.Up.or.Down.buttons.as.appropriate.
To edit/remove access control entries1. In.the.access.control.list,.click.on.the.appropriate.entry.
2. Click.either.the.Edit.or.Remove.button.as.appropriate.
Network/AddressEnter.the.network.address.that.is.to.be.allowed.or.denied.access..If.a.range.of.addresses.is.being.specified.then.specify.any.one.of.the.addresses.within.the.range.and.use.the.Mask.entry.to.indicate.the.size.of.the.range.
MaskEnter.an.IP.network.mask.that.indicates.the.range.of.addresses.that.are.to.be.allowed.or.denied.access..For.instance,.if.only.a.single.specified.IP.address.were.to.be.required,.the.mask.entry.would.be.255.255.255.255.in.order.to.specify.a.single.location..See.Calculating the mask for IP access control.for.details.
AccessUse.the.arrow.buttons.to.select.either.‘Allow’.or.‘Deny’.as.appropriate.
In.the.list,.access.control.addresses.prefixed.by.‘+’.are.allow.entries.while.those.prefixed.by.‘–.‘.are.deny.entries.
To get here1. Using.VNC.viewer.or.a.browser,.log.on.as.the.‘admin’.user.
2. Click.the.‘Configure’.button.in.the.top.right.corner.
3. Click.the.‘Network.configuration’.option.

90
Serial port configurationThis.page.provides.all.access.to.settings.concerned.with.the.two.serial.ports.(modem.and.power.control).that.are.situated.at.the.rear.of.the.AdderView.CATx.IP.unit..
Modem portPPP Server IP Address / PPP Client IP AddressWhen.a.user.dials.into.the.AdderView.CATx.IP.via.a.modem.or.ISDN.adapter,.the.AdderView.CATx.IP.sets.up.a.temporary.two-device.network.using.PPP.(Point.to.Point.Protocol)..For.this.purpose,.both.devices.must.have.‘dummy’.IP.addresses.so.that.they.can.communicate.correctly..These.two.addresses.can.be.almost.anything.expressed.in.the.quad.octet.format.(i.e..192.168.3.1.)..However,.it.is.advisable.not.to.make.them.the.same.as.the.real.IP.addresses.used.by.either.the.remote.system.or.the.AdderView.CATx.IP..
Baud RateThis.option.configures.the.speed.of.the.serial.connection.between.the.AdderView.CATx.IP.and.a.connected.modem.or.ISDN.terminal.adapter..The.default.setting.is.115200..The.other.communication.settings.are.fixed.as:.No.parity,.8.bit.word,.1.stop.bit.
Initialization SequenceThe.codes.entered.here.are.used.to.prepare.the.connected.modem.or.ISDN.terminal.adapter.for.use.with.the.AdderView.CATx.IP..The.default.code.is.a.Hayes-compatible.string.to.configure.auto.answer.mode.and.would.be.understood.by.the.vast.majority.of.modem/ISDN.devices..The.code.is.sent.when.the.AdderView.CATx.IP.is.first.switched.on.or.whenever.the.Initialize.button.is.clicked.
InitialiseWhen.clicked,.this.option.sends.the.characters.entered.in.the.Initialization.sequence.field.to.the.connected.modem.or.ISDN.terminal.adapter.
Restore DefaultsWhen.clicked,.this.option.resets.the.Baud.rate.and.Initialization.sequence.values.to.their.original.default.settings.
Power control portBaud RateThis.option.configures.the.speed.of.the.serial.connection.between.the.AdderView.CATx.IP.and.a.connected.power.control.unit..The.default.setting.is.9600.as.used.by.the.majority.of.power.units..The.other.communication.settings.are.fixed.as:.No.parity,.8.bit.word,.1.stop.bit.
To get here1. Using.VNC.viewer.or.a.browser,.log.on.as.the.‘admin’.user.
2. Click.the.‘Configure’.button.in.the.top.right.corner.
3. Click.the.‘Serial.port.configuration’.option.

9�
Host configurationThis.page.provides.the.opportunity.to.configure.various.details.for.each.of.the.host.systems.that.may.be.connected.to.the.AdderView.CATx.IP.via.one.or.more.KVM.switch.units..There.are.128.entries,.each.of.which.can.be.configured.with.a.name,.the.permitted.users,.the.hot.key.combinations.required.to.switch.to.it.and,.if.required,.appropriate.power.control.commands.
To create a new host entry1. Click.one.of.the.host.entries.to.reveal.a.Host.configuration.dialog.
Name
. Enter.the.name.that.will.be.displayed.in.the.viewer.window.when.you.click.the.Host.button.
Users
. Select.the.users.that.will.be.permitted.to.connect.to.this.host..Either.enter.*.to.allow.all.users.or.a.list.of.users.separated.by.commas.(e.g..admin,.nigel,.andy,.steve).
KVM Port
. Declare.the.Adder.Port.Direct.address.that.will.link.with.the.required.host.system..See.Adder Port Direct.for.details.
. A.list.of.valid.hotkey.codes.are.given.in.Appendix 8.
Power On
. Enter.the.code.required.to.make.an.attached.power.control.unit.apply.power.to.the.selected.host..See.Power switching configuration.for.details..
Power Off
. Enter.the.code.required.to.make.an.attached.power.control.unit.remove.power.from.the.selected.host..See.Power switching configuration.for.details.
2. Enter.the.required.information.in.each.field.
3. Click.the.OK.button.
To get here1. Using.VNC.viewer.or.a.browser,.log.on.as.the.‘admin’.user.
2. Click.the.‘Configure’.button.in.the.top.right.corner.
3. Click.the.‘Host.configuration’.option.
Add entry for unrecognised host. When.selected,.any.systems.visited.that.are.not.specified.in.the.Hosts.list,.will.
be.added.to.the.list..Use.with.care.when.visiting.complex.cascaded.systems.
Erase Host Configuration. Removes.all.hosts.from.the.list..

9�
Adder Port DirectAdder.Port.Direct.is.totally.transparent.communication.system.that.allows.supporting.devices.to.communicate.with.each.other..Using.the.keyboard.connections.that.link.each.device,.Adder.Port.Direct.allows:.
•. A.controlling.device.to.provide.address.details.of.the.required.port,.the.user’s.name.and.access.rights,.mouse.calibration.and.video.mode.information.
•. A.controlled.device.to.confirm.the.address.and.other.details.of.the.current.port.
Such.communication.simplifies.both.the.configuration.and.selection.of.systems,.especially.within.a.complex.cascade.structure..Adder.Port.Direct.also.allows.the.AdderView.CATx.Hosts.option.to.directly.control.the.connected.switching.devices.(such.as.other.AdderView.CATx.units.in.cascade).and.then.apply.the.appropriate.video.capture.and.mouse.scaling.settings..Adder.Port.Direct.provides.excellent.security.control.to.prevent.users.from.accessing.systems.for.which.they.do.not.access.rights.(‘sideways.movement’).because.each.unit.is.fully.informed.of.each.user’s.precise.access.rights.
Port/host addressing using Adder Port DirectWhen.adding.new.computers.to.the.Hosts.list,.the.option.‘Add entry for unrecognised host’.is.provided.to.automatically.add.new.entries.if.a.port.is.visited.that.does.not.already.have.a.matching.host.entry..This.is.a.useful.option.for.simple.configurations,.but.should.be.used.with.care.when.complex.cascades.of.units.are.being.used.as.it.may.lead.to.more.host.entries.being.added.than.are.strictly.necessary..
Additionally,.you.can.specify.the.port.number.of.the.required.system.using.the.same.format.as.if.controlling.the.KVM.switch.directly..
Examples ��... selects.port.16.and.is.equivalent.to.the.hotkey.sequence.+CTRL+ALT+–
1+6
A.0�. selects.port.5.on.AdderView.CATx.unit.that.is.cascaded.through.port.group.A.(see.cascade port numbering)...

9�
Logging and statusThis.screen.provides.various.details.about.the.user.activity.on.the.AdderView.CATx.IP.unit..
To get here1. Using.VNC.viewer.or.a.browser,.log.on.as.the.‘admin’.user.
2. Click.the.‘Configure’.button.in.the.top.right.corner.
3. Click.the.‘Logging.and.status’.option.
To copy and paste the logYou.can.copy.the.information.listed.within.the.log.and.paste.it.into.another.application.
1. While.viewing.the.log.screen,.press.Ctrl.and.C,.to.copy.the.data.into.the.clipboard.
2. In.a.text.application.(i.e..Word,.WordPad,.Notepad).press.Ctrl.and.V,.or.right.mouse.click.and.‘Paste’...
Date and time the event occurred
Type of event, user name and access method or remote IP address
Click to clear all log entries
Click to refresh the list
Click to return to the main menu
Optionally enter an IP address to which the status log should be sent
Syslog Server IP Address Logging.information.can.optionally.be.sent,.as.it.occurs,.to.a.separate.system.using.the.standard.Syslog.protocol..Enter.the.IP.address.of.a.suitable.system.in.the.field.provided.
For further details•. For.details.of.the.Syslog.protocol.(RFC.number:.3164).
http://www.ietf.org/rfc.html

9�
Appendix 3 - VNC viewer connection optionsWhen.you.are.connecting.to.the.AdderView.CATx.IP.using.the.VNC.viewer,.a.number.of.options.are.available..
Colour/Encoding
Auto selectWhen.ticked,.this.option.will.examine.the.speed.of.your.connection.to.the.AdderView.CATx.IP.and.apply.the.most.suitable.encoding.method..This.option.is.suggested.for.the.majority.of.installations.
Preferred encodingThere.are.three.manually.selectable.encoding.methods.which.are.accessible.when.the.Auto.select.option.is.unticked..
•. ZRLE.–.This.is.a.highly.compressed.method.that.is.best.suited.to.slow.modem.connections.
•. Hextile.–.This.method.offers.better.performance.than.the.ZRLE.when.used.over.a.high.speed.network.because.there.is.no.need.for.the.AdderView.CATx.IP.to.spend.time.highly.compressing.the.data.
•. Raw.–.This.is.a.primitive,.uncompressed.method.that.is.mainly.used.for.technical.support.issues..You.are.recommended.not.to.use.this.method..
Colour levelThis.section.allows.you.to.select.the.most.appropriate.colour.level.for.the.speed.of.the.connection.to.the.AdderView.CATx.IP..Where.the.connection.speed.is.slow.or.inconsistent.there.will.be.a.necessary.compromise.between.screen.response.and.colour.depth.
•. Full.–.This.mode.is.suitable.only.for.fast.network.connections.and.will.pass.on.the.maximum.colour.depth.being.used.by.the.host.system.
•. Medium (��� colours).–.This.mode.reduces.the.host.system.output.to.a.256.colour.mode.and.is.more.suitable.for.ISDN.and.fast.modem.connections.
•. Low (�� colours).–.This.mode.is.suitable.for.slower.modem.connections.and.reduces.the.host.system.output.to.64.colours..
•. Very low (� colours).–.This.mode.provides.very.rudimentary.picture.quality.and.hardly.any.speed.advantage.over.the.64.colour.setting..You.are.recommended.not.to.use.this.mode....
IMPORTANT:.If.you.make.any.changes.to.the.options.given.here.and.wish.to.retain.them.for.successive.connection.sessions,.you.must.save.the.changes...To.do.this,.change.to.the.‘Load/Save’.tab.and.click.the.‘Save’.button.within.the.‘Default’.section..
Click here to access the options
There.are.six.tabbed.pages.of.options:
•. Colour/Encoding
•. Inputs
•. Scaling
•. Misc
•. Identities
•. Load/Save

9�
Inputs
Enable all inputsWhen.selected,.allows.keyboard,.mouse.and.clipboard.data.to.be.transferred.between.server.and.viewer.systems.
Disable all inputs (view-only mode)When.selected,.prevents.control.data.being.passed.between.server.and.viewer..Viewer.can.display.the.server.output,.but.cannot.control.it.
CustomiseAllows.you.to.select.which.data.can.be.transferred.between.server.and.viewer.
Send pointer events to serverWhen.un-ticked,.the.VNC.viewer.will.not.send.mouse.movement.or.click.data.to.the.AdderView.CATx.IP.or.host.system.
Send keyboard events to serverWhen.un-ticked,.the.VNC.viewer.will.not.send.keyboard.information.to.the.AdderView.CATx.IP.or.host.system.
Send clipboard changes to serverThis.feature.is.restricted.to.software.server.versions.of.VNC.and.has.no.effect.on.AdderView.CATx.IP.installations.
Accept clipboard changes from serverThis.feature.is.restricted.to.software.server.versions.of.VNC.and.has.no.effect.on.AdderView.CATx.IP.installations,.except.for.retreiving.the.activity.log.as.described.in.the.logging.and.status.section.
Rate-limit mouse move eventsWhen.ticked,.this.feature.reduces.the.mouse.movement.information.that.is.sent.to.the.AdderView.CATx.IP.and.host.system..This.is.useful.for.slow.connections.and.you.will.notice.that.the.remote.cursor.will.catch.up.with.the.local.cursor.roughly.once.every.second.
Enable 3-button mouse emulationThis.feature.allows.you.to.use.a.2-button.mouse.to.emulate.the.middle.button.of.a.3-button.mouse..When.enabled,.press.the.left.and.right.mouse.buttons.simultaneously.to.create.a.middle.button.action..You.are.advised.to.generally.use.a.3-button.mouse.
Pass special keys directly to serverWhen.ticked,.‘special’.keys.(the.Windows.key,.the.Print.Screen.key,.Alt+Tab,.Alt+Escape.and.Ctrl+Escape).are.passed.directly.to.the.AdderView.CATx.IP.rather.than.being.interpreted.locally..
Menu keyThis.feature.allows.you.to.select.which.function.key.is.used.to.display.the.VNC.viewer.options.menu..The.menu.key.is.only.way.to.exit.from.the.full.screen.viewer.mode...
IMPORTANT:.If.you.make.any.changes.to.the.options.given.here.and.wish.to.retain.them.for.successive.connection.sessions,.you.must.save.the.changes...To.do.this,.change.to.the.‘Load/Save’.tab.and.click.the.‘Save’.button.within.the.‘Default’.section..

9�
Scaling
No ScalingNo.attempt.is.made.to.make.the.screen.image.fit.the.viewer.window..You.may.need.to.scroll.horizontally.and/or.vertically.to.view.all.parts.of.the.screen.image.
Scale to Window SizeAdjusts.the.server.screen.image.to.suit.the.size.of.the.viewer.window.
Custom SizeAdjusts.the.server.screen.image.according.to.the.Width.and.Height.settings.in.the.adjacent.fields..A.drop.box.to.the.right.of.the.fields.allows.you.to.define.the.image.size.by.percentage.or.by.pixels,.as.required.
Preserve Aspect RatioWhen.ticked,.maintains.a.consistent.ratio.between.the.horizontal.and.vertical.dimensions.of.the.screen.image.
Misc
Shared connection (do not dis-connect other viewers)This.option.does.not.apply.to.AdderView.CATx.IP.connections.
Full screen modeWhen.ticked,.the.VNC.viewer.will.launch.in.full.screen.mode..Use.the.menu.key.(usually.F8).to.exit.from.full.screen.mode.
Render cursor locallyThis.option.does.not.currently.apply.to.AdderView.CATx.IP.connections..
Allow dynamic desktop resizingWhen.ticked,.the.viewer.window.will.be.automatically.resized.whenever.the.host.system’s.screen.resolution.is.altered..
Only use protocol version �.�This.option.does.not.apply.to.AdderView.CATx.IP.connections.
Beep when requested to by the server When.ticked,.your.local.system.will.beep.in.response.to.any.error.beeps.emitted.by.the.AdderView.CATx.IP.
Offer to automatically reconnectWhen.ticked,.the.viewer.will.offer.to.restore.a.lost.connection.with.the.server.
Try Single Sign-On if server allows itThis.option.does.not.apply.to.AdderView.CATx.IP.connections.
IMPORTANT:.If.you.make.any.changes.to.the.options.given.here.and.wish.to.retain.them.for.successive.connection.sessions,.you.must.save.the.changes...To.do.this,.change.to.the.‘Load/Save’.tab.and.click.the.‘Save’.button.within.the.‘Default’.section..

9�
IdentitiesThis.feature.helps.your.VNC.viewer.to.confirm.that.a.revisited.AdderView.CATx.IP.is.genuine.and.not.another.device.masquerading.as.an.AdderView.CATx.IP..The.list.given.will.retain.the.identities.of.all.visited.units.(that.have.full.security.enabled)..
When.you.first.make.a.secure.connection.to.the.AdderView.CATx.IP,.the.security.information.for.that.AdderView.CATx.IP.unit.is.cached.within.this.Identities.tab.(i.e..the.“identity”.is.known)..The.next.time.that.you.connect.to.the.AdderView.CATx.IP,.its.identity.is.checked.against.the.stored.version..If.a.mismatch.is.found.between.the.current.and.the.stored.identities.then.a.warning.will.be.issued.to.you.
If.an.existing.AdderView.CATx.IP.is.fully.reconfigured.then.it.will.need.to.issued.with.a.new.identity..In.this.case.the.previous.identity,.listed.in.this.tab,.should.be.removed.so.that.a.new.identity.can.be.created.on.the.next.connection....
Load / Save
Configuration File - ReloadAllows.you.to.load.a.configuration.file.saved.from.this,.or.another.viewer.
Configuration File - SaveAllows.you.to.save.the.current.settings.so.that.they.can.be.copied.from.one.viewer.to.another.
Configuration File - Save As...Allows.you.to.save.the.current.settings.under.a.new.name.so.that.they.can.be.copied.from.one.viewer.to.another.
Defaults - ReloadWhen.clicked,.all.connection.options.are.returned.to.the.default.settings.that.are.currently.saved.
Defaults - SaveWhen.clicked,.saves.the.current.connection.options.as.the.default.set.that.will.be.used.in.all.subsequent.VNC.connections..

9�
Appendix 4 - VNC viewer window optionsClick.the.VNC.icon.in.the.top.left.corner.of.the.viewer.window.(or.press.F8).to.display.the.window.options:.
Standard window control items
Full screenExpands.the.VNC.viewer.window.to.fill.the.whole.screen.with.no.visible.window.edges.or.toolbar..Press.F8.to.re-display.this.menu.
Single mouse mode (P)Used.for.fast.network.connections.where.a.second,.“predictor”.cursor.is.not.required.
Ctrl, Alt, Send F�, Send Ctrl-Alt-DelSends.the.selected.keypress(es).to.the.AdderView.CATx.IP.and.host.computer..This.is.necessary.because.certain.keys.and.key.combinations.are.trapped.by.the.VNC.viewer.
Refresh ScreenRequests.data.from.the.server.for.a.complete.redraw.of.the.screen.image,.not.just.the.items.that.change.
New connection...Displays.the.connection.dialog.so.that.you.can.log.on.to.a.different.AdderView.CATx.or.VNC.server.location.
Options...Displays.the.full.range.of.connection.options.-.see.Appendix 3.for.more.details.
Connection info...Displays.various.connection.and.display.details.
About...Displays.information.about.your.VNC.viewer....

99
Appendix 5 - Browser viewer optionsWhen.you.are.connecting.to.the.AdderView.CATx.IP.using.a.Web.browser,.a.number.of.options.are.available..
There.are.four.options.pages:
Encoding and colour level
Auto selectWhen.ticked,.this.option.will.examine.the.speed.of.your.connection.to.the.AdderView.CATx.IP.and.apply.the.most.suitable.encoding.method..This.option.is.suggested.for.the.majority.of.installations.
Preferred encodingThere.are.three.manually.selectable.encoding.methods.which.are.accessible.when.the.Auto.select.option.is.unticked..
•. ZRLE.–.This.is.a.highly.compressed.method.that.is.best.suited.to.slow.modem.connections.
•. Hextile.–.This.method.offers.better.performance.than.the.ZRLE.when.used.over.a.high.speed.network.because.there.is.no.need.for.the.AdderView.CATx.to.spend.time.highly.compressing.the.data.
•. Raw.–.This.is.a.primitive,.uncompressed.method.that.is.mainly.used.for.technical.support.issues..You.are.recommended.not.to.use.this.method..
Colour levelThe.colour.level.is.fixed.at.Medium.(256.colours).for.almost.all.browsers.
Inputs
View only (ignore mouse & keyboard)When.ticked,.the.viewer.will.not.send.keyboard.or.mouse.information.to.the.AdderView.CATx.IP.or.host.computer.
Accept clipboard from serverThis.feature.is.restricted.to.software.server.versions.of.VNC.and.has.no.effect.on.AdderView.CATx.IP.installations.
Send clipboard to serverThis.feature.is.restricted.to.software.server.versions.of.VNC.and.has.no.effect.on.AdderView.CATx.IP.installations.
Security
��� bits (low security)Selects.the.lowest.level.of.encoding.for.communications.between.the.browser.and.the.AdderView.CATx.IP.
�0�� bits (medium security)Selects.the.middle.level.of.encoding.for.communications.between.the.browser.and.the.AdderView.CATx.IP.
�0�� bits (high security)Selects.the.highest.level.of.encoding.for.communications.between.the.browser.and.the.AdderView.CATx.IP.
Misc
Shared (don’t disconnect other viewers)This.feature.is.restricted.to.software.server.versions.of.VNC.and.has.no.effect.on.AdderView.CATx.IP.installations.
Render cursor locallyThis.feature.is.restricted.to.software.server.versions.of.VNC.and.has.no.effect.on.AdderView.CATx.IP.installations.
Fast CopyRectThis.feature.is.restricted.to.software.server.versions.of.VNC.and.has.no.effect.on.AdderView.CATx.IP.installations.
Click here to access the options

�00
Appendix 6 – Addresses, masks and portsIP.address,.network.masks.and.ports.are.all.closely.linked.in.the.quest.for.one.device.to.find.another.across.disparate.network.links.
IP addressesAs.a.rough.analogy,.consider.how.you.use.the.telephone.system..The.phone.number.for.Adder.Technology.in.the.UK.is.0044 (0)1954 780044..This.number.consists.of.three.distinct.parts:
•. 0044.connects.from.another.country.to.the.UK
•. (0)1954.selects.the.main.telephone.exchange.in.the.Bar.Hill.area.of.Cambridgeshire,.and
•. 780044.is.the.unique.code.for.Adder.Technology.within.Bar.Hill.
The.important.parts.of.the.whole.number.depend.on.where.you.are..If.you.were.based.in.the.same.local.area.as.Adder.Technology,.there.would.be.no.point.in.dialling.out.of.the.UK,.or.even.out.of.the.area..The.only.part.of.the.whole.number.that.you.are.interested.in.is.the.final.part:.780044.
In.a.similar.way.to.the.various.parts.of.the.telephone.number,.the.four.sections.(or.Octets).of.every.IP.address.have.different.meanings.or.“weights”..Consider.the.following.typical.IP.address:.
192.168.142.154
192.is.the.most.global.part.of.the.number.(akin.to.the.0044.of.the.phone.number).and.154.is.the.most.local.(similar.to.the.780044.unique.local.code.of.the.phone.number)...
When.two.network.devices.communicate.with.each.other,.they.always.“dial.the.whole.number”.regardless.of.their.respective.locations.in.a.network..However,.they.still.need.to.know.whether.the.other.device.is.local.to.them.or.not,.and.this.is.where.the.net.mask.comes.into.play.
Net masksThe.net.mask.(or.sub-net.mask).informs.a.device.as.to.its.own.position.within.a.network..From.this.it.can.determine.whether.any.other.device.is.within.the.same.local.network.or.is.situated.further.afield.
Taking.the.telephone.number.analogy.given.in.the.IP.address.section,.in.order.to.use.the.telephone.system.efficiently,.it.is.vital.for.you.to.know.your.location.relative.to.the.person.you.are.calling..In.this.way.you.avoid.dialling.unnecessary.numbers...
When.one.network.device.needs.to.talk.to.another,.the.first.thing.that.it.will.do.is.a.quick.calculation.using.its.own.IP.address,.the.other.device’s.IP.address.and.its.own.net.mask..Suppose.a.device.with.address.192.168.142.154.and.net.mask.255.255.255.0 needed.to.communicate.with.a.device.at.address.192.168.142.22..The.sending.device.would.perform.several.calculations:
The.reason.for.doing.this?.It.makes.the.network,.as.a.whole,.much.more.efficient..If.every.message.for.every.recipient.was.shoved.straight.out.onto.the.Internet,.the.whole.thing.would.grind.to.a.halt.within.seconds..Net.masks.keep.local.traffic.just.that.-.local.
Want to know more?
1.The.net.mask.is.used.to.determine.the.local.and.global.parts.of.the.sender’s.IP.address..Where.there.is.255.in.the.mask,.the.corresponding.address.slips.through,.where.there.is.a.0,.it.is.blocked.
2.Where.the.net.mask.was.0,.the.corresponding.part.of.the.result.is.also.zero.-.this.section.is.now.known.to.be.the.local.part.of.the.IP.address.
3.The.same.process.is.carried.out.for.the.destination.address,.again.using.the.sender’s.net.mask..Now.the.local.parts.of.both.addresses.have.been.equalised.to.zero,.because.their.values.are.not.important.in.determining.whether.they.are.both.in.the.same.local.network....
4.The.results.of.the.two.net.mask.operations.are.now.compared,.if.they.match,.the.destination.is.local..If.not,.then.the.sender.will.still.use.the.same.full.destination.IP.address.but.will.also.flag.the.message.to.go.via.the.local.network.gateway.and.out.into.the.wider.world..
Sending.device.IP.address
Net.mask
Destination.device.IP.address
192.168.142.000..=..192.168.142.000.?...Answer:.Yes Address is local
1
2
4
192
192
168
168
142
142
154
000
192
192
168
168
142
142
22
000Result
3

�0�
Net masks - the binary explanationTo.really.understand.the.operation.of.a.net.mask.it.is.necessary.to.delve.deeper.into.the.life.blood.of.computers.–.binary;.this.is.native.digital,.where.everything.is.either.a.1.(one).or.0.(zero),.on.or.off,.yes.or.no..
The.net.mask.operation.described.on.the.previous page.is.known.as.a.‘bit-wise.AND.function’..The.example.of.255.255.255.0.is.handy.because.the.last.octet.is.completely.zero.and.is.“clean”.for.illustrative.purposes..However,.actual.net.mask.calculations.are.carried.out,.not.on.whole.decimal.numbers,.but.bit.by.bit.on.binary.numbers,.hence.the.term.‘bit-wise’..In.a.real.local.network,.a.net.mask.might.be.255.255.255.240..Such.an.example.would.no.longer.be.quite.so.clear,.until.you.look.at.the.net.mask.in.its.binary.form:
. 11111111.11111111.11111111.11110000
In.this.case,.the.four.zeroes.at.the.end.of.the.net.mask.indicate.that.the.local.part.of.the.address.is.formed.by.only.the.last.four.bits..If.you.use.the.diagram.from.the.previous.example.and.insert.the.new.net.mask,.it.will.have.the.following.effect.on.the.final.result:
192
192
168
168
142
142
154 154
144
1
1
1
0
0
0
0
1
1
1
0
0
0
1
0
0
0
1110 0 0 0144
Thus,.when.154.is.bit-wise ANDed.with.240,.the.result.is.144..Likewise,.any.local.address.from.192.168.142.144.through.to.192.168.142.159.would.produce.exactly.the.same.result.when.combined.with.this.net.mask,.hence.they.would.all.be.local.addresses..However,.any.difference.in.the.upper.three.octets.or.the.upper.four.bits.of.the.last.octet.would.slip.through.the.mask.and.the.address.would.be.flagged.as.not.being.local.....
Inside a bit-wise AND functionWhen.you.“open.up”.the.last.octet.of.the.net.mask.and.look.at.the.binary.inside,.you.can.see.the.last.four.zero.bits.preventing.any.1’s.in.the.address.from.falling.through..
Decimal octet prior to AND operation with net mask
Binary equivalent of ���
Binary octet after AND operation with net mask
Decimal equivalent of �00�0000

�0�
Calculating the mask for IP access controlThe.IP.access.control.function.uses.a.standard.IP.address.and.a.net.mask.notation.to.specify.both.single.locations.and.ranges.of.addresses..In.order.to.use.this.function.correctly,.you.need.to.calculate.the.mask.so.that.it.accurately.encompasses.the.required.address(es).
Single locationsSome.of.the.simplest.addresses.to.allow.or.deny.are.single.locations..In.this.case.you.enter.the.required.IP.address.into.the.‘Network/Address’.field.and.simply.enter.the.‘Mask’.as.255.255.255.255.(255 used throughout the mask means that every bit of the address will be compared and so there can only be one unique address to match the one stated in the ‘Network/Address’ field).
All locationsThe.other.easy.setting.to.make.is.ALL.addresses,.using.the.mask.0.0.0.0..As.standard,.the.IP.access.control.section.includes.the.entry:.+0.0.0.0/0.0.0.0 The.purpose.of.this.entry.is.to.include.all.IP.addresses..It.is.possible.to.similarly.exclude.all.addresses,.however,.take.great.care.not.to.do.this.as.you.instantly.render.all.network.access.void..There.is.a.recovery procedure.should.this.occur..
Address rangesAlthough.you.can.define.ranges.of.addresses,.due.to.the.way.that.the.mask.operates,.there.are.certain.restrictions.on.the.particular.ranges.that.can.be.set..For.any.given.address.you.can.encompass.neighbouring.addresses.in.blocks.of.either.2,.4,.8,.16,.32,.64,.128,.etc..and.these.must.fall.on.particular.boundaries..For.instance,.if.you.wanted.to.define.the.local.address.range:.
192.168.142.67 to 192.168.142.93.
The.closest.single.block.to.cover.the.range.would.be.the.32.addresses.from:.
192.168.142.64 to 192.168.142.95..
The.mask.needed.to.accomplish.this.would.be:.255.255.255.224..
When.you.look.at.the.mask.in.binary,.the.picture.becomes.a.little.clearer..The.above.mask.has.the.form:.11111111.11111111.11111111.11100000.
Ignoring.the.initial.three.octets,.the.final.six.zeroes.of.the.mask.would.ensure.that.the.32.addresses.from..64.(01000000).to..95.(01011111).would.all.be.treated.in.the.same.manner..See.Net masks - the binary explanation.for.details........
When.defining.a.mask,.the.important.rule.to.remember.is:
There must be no ‘ones’ to the right of a ‘zero’..
For.instance,.(ignoring.the.first.three.octets).you.could.not.use.a.mask.that.had.11100110 because.this.would.affect.intermittent.addresses.within.a.range.in.an.impractical.manner..The.same.rule.applies.across.the.octets..For.example,.if.you.have.zeroes.in.the.third.octet,.then.all.of.the.fourth.octet.must.be.zeroes..
The.permissible.mask.values.(for.all.octets).are.as.follows:.
Mask octet Binary Number of addresses encompassed
255 11111111 1 address
254 11111110. 2 addresses.
252 11111100. 4 addresses
248 11111000. 8 addresses
240 11110000. 16 addresses
224 11100000. 32 addresses
192 11000000. 64 addresses
128 10000000. 128 addresses
0 00000000. 256 addresses
If.the.access.control.range.that.you.need.to.define.is.not.possible.using.one.address.and.one.mask,.then.you.could.break.it.down.into.two.or.more.entries..Each.of.these.entries.could.then.use.smaller.ranges.(of.differing.sizes).that,.when.combined.with.the.other.entries,.cover.the.range.that.you.require.
For.instance,.to.accurately.encompass.the.range.in.the.earlier.example:
192.168.142.67 to 192.168.142.93.
You.would.need.to.define.the.following.six.address.and.mask.combinations.in.the.IP.access.control.section:
Network/address entry Mask entry
192.168.142.67 255.255.255.255 defines 1 address (.67)
192.168.142.68 255.255.255.252 defines 4 addresses (.68 to .71)
192.168.142.72 255.255.255.248 defines 8 addresses (.72 to .79)
192.168.142.80 255.255.255.248 defines 8 addresses (.80 to .87)
192.168.142.88 255.255.255.252 defines 4 addresses (.88 to .92)
192.168.142.93 255.255.255.255 defines 1 address (.93)

�0�
PortsIf.you.accept.the.analogy.of.IP addresses.being.rather.like.telephone.numbers,.then.think.of.ports.as.extension.numbers..In.a.company.of.any.size,.you.generally.wouldn’t.expect.the.accounts.department.to.share.the.same.telephone.with.the.technical.department..Although.their.calls.may.all.be.related.to.the.same.company,.they.concern.very.different.aspects.of.that.company..
It.is.the.same.with.IP.network.connections..Although.you.have.only.one.network.link.into.your.computer.and.only.one.IP.address.(phone.number),.you.are.probably.performing.many.different.tasks.through.that.one.link,.often.at.the.same.time..Thus,.when.you.browse.the.web.your.outgoing.requests.and.the.incoming.information.are.all.channelled.through.port.80..When.you.send.an.email,.it.travels.through.port.25.and.when.you.transfer.files.you.are,.without.knowing.it,.using.port.20.
At.the.“border.crossing”.between.the.wider.Internet.and.every.local.network.attached.to.it,.there.is.a.router.that.is.usually.combined.with.a.firewall..One.of.its.main.tasks.is.to.direct.incoming.traffic.to.the.correct.place.within.its.local.network..A.key.piece.of.information.to.help.it.do.this.is.the.port.number:.
Security issues with portsThe.settings.of.port.numbers.become.important.when.the.AdderView.CATx.IP.is.situated.behind.a.network.firewall..In.order.for.a.remote.VNC.viewer.or.web.browser.to.make.contact.with.your.AdderView.CATx.IP,.it.is.necessary.for.the.firewall.to.allow.communication.through.a.particular.numbered.port.to.occur..
One.specific.function.of.firewalls.is.to.restrict.access.to.ports.in.order.to.prevent.malicious.attackers.using.them.as.a.route.into.your.network..Every.new.port.that.is.opened.offers.a.new.possibility.for.hackers.and.so.the.number.of.accessible.ports.is.purposefully.kept.to.a.minimum..In.such.cases,.it.may.be.advantageous.to.change.one.or.both.AdderView.CATx.IP.ports.to.use.the.same.number..The.other.alternative.is.to.place.the.AdderView.CATx.IP.unit.outside.the.firewall.and.take.full.advantage.of.its.secure.operation.features.–.see.Networking issues.for.details.
IMPORTANT: The correct configuration of routers and firewalls requires advanced networking skills and intimate knowledge of the particular network. Adder Technology cannot provide specific advice on how to configure your network devices and strongly recommend that such tasks are carried out by a qualified professional.
AdderView.CATx.IP.has.the.local.IP.address:.192.168.0.3
User.with.VNC.viewer.accesses.IP.address:.129.7.1.10.(this.automatically.uses.port.5900)..
Router/firewall address: ��9.�.�.�0Router.is.programmed.to.send.port.5900.VNC.traffic.to.local.address.192.168.0.3.and.port.80.web.traffic.to.local.address.192.168.0.42
.
User.accesses.the.company.website.at:.129.7.1.10.(this.automatically.uses.port.80)..
Web.server.has.the.local.IP.address:.192.168.0.42

�0�
Appendix 7 – Cable and connector specificationsRS232 serial mouse to PS/2 converter cable
5 1CLK DCDNC
NC
NC
1 2DAT RXD
2 5TXD GND
3 4GND
Female6543
21
DTR
4 6+5V DSR
6 7-12V RTS
3 TXD (-12V)
8 CTS
9 RI
�pin mini-DIN female
9pin D-type female
AdderView CATx to power switch cable
Power switch to power switch daisy chain cable
9pin D-type female �pin RJ9
�pin RJ9 �pin RJ9
RS232 serial flash upgrade cable
9pin D-type female 9pin D-type male

�0�
Multi-head synchronisation cable
MASTER end9pin D-type male
SLAVE end9pin D-type male
MASTER end9pin D-type male
SLAVE� end9pin D-type male
Use this cable when two AdderView CATx devices are being synchronised.
Use this cable when three AdderView CATx devices are being synchronised.
SLAVE� end9pin D-type male

�0�
Appendix 8 – Hotkey sequence codesThese.codes.are.used.when.defining.hotkey.switching.sequences.(macros).for.host.computers.and.allow.you.to.include.almost.any.of.the.special.keys.on.the.keyboard...
Permissible key presses
Main control keys (see ‘Using abbreviations’)Backspace.|.Tab.|.Return.|.Enter.|.Ctrl.|.Alt.|.Win.|.Shift.|.LShift.|.RShift..LCtrl.|.RCtrl.|.LAlt.|.AltGr.|.RAlt.|.LWin.|.RWin.|.Menu.|.Escape.|.Space.CapsLock.|.NumLock.|.PrintScreen.|.Scrolllock
Math operand keys (see ‘Using abbreviations’)Add.(Plus).|.Subtract.(Minus).|.Multiply
Central control keys (see ‘Using abbreviations’)Insert.|.Delete.|.Home.|.End.|.PageUp.|.PageDown
Up.|.Down.|.Left.|.Right.|.Print.|.Pause
Keypad keys (see ‘Using abbreviations’)KP_Insert.|.KP_Delete.|.KP_Home.|.KP_End.|.KP_PageUp.
KP_PageDown.|.KP_Up.|.KP_Down.|.KP_Left.|.KP_Right.|.KP_Enter
KP_Add.|.KP_Subtract.|.KP_Divide.|.KP_Multiply.
KP_0.to.KP_9
Function keysF1.|.F2.|.F3.|.F4.|.F5.|.F6.|.F7.|.F8.|.F9.|.F10.|.F11.|.F12
ASCII charactersAll.characters.can.be.entered.using.their.ASCII.codes,.from.32.to.126.(i.e..A,B,C,.….1,2,3.etc.).with.the.exception.of.the.special.characters.‘+’,.‘-’,.‘+–’.and.‘*’.which.have.special.meanings,.as.explained.below.
Codes with special meanings+.. means.press.down.the.key.that.follows
–.. means.release.the.key.that.follows
+–.means.press.down.and.release.the.key.that.follows
*.. means.wait.250ms.(note:.if.a.number.immediately.follows.the.asterisk,.then...the.delay.will.equal.the.number,.in.milliseconds)
Note: Hotkey sequences are not case sensitive.
Creating macro sequencesHot.key.macro.sequences.can.be.up.to.256.characters.long..All.keys.are.assumed.to.be.released.at.the.end.of.a.line,.however,.you.can.also.determine.that.a.key.is.pressed.and.released.within.a.sequence..Any.of.the.following.three.examples.will.send.a.command.that.emulates.and.a.press.and.release.of.the.Scroll.Lock.key:.
+SCROLL-SCROLL.+-SCROLL.+SCROLL-
Example:
+-SCROLL+-SCROLL+1+ENTER
Press.and.release.scroll.twice,.press.1.then.enter.then.release.all.keys.(equivalent.definition.is.+SCROLL-SCROLL+SCROLL-SCROLL+1+ENTER-1-ENTER)
Using abbreviationsTo.reduce.the.length.of.the.key.definitions,.any.unique.abbreviation.for.a.key.can.be.used..For.example:.“scroll”,.“scr”.and.even.“sc”.all.provide.an.identifiable.match.for.“ScrollLock”.whereas.“en”.could.not.be.used.because.it.might.mean.“Enter”.or.“End”.(“ent”.would.be.suitable.for.“Enter”)..
Note: Hotkey sequences and abbreviations are not case sensitive..
For.information.about.where.to.enter.these.codes,.please.see.the.sections.Host configuration.or.Keyboard control.

�0�
Appendix 9 – Supported video modesThe.following.video.modes.are.supported.and.can.be.automatically.configured.by.the.AdderView.CATx.units..If.a.recognised.video.mode.cannot.be.found,.the.AdderView.CATx.will.gradually.change.some.of.the.key.parameters.to.discover.whether.a.video.lock.can.be.achieved..Support.for.VESA.GTF.(Generalized.Timing.Formula).is.available.and.can.be.enabled.via.the.Advanced Unit Configuration.screen..
The.half.width.video.modes.capture.every.other.pixel..These.are.not.generally.recommended.for.normal.use.but.may.be.used.for.emergency.access.to.high.resolution,.high.frequency.system.screens..Half.width.screens.can.be.expanded.to.normal.width.using.the.scaling.features.of.the.viewer..
*.. Not.actually.a.VESA.mode.but.a.common.DOS/BIOS.mode
**.May.also.work.on.some.systems.when.the.operating.temperature.of.the.AdderView.CATx.is.controlled.

�0�
Safety information•. For.use.in.dry,.oil.free.indoor.environments.only.
•. Both.the.AdderView.CATx.and.its.power.supply.generate.heat.when.in.operation.and.will.become.warm.to.the.touch..Do.not.enclose.them.or.place.them.locations.where.air.cannot.circulate.to.cool.the.equipment..Do.not.operate.the.equipment.in.ambient.temperatures.exceeding.40.degrees.Centigrade..Do.not.place.the.products.in.contact.with.equipment.whose.surface.temperature.exceeds.40.degrees.Centigrade.
•. Warning.-.live.parts.contained.within.power.adapter.
•. No.user.serviceable.parts.within.power.adapter.-.do.not.dismantle.
• Plug.the.power.adapter.into.a.socket.outlet.close.to.the.module.that.it.is.powering.
• Replace.the.power.adapter.with.a.manufacturer.approved.type.only..
• Do.not.use.the.power.adapter.if.the.power.adapter.case.becomes.damaged,.cracked.or.broken.or.if.you.suspect.that.it.is.not.operating.properly.
• If.you.use.a.power.extension.cord.with.the.AdderView.CATx,.make.sure.the.total.ampere.rating.of.the.devices.plugged.into.the.extension.cord.does.not.exceed.the.cord’s.ampere.rating..Also,.make.sure.that.the.total.ampere.rating.of.all.the.devices.plugged.into.the.wall.outlet.does.not.exceed.the.wall.outlet’s.ampere.rating.
• Do.not.attempt.to.service.the.AdderView.CATx.yourself.
Safety considerations when using power switches with AdderView CATx•. Follow.the.manufacturer’s.instructions.when.setting.up.and.using.power.
switching.products.
•. Always.ensure.that.the.total.ampere.rating.of.the.devices.plugged.into.the.power.switching.product.does.not.exceed.the.power.switching.product’s.ampere.rating..Also,.make.sure.that.the.total.ampere.rating.of.all.the.devices.plugged.into.the.wall.outlet.does.not.exceed.the.wall.outlet’s.ampere.rating.
WarrantyAdder.Technology.Ltd.warrants.that.this.product.shall.be.free.from.defects.in.workmanship.and.materials.for.a.period.of.two.years.from.the.date.of.original.purchase..If.the.product.should.fail.to.operate.correctly.in.normal.use.during.the.warranty.period,.Adder.will.replace.or.repair.it.free.of.charge..No.liability.can.be.accepted.for.damage.due.to.misuse.or.circumstances.outside.Adder’s.control..Also.Adder.will.not.be.responsible.for.any.loss,.damage.or.injury.arising.directly.or.indirectly.from.the.use.of.this.product..Adder’s.total.liability.under.the.terms.of.this.warranty.shall.in.all.circumstances.be.limited.to.the.replacement.value.of.this.product.
If.any.difficulty.is.experienced.in.the.installation.or.use.of.this.product.that.you.are.unable.to.resolve,.please.contact.your.supplier.
General Public License (Linux)The.AdderView.CATx.runs.an.embedded.version.of.the.Linux.operating.system,.licensed.under.the.GNU.General.Public.License..To.obtain.the.source.code.for.the.open-source.components.of.the.system.visit:
. http://www.realvnc.com/products/AdderLinkIP/gpl.html

�09
End user licence agreement
PLEASE.READ.THIS.AGREEMENT.CAREFULLY..THIS.AGREEMENT.CONCERNS.ENHANCED.VNC.VIEWER.SOFTWARE.(“the.SOFTWARE”).FOR.USE.WITH.THE.AdderView.CATx.PRODUCT.(“the.PRODUCT”)..THE.SOFTWARE.IS.PROVIDED.TO.ENABLE.YOU.TO.OPERATE.THE.PRODUCT...BY.USING.ALL.OR.ANY.PORTION.OF.THE.SOFTWARE.YOU.ACCEPT.ALL.THE.TERMS.AND.CONDITIONS.OF.THIS.AGREEMENT..IF.YOU.DO.NOT.ACCEPT.ALL.THE.TERMS.AND.CONDITIONS.OF.THIS.AGREEMENT.THEN.DO.NOT.USE.THE.SOFTWARE...BY.USING.ANY.UPDATED.VERSION.OF.THE.SOFTWARE.WHICH.MAY.BE.MADE.AVAILABLE,.YOU.ACCEPT.THAT.THE.TERMS.OF.THIS.AGREEMENT.APPLY.TO.SUCH.UPDATED.SOFTWARE.
�. Intellectual Property RightsThe.Software.and.its.structure.and.algorithms.are.protected.by.copyright.and.other.intellectual.property.laws,.and.all.intellectual.property.rights.in.them.belong.to.RealVNC.Limited.(“RealVNC”),.a.United.Kingdom.Limited.Company,.or.are.licensed.to.it...You.may.not.reproduce,.publish,.transmit,.modify,.create.derivative.works.from,.publicly.display.the.Software.or.part.thereof...Copying.or.storing.or.using.the.Software.other.than.as.permitted.in.Clause.2.is.expressly.prohibited.unless.you.obtain.prior.written.permission.from.RealVNC.
�. Permitted and Prohibited Uses2.1. During.the.term.of.this.Agreement.and.as.long.as.you.comply.with.the.
terms.of.this.agreement,.you.may.use.the.Software.only.with.the.Product.for.your.personal.use.or.for.the.internal.use.of.your.business...You.may.make.as.many..copies.of.the.Software.as.you.require.for.your.own.internal.business.purposes.only.and.for.archival.purposes..You.are.expressly.prohibited.from.distributing.the.Software.in.any.format,.in.whole.or.in.part,.for.sale,.or.for.commercial.use.or.for.any.unlawful.purpose.
2.2. You.may.not.rent,.lease.or.otherwise.transfer.the.Software.or.allow.it.to.be.copied...Unless.permitted.by.law,.you.may.not.reverse.engineer,.decompile.or.disassemble.the.Software.
�. WarrantyREALVNC.DOES.NOT.WARRANT.ANY.RESULTS.OBTAINED.USING.THE.SOFTWARE..TO.THE.EXTENT.PERMITTED.BY.LAW,.REALVNC.DISCLAIMS.ALL.OTHER.WARRANTIES.ON.THE.SOFTWARE,.EITHER.EXPRESS.OR.IMPLIED,.INCLUDING.BUT.NOT.LIMITED.TO.THE.IMPLIED.WARRANTIES.OF.MERCHANTABILITY,.NON-INFRINGEMENT.OF.THIRD.PARTY.RIGHTS.AND.FITNESS.FOR.PARTICULAR.PURPOSE...
�. Limitation on LiabilityUNDER.NO.CIRCUMSTANCES.SHALL.REALVNC.BE.LIABLE.FOR.ANY.CONSEQUENTIAL.INDIRECT.OR.INCIDENTAL.DAMAGES.WHATSOEVER.INCLUDING.LOST.PROFITS.OR.SAVINGS.ARISING.OUT.OF.THE.USE.OF.THE.SOFTWARE,.THE.SERVICE.OR.THE.INFORMATION,.RELIANCE.ON.THE.DATA.PRODUCED.OR.INABILITY.TO.USE.THE.SOFTWARE,.THE.SERVICE.OR.THE.INFORMATION.EVEN.IF.REALVNC.HAS.BEEN.ADVISED.OF.THE.POSSIBILITY.OF.SUCH.DAMAGES...BECAUSE.SOME.STATES.AND.COUNTRIES.DO.NOT.ALLOW.THE.EXCLUSION.OR.LIMITATION.OF.LIABILITY.FOR.CONSEQUENTIAL.OR.INCIDENTAL.DAMAGES,.THE.ABOVE.LIMITATION.MAY.NOT.APPLY.TO.YOU.
NOTHING.IN.THIS.AGREEMENT.LIMITS.LIABILITY.FOR.DEATH.OR.PERSONAL.INJURY.ARISING.FROM.A.PARTY’S.NEGLIGENCE.OR.FROM.FRAUDULENT.MISREPRESENTATION.ON.THE.PART.OF.A.PARTY
�. Export ControlThe.United.States.and.other.countries.control.the.export.of.Software.and.information....You.are.responsible.for.compliance.with.the.laws.of.your.local.jurisdiction.regarding.the.import,.export.or.re-export.of.the.Software,.and.agree.to.comply.with.such.restrictions.and.not.to.export.or.re-export.the.Software.where.this.is.prohibited...By.downloading.the.Software,.you.are.agreeing.that.you.are.not.a.person.or.entity.to.which.such.export.is.prohibited.
�. Term and TerminationThis.licence.shall.continue.in.force.unless.and.until.it.is.terminated.by.RealVNC.by.e-mail.notice.to.you,.if.it.reasonably.believes.that.you.have.breached.a.material.term.of.this.Agreement
In.the.case.above,.you.must.delete.and.destroy.all.copies.of.the.Software.in.your.possession.and.control.and.overwrite.any.electronic.memory.or.storage.locations.containing.the.Software.
�. General Terms7.1. The.construction,.validity.and.performance.of.this.Agreement.shall.be.
governed.in.all.respects.by.English.law,.and.the.Parties.agree.to.submit.to.the.exclusive.jurisdiction.of.the.English.courts.
7.2. If.any.provision.of.this.agreement.is.found.to.be.invalid.by.any.court.having.competent.jurisdiction,.the.invalidity.of.such.provision.shall.not.affect.the.validity.of.the.remaining.provisions.of.this.agreement,.which.shall.remain.in.full.force.and.effect.
7.3. No.waiver.of.any.term.of.this.agreement.shall.be.deemed.a.further.or.continuing.waiver.of.such.term.or.any.other.term.
7.4. This.agreement.constitutes.the.entire.agreement.between.you.and.RealVNC...

��0
Radio Frequency EnergyA.Category.5.(or.better).twisted.pair.cable.must.be.used.to.connect.the.units.in.order.to.maintain.compliance.with.radio.frequency.energy.emission.regulations.and.ensure.a.suitably.high.level.of.immunity.to.electromagnetic.disturbances.
All.other.interface.cables.used.with.this.equipment.must.be.shielded.in.order.to.maintain.compliance.with.radio.frequency.energy.emission.regulations.and.ensure.a.suitably.high.level.of.immunity.to.electromagnetic.disturbances.
European EMC directive 89/336/EECThis.equipment.has.been.tested.and.found.to.comply.with.the.limits.for.a.class.A.computing.device.in.accordance.with.the.specifications.in.the.European.standard.EN55022..These.limits.are.designed.to.provide.reasonable.protection.against.harmful.interference..This.equipment.generates,.uses.and.can.radiate.radio.frequency.energy.and.if.not.installed.and.used.in.accordance.with.the.instructions.may.cause.harmful.interference.to.radio.or.television.reception..However,.there.is.no.guarantee.that.harmful.interference.will.not.occur.in.a.particular.installation..If.this.equipment.does.cause.interference.to.radio.or.television.reception,.which.can.be.determined.by.turning.the.equipment.on.and.off,.the.user.is.encouraged.to.correct.the.interference.with.one.or.more.of.the.following.measures:.(a).Reorient.or.relocate.the.receiving.antenna..(b).Increase.the.separation.between.the.equipment.and.the.receiver..(c).Connect.the.equipment.to.an.outlet.on.a.circuit.different.from.that.to.which.the.receiver.is.connected..(d).Consult.the.supplier.or.an.experienced.radio/TV.technician.for.help..
FCC Compliance Statement (United States)This.equipment.generates,.uses.and.can.radiate.radio.frequency.energy.and.if.not.installed.and.used.properly,.that.is,.in.strict.accordance.with.the.manufacturer’s.instructions,.may.cause.interference.to.radio.communication..It.has.been.tested.and.found.to.comply.with.the.limits.for.a.class.A.computing.device.in.accordance.with.the.specifications.in.Subpart.J.of.part.15.of.FCC.rules,.which.are.designed.to.provide.reasonable.protection.against.such.interference.when.the.equipment.is.operated.in.a.commercial.environment..Operation.of.this.equipment.in.a.residential.area.may.cause.interference,.in.which.case.the.user.at.his.own.expense.will.be.required.to.take.whatever.measures.may.be.necessary.to.correct.the.interference..Changes.or.modifications.not.expressly.approved.by.the.manufacturer.could.void.the.user’s.authority.to.operate.the.equipment.
Canadian Department of Communications RFI statementThis.equipment.does.not.exceed.the.class.A.limits.for.radio.noise.emissions.from.digital.apparatus.set.out.in.the.radio.interference.regulations.of.the.Canadian.Department.of.Communications.
Le présent appareil numérique n’émet pas de bruits radioélectriques dépassant les limites applicables aux appareils numériques de la classe A prescrites dans le règlement sur le brouillage radioélectriques publié par le ministère des Communications du Canada.

���
©.2008.Adder.Technology.Limited
All.trademarks.are.acknowledged.
Release.1.1b
February.2008
Part.No..ADD0065
Adder.Technology.Limited,
Technology.House,
Trafalgar.Way,.Bar.Hill,
Cambridge,.CB3.8SQ,
United.Kingdom
Tel:.+44.(0)1954.780044
Fax:.+44.(0)1954.780081
Adder.Corporation,
29.Water.Street,
Newburyport,
MA.01950,
United.States.of.America
Tel:.+1-888-932-3337
Fax:.+1-888-275-1117
www.ctxd.com Documentation by:
Adder.Asia.Pacific
6.New.Industrial.Road,.
Hoe.Huat.Industrial.Building
#07-01,.
Singapore.536199
Tel:.+65.6288.5767
Fax:.+65.6284.1150
.

���
HT
IndexA
Accesslocal.and.remote.users..51via.dial.up.link..66
Access.controlconfiguration..89mask.calculation..102
Access.modeshared.&.private..62
Accountcreation.for.users..84
Addressexplanation..100
Addressingcascaded.computers..18DNS..43network.issues..42power.switch.boxes..15
ADMINforgotten.password..36password..25
Admin.passwordinitial.setup..38local.setting..79
Advanced.options..76Advanced.unit.configuration..
86Artifacts
on.screen..60Auto.calibrate..62Autoscanning..33Auto.select..94,99
B
Baud.rate..76local.setting..81remote.setting..90
Binarynet.masks..101
Bracketsfitting..7
Browserconnection..59viewer.options..99
C
Cable.lengthsto.computers..12to.remote.users..10
Cable.specifications..104Calibrate
mouse..62screen..62
Calibrate.allvideo.settings..65
CAMconnection..12
Cascadegroups..17
Cascade.connectionsaddressing..18how.they.work..17introduction..16testing..20tips.for.success..19
Cascaded.computersselecting..54
Clear.IP.access.control..82local.setting..80
Client.IPlocal.setting..81
Colour.level..94COM1
baud.rate..90connection..13
COM2baud.rate..90
Compensationfor.computer.links..28for.remote.user.links..30
Computerconnection..12name.editing..27ports..5registering..27selecting..51
Computer.Access.Moduleconnection..12
Configuration..23initial.IP..39menus..24,69overall.steps..23pages..83saving.and.restoring..34
Configuration.settingssaving.and.restoring..34
Configure.IP.port..78Confirmation.box..54
Connections..8Computer.Access.Module..12computer.system..12global.user..11host.computer..9ISDN..13keyboard..9local.user..9modem..13multiple.video.head..21network.port..11power.control..15power.supply..14remote.user..10
Connector.specifications..104Control.menus
for.remote.connection..60Controls
viewer.options..63Control.strings
power.switching..45
D
Daisy.chain.cable..104Data.Transfer.utility..34Date
local.setting..79DDC
options..76,77DHCP
discovering.allocations..43during.initial.setup..38local.setting..80remote.setting..88
Dial.upconnection..66
DNS.addressing..43
E
Encryption.key..38Encryption.settings..40
viewer..67End.user.licence..109Extender
remote.user..10
F
Firewall..42Firmware
current.version..85upgrade..47
Force.encryption..79Format
power.control.port..76Front.panel
controls..50controls.and.indicators..50
Full.screen.modeescape.from.(F8)..60
Functions..70,76,78
G
Gatewaylocal.setting..80remote.setting..88
Global.preferences..72,76Global.user
access..57connection..11

���
H
Hextile..94,99Host.computer
connecting..9connection..12power.switching.setup..45
Host.configuration..91Hosts
changing.between..60,61configuration..91
Host.selection..61Hotkeys
changing..25codes.and.macros..106selecting.computers..52sequences..92
Hot.plugging..37HTTP.port
initial.setup..38local.setting..80remote.setting..88when.altered..42
I
IdentitiesVNC.Viewer..97
Indicators..5,50Initial.configuration..23Initialise.button..90Initialize.port
local.setting..81Init.string
local.setting..81IntelliMouse..37IP.access.control..88,89
calculating.mask..102clearing..82
IP.addressexplanation..100local.setting..80remote.setting..88
IP.gateway..88IP.network.mask..88IP.network.port..5
connecting..11IP.port
connection..11initial.configuration..38
IP.port.configurationconfiguration.via.viewer..39
ISDNconnecting..13dial.up.link..66
K
Keyboard.codessending..64
Keyboard.layoutlocal.setting..79remote.setting..85
KVMADMIN.utility..46
L
Local.connection..51Local.network
connection..41Local.user
connection..9port..5
Logging..93Logging.in.and.out
section..54Log.on..58
M
MAC.address..80,87,88Mask
explanation..100for.IP.access.control..102
Menu.barviewer.window..60
Menu.keychanging..95
Modemconnecting..13dial.up.link..66port..5
Modem.configuration..81Mounting..7Mouse
calibration..62control..63pointers..61restoration..37resync..62,63
Multiple.video.headconnections..21
N
Net.mask..80explanation..100
Network.configuration..80,88Networking.issues..41Network.port
connection..11
O
Octetsip.address..100
Operation..50
P
Partssupplied.and.extra..6
Passwordadmin..25admin.-.setting..79forgotten..36initial.setup..38remote.logon..58setting.for.users..84
Port.numberentering..66
Power.control..5connection..15options..76
Power.stringsfor.switching..45
Power.supplyconnecting..14part.number..6
Power.switchingaddressing..15configuration..45connection..15control.sequences..45on.&.off.select..62user.permissions..84via.viewer..62
PPP.IP.address..90Preferred.encoding..94Private
access.mode..62
R
Raw..94,99RealVNC..5Refresh.screen..63Reminder.banner..55Remote.configuration
advanced.unit.configuration..86
host.configuration..91logging.and.status..93network.configuration..88serial.port.configuration..90setting.IP.access.control..89unit.configuration..85user.accounts..84
Remote.usercable.lengths..10connection..10ports..5
Reset.configuration..82Restore.Defaults
local.setting..81Restoring
configuration.settings..34Resync.mouse..63RJ9.connector..15Router..42Routing.status..55

���
S
Safety.information..108Saving
configuration.settings..34Scaling
VNC.Viewer..96Screen
best.resolution..60calibration..62navigation..60refresh..63
Screensaverlocal.setting..79
Securityenabling..25ensuring..44general.steps..25
Selectingcascaded.computers..54computers..51with.front.panel..51with.hotkeys..52with.mouse.buttons..53with.on-screen.menu..53
Serial.portconfiguration..90modem.connection..13
Serverconfiguration..91
Server.IPlocal.setting..81
Setup.options..70,74Shared
access.mode..62Single.mouse.mode..61,63Skew.adjustment..31Slow.connections
optimising.for..60Supplied.items..6Syslog..93
T
Testinglinks.to.cascaded.computers..
20Threshold
adjustment..65Time
local.setting..79Time.&.date.configuration..87Troubleshooting..68
U
Unit.Configuration..79,85Unit.name
local.setting..79remote.setting..85
Upgradefirmware..47
Use.DHCPlocal.setting..80
User.accounts..84User.list
editing..26Username
remote.logon..58User.preferences..71,74
V
Video.compensation..28Video.modes..107Video.settings..64Viewer.window..60VNC.port
initial.setup..38local.setting..80remote.setting..88when.altered..42
VNC.viewerconnection..58connection.options..94download..58window.options..98
W
Warranty..108Web.browser
connection..59viewer.options..99
X
X100.extender..10X200.extender..10
Z
ZRLE..94,99