adaptaire digital control system user manual - …mesteksa.com/fileuploads/literature/applied...
TRANSCRIPT
1
AdaptAire
Digital Control System
User Manual
Rev. 05-07-13

2

3
Table of Contents
OVERVIEW................................................................................................................................. 7
NETWORKING ......................................................................................................................... 9
ADAPTAIRE DEFAULT SETTINGS ................................................................................. 9
UNIT OPERATING MODES .............................................................................................. 10
MRT Controls: ......................................................................................................................... 10 UNIT OFF MODE ............................................................................................................................................. 10 UNIT MANUAL MODE ................................................................................................................................... 11 UNIT AUTO MODE ......................................................................................................................................... 11
MDT Controls: ......................................................................................................................... 11 UNIT OFF MODE ............................................................................................................................................. 11 UNIT MANUAL MODE ................................................................................................................................... 11 UNIT AUTO MODE ......................................................................................................................................... 11
MRT-Expert Controls: ............................................................................................................ 11 UNIT OFF MODE ............................................................................................................................................. 11 UNIT MANUAL MODE ................................................................................................................................... 12 UNIT AUTO MODE ......................................................................................................................................... 12 Scheduling Time Clock ....................................................................................................................................... 12 Heating Night Setback ....................................................................................................................................... 15 Cooling Night Setback ....................................................................................................................................... 15 Auxiliary Unit Enable ........................................................................................................................................ 15
MDT-Expert Controls: ............................................................................................................ 16 UNIT OFF MODE ............................................................................................................................................. 16 UNIT MANUAL MODE ................................................................................................................................... 16 UNIT AUTO MODE ......................................................................................................................................... 16 Scheduling Time Clock ....................................................................................................................................... 16 Auxiliary Unit Enable ........................................................................................................................................ 19
Heating/Ventilating/Cooling Operating Modes .................................................... 20
Heating Mode .......................................................................................................................... 20 General Burner Control ...................................................................................................................................... 20 Recirculating Direct-Fired Heaters ................................................................................................................... 21 Energy Savings Mode 1 Mixing Box Recirculating Units.............................................................................. 22 Energy Savings Mode 1 Non-Recirculating Units .......................................................................................... 22 Energy Savings Mode 2 Mixing Box Recirculating Direct-Fired Units ......................................................... 22 Energy Savings Mode 3 ..................................................................................................................................... 22
Ventilation Mode ..................................................................................................................... 22
Cooling Mode .......................................................................................................................... 25 General Cooling Control .................................................................................................................................... 25 Energy Savings Mode 4 ..................................................................................................................................... 25
Damper Control Modes ..................................................................................................... 26
Manual Mode .......................................................................................................................... 26 MRT and MDT Controls .................................................................................................................................... 26 MRT-Expert and MDT-Expert Controls ............................................................................................................ 26

4
Mixed Air Temperature Mode ............................................................................................... 27 MRT Control……. ............................................................................................................................................. 27 MRT-Expert Control .......................................................................................................................................... 27 MDT and MDT-Expert Controls........................................................................................................................ 27
Building Pressure Mode ........................................................................................................ 27 MRT and MDT Controls .................................................................................................................................... 27 MRT-Expert and MDT-Expert Controls ............................................................................................................ 27
100% Outside Air ................................................................................................................. 28
Minimum Ventilation ......................................................................................................... 28
Freezestat ............................................................................................................................... 28
Clogged Filter ........................................................................................................................ 28
User Configured PID Control ......................................................................................... 28
Direct Acting ............................................................................................................................ 29
Reverse Acting ....................................................................................................................... 30
Unit Resets ............................................................................................................................. 32
ALARM ..................................................................................................................................... 32
CALIBRATE ............................................................................................................................ 33
FAN COUNT ........................................................................................................................... 33
HEATING COUNT ................................................................................................................. 33
COOLING COUNT ................................................................................................................. 34
Multiplexed Inputs .............................................................................................................. 34
Clock Set ................................................................................................................................. 35
Diagnostics – Critical Alarm Codes ........................................................................... 35
ALARM CODE: Low Discharge Temperature ................................................................. 35 SOLUTION: If burner was operating prior to shutdown (check prior alarm log) ..................................... 35 SOLUTION: If burner was not operating prior to shutdown (check prior alarm log) ............................... 36
ALARM CODE: Safety Circuit Open ................................................................................. 38 SOLUTION: If fan is not running (check prior alarm log) ........................................................................ 38 SOLUTION: If fan is running (check prior alarm log) .............................................................................. 38
ALARM CODE: Burner Status ........................................................................................... 39 SOLUTION: Inspect burner control circuit and burner ............................................................................ 39
ALARM CODE: Burner Hand ............................................................................................. 40 SOLUTION: Inspect burner control circuit. This alarm has the potential to be a very serious problem.
Close the manual gas valves immediately if the fan is not running. .................................................................. 40
ALARM CODE: Flame Failure ........................................................................................... 41 SOLUTION: Investigate flame relay ........................................................................................................ 41

5
Diagnostics – Non-Critical Alarm Codes ................................................................. 41
ALARM CODE: Unit off/Fan on ......................................................................................... 41 SOLUTION: If fan is running ................................................................................................................... 41 SOLUTION: If fan is not running ............................................................................................................. 42
ALARM CODE: Unit on/Fan off ......................................................................................... 42 SOLUTION: If fan/motor is running ........................................................................................................ 42 SOLUTION: If fan/motor is not running .................................................................................................. 42
ALARM CODE: Check Airflow Switches .......................................................................... 43 SOLUTION: If high airflow switch is opening. Do not adjust the switch setpoints .................................. 43 SOLUTION: If low airflow switch is opening. Do not adjust the switch setpoints ................................... 43
ALARM CODE: Clogged Filter Switch ............................................................................. 44 SOLUTION: If clogged filter switch is closing. ........................................................................................ 44
ALARM CODE: Insufficient OA ......................................................................................... 45 SOLUTION: If heat is desired ................................................................................................................... 45 SOLUTION: If less outside air is desired .................................................................................................. 46
ALARM CODE: Invalid Damper Control Mode ............................................................... 46 SOLUTION: If the unit is configured for MRT or MRT-Expert controls ................................................ 46 SOLUTION: If the unit is configured for MDT or MDT-Expert controls ................................................ 46
ALARM CODE: Room Sensor Failure ............................................................................. 46 SOLUTION: Investigate room sensor ....................................................................................................... 46
Glossary ................................................................................................................................... 47
Menu Selection Tree for BACview ............................................................................. 48
MODSTAT ............................................................................................................................... 49
UNIT MODES HOTKEY - 2 ............................................................................................... 49
SETPOINTS HOTKEY - 3 ................................................................................................ 50
STATUS MENU HOTKEY - 4 ............................................................................................ 50
ALARM HOTKEY - 1 ........................................................................................................ 51
RESETS HOTKEY - 6 ........................................................................................................ 51
SCHEDULES HOTKEY - 7 ................................................................................................ 51
CLOCKSET HOTKEY - 0 ................................................................................................ 52
HELP HOTKEY - 5 ............................................................................................................ 52
USER CONFIGURABLE OUTPUT HOTKEY - 8 ........................................................... 53
Appendix I ............................................................................................................................... 54
10KΩ Thermistor Output Curve ........................................................................................... 54
Appendix II .............................................................................................................................. 55
Airflow Station Layout ............................................................................................................ 55
Appendix III ............................................................................................................................ 56
I/O Zone 583 Controller Specifications ............................................................................... 56

6
Appendix IV ............................................................................................................................ 57
I/O Zone 583 Controller Battery Checkout ......................................................................... 57
Appendix V .............................................................................................................................. 58
Control System Field Conversion ........................................................................................ 58
Typical Wiring Schematic ............................................................................................... 60
RECIRCULATING DFL MODEL DIAGRAM ...................................................................... 60
NON-RECIRCULATING DFL MODEL DIAGRAM ............................................................ 61
RECIRCULATING DFC and DFM MODEL DIAGRAM .................................................... 62
NON-RECIRCULATING DFC and DFM MODEL DIAGRAM .......................................... 63
RECIRCULATING IFL MODEL DIAGRAM ........................................................................ 64
NON-RECIRCULATING IFL MODEL DIAGRAM .............................................................. 65
NON-RECIRCULATING IF MODEL DIAGRAM ................................................................ 66

7
OVERVIEW
A glossary has been provided to assist the reader in understanding distinctive terms and
phrases. These terms and phrases appear in italics.
Applied Air’s Digital Control System, AdaptAire, is designed to give the user the
ultimate in unit performance and operational flexibility, adaptability, and reliability in a
user-friendly package. The AdaptAire DDC system is a standard component on Applied
Air heating and cooling units. Because the AdaptAire system encompasses a wide
variety of unit types, not all of the system’s capabilities and functions are relevant to
all units. Where a function is similar but different between recirculating and non-
recirculating units or direct fired or indirect fired units, the function is explained
separately.
AdaptAire accepts single or multiple units on the system network. Each unit can be
provided with a BACview. The BACview connects to the unit control module via the
Local Access Port (see Figure 1 for the location of the Local Access Port). The operating
parameters for individual units may be input through the BACview. A PC may also be
connected to the network. This allows the user to configure each unit separately, or all
units can be configured simultaneously. A controls contractor can provide assistance in
networking.
Figure 1
The BACview ships with a cable. One end of the cable consists of a pre-wired black
screw terminal connector while the other end consists of a 5-pin red-tipped plug.
For MRT and MRT-Expert systems, plug the pre-wired black screw terminal connector
into the back of the BACview and plug the 5-pin red-tipped plug into the bottom of the
room sensor. Because the room sensor is hard-wired to the controller via the Rnet port on
the left-hand side of the controller and the BACview is connected to the room sensor via
the plug connection on the bottom of the room sensor, this creates a communications link
between the BACview and the controller without having to directly wire the BACview to
the controller.

8
It is easy to move the BACview between the location of the room sensor in the space and
the unit’s location without having to do any additional wiring. Simply unplug the
BACview from the bottom of the room sensor in the space and take it to where the unit is
located. Then, plug the BACview into the Local Access Port on the controller as shown in
Figure 1. To go from where the unit is located to the room sensor in the space, unplug the
BACview from the Local Access Port and take it to the room sensor. Then, plug the
BACview into the bottom of the room sensor.
For MDT and MDT-Expert systems, simply plug the BACview into the Local Access Port
on the controller as shown in Figure 1 as a room sensor is not provided with these
systems.
If there are multiple units at the jobsite, the BACview can easily be unplugged from one
unit and plugged into another. For this reason, it is not recommended to hardwire the
BACview into the Rnet port on the left-hand side of the controller because it sacrifices the
convenience of portability.
Applied Air’s AdaptAire system also includes operational modes such as time
scheduling, filter monitoring, and multiple damper control and temperature control
schemes. All of these modes provide the maximum in unit operational flexibility.
The optional airflow station imparts unparalleled adaptability into the operation of each
unit. A daily self-calibration enables AdaptAire to detect the exact ratio of outside and
return air entering the unit. Then AdaptAire daily fine-tunes the unit’s operation based on
these new parameters. Air volume can vary because of changes in static pressure
conditions due to loading filters, VAV boxes, and building dynamics. These varying
conditions influence the ventilation air provided by the unit. On certain models of
recirculating direct-fired heaters this impacts the allowable equivalent temperature rise of
the unit that is allowed under the latest ANSI standard for direct-fired heaters.
AdaptAire diagnostic capabilities insure swift response to abnormal unit conditions. An
alarm is generated anytime a discrepancy exists between operational parameters and
actual unit operation. An alarm indication is displayed at the BACview and system PC in
text format. In the Diagnostics section of this manual is a list of all alarms and possible
causes and solutions.
All of the features of the AdaptAire system are designed to provide the user with real
time information. At any time the user can display all of the operational parameters, make
changes, if necessary, and observe the various temperature, pressure, and damper
readings. The system’s diagnostic capabilities provide the user with up to the minute
status reporting. (BACview remote keypad or WebCTRL internet connection is required
for these features.)

9
NETWORKING
AdaptAire is adaptable to a variety of different network architectures and protocols. Each
controller has built-in protocol translation and can be configured for operation on
ARCnet156 or EIA-485 communication networks. See Appendix III for specific
controller specifications.
The AdaptAire system can be connected to most existing building automation systems.
Some systems may require the use of special controllers and network communication
devices.
ADAPTAIRE DEFAULT SETTINGS
The following is a list of AdaptAire DDC controller defaults. These are the default
operating parameters set at the factory prior to shipment.
ITEM DEFAULT RANGE
Unit Network Address varies 000 – 100 rotary switches
Unit Operating Mode Off Auto – Off – Manual
Control System As specified MRT (modulating room
temperature control) – MDT
(modulating discharge
temperature control)
Time Clock Schedule None 4 Daily - 12 Holiday - 2
Override schedules
Damper Operating Mode As specified Manual – Building Pressure –
Mixed Air Temperature
Fuel Selection As specified Natural – Propane
Heating Unoccupied Setpoint 55°F 40°F - 130°F
Cooling Unoccupied Setpoint 100°F 40°F - 130°F
Remote Temperature Setpoint OFF 55°F - 90°F
Heating Occupied Setpoint 65°F 40°F - 130°F
Cooling Occupied Setpoint 73°F 40°F - 130°F
Outside Temperature for
Heating/Cooling Changeover
Setpoint (MDT-Expert Control)
55°F 40°F - 130°F
Freezestat 45°F 35°F - 80°F
Heating Economizer Setpoint 65°F 40°F - 130°F
Cooling Economizer Setpoint 55°F 40°F - 130°F
Minimum Heating Discharge
Temperature Setpoint
55°F 40°F - 130°F
Maximum Heating Discharge
Temperature Setpoint
100°F 40°F - 130°F
Minimum Cooling Discharge
Temperature Setpoint
55°F 40°F - 130°F
Maximum Cooling Discharge
Temperature Setpoint
75°F 40°F - 130°F
Heating Discharge Setpoint
(MDT-Expert Control)
65°F 40°F - 130°F

10
ITEM DEFAULT RANGE
Cooling Discharge Setpoint
(MDT-Expert Control)
73°F 40°F - 130°F
Remote Damper Position Setpoint 0% Outside Air 0% - 100%
Mixed Air Temperature Setpoint 50°F 30°F - 90°F
Building Pressure Setpoint 0.00” W. C. -0.10” - +0.10” W. C.
Manual Damper Position Setpoint 20% Outside Air 0% - 100%
Minimum Ventilation Setpoint 20% Outside Air 0% - 100%
Manual Damper Position Setpoint
(75/25 direct fired heaters)
25% Outside Air 25% - 100%
Minimum Ventilation Setpoint
(75/25 direct fired heaters)
25% Outside Air 25% - 100%
Unit Model As specified IFL20-IFL40-IFL60-OTHER
User PID Select Direct Acting DIRECT –REVERSE
High Input Value 0.00 -9999.99 – 99999.99
Low Input Value 0.00 -9999.99 – 99999.99
User Control Setpoint 0.00 -9999.99 – 99999.99
Maximum User Setpoint 0.00 -9999.99 – 99999.99
Minimum User Setpoint 0.00 -9999.99 – 99999.99
UNIT OPERATING MODES
There are three different modes that control the supply fan and unit operation:
Off
Manual
Auto
There are also four different methods for controlling the operating modes:
a remote control panel with one or two rotating adjustment knobs (MRT and
MDT controls)
an intelligent room sensor and BACview panel with LCD display (MRT-Expert
controls)
an BACview panel with LCD display (MDT-Expert controls)
any of the these controls with an internet-based WebCTRL interface or other 3rd
party building automation system
MRT Controls: Modulating room temperature (MRT) control is the most basic AdaptAire control for
room temperature. The MRT control system includes a remote control panel equipped
with 1 or 2 potentiometers, 3 or more pilot lights, and up to 2 switches.
AdaptAire units configured for MRT or MRT-Expert controls will have a fixed
discharge temperature of 70°F if the room temperature sensor is disconnected or
otherwise fails to communicate with the unit control module.
UNIT OFF MODE
Off Mode is the default unit operational mode. To place the unit in Off Mode, rotate the
“temperature setpoint” knob on the remote control panel counterclockwise to the stop.
This will place the unit in the OFF mode and extinguish the “fan on” light. The OFF
mode prevents the unit from starting.

11
UNIT MANUAL MODE
Manual Mode allows the unit to turn on. To place the unit in Manual Mode, rotate the
“temperature setpoint” knob on the remote control panel clockwise to the desired room
temperature setpoint. This will place the unit in the MANUAL mode and enable the fan
and burner. See Heating/Ventilating/Cooling Modes and Energy Saving Modes of this
manual for more information.
UNIT AUTO MODE
The MRT control does not support the time clock, night setback, or auxiliary unit
enable functions.
MDT Controls: Modulating discharge temperature (MDT) control is the most basic AdaptAire control for
discharge temperature. The MDT control system includes a remote control panel
equipped with 1 or 2 potentiometers, 3 or more pilot lights, and up to 2 switches.
UNIT OFF MODE
Off Mode is the default unit operational mode. To place the unit in the Off Mode, rotate
the “temperature setpoint” knob on the remote control panel counterclockwise to the
stop. This will place the unit in the OFF mode and extinguish the “fan on” light. The OFF
mode prevents the unit from starting.
UNIT MANUAL MODE
Manual Mode allows the unit to turn on. To place the unit in the Manual Mode, rotate the
“temperature setpoint” knob on the remote control panel clockwise to the desired
discharge air temperature setpoint. This will place the unit in the MANUAL mode and
enable the fan and burner. See Heating/Ventilating/Cooling Modes and Energy Saving
Modes of this manual for more information.
UNIT AUTO MODE
The MDT control does not support the time clock, night setback, or auxiliary unit
enable functions.
MRT-Expert Controls: The AdaptAire MRT-Expert (modulating room temperature) control system provides full
information regarding unit operation and allows the user to adjust all operational
parameters using the BACview panel. See the Menu Selection Tree for BACview section
of this manual for more information about navigating the BACview menus.
AdaptAire units configured for MRT or MRT-Expert controls will have a fixed
discharge temperature of 70°F if the room temperature sensor is disconnected or
otherwise fails to communicate with the unit control module.
UNIT OFF MODE
Off Mode is the default unit operational mode. To place the unit in Off Mode, scroll
through the Unit Modes menu tree, locate the AUTO/OFF/MANUAL branch, and select
OFF. This will place the unit in the OFF mode. The OFF mode prevents the fan and
burner from starting. This mode will override the Time Clock and Night Setback
functions.
12
UNIT MANUAL MODE
Manual Mode allows the supply fan to turn on regardless of the Time Clock or Night
Setback functions. Heating and cooling functions use the Occupied Setpoints. To place
the unit in Manual Mode, scroll through the Unit Modes menu tree, locate the
AUTO/OFF/MANUAL branch, and select MANUAL. This will place the unit in the
MANUAL mode.
UNIT AUTO MODE
Auto Mode has four different functions that control the supply fan and unit operation.
They are a time clock function, heating and cooling night setbacks, and a signal from an
external source to an auxiliary digital input. To place the unit in Auto Mode, scroll
through the Unit Modes menu tree, locate the AUTO/OFF/MAN branch, and select
AUTO. This will place the unit in the AUTO mode. This activates the four Auto mode
functions.
Scheduling Time Clock
The primary Auto Mode function is the Time Clock Schedule. The Time Clock function
allows the user to schedule the unit’s occupied and unoccupied periods. There are four
different schedules available: 24 hour continuous operation, daily, holiday, and override.
The daily schedule can be programmed for up to 4 separate On/Off events with any
combination of days. The daily schedule sets the typical Occupied/Unoccupied times for
the unit. The holiday schedule can be programmed for up to 12 separate
Occupied/Unoccupied events with any combination of days. The holiday schedule sets
the Unoccupied times for holidays and other shutdown periods. The override schedule
can be programmed for up to 2 separate Occupied/Unoccupied events with any
combination of days. The override schedule sets the Occupied times that will override the
holiday schedule. This scheduling system allows the user to program a diverse array of
Occupied/Unoccupied operations. The AdaptAire DDC system has no preset
Occupied/Unoccupied schedule.
To set the Occupied/Unoccupied times of the unit scroll through the SCHEDULES menu
tree, and locate the desired Daily, Holiday, or Override branch. Enter the days and times
for the unit to run in Occupied mode. In the Daily or Override section these times should
correspond to the desired Occupied times for the unit’s operation. In the Holiday section
these times should correspond to the desired Unoccupied times for the unit’s operation.
For any schedule to function the Use tab must be set to yes.
To set the time clock function for 24 hour continuous operation, scroll through the
menu tree and locate the SCHEDULES page. Set the 24 Hr Operation to yes. Enter the
Daily section of the menu and set the Use tab to yes. Finally select the days for 24 hour
operation. The unit uses the Occupied setpoints in 24 hour continuous operation mode.
See the CLOCK SET section of this manual for setting the time, date and Daylight
Savings function.
The following instructions demonstrate how to set up a sample schedule using the
BACview remote. An example of a typical schedule would be to have the unit Occupied
Monday through Friday from 6:00 AM to 5:00 PM, except during the week of
Thanksgiving when the units will be Unoccupied. However they will be Occupied each
weekday during Thanksgiving week from 8:00 AM until noon while a maintenance crew
13
is in the building. The maintenance crew will come in at 5:00 AM on Friday to complete
preliminary tasks in preparation for the week. We will use this sample schedule as our
guide in programming the sample schedule. Refer to the Menu Selection Tree for
BACview section of this manual for more information about the BACview buttons,
hotkeys, and menus.
The sample schedule and instructions below are just a guide; you may skip the rest of the
Scheduling Time Clock section of this manual if you are already comfortable
programming daily, holiday, and override schedules. Simply determine when you want
the unit to operate on the Occupied and Unoccupied setpoints and set the schedule in the
BACview accordingly.
1. Use the FN + 7 hotkey to jump directly to the Schedules screen of the menu tree.
While holding the FN key, press the 7 key, and the Schedules screen will appear.
The BACview may prompt you for the User password. The default password is
0000.
2. Navigate to the Daily field and press the Enter button. The screen will show a
blank daily schedule.
3. To enable the Daily schedule, set the Use field to Yes. The Stat field indicates
whether the schedule on that screen is currently active, so you may see either ON
or OFF in this field. Navigate to the Start Time field and set the start time for
6:00 AM. Be aware that times are programmed in a 24 hour format. For example,
2:00 PM would be programmed as 14:00, which will show up on the BACview
screen as “14 : 0”.
4. Navigate to the Stop Time field and set the stop time for 5:00 PM (17:00 in the
24 hour format).
14
5. Navigate to the Days fields, making sure the cursor surrounds the first hyphen ( [
- ] ). Press the Enter button and then press the link key that corresponds to
INCR on the screen. The field will now show MON, indicating that this schedule
will be active every Monday from 6:00 AM to 5:00 PM. Repeat this process for
each of the remaining Days fields, except for SAT and SUN. Your screen should
now look like this:
6. The week of Thanksgiving for 2012 is from Sunday, November 18th
to Saturday,
November 24th
. We want the unit to operate in Occupied mode each weekday
from 8:00 AM to 12:00 PM while the maintenance crew is in the building during
that week. We will need to set up a few Holiday schedules to accomplish this.
Since the unit normally runs in the Occupied mode from 6:00 AM to 5:00 PM on
weekdays, we need to set the Unoccupied periods in the Holiday schedules. The
Unoccupied period we want to schedule then is from 6:00 AM to 8:00 AM and
12:00 PM to 5:00 PM. We will use 10 Holiday schedules to accomplish this (two
for each weekday).
7. Navigate back to the Schedules screen using the FN + 7 hotkey. Move the cursor
to select the Holiday field and press Enter. Set the start time to 6:00 AM and the
stop time to 8:00 AM. Remember, the Holiday schedules represent the period
during which the unit is to be Unoccupied. Set the Month field to 11 (November)
and the Day field to 19 (Monday, the first weekday that week). Your screen
should now look like this:
8. Press the link key corresponding to the Next field on the screen. This will take
you to Holiday Schedule 2. Set the start time for Holiday Schedule 2 to 12:00 PM
and the stop time to 5:00 PM. Set the Month field to 11 (November) and the Day
field to 19 (Monday, the first weekday that week). Your screen should now look
like this:
Repeat this step for the 20th
, 21st, 22
nd, and 23
rd (Tuesday, Wednesday, Thursday,

15
and Friday) using Holiday Schedules 3 through 10, then proceed to the next step.
9. Since the maintenance crew will be in the building at 5:00 AM on Monday, we
will need an override schedule to override part of the Holiday schedule we just
created. Navigate back to the Schedules screen using the FN + 7 hotkey. Move
the cursor to select the Override field and press Enter. Set the start time to 5:00
AM and the stop time to 8:00 AM. Remember, the Override schedules override
the Holiday schedules and represent the period during which the unit is to be
Occupied. Set the Month field to 11 (November) and the Day field to 19
(Monday, the first weekday of Thanksgiving week in 2012). Your screen should
now look like this:
10. Press the link key corresponding to the Home field on the screen to return to the
Home screen. The sample schedule is programmed and the units will
automatically switch between Occupied and Unoccupied modes based on the
daily, holiday, and override schedules.
Heating Night Setback
The Heating Night Setback function automatically cycles the unit “on” if the room
temperature falls below the Heating Setback temperature setpoint, and the unit is
scheduled to be “off”. If the unit is scheduled to be “off” and the Heating Setback
function turns the unit “on”, the unit will be cycled “off” once the room air temperature
has risen 2° above the Heating Setback setpoint. The default for this setpoint is 55°F. To
change the Heating Setback setpoint scroll through the SETPOINTS menu tree, locate the
Heating Setback setpoint and enter a new temperature. The allowable temperature range
is 40°F - 130°F.
Cooling Night Setback
The Cooling Night Setback function automatically cycles the unit “on” if the room
temperature rises above the Cooling Setback temperature setpoint and the unit is
scheduled to be “off”. If the unit is scheduled to be “off” and the Cooling Setback
function turns the unit “on”, the unit will be cycled off once the room air temperature has
fallen 2° below the Cooling Setback setpoint. This function toggles digital output DO1.
The default for this setpoint is 100°F. To change the Cooling Setback setpoint scroll
through the SETPOINTS menu tree, locate the Cooling Setback setpoint and enter a new
temperature. The allowable temperature range is 40°F - 130°F.
Auxiliary Unit Enable
The Auxiliary Unit Enable function overrides all other Auto Mode functions and
automatically cycles the unit into operation. This function is activated whenever a contact
is closed between the appropriate terminals on the unit’s terminal strip located in the
unit’s main control panel. Heating and cooling functions use the Night Setback Setpoints.
See the Typical Wiring Schematic and Multiplexed Input sections of this manual for
more information. This function can be used with a twist timer, toggle switch, door

16
switch, exhaust fan interlock, or any other dry contact to override the time clock
schedule.
MDT-Expert Controls: The AdaptAire MDT-Expert (modulating discharge temperature) control system provides
full information regarding unit operation and allows the user to adjust all operational
parameters using the BACview panel. See the Menu Selection Tree for BACview section
of this manual for more information about navigating the BACview menus.
UNIT OFF MODE
Off Mode is the default unit operational mode. To place the unit in Off Mode scroll
through the Unit Modes menu tree, locate the AUTO/OFF/MANUAL branch, and select
OFF. This will place the unit in the OFF mode. The OFF mode prevents the fan and
burner from starting. This mode will override the Time Clock function.
UNIT MANUAL MODE
Manual Mode allows the supply fan to turn on regardless of the Time Clock function. To
place the unit in Manual Mode scroll through the Unit Modes menu tree, locate the
AUTO/OFF/MANUAL branch, and select MANUAL. This will place the unit in the
MANUAL mode.
UNIT AUTO MODE
Auto Mode has two different functions that control the supply fan and unit operation.
They are a time clock function and a signal from an external source to an auxiliary digital
input. To place the unit in Auto Mode scroll through the Unit Modes menu tree, locate
the AUTO/OFF/MAN branch, and select AUTO. This will place the unit in the AUTO
mode. This activates the four Auto mode functions.
Scheduling Time Clock
The MDT-EXPERT control does not support the night setback functions.
The primary Auto Mode function is the Time Clock Schedule. The Time Clock function
allows the user to schedule the operational times of the unit. There are four different
schedules available: 24 hour continuous operation, daily, holiday, and override. The daily
schedule can be programmed for up to 4 separate On/Off events with any combination of
days. The daily schedule sets the typical operational times for the unit. The holiday
schedule can be programmed for up to 12 separate On/Off events with any combination
of days. The holiday schedule sets the Off times for holidays and other shutdown periods.
The override schedule can be programmed for up to 2 separate On/Off events with any
combination of days. The override schedule sets the On times that will override the
holiday schedule. This scheduling system allows the user to program a diverse array of
On/Off operations. The AdaptAire DDC system has no preset On/Off schedule.
To set the On/Off times of the unit scroll through the SCHEDULES menu tree, and locate
the desired Daily, Holiday, or Override branch. Enter the days and times based on the
desired schedule. In the Daily or Override section these times should correspond to the
desired On times for the unit’s operation. In the Holiday section these times should
correspond to the desired Off times for the unit’s operation. For any schedule to
function the Use tab must be set to yes.

17
To set the time clock function for 24 hour continuous operation, scroll through the
menu tree and locate the SCHEDULES page. Set the 24 Hr Operation to yes. Enter the
Daily section of the menu and set the Use tab to yes. Finally select the days for 24 hour
operation.
See the CLOCK SET section of this manual for setting the time, date and Daylight
Savings function.
The following instructions demonstrate how to set up a sample schedule using the
BACview remote. An example of a typical schedule would be to have the unit On
Monday through Friday from 6:00 AM to 5:00 PM, except during the week of
Thanksgiving when the units will be Off. However they will be On each weekday during
Thanksgiving week from 8:00 AM until noon while a maintenance crew is in the
building. The maintenance crew will come in at 5:00 AM on Friday to complete
preliminary tasks in preparation for the week. We will use this sample schedule as our
guide in programming the sample schedule. Refer to the Menu Selection Tree for
BACview section of this manual for more information about the BACview buttons,
hotkeys, and menus.
The sample schedule and instructions below are just a guide; you may skip the rest of the
Scheduling Time Clock section of this manual if you are already comfortable
programming daily, holiday, and override schedules. Simply determine when you want
the unit to operate on the Occupied and Unoccupied setpoints and set the schedule in the
BACview accordingly.
1. Use the FN + 7 hotkey to jump directly to the Schedules screen of the menu tree.
While holding the FN key, press the 7 key, and the Schedules screen will appear.
The BACview may prompt you for the User password. The default password is
0000.
2. Navigate to the Daily field and press the Enter button. The screen will show a
blank daily schedule.

18
3. To enable the Daily schedule, set the Use field to Yes. The Stat field indicates
whether the schedule on that screen is currently active, so you may see either ON
or OFF in this field. Navigate to the Start Time field and set the start time for
6:00 AM. Be aware that times are programmed in a 24 hour format. For example,
2:00 PM would be programmed as 14:00, which will show up on the BACview
screen as “14 : 0”.
4. Navigate to the Stop Time field and set the stop time for 5:00 PM (17:00 in the
24 hour format).
5. Navigate to the Days fields, making sure the cursor surrounds the first hyphen ( [
- ] ). Press the Enter button and then press the link key that corresponds to
INCR on the screen. The field will now show MON, indicating that this schedule
will be active every Monday from 6:00 AM to 5:00 PM. Repeat this process for
each of the remaining Days fields, except for SAT and SUN. Your screen should
now look like this:
6. The week of Thanksgiving for 2012 is from Sunday, November 18th
to Saturday,
November 24th
. We want the unit to be On each weekday from 8:00 AM to 12:00
PM while the maintenance crew is in the building during that week. We will need
to set up a few Holiday schedules to accomplish this. Since the unit is normally
On from 6:00 AM to 5:00 PM on weekdays, we need to set the Off periods in the
Holiday schedules. The Off period we want to schedule then is from 6:00 AM to
8:00 AM and 12:00 PM to 5:00 PM. We will use 10 Holiday schedules to
accomplish this (two for each weekday).
7. Navigate back to the Schedules screen using the FN + 7 hotkey. Move the cursor
to select the Holiday field and press Enter. Set the start time to 6:00 AM and the
stop time to 8:00 AM. Remember, the Holiday schedules represent the period
during which the unit is to be Off. Set the Month field to 11 (November) and the
Day field to 19 (Monday, the first weekday that week). Your screen should now
look like this:

19
8. Press the link key corresponding to the Next field on the screen. This will take
you to Holiday Schedule 2. Set the start time for Holiday Schedule 2 to 12:00 PM
and the stop time to 5:00 PM. Set the Month field to 11 (November) and the Day
field to 19 (Monday, the first weekday that week). Your screen should now look
like this:
Repeat this step for the 20th
, 21st, 22
nd, and 23
rd (Tuesday, Wednesday, Thursday,
and Friday) using Holiday Schedules 3 through 10, then proceed to the next step.
9. Since the maintenance crew will be in the building at 5:00 AM on Monday, we
will need an override schedule to override part of the Holiday schedule we just
created. Navigate back to the Schedules screen using the FN + 7 hotkey. Move
the cursor to select the Override field and press Enter. Set the start time to 5:00
AM and the stop time to 8:00 AM. Remember, the Override schedules override
the Holiday schedules and represent the period during which the unit is to be On.
Set the Month field to 11 (November) and the Day field to 19 (Monday, the first
weekday of Thanksgiving week in 2012). Your screen should now look like this:
10. Press the link key corresponding to the Home field on the screen to return to the
Home screen. The sample schedule is programmed and the units will
automatically switch between On and Off modes based on the daily, holiday, and
override schedules.
Auxiliary Unit Enable
The Auxiliary Unit Enable function overrides the time clock function and automatically
cycles the unit into operation. This function is activated whenever a contact is closed
between the appropriate terminals on the unit’s terminal strip located in the unit’s main
control panel. See the Typical Wiring Schematic and Multiplexed Input sections of this
manual for more information. This function can be used with a twist timer, toggle switch,
door switch, exhaust fan interlock, or any other dry contact to override the time clock
schedule.

20
Heating/Ventilating/Cooling Operating
Modes
The AdaptAire DDC controller automatically switches between the heating, ventilating
and cooling modes of operation. The previous sections described the Heating and
Cooling Setback operation. This section concentrates primarily on the Occupied
operating modes. Figures 1 and 2 provide a pictorial representation of the slight
differences between the occupied and unoccupied periods.
Heating Mode Depending on the control type, the Occupied Heating Mode allows the burner to operate
as needed and is activated whenever the room or outside air temperature is 2°F below the
heating setpoint. During the Unoccupied Heating Mode, the burner is activated whenever
the room or outside air temperature is at the heating setpoint and is deactivated 2°F above
the heating setpoint.
MDT and MDT-Expert control systems do not require a room sensor. As such, one
is not provided for units that ship from the factory configured for either of these
control systems.
General Burner Control
In the Heating Mode the burner will modulate to maintain a constant temperature.
To change the desired heating discharge or room temperature of an MDT or MRT control
system, rotate the temperature setpoint knob on the remote control panel clockwise to the
desired temperature. The allowable temperature range is 55°F - 90°F.
AdaptAire units configured for MRT or MRT-Expert controls will have a fixed
discharge temperature of 70°F if the room temperature sensor is disconnected or
otherwise fails to communicate with the unit control module.
To change the desired heating room temperature of an MRT-Expert control system, scroll
through the SETPOINTS menu tree using the BACview, locate the Occupied Heating
Setpoint, and enter a new temperature. The allowable temperature range is 40°F - 130°F.
The burner will modulate using a PID loop to maintain this temperature.
To change the desired heating discharge temperature of a MDT-Expert control system,
scroll through the SETPOINTS menu tree using the BACview, locate the OA for Htg/Clg
Changeover Setpoint, and enter the desired temperature. The allowable temperature range
is 40°F - 130°F. Next scroll through the SETPOINTS menu tree using the BACview,
locate the Discharge Heating Setpoint, and enter a new temperature. The allowable
temperature range is 40°F - 130°F. The burner will modulate using a PID loop to
maintain this temperature.
Additionally, on all controls systems except the MDT and MDT-EXPERT the control
system modulates the burner to maintain the supply air temperature within a defined
operating window. This window defines the maximum and minimum discharge
temperatures.

21
To change the desired minimum supply or discharge air temperature scroll through the
SETPOINTS menu tree, locate the HTG MIN DA Setpoint, and enter a new temperature.
This temperature must not be greater than the HTG MAX DA Setpoint. The allowable
temperature range is 40°F - 130°F. This sets the lowest discharge air temperature that will
leave the unit.
To change the desired maximum supply or discharge air temperature scroll through the
SETPOINTS menu tree, locate the HTG MAX DA Setpoint, and enter a new
temperature. This temperature must not be less than the HTG MIN DA Setpoint. The
allowable temperature range is 40°F - 130°F. This sets the highest discharge air
temperature that will leave the unit.
If the maximum and minimum discharge temperature setpoints are set for the same
temperature, the supply air temperature will be the same as the setpoint regardless of the
room temperature setpoint or actual room temperature.
Recirculating Direct-Fired Heaters
Using different controller software, the AdaptAire DDC system can accommodate three
distinct types of recirculating direct-fired units: those that return air before the burner and
employ a special airflow station, those that return air before the burner and do not employ
a special airflow station, and those that recirculate air after the burner. Recirculating
direct-fired units, like all direct-fired units, deliver all of their products of combustion
directly to the heated air space. For this reason it is extremely important that the proper
ventilation rate be maintained to dilute these emissions.
AdaptAire units, that recirculate air before the burner and employ an airflow measuring
station, utilize a control scheme that measures air pressure to determine the ratio of
outside air and return air. These units are listed by an independent third party testing
agency and use the equivalent temperature rise control scheme to limit burner
modulation. The AdaptAire system accurately measures the ratio of outside and return
air, calculates the allowable equivalent temperature rise and automatically limits the
burners firing rate. This insures the products of combustion, delivered to the space by the
unit, are held at or below allowable OSHA thresholds. The outside air percentage is the
driving parameter for this function. A greater percentage of outside air or dilution air
enables the unit to generate a higher allowable equivalent temperature rise. The
maximum allowable equivalent temperature rise for 20% outside air is 48.9°F. The
maximum allowable equivalent temperature rise increases 1.22°F for each 1% increase in
outside air.
AdaptAire units, that recirculate air before the burner and do not employ an airflow
measuring station, utilize a control scheme that measures damper position to determine
the percentage of return air. These units are not listed by an independent third party
testing agency but do use the equivalent temperature rise control scheme to limit burner
modulation. The maximum allowable equivalent temperature rise for 20% outside air is
48.9°F. The maximum allowable equivalent temperature rise increases 1.22°F for each
1% increase in outside air.
For AdaptAire units that recirculate air before the burner and use the MDT or
MDT-Expert control, the maximum burner firing rate is limited by the discharge
setpoint or the maximum allowable equivalent temperature rise whichever is less.

22
AdaptAire units that recirculate air after the burner are physically constrained to limit the
percentage of return air. These constraints are meant to provide the proper dilution air.
These units are not listed by an independent third party testing agency and do not use the
equivalent temperature rise control scheme to limit burner modulation.
In order of lowest to greatest priority the burner modulation parameters are: room
temperature, discharge or supply air temperature, and equivalent temperature rise.
There are three Energy Savings modes that could disable the burner.
Energy Savings Mode 1 Mixing Box Recirculating Units
Energy Savings Mode 1 will automatically disable the burner if the mixed air temperature
is equal to or greater than the minimum discharge air temperature setpoint, and the room
air temperature is 5°F above the room air temperature setpoint. This function is intended
to restrain the room temperature from rising uncontrollably in buildings with internal heat
gain. In certain conditions it may be necessary to readjust the minimum discharge air or
room temperature setpoint upward or adjust the outside/return air ratio to provide a
warmer supply air temperature.
Energy Savings Mode 1 Non-Recirculating Units
Energy Savings Mode 1 will automatically disable the burner if the outside air
temperature is equal to or greater than the minimum discharge air temperature setpoint,
and the room air temperature is 5°F above the room air temperature setpoint. This
function is intended to restrain the room temperature from rising uncontrollably in
buildings with internal heat gain. In certain conditions it may be necessary to readjust the
minimum discharge air or room temperature setpoint upward to provide a warmer supply
air temperature.
Energy Savings Mode 2 Mixing Box Recirculating Direct-Fired Units
Energy Savings Mode 2 will automatically disable the burner if the burner’s minimum
firing rate exceeds the allowable equivalent temperature rise. This condition is unlikely to
occur unless the burner’s minimum firing rate is misadjusted and set too high, or the inlet
air opening is restricted.
Energy Savings Mode 3
Energy Savings Mode 3 will automatically disable the burner if the outside air
temperature is above the Heating Economizer setpoint. This function is similar to an inlet
duct thermostat. The burner will cycle back on if the supply air temperature drops 3°F
below the Heating Economizer setpoint.
To change the desired heating economizer temperature scroll through the SETPOINTS
menu tree, locate the HEATING ECONOMIZER Setpoint, and enter a new temperature.
The default for this setpoint is 65°F. The allowable temperature range is 40°F - 130°F.
Ventilation Mode Ventilation Mode occurs when the fan is running but the unit is not providing heating or
cooling.
The ventilation mode is dependent on the room (MRT and MRT-Expert) or outside air
(MDT and MDT-Expert) temperature. The heating/ventilation/cooling operation is

23
demonstrated below. The dotted line in the middle of the diagram represents the change
between room temperature rise and room temperature fall. Select a point on the heavy
line in the diagrams on the following pages to determine the mode of operation.
Figure 2 Unoccupied Example: (except MDT and MDT-Expert): Start at point
“A”. The unit is off, because neither heating nor cooling is required, and the room
temperature is rising. Follow the dashed line upward. If the room temperature
rises to the cooling setpoint, the fan and cooling will be enabled, and the unit will
be in the cooling mode. Follow the solid line clockwise. Once the room
temperature has fallen to a temperature that is 2°F below the cooling setpoint, the
cooling and fan will be disabled. Follow the dashed line downward. If the room
temperature falls to the heating setpoint, the fan and heating will be enabled, and
the unit will be in the heating mode. Continue following the solid line in a
clockwise direction to the heating setpoint. Once the room temperature rises to a
temperature that is 2°F above the heating setpoint, the heating and fan will be
disabled.
Figure 2
+2°F of heating SP
heating disable
Heating
mode
cooling SP
cooling enable
Fan off
T
E
M
P
E
R
A
T
U
R
E
R
I
S
E
-2°F of cooling SP
cooling disable
heating SP
heating enable
Fan off
Cooling
mode
Heating
mode
Cooling
mode
T
E
M
P
E
R
A
T
U
R
E
F
A
L
L
Heating mode
Cooling mode
A

24
Figure 3 Occupied Example (except MDT and MDT-Expert): Start at point “A”.
The unit is in the ventilation mode and the room or outside air temperature is
rising. Follow the dashed line upward. If the room or outside air temperature rises
to a temperature that is 2°F over the cooling setpoint, the cooling will be enabled,
and the unit will be in the cooling mode. Follow the solid line clockwise. Once
the room or outside air temperature has fallen to the cooling setpoint, the cooling
mode will be disabled, and the unit will be in the ventilation mode. Follow the
dashed line downward. If the room or outside air temperature falls to a
temperature that is 2°F below the heating setpoint, the heating will be enabled,
and the unit will be in the heating mode. Continue following the solid line in a
clockwise direction to the heating setpoint. Once the room or outside air
temperature rises to the heating setpoint, the heating mode will be disabled, and
the unit will be in the ventilation mode.
Figure 3
heating SP
Heating
mode
+2°F of cooling SP
cooling enable
Ventilation
mode
T
E
M
P
E
R
A
T
U
R
E
R
I
S
E
cooling SP
-2°F of heating SP
heating enable
Ventilation
mode
Cooling
mode
Heating
mode
Cooling
mode
T
E
M
P
E
R
A
T
U
R
E
F
A
L
L
Heating mode
Cooling mode
A

25
Cooling Mode
General Cooling Control
Depending on the control type, the Occupied Cooling Mode allows the cooling to operate
as needed and is activated whenever the room or outside air temperature is 2° above the
cooling setpoint. During the Unoccupied Cooling Mode, the cooling is activated
whenever the room or outside air temperature is at the cooling setpoint and is deactivated
2°F below the cooling setpoint. In the Cooling Mode the cooling output will cycle to
maintain a constant room temperature. The cooling outputs are protected by an anti-cycle
timer which has a 3 minute off / 3 minute on delay. Additionally, the fan is required to be
running before any cooling outputs are enabled.
To change the desired cooling temperature of an MDT or MRT control system, rotate the
temperature setpoint knob on the remote control panel clockwise to the desired
temperature. The allowable temperature range is 55°F - 90°F. The cooling will be
disabled when the temperature drops to the Cooling Setpoint.
To change the desired cooling room temperature of an MRT-Expert control system, scroll
through the SETPOINTS menu tree using the BACview, locate the Occupied Cooling
Setpoint, and enter a new temperature. The allowable temperature range is 40°F - 130°F.
Additionally, on all controls systems except the MDT and MDT-EXPERT the control
system cycles the cooling output to maintain the supply air temperature within a defined
operating window. This window defines the maximum and minimum discharge
temperatures.
To change the desired minimum supply or discharge air temperature scroll through the
SETPOINTS menu tree, locate the CLG MIN DA Setpoint, and enter a new temperature.
This temperature must not be greater than the CLG MAX DA Setpoint. The allowable
temperature range is 40°F - 130°F. This sets the lowest discharge air temperature that will
leave the unit.
To change the desired maximum supply or discharge air temperature scroll through the
SETPOINTS menu tree, locate the CLG MAX DA Setpoint, and enter a new
temperature. This temperature must not be less than the CLG MIN DA Setpoint. The
allowable temperature range is 40°F - 130°F. This sets the highest discharge air
temperature that will leave the unit.
If the maximum and minimum discharge temperature setpoints are set too closely
together, the condenser may cycle excessively.
Energy Savings Mode 4
Energy Savings Mode 4 will automatically disable the cooling if the outside air
temperature is below the Cooling Economizer setpoint. This function is similar to an inlet
duct thermostat. The cooling will cycle back on if the outside air temperature rises 3°F
above the Cooling Economizer setpoint.
To change the desired cooling economizer temperature scroll through the SETPOINTS
menu tree, locate the COOLING ECONOMIZER Setpoint, and enter a new temperature.
The default for this setpoint is 55°F. The allowable temperature range is 40°F - 130°F.

26
Damper Control Modes
There are four different modes that control the unit damper operation: Manual, Mixed Air
Temperature, Building Pressure, and 100% Outside Air. Except for the 100% Outside Air
mode, these operating modes are selected through the menu tree of the BACview or PC.
Not all damper modes are available on all units.
The sequence described in the following paragraph overrides manual, mixed air
temperature, and building pressure control modes during the Unoccupied period of
Auto mode. It does not override the 100% outside air function.
Outside air dampers will remain in the fully closed position during the Unoccupied
period of Auto mode unless a minimum percentage of outside air (20% or 25%) is
required for ventilation as described in the following paragraphs of this section of the
manual.
Manual Mode Manual Mode is the default damper operational mode. This will set the outside air
damper to a fixed position.
MRT and MDT Controls
To place the damper operation in Manual Mode on an MDT or MRT control system be
sure the appropriate terminals in the unit control panel are not shorted. See the Typical
Wiring Schematic and Multiplexed Input sections of this manual for more information.
Rotate the damper control knob on the remote control panel to the desired percentage of
outside air.
If the unit served by this control is a direct-fired heater, that recirculates air before the
burner, and is operating in the heating mode, the unit will automatically keep the
minimum outside air at 20%. If the outside air drops below 20%, the burner will cycle
off. See Minimum Ventilation.
If the unit served by this control is a direct-fired heater, that recirculates air after the
burner, it is designed to provide a minimum of 25% outside air. Therefore the damper
control knob on the remote control panel has no effect below 25%. See Minimum
Ventilation.
MRT-Expert and MDT-Expert Controls
To place the damper operation in Manual Mode on an MRT-Expert or MDT-Expert
control system scroll through the menu tree, locate the Damper Mode branch and select
Manual Pos. Next, scroll through the menu tree, locate the Setpoints branch, select Man
Vent SP, and enter the desired damper position. The allowable range is 0% to 100%. If
the unit served by this control is a direct-fired heater that recirculates air after the burner,
the unit is designed to provide a minimum of 25% outside air. If the unit served by this
control is a direct-fired heater, that recirculates air before the burner, and is operating in
the heating mode, the unit will automatically keep the minimum outside air at 20%. If the
outside air drops below 20%, the burner will cycle off. See Minimum Ventilation.

27
Mixed Air Temperature Mode The Mixed Air Temperature mode varies the percentages of outside air and return air to
maintain a constant mixed air temperature. The AdaptAire controller computes the mixed
air temperature using the outside air and return air temperatures and the ratio of their
respective airflows. Direct fired units that recirculate after the burner do not have mixed
air temperature control.
MRT Control
To place the damper operation in Mixed Air Temperature Mode on an MRT control
system be sure the appropriate terminals in the unit control panel are shorted. See the
Typical Wiring Schematic and Multiplexed Input sections of this manual for more
information. Rotate the damper control knob on the remote control panel to the desired
mixed air temperature. The allowable range is 55°F - 90°F. If the unit served by this
control is a direct-fired heater, that recirculates air before the burner, and is operating in
the heating mode, the unit will automatically keep the minimum outside air at 20%. If the
outside air drops below 20%, the burner will cycle off. See Minimum Ventilation.
MRT-Expert Control
To place the damper operation in Mixed Air Temperature Mode on and MRT-Expert
control system scroll through the menu tree, locate the Damper Mode branch and select
MA Temp Ctrl. Next, scroll through the menu tree, locate the Setpoints branch, select
Mixed Air, and enter the desired temperature. The allowable range is 30°F - 90°F. If the
unit served by this control is a direct-fired heater, that recirculates air before the burner,
and is operating in the heating mode, the unit will automatically keep the minimum
outside air at 20%. If the outside air drops below 20%, the burner will cycle off. See
Minimum Ventilation.
MDT and MDT-Expert Controls
The MDT and MDT-Expert control systems do not support mixed air temperature control
mode.
Building Pressure Mode The Building Pressure mode varies the percentages of outside air and return air to
maintain a constant pressure within the space. A pressure transducer compares the
pressure outside the space to the pressure inside the space and transmits a corresponding
signal to the AdaptAire controller. The controller compares this signal to the desired
building pressure setpoint and uses a PID loop to modulate the outside air and return air
dampers to maintain the specified building pressure.
MRT and MDT Controls
The MRT and MDT control systems do not support building pressure control mode.
MRT-Expert and MDT-Expert Controls
To place the damper operation in Building Pressure Mode on an MRT-Expert or MDT-
Expert control system scroll through the menu tree, locate the Damper Mode branch and
select Bldg Pres Ctrl. Next, scroll through the menu tree, locate the Setpoints branch,
select Bldg Pres, and enter the desired pressure. The allowable range is –0.05”wc to
+0.05”wc. If the unit served by this control is a direct-fired heater, that recirculates air
before the burner, and is operating in the heating mode, the unit will automatically keep
28
the minimum outside air at 20%. If the outside air drops below 20%, the burner will cycle
off. See Minimum Ventilation.
100% Outside Air
The 100% Outside Air function automatically opens the outside air dampers and closes
the return air dampers. This function is activated whenever a contact is closed between
the appropriate terminals on the unit’s terminal strip located in the unit’s main control
panel. See the Typical Wiring Schematic and Multiplexed Input sections of this manual
for more information. The 100% Outside Air function overrides all other damper
control functions. See User Configured PID Control for use with non-recirculating
units.
Minimum Ventilation
To change the Minimum Ventilation requires the use of a BACview or PC. The Minimum
Ventilation function defines the minimum outside air percentage and automatically
prevents the dampers from modulating below this point. This function can be used in
heating or cooling mode. If the unit served by this control is a direct-fired heater that
recirculates air before the burner, and is operating in the heating mode, the unit will
automatically keep the minimum outside air at 20%. If the outside air drops below 20%,
the burner will cycle off. To specify the Minimum Ventilation scroll through the menu
tree, locate the Setpoints branch and select Min Vent, and enter the desired outside air
percentage. The allowable range is 0% - 100% outside air. By physical design direct-fired
heaters, that recirculate air after the burner, supply a minimum of 25% outside air.
Freezestat
The Freezestat function automatically cycles the unit off if the supply air temperature
drops below the Freezestat setpoint for 3 continuous minutes. On all units there is an
initial 8-minute delay prior activation. The Freezestat function prevents the unit from
starting. The default for this setpoint is 45°F. To change the Freezestat setpoint scroll
through the menu tree, locate the Setpoints branch, select Freezestat SP, and enter a new
temperature. The allowable temperature range is 35°F - 80°F.
Clogged Filter
An optional clogged filter switch is required for this function. The Clogged Filter
function automatically notifies the user of a dirty filter condition. A Clogged Filter
indication will appear on the BACview. This function is activated whenever a contact is
closed between the appropriate terminals on the unit’s terminal strip located in the unit’s
main control panel. See the Typical Wiring Schematic and Multiplexed Input sections of
this manual for more information.
User Configured PID Control
This function is applicable to units without modulating return air dampers only. The User
Configured PID Control function allows the user to control an analog output based on a
user defined analog input and setpoint. See the Typical Wiring and Unit Controller
Specification sections of this manual for more information regarding the inputs and
outputs. This function also allows the user to select the PID type (direct or reverse acting)

29
and establish upper and lower control limits. Five keypad entries define the operational
parameters. These parameters are: User Control Setpoint, Minimum User Setpoint,
Maximum User Setpoint, Low Input Value, and High Input Value. The low and high
input values describe the input transducer range. The control setpoint is the primary
operational parameter while the minimum and maximum setpoints describe the extents of
the desired operating range and provide secondary control as described below. The
allowable range for all of these parameters is –9999.99 - +9999.99.
The analog input and output are polarity sensitive and can be configured for different
types of inputs. See the Typical Wiring and Unit Controller Specification sections of this
manual for more information regarding the inputs and outputs.
The analog input must be connected to IN-2. This input must be configured for either of
two different types of input signals:
0-5Vdc: The output impedance must not exceed 10KΩ. The input impedance of
the controller is 1MΩ. This input is polarity sensitive. Be sure the connections
from the source are correctly polarized at the controller.
Thermistor: Precon type 2 (10k ohm at 77°F) Input voltages should range
between 0.489V and 3.825V. See the wiring diagrams for recirculating model
units for typical connections of transducers.
The IN-2 configuration jumpers on the controller must be set for the
appropriate input signal.
A contact closure between the appropriate terminals on the unit’s terminal strip
located in the unit’s main control panel will drive the output to 100%. See the
Typical Wiring Schematic and Multiplexed Input sections of this manual for more
information.
Direct Acting The controller output is modulated by a PID loop from 0% to 100% based on the User
Control setpoint and the input signal. As the input signal increases the output voltage
increases. Additionally, a secondary control acts to override the PID loop to scale the
output as follows.
If the input variable equals the User Control setpoint, the output will be determined by
the PID loop. In this situation the override has no effect on the output value.
If the input variable is above the User Control setpoint, the output could increase from
0% to 100% as the input variable increases from the User Control setpoint to the Max
User setpoint. In this situation the output value is the greater of the PID output or the
override output.
If the input variable is below the User Control setpoint, the output could decrease from
100% to 0% as the input variable decreases from the User Control setpoint to the Min
User setpoint. In this situation the output value is the lesser of the PID output or the
override output. See the following example.

30
Assume the user wishes to control a chilled water valve using a temperature transducer.
The control variable will be supply air temperature. As the supply air temperature
increases, the chilled water valve should open to lower the temperature. The temperature
transducer has a range of 50ºF - 85ºF. The user would like the supply air temperature to
be 75ºF but does not want it to drop below 70ºF or go above 80ºF. The parameters
entered on the keypad display will be:
PID Select Direct (as input increases output increases)
High Input Val 85ºF
Low Input Val 50ºF
User Ctrl SP 75ºF
Max User SP 80ºF
Min User SP 70ºF
The temperature transducer senses the supply air temperature and sends a corresponding
signal to the AdaptAire controller. The controller compares this signal to the desired user
control setpoint (75ºF) and uses the PID loop to modulate the output from 0-100% (0-
10Vdc). The output is connected to the chilled water valve that opens or closes to
maintain the specified supply air temperature.
If the supply air temperature is 75ºF, the output from the controller will be determined by
the PID control sequence, and the override will have no effect on the output.
If the supply air temperature is more than 75ºF, the output from the controller will be
determined by the PID control sequence or the override whichever is less.
If the supply air temperature is less than 75ºF, the output from the controller will be
determined by the PID control sequence or the override whichever is more.
80ºF 100%
override scaler
75ºF 0%
Max User SP
75ºF PID 0-100%
Min User SP
User Ctrl SP > = <
0-100% Output
75ºF 100%
override scaler
70ºF 0%
Input > 75ºF?
Input < 75ºF?

31
Reverse Acting The controller output AO-1 is modulated by a PID loop from 0% to 100% based on the
User Control setpoint and the input signal to IN-2. As the input signal increases the
output voltage decreases. Additionally, a secondary control acts to override the PID loop
to scale the output as follows.
If the input variable equals the User Control setpoint, the output will be determined by
the PID loop. In this situation the override has no effect on the output value.
If the input variable is above the User Control setpoint, the output could decrease from
100% to 0% as the input variable increases from the User Control setpoint to the Max
User setpoint. In this situation the output value is the lesser of the PID output or the
override output.
If the input variable is below the User Control setpoint, the output could increase from
0% to 100% as the input variable decreases from the User Control setpoint to the Min
User setpoint. In this situation the output value is the greater of the PID output or the
override output. See the following example.
Assume the user wishes to control the fan speed using a variable frequency drive (VFD).
The VFD input is 0-10Vdc. The control variable will be building pressure. As the
building pressure increases, the fan speed should decrease. The building pressure
transducer has a range of –0.1” to +0.1”. The user would like the building pressure to be
+0.03” but does not want it to drop below 0.0” or go above +0.05”. The parameters
entered on the keypad display will be:
PID Select Reverse (as input increases output decreases)
High Input Val 0.10
Low Input Val -0.10
User Ctrl SP 0.03
Max User SP 0.05
Min User SP 0.00
.05” 0%
override scaler
.03” 100%
Max User SP
.03” PID 0-100%
Min User SP
User Ctrl SP > = <
0-100% Output
.03” 0%
override scaler
.00” 100%
Input > .03”?
Input < .03”?
32
The pressure transducer compares the pressure outside the space to the pressure inside the
space and transmits a corresponding signal to the AdaptAire controller. The controller
compares this signal to the desired user control setpoint (0.03”) and uses the PID loop to
modulate the output from 0-100% (0-10Vdc). The output is connected to the VFD that
changes speed to maintain the specified building pressure.
If the building pressure is 0.03”, the output from the controller will be determined by the
PID control sequence, and the override will have no effect on the output.
If the building pressure is more than 0.03”, the output from the controller will be
determined by the PID control sequence or the override whichever is less.
If the building pressure is less than 0.03”, the output from the controller will be
determined by the PID control sequence or the override whichever is more.
Unit Resets
This section should assist the user in resetting alarms and cycle counters which have been
displayed on the BACview.
ALARM There are two methods that can be used to reset alarms on an MRT or MDT system. The
first is to remove the green screw terminal connector that has eight screw terminals on the
left-hand side of the unit control module. See Figure 4 below. This connector corresponds
to IN-1, IN-2, IN-3, IN-4, and their respective grounds. The plastic connector can be
removed directly from the side of the module without having to disconnect individual
wires from the screw terminal connector. Leave the connector disconnected for three
seconds before plugging it back into the controller. Do not leave the connector
disconnected for longer than three seconds.
Figure 4
The second method is to turn off the unit’s main disconnect switch. All active alarms will
be cleared. However, an alarm will regenerate if the alarm condition that triggered it is

33
still present after power is restored, no matter which method was used to reset the alarms.
For example, if the Room Sensor Failure alarm is active when the alarms are reset but the
unit is still configured for MRT control and the room sensor is disconnected, the Room
Sensor Failure alarm will regenerate.
To reset an alarm on an MRT-Expert or MDT-Expert system, scroll through the menu
tree, locate the Unit Resets branch and select Alarm. Press the Enter key. The word OFF
should flash. Now press the INC key and the word ON should flash on the display. Press
the Enter key again and ON should stop flashing. Repeat this process so the word OFF is
displayed and not flashing. The alarm has now been cleared and the Alarm RS function
has been rearmed. See the Menu Selection Tree for BACview section of this manual for
more information about navigating the BACview menus.
Always change the Alarm Reset parameter to OFF after resetting the alarms.
If the Alarms Reset parameter was left in the ON state continuously, the alarms can still
trigger on alarm conditions, however, to reset the alarms from this state you must move
change the Alarm Reset parameter to OFF, then ON, then OFF again. Otherwise, the
alarms will not reset and you will not be alerted if an alarm that was previously triggered
happens to trigger again during the period the alarm remained active.
A history of alarms can be viewed on the Alarms screen of the BACview. To view the
alarms history, locate the Alarms page in the BACview menu tree. The alarms history
shows active alarms, alarms that have returned to normal, and manually cleared alarms.
CALIBRATE The Calibrate function forces the controller to recalibrate the return air flow station. The
recalibration will occur immediately if the fan is running or at the next fan start. To
recalibrate scroll through the menu tree, locate the Unit Resets branch and select
Calibrate. Press the Enter key. The word OFF should flash. Now press the INC key and
the word ON should flash on the display. Press the Enter key again and ON should stop
flashing. Repeat this process so the word OFF is displayed and not flashing. The
calibration has now been initiated and the Calibration function has been rearmed.
The Calibrate function will occur automatically each day. At 3:00 AM a flag is set within
the controller. This flag instructs the controller to recalibrate the return air flow station
immediately if the fan is running or at the next fan start.
FAN COUNT Fan Count records each fan start. To reset a fan count scroll through the menu tree, locate
the Unit Resets branch and select Fan Count. Press the Enter key. The word OFF should
flash. Now press the INC key and the word ON should flash on the display. Press the
Enter key again and ON should stop flashing. Repeat this process so the word OFF is
displayed and not flashing. The fan count has now been cleared and the Fan Count
function has been rearmed.
HEATING COUNT Heating Count records each burner start. To reset a heating count scroll through the menu
tree, locate the Unit Resets branch and select Heating Count. Press the Enter key. The

34
word OFF should flash. Now press the INC key and the word ON should flash on the
display. Press the Enter key again and ON should stop flashing. Repeat this process so
the word OFF is displayed and not flashing. The heating count has now been cleared and
the Heating Count function has been rearmed.
COOLING COUNT Cooling Count records each cooling start. To reset a cooling count scroll through the
menu tree, locate the Unit Resets branch and select Cooling Count. Press the Enter key.
The word OFF should flash. Now press the INC key and the word ON should flash on the
display. Press the Enter key again and ON should stop flashing. Repeat this process so
the word OFF is displayed and not flashing. The cooling count has now been cleared and
the Cooling Count function has been rearmed.
Multiplexed Inputs
DDC controllers are designed with a finite number of inputs and outputs. Multiplexing
expands the functionality of the controller by allowing multiple devices to effectively
share the same input. This is usually accomplished by connecting resistors, either in a
series or parallel configuration, to an analog input. A switch is used in conjunction with
each resistor. When a switch is closed, the resistance at the controller input changes. This
allows the controller to identify which switch has closed. The controller is programmed
to associate each different resistance with a specific function. For example when the
optional clogged filter switch is closed between the appropriate terminals on the unit’s
terminal strip located in the unit’s main control panel, this tells the controller that the
filters are clogged, and it notifies the user through the BACview. See the table below for a
complete list of inputs in the multiplexed circuits and how their open and closed states
relate to the resistance in the circuit and the voltage at controller inputs IN-3 and IN-4.
RESISTOR VALUE RESISTOR ID SWITCH CLOSED OHMS IN CIRCUIT ZN 583 VOLTS DC
1000 RS1 RS1,2,3,4 0 0
2000 RS2 RS2,3,4 1000 0.30
4020 RS3 RS1,3,4 2000 0.55
8060 RS4 RS3,4 3000 0.76
MULTIPLEXED VOLTAGE VALUES
RS1,2,4 4020 0.95
RS2,4 5020 1.10
RS1,4 6020 1.24
RS4 7020 1.36
RS1,2,3 8060 1.47
RS2,3 9060 1.57
RS1,3 10060 1.65
RS3 11060 1.73
RS1,2 12080 1.80
RS2 13080 1.87
RS1 14080 1.92
NONE 15080 1.98
UNPLUGGED NA 3.30
IN-3 JUMPER RS-04 MIXED AIR TEMP
RE-56 RS-03 SAFETY CKT STATUS RE-09 RS-02 FLAME FAILURE SW-72 RS-01 100% OA or 100% OUTPUT
IN-4 RE-27 RS-04 BURNER STATUS
RE-65 RS-03 FAN STATUS RE-12 RS-02 CLOGGED FILTER SW-09 RS-01 AUXILIARY UNIT ENABLE

35
Clock Set
The Clock Set function is used to set the current time and date as well as enabling
Daylight Saving Time. To set the clock scroll through the menu tree, locate the Clockset
branch, select Date, and enter a new date and time. Select DST to enable Daylight Saving
Time. Daylight Saving Time is the default. For your convenience Daylight Saving Time
has been preprogrammed for the next several years. To reset the starting and ending DST
dates scroll through the DST menu tree, locate the desired year, and enter a new date. If
your area does not subscribe to Daylight Saving Time, set the AMOUNT value to
000.
Diagnostics – Critical Alarm Codes
This section should assist the user in troubleshooting critical alarm codes messages that
have been displayed on the BACview. These alarms almost always require the operator to
correct the condition and reset the alarm before normal unit operation resumes.
Exceptions to this rule are noted in the alarm problem descriptions that follow.
ALARM CODE: Low Discharge Temperature PROBLEM: The controller has detected a low temperature at the fan outlet and
has shut off the unit. See Freezestat section of this manual.
SOLUTION: If burner was operating prior to shutdown (check prior alarm log)
1. Is the outside air (OA Temp) or room air (Room Temp) displayed on the
BACview remote, reading 150°F or more?
a. Yes. That sensor circuit or the sensor itself is shorted. Unplug the input
jack from the AdaptAire controller. Did the display change to -40°F or
less?
1) No. There is a short in the controller input. Replace the
controller.
2) Yes. Disconnect the sensor wiring at the sensor. Connect an
ohmmeter to the sensor. If it is shorted replace the sensor. At
77°F the resistance should be 10KΩ. See thermistor output
curve for other temperatures. If it is not shorted, there is a short
in the wiring between the sensor and the input plug. Determine
cause and rectify. Refer to Appendix I for a typical 10KΩ
thermistor output curve.
b. No. Continue.
2. Is the discharge air temperature (DA Temp), displayed on the BACview
remote, reading -40°F or less?
a. Yes. That sensor circuit or the sensor itself is open. Jumper the input
for the sensor. Did the display change to 150°F or more?
1) No. There is an open in the controller input. Replace the
controller.
2) Yes. Disconnect the sensor wiring at the sensor. Connect an
ohmmeter to the sensor. If it is open replace the sensor. At
77°F the resistance should be 10KΩ. See thermistor output
curve for other temperatures. If it is not open, there is a break
in the wiring between the sensor and the input plug. Determine
cause and rectify.
b. No. Continue

36
3. Reset the alarm. Check and note the DC voltage at output for the gas valve
modulation. Set the Heating Setpoint for 130°F. Set the MAX DAT and MIN
DAT Setpoints for 130°F. Did the Burner VDC, displayed on the BACview
remote, increase?
a. No. Unless the outside air temperature is extremely warm the Burner
VDC should have increased to 7.5VDC or more. Close the manual
main gas valve closest to the burner and measure the discharge air
temperature. Is it less than 130°F?
1) Yes. There is a problem with the controller program or
controller itself. Contact the factory.
2) No. The outside air temperature is too hot to determine the
actual cause of the problem. Reset the alarm and recheck when
the outside air temperature is much cooler.
b. Yes. This signal is fed to the gas valve modulation signal conditioner.
Disconnect the wires from input signal terminals on the signal
conditioner and measure the voltage on the wires. Is it the same as the
voltage coming from the controller?
1) No. There is an open in the wiring from the controller output.
Correct wiring and reconnect the wires to the terminals on the
signal conditioner. Be sure the ground wire from the controller
output terminal is connected to the signal conditioner’s
negative terminal.
2) Yes. Continue.
4. Is there 24VAC on the signal conditioner power terminals?
a. No. Determine cause and rectify.
b. Yes. Continue.
5. Is there twice the DC voltage on the signal conditioner’s output terminals as
there is on the signal conditioner’s input terminals?
a. No. Replace the signal conditioner.
b. Yes. Continue.
6. Is the DC voltage on the modulating valve terminals the same as the DC
voltage on the signal conditioner’s output terminals?
a. No. There is a break in the wiring between the signal conditioner and
the modulating valve terminals. Determine cause and rectify.
b. Yes. The electronics are working to this point. Continue.
7. Is there sufficient temperature rise for the amount of outside air that is being
delivered to the space?
a. No. Follow the instructions in this manual for placing the unit in
Manual damper control mode. Adjust the Man. Vent setpoint to 20%
outside air. Is there sufficient temperature rise for the amount of
outside air that is being delivered to the space?
1) No. Contact the factory.
2) Yes. Continue.
b. Yes. Continue.
8. Verify there is sufficient inlet gas pressure. Verify the modulating valve is
properly adjusted. Verify the burner orifices are clear of obstruction. Contact
the factory.
SOLUTION: If burner was not operating prior to shutdown (check prior alarm log)
1. Is there a prior alarm such as Safety Ckt., Airflow Sw., or Flame Failure?
a. Yes. See the Diagnostic section for the previous alarm.
b. No. Continue.

37
2. Is the room air (Room Temp) displayed on the BACview remote, reading
150°F or more?
a. Yes. The sensor circuit or the sensor itself is shorted. Unplug the input
jack from the AdaptAire controller. Did the display change to -40°F or
less?
1) No. There is a short in the controller input. Replace the
controller.
2) Yes. Disconnect the sensor wiring at the sensor. Connect an
ohmmeter to the sensor. If it is shorted replace the sensor. At
77°F the resistance should be 10KΩ. See thermistor output
curve for other temperatures. If it is not shorted, there is a short
in the wiring between the sensor and the input plug. Determine
cause and rectify. Refer to Appendix I for a typical 10KΩ
thermistor output curve.
b. No. Continue.
3. Is the discharge air temperature (DA Tempt), displayed on the BACview
remote, reading -40°F or less?
a. Yes. The discharge air temperature sensor circuit or the sensor itself is
open. Jumper the input for the sensor. Did the display change to 150°F
or more?
1) No. There is an open in the controller input. Replace the
controller.
2) Yes. Disconnect the discharge air temperature sensor wiring at
the sensor. Connect an ohmmeter to the sensor. If it is open
replace the sensor. At 77°F the resistance should be 10KΩ. See
thermistor output curve for other temperatures. If it is not open,
there is a break in the wiring between the sensor and the input
plug. Determine cause and rectify.
b. No. Continue
4. Reset the alarm. Check and note the DC voltage at controller’s analog output
for the heating signal. Set the Heating Setpoint for 130°F. Set the HTG MAX
DA and HTG MIN DA Setpoints for 130°F. Did the Burner VDC, displayed
on the BACview remote, increase?
a. No. Unless the outside air temperature is extremely warm the Burner
VDC should have increased to 7.5VDC or more. Close the manual
main gas valve closest to the burner and measure the discharge air
temperature. Is it less than 130°F?
1) Yes. There is a problem with the controller program or
controller itself. Contact the factory.
2) No. The outside air temperature is too hot to determine the
actual cause of the problem. Reset the alarm and recheck when
the outside air temperature is much cooler.
b. Yes. This signal is fed to the signal conditioner. Disconnect the wires
from the signal conditioner’s input signal terminals and measure the
voltage on the wires. Is it the same as the voltage coming from the
controller?
1) No. There is an open in the wiring from the controller output.
Correct wiring and reconnect the wires to the terminals on the
signal conditioner. Be sure the wire from the controller’s
ground terminal is connected to the signal conditioner’s ground
terminal.

38
2) Yes. Continue.
5. Is there 24VAC on the signal conditioner power terminals?
a. No. Determine cause and rectify.
b. Yes. Continue.
6. Is there twice the DC voltage on the signal conditioner’s output terminals as
there is on the signal conditioner’s input terminals?
a. No. Replace the signal conditioner.
b. Yes. Continue.
7. Is the DC voltage on the modulating valve terminals the same as the DC
voltage on the signal conditioner’s output terminals?
a. No. There is a break in the wiring between the signal conditioner and
the modulating valve terminals. Determine cause and rectify.
b. Yes. The electronics are working to this point. Continue.
8. Is there sufficient temperature rise for the amount of outside air that is being
delivered to the space?
a. No. Follow the instructions in this manual for placing the unit in
Manual damper control mode. Adjust the Man. Vent setpoint to 20%
outside air. Is there sufficient temperature rise for the amount of
outside air that is being delivered to the space?
1) No. Contact the factory.
2) Yes. Continue.
b. Yes. Continue.
9. Verify there is sufficient inlet gas pressure. Verify the modulating valve is
properly adjusted. Verify the burner orifices are clear of obstruction. Contact
the factory.
ALARM CODE: Safety Circuit Open PROBLEM: The controller has detected a failure in the safety circuit. This
alarm does not disable the burner and does not affect actual operation of the unit in any
way. It merely provides status information to the user indicating that the safety circuit
tripped. Though the condition may have already been rectified automatically, the alarm
must be manually reset in order to be cleared from the system. Requiring the manual reset
gives the user the ability to know that the alarm occurred at some previous time should
they wish to further investigate the situation. See the Unit Resets section of this manual
for information on how to manually reset the alarm.
SOLUTION: If fan is not running (check prior alarm log)
1. Is there a prior alarm such as Unit On/Fan Off or Airflow Sw?
a. Yes. See the Diagnostic section for the previous alarm.
b. No. Continue.
2. Set Unit Mode to Manual. Did fan start?
a. No. See the Diagnostic section for Unit On/Fan Off.
b. Yes. Continue.
SOLUTION: If fan is running (check prior alarm log)
1. Is the high temperature limit tripped?
a. Yes. Determine cause and rectify.
b. No. Continue.
2. Is the low gas pressure switch closed?
a. No. Verify the inlet gas pressure is as specified on the gas piping
diagram. The low gas pressure switch setpoint should not be
adjusted. The inlet gas pressure must remain as specified when unit
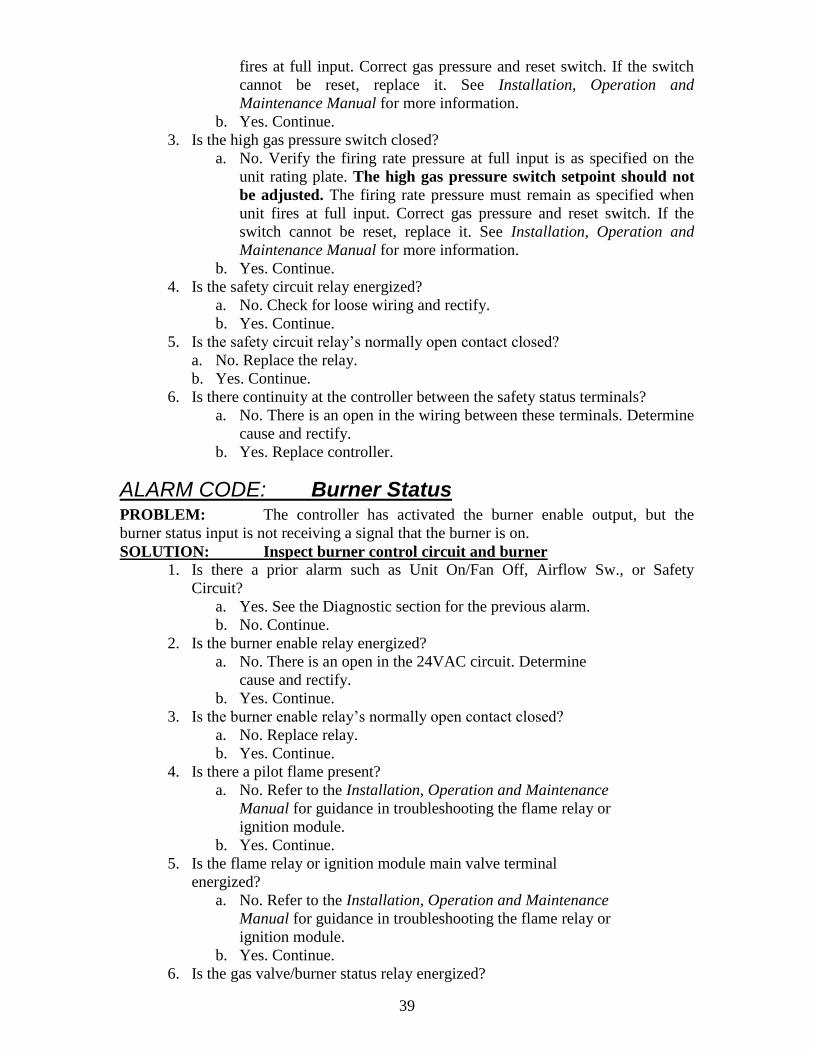
39
fires at full input. Correct gas pressure and reset switch. If the switch
cannot be reset, replace it. See Installation, Operation and
Maintenance Manual for more information.
b. Yes. Continue.
3. Is the high gas pressure switch closed?
a. No. Verify the firing rate pressure at full input is as specified on the
unit rating plate. The high gas pressure switch setpoint should not
be adjusted. The firing rate pressure must remain as specified when
unit fires at full input. Correct gas pressure and reset switch. If the
switch cannot be reset, replace it. See Installation, Operation and
Maintenance Manual for more information.
b. Yes. Continue.
4. Is the safety circuit relay energized?
a. No. Check for loose wiring and rectify.
b. Yes. Continue.
5. Is the safety circuit relay’s normally open contact closed?
a. No. Replace the relay.
b. Yes. Continue.
6. Is there continuity at the controller between the safety status terminals?
a. No. There is an open in the wiring between these terminals. Determine
cause and rectify.
b. Yes. Replace controller.
ALARM CODE: Burner Status PROBLEM: The controller has activated the burner enable output, but the
burner status input is not receiving a signal that the burner is on.
SOLUTION: Inspect burner control circuit and burner
1. Is there a prior alarm such as Unit On/Fan Off, Airflow Sw., or Safety
Circuit?
a. Yes. See the Diagnostic section for the previous alarm.
b. No. Continue.
2. Is the burner enable relay energized?
a. No. There is an open in the 24VAC circuit. Determine
cause and rectify.
b. Yes. Continue.
3. Is the burner enable relay’s normally open contact closed?
a. No. Replace relay.
b. Yes. Continue.
4. Is there a pilot flame present?
a. No. Refer to the Installation, Operation and Maintenance
Manual for guidance in troubleshooting the flame relay or
ignition module.
b. Yes. Continue.
5. Is the flame relay or ignition module main valve terminal
energized?
a. No. Refer to the Installation, Operation and Maintenance
Manual for guidance in troubleshooting the flame relay or
ignition module.
b. Yes. Continue.
6. Is the gas valve/burner status relay energized?

40
a. No. There is an open in the main valve control circuit.
Determine cause and rectify.
b. Yes. Continue.
7. Is the gas valve/burner status relay’s normally open contact
closed?
a. No. Replace relay.
b. Yes. Continue.
8. Is there continuity at the controller between the burner status terminals?
a. No. There is an open in the wiring between these terminals. Determine
cause and rectify.
b. Yes. Replace controller.
ALARM CODE: Burner Hand PROBLEM: The controller has not activated the burner enable output, but the
burner status input is receiving a signal that the burner is on.
SOLUTION: Inspect burner control circuit. This alarm has the potential to
be a very serious problem. Close the manual gas valves immediately if the fan is not
running.
1. Is the controller’s burner enable output LED lit?
a. Yes. Close manual gas valves. There is a problem with the
controller program. Contact factory.
b. No. Continue.
2. Are the main automatic gas shutoff valves energized?
a. No. The main automatic gas shutoff valves are leaking.
Turn off unit and close manual gas valves. Determine cause
of valve failure and rectify.
b. Yes. Continue.
3. Is the flame relay energized?
a. No. There is a short in the wiring of the gas valves. Close
manual gas valves. Determine cause of short and rectify.
b. Yes. Continue.
4. Is the burner enable relay energized?
a. Yes. There is a short in the wiring of the flame relay. Close
manual gas valves. Determine cause of short and rectify.
b. No. Continue.
5. Is the burner enable relay’s normally open contact closed?
a. Yes. Close manual gas valves. Replace the relay.
b. No. Continue.
6. Unplug the input terminals from the input jack. Is there continuity
at the controller between the burner status terminals?
a. No. Close manual gas valves. There is a short in the wiring
between the burner status relay and the burner status
terminals. Determine cause and rectify.
b. Yes. Close manual gas valves. Replace the controller.
41
ALARM CODE: Flame Failure This alarm code is not applicable to all unit types.
PROBLEM: The controller has received a signal from the flame relay indicating
a flame failure.
SOLUTION: Investigate flame relay
1. Is there a prior alarm such as Unit On/Fan Off, Airflow Sw., or Safety
Circuit?
a. Yes. See the Diagnostic section for the previous alarm.
b. No. Continue.
2. See flame relay troubleshooting information in unit Installation,
Operation, and Maintenance Manual.
Diagnostics – Non-Critical Alarm Codes
This section should assist the user in troubleshooting non-critical alarm code messages
that have been displayed on the BACview. Most of these alarms are automatically reset
once the alarm is corrected or condition changes. Exceptions to this rule are noted in the
alarm problem descriptions that follow.
ALARM CODE: Unit off/Fan on PROBLEM: The controller has not activated the unit enable output to start the
fan, but the fan status input, is receiving a signal that the fan is running. This alarm will
automatically clear about 15 seconds after the alarm is corrected.
SOLUTION: If fan is running
2. Is controller unit enable output LED for lit?
a. Yes. There is a problem with the controller program. Call factory.
b. No. Continue.
3. Is controller output contact for the unit enable output closed?
a. Yes. Turn off the power to the controller and recheck. If contact is still
closed the controller output is shorted. Replace the controller.
b. No. Continue.
4. Is the unit enable relay energized?
a. Yes. There is a short or jumper in the wiring. Determine cause and
rectify.
b. No. Continue.
5. Is motor starter energized?
a. Yes. There is a short or jumper in the wiring. Determine cause and
rectify.
b. No. Continue.
6. Is the fan status relay energized?
a. Yes. There is a short or jumper in the wiring. Determine cause and
rectify.
b. No. Continue.
7. Is the fan status relay’s normally open contact, closed?
a. Yes. Replace relay.
b. No. Continue.
8. Is there continuity between at the controller between the fan status terminals?
a. Yes. There is a short in the wiring between these terminals. Determine
cause and rectify.
b. No. Replace controller.

42
SOLUTION: If fan is not running
1. Is the fan status relay’s normally open contact, closed?
a. Yes. Replace relay.
b. No. Continue.
2. Is there approximately 5VDC at both controller terminals used for the fan
status?
a. Yes. There is a short in the wiring between these terminals. Determine
cause and rectify.
b. No. Replace controller.
ALARM CODE: Unit on/Fan off PROBLEM: The controller has activated the unit enable output to start the fan,
but the fan status input, is not receiving a signal that the fan is running. This alarm will
automatically clear about 60 seconds after the alarm is corrected. Turning the unit off and
then on will clear this alarm at any time.
SOLUTION: If fan/motor is running
1. Is the BACview remote indicating an alarm?
a. Yes. Check previous alarms and continue.
b. No. Continue.
2. Is the motor starter’s normally open auxiliary contact, closed?
a. No. Replace contact.
b. Yes. Continue.
3. Are the high and low velocity airflow switch contacts, closed?
a. No. Are the belts on and is the fan motor.
1) Yes. Contact factory. Do not adjust the switches setpoints.
2) No. Determine cause and rectify.
b. Yes. Continue.
4. Is the fan status relay energized?
a. No. There is an open or break in the wiring. Determine cause and
rectify.
b. Yes. Continue.
5. Is the fan status relay’s normally open auxiliary contact, closed?
a. No. Replace relay.
b. Yes. Continue.
6. Is there continuity at the controller between the fan status terminals?
a. No. There is an open in the wiring between these terminals. Determine
cause and rectify.
b. Yes. Replace controller.
SOLUTION: If fan/motor is not running
1. Is the BACview remote indicating an alarm?
a. Yes. Check previous alarms and continue.
b. No. Continue.
2. Is controller output LED for the unit enable output lit?
a. No. There is a problem with the controller. Replace controller.
b. Yes. Continue.
3. Is the unit enable relay energized?
a. No. There is an open in the wiring between these terminals. Determine
cause and rectify.
b. Yes. Continue.
4. Is the unit enable relay’s normally open contact, closed?

43
a. No. Replace relay.
b. Yes. Continue.
5. Is the motor overload relay tripped?
a. Yes. Determine cause, rectify and reset.
b. No. Continue.
6. Is the motor starter energized?
a. No. There is an open or break in the wiring. Determine cause and
rectify.
b. Yes. Check motor and motor wiring.
ALARM CODE: Check Airflow Switches PROBLEM: The controller has activated the unit enable output to start the fan,
and detected that the fan is running from a signal at the fan status input. Subsequently, the
controller has detected several short momentary openings of the fan status input. The
momentary openings must occur at least 4 times within 15 seconds. This alarm requires
the operator to correct the condition and reset the alarm before normal unit operation
resumes.
SOLUTION: If high airflow switch is opening. Do not adjust the switch setpoints
1. Are all of the filters in place?
a. No. Install filters and continue.
b. Yes. Continue.
2. Does the external static pressure match that listed on the rating plate?
a. No. Verify all associated ductwork is installed and continue.
b. Yes. Continue.
3. Does the fan RPM match that listed on the Spec. Sheet?
a. No. Correct to reduced fan speed and continue.
b. Yes. Continue.
4. Are the airflow switches’ sensing tubes obstructed?
a. Yes. Clear and continue.
b. No. Continue.
5. Contact factory.
SOLUTION: If low airflow switch is opening. Do not adjust the switch setpoints
1. Does low airflow switch open when the burner is off
a. No. Disconnect both pressure sensing tubes from one of the airflow
switches and measure the differential pressure by connecting the high
sensing port of a manometer to one of the airflow sensing tubes and
the low sensing port to the other. Is the differential pressure
approximately the midpoint between the high and low airflow switch
setpoints?
1) No. Close the profile opening until the differential pressure is
approximately the midpoint between the high and low airflow
switch setpoints. Reconnect the sensing tubes, restart the
burner, and verify the airflow switch remains closed when the
burner is at the maximum rated input. Continue.
2) Yes. Continue.
2. Are all of the filters dirty?
a. Yes. Install clean filters and continue.
b. No. Continue.
3. Does the external static pressure match that listed on the rating plate?

44
a. No. Verify all associated ductwork is installed as designed, and there
are no obstructions. Continue.
b. Yes. Continue.
4. Does the fan RPM match that listed on the Spec. Sheet?
a. No. Correct to increased fan speed and continue.
b. Yes. Continue.
5. Are the airflow switches’ sensing tubes obstructed?
a. Yes. Clear and continue.
b. No. Continue.
6. Contact factory.
ALARM CODE: Clogged Filter Switch PROBLEM: The filter air pressure switch has closed between the appropriate
terminals on the unit’s terminal strip located in the unit’s main control panel indicating a
clogged filter. See the Typical Wiring Schematic, Multiplexed Input, and Clogged Filter
sections of this manual for more information. This alarm will automatically clear about 5
seconds after the alarm is corrected.
SOLUTION: If clogged filter switch is closing.
1. Are the filters dirty?
a. Yes. Install clean filters and continue.
b. No. Continue.
2. Are the airflow switch sensing tubes obstructed?
a. Yes. Clear and continue.
b. No. Continue.
3. Is the airflow switch setpoint properly adjusted?
a. No. Adjust setpoint.
b. Yes. Continue.
4. Are the wires connected to the air pressure switch’s normally open contact?
a. No. Rewire switch and continue.
b. Yes. Continue.
5. Is the air pressure switch’s normally open contact open?
a. No. Disconnect the sensing tubes and recheck. Replace the switch if
contacts do not open.
b. Yes. Continue.
6. Find the clogged filter switch on the electrical schematic and identify the
control panel terminals to which it is connected. Disconnect the wire from
these terminals. Does this clear the alarm?
a. Yes. There is short in the wiring between the terminal strip and the
switch. Determine cause and rectify.
b. No. Continue.
7. Unplug the connector from the controller that is connected to the multiplexed
input. Does this clear the alarm?
a. Yes. There is short in the wiring of the multiplexed resistors.
Determine cause and rectify.
b. No. There is an internal short in the controller. Replace the controller.

45
ALARM CODE: Insufficient OA PROBLEM: The controller has turned off the burner enable output because the
percentage of outside air has dropped below 20% for more than five minutes, and the unit
is in the Heating mode. This alarm will automatically clear about 5 seconds after the
alarm is corrected.
SOLUTION: If heat is desired
1. Are the outside air hood filters or bird screen or any associated outside air
ductwork obstructed?
a. Yes. Clear obstruction or change filters.
b. No. Continue.
2. Are the outside air and return air dampers and actuators working properly?
a. Yes. Continue.
b. No. Make necessary adjustments and force the unit to recalibrate. See
Calibrate in the Resets Section of this manual.
3. Are the flow measuring station pitot tubes and pressure tubing clear?
a. Yes. Continue.
b. No. Clean and force the unit to recalibrate. See Calibrate in the Resets
Section of this manual.
4. Do the dampers track with a change in the %OA setpoint? The dampers
utilized on the unit are not linear with respect to airflow and openness, and as
such, the proportion of outside air damper movement will not be exactly equal
to the %OA setpoint. However, at 20% OA the dampers should be
approximately ½” open.
a. Yes. Continue.
b. No. Check the damper motor and linkage connections. When 24VAC
is powering the damper actuator and the control signal is 0VDC, the
outside air damper should be close to a “rattle tight” position and the
return air damper should be open. If the 24VAC power is removed, the
actuator will draw the outside air damper tightly closed and the return
air damper tightly open. When 24VAC is powering the damper
actuator and the control signal is 10VDC, the outside air damper
should be fully open and the return air damper should be closed.
5. Is there approximately 24VAC at the COM and EXC terminals on the airflow
station pressure transducer?
a. Yes. Continue.
b. No. Is there 120VAC on the primary side of the low voltage
transformer and 24VAC volt at the transformer secondary?
1) Yes. There is an open in the wiring between the transformer
and the transducer. Locate the wiring problem and rectify.
2) No. If there is 120VAC on the primary and 0VAC on the
secondary, replace the transformer. If there is 0VAC on the
primary, there is an open in the wiring supplying power to the
transformer. Locate the wiring problem and rectify.
6. Remove both of the plastic tubes from the airflow station pressure transducer
and gently blow into the HIGH side port. Caution: The transducer is
extremely sensitive. Blowing too hard into the sensing tube may damage
the transducer. Is there approximately 5VDC across the COM and OUT
terminals of the pressure transducer?
a. Yes. Continue.
b. No. The pressure transducer is defective. Replace it.

46
7. Remove both of the plastic tubes from the airflow station pressure transducer
and gently blow into the HIGH side port. Caution: The transducer is
extremely sensitive. Blowing too hard into the sensing tube may damage
the transducer. Is there approximately 5VDC across the controller input
terminals that are connected to the transducer?
a. Yes. There is a problem with the controller. Replace it.
b. No. There is an open in the wiring between these pressure transducer
and the AdaptAire controller terminals. Locate and rectify.
SOLUTION: If less outside air is desired
1. Is heat required?
a. Yes. The AdaptAire control system must be in the Heating mode. In
this mode the smallest allowable amount of outside air is 20%. Verify
the system is in the Heating mode and the MIN VENT SP is set for
20%. See Heating/Cooling Mode and Minimum Ventilation Sections
of this manual.
b. No. Continue.
2. Is cooling or ventilation required?
a. Yes. The AdaptAire control system must be in the Ventilation/Cooling
mode. In this mode the smallest allowable amount of outside air is 0%.
Verify the system is in the Cooling mode and the MIN VENT SP is set
for the desired percent of outside air. See Heating/Ventilating/Cooling
Mode and Minimum Ventilation Sections of this manual.
b. No. Contact factory.
ALARM CODE: Invalid Damper Control Mode PROBLEM: The user has selected Mixed Air Temperature control mode for
damper operation and the unit is configured for MDT or MDT-Expert control, or
communications between the room sensor and the unit control module have failed. This
alarm will automatically clear after the alarm is corrected.
SOLUTION: If the unit is configured for MRT or MRT-Expert controls
1. Is the room sensor wired correctly and securely in the terminal connectors
located on the back of the room sensor as well as at the Rnet input on the left
side of the unit control module?
a. No. Correct wiring and securely tighten connections.
b. Yes. Internal room sensor failure. Replace room sensor.
SOLUTION: If the unit is configured for MDT or MDT-Expert controls
1. Select either the Manual or Building Pressure damper control modes. Mixed
Air Temperature control mode is incompatible with MDT and MDT-Expert
control systems. Mixed Air Temperature control mode requires that the unit
be configured for MRT or MRT-Expert controls and that a room sensor be
installed and functioning.
ALARM CODE: Room Sensor Failure PROBLEM: The unit is configured for MRT or MRT-Expert control and
communications between the room sensor and the unit control module have failed. This
alarm will automatically clear after the alarm is corrected.
SOLUTION: Investigate room sensor
1. When room sensor communications are interrupted, the displayed room
temperature will be equal to the last good temperature reading received from
the room sensor for approximately 5 minutes following the interruption. For

47
example, if the room temperature was 67ºF when the room sensor was
disconnected, the displayed room temperature will be 67ºF for approximately
5 minutes. After this period has elapsed, the unit will default to a failsafe
mode during which the discharge air temperature will be maintained at 70°F.
The displayed room temperature on the BACview will be 45°F. If the unit
control module then loses power any time after the loss of communications
and is repowered, the room temperature will be displayed as 0ºF until the
communications failure is rectified. Is the room sensor wired correctly and
securely in the terminal connectors on the back of the room sensor as well as
at the Rnet input on the left side of the unit control module?
a. No. Correct wiring and securely tighten connections. Check to see if
the alarm has turned off, indicating the problem has been resolved.
b. Yes. Internal room sensor failure. Replace room sensor.
Glossary
BACview – A four line by forty character display used to change setpoints and monitor
the unit’s operation. See BACview.
Equivalent temperature rise – Simply stated this value is the actual temperature rise
generated by the unit at any given time. More precisely stated, it is the quantity of outside
air raised to the discharge air temperature, plus, the quantity of return air raised to the
discharge air temperature. It is equivalent to the heat actually delivered to the space. The
purpose for this in the burner control scheme is to limit the burner’s firing rate, based on
the percentage of outside air, and thus the carbon monoxide generated by the unit.
Expressed mathematically it is: Teq = %OA (Tda – Toa) + %RA (Tda – Tra)
PID Control or loop – Proportional, Integral, Derivative control, a common control
scheme used in modulating HVAC systems.
Remote Control Panel – The remote control panel is a cover plate with one or more of the
following controls and indicators: unit enable/remote temperature setpoint pot, remote
damper control pot, speed control switch, fill/drain switch, fan on, clogged filter, high
speed, low speed, burner on, cool on lights. This cover plate fits on a standard 3 gang
electrical switch box. See BACview.
WebCTRL – A web based graphical user interface, which provides the user access to the
unit via the internet.
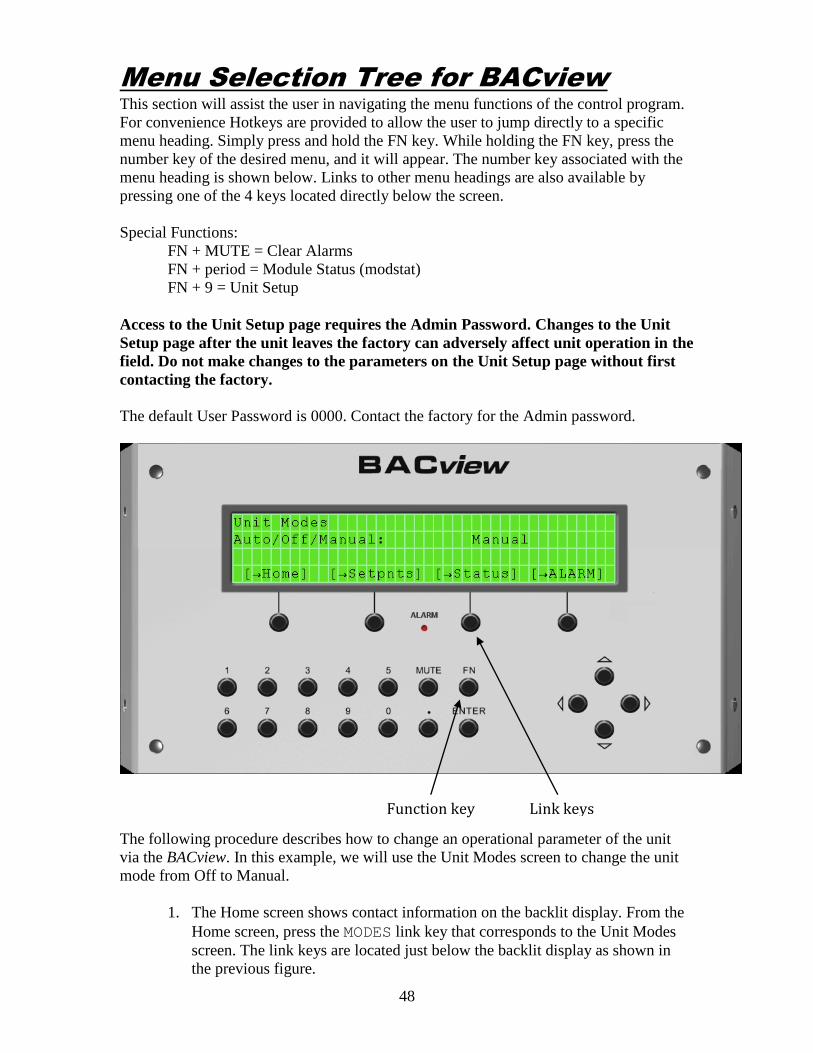
48
Menu Selection Tree for BACview
This section will assist the user in navigating the menu functions of the control program.
For convenience Hotkeys are provided to allow the user to jump directly to a specific
menu heading. Simply press and hold the FN key. While holding the FN key, press the
number key of the desired menu, and it will appear. The number key associated with the
menu heading is shown below. Links to other menu headings are also available by
pressing one of the 4 keys located directly below the screen.
Special Functions:
FN + MUTE = Clear Alarms
FN + period = Module Status (modstat)
FN + 9 = Unit Setup
Access to the Unit Setup page requires the Admin Password. Changes to the Unit
Setup page after the unit leaves the factory can adversely affect unit operation in the
field. Do not make changes to the parameters on the Unit Setup page without first
contacting the factory.
The default User Password is 0000. Contact the factory for the Admin password.
The following procedure describes how to change an operational parameter of the unit
via the BACview. In this example, we will use the Unit Modes screen to change the unit
mode from Off to Manual.
1. The Home screen shows contact information on the backlit display. From the
Home screen, press the MODES link key that corresponds to the Unit Modes
screen. The link keys are located just below the backlit display as shown in
the previous figure.
Function key Link keys

49
2. The Unit Modes screen will appear on the backlit display. The unit ships from
the factory with the Auto/Off/Manual parameter set to Off. To change this
parameter to Manual or Auto, use the arrow keys to move the cursor so that
“Off” is selected. When “Off” is selected by the cursor, it will appear on the
screen surrounded by brackets: “[Off]”.
3. Press the ENTER button. “Off” will flash on the screen, indicating that this
value is now editable. Use the link keys corresponding to INCR and DECR to
scroll through the available parameter values, which are Auto, Off, and
Manual. Set the value of the parameter to Manual and press the ENTER
button.
4. Once the system has accepted this new parameter value, the unit will run
continuously in Manual mode. Use a similar procedure to make changes to
other operational parameters and setpoints as necessary.
MODSTAT The modstat (module status) screen allows the user to check the program version number
and whether the programs are initialized and running. If the red error LED is flashing on
the module, a modstat is a useful troubleshooting tool. Perform the modstat by pressing
and holding the FN key and then pressing the period key and then releasing both keys at
the same time. Scroll down until you see the following message:
2 PRGs initialized. 2 PRGs running.
If this message is not visible anywhere on the modstat screen (after scrolling through the
whole screen), contact the factory to troubleshoot the issue with the unit control module.
There is likely an issue with the unit control module that is preventing the unit from
functioning correctly.
The name of the main control program and its version number can also be seen on the
modstat screen, for example:
Application Software Version: ifrrecircz583_032813
For networking purposes, the device instance number can also be accessed via the
modstat function, for example:
Device Instance: 0024009
UNIT MODES HOTKEY - 2
Auto/Off/Man
o Auto
o Off
o Manual
Damper Mode
o MATempCtrl
o BldgPressCtrl
o ManualCtrl

50
Home
Setpoints
Status
Alarm
SETPOINTS HOTKEY - 3
Htg Occupied °F range 40-130
Htg Setback °F range 40-130
Htg Min DA °F range 40-130
Htg Max DA °F range 40-130
Clg Occupied °F range 40-130
Clg Setback °F range 40-130
Clg Min DA °F range 40-130
Clg Max DA °F range 40-130
Man Vent %OA range 0-100
Mixed Air °F range 30-90
Bldg Pres “WC range –0.10-+0.10
Min Vent % range 0-100
Htg Economizer Temp °F range 40-130
Clg Economizer Temp °F range 40-130
Freeze Stat °F range 35-80
OA Temp for Htg/Clg Changeover °F range 40-130
Htg DA Temp °F range 40-130
Clg DA Temp °F range 40-130
Home
Status
Alarm
Resets
STATUS MENU HOTKEY - 4
The Status Menu always displays the current status of the fan, burner and cooling.
Room Temp °F
OA or Inlet Temp °F
DA Temp °F
MA Temp °F
Outside Air %
Bldg Pres “WC
Energy Save Mode
Fan Cycles
Fan Hours
Bnr Cycles
Bnr Hours
Clg Cycles
Clg Hours
Damper VDC
Burner VDC
Burner Gas VDC

51
Burner Air VDC
Safety Ckt Open/Closed
ActEQ Temp °F
MaxEQ Temp °F
Home
Alarm
Resets
Help
ALARM HOTKEY - 1
Module Event History (100 Most Recent)
o Active Alarms
o Active Faults
o Returned-To-Normal
o Manually Cleared
o Previous
RESETS HOTKEY - 6
Alarm
Burner Reset
Fan Count
Cooling Reset
Calibrate
Home
Schedules
Clock Set
Help
SCHEDULES HOTKEY - 7
24 hr Operation yes/no
Daily
o Schedule1 (typical 1 through 4)
Use yes/no
Start Time hr:min
Stop Time hr:min
DAYS SUN, MON, TUE, WED, THU, FRI, SAT
Previous
Next
Home
Logout
Holiday
o Holiday1 (typical 1 through 12)
Use yes/no
Start Time hr:min
Stop Time hr:min
Month (1-12)
Day (1-31)
Previous

52
Next
Home
Logout
Override
o Override1 (typical 1 through 2)
Use yes/no
Start Time hr:min
Stop Time hr:min
Month (1-12)
Day (1-31)
Previous
Next
Home
Logout
CLOCKSET HOTKEY - 0
Time hh:mm:ss
Date dd-mm-yy
Previous
DST
o Start Time hh:mm
o Amount 060
o Beg Mar 11 2012 End Nov 04 2012
o Beg Mar 10 2013 End Nov 03 2013
o Beg Mar 09 2014 End Nov 02 2014
o Beg Mar 08 2015 End Nov 01 2015
o Beg Mar 13 2016 End Nov 06 2016
o Beg Mar 12 2017 End Nov 05 2017
o Beg Mar 11 2018 End Nov 04 2018
o Beg Mar 10 2019 End Nov 03 2019
o Beg Mar 08 2020 End Nov 01 2020
o Beg Mar 14 2021 End Nov 07 2021
o Previous
HELP HOTKEY - 5
Fan Sequence
Room Sensor
Heating Sequence
Cooling Sequence
Schedule Sequence
Calibrate Sequence
User Configured Output
Previous
Home
Alarm
User Config

53
USER CONFIGURABLE OUTPUT HOTKEY - 8
User Control Setpoint
User Input Variable
User Output %
PID Select Direct Acting / Reverse Acting
High Input Value
Low Input Value
Maximum User Setpoint
Minimum User Setpoint
Previous
Home
Setpoints
Help
UNIT SETUP HOTKEY – 9
Access to the Unit Setup page requires the Admin Password. Changes to the Unit
Setup page after the unit leaves the factory can adversely affect unit operation in the
field. Do not make changes to the parameters on the Unit Setup page without first
contacting the factory.
Brand Applied Air / Temprite / Sterling / Trane / LJ Wing
Fuel Type Natural Gas / Propane
Duct Furnace Size IFD-160 / IFD-320 / IFD-480 / Other
Control System MRT (modulating room temperature) /
MDT (modulating discharge temp)

54
Appendix I
10KΩ Thermistor Output Curve

55
Appendix II
Airflow Station Layout

56
Appendix III
I/O Zone 583 Controller Specifications
POWER REQUIREMENTS
24VAC ± 10%, 20VA
NETWORK COMMUNICATION
BACnet (ARCNET and MS/TP), Modbus
RTU, or N2 bus at up to 76.8K baud or
156K baud over ARCnet. LonWorks and
Ethernet using plug-in communications
board.
USER INTERFACE
MDT: modulating discharge temperature
control with manually adjusted
potentiometer at remote control panel.
MRT: modulating room temperature control
with manually adjusted potentiometer at
remote control panel.
MRT-Expert: modulating room temperature
control with intelligent room sensor and
BACview LCD control panel.
MDT-Expert: modulating discharge
temperature control with BACview LCD
control panel.
MEMORY
1M bytes of flash memory and 512K
bytes of non-volatile battery-backed
RAM
REALTIME CLOCK
Battery-backed to keep time in event of
power failure.
TEMPERATURE OPERATING RANGE
0°F to 130°F, 10% to 95% RH non-
condensing
INPUTS/OUTPUTS
8 Universal Inputs
Inputs 1 & 2
o Dry, thermistor, 0-5VDC
Inputs 3 – 6
o Dry, thermistor
Inputs 7 & 8
o 1k –10k pot
5 Digital Outputs
Relay contacts rated at 1A
Resistive @ 24VAC
LED indication
3 Analog Outputs
0 – 10 VDC
OUTPUT ASSIGNMENTS - ANALOG
AO1 Burner gas firing rate 0 – 10 VDC
AO2 RA or Mixing Damper Control/ User
Configured 0 – 10VDC
AO3 Burner gas firing rate
OUTPUT ASSIGNMENTS - DIGITAL
DO1 Unit Enable
DO2 Burner Enable
DO3 Stg 1 Cooling Enable
DO4 Stg 2 Cooling Enable
DO5 Pilot to Main Flame Sensor
Changeover Switch
INPUT ASSIGNMENTS - UNIVERSAL
IN1 Pressure Transducer for Building
Pressure Control or User Configured
IN2 Pressure Transducer for Flow Station
IN3 Multiplexed
100% Outside Air/100% Output
Flame Failure Alarm
Safety Circuit Status
Manual/Mixed Air Dmpr Control
IN4 Multiplexed
Auxiliary Unit Enable
Clogged Filter
Fan Status
Burner Status
IN5 Outside Air sensor
IN6 Discharge Air sensor
IN7 Unit Enable/Remote Setpoint
IN8 Damper Control
RNET Room Air sensor

57
Appendix IV
I/O Zone 583 Controller Battery Checkout
The battery on the unit control module retains the controller’s memory in the event of
power failure. The 10-year Lithium CR2032 battery provides a minimum of 10,000 hours
of data retention during power outages. Remember to check the battery periodically (once
a month or so) to verify that its voltage is approximately 3 VDC.
If the voltage is not approximately 3 VDC, replace the battery so that the controller’s
program is not lost during a power outage. Loss of the program will require the controller
to be shipped back to the factory for reprogramming because the unit will not function
without the program.
Make sure the controller is powered any time the battery is removed or the
controller’s memory may be lost.
Figure 5 shows the location of the battery on the controller.
Figure 5

58
Appendix V
Control System Field Conversion The unit can be converted to a different control system in the field. Locate the unit’s
current control system in the “From” column and the new control system in the “To”
column that is in the same row as the current control system. Follow the steps outlined in
the “New” column to complete the field conversion.
NOTE: Contact the factory for the BACview Admin password if required and to
have the wiring diagram updated when doing a control system field conversion.
Failure to do so will result in inaccurate documentation that can complicate possible
future troubleshooting efforts.
From To
MRT
MDT
1. Order a BACview remote panel from the factory and plug it into the local
access connection on the front of the unit control module.
2. Change the Control System parameter on Unit Modes screen of BACview
to MDT.
MRT-Expert
1. Order a BACview remote panel from the factory and plug it into the local
access connection on the front of the unit control module. Leave the room
sensor connected.
2. Disconnect the unit enable potentiometer from terminals 214, 215, and 216
and place a jumper between terminals 213 and 216 on the main terminal
strip.
MDT-Expert
1. Order a BACview remote panel from the factory and plug it into the local
access connection on the front of the unit control module.
2. Disconnect the unit enable potentiometer from terminals 214, 215, and 216
and place a jumper between terminals 213 and 216 on the main terminal
strip.
3. Change the Control System parameter on Unit Modes screen of BACview
to MDT.
MDT
MRT
1. Order a BACview remote panel and a room sensor from the factory.
2. Plug the BACview into the local access connection on the front of the unit
control module.
3. Wire the room sensor into the four-wire Rnet input on the left side of the
unit control module.
4. Change the Control System parameter on Unit Modes screen of BACview
to MRT.
MRT-Expert
1. Order a BACview remote panel and a room sensor from the factory.
2. Disconnect the unit enable potentiometer from terminals 214, 215, and 216
and place a jumper between terminals 213 and 216 on the main terminal
strip.
3. Plug the BACview into the local access connection on the front of the unit
control module.

59
From To
MDT
(cont.)
MRT-Expert (continued)
4. Wire the room sensor into the four-wire Rnet input on the left side of the
unit control module.
5. Change the Control System parameter on Unit Modes screen of BACview
to MRT.
MDT-Expert
1. Order a BACview remote panel from the factory and plug it into the local
access connection on the front of the unit control module.
2. Disconnect the unit enable potentiometer from terminals 214, 215, and 216
and place a jumper between terminals 213 and 216 on the main terminal
strip.
MRT-
Expert
MRT
1. Remove the jumper between terminals 213 and 216 on the main terminal
strip and connect the unit enable potentiometer to terminals 214, 215, and
216.
2. Disconnect the BACview remote panel from the local access connection on
the front of the unit control module. Leave the room sensor connected.
MDT
1. Remove the jumper between terminals 213 and 216 on the main terminal
strip and connect the unit enable potentiometer to terminals 214, 215, and
216.
2. Change the Control System parameter on Unit Modes screen of BACview
to MDT.
3. Disconnect the BACview remote panel from the local access connection on
the front of the unit control module.
MDT-Expert
1. Change the Control System parameter on Unit Modes screen of BACview
to MDT.
MDT-
Expert
MRT
1. Remove the jumper between terminals 213 and 216 on the main terminal
strip and connect the unit enable potentiometer to terminals 214, 215, and
216.
2. Change the Control System parameter on Unit Modes screen of BACview
to MRT.
3. Disconnect the BACview remote panel from the local access connection on
the front of the unit control.
4. Order a room sensor from the factory and wire it into the four-wire Rnet
input on the left side of the unit control module.
MDT
1. Remove the jumper between terminals 213 and 216 on the main terminal
strip and connect the unit enable potentiometer to terminals 214, 215, and
216.
2. Disconnect the BACview remote panel from the local access connection on
the front of the unit control module.
MRT-Expert
1. Order a room sensor from the factory and wire it into the four-wire Rnet
input on the left side of the unit control module.
2. Change the Control System parameter on Unit Modes screen of BACview
to MRT.

60
Typical Wiring Schematic
RECIRCULATING DFL MODEL DIAGRAM

61
NON-RECIRCULATING DFL MODEL DIAGRAM

62
RECIRCULATING DFC and DFM MODEL DIAGRAM

63
NON-RECIRCULATING DFC and DFM MODEL DIAGRAM

64
RECIRCULATING IFL MODEL DIAGRAM

65
NON-RECIRCULATING IFL MODEL DIAGRAM

66
NON-RECIRCULATING IF MODEL DIAGRAM

67

68