actuator for mixing valves feruary 2017 actu ator … · actu ator with integr ated regul ator...
TRANSCRIPT

1
0786EN February 2017ActuAtor for mixing vAlves
ActuAtor with integrAted regulAtor K275Y002for mixing vAlves r296 And r297
DescriptionK275Y002 is an actuator with constant temperature regulator and it is designed for mounting on R296/R297 mixing valves. It controls fixed delivery temperature both heating and cooling systems (without umidity control), in “stand-alone” functioning.The actuator has a fixed angle rotation of 90° and possibility of manual control.With DIP switches inside actuator is possible to set the following parameters:• Direction of rotation (counterclockwise CCW / clockwise CW)• Different temperature ranges depending on the application• Reaction factor x1/x10Typical applications:• Maintaining a constant temperature in boiler heating circuit• Underfloor heating applications, industrial processes, heat accumulators• Domestic hot water systems or swimming pools
Versions and product codes
Product code Power supply For use withmixing valves
K275Y002 24 V - 50 Hz R296, R297
Technical dataElectrical data• Supply voltage: 24 Vac, 50 Hz, ± 10 % (230 Vac, 50 Hz with adapter included)• Power: 5 VA• Connection cable: 2 x 0,5 mm2; length 2 m• Sensor type: KTY 81-210 PVC (cable length 1,5 m) insulation: -30 °C to 105 °C (adapter set enclosed)
Functional data• Torque: max 15 Nm• Rotation time: 73 s / 90°• Manual override: manual or permanent with pushbutton (for maintenance purposes)• DIP switches settings: direction of rotation (counterclockwise CCW / clockwise CW); different temperature ranges depending on the application (0÷100 °C, 60÷85 °C, 20÷70 °C, 25÷45 °C); reaction factor x1/x10
Safety• Protection class. II• Degree of protection: IP44• Ambient temperature: 0÷55 °C• Media temperature: according to valve’s specifications• Storage temperature: -20÷80 °C• Maintenance: maintenance free
OperationFront pannel description
AUTO-M
AN
90°
1
2
MAN
AUTO
MR-B-0124V , 50Hz, 7,5VA
IP44, max 15Nm
POWER
T (°C) T set
Xp
2
4
31
567
8
Legend
1 Mechanical indication
2 Button for manual/auto control
3 Handle for manual controll, which also serves for the indication of the valve position
4 Button for adjusting the required temperatureWhen adjusting the temperature, the set value flashes on LCD screen
5 LED indication of operation
6 Xp parameter screw cover
7 LCD screen for displaying temperature
8 DIP switches cover
DIP switches and Xp knob are located inside the actuator.They can be set by removing the plastic protection caps on top of the actuator (without removing the red shell).
LED indication of operation:- Blinking: actuator calibration- ON: normal operation
Xp parameter:proportional control of valve range (from 10K to 100K)
DIP switches
Factory settingsDIP1: OFF - way of opening CCW (counterclockwise)DIP2, 3: OFF - temperature range 0÷100 °CDIP4: OFF: reaction factor x1
K275Y002

2
0786EN February 2017ActuAtor for mixing vAlves
ActuAtor with integrAted regulAtor K275Y002for mixing vAlves r296 And r297
DIP switches settingsWith DIP switches inside the actuator is possible to set the following parameters:• DIP1 - Setting direction of valve opening:
ON: opening direction CW (clockwise direction)OFF: opening direction CCW (counterclockwise direction)
• DIP2, 3 - Different temperature ranges depending on the application (0÷100 °C, 60÷85 °C, 20÷70 °C, 25÷45 °C)
• DIP4 - Reaction factor x1/x10
NB.Reaction factor x1/x10 - response speed of the actuator.In most cases, the factor x1 is used.x10 factor is recommended in case of installation with a low thermal inertia (PVC pipe, plastic pipes for drinking water).
NB.Every time the position of DIP1 is changed, actuator calibration is made. The LED blinks (1x/sec) and actuator is rotated to the left and right side. In this case leave the actuator in position AUTO, do not change settings and do not disconnect the power supply.During calibration of actuator system, because of system protection, is necessary to turn off the circulator to prevent oscillation of temperature in the system (underfloor heating, hot water....)
• Operation to set the DIP switches1) Remove the protection cap from the cover.2) With a small screwdriver move the DIP switches to the desired position.3) Put the protection cap back in its original position.
Xp parameter - proportional valve control area (from 10K to 100K)With the screw potentiometer inside the actuator can be set reaction factor - parameter Xp. The setting allows actuator adjustment according to the actuator speed response or inertia of the system.In roughly means, the temperature of regulation range in which the actuator opens or closes completely mixing valve.For example: to maintain the boiler temperature and for most systems we recommend setting Xp = 50K (factory setting). This means that the actuator will operate in a pulse range of ± 25 °C from set temperature.During the Xp parameter setup, the set value flashes on the display.
• Operation to set the Xp parameter1) With a screwdriver remove the protection cap from the cover.2) With a screwdriver (max 3 mm), adjust the potentiometer to the desired position. An arrow in the vertical position means Xp = 50K.3) Put the protection cap back in its original position.
Setting desired temperature
min max
With this knob you can set the desired temperature. Temperature setting range depends on the setting of DIP switches (factory setting is 0÷100 °C).When the knob is turned, the LED screen displays the set temperature and this value will blink for about 3 seconds.After that time, the LED screen shows the current sensor temperature.
Manual controlIn the case of power failure or for service purposes, user can manually operate with the actuator.
NB.When the button for manual operation is in MAN position, the actuator stays in temporary position regardless of control signal.
90°90°
1
2
AUTOM
AN
1) With a screwdriver push and turn off the button to the MAN position
2) Manually move the handle to desired position.
3
0786EN February 2017ActuAtor for mixing vAlves
ActuAtor with integrAted regulAtor K275Y002for mixing vAlves r296 And r297
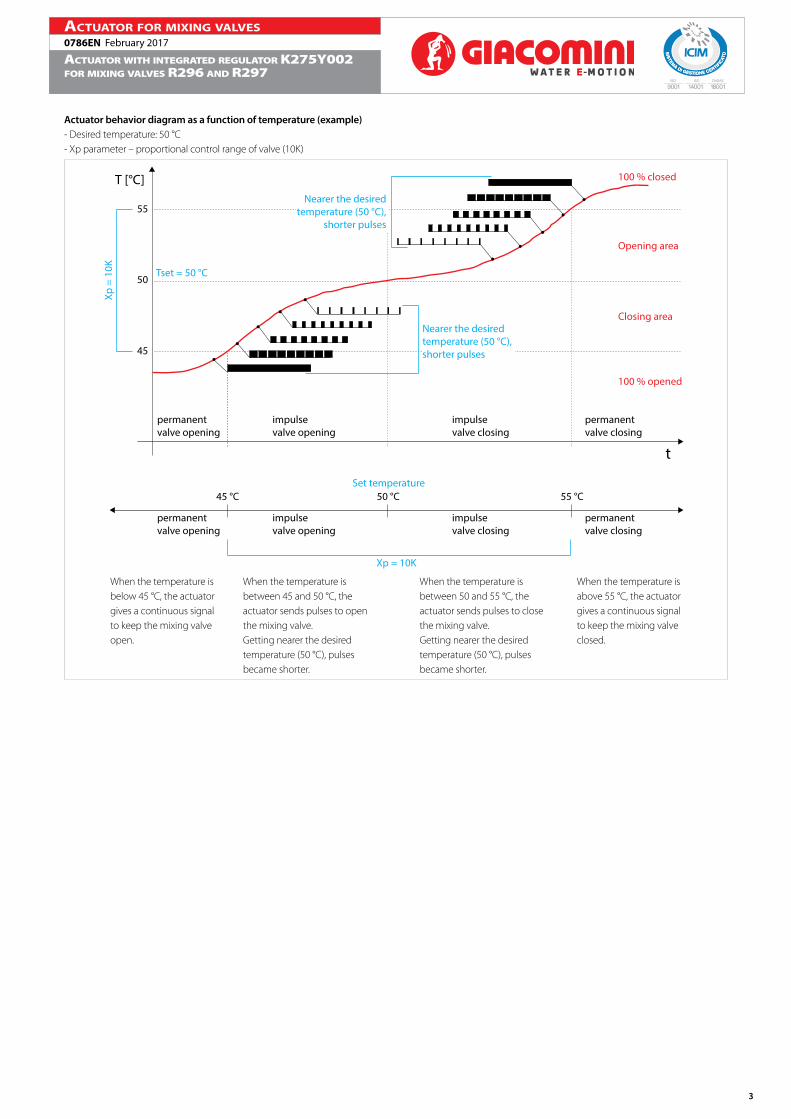
Actuator behavior diagram as a function of temperature (example)- Desired temperature: 50 °C- Xp parameter – proportional control range of valve (10K)
T [°C]
permanent valve opening
permanent valve closing
impulsevalve opening
impulsevalve closing
permanent valve opening
permanent valve closing
impulsevalve opening
impulsevalve closing
45
50
55
t
Tset = 50 °C
Xp =
10K
Nearer the desired temperature (50 °C),
shorter pulses
Nearer the desired temperature (50 °C),
shorter pulses
Nearer the desired temperature (50 °C), shorter pulses
100 % closed
100 % opened
Opening area
Closing area
45 °C 50 °C 55 °CSet temperature
Xp = 10K
When the temperature is below 45 °C, the actuator gives a continuous signal to keep the mixing valve open.
When the temperature is above 55 °C, the actuator gives a continuous signal to keep the mixing valve closed.
When the temperature is between 45 and 50 °C, the actuator sends pulses to open the mixing valve.Getting nearer the desired temperature (50 °C), pulses became shorter.
When the temperature is between 50 and 55 °C, the actuator sends pulses to close the mixing valve.Getting nearer the desired temperature (50 °C), pulses became shorter.

4
0786EN February 2017ActuAtor for mixing vAlves
ActuAtor with integrAted regulAtor K275Y002for mixing vAlves r296 And r297
Installation
Note: installation on the valvesTo correctly install the K275Y002 actuator on Giacomini valves,refer to the instructions of the valves.
Recommended mounting position
Electrical installation
230 V
Adapter
24 V
Installation of temperature sensorThe temperature sensor has to be installed after the circulator of the system, at a max.distance of 1,5 m from the actuator.It can be installed in contact with pipe or as immersion sensor.• For contact installation use the kit included. It is necessary to provide a flat smooth surface in contact lenght min. 40 mm for the placing of the sensor. This guarantees max thermal sensor connection and the optimal reaction time of the actuator.
• For immersion installation the sensor must be mounted in sleeve till mid-pipe.
When installing, it is necessary to provide adequate mechanical protection of sensor and sensor’s cable. It is necessary to isolate the sensor cable from heat in case of very hot parts.By optimizing the thermal insulation of the measuring point can eliminate the influence of ambient temperature on the actuator operation.
Operation examplesUnderfloor heatingMaintain a constant temperature of heating water.The installation of a safety thermostat is recommended.
Tsensor
safety thermostat
Radiator and underfloor radiant systemsMaintain a constant return flow water temperature (protection against condesation in solid fuel boiler) and constant temperature in the heating system.
sensor
Tsensorsafety
thermostat
Tank to heat the drinking waterMaintain a constant water temperature inside the hot water tank.
sensor
5
0786EN February 2017ActuAtor for mixing vAlves
ActuAtor with integrAted regulAtor K275Y002for mixing vAlves r296 And r297
Most common errorsDescription of errors Cause Repair
On LED screen is displayed:- Er1- Er2
- sensor is disconnected (Er1)- sensor is in short cut (Er2)
Check the sensor, replace if necessary
Fast blinking of LED diode (2/sec)and on LED display: 888
- low voltage supply - check the voltage supply
Blinking of LED (1/sec) and rotating of actuator in extreme left and right side
- actuator is calibrating- leave the actuator calibrating till the end and then will actuator pass in normal operation
Continuous operation of the actuator opening/closing
- Xp factor is set too low - Xp factor increase to a higher value
- Xp factor is set too high - Xp factor decrease to a lower value
- DIP4 (reaction factor) is in position x10 (too fast response to changes)
- DIP4 switch move to the position x1 (slower response)
Too slow response of actuator or temperature exceeds the desired value
- Xp factor is set too high - Reduce the value Xp
The actuator does not reach its set value
- sensor is not properly installed (bad contact)- check the sensor mounting, check if the sensor is thermally insulated
- AUTO/MAN button of actuator is in a position MAN - set the button to position AUTO
- actuator is not properly installed on the mixing valve- check the actuator mounting on the mixing valve or mechanical installation
If it is necessary to set the temperature to 60 °C, but actuator only allows you to set 45° C
- inappropriate temperature range settings on the DIP switches 2 and 3
- DIP switches 2 and 3 put into right position
The actuator closes the mixing valve but in the system is too cold
- inappropriate set of DIP switch 1 - check the appropriate position of DIP switch 1
The actuator is too slowly responding to the changes, does not reach the desired temperature
- inappropriate set of DIP switch 4 - in the position x1- for a faster response is necessary to put DIP switch 4 on position x10
LED indicator is not ON, LED display is not illuminated, the actuator stand still
- there is no power - check power supply
Manual button is in the MAN position, you can not move handle with your hand
- mixing valve is blocked- remove the actuator from the mixing valve, move the valve axes with tool
The temperature of the system is too low according to the desired temperature or oscillates
- inappropriate sensor insulation from its environment (wind exposure)
- install thermal insulation on the sensor
Safety note• The actuator has been designed for use in heating, ventilation and cooling systems (NB: without umidity control) and cannot to be used outside the specified field of application, especially in aircraft or in any other airborne means of transport.• Caution: power supply voltage – 24 VAC.• It may only be installed by suitably trained personnel. All applicable legal or institutional installation regulations must be complied with.• The device must be protected from moisture and is not recommended for use in external applications.• The device may only be opened at the manufacturer’s site. It does not contain any part that can be replaced or repaired by the user.• The cable must not be removed from the device.• The device contains electrical and electronic components and cannot be disposed as a household refuse. All locally valid regulations and requirements must be observed.
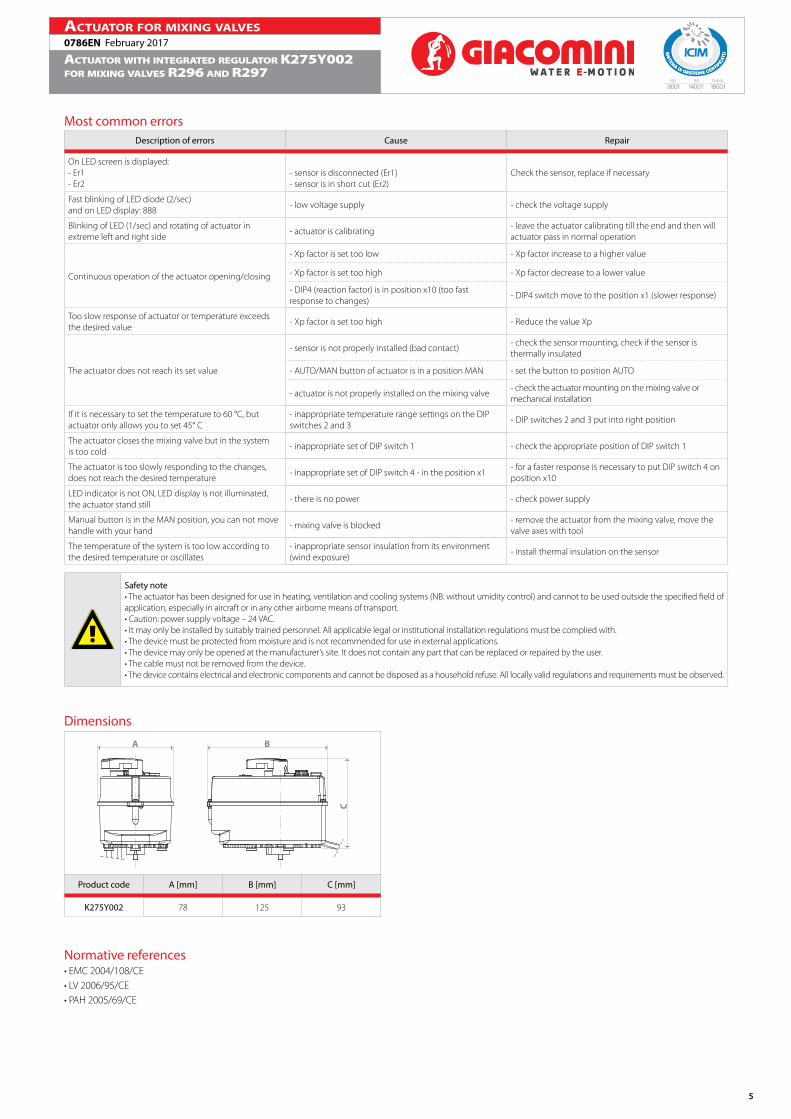
Dimensions
A B
C
Product code A [mm] B [mm] C [mm]
K275Y002 78 125 93
Normative references• EMC 2004/108/CE• LV 2006/95/CE• PAH 2005/69/CE

6
0786EN February 2017ActuAtor for mixing vAlves
ActuAtor with integrAted regulAtor K275Y002for mixing vAlves r296 And r297
Additional informationFor additional information please check the website www.giacomini.com or contact the technical service: ' +39 0322 923372 6 +39 0322 923255 * [email protected] pamphlet is merely for information purposes. Giacomini S.p.A. retains the right to make modifications for technical or commercial reasons, without prior notice, to the items described in this pamphlet. The information described in this technical pamphlet does not exempt the user from following carefully the existing regulations and norms on good workmanship.Giacomini S.p.A. Via per Alzo, 39 - 28017 San Maurizio d’Opaglio (NO) Italy