activity 1.2.6 variables and functions –...
TRANSCRIPT

Activity 1.2.6 Variables and Functions (VEX)
IntroductionA program can accomplish a given task in any number of ways. Programs can quickly grow to an unmanageable size, so variables and functions provide a technique to reduce the size of the program. A variable is a space in your robot’s memory where you can store data, such as whole numbers, decimal numbers, and words. Functions group together several lines of code, which can then be referenced many times in task main or even other functions. The use of variables and functions allows for complex control of a system.
Equipment Computer with ROBOTC software CIM VEX® testbed PLTW ROBOTC template
Procedure1. Form groups of four and acquire your group’s CIM VEX® Kit under your teacher’s
direction.
2. Within your four-student group, form a two-student team known as Team A and a two-student team known as Team B.
a. Team A will construct the VEX® Testbed with the exception of the ultrasonic and the light sensor.
b. Team B will construct the VEX® Testbed with the exception of the servo motor and flashlight.
3. Connect the CIM VEX® testbed Cortex to the computer.
© 2013 Project Lead The Way, Inc.
Computer Integrated Manufacturing Activity 1.2.6 Variables and Functions (VEX) – Page 1

CIM VEX® Testbed
Part 1: Using a variable to loop n times4. Open the PLTW ROBOTC template. Click File, Save As, select the folder that
your teacher designated, and then name the file A1_2_6_Part1.
5. In this activity you will use the green LED, right motor, and bumper switch. Leave the previously connected motors and sensors wired to the Cortex. Go to the Motors and Sensors Setup window. Configure the Motors and Sensors Setup to reflect the inputs and outputs to be used. Note that additional motors and sensors that are physically attached may be configured; however, these are not required to be configured. Click OK to close the window.
Cortex Wiring Diagram
6. Use the program below in the task main() section of the program between the curly braces.
© 2013 Project Lead The Way, Inc.
Computer Integrated Manufacturing Activity 1.2.6 Variables and Functions (VEX) – Page 2

int motorCount;
motorCount = 0;
while (motorCount < 3)
{
startMotor(rightMotor, 95);
wait(2);
stopMotor(rightMotor);
wait(2);
motorCount = motorCount + 1;
}
7. Save the program, power on the Cortex, compile, and download the program. If you have any errors, check with your instructor to troubleshoot your program.
8. Press Start to run the program and observe the behaviors.
9. Document what this program would look like as pseudocode simple behaviors.
10.Create a program that will run a motor back and forth 20 times, 0.5 seconds each way. Test the program and troubleshoot until the expected behavior has occurred. Make sure your code is documented with a task description, pseudocode, and line-by-line comments. Save the program. You will reuse this program in Activity 3.1.6.
Part 2: Using a variable to remember a maximum or minimum valueand using debugger windows
11.Open the PLTW ROBOTC template. Click File, Save As, select the folder that your teacher designated, and then name the file A1_2_6_Part2.
12.Use the program below in the task main() section of the program between the curly braces.
int biggest; while (1==1) { biggest = 0; while (SensorValue(bumpSwitch)==0) {
© 2013 Project Lead The Way, Inc.
Computer Integrated Manufacturing Activity 1.2.6 Variables and Functions (VEX) – Page 3
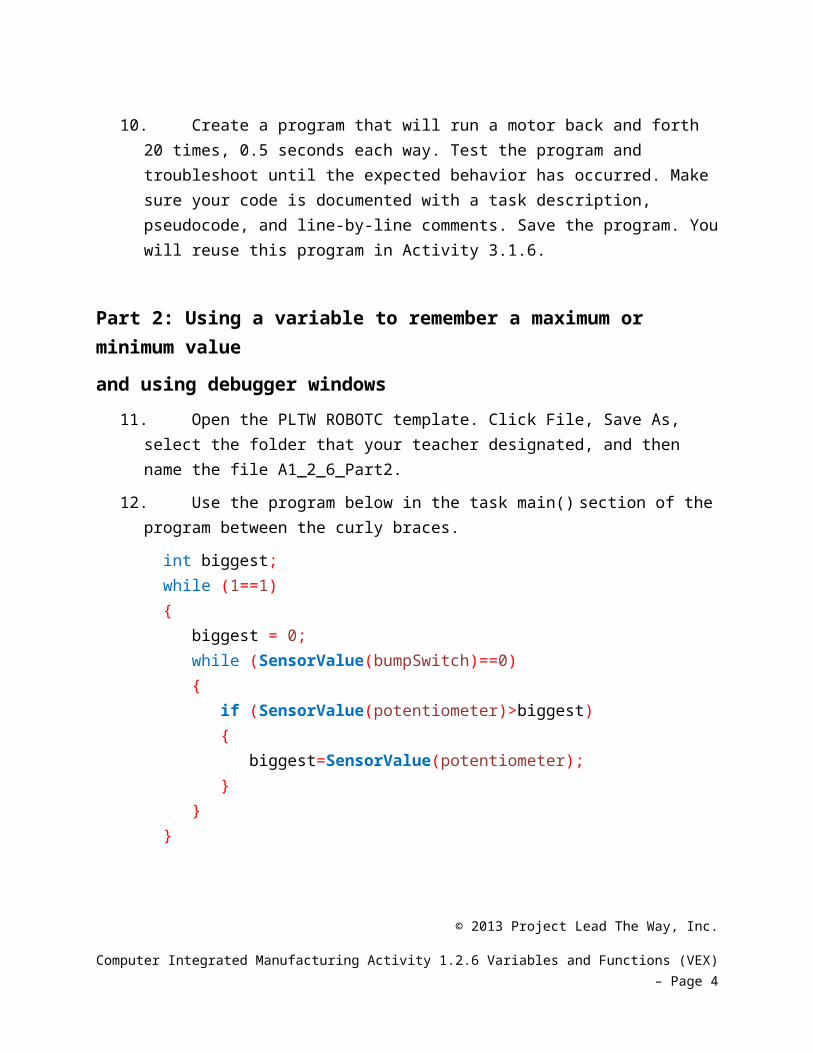
if (SensorValue(potentiometer)>biggest) {
biggest=SensorValue(potentiometer); } } }
13.Select View, Preferences, Compiler, Code Generation, and then select Force ‘Classic’ as the Code Generation For Stack. Click OK. Compile and download the program to the Cortex.
14.Use the Robot and Debugger Windows menu to make sure that both the Global Variables and Sensors tabs are checked. See the figure for how the menu should appear.
© 2013 Project Lead The Way, Inc.
Computer Integrated Manufacturing Activity 1.2.6 Variables and Functions (VEX) – Page 4

15.These debugger windows can be placed wherever they are convenient for you on the ROBOTC screen. To read about this, choose Help, Open Help, and then in the Contents tab, expand ROBOTC Debugger by clicking on its plus sign. Select Docking Debugger Windows. Steps 16-18 repeat the information from the built-in help. If you are able to learn from the built-in help, just make your debugger windows look like the picture in step 17, and then continue with step 19.
16.To move the debugger windows, click on the title bar of the debugger window and drag it to the desired location. If the Global Variables and Sensors debugger windows are sharing a single pane with separate tabs, you can tear one of the tabs off and then make it into its own window by clicking on the tab and dragging it to a new location. Make two separate windows, one for the Sensors debugger window and one for the Global Variables window.
17.Place the Global Variables and Sensors debugger windows on top of one another so that you can easily see the value of the variable “biggest” and the value of the sensor potentiometer at the same time. The windows might look like the image below.
© 2013 Project Lead The Way, Inc.
Computer Integrated Manufacturing Activity 1.2.6 Variables and Functions (VEX) – Page 5

18.Later, you can make the debugger windows dock again at the bottom of the code editing pane. Drag the debugger window’s title bar and release the mouse on one of the icons shown in the figure below. The debugger window will dock at one edge of the ROBOTC window or of the selected ROBOTC pane. A debugger window can also be placed back into a tab within another debugger window this way.
19.Start the program and slowly turn the potentiometer back and forth, using the debugger windows to monitor the value of the variable “biggest” and the value of the potentiometer. Press the bump switch and note the effect. Continue to turn the potentiometer, press the bump switch, and monitor the variable and sensor values until you think you understand how the code works. What does this program do? Annotate the program with a task description, pseudocode, and line-by-line comments.
© 2013 Project Lead The Way, Inc.
Computer Integrated Manufacturing Activity 1.2.6 Variables and Functions (VEX) – Page 6

20.Click File, Save As, select the folder that your teacher designated, and then name the file A1_2_6_Part2_ Modify_A.
a. If you have the ultrasonic distance sensor, modify the program so that a variable “closest” will remember the closest distance detected by the ultrasonic distance sensor. The limit switch should reset the record.
OR
b. If you have the light sensor, modify the program so that a variable “brightest” will remember the brightest light detected by the light sensor. The limit switch should reset the record.
21.Test your program and troubleshoot until the expected behavior has occurred. Make sure your code is documented with a task description, pseudocode, and line-by-line comments. Save the program.
© 2013 Project Lead The Way, Inc.
Computer Integrated Manufacturing Activity 1.2.6 Variables and Functions (VEX) – Page 7

Part 3: Define a function22.Open the PLTW ROBOTC template. Click File, Save As, select the folder that
your teacher designated, and then name the file A1_2_6_Part3.
23.Use the program below in the task main() section of the program between the curly braces.
void LEDControl(); //this is a function declaration
task main()
{
while (1==1)
{
LEDControl(); //function call
}
}
void LEDControl() //function definition
{
if (SensorValue(bumpSwitch)==1)
{
turnLEDOn(green);
}
else
{
turnLEDOff(green);
}
}
24.Test the program and troubleshoot until the expected behavior has occurred. Save the program.
25.Describe the behaviors observed.
26.Follow teacher direction and either print the programs or submit electronically with this activity.
Conclusion1. Describe any challenges that you encountered while developing the program.
© 2013 Project Lead The Way, Inc.
Computer Integrated Manufacturing Activity 1.2.6 Variables and Functions (VEX) – Page 8

2. Describe applications for which variables and functions could be used.
© 2013 Project Lead The Way, Inc.
Computer Integrated Manufacturing Activity 1.2.6 Variables and Functions (VEX) – Page 9