acr accreditation image upload instructions · pdf fileimage upload instructions contents ......
TRANSCRIPT

Page 1 of 19 ACRAccreditationImageUploadInstructions_20180124
ACRAccreditationImageUploadInstructions
Contents
I. Introduction .......................................................................................................................................... 2
II. Your Application .................................................................................................................................... 2
III. Your Testing Package ........................................................................................................................ 3
A. ACRedit Web Client ........................................................................................................................... 4
B. TRIAD Windows Client ...................................................................................................................... 7
Step 1: Select Modality Testing Package .............................................................................................. 9
Step 2: Choose image files to submit for your examination ................................................................. 9
Step 3: Viewing your images using the TRIAD Windows Client .......................................................... 12
Step 4: Upload or delete files that are checked () ........................................................................... 13
Step 5: View and Print Image Upload Summary ................................................................................. 13
Step 6: Submit Testing Package .......................................................................................................... 13
IV. Installing ClearCanvas Workstation ................................................................................................ 13

Page 2 of 19 ACRAccreditationImageUploadInstructions_20180124
I. Introduction
Facilities seeking ACR Accreditation can choose to upload clinical and phantom images to an encrypted,
secure server for accreditation review.
There are two choices for uploading your images:
1. Web Client ‐ compatible with your Windows PC or MAC – no software to install, only needs an
internet connection.
2. Windows Client ‐ compatible with your Windows PC, allows you to connect directly to your
PACS for image retrieval.
This document will give you the information on the process and functionality of both Web Client and
Windows Client.
II. YourApplication
When you apply for accreditation, in addition to choosing modules and/or examinations for submission
(depending on the accreditation program), you also choose the type of submission. For unit based
accreditation programs, you may choose the way you submit your images differently for each unit. For
facility based accreditation programs such as ultrasound, you will choose one submission type no matter
how many units are at that facility.
Electronic Image Selection in ACRedit Application
Select submission as
Upload from the drop
down.

Page 3 of 19 ACRAccreditationImageUploadInstructions_20180124
If you choose upload submission, please be aware that you will be required to upload both clinical and
phantom images (if applicable), and any supporting documents required in the online testing package
for that modality. For instance, if you are applying for CT Accreditation, you must submit copies of your
written protocols for the examinations on your application, as well as the most recent Annual System
Performance Evaluation, for that unit. These must be uploaded– they should not be mailed or faxed.
After you finish and submit your application, ACR staff will ensure that everything is received (fees,
survey agreement if applicable, etc.) and accept your application. You will then receive an email stating
that your online testing package is available.
III. YourTestingPackage
Once the testing package is available you may access it by clicking on “My Testing Packages”. To open
your testing package, you will click the “Modify” link under the Action column. You will see several
items on the left hand navigation pane. Each item will have a red X next to it, indicating that section is
not completed. As you complete each section, a green check mark will appear. All items must have a
green check prior to submitting your testing package. This document will focus exclusively on the item
“Upload Images”.
Left navigation pane in ACRedit online Testing Package
Fields marked X are the
incomplete sections.
Fields marked with a green check
are the completed sections.
This section of the page is used to
upload the images electronically.

Page 4 of 19 ACRAccreditationImageUploadInstructions_20180124
PLEASE REFER TO THE TESTING INSTRUCTIONS SPECIFIC FOR YOUR MODALITY AT
https://www.acraccreditation.org/ TO ENSURE YOU ARE UPLOADING ONLY THE IMAGES THAT ARE
REQUIRED FOR YOUR TESTING PACKAGE. IT IS IMPORTANT WHEN UPLOADING IMAGES TO ENSURE
THAT ALL IMAGES HAVE BEEN SUCCESSFULLY UPLOADED AND VIEWED PRIOR TO SUBMISSION.
On the “Upload Images” screen, there are two choices for uploading your images, ACRedit Web Client
and TRIAD Windows Client.
You can switch between these two uploading methods at any time. We will go into more detail of these
two choices separately. You will be able to add or delete images until your online testing package is
submitted. Once your testing package is fully submitted, you cannot make any changes to the images
you have chosen.
Upload Images Screen of ACRedit Testing Package
A. ACReditWebClient
The ACRedit Web Client requires no download or installation of any software to your computer or
network. An internet connection and access to the images on your computer hard drive, network or
CD/DVD/thumb drive are required. Web Client requires the use of an up‐to‐date web browser. Here is a
list of the supported browsers:
Internet Explorer – IE 10 or above – upload files
Google Chrome – Chrome 22 or above – upload files or folders
Safari – Safari 5 or above
Mozilla Firefox – Firefox 27 or above – upload files or folders
The Web Client option does not require software installation for
uploading your images. You can view the images using the DICOM
viewer provided prior to submitting the images and testing package.
See Section A for more details.
This option (TRIAD Windows Client) requires software installations and allows you
to upload images directly from your PACS system or from your computer. You can
view the images using ClearCanvas Workstation viewer prior to submitting the
testing package. See Section B for more details.

Page 5 of 19 ACRAccreditationImageUploadInstructions_20180124
Upload Images Screen with Web Client chosen
From this window, you may view supported file types for each modality, get further instruction and
view/upload images.
To upload images, click “File Upload” or “Folder Upload” (if available). This will open a new window
allowing you to navigate to the image files for upload. For many examinations, images will be stored in
separate folders for each series of images. If that is the case, it is necessary to click “File Upload” or
“Folder Upload” separately for each series in a particular examination. You may, however, select
multiple files from a particular folder with your selection. To select all files from a folder, press “Ctrl +
A”.
Please note that a progress bar will appear while your files and/or folders are uploading. You may also
remove one file or all files by clicking the “Delete” button. Once all of the exams have been uploaded,
you must view the images by clicking the “View” button. When you have finished uploading images for
that examination, click the Ready for Submission box in the upper right corner of that exam. This will
save the uploaded images.
Select ACRedit Web Client and
the below window appears.
Select
View/Upload.

Page 6 of 19 ACRAccreditationImageUploadInstructions_20180124
It is important to view all the uploaded images prior to submitting the testing package to ensure all
required images have been uploaded and can be viewed successfully. At this point, you can log out of
the ACRedit database and finish later, or click next to progress. When you are finished uploading the
images for all examinations, click on Image Upload Summary. A new window will open.
Once all the testing materials have been uploaded and all items are checked with a green check mark on
the left navigation menu, you are then able to submit your testing package. Please note that once you
finish and submit your testing package you are not able to make any changes to the uploaded
documents and images.
You will be able to view the images you uploaded and submitted for accreditation by clicking on “My
Testing Packages” and then “View images for Submission” once the link is available.

Page 7 of 19 ACRAccreditationImageUploadInstructions_20180124
B. TRIADWindowsClient
o Software installation required
TRIAD Windows Client application
ClearCanvas Workstation
You can download both here: https://triad4.acr.org/TriadClientATI/
o Ability to connect with Clear Canvas Workstation for viewing full images before submission
o May choose entire folders for uploading in addition to individual files
o Can retrieve images from PACS for upload
Minimum system requirements for TRIAD Windows Client: Windows 7 (32 or 64 bit) only (Windows 8 and Windows 10 are not currently supported) Intel/AMD CPU / 2.4 GHz or above 2 GB RAM 60 GB Hard Disk space Microsoft .NET Framework 4.5.2 Microsoft Visual C++ 2010 x86 Redistributable Microsoft Visual C++ 2012 x86 Redistributable
Installing Microsoft .NET Framework requires administrative privileges on the local computer.
You can download .NET Framework from: https://www.microsoft.com/en‐us/download/details.aspx?id=42643
Choosing TRIAD Windows Client (from the Upload Images screen of your online testing package)
changes the screen to allow you to install, launch or update the TRIAD Windows Client.
Upload Images screen with TRIAD Windows Client chosen
This link will:
Install TRIAD if you have not already
installed the software.
Launch TRIAD if the software is already
installed.
This link will take you to a site to
download Clear Canvas. See Section IV:
Installing Clear Canvas Workstation for
further instructions.

Page 8 of 19 ACRAccreditationImageUploadInstructions_20180124
Administrative privileges to your PC are required to install TRIAD Windows Client and Clear Canvas
Workstation viewer. If you are unable to acquire these privileges or receive assistance from your IT
department, you may still upload images with the ACRedit Web Client.
While the Web Client allows you to upload and view your images prior to submission, it does not allow
you to access your PACS system directly to upload your images. With the TRIAD Windows Client you can
view the DICOM images by using Clear Canvas Workstation, a free DICOM viewer (see section IV.
Installing Clear Canvas Workstation). When installing the Clear Canvas Workstation please ensure that
you also install the patch.
Once TRIAD is installed and you have launched the software, you will see the TRIAD Home screen. The
pane on the left side of the TRIAD window is the log in screen. You must first select the appropriate
Accreditation program before logging in. The username and password are the same as your login for
your ACRedit account.
TRIAD Windows Client software log in screen
Select the Accreditation Program
from the domain drop down list.
Page 9 of 19 ACRAccreditationImageUploadInstructions_20180124
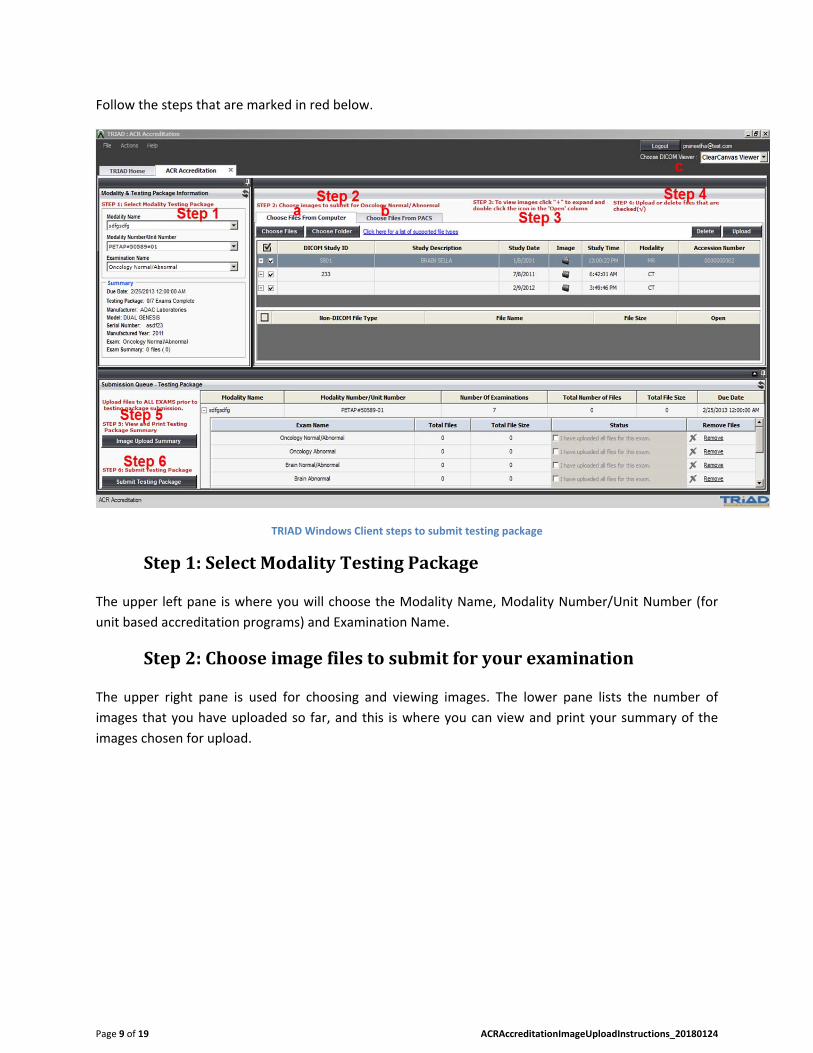
Follow the steps that are marked in red below.
TRIAD Windows Client steps to submit testing package
Step1:SelectModalityTestingPackage
The upper left pane is where you will choose the Modality Name, Modality Number/Unit Number (for
unit based accreditation programs) and Examination Name.
Step2:Chooseimagefilestosubmitforyourexamination
The upper right pane is used for choosing and viewing images. The lower pane lists the number of
images that you have uploaded so far, and this is where you can view and print your summary of the
images chosen for upload.

Page 10 of 19 ACRAccreditationImageUploadInstructions_20180124
a) ConfigurePACS
You must setup a connection between your PACS and TRIAD Windows Client in order to select files from
the PACS and you may need assistance from your PACS/IT team.
a) Click here to establish a
connection to your PACS and/or
only choose files
b) Click to choose files from PACS.
Click Manage to add Device
details and test the
connection.
Click ‘DICOM Info’ to
get DICOM
information to be
given at PACS side.
Page 11 of 19 ACRAccreditationImageUploadInstructions_20180124
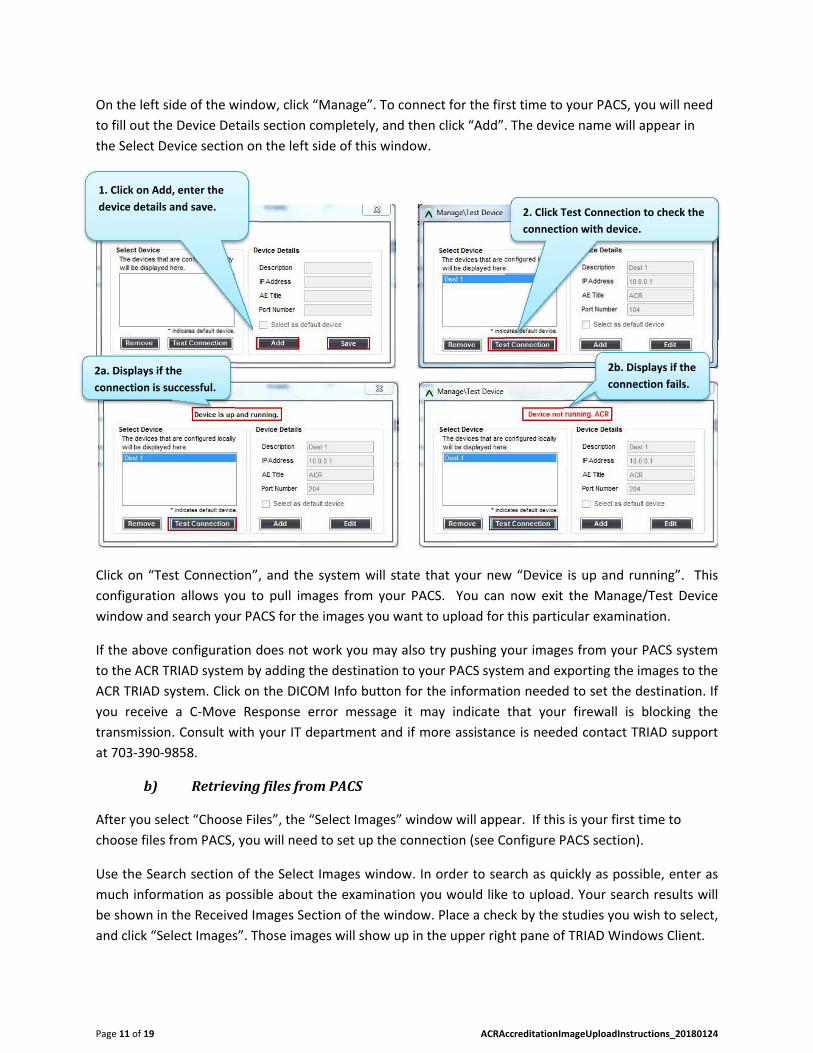
On the left side of the window, click “Manage”. To connect for the first time to your PACS, you will need
to fill out the Device Details section completely, and then click “Add”. The device name will appear in
the Select Device section on the left side of this window.
Click on “Test Connection”, and the system will state that your new “Device is up and running”. This
configuration allows you to pull images from your PACS. You can now exit the Manage/Test Device
window and search your PACS for the images you want to upload for this particular examination.
If the above configuration does not work you may also try pushing your images from your PACS system
to the ACR TRIAD system by adding the destination to your PACS system and exporting the images to the
ACR TRIAD system. Click on the DICOM Info button for the information needed to set the destination. If
you receive a C‐Move Response error message it may indicate that your firewall is blocking the
transmission. Consult with your IT department and if more assistance is needed contact TRIAD support
at 703‐390‐9858.
b) RetrievingfilesfromPACS
After you select “Choose Files”, the “Select Images” window will appear. If this is your first time to
choose files from PACS, you will need to set up the connection (see Configure PACS section).
Use the Search section of the Select Images window. In order to search as quickly as possible, enter as
much information as possible about the examination you would like to upload. Your search results will
be shown in the Received Images Section of the window. Place a check by the studies you wish to select,
and click “Select Images”. Those images will show up in the upper right pane of TRIAD Windows Client.
1. Click on Add, enter the
device details and save. 2. Click Test Connection to check the
connection with device.
2a. Displays if the
connection is successful.
2b. Displays if the
connection fails.

Page 12 of 19 ACRAccreditationImageUploadInstructions_20180124
Step3:ViewingyourimagesusingtheTRIADWindowsClient
Whether you imported your images from PACS or from your computer/network, you will view the
images the same way. In the top right corner of TRIAD, you will see the DICOM viewer to use when
viewing your images. If you have not downloaded ClearCanvas, then see section IV: Installing
ClearCanvas Workstation.
The images appear in the upper right pane of TRIAD, double click on the image icon to open images at
study level in ClearCanvas. Click the “+” next to the study. The study will open into folders for each
series. Click the folder icon in the “Image” column. This will open the images for that series with
ClearCanvas.
Enter information then press
“Search Images”

Page 13 of 19 ACRAccreditationImageUploadInstructions_20180124
Step4:Uploadordeletefilesthatarechecked()
After you have viewed your images, the next step is to upload them. Mark the images you want to
upload or delete by checking the box just left of the study ID. Please note that if you chose images from
other formats, they will be listed separately, and you may need to use the scroll bar on the right side of
the pane if they do not all fit in the window.
Step5:ViewandPrintImageUploadSummary
You may view and print a summary of the images that you have uploaded by clicking on the Image
Upload Summary button.
Step6:SubmitTestingPackage
After all of your images have been successfully uploaded, Select “Submit Testing Package” in the lower
pane of TRIAD. You will not be able to submit the images until all items have been completed in the
testing package. If all items have not been completed, then you will be redirected to your testing
package in ACRedit. Once all the testing materials have been uploaded, you are then able to submit
your testing package. Please note that once you finish and submit your testing package you will not be
able to make any changes to the uploaded documents and images. You will however be able to view the
images you uploaded and submitted for accreditation by clicking on “My Testing Packages” and then
“View images for Submission” once the link is available (see illustrations on the bottom of page 7 top of
page 8)
IV. InstallingClearCanvasWorkstation
In order to view the DICOM images using the TRIAD Windows Client in a testing packet, you must
download and install the free DICOM viewer ClearCanvas. This requires administrative privileges on the
PC. If you are attempting to install ClearCanvas on your work PC, you may need help from your IT
department. Follow the instructions below to download and install ClearCanvas. When you open DICOM
images in TRIAD Windows Client, the ClearCanvas viewer will open.
Download the ClearCanvas DICOM Viewer 13.2 (32bit or 64bit) from the link below to your local drive:
https://triad4.acr.org/TriadClientATI/
Page 14 of 19 ACRAccreditationImageUploadInstructions_20180124
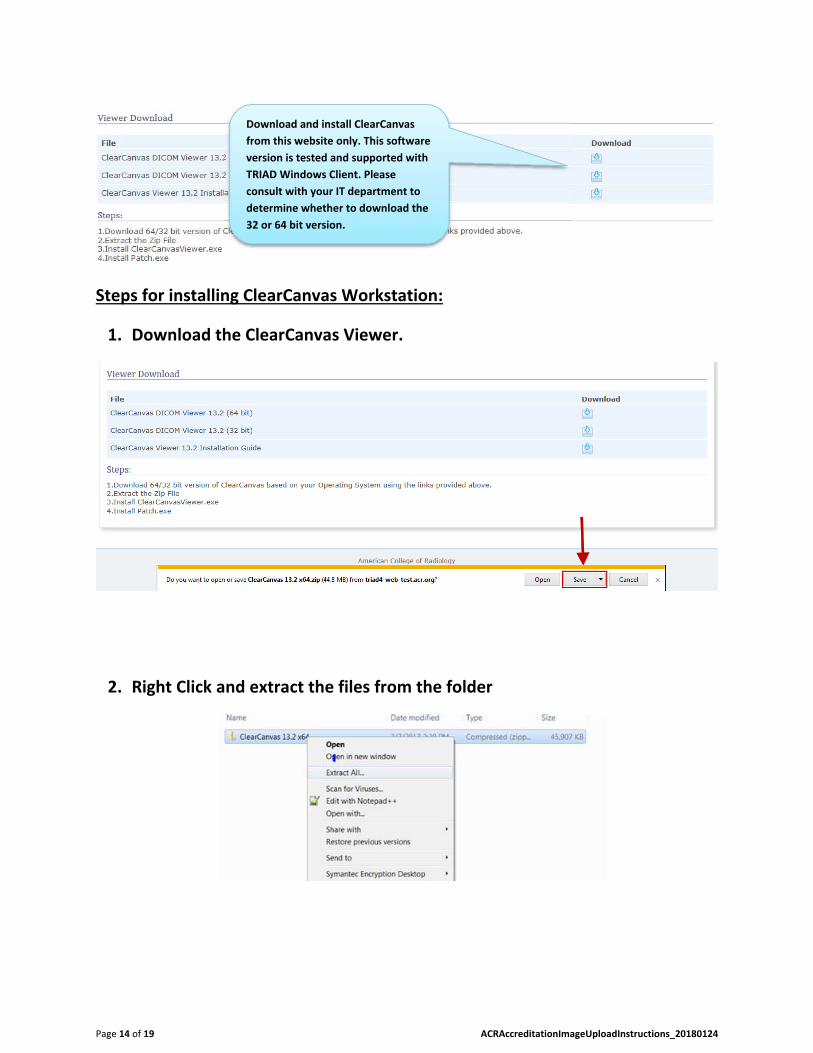
Steps for installing ClearCanvas Workstation:
1. Download the ClearCanvas Viewer.
2. Right Click and extract the files from the folder
Download and install ClearCanvas
from this website only. This software
version is tested and supported with
TRIAD Windows Client. Please
consult with your IT department to
determine whether to download the
32 or 64 bit version.

Page 15 of 19 ACRAccreditationImageUploadInstructions_20180124
3. Open the Clean Canvas folder and double Click on “ClearCanvasViewer.exe“
4. Select “No” for the following message.
5. Now ClearCanvas will display the below dialog. Click “Next” to continue.

Page 16 of 19 ACRAccreditationImageUploadInstructions_20180124
6. Click “OK” to review the End user license agreement and then “I Agree”.

Page 17 of 19 ACRAccreditationImageUploadInstructions_20180124
7. Click “Next” (leave the default path. Please do NOT modify.)
8. Please change the AE Title to “CCSERVER” and Port to “200” to avoid
conflicts as port 104 is the most commonly used port among other
applications.
Page 18 of 19 ACRAccreditationImageUploadInstructions_20180124
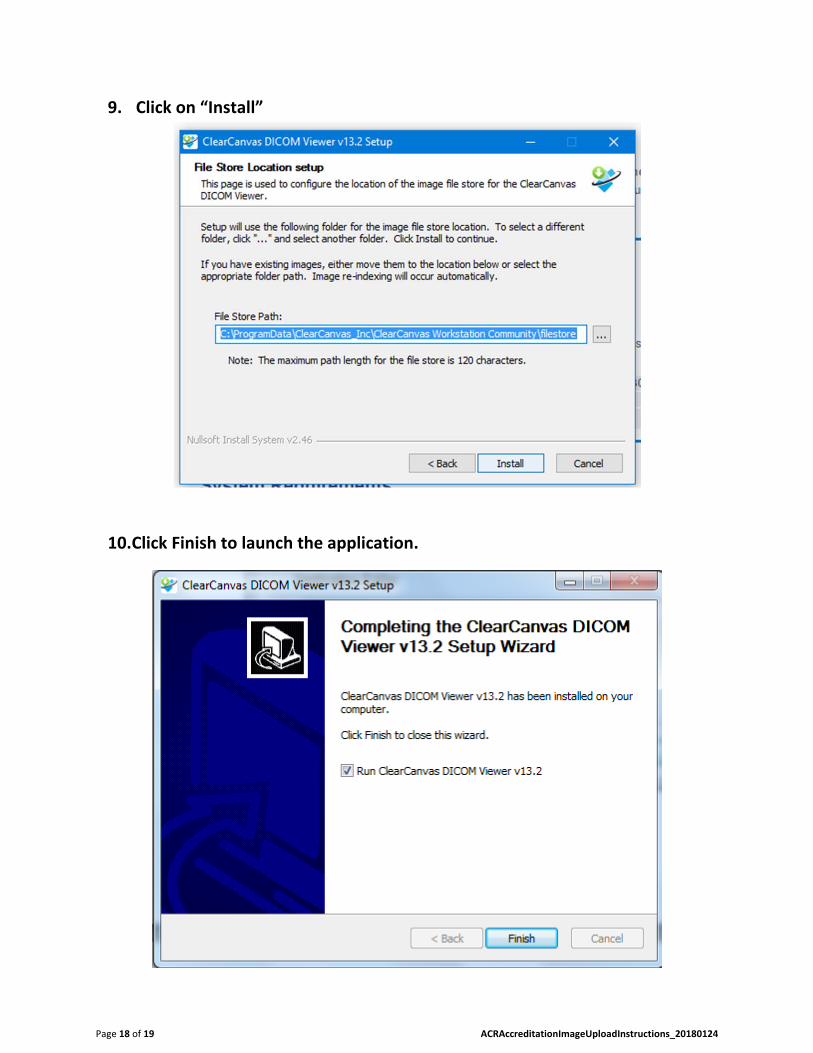
9. Click on “Install”
10. Click Finish to launch the application.

Page 19 of 19 ACRAccreditationImageUploadInstructions_20180124
11. Close ClearCanvas and double click on “Patch.exe”
12. Click on “ Ok”
13. Click on “ Close”