acme dreamweaver cc basics - 2010-12 academic catalogfaculty.wartburg.edu/payne/shared/pdf/acme...
TRANSCRIPT

ACME Dreamweaver CC Basics
THOMAS PAYNE UPDATED TO VERSION CC 2015.2
i
ACME Dreamweaver CC Basics
These lessons are designed to get you through the basics of making web sites
in Dreamweaver with the most flexibility and the least amount of work.
Think of them as supplying you with a toolbox full of tools to start making
good websites. Perhaps more importantly these lessons are also designed to
give you a familiarity with how web sites (and HTML and CSS) work.
They are deceptively packed with information, and they are designed to also
act as reference after you are finished completing them. Web pages across
the web have many similarities, and the information here is designed to cover
many of these similarities.
The fancy stuff is not covered here—you are on your own for those tech-
niques. But many fancy things are not too difficult to learn if you have the
firm foundation that these lessons provide. But as you learn more, keep in
mind that fancier is not always better than clean and simple.
It is very important that you try to somewhat understand what you are do-
ing in these lessons, and I would recommend doing each at least twice, the
second time trying not to look at the instructions. Lessons not done this
way have a tendency to go in one ear and out the other.
If you have problems with doing the lessons, just go back as many steps as
needed and try again. Terms in dark red can be defined by touching the word
(with the iBook edition).
The lessons are designed to be done on a Macintosh, and assume a basic fa-
miliarity with the Mac, although you could certainly do them on a Windows
computer without much trouble.
The illustrations in these lessons are from Dreamweaver CC, August 2016. If
you need lessons designed for CS5, 5.5, or 6, there is a book for those ver-
sions also.
A disclaimer and a brag here: I am not an expert at programming for the
web. I see this as a good thing for you. The terms and methods I present are
as simple as they can be while still giving you a basic understanding of how
Dreamweaver works. I am not showing you the best ways of doing things
here, just the easiest ways. And by the way: ‘responsive design’ is not cov-
ered here, as it is best looked at as an advanced option.
And finally: as programs such as Muse and Wordpress get better and more
flexible there would seem to be little need for raw code programs like
Dreamweaver. That is partially true, but even in the future any complicated
website that is updated frequently will be done in a program such as Dream-
weaver. You will certainly need to know at least a bit about what the pro-
grammers are up to.
Thomas Payne, August 2016
CHAPTER 1
Making simple
pages and links
A web page is simply a bunch of words. In a browser, such as Chrome, you can go
to View>Developer>View Source (go to the menu View, then click Developer, then
View Source). Here you will see this ‘source code’. The browser’s job is to take all
this source code and make it into something more visual. Much of the source code
in a web page tells the browser how to do this.
This is very different from just about any other application where the ‘source code’
(the stuff that tells the application how to display it) is totally hidden from the per-
son using that application.
In this lesson you will be making a very simple website, and I will have you display
the code on the page just to get used to it. You don’t ever really need to know
what all of it means, but eventually you will have to deal with it on some level.
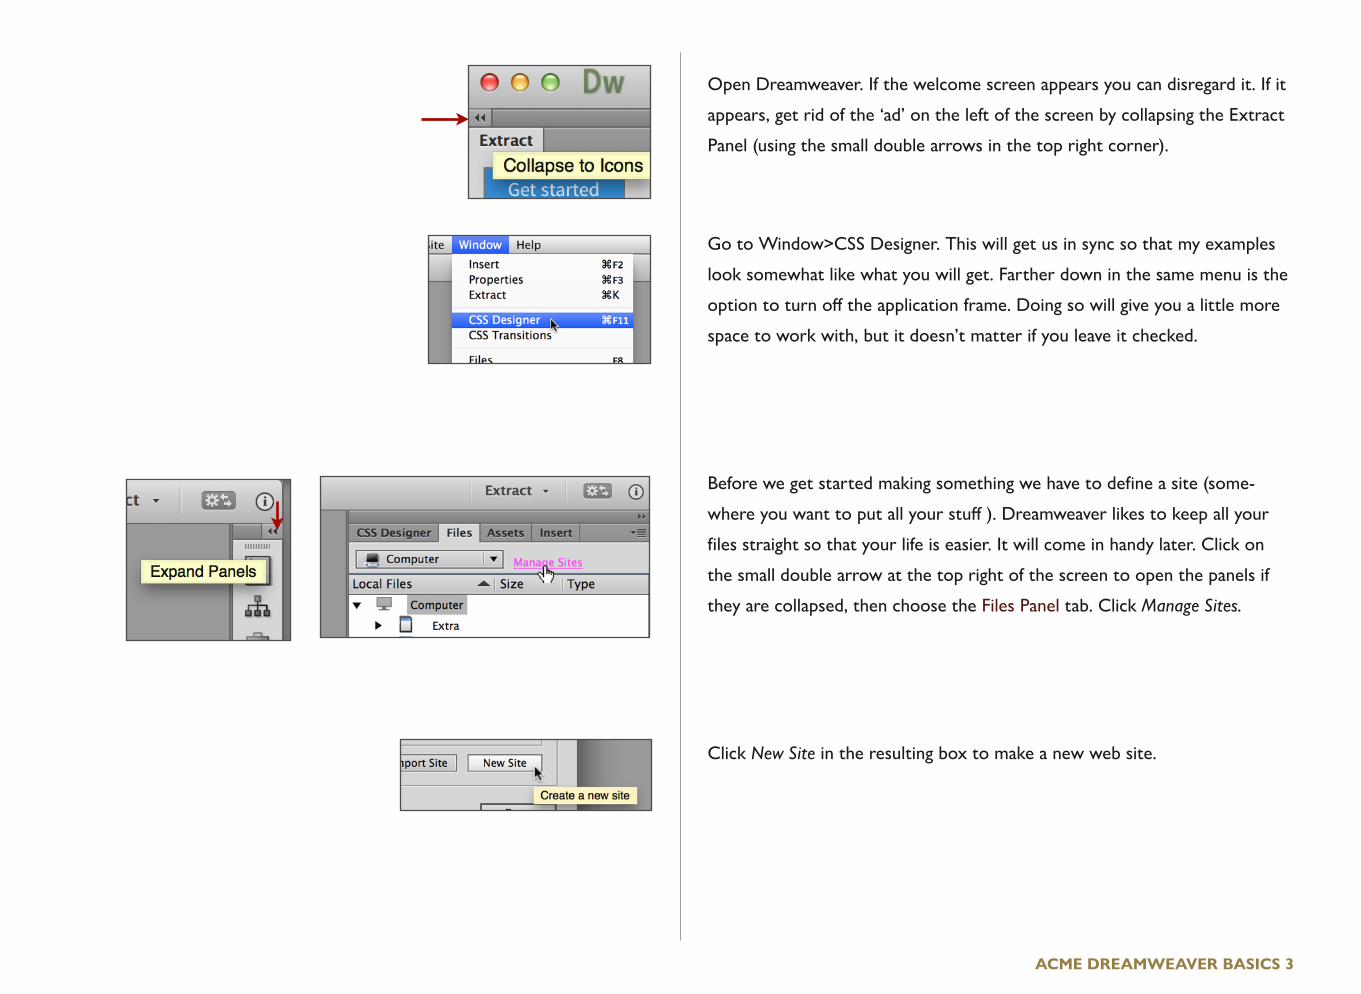
Open Dreamweaver. If the welcome screen appears you can disregard it. If it
appears, get rid of the ‘ad’ on the left of the screen by collapsing the Extract
Panel (using the small double arrows in the top right corner).
Go to Window>CSS Designer. This will get us in sync so that my examples
look somewhat like what you will get. Farther down in the same menu is the
option to turn off the application frame. Doing so will give you a little more
space to work with, but it doesn’t matter if you leave it checked.
Before we get started making something we have to define a site (some-
where you want to put all your stuff ). Dreamweaver likes to keep all your
files straight so that your life is easier. It will come in handy later. Click on
the small double arrow at the top right of the screen to open the panels if
they are collapsed, then choose the Files Panel tab. Click Manage Sites.
Click New Site in the resulting box to make a new web site.
ACME DREAMWEAVER BASICS 3

Name your site with something like your name, and specify a location to
keep your files on the computer you are working on by clicking on the little
folder icon. At this point you can choose a place to keep your web folder,
then click New Folder and name it appropriately (I called mine WebSiteTest).
All of the information for your site will be contained in this folder. Click Save
and then Done.
Now you are ready to make a page. Go to the menu File>New. There are a
lot of options here, but the most useful is the first and simplest—choose
New Document and HTML, then Create.
When the new window comes up choose the Design view by changing it
from Live near the top left of the window, then push the Split button to go
to Split View. Now the window on the bottom is the source code, and the
window on the top is the design. Don’t get intimidated by this code. We are
going to have to keep track of it later (sorry about that), but you really don’t
have to know what everything means.
But it isn’t that difficult. Look at the code and replace Untitled Document with
1st Page. Now you can say that you have written some code, and you have
more importantly done some good housekeeping. The title is the text that
sometimes shows up in a browsers top bar or with a saved link.
ACME DREAMWEAVER BASICS 4

In the Design View (make sure Live View is not showing in the box) type
something like The First Page, hit the return key, and type something like Go
to the Second Page. That will be our link to the second page pretty soon.
Save your page into the folder you defined before with your name
(File>Save). Call it something like FirstPage (and leave the .html). Try to get
out of the habit of using spaces (or punctuation) in a filename. You can use
camel-case like in this example, or use underscores or hyphens to separate
words. If you need to navigate to your web folder, click the small discloser
triangle to the right of the filename. After you save your file you can close its
window.
Make a new page like the one we made before. In the design view (the top of
the window) type something like The Second Page, hit return, and then type
Go to the First Page as what will be our link. You should also name the page as
you did with the first page. If for no other reason than it is a good habit to
be in. And you get to do some more coding.
Save the page in the same place as the last one you saved, naming it some-
thing like SecondPage. Do not close the window, as we will work on this page
next.
ACME DREAMWEAVER BASICS 5

With the second page still open, highlight the text Go to First Page by drag-
ging across it, and then go to the Insert Panel on the top right of the screen
(click the tab to reveal it). Change the panel option to HTML (if you need to)
and click the Hyperlink button.
Click the small folder icon and navigate to the file for the first page and
choose it (this is where we want the link to take us). Click OK.
Save your second page, close the window, and if you closed the first page,
open it by double-clicking on it in the Files Panel on the upper right of the
screen in the Files tab.
ACME DREAMWEAVER BASICS 6

Make a link for the Go to the Second Page type the same way you did for the
second page, but of course this time specify the second page as the one to
link to.
Very important—now save your file since we are going to be testing it.
Go to the File menu, then Preview in Browser and choose a browser to pre-
view your file in. After it opens, you should be able to go back and forth be-
tween your two pages. If not, then try this short lesson again.
What you have just done in this lesson is make your first website. Here is
how to prove that: Quit or hide Dreamweaver, open the folder that you
made, and open one of the two files in a web browser (just drag the file onto
the browser icon or double-click the file).
You could take your folder and save it to another drive, open it on another
computer, or email it to someone. You could even upload it to a web server,
and the whole world could see your creation. As long as the files stay in the
same place in that folder and the file names remain the same it will work fine.
As long as your files stay in the same place in that folder and the file
names remain the same it will work fine. Yes, that did bear repeating! And
it should be in bold! One very common mistake students make is to ‘clean up’
their folders and rename things after they are finished, which breaks links to
other pages and image sources.
ACME DREAMWEAVER BASICS 7

There is one last step in this lesson. Open Dreamweaver, and do the whole
thing over again. Maybe this time without looking too much at these instruc-
tions. Look at the code and try to figure out what is going on—the color of
the code type or the line numbers don’t matter since these are just a conven-
tions Dreamweaver uses to help find things in more complicated code.
The remaining lessons in this book depend on you knowing what was cov-
ered in this chapter. You should save your work from this lesson so you can
expand on it in Chapter 2.
ACME DREAMWEAVER BASICS 8

CHAPTER 2
Structure,
Images, & Text
In the last lesson you learned how to make a web site, and if you just want words
and don’t care how it looks, you learned pretty much all you need to know.
In this lesson we will be making a web page and adding photographs and text for-
matting. More information choices, nicer to read.
By the way—we will be sizing images in this lesson. Inches don’t matter on the
web (as in anything viewed on the screen as the final product). Pixels are the only
thing that matters, and they matter a lot.
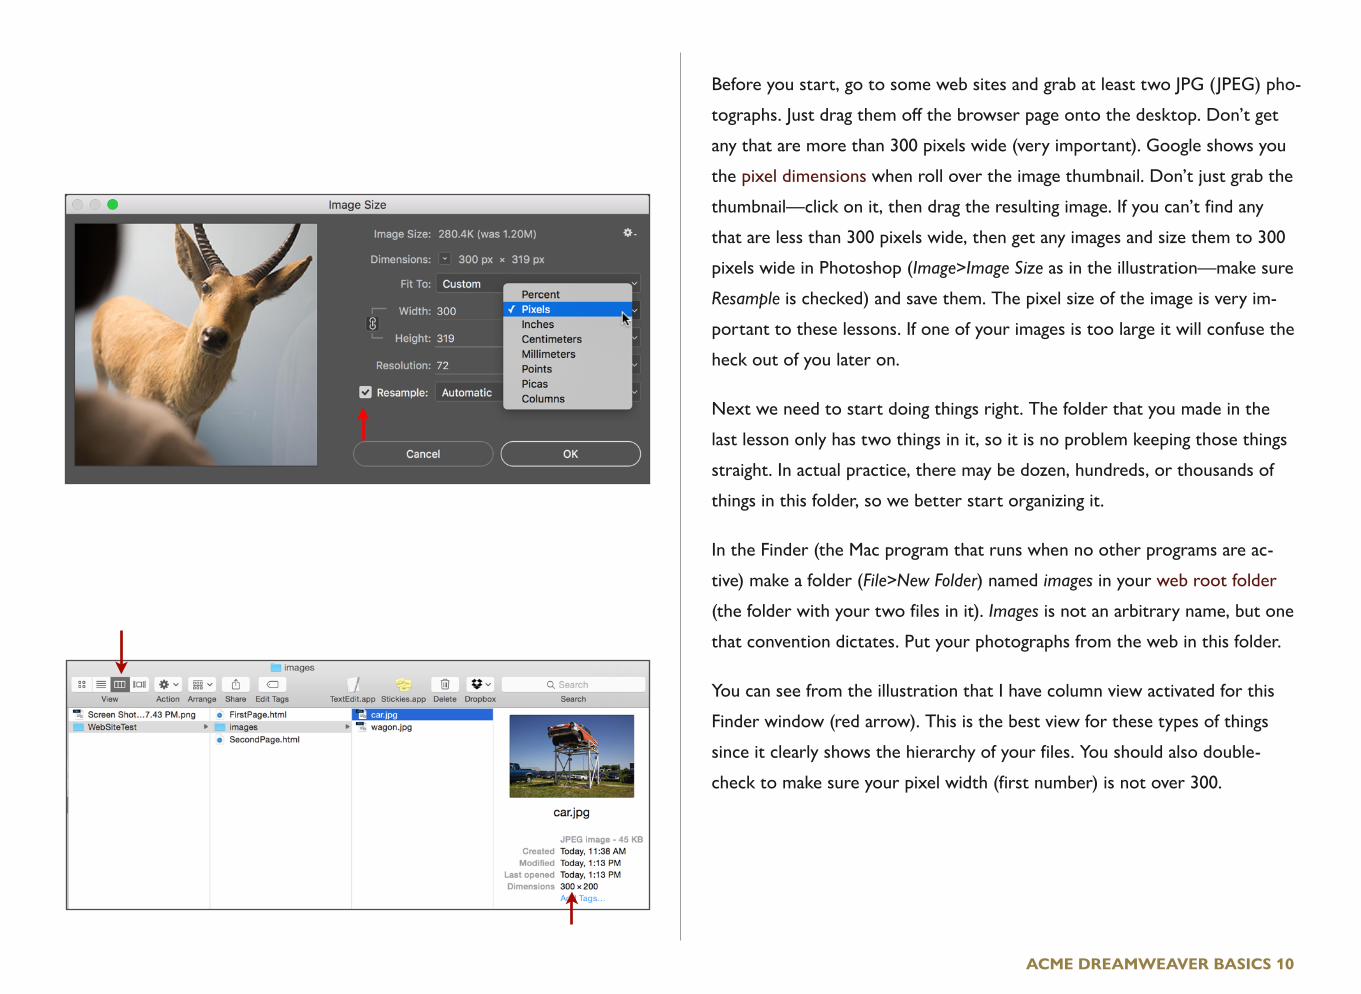
Before you start, go to some web sites and grab at least two JPG (JPEG) pho-
tographs. Just drag them off the browser page onto the desktop. Don’t get
any that are more than 300 pixels wide (very important). Google shows you
the pixel dimensions when roll over the image thumbnail. Don’t just grab the
thumbnail—click on it, then drag the resulting image. If you can’t find any
that are less than 300 pixels wide, then get any images and size them to 300
pixels wide in Photoshop (Image>Image Size as in the illustration—make sure
Resample is checked) and save them. The pixel size of the image is very im-
portant to these lessons. If one of your images is too large it will confuse the
heck out of you later on.
Next we need to start doing things right. The folder that you made in the
last lesson only has two things in it, so it is no problem keeping those things
straight. In actual practice, there may be dozen, hundreds, or thousands of
things in this folder, so we better start organizing it.
In the Finder (the Mac program that runs when no other programs are ac-
tive) make a folder (File>New Folder) named images in your web root folder
(the folder with your two files in it). Images is not an arbitrary name, but one
that convention dictates. Put your photographs from the web in this folder.
You can see from the illustration that I have column view activated for this
Finder window (red arrow). This is the best view for these types of things
since it clearly shows the hierarchy of your files. You should also double-
check to make sure your pixel width (first number) is not over 300.
ACME DREAMWEAVER BASICS 10
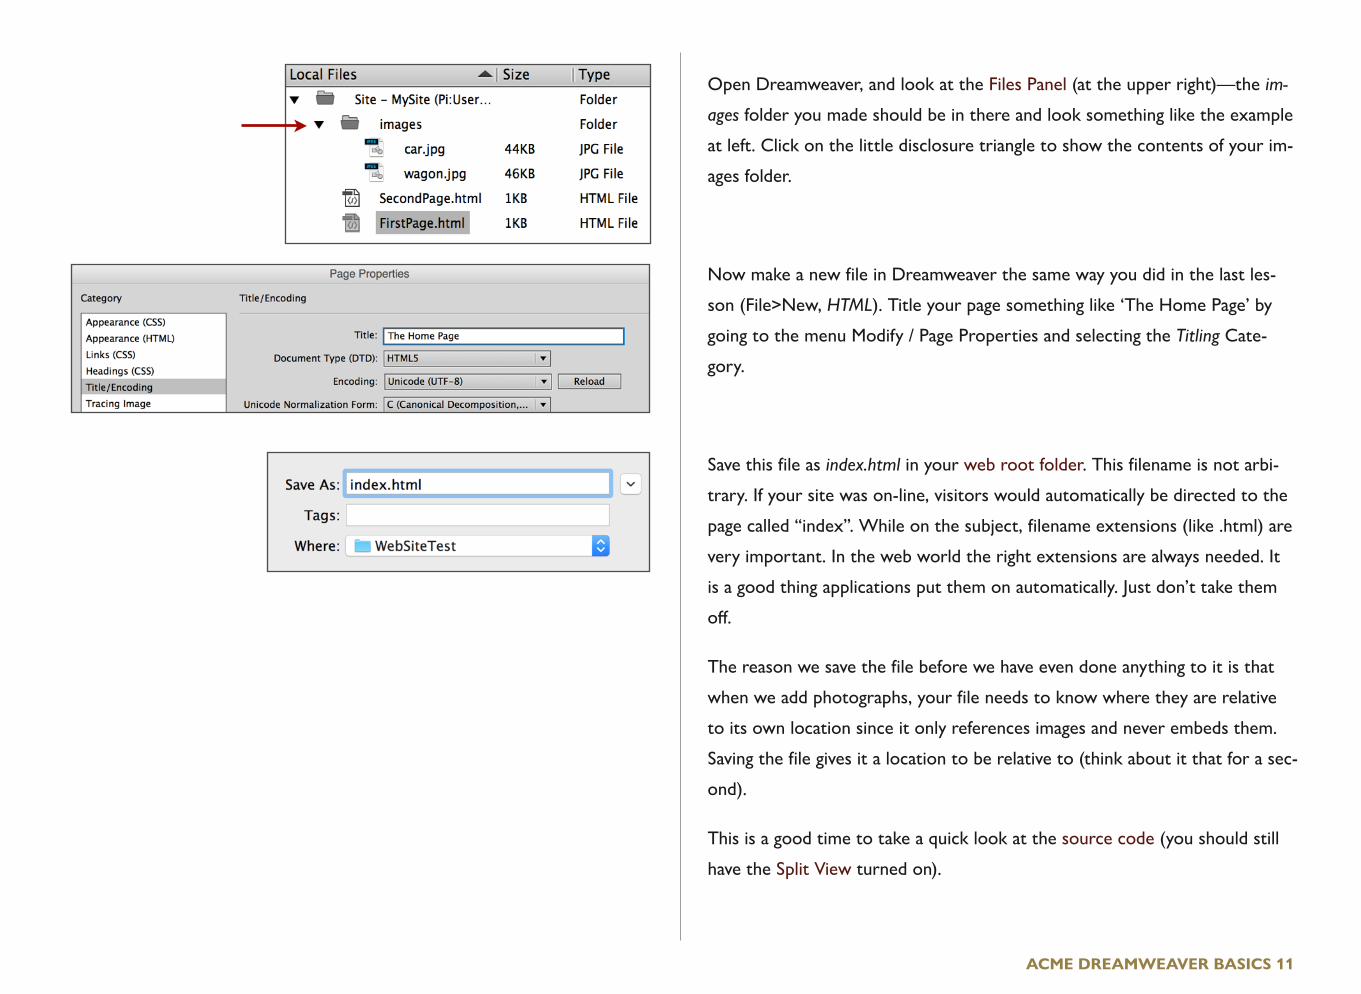
Open Dreamweaver, and look at the Files Panel (at the upper right)—the im-
ages folder you made should be in there and look something like the example
at left. Click on the little disclosure triangle to show the contents of your im-
ages folder.
Now make a new file in Dreamweaver the same way you did in the last les-
son (File>New, HTML). Title your page something like ‘The Home Page’ by
going to the menu Modify / Page Properties and selecting the Titling Cate-
gory.
Save this file as index.html in your web root folder. This filename is not arbi-
trary. If your site was on-line, visitors would automatically be directed to the
page called “index”. While on the subject, filename extensions (like .html) are
very important. In the web world the right extensions are always needed. It
is a good thing applications put them on automatically. Just don’t take them
off.
The reason we save the file before we have even done anything to it is that
when we add photographs, your file needs to know where they are relative
to its own location since it only references images and never embeds them.
Saving the file gives it a location to be relative to (think about it that for a sec-
ond).
This is a good time to take a quick look at the source code (you should still
have the Split View turned on).
ACME DREAMWEAVER BASICS 11

The first few lines of code you can disregard—these are just telling the
browser what type of language it is speaking.
Look at the line where you added your page title. <title> is an opening tag.
You can tell it is a tag because of those pointy brackets that are on either
side of tags. Following this is what you named your web page, and following
that is the closing tag </title> (often just like the opening tag but with the ad-
dition of a forward slash).
These tags tell the browser what you want to do with the text (or whatever
else) between them. In this case it is telling the browser to put the words
The Home Page whenever the title of the page appears (when viewed in a
browser).
A very important point is that web pages are only made of of words—you
could do all of your web site just using a word processor instead of Dream-
weaver, and some people still do. Images and animations and such are not ac-
tually part of the web page, but are pieced together with the web page when
the viewer opens the page in a browser. So, the source code is actually what
the web page is in reality. The design view is only a view of how it will look in
a browser.
The way Dreamweaver works is that in the Design View you type, and the
program puts in tags and other things for you. The reason you need to deal
with the code at all is that Dreamweaver will sometimes do it wrong. Not
the fault of Dreamweaver, just the way that HTML code works. By the way—
I am trying to make these lessons as simple as possible. I wouldn’t have you
looking at the code if you never had to deal with it.
ACME DREAMWEAVER BASICS 12

That is enough code for now, so let’s make things simpler to look at by going
to Design View (the top of the window).
Just like in a word processing program, a paragraph is defined as what hap-
pens before or after you hit the return key. Make a very short paragraph and
a longer paragraph in the design view window. The short paragraph in the
example is simply My Web Page. Do not hit the return key within your longer
paragraph—just let the type wrap at the end of the window.
Now might be a good time to check the spelling, since I suspect there is a
mistake or two. In Dreamweaver Check Spelling is enigmatically placed in the
Commands menu.
Add an image (photograph) now. With your cursor (insertion bar) at the end
of the first paragraph (the short one), hit return to make another paragraph
between your paragraphs. In the Insert Panel click on Images, then choose a
photograph from the ones in your image folder. It should appear on your
web page where you placed the insertion bar after the return.
ACME DREAMWEAVER BASICS 13

Go ahead and add the other photograph after the second paragraph. Remem-
ber to put the cursor at the end of the paragraph and hit return before you
insert the image. Images are inserted at the location of your cursor.
Notice that the images came into your web page the same size as they were
in the web page you took them from. You could change the size of images in
Dreamweaver, but DON’T! They don’t display very well and take more mem-
ory (which translates to download speed). You can always size them in Pho-
toshop—the size they are in Photoshop at 100% is the same size they will
display in Dreamweaver or in a web browser. There is one exception to this,
and that is when you make images to be compatible with newer high-
resolution devices.
While on the subject of good habits, it probably about time you save your
file. Just hit the Command & S keys if you don’t know that already.
Before the end of this lesson we should format some of the text and layout.
This will turn out to be background information since we will later be doing
it a bit differently.
Highlight your first paragraph (the short one) by dragging your cursor across
it just like in a word processing program.
Now go to the Format menu and select Paragraph Format and Heading 1.
ACME DREAMWEAVER BASICS 14

What this does is put a tag around your words which tells your browser to
make the type bigger in a pre-defined way. In this instance <h1> tells the
browser to start the bigger letters and </h1> tells it to stop making the big-
ger letters. Look at it in the design view and check it out in the source code.
If you still have the first paragraph highlighted Dreamweaver will also highlight
it in the source code.
Let’s center this paragraph now. With the paragraph still selected, go to the
menu Window / Properties. In the resulting panel, change the tab on the left to
CSS and click the Align Center icon on the right.
If you look at the source code you will see that Dreamweaver has changed
the tag to specify that the type be bigger and centered (h1 and ”center”).
Again, the emphasis on the source code in these lessons is necessary—if it
wasn’t, I wouldn’t include it. In the end it does make things easier. On the
good side, nowhere will I ask you to actually write code (well, except for that
page title).
One of the things that should be mentioned as background is that web pages
are made up of several different ‘languages’ or ways of doing things. We made
the paragraph bigger by using an HTML command, but we centered it by us-
ing a newer CSS command. Don’t worry about these things, as they can get
very confusing and are really not too important for what we are doing. It is
just mentioned to explain why we had to go to two very different places to
make type bigger and to make it centered.
ACME DREAMWEAVER BASICS 15

Now you know enough to do an extremist wingnut website (the standards
are low with these). Play around with the techniques you have learned so far.
Make a link to one of the pages you did in the first lesson, and add some
more images to your site. Preview the whole thing in a web browser (a little
globe icon at the bottom of the window is an alternative to going to the
menu) to make sure everything is working right.
You might also experiment with other ways of doing things so that they are
more convenient for you. Try dragging an image file directly to the page from
the Files Panel (not from the finder).
If you would like you can save your files for the next lesson, or just redo
some files like this for practice.
ACME DREAMWEAVER BASICS 16
CHAPTER 3
CSS for Type
Formatting
CSS stands for Cascading Style Sheets. This name will make a little bit more
sense after you know how to use them. We will be using them for two things. The
first is to format text. The second is to lay out a web page, which will be covered
in the next lesson.
All web designers use CSS in preference to formatting by other methods (like the
HTML h1 tag you used in the last lesson). It is far more powerful and flexible. But
it is a bit more complicated. Try to get your head around it in this lesson, since we
will build upon the knowledge in the next chapter.

If you didn’t save your index file from the last lesson, or messed it up quite a
bit, then make a new one which approximates it. Now go to Design View to
start.
Highlight the second (longer) paragraph and in the Insert Panel click the Div
button.
What we are going to do here is define a style for that selection (the long
paragraph) that governs how it looks. If you are familiar with using styles in a
word processing program this will seem familiar. Click the New CSS Rule but-
ton in the Insert Div box.
In defining the new style all we have to do is name it since the other options
in the box default to what we need (more about that later). Use a name that
does not have spaces within it. I called mine maintext for reasons that will
soon be obvious. Click OK after you name it.
Now we can decide how that highlighted text will look. For the font I chose
a sans-serif font. By clicking on the small triangle next to the Font-Family box
you will see a number of fonts in each choice. More about this later. For the
color I chose grey by clicking on the small square, and for font size I chose 16
pixels by again clicking on the small triangle next to the Font-size box. Click
OK, then again click OK in the Insert Div box.
ACME DREAMWEAVER BASICS 18

After you click OK, you should see the paragraph you highlighted change to
conform to the rule. Now is a good time to see what all of that work did to
your source code. Near the top of your code is your rule with a period be-
fore the name and the definition in curly brackets ({ }). That is the rule defini-
tion that is looked up when something on the page calls for it. See if you can
find out where in the code it is applied to your paragraph (look for maintext
elsewhere in the code).
This is also a good time to point out that things that display on your web-
page are between the tags <body> and </body>. Since the definition for your
style doesn’t display on the page, but is only referred to by something on the
page, it is before the <body> tag.
Go ahead and make a another paragraph under your second image, highlight
it, and apply the rule you just made to it. To apply the rule, again go to Insert
Div (in the Insert Panel) and choose maintext in the drop-down menu next
to the Class field.
ACME DREAMWEAVER BASICS 19
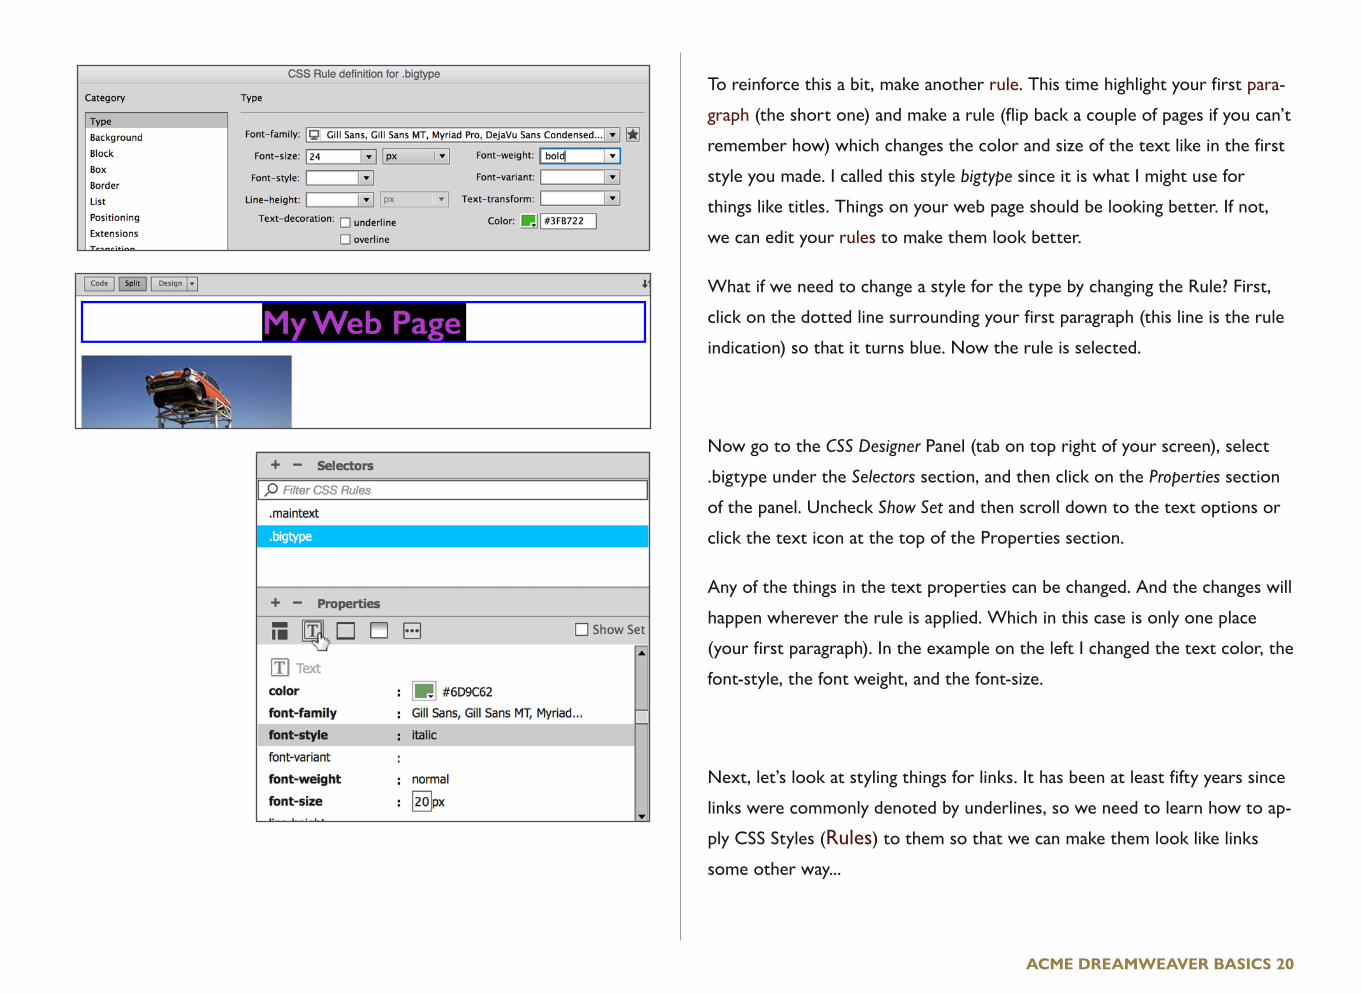
To reinforce this a bit, make another rule. This time highlight your first para-
graph (the short one) and make a rule (flip back a couple of pages if you can’t
remember how) which changes the color and size of the text like in the first
style you made. I called this style bigtype since it is what I might use for
things like titles. Things on your web page should be looking better. If not,
we can edit your rules to make them look better.
What if we need to change a style for the type by changing the Rule? First,
click on the dotted line surrounding your first paragraph (this line is the rule
indication) so that it turns blue. Now the rule is selected.
Now go to the CSS Designer Panel (tab on top right of your screen), select
.bigtype under the Selectors section, and then click on the Properties section
of the panel. Uncheck Show Set and then scroll down to the text options or
click the text icon at the top of the Properties section.
Any of the things in the text properties can be changed. And the changes will
happen wherever the rule is applied. Which in this case is only one place
(your first paragraph). In the example on the left I changed the text color, the
font-style, the font weight, and the font-size.
Next, let’s look at styling things for links. It has been at least fifty years since
links were commonly denoted by underlines, so we need to learn how to ap-
ply CSS Styles (Rules) to them so that we can make them look like links
some other way...
ACME DREAMWEAVER BASICS 20

We are going to make a word in one of your paragraphs a link and change
the style of all your links. Highlight a word in one of your longer paragraphs
and add a hyperlink the way you did in the first chapter (remember? Insert
Panel / Hyperlink). Choose one of the pages you made for the first lesson as
the link (I chose the first one) and click OK.
Click anywhere in the Design View to deselect the word you highlighted. It
should now be blue and underlined, because that is the way links are made to
look, and this overrides the CSS rule you made (but notice that the type size
and style is the same).
We are going to change the look of the links on the page, and we are go-
ing to do it by applying a CSS style to override the HTML convention
that says links should be blue and underlined.
There are many ways to change the way links look, but we are going to
redefine the style of links using CSS by going to Modify / Page Properties in
the menu.
In the Page Properties box, choose Links (CSS) in the Category list, and
change the link color to whatever you would like (I chose red, a rather
unlikely link color). While you are at it, change the visited link to the
same color. You should also get rid of the underline in the Underline style
box. Click okay.
ACME DREAMWEAVER BASICS 21
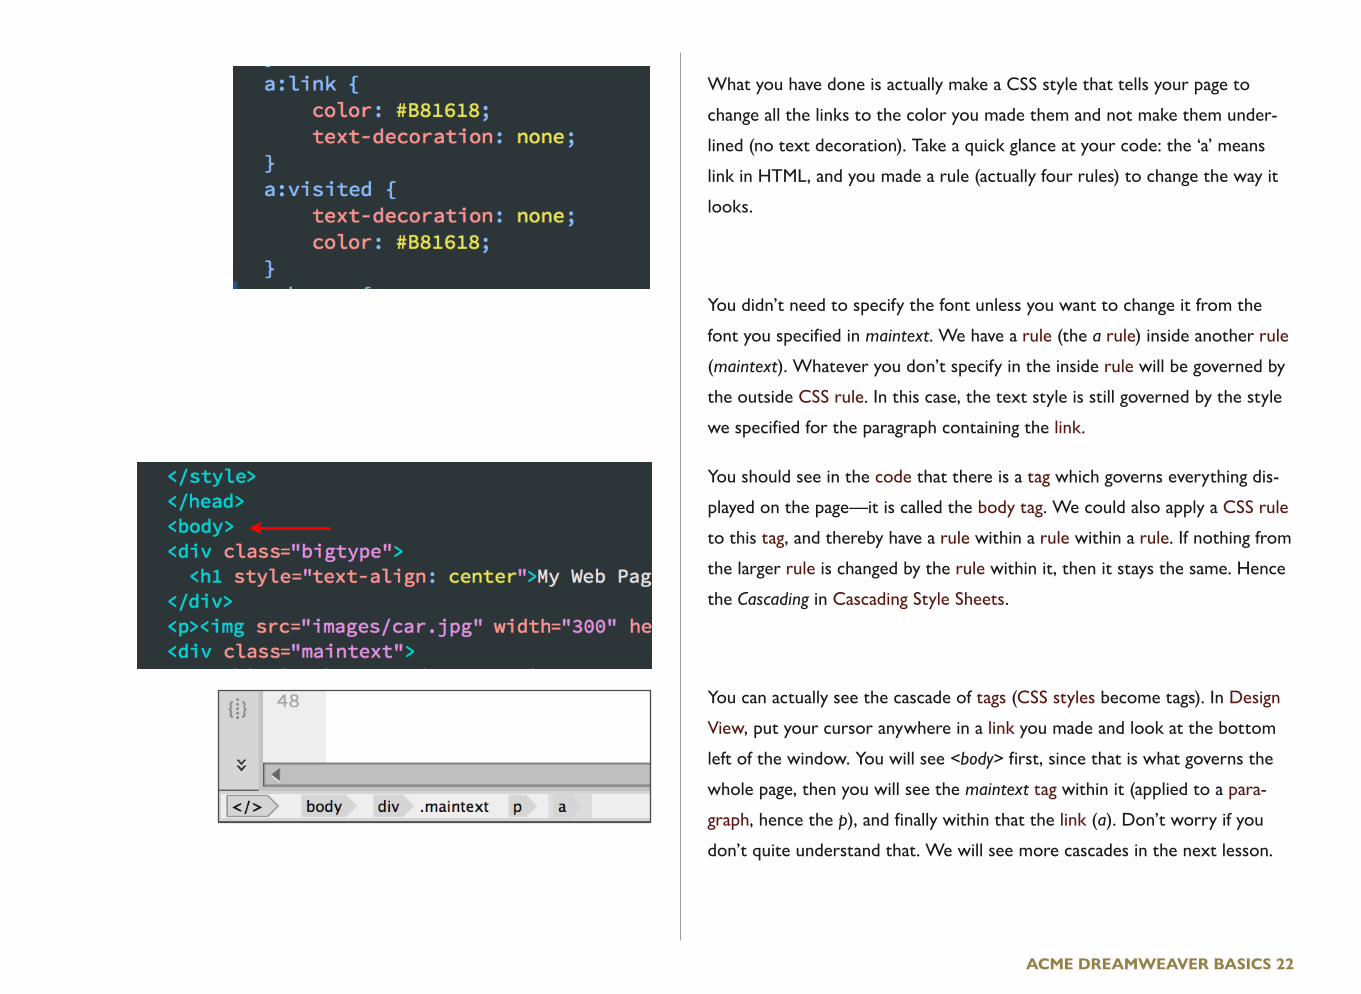
What you have done is actually make a CSS style that tells your page to
change all the links to the color you made them and not make them under-
lined (no text decoration). Take a quick glance at your code: the ‘a’ means
link in HTML, and you made a rule (actually four rules) to change the way it
looks.
You didn’t need to specify the font unless you want to change it from the
font you specified in maintext. We have a rule (the a rule) inside another rule
(maintext). Whatever you don’t specify in the inside rule will be governed by
the outside CSS rule. In this case, the text style is still governed by the style
we specified for the paragraph containing the link.
You should see in the code that there is a tag which governs everything dis-
played on the page—it is called the body tag. We could also apply a CSS rule
to this tag, and thereby have a rule within a rule within a rule. If nothing from
the larger rule is changed by the rule within it, then it stays the same. Hence
the Cascading in Cascading Style Sheets.
You can actually see the cascade of tags (CSS styles become tags). In Design
View, put your cursor anywhere in a link you made and look at the bottom
left of the window. You will see <body> first, since that is what governs the
whole page, then you will see the maintext tag within it (applied to a para-
graph, hence the p), and finally within that the link (a). Don’t worry if you
don’t quite understand that. We will see more cascades in the next lesson.
ACME DREAMWEAVER BASICS 22

Now look again at the source code in the Code View Window. You can see
that the CSS rule that changed our a:link tag doesn’t have a period before it
like the other rules do. This tells the browser that it is a rule which changes a
tag, not a rule you made and happened to call a:link. Just browser language
you should be dimly aware of.
Now we want to change our links so that when we roll over them, they get
bold. This rollover is also called hover.
With your cursor somewhere in your link, go to the CSS Designer panel and
chose a:hover in the selectors catagory. Now in the Properties choose the
icon for type (or scroll to it) and change the font-weight to bold. Heck,
change anything you want to happen when the user rolls the cursor (hovers)
over the link.
Now preview the page in a browser (remember the little globe at the bot-
tom of the working window?). Your link should change when you roll the cur-
sor over it and go to your other page when you click it. By the way, when-
ever Dreamweaver asks, tell it you want to save the file. “Save early, Save of-
ten” as my grandpappy used to say.
Instead of previewing in a browser to see things like this you can also click
the Live View button at the top of the window next to the Design View but-
ton. It will not necessarily look the same as in a browser, but it should be
close. Just remember to turn off Live View when you are done, since when it
is on it changes the way Dreamweaver works.
ACME DREAMWEAVER BASICS 23

In this lesson we have bitten a lot off. It would be wise to go back through it
and make sure you understand what we did. Experiment with things and try
different ways to do things. Save your file for the next lesson.
Using CSS styles for text formatting gives you a very flexible and powerful
way to format text. We have only touched on a few in this chapter—perhaps
you have found some other useful options like line spacing (line height). In
the next chapter you will see how to use this same type of formatting to gov-
ern how blocks of text and other page elements behave.
And since I said I was going to get to this: When you specified a font in this
chapter, you noticed that more than one was specified. Since fonts are differ-
ent on different computers, this means that the first one will be used unless
it is not on the viewer’s computer. If that is the case, the second font will be
used. And so on.
While updating this lesson, the type rendering in browser previews were
very different. From top to bottom is Safari, Firefox, Chrome, and Dream-
weaver’s live view. This illustrates why it is a good idea to test any website in
all common browsers and mobile devices. The fix for these discrepancies was
to go simply to delete all but Helvetica and Arial in the ‘.maintext’ font
choices, as the other fonts were confusing the browsers. These kind of prob-
lems are not uncommon in web development.
ACME DREAMWEAVER BASICS 24

CHAPTER 4
CSS for Layout
You may have noticed that we have gotten absolutely nowhere in being able to
change the layout of web pages so far. With this lesson that will change.
In the past, things called tables were used for layout, and they were pretty simple.
But they are not really used much anymore (that is a good thing overall), so learn-
ing how to layout pages had to wait until we got a bit of a handle on CSS styles.
We will now apply a layout to our page using CSS styles. I am going to use the
same page as I was using, but you could use a new page populated by text and
images (300 pixels wide or less).
For this lesson you need to know something strange about the way Dreamweaver
works. It might take more than one undo to take you back a step, especially when
using CSS. For this reason it might be wise to save often and use revert (File>Re-
vert) when you get into trouble. Yes, you have to do the same steps over and over,
but hey, it’s good practice.

Web pages, unlike a physical page, have only two fixed borders—on the top
and on the left. The bottom and right sides have no defined border. The bot-
tom goes on for as long as you can scroll, and the right side will change ac-
cording to how large your browser (or Dreamweaver) window is stretched
to.
So, our first task is to make a defined right border. This is almost always
done by making a wide column in the middle of the page that moves to cen-
ter once the browser window gets wide enough. Look at a few websites—in
most websites if your browser window is larger than a certain size then the
information centers within it (this is different in newer ‘responsive design’
sites).
This centered box (container) for the information is the first thing we will
make using CSS layout.
Open the index page you made in the last lesson. With your cursor any-
where in the Design View, go to the bottom left of the window and push
<body>. This is actually a button which selects everything within the body
tags. That is everything on the page. You can verify this by looking at the
source code—everything between the body tags will be selected.
ACME DREAMWEAVER BASICS 26
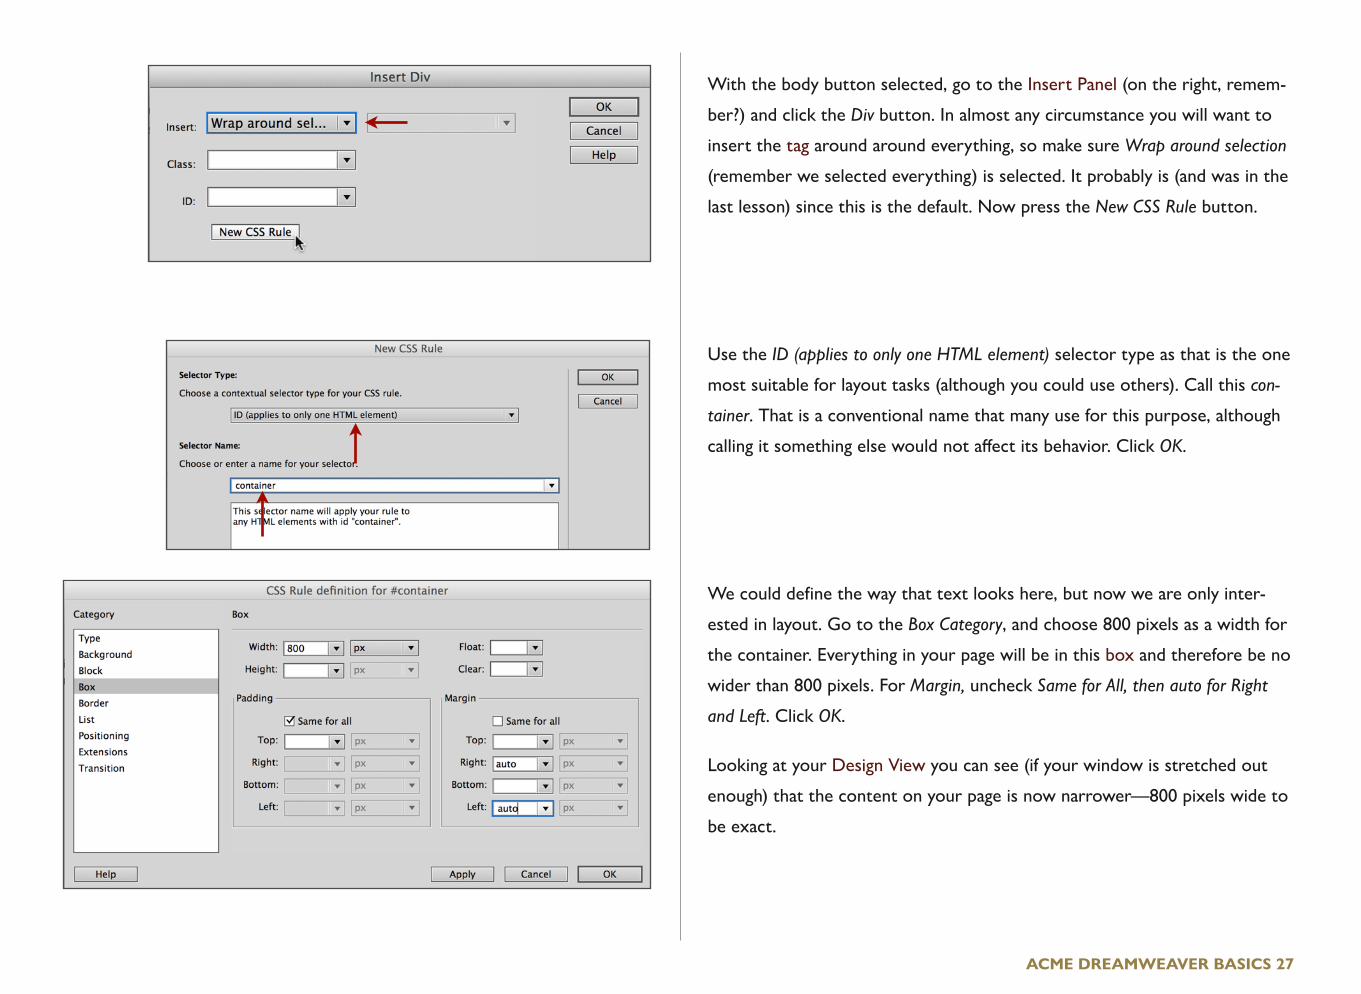
With the body button selected, go to the Insert Panel (on the right, remem-
ber?) and click the Div button. In almost any circumstance you will want to
insert the tag around around everything, so make sure Wrap around selection
(remember we selected everything) is selected. It probably is (and was in the
last lesson) since this is the default. Now press the New CSS Rule button.
Use the ID (applies to only one HTML element) selector type as that is the one
most suitable for layout tasks (although you could use others). Call this con-
tainer. That is a conventional name that many use for this purpose, although
calling it something else would not affect its behavior. Click OK.
We could define the way that text looks here, but now we are only inter-
ested in layout. Go to the Box Category, and choose 800 pixels as a width for
the container. Everything in your page will be in this box and therefore be no
wider than 800 pixels. For Margin, uncheck Same for All, then auto for Right
and Left. Click OK.
Looking at your Design View you can see (if your window is stretched out
enough) that the content on your page is now narrower—800 pixels wide to
be exact.
ACME DREAMWEAVER BASICS 27

Now preview your page in a web browser (remember the little globe at the
top of the window)? As you resize the width of your page past the size of
your container it will center in the window.
Up to this point everything in this lesson is something you could easily use
for every web page you make. Your web page should be starting to look in-
tentional.
Now I am going to have to make a design decision. Since a two-column lay-
out with a header (information across at the top) is fairly common, let’s give
our page that layout.
To do this, first define a space (a box) for the header, which will stretch
across the page. Highlight only your short first paragraph and click the Div
button in the Insert Panel.
Making sure that the requestor box is set to Insert: Wrap around selection,
click the button to make a New CSS Rule.
Change the selector type to ID (applies to only one HTML element) and name
the style something descriptive like header and click OK.
In the Box Category, enter in the information as in the illustration. The margin
is how much room around the outside of the box there will be. I set it to 20
pixels at the top just to get it away from the very top of the page. I set the
left and the right to auto since that will center the box. You can always
change any of these things later. Click OK when you are done.
ACME DREAMWEAVER BASICS 28

You should see that your first paragraph is centered within the main box
(container) and is down a little (20 pixels) from the top of the box.
Now is a good time to point out that in web (as with anything where the
screen is the final medium), we don’t use inches as a measure. It really has no
meaning since screens come in all different sizes and resolutions. Pixels is the
unit that is used for most things. Get used to thinking in terms of them.
As a frame of reference, the computer you are working on has a pixel dimen-
sion of at least 1024 pixels (wide) by 768 pixels high. All newer computers
exceed this dimension (actually, on a computer display the dots are called
dots, not pixels, but don’t worry about that).
In the Design View you can see that the box that we made for the header is
shown by dotted lines. We could have made our header box longer than 600
pixels to fill the container, but since we are not going to be using the upper
left or right, this measurement works fine. And you can always change it
later. Many web pages use an image for the header even if it is an image of
type. To do it that way, just highlight the image instead of the type as we did
here.
Now let’s make a left column in the same way you made the header. Select
everything you want to be in the left column—in my case I selected the first
photograph and the second paragraph (the long one) by dragging the cursor
over it all starting at the end (easier that way). Click the Div button in the In-
sert Panel.
As before, make a new CSS rule and change your selector type to ID. Name
your rule something descriptive. I named it leftcolumn.
ACME DREAMWEAVER BASICS 29
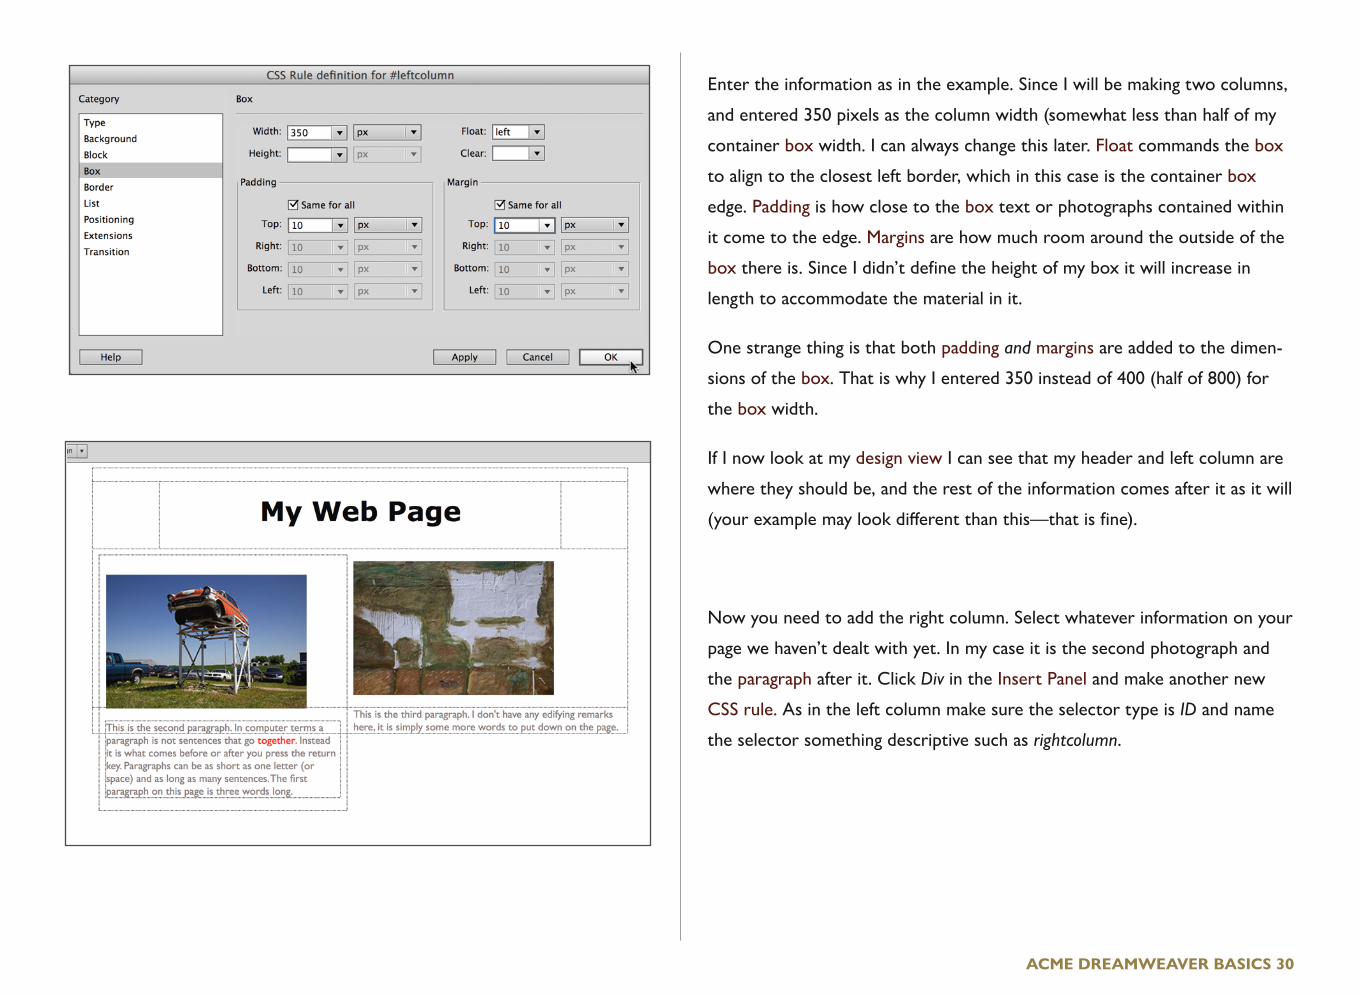
Enter the information as in the example. Since I will be making two columns,
and entered 350 pixels as the column width (somewhat less than half of my
container box width. I can always change this later. Float commands the box
to align to the closest left border, which in this case is the container box
edge. Padding is how close to the box text or photographs contained within
it come to the edge. Margins are how much room around the outside of the
box there is. Since I didn’t define the height of my box it will increase in
length to accommodate the material in it.
One strange thing is that both padding and margins are added to the dimen-
sions of the box. That is why I entered 350 instead of 400 (half of 800) for
the box width.
If I now look at my design view I can see that my header and left column are
where they should be, and the rest of the information comes after it as it will
(your example may look different than this—that is fine).
Now you need to add the right column. Select whatever information on your
page we haven’t dealt with yet. In my case it is the second photograph and
the paragraph after it. Click Div in the Insert Panel and make another new
CSS rule. As in the left column make sure the selector type is ID and name
the selector something descriptive such as rightcolumn.
ACME DREAMWEAVER BASICS 30

Enter the information as in the example. You will notice that it is the same
information we entered for the left column. In this case the Float: left will
cause the box to align with the closest left border, which in this case is now
the left column (we could have also had it float right—to the container edge).
If the width of the right column was too large (which it is not), then it would
simply slide under the right column to where it would fit. Click OK as
needed.
In the Design View, you will see that everything is pretty much how it should
be. If it isn’t, back up and try again. Make sure your photographs are at most
300 pixels wide—if they are much bigger they will prevent the right column
from going to the right.
Now is a good time to see what havoc you have made. Go to split view and
look at the code as you select different things on your page. When you se-
lect a box you will see the selection in the code running from the beginning
to the end of the box.
In code view on the bottom of your screen, everything displayed on your
page starts after the body tag (<body>). Before that tag you will see how you
defined your CSS styles.
ACME DREAMWEAVER BASICS 31

You can also see only the code with the Code button on the top left of your
windows. All that code certainly looks formidable, and it would be if you had
to write it from scratch. But really, you just need to be able to sort of read
it. Dreamweaver is not a fool-proof program, and there are many times you
have to go in and manually remove or change code (like the font confusion in
the last chapter). It is not really the fault of the program, just the way web
(HTML) works. Many times it is also easier to change things (especially with
Search & Replace) in code view.
Save your file and then mess around with it, periodically previewing it in a
browser. Try editing your column sizes to different widths. How about a
main column and a sidebar (edit the style for rightcolumn to make it 500 pix-
els and for the right column to be something like 200 pixels. How about add-
ing more photographs and text to the columns?
Experiment and play around with this stuff. Refer back to the lessons as
needed.
And that’s it. You now have a toolbox for doing very functional websites. You
can add pages, information, styles, and add photographs. If you add photo-
graphs, you should size them in Photoshop or another image editing applica-
tion to fit within your columns (remember to leave pixels for padding) and
you should save them as JPEGs (or PNG or GIF) files.
Actually, you might find that you can just use the pages we made here as a
template. Two columns with a header is a very common format—just take
out the information you don’t want, and put in the information you do
want.
ACME DREAMWEAVER BASICS 32
Or, if you would like a one column with a side-bar, just make one of the col-
umns narrow. Or we could make a third column (or side-bar) by just adding a
third column the same way we added the second.
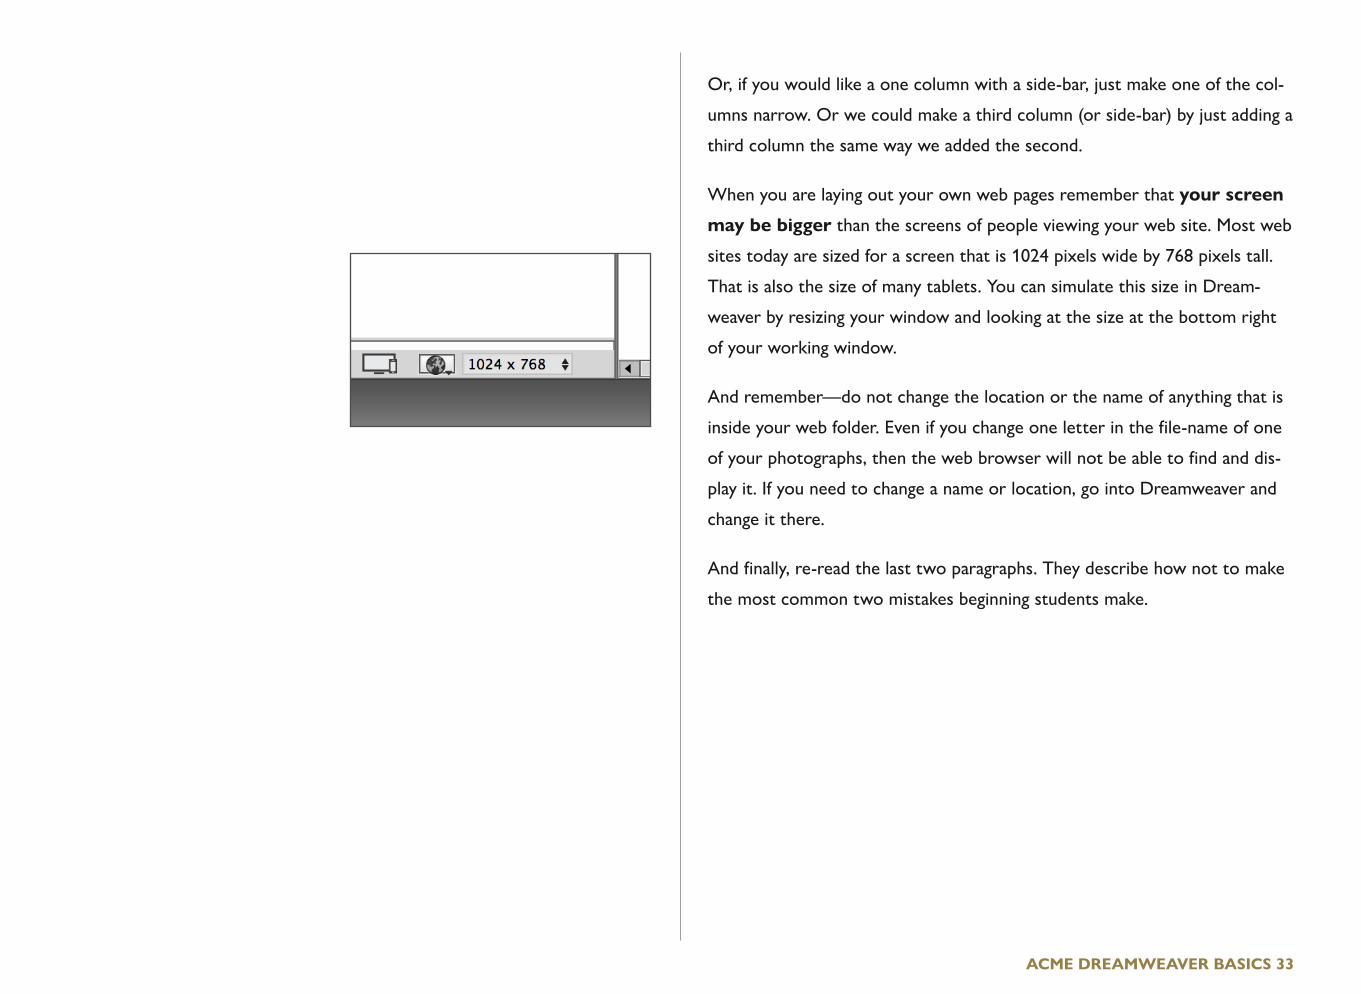
When you are laying out your own web pages remember that your screen
may be bigger than the screens of people viewing your web site. Most web
sites today are sized for a screen that is 1024 pixels wide by 768 pixels tall.
That is also the size of many tablets. You can simulate this size in Dream-
weaver by resizing your window and looking at the size at the bottom right
of your working window.
And remember—do not change the location or the name of anything that is
inside your web folder. Even if you change one letter in the file-name of one
of your photographs, then the web browser will not be able to find and dis-
play it. If you need to change a name or location, go into Dreamweaver and
change it there.
And finally, re-read the last two paragraphs. They describe how not to make
the most common two mistakes beginning students make.
ACME DREAMWEAVER BASICS 33
CHAPTER 5
Some Useful
Things
Now that you have a toolbox full of tools, it is time to figure out a little bit more
about the finer aspects of using these tools.
But don’t forget to learn to the tools we have covered so far in these lessons. They
represent a firm foundation from which to explore further.

Test your pages in different web browsers. Personally, I test in Safari, Firefox,
Chrome, and sometimes even Explorer. Remember that little globe at the
bottom of your Dreamweaver window that allows you to test in different
browsers. You can add more browsers by going to the menu File>Preview in
Browser>Edit Browser list. You also set a primary browser which you can ac-
cess with a keyboard shortcut.
Inevitably, things go wrong. One handy way of tracking down what went
wrong in layout is to go to the top of the window, click on the Live button,
and then click the Inspect button.
This will show your layout element as a different groovy colors, lines, and
boxes. It is useful when you get stumped as to why something is not working
correctly.
Look at your code. One of the things that I am always taking out are para-
graph tags (<p> and </p>). They screw me up so much that I usually just use
line breaks between elements (images or paragraphs). You can insert a line
break in Design View by hitting shift and return together instead of just hit-
ting return.
Often times, especially after a lot of editing in Design View, the code gets
screwed up, so something like a link will extend across another link. HTML
code uses pretty much plain English, and it is not too difficult to correct
these things by moving the code around a bit. Paragraph returns you make in
Code View don’t effect anything, and you can use them to make the code
easier to view and sort out. So, spread out and group your code.
ACME DREAMWEAVER BASICS 35

But most of all, try different things. By default, Dreamweaver is set up for 50
undos. Also, if you would like to preview your files in a browser without hav-
ing to save them you can turn on this option in the preferences.
You should save multiple copies of a file, so that if you make too many mis-
takes you can always fall back on a file you saved before you really screwed
things up.
Look at other people’s websites. If you see a rollover effect or something
else you really like, you can always ‘borrow’ it. All browsers allow you to
view the source code (although in Safari you have to turn on Developer in
preferences), and you can copy as much as you need and paste it into your
file.
It may be a little hard in this case to see where others keep their CSS style
definitions, and this leads us to one other thing you should know, which is
how to keep your CSS styles in a separate place.
When you make a new style you can either apply it to the document you are
working on, or you can save it somewhere else (New Style Sheet File).
There is one advantage to saving it somewhere else. If you are using the same
styles across multiple pages (be it two or two hundred), changing only your
style sheet will change all the pages.
ACME DREAMWEAVER BASICS 36

So let’s say you make a website, and then a month later decide your link col-
ors are too bright, your text is a bit too small, and your columns are a bit
too narrow. If you are using what is called an external style sheet where the
styles for your entire site are on one page, it is a very simple matter to
change the look of these things in one place and it will change your entire
site.
The example on the left shows the basic folder structure for a website I use
for my classes. Notice that there are three style sheets that govern the en-
tire site. The first I called AdobeAdd, since this is where I make changes to
styles that Adobe Lightroom produces when I have it automatically make
web pages of student work.
The second style sheet is called LayoutStyles, and contains just that. I like to
keep the layout styles separate from the styles that govern text (TextStyles),
but making three pages instead of one to govern everything is purely per-
sonal preference. It would work just as well to have all the styles in one style
sheet.
Each page you use a style in must be linked to the stylesheet. Here is the
code for the home page (index) of the above website. I got to it in Firefox by
just going to the menu Tools>Web Developer>Page Source. You can see (high-
lighted) the part of the page that tells the web browser where to find my
CSS styles, in this case in the folder named css.
ACME DREAMWEAVER BASICS 37

In Firefox you can also just click the style sheet location (it is underlined in
the page source) and it will open the style sheet.
In the example on the left you can see that my links (a:link) on this site have
something fancy going on. This is a transition effect that changes the back-
ground color of my links gradually as you roll over them (it is a very quick, so
it is not very noticeable).
If you wanted a similar effect to your links, you could highlight the text you
find in the source code and paste it into your CSS style.
Even just doing the techniques we covered in these lesson, you will need addi-
tional information. Use Dreamweaver Help (in the help menu). Adobe’s ways
of showing help information leaves something to be desired (they like to pull
in information from multiple sources), but it works.
This book covers the very basics, but there is more. As a matter of fact, a lot
more. And a lot of it is not that difficult. The developing HTML 5 standard
allows for a lot of functionality in web pages, and new versions of CSS give
more control.
Many times, if you want to have something fancy like a slide-show on your
web page, it is a simple matter of finding the code and pasting it in. And al-
though Flash as a multimedia tool is becoming more of a special-use tool,
there are other programs that allow you to do interactive things and include
them in your pages. These applications, which take advantage of HTML 5’s
capabilities in a user-friendly way, include Tumult Hype and Adobe Edge.
ACME DREAMWEAVER BASICS 38

But there are, of course, times when you need someone else programming
your web site for you (unless you are going to be a programmer yourself).
Anything to do with the exchange of money is a good example. Or web
pages that link into databases, such as for forms or for user-editing capabili-
ties.
Modern web techniques can get very complicated, and best leave the hard
stuff to the people who know best. But if you know the basics, you can at
least communicate more effectively with programmers when you do need
them.
ACME DREAMWEAVER BASICS 39
CHAPTER 6
Reference
Here are a few things that are somewhat difficult to remember, so they are in a
handy place for quick reference.

CSS Type
Class Usually used for text formatting. Can also be used for layout if you
want the same layout box to appear multiple times on a page. These show
up in the CSS Style Panel and code with a period before the name
(.bodytext).
ID Usually used for layout. Can be used across multiple pages with the same
layout or even pages with different layouts (although you wouldn’t probably
want to do this. These show up in the CSS Style Panel and code with a
pound sign before the name (#centercolumn).
Tag HTML has built-in formatting tags for things like bold type, headers (big-
ger type), and so on. This redefines these tags to appear differently than the
built-in appearances. These show up in the CSS Style Panel and code as a
name with no prefix symbol (body). Instead of naming these yourself, you
should pick from the list of available tags when selecting.
ACME DREAMWEAVER BASICS 41

Box Category for CSS layout
Width and Height Width is used more than height, since an unspecified
height will allow you to keep adding elements (pages scroll vertically!).
Float If you don’t want your layout box to have a set dimension from the
edge of the container (or whatever contains it), turn on float. This is used
quite a bit.
Clear If you don’t want to have anything after your box to the right of it,
but instead have additional things go down below it, specify this. This is not
needed much of the time.
Padding This is the margin within a box.
Margin This is the margin outside a box.
Both margin and padding increase the size of a box (e.g. two 100 pixel wide
boxes will not fit into a 200 pixel wide box if there is any margin or padding).
Remember the help system – in this dialogue box (as in others), there is a help
button which will take you to actual definitions.
ACME DREAMWEAVER BASICS 42

Photoshop File types (Save for Web)
The Save for Web option in Photoshop (File / Export / Save for Web) allows
you to pick different formats for your images and even size them to the pixel
dimensions you need. These are the common web formats for images:
GIF Good for type (like titles and other things you don’t want to use the
browser fonts for) and other things with few colors. Can also save anima-
tions. Do not use for photographs.
JPEG Best for photographs. If a color profile is saved, make sure it is sRGB.
PNG-24 PNG files basically replace GIF and JPEG, but with little advantage.
The one exception to this is when you need something with a transparent
background, such as type (like a title) or a logo over a solid color back-
ground. In Photoshop, put your logo, type, etcetera in a transparent layer
and save as PNG-24.
One can also copy type from Illustrator, paste it into Photoshop (it will come
in as a smart object), and go back and forth between the applications to
tweak and edit the type. Very cool.
ACME DREAMWEAVER BASICS 43

Body Tag
In code view, this is the tag that defines everything that is shown on a web page. By clicking on ‘body’ at the
bottom of the working window you ensure that everything on the page (including code) is selected.
Related Glossary Terms
Index
Chapter 3 - CSS for Type FormattingChapter 4 - CSS for LayoutChapter 4 - CSS for LayoutChapter 4 - CSS for Layout
Drag related terms here
Find Term

Box
This term is a little idiosyncratic. CSS boxes made with Div are usually called containers, but since we use
the formal convention of naming the largest CSS container “container”, it becomes very confusing very fast.
So, for the purpose of these lessons, CSS containers are called “boxes”. Since we are mostly working with
the box category in the CSS style, and since in viewing and thinking about it “boxes” makes sense, there is a
certain logic to this.
Related Glossary Terms
Index
Chapter 4 - CSS for LayoutChapter 4 - CSS for LayoutChapter 4 - CSS for LayoutChapter 4 - CSS for LayoutChapter 4 - CSS for LayoutChapter 4 - CSS for LayoutChapter 4 - CSS for LayoutChapter 4 - CSS for LayoutChapter 4 - CSS for LayoutChapter 4 - CSS for LayoutChapter 4 - CSS for LayoutChapter 4 - CSS for LayoutChapter 4 - CSS for LayoutChapter 4 - CSS for LayoutChapter 4 - CSS for Layout
Drag related terms here
Find Term
Browser
A web browser such as Safari, Firefox, Chrome, and Explorer. And don’t forget mobile devices—if your
web page formats nicely on a phone, more people will be able to use it easily.
Related Glossary Terms
Index
Chapter 1 - Making simple pages and linksChapter 2 - Structure, Images, & TextChapter 2 - Structure, Images, & TextChapter 2 - Structure, Images, & TextChapter 2 - Structure, Images, & TextChapter 3 - CSS for Type FormattingChapter 3 - CSS for Type FormattingChapter 3 - CSS for Type FormattingChapter 4 - CSS for LayoutChapter 4 - CSS for LayoutChapter 4 - CSS for LayoutChapter 5 - Some Useful ThingsChapter 5 - Some Useful ThingsChapter 5 - Some Useful ThingsChapter 5 - Some Useful Things
Drag related terms here
Find Term

Cascading Style Sheets (CSS)
A style sheet is basically lines of code that tells the browser how something (like text) should look. Think
of it as a dictionary definition for your browser. When it is referred to in other parts of a web page by a
name, it is looked up in the ‘dictionary’ each time it is used. Cascading refers to the fact that you can have
styles within styles that further modify them (think boxes in boxes).
Related Glossary Terms
Index
Chapter 3 - CSS for Type Formatting
Drag related terms here
Find Term
Closing Tag
Just about any code that starts governing how something on a web page looks has to end somewhere. That
is what the closing tag does. It is usually the same as the start tag with the addition of a forward slash be-
fore the tag name. Tags are enclosed in brackets like this < >.
Related Glossary Terms
Index
Chapter 2 - Structure, Images, & Text
Drag related terms here
Find Term

Code View
Dreamweaver’s main window that shows the web page you are making. Control which view you are in (De-
sign, Split, or Code) by the buttons near the top left of the open window. Code View shows the web page’s
source code.
Related Glossary Terms
Index
Chapter 3 - CSS for Type FormattingChapter 4 - CSS for LayoutChapter 5 - Some Useful Things
Drag related terms here
Find Term
CSS Designer Panel
Located on the lower right of the screen in Design Layout View. The panel with which you can add and edit
CSS rules. One of the confusing things is that much of the functionality of this panel is duplicated in other
places. By going to Expanded View (Window>Workspace Layout> Expanded) the panel expands, making it
easier to see options.
Related Glossary Terms
Index
Drag related terms here
Find Term

CSS Layout
Determining where things (like columns, etcetera) appear on a web page is done with CSS layout. Tables
were previously used for this, and can still be used, although they are not as flexible.
Related Glossary Terms
Index
Chapter 4 - CSS for Layout
Drag related terms here
Find Term

CSS Rule (Rule)
A CSS rule dictates how any element on a web page looks. It is defined in code near the beginning of a web
page or can be in a separate file. When it is invoked in a web page the browser looks for its definition ei-
ther before the body tag in the same file or in a separate file.
Related Glossary Terms
Index
Chapter 3 - CSS for Type FormattingChapter 3 - CSS for Type FormattingChapter 3 - CSS for Type FormattingChapter 3 - CSS for Type FormattingChapter 3 - CSS for Type FormattingChapter 3 - CSS for Type FormattingChapter 3 - CSS for Type FormattingChapter 3 - CSS for Type FormattingChapter 3 - CSS for Type FormattingChapter 3 - CSS for Type FormattingChapter 3 - CSS for Type FormattingChapter 3 - CSS for Type FormattingChapter 3 - CSS for Type FormattingChapter 3 - CSS for Type FormattingChapter 3 - CSS for Type FormattingChapter 3 - CSS for Type FormattingChapter 3 - CSS for Type FormattingChapter 3 - CSS for Type FormattingChapter 3 - CSS for Type FormattingChapter 3 - CSS for Type FormattingChapter 3 - CSS for Type FormattingChapter 3 - CSS for Type FormattingChapter 4 - CSS for LayoutChapter 4 - CSS for Layout
Cascading Style Sheets (CSS)
Find Term

CSS Style
The style of type or anything else that is governed by CSS tags. As opposed to HTML styles where the
style is governed by non-CSS tags.
Related Glossary Terms
Index
Chapter 3 - CSS for Type FormattingChapter 3 - CSS for Type FormattingChapter 5 - Some Useful ThingsChapter 5 - Some Useful ThingsChapter 5 - Some Useful ThingsChapter 5 - Some Useful ThingsChapter 5 - Some Useful ThingsChapter 5 - Some Useful ThingsChapter 5 - Some Useful Things
Drag related terms here
Find Term
Design View
Dreamweaver’s main window that shows the web page you are making. Control which view you are in (De-
sign, Split, or Code) by the buttons near the top left of the open window. Design View shows the web
page’s design without showing the code.
Related Glossary Terms
Index
Chapter 1 - Making simple pages and linksChapter 2 - Structure, Images, & TextChapter 2 - Structure, Images, & TextChapter 2 - Structure, Images, & TextChapter 3 - CSS for Type FormattingChapter 3 - CSS for Type FormattingChapter 3 - CSS for Type FormattingChapter 3 - CSS for Type FormattingChapter 4 - CSS for LayoutChapter 4 - CSS for LayoutChapter 4 - CSS for LayoutChapter 4 - CSS for LayoutChapter 4 - CSS for LayoutChapter 5 - Some Useful ThingsChapter 5 - Some Useful Things
Split View
Find Term
Enigmatically
Mysterious. As in: He added the term enigmatically to the glossary for no obvious reason.
Related Glossary Terms
Index
Chapter 2 - Structure, Images, & Text
Drag related terms here
Find Term

External style sheet
An external style sheet is a file that contains definitions for CSS rules you use in a website. These are usu-
ally located in the web root folder. When you use an external style sheet you must also include its location
when you use the terms in another web page.
Related Glossary Terms
Index
Chapter 5 - Some Useful Things
Drag related terms here
Find Term

Files Panel
The Files Panel (Window>Files, or on the right side in the designer workspace layout) shows the files inside
your root folder. From this “mini-browser” you can open pages, make hyperlinks, or connect to a remote
server.
Related Glossary Terms
Index
Chapter 1 - Making simple pages and linksChapter 1 - Making simple pages and linksChapter 2 - Structure, Images, & TextChapter 2 - Structure, Images, & Text
Drag related terms here
Find Term

Float
Float is a CSS term meaning where the object (such as a box) occurs horizontally on the page, column, or
other container (either left, right, or center).
Related Glossary Terms
Index
Chapter 4 - CSS for Layout
Drag related terms here
Find Term
H1
The h1 tag is one of several pre-defined HTML tags. It is generally not used since using CSS styles is a much
more flexible way of defining how type is formatted. It is included in these lessons as a quick way of seeing
how code works.
Related Glossary Terms
Index
Drag related terms here
Find Term

HTML
Hyper-Text Markup Language. Not that you really need to know that. It is the ‘language’ the code in web
pages are written in. Fortunately, it uses enough English that we can many times figure out what it is saying.
CSS is also part of the HTML language, but don’t let that confuse you.
Related Glossary Terms
Index
Chapter 2 - Structure, Images, & TextChapter 3 - CSS for Type FormattingChapter 4 - CSS for LayoutChapter 5 - Some Useful Things
Drag related terms here
Find Term

HTML Button
Along with the CSS Button, the most overlooked button in the Properties Panel.
Related Glossary Terms
Index
Drag related terms here
Find Term

Hyperlink (Link)
A hyperlink (or just plain link) is an object such as a photograph or piece of text which takes the user to
another web page when it is clicked.
Related Glossary Terms
Index
Chapter 1 - Making simple pages and linksChapter 2 - Structure, Images, & TextChapter 3 - CSS for Type FormattingChapter 3 - CSS for Type FormattingChapter 3 - CSS for Type FormattingChapter 3 - CSS for Type FormattingChapter 5 - Some Useful ThingsChapter 5 - Some Useful ThingsChapter 5 - Some Useful ThingsChapter 5 - Some Useful Things
Drag related terms here
Find Term

Insert Panel
The Insert Panel (Window > Insert) allows you to insert material into your web page such as links and im-
ages. It is on the right top of the screen in the Design Workspace Layout.
Related Glossary Terms
Index
Chapter 1 - Making simple pages and linksChapter 2 - Structure, Images, & TextChapter 3 - CSS for Type FormattingChapter 4 - CSS for LayoutChapter 4 - CSS for LayoutChapter 4 - CSS for LayoutChapter 4 - CSS for Layout
Drag related terms here
Find Term
Live View
Live View is Dreamweaver’s way of showing how a web page might look and behave if it were in a browser.
Your milage may vary.
Related Glossary Terms
Index
Chapter 3 - CSS for Type FormattingChapter 3 - CSS for Type Formatting
Drag related terms here
Find Term
Margins
A margin is how much room around the outside of a layout box there is. Measured in pixels.
Related Glossary Terms
Index
Chapter 4 - CSS for LayoutChapter 4 - CSS for Layout
Drag related terms here
Find Term

Opening Tag
Just about any code that starts governing how something on a web page looks. Tags are enclosed in brack-
ets like this < >.
Related Glossary Terms
Index
Chapter 2 - Structure, Images, & Text
Drag related terms here
Find Term

Padding
Padding is how close to the layout box text or photographs contained within it come to the edge. Meas-
ured in pixels (as is everything in web).
Related Glossary Terms
Index
Chapter 4 - CSS for LayoutChapter 4 - CSS for Layout
Drag related terms here
Find Term

Paragraph
The text or object placed before or after hitting the return key.
Related Glossary Terms
Index
Chapter 2 - Structure, Images, & TextChapter 2 - Structure, Images, & TextChapter 2 - Structure, Images, & TextChapter 2 - Structure, Images, & TextChapter 2 - Structure, Images, & TextChapter 2 - Structure, Images, & TextChapter 2 - Structure, Images, & TextChapter 2 - Structure, Images, & TextChapter 3 - CSS for Type FormattingChapter 3 - CSS for Type FormattingChapter 3 - CSS for Type FormattingChapter 3 - CSS for Type FormattingChapter 3 - CSS for Type FormattingChapter 4 - CSS for LayoutChapter 4 - CSS for LayoutChapter 4 - CSS for Layout
Drag related terms here
Find Term

Paragraph Tags
Paragraph tags (<p>) start at the beginning of a paragraph and close at the end of a paragraph (</p>). Saner
people like to use line breaks (shift + return in design view) instead of paragraphs. Some would disagree.
And they probably know more. Oh well.
Related Glossary Terms
Index
Chapter 5 - Some Useful ThingsChapter 5 - Some Useful ThingsChapter 5 - Some Useful Things
Drag related terms here
Find Term

Pixel Dimension
Web pages and computer screens are measured in pixels instead of inches or centimeters. The pixel dimen-
sion of this iPad is effectively 1024 pixels wide by 768 pixels high. Just to give you an idea of how big they
are.
Related Glossary Terms
Index
Chapter 2 - Structure, Images, & TextChapter 4 - CSS for Layout
Drag related terms here
Find Term

Preview
Previewing at a file through a browser such as Firefox or Safari will ensure that your web pages behave as
they should in any particular browser. Generally you should preview all your pages in all browsers you
would like them to behave properly in, including those on mobile devices such as phones and tablets. The
button to preview a file is a small world icon at the top of Dreamweaver’s main window.
Related Glossary Terms
Index
Chapter 1 - Making simple pages and linksChapter 2 - Structure, Images, & TextChapter 3 - CSS for Type FormattingChapter 5 - Some Useful Things
Drag related terms here
Find Term

Properties Panel
Window/Properties or near the bottom of your screen in Designer Workspace Layout. This is a multi-
purpose panel that has two modes—CSS and HTML. Most of the choices in this panel are also found in
other panels and menu items, but are easier and quicker to get to in this panel.
Related Glossary Terms
Index
Drag related terms here
Find Term
Responsive Design
Many newer web pages use this approach to design where content scales and reformats according to the
browser size or device it is viewed with (such as a phone or tablet). While in theory this is a great thing, in
practice it is fraught with problems. It constricts design options (every wonder why a lot of ‘hip’ websites
look about the same?), and unless done very carefully causes the computer to make design decisions like
type placement (which are many times horrid).
The best use of responsive design is to use it sparingly, and usually not for pages where you want to give
the viewer a lot of information. These lessons do not cover responsive design, but Dreamweaver is cer-
tainly capable enough to do it.
Related Glossary Terms
Index
Preface - PrefaceChapter 4 - CSS for Layout
Drag related terms here
Find Term
Rollover (Hover)
When you put your cursor over an object in a web page it can change (text can change color, images can
change, etcetera). This is called a rollover or a hover. Most mobile devices do not recognize the hover state of
objects, so it is not a good idea to make them necessary.
Related Glossary Terms
Index
Chapter 3 - CSS for Type FormattingChapter 3 - CSS for Type Formatting
Drag related terms here
Find Term

Source code (code)
The source code (also just called code) is made up of words and symbols that tell the browser how to dis-
play the information on a web page. All applications have code underlying the what you see, but in Dream-
weaver it is necessary to sometimes work with it. At least a little.
Related Glossary Terms
Index
Chapter 1 - Making simple pages and linksChapter 1 - Making simple pages and linksChapter 1 - Making simple pages and linksChapter 2 - Structure, Images, & TextChapter 2 - Structure, Images, & TextChapter 2 - Structure, Images, & TextChapter 2 - Structure, Images, & TextChapter 2 - Structure, Images, & TextChapter 2 - Structure, Images, & TextChapter 3 - CSS for Type FormattingChapter 3 - CSS for Type FormattingChapter 3 - CSS for Type FormattingChapter 3 - CSS for Type FormattingChapter 3 - CSS for Type FormattingChapter 3 - CSS for Type FormattingChapter 5 - Some Useful ThingsChapter 5 - Some Useful ThingsChapter 5 - Some Useful ThingsChapter 5 - Some Useful ThingsChapter 5 - Some Useful ThingsChapter 5 - Some Useful Things
Drag related terms here
Find Term

Split View
Dreamweaver’s main window that shows the web page you are making. Control which view you are in (De-
sign, Split, or Code) by the buttons near the top left of the open window. Split View shows the web page’s
source code under its design.
Related Glossary Terms
Index
Chapter 1 - Making simple pages and linksChapter 2 - Structure, Images, & TextChapter 4 - CSS for Layout
Design View
Find Term

Tag
Code that governs how something on a web page looks. If a word needs to be in bold, then a tag before
the word, called the opening tag, (or just tag) would tell it to be bold. After the word a closing tag would tell
it to not be bold anymore. Tags are enclosed in brackets like this < >.
Related Glossary Terms
Index
Chapter 2 - Structure, Images, & TextChapter 2 - Structure, Images, & TextChapter 2 - Structure, Images, & TextChapter 2 - Structure, Images, & TextChapter 2 - Structure, Images, & TextChapter 3 - CSS for Type FormattingChapter 3 - CSS for Type FormattingChapter 3 - CSS for Type FormattingChapter 3 - CSS for Type FormattingChapter 3 - CSS for Type FormattingChapter 3 - CSS for Type FormattingChapter 4 - CSS for Layout
Drag related terms here
Find Term

Web Root Folder (Root Folder)
A web browser needs to ‘know’ where things like images and linked pages are. Therefore, it is crucial that
all of your files are in the same ‘master folder’. This folder is called the web root folder or simply the root
folder.
Related Glossary Terms
Index
Chapter 2 - Structure, Images, & TextChapter 2 - Structure, Images, & Text
Drag related terms here
Find Term