achievement day requirements - prince … sells cake decorating supplies or visit a local cake...
TRANSCRIPT

CA
KE
DE
CO
RA
TIN
G 1
08/14
WELCOME Welcome to the Cake Decorating Project! Please read through this guide carefully, as it contains information and suggestions that are important for your project. Hopefully you, as a member, will “Learn to do by Doing” through hands-on activities that will encourage learning and enjoyment. If you have any questions, contact your District 4-H Officer or your 4-H project leader.
4-H YEAR COMPLETION You complete a project by: • completing the project Achievement Day requirements • completing a communication project • completing a community project • completing an agriculture awareness project • taking part in Achievement Day
You must complete all
of the listed aspects
in order to show at
Fairs and Exhibitions.
ACHIEVEMENT DAY REQUIREMENTS Decorated Real Cake 75
• The cake can be either round or square in shape and measure
8” - 9” (20.0 - 22.5 cm) in size, single layer.
• Cake must be decorated using butter cream icing and at least
4 different tips.
Tip and Border Tray 25
• The tip and border tray uses actual icing to show samples
of three (3) tips to make both designs and borders. 100
NOTE: Tips and other decorating equipment referred to are taken from Wilton Cake
Decorating products. Suggested beginner level tips include #4, 16, 21, 131 and 67.
A suggestion would be to do the actual tip design and border using the same tip. For
example, this tip makes dots or hearts and can make a flowing border.
EXHIBITION REQUIREMENT
Decorated Cake (Foam Form)
6” or 7” round or square, cake form to be decorated using butter cream icing, Including display of three (3) tips showing the actual tip and border design of each.
Please Note: This item is to be freshly decorated for each exhibition
WELCOME TO THE WONDERFUL WORLD OF CAKE DECORATING
This project is designed to be fun and meaningful as you learn the art of cake decorating. Many occasions such as birthdays, anniversaries, weddings and other holiday occasions are examples of where the art of cake decorating can be put to use. Cake Decorating can serve as a creative outlet for all ages...the mastery of this skill is one that members and leaders alike will carry with them for years to come. The art of Cake Decorating does require practice and persistence...but the outcome is worth the investment!
Cake Decorating I will cover the following basics: • Tips and Borders
• Filling the Bag and Using Pressure Control
• Practicing with Tips
• Preparing & Tinting Icing
• Decorating...trial and error - The Practice Cake
• Decorating...the real deal - The Achievement Day Cake
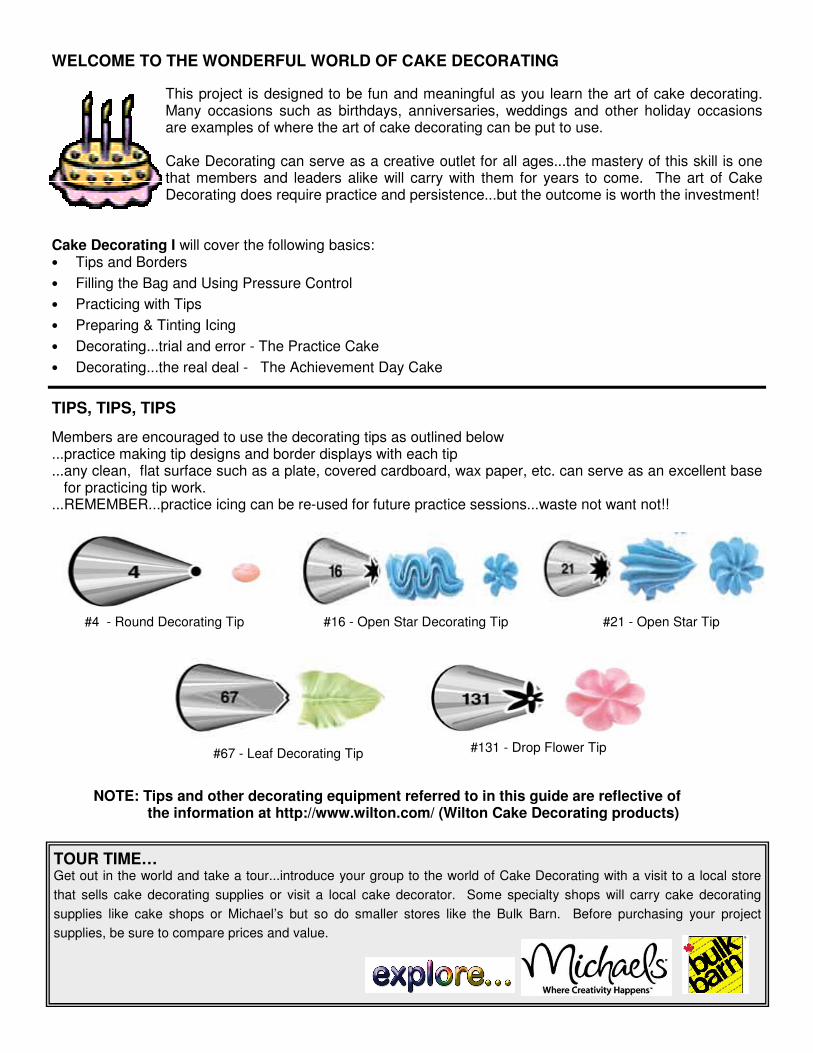
#21 - Open Star Tip
#131 - Drop Flower Tip
#4 - Round Decorating Tip #16 - Open Star Decorating Tip
#67 - Leaf Decorating Tip
TOUR TIME… Get out in the world and take a tour...introduce your group to the world of Cake Decorating with a visit to a local store
that sells cake decorating supplies or visit a local cake decorator. Some specialty shops will carry cake decorating
supplies like cake shops or Michael’s but so do smaller stores like the Bulk Barn. Before purchasing your project
supplies, be sure to compare prices and value.
TIPS, TIPS, TIPS
Members are encouraged to use the decorating tips as outlined below ...practice making tip designs and border displays with each tip ...any clean, flat surface such as a plate, covered cardboard, wax paper, etc. can serve as an excellent base
for practicing tip work. ...REMEMBER...practice icing can be re-used for future practice sessions...waste not want not!!
NOTE: Tips and other decorating equipment referred to in this guide are reflective of the information at http://www.wilton.com/ (Wilton Cake Decorating products)

LET’S GET DECORATING Cleanliness is very important since you are working with food. Remember to tie hair back, wear an apron, have a clean work area, and wash your hands before you begin cake decorating.
EQUIPMENT You should have the use of a set of tips as well as a decorating bag and coupler. You can practice at home between lessons if you have your own equipment and be ready to decorate your Achievement Day cake. An important part of cake decorating begins before you start working with the tips. Learn how the decorating unit fits together properly and then you’re ready to practice with your tips.
The Cake Decorating Unit The decorating unit consists of three parts: Fitting the Decorating Unit Together
• With the coupler in hand, unscrew the retainer ring
• Proceed to drop the coupler base (narrow end down) into decorating bag
• Slip the decorating tip onto the coupler base
• Screw the coupler retainer ring in place over the tip (picture shows extra step of cutting the tip from a disposable decorating bag) Filling the Cake Decorating Bag with Icing
• Fold the edge of the decorator bag over making a cuff of about 5 cm (2”) wide
• Hold the bag below the folded cuff
• Use a spatula to push your decorator icing down into the bag
• Use a butter knife or flat spatula to push the icing towards the end
• When icing is pushed into place, twist the end closed or put an elastic around top to secure
Decorating Bags
• Cone shaped and available in various sizes
• Can be a plastic polyester coated fabric cone, a clear plastic cone or a parchment paper bag
NOTE: You will find it easier to work with the plastic polyester coated decorating bags as they are easy to clean and reusable. Parchment cones are also available; however, they come as a flat sheet and are then rolled into a cone.
Decorating Tips
• Cone shaped and made of metal or plastic.
• Decorating tips can either fit directly inside the decorating bag or they can attach on the outside of the bag to a “coupler”.
• Decorating tips determine the size and shape of the icing squeezed on to your decorated surface.
Coupler
• A grooved insert and retainer ring that fits together allowing easy tip changes.
• The insert is placed in the narrow end of the decorating bag.
• The decorating tip fits onto the coupler base and the coupler retainer ring is screwed on to hold the tip in place.
.

Pressure Control To achieve the desired decoration, the angle at which you hold your decorating bag must be
correct. To hold the decorating bag correctly, grip the bag near the tip with the twisted or folded
end locked between your thumb and fingers. There are two basic positions for the decorating
bag: the 90 angle and the 45 angle. You will become better acquainted with these positions as
you learn to decorate. Use your free hand to guide the bag.
The amount of pressure and steadiness applied to the decorating bag will determine the size and
uniformity of any icing design. For your decoration to be exact, you must control the pressure.
Only practice can help you to accomplish this.
Special Note for Left-Handers
If you are left-handed, hold the decorating bag in your left hand and guide
the decorating tip with the fingers or your right hand. A left-handed person
should keep in mind they should always decorate from right to left except
with printing or writing.
Putting it all together PRACTICE is extremely important! Take the time to practice decorating techniques using the
decorating tips you will be using during the year.
You should practice on cookie sheets or foil covered plates because icing can be scraped off
easily. Put the icing back into the bowl and mix it gently. Re-fill the decorating bag and start
again. Continue to remix and practice.
Once you can do a row of at least 10 uniform dots, balls, stars, etc., then you can move on to
something new.
Grip & Lock
Guide
Guide Grip & Lock
PRACTICE, PRACTICE., PRACTICE… cover the template below with wax paper or slip it inside a plastic
sleeve...practice making the shapes focusing on your pressure, control and accuracy...when you’re finished a line,
scrape off the icing and try again…Be sure to use the decorating tips as recommended for Cake Decorating I
PRACTICE MAKES PERFECT
DOTS . . .
BORDERS
LINES A B
A B
A
A B B
Decorating templates can be found on-line...Google, Print & Practice!!

BUTTER CREAM ICING
Ingredients 125 mL shortening 1/2 cup 125 mL butter or margarine 1/2 cup 5 mL vanilla 1 tsp 1 L sifted icing sugar 4 cups 25 mL milk 2 Tbsp Method
• Cream butter and shortening together.
• Add vanilla.
• Add sugar gradually, 250 mL (1 cup) at a time.
• Mix this together scraping both the sides and bottom of the bowl.
• Add milk and beat until thoroughly mixed.
• Once all the sugar is mixed, icing should be covered with a damp cloth until ready to use.
CAUTION: Overbeating causes air bubbles and icing becomes too creamy. More milk could be added if icing is to be
used to cover cake; however, the icing should be fairly stiff for decorating purposes.
Butter Cream Icing: *is a very serviceable icing and can be used for most decorations.
*has a sweet buttery flavor with medium consistency.
*is extremely versatile and is suitable for border, writing, roses, drop
flowers and icing cakes smoothly.
*can be stored in the refrigerator for two weeks in an airtight container.
White Icing (This is an alternative recipe which you may prefer to use for decorating) Ingredients 1 kg icing sugar 2 lb 250 mL shortening, softened* 1 cup 60 - 125 mL water ** 1/4 - 1/2 cup 5 - 10 mL flavoring*** 1 - 2 tsp Method
• Cream icing sugar and shortening together.
• Add one half the water and flavoring.
• Add more water until required consistency is reached.
Thank You to 4-H Nova Scotia for the sharing of their
Cake Decorating Project - Leader’s Resource Guide.
More information is available at 4-H Nova Scotia
http://novascotia.ca/agri/documents/4h/manuals/RGcakedeco.pdf
RECIPES
* Crisco (or other shortening) which is pure white. ** More water for icing to smooth on cake, less water for
flowers. *** Vanilla, almond, etc., depends on taste.

CAKES - THE BASE TO WORK ON Baking the Cake
Baking a cake for decorating purposes calls for careful preparation. Keep in mind that the surface should be level and
smooth to enable a favorable decorating surface. By carefully following these steps, the resulting cake will enable you to
have a finished cake worthy of any Cake Boss!
1. Preheat oven.
2. Prepare your pan. Grease the inside of the cake pan generously with
oil/shortening so that all the pan’s indentations are covered.
3. Sprinkle the pan with flour, spreading until all surface area is covered,
then tap out excess flour. If any shiny spots are showing be sure to
touch them up with more shortening and flour. This helps to prevent
the cake from sticking.
4. Bake the cake according to the recipe.
5. Allow the cake to cool in the pan on a cooling rack for 10 minutes. When removing the cake from the pan, place
the cooling rack against the cake and turn over the pan. Lift the cake pan off carefully.
HELPFUL HINTS:
• Your cake should be cooled for at least one hour. If after cooling, the cake is stuck to pan, return cake to the oven for
five minutes to loosen.
• To save time, you can bake the cake ahead of decorating day and freeze or cover cake until you are ready to
decorate. Just be sure to thaw completely before decorating as any moisture will affect the decorating set-up
• Character pans and shaped cakes are not acceptable Cake Decorating 1 Achievement Day Requirements.
Character pans are very costly to purchase and have limited use; however they may be of benefit to you in future
years of cake decorating!
1. Place the cake on a plate or cardboard circle at least 2.5 cm (1”)
larger than the actual cake.
HINT: If the cake top is unlevel, turn the cake upside down for a flat-
ter surface to decorate.
2. Apply a basic crumb coating...What is a crumb coating?? Simply put,
it is a very thin layer of icing that will “glue” any crumbs down. The
key is thinning the buttercream icing (with small amounts of water) to
a consistency that will not tear the cake as it is spread on.
3. Brush loose crumbs from the cake and spread a thin layer of icing over the top and the sides of the
cake.
4. Use a spatula or smooth edged knife to smooth the icing as best you can
5. Let it dry (apprx. 20 minutes). The crumb coat needs to be dry (not tacky) before you apply the final
layer of icing.
6. Once the crumb coat is completely dry, you are ready to continue icing and decorating. At this point you would
continue icing the cake as you normally do. The crumb coat will hold in all of the loose crumbs that could have
easily caused you to have fits...Applying the Top Coat is continued on the next page...
• Chocolate cakes tend to have more crumbs!!! Starting with a crumb coat can make
icing and decorating chocolate cakes so much easier!
• A crumb coat can also serve as a sealer on a cake in the event that you are not able
to decorate it immediately. This also will help keep your cake moist.
The Icing on the Cake! Once the cake has cooled completely, it’s ready to ice.

FINAL ICING
• Ice the sides first, working from bottom towards the top. Use long even strokes, building up edges slightly higher than cake’s top surface.
• Ice the top of the cake next. With your spatula in hand, heap icing on the top of the cake and spread to meet built up edges.
• To smooth the cake top, dip the spatula in hot water, then place it flat on cake top, half-way across the cake. Press down lightly, holding spatula still, and carefully drag across the top of the cake.
• To smooth the cake sides, once again dip the spatula in hot water, then press it to the side of the cake. Apply gentle but consistent pressure while moving around the cake. Repeat until the sides are smooth..
NOW YOUR CAKE CANVAS IS READY!!!
DECORATING WITH COLOR Colouring Icing Color brings cake decorations to life. In order to achieve pleasant, top quality cake decora-tions, you must learn to appreciate good colour combinations and how to balance colours. Colour bases used for tinting icing come in both liquid and paste:
• Liquid colours are concentrated and blend easily into icing.
• Paste colouring is the preferred colouring for decorators because it is concentrated in a creamy, rich base that can be added to icing without changing its consistency.
• Both colouring tints give vivid and deep rich colouring. Facts About Colours Reds, oranges and yellows stimulate, attract, excite and make things appear larger. They are associated with fire, danger, warmth and sunlight and are considered advancing colours. Greens, blues and purples are soothing, cool, calm and restful and make things appear smaller. They are associated with grass, water and sky, and are considered receding colours. Orange, red and blue have the greatest attention value. Yellow, green and orange have the greatest amount of brightness.
• Lightness and darkness create the sense of increased or decreased space; light colours seem to increase the size of objects and dark colours decrease their apparent size.
• Background colours should be neutral lor less intense than the objects shown on them. They should blend harmoni-ously with decorations on the cake unless contrast is desired.
• Vivid colours should be used sparingly and on small areas; dull colours on large areas. Tinting Icing Begin with white icing adding the colour a little at a time until you achieve the desired shade.
• Liquid colouring should be added to icing a drop at a time
• Paste colouring should be added with a toothpick. Deep or Darker colours will require a larger amount of colouring. Tint a small amount of icing first then mix in with remainder of white icing. The colour of icing usually darkens 1-2 hours after mixing. Always be sure to mix enough of any one colour icing. As you gain decorating experience, you will learn just how much of any one colour you will need. This is very important because it is extremely hard to duplicate an exact shade of any colour.
AGRICULTURE AWARENESS PROJECT Agriculture is one of PEI’s main industries. You are expected to participate with your club to complete a project (or provide a service) which helps your club or others become aware of the importance of agriculture in our lives. As in the community project, you should actively participate. Our Agricultural Awareness Project was ________________________________________ ________________________________________________________________________ I helped by _____________________________________________________________________________ It was beneficial because __________________________________________________________________ ______________________________________________________________________________________ ______________________________________________________________________________________ I learned _______________________________________________________________________________ ______________________________________________________________________________________ ______________________________________________________________________________________
COMMUNITY PROJECT Each year you are encouraged to provide a service to your community as a 4-H member. This introduces you to the responsibilities of citizenship. You must participate in your club’s plan for a community project and you should have a role to play. Describe your involvement with your club’ community project this year. Our Community Project was _________________________________________________ ______________________________________________________________________________________ I helped by _____________________________________________________________________________ It was beneficial because __________________________________________________________________ ______________________________________________________________________________________ ______________________________________________________________________________________ I learned ______________________________________________________________________________ ______________________________________________________________________________________ ______________________________________________________________________________________