ach guide - central bank · ach guide. commercial customer edition . page 2 ... ***see details in...
TRANSCRIPT

Page 1 September 2016
ACH Guide Commercial Customer Edition

Page 2 September 2016
Wire Transfer
7 Easy Steps
Login to the bank’s website and enter your User ID in the Account Login for Business.
Password: Enter your Password PIN: Enter your Token Password and PIN received from your Token Device
Enter the ACH amount.
Click Submit
***All deposits received by 7:00 P.M. will be originated on that day’s business.
Click Create Payment from the menu.
Create a profile if a profile hasn’t been created for the ACH you are initiating. ***see details in the guide on creating profiles.
Click on the Payments tab and select Access ACH/Wires. A new pop-up window will appear taking you to the BusinessLink Corporate Home Page. Click on the ACH tab.
Click on your BusinessLink profile
ACH
1
2
3
4
5
6
7

Page 3 September 2016
Table of Contents
Introduction .......................................................................................................................................................... 5
Understanding the Icons ...................................................................................................................................... 6
ACH Status Descriptions........................................................................................................................................ 8
Signing In ............................................................................................................................................................... 9
Home Page .......................................................................................................................................................... 11
Summary Page .................................................................................................................................................... 12
Creating Profiles ................................................................................................................................................. 14
Payment Methods ............................................................................................................................................... 15
Creating a Direct Deposit Profile .................................................................................................................... 16
Creating a Preauthorized Debit Profile ........................................................................................................... 19
Creating a Cash Concentration Profile ............................................................................................................ 22
Creating a Cash Disbursement Profile ............................................................................................................ 25
Creating a Tax Profile ...................................................................................................................................... 28
Creating a Vendor Profile ................................................................................................................................ 33
Creating a Child Support Profile ...................................................................................................................... 36
Creating a Telephone Initiated Profile ............................................................................................................ 40
Creating a Web Initiated Profile ..................................................................................................................... 43
Creating a International ACH Profile ............................................................................................................... 46
Creating a Re-presented Check Profile ........................................................................................................... 50
Modify an Existing ACH Payment ........................................................................................................................ 53
Manually Modify the Recipient Information .............................................................................................. 54
Automatically Modify Status for Recipient ................................................................................................ 55
Creating an ACH Payment .................................................................................................................................. 56
Creating a Same-Day ACH Payment .................................................................................................................. 60
Approval Structures Within Profiles ............................................................................................................... 65
Page 4 September 2016
Approving an ACH Payment ........................................................................................................................... 66
ACH Reports........................................................................................................................................................ 68
Administration ................................................................................................................................................... 71
Alerts ............................................................................................................................................................... 72
Audit Summary ............................................................................................................................................. 77
Audit Customer User Summary ................................................................................................................. 78
File Mapping .................................................................................................................................................. 79
Transaction Search .......................................................................................................................................... 81

Page 5 September 2016
Introduction ACH payments through BusinessLink provides you the ability to send and receive funds between accounts that reside at the same bank or different financial institutions. Users must be assigned permissions by the bank in order to have access to the ACH link in the main navigation. If you need to add access for ACH to a user, please contact your Commercial Banking Services Representative at the bank and they will assist you. The ACH function allows access to the following:
• ACH Summary • Create and Manage ACH Profiles • Create ACH Payments • Create and Print Reports • Create and Manage Approval Structures for all ACH Payments
System Requirements
• Microsoft Internet Explorer 7.0 or higher browser software • FireFox 18 or higher browser software • Safari 6 or higher browser software • Adobe PDF Viewer
Data Archiving BusinessLink database retains your financial information from the past 30 days to 18 months, depending on the data type. To keep a record of your statements as well as balances, transfer and other reports, you can easily export information to storage media.
Page 6 September 2016
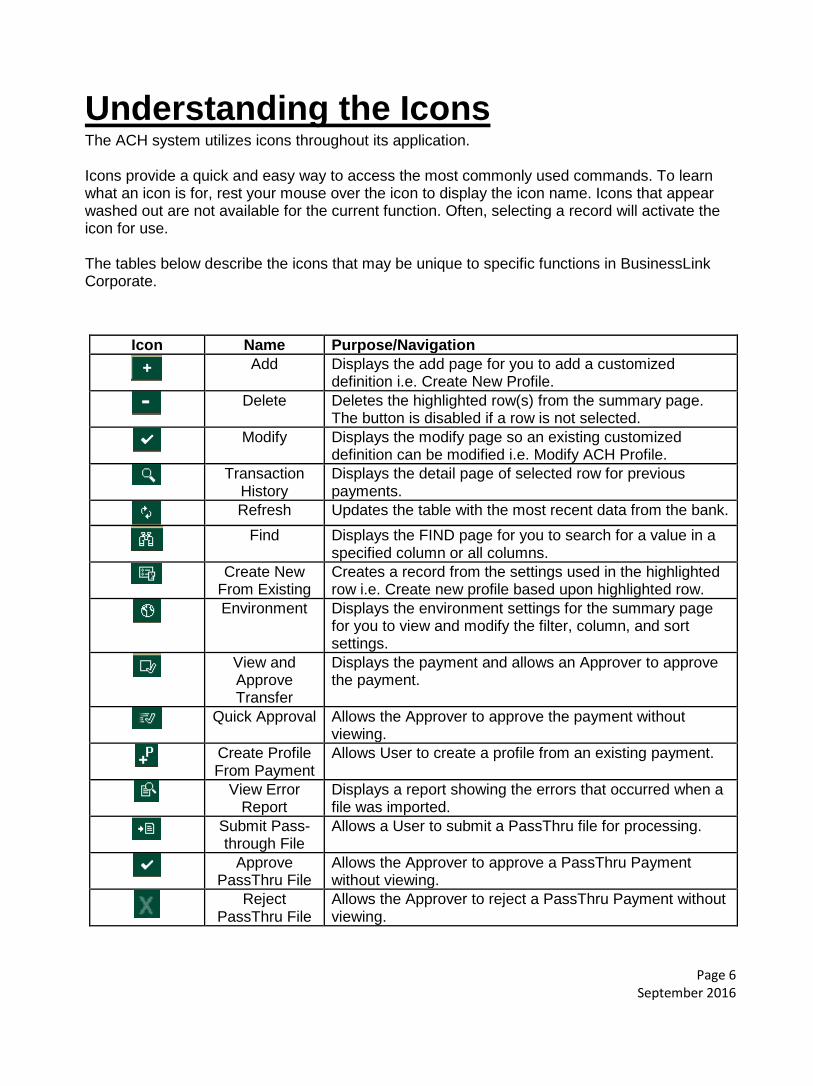
Understanding the Icons The ACH system utilizes icons throughout its application. Icons provide a quick and easy way to access the most commonly used commands. To learn what an icon is for, rest your mouse over the icon to display the icon name. Icons that appear washed out are not available for the current function. Often, selecting a record will activate the icon for use. The tables below describe the icons that may be unique to specific functions in BusinessLink Corporate.
Icon Name Purpose/Navigation
Add Displays the add page for you to add a customized
definition i.e. Create New Profile.
Delete Deletes the highlighted row(s) from the summary page. The button is disabled if a row is not selected.
Modify Displays the modify page so an existing customized definition can be modified i.e. Modify ACH Profile.
Transaction History
Displays the detail page of selected row for previous payments.
Refresh Updates the table with the most recent data from the bank.
Find Displays the FIND page for you to search for a value in a
specified column or all columns.
Create New From Existing
Creates a record from the settings used in the highlighted row i.e. Create new profile based upon highlighted row.
Environment Displays the environment settings for the summary page for you to view and modify the filter, column, and sort settings.
View and Approve Transfer
Displays the payment and allows an Approver to approve the payment.
Quick Approval Allows the Approver to approve the payment without viewing.
Create Profile From Payment
Allows User to create a profile from an existing payment.
View Error Report
Displays a report showing the errors that occurred when a file was imported.
Submit Pass-through File
Allows a User to submit a PassThru file for processing.
Approve
PassThru File Allows the Approver to approve a PassThru Payment without viewing.
Reject
PassThru File Allows the Approver to reject a PassThru Payment without viewing.
Page 7 September 2016
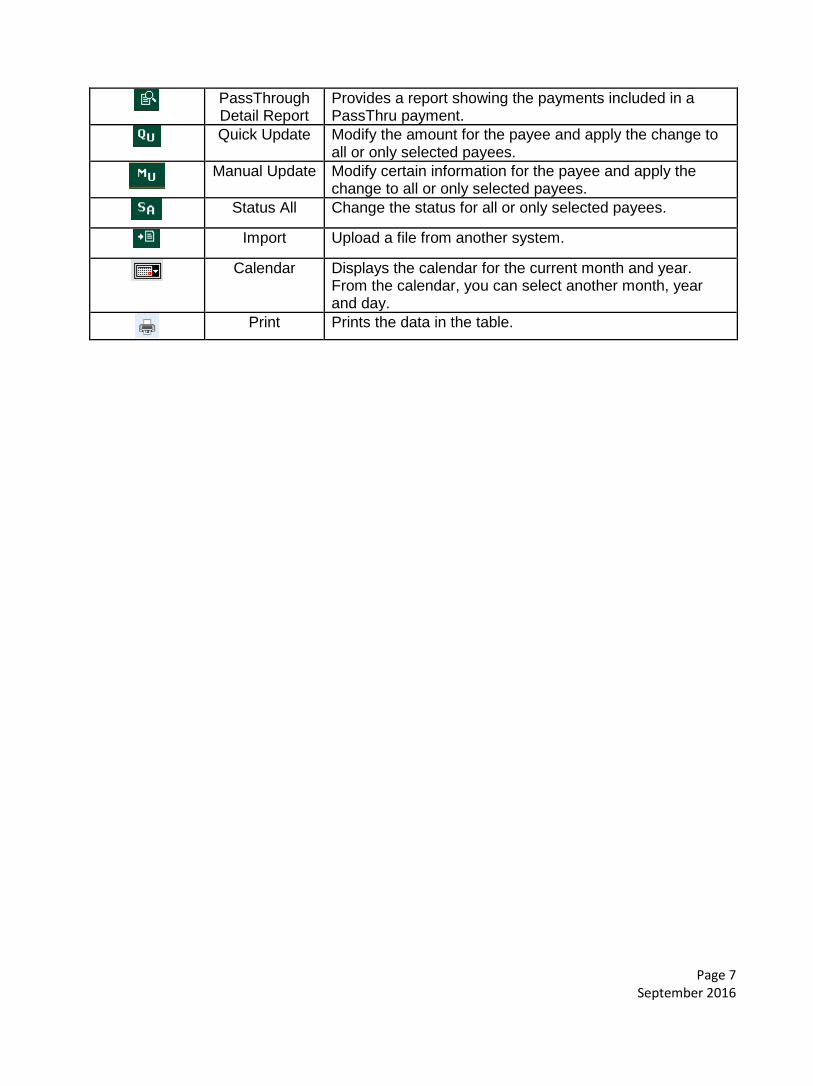
PassThrough Detail Report
Provides a report showing the payments included in a PassThru payment.
Quick Update Modify the amount for the payee and apply the change to all or only selected payees.
Manual Update Modify certain information for the payee and apply the
change to all or only selected payees.
Status All Change the status for all or only selected payees.
Import Upload a file from another system.
Calendar Displays the calendar for the current month and year. From the calendar, you can select another month, year and day.
Print Prints the data in the table.

Page 8 September 2016
ACH Status Descriptions ACH Status Examples
Status Description Pending ACH is queued for pickup from the bank. Submitted BusinessLink has submitted the ACH to the bank for processing. Delivered The bank’s ACH processing system recognizes the ACH and will
queue it for further processing. Processed The ACH was successfully processed. Rejected ACH was not processed – ABA number could be incorrect, account
may not enough funds, etc. Pending 1 Approval ACH awaiting approval before being queued for processing. Pending 2 Approval ACH awaiting 2
nd approval.
Pending 3 Approval ACH awaiting 3rd
approval. Pending 4 Approval ACH awaiting 4
th approval.
Pending 5 Approval ACH awaiting 5th
approval. Future Dated Future dated ACH awaiting release to the bank after having received
all necessary approvals. Stale ACH whose value dated occurs in the past, but has not yet received all
necessary approvals. This transfer cannot be queued for processing.

Page 9 September 2016
Signing In
Our bank utilizes an added layer of security known as Multi-factor authentication. Multi-factor authentication is a term used to describe an authentication mechanism where more than one piece of information is required to authenticate a user. We have chosen a small, digital token device to provide users with a random code that changes every few seconds. The user utilizes this unique code, combined with his or her User ID and Password, to access Business Online Services. Your User ID in combination with your password and the PIN number displayed on your token device will grant you secure access once you have been “authenticated”.
Sign on to your bank’s website: • www.centralbank.net • www.jeffeerson-bank.com Enter your User ID, make sure Business is selected and click Go.
userid
Enter in your Password and PIN number received from the Token device screen. (i.e. 612345403580) Token Password = 612345 Token PIN = 403580 Click Go To have the ability to create Wire Transfers, customers are required to have a Token. If you do not have a Token and wish to create Wire Transfers, please contact the bank.
Page 10 September 2016
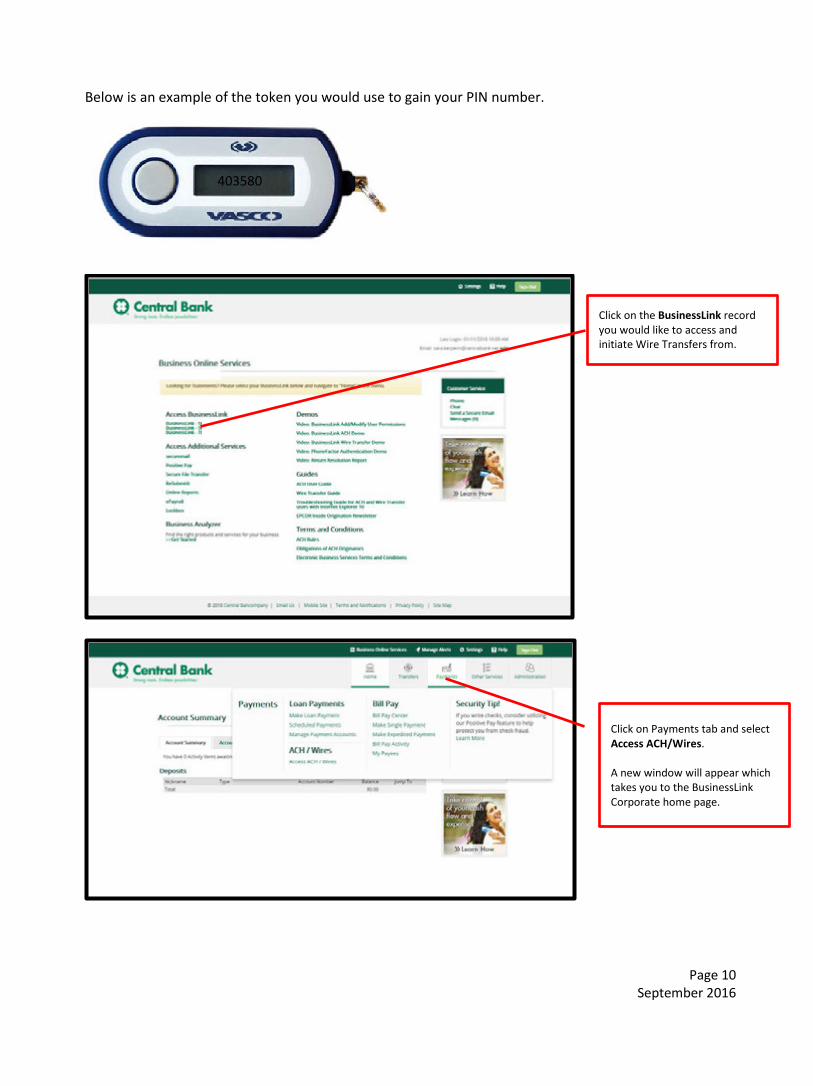
Below is an example of the token you would use to gain your PIN number.
403580
Click on Payments tab and select Access ACH/Wires. A new window will appear which takes you to the BusinessLink Corporate home page.
Click on the BusinessLink record you would like to access and initiate Wire Transfers from.

Page 11 September 2016
Home Page BusinessLink Corporate is the BusinessLink module for Wire Transfers and ACH. A new browser window will open when you click on the link. Depending upon the permissions you have been assigned will determine the navigation you see.
• Users with administrative capabilities will see the Administration link. • Users who can create and submit Wire Transfers will see the Wire Transfer link which is
the link you would use to initiate and approve Wire Transfers. • Users with permissions to originate ACH transactions will see the webACH link. • Users with permissions to originate ACH transactions and are converting to the new ACH
solution will see the ACH link.
To initiate and approve wire transfers, you will need to click on the ACH tab.
The Message and Alerts Center are ways for the bank to communicate specific information regarding wire transfers or ACH.

Page 12 September 2016
Summary Page Use this page to view a list of ACH payments and their associated status. You can use the summary bar to search and/or sort transactions based upon specific information. Use the scroll bar to scroll over and see additional information about the ACH you’ve submitted. Below is a list of the status headings listed on the summary page and a definition of what each mean.
Summary Page Headings Create Date/Time: The date and time the payment was created. Effective Entry Date: The date that the payment is effective at the sending financial institution. It is automatically set to a non-editable current date if future value dating is not provided. Process Date: Date on which the item is to be processed by the host system. Entry Date: The date upon which the transfer information was entered into the system.

Page 13 September 2016
Status: The stage of the ACH. Type: The type of ACH payment. Tracking Number: The number assigned to the ACH after the transfer is entered into the system. Total Transactions: The number of payees receiving a payment. Credit Amount: The monetary credit value of the ACH payment. Debit Amount: The monetary debit value of the ACH payment. Profile Name: The name of the profile. Profile Description: The type of ACH payment. Payment Method: The reason the payment was created. Entry User: ID of the user who entered the ACH into the system. Company Entry Description: The description the payee will see when receiving the payment. State Date: The first date the reoccurring ACH payment will begin processing. End Date: The last date the reoccurring ACH payment will process. Maximum Executions: The number of times a reoccurring payment will process. Completed Executions: The number of times a reoccurring ACH payment has processed.

Page 14 September 2016
Creating Profiles The first step in submitting ACH payments is creating an ACH Profile. For a full description of the different profile options available, please see the Profile Types.
From the Summary screen, click on the Profile Maintenance tab to create an “ACH Profile”.
Click the ACH link to create an “ACH profile”.

Page 15 September 2016
Payment Methods To create a profile, you need to identify the type of ACH payment you need to create.
ACH Payment Methods Use to Initiate
Direct Deposit Send payments to a person. A common use for Direct Deposit is sending payroll payments.
Preauthorized Debit Pull payments from a person. A common use for Preauthorized Debit is pulling dues.
Cash Concentration Pull money from a business.
Cash Disbursement Send money to a business.
Tax Send tax payments to Federal and State Governments.
Vendor Send payments to a business and include invoice information.
Child Support Send payments for Child Support.
Telephone Initiated Submit payments initiated through a telephone conversation.
Web Initiated Submit payments initiated through a website.
International ACH Submit payments to recipients banking in a foreign country.
Re-presented Check Convert a paper check to an ACH payment.
Page 16 September 2016
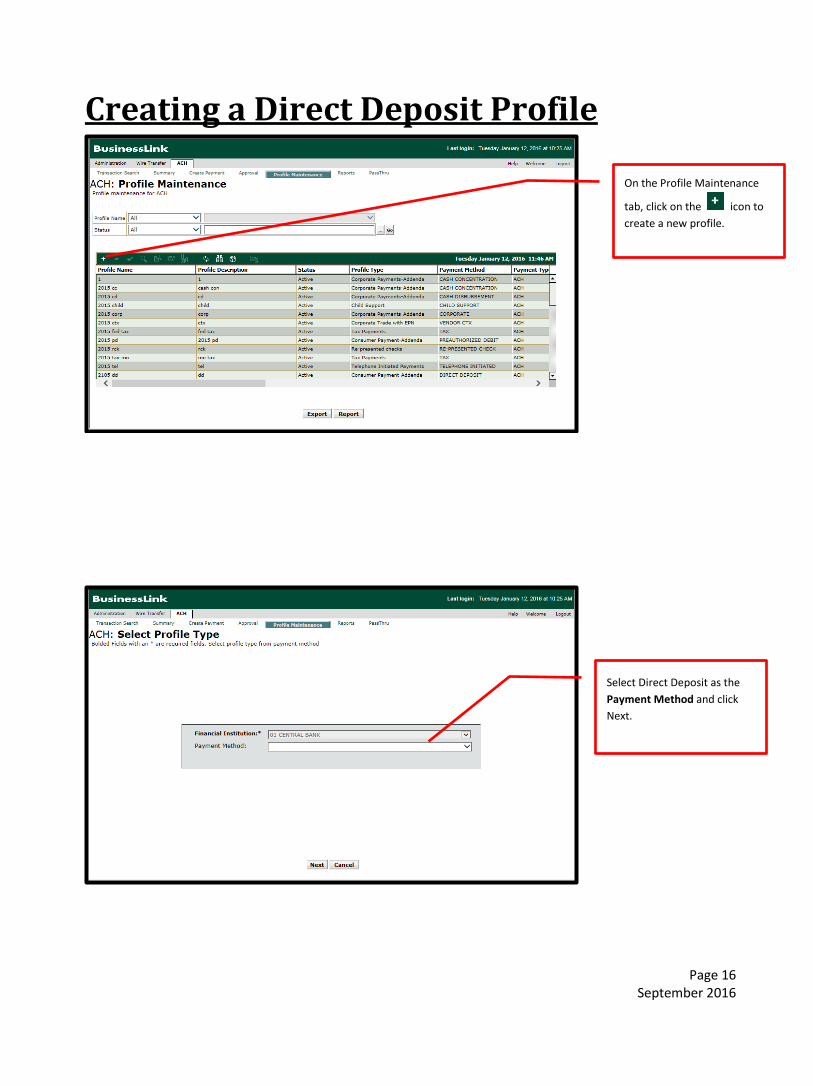
Creating a Direct Deposit Profile
On the Profile Maintenance
tab, click on the icon to create a new profile.
Select Direct Deposit as the Payment Method and click Next.

Page 17 September 2016
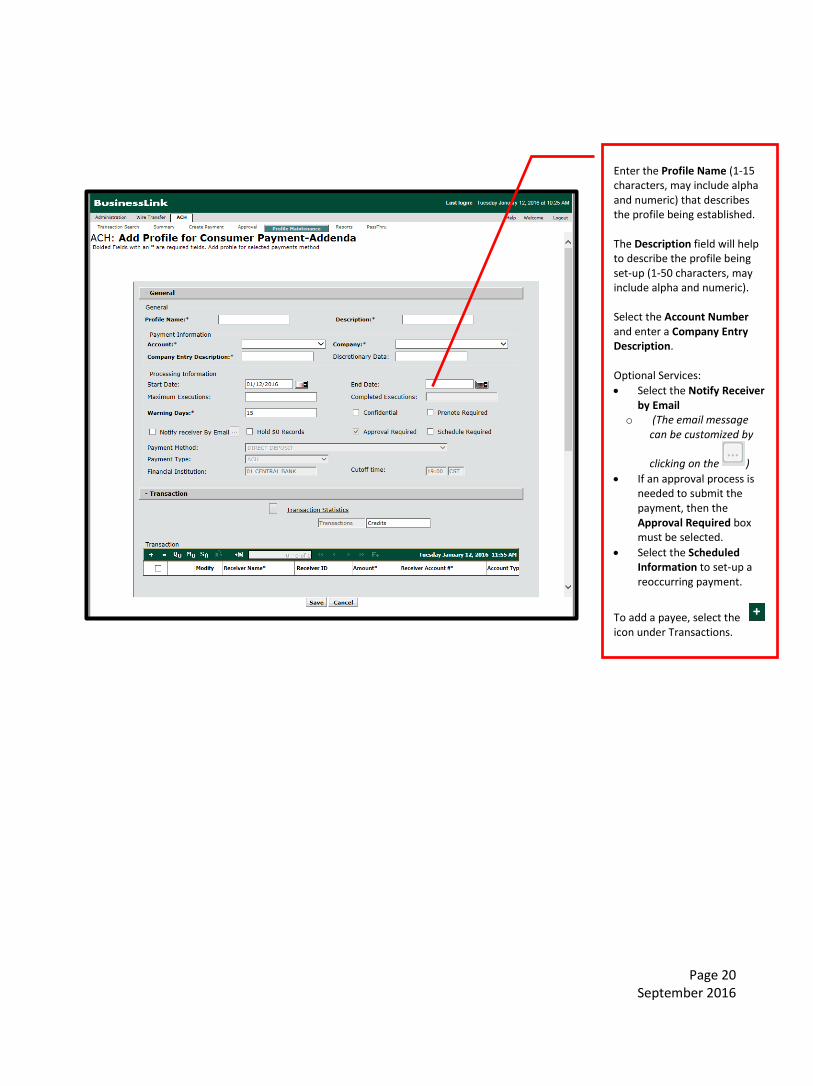
Enter the Profile Name (1-15 characters, may include alpha and numeric) that describes the profile being established. The Description field will help to describe the profile being set-up (1-50 characters, may include alpha and numeric). Select the Account Number and enter a Company Entry Description. Optional Services: • Select the Notify Receiver
by Email o (The email message
can be customized by
clicking on the ) • If an approval process is
needed to submit the payment, then the Approval Required box must be selected.
• Select the Scheduled Information to set-up a reoccurring payment.
To add a payee, select the icon under Transactions.

Page 18 September 2016
User ID User ID
User ID
On the Permissions and Approval Structure section, select the users who can create ACH payments for this profile by placing a check mark in the Create Payment box. If approval will be required for this profile, click on the drop down box to select an approval level for users you wish to designate as approvers. If no approval is necessary, leave the approval level set to None. Note: Please refer to the Approval Structure section of this guide for more details.
Your Profile has now been created and added to the list of profiles.
Enter the following required information: • Receiver’s Name • Receiver ID • Receiver Account # • Account Type • Bank R/T • Amount
User ID User ID

Page 19 September 2016
Creating a Preauthorized Debit Profile
On the Profile Maintenance
tab, click on the icon to create a new profile.
Select Preauthorized Debit as the Payment Method and click Next.
Page 20 September 2016
Enter the Profile Name (1-15 characters, may include alpha and numeric) that describes the profile being established. The Description field will help to describe the profile being set-up (1-50 characters, may include alpha and numeric). Select the Account Number and enter a Company Entry Description. Optional Services: • Select the Notify Receiver
by Email o (The email message
can be customized by
clicking on the ) • If an approval process is
needed to submit the payment, then the Approval Required box must be selected.
• Select the Scheduled Information to set-up a reoccurring payment.
To add a payee, select the icon under Transactions.

Page 21 September 2016
User ID User ID User ID
On the Permissions and Approval Structure section, select the users who can create ACH payments for this profile by placing a check mark in the Create Payment box. If approval will be required for this profile, click on the drop down box to select an approval level for users you wish to designate as approvers. If no approval is necessary, leave the approval level set to None. Note: Please refer to the Approval Structure section of this guide for more details.
Your Profile has now been created and added to the list of profiles.
Enter the following required information: • Receiver’s Name • Receiver ID • Receiver Account # • Account Type • Bank R/T • Amount
User ID User ID

Page 22 September 2016
Creating a Cash Concentration Profile
On the Profile Maintenance
tab, click on the icon to create a new profile.
Select Cash Concentration as the Payment Method and click Next.

Page 23 September 2016
Enter the Profile Name (1-15 characters, may include alpha and numeric) that describes the profile being established. The Description field will help to describe the profile being set-up (1-50 characters, may include alpha and numeric). Select the Account Number and enter a Company Entry Description. Optional Services: • Select the Notify Receiver
by Email o (The email message
can be customized by
clicking on the ) • If an approval process is
needed to submit the payment, then the Approval Required box must be selected.
• Select the Scheduled Information to set-up a reoccurring payment.
To add a payee, select the icon under Transactions.
Enter the following required information: • Receiver’s Name • Receiver ID • Receiver Account # • Account Type • Bank R/T • Amount

Page 24 September 2016
On the Permissions and Approval Structure section, select the users who can create ACH payments for this profile by placing a check mark in the Create Payment box. If approval will be required for this profile, click on the drop down box to select an approval level for users you wish to designate as approvers. If no approval is necessary, leave the approval level set to None. Note: Please refer to the Approval Structure section of this guide for more details.
User ID User ID
User ID
Your Profile has now been created and added to the list of profiles.
User ID
User ID
Page 25 September 2016
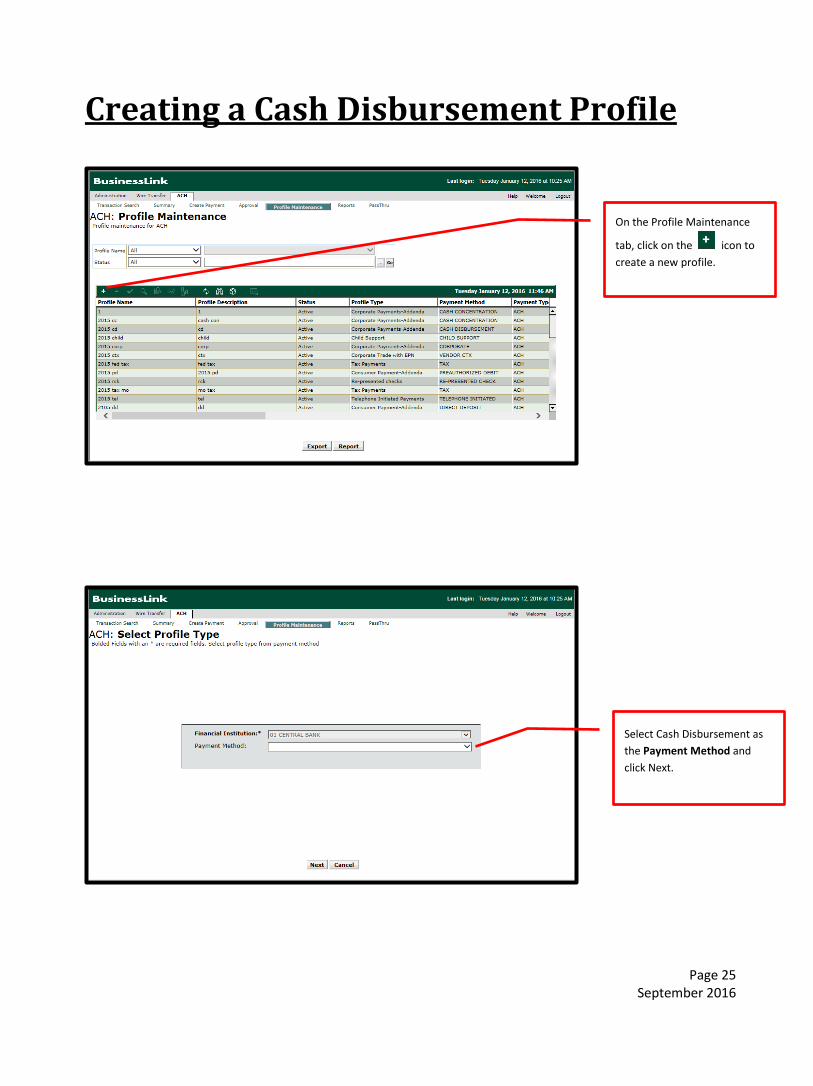
Creating a Cash Disbursement Profile
On the Profile Maintenance
tab, click on the icon to create a new profile.
Select Cash Disbursement as the Payment Method and click Next.

Page 26 September 2016
Enter the Profile Name (1-15 characters, may include alpha and numeric) that describes the profile being established. The Description field will help to describe the profile being set-up (1-50 characters, may include alpha and numeric). Select the Account Number and enter a Company Entry Description. Optional Services: • Select the Notify Receiver
by Email o (The email message
can be customized by
clicking on the ) • If an approval process is
needed to submit the payment, then the Approval Required box must be selected.
• Select the Scheduled Information to set-up a reoccurring payment.
To add a payee, select the icon under Transactions.
Enter the following required information: • Receiver’s Name • Receiver ID • Receiver Account # • Account Type • Bank R/T • Amount

Page 27 September 2016
On the Permissions and Approval Structure section, select the users who can create ACH payments for this profile by placing a check mark in the Create Payment box. If approval will be required for this profile, click on the drop down box to select an approval level for users you wish to designate as approvers. If no approval is necessary, leave the approval level set to None. Note: Please refer to the Approval Structure section of this guide for more details.
User ID User ID User ID
Your Profile has now been created and added to the list of profiles.
User ID User ID

Page 28 September 2016
Creating a Tax Profile
On the Profile Maintenance
tab, click on the icon to create a new profile.
Select Tax as the Payment Method and select the Tax Agency. The Tax Agency can be: Federal Payments: • EFTPS Multi (Quarterly
Payments) • EFTPS Single (Annual
Payments) For State or Other Agencies, select the appropriate Agency. Click Next.

Page 29 September 2016
Enter the Profile Name (1-15 characters, may include alpha and numeric) that describes the profile being established. The Description field will help to describe the profile being set-up (1-50 characters, may include alpha and numeric). Select the Account Number and enter a Company Entry Description. Optional Services: • Select the Notify Receiver
by Email o (The email message
can be customized by
clicking on the ) • If an approval process is
needed to submit the payment, then the Approval Required box must be selected.
• Select the Scheduled Information to set-up a reoccurring payment.
To add a payee, select the icon under Transactions.

Page 30 September 2016
For EFTPS Multi payments, enter the following required information: • Receiver’s Name • Receiver ID • Receiver Account # • Account Type • Bank R/T • Amount
Provide the following Addenda Information: • Taxpayer ID • Tax Type Code • Tax Period End Date • Amount
For EFTPS Single payments, enter the following required information: • Receiver’s Name • Receiver ID • Receiver Account # • Account Type • Bank R/T • Amount
Provide the following Addenda Information: • Taxpayer ID • Tax Type Code • Tax Period End Date • Amount

Page 31 September 2016
On the Permissions and Approval Structure section, select the users who can create ACH payments for this profile by placing a check mark in the Create Payment box. If approval will be required for this profile, click on the drop down box to select an approval level for users you wish to designate as approvers. If no approval is necessary, leave the approval level set to None. Note: Please refer to the Approval Structure section of this guide for more details.
User ID User ID
User ID
For State payments, enter the following required information: • Receiver’s Name • Receiver ID • Receiver Account # • Account Type • Bank R/T • Amount
Provide the following Addenda Information: • Taxpayer ID • Tax Type Code • Tax Period End Date • Amount Type • Amount
User ID User ID

Page 32 September 2016
Your Profile has now been created and added to the list of profiles.
Page 33 September 2016
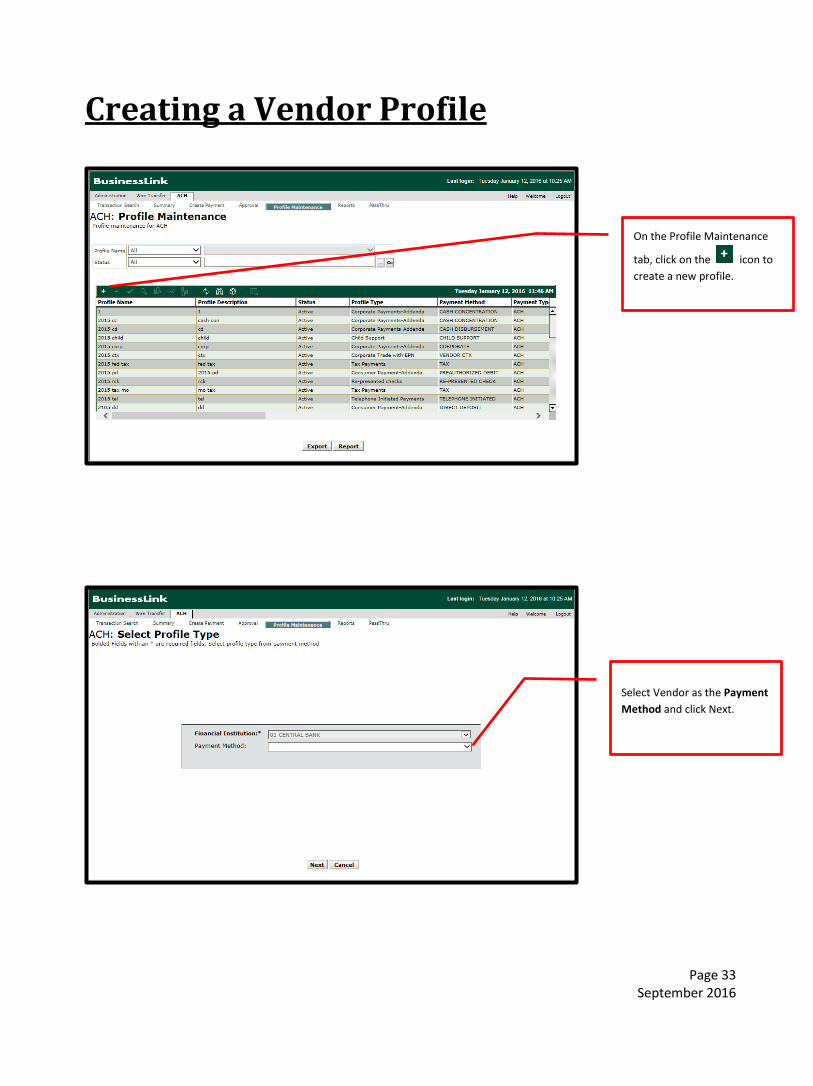
Creating a Vendor Profile
On the Profile Maintenance
tab, click on the icon to create a new profile.
Select Vendor as the Payment Method and click Next.

Page 34 September 2016
Enter the Profile Name (1-15 characters, may include alpha and numeric) that describes the profile being established. The Description field will help to describe the profile being set-up (1-50 characters, may include alpha and numeric). Select the Account Number and enter a Company Entry Description. Optional Services: • Select the Notify Receiver
by Email o (The email message
can be customized by
clicking on the ) • If an approval process is
needed to submit the payment, then the Approval Required box must be selected.
• Select the Scheduled Information to set-up a reoccurring payment.
To add a payee, select the icon under Transactions.
Enter the following required information: • Receiver’s Name • Receiver ID • Receiver Account # • Account Type • Bank R/T • Amount

Page 35 September 2016
On the Permissions and Approval Structure section, select the users who can create ACH payments for this profile by placing a check mark in the Create Payment box. If approval will be required for this profile, click on the drop down box to select an approval level for users you wish to designate as approvers. If no approval is necessary, leave the approval level set to None. Level 1 and 2 will be further defined when the Approval tab is selected Note: Please refer to the Approval Structure section of this guide for more details.
User ID User ID
User ID
Your Profile has now been created and added to the list of profiles.
User ID
User ID

Page 36 September 2016
Creating a Child Support Profile
On the Profile Maintenance
tab, click on the icon to create a new profile.
Select Child Support as the Payment Method and click Next.

Page 37 September 2016
Enter the Profile Name (1-15 characters, may include alpha and numeric) that describes the profile being established. The Description field will help to describe the profile being set-up (1-50 characters, may include alpha and numeric). Select the Account Number and enter a Company Entry Description. Optional Services: • Select the Notify Receiver
by Email o (The email message
can be customized by
clicking on the ) • If an approval process is
needed to submit the payment, then the Approval Required box must be selected.
• Select the Scheduled Information to set-up a reoccurring payment.
To add a payee, select the icon under Transactions.

Page 38 September 2016
Enter the following required information: • Receiver’s Name • Receiver ID • Receiver Account # • Account Type • Bank R/T • Amount
Provide the following Addenda Information: • Case ID • Absent Parent SSN • Medical Support
Provided • Absent Parent First Name • Absent Parent Last Name
On the Permissions and Approval Structure section, select the users who can create ACH payments for this profile by placing a check mark in the Create Payment box. If approval will be required for this profile, click on the drop down box to select an approval level for users you wish to designate as approvers. If no approval is necessary, leave the approval level set to None. Note: Please refer to the Approval Structure section of this guide for more details.
User ID User ID User ID
User ID
User ID

Page 39 September 2016
Your Profile has now been created and added to the list of profiles.

Page 40 September 2016
Creating a Telephone Initiated Profile
On the Profile Maintenance
tab, click on the icon to create a new profile.
Select Telephone Initiated as the Payment Method and click Next.

Page 41 September 2016
Enter the Profile Name (1-15 characters, may include alpha and numeric) that describes the profile being established. The Description field will help to describe the profile being set-up (1-50 characters, may include alpha and numeric). Select the Account Number and enter a Company Entry Description. Optional Services: • Select the Notify Receiver
by Email o (The email message
can be customized by
clicking on the ) • If an approval process is
needed to submit the payment, then the Approval Required box must be selected.
• Select the Scheduled Information to set-up a reoccurring payment.
To add a payee, select the icon under Transactions.

Page 42 September 2016
On the Permissions and Approval Structure section, select the users who can create ACH payments for this profile by placing a check mark in the Create Payment box. If approval will be required for this profile, click on the drop down box to select an approval level for users you wish to designate as approvers. If no approval is necessary, leave the approval level set to None. Note: Please refer to the Approval Structure section of this guide for more details.
Enter the following required information: • Receiver’s Name • Receiver ID • Receiver Account # • Account Type • Bank R/T • Amount • Payment Type Code
User ID User ID
User ID
Your Profile has now been created and added to the list of profiles.
User ID User ID
Page 43 September 2016
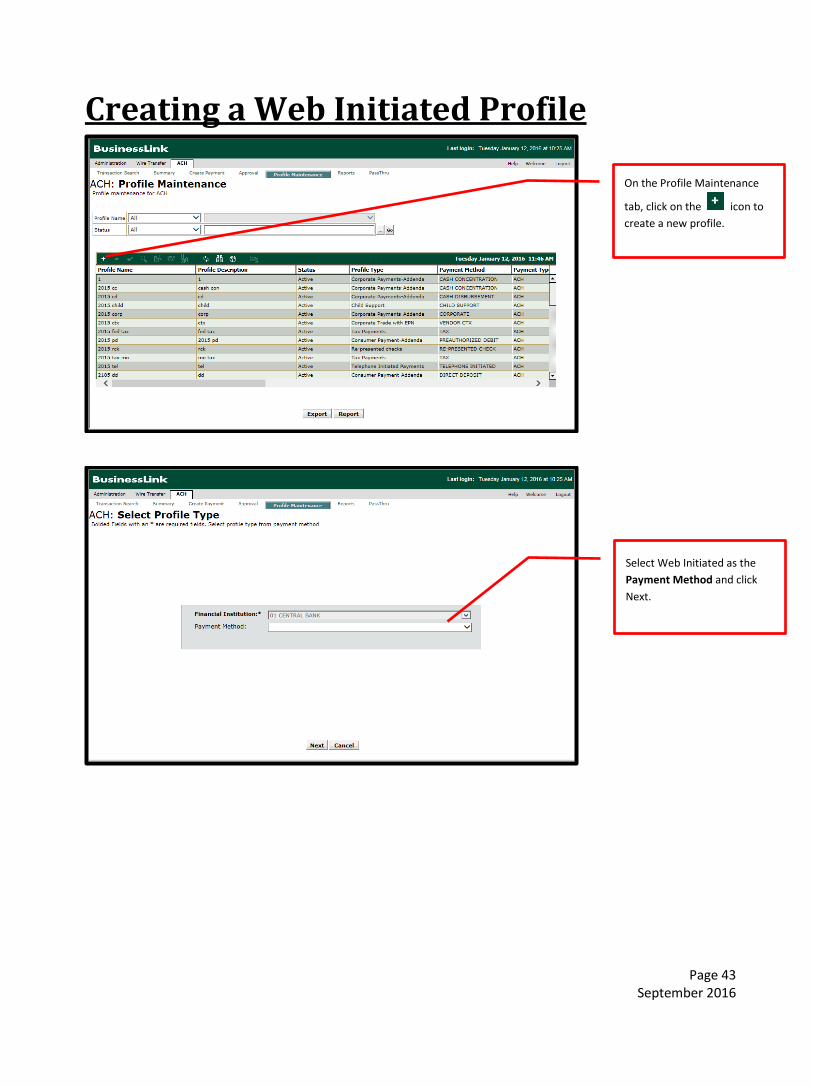
Creating a Web Initiated Profile
On the Profile Maintenance
tab, click on the icon to create a new profile.
Select Web Initiated as the Payment Method and click Next.

Page 44 September 2016
Enter the Profile Name (1-15 characters, may include alpha and numeric) that describes the profile being established. The Description field will help to describe the profile being set-up (1-50 characters, may include alpha and numeric). Select the Account Number and enter a Company Entry Description. Optional Services: • Select the Notify Receiver
by Email o (The email message
can be customized by
clicking on the ) • If an approval process is
needed to submit the payment, then the Approval Required box must be selected.
• Select the Scheduled Information to set-up a reoccurring payment.
To add a payee, select the icon under Transactions.
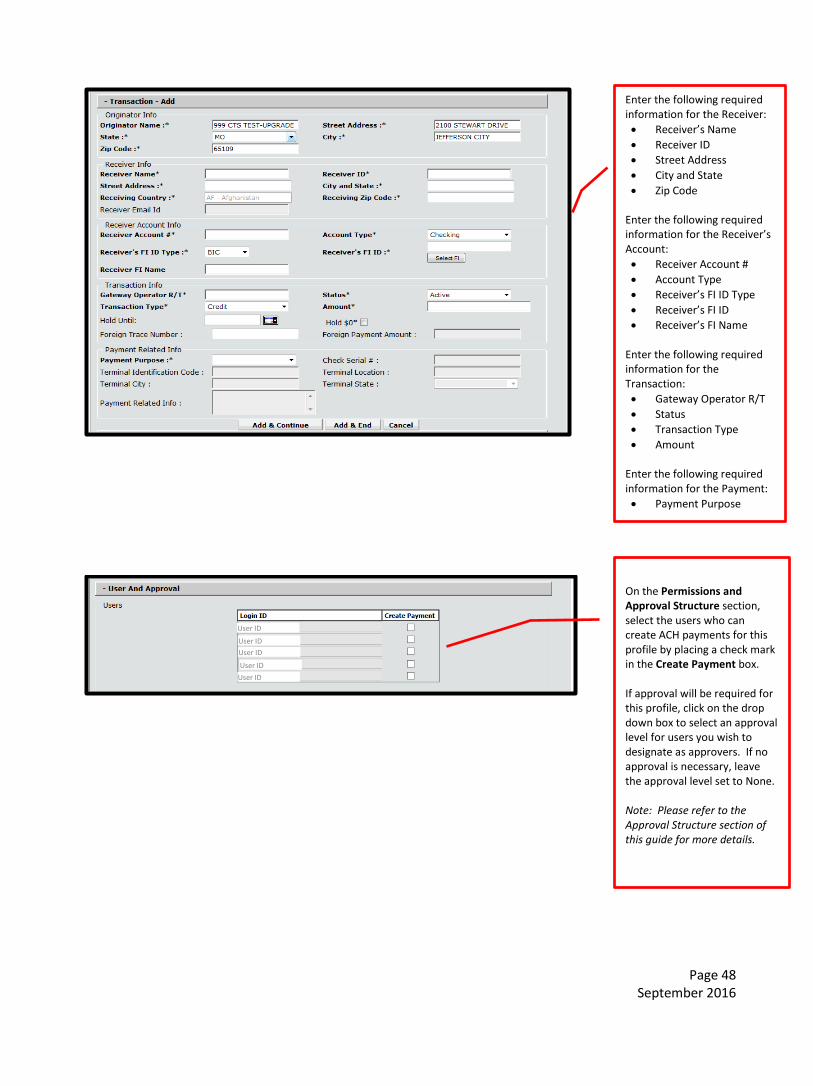
Enter the following required information: • Receiver’s Name • Receiver ID • Receiver Account # • Account Type • Bank R/T • Amount • Payment Type Code

Page 45 September 2016
On the Permissions and Approval Structure section, select the users who can create ACH payments for this profile by placing a check mark in the Create Payment box. If approval will be required for this profile, click on the drop down box to select an approval level for users you wish to designate as approvers. If no approval is necessary, leave the approval level set to None. Level 1 and 2 will be further defined when the Approval tab is selected Note: Please refer to the Approval Structure section of this guide for more details.
User ID User ID User ID
User ID User ID
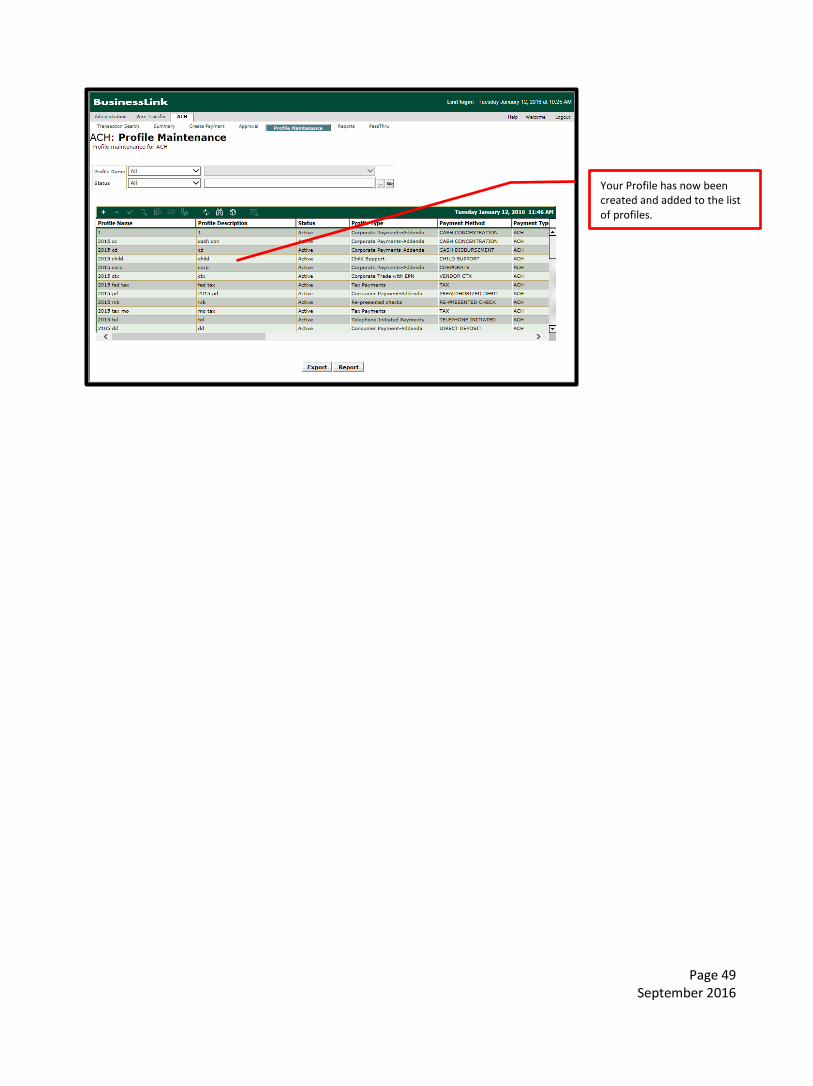
Your Profile has now been created and added to the list of profiles.

Page 46 September 2016
Creating a International ACH Profile
Select International ACH as the Payment Method and click Next.
On the Profile Maintenance
tab, click on the icon to create a new profile.

Page 47 September 2016
Enter the Profile Name (1-15 characters, may include alpha and numeric) that describes the profile being established. The Description field will help to describe the profile being set-up (1-50 characters, may include alpha and numeric). Select the Account Number, Company and enter a Company Entry Description. The FX Indicator should be set to Fixed to Fixed. Select the Destination Country Optional Services: • Select the Notify Receiver
by Email o (The email message
can be customized by
clicking on the ) • If an approval process is
needed to submit the payment, then the Approval Required box must be selected.
• Select the Scheduled Information to set-up a reoccurring payment.
To add a payee, select the icon under Transactions.
Page 48 September 2016
Enter the following required information for the Receiver: • Receiver’s Name • Receiver ID • Street Address • City and State • Zip Code
Enter the following required information for the Receiver’s Account: • Receiver Account # • Account Type • Receiver’s FI ID Type • Receiver’s FI ID • Receiver’s FI Name
Enter the following required information for the Transaction: • Gateway Operator R/T • Status • Transaction Type • Amount
Enter the following required information for the Payment: • Payment Purpose
On the Permissions and Approval Structure section, select the users who can create ACH payments for this profile by placing a check mark in the Create Payment box. If approval will be required for this profile, click on the drop down box to select an approval level for users you wish to designate as approvers. If no approval is necessary, leave the approval level set to None. Note: Please refer to the Approval Structure section of this guide for more details.
User ID
User ID User ID
User ID User ID
Page 49 September 2016
Your Profile has now been created and added to the list of profiles.

Page 50 September 2016
Creating a Re-presented Check Profile
On the Profile Maintenance
tab, click on the icon to create a new profile.
Select Re-presented Check as the Payment Method and click Next.

Page 51 September 2016
Enter the Profile Name (1-15 characters, may include alpha and numeric) that describes the profile being established. The Description field will help to describe the profile being set-up (1-50 characters, may include alpha and numeric). Select the Account Number, Company and enter a Company Entry Description. Optional Services: • Select the Notify Receiver
by Email o (The email message
can be customized by
clicking on the ) • If an approval process is
needed to submit the payment, then the Approval Required box must be selected.
• Select the Scheduled Information to set-up a reoccurring payment.
To add a payee, select the icon under Transactions.
Enter the following required information for the Receiver: • Receiver’s Name • Receiver ID • Account Number • Bank Routing # • Amount • Check Serial Number

Page 52 September 2016
Your Profile has now been created and added to the list of profiles.
On the Permissions and Approval Structure section, select the users who can create ACH payments for this profile by placing a check mark in the Create Payment box. If approval will be required for this profile, click on the drop down box to select an approval level for users you wish to designate as approvers. If no approval is necessary, leave the approval level set to None. Level 1 and 2 will be further defined when the Approval tab is selected Note: Please refer to the Approval Structure section of this guide for more details.
User ID User ID User ID
User ID
User ID

Page 53 September 2016
Modify an Existing ACH Payment BusinessLink ACH allows you the opportunity to modify ACH payments at any time. To modify an existing profile:
Select the profile and click the
icon.
The following fields can be modified in the General section: • Profile Name • Description • Account # • Company • Company Entry
Description
Page 54 September 2016
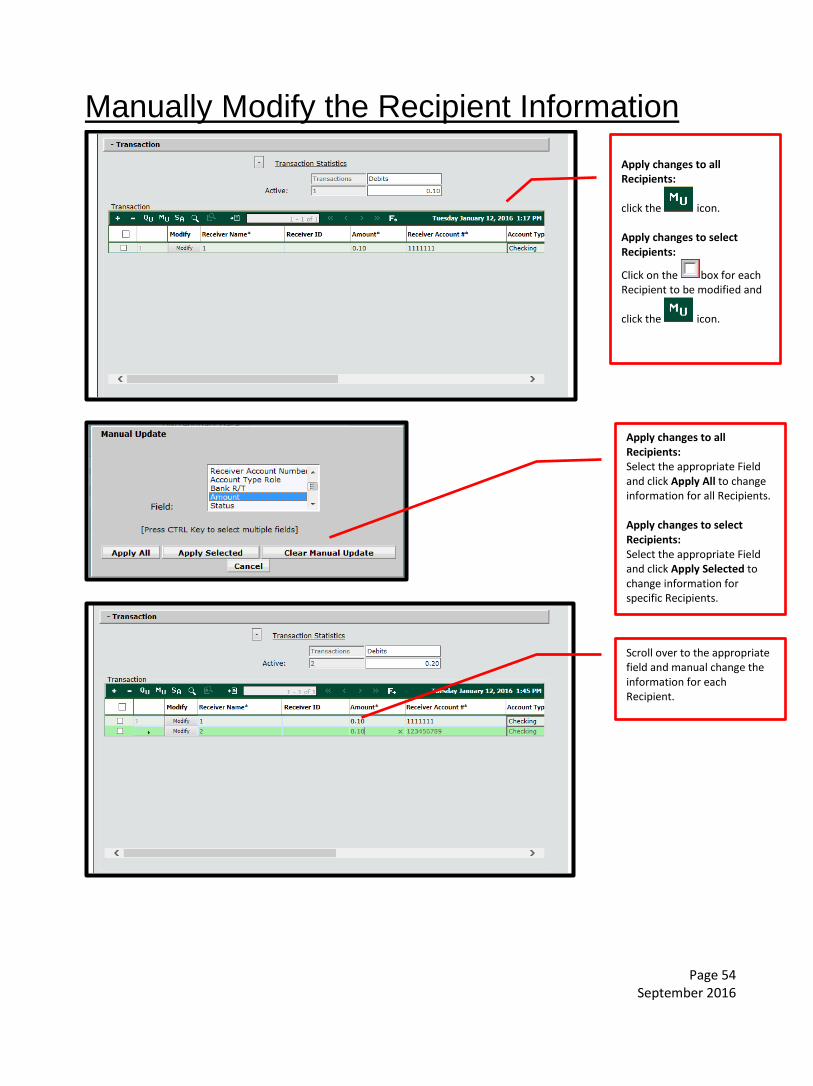
Manually Modify the Recipient Information
Apply changes to all Recipients:
click the icon. Apply changes to select Recipients:
Click on the box for each Recipient to be modified and
click the icon.
Apply changes to all Recipients: Select the appropriate Field and click Apply All to change information for all Recipients. Apply changes to select Recipients: Select the appropriate Field and click Apply Selected to change information for specific Recipients.
Scroll over to the appropriate field and manual change the information for each Recipient.

Page 55 September 2016
Automatically Modify Status for Recipient
Change the Status for all Recipients: To modify the Status for All
Receivers, click the icon. Change the Status for all Recipients: To modify the Status for select Receiver, click on the
box for each Recipient
and select the icon.
Apply changes to all Recipients: Select the appropriate Status and click Apply All to change information for all Recipients. Apply changes to select Recipients: Select the appropriate Status and click Apply Selected to change information for specific Recipients.
Page 56 September 2016
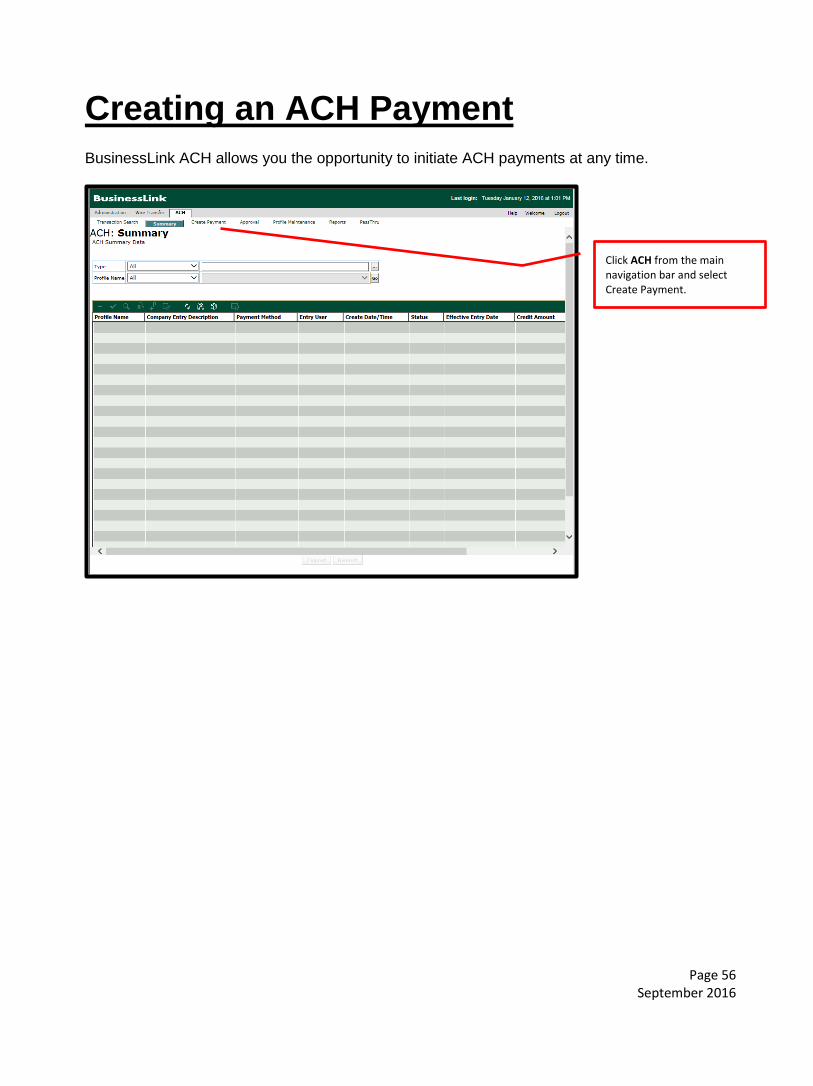
Creating an ACH Payment BusinessLink ACH allows you the opportunity to initiate ACH payments at any time.
Click ACH from the main navigation bar and select Create Payment.
Page 57 September 2016
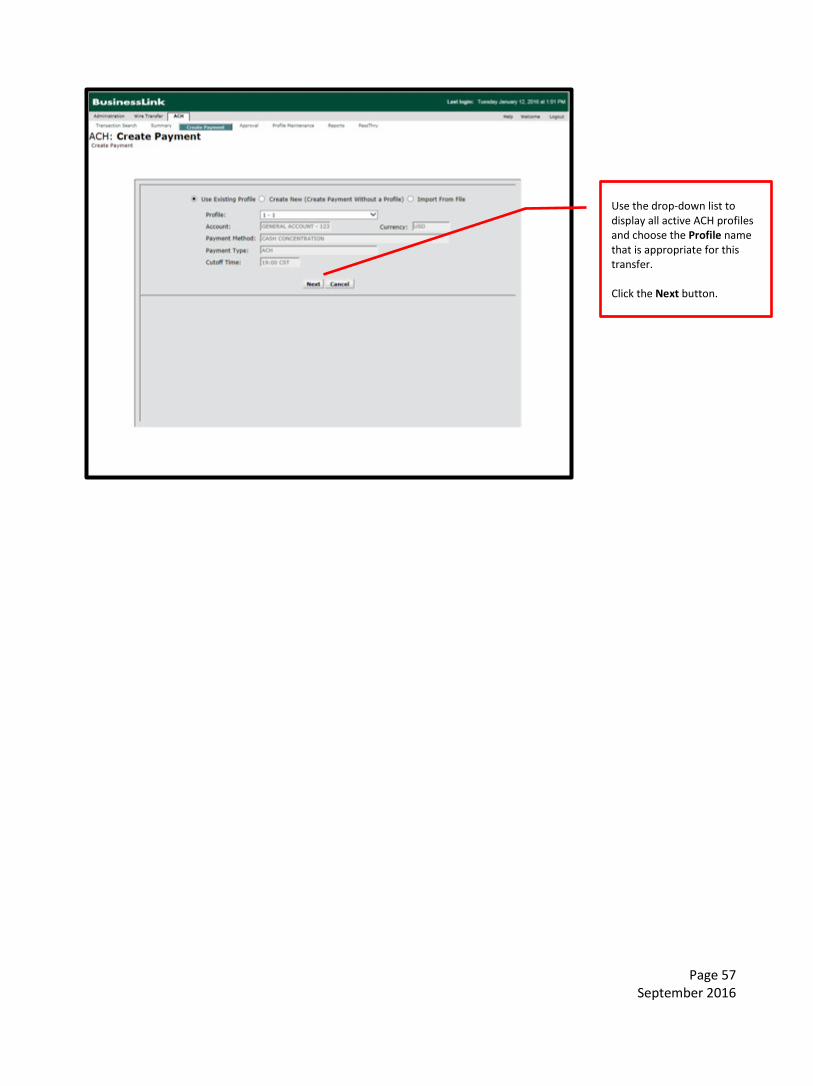
Use the drop-down list to display all active ACH profiles and choose the Profile name that is appropriate for this transfer. Click the Next button.

Page 58 September 2016
If a file needs to be imported before the file is submitted, the user will select the Import icon. The user will select Browse to search for the file. If the file is a NACHA formatted file, select NACHA as the Import File Mapping option. If a separate file mapping has been created, select the name of the file mapping. Select either to add the transactions in the file to the existing payment transactions, overwrite the existing transactions or update the transactions. Click OK to upload the file.
Select the Effective Entry Date and verify that all the information is correct. Click Submit.

Page 59 September 2016
Your ACH has now been submitted.

Page 60 September 2016
Creating a Same-Day ACH Payment BusinessLink ACH allows you the opportunity to initiate a Same-Day ACH payments.
Click ACH from the main navigation bar and select Create Payment.

Page 61 September 2016
Use the drop-down list to display all active ACH profiles and choose the Profile name that is appropriate for this transfer. Select the Payment Type Same Day ACH Click the Next button.

Page 62 September 2016
Transactions for amounts greater than $25,000 cannot be submitted as a Same-Day payment. If a transaction is over the $25,000 limit, a pop-up box will appear requesting one of the following actions be taken:
• Hold Transaction – the transaction(s) greater than $25,000 will not be submitted as a Same-Day payment.
• Change EDD – The Effective Entry Date for the payments will be changed to the next business day
• Edit – The customer will be able to edit the transaction.
The Effective Entry Date is preselected as the current business day. Verify that all the information is correct. Click Submit.

Page 63 September 2016
Your ACH has now been submitted.

Page 64 September 2016
Your ACH has now been submitted.
Page 65 September 2016
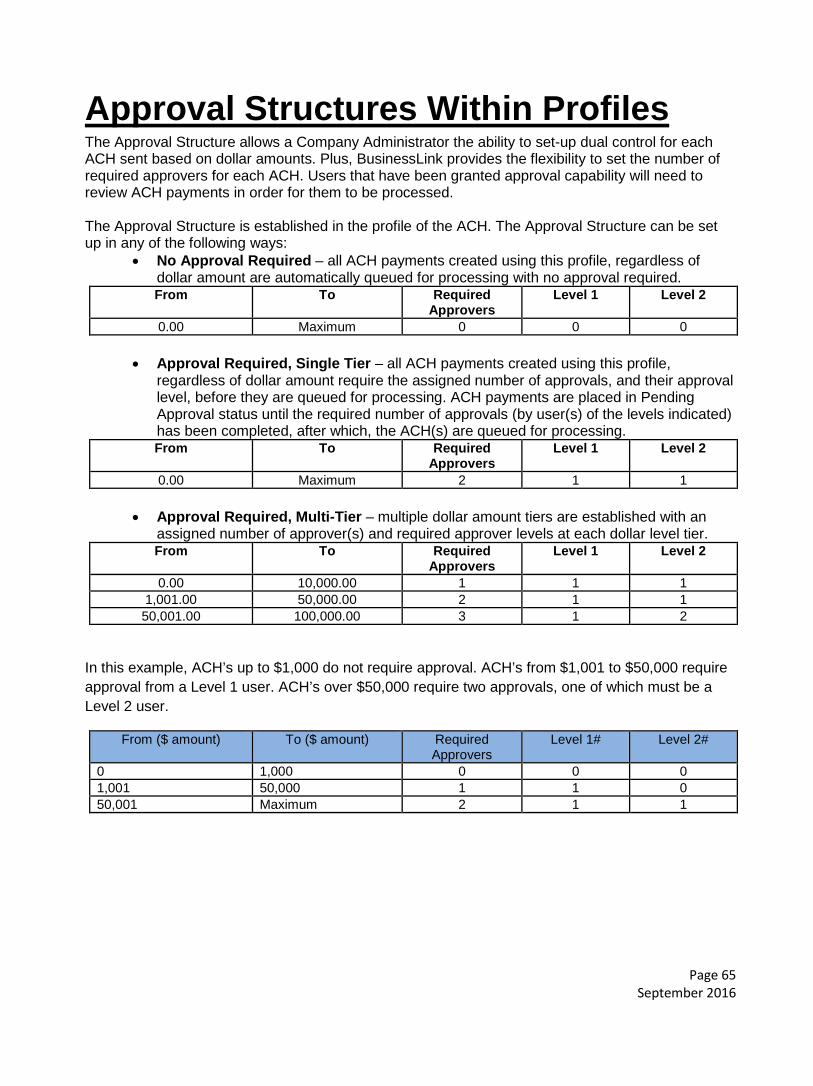
Approval Structures Within Profiles The Approval Structure allows a Company Administrator the ability to set-up dual control for each ACH sent based on dollar amounts. Plus, BusinessLink provides the flexibility to set the number of required approvers for each ACH. Users that have been granted approval capability will need to review ACH payments in order for them to be processed. The Approval Structure is established in the profile of the ACH. The Approval Structure can be set up in any of the following ways:
• No Approval Required – all ACH payments created using this profile, regardless of dollar amount are automatically queued for processing with no approval required. From To Required
Approvers Level 1 Level 2
0.00 Maximum 0 0 0
• Approval Required, Single Tier – all ACH payments created using this profile, regardless of dollar amount require the assigned number of approvals, and their approval level, before they are queued for processing. ACH payments are placed in Pending Approval status until the required number of approvals (by user(s) of the levels indicated) has been completed, after which, the ACH(s) are queued for processing. From To Required
Approvers Level 1 Level 2
0.00 Maximum 2 1 1
• Approval Required, Multi-Tier – multiple dollar amount tiers are established with an assigned number of approver(s) and required approver levels at each dollar level tier. From To Required
Approvers Level 1 Level 2
0.00 10,000.00 1 1 1 1,001.00 50,000.00 2 1 1 50,001.00 100,000.00 3 1 2
In this example, ACH’s up to $1,000 do not require approval. ACH’s from $1,001 to $50,000 require approval from a Level 1 user. ACH’s over $50,000 require two approvals, one of which must be a Level 2 user.
From ($ amount) To ($ amount) Required Approvers
Level 1# Level 2#
0 1,000 0 0 0 1,001 50,000 1 1 0 50,001 Maximum 2 1 1
Page 66 September 2016
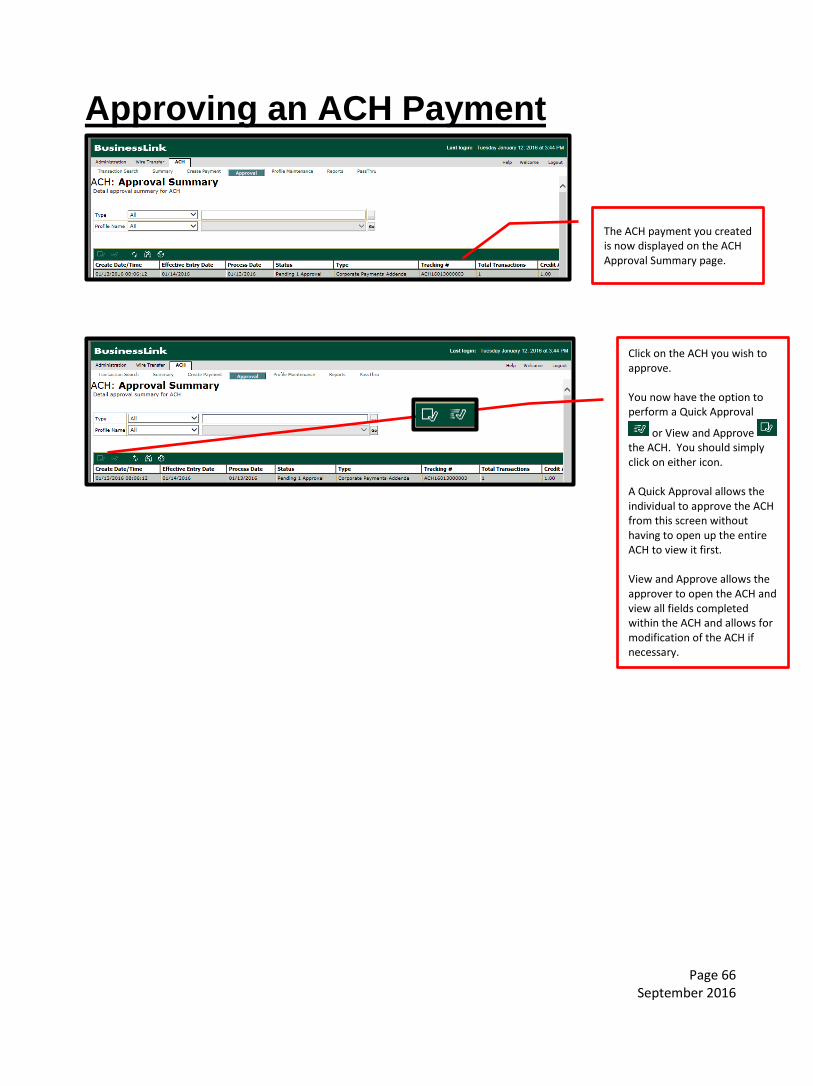
Approving an ACH Payment
The ACH payment you created is now displayed on the ACH Approval Summary page.
Click on the ACH you wish to approve. You now have the option to perform a Quick Approval
or View and Approve the ACH. You should simply click on either icon. A Quick Approval allows the individual to approve the ACH from this screen without having to open up the entire ACH to view it first. View and Approve allows the approver to open the ACH and view all fields completed within the ACH and allows for modification of the ACH if necessary.

Page 67 September 2016
Button Description
Approves the currently displayed ACH payments and displays details of the next ACH selected in the summary page. If Blind Key Verification is required, type the amount of the transfer that matches the amount stored in the database for the transfer. Once all ACH’s are approved, the ACH Approval Summary page displays. The just-approved ACH’s are not shown.
Displays the Modify ACH page showing the ACH you were reviewing for approval. Click Modify to display the next transfer selected for approval. When all ACH’s have been modified, the ACH Approval Summary page displays again.
Moves to the next ACH without approval or review.
Click Cancel to close the current page and display the next ACH selected for approval. When all transfers have been reviewed, the ACH Approval Summary page displays again.
This is an example of the View
and Approve screen. The approver has the opportunity to view the Wire before approving or make modifications.
Page 68 September 2016
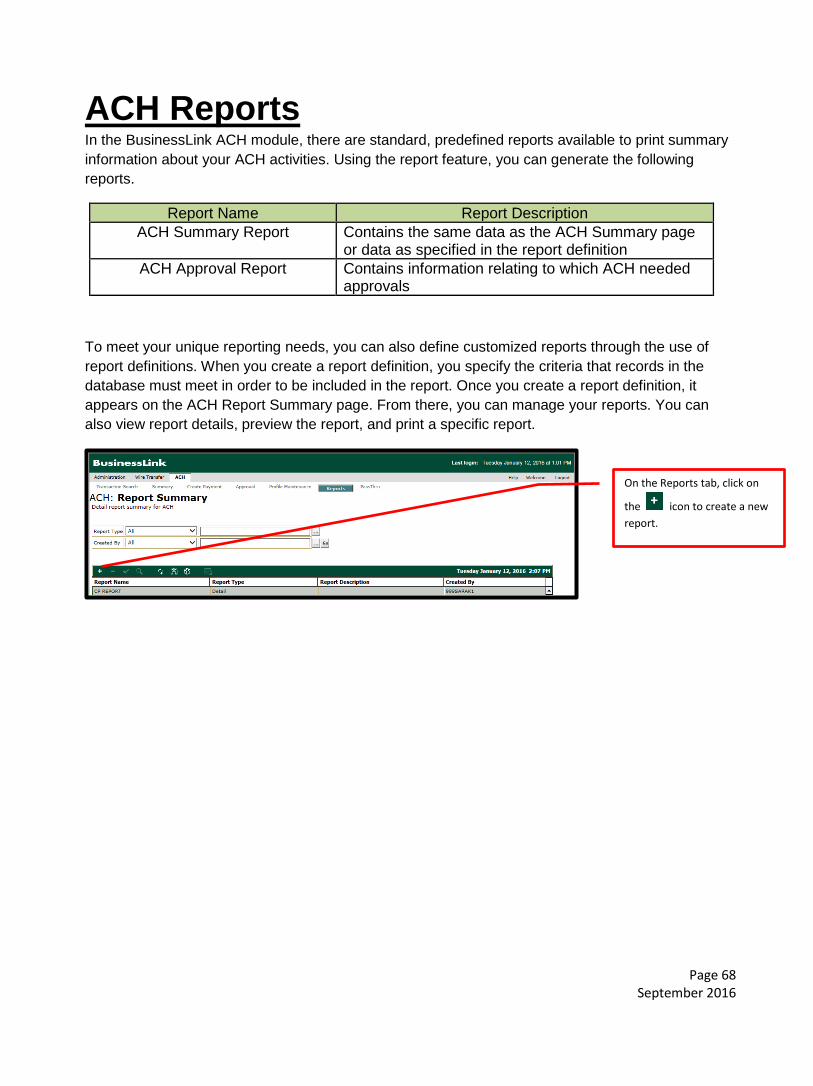
ACH Reports In the BusinessLink ACH module, there are standard, predefined reports available to print summary information about your ACH activities. Using the report feature, you can generate the following reports.
Report Name Report Description ACH Summary Report Contains the same data as the ACH Summary page
or data as specified in the report definition ACH Approval Report Contains information relating to which ACH needed
approvals
To meet your unique reporting needs, you can also define customized reports through the use of report definitions. When you create a report definition, you specify the criteria that records in the database must meet in order to be included in the report. Once you create a report definition, it appears on the ACH Report Summary page. From there, you can manage your reports. You can also view report details, preview the report, and print a specific report.
On the Reports tab, click on
the icon to create a new report.

Page 69 September 2016
Create a Report: • In the Report Type field,
choose between Summary or Detail
• In the Report Identifiers field, specify a Report Name and input a Report Description
• Define the filters and criteria to be set for the selected report
• Under Report Sort, choose how you would like to sort the report data
• Click Preview If you would like to save the report you created, click the save button.

Page 70 September 2016
A pop-up will appear with a PDF printer friendly report displayed. You may print or save this report for your records. Remember to properly print and store confidential documents in a secure location and properly destroy documents when no longer needed.

Page 71 September 2016
Administration The administrator has the ability to view audits of what their users have performed within the system. Only administrators will have access to the administrator tab. Functions an administrator will need bank assistance includes:
• Adding a new user • Adding an account to the list of accounts displayed on BusinessLink • Deleting an existing user • Assigning and editing permissions for a user
Using the Administration Tab Below is a screenshot of the Administration home page. You will see all of the users that are set up for your company as well as a menu bar consisting of several tabs. The tabs you will be using include Alert Setup, Audit Summary, Audit Customer User Summary and File Mapping.
Page 72 September 2016
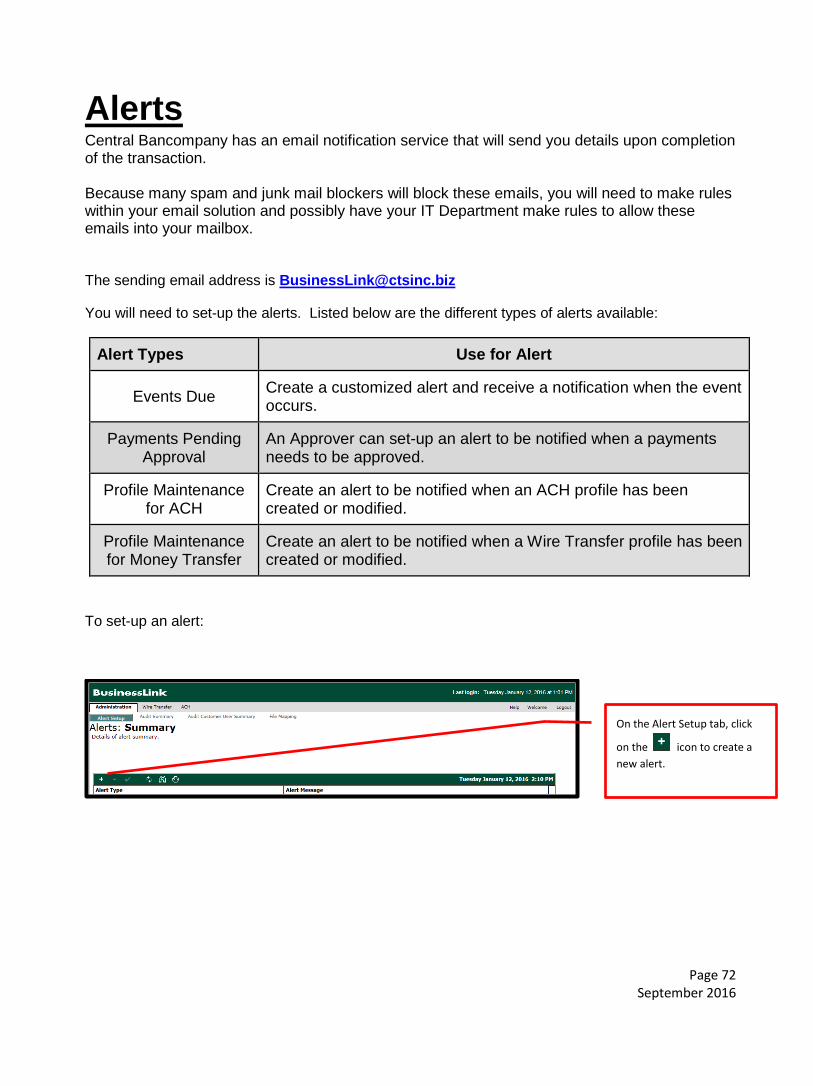
Alerts Central Bancompany has an email notification service that will send you details upon completion of the transaction. Because many spam and junk mail blockers will block these emails, you will need to make rules within your email solution and possibly have your IT Department make rules to allow these emails into your mailbox.
The sending email address is [email protected]
You will need to set-up the alerts. Listed below are the different types of alerts available:
Alert Types Use for Alert
Events Due Create a customized alert and receive a notification when the event occurs.
Payments Pending Approval
An Approver can set-up an alert to be notified when a payments needs to be approved.
Profile Maintenance for ACH
Create an alert to be notified when an ACH profile has been created or modified.
Profile Maintenance for Money Transfer
Create an alert to be notified when a Wire Transfer profile has been created or modified.
To set-up an alert:
On the Alert Setup tab, click
on the icon to create a new alert.

Page 73 September 2016
Select the type of alert you would like to add and click Continue.

Page 74 September 2016
For Events Due alerts, provide the following: • Frequency • Beginning Date • End Date • Email Message
Indicate if you want the email displayed on the Welcome Page and if you want the email sent to you.
Click Save.
Page 75 September 2016
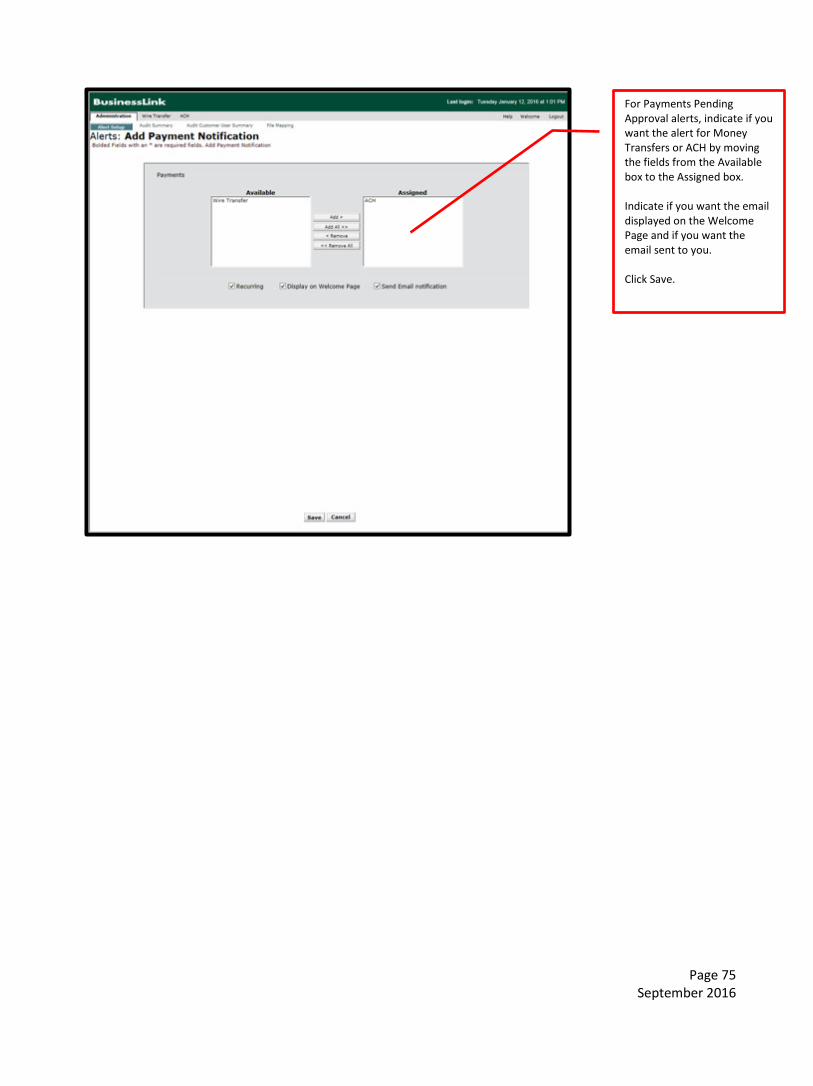
For Payments Pending Approval alerts, indicate if you want the alert for Money Transfers or ACH by moving the fields from the Available box to the Assigned box. Indicate if you want the email displayed on the Welcome Page and if you want the email sent to you. Click Save.

Page 76 September 2016
For ACH Profile Maintenance and Money Transfer Profile Maintenance alerts, indicate if you want the email displayed on the Welcome Page and if you want the email sent to you. Click Save.
Page 77 September 2016
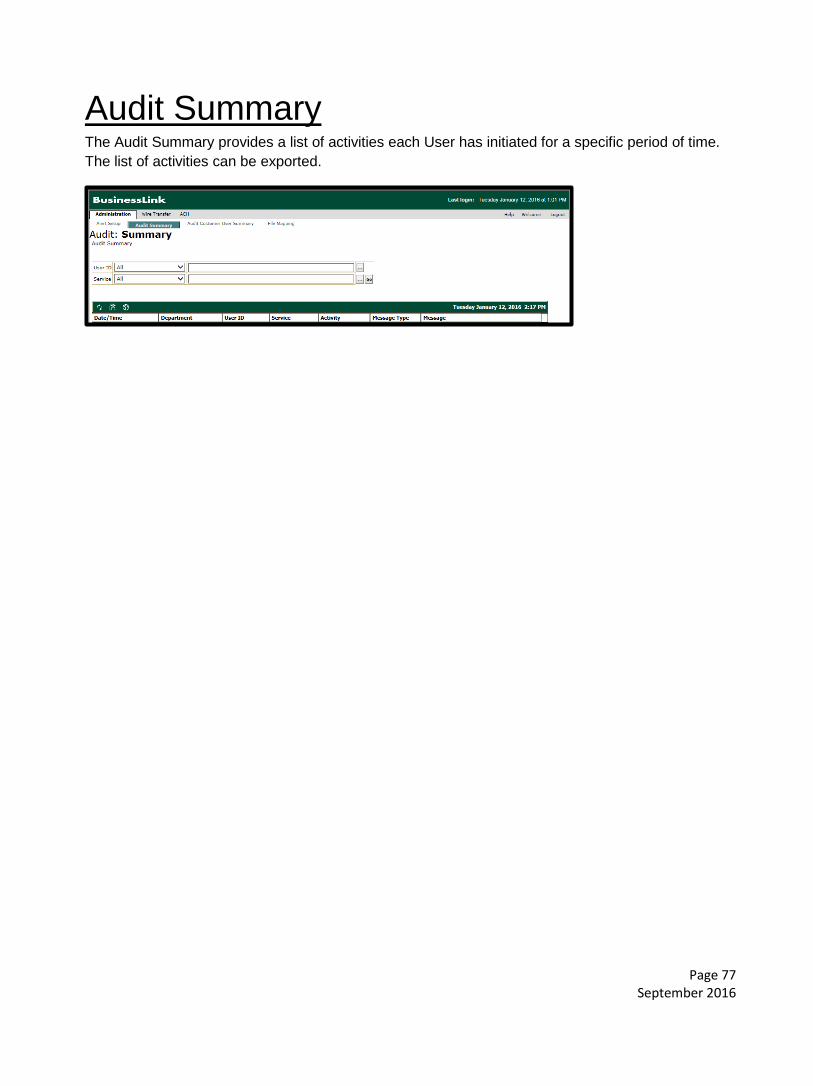
Audit Summary The Audit Summary provides a list of activities each User has initiated for a specific period of time. The list of activities can be exported.
Page 78 September 2016
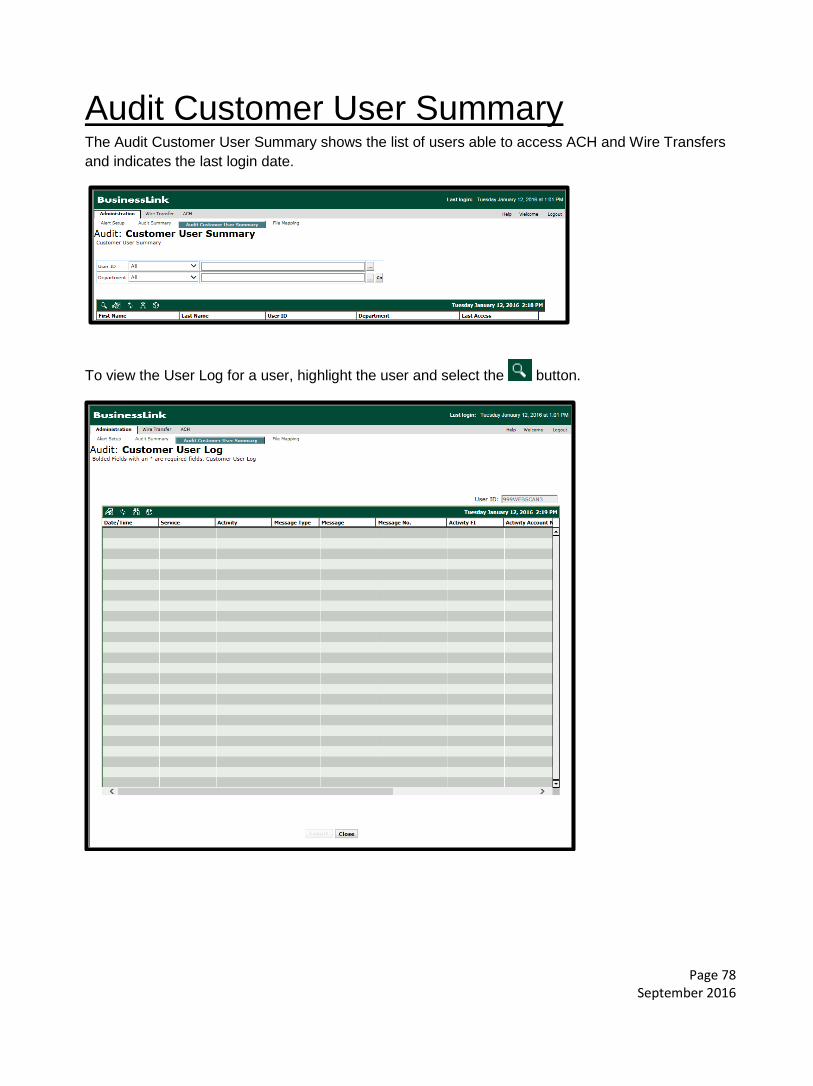
Audit Customer User Summary The Audit Customer User Summary shows the list of users able to access ACH and Wire Transfers and indicates the last login date.
To view the User Log for a user, highlight the user and select the button.

Page 79 September 2016
File Mapping If a User needs to import a non-NACHA formatted file into BusinessLink Corporate, then a File Mapping option needs to be set-up. To create a File Mapping:
On the File Mappings tab,
click on the icon.
Enter the Import Definition Name that describes the file being imported. Select the Import Definition Type. Identify the following: • Format
o Delimited is used for CSV files
o Fixed-width is used for TXT files
• Date Format (How will the date appear in the file)
• Amount Format (will the amount include a decimal?)
Click Continue.

Page 80 September 2016
Identify the following: • Field Delimiter (how is
the information in the file separated)
• End-of-line Delimiter • Import Line Offset (On
what line of the file does the data start)
• Field Layout (in what column on the file will the information be obtained) o If the information is
included in the file, select the File option.
o If the information isn’t included in the file: Select Default and
enter a Default Value if each payee is to have the same value.
Select Ignore to utilize the information currently stored in the profile.
• For the Field Code Value Mapping, identify the value on the file for Checking and Savings.
Click Save.

Page 81 September 2016
Transaction Search If a User needs to search for information within a payment or profile, they can access Transaction Search.
Select Payment Search or Profile Search. When searching for a payment or a profile, enter any the search criteria for a transaction or a transaction within a batch. Click Ok.
A page will appear displaying all possible payment or profile information that matches the criteria. The User can select the payment/profile to view the details. The data displayed can be exported to a CSV file by clicking the Export button or view a PDF report by selecting the Report button.