accounts receivable user procedures - noaa 5... · accounts receivable may 2006 -2 5.1.1 execute...
TRANSCRIPT

Accounts Receivable User Procedures
Table of Contents 5.0 Batch Processing.............................................................................................................. 5-1
5.1 Dunning Process (AR200) ...................................................................................... 5-1 5.1.2 Process Log.......................................................................................... 5-3 5.1.3 Dunning Process Report……………..……………………………….5-4 5.1.3.1 Dunning Process Report Example ....................................................... 5-5
5.2 Create Bill (AR202).............................................................................................. 5-11
5.2.1 Bill Generation Process...................................................................... 5-11 5.2.2 Process Log........................................................................................ 5-13 5.2.3 Bill Generation Report....................................................................... 5-14 5.2.3.1 Bill Generation Report Example........................................................ 5-15
Accounts Receivable
May 2006 -1
5.0 Batch Processing
Batch processing automates processes which are performed on a regular basis. Within the Accounts Receivable module, batch processing is used for bill generation and the dunning process applicable to delinquent accounts. Process logs are available for each batch.
5.1 Dunning Process (AR200)
The Dunning Process is used to assess the Debt Collection Act (DCA) charges (Treasury late fees) against delinquent bills. The system determines which bills are assessed DCA charges of interest, administrative fees, and penalties based on the bill due date and parameters established on the System Types and Codes (AR050) and Bureau Parameters (AR055) screens.
The dunning process creates system generated bill adjustment transactions, and applicable general ledger entries, on the Bill Adjustments (AR004) screen. There are three reports available upon completion of the dunning process which is: Summary Dunning Process Report, Dunning Process Reject Report and Dunning Process Activity Report.
There are two options for initiating the Dunning Process. The first is by including the Dunning Process in a scheduler which will be automatically kicked off at a specified time every night. The second option is for the Database Administrator to manually execute the Dunning Process.
The normal business process will be to include the Dunning Process in the nightly scheduler. User intervention is not required if the process is generated and successfully completed in the nightly scheduler. However, if the nightly scheduler does not successfully complete the process (i.e., system down, power failure), the Database Administrator can manually intervene and generate the process.
Accounts Receivable
May 2006 -2
5.1.1 Execute Dunning Process
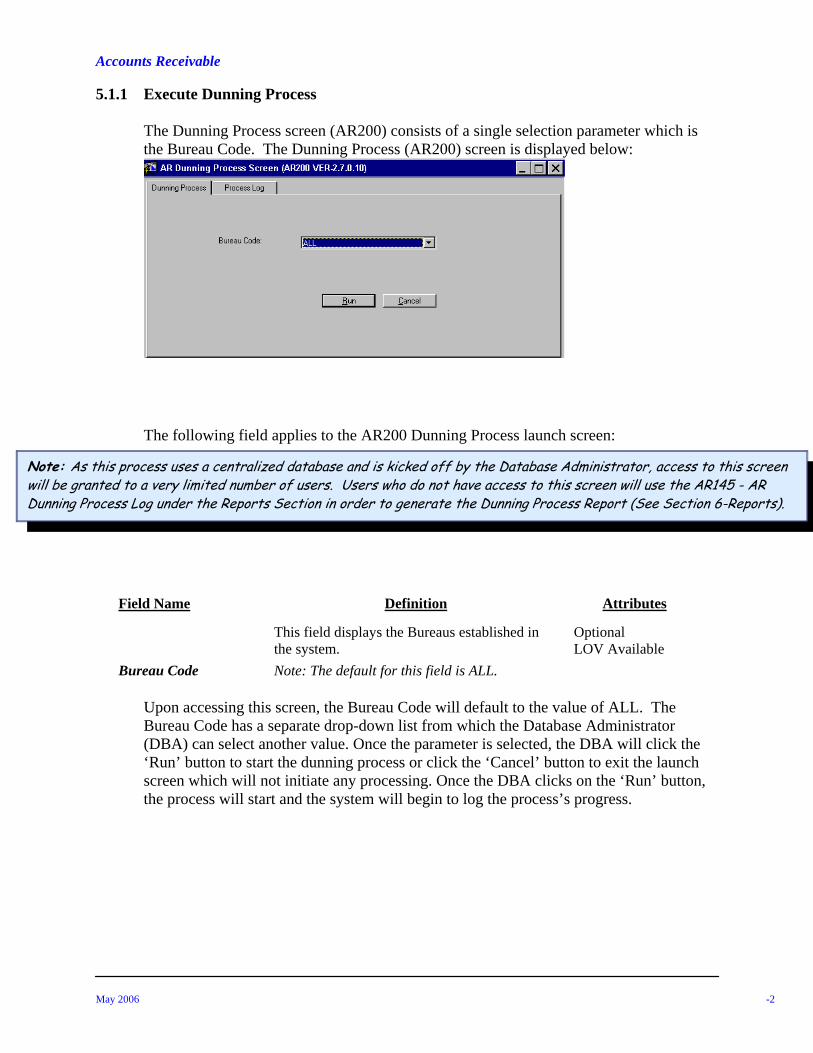
The Dunning Process screen (AR200) consists of a single selection parameter which is the Bureau Code. The Dunning Process (AR200) screen is displayed below:
The following field applies to the AR200 Dunning Process launch screen:
Note: As this process uses a centralized database and is kicked off by the Database Administrator, access to this screen will be granted to a very limited number of users. Users who do not have access to this screen will use the AR145 - AR Dunning Process Log under the Reports Section in order to generate the Dunning Process Report (See Section 6-Reports).
Field Name Definition Attributes
Bureau Code
This field displays the Bureaus established in the system. Note: The default for this field is ALL.
Optional LOV Available
Upon accessing this screen, the Bureau Code will default to the value of ALL. The Bureau Code has a separate drop-down list from which the Database Administrator (DBA) can select another value. Once the parameter is selected, the DBA will click the ‘Run’ button to start the dunning process or click the ‘Cancel’ button to exit the launch screen which will not initiate any processing. Once the DBA clicks on the ‘Run’ button, the process will start and the system will begin to log the process’s progress.
Accounts Receivable
May 2006 -3
To view or print the AR200 Dunning Process, users execute the following steps:
Step Action
1 Select the AR200 - Dunning Process option from the Navigator Menu to access the Dunning Process screen. The focus will be on the Dunning Process tab
2 Click on the down arrow from the Bureau Code field to select the Bureau from the drop down list or use the default value of ALL.
3 Click on the Run button to execute the dunning process. A message “Dunning Process is complete” will appear on the screen if the process runs successfully.
4 Click the OK button in the confirmation dialogue box. 5.1.2 Process Log
The Process Log tab allows the user to view the progress of a particular process. If a user accesses the AR200 Dunning Process screen while another dunning process is in progress, the screen displays a message which notifies the user there is another process still running. The following message will be displayed: “AR200 is currently processing, unable to start a new batch.” Only one batch process can be executed at a time.
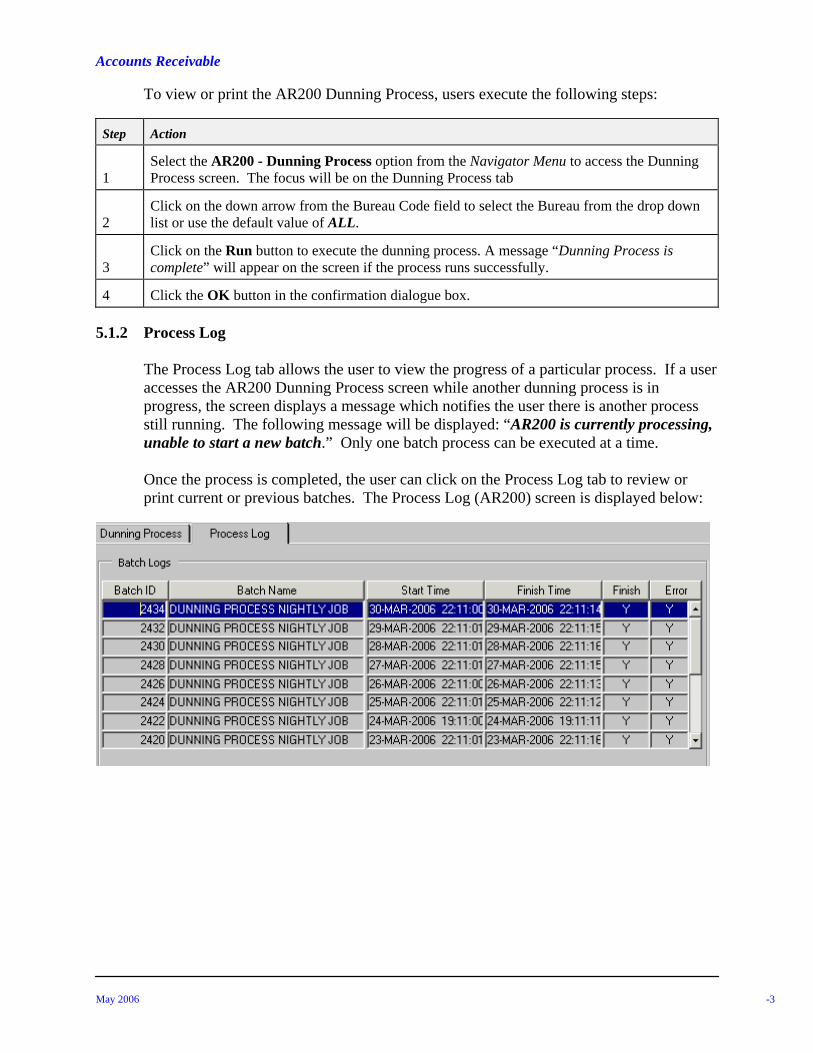
Once the process is completed, the user can click on the Process Log tab to review or print current or previous batches. The Process Log (AR200) screen is displayed below:
Accounts Receivable
May 2006 -4
The following fields apply to the Process Log tab on the Dunning Process (AR200) screen:
Field Name Definition Attributes
Batch ID This field is a system assigned sequential number.
System generated
Batch Name
This field identifies whether the batch process was manually executed or system generated in the nightly scheduler.
System generated
Start Time This field identifies the time the assessment of late fees process started.
System generated
Finish Time This field identifies the time the assessment of late fees process completed.
System generated
Finish
This field displays Y if process was completed and N if not yet completed. Note: Process can be completed although the batch may contain errors.
System generated
Errors This field displays Y if the batch contained errors and N if no errors were detected.
System generated
5.1.3 Dunning Process Report
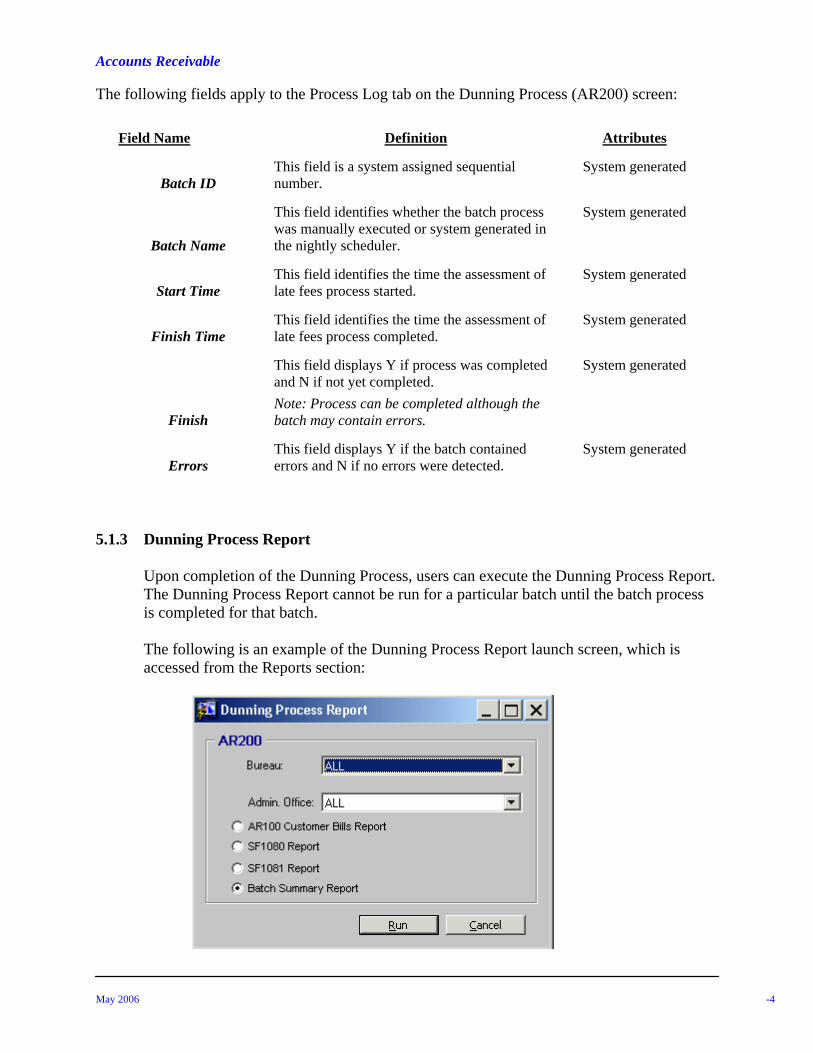
Upon completion of the Dunning Process, users can execute the Dunning Process Report. The Dunning Process Report cannot be run for a particular batch until the batch process is completed for that batch.
The following is an example of the Dunning Process Report launch screen, which is accessed from the Reports section:

Accounts Receivable
May 2006 -5
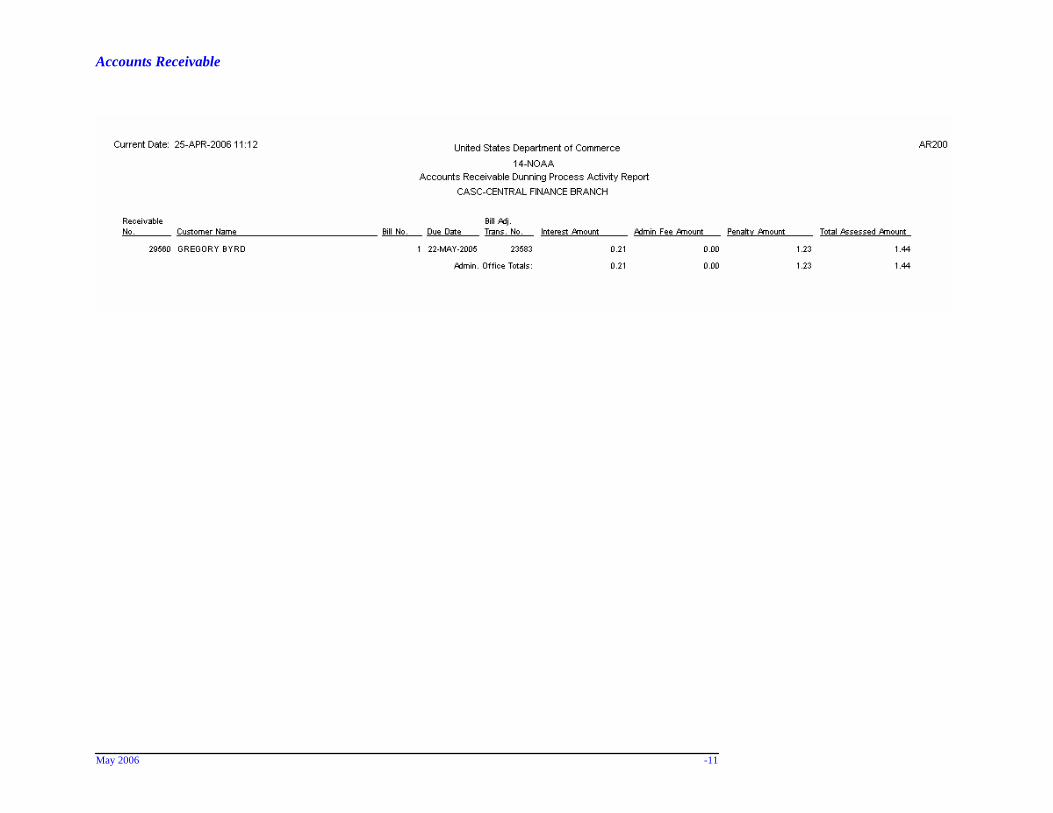
The Dunning Process Report is divided into three sections: • Summary Dunning Process Report • Dunning Process Reject Report • Dunning Process Activity Report.
The Summary Dunning Process Report provides a statistical summary of the dunning adjustments that were generated during the dunning process. The Dunning Process Reject Report lists the records that could not be processed by the dunning program and the associated error messages by Bureau. The Dunning Process Activity Report lists the Treasury Late Fees (DCA interest, administrative fee and penalty) assessed on the bills within the receivables by Bureau and Admin Office.
Users should perform the following steps to execute the Dunning Process Report:
Step Action
1 Select the AR200 - Dunning Process option from the Navigator Menu to access the Dunning Process screen. The focus will be on the Dunning Process tab
2 Click on the Process Log Tab. The Process Log Tab will display current and previous batches.
3 Highlight the batch to be printed. The batch process must be completed before the user can execute the Dunning Process Report.
4 Double-click on the batch to be printed. The system will pop-up the Dunning Process Report Launch Screen with the default on the radio button Batch Summary Report
5 Click on the Bureau Code field to select the Bureau from the drop down list or select the default value of ALL.
6 Click on the Admin. Office field to select the Admin. Office from the drop down list or select the default value of ALL.
7 Click on the Run button to execute the Dunning Process Report. The system will display the Dunning Process Report on-line.
8 Click on the right arrow to view the Summary Dunning Process Report on-line.
9 Click on the right arrow to view the Dunning Process Reject Report on-line.
10 Click on the right arrow to view the Dunning Process Activity Report on-line.
11
Click on the printer icon on the toolbar to print a hard copy of the report. The Print selection box will be displayed. On this box, the user will define the printer and the number of copies to be printed.
12 Click the OK button to print the report.
13 Click on the X icon at the top right corner of the launch screen to exit the screen. The system will return the user to the Dunning Process Screen on the Process Log tab.
Accounts Receivable
May 2006 -6
Step Action
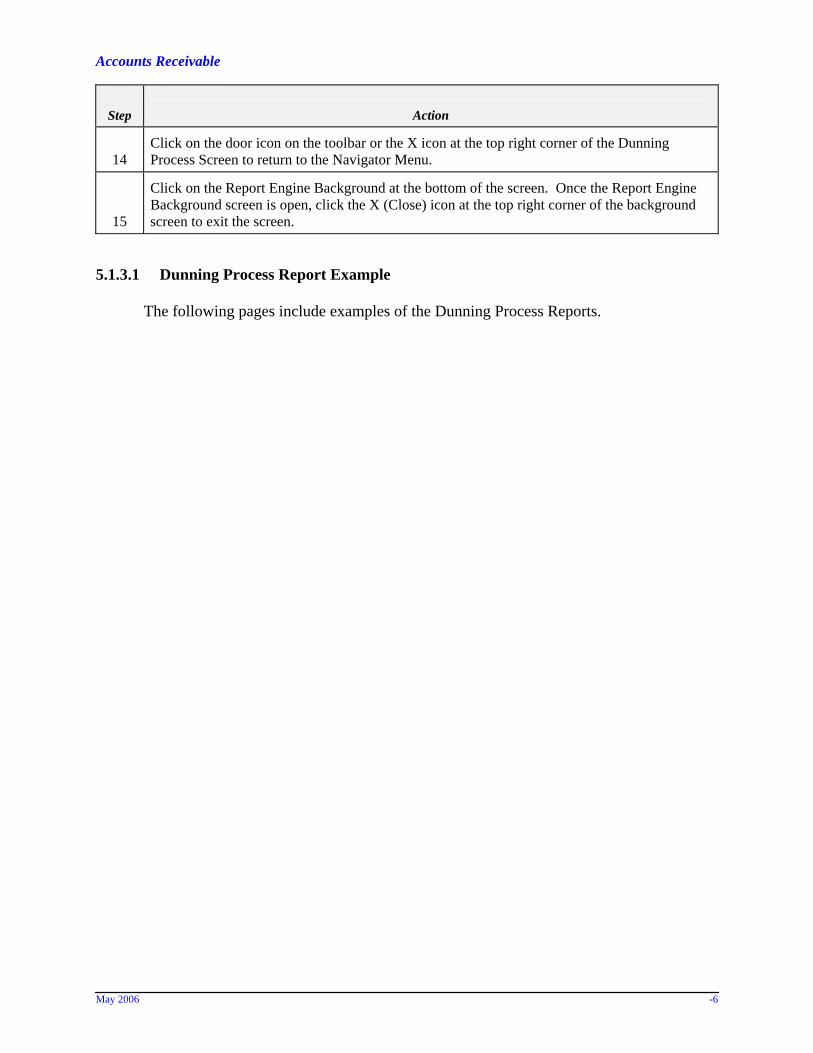
14 Click on the door icon on the toolbar or the X icon at the top right corner of the Dunning Process Screen to return to the Navigator Menu.
15
Click on the Report Engine Background at the bottom of the screen. Once the Report Engine Background screen is open, click the X (Close) icon at the top right corner of the background screen to exit the screen.
5.1.3.1 Dunning Process Report Example
The following pages include examples of the Dunning Process Reports.

Accounts Receivable
May 2006 -7
This page left blank intentionally

Accounts Receivable
May 2006 -8

Accounts Receivable
May 2006 -9

Accounts Receivable
May 2006 -10
Accounts Receivable
May 2006 -11

Accounts Receivable
May 2006 -12
The Create Bill Process is used to generate scheduled bills which have a status of ‘Pending’ and where the bill date is equal to or less than the current system date. In order for a bill to be updated during this process, the corresponding receivable must be in an open status. If the receivable status is open, the system checks to see if any associated bill(s) for the receivable has a bill date equal to or less than the current system date. If the bill(s) meets the above criteria, the bill status is updated from Pending to Open during this process. This process also creates applicable general ledger entries. Once the process is completed, the user can access the AR001 - Receivable screen and/or the AR002 - Bill screen to verify the system updated the status of the bill from ‘Pending’ to ‘Open’.
The Generate Bill Process can be generated in two ways: 1) The first is by including the Generate Bill Process in a scheduler which will be automatically kicked off at a specified time every night. 2) The second is by the Database Administrator who can manually execute the Generate Bill Process. The normal business process will be to include the Generate Bill Process in the nightly scheduler. There will not be any user intervention if the process is generated and successfully completed in the nightly scheduler. However, if the nightly scheduler does not complete the process (i.e., system down, power failure) the Database Administrator can execute the process.
5.2.1 Bill Generation Process
The Generate Bill Process screen consists of two selection parameters which are: Bureau Code and Admin. Office with a default value of ALL. Each selection parameter has a separate drop-down list from which the Database Administrator (DBA) can select if not selecting the default value.
After selecting the applicable parameters, the DBA will click the ‘Run’ button to start the bill generation process or click the ‘Cancel’ button to exit the launch screen which will not initiate any processing. Once the DBA clicks the ‘Run’ button, the process will start and the system will begin to log the process’s progress.
Note: As this process uses a centralized database and is kicked off by the Database Administrator, access to this screen will be granted to a very limited number of users. Users who do not have access to this screen will use the AR146-Bill Generation Process Log under the Reports Section in order to generate the Bill Generation Process Report (See Section 6-Reports).
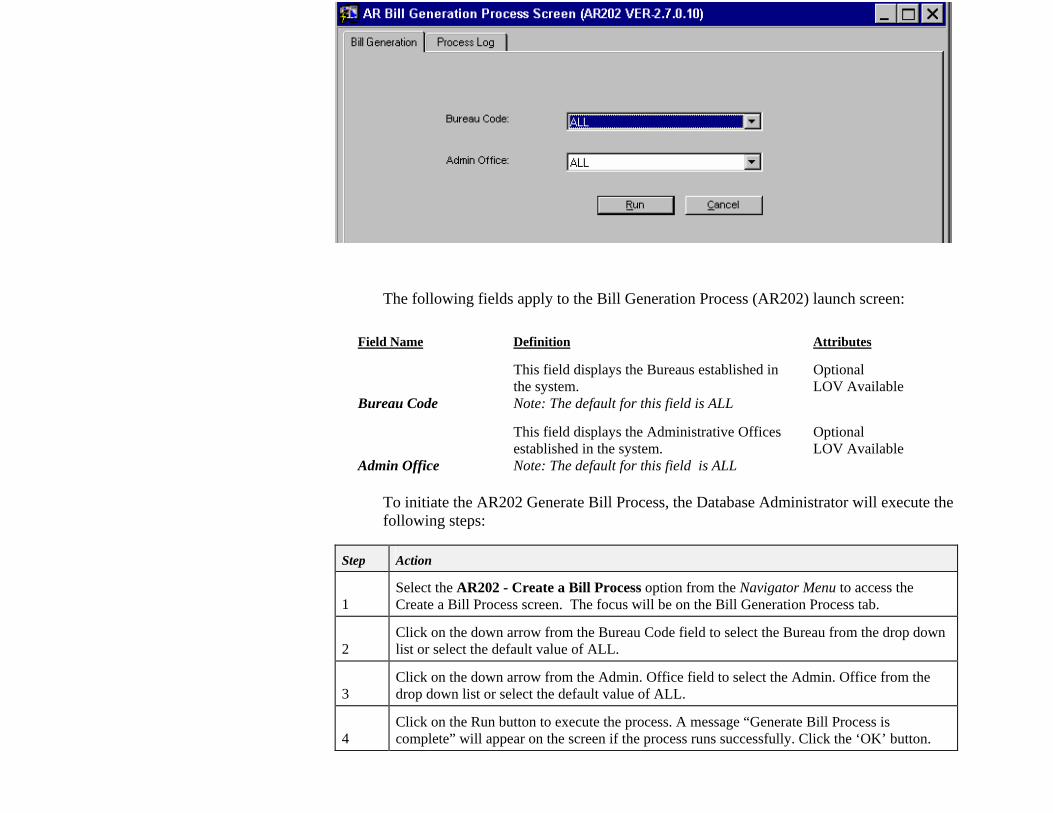
The following fields apply to the Bill Generation Process (AR202) launch screen:
Field Name Definition Attributes
Bureau Code
This field displays the Bureaus established in the system. Note: The default for this field is ALL
Optional LOV Available
Admin Office
This field displays the Administrative Offices established in the system. Note: The default for this field is ALL
Optional LOV Available
To initiate the AR202 Generate Bill Process, the Database Administrator will execute the following steps:
Step Action
1 Select the AR202 - Create a Bill Process option from the Navigator Menu to access the Create a Bill Process screen. The focus will be on the Bill Generation Process tab.
2 Click on the down arrow from the Bureau Code field to select the Bureau from the drop down list or select the default value of ALL.
3 Click on the down arrow from the Admin. Office field to select the Admin. Office from the drop down list or select the default value of ALL.
4 Click on the Run button to execute the process. A message “Generate Bill Process is complete” will appear on the screen if the process runs successfully. Click the ‘OK’ button.

Once the Generate Bill Process message is displayed, the user can access the process log tab which will display current and previous batches which have been executed. On the process log, the system will display the Batch ID, Batch Name, Start Time, Finish Time, Finish (process completed) and Errors (the process can be completed although the batch may contain errors). The batch process information is all system generated. The Batch ID is a system assigned sequential number. The Batch Name identifies whether the batch process was manually kicked off by the launch screen or the batch process was system generated in the nightly scheduler. The Start Time states when the generated bill process was started and the Finish Time states when the generated bill process was completed. The column titled Finish displays a Y if the process was completed and an N if the process has not yet completed.
The Process Log tab allows the user to view the progress of a particular process. If a user accesses the AR202 Bill Generation screen while another bill generation is in progress, the screen displays a message which notifies the user that there is another process still running. The following message will be displayed: “AR202 is currently processing, unable to start a new batch.” Only one batch process can be executed at a time.
Once the process is completed, the following message will be displayed: “Bill Generation Process is complete.” Once this message is received, the user can click on the Process Log tab to review or print current or previous batches. The Process Log (AR202) screen is displayed below:
( )
Field Name Definition Attributes
Batch ID This field is a system assigned sequential number.
System generated
Batch Name
This field identifies whether the batch process was manually executed or system generated in the nightly scheduler.
System generated
Start Time This field identifies the time the generated bill process started.
System generated
Finish Time This field identifies the time the generated bill process completed.
System generated
Finish
This field displays Y if process was completed and N if not yet completed. Note: Process can be completed although the batch may contain errors.
System generated
Errors This field indicates if the batch contained errors System generated 5.2.3 Bill Generation Report
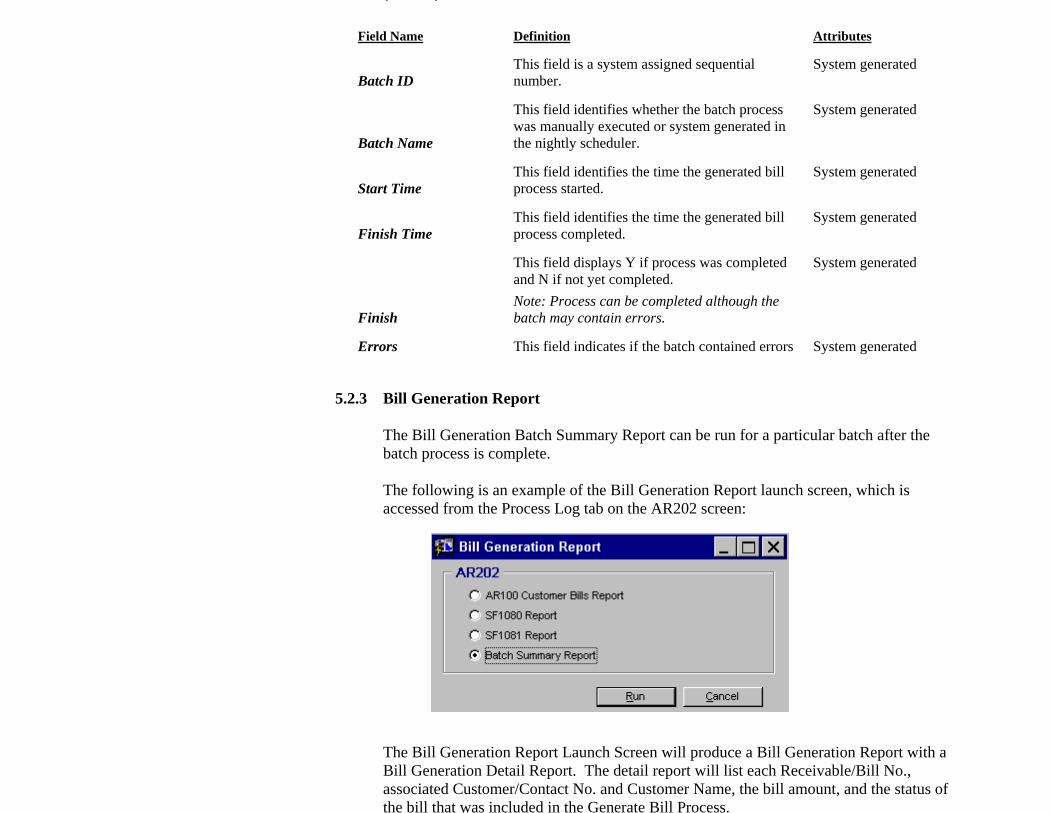
The Bill Generation Batch Summary Report can be run for a particular batch after the batch process is complete.
The following is an example of the Bill Generation Report launch screen, which is accessed from the Process Log tab on the AR202 screen:
The Bill Generation Report Launch Screen will produce a Bill Generation Report with a Bill Generation Detail Report. The detail report will list each Receivable/Bill No., associated Customer/Contact No. and Customer Name, the bill amount, and the status of the bill that was included in the Generate Bill Process.
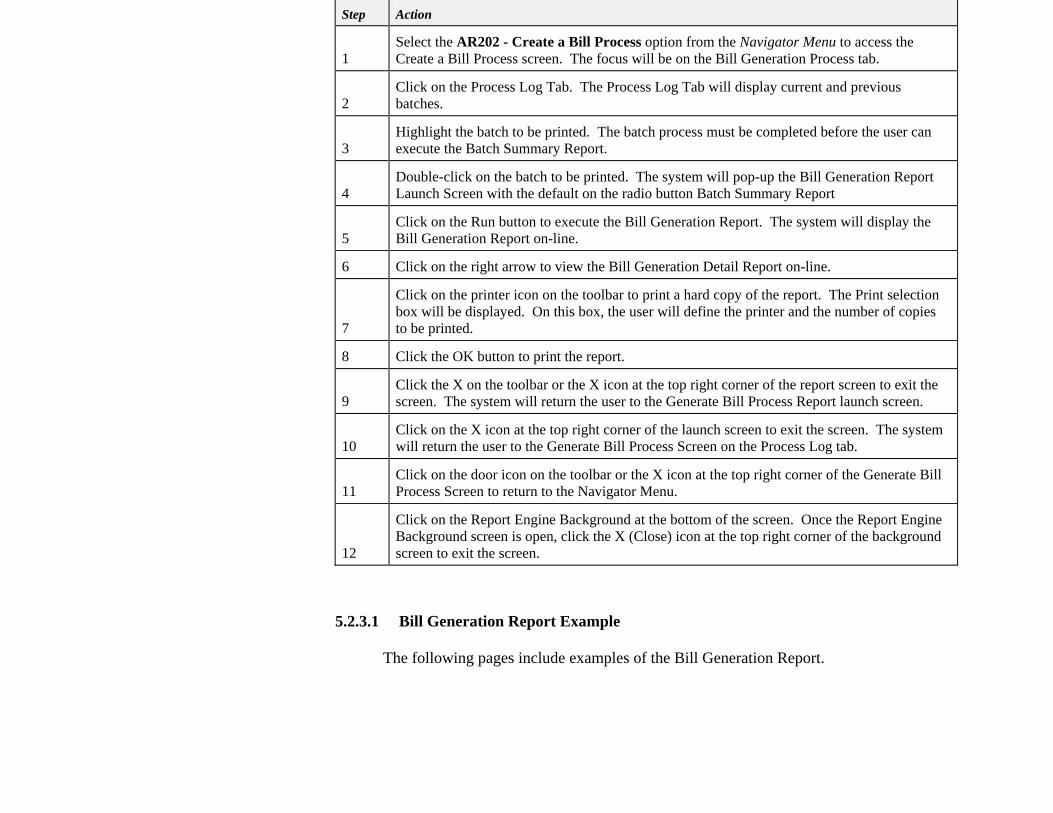
Step Action
1 Select the AR202 - Create a Bill Process option from the Navigator Menu to access the Create a Bill Process screen. The focus will be on the Bill Generation Process tab.
2 Click on the Process Log Tab. The Process Log Tab will display current and previous batches.
3 Highlight the batch to be printed. The batch process must be completed before the user can execute the Batch Summary Report.
4 Double-click on the batch to be printed. The system will pop-up the Bill Generation Report Launch Screen with the default on the radio button Batch Summary Report
5 Click on the Run button to execute the Bill Generation Report. The system will display the Bill Generation Report on-line.
6 Click on the right arrow to view the Bill Generation Detail Report on-line.
7
Click on the printer icon on the toolbar to print a hard copy of the report. The Print selection box will be displayed. On this box, the user will define the printer and the number of copies to be printed.
8 Click the OK button to print the report.
9 Click the X on the toolbar or the X icon at the top right corner of the report screen to exit the screen. The system will return the user to the Generate Bill Process Report launch screen.
10 Click on the X icon at the top right corner of the launch screen to exit the screen. The system will return the user to the Generate Bill Process Screen on the Process Log tab.
11 Click on the door icon on the toolbar or the X icon at the top right corner of the Generate Bill Process Screen to return to the Navigator Menu.
12
Click on the Report Engine Background at the bottom of the screen. Once the Report Engine Background screen is open, click the X (Close) icon at the top right corner of the background screen to exit the screen.
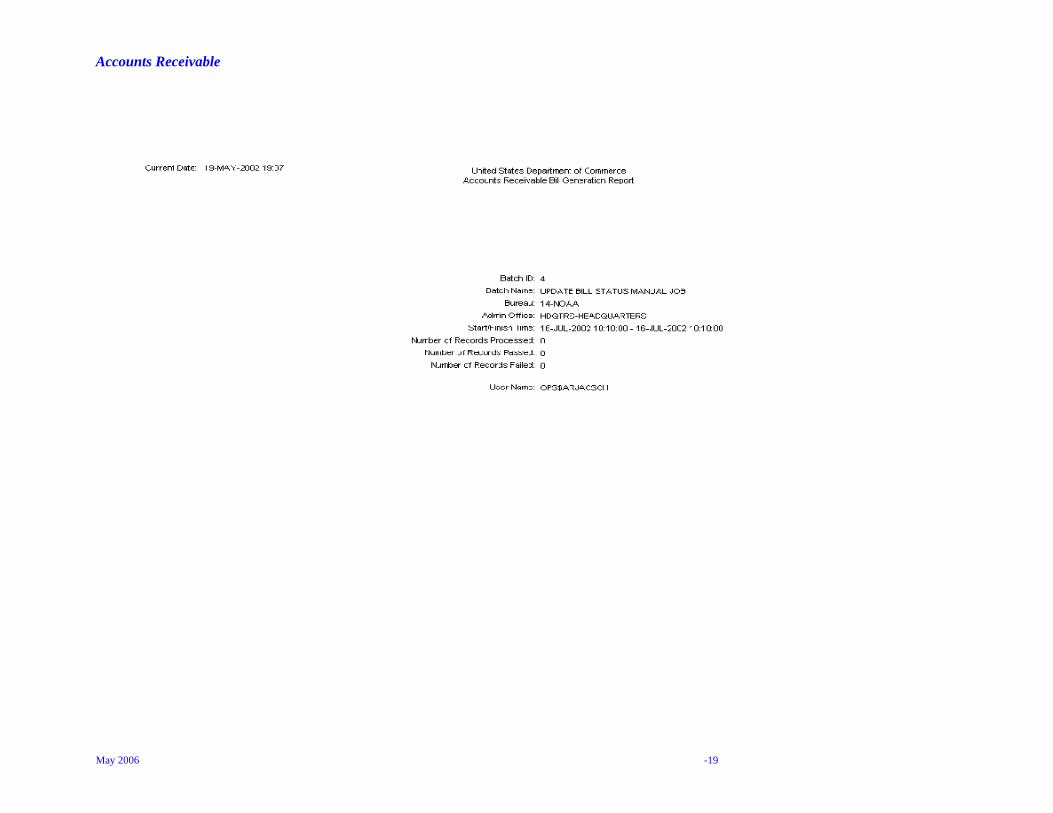
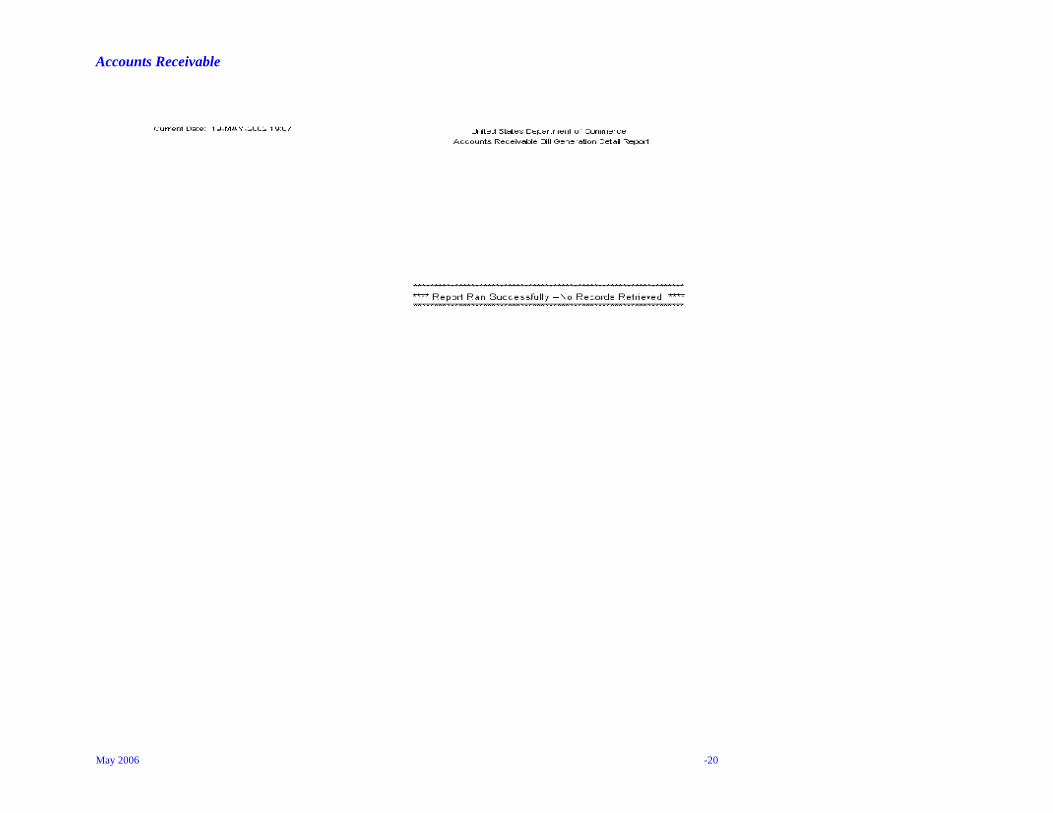
5.2.3.1 Bill Generation Report Example
The following pages include examples of the Bill Generation Report.

Accounts Receivable
May 2006 -19
Accounts Receivable
May 2006 -20
Accounts Receivable
May 2006 -21