accounts receivable fund receipts
TRANSCRIPT

SW AR326
Accounts Receivable – Fund Receipts
Instructor Led Training
Rev 5/7/2021

This training provides participants with the skills and information necessary to use Cardinal and is not intended to replace existing
Commonwealth and/or agency policies.
This course, and the supplemental resources listed below, are located on the Cardinal website (www.cardinalproject.virginia.gov)
under Learning.
Cardinal Reports Catalogs are located on the Cardinal website under Resources:
• Instructor led and web based training course materials
• Job aids on topics across all functional areas
• Variety of simulations
• Glossary of frequently used terms
The Cardinal screenshots included in this training course show system pages and processes that some users may not have
access to due to security roles and/or how specific responsibilities relate to the overall transaction or process being discussed.
For a list of available roles and descriptions, see the Statewide Cardinal Security Handbook on the Cardinal website in the
Security section under Resources.
1
Welcome to Cardinal Training

After completing this course, you will be able to:
2
Course Objectives
Review Accounts Receivable - Fund Receipts key concepts
Review the integration of Accounts Receivable - Fund Receipts with the General Ledger
Create, process and finalize a deposit in Cardinal
Review the process for interfaced deposits

3
Agenda
1
2
3
4
Accounts Receivable – Fund Receipts Overview
Creating a Deposit
Processing a Deposit
Finalizing a Deposit

This lesson covers the following topics:
• Key Concepts
• Accounts Receivable process for online and interfacing agencies
4
Lesson 1: Introduction
1 Accounts Receivable – Fund Receipts Overview

The Fund Receipts module is part of the
Accounts Receivable (AR) functional
area of Cardinal.
The Fund Receipts module is used to
enter, process, and finalize payments
and fund transfers received.
In this lesson, we will key concepts
within the Fund Receipts module of
Cardinal.
5
Introduction

Some key concepts in Accounts Receivable - Fund Receipts include:
• Deposits are entered into the Accounts Receivable - Fund Receipts module. Users enter accounting entries that post to
the General Ledger module.
• In Accounts Receivable - Fund Receipts, a deposit is a collection of one or more payments.
• Fund Receipts is also referred to as Cash Receipts.
• Deposits can be entered in the Accounts Receivable module online, as well as through the Fund Receipts Upload
process for interfacing agencies.
6
Key Concepts

Accounts Receivable - Fund Receipts in Cardinal enables the user to record receipts / deposits and their associated
accounting entries.
Fund Receipts is the key process in the Accounts Receivable functional area.
The diagram below shows the business process relationships with other Cardinal functional areas.
7
The Accounts Receivable Functional Area in Cardinal
Accounts Payable
Expenses
Accounts Payable
General Ledger
Accounts
Receivable (Fund
Receipts)

The Fund Receipts process for online transactions is diagrammed below.
The Processor creates the deposit record and the accounting entry in Cardinal.
The Approver reviews the accounting entry, initiates budget check, creates the deposit certificate, and approves the deposit.
*Agency policy determines whether the Processor, or the Approver, will mark the entries complete and perform the manual
Budget Check.
Note: There is no approval workflow process in Cardinal for Accounts Receivable. Follow your agency guidelines regarding
how to notify the approver of transactions that require approval.8
Online Accounts Receivable Process (continued)
Budget
Check*
Enter Deposit
Certificate #’s
and Tie Them to
Deposits
Approve
Deposit
Processor Approver
Review
Accounting
Entries and
Mark
Complete*
Create
Accounting
Entries
Create
Deposit

Once the accounting entry is marked Complete, it is:
• Automatically edit checked (ChartField values and combinations are verified)
• Placed in the queue for nightly Budget Check (budget check can also be initiated manually)
Once a deposit has been successfully budget checked, the deposit or the accounting entry cannot be modified in the AR
module.
For more detailed information about correcting deposit account entries, see the job aid entitled SW AR326: Correcting
Deposits and Accounting Entries located on the Cardinal website in Job Aids under Learning.
A Help Desk ticket can be submitted to the Cardinal AR PPS Team to determine if this is a correction that can be made.
9
Online Accounts Receivable Process (continued)

After the deposit is approved, the following batch processes run:
• The Deposit Post Processor process runs first to post the journal entries in Accounts Receivable.
• The Journal Generator process runs next to pick up the posted transactions and sends them to the General Ledger.
10
The Accounts Receivable Functional Area in Cardinal
(continued)

The Fund Receipts process for interface transactions is diagrammed below. Deposit transactions processed in the agency’s
system are captured in a file and sent to Cardinal. The transactions in the file are checked for errors during upload and then
processed. Deposits that process successfully will post to the General Ledger.
If errors occur during the upload, they will appear on the Funds Receipts Upload Error Report.
Any errors that occur after a transaction is loaded into Cardinal, including all budget check errors, must be corrected online in
Cardinal. If corrections are made online in Cardinal, the deposit requires agency approval online in Cardinal.
For more detailed information about error processing for interfaced transactions, see the job aid entitled SW AR326: Fund
Receipts Interface Processing located on the Cardinal website in Job Aids under Learning.
11
Interface Accounts Receivable Process
Fund Receipts
Created and
Approved in
Agency System
Deposit,
Accounting
Entries, and
Deposit Certificate
uploaded to
Cardinal
Budget Check
Completed
Online
General
Ledger
Deposit Post
Processor
Online
Journal
Generator
Online

12
Lesson 1: Checkpoint
Now is your opportunity to check your understanding of the course material. Read the question and make note of your
answer below.
3. True or False. After a deposit is budget checked, you cannot modify the deposit accounting entries in
Accounts Receivable.
1. Which module receives entries from Accounts Receivable - Fund Receipts?
a. General Ledger
b. Accounts Payable
c. Expenses
2. In Cardinal, the Processor and the Approver roles can both do which of the following (select all that
apply)
a. Create a deposit
b. Mark the entries as complete
c. Perform manual budget check
d. Enter the Deposit Certificate numbers
e. Approve the Deposit

In this lesson, you learned:
• Key Concepts
• Accounts Receivable process for online and interfacing agencies
Lesson 1: Summary
1 Accounts Receivable – Fund Receipts Overview
13

This lesson covers the following topics:
• Creating a deposit
• Agency to Agency Transactions (ATA)
• Saving a deposit
14
Lesson 2: Introduction
2 Creating a Deposit

The receipt of payments initiates the creation of a deposit in Cardinal. The entry used to enter this deposit in Accounts
Receivable is a Direct Journal. A Direct Journal Payment is a payment that does not correspond to a receivable
established in Cardinal.
Various forms of payments may be received (e.g., cash, checks, electronic funds transfers, etc.).
Deposits are entered into Cardinal by Deposit Unit (Business Unit) which identifies the agency making the deposit.
15
Creating a Deposit (continued)
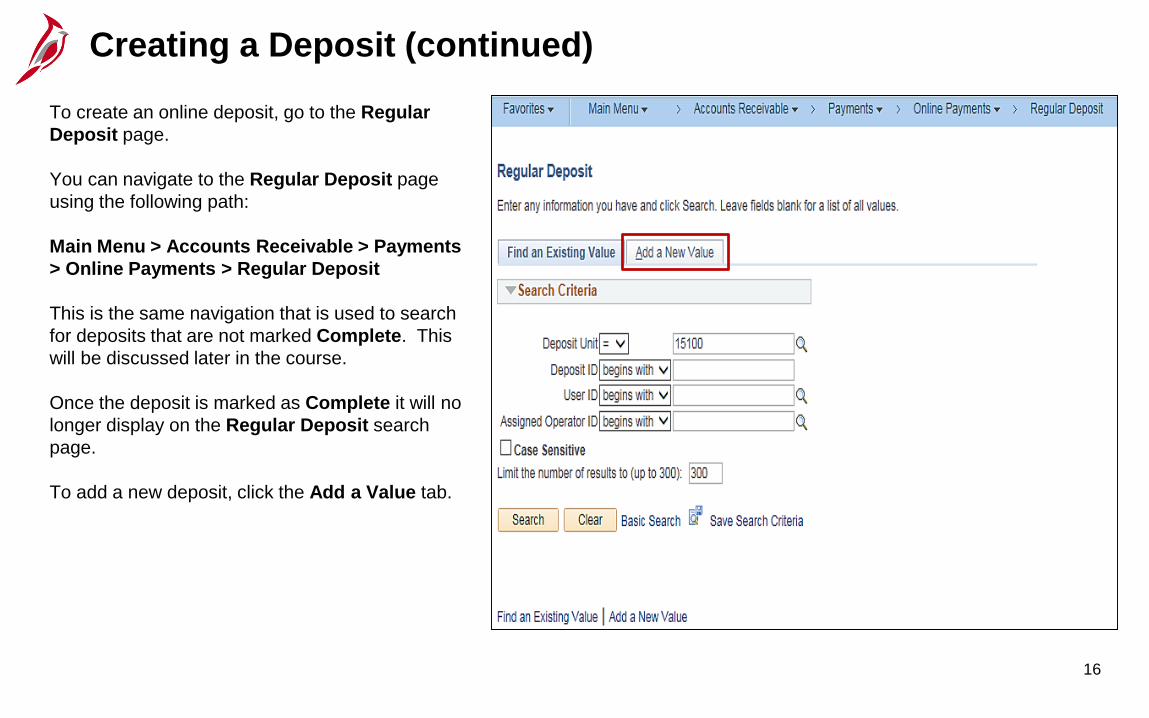
To create an online deposit, go to the Regular
Deposit page.
You can navigate to the Regular Deposit page
using the following path:
Main Menu > Accounts Receivable > Payments
> Online Payments > Regular Deposit
This is the same navigation that is used to search
for deposits that are not marked Complete. This
will be discussed later in the course.
Once the deposit is marked as Complete it will no
longer display on the Regular Deposit search
page.
To add a new deposit, click the Add a Value tab.
16
Creating a Deposit (continued)

On the Regular Deposit Add a New Value tab:
• Deposit Unit defaults to your agency Business Unit. If you have access to multiple Business Units, you can edit this field
as appropriate.
• Deposit ID displays as NEXT and cannot be changed
• Cardinal assigns the next sequential number to the Deposit ID when it is saved
• Click the Add button
17
Creating a Deposit (continued)

The Regular Deposit page displays and defaults to the Totals tab. The information on this tab, including the Unit, Deposit
ID, Accounting Date, Bank Code, Bank Account, and Deposit Type apply to and are the same for every payment included
in the Deposit.
18
Totals Tab

To create a deposit:
• In the first section, the Accounting Date
defaults to the current date but can be changed
if necessary. The Accounting Date field is
what determines which fiscal period the batch
will post to and in accordance with how the AR
Deposit templates are set in the General
Ledger at month end.
This is not necessarily the same as the deposit
date. Cardinal validates the Accounting Date
to make sure it falls within an open period for
the business unit and transaction type.
• Select the Bank Code. Bank Code determines
which Bank Account is available for selection.
For more detailed information about Cardinal
Bank Codes, see the job aid entitled SW
AR326: Bank Code Crosswalk located on
the Cardinal website in Job Aids under
Learning.
19
Creating a Deposit

• Select the Bank Account. When the Bank
Account is selected, the Deposit Type
choices populate.
• Select the appropriate Deposit Type. Do not
automatically accept the default value. Values
include:
• 1 = Cash or checks
• 2 = Lockbox
• 3 = Wire
• 4 = ACH
• 5 = Credit Card
• 6 = ZBA Transfers – not typically used
• 7 = Bank Credit Memos – not typically
used
• 8 = Bank Debit Memos – not typically
used
• In the Control Currency field select USD.
This is the only option currently available.
20
Creating a Deposit (continued)

In the Control Totals section of the page, enter the Control Total Amount (i.e. the total amount of the deposit), and Count
(i.e., the number of checks in the deposit.)
For this scenario, there is one.
21
Creating a Deposit – Example with One Payment

If the deposit has multiple payments (multiple checks), then the count would change. For this example, there are 3 payments
that make up this deposit.
22
Creating a Deposit – Example with Multiple Payments

In the Control Data section of the page,
the Received Date, and the Entered Date
default to the current date. These can be
changed if necessary.
• The Received date is the date when
the agency received the payment or
the date when the bank received the
payment (e.g., wire transfer, EFT).
• The Entered date should be the date
the Deposit ID is created in Cardinal.
• The User field tracks the creator of the
deposit. If another user modifies the
deposit, his/her ID is captured in the
Assigned field.
23
Creating a Deposit – Control Data Section

Once the Totals page is complete, all the payments for the deposit can be entered.
Click the Payments tab.
24
Payments Tab

The Payments tab is where specific
information about each payment in
the deposit is entered:
• Cardinal assigns the Payment
Seq to track the order in which
payments are entered in the
deposit when there is more than
one payment.
• The Payment ID is an identifier
assigned by the agency, such as
the payee’s check number.
• Enter the amount of the deposit
associated with the Payment ID
that was entered.
25
Payments Tab (continued)

• Payment Predictor: Uncheck this box.
• Journal Directly checkbox: Check this box. This ensures the deposit is picked up. It must be checked in order for the
payment lines to be available to create accounting entries.
26
Payments Tab (continued)

• Payment Method: Select the
appropriate Payment Method.
This field defaults with the method
of Check.
• Use the drop-down to change to
the appropriate Payment Method.
• Methods include:
• Agency Transfer
• Check
• Clearing House
• Credit Card
• Electronic Fund Transfer
• Giro – EFT
• Lockbox
• Money Order
• Wire Transfer
27
Payments Tab (continued)

If there is more than one payment, click
the + sign in the upper right corner of the
Payment Information section and
repeat the same steps for each
payment.
Where there are multiple payments that
make up the deposit, Cardinal
automatically increments the Payment
Seq number by one for each deposit
added.
28
Adding Multiple Payments

Agency to Agency (ATA) transactions are payments received for goods and/or services provided by one Commonwealth of
Virginia (COVA) agency to another.
The Paying Agency:
• Creates a voucher to issue a payment to the receiving agency
• Is a Customer to the receiving agency
The Receiving Agency:
• Creates a Deposit and related accounting entries to record the payment from the paying agency
• Is a Supplier to the paying agency
For more detailed information about each agency Customer ID (Business Unit) and Supplier ID for ATA transactions, see the
job aid entitled SW Agency to Agency (ATA) Transactions Information Sheet located on the Cardinal website in Job Aids
under Learning.
29
Agency to Agency (ATA) Transactions

The following fields must be selected on the Payments tab when entering an ATA payment in Cardinal:
• In the Payment Information section, Agency Transfer must be selected as the Payment Method, even if the payment
was a check, wire, etc.
• Select the paying agency in the Customer ID field. The Customer ID is the same as the paying agency business unit.
This field should only be entered for ATA payments.
• It is critical that the Customer ID is accurate, as it is used for reporting and reconciliation purposes.
30
Agency to Agency (ATA) Transactions (continued)

In order for the transaction to be
processed, the Balance field value must
display as Balanced.
The deposit is balanced when the total
amount and number of entered payments
equal the control amount and count from
the Regular Deposit - Totals tab.
Note: An unbalanced deposit, can be
saved but it cannot be processed further
until it is balanced.
After entering all information, click the
Save button to save the deposit. Cardinal
assigns a sequential Deposit ID number.
31
Saving Your Entries

Now you have an opportunity to practice the lessons learned today in a training environment.
Your instructor will provide direction on how to log in and complete the exercise.
If you have any questions, please ask your instructor.
32
Lesson 2: Hands-On Practice

33
Lesson Checkpoint
Now is your opportunity to check your understanding of the course material. Read the question and make note of your
answer below.
1. True or False. When entering a deposit, the accounting date, bank code, bank account and
deposit type must be the same for every deposit entered.
2. True or False. ATAs payments are entered the exact same as any other payments.

In this lesson, you learned:
• Creating a deposit
• Agency to Agency Transactions (ATAs)
• Saving a deposit
Lesson 2: Summary
2 Creating a Deposit
34

This lesson covers the following topics:
• Creating accounting entries for deposits
• Reviewing and modifying accounting entries for deposits
• Reviewing and correcting budget check errors
• Processing of interfaced deposit transactions
35
Lesson 3: Introduction
3 Processing a Deposit

Once the deposit information has been entered and saved, the corresponding accounting entries can be created. These entries
will post to the General Ledger.
This process, called Direct Journaling in Cardinal, defines deposit accounting entries.
To create accounting entries for deposits, go to the Create Accounting Entries page.
There are two ways to access this page depending how many payments (Count) make up your deposit:
• Deposit Count equals 1 - Use the Apply Payment link on the Payments tab.
• Deposit Count equals 2 or more - Navigate to the Create Accounting Entries page.
The next slides will walk through each option as noted above.
36
Accessing the Create Accounting Entries Page

If your Deposit Count is equal to 1,
you can access the Create
Accounting Entries page by clicking
the Apply Payment link on the
Payments tab under the Payment
Information section.
After you click the link, Cardinal
automatically opens the Create
Accounting Entries page.
37
Navigating to the Create Accounting Entries Page –
Deposit Count of One

When the Deposit Count is greater than
1, navigate to the Create Accounting
Entries page using the following path:
Main Menu > Accounts Receivable >
Payments > Direct Journal Payments >
Create Accounting Entries
38
Navigating to the Create Accounting Entries Page –
Deposit Count Greater than One

The Find an Existing Value tab
displays.
Enter the deposit id number in the
Deposit ID field.
Click the Search button.
When the Deposit count is greater than
one, the Search Results displays one
line for each Payment Sequence that
makes up the deposit.
For this scenario, there are three.
Click the first line listed to begin
entering the accounting distribution
information.
39
Creating Accounting Entries for Deposits (continued)

On the Accounting Entries tab, the information entered when the deposit was created (Unit, Deposit ID, Payment, and
Seq) auto-populate, along with the Amount for the Deposit ID.
On the ChartFields tab under the Distribution Lines section of the page, enter the Line Amount as a credit (-) to record
either an increase in revenues or a decrease in expenses, for example. The line amount(s) must offset the payment (deposit)
amount.
40
Entering the Line Amounts

An accounting entry must be created
for each payment sequence that is
part of the Deposit ID. For this
example, there is only one.
On the ChartFields tab under the
Distribution Lines section of the
page, enter the distribution.
If the agency uses SpeedTypes, click
the SpeedType button to enter it.
If more than one distribution, needs to
be credited use the scrollbar to scroll
to the end of the line and click the +
(plus) button.
41
Creating Accounting Entries for Deposits

In order to enter a value in the Project field on the distribution line, the Project Costing Business Unit (PCBU) must be entered
in the PC Bus Unit field first. The PC Bus Unit is the same value as the agency’s Business Unit.
Select the appropriate Activity associated to the project entered.
42
Entering Projects on the Distribution Line

Agency specific information (such as license numbers, agency invoice #s, etc.) can be recorded in the Ref field on the
Journal Reference Information tab. Do not enter sensitive data, such as a Social Security number, in this field. This field
holds a maximum of 10 characters.
43
Recording Reference Information

When the distribution and amounts have been
entered, click the lightning bolt icon to create the
system generated cash and interunit lines for the
accounting entry.
Cardinal verifies that the total credits on the journal
lines offset the payment amount before creating
the cash and interunit lines.
Click the Save button.
44
Generating the Cash Line and Interunit Lines

If the Deposit has a count greater
than one, complete this process for
each one.
Click the Next in List button to
move to the next deposit.
When the last deposit is reached,
the Next in List button is grayed
out.
45
Creating Accounting Entries with Multiple Payments

At this point the Processor should follow agency
guidelines as to whether to:
• Notify the approver that the Deposit(s) are
ready for review, mark complete and save
(there is no workflow in Cardinal for this
process).
Or
• Continue to the next step in the process to
mark the accounting entries complete and
save.
• Verify the accounting distribution is accurate
• Check the Complete checkbox
• Click the Save button.
Upon save, Cardinal verifies the ChartField values
in the entries, based on the combination edit rules
configured.
46
Completing and Saving the Accounting Distribution

At this point the Processor should follow agency
guidelines as to whether to:
• Notify the approver that the Deposit(s) are ready for
review, mark complete and save (there is no workflow
in Cardinal for this process).
Or
• Continue to the next step in the process to mark the
accounting entries complete and save.
To mark the accounting entries as complete (this step can
be performed by the Processor or Approver):
• Verify the accounting distribution is accurate
• Check the Complete checkbox
• Click the Save button.
Upon save, Cardinal verifies the ChartField values in the
entries, based on the combination edit rules configured.
47
Completing and Saving the Accounting Distribution
(continued)

To correct accounting entries while on
this page:
• Deselect the Complete checkbox
• Click the Save button
• Click the delete icon (next to the
lightning bolt icon) to remove the
system generated cash and interunit
lines
48
Correcting Accounting Entries

The system generated lines must always be
deleted prior to modifying the user entered line of
the accounting entry.
After clicking the Delete icon, the cash and
Treasury (Interunit) lines are removed and the
Distribution Lines are open to edit.
To make edits:
1. Make any necessary updates.
2. Click the Lightning Bolt to create the system
generated cash and interunit lines.
3. Click the Save button.
49
Correcting Accounting Entries (continued)

Interfacing agencies send their fund receipts transactions to Cardinal using the Fund Receipts Upload process.
An inbound interface file with fund receipts data is submitted by the agencies to Cardinal. The file contains Deposit
information such as:
• Deposit business unit
• Deposit type
• Banking information
• Payment amount
• Deposit certificate number
• Accounting information
The Cardinal Fund Receipts Upload process will validate:
• All required fields are populated
• Valid values are provided
• Detail level counts and amounts are in sync with header level counts and amounts
• ChartField combinations are valid
Transactions that pass these checks are loaded into Cardinal.
Transactions that do not pass these checks are rejected. Cardinal generates a Fund Receipts Error Report nightly that
displays details for all rejected transactions.
Rejected transactions are reviewed and corrected by the agency, before being re-sent to Cardinal.
For more detailed information about the Cardinal Funds Receipts Upload process, see the job aid entitled SW AR326: Funds
Receipts Interface Processing located on the Cardinal website in Job Aids under Learning.
50
Interfaced Fund Receipts Transaction

Once Accounting Entries have been saved
and marked complete, if you navigate away
from the Create Accounting Entries page,
they can no longer be modified on the Create
Accounting Entries page.
To review or change the accounting entries for
a completed and saved Deposits, go to the
Modify Accounting Entries page.
Navigate to the Modify Accounting Entries
page using the following path:
Main Menu > Accounts Receivable >
Payments > Direct Journal Payments >
Modify Accounting Entries
51
Navigating to the Modifying Accounting Entries for
Deposits

On the Modify Accounting Entries search page, Deposit Unit defaults to the Business Unit.
Enter the Deposit ID of the entry to be reviewed and/or modified, and click the Search button.
52
Searching for the Deposit ID

On the Directly Journalled Payments tab:
• Deselect the Complete checkbox
• Click the Save button
Return to the Create Accounting Entries page
and modify the accounting entry.
Note:
A deposit entry can only be modified before its
Budget Status updates to Valid.
Once the status is Valid, the entry cannot be
changed or deleted.
If the Budget Status is Valid, the Complete
checkbox will be grayed out.
53
Reviewing and Modifying Accounting Entries for Deposits

After Creating accounting entries for a deposit,
mark it Complete and click Save, it is ready to
be budget checked.
Budget checking occurs during the nightly
batch processing, but can also be done
manually online.
Once the deposit has been successfully budget
checked, the Deposit or the Accounting entries
CANNOT be modified.
To manually run budget check, click the
Budget check icon on the Create or Modify
Accounting Entries page.
This icon is only available if the deposit is
saved as Complete.
54
Budget Checking the Deposit

During the budget check process, Cardinal validates that a control budget exists.
All accounting entry lines must pass a check against the established commitment control budget. An error will be received if
the accounting distribution includes an expenditure account and does not have a corresponding commitment control budget.
Interfacing Agencies
Budget check errors for deposits uploaded by interfacing agencies will be identified during the nightly batch process and must
be corrected online.
Once budget check errors are corrected online, the budget check process can be run manually online to validate the errors
were successfully corrected. Otherwise the budget check process will run again during the nightly batch to check for errors.
If changes are made to the deposit online, the deposit must be approved online.
55
Budget Checking the Deposit (continued)

The Budget Status for the entire payment is displayed on the header of the Direct Journal Accounting entry and on the
Budget tab for each distribution line.
The budget checking status values include:
• Error - The entry failed to pass budget checking. The transaction must be corrected before it will post to commitment
control ledgers and the General Ledger.
• Valid - The entry passed budget checking and the process updated the commitment control ledger.
• Warning - The budget check process issued a warning, but also updated the commitment control ledger.
The budget check Error and Warning messages can be researched using two different tabs:
• Directly Journalled Payments
• Misc Payment Exceptions
56
Reviewing and Correcting Budget Check Errors

To view the error using the Directly Journalled Payments tab, use the following path:
Main Menu > Accounts Receivable > Payments > Direct Journal Payments > Modify Accounting Entries
Enter the Deposit ID and click the Search button.
57
Reviewing and Correcting Budget Check Errors (continued)

The search page displays. Click the budget check icon to view the error.
58
Reviewing and Correcting Budget Check Errors (continued)

The Direct Journal page opens and displays the reason for the Exception on the Misc. Payment Exceptions tab.
59
Reviewing and Correcting Budget Check Errors (continued)

Navigate directly to the Direct Journal tab, using the following path:
Main Menu > Commitment Control > Review Budget Check Exceptions > Revenues > Direct Journal
On the Direct Journal search page enter the Deposit ID with the error and click Search to view the exception.
60
Reviewing and Correcting Budget Check Errors (continued)

One of the following actions may be used to correct a budget check error:
• Correct the direct journal distribution lines that caused a budget error, if the distribution is incorrect
• Have the budget modified if the ChartField distribution is correct
61
Reviewing and Correcting Budget Check Errors (continued)

To correct the ChartField distribution on the
deposit accounting entry:
• Navigate to the Modify Accounting
Entries page using the following path:
Main Menu > Accounts Receivable >
Payments > Direct Journal Payments >
Modify Accounting Entries
• Uncheck the Complete box.
• Click the Save button.
62
Correcting a ChartField Distribution

Next, navigate to the Create Accounting
Entries page using the following path:
Main Menu > Accounts Receivable >
Payments > Direct Journal Payments >
Create Accounting Entries
Access the Deposit then:
• Click the delete icon to delete the system
generated lines
• Enter the changes to the user defined
distribution line
• Click the lightning bolt icon to rebuild
the accounting entries.
• Select the Complete checkbox, then the
Save button
• The combination edit process will run
again
The nightly batch process will re-budget check
the deposit, or you can re-budget check online
by clicking the budget check icon.
63
Correcting a ChartField Distribution (continued)

Now you have an opportunity to practice the lessons learned today in a training environment.
Your instructor will provide direction on how to log in and complete the exercise.
If you have any questions, please ask your instructor.
64
Lesson 3: Hands-On Practice

65
Lesson Checkpoint
Now is your opportunity to check your understanding of the course material. Read the question and make note of your
answer below.
1. True or False. An accounting entry must be created for each payment sequence that is part of
the Deposit ID.
2. True or False. Once the deposit has been successfully budget checked, the Deposit or the
Accounting entries CAN be modified.

In this lesson, you learned:
• Creating accounting entries for deposits
• Reviewing and modifying accounting entries for deposits
• Reviewing and correcting budget check errors
• Processing of interfaced deposit transactions
Lesson 3: Summary
3 Processing a Deposit
66

This lesson covers the following topics:
• Creating and Approving a Deposit Certificate
• Reviewing General Ledger journal information
67
Lesson 4: Introduction
4 Finalizing a Deposit

Completed deposits are batched together under a Deposit Certificate before the entries are sent to the General Ledger.
The Deposit Certificate (DC) is created on the Approve Deposits page. This page allows batching one or more deposits
under a deposit certificate ticket for transmission to the General Ledger and subsequently to Treasury.
The Deposit Certificate/Ticket Number is entered directly into Cardinal, and the associated Deposit IDs are selected.
A Deposit Certificate/Ticket Number can be used more than once, however, the Bank Deposit Date has to be different for the
DC to be processed. If the same DC number and date are used, Cardinal displays an error message.
For interfaced transactions, the Deposit Certificate is approved automatically unless manual intervention is required and the
Deposit Certificate is modified online.
68
Creating and Approving a Deposit Certificate

Navigate to the Approve Deposits page using
the following path:
Main Menu > Accounts Receivable >
Payments > Apply Payments > Approve
Deposit
• Click the Add a New Value tab
• Enter the Deposit Unit (the Agency to
which a deposit will be credited)
• Enter the Deposit Control Ticket Number
(also referred to as the Deposit Certificate
Number)
• Enter or select the Bank Deposit Date (the
date that funds were deposited in the bank)
• Click the Add button to open the Approve
Deposits page
69
Creating and Approving a Deposit Certificate (continued)

The Deposit Unit, Deposit Control Ticket
Number, and the Bank Deposit Date
default from values entered on the Add a
New Value tab.
Enter the total sum of all deposits in the
Control Total Amount field and the total
number of deposits (Deposit IDs) in the
Control Count field.
Enter the Deposit ID in the Deposit ID
field. A Deposit Control Ticket can have one
or more Deposit IDs associated with the DC
number.
If there is more than one deposit, click the
plus (+) icon to enter additional Deposit IDs.
The sum of all Deposit Amount(s) must
equal the Control Total Amount.
70
Creating and Approving a Deposit Certificate (continued)

If the Deposit Certificate contains more than one
Deposit ID:
• Enter the Control Total Amount for all
Deposit IDs
• Enter the Control Count (based on the
number of Deposit IDs).
• For this example, there are two
• In the Deposit ID field, enter or select the first
Deposit ID
• Click the + (plus) to add a new row
• Enter or select the next Deposit ID
• Repeat this until all Deposit IDs are added
71
Creating and Approving a Deposit with Multiple Deposit IDs

Click the View Detail Status icon to verify the
status of deposit.
The Deposit Detail Status pop-up window
displays.
The Deposit ID and Bank Code values
display so to ensure that all the deposits in the
Deposit Certificate have the same bank
account.
It also provides information to indicate if the
deposit is ready for approval.
A deposit must have the following statuses to
be approved:
• Edit Status: Complete
• Budget Check Status: Valid
• Payment Status: Journalled
Click the Return button to return to the
Approve Deposits page.
72
Deposit Detail Status

After selecting the Deposit ID(s), click the
Save button.
A Status of Complete on the Approve
Deposit page indicates the individual
Deposit ID(s) have valid edit, budget, and
payment status and are ready for approval.
If the Status is Error, click the View Detail
Status icon to determine whether the deposit
has edit errors and/or budget check errors.
Once the deposit status is Complete, the
deposit is now ready for approval. The
Approve button becomes active.
Click the Approve button to approve the
deposit.
73
Approving a Deposit Certificate

A Message displays indicating the Deposit is approved. The Approved By and Approved Date fields on the page are
auto-populated. The Approve button grays out.
The Approved By and Approved Date fields on the page auto-populate with the User ID and the current date.
74
Approving a Deposit Certificate (continued)

Once the deposit is approved, it will be
processed further during nightly batch
processing.
• The Deposit Post Processor prepares
the batched and approved direct journal
deposit for posting to the General
Ledger.
• A subsequent nightly batch process,
Journal Generator, then creates journal
entries from the Accounts Receivable
module and posts them to the General
Ledger.
The Deposit (Direct Journal) accounting
entry in the Accounts Receivable module is
then updated with the GL journal
information.
The GL Journal ID and Journal Date are
then updated and display on the
ChartFields tab.
75
Reviewing General Ledger Journal Information

76
Reviewing General Ledger Journal Information (continued)

The accounting date and deposit ID are written to the Line Desc field on the Currency Details tab. Cardinal uses this and
other information for reporting and reconciliation purposes.
77
Reviewing General Ledger Journal Information (continued)

Now you have an opportunity to practice the lessons learned today in a training environment.
Your instructor will provide direction on how to log in and complete the exercise.
If you have any questions, please ask your instructor.
78
Lesson 4: Hands-On Practice

79
Lesson Checkpoint
Now is your opportunity to check your understanding of the course material. Read the question and make note of your
answer below.
1. True or False. A Deposit Certificate/Ticket Number can be used more than once.
2. True or False. A Deposit can be approved even if the status deposit Status is Error.
3. True or False. The GL Journal information for the deposit can be viewed as soon as it is saved.

In this lesson, you learned:
• Creating and Approving a Deposit Certificate
• Reviewing General Ledger journal information
Lesson 4: Summary
4 Finalizing a Deposit
80

In this course, you learned:
• Key Accounts Receivable - Fund Receipts concepts
• How Accounts Receivable - Fund Receipts integrates with the General Ledger module in Cardinal
• How to enter, process and finalize a deposit in Cardinal
• Interfaced Deposits process
81
Course Summary
AR326 Accounts Receivable - Fund Receipts

Congratulations! You successfully completed the SW AR326: Accounts Receivable - Fund Receipts course.
Your instructor will provide instructions on how to access the evaluation survey for this course.
82
Course Evaluation

• Key Terms
• Flowchart Key
83
Appendix

Accounts Payable: The functional area that handles Cardinal Commonwealth of Virginia (COVA) payments and consists of
two modules, the Accounts Payable module and the Expenses module.
Accounts Receivable: The module in Cardinal which allows COVA agencies to manage funds received through deposit
creation and the recording of cash, revenue, and other fund receipts (e.g., petty cash).
Agency to Agency (ATA) Transactions: Includes payments by one agency to another for goods or services, pass through
federal funds, cash transfers (state grants), transfer of appropriations, transfer of cash collected on behalf of another agency,
etc. In Cardinal, ATA transactions are handled in one of three different ways depending on the type of transaction. Transfer of
funds are handled in the General Ledger. Inter-agency payments are handled in Accounts Payable. Inter-agency deposits
are handled in Accounts Receivable.
Budget Checking: The process of comparing transactions to budget ledgers to ensure that amounts do not exceed the
controlling budget. Transactions may pass, fail, or pass with a warning. The budget check process is run via a batch
process. Once a valid budget check status is achieved, the budget balances are updated.
Business Unit: An operational subset of an organization. In Cardinal, each state agency is a Business Unit.
Combination Edits: Rules that determine which ChartField values are required, or not allowed, in combination, in order for
an accounting entry to be posted.
Commitment Control: Tool that enables the tracking or controlling of expenses against budgets and revenues against
estimates.
84
Key Terms

Customer ID: The number that identifies the COVA agency submitting the payment.
Deposit Certificate Number (DC Number): A number keyed into Cardinal to identify the deposit when entering a fund
receipts / payment deposit transaction. This number is usually derived from a list provided to the agency by Treasury. The
DC number can be used again however the Deposit date must be different.
Deposit Control: Tool that establishes the control totals and amounts for each deposit.
Deposit ID: The unique key reference for deposits in Cardinal. This number is associated with one deposit and can be used
as a lookup to view details of a deposit, including control totals and status.
Deposit Type: Value that is used to categorize different types of deposits in the system (e.g., cash, checks, wire, etc). In
Cardinal, the deposit type defaults from the bank configuration.
Deposit Unit: Element that defines the agency to which a deposit will be credited.
Direct Journals: Entry used to enter payments in the Accounts Receivable module.
Direct Journal Payments: Payments that do not correspond to receivables established in Cardinal. Cardinal refers to these
payments as directly journaled entry payments and treats them as miscellaneous cash receipts.
Electronic Payment: Payments from EDI (Electronic Data Interchange) transmissions and EFT (Electronic Funds Transfer)
payment files that are routed to the Treasury.
85
Key Terms (continued)

Fund Receipts: The process that allows COVA agencies to record funds received through deposit creation and the
recording of cash, revenue, and other fund receipts / deposits (e.g. petty cash) by creating direct journal entries for payments
that will be sent to the General Ledger.
General Ledger: The module that contains all the accounts (e.g. Budget, Actuals, Modified Accrual, Full Accrual, and Cash)
used to track accounting transactions. The General Ledger serves as the basis for the preparation of financial statements.
Payments: In the Accounts Receivable module, this term refers to funds received by the agency.
Payment Status: Code that identifies a payment’s status as it is processed. A direct journal has a payment status of
“unidentified” when entered, but the status changes to “Directly Journalled” when the accounting entries are created and
marked complete.
Posting: Process that creates the accounting entries for vouchers, cash advances, expense reports, and payments. When
an entry is free of errors, it can be posted.
SpeedType: A predetermined chart of accounts value string which populates or partially populates the accounting
distribution line when entered on a transaction.
86
Key Terms (continued)

Flowchart Key
87

Congratulations! You successfully completed the appendix section of SW AR326: Accounts Receivable Funds Receipts
course.
To close the web based training course, click the ‘X’ button in the upper right corner.
88
End Of Appendix