access online - army contracting...
TRANSCRIPT

Access Online
ArmyUser Guide
Version 1.5A/OPC

Army A/OPC
Contents Introduction...............................................................................4
Confirm and Pay Payment Model ........................................................... 4
Getting Started .........................................................................5 Login/Logoff............................................................................................. 5 Basic Navigation...................................................................................... 7
Breadcrumbs ........................................................................................ 9 My Personal Information ....................................................................... 10
Create a User Profile and User ID ..........................................14 Unlock a User ID................................................................................. 21
Set Up a Managing Account ...................................................23 Managing Account Setup with Workflow............................................. 23 Managing Account Setup Without Workflow ...................................... 23 Set Up a New Managing Account ......................................................... 24 Set Up a Non-Electronic Data Interchange Account........................... 38 Perform Final Approval ......................................................................... 40 Modify an Existing Managing Account ................................................ 40 Perform a Managing Account Maintenance Final Review.................. 43
Set Up a Cardholder Account .................................................47 Cardholder Account Setup with Workflow .......................................... 48 Cardholder Account Setup Without Workflow .................................... 48 Set Up a New Cardholder Account....................................................... 49 Perform a Setup Final Review and Approval....................................... 60 Maintain a Cardholder Account............................................................ 66
Close or Reopen an Account ............................................................ 67 Perform a Cardholder Account Maintenance Final Approval ............ 69
Work with Queues ...................................................................73
View an Account Profile .........................................................74
Run a Standard Report............................................................82
Schedule a Standard Report...................................................88
Create a Flex Data Report ......................................................97
Access and Run a Shared Custom Report............................106
Upload and Download Files with Data Exchange ................111
Additional Roles and Tasks ..................................................117
Additional Resources............................................................118
©2010 U.S. Bancorp Agency/Organization Program Coordinator 2

Army A/OPC
Icons As you read this document, you will notice the following icons:
Tip! Tips contain additional information to help you complete your work more efficiently.
Learn More: Additional information explains a business concept in more detail.
Web Addresses Live System You can easily access the live system at U.S. Bank Access® Online or by typing the following address into your web browser:
https://access.usbank.com Web-based Training Make sure you have the most current version of this user guide (and access additional training content) by checking this guide’s version number against the user guide on the web-based training (WBT) site. You can also type the following address into your web browser:
https://wbt.access.usbank.com
©2010 U.S. Bancorp Agency/Organization Program Coordinator 3

Army A/OPC
Introduction In this user guide, you will learn how to access and complete the key tasks you perform in U.S. Bank Access® Online. This guide provides you with the basic steps for critical tasks. For field descriptions and additional options, we give you a cross reference to the comprehensive user guide on a specific topic. By presenting your tasks in this way, we hope to provide you with the information you need without overloading you with extraneous detail not relevant to your specific tasks.
Be sure to access and review the web-based training (WBT) lessons, as well as user guides, quick references, guided and hands-on simulations, and recorded training classes available to you on the WBT.
Tip! Bank security policies prohibit us from accessing and using your live site for training purposes. So, to safeguard your account information, we use sample screens throughout this user guide. Your actual user interface in Access Online is customized to meet Army needs and will look slightly different.
Confirm and Pay Payment Model The tasks in this user guide reflect the Army’s Confirm and Pay model, as the diagram below shows.
©2010 U.S. Bancorp Agency/Organization Program Coordinator 4

Army A/OPC
Get Started Getting started in Access Online is quick and easy. In this section, you will learn how to get started using Access Online, including how to log in, navigate the system, and access and update your personal information.
Log In and Log Off
2
1
3
4
You must fill in all three fields.
After two failed login attempts, click the Forgot Your Password link and then answer your authentication question to reset your password and log in.
To log in:
1. Type your organization short name (ARMY) in the Organization Short Name field. The organization short name is a code that identifies your organization in Access Online.
2. Type your user ID in the User ID field.
3. Type your password in the Password field.
4. Click the Login button. The Access Online Client Home page displays.
Tip! For security reasons, if you do not perform any task in Access Online for 15 minutes, the system will log you out of your session automatically. Also, you must change your password every 60 days. Your password must be 8–20 alpha/numeric characters, and must contain at least one letter and one number. You cannot reuse a password for 12 months. If you forget your password, you can still log in to Access Online using your authentication. Your authentication is an answer to a question that only you know, such as your father’s middle name or your mother’s maiden name.
©2010 U.S. Bancorp Agency/Organization Program Coordinator 5
Army A/OPC
5
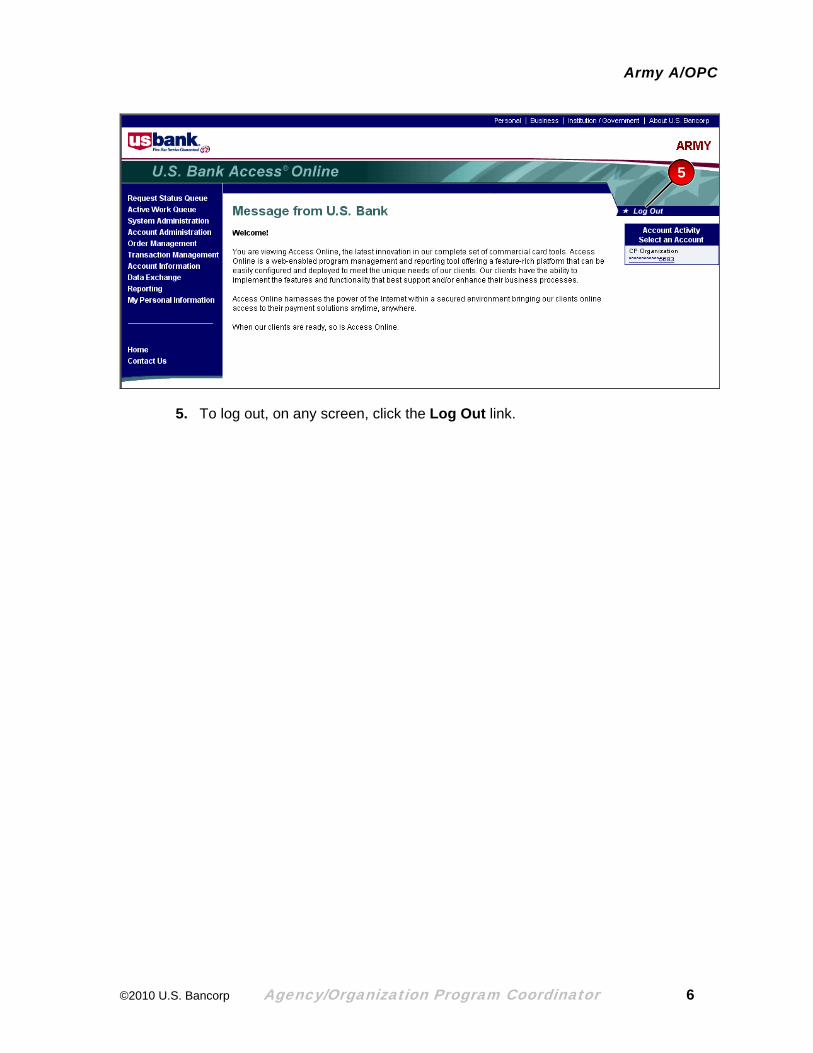
5. To log out, on any screen, click the Log Out link.
©2010 U.S. Bancorp Agency/Organization Program Coordinator 6

Army A/OPC
Basic Navigation
The Left-column Navigation Bar gives you access to all tasks and functions. Click to display subtasks.
Check your Client Home page often for U.S. Bank and agency-specific notices.
The Client Home page displays each time you log in to Access Online and whenever you click the Home link in the Left-Column Navigation Bar. The Client Home page has the following elements:
• Left-column Navigation Bar—Provides access to all tasks and functions in Access Online.
• Messages—Provides important notices
Tip! Never use your browser’s Back button.
Learn More: Refer to the Access Online: Government Glossary for definitions of terms in Access Online.
©2010 U.S. Bancorp Agency/Organization Program Coordinator 7

Army A/OPC
U.S. Bank links
Error messages
Logout button
Left-Column Navigation Bar with menu expanded.
Back link
The following elements are common to all Access Online screens:
• U.S. Bank links—Display other U.S. Bank web sites in new browser windows
• Client name—Displays in the right-hand corner of the screen
• Error message—Displays in red text at the top of the screen
• Log Out button—Ends your Access Online session and displays the Login page
• Left-Column Navigation Bar—Specific to each user, displays links only to those Access Online functions assigned to your user ID
• Back link—Displays a previous screen
©2010 U.S. Bancorp Agency/Organization Program Coordinator 8
Army A/OPC
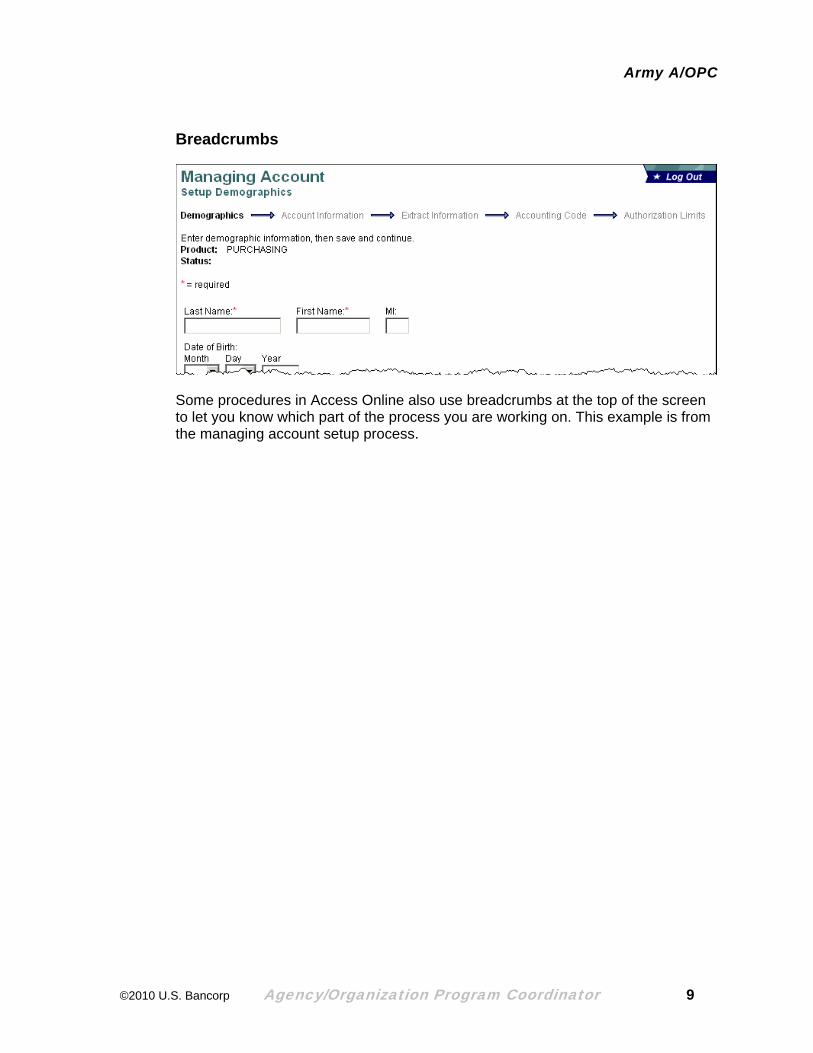
Breadcrumbs
Some procedures in Access Online also use breadcrumbs at the top of the screen to let you know which part of the process you are working on. This example is from the managing account setup process.
©2010 U.S. Bancorp Agency/Organization Program Coordinator 9

Army A/OPC
My Personal Information You can easily view and manage your personal information, including your password, authentication question, contact information, and e-mail notifications.
In addition, you can view (but not edit), your organization short name (ARMY), your functional entitlement group (which controls the tasks you have access to), your accounts, and your processing and reporting hierarchies.
2a
1
You can click a link on the screen or click a menu option at left.
To access your personal information:
1. Click the My Personal Information high-level task on the Left-column Navigation Bar.
2. To change your password or authentication question:
a. Click the Password link on the screen or the Left-column Navigation Bar.
©2010 U.S. Bancorp Agency/Organization Program Coordinator 10
Army A/OPC
2b
2c
2d
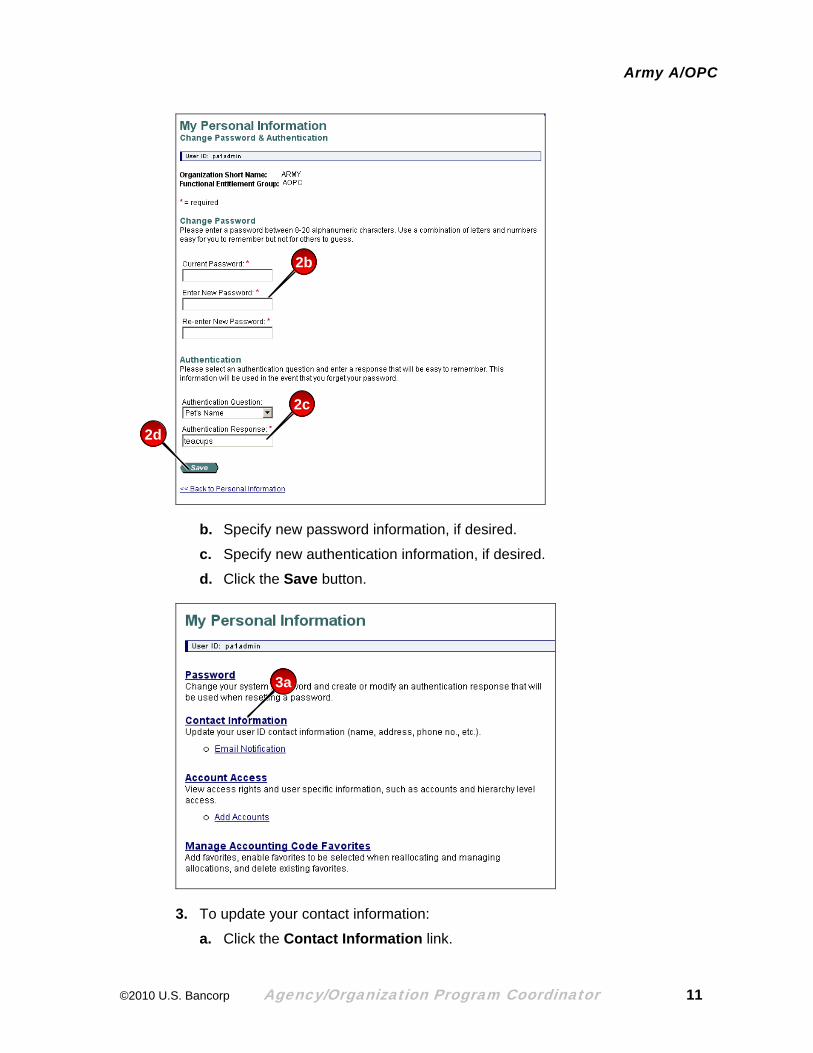
b. Specify new password information, if desired.
c. Specify new authentication information, if desired.
d. Click the Save button.
3a
3. To update your contact information:
a. Click the Contact Information link.
©2010 U.S. Bancorp Agency/Organization Program Coordinator 11

Army A/OPC
Required fields have red asterisks.
3b
3c
b. Specify new information any field.
c. Click Save.
©2010 U.S. Bancorp Agency/Organization Program Coordinator 12

Army A/OPC
4a
4. To update your e-mail notification:
a. Click the Email Notification link.
4b
4c
4d
Do not use this section to enable/disable statement notification or to assign additional accounts.
b. Specify new information, including new email address or statement notification parameters.
c. Specify new data exchange options, if needed.
d. Click Save.
©2010 U.S. Bancorp Agency/Organization Program Coordinator 13

Army A/OPC
Create a User Profile and User ID You can create a user profile and user ID to give staff members user IDs that they can use to log in to and use Access Online. You can create user profiles and user IDs for cardholders, Agency Program Coordinators (APCs), Billing Officials, Resource Managers, and Alternate APCs. However, cardholders should continue to use the online registration function.
1 2
3
To create a user profile:
1. Select the System Administrator high-level task.
2. Click the User Profile option.
3. Click the Setup a new user link.
©2010 U.S. Bancorp Agency/Organization Program Coordinator 14
Army A/OPC
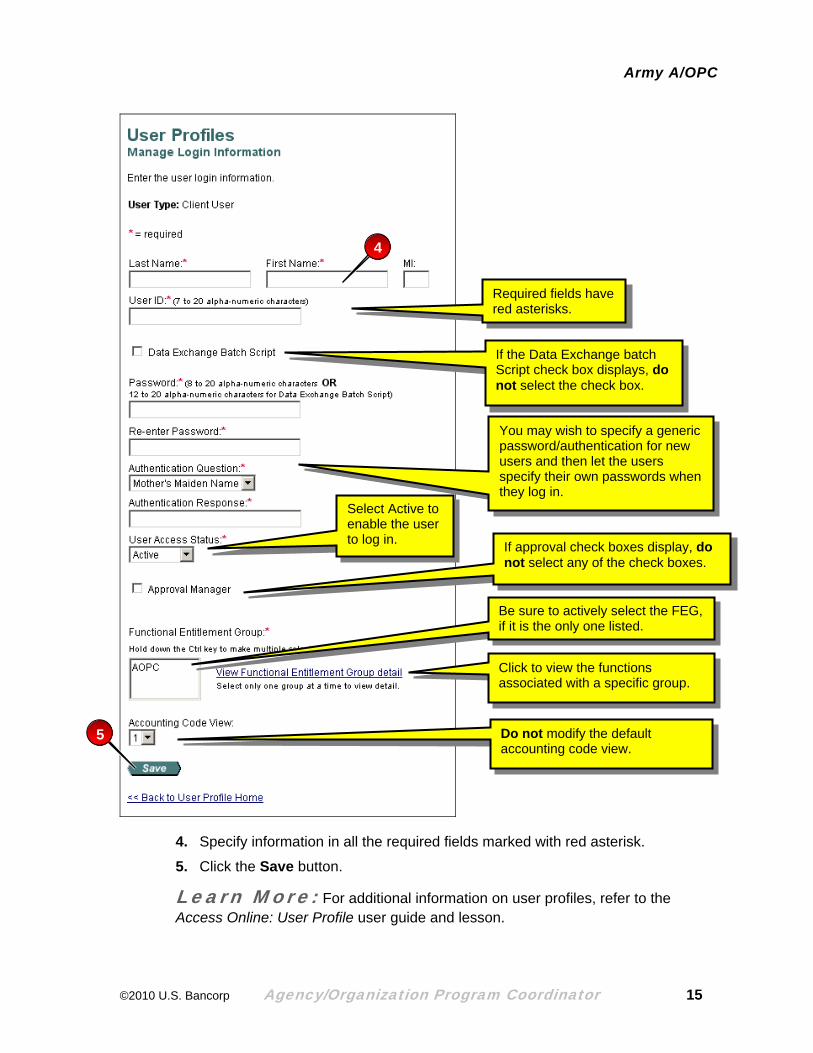
4. Specify information in all the required fields marked with red asterisk.
5. Click the Save button.
Learn More: For additional information on user profiles, refer to the Access Online: User Profile user guide and lesson.
Be sure to actively select the FEG, if it is the only one listed.
Click to view the functions associated with a specific group.
Do not modify the default accounting code view.
4
Required fields have red asterisks.
If the Data Exchange batch Script check box displays, do not select the check box.
You may wish to specify a generic password/authentication for new users and then let the users specify their own passwords when they log in.
Select Active to enable the user to log in. If approval check boxes display, do
not select any of the check boxes.
5
©2010 U.S. Bancorp Agency/Organization Program Coordinator 15

Army A/OPC
6 Since the Army adds all accounts based on processing hierarchy assignment, do not make any edits to the Account Assignments section.
6. Click the View/Add Processing Hierarchy Assignments link to assign the user to a processing hierarchy position.
©2010 U.S. Bancorp Agency/Organization Program Coordinator 16
Army A/OPC
7
8
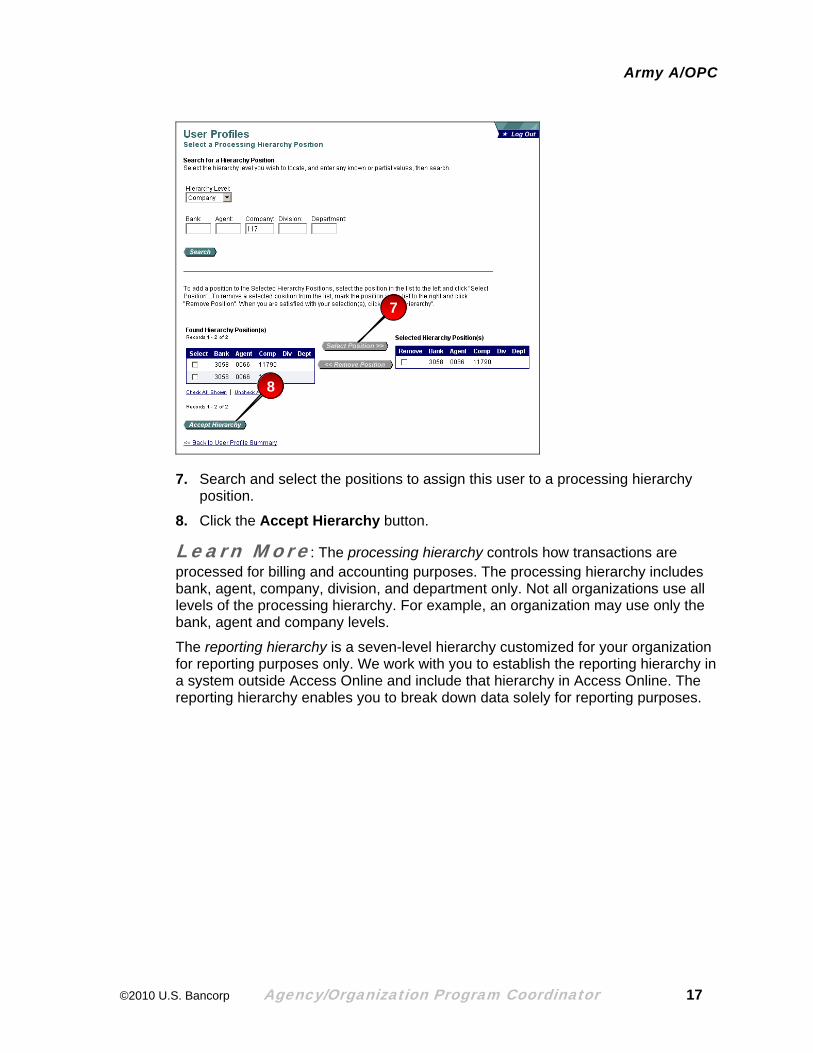
7. Search and select the positions to assign this user to a processing hierarchy position.
8. Click the Accept Hierarchy button.
Learn More : The processing hierarchy controls how transactions are processed for billing and accounting purposes. The processing hierarchy includes bank, agent, company, division, and department only. Not all organizations use all levels of the processing hierarchy. For example, an organization may use only the bank, agent and company levels.
The reporting hierarchy is a seven-level hierarchy customized for your organization for reporting purposes only. We work with you to establish the reporting hierarchy in a system outside Access Online and include that hierarchy in Access Online. The reporting hierarchy enables you to break down data solely for reporting purposes.
©2010 U.S. Bancorp Agency/Organization Program Coordinator 17

Army A/OPC
9
10
9. Repeat Steps 8–9 to assign this user to a reporting hierarchy position.
10. To edit the user’s contact information, click the Edit link.
©2010 U.S. Bancorp Agency/Organization Program Coordinator 18

Army A/OPC
Note that on this screen, you are adding the user’s contact information, which may be different from the demographic information you specified on the login information screen.
11
12
13
14
The Data Exchange selections let the user get e-mails about uploads and downloads.
11. Specify address, phone and email information.
12. Select data exchange e-mail options.
13. Click a link to add accounts accessible through the user’s assigned hierarchy.
14. When you are done, click Save.
©2010 U.S. Bancorp Agency/Organization Program Coordinator 19

Army A/OPC
Learn More: After you create a user profile, you can modify the profile at any time. For steps and additional information on user profiles, refer to the Access Online: User Profile user guide and lesson. Keep in mind that users can also modify their personal information, including password, authentication, e-mail notifications, and contact information as described in the Access Online: Managing My Personal Information user guide and lesson.
©2010 U.S. Bancorp Agency/Organization Program Coordinator 20
Army A/OPC
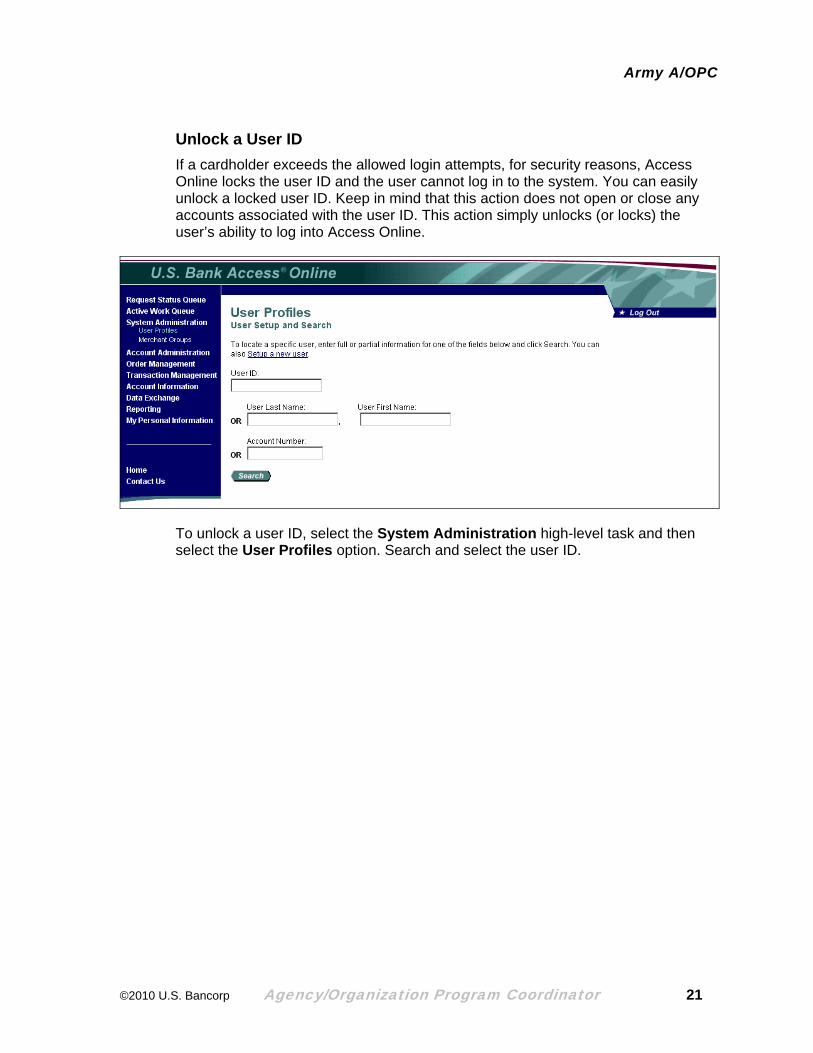
Unlock a User ID If a cardholder exceeds the allowed login attempts, for security reasons, Access Online locks the user ID and the user cannot log in to the system. You can easily unlock a locked user ID. Keep in mind that this action does not open or close any accounts associated with the user ID. This action simply unlocks (or locks) the user’s ability to log into Access Online.
To unlock a user ID, select the System Administration high-level task and then select the User Profiles option. Search and select the user ID.
©2010 U.S. Bancorp Agency/Organization Program Coordinator 21
Army A/OPC
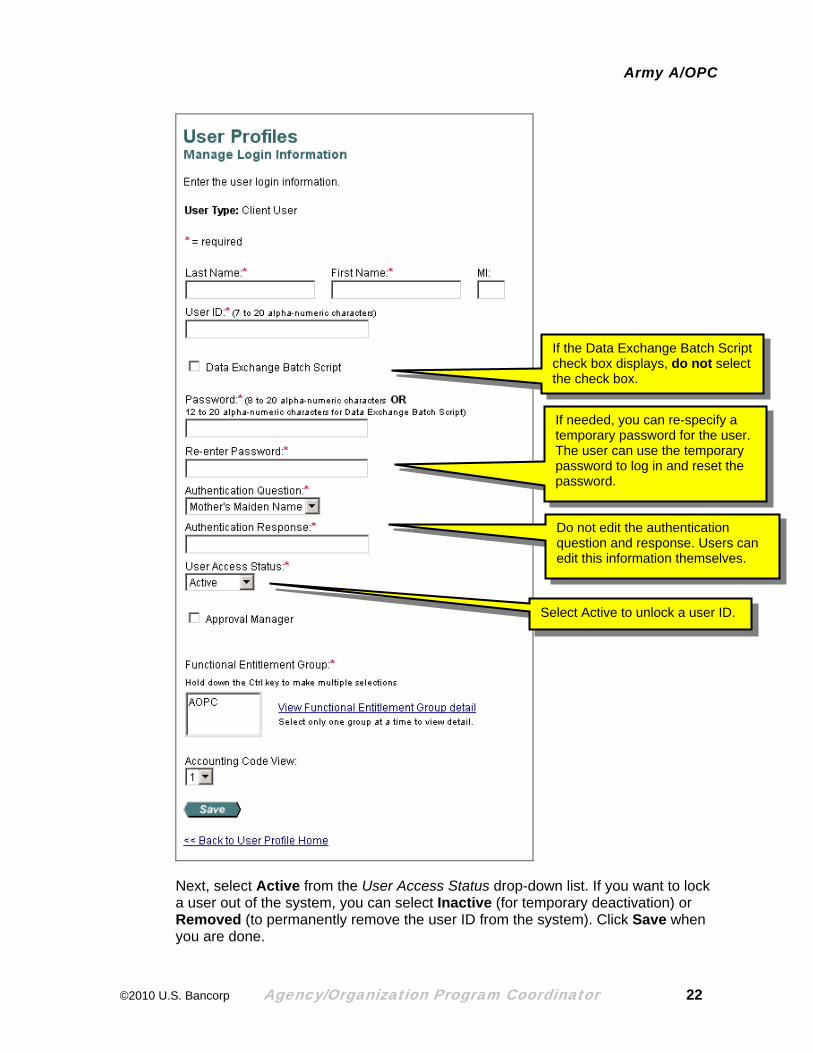
Do not edit the authentication question and response. Users can edit this information themselves.
Select Active to unlock a user ID.
If needed, you can re-specify a temporary password for the user. The user can use the temporary password to log in and reset the password.
If the Data Exchange Batch Script check box displays, do not select the check box.
Next, select Active from the User Access Status drop-down list. If you want to lock a user out of the system, you can select Inactive (for temporary deactivation) or Removed (to permanently remove the user ID from the system). Click Save when you are done.
©2010 U.S. Bancorp Agency/Organization Program Coordinator 22

Army A/OPC
Set Up a Managing Account You can easily set up new managing accounts and modify existing managing accounts. Depending on how your program is set up, you may also use the workflow and final review functions. The workflow function enables different users to set up different portions of the managing account. The final review function enables a designated A/OPC to review and approve the completed setup before submitting the setup to U.S. Bank for processing. Below are two sample scenarios: one with workflow and one without.
Managing Account Setup with Workflow
You and the Resource Manager pick up setup tasks in the active work queue.
Managing Account Setup Without Workflow If you want to set up managing accounts without using the workflow process, then you need to get approval from Army Level 2.
Learn More: Refer to Work with Queues on page 73 for information.
©2010 U.S. Bancorp Agency/Organization Program Coordinator 23

Army A/OPC
Set Up a New Managing Account
1
2
To set up a new managing account:
1. Select the Account Administration high-level task.
2. Click the Create New Managing Account link.
©2010 U.S. Bancorp Agency/Organization Program Coordinator 24
Army A/OPC
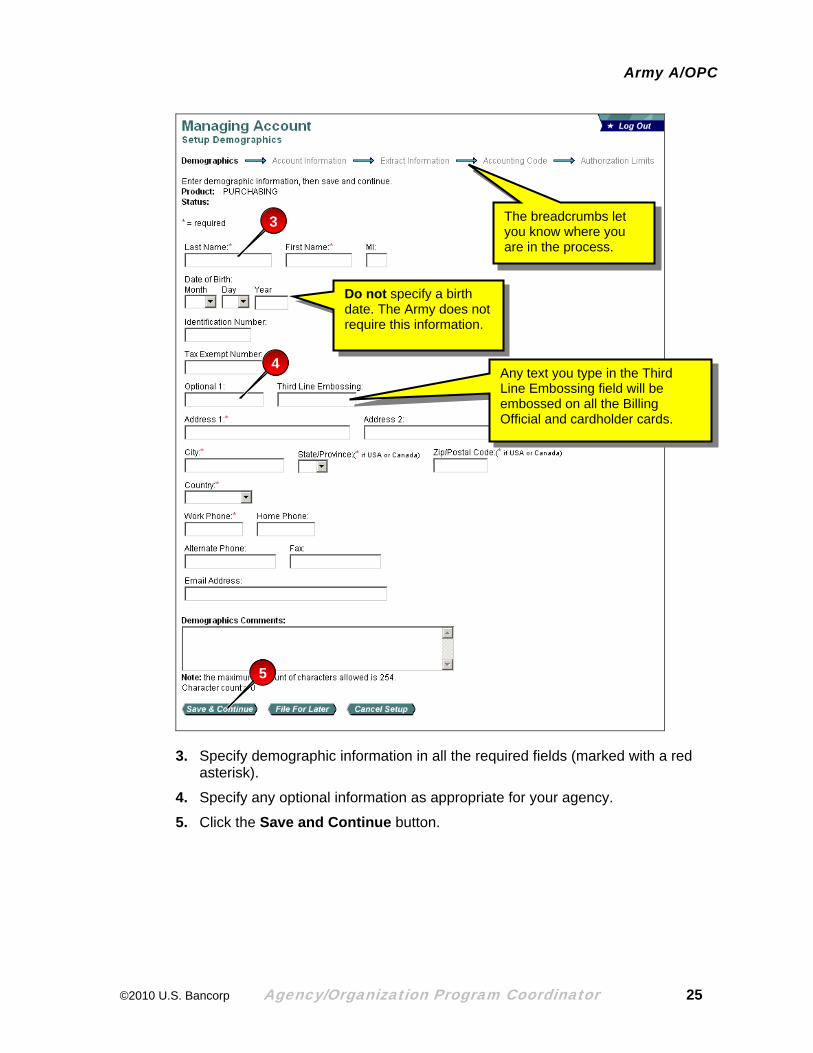
The breadcrumbs let you know where you are in the process.
3
4
Do not specify a birth date. The Army does not require this information.
Any text you type in the Third Line Embossing field will be embossed on all the Billing Official and cardholder cards.
5
3. Specify demographic information in all the required fields (marked with a red asterisk).
4. Specify any optional information as appropriate for your agency.
5. Click the Save and Continue button.
©2010 U.S. Bancorp Agency/Organization Program Coordinator 25
Army A/OPC
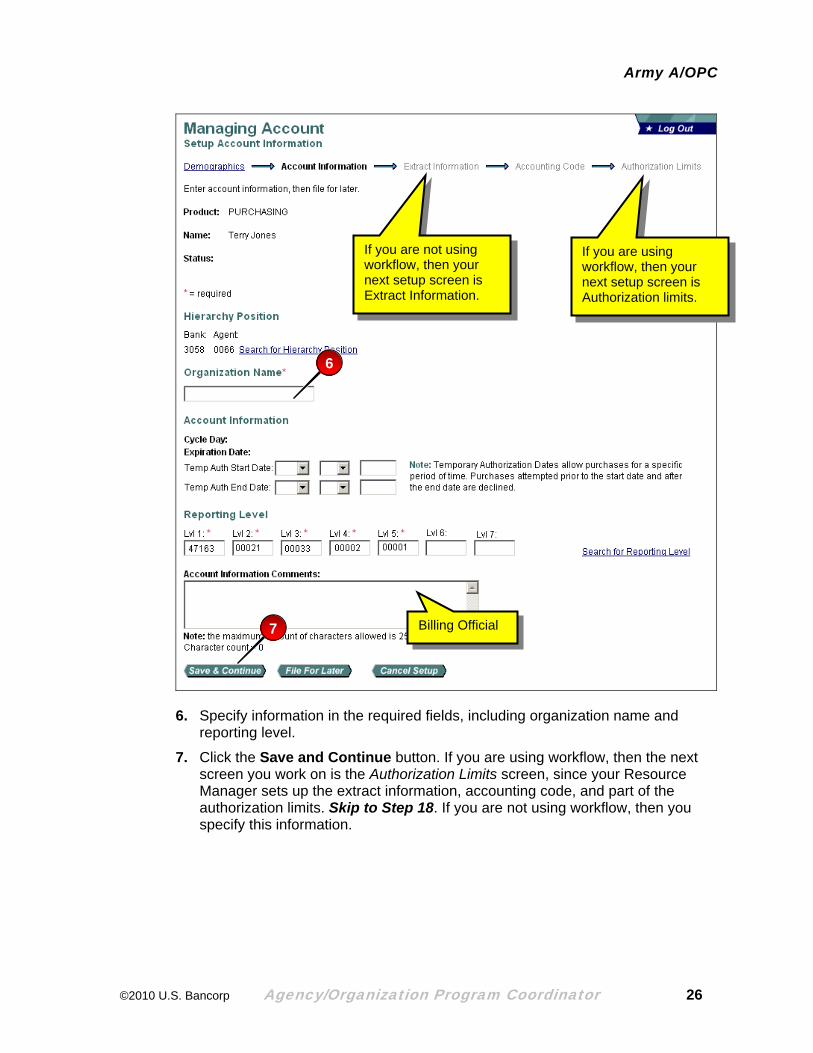
If you are not using workflow, then your next setup screen is Extract Information.
If you are using workflow, then your next setup screen is Authorization limits.
6
Billing Official 7
6. Specify information in the required fields, including organization name and reporting level.
7. Click the Save and Continue button. If you are using workflow, then the next screen you work on is the Authorization Limits screen, since your Resource Manager sets up the extract information, accounting code, and part of the authorization limits. Skip to Step 18. If you are not using workflow, then you specify this information.
©2010 U.S. Bancorp Agency/Organization Program Coordinator 26
Army A/OPC
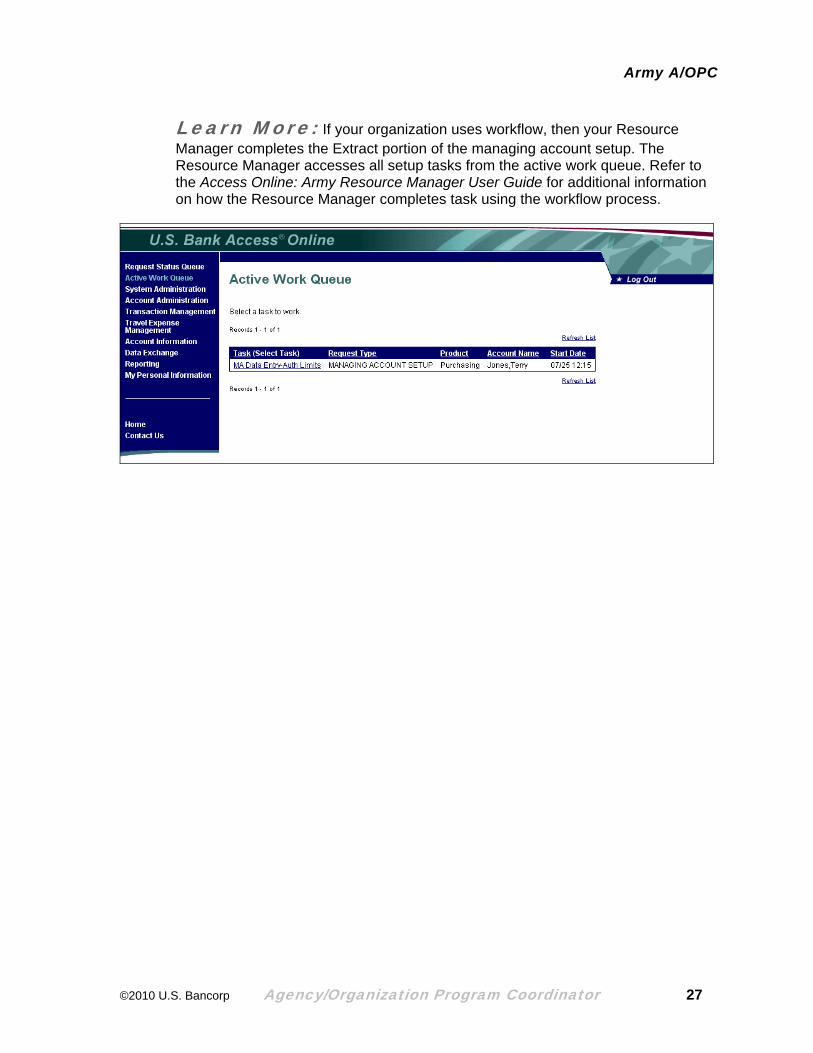
Learn More: If your organization uses workflow, then your Resource Manager completes the Extract portion of the managing account setup. The Resource Manager accesses all setup tasks from the active work queue. Refer to the Access Online: Army Resource Manager User Guide for additional information on how the Resource Manager completes task using the workflow process.
©2010 U.S. Bancorp Agency/Organization Program Coordinator 27
Army A/OPC
98
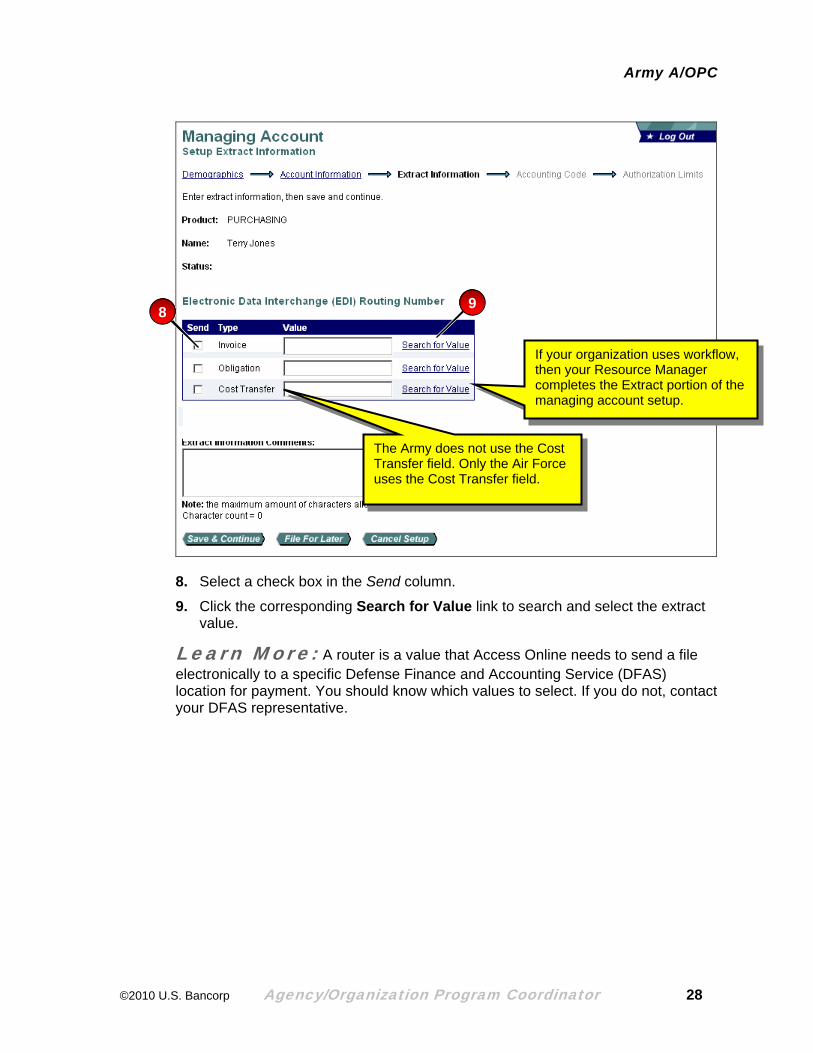
If your organization uses workflow, then your Resource Manager completes the Extract portion of the managing account setup.
The Army does not use the Cost Transfer field. Only the Air Force uses the Cost Transfer field.
8. Select a check box in the Send column.
9. Click the corresponding Search for Value link to search and select the extract value.
Learn More: A router is a value that Access Online needs to send a file electronically to a specific Defense Finance and Accounting Service (DFAS) location for payment. You should know which values to select. If you do not, contact your DFAS representative.
©2010 U.S. Bancorp Agency/Organization Program Coordinator 28
Army A/OPC
10
11
12
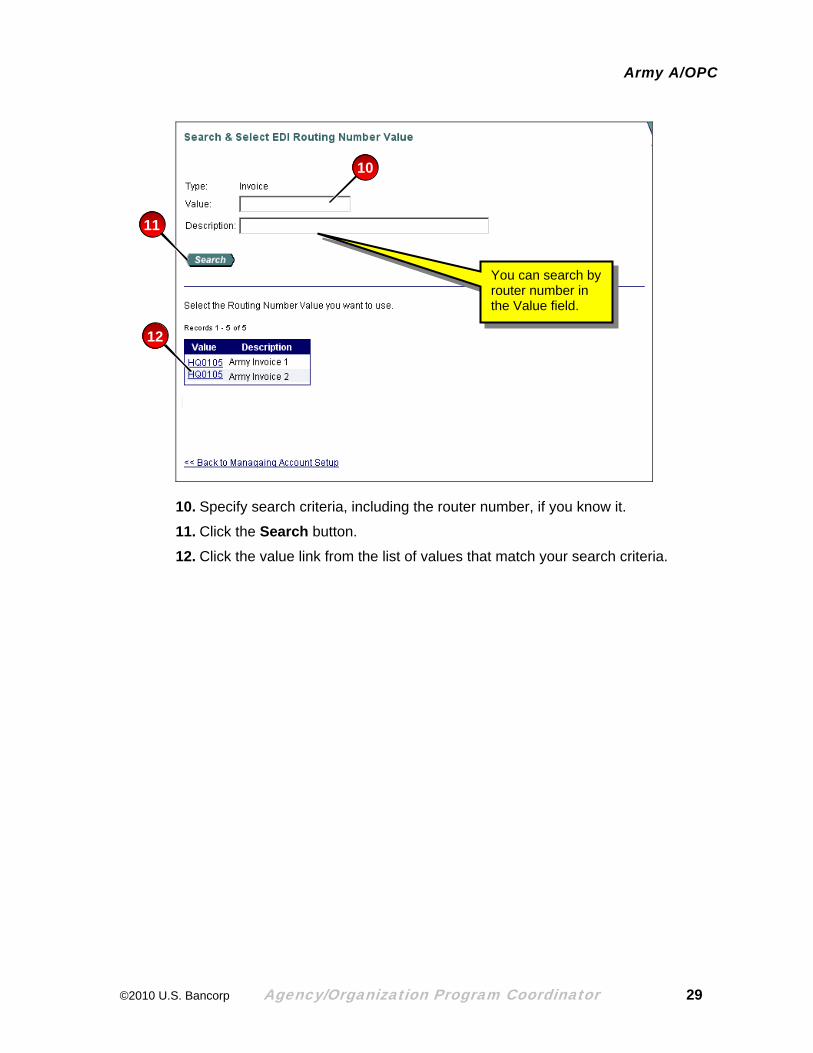
You can search by router number in the Value field.
10. Specify search criteria, including the router number, if you know it.
11. Click the Search button.
12. Click the value link from the list of values that match your search criteria.
©2010 U.S. Bancorp Agency/Organization Program Coordinator 29

Army A/OPC
13
13. Click Save and Continue.
©2010 U.S. Bancorp Agency/Organization Program Coordinator 30

Army A/OPC
14b
14aYou may not need to attach a different AVC.
14. To attach an AVC:
a. Select the Reallocate by Accounting Validation Control radio button.
b. Review the attached AVC and click the Switch AVCs link to attach a new one.
©2010 U.S. Bancorp Agency/Organization Program Coordinator 31
Army A/OPC
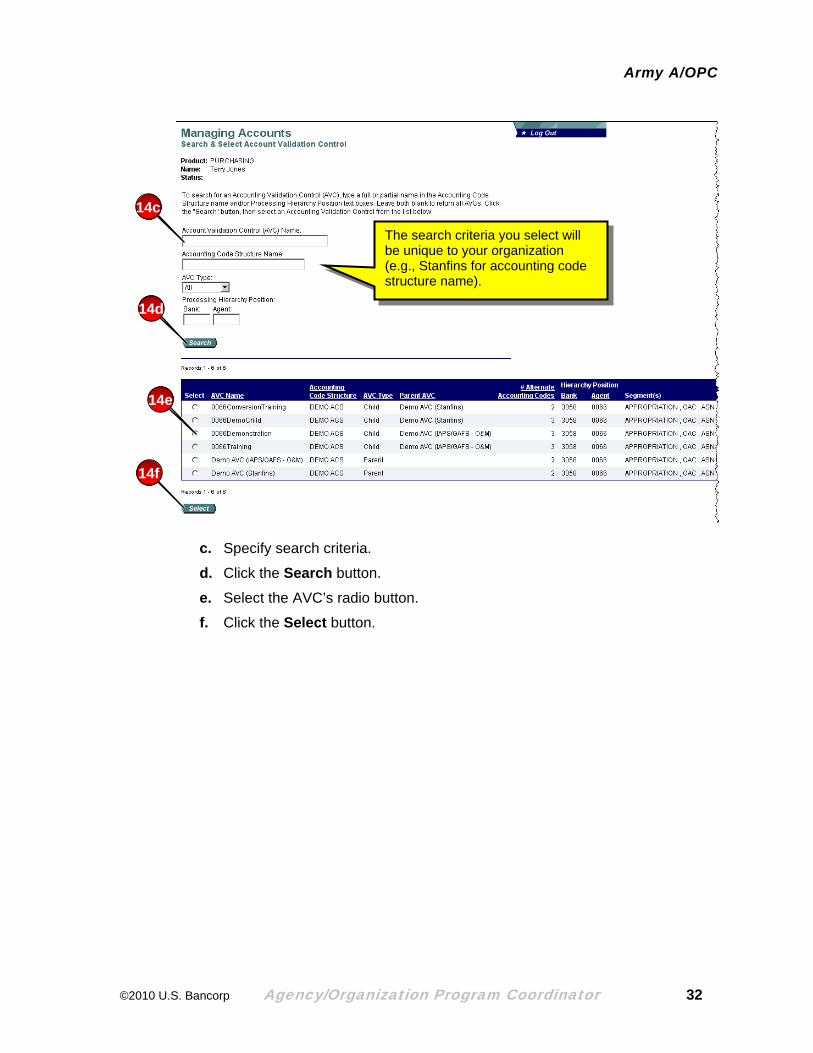
14c
14d
14e
14f
The search criteria you select will be unique to your organization (e.g., Stanfins for accounting code structure name).
c. Specify search criteria.
d. Click the Search button.
e. Select the AVC’s radio button.
f. Click the Select button.
©2010 U.S. Bancorp Agency/Organization Program Coordinator 32
Army A/OPC
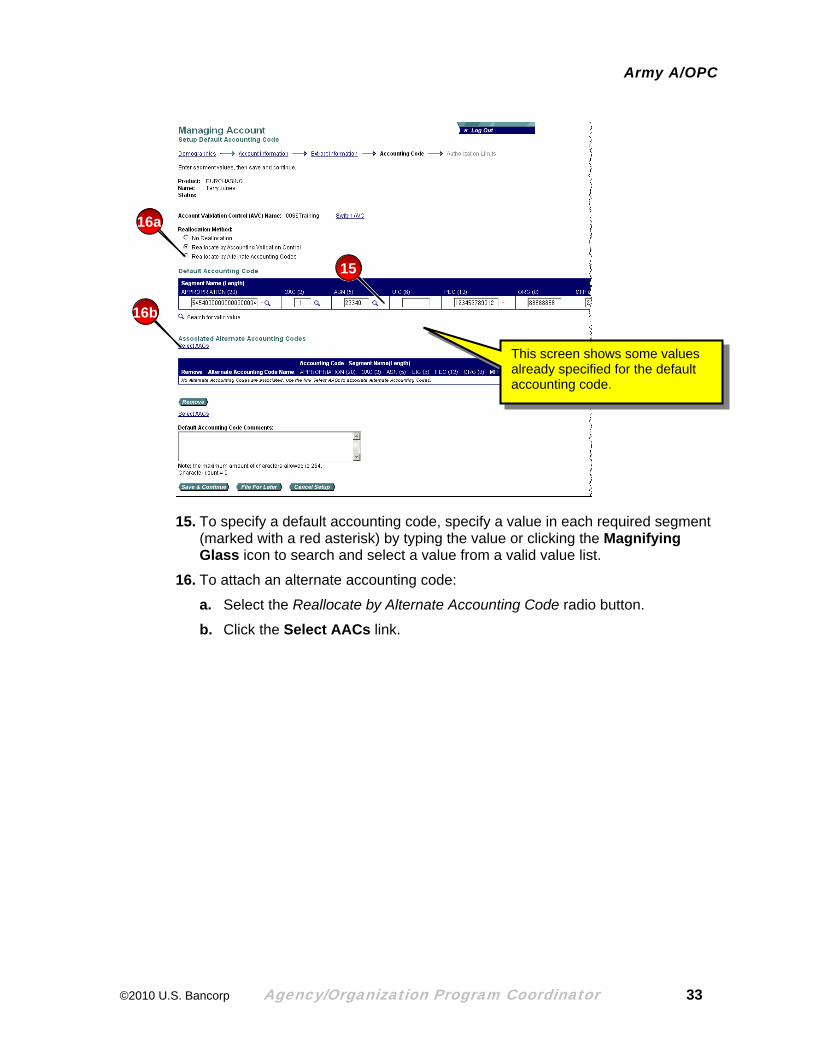
16a
15
16b
This screen shows some values already specified for the default accounting code.
15. To specify a default accounting code, specify a value in each required segment (marked with a red asterisk) by typing the value or clicking the Magnifying Glass icon to search and select a value from a valid value list.
16. To attach an alternate accounting code:
a. Select the Reallocate by Alternate Accounting Code radio button.
b. Click the Select AACs link.
©2010 U.S. Bancorp Agency/Organization Program Coordinator 33
Army A/OPC
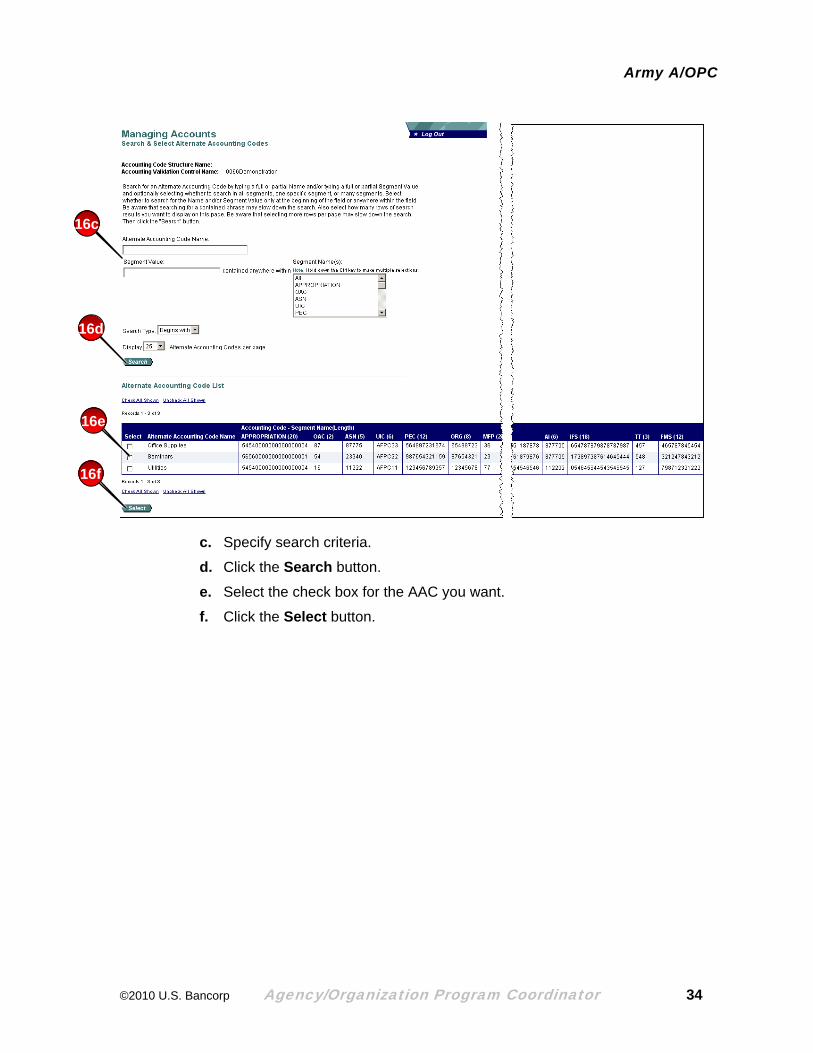
16c
16d
16e
16f
c. Specify search criteria.
d. Click the Search button.
e. Select the check box for the AAC you want.
f. Click the Select button.
©2010 U.S. Bancorp Agency/Organization Program Coordinator 34

Army A/OPC
17
17. When you are done specifying the default accounting code and/or the alternate accounting code, review your work and then click the Save and Continue button.
©2010 U.S. Bancorp Agency/Organization Program Coordinator 35
Army A/OPC
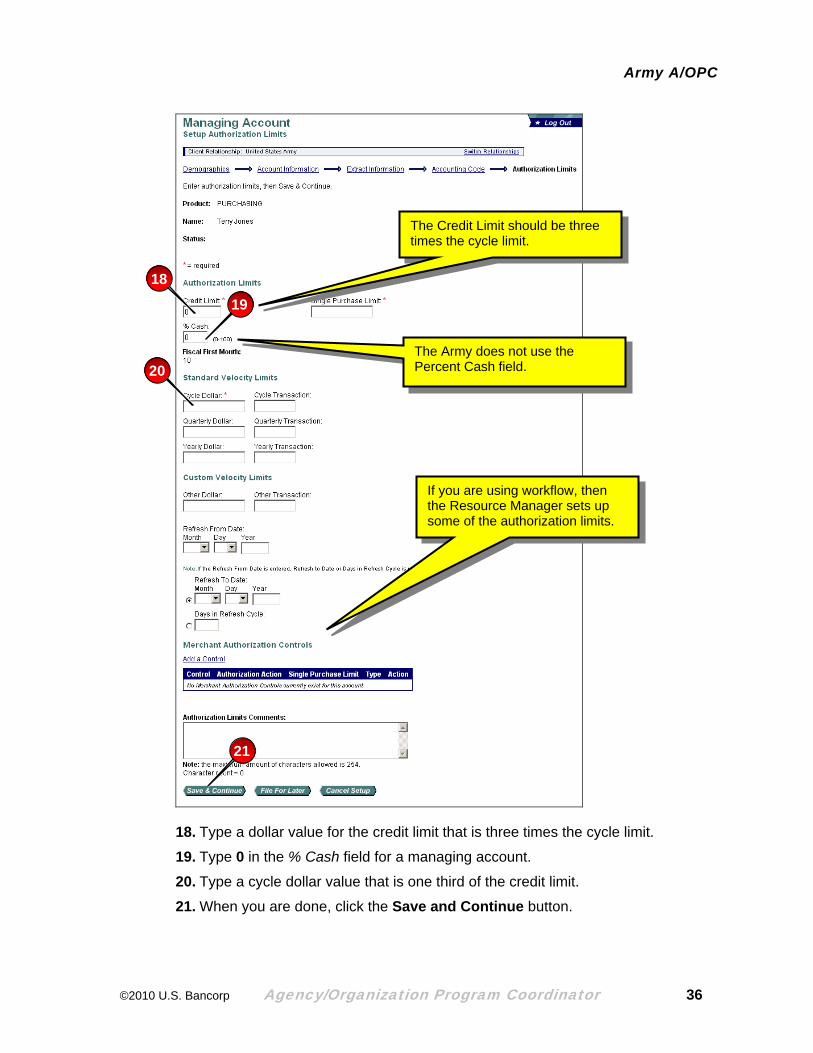
19
The Army does not use the Percent Cash field.
The Credit Limit should be three times the cycle limit.
18
20
If you are using workflow, then the Resource Manager sets up some of the authorization limits.
21
18. Type a dollar value for the credit limit that is three times the cycle limit.
19. Type 0 in the % Cash field for a managing account.
20. Type a cycle dollar value that is one third of the credit limit.
21. When you are done, click the Save and Continue button.
©2010 U.S. Bancorp Agency/Organization Program Coordinator 36

Army A/OPC
Tip! You set the merchant authorization controls on a cardholder account, not a managing account, so you do not normally need to specify them during a managing account setup.
If you are using the workflow process, then the setup goes to your Resource Manager for additional setup tasks, such as accounting code specification, attachment of AVCs or AACs, and some of the authorization limits. Once the Resource Manager completes these tasks, then the setup will come back to you for your part of authorization limit setup, plus your review and final approval.
If you are not using the workflow process, and you completed all the setup tasks yourself, then the setup comes to U.S. Bank for final processing.
©2010 U.S. Bancorp Agency/Organization Program Coordinator 37
Army A/OPC
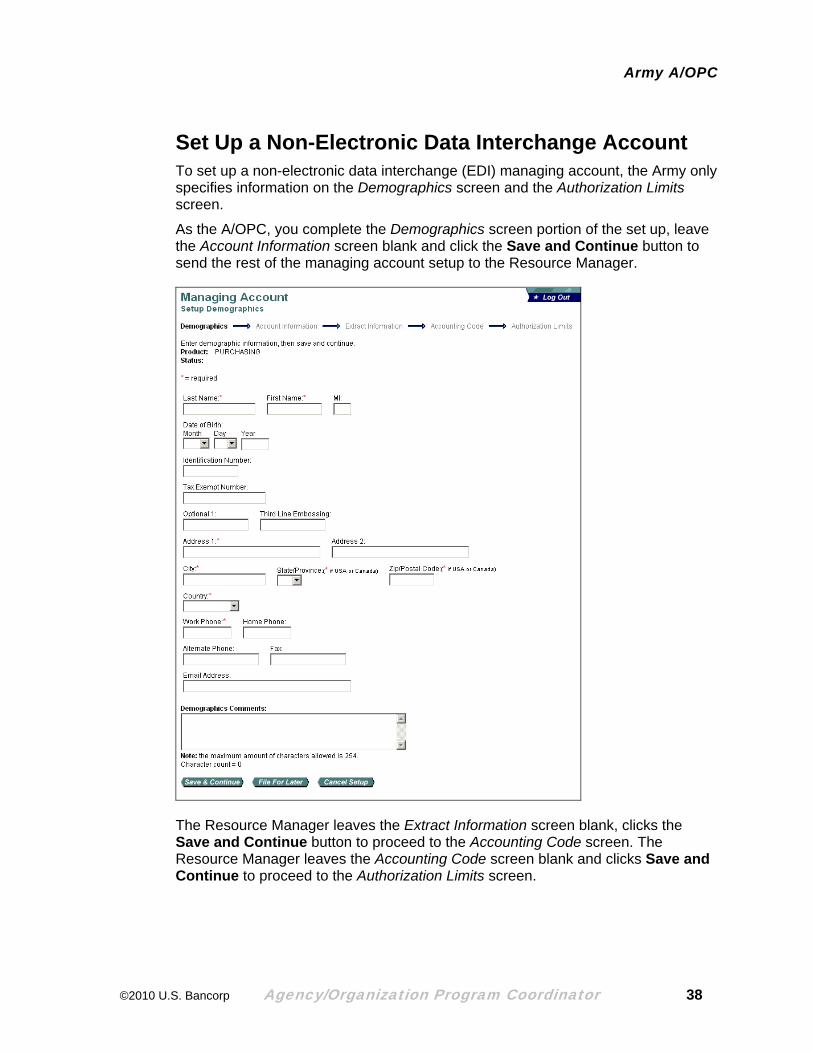
Set Up a Non-Electronic Data Interchange Account To set up a non-electronic data interchange (EDI) managing account, the Army only specifies information on the Demographics screen and the Authorization Limits screen.
As the A/OPC, you complete the Demographics screen portion of the set up, leave the Account Information screen blank and click the Save and Continue button to send the rest of the managing account setup to the Resource Manager.
The Resource Manager leaves the Extract Information screen blank, clicks the Save and Continue button to proceed to the Accounting Code screen. The Resource Manager leaves the Accounting Code screen blank and clicks Save and Continue to proceed to the Authorization Limits screen.
©2010 U.S. Bancorp Agency/Organization Program Coordinator 38
Army A/OPC
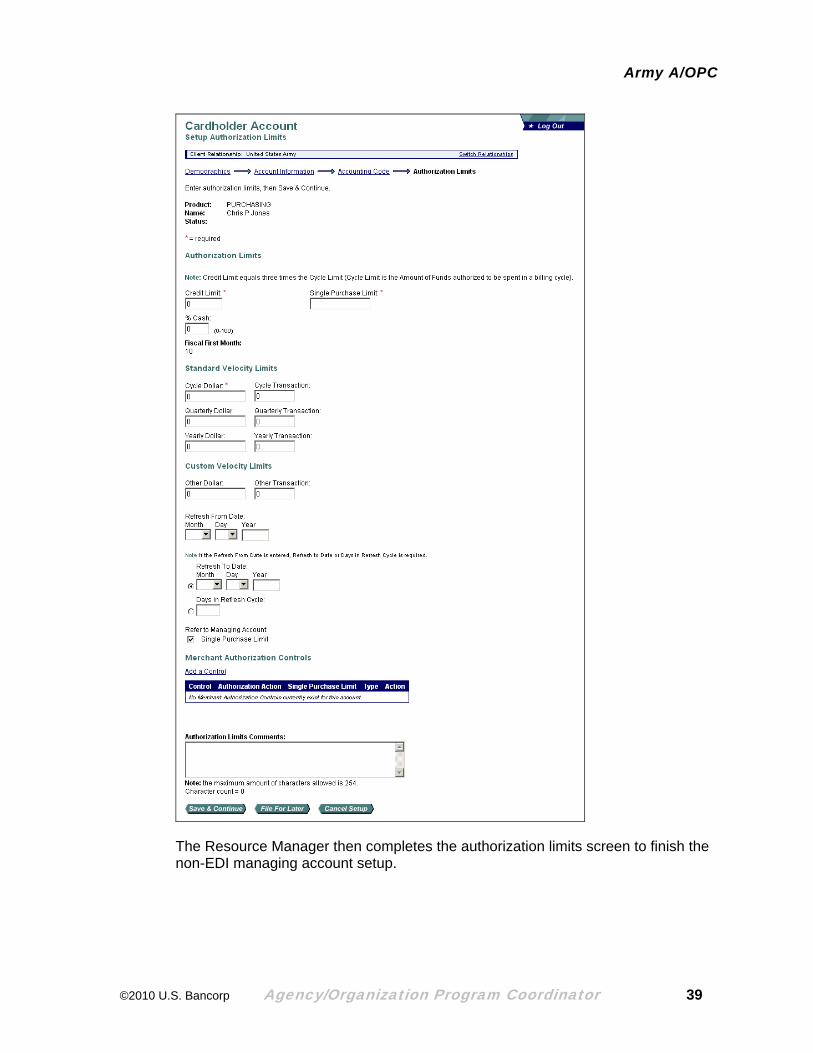
The Resource Manager then completes the authorization limits screen to finish the non-EDI managing account setup.
©2010 U.S. Bancorp Agency/Organization Program Coordinator 39
Army A/OPC
Perform Final Approval To perform a final review on a managing account setup, you simply access the managing account setup from your active work queue and review each screen to approve or reject the information. If you reject a screen, you need to specify a reason. At that point the managing account setup goes to the active work queue of the user who completed the setup task in the first place, that person fixes the problem and then the setup comes back to your active work queue. You access the setup again and begin the screen-by-screen review process again until you are able to approve all the screens in the setup. At that point, the approved setup comes to U.S. Bank for final processing. For additional information, refer to Perform a Setup Final Review and Approval on page 60. You can also refer to the Access Online: Managing Account Setup and Maintenance user guide and lesson.
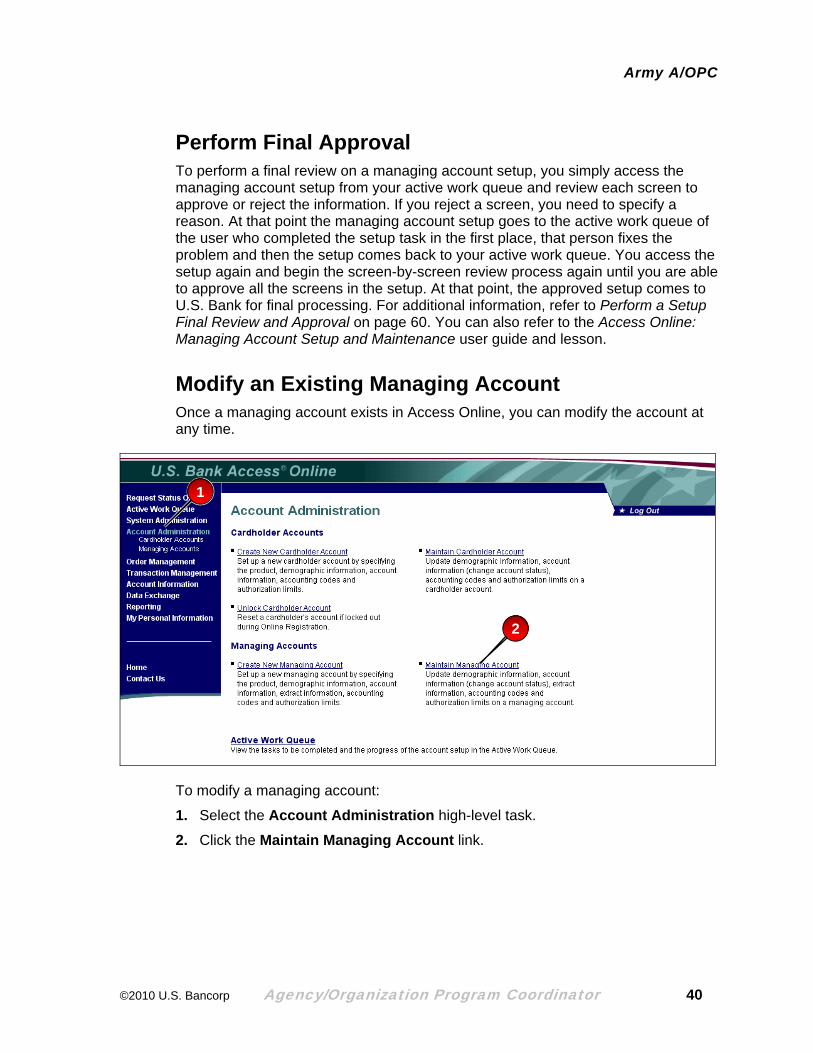
Modify an Existing Managing Account Once a managing account exists in Access Online, you can modify the account at any time.
1
2
To modify a managing account:
1. Select the Account Administration high-level task.
2. Click the Maintain Managing Account link.
©2010 U.S. Bancorp Agency/Organization Program Coordinator 40

Army A/OPC
3
4
5
3. Specify search criteria.
4. Click the Search button.
5. Click the account number link for the account you want to modify.
©2010 U.S. Bancorp Agency/Organization Program Coordinator 41
Army A/OPC
6
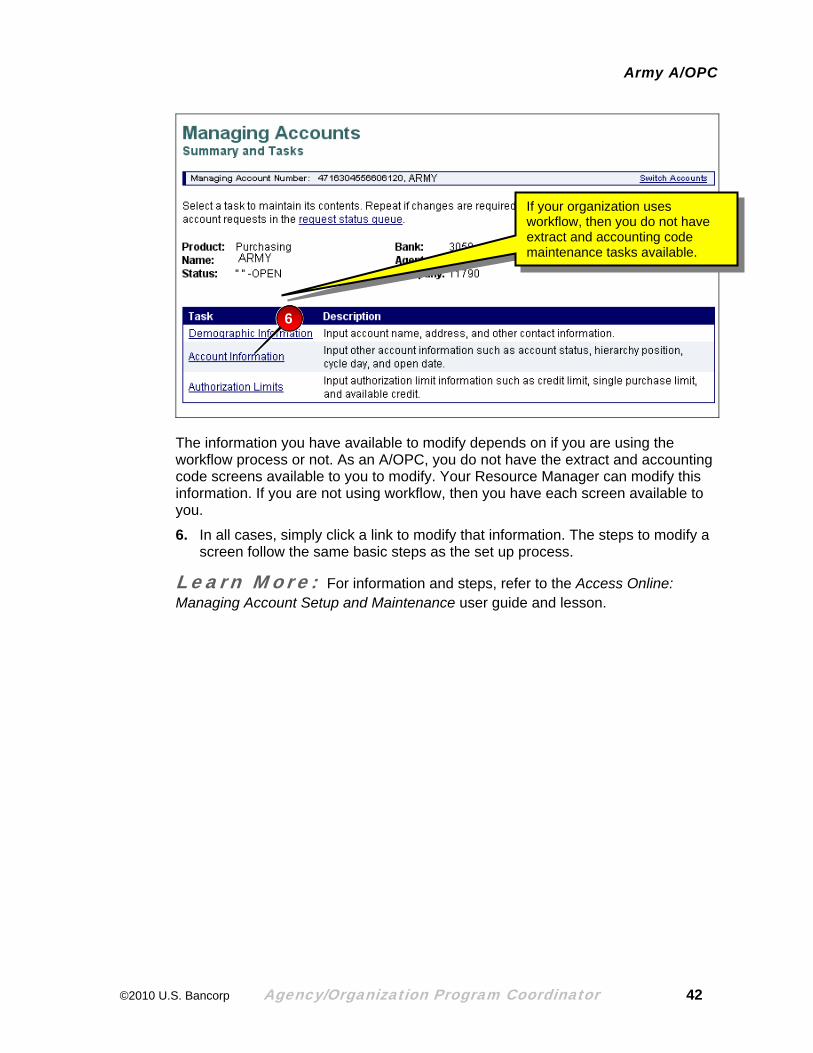
If your organization uses workflow, then you do not have extract and accounting code maintenance tasks available.
The information you have available to modify depends on if you are using the workflow process or not. As an A/OPC, you do not have the extract and accounting code screens available to you to modify. Your Resource Manager can modify this information. If you are not using workflow, then you have each screen available to you.
6. In all cases, simply click a link to modify that information. The steps to modify a screen follow the same basic steps as the set up process.
Learn More: For information and steps, refer to the Access Online: Managing Account Setup and Maintenance user guide and lesson.
©2010 U.S. Bancorp Agency/Organization Program Coordinator 42

Army A/OPC
Perform a Managing Account Maintenance Final Review As the A/OPC, you review and final-approve the managing account maintenance requests that the Resource Manager makes to the managing account's default accounting code, authorization limits (e.g., credit limits), and extract information (e.g., EDI 810/821 routers).
After the Resource Manager updates the managing account, the Resource Manager submits the request. The request displays in your active work queue. After you access and review the request, you either approve or reject the request. If you approve the request, the change becomes effective immediately. The request stays in the request status queue for two weeks with a Completed status. After two weeks, the request stays archived in the system and you can access information about the request by running the Request Status Queue report.
If you reject the request, you specify a reject reason and the request returns to the Resource Manager's active work queue. The Resource Manager accesses the rejected requests, fixes the request, and then resubmits the request to you for final review and approval.
1
2
To perform a final review on a managing account maintenance request:
1. Select the Active Work Queue high-level task from the Left-Column Navigation Bar.
2. Click the link for the managing account maintenance request that you want to review.
©2010 U.S. Bancorp Agency/Organization Program Coordinator 43

Army A/OPC
Click the Reject button to return the request to the A/OPC’s or Resource Manager’s active work queue.
Be sure to review any comments.
3. Review the current value (on the left) and the new value (on the right) and select an approval option:
a. To approve, click the Approve & Submit button. A confirmation message displays and the approved managing account maintenance request moves to the request status queue.
–Or–
b. To reject, click the Reject button. The maintenance request returns to the active work queue of the A/OPC or Resource Manager who initiated the request.
©2010 U.S. Bancorp Agency/Organization Program Coordinator 44
Army A/OPC
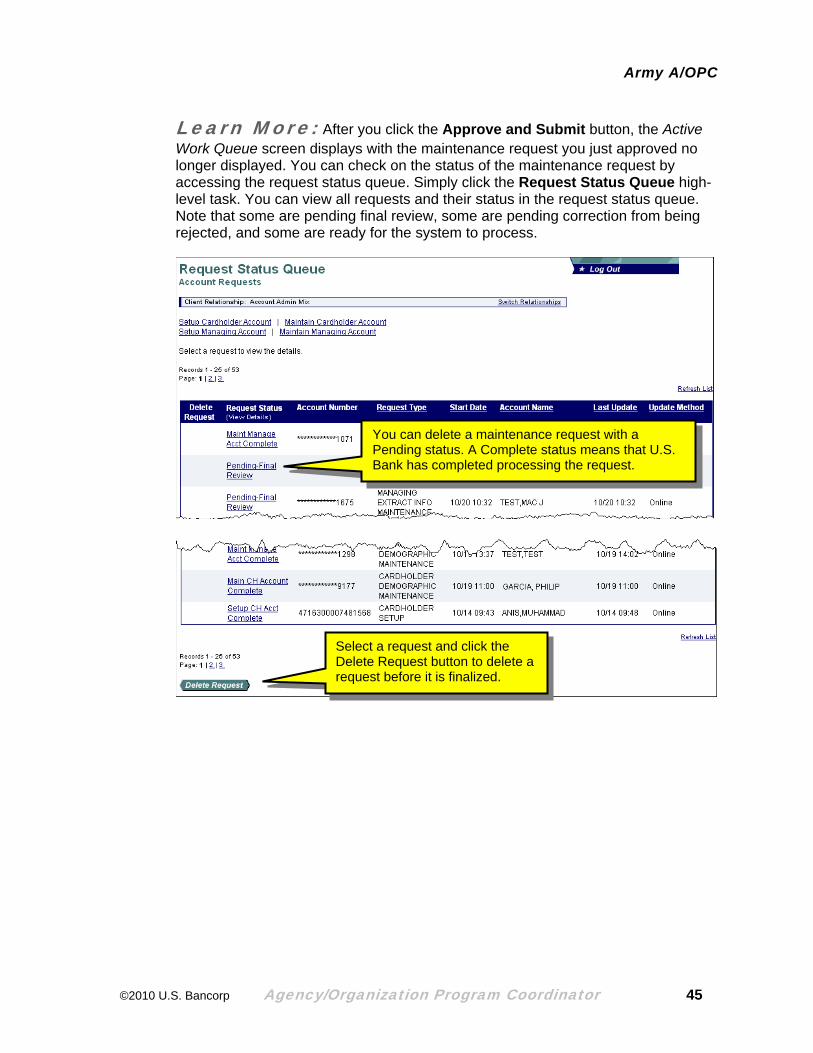
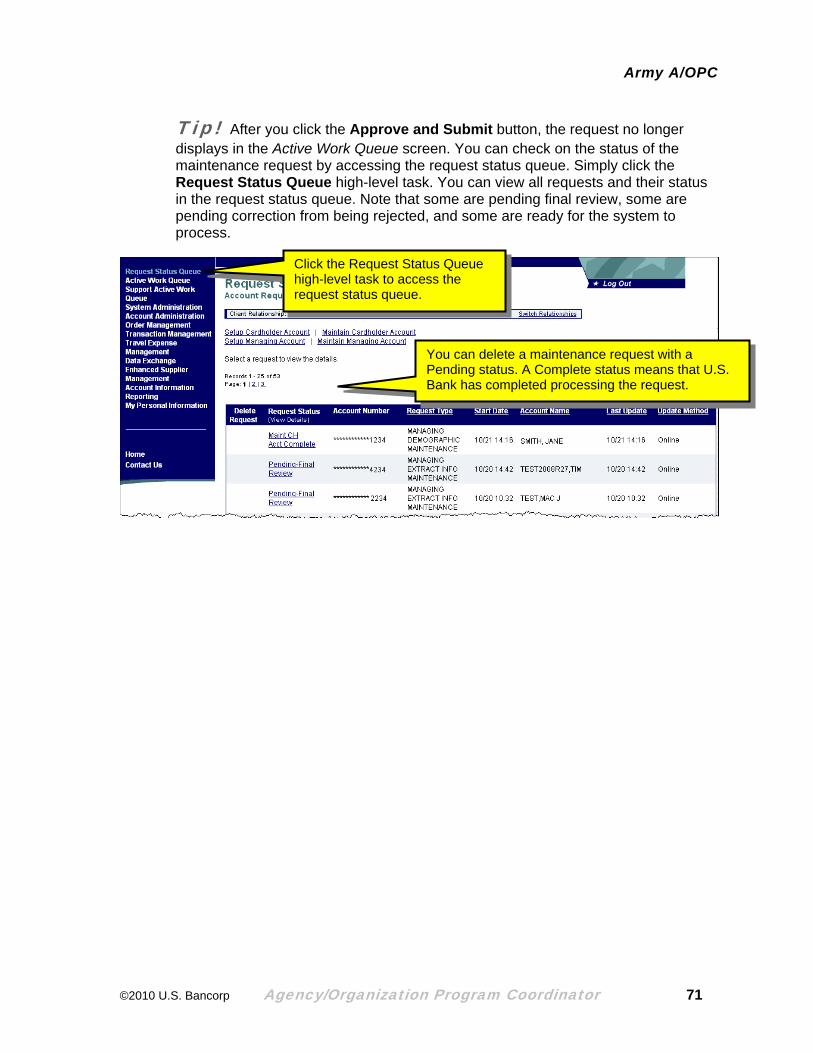
Learn More: After you click the Approve and Submit button, the Active Work Queue screen displays with the maintenance request you just approved no longer displayed. You can check on the status of the maintenance request by accessing the request status queue. Simply click the Request Status Queue high-level task. You can view all requests and their status in the request status queue. Note that some are pending final review, some are pending correction from being rejected, and some are ready for the system to process.
You can delete a maintenance request with a Pending status. A Complete status means that U.S. Bank has completed processing the request.
Select a request and click the Delete Request button to delete a request before it is finalized.
©2010 U.S. Bancorp Agency/Organization Program Coordinator 45

Army A/OPC
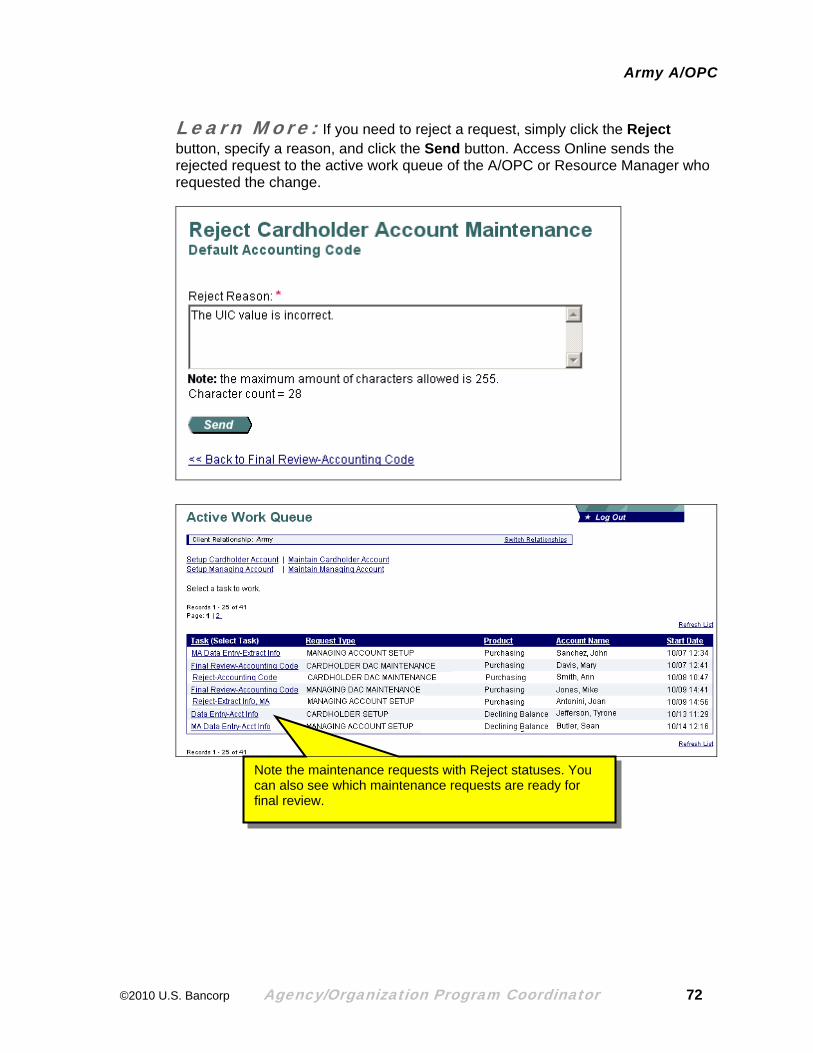
Learn More: If you need to reject maintenance request, simply click the Reject button, specify a reason, and click the Send button. Access Online sends the rejected request to the active work queue of the A/OPC or Resource Manager who requested the change.
Note the maintenance requests with Reject statuses. Click the link, review the reject reason, make any necessary changes to the request, and resubmit for final approval. You can also see which maintenance requests are ready for final review.
©2010 U.S. Bancorp Agency/Organization Program Coordinator 46
Army A/OPC
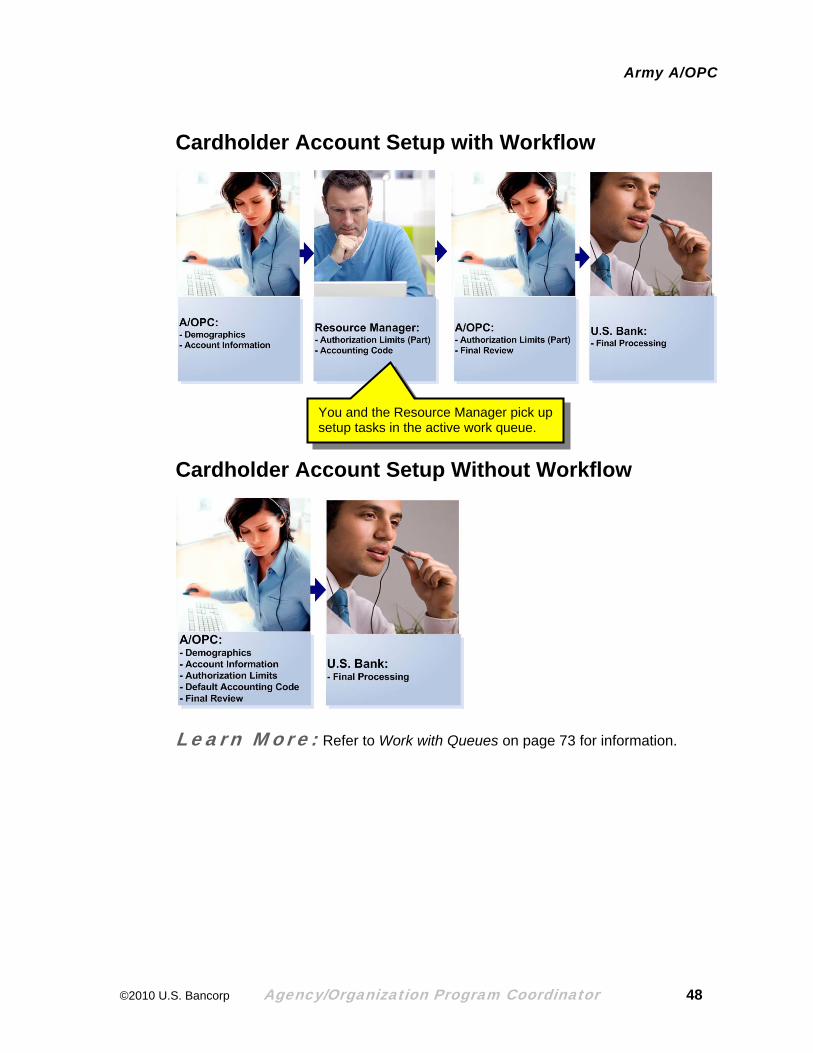
Set Up a Cardholder Account You can easily set up new cardholder accounts and modify existing cardholder accounts. The setup procedure requires you to enter data about the cardholder on four screens that contain the following account information:
• Demographics
• Account information
• Default accounting code
• Authorization limits
Depending on how your program is set up, you may also use the workflow and final review functions. The workflow function enables different users to set up different portions of the cardholder account. The final review function enables a designated A/OPC to review and approve the completed setup before submitting it to U.S. Bank for processing. Below are two sample scenarios: one with workflow and one without.
©2010 U.S. Bancorp Agency/Organization Program Coordinator 47
Army A/OPC
Cardholder Account Setup with Workflow
You and the Resource Manager pick up setup tasks in the active work queue.
Cardholder Account Setup Without Workflow
Learn More: Refer to Work with Queues on page 73 for information.
©2010 U.S. Bancorp Agency/Organization Program Coordinator 48

Army A/OPC
Set Up a New Cardholder Account
1 2
To set up a new cardholder account:
1. Select the Account Administration high-level task.
2. Click the Create New Cardholder Account link.
©2010 U.S. Bancorp Agency/Organization Program Coordinator 49
Army A/OPC
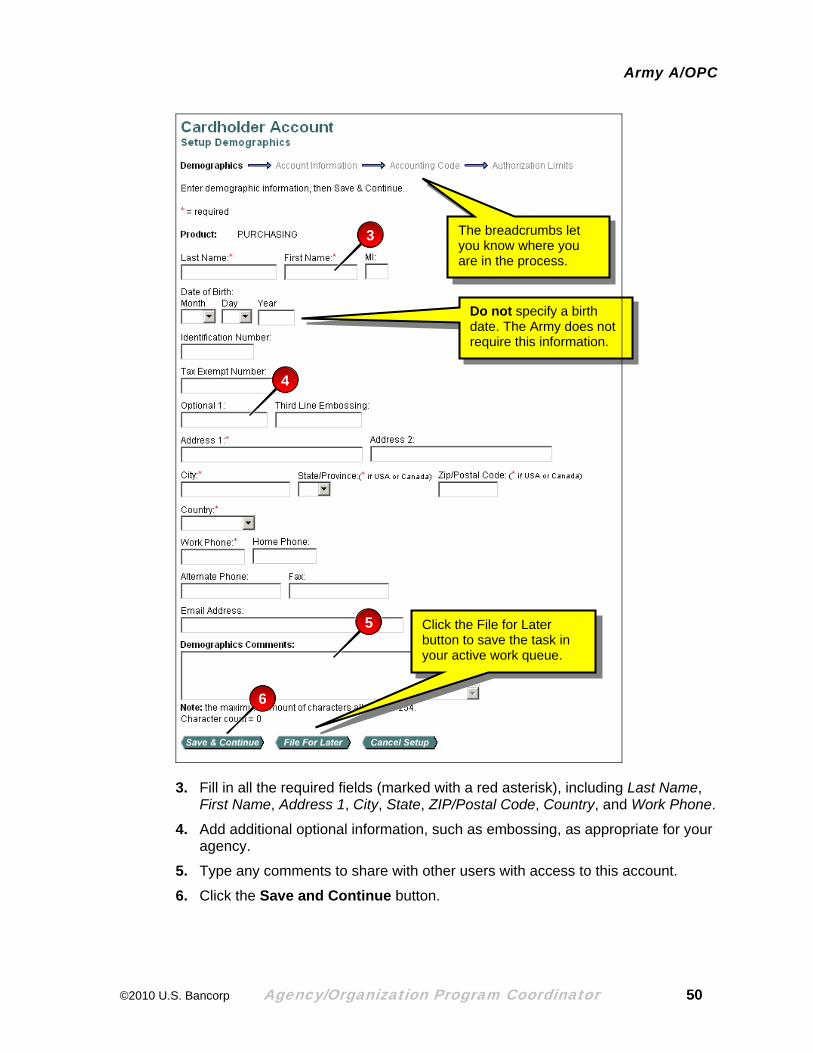
The breadcrumbs let you know where you are in the process.
3
Do not specify a birth date. The Army does not require this information.
4
5 Click the File for Later button to save the task in your active work queue.
6
3. Fill in all the required fields (marked with a red asterisk), including Last Name, First Name, Address 1, City, State, ZIP/Postal Code, Country, and Work Phone.
4. Add additional optional information, such as embossing, as appropriate for your agency.
5. Type any comments to share with other users with access to this account.
6. Click the Save and Continue button.
©2010 U.S. Bancorp Agency/Organization Program Coordinator 50
Army A/OPC
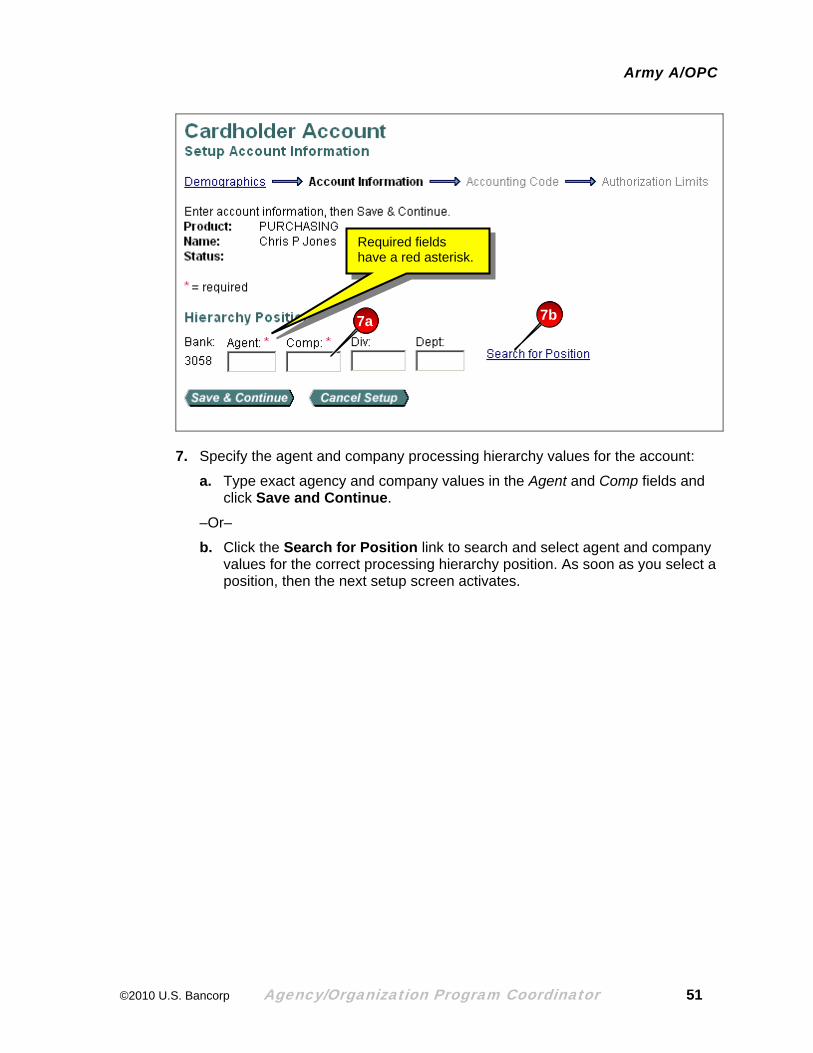
7a
Required fields have a red asterisk.
7b
7. Specify the agent and company processing hierarchy values for the account:
a. Type exact agency and company values in the Agent and Comp fields and click Save and Continue.
–Or–
b. Click the Search for Position link to search and select agent and company values for the correct processing hierarchy position. As soon as you select a position, then the next setup screen activates.
©2010 U.S. Bancorp Agency/Organization Program Coordinator 51

Army A/OPC
8
9
10
11
The only hierarchy positions you can select are the positions that your user ID is associated with.
8. Select card plastic options.
Tip! If you are setting up a convenience check account, then select No for plastic card and Yes for checks and set the dollar amount to the amount required, but not more than $3,000. For foreign drafts, select No for plastic and No for checks and contact your relationship management team when the setup is complete.
9. Specify a reporting hierarchy position for the cardholder account.
10. Specify any additional information, including temporary authorization dates. These dates let you set a time period during which the account is active (e.g., for two months at the end of the year), alternate address information, reporting hierarchy position, and/or comments.
11. Click the Save and Continue button. If you are using workflow, then the next screen you work on is the Authorization Limits screen. (The Resource Manager specifies the default accounting code and part of authorization limits.) Skip to Step 17. If you are not using the workflow function, then you will also need to specify the accounting code information.
©2010 U.S. Bancorp Agency/Organization Program Coordinator 52

Army A/OPC
13
14
15
If your organization uses workflow, then your resource manager specifies the default accounting code.
12
12. Type values or click a Magnifying Glass icon to search and select a valid value.
13. Specify search criteria in the Value, Description and/or Search Type fields.
14. Click the Search button.
15. Click the Select link for the value you want to use for that segment.
©2010 U.S. Bancorp Agency/Organization Program Coordinator 53

Army A/OPC
Tip! An error icon displays to let you know if you have specified a non-valid value.
16
16. When you are done, click the Save and Continue button.
©2010 U.S. Bancorp Agency/Organization Program Coordinator 54
Army A/OPC
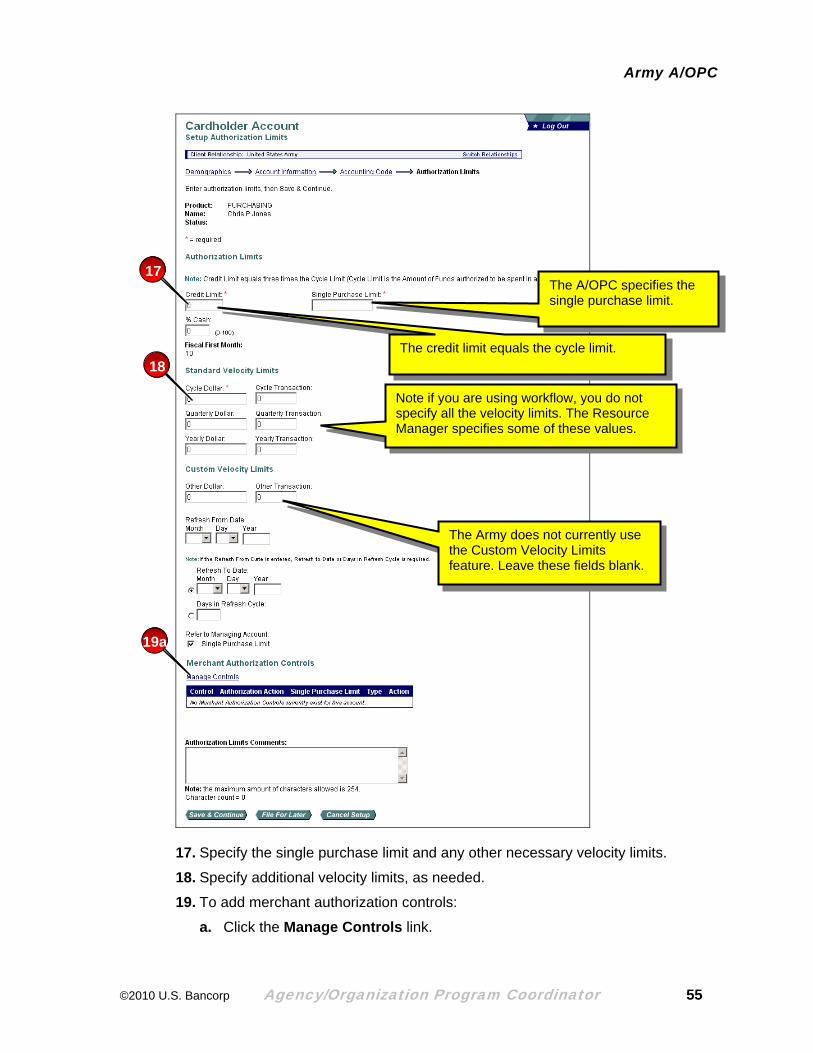
17
18
19a
The A/OPC specifies the single purchase limit.
The credit limit equals the cycle limit.
Note if you are using workflow, you do not specify all the velocity limits. The Resource Manager specifies some of these values.
The Army does not currently use the Custom Velocity Limits feature. Leave these fields blank.
17. Specify the single purchase limit and any other necessary velocity limits.
18. Specify additional velocity limits, as needed.
19. To add merchant authorization controls:
a. Click the Manage Controls link.
©2010 U.S. Bancorp Agency/Organization Program Coordinator 55
Army A/OPC
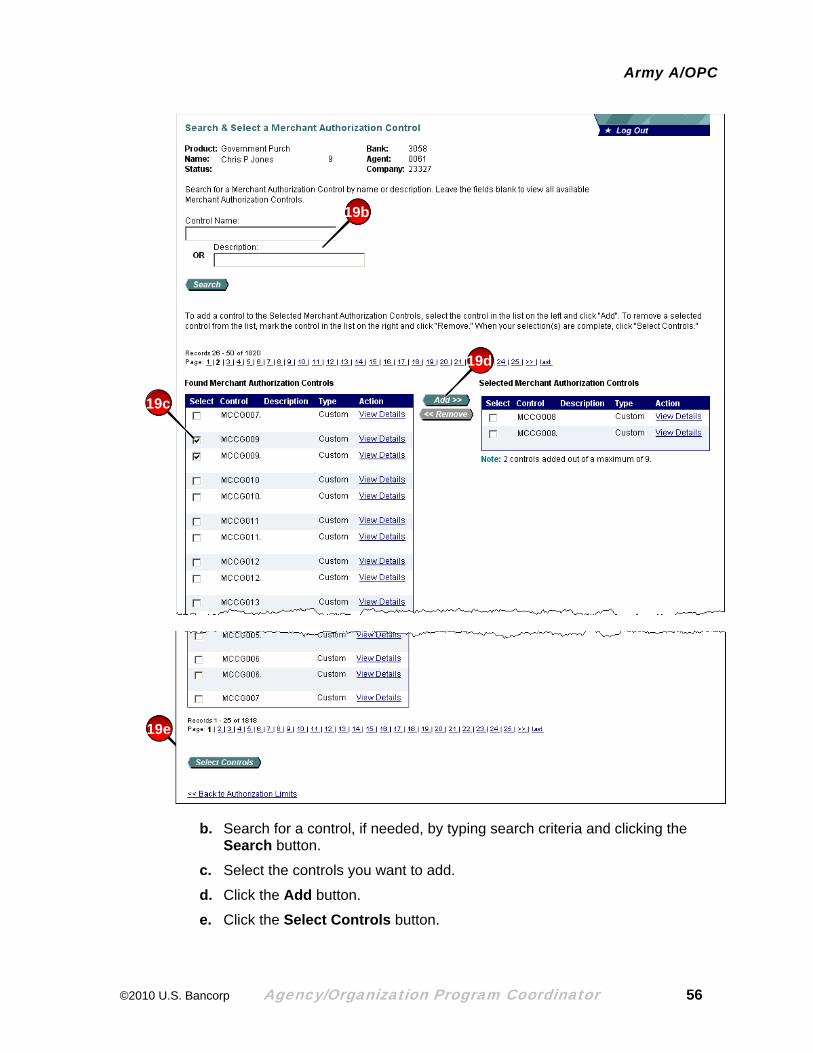
19e
19b
19d
19c
b. Search for a control, if needed, by typing search criteria and clicking the Search button.
c. Select the controls you want to add.
d. Click the Add button.
e. Click the Select Controls button.
©2010 U.S. Bancorp Agency/Organization Program Coordinator 56

Army A/OPC
Learn More: Click the View Details link to view the details of a control. Do not click the Maintain button to set limits since your organization does not set limits on the controls. You can also refer to the Access Online: Government Merchant Category Codes user guide for additional information.
©2010 U.S. Bancorp Agency/Organization Program Coordinator 57
Army A/OPC
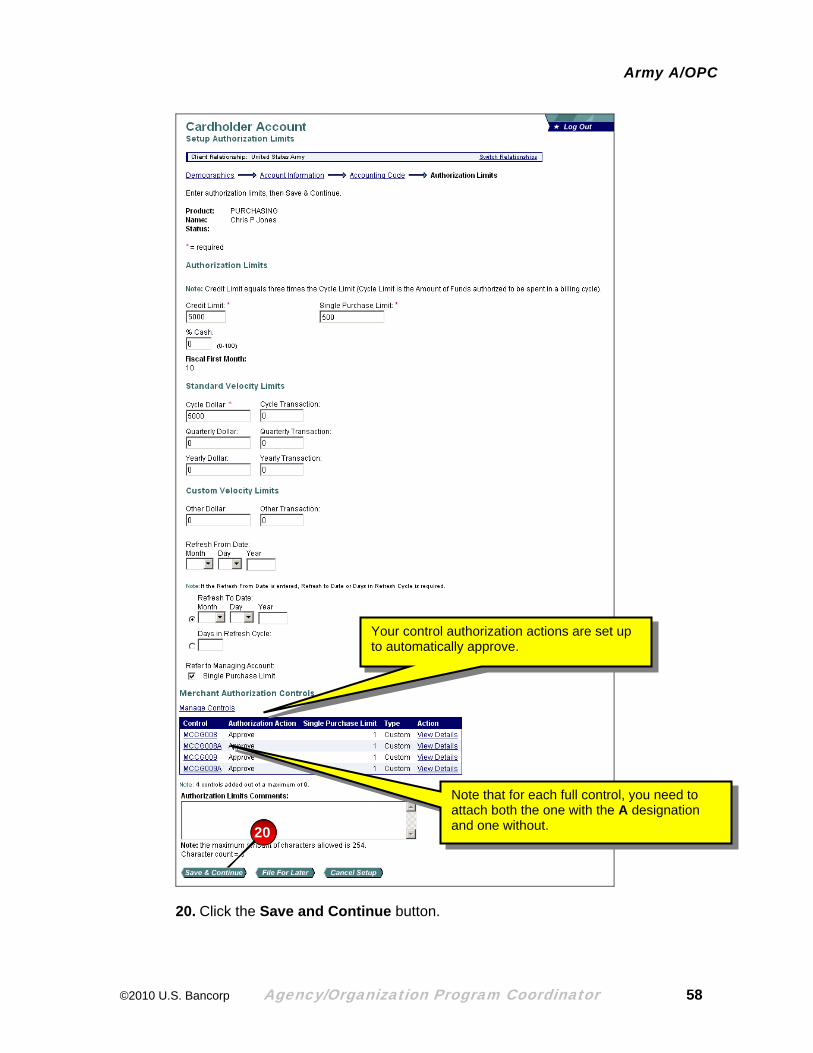
Your control authorization actions are set up to automatically approve.
20
Note that for each full control, you need to attach both the one with the A designation and one without.
20. Click the Save and Continue button.
©2010 U.S. Bancorp Agency/Organization Program Coordinator 58
Army A/OPC
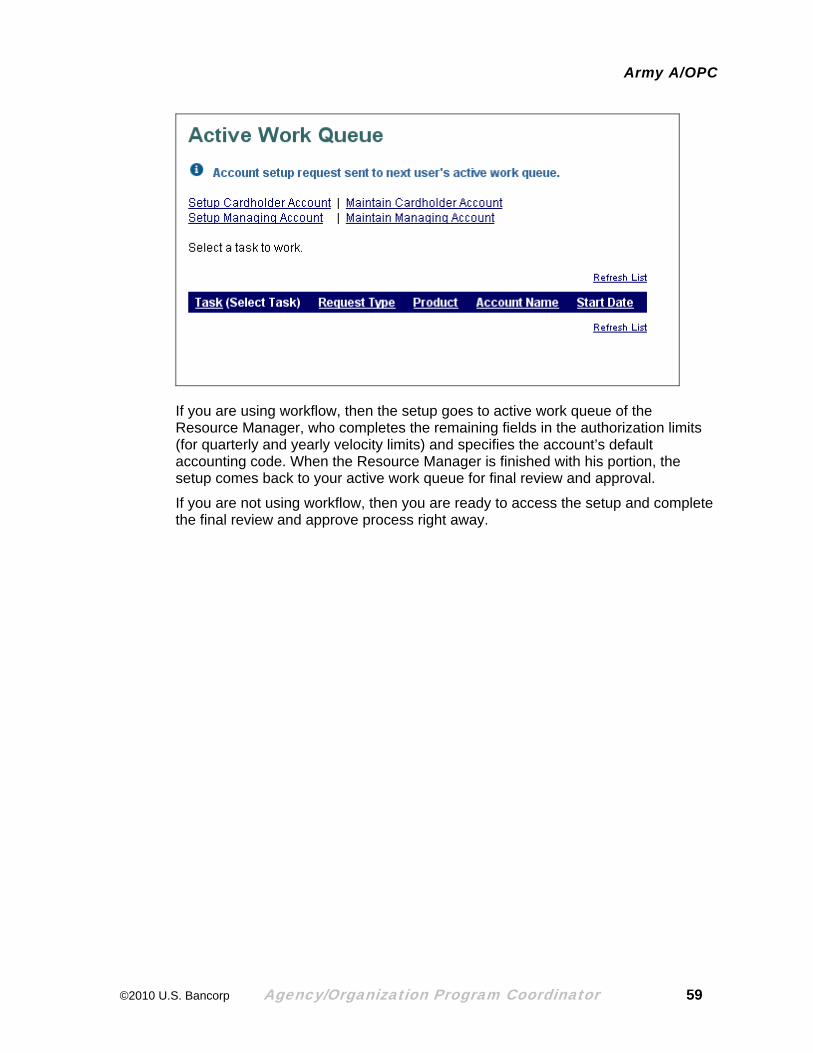
If you are using workflow, then the setup goes to active work queue of the Resource Manager, who completes the remaining fields in the authorization limits (for quarterly and yearly velocity limits) and specifies the account’s default accounting code. When the Resource Manager is finished with his portion, the setup comes back to your active work queue for final review and approval.
If you are not using workflow, then you are ready to access the setup and complete the final review and approve process right away.
©2010 U.S. Bancorp Agency/Organization Program Coordinator 59
Army A/OPC
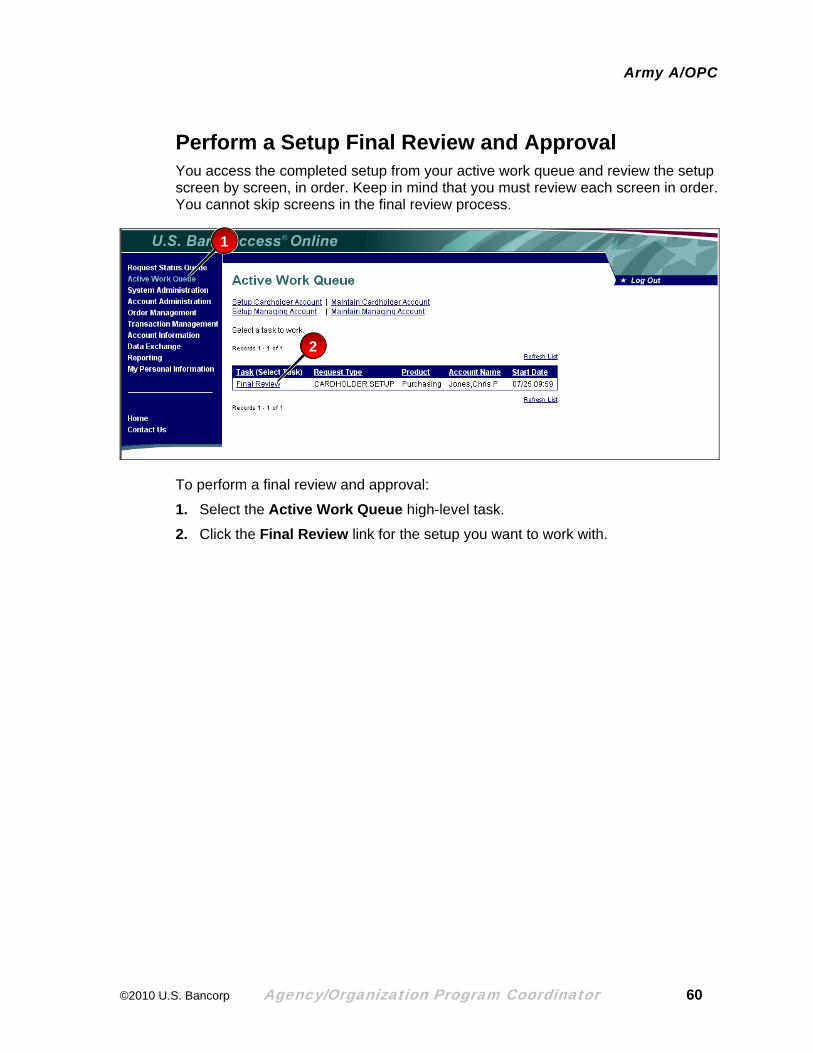
Perform a Setup Final Review and Approval You access the completed setup from your active work queue and review the setup screen by screen, in order. Keep in mind that you must review each screen in order. You cannot skip screens in the final review process.
1
2
To perform a final review and approval:
1. Select the Active Work Queue high-level task.
2. Click the Final Review link for the setup you want to work with.
©2010 U.S. Bancorp Agency/Organization Program Coordinator 60
Army A/OPC
Click to reject a screen and send the setup back to the initiator to fix.
3
4
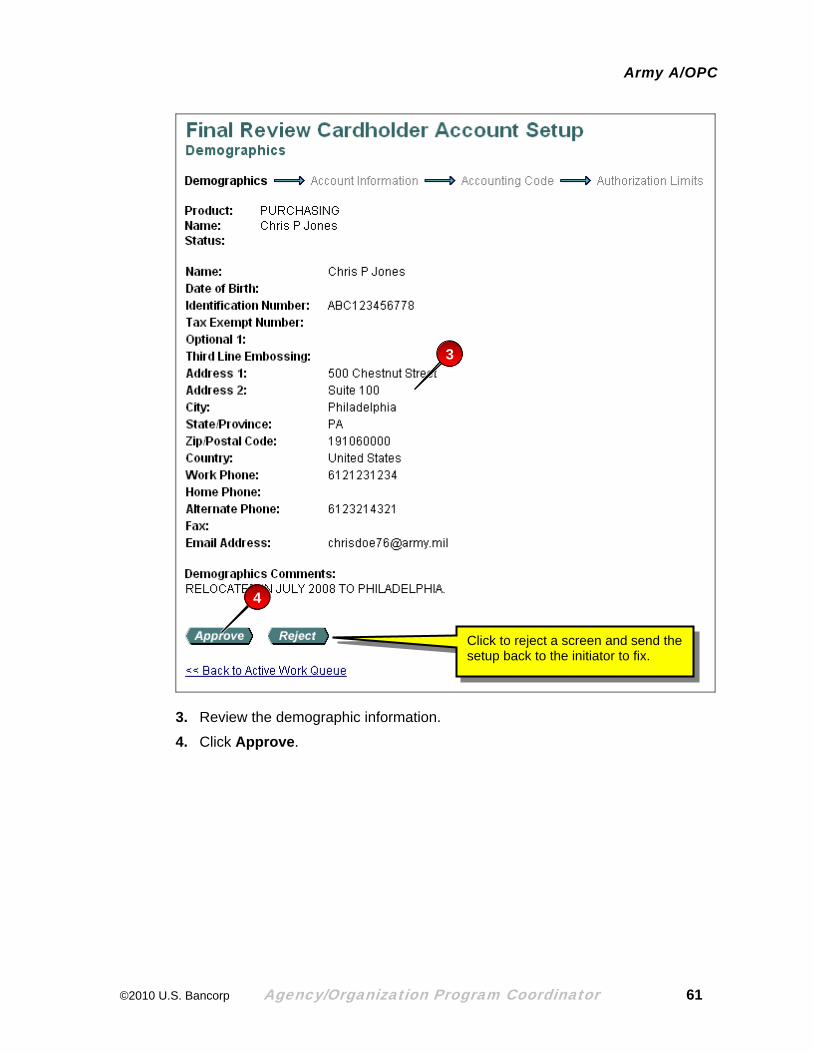
3. Review the demographic information.
4. Click Approve.
©2010 U.S. Bancorp Agency/Organization Program Coordinator 61

Army A/OPC
5
6
5. Review the account information.
6. Click Approve.
©2010 U.S. Bancorp Agency/Organization Program Coordinator 62
Army A/OPC
7
8
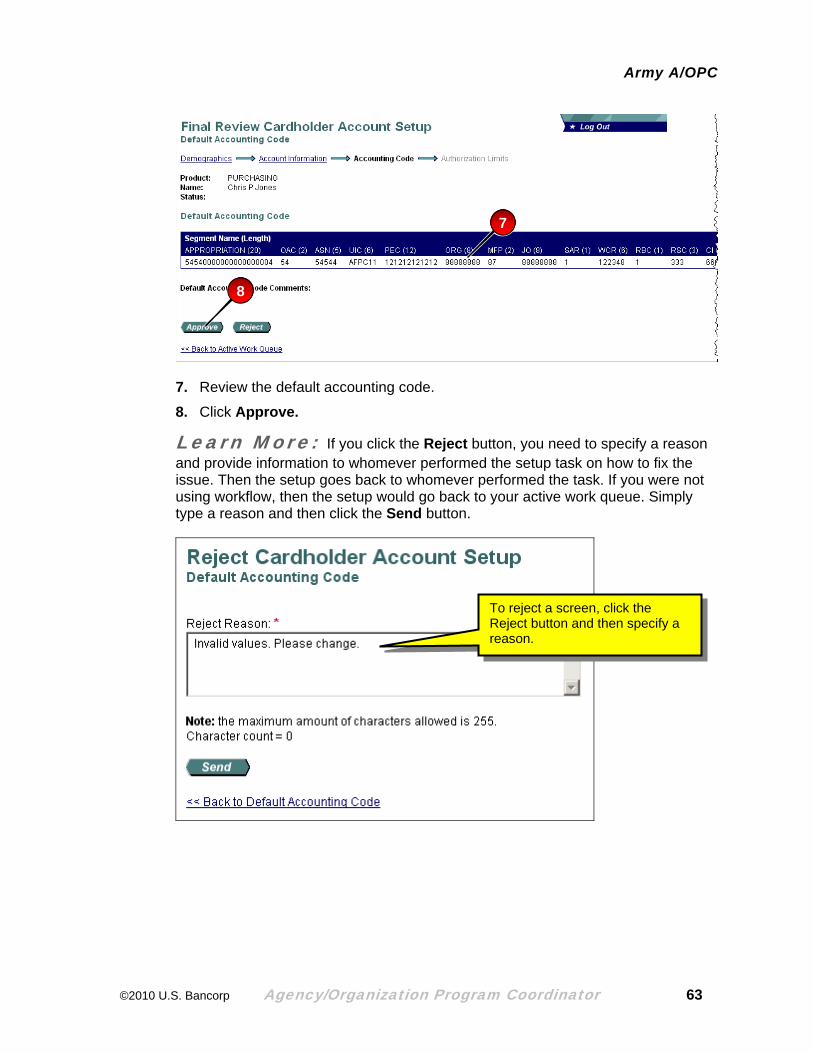
7. Review the default accounting code.
8. Click Approve.
Learn More: If you click the Reject button, you need to specify a reason and provide information to whomever performed the setup task on how to fix the issue. Then the setup goes back to whomever performed the task. If you were not using workflow, then the setup would go back to your active work queue. Simply type a reason and then click the Send button.
To reject a screen, click the Reject button and then specify a reason.
©2010 U.S. Bancorp Agency/Organization Program Coordinator 63

Army A/OPC
9
10
9. Review the authorization limits, velocity limits, and merchant authorization controls, to ensure that they are consistent with your organization’s policies.
10. Click the Approve and Submit button. The account setup comes to U.S. Bank for final processing.
©2010 U.S. Bancorp Agency/Organization Program Coordinator 64

Army A/OPC
Tip! You can see the setup in your request status queue. Pending requests are waiting for U.S. Bank to complete.
©2010 U.S. Bancorp Agency/Organization Program Coordinator 65
Army A/OPC
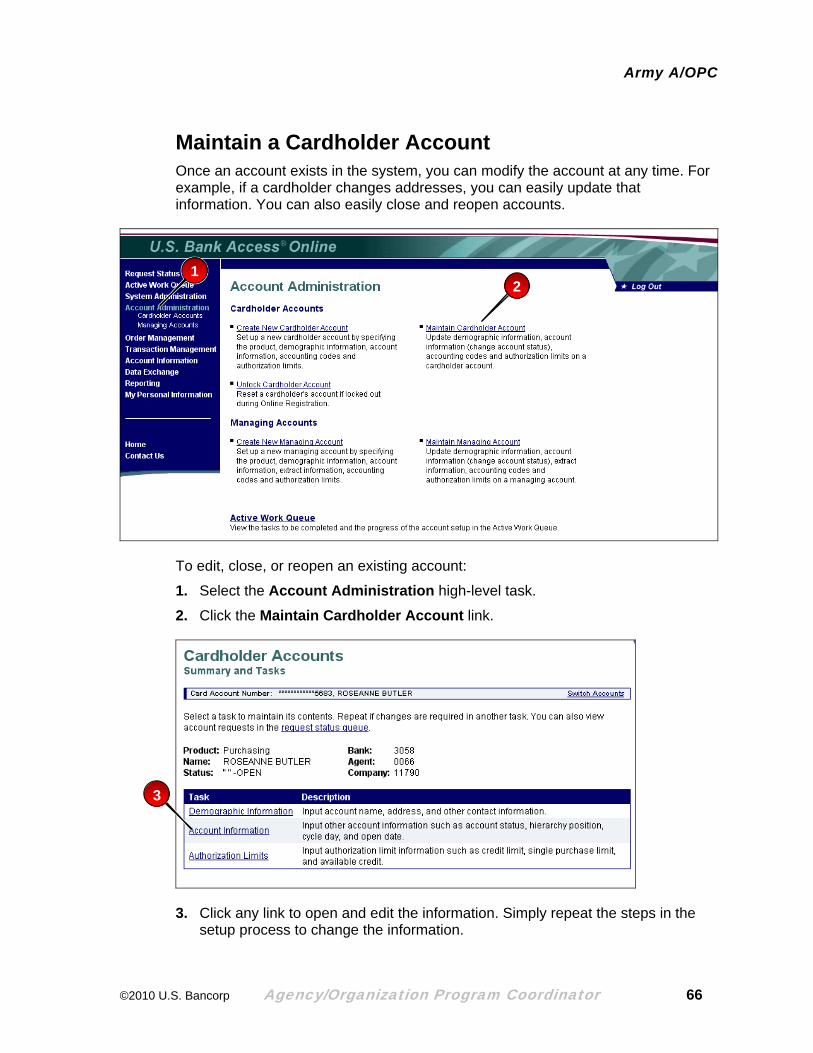
Maintain a Cardholder Account Once an account exists in the system, you can modify the account at any time. For example, if a cardholder changes addresses, you can easily update that information. You can also easily close and reopen accounts.
1 2
To edit, close, or reopen an existing account:
1. Select the Account Administration high-level task.
2. Click the Maintain Cardholder Account link.
3
3. Click any link to open and edit the information. Simply repeat the steps in the setup process to change the information.
©2010 U.S. Bancorp Agency/Organization Program Coordinator 66

Army A/OPC
Close or Reopen an Account
1
To close or reopen an account:
1. Click the Account Information link.
2a2b
2. Specify whether to open or close the account:
a. To close the account, select a V9-TEMP CLOSED option from the Account Status drop-down list.
Tip! You cannot reactivate a permanently closed (T9) account. For detailed information on the status options, refer to the Access Online: Government Glossary user guide.
b. To reopen a terminated account, select the OPEN option.
©2010 U.S. Bancorp Agency/Organization Program Coordinator 67
Army A/OPC
3
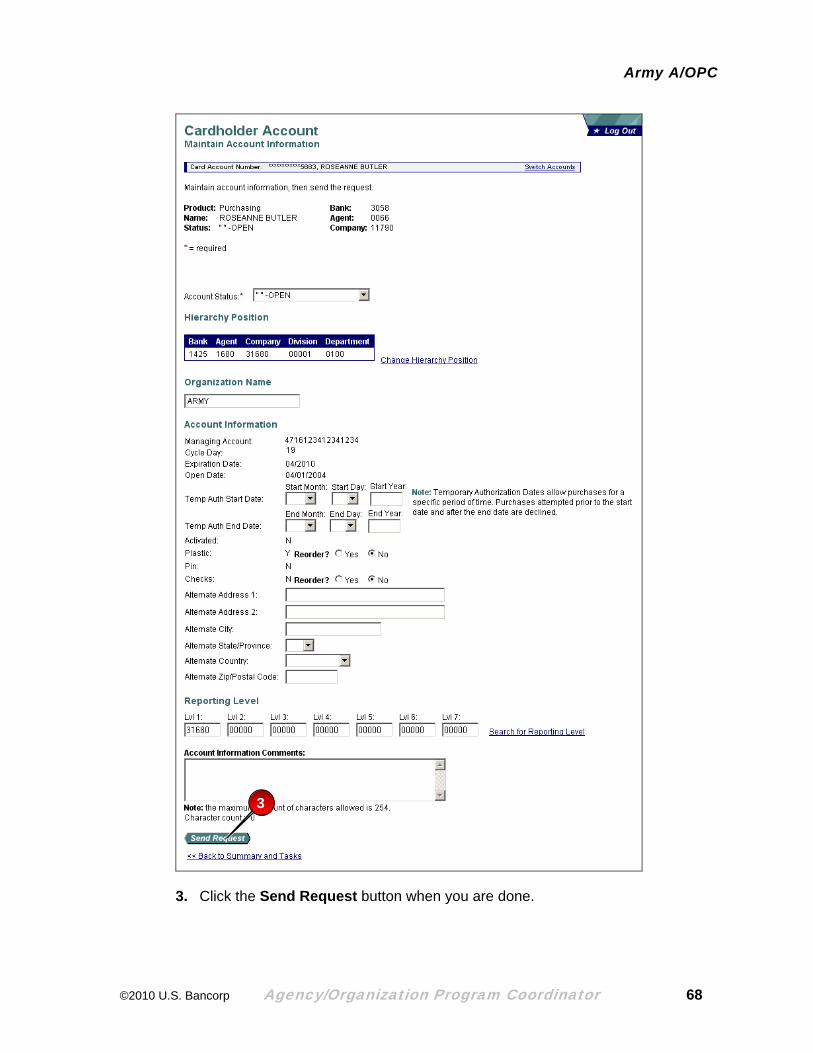
3. Click the Send Request button when you are done.
©2010 U.S. Bancorp Agency/Organization Program Coordinator 68
Army A/OPC
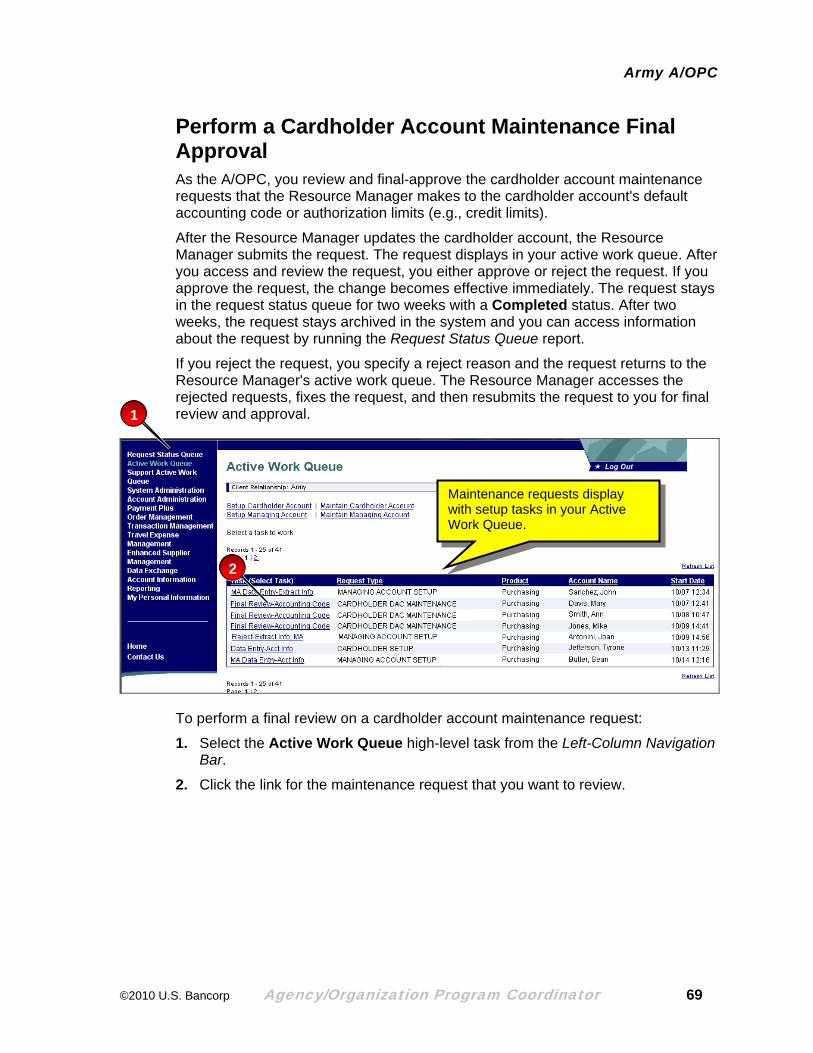
Perform a Cardholder Account Maintenance Final Approval As the A/OPC, you review and final-approve the cardholder account maintenance requests that the Resource Manager makes to the cardholder account's default accounting code or authorization limits (e.g., credit limits).
After the Resource Manager updates the cardholder account, the Resource Manager submits the request. The request displays in your active work queue. After you access and review the request, you either approve or reject the request. If you approve the request, the change becomes effective immediately. The request stays in the request status queue for two weeks with a Completed status. After two weeks, the request stays archived in the system and you can access information about the request by running the Request Status Queue report.
If you reject the request, you specify a reject reason and the request returns to the Resource Manager's active work queue. The Resource Manager accesses the rejected requests, fixes the request, and then resubmits the request to you for final review and approval.
1
Maintenance requests display with setup tasks in your Active Work Queue.
2
To perform a final review on a cardholder account maintenance request:
1. Select the Active Work Queue high-level task from the Left-Column Navigation Bar.
2. Click the link for the maintenance request that you want to review.
©2010 U.S. Bancorp Agency/Organization Program Coordinator 69
Army A/OPC
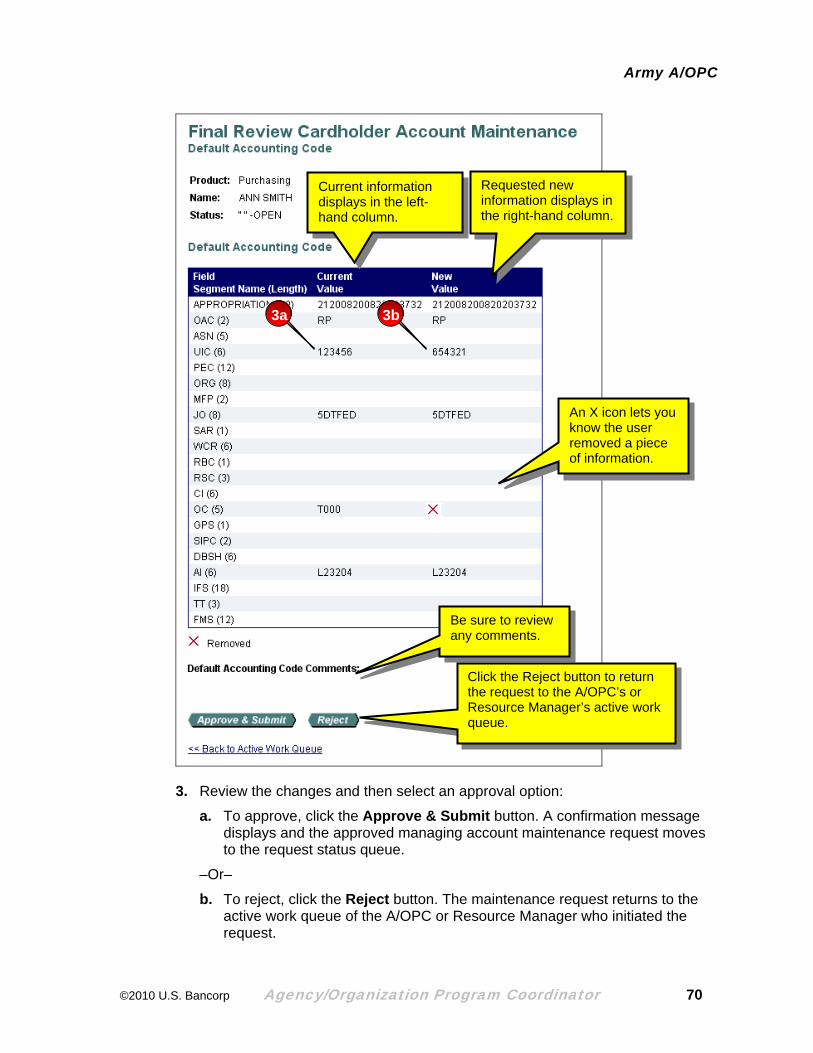
Click the Reject button to return the request to the A/OPC’s or Resource Manager’s active work queue.
Be sure to review any comments.
Requested new information displays in the right-hand column.
Current information displays in the left-hand column.
3a 3b
An X icon lets you know the user removed a piece of information.
3. Review the changes and then select an approval option:
a. To approve, click the Approve & Submit button. A confirmation message displays and the approved managing account maintenance request moves to the request status queue.
–Or–
b. To reject, click the Reject button. The maintenance request returns to the active work queue of the A/OPC or Resource Manager who initiated the request.
©2010 U.S. Bancorp Agency/Organization Program Coordinator 70
Army A/OPC
Tip! After you click the Approve and Submit button, the request no longer displays in the Active Work Queue screen. You can check on the status of the maintenance request by accessing the request status queue. Simply click the Request Status Queue high-level task. You can view all requests and their status in the request status queue. Note that some are pending final review, some are pending correction from being rejected, and some are ready for the system to process.
Click the Request Status Queue high-level task to access the request status queue.
You can delete a maintenance request with a Pending status. A Complete status means that U.S. Bank has completed processing the request.
©2010 U.S. Bancorp Agency/Organization Program Coordinator 71
Army A/OPC
Learn More: If you need to reject a request, simply click the Reject button, specify a reason, and click the Send button. Access Online sends the rejected request to the active work queue of the A/OPC or Resource Manager who requested the change.
Note the maintenance requests with Reject statuses. You can also see which maintenance requests are ready for final review.
©2010 U.S. Bancorp Agency/Organization Program Coordinator 72

Army A/OPC
Work with Queues Your active work queue lists tasks that have been passed to you to work on via the workflow process or that you have selected to file for later. Before you begin any setup work, we recommend that you check your active work queue to take care of tasks that are waiting for you to complete.
Your active work queue has tasks you selected to save and work on later, as well as tasks that other users have sent to you.
Click a task to open and work on the task.
Simply click on a task to access the task and complete your work.
Once you final-approve the managing account setup, the setup comes to us for final processing. You can see which setups you have sent to us by accessing your request status queue.
The request status queue has tasks you have sent to us. A Pending status means that we are working on your request.
Simply click a link to review the detail.
©2010 U.S. Bancorp Agency/Organization Program Coordinator 73

Army A/OPC
View an Account Profile You can easily view a cardholder or managing account profile. The account profile reflects the information you and/or your Resource Manager specified during the account’s setup. Your cardholders can view their own account profiles, as well as the profile of any other account they have access to. In our example, we will cover viewing a cardholder account profile. The steps for viewing a managing account profile are the same.
1
2
To view an account profile:
1. Select the Account Information high-level task.
2. Click the Cardholder Account Profile link.
3
3. Search and select an account, if needed, and then click a link (e.g., Demographic Information, Account Information) to view the information on that aspect of the account.
©2010 U.S. Bancorp Agency/Organization Program Coordinator 74
Army A/OPC
4
Any comments you or another user type during setup display here.
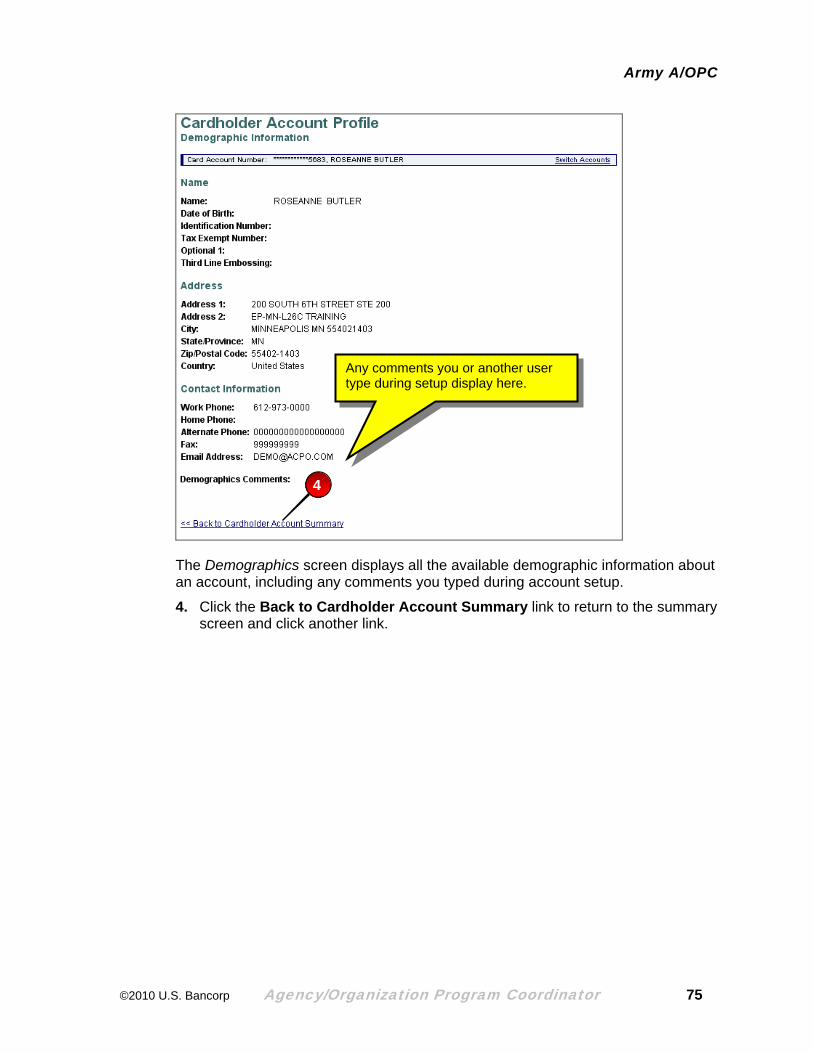
The Demographics screen displays all the available demographic information about an account, including any comments you typed during account setup.
4. Click the Back to Cardholder Account Summary link to return to the summary screen and click another link.
©2010 U.S. Bancorp Agency/Organization Program Coordinator 75
Army A/OPC
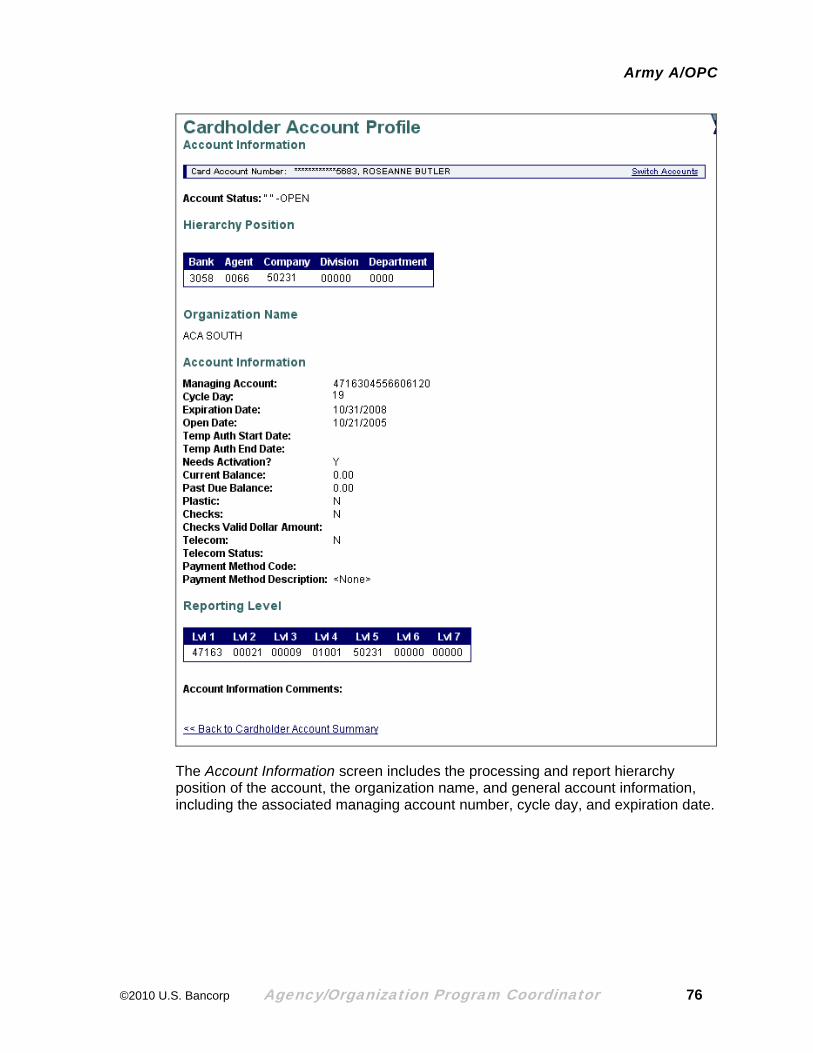
The Account Information screen includes the processing and report hierarchy position of the account, the organization name, and general account information, including the associated managing account number, cycle day, and expiration date.
©2010 U.S. Bancorp Agency/Organization Program Coordinator 76

Army A/OPC
The Default Accounting Code screen displays the account’s default accounting code.
©2010 U.S. Bancorp Agency/Organization Program Coordinator 77
Army A/OPC
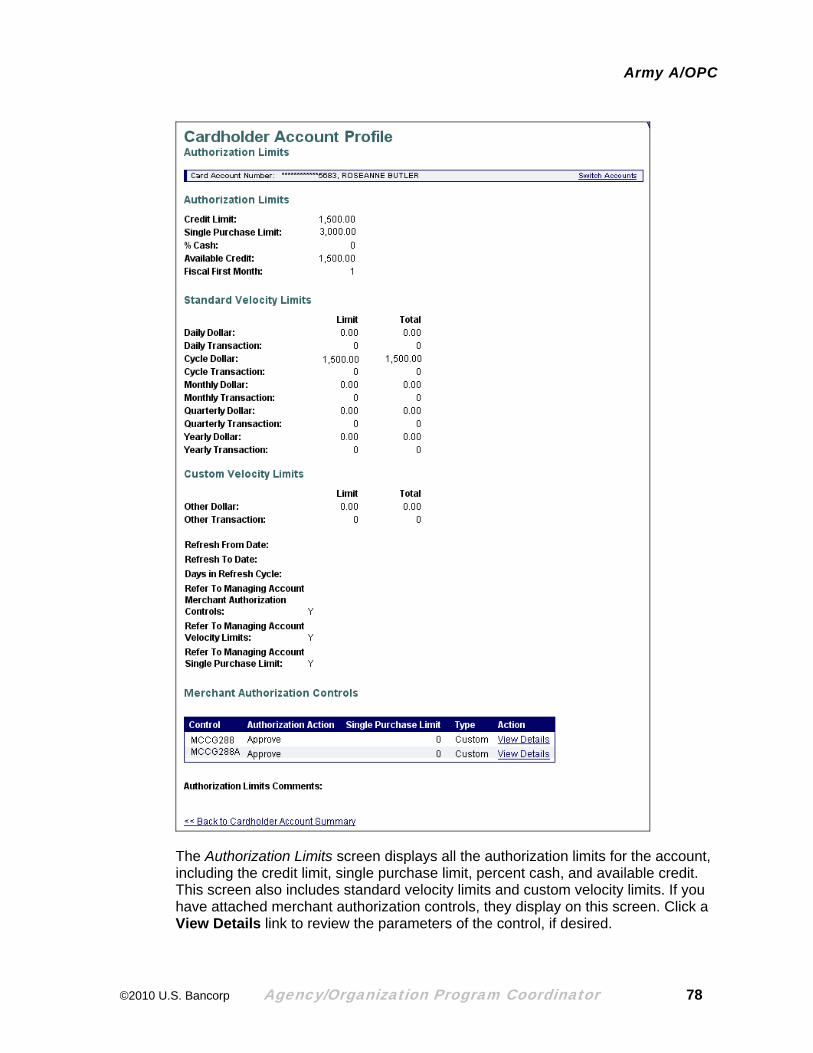
The Authorization Limits screen displays all the authorization limits for the account, including the credit limit, single purchase limit, percent cash, and available credit. This screen also includes standard velocity limits and custom velocity limits. If you have attached merchant authorization controls, they display on this screen. Click a View Details link to review the parameters of the control, if desired.
©2010 U.S. Bancorp Agency/Organization Program Coordinator 78

Army A/OPC
The Account Authorizations screen lets you view transaction authorization information, flagged as approved or declined. The table also includes the request date, request type, transaction amount, MCC, and MCC description. Click a link in the Auth Time column to view additional detail.
Declines display in Access Online in nearly real time.
The detail screen displays a series of six tabs that provide details about the authorization. This information can help you assess and analyze the reasons for authorizations and declines on an account. Select each tab to view the associated detail.
Learn More: For additional information on account profiles, including descriptions of each field available on each screen, refer to the Access Online: Account Profiles user guide and lesson.
©2010 U.S. Bancorp Agency/Organization Program Coordinator 79

Army A/OPC
The 12 Month History tab contains financial history data for the past 12 months.
The Financial History screen displays information about the history of the account, including 12-month history, seven-year historical analysis, and seven-year history.
©2010 U.S. Bancorp Agency/Organization Program Coordinator 80

Army A/OPC
The 7 Year History Analysis tab lists the number of times listed events occurred during each year (grouped by month).
The 7 Year History tab provides a yes/no indication of the listed events by month/year.
Tip! If you are viewing a managing account, then you can also view the extract information.
©2010 U.S. Bancorp Agency/Organization Program Coordinator 81
Army A/OPC
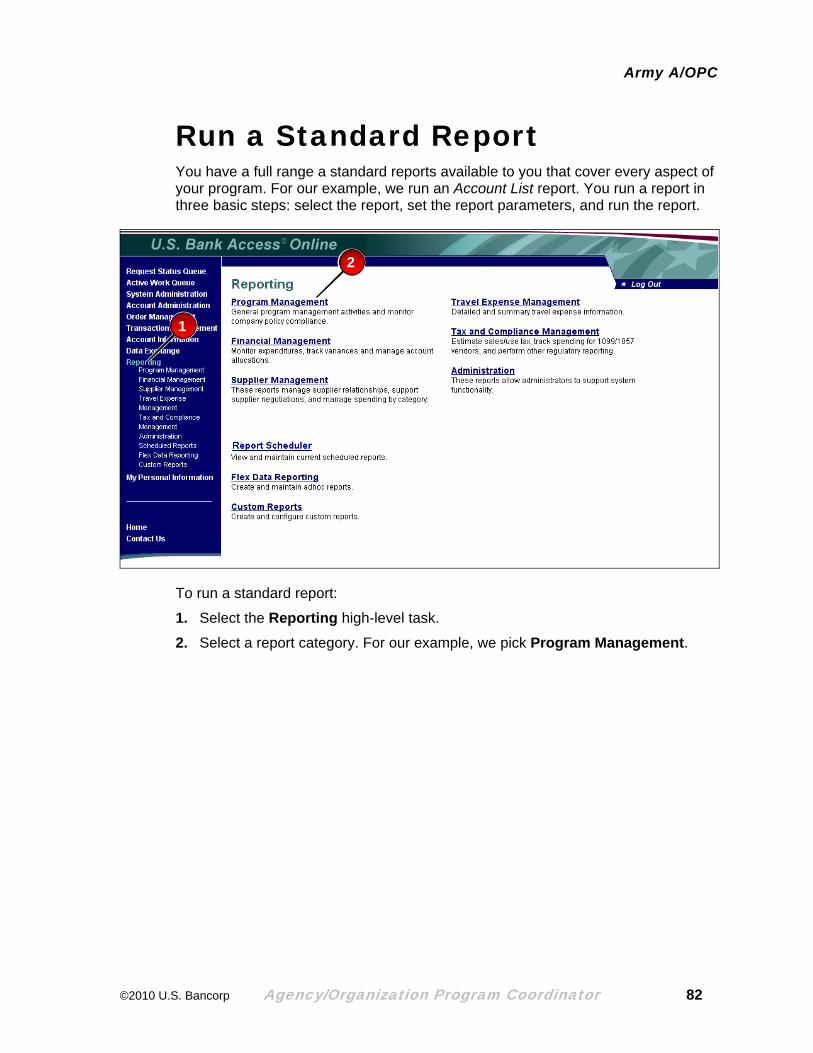
Run a Standard Report You have a full range a standard reports available to you that cover every aspect of your program. For our example, we run an Account List report. You run a report in three basic steps: select the report, set the report parameters, and run the report.
2
1
To run a standard report:
1. Select the Reporting high-level task.
2. Select a report category. For our example, we pick Program Management.
©2010 U.S. Bancorp Agency/Organization Program Coordinator 82
Army A/OPC
3
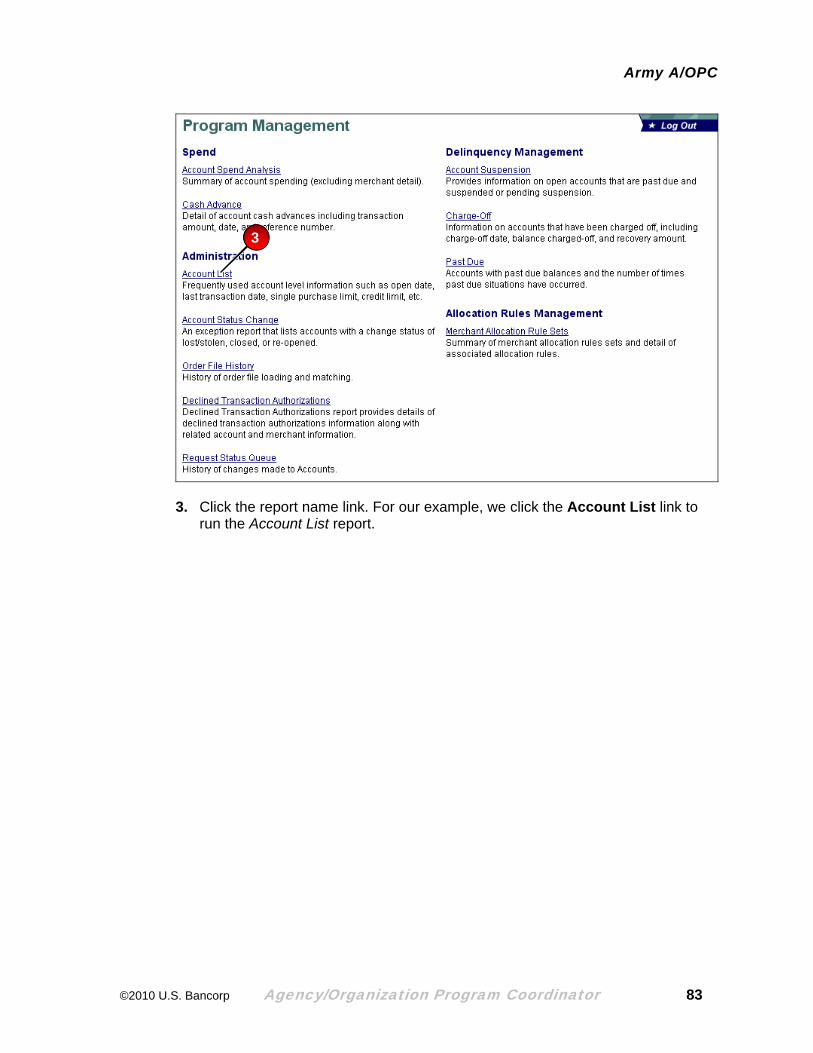
3. Click the report name link. For our example, we click the Account List link to run the Account List report.
©2010 U.S. Bancorp Agency/Organization Program Coordinator 83

Army A/OPC
4
5
6
7
8
9a 9b
10
For this report, you can select the method of setup or maintenance from the Method scroll box.
4. Specify a date range.
5. Specify account information (which accounts to include in your report), including setup method, if desired.
6. Select which additional detail to include in your report.
7. Specify how you want to sort the report information by selecting a field and then selecting to sort the data in that field in ascending or descending order.
8. Select the report’s output.
9. Specify how to group the report data:
a. Select a radio button.
b. Type the value or click the Search for Position or Add Multiple link.
©2010 U.S. Bancorp Agency/Organization Program Coordinator 84

Army A/OPC
9c
9d
9f 9e
9g
c. Specify search criteria.
d. Click the Search button.
e. Select the check boxes for the positions to include.
f. Click the Select Position button.
g. Click the Accept Hierarchy button.
10. When you are done, click the Run Report button.
©2010 U.S. Bancorp Agency/Organization Program Coordinator 85
Army A/OPC
©2010 U.S. Bancorp Agency/Organization Program Coordinator 86

Army A/OPC
Learn More: The parameters that you need to set for your report depend on which report you are running. For another example, you can see the more complex parameters for a Transaction Detail report. For information on each possible parameter, refer to the Access Online: Running Standard Reports user guide. To review a description and sample of each standard report, refer to the Access Online: Standard Report Samples user guide.
©2010 U.S. Bancorp Agency/Organization Program Coordinator 87

Army A/OPC
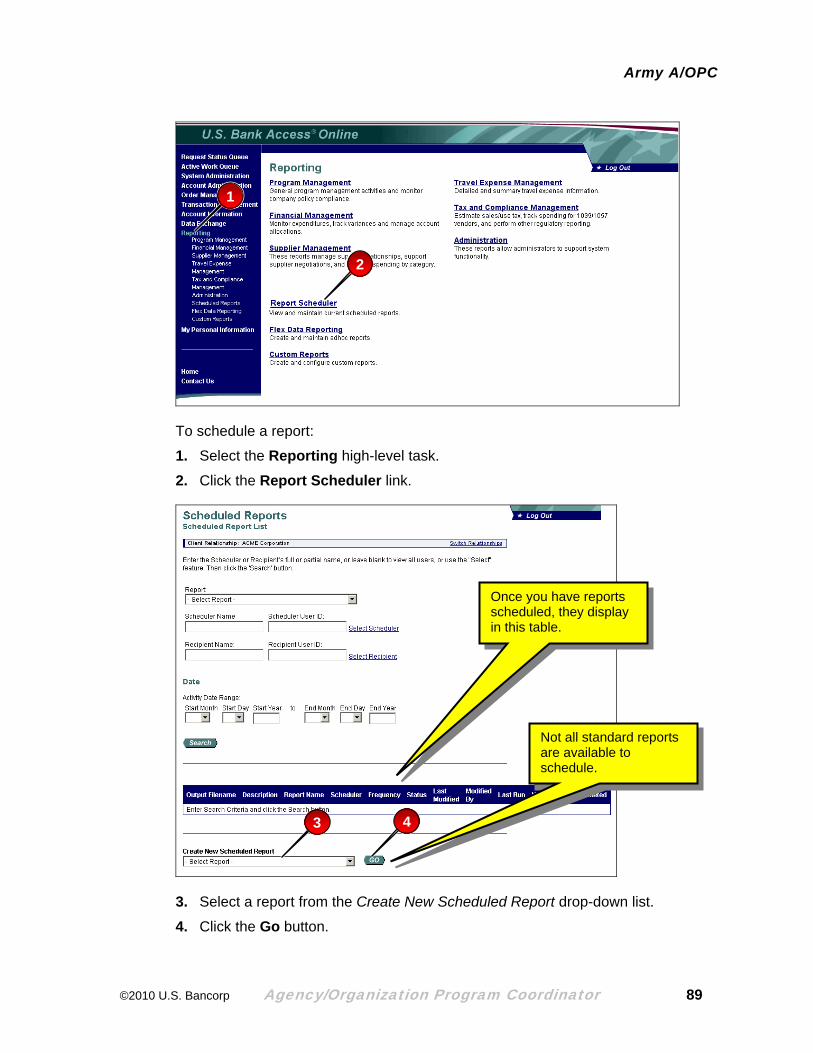
Schedule a Standard Report Scheduling a report is simple and quick. After you access the scheduled reports function, you simply select a report to schedule, specify the report’s parameters (e.g., date range, sorting, filtering, grouping, etc.), and then specify the scheduling parameters (e.g., report description, schedule, and recipients). Then, once you save the report, Access Online automatically runs the report on your scheduled day and sends the report to your designated recipients’ Data Exchange mail boxes.
Keep in mind the difference between the report date range and the scheduled date range.
• Report date range—The report date range sets a time period filter to control which data the scheduled report includes when the report runs in the future (e.g., include a week’s worth of data, include a month’s worth of data).
• Schedule date range—The schedule date range establishes a future time period during which your report will run automatically.
The illustration shows how a report date range and schedule date range work together.
©2010 U.S. Bancorp Agency/Organization Program Coordinator 88
Army A/OPC
1
2
To schedule a report:
1. Select the Reporting high-level task.
2. Click the Report Scheduler link.
43
Not all standard reports are available to schedule.
Once you have reports scheduled, they display in this table.
3. Select a report from the Create New Scheduled Report drop-down list.
4. Click the Go button.
©2010 U.S. Bancorp Agency/Organization Program Coordinator 89

Army A/OPC
Keep in mind that Access Online moves the report date range forward in time for you, if you schedule the report to run repeatedly in the future.
5
Each report has unique filtering options.
You can select a data element to sort ascending or descending.
You can specify the report’s output file type.
You can filter by one or more processing or reporting hierarchy positions. You may also be able to filter by account number.
6
You can run the report to review it before you save it as a scheduled report.
You can specify where the report should have page breaks and subtotals.
5. Set the parameters for your report, paying careful attention to the date range.
6. Click the Create Scheduled Report button.
©2010 U.S. Bancorp Agency/Organization Program Coordinator 90

Army A/OPC
7
8
109
Do not use spaces or special characters in the output file name. You do not need to include a file extension (e.g., *.pdf.).
By specifying a period option, you can specify that your report run on a specific day during the scheduled date range
7. Type a name (without any spaces or special characters) for the output file in the Output Filename field.
8. Modify the report description in the Report Description field, if desired.
9. Select a frequency from the Report Frequency drop-down list.
10. Specify the period’s parameters, if needed (e.g., select a month from the Month of Period drop-down list).
©2010 U.S. Bancorp Agency/Organization Program Coordinator 91

Army A/OPC
11
11. Specify a date range for the scheduled report to run.
©2010 U.S. Bancorp Agency/Organization Program Coordinator 92
Army A/OPC
12a
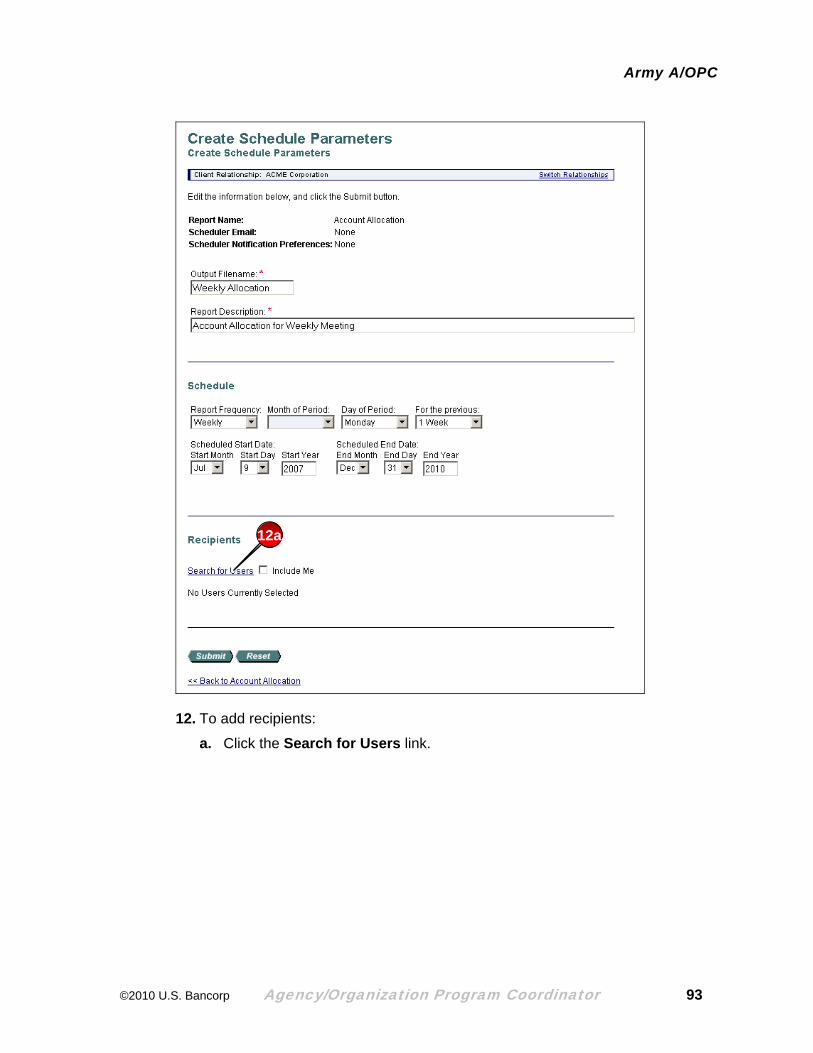
12. To add recipients:
a. Click the Search for Users link.
©2010 U.S. Bancorp Agency/Organization Program Coordinator 93

Army A/OPC
Select checkboxes display only for recipients with Data Exchange download capability. Also note the Data Exchange Yes/No settings.
12b
12c
12d
12e
b. Specify search criteria.
c. Click the Search button.
d. Selecting the check box for each recipient. Note that the recipient must have Data Exchange download capability.
e. Click the Select User(s) button.
©2010 U.S. Bancorp Agency/Organization Program Coordinator 94
Army A/OPC
13
14
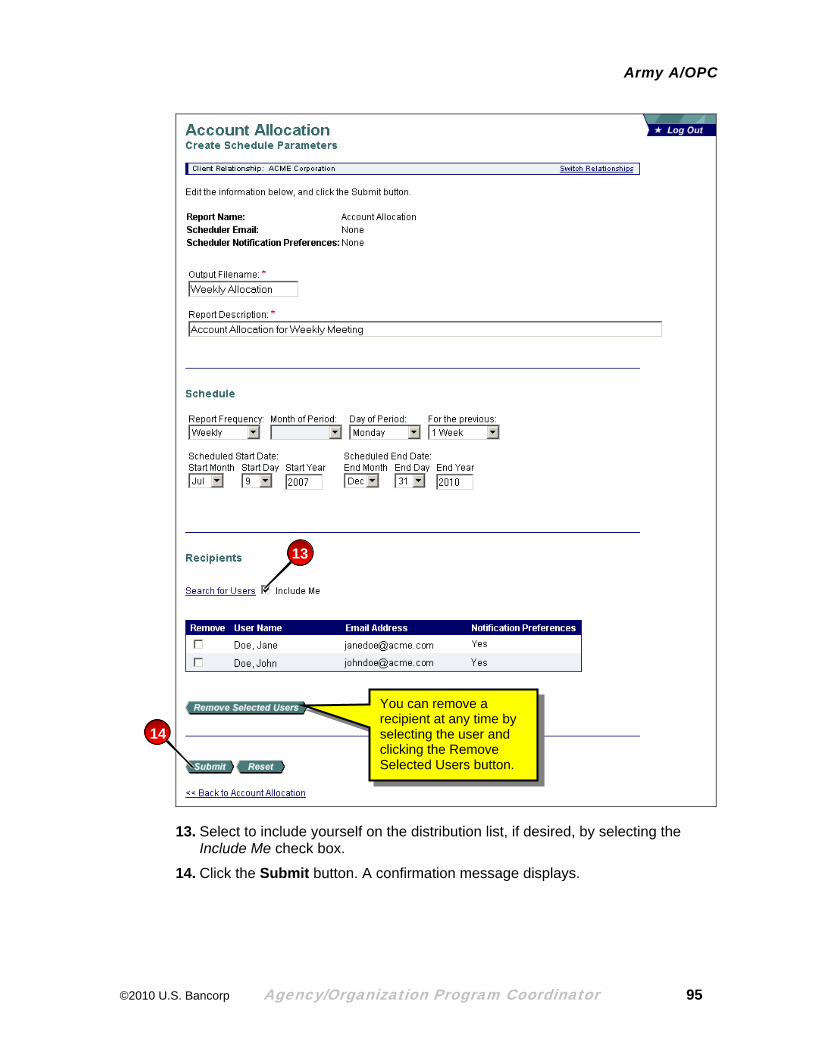
You can remove a recipient at any time by selecting the user and clicking the Remove Selected Users button.
13. Select to include yourself on the distribution list, if desired, by selecting the Include Me check box.
14. Click the Submit button. A confirmation message displays.
©2010 U.S. Bancorp Agency/Organization Program Coordinator 95
Army A/OPC
15
16
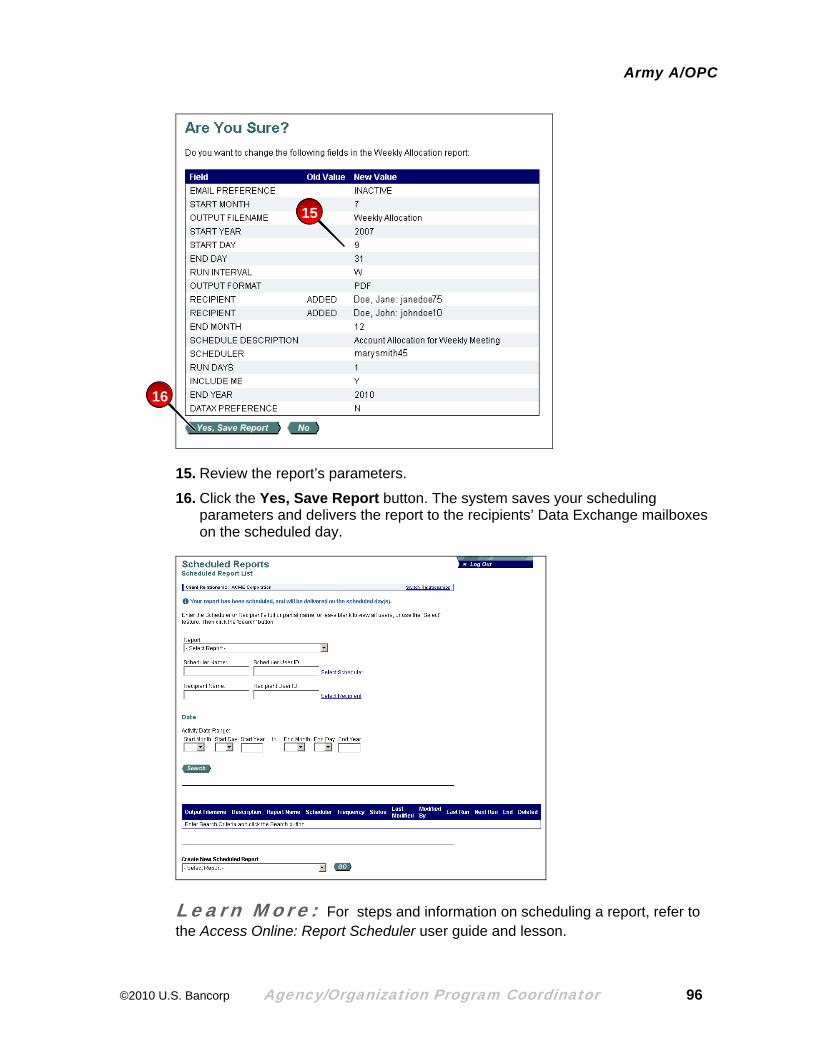
15. Review the report’s parameters.
16. Click the Yes, Save Report button. The system saves your scheduling parameters and delivers the report to the recipients’ Data Exchange mailboxes on the scheduled day.
Learn More: For steps and information on scheduling a report, refer to the Access Online: Report Scheduler user guide and lesson.
©2010 U.S. Bancorp Agency/Organization Program Coordinator 96
Army A/OPC
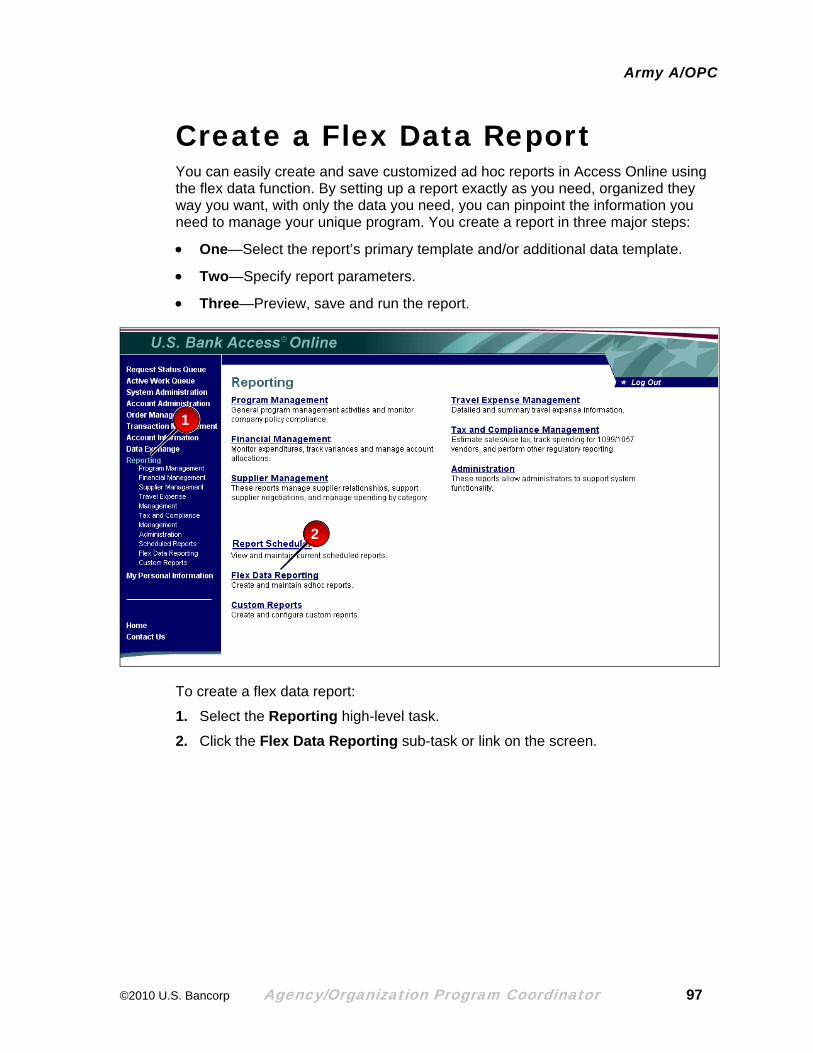
Create a Flex Data Report You can easily create and save customized ad hoc reports in Access Online using the flex data function. By setting up a report exactly as you need, organized they way you want, with only the data you need, you can pinpoint the information you need to manage your unique program. You create a report in three major steps:
• One—Select the report’s primary template and/or additional data template.
• Two—Specify report parameters.
• Three—Preview, save and run the report.
1
2
To create a flex data report:
1. Select the Reporting high-level task.
2. Click the Flex Data Reporting sub-task or link on the screen.
©2010 U.S. Bancorp Agency/Organization Program Coordinator 97

Army A/OPC
3
3. Select the Create a New Report tab.
4 5
6
4. Select a report template radio button from the Primary Report Data column.
5. If desired, select one additional data template from the Additional Data column.
6. Click the Create button.
©2010 U.S. Bancorp Agency/Organization Program Coordinator 98

Army A/OPC
7
Click the Save button at any time to save your work so far.
If you have already saved the report, then you can click the Revert to Last Saved button to discard your changes since your last save.
Because you must define which data to include in some basic way, you must select a single filtering option radio button.
8
10a
9
10b
7. Type a new report name and/or description if desired.
8. Select an output type and/or parameter page placement (PDF output only).
9. Click the checkbox for each column to include in your report.
10. To use the Select Report Columns feature:
a. Select the Check All check box to include all the listed data elements in your report.
–And/Or–
b. Select the Show Only Selected check box to display only your selected data elements on the screen as you work.
©2010 U.S. Bancorp Agency/Organization Program Coordinator 99

Army A/OPC
12
13
14
11
Some data elements and filtering options are already selected for you as part of the template.
11. Type a new column label, if desired.
12. Type the number of column inches to wrap the field in the Wrap Data field.
13. Select a quantitative data element’s Total check box to total that element’s column.
14. Select an element’s Filter radio button or check box to filter by that data element.
©2010 U.S. Bancorp Agency/Organization Program Coordinator 100

Army A/OPC
15
15. Select the Filter for Content tab.
©2010 U.S. Bancorp Agency/Organization Program Coordinator 101
Army A/OPC
The screen updates with your new report description.
16
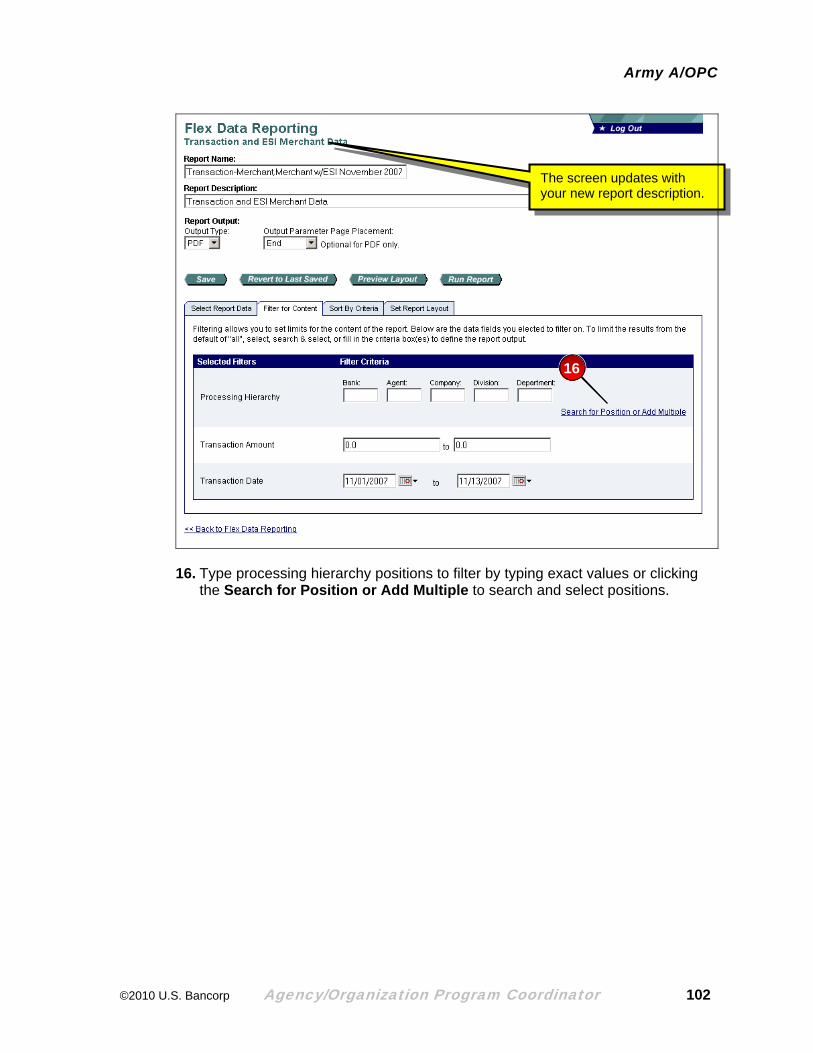
16. Type processing hierarchy positions to filter by typing exact values or clicking the Search for Position or Add Multiple to search and select positions.
©2010 U.S. Bancorp Agency/Organization Program Coordinator 102

Army A/OPC
19
17
18
Click the Edit link to change your selected hierarchy positions.
17. To filter by transaction amount, specify a dollar values.
18. To filter by date range, specify beginning and end dates.
19. Select the Sort By Criteria tab.
Tip! For sample purposes, we have included only a few of the possible filtering options in our sample report. For information on additional filtering options, refer to the Access Online: Creating Flex Data Reports user guide and lesson.
©2010 U.S. Bancorp Agency/Organization Program Coordinator 103
Army A/OPC
Select the No Break/Subtotal radio button if you do not want any breaks or subtotals.
24
20 21
22
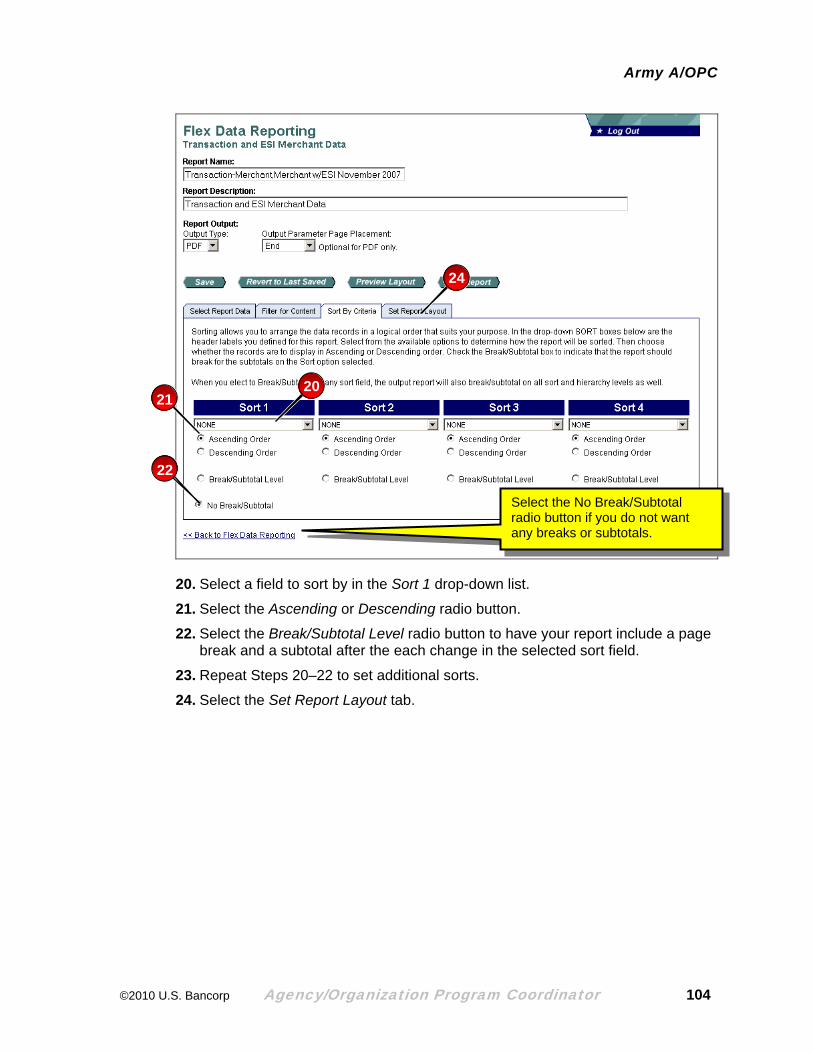
20. Select a field to sort by in the Sort 1 drop-down list.
21. Select the Ascending or Descending radio button.
22. Select the Break/Subtotal Level radio button to have your report include a page break and a subtotal after the each change in the selected sort field.
23. Repeat Steps 20–22 to set additional sorts.
24. Select the Set Report Layout tab.
©2010 U.S. Bancorp Agency/Organization Program Coordinator 104
Army A/OPC
27
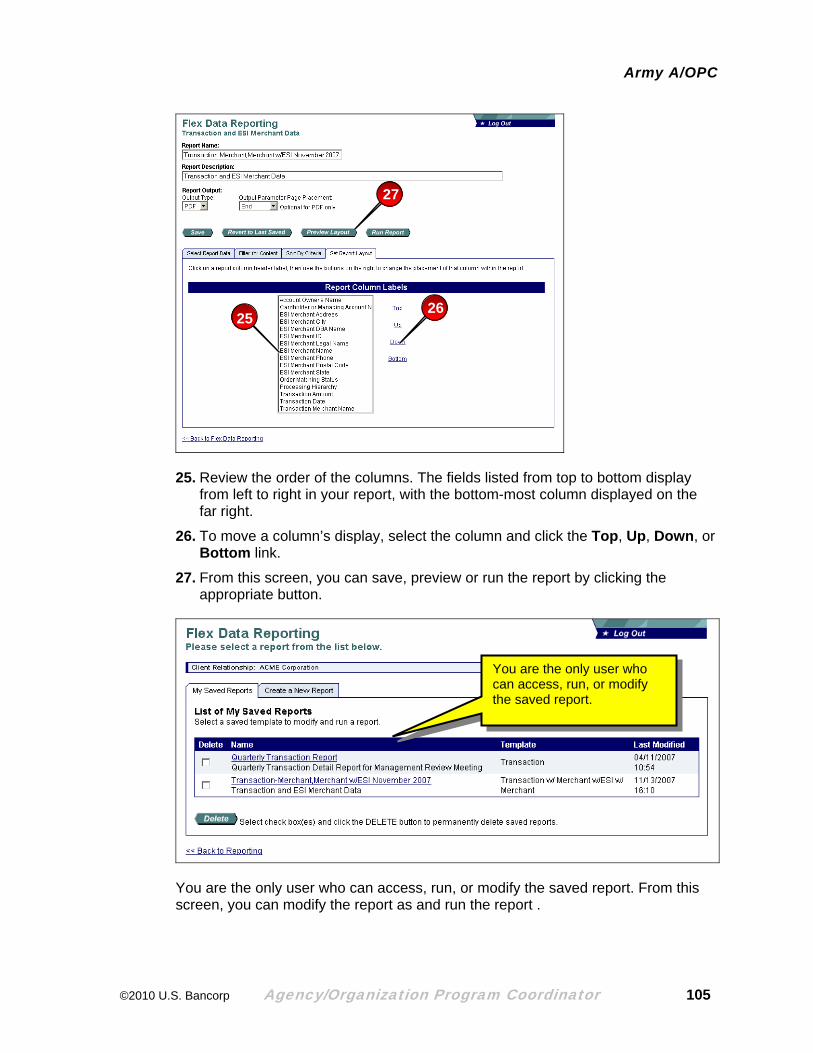
2625
25. Review the order of the columns. The fields listed from top to bottom display from left to right in your report, with the bottom-most column displayed on the far right.
26. To move a column’s display, select the column and click the Top, Up, Down, or Bottom link.
27. From this screen, you can save, preview or run the report by clicking the appropriate button.
You are the only user who can access, run, or modify the saved report.
You are the only user who can access, run, or modify the saved report. From this screen, you can modify the report as and run the report .
©2010 U.S. Bancorp Agency/Organization Program Coordinator 105
Army A/OPC
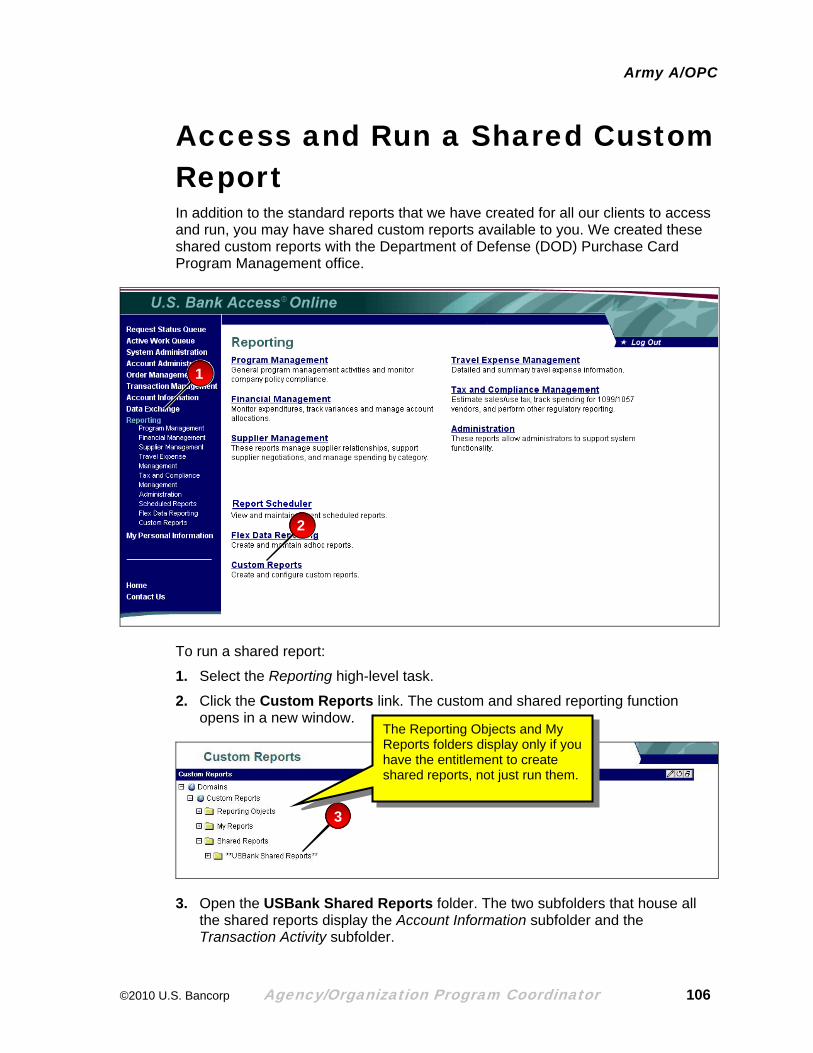
Access and Run a Shared Custom Report In addition to the standard reports that we have created for all our clients to access and run, you may have shared custom reports available to you. We created these shared custom reports with the Department of Defense (DOD) Purchase Card Program Management office.
1
2
To run a shared report:
1. Select the Reporting high-level task.
2. Click the Custom Reports link. The custom and shared reporting function opens in a new window.
3
The Reporting Objects and My Reports folders display only if you have the entitlement to create shared reports, not just run them.
3. Open the USBank Shared Reports folder. The two subfolders that house all the shared reports display the Account Information subfolder and the Transaction Activity subfolder.
©2010 U.S. Bancorp Agency/Organization Program Coordinator 106
Army A/OPC
4
5
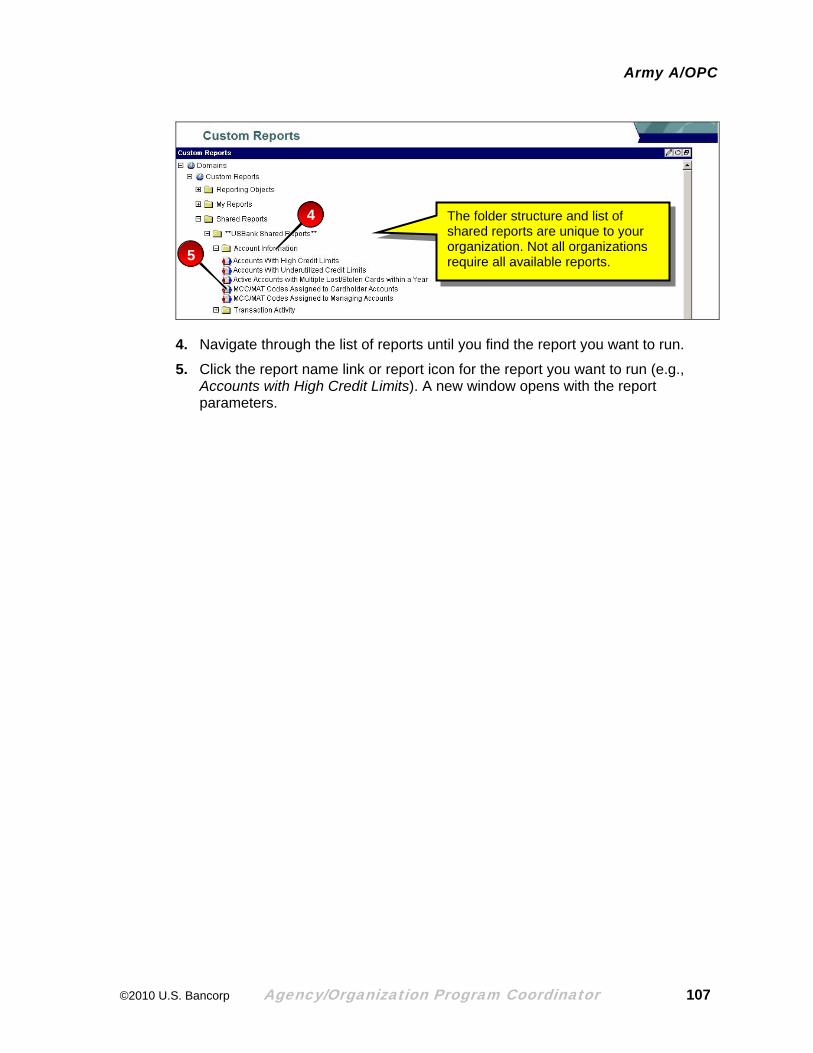
The folder structure and list of shared reports are unique to your organization. Not all organizations require all available reports.
4. Navigate through the list of reports until you find the report you want to run.
5. Click the report name link or report icon for the report you want to run (e.g., Accounts with High Credit Limits). A new window opens with the report parameters.
©2010 U.S. Bancorp Agency/Organization Program Coordinator 107

Army A/OPC
11
Each report has unique parameters, which are normally on the lower portion of the parameter screen.
To filter the report by hierarchy, you need to type only the value for the lowest position (not all positions above as well).
6 8
9
10
7
6. Type a start date (e.g., a cycle start date, a post date start date) in YYYY/MM/DD format (type 2009/01/19 for a cycle start date of January 19, 2009) in the start date field (if needed).
7. Type an end date in YYYY/MM/DD format in the end date field (if needed).
8. Type a bank number in the Hierarchy Position Bank (Required) field.
9. To filter the report by a specific processing or reporting level position, type the value in the field for the lowest level you want to report by (e.g., type 45678 in the Reporting Hierarchy Position Level 4 field to report by level 4, value 45678 and above).
10. Specify additional optional or required report parameters in the format indicated. For example, type a monthly spend limit of 50000 to filter the report to include only accounts with a specific monthly spend limit of $50,000 or more.
11. Select the Run in a new window check box to have the report display in a new window.
Learn More: Each report has unique parameters. For detailed steps on each report’s parameters, refer to the user guide. Access Online: Run a Shared Custom Report user guide.
©2010 U.S. Bancorp Agency/Organization Program Coordinator 108

Army A/OPC
Click the Reset button to return to the default settings.
Click the Clear Output to clear the report output.
12
12. Click the Run button. A File Download dialog box displays on which you can select to open the report immediately or save the report to your computer and then open later.
Click the Cancel button to cancel running the report.
13
13. Select to open or save the report to your computer.
©2010 U.S. Bancorp Agency/Organization Program Coordinator 109
Army A/OPC
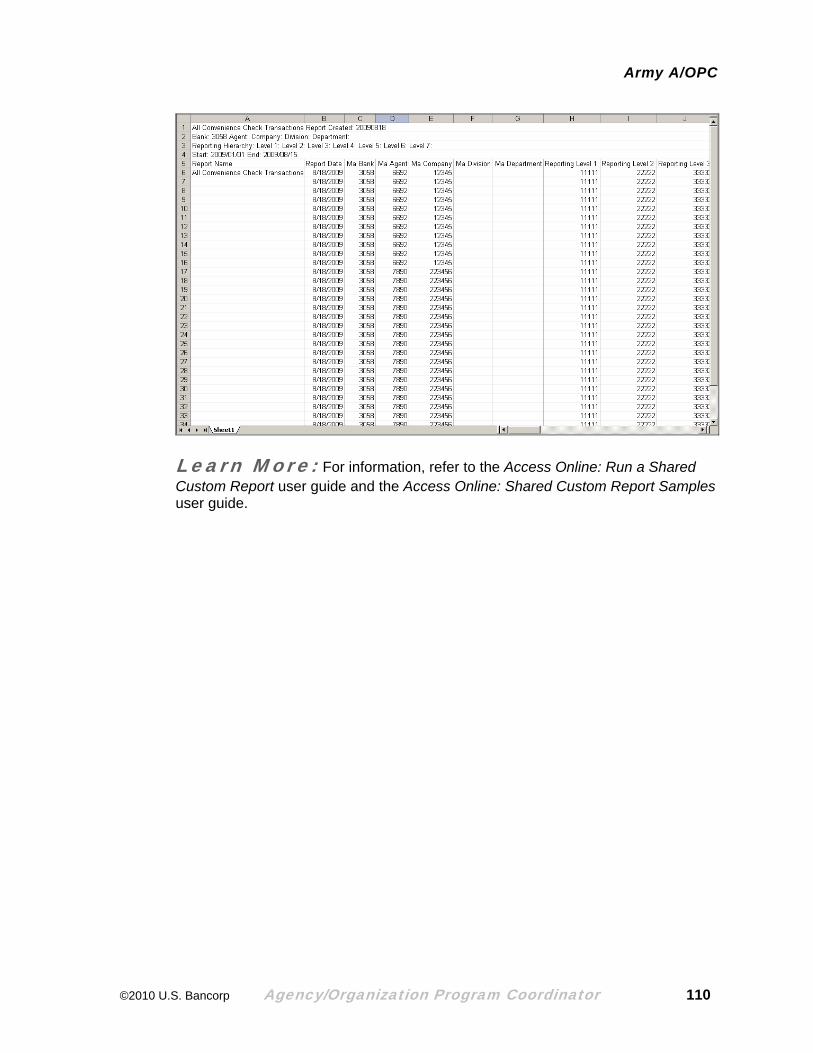
Learn More: For information, refer to the Access Online: Run a Shared Custom Report user guide and the Access Online: Shared Custom Report Samples user guide.
©2010 U.S. Bancorp Agency/Organization Program Coordinator 110
Army A/OPC
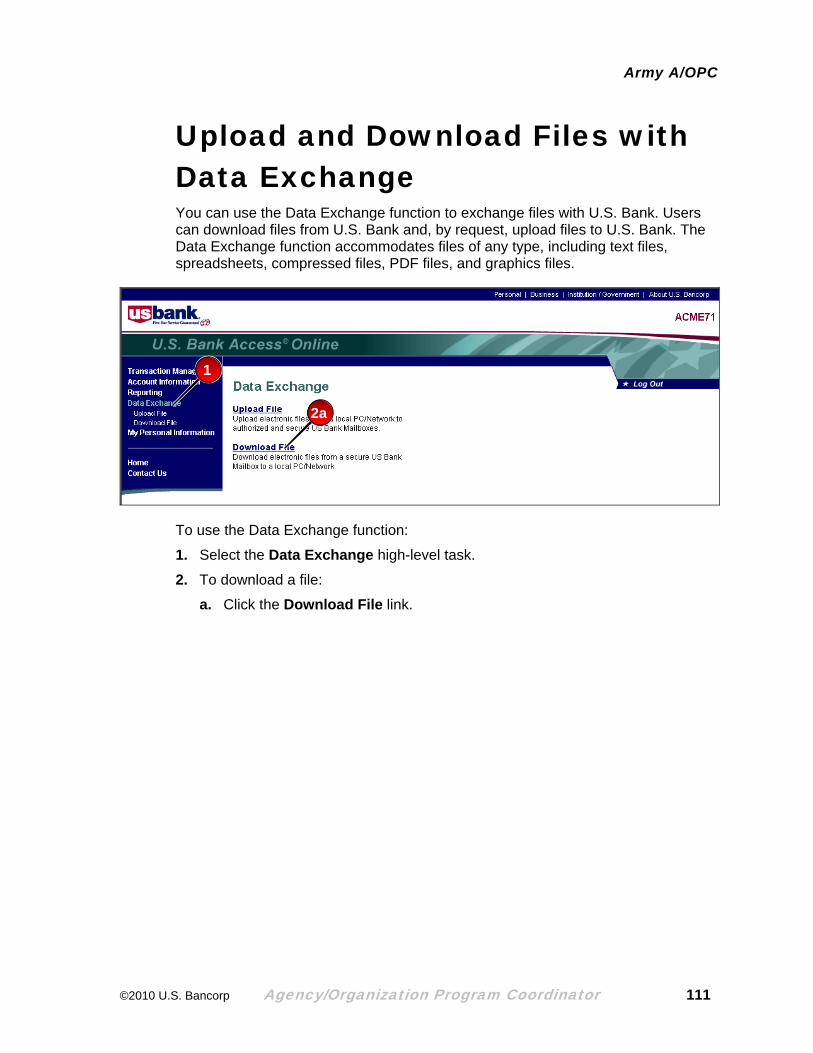
Upload and Download Files with Data Exchange You can use the Data Exchange function to exchange files with U.S. Bank. Users can download files from U.S. Bank and, by request, upload files to U.S. Bank. The Data Exchange function accommodates files of any type, including text files, spreadsheets, compressed files, PDF files, and graphics files.
1
2a
To use the Data Exchange function:
1. Select the Data Exchange high-level task.
2. To download a file:
a. Click the Download File link.
©2010 U.S. Bancorp Agency/Organization Program Coordinator 111

Army A/OPC
2b
You may close the Data Exchange window during the download, but you must keep the File Download dialog box open during the download.
b. Navigate to the file you want to download and right-click the file name and select Save Target As….
2c
c. Wait for the download to complete.
©2010 U.S. Bancorp Agency/Organization Program Coordinator 112

Army A/OPC
2d
d. Select a location and new name (if desired) for the file and then click the Save button.
©2010 U.S. Bancorp Agency/Organization Program Coordinator 113
Army A/OPC
3a
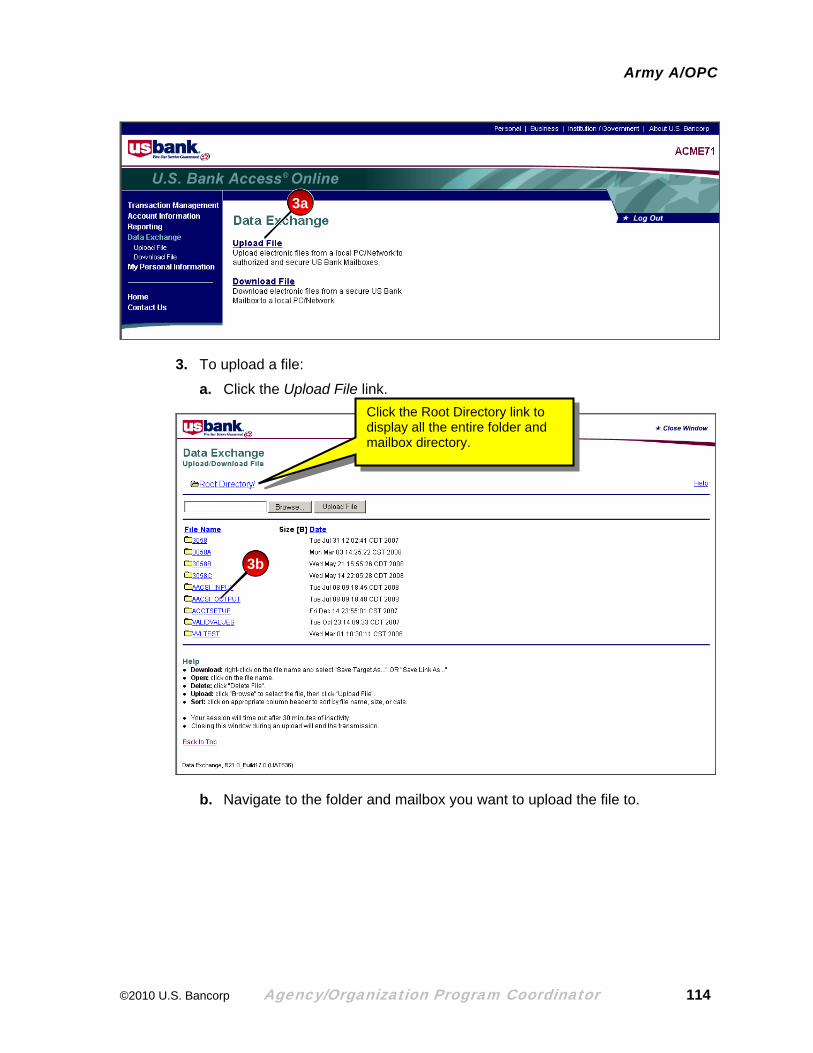
3. To upload a file:
a. Click the Upload File link.
Click the Root Directory link to display all the entire folder and mailbox directory.
3b
b. Navigate to the folder and mailbox you want to upload the file to.
©2010 U.S. Bancorp Agency/Organization Program Coordinator 114
Army A/OPC
3c
c. Click the Browse button.
3d
Your file name must not contain any spaces or special characters.
d. Navigate to and select the desired file and then click the Open button.
©2010 U.S. Bancorp Agency/Organization Program Coordinator 115

Army A/OPC
3e
Note the filepath displayed.
e. Click the Upload File button.
Note that although you uploaded a file with a name that was previously uploaded, Access Online simply adds a new date/time stamp to the newly uploaded file. The system does not replace the previously uploaded file.
Tip! If you attempt to upload a file with spaces or special characters in the file name, an error message displays. Simply rename your file without spaces or special characters and upload the file again.
©2010 U.S. Bancorp Agency/Organization Program Coordinator 116

Army A/OPC
Additional Roles and Tasks You can review the tasks that the other roles in your organization perform, including Resource Managers, Billing Officials, and Cardholders.
• For Resource Manager tasks, including their portion of managing and cardholder account setup and maintenance and accounting validation control creation, refer to the Access Online: Resource Manager user guide.
• For Billing Official tasks, including managing account certification and statement approval, refer to the Access Online: Billing Official user guide.
• For Cardholder tasks, including order creation, transaction management, and order and transaction matching, refer to the Access Online: Cardholder user guide. You can log in to the web-based training as a cardholder (simply use the cardholder password) and review cardholder lessons and training material.
©2010 U.S. Bancorp Agency/Organization Program Coordinator 117

Army A/OPC
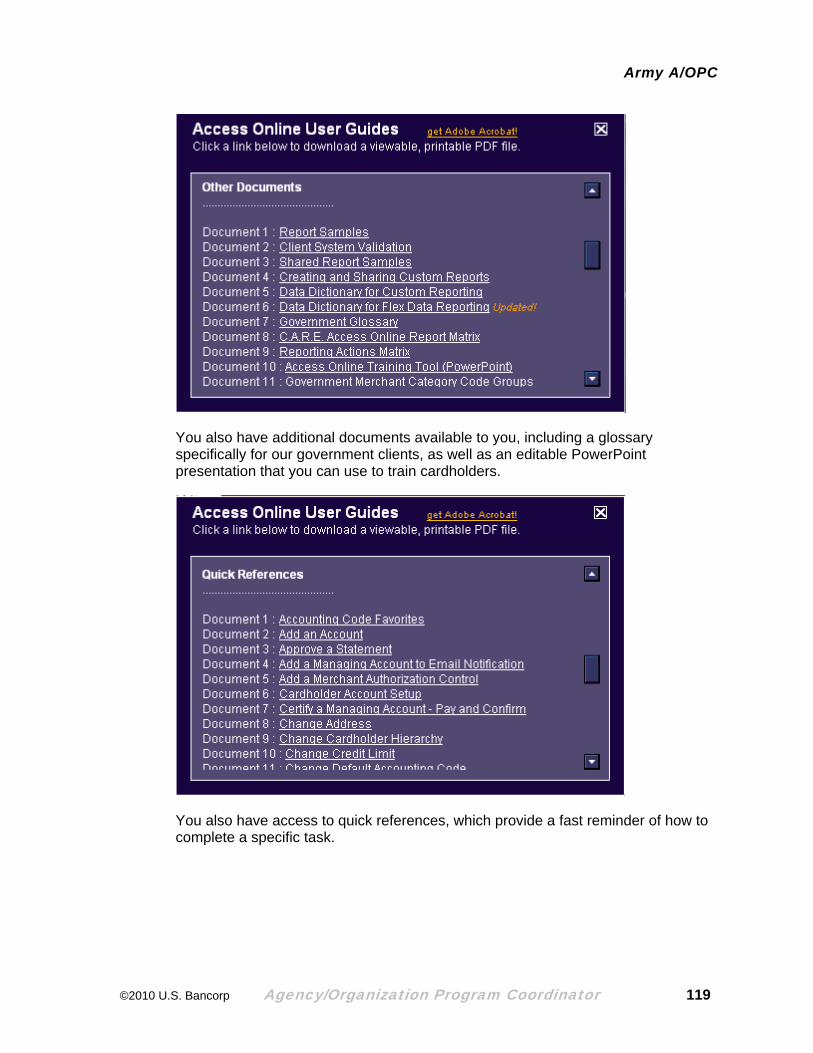
Additional Resources You can easily access topic-specific lessons on the WBT.
Each lesson provides step-by-step instructions on completing tasks.
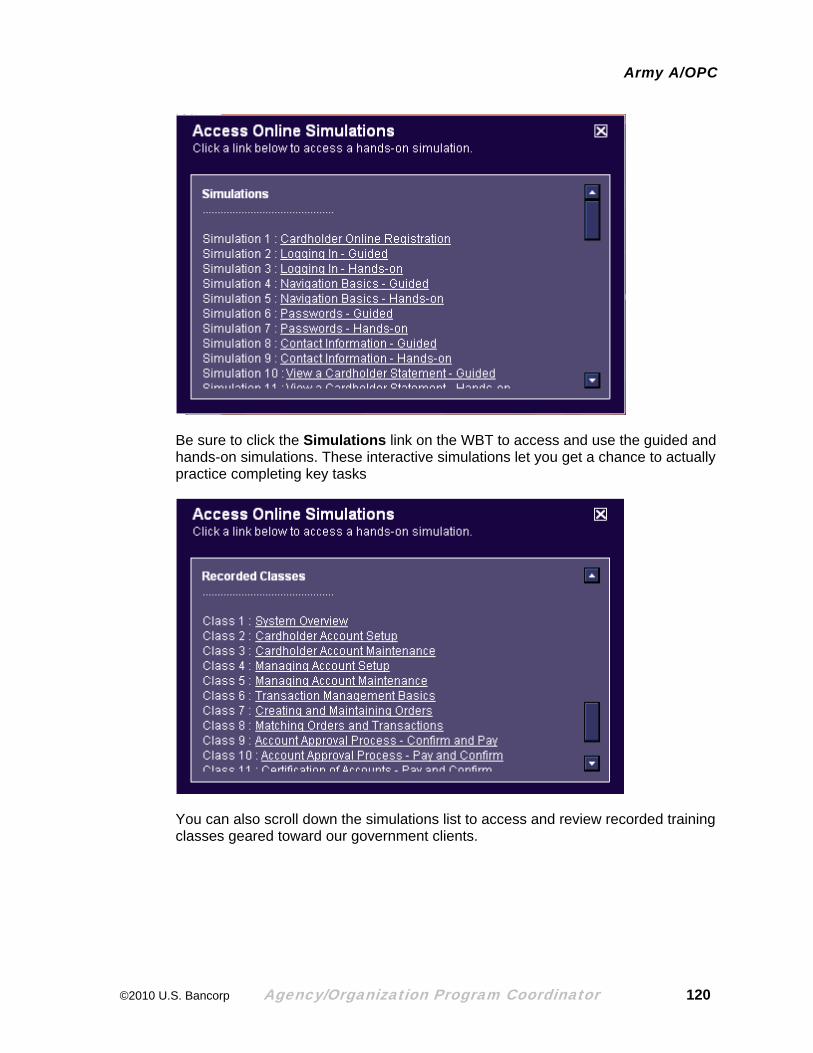
Click the Simulations link for guided and hands-on simulations, plus recorded training classes.
To access the topic-specific user guides (with additional, topical information), click the User Guide link and then navigate to the guide you want to look at.
©2010 U.S. Bancorp Agency/Organization Program Coordinator 118
Army A/OPC
You also have additional documents available to you, including a glossary specifically for our government clients, as well as an editable PowerPoint presentation that you can use to train cardholders.
You also have access to quick references, which provide a fast reminder of how to complete a specific task.
©2010 U.S. Bancorp Agency/Organization Program Coordinator 119
Army A/OPC
Be sure to click the Simulations link on the WBT to access and use the guided and hands-on simulations. These interactive simulations let you get a chance to actually practice completing key tasks
You can also scroll down the simulations list to access and review recorded training classes geared toward our government clients.
©2010 U.S. Bancorp Agency/Organization Program Coordinator 120
Army A/OPC
©2010 U.S. Bancorp. All rights reserved. U.S. Bank Government Services is a division of U.S. Bank National Association ND. All other trademarks are the property of their respective owners. This publication is neither paid for, sponsored by, nor implies endorsement, in whole or in part, by any element of the United States Government. The information provided is for general use only. Contact the GSA Contracting Office with any questions related to proper use of the master contract. Printed in the USA.
You may not reproduce this document, in whole or in part, without written permission from U.S. Bank.
©2010 U.S. Bancorp Agency/Organization Program Coordinator 121