accellion end user g uide - vanderbilt it · pdf fileaccellion end user g uide accellion, inc....
TRANSCRIPT

ACCELLION END USER GUIDE
Accellion, Inc.
1804 Embarcadero Road
Suite 200
Palo Alto, CA 94303
Tel +1 650 485-4300
Fax +1 650 485-4308
www.accellion.com
PROPRIETARY AND CONFIDENTIAL
SUBJECT TO CHANGE WITHOUT NOTICE.
© 2011 Accellion, Inc. All Rights Reserved.
Version 8.0 End User Guide 2
TABLE OF CONTENTS
QUICK START ............................................................... 4
Create an Account ............................................................................................... 4
Send a file ............................................................................................................. 4
USING ACCELLION ........................................................ 7
User Types ............................................................................................................ 7
LogIn ..................................................................................................................... 8
Send File ............................................................................................................. 10
Folder/Large File Applet .................................................................................... 14
Expert Mode ........................................................................................................ 19
Invite .................................................................................................................... 21
Request A File .................................................................................................... 23
Saved Drafts ....................................................................................................... 25
Resending Files.................................................................................................. 31
My Settings ......................................................................................................... 33
Send File Setting ................................................................................................ 33
All Contacts ........................................................................................................ 34
Create Contact.................................................................................................... 34
Create Group ...................................................................................................... 35
User Guide .......................................................................................................... 35
Logout ................................................................................................................. 35
RECEIVING FILES ........................................................ 36
Receiving Files Over 2GB ................................................................................. 40
RESOURCES ............................................................... 42

Version 8.0 End User Guide 3
WELCOME
Welcome to Accellion, the world’s simplest large file transfer solution. Accellion offers a familiar and intuitive email-like interface that gives you the ability to send very large files securely.
On the following pages, you will find instructions on how to use Accellion secure file transfer. The entire process should not take more than a few minutes.
If you experience ANY difficulties, please contact your company’s system administrator.

Version 8.0 End User Guide 4
QUICK START
This section will get you started using Accellion secure file transfer as quickly as possible. For a more detailed explanation of the features, please refer to the “Using Accellion” section of this document.
CREATE AN ACCOUNT
An account may have been created for you. If so, proceed to the LOGIN section of this
document. Otherwise go to the URL of the Accellion Appliance and, if available, click on
New User to register for a new account. Alternatively, if you have received an invitation
email, click on the link in the invitation email to access the Accellion Appliance and
register for an account.
SEND A FILE
Select Send File tab. You will see the following options.
TO: Enter the recipient email address. Use comma or semicolon to separate multiple
recipients. The maximum number of recipients should not exceed 100. Use the auto
complete feature to send to email addresses that have sent files previously with using
Accellion. Click on “Add CC” and/or “Add BCC”, to add CC and/or BCC recipients.
SUBJECT/BODY TEXT: Enter the subject and body text you want for the email
ATTACHMENTS: Select the files to send using the steps outlined below:
1. Click Browse to open the Choose File dialog box for your local system
2. Highlight the file to attach
3. Click Open to attach
4. Click on Browse again if you wish to upload more files
5. Click on Remove if you wish to remove a file
Quick Start

Version 8.0 End User Guide 5
The Send File tab
Click Send to send the file(s). A progress bar will show upload status
Quick Start

Version 8.0 End User Guide 6
A Sent Mail confirmation window will appear upon completion of file upload and message
sent. The recipient will receive an email from your email address containing links allowing
them to download the files.
Quick Start
Version 8.0 End User Guide 7
USING ACCELLION
The following pages show you how to use the Accellion web interface in greater depth.
USER TYPES
There are four main types of users on the Accellion system:
Recipient – Can only download received files. May not upload or send files. Will not show
the Send File or File Manager tabs.
Restricted Sender – Can download, and upload files. Can send files only to Standard or
Expert users of that Accellion appliance. Typically an external user
Standard User – Can download, upload, and send files to anyone. Typically an internal
user.
Expert User – Can download, upload, and send files to anyone. They have more control
over settings, and can send files that require no authentication. Expert Users can only be
created by the administrator of the Accellion appliance. Typically an internal user with
special requirements.

Version 8.0 End User Guide 8
LOGIN
Since the Accellion appliance is web based, make sure you are connected to the Internet.
If an account has been created for you, proceed to the LOGIN section. Otherwise, click
on “New User” to register for a new account, or click the link in the invitation email to
access the Accellion web site.
Using Accellion – Login

Version 8.0 End User Guide 9
Upon login either the “Home or “Send File” page will display. From the Home page you
can access the “Quick Start” guide.
Using Accellion – Login

Version 8.0 End User Guide 10
SEND FILE
From the Send File page you can upload files, and create and send an email using the web interface. This section will cover the options available on the Send File page.
SUBJECT/ BODY TEXT: enter the subject and body text you want for the email
ATTACHMENTS: The maximum number of attachments per email is 10, and can
include a mix of new uploads and previously sent files. The total size of all new
attachments upload should be less than 2 GB. (Alternatively you may upload individual
large files at the File Manager tab using “Add to Cabinet”, each up to 2 GB, and then send
them using “Resend Files”.)
To attach a file:
1. Click Browse to open the Choose File dialog box for your local system
2. Highlight the file to attach
3. Click Open to attach the file to the email and trigger it to upload
Using Accellion – Send File
Using Accellion – Send File

Version 8.0 End User Guide 11
4. Click on Browse again if you wish to upload more files
5. Click on Remove if you wish to remove a file
Click on More next to Delivery Notification to enter additional email addresses who will
also be notified on download of the files. You can enter multiple email addresses, each
separated by comma.
TO: Enter the recipient email address. Use comma or semicolon to separate multiple
recipients and maximum number of recipients should not exceed 100. Use the auto
complete feature to send to email addresses previously sent files using Accellion. Click on
“Add Cc” and/or “Add Bcc” to add Cc and/or Bcc recipients.
SUBJECT/BODY TEXT: Enter the subject and body text you want for the email.
ATTACHMENTS: The maximum number of attachments is 10 and can include a mix of
new uploads and previously sent files. The total size of all new attachments uploaded
should be less than 2 GB. (Alternatively you may upload individual large files at the File
Manager tab using “Add to Cabinet”, each up to 2 GB, and then send them using “Resend
Files”.)
1. Click Browse to open the Choose File dialog box for your local system:
a. highlight the file to attach
b. click Open to attach
2. Click on Browse again if you wish to upload more files
3. Click on Remove if you wish to remove a file
Depending on company policy, Send me a copy, Notify on Attachment Delivery,
Encryption, and Non Confidential options may be turned on.
SEND ME A COPY: A copy of the email will be sent to your email address.
NOTIFY ON ATTACHMENT DELIVERY: When the recipient completely downloads
those files, you will be notified of such. Click on “More” to enter additional email
addresses who will also be notified on download of the files. You can enter multiple email
addresses, each separated by comma.
NON CONFIDENTIAL: Files sent with this option enabled will allow the recipients to
download files without authentication. Please note that non-confidential transmissions will
Using Accellion — Send File
Version 8.0 End User Guide 12
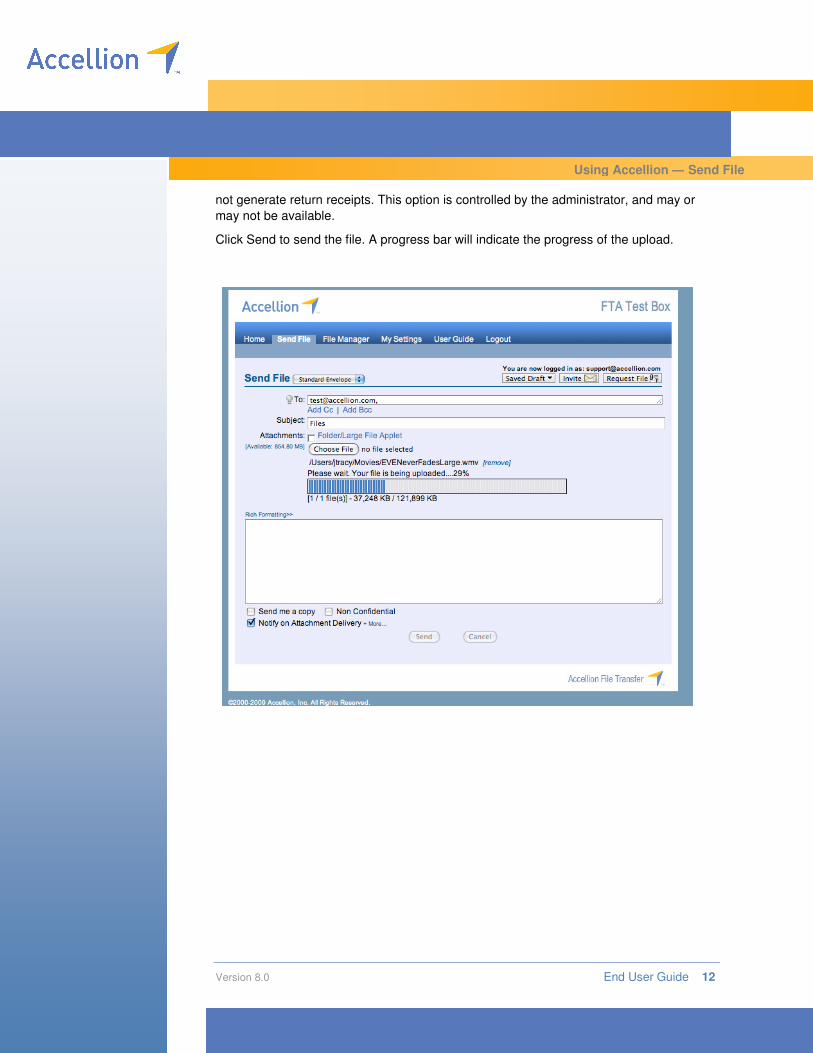
not generate return receipts. This option is controlled by the administrator, and may or
may not be available.
Click Send to send the file. A progress bar will indicate the progress of the upload.
Using Accellion — Send File

Version 8.0 End User Guide 13
A Sent Mail confirmation window will appear upon completion of file upload and message
sent.
Using Accellion — Send File
Version 8.0 End User Guide 14
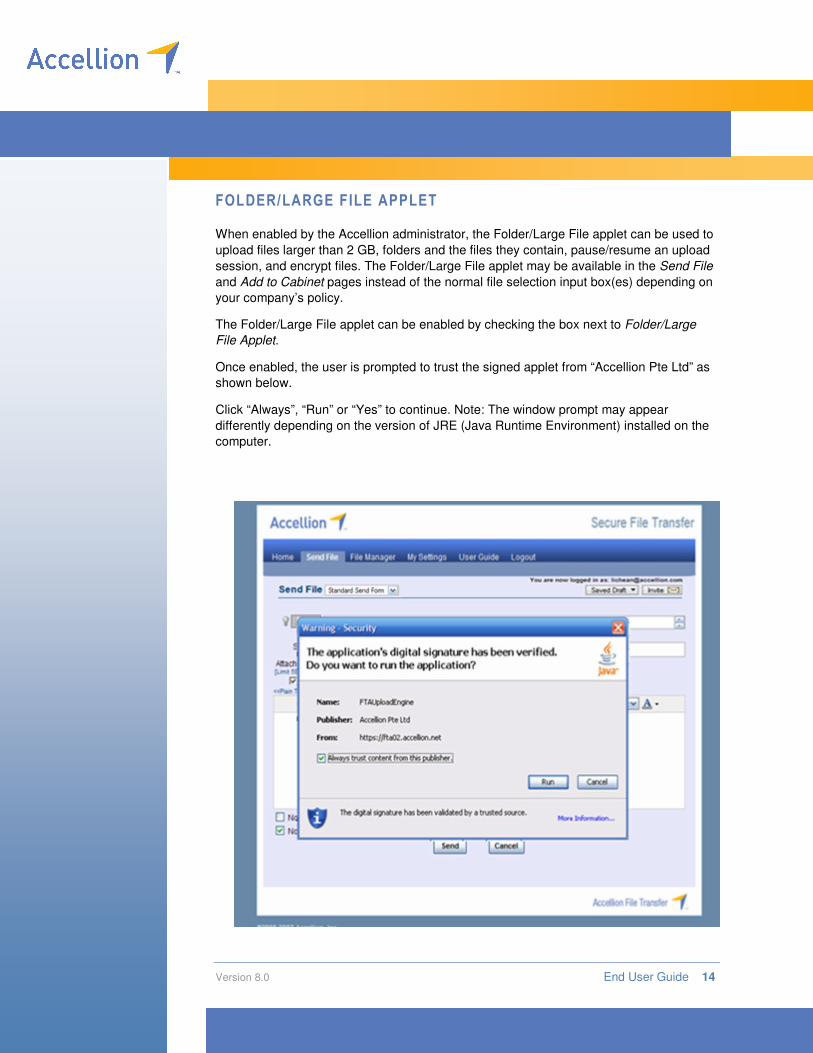
FOLDER/LARGE FILE APPLET
When enabled by the Accellion administrator, the Folder/Large File applet can be used to
upload files larger than 2 GB, folders and the files they contain, pause/resume an upload
session, and encrypt files. The Folder/Large File applet may be available in the Send File
and Add to Cabinet pages instead of the normal file selection input box(es) depending on
your company’s policy.
The Folder/Large File applet can be enabled by checking the box next to Folder/Large
File Applet.
Once enabled, the user is prompted to trust the signed applet from “Accellion Pte Ltd” as
shown below.
Click “Always”, “Run” or “Yes” to continue. Note: The window prompt may appear
differently depending on the version of JRE (Java Runtime Environment) installed on the
computer.

Version 8.0 End User Guide 15
When using the Folder/Large File applet, the user can select a file or a folder to upload.
When a folder is selected, its contents will be zipped and uploaded. Note: The 2GB total
size limitation does not apply to files uploaded using the Folder/Large File applet, hence
very large folders/files can be uploaded using the Folder/Large File applet.
Click on the Browse button when the applet is loaded, select the desired file or the folder,
and click Open. To explore the contents of a folder for further selection, double-click on
the folder.
If a folder is selected, it will be automatically zipped and added to the email.
Using Accellion – Applet
Version 8.0 End User Guide 16
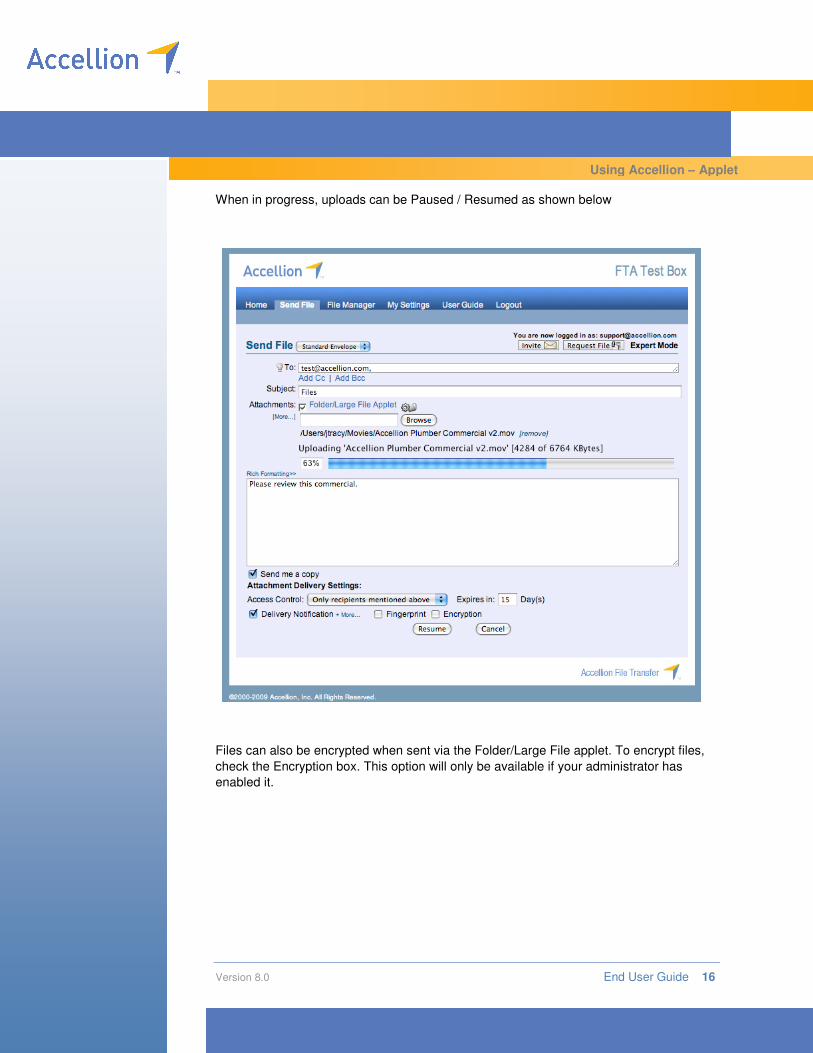
When in progress, uploads can be Paused / Resumed as shown below
Files can also be encrypted when sent via the Folder/Large File applet. To encrypt files,
check the Encryption box. This option will only be available if your administrator has
enabled it.
Using Accellion – Applet

Version 8.0 End User Guide 17
The temp directory used by the Folder/Large File directory can be changed if needed.
This is typically done if the current temp directory does not have enough disk space, or
cannot be accessed due to user privileges.
Click the gear icon to choose the new temp directory.
Using Accellion – Applet

Version 8.0 End User Guide 18
If an upload session is aborted by the user during file upload, the user is prompted to
resume the previous incomplete session upon login.
The Folder/Large File applet will also be available in the ADD TO CABINET section
when uploading files to your cabinet.
All other features will be similar regular Send File section.
Using Accellion – Applet
Version 8.0 End User Guide 19
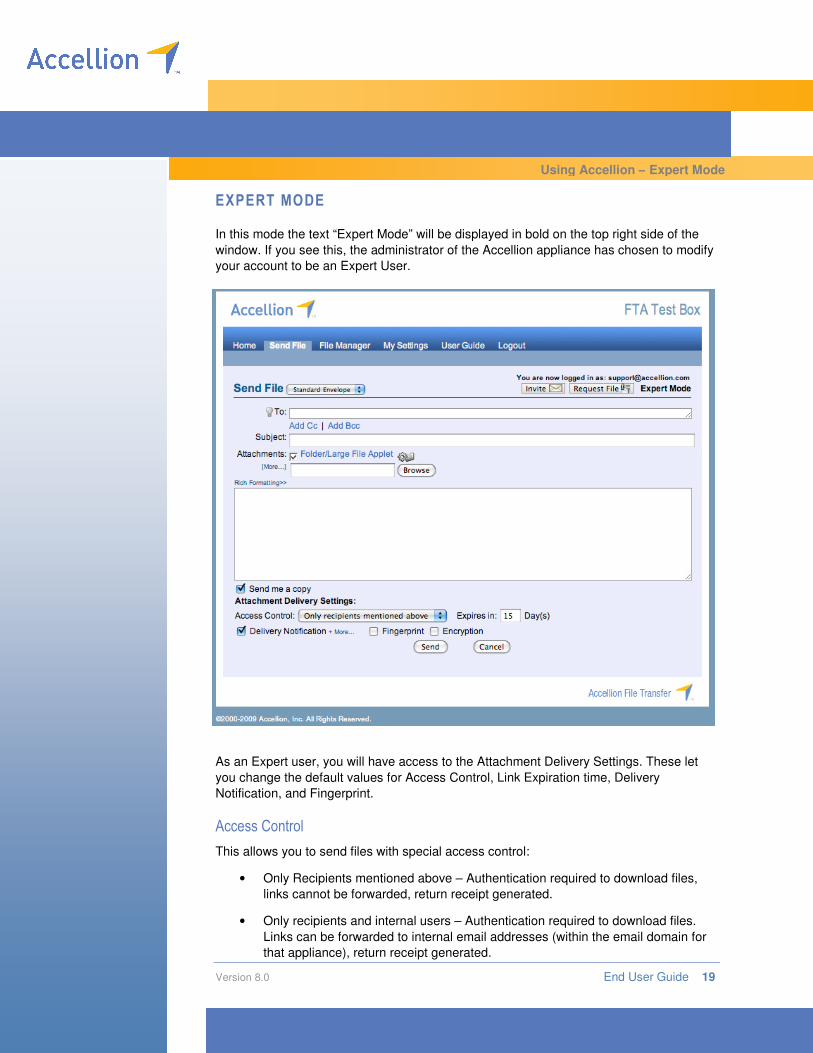
EXPERT MODE
In this mode the text “Expert Mode” will be displayed in bold on the top right side of the
window. If you see this, the administrator of the Accellion appliance has chosen to modify
your account to be an Expert User.
As an Expert user, you will have access to the Attachment Delivery Settings. These let
you change the default values for Access Control, Link Expiration time, Delivery
Notification, and Fingerprint.
Access Control
This allows you to send files with special access control:
• Only Recipients mentioned above – Authentication required to download files,
links cannot be forwarded, return receipt generated.
• Only recipients and internal users – Authentication required to download files.
Links can be forwarded to internal email addresses (within the email domain for
that appliance), return receipt generated.
Using Accellion – Expert Mode

Version 8.0 End User Guide 20
• Anyone after authentication – Authentication required to download files, links can
be forwarded to anyone, return receipt generated.
• Anyone (No Authentication) – No authentication required to download files, links
can be forwarded to anyone by anyone, no return receipt generated.
Link Expiry
Expert users can set their own link expiry up to the limit dictated by the administrator.
Delivery Notification
Determines if you receive a return receipt after the recipient has downloaded the file.
Fingerprint
Every file uploaded to the Accellion appliance has an MD5 Checksum taken of it. This is
so the integrity of the file can be independently verified by the recipient. The Fingerprint
includes the MD5 string for each file linked to the email. If you do not require the
Fingerprint, we recommend not using it, as the email appears less cluttered without it. If
your company or your recipient’s company requires the MD5 fingerprint, then enable it
here.
Using Accellion – Expert Mode

Version 8.0 End User Guide 21
INVITE
If enabled, Standard and Expert Users can send an invitation to use the Accellion
appliance to send files. To invite someone, click Invite, enter the invitee’s E-mail
address(es), and click the Invite button to send an invitation. Optionally you can add a
personal message to the invitation.
Using Accellion – Invite

Version 8.0 End User Guide 22
The recipient will receive an invitation email with a link.
The recipient clicks the link to complete the registration process.
Using Accellion – Invite

Version 8.0 End User Guide 23
REQUEST A FILE
When enabled, Standard and Expert Users are able to send a link to request a file from
someone, as well cc others. Recipients of this link can send files back to the requester.
Others on the cc list will also be copied on the response.
Click the Request File button to bring up the Request File window. Fill in the recipient and
any CC addresses desired. All recipients will be able to send files to via the Request file
link to the requestor. The recipients will receive an email with a link.
Using Accellion – Request A File

Version 8.0 End User Guide 24
Upon clicking the link the recipients will be taken to this page.
From here they can send a file back. Note the Subject line, and To: and From: addresses
cannot be changed. Once sent, the original requestor will receive an email with a link to
the file.
The amount of times the file can be shared and length the links are valid for is set by the
administrator of the appliance.
Using Accellion – Request A File
Version 8.0 End User Guide 25
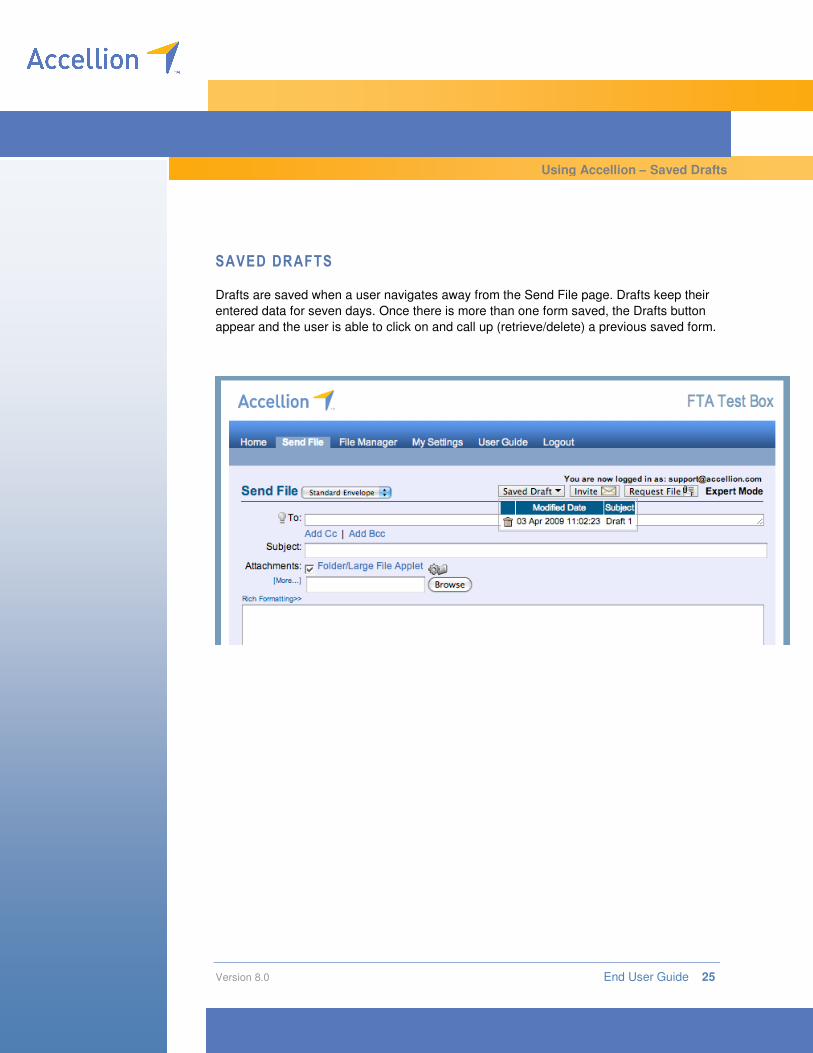
SAVED DRAFTS
Drafts are saved when a user navigates away from the Send File page. Drafts keep their
entered data for seven days. Once there is more than one form saved, the Drafts button
appear and the user is able to click on and call up (retrieve/delete) a previous saved form.
Using Accellion – Saved Drafts

Version 8.0 End User Guide 26
ENVELOPES Depending on the company policy, the Send File page may present to you a drop down
list of envelopes (send forms) available to you.
Using Accellion – Envelopes
Version 8.0 End User Guide 27
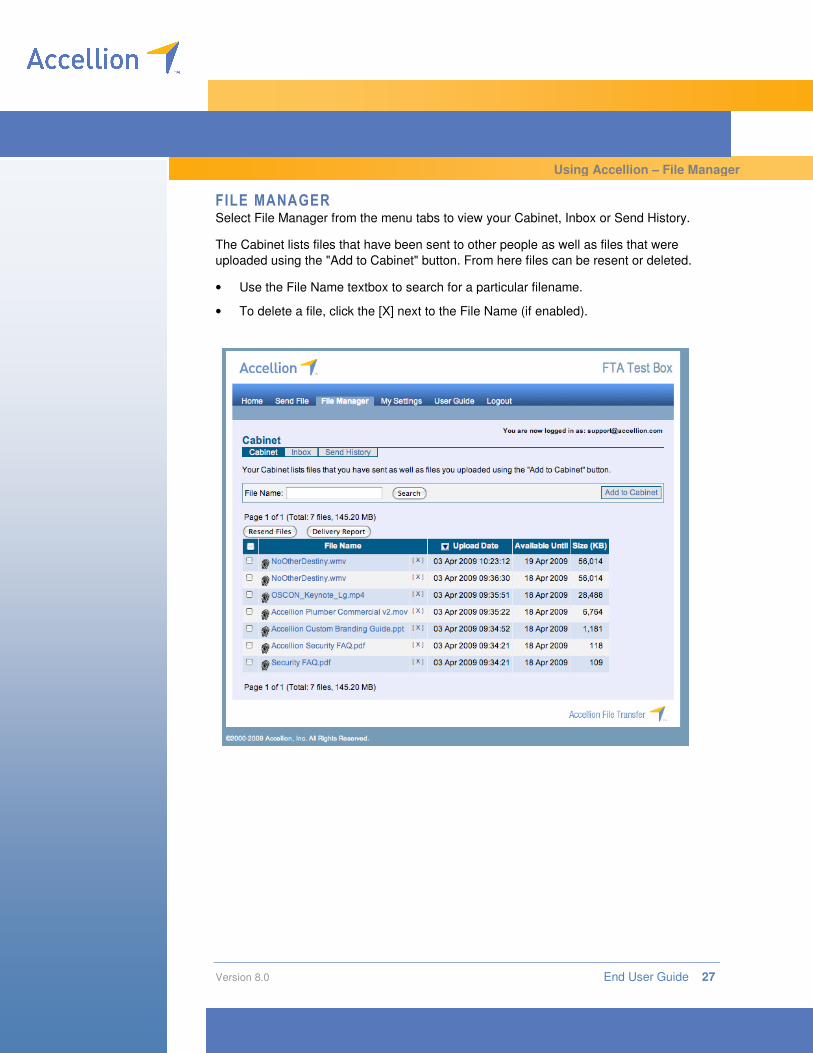
FILE MANAGER Select File Manager from the menu tabs to view your Cabinet, Inbox or Send History.
The Cabinet lists files that have been sent to other people as well as files that were
uploaded using the "Add to Cabinet" button. From here files can be resent or deleted.
• Use the File Name textbox to search for a particular filename.
• To delete a file, click the [X] next to the File Name (if enabled).
Using Accellion – File Manager
Version 8.0 End User Guide 28
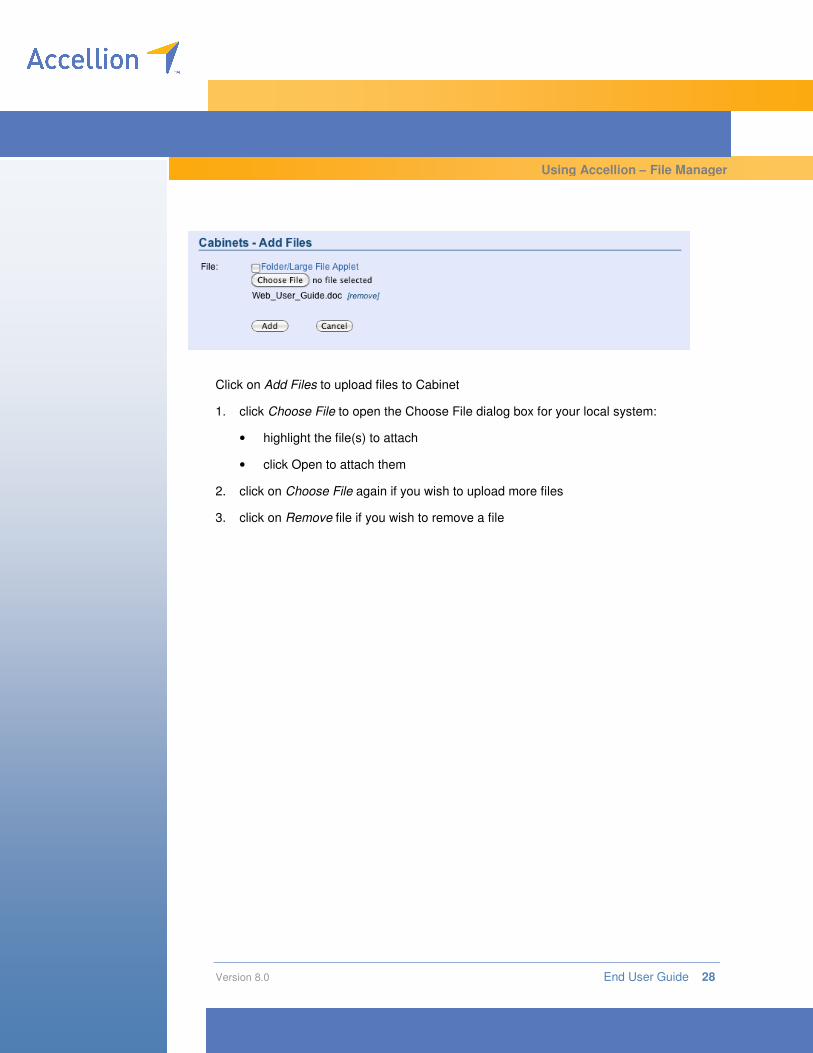
Click on Add Files to upload files to Cabinet
1. click Choose File to open the Choose File dialog box for your local system:
• highlight the file(s) to attach
• click Open to attach them
2. click on Choose File again if you wish to upload more files
3. click on Remove file if you wish to remove a file
Using Accellion – File Manager
Version 8.0 End User Guide 29
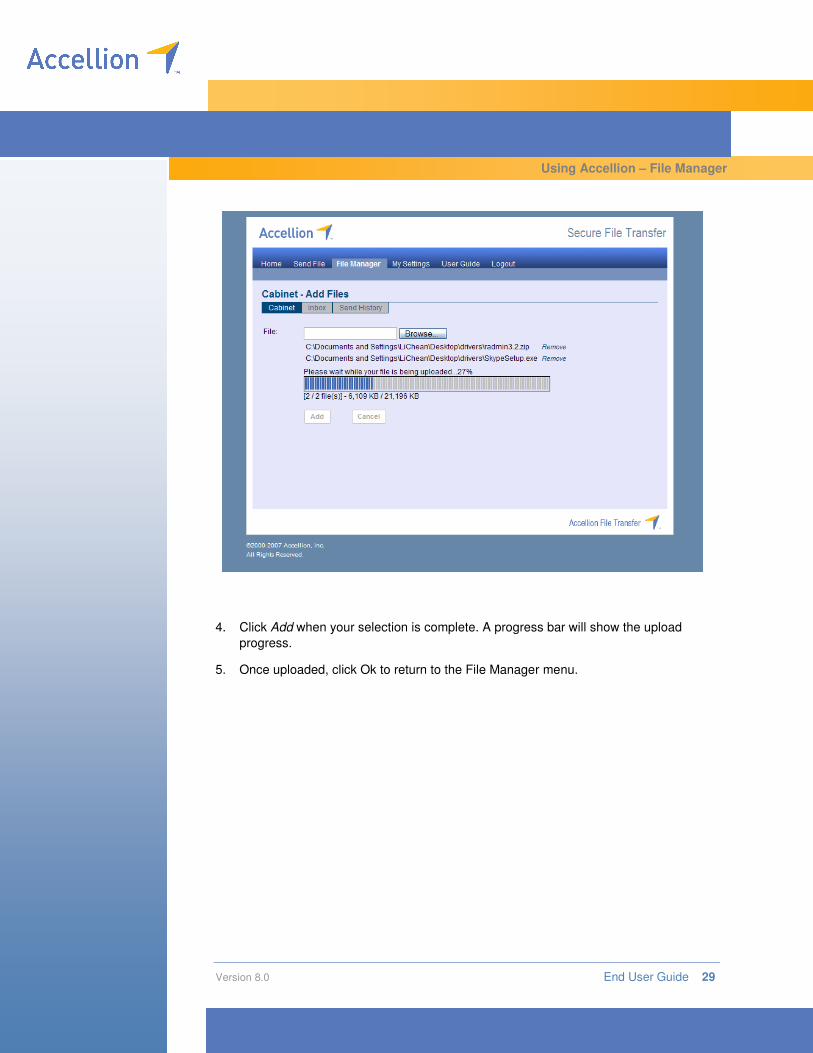
4. Click Add when your selection is complete. A progress bar will show the upload
progress.
5. Once uploaded, click Ok to return to the File Manager menu.
Using Accellion – File Manager

Version 8.0 End User Guide 30
Click on the Inbox to view or forward the files that were sent to you. Use the File Name
textbox to search for a particular filename.
To forward a file that you’ve received, check the checkbox next to file or files, then click
the “Forward Files” button. This will open the Send File tab with the file(s) already added.
Using Accellion – File Manager

Version 8.0 End User Guide 31
Click on Send History to view the report of files that have been sent to others.
RESENDING FILES
To resend a file, check the box next to the file to be resent, and click the “Resend File”
button. This will open the Send File tab with the file already added. You can select
multiple files to be sent this way by checking the box next to them. To Resend Files from
a particular send event, simply select it and click on Resend Files. Resend Message
allows you to resend the files with exactly the same details as the original message.
Using Accellion – File Manager

Version 8.0 End User Guide 32
Click on the magnifying glass next to the Send date to bring up the delivery report for that
event.
Using Accellion – File Manager

Version 8.0 End User Guide 33
MY SETTINGS
Select My Settings from the menu tab to change password, signature, add up to 300
contacts, add contact groups, enable rich text editor, set the display name in your emails,
or reset your auto completion list. Depending on the company policy, you might also have
the option to enable or disable the loading of the Folder/Large File applet.
SEND FILE SETTING
Can change editor type (Rich Text or Plain Text), enabled/disable Folder/Large File
Applet (when enabled by administrator) and set the signature on emails sent via the web
interface.
Using Accellion — My Settings

Version 8.0 End User Guide 34
ALL CONTACTS
When a user sends an email via the web interface, the recipient’s email address is saved
for faster addressing of future emails. The All Contacts tab shows the addresses that
have been saved. From here emails can be edited (if an incorrect one was saved) or
deleted.
CREATE CONTACT
Contacts can be created from this tab. If more than one email address should be
associated with the contact, click the +Add more email... link to create another email
address field. Then, when typing the name of the contact in the Send File To: field, all
email addresses for that contact will be available to choose from.
Using Accellion — My Settings
Version 8.0 End User Guide 35
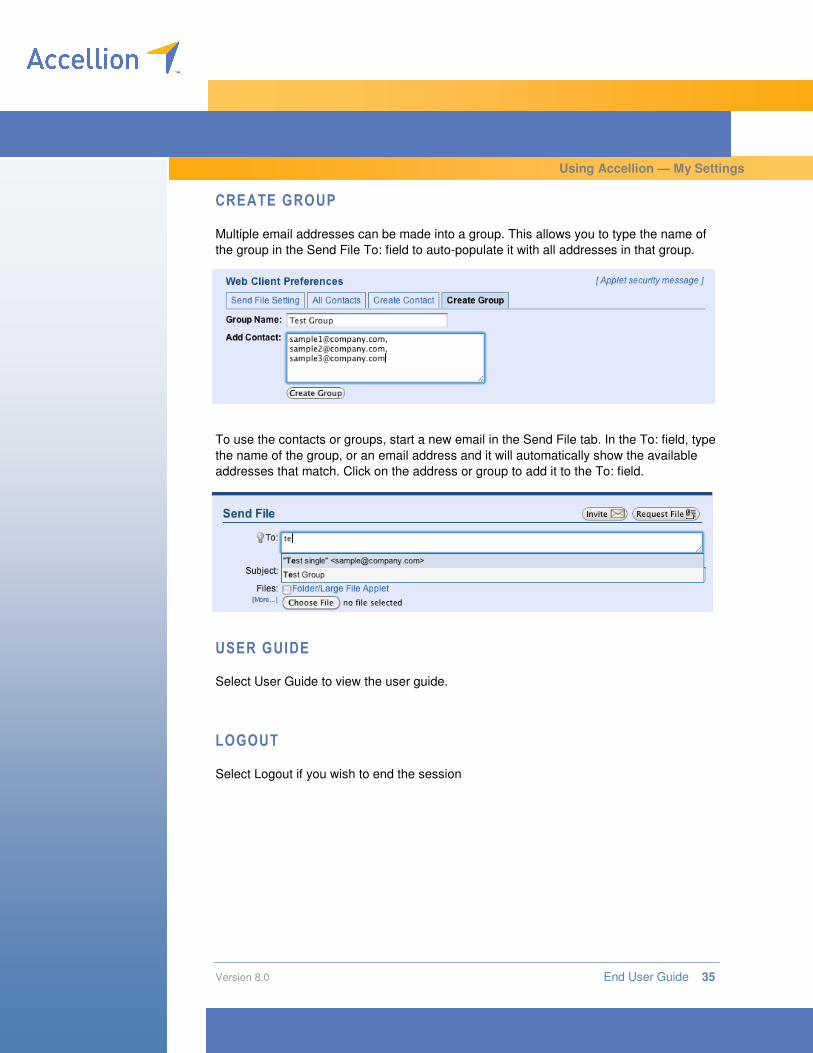
CREATE GROUP
Multiple email addresses can be made into a group. This allows you to type the name of
the group in the Send File To: field to auto-populate it with all addresses in that group.
To use the contacts or groups, start a new email in the Send File tab. In the To: field, type
the name of the group, or an email address and it will automatically show the available
addresses that match. Click on the address or group to add it to the To: field.
USER GUIDE
Select User Guide to view the user guide.
LOGOUT
Select Logout if you wish to end the session
Using Accellion — My Settings

Version 8.0 End User Guide 36
RECEIVING FILES
The Recipient receives the email with download link(s) in lieu of attachment(s).
The Recipient clicks the link to open it.
The Welcome window will open for you to enter Your Email Address
Receiving Files
Version 8.0 End User Guide 37
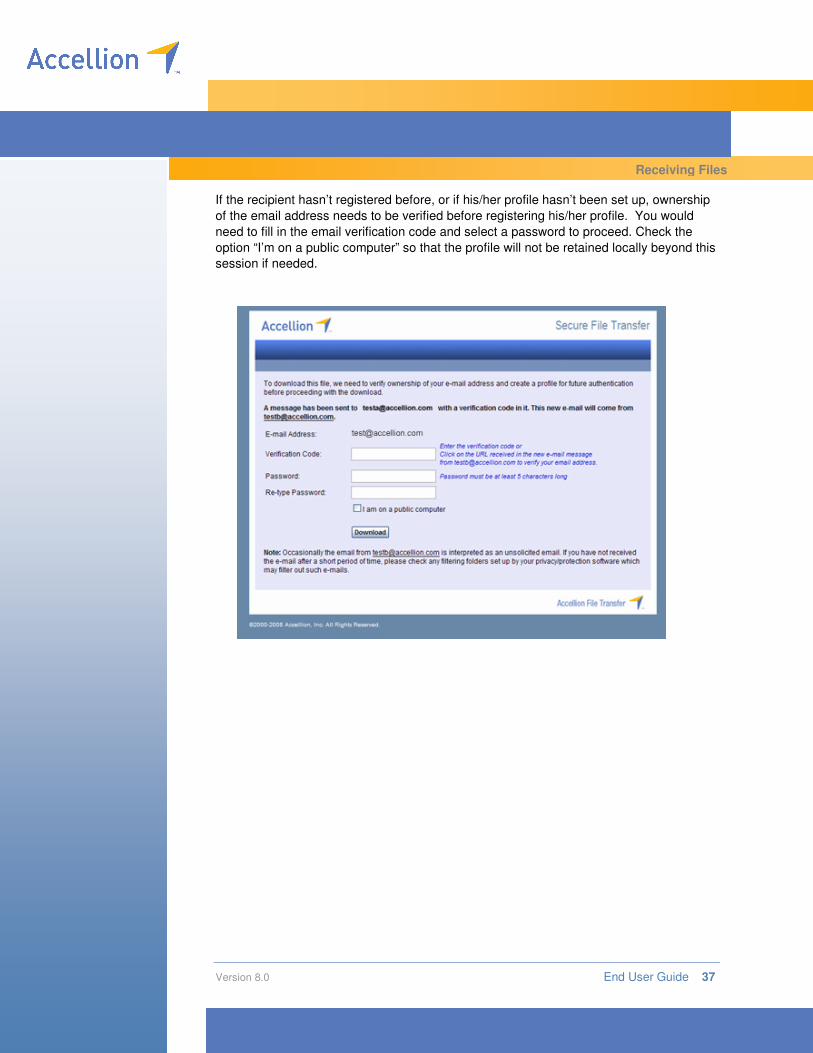
If the recipient hasn’t registered before, or if his/her profile hasn’t been set up, ownership
of the email address needs to be verified before registering his/her profile. You would
need to fill in the email verification code and select a password to proceed. Check the
option “I’m on a public computer” so that the profile will not be retained locally beyond this
session if needed.
Receiving Files

Version 8.0 End User Guide 38
If you have already registered, you need to only enter Your Password.
The download process will then begin.
Receiving Files

Version 8.0 End User Guide 39
If enabled, you will also have the option to download multiple files at once. Check the box
next to the files you wish to download. To download all files, click “Download All”.
Once fully downloaded, the file can be opened and/or be saved
For convenience, files that are sent in the same package can also be retrieved by clicking
on the appropriate filename to begin the download.
Receiving Files

Version 8.0 End User Guide 40
RECEIVING FILES OVER 2GB
If the Download Applet has been enabled by the administrator of the Accellion appliance,
the complete file will download and these steps will not be necessary as the file will
download as one complete file.
If the Download Applet is not enabled, files larger than 2GB need to be downloaded as
sub-files and concatenated (put back together) to get the original file. For example, in the
screen below the original file sent can be re-created from the 3 sub-files listed after
downloading them.
Click on ”Click here to learn how to concatenate all sub-files into one file” for further
instructions. These instructions are provided for Windows, Linux, and Macintosh systems.
Receiving Files – Receiving Files Over 2 GB

Version 8.0 End User Guide 41
Receiving Files – Receiving Sub-Files
Version 8.0 End User Guide 42
Resources
For further information on settings for the rest of the appliance, please refer to the
Administration and Best Practices guides.
If you have questions that were not answered by this guide, please visit our knowledge
base at:
http://support.accellion.net/
For support on technical issues, please visit our support portal at:
http://www.accellion.com/support
Or send us an email at: