ac-7 core hd - saitara softwaresaitarasoftware.com/assets/ac-7corehdv1.01.pdf · ac-7 core hd user...
TRANSCRIPT

Ac-7 Core HDUser Guide V1.01

Ac-7 Core HD User Guide
1
Welcome!
ank you for purchasing the Ac-7 Core HD. It can become a valuable part of your studio setup, giving wired or wireless control over your recording/mixing software. Of course there’s always a learning curve when starting to use a new system, so this user guide is designed to get you up and running as quickly and painlessly as possible.
We’ll start with con"guring your host computer, then move on to individual set up instructions for each piece of recording/mixing software we support. ere will also be a Tips section, giving pointers we’ve learned over the years to get the most out of a controller.
So sit back, relax, and let’s begin.
Ac-7 Core HD User Guide
2
Setting Up Your Computer
e Ac-7 Core HD uses iOS/OS X’s built-in CoreMIDI frameworks for wired/wireless communication with the host computer.
Wired
Using a wired connection is very simple. You’ll need the iPad Camera Connection Kit (USB)*, an iOS CoreMIDI compatible USB to MIDI cable/interface and a spare MIDI in and out port on your system. Simply connect everything up, start the app fresh**, and everything will “just work”.
* At the time of writing, the Camera Connection Kit only works with 30-pin connectors (so iPad 2 or 3). I’m sure there will be a similar solution soon for users with the new “Lightning” connector.
**starting the app fresh means a clean launch. So remove the app from the iPad’s multitasking area, then start the app from its icon.
Wireless
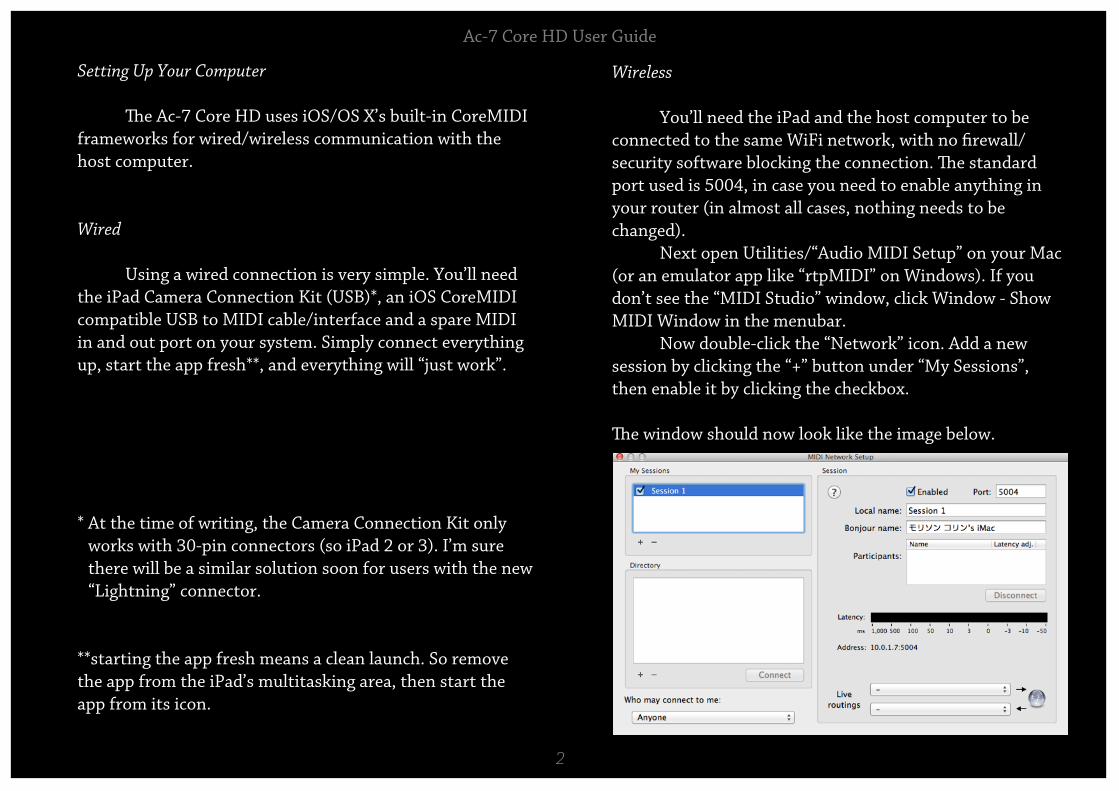
You’ll need the iPad and the host computer to be connected to the same WiFi network, with no "rewall/security software blocking the connection. e standard port used is 5004, in case you need to enable anything in your router (in almost all cases, nothing needs to be changed). Next open Utilities/“Audio MIDI Setup” on your Mac (or an emulator app like “rtpMIDI” on Windows). If you don’t see the “MIDI Studio” window, click Window - Show MIDI Window in the menubar. Now double-click the “Network” icon. Add a new session by clicking the “+” button under “My Sessions”, then enable it by clicking the checkbox.
e window should now look like the image below.

Ac-7 Core HD User Guide
3
Now on to the app itself
Now you can launch the Ac-7 Core HD app on your iPad, and push the “SETUP” button at the top right of the screen.
You’ll then be presented with some app options:
Latency Reducer - Leave this off for now, but you can switch it on later if you "nd your wireless network is lagging, or you suffer network dropouts. It’s a kind of magic ;-)
Meter Response - is affects both meter and fader movement. Leave it on Smooth for a natural type of response, or switch to Fast for instant “blocky” moves.
Alerts for Connections - Now the fun begins... Switching this to On will bring up each available wireless MIDI connection as an alert with 2 options : Ignore and Connect. You’ll "nd your iPad’s name is included as a connection too... Ignore this for now (there may be a use for it in the future). Tap Connect for the connection with your computer’s name, and Ignore for any others.
You can then switch the Alerts for Connections option back to off, if you don’t want any new connections to disturb you.
If no suitable connections were found, you’ll have to check your network connections and computer settings then try again.

Ac-7 Core HD User Guide
4
Almost Done!
All that’s left now is to choose your DAW mode. Scroll down from the app options to see the full list of DAW’s supported, and push the Select button next to the one you want to use. Now push the SETUP button again to close the option box.
at’s it for the app setup!
Before we go on, it’s important to understand that you can change the button layouts by swiping left/right at the top of each button bank. Your changes will be remembered.
If you go back and check your MIDI Network window, it should look like the bottom image on the right. If not, go back and try the Alerts for Connections method again.
Now you’ll have to start your DAW and add a virtual “Mackie Control Universal” compatible controller in each DAW, except for ProTools which uses “HUI”. You’ll need to set “Session 1” as the input and output ports for the controller.
For most DAW’s this is straightforward (check your DAW manual) but there are some with speci"c steps required...

Ac-7 Core HD User Guide
5
ProTools
First you have to enable the “Network, Session 1” as an input device. So go to Setup->MIDI->Input Devices and click the checkbox next to “Network, Session 1”. Next go to Setup->Peripherals... and move to the MIDI Controllers tab. Add a new controller, setting “Type” to “HUI”, “Receive from” to “Network, Session 1”, and “Send to” to “Network, Session 1”. en click OK.
*special additional instructions for ProTools are later in this guide
Logic Pro
e Ac-7 Core HD should be detected and installed automatically when Logic starts up. If not try pushing the RESET button. If you have to add it manually, go to Preferences->Control Surfaces Setup... and add a new “Mackie Control Universal” remembering to set “Session 1” for the MIDI input and output ports.

Ac-7 Core HD User Guide
6
Cakewalk Sonar
In Sonar, you’ll need to add the “Mackie Control Universal” controller as usual - setting “Session 1” as the “In Port” and “Out Port”. But just after adding it, you’ll need to push the RESET button on the Ac-7 Core HD to sync with Sonar properly. It may take a couple of tries to get the timing right.
Cockos Reaper
In Reaper, "rst you’ll have to disable the “Session 1” as a MIDI input and output, by going to Options->Preferences->MIDI Devices and setting them to <disabled>. Now you can go to Options->Preferences->Control Surfaces and add a new Mackie Control with “Session 1” as the input and output.
To improve Reaper’s implementation, search for Klinke’s MCU plugin in Reaper’s user forums. It’s very cool.

Ac-7 Core HD User Guide
7
Presonus Studio One
Choose “Con"gure External Devices...” at the main screen then click Add. Choose “Mackie Control” from the list and select “Session 1” as the “Send to” and “Receive from” option. Some users prefer the HUI implementation instead, so change the Ac-7 Core HD to “Pro Tools Mode”, then add a “HUI” instead of a “Mackie Control”.
Ableton Live
Go to Preferences->MIDI Sync. Choose “MackieControl” from the Control Surface list and select “Session 1” as the input and output. Track and Sync for the MIDI ports should be off, but Remote should be on for both.

Ac-7 Core HD User Guide
8
FL Studio
After adding the “Mackie Control Universal” as usual, you’ll need to set the output port to 102.
Final Cut Pro (not X yet)
After adding the “Mackie Control Universal” as usual, the audio mixer window must be open for Ac-7 Core HD to operate correctly.

Ac-7 Core HD User Guide
9
Congratulations!
You should now be connected with your DAW and be able to use all standard controls. For more detailed instructions on what all the buttons do, check your DAW’s documentation related to using a Mackie Control (or HUI for ProTools).
We’ll now go through using the Ac-7 Core HD’s interface, showing how to call on Mackie Control functions.
e V-Pots
e silver knobs (V-Pots) on each channel actually have two functions. ey can be turned or “clicked”. A clockwise turn is accomplished by dragging up or right from the knob. An anti-clockwise turn is accomplished by dragging down or left from the knob.In this way it’s very simple to set pan, send levels etc. Sometimes a V-Pot needs to be “clicked”... simply tap the knob once. e six dark dots on the knob will “bounce” to let you know that a “click” was sent. In Logic, for example, tapping a knob will set the pan to center. Other DAW’s will differ, so check your DAW’s documentation.

Ac-7 Core HD User Guide
10
Bank and Track Buttons
Buttons with 2 arrows are for moving the fader bank left/right by 8 tracks, buttons with a single arrow are for moving left/right by a single track. So no matter how many tracks are in your project, it’s simple to switch between them in banks of 8. Many DAW’s use SHIFT + BANK to move to the "rst/last bank in the project.

Ac-7 Core HD User Guide
11
ProTools (or HUI) Only -
ere is a button labelled “Plugin Mode”, which enters/exits Plugin edit mode. To select a channel, hold Insert and tap the channel’s SEL button. Now the "rst 4 channel’s V-Pots control Plugin parameters, while the 8th V-Pot is used to scroll through banks of parameters.
For example to add a plugin on channel 1...
Push the Plugin Mode button to enter Plugin edit mode. Push Insert + Channel 1's SEL button.Push the Assign button to enter Plugin select mode. Turn channel 1's V-Pot to select the desired plugin. Tap channel 1's V-Pot to con"rm your choice.Tap channel 1's V-Pot again to enter parameter edit mode.Now the "rst 4 V-Pots are assigned to plugin parameters, while the 8th can be used to bank to the next set of 4 parameters.

Ac-7 Core HD User Guide
12
Success?
If you’re having problems getting up and running, feel free to email me at: [email protected] and I’ll do my best to help you out.
Bear in mind though that I probably won’t be able to help with DAW-speci"c questions e.g. How do I do X in Cubase? For that, I’m afraid you’ll need to read your DAW’s documentation, or ask at your DAW’s user forums.
A hints and tips section will be added here soon, but for now... good luck!