abi prism genemapper software version...
TRANSCRIPT

ABI PRISM® GeneMapper™ Software Version 3.0SNP Genotyping
Tutorial


DRAFTSeptember 25, 2002 1:20 pm, 7x9_Title.fm
ABI PRISM® GeneMapper™ Software Version 3.0SNP Genotyping
Tutorial

DRAFTSeptember 25, 2002 1:20 pm, 7x9_Title.fm
© Copyright 2002, Applied Biosystems. All rights reserved.
For Research Use Only. Not for use in diagnostic procedures.
Notice to Purchaser: License Disclaimer.
Purchase of this software product alone does not imply any license under any process, instrument or other apparatus, system, composition, reagent or kit rights under patent claims owned or otherwise controlled by PE Corporation (NY), either expressly, or by estoppel.
Information in this document is subject to change without notice. Applied Biosystems assumes no responsibility for any errors that may appear in this document. This document is believed to be complete and accurate at the time of publication. In no event shall Applied Biosystems be liable for incidental, special, multiple, or consequential damages in connection with or arising from the use of this document.
ABI PRISM and its design, Applied Biosystems, GeneScan, Genotyper, LIZ, and SNaPshot are registered trademarks of Applera Corporation or its subsidiaries in the U.S. and certain other countries.
AB (Design), ABI, Applera, GeneMapper, GeneScan, and Primer Focus are trademarks of Applera Corporation or its subsidiaries in the U.S. and certain other countries.
Macintosh is a registered trademark of Apple Computer, Inc.
All other trademarks are the sole property of their respective owners.
Part Number 4335524 Rev. B09/2002

DRAFTSeptember 25, 2002 1:21 pm, 4335524A_BookTOC.fm
SNP Genotyping with ABI PRISM GeneMapper Software Version 3.0 Tutorial iv
Contents
Chapter 1 IntroductionAbout the SNP Genotyping Tutorial . . . . . . . . . . . . . . . . . . . . . . . . . . . 1-2
Data Provided . . . . . . . . . . . . . . . . . . . . . . . . . . . . . . . . . . . . . . . . . . . . 1-4
New Features in GeneMapper Software Version 3.0 . . . . . . . . . . . . . . 1-5
Process Flowchart . . . . . . . . . . . . . . . . . . . . . . . . . . . . . . . . . . . . . . . . 1-7
Chapter 2 Working With Kits, Bin Sets, and PanelsProcess Flowchart . . . . . . . . . . . . . . . . . . . . . . . . . . . . . . . . . . . . . . . . 2-2
Importing and Sizing Reference Data . . . . . . . . . . . . . . . . . . . . . . . . . . 2-3
Setting Up Kits, Bin Sets, and Panels . . . . . . . . . . . . . . . . . . . . . . . . . . 2-8
Creating Markers and Bins . . . . . . . . . . . . . . . . . . . . . . . . . . . . . . . . . 2-13
Chapter 3 Data AnalysisProcess Flowchart . . . . . . . . . . . . . . . . . . . . . . . . . . . . . . . . . . . . . . . . 3-2
Creating an Analysis Method . . . . . . . . . . . . . . . . . . . . . . . . . . . . . . . . 3-2
Performing Analysis on SNP Genotyping Data . . . . . . . . . . . . . . . . . . 3-10
Examining the Analyzed Data . . . . . . . . . . . . . . . . . . . . . . . . . . . . . . . 3-13
Performing Tasks in the Plot Windows . . . . . . . . . . . . . . . . . . . . . . . . 3-18
Chapter 4 Auto Panel Feature for Primer FocusProcess Flowchart . . . . . . . . . . . . . . . . . . . . . . . . . . . . . . . . . . . . . . . . 4-2
Importing and Sizing Reference Data . . . . . . . . . . . . . . . . . . . . . . . . . . 4-3
Setting Up Kits and Bin Sets . . . . . . . . . . . . . . . . . . . . . . . . . . . . . . . . 4-8
Using the Auto Panel Feature . . . . . . . . . . . . . . . . . . . . . . . . . . . . . . . 4-10

DRAFTSeptember 25, 2002 1:21 pm, 4335524A_BookTOC.fm
v SNP Genotyping with ABI PRISM GeneMapper Software Version 3.0 Tutorial
Appendix A Peak Detection Algorithms
Index

DRAFTSeptember 25, 2002 1:21 pm, 01_About
SNP Genotyping with ABI PRISM GeneMapper Software Version 3.0 Tutorial
1
Introduction 1In This Chapter This chapter contains the following topics:
About the SNaPshot Tutorial. . . . . . . . . . . . . . . . . . . . . . . . . . . . . .1-2Data Provided . . . . . . . . . . . . . . . . . . . . . . . . . . . . . . . . . . . . . . . . .1-4New Features in GeneMapper Software Version 3.0. . . . . . . . . . . .1-5Process Flowchart . . . . . . . . . . . . . . . . . . . . . . . . . . . . . . . . . . . . . .1-7
SnapShot.fm
1-1

Chapter 1 Introduction
About the SNP Genotyping Tutorial
Overview This tutorial is intended to help you get quickly up to speed in performing analyses of SNaPshot® data with ABI PRISM® GeneMapper™ Software Version 3.0.
Note: This tutorial contains basic information only. For more advanced information, please refer to the ABI PRISM® GeneMapper™ Genotyping Software User’s Manual (PN 4335526).
Goals After completing this tutorial, you should be able to:
• Set up a GeneMapper software project.• Import sample files for analysis.• Define new SNP markers and bin sets using the Auto Panel
feature. This feature is only for reference data generated by the SNaPshot® Primer Focus™ kit.
How to Use ThisTutorial
\When you are following the procedures in this tutorial, it is important that you:
• Perform every step in the order listed.• Do not introduce any extraneous samples or bins.
The procedures are written using menu selections, for example:
Select Tools > GeneMapper Manager.
You may also use the icons located on the toolbar.
Terms Used inThis Tutorial
The following terms are used in this tutorial:
Table 1-1 Terms and Definitions
Term Definition
Analysis Method A collection of parameters set by the user to determine the bin set and analysis algorithms. See page 3-2.
Bin A fragment size or basepair range and dye color that define an allele.
DRAFTSeptember 25, 2002 1:21 pm, 01_AboutSnapShot.fm
1-2 SNP Genotyping with ABI PRISM GeneMapper Software Version 3.0 Tutorial

About the SNP Genotyping Tutorial
For MoreInformation
For more information about the GeneMapper software, refer to the documents listed below.
Bin set A set of bins (that is, allele definitions) for one source or set of experimental conditions, usually an instrument. Bin sets are available inside a kit.
Marker A known SNP location.
Panel A set of markers.
Project settings Parameters set by the user to prepare a project for analysis. See page 3-12.
Table 1-1 Terms and Definitions (continued)
Term Definition
Document Part Number
ABI PRISM® GeneMapper™ Genotyping Software User’s Manual
4335526
Microsatellite Analysis with ABI PRISM® GeneMapper™ Software Version 3.0 Tutorial
4335525
DRAFTSeptember 25, 2002 1:21 pm, 01_AboutSnapShot.fm
SNP Genotyping with ABI PRISM GeneMapper Software Version 3.0 Tutorial 1-3

Chapter 1 Introduction
Data Provided
Overview GeneMapper Software Version 3.0 comes with the data listed below.
Algorithms andQuality Values
To support SNaPshot multiplex analysis, the following algorithms and quality values are provided:
• Double Peak: Two peaks with the same color in the same bin• Narrow Bin: Peak of the same color as a bin within 0.5 basepairs
of the bin• SNaPshot Cutoff Value: Examines the ratio (Y/X) between two
peaks (X and Y) within a marker; if the ratio is less than the cutoff value, the second peak will not be called
Default Settings The following SNaPshot default settings are listed below.
Primer FocusSample Files
Six Primer Focus sample files are provided. Each of these is a single primer that corresponds with the SNaPshot® Multiplex Control Primers.
SNaPshotSample Files
Five sample files of SNaPshot multiplex data are provided:
• Four sample files were generated using the SNaPshot Multiplex Control Primers on different individuals.
• One sample file contains the GeneScan™-120 LIZ® size standard only.
Type Name Parameters
Analysis Method
SNaPshot Default • Analysis Type = SNaPshot• Bin Set = none• Analysis Algorithm = basic
Plot Setting SNP Default N/A
Table Setting SNP Default
DRAFTSeptember 25, 2002 1:21 pm, 01_AboutSnapShot.fm
1-4 SNP Genotyping with ABI PRISM GeneMapper Software Version 3.0 Tutorial

New Features in GeneMapper Software Version 3.0
Size StandardDefinition
The GeneScan™ –120 LIZ® (GS120LIZ) size standard definition is provided.
Note: Custom size standard definitions can be created. For procedures, refer to the ABI PRISM® GeneMapper™ Genotyping Software User’s Manual (PN 4335526).
New Features in GeneMapper Software Version 3.0
List of NewFeatures
GeneMapper Software Version 3.0 is an enhancement of GeneMapper Software Version 2.0. The new features in GeneMapper Software Version 3.0 are listed below.
• ABI PRISM® GeneScan® software functionality, including:– EPT Data tab added to the Samples tab (accessed via the
Project window)– Sizing Table tab added to the Plot Settings Editor (accessed via
the Plots window)– Standard Curve tab added to the Size Match Editor
• ABI PRISM® Genotyper® software functionality, including:– Enhanced allele call labels in the Plots window– Customized allele labeling options in the Plots window– Marker and bin editing within the Plots window
• User interface consistency across products, including new or revised menus and shortcut keys
For detailed information about these new features, refer to the ABI PRISM® GeneMapper™ Genotyping Software User’s Manual (PN 4335526).
How TheseFeatures Affect
Data Analysis
When you perform SNaPshot data analysis with GeneMapper Software Version 3.0 you will:
• Have increased editing flexibility• Be able to save panels that may pre-exist (for Primer Focus data)
DRAFTSeptember 25, 2002 1:21 pm, 01_AboutSnapShot.fm
SNP Genotyping with ABI PRISM GeneMapper Software Version 3.0 Tutorial 1-5

Chapter 1 Introduction
Auto PanelFeature
GeneMapper software contains an Auto Panel feature that takes advantage of the reference data generated by the Primer Focus kit to define new SNP markers and bin sets quickly. The software determines the overlap potential of SNP markers and recommends panels to achieve accurate SNaPshot multiplexing results.
Note: Auto Panelizing procedures are provided in Chapter 4.
DRAFTSeptember 25, 2002 1:21 pm, 01_AboutSnapShot.fm
1-6 SNP Genotyping with ABI PRISM GeneMapper Software Version 3.0 Tutorial

Process Flowchart
Process Flowchart
AnalyzingSNaPshot Data
The flowchart below provides an overview of the tasks required to analyze SNaPshot data with the GeneMapper software. For detailed procedures, see the references below.
Rules for SNPKits, Panels, and
Bins
The following rules apply to SNP kits, panels, and bins:
• Bins of the same color may not overlap anywhere within a panel.• A bin is one color. There are up to four bins or colors per marker,
one for each of the ddNTP bases (A, C, T, G).• Markers in a panel may overlap as long as bins of the same color
do not overlap.
Set up a new project:• Import and size reference data• Manually create panels/bins or use the Auto
Panel feature with Primer Focus sample files
Define a size standard, if necessary
Examine the analyzed data:• Adjust panels or bins• Edit allele calls
Import data, convert Macintosh® files, if necessary
Analyze data, apply project settings
Create an Analysis Method:• Select the analysis type (SNaPshot)• Select a bin set• Select an analysis algorithm
See Chapter 2 and Chapter 4
See page 3-5
See User Manual
See page 3-10
See page 3-13
See page 2-3 and User Manual
DRAFTSeptember 25, 2002 1:21 pm, 01_AboutSnapShot.fm
SNP Genotyping with ABI PRISM GeneMapper Software Version 3.0 Tutorial 1-7

Chapter 1 Introduction
• Bins in a marker are single continuous ranges; there is only one bin of each color in a marker.
• Bins in a marker must be different colors and may overlap; for almost all markers there will be some overlap of their constituent bins.
• The marker size range is the minimum and maximum of its bin size ranges. A margin may be necessary to accommodate alleles not seen in the SNP Reference Data samples.
• Duplicate bin names are not allowed in a marker.• Each kit can only have one bin set.
DRAFTSeptember 25, 2002 1:21 pm, 01_AboutSnapShot.fm
1-8 SNP Genotyping with ABI PRISM GeneMapper Software Version 3.0 Tutorial

DRAFTSeptember 25, 2002 1:21 pm, 02_Proje
SNP Genotyping with ABI PRISM GeneMapper Software Version 3.0 Tutorial
2
Working With Kits, Bin Sets, and Panels 2In This Chapter This chapter contains the following topics:
Process Flowchart . . . . . . . . . . . . . . . . . . . . . . . . . . . . . . . . . . . . . .2-2Importing and Sizing Reference Data . . . . . . . . . . . . . . . . . . . . . . .2-3Setting Up Kits, Bin Sets, and Panels . . . . . . . . . . . . . . . . . . . . . . .2-8Creating Markers and Bins . . . . . . . . . . . . . . . . . . . . . . . . . . . . . .2-13
Assumptions This chapter guides you through setting up a project in ABI PRISM® GeneMapper™ Software Version 3.0 in order to analyze SNaPshot® data.
It is assumed that you have already installed and logged on to the GeneMapper software.
Note: This chapter provides instructions for manually creating kits, bins sets and panels. To create these using the Auto Panel feature with SNaPshot® Primer Focus™ kit sample files, please refer to Chapter 4.
ctSetup.fm
2-1

Chapter 2 Working With Kits, Bin Sets, and Panels
Process Flowchart
Setting Up aProject
The flowchart below provides an overview of the tasks required to set up a GeneMapper project when you are manually creating kits, bin sets, and panels.
Pan
el M
anag
erP
roje
ct W
ind
ow
Create a new kit
Import reference data into a new project
Size the reference data:• Select an Analysis Method with
SNaPshot as the analysis type• Set the panel to None• Select a size standard
Create a new panel
Add reference data to the kit
Create markers and bins
Add reference data to the panel
Create a new bin set
DRAFTSeptember 25, 2002 1:21 pm, 02_ProjectSetup.fm
2-2 SNP Genotyping with ABI PRISM GeneMapper Software Version 3.0 Tutorial

Importing and Sizing Reference Data
Importing and Sizing Reference Data
Overview Predefined panel and bin information does not exist for SNaPshot multiplex samples, since every user has a different set of primers, primer lengths, and multiplexing levels. Therefore, the first tasks required when creating panels and bins are to import reference data into a new project and perform sizing analysis.
The steps required are:
• Converting the sample files, if necessary• Importing reference data (that is, SNP sample files) into a
new project• Performing sizing analysis on the reference data
ConvertingSample Files
Note: Information on converting sample files is not necessary for this tutorial. However, you may find it useful when you are working with your own sample files.
If necessary, convert ABI PRISM® GeneScan® Analysis Software sample files generated by the Apple Macintosh® software to the .fsa format. The conversion is described in the ABI PRISM® GeneMapper™ Genotyping Software User’s Manual (PN 4335526).
ImportingReference Data
into a NewProject
To import reference data into a new project:
1. In the Project window, select File > Add Samples to Project.
The Add Samples to Project window opens.
DRAFTSeptember 25, 2002 1:21 pm, 02_ProjectSetup.fm
SNP Genotyping with ABI PRISM GeneMapper Software Version 3.0 Tutorial 2-3

Chapter 2 Working With Kits, Bin Sets, and Panels
2. Navigate to the disk/directory containing the GeneMapper software application.
3. Add sample files from the SNaPshot folder to this project, as follows:
a. Open the following folders in this order:GMdistribution > Tutorial Data > SNaPshot > SNaPshot
b. Select the SNaPshot folder.
c. Click Add To List.
The SNaPshot folder moves to the Samples To Add list in the Add Samples to Project window.
Note: If you move the wrong folder to the Samples To Add list, select the folder and click Clear to remove it.
4. Clicking Add performs these functions:
a. Imports the sample files into a new project
b. Closes the Add Samples to Project window.
c. Reveals the Project window (previously hidden behind the Add Samples to Project window) now populated with the imported sample files (in the Samples tab).
To import reference data into a new project: (continued)
DRAFTSeptember 25, 2002 1:21 pm, 02_ProjectSetup.fm
2-4 SNP Genotyping with ABI PRISM GeneMapper Software Version 3.0 Tutorial

Importing and Sizing Reference Data
Performing SizingAnalysis
To perform sizing analysis on the reference data:
1. Go to the Samples tab view in the Project window.
2. Select an Analysis Method:
a. Select the top cell in the Analysis Method column.
b. Select SNaPshot Default from the drop-down list.
Note: When you are analyzing your own SNaPshot reference data, make sure the Analysis Method you choose has SNaPshot as the analysis type.
3. For this tutorial, the Panel column should already be set to None. If it is not:
a. Select the top cell in the Panel column. The Select a Panel window opens.
b. Double-click None.
The Select a Panel window closes and None is entered into the first cell of the Panel column in the Samples tab.
Note: Setting the Panel column to None ensures that a sizing-only analysis is performed.
4. Select a size standard:
a. Select the top cell in the Size Standard column.
b. Select GS120LIZ from the drop-down list.
Note: The GS120LIZ size standard has been predefined for you. To learn how to create your own size standard, refer to the ABI PRISM® GeneMapper™ Genotyping Software User’s Manual (PN 4335526).
5. Apply the selections to the selected samples, as follows:
a. Click and drag the mouse across the three column headings (Analysis Method, Panel, and Size Standard) to select the entire columns.
b. Select Edit > Fill Down (or press Ctrl+D) to apply the selection to the selected samples.
DRAFTSeptember 25, 2002 1:21 pm, 02_ProjectSetup.fm
SNP Genotyping with ABI PRISM GeneMapper Software Version 3.0 Tutorial 2-5

Chapter 2 Working With Kits, Bin Sets, and Panels
6. Select Analysis > Analyze.
The Save Project dialog box opens.
7. Type SNaPshot Tutorial and click OK.
The program initiates analysis, then saves each analyzed sample to the project you have just named. While analysis is proceeding, progress is displayed as follows:• The progress indicator at the bottom of the Project
window shows progress in two ways:– As a bar graph extending from the left– As a percentage indicator
• The current sample undergoing analysis is indicated by the sample row in the table displayed in green (or red if analysis failed for the sample).
When the program has finished analyzing the samples, the message “Analysis Completed” displays on the Status bar of the Project window (lower left corner).
When samples are sized successfully:• A green square is displayed in the SQ column.• The Status column is cleared.
Note: Auto-saving takes place after every 10 sample files are analyzed or before the “Analysis Completed” message displays.
To perform sizing analysis on the reference data: (continued)
DRAFTSeptember 25, 2002 1:21 pm, 02_ProjectSetup.fm
2-6 SNP Genotyping with ABI PRISM GeneMapper Software Version 3.0 Tutorial

Importing and Sizing Reference Data
8. To verify the size calling:
a. Select a sample.
b. Select Analysis > Size Match Editor. The Size Match Editor window opens, showing how the size standard peaks were labeled.
Note: The sizing should be successful for this tutorial. When analyzing your own data, if the size standard failed or if labels were assigned to the wrong peaks, you can make changes in the Size Match Editor window. For more information on using this window, refer to the ABI PRISM® GeneMapper™ Genotyping Software User’s Manual (PN 4335526).
To perform sizing analysis on the reference data: (continued)
DRAFTSeptember 25, 2002 1:21 pm, 02_ProjectSetup.fm
SNP Genotyping with ABI PRISM GeneMapper Software Version 3.0 Tutorial 2-7

Chapter 2 Working With Kits, Bin Sets, and Panels
Setting Up Kits, Bin Sets, and Panels
Overview The steps required to set up kits, bin sets, and panels are:
• Creating an SNP kit• Creating an SNP bin set• Creating a panel• Adding reference data (that is, SNP sample files) to the new kit• Adding reference data (that is, SNP sample files) to the new panel
Creating aSNP Kit
To create an SNP kit:
1. In the Project window, select Tools > Panel Manager.
The Panel Manager window opens.
2. Select Panel Manager in the navigation pane.
DRAFTSeptember 25, 2002 1:21 pm, 02_ProjectSetup.fm
2-8 SNP Genotyping with ABI PRISM GeneMapper Software Version 3.0 Tutorial

Setting Up Kits, Bin Sets, and Panels
Creating aSNP Bin Set
Bin sets are always created at the kit level. You can only have one bin set defined for each SNP kit.
3. Select File > New Kit.
The New Kit dialog box opens.
4. Complete the following information:
a. In the Kit name text field, type SNaPshot Tutorial.
b. From the Kit type drop-down list, select SNP.
c. Click OK.
The Kit dialog box closes and reveals the previously hidden Panel Manager window with the new SNP kit (SNaPshot Tutorial) displayed in the navigation pane.
To create an SNP kit: (continued)
To create an SNP bin set:
1. In the navigation pane of the Panel Manager window, select the SNaPshot Tutorial kit.
2. Select Bins > New Bin Set.
The New Bin Set dialog box opens.
DRAFTSeptember 25, 2002 1:21 pm, 02_ProjectSetup.fm
SNP Genotyping with ABI PRISM GeneMapper Software Version 3.0 Tutorial 2-9

Chapter 2 Working With Kits, Bin Sets, and Panels
Creating aSNP Panel
Note: A panel is a set of markers.
Adding ReferenceData to the New
SNP Kit
You can add whole folders or individual files at the kit level. By adding reference data at the kit level initially, you can add multiple sample files at once. After you add sample files to a kit, you can sort them into individual panels (see page 2-12).
3. Type SNP Demobins as the name of the new bin set, then click OK.
The new bin set name (SNP Demobins) is added to the Bin Set drop-down list at the top of the Panel Manager window.
To create an SNP bin set: (continued)
To create a SNP panel:
1. Select File > New Panel.
A New Panel text box displays on the right side of the Panel Manager window.
2. Type 6plex Sample in the text box, then press Enter.
The new panel (6plex Sample) is displayed in the navigation pane of the Panel Manager window.
To add reference data to the new SNP kit:
1. Select the SNaPshot Tutorial kit in the Panel Manager navigation pane.
2. Select Bins > Add Reference Data.
The Add SNP Reference Data dialog box opens.
3. Click Search. Results are displayed in the Search Results pane.
Note: All sized projects stored in the GeneMapper database are shown.
DRAFTSeptember 25, 2002 1:21 pm, 02_ProjectSetup.fm
2-10 SNP Genotyping with ABI PRISM GeneMapper Software Version 3.0 Tutorial

Setting Up Kits, Bin Sets, and Panels
Adding theSample File to the
New Panel
Once you have added reference data to a kit (see page 2-10), you can sort the sample files into individual panels. This is also called “paneling” the reference data.
4. Expand the following folders in this order:
SNaPshot Tutorial > SNaPshot
Note: The SNaPshot Tutorial folder contains the reference data you sized on page 2-5.
5. Select the 5_E03_09.fsa sample file.
Note: For this tutorial, you will add only one sample file from the SNaPshot Tutorial folder.
6. Click Add To List, then click Add, to close the Add SNP Reference Data dialog box.
The message “SNP data added” displays. The 5_E03_09.fsa sample file has been added to the new SNP kit.
7. Click OK to close the message and return to the Panel Manager window.
To add reference data to the new SNP kit: (continued)
To add the sample file to the new panel:
1. In the Panel Manager window, select the 6plex Sample panel from the navigation pane. (This is the panel you created on page 2-10.)
DRAFTSeptember 25, 2002 1:21 pm, 02_ProjectSetup.fm
SNP Genotyping with ABI PRISM GeneMapper Software Version 3.0 Tutorial 2-11

Chapter 2 Working With Kits, Bin Sets, and Panels
2. Select Bins > Panel Reference Data.
The SNP Reference Data dialog box opens.
3. To associate the 5_E03_09.fsa sample file as the reference data for the selected panel:
a. Select 5_E03_09.fsa.
b. Move the file from the kit level to the panel level by clicking the > button.
Note: Multiple sample files can be used as SNP reference data for one panel.
4. Click OK to close the SNP Reference Data dialog box and return to the Panel Manager window.
To add the sample file to the new panel: (continued)
DRAFTSeptember 25, 2002 1:21 pm, 02_ProjectSetup.fm
2-12 SNP Genotyping with ABI PRISM GeneMapper Software Version 3.0 Tutorial

Creating Markers and Bins
Creating Markers and Bins
Overview This section guides you through setting up bins for the individual markers within a panel. The steps included are:
• Selecting SNP sample files (reference data) in the Plot tab• Creating markers and bins• Reviewing and editing marker and bin information (optional)
Selecting SNPSample Files
To select SNP sample files in the Plot tab:
1. In the Panel Manager window, select the Plot tab.
2. Select one or more sample files from the Reference Samples list in the lower navigation pane.
An electropherogram of the selected sample file(s) is displayed in basepairs along the X axis.
DRAFTSeptember 25, 2002 1:21 pm, 02_ProjectSetup.fm
SNP Genotyping with ABI PRISM GeneMapper Software Version 3.0 Tutorial 2-13

Chapter 2 Working With Kits, Bin Sets, and Panels
3. If desired, you can:• Change the scales for the X and Y axes by using the View
menu or by right-clicking on the labels of the X and Yaxes.
• Turn the dye colors on and off by selecting the individual colors from the toolbar.
To select SNP sample files in the Plot tab: (continued)
DRAFTSeptember 25, 2002 1:21 pm, 02_ProjectSetup.fm
2-14 SNP Genotyping with ABI PRISM GeneMapper Software Version 3.0 Tutorial

Creating Markers and Bins
Creating Markersand Bins
To create markers and bins:
1. In the electropherogram, zoom* in around the first green peak (a homozygote allele located ~24 basepairs).
* To zoom:
If you want to... Then...
zoom in on a specific region
click the X or Y axis labels and, while holding down the left mouse button, drag it to the desired region.
zoom out to the full view
double-click the X or Y axis labels.
access additional zoom options
right-click the X or Y axis labels.
DRAFTSeptember 25, 2002 1:21 pm, 02_ProjectSetup.fm
SNP Genotyping with ABI PRISM GeneMapper Software Version 3.0 Tutorial 2-15

Chapter 2 Working With Kits, Bin Sets, and Panels
2. Select File > New SNP Marker.
The Add Marker dialog box opens.
3. In the Marker Name text field, type 20mer.
4. Type in a basepair range for the green allele that you are zoomed in on:
Note: This marker is a homozygote allele, so only one bin is created.
Note: For the SNaPshot Multiplex Kit, use the following:
• Blue = ddGTP = G• Green = ddATP = A• Yellow = ddCTP = C• Red = ddUTP = T
To create markers and bins: (continued)
Field Entry
Min (green) 24.6
Max (green) 26.1
DRAFTSeptember 25, 2002 1:21 pm, 02_ProjectSetup.fm
2-16 SNP Genotyping with ABI PRISM GeneMapper Software Version 3.0 Tutorial

Creating Markers and Bins
5. Click OK.
The marker and bin information is saved to the panel. The electropherogram is redisplayed with the newly created bin overlaid on it.
6. To view other peaks, zoom out by:• Selecting View > Full View, or• Clicking the Full View icon on the toolbar,
or,• Double-clicking in the axis tick area
To create markers and bins: (continued)
DRAFTSeptember 25, 2002 1:21 pm, 02_ProjectSetup.fm
SNP Genotyping with ABI PRISM GeneMapper Software Version 3.0 Tutorial 2-17

Chapter 2 Working With Kits, Bin Sets, and Panels
7. Zoom in around the heterozygote allele with blue and green peaks.
8. Repeat steps 2 to 4 to create another new marker (28mer), filling in the dialog box as shown below.
To create markers and bins: (continued)
DRAFTSeptember 25, 2002 1:21 pm, 02_ProjectSetup.fm
2-18 SNP Genotyping with ABI PRISM GeneMapper Software Version 3.0 Tutorial

Creating Markers and Bins
9. Click OK.
The marker and bin information is saved to the panel. The electropherogram is redisplayed with the newly created bins overlaid on it.
To create markers and bins: (continued)
DRAFTSeptember 25, 2002 1:21 pm, 02_ProjectSetup.fm
SNP Genotyping with ABI PRISM GeneMapper Software Version 3.0 Tutorial 2-19

Chapter 2 Working With Kits, Bin Sets, and Panels
10. Continue to create new markers and bins for the other four markers (36mer, 44mer, 52mer and 60mer) by repeating the above steps. This reference set of data contains four homozygote and two heterozygote alleles.
Your finished plot should look similar to the one below.
11. Click OK to close the Panel Manager window.
To create markers and bins: (continued)
DRAFTSeptember 25, 2002 1:21 pm, 02_ProjectSetup.fm
2-20 SNP Genotyping with ABI PRISM GeneMapper Software Version 3.0 Tutorial

Creating Markers and Bins
Reviewing andEditing Marker
and BinInformation
The procedure below shows you how to view the markers and bins in table format. You can review the markers and bins that you just created, then edit them if necessary.
To review and edit marker and bin information:
1. In the Panel Manager window, select the Table tab.
Your finished table for this example should look similar to the one below.
Note: The software automatically calculates the marker size range values (Marker Min and Marker Max) based on the individual bin information you provide.
2. To edit the markers and bins, click the appropriate cell and type in the correct information.
Note: Editable fields are:
• Marker name• Bin name• Bin min• Bin max• Control• Comments
3. Click OK to close the Panel Manager window.
DRAFTSeptember 25, 2002 1:21 pm, 02_ProjectSetup.fm
SNP Genotyping with ABI PRISM GeneMapper Software Version 3.0 Tutorial 2-21

Chapter 2 Working With Kits, Bin Sets, and Panels
DRAFTSeptember 25, 2002 1:21 pm, 02_ProjectSetup.fm
2-22 SNP Genotyping with ABI PRISM GeneMapper Software Version 3.0 Tutorial

DRAFTSeptember 25, 2002 1:21 pm, 03_Data
SNP Genotyping with ABI PRISM GeneMapper Software Version 3.0 Tutorial
3
Data Analysis 3In This Chapter This chapter contains the following topics:
Process Flowchart . . . . . . . . . . . . . . . . . . . . . . . . . . . . . . . . . . . . . .3-2Creating an Analysis Method . . . . . . . . . . . . . . . . . . . . . . . . . . . . .3-2Performing Analysis on SNaPshot Data . . . . . . . . . . . . . . . . . . . .3-11Examining the Analyzed Data. . . . . . . . . . . . . . . . . . . . . . . . . . . .3-14Performing Tasks in the Plot Windows . . . . . . . . . . . . . . . . . . . . .3-19
Assumptions This chapter describes how to analyze SNP genotyping data with ABI PRISM® GeneMapper™ Software Version 3.0.
It is assumed that you have already:
• Installed and logged on to the GeneMapper software• Set up a project in the GeneMapper software, as discussed in
Chapter 2
Analysis.fm
3-1

Chapter 3 Data Analysis
Process Flowchart
Performing DataAnalysis
The flowchart below provides an overview of the tasks required to perform data analysis.
Creating an Analysis Method
Overview Creating an Analysis Method allows you to reference the correct bin set and analysis algorithms for your data. The steps required are:
• Accessing the Analysis Method Editor via the GeneMapper Manager window
• Creating the Analysis Method
ProcessFlowchart
The flowchart on page 3-3 provides an overview of the tasks required to create an Analysis Method.
Add sample files to your project
Apply project settings:• Select the Analysis Method• Select the size standard• Select the panel
Start analysis
You can preconfigure the project settings using the Add Samples tab in the Options window (see the User Manual).
Examine the analyzed data
Create an Analysis Method
Perform tasks in the Plot windows (optional)
DRAFTSeptember 25, 2002 1:21 pm, 03_DataAnalysis.fm
3-2 SNP Genotyping with ABI PRISM GeneMapper Software Version 3.0 Tutorial

Creating an Analysis Method
Pro
ject
W
ind
ow
Select the Analysis Methods tab
Select Tools > GeneMapper Manager
In the Alleles tab, select the bin set to use
Select the analysis type (SNaPshot)
Click New
Gen
eMap
per
M
anag
er W
ind
ow
In the General tab, type a name for the new Analysis Method
In the Peak Detector tab, select a peak detection algorithm for your application
In the Peak Quality tab, set the minimum requirements
In the Quality Flags tab, adjust the PQV and threshold settings
Click OK to save the new Analysis MethodA
naly
sis
Met
hod
Ed
itor
Win
dow
DRAFTSeptember 25, 2002 1:21 pm, 03_DataAnalysis.fm
SNP Genotyping with ABI PRISM GeneMapper Software Version 3.0 Tutorial 3-3

Chapter 3 Data Analysis
Accessing theAnalysis Method
Editor
To access the Analysis Method Editor:
1. In the Project window, select Tools > GeneMapper Manager.
The GeneMapper Manager window opens.
2. Select the Analysis Methods tab, then click New.
The New Analysis Method dialog box opens.
DRAFTSeptember 25, 2002 1:21 pm, 03_DataAnalysis.fm
3-4 SNP Genotyping with ABI PRISM GeneMapper Software Version 3.0 Tutorial

Creating an Analysis Method
Creating anAnalysis Method
3. Select SNaPshot as the analysis type, then click OK.
The Analysis Method Editor window opens.
Note: The analysis type you select:
• Sets the analysis algorithm• Displays the appropriate fields for that type of analysis in
the Analysis Method Editor tabs
To access the Analysis Method Editor: (continued)
To create an Analysis Method:
1. In the Analysis Method Editor window, select the General tab.
DRAFTSeptember 25, 2002 1:21 pm, 03_DataAnalysis.fm
SNP Genotyping with ABI PRISM GeneMapper Software Version 3.0 Tutorial 3-5

Chapter 3 Data Analysis
2. Complete the following information:
a. In the Name text field, type SNPtutorial.
b. In the Description text field, type a description of the Analysis Method, if desired.
c. In the Instrument text field, type your instrument name/serial number, if desired.
3. Select the Allele tab, then:
a. Select SNP Demobins from the Bin Set drop-down list. (This is the bin set you created earlier; see page 2-9).
b. Leave the default values as they are for all other fields.
Note: The Cutoff Value and the Min Peak Height Ratio (from the Peak Quality tab; see step 5) may need to be adjusted for your own data. These parameters measure the ratio between two peaks in a heterozygote allele. If the values are not low enough, your allele may be called as a homozygote. If you change only the Cutoff Value, the Min Peak Height Ratio value is flagged. Lowering the Min Peak Height Ratio allows this quality value to pass more often. Again, these values will vary for your own data.
To create an Analysis Method: (continued)
DRAFTSeptember 25, 2002 1:21 pm, 03_DataAnalysis.fm
3-6 SNP Genotyping with ABI PRISM GeneMapper Software Version 3.0 Tutorial

Creating an Analysis Method
4. Select the Peak Detector tab, then:
a. Select Basic from the Peak Detection Algorithm drop-down list. (Be sure to use the Basic mode for this tutorial; the Advanced and Classic algorithm modes are described in the ABI PRISM® GeneMapper™ Genotyping Software User’s Manual (PN 4335526).
b. Select User specified (rfu) in the Minimum Peak Height pane.
c. Leave the default values for each color/dye (50 relative fluorescent units).
Note: The automatic Minimum Peak Height setting is equivalent to 10X the noise level for each sample individually.
‘
To create an Analysis Method: (continued)
DRAFTSeptember 25, 2002 1:21 pm, 03_DataAnalysis.fm
SNP Genotyping with ABI PRISM GeneMapper Software Version 3.0 Tutorial 3-7

Chapter 3 Data Analysis
5. Select the Peak Quality tab, then:
a. Change the Min peak height ratio value to 0.3.
b. Leave the default values as they are for all other fields.
Note: When analyzing your own data, adjusting these values triggers specific PQV flags within a sample. For example, if a homozygous peak is detected with a signal level below 200 RFUs, then the Low Peak Height value will be flagged. For more information, refer to the ABI PRISM® GeneMapper™ Genotyping Software User’s Manual (PN 4335526).
To create an Analysis Method: (continued)
DRAFTSeptember 25, 2002 1:21 pm, 03_DataAnalysis.fm
3-8 SNP Genotyping with ABI PRISM GeneMapper Software Version 3.0 Tutorial

Creating an Analysis Method
6. Select the Quality Flags tab. No changes need to be made; the defaults are satisfactory for this tutorial.
Note: When analyzing your own data, use the Quality Flags to manipulate the importance level of the individual quality values. The quality values are on a scale of 0 to 1, with 0 being of no importance and 1 being of high importance. Changing these values will affect your final GQ value.
7. Click OK to close the Analysis Method Editor window and save the new Analysis Method.
Note: Clicking Cancel will close the window without saving your changes.
8. Click Done to exit the GeneMapper Manager window.
To create an Analysis Method: (continued)
DRAFTSeptember 25, 2002 1:21 pm, 03_DataAnalysis.fm
SNP Genotyping with ABI PRISM GeneMapper Software Version 3.0 Tutorial 3-9

Chapter 3 Data Analysis
Performing Analysis on SNP Genotyping Data
Overview The steps required to perform analysis on SNP genotyping data are:
• Converting the sample files, if necessary• Adding samples files to the project• Applying project settings and starting the analysis
ConvertingSample Files
Note: The information below is not necessary for this tutorial; however, you may find it useful when you are working with your own sample files.
If necessary, convert ABI PRISM® GeneScan® Analysis Software sample files generated by the Apple Macintosh® software to the .fsa format. The conversion is described in the ABI PRISM® GeneMapper™ Genotyping Software User’s Manual (PN 4335526).
Adding SampleFiles
If you have followed along through this tutorial, you should already have added your sample files to the Project window. These are the same files that you used for sizing; see “Importing and Sizing Reference Data” on page 2-3.
DRAFTSeptember 25, 2002 1:21 pm, 03_DataAnalysis.fm
3-10 SNP Genotyping with ABI PRISM GeneMapper Software Version 3.0 Tutorial

Performing Analysis on SNP Genotyping Data
Applying ProjectSettings
The project settings include:
• The desired Analysis Method, containing the appropriate bin set• The appropriate panel• The appropriate size standard
To apply project settings:
1. In the Project window, select the Samples tab.
2. Select an Analysis Method:
a. Select the top cell in the Analysis Method column.
b. Select SNPtutorial from the drop-down list. (This is the Analysis Method you created earlier; see page 3-5.)
3. Select a panel:
a. Select the top cell in the Panel column. The Select a Panel window opens.
b. Open the SNaPshot Tutorial folder.
c. Double-click the 6plex Sample panel.
The Select a Panel window closes and 6plex Sample is entered into the first cell of the Panel column in the Samples tab.
4. Select a size standard:
a. Select the top cell in the Size Standard column.
b. Select GS120LIZ from the drop-down list.
Note: The GeneScan™ 120 LIZ® (GS120LIZ) size standard has been predefined for you. To learn how to create your own size standard, refer to the ABI PRISM® GeneMapper™ Genotyping Software User’s Manual (PN 4335526).
DRAFTSeptember 25, 2002 1:21 pm, 03_DataAnalysis.fm
SNP Genotyping with ABI PRISM GeneMapper Software Version 3.0 Tutorial 3-11

Chapter 3 Data Analysis
5. Apply the selections to the selected samples, as follows:
a. Click and drag the mouse across the three column headings (Analysis Method, Panel, and Size Standard) to select the entire columns.
b. Select Edit > Fill Down (or press Ctrl+D) to apply the selections to the selected samples.
New icons are now displayed, indicating that the analysis needs to be performed.
6. Select Analysis > Analyze.
Note: Since this project is the one you created in Chapter 2, the Save As dialog box does not appear. Your project will be saved automatically under the same name.
7. The program initiates analysis, then saves each analyzed sample to the project. While analysis is proceeding, progress is displayed as follows:• The progress indicator at the bottom of the Project
window shows progress in two ways:– As a bar graph extending from the left– As a percentage indicator
• The current sample undergoing analysis is indicated by the sample row in the table displayed in green (or red if analysis failed for the sample).
When the program has finished analyzing the samples, the message “Analysis Completed” displays on the Status bar of the Project window (lower left corner).
Note: Auto-saving takes place after every 10 sample files are analyzed or before the “Analysis Completed” message displays.
8. Continue with “Examining the Analyzed Data” on page 3-13.
To apply project settings: (continued)
DRAFTSeptember 25, 2002 1:21 pm, 03_DataAnalysis.fm
3-12 SNP Genotyping with ABI PRISM GeneMapper Software Version 3.0 Tutorial
Examining the Analyzed Data
Examining the Analyzed Data
Overview You can examine the analyzed data in both the Samples and Genotypes tabs of the Project window. The steps included are:
• Customizing the Project window (optional)• Displaying plots in the Samples tab• Displaying plots in the Genotypes tab
Customizing theProject Window
As you examine your data, you may want to customize the Project window to better view your data. You can do this by:
• Resizing the Project window• Creating a new Table Setting
These tasks are optional. For procedures, refer to the ABI PRISM® GeneMapper™ Genotyping Software User’s Manual (PN 4335526).
About CreatingPlot Settings
For this tutorial, you do not need to create your own Plot Settings. You will use the default Plot Setting provided (named SNP Default).
When examining your own data, however, you may wish to create your own Plot Settings to customize the information that is displayed. For procedures, refer to the ABI PRISM® GeneMapper™ Genotyping Software User’s Manual (PN 4335526).
DRAFTSeptember 25, 2002 1:21 pm, 03_DataAnalysis.fm
SNP Genotyping with ABI PRISM GeneMapper Software Version 3.0 Tutorial 3-13
Chapter 3 Data Analysis
DisplayingSamples in the
Samples PlotWindow
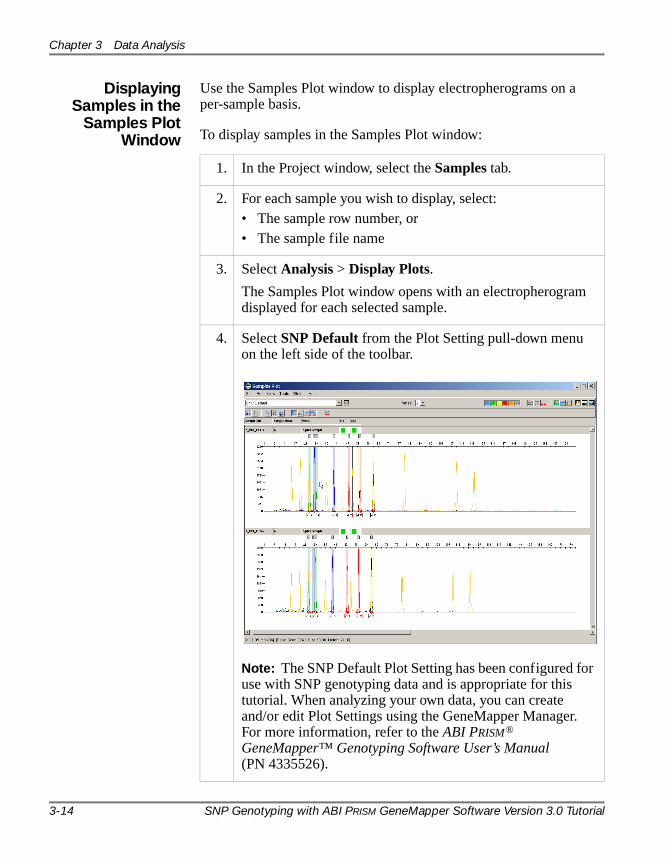
Use the Samples Plot window to display electropherograms on a per-sample basis.
To display samples in the Samples Plot window:
1. In the Project window, select the Samples tab.
2. For each sample you wish to display, select:• The sample row number, or• The sample file name
3. Select Analysis > Display Plots.
The Samples Plot window opens with an electropherogram displayed for each selected sample.
4. Select SNP Default from the Plot Setting pull-down menu on the left side of the toolbar.
Note: The SNP Default Plot Setting has been configured for use with SNP genotyping data and is appropriate for this tutorial. When analyzing your own data, you can create and/or edit Plot Settings using the GeneMapper Manager. For more information, refer to the ABI PRISM® GeneMapper™ Genotyping Software User’s Manual (PN 4335526).
DRAFTSeptember 25, 2002 1:21 pm, 03_DataAnalysis.fm
3-14 SNP Genotyping with ABI PRISM GeneMapper Software Version 3.0 Tutorial

Examining the Analyzed Data
5. Take a moment and test all the options in the Samples Plot window.
By default, each electropherogram is displayed with the following options.• The Peak Selection mode is on.• The Combine Dyes mode is on (that is, all dye colors for a
sample are overlaid within a single pane).• The samples are displayed in Full View.• The X-axis is displayed in Basepairs.• The Bins mode is on.• The Header mode is on.• The Marker Range mode is on.• The Indicators mode is on.• The allele call labels are displayed horizontally.
The default options may be changed.
6. If you would like to learn more about all of the available options in the Samples Plot window, refer to:• “Performing Tasks in the Plot Windows” on page 3-18• The ABI PRISM® GeneMapper™ Genotyping Software
User’s Manual (PN 4335526)
To display samples in the Samples Plot window: (continued)
DRAFTSeptember 25, 2002 1:21 pm, 03_DataAnalysis.fm
SNP Genotyping with ABI PRISM GeneMapper Software Version 3.0 Tutorial 3-15

Chapter 3 Data Analysis
DisplayingGenotypes in the
Genotypes PlotWindow
Use the Genotypes Plot window to display electropherograms on a per-marker basis.
To display genotypes in the Genotypes Plot window:
1. In the Project window, select the Genotypes tab.
2. For each genotype you wish to display, select the genotype row number, or the sample file name.
3. Select Analysis > Display Plots.
The Genotypes Plot window opens with an electropherogram displayed for each selected marker.
4. Select SNP Default from the Plot Setting pull-down menu on the left side of the toolbar.
Note: The SNP Default Plot Setting has been configured for use with SNP genotyping data and is appropriate for this tutorial. When analyzing your own data, you can create and/or edit Plot Settings using the GeneMapper Manager. For more information, refer to the ABI PRISM® GeneMapper™ Genotyping Software User’s Manual (PN 4335526).
DRAFTSeptember 25, 2002 1:21 pm, 03_DataAnalysis.fm
3-16 SNP Genotyping with ABI PRISM GeneMapper Software Version 3.0 Tutorial
Examining the Analyzed Data
5. Take a moment now to test all of the available options in the Genotypes Plot window.
By default, each electropherogram is displayed with the following options:• The Peak Selection mode is on.• Only the marker size range of the selected genotype is
shown, together with a marker margin of five basepairs.• The X-axis is displayed in Basepairs.• The Bins mode is on.• The Header mode is on.• The Marker Range mode is on.• The Indicators mode is on.• The allele call labels are displayed horizontally.
The default options may be changed.
6. If you would like to learn more about all of the available options in the Genotypes Plot window, refer to:• “Performing Tasks in the Plot Windows” on page 3-18• The ABI PRISM® GeneMapper™ Genotyping Software
User’s Manual (PN 4335526)
To display genotypes in the Genotypes Plot window: (continued)
DRAFTSeptember 25, 2002 1:21 pm, 03_DataAnalysis.fm
SNP Genotyping with ABI PRISM GeneMapper Software Version 3.0 Tutorial 3-17

Chapter 3 Data Analysis
Performing Tasks in the Plot Windows
Overview This section provides information about some common tasks performed in the Samples and Genotypes Plot windows. These are:
• Zooming• Adjusting the X-Axis Scale• Adjusting the Y-Axis Scale• Editing Allele Calls• Editing Marker and Bin Information
If you would like to learn more about all of the available options in the Samples and Genotypes Plot windows, refer to the ABI PRISM® GeneMapper™ Genotyping Software User’s Manual (PN 4335526).
Zooming
Adjusting theX-Axis Scale
If you want to... Then...
zoom in on a specific region
click the X or Y axis labels and, while holding down the left mouse button, drag it to the desired region.
zoom out to the full view
double-click the X or Y axis labels.
access additional zoom options
right-click the X or Y axis labels.
To adjust the X-axis scale:
1. Select View > X-Axis Scale.
2. Select one of the following options:• Basepairs (default)• Data Points (also known as Scan numbers)
Note: If you choose the Data Points option, be aware that the point where sample extraction begins, while always labeled “0” or zero in GeneMapper, may correspond to a later scan number in the gel-processing application.
DRAFTSeptember 25, 2002 1:21 pm, 03_DataAnalysis.fm
3-18 SNP Genotyping with ABI PRISM GeneMapper Software Version 3.0 Tutorial

Performing Tasks in the Plot Windows
Adjusting theY-Axis Scale
Editing AlleleCalls
To adjust the Y-axis scale:
1. Select View > Y-Axis Scale.
2. Select one of the following options:• Scale Individually (default). This option scales each
electropherogram to its individual maximum height.• Scale to maximum Y. If you are viewing multiple
electropherograms, this option scales all panes to the global maximum height.
• Scale To. This option allows you to set the Y-scale for all of the electropherograms you are currently viewing.
To edit SNP genotyping alleles in the Plot window:
1. Select Alleles > Editing Mode > Peak Selection.
2. If labels are not shown, turn them on by selecting:• View > Labels > Horizontal Labels, or• View > Labels > Vertical Labels
Note: If you are in the Samples Plot window, the Combine Dyes mode must be on in order to view the labels.
3. Click the desired peak to select it.
4. Right-click the selected peak to bring up the editing options. The options are different for labeled and unlabeled peaks, as described below.
If you have selected... You can...
a labeled peak edit or delete the allele call.
an unlabeled peak you can only add an allele call.
DRAFTSeptember 25, 2002 1:21 pm, 03_DataAnalysis.fm
SNP Genotyping with ABI PRISM GeneMapper Software Version 3.0 Tutorial 3-19

Chapter 3 Data Analysis
Editing Markerand Bin
Information
5. When you have finished editing, note that:• In the Plot window, the edited allele(s) display the allele
edit history comments (This can be turned off by selecting View > Allele Changes).
• In the Project window, the edited allele(s) display gray quality flags (These are displayed in the Genotypes tab only).
To edit SNP genotyping alleles in the Plot window: (continued)
To edit marker and bin information:
1. Select Alleles > Editing Mode > Binning.
If necessary, the Plot window will automatically switch to a view appropriate for editing marker and bin information.
Note: Marker ranges for SNPs can only be changed by modifying bin ranges.
2. To edit a bin:
a. Click a bin to select it.
b. Right-click the selected bin to delete or edit the bin information.
3. To move a bin:
a. Click a bin to select it.
b. Click and drag the center of the bin to the desired location.
4. To resize a bin:
a. Click a bin to select it.
b. Drag the left and right bin range handles to the desired locations.
5. Close the Plot window.
DRAFTSeptember 25, 2002 1:21 pm, 03_DataAnalysis.fm
3-20 SNP Genotyping with ABI PRISM GeneMapper Software Version 3.0 Tutorial

Performing Tasks in the Plot Windows
6. At the prompt, save the changes you made to:• The existing panel by selecting Save panel.
Or,• The new panel by selecting Save panel as.
To edit marker and bin information: (continued)
DRAFTSeptember 25, 2002 1:21 pm, 03_DataAnalysis.fm
SNP Genotyping with ABI PRISM GeneMapper Software Version 3.0 Tutorial 3-21

Chapter 3 Data Analysis
DRAFTSeptember 25, 2002 1:21 pm, 03_DataAnalysis.fm
3-22 SNP Genotyping with ABI PRISM GeneMapper Software Version 3.0 Tutorial

DRAFTSeptember 19, 2002 9:48 am, 04_AutoP
SNP Genotyping with ABI PRISM GeneMapper Software Version 3.0 Tutorial
4
Auto Panel Feature for Primer Focus 4In This Chapter This chapter contains the following topics:
Process Flowchart . . . . . . . . . . . . . . . . . . . . . . . . . . . . . . . . . . . . . .4-2Importing and Sizing Reference Data . . . . . . . . . . . . . . . . . . . . . . .4-3Setting Up Kits and Bin Sets. . . . . . . . . . . . . . . . . . . . . . . . . . . . . .4-8Using the Auto Panel Feature . . . . . . . . . . . . . . . . . . . . . . . . . . . .4-10
Assumptions In Chapter 2, you manually created panels. It is also possible to create panels automatically using the Auto Panel feature with sample files generated from the SNaPshot® Primer Focus™ kit.
It is assumed that you have already installed and logged on to the ABI PRISM® GeneMapper™ Software Version 3.0.
anelizing.fm
4-1

Chapter 4 Auto Panel Feature for Primer Focus
Process Flowchart
Setting Up aProject with the
Auto PanelFeature
The flowchart below provides an overview of the tasks required to set up a GeneMapper project when you are creating panels and bins using the Auto Panel feature with Primer Focus kit samples.
Pan
el M
anag
erP
roje
ct W
ind
ow
Create a new SNP kit
Import Primer Focus sample files into a new project
Size the Primer Focus sample files:• Set the sample type to Primer
Focus• Select an Analysis Method with
SNaPshot as the analysis type• Set the panel to None• Select a size standard
Create a new bin set
Add Primer Focus sample files to the kit
Review the panels
Perform Auto Panelizing
DRAFTSeptember 19, 2002 9:48 am, 04_AutoPanelizing.fm
4-2 SNP Genotyping with ABI PRISM GeneMapper Software Version 3.0 Tutorial

Importing and Sizing Reference Data
Guidelines forPrimer Focus
Chemistry
Follow the guidelines below when using the GeneMapper software:
• Primer Focus samples cannot be multiplexed. The software will Auto Panelize only samples that have one primer per capillary.
• Samples must be labeled as Primer Focus in the Project window and sized with the GeneScan™ 120 LIZ® (GS120LIZ) size standard prior to being used for Auto Panelizing.
• Offscale data produces wide bins and limits the multiplex level of the SNP panel. To reduce offscale signals, either use less primer in the Primer Focus reaction or dilute the final product prior to electrophoresis.
• If you do not like the panels created by the Auto Panel feature, you can manually create panels, markers, and bins with your Primer Focus data.
Importing and Sizing Reference Data
Overview Predefined panel and bin information does not exist for SNP genotyping multiplex samples, since every user has a different set of primers, primer lengths, and multiplexing levels. Therefore, the first tasks required when creating panels and bins are to import reference data into a new project and perform sizing analysis.
The steps required are:
• Converting the sample files, if necessary• Importing reference data (that is, Primer Focus sample files) into a
new project• Performing sizing analysis on the reference data
ConvertingSample Files
Note: The information below is not necessary for this tutorial. However, you may find it useful when you are working with your own sample files.
If necessary, convert ABI PRISM® GeneScan® Analysis Software sample files generated by the Apple Macintosh® software to the .fsa format. The conversion is described in the ABI PRISM® GeneMapper™ Genotyping Software User’s Manual (PN 4335526).
DRAFTSeptember 19, 2002 9:48 am, 04_AutoPanelizing.fm
SNP Genotyping with ABI PRISM GeneMapper Software Version 3.0 Tutorial 4-3

Chapter 4 Auto Panel Feature for Primer Focus
ImportingReference Data
into a NewProject
To import reference data into a new project:
1. In the Project window, select File > Add Samples to Project.
The Add Samples to Project window opens.
2. Navigate to the disk/directory containing the GeneMapper software application.
3. Add sample files from the PrimerFocus folder to this project, as follows:
a. Expand the following folders in this order:GeneMapper > Tutorial Data > SNaPshot > PrimerFocus
b. Select the PrimerFocus folder.
c. Click Add To List.
The PrimerFocus folder moves to the Samples To Add list in the Add Samples to Project window.
Note: If you move the wrong folder to the Samples To Add list, select the folder and click Clear to remove it.
DRAFTSeptember 19, 2002 9:48 am, 04_AutoPanelizing.fm
4-4 SNP Genotyping with ABI PRISM GeneMapper Software Version 3.0 Tutorial

Importing and Sizing Reference Data
Performing SizingAnalysis
4. Clicking Add performs these functions:
a. Imports the sample files into a new project
b. Closes the Add Samples to Project window.
c. Reveals the Project window (previously hidden behind the Add Samples to Project window) now populated with the imported sample files (in the Samples tab).
To import reference data into a new project: (continued)
To perform sizing analysis on the reference data:
1. Go to the Samples tab view in the Project window.
2. Select a sample type:
a. Select the top cell in the Sample Type column.
b. Select Primer Focus from the drop-down list.
3. Select an Analysis Method:
a. Select the top cell in the Analysis Method column.
b. Select SNaPshot Default from the drop-down list.
Note: When you are analyzing your own SNP genotyping reference data, make sure the Analysis Method you choose has SNaPshot as the analysis type.
DRAFTSeptember 19, 2002 9:48 am, 04_AutoPanelizing.fm
SNP Genotyping with ABI PRISM GeneMapper Software Version 3.0 Tutorial 4-5

Chapter 4 Auto Panel Feature for Primer Focus
4. For this tutorial, the Panel column should already be set to None. If it is not:
a. Select the top cell in the Panel column. The Select a Panel window opens.
b. Double-click None.
The Select a Panel window closes and None is entered into the first cell of the Panel column in the Samples tab.
Note: Setting the Panel column to None ensures that a sizing-only analysis is performed.
5. Select a size standard:
a. Select the top cell in the Size Standard column.
b. Select GS120LIZ from the drop-down list.
Note: The GS120LIZ size standard has been predefined for you. To learn how to create your own size standard, refer to the ABI PRISM® GeneMapper™ Genotyping Software User’s Manual (PN 4335526).
6. Apply the selections to the selected samples, as follows:
a. Click and drag the mouse across the four column headings (Sample Type, Analysis Method, Panel, and Size Standard) to select the entire columns.
b. Select Edit > Fill Down (or press Ctrl+D) to apply the selection to the selected samples.
7. Select Analysis > Analyze.
The Save Project dialog box opens.
To perform sizing analysis on the reference data: (continued)
DRAFTSeptember 19, 2002 9:48 am, 04_AutoPanelizing.fm
4-6 SNP Genotyping with ABI PRISM GeneMapper Software Version 3.0 Tutorial

Importing and Sizing Reference Data
8. Type Primer Focus Example and click OK.
The program initiates analysis, then saves each analyzed sample to the project you have just named. While analysis is proceeding, progress is displayed as follows:• The progress indicator at the bottom of the Project
window shows progress in two ways:– As a bar graph extending from the left– As a percentage indicator
• The current sample undergoing analysis is indicated by the sample row in the table displayed in green (or red if analysis failed for the sample).
When the program has finished analyzing the samples, the message “Analysis Completed” displays on the Status bar of the Project window (lower left corner).
Note: Auto-saving takes place after every 10 sample files are analyzed or before the “Analysis Completed” message displays.
9. When samples are sized successfully:• A green square is displayed in the SQ column.• The Status column is cleared.
If you would like to verify the size calling:
a. Select a sample.
b. Select Analysis > Size Match Editor. The Size Match Editor window opens, showing how the size standard peaks were labeled.
Note: The sizing should be successful for this tutorial. When analyzing your own data, if the size standard failed or if labels were assigned to the wrong peaks, you can make changes in the Size Match Editor window. For more information on using this window, refer to the ABI PRISM® GeneMapper™ Genotyping Software User’s Manual (PN 4335526).
To perform sizing analysis on the reference data: (continued)
DRAFTSeptember 19, 2002 9:48 am, 04_AutoPanelizing.fm
SNP Genotyping with ABI PRISM GeneMapper Software Version 3.0 Tutorial 4-7

Chapter 4 Auto Panel Feature for Primer Focus
Setting Up Kits and Bin Sets
Overview The steps required to set up kits and bin sets are:
• Creating an SNP kit• Creating an SNP bin set• Adding reference data (that is, Primer Focus sample files) to the
new kit
Creating anSNP Kit
Creating anSNP Bin Set
Bin sets are always created at the kit level. You can only have one bin set defined for each kit.
To create an SNP kit:
1. In the Project window, select Tools > Panel Manager.
The Panel Manager window opens.
2. Select Panel Manager in the navigation pane.
3. Select File > New Kit.
The New Kit dialog box opens.
4. Complete the following information:
a. In the Kit name text field, type a new SNP kit name.
b. From the Kit type drop-down list, select SNP.
c. Click OK.
The Panel Manager window re-opens with the new SNP kit displayed in the navigation pane.
To create an SNP bin set:
1. In the navigation pane of the Panel Manager window, select the SNP kit you created above.
2. Select Bins > New Bin Set.
The New Bin Set dialog box opens.
DRAFTSeptember 19, 2002 9:48 am, 04_AutoPanelizing.fm
4-8 SNP Genotyping with ABI PRISM GeneMapper Software Version 3.0 Tutorial

Setting Up Kits and Bin Sets
Adding ReferenceData to the New
SNP Kit
3. Type a name for the new bin set and click OK.
The new bin set name is added to the Bin Set drop-down list at the top of the Panel Manager window.
To create an SNP bin set: (continued)
To add reference data to the new SNP kit:
1. In the Panel Manager window, select Bins > Add Reference Data.
The Add SNP Reference Data dialog box opens.
2. Click Search. Results are displayed in the Search Results pane.
Note: All sized projects stored in the GeneMapper database are shown.
3. Expand the PrimerFocus Example folder (The PrimerFocus Example folder contains the reference data you sized on page 4-5).
4. Select the Primer Focus folder.
Note: Only samples with Primer Focus set as the sample type can be used as reference data for Auto Panelizing.
5. Click Add to List, then click Add.
The message “SNP data added” displays. The entire folder has been added to the new SNP kit.
6. Click OK to return to the Panel Manager window.
DRAFTSeptember 19, 2002 9:48 am, 04_AutoPanelizing.fm
SNP Genotyping with ABI PRISM GeneMapper Software Version 3.0 Tutorial 4-9

Chapter 4 Auto Panel Feature for Primer Focus
Using the Auto Panel Feature
Overview Use the Auto Panel feature with the Primer Focus sample files to create panels automatically. The steps included are:
• Automatically creating panels• Adding markers to existing panels (optional)• Reviewing and editing the panels
Note: A panel is a set of markers.
Creating Panels To create panels with the Auto Panel feature:
1. In the Panel Manager window, select Bins > Auto Panel.
The Auto Panel dialog box opens.
2. In the Allele Names pane, enter your desired allele designations; these will also be the names of the bins within each marker. Marker names are based on the sample name.
The default is set to the ddNTP base name.
DRAFTSeptember 19, 2002 9:48 am, 04_AutoPanelizing.fm
4-10 SNP Genotyping with ABI PRISM GeneMapper Software Version 3.0 Tutorial

Using the Auto Panel Feature
3. In the Marker multiplex pane, enter the minimum and maximum multiplex level you would like for your data.
The software attempts to meet your requirements, but it may generate panels below your minimum level if the data is of poor quality or too much overlap occurs.
4. In the Panel Names pane, enter the base panel name you would like the software to call each panel.
Note: If you do not enter a name, each panel will be given a number designation. If you enter a name (for example, DataSet), each panel will be listed as DataSet1, DataSet2, etc.
5. In the Marker Overlap pane, select Maximum overlap or No overlap based on panels created with a maximum level of overlap or no overlap. (See “Rules for SNP Kits, Panels, and Bins” on page 1-7.)
6. If you have chosen No overlap, enter the number of basepairs between the markers.
This number determines the distance when no overlap is allowed.
7. The Auto Panel feature allows you to add markers to panels that already exist. To add markers to a panel, check the Save Existing Panels check box.
The Auto Panel feature attempts to add markers to panels that already exist.
Note: Markers can also be manually added. For procedures, see “Adding the Sample File to the New Panel” on page 2-11 through “Creating Markers and Bins” on page 2-14.
8. Click OK to begin Auto Panelizing.
To create panels with the Auto Panel feature: (continued)
DRAFTSeptember 19, 2002 9:48 am, 04_AutoPanelizing.fm
SNP Genotyping with ABI PRISM GeneMapper Software Version 3.0 Tutorial 4-11

Chapter 4 Auto Panel Feature for Primer Focus
Reviewing andEditing Panel
Information
After Auto Panelizing is performed, you can review the panels that were created, and then edit them if necessary.
To review and edit panel information:
1. Select a panel in the navigator pane.
The selected panel displays in the Panel Manager window. A green check mark displays next to the sample files that were used to create the panel. The figure below is a sample of a panel.
2. To edit the markers and bins:
a. Right-click on the marker or bin name and select Edit SNP Marker.
b. Make any desired changes.
Note: You can quickly resize bins by clicking on them and dragging the black handles to the desired size. The allele marker range values (Marker Min and Marker Max) are automatically adjusted.
3. Click OK to close the Panel Manager window.
DRAFTSeptember 19, 2002 9:48 am, 04_AutoPanelizing.fm
4-12 SNP Genotyping with ABI PRISM GeneMapper Software Version 3.0 Tutorial

Using the Auto Panel Feature
4. You are now ready to analyze your SNP genotyping data. Refer to Chapter 3 for analysis procedures, making sure to:• Create an Analysis Method that uses the bin set you
created with the Primer Focus sample files (created on page 4-8)
• Select the correct panel in the Samples tab (created on page 4-10)
To review and edit panel information: (continued)
DRAFTSeptember 19, 2002 9:48 am, 04_AutoPanelizing.fm
SNP Genotyping with ABI PRISM GeneMapper Software Version 3.0 Tutorial 4-13

Chapter 4 Auto Panel Feature for Primer Focus
DRAFTSeptember 19, 2002 9:48 am, 04_AutoPanelizing.fm
4-14 SNP Genotyping with ABI PRISM GeneMapper Software Version 3.0 Tutorial

DRAFTSeptember 18, 2002 1:37 pm, A_Appendix.fm
SNP Genotyping with ABI PRISM GeneMapper Software Version 3.0 Tutorial A-1
APeak Detection Algorithms A
3 Types of PeakDetection
Three types of Peak Detection algorithms are available:
• Basic: Contains limited parameters that may not provide enough user control over data analysis for desired results.
• Classic: Includes the same parameters and the same size caller and produces similar results to GeneScan software version 3.1.2 designed for use with the Macintosh operating system.
• Advanced: Includes the same parameters and the same size caller and produces similar results to GeneScan software designed for use with the Microsoft Windows NT operating system. Also, it includes a new size caller, with the exception of the smoothing function.
Usage Guidelines The table below lists general guidelines for selecting an algorithm to use based on the instrument.
Instrument Peak Detection Algorithm
310 and 377 Classic
Multi-capillary Advanced

DRAFTSeptember 18, 2002 1:37 pm, A_Appendix.fm
Appendix A Peak Detection Algorithms
A-2 SNP Genotyping with ABI PRISM GeneMapper Software Version 3.0 Tutorial

Index
AAnalysis 3-2Analysis Method
definition 1-2analysis method
creating 3-2Analyzing
SNaPshot data 1-7Auto Panel
use with Primer Focus kit 4-1Auto Panel feature 1-5
Bbin
creating 2-15definition 1-2
bin setcreating 2-9definition 1-3setting up 2-8
Cconverting sample files 3-10, 4-3creating an SNP kit 2-8creating bins and markers 2-13cutoff value
adjusting 3-6definition 1-4
Ddata analysis
examining data and results 3-13flowchart overview 3-2
default settings 1-4
Fflowchart
process 1-7Focus 1-4
GGeneMapper software version 3.0
new features list 1-5
Iimporting reference data 2-10
Kkits, setting up 2-8
Mmarker
creating 2-15definition 1-3
Ppanel
definition 1-3setting up 2-8
Panel Manager window 2-8Plot tab 2-13Primer Focus
guidelines for 4-3sample files 1-4
process flowchart 1-7analyzing SNaPshot Data 1-7setting up a project 2-2
project settingsapplying 3-11definition 1-3
Project window 2-4, 4-5PVQ
values 3-8
Rreference data
importing 4-3sizing 4-3
reference datesizing 2-3
Index-1

rulesfor bins 1-7for panels 1-7for SNP kits 1-7
Ssample files
adding 3-10converting 2-3, 3-10, 4-3Primer Focus 1-4SNaPshot 1-4
Sample Node 2-13settings
default 1-4sizing analysis, performing 2-5sizing analysis, set-up for 4-5sizing analysis, setup for 2-5SNaPshot data
analyzing 1-7SNaPshot sample files 1-4SNaPshot tutorial
how to use 1-2terms used in 1-2
SNPadding reference SNP samples to a
project 2-3, 4-4bin set, creating 2-9panel, creating 2-10selecting sample files 2-13
standard size definition, provided with tutorial 1-5
TTable tab 2-21terms and definitions 1-2Tutorial 1-2
Uusing the SNaPshot tutorial 1-2
Index-2

Headquarters850 Lincoln Centre DriveFoster City, CA 94404 USAPhone: +1 650.638.5800Toll Free (In North America): +1 800.345.5224Fax: +1 650.638.5884
Worldwide Sales and SupportApplied Biosystems vast distribution and service network, composed of highly trained support and applications personnel, reaches 150 countries on six continents. For sales office locations and technical support, please call our local office or refer to our Web site atwww.appliedbiosystems.com.
Applera Corporation is committed to providing the world’s leading technology and information for life scientists. Applera Corporation consists of the Applied Biosystems and Celera Genomics businesses.
Printed in the USA, USA 09/2002Part Number 4335524 Rev. B