aadhaar enrolment client operator’s qrg uidai - nict …nictcsc.com/images/aadhaar project...
TRANSCRIPT

Aadhaar Enrolment Client Operator’s QRG
Version: 1.0.0.0 Release date: 18-12-2012
UIDAI
Unique Identification Authority of India

Unique Identification Authority of India
i
Aadhaar Enrolment Client
Table of Contents OUTLINE OF ENROLMENT AND AADHAAR DELIVERY TO RESIDENT .......................................................... 1
ENROLMENT PREREQUISITES ................................................................................................................... 2
STEP 1: FILLING OF ENROLMENT FORM (KYR, KYR+ DATA) ................................................................................. 2 STEP 2: VERIFICATION OF RESIDENT’S DOCUMENTS ........................................................................................... 2 STEP 3: PRELIMINARY CHECKS BY OPERATOR.................................................................................................... 2
WORKING WITH AADHAAR ENROLMENT CLIENT ..................................................................................... 4
STEP 1: LOGGING IN TO THE AADHAAR ENROLMENT CLIENT ................................................................................. 4 STEP 2: IMPORTING PRE‐ENROLMENT DATA .................................................................................................... 4 STEP 3: CAPTURING RESIDENT’S DEMOGRAPHIC DATA, REFERENCES AND BANKING INFORMATION ................................ 6 STEP 4: CAPTURING RESIDENT’S PHOTOGRAPH ............................................................................................... 12 STEP 5: CAPTURING RESIDENT’S FINGERPRINT ................................................................................................ 16 STEP 6: CAPTURING RESIDENT’S IRIS ............................................................................................................ 23 STEP 7: REVIEW AND CONFIRMATION OF CAPTURED DATA ................................................................................ 27 STEP 8: GENERATE ENROLMENT ID AND PRINT ACKNOWLEDGEMENT & CONSENT FOR ENROLMENT ............................ 29
BEGINNING OF DAY ACTIVITIES .............................................................................................................. 31
GPS DETAILS ......................................................................................................................................... 31
END OF DAY ACTIVITIES ......................................................................................................................... 32
VERIFY ENROLMENT DETAILS ...................................................................................................................... 32
CORRECTION PROCESS ........................................................................................................................... 35
DATA BACKUP AT LOCAL LEVEL .............................................................................................................. 41
DATA RESTORE FOR ENROLMENT CLIENT ....................................................................................................... 41
EXPORT RESIDENT DATA FILE ................................................................................................................. 42
SYNCING WITH CIDR .............................................................................................................................. 43
ECMP LITE .............................................................................................................................................. 44
DOCUMENT STORAGE PROCESS ............................................................................................................. 46
EXCEPTIONS HANDLING ......................................................................................................................... 47
CROWD MANAGEMENT ......................................................................................................................... 50
COMPONENTS OF CROWD MANAGEMENT ..................................................................................................... 50 SOME EXAMPLES OF FRIENDLY SPEECH ......................................................................................................... 51
INTERACTION WITH SENIOR CITIZENS .................................................................................................... 52
INTRODUCTION ....................................................................................................................................... 52 BENEFITS OF EFFECTIVE COMMUNICATION WITH SENIOR CITIZENS ....................................................................... 52 CASE SCENARIO: HOW TO HANDLE SENIOR CITIZENS?....................................................................................... 52

Unique Identification Authority of India
ii
Aadhaar Enrolment Client
DO’S AND DON’TS OF DEALING WITH SENIOR CITIZENS ..................................................................................... 53
APPENDIX I – LIST OF BOD AND EOD ACTIVITIES .................................................................................... 54
BEGINNING OF DAY (BOD) ACTIVITIES ......................................................................................................... 54 END OF DAY (EOD) ACTIVITIES ................................................................................................................... 54
APPENDIX II – DOS AND DON’TS FOR ENROLMENT OPERATOR ............................................................. 56
DOS .................................................................................................................................................... 56 DON’TS ............................................................................................................................................... 59

Unique Identification Authority of India
1
Aadhaar Enrolment Client
Stage 2 Stage 1 Stage 3 Stage 4 Stage 5 Stage 6
Enrolment Agency sets
Up the Enrolment
Centre
Enrolment Agency
Captures Residents’
Demographic and Biometric
Data
EnrolmentAgency
Performs Backup of Data and
sync
Transfer ofDemographic and Biometric
Data Collected By
the Enrolment Agencies to the CIDR
Data De- duplication
and Aadhaar Generation By UIDAI at
CIDR
UIDAI SendsThe AadhaarIn a Letter to The Resident
Outline of Enrolment and Aadhaar Delivery to Resident
Figure 1: Broad Outline of the Enrolment Process and Aadhaar Delivery to Residents
Figure 2: Enrolment Stages

Unique Identification Authority of India
2
Aadhaar Enrolment Client
Enrolment Prerequisites • Before starting enrolment, Operators (Supervisors and Introducers also) must be on-
boarded in the Aadhaar enrolment client application.
Enrolment Agency Supervisor/Enrolment Agency Administrator performs Local Enrolment (on-board) using ECA (Enrolment Client Administrator) login.
• Residents have to fill up the Enrolment Form.
• The Verifier must have verified all information given in the Enrolment Form by the resident.
Step 1: Filling of Enrolment Form (KYR, KYR+ data)
• The resident has to fill the Enrolment Form with the KYR and if available, KYR+ information
• If the resident has any difficulty in filling the Enrolment Form, the Verifier can guide the resident in filling up the Form
• The Enrolment Operator may direct the resident to take assistance from local support such as village officials, field Inspector, Introducer, staff from Non-Government Organizations (NGOs), Civil Society Outreach (CSOs), etc.
• At the start of Enrolment the Operator must ensure that the Enrolment Form has been verified by looking for and confirming the presence of the Verifier’s signature and seal on the Form.
A sample Enrolment Form, which is also used for Corrections, is given in Figure: 3
Step 2: Verification of Resident’s Documents
• Resident needs to carry original documents for verification and photocopies of Proof of Identity (PoI), Proof of Address (PoA), Date of Birth (DoB), Proof of Relationship (PoR) documents for submission.
• Verifier will verify the Enrolment Form details and photocopies against PoI/PoA/DoB/HoF documents; even if pre-enrolment data is used.
NOTE: Operator must enter enrolment data from verified Enrolment Forms only
Step 3: Preliminary Checks by Operator
• Confirm that the Enrolment Form and documents belong to the same resident who is getting enrolled
• Check that the resident’s Enrolment Form has been verified (carries Verifier’s signature/thumbprint and stamp/initials)
• The Enrolment Form has the resident’s signature/thumbprint
• In case of Introducer/HoF based enrolment, check whether the Introducer/HoF’s signature/thumbprint in the Form along with their details is available

Unique Identification Authority of India
3
Aadhaar Enrolment Client
Figure 3: Enrolment Form

Unique Identification Authority of India
4
Aadhaar Enrolment Client
1. Select your Operator ID
from the drop-down
2. Enter Password
4. Click the Login button
On selecting an Operator
ID, the corresponding
Operator’s name would be displayed
in the ‘Operator
Name’ field
3. Provide your
fingerprint
Working with Aadhaar Enrolment Client UIDAI client application software, the Aadhaar enrolment client (AEC), is used to record demographic and biometric data of residents. Aadhaar enrolment client is also referred as ECMP, i.e. Enrolment Client Multi Platform, from version 1.5 onwards. Multiplatform implies that the AEC is now available for the Windows and Linux operating system platforms.
The usage of the AEC software is described in the following steps.
Step 1: Logging in to the Aadhaar Enrolment Client The first step in the process of capturing resident data is to login to the Aadhaar enrolment client. Launch the Aadhaar enrolment client in any one of the following two ways:
1. Click the Aadhaar enrolment client icon on the desktop.
OR
2. Click Start All Programs UID Authority of India Aadhaar Enrolment Client Aadhaar Enrolment Client.
Figure 4: Aadhaar Login screen
Every user has to be on-boarded before login. During login, both, the password and biometrics of the user has to match with the records in the database.
Closing Aadhaar Enrolment Client
Click on the Cross ( ) icon, at the top-right corner of the application, to close Aadhaar enrolment client.
Step 2: Importing Pre-enrolment Data The next step in the process of enrolling residents is importing pre-enrolment data, if available, into the Aadhaar enrolment client. The data available in the pre-enrolment data file can be used to auto-fill some or all of the demographic fields. This reduces the time spent on typing and also reduces errors in data entry.

Unique Identification Authority of India
5
Aadhaar Enrolment Client
Select Pre-Enrolment Data File (.csv file)
1. Click Processes
2. Click Import Pre-Enrolment
Data
• Click Processes Import Pre-Enrolment Data menu from the top of the application to open the Import Pre-Enrolment Data screen. [Shortcut key: Alt + Ctrl + L]
To import Pre-enrolment data into the ECMP application,
• Import from External Source
• Import from Aadhaar Lite Edition
Import from External Source
Figure 6: Import Pre-Enrolment Data Import from External Source
• Go to the appropriate folder from the Look in drop-down field.
• Select the pre-enrolment data file and click the Open button.
• Click the Import button to complete the import.
Click the Browse button
Figure 5: Pre-enrolment Data
Figure 7: Select File
Unique Identification Authority of India
6
Aadhaar Enrolment Client
1. Enter the Pre-
Enrolment ID
2. Click Local
Search or Web
Search
Import from Aadhaar Lite Edition
You can also import resident’s pre-enrolment data entered through Aadhaar enrolment client Lite Edition (ECMP Lite).
• Click the Import from Aadhaar Lite Edition tab to go to the Import from Aadhaar Lite Edition screen.
• Now import data. The procedure is same as Import from External Source.
Step 3: Capturing Resident’s Demographic Data, References and Banking Information
Capturing Resident’s Demographic Data
Now, capture the resident’s demographic data in the Aadhaar enrolment client.
• To begin doing this, first click the Resident Enrolment menu then select Enrol a Resident sub-menu option (if you are presently not in the Demographics screen) [Shortcut key: Alt + Ctrl + N]. This will take you to the demographics data capture screen.
The Enrolment Operator can capture the resident’s demographic data,
1. By entering the Pre-Enrolment ID that was provided to the resident when the pre-enrolment data was collected by the registrar
OR
2. With the help of the Pre-Enrolment ID that is received from the pre enrolment portal where the resident can provide demographic data online
OR
3. By manually entering the resident’s data from the Enrolment Form, filled-up by the resident
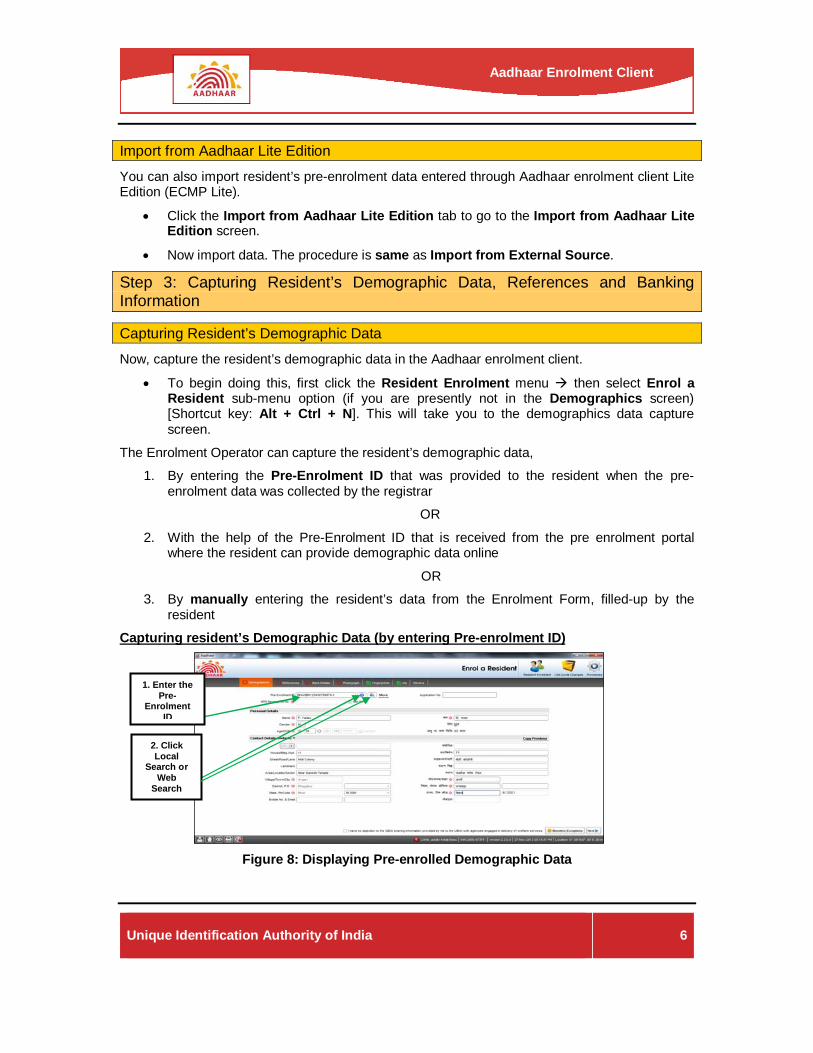
Capturing resident’s Demographic Data (by entering Pre-enrolment ID)
Figure 8: Displaying Pre-enrolled Demographic Data

Unique Identification Authority of India
7
Aadhaar Enrolment Client
1. Enter Application Number 2. Enter NPR
Receipt Number or click Not
Given
4. Type the Gender
6. Enter Contact Details
including Mobile No.
and email ID
7. Select Information
Sharing Consent
3. Enter Name of the
resident
5. Enter Age or Date of
Birth of the resident
You can use the Advanced Search option to first view and then select a particular resident’s data using the Pre-enrolment ID. Enter a few characters in the Pre-Enrolment ID field and click More.
• In the demographic data capture screen, enter the Pre-enrolment ID. (Pre Enrolment ID is the document ID for the document which the resident has.) For example, Ration Card number, Passport number etc. Pre-Enrolment ID field auto suggests all the matching
records after the 4th character is entered. Then click the Local Search ( ) icon. This will automatically fill the resident’s demographic data from the pre-enrolment data file, if available.
• Also, if the resident uses pre-enrolment Portal and receives the Web Pre-Enrolment ID from the portal, then this can be used to automatically fill the resident’s demographic data. Connect to internet, enter Web Pre-Enrolment ID in the Pre-Enrolment ID field and
click Web Search ( ) icon.
• After auto-filling, you can manually add or change the data, if required.
Capturing resident’s Demographic Data (manually filling-in Data)
If the resident’s demographic data is not present in the pre-enrolment database, data has to be entered manually using the Enrolment Form and supporting documents.
In the Demographic Data screen, enter the following details of the resident: The indicates the fields are mandatory. You cannot proceed without filling these fields.
Figure 9: Manually Capturing Resident’s Demographic Data

Unique Identification Authority of India
8
Aadhaar Enrolment Client
• Application No.: The Form number printed on Enrolment Form should be recorded in the Application Number field.
• NPR Receipt Number: NPR stands for National Population Register. Check with the Enrolment Form, for the census survey Temporary Identification Number (TIN) / schedule number provided by the Registrar General of India [RGI (census)] officials to the household / individual. If available, enter this number in the NPR Receipt Number field. This is a mandatory field. Click the Not Given check box if the number is not given.
• Personal Details o Name: In the Name field, enter the name of the resident.
Please note that the name field cannot be blank. At least one character needs to be entered.
Special characters like dot or space cannot be repeated. For example Adrijit K dot Basu is correct, but you cannot enter Adrijit K dot dot Basu.
The name must NOT include salutations, titles, etc. For instance Mr. / Mrs. / Miss / Dr / Major / Retd. / D.Lit. etc. are not a part of the name.
After entering the name, ask the resident to verify the name on the screen. o Gender: In the Gender field, enter the gender of the resident. Enter M for male, F for
female and T for transgender. If gender is selected as transgender, application will display a message to confirm the selection.
o Age/Date of Birth: In this field you can enter either the age or date of birth of the resident. If the exact date of birth is not known, then resident can provide her / his age (in
years). Select the first radio ( ) button and insert the age of the resident. By default, this option is selected.
If the resident has provided the exact date of birth, select the second radio ( ) button and insert the date of birth directly in the DD MM YYYY format in the relevant boxes provided.
o If the date of birth has been obtained from one of the documents submitted by the resident and the same has been verified, then check the Verified check box.
• Contact Details o User can select the different types of address templates from the Contact Details
drop down list: Complete, Default, Default: Printable Labels and Simple.
o Default Contact is set by default. The Complete Contact form may be used when information like house no., street name, etc. are available; like urban areas. A Simple Contact form may be used for remote/rural places where information like street name, etc. isn’t available and address is short and does not have too much detail.

Unique Identification Authority of India
9
Aadhaar Enrolment Client
While entering resident’s address, keep the following points in mind:- 1. In line 1 of the address, record care of person’s name, if any. C/O specifies the
care of details of resident. C/O field has a dropdown menu (with the following options: C/O, S/O, W/O, D/O) and a text field. If information not available, leave the address line 1 blank.
2. Enter major/minor landmark, if any, in address line 4, otherwise leave it blank.
In the Landmark field, there must be a "near / behind / ...", or other string - since that is how landmarks show up in the address. For example, don’t just type "Ganesh Temple". In any real address, it would be "Near Ganesh Temple", or something similar.
3. Enter the Postal Index Number Code (PIN code) in the PIN Code box. Based on Pin Code provided, village/town/city, P.O., District and State name are auto-populated by the application. Partial search on Pin code is enabled at 5th character.
Copy Previous: The Copy Previous option is used to recall the values entered in the address fields (such as Pin Code, Village/Town/City, District and State) for the previous enrolment. As a result, for the current enrolment, the Operator does not have to enter data related to these fields.
• Information Sharing Consent o Information sharing consent has to be obtained from the resident authorizing
UIDAI to share the resident’s details with the other agencies.
o From the Enrolment Form, check if the resident wants to share her/his details with other government departments, and private agencies for the purpose of service delivery.
o If the resident marks YES against information sharing consent in the Enrolment Form, then check the check box, otherwise leave it blank.
• Transliteration and Translation
o For each entry, after entering data in the English field, press the Tab button to move to the corresponding regional language field. You can also click on the corresponding regional language field directly. The application will then automatically transliterate the data from English to the regional language.
o Transliterated fields are editable. In case of improper transliteration of data like name, landmark, village/town/city, district & state name etc. by the application, you can modify them.
o In order to enter data in the local language, you can use the bilingual keyboard. Bilingual keyboard is displayed by pressing Ctrl + K.

Unique Identification Authority of India
10
Aadhaar Enrolment Client
1. Click on specific part of the image to indicate biometric exception
2. Click OK
Specifying Exceptions
To specify any biometric exceptions, click the Biometric Exceptions button on the Demographics screen.
The following pop-up window will open.
Figure 11: Biometric Exception Capture – After Identifying the Exception
• Specify the resident’s biometric exceptions by clicking on the specific part of the image and then click OK.
After completing demographic data capture, click the Next button to go to the References screen. You can also click the References tab from the upper panel.
Capturing Resident’s References Details
Figure 12: References screen
Click the Biometric Exceptions button
Figure 10: Biometric exception information capture
Select verification
option

Unique Identification Authority of India
11
Aadhaar Enrolment Client
• Proof of Date of Birth - If the DoB is entered and the Verified box is checked in the Demographics screen, the Document related to Date of Birth must be selected from the Date of Birth Proof drop-down in the References screen.
• Identity and Address Verification In the Identity and Address Verification section,
o Select the Verify using supporting documents radio button if the resident has Proof of Identity (PoI) and Proof of Address (PoA) documents. Select the PoI and PoA document name from the Identity Proof and Address Proof drop-down list.
o Select Introducer shall verify the resident’s identity/address radio button if the resident does not have documents and needs to be ‘introduced’. Enter the Introducer's name and Aadhaar in the corresponding fields.
o Select Head Of The Family shall verify the resident’s identity/address radio button if the resident does not have documents and needs to be ‘introduced’ by the head of the family. In case of the Head Of The Family based verification, her/his name must be present in the supporting document like MNREGA Job Card, PDS Card etc. as the head of the family. Select the supporting document name from the Supporting Documents drop-down list.
• Relative Details o Enter the relationship details in the corresponding fields, if available. Otherwise
click Not Given check box. o Relative details are compulsory in case of enrolment of minors below 5 years
of age.
o Relative details are also compulsory in case of Head of the Family based verification.
• Documents submitted for verification are used for reporting the total number of supporting document pages (including the Enrolment Form) submitted. It is a mandatory field.
After all references data have been captured, click the Next button to go to the Bank Details screen. You can also click the Bank Details tab from the upper panel.
Capturing Resident’s Banking Details
The next step is to capture the banking details of the resident. There are three options.
Option 1: New Aadhaar enabled bank account to be opened
• If the resident wants an Aadhaar based bank account, click I want UIDAI to facilitate opening an Aadhaar enabled bank account. radio button.
• On clicking the radio button, Bank Details field is enabled, showing the names of the partner banks in the drop-down. You can select the bank, specified by the resident in the Enrolment Form, from the list.

Unique Identification Authority of India
12
Aadhaar Enrolment Client
Figure 13: Bank Details screen Option 2: Existing Bank Account to be linked to Aadhaar
• If this option has been specified in the Enrolment Form, click I request to link my existing bank account with my Aadhaar. Details are as given below: radio button.
• On clicking the radio button, all fields under this option is enabled. Enter banking details.
Option 3: Existing bank details not to be linked with Aadhaar
• Click I do not wish to link my bank details with Aadhaar at this time. radio button if the resident does not want to link her/his bank account with Aadhaar.
Click the Next button on the Bank Details screen, to go to the Photograph screen. You can also click the Photograph tab from the upper panel.
Step 4: Capturing Resident’s Photograph The next step after collecting demographic data is capturing the resident’s photograph.
• The photograph must have a White background.
• The resident should be instructed to be seated properly with their back upright and their face towards the camera.
Click on the green triangular capture icon ( ) or anywhere on the photograph capture area to capture the photo.
Select banking details option
For option 1, Select
preferred bank
For option 2,
select/enter existing
bank details
IFSC is automatically
populated when the
branch name is selected

Unique Identification Authority of India
13
Aadhaar Enrolment Client
Figure 14: Photograph screen
• If the captured photograph passes the quality parameter, the Score bar is indicated in green else a red outline will be displayed.
• If the quality of the captured image is not acceptable then re-capture is required.
• Click on the Actionable feedback icon ( ) to view Quality Details.
• If any biometric exceptions have been specified in the Demographics screen, capture them as photograph on the Photograph screen. Use the capture icon ( ).
Figure 15: Captured Photograph of the Resident and Photograph of Biometric Exception
Specification of the Exception photograph - palms facing the camera (the position of the hands), face and both hands in the frame.
Photo of Biometric
Exceptions
Captured photograph
Click here to start the
photograph capturing

Unique Identification Authority of India
14
Aadhaar Enrolment Client
• Click the Next button after the photograph and biometric exception (if required) have been captured. The Fingerprints screen will be displayed.
• You can also click on the Fingerprints tab from the upper panel.
Data Quality
Sometimes the captured image may not meet the quality expected. You must look at the different types of actionable feedback provided by the AEC. If there are one or more errors while capturing resident’s photograph, Face Quality Details pop up window is displayed by default. Click on the Actionable feedback icon ( ) to view Quality Details.
Figure16: Face Quality Details
The Face Quality Details pop up window displays the Score, Compliance, and the Comments for each of attribute.
Some of the actionable feedback comments are:
• No face Found
• Enrollee too far (eye distance in input image is less than 90)
• Enrollee too close (eye distance in input image is greater than one third of image width)
• Pose (Look Straight)
• Insufficient lighting
• Very low face confidence (faceless, object not identified as human face)

Unique Identification Authority of India
15
Aadhaar Enrolment Client
• Pose (yaw angle in output image is greater than 11.5 deg)
• Non-uniform lighting (of face in output image)
• Incorrect background (in output image)
• Insufficient lighting (bad gray values in face area of output image)
Steps to Capture Facial Image The steps to capture Face Biometric Data are as follows:
1. Checking the enrollee’s Position: The photograph should be taken with the resident directly facing the camera. No head rotation or tilt is acceptable.
2. Adjusting the Camera: It is advised that the Operator should adjust the camera instead of changing Enrollee’s position for the right distance and posture.
3. Checking the enrollee’s Expression: The Operator must ensure that the enrollee has a neutral expression. For example, the enrollee should not be smiling while being photographed. During the capture the resident’s mouth should be closed and both the eyes must be open.
4. Checking the Shadow/Reflection: There should be sufficient light to get a proper image of the face. The Operator must ensure that there is no shadow on the enrollee’s face and no reflection in his/her eyes. Additional light source should be placed in front of the enrollee so that there are no shadows under the eye.
5. Checking the visibility of iris and pupil through Eye Glasses: If the enrollee is wearing glasses, the photograph must be taken with the glasses on. But the Operator has to ensure that the iris and the pupil are clearly visible and that enrollee is not wearing dark/coloured glasses.
6. Manually capturing the photograph: The Operator can click anywhere on the preview video to capture the facial image. There is no auto capturing mechanism in case of photograph.
Guidelines for Capturing Facial Image
1. The digital camera used for capturing the image is enabled with auto focus technology. So it does not require any focusing adjustment by the Operator.
2. The Operator must ensure that the output image is not blurred because of jerks or movements of the camera. The image should neither be too dark nor too bright.
3. If there is insufficient light due to low voltage, then Operator can ask the Enrolment Agency Supervisor to use generator backup.
If the lighting condition is not sufficient in a particular room, then Operator can ask the Enrolment Agency Supervisor to shift the Enrolment Station to a different room having proper light.
In either of the above conditions, Operator should not use flash light to capture a photograph.
4. It is preferable to place the backdrop (a white background behind the resident) against an opaque wall/partition.

Unique Identification Authority of India
16
Aadhaar Enrolment Client
5. The Operator can capture facial image of a resident wearing a turban or scarf or any other garment. He/she must ensure that the entire face of the resident is visible. The Operator has to adjust the position of the camera to get the full coverage of residents face.
6. Use of accessories that cover any region of the face is not permitted. However, accessories like eye patches due to medical conditions are allowed.
7. While enrolling a lady resident, the lady volunteer should help the resident wherever necessary.
8. In case the enrollee is a child, it may be allowed to sit on its parent’s lap. But the Operator must ensure that parent’s face is not captured along with the child’s face. The background may get rejected due to non-white screen in this case but two faces should not get captured in one picture.
9. The image should not contain any kind of radial distortion i.e., distortion of a straight line. The radial distortion is illustrated in the following figures.
Figure 17: Radial Distortions in an Image
10. The Operator must ensure that the enrollee has a neutral expression i.e., unsmiling, mouth closed and eyes open.
11. The Operator must ensure that there is proper and equally distributed lighting and that there are no shadows on resident’s face and eyes.
12. The eye glasses of resident should be clear and transparent so that both the iris and the pupil are clearly visible. If Enrollee is wearing tinted glasses then the direct and background lighting sources should be tuned accordingly.
Step 5: Capturing Resident’s Fingerprint A slap fingerprint scanner is used to capture the fingerprint data of the resident. This may be normal data or with the specified exceptions.
• Capture the resident’s fingerprint data. This is done on a slap scanner by
o capturing the fingerprints of four fingers of left hand
o then capturing the fingerprints of four fingers of right hand
o and then capturing the two thumb prints

Unique Identification Authority of India
17
Aadhaar Enrolment Client
Click on the green triangular capture icon ( ) or anywhere on the fingerprint slap capture area to capture the photo.
Figure 18: Fingerprints screen
Figure 19: Capturing Fingerprints
• When quality indicator displays pass or if maximum number of captures have been exhausted, click the Next button to move on to the next step. Otherwise, you can also click the Iris tab from the upper panel.
Click here to start the
fingerprint capturing
Captured fingerprints

Unique Identification Authority of India
18
Aadhaar Enrolment Client
Data Quality
If the quality of data captured meets the quality threshold specified in the system, it will accept and save the data.
Note that, you have to get an acceptable quality to make progress from here. On clicking the Actionable feedback icon ( ), Quality Details pop up window is displayed on which the slap compliance reports are displayed.
Figure20: Fingerprint Quality Details
Some actionable feedback provided by the software are:
• Number of fingers present does not match with expected number of fingers
• Finger not positioned correctly
• Too much Pressure
• Too little pressure
• Central region missing
• Excessive moisture (wetness)
• Excessive dryness

Unique Identification Authority of India
19
Aadhaar Enrolment Client
Steps to Capture Image of Fingerprint
The Enrolment Operator should obtain the fingerprints of all five fingers of each hand i.e., ten fingers of two hands.
The following steps illustrate how to capture the fingerprint image of the enrollee:
1. Left Hand Fingerprint: Firstly, the fingerprints of the four fingers of the left hand except the thumb are captured simultaneously. The Operator would ask the enrollee to place the four fingers of the left hand on the platen and to apply some pressure (if required, with the right hand) to have good contact with the surface.
2. Right Hand Fingerprint: Secondly, the fingerprints of the four fingers of the right hand except the thumb are captured simultaneously. Then the Operator would ask the enrollee to place the four fingers of the right hand on the platen and to apply some pressure (if required, with the left hand) to have good contact with the surface.
3. Two Thumb Prints: Thumbprints of both the hands are captured simultaneously.
The Operator asks the enrollee to place the thumbs of both the hands on the platen and to apply some amount of pressure to have good contact with the surface.
Figure 22: Finger position on the platen Figure 21: Figure showing the fingers to be scanned
Figure 24: Finger position on theplaten
Figure 23: Figure showing the fingers to be scanned

Unique Identification Authority of India
20
Aadhaar Enrolment Client
The Operator must ensure that the enrollee uses the maximum area of the surface to get a proper scanned fingerprint image.
4. Auto capture: The application software automatically captures the fingerprint when the fingers are placed on the platen. It does not require any click of the mouse or pressing of any button.
When the scanner indicates successful grab of the image, the application software captures the image of the fingerprint.
5. Visual Checking: Finally, the Operator should check the images of the fingerprints visually in the application software for quality and typical problems.
In case there are some problems, repeat the steps given above.
Guidelines for Fingerprint Scanning
1. If the image of fingerprints for an enrollee is not proper in spite of repeated attempts, the Operator should ask the enrollee to wash his/her hands. The Operator can provide a wet sponge or towel available at the Centre.
2. The Operator must demonstrate the way to place the fingers on the platen but he should not touch the Enrollee while demonstrating the process. The following Figure demonstrates the procedure.
Figure 27: Helping the resident during Fingerprint scanning
Figure 26: Scanning of Thumbs Figure 25: Thumb position on platen
Unique Identification Authority of India
21
Aadhaar Enrolment Client
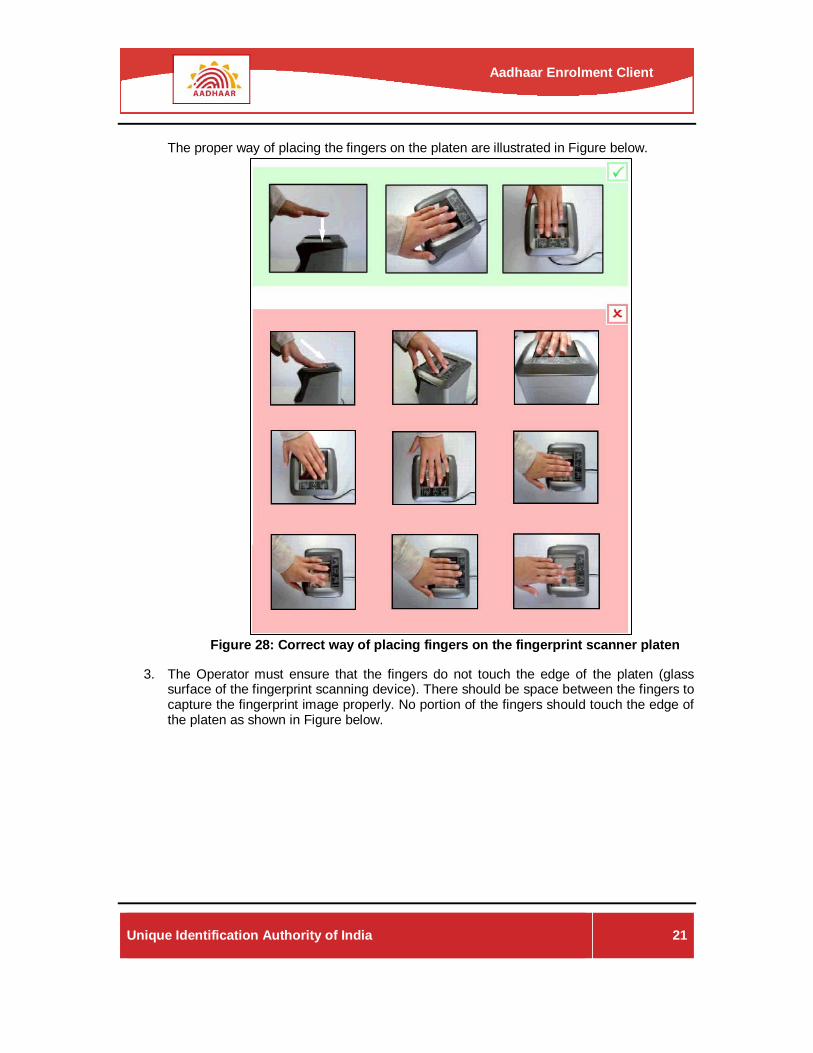
The proper way of placing the fingers on the platen are illustrated in Figure below.
3. The Operator must ensure that the fingers do not touch the edge of the platen (glass surface of the fingerprint scanning device). There should be space between the fingers to capture the fingerprint image properly. No portion of the fingers should touch the edge of the platen as shown in Figure below.
Figure 28: Correct way of placing fingers on the fingerprint scanner platen

Unique Identification Authority of India
22
Aadhaar Enrolment Client
Figure 29: Correct position of fingers on the platen
4. The Operator should request the resident to apply some pressure on the platen to increase the area of contact and thereby obtain the requisite image quality.
For applying pressure, first the Operator has to rely on the efforts of the resident. If he is not successful, the Operator may take the permission of the resident and then assist him. If the Operator is enrolling a lady then he has to take the assistance of a lady volunteer present in the Enrolment Centre.
5. If the enrollee is unable to flatten his/her fingers on the platen, the enroller/Operator can assist the resident after taking his/her permission.
If this is not successful, the Operator may try to obtain fingerprints to the extent that the enrollee is able to flatten and place his/her fingers on the platen.
The enrollee can then be made to move to the next set of fingerprints of the other hand or the two thumbs.
6. In case the enrolee has Mehendi on her hands, the Operator should follow the normal procedure to capture the fingerprint image. In case of worn out ridges in enrollee’s hand, the Operator may ask to rub his/her hands to get the proper image of fingerprint.
7. The Operator must ensure that the fingers are placed flat and till the top joint of the finger is placed well on the scanner. There should be no direct light shining on the platen. Use the indicators on the fingerprint device for positioning of fingers. The fingers should be placed in right direction on the device.
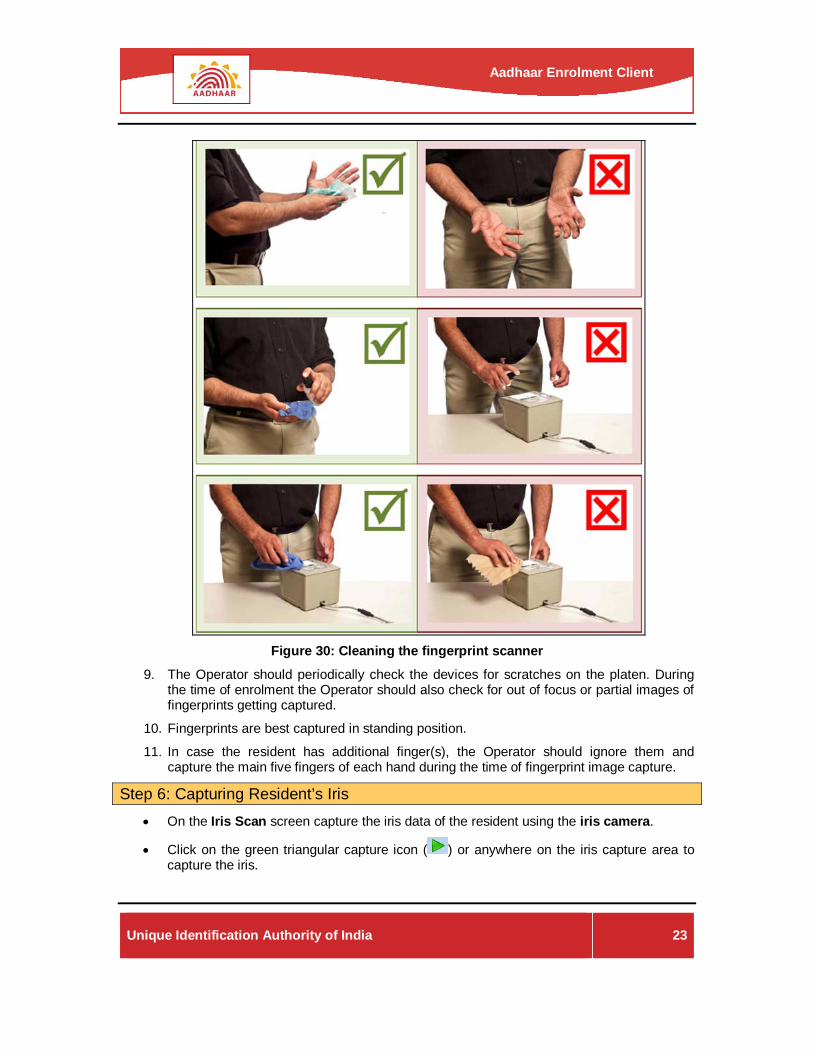
8. The Operator should use lint free cloth to clean the platen periodically. The procedure for cleaning the device is illustrated in Figure below.
Unique Identification Authority of India
23
Aadhaar Enrolment Client
Figure 30: Cleaning the fingerprint scanner
9. The Operator should periodically check the devices for scratches on the platen. During the time of enrolment the Operator should also check for out of focus or partial images of fingerprints getting captured.
10. Fingerprints are best captured in standing position.
11. In case the resident has additional finger(s), the Operator should ignore them and capture the main five fingers of each hand during the time of fingerprint image capture.
Step 6: Capturing Resident’s Iris • On the Iris Scan screen capture the iris data of the resident using the iris camera.
• Click on the green triangular capture icon ( ) or anywhere on the iris capture area to capture the iris.

Unique Identification Authority of India
24
Aadhaar Enrolment Client
Figure 31: Iris screen
Figure 32: Capturing Iris Images
Please note that, you have to get an acceptable quality image to make progress from here.
Click the Next button when finished. Otherwise, you can click the Review tab from the upper panel. The Review screen will be displayed.
Click here to start the iris capturing
Captured iris of
both eyes

Unique Identification Authority of India
25
Aadhaar Enrolment Client
Data Quality
If the quality of data captured meets the quality threshold specified in the system, it will accept and save the data.
If the Iris capture is okay, the Score bar will be green. Red colour indicates that the capture has fail.
On clicking the Actionable feedback icon, Quality Details pop up window is displayed on which the Score, Quality Attribute, Compliance and Comments to each of the attributes are displayed.
Figure33: Iris Quality Details
Some actionable feedbacks provided by software are:
• Occlusion (significant part of iris is not visible)
• Iris not in focus
• Gaze incorrect (resident looking away)
• Pupil dilation

Unique Identification Authority of India
26
Aadhaar Enrolment Client
Steps to Capture Image of Iris
To capture iris biometric using Iris Capturing Device perform the following steps:
1. Checking the existence of enrollee’s eyes: If capturing the iris image is not possible due to non-existence of one or both the eyes or bandage across one or both the eyes / any other deformity or disease, the same has to be recorded in the Aadhaar Enrolment Client application software.
2. Checking the enrollee’s position: Request the enrollee to sit in a fixed position. The posture should be like taking a portrait photograph.
3. Aiming the Iris Capturing Device: Aim the Iris Capturing Device towards the eye of the enrollee. The device should be held steady. In case, if the device is required to be held by the resident, the Enrolment Operator may help the enrollee to hold the device steady.
4. Checking the light in the room: The iris capture process is sensitive to lighting condition present in the room. Make sure that no direct or artificial light directly reflects off the enrollee’s eyes. Light source used for facial image capture should be switched off during the iris capture.
5. Checking the image quality: After capturing the iris image, the Aadhaar Enrolment Client application software is able to measure the iris image quality. An initial image quality assessment would be done to provide feedback to the Operator during the capture process. The device alerts the Operator if the captured iris image is of poor quality. If the captured iris image is of poor quality then try again to capture a good quality image.
Guidelines for Iris Scanning
1. If enrollee is squint eyed and the capture of both eyes at a time is not possible, Operator may attempt recapture.
2. If enrollee is unable to open the eyes properly for iris scan, then gently guide him/her using mimicry / play act to open the eyes wide. If that does not work, then do the best you can to capture a good quality image by using recapture.
3. Iris Capture Device uses auto focus and auto-capture functions. So it does not require any focusing or capturing adjustment by the Operator.
Note In few cases it is possible to capture iris patterns for a blind person. The iris recognition technology used by the Iris Capturing Device captures details based on iris pattern. As long as the iris pattern is visible in a blind eye, its details can be captured.

Unique Identification Authority of India
27
Aadhaar Enrolment Client
Click here to expand
biometrics
Step 7: Review and Confirmation of Captured Data After the data capture has been completed, the data has to be reviewed and confirmed with the resident.
Figure 34: Review and Confirmation of Captured Data by Resident Clearly read out the text on the screen and ensure that resident is Ok with:
• Name entered
• Age / Date of Birth entered
• Gender entered
• Relationship entered
• Address entered
You can view the Acknowledgement and Consent for Enrolment by clicking Print Preview button.
After review by the resident, click the Confirm button. Aadhaar: Confirm Enrolment window will open.
Operator Confirmation for Captured Data
• After collecting data from a resident, you are required to confirm the data by providing your fingerprint. This is mandatory.
• By default the name of the Operator who logged into the enrolment client application would be displayed under the Operator Confirmation area.
In the Aadhaar: Confirm Enrolment window of the Review screen, provide your fingerprint in
the Operator’s Confirmation section by clicking the capture icon ( ). It can be any one of your fingers.

Unique Identification Authority of India
28
Aadhaar Enrolment Client
For Introducer-based
verification, capture
Introducer’s fingerprint
Capture your own fingerprint
For biometric
exceptions, capture
Supervisor’s fingerprint
Supervisor Verification for Biometric Exceptions
• Biometric exceptions captured by the Operator have to be verified by the Supervisor by providing her/his fingerprint.
• Select your Supervisor’s name from Supervisor drop-down box situated above the Supervisor Confirmation area.
• Click the capture icon ( ) or anywhere in the fingerprint display area to activate the fingerprint scanner and then capture the fingerprint of the Supervisor. It can be any one finger.
Introducer Validations for Resident’s Credentials
• If the resident does not have any valid PoI and PoA documents, then Introducer based verification can be used.
• In this case, you have to enter the Introducer's name and Aadhaar in the corresponding fields of the Identity and Address Verification section of the References screen. In the Review screen, the Introducer’s fingerprint (any one finger) will be required.
• In case of Introducer based verification, in the Review screen, capture the Introducer’s
fingerprint by clicking the capture icon ( ) in the Introducer Confirmation area.
Figure 35: Operator, Supervisor and Introducer’s Confirmation
• In case of Introducer-based verification, Currently not present check box is displayed at the Introducer’s Confirmation section. This option is used if the Introducer is not available during the enrolment.

Unique Identification Authority of India
29
Aadhaar Enrolment Client
• When Currently not present checkbox is set to True, the application allows you to complete the enrolment process without capturing the Introducer biometric details. Introducer has to verify these cases at the time of day-end review.
Head of the Family’s Biometric Capture
• In case of Head of the Family based verification, you must obtain the Head of the family’s biometric authentication in the Review screen.
Figure 36: Head of the Family’s Confirmation
• In the Aadhaar: Confirm Enrolment window, capture the Head of the family’s fingerprint
(any one finger) by clicking the capture icon ( ) at the Introducer: (HOF) area.
• Click Save to save the capture.
Step 8: Generate Enrolment ID and Print Acknowledgement & Consent for Enrolment On clicking the Save button a dialog-box confirming Success, the Enrolment ID and the option to print a receipt will be displayed.
Figure 37: Enrolment Completion Confirmation window
For HoF based verification,
select Head of the Family’s fingerprint
Click Save
Click Print Receipt
You can select regional language
option

Unique Identification Authority of India
30
Aadhaar Enrolment Client
Check the Generate receipt in regional language checkbox to print the receipt in the local language, as set in the ECA. Otherwise, the Acknowledgement would be printed in English.
• Click the Print Receipt button in the confirmation message box to generate and print an Acknowledgement and Consent for Enrolment.
Ask resident to sign / give thumb impression on the Consent for Enrolment (office copy) and file it properly. Sign and stamp the Acknowledgement. Give the Acknowledgement (resident’s copy) to the resident. In case of Introducer/HoF based enrolment, Introducer/HoF also has to sign the Consent.
On clicking the Print Receipt button, the Attach Documents button is enabled. Click the Attach Documents button to attach / scan and attach the documents selected in the References screen.
• To attach a previously scanned document, click on the Attach ( ) icon. Scanned document file type should be PDF, file size should be less than 300 KB and file name should contain EID of the current enrolment or resident’s name and type of document (poi, poa etc.).
• To scan and attach a document, select the connected scanner from the Scanner drop down list, select the required DPI (dots per inch) from the Dpi drop down list, select the Scan mode (colour or black and white), place the document to be scanned in the
scanner and click on the Scan ( ) icon.
Figure 38: Documents Attachment window On clicking the Print Receipt button, the Next Enrolment button is also enabled. You can either print once again or press Next Enrolment to start new enrolment. The option of printing again is provided to deal with possible printer issues (like paper jam, poor quality print, etc.).
Operator should collect the photocopies of the resident’s documents including Enrolment Form & Consent for Enrolment and store them safely.
To attach a previously scanned
document, click here
To scan and attach a document, click here

Unique Identification Authority of India
31
Aadhaar Enrolment Client
Beginning of Day Activities
GPS Details To identify the physical location of the enrolment station, GPS (Global Positioning System) has been integrated with enrolment client. GPS is used at the start of day to obtain the latitude-longitude-altitude for the station/centre. A GPS dongle must be connected to the USB port of the system.
A globe shaped icon at the bottom left corner of the screen represents the GPS device connectivity. A red icon will appear on top of the image if the GPS device is not connected or recognized.
Figure 39: GPS Details screen
• Click Processes GPS Details. GPS Details screen will appear.
• Baud is a data transmission rate (bits/second). It's the speed at which the data is transferred from the GPS receiver to the laptop/desktop. Select the Baud rate from the Baud rate drop down list. (Most of the GPS receivers work at a baud rate of 4800 bits per second. If your GPS receiver has a different baud rate, select the same from the drop down list).
• Click on the Start GPS button. Application displays start message.
• Once GPS is ready, the Latitude, Longitude and Altitude are displayed on the screen.
• After the co-ordinates are displayed, click on the Stop GPS button. Application displays stop message.
Note that, GPS receivers calculate the co-ordinates with help of signals from multiple GPS satellites. Hence it may take some time for the co-ordinates to appear on the screen.
2. Click Stop GPS
1. Click Start GPS
Unique Identification Authority of India
32
Aadhaar Enrolment Client
1. Click Processes
2. Click Verify Enrolment
End of Day Activities
Verify Enrolment Details Verify Enrolment Details (review and confirm) process is a mandatory step to be carried out by the Supervisor before exporting the new or corrected enrolment packets. If the new packets are not moderated by the Supervisor, the enrolment client application does not allow the Operator to export the generated packets.
For Supervisor’s review, in addition to Supervisor, the review can also be done by the peer/buddy Operator, but not by that Operator who has done that particular enrolment.
Figure 40: Moving to the Verify Enrolment Details screen
Click Processes Verify Enrolment Details [Shortcut key: Alt + Ctrl + V]. Verify Enrolment Details screen appears.
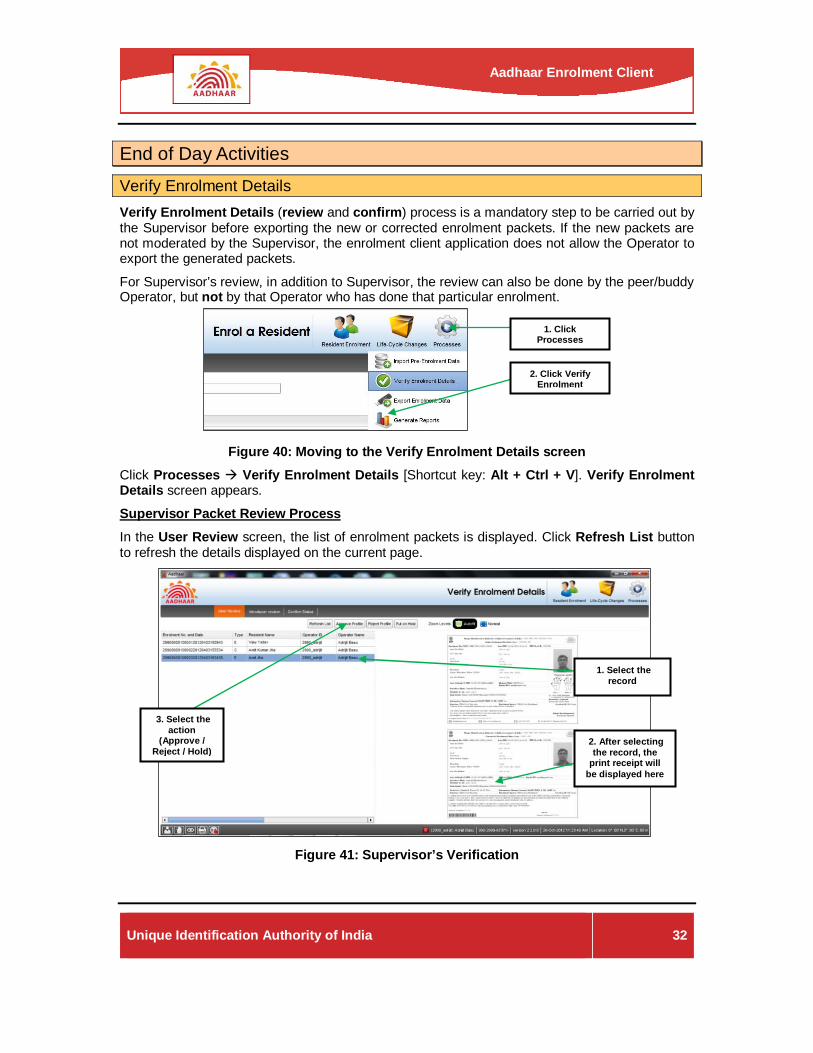
Supervisor Packet Review Process In the User Review screen, the list of enrolment packets is displayed. Click Refresh List button to refresh the details displayed on the current page.
Figure 41: Supervisor’s Verification
3. Select the action
(Approve / Reject / Hold)
1. Select the record
2. After selecting the record, the
print receipt will be displayed here
Unique Identification Authority of India
33
Aadhaar Enrolment Client
• In the User Review screen, all new and corrected enrolment packets which have not been exported will be displayed.
• On selecting a record (enrolment packet), the corresponding print receipt will be displayed on the screen.
• Go through the print receipt displayed and select one of the actions for packet - Approve, Reject or Hold. Resident packets put on hold are marked for correction.
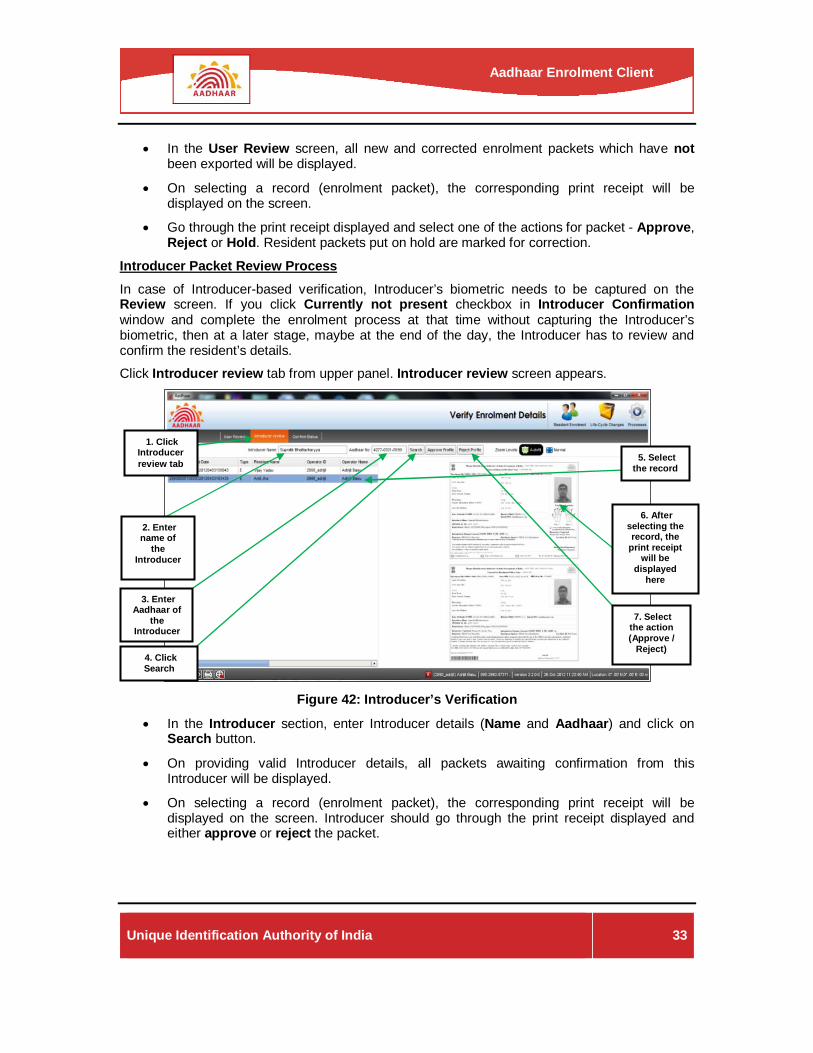
Introducer Packet Review Process In case of Introducer-based verification, Introducer’s biometric needs to be captured on the Review screen. If you click Currently not present checkbox in Introducer Confirmation window and complete the enrolment process at that time without capturing the Introducer’s biometric, then at a later stage, maybe at the end of the day, the Introducer has to review and confirm the resident’s details.
Click Introducer review tab from upper panel. Introducer review screen appears.
Figure 42: Introducer’s Verification
• In the Introducer section, enter Introducer details (Name and Aadhaar) and click on Search button.
• On providing valid Introducer details, all packets awaiting confirmation from this Introducer will be displayed.
• On selecting a record (enrolment packet), the corresponding print receipt will be displayed on the screen. Introducer should go through the print receipt displayed and either approve or reject the packet.
2. Enter name of
the Introducer
3. Enter Aadhaar of
the Introducer
4. Click Search
1. Click Introducer review tab
7. Select the action (Approve /
Reject)
5. Select the record
6. After selecting the record, the
print receipt will be
displayed here

Unique Identification Authority of India
34
Aadhaar Enrolment Client
Confirm Process
• Click Confirm Status tab to go to the Confirm Status screen.
In case of Introducer confirmation, in the Confirm Status screen, enter Introducer Name and Aadhaar No. and click Search button. The packets for this Introducer are displayed on the screen.
• Select the packet(s) and click Confirm Selected Packets button.
• Aadhaar: Confirm window appears. Now capture Introducer’s fingerprint (any one finger).
• Click Save.
In case of Supervisor confirmation, in the Confirm Status screen, click Show packets for the currently logged in user radio button and click Search. The packets for this Supervisor display on the screen.
• Select the packet(s) and click Confirm Selected Packets button. You can select multiple packets by holding the Ctrl key.
Figure 43: Supervisor’s Confirmation
• Aadhaar: Confirm window appears. Now capture Supervisor’s fingerprint (any one finger).
• Click Save.
1. Click the radio button
2. Click Search
3. Select Resident packets
4. ClickConfirm Selected Packets
5. Capture Supervisor’s fingerprint
6. Click Save
Unique Identification Authority of India
35
Aadhaar Enrolment Client
1. Click Resident Enrolment
2. Click Correct Enrolment Details
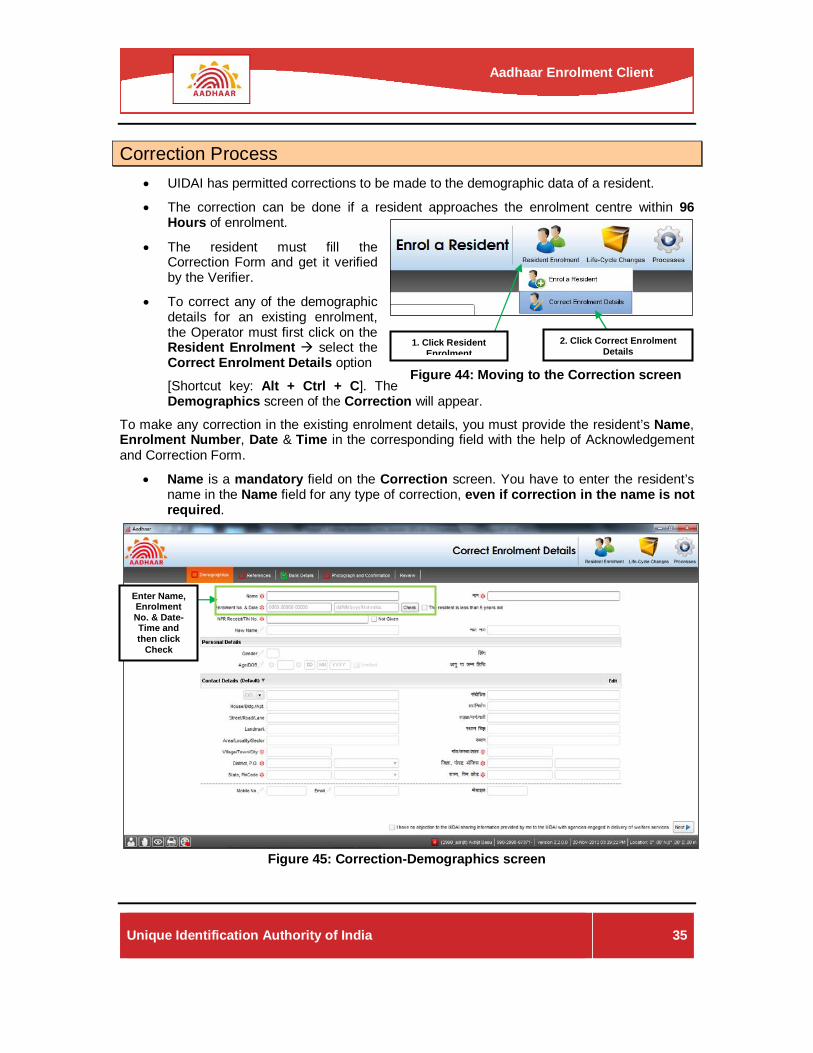
Correction Process • UIDAI has permitted corrections to be made to the demographic data of a resident.
• The correction can be done if a resident approaches the enrolment centre within 96 Hours of enrolment.
• The resident must fill the Correction Form and get it verified by the Verifier.
• To correct any of the demographic details for an existing enrolment, the Operator must first click on the Resident Enrolment select the Correct Enrolment Details option [Shortcut key: Alt + Ctrl + C]. The Demographics screen of the Correction will appear.
To make any correction in the existing enrolment details, you must provide the resident’s Name, Enrolment Number, Date & Time in the corresponding field with the help of Acknowledgement and Correction Form.
• Name is a mandatory field on the Correction screen. You have to enter the resident’s name in the Name field for any type of correction, even if correction in the name is not required.
Figure 45: Correction-Demographics screen
Enter Name, Enrolment No. & Date-Time and then click
Check
Figure 44: Moving to the Correction screen

Unique Identification Authority of India
36
Aadhaar Enrolment Client
• Click the Check button to validate. If the entered Name, Enrolment number, date and time passes the validation check, a valid message appears. Click OK to proceed.
Correction in the Name
• To make a correction in the resident’s name, you should click on the Edit icon ( ) displayed next to New Name. It will activate the New Name field. Now enter the resident’s corrected name in the New Name field.
• When the New Name field is activated, the Identify Proof field of the References screen is by default set to mandatory.
Correction in the Personal details Correction in Personal Information section could be in any of the following fields: Gender and Age or DOB. In order to correct the Gender and Age or Date of Birth, the Operator should click on the Edit Icon to enable the corresponding fields.
• Click on the Edit icon to enable the corresponding field to make any correction.
(Before clicking – [ ]. After clicking – [ ].)
• Enter the correct data.
Correction in Contact details
• In order to correct the existing contact details, click on the Edit Icon ( ) displayed in the Contact Details bar. All fields under Contact Details section will now be enabled for making the required changes. All data in the contact section fields must be re-entered.
• When the Edit Icon of the Contact Details is clicked, the Address Proof field of the References screen is activated.
Correcting the details of child who is less than 5 years old
• Click on The resident is less than 5 years old checkbox, after entering Name and Enrolment No. & Date.
• The Relative Details section in the References screen is mandatory, in this case. On clicking The resident is less than 5 years old checkbox, the Relationship to Resident section will be enabled automatically and will then allow you to enter details.
• Now, in the Demographics screen, click the corresponding Edit icon ( ) and enter the corrected data.
• In the References screen, you have to capture the Relative Name and her/his Enrolment ID or Aadhaar No.
Click the Next button when corrections are made. Or else, you can click the References tab from the upper panel. The References screen under Correction will be displayed.

Unique Identification Authority of India
37
Aadhaar Enrolment Client
References Capture
Figure 46: References Capture for Correction
In the References screen,
• For Name correction, enter Identity Proof details
• For Address correction, enter Address Proof details
• For Child details correction, enter Relative details
• In case of Introducer based correction, enter Introducer details
• In case of Head of the family based correction, enter HoF and Relative details
Photograph and Confirmation Capture The resident must be photographed after a correction. Resident also needs to confirm the correction. Get the resident’s biometric details for confirmation and authentication.

Unique Identification Authority of India
38
Aadhaar Enrolment Client
Figure 47: Capturing Photograph and Resident’s Confirmation at the time of Correction
• Capture the resident’s photograph.
• You should ensure capture of any one of the following biometric of the resident:
Left Slap / Right Slap / Two Thumbs / Left Iris / Right Iris
• If the resident who is undergoing enrolment correction is below 5 years of age, you have to capture the biometric detail of the resident’s Guardian.
Click the Next button when the photograph and resident confirmation are captured. Or else, you can click the Review tab from the upper panel. The Review screen under Correction will be displayed.
Review of Corrections
Once the corrections are captured, you should ask the resident to verify the data captured.
After that, you have to authenticate the corrections made to the resident’s demographic details by providing your finger print.
1. Capture resident’s
photograph
2. Capture resident’s fingerprint or iris to
confirm the correction

Unique Identification Authority of India
39
Aadhaar Enrolment Client
Figure 48: Correction – Review screen
• Click the Confirm button. Aadhaar: Confirm Enrolment Correction window opens.
Figure 49: Operator’s Authentication and Introducer’s Validation for Correction
Click Confirm
Click Save
Capture your own fingerprint
For Introducer based or HoF
based correction,
capture their fingerprint

Unique Identification Authority of India
40
Aadhaar Enrolment Client
• If the resident has been introduced, capture the Introducer’s biometric detail (Any finger) in the Introducer Confirmation area.
• Set Currently not present checkbox to True to capture Introducer’s Confirmation at a later stage.
• If it is a Head of the family based correction, then capture HoF’s biometric detail (Any finger) in the Introducer: (HOF) Confirmation area. Head of the Family acts similar to Introducer.
• Capture your own biometric in the Operator Confirmation area of Aadhaar: Confirm Enrolment Correction window.
• Click Save button to save the capture.
.
Figure 50: Correction Completion Confirmation window
• New Enrolment ID is generated.
• Along with the Enrolment ID, the Generate receipt in regional language option is also displayed.
• Check the Generate receipt in regional language checkbox to true to generate print receipt in local language as set in the ECA. Otherwise, the Acknowledgement would be printed in English.
• Click the Print Receipt button in the confirmation message box to generate and print an Acknowledgement of Correction and Request for Correction.
• On clicking the Print Receipt button, the Attach Documents button is enabled. The Attach Documents button is used to attach / scan and attach the documents selected in the References screen.
• Once the Print Receipt button is triggered, Next Correction button is also enabled. You can either print once again or press Next Correction to start a new enrolment correction.
• Operator should collect the photocopies of the resident’s documents including Correction Form and store them safely along with the documents submitted by the resident during the original enrolment.
Click Print Receipt
You can select
regional language
option

Unique Identification Authority of India
41
Aadhaar Enrolment Client
Data Backup at Local Level Data backup of each station to an external hard disk drive is required to be performed at least twice a day, one should be at mid-day and the other at the end-of-day. Backups are to be maintained for a minimum period of 60 days (or as specified by UIDAI from time to time).
• Take a back up of all folders and files in C:\UID_Export
• Take a back up of MS SQL Express data and log files. The procedure is:
o Click Start Run
o Type services.msc and click OK
o Select and STOP SQL Express 2008
o Go to C:\Program Files\Microsoft SQL Server\MSSQL10_50.SQLEXPRESS\MSSQL\DATA\
Note: The above path shows the default location.
o Copy AADHAAREnrolmentClient.mdf file to your backup folder
o Go to C:\Program Files\Microsoft SQL Server\MSSQL10_50.SQLEXPRESS\MSSQL\Log\
Note: The above path shows the default location.
o Copy AADHAAREnrolmentClient.ldf file to your backup folder
o Go to services.msc
o Start SQL Express 2008
Data Restore for Enrolment Client To restore Aadhaar enrolment client database, use the backed-up copies of
AADHAAREnrolmentClient.mdf and AADHAAREnrolmentClient.ldf
In order to restore follow these steps:
• Stop SQL Express 2008 Services
• Place AADHAAREnrolmentClient.mdf under C:\Program Files\Microsoft SQL Server\MSSQL10_50.SQLEXPRESS\MSSQL\DATA\
• Place AADHAAREnrolmentClient.ldf under C:\Program Files\Microsoft SQL Server\MSSQL10_50.SQLEXPRESS\MSSQL\LOG\
• Restart SQL Express 2008 Services

Unique Identification Authority of India
42
Aadhaar Enrolment Client
Export Resident Data File At the end of the enrolment session (which may be a given time of day or end-of-day or set of days), the folder containing the resident data files should be exported to a Portable External Hard Disk drive.
• To begin exporting the directory containing the resident data files, first click the Processes then select Export Enrolment Data menu from the top panel (if you are not in the Export Enrolment Data screen) [Shortcut key: Alt + Ctrl + X]. The Export Enrolment Data screen will be displayed.
Figure 51: Export Enrolment Data
• Click the browse ( ) button to Select export location field to select the directory.
• Select the directory.
• Click the Export button. This will export the data file to the External Hard Disk.
2. Click Export
Enrolment Data
1. Click Processes
2. Click the Start Export
button
1. Click the Browse button and select the portable HDD
location

Unique Identification Authority of India
43
Aadhaar Enrolment Client
Syncing with CIDR Client Sync is required every 24 to 48 hours. In case of remote locations or due to any other limitations, this time may extend to 5 to 7 days.
At the end of the export data, system needs to clean up the database in the local system.
• Connect the computer system to the internet, and start Aadhaar enrolment client.
• Go to the Export Enrolment Data screen and click on Synchronize Packet States button to start the synchronization.
• It will connect Aadhaar enrolment client to CIDR server. The server/client will communicate with each other to manage the data (deleting data, extracting backup if required etc.). During synchronization, the Operator will not be allowed to do any other work in the application.
• Synchronization can be full or incremental. Default option is incremental sync. To do a complete sync, select the full sync check box and click on the Synchronize Packet States button. Note that, full sync is time consuming operation. Use it only when necessary.
•
Figure 52: Syncing with CIDR Success message is displayed on successful client server sync process.
Click Synchronize
Packet States button

Unique Identification Authority of India
44
Aadhaar Enrolment Client
2. Enter Password
3. Click theLogin button
1. Select User ID from drop-down
On selecting an Operator ID, the corresponding Operator name is displayed in the Operator Name field
ECMP Lite ECMP Lite can be used to enter demographic data using the Enrolment Form. It’s an off-line tool to speed-up the enrolment process.
The Operator has to enter and save the resident details on the demographic screen from the application filled by the resident. At the time of actual enrolment process, Operator can import the file into the enrolment station.
Click Start All Programs UID Authority of India Aadhaar Enrolment Client ECMP Lite
You will see the following login window:
Figure 53: ECMP Lite (Pre-Enrolment Mode) Login Select the Operator ID from the drop-down. The Operator name is displayed in the Operator Name field. Enter Password and click the Login button.
The following screen appears after a successful login:

Unique Identification Authority of India
45
Aadhaar Enrolment Client
Figure 54: ECMP Lite Demographic Data Capture screen
• After logging in to the ECMP Lite, you can capture the pre-enrolment data.
• The procedure is the same as the enrolment data capture.
• An Application Number must be assigned to each record entered in this mode. Application No. may be the unique Enrolment Form Number.
• After capturing the demographic and banking data, go to the Review screen and click Save.
Now, you should export the captured data using the export records tab from the upper panel. Select the preferred location where you want to export the saved data using Select button and then export the file.
At the time of actual enrolment, browse to the folder where the data had been exported and import the file using the Import from Aadhaar Lite Edition tab. After that, in the Demographics screen, enter the Application No. in the Pre-Enrolment ID field and click Local Search icon. The pre-captured demographics and banking data will be fetched and displayed in the corresponding fields.

Unique Identification Authority of India
46
Aadhaar Enrolment Client
Document Storage Process • Upon completion of enrolment, immediately collate the set of documents and staple it at
left hand corner. Ensure documents for a resident are tagged together along with Enrolment Form on top. Ensure all documents in one set belong to one resident
• Store documents in proper box and avoid folding and excessive stacking
• Protect documents from direct sun light, inflammable material, dust and water. It is recommended that plastic covers be used to store a set of documents to protect against environmental hazard
• Avoid writing on documents; this may create confusion in later phases
• Avoid tying up documents using rope or packing tapes directly. This will permanently damage documents. If tying up is unavoidable, use PET Straps with edge protectors
• File documents in order of enrolment
• Handle enrolment documents with care and protect from damage and theft
• Make sure to hand over the documents to your Supervisor/ other assigned authority at the end of the day
When scanning facility is available:-
• Scan Originals of each of the documents
• Make sure that the desired portions (the data entered during Aadhaar enrolment) of the document are visible clearly in the scan and the document pages do not overlap
• Once all document pages are scanned, check the total no. of pages scanned and confirm that all pages are scanned
• Return all the original documents to the resident

Unique Identification Authority of India
47
Aadhaar Enrolment Client
Exceptions Handling Exceptions are mainly Biometric Exceptions. Exceptions occur when an enrollee is not able to to give the complete set of biometrics as required by UIDAI.
The following is a list of types of exceptions:
• Missing finger/s
• Amputation of finger/s
• Amputation of hand/s
• Missing eye/s
Fingerprints quality can be affected by:
• Mehendi paste
• Rough fingers/calloused hands
• Injury
Exceptions have to be handled with utmost care. Special care has to be taken to make the residents comfortable throughout the entire process. Given below are the ways to handle exceptions.
Facts about Exceptions
Rural India has many residents who have worn out fingerprints because of physical labour.
The key is to ensure that capture quality is monitored carefully by the Operator What kind of problems can occur in facial image capture?
• Poor light
• Inability to crop the image because of turban or head scarf
• Resident unable to keep the face or body still and vertical
Poor Light Conditions
• Do not use flash
• Contact the local authorities to improve the light in the surroundings
• Use the generator backup to improve lighting, in case of insufficient lighting due to low voltage
• Consider moving to a location in the room with better light
• White backdrop should be placed against an opaque wall or partition
Inability to Crop Image Because Of Turban / Head Scarf
• If accessories are worn due to religious reasons, choose the manual capture option
• The Operator may politely request the resident to remove the headgear

Unique Identification Authority of India
48
Aadhaar Enrolment Client
• In the case of women enrollees, a lady Operator or volunteer must handle this process
Inability to Keep Head / Torso Still and Vertical
• Assist the enrollee if needed
• In case of lady enrollees, assistance should be provided by the lady Operators or volunteers
What kind of problems can occur in fingerprint capture?
• Missing / amputated fingers
• Inability to flatten the fingers
• Worn out ridges
• Hands blackened through Mehendi paste or some other substance
Missing/Amputated Fingers
• Capture the biometric exception in the enrolment client
• If the resident has an extra finger/s
o The Operator should ignore the extra finger
o The extra finger should not be captured as a biometric exception
o The Operator needs to assist the resident in the fingerprint capture to avoid capture of the extra finger/s
Fingerprint Captured Is Not of the Desired Quality
• If standard images are not obtained despite repeated attempts, politely ask the enrollee to wash his hands
• Provide a wet sponge or towel available in the centre
• Request the enrollee to apply pressure on the platen
• First rely on the enrollee’s efforts for applying pressure
• If not successful, take permission and assist her/him in applying the pressure to capture the image
• Ensure that women residents are assisted by women Operators / volunteers
• Make a reasonable number of attempts to capture the biometrics of the resident
• The number of attempts that can be made is built into the software
Inability to Flatten the Fingers
• Take the enrollee’s permission. Then assist him in order to capture fingerprints
• If this is not successful, the Operator can try to obtain fingerprints to the extent that the enrollee is able to flatten and place her / his fingers on the platen

Unique Identification Authority of India
49
Aadhaar Enrolment Client
• The enrollee can then move to the next set of fingerprints of the other hand or the two thumbs
Worn Out Ridges or Hands Blackened Through Mehendi or Any Other Substance
• Attempt a manual capture
• Proceed to capture fingerprints of fingers which are not blackened or without worn out ridges
• If an enrollee has Mehendi paste on her hands, request her to wash her hands before the fingerprint capture
Be Sensitive to Women Residents
• If the lady is unable to provide sufficient pressure for the fingerprints to be captured you can:
o Take the help of the lady volunteer
o Place the piece of foam (available at the enrolment centre) on the lady’s hand and then apply pressure
Squint / Disoriented Eye
• If the capture of both eyes at a time is not possible, the single eye iris scan device or Capture each eye separately feature of the application may be used
Inability to Open the Eyes Properly
• Guide the enrollee to open the eyes wide
• Help the enrollee to open the eyes with the help of your own hands
• Take the help of a lady volunteer in case of women enrollees
Generic Exceptions
• The enrollee may not be able to keep herself / himself in the correct posture photograph due to old age or sickness
• In such cases the Operator should arrange to capture biometric data by moving the equipment close to the enrollee
Handling Exceptions is About GAINING THE RESIDENTS TRUST! Gaining the Resident’s Trust
• Be polite to residents
• Be sensitive to physical disabilities
• Provide assistance wherever needed
• Assure the resident that exceptions will not cause any problem in data capture
• Explain any related information that the resident would like to know

Unique Identification Authority of India
50
Aadhaar Enrolment Client
Crowd Management
Components of Crowd Management
• Managing queues
• Dealing with irate enrollees
• Building rapport with disruptive elements
• Engaging local administration
Managing Queues
• Attend to residents with a helpful attitude
• Observe the nature of queues
• By understanding when the queues form most often, a staffing plan can be created
• Have break times before and after the peak period
• Reduce the cycle time per resident
o How long does it take for the resident to walk into the enrolment centre, wait in line and get enrolled?
o How much time does it take to enroll a resident once they have reached the Operator?
• Ask enrollees to take a break and come back later
• The Sarpanch could make announcements when required
• Chalk can be used to draw lines on the ground. This will help discipline the queues
• Token system to manage queue or prior online appointment using portal (uidai.gov.in) can be used
Dealing with Irate Enrollees
• In the event of a verbal or physical altercation, the Operator/Supervisor must not lose their cool
• Reactive behaviour needs to be avoided at all costs
• Be polite and helpful
• Don’t talk back
• Don’t take things personally
Building Rapport with Locals
Rapport involves building peace, trust and cooperation in a relationship
• Allow them to feel important

Unique Identification Authority of India
51
Aadhaar Enrolment Client
• Be conscious of the tone of your voice
• Use positive body language
• Be friendly
• Practice active listening
• Do not show your ego
Engaging Local Administration
• Co-ordinate with the local district administration or village authorities for crowd management
• The Sarpanch / Panchayat authorities could help identify villagers who could contribute in managing crowds:
o Controlling crowds at the main entrance of the enrolment centre
o Managing queues
o Controlling crowds at the entrance of the hall
o Escorting elderly and physically challenged residents to the enrolment station
Some Examples of Friendly Speech
Instead of saying: Say:
I can’t / I won’t enroll you right away… Sir, may I do the enrolment for you earlytomorrow morning?
When this set of enrolments gets done,I will let you know…
I hope you understand…This might take 3hours…
Perhaps you could try enrolling at someother station…
Give me a moment. Please let me see what I cando to accommodate you…

Unique Identification Authority of India
52
Aadhaar Enrolment Client
Interaction with Senior Citizens
Introduction Senior citizen is a term used for an elderly person. Generally speaking these citizens are from the retired strata of the society.
Senior Citizens may suffer from poor health and age related disabilities, hence enrolment centre Operator should make them comfortable throughout the entire enrolment procedure.
Enrolment Operator should take utmost care while handling Senior Citizens.
Benefits of Effective Communication with Senior Citizens By proper communication with Senior Citizens you can ensure a comfortable enrolment procedure without irritating or annoying them.
It would help resolve Senior Citizens queries in an effective & timely manner.
Handling Senior Citizens with care will send out a positive impression of UIDAI among citizens.
Case Scenario: How to handle Senior Citizens? Dilip Ratha is an old man. He has come to the Enrolment Centre to enroll for UID. He is a 65 year old man. He has been suffering from back problem for the last few years.
Mr. Dilip Ratha can be handled as follows:
• Greet him with a smile & by saying Namaste or Hello!
• Help him to sit comfortably on the chair
• Enquire about his health & wish him a speedy recovery
• Proactively offer your help in filling the Form
• Ask all enrolment related questions politely
• Make sure that he does not have to move around too much
• Do not get irritated and angry if he is not able to understand your questions
• Confirm all the enrolment data taken from him by reading it loudly
• Assist him while the fingerprints are being captured, as the resident may not be able to give adequate pressure on the slap scanner
• Apologize to him if any of the biometric scans does not get recorded properly and take the scan again
• After finishing the enrolment procedure:
o Give all the relevant information to him
o Help him to get up from the chair
o Thank him for coming for enrolment

Unique Identification Authority of India
53
Aadhaar Enrolment Client
Do’s and Don’ts of Dealing with Senior Citizens Do’s of Dealing Senior Citizens
• Senior Citizens should be guided towards the enrolment station which is specifically reserved for them
• Greet the Senior Citizen respectfully
• Be polite and courteous
• Listen to them very carefully
• It is important to empathize with the Senior Citizens
• Talk to Senior Citizens with respect
• Body language should be positive & attentive
• The Operator needs to be patient
• Speak clearly and confirm all details taken from them
• Proactively help them as and when required during the entire enrolment procedure
• Try to ensure that all their queries & doubts are answered before they leave the enrolment centre
• Behave naturally and don't go overboard while try to help them
Don’ts of Dealing Senior Citizens
• Do not get frustrated if Senior Citizens take time while completing the enrolment process
• Do not shout or misbehave with Senior Citizens if they are not able to understand you
• Do not get angry if Senior Citizens ask you to repeat certain instructions or questions

Unique Identification Authority of India
54
Aadhaar Enrolment Client
Appendix I – List of BOD and EOD Activities
Beginning of Day (BOD) Activities 1. Review Setting up Enrolment Centre Checklist and ensure all requirements are in place.
Enrolment Agency Supervisor should sign off the checklist.
2. GPS co-ordinates must be captured once in every 24 hrs, preferably beginning of each day.
End of Day (EOD) Activities 1. Supervisor or peer/buddy Operator (named as User) must Review all enrolments of the
day to ensure that data has been correctly entered.
a. The default status of packets is Approved. User can Reject or put a packet on Hold for Correction by giving a valid reason for same
b. User must sign off by giving his/her fingerprint after End of Day Review
c. For the packets on Hold for Correction, EA must inform the resident to come to the enrolment centre on the next day for data correction.
d. Once correction is done to the resident's data, the User will again manually Approve/ Reject the resident's packet put on Hold earlier for correction, with appropriate reason if rejected.
e. At the time of Export, those packets will be considered which have either been approved or rejected by User.
f. Packets on Hold for Correction will get auto Rejected and exported after correction window timeframe have elapsed and no action been taken on packet status.
Figure 55: Packet Handling
2. Packets Rejected by Introducer will not be available to the Supervisor for Review. These packets will get exported when Export is carried out.
3. Export Data for transfer to CIDR.
4. Maintain a Register for data exported. Record date, station number and packets exported at each station.

Unique Identification Authority of India
55
Aadhaar Enrolment Client
5. Take End of Day back up (note that backup is required twice a day preferable once during lunch time and another at end of day. Backup needs to be maintained for at least 60 days) and record the date and station number where the backup was done in the Register.
6. The number of consents for enrolment should match the number of packets exported.
7. End of Day meeting at centre for sharing learning-of-the-day and issues faced.
8. Make arrangements for replacements of faulty devices, hardware and other logistics for next day enrolments.
9. Hand over completed documents (PoI, PoA, Consent etc.) and Enrolment Forms to Registrar’s Supervisor with pickup list of documents.
10. Ensure all devices and laptops are shut down. Check power off to avoid accidents. Ensure security arrangements for devices and other equipments.
11. Specific End-of-Day Reports are available on the client, for selected time period, to facilitate EA Operations. This includes Hold and Reject Reports for Enrolment Station.

Unique Identification Authority of India
56
Aadhaar Enrolment Client
Appendix II – DOs and DON’Ts for Enrolment Operator
DOs
One time Activity
Must be enrolled for Aadhaar and obtained Aadhaar/Enrolment number
Register with UIDAI appointed certification agency for taking test and get Certified
Get activated by the Enrolment Agency with a unique Operator ID
Get on-boarded (enrolled) by providing biometrics in the Aadhaar client software
Beginning of Day
Login with own Operator ID and fingerprint
After login, make sure that the date and time setting on the computer is current
After login, check the footer area i.e. left hand bottom corner icons to ensure proper connections of Biometric devices, printers etc.
Check the pop up message that appears every time the logs in intimating last Sync and time left for export. Inform EA Supervisor accordingly
Capture GPS coordinates at least once in 24 Hours.
Log off the application when going away from the seat
During Enrolment
Ensure clarity and quality of submitted document copies
Ensure correct documents are collected against PoI, PoA, DoB & PoR
Keep documents during enrolment in tray and do not fold them
Confirm that the Enrolment Form and documents belong to the same resident who is getting enrolled
Check that the resident’s Enrolment Form has been verified (carries Verifier’s signature/thumbprint and stamp/initials).
The Enrolment Form has the resident’s signature/thumbprint
In case of Introducer/HoF based enrolment, check the Introducer/HoF’s signature/thumbprint in the Form along with their details is available
Put the resident at ease
Make sure that the resident’s screen is on all the time during the enrolment and ask the resident to cross check the data being entered
Follow the sequence of data capture as per the screens provided on the software client

Unique Identification Authority of India
57
Aadhaar Enrolment Client
During Demographic Data Capture
Enter all the demographic data from the verified Enrolment Form
Cross check the spelling, spaces, punctuation marks, capital & small letters etc.
Check and correct transliterated errors, like spelling mistake etc., if any
In case of Pre-enrolment data, make sure that the data retrieved using pre-enrolment ID belongs to the resident getting enrolled, by confirming against Enrolment Form details
Check and correct the pre-enrolment data as per verified Enrolment Form details
In case of temporary damage to fingers or eyes, record it as an exception. Ask the resident to get his/her biometric updated later
Be sympathetic and gentle but firm while checking for biometric exceptions
During References and Banking Data Capture
In case of document based verification always select the respective document names
Always enter total number of documents submitted by the resident
During Biometric Data Capture
Help and encourage the resident while capturing biometric information
During Photograph Capture
Ensure availability of a white background
Make sure that the camera use auto focus and auto-capture functions
Capture enrollee’s face with neutral (non-smiling) expression, teeth closed, and both eyes open and looking into the camera
If the capture fails, check the actionable feedback using Quality Details icon
Switch off the table light after the facial image capture is complete
During Fingerprint Capture
Remember that fingerprint capture is mandatory for all residents aged 5 years and above
Use a lint free cloth periodically to clean the platen of the finger print device
If the capture fails, check the actionable feedback using Quality Details icon
Ask the resident to stand as fingerprints are best captured in standing position
In case of additional fingers, ignore the additional finger and capture the main five fingers
In case of hands blackened through mehendi paste or any other substance, capture as normal
In case of worn out ridges, capture as normal. The resident may be asked to rub his/her hands

Unique Identification Authority of India
58
Aadhaar Enrolment Client
During Iris Capture
Remember that iris capture is mandatory for all residents aged 5 years and above
Handle the iris capture device by yourself, generally not by the resident
Tell children and other fearful residents that the iris scan procedure is as simple and safe as taking a normal photograph
Ensure that no direct or artificial light is reflected off the enrollee’s eyes
Hold the device steadily. Incase device requires to be held by resident, help the resident to hold the device steadily
If resident is experiencing difficulty during iris scan and recapture is required, then navigate to next screen to capture other details and then return to iris capture. This will relax the resident from constant pressure to keep eyes wide open during iris capture
Be patient during capture and wait for the device response instead of scrolling, navigating back and forth on screen
If the capture fails, check the actionable feedback using Quality Details icon
During Review, Confirmation and Print
Check the colours (red/green/orange) next to the screen-names at the top bar of the screen to verify the completeness of the data capturing process
Ask the resident to observe and verify the recorded data from the monitor facing the resident
Read out the text on the screen if resident is blind or unable to read or if required
In case of any errors, correct recorded data and review again with the resident
Get the Supervisor’s Sign Off in case enrollee has biometric exceptions
In case of Introducer/HOF based verification, get the Introducer’s/HOF’s sign off
Get the resident’s signature or thumb impression on the Consent for Enrolment
In case resident is a child below 5 years, father/mother/guardian of the child whose enrolment ID was recorded in software will sign/ provide thumbprint the Consent
In case of Introducer based verification, the Introducer should sign/provide thumbprint on the Consent for Enrolment endorsing the resident
Sign and seal the Acknowledgement. Give the Acknowledgement (resident’s copy) to the resident
While handing over the acknowledgement to the resident, inform the resident that -
o The Enrolment Number printed on acknowledgement is not the Aadhaar number and that the resident’s Aadhaar number will be communicated through a letter subsequently. This message is also printed in the Acknowledgement.
o The resident must preserve his/her and the children’s Enrolment Acknowledgement for future reference.

Unique Identification Authority of India
59
Aadhaar Enrolment Client
o There is a 96 hour period during which the resident’s data can be corrected, so in case of any mistake they should avail of this facility
o To know the Aadhaar Generation Status they can call the Call Centre or log on to e-Aadhaar portal/Aadhaar Portal/website
o Aadhaar number will be delivered by the local post office/or other designated agency to the address provided at the time of enrolment
During Document Management
Upon completion of enrolment, immediately collate the set of documents and staple it at left hand corner. Ensure documents for a resident are tagged together along with Enrolment Form on top. Ensure all documents in one set belong to one resident
Store documents in proper box and avoid folding and excessive stacking
Protect documents from direct sun light, inflammable material, dust and water. It is recommended to use plastic covers to store set of documents to protect against environmental hazard
Avoid writing on documents; this may create confusion in later phases
Avoid tying up documents using rope or packing tapes directly. This will permanently damage documents. If tying up is unavoidable use PET Straps with edge protectors
File documents in order of enrolment
Handle enrolment documents with care and protect from damage and theft
Make sure to hand over the documents to your Supervisor/ other assigned authority at the end of the day
During Document Management (when scanning facility is available)
Scan Originals of each of the documents
Make sure that the desired portions (the data entered during Aadhaar enrolment) of the document are visible clearly in the scan and the document pages do not overlap
Once all document pages are scanned, check the total no. of pages scanned and confirm that all the pages have been scanned
Return all the original documents to the resident
DON’Ts Do not ask for any payment from the resident for enrolment
Do not allow any person to substitute for a resident
Do not include salutations or titles like Mr, Miss, Mrs, Major, Retd etc. while entering name in the demographic section
Do not use unnecessary spaces, punctuation marks and capital letters during data capture

Unique Identification Authority of India
60
Aadhaar Enrolment Client
Do not enter N/A, NA etc. in fields where resident has not provided any data. Leave those non-mandatory fields blank
Do not mark Biometric Exceptions where Biometrics can be captured. It will be treated as ‘fraud’ and invite strictest penalty
Do not allow any head rotation or tilt of the head while capturing Facial Image of the resident
Do not allow the resident to chew and talk while taking Facial photograph
Do not accept or record any Facial Image which suffers from motion blur, over or under exposure, unnatural coloured lighting, or distortion
Do not accept or record any Facial Image which is captured with non-neutral (smiling) expression, teeth visible, any or both eyes closed or the resident is not looking into the camera
Do not use any light exactly above the enrollee since it can cause shadows
Do not allow dark glasses/tinted glasses on eyes while taking Facial photograph
Do not allow hats or head/face covering unless worn for religious reason. Ensure that the full face is clearly visible
Do not allow any accessories that cover any region of the face while capturing Facial Image
Do not allow anyone else to sign for an enrolment that has been done by you
Do not sign for enrolment that is done by another Operator
Do not write on the resident’s documents
Do not tie up documents using rope or packing tapes directly, as this may permanently damage the documents
Do not de-staple, re-staple or fold the documents that are collected from residents
Do not keep the documents in direct sun light, near inflammable material, dust or water
Do not allow corrections of resident’s data, more than once
Do not instantly react and mutter something in anger
Do not use technical terms that are not easily understood by most people
Do not speak too fast or too slow