a tutorial guide for students - meridiancc.edu tutorial guide for students updated: may 2015 . 2...
TRANSCRIPT

1
A Tutorial Guide for Students
Updated: May 2015

2
Table of Contents
Getting Started ............................................................................................................................................ 3
Scheduling an Exam ................................................................................................................................... 6
Rescheduling an Exam..………………………………………………………………………………….10
B Virtual Option ....................................................................................................................................... 11

3
Getting Started
To launch SmarterProctoring:
Log in to your Canvas
Click on the class you want to work in
At the bottom left hand of the screen, click SmarterProctoring
The Log in screen will then appear. Click Log in.

4
You will be taken to the Launch screen. Click Launch.
You must now register an account. After all the information is complete, click
Continue Setup.

5
You will now choose whether or not you want to receive SMS notification/messages
from SmarterProctoring.
After reviewing the information, click Save Registration.
You will now be directed to your Course Dashboard.

6
Scheduling an Exam
Click on the SmarterProctoring button in your Canvas course.
On your Course Dashboard you will see the Your Exams box. The exam available for
the course you selected will be listed.
To select the course you want, click the Courses tab. Choose the course you want from
the drop down menu.
To begin scheduling, click the Select Proctor button under the exam you wish to
schedule.
You will now see the Select Proctor Type options.

7
Select Face to Face Proctor if you want to schedule your test at a testing center. Select
Use B Virtual if you would like to take your test with a live virtual proctor. This option
requires payment. The payment is the responsibility of the student, not the instructor
or institution.
If you select B Virtual, turn to page 10 for further instructions.
When you find the location you want, click the Request Session button.
The Request Blast box will appear.
8
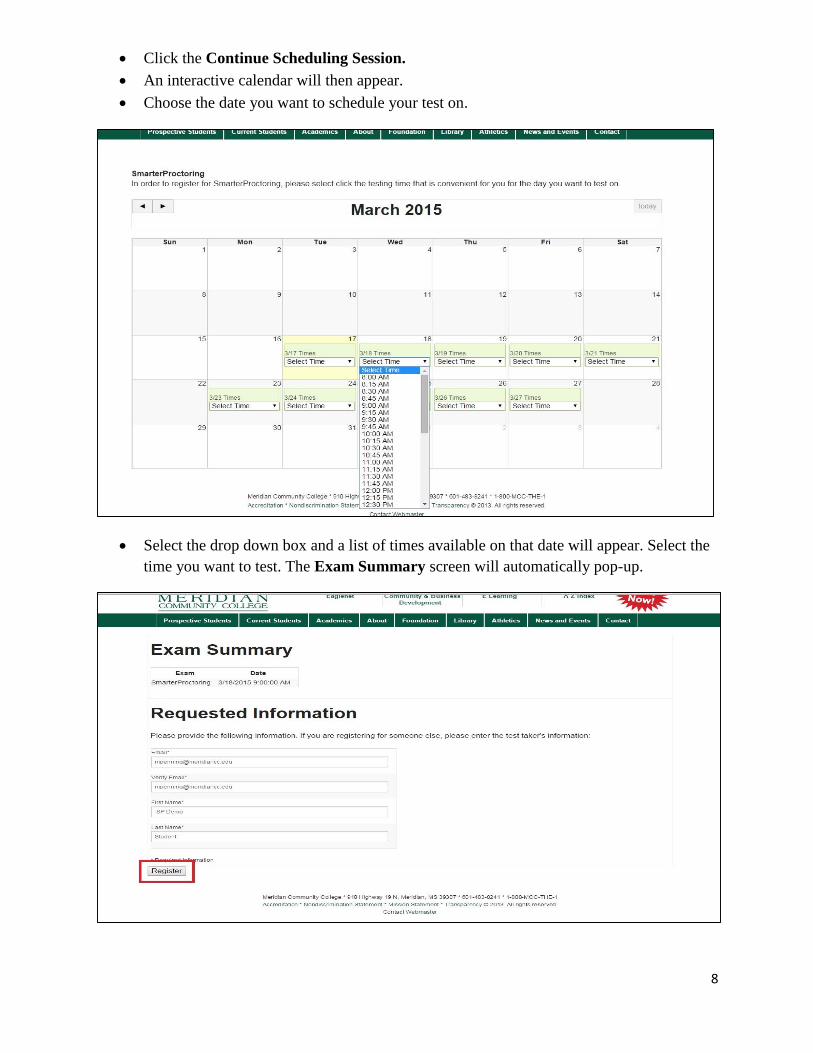
Click the Continue Scheduling Session.
An interactive calendar will then appear.
Choose the date you want to schedule your test on.
Select the drop down box and a list of times available on that date will appear. Select the
time you want to test. The Exam Summary screen will automatically pop-up.

9
Verify the information and click Register.
At this point your scheduling session is complete. Review the information and click
Continue.
You will then be directed back to the Course Dashboard.
Your test has been scheduled and will appear on the Course Dashboard.

10
Rescheduling an Exam Appointment
On your Smarter Proctoring dashboard, you will see all of the exams you have scheduled.
Find the exam you want to cancel and click the red Reschedule or Cancel Session
button.
After clicking Reschedule, you will be directed back to the calendar to choose a different
appointment date and time.

11
B Virtual Proctoring Option
From the following screen, click the Use B Virtual option.
After you have selected B Virtual, the B Virtual registration screen will appear.
To schedule your appointment, click the blue Click Here button.

12
The B Virtual Session Details will appear. From this screen, select the date and time you
want to test.
After selecting the time and day you want to test, the payment screen will appear. A
debit or credit card is required for payment. Fill in the appropriate information and
Submit Payment. The payment is the responsibility of the student, not the instructor
or institution.
After submitting your payment, you will be able to finish the scheduling process.