a guide to google fusion tables visualizations - david … guide to google fusion tables...
TRANSCRIPT

A guide to Google Fusion Tables Visualizations
Summary: The Google Fusion Tables is described as “experimental”, which
means that it always in beta format. Still, as we saw in chapter 6, the application
provides an excellent way of displaying data in a map, either by plotting the
geographic coordinates such as longitude and latitude that are part of the dataset
that you’re uploading, or by linking to a KML file, the native format for Google
Maps and an open standard. Because chapter 6 already has a tutorial on building
maps with Fusion Tables, this tutorial will function more as a general guide,
demonstrating how to build some of the graphs discussed in chapter 8.
What you will learn:
1. Downloading the Fusion Table app.
2. Uploading and importing a spreadsheet.
3. Creating a chart, colour-coding and labelling.
4. Saving and embedding your finished product.
Task 1: Downloading the Fusion Table app.
If you already have the Fusion Table app, you can ignore this task and move on to
the second one.
Open your Google Drive account. If you don't have a Google account, you'll need
to create one at www.google.com.
To begin the upload process, click on the "create" button in the Drive interface.
Those with the latest updated version of Google Drive should click on the "new"
button. In the dialogue that opens, choose "Fusion Table." If you don't see the
Fusion Table option, click on "Connect More Apps," find Fusion Tables, and add

to your Google Drive.
Downloading will add Fusion Tables to the other applications on your Google
Drive. Your menu will look different than this one, but the key is seeing the Fusion

Table app has been added.
Task 2: Uploading and importing a spreadsheet.
A word about the dataset we’re about to upload: The city of Ottawa uses the
monthly service request data to track complaints ranging from noise to wild

animals. Beginning in 2013, the city began uploading monthly data in csv files.
The dataset for this tutorial combines the files from 2013 to 2015, groups them by
ward and filters the violations for noise. This was made possible using MySQL to
import the monthly files, standardized the dates, and then exporting a clean csv file
for the three full years. For more on MySQL, check out the “Making Tables and
Importing Data into MySQL” tutorial that accompanies chapter 5.
Downloadable data: You can download the sample 2013-2015 data for this task
here.

There are three columns: “Ward Number”, “Ward Name” and the “Number of
Noise Violations from 2013-2015”. This is the table that we will upload to Fusion
Tables.
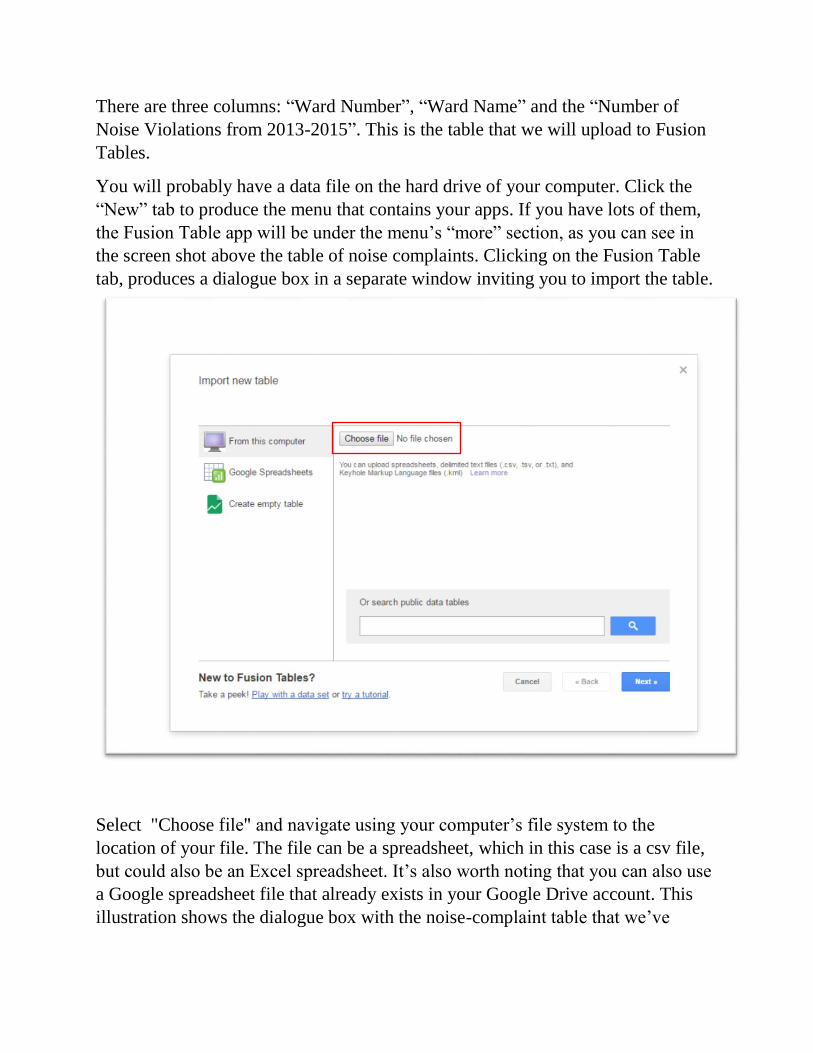
You will probably have a data file on the hard drive of your computer. Click the
“New” tab to produce the menu that contains your apps. If you have lots of them,
the Fusion Table app will be under the menu’s “more” section, as you can see in
the screen shot above the table of noise complaints. Clicking on the Fusion Table
tab, produces a dialogue box in a separate window inviting you to import the table.
Select "Choose file" and navigate using your computer’s file system to the
location of your file. The file can be a spreadsheet, which in this case is a csv file,
but could also be an Excel spreadsheet. It’s also worth noting that you can also use
a Google spreadsheet file that already exists in your Google Drive account. This
illustration shows the dialogue box with the noise-complaint table that we’ve

chosen.
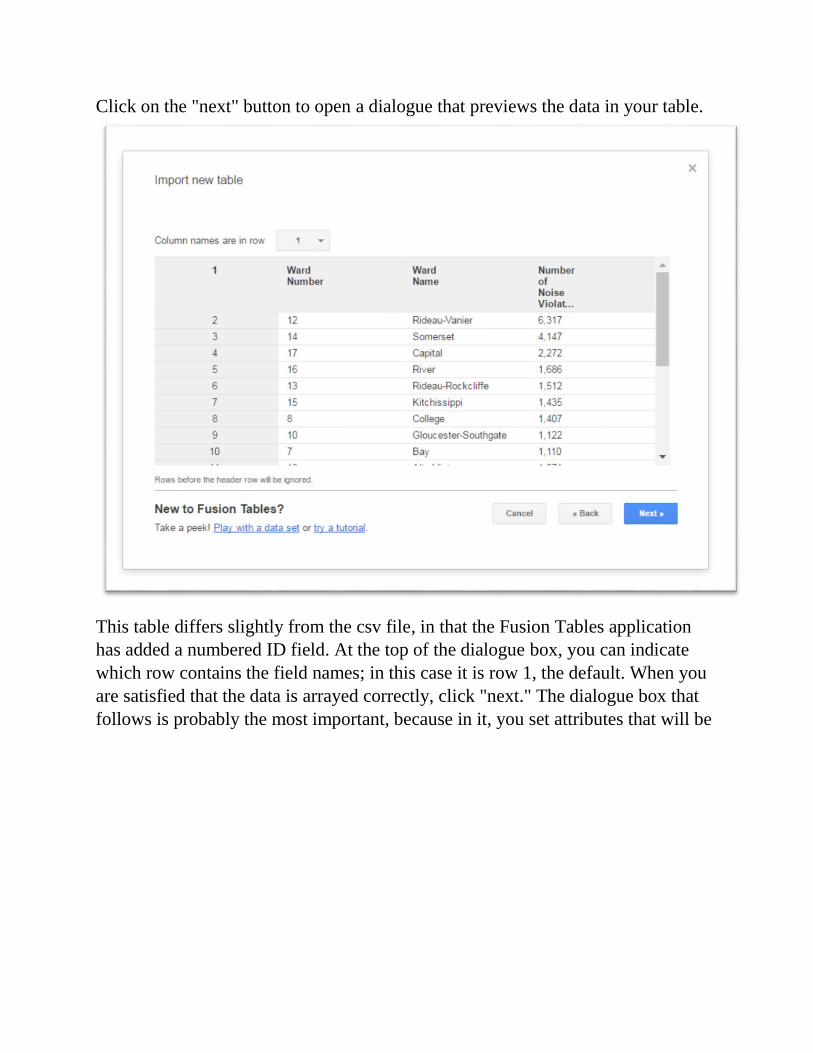
Click on the "next" button to open a dialogue that previews the data in your table.
This table differs slightly from the csv file, in that the Fusion Tables application
has added a numbered ID field. At the top of the dialogue box, you can indicate
which row contains the field names; in this case it is row 1, the default. When you
are satisfied that the data is arrayed correctly, click "next." The dialogue box that
follows is probably the most important, because in it, you set attributes that will be

seen by those with whom you may share the data.
As you can see, you can change the table name, indicate whether other Fusion
Tables users can download your data, attribute the source of the data, provide a
link to the data source, and provide a narrative description of the data. The latter
may be most important to you, as it will help you remember the contents of your
table if you return to it months or years later. The description of the data defaults to
generic information about when you imported the file and the name of the table.
Once you are satisfied, click Finish, and the data will be imported into a new
Fusion Table. Within seconds, you should see your uploaded table.
Task 3: Creating a chart, colour-coding and labelling.


The dataset is clean, with the numbers properly formatted. Though Fusion Tables
allows for a fair bit of data formatting, it’s best to do all your cleaning and
formatting in your spreadsheet. If you want to edit the content, click on
“Edit>Change Columns”, which produces another dialogue box.
You can choose the field you wish to alter, selecting the proper “Type” and
“Format”.
Now we are ready to create our chart. Click the “plus sign” to the right of the
“Rows 1” tab.


Select “Add chart”.
The chart options, which we discussed in chapter 8, are to the left. Because we
want to make it easiest to see the ward with the highest number of complaints, it’s
probably best to choose a horizontal bar chart that you can see highlighted in the
red square above.
So, let’s do that.
By default, Fusion Tables has sorted the columns by name on the Y-axis; that is, in
alphabetical order. The numbers are below on the X-axis. As we discussed on page
178 of our textbook, horizontal bar charts are good options for helping the reader
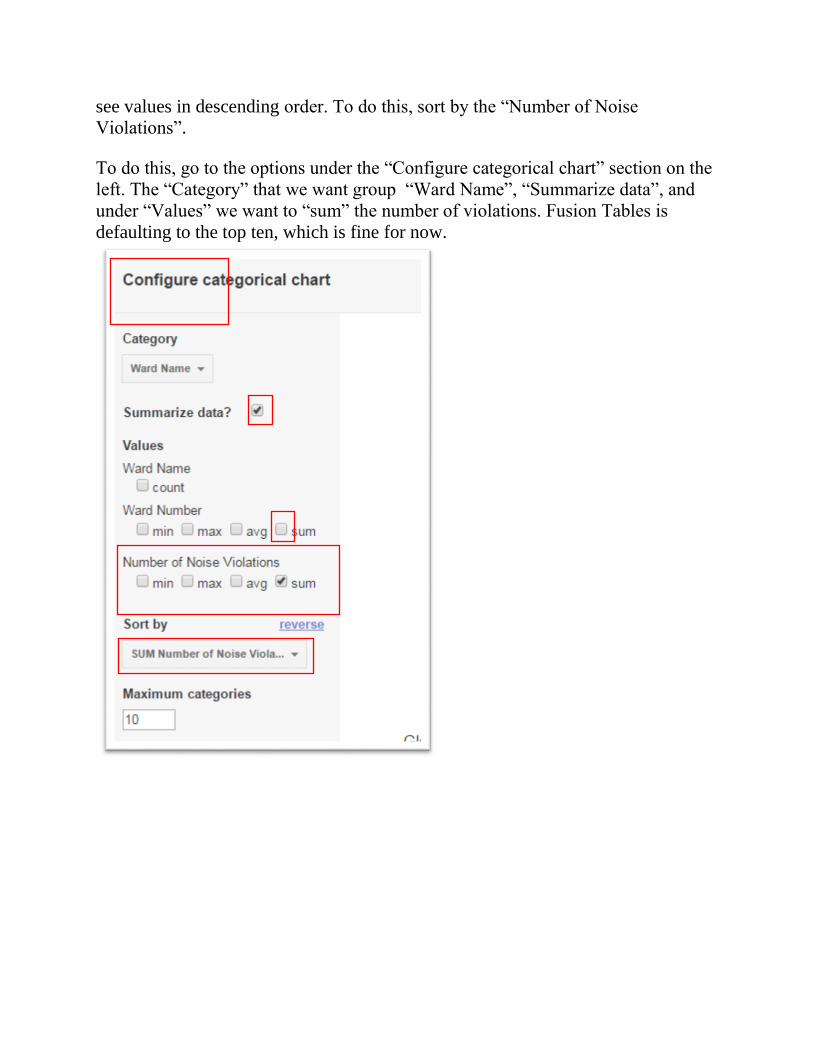
see values in descending order. To do this, sort by the “Number of Noise
Violations”.
To do this, go to the options under the “Configure categorical chart” section on the
left. The “Category” that we want group “Ward Name”, “Summarize data”, and
under “Values” we want to “sum” the number of violations. Fusion Tables is
defaulting to the top ten, which is fine for now.

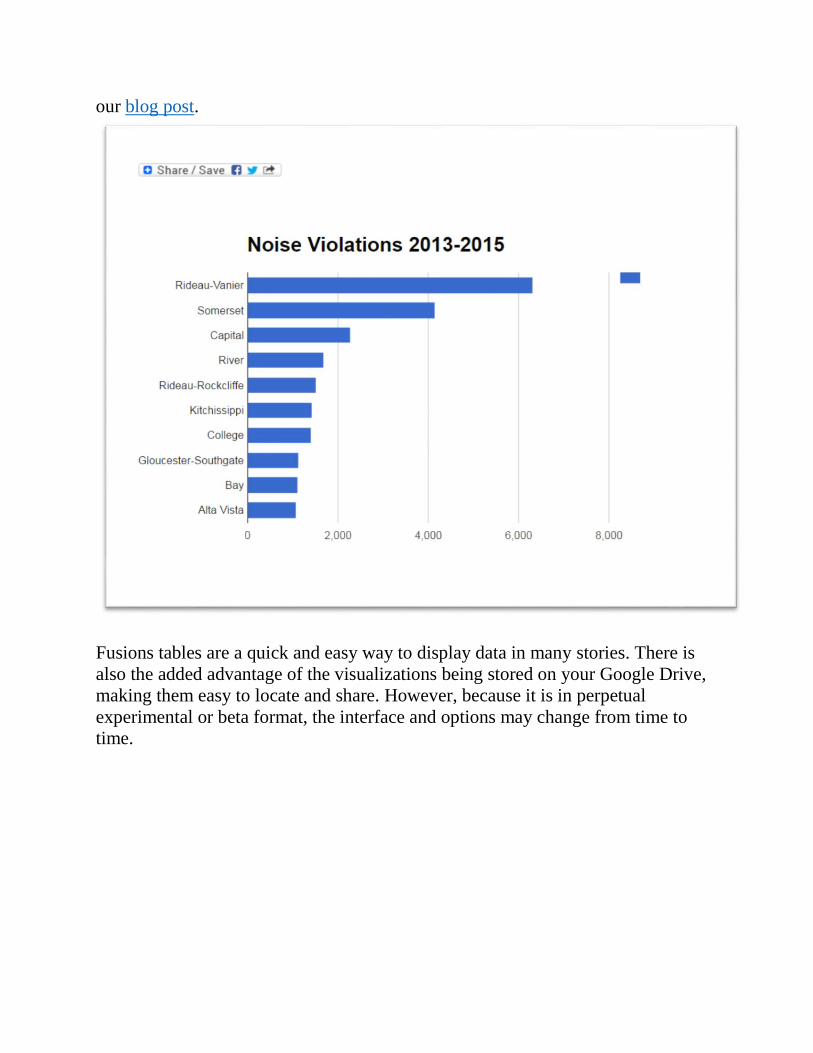
So we can see that Rideau-Vanier has the highest number of complaints, which
makes sense, given that it’s one of the city’s densely populated municipal districts
minutes from Parliament Hill and home to a dozens of bars and restaurants.
Now we have to give the chart a title. To do this, click on the “Change appearance”
tab, which produces a “Chart Editor” dialogue box.

Type a title in the “Title” section, increase the font size to make it stand out. You
can also do some other formatting and even change the colour. Once you’re happy
with the result, select “OK.”
Note that we have only chosen to display the top 10. You could also display all 23
wards, though visibility becomes an issue. Generally speaking, it’s best to stick
with the top results for reasons spelled out in chapter 8.
Task 4: Saving and embedding your finished product.
Before we can embed this chart into our blog post, we must share it. Sharing is a
standard protocol for any cloud-based service like Fusion Tables, or as we’ll see in
the next tutorial, Tableau Public. So, select the “Share” button located at the top

right.
This produces an option to change the access level from private to public by
selecting the “Change” option.


The selection depends on what you want to do. If the visualization is for your
story, then the first option makes sense. If you want to limit the exposure to
colleagues or classmates, the second or third choices might be better options. For
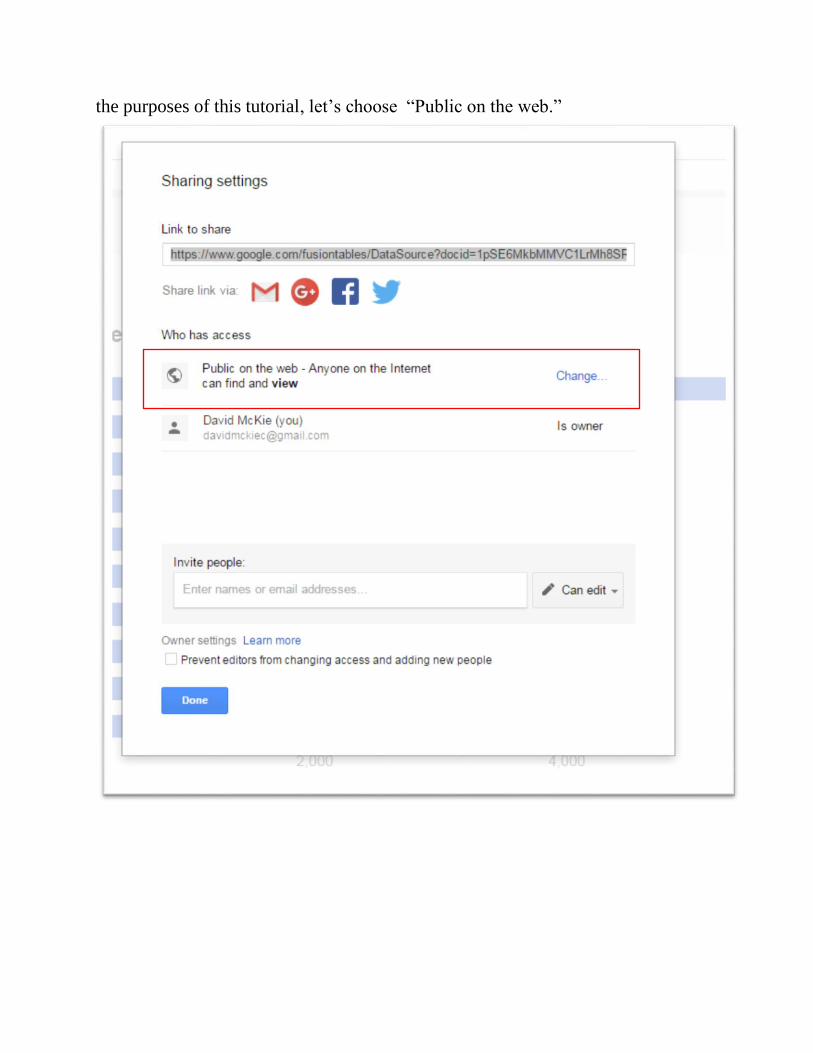
the purposes of this tutorial, let’s choose “Public on the web.”
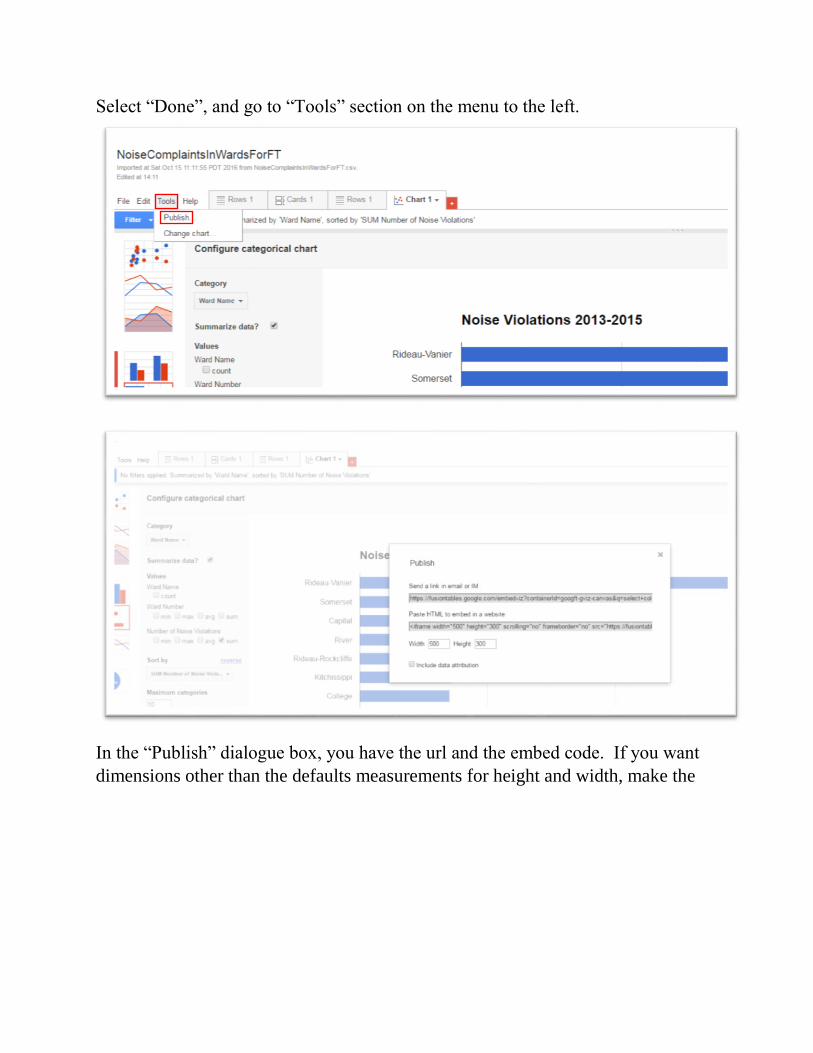
Select “Done”, and go to “Tools” section on the menu to the left.
In the “Publish” dialogue box, you have the url and the embed code. If you want
dimensions other than the defaults measurements for height and width, make the
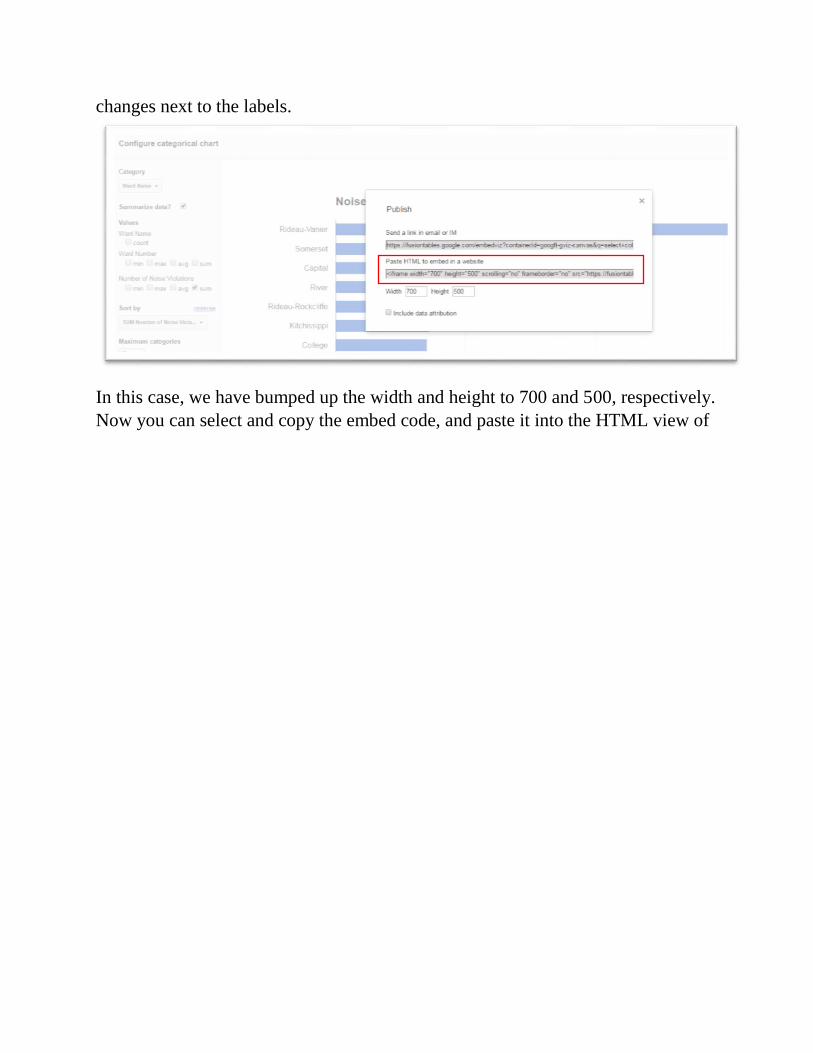
changes next to the labels.
In this case, we have bumped up the width and height to 700 and 500, respectively.
Now you can select and copy the embed code, and paste it into the HTML view of
our blog post.
Fusions tables are a quick and easy way to display data in many stories. There is
also the added advantage of the visualizations being stored on your Google Drive,
making them easy to locate and share. However, because it is in perpetual
experimental or beta format, the interface and options may change from time to
time.
