a dark world - eamonmallon.files.wordpress.com · ‘a dark world’ is a 2d resource gathering rpg...
TRANSCRIPT
A Dark World A 2D Android Game
Author Eamon Mallon
Supervisor Dr. Patrick Healy
B.Sc. Computer Games Development
Department of Computer Science and Information Systems University of Limerick
Ireland

i
Acknowledgements
I would like to express my special gratitude and thanks to my supervisor Dr. Patrick
Healy for his continues support, encouragement and guidance which was an inordinate
help in the completion of this project.
A special thanks and appreciations go to my parents Matt and Bridie Mallon, without
whom none of this would have been possible. I would also like to thank my two siblings
Mary-Rose and Madeleine Mallon for supporting and encouraging me along the way.
Finally I would like to express my gratitude towards the ten members of the Alpha
testers group on this project: Caoimhe Sweeney, Madeleine Mallon, Mary-Rose
Mallon, Louise Daly, Úna Howley, Jake Sweeney, James Dilleen, Michael Dowling,
Patrick McHale and Zeke Jaroszek.

ii
Declaration
This final year project is presented in part fulfilment of the requirements for the
degree of Bachelor of Science in Computer Games Development. It is entirely my
own work and has not been submitted to any other University or higher education
institution, or for any other academic award in this University.
Where there has been use made of the work of other people, it has been fully
acknowledged and fully referenced.
All brands, product names, or trademarks are properties of their respective owners.
___________________
Eamon Mallon
14th April 2016

iii
Table of Contents
Acknowledgements ......................................................................................................... i
Declaration ..................................................................................................................... ii
Table of Contents ......................................................................................................... iii
Table of Figures ............................................................................................................. v
Table of Code Samples ................................................................................................. vi
Abstract ......................................................................................................................... 1
1. Introduction .......................................................................................................... 2
1.1 Overview ......................................................................................................... 2
1.2 Motivation ....................................................................................................... 3
1.3 Technologies used ........................................................................................... 4
2. Research ............................................................................................................... 6
2.1 The Original ‘A Dark Room’ Game ............................................................... 6
2.2 What would improve the original game? ........................................................ 6
2.3 Software Research ........................................................................................... 7
2.4 Programming Language .................................................................................. 9
2.5 Design Patterns ................................................................................................ 9
2.6 Game Controls and Ergonomics ................................................................... 10
2.7 User Interface ................................................................................................ 11
2.8 Pathfinding .................................................................................................... 12
3. Design ................................................................................................................. 14
3.1 Character Design ........................................................................................... 14
3.2 Level Design ................................................................................................. 16
3.3 Menu Design ................................................................................................. 19
3.4 Player Controls Design.................................................................................. 20
4. Implementation ................................................................................................. 21
4.1 Setting up the Environment ........................................................................... 21
iv
4.2 UI ................................................................................................................... 22
4.3 Player Controls .............................................................................................. 23
4.4 Ray Casting ................................................................................................... 25
4.5 A* Pathfinding .............................................................................................. 27
4.6 Timed Events................................................................................................. 29
4.7 Data Storage .................................................................................................. 30
4.8 Particle Systems & Prefabs ........................................................................... 31
5. Evaluation .......................................................................................................... 33
5.1 Development Testing .................................................................................... 33
5.2 User Testing .................................................................................................. 35
5.3 Implementation Issues ................................................................................... 35
5.4 Future Development ...................................................................................... 36
6. Conclusion ......................................................................................................... 38
References .................................................................................................................... 39

v
Table of Figures
Figure 1Clash of Clans Map UI ..................................................................................... 7
Figure 2 Nintendo DS .................................................................................................. 10
Figure 3 Clash of Clans UI , Figure 4 Fallout Shelter UI ............................................ 11
Figure 5 Need for Speed Map UI ................................................................................. 12
Figure 6 Pseudocode of A* .......................................................................................... 13
Figure 7 Female Engineer Sketch , Figure 8 Female Engineer Digital ....................... 14
Figure 9 Male Engineer Sketch , Figure 10 Male Engineer Digital ............................ 14
Figure 11 Female Stranger Sketch , Figure 12 Female Stranger Digital ..................... 15
Figure 13 Male Stranger Sketch , Figure 14 Male Stranger Digital ............................ 15
Figure 15 Player Sprite Red , Figure 16 Player Sprite Green , Figure 17 Player Sprite
Blue .............................................................................................................................. 15
Figure 18 NPC Sprite , Figure 19 Boss Sprite ............................................................. 16
Figure 20 The Legend of Zelda A Link to the Past Forest Map , Figure 21 Pokémon
Emerald Cave Map ...................................................................................................... 16
Figure 22 Layer 1 Floor , Figure 23 Layer 2 Walls ..................................................... 17
Figure 24 Layer 3 Collision Detection......................................................................... 17
Figure 25 Collider Unedited Mesh , Figure 26 Collider Edited Mesh......................... 18
Figure 27 Edit Collider Button .................................................................................... 18
Figure 28 A Dark World, world Map .......................................................................... 18
Figure 29 Original Concept For Crafting UI , Figure 30 A Dark World Crafting UI . 19
Figure 31 A Dark World Inventory Menu ................................................................... 19
Figure 32 Minecraft Chest to Inventory System , Figure 33 A Dark World Inventory to
Backpack System ......................................................................................................... 20
Figure 34 Button Pressed Player Controls UI , Figure 35 Player Controls & UI Layout
...................................................................................................................................... 20
Figure 36 External Tools in Unity, Figure 37 Player Settings ..................................... 21
Figure 38 Unity UI Builder .......................................................................................... 22
Figure 39 Unity Inspector onClick(), Figure 40 Craft window Closed ....................... 22
Figure 41 Gizmo Wire Grid with A* path to player in black ...................................... 27
Figure 42 Particle System Settings in Unity ................................................................ 31

vi
Table of Code Samples
Code Sample 1 Show and Hide Canvas Method ......................................................... 23
Code Sample 2 Update Method that checks player input ............................................ 24
Code Sample 3 Moving Up Method Demonstrates Vector3.up .................................. 25
Code Sample 4 Line Casting Detection ....................................................................... 26
Code Sample 5 Code to determine the distance between NPC and Player ................. 26
Code Sample 6 Implementation of Gizmos ................................................................. 28
Code Sample 7 Generate Duration until next event..................................................... 29
Code Sample 8 Example of Timer and Event .............................................................. 29
Code Sample 9 Saving Data Using Prefabs ................................................................. 30
Code Sample 10 Loading Data from PlayerPrefs ........................................................ 31
Code Sample 11 Instantiating the Prefab ..................................................................... 32
Code Sample 12 Destroys Game Object that this script is attached to. ....................... 32
1
Abstract
‘A Dark World’ is a 2D resource gathering RPG developed for the Android platform
using the Unity engine. It is based on an existing 2D web-based game called ‘A Dark
Room’ (A Dark Room, 2015) where the player must gather resources in order to craft
new items and survive the post-apocalyptic world. As the player progresses, people
randomly approach them in search of refuge from the outside world. Once there are
people in the camp, they can be assigned to carry out the various tasks for the player
whilst they explore the outer world in search of mines and caves. However, exploring
these areas won’t be easy as the caves and mines are guarded by various enemies trying
to keep them for themselves. If the player dies in combat, they will lose the items they
currently have with them. In order to complete the game, the player must craft or find
the best armour and weaponry to beat all ten levels in the world map.

2
1. Introduction
The following section will cover the motivation behind the project, an overview on how
the game plays and finally the technologies used to develop the game.
1.1 Overview
‘A Dark World’ is a 2D resource gathering RPG (Role Playing Game) developed for
the Android platform using the Unity engine. The concept is based on an existing game
‘A Dark Room’ were the player must gather the surrounding materials and set traps for
food in order to survive and to craft different items. The player is first greeted in a
darkened room by a shadow-like figure. This person asks the player which of the three
colours shown they prefer. The answer will determine if the shadow character is a male
or female character, allowing for a slightly different experience for every player. They
will then ask the player what their name is. Once this is established, the shadow figure
will require the player to light a fire. When the fire is lit, the character will reveal
themselves and give a small background about themselves. The character will mention
that they are an engineer and can teach them how to craft different items like a hut so
they can help others who need shelter. Once the player has built their first hut, a timer
is started where after two to three minutes of playing the game, an event is triggered.
This event adds a new person to the population of the camp, giving the player the option
to now assign people to carry out tasks such as gather wood. Assigning people to do
these tasks will vastly increase the rate at which resources are gathered in the game.
In order to progress to the outside world, the player must craft three items. The three
items required are a wooden sword, cured meat and armour. The player will then be
approached by a person in distress who has been running from people that have taken
over their home. The stranger gives the player a map of the outside world allowing them
to explore the caves and mines.
Once the player has acquired the map and crafted the necessary items, they can begin
to explore the surrounding area of the camp. They are presented with a map on screen
where they choose the destination on the map that they would like to go to. However
the player must complete the map in sequence in order to progress to each stage. As the
player explores the surrounding caves and mines, they will be attacked by various
enemies. If the player receives damage from combat, they can replenish their health by
eating food or medicine found in chests at the end of each level. If a player is defeated
3
in a combat situation, they will “wake up” back in their camp where they will find out
that their items have been stolen and that the engineer has found them just in time.
1.2 Motivation
My motivation for this project originated from playing various resource gathering
games and RPG’s. Also, as I am a Computer Games Development student I wanted to
make a game for my final year project. ‘A Dark Room’, the original game that my FYP
is based off of, is what mainly motivated me to develop this game as a final year project.
‘A Dark Room’ is a very plain game with a seemingly complex backend to it, with
various items that can be crafted, and timed events. It is a primarily text-based game
with a simple button interface with a text map used for exploration. The game lacked a
functional mobile application, and an absence of an attractive user interface meant the
game was not as popular as I fell it should have been. This, however, is why the game
motivated me to recreate it. I feel that I will be able to recreate an Android version of
the game with a graphical representation of the player’s progress as they play through
the game, instead of leaving it up to the imagination as ‘A Dark Room’ required the
player to do. With the addition of animation and visible characters, the game will be
more immersive and enjoyable for the player. As the game will be on Android it will
be easily accessed by the player on the go and won’t need an internet connection. This
allows the player to play the game whenever and wherever they please. The original
game was on a webpage meaning players required an internet connection and a laptop
or device with a big enough screen to play it at any time.
As a Narratologist, a person who prefers more story driven gameplay to other types of
gameplay, adding a background to characters was very important to the game as I feel
it gives the game more depth. The main character that the player meets is the Engineer
who is also their companion for the rest of the game. The reason why I picked an
engineer is to add logic to how that character knows how to build different things in the
game for example huts and traps. The inspiration for the games story comes from
various dark themed films, games and comics associated with an apocalyptic setting.
The main storyline for the game is as follows:
“The world was involved in a massive war that led to the people in power using nuclear
warfare. This led to what the player now sees, a broken world where the human
population is nearly wiped out and people now fight to survive. All modern technology

4
has been destroyed including guns. Ever since the first bomb went off, the sky has been
covered in a dark chemical cloud leaving the world shrouded in darkness. Day and night
have become one, forever in eternal darkness.”
The reason why I chose such a dark setting was to give the player a reason to complete
certain objectives in the game. For example, keeping the fire alive to warn off enemies,
or to attack the enemies in nearby caves and mines because the enemies have attacked
innocent people. The intention of this is to give the player a sense of completing heroic
acts and a sense of accomplishment for their victories over their foes.
1.3 Technologies used
The following are a list of technologies used to create ‘A Dark world’ and the reason
for choosing them.
1.3.1 Why Unity?
The game engine used in this project was Unity (Unity, 2015). It is a popular choice for
Android development (Kar, 2015) as it allows a developer to create cross platform
games in C# and Java Script. In using unity it allows for future development for other
platforms such as IOS and PC with its simple build process. Unity also has a very user
friendly UI allowing new developers to grasp it quickly.
1.3.2 Why C#?
As I have a strong working knowledge of the language from my Co-Op, choosing C#
was an easy decision to make. In using C#, it will also expand my knowledge of the
language, which is vital for future development as C# with Unity are very popular in
the game development industry. To have knowledge of both of the language and engine
could prove invaluable for career prospects after graduation.
1.3.3 Why Adobe?
For animation and character design in the game I will be using Adobe after Effects
(Adobe After Effects CC, 2015) and Photoshop (Photoshop CC, 2015). I have chosen
these two programs as I have previous knowledge of the two from creating my own
animations and videos. In using these two products it will eliminate the time spent
learning how to use new software and it allows me to focus on research and learning
how to use unity. Both softwares are renowned for their video editing and photo editing
making them one of the best options for graphical design.

5
1.3.4 Why Tiled and Tiled2Unity?
Tiled (Tiled Map Editor, 2016) is an open source map editor for 2D based games. It has
a very simplistic user interface giving it a small learning curve. I have chosen Tiled as
a map editor because of its easy porting to Unity using Tiled2Unity (Tiled2unity, 2016).
Both are very simplistic but powerful tools for creating a map for a game. One of the
key features in Tiled is the capability to add in 2D Box Colliders to the boundaries of a
map. A Box Collider 2D component is a collider used with 2D physics in Unity. The
collider has a rectangle shape with a given position, width and height in the local
coordinate space of a Sprite. The rectangle is also axis-aligned, i.e. its edges are parallel
to the X or Y axes of local space. These Colliders define an approximate shape for an
object that’s used by the physics engine to determine collisions with other objects. In
addition to this the user can make multiple levels for the textures such as a level for
floors and a different level or layer for a tree top. Once imported into Unity using
Tiled2Unity, the layers are picked up by Unity. This allows the programmer to assign
a layer number to a sprite. For example, the player sprite is assigned a layer number 1
so that it has the ability move either behind or in front of a texture or layer depending
on the layers number. An example of this would be assigning the number 0 to the floor
layer, number 2 to the top half of a tree layer. Then once inside Unity assign a player
sprite the layer number 1. This would allow the player sprite to be seen in front of the
floor layer but also allow the player sprite to move out of view behind the tree layer.
1.3.5 Why Chibi Character Maker?
Chibi Character Maker (Famitsu Chibi Creator, 2016) is a royalty-free open source
character generator that allows the user to style and download both a male and female
sprite sheet. The sprite sheet generator also creates sprites that work perfectly with
Unity’s sprite cutter. The sprite cutter divides the sprite sheet into single sprites and
allows the user to animate the sprite easily.

6
2. Research
This section will cover research into ‘A Dark Room’.
2.1 The Original ‘A Dark Room’ Game
‘A Dark Room’ was originally created by Michael Townsend and Amir Rajan (Amirali
Rajan, 2016). The game was developed at Doublespeak Games and was inspired by a
game called Candy Box (Candy Box, 2016) which was developed by an indie game
developer called Aniwey a 19 year old from France in April 2013. ‘A Dark Room’
consists of three tabs, The player can interact with “The Room”, “The Village” and
“The Dusty Path” which links to a world map that the player can explore. In these tabs
the player can craft and gather their resources for their adventures in the outside world.
Similar to how I have mentioned before the player will be approached by strangers at
random looking for shelter and food but they do not have a choice in taking them in. If
there is room in the camp the stranger automatically enters the camp and stays there.
The original game has a hidden story to it were the player finds alien alloy whilst
exploring the world map. After finding the alien alloy the player will then find a broken
alien spaceship which they can fix if the player can find more alien alloy. Once the ship
is fixed they can fly into space were they must dodge the asteroids hurtling towards
them. If, and when, the player completes this level a piece of text will appear saying
the ship has crashed again. The player is then presented with their score for the game
and asked if they would like to restart the game.
2.2 What would improve the original game?
In the original game the user interface was plain and easy to understand but lacked the
ability to immerse and captivate a player. One way that would improve the game and
make it more immersive is by implementing a graphical user interface similar to games
like Clash of Clans (Clash Of Clans, 2016) or Fallout shelter (Fallout Shelter, 2016).
Adding in cut scenes or animations for the strangers approaching the camp site would
improve on immersion and grab the player’s attention as the strangers are randomised.
7
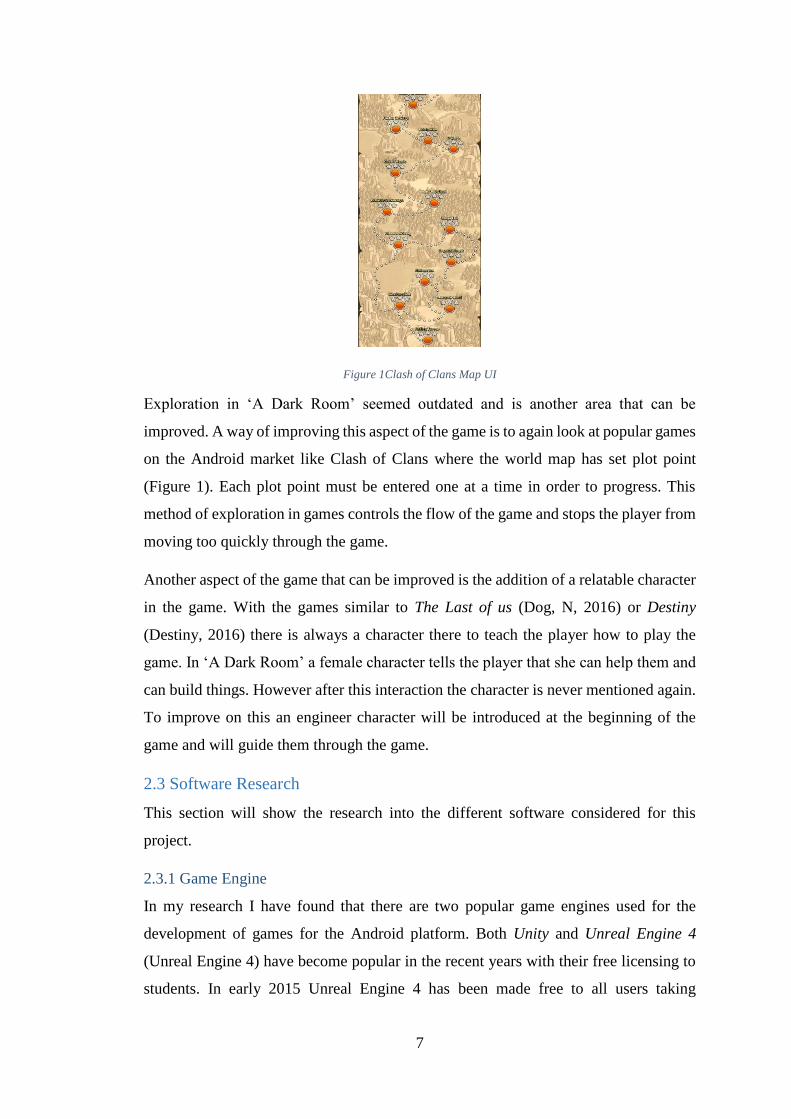
Figure 1Clash of Clans Map UI
Exploration in ‘A Dark Room’ seemed outdated and is another area that can be
improved. A way of improving this aspect of the game is to again look at popular games
on the Android market like Clash of Clans where the world map has set plot point
(Figure 1). Each plot point must be entered one at a time in order to progress. This
method of exploration in games controls the flow of the game and stops the player from
moving too quickly through the game.
Another aspect of the game that can be improved is the addition of a relatable character
in the game. With the games similar to The Last of us (Dog, N, 2016) or Destiny
(Destiny, 2016) there is always a character there to teach the player how to play the
game. In ‘A Dark Room’ a female character tells the player that she can help them and
can build things. However after this interaction the character is never mentioned again.
To improve on this an engineer character will be introduced at the beginning of the
game and will guide them through the game.
2.3 Software Research
This section will show the research into the different software considered for this
project.
2.3.1 Game Engine
In my research I have found that there are two popular game engines used for the
development of games for the Android platform. Both Unity and Unreal Engine 4
(Unreal Engine 4) have become popular in the recent years with their free licensing to
students. In early 2015 Unreal Engine 4 has been made free to all users taking

8
commission for the games sold by developers rather than a paid monthly subscription.
The biggest difference between the two engines are the languages used in their
development. Unity provides its users with the choice of scripting languages, C#, Java
Script or Boo, Unreal provides its users with C++. Both engines provide cross platform
capabilities allowing for future expansion of games. However the Unreal engine seems
to be primarily used for the development of games on devices other than mobile for
example PC or PlayStation. On the other hand Unity is known for the development of
a lot of the popular games on the Android market such as Crossy Road (Andrew Sum,
2016) and Clash of Clans. Apart from this fact, as I have a stronger knowledge of C#
over C++, I have chosen Unity to be the games engine.
2.3.2 IDE
The Unity engine allows users to programme their scripts in a separate IDE from the
one that comes with the game engine called Mono (Monodevelop, 2016). Research into
IDEs that are compatible with this feature showed that any IDE can be used with the
engine. There are three IDEs that I have a strong knowledge of and they are Sublime
(Sublime, 2016), Visual studio (Visual Studio - Microsoft Developer Tools, 2016) and
Eclipse (Eclipse, 2016). When looking into the best of these three IDEs to use I have
found that Visual Studio best suits the environment as it makes suggestions to Unity-
related objects such as Canvas and Game Object. Visual studio also has a package
installer called a NuGet. This package installer allows the developer to install different
packages developed by Microsoft some of which can display how many times a method
or object is being referenced. The use of these plugins are designed for a faster and
easier development process.
2.3.3 Animation software
Popular animating software programs that I have come across are from Adobe. Adobe
supplies three programs that can be used to create videos or animations, Flash (Adobe
Animate CC, 2016), Photoshop and After Effects. Flash is a popular choice in for
animation as it is geared towards beginner animators, whereas Photoshop is popular for
photo editing and digital drawings. After Effects is a widely used video editing software
used in many professional environments. As I have previous experience of Photoshop
and After Effects I will be using both of these to create the cut scenes for the game and
character drawings. Other animation software I have researched are Cinema 4D
(MAXON, 2016) and Maya (Maya, 2016) both of which are very powerful animation

9
software. However their primary use is for 3D animation and as ‘A Dark Room’ is a
2D game they are not appropriate for this in particular project.
2.3.4 Tile Editor
Unfortunately as Unity is primarily a 3D-based game engine creating tile maps is not
an easy task inside of Unity. However there are multiple open source tile editors
available online. Some of the top editors I have found are Tiled, OGMO editor (OCMO
EDITOR, 2016) and Tile Studio (Tile Studio, 2016). While all three editors are easy to
use and have similar user interfaces, during my research I found Tiled to be the most
compatible with Unity. This is due to Tiled’s accompanying exporting program
Tiled2Unity. Tiled2Unity is a simple map exporting software specifically designed for
Unity. The tool allows the user to export their map project with its various layers into
their Unity project while maintaining the maps information such as layer numbering
and collision detection.
2.4 Programming Language
There are two popular languages used in Android development, Java and C#. Other
languages such as C++ and Java Script are also used often, but C# and Java appear to
be the more dominant languages used. The reason for Java’s popularity is due to Java
being the native language of Android and the release Android Studio (Android Studio,
2016) by Google in May 2013. With the release of Android Studio as an open source
IDE it became an easy way to develop Android apps for free. However C# has gained
popularity due to its similarities to Java and the popularity of the Unity game engine.
With both languages having similarities it allows developers to transition over to Unity
easily giving them the option for cross platform development. Once a beginner
developer knows the basics of programming it is easy for them to use both languages.
On the other hand C++ is an intermediate or advanced language meaning the developer
would need a greater knowledge of programming to develop Android applications. A
lack of knowledge of C++ could lead to memory leaks; as mobile devices have such a
limited amount of memory it is vital to avoid this if possible.
2.5 Design Patterns
Some design patterns that have I have researched are the command pattern and
decorator pattern. The command pattern would be used to implement the controls of
the game such as a swipe left or right on the screen. If the command pattern were to be
10
implemented it would allow the game to be developed for multiple platforms as the
pattern gives ease for the addition of new controls for the game. Similarly the decorator
pattern would allow for new characters to be added to the game in the future as they are
randomly created at each event. An example of this would be if a stranger approached.
That character would receive their attributes using the decorator pattern, deciding if that
character would be male or female, a merchant or wanderer and so on.
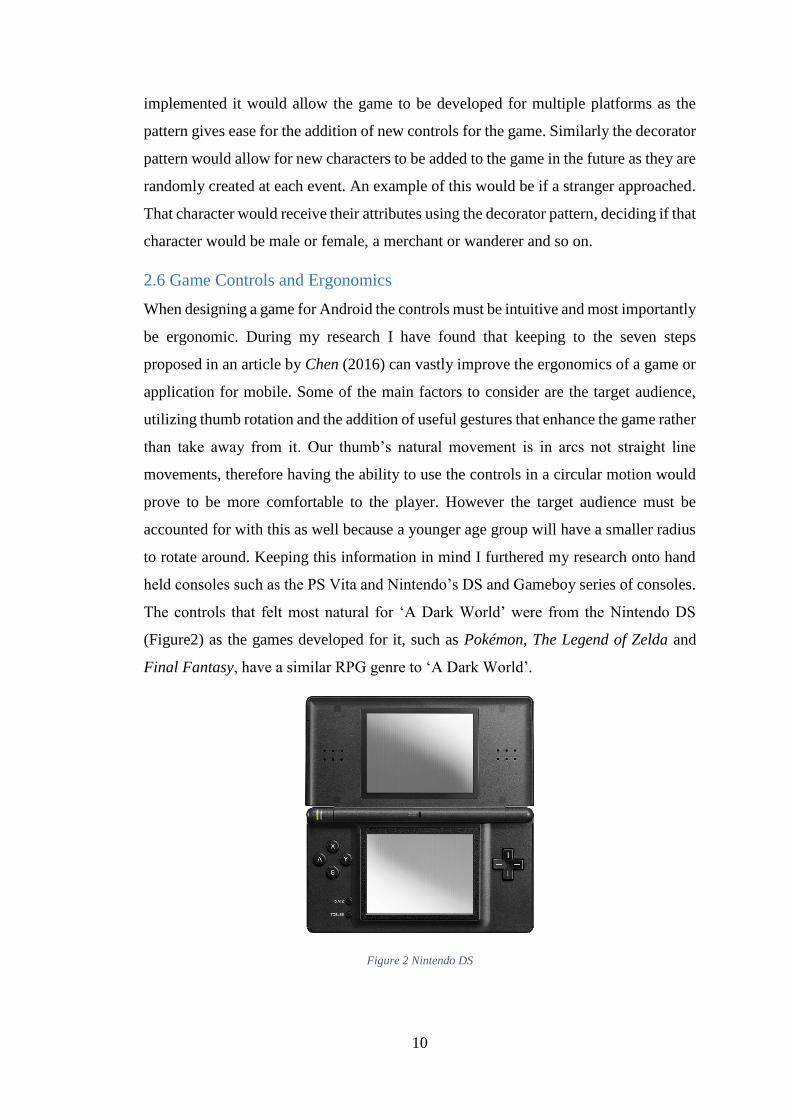
2.6 Game Controls and Ergonomics
When designing a game for Android the controls must be intuitive and most importantly
be ergonomic. During my research I have found that keeping to the seven steps
proposed in an article by Chen (2016) can vastly improve the ergonomics of a game or
application for mobile. Some of the main factors to consider are the target audience,
utilizing thumb rotation and the addition of useful gestures that enhance the game rather
than take away from it. Our thumb’s natural movement is in arcs not straight line
movements, therefore having the ability to use the controls in a circular motion would
prove to be more comfortable to the player. However the target audience must be
accounted for with this as well because a younger age group will have a smaller radius
to rotate around. Keeping this information in mind I furthered my research onto hand
held consoles such as the PS Vita and Nintendo’s DS and Gameboy series of consoles.
The controls that felt most natural for ‘A Dark World’ were from the Nintendo DS
(Figure2) as the games developed for it, such as Pokémon, The Legend of Zelda and
Final Fantasy, have a similar RPG genre to ‘A Dark World’.
Figure 2 Nintendo DS

11
2.7 User Interface
In researching games on the Android market one user interface appears to be commonly
used for menus in most games. These layouts mostly consist of images of the items the
player wants to craft alongside the required items needed to create that item. Two games
that are perfect examples of this layout are Clash of Clans (Figure 3) and Fallout Shelter
(Figure 4). As seen from the images below the menu presents the player with an image
of the item, a description and the cost of crafting that item. Also seen in the below
images a user can see what items are locked and how they can unlock them. In doing
this it encourages the player to continue playing the game until they have unlocked the
new item.
Figure 3 Clash of Clans UI Figure 4 Fallout Shelter UI
A commonly used UI for world maps in mobile games is a plot-based UI where the
player can choose between the plots on the map. Some games allow the player to choose
any of the points on the map whilst others have a progression system. Games similar to
Clash of Clans (Figure 1) use this progression system on their world map, forcing
players to move through the map one point at a time. In using this system it controls the
flow of the game and can extend the duration of gameplay. Games such as Need for
Speed (Figure 5 ; Need For Speed Games For Android, 2016) use world map systems
that allow a player to choose whatever points on the map they want once the point is
unlocked. Games that use this system tend to have levels inside each map point which
the player must complete one after the other. This is generally how the game’s flow is
controlled.

12
Figure 5 Need for Speed Map UI
2.8 Pathfinding
There are many different algorithms for pathfinding such as, A*(A-Star), DFS (Depth
First search), BFS (Bread First Search) and Dijkstra’s algorithm. During my research
my main focus was directed towards A* pathfinding as I have a greater knowledge of
the algorithm from our Machine Learning and AI for Games module in semester one
of four year.
A* uses a method of pathfinding that will always guarantee the shortest path, this is
done by checking neighbouring or reachable nodes for a lower value. This is done until
the end goal or target is found, then the list of nodes with the lowest values becomes
the path to that target. However, even though the algorithm will guarantee the shortest
path it can be very resource intensive. This is something that cannot overlooked when
it comes to developing a game for Android devices as their resources can be limited. A
way to resolve this issue was described in Xiao and Hao Shi’s paper “A*-based
Pathfinding in Modern Computer Games” where they mentioned:
“The most popular way to avoid memory waste is to pre-allocate a minimum
amount of memory.”
13
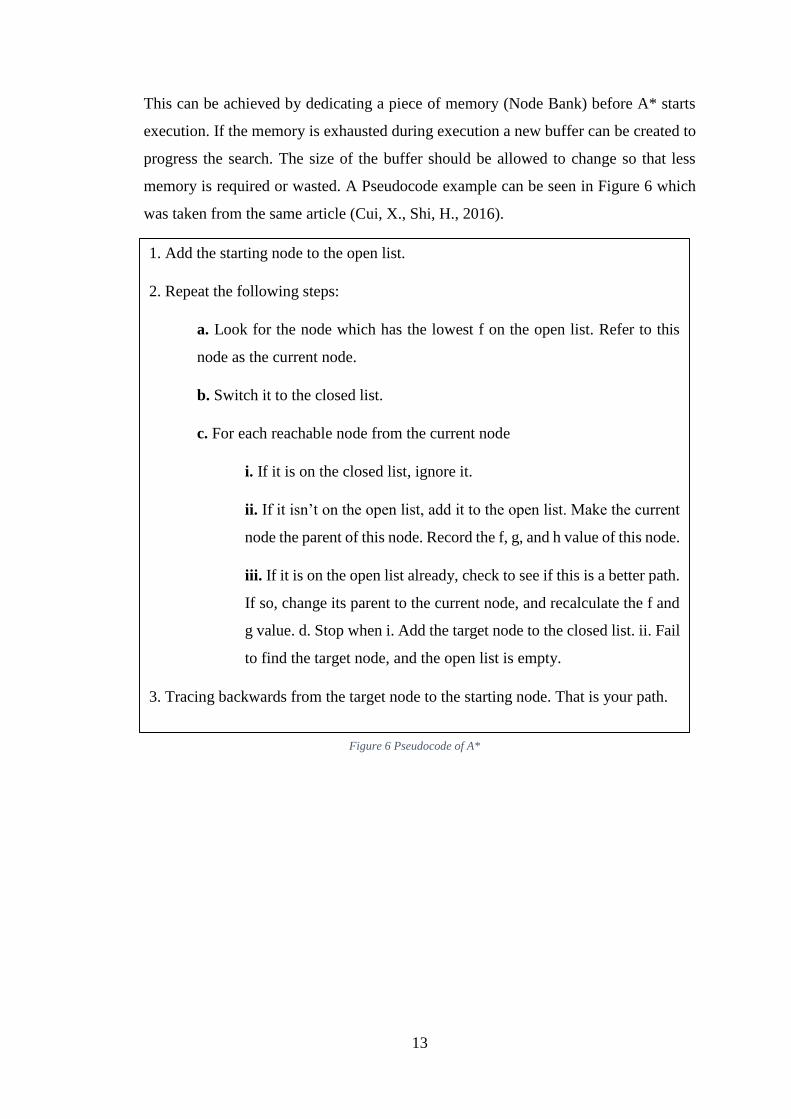
This can be achieved by dedicating a piece of memory (Node Bank) before A* starts
execution. If the memory is exhausted during execution a new buffer can be created to
progress the search. The size of the buffer should be allowed to change so that less
memory is required or wasted. A Pseudocode example can be seen in Figure 6 which
was taken from the same article (Cui, X., Shi, H., 2016).
1. Add the starting node to the open list.
2. Repeat the following steps:
a. Look for the node which has the lowest f on the open list. Refer to this
node as the current node.
b. Switch it to the closed list.
c. For each reachable node from the current node
i. If it is on the closed list, ignore it.
ii. If it isn’t on the open list, add it to the open list. Make the current
node the parent of this node. Record the f, g, and h value of this node.
iii. If it is on the open list already, check to see if this is a better path.
If so, change its parent to the current node, and recalculate the f and
g value. d. Stop when i. Add the target node to the closed list. ii. Fail
to find the target node, and the open list is empty.
3. Tracing backwards from the target node to the starting node. That is your path.
Figure 6 Pseudocode of A*

14
3. Design
The following section will cover the process design within the game.
3.1 Character Design
There are a total of 4 types of NPC in “A Dark World”, an engineer, a stranger, enemies
and a boss outside the camp. Each character has a male and female equivalent which is
decided by the game before the player sees the character. However the female and male
engineers (Figure 7, 8, 9, 10) are unknowingly decided by the player at start of the
game. Once the player wakes up in the dark room they are greeted by the dark figure in
the room and asked a series of questions. From the question “which colour do you
prefer, red, green or blue?” the gender of the engineer will be decided. If the player
chooses red they will be greeted by a female engineer or if they choose blue a male
engineer will greet them. If the player chooses green the game decides the gender of
the character. Whichever gender engineer the player does not get will automatically
become the boss at the end of a cave or mine.
Figure 7 Female Engineer Sketch Figure 8 Female Engineer Digital
Figure 9 Male Engineer Sketch Figure 10 Male Engineer Digital
15
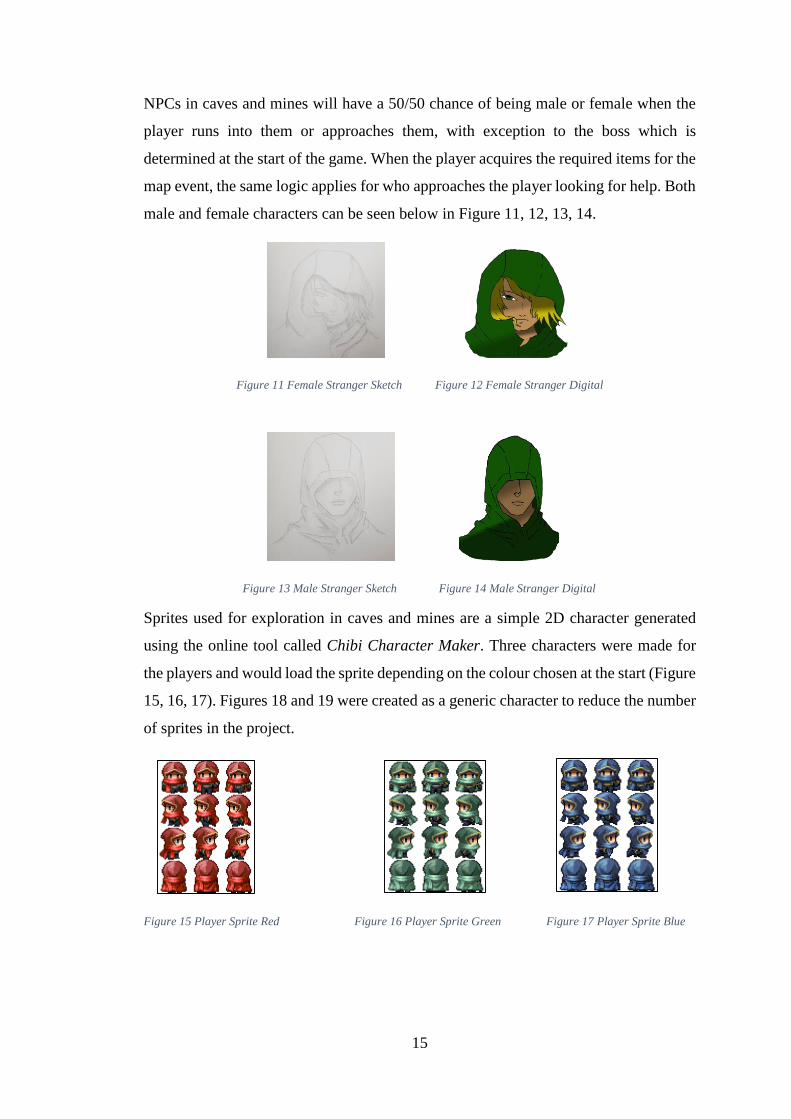
NPCs in caves and mines will have a 50/50 chance of being male or female when the
player runs into them or approaches them, with exception to the boss which is
determined at the start of the game. When the player acquires the required items for the
map event, the same logic applies for who approaches the player looking for help. Both
male and female characters can be seen below in Figure 11, 12, 13, 14.
Figure 11 Female Stranger Sketch Figure 12 Female Stranger Digital
Figure 13 Male Stranger Sketch Figure 14 Male Stranger Digital
Sprites used for exploration in caves and mines are a simple 2D character generated
using the online tool called Chibi Character Maker. Three characters were made for
the players and would load the sprite depending on the colour chosen at the start (Figure
15, 16, 17). Figures 18 and 19 were created as a generic character to reduce the number
of sprites in the project.
Figure 15 Player Sprite Red Figure 16 Player Sprite Green Figure 17 Player Sprite Blue
16
Figure 18 NPC Sprite Figure 19 Boss Sprite
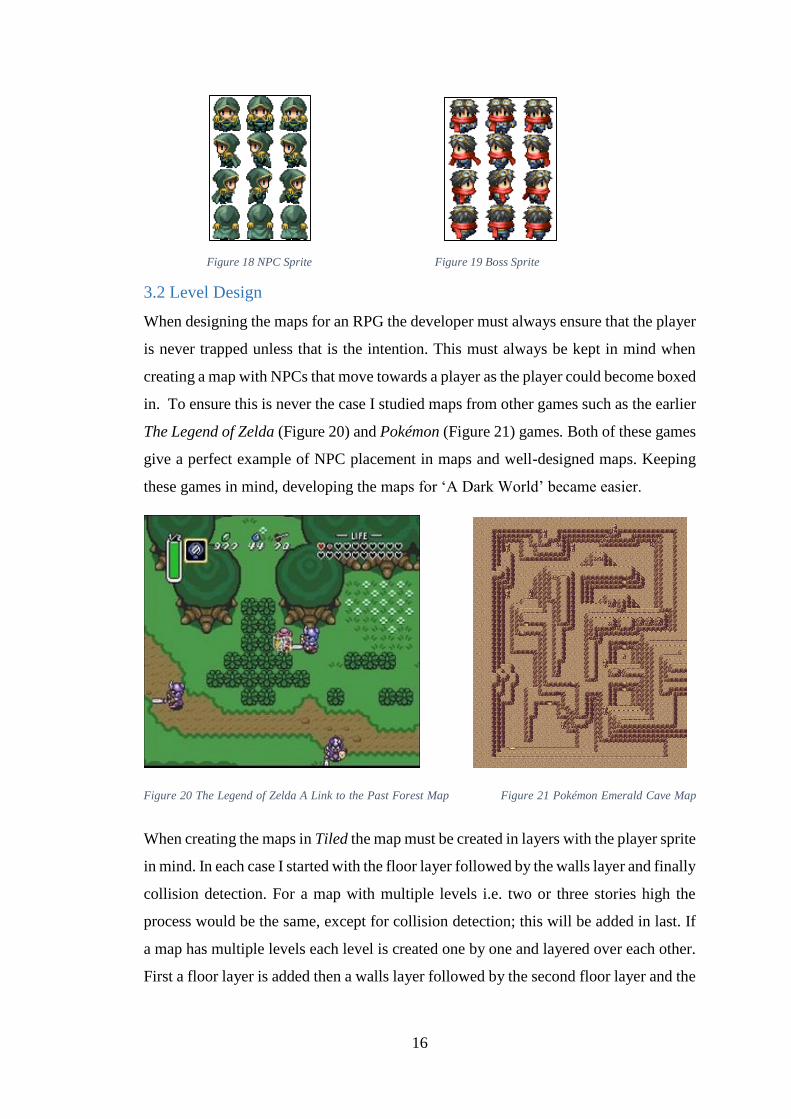
3.2 Level Design
When designing the maps for an RPG the developer must always ensure that the player
is never trapped unless that is the intention. This must always be kept in mind when
creating a map with NPCs that move towards a player as the player could become boxed
in. To ensure this is never the case I studied maps from other games such as the earlier
The Legend of Zelda (Figure 20) and Pokémon (Figure 21) games. Both of these games
give a perfect example of NPC placement in maps and well-designed maps. Keeping
these games in mind, developing the maps for ‘A Dark World’ became easier.
Figure 20 The Legend of Zelda A Link to the Past Forest Map Figure 21 Pokémon Emerald Cave Map
When creating the maps in Tiled the map must be created in layers with the player sprite
in mind. In each case I started with the floor layer followed by the walls layer and finally
collision detection. For a map with multiple levels i.e. two or three stories high the
process would be the same, except for collision detection; this will be added in last. If
a map has multiple levels each level is created one by one and layered over each other.
First a floor layer is added then a walls layer followed by the second floor layer and the
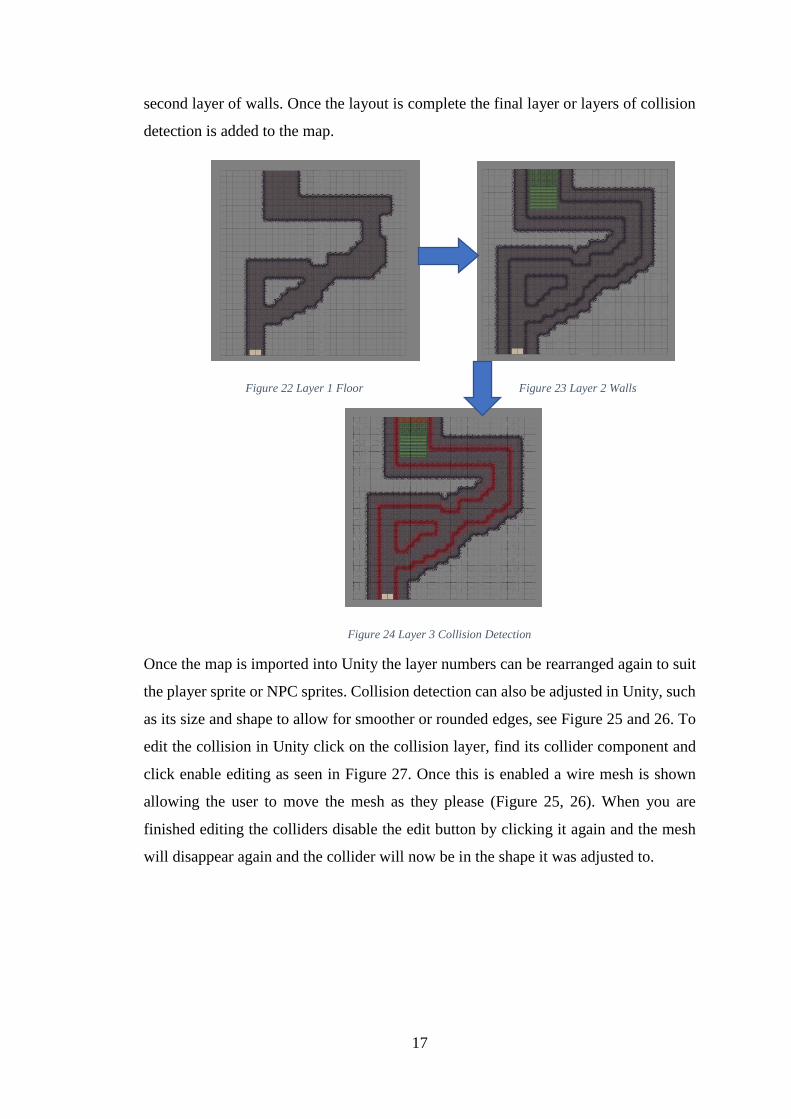
17
second layer of walls. Once the layout is complete the final layer or layers of collision
detection is added to the map.
Figure 22 Layer 1 Floor Figure 23 Layer 2 Walls
Figure 24 Layer 3 Collision Detection
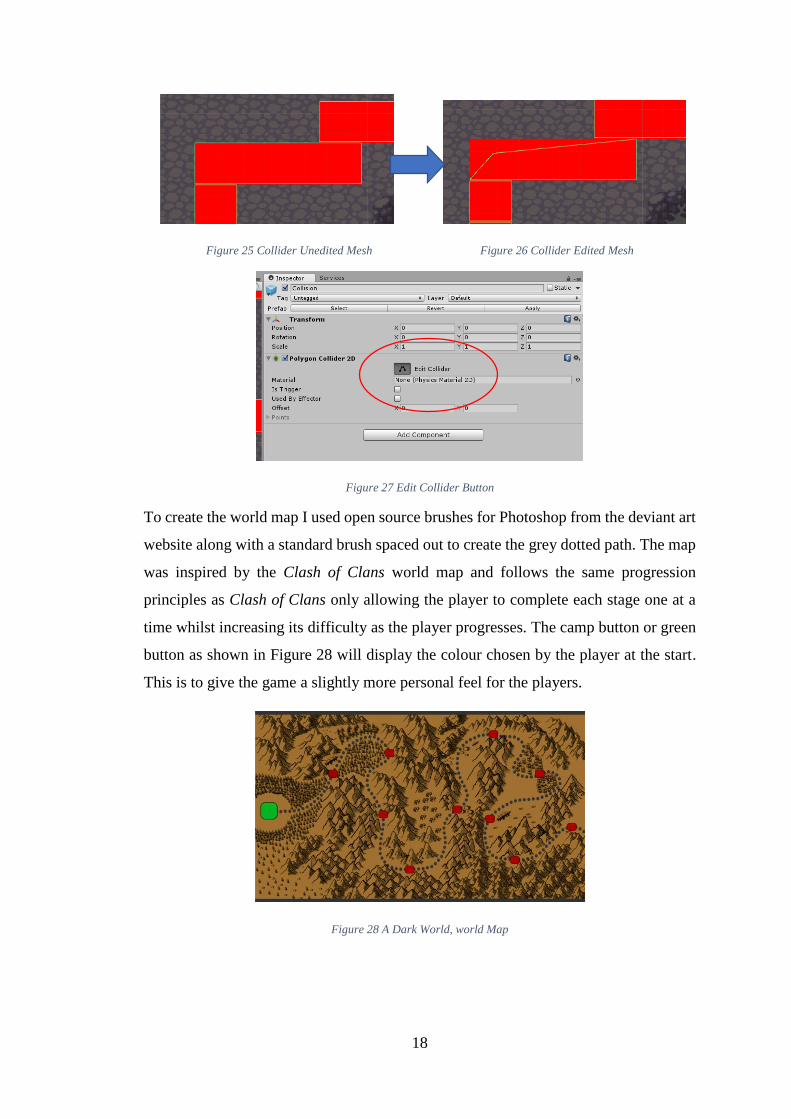
Once the map is imported into Unity the layer numbers can be rearranged again to suit
the player sprite or NPC sprites. Collision detection can also be adjusted in Unity, such
as its size and shape to allow for smoother or rounded edges, see Figure 25 and 26. To
edit the collision in Unity click on the collision layer, find its collider component and
click enable editing as seen in Figure 27. Once this is enabled a wire mesh is shown
allowing the user to move the mesh as they please (Figure 25, 26). When you are
finished editing the colliders disable the edit button by clicking it again and the mesh
will disappear again and the collider will now be in the shape it was adjusted to.
18
Figure 25 Collider Unedited Mesh Figure 26 Collider Edited Mesh
Figure 27 Edit Collider Button
To create the world map I used open source brushes for Photoshop from the deviant art
website along with a standard brush spaced out to create the grey dotted path. The map
was inspired by the Clash of Clans world map and follows the same progression
principles as Clash of Clans only allowing the player to complete each stage one at a
time whilst increasing its difficulty as the player progresses. The camp button or green
button as shown in Figure 28 will display the colour chosen by the player at the start.
This is to give the game a slightly more personal feel for the players.
Figure 28 A Dark World, world Map

19
3.3 Menu Design
Using a similar layout to the Clash of Clans menu, seen previously in Figure 3, the
design for the crafting menu has a list of items required to craft that item. An image of
the craft-able item will appear left of a text field with the quantities of each item
required. Beside the required field is the quantity of that item in the player’s inventory.
This is updated on load of the panel and when an item is crafted. The panel that the list
of items lies on can be hidden by pressing the ‘Craft Item’ button again or any other
left of the crafting window. The original concept for the player crafting UI can be seen
in Figure 29 alongside the finished product’s crafting UI seen in Figure 30.
Figure 29 Original Concept For Crafting UI Figure 30 A Dark World Crafting UI
Figure 31 A Dark World Inventory Menu
Other menus such as the Inventory menu (Figure 31), interact similarly to this and use
the same logic for displaying an up to date list of item quantities. However the backpack
menu is designed slightly differently to the other menus. Once the player opens the
backpack they are presented with two menus (Figure 33). One that contains items in
their inventory that can be brought on quests. These items are any item of type weapon
or type consumable. The other menu consists of what is in their backpack.
In order for map button to be interactive, the players backpack must consist of one
weapon, armour and food. If the player wishes to place items into their backpack they
must first open the backpack, then tap the items they wish to bring from their inventory.
If a player decided they did not want to bring an item they have chosen, tapping the

20
item in the backpack will move it back to the inventory. The design for the backpack
menu was inspired by a similar system used in Minecraft for storing items (Figure 32).
Figure 32 Minecraft Chest to Inventory System Figure 33 A Dark World Inventory to Backpack System
3.4 Player Controls Design
When a player is exploring a cave or mine they are presented with a simplistic UI to
navigate through the area. In the bottom left corner of the screen the player is given a
D-pad to control their character along with an interact button in the bottom right of their
screen. Both of these controls are placed here for easy access to the player’s thumbs
and ergonomic reasons, as the players natural hand placement for a game in landscape
mode is in this area. The control layout can be seen in figure 35. If a button is pressed,
for example the dowm arrow on the D-pad, it changes to a shaded texture (Figure 34).
This is to indicate to the player that the button has been pressed. The design mimics
that of Nintendo’s Nintendo DS because this console was created with 2D RPGs in
mind such as Pokémon and Super Mario. The controls also have a very natural and
comfortable feel to them during gameplay as the players thumbs will naturally rest here.
Figure 34 Button Pressed Player Controls UI Figure 35 Player Controls & UI Layout
Some item textures and icons within the game were out-sourced (420 Icons For RPG,
2016 ; Sketchy Cartography Brushes, 2016).

21
4. Implementation
This section contains the implementation of certain aspects in ‘A Dark World’.
4.1 Setting up the Environment
To set up the environment for Android development in Unity there are a couple of
things that must be done. First, download and install the Android SDK Manager. The
Android Software Development Kit Manager will display a list of Google Play services
and Android APIs that can be installed. Each API level corresponds with an operating
system for Android. For example API 18 is used with the Jelly Bean operating system.
Once the required APIs are downloaded and installed a link to their drive must be
created in Unity. Open a Unity project and click Edit in the top navigation bar and select
Preferences, then External Tools (Figure 36). From here a developer can change the
script editor and also create a link to the installed Android APIs. At the bottom of
External Tools a section for Android is available. Click the browse button beside SDK
and find the location of the Android folder that was installed.
Figure 36 External Tools in Unity Figure 37 Player Settings
Now that the link to the Android APIs has been created a build identifier and version
must be created in order for the app to be deployed to a mobile device. This can be done
by clicking file in the top navigation bar, build setting, player settings and other settings.
Here the input can be added to the project and the build version set.
22
4.2 UI
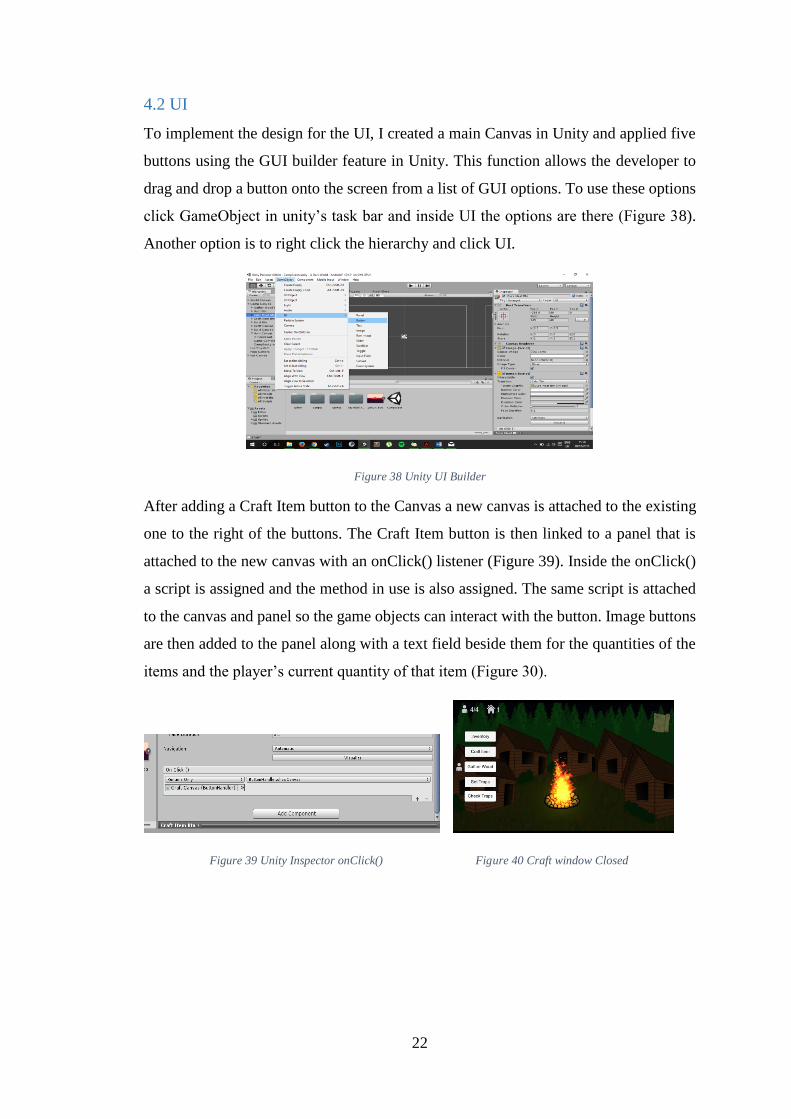
To implement the design for the UI, I created a main Canvas in Unity and applied five
buttons using the GUI builder feature in Unity. This function allows the developer to
drag and drop a button onto the screen from a list of GUI options. To use these options
click GameObject in unity’s task bar and inside UI the options are there (Figure 38).
Another option is to right click the hierarchy and click UI.
Figure 38 Unity UI Builder
After adding a Craft Item button to the Canvas a new canvas is attached to the existing
one to the right of the buttons. The Craft Item button is then linked to a panel that is
attached to the new canvas with an onClick() listener (Figure 39). Inside the onClick()
a script is assigned and the method in use is also assigned. The same script is attached
to the canvas and panel so the game objects can interact with the button. Image buttons
are then added to the panel along with a text field beside them for the quantities of the
items and the player’s current quantity of that item (Figure 30).
Figure 39 Unity Inspector onClick() Figure 40 Craft window Closed

23
In Figures 40 and 30 we can see the onClick() in action as it shows and hides the panel.
If another button on the left is pushed the current canvas on display will be hidden and
if there is a canvas linked to that button it is displayed instead. In order to achieve this,
an array of canvas objects are created by first importing the GameObjects (the canvases)
and changing them to canvas objects. These canvas objects are then added to the canvas
array of type Canvas. Once a button is clicked a check is done to see what Canvas is
linked to the button pressed; a check is done to see if that canvas is in the array and also
to see if it is visible. If the canvas is linked to the button and visible that canvas’s
visibility is set to false. If the canvas is invisible then it is set to true. However if the
canvas is not linked to the button pressed its visibility is set to false and the canvas
linked to that button, if any, is set to visible. See code below (Code Sample 1).
4.3 Player Controls
As previously mentioned in the Player Controls Design section, the controls consist of
four directional arrow buttons on the left of the screen and one ‘A’ button on the right
of the screen. There are multiple ways to implement character movement within a game.
Some of these involve using a Rigidbody to move the character while others require the
Transform of the object being moved. A Rigidbody component places an object under
the control of the physics engine i.e. will give an object mass, allowing it to be affected
by gravity within the game engine. The Transform component determines the Position,
Rotation, and Scale of each object in the scene. Every GameObject has a Transform.
public void showCanvas() { var fireOBJ = GameObject.Find("FireParticle").GetComponent<ParticleSystem>(); canvas = GetComponent<Canvas>(); populateCanvasList(); if (canvas.enabled == false) { for (int i = 0; i < canvasArray.Length; i++) { if (canvas == canvasArray[i]) { canvasArray[i].enabled = true; fireOBJ.enableEmission = false; } else canvasArray[i].enabled = false;
} } else if (canvas.enabled == true) { canvas.enabled = false; fireOBJ.enableEmission = true; } }
Code Sample 1 Show and Hide Canvas Method
24
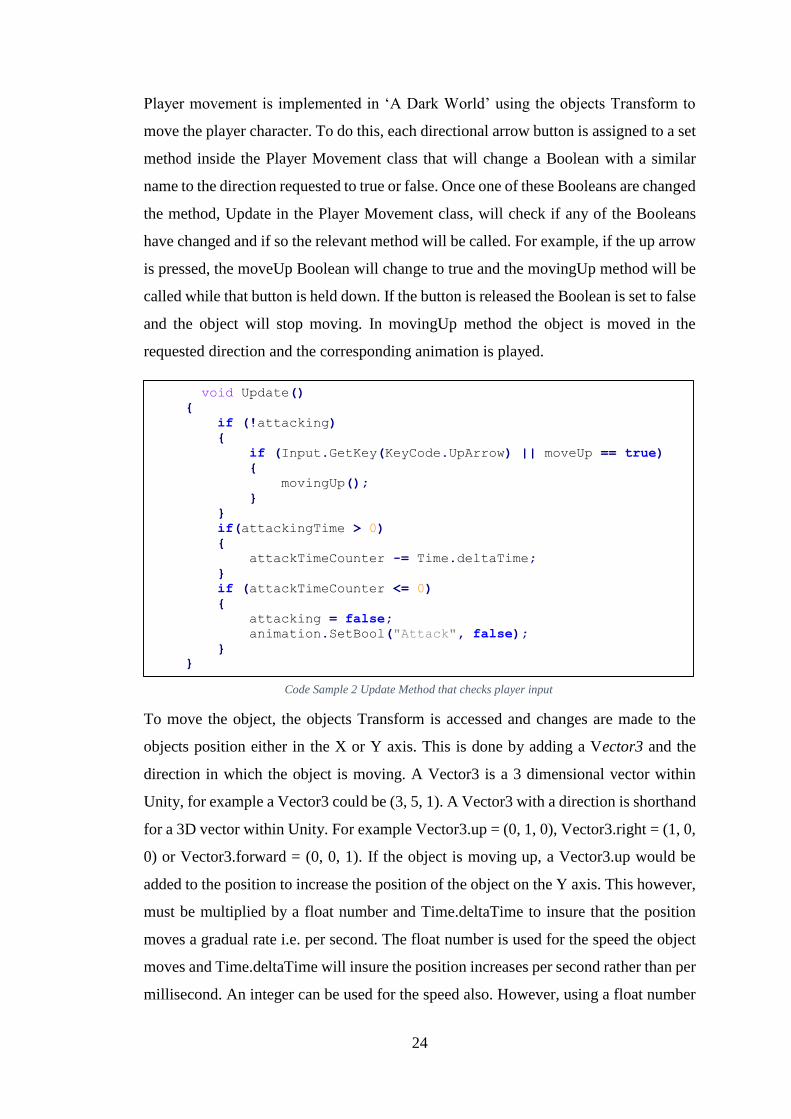
Player movement is implemented in ‘A Dark World’ using the objects Transform to
move the player character. To do this, each directional arrow button is assigned to a set
method inside the Player Movement class that will change a Boolean with a similar
name to the direction requested to true or false. Once one of these Booleans are changed
the method, Update in the Player Movement class, will check if any of the Booleans
have changed and if so the relevant method will be called. For example, if the up arrow
is pressed, the moveUp Boolean will change to true and the movingUp method will be
called while that button is held down. If the button is released the Boolean is set to false
and the object will stop moving. In movingUp method the object is moved in the
requested direction and the corresponding animation is played.
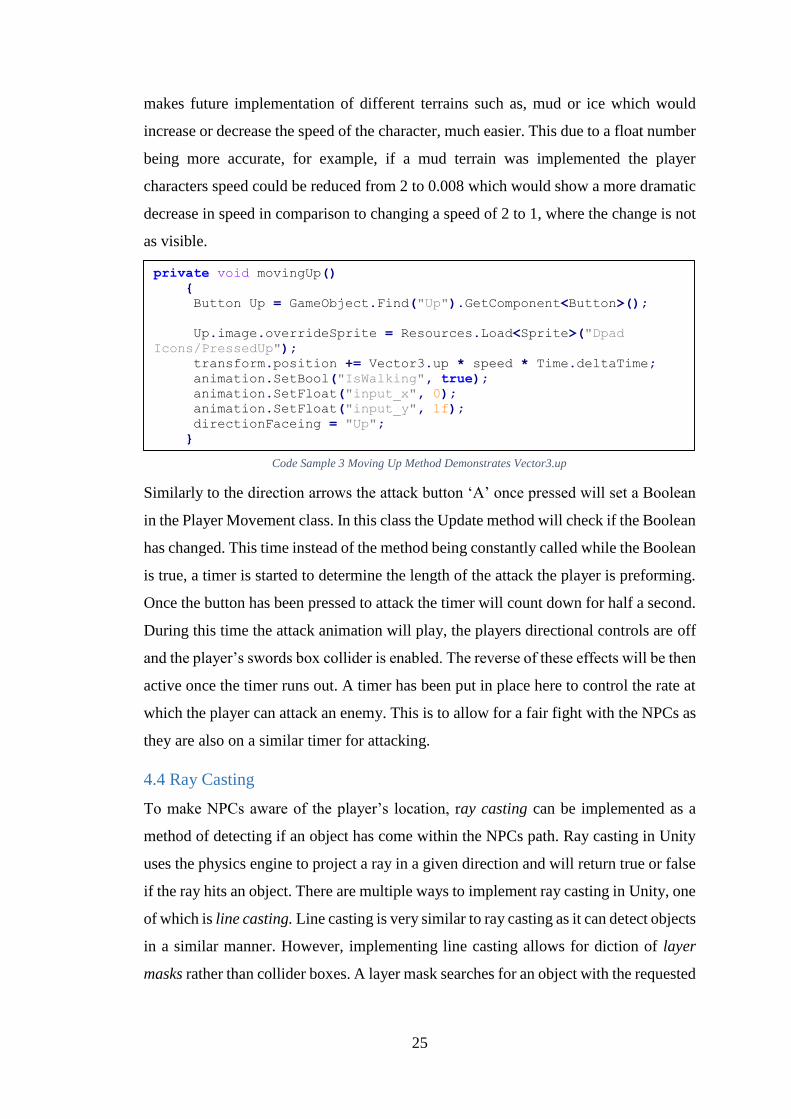
To move the object, the objects Transform is accessed and changes are made to the
objects position either in the X or Y axis. This is done by adding a Vector3 and the
direction in which the object is moving. A Vector3 is a 3 dimensional vector within
Unity, for example a Vector3 could be (3, 5, 1). A Vector3 with a direction is shorthand
for a 3D vector within Unity. For example Vector3.up = (0, 1, 0), Vector3.right = (1, 0,
0) or Vector3.forward = (0, 0, 1). If the object is moving up, a Vector3.up would be
added to the position to increase the position of the object on the Y axis. This however,
must be multiplied by a float number and Time.deltaTime to insure that the position
moves a gradual rate i.e. per second. The float number is used for the speed the object
moves and Time.deltaTime will insure the position increases per second rather than per
millisecond. An integer can be used for the speed also. However, using a float number
void Update() { if (!attacking) { if (Input.GetKey(KeyCode.UpArrow) || moveUp == true) { movingUp(); } } if(attackingTime > 0) { attackTimeCounter -= Time.deltaTime; } if (attackTimeCounter <= 0) { attacking = false; animation.SetBool("Attack", false); } }
Code Sample 2 Update Method that checks player input
25
makes future implementation of different terrains such as, mud or ice which would
increase or decrease the speed of the character, much easier. This due to a float number
being more accurate, for example, if a mud terrain was implemented the player
characters speed could be reduced from 2 to 0.008 which would show a more dramatic
decrease in speed in comparison to changing a speed of 2 to 1, where the change is not
as visible.
Similarly to the direction arrows the attack button ‘A’ once pressed will set a Boolean
in the Player Movement class. In this class the Update method will check if the Boolean
has changed. This time instead of the method being constantly called while the Boolean
is true, a timer is started to determine the length of the attack the player is preforming.
Once the button has been pressed to attack the timer will count down for half a second.
During this time the attack animation will play, the players directional controls are off
and the player’s swords box collider is enabled. The reverse of these effects will be then
active once the timer runs out. A timer has been put in place here to control the rate at
which the player can attack an enemy. This is to allow for a fair fight with the NPCs as
they are also on a similar timer for attacking.
4.4 Ray Casting
To make NPCs aware of the player’s location, ray casting can be implemented as a
method of detecting if an object has come within the NPCs path. Ray casting in Unity
uses the physics engine to project a ray in a given direction and will return true or false
if the ray hits an object. There are multiple ways to implement ray casting in Unity, one
of which is line casting. Line casting is very similar to ray casting as it can detect objects
in a similar manner. However, implementing line casting allows for diction of layer
masks rather than collider boxes. A layer mask searches for an object with the requested
private void movingUp() { Button Up = GameObject.Find("Up").GetComponent<Button>();
Up.image.overrideSprite = Resources.Load<Sprite>("Dpad
Icons/PressedUp"); transform.position += Vector3.up * speed * Time.deltaTime; animation.SetBool("IsWalking", true); animation.SetFloat("input_x", 0); animation.SetFloat("input_y", 1f); directionFaceing = "Up"; }
Code Sample 3 Moving Up Method Demonstrates Vector3.up
26
layer name that is attached to that object. For example, player would have a Player layer
attached to it.
When implementing line casting, a start and end point must be defined to determine the
length of the ray being cast from the NPC. To do this two empty game objects are
created and attached to the NPC. One will determine the start of the ray and the other
will determine the end of the ray. Three more empty game objects are created to
determine the end points of the rays pointing in the other directions. Once the player
hits this ray the NPC will be able to get the players location and begin to advance on
the player.
An alternative way to make NPCs aware is to check the player position against the
NPCs position. This can be easily determined by using the function in Unity
Vector2.Distance. When the two Vectors are within a certain range of each other the
NPC can begin to advance on the player. This method is implemented for the Boss NPC
within the game to increase the difficulty for the player.
Once an NPC has spotted the player the NPCs position will begin to move toward the
player’s position. This can be achieved using a function in Unity called
Vector3.MoveTowards(). This function will continue to change the NPCs position until
it either matched the player’s position or meets a condition similar to what is shown in
Code Sample 5. This method of AI is not intelligent when an obstacle comes in its path
as the NPC object will continue to try and move through the obstacle to get to the player.
To combat this a more intelligent AI can be implemented such as A*.
if (Physics2D.Linecast(startPoint.position, upDir.position, 1 <<
LayerMask.NameToLayer("Player"))) {
spotted = Physics2D.Linecast(startPoint.position,
upDir.position, 1 << LayerMask.NameToLayer("Player")); }
if (Physics2D.Linecast(startPoint.position, upDir.position, 1 <<
LayerMask.NameToLayer("Player"))) {
spotted = Physics2D.Linecast(startPoint.position,
upDir.position, 1 << LayerMask.NameToLayer("Player")); }
var range = Vector2.Distance(transform.position, player.transform.position);
if (range <= 10f && range >= 1.7f) { transform.position = Vector3.MoveTowards(transform.position,
player.position, speed * Time.deltaTime); }
var range = Vector2.Distance(transform.position, player.transform.position);
if (range <= 10f && range >= 1.7f) { transform.position = Vector3.MoveTowards(transform.position,
player.position, speed * Time.deltaTime); }
Code Sample 4 Line Casting Detection
Code Sample 5 Code to determine the distance between NPC and Player

27
4.5 A* Pathfinding
A* is a pathfinding algorithm used in many games. It is generally implemented to give
intelligence to NPCs so they can find and attack or interact with the player. By
following Sebastian Lague’s YouTube tutorial (Lague, 2016), I was able to implement
A* into the project.
To implement A* in the project a grid to map out the level was created. This grid will
define the walkable areas in the level in which the NPC can travel. To display the grid
in Unity a function called Gizmos is used to display the grid with the walkable areas
and obstacles. A Gizmo is a unity function that can be used to draw a wireframe of an
invisible object such as the grid (Figure 41). 3D objects are then added to the level and
marked as unwalkable using a Tag in Unity. These objects are used to allow the
algorithm to detect obstacles such as walls or rocks that may be in the NPCs path to the
player.
Figure 41 Gizmo Wire Grid with A* path to player in black

28
Once the grid is created a Node class is created to calculate the fcost for each node
processed by the algorithm. An fcost is the gcost combined with the hcost. The gcost
represents the exact cost of the path from the starting point to any vertex n, and the
hcost represents the heuristic estimated cost from vertex n to the goal. Each node is
added to the Heap and the fcosts of each node is compared to its neighbouring node.
The node with the lowest fcost is then added to a list which will create the path for the
NPC to follow to the player. Once the path has been found, a list of waypoints is then
calculated for the NPC object to move towards. Each waypoint is a 3D vector that the
NPC position will gradually move towards. This algorithm was applied to one NPC in
the level as the scripts clashed when more than one NPC began to search for new
waypoints as the player moved.
A path request manager script was created to fix this problem. The path request manager
script is designed to give each NPC a new waypoint to move towards in different
frames. This is to avoid conflict between NPCs when a new waypoint is requested.
However, the script will not work if the target i.e. the player is moving. It will work if
the target does not move.
void OnDrawGizmos() {
Gizmos.DrawWireCube(transform.position, new
Vector3(gridWorldsize.x, gridWorldsize.y, 1)); if (grid != null) { Node playerNode = NodeFromWorldPoint(player.position); foreach (Node n in grid) { Gizmos.color = (n.walkable) ? Color.white : Color.red; if (path != null) { if (path.Contains(n)) { Gizmos.color = Color.black; } } if (playerNode == n) { Gizmos.color = Color.cyan; } Gizmos.DrawCube(n.worldPosition, Vector3.one * (nodeDiame
ter - 0.1f)); } } }
Code Sample 6 Implementation of Gizmos

29
4.6 Timed Events
Throughout the game different events are triggered. Most of these events are set up
using timers within an Update method that are continuously running in the background.
While other events are triggered and user a timer to determine the events duration. An
example of an event that is triggered in ‘A Dark World’ is the gather wood function.
Once the player assigns people to gather wood and presses the button the Boolean
triggerCounter is set to true and a timer starts. A timer is created by declaring a float or
a double and inside the method Update, add Time.deltaTime to its total. The event is
then triggered every one second adding a quantity of wood to the player’s inventory.
Once the timer hits the condition for its max duration, for example, thirty seconds, the
Boolean is set to false and the timer is set back to zero so it is ready for the next gather
wood event.
Similar to this event a continuously timed event such as, the fire dying in the game or
people arriving into the camp, a timer is created using a double or float. However for
these events there is no limit to the duration only a reset condition for the timer to set it
back to zero. For example, when the fire is alive in the game the timer will increase
until it reaches twenty seconds. Once it reaches this point it will trigger the event to
reduce the size of the fire and set the timer back to zero to prepare it for the next event.
If the fire were to die the timer will stop and only start again when the fire is lit again.
A similar action is done for other timed events with the exception of the people arriving
into the camp. This events duration is set by a randomly generated number between two
if (PlayerInformation.PeopleInCamp < campCapacity) { timer += Time.deltaTime; if (timer >= nextEvent) { PlayerInformation.PeopleInCamp += 1; populationText.text = PlayerInformation.PeopleInCamp + "/"
+ campCapacity; PlayerPrefs.SetInt("PeopleInCamp",
PlayerInformation.PeopleInCamp); PlayerPrefs.Save(); timer = 0f; nextEvent = Random.Range(2, 4); nextEvent = nextEvent * 60f; } }
nextEvent = Random.Range(2, 4); nextEvent = nextEvent * 60f;
Code Sample 8 Generate Duration until next event
Code Sample 7 Example of Timer and Event
30
and four that will determine the number of minutes until the next person will arrive in
the camp.
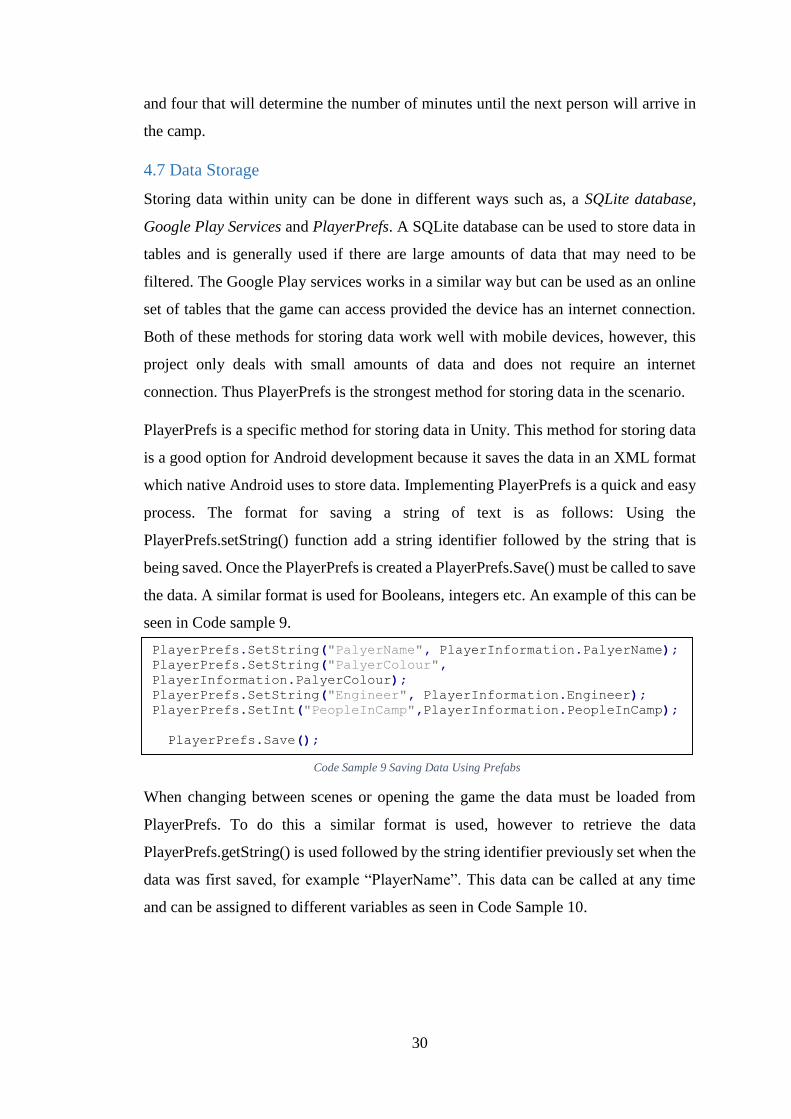
4.7 Data Storage
Storing data within unity can be done in different ways such as, a SQLite database,
Google Play Services and PlayerPrefs. A SQLite database can be used to store data in
tables and is generally used if there are large amounts of data that may need to be
filtered. The Google Play services works in a similar way but can be used as an online
set of tables that the game can access provided the device has an internet connection.
Both of these methods for storing data work well with mobile devices, however, this
project only deals with small amounts of data and does not require an internet
connection. Thus PlayerPrefs is the strongest method for storing data in the scenario.
PlayerPrefs is a specific method for storing data in Unity. This method for storing data
is a good option for Android development because it saves the data in an XML format
which native Android uses to store data. Implementing PlayerPrefs is a quick and easy
process. The format for saving a string of text is as follows: Using the
PlayerPrefs.setString() function add a string identifier followed by the string that is
being saved. Once the PlayerPrefs is created a PlayerPrefs.Save() must be called to save
the data. A similar format is used for Booleans, integers etc. An example of this can be
seen in Code sample 9.
When changing between scenes or opening the game the data must be loaded from
PlayerPrefs. To do this a similar format is used, however to retrieve the data
PlayerPrefs.getString() is used followed by the string identifier previously set when the
data was first saved, for example “PlayerName”. This data can be called at any time
and can be assigned to different variables as seen in Code Sample 10.
PlayerPrefs.SetString("PalyerName", PlayerInformation.PalyerName);
PlayerPrefs.SetString("PalyerColour",
PlayerInformation.PalyerColour);
PlayerPrefs.SetString("Engineer", PlayerInformation.Engineer);
PlayerPrefs.SetInt("PeopleInCamp",PlayerInformation.PeopleInCamp);
PlayerPrefs.Save();
Code Sample 9 Saving Data Using Prefabs
31
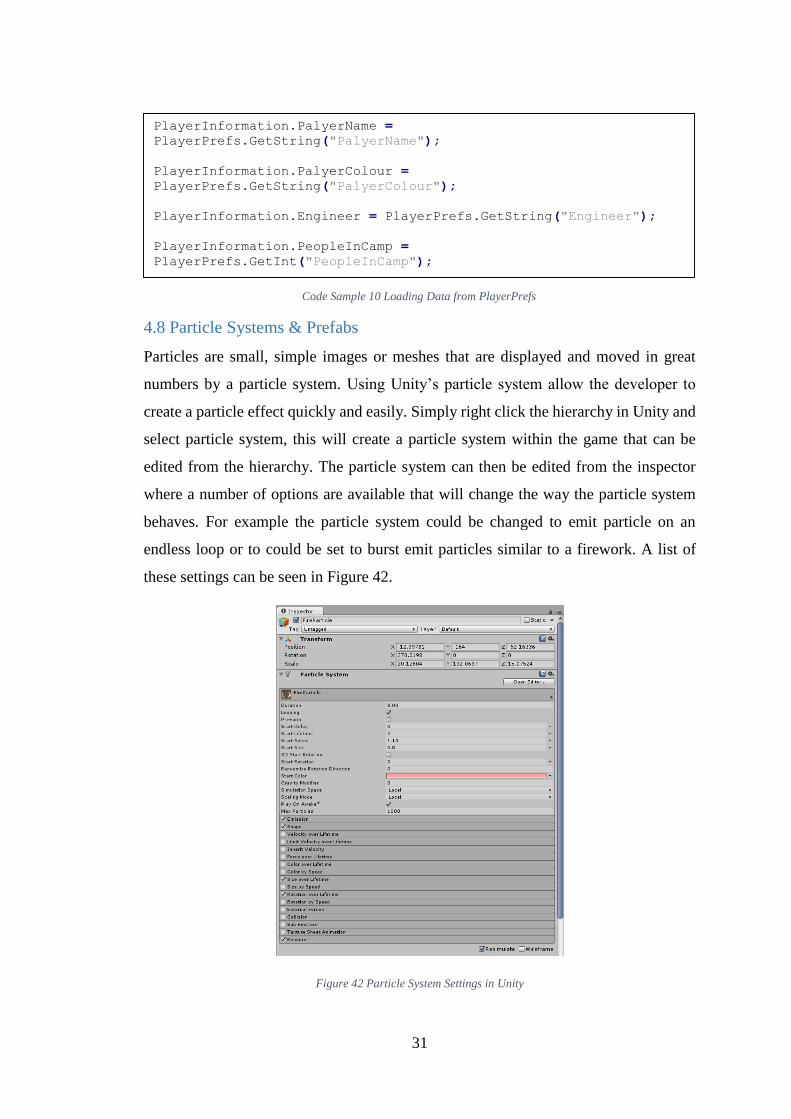
4.8 Particle Systems & Prefabs
Particles are small, simple images or meshes that are displayed and moved in great
numbers by a particle system. Using Unity’s particle system allow the developer to
create a particle effect quickly and easily. Simply right click the hierarchy in Unity and
select particle system, this will create a particle system within the game that can be
edited from the hierarchy. The particle system can then be edited from the inspector
where a number of options are available that will change the way the particle system
behaves. For example the particle system could be changed to emit particle on an
endless loop or to could be set to burst emit particles similar to a firework. A list of
these settings can be seen in Figure 42.
Figure 42 Particle System Settings in Unity
PlayerInformation.PalyerName =
PlayerPrefs.GetString("PalyerName");
PlayerInformation.PalyerColour =
PlayerPrefs.GetString("PalyerColour");
PlayerInformation.Engineer = PlayerPrefs.GetString("Engineer");
PlayerInformation.PeopleInCamp =
PlayerPrefs.GetInt("PeopleInCamp");
Code Sample 10 Loading Data from PlayerPrefs

32
Once the particle system is created it can be saved as a prefab. A prefab is a folder of
game objects saved in the projects Assets folder. To make a game object like a particle
system a prefab, go to the object in the hierarchy and copy it into the prefabs folder.
Creating prefabs in Unity can be invaluable to a project as an instance of that game
object can be created at any time in the game. For example, in ‘A Dark World’ there
are two prefabs both of which are used for combat. One is a text object that creates the
floating hit points during combat and the other is a burst particle system used for the
blood splat when an enemy is hit. The code in Code Sample 11 demonstrates an instance
of a prefab being created and Code sample 12 shows the object being destroyed within
a certain time. The object is destroyed to reduce the number of game objects in the
world at one time.
void OnTriggerEnter2D(Collider2D collision)
{
if (collision.gameObject.tag == "NPC")
{
collision.gameObject.GetComponent<NPCStats>().HurtNpc(damageToGive
);
Instantiate(damageBurst, hitPoint.position,
hitPoint.rotation);
var clone = (GameObject) Instantiate(damageNumber,
hitPoint.position, Quaternion.Euler(Vector3.zero));
clone.GetComponent<FloatingNumbers>().damageNumber =
damageToGive;
}
}
void Update () {
timeToDestroy -= Time.deltaTime;
if(timeToDestroy <= 0)
{
Destroy(gameObject);
}
}
Code Sample 11 Instantiating the Prefab
Code Sample 12 Destroys Game Object that this script is attached to.
33
5. Evaluation
5.1 Development Testing
During the development process the Unity function Debug.Log() was regularly used to
test the expected outcome with the actual outcome. Debug.Log() will print a message
to the console in Unity. For example, to print an integer to the console the following
would be used: Debug.Log(2); or for a string Debug.Log(“Test”);. Variable can also be
logged to the console using this method. For testing purposes two development buttons
were added to the Camp view that added items and reduced items from the player’s
inventory.
The following are a few manual tests using Debug.Log() during development to test
expected outcome with actual outcome.
Test Case 1: Player Controls
Steps Expected Outcome
1. Select map from Camp view.
2. Select location on map.
3. Press and hold up arrow button
4. Release up arrow
1. Player characters Y positon increases.
2. Walk Boolean is set to true.
3. Up animation plays.
4. Player characters position does not change.
5. Walk Boolean is set to false.
6. Character animation is set to idle.
Test Case 2: Moving inventory items to backpack
Steps Expected Outcome
1. Select backpack button.
2. Select item from inventory panel.
1. Image selected matches moved item.
2. Item is added to list if it does not exist in
backpack
3. Item moved appears with corresponding
image in backpack panel.
4. Quantity of item selected is reduced by one
in inventory list.
34
Test Case 3: Moving armour from inventory to backpack
Steps Expected Outcome
1. Select backpack button.
2. Select armour form inventory
panel.
3. Repeat step 2.
1. Selected Armour is added to backpack list,
Quantity of selected armour is reduced by one
in inventory list.
2. Selected Armour is displayed on backpack
Panel.
3. Nothing happens when another armour is
selected from inventory panel.
Test Case 4: Assigning a quantity less than the population to gather wood
Steps Expected Outcome
1. Select person icon beside gather wood
button.
2. Enter a quantity less than the current
population of the camp.
3. Select gather wood.
1. Keyboard appears on screen.
2. Keyboard disappears off screen.
3. Quantity entered is displayed on screen
beside the gather wood button.
4. Wood increases per second by the
entered quantity.
Test Case 5: Assigning a quantity greater than the population to gather wood
Steps Expected Outcome
1. Select person icon beside gather
wood button.
2. Enter a quantity greater than the
population of the camp.
3. Select gather wood.
1. Keyboard appears on screen.
2. Keyboard disappears off screen.
3. Quantity entered is displayed on screen
beside the gather wood button.
4. Wood increases per second by the
population of the camp.
35
Test Case 6: Fire particle size increase and decrease
Steps Expected Outcome
1. Start game.
2. Tap fire until it reaches max size.
3. Wait 20 seconds.
4. Repeat step 3 until fire is
extinguished.
1. Game loads with fire particles emitting.
2. Fire particle start size increases by 0.2f per
tap.
3. Fire particle start size stops increasing when
start size equals 1.8f.
4. Fire particle start size decreases by 0.1f.
5. Fire extinguished, screen darkens.
The outcome from these test met the expected outcome required.
5.2 User Testing
Another form of testing performed during this project was user testing. This was carried
out by a group of ten testers that were given exclusive access to the game on Google
Play. After each update was uploaded to the Alpha testing section of Google Play the
testers were asked to update the game and give feedback on new features in the game
or changes made to the game. Once the feedback was all positive from the testers, the
game was published to public Google Play where anyone can download it.
5.3 Implementation Issues
In the initial development stages of the project there were major and minor issues that
were caused due to lack of knowledge of the game engine.
One of the major issues that raised was the saving of data using text files. Once the
game was running on an Android device for the first time this method of saving data
worked. However after relaunching the game for the 10th plus time the text file would
be erased and the game would no longer work.
On the other hand when implementing this method of saving data there were no issues
while running the game in Unity. It was only when the data was being saved on an
Android device that the issue occurred. The cause of this was due to Unity not having
write permissions on the Android device. None the less a different method of saving
data was used as write permissions are not available for free Unity users.
A second issue that arose when using multiple Canvas objects. Using multiple Canvas
objects in Unity can cause a minor issue for games developed for platforms other than
mobile whereas on mobile it can cause a major issue. This is due to a Canvas objects

36
ray casting being enabled when it is created. Ray casting on an object is what allows it
to accept the touch inputs on mobile devices, without ray casting the object cannot be
interacted with.
Using more than one Canvas object in the same location on the screen can cause one to
interfere with the other if both of the Canvas objects are enabled. For example, if two
Canvas objects are using ray casting and one has a button on it. The button may have
to be pressed multiple times before it completes its action. A method of fixing this is to
only have one Canvas object with ray casting enabled at a time. Alternatively, multiple
Canvas objects can be enabled if only one is used for UI with ray casting enabled. This
issue however, is not a major issue on other platforms as they do not rely on touch input,
which needs the ray casting component enabled.
5.4 Future Development
Due to time constraints there are many aspects of the game’s original idea that didn’t
make it into the final product. These different game aspects will be implemented in the
future to give the game a more complete feel. Once of the biggest features that will be
implemented will be the ability to use the mines to gather ores and craft new items in
the base camp. This feature will also tie in with the gather wood feature as the player
will have the ability to assign people from the camp to complete this task from them.
Performance improvements such as implementing the researched design patterns will
also be implemented. For example implementing the Command pattern would allow
for ease of implementing cross platform controls such as mouse and keyboard or a
console controller. Another performance improvement would be the implementation of
a SQLite database to allow for an expansion of items in the game. This would also allow
for the game to have more levels because of these new items.
Level design will be a major future development priority as there currently is only one
level within the game that is reused for each level on the map. With this in mind a
texture and graphics revamp would be a part of this development section as some of the
current textures are out sourced.
Animated cut scenes were originally going to be a key aspect of the game to increase
the game’s immersion. This would also be considered along with a new set of
animations for player characters attacks to make the game seem more dynamic and
complete. Included with these animations would be music and game sounds similar to

37
those used in the final product that were obtained from the Unity Asset Store (Studio,
4, 2016).
38
6. Conclusion
The aim of this project was to create a resource gathering RPG for Android devices.
The process of developing this game was preceded by extensive research. During the
research process multiple games in the RPG and resource gathering genre on the mobile
platform were analysed for user interface design, level design, game balancing and
game mechanics. From this research clear achievable goals could be set which guided
the applications development process. Other areas of research gave a better
understanding on how to use and implement the different aspects of mobile
development such as, mobile ergonomics. Further research was done during the
implementation stage as a lot of time was needed to learn how to use the new
technologies. This however, was time well spent as the additional research enriched the
development experience in Unity.
The main goal of this project was to create a resource gathering game that resembled
‘A Dark Room’, the game it was based on. This goal I feel was achieved as it holds
most of the original properties of ‘A Dark Room’ while maintaining enough
individuality for the game to be called its own game.
As mentioned before in the Evaluation chapter under Future Development there are a
few aspects of the game that were left out due to time constraints and a lack of
knowledge of the technologies used. Taking these aspects of the game into
consideration I feel that with better project planning and prioritization within the
projects original plan, these aspects would have been implemented in the final product.
However, the lack of knowledge of technologies used plays a major role in this as it
was very time consuming to fully grasp in the beginning. In saying this the technologies
used in this project are still the best option as they are very powerful tools and allow
for ease of future development once the knowledge is there.
39
References
7 Essentials To Designing An Ergonomic App [online] (2013) [online], Raizlabs.
420 Icons For RPG @ Pixeljoint.Com [online] (2016) [online], Pixeljoint.com.
A Dark Room [Computer Game] (2016) [online], Adarkroom.wikia.com.
Adobe After Effects CC [online] (2016) [online], Adobe.com.
Adobe Animate CC (Flash Pro) [online] (2016) [online], Adobe.com.
Amirali Rajan [online] (2016) [online], A Dark Room Wiki.
Andrew Sum, M. (2016) Crossy Road - Endless Arcade Hopper Game #Crossyroad
[Computer Game],Crossyroad.com, available: http://www.crossyroad.com/ [accessed
13 Apr 2016].
Android Studio [online] (2016) [online], Developer.android.com.
Candy Box [Computer Game] (2016) [online], Candies.aniwey.net.
Clash Of Clans [Computer Game] (2016) [online], Supercell.
Cui, X., Shi, H. (2016) "A*-based Pathfinding in Modern Computer
Games", International Journal of Computer Science and Network Security,
VOL.11(No.1), available:
https://www.researchgate.net/profile/Xiao_Cui7/publication/267809499_A*-
based_Pathfinding_in_Modern_Computer_Games/links/54fd73740cf270426d125adc.
pdf [accessed 3 Apr 2016].
Destiny [Computer Game] (2016) [online], Destinythegame.com.
Dog, N. (2016) The Last Of Us - Naughty Dog [online], Thelastofus.playstation.com,
available: http://www.thelastofus.playstation.com/ [accessed 13 Apr 2016].
Eclipse [Computer Game] (2016) [online], eclipse.org.
Fallout Shelter [Computer Game] (2014) [online], Bethsoft.com.
Famitsu Chibi Creator [online] (2016) [online], famitsu.com.
Kar, S. (2016) Best Game Development Tools For Android To Build Killer Apps
[online],SiliconANGLE, available: http://siliconangle.com/blog/2015/01/08/best-
game-development-tools-for-android-to-build-killer-apps/ [accessed 13 Apr 2016].
Lague, S. (2016) [Unity Pathfinding Tutorial] Creating The Node Grid
[online], YouTube, available: https://www.youtube.com/watch?v=nhiFx28e7JY
[accessed 13 Apr 2016].
40
MAXON [online] (2016) [online], Maxon.net.
Maya [online] (2016) [online], Autodesk.com.
Monodevelop [online] (2016) [online], Monodevelop.com.
Need For Speed Games For Android - EA [Computer Game] (2016) [online], Ea.com.
OGMO EDITOR [online] (2016) [online], Ogmoeditor.com.
Photoshop CC [online] (2016) [online], Adobe.com.
Sketchy Cartography Brushes [online] (2016) [online], Starraven.deviantart.com.
Studio, 4. (2016) 4Knights Game Studio [online], SoundCloud, available:
https://soundcloud.com/4knights-game-studio [accessed 13 Apr 2016].
Sublime [online] (2016) [online], sublime.com.
Tile Studio [online] (2016) [online], Tilestudio.sourceforge.net.
Tiled2unity [online] (2016) [online], Seanba.com.
Tiled Map Editor [online] (2016) [online], Mapeditor.org.
Unity - Game Engine [online] (2016) [online], Unity3d.com.
Unreal Engine 4 [online] (2016) [online], Unrealengine.com.
Visual Studio - Microsoft Developer Tools [online] (2016) [online], Visualstudio.com.