a complete course in dressmaking, (vol. 8, draping and
TRANSCRIPT
T T
5/2 C 76 / f 2. Z.
Complete Couer e in
Dressmaking in
‘^Twelve lejroru Lesson VIII
Draping and Taltern Making
Quick, practical and
easily understand-
able methods of pat¬
tern making and
draping. All the
fundamental prin¬
ciples that will en¬
able you to copy any
garment you see.
Pattern making and
draping made easy.


A COMPLETE COURSE IN
DRESSMAKING
BY
ISABEL DeNYSE CONOVER
LESSON VIII
DRAPING AND PATTERN MAKING
NEW YORK
EDWARD J. CLODE _

COPYRIGHT, 1 92 1, 1 9 22, BY
EBWARB J . CLODE
Entered at Stationers' Hall
c
c
c c t
0
©aAesoflOL* ' „
PRINTED IN THE UNITED STATES OF AMERICA
JAN'4’23
'Vu i

LESSON VIII
DRAPING AND PATTERN MAKING
VTDU have learned in the preceding lessons how to use a block pattern. Now I am
going to tell you how to make one. Draping is one of the easiest methods. By this I mean pinning muslin on a form, cutting and copying the pattern from the muslin. It’s the method used in most of the commercial pat¬ tern houses and by professional dressmakers.
Of course, you may have a plain commercial pattern that will serve your purpose, but it will give you assurance to know how to make a pattern from a square piece of paper and a plain piece of goods.
You could drape every garment that you cut but draping a block pattern and then using this as a foundation for copying other styles is quicker. It's a surer way of working, too. You won’t have to test the fit each time you cut a garment. If your block pattern is
HI

A COMPLETE COURSE IN DRESSMAKING
a perfect fit, you will be certain of a pleasing result.
If you are mak¬ ing the pattern for someone else you can drape the muslin on them. (See Fig. 1.) You will be sure of the fit and propor¬ tions. However, if the pattern is for you, drape on your dummy and then try on the muslin. It may take a little longer
Fig. (/) You can fit any figure if you but, if VOU Work drape a muslin for the pattern r ,
carefully, you will have just as good a result.
A blouse pattern can be made to serve as a block pattern for most waists and many dresses but a fitting lining pattern is even a surer basis on which to work. With a fitted lining you can copy any garment that comes above the waistline. Coats can be made froixi your block as easily as dresses and waists.
12]
DRAPING AND PATTERN MAKING
How to Drape a Fitted Lining: Some¬ times the muslin is draped on the person for whom the garment is intended, but more often it is draped on a dressmaker’s dummy. For convenience’s sake we will suppose that the muslin is to be draped on a dummy. If it were being draped on a person the process would be similar.
First of all cut a straight length of material five or six inches longer than the distance from the shoulder to the hips. If you want a hem and lap at the center-front of the lining, measure back from one of the sel¬ vedge edges one and three-eighths inches and mark a line; then measure one-half inch be¬ yond this line and mark a second line. The second line will be the center-front of the lining; and the material from the first mark to the selvedge, the hem.
If the front of the lining is to fasten with hooks and eyes and the edges just come to¬ gether without a lap, measure an inch and three-eighths from the selvedge edge and mark a line. This line indicates where the goods turns for the hem and also marks the center-front.
In either case, do not turn the hem but pin the muslin to the dummy bringing the line
[33
A COMPLETE COURSE IN DRESSMAKING
which marks the center-front of the muslin to the center-front of the dummy. (See Fig. 2.) Below fullest part of bust, bring straight thread of goods parallel to center-front: above bust line swing edge of goods over one- quarter inch for a dart.
Fig. (2) Keep the straight thread Fig. (3) The muslin pinned at the of the goods along the center-front neck, shoulder, chest and underarm
Run your hand over the muslin, smoothing the muslin to the shape of the dummy. Pin it around the neck, across the shoulder, around the armhole and across the bust-line. Also, pin the muslin to the dummy at the underarm, allowing fullness enough from the center-front to the underarm so that the wrinkles run straight up and down. (Fig. 3.)
[41

DRAPING AND PATTERN MAKING
Cut off the material which extends beyond the pins at the neck, armhole and underarm to within one inch of the pins. Now you are ready to fit the dart from the bust to the lower edge and to get the exact run of the seams.
Use a black tape to mark the edge of the piece at the shoulder, neck and underarm. Pin the tape on, then stand away from the dummy and see if you have the shoulder and underarm seams placed correctly. The shoul¬ der seam should come on the top of the shoul¬ der and the underarm seam ought to start at the center of the armhole under the arm
and run straight down.
Care must be used that the underarm seam does not slant toward the front or the back. This is a common fault.
The curve of the armhole must be a continuous curve without bumps or hollows in it. The same holds true of the neck. After the edges have been deter¬ mined satisfactorily, pencil mark along the outer edges of the
Fig. {4) The front tape anc[ remove the tape. Also dart ptnnrd .» the darts. (See Fig. 4.)
[5]
A COMPLETE COURSE IN DRESSMAKING
It is a good plan to leave the front pinned to the dummy while draping the back. The same method is used in pinning the back to the dummy. .(See. Fig. 5.) The straight thread of the goods is placed along the center- back, the muslin is then pinned at the neck,
Fig. (6) Pin the back muslin to the form the same as you did the front
armhole and underarm. (See Fig. 6.) Darts can be taken out extending into seams at the side of the armhole. Of course, the seams will be only marked on the muslin. They will not be cut.
In putting the tapes on to mark the outer edges, be sure to notice the run of the arm-
16]

DRAPING AND PATTERN MAKING
hole at the top. The armhole ought to take a continuous curve from the side-front to the side-back. It must not jog at the shoulder seam nor run out in a point.
Directly below the darts, split the muslin over the hips, so that it will hang straight down with¬ out drawing toward the back. Baste or pin in V-shaped pieces, allowing the muslin to spread as much as necessary for an easy fit over the hips. Continue the dart below the waistline, marking the direction of the seam below where it is necessary to take up the goods. (See Fig. 7.)
If you want to drape the mus¬ lin on a person, fit the person with a muslin collar and yoke (See Fig. 8.) This gives you a
foundation on which to pin.
Making a Fitting Lining Pattern: After the muslin pieces have been removed from the dummy or person, spread them on pieces of paper and trace the pattern. (See Figs. 9 and 10.)
rat Fig. (7) Mark the position of the seams and darts
on the muslin
pieces first.
[7]

A COMPLETE COURSE IN DRESSMAKING
To do this, thumbtack the goods firmly to the paper, keeping the straight threads of the goods straight. Trace along the sewing line of the waist, that is without seam allowances. In making the pattern for the front, mark the bust line, the waistline and the dart, as well as the outer edges. After the mus¬ lin has been removed, true up the lines, making the lines that should be straight, even with a ruler and the curves continuous and without breaks.
In making the pattern for the back, first smooth out the muslin and trace the"" section nearest the back. Remove the muslin and cut out this section. Then, place the muslin on another piece of paper and trace the centerpiece. Afterthis piece _ has been cut out, trace the Wj) w^.s section at the underarm. person if you use a muslin
You cannot trace them all yoh for a faun-
[8]

DRAPING AND PATTERN MAKING
atone time on account of the V-shaped pieces that you set in at the bottom.
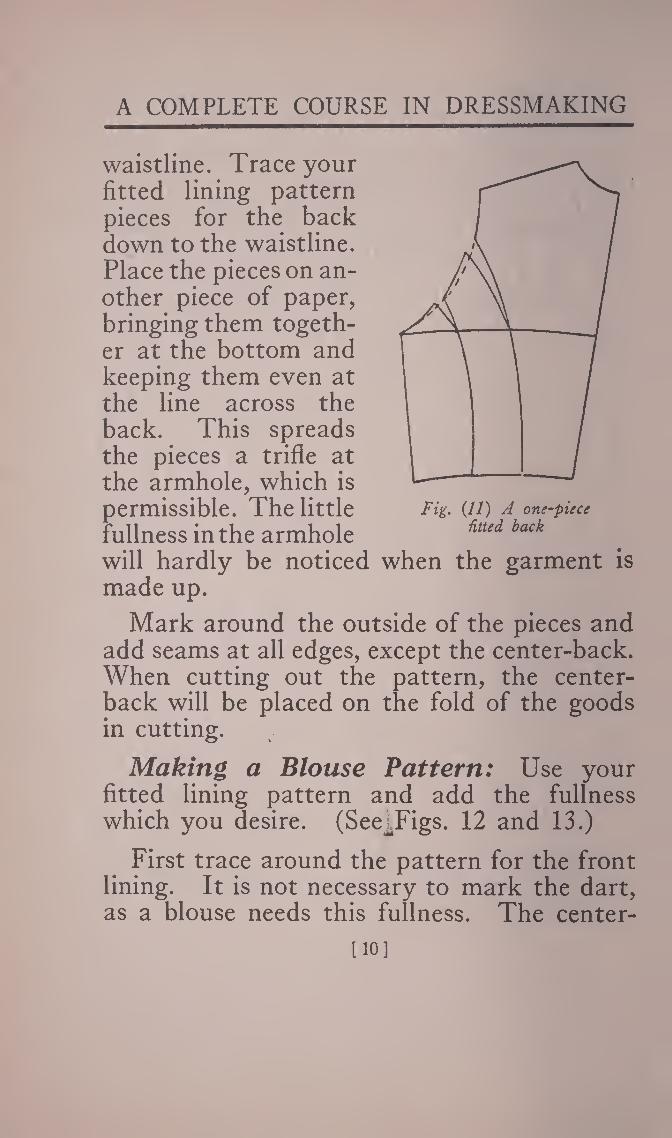
Making a Pattern for a One-Piece Back:
Fig. (9) Making a diagram from Fig. (10) The hack muslin used the front muslin as a diagram
[9]
A COMPLETE COURSE IN DRESSMAKING
waistline. Trace your fitted lining pattern pieces for the back down to the waistline. Place the pieces on an¬ other piece of paper, bringing them togeth¬ er at the bottom and keeping them even at the line across the back. This spreads the pieces a trifle at the armhole, which is permissible. The little Fig. tu) A one-piece
fullness in the armhole nued back will hardly be noticed when the garment is made up.
Mark around the outside of the pieces and add seams at all edges, except the center-back. When cutting out the pattern, the center- back will be placed on the fold of the goods in cutting.
Making a Blouse Pattern: Use your fitted lining pattern and add the fullness which you desire. (See^Figs. 12 and 13.)
First trace around the pattern for the front lining. It is not necessary to mark the dart, as a blouse needs this fullness. The center-
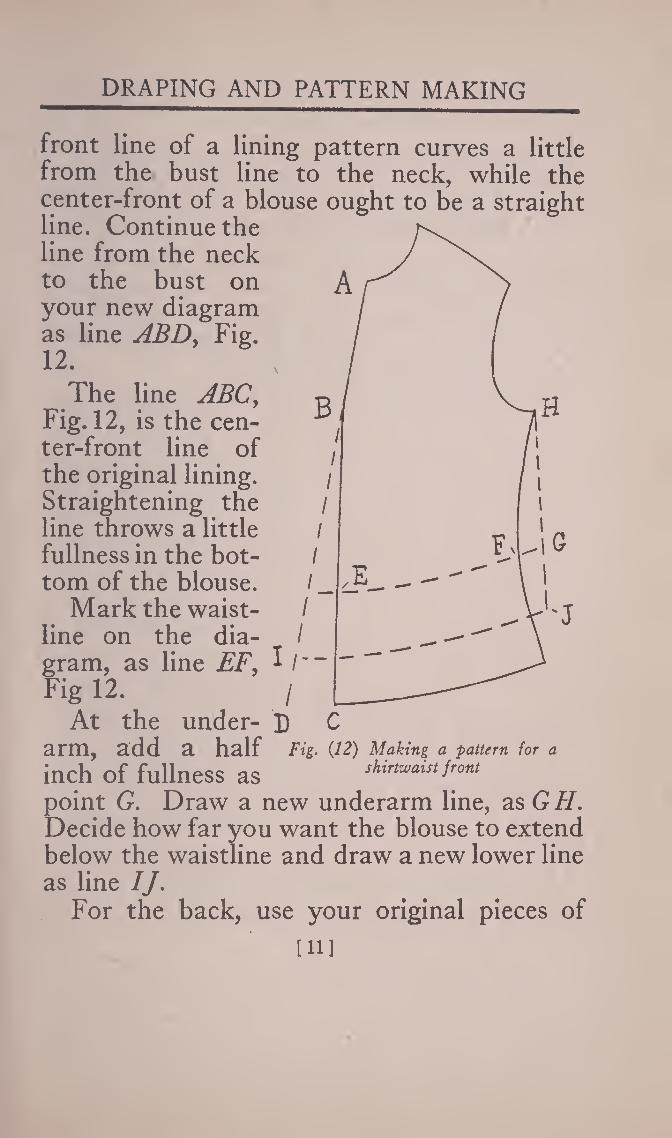
DRAPING AND PATTERN MAKING
front line of a lining pattern curves a little from the bust line to the neck, while the center-front of a blouse ought to be a straight line. Continue the line from the neck to the bust on your new diagram as line ABD, Fig. 12.
The line ABC, Fig. 12, is the cen¬ ter-front line of the original lining. Straightening the line throws a little fullness in the bot¬ tom of the blouse.
Mark the waist¬ line on the dia¬ gram, as line EF, I / ■ ~ Fig 12. /
At the under- D arm, add a half inch of fullness as point G. Draw a new underarm line, as GH. Decide how far you want the blouse to extend below the waistline and draw a new lower line as line //.
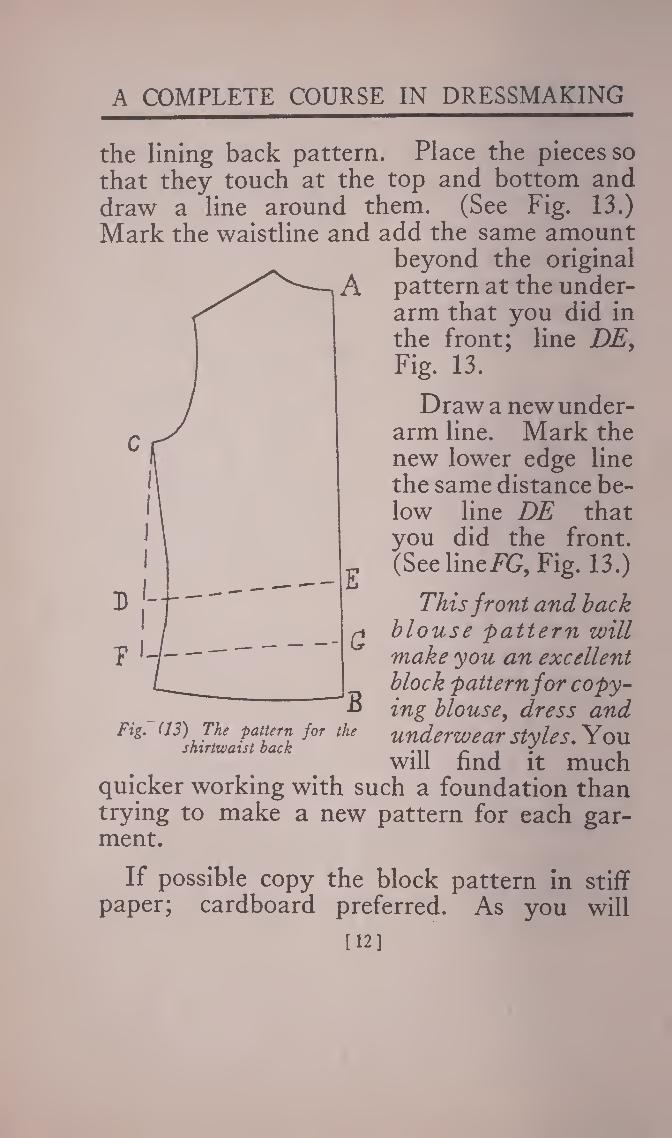
For the back, use your original pieces of
[li]
Fig. (12) Making a pattern for a shirtwaist front
A COMPLETE COURSE IN DRESSMAKING
the lining back pattern. Place the pieces so that they touch at the top and bottom and draw a line around them. (See Fig. 13.) Mark the waistline and add the same amount
beyond the original pattern at the under¬ arm that you did in the front; line DE, Fig. 13.
Draw a new under¬ arm line. Mark the new lower edge line the same distance be¬ low line DE that you did the front. (SeelineFG, Fig. 13.)
This front and back blouse pattern will make you an excellent block pattern for copy¬ ing blousey dress and underwear styles. You will find it much
quicker working with such a foundation than trying to make a new pattern for each gar¬ ment.
If possible copy the block pattern in stiff paper; cardboard preferred. As you will
[12]
3)-
T —
--B Fig. (13) The pattern for the
shirtwaist back

DRAPING AND PATTERN MAKING
mark around it many times in making dia¬ grams, the edge ought to be stiff enough not to bend when the pencil is run along it.
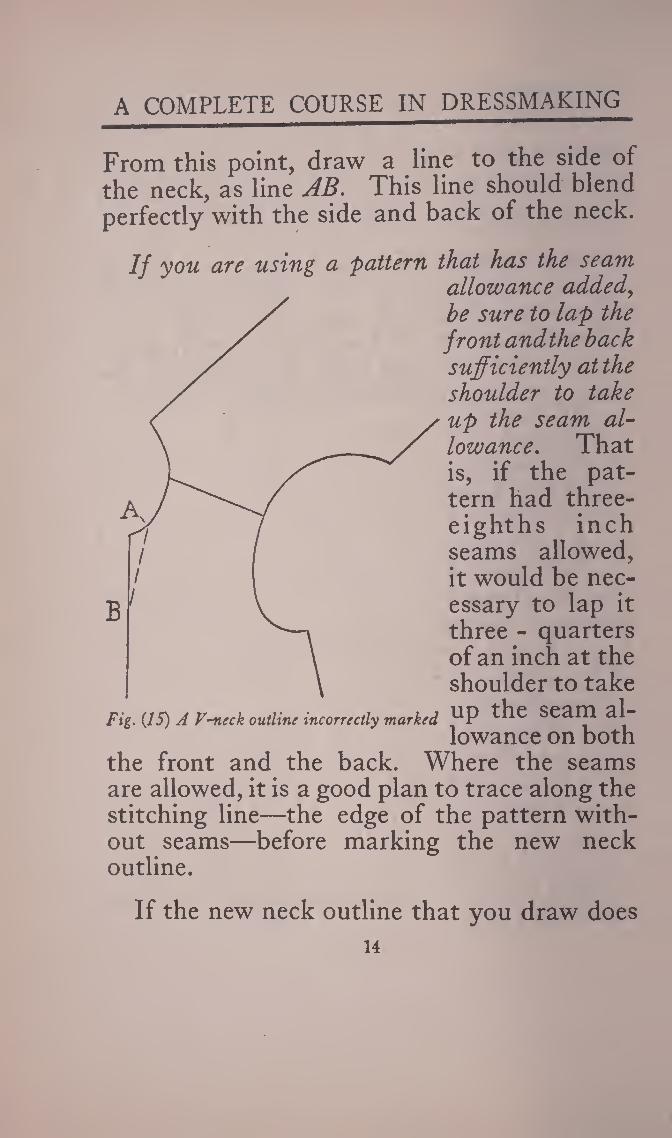
Neck Outlines in Patterns: In copying a style, one of the first considerations is the neck outline. Is the neck going to be V-shaped, square, in U-outline or perhaps an oval? You will need both the front and the back pattern to determine the best shape.
To make a V-neck outline, place the front and back of the block pattern on another piece of paper and mark around them, keeping the edges together at the shoulder. (See Fig. 14.) Decide how deep you want the neck to come in the front and mark a point, as point B, Fig. 14. pattern
[13]
A COMPLETE COURSE IN DRESSMAKING
From this point, draw a line to the side of the neck, as line AB. This line should blend perfectly with the side and back of the neck.
If you are using a pattern that has the seam allowance added, be sure to lap the front and the back sufficiently at the shoulder to take
• up the seam al¬ lowance. That is, if the pat¬ tern had three- eighths inch seams allowed, it would be nec¬ essary to lap it three - quarters of an inch at the shoulder to take
Fig. (IS) A V-neck outline incorrectly marked Seam al¬ lowance on both
the front and the back. Where the seams are allowed, it is a good plan to trace along the stitching line—the edge of the pattern with¬ out seams—before marking the new neck outline.
If the new neck outline that you draw does
14

DRAPING AND PATTERN MAKING
not blend into the line at the side and back of the neck, you will have an unsightly jog in the neck of the gar¬ ment. For instance, if the V-line is drawn, as in Fig. 15, the neck of the garment will look like Fig. 16. Fig. 17 shows you a smooth run to the neckline as you would secure with such a diagram as Fig. 14.
Fig. (16) A poor line at the neck
To make a square neck outline, trace around the upper part of the front and back pat¬ terns as described be¬ fore. Then draw lines at right angles to the center-front and cen¬ ter-back lines, as lines AB and DE, Fig. 18. Decide how wide you want the neck open¬ ing at the front and back and mark these distances on the lines AB and DE. Connect Fig. (17) A perfect neckline
115]

A COMPLETE COURSE IN DRESSMAKING
the two lines, curving the side line to touch the side of the neck or to come any distance from the side of the neck desired.
Sometimes a square neck outline is only used in the front while the back of the pattern comes up to the high neck line. In this case,draw the square out¬ line in the front only, blending it into the side of the neck.
To make a pointed outline in front, first draw the square outline on the pattern, as in Fig. 18. Then add the pointed
outline as line CB, Fig. 19.
To make a U-shaped neck outline, use the upper part of the front and back patterns for a new diagram, as described before. Draw lines at right angles to the center-front and
[16]

o>
DRAPING AND PATTERN MAKING
and mark a point on the diagram. Oval the lines at the front and back to blend into the lines AB and CD. Connect these lines touching the point marked on the shoulder.
With the U out-
Fig. (19) A pointed front outline
center-back lines, placing them the depth from the neck, front and back, that you want the outline. See lines AB and CD, Fig. 20.) Also decide how far away from the side of the high neck you want the new outline
[17]

A COMPLETE COURSE IN PRESSMAKING
line, too, the neck may be high in the back as line AFE, Fig. 20. This is especially desirable, if the dress is to have a collar.
To make a round neck outline, draw lines on the diagram at right angles to the center- front and center-back lines, as lines AB and CD> Fig. 21. Then swing in your outline free hand blending it into these lines. (See dotted line on the diagram.)
To make a boat-shaped outline, trace your diagram from the block
pattern as described before and mark a point on the shoulder seam the distance from the neck that you want the new neck opening. (See point By Fig. 22.) Draw the new neck outline, as lines AB and CD, Fig. 22.
Fig. (21) coal neck outline marked on the pattern
[18]

DRAPING AND PATTERN MAKING
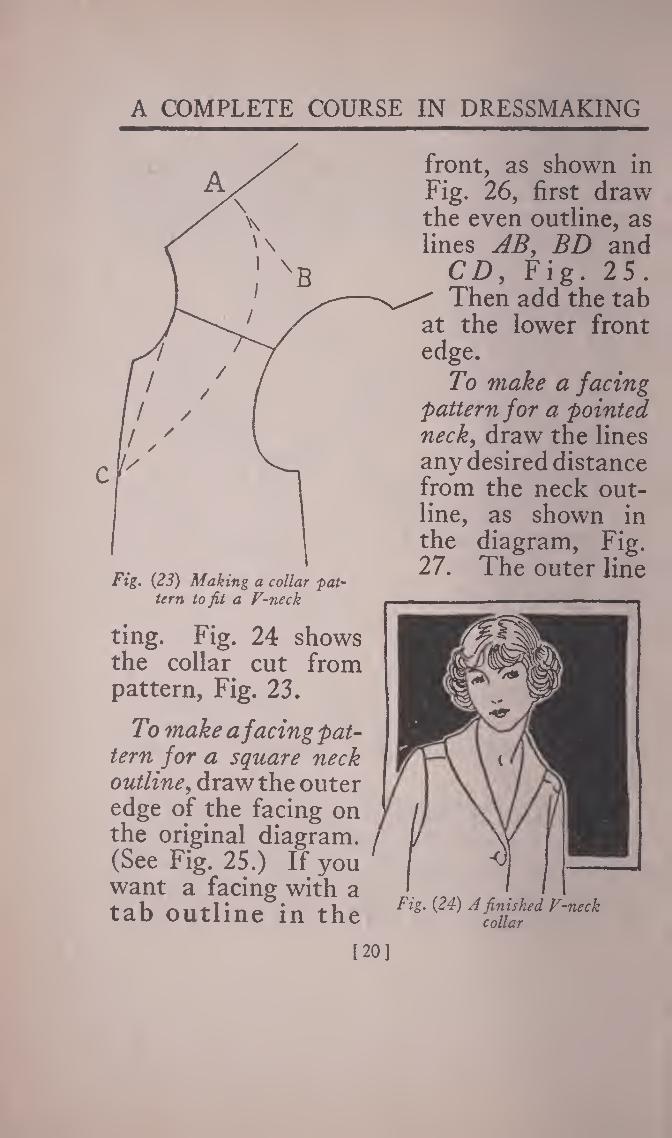
Making Collar Patterns: If you want to add a collar to the V-neck outline, draw the outer edge of the collar on the diagram, as shown in Fig. 23.
Point A is the depth of the col¬ lar at the center- back. From this point draw a line at right angle to the center-back line, as line AB.
Draw the outer line of the collar free hand, blend¬ ing it into the line AB about one- half inch from the center-back line. IL IS an ea sy /7g. (22) A boatr shaped, veck
matter to shape the outer edge of a collar in any desired out¬ line.
Place another piece of paper under the dia¬ gram and trace along the outer edges of the collar, adding seams at all edges, except the center-back. This edge of the pattern ought to be placed on the fold of the goods in cut-
[19]
A COMPLETE COURSE IN DRESSMAKING
Fig. (23) Making a collar pat¬ tern to fit a V-neck
ting. Fig. 24 shows the collar cut from pattern, Fig. 23.
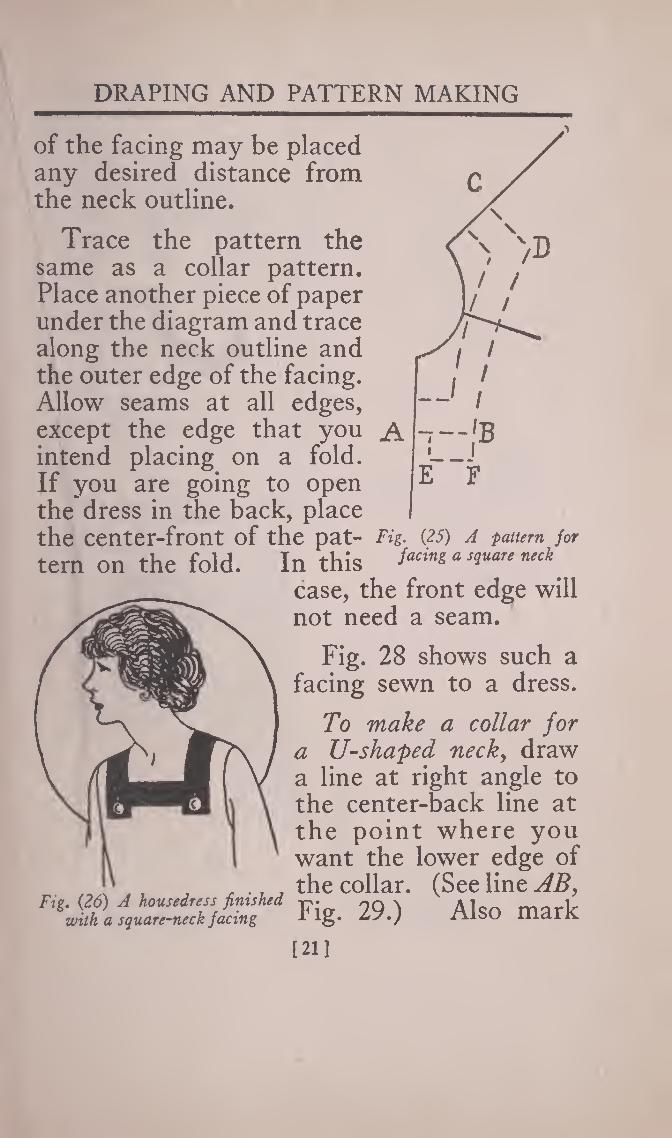
To make a facing 'pat¬ tern for a square neck outline, draw the outer edge of the facing on the original diagram. (See Fig. 25.) If you want a facing with a tab outline in the
front, as showrn in Fig. 26, first draw the even outline, as lines ABy BD and
CD, Fig. 25. Then add the tab
at the lower front edge.
To make a facing pattern for a pointed neck, drawr the lines any desired distance from the neck out¬ line, as shown in the diagram, Fig. 27. The outer line
Fig. (24) A finished V-neck collar
[20]
DRAPING AND PATTERN MAKING
of the facing may be placed any desired distance from the neck outline.
Trace the pattern the same as a collar pattern. Place another piece of paper under the diagram and trace along the neck outline and the outer edge of the facing. Allow seams at all edges, except the edge that you intend placing on a fold. If you are going to open the dress in the back, place the center-front of the pat- Fig. (25) a pattern for
tern on the fold. In this case, the front edge will not need a seam.
Fig. 28 shows such a facing sewn to a dress.
To make a collar for a U-shaped necky draw a line at right angle to the center-back line at the point where you want the lower edge of
x , f , . ., . the collar. (See line ABy Fig- 29.) Also mark
[21]

A COMPLETE COURSE IN DRESSMAKING
outline Fig. {28) Dress finished with
pointed facing
Fig. {30) Dress with U-shaped neck finished with fiat collar
[22]

DRAPING AND PATTERN MAKING
point every inch or so around the neck at the depth you want the collar. Swing in the outer line of collar, free hand, touch¬ ing these points and blend¬ ing the line into line AB about one-half inch from the center-back line. On a U-shaped neck, the collar usually stops at the side front, as line CD, Fig. 29. Trace the collar pattern, allowing seams at all edges except the center-back.
Fig. {31) Diagram for bertha ‘pattern
Fig. 30 shows such a collar sewn to the dress.
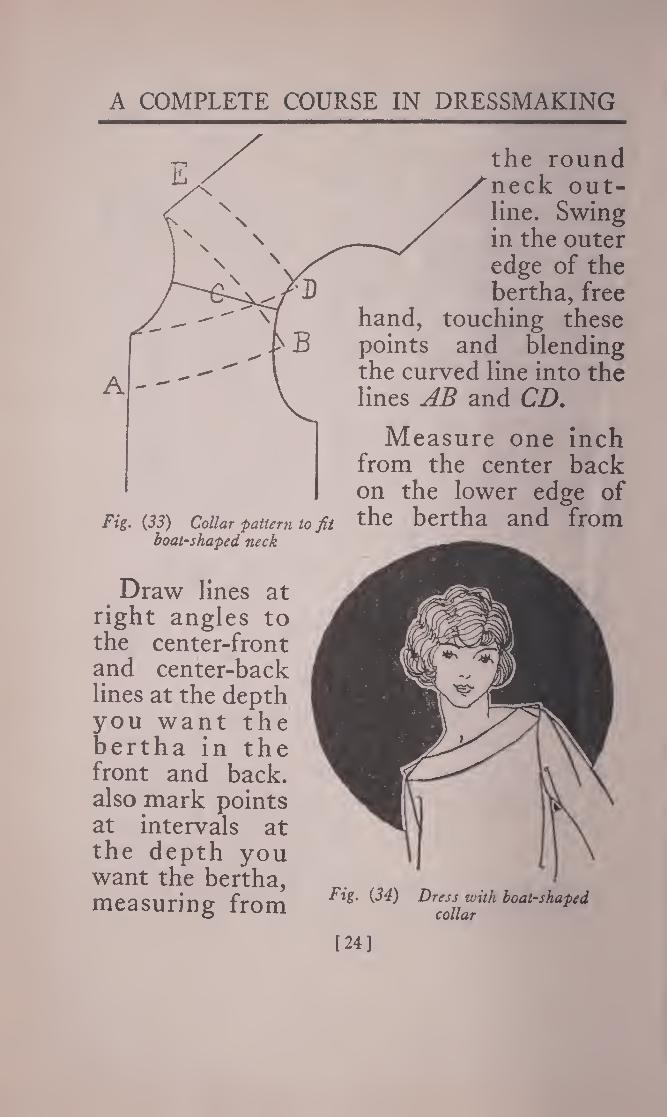
Making a pattern for a bertha is practically the same as making a pattern for a wide col¬ lar. (See Fig. 31.) This shows a diagram for a bertha for a round neck.
[23]
A COMPLETE COURSE IN DRESSMAKING
the round y'neck out-
line. Swing —in the outer
edge of the bertha, free
hand, touching these points and blending the curved line into the lines AB and CD.
Measure one inch from the center back on the lower edge of
Fig. (33) Collar pattern to fit the bertha and from boat-shaped neck
Draw lines at right angles to the center-front and center-back lines at the depth you want the bertha in the front and back, also mark points at intervals at the depth you want the bertha, measuring from Fig. (34) Dress with boat-shaped
collar
[24]

DRAPING AND PATTERN MAKING
this point draw a line to the round neck out¬ line at the center-back. This gives you the back edge of the bertha.
In tracing the pattern, allow seams at all edges, except the center-front. The center-front will be placed on the fold of the goods in cutting.
Fig. 32 shows a bertha cut from a pattern such as shown in Fig. 31.
To make a boat- shaped collar pattern, use your boat-shaped neck outline diagram and draw on the col¬ lar, making the outer edge any desired dis¬ tance from the neck outline. (See Fig. 33.)
Usually, a collar on such a neck is in two sections: one for the front and one for the back. They do not meet at the shoulder. These edges may be spread apart as much or as little as desired
[25]
Fig. (35) Allowing for a lapped closing on the pattern

A COMPLETE COURSE IN DRESSMAKING
by placing points D and B nearer together or further apart.
In tracing the collar pattern allow seams at all edges, except the center-front and cen-
Fig. (5(5) A waist finished with a lapped closing
ter-back. These edges are placed on the fold of the goods in cutting.
Fig. 34 shows a neck finished with a boat¬ shaped collar.
[26]

DRAPING AND PATTERN MAKING
Allowing for Different Closing on Your Pattern: Closings are a matter of extensions and extra allowances beyond the edge of your block pattern. After you have traced the block pattern onto another piece of paper for a diagram, it is an easy matter to mark allowances for any style of closing.
Allowing f or a lapped closing means adding the amount of the lap and a hem. (See Fig. 35.)
If you are figuring on a center-front closing of a waist or dress, the usual lap is one inch. This re¬ quires one-half inch added to half the Fig. (37) A box-pleat added to
pattern. a vatUrn
In Fig. 35, line AB is the center-front line and CD is the edge on which the hem will turn. CD is placed one-half inch from AB which will give an inch lap in the finished garment. EF marks the hem allowance. The
[27]

A COMPLETE COURSE IN DRESSMAKING
Fig. (38) Here a box-pleat is the finish at the closing
hem is usually wide enough to cover the lap. In this case a one-inch hem allowance is used. In tracing such a pattern, allow seams at all points. Fig. 36 shows a blouse finished with a lapped closing.
To make a box-pleat closing, place your block pattern on another piece of paper and trace around it, as shown in Fig. 37. Line
128]

DRAPING AND PATTERN MAKING
AB is the center-front. The box-pleat ought to extend half on one side and half on the other side of the center-front.
Draw the edges of the finished pleat on the diagram. This will give you lines CD and EF. If the pleat q is to finish two inches | wide, line CD will be one inch on one side j of line AB — the i center front—and I line EF will be one I inch on the other I side of the line AB. I
Draw a line the 1 width of the pleat beyond line EF, as 1 line Gif, Fig. 37. If 1 the pleat is to finish two inches wide, this line will be placed 1 ^ two inches from EF. D # Before cutting the Fig. (39) Pattern for waist with
pattern, allow a seam Duchgss closin\ beyond the line GH and bring the line GH to the center-front. Pin the line GH to the line AB—center-front—and crease the pleat into its finished position.
[29]
A COMPLETE COURSE IN DRESSMAKING
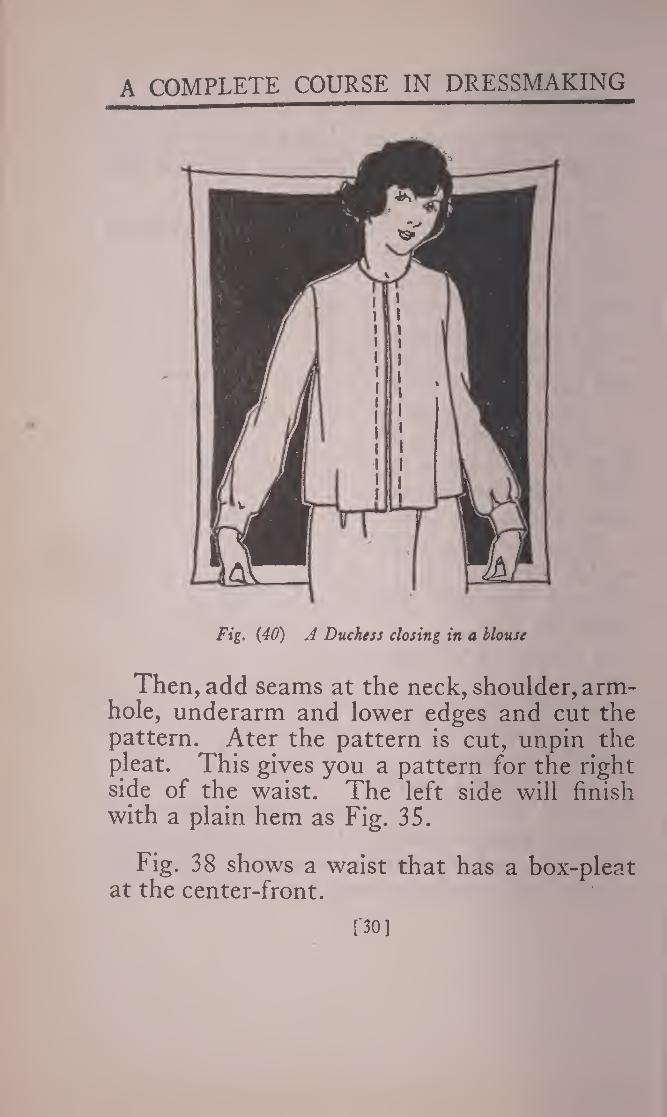
Fig. (40) A Duchess closing in a blouse
Then, add seams at the neck, shoulder, arm¬ hole, underarm and lower edges and cut the pattern. Ater the pattern is cut, unpin the pleat. This gives you a pattern for the right side of the waist. The left side will finish with a plain hem as Fig. 35.
Fig. 38 shows a waist that has a box-pleat at the center-front.
f30 ]

DRAPING AND PATTERN MAKING
If you want a slot seam closing or what is sometimes called a Duchess closing, add a tuck allowance beyond the center-front of your diagram, as shown in Fig. 39.
Suppose you want . the stitchings either 0/ side of the center- front one inch from the edges, then allow a one-inch tuck. B
In Fig. 39, line AB E \ is the center-front r -=*- and line CD is the tuck allowance and is placed one inch from line AB.
Before cutting out the pattern, allow a seam beyond the line CD. Crease dia- gram along the center-front, bring- (41) Pattern of waist from • . | ii ° with fancy tab ing the tuck allow¬ ance onto the wrong side and then add seams beyond the other edges. After the pattern is cut, unfold the tuck.
Such a closing is finished with an underlap which is a separate piece of material, cut to
[31]

A COMPLETE COURSE IN DRESSMAKING
finish an inch wider than the two tucks. In the case of the closing with inch-wide tucks, the underlap or buttonstand should be three inches wide.
Cut a piece of paper three inches wide plus seams at either edge and a little longer than the pattern. Draw a line through the center of it. This will be the center-front of the underlap. Place your waist pattern on top of this piece, bringing the center-fronts to¬ gether and mark along the waist pattern at the top and bottom. Remove the waist pattern, crease the under lap through the center and cut it off, top and bottom, along the lines just marked. Then, flatten it out.
In finishing the closing, line the underlap and stitch it to the right front along the stitching of the tuck.
Fig. 40 shows a blouse that has a slot seam or Duchess closing at the center front.
To make a pattern for a blouse with a tab closing, as shown in Fig. 42, place your block pattern on another piece of paper and mark around it for a working diagram. Then, mark a point at the depth you want the neck opening, as point A, Fig. 41.
Decide the width that you want the tab and
[32]

DRAPING AND PATTERN MAKING
1 Fig. (42) As the tab waist would look when made up
mark another point, as D, on the center front line. From these points, draw lines at right angles to the center-front line, as lines AB and CD.
Trace the tab portion onto another piece of paper and fold it through the center, then round off the corner and unfold it. This will
[33]
A COMPLETE COURSE IN DRESSMAKING
E D
Fig. X.43) The whole front pattern is needed for a one-sided efect
give you a guide for marking the curve. Place the center of the guide at the center of the tab on the diagram, point E and mark the curved edge.
This gives you the outline for the right front. In finishing such a front the edge must be faced with a piece of material which is cut the same shape as the outside. Mark the depth that you want your facing, as line
[34]

DRAPING AND PATTERN MAKING
GH, Fig. 41. Place another piece of paper under the diagram and trace along the lines FGy GA, AED, the center-front and across the bottom to point F. Allow seams at all edges and cut out the facing pattern.
The left front will have a plain lap an inch wide and finish with a hem.
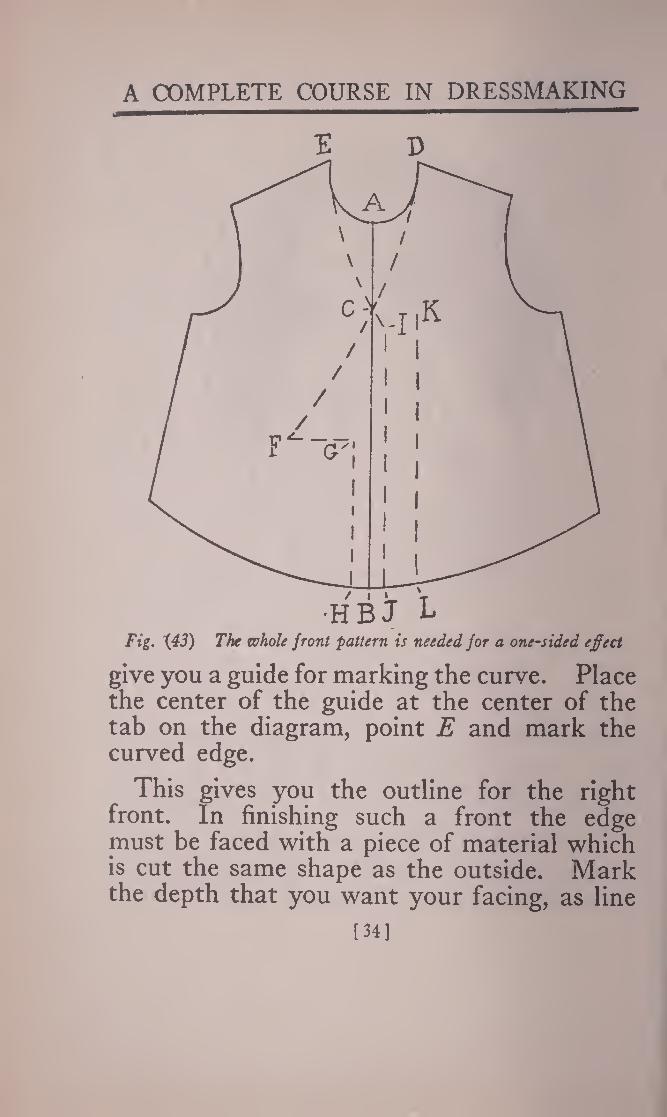
To make a 'pattern for a blouse with one¬ sided closing, as shown in Fig. 45, you will need a complete front diagram. (See Fig. 43.)
Place your block pattern on another piece of paper and trace around it, then turn it over and, keeping the front edge along the center-front line of the trace outline, mark around it again. In Fig. 43, line AB is the center-front.
First decide the depth that you want the neck opening and mark a point on the center- front line, as point C, Fig. 43. Draw lines from this point to the sides of the neck. Continue the neck line to form the tab of the right front. (See lines DCF, FG, GH.) From G to H, the line is one inch beyond the center front. This completes the lines for your right front pattern.
The left front ought to extend about one- half inch beyond the center-front. Mark a
[35]
A COMPLETE COURSE IN DRESSMAKING
line on the diagram one-half inch beyond the center-front, as line //. This edge will also need a hem, so mark the hem allowance be¬ yond //, as line KL, Fig. 43.
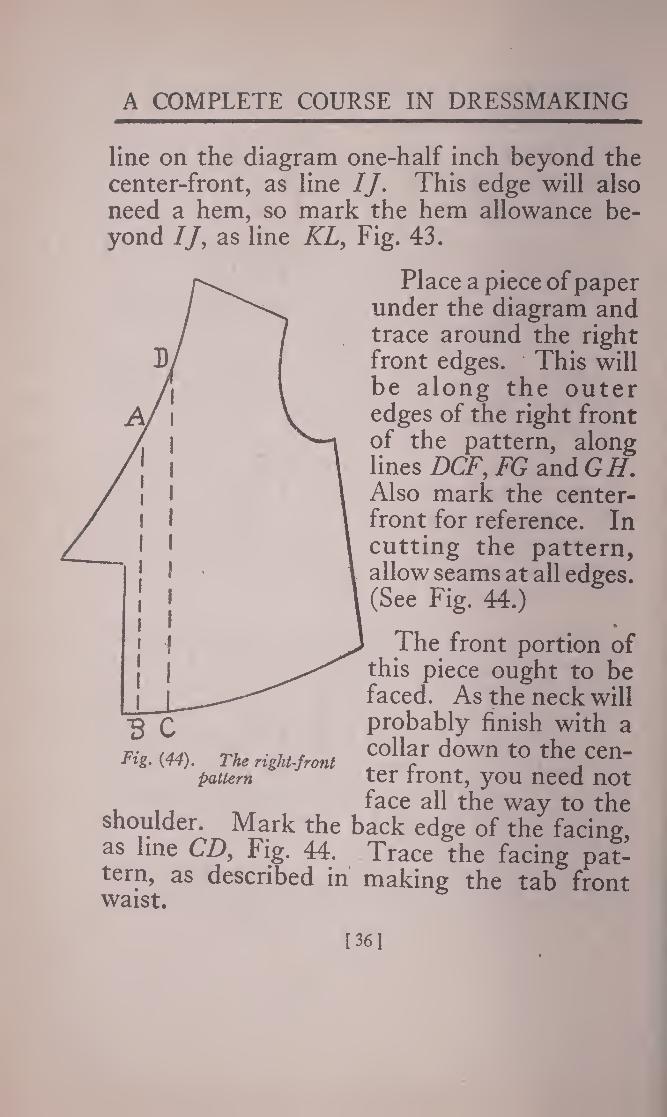
Place a piece of paper under the diagram and trace around the right front edges. This will be along the outer edges of the right front of the pattern, along lines DCF, FG and GH. Also mark the center- front for reference. In cutting the pattern, allow seams at all edges. (See Fig. 44.)
The front portion of this piece ought to be faced. As the neck will probably finish with a collar down to the cen¬ ter front, you need not face all the w'ay to the
shoulder. Mark the back edge of the facing, as line CD, Fig. 44. Trace the facing pat¬ tern, as described in making the tab front waist.
The right-front pattern
[361

DRAPING AND PATTERN MAKING
Place another piece of paper under the original diagram, Fig. 43, and trace the left front. From the shoulder trace along the line EC over to/. Trace both lines IJ and KL. Before cutting out the pattern, allow a seam beyond the line KL, crease along line IJ turning the hem allowance onto the wrong side of the pattern, then allow seams at the other edges and cut the pattern.
[37]

A COMPLETE COURSE IN DRESSMAKING
Making a pattern for a waist with a vest front is just a matter, too, of marking the outline on the diagram that you make from the block pattern. (See Fig. 46.)
If you are copying a style, as shown in Fig. 48, decide the depth of the neck opening in front first. Mark a point on the center-front line at this point, as point E> Fig. 46. From this point draw a line at right angle to the center- front. (See line EFy Fig. 46.) This gives you the top of the vest. Line AB is the center- front.
Draw a line where you want the side of the vest
Fig. <«> Pati<m for a to come as line CD. This west-front waist ought to blend into the
side line of the neck, that is, not make an abrupt angle where it joins the neck line. J
Also, mark how far you want the vest to
[38]

DRAPING AND PATTERN MAKING
lap under the side of the front, as line FG, Fig. 46.
Put a piece of paper under the diagram and trace the side of the waist. This will be around the back portion and along line CD. Remove the paper and mark a tuck allowance beyond the front line of the new piece. (See Fig. 47.) Here the line AB—the front edge— was the old line CD in Fig. 46.
[39]
A COMPLETE COURSE IN DRESSMAKING
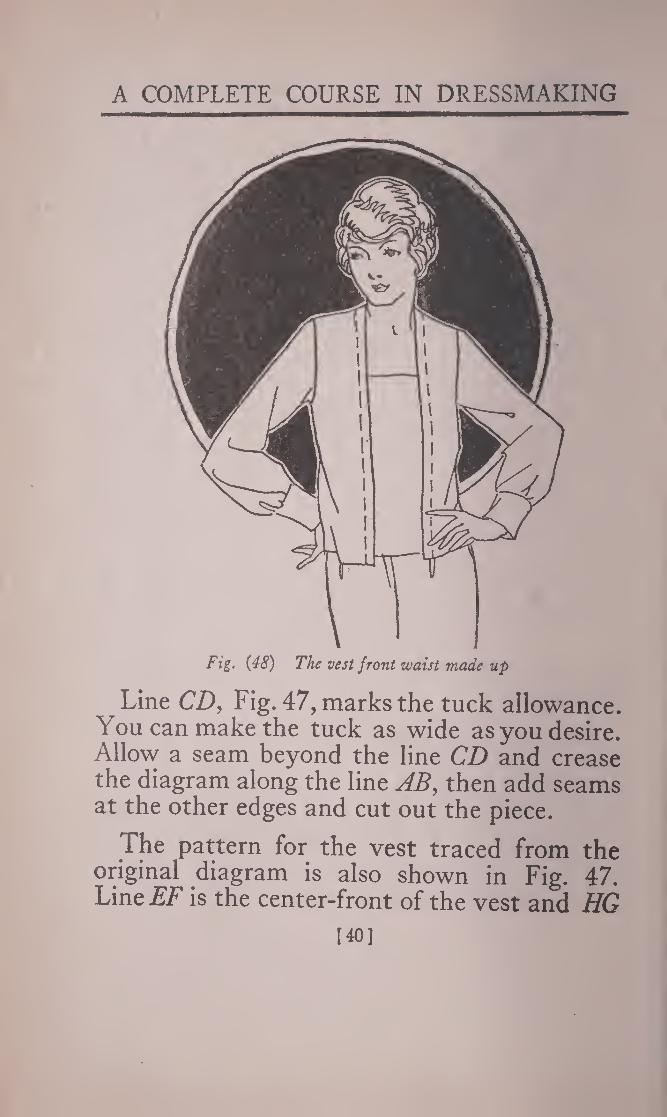
Fig. (48) The vest front waist made up
Line CD, Fig. 47, marks the tuck allowance. You can make the tuck as wide as you desire. Allow a seam beyond the line CD and crease the diagram along the line AB, then add seams at the other edges and cut out the piece.
The pattern for the vest traced from the original diagram is also shown in Fig. 47. LineisF is the center-front of the vest and HG
[40]

DRAPING AND PATTERNMAKING
corresponds to line FG in Fig. 46. Add a hem beyond the back edges as line IJ. Allow the seam beyond the hem, fold the hem, allow seams at the top and bottom and cut out the pattern. The center-front will not need a seam, as this edge will be placed on the fold of the goods in cutting.
Adding a Yoke to a Waist Pattern: If you want to add a shoulder yoke to a plain waist pat¬ tern, make a diagram from your block and mark the line of the yoke, as shown in Fig. 49. You may place the yoke line as near or far away from the shoulder seamas you fancy. It may be just a straight line or in a fancy outline. Styles change. Sometimes a straight line is considered Fig. (49) Adding a yoke
the only smart thing for a t0 a plain pa,urn yoke, while another season all yokes may be pointed.
Place another piece of paper under the diagram and trace around the yoke outline. Remove the pattern and add seams at all
[41]

A COMPLETE COURSE IN DRESSMAKING
edges or, if you want the lower edge of the yoke to finish with a narrow tuck, add a tuck allowance of about one-half inch beyond this edge and a seam beyond the tuck. Crease
Fig. (51) Spreading the pattern to add fullness
the tuck into its finished position before cutting the pattern.
Place another piece of paper under the diagram and trace around the lower portion and across the yoke line. Remove the piece and add an extension above the yoke line,
142]

DRAPING AND PATTERN MAKING
the width of the tuck. Add seams beyond the edges.
To add fullness below the yoke, mark three places to split the pattern, as the dotted lines
in Fig. SO. These lines are parallel to the center-front.
Also, number the sections of the pattern as indicated in this diagram. Line AB marks the extension at the yoke line for the tuck. Cut the pattern along the dotted lines and
[43]

A COMPLETE COURSE IN DRESSMAKING
place it on another piece of paper, as shown in Fig. 51. Spread the pieces to add as much fullness as desired, keeping the upper front edge of each section at right angle to the lower back edge of the preceding section. Reslope the upper line, touching the highest points. Also smooth the curve at the bottom.
To add fullness at the top only, spread the
[44]

DRAPING AND PATTERN MAKING
pieces as shown in Fig. 52. Here, they are kept together at the bottom and spread only at the upper edges. Reshape the top, touch¬ ing the highest points.
Fullness can be added to any portion of a pattern in this same way.
To cut the yoke and hack in one, trace around your back pattern on another piece of paper. (See Fig. 53.) Then place the yoke pattern without seams along the shoulder edge of the back diagram. Be sure to match the shoulder edge of the yoke with the shoulder edge of the back. Mark around the outer edge of the yoke and add the tuck allowance beyond. Turn the tuck into its finished position, add Fig. (55) A pattern marked
seams and cut the pattern. ^or tuc s
Fig. 54 shows a blouse with shoulder yoke.
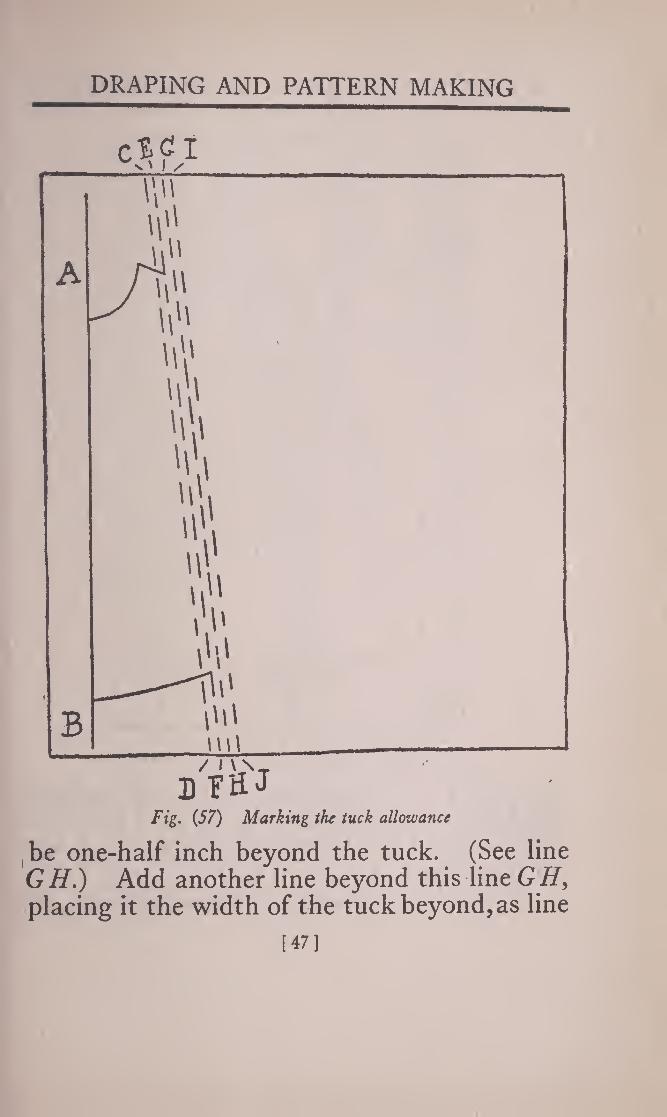
Allowing for Tucks: Draw the tucks on your diagram as they will appear when finished. See (Fig. 55.) This diagram shows
[45]

A COMPLETE COURSE IN DRESSMAKING
three one-half inch tucks at the side front. Add your seam allowances and cut out the
pattern.
Your next step is to fold the tucks into an¬ other piece of paper. To do this, draw a straight line on your new paper as line AB, Fig. 56, and place your pattern along this line, thumbtacking it in place. Mark around the outer edge of the pattern from the front line across the first tuck. Continue the lines of the first tuck on the paper as lines CD and EF.
Remove the pattern and draw the original tuck lines with your ruler; lines CD and
Fig. (5(5) Indicating the position of the first tuck on another diagram
Fig. 57. Also add a line, the width of the tuck, beyond line EF. In this case, it would
[46]
DRAPING AND PATTERN MAKING
Fig. {57) Marking the tuck allowance
(be one-half inch beyond the tuck. (See line GH.) Add another line beyond this line GH, placing it the width of the tuck beyond,as line
[47]

A COMPLETE COURSE IN DRESSMAKING
Fig. (58) The tuck folded in the diagram
IJ, Fig. 57. Crease the paper along the back edge of the original tuck, line EF, and bring this line to line IJ. This gives you a tuck folded in the paper. (See Fig. 58.)
Pin the tuck securely in place and place the [48]

DRAPING AND PATTERN MAKING
Fig. (59) The second tuck marked on the diagram
original pattern on the paper again, as shown in Fig. 59, being sure to place it in the old outline. Thumbtack it in place and mark along the outer edges across the second tuck. Trace along the second tuck. Remove the
[49]

A COMPLETE COURSE IN DRESSMAKING
Fig. (60) Many tailored blouses have tucks at the sides
pattern, add lines beyond the tuck mark as before and fold the tuck in the paper. After the tuck is pinned, place the pattern on again and mark the third tuck. Form this tuck in the paper as described in the case of the first tuck. Pin it in place and place the original pattern on the diagram to mark the remain¬ der of the outer edge. Remove the pattern,
150]

DRAPING AND PATTERN MAKING
add seams to the diagram and cut it out while the tucks are folded and pinned. Then unpin the tucks and straighten out the pattern.
Fig. 60 shows the waist with three tucks which was described in the precedingpara- graphs. The width £ and spacing of the tucks may be varied. Just follow the idea of marking the tucks on your plain pat¬ tern and then folding them in paper and you won’t have any difficulty in copying a tucked style.
Making a Pat¬ tern for a Blouse with Bosom Front: Here, too, use the block pattern to mark your diagram. (See Fig. 61.)
F DB
Fig• (61) A plain pattern marked for a bosom front
Line AB is the center-front. Mark the shape of the bosom on the diagram, as lines GH% IJ. Usually, a blouse with a bosom front
[51]

A COMPLETE COURSE IN DRESSMAKING
Fig. (62) Pattern for bosom and front
has a lapped closing. Mark the amount of the lap and the hem as lines CD and EF.
Place another piece of paper under the dia¬ gram and trace the waist portion which will be along the outer edges of the back and lower part and along lines I/ and GH Remove the paper and allow seams beyond the edges as in Fig. 62. Fold the hem before cutting the pattern.
[52]
DRAPING AND PATTERN MAKING
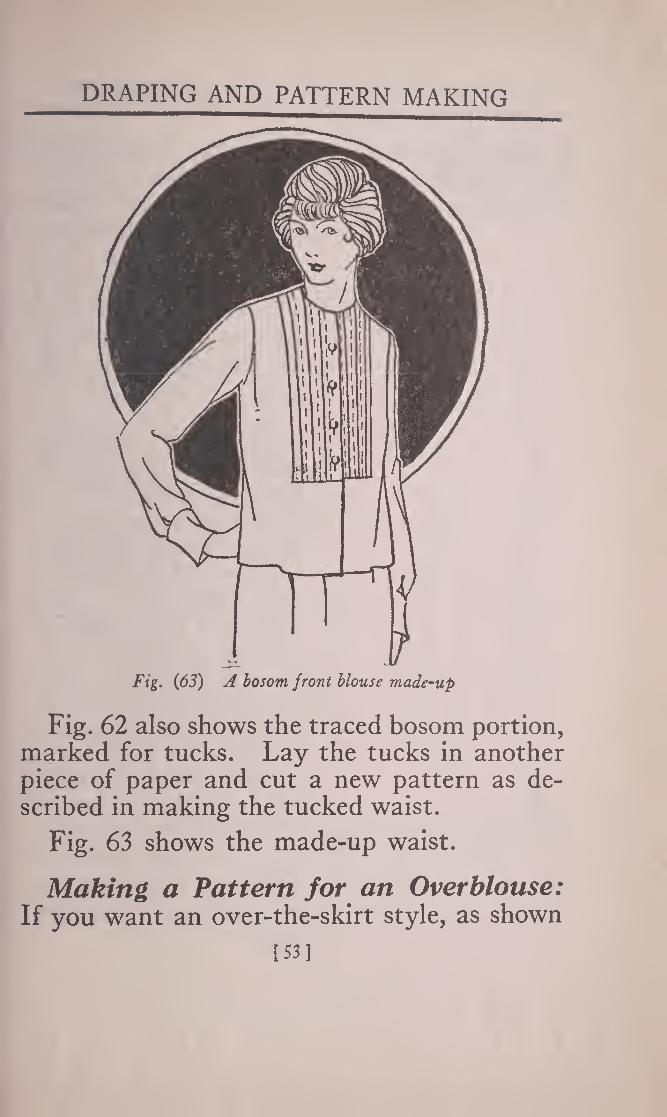
Fig. (63) A bosom front blouse made-up
Fig. 62 also shows the traced bosom portion, marked for tucks. Lay the tucks in another piece of paper and cut a new pattern as de¬ scribed in making the tucked waist.
Fig. 63 shows the made-up waist.
Making a Pattern for an Over blouse: If you want an over-the-skirt style, as shown
[53]

A COMPLETE COURSE IN DRESSMAKING
in Fig. 67, go back to your fitted lining block and work from that. An overblouse can be made with a shirtwaist pattern but it’s easier
to work with the foun¬ dation pattern. You will not be guessing about the amount of fullness you are putting in and where it will hang.
Of course you want fullness in the bottom but not in the front, as is the case in a shirt¬ waist. You really want some of the dart full¬ ness taken out. You can do this without adding a seam at the side front, if you swing a little fullness into the armhole. (See Fig. 64.)
This is the fitted n. rT . block pattern traced Fig. (64) Using the fitted lining nnt-n onnfV,pr n:prp nf pattern as a block for an overblouse anOtUer piece OI
paper. Mark the dart and the waistline. Also draw a line from the top of the dart to the armhole. It is along this
[54]

DRAPING AND PATTERN MAKING
line that you will swing out the fullness. The new neck line ought to be marked on
the pattern, as line CD. Use the straight line AB for the new center- front line. This will throw a little fullness in the * blouse at the neck in the ** front but it can be held into the binding when the Q - waist is made. If you eliminated this fullness, it would mean continuing the upper center-front line of the original fitted lining, which would throw full¬ ness in the lower edge at the center front—the very thing you ought to avoid in an overblouse.
Trace the lower back portion of the pattern on another piece of paper. This will be along the back edge of the dart, across the line EF, along the bottom of the armhole, the B underarm seam and the lower edge. Cut out this traced portion and place it on the original dia-

A COMPLETE COURSE IN DRESSMAKING
gram, bringing the lower edges of the dart nearer together and throwing a small dart in the armhole. A half inch can be thrown in the armhole without spoiling the set of the waist.
pattern from the
Continue the cen¬ ter-front line of the diagram and mark the depth of the overblouse on this. Draw a line at the lower edge at right angle to the center- front line. Mark the width you want the lower edge on this line and draw a line from the lower edge to the bottom of the armhole. (SeeFig.65.)
Use your fitted lin¬ ing pieces to mark the diagram for the back. (See Fig. 66.) Place this diagram along the front diagram to mark neck outline.
■front length of your neck outline to the
[56]

DRAPING AND PATTERN MAKING
lower edge. Measure this amount on the person at the center-front from the neck. Find out how far this point is from the floor. Whatever the lower edge is from the floor in the front, measure this amount from the floor at the center-back and, from this point, meas¬ ure to the neck of the person. It will give you the length of back for your diagram.
Apply this along the center-back of the diagram and from the lower edge draw a line at right angle to the center-back. On this line, mark the width at the lower edge and draw a line from this point to armhole.
Bring the diagrams together at the under¬ arm seams, matching the edges at the armhole, and curve the lower edge into a smooth line.
On the front mark a point one inch from the underarm line at the waistline. Draw a new underarm line, curving it to touch this point. Trace this line onto another piece of paper, also tracing along the lower edge and the armhole for an inch or so, and use this as a guide in marking the curve on the back at the underarm. These edges must exactly match in the garment.
In cutting the pattern, add a hem at the lower edge and seams at all other edges, except the center-front and the center-back. The
[57]

A COMPLETE COURSE IN DRESSMAKING
Fig. (67) An overblouse suitable for taffeta or crepe de chine
center-front and the center-back will be placed on the fold of the goods in cutting.
Fig. 67 shows the overblouse cut from this pattern.
Making a Pattern for a Straight Hang¬ ing Dress: A straight hanging dress is about the same problem as an overblouse, only of course, it’s longer. Here too, the fullness
158]

DRAPING AND PATTERN MAKING
Fig. {68) Diagram for straight hanging dress pattern
[59]
must be placed at the sides and the front kept flat. You don’t want a straight hanging dress to poke out in the front. It’s the one point that causes more trouble than any other.
Use your fitted lin¬ ing pattern to make the diagrams for the front and back. (See Figs. 68 and 69.) Throw the dart in the armhole, as de¬ scribed in makingthe overblouse.
If the dress is to finish with round col¬ lar and slashed open¬ ing at the neck as in Fig. 72, it will be an easy matter to get rid of the fullness at the neck. Lower the neck outline about one quarter of an
F inch as you will not
A COMPLETE COURSE IN DRESSMAKING
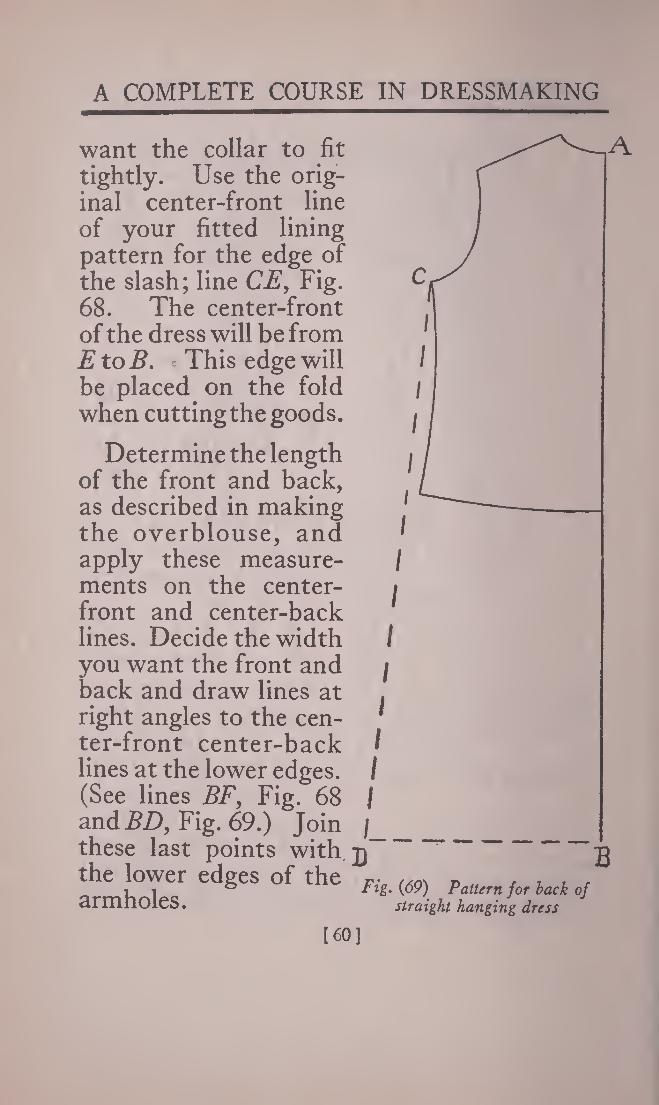
want the collar to fit tightly. Use the orig¬ inal center-front line of your fitted lining pattern for the edge of the slash; line CE, Fig. 68. The center-front of the dress will be from E to B. This edge will be placed on the fold when cutting the goods.
Determine the length of the front and back, as described in making the overblouse, and apply these measure¬ ments on the center- front and center-back lines. Decide the width you want the front and back and draw lines at right angles to the cen¬ ter-front center-back lines at the lower edges. (See lines BF, Fig. 68 and BD, Fig. 69.) Join these last points with the lower edges of the armholes.
[60]

DRAPING AND PATTERN MAKING
[61]

A COMPLETE COURSE IN DRESSMAKING
B
A- Fig. (71)
[62]
Bring the dia¬ grams together at the underarm seams, keeping the edges even at the armholes, and re¬ slope the bottom. (See dotted line, Fig.70.)Curvethe underarm seam of the front, as de¬ scribed in making the overblouse pattern and draw the same curve on the back pattern. (See Fig. 71.)
This would give you a pattern suit¬ able for a dress such as is shown in Fig. 72.
Making Sleeve Patterns: Before you start making sleeve patterns, you ought to have the types fixed in

DRAPING AND PATTERN MAKING

A COMPLETE COURSE IN DRESSMAKING
your mind. There are two-piece sleeves which are used in coats and sometimes in tailored dresses. These are usually tight fitting, except in a heavy coat. In the two- piece sleeves, the seam comes to the front of the armhole.
Fig. (73) Diagram /or sleeve pattern
Generally speaking, there are two kinds of one-piece sleeves. Those that have a seam matching the underarm seam and others where the seam comes to the front of the armhole.
[64]

DRAPING AND PATTERN MAKING
Of course, these are varied in innumerable ways. They are made tight fitting and loose and the design changed.
You can tell whether a sleeve seam is to sew to the underarm seam or to the front of
Fig. (74) A sleeve with a deep top hangs close to the figure
Fig* (75) A medium top sleeve swings away a little from the figure
the armhole by the shape of the pattern, but we will come to that just a little later.
The curve at the top of the sleeve regulates the hang. First we will consider the sleeve where the seam matches the underarm seam. (See
Fig. 73.)
[65]

A COMPLETE COURSE IN DRESSMAKING
If a sleeve is cut with a high top as CDE when made up, it will hang close to the garment as the sleeve in Fig. 74.
On the other hand, if the top is lowered a little as point F, the sleeve naturally will hang
a little further away from the garment as in Fig. 75.
If still more of the top of the sleeve is taken off, it will hang still further away as Fig. 76. This sleeve is similar to a man’s shirt sleeve.
[66]

DRAPING AND PATTERN MAKING
If the garment were cut off straight at the shoulder and a straight piece sewn back, it would stand straight out from the shoulder as in Fig. 77. This is what a kimono sleeve does.
You will notice in Fig. 73 that as the top of the sleeve is lowered it is necessary to widen the sleeve to make each top an equal size. The sides of the sleeve with the highest top
C
are at C and Z), the sides of the medium top sleeve end at H and I and the lowest top extends to J and K.
Shirt and middy sleeves are made with an equal curve at either side of the top. There is no front and back to such sleeves. However, in blouse and dress sleeves, a better fit is obtained by adding a little to the back of the sleeve at the top. (See Fig. 78.) This
[67]

A COMPLETE COURSE IN DRESSMAKING
shows the top of a sleeve that is made with the seam to match the underarm seam of the garment.
Line CD is the center. The solid line shows the curves the same at the front and the back. If a little extra were added, as the dotted line at the back, it would give a sleeve with more reach room. That is, when made up, the little extra goods at this point would allow you to reach forward without straining the gar¬ ment.
You can tell the front and back of a sleeve pattern that is made to sew to the underarm seam by folding it through the center and seeing which side is rounded the most. The side with the most “swell” goes to the back.
In making a sleeve pattern, first draw a straight line for the center as line EF, Fig. 79. Draw a line crossing this line and at right angle to it from A to B.
In order to know what size to make the top of the sleeve, it will be necessary to measure the armhole of your pattern. Be sure to measure on the stitching line without the seam allowance. A sleeve must be a little larger than the armhole. If a sleeve is exactly the same size as the armhole, the garment will appear to be fulled to the sleeve
[68]

A COMPLETE COURSE IN DRESSMAKING
when it is sewn in. Make your sleeve at least one inch larger than the tight measure¬ ment around the front and back of your
E
armhole. Make a memorandum of this amount.
Next consider how much top you want on the sleeve, that is, how high the upper part of
[69]
DRAPING AND PATTERN MAKING
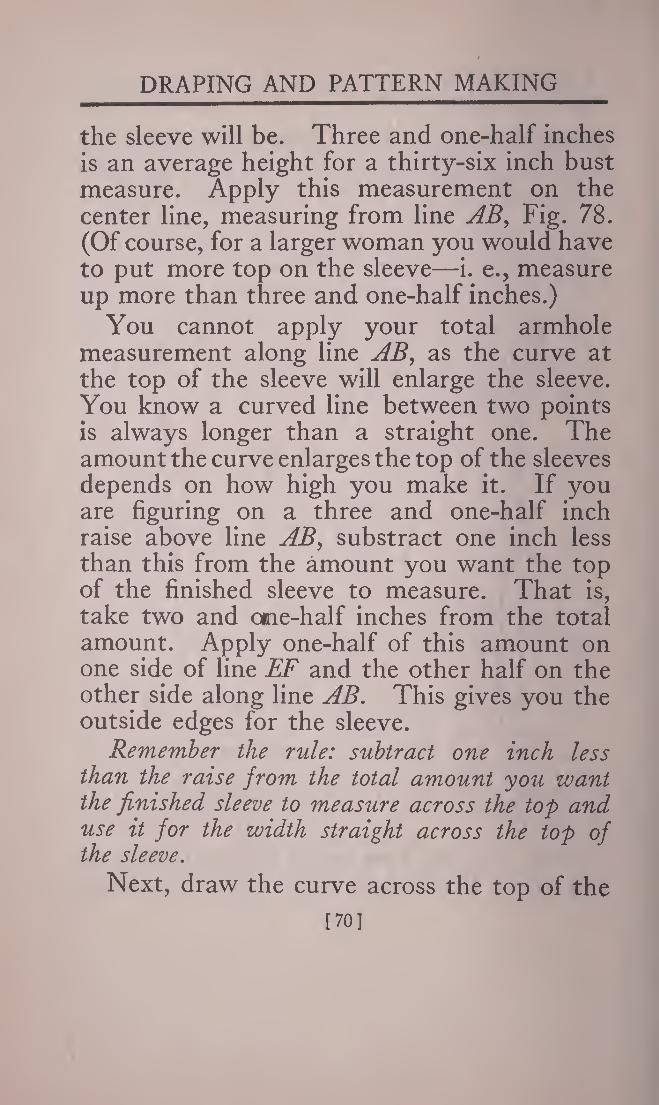
the sleeve will be. Three and one-half inches is an average height for a thirty-six inch bust measure. Apply this measurement on the center line, measuring from line AB, Fig. 78. (Of course, for a larger woman you would have to put more top on the sleeve—i. e., measure up more than three and one-half inches.)
You cannot apply your total armhole measurement along line AB, as the curve at the top of the sleeve will enlarge the sleeve. You know a curved line between two points is always longer than a straight one. The amount the curve enlarges the top of the sleeves depends on how high you make it. If you are figuring on a three and one-half inch raise above line AB> substract one inch less than this from the amount you want the top of the finished sleeve to measure. That is, take two and ome-half inches from the total amount. Apply one-half of this amount on one side of line EF and the other half on the other side along line AB. This gives you the outside edges for the sleeve.
Remember the rule: subtract one inch less than the raise from the total amount you want the finished sleeve to measure across the top and use it for the width straight across the top of the sleeve.
Next, draw the curve across the top of the
[70]
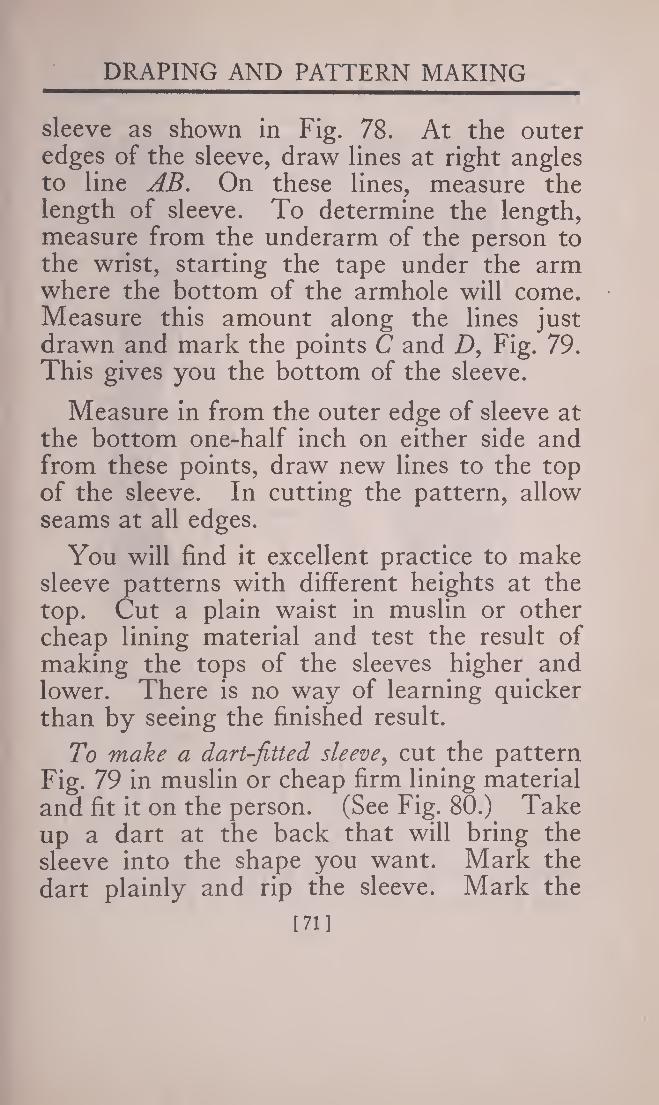
DRAPING AND PATTERN MAKING
sleeve as shown in Fig. 78. At the outer edges of the sleeve, draw lines at right angles to line AB. On these lines, measure the length of sleeve. To determine the length, measure from the underarm of the person to the wrist, starting the tape under the arm where the bottom of the armhole will come. Measure this amount along the lines just drawn and mark the points C and Z), Fig. 79. This gives you the bottom of the sleeve.
Measure in from the outer edge of sleeve at the bottom one-half inch on either side and from these points, draw new lines to the top of the sleeve. In cutting the pattern, allow seams at all edges.
You will find it excellent practice to make sleeve patterns with different heights at the top. Cut a plain waist in muslin or other cheap lining material and test the result of making the tops of the sleeves higher and lower. There is no way of learning quicker than by seeing the finished result.
To make a dart-fitted sleeve, cut the pattern Fig. 79 in muslin or cheap firm lining material and fit it on the person. (See Fig. 80.) Take up a dart at the back that will bring the sleeve into the shape you want. Mark the dart plainly and rip the sleeve. Mark the
[71]

A COMPLETE COURSE IN DRESSMAKING
Fig. (80) Draping a sleeve
position of the dart on your original sleeve diagram. (See Fig. 81.) You will need to add to the lower edge of this pattern at the dart to have the best run at the bottom. The lower lines ought to form right angles with the dart edges. This may make the front edge of the dart longer than the back but it can be gathered slightly in making up the sleeve. (See lines CJ and KD, Fig. 81.)
172]

DRAPING AND PATTERN MAKING
Fig. (81) A dart-fitted sleeve pattern
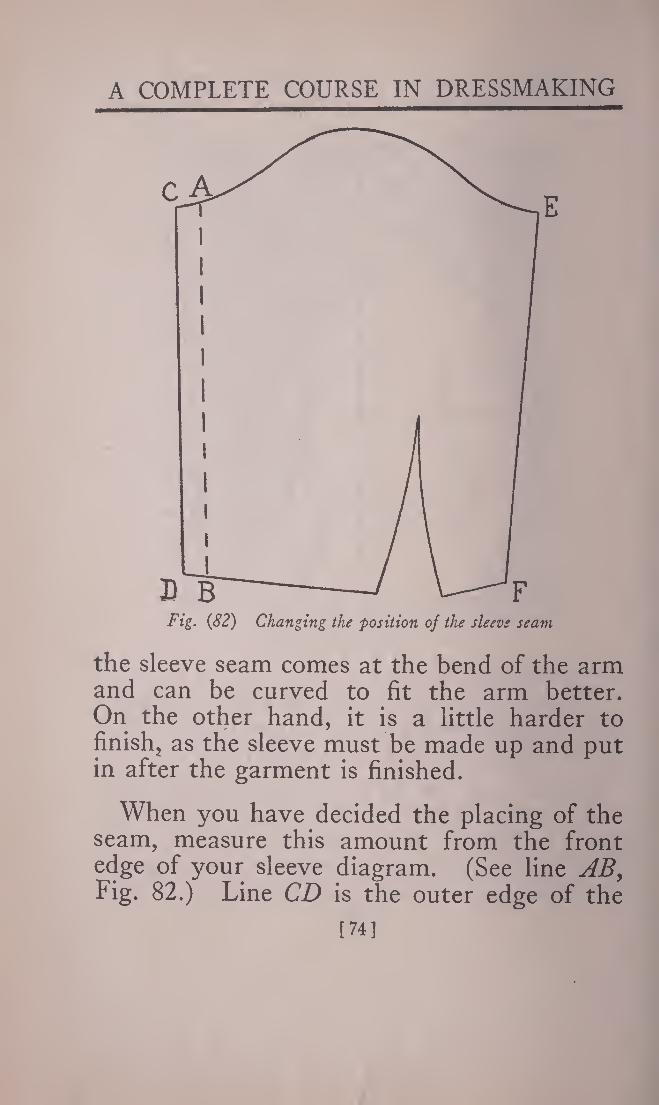
To make a pattern for sleeve where the seam comes to the front of the armhole, use your fitted sleeve diagram, shown in Fig. 81.
Decide how far in front of the underarm seam you want to place the seam of the sleeve. Usually it is placed two and one- half inches in front of the armhole seam. The advantage of using such a sleeve, is that
[73]
A COMPLETE COURSE IN DRESSMAKING
Fig. (82) Changing the position of the sleeve seam
the sleeve seam comes at the bend of the arm and can be curved to fit the arm better. On the other hand, it is a little harder to finish, as the sleeve must be made up and put in after the garment is finished.
When you have decided the placing of the seam, measure this amount from the front edge of your sleeve diagram. (See line AB> Fig. 82.) Line CD is the outer edge of the
[74]

DRAPING AND PATTERN MAKING
original sleeve and line AB the position of the new seam.
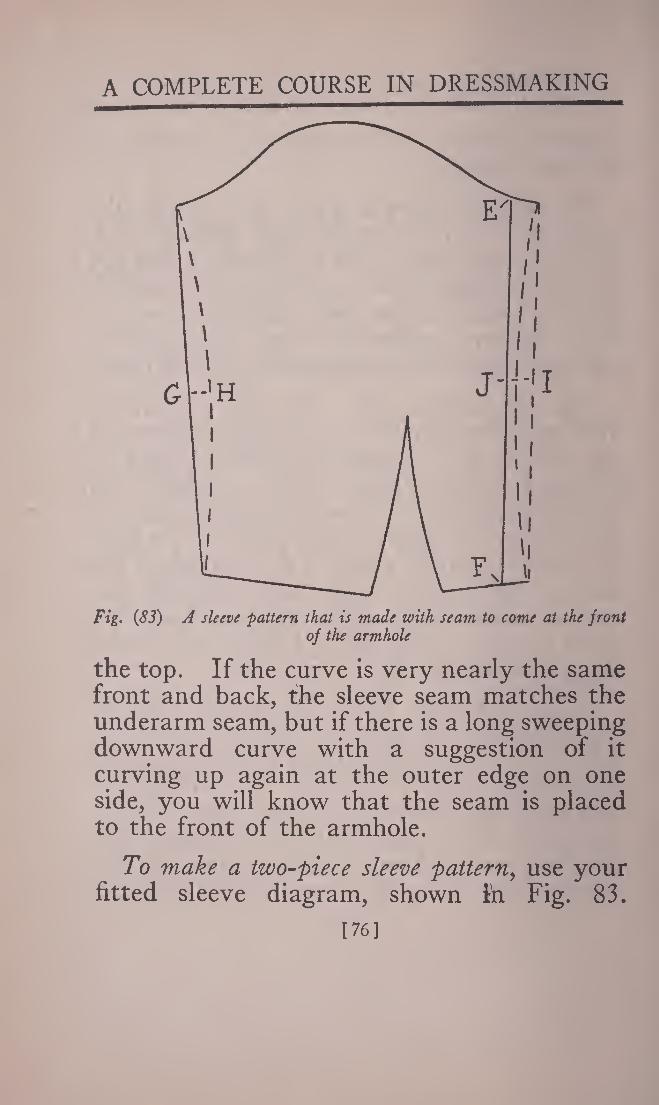
Put another piece of paper under your dia¬ gram and trace the portion AB, BD, DC, CA. Cut this piece and place it along the line EF, Fig. 82, bringing the line CD to the line EF. Mark around the new piece, and trace the new sleeve pattern, making the front edge AB and the back edge the outer edge of the added piece.
Fig. 83 shows the new sleeve pattern. Half way between the top and the bottom of the sleeve mark points as points G and J. Measure in from these points one-half inch and mark points. Curve the seams from top to bottom, touching these points. Be sure the curves exactly match on the sides of the sleeve. It is a good plan first to mark the curve on the front, trace this onto another piece of paper and use it as a guide in marking the curve on the back.
After you have made this sleeve pattern, carefully note the curve at the top. You will have an abrupt curve at the front and a long sweeping curve at the back. The curve at the back will sweep down and then slightly upward. You can tell whether a sleeve seam matches the underarm seam or goes to the front of the armhole, by noting the curve at
[75]
A COMPLETE COURSE IN DRESSMAKING
Fig. (83) A sleeve pattern that is made with seam to come at the front of the armhole
the top. If the curve is very nearly the same front and back, the sleeve seam matches the underarm seam, but if there is a long sweeping downward curve with a suggestion of it curving up again at the outer edge on one side, you will know that the seam is placed to the front of the armhole.
To make a two-piece sleeve patterny use your fitted sleeve diagram, shown In Fig. 83.
[76]

DRAPING AND PATTERN MAKING
Draw a line center way between the top and the bottom of the sleeve, that is, from point G to J. Then draw a line at right angle to this line, touching the top of the dart. Con¬ tinue the line to the top of the sleeve. Curve a line from the top of the dart that will blend and continue the front edge of the dart. (See line CDA, Fig. 84.) Also, curve a line that will continue the back edge of the dart as line CBA, Fig. 84. Put another piece of
[77]

A COMPLETE COURSE IN DRESSMAKING
paper under the diagram and trace the pattern for the front sleeve. This will be around the front, outer edge and along the line CDA to the bottom of the front of the dart. Remove the paper and allow seams at all edges in cutting out the pattern.
Put another piece of paper under the dia¬ gram and trace the back pattern, marking along the back outer lines and across line CBA and the back of the dart.
These patterns will give you block founda¬ tions for copying any sleeve design you happen to run across.
Changing the Size of a Pattern: Don’t try to make a pattern larger by adding to it at all points. You will really make it smaller, you know, in some places—for instance, the armhole and the neck. Don’t try to work with the seams on the pattern, either. They are confusing.
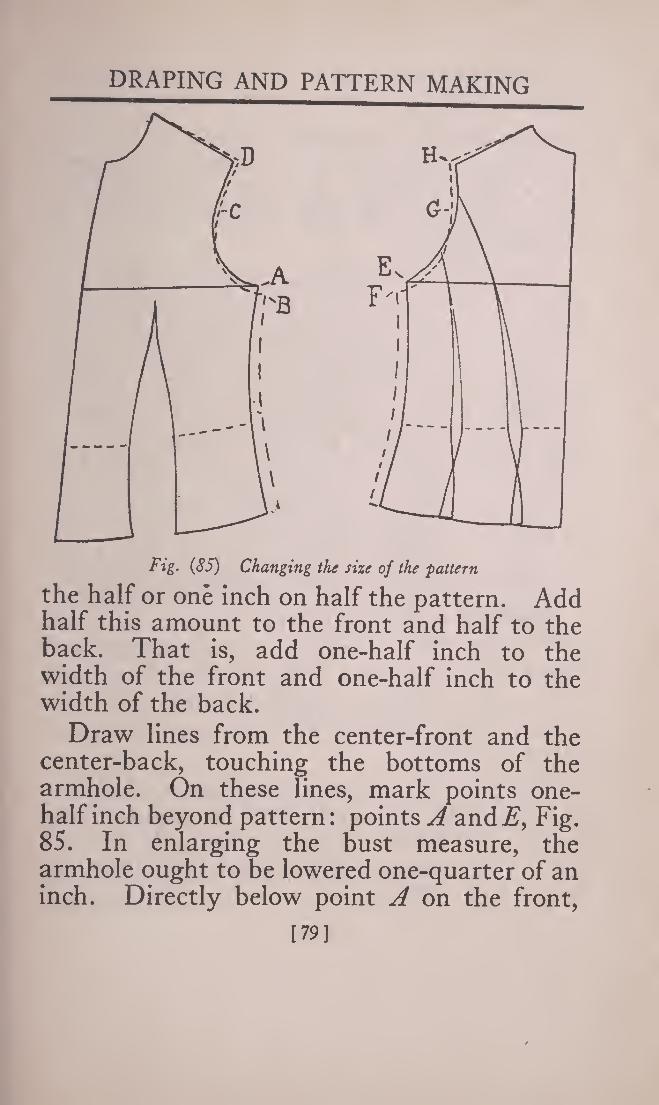
Fig. 85 shows a block lining pattern which is enlarged at the chest, across the back, the bust and the armhole.
Suppose you want to enlarge the bust two inches, making a thirty-six pattern measure thirty-eight inches around the bust. This means that you must add half that amount on
[78]
DRAPING AND PATTERN MAKING
Fig. (85) Changing the size of the pattern
the half or one inch on half the pattern. Add half this amount to the front and half to the back. That is, add one-half inch to the width of the front and one-half inch to the width of the back.
Draw lines from the center-front and the center-back, touching the bottoms of the armhole. On these lines, mark points one- half inch beyond pattern: points A andE, Fig. 85. In enlarging the bust measure, the armhole ought to be lowered one-quarter of an inch. Directly below point A on the front,
[79]

A COMPLETE COURSE IN DRESSMAKING
mark point B and directly below point E on the back, mark point F. Draw lines from these last points to the lower edge, keeping them one-half inch from the outer edges of the old pattern.
The shoulder ought to be lengthened one- quarter of an inch and the chest made one- quarter of an inch wider. Measure one- quarter inch from the outer edge of the shoulder, not continuing the slope of the shoulder but at right angles to the center- front line of the pattern. Draw a new shoulder line from the neck to this new point.
Half way down the armhole, mark a point one-quarter inch from the armhole. Re¬ curve the armholes touching this last point and the new point at the underarm seams.
Making a Coat Pattern: You can use your lining block to make a coat pattern but make it two inches larger in the bust and lower the armhole as shown in Fig. 85. As a coat is put on over the other garments, it must be larger.
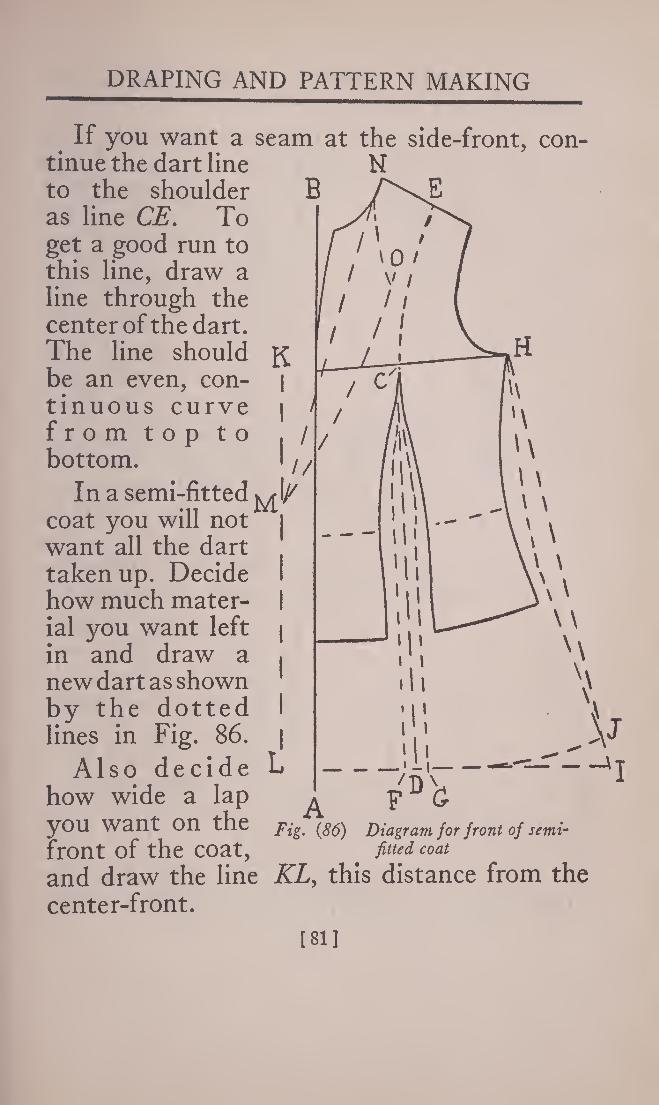
Fig. 86 shows the diagram for the front of a semi-fitted, suit coat. Mark around your block pattern, as described in making the other diagrams, continuing your center-front line. Line AB is the center-front in Fig. 86.
[80]
DRAPING AND PATTERN MAKING
If you want a seam at the side-front, con¬ tinue the dart line to the shoulder as line CE. To get a good run to this line, draw a line through the center of the dart. The line should be an even, con¬ tinuous curve from top to bottom.
In a semi-fitted coat you will not want all the dart taken up. Decide how much mater¬ ial you want left in and draw a new dart as shown by the dotted lines in Fig. 86.
Also decide how wide a lap you want on the front of the coat, and draw the line center-front.
Fig. (86) Diagram for front of semi- fitted coat
KL, this distance from the
[811

A COMPLETE COURSE IN DRESSMAKING
The next consideration is the neck. On the center-front line, mark the point where you want the fronts to cross and draw a line from this point to the neck. Continue it to the outer line. (See line NM, Fig. 86.) Draw the lapel in the exact position that you want the finished lapel to lie. (See line NOM.) Determine the length you want the coat, as described in making the over¬ blouse pattern and draw a line at right angle to the center- front line at this point. Also mark the width and draw a new underarm line.
Fig. {87) Diagram for back of semi-fitted coat
Use your lining back to make the diagram. (See Fig. 87.) Mark a point on the shoulder
[82]

DRAPING AND PATTERN MAKING
seam to match the point E on the front. Mark the point that you want the seam at the bottom and draw a line as lineFG, Fig. 87. Bring the back diagram to the front, matching the shoulder seams and see if the side-front and side-back seams blend properly at the shoulder. They ought not to make an abrupt angle where they meet. It may be necessary to curve the back seam a little.
At the waistline, take out a small dart. Mark the back length and the width and draw a new underarm line. Bring the front and back diagrams together to mark the line of the lower edge. Curve the underarm seam at the waistline about one-half inch. Draw the curve on the front first, then use this as a guide in duplicating the curve on the back.
To make the collar pattern, draw the front part of the collar on the front diagram. (See Fig. 88.) Trace this portion of the collar on another piece of paper.
Draw a straight line as line 1—2, Fig. 89, and then draw another line as line 3—4, Fig. 89, placing them, the width of the collar at the shoulder, apart—that is, the distance apart that A is from B in Fig. 88. Draw a line at right angle to them across one
[83]

A COMPLETE COURSE IN DRESSMAKING
end. This will be the center-back of the collar.
The regulation notch collar has a stand or crescent shaped portion that comes at the
back of the neck. Decide how high you want this and measure one-half this amount on either side of the line 1—2, drawing lines from these points at right angles to the center-back line, as
1 \ lines 6 and 7. From \ these lines, curve lines
^ to line 1—2 making the lower line equal the measurement at the back of the neck on the coat pattern. This portion will sew
Fig. (88) The lapel and flip nppL of* 1"Lp mat collar drawn on the tC> Tne OI tne COat pattern across the back.
Where these lines meet at point 5, draw a line at right angle to the line 1—2. Now place the portion of the front of the collar that you traced from the coat diagram, Fig. 88, on this pattern, bring¬ ing the shoulder edge AB to the line 5 on the
[84]

DRAPING AND PATTERN MAKING
1 1 1
\
1 1
I 1
| l /'
»\ /l /
NV i /
\ f / :!
A n 1 1
if* \ \
\ \
\ \ \ ,3(
t > D
diagram. Mark around it. This gives you the portion ABCDy which is the front of the finished collar.
Decide how wide you want the portion of the collar in the back that turns over and measure this amount on the center-back line from line 6, marking point 8. From point 8 curve a line to blend into the front of the collar.
In tracing the collar pattern, mark along linesCS—8, from 8 across line 8—3—1 to line 7, from here to point 5 and from point 5 to D and across to C. Allow seams at all except the center- back edge.
To complete the lapel on the front of the pat¬ tern, trace the lapel portion, Fig. 86, that is, portion NOM. Cut out this piece and lay it on the original diagram, keeping the line NM in the cut-out piece along the line NM in the original diagram. Mark around
185]
Fig. {89) Collar pattern

A COMPLETE COURSE IN DRESSMAKING
the piece. (See Fig. 90.) Here line AB corresponds to line MN in Fig. 86.
J3
In tracing the pattern for the front piece, mark along the outer edge of this new lapel. First trace the front piece
onto another piece of paper, allow seams at Fig. (91) Making a pattern for
all edges and cut it out. the facing
Then, trace the side-front section. Here, too, allow seams at all edges. In tracing the
[86]

DRAPING AND PATTERN MAKING
back sections, allow seams on all edges of the side-back, but the center-back edge will be placed on a fold in cutting.
Usually coats have cloth facings at the front. On your original diagram, mark where you want the facing to come. See line AB, Fig. 91. Put a piece of paper under the diagram and trace this pattern.
[87]

A COMPLETE COURSE IN DRESSMAKING
Fig. (93) A semi-fitted coat is always in good style
To make the coat sleeve, use your two-piece sleeve block, making sure that it will fit the armhole. Allow extensions at the back for a vent as shown in Fig. 92.
Fig. 93 shows the coat finished.
[88]
DRAPING AND PATTERN MAKING
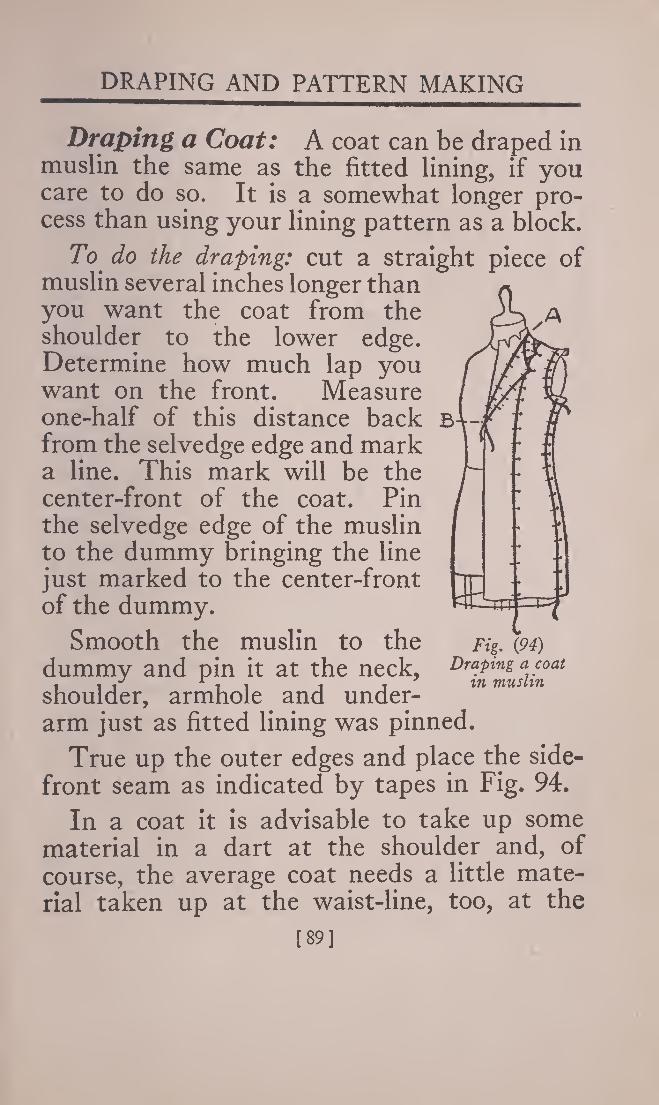
Draping a Coat: A coat can be draped in muslin the same as the fitted lining, if you care to do so. It is a somewhat longer pro¬ cess than using your lining pattern as a block.
To do the draping: cut a straight piece of muslin several inches longer than you want the coat from the shoulder to the lower edge. Determine how much lap you want on the front. Measure one-half of this distance back from the selvedge edge and mark a line. This mark will be the center-front of the coat. Pin the selvedge edge of the muslin to the dummy bringing the line just marked to the center-front of the dummy.
Smooth the muslin to the dummy and pin it at the neck, shoulder, armhole and under¬ arm just as fitted lining was pinned.
True up the outer edges and place the side- front seam as indicated by tapes in Fig. 94.
In a coat it is advisable to take up some material in a dart at the shoulder and, of course, the average coat needs a little mate¬ rial taken up at the waist-line, too, at the
[89]

A COMPLETE COURSE IN DRESSMAKING
Fig. (95) Diagram for a top coat pattern
side-front, as described in making the fit- t e d lining. Both these darts are taken up along the line where the side-front seam will come.
The back of acoat is draped in the same way, the under¬ arm and shoul¬ der seams being matched with the front. Here, too, the curve of the armhole must be continuous with the curve of the front armhole.
Fig. 94 also shows the marking with tape for the
[90]

DRAPING AND PATTERN MAKING
collar and revers. Place the tape along the lines where you want finished collar and revers. Mark the tape lines on the muslin before removing the muslin. When you are tracing the pattern from the muslin, trace the shape of the revers on an extra piece of paper. Cut out the revers and place this piece of paper along the neck edge of your coat pattern, trace around the outside of the revers piece adding it to the coat pattern.
Make a pattern from the muslin. Make the collar pattern as described in making the semi-fitted coat.
Making a Pattern for a Top Coat: If you are using your fitted lining as a block for a top coat, make extra allowances in the bust measure for the fullness you want in your coat. Also the armhole will need enlarging as shown in Fig. 85. Mark the length you want the coat and mark the new underarm seam, as described in making the overblouse. Also decide how much of the dart fullness you want to take out and draw the new lines for the dart.
You need not have a seam at the side-front unless you want it. You can close the dart at the bottom and throw the fullness into a shoulder dart. (See Fig. 96.) The dart will have to extend to the bust line, so that you will not make the pattern smaller through the
[91]
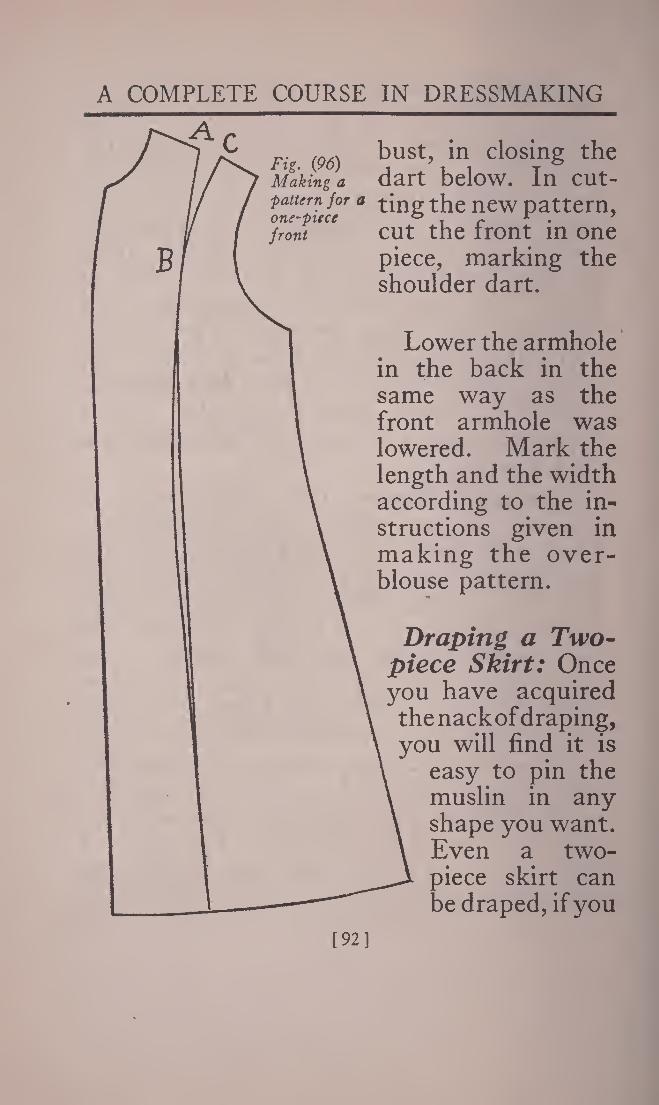
A COMPLETE COURSE IN DRESSMAKING
r. bust, in closing the Making a dart below. In cut- pattern for a ting the new pattern, front cut the front in one
piece, marking the shoulder dart.
Lower the armhole in the back in the same way as the front armhole was lowered. Mark the length and the width according to the in¬ structions given in making the over¬ blouse pattern.
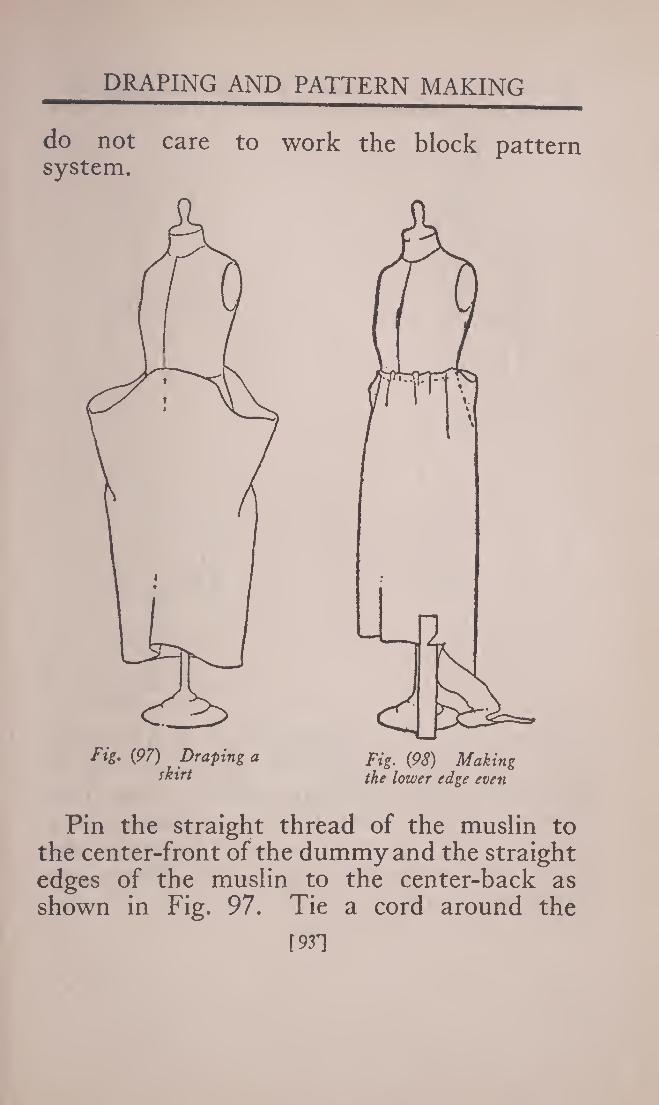
Draping a Two- piece Skirt: Once you have acquired the nackof draping, you will find it is
easy to pin the muslin in any shape you want. Even a two- piece skirt can
[92]
DRAPING AND PATTERN MAKING
do not care to work the block pattern system.
Pin the straight thread of the muslin to the center-front of the dummy and the straight edges of the muslin to the center-back as shown in Fig. 97. Tie a cord around the
[931
A COMPLETE COURSE IN DRESSMAKING
waistline, catching the top edge of the muslin under the cord. Raise or lower the top of the skirt under the cord until it hangs cor¬ rectly. Mark where the cord comes on the muslin with a soft pencil. Remove the cord and gather the top of the skirt along the pencil mark.
[94]

DRAPING AND PATTERN MAKING
Except in very sheer materials, there are usually darts taken out at the sides of the skirt. (See Fig. 98.) To even the lower edge of the skirt, cut a pasteboard guide as shown in Fig. 98.
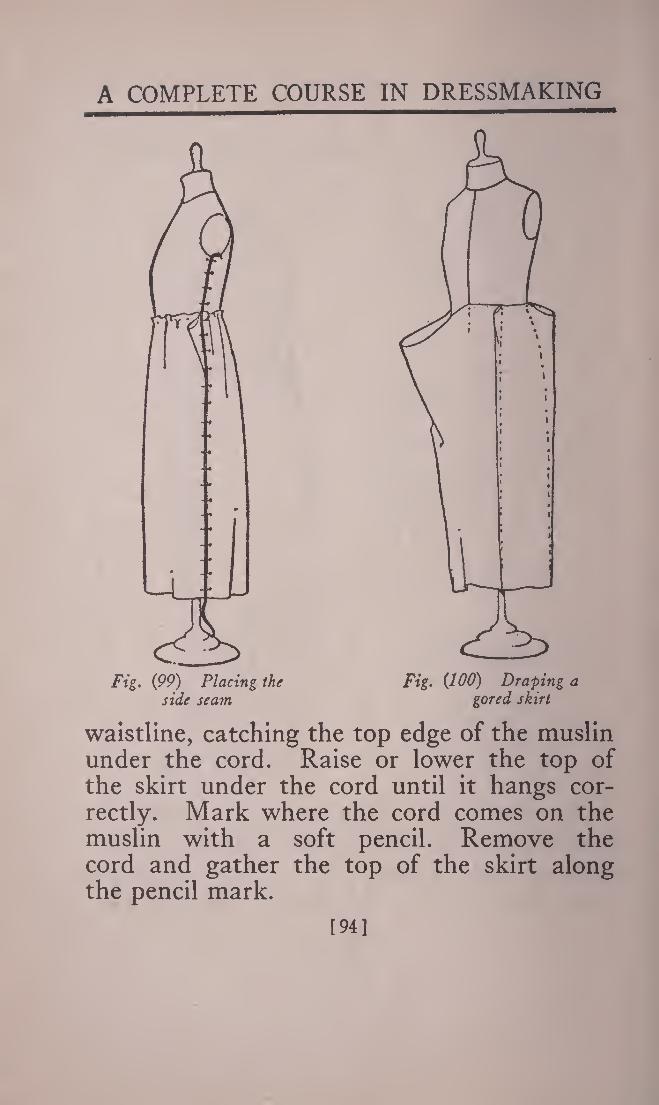
If the skirt is to have side seams, use black tape to place the seams as shown in Fig. 99. Care must be taken that the seams do not run toward the front or the back. As many seams may be added as desired and in any place desired in this way.
Draping a Gored Skirt: Working on the same principle you can drape the muslin
[95]

A COMPLETE COURSE IN DRESSMAKING
Fig. {102) The gored skirt pattern
in a gored skirt. (See Fig. 100.) In this case, decide how wide you want the skirt and cut the muslin the entire width.
Pin the straight threads along the center- front and the center-back. Take up a dart at the side-front, the side and the side-back, bringing the straight thread of the goods center way of the side-front and the side- back sections. Mark an even line at the lower edge and also mark the run of the waistline.
Making a Pattern for a Gored Skirt: After the gored skirt has been draped on the
[96]

DRAPING AND PATTERN MAKING
Fig. (103) Copying a draped skirt style
Fig. (104) Draping the back
figure, remove the muslin and open it out. Fig. 101 shows half of it. If you have marked your darts and the top and lower edges of your skirt you will have the outline of the gores as shown in Fig. 101. Put a piece of paper under the muslin and trace each gore.
[97]

A COMPLETE COURSE IN DRESSMAKING
This will give you a block skirt pattern on which to copy any style you happen to fancy.
When the edges of the pattern are brought together you will have a working diagram as Fig. 102.
Making a Draped Skirt Pattern: If you study the picture of a draped skirt carefully, you will find it is easy to duplicate in muslin. You can evolve many interesting new drapes, too.
Just in the way of example—Figs. 103 and 104 show a skirt that is plain across the front and draped in pleats at the back.
To do this, pin a straight thread of the material parallel to the center-front of the dummy. Smooth the muslin over the dummy and pin it at the waistline across the front and down about ten inches at the side. Then pin a straight thread of the material to the center-back of the dummy so that the lower edge of the skirt hangs evenly.
Lay the fullness in pleats at the waistline. (See Fig. 104.) Remember in hanging any draped skirt to pin what is to be the smooth part of the skirt to the dummy first and then fold the pleats.
Testing the Size of a Pattern: Trace your pattern onto another piece of paper.
198]

DRAPING AND PATTERN MAKING
(See Fig. 105.) Draw a line at right angle to the center-front that touches the armhole at the narrowest point. Also draw a line across the narrowest part of the back.
Fig. (.105) Diagram showing how to test the fit of a pattern
Draw another line at right angle to the center-front that will touch the bottom of the armhole. From this line, draw a line at
[99]
A COMPLETE COURSE IN DRESSMAKING
right angle to it that touches the side of the armhole. Draw corresponding lines in the back. Mark the waistline of the pattern.
To test the size of the neck, measure from C to D and from S to T. If the neck is large, fill it in until it is the right size. If it is small draw a line a trifle below the original neck line and remeasure this line.
The width of the shoulder makes a difference, too. Measure on the person the width of the shoulder and apply this measure along line D on the front and US on the back. Shorten or lengthen the shoulder, as desired.
The slope of the shoulders can be tested, too. Put a ruler under the person’s arm and pass a tape from the ruler at the front of the arm to the ruler at the back of the arm, drawing the tape tightly. Measure from point J to the top of the shoulder in the front and from the top of the shoulder in the back to Z. If the measurement on your pattern is longer than the measurement on the person, reslope the shoulder, taking off suffi¬ cient at the armhole edge to bring the pattern to the size corresponding to the measurement taken on the person. If the pattern measures less than the measurement taken on the person, add an equal amount to the top of the shoulder at the front and back.
U00]

DRAPING AND PATTERN MAKING
The width of chest and the width of hack can be compared with the pattern along lines El and XY. Use half of your width of chest measurement and half of your width of back measurement. If the person’s chest measure¬ ment is wider than the pattern, mark a point beyond the pattern on line El and reslope the armhole. Or, if you want to make the chest less, mark a line in from the original armhole on line El and reshape the armhole. The back width can be trued up in the same way.
The bust measure can be changed according to the directions given in Fig. 85.
The waistline for a tight fit should measure, between points KL, MiV, 1—2, 3—4 and 5—6, one-half the person’s waist measure. The waist measure can be added to or taken away from at the front dart, the underarm seam and the back darts. It needs only a little in each place to change it considerably. For instance, it you wanted to make the waistline one inch smaller on the half it would mean taking only one-eighth of an inch off at these edges.
The hip measure can be changed in the same way. From B to P, Q to R, 7 to. 8, 8 to 9 and 9 to 10 ought to equal half the hip measure of the person, taken just the number of inches
[101]

A COMPLETE COURSE IN DRESSMAKING
below the waistline that these lines are below the waistline on the pattern.
Practice Pattern Making: This lesson has given you the basic principles of draping and pattern making. It shows you how to make the block pattern that you have learned about in the other lessons.
Practice fitting unusual forms and figures. Copy styles from your favorite fashion maga¬ zine. The more you practice, the quicker you will be able to make the different patterns. It’s practice, too, that counts in making a good pattern. The only way that you will be able to acquire skill in drawing graceful, even curves and true lines is by doing it over and over.
If you do not want to make each pattern up, cut out the paper and pin it up. Try on this paper garment. It will show you whether you have good lines on your pattern. Re¬ member that underarm seams ought always to run perpendicular to the floor, not slant to the front or the back. The same is true of side-front and side-back seams and darts. Study the placing of each seam and see if you could have improved it.
[102]

DRAPING AND PATTERN MAKING
TEST QUESTIONS
Test your knowledge of pattern making by answering the following questions:
How can you test the outline of the neck to make sure the lines blend?
Is it possible to have a fitted back in one-piece ?
In adding tucks is it necessary to fold the tucks in the paper?
What regulates the hang of a sleeve ?
How can you tell the front from the back of a sleeve, where the sleeve seam matches the underarm seam?
How can you tell the front from the back of a sleeve, where the sleeve seam is to be placed in front of the underarm seam?
Ought a plain sleeve to be larger than the armhole ?
How can you tel! if the slope at the shoulder of a pattern is correct ?
Can a block pattern be used to make a coat pattern ?
1103]


