97361077 the book of diy solar cooker designs and recipes
DESCRIPTION
PlansTRANSCRIPT

The Book of DIYSolar Cooker Designs
and Recipes

"Minimum" Solar Box Cooker
The "Minimum" Solar Box Cooker is a solar oven that you can built quickly from two cardboard boxes.
The "Minimum" Solar Box Cooker is a simple box cooker that can be built in a few hours for very little money. When we designed this cooker, we named it the "Minimum Solar Box Cooker" because, at the time, it represented the simplest design we could devise. What we didn't communicate with that name was that this is a full-power cooker that works very well, and is in no way minimum as far as its cooking power goes.
What You Will NeedTwo cardboard boxes. We would suggest that you use an inner box that is at least 15 inch x 15 inch (38 cm x 38 cm), but bigger is better. The outer box should be larger than the small box all around, but it doesn't matter how much bigger, as long as there is a half
inch(1.5cm) or more of an airspace between the two boxes. The distance between the two boxes does not have to be equal all the way around. Also, keep in mind that it is very
easy to adjust the size of a cardboard box by cutting and gluing it. One sheet of cardboard

to make the lid. This piece must be approximately 2 to 3 inch (4 to 8 cm) larger all the way around than the top of the finished cooker (the outer box).
• One small roll of aluminum foil. • One can of flat-black spray paint (look for the words "non-toxic when dry") or
one small jar of black tempera paint. Some people have reported making their own paint out of soot mixed with wheat paste.
• At least 8 ounces (250 g) of white glue or wheat paste. • One Reynolds Oven Cooking Bag®. These are available in almost all
supermarkets in the U.S. and they can be mail-ordered from Solar Cookers International. They are rated for 400 °F (204 °C) so they are perfect for solar cooking. They are not UV-resistant; thus they will become more brittle and opaque over time and may need to be replaced periodically. A sheet of glass can also be used, but this is more expensive and fragile, and doesn't offer that much better cooking except on windy days.
Building the Base
Fold the top flaps closed on the outer box and set the inner box on top and trace a line around it onto the top of the outer box, Remove the inner box and cut along this line to form a hole in the top of the outer box (Figure 1).
Decide how deep you want your oven to be. It should be about 1 inch (2.5 cm) deeper than your largest pot and about 1" shorter than the outer box so that there will be a space between the bottoms of the boxes once the cooker is assembled. Using a knife, slit the corners of the inner box down to that height. Fold each side down forming extended flaps (Figure 2). Folding is smoother if you first draw a firm line from the end of one cut to the other where the folds are to go.

Glue aluminum foil to the inside of both boxes and also to the inside of the remaining top flaps of the outer box. Don't bother being neat on the outer box, since it will never be seen, nor will it experience any wear. The inner box will be visible even after assembly, so if it matters to you, you might want to take more time here. Glue the top flaps closed on the outer box.
Place some wads of crumpled newspaper into the outer box so that when you set the inner box down inside the hole in the outer box, the flaps on the inner box just touch the top of the outer box (Figure 3). Glue these flaps onto the top of the outer box. Trim the excess flap length to be even with the perimeter of the outer box.
Finally, to make the drip pan, cut a piece of cardboard, the same size as the bottom of the interior of the oven and apply foil to one side. Paint this foiled side black and allow it to dry. Put this in the oven so that it rests on the bottom of the inner box (black side up), and place your pots on it when cooking. The base is now finished.
Building the Removable Lid
Take the large sheet of cardboard and lay it on top of the base. Trace its outline and then cut and fold down the edges to form a lip of about 3" (7.5cm). Fold the corner flaps

around and glue to the side lid flaps. (Figure 4). Orient the corrugations so that they go from left to right as you face the oven so that later the prop may be inserted into the corrugations (Figure 6). One trick you can use to make the lid fit well is to lay the pencil or pen against the side of the box when marking (Figure 5). Don't glue this lid to the box; you'll need to remove it to move pots in and out of the oven.
To make the reflector flap, draw a line on the lid, forming a rectangle the same size as the oven opening. Cut around three sides and fold the resulting flap up forming the reflector (Figure 6). Foil this flap on the inside.
To make a prop bend a 12" (30cm) piece of hanger wire as indicated in Figure 6. This can then be inserted into the corrugations as shown.
Next, turn the lid upside-down and glue the oven bag (or other glazing material) in place. We have had great success using the turkey size oven bag (19" x 23 1/2", 47.5cm x 58.5cm) applied as is, i.e., without opening it up. This makes a double layer of plastic. The two layers tend to separate from each other to form an airspace as the oven cooks. When using this method, it is important to also glue the bag closed on its open end. This stops water vapor from entering the bag and condensing. Alternately you can cut any size oven bag open to form a flat sheet large enough to cover the oven opening.
Improving Efficiency

The oven you have built should cook fine during most of the solar season. If you would like to improve the efficiency to be able to cook on more marginal days, you can modify
your oven in any or all of the following ways: • Make pieces of foiled cardboard the same size as the oven sides and place these in
the wall spaces. • Make a new reflector the size of the entire lid (see photo above). • Make the drip pan using sheet metal, such as aluminum flashing. Paint this black
and elevate this off the bottom of the oven slightly with small cardboard strips.
Easy Lid Cooker

The Easy Lid cooker is a variation of the Minimum Solar Box Cooker. In this design half of the larger cardboard box is used to form the lid. This innovation was first
conceived of by Chao Tan and then refined by Tom Sponheim Although designs for cardboard cookers have gotten simpler, fitting a lid can still be difficult and time consuming. In this version, a lid is formed automatically from the outer box.
Making the Base
Take a large box and cut it in half as shown in Figure 1. Set one half aside to be used for the lid. The other half becomes the base.
Fold an extra cardboard piece so that it forms a liner around the inside of the base (see Figure 2).
Use the lid piece as shown in Figure 3 to mark a line around the liner.
Cut along this line, leaving the four tabs as shown in Figure 4.

Glue aluminum foil to the inside of the liner and to the bottom of the outer box inside. Set a smaller (inner) box into the opening formed by the liner until the flaps of the smaller box are horizontal and flush with the top of the liner (see Figure 5). Place some wads of newspaper between the two boxes for support.
Mark the underside of the flaps of the smaller box using the liner as a guide. Fold these flaps down to fit down around the top of the liner and tuck them into the space between the base and the liner (see Figure 6). Fold the tabs over and tuck them under the flaps of the inner box so that they obstruct the holes in the four corners (see Figure 6).

Now glue these pieces together in their present configuration. As the glue is drying, line the inside of the inner box with aluminum foil.
Finishing the Lid
Measure the width of the walls of the base and use these measurements to calculate where to make the cuts that form the reflector in Figure 7. Only cut on three sides. The
reflector is folded up using the fourth side as a hinge. Glue an oven cooking bag or glass in place on the underside of the lid. If you are using glass, sandwich the glass using extra
strips of cardboard. Allow to dry.

Bend the ends of the wire as shown in Figure 7 and insert these into the corrugations on the lid and on the reflector to prop open the latter. Paint the sheet metal (or cardboard) piece black and place it into the inside of the oven.
Improving Efficiency
Glue thin strips of cardboard underneath the sheet metal (or cardboard) piece to elevate it off of the bottom of the oven slightly. Cut off the reflector and replace it with one that is as large as (or larger than) the entire lid. This reflects light into the oven more reliably. Turn the oven over and open the bottom flaps. Place one foiled cardboard panel into each airspace to divide each into two spaces. The foiled side should face the center of the oven.
Making and usinga solar cooker
Solar cooking is a delightful alternative to conventional cooking methods. The solar cookers available today really work and they deserve serious evaluation by a much larger audience. For 40 years, small groups of people have been using and refining some very good designs. But these designs have, for the most part, gone unnoticed even by those involved with alternative energy. With such a lack of support, you’d think they would have vanished from view long ago. But they haven’t.
The people who have taken the time to integrate solar cooking into their lives find the motivation to keep refining the designs comes from the tools themselves: solar-cooked foods taste delicious and the ovens are fun and easy to use.
My own involvement with solar cooking began in the mid-seventies. I found myself drawn to the alternative energy movement. Those were idealistic and innocent times, but they were also serious and important times.
With the collectors back and the glass removed, it's easy to get at
the cooked food.

Started as a hobby
It was during those days that I saw my first solar cooker and began the hobby that led to the cooker described in this article. I started out building the most efficient styles I could come up with. Later, while keeping this efficiency, I strove to simplify the building process, the materials needed, and the actual use of the cooker. The cooker is now basically cardboard, aluminum foil, and glass. Yet, because of the design, it is remarkably efficient and durable.
It looks so simple now, but you should realize that this simplicity took years of effort and many accidental
breakthroughs. The testing for this cooker is now complete.
What I have included here is a very good starter model that can lead you and your family to a lifetime of enjoyment without threatening your pocketbook. A solar cooker can easily be built for under $10.
Gathering materials
The first step involves a search for cardboard boxes in your local grocery and department stores. For the oven box, you are looking for two particular boxes. These can be rectangular (easier to find) or square (their collectors work better). The smaller of the two boxes becomes the inner box, so it defines the cooking area and the power of the cooker. For a medium size cooker, the area of opening of the inner box (length times width) should equal 120 to 160 square inches, and it should be 9 to 12 inches deep. The larger box, the outer one, must be two to three inches larger in all directions.
The oven box
For collectors, find four flat pieces of regular (not double strength) cardboard from appliance or bicycle stores. These should be about two feet by three feet. And gather five to seven more boxes which you will cut up for insulation.
Other things to gather:
1. Eight ounces of white paper glue (such
The top of the inner box must rest one inch lower than the top rim of the outer box
Side view of the solar cooker in action
A solar-cooked meal of rice, tomato sauce and winter squash.
The solar cooker aimed at the sun.

as Elmer’s™). 2. One small roll of 18" wide heavy duty aluminum kitchen foil. 3. A piece of double strength glass ½" larger than the length and width of the inner box
(about $2 to $3 at a glass store). Buff the edges of the glass by rubbing a rock or metal over them, so they’re not dangerously sharp.
4. A small amount of flat black paint. 5. (For square oven only:) One yard of elastic band material, say 3/8" wide, from a
sewing store. 6. A baking tin that fits in the inner box, preferably one that puts a slight pressure on the
sidewalls, to form a rack. 7. Some cotton cloth from recycled clothes. 8. Some string.
Take the outer box and cut up cardboard pieces to fit in the bottom (cut the cardboard with a mat knife, being careful not to cut yourself). Make these layers thick enough so that, when the inner box is placed in the outer box, the top rim of the inner box is one inch lower than the top rim of the outer box.
The outer box must have two opposite flaps left sticking out. Tuck the other two between the inner and outer boxes. The inner box must have all of its top flaps bent out and all the way back so that they fit between the inner and outer boxes.
Now cut more pieces of cardboard to stuff between the inner and outer boxes until the inner box is wedged tightly. Doubled-over pieces look nicer.
The tops of these filler insulation pieces must be arranged so that, when the glass rests on the top rim of the inner box, it makes a good seal. (That is, you don’t want big gaps where the heated air will escape.) Also, it must be easy to slip a finger under the glass for easy removal. In use, the cooker will be tilted toward the sun. Therefore, the sidewall, which will be lower when it’s tilted, must be arranged so it will
support the glass in position.
Now paint the inside black. Optionally, you may cut handholds in the outer box and squirt glue under the cuts to keep them from tearing out.
Note for later: The box will smoke slightly during the first couple of times it is heated up, but this is just a curing process. Also, cardboard shrinks slightly when heated, so you will have to repack later to keep the inner box tight.
The collectors
Here's the pattern for the collectors.
The dimensions will depend on the dimensions of your box.
Loaves of solar-baked bread

Draw the collectors, as shown, on the four flat pieces of cardboard. A square cooker will have all four collectors the same size, while a rectangular cooker will have two sizes, based on the length and width of the glass. The 67° angle can be found using a protractor, or by folding a piece of paper like an airplane, as shown in the diagram.
Cut out all four collectors. Then take a tool with a blunt point and crease a line along the dotted lines. Bend in on the crease lines. Next, bend the upper and lower flaps all the way over and glue them down. Press with weights until the glue dries.
Gluing aluminum foil to the collectors
Roll foil over the collectors, and rub your finger over the side flap bends to show where to cut. Cut the foil so that it does not quite reach these bends; it will be easier to center later. Do not cover the side flaps.
Smear a glue mixture (two parts water, one part white glue) over the dull side of the foil, using a piece of cloth and two to three tablespoons of glue mix. Line up the collector and lower it onto the foil, tap it lightly, and turn it over. Apply the foil to the side of the collector that is not glued to the bent-over upper and lower flaps. Being a little off center is okay, but if it’s off too much, peel off the foil and try again. Press on the edges of the foil and pull out large wrinkles. Take a clean cloth and rub outward on the foil to smooth it.
Connecting the collectors
Leave two of the flaps on the outer box out, so you can tie the collectors to them when it's windy.
Arrange the filler pieces so the g lass rests on the top rim of the
inner box, and so you can slip a finger under the glass to remove it.

For a rectangular cooker, set collectors out as they will fit on the box and glue the side flaps together on two opposite corners. When the glue has dried, poke holes in the side flaps on the other two corners, placing holes near the cardboard bend, and tie these corners together with a cotton cord. When it comes time later to fold the collectors flat and pack them away, the rectangular collectors will be untied and separated into two sets of paired collectors.
For a square cooker, glue two opposite sets of side flaps together, as below. Then lay them out as they will fit on the oven box. Cut off the side flaps from one of the unattached corners. Connect this corner by laying these two collectors next to each other (about ¼" apart), with the foil sides down. Now cut a cloth about 18" x 4" and glue it over this corner, as shown. When the glue is dry, fold inward on this cloth hinge and arrange the collectors so that the unattached side flaps are on the outside and line up with each other. Poke holes near the bends of the side flaps, and tie the two segments tightly together with elastic material. This will allow these corners to separate slightly when the collectors are folded flat, but pulls the corners together when unfolded.
The slip-in piece
A slip-in piece made from cardboard and cloth is attached to the upper collector. This slips between the cardboard filler pieces of the upper sidewall for quick attachment of the collectors to the oven box.
To make it, cut a piece of cardboard 16" one way and the length of the glass the other way. Crease two lines and bend as shown. Then cut a piece of cloth six inches one way and the length of the glass the other way, and glue three inches of the cloth inside the folded cardboard (leave three inches outside), as shown. Next, glue the cloth that was left out to the upper collector (glue it to the doubled-over lower flap of the collector). On square collectors, this would be to the right of the cloth hinge
Finishing up, setting up
The rack: A dark baking tin is used for a rack to hold food and catch boil-over. It’s nice if the rack puts a slight pressure on the sidewalls, for
stability. If the baking tin has handholds, these may be bent for a better fit. You can also build a rack from wood, or by bending sheet metal. The glass: Check again to see that it rests on the top rim of the inner box with no large air gap. The glass will become hot, so handle it by the edges or use a cloth. Keep the glass clean. Remember to buff the edges so they’re not sharp.
Connect the collector panels with glue and with laces.
You can find the 67° angle by folding a piece of paper as shown here.

Propping the oven toward the sun: Use rocks or other objects in front and back. If you use only one, the wind easily tips the cooker.
Aiming: Use shadows created by the cooker to orient it; don’t look at the sun. Approach the cooker from behind, checking shadows on the sides for east/west adjustments. Touch the oven box and see where the shadow line from the collectors crosses your arm for up/down adjustments. Aim the cooker in front of the sun’s path.
Wind: Poke holes in the flaps left out of the oven box and also in the collectors on the top and bottom. Tie collectors to flaps with cotton cord.
To make a cloth hinge for the collectors: First, cut off the side
flaps from one corner.
Next, glue the cloth to the panels
Cooking
Jars: Boil and steam food in recycled jars, half-gallon or smaller in size. Painting them black will reduce cooking time, but leave a clear strip to see food by using tape when painting.
When cooking, don’t overfill jars with beans and grains, as these foods expand. You can poke a hole in the lid or leave it on loose to avoid pressure buildup. If food is actively boiling, open jars slowly to release any built-up pressure. I’ve never broken a jar because of pressure buildup. If a lid sticks, tap around the edge, or pry up under it, to release any vacuum pressure. It should then open easily.
Making the slip-in piece
The side flaps are glued together with the foil sides facing each
other.

Hinged collector panels in the folded position
Attach the slip-in piece to the upper collector
Learn to cook with more than one jar at a time. Start with the longest-cooking food, and when it is boiling, add more jars. Learn which foods (grains, potatoes, squash, lentils, etc.)—and what quantities of them— you can cook in one pass, so you can cook when you are gone all day. Learn cooking patterns that fit your lifestyle.
Beans: Use 2¼ cups of water for 1 cup of beans. If you boil them actively over a long time, add more water. Pintos take the longest.
Grains: Most grains cook better if you preheat the water in the solar cooker for an hour or so. Use a two-to-one water-to-grains ratio. Long grain rice can be put in the cooker in cold water.
Vegetables: These cook in jars with little or no water, or they can be added to beans and grains. Potatoes and sweet potatoes cook well on the rack, if lightly oiled. Otherwise, put them in jars. Winter squash cooks in its own skin. Corn on the cob steam-bakes in its own sheath.
Bread: Bread cooks best in dark, one-pound coffee cans. Oil the cans. Let dough rise in the cooker without collectors attached, then add the collectors when you’re ready to bake. Bread shrinks, so it will come out of the cans with a gentle tapping when it’s done.
Pizza and pies: Bake the crust first.
Etc.: Try jams, cinnamon rolls, cake, corn bread, cookies, and other munchies, as well.
When the food is cooked, you can fold the collectors down over the glass. This provides good insulation, so the food stays hot until you are ready to eat.
A Simple Solar Water PasteurizerDrinking water can be easily pasteurized using solar energy and a few simple materials. When water or milk is pasteurized the common disease-causing organisms are killed.

What you will need• A cardboard box or other container such as a basket or wooden box. Container
materials must have basic heat retaining qualities. Bricks and metal containers do not work well unless they are insulated.
• Aluminum foil to line the inside of the box and the flaps. While it is possible to pasteurize a small amount of water without aluminum foil, its use appreciably improves performance.
• A dark colored solar absorber plate made of sheet metal, cardboard, or wood. Metal works best to conduct the heat to the water containers.
• A solar "window" made of glass or plastic film over the top of the box.

• A reflector to bounce in additional sunlight. • Dark or clear containers to hold water or food (since you can cook in this oven as
well).
To pasteurize water, heat it in the solar box to at least 65 degrees C (150 F) and keep the water at that temperature or above for at least 30 minutes. If no thermometer is available, heat until bubbles are rising from the bottom steadily. Natural waxes, such as beeswax, can be used to indicate pasteurization temperature.
Solar conditions, weather conditions, latitude and box efficiency are all variables that affect the ability of solar boxes to pasteurize water. As a general guideline, 4 liters (~1 gallon) of water can be pasteurized in about 3 hours on a day with strong sunlight and the sun high in the sky. The plastic- or glass-covered opening should be at least 45 x 60 cm (18" x 24") and have a depth just taller than the water containers inside. Larger boxes can pasteurize more water, smaller less.
Pasteurization kills germs and disease-carrying organisms in drinking water including bacteria, rotaviruses, enteroviruses, and cysts commonly transmitted in contaminated water. Pasteurized water is not sterilized, however, and therefore should not be used for medical procedures. Pasteurization does not remove chemical contamination such as pesticides or industrial wastes.

SunPan
The "SunPan" was specifically designed to be built in any country with local materials and hand tools, a home-town solar cooker. This solar cooker can be mass produced.
It is light weight for moving, easy to store, easy to clean, user friendly and stacks for shipping. The material cost for the unit and six pans (rectangular pots) is less than $10.00. Materials can be purchased with local currency and minimum capital is required to start a business. The unit should be profitable for a manufacturer and its distributors. Local NGO's, service organizations, religious groups and the government are needed to assist in the verbal promotion and demonstrations so necessary in rural areas. The key to the "SunPan" is scrap aluminum lithograph plates. Every government printing office, printer and newspaper uses these plates. The cost of printing plates for one solar cooker is approximately $2.00. (about $1.25 per kilogram). These printing plates are used for the outer case, the interior and the reflectors. The printing plates are cut to size and attached to a rectangular wood frame, 385 mm x 960 mm; insulation is 30 mm of scrap textile ends, rug, carpet, blanket or natural fibers (wool, jute, etc.), mineral wool, Fiberglas, etc.; and the solar window is a 370 mm x 955 mm glass or plastic sheet (or film). It is recommended that the frame and printing plates be screwed together.

Approximately 2,400 square centimeters of scrap aluminum plate will make one 20 cm x 27.5 cm x 5.5 cm pan, with cover. The material cost is less than $0.30 per pan! The aluminum printing plate is relatively hard. Therefore, all bends should have a radius-- rebending can cause the metal edges to crack.
The drawings are based on a Heidelberg #102 printing plate, 770mm x 1030mm which is a common printing plate (3 plates per cooker). Another common printing plate is 610mm x 740mm; (five of these plates could make a cooker and six pans). Newspapers commonly use a 380mm x 630mm aluminum plate; (ten of these plates would make a cooker and six pans). The scrap value of aluminum used in the solar cooker and pans is approximately $2.00 to $2.50 whether 3 large plates, 5 smaller plates or 10 newspaper printing plates.
This unit should be used as a guide to build your unit with the aluminum plates available in your country. The size of plate will dictate the size of the cooker. You could find that a smaller or larger unit is more economical. Also the available glass or plastic could determine the size and shape of the unit. The area of the solar window and reflector will determine the amount of food that can be cooked. When the solar energy is 4kw/sq.meter or more, a window and reflector of 0.1sq. meter width can cook 1 to 2 kg of grains, meat, vegetables, etc. A reflector that adjusts to the angle of the sun will improve performance.

The Tire CookerThis solar cooker has been designed by Suresh Vaidyarajan - an architect, who has found a simple solution for a tough problem. For the last one year he has been cooking his food in this solar cooker. This is the simplest solar cooker I have ever seen.
1. There is a tremendous shortage of wood, kerosene and fuel for cooking. But can we not use the tremendous heat of the sun to cook food?
2. Take an old car tube. If the tube is punctured get it patched. Inflate the tube and keep it on a wooden board.
3. Take an aluminum cooking vessel with a lid. Paint it black from the outside. Put all the ingredients for cooking Khichdi - rice, daal, salt, water etc. in the cooking pot.
4. Place the cooking vessel inside the tube. Cover the tube with a piece of plain glass. Within three hours the Khichdi will get cooked.

5. What happens? The place in the well of the tube is like a closed cavity. Air neither go out nor come in. The rays of the sun enter the glass and get trapped. Slowly, the temperature of the cooking vessel rises and the Khichdi gets cooked.
The Inclined Box-Type Solar Cooker – A New Design
Several types of solar cooker have been described in different books and literatures. In the present investigation a highly efficient inclined box solar cooker is designed and fabricated Details constructional feature of the cooker are described. The test results

obtained so far are encouraging. The proposed cooker can readily be put into use at its present state.
IntroductionSolar cooker available, generally fall under two categories. One is box type and the other is parabolic reflector focusing type .The cooking ability of existing box type simple solar cooker is seems to be not satisfactory in comparison to the cost involved. .Parabolic reflector focusing type cooker needs frequent adjustment to track the apparent motion of the sun .For these reasons this type of parabolic reflector solar cooker is not much popular.
In the proposed box type cooker beam radiation is always perpendicularly accessible for its adjustable inclined position and for convenient implementation of two reflectors the cooking time is remarkably reduced than that of a usual box type cooker. The cost of cooker is however, slightly higher than usual box type but it can be considered reasonable in respect to its improved performance.
Detailed Constructional FeaturesThe detailed
constructional feature of the cooker is shown in Fig-1.The cooker box consists of a top open black painted inner box kept inside of the another box and the space between the
two boxes is filled with glass wool insulation. The upside of this cooker box is covered by two layers of transparent glass keeping a gap in between and the supporting frame of the cover is hinged with cooker box for keeping glass cover in inclined position to handle the cooking pots. So the cooker box is similar to conventional box type cooker, but the shape of the box is different from common type. The length of the box in presently proposed type is at about three times of its width and depth is equal to the width.
The cooker is to be placed facing sun, keeping longer side vertically inclined position and the inclination of the cooker box can easily be changed from 15 degree to 45 degrees with respect to the ground by the adjustable stand, attached at the back side of the box.
Two mirror reflectors are used in this cooker, however even up to four reflectors can be conveniently arranged in this box type cooker (provided the reflectors are light weight). The reflectors are set along the length of the cooker box cover, one in each side, by hinge and holding strip. So length of reflectors are equal to the length of the glass cover .The widths are equal to the width of the glass cover .When the cooker is in use, each reflector is kept at the inclination of about 115 degree with the face of the box cover .In this position the reflections from the top edge of the reflectors touch the outer longitudinal edge of cover glass when the cooker is placed in perpendicular direction to the solar rays .If four reflectors are used then other two reflectors are to be hinged at the top of the inner reflectors, one in each side at an angle of nearly 15 degree with the inner one All the reflectors can be folded for keeping on the top of the cooker box cover when not in use. The face of the cooker is to be placed perpendicular to beam radiation to collect the maximum energy. This perpendicular position can be easily achieved simply by the rotation of the cooker towards the sun with the help of caster wheels ,suitably attached at the bottom side of the cooker and by changing the inclination of the cooker by adjustable stand of the back side .But the position of the reflectors remain unchanged throughout the working period.
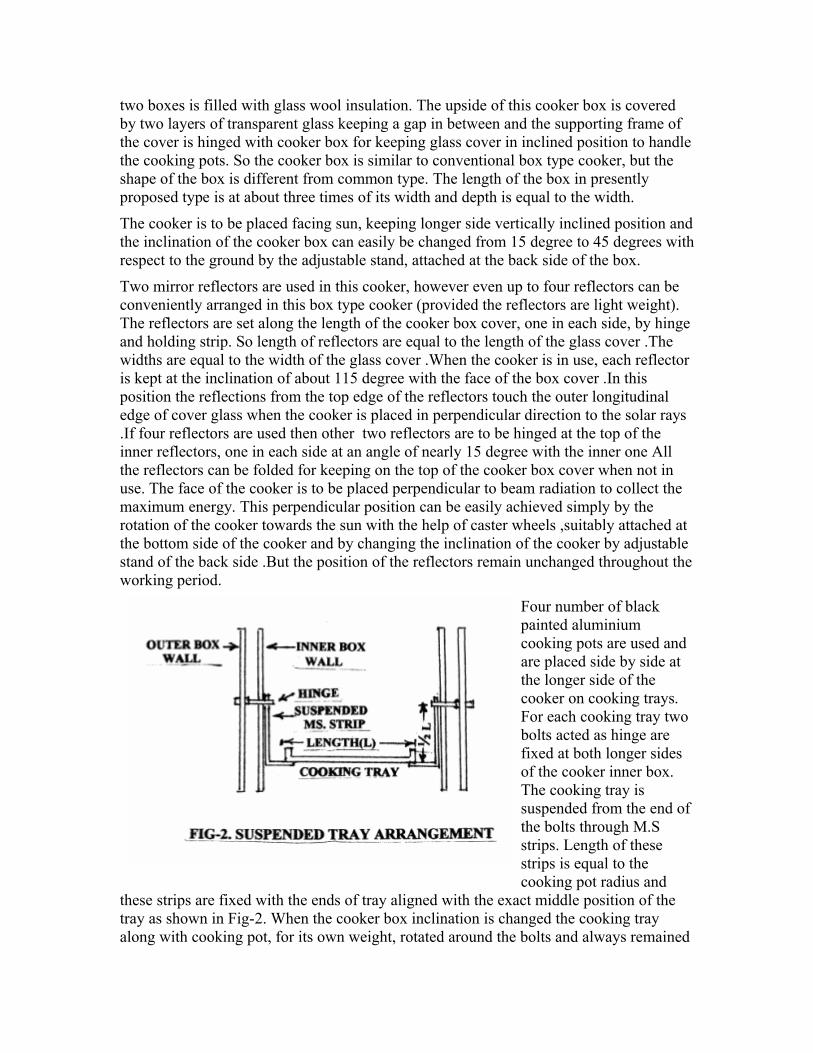
Four number of black painted aluminium cooking pots are used and are placed side by side at the longer side of the cooker on cooking trays. For each cooking tray two bolts acted as hinge are fixed at both longer sides of the cooker inner box. The cooking tray is suspended from the end of the bolts through M.S strips. Length of these strips is equal to the cooking pot radius and
these strips are fixed with the ends of tray aligned with the exact middle position of the tray as shown in Fig-2. When the cooker box inclination is changed the cooking tray along with cooking pot, for its own weight, rotated around the bolts and always remained

in horizontal position. To avoid the chance of tilting of pots, square shaped trays, length of which are kept equal to the diameter of pots are used and ends of the trays are folded upward.
Advantages of the Cookeri) Almost 90% of the energy collected by a solar system occurs between 9 am to 3 pm .The provision for changing the inclination of proposed cooker from 15 degree to 45 degree with the horizontal is sufficient to collect direct solar radiation perpendicularly throughout the mentioned period. Thus radiant energy falling per unit aperture area of the cooker face is increased than if the cooker is placed horizontally like conventional box type cooker .Also transmissivity of the cooker glazing is increased for its perpendicular position with the beam radiation.
ii) In this cooker system with two reflectors ,energy collection is high and even four reflectors can be conveniently used to concentrate solar radiation similar to tracking reflectors ,but without the hazards of frequent manual adjustment to follow the apparent motion of the sun.
Arrangement of multiple reflectors is also possible in horizontally placed box type cooker, but except of the south facing reflector other reflectors will not be able to reflect radiation properly to the inside of the cooker box except the noon time .This is due to the fact that either effective area of the reflecting surface of the reflectors exposed to the sun will be
very less than its actual area or major portion of the reflection from the reflectors will not fall on the cooker inside
Raw Materials Required For FabricationG.I.sheet, Aluminium sheet, M.S. Channels , Glass , Mirror ,Asbestos fiber Sheet, Glass wool, Caster wheel, Black board paint, Hinge , lock , Screws and other miscellaneous items .
Details of Machinery and Equipment Required For FabricationHand saw, Hand shear, Portable drilling machine, Hammer, Screwdriver, Pliers, Measuring tape Painting brush etc.
CostApproximately Rs.2000 per cooker, including materials, cost of fabrication etc. In fact the cost is expected to be less to some extent if a number of cookers fabricated at a time.
Specifications of the Cooker

Cover PlateNumber of glazings: Two Material: Plain glassSpacing between two glazings: 20mmGlass thickness: Inner: 3mm & outer - 4mmGeneral appearance of glazing: Free from bubbles/ rough surfacesAperture area: 184800 sq.mmAdditional Design Feature--Provision or keeping cover plate in inclined position (opened -Position) with respect to its closing position by use of hinge.Inner BoxMaterial: Aluminum SheetThickness of Sheet: 0.5mmSize: Length=840mm, Width=220mm, depth=220mmThickness of wall: 0.5mmPaint on Inner Surface: Mat black finish by black board paintSuspended Cooking TraysMaterial: AluminiumSize: 170mm x 155mmThickness of Sheet: 0.5mmPaint on Inner Surface: Mat black finish by black board paintLength of M.S strips (for suspension of the trays): 90mmDepth of hinge (for suspension of trays) from inner box top: 65mm. Cooking Pot with LidMaterial: AluminiumThickness: 0.5mmNumber: FourDiameter: 150mmDepth: 90mm Total capacity of the pots: 5 Liters (1.25 liters x 4)Cooker Box (Outer)Material: G.I. SheetThickness: 1mmSize: Length=940mm, Width=320mm, Height=295mmGeneral Finish: Smooth, Free from sharp edgesGasket and InsulationGasket Material: Compressed asbestos fiberThickness: 2mmInsulation Material: Glass WoolPad (insulation) thickness: Side=50mm, Bottom=50mmReflecting MirrorNumber of reflector: TwoGeneral Appearance: Free from bubbles /wavinessThickness: 4mmSize: Length=840, Width=220mm

Additional design Feature: Provision for keeping the mirror in inclined position (working position) with respect to its folding position (when not in use)Caster WheelNumber- FourConstruction- Nylon Ball
Test ResultRoutine Test:
i) Inner box leakage test (by filling water, then joints are examined): No sign of leakage
ii) Cover gasket leakage test ( By inserting pieces of papers in four positions in each side of the cooker below the cover plate, after properly tightening the cover plate, the paper pieces should exhibit a firm resistance at the time of withdrawal by hand ): No sign of leakage
iii) Leakage test of upper side of cover plate (by pouring a thin film water on the cover plate and then by examine the cover plate for any sign of water entry between the glass sheets ): No sign of leakage
iv) Leakage test of lower side of cover plate (after boiling of water in cooking pots by solar heating and then by keeping the cooker in shaded location to allow the vapour to condense, there should be no sign of vapour entry between inner and outer glass sheets of the cover plate): No sign of leakage.
V) Temperature test for paint on inner box, cooking tray and cooking pots at 160 degree Celsius for one hour and temperature tests of cover gasket, cover glass and insulation at 200 degree Celsius in electric oven: No sign of damage or crack
Performance Test of Proposed Cooker:1. Test timing and date- 03-03-2003, from 10 am to 12-30 pm
Ambient temperature- 21degree Celsius
Intensity of solar radiation during test period: 0.55kw/sqmt/per hour
Peak temperature of the top cover of empty cooking pots 148 deg Celsius
2. Test timing and date- 04-03-2003, from 10.30 am to 12-15 pm
Time taken for boiling of 4 liters of water in cooking pots (1 liter in each pot) 105 minutes.
Inlet water temperature- 22 degree CelsiusComparative performance of proposed cooker by placing it horizontally and only with one reflector facing sun (i.e., by converting of proposed cooker similar to conventional box type cooker):
1. Test timing and date- 05-03-2003, From 11 a.m to 1.00 pm
Ambient temperature 23 degrees Celsius
Intensity of solar radiation during test: 0.56kw per/sq.mt./per hr.

Peak temperature of the top cover of empty cooking pots: 123 degree Celsius
2. Test timing and date- 07-03-2003, from 10 am to 12.15 pm
Inlet water temperature- 22 degree Celsius
Time taken for boiling of 4 liters of water in cooking pots (1 liter in each pot): 120 minutes
ConclusionDetailed constructional methodology along with some cost and performance figures are narrated in developing the presently proposed solar cooker. Improved performance over a conventional box type solar cooker is the main feature of this cooker.
The cooker, presently fabricated can able to cook 2 Kg rice or equivalent food item at a time within two hours cooking is possible in between 9am to 3 pm.
PORTABLE SOLAR BARBECUE A Portable Parabolic Cooker Built from an Umbrella

I would like to relate my experience and describe my solar cooker in order to thank all of those who have done so previously and have inspired me, and so that anyone else can learn from my experiences, which have shown that it works: Half a litre of water began to boil in 20-30 minutes and this was on a windy day. My objective was to get results close to those of commercial parabolic cookers, but in a portable design since I do not have a terrace or yard with space for a cooker. White rice for 4 people cooked in approximately one hour - and it was a little overdone!

I learned about solar cookers two months ago, primarily thanks to Solar Cookers International, and I put myself to work: I just had to try it! Cook with the sun? And after many attempts and disappointments, I eventually obtained better results than I had hoped for.
Before making this model I made a paracocina,but instead of aluminium foil I used the sunscreens for car windshields for improved strength, but they were disappointing. Probably this was because these sunscreens were not good reflectors, in addition to other factors such as not being able to find an adequate plant stand of the right size and the fact that the umbrella had ten ribs.
My model is based on paracocina designed by Marc Ayats http://www.cuinessolaar.iespana.es/ and the Sumbrella designed by Quinton Stowell http://www.sunspot.org.uk/ , but with some differences:

ReflectorThe most important and difficult item to find is the umbrella. It should be an umbrella with sixteen ribs of 1 – 1.2 cm in diameter, which are not easy to find as most umbrellas have only 8 or 10 ribs. I located one of these in an online store at http://www.bazarfrancia.com/ . It cost me 15 € with shipping costs.
Using the same procedure as that for the paracocina I cut off the shaft of the umbrella but I don’t use it for closing; instead I fold it so that it is easier to carry. In order to position the structure I use a screw that fits into the drilled hole on the shaft. I left a part of the closing strap for storing it as you can see in the central photo. In addition, I had to attach a couple of tension cords to stabilize the cooker in the wind.
As for reflective material, I thought over various possibilities. I think I found something ideal but I didn’t use it since I live in the Canary Islands (Spain) and it would have to be shipped from Barcelona, which didn’t seem to be worth it. If you have better access to this material and want to test it out I would recommend mirror polished aluminium:
This material is used for lighting. A sheet of 2000x1000x0.4m/m weighs about 2.20Kg and costs between 4.85€/Kg. to 5.55€/Kg. The quantity needed depends on the size of the umbrella used.
Apart from this, I went back and forth between various possibilities because aluminium foil has the disadvantages of wrinkling easily, and it won’t stand up to all the repeated opening and closing of the umbrella. In my opinion, the more polished, shiny and mirror-like a material is the better. I came across various: aluminium tape that is used for heating systems, aluminized cardboard, and adhesive plastic that can be easily found in fabric or stationary stores, which is what I finally used. .

The stand and grillI used a compact camera tripod because I was not able to find a plant stand of the right size, though I know they do exist. With this tripod I gained in portability and precision because you can adjust the height in order to find the exact focal point. The umbrella with 16 ribs provides a very precise focal point in the direction of the shaft. Its disadvantage is that it is more fragile and more expensive, about 20€.
For the grill I glued a small barbecue grill with high-temperature resistant silicon. This is the weakest point of my model because if you’re not careful the grill can fall off the tripod. I think that ideally the grill should be soldered onto the tripod
I positioned the silicon glue such that it maximizes the stability of the cooking pot. The pot doesn’t move at all.
The cooking pot The cooking pot gave me plenty to mull over: what would be the best type? If I let my imagination run wild, I thought that the ideal solar pot would be a Pyrex pressure cooker in which one could place various black pots of different forms and sizes. But let’s stop dreaming. In order to select the type of pot, I read practically all of the reports on every type of solar cooker that I could find, these are the conclusions that I came to:
• Material: aluminium or thin steel. • Type: lower is better than high, but with enough height for cooking. A low pot
or a high frying pan is best.
• Color: black.

• Lid: black is better than glass. • Size: 20 cm in diameter. About 1.5-2 litros. At first I thought that the smaller
the pot the more quickly it would heat up, but then I realized that a small pot is less efficient because it captures fewer rays..
Personally I like frying pans or casserole dishes because they have most of these characteristics and they may come with pressure lids that maintain the heat. Steel ones are stronger than aluminium. Unfortunately I haven´t seen any that are black. They are all the colour of metal. One solution is to paint them with a black matte heat-resistant spray paint that is used for barbecues. It is not expensive and with practice good results can be achieved. .
In addition, I used a second frying pan made of glass in order to insulate the first one. It is a bit bigger so I stuck on bits of cardboard for a better fit.
RecommendationsDon’t take it lightly. It really heats up. In order to prevent any type of risk, it’s best to use gloves and sunglasses. Also it’s better to cook while standing behind the cooker. That way you also don’t create shadows on the reflector.
In order to capture the maximum solar radiation it’s necessary to turn the cooker at least twice an hour so it faces the sun. Turn it very slowly and carefully holding the stand and the pot or else removing them for a moment.
For transporting the pots it’s a good idea to use a basket in which they fit well. The basket will protect them as well as help conserve the heat.
I carried out this Project with lots of interest and a fair bit of effort. I hope that it helps in some way. If you decide to try it out, please, I would love to hear about your experiences. If you wish,

send me an email. I think that vegetables cooked in their own juices, and new potatoes cooked in their skins would be delicious. Why not try them?
Juan FranciscoSeptember 16, 2006
Soda bottle pasteurizer
Tools and equipment:

Scissors, Knife, Glue, Tape, Thermometer*
Materials• 1 or 2 liter clear plastic soda bottle. • 12 oz. aluminum soda can, • Corrugated cardboard box approx. 16” x 16” x 16” • Aluminum foil or reflective plastic from inside chip bags, etc.
InstructionsFrom a 1 or 2 liter clear plastic soda bottle (A) cut off the top, 1" below where it becomes straight. Cut 4 tabs 1/2" wide x 1" long into the top (fig.1)
Paint a 12 oz. aluminum can (B) with black paint. It is also possible to coat the can with carbon black from a candle or wood fire.
Put the can filled with water into the plastic bottle bottom and insert top with tabs folded out (fig.2).

To make the reflector (C), start with a corrugated cardboard box approximately 16" x 16" x 16". Cut off the top and two sides of the box. Cover the two remaining sides and
bottom with aluminum foil or potato chip bags with silver coating facing out (use wheat paste, glue or tape to adhere to cardboard).Place bottle on reflector (C) and place in sun.
Keep bottle shadow centered on back of solar panel. To pasteurize, water must be heated to 158° F (65° C).
Recipes

Solar cooking guidelines
[Note: The recipes on this Wiki have been developed for the simple solar box cookers with one reflector which cook at temperatures between 120°C and 150°C (250°F -
300°F). Recipes may need to be adapted when cooking with solar panel cookers and parabolic cookers.]
COOKED DRIED CEREALS AND GRAINS - (barley, corn, millet, oats, quinoa, rice, wheat) : 2 hours. Start with usual amount of water. Next time adjust to your taste. If your sky conditions are less than ideal, you may have better luck if you preheat the water and grain separately, as suggested for pasta. This is especially helpful if the grain is either very slow to tenderize (brown rice, hulled but not pearled barley) or gets mushy easily (quinoa, millet). To learn about using barely-sprouted grains and beans, which take to sun cooking very well, see Sprouting seeds and grains. See also Rice and Hard porridge.
VEGETABLES - Add no water. Artichokes: 2 1/2 hours; Asparagus: 1 1/2 - 2 hours; Other fresh green vegetables: 1-1 1/2 hours. If cooked longer they will taste fine but lose their nice green color. Beans - dried: 3-5 hours. Usual amount of water, can be soaked ahead of time; Beets, Carrots, Potatoes and other root vegetables: 3 hours. Cabbage, eggplant: 1 1/2 hours if cut up. Eggplant turns brownish, like a cut apple, but the flavor is good; Corn on the cob: 1 - 1 1/2 hours. The corn kernels will fade slightly if left longer in direct sunlight. The husk will hold the moisture in and protect the kernels naturally. A clean black sock can be put over an ear of corn to help absorb heat for faster cooking time. Squash, zucchini: 1 hour. Will turn mushy if left longer. EGGS - Add no water. Two hours for hard yolks. If cooked longer the whites turn brownish, but the flavor is the same.
MEATS - Add no water. If cooked longer they just get more tender. Fish: 1-2 hours; Chicken: 2 hours cut up, 3 hours whole; Beef, Lamb, etc.: 2 hours cut up, 3 - 5 hours for large pieces; Turkey, large, whole: all day
PASTA - Heat water in one pot and put dry pasta with a small amount of cooking oil in another pot, and heat until water is near boiling. Add hot pasta to hot water, stir, and cook about 10 minutes more.
BAKING - is best done in the middle of the day (9 or 10 am - 2 or 3 pm) Breads: Whole loaves - 3 hours; Cakes: 1 1/2 hours; Cookies: 1 - 1 1/2 hours and do not need to be covered. Avoid bottom crusts - they get soggy. Black socks can also be used to cover foil-wrapped garlic/herb breads. Takes awhile for the heat to work through, but with the sock to dull the foil it eventually will, and the sun makes wonderful fresh garlic bread.
SAUCES & GRAVIES MADE WITH FLOUR OR STARCH - Heat juices and flour separately, with or without a little cooking oil in the flour. Then combine and stir. It will be ready quickly.
ROASTING NUTS - Bake uncovered. Almonds: 1 hour, Peanuts: 2 hours.

TYPICAL COOKING TIMES FROM Solar Cookers: How to make, use, and enjoy, Solar Cookers International, 2004
General guidelines• After a a bit of experience, you’ll see how readily you can adapt your present
cooking and baking to solar cooking. Using the solar cooker can actually reduce the total amount of effort in meal preparation. Also cooking outside in the summer allows you to eliminate extra heat in the house. With solar cooking, you start your meals early in the day and then relax. At lunch or later in the afternoon or evening, when you’re tired after a day of work, the sun will have cooked your food.
• Most food, with the exception of cookies and open-faced cheese sandwiches, are cooked in containers with the lids on. The dark, speckled GranitWare pots are the best for most of the cooking and baking in the solar cooker. (The 9-inch round roaster makes a beautiful round loaf of bread). Be sure to use hot pads when removing the pots from the oven; the pot will be very hot!
• If this is your first attempt at solar cooking, start with something easy such as chicken, rice, zucchini, or quick bread such as banana bread. Baking potatoes is also easy, but don't wrap them in aluminum foil; just put them in a dark covered pot without adding any water.
Inexpensive solar cooking pots can be ordered online from Solar Cookers International.
• Food such as roasts, stews, casseroles, poultry, potatoes, carrots, pot roasts and rice are almost impossible to overcook; therefore, the timing on the food is not critical.
• Chicken will still be juicy and will fall of the bone when solar cooked four hours instead of the needed two hours. The major advantage of solar cooking is the flexibility in cooking times. You can remove the food any time after it is done.
• In cooking fresh fish, you can judge when the fish is cooked thoroughly when juice begins to drop. If you cook fish on a rack, it is easy to see this change. Then check to see that the fish is cooked to the bone in the thickest part.

• For best results, do not overcook the following food: green vegetables, cookies, cakes, and bread.
• Use dark covered pots or pans with tight fitting lids. With rare exceptions (e.g., cookies) the lid is kept on the pot while cooking. Dark baking pans can be purchased in pairs so one can be turned upside-down for a lid. Secure with binder clips.
• The golden rule of solar cooking is: GET THE FOOD ON EARLY, AND DON’T WORRY ABOUT OVERCOOKING.
• You do not need to stir food while cooking. However, it’s OK to check the food if you quickly replace the lid.
• Place the hard-to-cook or larger quantity items in the back of the cooker where they will receive more direct sun. When using several pots, place the easy-to-cook food in the front of the cooker.
• The solar oven will be hot! Use potholders when removing lids or pots.
• To keep the food hot after the sun goes down, add several bricks or heavy stones when you begin cooking. To maximize heat retention, lower the reflective lid onto the glass, and cover the cooker with a blanket.
• Many meals may be cooked without refocusing, and you will learn by experience. Just face the cooker so that halfway through the cooking time the sun will be right in front of the cooker with the prop stick casting a shadow on the proper stick holder. With lots of food, or on less than fully sunny days, refocus the oven once or twice.
• To bake cakes or bread in a solar box cooker, preheat the cooker for at least ½ hour before adding the food.
• If you are cooking a large amount of food, it will cook more quickly if distributed between two or three smaller pots instead of one large pot.
• Several small, uncovered bowls may be placed inside a large covered pot to cook.
• Leftovers are easily reheated in the solar cooker.
• Most recipes take slightly less liquid when cooked in a solar oven.
• Time for cooking depends on the temperature of the food as it is placed in the oven, as well as the brightness of the day.
• Allow plenty of time. Foods hold well in the solar oven without scorching or drying out.
• Focus oven and check food about once an hour when you're just getting started. Later, you'll relax and tend the cooking only once every two or three hours.
• Most recipes calling for a higher temperature will do fine if you give them more time.

High altitude adjustmentThe temperature of boiling water is reduced as the altitude increases. For instance the boiling temperature of water is only 95°C (203°F) at 6000 ft. and this slows the cooking. Vegetables and dried beans may be difficult to cook at high altitudes because of this effect. You may try cooking your food in darkened canning jars with regular canning lids and rings tightened. The rubber seal allows excess pressure to be released but a low increase in pressure is retained and speeds cooking. We only recommend standard canning jars and lids as they are designed for pressure.
Solar Mint Tea1 gallon water
several sprigs of freshly picked and washed mint Crush the mint slightly before adding it to the water. Leave in sun all day. A jar can be painted black to increase temperature and keep an "off taste" from forming.

Solar Tea1 gallon water 2 to 3 teaspoons loose tea or tea bags
Pour water into gallon jar. Add tea into a tea ball and drop into a gallon jar. Place a lid onto the jar loosely (to allow more expansion while the jar heats) and place the jar on the cardboard sun reflector facing the sun. Set tea in sun all day and then cool it overnight outdoors (this keeps the tea from becoming bitter).
Tip - using the black painted jar and sun reflector increases the amount of heat generated in the jar and prevents photochemical reactions from giving the tea an off flavor - which occurs when sunlight shines directly on the tea.
The off taste that develops sometimes is caused by growth of bacteria and this is a danger in the classic "sun tea" which sits outside all day at modest temperatures. Bring the brew (both water and herbs used) to pasteurizing temperature by a short solar box exposure before setting it in the sun simple reflector. Or the tea can be brewed completely inside the solar box cooker.
SharonID's Solar Coffee
You can make great solar coffee in a black cooking (canning) jar! No, it won't be ready at sunup, but if you want coffee for a midmorning or afternoon break or for lunch or brunch, it is easy to do when the sun is shining (and if you strain off the grounds and refrigerate any remaining coffee, leftover coffee would still be good reheated the next morning). Making coffee in a cooking jar really preserves subtle flavors that often end up floating in the air instead of landing in your cup. Put 4 rounded tablespoons of coffee in a quart cooking jar (or 8 in a half-gallon jar, or 2 in a pint jar). Fill the jar with water to within about half an inch of the top, being careful to moisten the coffee grounds in the process (but don't stir). Close the jar, bag or cover if using a panel cooker, and set it to cook. If you are sure that rain or dew during the night won't hurt your cooker, you can put it out before you go to bed, pointing the cooker just a little south of east to catch the first rays (then, when you wake up, adjust the cooker as needed). When the coffee is steaming hot (try not to let it reach a full boil—around 190F is plenty, if you're using a thermometer) and slight agitation causes the grounds to settle to the bottom, it is done. Pour through a strainer or filter and enjoy a great cup of coffee. My husband loves waking up to fresh solar coffee on the weekends when he sleeps a little late.
This would also work with similar proportions in a black lidded pot, but I think the canning jar lid keeps in more of the volatile flavor components.

Naomi's Sherry Chutney Chicken Bites
4 halves skinned & boned chicken breasts 2 cups half & half 1 1/2 cups mayonnaise 3 tbsp. mango chutney 2 tbsp. dry sherry 1 tbsp. sherry vinegar 2 tbsp. plus 1 tsp. curry powder 1 tsp. turmeric 2 cups finely chopped salted roasted peanuts Preheat oven to 350º F. Place chicken breasts in a shallow baking dish just large enough to hold them. Pour half and half over them and bake for 30 minutes. Let cool and cut into 1" cubes. Process mayonnaise, chutney, sherry, vinegar, curry powder and turmeric in a blender or food processor. Dip chicken pieces into the curry mayonnaise and roll in the chopped nuts. Refrigerate 30 minutes. Arrange on a serving plate with fancy toothpicks.
Sunbeam Chicken Wings
This recipe is wonderful in the HotPot but will work well in any cooker that gets hot enough to cook chicken.
1/3 cup brown sugar
1/4 cup tapioca flour or 3 tablespoons minute tapioca
1/4 cup soy sauce
Juice and rind of 1/2 orange

2 teaspoons dark sesame oil or spicy sesame oil blend
3 cloves garlic, crushed
2 green onions, sliced
1 teaspoon sea salt
1 teaspoon dried basil or Thai basil
1/4 teaspoon Chinese 5-Spice powder or cinnamon
1/2 teaspoon turmeric
1 teaspoon paprika
2 tablespoons black sesame seed
2 T. sherry or white wine
2 T. Hoisin Sauce
dash of Tabasco or pinch of cayenne
3-4 lbs. "party wings" or chicken wings (the two larger parts... disjoint and discard tips or use for stock) or wing "drummettes"
Combine sugar and tapioca; add soy sauce and mix well. Add remaining sauce ingredients and mix well. Combine with chicken wings and mix well. (This can be done the night before, if you refrigerate the mixture overnight.) Place in dark, oiled pot, HotPot pot, or roaster with a dark cover, place thermometer sensor (if using) in the middle, cover, enclose (if using panel cooker... a box oven or HotPot would not require an enclosure), and set out in solar cooker by 10am on a sunny day. If you are using a panel or funnel cooker, turn the enclosed pot front-to-back after an hour or so. When the thermometer reaches 150F (around 12:30 or 1pm, if you don't have a thermometer—sooner if there are definite signs of steam), open and give things one good but gentle stir, then shut it back up quickly. Turn front-to-back again after an hour. Wings must reach 180F to be safe, but will be even better if they simmer gently for a while. If the top is browning, you can give it another gentle stir or two, to let more of the pieces get a little brown, though it will be tender and mysteriously delicious whether it browns or not.
If you have a HotPot or other solar cooker that can handle four or five quarts, you can double this recipe for a crowd, but get it out early! If you can't find hoisin sauce, substitute oyster flavored sauce, molasses, or ketchup.
Can be kept hot for two or three hours in a retained heat cooker or box oven with extra insulation (old quilt, pillows, etc.).
Note: You could use other chicken parts in the sauce, such as thighs, drumsticks, etc., or even a cut-up whole chicken though the smaller wing parts are nice for appetizers. If you

have a HotPot or other cooker that can handle four or five quarts/liters of food, you can double the recipe for a crowd, but set it out early!
SoupMark's 30-second Bean Soup
1 cup of mixed beans (7-bean, 10-bean etc. - frequently sold in bulk bins)
1 bouillon cube (chicken, beef, vegetable, etc.) or 1 teaspoon bouillon broth powder
The '30 seconds' refers to how long it takes to prepare this soup. I'm really lazy, and almost never pre-soak the beans. Put beans and bouillon in 32 oz. black-painted mason jar. Fill jar with water to within 1 inch of neck line. Seal with black-painted ring and lid (oil the inside parts of the lid and ring first). Cooks in 2.5 to 8 hours depending on conditions, solar cooker type, etc.
Many spaghetti sauces come packed in 26 oz. canning jars. If you've converted one of these 'free' jars into a cooking jar (by painting it black), follow the same recipe except use only 3/4 cup beans.
60-second Split Pea and Potato Soup1 cup split peas (frequently sold in bulk bins) 1 bouillon cube (chicken, beef, vegetable, etc.) or 1 teaspoon bouillon broth powder
1/2 cup diced potato pieces
Put peas, potatoes, and bouillon in 32 oz. black-painted mason jar. Or, if using a 26 oz. jar, use only 3/4 cup of split peas. Fill jar with water to within 1 inch of neck line. Seal with black-painted ring and lid (oil the inside parts of the lid and ring first). Cooks in 2.5 to 8 hours depending on conditions, solar cooker type, etc.
Note that texture of soup will vary with cooking time. Thoroughly cooked pea soup will have almost no pea chunks in it -- they all dissolve! So watch the soup carefully after the first 1.5 hours if you like your soup with a few remaining split peas.
Solar Veggie PureePut an assortment of garden vegetables in a solar cooker. You can use carrots, potato, summer squash, green bean, beet, tomato, winter squash etc. Use what ever method you prefer for the cooking (black painted canning jar, black pot in cooking bag, etc.) You can be creative according to what vegetables you have on hand.
Cook them until tender -- they can be slightly under cooked and still be good.

Puree or mash the cooked vegetables until smooth. Add your favorite seasonings -- salt, pepper, garlic powder, curry powder, ginger, nutmeg etc. You may want to add a bit of water, broth, cream or butter or oil to create the texture you like. That's all there is to it.
Note 1: Potato helps add a smooth texture to the puree so I usually include a few small ones to the group of vegetables. Note 2: raw onion cooked with the other vegetables does not taste as good as sautéed onion or onion powder added later. I prefer to add onion powder along with other spices while pureeing.
Today I cooked a few small new potatoes, 2 carrots, a hand full of green beans, 2 summer squash and then pureed them together with a pinch of curry, salt and pepper. I added no broth or cream but it was still VERY GOOD.
SharonID's Solar Project SoupThis formula was developed for a project with kids from a Roots and Shoots group. Each child will make their own small cooker, then we will have a field trip at a country park, where each child will get to make a little pot of soup, tailored to their individual taste preferences. This recipe was designed for the small backpacking pots we'll be using, but I think it would fit in a one pint cooking jar, too. I tried this out a couple of days ago, and it worked like a charm. Cut up the vegetables ahead of time and present them separately, so that each child can fill a measure with their favorites. Try for a variety of vegetables, such as carrots, celery, onions, garlic, corn, peas, green beans, squash, potato, etc. Slightly sprouted legumes could also be used as part of the vegetable and would add protein to the soup.
Put into a small dark cooking pan or pint cooking jar:
1 cup water
1/4 cup chopped tomatoes (or an additional 1/4 cup water) 1/2 teaspoon stock concentrate or bouillon powder or 1/2 a bouillon cube
1/2 cup mixed chopped vegetables of choice
a pinch or two of dried herbs if desired (basil, oregano, marjoram, thyme, etc) Close the pot or jar and put into the cooker for about an hour and a quarter (soup should be at or near a boil by this point). Take out the pot or jar, open it, and add:
a heaping tablespoon of small pasta (alphabet noodles are a favorite of many children) or quick-cooking grain, such as white rice or quinoa.
Close the pot or jar, return to cooker, and give it another 45 minutes. Take out the pot or jar and sit down to a delicious lunch! If someone in the group has a box oven, you could use that to bake cornbread or flatbread or some other quick bread to go with the soup. When we do our field trip, we'll make cornbread in my box oven and use my monster truck windshield cooker to make warm, spiced apple cider for the whole group.
Note: This formula could certainly be multiplied to make multiple servings of soup in a single pot. This recipe was tested in the autumn. Cooking time would be less with higher sun. A quarter cup of protein food, such as tofu or precooked beans or meat or poultry
could also be added. Condiments such as salt, pepper, hot sauce, etc, can be added after the soup is cooked.
Gallon of Great Sun Soup1 pint diced tomatoes (canned or fresh, undrained) 1 can whole kernel corn (undrained) 1 can broth (OR homemade stock OR water plus bouillon or stock concentrate) 1 large onion, diced
2-8 cloves garlic, minced
2 stalks celery, diced
1 carrot, sliced
1/2 c. dry beans or lentils, soaked/drained or slightly sprouted
1-2 tablespoons olive or canola or other healthy oil Water or tomato juice or vegetable cocktail
2 cups mixed seasonal vegetables
1/2 c. white rice, quinoa, pearled barley, OR small pasta
1 teaspoon salt 2-4 cups chopped chard, kale, cabbage, bok choy OR collards (optional) 1-3 tablespoons herbs, fresh or dried
Pepper or seasoned pepper
Mix first nine ingredients in dark pot that holds a gallon. Add hard seasonal vegetables now, tender ones with second additions. Add water (or tomato juice or vegetable cocktail) to bring level an inch or so from the one-gallon mark.
Bag or cover; set in cooker in full sun, early in the day. Once it starts to simmer (watch for steam, don't open to check), give it an hour, then quickly stir in remaining ingredients. Cover and cook until it reaches a simmer again, then give it at least half an hour before checking to see if the grain or pasta is done. Holds well in a heat retention cooker or box oven. Freeze leftovers for an easy supper another night. Good for solar cooking demos. Since it's vegan, almost everyone can eat it (if you will be cooking for the gluten intolerant, rice or quinoa are the safest grain choices).
Note: To use slower cooking grains (brown rice, wheat berries, hulled barley) soak overnight or sprout slightly and add at beginning. Cans are the size that is close to a pint.
Solar Project Soup(Makes aprox. 1 pint)

Put into a small dark cooking pan or pint cooking jar:
• 1 cup water • 1/4 cup chopped tomatoes (or an additional 1/4 cup water) • 1/2 teaspoon stock concentrate or bouillon powder or 1/2 a bouillon cube • 1/2 cup mixed chopped vegetables of choice a pinch or two of dried herbs if
desired (basil, oregano, marjoram, thyme, etc)
Close the pot or jar and put into the cooker for about an hour and a quarter (soup should be at or near a boil by this point). Take out the pot or jar, open it, and add a heaping tablespoon of small pasta (alphabet noodles are a favorite of many children) or quick-cooking grain, such as white rice or quinoa.
Close the pot or jar, return to cooker, and give it another 45 minutes. Take out the pot or jar and sit down to a delicious lunch! If someone in the group has a box oven, you could use that to bake cornbread or flatbread or some other quick bread to go with the soup. When we do our field trip, we'll make cornbread in my box oven and use my monster truck windshield cooker to make warm, spiced apple cider for the whole group.
Note: This formula could certainly be multiplied to make multiple servings of soup in a single larger pot in a larger solar cooker. This recipe was tested in the autumn. Cooking time would be less with higher sun. A quarter cup of protein food, such as tofu or precooked beans or meat or poultry could also be added. Condiments such as salt, pepper, hot sauce, etc, can be added after the soup is cooked.
Gallon of Great Sun Soup1 pint diced tomatoes (canned or fresh, undrained)
• 1 can whole kernel corn (undrained) • 1 can broth (OR homemade stock OR water plus bouillon or stock concentrate) • 1 large onion, diced • 2-8 cloves garlic, minced • 2 stalks celery, diced • 1 carrot, sliced • 1/2 c. dry beans or lentils, soaked/drained or slightly sprouted • 1-2 tablespoons olive or canola or other healthy oil
• Water or tomato juice or vegetable cocktail • 2 cups mixed seasonal vegetables (or mixed frozen vegetables, if necessary)
• 1/2 c. white rice, quinoa, pearled barley, OR small pasta • 1 teaspoon salt • 2-4 cups chopped chard, kale, cabbage, bok choy OR collards (optional) • 1-3 tablespoons herbs, fresh or dried • Pepper or seasoned pepper
Mix first nine ingredients in dark pot that holds a gallon. Add hard seasonal vegetables now, tender ones with second additions. Add water (or tomato juice or vegetable cocktail) to bring level an inch or so from the one-gallon mark.

Bag or cover; set in cooker in full sun, early in the day. Once it starts to simmer (watch for steam, don't open to check), give it an hour, then quickly stir in remaining ingredients. Cover and cook until it reaches a simmer again, then give it at least half an hour before checking to see if the grain or pasta is done. Holds well in a heat retention cooker or box oven. Freeze leftovers for an easy supper another night.
Note: To use slower cooking grains (brown rice, wheat berries, hulled barley) soak overnight or sprout slightly and add at beginning. Cans are the size that is close to a pint.
Pizza Anastasia4 - 8 Can Biscuits Pizza Sauce
Shredded Mozzarella Cheese
Peperoni Other meats and vegetables of choice
Pre-heat oven. Mold the biscuits into a round, flat pie shape. The number of biscuits depends on the size of your oven and/or the number of people to feed. then place your sauce, cheese, and vegetable or meats and put in oven for about 30 minutes or until the cheese is browned or is crisp enough to your liking.
You can also easily use a frozen pizza from the store. Rule of thumb, just double the conventional oven cooking time. Keep in mind, the more items on the pizza the longer it will need to cook.
Scalloped Corn Casserole
2 eggs, beaten
1 c. sour cream (can be light or fat-free or regular or a combination) 1 can cream style corn
1 can whole kernel corn (about half-drained) 6 T. melted butter (can substitute other fats/oils/spreads for all but 2T., and up to 2T. can be a fat-free product) 1/2 t. seasoned salt (I use Tony's Creole, a rather spicy seasoned salt) 1/2 t. Tabasco or other hot sauce (this is not enough to make it overly spicy, as corn is very bland) Corn Muffin packaged mix (8.5 oz.)

1 T. sugar, honey, or maple syrup
Paprika (optional, but may give a better color if your solar cooker is on the slow side in terms of browning—add 1/2 t. or so to the batter and sprinkle some on top) Preheat solar oven (or other cooker in which you have successfully managed to bake things like casseroles and breads). Combine all ingredients, mix well, and pour into whatever greased suncooking pan you have that comes closest to a 13"x9" baking pan or 2 1/2 qt. casserole. Sprinkle some paprika on top if you like, put on the lid, and put it in your cooker.
Times are wildly various in suncooking, but if it were going into a 350F conventional oven, it would take 35-45 minutes. It's done when it's not jiggly in the middle... it should be set up enough to cut or scoop pretty cleanly when you serve it. It's a very moist casserole, so you don't have to worry too much about overcooking and it's easy to hold for awhile by hayboxing if the sun starts to drop and you're not ready to eat yet. (It's not bad at room temperature, either, though you wouldn't want to store it that way for too long.)
You can bake this casserole as low as 180F, but it would probably take at least 3 or 4 hours at that temperature. The lower your oven temperature, the more tendency it has to sort of separate into layers... more bread-like towards the bottom, more custardy at the top—while higher temperatures (say 225F and up) result in a more homogenous structure, but it's delicious either way.
If your family is very small (1-3), you can bake half of the mixture (in a smaller pan) and freeze the other half (raw) for another time. Just thaw completely (if you freeze in plastic bags, set in bowl to thaw so you'll keep your liquid if it leaks), mix a bit, pour into greased pan, cover, and bake.
This is a great recipe that works as a hearty side or a vegetarian entree. You can make big batches of the mixture and divide it up for freezing, so all you have to do is start thawing the night before to have something ready for your cooker the following day.
Corn-on-the-Cob for freezingHusk the corn and place in a dark colored pan. Do NOT add water. Cover and bake for 1 hour. Fresh corn with husks
1 tablespoon water
Pull back the husks, but do not remove. Clean corn and remove silks. Fold up the husks to cover the corn. Place in a black roaster and add water. Cover and bake 45 minutes. Drain the husk and submerge corn in ice water. Drain, cut the kernels from the cob, package and freeze.
ZucchiniCut zucchini into 1/2 inch diagonal slices; place in dark enamel pan, and season with with butter, oregano and garlic. Do not add water. Cover and bake 45 minutes.

Zucchini Quiche2 medium zucchini, chopped or shredded
2 cups Swiss cheese, coarsely shredded
3 to 4 eggs
1 cup biscuit or buttermilk pancake mix
1/4 cup salad oil 1/4 teaspoon Italian seasoning
1/4 teaspoon nutmeg
1/2 cup chopped onion
Diced mushrooms
Salt and pepper
Lightly oil a dark 9-inch round roaster. Beat eggs, stir in the biscuit or pancake mix and seasonings in the bottom of the pan. Add zucchini and shredded cheese and stir lightly with a fork. Cover and bake in a preheated solar oven about 2 hours or until a knife inserted in the center comes out clean. Makes 6 servings.
Cheesed Onions5 to 6 medium onions
2 cups grated cheddar cheese
2 cups milk
1/4 cup butter or margarine
3 tablespoons flour
1/2 teaspoon salt Slice onions and place in a dark round pan. Blend milk, butter, flour, salt and cheese together. Pour over the onions. Cover and bake 1 to 2 hours.
Whole Stewed TomatoesWhole tomatoes
Bread
Cheese
Italian seasoning
salt

Pepper
Place each whole tomato into a greased custard cup and cut tomato into four sections. Spread cheese onto bread and tear into small pieces. Add cheese/bread pieces to the tomato. Sprinkle with Italian seasoning and pepper. Cover and bake about 45 minutes.
Artichokes
Tops of artichokes
bottom of artichokesArtichokes
Many of us love artichokes but find that they take a lot of energy and time to cook. They do cook well in a solar cooker, and they are easy to do, compared to cooking them in the house. They turn out quite delicious when cooked with sunshine, but they are not exactly pretty to look at. I got a great deal on four fresh, big, beautiful artichokes, so thought I would experiment with them. I cut of the tops, put them in a pan with an inch of water in the bottom, and put them in, top side down. I let them cook for three hours and they were delicious, but not pretty. The top picture shows the finished artichokes, and the bottom photo shows how they cooked in my Global Sun Oven. Would I cook them this way again? Oh yes. They were delicious, both hot and cold. The centers were absolutely tender and the chokes pulled away quite easily. We ate them with both melted butter and seasoned vinegar.
BeetsPlace fresh beets in a black pot. Cover and bake for one hour or so. The skins slip right off. The beets are ready for chilling or adding to salads.

Baked PotatoesClean potatoes and rub with shortening or butter. Place in a dark dish. Cover and bake 3 hours or until done.
Scalloped Potatoes4 cups thinly sliced potatoes
1/4 cup finely chopped onion
1/2 teaspoon salt 1/4 teaspoon pepper
1/4 cup butter or margarine
1 can cream of mushroom soup
1/4 to 1/2 cup milk
grated cheddar cheese (optional) In a greased 2-quart dark casserole dish, arrange 1 layer of potatoes. Dot with butter and sprinkle with some of the grated onion, salt, and pepper. Make about 4 layers. Mix soup and milk together and pour over the layers. Cover and bake about 2 hours or until a fork goes through potatoes easily. Sprinkle grated cheese over the top. Before serving, replace cover for a few minutes to melt the cheese.
HutspotCut 4 potatoes, 1 carrot and half an onion in 1cm cubes. Beef or pork sausage can be added for taste. Cook in solar oven with a tablespoon of olive oil for 3 hours. Mush. Add salt, pepper and fresh parsley.
Pineapple and Sweet Potato1 large sweet potato, peeled and diced
1/2 cup pineapple chunks, unsweetened
1 tablespoon pineapple juice
1/4 teaspoon cinnamon, optional Combine ingredients in a dark casserole dish. Cover. Bake in solar oven until sweet potato is soft.
Solar Mexican Beans2 cups pinto beans
2 cloves garlic, chopped
1 8-oz. can tomato sauce
1 or 2 tablespoons chili powder
1/2 teaspoon oregano
1 sliced onion
1 or 2 fresh chili peppers, chopped
1 teaspoon cumin
Salt Soak beans overnight. Drain. Cover beans with fresh water. Add onion and garlic. Stir. Cover. Place in oven and bake about three hours. Combine 1 can of tomato sauce, chili powder, cumin and oregano and add to beans. Cover and cook another 4 hours. Check to see if beans need more moisture. Add salt to taste.
Quick Baked Beans1 can pork and beans or B & M baked beans
1/2 cup brown sugar
1/4 cup Worcestershire sauce
1/4 cup mustard
Combine ingredients and mix well. Place in a dark 9-inch round roaster or amber glass dish. Cover and bake for 2 hours.
Black Beans1 pound package black beans
6 cups water
2 16-oz. cans diced tomatoes
2 ounces of picante sauce
Place clean and sorted beans in a black pot. Add water to cover top of beans by 2 inches. Cover and cook approximately 9 hours (start beans anytime before 9:00 a.m. and add tomatoes and picante sauce after 4:00 p.m.) Variations: serve over white or brown rice or top servings with shredded cheddar cheese.

Brown Rice1 1/2 to 1 3/4 cups water
1 cup rice
1 tablespoon butter
Salt Soy sauce
Pour desired amount of rice into a dark pot. For every cup of rice, add a tablespoon of butter. Pour hot water over the rice and butter. Add spices as you wish, except for salt or soy sauce (add salty spices after cooking). Cover. Cook 1 1/2 hours if starting with a hot oven. Cook 2 hours, starting with a cold oven. You may substitute white rice in this recipe, using 1 cup of water for every cup of rice.
Green Bean Casserole1 10 oz. package French green beans, frozen
1 can cream of mushroom soup
1 small can French fried onion rings
Combine beans, soup and 1/2 of the onion rings. Place in a dark pan. Top with remaining onion rings. Cover and bake 1 1/2 hours.
Dot's Stewed Okra1/2 lb. Okra, rinsed...don't cut!
1 large can of whole tomatoes with juice
1 medium yellow onion, halved and sliced
1 teaspoon salt 1 teaspoon pepper
2 tablespoons oil or bacon fat 1 tablespoon sugar
This dish is great when slowly cooked in a SBC all day long. The smaller the better when it comes to the okra. Put salt, pepper, onion and tomatoes with juice in heavy saucepan. Crush tomatoes with hands. Stir in sugar and oil. Cook in solar box cooker until okra is tender. Serve with steamed rice.

Note: Small okra pods are more tender. Recipe from article in “Natural History” magazine.
Larry's Polenta del Sole
Picture courtesy of Mark Saliers
1/2 cup corn meal 1/2 cup chopped onions
2 3/4 cups water
2/3 cup grated cheese
Herbs
Seasoned salt Combine first 3 ingredients and cook until soft (45 min. to 2 hours, depending on conditions.) Stir in remaining ingredients, and return to cooker for 15 to 30 minutes. It can be enjoyed while still hot and soft, or let the polenta set and cut into squares. Eat warm or cold.
Dar's Scalloped Eggplant1 large eggplant, peeled & diced
1 onion, minced
1 cup Saltine crackers crushed
2 teaspoons baking powder
2 tablespoons butter, melted
2 eggs
2 1/2 oz. evaporated milk, to moisten
Salt and pepper
Parmesan cheese, grated
Mix all ingredients except cheese in greased covered pot and solar cook until the consistency of pudding. (2 hours?)
Sprinkle cheese on top and cook for 15 minutes more.

Poor and Healthy Style LentilsLentils
Water
Onion
Garlic
Vegetable Oil Soak lentils in the water overnight or for a few hours. Drain and place them in a pan. Add the same quantity of water in the pan, season with salt & pepper. Chop onion and add it too. Also add a small amount of vegetable oil. Optional, add 1 or 2 sliced cloves of garlic and bay leaves. Optional, a carrot finely sliced may be added. Stir thoroughly all the ingredients with a wooden or plastic spoon. Cooking time: 6 to 9 hours, depending of the sun & the quantity of food.
Mixed Spring VegetablesTake a mixture of vegetables, like leeks, courgettes, French beans, peas, carrots, potatoes, onions, pepper, tomatoes or any other type. Wash and slice them and place in a pan. Add water to cover the vegetables, season with salt and pepper. Add 1 or 2 sliced cloves of garlic and a bay leaf. Add a little vegetable oil. Cooking time: 6 to 8 hours.
Solar BroccoliCut fresh broccoli into spears and place into dark pot with lid. Add butter and seasoning to broccoli. Do not add water. Cooking time varies depending on desired texture (approximately 2 hours for tender broccoli).
Minty James (green peppers)2 chopped Green Peppers
1 clove of Garlic
1 tablespoon of Butter
1 teaspoon of Mint dash of salt dash of pepper
half a cup of water

Put everything in a jar and leave for two hours if you like your peppers a bit crunchy, if
not leave it longer.
Jim's Spaghetti Squash1 spaghetti squash
1 tbsp butter/margarine
1 cup water
spaghetti sauce of choice
parmesan cheese
Cut squash in half lengthwise and remove seeds. Coat inside with butter/margarine. Place skin side up in small roaster. Pour in 1 cup water. Cover, place in solar oven for 2 hours. Remove insides from skin, serve with spaghetti sauce and parmesan cheese.
We use a global sun oven...temps in Jan. in Arizona desert country get to 320F. at altitude of 850 feet. This serves 2...1/4 squash each. A whole squash could be done the same after cleaning and buttering.
Kelewele and Red Red
Red Red, a stew native to Ghana, cooking in a small solar oven.
Kelewele with Red Red stew.
To make the Kelewele you will need:
3 ripened plantains
1 tablespoon of ginger powder
1 tablespoon of red pepper powder
10 tablespoons of red palm oil (peanut oil can be used as a substitute)

Peel the plantain and cut into thin slices. Sprinkle the powdered ginger and red pepper on the plantain. Place the plantain into a cooking pot and place the pot into a parabolic type of cooker. I believe the flavor will be good if a solar oven is used, but it will most likely take a parabolic cooker to roast the plantain.
To make the Red Red stew you will need:
1 cup of cow peas (black eyed peas) 1 tomato
1 onion
1 small fish with the bones removed
1 teaspoon of dried shrimp
1 teaspoon of red pepper
Small quantity of salt to taste
I used frozen peas as they are available at our local store. If the cow peas are dried, cover them in water and soak for about an hour. When bubbles appear, they are ready to cook. Chop a fish into small bite size chunks. I used catfish "nuggets", but any locally available fish should be fine. Add the fish pieces to the pot. Chop up the onion and tomato. Add the onion and tomato pieces to the pot. Add the seasoning and stir the stew around to mix everything together well. Place in a solar oven for about 3 or 4 hours. It may take less time, depending on conditions.
This stew really taste great. If you ever try it once, you will make it again and again!
Sunshine Party Beans
1-1/2 cup ketchup 1 medium onion -- chopped
1 medium green bell (sweet) pepper -- chopped
1 medium red bell (sweet) pepper -- chopped
1 stalk celery, chopped
1/4 cup water
1/2 cup packed brown sugar
2 bay leaves
1 tablespoon cider vinegar
2 tablespooons molasses
1 tablespoon worcestershire sauce

1 teaspoon ground mustard
1/4 teaspoon salt 1/2 teaspoon Tony's or other spicy seasoned salt (opt.) 1/8 teaspoon pepper
1 can kidney beans -- rinsed and drained
1 can great northern (white) beans -- rinsed and drained
1 can lima beans -- rinsed and drained
1 can black beans -- rinsed and drained
1 can black eyed peas -- rinsed and drained
1 can garbanzos -- rinsed and drained
1 can whole kernal corn, drained
1/4 cup rice or quinoa (optional) Directions:
In a dark pot that holds at least a gallon, combine the fresh veggies and sauce ingredients; mix well. Add the beans, peas, and corn; mix well. Cover, bag/clear-cover (if needed), and set in cooker early in the day. Cook until hot and bubbling and onions/peppers have softened a bit. For a less soupy mixture, add the rice or quinoa after mixture gets hot. Everyone likes it, vegetarians and meat eaters alike! A great addition to any Potluck or Barbecue!
Note: the cans of beans and corn are the size that is close to a pint, and you can use any colorful combination of beans or peas you like as long as it adds up to 6 cans. If clouds roll in, you can finish this indoors in your slow cooker. This is a terrific recipe for the HotPot or Molly Baker cookers, but it will work in any solar cooker that can handle a gallon of food.
Cornmeal Mush (Maize Porridge, Polenta) Method
Cornmeal mush (or maize porridge or polenta) can be successfully cooked in a panel cooker or box oven. The reason for stirring while cooking on a stove or over a fire is to prevent the porridge from sticking and scorching and to help prevent lumps. Your porridge will not burn in a solar panel or box oven, and here is the trick for preventing lumps. Use water and corn (maize) meal in the proportions you would usually use (for me that is, by volume measure, four parts water to one part cornmeal) and add salt or other seasonings as usual. The trick is to use cold or cool water and add it gradually at first, stirring carefully so that there are no lumps in the mixture. Then set it to cook (dark, lidded pot with bag or clear cover unless it's going into a box oven) and just leave it alone until the porridge is done (if you think your cooker heats unevenly, it is all right to rotate the pot a half-turn occasionally). I suspect that if you tried to stir it while cooking, you would just create lumps, since it cooks from the bottom up, rather like rice, so if you

stir halfway through, you will mix the firmer, cooked part from the bottom with the less cooked part on top and lumps may result. If you just let it cook until all the water is taken up, you will have a nice smooth porridge. If it stays in the cooker beyond that point, it may begin to brown just a bit, which can give it an especially good flavor. If you want to make fried mush, start one day early and let your mixture cook in a dark loaf pan (a matching pan upside down makes a good lid—secure with binder clips). When it is done, cool and then chill for slicing the next day to fry.
CasserolesMariellen's Eggplant Parmigiana1 Eggplant (cut into 1/4 inch slices) 1 to 2 eggs
1 to 2 cups breadcrumbs
Olive oil 1 block of mozzarella cheese (sliced thin) Grated parmesan cheese
Jar of spaghetti sauce (or homemade, whichever you prefer) Preheat solar oven. In shallow bowl, beat eggs with fork. In another bowl, place breadcrumbs. Preheat skillet and coat with olive oil.
Dip eggplant slices in eggs, then coat with breadcrumbs. Brown in skillet. Save on plate.
In casserole dish, layer bottom with 1/2 of the portion of browned eggplant slices, cover with 1/2 of the spaghetti sauce, then layer with cheese, repeat with eggplant slices on top of cheese, pour remainder of spaghetti sauce over eggplant and top with cheese slices.
Put casserole in solar box oven until cooked through and cheese is bubbly and brown on top (no need to cover).
Serve with parmesan cheese. Goes great with salad and garlic bread!
Cheeseburger Pie1 1/2 cups plus 2 tablespoons of Bisquick
1/4 cup plus 2 tablespoons water
1 pound ground beef 1/2 cup onion, chopped
1/2 teaspoon salt 1/4 teaspoon pepper
1 tablespoon Worcestershire sauce

2 eggs
1 cups small curd cottage cheese
2 fresh tomatoes, sliced
1 cup (4 oz.) shredded cheddar cheese
Mix 1 1/2 cups Bisquick with water until soft dough forms; beat vigorously 20 strokes. Gently smooth dough into ball on floured cloth-covered board. Knead 5 times, roll dough to fit bottom of 9-inch dark roaster pan. Ease into pan. Bake covered 1 hour, then add other ingredients.
Bake ground beef and onions, salt, pepper for one hour in dark round roaster; drain grease. Add 2 tablespoons Bisquick and Worcestershire sauce to the meat. Blend thoroughly, and then add the mixture to top of baked bottom crust. Mix eggs with small curd cottage cheese, pour over beef mixture. Arrange slices of tomatoes on top, sprinkle with shredded cheddar cheese. Cover and bake 1 to 1 1/2 hours.
Photo courtesy of Mark Saliers
Chili Pie2 cans of chili 1 small can sliced olives
1 cup shredded cheddar cheese
3/4 cup Bisquick
1 1/4 cup milk
3 eggs (beaten)
Butter a dark oblong or dark round roaster pan. Spread chili on bottom, then layer the olives, then layer the cheese. In a separate pan, mix Bisquick, milk, and eggs and pour over the cheese. Cover and bake until brown, about 1 1/2 hours.
Salsa1 small onion, chopped
1 16-oz. can stewed tomatoes
Salt and pepper to taste
1/4 teaspoon garlic powder
1/4 teaspoon oregano
Combine ingredients in dark pan. Cover and bake 1 hour.

Broccoli Casserole3 eggs
3 tablespoons flour
2 teaspoons salt 8 oz. cottage cheese
1 cup grated sharp cheddar cheese
2 packages chopped broccoli In a dark round roaster, mix together eggs, cottage cheese, grated cheese, flour and salt. Thaw broccoli, drain and mix into egg mixture. Cover and bake 1 hour. (may use 1 large or 2 small heads of fresh broccoli).
Casserole of Fish FilletsFish fillets
Wheat germ
Salt and pepper
Lemon pepper
Celery salt Green onions, chopped
Butter
Lemon juice
Place fish fillets in oiled dark casserole, sprinkle with seasoning and green onions. Dot the top of fish with butter and lemon juice. Cover. Cook briefly, until tender. If using frozen fish, you will need liquid - try some soy sauce.
Zucchini Casserole1 and 1/2 pounds zucchini, cut in 1/4 inch rounds
1 teaspoon garlic or seasoned salt 1 teaspoon crushed oregano
(1) 10 1/2-oz. can cream of mushroom soup
1 cup grated sharp cheddar cheese
1 pound ground beef 1 cup instant rice
2 cups small curd cottage cheese
Cook zucchini in boiling, salted water until barely tender. Drain well. Sauté beef until meat is lightly browned. Add rice and seasonings. Place half the zucchini in bottom of 2 1/2 quart shallow dark casserole. Cover with beef mixture and cottage cheese. Cover with

remaining zucchini. Then spread soup over all. Sprinkle with grated cheese. Cover. Bake about 1 hour until bubbly and hot.
Lentil and Rice Casserole6 to 7 cups water or soup stock
1 cup lentils
1/2 teaspoon garlic salt 1 cup uncooked brown rice
1/2 teaspoon kelp powder
1/2 to 1 tablespoon brewer's yeast 2 onions, chopped
1 1/2 cups shredded cheddar cheese
Mix all ingredients, except cheese, in a dark colored pot. Cover and place in solar cooker all day or all afternoon (3 hours minimum).
Top with cheese or yogurt just before serving. Optional: 1 cup almonds or other nuts, carrot pieces, chopped celery, shredded cabbage, Brussels sprouts, beets or water chestnuts may be added.
Walnut Loaf1/2 cup onion, finely chopped
1 1/2 cups walnuts, ground
2 eggs, beaten
1 cup tomato juice
1 cup celery, finely chopped
3 cups whole wheat bread crumbs
1/2 cup parsley, finely chopped
In a large bowl, mix all ingredients together. Bake in a buttered 8 x 14-inch dark loaf pan. Cover with foil, then place a black cookie sheet over the top to attract the sun's rays. Serve with tomato sauce or mushroom gravy. Season to taste.
Grits Deluxe1 cup quick grits
1 teaspoon salt 2/3 pounds cheddar cheese, grated
Tabasco sauce, a few drops
4 cups boiling water
1/2 cup butter or margarine
1 teaspoon savory salt 2 eggs, well beaten
On surface unit, slowly sir quick grits into boiling, salted water. Reduce heat to low. Cover pan and cook 4 to 5 minutes, stirring occasionally. Remove from heat and add butter, cheddar cheese, savory salt, and Tabasco. Stir. Add eggs and mix well. Pour into greased baking dish, sprinkle with paprika, cover and back in solar oven for 2 to 3 hours (garlic and chilies are interesting additions).
Chili Relleños Casserole2 7-oz. cans whole green chilies
1/2 pound jack cheese, shredded
1/2 pound cheddar cheese, shredded
3 eggs, beaten
3 tablespoons flour
1 small can evaporated milk
Cut chilies lengthwise, wash, remove any seeds and membrane and pat dry on paper towels. Spray a 9-inch dark casserole pan with non-stick. Layer half of chilies and then cheese, repeat layers, reserving 1/2 cup cheese for the topping. Beat eggs, add flour and milk until blended. Pour over chilies and cheese. Bake, covered, one our or until set in center.
Chicken-Broccoli Casserole4 chicken breasts
1 cup sour cream
1 teaspoon curry
2 cans cream of chicken soup
1 teaspoon lemon juice
Broccoli, cut in pieces
Bread crumbs
Cheddar cheese, shredded
Preheat solar oven. Bone and fry 4 chicken breasts using conventional heat. Do not overcook. Set aside. In a mixing bowl, mix together undiluted soup, sour cream, lemon juice and curry. Set aside. In a dark rectangular pan, line the bottom with broccoli. Cut up the chicken and place it over the broccoli. Top with sour cream mixture. Top everything with shredded cheddar cheese and bread crumbs. Cover and place in oven. Bake about 1 to 1 1/2 hours.
Esther Garvi's Maerua crassifolia Risotto3 dl rice

3 dl of pre solar cooked Maerua crassifolia leaves (also known as famine food) 6 chopped tomatoes
salt, pepper and spices of your choice
Mix all the ingredients with water, then cook in solar oven until the rice is done. Take out and mix with some peanut oil (or oil of your choice), fresh garlic and your famine food is ready to be enjoyed! Should you have no access to the spinage-tasting Maerua crassifolia leaves, any green leaves of your choice will do as a substitute.
Pasta & RiceSolar Oven Lasagna
1 32-oz. jar spaghetti sauce 1 pound ricotta cheese 1 pound mozzarella cheese, shredded Parmesan cheese 8 oz. package of lasagna noodles Spread 1 1/2 cups of sauce over bottom of dark roaster. Coat uncooked noodles with ricotta cheese and layer over the sauce. Add half of the mozzarella cheese. Repeat layers of sauce, noodles and cheese. Top with remaining sauce. Sprinkle Parmesan cheese over the top. Cover and bake for 3 hours. Optional: 1 pound of ground beef cooked in a separate dark pan may be added to the sauce before preparing the lasagna.
If ricotta cheese is unavailable, fat free cottage cheese can be substituted.
RiceWhen cooking rice in a solar cooker, one uses less water than on a conventional stove since none of the water is lost during the cooking process.
2 cups Rice
3 cups water
Cooking white rice in unsalted water is common in South-East Asia and keeps the flavour of the rice. Take 2 cups of rice and wash it (if your rice needs washing. White rice sold in the USA should not be washed.) Heat 3 cups of water until small bubbles appear (approx. 90 degrees C). Put the washed rice into the water. Leave it in the solar cooker for 10-20 minutes. Take the pot out of the solar cooker and keep it warm, e.g. in an insulated box or covered with many blankets. Ready to serve after another 10 to 15 minutes.
The mentioned amounts are to be taken by volume, not weight. This means for example 2 cups of rice to 3 cups of water for about 6 persons. Or: 1 cup of rice to 1 1/2 cups of water to feed about 3 persons. Recipe works best in a box cooker; the rice could stick on
the walls of the pot if a powerful parabolic cooker is used. It is useful to take a heavy pot instead of a light one because of the heat storage in the metal.
Cook brown rice using the same proportions. Just add the rice to the cold water. Heat until boiling in the solar cooker. If you want to use heat-retention cooking, keep the rice in the solar oven for 10-15 minutes before putting the put into an insulated box. Otherwise keep the rice in the solar cooker until it is done.
Lentils & RiceSoak lentils in water during the night In the morning, cook in oil on a gas burner: 1 chopped onion
1/2 chopped bell pepper
2" chunk of salami cut into small pieces
1 clove garlic
2 chopped tomatoes
1 chopped carrot In the hot skillet, add enough water to cook the lentils and bring to a boil. Put in a beef bouillon cube and pour into the pot with the lentils. Cover and place in solar oven.
Mediterranean Chicken Breasts4 boneless, skinless chicken breasts
2/3 cup sun dried tomatoes, packed in oil 1 medium onion, sliced
3 cloves garlic, crushed
½ teaspoon dried basil ½ teaspoon dried oregano
1/3 cup kalmata olives
½ cup freshly grated Romano, parmesan, or asiago cheese or crumbled feta
Wash chicken breasts and put in bottom of solar pan. Spread the remaining ingredients (except cheese) on top of the breasts. Bake for an hour, add cheese, and finish cooking, until the pan juices come to a simmer. This creates a luscious broth, and must be served with crusty French bread for dipping into this delicious sauce.

Spanish Chicken1 chicken, skinned and cut in pieces
1/2 bell pepper
1 tomato, cut in 6 pieces
1 medium onion
2 gloves garlic
2 bay leaves
Ground pepper
5 to 6 chicken breasts, skinned
1 package Italian salad dressing mix
1 cup long grain white rice
2 cups water
1 tablespoon butter or margarine
Place chicken breasts in a roaster. Sprinkle package of Italian salad dressing mix over pieces of chicken. Cover. In another pot, place rice with water and butter or margarine. Cover. Place in solar oven at noon and remove at 5:00 p.m.
Chicken in the Pot4 chicken breasts, halved and skinned
4 medium potatoes, quartered
2 large carrots, cut in 1-inch chunks
2 stalks celery, cut diagonally in 1-inch chunks
1 can Swanson's chicken broth
1/4 teaspoon pepper
pinch of basil pinch of rosemary
Place chicken in a 3-quart pot or casserole. Arrange vegetables over the top. Sprinkle with seasonings. Add chicken broth. Cover and cook approximately 1 1/2 to 2 hours. Stir a couple of times while baking. You may substitute thighs for chicken breasts and add other seasonings.
Chicken Teriyaki1 medium fryer, cut-up and skin removed
1/4 cup white wine

1 to 2 tablespoons sugar
2/3 cup soy sauce
1 clove chopped garlic
1/2 tablespoon ginger
Place chicken in a pot and add the remaining ingredients. Cover pan and bake 3 to 4 hours, turning chicken once or twice. Cook rice in another pan at the same time. In place of fryer pieces, you may use a half-chicken breast for each person to be served.
Soy Sauce Marinated Chicken2 to 3 pounds chicken, cut-up into serving pieces and skinned
1/2 cup soy sauce or tamari dash paprika
1/8 teaspoon garlic powder
3 teaspoons Tabasco, optional 1 1/2 teaspoons ginger, optional Place all ingredients in a large bowl and add chicken pieces. Cover with foil and marinate in refrigerator overnight. Turn occasionally. Place chicken in dark casserole. Pour sauce over chicken. Cover and bake in solar oven about 2 hours. For additional flavor, add Tabasco and ginger.
No Peek Chicken1 whole cut-up fryer or 4 chicken breasts
2 cans cream of mushroom soup
1 box Rice-a-Roni chicken mix
1 package onion soup
Preheat solar oven 30 to 45 minutes. Arrange chicken in a dark baking pan. Mix together the mushroom soup, Rice-a-Roni and onion soup. Pour the mixture over the chicken so it is completely covered. Cover and bake for 2 to 2 1/2 hours.
Barbequed Chicken1/2 cup vinegar
2 tablespoons Worcestershire sauce
1 teaspoon dry mustard
1 teaspoon paprika
1 tablespoon sugar
1/2 cup catsup
1/2 teaspoon pepper

1 clove garlic, minced
cut-up chicken
Place chicken pieces in a dark pan. Combine ingredients and pour over the chicken pieces. Cover and bake in solar oven for 2 to 3 hours.
Chicken and VegetablesPotatoes
Carrots
Onions
Turnips
Green beans
Any fresh vegetables
Chicken pieces
Salt Pepper
Place cut-up vegetables in bottom of dark casserole. Rub chicken pieces with salt and pepper. Place chicken pieces, (fat side up) on top of vegetables. Bake about 2 to 2 1/2 hours.
Roast Turkey with Bread Stuffing1 turkey, 8 to 10 pounds
14 cups bread cubes
2 eggs, slightly beaten
1/4 cup minced parsley
1 cup chopped onions
1 1/2 cups chopped celery
3/4 cup butter or margarine
1 cup slivered almonds (optional) 1 1/2 teaspoons salt 1/4 teaspoon pepper
Sautee onions and celery in butter. Add remaining ingredients. Mix well. Stuff turkey and place in black roasting pan; cover. Bake in solar oven for 6 to 8 hours (on a clear, sunny day). Bird is done when interior temperature reaches 180°F on meat thermometer.

Chicken a La Melanie1 cup brown rice
3 chicken breast halves, boned
1 to 2 cups cheddar cheese, grated
1 1/2 to 2 cups mushrooms, sliced
1 can of cream of mushroom soup, undiluted
Paprika
Garlic powder
Salt Parmesan cheese
Place brown rice in bottom of dark roaster. Add chicken breasts. Layer with grated cheese, then mushrooms and pour soup over top. Sprinkle with remaining ingredients. Cover. Bake for 3 hours or longer.
Easy Solar Sweet & Sour Chicken1 15-oz. can sweet and sour sauce
1 8-oz. can pineapple chunks or tidbits, drained
1 chicken breast or 2 chicken legs
If using chicken breasts, cut them in half and remove skin. Cut into small chunks. Place in dark pan. Add sauce and pineapple. Cover and bake for 2 to 3 hours. Serve over brown or white rice.
Roast DucklingDuckling
Sweet-sour, orange or cranberry sauce
Onion or apple
Refer to a cookbook for the preparation of duckling. Rinse duck, put an onion or apple into the unstuffed body cavity, and then tie the legs together. Using a sharp fork, puncture skin 1/4-inch deep all over so the body fat will drip out. Place on a trivet as high as

possible above the bottom of the roasting pan. Cover and cook all afternoon or for approximately 2 1/2 hours until internal temperature reaches 160°F-170°F.
Turkey LegsTurkey legs
Sherry
Celery stalks with leaves
Sliced onions
Halved garlic cloves
Salt and pepper
Place turkey legs in a black enamel roaster with other ingredients to suit your taste. Cover and bake for 4 hours or more. When done, discard vegetables make gravy from broth.
Moroccan Chicken Tagine1 chicken (small enough to fit in the HotPot) 8 cloves garlic
1 onion
1 tsp. salt, or more to taste
1 tsp. sweet red pepper
1 tsp. ginger
1 tsp. pepper
1 tsp. cumin
2 rounded tsps saffron
5 Tbsps. butter, two times
1/4 C. oil, two times
3/4 C. water
1 small bunch coriander and parsley tied with a string
1 heaping tsp. flour
1.) Finely chop the garlic and onion and mix together with all the spices. Rub the bird inside and out with this mixture. 2.) Slowly heat the oil and butter in the HotPot, add the chicken. Add ¾ C. water and coriander and parsley tied together and cook until the chicken is done. 3.) Remove the cooked chicken and discard the coriander and parsley. Add flour to the sauce in the bowl. Stir quickly. 4.) 20 min. before serving, heat the second 5 Tbsp. butter and the second 1/4 Cup oil. Fry the chicken on the stove in the melted fat, turning it often. When golden, place on a serving dish. Add 2 Tbsp. of the frying oil to the sauce, mix well, and pour on the chicken. Serve at once over couscous.

Serves 4 Cooking time: 3-4 hours
Sunshine Chili1 pound small red beans (dry) 1 pound ground chuck
2 medium onions
1 small green pepper
1/2 cup fresh parsley, minced
dash of salt and pepper
1 28-oz. can tomatoes (may be blended first) 4 cups V-8 juice
1 tablespoon chili powder
Soak red beans in water overnight. Brown ground chuck, onions, green pepper, parsley, salt and pepper. Drain well after about one hour. Add tomatoes, red beans, V-8 juice and chili powder. Cover and bake about 4-5 hours in solar oven; serves 10. You may add more V-8 juice as cooking proceeds.
Pork Chops1/2 cup chopped celery
1 clove garlic
1/2 cup onion, sliced
6 to 8 mushrooms
1 bell pepper, sliced
1 can mushroom soup
4 pork chops
Combine ingredients except pork chops. Make a thin layer on the bottom of the pan. Place pork chops on top of the ingredients. Pour remainder of ingredients on top of meat. Cover and cook 2 to 3 hours. Pour off juice and save for gravy. Add mushroom soup, cover and cook 1 hour longer. Gravy may be thickened by adding flour.
Pot Roast with Vegetables2 to 3 pound chuck roast (1 1/2 to 2 inches thick) 3 to 4 carrots, cut in 3-inch lengths

3 to 4 potatoes, peeled and cut in 1/2 inch lengths
2 tablespoons water
1 package dry onion soup mix
Place vegetables in bottom of dark granite pan and sprinkle with water. Put meat on top and sprinkle with package of soup mix. Cover and bake 3 to 4 hours or longer. Thicken gravy if desired.
Solar Stew1 pound beef stew meat 1 medium onion, chopped
3 potatoes, diced
3 carrots, diced
6 to 8 ounces stewed tomatoes (or vegetable liquid or tomato juice) Seasoned flour
1 bay leaf 1 parsnip
1 green pepper
fat for browning
Indoors, using conventional stove top, heat "Dutch oven" or other suitable browning/stewing utensil that has a dark exterior. Mix seasonings with flour and shake onto meat. Place fat in "Dutch oven", add meat and brown on all sides. Add onions and carrots. Turn heat off. Combine the remaining ingredients and pour over meat. Cover and cook in solar oven for about 3 hours.
Sunny Fiesta Pork Stew

1 med. onion, chopped
3 large cloves garlic, minced
2 lbs. boneless pork, cut into 1" chunks
¼ cup cornmeal
2 teaspoons ground cumin (fresh ground is best)
1 teaspoon oregano
½ teaspoon salt
1 teaspoon chicken stock concentrate or 1 bouillon cube
1 can (15-16 oz.) chili beans in sauce (undrained)
1 can (14-16 oz.) diced tomatoes with green chilies
1 can (14-16 oz.) canned corn, (undrained)
1 small can green chillies (opt. – leave out if you want it very mild)
2 tablespoons quinoa (opt.)
Put onion and garlic in round roaster or other solar pot that holds about three quarts. Top with pork. Mix dry ingredients; sprinkle over pork and mix well. Add beans, tomatoes, corn, and green chillies (if using); mix well.
Cover pot, bag or clear-cover if needed, and set out to cook early. Give it a gentle stir at midday, breaking up any clumps of pork chunks. If you want a less soupy mixture, add 2 tablespoons quinoa (or rice) at this time. Give it another stir an hour or two later and let it sit and cook and tenderize until temperatures start to drop. The longer it simmers, the better it gets! Haybox while still very hot if you're not ready to eat when it's done.
Notes: This recipe would work very well in the HotPot and could be doubled if you're feeding a crowd or want to make extra to freeze for another night (get big batches out early!). If you'd rather use frozen corn, measure two cups the night before to thaw and add 3/4 cup water or chicken broth (in which case you can skip the stock concentrate or bouillon). The cornmeal used as a thickener gives it a lovely subtle sweetness. Great with cornbread or warmed tortilla. You can add more vegetables if you like. Bell peppers and sliced carrots could be good additions.
Solar Baked Brownies1/2 cup shortening
2 1-oz. squares unsweetened chocolate
2 eggs
1 cup sugar
1 teaspoon vanilla
3/4 cup flour

1/2 teaspoon baking powder
1/2 teaspoon salt 1 cup broken walnuts (optional) Melt shortening and chocolate together in solar cooker; cool. Beat eggs until light; stir in sugar, then chocolate mixture and vanilla. Add dry ingredients, mix well. Add nuts. Bake in greased 9-inch round dark roaster pan, covered, for one hour. Cut into squares. Try it!
Oatmeal Squares1 egg, beaten
1/2 cup honey
1/2 cup melted butter
1 teaspoon vanilla
1/2 cup whole wheat flour
1/2 teaspoon baking soda
1/2 teaspoon nutmeg
1 cup quick-cooking rolled oats
1/2 cup chopped walnuts
In a small bowl, beat together egg, honey, melted butter, and vanilla. In another bowl, sift together flour, soda and nutmeg. Add oats and walnuts to the flour mixture. Stir. Add the egg mixture to dry ingredients. Mix well. Bake in a covered, buttered 9 x 9 inch pan. Raisins and/or carob chips may be added.
Blueberry Muffin Cake1 package blueberry muffin mix
1 egg
1/3 cup brown sugar
milk
margarine
1 teaspoon cinnamon
Prepare 1 package of blueberry muffin mix following the instructions. Line the bottom of a 9-inch round roaster with a piece of wax paper. Pour in the blueberry muffin mix and cover with lid. Place in a preheated solar oven and bake for 1 hour. After removing cake from oven, a mixture of brown sugar and cinnamon may be added to the top. Cover cake with lid for five minutes to let heat of cake adhere the topping. Remove lid, let cool. Run

knife around edge, hold hand over cake with hot pad, invert and remove cake, peel off wax paper, invert plate over cake bottom and turn right side up. This dessert is delicious!