826 ph mobile / 827 ph lab - unideb.huweb.unideb.hu/uh9v32/muszer2/827phlab.pdfmetrohm ag ch-9100...
TRANSCRIPT

826 pH mobile / 827 pH lab
Manual8.827.8001EN


Metrohm AGCH-9100 HerisauSwitzerlandPhone +41 71 353 85 85Fax +41 71 353 89 [email protected]
826 pH mobile / 827 pH lab
Program version 5.826.0011 and 5.827.0011
Manual
8.827.8001EN 12.2010 jb/ebe

TeachwareMetrohm AGCH-9100 [email protected]
This documentation is protected by copyright. All rights reserved.
Although all the information given in this documentation has beenchecked with great care, errors cannot be entirely excluded. Should younotice any mistakes please send us your comments using the addressgiven above.
Documentation in additional languages can be found onhttp://documents.metrohm.com.

Contents
826/827 pH meter, Instructions for Use I
Table of contents
1 Introduction .......................................................... 11.1 Instrument description ................................................................................. 1
1.2 Parts and controls ........................................................................................ 2
1.3 Information about these Instructions for Use ............................................. 41.3.1 Notation and pictograms ......................................................................... 4
1.4 Safety information ........................................................................................ 51.4.1 Electrical safety ........................................................................................ 51.4.2 General handling rules ............................................................................. 5
2 Installation ........................................................... 72.1 Instrument setup .......................................................................................... 7
2.1.1 Packaging ................................................................................................. 72.1.2 Checks ...................................................................................................... 72.1.3 Location .................................................................................................... 7
2.2 Inserting the batteries at 826 pH mobile ..................................................... 7
2.3 Connecting the electrodes and sensors ..................................................... 7
2.4 Mains connection ......................................................................................... 8
2.5 Switch on ...................................................................................................... 8
2.6 Connecting a printer .................................................................................... 9
2.7 Initial configuration ...................................................................................... 9
3 Operation ........................................................... 113.1 Operating concept ..................................................................................... 11
3.2 All key functions at a glance ...................................................................... 12
3.3 Operating principles .................................................................................. 143.3.1 Configuration and method parameters .................................................143.3.2 Editing menu entries ..............................................................................143.3.3 Entering text and numbers .....................................................................15
4 Short operating tutorial ..................................... 174.1 Requirements ............................................................................................. 17
4.2 pH calibration ............................................................................................. 17
4.3 pH measurement ........................................................................................ 19
5 Configuration ..................................................... 215.1 Report ......................................................................................................... 21
5.2 Printing out measured values .................................................................... 22
5.3 Storing measured values ........................................................................... 25
5.4 Auxiliaries ................................................................................................... 26
6 Methods / Parameters ....................................... 296.1 pH measurement (pH mode) ..................................................................... 29
6.1.1 Measuring parameters ...........................................................................296.1.2 Calibration parameters ...........................................................................306.1.3 Limits ......................................................................................................326.1.4 pH calibration data .................................................................................33

Contents
II 826/827 pH meter, Instructions for Use
6.2 Temperature measurement (T mode) ........................................................ 34
6.3 Potential measurement (U mode) .............................................................. 34
7 Various functions ............................................... 357.1 Reports ....................................................................................................... 35
7.1.1 Arrangement of a report ......................................................................... 367.1.2 Report identification ............................................................................... 367.1.3 Measuring point report ........................................................................... 377.1.4 Calibration report ................................................................................... 377.1.5 Configuration report ............................................................................... 377.1.6 Parameter report .................................................................................... 387.1.7 Measured values memory report ........................................................... 387.1.8 PC/LIMS report ....................................................................................... 387.1.9 System test report .................................................................................. 39
7.2 Measured values memory .......................................................................... 407.2.1 Store measured values .......................................................................... 407.2.2 Print measured values ........................................................................... 407.2.3 Show measured values .......................................................................... 40
7.3 Setup .......................................................................................................... 427.3.1 Locking ................................................................................................... 42
8 Troubleshooting – Messages – Maintenance ..... 438.1 Troubleshooting ......................................................................................... 43
8.2 Messages ................................................................................................... 45
8.3 Diagnosis ................................................................................................... 47
8.4 Maintenance ............................................................................................... 498.4.1 Changing the batteries (826 only) ......................................................... 498.4.2 Changing the batteries (827 only) ......................................................... 50
9 Appendix ............................................................. 519.1 Technical data ............................................................................................ 51
9.1.1 Measuring modes .................................................................................. 519.1.2 Measuring inputs .................................................................................... 519.1.3 Measuring input specifications .............................................................. 529.1.4 Measured values memory ..................................................................... 529.1.5 Display .................................................................................................... 529.1.6 Interfaces ................................................................................................ 529.1.7 Power supply .......................................................................................... 529.1.8 Housing specifications ........................................................................... 529.1.9 Safety specifications .............................................................................. 539.1.10 Electromagnetic compatibility (EMC) .................................................... 539.1.11 Ambient temperature ............................................................................. 539.1.12 Reference conditions ............................................................................. 539.1.13 Dimensions ............................................................................................ 53
9.2 Menu structures ......................................................................................... 559.2.1 Instrument configuration ........................................................................ 559.2.2 Parameters in the pH mode ................................................................... 569.2.3 Parameters in the T mode ...................................................................... 569.2.4 Parameters in the U mode ..................................................................... 56
9.3 Stored buffer series ................................................................................... 57

Contents
826/827 pH meter, Instructions for Use III
9.4 Scope of delivery ....................................................................................... 629.4.1 826 pH mobile ........................................................................................629.4.2 Optional accessories for 826 pH mobile ...............................................659.4.3 827 pH lab ..............................................................................................659.4.4 Optional accessories for 827 pH lab .....................................................67
9.5 Warranty and conformity ........................................................................... 689.5.1 Warranty ..................................................................................................689.5.2 Declaration of Conformity ......................................................................699.5.3 Declaration of Conformity ......................................................................709.5.4 Quality Management Principles .............................................................71
10 Index ................................................................... 73

Contents
IV 826/827 pH meter, Instructions for Use
List of illustrations Fig. 1: pH meter 827 .................................................................................................................. 1Fig. 2: Front view of the 827 pH lab ........................................................................................... 2Fig. 3: Rear view of the 827 pH lab ........................................................................................... 3Fig. 4: Connecting sensors ........................................................................................................ 8Fig. 5: Changing the batteries for the 826 pH mobile ............................................................. 49Fig. 6: Changing the batteries for the 827 pH lab ................................................................... 50

1 Introduction
826/827 pH meter, Instructions for Use 1
1 Introduction These instructions provide you with a comprehensive overview of the installation, working principles and operation of the 826 pH mobile and 827 pH lab.
Additional theoretical principles can be found in the Metrohm Mono-graph 8.015.5013 "Electrodes in Potentiometry".
You can also request our descriptions of applications involving pH measurements in the form of Application Notes and Application Bul-letins from your local Metrohm agency or download them from the In-ternet under www.metrohm.com.
Fig. 1: pH meter 827
1.1 Instrument description Both instrument versions, the portable 826 pH mobile and the labora-tory device 827 pH lab, are used for measuring pH, temperature and potential reliably. The functional range is identical. The pH meter 826 pH mobile is operated with batteries whereas the 827 pH lab has got an external power supply.
Up to 200 values can be stored in the memory together with the most important additional data; these can be viewed and printed as a report.
All stored information (measured values, configuration, parameters, etc.) can be transmitted via the infrared interface to a printer or com-puter for output as a report.

1.2 Parts and controls
2 826/827 pH meter, Instructions for Use
Both instruments have the following features:
• Dot-matrix display for both the continuous display of the measured value and for showing the user dialog.
• High-impedance measuring input for pH, redox or ISE sensors, a connection for a separate reference electrode and an input for tem-perature sensors (NTC or Pt1000).
• Infrared interface for a infrared printer.
1.2 Parts and controls
Fig. 2: Front view of the 827 pH lab
1 LCD display
3 Input and navigation keys Menu selection, text and number input
2 On/Off key Key for switching the instrument on and off

1 Introduction
826/827 pH meter, Instructions for Use 3
Fig. 3: Rear view of the 827 pH lab
4 Connection for potentiometric elec-trodes pH, ISE, redox or silver electrodes with built-in or separate reference elec-trode; socket type F
7 Infrared interface Connection for printer or PC with infra-red interface
5 Connection for separate reference electrode for connection with two 2 mm B-plugs; the adapter 6.2103.180 or 6.2103.190 is necessary with 4 mm banana plugs
8 6 V power connection with 827 pH lab only
6 Connection for temperature sensor Pt1000 or NTC, for connection with two 2 mm B-plugs; the adapters 6.2103.180 and 6.2103.190 are neces-sary with 4 mm banana plugs; red plug in socket "Temp."!

1.3 Information about these Instructions for Use
4 826/827 pH meter, Instructions for Use
1.3 Information about these Instructions for Use
Attention! Please study these instructions carefully before you start to use the instrument. The instructions contain information and warnings that must be observed by the user in order to guarantee the safe use of the instrument.
1.3.1 Notation and pictograms
The following notations and pictograms (symbols) are used in these in-structions:
Parameter Menu item, parameter or input value
<< config >> Menu
<OK> Key
4 Operating element
Danger This symbol indicates a possible risk of death or injury if the given information is not properly observed.
Warning This symbol indicates a possible risk of dam-age to the instrument or its components if the given information is not properly observed.
Attention This symbol indicates important information. Please read it carefully before you continue.
Information This symbol indicates additional information and tips.
1 Introduction
826/827 pH meter, Instructions for Use 5
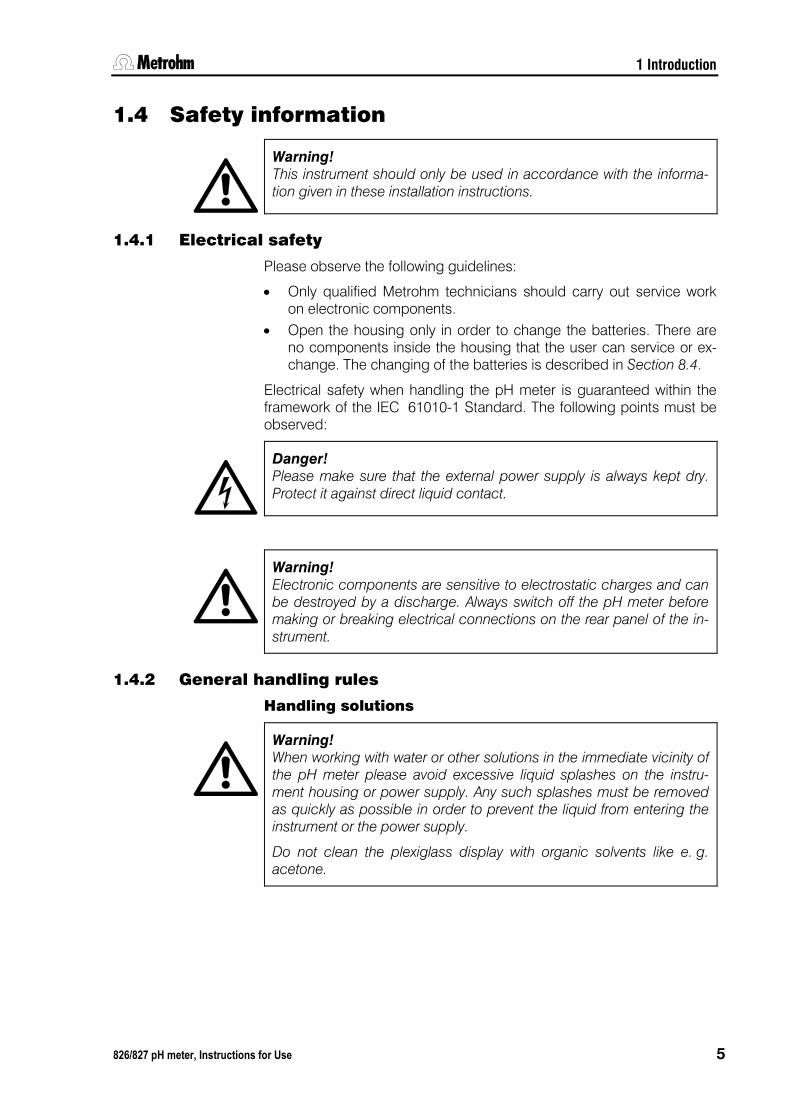
1.4 Safety information
Warning! This instrument should only be used in accordance with the informa-tion given in these installation instructions.
1.4.1 Electrical safety
Please observe the following guidelines:
• Only qualified Metrohm technicians should carry out service work on electronic components.
• Open the housing only in order to change the batteries. There are no components inside the housing that the user can service or ex-change. The changing of the batteries is described in Section 8.4.
Electrical safety when handling the pH meter is guaranteed within the framework of the IEC 61010-1 Standard. The following points must be observed:
Danger! Please make sure that the external power supply is always kept dry. Protect it against direct liquid contact.
Warning! Electronic components are sensitive to electrostatic charges and can be destroyed by a discharge. Always switch off the pH meter before making or breaking electrical connections on the rear panel of the in-strument.
1.4.2 General handling rules
Handling solutions
Warning! When working with water or other solutions in the immediate vicinity of the pH meter please avoid excessive liquid splashes on the instru-ment housing or power supply. Any such splashes must be removed as quickly as possible in order to prevent the liquid from entering the instrument or the power supply.
Do not clean the plexiglass display with organic solvents like e. g. acetone.

1.4 Safety information
6 826/827 pH meter, Instructions for Use

2 Installation
826/827 pH meter, Instructions for Use 7
2 Installation 2.1 Instrument setup
2.1.1 Packaging
The 826/827 pH meter and its specially packed accessories are sup-plied in very protective special packaging. Please store this packaging in a safe place; it is the only way in which the safe transport of the in-strument can be guaranteed.
2.1.2 Checks
Please check that the delivery is complete and undamaged immediate-ly on receipt (compare with delivery note and list of accessories given in Section 9.4).
2.1.3 Location
Place the instrument on a suitable vibration-free laboratory bench, pro-tected from corrosive atmospheres and contact with chemicals.
2.2 Inserting the batteries at 826 pH mobile The 826 pH mobile is delivered without inserted batteries. Inserting the batteries is described in Section 8.4.1.
2.3 Connecting the electrodes and sensors On its rear panel the 826/827 pH meter has connections for a potenti-ometric electrode 4, a separate reference electrode 5 and a tempera-ture sensor 6.
Connect your electrodes and sensors according to the following dia-gram to the switched off pH meter:

2.4 Mains connection
8 826/827 pH meter, Instructions for Use
Fig. 4: Connecting sensors
4 Connection for potentiometric electrodes pH, ISE, redox or silver electrodes with built-in or separate reference electrode; plug F
5 Connection for separate reference electrode
6 Connection for temperature sensor Pt1000 or NTC, connected via two 2 mm banana plugs, re-ducing adapters for 4 mm plug B may be necessary (6.2103.180 / 6.2103.190). Please observe: The red plug must be put in the socket "Temp." for shielding purposes!
2.4 Mains connection The 827 pH lab has an external power supply providing 6 V (DC). This is connected to 6 V mains connection 8.
The following power supply units are available:
• 6.2161.010 power supply unit EU 230 V / 6 V DC • 6.2161.020 power supply unit US 115 V/ 6 V DC • 6.2161.030 power supply unit UK 230 V / 6 V DC • 6.2161.040 power supply unit AUS 240 V / 6 V DC
Attention! Please make sure that the power supply is always kept dry. Protect it against direct liquid contact.
2.5 Switch on Switch on the pH meter with the < > key. The instrument will start in the last operating mode to have been used for measuring pH, tempera-ture or potential.
During the switch-on process an instrument checking routine is carried out automatically. If an error message is displayed here ('Err x') then please contact your local Metrohm agency.

2 Installation
826/827 pH meter, Instructions for Use 9
2.6 Connecting a printer A printer with an infrared interface can be connected to the infrared in-terface for printing out reports.
Activate the infrared interface of the pH meter under
configuration/auxil/IR interface: (see Section 5.4)
No further transmission parameters need to be set.
Attention! In order to guarantee a perfect transmission the distance between the pH meter and the printer should be 80 cm at the maximum. The infra-red interfaces must face each other directly. Never expose the infra-red interface to direct sunlight.
2.7 Initial configuration The pH meter is delivered with standard settings for the configuration. If it should ever be necessary to reset the configuration of the instrument to its original condition then this can be carried out by a re-initialization of the instrument memory (see Section 8.3).
Before you start to make measurements please change the following configuration settings. If you first want to make yourself familiar with the operation of the pH meter then please read Sections 3.1 to 3.3. More detailed explanations of the individual configuration settings are given in Section 5.
Date and time
configuration/auxil/date and /time
Please check that the date and time are correct.
Temperature sensor
configuration/auxil/temp.sens.
Enter the type of temperature sensor that is connected. If no tempera-ture sensor is connected and you always want to enter the measuring temperature manually then you can ignore this setting.

2.7 Initial configuration
10 826/827 pH meter, Instructions for Use

3 Operation
826/827 pH meter, Instructions for Use 11
3 Operation 3.1 Operating concept
The pH meter provides two types of display:
1. The measured value display. This is the normal instrument display.
2. The menu display This is used for editing various settings.
In the measured value display the current measured value is shown together with the method of the temperature measurement (only for mode pH) and the date and time (only for modes U and T) respectively. The measured value display changes when the operating mode of the pH meter is changed with <OK> in the menu << pH/°C/mV >>. You can easily see which mode is set from the measuring unit or the prefix "pH" shown in the display.

3.2 All key functions at a glance
12 826/827 pH meter, Instructions for Use
3.2 All key functions at a glance The functions of all the keys are described below both for the measured value display and the menu display:
Key Measured value display Menu display
On/Off • The < > key switches the instru-
ment on and off.
• After switching-on the pH meter is in the initial state of the last mode to have been used.
On/Off • The < > key switches the instru-
ment off at any time.
Starting calibration • The <CAL> key starts the pH cali-
bration (in mode pH only).
Acknowledging messages • Displayed messages are normally
acknowledged with <QUIT> (Ex-ceptions: see Section 8.2).
• If the cause of the message has not been remedied, then it will appear again at the next check.
Canceling working step • In menus <QUIT> causes a jump
to the next higher level without ac-cepting the alterations.
Menu selection
• The menu is being changed with the arrow keys <> and <>.
Selecting predefined entries • For menu parameters which offer a
fixed choice of settings (recogniza-ble by the final colon) the selection list can be viewed with the arrow keys. The arrow determines the se-lection direction.
Cursor control for text input • The cursor is moved to that position
which needs to be altered.

3 Operation
826/827 pH meter, Instructions for Use 13
Key Measured value display Menu display
Altering display contrast • The contrast of the LCD display can
be altered with the arrow keys <> and <> during the measured val-ue display.
• This setting is retained after the in-strument has been switched off and on. The default value is only reset af-ter the memory has been initialized.
Controlling the menu bar • In each menu display the <> und
<> keys can be used to move the selection bar up and down by one line.
Cursor control for text input • The character to be entered is se-
lected with the arrow keys and en-tered with <OK>.
Leafing through the measured value memory • Leafing through between the entries
in the measured value memory dis-play: starting from the last measured value having been stored you can access older entries with <> and vice versa.
Calibration • The calibration sequence is contin-
ued with <OK>.
• The calibration data are accepted with <OK> in case they are out of the defined limits.
Confirming entry • The <OK> key is used to complete
each entry with the selection bar moving on to the next parameter. If an entry is exited without this confir-mation then the entered value will be rejected.

3.3 Operating principles
14 826/827 pH meter, Instructions for Use
3.3 Operating principles
3.3.1 Configuration and method parameters
Instrument configuration and parameters for the pH mode (no adjusta-ble parameters are required for the measuring modes U (mV) and T (°C)) are each contained in menus with a tree structure. These menu structures are shown in the appendix in Section 9.2.
The instrument configuration of the pH meter is described in the menu << config >>. This contains the basic settings that apply for all mea-suring modes. The parameters for the pH mode are stored in the menu << param >>.
The change from the measured value display to the menu display is made by selecting the corresponding menu and confirming with the <OK> key. The title of the submenu appears first, and is shown with an '>' (e. g. >report). You can now move the selection bar up and down with the <> and <> arrow keys. Each underlying level in the menu structure is opened with <OK> and exited with <QUIT>. Altera-tions to individual entries must be confirmed with <OK>. If such altera-tions are exited with <QUIT> then they remain ineffective.
If an entry is confirmed with <OK> then the selection bar will move to the next entry. At the end of a submenu it will finally change to the next point of the superior menu selection.
In this way you can run through the complete menu structure for the configuration and parameters by repeatedly pressing the <OK> key. This can be helpful when carrying out checks.
Not all parts of the menu structure described below are visible in the display at all times. Only the specific possible settings of the option which is currently activated are shown. For example, the various set-tings for printing under configuration/print/print crit. are not vis-ible when printing has been deactivated completely (off). If one of the other printing criteria is selected then the particular settings it requires will appear in the display.
3.3.2 Editing menu entries
A basic differentiation is made between two types of menu entry.
Entries with a fixed selection are indicated by a colon:
print crit.: immed., time, drift, change, off
The selection is then made with the arrow keys and confirmed with <OK>.
Entries which can be edited are altered by entering a new value and confirming it with <OK>.

3 Operation
826/827 pH meter, Instructions for Use 15
3.3.3 Entering text and numbers
The editing of text and number inputs is activated with the <> or <> key. The first digit of the entry field will be displayed inverted for text entries whereas it is the last digit for number entries. The cursor can be moved to the position to be changed with the <> or <> key.
The desired character can be selected from a cylinder with the <> or <> keys. The cursor movement can be accelerated by keeping the arrow keys pressed down.
The following characters can be selected:
• For ASCII entry fields: a, b, c, d, e, f, g, h, i, j, k, l, m, n, o, p, q, r, s, t, u, v, w, x, y, z, 0, 1, 2, 3, 4, 5, 6, 7, 8, 9, ., –, empty
• For number entry fields: 0, 1, 2, 3, 4, 5, 6, 7, 8, 9, ., –, empty
The entry is checked for validity and accepted if it is valid. Otherwise the entered value is blinking and it can be corrected. If a space has been entered between two numbers of a number entry, the display is blinking as well. The value can be corrected then or the original value is entered by pressing <QUIT>. The editing can be exited with <QUIT> without storing the setting.

3.3 Operating principles
16 826/827 pH meter, Instructions for Use

4 Short operating tutorial
826/827 pH meter, Instructions for Use 17
4 Short operating tutorial In this section the necessary steps for carrying out a simple pH and ion measurement with calibration are described. The instructions are li-mited to those steps that are absolutely necessary and will enable you to carry out your first measurements with the pH meter directly. The op-erating principles are described in Section 3.3.
4.1 Requirements The following instruments, accessories and solutions are required for carrying out the pH calibration and measurement described below:
• 826 pH mobile (2.826.0XX0) or 827 pH lab (2.827.011X, 2.827.021X)
• pH electrode
• Calibration buffers Metrohm buffer solutions pH 4.00 and pH 7.00
The calibration parameters for the pH mode are set for a calibration us-ing two Metrohm buffers as default (see Section 6.1.2). If you want to use other buffers then the corresponding buffer type must be entered.
4.2 pH calibration
1 Start calibration with first buffer • Start calibration with <CAL> • Immerse pH electrode in buffer solution pH 7 and confirm with
<OK> • If a temperature sensor is connected, the calibration tempera-
ture is being determined • If no temperature sensor is connected:
enter the temperature with the arrow keys and confirm with <OK>
• The first buffer is being measured • The following message is displayed after successful mea-
surement: change buffer <OK>
2 Continue calibration with second buffer • Remove pH electrode from first buffer and rinse with water • Immerse pH electrode in second buffer solution pH 4 and
continue calibration sequence with <OK> • The second buffer is being measured

4.2 pH calibration
18 826/827 pH meter, Instructions for Use
3 Result • Wait for potential measurement, the result will be displayed:
• After 30 s the pH meter will switch back automatically to the measurement display. This can also be done immediately with <OK> or <QUIT>.
3 Poor calibration data • If the calibration data are outside the calibration parameters
defined as the limits (see Section 6.1.3) then a corresponding message will be shown:
• You can still accept the calibration data with <OK>, or reject it with <QUIT>.
4 Show calibration data You can now display the calibration data under param/ cal.data.
5 Print calibration report • Change to the menu << report >> with the arrow keys <>
or <>.
• Press <OK>.
• Select the report cal with the arrow keys <> or <> and start the printing with <OK>.

4 Short operating tutorial
826/827 pH meter, Instructions for Use 19
6 Possible error messages • In case buffer pH 7 has been measured again by mistake, the
following message is displayed:
same buffer Change the buffer and press <OK>. The calibration is being
continued. The calibration can be canceled with <QUIT>.
• If the temperature difference is > 2 °C between the buffers, the following message is displayed:
delta T > 2 °C
Adjust the temperature and continue the calibration with <OK> or cancel it with <QUIT>
4.3 pH measurement
1 Select print criterion • If the obtained measured value is to be printed out directly as
a measuring point report then the required print criterion must be set (see Section 5.2):
configuration/print crit.: drift
2 Start measurement • Immerse the pH electrode in the sample
3 Determine measured value • You can read off the current pH value of the sample from the
display. It is stable when the message drifting... is no longer being displayed (preset drift threshold: 0.028 pH/min)1
4
.
Print measured value • Change to the menu << print >> with the arrow keys <>
or <>.
• The output of a measuring point report on a printer is started with <OK>. Due to the print criterion drift the recording of the measurement and its output takes place only when the measured value is stable:
1 Further preset drift thresholds: for potential measurement: U/mV: 1.875 mV/min, for temperature measurement: t/°C: 0.974 °C/min
'mp 827 pH lab 01106 5.827.0010 print date 2005-02-08 15:43:01 pH = 4.612 22.8 °C NTC ==============

4.3 pH measurement
20 826/827 pH meter, Instructions for Use

5 Configuration
826/827 pH meter, Instructions for Use 21
5 Configuration The configuration menu contains all the instrument settings for the pH meter. These are independent of the mode. They continue to exist until they are edited or the permanent memory containing the instrument configuration is re-initialized (see Section 8.3).
All the settings of this menu are described in this section. For each point you will find all the possible entries or the valid entry range to-gether with the default value. This will always be reset when the perma-nent memory of the pH meter is re-initialized. The default is written in bold type below.
Example:
print crit. immed., time, drift, change, off
The print criterion defines at what point in time the report or the meas-ured value is being printed. The printing is started immediately with the default value immed..
5.1 Report
<< config >> configuration report id : line feed dev.label sys.test rep.
In the configuration menu report you can define the output format of the report header.
A report header containing all the elements described here could look like this:
Report identification: 'mp Device identification (unchangeable): 827 pH lab 01106 5.827.0010
Device identification (changeable): dev.label lab 1a Date, Time: print date 2005-01-25 08:23:56
Remark id sample 1 ...
id 8 ASCII characters
This is where you can define a short identification for the report header of the measuring point report and the calibration report (e. g. sam-ple/electrode identification). This entry will be printed out only if an iden-tification has been entered. This identification is saved with each meas-ured value being stored (see Section 7.2) in order to label the measured values individually.

5.2 Printing out measured values
22 826/827 pH meter, Instructions for Use
line feed 0...3...999
The paper feed of the printer at the end of a report can be set here. You can select the number of empty lines so that after the report has been printed out you can tear off the printed paper directly at a suitable point. The paper feed depends on the type of printer and has to be set accor-dingly.
Note! The line feed must be set to 999 when using a A4 printer.
dev.label 8 ASCII characters
If you wish to assign the printed reports to a particular pH meter not on-ly by the unchangeable device identification, you can enter any text here. This entry will be printed out in each report provided that an identi-fication has been entered.
sys.test rep. on, off
After switching on the 826/827 pH meter a system diagnosis is carried out automatically. If this parameter is switched on, the result is printed automatically after switching on the pH meter.
5.2 Printing out measured values
<< config >> configuration : print : print crit. immed. date & time rep.header cal.report time date & time rep.header cal.report time int. stop time drift date & time rep.header cal.report change date & time rep.header cal.report delta pH/T/mV stop time
off
In the configuration menu print the output form of measured values, triggered by <OK> in the menu << print >> is defined.
print crit.: immed., time, drift, change, off
Depending upon the print criterion a measured value report will be transmitted to a printer either immediately, at defined time intervals,

5 Configuration
826/827 pH meter, Instructions for Use 23
when the drift condition has been fulfilled or after a certain difference of the measured value has been exceeded.
print crit.: immed.
With this setting a measured value report will be printed out after press-ing <OK> in the menu << print >>. The following options can be used:
date & time: on, off Here you can choose whether the date and time at which the measured value was recorded are to be included with each indi-vidual measured value. This can take place irrespective of wheth-er a report header is used.
rep.header: once, always, off Normally each measured value is accompanied by the report header for documentation purposes. The exact contents of the report header are defined under configuration/report (see above).
With a larger series of manually triggered measurements it may be advisable to print out the report header only once with the first measured value. In this case all the measurements should be made under the same conditions.
Note! The report header will only appear again when you switch off and on the pH meter again.
cal.report: on, off You have the possibility of providing each measured value with the associated calibration data of the electrode used, e. g. within the context of a GLP documentation.
print crit.: time
With this print criterion you can automatically record and output the measured values at fixed intervals. The following options are used:
date & time: on, off rep.header: once, always, off cal.report: on, off These settings correspond to those of the print criterion 'immed.' (see above).
time int.: 1...4...99'999 s Automatic measuring value recording can be carried out at time intervals of down to 1 s. Please note that if small time intervals are used then the amount of data for each measured value must be

5.2 Printing out measured values
24 826/827 pH meter, Instructions for Use
adapted accordingly, as otherwise the buffer memory of the con-nected printer would be filled too quickly. This means, for exam-ple, that the report header should only be printed out once at the start of a series of measurements. Otherwise data could be lost. In this case you should consider matching the measured value recording to the measured value memory (see Section 5.3).
stop time: 0...999'999 s The time after which an automatic series of measurements is to be terminated can be entered in whole seconds. You can also let a series of measurements run indefinitely without a fixed stop time and then stop it manually with <QUIT> if you select the default value'0 s' for this setting.
print crit.: drift
If this print criterion is used, a measured value will be printed out after pressing <OK> in the menu print not until the message drift-ing... is no longer displayed.
date & time: on, off rep.header: once, always, off cal.report: on, off These settings correspond to those of the print criterion 'immed.' (see above).
print crit.: change
The next measured value is printed automatically not until the difference to the previous measured value is bigger than the parameter delta pH/T/mV defined here.
date & time: on, off rep.header: once, always, off cal.report: on, off These settings correspond to those of the print criterion 'immed.' (see above).
delta pH: 0.10...0.50...16.00 pH delta T: 0.1...0.5...100.0 °C delta mV: 0.1...30.0...999.9 mV
stop time: 0...999'999 s The printout of the measured values is terminated when the stop time has elapsed or will continue indefinitely ('0 s'). A termination is always possible with <QUIT>.

5 Configuration
826/827 pH meter, Instructions for Use 25
5.3 Storing measured values
<< config >> configuration : store : store crit. immed., drift, off time time int. stop time change delta pH/T/mV stop time
Up to 200 measured values can be stored manually or automatically af-ter reaching the drift criterion, at definite time intervals or after changing by a certain amount (see Section 7.2). The storing is done by pressing <OK> in the menu << store >>.
store crit.: immed., time, drift, change, off
Depending upon the store criterion a measured value will be stored ei-ther immediately, at defined time intervals, when the drift condition has been fulfilled or after a certain difference of the measured value has been exceeded.
The following additional information are stored with each measured val-ue:
• Temperature (Mode pH only) • Id • Date • Time
store crit.: immed.
The current measured value is stored with <OK> if you are in the menu << store >>.
store crit.: time
time int.: 1...4...99'999 s stop time: 0...999'999 s
You can automatically record and save the measured values at fixed time intervals until the stop time has been reached.
store crit.: drift
A measured value can only be stored if the message drifting... is no longer displayed.
store crit.: change
The next measured value is stored automatically not until the difference to the previous measured value is bigger than the parameter delta pH/T/mV defined here.

5.4 Auxiliaries
26 826/827 pH meter, Instructions for Use
delta pH: 0.10...0.50...16.00 pH delta T: 0.1...0.5...100.0 °C delta mV: 0.1...30.0...999.9 mV
stop time: 0...999'999 s The storage of the measured values is terminated when the stop time has elapsed or will continue indefinitely ('0 s'). A termination is always possible with <QUIT>.
While storing the 200th measured value and each time a further storage attempt is made, the pH meter will produce a corresponding warning:
mv memory overflow
You now have the possibility to view the stored measured values in the menu << recall >> or to clear the whole measured value memory (see Section 7.2). It is also possible to output all measured values as a re-port via the infrared interface (see Section 7.1.7).
5.4 Auxiliaries
configuration : auxil last digit IR interface date time temp.sens. power save progr.
Various basic settings for the configuration of the pH meter are made in this submenu.
last digit: on, off
Switch on this parameter if the pH values should be displayed with 3 decimal places and the potential with one decimal place respectively. The hiding can be useful in improving the readability of a rapidly chang-ing measured value. Please note that this setting does not influence the drift control of a measurement. This setting refers only to the display.
IR interface on, off
The infrared interface is activated or deactivated respectively with this parameter. This parameter is deactivated by default.
Note! As soon as the alteration of this parameter has been confirmed with <OK>, the pH meter is switched off and on automatically.
If the connection between pH meter and printer is working perfectly, it will be shown with the symbol at the down left margin of the display.

5 Configuration
826/827 pH meter, Instructions for Use 27
If no printer is within the range of the infrared interface after switching on the pH meter or if the printer is switched off respectively, the follow-ing message is displayed:
no IR connection
Please consider the transmission range of the infrared interface (see Section 2.2) or switch on the printer respectively. The pH meter has to be switched off and on again.
date YYYY-MM-DD time hh:mm:ss
You can set the date and time here. The program will only accept num-bers which make sense.
temp.sens.: NTC, Pt1000
The 826/827 pH meter supports the use of two different types of tem-perature measuring techniques: NTC ('Negative Temperature Coeffi-cient' semiconductor) and Pt1000 (platinum resistance thermometer). This means that the configuration must be adapted accordingly. If NTC sensors are used then it is also necessary to enter two sensor characte-ristics; these can be found in the specification of the sensor:
R (25 °C) 10'000...30'000...100'000 B value 1'000...4'100...9'999
The standard values R (25 °C) = 30'000 Ω and B value = 4'100 K apply to the use of a Metrohm electrode with NTC sensor (e. g. LL Primatrode NTC 6.0228.0X0), where the B value refers to 25 °C and 50 °C. B values of other NTC sensors are frequently based on different reference tem-peratures (usually 25 °C / 50 °C – 100 °C). When entering your own sensor characteristics the effect of the second reference temperature on the measuring accuracy of an NTC sensor is negligible.
power save: off, 5, 15, 30, 60 min
When this time interval has expired after the last operation the pH meter is switched off automatically.
progr.
This is the version number of the instrument software and cannot be al-tered. It is included in the report header as part of the device identifica-tion.

5.4 Auxiliaries
28 826/827 pH meter, Instructions for Use

6 Methods / Parameters
826/827 pH meter, Instructions for Use 29
6 Methods / Parameters The exact measuring method of the pH meter is described by parame-ters which, like the instrument configuration, are arranged in a tree structure in the menu display. The complete tree is shown in the ap-pendix (see Section 9.2) to provide a better overview.
The parameters are set analogous to the instrument configuration. No parameters are available for the measuring modes U (mV) and T (°C). The menu << param >> is therefore not visible in these modes.
This means that one of the following subsections, together with the in-strument configuration, forms a complete description of all the settings which are important for the operation of the pH meter in a particular measuring mode.
6.1 pH measurement (pH mode)
6.1.1 Measuring parameters
param measurement : temp.
The measuring parameters describe the settings which are of direct importance for the measurement.
temp.: -999.9...25.0...999.9 °C
If no temperature sensor is connected, you can enter the temperature of the sample solution here. Otherwise the temperature is measured continuously and this value will be ignored. In case that the measuring and calibration temperatures are different, then it is necessary to record the temperature for the automatic correction of the electrode slope (temperature compensation). Information about the measuring temper-ature is also absolutely necessary for the complete documentation of a pH value. In the report printout of the measured value this manually de-termined temperature is indicated by the suffix 'man.'.

6.1 pH measurement (pH mode)
30 826/827 pH meter, Instructions for Use
6.1.2 Calibration parameters
param : cal.settings : temperature report cal.interval no.of buffers buff.type
The calibration parameters describe the most important settings for the calibration such as buffer types and number of buffers.
temperature 0.0...25.0...99.9 °C
Just as for the measuring temperature, the calibration temperature should also be entered when no temperature sensor is connected. Otherwise the temperature is measured continuously and this value will be ignored. If the measuring and calibration temperatures are different, then this is absolutely necessary for the automatic temperature correc-tion of the electrode slope. The temperature is also stored with the suf-fix 'manual' and marked in this way in the calibration report.
The exact temperature recording is also important for the pH calibration as the pH meter works with automatic buffer recognition (see below: buff.type).
report: on, off
After the calibration it is possible to output the calibration data automat-ically as a report.
Such a report can also be printed out at a later date.
cal.interval 0...999 h, 0 = off
The pH meter can automatically remind you about any recalibration of the pH electrode used. When this interval has elapsed, a message will appear on the display:
cal.interval exp.
This message can be deleted from the display with <QUIT>. It is dis-played again every 10 min until a new calibration has been carried out. Until then it will be printed out on every measuring point report.
Note! The calibration interval is only valid after the next calibration.

6 Methods / Parameters
826/827 pH meter, Instructions for Use 31
no.of buffers 1...2...3
Up to 3 buffers can be used for the pH calibration. If the calibration is carried out with only one buffer then the program will use the theoretical value of 100.0 % for the slope. This also applies when a calibration with several buffers is canceled with <QUIT> after the first buffer has been measured and then confirmed with <OK>.
Enter "3" if you carry out a 2-point calibration but wish to measure the second buffer twice in order to give it more statistical weight.
buff.type: Metrohm, NIST, DIN, Fisher, Fluka BS, Mettler, MerckTitrisol, MerckCertiPUR, Beckman, Radiome-ter, Baker, Hamilton, Precisa, special
For the automatic temperature-specific buffer recognition during the ca-libration, information about the type of buffer used is required. In the pH meter the temperature-dependent pH values of reference buffer solu-tions and technical buffer solutions from some suppliers are stored. Such a buffer table for Metrohm buffers looks like this:
Metrohm buffers
T [°C] pH 4.00 pH 7.00 pH 9.00
0 5 10 15 20 25 30 35 40 45 50 55 60 65 70 75 80 85 90 95
3.99 3.99 3.99 3.99 3.99 4.00 4.00 4.01 4.02 4.03 4.04 4.06 4.07 4.09 4.11 4.13 4.15 4.18 4.20 4.23
7.11 7.08 7.06 7.04 7.02 7.00 6.99 6.98 6.98 6.97 6.97 6.97 6.97 6.98 6.98 6.99 7.00 7.00 7.01 7.02
9.27 9.18 9.13 9.08 9.04 9.00 8.96 8.93 8.90 8.87 8.84 8.81 8.79 8.76 8.74 8.73 8.71 8.70 8.68 8.67

6.1 pH measurement (pH mode)
32 826/827 pH meter, Instructions for Use
The other stored buffer tables are described in Section 9.3. During the calibration the pH meter shows the type and temperature-specific pH value of the recognized buffer. For temperatures within the 5 °C steps the pH value is linearly interpolated.
buff.type: special If you would like to use different buffers from those described, then you require the exact pH value of each buffer at the tempera-ture used for calibration. These pH values can be entered here. During the calibration they can again be adapted before each measurement.
A general rule is that you can only calibrate in defined temperature ranges, as otherwise the following error message appears:
buffer not defined
6.1.3 Limits
param : cal.limits : lo.lim.slope up lim.slope lo.lim.pH(0) up lim.pH(0)
The most important calibration data such as slope and pH(0) must be within the limits defined here in order to be adopted automatically.
lo.lim.slope 1.0...95.0...999.9 % up lim.slope 1.0...103.0...999.9 % lo.lim.pH(0) 0.00...6.40...99.99 up lim.pH(0) 0.00...8.00...99.99
If one of the values of the calibration data lies outside these limits then at the end of the calibration the following message is displayed:
cal. out of limits
You can accept these calibration data nevertheless with <OK> or you can reject them with <QUIT>.

6 Methods / Parameters
826/827 pH meter, Instructions for Use 33
6.1.4 pH calibration data
The current pH calibration data can be called up at any time under pa-ram/cal.data.
If no calibration has yet been carried out then only the theoretical cali-bration data slope = 100.00 % and pH(0) = 7.000 will be shown and taken into account for the measurement.
param : cal.data : slope pH(0) variance temperature temp.sensor cal.date cal.time cal.interval buff.type no.of buffers
slope
The slope of the linear calibration curve obtained during the calibration will be shown here as a percentage. This is a relative quantity which is based on the temperature-specific value of the Nernst constant (e. g. 59.16 mV at 25 °C). Due to the fact that only pH(0) can be calculated af-ter a single buffer calibration, the slope is set to 100 %.
This value can be altered manually for test purposes.
pH(0)
This is the second characteristic quantity of the calibration curve. pH(0) is the pH value at 0 mV. It can also be altered manually for test purpos-es.
Note! The manual alteration of either slope or pH(0) is documented by de-leting the remaining calibration data.
variance
For the calibration with 3 buffers the calibration function will be calcu-lated as a compensation curve according to the principle of the smal-lest mean-square error (linear regression). The resulting variance will be given here.

6.2 Temperature measurement (T mode)
34 826/827 pH meter, Instructions for Use
temperature
The calibration temperature is shown here.
temp.sensor
If the calibration temperature has been determined automatically by a connected temperature sensor then its type will be shown here ('NTC' or 'Pt1000'). A manually entered temperature for the calibration will be indicated accordingly ('manual').
cal.date
The date of the calibration is shown here.
cal.time
The time of the calibration is shown here.
cal.interval
If a calibration interval has been defined under param/cal.settings then it will be shown here. It can be used together with the calibration time to estimate the time that the next calibration is due.
buff.type
The type of buffer defined in the calibration parameters at the time when calibration was carried out is shown here.
no.of buffers
The number of buffers actually measured is shown here. This can be lower than that given in the calibration parameters, as a calibration can be terminated prematurely with <QUIT>; only the buffers which have already been measured will then be used for the calculation of the cali-bration data.
6.2 Temperature measurement (T mode) No editable parameters are necessary for this measuring mode. The menu << param >> can therefore not be selected.
6.3 Potential measurement (U mode) No editable parameters are necessary for this measuring mode. The menu << param >> can therefore not be selected.

7 Various functions
826/827 pH meter, Instructions for Use 35
7 Various functions This section describes various functions of the pH meter which cannot be assigned to individual modes.
7.1 Reports A pH meter report is produced by transmitting data to a printer or com-puter via the infrared interface. In this way you can document e. g. measuring results, calibration data or the configuration of the instru-ment in written form.
A requirement for a properly functioning report output is the activation of the infrared interface (see Section 5.4).
The following reports can be printed automatically:
• Calibration report: The report of the current calibration can be printed additionally to each printed measuring point. Therefor acti-vate the parameter report under param/cal.settings.
• System test report: The result of the system test after switching on the pH meter is printed out automatically if the parameter sys.test rep. under configuration/report is activated.
Apart from the measuring point report, all reports can be triggered ma-nually at a later date via the menu << report >>. The required report can be selected with the arrow keys <> or <> after confirming with <OK>:
cal Calibration report
config Instrument configuration report
param Parameter report of the pH measurement
mval Output of all stored measured values
pc/lims Output of all stored measured values in machine readable form for storage with a PC
all Output of all existing reports
The reports cal and param are only available in the pH mode.
Attention! The report output can be terminated at any time with <QUIT>. For this reason you should wait for the report output to be finished before operating the pH meter again. In this way you avoid the accidental cancellation of a report output.
The following pages show the arrangement of reports together with the different types of reports.

7.1 Reports
36 826/827 pH meter, Instructions for Use
7.1.1 Arrangement of a report
The first lines of a report provide a general description. This report header is configured under configuration/report (see Section 5.1):
Report Id: 'mp Device Id: 827 pH lab 01106 5.827.0010
Date, Time: print date 2005-01-27 14:21:52 ...
If you have entered a device identification (dev.label) under configu-ration/report then this will appear in the report header as an addi-tional line between the device Id and the line date/time. A further defin-able identification for the report header (id) will appear subsequently to the line date/time (measuring point and calibration report only).
Each report is concluded with a finishing line. For an automatically triggered original report (measuring point or calibration report) this is in the form of a double line:
==============
Each report triggered manually via the menu << report >> is con-cluded with a single line:
--------------
7.1.2 Report identification
The report identification, known here as Report Id, is an abbreviation describing the type of report.
The following report Ids exist for the 826 pH mobile and 827 pH lab:
Report Id Report name
'cr pH calibration report
'co configuration
'pa parameter
'mv measured values stored
'mp measuring points
'md measuring values to database (PC/LIMS)
'di diagnosis

7 Various functions
826/827 pH meter, Instructions for Use 37
7.1.3 Measuring point report
By pressing the <OK> key in the in the menu << print >> a measur-ing point report will be produced. The following examples show ver-sions of this type of report, the various configurations of which are de-fined under configuration/print (see Section 5.2).
A typical version of a measuring point report is the output of a single measured value. The print criterion 'immed.' or 'drift' must be selected.
'mp 827 pH lab 01106 5.827.0010 print date 2005-01-27 14:24:38 pH = 6.958 23.6 °C NTC ==============
If a whole series of measured values is to be documented then this is done by selecting the option rep.header: once under configura-tion/print. In this way the report header will be printed out once with the first measured value.
Note! In order that the report header is printed again for a new series of measured values, the pH meter must be switched off and on again.
Each further time that the <OK> key is pressed a further measured value will be printed out:
pH = 6.963 23.6 °C NTC pH = 6.968 23.6 °C NTC pH = 6.969 23.6 °C NTC
Such a series of measured values can also be produced automatically by selecting the print criterion 'time'.
With the print criterion 'change' the next measured value is printed au-tomatically not until the difference to the previous measured value is bigger than the value delta pH/T/mV defined under configura-tion/print.
7.1.4 Calibration report
Subsequent to a calibration a calibration report can printed out. Under param/cal.settings/report you can define whether this report is to be produced automatically after the measurement.
7.1.5 Configuration report
The current device settings are printed out with a configuration report.
<< print >>
<< report >> cal
<< report >> config

7.1 Reports
38 826/827 pH meter, Instructions for Use
7.1.6 Parameter report
The complete set of parameters of the mode pH is printed out with a parameter report. A parameter report can't be printed for the measuring modes U (mV) and T (°C) because these modes don't have any edita-ble parameters.
7.1.7 Measured values memory report
Up to 200 measured values can be stored in the menu << store >> (see Section 7.2). If you want to print out all the stored data then you can produce a measured values memory report.
The 'id' will only be included in the report if an identification has been entered under configuration/report.
7.1.8 PC/LIMS report
The PC/LIMS report is a machine readable report of all the stored measured values. It can be sent to a PC for storage (e. g. Metrohm Ve-suv© 3.0 for WindowsTM).
The PC/LIMS report has got the following structure:
Start of the data set: $S Report identification: 'md Device identification: 827 pH lab
Serial number: 01106 Program version: 5.827.0010
Device identification (dev.label): lab 1a No. of measured value: #1
Measuring quantity 1: pH/U/T Value: 4.477/165.3/24.3
Unit: --/mV/°C NTC Measuring quantity 2 (temperature): T/--/--
Value: 23.8/--/-- Temperature unit, sensor type: °C NTC/--/--
Remark (id): sample 1 Date, time: 2005-01-31 17:05:39
Start of the data set: $E --------------
<< report >> param
<< report >> mval
<< report >> pc/lims

7 Various functions
826/827 pH meter, Instructions for Use 39
7.1.9 System test report
After the pH meter has been switched on an electronic system test is carried out automatically.
The tests are documented in the system test report which can be printed out when the pH meter is switched on: (see Section 5.1):
'di 827 pH lab 01106 5.827.0010 print date 2005-01-28 08:16:41 EPROM test OK ADC adjust test OK real time clock OK A/D converter OK LCD display OK ==============
Note! The system test report can't be printed manually via the menu << re-port >>.
If one of these tests is not concluded with 'OK' then please contact Me-trohm Service.
With a real time clock error you can try resetting the date and time. If the test is then 'OK', you should check whether the instrument configu-ration is still unchanged.

7.2 Measured values memory
40 826/827 pH meter, Instructions for Use
7.2 Measured values memory The pH meter can store up to 200 measured values with additional in-formation. Depending on the storage criterion you can store the meas-ured values immediately, at fixed time intervals, drift-controlled or after the change by a certain amount.
The appropriate instrument settings are made under configura-tion/store. A more detailed description of the configuration is given in Section 5.3.
7.2.1 Store measured values
Storing measured values is triggered with <OK> in the menu << store >>. Each storage process is indicated with a message, e. g.:
mv 5 stored
While storing the 200th measured value, and after each further attempt to store a measured value, the pH meter will produce a warning mes-sage:
mv memory overflow
You now have the possibility to view the stored data or to delete the whole measured values memory in the menu << recall >> (see Sec-tion 7.2.3).
7.2.2 Print measured values
The output of all stored measured values to a printer or computer via the infrared interface is made as a measured values memory report (see Section 7.1.7) or as a PC/LIMS report see Section 7.1.8). Select mval in the menu << report >> for the measured values memory re-port or pc/lims for a PC/LIMS report respectively.
7.2.3 Show measured values
Call the dialog for displaying or deleting stored measured values in the menu << recall >>:
meas.value memory >show meas.val del mv store: no
Select the item show meas.val in order to access the corresponding display. The last measured value having been stored with the highest number will always be shown first:

7 Various functions
826/827 pH meter, Instructions for Use 41
Measured value no. No. of stored measured values
You can now use the two arrow keys <> and <> to leaf between the measured values.
In order to delete all measured values select the second parameter del mv store: in the above measured values memory menu and set it to 'yes' with <>; then confirm this and the following safety query delete ? with <OK>.
Note! It is not possible to delete just individual measured values out of the measured values memory.

7.3 Setup
42 826/827 pH meter, Instructions for Use
7.3 Setup Certain settings of the pH meter can be found in the setup menu. This menu cannot be accessed from the normal instrument display, as alte-rations to these settings have a great influence on the functions of the pH meter.
The setup menu is called up by pressing down and holding down the <CAL> key while switching on the pH meter.
setup lock instr.number instr.type serial type power type
Attention! Be very careful when making alterations in this menu! Alterations have a very large influence on the functions of the instrument. Accidental alterations can be rejected by carrying out a deliberate RAM initializa-tion (see Section 8.3).
7.3.1 Locking
Setup lock : all funct. <CAL>
With all funct. you can disable all functions as well as the <CAL> key, e. g. to prevent unwanted alterations to the instrument settings. The measuring mode can be changed nevertheless. The <CAL> key can be locked separately.
You can activate such a disablement by setting the corresponding pa-rameter to 'on'. This does not affect access to the Setup menu in any way.
Please note that all disablements will be invalidated if a RAM-Init is car-ried out (see Section 8.3).

8 Troubleshooting – Messages – Maintenance
826/827 pH meter, Instructions for Use 43
8 Troubleshooting – Messages – Maintenance
8.1 Troubleshooting If problems occur during pH measurement then these can have various causes:
1. Application
Difficult sample matrices or interferences can prevent reliable mea-surements (e. g. insufficient ionic strength). Our Application Bulle-tins and Application Notes support you in correct selection of the analytical conditions. The most suitable electrode for your applica-tion can be found under www.metrohm.com.
2. Buffer solution
The precision of pH measurements depends primarily on the correct calibration of the electrode. You should use clean and fresh buffer solutions. For example, a frequent cause of incorrect calibration is the use of an old pH 9 or pH 10 buffer, whose pH can vary consi-derably from the certified pH of a new buffer as a result of the ab-sorption of atmospheric CO2.
3. Measuring / Reference electrode
The electrodes are the most important element of the whole measur-ing system. The correct handling of the measuring and reference electrodes is described in the leaflet which accompanies the elec-trode.
4. pH meter
If the pH meter is thought to be the cause of a measuring problem then first check all the configuration and parameter settings. The di-agnostic functions help you in searching for the fault (see Sec-tion 8.3).
The pH meter will inform you directly about problems during the mea-surement. These messages are explained in the following Section 8.2. The following table lists general problems that can occur during pH measurements. Possible causes and appropriate remedies are also described.

8.1 Troubleshooting
44 826/827 pH meter, Instructions for Use
Problem Possible cause Remedy
Measuring signal absent or very variable
Electrode not connected • Connect electrode
Air in or in front of the diaph-ragm
• Remove air
Faulty electrode • Replace electrode
Measured value remains unstable and does not fulfill drift criterion
Dirty glass membrane or diaph-ragm
• Clean membrane or diaphragm
pH or temperature of the solu-tion is not stable
• Measure under exclusion of air • Thermostat the solution
Unsuitable electrode: • Conductivity too low • Organic solution
• Use suitable electrode
Electrode not connected • Connect electrode
Faulty electrode • Replace electrode
Slow adjustment of measured value
Dirty glass membrane or diaph-ragm
• Clean membrane or diaphragm
Slope too small on cali-bration
Dirty glass membrane or diaph-ragm
• Clean membrane or diaphragm
Glass membrane deswollen af-ter measurement in non-aqueous solution
• Immerse electrode in water between measurements
Poor buffer solutions • Replace buffers
Old Electrode • Replace electrode
Measured value obvious-ly incorrect
Incorrect calibration • Check / Repeat calibration • Check / Replace buffers
Manual temperature input incor-rect
• Enter correct temperature of the solu-tion
Dirty glass membrane or diaph-ragm
• Clean membrane or diaphragm
Electrolyte or electrode too old • Refill electrolyte or replace electrode
Faulty electrode • Replace electrode

8 Troubleshooting – Messages – Maintenance
826/827 pH meter, Instructions for Use 45
Problem Possible cause Remedy
No display after switch-ing on despite mains connection (827 only)
Empty batteries • Change batteries
System test message: Err #X
Instrument fault • Note error number and inform Me-trohm Service
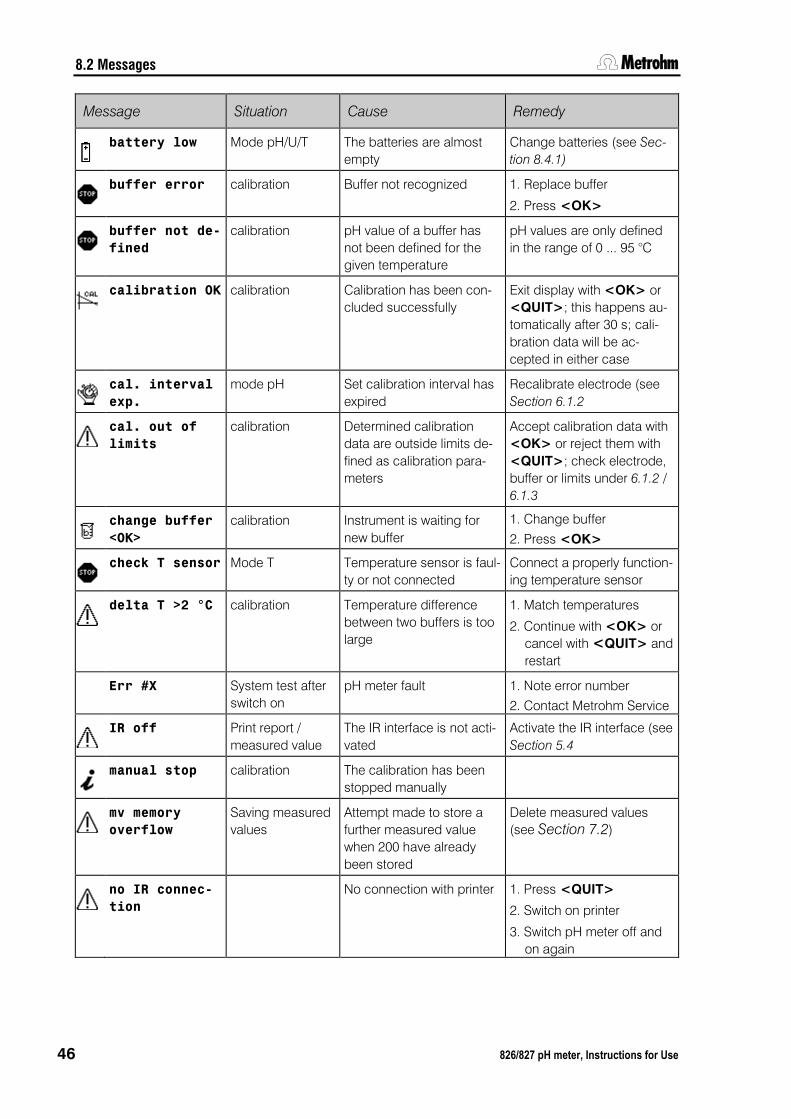
8.2 Messages The pH meter uses various messages to selectively inform you about possible errors or operating problems. These are shown in the bottom line of the display and illustrated by a symbol in front:
Type Symbol Example of a message
Error same buffer
Warning calibration data out of limits
Information manual stop
drifting measured value
change buffer
calibration OK
infrared connection OK (symbol only, no message)
battery low
Monitoring calibration interval expired
These messages can normally be removed by pressing the <QUIT> key. However, some messages will remain until their cause has been remedied. For example, this applies to the mode T if no temperature sensor is connected.
Attention! Please note that you should not press <QUIT> to acknowledge a message while a report is being produced as this will cancel the re-port.
The following table lists alphabetically all the messages which could appear on the display of the pH meter.
8.2 Messages
46 826/827 pH meter, Instructions for Use
Message Situation Cause Remedy
battery low Mode pH/U/T The batteries are almost
empty Change batteries (see Sec-tion 8.4.1)
buffer error calibration Buffer not recognized 1. Replace buffer
2. Press <OK>
buffer not de-fined
calibration pH value of a buffer has not been defined for the given temperature
pH values are only defined in the range of 0 ... 95 °C
calibration OK calibration Calibration has been con-
cluded successfully Exit display with <OK> or <QUIT>; this happens au-tomatically after 30 s; cali-bration data will be ac-cepted in either case
cal. interval exp.
mode pH Set calibration interval has expired
Recalibrate electrode (see Section 6.1.2
cal. out of limits
calibration Determined calibration data are outside limits de-fined as calibration para-meters
Accept calibration data with <OK> or reject them with <QUIT>; check electrode, buffer or limits under 6.1.2 / 6.1.3
change buffer <OK>
calibration Instrument is waiting for new buffer
1. Change buffer
2. Press <OK>
check T sensor Mode T Temperature sensor is faul-
ty or not connected Connect a properly function-ing temperature sensor
delta T >2 °C calibration Temperature difference
between two buffers is too large
1. Match temperatures
2. Continue with <OK> or cancel with <QUIT> and restart
Err #X System test after switch on
pH meter fault 1. Note error number
2. Contact Metrohm Service
IR off Print report /
measured value The IR interface is not acti-vated
Activate the IR interface (see Section 5.4
manual stop calibration The calibration has been
stopped manually
mv memory overflow
Saving measured values
Attempt made to store a further measured value when 200 have already been stored
Delete measured values (see Section 7.2)
no IR connec-tion
No connection with printer 1. Press <QUIT>
2. Switch on printer
3. Switch pH meter off and on again

8 Troubleshooting – Messages – Maintenance
826/827 pH meter, Instructions for Use 47
Message Situation Cause Remedy
same buffer calibration Potential difference be-
tween 1st and 2nd buffer is less than 6 mV
1. Change buffer
2. Press <ENTER>
----.- overrange
Mode pH/U/T Measuring range ex-ceeded
Remedy error or change mode
8.3 Diagnosis The pH meter is equipped with a diagnosis program. This allows selec-tive checks of the functions of individual assemblies.
The diagnosis is called up by pressing down and holding down the <OK> key while switching on the pH meter. Only those tests that you can carry out yourself are described below; the other functions are re-served for Metrohm Service personnel.
If one of the following tests is concluded with an error message, please note it down and contact your local Metrohm agency.
Attention! You are expressly warned against triggering any other functions than those listed and documented below. Improper use can disturb the correct functioning of the pH meter and may render it unusable.
diagnose RAM init EEPROM init AD converter test LC display test key test :
RAM init
The initialization of the instrument memory can be a good idea if you want to return parameter and configuration settings to their original condition.
Note! The calibration data as well as the measured values memory won't be deleted with a RAM initialization.
EEPROM init
The calibration data and the measured values memory are deleted with an EEPROM initialization.

8.3 Diagnosis
48 826/827 pH meter, Instructions for Use
AD converter test
The electronic components of the analog-digital converter are checked. At the end the messages 'Init ADC ok', 'Comm.test ADC ok' and 'ADC Interrupt ok' should appear.
LC display test
With this test you can check that the LCD display is functioning proper-ly. It consists of a sequence of individual tests which can be switched forward with any key (except <QUIT>). After displaying the character set the test must be terminated with <QUIT>.
key test
The correct functions of all the instrument keys can be checked here. The instrument will respond to the pressing of each key by displaying the corresponding key code. This test is terminated by pressing the <QUIT> key twice.
Key Code < > 2
<CAL> 5 <QUIT> 1 <OK> 7 <> 4 <> 6 <> 8 <> 3

8 Troubleshooting – Messages – Maintenance
826/827 pH meter, Instructions for Use 49
8.4 Maintenance
Warning! You should remove the batteries in case the pH meter is not used for a longer period. Leaking batteries can damage the pH meter.
8.4.1 Changing the batteries (826 only)
The 826 pH mobile reminds you of changing the batteries by displaying the message "battery low" and the symbol . The measurement ac-curacy is not affected at all.
Note! All the parameters are reset to the default values. The current date and time are reset to 2005-01-01 and 00:00:00 respectively. The cali-bration data as well as the stored measured values are not lost.
Metrohm recommends using batteries of the type alkaline or lithium.
Proceed as follows:
Switch off the pH meter.
Unscrew the six screws on the base of the housing with the en-closed allen key and remove the base plate.
Fig. 5: Changing the batteries for the 826 pH mobile
Warning! Do not remove the gray shielding plate under any circumstances and do not touch any electronic components.

8.4 Maintenance
50 826/827 pH meter, Instructions for Use
Exchange the existing four batteries for four new ones, type LR6/AA/AM3,1.5 V (Metrohm order number 6.2133.000).
Take care of the correct polarity of the batteries! The correct ar-rangement is shown in the battery compartment.
Reattach the base plate with the six screws. Tighten the screws firmly (always crosswise) to ensure that the housing is tight.
Switch on the pH meter. The following message is displayed:
set date and time
Set the date and time correctly (see section 5.4).
Note! In case that no electrode or no temperature sensor (mode T only) has been connected, the message above is overlaid by the message
overrange and is therefore not visible anymore.
8.4.2 Changing the batteries (827 only)
The 827 pH lab contains two batteries (type LR6/AA/AM3, 1.5 V) for the correct date and time as well as for switching on the instrument. In or-der to prevent leakage, the batteries should be replaced after approx-imately five years. The instrument reminds you of changing the batteries by displaying the message "battery low" and the symbol . The measurement accuracy is not affected at all.
Proceed as follows:
Switch off the pH meter.
Unscrew the five recessed head screws on the base of the housing and remove the base plate.
Fig. 6: Changing the batteries for the 827 pH lab
Continue as described in the previous chapter.

9 Appendix
826/827 pH meter, Instructions for Use 51
9 Appendix In this section you will find the most important technical data of the pH meter, dialog structures, a list of standard accessories and optional ac-cessories as well as warranty and declarations of conformity.
9.1 Technical data Provided that nothing to the contrary is mentioned, the published val-ues represent the typical data of the 826 pH mobile and the 827 pH lab.
9.1.1 Measuring modes
Measuring mode Prim. measured quantity
Sec. measured quantity
pH pH T
Temperature T
Potential U
9.1.2 Measuring inputs
Potentiometric
for pH value, potential
- 1 high-impedance measuring input for pH, redox and ISE electrodes
- 1 reference input for separate reference electrode
Input resistance > 1 * 1012 Ohm (under reference conditions)
Temperature
Also for automatic temperature compensation
- 1 measuring input for temperature sensors (Pt1000 or NTC)
NTC characteristics configurable
Default values R (25°C) = 30'000 Ohm / B25/50 = 4100
Measuring interval
Measuring cycle 1 s for all measuring modes

9.1 Technical data
52 826/827 pH meter, Instructions for Use
9.1.3 Measuring input specifications
Measuring range Resolution Measuring accuracy 1)
pH –8.000 ... +22.000 0.001 pH ± 0.003 pH
Temperature Pt1000 NTC (30 kΩ)
–150 °C ... +250 °C –5 °C ... +250 °C
0.1 °C 0.1 °C
± 0.2 °C (–20 °C ... +150 °C) ± 0.6 °C (+10 °C ... +40 °C)
Potential –1200.0 mV ... +1200.0 mV 0.1 mV ± 0.2 mV 1) ±1 digit, without sensor error, under reference conditions
9.1.4 Measured values memory
Memory capacity 200 measured values, nonvolatile storage
9.1.5 Display
Display LC display b/w, 128 x 64 pixel, 65 mm x 35 mm
9.1.6 Interfaces
Infrared interface
IR Sending reports to an IrDA compatible printer (IrComm and IrLPT, not IrOBEX), IBM character set, Code page 437
9.1.7 Power supply
826 pH mobile
4 batteries Battery life
1.2 ... 1.5 V, type LR6, AA, AM3 or mignon approx. 2 years (in operation for 1 hour/day with con-nected NTC temperature sensor and IR interface switched off, with alkaline batteries)
827 pH lab
Power supply unit 2 batteries
6 V, 0.1A 1.2 ... 1.5 V, type LR6, AA, AM3 or mignon for the clock
9.1.8 Housing specifications
826 pH mobile IP 66/67 (with connected splash-proof electrode plug I) IP 66: Protection against hose water IP 67: Protection against short-term immersion in water

9 Appendix
826/827 pH meter, Instructions for Use 53
9.1.9 Safety specifications
Instrument 826/827 Standards fulfilled: - EN/IEC 61010-1 - UL 61010-1 - CSA-C22.2 No. 61010-1 - EN/IEC 60529 (only 826) - Protection class III
9.1.10 Electromagnetic compatibility (EMC)
Emission Standards fulfilled: - EN/IEC 61326-1 - EN/IEC 61000-6-3 - EN 55022 / CISPR 22
Immunity Standards fulfilled: - EN/IEC 61326-1 - EN/IEC 61000-6-2 - EN/IEC 61000-4-2 - EN/IEC 61000-4-3 - EN/IEC 61000-4-4 (only 827) - EN/IEC 61000-4-5 (only 827) - EN/IEC 61000-4-6 (only 827) - EN/IEC 61000-4-11 (only 827) - EN/IEC 61000-4-14 (only 827)
9.1.11 Ambient temperature
Nominal working range Storage Transport
–10 °C...+55 °C (max. 85 % rel. humidity) –20 °C...+60 °C (≤ 65 % rel. humidity) –40 °C...+60 °C
9.1.12 Reference conditions
Ambient temperature Rel. humidity Device status Validity of data
+25 °C (±3 °C) ≤ 60% > 30 min. in operation After adjustment
9.1.13 Dimensions
826 pH mobile
Housing material Keyboard material Display cover material
Polycarbonate / Acrylonitrile-butadiene-styrene (PC/ABS) Silicon rubber Polymethyl methacrylate (PMMA)
Width Height Depth
98 mm 37 mm 183 mm
Weight (without stand) 370 g

9.1 Technical data
54 826/827 pH meter, Instructions for Use
827 pH lab
Housing material Keyboard material Display cover material
Polycarbonate / Acrylonitrile-butadiene-styrene (PC/ABS) Silicon rubber Polymethyl methacrylate (PMMA)
Width Height Depth
210 mm 45 mm 183 mm
Weight (without stand) 900 g

9 Appendix
826/827 pH meter, Instructions for Use 55
9.2 Menu structures The menu structures of the instrument configuration and the parame-ters of all operating modes are shown on the following pages.
9.2.1 Instrument configuration
configuration report id line feed dev.label sys.test rep. print print crit. immed. date & time rep.header cal.report time date & time rep.header cal.report time int. stop time drift date & time rep.header cal.report change date & time rep.header cal.report delta pH/T/mV stop time off store store crit. immed., drift, off time time int. stop time change delta pH/T/mV stop time auxil last digit IR interface date time temp.sens. NTC R (25°C) B value Pt1000 power save progr.

9.2 Menu structures
56 826/827 pH meter, Instructions for Use
9.2.2 Parameters in the pH mode
param measurement temp. cal.settings temperature report cal.interval no.of buffers buff.type Metrohm, NIST, DIN, ... special pH buffer1 pH buffer2 pH buffer3 cal.limits lo.lim.slope up lim.slope lo.lim.pH(0) up lim.pH(0) cal.data slope pH(0) variance temperature temp.sensor cal.date cal.time cal.interval buff.type no.of buffers
9.2.3 Parameters in the T mode
No editable parameters are necessary for this measuring mode. The menu << param >> can therefore not be selected.
9.2.4 Parameters in the U mode
No editable parameters are necessary for this measuring mode. The menu << param >> can therefore not be selected.

9 Appendix
826/827 pH meter, Instructions for Use 57
9.3 Stored buffer series For automatic buffer recognition during pH calibration the temperature-dependent pH values of several common pH buffers are stored in the 826/827 pH meter. Apart from the Metrohm buffer solutions other refer-ence and technical buffers are also included in the tables.
The following tables provide an overview of the stored pH(T) series:
The pH values printed in bold are the values at the reference tempera-ture of the particular buffer set.
The pH values marked with 1) are interpolated or extrapolated values, all the others correspond to the manufacturer's specifications.
Metrohm NIST (according to DIN standard 19266, 2000)
Temp. (°C)
Met4 Met7 Met9 NIST1 NIST4 NIST7 NIST9 NIST13
pH 4.00 pH 7.00 pH 9.00 pH 1 pH 4 pH 7 pH 9 pH 13
0 3.99 7.11 9.27 - 4.010 6.984 9.464 13.423
5 3.99 7.08 9.18 1.668 4.004 6.950 9.392 13.207
10 3.99 7.06 9.13 1.670 4.001 6.922 9.331 13.003
15 3.99 7.04 9.08 1.672 4.001 6.900 9.277 12.810
20 3.99 7.02 9.04 1.676 4.003 6.880 9.228 12.627
25 4.00 7.00 9.00 1.680 4.008 6.865 9.184 12.454
30 4.00 6.99 8.96 1.685 4.015 6.853 9.144 12.289
35 4.01 6.98 8.93 1.691 4.025 6.843 9.107 12.133
40 4.02 6.98 8.90 1.697 4.036 6.837 9.076 11.984
45 4.03 6.97 8.87 1.704 4.049 6.834 9.046 11.841
50 4.04 6.97 8.84 1.712 4.064 6.833 9.018 11.705
55 4.06 6.97 8.81 1.715 4.075 6.834 8.985 11.574
60 4.07 6.97 8.79 1.723 4.091 6.836 8.962 11.449
65 4.09 6.98 8.76 1.7321) 4.1081) 6.8401) 8.9411) -
70 4.11 6.98 8.74 1.743 4.126 6.845 8.921 -
75 4.13 6.99 8.73 1.7541) 4.1451) 6.8521) 8.9021) -
80 4.15 7.00 8.71 1.766 4.164 6.859 8.885 -
85 4.18 7.00 8.70 1.7781) 4.1851) 6.8671) 8.8671) -
90 4.20 7.01 8.68 1.792 4.205 6.877 8.850 -
95 4.23 7.02 8.67 1.806 4.227 6.886 8.833 -

9.3 Stored buffer series
58 826/827 pH meter, Instructions for Use
DIN (according to DIN standard 19267, 1978)
Temp. (°C)
DIN1 DIN3 DIN4 DIN7 DIN9 DIN12
pH 1 pH 3 pH 4 pH 7 pH 9 pH 12
0 1.08 - 4.67 6.89 9.48 -
5 1.081) - 4.661) 6.861) 9.431) -
10 1.09 3.10 4.66 6.84 9.37 13.37
15 1.091) 3.081) 4.651) 6.821) 9.321) 13.151)
20 1.09 3.07 4.65 6.80 9.27 12.96
25 1.09 3.06 4.65 6.79 9.23 12.75
30 1.10 3.05 4.65 6.78 9.18 12.61
35 1.101) 3.051) 4.661) 6.771) 9.131) 12.441)
40 1.10 3.04 4.66 6.76 9.09 12.29
45 1.101) 3.041) 4.671) 6.761) 9.041) 12.131)
50 1.11 3.04 4.68 6.76 9.00 11.98
55 1.111) 3.041) 4.691) 6.761) 8.971) 11.841)
60 1.11 3.04 4.70 6.76 8.92 11.69
65 1.111) 3.041) 4.711) 6.761) 8.901) 11.561)
70 1.11 3.04 4.72 6.76 8.88 11.43
75 1.121) 3.041) 4.741) 6.771) 8.861) 11.301)
80 1.12 3.05 4.75 6.78 8.85 11.19
85 1.121) 3.061) 4.771) 6.791) 8.831) 11.081)
90 1.13 3.07 4.79 6.80 8.82 10.99
95 - - - - - -
Fisher Fluka Basel
Temp. (°C)
Fis2 Fis4 Fis7 Fis10 FBS4 FBS7 FBS9
pH 2 pH 4 pH 7 pH 10 pH 4 pH 7 pH 9
0 - 4.01 7.13 10.34 4.01 7.11 9.20
5 1.98 3.99 7.10 10.26 4.00 7.08 9.15
10 1.98 4.00 7.07 10.19 4.00 7.05 9.10
15 2.02 3.99 7.05 10.12 4.00 7.02 9.05
20 2.00 4.00 7.02 10.06 4.00 7.00 9.00
25 2.00 4.00 7.00 10.00 4.01 6.98 8.96
30 2.00 4.01 6.99 9.94 4.01 6.97 8.91
35 2.02 4.02 6.98 9.90 4.02 6.96 8.88
40 2.01 4.03 6.97 9.85 4.03 6.95 8.84
45 2.01 4.041) 6.971) 9.811) 4.04 6.94 8.80
50 2.01 4.06 6.97 9.78 4.06 6.94 8.77
55 - 4.071) 6.971) 9.741) 4.07 6.93 8.74
60 - 4.09 6.98 9.70 4.09 6.93 8.71
65 - 4.111) 6.991) 9.681) 4.111) 6.931) 8.691)
70 - 4.131) 7.001) 9.651) 4.13 6.94 8.67
75 - 4.141) 7.021) 9.631) 4.141) 6.941) 8.651)
80 - 4.161) 7.031) 9.621) 4.16 6.95 8.63
85 - 4.181) 7.061) 9.611) 4.181) 6.961) 8.611)
90 - 4.211) 7.081) 9.601) 4.21 6.97 8.60
95 - 4.231) 7.111) 9.601) 4.231) 6.981) 8.591)

9 Appendix
826/827 pH meter, Instructions for Use 59
Mettler Toledo Beckmann
Temp. (°C)
MT2 MT4 MT7 MT9 MT11 Bec4 Bec7 Bec10
pH 2 pH 4 pH 7 pH 9 pH 11 pH 4 pH 7 pH 10
0 2.031) 4.011) 7.121) 9.521) 11.901) 4.00 7.12 10.32
5 2.02 4.01 7.09 9.45 11.72 4.00 7.09 10.25
10 2.01 4.00 7.06 9.38 11.54 4.00 7.06 10.18
15 2.00 4.00 7.04 9.32 11.36 4.00 7.04 10.12
20 2.00 4.00 7.02 9.26 11.18 4.00 7.02 10.06
25 2.00 4.01 7.00 9.21 11.00 4.00 7.00 10.01
30 1.99 4.01 6.99 9.16 10.82 4.01 6.99 9.97
35 1.99 4.02 6.98 9.11 10.64 4.02 6.99 9.93
40 1.98 4.03 6.97 9.06 10.46 4.03 6.98 9.89
45 1.98 4.04 6.97 9.03 10.28 4.05 6.98 9.86
50 1.98 4.06 6.97 8.99 10.10 4.06 6.97 9.83
55 1.981) 4.081) 6.981) 8.961) - 4.08 6.98 -
60 1.981) 4.101) 6.981) 8.931) - 4.09 6.98 -
65 1.981) 4.131) 6.991) 8.901) - 4.11 6.99 -
70 1.991) 4.161) 7.001) 8.881) - 4.12 6.99 -
75 1.991) 4.191) 7.021) 8.851) - 4.14 7.00 -
80 2.001) 4.221) 7.041) 8.831) - 4.16 7.00 -
85 2.001) 4.261) 7.061) 8.811) - 4.18 7.01 -
90 2.001) 4.301) 7.091) 8.791) - 4.19 7.02 -
95 - 4.351) 7.121) 8.771) - 4.21 7.03 -
Radiometer Baker
Temp. (°C)
Rad4.01 Rad7.00 Rad9.18 Bak4 Bak7 Bak9 Bak10
pH 4.01 pH 7 pH 9.18 pH 4.00 pH 7.00 pH 9.00 pH 10.00
0 4.000 7.118 9.464 4.00 7.13 9.23 10.30
5 3.998 7.087 9.395 4.001) 7.091) 9.171) 10.241)
10 3.997 7.059 9.332 4.00 7.05 9.10 10.17
15 3.998 7.036 9.276 4.001) 7.031) 9.051) 10.111)
20 4.001 7.016 9.225 4.00 7.00 9.00 10.05
25 4.005 7.000 9.180 4.001) 6.981) 8.961) 10.00
30 4.011 6.987 9.139 4.01 6.98 8.91 9.96
35 4.018 6.977 9.102 4.021) 6.981) 8.881) 9.931)
40 4.027 6.970 9.068 4.03 6.97 8.84 9.89
45 4.038 6.965 9.038 4.041) 6.971) 8.811) 9.861)
50 4.050 6.964 9.011 4.05 6.96 8.78 9.82
55 4.064 6.965 8.985 4.071) 6.961) 8.761) 9.791)
60 4.080 6.968 8.962 4.08 6.96 8.73 9.76
65 4.097 6.974 8.941 4.101) 6.971) 8.711) 9.741)
70 4.116 6.982 8.921 4.12 6.97 8.69 9.72
75 4.137 6.992 8.900 4.141) 6.981) 8.681) 9.701)
80 4.159 7.004 8.885 4.16 6.98 8.66 9.68
85 4.183 7.018 8.867 4.191) 6.991) 8.641) 9.661)
90 4.210 7.034 8.850 4.21 7.00 8.62 9.64
95 4.240 - - - - - -

9.3 Stored buffer series
60 826/827 pH meter, Instructions for Use
Hamilton DURACAL Precisa
Temp. (°C)
Ham4.01 Ham7.00 Ham9.21 Ham10.01 Pre4 Pre7 Pre9
pH 4.01 pH 7.00 pH 9.21 pH10.01 pH 4.00 pH 7.00 pH 9.00
0 - - - - 3.99 7.11 9.27
5 4.01 7.09 9.45 10.19 3.99 7.08 9.18
10 4.00 7.06 9.38 10.15 3.99 7.06 9.13
15 4.00 7.04 9.32 10.11 3.99 7.04 9.08
20 4.00 7.02 9.26 10.06 3.99 7.02 9.04
25 4.01 7.00 9.21 10.01 4.00 7.00 9.00
30 4.01 6.99 9.16 9.97 4.00 6.99 8.96
35 4.02 6.98 9.11 9.92 4.01 6.98 8.93
40 4.03 6.97 9.06 9.86 4.02 6.98 8.90
45 4.04 6.97 9.03 9.83 4.03 6.97 8.87
50 4.06 6.97 8.99 9.79 4.04 6.97 8.84
55 - - - - 4.06 6.97 8.81
60 - - - - 4.07 6.97 8.79
65 - - - - 4.09 6.98 8.76
70 - - - - 4.11 6.98 8.74
75 - - - - 4.13 6.99 8.73
80 - - - - 4.15 7.00 8.71
85 - - - - 4.18 7.00 8.70
90 - - - - 4.20 7.01 8.68
95 - - - - 4.23 7.02 8.67
Merck Titrisol
Temp. (°C)
Mer2 Mer4 Mer7 Mer9 Mer12
pH 2 pH 4 pH 7 pH 9 pH 12
0 2.01 4.05 7.13 9.24 12.58
5 2.01 4.04 7.07 9.16 12.41
10 2.01 4.02 7.05 9.11 12.26
15 2.00 4.01 7.02 9.05 12.10
20 2.00 4.00 7.00 9.00 12.00
25 2.00 4.01 6.98 8.95 11.88
30 2.00 4.01 6.98 8.91 11.72
35 2.00 4.01 6.96 8.88 11.67
40 2.00 4.01 6.95 8.85 11.54
45 2.001) 4.001) 6.951) 8.821) 11.441)
50 2.00 4.00 6.95 8.79 11.33
55 2.001) 4.001) 6.951) 8.761) 11.191)
60 2.00 4.00 6.96 8.73 11.04
65 2.001) 4.001) 6.961) 8.7151) 10.971)
70 2.01 4.00 6.96 8.70 10.90
75 2.011) 4.001) 6.961) 8.681) 10.801)
80 2.01 4.00 6.97 8.66 10.70
85 2.011) 4.001) 6.981) 8.651) 10.591)
90 2.01 4.00 7.00 8.64 10.48
95 - 4.001) 7.021) - -

9 Appendix
826/827 pH meter, Instructions for Use 61
Merck CertiPUR (25 °C)
Temp. (°C)
MerC4.01 MerC7.00 MerC9.00 MerC10.00
pH 4.01 pH 7.00 pH 9.00 pH 10.00
0 - - - -
5 4.00 7.09 9.22 10.22
10 4.00 7.06 9.16 10.16
15 4.00 7.04 9.10 10.10
20 4.00 7.02 9.05 10.05
25 4.01 7.00 9.00 10.00
30 4.01 6.98 8.96 9.94
35 4.03 6.98 8.93 9.90
40 4.03 6.97 8.89 9.86
45 4.05 6.97 8.87 9.80
50 4.06 6.97 8.84 9.73
55 - - - -
60 - - - -
65 - - - -
70 - - - -
75 - - - -
80 - - - -
85 - - - -
90 - - - -
95 - - - -
When using Merck CertiPUR (20 °C) buffers, you have to select the buffer type "Merck Titrisol".

9.4 Scope of delivery
62 826/827 pH meter, Instructions for Use
9.4 Scope of delivery Immediately upon receipt of the instrument please check that the deli-very is complete. The illustrations in the lists of accessories are not to the same scale.
9.4.1 826 pH mobile
Order no. 2.826.0010 (model version without electrode, without case) The following accessories are included:
No. Order no. Description
1 1.826.0010 826 pH mobile
1 6.2050.000 Carrying strap
1 6.2133.000 Set of 4 batteries, 1.5 V LR6
1 6.2621.140 Hexagon key 2.5 mm
1 8.827.8001EN Instructions for Use for 826 pH mobile and 827 pH lab, english
1 8.827.1203 Quick references for 826 pH mobile and 827 pH lab, english
Order no. 2.826.0020 (model version electrode, without case) The following accessories are included:
No. Order no. Description
1 1.826.0010 826 pH mobile
1 6.0228.020 LL Primatrode NTC comb. pH glass electrode with NTC temperature sensor, fixed cable plug I (splash-proof ac-cording to IP67) and 1 x 2 mm
1 6.2050.000 Carrying strap

9 Appendix
826/827 pH meter, Instructions for Use 63
1 6.2133.000 Set of 4 batteries, 1.5 V LR6.
1 6.2621.140 Hexagon key 2.5 mm
1 8.827.8001EN Instructions for Use for 826 pH mobile and 827 pH lab, english
1 8.827.1203 Quick references for 826 pH mobile and 827 pH lab, english
Order no. 2.826.0110 (model version with electrode and case) The following accessories are included:
No. Order no. Description
1 1.826.0010 826 pH mobile
1 6.0228.020 LL Primatrode NTC comb. pH glass electrode with NTC temperature sensor, fixed cable plug I (splash-proof ac-cording to IP67) and 1 x 2 mm
1 6.1236.050 Sleeve SGJ 14, PE
1 6.1446.000 Plastic stopper B-14(15), PP
1 6.1613.020 Bottle 25 mL pH7 (without buf-fer), PE
1 6.1613.030 Bottle 25 mL pH4 (without buf-fer), PE
1 6.1614.000 Rinsing bottle 250 mL, PE

9.4 Scope of delivery
64 826/827 pH meter, Instructions for Use
3 6.1614.030 Bottle 50 mL, PP
1 6.2050.000 Carrying strap
1 6.2133.000 Set of 4 batteries, 1.5 V LR6
1 6.2307.230 Buffer solutions pH 4 / 7 / 9 10 x 30 mL each
1 6.2308.050 Electrolytic solution c(KCl) = 3 mol/L for Ag/AgCl reference systems, 50 mL
1 6.2621.140 Hexagon key 2.5 mm
1 6.2716.040 Case for 826 pH meter
1 6.2717.000 Beaker 100 mL, PP
1 8.827.8001EN Instructions for Use for 826 pH mobile and 827 pH lab, english
1 8.827.1203 Quick references for 826 pH mobile and 827 pH lab, english

9 Appendix
826/827 pH meter, Instructions for Use 65
9.4.2 Optional accessories for 826 pH mobile
Order no. Valid for: Description
6.2307.230 2.826.0010 2.826.0020
Buffer solutions pH 4 / 7 / 9, 10 x 30 mL each
6.2325.000 2.826.0XX0 pHit kit, maintenance kit for pH electrodes
6.2103.180 2.826.0XX0 Adapter red, plug B (2 mm) / socket 4 mm
6.2103.190 2.826.0XX0 Adapter black, plug B (2 mm) / socket 4 mm
9.4.3 827 pH lab
Order no. 2.827.011X The following accessories are included:
No. Order no. Description
1 1.827.0010 827 pH lab
1 6.0228.010 LL Primatrode NTC comb. pH glass electrode with NTC temperature sensor, fixed cable plug F and 1 x 2 mm
1 6.2013.010 Clamping ring 10 mm for support rod
1 6.2016.050 Support rod 300 mm
1 6.2021.020 Electrode holder
1 6.2161.010 6.2161.020 6.2161.030 6.2161.040
Power supply unit: EU 230V/6V DC US 120V/6V DC UK 230V/6V DC AUS 240V/6V DC

9.4 Scope of delivery
66 826/827 pH meter, Instructions for Use
1 6.2621.070 Hexagon key 5 mm
1 V.0208.016 Recessed head screws
1 8.827.8001EN Instructions for Use for 826 pH mobile and 827 pH lab, english
1 8.827.1203 Quick references for 826 pH mobile and 827 pH lab, english
Order no. 2.827.021X The following accessories are included:
No. Order no. Description
1 1.827.0010 827 pH lab
1 6.0258.600 LL Unitrode Pt1000 OK (Elec-trode head U)
1 6.2104.600 Electrode cable for plug in head U/plug F 2x2 mm B, 1m
1 6.2013.010 Clamping ring 10 mm for support rod
1 6.2016.050 Support rod 300 mm
1 6.2021.020 Electrode holder
1 6.2161.010 6.2161.020 6.2161.030 6.2161.040
Power supply unit: EU 230V/6V DC US 120V/6V DC UK 230V/6V DC AUS 240V/6V DC

9 Appendix
826/827 pH meter, Instructions for Use 67
1 6.2621.070 Hexagon key 5 mm
1 V.0208.016 Recessed head screws
1 8.827.8001EN Instructions for Use for 826 pH mobile and 827 pH lab, english
1 8.827.1203 Quick references for 826 pH mobile and 827 pH lab, english
9.4.4 Optional accessories for 827 pH lab
Order no. Description
6.2307.230 Buffer solutions pH 4 / 7 / 9, 10 x 30 mL each
6.2325.000 pHit kit, maintenance kit for pH electrodes
6.2103.180 Adapter red, plug B (2 mm) / socket 4 mm
6.2103.190 Adapter black, plug B (2 mm) / socket 4 mm

9.5 Warranty and conformity
68 826/827 pH meter, Instructions for Use
9.5 Warranty and conformity
9.5.1 Warranty
Metrohm guarantees that the deliveries and services it provides are free from material, design or manufacturing errors. The warranty period is 36 months from the day of delivery; for day and night operation it is 18 months. The warranty remains valid on condition that the service is pro-vided by an authorized Metrohm service organization.
Glass breakage is excluded from the warranty for electrodes and other glassware. The warranty for the accuracy corresponds to the technical specifications given in the manual of the instrument. For components from third parties that make up a considerable part of our instrument, the manufacturer's warranty provisions apply. Warranty claims cannot be pursued if the Customer has not complied with the obligations to make payment on time.
During the warranty period Metrohm undertakes, at its own choice, to either repair at its own premises, free of charge, any instruments that can be shown to be faulty or to replace them. Transport costs are to the Customer's account.
Faults arising from circumstances that are not the responsibility of Me-trohm, such as improper storage or improper use, etc. are expressly excluded from the warranty.

9 Appendix
826/827 pH meter, Instructions for Use 69
9.5.2 Declaration of Conformity
This is to certify the conformity to the standard specifications for electrical appliances and accessories, as well as to the standard specifications for security and to system validation issued by the manufactur-ing company.
Name of commodity
826 pH mobile
CH-9101 Herisau/Switzerland E-Mail [email protected] www.metrohm.com
Description Portable pH meter for the measurement of pH, voltage and temperature; Connections for measuring electrode, reference electrode and temperature sensor.
This instrument has been built and has undergone final type testing according to the standards:
Electromagnetic compatibility: Emission EN/IEC 61326-1: 2006, EN/IEC 61000-6-3: 2006, EN 55022 / CISPR 22: 2003
Electromagnetic compatibility: Immunity EN/IEC 61326-1: 2006, EN/IEC 61000-6-2: 2005, EN/IEC 61000-4-2: 2001, EN/IEC 61000-4-3: 2006
Safety specifications EN/IEC 61010-1: 2001, UL 61010-1: 2004, CSA-C22.2 No. 61010-1: 2004, EN/IEC 60529: 2000, protection class III
The instrument meets the requirements of the CE mark as contained in the EU direc-tives 2006/95/EC (LVD), 2004/108/EC (EMC). It fulfils the following specifications:
EN 61326-1 Electrical equipment for measurement, control and laboratory use – EMC requirements
EN 61010-1 Safety requirements for electrical equipment for measurement, control and laboratory use
Manufacturer Metrohm Ltd. is holder of the SQS-certificate ISO 9001:2000 Quality management system for devel-opment, production and sales of instruments and accessories for ion analysis.
Herisau, 18 November, 2010
D. Strohm A. Dellenbach Vice President, Head of R&D Head of Quality Management

9.5 Warranty and conformity
70 826/827 pH meter, Instructions for Use
9.5.3 Declaration of Conformity
This is to certify the conformity to the standard specifications for electrical appliances and accessories, as well as to the standard specifications for security and to system validation issued by the manufactur-ing company.
Name of commodity
827 pH lab CH-9101 Herisau/Switzerland E-Mail [email protected] www.metrohm.com
Description Laboratory pH meter for the measurement of pH, voltage and temperature; Connections for measuring electrode, reference electrode and temperature sensor.
This instrument has been built and has undergone final type testing according to the standards:
Electromagnetic compatibility: Emission EN/IEC 61326-1: 2006, EN/IEC 61000-6-3: 2006, EN 55022 / CISPR 22: 2003
Electromagnetic compatibility: Immunity EN/IEC 61326-1: 2006, EN/IEC 61000-6-2: 2005, EN/IEC 61000-4-2: 2001, EN/IEC 61000-4-3: 2006, EN/IEC 61000-4-4: 2004, EN/IEC 61000-4-5: 2006, EN/IEC 61000-4-6: 2007, EN/IEC 61000-4-11: 2004, EN/IEC 61000-4-14: 2004
Safety specifications EN/IEC 61010-1: 2001, UL 61010-1: 2004, CSA-C22.2 No. 61010-1: 2004, protection class III
The instrument meets the requirements of the CE mark as contained in the EU directives 2006/95/EC (LVD), 2004/108/EC (EMC). It fulfils the following specifications:
EN 61326-1 Electrical equipment for measurement, control and laboratory use – EMC requirements
EN 61010-1 Safety requirements for electrical equipment for measurement, control and laboratory use
Manufacturer Metrohm Ltd. is holder of the SQS-certificate ISO 9001:2000 Quality management system for devel-opment, production and sales of instruments and accessories for ion analysis.
Herisau, 18 November, 2010
D. Strohm A. Dellenbach Vice President, Head of R&D Head of Quality Management

9 Appendix
826/827 pH meter, Instructions for Use 71
9.5.4 Quality Management Principles
Metrohm Ltd., CH-9101 Herisau, Switzerland
CH-9101 Herisau/Switzerland E-Mail [email protected] Internet www.metrohm.com
Metrohm Ltd. holds the ISO 9001:2000 Certificate, registration number 10872-02, issued by SQS (Swiss Association for Quality and Management Systems). Internal and external audits are carried out periodically to assure that the standards defined by Metrohm’s QM Manual are maintained. The steps involved in the design, manufacture and servicing of instruments are fully do-cumented and the resulting reports are archived for ten years. The development of soft-ware for PCs and instruments is also duly documented and the documents and source codes are archived. Both remain the possession of Metrohm. A non-disclosure agree-ment may be asked to be provided by those requiring access to them.
The implementation of the ISO 9001:2000 quality management system is described in Metrohm’s QM Manual, which comprises detailed instructions on the following fields of activity:
Instrument development The organization of the instrument de-sign, its planning and the intermediate controls are fully documented and trace-able. Laboratory testing accompanies all phases of instrument development.
Software development Software development occurs in terms of the software life cycle. Tests are per-formed to detect programming errors and to assess the program’s functionali-ty in a laboratory environment.
Components All components used in the Metrohm instruments have to satisfy the quality standards that are defined and imple-mented for our products. Suppliers of components are audited by Metrohm as the need arises.
Manufacture The measures put into practice in the production of our instruments guarantee a constant quality standard. Production planning and manufacturing procedures, maintenance of production means and testing of components, intermediate and finished products are prescribed.
Customer support and service Customer support involves all phases of instrument acquisition and use by the customer, i.e. consulting to define the adequate equipment for the analytical problem at hand, delivery of the equip-ment, user manuals, training, after-sales service and processing of customer complaints. The Metrohm service organ-ization is equipped to support customers in implementing standards such as GLP, GMP, ISO 900X, in performing Opera-tional Qualification and Performance Ve-rification of the system components or in carrying out the System Validation for the quantitative determination of a sub-stance in a given matrix.

9 Appendix
72 826/827 pH meter, Instructions for Use

10 Index
826/827 pH meter, Instructions for Use 73
10 Index < < > ...................................... 12 <>, <> ........................... 12 <>, <> .................................. 13 <CAL> ................................... 12 <OK> ..................................... 13 <QUIT> ................................. 12
A Accuracy ................................. 55 AD converter test .................... 51 Ambient temperature .............. 56 Appendix ................................. 54 Arrow keys .............................. 12 Auxiliaries ................................ 28
B B value .................................... 29 Battery changing ..................... 52 Buffer recognition ................... 34 Buffer tables ............................ 60 Buffer type
Calibration data ............. 37 Calibration parameter .... 34
C Calibration data
Limits ............................. 35 Calibration date ...................... 37 Calibration interval
Calibration data ............. 37 Calibration parameter .... 33
Calibration parameters ........... 33 Calibration report .............. 24, 40 Calibration time ....................... 37 Change
Print criterion .................. 25 Store criterion ................ 28
Configuration .......................... 22 Menu structure ............... 58
Configuration report ................ 40 Connection
Electrodes/Sensors ......... 7 Printer............................... 9
Connections .............................. 3
D Date ........................................ 29 Device label ............................ 23 Diagnosis ................................ 50 Dimensions ............................. 56 Display .................................... 55 Drift
Drift threshold ................ 19 Print criterion .................. 25 Store criterion ................ 27
E Editing ..................................... 14 EEPROM init ........................... 50 Electrical safety ......................... 5 Electrodes
Connection ...................... 7 Electromagn. compatibility ..... 56 EMC ........................................ 56
F Faults
General .......................... 46 Front view .................................. 2
G General handling rules .............. 5 Guarantee ............................... 71
I Id ............................................. 22 Immediate
Print criterion .................. 24 Store criterion ................ 27
Infrared interface ............... 28, 55 Init. of the instrument memory 50 Initial configuration .................... 9 Input resistance ...................... 54 Installation ................................. 7 Instrument description .............. 1 Instrument id ........................... 23 Instrument setup ....................... 7 Instrument versions................... 1 Interfaces ................................ 55 Introduction ............................... 1
K Key test ................................... 51 Keys
Functional description ... 12 Illustration ........................ 2 Lock ............................... 45
L Last digit ................................. 28 LC display test ........................ 51 Limits
pH(0) .............................. 35 Slope .............................. 35
Line feed ................................. 23 Locking ................................... 45
M Meas. values memory report .. 41 Measured value display .......... 11 Measured values
Print .......................... 23, 43 Show .............................. 43 Store ........................ 27, 43
Measured values memory 43, 55 Measuring accuracy ............... 55 Measuring interval ................... 54 Measuring modes ................... 54 Measuring parameters ............ 32 Measuring point report ........... 40 Measuring ranges ................... 55 Memory initialization ............... 50 Menu display .......................... 11 Menu structures ...................... 58 Messages ............................... 48 Metrohm buffers ..................... 34
N No. of buffers
Calibration data ............. 37 Calibration parameter .... 34
Notations ................................... 4 NTC
Characteristics ............... 54 Configuration ................. 29
O ON/OFF .................................. 12 Operating tutorial .................... 17 Operation
Concept ......................... 11 Principles ....................... 14
P Paper feed .............................. 23 Parameter report ..................... 41 Parameters
Description .................... 32 Menu structure ............... 59
Parts and controls ..................... 2 PC/LIMS report ....................... 41 pH calibration
Tutorial ........................... 17 pH calibration data ................. 36 pH measurement
Parameters .................... 32 pH(0)
Calibration data ............. 36 Pictograms ................................ 4 Potential measurement
Parameter ...................... 37 Power save ............................. 29 Power supply .......................... 55 Print criterion ........................... 24 Printer
Connection ...................... 9 Program version...................... 30

10 Index
74 826/827 pH meter, Instructions for Use
Pt1000 Configuration ................. 29
R R (25 °C) ................................. 29 RAM Initialization .................... 50 Rear view .................................. 3 Reference conditions .............. 56 Report
Arrangement .................. 39 Calibration data ....... 33, 40 Configuration ........... 22, 40 Finishing line .................. 39 Measured values memory ....................................... 41 Measuring points ........... 40 Output ............................ 38 Overview ........................ 38 Parameter ...................... 41 PC/LIMS ......................... 41 Selection ........................ 38 System test .................... 42
Report header ................... 22, 39 Print criterion .................. 24
Report Id ................................. 39 Report identification ................ 39
Resolution ............................... 55
S Safety information ..................... 5 Safety specifications ............... 56 Scope of delivery .................... 65 Sensors
Connection ...................... 7 Setup ...................................... 45 Slope
Calibration data ............. 36 Stop time
Print criterion .................. 25 Store criterion ................ 27
Store criterion.......................... 27 Stored buffer series ................ 60 Switch on .................................. 8 System test
Description .................... 42 System test report ............ 23, 42
T Technical data ........................ 54 Temperature
Calibration data ............. 37
Calibration parameter .... 33 Measuring parameter .... 32
Temperature measurement Parameters .................... 37
Temperature sensor Calibration data ............. 37 Configuration ................. 29
Time Configuration ................. 29 Print criterion .................. 24 Store criterion ................ 27
Time interval Print criterion .................. 25 Store criterion ................ 27
Transport .................................. 7 Troubleshooting ...................... 46
V Variance
Calibration data ............. 36 Various functions .................... 38
W Warranty .................................. 71