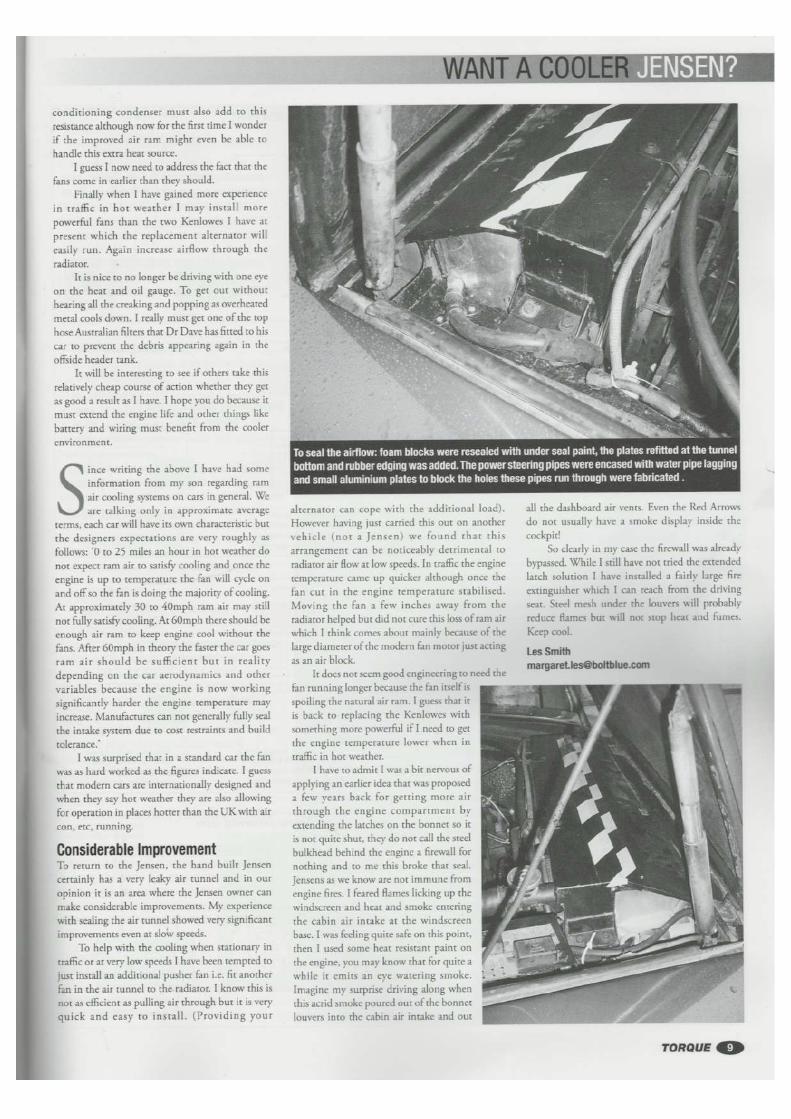
8.1 cooling fans joc mag 065
TRANSCRIPT


Technical
Cooling systems in cars :causes of overheating
and some solutionsLet’s look at the basics
If your car is overheating you are looking at a symptom and not the cause of the problem. Collectively all of the following minor issues can contribute a small percentage of extra heat to deal with, a few of them together will no doubt tax an already overworked cooling system.
Looking at the drawing below this represents a simple sealed water cooling system in a car. A basic coolant system passes liquid through the engine through waterways close to the combustion chambers, as each cylinder fires a huge amount of energy is released, not all this energy can be harnessed and sent to the wheels and thus the remainder is released in the form of heat, we have to deal with this heat and keep our engines at a reasonable temperature to operate correctly or they may overheat and destroy critical component parts very quickly.
Hot coolant leaves the water pump and enters the radiator at the top in the majority of installations (as heat rises), it is cooled by air passing through the fins of the radiator.
Cooling system failure, or other seemingly unrelated problems?
Radiator pressure cap failure: Cooling systems are designed to be pressurised, this increases the boiling point of the coolant so it doesn’t actually boil from the heat of our engines. Failing radiator caps will result in loss of pressure so the coolant can now boil, boiling coolants bubble and will not pump or circulate properly, and as such will not surrender as much heat in the airflow through the radiator: it will gas off the water content as steam from the leaking radiator cap and the amount of coolant in the system will be reduced. Less coolant means the remaining water will have to work harder to take heat away from the engine – eventually there will be insufficient coolant in the system to perform the required task and the car will overheat... Radiator caps are cheap - about £7.50 for a pressure relief type and £5 for a non-pressure relief type so don’t overlook these. The same applies to hoses: tired and cracked or hardened hoses are just overheat situations waiting to happen.
Be warned: To avoid burns and injuries, never, ever attempt to remove a radiator or overflow tank cap while the engine is hot!
Bad radiator fan switch: There is a switch that tells your cooling fan to come on when your coolant reaches a certain temperature. Test this switch to be sure your fans are coming on; a good idea is to get a manual override fitted so you can be in control, especially in traffic. Generally a simple jumper wire across the harness contacts that engage the fans is all that’s required but seek advice if you are not sure.
Bottom hose: Occasionally bottom hoses collapse under the vacuum pull of a water pump, this collapsed area of hose reduces the water flow back to the engine: the coolant in the engine will now leave hotter than it should, so ensure that correctly routed and good condition/new hoses are used. Generally if this is the case the bottom hose will be significantly colder than the top hose. Check with an infrared thermometer if you can.
Coolant: Water is not good enough on its own, you really need a coolant with antifreeze to withstand high and low temperatures which contains rust inhibitors and a lubricant too. If you must use water then you need to use distilled water and add a wetting agent, this breaks the surface tension of the water allowing it to make better contact with the metal surfaces in the engine. Be sure to use the correct ratio of water/antifreeze mixture - too much antifreeze can also cause boiling over. Always follow antifreeze instructions, wear gloves and safety
As it makes its away along the tubes of the radiator core the heat is taken away to atmosphere by the airflow; the water leaves the radiator at the bottom cooler than it entered, and is returned to the engine to collect more heat, and the cycle begins again. If the vehicle is stationary there is no forced air flow through the radiator so a fan or multiple fans are provided to force cool the coolant. If the now heated air that has passed through the radiator cannot escape the engine compartment to atmosphere then there is also a danger of overheating...
14

glasses when using it, and wash your hands thoroughly afterwards, as ingestion can cause serious health problems or worse!
Restricted airflow to the radiator: Leaves and debris in front of the radiator will reduce the efficiency of the radiator as will lots of grill badges and spotlights in front of the grill. Only a few leaves against the front of a radiator can have a dramatic effects on the efficiency of a cooling. Whilst not a Jensen radiator it’s clear to see this radiator would have been down by about 40% on its cooling ability.
Thermostat: Often overlooked; this is placed between the engine and the radiator to ensure the coolant stays above a certain temperature. Because it’s a mechanical device it can fail open or closed, collapse, stick or not open at the right temperature, again a very cheap item to replace and for the peace of mind it’s worth doing it. (Editor’s note: - High-flow thermostats are also available, and should be used if a high output water pump is fitted).
Blockages: Rust, dirt and sediments can all block or greatly reduce the flow of coolant through the cooling system. In turn limiting the ability to control coolant temperature, which may result in higher operating temperatures and engine overheating. A good quality radiator flushing chemical and wash out is recommended to remove debris. Copious amounts of water flushing and back flushing i.e.: from the bottom and out via the top hose is a winner too. An old radiator cap adapted to take a hose connector is a good way to direct the dirty water away from your car’s engine bay area to a suitable receptacle.
Water pump: It’s the job of the water pump to circulate the water through the engine and radiator. They typically only fail in 3 ways:-1. The seal fails and the coolant leaks out, if the seal failure is
unnoticed for a while it’s possible that the coolant will get into the bearings, the bearings will eventually seize and the car may throw a belt as a result too.
2. The impeller breaks, comes loose on the shaft, or the blades erode and wear out. (Plastic impellers are commonly found to have this issue).
3. The bearings fail through general wear and tear.
Belt tensions: The third water pump failure mode can occur after a long life or we can introduce it ourselves - if we over tighten our belts we add excess loads to the various shafts on our ancillary parts. This load is taken up by the bearings, which will eventually start to fail and results in excessive play in the shaft; but the water pump seal is designed to run on a concentric shaft and so will now be attempting
to take up this eccentric shaft movement. It will subsequently fail too, water will be likely to enter the bearings as per scenario 1 and accelerated failure will follow...
Belts: I have shared this snippet with a few people and most understand it as explained. With regard to belt tension I will explain how a v-belt actually works so that you can see what tension actually does to a belt. If you bend your finger it gets fatter, this is the same for a belt, as it goes around a pulley it exerts a sideways gripping force on the pulley. If you look at a belt in cross section a v-belt is generally curved on the top: under tension the cords are pulled tight and the top radius is pulled flat. This in turn causes a bulging effect on the sidewalls of the belt (under tension) as it travels around the radius of the pulleys. This in turn exerts a strong sideways force and gripping effect on the pulleys, and is principally how they are driven.
Overtightening the belt will (amongst other things) cause the top surface to become concave - the sideways force is now relieved, thus at a certain point of tension there is a maximum side force exerted on the pulley, beyond that tension limit the gripping force is now reduced. Always follow recommended tensioning instructions for a given belt.
Once a belt starts to squeal it’s not an indication that it is slack (although tightening may improve things short-term) it’s really an indication that the belt is at the end of its useful life, its rubber will have become hard and brittle and will no longer exert the required gripping forces. Running a tired belt will eventually wear the pulleys.
Gauges are available to check pulley wear, however for our purposes a small steel ruler or straight steel bar laid across the flanks of the pulley with a flashlight behind will reveal an arc shaped slither of light on a worn pulley. Excess pulley wear generally looks like the inner walls of the pulley have become dished, here we can see severely worn pulleys, not only will the belt not grip the side but it may bottom out in the pulley and never grip, and there should always be an air gap between the belt underside and pulley. New belts on worn pulleys tend to fail prematurely, and can turn over as they try to run up the arc. They won’t grip correctly and will slip, they will overheat and the rubber compound will denature, become brittle and hard and crack, eventually throwing the belt off.
Similarly misaligned pulleys will put side load on a belt causing overheating, lack of traction and premature failure.
Example of a radiator partially blocked by leaves and debris
Radius top
Cords
Curved edges
V-belt in cross section
15

Old worn out transmission fluid or badly adjusted auto transmission: This may generate excess heat from slippage in the clutches and higher losses in the torque convertor. A correctly adjusted and fresh fluid filled auto box will produce less heat. Many cars have transmission fluid coolers, usually in its basic form it’s a tube on the cool side of the coolant radiator, hot fluid enters at the top and leaves cooler at the bottom having lost its heat into the engine coolant just before it returns to the engine - it’s quite flawed really - we have just cooled our engine coolant in the radiator and now - just before we return it to the engine - we are introducing heat from the transmission into it!
Ideally a separate transmission cooler could be fitted, but dependent on its location it can also re-introduce heat into the coolant radiator: the airflow over it to cool the transmission fluid has to go somewhere, and if the cooler is sited in front of the existing radiator then it has to go through it. If you plan to fit a transmission fluid cooler then try and fit it out of the airflow of the coolant radiator. The big bonus here is that there is no risk of transmission fluid getting into your gearbox, which would be catastrophic. Likewise an inefficient engine cooling system may introduce heat into the auto transmission fluid, and so the gearbox will not operate as efficiently as it could because the engine’s coolant transfers some heat into the automatic transmission fluid through the fluid cooler itself.
Exhaust: The exhaust transports a significant amount of heat to the rear of the car and dumps it into the atmosphere: a damaged, dented or partially blocked exhaust may exacerbate overheating problems as some of this heat is not naturally taken away from the engine bay, and thus has to be dealt with by the engine’s cooling system.
Retarded timing can contribute to overheating: This promotes the fuel air mixture to burn rather than explode. Advanced timing can help cooling, this promotes the fuel/air mixture to explode and finish combusting before the exhaust valve is opened, resulting in cooler exhaust temperatures - and less heat is transferred to the engine valves and head. Changing your initial timing a few degrees may help the car run cooler. An easy and practical fix (if you know how to do it) is to advance the timing enough to cause pre-ignition or detonation, (which will cause the engine to overheat), and then back off the timing slightly to remove the detonation.
Overheating cars should always run vacuum advance. Vacuum advance helps cooling. Checking the distributor counterbalance weights are free and operational is an easy win if it’s a stock distributor. Check the vacuum pipes around the engine and brake servo as small vacuum leaks whilst not noticeable too much in the braking system can have dramatic effects on vacuum advance...
Engine Tuning: Make sure it’s set up correctly and your mixtures are right: improperly set up engines running too lean or too rich may have overheating problems.
Low engine oil level or ATF level: Check your oil levels, if it takes 8 pints to fill and it’s low by 1 pint then the oil is now unable to carry away 12.5% of the heat that it is designed to, the remaining oil has to carry this extra heat and so becomes thinner and less efficient...
Cracked block, heads, cylinder head gasket failure or other leaks? You may notice your coolant level going down slowly but no leaks are apparent, check your oil for silkiness/evidence of water, or have your system radiator pressure checked. Inexpensive but reasonable pressure test kits are available for £50 that allow us to artificially pressurise the cooling system with a pump via a radiator cap adaptor; if all is well then the pressure should be held for a good length of time.
If a cylinder head gasket has failed, then combustion products will leak into cooling system. This can be tested with a combustion gas test kit which test for combustion gases in the steam of an open radiator cap, a fluid is placed in a special vial and the steam is sucked through it - if combustion gas is present it turns yellow or green; indicating - major engine repair time!
Your driving habits: Hard acceleration and late braking always produce heat!
Check out all these things, it’s far cheaper than expensive parts to cure a problem if we can cure it with common sense and good maintenance!
Steve Makin
Diagram of wear upon the pulley sidewallChecking pulley
wear with a ruler or small piece of straight steel
Original pulley sidewall
Worn pulley sidewall
Combustion gas test kit
16


Technical
My FF MkII cooling issues solved
I proved this by driving with the bonnet chocked open 3 inches and the difference was immense. I therefore decided to build a bespoke fan and cowl system; it had to look period and in keeping, use no more amps than the present 2 fans, be reliable and move more air.
I proceeded to measure up the inside area of the radiator where the cowl would sit, and cut out a large piece of card to the same size; I checked it for size against the radiator and was happy that this was to be my template. The depth of the cowl is a little restricted on an FF MKII as there is a diagonal cross brace running across the front of the engine bay, so I had to bear this in mind when selecting new fans. I decided upon a 16” fan that moves 2300 cfm (cubic feet of air per minute) running at 6.6 amps and 2 x 8 inch fans also moving 2300 CFM each at 6.6 amps each.
I carefully positioned the fans on the cardboard template to make sure I had selected the most appropriate sized fans, initially I selected a 16 and 2 x 7 inch but then I found a slightly different design of 8 inch fan that would fit in the same place, very tightly but nonetheless a good fit.
Once I was happy with the fans it was on with the mould, as this was a one shot job I really didn’t go over the top on mould design. I used a sheet of stainless steel and some timber strips 35mm deep which I bonded onto the stainless with acrylic decorator’s sealer (as I wanted to remove them later); silicone sealer would have done instead but silicone near fibreglass resin is not a good combination. I re-checked that the fans still fitted inside.
Having gone through all the checks and maintenance stated in my article on solutions to overheating of cooling systems (see page 14 of this magazine), my FF (whilst not overheating at any time) sits above the N on the temperature gauge in traffic;
on a warm day it’s between the N and the Red. My hypothesis was that the stock cooling fans just don’t pull in enough air to force the heat out of the very full FF engine bay...
Steve Makin’s FF
The new 8” and 16” fans used Template marked on card
20

Mould shell made from stainless steel sheet
Marking out the fans on the steel sheet
Mould coated in PVA-based release agent
Fan positons taped
Cloth and resin in the mould
Checking fans still fit!
Photos of the brackets. Both sides are the same, one picture shows the outer bracket and the other showing the keep plate; basically I sandwiched the cowl between the outer plate and the keep plate and then riveted them through. The slot was put in for ease of assembly and adjustment. I used the bracket as the earth for the fans too as they are bolted directly to the chassis, that’s what the small screw is.
21

I drew around the fans’ mounting holes, and then drew straight lines to give me the centre of each fan. I then drew a circle with a compass holding a permanent maker pen. I then followed the profile of each fan with masking tape and filled in the holes. There is no point in fibre glassing where a hole will be but the tape thickness will show through on the outside of the moulding showing me exactly where to cut the holes for each fan. I then coated the mould in a PVA-based mould release agent and allowed to dry for 24 hours
It’s always a good idea to pre-cut the glass cloth to the appropriate shapes before you mix any resins. I then mixed my resin; I bought everything from www.easycomposites.co.uk to whom I have no affiliation, but they were very helpful to make sure I ordered the correct items when I rang and explained what I was doing.
To achieve the older look on the finished component I mixed a tablespoonful of a carbon black powder that they also supplied to colour the resin grey. I proceeded to lay down 3 layers of 600gm/square metre chopped strand glass cloth and resin. I did this on a warm day and managed it in about 25 minutes.
I didn’t resin too far over where the holes were as they were to be cut out anyway. I allowed everything to fully cure for 48 hours. Subsequently the shroud came out of the mould with ease. I cut around the edges and the holes with a Dremel tool and a small diamond disc cutter with ease - a dust mask is recommended with safety glasses for this job.
I then mounted the fans on the shroud with stainless steel set screws, washers and nyloc nuts, as we don’t want them coming loose. I made up a couple of flat aluminium plates that I attached to the sides of the cowl with pop rivets into a strip of aluminium on the inside and mounted using the same mounting holes as the original fan assembly, so the car has not been altered at all during fitment. I surrounded the cowl with a strip of soft door edging trim bought at an auto jumble but it is available on eBay and mounted it in the car.
The 3 fans pull 18 amps in total, the 16 inch fan on its own keeps the car on N on the gauge, with the two 8 inch fans running too the car cools down and the fans shut off.
For me this has been a great result however it’s worth pointing out that this was the final straw in fixing a lot of smaller issues. I checked all of the list I have provided on pages 14-16 of this mag. before taking this measure: I found that my thermostat was disintegrated and the rubber seal on my non pressure cap was perished, don’t overlook the obvious...
Total cost for this job was just over £100 including the fans.
Remember overheating is a symptom of a failure - find the failure and the symptom usually goes away.
Steve Makin
The new radiator shroud and fans installed
22