8-wdm products remote commissioning guide-20090302
TRANSCRIPT
HUAWEI TECHNOLOGIES CO., LTD. Huawei Confidential
Security Level:
Slide title :40-47pt
Slide subtitle :26-30pt
Color::white
Corporate Font :
FrutigerNext LT Medium
Font to be used by customers and
partners :
Arial
www.huawei.com
Transport Network WDM Products Remote Commissioning Guide
Product Introduction dept., WDM Product Series

HUAWEI TECHNOLOGIES CO., LTD. Page 2Huawei Confidential
Slide title :32-35pt Color: R153 G0 B0
Corporate Font :FrutigerNext LT Medium
Font to be used by customers and
partners : Arial
Slide text :20-22ptBullets level 2-5:
18pt Color:Black
Corporate Font :FrutigerNext LT Medium
Font to be used by customers and
partners : Arial
Foreword
This document describes:
• New features of remote commissioning of the WDM products
• How to commission the WDM products remotely
After completing this document, you should be able to master the skills and
techniques for remote commissioning during the deployment of a new WDM project.
If you come across any problem when you read this document, please feel free to contact Mr. Hong Haibo/92682.
Content Page Title
35-40pt
Color: R153 G0 B0
Corporate Font:
FrutigerNext LT Medium
Font to be used by customers and
partners:
Arial
Content Page Text :
28-30pt
Bullets level 2-5
20-30pt
Color:Black
Corporate Font:
FrutigerNext LT Medium
Font to be used by customers and
partners:
Arial
Contents
• New Features of Remote Commissioning of the WDM Products
• Operation Guidelines on Remote Commissioning of the WDM Products

HUAWEI TECHNOLOGIES CO., LTD. Page 4Huawei Confidential
Slide title :32-35pt Color: R153 G0 B0
Corporate Font :FrutigerNext LT Medium
Font to be used by customers and
partners : Arial
Slide text :20-22ptBullets level 2-5:
18pt Color:Black
Corporate Font :FrutigerNext LT Medium
Font to be used by customers and
partners : Arial
New Features of Remote Commissioning of the
WDM Products (1/3)
Either the MVOA or the EVOA can be used for
marketing. In general, the MVOA is used.
The MVOA needs to be adjusted manually on site, costing more time and man-hours.
Remote commissioning of optical power is realized, reducing time and manpower, and eventually reducing the on-site cost.
As per the notice released on Nov 30, the EVOA must be used in the main optical path on the entire network.
The EVOA supports remote commissioning of the optical power, reducing cost on manpower.
E V
OA
for C
on
figu
ration

HUAWEI TECHNOLOGIES CO., LTD. Page 5Huawei Confidential
Slide title :32-35pt Color: R153 G0 B0
Corporate Font :FrutigerNext LT Medium
Font to be used by customers and
partners : Arial
Slide text :20-22ptBullets level 2-5:
18pt Color:Black
Corporate Font :FrutigerNext LT Medium
Font to be used by customers and
partners : Arial
New Features of Remote Commissioning of the
WDM Products (2/3)
Distribution of fixed optical attenuators,
on-site installation
IDs and IP addresses set station by station
Attenuation of the EVOA or MVOA is set on site; optical paths are
made available on site
EVOAs supporting ESC and single-wavelength MVOA are used networkwide; attenuation is pre-set by the supply chain dept.supporting plug-and-play
Fixed optical attenuators are pre-installed by the supply chain
dept. based on the design principles
Unique IDs/IP addresses assigned by supply chain dept. in advance;
remote creation or loading of IDs and IP addresses
The shift from on-site operation to pre-installation by the supply chain Dept helps to reduce on-site manpower and cost greatly!
Ex
tend
ed
pre
-ins
talla
tion
ra
ng
e

HUAWEI TECHNOLOGIES CO., LTD. Page 6Huawei Confidential
Slide title :32-35pt Color: R153 G0 B0
Corporate Font :FrutigerNext LT Medium
Font to be used by customers and
partners : Arial
Slide text :20-22ptBullets level 2-5:
18pt Color:Black
Corporate Font :FrutigerNext LT Medium
Font to be used by customers and
partners : Arial
New Features of Remote Commissioning of the
WDM Products (3/3)
Manual commissioning of
optical power on site
When on-site operation is impossible, remote access to the equipment on the entire network can be realized at the central node by using the MDS 5600, which adjusts the networkwide optical power by adjusting the attenuation of the EVOAs. This reduces the on-site delivery cost.
Commissioning personnel needs to commission the optical power for several times on site.
Remote commissioning by using the automatic commissioning tool
(MDS5600) for WDM products
Commissioning is performed remotely by using the MDS 5600.
Rem
ote co
mm
ission
ing
orien
ted
softw
are

Content Page Title
35-40pt
Color: R153 G0 B0
Corporate Font:
FrutigerNext LT Medium
Font to be used by customers and
partners:
Arial
Content Page Text :
28-30pt
Bullets level 2-5
20-30pt
Color:Black
Corporate Font:
FrutigerNext LT Medium
Font to be used by customers and
partners:
Arial
Contents
• New Features of Remote Commissioning of the WDM Products
• Operation Guidelines on Remote Commissioning of the WDM Products

HUAWEI TECHNOLOGIES CO., LTD. Page 8Huawei Confidential
Slide title :32-35pt Color: R153 G0 B0
Corporate Font :FrutigerNext LT Medium
Font to be used by customers and
partners : Arial
Slide text :20-22ptBullets level 2-5:
18pt Color:Black
Corporate Font :FrutigerNext LT Medium
Font to be used by customers and
partners : Arial
Remote Commissioning Process for WDM Products
Configuration
Hardware installation
Commissioning by using the software
Acceptance test
The EVOA is configured in main optical path as per the marketing telecom design.
Prepare the T2000 and the MDS 5600.
Configure the NEs and network remotely on the T2000.
Hardware installation is complete and has passed the QA check; optical paths are available.
Make sure that all required engineering design documents, which are applied for before the hardware installation, are available.
Starts remote commissioning by using the MDS 5600.
Check the commissioning results.
Save the configuration data.
Perform the acceptance test.
This process focuses on the remote commissioning of a new project by using the software. The other operations are similar to those for the existing commissioning mode.
HUAWEI TECHNOLOGIES CO., LTD. Page 9Huawei Confidential
Slide title :32-35pt Color: R153 G0 B0
Corporate Font :FrutigerNext LT Medium
Font to be used by customers and
partners : Arial
Slide text :20-22ptBullets level 2-5:
18pt Color:Black
Corporate Font :FrutigerNext LT Medium
Font to be used by customers and
partners : Arial
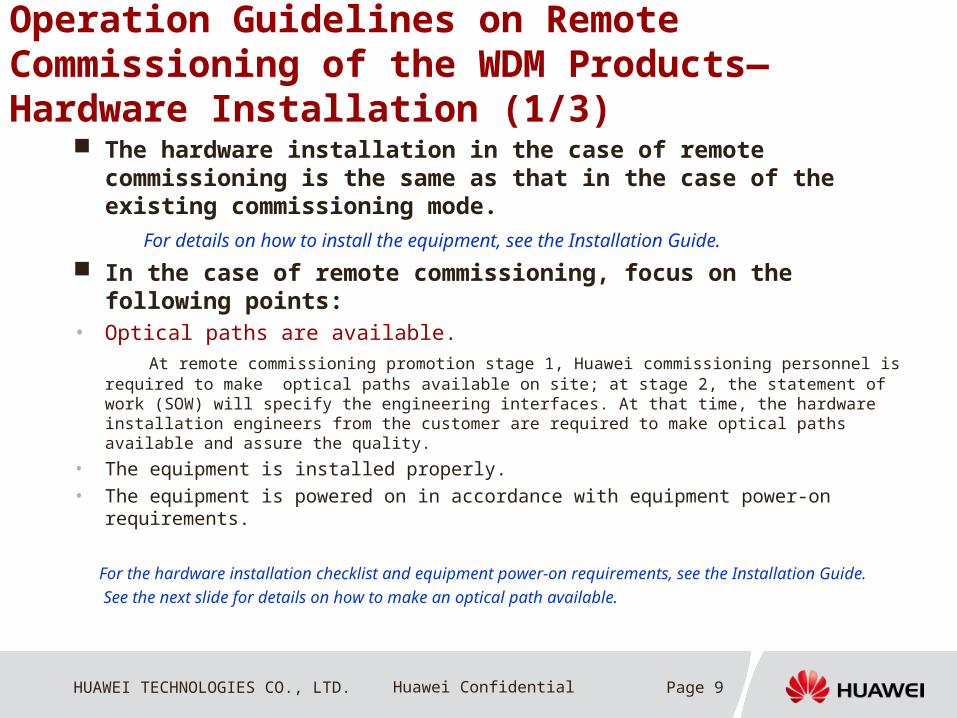
Operation Guidelines on Remote Commissioning of the WDM Products—Hardware Installation (1/3)
The hardware installation in the case of remote commissioning is the same as that in the case of the existing commissioning mode.
For details on how to install the equipment, see the Installation Guide.
In the case of remote commissioning, focus on the following points:
• Optical paths are available. At remote commissioning promotion stage 1, Huawei commissioning personnel is required to make
optical paths available on site; at stage 2, the statement of work (SOW) will specify the engineering interfaces. At that time, the hardware installation engineers from the customer are required to make optical paths available and assure the quality.
• The equipment is installed properly. • The equipment is powered on in accordance with equipment power-on requirements.
For the hardware installation checklist and equipment power-on requirements, see the Installation Guide.
See the next slide for details on how to make an optical path available.

HUAWEI TECHNOLOGIES CO., LTD. Page 10Huawei Confidential
Slide title :32-35pt Color: R153 G0 B0
Corporate Font :FrutigerNext LT Medium
Font to be used by customers and
partners : Arial
Slide text :20-22ptBullets level 2-5:
18pt Color:Black
Corporate Font :FrutigerNext LT Medium
Font to be used by customers and
partners : Arial
Operation guidelines on Remote Commissioning of the WDM Products—Hardware Installation (2/3)
1. Confirm with the customer that line fibers between stations have been connected properly on the ODF.
2. Connect the optical power meter to the OUT port on the FIU board by using a fiber jumper. (There is no FIU if ESC is adopted. Thus, connect the optical power meter to the OUT port on the OTU that functions as an optical source, or connect it directly to the optical source.) Record the obtained optical power value as A. Then, reconnect the fiber to the port on the FIU or the OUT port on the OTU.
3. Connect the line-side fiber to the user-specified port on the ODF, and then connect the optical power meter to the corresponding port on the opposite side of the ODF. Record the obtained optical power value as B. After that, reconnect the line-side fiber to the ODF.
4. Obtain the insertion loss of the line-side fiber at the upstream station by subtracting A from B. The insertion loss should be not more than 1 dB. Otherwise, you need to clean the connector on the line-side fiber or replace the fiber (If the fiber is normal, clean or replace the corresponding port on the ODF.) Then, retest the insertion loss until it meets the specification requirement.
5. Exchange the transmit fiber with the receive fiber at the upstream station. Re-measure value A and value B to calculate the insertion loss. Make sure that the insertion loss of the fiber in the reverse direction meets the specification requirement.
Guideline on making cross-station optical paths available
Optical source: FIU board, OTU board, or optical source device
Test instrument: optical power meter
Availability criterion: the actual insertion loss of the equipment on the two stations should be less than the fiber insertion loss as specified in the engineering design diagram
Insertion loss of the equipment = Insertion loss of the line fiber + Insertion loss of the line fibers of the upstream and downstream stations + Insertion loss of two FIUs (in general, the insertion loss of one FIU is 1 dB)
Upstream station
Downstream station
Optical source
ODF
Optical source
ODF
OUT IN
Optical power meter
Line fiber
Optical power meter
Value A Value B
OUTIN

HUAWEI TECHNOLOGIES CO., LTD. Page 11Huawei Confidential
Slide title :32-35pt Color: R153 G0 B0
Corporate Font :FrutigerNext LT Medium
Font to be used by customers and
partners : Arial
Slide text :20-22ptBullets level 2-5:
18pt Color:Black
Corporate Font :FrutigerNext LT Medium
Font to be used by customers and
partners : Arial
Operation Guidelines on Remote Commissioning of the WDM Products—Hardware Installation (2/3)
6. Connect the optical power meter to the port on the ODF on the line side towards the upstream station. Measure the optical power and record it as C. Then, reconnect the fiber to the ODF.
7. Connect the optical power to the IN port on the OA or FIU at the downstream station. (The FIU board is preferred if it exists. If there is no FIU board, but there is an EVOA or similar board, connect the optical power to the IN port on the EVOA.) Measure the optical power and record it as D. Then, reconnect the fiber to the FIU board.
8. Obtain the insertion loss of the line-side fiber at the downstream station by subtracting C from D. The insertion loss should be not more than 1 dB. Otherwise, you need to clean the connector on the line-side fiber or replace the fiber (If the fiber is normal, clean or replace the corresponding port on the ODF). Then, retest the insertion loss until it meets the specification requirement.
9. After all faults are eliminated, obtain the actual line attenuation between the two stations by subtracting A from D. (If the FIU board is used on site, the line attenuation equals the subtraction value plus 2 dBm.) The line attenuation should be not more than the design attenuation of the fiber between the two stations.
10. If the actual line attenuation is greater than the design attenuation, and the summation of the insertion loss of the line-side fiber of the two stations is not greater than 2 dB, inform the customer that the fiber must be rectified or replaced, to ensure that the actual line attenuation meets the design requirement. If the actual line attenuation meets the design requirement, recover all involved fibers. At this point, optical paths are made available.
Optical power meter
Upstream station
Downstream station
Optical source
ODF
Optical source
ODF
OUT IN
Optical power meter
Line fiber Value DValue CValue BValue A
OUTIN
HUAWEI TECHNOLOGIES CO., LTD. Page 12Huawei Confidential
Slide title :32-35pt Color: R153 G0 B0
Corporate Font :FrutigerNext LT Medium
Font to be used by customers and
partners : Arial
Slide text :20-22ptBullets level 2-5:
18pt Color:Black
Corporate Font :FrutigerNext LT Medium
Font to be used by customers and
partners : Arial
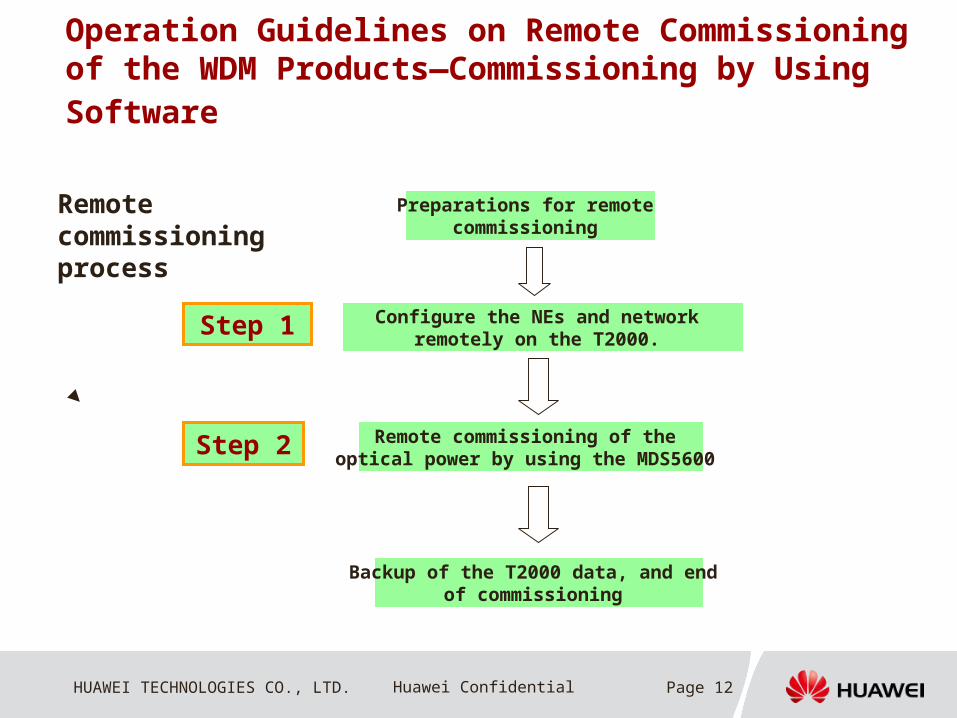
Operation Guidelines on Remote Commissioning of the WDM Products—Commissioning by Using Software
Configure the NEs and network remotely on the T2000.
Preparations for remote commissioning
Backup of the T2000 data, and end of commissioning
Remote commissioning of the optical power by using the MDS5600
Step 1
Step 2
Remote commissioning process

HUAWEI TECHNOLOGIES CO., LTD. Page 13Huawei Confidential
Slide title :32-35pt Color: R153 G0 B0
Corporate Font :FrutigerNext LT Medium
Font to be used by customers and
partners : Arial
Slide text :20-22ptBullets level 2-5:
18pt Color:Black
Corporate Font :FrutigerNext LT Medium
Font to be used by customers and
partners : Arial
Operation Guidelines on Remote Commissioning of the WDM Products—Commissioning Preparations (1/3)
Apply for and obtain engineering design documents The engineering design documents include networking diagram of the entire network, OA
configuration diagram, wavelength allocation diagram, slot assignment diagram, and fiber connection diagram. The networking diagram of the entire network and OA configuration diagram are mainly used to guide the configuration of NE IDs and IP addresses; the slot assignment diagram and fiber connection diagram are mainly used to guide fiber creation on the T2000 or MDS 5600.
Application method: The project responsible person writes an email to request the engineering design team at the
headquarters to produce engineering design documents. Also, he is responsible for replying to related technical questions.
For details, see the attachment:
Engineering design must be initiated after the project contract is signed. Before the start of the project, the marketing product manager is required to obtain telecom design documents and contract configurations and then submits an engineering application to the headquarters.
Optical Network Engineering Design Appli
HUAWEI TECHNOLOGIES CO., LTD. Page 14Huawei Confidential
Slide title :32-35pt Color: R153 G0 B0
Corporate Font :FrutigerNext LT Medium
Font to be used by customers and
partners : Arial
Slide text :20-22ptBullets level 2-5:
18pt Color:Black
Corporate Font :FrutigerNext LT Medium
Font to be used by customers and
partners : Arial
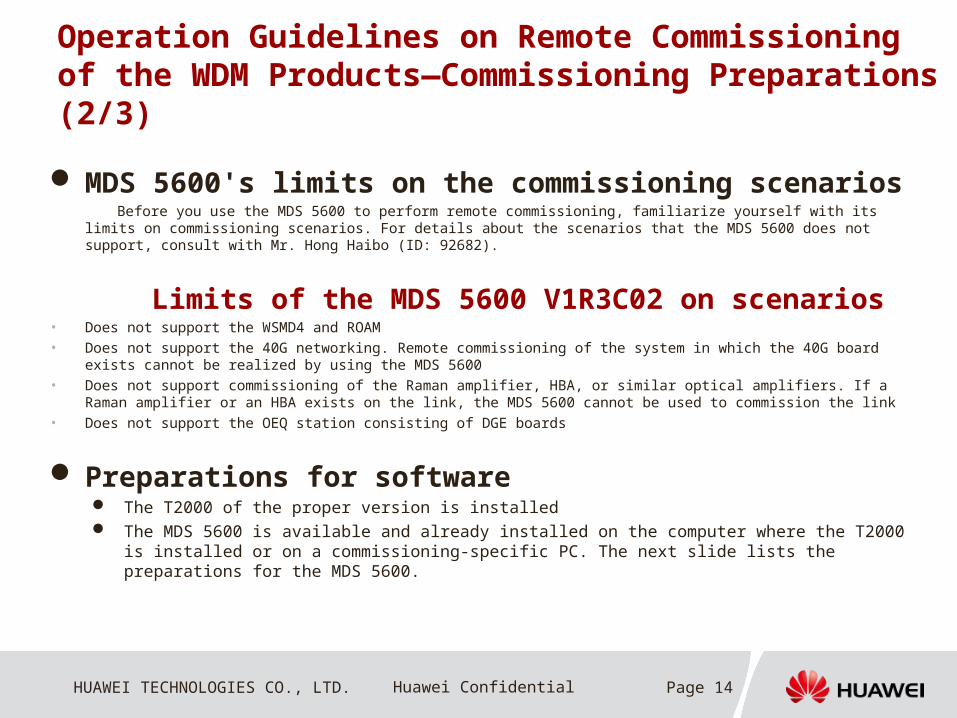
MDS 5600's limits on the commissioning scenarios Before you use the MDS 5600 to perform remote commissioning, familiarize yourself with its limits on
commissioning scenarios. For details about the scenarios that the MDS 5600 does not support, consult with Mr. Hong Haibo (ID: 92682).
Limits of the MDS 5600 V1R3C02 on scenarios • Does not support the WSMD4 and ROAM • Does not support the 40G networking. Remote commissioning of the system in which the 40G board exists cannot
be realized by using the MDS 5600 • Does not support commissioning of the Raman amplifier, HBA, or similar optical amplifiers. If a Raman amplifier or
an HBA exists on the link, the MDS 5600 cannot be used to commission the link • Does not support the OEQ station consisting of DGE boards
Preparations for software The T2000 of the proper version is installed The MDS 5600 is available and already installed on the computer where the T2000 is
installed or on a commissioning-specific PC. The next slide lists the preparations for the MDS 5600.
Operation Guidelines on Remote Commissioning of the WDM Products—Commissioning Preparations (2/3)

HUAWEI TECHNOLOGIES CO., LTD. Page 15Huawei Confidential
Slide title :32-35pt Color: R153 G0 B0
Corporate Font :FrutigerNext LT Medium
Font to be used by customers and
partners : Arial
Slide text :20-22ptBullets level 2-5:
18pt Color:Black
Corporate Font :FrutigerNext LT Medium
Font to be used by customers and
partners : Arial
Operation Guidelines on Remote Commissioning of the WDM Products—Commissioning Preparations (3/3)
The MDS 5600 must be installed before applying for its license. The installation of the MDS
5600 is completed only after the license is imported.
• MDS 5600 installation steps 1. Check whether the PC meets the configuration requirements of the MDS 5600. If not, replace it.
For details about the configurations, see the User Guide of the MDS 5600.
2. Make sure that the MDS 5600 installation CD-ROM or the installation package is available.
The MDS 5600 installation package is available on the http://support.huawei.com website.
3. Run the installation file. Install the MDS 5600 by following the installation instructions. If you need to install the MDS 5600 on a stand-alone PC, you need to install the server and client components at the same time.
For detailed installation steps, see the User Guide of the MDS 5600.
• MDS 5600 license application steps 1. Run the server of the MDS 5600, the "OptiX MDS 5600 Monitor" window is displayed. Click
"Generate ESN" to generate ESN codes.
2. In the license application e-flow, apply for non-commercial license.
3. After the application is approved, change the name of the returned license file from "ORXXXX.DAT" to "lic***.dat", and then save it in the Server directory on the OptiX MDS 5600 installation path.
4. Start the MDS 5600, and make sure that it functions normally.
For details about the application steps, see the License Application Guide for the MDS 5600.
Guidelines on preparing the MDS 5600

HUAWEI TECHNOLOGIES CO., LTD. Page 16Huawei Confidential
Slide title :32-35pt Color: R153 G0 B0
Corporate Font :FrutigerNext LT Medium
Font to be used by customers and
partners : Arial
Slide text :20-22ptBullets level 2-5:
18pt Color:Black
Corporate Font :FrutigerNext LT Medium
Font to be used by customers and
partners : Arial
Step 1: Configure NEs and network data remotely on the T2000 (1/3)
Operation Guidelines on Remote Commissioning of the WDM Products—Commissioning by Using Software
1. Create optical NEs (ONEs).
2. Search and create NEs.
3. Load mass NEs.
4. Set NE IDs and IP addresses.
5. Configure the WDM interface attributes of boards.
6. Synchronize the NE time with the NMS time.
7. Enable performance monitoring of NEs.
8. Set the inter-subrack communication mode.
9. Set the extended ECC mode.
10. Create fiber connections.
Remote commissioning modeOn-site commissioning mode
1. Search and load NEs.
2. Set NE IDs and IP addresses.
3. Configure WDM interface attributes of boards.
4. Synchronize NE time with the NMS time.
5. Enable performance monitoring of NEs.
6. Set the inter-subrack communication mode.
7. Enable performance monitoring of NEs.
8. Set the extended ECC mode.
9. Create and load mass data remotely.
10. Create fiber connections remotely.
The major difference between the on-site commissioning mode and remote commissioning mode lies in the commissioning location. For the former, steps 1 to 8 are usually performed on site to configure single NEs, whereas for the latter, all steps are performed remotely at the central node.
In the case of the remote commissioning mode, only step 2 is different from on-site commissioning, and you need to exercise caution at step 9; the other steps are performed in the similar way as those in the on-site commissioning mode. Thus, you only need to perform the other steps for remote commissioning by following the same steps adopted by on-site commissioning.
The steps for on-site commissioning may need to be adjusted as required.
Note: The configuration of a single NG-WDM station also involves configuration of optical and electrical cross-connections.
Fiber connections are very important for commissioning by using the MDS 5600. Thus, logical fiber connections must be completed during configuration by using the NMS.
Remarks

HUAWEI TECHNOLOGIES CO., LTD. Page 17Huawei Confidential
Slide title :32-35pt Color: R153 G0 B0
Corporate Font :FrutigerNext LT Medium
Font to be used by customers and
partners : Arial
Slide text :20-22ptBullets level 2-5:
18pt Color:Black
Corporate Font :FrutigerNext LT Medium
Font to be used by customers and
partners : Arial
Step 1: Configuring NEs and Network Data Remotely on the T2000 (2/3)
Guidelines on searching and creating NEs remotely 1. Assume that the default IP address of the WDM equipment is 129.9.X.X, and the IP address of the network
section is 255.255.0.0.
2. Set the IP address of the NMS computer or the commissioning-specific PC in the equipment room of the central node to 129.9.X.X and the IP address of the network section to 255.255.0.0. (Set the IP address flexibly based on the actual situation. If the IP address already exists, change it to another one.)
3. Connect the computer to a relevant hub or the corresponding Ethernet port on the GNE at the central node. (The Ethernet port of different WDM equipment differs. For details, see the corresponding Hardware Description.) After the connection is established properly, the ETH indicator on the SCC of the equipment is always on.
4. Start the T2000, and use the auto-search function to search for all equipment of which the IP address of the network section is 129.9.255.255. The default NE user and password are root and password respectively.
5. If no such NEs are found, re-set the IP address of the NMS computer or the commissioning-specific PC, and then search the NEs again. If the number of the searched NEs is inconsistent with the number of actual NEs (this can be checked against the engineering documents), check the connections between the GNE at the central node and NEs at other stations.
6. After the search is successful, select the NE that is not created in the NE list, and then create a corresponding NE.
7. After NEs are created, upload NE data in batches.
8. Based on the network configuration diagram provided in the engineering documents and the obtained corresponding subrack IDs that have been searched out, assort the ONEs on the T2000.
For details about the preceding steps, see the corresponding Commissioning Guide.

HUAWEI TECHNOLOGIES CO., LTD. Page 18Huawei Confidential
Slide title :32-35pt Color: R153 G0 B0
Corporate Font :FrutigerNext LT Medium
Font to be used by customers and
partners : Arial
Slide text :20-22ptBullets level 2-5:
18pt Color:Black
Corporate Font :FrutigerNext LT Medium
Font to be used by customers and
partners : Arial
Guidelines on setting the extended ECC mode remotely
Scenarios As per the factory default settings, automatically extended ECC is enabled. When there are more than nine single NEs
(for BWS 1600G V1R1-V1R3, 320G, Metro 6100, and 6040 equipment, the maximum number of single NEs is four), you need to change the ECC communication to the manual mode.
In general, the NE that adopts OSC and closest to the GNE is defined as the server end.
Steps Assume that a BWS1600G V1R3 station consists five NEs (1#, 2#, 3#, 4#, and 5#), and
1# NE communicates with the GNE via the SC2. 1. Disable the auto extend ECC function of 2# NE. Configure 2# NE as the client end. In this case, 2# NE may be
unreachable (if there are other routes in addition to ECC, it will be reachable). 2. Repeat steps 1 to configure 3# NE, 4# NE, and 5# NE as the client end. Note that they may be unreachable after the
configuration is made.3. Configure 1# NE as the server end. 1# NE, 2# NE, 3# NE, 4# NE, and 5# NE can be accessed by the NMS. No
abnormal disconnection between them and the NMS will occur in this case. Note that the client end must be configured before the server end is configured. Otherwise, the configured NEs will be
unreachable, and you need to change the setting on site by logging in to each NE. For information on how to set the extended ECC to manual mode, see the corresponding Commissioning Guide.
Step 1: Configuring NEs and Network Data Remotely on the T2000 (3/3)

HUAWEI TECHNOLOGIES CO., LTD. Page 19Huawei Confidential
Slide title :32-35pt Color: R153 G0 B0
Corporate Font :FrutigerNext LT Medium
Font to be used by customers and
partners : Arial
Slide text :20-22ptBullets level 2-5:
18pt Color:Black
Corporate Font :FrutigerNext LT Medium
Font to be used by customers and
partners : Arial
Step 2: Commissioning optical power
Commission the optical power remotely by adjusting the corresponding EVOA on the MDS 5600 .
Starting the MDS 5600
1. Create network data.
2. Generate WDM links.
3. Set parameters for the objects to be commissioned.
4. Set commissioning parameters for a subnetwork.
5. Commission the optical power.
There are two methods to create network data:• Import the network configuration data from the
T2000 to the MDS 5600• Create network data directly on the MDS 5600,
such as creating NEs, stations, subnets, and fiber connections.
• In general, the first method is recommended.
1. Synchronize NE configuration data.
2. Back up the NE data.
These two steps are performed on the T2000.
Operation Guidelines on Remote Commissioning of the WDM Products—Commissioning by Using Software
Step 3: Backing up data
For details about step 3, see the corresponding Commissioning Guide.
The guidelines on remote commissioning are specific to new WDM projects, and not applicable for expansion projects.
According to the commissioning objects, optical power commissioning involves: •Subnetwork commissioning and link commissioning According to the implementation method, optical power commissioning involves: •Automatic commissioning and commissioning by wizard
6. Check the commissioning results.

HUAWEI TECHNOLOGIES CO., LTD. Page 20Huawei Confidential
Slide title :32-35pt Color: R153 G0 B0
Corporate Font :FrutigerNext LT Medium
Font to be used by customers and
partners : Arial
Slide text :20-22ptBullets level 2-5:
18pt Color:Black
Corporate Font :FrutigerNext LT Medium
Font to be used by customers and
partners : Arial
1. Creating Network Data (1/2)
Steps: 1. Export the configuration data script of the entire network from the T2000. Make sure that the
NE data and fiber connection data are correct.
2. On the MDS 5600, import the configuration data script of the entire network.
Choose System > Import Network Data from the Main Menu. If you select Full import, the original data is overwritten; if you select Incremental import, the original data is retained.
3. Create a new subnet and assort the information of cross-subnet stations and NEs (optional). Choose System > New Subnet. In the attributes dialog box of each subnet, add the stations and NEs to the
subnet.
Note: WDM commissioning is performed on a subnet basis to generate WDM links. The information of each subnet can be exported from the T2000 and then imported to the MDS 5600. The MDS 5600 of the current version, however, cannot display the fiber connections and generate corresponding WDM links based on the cross-subnet fiber connection information in the root directory of the T2000. You need to create the WDM links manually on the MDS 5600, and then place the interconnected subnets into the new subnet.
Guidelines on importing the network configuration script from the T2000 to the MDS 5600
HUAWEI TECHNOLOGIES CO., LTD. Page 21Huawei Confidential
Slide title :32-35pt Color: R153 G0 B0
Corporate Font :FrutigerNext LT Medium
Font to be used by customers and
partners : Arial
Slide text :20-22ptBullets level 2-5:
18pt Color:Black
Corporate Font :FrutigerNext LT Medium
Font to be used by customers and
partners : Arial
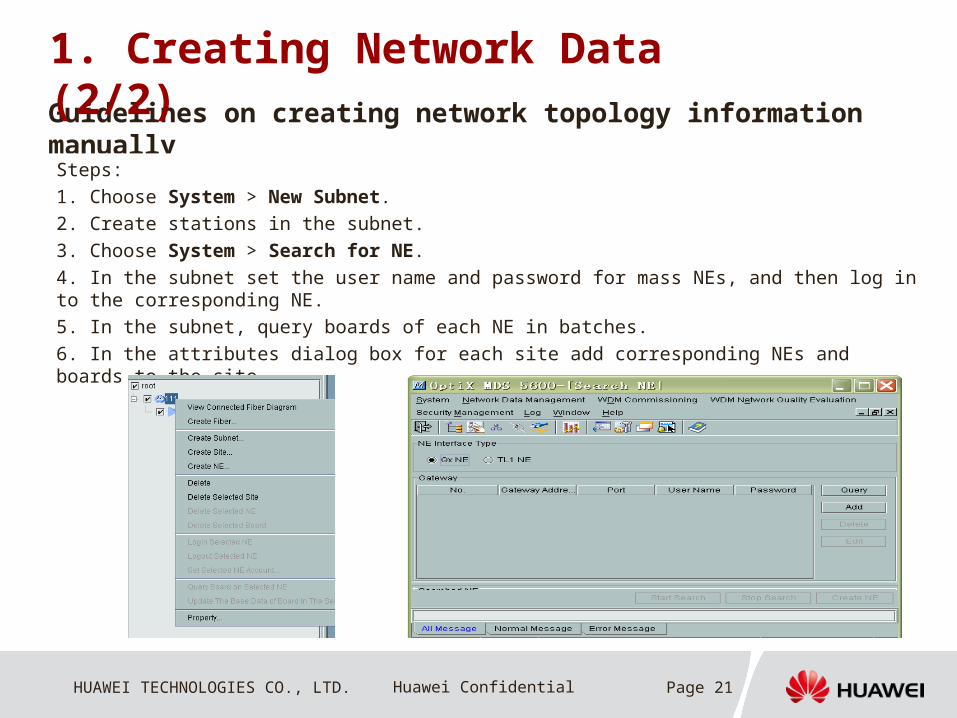
Guidelines on creating network topology information manually
Steps:
1. Choose System > New Subnet.
2. Create stations in the subnet.
3. Choose System > Search for NE.
4. In the subnet set the user name and password for mass NEs, and then log in to the corresponding NE.
5. In the subnet, query boards of each NE in batches.
6. In the attributes dialog box for each site add corresponding NEs and boards to the site.
1. Creating Network Data (2/2)

HUAWEI TECHNOLOGIES CO., LTD. Page 22Huawei Confidential
Slide title :32-35pt Color: R153 G0 B0
Corporate Font :FrutigerNext LT Medium
Font to be used by customers and
partners : Arial
Slide text :20-22ptBullets level 2-5:
18pt Color:Black
Corporate Font :FrutigerNext LT Medium
Font to be used by customers and
partners : Arial
Note: During the generation of a WDM link, the MDS 5600 may report errors.
This is because the data about logical fiber connections from the T2000 is incomplete. That is, certain fiber connection data on the T2000 is missing. For example, only internal fiber connections at the transmit end are created, but the fiber connections on the line side or at the receive end are not created. The MDS 5600 does not report errors if the data about the logical fiber connections on the entire link is missing, but indicates that the WDM link is generated successfully. The MDS 5600, however, considers that this WDM link does not exist by default. Thus, the MDS 5600 fails to commission the WDM link.
Solution: 1. Consult the engineering documents, and recheck the fiber connection data on the T2000. Make sure that the data is complete and correct and then generate the configuration script. Then, import the configuration script to the MDS 5600 to regenerate WDM links. 2. Create logical fiber connections directly on the MDS 5600. The first method is recommended to ensure that the data on the T2000 is consistent with the data on the MDS 5600.
2. Generating WDM LinksWDM links must be generated before you commission the optical power.
On the MDS 5600, choose Manage Network Data > Manage WDM Links. In the displayed window,
click Generate to generate WDM links automatically.
For details, see the User Guide of the MDS 5600.

HUAWEI TECHNOLOGIES CO., LTD. Page 23Huawei Confidential
Slide title :32-35pt Color: R153 G0 B0
Corporate Font :FrutigerNext LT Medium
Font to be used by customers and
partners : Arial
Slide text :20-22ptBullets level 2-5:
18pt Color:Black
Corporate Font :FrutigerNext LT Medium
Font to be used by customers and
partners : Arial
3. Setting Parameters for Objects to Be Commissioned
On the MDS 5600, choose WDM Commissioning > New Deployment Commissioning. In the user interface, set parameters, including Target OSNR and Demand BER Before Error Correction.
• About setting of target OSNR: Set the target OSNR based on the wavelength allocation diagram in the marketing telecom design document or the customer requirement on the OSNR of the network. If multiple channels exist on the link and the OSNR design value of the channels at the receive end are different, set the target OSNR based on the biggest design value. If the MDS 5600 detects that the OSNR is lower than the set value, it provides an indication. In this case, check the network based on the indication.
• About target BER before error correction: The MDS 5600 regards that the BER before error correction is 1,00E-8 by default. For the OTU board that adopts FEC mode, set the target BER before error correction to a value lower than or equal to the default value; for the OTU board that adopts AFEC mode, set it to 1,00E-5 or a smaller value; for the OTU board that has no FEC function, retain the default value because it is useless to set this parameter.
For details, see the User Guide of the MDS 5600.

HUAWEI TECHNOLOGIES CO., LTD. Page 24Huawei Confidential
Slide title :32-35pt Color: R153 G0 B0
Corporate Font :FrutigerNext LT Medium
Font to be used by customers and
partners : Arial
Slide text :20-22ptBullets level 2-5:
18pt Color:Black
Corporate Font :FrutigerNext LT Medium
Font to be used by customers and
partners : Arial
4. Configuring Commissioning Parameters of Subnets
The WDM equipment can be commissioned successfully only after commissioning parameters of subnets are set properly. Otherwise, the commissioning fails.
1. Set the commissioning parameters of subnets in the Subnet Commissioning Parameter Settings dialog box.
2. The parameters of subnets need to be set are fiber type and maximum wavelengths of the system. The MDS 5600 determines the typical single-wavelength optical power of the OA based on the values of the parameters.
• For Fiber Type, select a proper type based on the actual fiber type. The values include G.652, G.653, G.655 and G.652/655. The value of System Full Wavelengths varies with the fiber type.
• Set the System Full Wavelengths parameter properly based on the actual maximum number of wavelengths of the system. Obtain the maximum number of wavelengths that the system supports based on the frequency allocation table in the marketing telecom design document, or based on the analysis of the product configuration. For example, if the ITL and M48/D48 boards are used in the system, the system can access a maximum number of 96 wavelengths; if the ITL and M40/D40 boards are used, the system can access a maximum number of 80 wavelengths; if only the M40/D40 boards are used, the system can access a maximum number of 40 wavelengths.
For details, see the User Guide of the MDS 5600.

HUAWEI TECHNOLOGIES CO., LTD. Page 25Huawei Confidential
Slide title :32-35pt Color: R153 G0 B0
Corporate Font :FrutigerNext LT Medium
Font to be used by customers and
partners : Arial
Slide text :20-22ptBullets level 2-5:
18pt Color:Black
Corporate Font :FrutigerNext LT Medium
Font to be used by customers and
partners : Arial
5. Commissioning Optical Power
According to the commissioning objects, optical power commissioning is classified into networkwide commissioning and link commissioning.
In the case of networkwide commissioning, all links displayed in the New Deployment Commissioning window are commissioned.
In the case of link commissioning, only the selected links in the New Deployment Commissioning window.
According to the implementation method, optical power commissioning is classified into automatic commissioning and commissioning by wizard.
In the case of automatic commissioning, after the objects are set properly, all the links on the entire network are commissioned automatically. In the commissioning, no manpower is involved. This shortens the commissioning time and thus improves the commissioning efficiency.
In the case of the commissioning by wizard, manpower must be involved, and only one link and its associated links can be commissioned at one time. In addition, the commissioning can be performed only after the target gain and the target optical power of each OA at the IN port are set manually.
HUAWEI TECHNOLOGIES CO., LTD. Page 26Huawei Confidential
Slide title :32-35pt Color: R153 G0 B0
Corporate Font :FrutigerNext LT Medium
Font to be used by customers and
partners : Arial
Slide text :20-22ptBullets level 2-5:
18pt Color:Black
Corporate Font :FrutigerNext LT Medium
Font to be used by customers and
partners : Arial
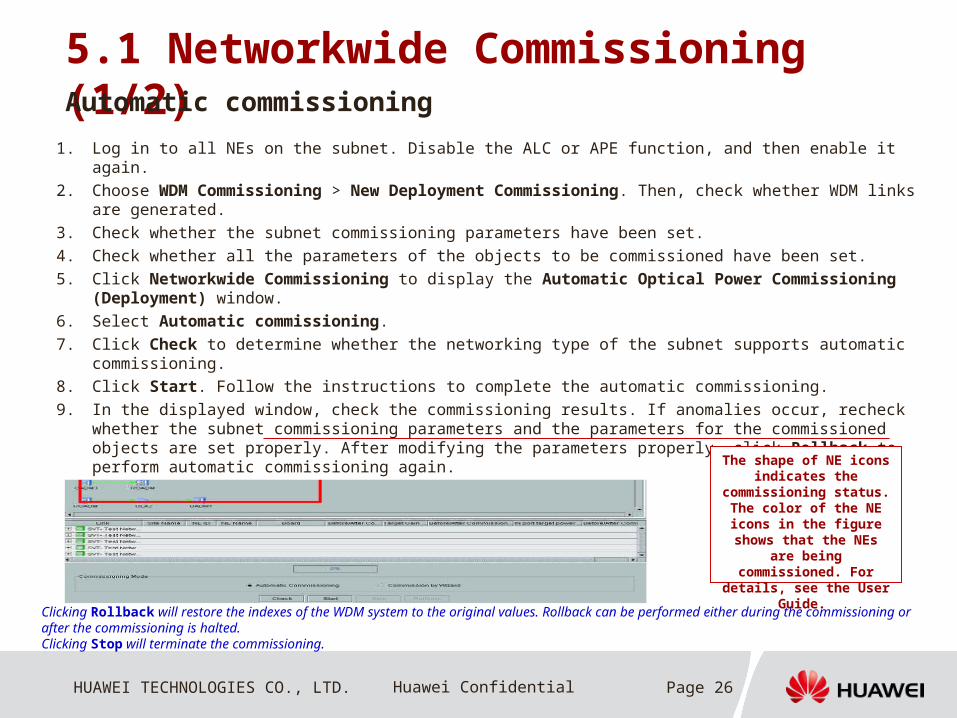
1. Log in to all NEs on the subnet. Disable the ALC or APE function, and then enable it again.
2. Choose WDM Commissioning > New Deployment Commissioning. Then, check whether WDM links are generated.
3. Check whether the subnet commissioning parameters have been set.
4. Check whether all the parameters of the objects to be commissioned have been set.
5. Click Networkwide Commissioning to display the Automatic Optical Power Commissioning (Deployment) window.
6. Select Automatic commissioning.
7. Click Check to determine whether the networking type of the subnet supports automatic commissioning.
8. Click Start. Follow the instructions to complete the automatic commissioning.
9. In the displayed window, check the commissioning results. If anomalies occur, recheck whether the subnet commissioning parameters and the parameters for the commissioned objects are set properly. After modifying the parameters properly, click Rollback to perform automatic commissioning again.
5.1 Networkwide Commissioning (1/2)Automatic commissioning
Clicking Rollback will restore the indexes of the WDM system to the original values. Rollback can be performed either during the commissioning or after the commissioning is halted. Clicking Stop will terminate the commissioning.
The shape of NE icons indicates the
commissioning status. The color of the NE icons in the figure shows that the NEs are being commissioned. For details, see the User
Guide.
HUAWEI TECHNOLOGIES CO., LTD. Page 27Huawei Confidential
Slide title :32-35pt Color: R153 G0 B0
Corporate Font :FrutigerNext LT Medium
Font to be used by customers and
partners : Arial
Slide text :20-22ptBullets level 2-5:
18pt Color:Black
Corporate Font :FrutigerNext LT Medium
Font to be used by customers and
partners : Arial
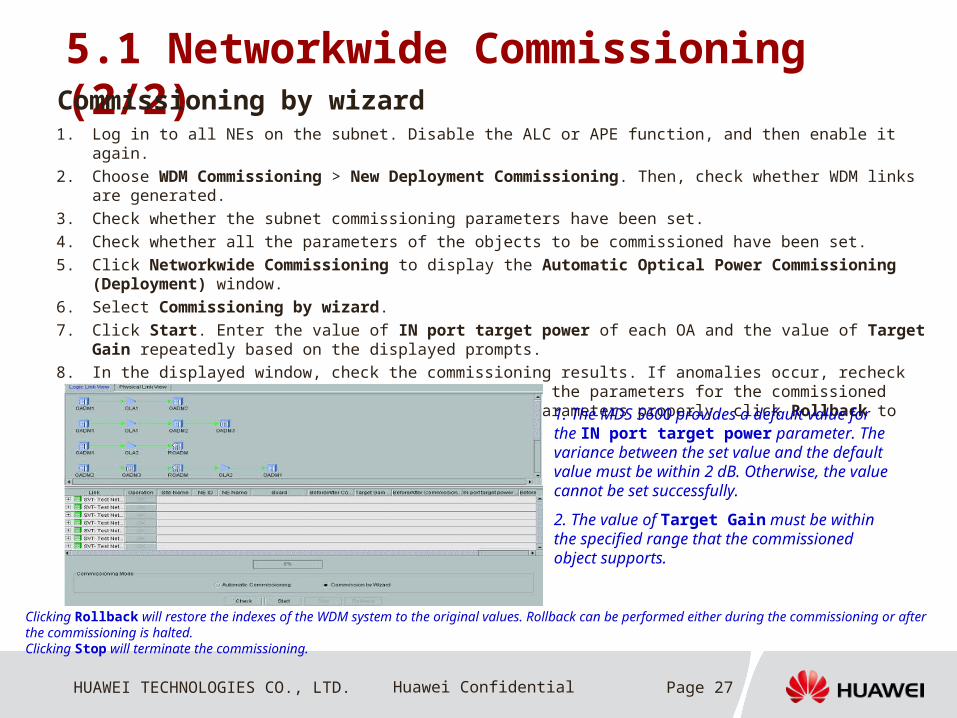
1. Log in to all NEs on the subnet. Disable the ALC or APE function, and then enable it again.
2. Choose WDM Commissioning > New Deployment Commissioning. Then, check whether WDM links are generated.
3. Check whether the subnet commissioning parameters have been set.
4. Check whether all the parameters of the objects to be commissioned have been set.
5. Click Networkwide Commissioning to display the Automatic Optical Power Commissioning (Deployment) window.
6. Select Commissioning by wizard.
7. Click Start. Enter the value of IN port target power of each OA and the value of Target Gain repeatedly based on the displayed prompts.
8. In the displayed window, check the commissioning results. If anomalies occur, recheck whether the subnet commissioning parameters and the parameters for the commissioned objects are set properly. After modifying the parameters properly, click Rollback to perform commissioning by wizard again.
5.1 Networkwide Commissioning (2/2)Commissioning by wizard
Clicking Rollback will restore the indexes of the WDM system to the original values. Rollback can be performed either during the commissioning or after the commissioning is halted. Clicking Stop will terminate the commissioning.
1. The MDS 5600 provides a default value for the IN port target power parameter. The variance between the set value and the default value must be within 2 dB. Otherwise, the value cannot be set successfully.
2. The value of Target Gain must be within the specified range that the commissioned object supports.
HUAWEI TECHNOLOGIES CO., LTD. Page 28Huawei Confidential
Slide title :32-35pt Color: R153 G0 B0
Corporate Font :FrutigerNext LT Medium
Font to be used by customers and
partners : Arial
Slide text :20-22ptBullets level 2-5:
18pt Color:Black
Corporate Font :FrutigerNext LT Medium
Font to be used by customers and
partners : Arial
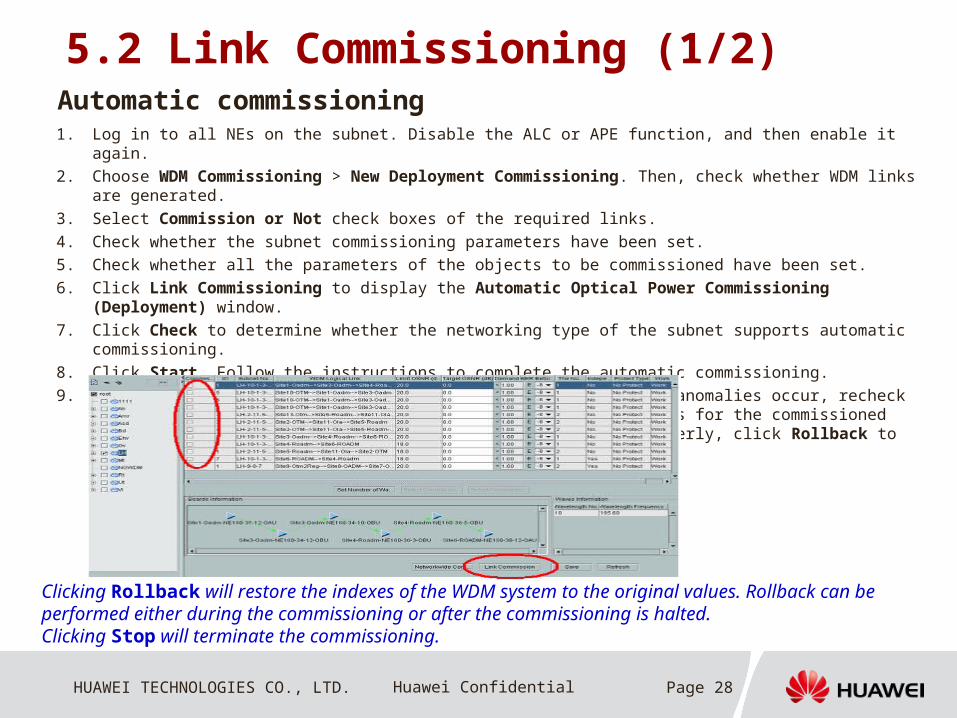
1. Log in to all NEs on the subnet. Disable the ALC or APE function, and then enable it again.
2. Choose WDM Commissioning > New Deployment Commissioning. Then, check whether WDM links are generated.
3. Select Commission or Not check boxes of the required links.
4. Check whether the subnet commissioning parameters have been set.
5. Check whether all the parameters of the objects to be commissioned have been set.
6. Click Link Commissioning to display the Automatic Optical Power Commissioning (Deployment) window.
7. Click Check to determine whether the networking type of the subnet supports automatic commissioning.
8. Click Start. Follow the instructions to complete the automatic commissioning.
9. In the displayed window, check the commissioning results. If anomalies occur, recheck whether the subnet commissioning parameters and the parameters for the commissioned objects are set properly. After modifying the parameters properly, click Rollback to perform automatic commissioning again.
5.2 Link Commissioning (1/2)Automatic commissioning
Clicking Rollback will restore the indexes of the WDM system to the original values. Rollback can be performed either during the commissioning or after the commissioning is halted. Clicking Stop will terminate the commissioning.

HUAWEI TECHNOLOGIES CO., LTD. Page 29Huawei Confidential
Slide title :32-35pt Color: R153 G0 B0
Corporate Font :FrutigerNext LT Medium
Font to be used by customers and
partners : Arial
Slide text :20-22ptBullets level 2-5:
18pt Color:Black
Corporate Font :FrutigerNext LT Medium
Font to be used by customers and
partners : Arial
1. Log in to all NEs on the subnet. Disable the ALC or APE function, and then enable it again.
2. Choose WDM Commissioning > New Deployment Commissioning. Then, check whether WDM links are generated.
3. Select Commission or Not check boxes of the required links.
4. Check whether the subnet commissioning parameters have been set.
5. Check whether all the parameters of the objects to be commissioned have been set.
6. Click Link Commissioning to display the Automatic Optical Power Commissioning (Deployment) window.
7. Select Commissioning by wizard.
8. Click Start. Enter the value of IN port target power of each OA and the value of Target Gain repeatedly based on the displayed prompts.
9. In the displayed window, check the commissioning results. If anomalies occur, recheck whether the subnet commissioning parameters and the parameters for the commissioned objects are set properly. After modifying the parameters properly, click Rollback to perform commissioning by wizard again.
5.2 Link Commissioning (2/2)Commissioning by wizard
Clicking Rollback will restore the indexes of the WDM system to the original values. Rollback can be performed either during the commissioning or after the commissioning is halted. Clicking Stop will terminate the commissioning.
1. The MDS 5600 provides a default value for the IN port target power parameter. The variance between the set value and the default value must be within 2 dB. Otherwise, the value cannot be set successfully.
2. The value of Target Gain must be within the specified range that the commissioned object supports.

HUAWEI TECHNOLOGIES CO., LTD. Page 30Huawei Confidential
Slide title :32-35pt Color: R153 G0 B0
Corporate Font :FrutigerNext LT Medium
Font to be used by customers and
partners : Arial
Slide text :20-22ptBullets level 2-5:
18pt Color:Black
Corporate Font :FrutigerNext LT Medium
Font to be used by customers and
partners : Arial
6. Checking the Commissioning Results
Focus on the following points when you verify the optical power commissioning results: • OSNR at the receive end.
• BER before FEC error correction at the receive end. For the OTU boards that do not provide the error correction function, no bit errors should occur in the performance events as displayed on the T2000.
• Input and output optical power of the OA and OTU boards.
Check methods:
•Commissioning Report of the OTU
According to the commissioning report of the OTU, check whether the input and output optical power, BER before error correction, and OSNR after the commissioning meet the commissioning requirements.
•Commissioning Report of the OA
According to the commissioning report of the OA, check whether the input and output optical power, and the gain of the OA after the commissioning meet the commissioning requirements.
Note that the commissioning results that do not meet the commissioning requirements are marked in red in the report.

HUAWEI TECHNOLOGIES CO., LTD. Page 31Huawei Confidential
Slide title :32-35pt Color: R153 G0 B0
Corporate Font :FrutigerNext LT Medium
Font to be used by customers and
partners : Arial
Slide text :20-22ptBullets level 2-5:
18pt Color:Black
Corporate Font :FrutigerNext LT Medium
Font to be used by customers and
partners : Arial
6.1 Commissioning Report of the OTU
Report generation steps:1. Choose WDM Commissioning > Commissioning Report. Select Commissioning Report of the OTU in the
Report Options drop-down list.
2. Set Path Selection, Subnet, File Type, and Select Conditions of the stations properly, and then click Generate to generate the commissioning report.
Checking the commissioning results: 1. If the OSNR and BER before error correction at the receive end do not comply with the commissioning requirements,
check the received optical power of each OTU.
2. The IN port optical power of the OTU board must be 3 dB higher than the receiver sensitivity and 5 dB lower than the receiver overload point.
3. If the optical power shown in the report is normal, check whether the DCM configuration of the link complies with the configuration requirement specified in the engineering design document.
The commissioning results that do not comply with the commissioning requirements are marked in red in
the report.
HUAWEI TECHNOLOGIES CO., LTD. Page 32Huawei Confidential
Slide title :32-35pt Color: R153 G0 B0
Corporate Font :FrutigerNext LT Medium
Font to be used by customers and
partners : Arial
Slide text :20-22ptBullets level 2-5:
18pt Color:Black
Corporate Font :FrutigerNext LT Medium
Font to be used by customers and
partners : Arial
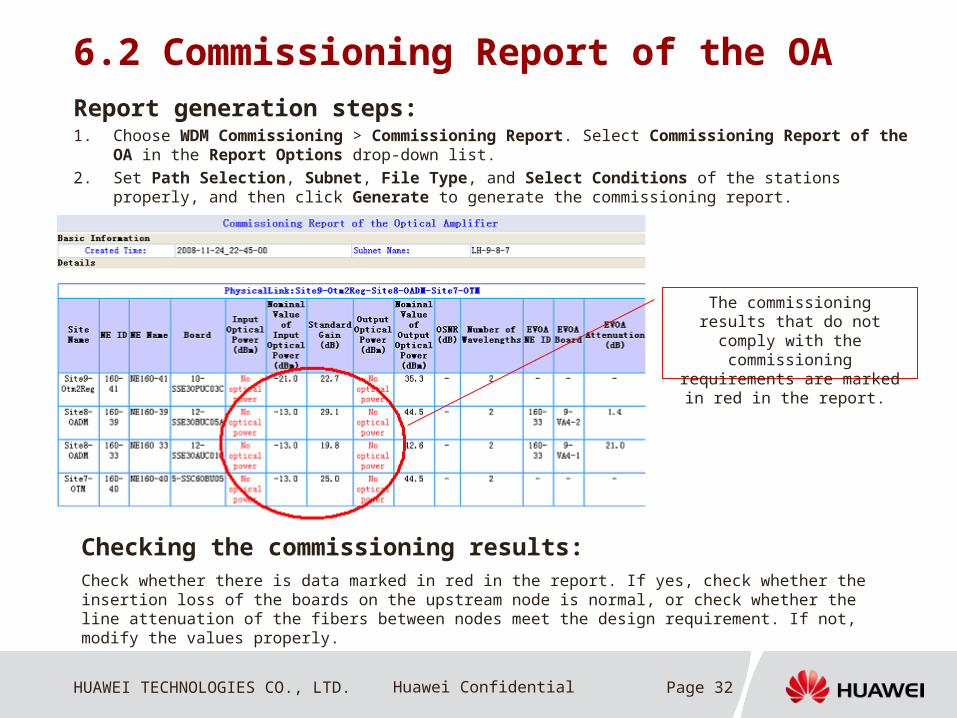
6.2 Commissioning Report of the OAReport generation steps:1. Choose WDM Commissioning > Commissioning Report. Select Commissioning Report of the OA in the
Report Options drop-down list.
2. Set Path Selection, Subnet, File Type, and Select Conditions of the stations properly, and then click Generate to generate the commissioning report.
Checking the commissioning results:Check whether there is data marked in red in the report. If yes, check whether the insertion loss of the boards on the upstream node is normal, or check whether the line attenuation of the fibers between nodes meet the design requirement. If not, modify the values properly.
The commissioning results that do not comply with the
commissioning requirements are marked in red in the report.

Thank youwww.huawei.com