7600dqdjhu - tsmmanager.com · 7600dqdjhu xvhuv jxlgh sdjh 7600dqdjhu 7kh xvhu dqg lqvwdoodwlrq...
TRANSCRIPT

05-05-2018 TSMManager users guide page 1
TSMManager
The user and installation guide for TSMManager.
Version 6.3

05-05-2018 TSMManager users guide page 2 What is TSMManager ? ....................................................................................................................... 4 Installation ............................................................................................................................................ 7
Possible configurations .................................................................................................................... 7 Single viewer, single TSM server, all in one server .................................................................... 7
Windows server.................................................................................................................................... 7 Single/multiple viewers, single/multiple TSM servers, collector housed with one TSM server . 7
Windows server.................................................................................................................................... 7 Single/multiple viewers, single/multiple TSM servers, collector housed separately .................. 7
Windows server.................................................................................................................................... 7 Single/multiple viewers, single/multiple TSM servers, collector housed with one viewer ......... 8
Windows server.................................................................................................................................... 8 Single/multiple viewers, multiple TSM servers, multiple collectors ........................................... 8
Windows server.................................................................................................................................... 8 Windows server.................................................................................................................................... 8
Collector installation ........................................................................................................................ 9 Viewer installation ........................................................................................................................... 9 Optional Windows agent installation ............................................................................................... 9 Installing multiple collectors on the same physical server .............................................................. 9 Define collector .............................................................................................................................. 10 Add/edit/delete TSM servers ......................................................................................................... 11
How to setup SSL communication............................................................................................. 12 Connection test ........................................................................................................................... 12
Global settings.................................................................................................................................... 13 Mail server setup ............................................................................................................................ 13 Daily report settings. ...................................................................................................................... 14 Daily report receivers ..................................................................................................................... 15 Message handling. .......................................................................................................................... 16 Sending alerts to an external reporting program ............................................................................ 17 Periodic checking ........................................................................................................................... 19 Additional report text ..................................................................................................................... 20 Node owner groups ........................................................................................................................ 21
The optional Windows agent ............................................................................................................. 22 TSM scheduler control ................................................................................................................... 22 DSMC access ................................................................................................................................. 23 TSM for virtual environments........................................................................................................ 24
General usage ..................................................................................................................................... 27 Right click - Right click - Right click ! .......................................................................................... 27 Window facilities ........................................................................................................................... 27
Display functions ............................................................................................................................... 29 Node info........................................................................................................................................ 29 Policy info ...................................................................................................................................... 30 Server info ...................................................................................................................................... 30 Operations ...................................................................................................................................... 30 Hardware ........................................................................................................................................ 30 Volume info ................................................................................................................................... 30
History ................................................................................................................................................ 31 How is it collected ? ....................................................................................................................... 31 14 day history ................................................................................................................................. 31 2 year history .................................................................................................................................. 31
Utilities ............................................................................................................................................... 33 Backupsets ......................................................................................................................................... 34

05-05-2018 TSMManager users guide page 3
What is a backupset ? ................................................................................................................. 34 Backupsets versus archives ........................................................................................................ 34 What can be done to improve the usability of backupsets ? ...................................................... 34 Using backupsets for disaster recovery ...................................................................................... 35 How can TSMManager help you in using backupsets ? ............................................................ 36
Vaulting .............................................................................................................................................. 38 What is vaulting ? .......................................................................................................................... 38 What should be vaulted ? ............................................................................................................... 39 How often should vaulting occur ? ................................................................................................ 39 When should vaulting occur ? ........................................................................................................ 39
How is vaulting implemented in TSMManager ? .............................................................................. 41 The vault status window : .............................................................................................................. 41 Vaulting setup ................................................................................................................................ 43
Vaulting jobs .............................................................................................................................. 43 Library handling ......................................................................................................................... 45 Generate recovery plan .............................................................................................................. 45 Volume list reports and Iron Mountain support. ........................................................................ 47
The vaulting mechanism ................................................................................................................ 49 Vault inventory handling ............................................................................................................... 50
Report generation ............................................................................................................................... 53 Scheduled execution of globally saved reports. ............................................................................. 54
Web access ......................................................................................................................................... 55 Administrator web.......................................................................................................................... 55 Customer web ................................................................................................................................ 56

05-05-2018 TSMManager users guide page 4
What is TSMManager ? The purpose of TSMManager is to monitor the state and manipulate the objects of TSM servers. It consists of :
A central collector part that is in charge of all communication with up to 30 TSM servers. A viewer part that can be installed on multiple PC's and supplies the user interface. A web server built into the collector that allows easy access to pulling lists for the vaulting
function plus allows access for users without a TSM administrative user. An optional Windows agent for manipulating node schedulers and their files.
TSMManager has several functions :
Vaulting Backupset generation Alert/Reporting Data gathering (history) Manual operations Utilities Display functions Reports Web access for non TSM administrators
Vaulting
The vaulting function of TSMManager is a complete replacement for Tivoli's DRM feature. It will handle everything necessary with regard to moving tapes out of libraries, producing pulling lists for operators, returning volumes and checking them in to libraries. Everything runs scheduled and without manual intervention. (Except for the physical movement of volumes, of course) It will handle copypool volumes, primary pool volumes, database backups, both full/incr and snapshot and backupsets. It will also generate a recovery plan with all needed support files and let you store it in a safe place in case your TSM server dies and needs to be rebuilt.
Backupset generation
If you think about replacing your monthly archives with backupsets, then it is very easy with this function. It will control retention, scheduling and use parallel streams to generate backupsets from the nodes you choose.
Alert/Reporting
Send a daily e-mail notification informing you of exception conditions in your TSM server. Show a visual indication of the server's availability, updated every 2 minutes. Send you an e-mail immediately if error messages occur. Optionally call an external reporting program for each alert.
Data gathering
The collector collects 3 types of data : 14-day statistic with measurements taken every 15 minutes. 2 year statistic with measurements taken every 24 hours. Volume statistics. (mounts and read/write errors)

05-05-2018 TSMManager users guide page 5 Manual operations
An administrative client type of interface. Console mode operation, showing you what happens right now.
Utilities
An editor for client option sets An editor for server scripts Retrieve dsm.sys, dsm.opt, dsmerror.log and dsmsched.log from any node. A database explorer
Library handling
Checkin/checkout control Labelling control Auditing control
Display and control functions
A graphical overview of the timing aspects of your client and administrative schedules. A timing chart showing all server activity for the last 12/24/48 hours. A graphical overview over your drive usage. How much data was transferred during the last 24 hours. How much space each node takes up. A summary of all data involving a certain node. On which volumes a node has its data. Status of all volumes Warning window with all abnormal conditions Graphic overview of the configuration of your TSM servers. An operational view showing you the status of all servers in one view. And lots of other views.
Reports
Printed Monthly average reports for all collected data. Printed Detailed reports for all collected data. Customized reports that you define. Scheduling for automatic generation of customized reports
Commands TSMManager supports more than 200 of the TSM commands.
Web access Users can be given access to the backup status of a single domain or several domains. Controlled via userid/password combinations defined by the TSMManager administrator. Data displayed only concerns the backup status, not the internal workings of the TSM server

05-05-2018 TSMManager users guide page 6
How does it work ? The minimum configuration consists of one viewer, one collector and one TSM server. It can be extended with more viewers and more TSM servers, but there will always be only one collector. The collector is a Windows service and performs several functions :
It collects statistical (historical) information. It receives and processes requests from the viewer(s) and returns data to them. It monitors the TSM server(s) and sends e-mail alerts if configured to do so.
The viewers never contact the TSM servers directly, only through the collector. The connection from the collector to the TSM servers is through the standard administrative command line program (dsmadmc). The connection from the viewer to the collector is standard TCP/IP on port 1955.
Collector Viewer API (dsmadmc)
Viewer
T S M
T S M
T S M Viewer

05-05-2018 TSMManager users guide page 7
Any Windows
Any Windows
Installation
Possible configurations The collector and viewer can be installed in different configurations:
Single viewer, single TSM server, all in one server
Single/multiple viewers, single/multiple TSM servers, collector housed with one TSM server
Single/multiple viewers, single/multiple TSM servers, collector housed separately
Windows server
Collector T S M
Viewer API
Windows server
Collector T S M
Viewer API
Any Windows
Viewer
Any platform
T S M
Windows server
Collector Viewer API
Any Windows
Viewer
Any platform
T S M
Any platform
T S M

05-05-2018 TSMManager users guide page 8
Single/multiple viewers, single/multiple TSM servers, collector housed with one viewer
Single/multiple viewers, multiple TSM servers, multiple collectors
Windows server
Collector Viewer API
Any Windows
Viewer
Any platform
T S M 1
Any platform
T S M 2
Any platform
T S M 3-30
Any Windows
Viewer
Windows server
Collector API
Any Windows
Viewer
Any platform
T S M 1
Any platform
T S M 2-30
Any Windows
Viewer Windows server
Collector API
Any platform
T S M 1
Any platform
T S M 2-30

05-05-2018 TSMManager users guide page 9
Collector installation After downloading the file tsmm_col.exe, just run it. It will self extract and the install program will be launched. The default installation directory is c:\program files(x86)\jamodat\tsmmgr_serv. It must be installed on a Windows server because it runs as a service. After installation, you will have 3 Windows services that have been started and set to start automatically. These are :
“TSMManager collector” which is the main service that performs all communication, history collection, vaulting etc. etc. This service MUST run.
“TSMManager Admweb” which is the service that allows web access for administrators. “TSMManager Cusweb” which is the service that allows web access for node owners.
Viewer installation After downloading the file tsmm_cli.exe, just run it. It will self extract and the install program will be launched. The default installation directory is c:\program files(x86)\jamodat\tsmmgr_viewer. It can be installed on any Windows platform and you can install the viewer on as many workstations as you like. You will have an entry in your start menu where you can start the program.
Optional Windows agent installation After downloading the file tsmm_age.exe, just run it. It will self extract and the install program will be launched. The default installation directory is c:\program files(x86)\jamodat\tsmmgr_agent. It must be installed on a Windows 2000/XP/2003/2008/2012/W7 because it runs as a service. After installation, you will have an installed Windows service that is started and set to start automatically.
Installing multiple collectors on the same physical server You can install a maximum of 3 collector service instances on one physical server. These instances do not share the same license file, each instance is licensed separately as if they were running on separate physical servers. After installing the collector code the first time, the first instance is installed and running. If you wish to install instance 2 and 3, go to the directory “c:\program files(x86)\jamodat\tsmmgr_serv\multi_instances”. You will find scripts to install or delete the 2 other instances. The following table summarizes the setup : Instance Home directory Port for viewer
communication Port for Admin
web access Port for user web access
1 C:\program files(86)\jamodat\tsmmgr_serv
1955 1950 1951
2 {instance 1 home}\instance2 1954 1948 1949 3 {instance 1 home}\instance3 1953 1946 1947
License files for the 3 instances must be placed in the respective home directories.

05-05-2018 TSMManager users guide page 10 Configuration After initial installation you must now perform the following steps :
1. Start the viewer. 2. Define the location (IP-address or DNS name) of the collector installation. 3. Go into "configuration/TSM servers" and define your first TSM server. 4. Repeat this for all your TSM servers. 5. Exit the program completely. 6. Start again and do a proper logon. 7. Go into "Configuration/Global settings" and set up the alert/mail system as you wish.
Define collector At the first start of the program, you will be presented with a window asking for the collector location. The collector needs to be installed and running at this time and it must be reachable by TCP/IP on port 1955. If you subsequently need to change the collector data or add more collectors, go into “configuration/collectors” to do it :

05-05-2018 TSMManager users guide page 11
Add/edit/delete TSM servers
Each TSM server to be managed/monitored, must be defined to TSMManager. You must provide a unique user-friendly name for each server and the information necessary to access it. If the server resides on OS/390, it is important that you mark it as such. An OS/390 server has no concept of libraries and drives and TSMManager needs to know this. As of TSM 6.x, TSM can report its version. So just select “6.0 and above”, unless you are running a TSM server that is below 6.0. In that case you must specify which version is correct.

05-05-2018 TSMManager users guide page 12 There are a many functions in TSMManager that will show data across multiple TSM servers. If you want a server to be part of this you will have to check “Include this server in cross server displays”. You can optionally use SSL protected communication between collector and TSM server :
How to setup SSL communication If you wish to use SSL communication between the collector and one or more of your TSM servers, you must perform these steps : 1. Install a normal TSM backup client version 5.5 or higher on the collector server. Use "custom install" in order to make sure that the "Administrative Command Line Client" gets installed with it. 2. After defining the TSM server to TSMManager, set it offline by right-clicking its icon and select "Set server offline". 3. In the TSM server overview window, click the button "SSL certificate handling". 4. In this window you must first use the button to create the SSL certification database. This only needs to be done once. 5. Obtain the certificate that was created by your TSM server. It is named "cert.arm" and resides in the server directory. (If you have TSM 6.3 and use 256 bit encryption, the certificate is named cert256.arm) 6. Copy this file to this servers corresponding directory on the collector server. If the TSM server is named "PROD01" and the collector is installed in its default directory, this will be "c:\program files(86)\jamodat\tsmmgr_serv\PROD01" 7. Now use the button "Add certificate for server" after selecting the correct server in the dropdown list. You can now set the TSM server online and it should work.
Connection test After defining the TSM server, you can test if the setup is OK by entering “Configuration/Test connection".
05-05-2018 TSMManager users guide page 13
Global settings
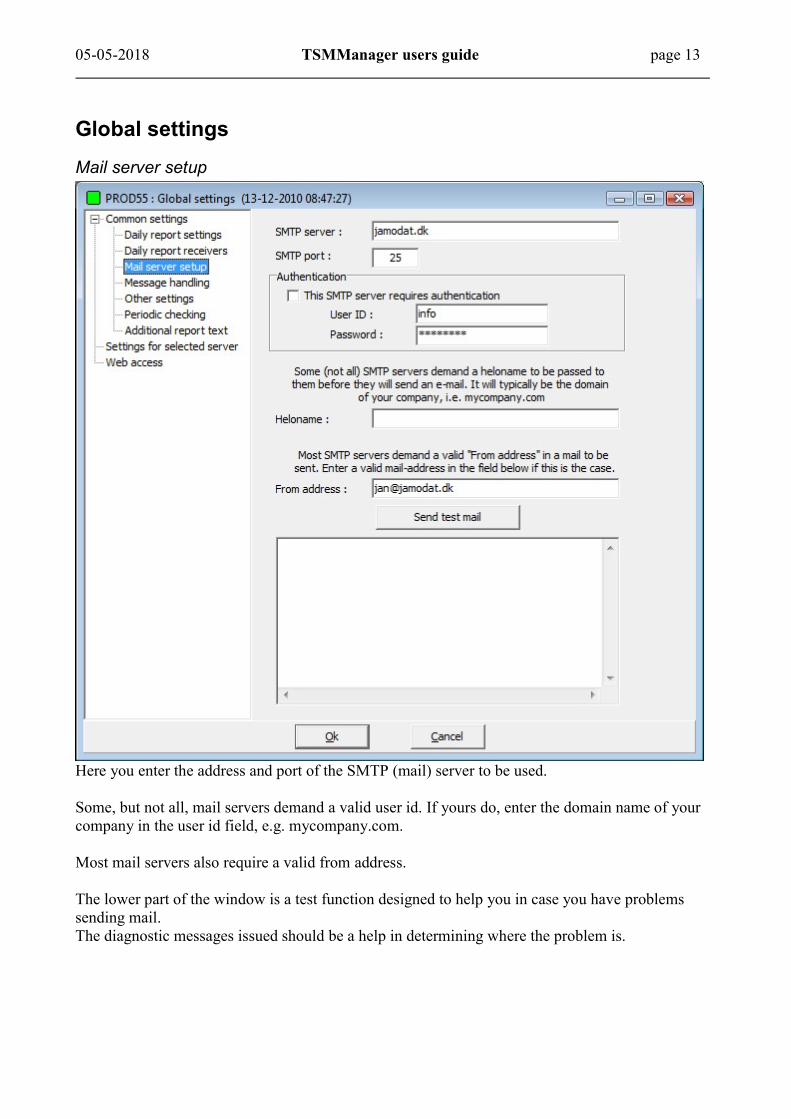
Mail server setup
Here you enter the address and port of the SMTP (mail) server to be used. Some, but not all, mail servers demand a valid user id. If yours do, enter the domain name of your company in the user id field, e.g. mycompany.com. Most mail servers also require a valid from address. The lower part of the window is a test function designed to help you in case you have problems sending mail. The diagnostic messages issued should be a help in determining where the problem is.

05-05-2018 TSMManager users guide page 14
Daily report settings.
The daily report is built once every 24 hours at a time you decide and with the limits specified by you. It can be displayed using the viewer and the web interface and it can be e-mailed to some receivers. After setting it up, you can use the button "Build daily report now" to force the collector to collect data and send them.

05-05-2018 TSMManager users guide page 15
Daily report receivers
The daily report contains a lot of data. You may want to send only part of the report to some receivers and other parts to other receivers. For this purpose, you can define up to 10 groups. Each group defines which parts of the daily report to include and who should receive the report. 2 lists of receivers are available. One list for receivers who will receive a report for each defined TSM server, the other list for receivers who should only receive a report for a single TSM server.

05-05-2018 TSMManager users guide page 16 Message handling.
The collector continually monitors all messages generated by the TSM servers. This function will send an e-mail alert to the relevant receivers if certain messages are encountered. Note : Each receiver field can be used for multiple receivers, just separate them from each other with a comma. You decide how severe a message must be to trigger an alert. To avoid being overflowed with e-mail in an error situation, you can enter a minimum amount of time that must elapse between sending e-mails. Some messages may be quite harmless, even if they are in the error category or higher. By entering them in the white list, they will be excluded and will not trigger an alert. You also have the option to send e-mail alerts if specific messages occur. I.e., you could send an e-mail to the guy responsible for the database if you receive a message saying “database full”. Specially highlighted messages are messages that you wish to collect from all defined TSM servers and show in a single window together. Any messages you define in the 4 coloured boxes will be presented in the monitor window with the colour selected under the heading “Special messages”.
05-05-2018 TSMManager users guide page 17
Sending alerts to an external reporting program TSMManager will allow you to use an external reporting program of your choice. If you have enabled E-mail alerting, then the following will also happen : When an alert is due to be sent, the program will look for a file named tsmm_alert.cmd in the directory below the collector installation directory, that is named after your TSM server. (If your TSM server is named ABC, then the directory is c:\program files\jamodat\tsmmgr_serv\ABC). If it finds this file, it will then write the alert as plain text to a file named tsmm_alert.txt (erasing the previous contents of this file) and then call the tsmm_alert.cmd file. It is your responsibility to enter something meaningful into tsmm_alert.cmd that will pass the contents of tsmm_alert.txt on to your reporting system.

05-05-2018 TSMManager users guide page 18 Settings for selected server
You can specify specific mail receivers for specific TSM servers. This means that these receivers will only receive mail regarding this specific TSM server, not mail for all the others. You may have certain nodes that are inactive for some reason, but under your control. To avoid having these nodes turn up as exceptions in the daily report, exclude them by writing the nodenames in the list. Individual e-mails See the chapter named “Node owner groups” for this function.

05-05-2018 TSMManager users guide page 19 Periodic checking
Every xx minutes (xx is set by you), the collector will check if any of the conditions specified are true. If a condition occurs, the icon representing the TSM server will have an exclamation mark in it and it will flash. Optionally, you can select to receive an e-mail notification. You will also have a very eye-catching “ATTENTION” sign on your viewer. If you then press the “Show” button beside the attention sign, a window will appear with details about the condition. The limit for “low scratch” is different for each server as each server may have libraries with different capacities. The limit can be set under the option “Settings for selected server”. (See previous page)

05-05-2018 TSMManager users guide page 20
Additional report text
TSMManager can produce a lot of various reports, daily report, vaulting reports and reports for missed/failed schedules etc. etc… If you wish to add your own personalized text to any of these reports, this is where you do it.

05-05-2018 TSMManager users guide page 21
Node owner groups
If you have one or more administrators that are responsible for a group of nodes, you can provide them with detailed daily reports for only their nodes without bothering them with data from all other nodes. Define one or more “Node owner groups”. Such a group specifies the e-mail address of one or more owners and the nodes for which these owners are responsible. Also give the group a descriptive name, like “AIX group” or… You can then for each group decide the level of information they should get :
An e-mail when a schedule on their nodes fails or misses. This mail is sent immediately upon the schedule failing or the schedule window timeout.
An e-mail when a schedule completes OK. This mail is also sent immediately upon schedule completion.
An extract of the daily report with an overview of schedule status and statistical information for only their nodes. This mail is sent during the daily report generation.

05-05-2018 TSMManager users guide page 22
The optional Windows agent The Windows agent is a small service program that you can install on your Windows nodes. The TSMManager viewer will communicate directly with the agent on port 1952 and this will give you these possibilities :
TSM scheduler control
Select which of the installed schedulers you wish to work with. Start / Stop the scheduler. View the scheduler log file. View the scheduler error log file. Edit the TSM option file.
Please note that the agent only works on nodes where the TSM scheduler is also installed.

05-05-2018 TSMManager users guide page 23
DSMC access
Through the agent, you can issue dsmc commands directly.

05-05-2018 TSMManager users guide page 24
TSM for virtual environments If you install the agent on the server where you have also installed TSM for VE (particularly the TSM for VE command line client), then you can do manual as well as backup and restore commands directly from TSMManager.
The viewer will communicate directly with the agent which will in turn issue commands through the TSM for VE command line client which is installed on the same server as the agent.

05-05-2018 TSMManager users guide page 25 Header window
The header window has the following functions :
Exit the program
Load/save your window configuration.
First you open some windows of interest and size and place them the way you like. Then you write a name for this configuration in the field and click the 'save' button. The configuration is now saved and can be retrieved simply by selecting it from the drop down list. There is no limit to the number of configurations you can define.
Automatic update.
If you start auto update by selecting a timed entry from the dropdown list, the contents of the active windows will be refreshed at the given intervals.

05-05-2018 TSMManager users guide page 26 Health monitoring
You will have one coloured button for each TSM server. Its status is updated every 60 seconds.
All is OK Error message(s) has been issued Admin/password combination entered in this TSM servers definition is invalid Server is not responding Server has manually been put offline
If a button is flashing, then it means that this server has an attention condition.
By right-clicking your mouse on the buttons you get this popup menu :
By right clicking a button and selection monitor console you get the console window for that server showing you error messages, all messages or the administrative console :

05-05-2018 TSMManager users guide page 27
General usage
Right click - Right click - Right click !
There are more than 300 different TSM commands and functions "hidden" in the program. Right clicking any window accesses these. By doing so you get a pop up menu with commands that are relevant for the window you are displaying. If some item is disabled, it is probably because it does not fit your TSM server version.
Window facilities
Most windows can be printed and saved to file. You do this by right clicking the mouse in the window or using the toolbar. The same goes for all graphs, just right-click and select print or save to file. If saved to file, it can be done as bitmap file or as a wmf file (Windows meta file). Lists In all windows where you have a list with different columns, you can sort by clicking on the column header :
In the bottom of the list you have the filtering and column selection options :
The filtering allows you to limit the number of rows displayed based on some filter that you define. For details of specifying filters, click the button with the question mark on it. The “columns” button allows you to limit the number of columns you wish to have displayed. Toolbar Most windows have a toolbar at the top with these functions:
Server(s) : Note the (s). It indicates whether this window can show data from several servers at once or only data from one server at a time. Clicking this button gets you this :
The left column allows you to select ”All servers” or a subset of these, called a ”Server view”. Server views are defined by you under the menu item “Configuration/Server views”.

05-05-2018 TSMManager users guide page 28 The other columns each correspond to one installed collector and allow fast switching between servers. Print/Save/Update : Just what you would think. New win. : You can have several windows of the same type open. This button gives you a new copy of the window you are currently viewing. You can then select another server in the new window and thus compare data from multiple servers. A new window can also be opened by selecting the same function again from the main menu. Timer : If you click this button, a one minute timer will start that will refresh (update) this window every 60 seconds until stopped.

05-05-2018 TSMManager users guide page 29 Security To gain access to the program, you must do a logon. You can use any administrator ID/password to logon. This will then be verified on the TSM server of your choice. This administrator ID will be used for all functions you perform. The option to bypass logon is used if it is impossible to gain access to any TSM server to verify the logon. This could be because the TSM server has changed IP-address. In this kind of logon, you only have access to the functions for adding, editing or deleting TSM servers. All other functions are blocked until you perform a logon that has been verified on a TSM server.
Display functions This manual is not going to show a screenshot for all the display functions. Most are quite obvious and easy to understand.
Node info All node overview Client schedule status Client schedule timing Disk space status Running sessions Occupancy Backup client activity for the last 24 hours Single node summary Single node session summary 30 day schedule status TDP client activity for the last 24 hours
Except for the "30 day schedule status", these are all online "here and now" displays. Data is collected at the time the window is shown on the screen. The "30 day schedule status" is a very useful display showing the status for all schedules on all nodes for the last 30 days. It is based on the daily data collection done at appx. 00:05 hours. At this time a "query event" command for the last 24 hours is issued. If some schedules are running at the

05-05-2018 TSMManager users guide page 30 time the command is issued, they will show up as either "pending" or "started" and will be marked with a blue colour. This is not an error condition, but simply a result of the way data is collected.
Policy info Associations Client schedules Management classes Domains Policy sets
Server info Administrators Administrative schedules Device classes Options/status Storage pool data Configuration Database and log status Storage agents and other servers
These are all online "here and now" displays. Data is collected at the time the window is shown on the screen.
Operations Administrative schedule status All timing overview Drive usage Migration/Reclaim status. Process timing Processes running Process summary Operational status Mounts
Hardware Drives Libraries Paths
Volume info Backupsets DB and log volumes Database backup DRM Library volumes Private volumes Volumes used per node Volume history

05-05-2018 TSMManager users guide page 31
Volume statistics Reclaim analysis
History
How is it collected ? The collector collects the historical data in 2 different ways. The data for the "14 day history" is collected every 15 minutes and kept for 14 days. The "2 year history" is collected once a day at appx. 06:30 hours and are kept for 2 years. The time (06:30) can be altered in the “Global settings” under the option “Other settings”. The data are stored in a database on the collector server and totally managed by the collector. The viewers only have facilities for displaying or printing the data.
14 day history Disk pool usage Number of sessions running Log usage
2 year history The following data is collected daily and can be shown/printed as a graph :
Database usage Total amount of data stored on the TSM server Total data amount stored per tapepool Occupancy (data space taken up on the TSM server) for each node Daily number of files backed up for each node Daily amount of data backed up for each node Time elapsed for the daily backup for each node Network transfer rate for each node Total number of volumes used Number of volumes used per tapepool Daily total data amount backed up Daily total data amount archived Daily total data amount restored Schedule success rate And more …
No data will be present when you have just installed the program, you must let at least 2 days elapse to allow the collector to collect some data before you will see any meaningful graphs. Below you see an example of how it may display :

05-05-2018 TSMManager users guide page 32

05-05-2018 TSMManager users guide page 33 Multi server data If you are running multiple TSM servers, these functions will allow you to compare the servers for :
Data stored per server Total data stored on all servers Daily data amount backed up per server Daily data amount archived per server Daily data amount restored per server Total data backed up daily
Utilities Warnings A summary of all non-normal conditions in the TSM server at this moment. Tape functions
This gives you nice GUI functions for doing : Checkin of volumes Checkout of volumes Audit library Audit volumes Label volumes
Node access allows you to access dsm.sys, dsm.opt, dsmerror.log or dsmsched.log from any Windows or Unix node you have. This function is called automatically when you click on a missed schedule in the schedule status windows. Database explorer is used to peek inside the database.

05-05-2018 TSMManager users guide page 34
Backupsets
What is a backupset ? A backupset is a snapshot of the active files for a single node. It is generated fully on the server and does not involve the node. The backupset can be retrieved directly from the server by the node over the LAN or it can be placed on a medium that the node can read and thus be restored to the node locally without involving the server.
Backupsets versus archives The backupset is often considered a replacement for doing archives, but both has both positive and negative features : Positive Negative
Backupsets Generated on the server, does not put a load on client and LAN.
Can be restored locally on the node if a common media is used.
No time dependency, all the week can be utilized to generate the backupsets.
Writing is directly to tape, no front-end diskpool is necessary.
Practically no impact on database size.
Each backupset occupies at least one full volume.
Generating backupsets can be a very slow process.
Single file restore can only be done using the command line client and you must know the filename beforehand.
No support for backupsets in TSM’s scheduling mechanism.
No central overview over which generations ran OK and which did not.
Archives Single file restore is easy
because you can see the file tree displayed graphically.
Full support for archives in TSM’s scheduling mechanism.
Puts a load on both clients and LAN. Big installations will often not be able
to finish the complete archiving within the time span of a weekend.
Many archiving schedules will report ‘Failed’ due to locked files even though they ran OK.
Generating many archives simultaneously requires a diskpool as front-end to the tapepool.
Can make your database grow a lot !
What can be done to improve the usability of backupsets ? Each backupset occupies a full volume.
If you store the backupset on a VTS, no space is wasted. If you are running more than one TSM server, then you can store backupsets as virtual
volumes on another server. This way each backupset is considered an archive file on the target server and multiple backupsets can be stored on each physical volume.

05-05-2018 TSMManager users guide page 35
It is possible to use virtual volumes on a single TSM server. This requires the DRM feature, but could be an excellent solution if Tivoli made a few improvements. See appendix A for an example of how to do this.
Scheduling the generation of backupsets. One way of scheduling backupsets is by inserting a number of “generate backupset...” commands into a server script and schedule the execution of this script. If you have 4 or more drives available, you can utilize more than one script and thus run the processes in parallel. But, it is your responsibility to keep the scripts updated with new nodes and balancing the nodes between scripts to best utilize your drives.
Using backupsets for disaster recovery If you only use backupsets as a replacement for archives, then skip this chapter, but if backupsets are your prime medium of restore in a disaster situation, then there are some point to be aware of. If you create a backupset that contains ALL the files from a node, then by restoring this set completely, you will overwrite the system part of your node. (c: for windows, rootvg for AIX etc. etc.) This is probably not what you want. In a disaster restore situation, you will normally restore the system files from an image backup or through normal OS installation. Afterwards you want to restore ALL OTHER files. You CAN do this using a backupset, but if you want to restore only part of a backupset, you will have to run the complete retrieval process for each desired file system. Each invocation of "restore backupset" can only hold one file spec and will require a full read of the entire backupset, even though you are restoring only a few Mbytes. It may take several hours to run through a large backupset, so if you have to do this 10 times, because you want to restore 10 different file systems, the time involved may be just too much ! There are two solutions to this : 1. When you generate the backupset, specify all the desired file systems on the "generate backupset" command. This way you only get the file systems you want and can restore them all in one restore pass. BUT, it requires a lot of discipline to maintain the "generate backupset" commands. Whenever a server has a new file system added to it, you must go into your script or wherever you keep the generate command, and update it. Can you be sure that you are always notified about the new file systems added to your servers and can you be sure that the backupsets will really contain ALL the file systems needed for disaster recovery ? 2. Logically split each server that you backup into two nodes. Backup all the system files using one nodename (nodeA) and backup all other data using another nodename (nodeB). Now, when you generate the backupset, generate it for all file systems (*) for nodeB only. The backupset will then contain all non-system files and can be restored in one pass.

05-05-2018 TSMManager users guide page 36
How can TSMManager help you in using backupsets ? It can :
Schedule the process of backupset generation. Either do ALL nodes or let you decide. Dynamically utilize your drives to the fullest. Control retention based on which month it is. This means that you can set it up to retain the
backupsets from January for maybe 60 months, and the backupsets for the other months for maybe 12 months or any other combination you may wish for.
After each monthly run, it will generate a status report showing what went OK and what did not.
Restart all failed backupsets Restart a single backupset.
Here you see the setup window for backupsets :
As you can see, it is pretty straightforward. We designed it with one monthly run in mind. If you wish to create backupsets more often than that, then you can disable the automatic generation and do it manually from the backupset status window seen below :
05-05-2018 TSMManager users guide page 37
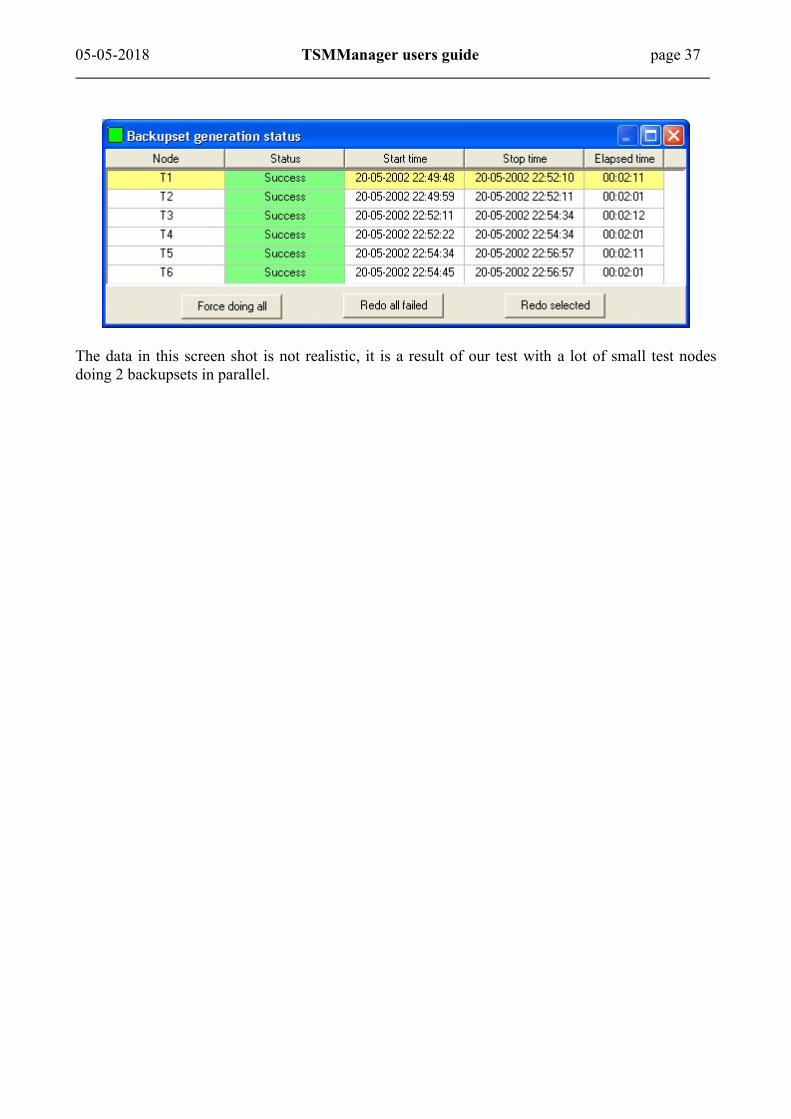
The data in this screen shot is not realistic, it is a result of our test with a lot of small test nodes doing 2 backupsets in parallel.

05-05-2018 TSMManager users guide page 38
Vaulting
What is vaulting ? Please note that vaulting is NOT supported for ACSLS libraries ! Vaulting is the process of removing volumes from libraries, moving them to a safe place (vault), waiting for them to become empty and then return them to the libraries for renewed use. This requires several functions :
1. Identify which library volumes are eligible for movement to the vault. 2. Checkout these volumes from the libraries. 3. Inform the operator about these volumes so he/she can remove them from the library and
physically move them to the vault. 4. Identify which volumes that are currently in the vault have become empty and should be
returned for other use. 5. Inform the operator about these volumes so he/she can retrieve them from the vault and
bring them back onsite. 6. Check the returned volumes into the libraries.

05-05-2018 TSMManager users guide page 39 The above functions are needed for the daily movement of volumes, but it is not enough. In case of a disaster wiping out your TSM server and library, you need certain information to enable you to rebuild your TSM server. Information like :
The placement and size of database volumes. The placement and size of log volumes. Which volume contains your last database backup. Which licenses where enabled. How where your libraries and drives defined. And a lot more…
TSMManager collects all this information automatically and will print and/or e-mail this information for you.
What should be vaulted ? Database backup volumes, full and incremental. Database snapshots.
Whether you use regular DB backups or snapshots backups or both, it is essential to have a copy of the database in the vault. Without the database to describe the contents of the rest of the volumes, they are worthless.
Copypool volumes. Of course !
Optionally volumes from primary storage pools. In some situations it makes sense to vault primary volumes. It could be an archive pool with data kept for many months. It could also be volumes from a storage pool containing large backups from databases that are to be kept for a long time. In both cases vaulting could be a good idea, either to free space in the library or simply because volumes are safer in a vault.
Optionally backupset volumes. Backupsets are typically kept for a long period, and like primary pools containing archive data, it could be sensible to keep them in the vault.
How often should vaulting occur ? Whether you vault 7 days a week, only Monday to Friday or maybe only once a week, is up to you. The more often you do it, the more up-to-date data you have in case of a disaster. TSMManager provides the scheduling mechanism you need to implement this.
When should vaulting occur ? You will have to decide on two points of time during the day. The first is the time when you have finished copying your primary pools to the copypools and you have done a database backup. This is the time when volumes should be checked out and moved to the vault. At the same time a list is generated, showing which volumes to return from the vault. The second time is the time when you are certain the operator has fetched the volumes from the vault and placed them back into the library, either in the I/O door or directly into the library. At this

05-05-2018 TSMManager users guide page 40 time, TSMManager will perform a checkin of these volumes and delete them from the “get from vault” list.

05-05-2018 TSMManager users guide page 41
How is vaulting implemented in TSMManager ? The best way of describing this is to go through the various Windows of TSMManager and refer to the chapter above.
The vault status window :
This window is really not needed !

05-05-2018 TSMManager users guide page 42 When vaulting has been setup correctly, TSMManager will generate the lists and the recovery plan and perform all needed actions without intervention. BUT, it is nice to be able to see what happens and which volumes are located where. This is the purpose of the vault status window. With the buttons on this window you can .
Show/print which volumes are inside the library and are eligible to be checked out. Show/print the current list of volumes to be removed from the library and moved to the
vault. The list you see here will cover today and several days backwards. The list that gets generated automatically only shows the volumes of the day. In case a removal day is bypassed (sickness, holiday, server down…), you can use this list to catch up on which volumes should be removed.
Show/print the list of volumes currently located in the vault. Show/print the list of volumes that should be removed from the vault and placed back in the
library. Show/print the vaulting log. Everything done by the vaulting mechanism is logged in a log
file. See what has been sent to Iron Mountain if you enabled this feature. Manually initiate the actions, which constitute the vaulting mechanism. The vaulting
scheduler normally does these actions automatically, but you can do them manually if you wish.
All the lists are maintained by TSMManager and should NEVER be edited directly by you, but sometimes it may be necessary to delete a volume manually from the return list, i.e. if the volume was destroyed. To do so, display the "Volumes to be returned" tab and right click the volume in question. That will allow the deletion.

05-05-2018 TSMManager users guide page 43
Vaulting setup
Vaulting jobs
Vaulting is performed by “vaulting jobs”. There are 4 types of job : Checkout : Volumes eligible for vaulting are checked out of the library and a list of the volumes is printed/e-mailed so they can be collected and sent to the vault. Release : Empty volumes are detected and released from vaulting status and pull list is printed/emailed for retrieval of the volumes from the vault.

05-05-2018 TSMManager users guide page 44 Checkin : Volumes returned from the vault are placed in the library and a checkin is performed so the volumes can be put to use again. Recoveryplan : All relevant recovery data for the TSM server is collected and printed/emailed. You can have more than one job of each type. For instance : You may select to checkout your copypool and database backup volumes daily, but then have another job that checks out one or more primary pools weekly, maybe after running archives during the weekend. The absolute minimum is 3 jobs : one checkout, one release and one checkin. Each job has its own schedule, but you may optionally select to start a job from a server script. This can be useful if you have some actions that need to finish before you want to start vaulting. Checkout job setup :
Vault all copypools If this is checked, the manual selection is overridden and all present and future copypools are automatically vaulted. If it is unchecked, you must manually select which copypools you want to include in vaulting, using the “add” and “remove” buttons. Primary pools to vault Select the primary pools you wish to vault (if any) by using the “add” and “remove” buttons. Database backups/Backupsets In the bottom part you decide which database and backupset volumes you wish to vault. Report volumes to Iron Mountain If you check this option, then a file will FTP’ed to Iron Mountain at a time you decide. The file contains a list of volumes for Iron Mountain to pick up.
Release job setup :
Days to retain Database volumes must be deleted from the volume history after a number of days. This is the only way to release them for reuse. With this setting you in fact decide how many versions of your database backups you want to keep. If you set the setting to zero, then TSMManager will NOT delete your database backups, you must do it manually or by an administrative schedule. Report volumes to Iron Mountain If you check this option, then a file will FTP’ed to Iron Mountain at a time you decide, recalling the released volumes.
Checkin job setup :
Each library needs its own checkin job. There are 4 different ways of checking in and you must select one or more of them.

05-05-2018 TSMManager users guide page 45
Library handling In order to make the best use of the facilities of your library, TSMManager needs some information about how to handle it. So, for EACH library that you use, select it in the list and set the appropriate settings for that particular library. Number of I/O slots in library If the library has an I/O door (bulk), indicate here how many slots are available in this door. When TSMManager starts checking out volumes, it will assume that the I/O door is empty. This is a client library A client library cannot perform checkout/checkin commands. TSMManager has to know this so these commands can be routed to the library manager and be performed there. How to handle checkout of volumes These are self-explanatory, select the one, which suits you best.

05-05-2018 TSMManager users guide page 46 Generate recovery plan
Access to input files... It is VITAL that the following files are saved as part of the recovery plan: DSMSERV.OPT, which is the server option file. VOLHIST.OUT, which contains information about the last database backups. DEVCNFG.OUT, which describes your hardware environment.
All 3 files are located in the server installation directory and you must provide the information necessary to access them.

05-05-2018 TSMManager users guide page 47 The TSM server generates VOLHIST.OUT and DEVCNFG.OUT if you have the appropriate statements in your DSMSERV.OPT. You must have two statements as follows:
devconfig devcnfg.out volumehistory volhist.out
After entering the required information, use the "Test access" button to verify that the collector part of TSMManager is able to access the files.
Volume list reports and Iron Mountain support.
Volume list reports The daily reports, telling the operator which volumes to remove from the library and which volumes to retrieve from the vault, can be e-mailed to a receiver and/or printed.
05-05-2018 TSMManager users guide page 48 Iron Mountain support If you enable this functionality in your checkout and release jobs, then a daily file will FTP’ed to Iron Mountain, specifying the volumes to be picked up or returned from them. The format of the file is this: comma delimited format column 1 = customer number column 2 = volume name column 3 = action, P=Pick up, R=Return column 4 = customers name for originating server A note on printing ! Printing is performed by the collector part of TSMManager. The collector runs as a Windows service, by default under the system account. The system account does not have a printer defined and is also not able to have it, so it cannot print. In order for the printing to work, you must run the collector service under a windows user that has a default printer assigned to it.

05-05-2018 TSMManager users guide page 49
The vaulting mechanism To achieve correct vaulting, the states of the various volume types are changed as follows : Volumes to be moved from library to vault Volume type Detection Action Copypool volumes select volume_name from volumes where
(stgpool_name=copypool and access<>'OFFSITE')
upd vol volume acc=offsite loc=OFFSITE
Primary volumes select volume_name from volumes where (stgpool_name=primarypools and access<>'UNAVAILABLE')
upd vol volume acc=unavail loc=OFFSITE
Database backup select volume_name, type,location,location from volhistory where ((type=''BACKUPFULL'' or type=''BACKUPINCR'') and location is NULL)
upd volh volume devc=deviceclass lo=OFFSITE
Database snapshot select volume_name, type,location,location from volhistory where (type='DBSNAPSHOT' and location is NULL)
upd volh volume devc=deviceclass lo=OFFSITE
Backupsets select volume_name from volhistory where (type='BACKUPSET' and location is NULL)
upd volh volume devc=deviceclass lo=OFFSITE
Volumes to be moved from vault to library Volume type Detection Action Copypool volumes select volume_name from volumes where
(stgpool_name=copypools and access=''OFFSITE'')
upd vol * acc=readw whereacc=of wherest=emp wherestg=copypools
Primary volumes select volume_name from volumes where (stgpool_name=primarypools and access='UNAVAILABLE')
upd vol * acc=readw loc='''' whereacc=unavail wherest=emp wherestg=primarypools
Database backup select volume_name,type, date_time, backup_series from volhistory where ((type='BACKUPFULL' or type='BACKUPINCR') and location like 'OFFSITE%')
del volh t=dbb todate=-xx
Database snapshot select volume_name, type,date_time,backup_series from volhistory where (location like 'OFFSITE%' and type='DBSNAPSHOT')
del volh t=dbs todate=-xx
Backupsets select volume_name,type, date_time, backup_series from volhistory where (type='BACKUPSET' and location like 'OFFSITE%')
Action is taken automatically by TSM during expiration
When building the list of volumes to be returned from the vault, the following is done : The vault content list is queried. (built) The action is taken, thus changing the relevant status. A new vault content list is queried (built). The delta between the first list and the second list is the list of volumes to be returned.

05-05-2018 TSMManager users guide page 50
Vault inventory handling It is very nice to have all your offsite volumes in an offsite location (vault), but if there are several hundred or maybe thousands, how do you keep track of their location within the vault ? TSMManager will do this for you. There are some ground rules :
You can define up to 30 different vaults. (Offsite locations where your tapes are stored) Each TSM server can only use one vault plus the “Onsite storage” vault. Several TSM servers can share a single vault. You can combine this, so that some TSM servers run with their own vault and some others
share a vault. TSMManager comes with one default vault location that is used if you do not specify
anything else plus a predefined “Onsite storage” location. This is used for the volumes which you take out of the library (maybe because of capacity limits) and store onsite, but not in a vault.
The volume locations within the vaults are called "slots" and are numbered from zero and upwards. TSMManager will assign slot positions to your offsite volumes and tell you were to put them.
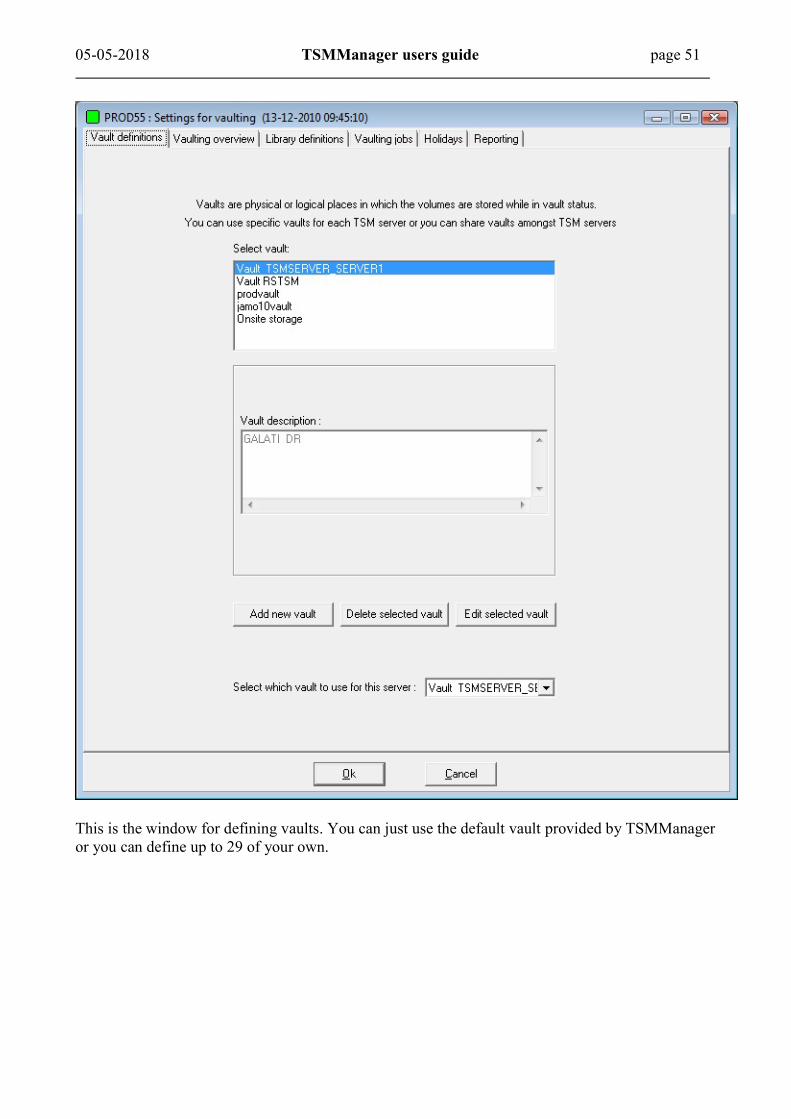
05-05-2018 TSMManager users guide page 51
This is the window for defining vaults. You can just use the default vault provided by TSMManager or you can define up to 29 of your own.

05-05-2018 TSMManager users guide page 52 Here is a typical display of the contents of a vault :
Note : If you upgraded to this function from a previous version that did not have vault management, how do you get started organizing all the volumes that you currently have in your vault ?
Go to the "vaulting" window. Click the tab "Logical vault content" to display what is currently in the vault. Right click the list and select "Auto assign slot numbers" from the popup menu. All volumes presently in vault status will get a slot assigned to them. You can then arrange
them accordingly in your vault and you have a good start.

05-05-2018 TSMManager users guide page 53
Report generation
These reports can be generated in various formats, pdf, rtf, xls, csv, e-mail and print. You have control over the display format, the time period involved and how much detail should be included. The report definition can be saved either locally on your PC, for your personal use only, or they can be saved globally, meaning on the collector PC. Globally saved report definitions have two advantages :
They can be used by anyone from any viewer They can be scheduled for automatic execution by the collector scheduler.

05-05-2018 TSMManager users guide page 54
Scheduled execution of globally saved reports. The purpose of this function is to have globally saved reports generated on a weekly or monthly basis automatically. As defined in the report definitions, output can be e-mailed, printed or saved to disk in various formats. When a report is saved to disk, it is given a unique name including the date and timestamp. This prevents overwriting of reports from previous runs. All reports are saved in the directory "myfiles" which is located below the collector installation directory. (c:\program files\jamodat\tsmmgr_serv), but the location can be changed in “Global settings”. As these reports are generated by the collector process, you need to let the collector service run under a user account with a default printer defined if you wish to have printed reports. If the collector is running under the system account (which is the default), then no printed reports can be generated as this account is unable to print.

05-05-2018 TSMManager users guide page 55
Web access
There are 2 types of web access :
1. Access for TSM administrators that need a quick status display. 2. Access for users that need the backup status for their servers, but who are not allowed to
access the TSM server itself.
Administrator web This access is protected by admin userid/password. The data displayed is global for one TSM server. To access this, start a web browser and go to http://yourcollectorpc:1950 If for security reason you do not wish this possibility, then stop and disable the Windows service “TSMManager Admweb”

05-05-2018 TSMManager users guide page 56 Customer web As a TSM administrator, you have "customers". These may be real customers for whom you provide backup facilities or the customers may be the different I/T departments within your own organization that are responsible for their individual servers. Such "customers" often wish to be able to follow up on the backup status of their servers, but it is not desirable to let them have direct access to the TSM server. TSMManager provides the following functionality : The TSMManager administrator can define any number of userid/password combinations. Each userid will have web access to the status of backups and statistics for a single or multiple domains on a single TSM server. To access multiple domains, list them all separated by commas. To access this, start a web browser and go to http://yourcollectorpc:1951 The user will be presented with a login window, and after successful login the user can access various data for their domain(s) only. If for security reason you do not wish this possibility, then stop and disable the Windows service “TSMManager Cusweb”