6 - zep® equipmentzepequipment.com/documents/n83801_manual.pdf · 2010-12-15 · 7 j06-00158-02...
TRANSCRIPT

Service Man
ual
Service Man
ual
For full warranty information, contact your delivering distribu-tor or contact the manufacturer at [email protected]

This symbol is used to identify safety information about hazards that can result in personal injury.A signal word (DANGER, WARNING, or CAUTION) is used with the alert symbol to indicate the likelihood and the potential severity of injury. In addition, a hazard symbol may be used to represent the type of hazard.
Indicates a hazard which, if not avoided, will result in death or serious injury.
Indicates a hazard which, if not avoided, could result in death or serious injury.
Indicates a hazard which, if not avoided, might result in minor or moderate injury.
CAUTION, when used without the alert symbol, indicates a situation that could result in damage to the equipment.
DANGER
CAUTION
WARNING
CAUTION
______________________________________________________INSTALLATION DATE PART NUMBER
______________________________________________________MAKE/MODEL SERIAL NUMBER
______________________________________________________SELLER
______________________________________________________ADDRESS CITY/STATE/ZIP

3SpecificationsSEM-00011F 20101006
SpecificationsPERFORMANCEDischarge Volume 3.0 gal/m / 11.4 L/mPump Head Pressure 2000 psi / 138 barTemperature Rise 120˚F @ 2.0 gal/m / 49˚C @ 7.6 L/mTemperature Limit (optional)
210˚F / 99˚CCombustion Smoke/Bacharach Scale
#1 OR #2 SMOKECarbon Monoxide Allowed
0.01%Draft/Stack Installation
0.2” – 0.04” WC READINGHeat Input
172,200 Btu/Hr / 43,394 Kcal/Hr
GENERALMinimum Inlet Water Pressure over 65 psi may require water inlet regulator
10 psi / 0.68 barStack Size
8” OD / 203.2 mm ODWeight
420 Lbs / 191 KgFuel Tank Capacity
4.5 gal / 17 LPump to Coil Hose p/n Y01-00016Spray Tip (#4.0 - 15˚) p/n JA0-15040-2Discharge Hose Assembly 3/8” x 50’ 4000psi
P/N K02-03150E5Belt
p/n R02-00229Trigger Gun & Wand
p/n J06-00158-B - Trigger Gun p/n J06-00158 - Trigger Wand p/n J06-00104EZCoil Standard Coil & SS Wrapper 14”OD x ½”ID x 95’ Schedule 40 p/n W216RS-05207Coil Back Pressure (New)
5 psi / 0.34 barCoil Back Pressure Requiring Descaling
50 psi / 3.40 bar

� Specifications
ELECTRICALMachine Voltage 230v 60hz 1PHCurrent 24 ATemp Control, Adjustable (optional)
Panel Mount p/n F04-00830Temp Control, Adjustable (optional)
Outlet Mount p/n F04-00818Temp Control (optional)
p/n F04-00845Power Cord p/n 320AX-00344Cam Switch
p/n F04-00743B
Pump MotorMotor P/N F02-00087-UMotor Horsepower 4.0 HP / 3.0 KWMotor Speed 3450 RPMMotor Voltage 208v / 230v 60hz 1PH
BURNERBurner Part Number V00-173189, V00-173191Burner Type Pressure AtomizingFuel Type Kerosene, #1 or #2 DieselFuel Pressure 125 PSI / 9 BARFuel Nozzle (1.10 80 Degree A) P/N V1.10 80DAFuel Consumption 1.23 GPhr/4.7LPhrFuel Pump (Dan Foss) P/N V-100714-001Voltage 230V 60 Hz 1PHMotor Horsepower 1/7 HPMotor Speed 3450 RPMFuel Filter P/N V04-00311
Burner Nozzle 1.10 80 Degree A p/n V1.10 80DA Fuel Consumption 1.23 Gal/Hr / 4.7 L/HrFuel Pressue 125 Psi
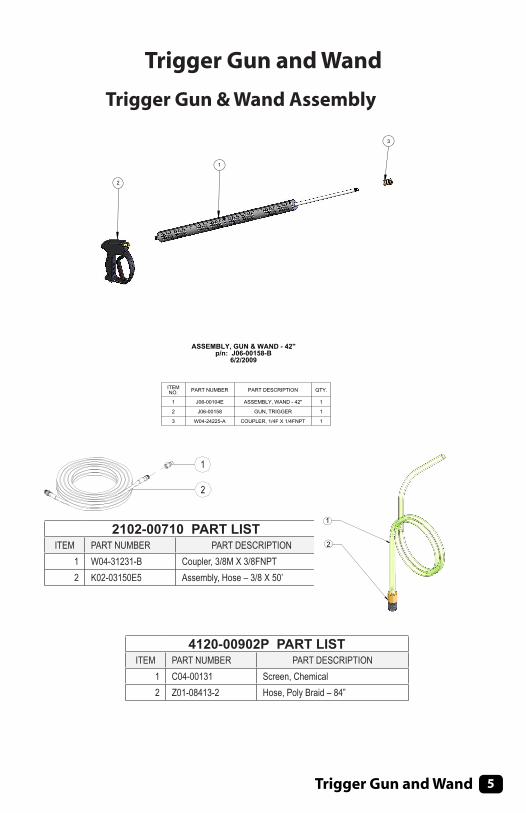
�Trigger Gun and Wand
6/2/2009p/n: J06-00158-B
ASSEMBLY, GUN & WAND - 42"
ITEMNO. PART NUMBER PART DESCRIPTION QTY.
1 J06-00104E ASSEMBLY, WAND - 42" 1
2 J06-00158 GUN, TRIGGER 1
3 W04-24225-A COUPLER, 1/4F X 1/4FNPT 1
2
1
3
Trigger Gun & Wand Assembly
2102-00710 PART LISTITEM PART NUMBER PART DESCRIPTION
1 W04-31231-B Coupler, 3/8M X 3/8FNPT2 K02-03150E5 Assembly, Hose – 3/8 X 50’
4120-00902P PART LISTITEM PART NUMBER PART DESCRIPTION
1 C04-00131 Screen, Chemical2 Z01-08413-2 Hose, Poly Braid – 84”
2
1
Trigger Gun and Wand

� Trigger Gun and Wand
1. Remove screws from handles and remove handle housings.2. With 18mm socket remove retainer being careful to catch the spring and ball as they fall out of the housing.3. Remove and replace parts with those found in the kit. 4. Assembly in reverse order.
PART LISTS
ITEM PART NUMBER PART DESCRIPTION QTY.
1 C07-01300-08 O-RING - 1/16CS X 5/16ID 12 C07-01425 FILTER, WATER 13 J06-00121-07 O-RING - 3/32 CS X 1/8 ID 14 J06-00121-15 BALL, SS 5/16 15 J06-00132-19 SCREW, SELF TAP - 3.5MM X 18MM 76 J06-00158-01 FITTING, DISCHARGE - 1/4 FNPT 17 J06-00158-02 PIN, TRIGGER - 5MM X 27.5MM 18 J06-00158-03 CAM 19 J06-00158-04 TRIGGER 110 J06-00158-05 LATCH, SAFETY 111 J06-00158-06 FITTING, INLET - 3/8 FNPT 112 J06-00158-08A SEAT, VALVE 113 J06-00158-09 WASHER, FLAT 114 J06-00158-10 WASHER, FLAT - BRASS 115 J06-00158-11 HOUSING, VALVE 116 J06-00158-12A RETAINER, VALVE 117 J06-00158-13 SPRING, COMPRESSION 118 J06-00158-14 PIN, VALVE - 4MM X 44MM 119 J06-99158A HOUSING, HANDLE 1
REPAIR INSTRUCTIONS
SPECIFICATIONS 2 3 4 6 71
BEVEL SIDE TOWARDS BALL
DISHED SIDE TOWARDS BALL
KIT, REPAIR PART - NUMBER J06-99158C
5
BREAKDOWN, GUN - TRIGGEREXPLODED VIEW - P/N J06-00158
16
17
2
4
1
12 18 13 314
15
6
19 5
9107
8
19
MAXIMUM VOLUME..............10.0 GPM / 37.9 LPMMAXIMUM PERSSURE.........5000 PSI / 344.7 BARRATED TEMPERATURE....................300 F / 150 CWEIGHT........................................1.8 LBS. / 0.8 KGINLET .........................................3/8" NPT FEMALEOUTLET......................................1/4" NPT FEMALE
YG3500
WARNING:DO NOT USE ACID CONCENTRATESTHROUGH THE GUN
WARNING:Never secure trigger gun in an openpostion (trigger pulled back) by means other than the operator's hand.Bodilay harm may occur if the operatorloses control of the trigger gun.
CAUTION:Always engage trigger safety latch when not in use.

�Pump Assembly
Pump Assembly
11
2
1621247
15
6
19
20
18
17
12
3
1
5
13
25
9
4
10
14
4
22
8
ASSEMBLY, PUMP9/11/2008
ITEM NO. PART NUMBER PART DESCRIPTION QTY.
1 C03-00810 VALVE, AIR 1
2 C07-03700X VALVE, UNLOADER (SILVER) 1
3 E04-00001-58 BUSHING, PIPE 1
4 E04-00005-48 BUSHING, PIPE 2
5 E07-00001-4 CROSS, PIPE 1
6 E08-00006-48 ELBOW, PIPE 1
7 E08-00011-58 ELBOW, PIPE 1
8 E09-00003-2 PLUG, PIPE 1
9 E10-00005-4 TEE, PIPE 1
10 E13-00010-2 NIPPLE, PIPE 111 E14-00010-68 NIPPLE, 3/8MNPT-CLOSE PS PIPE SCH80 112 E15-00010-48 NIPPLE, BRASS 1/2" 1
13 E15-00025-48 NIPPLE, BRASS 1/2" 1
14 F04-00761 SWITCH, VACCUM 1
15 K21-02214-1/4 ASSEMBLY, HOSE-OIL, DRAIN 1
16 K33-01300 HOSE, WATER - 3/8 X 13" 1
17 N07-00180 PUMP, WATER - 4PGM @ 2500PSI 1
18 N07-20046-P MOUNT, PUMP 1
19 R03-00674 PULLEY, V 1
20 R04-00001 BUSHING, PULLEY 1
21 W02-00032 CLAMP, HOSE 2
22 W02-10016-8 BARB, HOSE 1
23 W02-10030-8 BARB, HOSE 1
24 W02-10040-8 BARB, HOSE 1
25 W02-10057-8 BARB, HOSE 1

� Pump Breakdown
Pump, Water N0�-0001�
10-03-08 Z08-03934
PUMP, WATER DIMENSIONS - P/N N07-00180
PERFORMANCE DISCHARGE VOLUME.................................................. 4 GPM / 15.1 LPM
PUMP HEAD PRESSURE............................................ 2500 PSI / 172 BAR
GENERAL CRANKSHAFT ROTATION.CLOCKWISE AND COUNTERCLOCKWISE
MAXIMUM SPEED............................................................. 1450 / 1750 RPM
MAXIMUM PUMPED FLUID TEMPERATURE............................ 165°F / 74°C
INLET PRESSURE -9 IN HG@75°F TO 116 PSI / -0.3 BAR@24°C TO 8 BAR
WEIGHT .......................................................................... 19.0 LBS / 8.6 KG
LUBRICATION OIL CAHNGE INTERVA..........AFTER FIRST 50 HRS THEN AFTER 500 HRS
OIL TYPE .......................................SAE 20 OR SAE 30 (NON DETERGENT)
CRANKCASE CAPACITY .................................................4.0 FL OZ / 0.4LT
TORQUE VALVE PLUG ...................................................... 73.7 FT LBS / 10.7 KG M
MOUNT TO CRANKCASE ......................................14.7 FT LBS / 2.0 KG M
REAR CRANKCASE COVER TO CARNKCASE ....... 7.3 FT LBS / 1.0 KG M
*HEAD TO CRANKCASE .......................................14.7 FT LBS / 2.0 KG M *NOTE: When plunger nut is removed, it is important you install anew copper washer and flinger washer to ensure proper fit andseal of ceramic plunger. each time plunger screw is torqued, copperwashers conform to plunger. If same copper washers are used,plunger cracking or poor seal may result.
TX1813S17
ACCESSORIES Oil - Case - (6) One Pint Bottles................ p/n N07-0ILCA
Oil - Bottle - (1) One Pint Bottle.............. p/n N07-0ILCA-1
Oil - Case - (24) One Pint Bottles............ p/n N07-0ILCA-2
PART NO. DESCRIPTION ITEM QTY
N07-99123 VALVE ASSEMBLIESASS’Y, CHECK VALVE 36 60-RING 26A
N07-99124 VALVE PLUGSPLUG 38 60-RING 27 6
N07-99159 CROSSHEAD SEALSSEAL, CROSSHEAD 45 3
N07-99161 V-PACKINGSSEAL, WATER -18 MM 26 3PACKING, V-18MM 37 3
N07-99167 V-PACKINGS
SEAL, WATER - 18MM 26 1PACKING, V - 18MM 37 1REATINER, SEAL- 24 1
N07-99163 SEAL RETAINERRETAINER, SEAL 24 3
SPECIFICATIONS PARTS PACKAGES Parts ListItem p/n Description Item p/n Description
1 N07-20018 Screw, Cap 24 N07-98083 Retainer, Seal
2 N07-20019 Retainer, Bearing 25 N07-98016 O-Ring
3 N07-40029 Cover, Crankshaft 26 N07-98030 Seal, Water – 18mm
4 N07-20021 O-Ring 27 N07-99163 Adapter, Female – Front 18mm
5 N07-20022 Bearing, Roller 28 N07-98084 Packing, V – High Press 18mm
6 N07-20024 Dipstick, Oil 29 N07-20049 Plug, Pipe
7 N07-98023 Crankcase 30 N07-20050 Plug, Pipe
8 N07-98038 Crosshead 31 N07-20051 Washer, Flat
9 N07-98034 Rod, Connecting 32 N07-20011 Washer, Flat
10 N07-29026 O-Ring 33 N07-98001 Head, Pump – Brass
11 N07-98026 Cover, Rear 34 N07-20003 Washer, Flat
12 N07-20027 Screw, Cap 35 N07-98002 Screw, Cap – 8mm x 65mm
13 N07-98029 Indicator, Oil Level 36 N07-99123 Kit, Valve Assembly
14 N07-80009 O-Ring 37 N07-20004 O-Ring
15 N07-20030 Plug, Pipe 37A N07-20009 O-Ring
16 N07-20028 O-Ring 38 N07-47010 Plug, Pipe
17 N07-98032 Pin, Crosshead 39 N07-12056 Nut, Hex
18 N07-17931 Crankshaft 40 N07-98085 Adapter, Plunger
19 N07-98033 Key 41 N07-44040 Plunger – 18mm
20 N07-98045 Seal, Oil 42 N07-20039 Washer, Flinger – Copper
21 N07-20046 Mount, Pump 43 N07-98028 O-Ring
22 N07-20047 Washer, Lock 44 F04-76509 Ring, Anti-Extrusion
23 N07-20048 Screw, Cap 45 N07-99159 Kit, Crosshead
N07-00180

�Pump Breakdown
Parts ListItem p/n Description Item p/n Description
1 N07-20018 Screw, Cap 24 N07-98083 Retainer, Seal
2 N07-20019 Retainer, Bearing 25 N07-98016 O-Ring
3 N07-40029 Cover, Crankshaft 26 N07-98030 Seal, Water – 18mm
4 N07-20021 O-Ring 27 N07-99163 Adapter, Female – Front 18mm
5 N07-20022 Bearing, Roller 28 N07-98084 Packing, V – High Press 18mm
6 N07-20024 Dipstick, Oil 29 N07-20049 Plug, Pipe
7 N07-98023 Crankcase 30 N07-20050 Plug, Pipe
8 N07-98038 Crosshead 31 N07-20051 Washer, Flat
9 N07-98034 Rod, Connecting 32 N07-20011 Washer, Flat
10 N07-29026 O-Ring 33 N07-98001 Head, Pump – Brass
11 N07-98026 Cover, Rear 34 N07-20003 Washer, Flat
12 N07-20027 Screw, Cap 35 N07-98002 Screw, Cap – 8mm x 65mm
13 N07-98029 Indicator, Oil Level 36 N07-99123 Kit, Valve Assembly
14 N07-80009 O-Ring 37 N07-20004 O-Ring
15 N07-20030 Plug, Pipe 37A N07-20009 O-Ring
16 N07-20028 O-Ring 38 N07-47010 Plug, Pipe
17 N07-98032 Pin, Crosshead 39 N07-12056 Nut, Hex
18 N07-17931 Crankshaft 40 N07-98085 Adapter, Plunger
19 N07-98033 Key 41 N07-44040 Plunger – 18mm
20 N07-98045 Seal, Oil 42 N07-20039 Washer, Flinger – Copper
21 N07-20046 Mount, Pump 43 N07-98028 O-Ring
22 N07-20047 Washer, Lock 44 F04-76509 Ring, Anti-Extrusion
23 N07-20048 Screw, Cap 45 N07-99159 Kit, Crosshead
N07-00180

10 Pump Maintenance
6
72
6
31
GeneralPACKING EXTRACTION KIT P/N Z09-00028COMPLETE TOOL KIT P/N Z09-00021
Valve Service1. Remove the plugs holding the valve assemblies.2. Remove and discard o-rings from the plugs. Clean plugs with
solvent or soap and water. Allow to dry.3. Using needle nose pliers, fingers, or hook shaped tool,
remove the valve assemblies from the head. Remove and discard the o-rings from the valve assemblies and/or head. Examine each valve assembly and discard damaged parts. Refer to the PUMP BREAKDOWN for part numbers of any replacement items.
4. Clean any accumulated debris from the valve cavities and flush with water.
5. Wash the valve assemblies in clean water and rinse. While still wet, test each valve assembly by sucking on the valve seat. A properly sealing valve will allow a good vacuum to be developed and maintained, while a malfunctioning valve will not. Good valve assemblies should be set aside for installation in step 7.
6. Malfunctioning valve assemblies must be replaced.7. Lubricate a new o-ring with the pump crankcase oil and install
into valve cavity in the head. Install a good valve assembly into the cavity as illustrated.
8. Lubricate a new o-ring with pump crankcase oil and place on a plug cleaned in step 2 above.
9. Install a plug into the pump head. Tighten plug by hand.10. Torque the plug to the value indicated in the TORQUE section
of the pump specifications.11. Repeat steps 7 through 11 for remaining valve assemblies.
Head Removal1. Remove the cap screws holding the pump head to the
crankcase. A metric tool is required for this step. Be careful not to lose the washer on each cap screw.
2. Remove the head by rotating the crankshaft and tapping the head away from the crankcase with a soft mallet. Keep rear surface of the head parallel to the front surface of the crankcase to prevent binding on the plungers.
3. Once the head is removed, protect the plungers from damage.
Plunger Service1. Remove pump head per HEAD REMOVAL.2. Remove any packings and retainers left on the plungers by
pulling them straight off.
Pump Maintenance

11Pump Maintenance
3. Examine each plunger, looking for a smooth surface free of any scoring, cracks, or pitting. Any defective plungers should be removed per PLUNGER REMOVAL.
4. Discard and replace any defective plungers.5. Reinstall the plunger per PLUNGER INSTALLATION.6. Reinstall head per HEAD INSTALLATION.
Plunger RemovalNOTE: When the plunger screw is removed, it is important to install new o-ring, anti-extrusion, and copper washers.
1. When the plunger screw is removed, it is important to install a new o-ring, anti-extrusion, and copper washers.
2. Remove the plunger retaining screw by turning counterclockwise. Remove and replace copper washer.
3. Remove and discard o-ring and anti-extrusion ring from retainer screw.
4. Remove the plunger from the cross head and examine it for cracks, scoring, or pitting.
5. Remove and discard copper flinger washer, clean with solvent and allow to dry.
Plunger Installation1. Install the copper flinger washer onto the cross head.2. Slide the plunger onto the crosshead.3. Lubricate an o-ring with crankcase oil and install into the
groove on the plunger screw. Install the anti-extrusion ring
12 Pump Maintenance
into the groove next to the o-ring. NOTE: The o-ring should be nearest the screw head and the anti-extrusion ring nearest the threads.
4. Apply a drop of thread sealant to the threads of the retainer screw.
5. Thread the plunger retainer screw into the cross head making sure the copper flat washer is installed onto the screw.
6. Torque the plunger retainer screw to the value indicated in the torque section of the pump specifications.
Packing Service1. Remove the head per PUMP HEAD REMOVAL.2. Remove any packings and female adapters left on the
plungers by pulling them straight off. Insert proper packing extractor onto the extractor hammer. Insert packing extractor and tool through the packings and adapters remaining in the head. Tighten the hammer and remove the remaining items in the head. Remove packings and o-rings from adapters. Discard the o-rings and packings.
3. Clean the packing canities in the head and rinse with clean water.
4. Clean exposed plungers. Clean male and female adapters with soap and water and allow it to dry.
5. Examine male and female adapters, discard worn items. Trial fit the female adapters into the head checking for binding or damage. Discard and replace damaged items
6. Lubricate packing cavities in the head and all packings and adapters with pump crankcase oil.
7. Lay head on the bench with packing cavities up. Install one male adapter in each cavity with the flat side down.
8. Install one v-packing into each cavity with the lips pointing down. A packing insertion tool of the appropriate size is recommended for this operation.
9. Install the re-stop ring with the lips pointing down.10. Install a front female adapter into each cavity with the flat side
up. Make certain the adapter goes all the way down into the cavity.
11. Install the low pressure packing with the flat side down.12. Install the rear female adapter into each cavity with the lips
pointing down.13. Lubricate o-rings with pump crankcase oil and install one into
the groove of each adapter.14. Install one adapter and o-ring into each cavity with the flat
side up. Each adapter and o-ring assembly should push into the head to approximately 1/16 inch of being flush with the surface of the head. Only hand pressure should be required to perform this operation. This step is VERY IMPORTANT. If the rear female adapter does not fit is obtained, proceed to step 16. If a proper fit is not obtained, remove the female

13Pump Maintenance
53
17
64
28
7
adapters from the offending cavity and reinstall items per steps 8 through 15.15. Install head per HEAD INSTALLATION.
Head Installation1. Prepare pump head per instructions in PACKING SERVICE.2. Rotate the plungers so the outer plungers are projecting the same distance from the crankcase.3. Lubricate the exposed plungers with crankcase oil.4. Start the head onto the plungers and, using a soft mallet, tap the head evenly until it comes in
contact with the crankcase.5. Start the cap screws through the head and into the crankcase. Do not forget the lock washer on
each screw.6. Tighten all cap screws by hand.7. Torque the cap screws to the value indicated in the TORQUE section of PUMP SPECIFICATIONS.
Torque the cap screws in the order listed below.

1� Pump Maintenance Records
Oil ChangeMonth/Day/Year Operating Hours Oil Brand & Type
Pump ServiceMonth/Day/Year Operating Hours Type of Service
Pump Maintenance Record
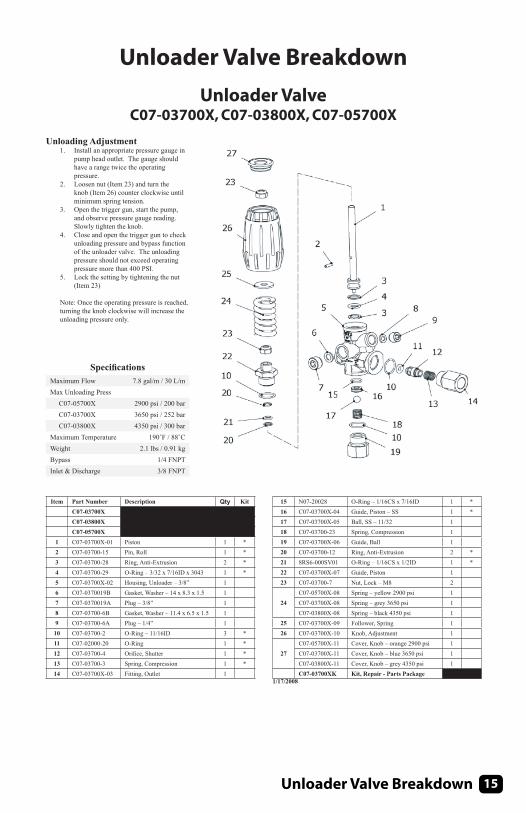
1�Unloader Valve Breakdown
Unloader ValveC07-03700X, C07-03800X, C07-05700X
Unloading Adjustment1. Install an appropriate pressure gauge in
pump head outlet. The gauge shouldhave a range twice the operatingpressure.
2. Loosen nut (Item 23) and turn theknob (Item 26) counter clockwise untilminimum spring tension.
3. Open the trigger gun, start the pump,and observe pressure gauge reading.Slowly tighten the knob.
4. Close and open the trigger gun to checkunloading pressure and bypass functionof the unloader valve. The unloadingpressure should not exceed operatingpressure more than 400 PSI.
5. Lock the setting by tightening the nut(Item 23)
Note: Once the operating pressure is reached,turning the knob clockwise will increase theunloading pressure only.
SpecificationsMaximum Flow 7.8 gal/m / 30 L/mMax Unloading Press
C07-05700X 2900 psi / 200 barC07-03700X 3650 psi / 252 barC07-03800X 4350 psi / 300 bar
Maximum Temperature 190˚F / 88˚CWeight 2.1 lbs / 0.91 kgBypass 1/4 FNPTInlet & Discharge 3/8 FNPT
Item Part Number Description Qty KitC07-03700XC07-03800XC07-05700X
1 C07-03700X-01 Piston 1 *2 C07-03700-15 Pin, Roll 1 *3 C07-03700-28 Ring, Anti-Extrusion 2 *4 C07-03700-29 O-Ring – 3/32 x 7/16ID x 3043 1 *5 C07-03700X-02 Housing, Unloader – 3/8” 16 C07-0370019B Gasket, Washer – 14 x 8.3 x 1.5 17 C07-0370019A Plug – 3/8” 18 C07-03700-6B Gasket, Washer – 11.4 x 6.5 x 1.5 19 C07-03700-6A Plug – 1/4” 110 C07-03700-2 O-Ring – 11/16ID 3 *11 C07-02000-20 O-Ring 1 *12 C07-03700-4 Orifice, Shutter 1 *13 C07-03700-3 Spring, Compression 1 *14 C07-03700X-03 Fitting, Outlet 1
15 N07-20028 O-Ring – 1/16CS x 7/16ID 1 *16 C07-03700X-04 Guide, Piston – SS 1 *17 C07-03700X-05 Ball, SS – 11/32 118 C07-03700-23 Spring, Compression 119 C07-03700X-06 Guide, Ball 120 C07-03700-12 Ring, Anti-Extrusion 2 *21 8RS6-000SV01 O-Ring – 1/16CS x 1/2ID 1 *22 C07-03700X-07 Guide, Piston 123 C07-03700-7 Nut, Lock – M8 2
24C07-05700X-08 Spring – yellow 2900 psi 1C07-03700X-08 Spring – grey 3650 psi 1C07-03800X-08 Spring – black 4350 psi 1
25 C07-03700X-09 Follower, Spring 126 C07-03700X-10 Knob, Adjustment 1
27C07-05700X-11 Cover, Knob – orange 2900 psi 1C07-03700X-11 Cover, Knob – blue 3650 psi 1C07-03800X-11 Cover, Knob – grey 4350 psi 1C07-03700XK Kit, Repair - Parts Package
1/17/2008
Unloader Valve Breakdown
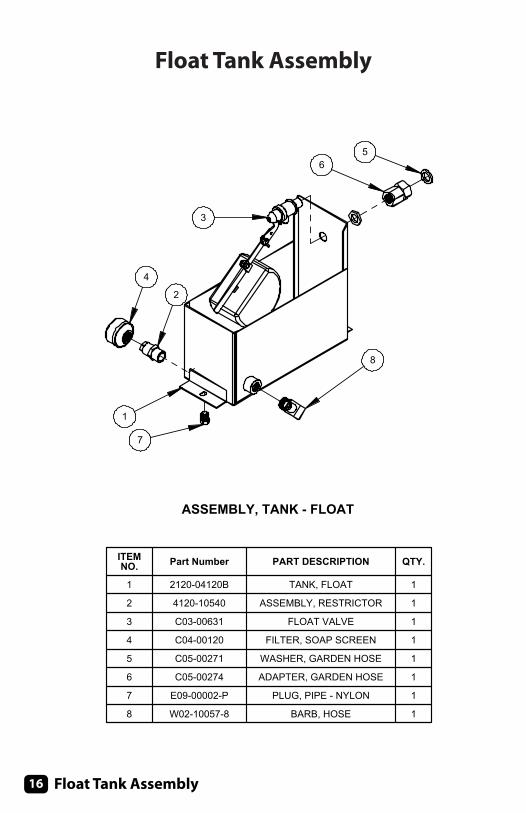
1� Float Tank Assembly
Float Tank Assembly
4
2
1
7
8
3
65
ASSEMBLY, TANK - FLOAT
ITEM NO. Part Number PART DESCRIPTION QTY.
1 2120-04120B TANK, FLOAT 1
2 4120-10540 ASSEMBLY, RESTRICTOR 1
3 C03-00631 FLOAT VALVE 1
4 C04-00120 FILTER, SOAP SCREEN 1
5 C05-00271 WASHER, GARDEN HOSE 1
6 C05-00274 ADAPTER, GARDEN HOSE 1
7 E09-00002-P PLUG, PIPE - NYLON 1
8 W02-10057-8 BARB, HOSE 1

1�Float Tank Assembly
3
54
68
9
10
17
15
14
1
12
7
13
16
11
2
18
PARTS LIST
VALVE, FLOAT - P/N C03-00631
SPECIFICATIONS8/8/2008
ITEMNO. PART NUMBER PART DESCRIPTION QTY.
1 C03-00625-10 SCREW, WING - 10-32UNF 1
2 C03-00628 FLOAT, PLASTIC 1
3 C03-00631-01 NUT,HEX - 3/8FNPT 1
4 C03-00631-02 WASHER, FLAT - RUBBER 1
5 C03-00631-03 NIPPLE, BRASS - 3/8NPT 1
6 C03-00631-04 SEAT, VALVE-NYLON 1
7 C03-00631-05 HOUSING, VALVE 1
8 C03-00631-06 PISTON 1
9 C03-00631-07 ROD, PISTON-5/16CS X 1 1/4 PLASTIC 1
10 C03-00631-08 GUIDE, PISTON 1
11 C03-00631-10 SCREW, CAP 1
12 C03-00631-11 ARM, FLOAT 1
13 C03-00631-14 NUT, HEX - BRASS 1
14 C03-00631-16 LEVER - BRASS 1
15 C03-00631-17 KEY, COTTER 1
16 C03-00631-18 NIPPLE, TOE 1
17 C03-0631-09 NUT, RETAINER 1
18 H05-18700 WASHER, FLAT 1
MAXIMUM VOLUME.............................7 GPM / 26 LPMMAXIMUM PRESSURE........................140 PSI / 10 BARMAXIMUM TEMPERATURE ......................140 F/60 CPORT SIZE - INLET..........................................3/8" NPTDIMENSIONS...11.4 X 4.1 X 2.8 IN / 290 X 104 X 71MMWEIGHT...................................................0.6 LB / 0.3 KGHOUSING MATERIAL .........................................BRASSO-RING MATERIAL............................................BUNA-N

1� Burner Assembly
Burner Assembly
1
4
23
6
7
8
ASSEMBLY, BURNER
ITEM NO. Part Number PART DESCRIPTION Defaul
t/QTY.
1 AS16-01204-PB BRACKET, TRANSFORMER 1
2 E08-00006-2 ELBOW, PIPE 1
3 E13-00010-2 NIPPLE, PIPE - 1/4" 1
4 H04-19011 SCREW, SELF TAP 2
5 V00-17318 BURNER, OIL - 230V 1
6 V04-0031 FILTER , FUEL 1
7 W02-10019-8 BARB, HOSE 1
8 W02-10031 BARB, HOSE 1

1�Burner Assembly
Maintenance Procedures
Priming the machineShut off the fuel tank valves. Spin off the clear bowl, fill with
clean fuel and coat the round gasket (3) with fuel. Reinstall the clear bowl and tighten ¼ to 1/3 turns after the gasket contacts the upper housing. Turn on the fuel tank valves. Start the machine and check that there are no leaks.
Draining waterCheck the collection bowl daily. Drain off water
contaminants by unscrewing the clear bowl turning counter-clockwise. Start the machine and allow air to purge from the fuel system prior to operating the equipment.
Element replacement frequencyFrequency of element replacement is determined by
contamination level in the fuel. Replace the element every 500 hours. Note: Foul smelling diesel fuel is an indication of microbiological contamination. A change in fuel source is recommended. Always carry a spare filter element as one tank full of contaminated fuel will plug the fuel filter element prematurely.
Element replacement procedure1. Shut off the fuel tank valves.2. Unscrew the clear bowl turning counter-clockwise.3. Remove and discard the filter element.4. Follow listed procedures under “PRIMING.”
2
3
1
4
FILTER, FUEL - 1/4F X 1/4Fp/n: V04-00314
2/26/2010ITEMNO. PART NUMBER PART DESCRIPTION QTY.
1 V04-00314-1 HOUSING, UPPER-1/4F X 1/4F ALUMINUM 1
2 V04-00314-2 O-RING, 1
3 V04-00314-3 SCREEN,FILTER-SS ELEMENT 1
4 V04-00314-4 BOWL, FILTER-CLEAR PLASTIC 1
Trouble Possible Cause Remedy1. Fuel bowl leaking. A. Deteriorated gasket.
B. Housing Cracked.C. Bowl rim cracked, nicked, or scratched.D. Gasket missing.E. Loose Fuel Bowl.
A. Remove and Replace Gasket.B. Remove and Replace Housing.C. Remove and Replace Bowl.
D. Replace Gasket.E. Tighten Fuel Bowl Onto Filter.
2. Air leaking into system (indicated by air bubbles in bowl during operation).
A. Cracked Component.
B. Loose Filter bowl.
A. Inspect Filter Bowl, Filter Housing, and Gasket.B. Tighten Fuel Bowl Onto Fuel Filter.

20 Buner Breakdown
Burner Breakdown

21Burner Specs
Burner SpecsPA
RTS LIST
ITEMPART NUMBER
PART DESCRIPTIONITEM
PART NUMBERPART DESCRIPTION
1V00-12701
Screw, Thread Cutting15
V00-14451Assembly, Oil Line – 6”
2V00-20892
Motor, Electric – 230V 1/8 HP16
V00-13424Coupling, Shaft 3 ¾”
3V00-13029
Strain Relief, Cord17
V-14283Pump, Fuel
4H04-19000
Screw, Thread Cutting18
V00-13494-1Elbow, Flare
5V00-13511
Screw, Machine19
V-20602-002Band, Air – Outer 1 ½” x 5”
6V00-13073
Cover, Junction Box20
V-20601-002Band, Air – Inner 1 ½” x 5”
7V00-21319
J-Box21
V-31910-002Housing, Fan – w/ Tube
8V-100991-002
Transformer, 230V 60HZ21A
V-22080-001Tube, Air – w/ Flange
9V-21723-012
Cover, Housing – w/ Gasket21B
V00-14157Cone, Air - #1A
10H04-13801
Screw, Machine21C
V00-14116Screw, Thread Cutting
11V-30537-019
Assembly, Burner Gun21D
V-21866-002Housing, Flange
12V-12689
Plug22
V00-12484Gasket, Flange
13V00-13392
Cover, Slot23
V00-21427Fan, Air – 4 1/4 “ OD
14V00-14296
Nut, Hex23A
H04-31302Screw, Set
* V-23103-M Trans. – w/ Screws & Cover

22 Burner Specs

23Burner Maintenance
Oil Burner MaintenanceOil Fired Cleaners
Air Band AdjustmentNote: The air band adjustment on this burner has been preset at the factor
(elevation approximately 1400 feet). On equipment installed where elevation is substantially different, the air band(s) must be readjusted.
1. Loosen the cap screw retaining the air bands.2. Move the air bands as indicated below with the machine in
operation. Note: The air band should be set so the exhaust gives the smoke spot specified in the GENERAL section of the MACHINE SPECIFICATIONS on a Shell-Bacharach scale. If a smoke tester is not available, a smoky exhaust, oily odor, or sweet smell indicates insufficient air while eye-burning fumes indicate too much air.
3. Tighten the cap screw retaining the air bands.
Fuel Pump FilterSundstrand Pump
1. Shut off fuel supply.2. Loosen the 4 screws holding the cover to the fuel pump housing.3. Take cover and cover gasket off and pull strainer off of pump
housing.4. Clean out any dirt remaining in the bottom of strainer cover. If
there is evidence of rust inside of the unit, be sure to remove water in supply tank and fuel filter.
5. Turn on fuel supply. Failure to do so will result in fuel pump damage.
Fuel Pump Pressure Adjustment1. Install a 0-200 PSI Pressure Gauge.2. Remove Plug on top of the fuel pump.3. Insert a 1/8” Allen Wrench and turn clockwise to increase pressure
and counter clockwise to decrease.4. Remove Gauge and reinstall plug.
Blower Fan Replacement1. Shut off power to the burner and disconnect wires.2. Loosen the two screws securing blower motor and fan to the
PART NUMBERV00-14283-2
PART NUMBERV00-14283-5

2� Burner Maintenance
housing.3. Remove the blower.4. Install the blower onto the shaft and place .030 feller gauge on
the motor as shown, sliding blower until it contacts feeler the gauge. Rotate wheel until set screw is centered on the flat of the motor shaft. Tighten set screws onto motor shaft.
5. Reinstall motor and blower assembly.6. Reconnect wires and turn on power.
Transformer Test1. Remove burner junction box cover.2. Turn on burner and make sure ignition transformer is receiving
rated voltage.3. Turn off burner.4. Loosen screw and swing transformer away from burner gun
assembly.5. Turn on burner.6. Short the high voltage terminals. 7. Open gap by drawing screwdriver away from one electrode
while touching the other.8. The spark should jump between 5/8 inches and ¾ inches, if it
doesn’t jump, replace the transformer.9. Turn burner off.10. Partially close transformer. Check if buss bars align and
contact transformer electrodes. If buss bars do not contact, see Buss Bar Alignment.
11. Close transformer, reposition retainer clip and tighten screw.
Buss Bar Alignment1. With burner off, loosen screw and swing the transformer away
from burner gun assembly.2. Inspect the buss bars and transformer electrodes for pitting or
corrosion.3. Partially close the transformer. Check if the buss bars contact
and are in alignment with transformer electrodes.4. Proper adjustment is obtained by gently bending the buss
bars until they spring against, parallel, and are in full contact with the transformer electrodes.
5. With buss bars aligned, carefully close and fasten the transformer.
Burner Gun Removal & Installation1. Disconnect the fuel line from the burner gun assembly oil line
fitting. Loosen the other end of the line and swing line out of the way.
2. Remove the retaining nut.3. Loosen screw and swing transformer away from burner gun
assembly.4. Carefully remove the burner gun assembly.
WARNING
Use screwdriver with a well insulated
handle to avoid shock.

2�Burner Maintenance
1) Check and replace electrode insulators if cracked.2) Clean burnt buss bars.3) Clean carbon off electrodes.4) Clean carbon off oil nozzle (use caution not to
scratch face of nozzle or orifice).5) Check for a loose oil nozzle. Note: Check with
dealer and/or replace nozzle with proper nozzle.5. Gently replace burner gun assembly in air tube. CAUTION:
Do not force. Forcing will cause electrode misalignment.6. Reinstall the retaining nut.7. Reinstall the oil line making sure both ends are tight.8. Partially close transformer. Check if buss bars align and
contact the transformer electrodes. If buss bars do not contact, see Buss bar Alignment.
9. Close transformer, reposition retainer and tighten screw.
Accessories p/n Y01-00041 Gauge-0- 200 PSI p/n Z09-00004 Bacharach Smoke Tester p/n Y01-00090 Allen Wrench 1/8” #8 p/n z01-00092 Fuel Nozzle Changing Wrench
Electrode Assembly Adjustment1. Loosen screws holding electrode assemblies.2. Raise electrode tips 5/32” above surface plane or end of oil
nozzle.3. Place each electrode tip 5/16” from center of spray nozzle
hole, maintaining previous measurement.4. Spread electrode tips to 1/8” gap maintaining previous
measurements.5. When the proper measurements are obtained, gently tighten
screws that hold electrode assembly in place. CAUTION: Do not over tighten, as this will cause the electrode insulator to fail.

2� Electical Schematic
Electrical SchematicPART NUMBER
DA
TE:
PAR
T NU
MB
ER
TITLE / DESC
RIPTIO
N
DR
AW
N B
Y:R
EDB
LACKW
HITE
BR
OW
N
YELLOW
BLUE
GREEN
PINKO
RA
NG
E
ELECTR
ICALSC
HEM
ATIC
ES-00024
ES-00024
06-07-03
BWK
EQUIPMENT
GROUND
LINE1
LINE2
`
GR
N(3X)
WHT / RED
BLK
WH
T / RED
BLK
WH
T
BLK
WH
T
BLK
BLK
BU
RN
ER
MO
TOR
230 VAC
IGN
ITION
TRA
NS
FOR
ME
R230 VAC
VA
CU
UM
SW
ITCH
PU
MP
MO
TOR
230 VAC
CA
MS
WITC
H
BLK
230V
AC
5 678
1 234

2�Coil Assembly
Coil Assembly
1
74
3
5 6
COIL, PIPE - TALL
ITEM NO. Part Number PART DESCRIPTION QTY.
1 350-00205A COIL, REMOVABLE 1
2 AA18-00101 ANGLE, BRACKET 1
3 AS16-04425-PR WRAPPER, COIL 1
4 E08-00012-1 ELBOW, REDUCING 1
5 E08-00016-5 ELBOW, FORGED 1
6 E15-00035-2 NIPPLE, PIPE - GS 1
7 E15-00045-2 NIPPLE, PIPE - GS 1
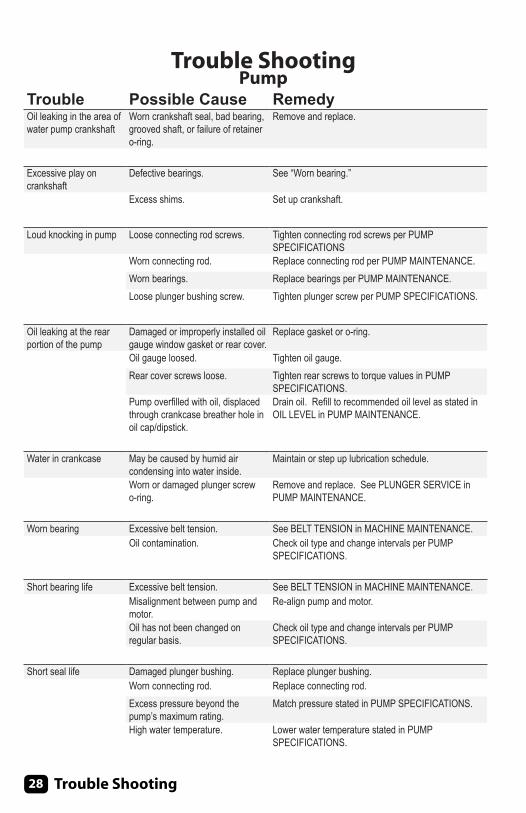
2� Trouble Shooting
Trouble ShootingPump
Trouble Possible Cause RemedyOil leaking in the area of water pump crankshaft
Worn crankshaft seal, bad bearing, grooved shaft, or failure of retainer o-ring.
Remove and replace.
Excessive play on crankshaft
Defective bearings. See “Worn bearing.”
Excess shims. Set up crankshaft.
Loud knocking in pump Loose connecting rod screws. Tighten connecting rod screws per PUMP SPECIFICATIONS
Worn connecting rod. Replace connecting rod per PUMP MAINTENANCE.Worn bearings. Replace bearings per PUMP MAINTENANCE.Loose plunger bushing screw. Tighten plunger screw per PUMP SPECIFICATIONS.
Oil leaking at the rear portion of the pump
Damaged or improperly installed oil gauge window gasket or rear cover.
Replace gasket or o-ring.
Oil gauge loosed. Tighten oil gauge.Rear cover screws loose. Tighten rear screws to torque values in PUMP
SPECIFICATIONS.Pump overfilled with oil, displaced through crankcase breather hole in oil cap/dipstick.
Drain oil. Refill to recommended oil level as stated in OIL LEVEL in PUMP MAINTENANCE.
Water in crankcase May be caused by humid air condensing into water inside.
Maintain or step up lubrication schedule.
Worn or damaged plunger screw o-ring.
Remove and replace. See PLUNGER SERVICE in PUMP MAINTENANCE.
Worn bearing Excessive belt tension. See BELT TENSION in MACHINE MAINTENANCE.Oil contamination. Check oil type and change intervals per PUMP
SPECIFICATIONS.
Short bearing life Excessive belt tension. See BELT TENSION in MACHINE MAINTENANCE.Misalignment between pump and motor.
Re-align pump and motor.
Oil has not been changed on regular basis.
Check oil type and change intervals per PUMP SPECIFICATIONS.
Short seal life Damaged plunger bushing. Replace plunger bushing.Worn connecting rod. Replace connecting rod.Excess pressure beyond the pump’s maximum rating.
Match pressure stated in PUMP SPECIFICATIONS.
High water temperature. Lower water temperature stated in PUMP SPECIFICATIONS.
2�Trouble Shooting
Dirty or worn check valves
Normal wear. Remove and replace.
Debris. Check for lack of water inlet screens.
Presence of metal particles during oil change
Failure of internal component. Remove and disassemble to find probable cause.
New pump. New pumps have machine fillings and debris and should be drained and refilled per PUMP SPECIFICATIONS.
Water leakage from under head
Worn packing. Install new packing.
Cracked/scored plunger. Remove and replace plunger.Failure of plunger retainer o-ring. Remove and replace plunger retainer o-ring.
Loud knocking noise in pump
Pulley loose on crankshaft. Check key and tighten set screw.
Defective bearing. Remove and replace bearing.Worn connecting rod, crankshaft, or crosshead.
Remove and replace.
Frequent or premature failure of the packing
Scored, damaged, or worn plunger. Remove and replace plungers.
Overpressure to inlet manifold. Reduce inlet pressure.Abrasive material in the fluid being pumped.
Install proper filtration on pump inlet pumping.
Excessive pressure and/or temperature of fluid being pumped.
Check pressures and fluid inlet temperature. Be sure they are within specified range.
Over pressure of pumps. Reduce pressure.Running pump dry. Do not run pump without water.
Low Pressure Dirty or worn check valves. Clean/replace check valves.Worn packing. Remove and replace packing.Belt slipping. See BELT TENSION in MACHINE MAINTENANCE.Improperly sized spray tip or nozzle.
See MACHINE SPECIFICATIOSN for specified spray tip or nozzle.
Inlet filter screen is clogged. Clean inlet filter screen.Pitted valves. See VALVE SERVICE in PUMP MAINTENANCE.

30 Trouble Shooting 30
Erratic pressure; pump runs rough
Dirty or worn check valves. Clean/replace check valves.
Foreign particles in valve assemblies.High inlet water temperature. See temperature in PUMP SPECIFICATIONS.
Excessive vibration Dirty or worn check valves See “Dirty or worn check valves.”
Scored plungers Abrasive material in fluid being pumped.
Install proper filtration on pump inlet plumbing.
Fitted plungers Cavitation. Decrease inlet water temperature and/or increase inlet water pressure.
Cavitation High inlet fluid temperature, low inlet pressure.
Lower inlet fluid temperature and raise inlet fluid pressure.
Trouble Possible Cause RemedyBurner will not ignite Electrodes out of alignment. See “ADJUSTING ELECTRODE ASSEMBLY” in
BURNER MAINTENANCE SECTION.Electrode insulator failure. Remove and replace if there are breaks, cracks,
or spark trails.Water flow switch not closing. Adjust, repair, or replace switch.Vacuum switch not closing. Adjust, repair, or replace switch.Temperature control switch not closing. Adjust or replace the TEMPERATURE CONTROL.Fuel solenoid valve not opening. Clean, repair, or replace solenoid.Weak transformer. Clean and check transformer terminals. Check
transformer for spark pre “TRANSFORMER TEST” in BURNER MAINTENANCE SECTION.
Faulty cad cell (if equipped). Clean and test cad cell, replace if required.Faulty primary control (if equipped). Replace primary control.Burner motor thermal protector locked out.
See “Burner motor thermal protector locked out.”
Wiring. All wire contacts are to be clean and tight. Wire should not be cracked or frayed.
Burner switch. Test switch operation. Remove and replace as necessary.
Pump pressure. See “Low fuel pressure.”Venting. A downdraft will cause delayed ignition. Soot
deposits on the coil and burner can interrupt air flow, and cause shorting of the electrodes. Clean as required.
Sooting. Soot deposits on the coil and burner can interrupt air flow, and cause shorting of the electrodes. Clean as required.
No fuel. See “No fuel.”
Burner

31Trouble Shooting
No fuel Clogged fuel filter. Remove and replace filter per FUEL FILTER SECTION.
Fuel leak. Repair as necessary.Kinked or collapsed fuel line. Remove and replace fuel line.Low fuel pressure. See “Low fuel pressure.”Faulty burner oil pump. Adjust pressure or replace.Air leak in intake lines. Tighten all fittings.Clogged burner nozzle. Remove and replace (do not clean).
Low fuel pressure Clogged fuel filter. See “No Fuel.”Clogged fuel pump filter screen. Remove pump cover and clean strainer using a
brush and clean fuel oil, diesel oil or kerosene.Fuel oil too viscous. Operate a lighter oil or in warmer area.Air leaks in intake lines. Tighten all fittings.Kinked or collapsed fuel line. Remove and replace.Burner shaft coupling slipping. Remove and replace.Fuel nozzle worn. Remove and replace with specified nozzle on
BURNER ASSEMBLY.Faulty oil pump. Remove and replace.
Pulsating pressure Partially clogged fuel pump strainer or filter.
Remove and replace strainer per FUEL PUMP FILTER in OIL BURNER MAINTENANCE section.
Air leaking around fuel pump cover. Check fuel pump cover screws for tightness and damaged gasket.
Unit smokes Improper fuel. Refuel with FUEL specified on MACHINE SPECIFICATIONS.
Air to burner insufficient. See AIR BAND ADJUSTMENT in OIL BURNER MAINTENANCE section.
Fuel nozzle interior loose. Replace nozzle.Water in fuel Inspect fuel filter for water presence.Gun out of alignment. Bend oil pipe to center burner nozzle.
Burner motor thermal protector kicked out
Low voltage. Voltage must match those specified in the BURNER section of MACHINE SPECIFICATIONS section.
Fuel too viscous. See “Low fuel pressure.”Fuel pump defective. Check that fuel pump turns freely.Motor defective. Call service technician or take motor to repair/
warranty station.

32 Trouble Shooting
Delayed ignition (rumbling, noise starts)
Dirty or damaged electrodes. Clean or replace.
Air adjustment open too far. Readjust per AIR BAND ADJUSTMENT in OIL BURNER MAINTENANCE section.
Poor fuel spray pattern. Remove and replace with fuel nozzle specified in BURNER ASSEMBLY.
Incorrect electrode setting. Readjust per ADJUSTING ELECTRODE ASSEMBLY in OIL BURNER MAINTENANCE section.
Weak transformer. See TRANSFORMER CHECK on OIL BURNER MAINTENANCE section.
Burner does not electrically come on
Burner motor reset button tripped. Reset if necessary. CAUTION: Do not keep hitting the “reset” button if you have oil pressure you are just filling the burner combustion chamber with oil and if ignited will cause an explosion.
High limit temp control reset tripped if so equipped.
Reset if necessary.
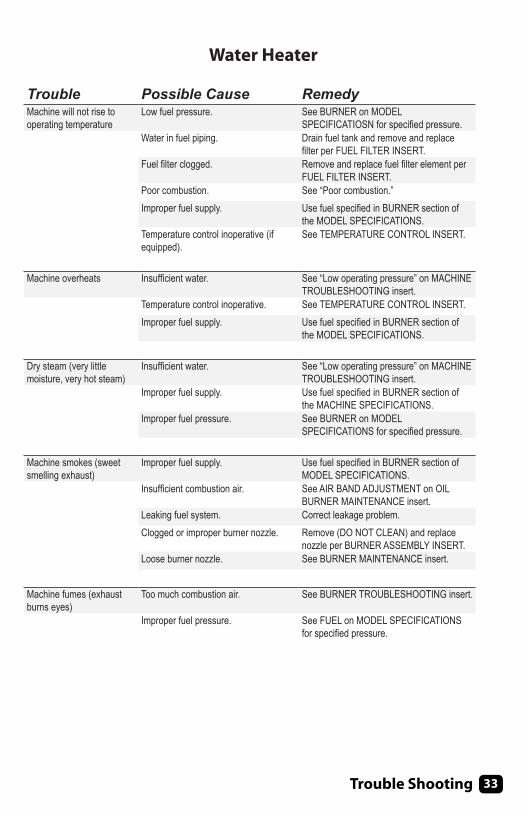
33Trouble Shooting
Water Heater
Trouble Possible Cause RemedyMachine will not rise to operating temperature
Low fuel pressure. See BURNER on MODEL SPECIFICATIOSN for specified pressure.
Water in fuel piping. Drain fuel tank and remove and replace filter per FUEL FILTER INSERT.
Fuel filter clogged. Remove and replace fuel filter element per FUEL FILTER INSERT.
Poor combustion. See “Poor combustion.”Improper fuel supply. Use fuel specified in BURNER section of
the MODEL SPECIFICATIONS.Temperature control inoperative (if equipped).
See TEMPERATURE CONTROL INSERT.
Machine overheats Insufficient water. See “Low operating pressure” on MACHINE TROUBLESHOOTING insert.
Temperature control inoperative. See TEMPERATURE CONTROL INSERT.Improper fuel supply. Use fuel specified in BURNER section of
the MODEL SPECIFICATIONS.
Dry steam (very little moisture, very hot steam)
Insufficient water. See “Low operating pressure” on MACHINE TROUBLESHOOTING insert.
Improper fuel supply. Use fuel specified in BURNER section of the MACHINE SPECIFICATIONS.
Improper fuel pressure. See BURNER on MODEL SPECIFICATIONS for specified pressure.
Machine smokes (sweet smelling exhaust)
Improper fuel supply. Use fuel specified in BURNER section of MODEL SPECIFICATIONS.
Insufficient combustion air. See AIR BAND ADJUSTMENT on OIL BURNER MAINTENANCE insert.
Leaking fuel system. Correct leakage problem.Clogged or improper burner nozzle. Remove (DO NOT CLEAN) and replace
nozzle per BURNER ASSEMBLY INSERT.Loose burner nozzle. See BURNER MAINTENANCE insert.
Machine fumes (exhaust burns eyes)
Too much combustion air. See BURNER TROUBLESHOOTING insert.
Improper fuel pressure. See FUEL on MODEL SPECIFICATIONS for specified pressure.

3� Trouble Shooting
Excessive oil dripping from laydown coil condensate.
Loose nozzle. See BURNER TROUBLESHOOTING insert.
Fuel pressure too high. See FUEL PRESSURE ADJUSTMENT section on BURNER MAINTENANCE insert.
Burner nozzle defective. Remove and replace with appropriate nozzle found on the BURNER ASSEMBLY or BREAKDOWN insert.
Incorrect burner nozzle. Remove and replace with appropriate nozzle found on the BURNER ASSEMBLY or BREAKDOWN insert.
Poor combustion Low fuel pressure. See “Low fuel pressure” on BURNER TROUBLESHOOTING insert.
Improper fuel supply. See “Low fuel pressure” on BURNER TROUBLESHOOTING insert.
Insufficient combustion air. See AIR BAND ADJUSTMENT section on OIL BURNER MAINTENANCE.

3�Trouble Shooting
WARRANTY POLICY
All machines and parts are guaranteed to be free from defects in material or workmanship under normal use and service for a period of 1 year after delivery from the factory. Any part (other than the vendor items) that is determined to be warranty will be repaired or replaced at NO CHARGE provided the warranty card is filled out in it’s entirety and the part is sent back freight prepaid. Any replacement parts accepted as warranty will be returned to you freight prepaid.
Our heating coil will carry a five year prorated warranty credit. The coil will be repaired or replaced without charge for 2 years after delivery date from the factory for any defect in the coil that was caused by workmanship or defective steel. After 2 years have expired, the credit will be prorated as follows:
2 years – 3 years 75% Credit Allowed3 years – 4 years 50% Credit Allowed4 years – 5 years 25% Credit AllowedAfter 5 years NO CREdIT ALLOWEd
Any parts supplied to us by other manufacturers will be subject to their guarantee and warranty. Generators, motors, and engines are required by vendors to be repaired or replaced by authorized warranty repair stations. We will assist you in locating warranty stations around the country in cases where that is necessary. Select items carry 6 (six) month warranty such as unloaders, trigger guns, etc.
This warranty covers the repair and replacement of defective parts only, and does not allow for field labor charges for removal, installation, analysis, travel expense, or special freight expenses incurred for replacement of parts.
Warranty does not apply to normal wear and tear including, but not limited to, freezing damage, freight damage, damage caused by misuse or misapplication, chemical related failures, contaminated filters and screens, moisture related fuel pump failures, stuck check valves, pump packing or seals, nozzles or orifices, paint, hoses, and gauges.
Record Model Number and Serial NumberAlways include them in Service Correspondence

Service Man
ual
Service Man
ual
For full warranty information, contact your delivering distribu-tor or contact the manufacturer at [email protected]