5 connections and configurations examples i gb · te rminals for power supply cables connection...
TRANSCRIPT
INTRODUZIONE
PR
INT
ED
IN
ITA
LY -
Cod
e 10
1258
10
62018 Potenza Picena (MC) Italy • Tel. 0733.870870 • Fax 0733.870880 • http://www.audison.com
POWER SUPPLYPower supply voltage: . . . . . . . . . . . . 11 ÷ 15 VDCIdling current: . . . . . . . . . . . . . . . . . . . . . . . . . 0.6 AIdling current when off: . . . . . . . . . . . . . . 0.002 mAMusical max consumption: . . . . . . . . . . . . . . . 15 A
AMPLIFIER STAGEDistortion –THD (1 kHz; 4 Ohms): . . . . . . . . 0.05 %Bandwidth (-3 dB): . . . . . . . . . . . . . . 4 Hz ÷ 50 kHzS/N Ratio (A weighed @ 1 V): . . . . . . . . . . . . 95 dBDamping factor (1 kHz, 4 Ohms): . . . . . . . . . . . 150Pre In input sensitivity: . . . . . . . . . . . . . . . 0.2 ÷ 5VSpeakers In input sensitivity: . . . . . . . . . . 0.4 ÷ 10VPre In input impedance: . . . . . . . . . . . . . 15 kOhmsSpeakers In input impedance: . . . . . . . . . 100 Ohms
LOAD IMPEDANCE:- 2 Ch. . . . . . . . . . . . . . . . . . . . . . . . . . 4 - 2 Ohms- 1 Ch. . . . . . . . . . . . . . . . . . . . . . . . . . . . 4 Ohms
NOMINAL OUTPUT POWER (RMS)NP @ 12VDC; THD 0.3% 4 Ohms: . . . . . . 45W x 2
OUTPUT POWER (RMS) @ 13.8 VDC; THD 1%:- 2 ch (4 Ohms) . . . . . . . . . . . . . . . . . . . . 65W x 2- 2 ch (2 Ohms) . . . . . . . . . . . . . . . . . . . . . 85W x 2- 1 ch (4 Ohms) . . . . . . . . . . . . . . . . . . . . 170W x 1
FILTERS/INPUTSInputs: . . . . . . . . . . . . . . . . . . Pre In / Speakers InFilters: . . . . . . 12dB/Oct., bypass / hi-pass / lo-pass. . . . . . . . . . . . . . . . . . . . . . . . . . . . . . (50÷220) Hz
OTHER FUNCTIONSRemote IN: . . . . . . . . . . . . . . . 7 ÷ 15 VDC – 1 mAConnections for VSR kitfor SUB remote volume: . . . . . . . . . . . . . optional kitFuse: . . . . . . . . . . . . . . . . . . . . . . . . . . blade, 20 AProtection: . . . . . . . . . . . . . . . . temperature >85°C,
DC voltage, overloadGreen-red LED indicators: . . . . . . . . . . . . on-safety
MAX SIZE (D x H x L): . . . . .178 x 49.5 x 210 mmWEIGHT: . . . . . . . . . . . . . . . . . . . . . . . . . . .1.5 kg
TECHNICAL FEATURES
F. Power
A. Pre In B. SpeakersIn
C. FiltersMode
D. OutMode
2 CONNECTIONS
LEFT
PLA
TE
RIG
HT
PLA
TE
E. On/Safety1 2
A. Levels
0.2
0.3
5.0
1.5
0.6
3 FUNCTIONS AND CONTROLS
B. Filtersadjusting
2202001506550
1 23
C. Speakers OutD. Remote In
E. VSR
- VRMS -
- Hz -
1 INSTALLATION
A. PLATES OPENING AND FIXING
70 m
m
194 mm
2 • Fixing
3 • Plates mounting
B. FUSE REPLACEMENT
RIGHTPLATE
1 • Plates removing
LEFTPLATE
RIGHTPLATE
C. VSR INSTALLATION (optional)
VCA.S.1
VSR
LEFT PLATE
D. CONNECTION CABLES
1 • Power supplycable
max d
max L
2 • Speakersoutput cables
3 • Cables forSpeakers In /REM / VSR
4.5 mm/0.177 inch
15 mm/0.59 inch
2.0 mm/0.078 inch
10 mm/0.39 inch
1.4 mm/0.055 inch
7.0 mm/0.27 inch
max d
Cable copper sizemax L
A. Pre In (preamplified inputs)Left and right channels inputRight channel mono input
B. Speakers In (amplified input signals) - Red connectionsLeft and right channels speaker level inputRight channel mono input
C. Speakers Out1 • Left channel power output2 • Right channel power output3 • Mono power output
D. Remote InInput for the amplifier remote switching on
E. VSR (Sub volume)Input for VSR (optional kit for sub volume remote control)
F. PowerTerminals for power supply cables connection (battery: 12V)
2 CONNECTIONS
A. Levels (0.2 ÷ 5 VRMS)It adjusts left and right (stereo) channels sensitivity or mono channel sensitivity
B. Filters adjustingIt adjusts the filter cut-off frequency between 50 Hz and 220 Hz
C. Filters Mode (filters configuration)It configures filters as HI-PASS, FULL RANGE or LO-PASS
D. Out Mode (outputs configuration)It configures output channels as stereo or mono
E. On/Safety (switching on / protection)1 • Green led indicator (ON)2 • Red led indicator (SAFETY)
3 FUNCTIONS AND CONTROLS
4 CONFIGURATION TABLE
Inputs Filters Out Mode SpeakersOut
PRE IN
L/R 1 - HI-PASS2 - FULL3 - LO-PASS
12
3 MONOSTEREO
PRE IN
L/R 1 - HI-PASS2 - FULL3 - LO-PASS
12
3 MONOSTEREO
PRE IN
L/R 1 - HI-PASS2 - FULL3 - LO-PASS
12
3 MONOSTEREO
PRE IN
R 1 - HI-PASS2 - FULL3 - LO-PASS
12
3 MONOSTEREO
50/220
L-R12dB
STEREO
R
50/220
12dB
MONO
STEREO
L-R
50/220
12dB
STEREO
RightLeft
+
TweeterMidrangeWoofer
+
TweeterMidrangeWoofer
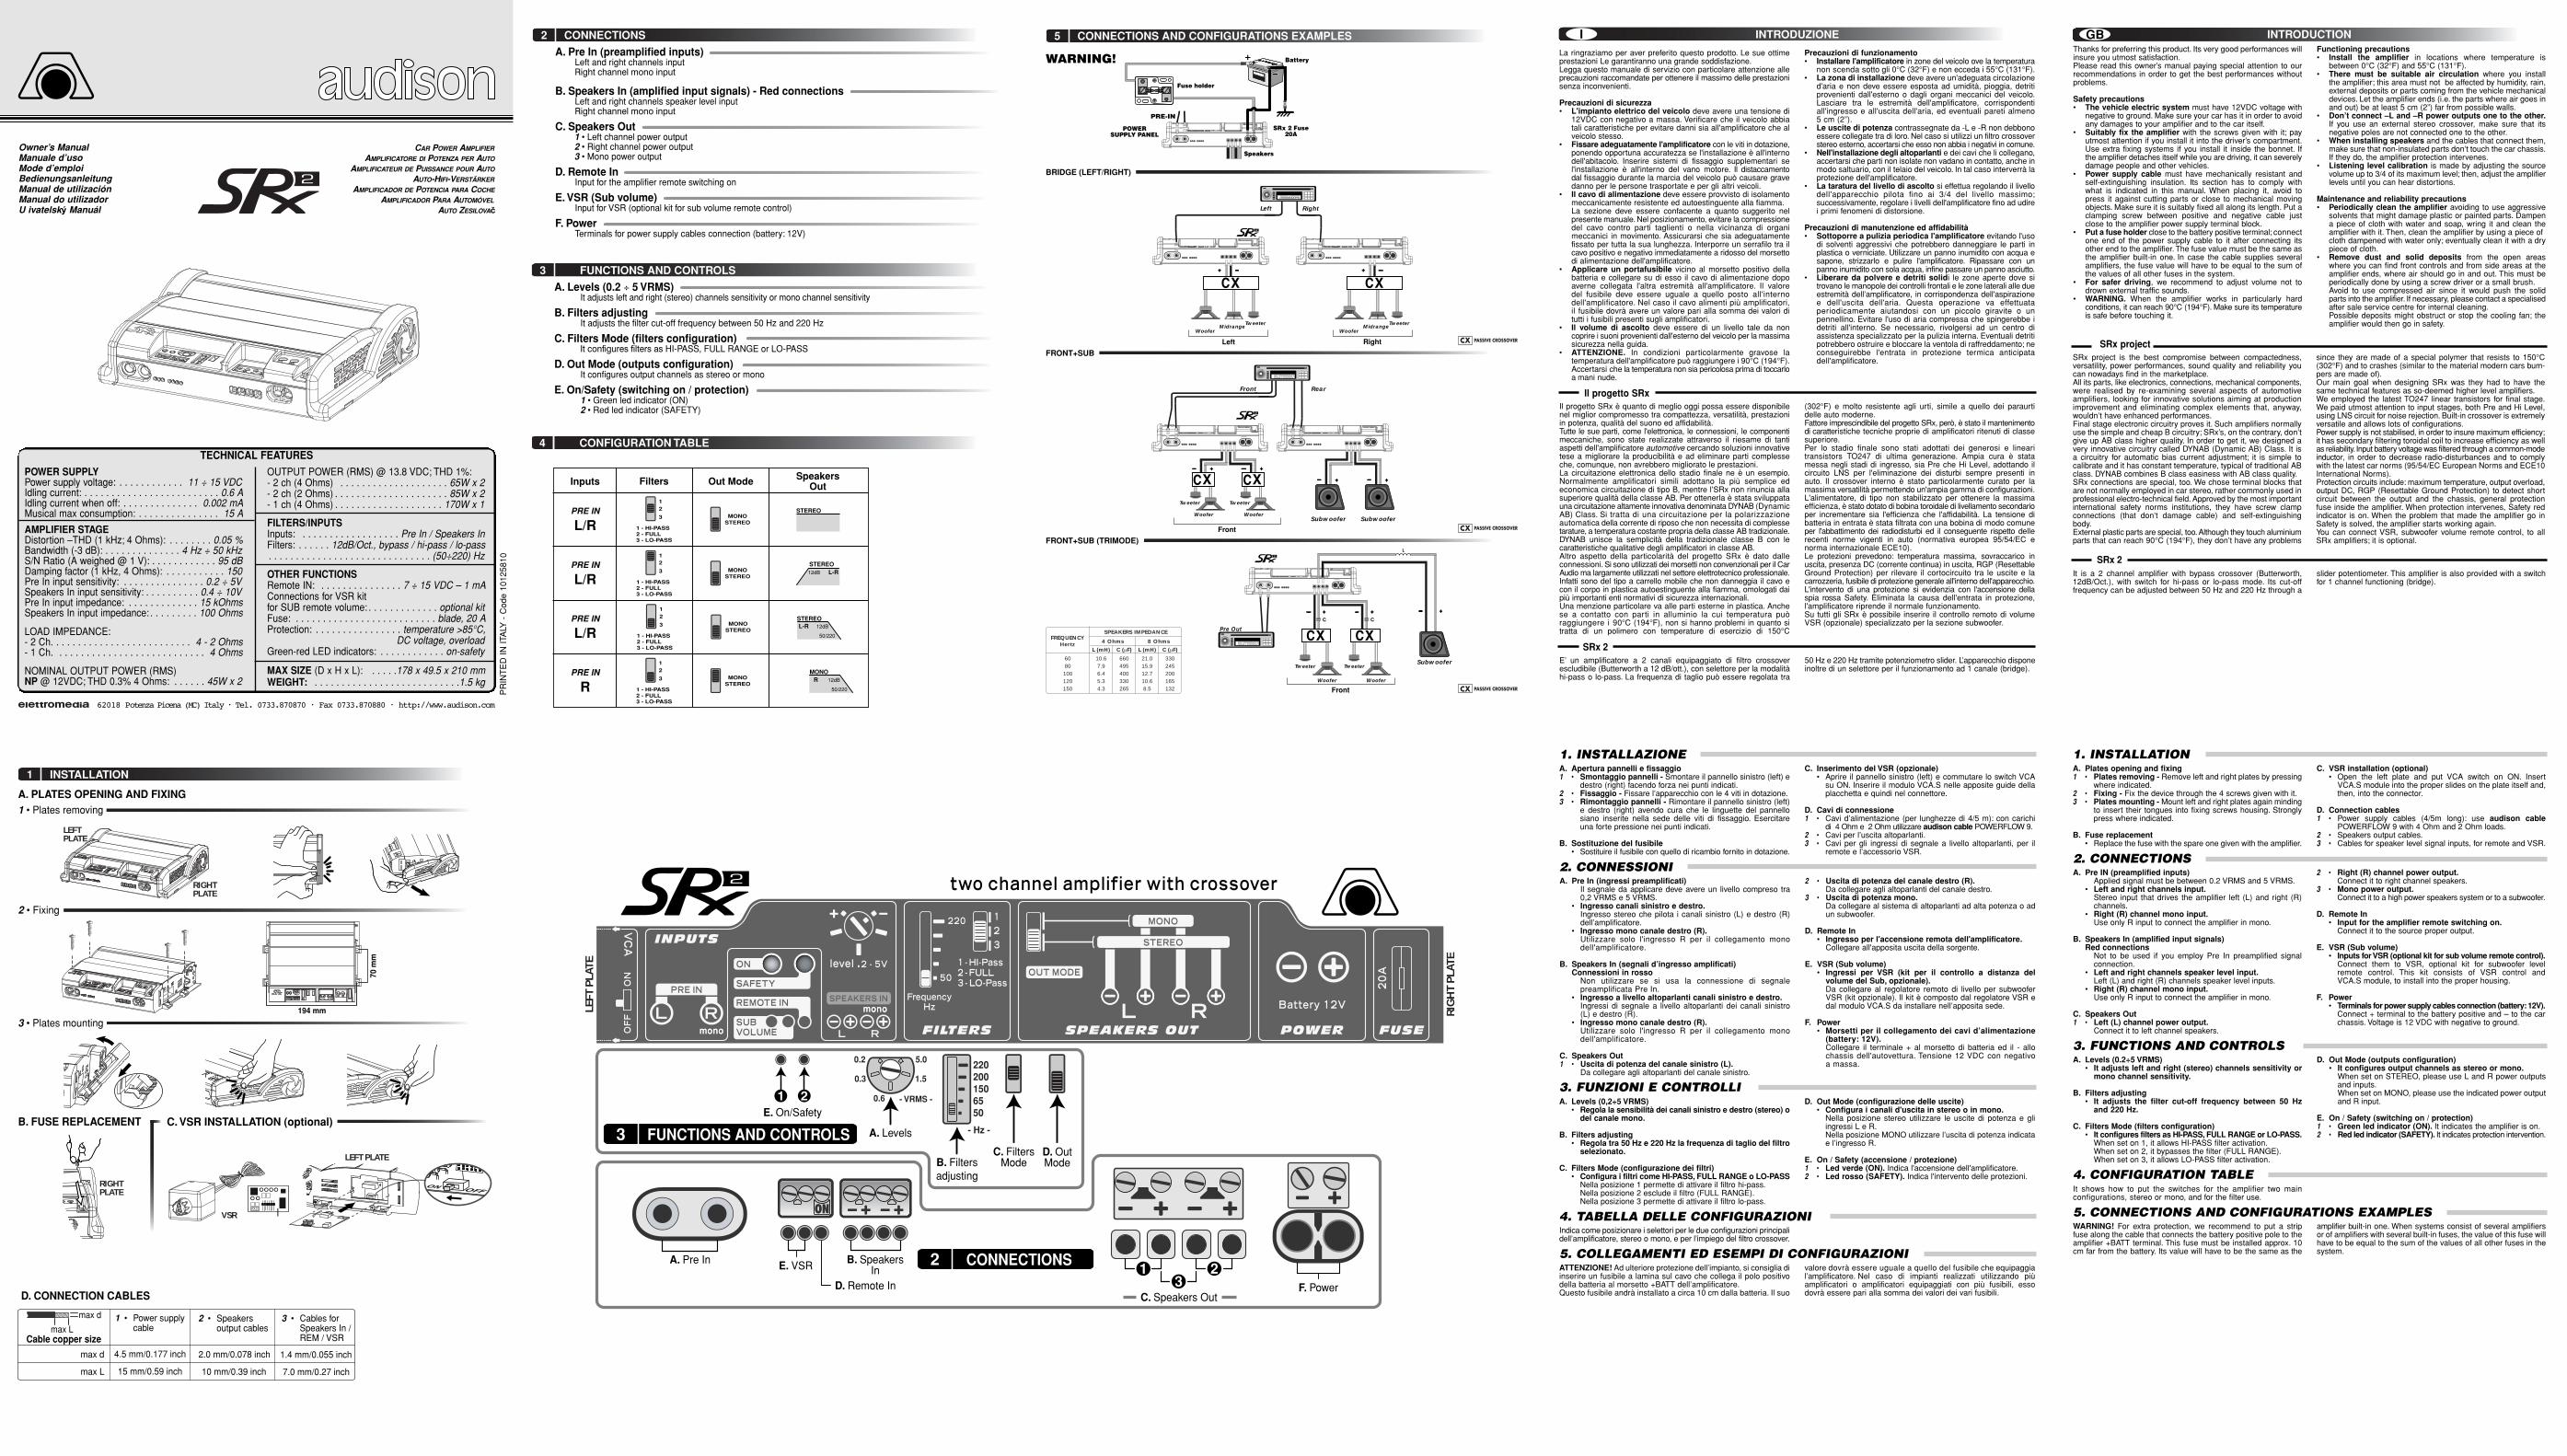
FRONT+SUB (TRIMODE)
5 CONNECTIONS AND CONFIGURATIONS EXAMPLES
SRx 2 Fuse20A
PRE-IN
WARNING!
FREQUENCYHertz
SPEAKERS IMPEDANCE
4 Ohms 8 OhmsL (mH) C (µF) L (mH) C (µF)
6080
100120150
10.67.96.45.34.3
660495400330265
21.015.912.710.68.5
330245200165132
Pre Out
Front
+
Woofer
Tweeter
+ +
Woofer
TweeterSubwoofer
BRIDGE (LEFT/RIGHT)
FRONT+SUB
RearFront
Front
Woofer
Tweeter
Woofer
Tweeter
++ +
++ +
Subwoofer Subwoofer
Left Right
Speakers
Battery
Fuse holder
POWERSUPPLY PANEL
La ringraziamo per aver preferito questo prodotto. Le sue ottimeprestazioni Le garantiranno una grande soddisfazione.Legga questo manuale di servizio con particolare attenzione alleprecauzioni raccomandate per ottenere il massimo delle prestazionisenza inconvenienti.
Precauzioni di sicurezza• L'impianto elettrico del veicolo deve avere una tensione di
12VDC con negativo a massa. Verificare che il veicolo abbia tali caratteristiche per evitare danni sia all'amplificatore che al veicolo stesso.
• Fissare adeguatamente l'amplificatore con le viti in dotazione,ponendo opportuna accuratezza se l'installazione è all'interno dell'abitacolo. Inserire sistemi di fissaggio supplementari se l'installazione è all'interno del vano motore. Il distaccamento dal fissaggio durante la marcia del veicolo può causare grave danno per le persone trasportate e per gli altri veicoli.
• Il cavo di alimentazione deve essere provvisto di isolamentomeccanicamente resistente ed autoestinguente alla fiamma.La sezione deve essere confacente a quanto suggerito nel presente manuale. Nel posizionamento, evitare la compressione del cavo contro parti taglienti o nella vicinanza di organi meccanici in movimento. Assicurarsi che sia adeguatamente fissato per tutta la sua lunghezza. Interporre un serrafilo tra il cavo positivo e negativo immediatamente a ridosso del morsetto di alimentazione dell'amplificatore.
• Applicare un portafusibile vicino al morsetto positivo della batteria e collegare su di esso il cavo di alimentazione dopo averne collegata l'altra estremità all'amplificatore. Il valore del fusibile deve essere uguale a quello posto all'interno dell'amplificatore. Nel caso il cavo alimenti più amplificatori,il fusibile dovrà avere un valore pari alla somma dei valori di tutti i fusibili presenti sugli amplificatori.
• Il volume di ascolto deve essere di un livello tale da non coprire i suoni provenienti dall'esterno del veicolo per la massimasicurezza nella guida.
• ATTENZIONE. In condizioni particolarmente gravose la temperatura dell'amplificatore può raggiungere i 90°C (194°F).Accertarsi che la temperatura non sia pericolosa prima di toccarlo a mani nude.
Precauzioni di funzionamento• Installare l'amplificatore in zone del veicolo ove la temperatura
non scenda sotto gli 0°C (32°F) e non ecceda i 55°C (131°F).• La zona di installazione deve avere un'adeguata circolazione
d'aria e non deve essere esposta ad umidità, pioggia, detriti provenienti dall'esterno o dagli organi meccanici del veicolo.Lasciare tra le estremità dell'amplificatore, corrispondenti all'ingresso e all'uscita dell'aria, ed eventuali pareti almeno 5 cm (2”).
• Le uscite di potenza contrassegnate da -L e -R non debbono essere collegate tra di loro. Nel caso si utilizzi un filtro crossoverstereo esterno, accertarsi che esso non abbia i negativi in comune.
• Nell'installazione degli altoparlanti e dei cavi che li collegano, accertarsi che parti non isolate non vadano in contatto, anche inmodo saltuario, con il telaio del veicolo. In tal caso interverrà la protezione dell'amplificatore.
• La taratura del livello di ascolto si effettua regolando il livellodell'apparecchio pilota fino ai 3/4 del livello massimo;successivamente, regolare i livelli dell'amplificatore fino ad udirei primi fenomeni di distorsione.
Precauzioni di manutenzione ed affidabilità• Sottoporre a pulizia periodica l'amplificatore evitando l'uso
di solventi aggressivi che potrebbero danneggiare le parti in plastica o verniciate. Utilizzare un panno inumidito con acqua e sapone, strizzarlo e pulire l'amplificatore. Ripassare con un panno inumidito con sola acqua, infine passare un panno asciutto.
• Liberare da polvere e detriti solidi le zone aperte dove si trovano le manopole dei controlli frontali e le zone laterali alle due estremità dell’amplificatore, in corrispondenza dell'aspirazionee dell'uscita dell'aria. Questa operazione va effettuata periodicamente aiutandosi con un piccolo giravite o un pennellino. Evitare l'uso di aria compressa che spingerebbe i detriti all'interno. Se necessario, rivolgersi ad un centro di assistenza specializzato per la pulizia interna. Eventuali detriti potrebbero ostruire e bloccare la ventola di raffreddamento; ne conseguirebbe l'entrata in protezione termica anticipata dell'amplificatore.
Il progetto SRxIl progetto SRx è quanto di meglio oggi possa essere disponibilenel miglior compromesso tra compattezza, versatilità, prestazioniin potenza, qualità del suono ed affidabilità.Tutte le sue parti, come l'elettronica, le connessioni, le componentimeccaniche, sono state realizzate attraverso il riesame di tantiaspetti dell'amplificatore automotive cercando soluzioni innovativetese a migliorare la producibilità e ad eliminare parti complesseche, comunque, non avrebbero migliorato le prestazioni.La circuitazione elettronica dello stadio finale ne è un esempio.Normalmente amplificatori simili adottano la più semplice edeconomica circuitazione di tipo B, mentre l’SRx non rinuncia allasuperiore qualità della classe AB. Per ottenerla è stata sviluppatauna circuitazione altamente innovativa denominata DYNAB (DynamicAB) Class. Si tratta di una circuitazione per la polarizzazioneautomatica della corrente di riposo che non necessita di complessetarature, a temperatura costante propria della classe AB tradizionale.DYNAB unisce la semplicità della tradizionale classe B con lecaratteristiche qualitative degli amplificatori in classe AB.Altro aspetto della particolarità del progetto SRx è dato dalleconnessioni. Si sono utilizzati dei morsetti non convenzionali per il CarAudio ma largamente utilizzati nel settore elettrotecnico professionale.Infatti sono del tipo a carrello mobile che non danneggia il cavo econ il corpo in plastica autoestinguente alla fiamma, omologati daipiù importanti enti normativi di sicurezza internazionali.Una menzione particolare va alle parti esterne in plastica. Anchese a contatto con parti in alluminio la cui temperatura puòraggiungere i 90°C (194°F), non si hanno problemi in quanto sitratta di un polimero con temperature di esercizio di 150°C
(302°F) e molto resistente agli urti, simile a quello dei paraurtidelle auto moderne.Fattore imprescindibile del progetto SRx, però, è stato il mantenimentodi caratteristiche tecniche proprie di amplificatori ritenuti di classesuperiore.Per lo stadio finale sono stati adottati dei generosi e linearitransistors TO247 di ultima generazione. Ampia cura è statamessa negli stadi di ingresso, sia Pre che Hi Level, adottando ilcircuito LNS per l'eliminazione dei disturbi sempre presenti inauto. Il crossover interno è stato particolarmente curato per lamassima versatilità permettendo un'ampia gamma di configurazioni.L'alimentatore, di tipo non stabilizzato per ottenere la massimaefficienza, è stato dotato di bobina toroidale di livellamento secondarioper incrementare sia l'efficienza che l'affidabilità. La tensione dibatteria in entrata è stata filtrata con una bobina di modo comuneper l'abbattimento dei radiodisturbi ed il conseguente rispetto dellerecenti norme vigenti in auto (normativa europea 95/54/EC enorma internazionale ECE10).Le protezioni prevedono: temperatura massima, sovraccarico inuscita, presenza DC (corrente continua) in uscita, RGP (ResettableGround Protection) per rilevare il cortocircuito tra le uscite e lacarrozzeria, fusibile di protezione generale all'interno dell'apparecchio.L'intervento di una protezione si evidenzia con l'accensione dellaspia rossa Safety. Eliminata la causa dell'entrata in protezione,l'amplificatore riprende il normale funzionamento.Su tutti gli SRx è possibile inserire il controllo remoto di volumeVSR (opzionale) specializzato per la sezione subwoofer.
A. Levels (0,2÷5 VRMS)• Regola la sensibilità dei canali sinistro e destro (stereo) o
del canale mono.
B. Filters adjusting• Regola tra 50 Hz e 220 Hz la frequenza di taglio del filtro
selezionato.
C. Filters Mode (configurazione dei filtri)• Configura i filtri come HI-PASS, FULL RANGE o LO-PASS
Nella posizione 1 permette di attivare il filtro hi-pass.Nella posizione 2 esclude il filtro (FULL RANGE).Nella posizione 3 permette di attivare il filtro lo-pass.
D. Out Mode (configurazione delle uscite)• Configura i canali d'uscita in stereo o in mono.
Nella posizione stereo utilizzare le uscite di potenza e gli ingressi L e R.Nella posizione MONO utilizzare l’uscita di potenza indicata e l’ingresso R.
E. On / Safety (accensione / protezione)1 • Led verde (ON). Indica l'accensione dell'amplificatore.2 • Led rosso (SAFETY). Indica l'intervento delle protezioni.
A. Pre In (ingressi preamplificati)Il segnale da applicare deve avere un livello compreso tra 0,2 VRMS e 5 VRMS.
• Ingresso canali sinistro e destro.Ingresso stereo che pilota i canali sinistro (L) e destro (R) dell’amplificatore.
• Ingresso mono canale destro (R).Utilizzare solo l'ingresso R per il collegamento mono dell'amplificatore.
B. Speakers In (segnali d’ingresso amplificati)Connessioni in rosso
Non utilizzare se si usa la connessione di segnale preamplificata Pre In.
• Ingresso a livello altoparlanti canali sinistro e destro.Ingressi di segnale a livello altoparlanti dei canali sinistro (L) e destro (R).
• Ingresso mono canale destro (R).Utilizzare solo l'ingresso R per il collegamento mono dell'amplificatore.
C. Speakers Out1 • Uscita di potenza del canale sinistro (L).
Da collegare agli altoparlanti del canale sinistro.
2 • Uscita di potenza del canale destro (R).Da collegare agli altoparlanti del canale destro.
3 • Uscita di potenza mono.Da collegare al sistema di altoparlanti ad alta potenza o ad un subwoofer.
D. Remote In• Ingresso per l'accensione remota dell'amplificatore.
Collegare all'apposita uscita della sorgente.
E. VSR (Sub volume)• Ingressi per VSR (kit per il controllo a distanza del
volume del Sub, opzionale).Da collegare al regolatore remoto di livello per subwoofer VSR (kit opzionale). Il kit è composto dal regolatore VSR e dal modulo VCA.S da installare nell’apposita sede.
F. Power• Morsetti per il collegamento dei cavi d’alimentazione
(battery: 12V).Collegare il terminale + al morsetto di batteria ed il - allo chassis dell'autovettura. Tensione 12 VDC con negativo a massa.
A. Apertura pannelli e fissaggio1 • Smontaggio pannelli - Smontare il pannello sinistro (left) e
destro (right) facendo forza nei punti indicati.2 • Fissaggio - Fissare l’apparecchio con le 4 viti in dotazione.3 • Rimontaggio pannelli - Rimontare il pannello sinistro (left)
e destro (right) avendo cura che le linguette del pannello siano inserite nella sede delle viti di fissaggio. Esercitare una forte pressione nei punti indicati.
B. Sostituzione del fusibile• Sostituire il fusibile con quello di ricambio fornito in dotazione.
C. Inserimento del VSR (opzionale)• Aprire il pannello sinistro (left) e commutare lo switch VCA
su ON. Inserire il modulo VCA.S nelle apposite guide della placchetta e quindi nel connettore.
D. Cavi di connessione1 • Cavi d’alimentazione (per lunghezze di 4/5 m): con carichi
di 4 Ohm e 2 Ohm utilizzare audison cable POWERFLOW 9.2 • Cavi per l’uscita altoparlanti.3 • Cavi per gli ingressi di segnale a livello altoparlanti, per il
remote e l’accessorio VSR.
1. INSTALLAZIONE
2. CONNESSIONI
3. FUNZIONI E CONTROLLI
Indica come posizionare i selettori per le due configurazioni principalidell’amplificatore, stereo o mono, e per l’impiego del filtro crossover.
4. TABELLA DELLE CONFIGURAZIONI
ATTENZIONE! Ad ulteriore protezione dell’impianto, si consiglia diinserire un fusibile a lamina sul cavo che collega il polo positivodella batteria al morsetto +BATT dell’amplificatore.Questo fusibile andrà installato a circa 10 cm dalla batteria. Il suo
valore dovrà essere uguale a quello del fusibile che equipaggial’amplificatore. Nel caso di impianti realizzati utilizzando piùamplificatori o amplificatori equipaggiati con più fusibili, essodovrà essere pari alla somma dei valori dei vari fusibili.
5. COLLEGAMENTI ED ESEMPI DI CONFIGURAZIONI
I
E’ un amplificatore a 2 canali equipaggiato di filtro crossoverescludibile (Butterworth a 12 dB/ott.), con selettore per la modalitàhi-pass o lo-pass. La frequenza di taglio può essere regolata tra
50 Hz e 220 Hz tramite potenziometro slider. L’apparecchio disponeinoltre di un selettore per il funzionamento ad 1 canale (bridge).
SRx 2
INTRODUCTIONThanks for preferring this product. Its very good performances willinsure you utmost satisfaction.Please read this owner’s manual paying special attention to ourrecommendations in order to get the best performances withoutproblems.
Safety precautions• The vehicle electric system must have 12VDC voltage with
negative to ground. Make sure your car has it in order to avoid any damages to your amplifier and to the car itself.
• Suitably fix the amplifier with the screws given with it; pay utmost attention if you install it into the driver’s compartment.Use extra fixing systems if you install it inside the bonnet. If the amplifier detaches itself while you are driving, it can severely damage people and other vehicles.
• Power supply cable must have mechanically resistant and self-extinguishing insulation. Its section has to comply with what is indicated in this manual. When placing it, avoid to press it against cutting parts or close to mechanical moving objects. Make sure it is suitably fixed all along its length. Put a clamping screw between positive and negative cable just close to the amplifier power supply terminal block.
• Put a fuse holder close to the battery positive terminal; connectone end of the power supply cable to it after connecting its other end to the amplifier. The fuse value must be the same as the amplifier built-in one. In case the cable supplies several amplifiers, the fuse value will have to be equal to the sum of the values of all other fuses in the system.
• For safer driving, we recommend to adjust volume not to drown external traffic sounds.
• WARNING. When the amplifier works in particularly hard conditions, it can reach 90°C (194°F). Make sure its temperature is safe before touching it.
Functioning precautions• Install the amplifier in locations where temperature is
between 0°C (32°F) and 55°C (131°F).• There must be suitable air circulation where you install
the amplifier; this area must not be affected by humidity, rain,external deposits or parts coming from the vehicle mechanicaldevices. Let the amplifier ends (i.e. the parts where air goes in and out) be at least 5 cm (2”) far from possible walls.
• Don’t connect –L and –R power outputs one to the other.If you use an external stereo crossover, make sure that its negative poles are not connected one to the other.
• When installing speakers and the cables that connect them, make sure that non-insulated parts don’t touch the car chassis.If they do, the amplifier protection intervenes.
• Listening level calibration is made by adjusting the source volume up to 3/4 of its maximum level; then, adjust the amplifier levels until you can hear distortions.
Maintenance and reliability precautions• Periodically clean the amplifier avoiding to use aggressive
solvents that might damage plastic or painted parts. Dampena piece of cloth with water and soap, wring it and clean theamplifier with it. Then, clean the amplifier by using a piece of cloth dampened with water only; eventually clean it with a dry piece of cloth.
• Remove dust and solid deposits from the open areaswhere you can find front controls and from side areas at the amplifier ends, where air should go in and out. This must be periodically done by using a screw driver or a small brush.Avoid to use compressed air since it would push the solid parts into the amplifier. If necessary, please contact a specialised after sale service centre for internal cleaning.Possible deposits might obstruct or stop the cooling fan; the amplifier would then go in safety.
SRx project is the best compromise between compactedness,versatility, power performances, sound quality and reliability youcan nowadays find in the marketplace.All its parts, like electronics, connections, mechanical components,were realised by re-examining several aspects of automotiveamplifiers, looking for innovative solutions aiming at productionimprovement and eliminating complex elements that, anyway,wouldn’t have enhanced performances.Final stage electronic circuitry proves it. Such amplifiers normallyuse the simple and cheap B circuitry; SRx’s, on the contrary, don’tgive up AB class higher quality. In order to get it, we designed avery innovative circuitry called DYNAB (Dynamic AB) Class. It isa circuitry for automatic bias current adjustment; it is simple tocalibrate and it has constant temperature, typical of traditional ABclass. DYNAB combines B class easiness with AB class quality.SRx connections are special, too. We chose terminal blocks thatare not normally employed in car stereo, rather commonly used inprofessional electro-technical field. Approved by the most importantinternational safety norms institutions, they have screw clampconnections (that don’t damage cable) and self-extinguishingbody.External plastic parts are special, too. Although they touch aluminiumparts that can reach 90°C (194°F), they don’t have any problems
since they are made of a special polymer that resists to 150°C(302°F) and to crashes (similar to the material modern cars bum-pers are made of).Our main goal when designing SRx was they had to have thesame technical features as so-deemed higher level amplifiers.We employed the latest TO247 linear transistors for final stage.We paid utmost attention to input stages, both Pre and Hi Level,using LNS circuit for noise rejection. Built-in crossover is extremelyversatile and allows lots of configurations.Power supply is not stabilised, in order to insure maximum efficiency;it has secondary filtering toroidal coil to increase efficiency as wellas reliability. Input battery voltage was filtered through a common-modeinductor, in order to decrease radio-disturbances and to complywith the latest car norms (95/54/EC European Norms and ECE10International Norms).Protection circuits include: maximum temperature, output overload,output DC, RGP (Resettable Ground Protection) to detect shortcircuit between the output and the chassis, general protectionfuse inside the amplifier. When protection intervenes, Safety redindicator is on. When the problem that made the amplifier go inSafety is solved, the amplifier starts working again.You can connect VSR, subwoofer volume remote control, to allSRx amplifiers; it is optional.
It is a 2 channel amplifier with bypass crossover (Butterworth,12dB/Oct.), with switch for hi-pass or lo-pass mode. Its cut-offfrequency can be adjusted between 50 Hz and 220 Hz through a
slider potentiometer. This amplifier is also provided with a switchfor 1 channel functioning (bridge).
SRx 2
GB
SRx project
A. Levels (0.2÷5 VRMS)• It adjusts left and right (stereo) channels sensitivity or
mono channel sensitivity.
B. Filters adjusting• It adjusts the filter cut-off frequency between 50 Hz
and 220 Hz.
C. Filters Mode (filters configuration)• It configures filters as HI-PASS, FULL RANGE or LO-PASS.
When set on 1, it allows HI-PASS filter activation.When set on 2, it bypasses the filter (FULL RANGE).When set on 3, it allows LO-PASS filter activation.
D. Out Mode (outputs configuration)• It configures output channels as stereo or mono.
When set on STEREO, please use L and R power outputs and inputs.When set on MONO, please use the indicated power outputand R input.
E. On / Safety (switching on / protection)1 • Green led indicator (ON). It indicates the amplifier is on.2 • Red led indicator (SAFETY). It indicates protection intervention.
A. Pre IN (preamplified inputs)Applied signal must be between 0.2 VRMS and 5 VRMS.
• Left and right channels input.Stereo input that drives the amplifier left (L) and right (R) channels.
• Right (R) channel mono input.Use only R input to connect the amplifier in mono.
B. Speakers In (amplified input signals)Red connections
Not to be used if you employ Pre In preamplified signal connection.
• Left and right channels speaker level input.Left (L) and right (R) channels speaker level inputs.
• Right (R) channel mono input.Use only R input to connect the amplifier in mono.
C. Speakers Out1 • Left (L) channel power output.
Connect it to left channel speakers.
2 • Right (R) channel power output.Connect it to right channel speakers.
3 • Mono power output.Connect it to a high power speakers system or to a subwoofer.
D. Remote In• Input for the amplifier remote switching on.
Connect it to the source proper output.
E. VSR (Sub volume)• Inputs for VSR (optional kit for sub volume remote control).
Connect them to VSR, optional kit for subwoofer levelremote control. This kit consists of VSR control andVCA.S module, to install into the proper housing.
F. Power• Terminals for power supply cables connection (battery:12V).
Connect + terminal to the battery positive and – to the car chassis. Voltage is 12 VDC with negative to ground.
A. Plates opening and fixing1 • Plates removing - Remove left and right plates by pressing
where indicated.2 • Fixing - Fix the device through the 4 screws given with it.3 • Plates mounting - Mount left and right plates again minding
to insert their tongues into fixing screws housing. Strongly press where indicated.
B. Fuse replacement• Replace the fuse with the spare one given with the amplifier.
C. VSR installation (optional)• Open the left plate and put VCA switch on ON. Insert
VCA.S module into the proper slides on the plate itself and, then, into the connector.
D. Connection cables1 • Power supply cables (4/5m long): use audison cable
POWERFLOW 9 with 4 Ohm and 2 Ohm loads.2 • Speakers output cables.3 • Cables for speaker level signal inputs, for remote and VSR.
1. INSTALLATION
2. CONNECTIONS
3. FUNCTIONS AND CONTROLS
It shows how to put the switches for the amplifier two mainconfigurations, stereo or mono, and for the filter use.
4. CONFIGURATION TABLE
WARNING! For extra protection, we recommend to put a stripfuse along the cable that connects the battery positive pole to theamplifier +BATT terminal. This fuse must be installed approx. 10cm far from the battery. Its value will have to be the same as the
amplifier built-in one. When systems consist of several amplifiersor of amplifiers with several built-in fuses, the value of this fuse willhave to be equal to the sum of the values of all other fuses in thesystem.
5. CONNECTIONS AND CONFIGURATIONS EXAMPLES
Owner’s ManualManuale d’usoMode d’emploiBedienungsanleitungManual de utilizaciónManual do utilizadorU ivatelský Manuál
CAR POWER AMPLIFIER
AMPLIFICATORE DI POTENZA PER AUTO
AMPLIFICATEUR DE PUISSANCE POUR AUTO
AUTO-HIFI-VERSTÄRKER
AMPLIFICADOR DE POTENCIA PARA COCHE
AMPLIFICADOR PARA AUTOMÓVEL
AUTO ZESILOVAč

Le SRx 2 est un amplificateur à 2 canaux équipé d'un filtre -quel'on peut désactiver (Butterworth à 12 dB/Oct.)- avec sélecteurpour la modalité Hi-pass ou Lo-pass. La fréquence de coupe
peut être réglée entre 50 Hz et 220 Hz au moyen du potentiomètreà curseur. En outre, l'appareil dispose d'un sélecteur pour lefonctionnement à 1 canal (bridge).
SRx 2
4. TABLEAU DES CONFIGURATIONS
1. INSTALLATIONA. Ouverture des panneaux et fixation1 • Démontage des panneaux - Démonter les panneaux gauche
(left) et droit (right) en appuyant aux points indiqués.2 • Fixation - Fixer l'appareil avec les 4 vis fournies.3 • Remontage des panneaux - Remonter les panneaux gauche
(left) et droit (right) en s'assurant que leurs languettes sont insérées dans l'emplacement des vis de fixation. Exercer une forte pression aux points indiqués.
B. Substitution du fusible• Ouvrir le panneau droit (right) et substituer le fusible par le
fusible fourni avec l'appareil.
C. Insertion du VSR (en option) • Ouvrir le panneau gauche (left) et commuter le switch
(interrupteur) VCA sur ON. Insérer le module VCA.S dans les rainures de la plaquette prévues à cet effet et ensuite dans le connecteur.
D. Câbles de connexion1 • Câbles d'alimentation (pour 4/5m de longueur); avec des
charges de 4 Ohm et 2 Ohm: utiliser audison cablePOWERFLOW 9.
2 • Câbles pour la sortie haut-parleurs.3 • Câbles pour les entrées de signal au niveau haut-parleurs,
pour le contrôle à distance et l'accessoire VSR.
Il indique comment positionner les sélecteurs pour les deuxconfigurations principales de l'amplificateur -stéréo ou mono- et
pour l'emploi du filtre.
ATTENTION! Pour une meilleure protection de l'installation, il estconseillé d'insérer un fusible à lame sur le câble qui connecte lepôle positif de la batterie à la borne +BATT de l'amplificateur. Cefusible devra être installé à 10cm environ de la batterie. Sa valeurdevra être égale à la valeur du fusible qui équipe l'amplificateur.
Dans le cas d'installations réalisées en utilisant plusieurs amplificateursou des amplificateurs équipés de plusieurs fusibles, la valeur dufusible devra être égale à la somme des valeurs des différentsfusibles.
5. CONNEXIONS ET EXEMPLES DE CONFIGURATIONS
2. CONNEXIONSA. PRE In (entrées pré-amplifiées)
Le signal à appliquer doit avoir un niveau compris entre 0,2 VRMS et 5 VRMS.
• Entrée canaux gauche et droit.Entrée stéréo qui pilote les canaux gauche (L) et droit (R) del'amplificateur.
• Entrée mono canal droit (R).Utiliser uniquement l'entrée R pour la connexion mono de l'amplificateur.
B. Speakers In (signaux d'entrée amplifiés)Connexions en rouge
Ne pas utiliser si l'on utilise la connexion de signal pré-amplifiée PRE IN.
• Entrée au niveau haut-parleurs canaux gauche et droit.Entrées de signal au niveau haut-parleurs des canaux gauche (L) et droit (R).
• Entrée mono canal droit (R).Utiliser seulement l'entrée R pour la connexion mono de l'amplificateur.
C. Speakers Out1 • Sortie de puissance du canal gauche (L).
A connecter aux haut-parleurs du canal gauche.
2 • Sortie de puissance du canal droit (R).A connecter aux haut-parleurs du canal droit.
3 • Sortie de puissance mono.A connecter au système de haut-parleurs à puissance élevée ou à un subwoofer.
D. Remote In• Entrée pour l'allumage à distance de l'amplificateur.
Connecter à la sortie spéciale de la source.
E. VSR (Sub volume)• Entrées pour VSR (kit pour le contrôle à distance du
volume du Sub, en option).A connecter au régulateur à distance de niveau pour subwoofer VSR (kit en option). Le kit est composé du régulateur VSR et du module VCA.S à installer à l'emplacement prévu à cet effet.
F. Power• Bornes pour la connexion des câbles d'alimentation
(batterie: 12V).Connecter le terminal + à la borne positive de la batterie et le terminal – au châssis de la voiture. Tension 12VDC avec négatif à la masse.
3. BOUTONS DE COMMANDE ET FONCTIONSA. Levels (0,2 ÷ 5 VRMS)
• Il règle la sensibilité des canaux gauche et droit (stéréo) ou du canal mono.
B. Filters adjusting• Il règle entre 50 Hz et 220 Hz la fréquence de coupe du
filtre sélectionné.
C. Filters Mode (configuration des filtres)• Il configure les filtres comme HI-PASS, FULL RANGE
ou LO-PASS.Dans la position 1, il permet d'activer le filtre HI-PASSDans la position 2, il désactive le filtre (FULL RANGE)Dans la position 3, il permet d'activer le filtre LO-PASS.
D. Out Mode (configuration des sorties)• Il configure les canaux de sortie en stéréo ou en mono.
Dans la position STEREO, utiliser les sorties de puissance et les entrées L et R.Dans la position MONO, utiliser la sortie de puissance indiquée et l'entrée R.
E. On / Safety (allumage / protection)1 • Led verte (ON). Elle indique l'allumage de l'appareil.2 • Led rouge (SAFETY). Elle indique l'intervention des protections.
F
Le projet SRx
Nous vous remercions pour votre choix et nous réjouissons avec vouscar les prestations élevées de ce produit vous apporteront de trèsgrandes satisfactions.Nous vous prions de lire ce livret d'instructions en prêtant une attentiontoute particulière aux précautions à prendre afin d'obtenir un maximumde prestations et éviter tout inconvénient.
Précautions de sécurité• L'installation électrique du véhicule doit avoir une tension de 12
VDC avec négatif à la masse. Vérifier que le véhicule possède de telles caractéristiques pour éviter des dommages tant à l'amplificateur qu'au véhicule lui-même.
• Fixer de façon adéquate l'amplificateur avec les vis fournies, en faisant particulièrement attention si l'installation a lieu à l'intérieur de l'habitacle. Insérer des systèmes de fixation supplémentaires si l'installation se fait à l'intérieur du logement prévu pour le moteur:le décrochement de l'appareil pendant la marche du véhicule peut entraîner d'importants dommages aux personnes transportées et aux autres véhicules en circulation.
• Le câble d'alimentation doit être pourvu d'une isolation mécaniquementrésistante et qui s'auto-éteint en cas d'incendie. La section doit être conforme aux indications de ce livret. Eviter de comprimer le câble contre des parties coupantes ou de le positionner près d'organes mécaniques en mouvement. S'assurer qu'il est fixé de façon adéquatesur toute sa longueur. Interposer un serre-fils entre le câble positif et le câble négatif juste après la borne d'alimentation de l'amplificateur.
• Appliquer un porte fusibles près de la borne positive de la batterie et y connecter le câble d'alimentation après en avoir connecté l'autreextrémité à l'amplificateur. La valeur du fusible doit être égale à celle du fusible placé à l'intérieur de l'amplificateur. Si le câble alimente plusieurs amplificateurs, la valeur du fusible doit être égale à la somme des valeurs de tous les fusibles présents sur les amplificateurs.
• Le volume d'écoute - pour conduire en toute sécurité - doit être réglé de façon à ne pas couvrir les bruits externes.
• ATTENTION: dans certaines conditions d'emploi, la température de l'amplificateur peut atteindre 90°C. S'assurer que la température n'est pas trop élevée avant de toucher l'appareil à mains nues.
Précautions de fonctionnement• Installer l'amplificateur dans un endroit du véhicule où la température
ne descend pas en dessous de 0°C et ne dépasse pas 55°C.• L'emplacement choisi doit disposer d'une circulation d'air adéquate
et ne doit pas être exposé à l'humidité, à la pluie ni aux poussières provenant de l'extérieur ou d'autres parties mécaniques du véhicule.Laisser environ 5cm entre les parois et les extrémités de l'amplificateur correspondant à l'entrée et à la sortie de l'air.
• Les sorties de puissance indiquées par –L et –R ne doivent pas être connectées entre elles. Dans le cas où l'on utiliserait un filtre stéréo externe, s'assurer que ce dernier n'a pas les mêmes négatifs.
• Au moment de l'installation des haut-parleurs et des câbles qui les connectent, s'assurer que des parties non-isolées n'entrent en contact, même de façon occasionnelle, avec le châssis du véhicule, auquel cas la protection de l'amplificateur se déclencherait.
• Le calibrage du niveau d'écoute s'effectue en réglant le niveau de l'appareil pilote jusqu'aux 3/4 du niveau maximum; ensuite, régler les niveaux de l'amplificateur jusqu'à entendre les premiers phénomènes de distorsion.
Précautions d’entretien et fiabilité• Nettoyer périodiquement l’amplificateur en évitant l’emploi de
solvants agressifs qui pourraient abîmer les parties vernies ou en plastique. Utiliser un chiffon humidifié avec de l’eau et du savon:bien l’essorer et nettoyer l’amplificateur. Repasser avec un chiffon humidifié uniquement avec de l’eau et enfin avec un chiffon sec.
• Oter la poussière et les impuretés des zones exposées: les boutons de commande frontaux et les parties latérales aux deux extrémités de l’amplificateur correspondant à l’entrée et à la sortie de l’air. Cette opération doit être accomplie périodiquement en s’aidant d’un petit tournevis ou d’un petit pinceau. Eviter l’emploi d’air compriméqui repousserait les impuretés à l’intérieur. Si nécessaire, s’adresser à un centre d’assistance spécialisé pour le nettoyage interne.D’éventuelles impuretés pourraient obstruer et bloquer le ventilateur de refroidissement; il en résulterait l’entrée en protection thermique anticipée de l’amplificateur.
Le projet SRx est ce qu’il y a de mieux aujourd’hui en fait decompromis optimal entre encombrement réduit, capacité d'adaptation,prestations en puissance, qualité du son et fiabilité.Toutes ses parties (électronique, connexions, composantsmécaniques) ont été réalisées après un réexamen de tant d'aspectspropres à l’amplificateur automotive, les solutions innovatricesvisant à améliorer la production et à éliminer les parties complexesqui, de toute façon, n’auraient pas amélioré les prestations.Le circuit électronique de l’étage final en est un exemple: normalement,de tels amplificateurs adoptent le circuit de type B le plus simpleet le plus économique. Le SRx, lui, ne renonce pas à la supérioritéde la classe AB, développant, pour l’obtenir, un circuit hautementinnovateur dénommé DYNAB (Dynamic AB) Class; il s’agit d’uncircuit pour la polarisation automatique du courant de repos quin’a pas besoin de calibrages compliqués, à température constantepropre à la classe AB traditionnelle. DYNAB réunit la simplicité dela classe B traditionnelle et les caractéristiques qualitatives desamplificateurs classe AB.Autre aspect de la particularité du projet SRx: les connexions; ona utilisé des bornes non conventionnelles pour l’Audio Car maislargement utilisées dans le domaine électrotechnique professionnel.En effet, elles sont à curseur, sans dommage pour le câble et avecun corps en plastique auto-éteignant: elles sont homologuées parles plus importants organismes internationaux de réglementationde la sécurité.Une mention particulière concerne les parties externes en plastique;même si elles sont en contact avec des parties en aluminium dontla température peut atteindre 90°C, cela ne pose aucun problèmecar il s’agit d’un polymère avec des températures d’emploi de
150°C; semblable à celui des pare-chocs des voitures modernes,il est également très résistant aux chocs.Cependant, l'aspect fondamental du projet SRx est le maintiendes caractéristiques techniques propres aux amplificateurs qualifiésde classe supérieure:Pour l'étage final, on a adopté des transistors généreux et linéairesTO247, de toute dernière génération. Les étages d'entrée, tant PREque Hi Level, ont fait l'objet de soins particuliers, adoptant le circuitLNS pour l'élimination des perturbations toujours présentes en auto.Le filtre interne a été particulièrement soigné pour un maximumd'adaptation, permettant ainsi une large gamme de configurations.L'alimentateur de type non stabilisé pour obtenir le maximumd'efficacité a été doté de bobine tore de nivellement secondairepour augmenter tant l'efficacité que la fiabilité. La tension de batterieen entrée a été filtrée avec une bobine de type commun pourl'élimination des perturbations radio et le respect, par conséquent,des récentes lois en vigueur pour les autos (réglementationeuropéenne 95/54/EC et loi internationale ECE10).Les protections prévoient: température maximale, surcharge ensortie, présence DC (courant continu) en sortie, RGP (ResettableGround Protection) pour détecter le court-circuit entre les sortieset la carrosserie et fusible de protection générale à l'intérieur del'appareil. L'intervention d'une protection est mise en évidence parl'allumage d'un voyant lumineux rouge (led) Safety. Une fois lacause d'entrée en protection éliminée, l'amplificateur reprend sonfonctionnement normal.Le contrôle à distance du volume VSR (en option) spécialisé pourla section subwoofer peut être inséré sur tous les SRx.
INTRODUCTION E INTRODUCCIÓN
El proyecto SRx
Le agradecemos el haber elegido este producto. Sus óptimasprestaciones le garantizarán una gran satisfacción.Lea este manual de servicio con particular atención a las precaucionesrecomendadas para obtener al máximo sus prestaciones sininconvenientes.
Precauciones de seguridad• El equipo eléctrico del vehículo debe tener una tensión de
12 VDC con negativo a masa. Verificar que el vehículo tenga estas características para evitar daños tanto al amplificador como al vehículo mismo.
• Fijar adecuadamente el amplificador con los tornillos en dotación, poniendo sumo cuidado si la instalación se hace en el interior del habitáculo. Insertar sistemas de fijación suplementarios si la instalación es dentro del vano motor.El soltarse la fijación durante la marcha del vehículo puede causar graves daños a las personas transportadas y a otros vehículos.
• El cable de alimentación debe estar provisto de aislamiento mecánicamente resistente y auto-extinguible a las llamas.La sección debe ser apropiada a lo que se sugiere en el presente manual. En su colocación, evitar la compresión de los cables contra partes cortantes o en vecindad de órganos mecánicos en movimiento. Asegurarse que sea adecuadamente fijado en toda su longitud. Interponer entre el cable positivo y negativo una protección de resguardo del terminal de alimentación del amplificador.
• Aplicar un porta fusible junto al borne positivo de la batería y conectar al cable de alimentación después de haber conectado el otro extremo al amplificador. El valor del fusible debe ser igual al que lleva dentro el amplificador. En el caso de que el cable alimente mas amplificadores, el fusible deberá tener un valor igual a la suma de los valores de todos los fusibles presentes en los amplificadores.
• El volumen de escucha debe ser de un nivel tal de no cubrir los sonidos provenientes del exterior del vehículo para la máximaseguridad en la conducción.
• ATENCIÓN: En condiciones particularmente gravosas la temperatura del amplificador puede alcanzar los 90ºC (194ºF).Asegurarse que la temperatura no sea peligrosa antes de tocarlo con la mano desnuda.
Precauciones de funcionamiento• Instalar el amplificador en zonas del vehículo donde la
temperatura no descienda debajo de los 0ºC (32ºF) y no exceda de los 55ºC (131Fº).
• La zona de instalación debe tener una adecuada circulación de aire y no debe estar expuesta a la humedad, lluvia, etc.proveniente del exterior o de los órganos mecánicos del vehículo.Dejar entre los extremos del amplificador, correspondientes a la entrada y salida del aire , y eventuales paredes por lo menos 5 cm (2”).
• Las salidas de potencia marcadas con –L y –R no deben ser conectadas entre ellas. En el caso de utilizar un filtro crossover estéreo externo, asegurarse que no tengan los negativos en común.
• En la instalación de los altavoces y de sus cables de conexión, asegurarse de que no hagan contacto con partes no aisladas, también de manera esporádica, con la masa del vehículo. En ese caso intervendría la protección del amplificador.
• El ajuste del nivel de escucha se efectúa regulando el nivel del aparato piloto hasta el nivel máximo; sucesivamente, regular el nivel del amplificador hasta advertir los primeros fenómenos de distorsión.
Precauciones de mantenimiento y seguridad• Someter a limpieza periódica el amplificador evitando el uso
de solventes agresivos que pudieran dañar las partes plásticas o pintadas. Utilizar un paño húmedo con agua y jabón, escurrirlo y pulir el amplificador. Repasar con un paño húmedo con agua solo, después pasar un paño escurrido.
• Sacar el polvo y restos sólidos de la zona abierta donde se encuentran los mandos de los controles frontales y la zona lateral de los dos extremos del amplificador, en correspondencia con la aspiración y la salida del aire. Esta operación debe hacerse periódicamente ayudándose con un pequeño destornillador. Evitar el uso de aire comprimido que empuja la suciedad hacia adentro. Si es necesario, dirigirse a un centro de asistencia técnica especializado para la limpieza interna.Eventuales residuos podrían obstruir y bloquear el ventilador de refrigeración, y provocarían la entrada en protección térmica anticipada del amplificador.
Es un amplificador de 2 canales equipado con filtro crossoverexcluible (Butterworth a 12 dB/ott.), con selector para la modalidadhi-pass o lo-pass. La frecuencia de corte puede ser regulada entre
50 Hz y 220 Hz a través de potenciómetro slider. El aparato disponeademás de un selector para el funcionamiento a 1 canal (bridge).
SRx 2
4. TABLA DE CONFIGURACIONES
1. INSTALACIÓNA . Apertura paneles y fijación1 • Desmontaje paneles – Desmontar el panel izquierdo (left)
y derecho (right) haciendo fuerza en los puntos indicados.2 • Fijación – Fijar el aparato con los 4 tornillos en dotación.3 • Montaje de paneles – Montar los paneles izquierdo (left)
y derecho (right) teniendo cuidado de que la lengüeta del panel sea insertada en el lugar de los tornillos de fijación.Hacer una fuerte presión en los puntos indicados.
B . Sustitución del fusible• Sustituir el fusible por el de recambio suministrado en dotación.
C . Conexión del VSR (opcional)
• Abrir el panel izquierdo (left) y conmutar el switch VCA a ON. Insertar el módulo VCA.S en la correspondiente guía de la placa y después en el conector.
D . Cables de conexiones1 • Cables de alimentación (longitud de 4/5 m): con cargas de 4
Ohm y 2 Ohm, utilizar ausidon cable POWERFLOW 9.2 • Cables para la salida de altavoces.3 • Cables para las entradas de señal a nivel altavoces, para el
remote y el accesorio VSR.
Indica como colocar los selectores para las dos configuracionesprincipales del amplificador, estéreo o mono, y para el empleo delfiltro crossover.
ATENCIÓN! Como protección adicional del equipo, se aconseja elintercalar un fusible de lámina en el cable que conecta el polopositivo de la batería al terminal + BATT del amplificador.Este fusible será instalado a unos 10 cm. de la batería.
Su valor deberá ser igual al que equipa el amplificador. En elcaso de instalaciones realizadas utilizando mas amplificadores oamplificadores equipados con mas fusibles, debería ser igual a lasuma de los valores de todos los fusibles.
5. CONEXIONES Y EJEMPLOS DE CONFIGURACIONES
2. CONEXIONESA . Pre in (entrada preamplificada)
La señal a aplicar debe de estar en un nivel comprendido entre 0.2 VRMS y 5 VRMS.
• Entrada canal izquierdo y derecho.Entrada estéreo que pilota los canales izquierdo (L) y derecho (R) del amplificador.
• Entrada mono canal derecho (R).Utilizar solo la entrada R para la conexión mono del amplificador.
B . Speakers In (señal de entrada amplificada) Conexiones en rojo
No utilizar si se usa la conexión de señal preamplificada Pre In.• Entrada a nivel altavoces canales izquierdo y derecho.
Entrada de señal a nivel de altavoces de los canales izquierdo (L) y derecho (R).
• Entrada mono canal derecho (R).Utilizar solo la entrada R para la conexión mono del amplificador.
C . Speakers out1 • Salida de potencia del canal izquierdo (L).
Para conectar los altavoces del canal izquierdo.2 • Salida de potencia del canal derecho (R).
Para conectar los altavoces del canal derecho.3 • Salida de potencia mono.
Para conectar al sistema de altavoces de alta potencia o a un subwoofer.
D . Remote In• Entrada para el encendido remoto del amplificador.
Conectar a la correspondiente salida de la fuente.
E . VSR (Sub volumen)• Entrada para el VSR (kit para el control a distancia del volumen
del Sub, opcional).Para conectar al regulador remoto de nivel para el subwoofer VSR (kit opcional). El kit está compuesto por el regulador VSR y por el módulo VCA.S a instalar en su lugar previsto.
F . Power• Terminal para la conexión de los cables de alimentación
(batería: 12V).Conectar los terminales + al borne positivo de la batería y el – al chasis del vehículo.Tensión 12 VDC con negativo a masa.
3. FUNCIONES Y CONTROLES A . Levels (0.2 ÷ 5 VRMS).
• Regula la sensibilidad del canal izquierdo y derecho (estéreo) o del canal mono.
B . Filters adjusting (ajuste)• Regula entre 50 Hz y 220 Hz la frecuencia de corte del filtro
seleccionado.
C . Filters Mode (configuración de los filtros)• Configura los filtros como HI-PASS, FULL RANGE o
LO-PASS.En la posición 1 permite el activar el filtro HI-PASS.En la posición 2 excluye el filtro (FULL RANGE)
En la posición 3 permite el activar el filtro LO-PASS.
D . Out Mode (configuración de las salidas)• Configura los canales de salida en estéreo o en mono.
En la posición STEREO utilizar la salida de potencia y las entradas L y R.En la posición MONO utilizar la salida de potencia indicada y la entrada R.
E . On / Safety (encendido / protección)1 • Led verde (ON). Indica el encendido del amplificador.2 • Led rojo (SAFETY). Indica la intervención de la protección.
D EINLEITUNG
Der SRx 2 ist ein 2- Kanalverstärker mit abschaltbarer Frequenzweiche(Butterworth mit 12 dB/Okt) und mit einem Schalter für die Hi-Passoder Lo-Pass Einstellung ausgestattet ist. Die Übergangsfrequenz
kann man zwischen 50 Hz und 220 Hz mittels Schiebepotentiometerneinstellen. Der Verstärker verfügt außerdem über einen Schalterfür den 1 Kanal Betrieb (Bridge).
SRx 2
4. KONFIGURATIONSTABELLE
1. INSTALLATIONA. Paneele öffnen und befestigen1 • Paneele abnehmen- Das linke (left) und das rechte (right)
Paneel abnehmen indem Sie an den angezeigten Punkten kräftig drücken.
2 • Befestigung- Befestigen Sie den Verstärker mit den 4 mitgelieferten Schrauben.
3 • Paneele wieder aufstecken- Stecken Sie das linke (left) und das rechte (right) Paneel wieder auf und beachten sie, dass die Plättchen auf die Schrauben zu setzen sind.Drücken Sie fest an den vorgegebenen Punkten.
B. Sicherung wechseln• Die Sicherung gegen eine neue, mitgelieferte Sicherung
auswechseln.
C. Einsetzen des VSR (Optional)• Das linke (left) Paneel öffnen und den VCA Schalter auf ON
stellen. Schieben Sie das VCA.S Modul in den vorgesehenen Steckplatz.
D. Verbindungskabel1 • Netzanschlußkabel (für 4/5 m Länge): bei 4 Ohm oder 2
Ohm Last benutzen Sie audison cable POWERFLOW 9.2 • Kabel für die Lautsprecherausgänge.3 • Kabel für Lautsprechereingänge, für Remote und das VSR
Optional.
Weist auf die Positionierung der Schalter hin, um die zweiHauptkonfigurationen des Verstärkers einzustellen, Stereo oder
Mono und für den Gebrauch der Frequenzweiche.
ACHTUNG! Um die Anlage weiter zu schützen, empfehlen wir dieInstallation einer Sicherung im Stromkabel. Das Kabel zwischendem + Pol der Batterie und der Sicherung sollte nur ca. 10 cm langsein. Der Wert der Sicherung sollte gleich dem des Verstärkers
sein. Falls an dem Kabel mehrere Verstärker angeschlossen sind,muss die Sicherung einen Wert haben, der der Summe allerGerätesicherungen entspricht.
5. ANSCHLÜSSE UND KONFIGURATIONSBEISPIELE
2. VERBINDUNGENA. Pre In (Vorverstärkereingänge)
Das Eingangssignal sollte 0,2 VRMS bis 5 VRMS betragen.• Eingang der linken und rechten Kanäle.
Stereo Eingang der den linken (L) und rechten (R) Kanal des Verstärkers betreibt.
• Mono Eingang des rechten (R) Kanals.Man benutzt nur den rechten (R) Kanal für den Mono Betrieb des Verstärkers.
B. Speakers In (Verstärkte Eingangssignale) Rote Verbindungen
Nicht benutzen wenn die Vorverstärkereingänge FRONT benutzt werden.
• Lautsprechereingänge der linken und rechten Kanäle.Lautsprechereingänge der linken (L) und rechten (R) Kanäle
• Mono Eingang des rechten (R) Kanals.Nur den Eingang R für den Mono Betrieb des Verstärkers benutzen.
C. Speakers Out1 • Leistungsausgang des linken Kanals.
Anschluß des vorderen, linken Lautsprechersystems.
2 • Leistungsausgang des rechten Kanals.Anschluß des vorderen, rechten Lautsprechersystems.
3 • Mono Leistungsausgang (Bridge).Anschluß an ein Hochleistungslautsprechersystem oder einen Subwoofer (LO-PASS 24dB Mono).
D. Remote In• Eingang für die Ferneinschaltung des Verstärkers
Zum Anschluß an den dafür vorgesehenen Ausgang des Steuergerätes.
E. VSR (Sub Volume)• Eingänge für die VSR (Kit für die Kontrolle der Lautstärke
des Subs, Optional) An den VSR anschließen (Kit ist Optional). Das Kit besteht aus einem VSR Regler und einem VCA.S Modul welches in den Verstärker installiert werden muss.
F. Power• Klemmen für die Stromversorgungskabel (Batterie: 12V).
Verbinden Sie den + Anschluß der Endstufe mit dem + Pol der Batterie und den – Anschluß mit dem Fahrzeugchassis.Spannung 12 VDC mit negativer Masse.
3. FUNKTIONEN UND REGLERA. Levels (0,2 ÷ 5 VRMS)
• Regelt die Empfindlichkeit des linken und rechten Kanals (stereo) oder den Mono Kanal.
B. Filtereinstellung• Regelt die Übergangsfrequenz von 50 ÷ 220 Hz des
ausgewählten Filters.
C. Filters Mode (Konfiguration der Filter)• Konfiguriert die Filter als HI-PASS, FULL RANGE oder
LO-PASSEinstellung 1 aktiviert den HI-PASS Filter.Einstellung 2 schaltet den Filter aus (FULL RANGE).Einstellung 3 aktiviert den LO-PASS Filter.
D. Out Mode (Konfiguration der Ausgänge)• Konfiguriert die Ausgangssignale in Stereo oder Mono.
In der Stereo- Einstellung benutzen Sie die Lautsprecherausgänge und die Eingänge L und R.In der Mono- Einstellung benutzen Sie den angegebenen Lautsprecheranschluß und den Eingang R.
E. On / Safety (Einschalten / Schutzschaltung)1 • Grüne LED (ON). Leuchtet, wenn der Verstärker eingeschaltet
ist.2 • Rote LED (SAFETY). Leuchtet, wenn die Schutzschaltung
aktiv ist.
Projecto SRx
Muito obrigado por ter escolhido este produto! Os excelentes desempenhosdo SRx certamente assegurarão a sua satisfação. Por favor, leiaatentamente este manual do utilizador para que possa usufruir o melhorpossível do seu amplificador... Dê especial atenção às nossasrecomendações.
Precauções de segurança• O sistema eléctrico do veículo deverá ter uma voltagem de
12VDC, com negativo à massa. Assegure-se que o seu carro realmente a tem, para que se evitem possíveis danos no amplificador, ou no próprio carro.
• Fixe convenientemente o amplificador com os parafusos já incluídos;preste a máxima atenção se o instalar no compartimento do condutor.Se o instalar no capot, utilize sistemas extra de fixação. Se o amplificador se desprender com o carro em movimento, pessoas e / ou outros veículos poderão ficar com danos sérios.
• O cabo de alimentação de potência terá que ser resistente, e terá que ter o isolamento incombustivel. A espessura terá que obedecer às indicações que incluímos neste manual. Quando o montar, evite pressioná-lo contra objectos cortantes, ou colocá-lo junto de objectos mecânicos movíveis. Verifique se se encontra convenientemente fixado em todo o seu comprimento. Coloque uma braçadeira nos cabos positivo e negativo, mesmo junto ao terminal de alimentação de potência do amplificador.
• Coloque um suporte de fusíveis junto ao terminal positivo da bateria; conecte-lhe uma das pontas do cabo de alimentação de potência, após conectar a outra ponta ao amplificador. O valor do fusível terá que ser o mesmo que o do já embutido no amplificador.No caso de o cabo alimentar vários amplificadores, o valor do fusível terá que ser igual à soma dos valores de todos os outros fusíveis no sistema.
• Para uma condução segura, recomendamos que ajuste o volume de modo a que não abafe os sons exteriores do transito.
• ATENÇÃO! Quando o amplificador trabalhar em condições extremas,pode chegar aos 90°C (194°F). Quando tocar no amplificador, assegure-se primeiro de que a temperatura se encontra tolerável.
Precauções de funcionamento• Instale o amplificador em locais onde a temperatura se situe entre
os 0°C (32°F) e os 55°C (131°F).• Onde montar o amplificador, deverá assegurar-se de que existe
uma conveniente circulação de ar; deverá assegurar-se, também, de que esta área não esteja afectada por humidade, chuva, depósitosexternos, ou partes dos dispositivos mecânicos do veículo. Deixe as partes finais do amplificador (i.e. as partes por onde o ar entra e sai) xafastadas de possíveis paredes – num mínimo de 5 cm (2”).
• Não conecte as saídas de potência –L e –R uma à outra.Se usa um crossover stereo externo, assegure-se que as polaridadesnegativas não estão conectadas uma à outra.
• Quando instalar os altifalantes, e os cabos que os conectam, assegure-se que as partes não isoladas não tocam o chassis do carro. Se isso acontecer, accionará a protecção do amplificador.
• A calibragem do nível de audição é feita ajustando a fonte de volume a 3/4 do seu nível máximo; depois, ajuste os níveis do amplificador até que consiga ouvir distorções.
Precauções de manutenção e segurança• Limpe periodicamente o amplificador, evitando utilizar solventes
agressivos que possam danificar o plástico, ou as partes pintadas.Humedeça tecido com água e sabão, torça e utilize-o para limpar o amplificador. Depois, limpe o amplificador usando tecido humedecidosomente com água. Eventualmente, poderá limpá-lo com um tecido limpo e seco.
• Remova o pó, e possíveis detritos, das partes abertas onde pode encontrar os controlos da frente, e das partes laterais nas pontas do amplificador (por onde o ar deve entrar e sair). Isto deve ser realizado periodicamente, usando uma chave de fendas ou um pequeno pincel. Evite usar ar comprimido pois este empurraria a sujidade para o interior do amplificador. Se necessário, contacte um serviço especializado pós-venda para uma limpeza interior. Os detritos podem eventualmente obstruir, ou fazer parar, a ventoinha de refrigeração (nesta situação, o amplificador entraria em modo segurança).
O projecto SRx é o melhor compromisso que podemos encontrarno mercado (entre compacidade, versatilidade, desempenho depotência, qualidade de som, e confiança).Todos os seus componentes (electrónicos, conectores, mecânicos),foram executados ao reexaminar os mais diversos aspectos dosamplificadores para automóveis, foram procuradas soluçõesinovadoras visando uma produção melhorada, e foram eliminadoselementos complexos que, de quaisquer modos, não teriamdesempenhos engrandecedores. A última etapa do circuitoelectrónico prova-o. Os amplificadores semelhantes normalmenteutilizariam o circuito classe B (simples e barato); os SRx, pelocontrário, não abandonam a elevada qualidade da classe AB...Para consegui-lo, concebemos um circuito (muito inovador)denominado classe DYNAB (Dynamic AB)! É um circuito de ajusteautomático e correcçao da corrente de bias; é de calibragemsimples, e mantém uma temperatura constante, típica da tradicionalclasse AB. A classe DYNAB combina a simplicidade da classeB com a qualidade da classe AB.Também os conectores SRx são especiais. Escolhemos blocos determinais que não são normalmente usados em car-audio, massim numa gama tecno-profissional. Aprovados pelos maisrepresentativos institutos reguladores das normas de segurança,estes têm conexões de grampos em C (que não danificam acablagem) e corpo incombustivel.Também os componentes plásticos (do revestimento exterior) sãoespeciais. Embora toquem em componentes de alumínio quepodem chegar aos 90°C (194°F), os componentes plásticosnão apresentam quaisquer problemas porque são feitos com umpolímero especial que resiste até aos 150°C (302°F), e que
resiste aos embates mais violentos (muito semelhante ao mate-rial com que os pára-choques dos carros modernos são feitos).Ao conceber os SRx, o nosso objectivo principal era reunir, nestesamplificadores, as características técnicas dos já tão conceituadosamplificadores de níveis francamente superiores.Para a etapa final, utilizámos os mais recentes transístoreslineares TO247. Prestámos a máxima atenção às etapas dasentradas (tanto em Pré como em Hi Level), usando o circuito LNSpara rejeição de ruídos. O crossover embutido apresenta-seextremamente versátil, permitindo imensas configurações.Para que se assegure uma eficiência máxima, a fonte não éestabilizada; para aumentar tanto a eficácia como a segurança, oamplificador tem um filtro secundário em forma toroidal. A entradada voltagem da bateria foi filtrada através de um indutor comum,para possibilitar a diminuição das interferências rádio, e paraacompanhar as mais recentes normas de carros (NormasEuropeias 95/54/EC, e Normas Internacionais ECE10).Os circuitos de protecção incluem: temperatura máxima, sobrecargadas saídas, DC na saída (corrente contínua), RGP (ResetableGround Protection – para detectar curtos-circuitos entre as saídase o chassis), protecção de fusível dentro do amplificador. Quandoa protecção é accionada, o indicador de segurança acende (côrvermelha). Quando ficar resolvido o problema, que fez comque o amplificador entrasse em modo segurança, o amplificadorrecomeça a trabalhar.Pode conectar VSR (controlo remoto de volume do subwoofer) atodos os amplificadores SRx – opcional!
O SRx 2 é um amplificador de 2 canais com by-pass crossover(butterworth de 12dB/Oct.), assim como com switch para modohi-pass e lo-pass.A frequência de corte pode ser facilmente
ajustada, através de um potenciómetro deslizante, entre os 50Hz e os 220 Hz.Este amplificador tem também um switch para afunção 1 canal (ponte).
SRx 2
4. DESCRIÇÃO DE CONFIGURAÇÃO
1. INSTALAÇÃOA. Abertura e Fixação dos Encaixes Laterais1 • Remoção dos Encaixes - Remova os encaixes esquerdo e
direito pressionando onde indicado.2 • Fixação - Fixe o amplificador através de 4 parafusos (já
incluídos).3 • Montagem dos Encaixes - Monte novamente os encaixes
esquerdo e direito, tendo o cuidado de inserir as linguetas nas casas dos parafusos de fixação. Pressione fortemente onde indicado.
B. Substituição dos fusíveis• Substitua o fusível pelo suplente (fornecido com o amplificador).
C. Instalação do VSR (Controlador do Volume do Sub – opcional)• Abra o encaixe esquerdo, e ponha o switch VCA em posição
'ON'. Insira o módulo VCA.S nas guias apropriadas (inseridas no próprio encaixe), e, depois, no conector.
D. Cabos de Conexão1 • Cabos de corrente aconselhados (compr. 4/5m): utilize o
audison cable POWERFLOW 9 com cargas de 4 Ohm e 2 Ohm.
2 • Cabos de saída dos altifalantes.3 • Cabos RCA / Remote / VSR.
Mostra como colocar os switches para o amplificador nas suasduas principais configurações, stereo e mono, e para a utilizaçãodo filtro.
CUIDADO! Para uma protecção acrescida, recomendamoscolocar um fusível de lâmina ao longo do cabo que conecta o pólopositivo da bateria ao terminal +BATT do amplificador. Estefusível terá que se encontrar instalado afastado em aprox. 10 cmda bateria. O valor deste fusível terá que ser o mesmo que o do
fusível embutido no amplificador. Quando o sistema é um conjuntode vários amplificadores, ou de amplificadores com vários fusíveisembutidos, o valor terá que ser igual à soma dos valores de todosos outros fusíveis do sistema.
5. EXEMPLOS DE CONEXÕES E DE CONFIGURAÇÕES
2. CONEXÕESA. Pré IN (entradas pré-amplificadas)
O sinal aplicado terá que se situar entre os 0.2 VRMS e os 5 VRMS.
• Canais de Entrada Esquerdo e Direito.Entrada ‘stereo’ que conduz os canais esquerdo (L) e direito (‘R’) do amplificador.
• Canal Direito (R) de Entrada Mono.Use apenas a entrada R para conectar o amplificador em mono.
B. Entradas AltasConexões Vermelhas
Não poderão ser utilizadas se se aplicar a conexão de sinal pré-amplificado 'Pré In'.
• Entrada de Sinal nos Canais Esquerdo (L) ou Direito (R).• Canal Mono de Entrada Direito (R).
Use apenas a entrada ‘R’ para conectar o amplificador em mono.
C. Saídas de Altifalantes1 • Saída de Potência do Canal Esquerdo (L).
Conecte-o ao altifalante do canal esquerdo.
2 • Saída de Potência do Canal Direito (R).Conecte-o ao altifalante do canal direito.
3 • Saída de Potência Mono.Conecte-o a um sistema de altifalantes high power, ou a um subwoofer.
D. In Remoto• Entrada para o switch on remoto do amplificador.
Conecte-o à fonte de saída apropriada.
E. VSR (volume Sub)• Entradas para VSR (kit opcional para controlo remoto
de volume sub).Conecte-as ao VSR, o kit opcional para controlo remoto do nível do subwoofer. Este kit consiste em controlo VSR e módulo VCA.S, para instalar na entrada apropriada.
F. Potência• Terminais para a conexão dos cabos de corrente
aconselhada (bateria: 12V).Conecte o terminal + ao positivo da bateria, e o – ao chassis do carro. A voltagem é de 12 VDC com negativo à massa.
3. FUNÇÕES E CONTROLOSA. Níveis (0.2 ÷ 5 VRMS)
• Ajusta a sensibilidade dos canais stereo esquerdo e direito, e a sensibilidade do canal mono.
B. Ajustar os Filtros• Ajusta o filtro da frequência de corte, entre os 50 Hz e
os 220 Hz.
C. Modo de Filtros (configuração dos filtros)• Configura os filtros como HI-PASS, FULL RANGE ou
LO-PASS.Quando colocado em 1, permite a activação do filtro HI-PASS.Quando colocado em 2, permite o by-pass do filtro (para FULL RANGE).Quando colocado em 3, permite a activação do filtro LO-PASS.
D. Modo Out (configurações de saída)• Configura os canais de saída como stereo ou mono.
Quando colocado em STEREO, por favor use as saídas e entradas de potência L e R.Quando colocado em MONO, por favor utilize a saída de potência indicada, e a entrada R.
E. On / Segurança (ligar / protecção)1 • Led de côr verde (ON): indica que o amplificador se
encontra ligado.2 • Led de côr vermelha (SAFETY): Indica que o amplificador
entrou em protecção.
P INTRODUÇÃO
Das SRx Projekt
Danke, dass Sie sich für dieses Produkt entschieden haben. Wir sindsicher, dass Sie mit den optimalen Leistungen dieses Produktes zufriedensein werden.Um ohne Schwierigkeiten beste Ergebnisse zu erzielen, lesen Siediese Anleitung bitte genau und achten Sie besonders auf dieVorsichtsmaßnahmen.
Sicherheitsmaßnahmen• Die Fahrzeugelektrik muss über eine 12 VDC Spannung mit
negativen Pol an Masse verfügen. Beachten Sie bitte diese Charakteristik, um Schäden sowohl am Verstärker, als auch am Auto zu vermeiden.
• Sachgemäße Installation des Verstärkers im Fahrzeuginnenraummit den beigefügten Schrauben unter besonderer Beachtung diser Sicherheitsmaßnahmen. Benutzen Sie separate Befestigungen für die Installation im Motorraum. Nicht ausreichend befestigte Anlagen während der Fahrt die Passagiere gefährden und am Fahrzeug große Schäden verursachen.
• Das Stromversorgungskabel muss mechanisch strapazierfähig isoliert und nicht entflammbar sein. Es muss wie in der vorliegenden Anleitung beschrieben installiert werden. Achten Sie bei der Installation, dass die Kabel nicht gegen scharfe Gegenstände gequetscht, oder in der Nähe von bewegten mechanischen Teilen velegt werden. Vergewissern Sie sich, dass alle Kabel auf ihrer gazen Länge stabil fixiert werden. Fixieren Sie die Stromkabel mit einer Kabelhalterung zwischen dem positiven und negativen Kabel in der Nähe des Stromanschlußblocks.
• Installieren Sie eine Sicherung im Stromkabel in der Nähe des positiven Pols der Batterie. Der Wert dieser Sicherung sollte mit dem Wert der Gerätesicherung übereinstimmen. Falls an dem Kabel mehrere Verstärker angeschlossen sind, muss die Sicherung einen Wert haben, der der Summe aller Gerätesicherungen entspricht.
• Die Lautstärke soll auf einem Niveau eingestellt werden, dass die äußeren Geräusche nicht übertönt werden um somit die Verkehrssicherheit zu garantieren.
• ACHTUNG. Bei besonders schwierigen Betriebssituationen kann die Temperatur des Verstärkers 90°C (194°F) erreichen.Vergewissern Sie sich, dass der Verstärker nicht mehr heiß ist, bevor Sie ihn mit den Händen anfassen.
Funktionsmaßnahmen• Installieren Sie den Verstärker an einen Ort an dem die Temperatur
nicht unter 0°C (32° F) sinkt und nicht über 55°C (131° F) steigt.• Der Ort der Installation soll ausreichend belüftet sein und nicht der
Feuchtigkeit, Regen und Ablagerungen ausgesetzt sein. Beachten Sie, dass der Abstand zu anderen Gegenständen mindestens 5 cm (2”) an den Lüftungsein- und Ausgängen betragen soll.
• Die Lautsprecherausgänge die mit –L und –R gekennzeichnet sind, dürfen nicht untereinander verbunden werden. Im Falle der Verwendung einer externen Frequenzweiche sollten Sie sich vergewissern, dass diese nicht über gemeinsame negativen Anschlüsse verfügt.
• Bei der Installation der Lautsprecher und der Lautsprecherkabel,achten Sie bitte darauf, dass abisolierte Kabelteile auf keinen Fall an die Autokarosserie kommen. In diesem Fall würde die Verstärkerschutzschaltung ansprechen.
• Zum Abgleich der Lautstärke wird das Radio auf 3/4 der maximalen Einstellung geregelt. Dann werden die Levelregler der Verstärker eingestellt bis man gerade die ersten Verzerrungen hört.
Vorsichtsmaßnahmen für die Instandhaltung und die Zuverlässigkeit• Reinigen Sie regelmäßig die Anlage, vermeiden Sie aber
aggressive Lösemittel, die die Kunststoff- oder die lackierten Teile angreifen könnten. Benutzen Sie ein feuchtes, ausgewrungenes Tuch und etwas Seife um den Verstärker zu reinigen. Wiederholen Sie diese Prozedur ohne Seife und trocknen Sie anschließend den Verstärker mit einem trockenem Tuch. Achten Sie darauf, dass keine Feuchtigkeit in das Gerät gelangt.
• Entfernen Sie Staub und Ablagerungen von den offenen Teilen, wie z.B.: Reglerpanele, Schalter, seitliche Lüftungsein- und auslässe. Die regelmäßige Reinhaltung ist mit einem kleinen Schraubendreher oder einem Pinsel durchzuführen. Vermeiden Sie Druckluft, da der Druck die Ablagerungen in den inneren Teil des Verstärkers bringen könnte. Falls eine Innenreinigung nötig sein sollte, wenden Sie sich an einen speziellen Kundendienst.Ablagerungen könnten auch die Ventilatoren verstopfen und blockierenund der Temperaturschutz des Verstärkers würde sich vorzeitig einschalten.
Das SRx Projekt ist der beste zur Verfügung stehende Kompromiß für Kompaktheit, Vielfältigkeit, Leistung, Klangqualität und Zuverlässigkeit.Alle Bestandteile wie z.B.: die Elektronik, die Verbindungen, diemechanischen Teile sind durch eine erweiterte Überprüfung desautomotiven Verstärkers entstanden um innovative Lösungen zu findenund die Fertigung zu verbessern ohne komplizierte Dinge zu verwenden,die sowieso nicht die Leistungen verbessert hätten.Die elektronische Schaltung des Endverstärkers ist ein Beispiel dafür.Ähnliche Verstärker verwenden normalerweise die einfachere und billigereClass B Schaltung, während der SRx nicht auf die qualitativ bessereClass AB Schaltung verzichtet. Für diese Schaltung wurde ein höchstinnovativer Schaltkreis entwickelt, die DYNAB Class (Dynamic AB)genannt wurde. Es handelt sich um eine Schaltung, die den Ruhestromautomatisch auf Class AB ohne kompliziertem Abgleich einstellt.DYNAB verbindet die Einfachheit der traditionellen Class B mit denCharakteristiken der qualitativ hochwertigeren Class AB Verstärker.Eine andere Eigenschaft des SRx Projektes sind die Anschlüsse. Wirhaben nicht normale Car Audio Klemmen, sondern Klemmen aus derprofessionellen Elektrotechnik verwendet. Es handelt sich dabei umverschiebbare Klemmen, die das Kabel nicht beschädigen und sindbei Flammgefahr selbstverlöschend. Sie sind von den wichtigsteninternationalen Sicherheitsinstitutionen geprüft und bestätigt worden.Wir möchten Sie auf die äußeren Kunststoffteile aufmerksam machen. DasKunststoffgehäuse ist im engen Kontakt mit dem Aluminiumkühlkörper, derTemperaturen bis zu 90°C (194°F) erreichen kann. Dies ist aber keinProblem da die Kunststoffteile aus einem besonderem Polymer bestehenund deshalb Temperaturen bis zu 150°C (302°F) aushalten können.Außerdem sind sie unempfindlich gegen Stöße, ähnlich wie bei
Stoßstangen moderner Autos.Unverzichtbare Faktoren am SRx Projekt sind aber die technischenCharakteristiken die eigentlich nur bei Verstärker höherer Klasse zu findensind.Für den Endbereich fanden ausgiebig dimensionierte und lineareTO247 Transistoren der letzten Generation Anwendung. BesondereBeachtung fanden die Vorverstärker- und Hi-Level-Eingänge, die miteiner LNS Schaltung versehen sind, um störende Faktoren, die inFahrzeugen immer vorhanden sind, zu verhindern. Die interneFrequenzweiche wurde sorgfältig ausgewählt um verschiedeneAnwendungen und Konfigurationsmöglichkeiten zu realisieren. DasNetzteil ist nicht stabilisiert um eine maximale Effizienz zu erzielen; esist mit einer sekundären toroidalen Drosselspule versehen, um dieLeistung und Effektivität zu erhöhen. Die Betriebsspannung amEingang wird mit einer gängigen Spule gefiltert um Störungen desRadios zu verhindern und um die internationale ECE10 und dieeuropäische 95/54/EC Norm zu berücksichtigen.Die Schutzschaltungen: Maximale Temperatur, Überbelastschutz derAusgänge, DC Strom (Gleichstrom) am Ausgang, RGP (ResettableGround Protection) um einen Kurzschluß zwischen den Ausgängenund der Autokarosserie festzustellen, Hauptsicherung im Innern desVerstärkers. Wird eine Schutzschaltung ausgelöst, wird das mit derroten Safety LED angezeigt. Sobald die Fehlerursache beseitigt ist,führt der Verstärker seine normale Funktion fort. Bei allen Verstärkernbesteht die Möglichkeit eine VSR Lautstärkefernbedienung (Optional)einzusetzen, die für die Subwoofersektion geeignet ist.
El proyecto SRx es sin duda hoy, el disponible con el mejor compromisoentre compactibilidad, versatilidad, prestaciones en potencia, calidad desonido y fiabilidad.Todas sus partes, como la electrónica, las conexiones, los componentesmecánicos, han sido realizados a través del nuevo examen de tantosaspectos del amplificador automotive buscando soluciones innovativastendentes a mejorar la producibilidad y a eliminar partes complejas que,de todas maneras, no habrían mejorado las prestaciones.La circuitería electrónica de la fase final es un ejemplo.Normalmente amplificadores similares adoptan la mas simple yeconómica circuitería del tipo B, mientras que los SRx no renuncian ala superior calidad de la clase AB. Para obtenerla ha sido desarrolladauna circuitería altamente innovativa denominada DYNAB (DynamicAB) Class. Se trata de un circuito para la polarización automática de lacorriente de reposo que no necesita de ajustes complejos, a temperaturaconstante propia de la clase AB tradicional. DYNAB une la simplicidadde la clase B con las características cualitativas de los amplificadoresde clase AB.Otro aspecto de la particularidad del proyecto SRx está dado por lasconexiones. Utilizan teminales no convencionales para el Car Audiopero que son ampliamente utilizadas en el sector electrotécnico profesional.En efecto, son del tipo carro móvil que no daña el cable y con el cuerpo enplástico auto-extinguible a las llamas, homologado por los mas importantesentes y normativas de seguridad internacionales.Una mención particular va a las partes externas de plástico. Tambiénsi tiene contacto con partes de aluminio en las que la temperaturapuede alcanzar los 90ºC (194ºF), no habiendo problemas ya que setrata de un polímero con temperatura de ejercicio de 150ºC (302ºF)
y muy resistente a los golpes, similar al de los parachoques de loscoches modernos.Factor imprescindible en el proyecto SRx, ha sido el mantenimiento delas características técnicas propias de amplificadores de clase superior.La fase final ha sido dotada de generosos y lineales transistoresTO247 de última generación. Sumo cuidado ha sido prestado en lafase de las entradas, tanto Pre como Hi Level, adoptando el circuitoLNS para la eliminación de las interferencias siempre presentes en elcoche. El crossover interno ha sido particularmente cuidado para lamáxima versatilidad permitiendo una amplia gama de configuraciones.El alimentador, de tipo no estabilizado para obtener la máxima eficiencia,ha sido dotado de bobina toroidal de nivelación secundaria paraincrementar tanto la eficiencia como la fiabilidad. La tensión de bateríaen la entrada ha sido filtrada con una bobina a modo de eliminar lasradio-interferencias y el consiguiente acatamiento de las recientes nor-mas vigentes del automóvil (normativa europea 95/54EC y normainternacional ECE10).Las protecciones preveen: temperatura máxima, sobrecargas en salida,presencia DC (corriente contínua) en salida, RGP (Resettable GroundProtectión) para detectar el cortocircuito entre la salida y la carrocería,fusible de protección general en el interior del aparato. La intervenciónde una protección se evidencia con el encendido del led rosa Safety.Eliminada la causa de la entrada en protección, el amplificadorreemprende su normal funcionamiento.En todos los SRx es posible insertar el control remoto de volumen VSR(opcional) especializado para la sección subwoofer.
ÚVOD
Děkujeme Vám za to, že jste si vybrali tento produkt. Vaše spokojenostje předem zaručena jeho výbornou výkonností.Abyste mohli zcela využít jeho služeb a vyhnuli se jakýmkolikomplikacím, přečtěte si pozorně tento manuál.
Bezpečnostní opatření:• Elektrické zařízení vozu musí mít napětí 12V DC s negativním
pólem ke kostře vozu. Ověřte, zda vůz má opravdu tyto vlastnosti, abyste se vyhnuli škodám jak na zesilovači, tak na voze samém.
• Připevněte pevně zesilovač šrouby z příslušenství. Dbejte na to, aby instalace byla ve vnitřním prostoru vozidla. Uvolnění během jízdy může způsobit vážné škody jak přepravovaným osobám, tak ostatním vozidlům.
• Napájecí kabel musí být opatřen dostatečnou izolacís jištěním proti zkratu (pojistkou). Při vedení kabelu interiéremvozu dbejte na to, aby nemohlo dojít k porušení izolace.Kabel musí být dostatečně upevněn po celé délce. Pojistkovépouzdro musí být umístěno na červeném kabelu (+12V), conejblíže baterii.
• Hodnota pojistky musí být stejná jako hodnota pojistky zesilovače. V případě, že kabel napájí více zesilovačů, pojistkaby měla mít stejnou hodnotu, jako je součet hodnot pojistek všech těchto zesilovačů.
• Úroveň hlasitosti poslechu musí být na té úrovni, abynepřekrýval zvuky z venku kvůli maximální bezpečnosti jízdy.
• POZOR. Za určitých podmínek může teplota zesilovačedosáhnout až 90 °C.
Funkční opatření:• Umístěte zesilovač na místo, kde teplota neklesá pod 0 °C
a nepřesahuje 55 °C.• Místo instalace musí mít vhodnou cirkulaci vzduchu a nesmí
být vystaveno vlhkosti, dešti a působení ostatních předmětů uvnitř vozu. Nechte volný prostor kolem zesilovače (min. 5 cm).
• Výstupy pro reproduktory ze zesilovače označené L a Rnesmí být propojeny mezi sebou. Při vkládání a vyndávánívýhybky dbejte na to, aby zesilovač nebyl pod napětím.
• Při instalaci reproduktorů a kabelů, které je spojují, dbejte nato, aby neizolované části nebyly v kontaktu s uzemněnímvozu. V tom případě by zasáhla ochrana zesilovače.
• Seřízení úrovně zesilovače provádějte při nastavení rádia naúrovně hlasitosti.
Údržba a spolehlivost• Čistěte pravidelně zesilovač. Nepoužívejte prostředky, které
by mohly poškodit plastové nebo lakované části. Použijte hadřík namočený ve vodě a saponátu, vyždímejte ho a vyčistětezesilovač. Potom znovu přetřete hadříkem namočeným pouze ve vodě. Nakonec utřete do sucha.
• Zbavte prachu a ostatních nečistot otevřená místa, kde jsouvstupy a výstupy zesilovače a boční plochy. Tato údržba by se měla provádět pravidelně. Nepoužívejte stlačený vzduch, který by zanesl nečistotu dovnitř. Pokud je třeba, obraťte se na centrum specializované na úklid interiérů. Eventuální nečistotyby mohly ucpat a zablokovat dmychadlo chlazení; následovaloby spuštění teplotní (termické) kontroly.
Projekt SRx je tím nejlepším možným kompromisem mezivšestranností, kompaktností, výkonností, kvalitou zvukua spolehlivostí.Všechny jeho části – elektronika, propojení, mechanické komponenty– byly vyvinuty opětovným testováním zesilovače z mnoharůzných hledisek. Díky tomu byla nalezena nová řešení a odstraněnycelé části, které nezlepšovaly výkonnost.Příkladem toho je elektronický obvod konečného stadia. Obvyklepodobné zesilovače jsou vybaveny nejjednodušším a nejlevnějšímobvodem, zatímco SRx se nevzdává vyšší kvality třídy AB. Projejí získání byl vyvinut okruh nazvaný DYNAB (Dynamic AB)Class, který při změně teploty a napětí automaticky dorovnáváztrátu na výkonu a zkreslení výsledného audiosignálu pro nejvěr-nější zvuk. DYNAB spojuje jednoduchost tradiční třídy B s kvali-tativními vlastnostmi zesilovačů třídy AB. Další zvláštností projektu SRx je připojení. Jsou použity svorky,které nejsou běžné pro Car Audio, ale jsou běžně používányv profesionálním zapojení zesilovačů.Svorky použité v těchto zesilovačích mají svírací plochu připojenía neničí vodič kabelu. Mají certifikát nejvýznamnějších mezinárodníchbezpečnostních institucí. Za zmínku stojí také vnější plastikové části. I když se dotýkajíaluminiových součástí, které mohou dosáhnout teploty až 90 °C,nenastávají problémy, protože se jedná o polymer s odolnostívůči teplotě až 150 °C, který při teplotních rozdílech odolává
i nárazům. Jednou z nejdůležitějších vlastností projektu SRx je udrženítechnických parametrů, které přísluší vyšší třídě.Pro koncové stupně byly použity lineární tranzistory poslednígenerace. Zvláštní pozornost byla věnována vstupním dílům jakPre, tak Hi Level, užitím obvodu LNS pro minimalizaci zkreslenía rušení, které jsou v autě vždy přítomny. Vnitřní výhybka bylavyvinuta pro maximální všestrannost – umožňuje širokou škálukonfigurací. Napájecí díl je vybaven transformátorem s vysokýmsycením pro zvýšení jak účinnosti, tak spolehlivosti. Napětí baterieje filtrováno tlumící cívkou pro odstranění vysokofrekvenčníhorušení jak vnitřního, tak vnějšího. Díky tomu vyhovuje nejpřísnějšímevropským i světovým normám (95/54/EC a ECE10). Elektrické ochranné obvody chrání zesilovač před přehřátím, přepětímv napájení a vysokými proudy. Má galvanicky oddělené obvody odkarosérie vozidla. Dále hlídá stejnosměrné napětí na výstupu,případný zkrat a také poškození některého z reproduktorovýchvodičů směrem ke kladnému nebo zápornému napájecímu pólu.Spuštění ochran signalizuje rozsvícení červené kontrolky Safety.Po odstranění problému způsobujícího aktivaci ochran, přístrojopět začne pracovat (po vypnutí a opětovném zapnutí). Všechnyzesilovače umožňují použití modulu VSR pro dálkové ovládáníhlasitosti subwooferu.
Automobilový zesilovač Audison SRx2 je dvoukanálový zesilovačvybavený vypínatelnou výhybkou hi-pass (12 dB/okt.), s přepínačemnastavení pásmové propusti hi-pass nebo lo-pass. Dělící frekvence
mohou být regulovány potenciometrem v rozmezí 50 Hz – 220 Hz.Zesilovač je vybaven také přepínačem funkce pro zapojení jako1 kanál (provoz do můstku).
SRx 2
CZ
Project SRx
A. Levels (0.2÷5 VRMS)• Reguluje citlivost pravého a levého kanálu (stereo)
a mono kanálu.
B. Filters adjusting (úprava filtrů)• Reguluje dělící frekvenci vybraného filtru na 50 Hz až
220 Hz.
C. Filters Mode (konfigurace filtrů) • Konfiguruje filtry jako HI-PASS, FULL-RANGE nebo
LO-PASS.V pozici 1 dovoluje aktivovat filtr HI-PASS (horní propust).V pozici 2 vypíná filtr FULL RANGE (lineární provoz).
V pozici 3 dovoluje aktivovat filtr LO-PASS (dolní propust)
D. Out Mode (konfigurace výstupů)• Konfiguruje kanály výstupu ve stereo nebo v mono
(můstek).V pozici STEREO použijte výstupy výkonu a vstupy L a R.V pozici MONO (můstek) použijte označené výstupyvýkonu a vstup R.
E. On / Safety (signalizace zapnutí a poruchy)1 • Zelená kontrolka (ON). Ukazuje zapnutí přístroje.2 • Červená kontrolka (SAFETY). Ukazuje bezpečnostní zásah
ochranných obvodů ( poruchu funkce nebo chybné zapojení).
A. Pre In (cinch (RCA) vstupy)Signál k zesílení musí mít úroveň mezi 0,2 VRMS a 5VRMS.
• Vstup pravého a levého kanáluStereo vstup, který obsahuje signál pro levý (L) a pravý (R)kanál zesilovače.
• Vstup pravého mono kanálu (R)Použijte pouze vstup R pro propojení zesilovače při monoprovozu (můstek).
B. B. Speakers IN (boostrové vstupy)Červená spojení
Nepoužívejte, pokud je použito spojení Pre In.• Vstup pro autorádia bez cinch výstupů pro pravý a levý
kanál Vstupy signálu pro autorádia pro pravý (R) a levý (L) kanál.
• Vstup pro pravý mono kanálPoužijte pouze vstup R pro propojení zesilovače při monoprovozu (můstek).
C. Speakers Out1 • Výstup do reproduktorů levého kanálu (L).
Připojte k systému reproduktorů levého kanálu.2 • Výstup do reproduktorů pravého kanálu (R)
Připojte k systému reproduktorů pravého kanálu.3 • Výstup pro provoz mono (můstek)
Připojte k subwooferovým reproduktorům.
D. Remote In• Vstup pro dálkové zapnutí zesilovače
Spojte s vhodným výstupem zdroje napájení (spínané +12Vautorádia-Remote).
E. VSR (Sub volume)• Vstupy pro VSR (sada pro dálkové ovládání Sub).
Ke spojení k dálkovému regulátoru úrovně pro subwooferVSR (sada je příplatková) je nutné použít regulátor VSR amodul VCA.S.
F. Power• Svorky pro spojení napájecích kabelů (baterie 12 V)
Spojte koncovku + ke kladné svorce baterie a – k zápornémupólu vozu.
A. Otevření panelu a připevnění1 • Demontáž panelu - Odstraňte levý (left) a pravý (right)
panel stlačením označených bodů.2 • Připevnění - Připevněte zesilovač 4 šrouby z příslušenství.3 • Připevnění panelů - Připevněte panely silným stlačením
vyznačených bodů. Dbejte na to, aby výstupky panelůzapadly do místa připevnění šroubů.
B. Výměna pojistky• Otevřete pravý (right) panel a vyměňte pojistku za náhradní
z příslušenství.
C. Vložení VSR (příplatkové)• Otevřete levý (left) panel a dejte přepínač VCA do polohy ON. Vložte modul VCA.S do zesilovače na předem určeně místo pro konektor.
D. Spojovací kabely1 • Napájecí kabely (délka 4/5 m): při použití 4 nebo 2 reproduktorů
použijte audison cable POWERFLOW 9.2 • Kabely pro výstup reproduktorů, délky podle umístění
zesilovače.3 • Kabely pro vstupy signálu (cinch kabel), pro dálkové ovládání
a příslušenství VSR.
1. INSTALACE
2. PROPOJENÍ
3. FUNKCE A KONTROLA
Ukazuje, jak nastavit přepínače pro dvě hlavní konfiguracezesilovače, stereo nebo mono, a pro využití výhybky.
4. TABULKA KONFIGURACÍ
Pro lepší ochranu přístroje se doporučuje vložení pojistky na kabel,který spojuje kladný pól baterie se svorkou +BATT zesilovače.Tato pojistka by měla být umístěna asi 10 cm od baterie. Jejíhodnota by měla být stejná jako u pojistky, kterou je vybaven
zesilovač. V případě, že v instalaci je použito více zesilovačůnebo že zesilovače jsou vybaveny více pojistkami, hodnota byměla být stejná jako součet hodnot všech pojistek.
5. ZAPOJENÍ A P¤ÍKLADY KONFIGURACÍ