4.4 e-commerce configuration guide · e-commerce configuration guide version 4.4 . accesso . 302...
TRANSCRIPT

E-Commerce Configuration Guide Version 4.4
accesso 302 Camino de la Placita
Taos, NM 87571
575.751.0633
www.accesso.com

Copyright
Copyright 2015 accesso Technology Group, plc. All rights reserved.
NOTICE: All information contained herein is the property of accesso Technology Group, plc. No part of this publication (whether in hardcopy or electronic form) may be reproduced or transmitted, in any form or by any means, electronic, mechanical, photocopying, recording, or otherwise, without the prior written consent of accesso Technology Group, plc. The software, which includes information contained in any databases, described in this document is furnished under a license agreement and may be used or copied only in accordance with the terms of that agreement.
This publication and the information herein is furnished AS IS, is subject to change without notice, and should not be construed as a commitment by accesso Technology Group, plc. accesso Technology Group, plc. assumes no responsibility or liability for any errors or inaccuracies, makes no warranty of any kind (express, implied, or statutory) with respect to this publication, and expressly disclaims any and all warranties of merchantability, fitness for particular purposes, and non-infringement of third party rights.
Overview of E-Commerce module ........................................................................................................................ 14
E-Commerce documentation set ....................................................................................................................... 14
Product evolution .............................................................................................................................................. 14
Common uses .................................................................................................................................................... 15
How E-Commerce module fits with Classic Salesware ........................................................................................ 15
Typical real-world configurations ....................................................................................................................... 17
Web pages hosted externally ......................................................................................................................... 18
Web pages hosted internally.......................................................................................................................... 18
A closer look at the components of E-Commerce module .................................................................................. 19
Web server .................................................................................................................................................... 19
ww.dll ............................................................................................................................................................ 19
ww_sales ....................................................................................................................................................... 20
Sales Host ...................................................................................................................................................... 20
ProtoBase and the Charge Cards module ....................................................................................................... 21
Web pages ..................................................................................................................................................... 22
eCommerce_Pages_xxxx.exe vs. custom-developed web pages ..................................................................... 23
eCommerce_Config_xxxx.exe ........................................................................................................................ 23
wwService ..................................................................................................................................................... 24
SiriusSQL database (on the database server).................................................................................................. 24
Messenger Service ......................................................................................................................................... 24
E-Commerce page flow ...................................................................................................................................... 25
Configuration and use of E-Commerce module .................................................................................................... 26
E-Commerce module licensing ........................................................................................................................... 26
Updating instructions ........................................................................................................................................... 27
SysManager setup ............................................................................................................................................. 32
Website administration ........................................................................................................................................ 32
Log-in as a Web Administrator ........................................................................................................................... 32
Restricting admin functionality to local only (recommended) ............................................................................ 33
Event Log .............................................................................................................................................................. 33
Setting up E-Commerce e-mail.............................................................................................................................. 34
General settings for e-mail sent from the pages ................................................................................................ 35
Configure central management of the regular expression used for email address validation ............................. 35
1

General settings for e-mail sent from Sales Host ................................................................................................ 36
Generating a second e-mail confirmation from the Sales Host ........................................................................... 36
SMTP settings .................................................................................................................................................... 37
E-mail formats ................................................................................................................................................... 37
Setting up Sales Host to send an e-mail in the event that Sales Host encounters a problem when processing the sale .................................................................................................................................................................... 38
Setting up the E-Commerce pages to send an e-mail in the event that ProtoBase goes offline .......................... 38
Editing e-mail templates .................................................................................................................................... 39
Editing confirmation e-mail templates ............................................................................................................... 39
Editing the second e-mail confirmation template .............................................................................................. 40
Editing password reset e-mail templates ........................................................................................................... 41
Page timeout configuration .................................................................................................................................. 42
Timed ticket and capacity setup ........................................................................................................................... 42
Installation:........................................................................................................................................................ 42
Item setup ......................................................................................................................................................... 44
Site configuration ................................................................................................................................................. 45
The SiteConfig.config vs. web.config .................................................................................................................. 45
Site Configuration interface ............................................................................................................................... 45
Importing your existing web.config settings ....................................................................................................... 46
Importing/exporting SiteConfig.config ............................................................................................................... 47
Editing a key ...................................................................................................................................................... 47
Refreshing values............................................................................................................................................... 48
New Configuration Keys..................................................................................................................................... 48
Item List configuration ....................................................................................................................................... 49
Item Tree ....................................................................................................................................................... 49
Item specific settings ..................................................................................................................................... 58
Page Includes (Advanced) .............................................................................................................................. 60
Specify dates in a link to the ItemList.aspx or the ItemShow.aspx page.......................................................... 61
Changing Themes .............................................................................................................................................. 61
Theme Pack Overview .................................................................................................................................... 62
MasterPageYourThemeName.master ............................................................................................................ 64
Dynamic Master pages ...................................................................................................................................... 66
Dynamic Mobile presentation ............................................................................................................................ 66
2

Dynamic Pricing capability ................................................................................................................................. 67
Displaying Help text ........................................................................................................................................... 67
Site Configuration Settings ................................................................................................................................... 68
Admin Settings .................................................................................................................................................. 68
ShowAdminLoginLink ..................................................................................................................................... 68
AllowedAdminIps ........................................................................................................................................... 69
Checkout Settings .............................................................................................................................................. 70
AllowStoredCards .......................................................................................................................................... 70
altAccountID .................................................................................................................................................. 71
altTermID ....................................................................................................................................................... 71
CCDeviceType ................................................................................................................................................ 71
CCRcptDTFmt ................................................................................................................................................. 72
CCYears .......................................................................................................................................................... 72
CheckoutSteps ............................................................................................................................................... 72
CombinedCCText ........................................................................................................................................... 72
CompanyAddress ........................................................................................................................................... 73
CompanyName .............................................................................................................................................. 73
CompanyPhone ............................................................................................................................................. 74
CompanyWeb ................................................................................................................................................ 74
CouponCodeField........................................................................................................................................... 75
CreditCardTypeText ....................................................................................................................................... 75
CurrencyCountry ............................................................................................................................................ 75
DeclineTxt ...................................................................................................................................................... 76
EnableCheckoutCoupons ............................................................................................................................... 76
GuestNotSelectedItemMessage ..................................................................................................................... 76
GuestNotSelectedModifierMessage............................................................................................................... 77
InHouseCardTypeText .................................................................................................................................... 77
MonerisReceipt ............................................................................................................................................. 77
PaymentTypeNotAllowedMsg ........................................................................................................................ 78
SingleTaxLine ................................................................................................................................................. 78
Tax1Name...................................................................................................................................................... 78
Tax2Name...................................................................................................................................................... 79
TermID ........................................................................................................................................................... 79
3

Connection Settings ........................................................................................................................................... 80
AltTicketServiceUrl......................................................................................................................................... 80
CCProcServer ................................................................................................................................................. 81
EncryptSvcComm ........................................................................................................................................... 81
FuseboxChainCode ........................................................................................................................................ 81
FuseboxLocation ............................................................................................................................................ 82
Localhost.wwSalesSvc .................................................................................................................................... 82
UseWebService .............................................................................................................................................. 82
Debitware Settings ............................................................................................................................................ 83
DWDispRows ................................................................................................................................................. 83
DWInsufficentFundsMsg ................................................................................................................................ 84
DWLookupField ............................................................................................................................................. 84
DWNameLink ................................................................................................................................................. 85
DWPinAttempts ............................................................................................................................................. 85
DWPinPrompt ................................................................................................................................................ 85
DWPinRedirectMessage ................................................................................................................................. 85
DWPinRedirectPage ....................................................................................................................................... 86
UseDwPin ...................................................................................................................................................... 86
DWPayment................................................................................................................................................... 87
DWReloadDCI ................................................................................................................................................ 87
DWSecureLookup .......................................................................................................................................... 87
IHCBonusCash ................................................................................................................................................ 87
ShowDWBalAsNeg ......................................................................................................................................... 88
Email Settings .................................................................................................................................................... 89
AcctPmtTxt .................................................................................................................................................... 89
CardPmtTxt .................................................................................................................................................... 90
CCTimeoutTemplate ...................................................................................................................................... 90
ChargedPayPlanTemplate .............................................................................................................................. 90
ChargedTemplate .......................................................................................................................................... 91
ChgEmailSubj ................................................................................................................................................. 91
DWPmtTxt ..................................................................................................................................................... 91
emailRegEx .................................................................................................................................................... 92
ErrEmailSubject1............................................................................................................................................ 92
4
ErrEmailSubject2............................................................................................................................................ 93
ErrEmailSubject3............................................................................................................................................ 93
ErrTemplate1 ................................................................................................................................................. 94
ErrTemplate2 ................................................................................................................................................. 94
ErrTemplate3 ................................................................................................................................................. 95
FinalizedPayPlanTemplate ............................................................................................................................. 95
FinalizedTemplate .......................................................................................................................................... 95
MailAttachment ............................................................................................................................................. 96
MailBCC ......................................................................................................................................................... 96
MailCC ........................................................................................................................................................... 97
MailFormat .................................................................................................................................................... 97
MailFromAddr ............................................................................................................................................... 97
MailFromName .............................................................................................................................................. 98
MailSubject .................................................................................................................................................... 98
NoFirstEmail .................................................................................................................................................. 98
PAHTemplate ................................................................................................................................................. 99
PswdEmailSubject1 ........................................................................................................................................ 99
PswdEmailSubject2 ...................................................................................................................................... 100
PswdEmailTemplate1 ................................................................................................................................... 100
PswdEmailTemplate2 ................................................................................................................................... 101
SavedTemplate ............................................................................................................................................ 101
SendChgEmail .............................................................................................................................................. 102
SHEMoverride .............................................................................................................................................. 102
SHMailBCC ................................................................................................................................................... 103
SHMailCC ..................................................................................................................................................... 103
SHMailFormat .............................................................................................................................................. 103
SHMailFromAddr ......................................................................................................................................... 104
SHMailFromName ........................................................................................................................................ 104
EXHIBITS MET_MODS MEMBERFREEPtsSel .................................................................................................. 104
Groups/Accounts and Club Management settings ........................................................................................... 106
cbActChgTxt ................................................................................................................................................. 106
ClubRptURL .................................................................................................................................................. 106
EnableActCharge ......................................................................................................................................... 107
5
EncryptReportQueryString ........................................................................................................................... 107
FilterByAccountTypeInClubLogin.................................................................................................................. 107
grpAccountType ........................................................................................................................................... 108
grpCreate ..................................................................................................................................................... 109
grpDCI .......................................................................................................................................................... 109
grpItemTree ................................................................................................................................................. 110
grpMessageForMembers ............................................................................................................................. 111
grpPayType .................................................................................................................................................. 112
grpReturnURL .............................................................................................................................................. 113
grpSubjectForEmail ...................................................................................................................................... 114
InheritGroup ................................................................................................................................................ 115
KeepCartOnGroupLogout ............................................................................................................................. 115
ReportQueryString ....................................................................................................................................... 116
ShowGroupNamesInClubLogin ..................................................................................................................... 116
UseClubLogin ............................................................................................................................................... 117
Guest Related Settings ..................................................................................................................................... 118
1PWEmail .................................................................................................................................................... 118
AgeAsOf ....................................................................................................................................................... 119
AllowMultiLogin ........................................................................................................................................... 119
AllowNoVerify .............................................................................................................................................. 120
BDateErrorMsg ............................................................................................................................................ 120
DefAddress .................................................................................................................................................. 121
DefEmailOK .................................................................................................................................................. 121
DefMailOK ................................................................................................................................................... 121
DefPhoneOK ................................................................................................................................................ 122
DefVerifyRegEx ............................................................................................................................................ 122
DefVerifyRegExMessage .............................................................................................................................. 122
ExistingGuestHideRows ............................................................................................................................... 123
ExistingPurchaserHideRows ......................................................................................................................... 124
ForceEditFields ............................................................................................................................................ 126
GetPassPhoto .............................................................................................................................................. 128
GLAltFNameTxt ............................................................................................................................................ 128
GLAltLNameTxt ............................................................................................................................................ 129
6

GLNoVerifyNoResultsText ............................................................................................................................ 129
GLUseUserID ................................................................................................................................................ 130
GuestDispRows ............................................................................................................................................ 130
GuestEditRows............................................................................................................................................. 132
GuestPhotos ................................................................................................................................................ 134
InfoExpr ....................................................................................................................................................... 135
InfoExprOnGuestSelected ............................................................................................................................ 135
InfoHeading ................................................................................................................................................. 135
IntlShipPh .................................................................................................................................................... 136
ItemGuestInheritsText ................................................................................................................................. 136
ItemGuestRequiredText ............................................................................................................................... 136
LockoutMessage .......................................................................................................................................... 137
LookupChars ................................................................................................................................................ 137
NewGuestFill ............................................................................................................................................... 137
NoPurchTracking.......................................................................................................................................... 138
NoUseSame ................................................................................................................................................. 138
OptionalGuestItemTypes ............................................................................................................................. 138
ParentingLevel ............................................................................................................................................. 139
PassPhotoHeight .......................................................................................................................................... 139
PassPhotoURL .............................................................................................................................................. 140
PassPhotoWidth .......................................................................................................................................... 140
PhoneFormat ............................................................................................................................................... 141
Photo2LargeError ........................................................................................................................................ 141
PurchaserDispRows ..................................................................................................................................... 141
PurchaserEditRows ...................................................................................................................................... 143
PurchaserForceEditFields ............................................................................................................................. 145
ShipAddress ................................................................................................................................................. 147
ShowShippingAddr....................................................................................................................................... 148
TransEditFields............................................................................................................................................. 148
TransEditFile ................................................................................................................................................ 148
TransEdits .................................................................................................................................................... 149
TransLookupFile ........................................................................................................................................... 149
TransLookups ............................................................................................................................................... 150
7

UploadPhotoMaxWidth ............................................................................................................................... 150
UseEmailUserID ........................................................................................................................................... 151
UseSameBtnText.......................................................................................................................................... 151
UseSameConfirm ......................................................................................................................................... 151
UseSameConfText ........................................................................................................................................ 151
VerifyField ................................................................................................................................................... 152
VerifyPrompt ............................................................................................................................................... 153
International Character Settings ...................................................................................................................... 154
AddAllowedChars ........................................................................................................................................ 154
AltAllowedChars .......................................................................................................................................... 154
AltEncoding ................................................................................................................................................. 155
Item Settings ................................................................................................................................................... 156
AvailableText ............................................................................................................................................... 156
CalDispCurrentMonthDays........................................................................................................................... 157
DatedItemTypes .......................................................................................................................................... 157
DefaultListView ............................................................................................................................................ 158
DefaultXsltFile.............................................................................................................................................. 158
DepletedInventoryMsg ................................................................................................................................ 158
DisableDirectItemAccess .............................................................................................................................. 159
EnableRTI ..................................................................................................................................................... 160
EnableSoldOutLinks ..................................................................................................................................... 160
HideRemainingColumn ................................................................................................................................ 161
ImageField ................................................................................................................................................... 161
ImageLgPath ................................................................................................................................................ 162
Imagenodes ................................................................................................................................................. 162
ImageRel ...................................................................................................................................................... 162
ImageTnPath................................................................................................................................................ 163
ItemMessageDDTable .................................................................................................................................. 163
ItemMessageEnabled................................................................................................................................... 164
ItemMessageRegEx ...................................................................................................................................... 164
ItemMessageRequired ................................................................................................................................. 165
ItemMessageUseDropDown ........................................................................................................................ 165
ItemRestrictByActualDate ............................................................................................................................ 165
8
ItemShowBadQtyMsg .................................................................................................................................. 166
ITNavLinkCSS ............................................................................................................................................... 166
ITReturntoTop ............................................................................................................................................. 167
LeadMax ...................................................................................................................................................... 167
LeadTime ..................................................................................................................................................... 167
Max4Sale ..................................................................................................................................................... 168
ModColLen .................................................................................................................................................. 168
ModifierSort ................................................................................................................................................ 169
ModMax4Label ............................................................................................................................................ 169
MultiAddITGroups ....................................................................................................................................... 170
MultiQtyMax ............................................................................................................................................... 170
NoCalAvail ................................................................................................................................................... 171
NoCartRulesOnMods ................................................................................................................................... 171
NoDefDate ................................................................................................................................................... 172
NoItemDateText .......................................................................................................................................... 172
Points4Sale .................................................................................................................................................. 173
PriceFormat ................................................................................................................................................. 174
PTItemLinks ................................................................................................................................................. 174
PtsRemHeaderText ...................................................................................................................................... 174
ReconcileRevModsWithMinMax .................................................................................................................. 175
RemHeaderText ........................................................................................................................................... 175
ReverseModDCIs.......................................................................................................................................... 176
RTIHoldTime ................................................................................................................................................ 176
ShowItemImages ......................................................................................................................................... 177
ShowModPrice............................................................................................................................................. 177
ShowOptionalMods ..................................................................................................................................... 177
ShowPointsCost ........................................................................................................................................... 178
ShowRevModQTYinCart ............................................................................................................................... 178
ShowTotalItemPriceInLineItemLists ............................................................................................................. 178
ShowUpsells ................................................................................................................................................ 179
SPType ......................................................................................................................................................... 179
ThumbDefaultWidth .................................................................................................................................... 179
TopNode ...................................................................................................................................................... 179
9

UnAvailableText ........................................................................................................................................... 180
UpsellPrompt ............................................................................................................................................... 180
UpsellThumbs .............................................................................................................................................. 181
UseItemTreeDescrip .................................................................................................................................... 181
UseLongItemDescrip .................................................................................................................................... 182
Liability Settings ............................................................................................................................................... 183
LiabilityField ................................................................................................................................................. 183
LiabilityItems ............................................................................................................................................... 184
LiabilitySeparator ......................................................................................................................................... 184
LiabilityText ................................................................................................................................................. 185
MinorGuestLiabilityField .............................................................................................................................. 185
Membership Settings ....................................................................................................................................... 186
0PmtTxt ....................................................................................................................................................... 186
Allow0Total.................................................................................................................................................. 187
DEPARTMENTCATEGORY ITEM PtsSel ..................................................................................................... 187
GuestLoginAsMember ................................................................................................................................. 187
MemberFilterDCIs ........................................................................................................................................ 188
MemberNoField ........................................................................................................................................... 188
MembersOnlyDCIs ....................................................................................................................................... 189
MemberVerifyAll ......................................................................................................................................... 189
MemberVerifyField ...................................................................................................................................... 190
MemberVerifyPrompt .................................................................................................................................. 190
MemberVerifyRegEx .................................................................................................................................... 191
MemberVerifyRegExMessage ...................................................................................................................... 191
NoValOptDCIs .............................................................................................................................................. 192
PointsModDCIs ............................................................................................................................................ 192
Miscellaneous Settings .................................................................................................................................... 193
AdminEmail ................................................................................................................................................. 193
BadWords .................................................................................................................................................... 194
BDateRegEx ................................................................................................................................................. 194
DonationDCIs ............................................................................................................................................... 194
DonationOtherModDCI ................................................................................................................................ 195
ForceSSL ...................................................................................................................................................... 195
10
JavascriptDisabledMessage .......................................................................................................................... 195
LinkedCountryState ..................................................................................................................................... 196
NeverSave.................................................................................................................................................... 196
NoSSLText .................................................................................................................................................... 196
OldURLEnc ................................................................................................................................................... 197
Salespoint .................................................................................................................................................... 197
ShowErrors .................................................................................................................................................. 197
SSLText ........................................................................................................................................................ 198
SSVerbosityLevel .......................................................................................................................................... 198
TributeDDTable............................................................................................................................................ 199
URLTrans ..................................................................................................................................................... 199
VerbosityLevel ............................................................................................................................................. 199
warnJavascriptDisabled ............................................................................................................................... 200
WebSiteID .................................................................................................................................................... 200
WTPDescrip ................................................................................................................................................. 201
WTPItemsText ............................................................................................................................................. 201
WTPRegex ................................................................................................................................................... 201
Pass Renewal Settings...................................................................................................................................... 203
AllowedRenewals......................................................................................................................................... 203
RenewalSpan ............................................................................................................................................... 204
RenewVerifyAll ............................................................................................................................................ 204
RenewVerifyField ......................................................................................................................................... 204
RenewVerifyPrompt..................................................................................................................................... 205
RenewVerifyRegEx ....................................................................................................................................... 205
RenewVerifyRegExMessage ......................................................................................................................... 206
Payment Plan settings ..................................................................................................................................... 207
PayPlanConfirmationDescription ................................................................................................................. 207
PayPlanDescription ...................................................................................................................................... 208
PayPlanEligCartText ..................................................................................................................................... 208
PayPlanEligLabel .......................................................................................................................................... 208
Print At Home Tickets Settings ......................................................................................................................... 210
AllowedPAH ................................................................................................................................................. 210
ForcePAH ..................................................................................................................................................... 211
11

PAHAttPDF ................................................................................................................................................... 211
PAHCartText ................................................................................................................................................ 211
PAHConf ...................................................................................................................................................... 211
PAHDefault .................................................................................................................................................. 212
PAHDisplayInConf ........................................................................................................................................ 212
PAHDisplayMaxQty ...................................................................................................................................... 212
PAHMailSubj ................................................................................................................................................ 213
PAHNoImagesMsg ....................................................................................................................................... 213
PAHRealTime ............................................................................................................................................... 213
SeparatePDFs ............................................................................................................................................... 214
Reservation Settings ........................................................................................................................................ 215
AlwaysWriteShipAddr2ResNote ................................................................................................................... 215
EnableResTracking ....................................................................................................................................... 216
ResHeaderNote............................................................................................................................................ 216
ResTrackField ............................................................................................................................................... 216
ResTrackRequired ........................................................................................................................................ 217
RHStaticField................................................................................................................................................ 217
RHStaticText ................................................................................................................................................ 218
UseResHeaders ............................................................................................................................................ 218
Second Level Modifier Settings ........................................................................................................................ 219
ModOnModColLen ...................................................................................................................................... 219
ModOnModModifierSort ............................................................................................................................. 220
ShowModOnMods ....................................................................................................................................... 221
ShowModOnModMinMaxMsg ..................................................................................................................... 222
ShowModOnModSelectionMsg ................................................................................................................... 223
ShowModOnModsError ............................................................................................................................... 223
Themes settings ............................................................................................................................................... 225
EnableMobileMasterPage ............................................................................................................................ 225
EnableMobileThemes .................................................................................................................................. 226
MasterPage ................................................................................................................................................. 226
RSMasterPage.............................................................................................................................................. 226
Theme ......................................................................................................................................................... 226
Validation settings ........................................................................................................................................... 228
12
ValidationEditText ....................................................................................................................................... 228
ValidationFailedText .................................................................................................................................... 229
ValidationOKText ......................................................................................................................................... 229
ValidationOptionalText ................................................................................................................................ 229
ValidationPrefix ........................................................................................................................................... 229
ValidationRequiredText ............................................................................................................................... 231
View Customization settings ............................................................................................................................ 232
BannerSliderOptions .................................................................................................................................... 232
CarouselNavOptions .................................................................................................................................... 232
CarouselSliderOptions ................................................................................................................................. 233
UpSellCarouselOptions ................................................................................................................................ 233
PopupGuest ................................................................................................................................................. 233
PopupItemShow .......................................................................................................................................... 233
MicroDonations settings .................................................................................................................................. 235
MicroDonateYesButtonText ......................................................................................................................... 235
MicroDonateNoButtonText.......................................................................................................................... 236
MicroDonate................................................................................................................................................ 236
MicroDonateText ......................................................................................................................................... 236
MicroDonationItemDCI ................................................................................................................................ 237
13

Overview of E-Commerce module
E-Commerce module extends Salesware to the Internet without having to create, manage and maintain a separate Internet infrastructure. E-Commerce module allows visitors/guests to not only manage their visitor/guest records, but also to buy online and pick up their purchases at any salespoint or even have tickets e-mailed to them. E-Commerce module allows you to customize your own unique web site while retaining full compatibility with your traditional Salesware salespoints. E-Commerce module includes built-in scalability that allows for fast online sales no matter how big your E-Commerce installation grows. E-Commerce module works perfectly for online season pass/membership sales and renewals as well as the handling of a variety of other item sales including advance tickets. You also have the ability to configure clubs and enable the club leader to manage club activity.
E-Commerce documentation set
The Salesware E-Commerce product is documented in the following three documents (available from http://www.siriusware.com/docs):
• Salesware E-Commerce Configuration Guide – This document. The configuration guide provides a description of the product and how to configure it. This information includes siteconfig.config settings within the Site Admin Panel and a description of the files that are provided by Siriusware® Inc. with the E-Commerce product.
• E-Commerce User Guide - The user guide provides detailed information on how to use the E-Commerce module product.
• Salesware E-Commerce Installation Guide – The installation guide describes how to install E-Commerce and is not needed after a successful E-Commerce installation is achieved. The installation guide includes detailed steps for installing and configuring Print At Home Tickets application.
In addition, E-Commerce training is available from http://www.siriusware.com/training.
Product evolution
• Compliance with PABP (industry-standard credit card security compliance) • Support for the .NET Framework 4.0 • An architecture that minimizes delays (ww.dll allows sales to be queued rather than having to wait as E-
Commerce Sales Host processes each sale) • Parity with most of the capabilities available from a standard (Classic) Salesware salespoint • Ability to run multiple instances of Sales Host, allowing you to scale your solution across multiple
computers to achieve the desired performance • Club Management capability
14

• Page elements (colors, fonts, graphics) that can be modified in a standard way using a cascading style sheet (CSS)
• Off-site page hosting via wwService (with built-in encryption) • Ability to limit which passes can be renewed; can also limit renewal of expired passes by time period (to
only those passes which expired a set number of years prior to current date) • Ability to configure mandatory “waiting period” between sale date and start date of ticket • Ability to configure date limit for how far into the future you can set a start date • Improved date entry formats and an attractive, customizable calendar control for setting start dates • Visitor/guest photo upload capability • Web Admin Panel • In-Application configuration changes • Custom Item List Views • Themes • Master Pages • Mobile Pages • Item Upsells • Popup ItemLists, ItemShow and/or visitor/guest lookups
Common uses
• Membership and Pass sales and renewals via the Internet • Ticket sales via the Internet including Print At Home Tickets application • Guest record management (creating and editing guests via the Internet) • Group and account sales via the Internet • Family Passes • Payment Plans • Rolling Memberships • Club management • In-House Cards money loading • Interface to the Retail module • Interface to the Rentals module
How E-Commerce module fits with Classic Salesware
The following diagram shows how E-Commerce module is configured to work with Classic Salesware. (Classic Salesware is Siriusware’s flagship product, whereby resorts, parks and museums deploy Salesware within a physical resort to sell tickets, passes, gift cards, retail items, rental items and so on, to in-person visitors.)
15
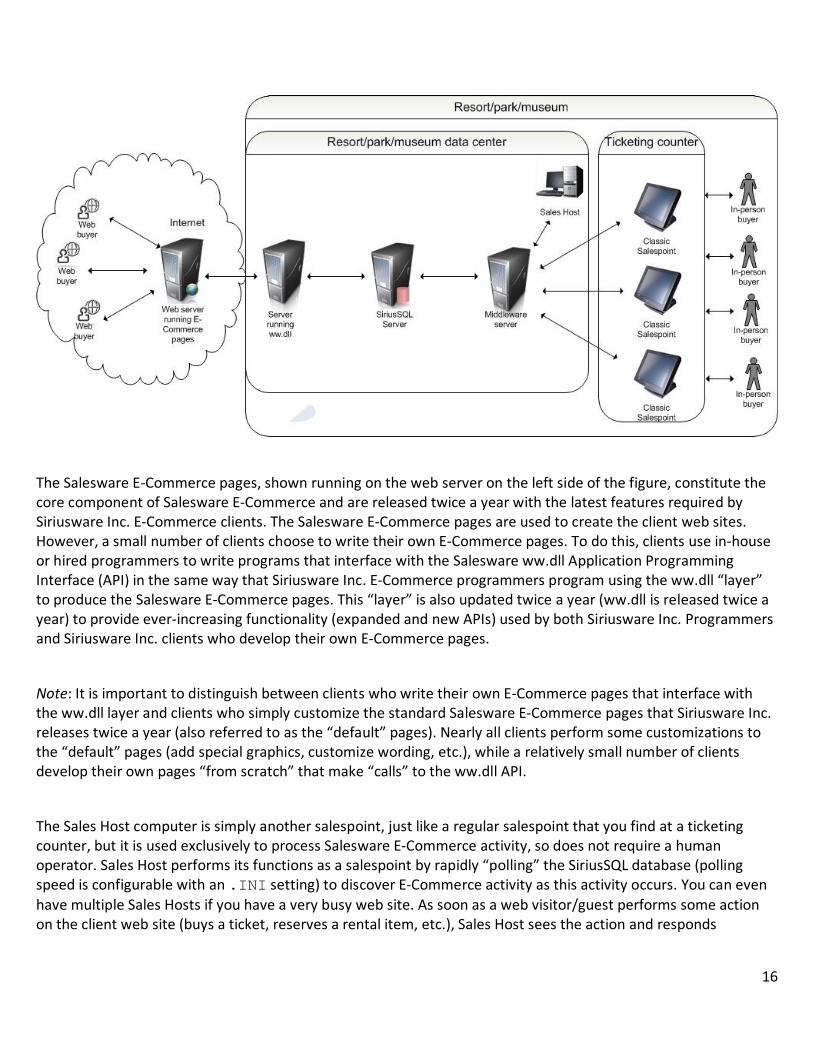
The Salesware E-Commerce pages, shown running on the web server on the left side of the figure, constitute the core component of Salesware E-Commerce and are released twice a year with the latest features required by Siriusware Inc. E-Commerce clients. The Salesware E-Commerce pages are used to create the client web sites. However, a small number of clients choose to write their own E-Commerce pages. To do this, clients use in-house or hired programmers to write programs that interface with the Salesware ww.dll Application Programming Interface (API) in the same way that Siriusware Inc. E-Commerce programmers program using the ww.dll “layer” to produce the Salesware E-Commerce pages. This “layer” is also updated twice a year (ww.dll is released twice a year) to provide ever-increasing functionality (expanded and new APIs) used by both Siriusware Inc. Programmers and Siriusware Inc. clients who develop their own E-Commerce pages.
Note: It is important to distinguish between clients who write their own E-Commerce pages that interface with the ww.dll layer and clients who simply customize the standard Salesware E-Commerce pages that Siriusware Inc. releases twice a year (also referred to as the “default” pages). Nearly all clients perform some customizations to the “default” pages (add special graphics, customize wording, etc.), while a relatively small number of clients develop their own pages “from scratch” that make “calls” to the ww.dll API.
The Sales Host computer is simply another salespoint, just like a regular salespoint that you find at a ticketing counter, but it is used exclusively to process Salesware E-Commerce activity, so does not require a human operator. Sales Host performs its functions as a salespoint by rapidly “polling” the SiriusSQL database (polling speed is configurable with an .INI setting) to discover E-Commerce activity as this activity occurs. You can even have multiple Sales Hosts if you have a very busy web site. As soon as a web visitor/guest performs some action on the client web site (buys a ticket, reserves a rental item, etc.), Sales Host sees the action and responds
16

appropriately (charges the guest credit card, e-mails the guest a confirmation, etc.). Sales Host operation is described in detail in Appendix A: Detailed description of Sales Host operation.
From a software “layering” point of view, Salesware E-Commerce module is implemented using the following software “stack.” There are clear software interfaces between each component in this stack.
Salesware E-Commerce web pages (or client-developed web pages)
ww.dll API (see the Salesware ww.dll API Reference for a complete description of this layer)
SiriusSQL database
Middleware (SalesEZ, BookEZ, etc.)
Sales Host “salespoint”
The modular nature of the Salesware E-Commerce and Classic components allows each component to be placed on a separate computer, or all components (except for the individual salespoints requiring separate physical operators) can be installed on the same computer. However, Siriusware Inc. does not recommend installing all components on the same computer, primarily for security reasons, but this configuration is possible.
The reason you can install more than one Salesware component on a computer is because of a feature of Windows operating systems called ports. Computer applications like ww.dll, SQL Server, SalesEZ and so on can communicate with one another using ports. If two applications are on the same computer, they can communicate using two different ports on the same computer. If two applications are on different computers, they can communicate using ports on different computers.
Typical real-world configurations
The web pages are hosted internally or externally to the resort/park/museum. Typical configurations are shown in this section. Details about these configurations are provided in the section A closer look at the components of E-Commerce.
17
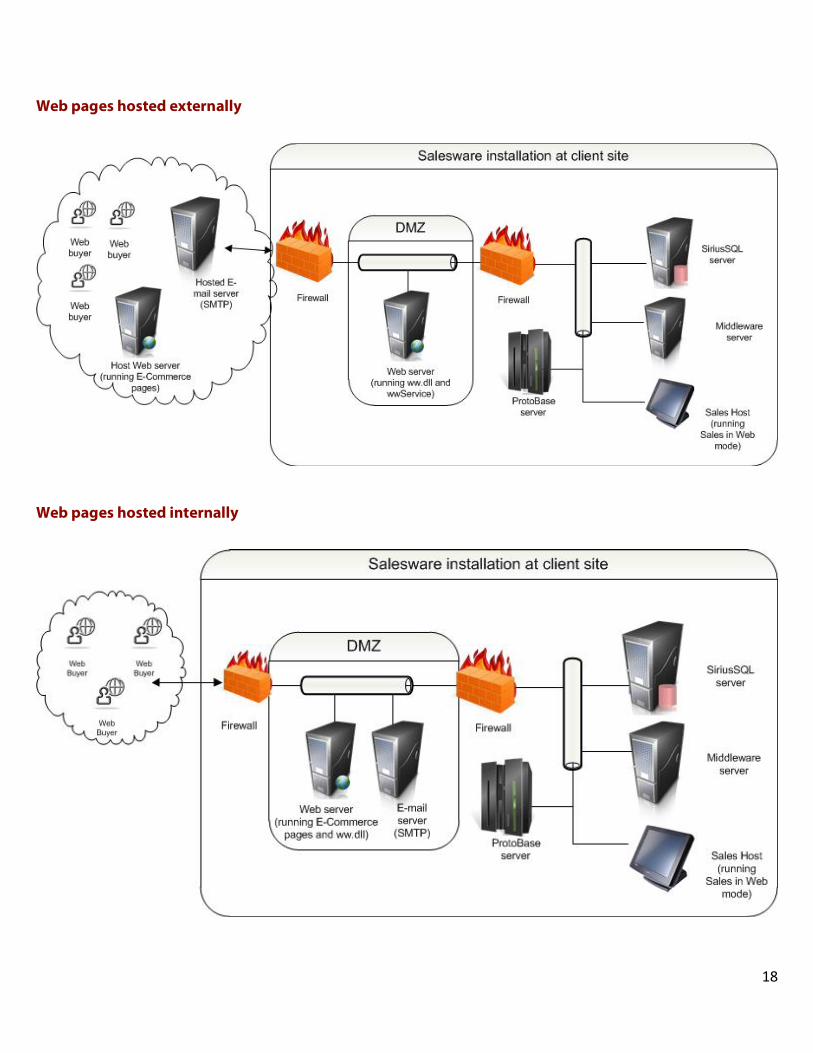
Web pages hosted externally
Web pages hosted internally
18

A closer look at the components of E-Commerce module
The components of E-Commerce module that you must understand to successfully use E-Commerce are the following:
• web server • ww.dll • ww_sales (database table) • Sales Host • ProtoBase • web pages either designed either by Siriusware Inc. programmers (eCommerce_Pages_xxxx.exe) or
custom-developed by programmers who do not work directly for Siriusware Inc. • eCommerce_Config_xxxx.exe • eCommerce_Pages_xxxx.exe • wwService • SiriusSQL database (on the database server) • Messenger Service • Site Admin Panel
Each of these components is described in the following sections.
Web server
A web server “serves” web pages to the Internet. People on the Internet access these pages using a web browser. A web server can also be used to “serve” pages on a local area network (LAN) or intranet (which is how the Salesware Self Entry product works). There is a variety of web server software, including Microsoft Internet Information Services (IIS) and Apache. Salesware E-Commerce module requires Microsoft IIS.
ww.dll
Web pages written by Siriusware Inc., a Siriusware client or a third party contain function calls to the ww.dll API. These calls are used by ww.dll to provide the interactive functionality for a web site. The ww.dll reads data from and writes data to the SiriusSQL database. One or more instances of ww.dll run continuously, communicating directly with the SiriusSQL database. The ww.dll converts the data entered through the web site and the data retrieved from SiriusSQL application into XML strings.
19

ww_sales
The XML strings generated by ww.dll describe sales, guest information and other data. As described in Appendix A: Detailed description of Sales Host operation, XML strings describing sales are written to a table in the SiriusSQL database named ww_sales. These strings are picked up from ww_sales by Sales Host. Sales Host then turns the XML strings into actual sales in the data.
The ww.dll goes directly to SiriusSQL application for information and only at the completion of a sale does it send an XML string to the ww_sales table for processing. For more information on ww_sales strings, see the ww.dll API Reference.
Sales Host
Sales Host picks up sales from ww_sales one by one, processes them and returns a valid sale number for each. Sales Host is connected to all middleware except TallyEZ (SalesEZ, RentEZ, BookEZ and PrintEZ) applications. The ww.dll is not connected to any middleware. The ww.dll must be running continuously to take incoming sales information and provide database information to the web pages. If Sales Host needs be taken offline for a software update or data troubleshooting, visitors/guests using the web site do not have to wait to use the web site – the sales generated through the web pages are processed when Sales Host is running again.
The E-Commerce Sales Host is basically the Salesware Sales application, running in web mode (a few changes are made to the Sales32c.INI file to set it up for web mode). Multiple copies of Sales Host can run simultaneously (on separate computers) to consume the sales generated by ww.dll, keeping lag time to a minimum and to complete the sales in the system, if needed. A separate salespoint-level computer is required for each Sales Host – this computer doesn’t have to be very fast but is where no one can interfere with its functioning. Some error processing is available (e.g., if a sale fails for some reason, you can view the reason for failure).
For detailed specifications for the Sales Host computer, see the Salesware System Architecture and Specifications document. If you are using Print At Home Tickets application, you need more memory than you would if you weren’t using it. This is because PDF generation is fast or slow depending on how much real memory you have.
Sales Host checks every n seconds (configurable in the Sales32c.INI file) to see if any new sales have been generated by ww.dll. Pause and Continue buttons are provided to let you stop and resume the processing of sales. You can resubmit by pausing the application (using the Pause button), clicking the Local Errors button, and then selecting the sale from the Web Sales dialog, and clicking the Resubmit button. Then, when you click the Continue button the application resubmits the sale for processing.
It is not possible to print through Sales when it is in web mode, as is possible when in Classic mode, because errors in printing would cause a halt to the processing of sales generated by the web site.
For a detailed description of all the settings you can use in the Sales32c.INI file, see the Salesware .INI Settings Reference.
20
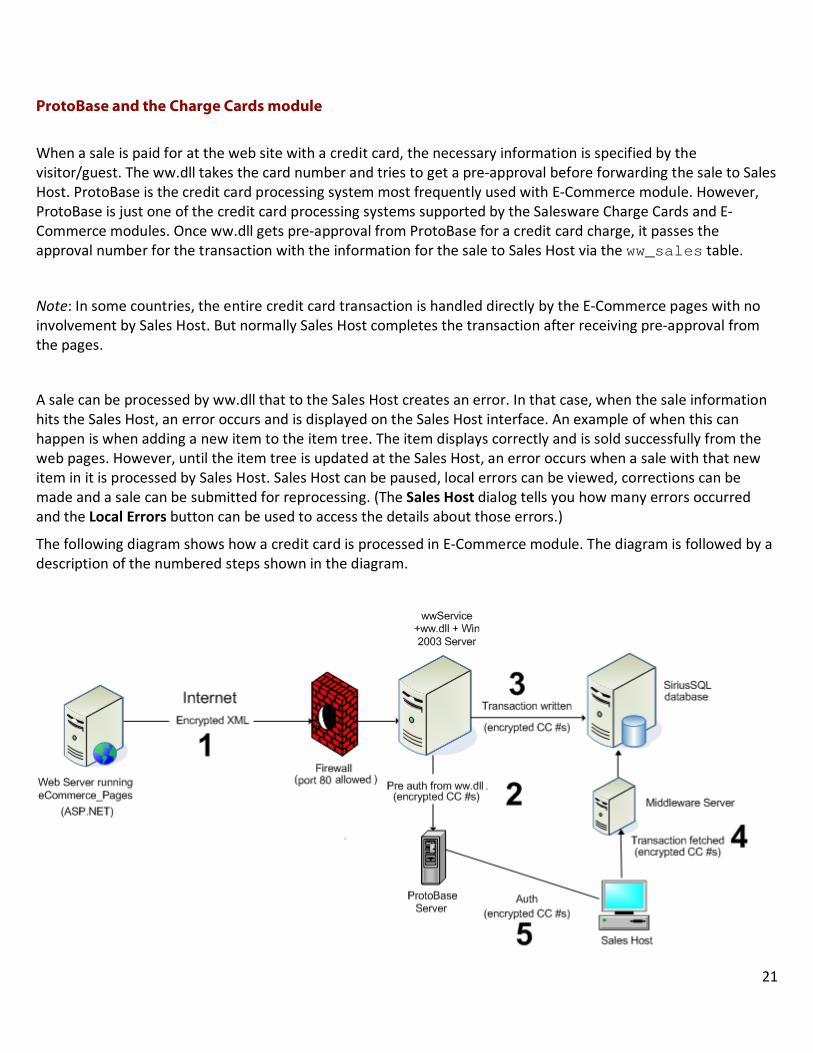
ProtoBase and the Charge Cards module
When a sale is paid for at the web site with a credit card, the necessary information is specified by the visitor/guest. The ww.dll takes the card number and tries to get a pre-approval before forwarding the sale to Sales Host. ProtoBase is the credit card processing system most frequently used with E-Commerce module. However, ProtoBase is just one of the credit card processing systems supported by the Salesware Charge Cards and E-Commerce modules. Once ww.dll gets pre-approval from ProtoBase for a credit card charge, it passes the approval number for the transaction with the information for the sale to Sales Host via the ww_sales table.
Note: In some countries, the entire credit card transaction is handled directly by the E-Commerce pages with no involvement by Sales Host. But normally Sales Host completes the transaction after receiving pre-approval from the pages.
A sale can be processed by ww.dll that to the Sales Host creates an error. In that case, when the sale information hits the Sales Host, an error occurs and is displayed on the Sales Host interface. An example of when this can happen is when adding a new item to the item tree. The item displays correctly and is sold successfully from the web pages. However, until the item tree is updated at the Sales Host, an error occurs when a sale with that new item in it is processed by Sales Host. Sales Host can be paused, local errors can be viewed, corrections can be made and a sale can be submitted for reprocessing. (The Sales Host dialog tells you how many errors occurred and the Local Errors button can be used to access the details about those errors.)
The following diagram shows how a credit card is processed in E-Commerce module. The diagram is followed by a description of the numbered steps shown in the diagram.
21
1. Sale information is collected and processed by ww.dll. In this example, the pages are hosted on one web server and ww.dll is hosted on another, but both can be on the same server, behind the firewall (open firewall port 443 instead of 80). When they are on separate servers, the information is encrypted via XML and passed through a firewall. The pages perform filtering and input validation to combat SQL injection attacks.
2. The server gets pre-authorization for the credit card. This is in plain text, but would be only on your LAN, which would typically be secure.
3. The server writes the details of the transaction to the SQL database. All sensitive information is encrypted. 4. Sales Host fetches the details of the transaction. The encrypted settlement string is retrieved from the
database and decrypted. 5. Sales Host gets authorization for the credit card and processes the sale. This is in plain text, but would be
only on your LAN, which would typically be secure.
Web pages
Most Siriusware clients use the default web pages provided by Siriusware Inc. The default pages are written in ASP.NET/VB.NET and provide the front-end for ww.dll. The pages create and submit sales to ww.dll which in turn submits the sales to the SQL database for pickup/processing by Sales Host. The source code for these pages is compiled into .dlls and is not viewable or accessible to clients.
The current set of default web pages settings are documented in the Site Configuration Settings. The default pages currently cover the following functionality:
• Customizable pages written in ASP.NET • Integrated with the rest of Salesware • Sales are live (no need to sync or import in batches) • Ticket sales (including items with modifiers and Dynamic Pricing capability) • Print At Home Tickets sales • Real-time inventory • Pass sales/renewals • Guest photo upload capability • Reservation Headers and marketing information collection • Guest record creation and editing with web passwords and customizable (user-defined) fields • Charge to stored credit card • Charge to accounts • Group functionality (who can see/buy a different set of items from other visitors/guests, controlled by a
log-in) • Customizable e-mail confirmations in text or HTML format • Selection of which pages are served using HTTPS and which are served using HTTP • Password reset • Account lockout controllable by a SysManager setting • In-House Cards lookup, money loading and sale payment
22

• Interface to the Rentals module • Interface to the Retail module • Support for Max4Sale and Points4Sale capability • Club Management capability
eCommerce_Pages_xxxx.exe vs. custom-developed web pages
The E-Commerce pages are released in a file named eCommerce_Pages_xxxx.exe. xxxx refers to the version number of the pages. The contents of this file are documented in the Salesware E-Commerce Reference. In addition, along with each release of the pages, Siriusware Inc. produces a document that describes how to updating your existing pages. You could install the new set of default pages but you would lose all of your custom changes. This document describes in detail how you update your custom pages with the changes required to implement the enhancements and bug fixes in the latest release of the pages.
You can also create your own pages from scratch. However, in order to create your own web pages, you need significant Internet application development experience. Often clients need to work directly with Siriusware Inc. developers on a contract basis. Although you can develop your application in any Internet development environment, Siriusware’s chosen platform is ASP.NET and that is what Siriusware Inc. offers the most assistance with. Clearly, creating your own web application would be a significantly larger time and resource investment. You also need a detailed understanding of how ww.dll works. For a detailed description of how ww.dll works, see the ww.dll API Reference.
eCommerce_Config_xxxx.exe
eCommerce_Config_xxxx.exe was created to contain a set of default settings files and templates. xxxx refers to the version of the configuration (config) files. Updated and new configuration files are released with each version of E-Commerce module. The current set of config settings are documented in the Site Configuration Settings. The contents of eCommerce_Config_xxxx.exe include:
• E-mail templates • Liability text template: liabilityText.txt • XML files
• DCI2DCI.xml • dynamicControls.xml • MiscTables.xml • StrTrans0.xml
• Style sheet: siriusware.css • Configuration file: siteconfig.config
23
wwService
The wwService is a web service pass-through wrapper for ww.dll. The service enables the pages of the web site to be on a different computer (different site, even) than ww.dll. Typically, this would be installed on a server at a local site along with ww.dll. When using wwService, clients should be using IP addresses to define the location of the ww.dll rather than a computer name.
If the Internet is to be used as transport, then encryption is enabled (with matching pass phrases) on both wwService and the web site hosting the web pages. The encryption capability in communications between wwService and the web site eliminates the need for an SSL certificate on the wwService computer. For more information on how this is done, see Secure web service.
SiriusSQL database (on the database server)
The SiriusSQL database is the database format (tables, records and fields) designed by Siriusware Inc. for use with the Salesware product. The same SiriusSQL database is used for both “Classic” Salesware and E-Commerce modules. Each time Salesware is released, there are usually changes made to the SiriusSQL database. Siriusware Inc. provides an update script that clients run when updating to the latest version of Salesware and the SiriusSQL database. When both Classic Salesware and E-Commerce modules are deployed, the same instance of SiriusSQL application is shared by both.
Messenger Service
Messenger Service application is responsible for generating automated messages to pre-established email recipients. This application handles email being sent from the Sales Host and pod booking emails. Also, Messenger Service creates an alert system that works in conjunction with the Kiosk module and Cash Management functionality. This service also monitors conditions such as duplicates and SQL errors of Kiosk, Cash Management and basic Sales functionality. See the Messenger Service document for more information on this application.
Siriusware Inc. revised its SMTP email function to use the Messenger Service application. This service provides TLS encryption required by cloud based exchange servers along with the ability to configure the IP address and port for the external server. The SMTP email that is driven through the MessengerService includes:
• E-Commerce Sales Host based emails • Emails when booking levels reach the specified thresholds (SysManager > Preferences > Pod Bookings) • The existing Notifications functionality based on salespoint activities (SysManager > Activities > System
Lists > Configure Notifications)
24
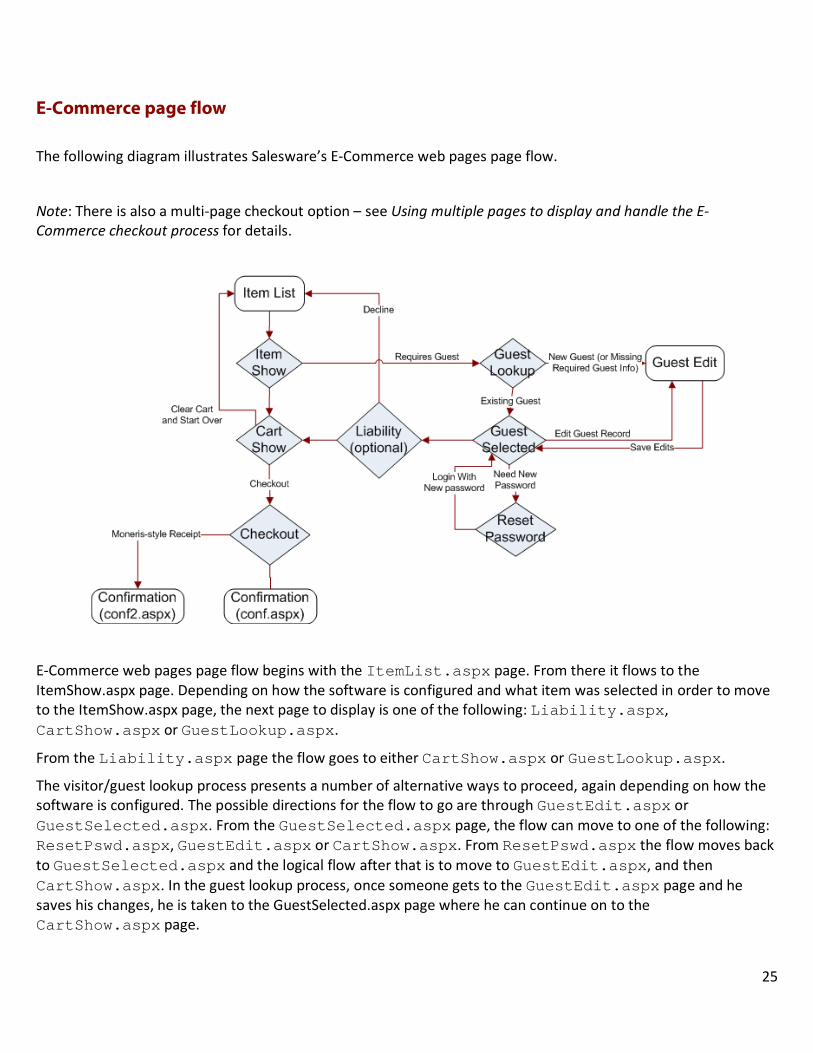
E-Commerce page flow
The following diagram illustrates Salesware’s E-Commerce web pages page flow.
Note: There is also a multi-page checkout option – see Using multiple pages to display and handle the E-Commerce checkout process for details.
E-Commerce web pages page flow begins with the ItemList.aspx page. From there it flows to the ItemShow.aspx page. Depending on how the software is configured and what item was selected in order to move to the ItemShow.aspx page, the next page to display is one of the following: Liability.aspx, CartShow.aspx or GuestLookup.aspx.
From the Liability.aspx page the flow goes to either CartShow.aspx or GuestLookup.aspx.
The visitor/guest lookup process presents a number of alternative ways to proceed, again depending on how the software is configured. The possible directions for the flow to go are through GuestEdit.aspx or GuestSelected.aspx. From the GuestSelected.aspx page, the flow can move to one of the following: ResetPswd.aspx, GuestEdit.aspx or CartShow.aspx. From ResetPswd.aspx the flow moves back to GuestSelected.aspx and the logical flow after that is to move to GuestEdit.aspx, and then CartShow.aspx. In the guest lookup process, once someone gets to the GuestEdit.aspx page and he saves his changes, he is taken to the GuestSelected.aspx page where he can continue on to the CartShow.aspx page.
25

Once someone gets to the CartShow.aspx page through the process described above, he has the option to clear the cart and start over (ItemList.aspx), continue shopping (ItemList.aspx) or proceed to checkout (Checkout.aspx).
Other options exist from each of the pages via direct links located in the header portion of the page. One can do a guest lookup (GuestLookup.aspx), a pass renewal (RenewPass.aspx) or an In-House Cards card lookup (DWLookup.aspx). If a pass renewal is done, then, depending on the configuration, the flow goes either to ItemShow.aspx or ItemList.aspx. If one does an In-House Cards card lookup, then this can lead to either the GuestSelected.aspx page, the GuestEdit.aspx page or the CartShow.aspx page. One can also get to the ItemList.aspx page or the CartShow.aspx page from the direct links in the header.
After the Checkout.aspx page, either the conf.aspx or conf2.aspx page displays (this is another configuration choice).
Other pages which could come into play are: cvv.aspx, error.aspx and gettix.aspx. The cvv.aspx page is basically an image that can be displayed on the checkout page. The error.aspx page displays under certain error conditions. And the GetTix.aspx page is only involved when selling Print At Home Tickets items.
Configuration and use of E-Commerce module
E-Commerce module licensing
E-Commerce module is licensed using a standard Salesware license as described in the Salesware Modules, Licensing and Maintenance document. The following points are specific to E-Commerce licenses:
• E-Commerce module requires a WebSales (W) mode license for the Sales Host. Sales Host is a standard salespoint that runs in E-Commerce (web) mode.
• There are five other modules that can be purchased for use with E-Commerce module: Charge Cards, Memberships/Passes, In-House Cards, Reservations and Rentals. If any of these modules is already in use at the client site, then there is no additional charge to use it.
• One guest (GST) license is included. • If the client has purchased Print At Home Tickets application, one ACC (Access Control, a.k.a., Ticketing)
license is added.
Note: that Print At Home Tickets module is sold separately from E-Commerce module.
The following screen capture shows how a fully configured E-Commerce module installation looks from SysManager > Preferences > Sales Point Licenses:
26
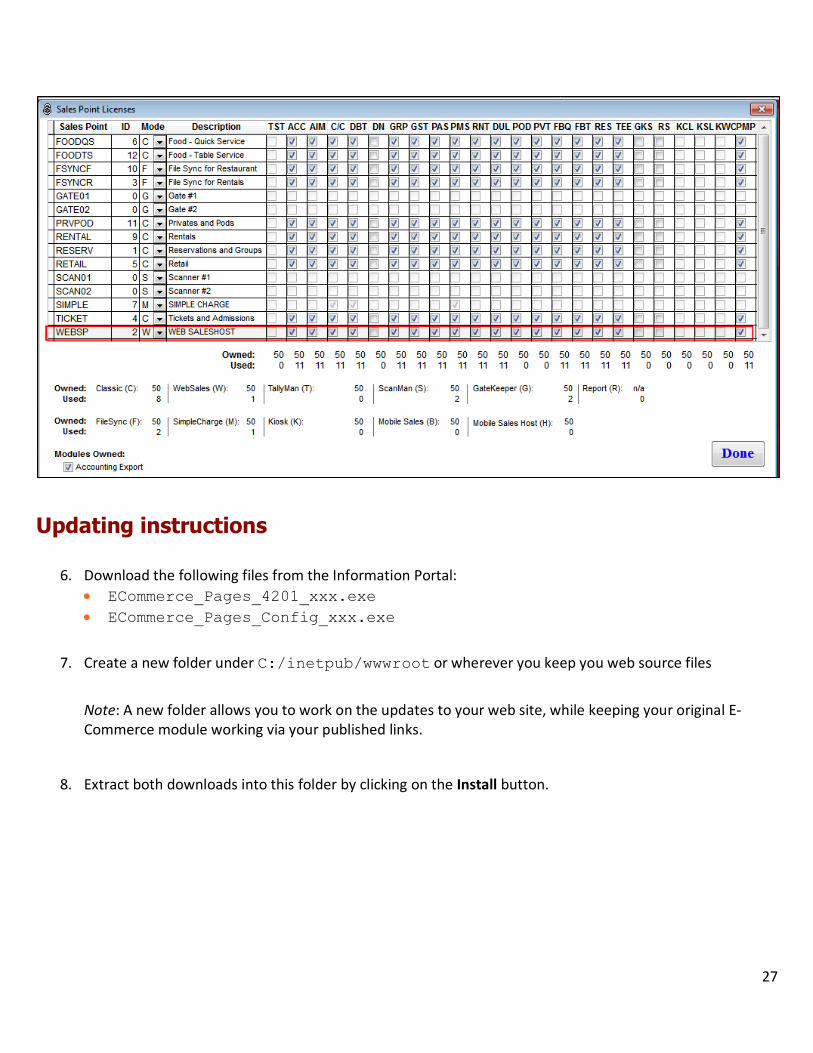
Updating instructions
6. Download the following files from the Information Portal: • ECommerce_Pages_4201_xxx.exe• ECommerce_Pages_Config_xxx.exe
7. Create a new folder under C:/inetpub/wwwroot or wherever you keep you web source files
Note: A new folder allows you to work on the updates to your web site, while keeping your original E-Commerce module working via your published links.
8. Extract both downloads into this folder by clicking on the Install button.
27

9. Copy all files from the DefaultConfig folder, and then paste them into the root folder you created for the new site.
10. Rename the web.config.default to web.config 11. Ensure the \IIS_IUSRS user has Modify permissions assigned to the following files/folders:
• Images folder • XMLfiles folder• SiteConfig.config
a. Right click on the file or folder and go to Properties > Security tab
28
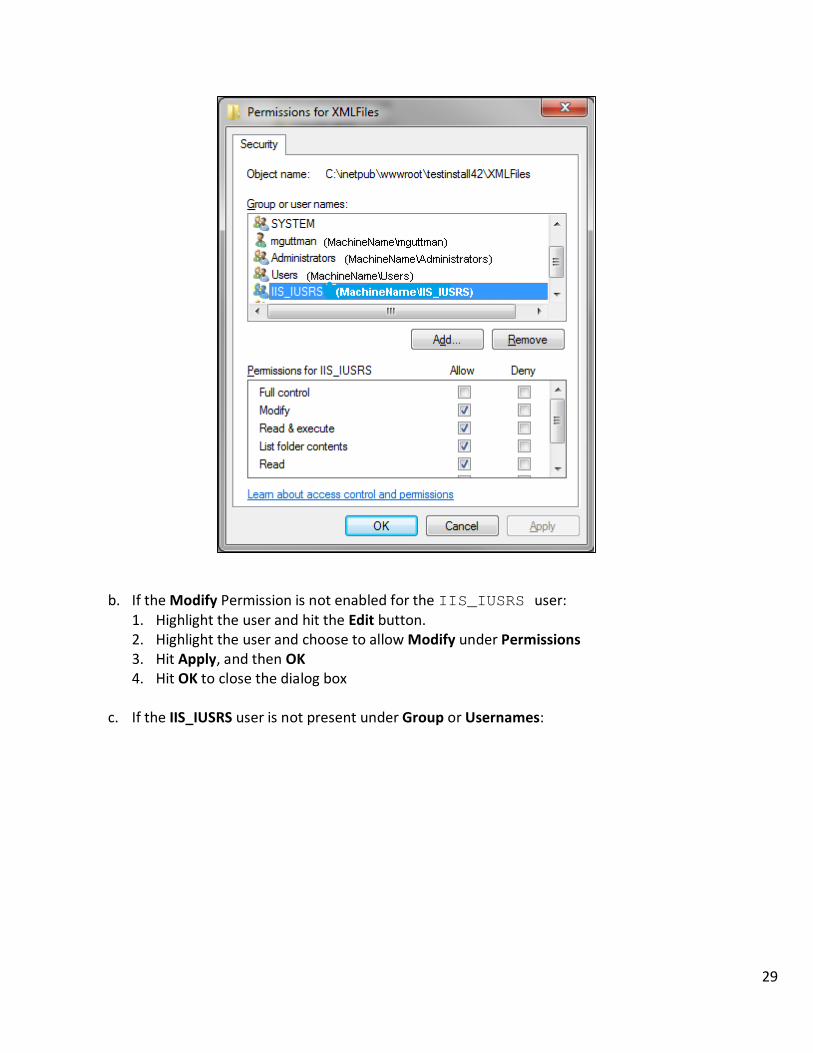
b. If the Modify Permission is not enabled for the IIS_IUSRS user: 1. Highlight the user and hit the Edit button. 2. Highlight the user and choose to allow Modify under Permissions 3. Hit Apply, and then OK 4. Hit OK to close the dialog box
c. If the IIS_IUSRS user is not present under Group or Usernames:
29

1. Click the Edit button on the Security tab. 2. On the next window click the Add button. 3. The From this location setting is set to the computer name. If it is not:
• Click the Locations button. • Select the computer name from the list of locations and click OK.
4. Enter IIS_IUSRS into the Enter the object names to select text box and click the Check Names button.
30

5. The entry in the Enter the object names to select text box appears as MACHINENAME\IIS_IUSRS.
6. Click OK to close the dialog box. 7. With the IIS_IUSRS user highlighted choose to Allow Modify under Permissions. 8. Click OK to close the dialog box.
12. Also, ensure that the ReadOnly check box is unchecked on the General tab for the files and folders mentioned above.
Note: This seems to be often overwritten and leads to an error trying to save changes from the Admin Panel.
13. If you are using wwService to connect to the ww.dll, make the following changes. (The SiteConfig.config file is set up for a local connection to the ww.dll by default)
a. Open the SiteConfig.config file in the text editor of your choice b. Find the Key localhost.wwSalesSvc and replace 000.000.000.000 in the Value with the IP
Address of your wwService. c. Find the Key UseWebService and change the Value to 1. d. Find the Key EncryptSvcComm and set the Value to either 1 or 0 depending on how your
wwService is set up. e. Your site is now able to connect and you can make additional modifications to settings via the
Admin Panel.
14. Make the following changes in Internet Information Services (IIS) Manager. a. Under the MachineName drill down into Sites > Default Web Site. b. Locate the folder you created in Step 2 above, right-click on it and select Convert to Application
31

c. On the Add Application dialog click the Select button and select the appropriate Application Pool which must be configured as follows: • Use the .NET Framework v4.0.30319 • Use Integrated managed pipeline mode • Enable 32-Bit Applications must be set to True
d. Click OK to close the Add Application dialog
SysManager setup
To access the new Web Administration Panel, you must first set up a web admin operator role. Then, you must establish an operator with that role in SysManager.
1. Open SysManager as an administrator 2. Go to Preferences > Security > New on the Security Roles Screen 3. Add a name such as, “WebAdmin”, on the Role Description. 4. Scroll down and add the Setting Web – Administrative functions for Ecommerce website to the Assigned
Settings column 5. Click Save to close the dialog 6. Assign this new role to an existing user or create a new user and give them this role. (Don’t forget to set a
password.) This role allows an operator to log into the admin panel of the E-Commerce web site.
Note: You are not able to log-in to the Admin Panel using the ADMIN username and password.
Website administration
Log-in as a Web Administrator
1. Open the new E-Commerce web site in a browser. 2. Bring up the Admin Panel by using the Admin Login link at the bottom of any page
(ItemList.aspx/ItemShow.aspx, etc.). Or alternatively, go to siteroot/admin/login.aspx. Log-in as the operator with web admin role, using the same password with which you would log into SysManager.
Note: The Admin log-in link can be activated/deactivated by changing the value of the ShowAdminLoginLink key in SiteConfig.config.
Note: passwords are not case sensitive.
32
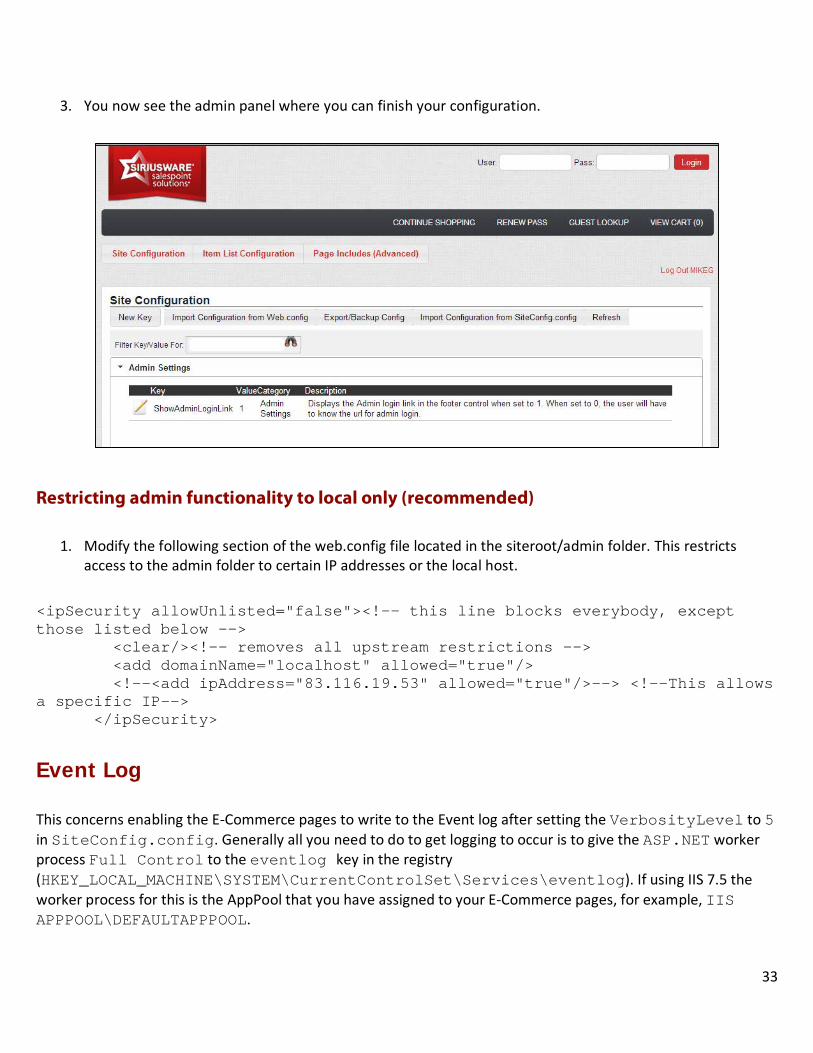
3. You now see the admin panel where you can finish your configuration.
Restricting admin functionality to local only (recommended)
1. Modify the following section of the web.config file located in the siteroot/admin folder. This restricts access to the admin folder to certain IP addresses or the local host.
<ipSecurity allowUnlisted="false"><!-- this line blocks everybody, except those listed below --> <clear/><!-- removes all upstream restrictions --> <add domainName="localhost" allowed="true"/> <!--<add ipAddress="83.116.19.53" allowed="true"/>--> <!--This allows a specific IP--> </ipSecurity>
Event Log
This concerns enabling the E-Commerce pages to write to the Event log after setting the VerbosityLevel to 5 in SiteConfig.config. Generally all you need to do to get logging to occur is to give the ASP.NET worker process Full Control to the eventlog key in the registry (HKEY_LOCAL_MACHINE\SYSTEM\CurrentControlSet\Services\eventlog). If using IIS 7.5 the worker process for this is the AppPool that you have assigned to your E-Commerce pages, for example, IIS APPPOOL\DEFAULTAPPPOOL.
33
To perform this process follow these steps: 1. Click Start, and then click Run. 2. In the Open text box, type, “regedit”. 3. Locate the following registry subkey:
HKEY_LOCAL_MACHINE\SYSTEM\CurrentControlSet\Services\eventlog
4. Right-click the eventlog subkey and select Permissions from the menu. 5. Click the Add button to open the Select Users or Groups window. 6. Make sure that Select this object type is set to Users, Groups, or Built-in security principals. 7. Make sure that From this location is set to your local machine name. 8. Enter the following into the Enter the object names to select text box: IIS
AppPool\DefaultAppPool substituting the AppPool that you have assigned to your E-Commerce pages for DefaultAppPool.
9. Click the Check Names button and you should now see the name of your AppPool underlined in the text box.
10. Click OK to return to the Permissions window. 11. Select the Full Control check box under the Allow column under Permissions for DefaultAppPool. 12. Close the Registry Editor.
Sometimes this will not be enough to enable logging to occur. If this is the case, you need to create an event source under the Application Event log in the Registry Editor.
To perform this operation, follow these steps: 1. Click Start, and then click Run. 2. In the Open text box, type, “regedit”. 3. Locate the following registry subkey:
HKEY_LOCAL_MACHINE\SYSTEM\CurrentControlSet\Services\eventlog\Application
4. Right-click the Application subkey, point to New, and then click Key. 5. Enter Siriusware E-Commerce Pages for the key name. 6. Close the Registry Editor.
Setting up E-Commerce e-mail
This section describes how to set up the site config file for all of the possible E-Commerce e-mail.
34

General settings for e-mail sent from the pages
The following mail settings are the basic fields involved in setting up e-mail from the E-Commerce application (only edit the portion between the double-quotes that follows value=):
• Site Admin Panel > Guest Related Settings > MailFromAddr value = [email protected] • Site Admin Panel > Guest Related Settings > MailFromName value = Your Company • Site Admin Panel > Guest Related Settings > MailCC value = "" • Site Admin Panel > Guest Related Settings > MailBCC value = "" • Site Admin Panel > Guest Related Settings > MailSubject value = Sales confirmation - Sale # • Site Admin Panel > Guest Related Settings > MailAttachment value = template/test.doc
The MailFromAddr and MailFromName keys are what display in the From field on e-mail from your site. The values entered for these keys are a valid e-mail address and your company name (typically), respectively. The MailCC and MailBCC keys are used when you want to CC or BCC someone with the confirmation e-mail and the values entered for these can be left blank or populated with valid e-mail addresses. If entering multiple e-mail addresses into either of these keys, each e-mail address is separated with only a comma. Both the MailCC and MailBCC key values are limited to a maximum of 100 characters. The subject of the confirmation e-mail gets populated from what is in the value for the MailSubject key. The default value is Sales confirmation - Sale # , which is usually adequate because the sale number automatically gets appended to this in the Subject line of the e-mail.
If you would like to include an attachment with each of your e-mail confirmations, use the MailAttachment key where the value can be any valid file path within the web application’s root. If the file doesn’t exist or is inaccessible, the mail is still sent without the attachment. Limitations on e-mail size are dictated by the e-mail servers on both the transmitting and receiving ends and are not set by E-Commerce module, so including an e-mail attachment with your confirmations takes these limitations into consideration.
Configure central management of the regular expression used for email address validation
Use the following key to centrally manage the regular expression used for email address validation throughout the E-Commerce pages substituting the regular expression you want for your situation:
Site Admin Panel > Guest Related Settings > emailRegEx value = ^([0-9a-zA-Z]([-.\w]*[0-9a-zA-Z])*@([0-9a-zAZ][-\w]*[0-9a-zA-Z]\.)+[a-zA-Z]{2,9})$
35
If present in the site config file, it overrides any other regular expressions that are used for email address validation in the following files: Email.ascx, Checkout.aspx, Checkout2.aspx and Guestlookup.aspx.
General settings for e-mail sent from Sales Host
You can have different settings for the e-mail confirmations that get sent from the Sales Host (ChargedTemplate and PAHTemplate) as opposed to those that get sent from the pages (SavedTemplate and FinalizedTemplate) upon completion of an online sale. The following settings are used to override the general e-mail settings listed above for the pages and are used by the Sales Host if the value for the key SHEMoverride is set to "1":
• Site Admin Panel > Guest Related Settings > SHEMoverride value = 1 • Site Admin Panel > Guest Related Settings > SHMailFromAddr value = [email protected] • Site Admin Panel > Guest Related Settings > SHMailFromName value = Your Company • Site Admin Panel > Guest Related Settings > SHMailCC value ="" • Site Admin Panel > Guest Related Settings > SHMailBCC value =""
The SHMailFromAddr and SHMailFromName keys are what display in the From field on e-mail sent out from Sales Host. The values entered for these keys are valid e-mail addresses and your company name (typically), respectively. The SHMailCC and SHMailBCC keys are used when you want to CC or BCC someone with the confirmation e-mail sent out from Sales Host. The values entered for these can be left blank or populated with valid e-mail addresses. Both the SHMailCC and SHMailBCC key values are limited to a maximum of 100 characters. If you are entering multiple e-mail addresses into either of these keys, each e-mail address is separated with only a comma.
Generating a second e-mail confirmation from the Sales Host
It is possible to have a second e-mail get sent to the web purchaser for a sale that does not contain a Print At Home Tickets item (Print At Home Tickets application automatically generate an e-mail that gets sent from the Sales Host upon completion of the sale). The second e-mail confirmation does not get sent until the sale has been finalized by the Sales Host and the credit card charge has been finalized. The following site config settings are used to get this to work:
• Site Admin Panel > Guest Related Settings > SendChgEmail value = 1 • Site Admin Panel > Guest Related Settings > ChgEmailSubj value = Sale Complete - Sale #
36
The SendChgEmail key controls whether or not the second e-mail is sent. A value of 1 makes it so the second e-mail is sent, while a value of 0 deactivates this functionality. The subject of the second confirmation e-mail gets populated from what is in the value for the ChgEmailSubj key. The default value is Sale Complete - Sale #. This is usually adequate because the sale number automatically gets appended to this in the Subject line of the e-mail.
In addition, in order for the second e-mail confirmation to work, Messenger Service application must be installed and functioning. Refer to the Messenger Service documentation for further information.
SMTP settings
With the move to .NET Framework 4.0, the SMTP settings for email delivery from the E-Commerce pages now look like this example, which is located outside of the <appSettings> section of the web.config file:
<system.net> <mailSettings> <smtp deliveryMethod="Network" from="[email protected]"> <network host="Exchange10" port="25" defaultCredentials="true" userName="" password="" enableSsl=”False”/> </smtp> </mailSettings> </system.net>
You enter the IP address of your SMTP Server for network host. If a username and password are not used to authenticate with your SMTP server, those settings can be omitted.
In addition, if you need to send e-mail from the E-Commerce pages to the SMTP server using the Secure Sockets Layer (SSL), use the site config setting enableSsl=“True”.
E-mail formats
The following settings are used to set the format (text or HTML) for e-mail generated through E-Commerce module (only edit the portion between the double-quotes that follows value=):
• Site Admin Panel > Guest Related Settings > MailFormat value= text • Site Admin Panel > Guest Related Settings > SHMailFormat value= text
Set the value for either of these keys to text to use plain text e-mail templates or set to html to use HTML-formatted e-mail templates. Be sure to update the appropriate templates to include the wording you desire and
37
update the pathname and filename for the templates as appropriate. See the section Editing e-mail templates for information on updating the default templates.
Setting up Sales Host to send an e-mail in the event that Sales Host encounters a problem when processing the sale
Sales Host can react to three different error situations:
1. Sale does not get saved/finalized and is not a credit card approval issue, but most likely a setup issue 2. Credit card approval error, and 3. Sale gets saved/finalized, but there was a problem generating Print At Home Tickets items.
If you resubmit the sale for processing and Sales Host encounters the problem again, Sales Host resends the error e-mail. If you resubmit the sale for processing and Sales Host successfully processes the sale, Sales Host sends out the second confirmation e-mail or the Print At Home Tickets e-mail upon completion of sale processing.
The following site config file settings are used to specify templates and subjects for each of these scenarios:
• Site Admin Panel > Guest Related Settings > ErrTemplate1 value= template/SaleErrorTemplate1.txt • Site Admin Panel > Guest Related Settings > ErrTemplate2 value= template/SaleErrorTemplate2.txt • Site Admin Panel > Guest Related Settings > ErrTemplate3 value= template/SaleErrorTemplate3.txt • Site Admin Panel > Guest Related Settings > ErrEmailSubject1 value = ECommerce Sale error - General
Setup • Site Admin Panel > Guest Related Settings > ErrEmailSubject2 value = ECommerce Sale error - Credit Card • Site Admin Panel > Guest Related Settings > ErrEmailSubject3 value = ECommerce Sale error - Tickets
The templates can be worded in the way you see fit for these error scenarios and they can use all the same variables as Print At Home Tickets e-mail, with the addition of {{err}}, which has the actual error message from the Sales Host. These variables include:
• {{first_name}} – the purchaser’s first name • {{last_name}} – the purchaser’s last name • {{sale_no}} – the wwsale_id for the sale
Setting up the E-Commerce pages to send an e-mail in the event that ProtoBase goes offline
The E-Commerce pages can send a credit card e-mail alert to the e-mail address specified in the site config file setting Site Admin Panel > Guest Related Settings > AdminEmail value = [email protected]. This e-mail is sent if ProtoBase goes offline or if ProtoBase is unable to communicate with the bank during a ww.dll
38
processsale call. In both of these cases, online sales charged to credit cards do not occur until the issue is resolved, so this e-mail notifies the appropriate person of the problem.
The credit card e-mail alert relies on a template that needs to be specified in the following site config file setting: Site Admin Panel > Guest Related Settings > CCTimeoutTemplate value = template/CCTimeout.txt. The template CCTimeout.txt can be a simple text file located in the template folder with your other e-mail templates. There are two fields that can be populated when the e-mail gets generated and sent: {{datetime}} and {{wwsale_id}}. {{datetime}} is the date and time when the problem occurred and {{wwsale_id}} is the wwsale_id of the sale affected by the problem.
Editing e-mail templates
There are several e-mail templates, both text- and HTML-formatted, that are located in the template folder in the virtual directory created during setup (usually C:\Inetpub\wwwroot\E-Commerce\template). These include ChargedTemplate.txt and .html, FinalizedTemplate.txt and .html, PasswordReset1.txt and .html, PasswordReset2.txt and .html, and SavedTemplate.txt and .html. The text portion of these default e-mail templates needs to be edited to provide information pertinent to your business.
The following settings contain the path and name of the file to use for the e-mail confirmations:
• Site Admin Panel > Guest Related Settings > SavedTemplate value = template/SavedTemplate.txt • Site Admin Panel > Guest Related Settings > FinalizedTemplate value = template/FinalizedTemplate.txt • Site Admin Panel > Guest Related Settings > ChargedTemplate value = template/ChargedTemplate.txt • Site Admin Panel > Guest Related Settings > PswdEmailTemplate1 value = template/PasswordReset1.txt • Site Admin Panel > Guest Related Settings > PswdEmailTemplate2 value = template/PasswordReset2.txt
Remember, if you are using HTML-formatted e-mail to update the template name accordingly (e.g., Site Admin Panel > Guest Related Settings > SavedTemplate value = template/SavedTemplate.html). Also, if you move your templates to a different directory, be sure to update the path accordingly.
Editing confirmation e-mail templates
There are two default confirmation e-mail templates that get sent out from the web pages after the online sale has finished processing, the FinalizedTemplate (used for sales that contain only passes and/or Print At Home Tickets items – these sales are automatically finalized) and the SavedTemplate (used for sales that contain any non-pass and/or non-Print At Home Tickets items – these sales are automatically saved). Both the text- and HTML- formatted templates contain tags that are similar to a mail merge document. Each tag is identified by double curly brackets as shown here: {{tag_name}}. Tags are processed and filled-in when the e-mail is generated. Available tags are listed in the table below and any tag you don’t want to use can be omitted.
39
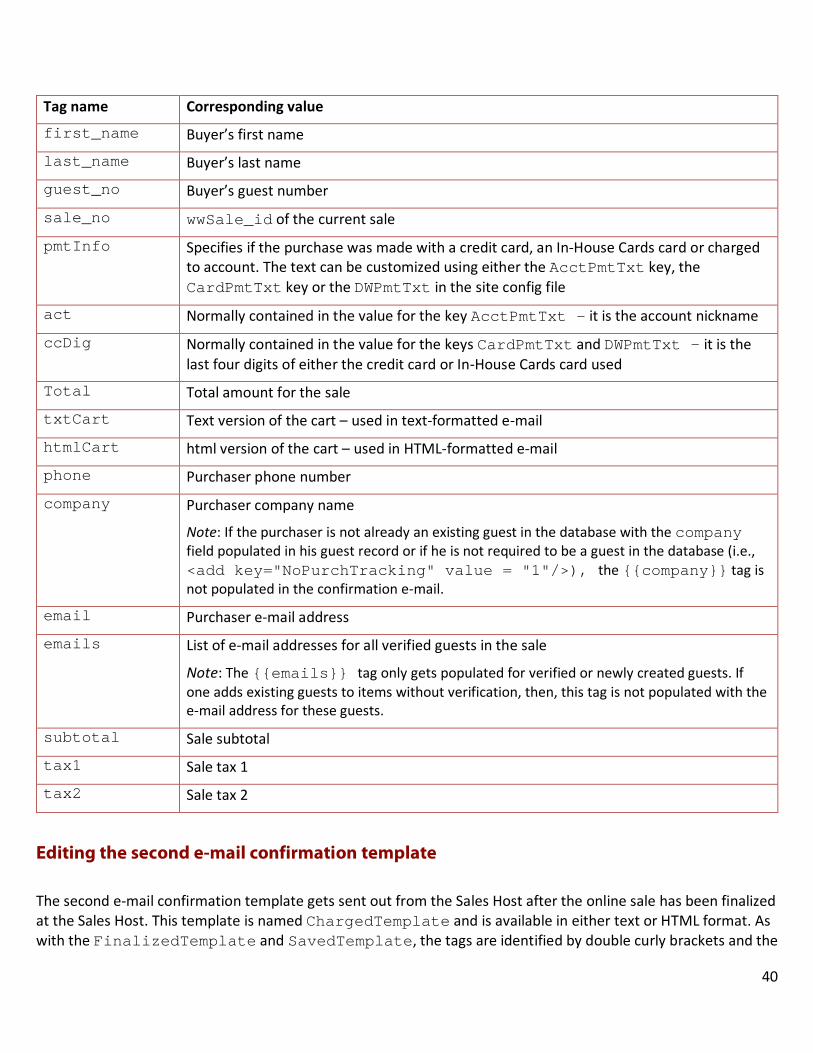
Tag name Corresponding value
first_name Buyer’s first name
last_name Buyer’s last name
guest_no Buyer’s guest number
sale_no wwSale_id of the current sale
pmtInfo Specifies if the purchase was made with a credit card, an In-House Cards card or charged to account. The text can be customized using either the AcctPmtTxt key, the CardPmtTxt key or the DWPmtTxt in the site config file
act Normally contained in the value for the key AcctPmtTxt – it is the account nickname
ccDig Normally contained in the value for the keys CardPmtTxt and DWPmtTxt – it is the last four digits of either the credit card or In-House Cards card used
Total Total amount for the sale
txtCart Text version of the cart – used in text-formatted e-mail
htmlCart html version of the cart – used in HTML-formatted e-mail
phone Purchaser phone number
company Purchaser company name
Note: If the purchaser is not already an existing guest in the database with the company field populated in his guest record or if he is not required to be a guest in the database (i.e., <add key="NoPurchTracking" value = "1"/>), the {{company}} tag is not populated in the confirmation e-mail.
email Purchaser e-mail address
emails List of e-mail addresses for all verified guests in the sale
Note: The {{emails}} tag only gets populated for verified or newly created guests. If one adds existing guests to items without verification, then, this tag is not populated with the e-mail address for these guests.
subtotal Sale subtotal
tax1 Sale tax 1
tax2 Sale tax 2
Editing the second e-mail confirmation template
The second e-mail confirmation template gets sent out from the Sales Host after the online sale has been finalized at the Sales Host. This template is named ChargedTemplate and is available in either text or HTML format. As with the FinalizedTemplate and SavedTemplate, the tags are identified by double curly brackets and the
40

tags are processed when the e-mail is generated. Available tags are listed in the table below and any tag you don’t want to use can be omitted
Tag name Corresponding value
first_name Buyer’s first name
last_name Buyer’s last name
sale_no wwSale_id of the current sale
pmtInfo Specifies if the purchase was made with a credit card, an In-House Cards card or charged to account. The text can be customized using either the AcctPmtTxt key, the CardPmtTxt key or the DWPmtTxt in the site config file
act Normally contained in the value for the key AcctPmtTxt – it is the account nickname
ccDig Normally contained in the value for the keys CardPmtTxt and DWPmtTxt – it is the last four digits of either the credit card or In-House Cards card used
Total Total amount for the sale
txtCart Text version of the cart – used in text formatted e-mail
htmlCart HTML version of the cart – used in HTML-formatted e-mail
subtotal Sale subtotal
tax1 Sale tax 1
tax2 Sale tax 2
Editing password reset e-mail templates
There are two password reset e-mail templates that are used in the password resetting process: PasswordReset1 and PasswordReset2. As with the other e-mail templates, the tags are identified by double curly brackets and the tags are processed when the e-mail is generated. Available tags are listed in the tables below and any tag you don’t want to use can be omitted.
The tags contained in PasswordReset1 are:
Tag name Corresponding value
first_name Guest’s first name
last_name Guest’s last name
Guest_no Guest number
41
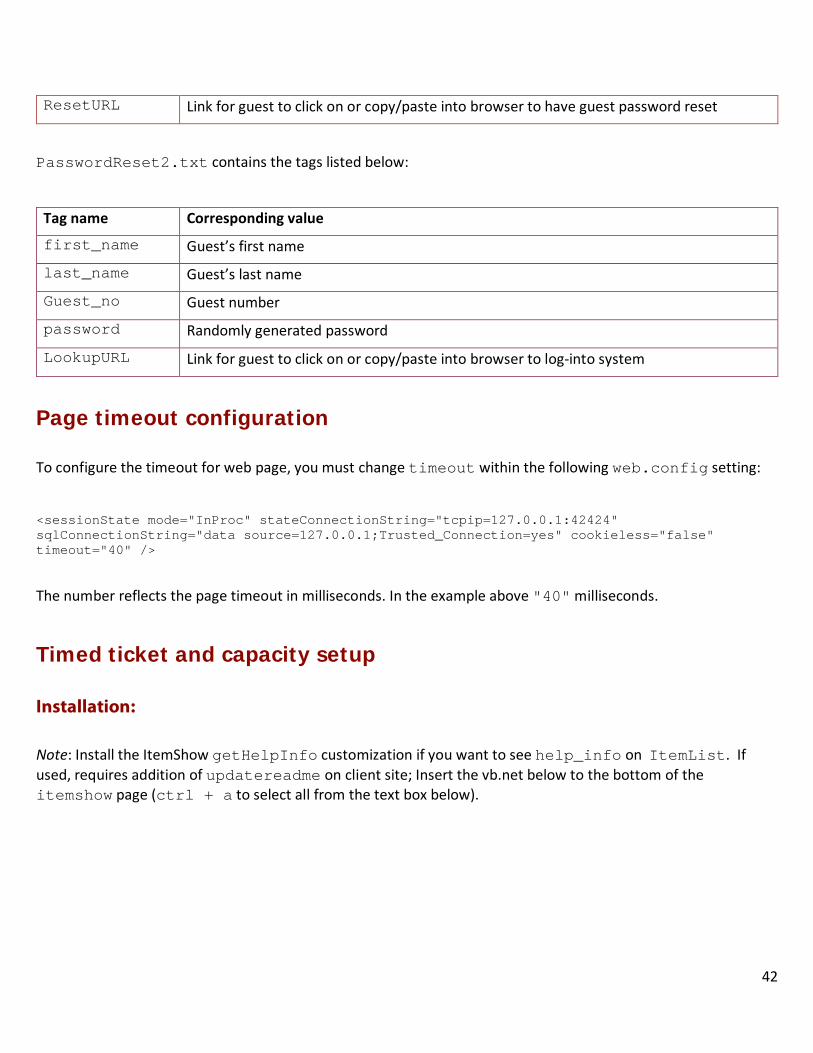
ResetURL Link for guest to click on or copy/paste into browser to have guest password reset
PasswordReset2.txt contains the tags listed below:
Tag name Corresponding value
first_name Guest’s first name
last_name Guest’s last name
Guest_no Guest number
password Randomly generated password
LookupURL Link for guest to click on or copy/paste into browser to log-into system
Page timeout configuration
To configure the timeout for web page, you must change timeout within the following web.config setting:
<sessionState mode="InProc" stateConnectionString="tcpip=127.0.0.1:42424" sqlConnectionString="data source=127.0.0.1;Trusted_Connection=yes" cookieless="false" timeout="40" />
The number reflects the page timeout in milliseconds. In the example above "40" milliseconds.
Timed ticket and capacity setup
Installation:
Note: Install the ItemShow getHelpInfo customization if you want to see help_info on ItemList. If used, requires addition of updatereadme on client site; Insert the vb.net below to the bottom of the itemshow page (ctrl + a to select all from the text box below).
42

1. Copy and paste the following files to the folders listed below • css/jquery.cluetip.css • scripts/jquery.hoverIntent.minified.js • scripts/jquery.cluetip.js • XMLFiles/Xslt/top.xslt • scripts/customplugins/omnimaxJquery.js • scripts/customplugins/getHelpInfo.js
2. Create the following page includes:
Type Location Page Name Include Value
Javascript Foot ItemList.aspx scripts/customplugins/omnimaxJquery.js
Javascript Foot ItemShow.aspx scripts/customplugins/getHelpInfos.js
3. Copy and paste a reference to these files in the <head> tag of the masterpage (you can insert these using the web admin panel if you wish)
4. Using the web admin panel > Item List Configuration > Edit for the effected Item Tree nodes: • Default view = XsltView
<script runat="server"> Dim ShowGrid As String = "" Protected Overrides Sub OnPreRender(ByVal e As EventArgs) MyBase.OnPreRender(e) ShowGrid = Request.QueryString("showgrid") DisplayImages4MultiaddItGroups() ShowCurrentItem() End Sub '' <summary> '' Subroutine will update the carousel with images from the '' first item of the multiaddit group '' </summary> Sub DisplayImages4MultiaddItGroups()
<link rel="stylesheet" media="screen" type="text/css" href="css/jquery.cluetip.css" /> <script src="scripts/jquery.hoverIntent.minified.js" type="text/javascript"></script> <script type="text/javascript" src="scripts/jquery.cluetip.js"></script>
43
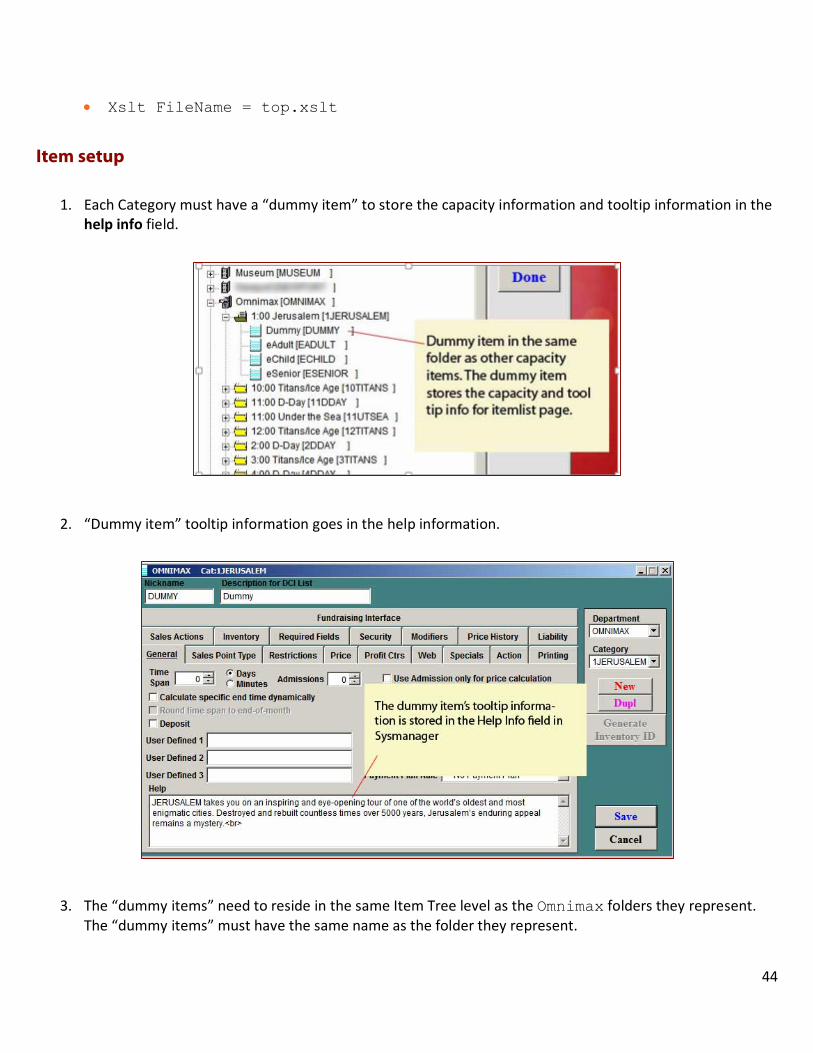
• Xslt FileName = top.xslt
Item setup
1. Each Category must have a “dummy item” to store the capacity information and tooltip information in the help info field.
2. “Dummy item” tooltip information goes in the help information.
3. The “dummy items” need to reside in the same Item Tree level as the Omnimax folders they represent. The “dummy items” must have the same name as the folder they represent.
44

Note: Order is not important, they are hidden by the jQuery, and only exist to store capacity and help info.
Site configuration
The SiteConfig.config vs. web.config • All config settings are now stored in the SiteConfig.config file as opposed to the web.config
file. • The <appSettings> section is empty in the web.config file for this new version of the pages. • SiteConfig.config can be hand edited using the text editor of your choice or edited through the
admin panel
See Site Configuration settings for a complete listing of Siteconfig.config settings.
Site Configuration interface
This interface is accessed through the Admin login > click Site Configuration. The following menu of options are available and are discussed in detail below.
• New Key • Import Configuration from web.config
45

• Export/Backup Config• Import Configuration from siteConfig.config • Refresh • A search box interface labeled Filter Key/Value For: which can be used to search for specific settings • A list of settings organized alphabetically by Category
Importing your existing web.config settings
Import configuration from web.config
This reads values from <appSettings> in the web.config and update them into SiteConfig.config. This was built so you can quickly take an existing site and import their settings one time. Once you import, delete the <appSettings> keys in the web.config file as they are not read by the application.
When you choose this tab you receive the following message:
Click OK to import your settings.
Perhaps the easiest way to import your settings is to copy and paste the <appSettings> section from your existing web.config file, and place them into the empty <appSettings> section in the default web.config file. Once you’ve done that, click on the Import Configuration from Web.config, click OK to the message, and then your settings are imported.
Note: Only the Values are imported from web.config into SiteConfig.config. Categories and Descriptions are left to the user to configure as they see appropriate.
Note: If you import keys from your web.config file that do not already exist in SiteConfig.config, they are placed into a Category called General. Feel free to change the Category and add a Description as you see fit.
46

Importing/exporting SiteConfig.config
• Export/Backup Config the SiteConfig.config to store a snapshot/copy of the configuration. The system labels the file with the date/time, e.g., SiteConfig_20121114_112200.config. The file is saved to the download location that you have set for your browser.
• Import Configuration from SiteConfig.config – this imports settings into your SiteConfig.config file from a previously saved file.
Important: This completely overwrites the existing SiteConfig.config file.
Editing a key
An easy way to edit the value for a key, is to use the built in search capability in Site Configuration. A search box labeled Filter Key/Value For is located near the top of the page. Enter the name of the key that you want to edit into the text box and click the binoculars icon. This returns the key matching the name entered. If you don’t know the full key name, you can search on a partial name. For example searching for node returns the keys imagenodes, NoDefDate, and TopNode. Click on the notepad/pencil icon to enter the edit mode for that setting. Here you can change the Value, Category and Description as needed. Once you have completed your edits click the Save icon to save your changes or click the red X icon to cancel your edits.
Important: You must click the Refresh link in order for your changes to take immediate effect in the pages.
47

Refreshing values
SiteConfig.config values are read and cached at the server when the application starts. Changing the .config does not affect the pages until you use the Refresh button from the Site Configuration in the Admin Panel or by performing an iisreset.
New Configuration Keys
You can enter a new Configuration Key if necessary, one at a time. This adds an entry in the SiteConfig.config file.
48
The Key and the Value options are always provided by Siriusware Inc. when a new key needs to be added. The user must decide on the key’s Category and Description.
Item List configuration
Item List Configuration is accessed from the Admin Panel by clicking on the Item List Configuration tab.
Item Tree
When the Item List Configuration page initially loads, it displays all nodes (item tree categories) and items from the item tree group that is set with the TopNode.
Editing Nodes and Items Nodes (item tree categories or groups) are displayed with a white and gray file folder icon next to the name along with the standard + icon to the left of the folder indicating that you can expand down into that node to access additional nodes/items. Items are displayed with a gold star icon to the left of the name. To edit a node or item, select it from the list, and then click the Edit tab to put the form into edit mode. To save changes, click the Save button at the bottom of the form. To exit edit mode without saving changes, click the Cancel button at the bottom of the form.
Example: Node edit form prior to clicking on the Edit tab:
49
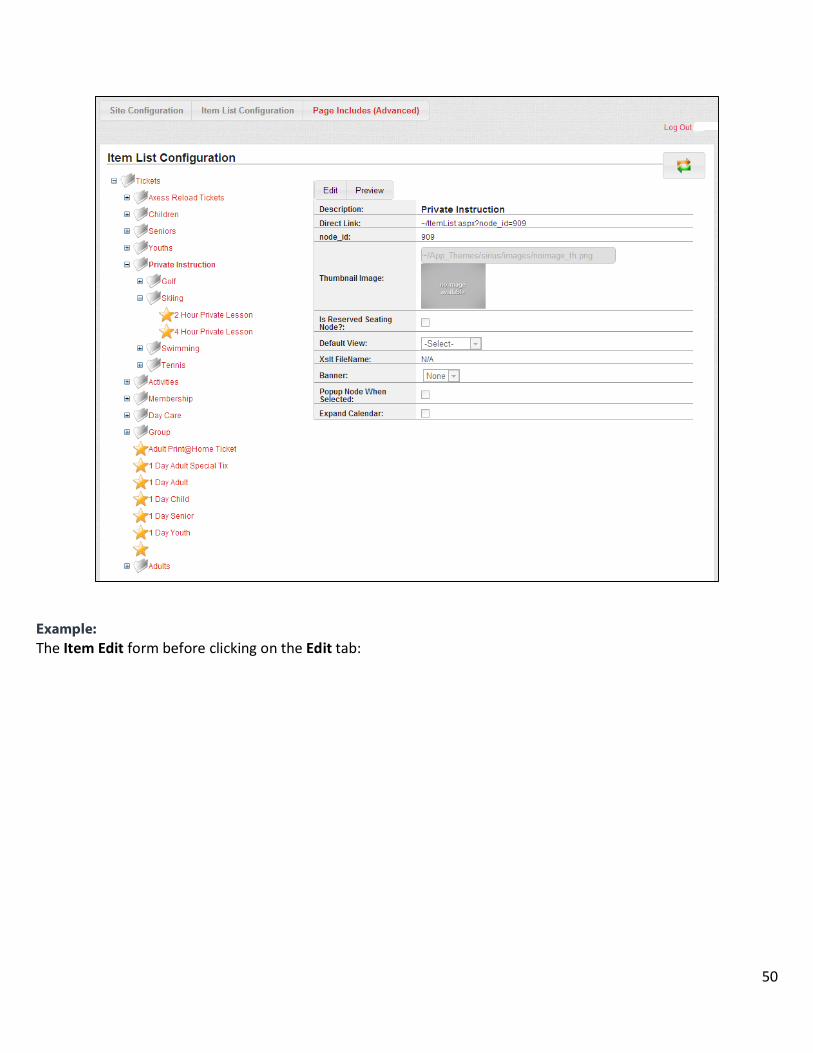
Example: The Item Edit form before clicking on the Edit tab:
50
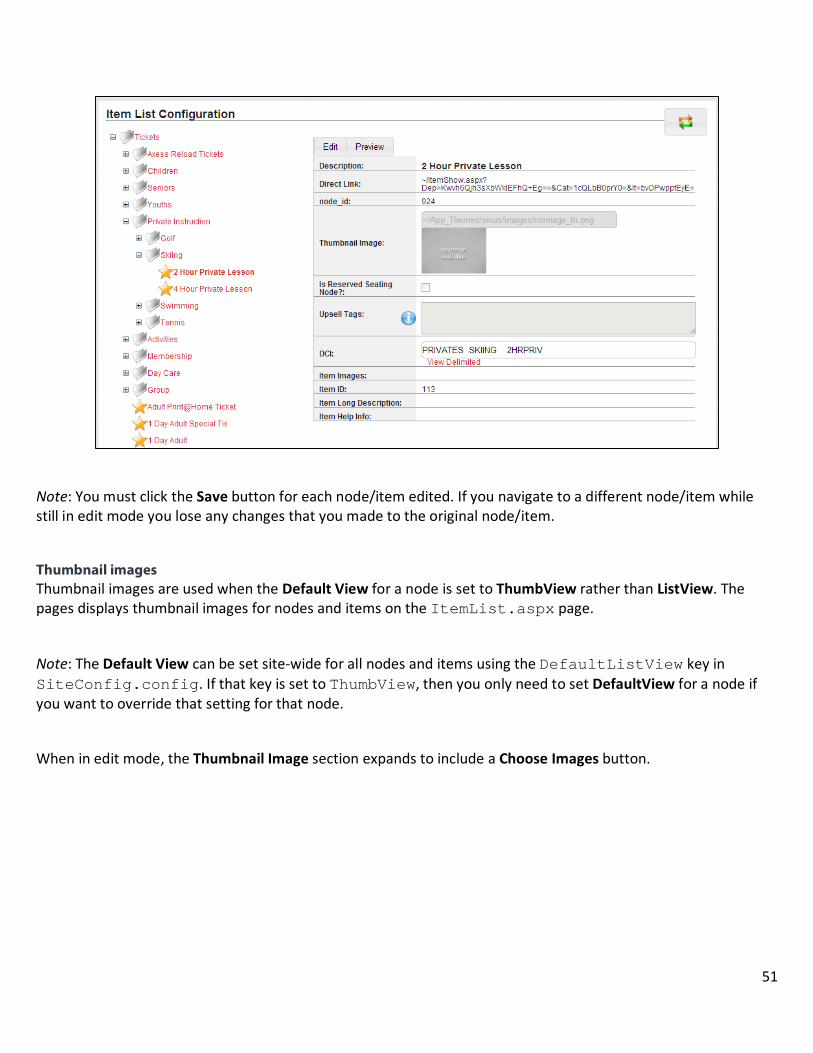
Note: You must click the Save button for each node/item edited. If you navigate to a different node/item while still in edit mode you lose any changes that you made to the original node/item.
Thumbnail images Thumbnail images are used when the Default View for a node is set to ThumbView rather than ListView. The pages displays thumbnail images for nodes and items on the ItemList.aspx page.
Note: The Default View can be set site-wide for all nodes and items using the DefaultListView key in SiteConfig.config. If that key is set to ThumbView, then you only need to set DefaultView for a node if you want to override that setting for that node.
When in edit mode, the Thumbnail Image section expands to include a Choose Images button.
51
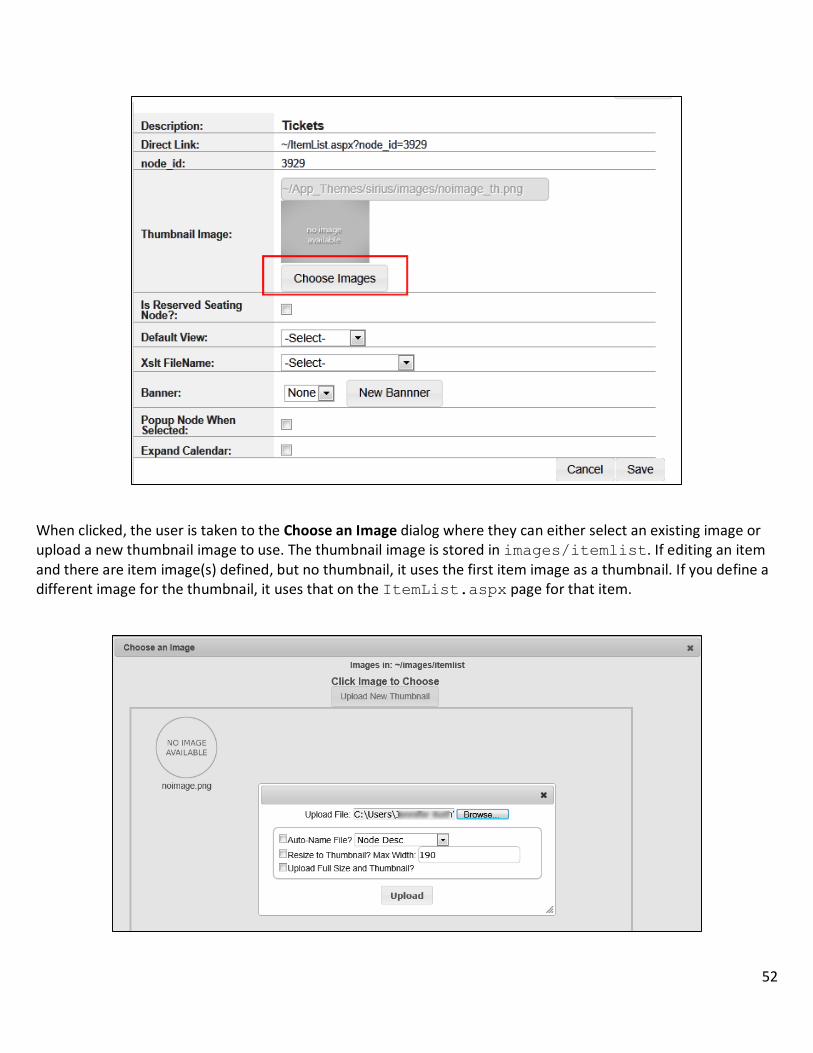
When clicked, the user is taken to the Choose an Image dialog where they can either select an existing image or upload a new thumbnail image to use. The thumbnail image is stored in images/itemlist. If editing an item and there are item image(s) defined, but no thumbnail, it uses the first item image as a thumbnail. If you define a different image for the thumbnail, it uses that on the ItemList.aspx page for that item.
52
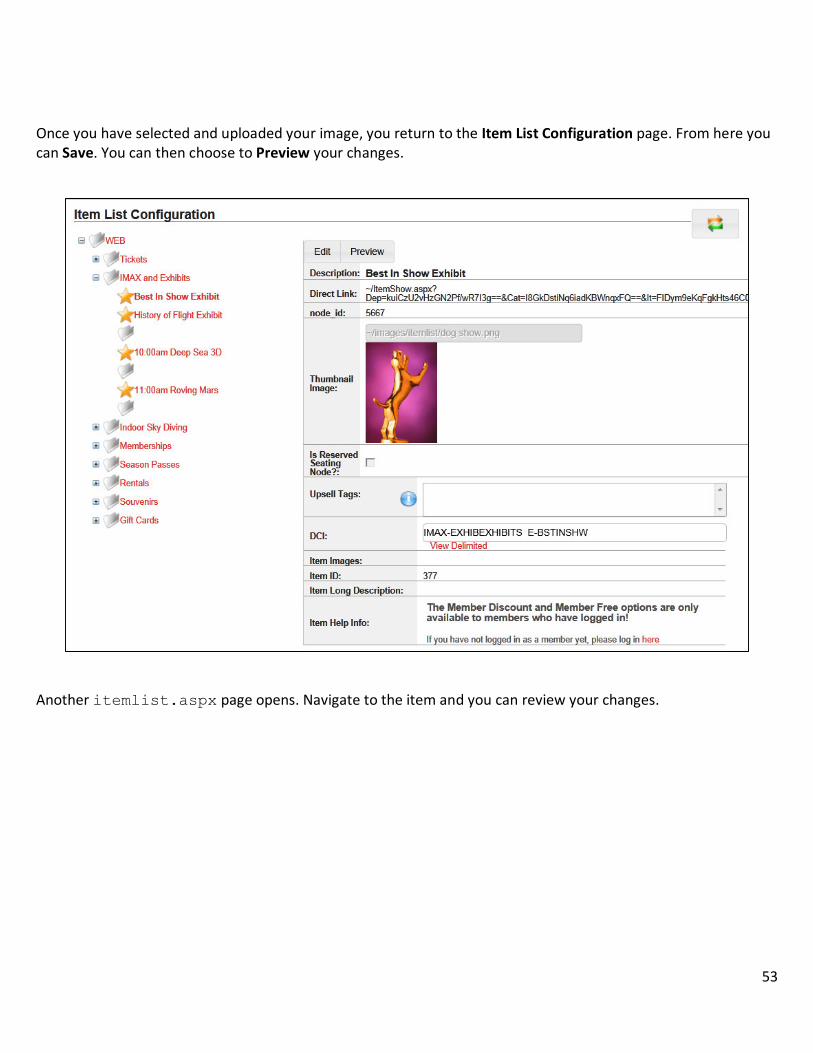
Once you have selected and uploaded your image, you return to the Item List Configuration page. From here you can Save. You can then choose to Preview your changes.
Another itemlist.aspx page opens. Navigate to the item and you can review your changes.
53

Default view This sets the default view for this node. ListView is the normal view that lists the items/nodes in a text-based grid. ThumbView is the thumbnail view that shows an image for the items/nodes. Xslt View is defined by an xslt file that can be placed in xmlfiles/xlst that dictates how the node is laid out on a page. This allows the client to totally customize the display for that node.
There is one final setting in the Default View dropdown, XsltTest. If this is selected and the user navigates to the page, it shows all the data that is fed to the page. The user then knows what fields are available and the names of the fields for their xslt file. XsltTest is never set for a production environment. If it is, it just displays a bunch of xml on the page instead of the actual itemlist.
XsltFile name This is used to set the xslt template that is applied to the page if the user chooses Xslt View as a Default View. The xslt file is located in the XMLFiles/xslt folder.
54

Banner Assigning a banner to a node displays a jQuery sliding banner above the items on that node. The Banner Builder interface allows you to create multiple banners. Clicking on Add Image adds images to the banner one at a time. Each banner item allows you to define the banner image, a hyperlink and a caption.
• The Image field allows you to define the path to the image. This can be a relative path to an image that already exists on your web server or an absolute path to an image that exists elsewhere.
Note: external images likely need to be referenced via https to avoid SSL warnings.
• Banner images should be all sized to the same size in a single banner. They need to be uploaded to Images/Banner folder before setting up the banner in the site. Banners should be .png or .jpg files. The recommended height/width is 855px wide by 245px tall. The banner control will shrink them to the container (div). Individual clients are free to modify these dimensions as they see fit. The most important key to banner size is that all banners images in a single banner should be the same size, so the images don’t “jump” when the slider switches from one to the next, and that the width is equal to or greater than the width of the container they are in.
Example: If the site is modified to make the banner 960px wide across the top, then the images should be sized accordingly. Otherwise, the banner will “stretch” the image and it will look pixelated. Likewise, if the image is much larger than its container, the image will take longer to load than necessary and will not scale as smoothly.
• The NavigateURL field allows you to define a hyperlink to that image. You can easily select an Item or Node from your Item Tree using the dropdown. Or you can define an absolute hyperlink to another location.
• The Caption field allows you to enter descriptive text that overlays on that image.
55

Once an image and/or caption is entered, you see the Image URL, the caption and the Thumbnail displayed on the Banner Builder page. You have the option to change the order to be displayed by selecting the blue up and down arrow icons. You can also delete an image by using the delete symbol. You are given a warning message, “Are you sure you want to delete this Banner Item?”
You can then choose to Create, Save, Refresh or Delete the Banner. Once you have created the banner, select the appropriate node and click on the Edit tab. Under the Banner dropdown you now see the name of your Banner. Select this banner and hit Save. You can then Preview how your Banner displays on the page
56

Popup node Choosing this check box causes the node to be displayed in a popup window rather than displaying the Itemlist.aspx page directly in the browser.
Note: There are two new SiteConfig.config settings that also affect popups in the pages, PopupItemShow which when set to 1 displays the ItemShow.aspx page in a popup window for all items and PopupGuest which when set to 1 displays the GuestLookup.aspx, GuestSelected.aspx and GuestEdit.aspx pages in a popup window when a guest/visitor is added to an item from the cart and when setting the purchaser during checkout.
57
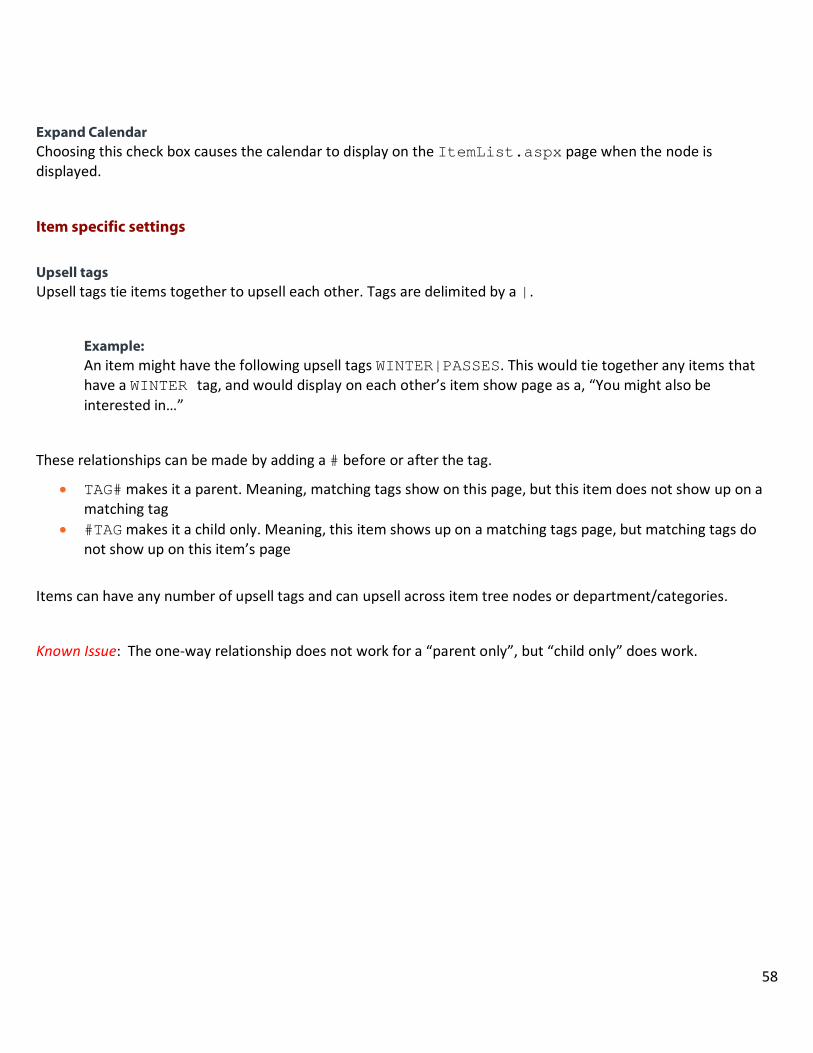
Expand Calendar Choosing this check box causes the calendar to display on the ItemList.aspx page when the node is displayed.
Item specific settings
Upsell tags Upsell tags tie items together to upsell each other. Tags are delimited by a |.
Example: An item might have the following upsell tags WINTER|PASSES. This would tie together any items that have a WINTER tag, and would display on each other’s item show page as a, “You might also be interested in…”
These relationships can be made by adding a # before or after the tag.
• TAG# makes it a parent. Meaning, matching tags show on this page, but this item does not show up on a matching tag
• #TAG makes it a child only. Meaning, this item shows up on a matching tags page, but matching tags do not show up on this item’s page
Items can have any number of upsell tags and can upsell across item tree nodes or department/categories.
Known Issue: The one-way relationship does not work for a “parent only”, but “child only” does work.
58
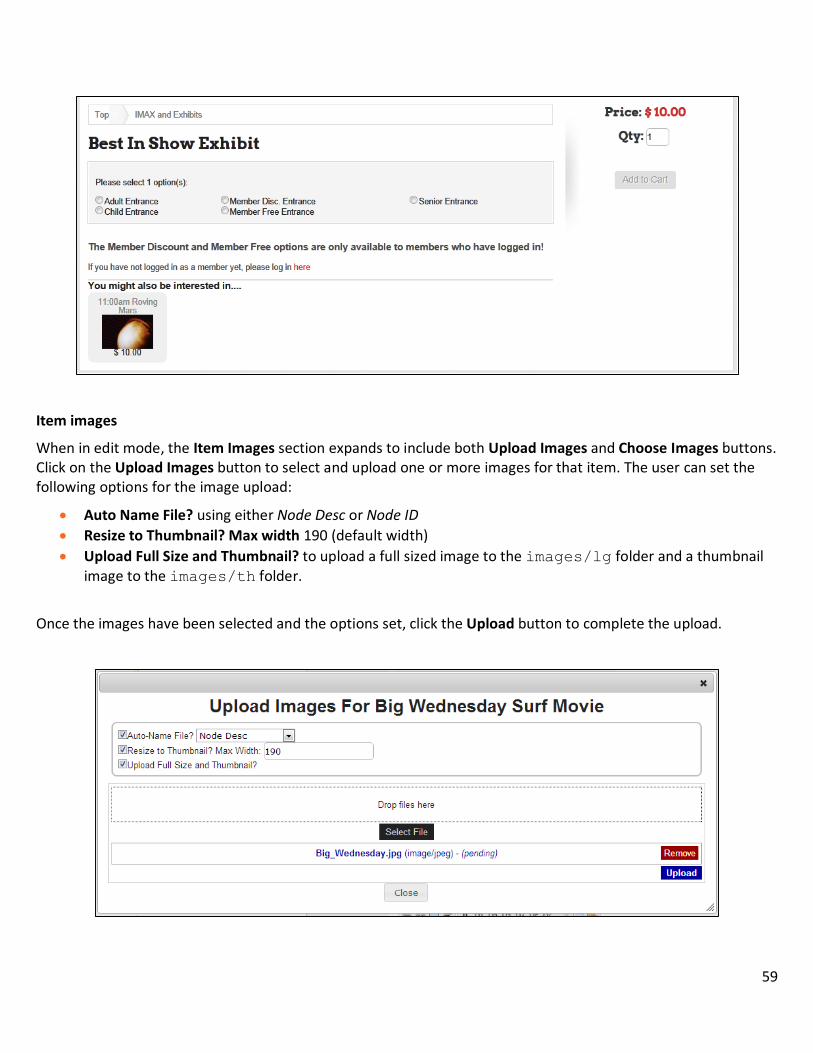
Item images
When in edit mode, the Item Images section expands to include both Upload Images and Choose Images buttons. Click on the Upload Images button to select and upload one or more images for that item. The user can set the following options for the image upload:
• Auto Name File? using either Node Desc or Node ID • Resize to Thumbnail? Max width 190 (default width) • Upload Full Size and Thumbnail? to upload a full sized image to the images/lg folder and a thumbnail
image to the images/th folder.
Once the images have been selected and the options set, click the Upload button to complete the upload.
59
Click on the Choose Images button to be taken to the Choose an Image dialog where you can select from previously uploaded images. Place a check in the box for one or more images that you want to associate with the item and click the Select Checked Files button. If no thumbnail image has been defined for the item, but you have set item images, the first image is automatically used as the thumbnail. If you define a different image for the thumbnail, it uses that in the itemlist views on the ItemList.aspx page for that item.
Item Long Description
This is used in lieu of the item or item tree description when one is defined. This also requires the UseLongItemDescrip key to be set to 1. Long ItemDescriptions are stored in the MiscTables.xml file. When in edit mode, text can be entered into the wysiwyg text entry area directly. There are many tools available at the top of the text entry area to aid in formatting. You can click the HTML button if you want to enter raw html. If you want to empty the field so that the long description is not used, use the Clear link in the left column.
Item Help info
The information you see displayed here is the same as what you see on the Help text box on the General tab of the Item Edit form in SysManager. This is displayed on the ItemShow.aspx page as an expanded description of the item. This can include xml, embedded videos, etc. Change the text entry area to “HTML” to enter raw html or use the wysiwyg editor with the formatting tools at the top. When saving the item, this information is written into the SiriusSQL database into items.help_info.
Note: If the help info originally had <webinfo>…</webinfo> tags inside SysManager, the pages only display and allow modification of the text inside those tags.
Page Includes (Advanced)
Page Includes (Advanced) is accessed from the Admin Panel by clicking on the Page Includes (Advanced) tab. This is used to inject either JavaScript or CSS includes into the page at runtime. It is intended to be a way to customize the page without modifying markup. You can include a reference to a js file, css file or script out raw JavaScript. You can define a page you want this script on and whether you want it to be in the Header or at the end of the page.
60

Specify dates in a link to the ItemList.aspx or the ItemShow.aspx page
You have the ability to specify a date in a link to the ItemList.aspx or the ItemShow.aspx page. Linking to those pages in this manner sets the calendar to the date in the link when the page loads. The following examples use the date October 26, 2013.
• To link to the main ItemList.aspx page, add:?&d=2013-10-26: https://www.yourdomain.com/eCommerce/ItemList.aspx?&d=2013-10-26
• To link to a specific item tree node using the ItemList.aspx page, add: &d=2013-10-26 https://www.yourdomain.com/eCommerce/ItemList.aspx?node_id=23040&d=2013-10-26
The node_id can be determined by going to that node in your browser and copying the URL from the browser’s address bar.
• To link to a specific item using the ItemShow.aspx page, add: &d2007-02-18 https://www.yourdomain.com/eCommerce/itemShow.aspx?Dep=p%2bGhw3l0RodrSAfJEl06aQ%3d%3d&Cat=dB2f3oDDqkHsUs0txv0k3w%3d%3d&It=LjIxsfHyf05oAodMV%2bIr0g%3d%3d&d=2013-10-26
The long encrypted string can be determined by going to that item in your browser and copying the URL from the browser’s address bar.
Changing Themes
The App_Themes folder. The web site must have an App_Themes theme defined. By default, it uses the, “Sirius” theme. If you have enabled mobile pages, it uses Sirius_mobile. The admin pages always use the Sirius_admin theme. The theme for the pages can be changed using the Theme key in the siteconfig.config file.
61

Theme Pack Overview
The styling of the E-Commerce pages are controlled by applying themes or skins in the admin panel and are meant to help maintain a separation between content and presentation. Above all else, this will ensure that future updates to the core pages are much easier.
The key to this kind of coding is to avoid using any inline styles and not to change the current markup in any way. When it is time to upgrade the core pages again in the future, any inline changes or customizations must be rolled over into the new pages and can incur additional time and cost.
Each theme pack contains a number of necessary files but the key files or folders that you need to work with in order to further develop your theme or extend the presentation are:
/App_Themes/YourThemeName/style-override.css MasterPageYourThemeName.master /scripts/customplugins/
/App_Themes/YourThemeName/style-override.css
All of the default styles for the E-Commerce pages are in /App_Themes/YourThemeName/. By adding style-override.css to override certain default classes and id’s (or selectors) that carry the most visual weight within the overall design, you can leave the core styles intact and adjust and troubleshoot your presentation.
In terms of presentation, the style-override.css file is the lynchpin of the theme pack and is what you will work with most.
Siriusware Inc. recommends that if changes or additions to style properties of the CSS files within the App_Themes folder (flexslider.css, fonts.css, ReservedSeating.css and style.css) are needed, that you keep those changes within style-override.css so that it eases future upgrades.
One way to do this, is to determine the selector that is to be changed, find the default properties in style.css and copy them into style-override.css. Then, remove all of the properties/values you will not change.
Example: If you wanted to change just the body background color this is what would be in style.css:
body { background:#1f1f1f; color:#1f1f1f; font-family:Arial, sans-serif; font-size:0.75em; width:auto; text-align:center;
62
}
When you copy and paste it into style-override.css, leave the background color property with the new color value:
body { background:#ffffff; }
New Class Selectors If you need to create new selectors, its best to place them at the end of style-override.css in the section labeled Client-Specific Styles. Of course, you can also include another separate CSS file in the App_Themes folder with your own styles. Please keep in mind however, that the E-Commerce pages will pull in all CSS files in the App_Themes folder in alphabetical order. If you want to ensure that your CSS file is called after style-override.css it should be named something like style-override-custom.css.
Import External Styles If you need to pull in your existing CSS files to support the E-Commerce pages so that they integrate seamlessly with your full site’s presentation, you can import these into style-override.css. By importing these files you avoid copying the files to the App_Themes folder and creating a separate instance to update and support. Also, by importing them directly into style-override.css you do not have to change the mark up in the MasterPage.
To import external CSS files, they must be the first to be called in the CSS file, otherwise the import does not work. The correct way to import external CSS files into style-override.css look like this:
@import url('https://www.yourURL.com/style/yourCustomStyles.css');
Added Flexslider
The following files were added to enable a flexslider for the Admin Panel:
App_Themes/sirius_admin/flexslider.css, App_Themes/sirius_admin/images/bg_direction_nav.png and admin/images/rmvImage.png
In admin/AdminMaster.master replace this:
<script src="../scripts/jquery.bxSlider.min.js" type="text/javascript"></script> With this:
63

<script src="../scripts/jquery.flexslider-min.js" type="text/javascript"></script> Fixed flexslider function for mobile. In MasterPage.master under this: <div id="wrapper"> Add this: <div id="desktop" style="display:none"></div> In UserControls/ItemListMulti.ascx: In two locations, change this: if (self == top) { To this: if (self == top && $("#desktop").length > 0) {
MasterPageYourThemeName.master
The MasterPage is essentially the boilerplate for all of the E-Commerce pages. What is included within its markup is used site-wide. The MasterPage can be broken down into three sections: Header, Content and Footer:
• Header: <div id=”HeaderDiv”>…</div> • Content: <div id=”MainContent”>…</div> • Footer: <div id=”Footer”>…</div>
The main content is dynamic and changes from page to page but the header and footer are contained in separate ASCX files that are also used site wide. You can apply markup within each file to update the header and footer sections, it’s recommended that you apply custom markup to the MasterPage in order to keep customizations to a single location as much as possible.
Custom markup in the MasterPage tends to be company contact information and links below the E-Commerce footer navigation. It can also be extensive markup from the main web site that enables you to mesh the presentation of the E-Commerce pages seamlessly.
The key is to restrict the amount of inline markup changes because of the impact this can have on future upgrades and the increase in time on rolling them forward.
/scripts/customplugins/
While the style-override.css and MasterPage files are there to control the existing content and presentation found in the default E-Commerce pages, script includes are more about adding and controlling custom markup without having to modify the pages themselves. Script includes can be quite effective in terms of their added flexibility. The script includes are by far the best tool in extending and adapting the E-Commerce pages with customizations without having to actually change the markup.
64
The script includes rely on the existing ID’s or selectors within the markup by targeting them and then using jQuery to apply the customization. Depending on what the need, script includes can be applied to a specific E-Commerce page or the entire E-Commerce site.
An example of a common script include is changing the text being used in the main navigation from Renew Pass to Renew Membership. Without the script include, you would modify the markup in Header.ascx and then continue to modify this with each future upgrade. Script includes can be used for adding CSS class names to existing selectors, moving the location of content blocks to a different part of the page or even hiding them altogether.
Page-Specific Script Include If you want to change content that only appears on ItemList.aspx, you do this through the Admin Panel. The same process can also be used for page-specific CSS when it would be better to apply changes directly to the pages to override site-wide style properties.
1. In the Admin Panel navigation, select Page Includes (Advanced) 2. Click on Insert New 3. In PageName, enter the file name of the E-Commerce page (i.e., ItemList.aspx) 4. On the dropdown menu for IncludeType, select JavaScript 5. On the dropdown menu for Include Location, select Head 6. For IncludeValue, enter the path to the JavaScript file (i.e., scripts/customplugins/itemlist-
replace.js ). For a CSS include, you would just insert the path to the file (i.e., includes/custom-styles.css). Be sure that any page-specific CSS files are not saved in the App_Themes folder because they are applied automatically to all E-Commerce pages.
7. Click Insert
When the page is refreshed, the script include will appear in the <HEAD> of ItemList.aspx. You can apply the JavaScript directly within the Admin Panel by choosing Literal for IncludeType, but it’s easier to support when you use separate JavaScript files because it allows you to edit them in a separate program like Visual Studio.
Site-Wide Script Include For a script include that needs to be applied across all E-Commerce Pages, it can be called from within the <HEAD> on the MasterPage:
<script src="scripts/customplugins/main.nav.js" type="text/javascript"></script>
Script Includes and Update panels If you ever use Script Includes and Update panels on the same page (like ItemShow.aspx), the Update panel doesn’t fire $(document).ready() when it updates, place the following within the script:
$(document).ready(function () {
65
setUpYourFormClickEventsAndStuff(); }); function pageLoad(sender, args) { setUpYourFormClickEventsAndStuff (); };
In this way, the set up function fires on a regular page load and also on the updatepanel load (which fires pageLoad()).
The update panel pageLoad() doesn’t get called if you put the script in the HEAD, you need to select FOOT. If you put it in the Head, the pageLoad() doesn’t fire and the script won’t work after asych postbacks. If you want scripts to run on a page with an updatepanel, put the script in the foot using the Admin panel.
Dynamic Master pages
For customizations, we can add custom master pages by copying MasterPage.master and modifying it. To configure to use the custom page, we change the MasterPage key to use a different master page. If mobile pages are being used, (EnableMobileMasterPage = 1) then the site expects to find a YourCustomPageMobile.master to use when in mobile mode.
Dynamic Mobile presentation
Site configuration • EnableMobileThemes=1 - makes the site look for yourtheme_mobile when using a mobile browser or
switching to mobile mode. 0 does not use a mobile theme • EnableMobileMasterPage=1 - makes the site look for a master page named
YourMasterPageMobile.master when in mobile mode. Otherwise it uses the same master page as the standard site.
Mobile themes A mobile theme must be defined if EnableMobileThemes=1. It is named yourtheme_mobile. Mobile themes can be created that are either narrower/less graphic intensive or responsive. The default Sirius_mobile theme is responsive to the viewport size.
Auto-detecting mobile browsers The site auto-detects a mobile browser and switch if the enableMobileThemes = 1. There is also a view switcher at the bottom of the screen that can be used to manually toggle between mobile and standard views.
66
Dynamic Pricing capability
E-Commerce module supports Dynamic Pricing Rules as described in the Salesware Dynamic Pricing document, with the following exceptions:
• Rules that are based on other line items being present don’t work • Rules that rely on other objects in the Sales environment don’t work
The ww.dll supports the following Dynamic Pricing Rules, HASMODS(D,C,I), SHAREMODS(D,C,I) and SHAREMODSPREV(D,C,I). These are supported in all functions that calculate pricing and take modifier information.
Displaying Help text
Up until now, the E-Commerce pages have had the ability to display all of the text entered into the Help field on the General tab of the Item Edit Form in SysManager on the ItemShow.aspx page. The control that handles this on the ItemShow.aspx is asp:label id=“lblInfo”. With the increase in uses for the Help field the ability to only display certain text from the Help field and display it on the ItemShow.aspx became necessary. If you only want to display some of what you have entered into the Help field on ItemShow.aspx, you need to place it between <webinfo>…</webinfo> tags.
Example: If the Help field contained the following:
<printtag>This is the stuff I want printed on the layout.</printtag> <anothertag>This is for some other purpose.</anothertag> <webinfo><span class=”smallbold”>Here is what I want to display when this is sold in E-Commerce.</span></webinfo>
Then, only “Here is what I want to display when this is sold in E-Commerce,” are displayed on the ItemShow.aspx and it is formatted as per the CSS class “smallbold”.
67

Site Configuration Settings
Admin Settings
ShowAdminLoginLink
Key value: 1 or 0
Description:
Displays the Admin Login link in the footer control when set to 1. When set to 0, the user has to know the URL for admin log-in.
See also: None
68
AllowedAdminIps
Key value: Localhost or IP address
Description: Comma separated list of IPs to allow access to the admin panel. Non-matching client IPs will be redirected to the itemlist page. Localhost will always have access. Enter an asterisk (*) by itself to allow any IP address.
See also: None
69
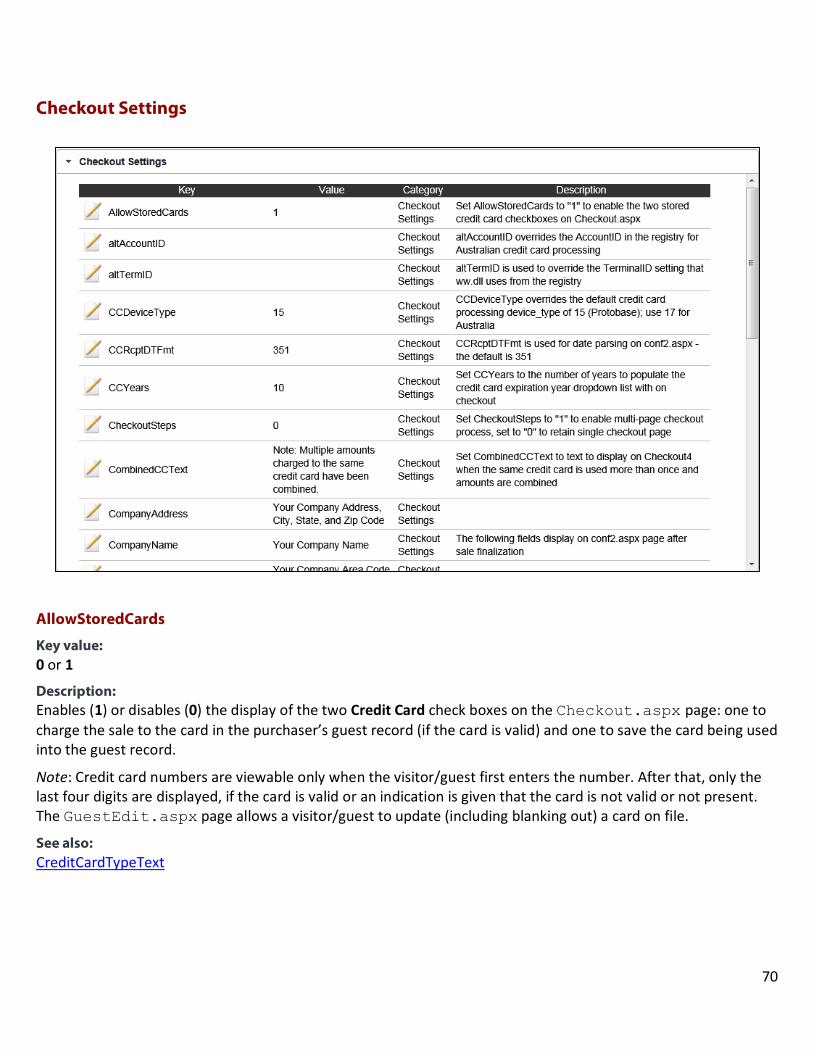
Checkout Settings
AllowStoredCards
Key value: 0 or 1
Description: Enables (1) or disables (0) the display of the two Credit Card check boxes on the Checkout.aspx page: one to charge the sale to the card in the purchaser’s guest record (if the card is valid) and one to save the card being used into the guest record.
Note: Credit card numbers are viewable only when the visitor/guest first enters the number. After that, only the last four digits are displayed, if the card is valid or an indication is given that the card is not valid or not present. The GuestEdit.aspx page allows a visitor/guest to update (including blanking out) a card on file.
See also: CreditCardTypeText
70
altAccountID
Key value: Valid account number
Description: Used to designate the appropriate account to use for credit card processing via OCV in Australia when multiple accounts need to be used. altAccountID overrides the AccountID in the registry for Australian credit card processing. The example below shows how the altAccountID key is used to override the AccountID setting in the registry of the computer where ww.dll resides.
Example: altAccountID = 0002
See also: altTermID
altTermID
Key value: Terminal ID in ProtoBase
Description: Used to override the TerminalID setting in the Windows registry, which is usually set via the TerminalID setting in ww.reg. If the altTermID setting is blank or not present in siteconfig.config, the TerminalID setting in the registry is used.
See also: altAccountID
CCDeviceType
Key value: Positive integer representing device type
Description: Sets the credit card processing device type. See the ww.dll API Reference for a listing of all valid device type integers.
See also: None
71
CCRcptDTFmt
Key value: Any three-digit number
Description: Controls parsing of the Transaction date on the conf2.aspx page. This key is used as a guide for date parsing. In some situations, the date order is not displayed the way you want it to be and you need to adjust this three-digit number. The default is 351.
See also: None
CCYears
Key value: Any positive integer
Description: Used to set the number of years to populate the credit card expiration year dropdown list with, for checkout.
See also: None
CheckoutSteps
Key value: 0 or 1
Description: Enables (1) or disables (0) the use of multiple pages to display and handle the checkout process. Set CheckoutSteps to 1 to enable multi-page checkout process; set to 0 to retain a single checkout page.
See also: None
CombinedCCText
Key value: Default: Please Note: Multiple amounts used by the same credit card have been combined.
This can be changed to display a customized message.
Description: A check has been added to the Checkout3.aspx page to determine if the same card is being used more than once to pay for a sale in a multi-card transaction in the E- Commerce pages. If the same card is used more than once, the pages combine the amounts towards the same card and make a note to the user which is displayed on Checkout4.aspx, the confirmation page (either conf.aspx or conf2.aspx) and the confirmation email.
72
The default wording of the notification, “Note: Multiple amounts used by the same credit card have been combined.” can be changed.
This works in this manner when the same credit card or the same In-House Cards item is used more than once in a sale.
Example: CombinedCCText = Please Note: You used the same card more than once on the previous page. Multiple amounts charged to the same card have been combined.
See also: None
CompanyAddress
Key value: Any text
Description: Displays on the conf2.aspx page after sale finalization. Displays in the field labeled lblCompanyAddress on the conf2.apsx page.
See also: CompanyName
CompanyPhone
CompanyWeb
TermID
Tax1Name
Tax2Name
CurrencyCountry
CompanyName
Key value: Any text
Description: Displays on the conf2.aspx page after sale finalization. Displays in the field labeled lblCompanyName on the conf2.apsx page.
See also: CompanyAddress
CompanyPhone
CompanyWeb
73
TermID
Tax1Name
Tax2Name
CurrencyCountry
CompanyPhone
Key value: Any text.
Description: Displays on the conf2.aspx page after sale finalization. Displays in the field labeled lblCompanyPhone on the conf2.apsx page.
See also: CompanyAddress
CompanyName
CompanyWeb
TermID
Tax1Name
Tax2Name
CurrencyCountry
CompanyWeb
Key value: Any text.
Description: Displays on the conf2.aspx page after sale finalization. Displays in the field labeled lblCompanyWeb on the conf2.apsx page.
See also: CompanyAddress
CompanyName
CompanyPhone
TermID
Tax1Name
Tax2Name
CurrencyCountry
74
CouponCodeField
Key value: srcecode or mktgcode
Description: This key is used with specials. It designates whether to use marketing codes (mktgcode) or source codes (srcecode) to apply the specials. Specials are enabled using EnableCheckoutCoupons.
See also: EnableCheckoutCoupons
CreditCardTypeText
Key value: Any text
Description: Used to change the payment type text for credit cards, which displays in the payment summary on the Checkout3.aspx page.
See also: AllowStoredCards
InHouseCardTypeText
CurrencyCountry
Key value: Three letter country code.
Description: Displays on the conf2.aspx page after sale finalization. Displays on the conf2.aspx page right after any money value displayed.
See also: CompanyAddress
CompanyName
CompanyPhone
CompanyWeb
TermID
Tax1Name
Tax2Name
CurrencyCountry
75
DeclineTxt
Key value: Any text.
Description: Text that gets displayed either on the conf2.aspx page or on the error.aspx page (when using conf.aspx) when a credit card is declined.
Example: DeclineTxt = This Card Was Not Approved. Message:
See also: None
EnableCheckoutCoupons
Key value: 0 or 1
Description: This key is for use with specials. If set to 1, a button and a text box entry area (the Enter Coupon Code controls) are enabled on the Checkout.aspx page.
See also: CouponCodeField
GuestNotSelectedItemMessage
Key value: Any text.
Description: When an item in the sale requires a guest to be attached and it has not yet been added by the user then a notification message pops up telling the user to attach a guest when the user tries to advance to the next page from Checkout1.aspx. In addition, the notification message pops up if a user tries to finalize a sale from either Checkout.aspx or Checkout4.aspx and a modifier still requires a guest to be attached. If the key is not set in the siteconfig.config file, then a default message is displayed, “Required Guest missing, please select guest for modifier.”
Example: GuestNotSelectedItemMessage = Please add guests to all modifiers in the cart where \'Guest required!\' is noted!
See also: GuestNotSelectedModifierMessage
76
GuestNotSelectedModifierMessage
Key value: Any text.
Description: When a modifier in the sale requires a guest to be attached and it has not yet been added by the user, a notification message pops up telling the user to attach a guest when the user tries to advance to the next page from Checkout1.aspx. In addition, the notification message pops up if a user tries to finalize a sale from either Checkout.aspx or Checkout4.asp and a modifier still requires a guest to be attached. If the key is not set in the siteconfig.config file, then, a default message is displayed, “Required Guest missing, please select guest for modifier.”
Example: GuestNotSelectedModifierMessage = Please add guests to all modifiers in the cart where \'Guest required!\' is noted!
See also: GuestNotSelectedItemMessage
InHouseCardTypeText
Key value: Any text
Description: Used to change the In-House Cards payment type text on the Checkout3.aspx page.
See also: CreditCardTypeText
DWPayment
MonerisReceipt
Key value: 0 or 1
Description: Enables (1) or disables (0) the Moneris-style receipt page (conf2.aspx). Set MonerisReceipt to 1 to make conf2.aspx the default confirmation page; set to 0 to use conf.aspx.
See also: None
77
PaymentTypeNotAllowedMsg
Key value: Any text.
Description: Message to display when incorrect payment type is used. An additional key in the siteconfig.config file handles situations where a visitor/guest tries to use a payment type that is not allowed. The following key is used to set the message that displays to the visitor/guest in this situation.
See also: SPType
SingleTaxLine
Key value: 0 or 1
Description: Enables (1) or disables (0) the ability to combine all taxes on one line in the shopping cart. Set SingleTaxLine to 1 to display taxes in the cart on one line. In other words, if you use both Tax1 and Tax2, they are combined into one tax total in the cart when this key is set to 1. In order for this to display properly in the pages, modifications to cart.ascx may need to be made.
See also: ShowTotalItemPriceInLineItemLists
Tax1Name
Key value: Any text.
Description: Displays on the conf2.aspx page after sale finalization. Displays in the field labeled lblStateTax on the conf2.apsx page.
See also: CompanyAddress
CompanyName
CompanyPhone
CompanyWeb
TermID
Tax2Name
CurrencyCountry
78
Tax2Name
Key value: Any text.
Description: Displays on the conf2.aspx page after sale finalization. Displays in the field labeled lblLocalTax on the conf2.apsx page.
See also: CompanyAddress
CompanyName
CompanyPhone
CompanyWeb
TermID
Tax1Name
CurrencyCountry
TermID
Key value: Terminal ID number supplied by Moneris
Description: Displays on the conf2.aspx page after sale finalization. Displays as part of the Reference Number on the conf2.aspx page.
See also: CompanyAddress
CompanyName
CompanyPhone
CompanyWeb
Tax1Name
Tax2Name
CurrencyCountry
79

Connection Settings
AltTicketServiceUrl
Key value: Localhost or IP address e.g., http://10.0.2.77/wwServiceTix/wwSalesSvc.asmx
Description: Alternate URL to call ticket images from (e.g., http://localhost/wwServiceTix/wwSalesSvc.asmx). Use this if you set up a separate service to render Real Time Print at Home Tickets items. Leave this key blank if you do not have an alternate wwService set up.
Example: AltTicketServiceUrl = http://10.0.2.77/wwServiceTix/wwSalesSvc.asmx
Note: Siriusware Inc. recommends if you are using Real Time Print at Home Tickets module that you start out with two wwServices on the ww.dll computer as the minimum configuration. If you are not happy with performance or expect high volume and you have an extra server (or virtual server computer) that you can set up as an additional wwService/ww.dll computer, then that is the configuration to use.
80

See Also: None
CCProcServer
Key value: IP address: port to use for ProtoBase
Description: This key allows the ability to point transactions from a set of E-Commerce pages to a different ProtoBase server than that designated in the ww_system.INI (for ww.dll) and Sales32c_system.INI (for Sales Host utility) files. Set the value for CCProcServer to the IP address: port to use for ProtoBase if you need to override what is configured for ww.dll and Sales Host utility. You can leave the key value blank to use what is already configured for ww.dll and Sales Host utility. If the value for the key is set, the pages add a <server></server> tag inside the settlement string with the server IP address and port. For example, <settlement><server>10.0.2.230:4209</server> . . . </settlement>
Example: CCProcServer = 10.0.2.230:4209
See also: None
EncryptSvcComm
Key value: 0 or 1
Description: Enables (1) or disables (0) the encryption of data sent between the pages and wwService. This setting must match between the siteconfig.config files of wwService and the pages.
See also: UseWebService
localhost.wwSalesSvc
FuseboxChainCode
Value: Chain setting
Description: If set, it is appended to the Sales string and override any .INI settings. Leave blank to use .INI settings
Example: FuseboxChainCode = TSTLAR
See also: FuseboxLocation
81

FuseboxLocation
Value: Location setting
Description: If set, it is appended to the Sales string and override any .INI settings. Leave blank to use .INI settings
See also: FuseboxChainCode
Localhost.wwSalesSvc
Key value: http://xxx.xxx.xxx.xxx/wwService/wwSalesSvc.asmx
https://xxx.xxx.xxx.xxx/wwService/wwSalesSvc.asmx
Description: The URL to wwService. Only change the IP address portion and leave the rest of the path as it is. If you are not using encryption (EncryptSvcComm = 0) then, use SSL (HTTPS protocol), but you must purchase another SSL certificate for your ww.dll server. Use of SSL here is equivalent to using encryption in terms of security.
See also: UseWebService
EncryptSvcComm
UseWebService
Key value: 0 or 1
Description: Enables (1) or disables (0) the use of a remote ww.dll via wwService. Enables utilization of the web service.
See also: localhost.wwSalesSvc
82
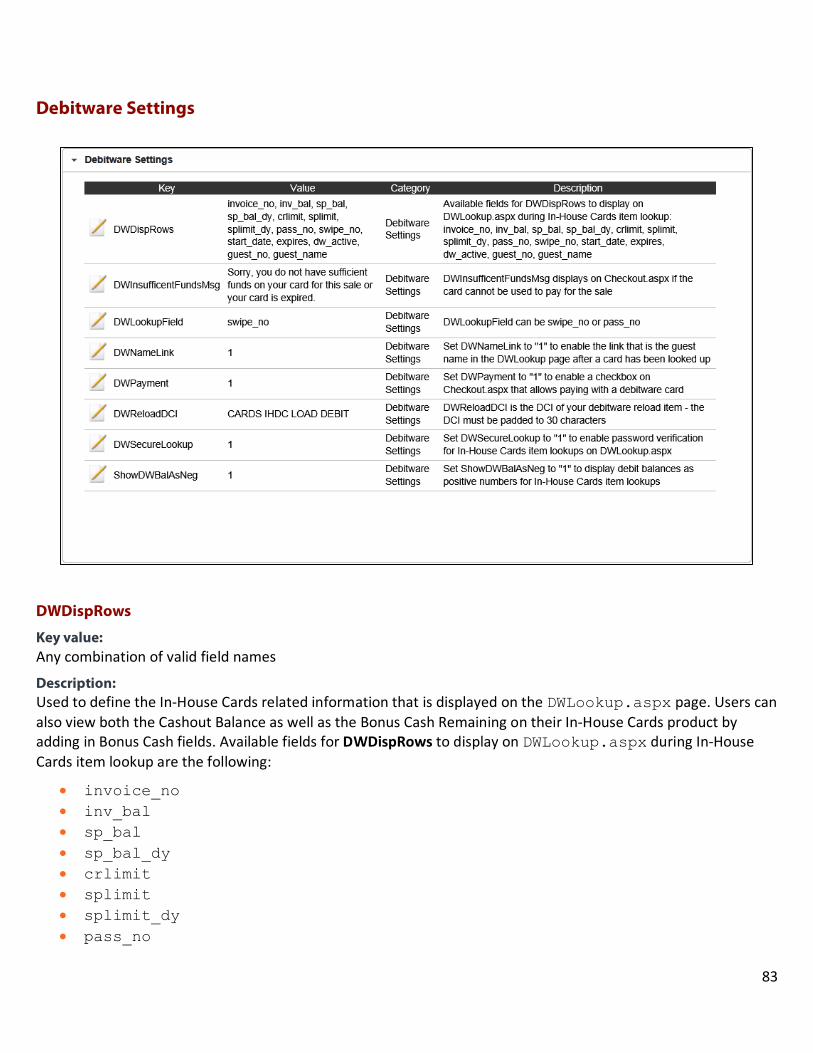
Debitware Settings
DWDispRows
Key value: Any combination of valid field names
Description: Used to define the In-House Cards related information that is displayed on the DWLookup.aspx page. Users can also view both the Cashout Balance as well as the Bonus Cash Remaining on their In-House Cards product by adding in Bonus Cash fields. Available fields for DWDispRows to display on DWLookup.aspx during In-House Cards item lookup are the following:
• invoice_no• inv_bal• sp_bal• sp_bal_dy• crlimit• splimit• splimit_dy• pass_no
83

• swipe_no • start_date • expires • dw_active • guest_no • guest_name • web.config • cash_out_balance • bonus_cash
Example: DWDispRows = invoice_no, inv_bal, sp_bal, sp_bal_dy, crlimit, splimit, splimit_dy, pass_no, swipe_no, start_date, expires, dw_active, guest_no, guest_name
Bonus Cash Example: DWDispRows = guest_name, swipe_no, inv_bal, cash_out_balance, bonus_cash, expires
This would allow users to view the guest name, In-House Cards swipe number, available balance, cashout balance, bonus cash amount and pass expiration date for an In-House Cards product lookup.
See also: None
DWInsufficentFundsMsg
Key value: Any text
Description: Displays on the checkout.aspx page if the card cannot be used to pay for the sale.
Example: DWInsufficentFundsMsg = Sorry, you do not have sufficient funds on your card for this sale or your card is expired.
See also: None
DWLookupField
Key value: swipe_no or pass_no
Description: Used to define if a swipe_no or a pass_no is used for the In-House Cards item lookup.
84
See also: None
DWNameLink
Key value: 0 or 1
Description: Enables (1) or disables (0) the link that is the guest name on the DWLookup.aspx page. Set DWNameLink to 1 to enable the link that is the guest name on the DWLookup.aspx page after a card has been looked up.
See also: None
DWPinAttempts
Key value: Any numeric value
Description: Number of times a user can enter an incorrect pin before they are redirected to the page specified with the DWPinRedirectPage key.
Example: DWPinAttempts = 3
See also: DWPinRedirectPage
DWPinPrompt
Key value: Any text
Description: The text prompt for the user to enter a pin if one is required with a DebitWare card purchase.
Example: DWPinPrompt = Please enter the PIN for this card:
See also: None
DWPinRedirectMessage
Key value: Any text
85

Description: Message to display after failing to validate the PIN the specified number of times.
Example: DWPinRedirectMessage = You have entered the PIN incorrectly too many times. Click OK to
Continue.
See also: DWPinAttempts
DWPinRedirectPage
Key value: Valid page address
Description: The page to redirect to if the max number of PIN attempts is reached – start with a "~" to indicate the root of the site
Example: DWPinRedirectPage = ~/cartshow.aspx
See also: DWPinAttempts
UseDwPin
Key value: 1 or 0
Description: Set to 1 if you are using validation number (PIN) with any of your DebitWare cards. Set to 0 if you want to skip checking for a PIN altogether with DebitWare cards.
Warning: if you are using validation numbers (PIN) and this is 0, DebitWare transactions that require a validation number (PIN) fails.
Example: UseDwPin = 1
See also:
None
86
DWPayment
Key value: 0 or 1
Description: Enables (1) or disables (0) In-House Cards item as a form of payment on the checkout.aspx page. Set DWPayment to 1 to enable a check box on the Checkout.aspx page that allows paying with an In-House Cards card.
See also: InHouseCardTypeText
DWReloadDCI
Key value: DCI of In-House Cards reload item
Description: DWReloadDCI is the DCI of the In-House Cards reload item. Entry must have the department, category and item, each padded with spaces to equal ten characters (thirty characters total).
Example: DWReloadDCI = CARDS DEBITWARE LOAD DEBIT
See also: None
DWSecureLookup
Key value: 0 or 1
Description: Enables (1) or disables (0) password verification for In-House Cards item lookups on DWLookup.aspx.
See also: None
IHCBonusCash
Key value: Any text
Description: Text to display to the user when bonus cash is available on an IHC product being sold or reloaded - the text is followed by the total load value.
Example: IHCBonusCash = Total load value: $
87
See also: None
ShowDWBalAsNeg
Key value: 0 or 1
Description: The account invoice balance that displays for an In-House Cards item lookup on the DWLookup.aspx page defaults to showing as a positive number if the visitor/guest has a balance remaining and as a negative number if he owes money on the card (i.e., he is using all or part of his credit limit). This can be overridden by setting ShowDWBalAsNeg to 0, which displays balances remaining as a negative number and money owed as a positive number.
See also: None
88

Email Settings
AcctPmtTxt
Key value: Text and {{act}} tag
Description: Used to override the default text regarding payment type {{pmtInfo}} in e-mail confirmations for sales on account.
Example: AcctPmtTxt = The {{act}} account
See also: CardPmtTxt
DWPmtTxt
0PmtTxt
89
CardPmtTxt
Key value: Text and {{ccdig}} tag
Description: Used to override the default text regarding payment type {{pmtInfo}} in e-mail confirmations for sales paid for with a credit card.
Example: CardPmtTxt = The credit card ending with the digits {{ccdig}}
See also: AcctPmtTxt
DWPmtTxt
0PmtTxt
CCTimeoutTemplate
Key value: Relative path to credit card e-mail alert template and template filename
Description: Used to specify the template with the text that gets sent to the AdminEmail address when ww.dll and ProtoBase cannot communicate during sale finalization. Path is relative to the root of the web application (the virtual directory created when installing). By default the templates are stored in the template folder in the E-Commerce module virtual directory. Template filename is the name of the copy (text or HTML) file used as the mail body template sent in the e-mail.
Example: CCTimeoutTemplate = template/CCTimeout.txt
See also: AdminEmail
ChargedPayPlanTemplate
Key value: Email template
Description: The email template that is used for confirmation emails when the sale is put on a payment plan, template/ChargedPayPlanTemplate.html
Example: ChargedPayPlanTemplate = template/ChargedPayPlanTemplate.txt
See also: FinalizedPayPlanTemplate
90
ChargedTemplate
Key value: Relative path to the template to be used when a non-Print At Home Tickets sale is processed
Description: Path is relative to the root of the web application (the virtual directory created when installing). By default the templates are stored in the template folder in the E-Commerce module virtual directory. Template filename is the name of the copy (text or HTML) file used as the mail body template sent when a sale has been successfully charged.
Example: ChargedTemplate = template/ChargedTemplate.txt
See also: SavedTemplate
FinalizedTemplate
PAHTemplate
ChgEmailSubj
Key value: Any text
Description: Used to populate the Subject field of the second confirmation e-mail sent from the Sales Host. The wwSale_id is appended to the end of the text used here.
Example: ChgEmailSubj = Sale Complete - Sale #
See also: NoFirstEmail
SendChgEmail
DWPmtTxt
Key value: Text and {{ccdig}} tag
Description: Used to override the default text regarding payment type {{pmtInfo}} in e-mail confirmations for sales paid for with In-House Cards item.
Example: DWPmtTxt = The gift card ending with the digits {{ccdig}}
91
See also: AcctPmtTxt
CardPmtTxt
0PmtTxt
emailRegEx
Key value: Regular expression you want to use for validation of email addresses
Description: This setting allows for central management of the regular expression used for email address validation.
If present in the siteconfig.config file it overrides any other regular expressions that are used for email address validation in the following files: Email.ascx, Checkout.aspx, Checkout2.aspx and GuestLookup.aspx. You can populate it with the regular expression you want to use for validation of email addresses throughout your E-Commerce pages.
Example: emailRegEx = ^([0-9a-zA-Z]([-.\w]*[0-9a-zA-Z])*@([0-9a-zA-Z][-\w]*[0-9a-zA-Z]\.)+[a-zA-Z]{2,9})$
See also: None
ErrEmailSubject1
Key value: Any text
Description: Used when Sales Host utility encounters an error when processing a sale. The sale was not finalized, probably due to a setup issue. Used to populate the Subject field of the general setup error e-mail sent from the Sales Host.
Example: ErrEmailSubject1 = ECommerce Sale Error - General
See also: ErrEmailSubject2
ErrEmailSubject3
ErrTemplate1
ErrTemplate2
ErrTemplate3
92
ErrEmailSubject2
Key value: Any text
Description: Used when Sales Host utility encounters an error when processing a sale. The sale was not finalized due to a credit card approval error. Used to populate the Subject field of the credit card error e-mail sent from the Sales Host.
Example: ErrEmailSubject2 = ECommerce Sale Error - Credit Card
See also: ErrEmailSubject1
ErrEmailSubject3
ErrTemplate1
ErrTemplate2
ErrTemplate3
ErrEmailSubject3
Key value: Any text
Description: Used when Sales Host utility encounters an error when processing a sale. The sale was finalized, but there was a problem generating the Print At Home Tickets items. Used to populate the Subject field of the ticket generation error e-mail sent from the Sales Host.
Example: ErrEmailSubject3 = ECommerce Sale Error - Tickets
See also: ErrEmailSubject1
ErrEmailSubject2
ErrTemplate1
ErrTemplate2
ErrTemplate3
93

ErrTemplate1
Key value: Relative path to general set-up error e-mail confirmation template and template filename
Description: Used when Sales Host utility encounters an error when processing a sale. The sale was not finalized, probably due to a setup issue. Path is relative to the root of the web application (the virtual directory created when installing). By default the templates are stored in the template folder in the E-Commerce module virtual directory. Template filename is the name of the copy (text or HTML) file used as the mail body template sent in the e-mail.
Example: ErrTemplate1 = template/SaleErrorTemplate1.txt
See also: ErrEmailSubject3
ErrEmailSubject1
ErrEmailSubject2
ErrTemplate2
ErrTemplate3
ErrTemplate2
Key value: Relative path to credit card error e-mail confirmation template and template filename
Description: Used when Sales Host utility encounters an error when processing a sale. The sale was not finalized due to a credit card approval error. Path is relative to the root of the web application (the virtual directory created when installing). By default the templates are stored in the template folder in the E-Commerce module virtual directory. Template filename is the name of the copy (text or HTML) file used as the mail body template sent in the e-mail.
Example: ErrTemplate2 = template/SaleErrorTemplate2.txt
See also: ErrEmailSubject3
ErrEmailSubject1
ErrEmailSubject2
ErrTemplate3
ErrTemplate1
94
ErrTemplate3
Key value: Relative path to ticket generation error e-mail confirmation template and template filename
Description: Used when Sales Host utility encounters an error when processing a sale. The sale was finalized, but there was a problem generating the Print At Home Tickets items. Path is relative to the root of the web application (the virtual directory created when installing). By default the templates are stored in the template folder in the E-Commerce module virtual directory. Template filename is the name of the copy (text or HTML) file used as the mail body template sent in the e-mail.
Example: ErrTemplate3 = template/SaleErrorTemplate3.txt
See also: ErrEmailSubject3
ErrEmailSubject1
ErrEmailSubject2
ErrTemplate1
ErrTemplate2
FinalizedPayPlanTemplate
Key value: Email template
Description: The email template that is used for confirmation emails when the sale is put on a Payment Plan template/FinalizedPayPlanTemplate.html
Example: FinalizedPayPlanTemplate = template/FinalizedPayPlanTemplate.txt
See also: ChargedPayPlanTemplate
FinalizedTemplate
Key value: Relative path to finalized sale e-mail confirmation template and template filename
Description: Path is relative to the root of the web application (the virtual directory created when installing). By default the templates are stored in the template folder in the E-Commerce module virtual directory. Template filename is the name of the copy (text or HTML) file used as the mail body template sent as part of a finalized sale.
95
Example: FinalizedTemplate = template/finalizedtemplate.txt
See also: SavedTemplate
ChargedTemplate
PAHTemplate
MailAttachment
Key value: Any valid filepath and name within the web application’s root
Description: A static e-mail attachment may be specified. If the file doesn’t exist or is inaccessible, the mail is still sent without the attachment. Use MailAttachment to specify a file (and path within the web application’s root) to attach to a confirmation e-mail.
Note: Limitations on e-mail size is dictated by the e-mail servers on both the transmitting and receiving ends and is not set by E-Commerce module, so including an e-mail attachment with your confirmations must take these limitations into consideration.
See also: None
MailBCC
Key value: Any valid e-mail address or blank
Description: Used to populate the BCC field of the confirmation e-mails from your site. If entering multiple e-mail addresses into this key, each e-mail address is separated with only a comma.
See also: MailFromAddr
MailFromName
MailCC
MailSubject
96

MailCC
Key value: Any valid e-mail address or blank
Description: Used to populate the CC field of the confirmation e-mails from your site. If entering multiple e-mail addresses into this key, each e-mail address is separated with only a comma.
See also: MailBCC
MailFromAddr
MailFromName
MailSubject
MailFormat
Key value: Text or HTML
Description: Defines the format of the e-mails sent from the pages. Can be text or HTML and applies to all e-mail templates used to send e-mail from the pages.
Example: MailFormat = text
See also: SHMailFormat
MailFromAddr
Key value: Any valid e-mail address
Description: Displays in the From field on e-mail confirmations from your site.
Example: MailFromAddr = [email protected]
See also: MailBCC
MailFromName
MailCC
MailSubject
97
MailFromName
Key value: Any text
Description: Displays in the From field on e-mail confirmations from your site.
Example: MailFromName = Your Company Name
See also: MailBCC
MailFromAddr
MailCC
MailSubject
MailSubject
Key value: Any text
Description: Used to populate the Subject field of the confirmation e-mails from your site. The wwSale_id is appended to the end of the text used here. The default value is Sales confirmation - Sale # , which is usually adequate because the sale number automatically gets appended to this in the Subject line of the e-mail.
Example: MailSubject = Sale Confirmation - Sale #
See also: MailFromName
MailFromAddr
MailCC
MailBCC
NoFirstEmail
Key value: 0 or 1
Description: Enables (0) or disables (1) the sending of the first confirmation e-mail that gets sent from the pages after an E-Commerce sale is processed. If this key is not present in the siteconfig.config file or the value is set to 0, the first e-mail is sent as usual. Used to prevent the confirmation e-mail from being sent from the pages.
98
Note: Typically, two e-mails are used for confirmation. The first e-mail is sent immediately from the pages and the second e-mail is sent from Sales Host after it processes the sale.
See also: SendChgEmail
ChgEmailSubj
SHEMoverride
PAHTemplate
Key value: Relative path to Print At Home Tickets e-mail template and template filename
Description: Path is relative to the root of the web application (the virtual directory created when installing). By default the templates are stored in the template folder in the E-Commerce module virtual directory. Used to specify the template filename and path of the copy (text or HTML) file used as the mail body template sent with Print At Home Tickets module.
Example: PAHTemplate = template/pahtixtemplate.txt
See also: FinalizedTemplate
SavedTemplate
ChargedTemplate
PswdEmailSubject1
Key value: Any text
Description: Allows you to change the Subject of the reset password e-mails. Sets the Subject line for password e-mails. Corresponds to PswdEmailTemplate1. PswdEmailTemplate1 is the template used for the first e-mail sent when a guest password is reset.
Example: PswdEmailSubject1 = Reset password
See also: PswdEmailSubject2
PswdEmailTemplate1
99
PswdEmailTemplate2
1PWEmail
PswdEmailSubject2
Key value: Any text
Description: Allows you to change the Subject of the reset password e-mails. Sets the Subject line for password e-mails. Corresponds to PswdEmailTemplate2. PswdEmailTemplate1 is the template used for the first e-mail sent when a guest password is reset.
Note: If you are using a single reset password e-mail (1PWEmail = 1) you only need to change the value for PswdEmailSubject2 if you want the subject for that e-mail to be something other than, “Your new password”.
Example: PswdEmailSubject2 = Your new password
See also: PswdEmailSubject1
PswdEmailTemplate1
PswdEmailTemplate2
1PWEmail
PswdEmailTemplate1
Key value: Relative path to the first reset password e-mail template and template filename
Description: Path is relative to the root of the web application (the virtual directory created when installing). By default, the templates are stored in the template folder in the E-Commerce module virtual directory. Template filename is the name of the copy (text or HTML) file used as the mail body template sent when resetting a password. Corresponds to PswdEmailSubject1. PswdEmailTemplate1 is the template used for the first email sent when a guest password is reset.
Example: PswdEmailTemplate1 = template/PasswordReset1.txt
See also: PswdEmailSubject1
PswdEmailSubject2
100

PswdEmailTemplate2
1PWEmail
PswdEmailTemplate2
Key value: Relative path to the second reset password e-mail template and template filename
Description: Path is relative to the root of the web application (the virtual directory created when installing). By default the templates are stored in the template folder in the E-Commerce module virtual directory. Template filename is the name of the copy (text or HTML) file used as the mail body template sent when resetting a password. Corresponds to PswdEmailSubject2. PswdEmailTemplate2 is the template used for the first email sent when a guest password is reset.
Note: This is also the template that is used when using one e-mail to reset a visitor’s/guest’s password (i.e., when 1PWEmail = 1.
Example: PswdEmailTemplate2 = template/PasswordReset2.txt
See also: PswdEmailSubject1
PswdEmailSubject2
PswdEmailTemplate1
1PWEmail
SavedTemplate
Key value: Relative path to saved sale e-mail confirmation template and template filename
Description: Path is relative to the root of the web application (the virtual directory created when installing). By default the templates are stored in the template folder in the E-Commerce module virtual directory. Template filename is the name of the copy (text or HTML) file used as the mail body template sent as part of a saved sale.
Example: SavedTemplate = template/savedtemplate.txt
See also: FinalizedTemplate
ChargedTemplate
101
PAHTemplate
SendChgEmail
Key value: 0 or 1
Description: Enables (1) or disables (0) a second confirmation e-mail after the sale is processed by the Sales Host. Set SendChgEmail to 1 to enable a second confirmation e-mail to be sent from the Sales Host.
See also: NoFirstEmail
ChgEmailSubj
SHEMoverride
Key value: 0 or 1
Description: Enables (1) or disables (0) overriding the e-mail settings for the e-mails sent out from the Sales Host. This allows you to have different settings for the e-mail confirmations that get sent from Sales Host
(ChargedTemplate and PAHTemplate) as opposed to those that get sent from the pages (SavedTemplate
and FinalizedTemplate) upon completion of an online sale.
Note: Typically, two e-mails are used for confirmation. The first e-mail is sent immediately from the pages and the second e-mail is sent from Sales Host after it processes the sale.
See also: SHMailFromAddr
SHMailFromName
SHMailCC
SHMailBCC
102
SHMailBCC
Key value: Any valid e-mail address or blank
Description: SHMail settings are used to set the basic fields involved in sending e-mail from Sales Host when SHEMoverride is set to 1. SHMailBCC is used to populate the BCC field of the confirmation e-mails sent from Sales Host. If entering multiple e-mail addresses into this key, each e-mail address is separated with only a comma.
See also: SHEMoverride
SHMailFromAddr
SHMailFromName
SHMailCC
SHMailCC
Key value: Any valid e-mail address or blank
Description: SHMail settings are used to set the basic fields involved in sending e-mail from Sales Host when SHEMoverride is set to 1. SHMailCC is used to populate the CC field of the confirmation e-mails sent from the Sales Host. If entering multiple e-mail addresses into this key, each e-mail address is separated with only a comma.
See also: SHMailBCC
SHEMoverride
SHMailFromAddr
SHMailFromName
SHMailFormat
Key value: Text or HTML
Description: Defines the mail format of the e-mails sent from the Sales Host. Can be text or html and applies to all e-mail templates used to send e-mail from Sales Host.
Example: SHMailFormat = text
See also: MailFormat
103
SHMailFromAddr
Key value: Any valid e-mail address
Description: SHMail settings are used to set the basic fields involved in sending e-mail from Sales Host when SHEMoverride is set to 1. SHMailFromAddr displays in the From field on e-mails sent from Sales Host.
Example: SHMailFromAddr = [email protected]
See also: SHMailBCC
SHEMoverride
SHMailFromName
SHMailCC
SHMailFromName
Key value: Any text
Description: SHMail settings are used to set the basic fields involved in sending e-mail from Sales Host when SHEMoverride is set to 1. SHMailFromName displays in the From field on e-mails sent from the Sales Host.
Example: SHMailFromName = Your Company
See also: SHMailFromAddr
SHMailBCC
SHEMoverride
SHMailCC
EXHIBITS MET_MODS MEMBERFREEPtsSel
Key value: DCI and text for statement
Description: The key contains the padded DCI of the free item modifier and a select statement. If you enter multiple DCIs into PointsModDCIs, then you need one of these select statement entries per DCI.
104

Example: EXHIBITS MET_MODS MEMBERFREEPtsSel = Select points1 as uses from gst_pass where pass_no = {{pass_no}} and voided_by='' and voided_for='' and start_date<=GETDATE() and expires>=GETDATE()
See also: EXHIBITS MET_MODS MEMBRFREE2PtsSel
EXHIBITS MET_MODS MEMBRFREE3PtsSel
MEMBERSHIPTMAMODS FRIENDS PtsSel
MEMBERSHIPTMAMODS FRIENDS2 PtsSel
105
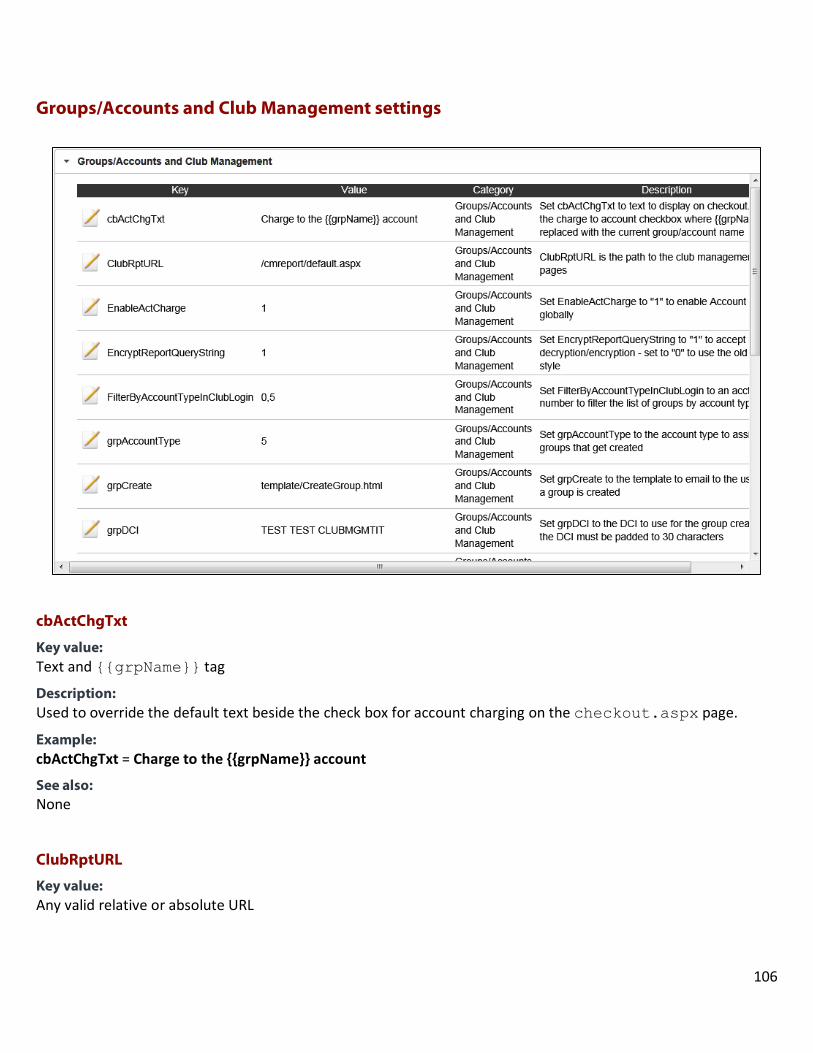
Groups/Accounts and Club Management settings
cbActChgTxt
Key value: Text and {{grpName}} tag
Description: Used to override the default text beside the check box for account charging on the checkout.aspx page.
Example: cbActChgTxt = Charge to the {{grpName}} account
See also: None
ClubRptURL
Key value: Any valid relative or absolute URL
106
Description: URL (relative or absolute) to a Reporting Services server (specifying the SQL named instance if applicable) path to the Club Report. If you are not using Reporting Services, the path would be in this format:
/clubreport/default.aspx
Example: http://ServerName/ReportServer$NamedInstance/Pages/ReportViewer.aspx
/clubreport/default.aspx
See also: ReportQueryString
EnableActCharge
Key value: 0 or 1
Description: Enables (1) or disables (0) account charging for online group/account sales. If set to 0, no charges are ever allowed for online group/account sales regardless of any other settings. Set EnableActCharge to 1 to enable account charging globally.
See also: None
EncryptReportQueryString
Key value: 0 or 1
Description: Enables (1) or disables (0) Club Management pages to use .NET decryption/encryption when running the Club Member Purchases Report. To enable this, set EncryptReportQueryString = 1 in the siteconfig.config file for the E-Commerce pages. To continue to use the old decryption/encryption set both of the keys to 0.
See also: None
FilterByAccountTypeInClubLogin
Key value: Numerical Entry based on SiriusSQL Account Types
Description: To make it so that not all accounts display to the end user, use the following siteconfig.config key to filter the accounts displayed to those account types that you have configured as Club Management accounts.
Account types can be found in the accounts table in SiriusSQL database under the acct_type column.
107

Example: FilterByAccountTypeInClubLogin = 2,3
See also: ShowGroupNamesinClubLogin
grpAccountType
Key value: Numerical Entry based on SiriusSQL Account Types
Description: This page allows Group Leaders to create their own Club Management Groups (accounts) online. The page is called GrpMiniCreate.aspx. This page is only distributed to clients who have purchased the Club Management application. Users can be directed to the GrpMiniCreate.aspx page via a link. The page requires the entry of the following information in order to create a new group: Group Name, Group Leader, Address, City, State, Zip code, Area Code, Phone Number, Email, Group Log-in Name, Group Leader Password and Group Member Password. Once the fields are populated, the user clicks the Create Group button and an email is sent to the email address set for the group notifying the user that the group has been created. After Sales Host utility processes the request, the group is ready to be used.
Set grpAccountType to the account type to assign to the groups that get created.
This functionality also requires the following email templates: CreateGroup.txt and CreateGroup.html. These templates can contain the following fields which get populated when the email is generated:
{{club owner}} Group Leader name
{{Nick Name}} Group Log-in name.
{{owner password}} Group Leader password
{{member password}} Group Member password
{{url}} the URL that gets set in the grpReturnURL key
Example: grpAccountType = 5
See also: GrpCreate
GrpDCI
GrpItemTree
GrpMessageForMembers
GrpPayType
GrpReturnURL
GrpSubjectForEmail
108
grpCreate
Key value: Appropriate template file
Description: A new page has been created that allows Group Leaders to create their own Club Management Groups (accounts) online. The new page is called GrpMiniCreate.aspx. This page is only distributed to clients who have purchased the Club Management application. Users can be directed to the GrpMiniCreate.aspx page via a link. The page requires the entry of the following information in order to create a new group: Group Name, Group Leader, Address, City, State, Zip code, Area Code, Phone Number, Email, Group Log-in Name, Group Leader Password and Group Member Password. Once the fields are populated, the user clicks the Create Group button and an email is sent to the email address set for the group notifying the user that the group has been created. After Sales Host utility processes the request, the group is ready to be used.
Set grpCreate to the template to email to the user when a group is created.
This functionality also requires the following email templates: CreateGroup.txt and CreateGroup.html. These templates can contain the following fields which get populated when the email is generated:
{{club owner}} Group Leader name
{{Nick Name}} Group Log-in name.
{{owner password}} Group Leader password
{{member password}} Group Member password
{{url}} the URL that gets set in the grpReturnURL key
Example: grpCreate = template/CreateGroup.txt
See also: GrpAccountType
GrpDCI
GrpItemTree
GrpMessageForMembers
GrpPayType
GrpReturnURL
GrpSubjectForEmail
grpDCI
Key value: Appropriate DCI (must be padded up to thirty characters)
109
Description: A page has been created that allows Group Leaders to create their own Club Management Groups (accounts) online. The new page is called GrpMiniCreate.aspx. This page is only distributed to clients who have purchased the Club Management application. Users can be directed to the GrpMiniCreate.aspx page via a link. The page requires the entry of the following information in order to create a new group: Group Name, Group Leader, Address, City, State, Zip code, Area Code, Phone Number, Email, Group Log-in Name, Group Leader Password and Group Member Password. Once the fields are populated, the user clicks the Create Group button and an email is sent to the email address set for the group notifying the user that the group has been created. After Sales Host utility processes the request, the group is ready to be used.
Set grpDCI to the DCI to use for the group creation sale. The DCI must be padded to thirty characters.
This functionality also requires the following email templates: CreateGroup.txt and CreateGroup.html. These templates can contain the following fields which get populated when the email is generated:
{{club owner}} Group Leader name
{{Nick Name}} Group Log-in name.
{{owner password}} Group Leader password
{{member password}} Group Member password
{{url}} the URL that gets set in the grpReturnURL key
Example: grpDCI = TEST TEST CLUBMGMTIT
See also: GrpAccountType
GrpCreate
GrpItemTree
GrpMessageForMembers
GrpPayType
GrpReturnURL
GrpSubjectForEmail
grpItemTree
Key value: Name of the Item Tree Node
Description: A page has been created that allows Group Leaders to create their own Club Management Groups (accounts) online. The new page is called GrpMiniCreate.aspx. This page is only distributed to clients who have purchased the Club Management application. Users can be directed to the GrpMiniCreate.aspx page via a link. The page requires the entry of the following information in order to create a new group: Group Name, Group
110
Leader, Address, City, State, Zip code, Area Code, Phone Number, Email, Group Log-in Name, Group Leader Password and Group Member Password. Once the fields are populated, the user clicks the Create Group button and an email is sent to the email address set for the group notifying the user that the group has been created. After Sales Host utility processes the request, the group is ready to be used.
Set grpItemTree to the name of the item tree node that you want the group to see once the group is created.
This functionality also requires the following email templates: CreateGroup.txt and CreateGroup.html. These templates can contain the following fields which get populated when the email is generated:
{{club owner}} Group Leader name
{{Nick Name}} Group Log-in name.
{{owner password}} Group Leader password
{{member password}} Group Member password
{{url}} the URL that gets set in the grpReturnURL key
Example: grpItemTree = ClubMgmt Group
See also: GrpAccountType
GrpCreate
GrpDCI
GrpMessageForMembers
GrpPayType
GrpReturnURL
GrpSubjectForEmail
grpMessageForMembers
Key value: Customized message
Description: A new page has been created that allows Group Leaders to create their own Club Management Groups (accounts) online. The new page is called GrpMiniCreate.aspx. This page is only distributed to clients who have purchased the Club Management application. Users can be directed to the GrpMiniCreate.aspx page via a link. The page requires the entry of the following information in order to create a new group: Group Name, Group Leader, Address, City, State, Zip code, Area Code, Phone Number, Email, Group Log-in Name, Group Leader Password and Group Member Password. Once the fields are populated, the user clicks the Create Group button and an email is sent to the email address set for the group notifying the user that the group has been created. After Sales Host utility processes the request, the group is ready to be used.
Set grpMessageForMembers to the message to display once the group has been created.
111

This functionality also requires the following email templates: CreateGroup.txt and CreateGroup.html. These templates can contain the following fields which get populated when the email is generated:
{{club owner}} Group Leader name
{{Nick Name}} Group Log-in name.
{{owner password}} Group Leader password
{{member password}} Group Member password
{{url}} the URL that gets set in the grpReturnURL key
Example: grpMessageForMembers = Your group is being created. Please check your email for more details.
See also: GrpAccountType
GrpCreate
GrpDCI
GrpItemTree
GrpPayType
GrpReturnURL
GrpSubjectForEmail
grpPayType
Key value: Payment type i.e., “Other”, “Cash”, etc.
Description: A page has been created that allows Group Leaders to create their own Club Management Groups (accounts) online. The page is called GrpMiniCreate.aspx. This page is only distributed to clients who have purchased the Club Management application. Users can be directed to the GrpMiniCreate.aspx page via a link. The page requires the entry of the following information in order to create a new group: Group Name, Group Leader, Address, City, State, Zip code, Area Code, Phone Number, Email, Group Log-in Name, Group Leader Password and Group Member Password. Once the fields are populated, the user clicks the Create Group button and an email is sent to the email address set for the group notifying the user that the group has been created. After Sales Host utility processes the request, the group is ready to be used.
Set grpPayType to the payment type to use for the group creation sale.
This functionality also requires the following email templates: CreateGroup.txt and CreateGroup.html. These templates can contain the following fields which get populated when the email is generated:
{{club owner}} Group Leader name
{{Nick Name}} Group Log-in name.
112
{{owner password}} Group Leader password
{{member password}} Group Member password
{{url}} the URL that gets set in the grpReturnURL key
Example: grpPayType = Other
See also: GrpAccountType
GrpCreate
GrpDCI
GrpItemTree
GrpMessageForMembers
GrpReturnURL
GrpSubjectForEmail
grpReturnURL
Key value: URL to be inserted i.e., https://www.greatskiing.com/ecommerce/GrpLogin2.aspx
Description: A page has been created that allows Group Leaders to create their own Club Management Groups (accounts) online. The page is called GrpMiniCreate.aspx. This page is only distributed to clients who have purchased the Club Management application. Users can be directed to the GrpMiniCreate.aspx page via a link. The page requires the entry of the following information in order to create a new group: Group Name, Group Leader, Address, City, State, Zip code, Area Code, Phone Number, Email, Group Log-in Name, Group Leader Password and Group Member Password. Once the fields are populated, the user clicks the Create Group button and an email is sent to the email address set for the group notifying the user that the group has been created. After Sales Host utility processes the request, the group is ready to be used.
Set grpReturnURL to the URL that gets inserted into the group create email, e.g., https://www.greatskiing.com/ecommerce/GrpLogin2.aspx.
This functionality also requires the following email templates: CreateGroup.txt and CreateGroup.html. These templates can contain the following fields which get populated when the email is generated:
{{club owner}} Group Leader name
{{Nick Name}} Group Log-in name.
{{owner password}} Group Leader password
{{member password}} Group Member password
{{url}} the URL that gets set in the grpReturnURL key
113

Example: grpReturnURL = http://localhost/clientsite4/GrpLogin2.aspx
See also: GrpAccountType
GrpCreate
GrpDCI
GrpItemTree
GrpMessageForMembers
GrpPayType
GrpSubjectForEmail
grpSubjectForEmail
Key value: Text representing email subject
Description: A page has been created that allows Group Leaders to create their own Club Management Groups (accounts) online. The page is called GrpMiniCreate.aspx. This page is only distributed to clients who have purchased the Club Management application. Users can be directed to the GrpMiniCreate.aspx page via a link. The page requires the entry of the following information in order to create a new group: Group Name, Group Leader, Address, City, State, Zip code, Area Code, Phone Number, Email, Group Log-in Name, Group Leader Password and Group Member Password. Once the fields are populated, the user clicks the Create Group button and an email is sent to the email address set for the group notifying the user that the group has been created. After Sales Host utility processes the request, the group is ready to be used.
Set grpSubjectForEmail to the subject for the email that gets sent after a group is created.
This functionality also requires the following email templates: CreateGroup.txt and CreateGroup.html. These templates can contain the following fields which get populated when the email is generated:
{{club owner}} Group Leader name
{{Nick Name}} Group Log-in name.
{{owner password}} Group Leader password
{{member password}} Group Member password
{{url}} the URL that gets set in the grpReturnURL key
Example: grpSubjectForEmail = New Group Created
See also: GrpAccountType
114

GrpCreate
GrpDCI
GrpItemTree
GrpMessageForMembers
GrpPayType
InheritGroup
Key value: 0 or 1
Description: Enables (1) or disables (0) the writing of the currently logged in group to any guest records present on finalize. Set InheritGroup to 1 to enable writing of the currently logged in group to any guest records present on finalize. If you want to have the currently logged into group get written into the guestgroup field (as documented in the ww.dll API Reference) for each visitor/guest attached to a product in the sale, you need to set the value for the InheritGroup key to 1. With the value set to 1, the currently logged into group also gets written into the guestgroup field for the purchaser even if the purchaser is not attached to an item in the sale, provided you also have the following siteconfig.config setting: NoPurchTracking = 0. The guestgroup can be viewed for a guest in SysManager by looking up a guest and viewing the Group field on the Group Info tab or in Sales by looking up a guest and viewing the Group field on the Guest Info tab. The group can also be seen for a guest in the Guest Listing Report in ReportManager (Reports > Guest Reports > Guest Listing).
See also: None
KeepCartOnGroupLogout
Key value: 0 or 1
Description: When making purchases when logged into a group or club in E-Commerce module, if the user logs out of the group before completing the sale, the default behavior for this action is to empty the cart contents along with logging the person out of the group/club. This behavior helps ensure tracking of items purchased while logged into a group or club.
Setting the value for KeepCartOnGroupLogout to 1 overrides the default behavior of clearing the cart on log-out and keeps the cart contents intact but logs the user out of the group/club. In addition, items that are added to the cart while logged in followed by the user logging out of the group/club still has the account name for the group or club written into the item’s Message field. However, the group name does not get written into any of the guest records for guests present in the sale if the user logs out even if they were added to items in the cart while logged into the group/club.
115
See also: None
ReportQueryString
Key value: ?Account= or /ReportServer$SS2005?%2fClubMemberPurchases&rs:Command=Render
Description: Used to select which presentation format the Club Management Report is using. The ?Account= format is specified when the Club Management Report is used as part of the E-Commerce pages, while the second format is used with Reporting Services.
Example: ReportQueryString = ?Account=
See also: ClubRptURL
ShowGroupNamesInClubLogin
Key value: 0 or 1
Description: Functionality has been added to the Club Management Log-in page in E-Commerce module that displays the letters of the alphabet in order as links. Clicking on one of the letters displays all of the configured club names that start with that letter. Clicking on the club name auto-populates the Club Name field on the Club Management Log-in page. This avoids the need to remember the exact club name. The password needs to be entered and the Log-in button clicked to complete the log-in.
To make it so that not all accounts display to the end user, use the following key to filter the accounts displayed to those account types that you have configured as Club Management accounts:
FilterByAccountTypeInClubLogin = 2,3
Account types can be found in the accounts table in SiriusSQL database under the acct_type column.
See also: FilterByAccountTypeInClubLogin
116
UseClubLogin
Key value: 0 or 1
Description: When set to 1, requests/links to the original group log-in page (GrpLogin.aspx) are redirected to GrpLogin2.aspx used with Club Membership. Set UseClubLogin to 1 to use grpLogin2.aspx for group log-ins; set to 0 to use grplogin.aspx.
See also: None
117

Guest Related Settings
1PWEmail
Key value: 0 or 1
Description: Enables (1) or disables (0) password-resetting with a single e-mail.
Note: Most E-Commerce module installations are moving away from the use of two e-mails for password resets. Previously a second e-mail would be sent with the password. Now, confirmation of the password is usually done immediately after selection of a new password, directly on the web page.
See also: PswdEmailSubject1
PswdEmailSubject2
118
PswdEmailTemplate1
PswdEmailTemplate2
AgeAsOf
Key value: A date in the format of xxxx-xx-xx for example, 2013-07-01 is July 1, 2013
Description: Used to calculate the age of a visitor/guest attached to a product as of a specified date rather than the current date. Used to override birth date calculation dates, which is usually done using the current date. The following example calculates guest ages attached to products as of July 1, 2013: AgeAsOf = 2013-07-01. If you specify the year as 0000 (e.g., AgeAsOf = 0000-07-01), age calculations are always performed on the next occurrence of the specified month and day. If you want to continue to use the current date for age calculations, the setting can be used as follows: AgeAsOf = ""or it can be omitted entirely from the siteconfig.config file. In addition, you need to add code similar to this to the pass item’s Sales Action tab:
<ISWEB>SELECTLAST()DATETIME(06/01/2013)</ISWEB>
Using the correct date, of course.
Example: AgeAsOf = ""
AgeAsOf = 0000-07-01
AgeAsOf = 2013 -07-01
See also: None
AllowMultiLogin
Key value: 0 or 1
Description: Enables (1) or disables (0) multiple independent log-ins by a parent and his children. If set to 0, children of a parent are automatically logged out when the parent logs out. If set to 1, this behavior is overridden and multiple visitors/guests can be logged in at the same time.
Note: The setting AllowMultiLogin = 1 must be set to a value of 1 in order to keep the head guest as the first guest to be verified. If the setting is not present in siteconfig.config or is set to a value of 0, the head guest is always the last guest looked up and verified.
119
If an online visitor/guest uses the Guest Lookup link in the page header or page footer from either Checkout.aspx or Checkout2.aspx and a guest has not yet been set as the purchaser, that guest lookup is used to set the guest looked up as the purchaser for the sale and the online visitor/guest is returned to either the Checkout.aspx or Checkout2.aspx page depending on where they started from. If, however, a guest has already been set as the purchaser, going through the process mentioned above simply results in an additional guest lookup, but are not replace the existing purchaser. The above actions occur with the setting AllowMultiLogin = 1.
When AllowMultiLogin = 0 is set, any guest lookup from either Checkout.aspx or Checkout2.aspx via the Guest Lookup link in the page header or page footer results in the guest that was looked up being set as the purchaser, even if a purchaser has already been set.
See also: ParentingLevel
AllowNoVerify
Key value: 0 or 1
Description: If 0, hides the Add without verification button that displays on the GuestSelected.aspx page when adding guests to products.
Siteconfig.config setting was added to display alternate text when utilizing username/password guest lookups and the user checks the Add Without Verification check box during the addition of a guest to an item or modifier.
See also: GLNoVerifyNoResultsText
BDateErrorMsg
Key value: Any text
Description: Used to specify the text that displays on the GuestSelected.aspx page when a birth date is entered in the wrong format for guest verification. If the value for this key is empty or the key is not present, the default error message is displayed.
Example: BDateErrorMsg = ""
BDateErrorMsg = Incorrect date entered! Please use the following format: mm/dd/yy
See also: None
120
DefAddress
Key value: Numeric values: 1, 10, 20 or 30
Description: Specifies the default address to be used for guest lookup, creation and editing (1 = Mailing, 10 = Shipping, 20 = Billing, 30 = Local).
See also: GuestEditRows
ForceEditFields
ExistingGuestHideRows
GuestDispRows
ShipAddress
DefEmailOK
Key value: 0 or 1
Description: If 1, the It’s OK to email me, check box defaults to checked when a new visitor/guest creates his guest record; if 0, the check box defaults to unchecked. Must have email in the GuestEditRows or PurchaserEditRows to display the check boxes and use this key.
See also: DefMailOK
DefPhoneOK
DefMailOK
Key value: 0 or 1
Description: If 1, the It’s OK to mail me check box defaults to checked when a new visitor/guest creates his guest record; if 0, the check box defaults to unchecked.
See also: DefEmailOK
DefPhoneOK
121
DefPhoneOK
Key value: 0 or 1
Description: If 1, the It’s OK to call me check box defaults to checked when a new visitor/guest creates his guest record; if 0, the check box defaults to unchecked.
See also: DefEmailOK
DefMailOK
DefVerifyRegEx
Key Value: Regex default
Description: Default regex is used to validate input when verifying a guest using alternate guest or address fields.
Example: DefVerifyRegEx = ^.{5,30}$
See also: DefVerifyRegExMessage
Verify field
DefVerifyRegExMessage
Key Value: Any message text
Description: The default message that is displayed if the regex check fails on GuestSelected.aspx.
Example: DefVerifyRegExMessage= Invalid Value
See also: DefVerifyRegEx
Verify field
122
ExistingGuestHideRows
Key value: Any combination of valid field names from the guests and/or address tables
Description: Used to define fields that you want hidden for existing guests but available to new guests. ExistingGuestHideRows are GuestEditRows that are hidden when an existing guest edits his record.
Available fields are: • guest_no • first_name • last_name • firstname2 • lastname2 • company • address • address2 • city • state • zipcode • country • phone • email • birth_date • cardonfile • contact • group • notes • last_pass • username • password • parent • children • height • weight • shoesize • type_skier • stance • gender • cb1 • cb2 • cb3 • numbers1
123

• numbers2 • text1 • text2 • text3 • misc1 • misc2 • misc3 • misc4 • misc5 • memo_1 • memo_2 • memo_3 • date_1 • datetime_1
Example: ExistingGuestHideRows = memo_1
See also: DefAddress
GuestEditRows
ForceEditFields
GuestDispRows
ShipAddress
ExistingPurchaserHideRows
Key value: Any combination of valid field names from the guests and/or address tables
Description: A new button appears on either Checkout.aspx or Checkout2.aspx (when using checkout steps) when you set a purchaser. The button has the default wording of Edit this Purchaser which can be changed in the markup for the page. This button allows easy access for the purchaser to edit the guest record.
Fields in the guest record for the purchaser in an E-Commerce module sale can be handled differently from fields in the guest record for guests attached to products. This works in the same manner as ExistingGuestHideRows except that they only affect the guest who is set as the purchaser in the sale. These Purchaser keys can take the same values as the corresponding Guest keys. Additional configuration can be done in the dynamicControls.xml file. Each field/section in that file now has a <Required_purch> . . . </Required_purch> setting which can be set to 1 (TRUE) or 0 (FALSE). Setting this to 1 makes it so that the field is required if the purchaser edits their guest record.
124

Available fields are: • guest_no • first_name • last_name • firstname2 • lastname2 • company • address • address2 • city • state • zipcode • country • phone • email • birth_date • cardonfile • contact • group • notes • last_pass • username • password • parent • children • height • weight • shoesize • type_skier • stance • gender • cb1 • cb2 • cb3 • numbers1 • numbers2 • text1 • text2 • text3 • misc1 • misc2 • misc3
125
• misc4 • misc5 • memo_1 • memo_2 • memo_3 • date_1 • datetime_1
Example: ExistingPurchaserHideRows =""
See also: PurchaserDispRows
PurchaserEditRows
PurchaserForceEditFields
ForceEditFields
Key value: Any combination of valid field names from the guests and/or address tables
Description: Used to define fields in a guest record that stop a visitor/guest from continuing if the fields are incomplete in the database after a lookup. ForceEditFields are guest and address fields that if empty in the database force a guest to edit his record.
Available fields are: • guest_no • first_name • last_name • firstname2 • lastname2 • company • address • address2 • city • state • zipcode • country • phone • email • birth_date • cardonfile • contact
126
• group • notes • last_pass • username • password • parent • children • height • weight • shoesize • type_skier • stance • gender • cb1 • cb2 • cb3 • numbers1 • numbers2 • text1 • text2 • text3 • misc1 • misc2 • misc3 • misc4 • misc5 • memo_1 • memo_2 • memo_3 • date_1 • datetime_1
Example: ForceEditFields = first_name, last_name, address, city, state, zip, country, area_code, phone, email, birth_date
See also: DefAddress
GuestEditRows
GuestDispRows
ShipAddress
127
GetPassPhoto
Key value: 0 or 1
Description: Enables (1) or disables (0) the pass photo upload capability. Set GetPassPhoto to 1 to enable the photo upload functionality on the GuestSelected.aspx page.
See also: GuestPhotos
UploadPhotoMaxWidth
PassPhotoHeight
PassPhotoWidth
PassPhotoURL
GLAltFNameTxt
Key value: Username
Description: The standard First Name / Last Name = text prompts on GuestLookup.aspx can now be overridden. The value from the key GLAltFNameTxt overrides the text from the <asp:label id="lblFirstName" runat="server" text="First Name"></asp:label> control.
Note: this siteconfig.config key can be used to override the text on the page whether or not you are using username/password guest lookups. Also, if you have these two keys in your siteconfig.config file and you set the value to blank, e.g., GLAltFNameTxt ="", no text is displayed for the prompts. Therefore it is best to either leave these out of your siteconfig.config file or comment them out rather than blanking them out if you are not going to use them.
To make the username/password guest lookup feature consistent with other forms of guest lookups, the I forgot my password link appears on the page if the entered username is associated with a guest but the password is incorrect. An Add Without Verification check box appears on the page when the product being sold allows a guest to be added without verification. This still requires the user to enter the Username of the guest being added, select the Add Without Verification check box and click the Look Me Up button, but no password is required.
Example: GLAltFNameTxt = Username
See also: GLAltLNameTxt
128
GLUseUserID
GLAltLNameTxt
Key value: Password
Description: The standard First Name/Last Name text prompts on GuestLookup.aspx can be overridden. The value from the key GLAltLNameTxt overrides the text from the <asp:label id="lblLastName" runat="server" text="Last Name"></asp:label> control.
Note: this siteconfig.config key can be used to override the text on the page whether or not you are using username/password guest lookups. Also, if you have these two keys in your siteconfig.config file and you set the value to blank, e.g., GLAltFNameTxt = "", no text is displayed for the prompts. Therefore it is best to either leave these out of your siteconfig.config file or comment them out rather than blanking them out if you are not going to use them.
To make the username/password guest lookup feature consistent with other forms of guest lookups, the I forgot my password link appears on the page if the entered username is associated with a guest but the password is incorrect. An Add Without Verification check box appears on the page when the product being sold allows a guest to be added without verification. This still requires the user to enter the Username of the guest being added, select the Add Without Verification check box and click the Look Me Up button, but no password is required.
Example: GLAltLNameTxt = Password
See also: GLAltFNameTxt
GLUserID
GLNoVerifyNoResultsText
Key value: Message to be displayed
Description: This can be used to display more meaningful text when doing guest lookups for items/modifiers that either have required fields or require a Liability form to be accepted by the guest and the guest is missing this information from their guest record. In these cases the guest must be verified in order to add the required information to the guest record.
129
Note: Do not use this setting with value="" as this makes it so that no text displays to inform the guest of what to do. If you do not want to use this setting, either comment it out, i.e., GLNoVerifyNoResultsText = No match found OR this guest cannot be added without verification. or remove it entirely from your siteconfig.config file.
Example: GLNoVerifyNoResultsText = No match found OR this guest cannot be added without verification.
See also: AllowNoVerify
GLUseUserID
Key value: 0 or 1
Description: Guest lookups can be done from the GuestLookup.aspx page using username/password rather than the standard first name/last name lookup. When doing username/password lookups, the guest enters both their username and password on the GuestLookup.aspx page, and then clicks the Look Me Up button. To enable this functionality, add the following key to the siteconfig.config file.
See also: GLAltFNameTxt
GLAltLNameTxt
GuestDispRows
Key value: Any combination of valid field names from the guests and/or address tables
Description: Used to define the fields that are displayed on the GuestSelected.aspx page. GuestDispRows are the guest and address rows displayed during a guest look up on the GuestSelected.aspx page.
Available fields are: • guest_no • first_name • last_name • firstname2 • lastname2 • company • address • address2 • city • state
130
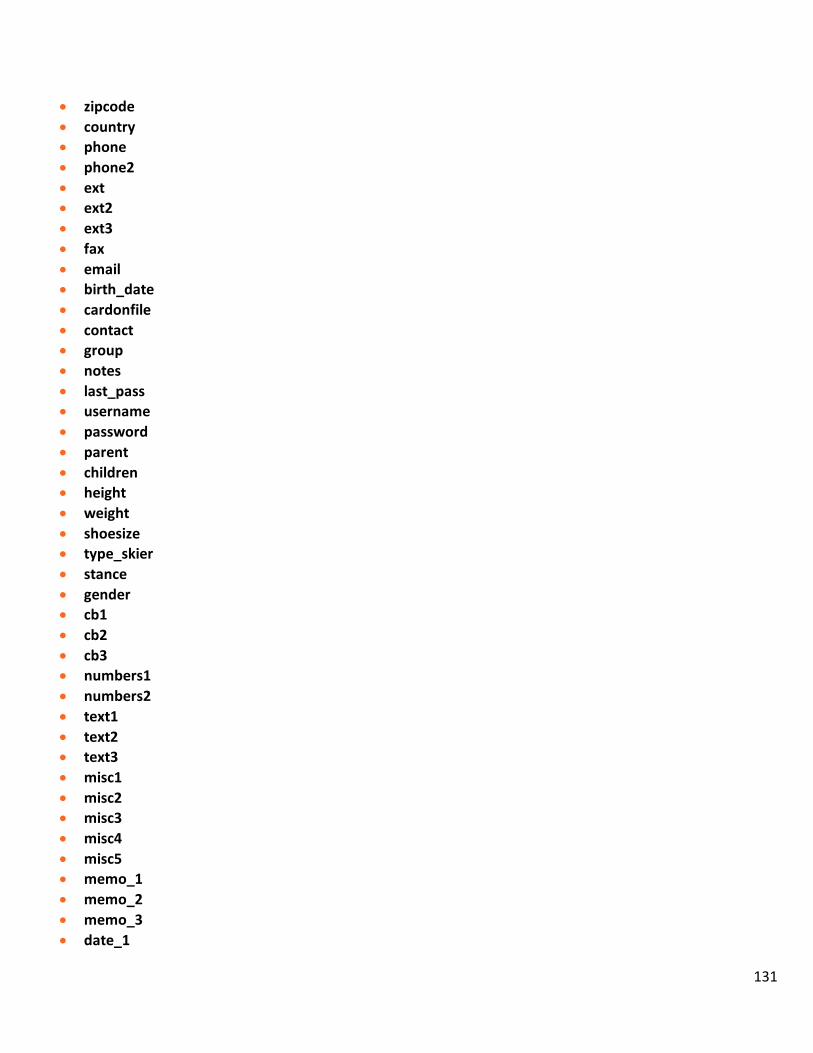
• zipcode • country • phone • phone2 • ext • ext2 • ext3 • fax • email • birth_date • cardonfile • contact • group • notes • last_pass • username • password • parent • children • height • weight • shoesize • type_skier • stance • gender • cb1 • cb2 • cb3 • numbers1 • numbers2 • text1 • text2 • text3 • misc1 • misc2 • misc3 • misc4 • misc5 • memo_1 • memo_2 • memo_3 • date_1
131

• datetime_1 • L_text1 • L_text2 • L_text3 • L_text4 • L_text5
Note: Last five guest user defined text fields are fifty characters each.
Example: GuestDispRows = guest_no, first_name, last_name, address, city, state, zipcode, country, phone, email, birth_date, username, password
See also: ForceEditFields
ExistingGuestHideRows
DefAddress
GuestEditRows
GuestDispRows
ShipAddress
GuestEditRows
Key value: Any combination of valid field names from the guests and/or address tables
Description: Used to define the fields that are displayed on the GuestEdit.aspx page. GuestEditRows are the guest and address rows displayed for guest editing on the GuestEdit.aspx page.
Note: GuestEditRows works in conjunction with the customizable XML in dynamicControls.xml, though most installations only need to configure this setting and not the code in dynamicControls.xml.
Available fields are: • guest_no • first_name • last_name • firstname2 • lastname2
132
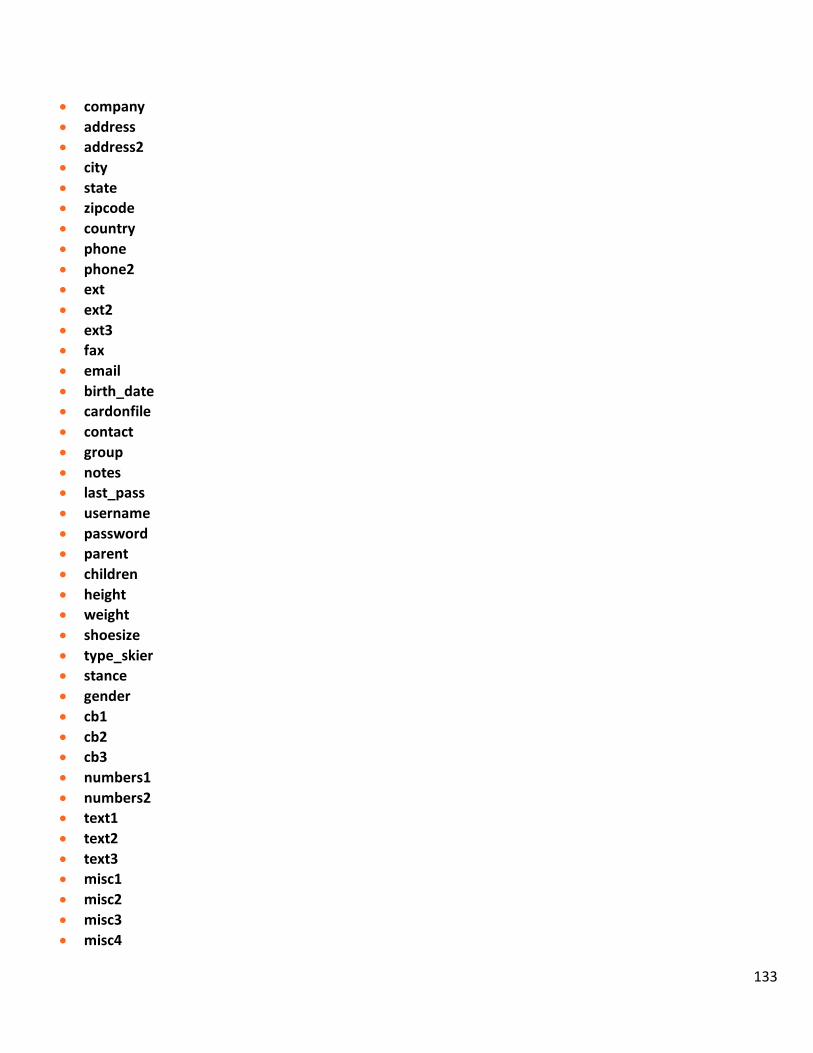
• company • address • address2 • city • state • zipcode • country • phone • phone2 • ext • ext2 • ext3 • fax • email • birth_date • cardonfile • contact • group • notes • last_pass • username • password • parent • children • height • weight • shoesize • type_skier • stance • gender • cb1 • cb2 • cb3 • numbers1 • numbers2 • text1 • text2 • text3 • misc1 • misc2 • misc3 • misc4
133
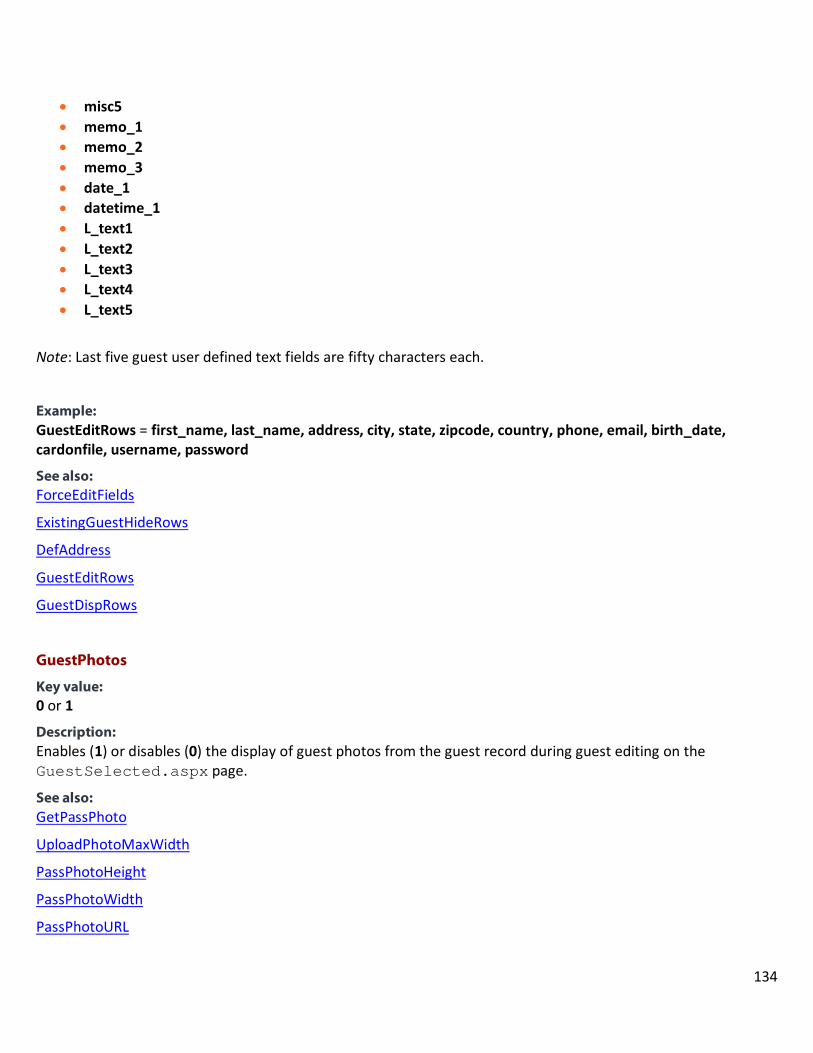
• misc5 • memo_1 • memo_2 • memo_3 • date_1 • datetime_1 • L_text1 • L_text2 • L_text3 • L_text4 • L_text5
Note: Last five guest user defined text fields are fifty characters each.
Example: GuestEditRows = first_name, last_name, address, city, state, zipcode, country, phone, email, birth_date, cardonfile, username, password
See also: ForceEditFields
ExistingGuestHideRows
DefAddress
GuestEditRows
GuestDispRows
GuestPhotos
Key value: 0 or 1
Description: Enables (1) or disables (0) the display of guest photos from the guest record during guest editing on the GuestSelected.aspx page.
See also: GetPassPhoto
UploadPhotoMaxWidth
PassPhotoHeight
PassPhotoWidth
PassPhotoURL
134

InfoExpr
Key value: Any valid VB.NET/ADO.NET expression including a field (or fields) from the address table
Description: Specifies the expression for additional information displayed on the GuestLookup.aspx page if there are multiple matches from a lookup (to help a visitor/guest identify his record in the database). Generates an additional column of information in the guest lookup grid for multiple matches. For example, SUBSTRING(phone, 7, 2) would give the last two digits of the phone number or just a field name like zip would return the zip code.
Example: InfoExpr = zip+' - '+SUBSTRING(phone, 5, 4)
See also: InfoHeading
InfoExprOnGuestSelected
Key value: 1 or 0
Description: In order to help verify correct guest lookups when only a single match is found when using first name/last name lookups, the display of additional information as set with the InfoExpr and InfoHeading keys from the siteconfig.config file has been added to the GuestSelected.aspx page.
See also: None
InfoHeading
Key value: Any text
Description: This text appears at the top of the column displaying the output of the InfoExpr when there are multiple matches to a guest lookup.
Example: InfoExpr = zip+' - '+SUBSTRING(phone, 5, 4)
InfoHeading = Zip code - last four digits of phone#
See also: InfoExpr
135

IntlShipPh
Key value: 0 or 1
Description: Enables (1) or disables (0) use of international phone numbers.
See also: ShowShippingAddr
ShipAddress
ItemGuestInheritsText
Key value: Inherits guest from main item above
Description:
Modifiers that inherit guest information from the main item is now be displayed in the E-Commerce shopping cart with a modified head image and text that says, “Inherits guest from main item above”. The displayed text is configurable using the following siteconfig.config key:
Example: ItemGuestInheritsText = Inherits guest from main item above
See also: None
ItemGuestRequiredText
Key value: Any Text
Description: Set ItemGuestRequiredText is the text to display in the cart when items that require a guest have not had a guest attached.
Example: ItemGuestRequiredText = Guest Required!
See also: None
136
LockoutMessage
Key value: Any text, can include {{glocktime}} variable
Description:
Text that a visitor/guest receives when his account is locked out after too many failed log-in attempts. {{glocktime}} variable is used to indicate exactly how much time is left in the lockout.
Example: LockoutMessage = Your account has been locked for {{glocktime}} minutes due to too many failed login attempts. Please contact us to correct this or try again after the time has elapsed.
See also: None
LookupChars
Key value: Any positive integer
Description: Specifies the minimum number of characters required in both Name fields required to do a lookup.
Example: LookupChars = 2
See also: None
NewGuestFill
Key value: 0, 1 or 2
Description: Specifies how new guest information is populated on the GuestEdit.aspx page in relation to the head guest during the Create New Guest process:
This key can be set to 0, 1 or 2:
• 0 - Always inherit basic information (last name, address information) from the head guest first, if present, and then whatever was entered into the Name fields from the last lookup, if filled.
• 1 - Only inherit information if the lookup fields are not populated or the last name is the same as the head guest, if there is one.
• 2 - Never inherit head guest information for new guests, just fill with lookup names if possible.
See also: None
137
NoPurchTracking
Key value: 0 or 1
Description: Enables (1) or disables (0) the use of form fields on the Checkout.aspx page for entry of the purchaser name, address and credit card information. Enabling bypasses the normal guest lookup/creation for the purchasing guest. Setting to 0 or not including this setting in the siteconfig.config file retains standard behavior (forcing the visitor/guest to be a guest in the system).
A record of the purchaser information is put into the sale string ww_sales. Sale_text for an E-Commerce sale when the purchaser is not required to be a guest in the database, i.e., NoPurchTracking = 1. When the sale is processed by the Sales Host utility, the information gets written into the salenote.Notes2 field in this format:
<save><first_name>Tom</first_name><last_name>Tuesday</last_name><phone>(555) 555-5555</phone><address>1234 5th Street</address><address2>Apt 67</address2><city>Santa Fe</city><state>NM</state><zip>87555</zip><country>USA</country><email>[email protected]</email></save>
See also: ResHeaderNote
NoUseSame
Key value: 0 or 1
Description: Enables (1) or disables (0) the display of the Use Same button on the GuestLookup.aspx page.
See also: None
OptionalGuestItemTypes
Key value: 1-5
Description: The ability to optionally allow a guest to be attached to a regular type item (item type = 1) or modifier has been added to the E-Commerce pages. This siteconfig.config key is used to designate item types that you want to allow an optional guest to be attached. Setting the value for this to 1 makes it so that all Regular Item item
138
types allow an optional guest to be attached. All other item types either require a guest already or are not allowed yet in E-Commerce module. Set the value for the key to 0 to not allow optional guests for regular items or modifiers.
Note: Items auto-added to the cart with a Cart Rule and second level modifiers do not show that optional guests are allowed (these are not supported).
In addition, editable text has been added to the cart control to indicate when a guest is required (as opposed to optional) for an item or modifier (item types 2, 3, 5).
See also: None
ParentingLevel
Key value: 0, 1 or 2
Description: Sets how guests are associated in a multi-guest sale; affects how guests in the sale get linked to the head guest. When the value is set to 0, no action is taken. When the value is set to 1, the parent of guests in the sale is set to the head guest’s guest number only if they do not have a parent set already. When the value is set to 2, the parent of guests in the sale is always set to the head guest’s guest number.
Note: The setting AllowMultiLogin = 1 must be set to a value of 1 in order to keep the head guest as the first guest to be verified. If the setting is not present in siteconfig.config or is set to a value of 0, the head guest is always the last guest looked up and verified.
See also: AllowMultiLogin
PassPhotoHeight
Key value: Any positive integer
Description: Expected height in pixels of photo to be uploaded. Recommended value is 320. Controls the size of the photo in pixels that gets uploaded into the database.
Example: PassPhotoHeight = 320
See also: GetPassPhoto
GuestPhotos
139
UploadPhotoMaxWidth
PassPhotoWidth
PassPhotoURL
PassPhotoURL
Key value: Valid URL
Description: Used to specify the URL for your E-Commerce pages. This includes everything leading up to the \temp folder must be used if you are using a hosting service for the E-Commerce pages
Example: PassPhotoURL = https://www.greatskiing.com/ecommerce
See also: GetPassPhoto
GuestPhotos
UploadPhotoMaxWidth
PassPhotoHeight
PassPhotoWidth
PassPhotoWidth
Key value: Any positive integer
Description: Expected width in pixels of photo to be uploaded. Recommended value is 240. Controls the size of the photo in pixels that gets uploaded into the database.
Example: PassPhotoWidth = 240
See also: GetPassPhoto
GuestPhotos
UploadPhotoMaxWidth
PassPhotoHeight
PassPhotoURL
140
PhoneFormat
Key value: Any valid format
Description: Used to format phone numbers displayed on the GuestSelected.aspx page.
Example: PhoneFormat = (###) ###-####
See also: None
Photo2LargeError
Key value: Default: Image is too large to upload, please use a smaller photo less than 4 Mbytes.
This message can be customized using this key
Description: The GuestPhotoUpload.aspx page now displays a message to the user if they try to upload a photo that is larger than 4 MBytes in size. The default message wording, “Image is too large to upload, please use a smaller photo less than 4 megabytes.” can be overridden using the siteconfig.config setting.
Example: Photo2LargeError = Image is too large to upload.
See also: None
PurchaserDispRows
Key value: Any combination of valid field names from the guests and/or address tables
Description: A new button appears on either Checkout.aspx or Checkout2.aspx (when using checkout steps) when you set a purchaser. The button has the default wording of Edit this Purchaser which can be changed in the markup for the page. This button allows easy access for the purchaser to edit the guest record.
Fields in the guest record for the purchaser in an E-Commerce sale can be handled differently from fields in the guest record for guests attached to products. This works in the same manner as GuestDispRows except that they only affect the guest who is set as the purchaser in the sale. These Purchaser keys can take the same values as the corresponding Guest keys. Additional configuration can be done in the dynamicControls.xml file. Each field/section in that file now has a <Required_purch> . . . </Required_purch> setting which can be set to 1 (TRUE) or 0 (FALSE). Setting this to 1 makes it so that the field is required if the purchaser edits their guest record.
141
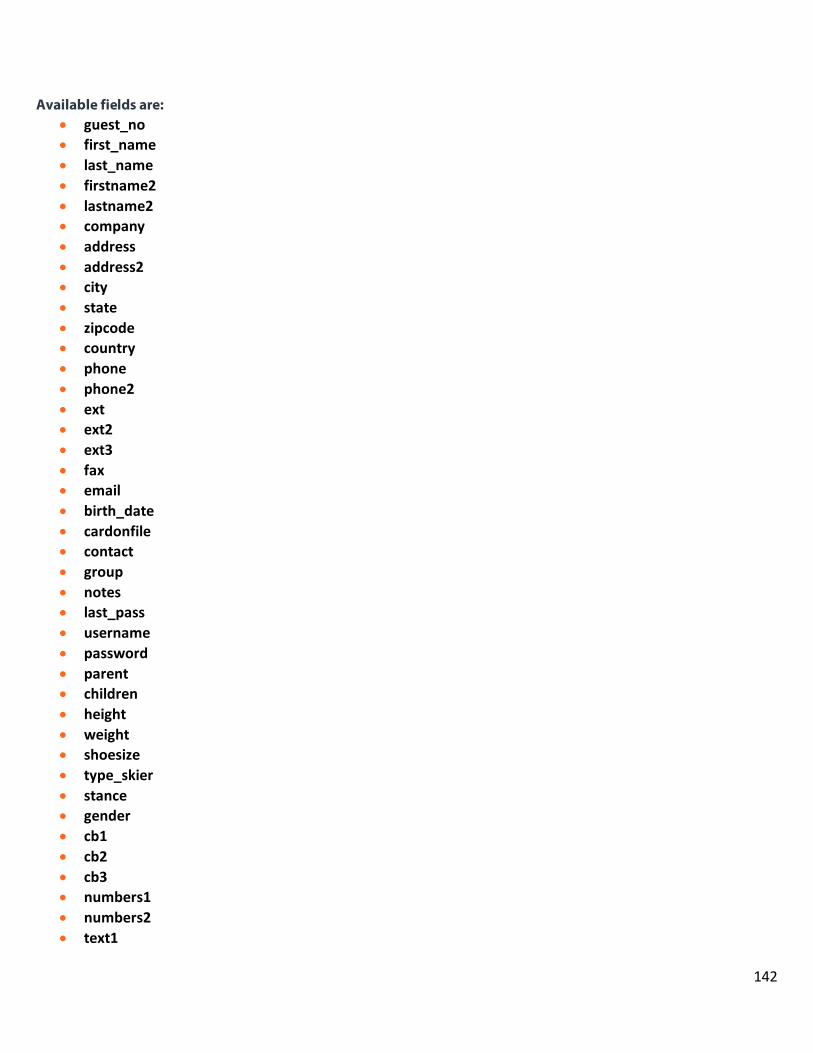
Available fields are: • guest_no • first_name • last_name • firstname2 • lastname2 • company • address • address2 • city • state • zipcode • country • phone • phone2 • ext • ext2 • ext3 • fax • email • birth_date • cardonfile • contact • group • notes • last_pass • username • password • parent • children • height • weight • shoesize • type_skier • stance • gender • cb1 • cb2 • cb3 • numbers1 • numbers2 • text1
142
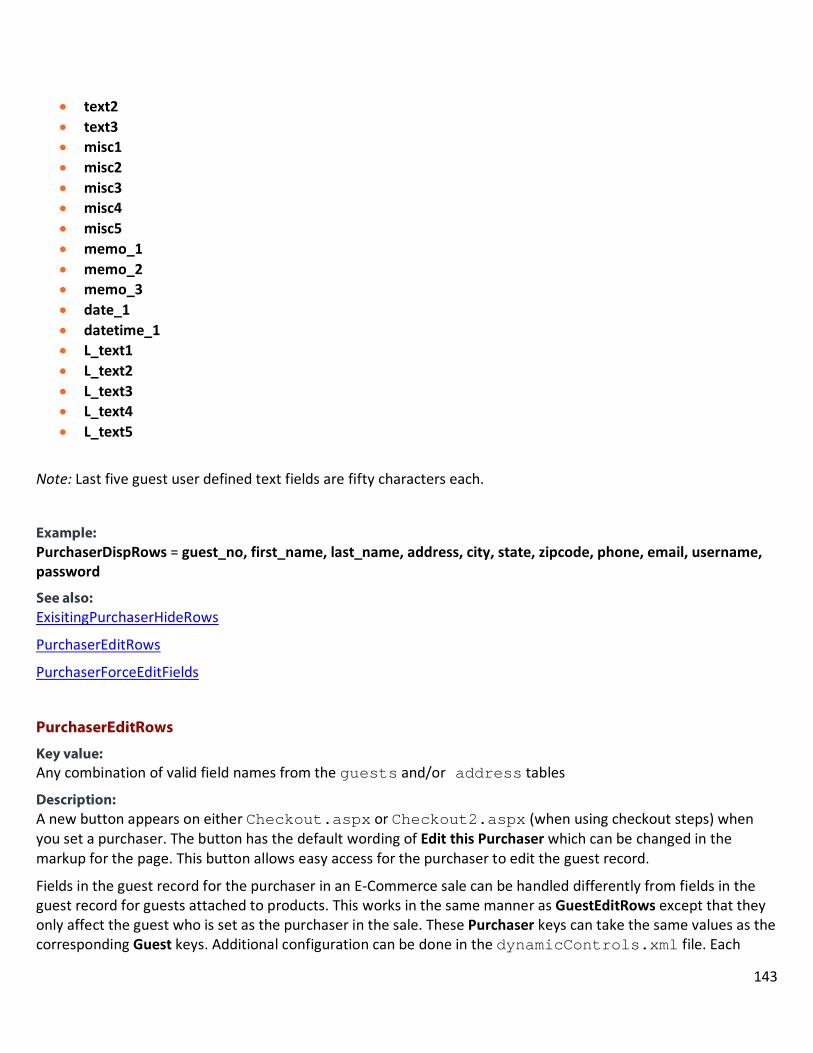
• text2 • text3 • misc1 • misc2 • misc3 • misc4 • misc5 • memo_1 • memo_2 • memo_3 • date_1 • datetime_1 • L_text1 • L_text2 • L_text3 • L_text4 • L_text5
Note: Last five guest user defined text fields are fifty characters each.
Example: PurchaserDispRows = guest_no, first_name, last_name, address, city, state, zipcode, phone, email, username, password
See also: ExisitingPurchaserHideRows
PurchaserEditRows
PurchaserForceEditFields
PurchaserEditRows
Key value: Any combination of valid field names from the guests and/or address tables
Description: A new button appears on either Checkout.aspx or Checkout2.aspx (when using checkout steps) when you set a purchaser. The button has the default wording of Edit this Purchaser which can be changed in the markup for the page. This button allows easy access for the purchaser to edit the guest record.
Fields in the guest record for the purchaser in an E-Commerce sale can be handled differently from fields in the guest record for guests attached to products. This works in the same manner as GuestEditRows except that they only affect the guest who is set as the purchaser in the sale. These Purchaser keys can take the same values as the corresponding Guest keys. Additional configuration can be done in the dynamicControls.xml file. Each
143
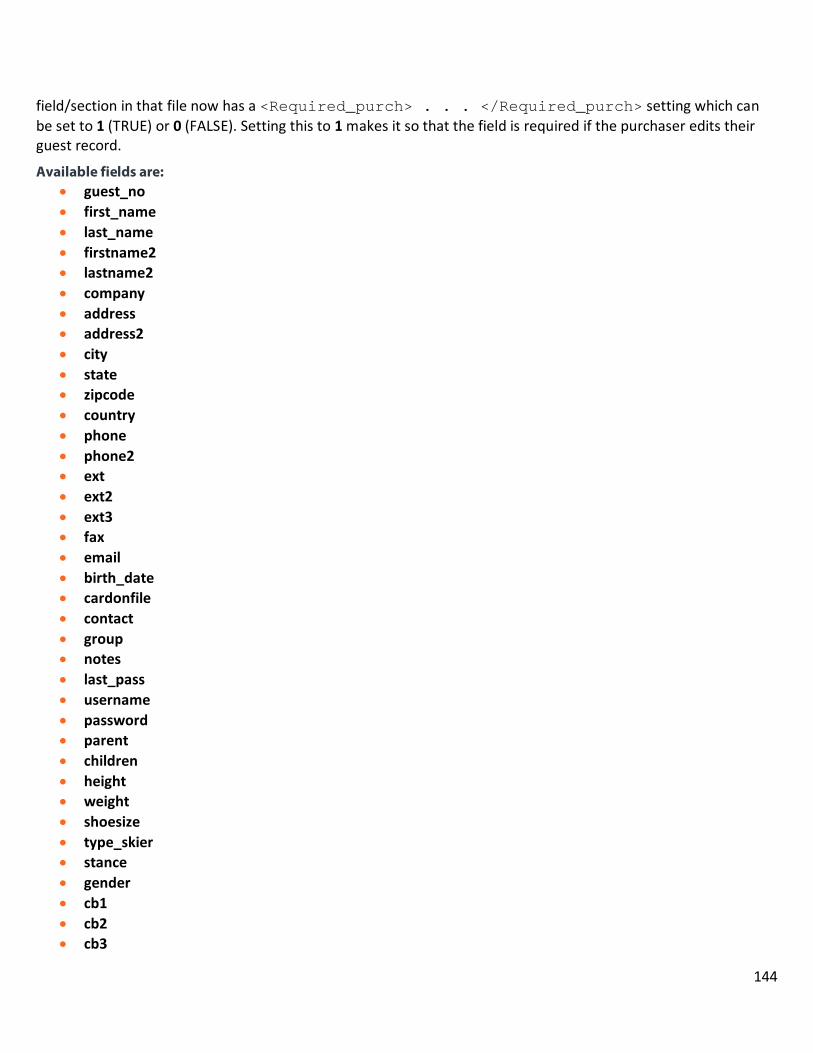
field/section in that file now has a <Required_purch> . . . </Required_purch> setting which can be set to 1 (TRUE) or 0 (FALSE). Setting this to 1 makes it so that the field is required if the purchaser edits their guest record.
Available fields are: • guest_no • first_name • last_name • firstname2 • lastname2 • company • address • address2 • city • state • zipcode • country • phone • phone2 • ext • ext2 • ext3 • fax • email • birth_date • cardonfile • contact • group • notes • last_pass • username • password • parent • children • height • weight • shoesize • type_skier • stance • gender • cb1 • cb2 • cb3
144

• numbers1 • numbers2 • text1 • text2 • text3 • misc1 • misc2 • misc3 • misc4 • misc5 • memo_1 • memo_2 • memo_3 • date_1 • datetime_1 • L_text1 • L_text2 • L_text3 • L_text4 • L_text5
Note: Last five guest user defined text fields are fifty characters each.
Example: PurchaserEditRows = first_name, last_name, address, city, state, zipcode, phone, email, cardonfile, username, password
See also: PurchaserDispRows
ExistingPurchaserHideRows
PurchaserForceEditFields
PurchaserForceEditFields
Key value: Any combination of valid field names from the guests and/or address tables
Description: A new button appears on either Checkout.aspx or Checkout2.aspx (when using checkout steps) when you set a purchaser. The button has the default wording of Edit this Purchaser which can be changed in the markup for the page. This button allows easy access for the purchaser to edit the guest record.
145
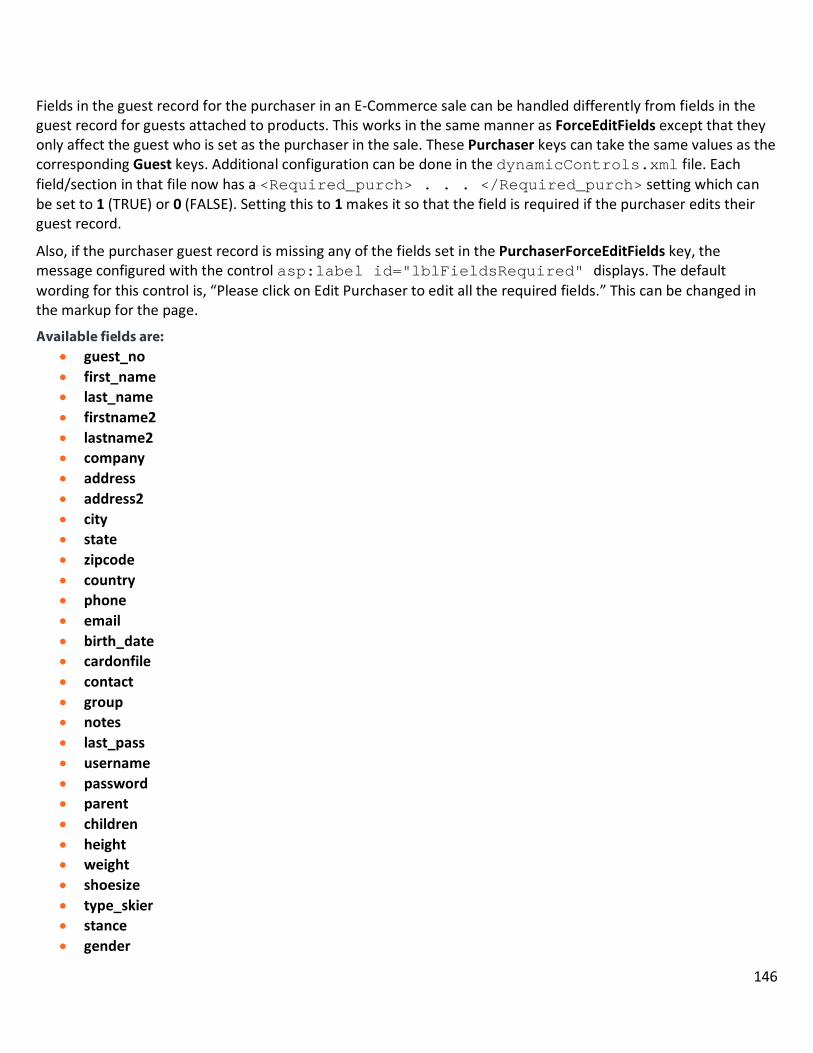
Fields in the guest record for the purchaser in an E-Commerce sale can be handled differently from fields in the guest record for guests attached to products. This works in the same manner as ForceEditFields except that they only affect the guest who is set as the purchaser in the sale. These Purchaser keys can take the same values as the corresponding Guest keys. Additional configuration can be done in the dynamicControls.xml file. Each field/section in that file now has a <Required_purch> . . . </Required_purch> setting which can be set to 1 (TRUE) or 0 (FALSE). Setting this to 1 makes it so that the field is required if the purchaser edits their guest record.
Also, if the purchaser guest record is missing any of the fields set in the PurchaserForceEditFields key, the message configured with the control asp:label id="lblFieldsRequired" displays. The default wording for this control is, “Please click on Edit Purchaser to edit all the required fields.” This can be changed in the markup for the page.
Available fields are: • guest_no • first_name • last_name • firstname2 • lastname2 • company • address • address2 • city • state • zipcode • country • phone • email • birth_date • cardonfile • contact • group • notes • last_pass • username • password • parent • children • height • weight • shoesize • type_skier • stance • gender
146

• cb1 • cb2 • cb3 • numbers1 • numbers2 • text1 • text2 • text3 • misc1 • misc2 • misc3 • misc4 • misc5 • memo_1 • memo_2 • memo_3 • date_1 • datetime_1
Example: PurchaserForceEditFields = first_name, last_name, address, city, state, zipcode, phone, email, username, password
See also: PurchaserDispRows
PurchaserEditRows
ExistingPurchaseHideRows
ShipAddress
Key value: Numeric values: 1, 10, 20 or 30
Description: Specifies the shipping address on the Checkout.aspx page. ShowShippingAdress must be set to 1.
• 1 = Mailing • 10 = Shipping • 20 = Billing • 30 = Local
See also: DefAddress
147

ShowShippingAddr
IntlShipPh
ShowShippingAddr
Key value: 0 or 1
Description: Enables (1) or disables (0) the optional Shipping Address fields on the Checkout.aspx page.
See also: ShipAddress
IntlShipPh
ResHeaderNote
UseResHeaders
TransEditFields
Key value: Any combination of valid field names from the guests and/or address tables
Description: Used to specify the fields to run through transformation from the guests and/or address tables. TransEditFields specifies the fields from guests or address on which to perform substitutions. If TransEditFields are not specified, the defaults are the first_name and last_name from the guests table.
Example: TransEditFields = first_name, last_name, address
See also: TransLookups
TransEdits
TransEditFile
TransLookupFile
TransEditFile
Key value: Any positive integer or 0.
Description: Used to specify the file number to be used for substitutions for guest edits (e.g., set to 3 when using StrTrans3.xml).
148
See also: TransEditFields
TransLookups
TransEdits
TransLookupFile
TransEdits
Key value: 0 or 1
Description: Enables (1) or disables (0) character / string substitutions during guest edits. Set TransLookups and TransEdits to 1 to enable character substitutions for guest lookups and guest edits.
Example: TransLookups = 1
TransEdits = 1
See also: TransEditFile
TransEditFields
TransLookups
TransLookupFile
TransLookupFile
Key value: Any positive integer
Description: Used to specify the filenumber to be used for substitutions for guest lookups (e.g., set to 2 when using StrTrans2.xml).
See also: TransEdits
TransEditFile
TransEditFields
TransLookups
149
TransLookups
Key value: 0 or 1
Description: Enables (1) or disables (0) character/string substitutions during guest lookups. Set TransLookups and TransEdits to 1 to enable character substitutions for guest lookups and guest edits.
Example: TransLookups = 1
TransEdits = 1
See also: TransLookupFile
TransEdits
TransEditFile
TransEditFields
UploadPhotoMaxWidth
Key value: Any positive integer
Description: The maximum size at which the photo is shown. If a user uploads a larger photo, the system automatically resizes it to this setting, keeping the same aspect ratio. This setting helps keep the user from having to scroll left or right for the cropping function. Set to control the maximum width of the photo displayed on the page before cropping and uploading to the database.
Recommended value is 800.
Example: UploadPhotoMaxWidth = 800
See also: PassPhotoHeight
GetPassPhoto
GuestPhotos
PassPhotoWidth
PassPhotoURL
150
UseEmailUserID
Key value: 0 or 1
Description: Enables (1) or disables (0) use of a guest’s e-mail address instead of first and last name for guest lookup on the GuestLookup.aspx page.
See also None
UseSameBtnText
Key value: Any text
Description: Used to override the Use same guest button text on the GuestLookup.aspx page. If the setting is not present, the button text behaves the same as it did in versions previous to 4.0.57.
Example: UseSameBtnText = Use {{guest_name}} again?
See also None
UseSameConfirm
Key value: 0 or 1
Description: Enables (1) or disables (0) the display of a pop-up Confirmation Message dialog (set with UseSameConfText) when the Use Same button is used on the GuestLookup.aspx page. The default is disabled.
See also: UseSameConfText
UseSameConfText
Key value: Any text
Description: Specifies the text to display on the pop-up Confirmation Message dialog that displays when the Use Same button is used on the GuestLookup.aspx page. Use {{guest_name}} to include the guest name; apostrophes are specified with \' and line breaks with \n.
151
Example: UseSameConfText = WARNING!!\nYou have chosen to use the same guest ({{guest_name}}) again.\nAre you sure?
See also: UseSameConfirm
VerifyField
Key value: Field names within the guests table
Description: Used to define which field to use for guest verification during guest lookups. VerifyField is the field in guests used to verify guest identity on GuestSelected.aspx. VerifyPrompt is the text prompt. In addition to passwords, birth_date and zip, guest verification in the E-Commerce pages also works with any of the following fields from the guests table:
• g.text_1 • g.text_2 • g.text_3 • g.text_4 • g.text_5 • g.text_6 • g.text_7 • g.text_7 • g.ltext_1 • g.ltext_2 • g.ltext_3 • g.ltext_4 • g.ltext_5
Note: Other fields in the table may work for guest verification as well. Please check with Siriusware Technical Support if using a field other than those listed here or be sure to test it out thoroughly before putting it into place in a live environment. Also, these additional fields from the guests table can only be used when doing First Name / Last Name or Email Address guest lookups.
Example: VerifyField = passwords
VerifyPrompt = Password:
See also: VerifyPrompt
152
DefVerifyRegEx
DefVerifyRegExMessage
VerifyPrompt
Key value: Any text
Description: Text to use to prompt the user to enter his verification information. VerifyField is the field in guests used to verify guest identity on GuestSelected.aspx. VerifyPrompt is the text prompt.
Example: VerifyField = passwords
VerifyPrompt = Password:
See also: VerifyField
153

International Character Settings
AddAllowedChars
Key value: Any alpha, numeric or symbol characters; do not use a delimiter for multiple characters
Description: Used to add characters to the default list of allowed characters. The default list is described in AltAllowedChars. Some characters need to be escaped to comply with XML guidelines. Unless you have a special need to replace the default list, it recommended that only AddAllowedCharacters is used.
See also: AltAllowedChars
AltAllowedChars
Key value: Any alpha, numeric or symbol characters; do not use a delimiter for multiple characters
154
Description: Used to add characters to the default list of allowed characters. The default list is described in AltAllowedChars. Some characters need to be escaped to comply with XML guidelines. Unless you have a special need to replace the default list, it recommended that only AddAllowedCharacters is used.
See also: AltAllowedChars
AltEncoding
Key value: utf-8 or ISO-8859-1
Description: Sets the default encoding for files being read in, such as the various template files. AltEncoding can be used to override the default encoding (UTF-8) for files being read in.
Note: When E-Commerce module reads in files such as e-mail templates and the siteconfig.config file, you can override default UTF-8 encoding even if it is specified in XML Headers by using this setting. Currently ISO-8859-1 is the only other type of character encoding supported in E-Commerce module.
Example:
AltEncoding = ISO-8859-1
See also: None
155
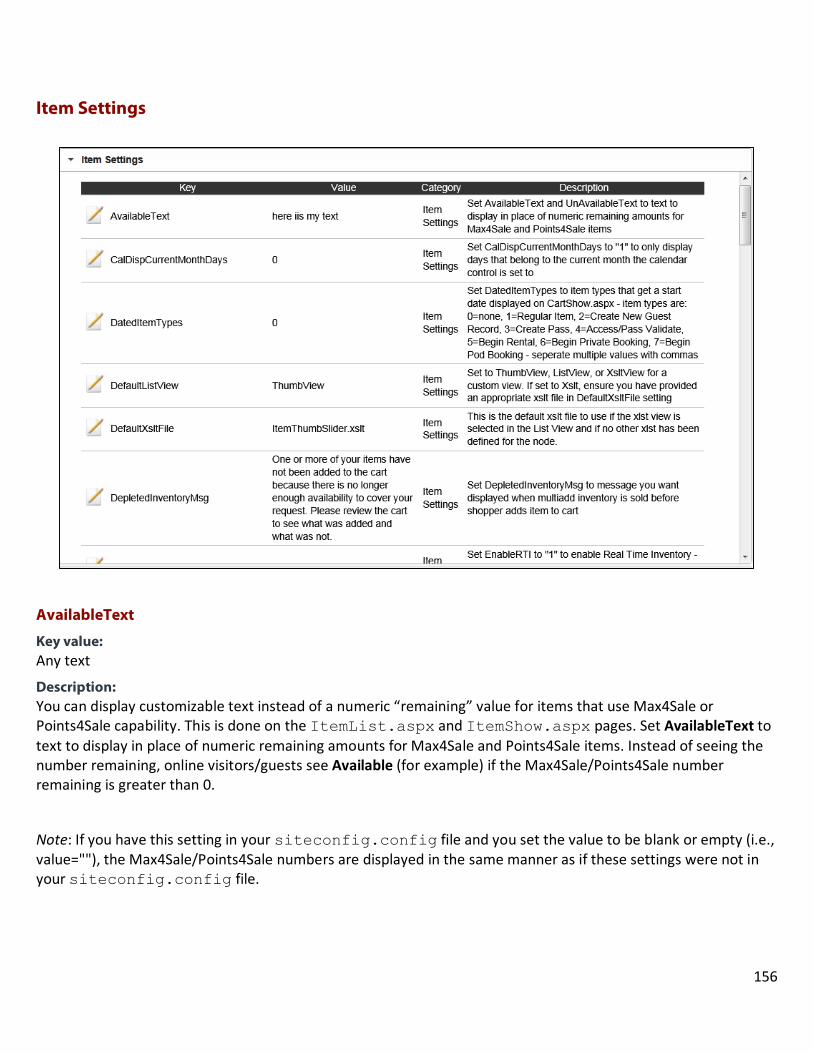
Item Settings
AvailableText
Key value:Any text
Description: You can display customizable text instead of a numeric “remaining” value for items that use Max4Sale or Points4Sale capability. This is done on the ItemList.aspx and ItemShow.aspx pages. Set AvailableText to text to display in place of numeric remaining amounts for Max4Sale and Points4Sale items. Instead of seeing the number remaining, online visitors/guests see Available (for example) if the Max4Sale/Points4Sale number remaining is greater than 0.
Note: If you have this setting in your siteconfig.config file and you set the value to be blank or empty (i.e., value=""), the Max4Sale/Points4Sale numbers are displayed in the same manner as if these settings were not in your siteconfig.config file.
156

Example: AvailableText = Available
See also: AvailableText
UnavailableText
Max4Sale
Points4Sale
ItemShowBadQuantity
DepletedInventoryMsg
CalDispCurrentMonthDays
Key value: 0 or 1
Description: Enables (0) or disables (1) the display of additional days on either side of the current month in the calendar control. When set to 1, only the days that belong to the month the calendar control is set to are displayed. When set to 0, six complete weeks are displayed with days that belong to the month before and the month after the month for which the calendar is set, filling out those weeks.
See also: None
DatedItemTypes
Key value: Numeric values: 0, 1, 2, 3, 4, 5, 6, 7
Description: Specifies the item type or types that will by default display a start date in the shopping cart. Separate multiple values with commas. Item types and their descriptions are shown and described in the following table:
Item type number Description
0 None
1 Regular item
2 Create guest item
3 Pass
4 Access/Pass Validate
157
5 Rental
6 Private booking
7 Pod booking
See also: None
DefaultListView
Key value: ThumbView, ListView or XsltView
Description: Set to ThumbView, ListView or XsltView for a custom view. If set to Xslt, ensure you have provided an appropriate .xslt file in DefaultXsltFile setting.
Example: DefaultListView = ThumbView
See also: DefaultXsltFile
DefaultXsltFile
Key value: ThumbView, ListView or XsltView
Description: Set to ThumbView, ListView or XsltView for a custom view. If set to Xslt, ensure you have provided an appropriate .xslt file in DefaultXsltFile setting.
Example: DefaultListView = ThumbView
See also: DefaultXsltFile
DepletedInventoryMsg
Key value: Any text
Description: Used to specify the message you want displayed when MultiAdd inventory is sold before the shopper adds an item to his cart. When dealing with items that are configured as part of MultiAddITGroups and Max4Sale/Real Time Inventory is enabled for the group of items, if the inventory has dropped below what the shopper requested
158
by the time he tries to add the item or items to the cart, he is directed to the error.aspx page where this message is displayed. The E-Commerce pages add what they can to the cart based on availability, but, depending on the quantity remaining and the quantity requested, it is possible that nothing is added to the cart.
Example: DepletedInventoryMsg = Unfortunately your item(s) cannot be added to the cart because there is no longer enough availability to cover your request. Please reset quantities and try again.
See also: ModMax4Label
Max4Sale
RTIHoldTime
Points4Sale
EnableSoldOutLinks
RemHeaderText
AvailableText
UnavailableText
NoCalAvail
EnableRTI
MultiAddITGroups
DisableDirectItemAccess
Key value: 0, 1 or 2
Description: This key disables any external direct links to the ItemShow.aspx page.
• 0 - Any item or node can be accessed if the user has the correct URL • 1 - No direct linking to items is allowed, must be accessed through itemlist. • 2 - Items and Nodes are checked to be sure they are in the item tree.
If logged into a group they can be accessed directly, if not the user is redirected to the top node. There may be noticeable overhead with this setting if the item tree is large and/or traffic is high.
Note: Please use caution in using this setting. If you have any Buy Now links for items that takes the user to an item on the ItemShow.aspx page, using this key and setting it to 1 disables those links.
159
See also: None
EnableRTI
Key value: 0 or 1
Description: Enables (1) or disables (0) Real-Time Inventory (RTI). Max4Sale capability must be enabled for Real Time Inventory to work.
Note: The difference between RTI and Max4Sale capability is that RTI is decremented immediately when the item is added to the cart, whereas Max4Sale capability is decremented when the sale is saved or finalized by Sales Host utility. Item reserved using RTI functionality are released if the line item is deleted from the cart, the user selects the Clear Cart and Start Over link or the session expires.
See also: ModMax4Label
Max4Sale
RTIHoldTime
Points4Sale
EnableSoldOutLinks
RemHeaderText
AvailableText
UnavailableText
NoCalAvail
DepletedInventoryMsg
EnableSoldOutLinks
Key value: 0 or 1
Description: This key enables (1) you to keep the item links active on the ItemList.aspx page when normally they are grayed out when Max4Sale is sold out. If the value for this key is set to 0 or the key is not present in the siteconfig.config file, sold out items with Max4Sale capability enabled are grayed out.
160

See also: EnableRTI
ModMax4Label
Max4Sale
RTIHoldTime
Points4Sale
RemHeaderText
AvailableText
UnavailableText
NoCalAvail
DepletedInventoryMsg
HideRemainingColumn
Key value: 1 or 0
Description: The E-Commerce pages have the ability to hide the Remaining column in the ItemList.aspx page and the Remaining quantity labels for the item, modifiers and modifiers on modifiers in the ItemShow.aspx page while still maintaining existing Max4Sale and Points4Sale capability. To maintain existing functionality of displaying the Remaining column and quantity labels set that key to value = 0.
See also: None
ImageField
Key value: Field name in the items table – usually item_id
Description: Used with the image column on the ItemList.aspx page. It is used to specify the field in the item record in the items table to use for the filenames of both the Tn (thumbnail) image and the Lg (large) image.
Example: ImageField = item_id
See also: ImageTnPath
ImageLgPath
ImageRel
161
Imagenodes
ImageLgPath
Key value: Relative path images
Description: Used with the image column on the ItemList.aspx page. The path of the image to use, when the thumbnail image is clicked. Path is relative to the root of the web application (the virtual directory created when installing). Path is to the folder containing large images that display when thumbnail image is clicked.
Example: ImageLgPath = images/lg/
See also: ImageField
ImageTnPath
ImageRel
Imagenodes
Imagenodes
Key value: One or more item trees separated by commas
Description: Used with the image column on the ItemList.aspx page. Specifies the item trees for which images are used. Imagenodes is a list of item tree groups that you want to display the image column in the datagrid on ItemList.aspx. Separate multiple values with commas.
See also: ImageField
ImageTnPath
ImageLgPath
ImageRel
ImageRel
Key value: lightbox
Description: Used with the image column on the ItemList.aspx page. Used to support a light box viewer for displaying the Lg (large) image. Set ImageRel to lightbox to support a light box viewer.
162
Example: ImageRel = lightbox
See also: ImageField
ImageTnPath
ImageLgPath
Imagenodes
ImageTnPath
Key value: Relative path to images
Description: Used with the image column on the ItemList.aspx page. Path to the thumbnail image to use. Path is relative to the root of the web application (the virtual directory created when installing). ImageTnPath sets the path to the folder containing thumbnail sized images.
Example: ImageTnPath = images/tn/
See also: ImageField
ImageLgPath
ImageRel
Imagenodes
ItemMessageDDTable
Key value: Text of xml tag
Description: Used to specify the xml tag used specify the dropdown choices in the MiscTables.xml file (when using a dropdown list, as specified by ItemMessageUseDropDown).
Example: ItemMessageDDTable = ItemMessageVal
Specifies the tags for a table like this:
<ItemMessageVals> <ItemMessageVal><value>**</value><text>Select</text></ItemMessageVal> <ItemMessageVal><value>1</value><text>1</text></ItemMessageVal> <ItemMessageVal><value>2</value><text>2</text></ItemMessageVal>
163
<ItemMessageVal><value>3</value><text>3</text></ItemMessageVal> <ItemMessageVal><value>4</value><text>4</text></ItemMessageVal> <ItemMessageVal><value>5</value><text>5</text></ItemMessageVal> </ItemMessageVals>
See also: ItemMessageEnabled
ItemMessageUseDropDown
ItemMessageRegEx
ItemMessageRequired
ItemMessageEnabled
Key value: 0 or 1
Description: Enables (1) or disables (0) use of the Message field in line items on the ItemShow.aspx page.
See also: ItemMessageDDTable
ItemMessageEnabled
ItemMessageUseDropDown
ItemMessageRegEx
ItemMessageRequired
ItemMessageRegEx
Key value: Any regular expression
Description: Used to specify a regular expression to validate the text the visitor/guest enters into the text box for the Message field (when not using a dropdown list, as specified by ItemMessageUseDropDown).
Example: ItemMessageRegEx = ^.{2,20}$
See also: ItemMessageDDTable
ItemMessageEnabled
ItemMessageUseDropDown
ItemMessageRequired
164

ItemMessageRequired
Key value: 0 or 1
Description: Enables (1) or disables (0) required use of the Message field by the visitor/guest.
See also: ItemMessageDDTable
ItemMessageEnabled
ItemMessageUseDropDown
ItemMessageRegEx
ItemMessageUseDropDown
Key value: 0 or 1
Description: Enables (1) or disables (0) use of a dropdown list for the Message field. A text box is the default, but, with the value set to 1, a dropdown list is used. When using a dropdown list, a table of values for populating the dropdown needs to be configured in the MiscTables.xml file.
See also: ItemMessageDDTable
ItemMessageEnabled
ItemMessageRegEx
ItemMessageRequired
ItemRestrictByActualDate
Key value: 0 or 1
Description: If set to 1, the actual date is used to determine the item’s availability for sale. If set to 0, the selected date from the calendar is used to determine if the item can be purchased. When determining item availability, the pages look at the Available For Sale dates as configured in the SysManager > Activities > DCIs > New/Edit > Restrictions tab > Available For Sale fields and in the Available For Sale fields in the SysManager > Activities > Item Tree > Edit > Restrictions area.
See also: None
165

ItemShowBadQtyMsg
Key value: Any text, plus {{qty}} plus {{rem}} variables
Description: Set ItemShowBadQtyMsg to the message you want displayed on ItemShow.aspx when a visitor/guest tries to add a quantity greater than that available for Max4Sale items. Use the {{qty}} (quantity being added to cart) and {{rem}} (Max4Sale remaining) variables to display quantity being added to cart and Max4Sale remaining.
If an online visitor/guest tries to add a quantity to the cart that exceeds the remaining quantity, a custom message is displayed. The asp:label id="lblBadQty" is the ASP control that displays this message on the ItemShow.aspx page.
Note: If you have this setting in your siteconfig.config file and you set the value to be blank or empty (i.e., value=""), the Max4Sale/Points4Sale numbers are displayed in the same manner as if these settings were not in your siteconfig.config file.
Example: ItemShowBadQtyMsg = Selected quantity ({{qty}}) is not available, ({{rem}} remaining).
See also: AvailableText
UnAvailableText
Max4Sale
Points4Sale
ITNavLinkCSS
Key value: CSS class
Description: Used to add a specific Cascading Style Sheet (CSS) class to the “breadcrumb” navigation links in ItemList.aspx and ItemShow.aspx pages.
Example: ITNavLinkCSS = small
See also: None
166

ITReturntoTop
Key value: 0 or b
Description: Set ITReturntoTop to 1 to return to the top node of the item tree after adding an item to the cart and clicking Continue Shopping or set to 0 to return to the last visited node of the item tree.
See also: None
LeadMax
Key value: Any positive integer
Description: The number of days in the future from today that is the furthest out a start date on a ticket can be set (in days from today).
Example: LeadTime = 2
LeadMax = 60
See also: LeadTime
LeadTime
Key value: Any positive integer or 0
Description: The number of days after today that a ticket can have for its start date. Visitors/guests are not able to set a start date before the lead time has passed. LeadTime is the soonest a ticket can be bought after today, in days. If 0, the start date is today.
Example: LeadTime = 2
LeadMax = 60
See also: LeadMax
167
Max4Sale
Key value: 0 or 1
Description: Enables (1) or disables (0) the calculating of Max4Sale limits on items or modifiers configured with this functionality. For items using Max4sale, limits can be viewed on both the ItemList.aspx and ItemShow.aspx pages. 0 disables Max4Sale information and hides the Remaining column in the item list table.
Note: The difference between RTI and Max4Sale capability is that RTI is decremented immediately when the item is added to the cart, whereas Max4Sale capability is decremented when the sale is saved or finalized by Sales Host utility.
See also: ModMax4Label
EnableRTI
RTIHoldTime
Points4Sale
EnableSoldOutLinks
RemHeaderText
AvailableText
UnavailableText
NoCalAvail
DepletedInventoryMsg
ModColLen
Key value: Any positive integer or 0.
Description: Used to define the maximum number of modifiers that display in a column on the ItemShow.aspx page. A new column is created if this number is exceeded. Set to 0 to disable (to display a single column only).
See also: ModifierSort
ShowOptionalMods
168

ModifierSort
Key value: Field from items table followed by either asc or desc.
Description: Used to specify the field (from the items table) and sort order (ascending or descending) of item modifiers that display on the ItemShow.aspx page. The first argument of what is entered for value is a field from the items table. The second part sets the sort order and can either be asc for ascending or desc for descending.
Note: Most but not all fields from the Items table can be used here. Test the field you wish to use before deploying in a live environment. If the field is not available for use, you get an error stating that the column cannot be found.
Example: ModifierSort = descrip asc
See also: ModColLen
ShowOptionalMods
ModMax4Label
Key value: Any text
Description: Used with Max4Sale and EnableRTI when showing quantities remaining for modifiers. Modifiers show the number remaining displayed in parenthesis next to the name of the modifier on the ItemShow.aspx page. This setting provides an additional label that can be configured to put a word after the number, like Remaining. For example: Test Modifier 01 (10 remaining). If the value for ModMax4Label is left blank (ModMax4Label = "") or the key is not present in the siteconfig.config file, only the number is displayed as, for example: Test Modifier 01 (10). ModMax4Label sets the text displayed after the Max4sale limit for modifiers on ItemShow.aspx.
Example: ModMax4Label = remaining
See also: Max4Sale
EnableRTI
RTIHoldTime
Points4Sale
EnableSoldOutLinks
169
RemHeaderText
NoCalAvail
DepletedInventoryMsg
MultiAddITGroups
Key value: Item tree group name
Description: Enables the ability to select multiple items/quantities to add to the cart from the ItemShow.aspx page. Multi-add requires that you list each item tree group name or description with which you want to use the multi-add feature in the web.config file using the MultiAddITGroups key, and separated by commas. An item tree (IT) group name consists of a group of items that all share the same Max4Sale limit configured at the department or category level in the DCI and that are “contained” in the same item tree group or folder. Multiple names must be separated by commas.
In order for items to be selected and added to the cart using multi-add from the ItemShow.aspx page, the items cannot require any additional actions such as requiring guest information or the selection of modifiers. The items can be Print At Home Tickets items; however, all of the items in each multi-add item tree group would then need to be Print At Home Tickets items.
Important: The items must be setup identically, for example if they are admission items, all of the items in a multi-add item tree group must be admission items.
Example: MultiAddITGroups = Museum Only 9:00 AM, Museum Only 11:00 AM, Museum Only 1:00 PM, Museum Only 3:00 PM
Note: The handling of depleted Max4Sale inventory on MultiAddITGroups has been changed. If the quantities selected cannot be added, the user is left at the ItemShow.aspx page with the text from the DepletedInventoryMsg setting is displayed.
See also: DepletedInventoryMsg
MultiQtyMax
Key value: Any positive integer
170
Description: Used to cap how many items a dropdown can have when setting item quantity. Quantity dropdowns are set to the Max4Sale limit if possible, MultiQtyMax or limited to 10 depending on what is available.
Example: MultiQtyMax = 20
See also: None
NoCalAvail
Key value: 0 or 1
Description: Set to 1 to stop the display of Max4Sale availability information in the calendar. The functionality to gray out dates on the calendar within the month being displayed on the ItemShow.aspx page if the item being viewed has Max4Sale or Points4Sale limits enabled and the item has zero availability on that date or less than the line item quantity being requested, can be configured with this setting. Set to 1 to make it so that the calendar dates do not get grayed out and set to 0 to keep the existing functionality of graying out the calendar dates. If set to 1 be sure to verify that there are no performance issues with the ItemShow.aspx page.
See also: Max4Sale
EnableSoldOutLinks
ModMax4Label
EnableRTI
RTIHoldTime
Points4Sale
RemHeaderText
AvailableText
UnavailableText
DepletedInventoryMsg
NoCartRulesOnMods
Key value: 0 or 1
Description: The Cart Rule function tally() can count modifiers in addition to items in the cart when evaluating the cart. To disable the counting of modifiers, set to 1.
171

See also: None
NoDefDate
Key value: 0 or 1
Description: Set NoDefDate to 1 to force date selection on ItemShow.aspx when the page first loads. Forces (1) visitor/guest to select a date from the calendar before she can add the item to the shopping cart. If at first no date is selected from the ItemList.aspx page, when the ItemShow.aspx page first loads for an item requiring a date, a message displays below the calendar, the text of which is configurable via the NoItemDateText setting.
The Add to Cart button does not become active until a date is selected from the calendar. If the visitor/guest selected the date from the ItemList.aspx page first, then, that date is auto-selected when the ItemShow.aspx page loads and the Add to Cart button becomes active. To force visitors/guests to always select the date from the ItemShow.aspx page, you can disable the link to the calendar on the ItemList.aspx page by adding visible="false" to the asp:linkbutton id="lbdate", as follows:
<asp:linkbutton id="lbdate" runat="server" visible="false" tooltip="Click to change date"></asp:linkbutton>
See also: NoItemDateText
NoItemDateText
Key value: Any text
Description: Displays a message below the calendar if at first no date is selected from the ItemList.aspx page and the NoDefDate is set to 1. Sets the text to display in place of the date.
Example: NoItemDateText = Please select a date!
See also: NoDefDate
172
NonMax4SaleQty
Key value: Any text
Description: The dash that displays for non-Max4Sale items in the Remaining column on the ItemList.aspx page can now be replaced.
Set the value for NonMax4SaleQty to whatever you want to display in place of the dash for items with no Max4Sale capability configured. You can even set it to display nothing by configuring the key in this manner – i.e., with a space between the quotes: NonMax4SaleQty =" ".
Example: NonMax4SaleQty = Available
See also: None
Points4Sale
Key value: 0 or 1
Description: Enables (1) or disables (0) display of Points4Sale quantities remaining on the ItemList.aspx and ItemShow.aspx pages.
See also: ShowPointsCost
Max4Sale
PtsRemHeaderText
ModMax4Label
EnableRTI
RTIHoldTime
EnableSoldOutLinks
AvailableText
UnavailableText
NoCalAvail
DepletedInventoryMsg
173
PriceFormat
Key value: A currency symbol followed by ###,##0.00
Description: PriceFormat is the string used to format prices. Change this if you want to have a different currency symbol or price display. Used to format how prices are displayed in the pages as well as the currency symbol.
Example: PriceFormat = $ ###,##0.00
See also: None
PTItemLinks
Key value: 0 or 1
Description: Enables (1) or disables (0) the use of clear text in query links generated by ItemList.aspx and consumed by ItemShow.aspx. Thus, instead of an encrypted query string in the URL for the ItemShow.aspx page (e.g., http://localhost/ecommerce35/itemShow.aspx?Dep=CKO6B2ECv0MkhiDv8G%2fxDw% 3d%3d&Cat=VgFozahlxSFN2i%2by%2fZrXxg%3d%3d&It=7UP2kVG4gziGpFuRhruHYw%3d%3d) the URL looks like this: http://localhost/ecommerce35/itemShow.aspx?Dep=TEST2&Cat=TEST2&It=TEST2.
Note: Do not enable this unless you have a specific reason to do so. Enabling this, opens up the possibility of someone guessing the DCI of an item you may not want to sell online, and then being able to purchase it.
See also: None
PtsRemHeaderText
Key value: Any text
Description: Sets the Column Header text that displays on ItemList.aspx to display points cost for Points4Sale items.
Example: PtsRemHeaderText = Points
See also: Points4Sale
ShowPointsCost
174

RemHeaderText
ReconcileRevModsWithMinMax
Key value: Numerical value for desired quantity
Description: When using Reverse Modifier functionality in the E-Commerce pages and the Minimum and Maximum modifiers required to sell are both set to 1 for the main item (which becomes the modifier when using Reverse Modifier functionality) it is now possible to add more than quantity 1 of these items to the shopping cart. The pages create a single line item with quantity of 1 for each item that is added in this manner. For example, if the user sets the quantity to 3 in this type of scenario, when they click the Add to Cart button, the cart displays with three identical line items each with quantity set to 1 instead of one line item with quantity set to 3.
Note: This only works when you have the min/max modifiers both set to 1.
Example: ReconcileRevModsWithMinMax = 1
See also: None
RemHeaderText
Key value: Any text
Description: Sets the Column Header text that displays on ItemList.aspx page to display Max4Sale remaining.
Example: RemHeaderText = Remaining
See also: EnableRTI
RTIHoldTime
Points4Sale
PtsRemHeaderText
Max4Sale
ModMax4Label
EnableSoldOutLinks
175

AvailableText
UnavailableText
NoCalAvail
DepletedInventoryMsg
ReverseModDCIs
Key value: DCI(s) of the modifier(s) to reverse
Description: Used to reverse the modifier/main item relationship. What this means is that the modifiers and main items swap places in E-Commerce module and the modifiers become the main item and the main items are modifiers to those items. Modifier DCIs must be padded to thirty characters total. Multiple DCIs must be separated with a comma. Set ReverseModDCIs to the DCIs of those items that you want to follow reverse modifier functionality.
Warning: ReverseModsDCIs do not work when ShowModOnMods is enabled.
Example: ReverseModDCIs = FUNTIMES PACKAGES BEGINNER ,FUNTIMES PACKAGES EXPERIENCE
See also: ReconcileRevsModsWithMinMax
RTIHoldTime
Key value: Any positive integer
Description: Used to set the duration of the item reservation in minutes for items that have Max4Sale capability and EnableRTI enabled. When EnableRTI is true, an item reservation is made for any item, using real-time inventory functionality, when it is added to the cart. The duration of the reservation is determined by RTIHoldTime. Item reservations are released if the line item is deleted from the cart, the user selects the Clear Cart and Start Over link or the session expires.
Example: RTIHoldTime = 10
See also: Points4Sale
Max4Sale
ModMax4Label
176
EnableRTI
RTIHoldTime
EnableSoldOutLinks
AvailableText
UnavailableText
NoCalAvail
DepletedInventoryMsg
ShowItemImages
Key value: 0 or 1
Description: Enables (1) or disables (0) the display the image carousel if there are images associated with the item.
See also: None
ShowModPrice
Key value: 1 or 0
Description: Setting the Value to 1 displays the price on the mods in the cart.
See also: None
ShowOptionalMods
Key value: 0 or 1
Description: Enables (1) or disables (0) the display of modifiers defined as Optional from SysManager > Activities > DCIs > New/Edit > Modifiers on the ItemShow.aspx page (Prompt and Required are always displayed).
See also: ModifierSort
ModColLen
177
ShowPointsCost
Key value: 0 or 1
Description: Set to 1 to display the Points column on the ItemList.aspx page (which displays the points cost of items configured to use Points4Sale capability) and set to 0 to not display the Points column.
See also: Points4Sale
PtsRemHeaderText
AvailableText
UnavailableText
ShowRevModQTYinCart
Key value: 1 or 0
Description: A setting that allows for a slightly different way of viewing ReverseMods in the shopping cart
See also: RecondileRevModsWithMinMax
ReverseModDCI
ShowTotalItemPriceInLineItemLists
Key value: 0 or 1
Description: Enables (1) or disables (0) the ability to show item total price, including taxes and discounts, in the shopping cart. Set ShowTotalItemPriceInLineItemLists to 1 to show item prices which include taxes in the cart, set to 0 to show item prices without taxes in the cart.
See also: SingleTaxLine
178

ShowUpsells
Key value: 0 or 1
Description: Set to 1 to show related upsells on ItemShow.aspx and ItemList.aspx. Set to 0 to hide the upsell control.
See also: UpsellPrompt
UpsellThumbs
SPType
Key value: Numeric values 0 through 10
Description: Used to define the salespoint type for the web pages. Names to correspond to the entries in the prefs_sl table. Set to 0 to inhibit filtering by type for the item list. Salespoint types are set from SysManager > Preferences > Sales Point Types. Can be used to filter a single item tree to control which items are displayed.
Payment types can now be restricted by salespoint type in the E-Commerce pages. This is done by selecting salespoint types in the Payment Type Edit form > Sales Point Type tab in SysManager for each of your payment types, and then setting the value of SPType key in the siteconfig.config file to the salespoint type(s) that you want to allow in E-Commerce module.
See also: PaymentTypeNotAllowedMsg
ThumbDefaultWidth
Key value: Numeric values
Description: Default width for thumbnails when uploading images via the web admin panel > Item List Configuration.
See also: None
TopNode
Key value: Any first level item tree folder name from your item tree or blank.
Description: Used to define the item tree group to be displayed on the web pages. Used for navigation purposes on the ItemList.aspx and ItemShow.aspx pages. If blank, the top of the item tree is used. The item tree group
179

referenced by this siteconfig.config setting must be the same item tree that is specified for Sales Host on the SysManager > Activities > System Lists > Salespoints > New/Edit > Item Tree tab.
See also: None
UnAvailableText
Key value: Any text
Description: You can display customizable text instead of a numeric “remaining” value for items that use Max4Sale or Points4Sale capability. This is done on the ItemList.aspx and ItemShow.aspx pages. Set UnAvailableText to text to display in place of numeric remaining amounts for Max4Sale and Points4Sale items. Instead of seeing the number remaining, online visitors/guests see Not Available (for example) if the Max4Sale/Points4Sale number has reached 0.
Note: If you have this setting in your siteconfig.config file and you set the value to be blank or empty (i.e., value=""), the Max4Sale/Points4Sale numbers are displayed in the same manner as if these settings were not in your siteconfig.config file.
Example: UnAvailableText = Unavailable
See also: AvailableText
Max4Sale
Points4Sale
ItemShowBadQuantity
DepletedInventoryMsg
UpsellPrompt
Key value: Any text
Description: Prompt that is shown on the upsell control. Defaults to, “You may also be interested in...” if no value is defined here
Example: UpsellPrompt = You might also be interested in....
180

See also: ShowUpsells
UpsellThumbs
UpsellThumbs
Key value: 0 or 1
Description: 1 shows thumbnails on the item upsells and 0 displays a description/hyperlink only.
See also: ShowUpsells
UpsellPrompt
UseItemTreeDescrip
Key value: 0 or 1
Description: Enables (1) or disables (0) the displaying of item descriptions from the ItemTree table instead of the Items table in the pages following ItemList.aspx. This option takes advantage of the fact that you can have the same item in an item tree multiple times, each with a different description. (You can change the description in SysManager in the item tree instance, but it doesn’t change the description in the DCI.)
The E-Commerce pages adds <descrip>itemtree.descrip</descrip> tags to the sale string for each item in the sale when the following is set in the siteconfig.config file. This then gets written into the tr_save.save_info field when Sales Host utility processes the sale. This allows the item tree description to be displayed when the sale is recalled at a regular salespoint.
Note: The item tree description can only be added to the sale string for items, not for modifiers or modifiers on modifiers.
See also: None
181
UseLongItemDescrip
Key value: 0 or 1
Description: Enables (1) or disables (0) the use of long descriptions in the MiscTables.xml file in place of normal item and modifier descriptions or item tree descriptions. See MiscTables.xml for more information.
See also: None
182
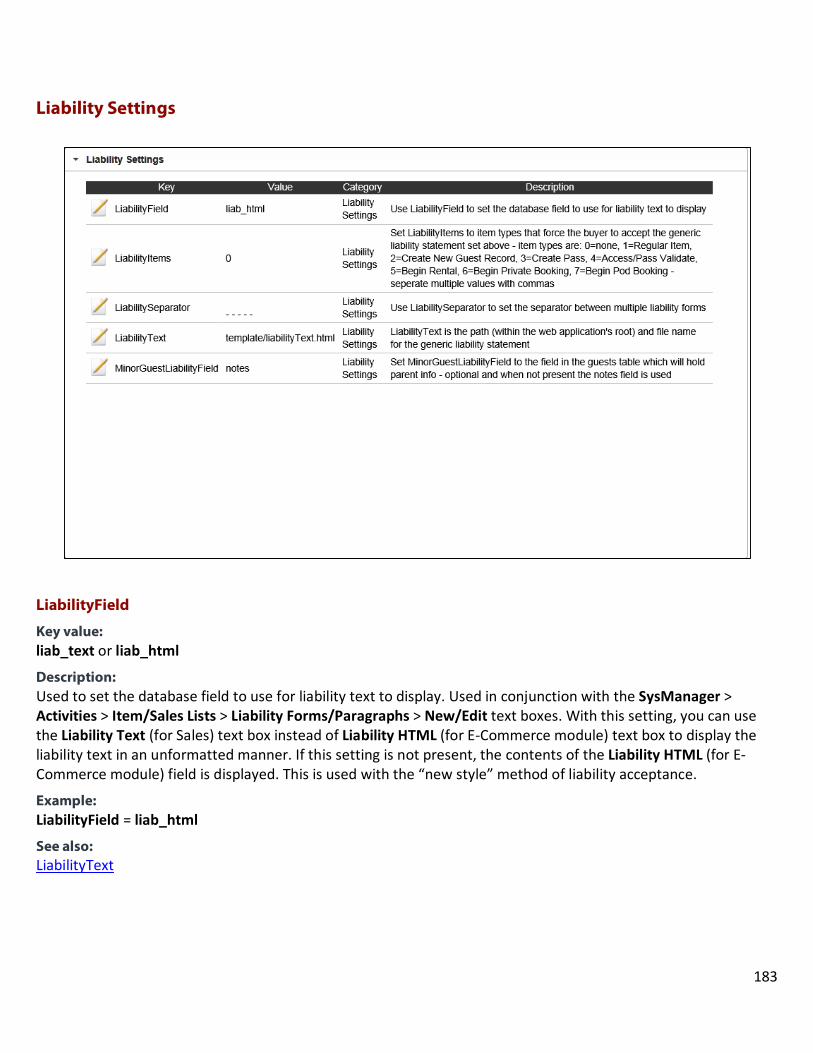
Liability Settings
LiabilityField
Key value: liab_text or liab_html
Description: Used to set the database field to use for liability text to display. Used in conjunction with the SysManager > Activities > Item/Sales Lists > Liability Forms/Paragraphs > New/Edit text boxes. With this setting, you can use the Liability Text (for Sales) text box instead of Liability HTML (for E-Commerce module) text box to display the liability text in an unformatted manner. If this setting is not present, the contents of the Liability HTML (for E-Commerce module) field is displayed. This is used with the “new style” method of liability acceptance.
Example: LiabilityField = liab_html
See also: LiabilityText
183
LiabilityItems
Key value: Numeric values: 0, 1, 2, 3, 4, 5, 6, 7
Description: Specifies the item type or types that require the buyer to accept the liability statement prior to purchasing. Separate multiple values with commas. Item types and their descriptions are shown and described in the following table:
Item type number Description
0 None
1 Regular item
2 Create guest item
3 Pass
4 Access/Pass Validate
5 Rental
6 Private booking
7 Pod booking
Example: LiabilityItems = 3
See also: None
LiabilitySeparator
Key value: HTML code used as separator
Description: Used for items that have multiple HTML liability forms required. When this is the case, each form is displayed one after the other. The default separator between forms is a line break (<br>) but this can be overridden with this setting.
Tags and special characters need to be escaped, so this example would produce two line breaks with five dashes between them – i.e., <br>-----<br>. This is used with the “new style” method of liability acceptance.
Example: LiabilitySeparator = <br> - - - - - <br>
184

See also: LiabilityField
LiabilityText
Key value: Relative path to liability text template and template filename
Description: Path is relative to the root of the web application (the virtual directory created when installing). By default the templates are stored in the template folder in the E-Commerce module virtual directory. Template filename is the name of the text file used as the liability template that displays and must be accepted when selling certain item types. This is used with the “old style” method of liability acceptance.
Example: LiabilityText = template/liabilityText.txt
See also: LiabilityField
MinorGuestLiabilityField
Key value: Notes
Description: This sets the field in the Guests table which holds the parent/guardian information. This is optional and when not present, the Notes field is used if an item requires a Liability form to be accepted and the guest being attached to the item does not meet the age requirements of the Liability form as set in the Liability Form/Paragraph Edit > Minimum Age To Accept field, and then the following notice appears just below the text of the liability, “Guest is underage. A parent or guardian must accept this release.” Just below the notice are three text boxes: Parent or guardian first name, Parent or guardian last name and Relationship to minor. Once these are populated and the, I have read and I accept the terms of this release check box is checked, the Continue button becomes active and can be clicked which writes the information into the guest record.
Example: MinorGuestLiabilityField = notes
See also: None
185

Membership Settings
0PmtTxt
Key value: Any text
Description: Used to allow $0 sales. Use 0PmtTxt to override the default text regarding payment type in e-mail confirmations for $0 sales. You need to provide some text for confirmations with $0 total with 0PmtTxt.
Example: 0PmtTxt = Your membership
See also: AcctPmtTxt
CardPmtTxt
DWPmtTxt
186
Allow0Total
Key value: 0 or 1
Description: If a sale total might be $0 under the membership free item modifier scheme (e.g., if a visitor/guest only “purchases” free tickets), use Allow0Total to allow (1) this. Set Allow0Total to 1 to allow E-Commerce sale totals of $0.
See also: None
DEPARTMENTCATEGORY ITEM PtsSel
Key value: Padded DCI followed by PtsSel
Description: The key contains the padded DCI of the free item modifier and a select statement. If you enter multiple DCIs into PointsModDCIs, then you need one of these select statement entries per DCI.
Example: EXHIBITS MET_MODS MEMBERFREE2PtsSel = Select points1 as uses from gst_pass where pass_no = {{pass_no}} and voided_by='' and voided_for='' and start_date<=GETDATE() and expires>=GETDATE()
See also: PointsModDCIs
GuestLoginAsMember
Key value: 0 or 1
Description: Guest log-ins are now linked to member log-ins. Add this key to your siteconfig.config file. Also, make sure MemberFilterDCIs key is set and has the list of valid DCI's: e.g., MemberFilterDCIs = MEMBERSHIPANNUAL FAMILY ,MEMBERSHIPANNUAL INDIVIDUAL. You also need to set AllowMultiLogin = 1 in order for this to work.
If a guest has a valid pass defined in MemberFilterDCIs and both GuestLoginAsMember and AllowMultiLogin are set to 1, then, a guest log-in also works as a member log-in.
If you have both GuestLoginAsMember and AllowMultiLogin set to 1 and MemberFilterDCIs ="" (no DCIs specified), then, all guests with a valid pass is logged in as members. If you populate the MemberFilterDCIs key, then, only guests with a valid pass from the list are logged in as members.
The guest who is logged in can be different from the member who is logged in, so you can log-out either the guest or the member.
187

See also: MemberFilterDCIs
AllowMultiLogin
MemberFilterDCIs
Key value: List of valid DCI’s
Description: E-Commerce pages have functionality that allows one to designate which pass/membership items can be used for a member log-in. This is done with a new siteconfig.config file key, MemberFilterDCIs. Set this to pass/membership DCIs (padded to thirty characters) that are allowed for member log-ins (pass/membership used to log-in must still be valid, i.e., not expired or voided). Separate multiple DCIs with a comma. If you set value = “”, then no memberships/passes will be allowed for member log-ins.
Note: You must populate this key with the DCIs of all memberships/passes for those that allow member log-ins. This string of DCI’s is limited to 80. Anything above 80 distinct DCI’s concatenated together and you may experience intermittent success/failure. This failure exhibits itself with one product working, but another one may not.
Example: MemberFilterDCIs = MEMBERSHIPMUSEUM LEVEL1 ,MEMBERSHIPMUSEUMLEVEL2 ,PASSES ADULT UNLIMITED ,PASSES ADULT LIMITED
See also: GuestLoginAsMember
AllowMultiLogin
MemberNoField
Key value: pass_no or addit_no
Description: Used to designate which field(s) (pass_no, addit_no, or both) online visitors/guests use to log in with to obtain free tickets and/or other “members only” discounts. The prefix that is associated with the gst_pass.pass_no field in Access Control Preferences needs to be appended to addit_no, pass_no, or both, separated by a dash. For a blank prefix, use only the field name. If both are used, they are separated only with a comma, no space. If this setting isn’t present, it defaults to pass_no.
Example: MemberNoField = pass_no
188
See also: NoValOptDCIs
MembersOnlyDCIs
Key value: DCI of members-only item
Description: Items in the E-Commerce item tree can be restricted to logged-in members only (this includes free modifier items). Non-members are not able to add these items to the shopping cart. Entries must have the department, category and item, each padded with spaces to equal ten characters (thirty total). Multiple entries must be separated only with a comma, no space. Use MembersOnlyDCIs to designate items that are restricted to logged in members.
Example: MembersOnlyDCIs = MEMBERONLYRETAIL MMBRMUG ,MEMBERONLYRETAIL MMBRPOSTER
See also: None
MemberVerifyAll
Key value: 0 or 1
Description: Used for verification of the guest for memberships. If set to 1, the guest is verified as if he had looked himself up in Guest Lookup. This works only when the MemberVerifyField key is not blank and the verification passes. If set to 0, the member is verified only for membership benefits (such as free tickets or member discounts) and still needs to verify himself to access personal information, such as to view/edit guest details or to use a card on file. If the value for the MemberVerifyField key is blank, this key is ignored. Set MemberVerifyAll to 1 to enable full member verification during a membership lookup.
See also: RenewVerifyAll
MemberVerifyField
MemberVerifyPrompt
MemberVerifyRegEx
MemberVerifyRegExMessage
189
MemberVerifyField
Key value: Any field name in the guest table, DefAddress from the address table or blank
Description: Used for verification of the guest for memberships. The member log-in can be verified in a manner similar to a Guest Lookup with this setting. MemberVerifyField is the field used to verify the guest from the guest or address tables (DefAddress address only). Passwords are masked on the MemberLogin.aspx page when setting MemberVerifyField to g.web_pswd. If left blank, the other “verify” siteconfig.config settings for membership verification are ignored and only the member number is required for member discounts.
Example: MemberVerifyField = g.web.pswd
MemberVerifyField = g.last_name
See also: RenewVerifyField
MemberVerifyAll
RenewVerifyAll
MemberVerifyField
MemberVerifyPrompt
MemberVerifyRegEx
MemberVerifyRegExMessage
MemberVerifyPrompt
Key value: Any text
Description: Used for verification of the guest for memberships. Specifies the text the visitor/guest is prompted with for verification on the MemberLogin.aspx page. If the value for the MemberVerifyField key is blank, this key is ignored.
Example: MemberVerifyPrompt = Member Last Name:
MemberVerifyPrompt = Password:
See also: RenewVerifyPrompt
RenewVerifyField
MemberVerifyAll
RenewVerifyAll
190
MemberVerifyField
MemberVerifyRegEx
MemberVerifyRegExMessage
MemberVerifyRegEx
Key value: A valid regular expression
Description: Used for verification of the guest for memberships. Used to provide the regular expression used to validate the input into the field used for verification. If the value for the MemberVerifyField key is blank, this key is ignored.
Example: MemberVerifyRegEx = ^.{2,20}$
(written for use with the last_name field – verifies that the text entered is at least two but no more than twenty characters in length)
MemberVerifyRegEx = ^.{6,12}$
See also: MemberVerifyPrompt
RenewVerifyRegEx
MemberVerifyAll
MemberVerifyField
MemberVerifyRegExMessage
MemberVerifyRegExMessage
Key value: Any text
Description: Used for verification of the guest for memberships. Used to specify the text displayed if the regular expression specified with MemberVerifyRegEx fails. If the value for the MemberVerifyField key is blank, this key is ignored.
Example: MemberVerifyRegExMessage = Please enter 2 to 20 characters
MemberVerifyRegExMessage = Please enter 6 to 12 characters
See also: MemberVerifyRegEx
RenewVerifyRegExMessage
MemberVerifyPrompt
191
RenewVerifyRegEx
MemberVerifyAll
MemberVerifyField
NoValOptDCIs
Key value: One or more DCIs
Description: Used to specify DCIs configured with Optional validation (SysManager > Activities > DCIs > New/Edit > Action tab > Validation section) to not be validated when processed through E-Commerce module when the purchaser is logged in as a member. The default behavior is for items configured with Optional validation to always be validated when processed through E-Commerce module. The setting can contain multiple DCIs, each of which must be separated by a comma. If specified in the MemberNoField setting (e.g., MemberNoField = pass_no-P), the prefix is included with validation items when submitted to Sales Host utility. Items configured with Force validation continue to always be validated, even if they are entered into the NoValOptDCIs setting.
Example: NoValOptDCIs = MEMBERONLYTICKETS ADULT1DAY
NoValOptDCIs = MEMBERONLYTICKETS MBM1DYSENR,MEMBERONLYTICKETS MBM1DYADLT
See also: MemberNoField
PointsModDCIs
Key value: DCI of free modifier item
Description: Used to designate free modifier items. Enter the department, category and item into the value for this key, padded to ten characters each, thirty characters total. Multiple entries must be separated only with a comma, no space. For example, PointsModDCIs = TICKETS MODIFIERS MEMBERFREE. PointsModDCIs designates free item modifiers based on a points system.
Example: PointsModDCIs = TESTDEPT TESTCAT TESTITEM
See also: DEPARTMENTCATEGORY ITEM PtsSel
192
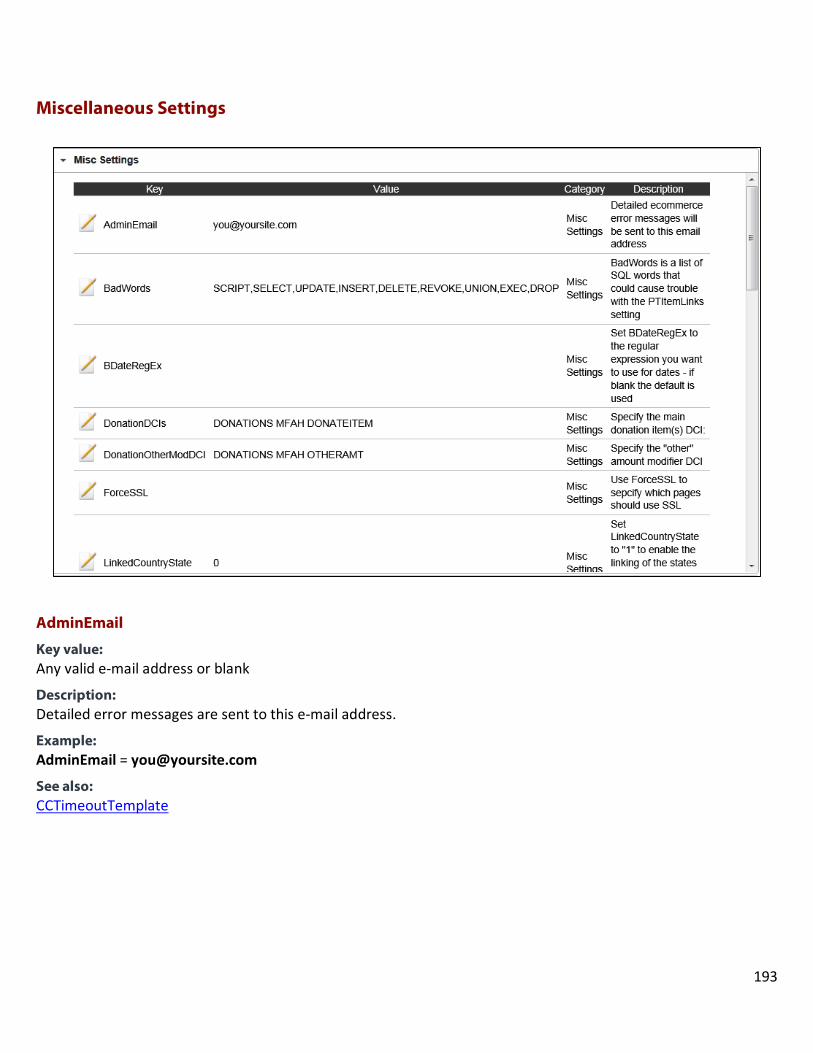
Miscellaneous Settings
AdminEmail
Key value:Any valid e-mail address or blank
Description: Detailed error messages are sent to this e-mail address.
Example: AdminEmail = [email protected]
See also: CCTimeoutTemplate
193
BadWords
Key value: SCRIPT, SELECT, UPDATE, INSERT, DELETE, REVOKE, UNION, EXEC, DROP
Description: E-Commerce pages have added the functionality to read BadWords from the siteconfig.config file as a check on input strings from various pages. This helps to prevent cross-site scripting attacks. The default values for this setting are as shown above.
Example: BadWords = SCRIPT,SELECT,UPDATE,INSERT,DELETE,REVOKE,UNION,EXEC,DROP
See also: None
BDateRegEx
Key value: Regular expression used to validate a birth date
Description: A substitute regular expression for checking birth dates if you need a different one than the default. Leaving it blank uses the default. Set BDateRegEx to the regular expression you want to use for dates. The default is:
^(?:(?:(?:0?[13578]|1[02])(\/|-|\.)31)\1|(?:(?:0?[1,3-9]|1[0-2])(\/|-|\.)(?:29|30)\2))(?:(?:1[6-9]|[2-9]\d)?\d{2})$|^(?:0?2(\/|-|\.)29\3(?:(?:(?:1[6-9]|[2-9]\d)?(?:0[48]|[2468][048]|[13579][26])|(?:(?:16|[2468][048]|[3579][26])00))))$|^(?:(?:0?[1-9])|(?:1[0-2]))(\/|-|\.)(?:0?[1-9]|1\d|2[0-8])\4(?:(?:1[6-9]|[2-9]\d)?\d{2})$
This expression (from www.regexlib.com) validates U.S. dates with two- or four-digit years using - , / or . as a separator.
See also: None
DonationDCIs
Key value: DCI of the main donation item
Description: Used with the E-Commerce module donations collection capability. Used to specify the main donation item(s) DCI.
Example: DonationDCIs = MUSEUM DONATIONS DONATEITEM
194
See also: DonationOtherModDCI
TributeDDTable
DonationOtherModDCI
Key value: DCI of the “other amount” modifier
Description: Used with the E-Commerce module donations collection capability. Used to specify the “other amount” (direct pricing) modifier.
Example: DonationOtherModDCI = MUSEUM DONATIONS OTHERAMT
See also: TributeDDTable
DonationDCIs
ForceSSL
Key value: Pages to load using SSL
Description: Used to specify which pages are loaded using SSL (HTTPS). The pages shown in the example setting are those recommended to be loaded using HTTPS because they deal with guest and credit card information. If this setting is not present, all pages load via the protocol the first page is loaded.
Example: ForceSSL = GuestSelected.aspx, GuestEdit.aspx, Checkout.aspx,Checkout1.aspx, Checkout2.aspx, Checkout3.aspx, checkout4.aspx
See also: SSLText
NoSSLText
JavascriptDisabledMessage
Value: Any text
Example: JavascriptDisabledMessage = You must have javascript enabled to use this web site
Description:
195

Set JavascriptDisabledMessage to the message to display if javascript is not enabled in the user's browser.
See Also: warnJavascriptDisabled
LinkedCountryState
Key value: 0 or 1
Description: To further enhance linking the States (Provinces) dropdown with the Country dropdown you could place Country before State on the GuestEdit.aspx page to suggest to the user that they select their country first. To enable this feature add the following key to the siteconfig.config file. Setting the value for this key to 0 disables this functionality.
See also: None
NeverSave
Key value: 0 or 1
Description: Enables (1) or disables (0) the “finalizing” of all online sales. Set NeverSave to 1 to force all E-Commerce sales to be finalized, including those with non-Print At Home Tickets and/or non-pass items. Omitting this setting keeps the saved/finalized logic as it was.
See also: None
NoSSLText
Key value: Any text
Description: Used to specify the text to display on mouse-overs (tool tips) when ForceSSL causes a lock icon to appear on each page and the lock icon is shown as open. Use SSLText and NoSSLText to specify mouse over text to display for SS /NoSSL images
Example: NoSSLText = SSL not in use
See also: ForceSSL
SSLText
196
OldURLEnc
Key value: 0 or 1
Description: Enables (1) or disables (0) use of the old style of encryption of URLs. E-Commerce pages use a default encryption scheme for URLs, especially for links to Print At Home Tickets application. URL encryption by the E-Commerce pages has is safer and less error prone. This requires clients who use hard-coded links to specific items, to update those links. To override the default encryption scheme and fall back to the original encryption scheme, add the key to the siteconfig.config file.
See also: None
Salespoint
Key value: Any valid salespoint nickname
Description: Used to pass a salespoint nickname to the Sales Host as part of the sale string for the purpose of salespoint impersonation.
See also: None
ShowErrors
Key value: 0 or 1
Description: Enables (1) or disables (0) the display of errors returned from ww.dll. Set ShowErrors to 1 to enable the showing of error messages to users for trapped errors. If an online shopper tries to add an unsupported item type to the E-Commerce shopping cart, the error.aspx page displays. If the siteconfig.config file for the pages has ShowErrors = 0, then, the generic error message, “Sorry, an error has occurred. Please go back and try again. If you continue to have problems call our ticket office and let us know!” displays. If the siteconfig.config file for the pages has ShowErrors = 1, then, the message, “Item type not supported” also appears on the page.
E-Commerce module supports items with the following item_types:
• 1 (Regular item) • 2 (Create new guest record) • 3 (Create pass) • 5 (Begin rental)
197
E-Commerce module currently does not support items with the following item_types:
• 6 (Begin private booking) • 7 (Begin pod booking) • 8 (Tee time reservation) • 9 (Gift card)
See also: SSVerbosityLevel
VerbosityLevel
SSLText
Key value: Any text
Description: Used to specify the text to display on mouse-overs (tool tips) when ForceSSL causes a lock icon to appear on each page and the lock icon is shown as locked. Use SSLText and NoSSLText to specify mouse-over text to display for SSL/NoSSL images.
Example: SSLText = SSL in use
See also: ForceSSL
NoSSLText
SSVerbosityLevel
Key value: 0 or 5
Description: Adds <DIAG> tags (diagnostic logging) to each sale string within the <item></item> tags when value = 5. Can either be omitted from the siteconfig.config file or the set value to 0 to turn off this type of logging. Set SSVerbosityLevel to 5 to add item diagnostic logging to the sale string, set to 0 to disable.
Example: SSVerbosityLevel = 5
See also: VerbosityLevel
198
TributeDDTable
Key value: Names of the table to use in MiscTables.xml
Description: Used with the E-Commerce module donations collection capability. Used to set up a list in MiscTables.xml for tribute choices available in the Tribute dropdown.
Example: TributeDDTable = Tribute
See also: DonationOtherModDCI
DonationDCIs
URLTrans
Key value: Old and new URLs
Description: Used to translate URLs produced by the pages (e.g., Print At
Home Tickets links) if the links are getting created incorrectly.
Example: URLTrans = localhost,mywebserver
This replaces localhost with mywebserver.
Or:
URLTrans = http://mysite.com/,https://mysecuresite.com/
This replaces http://mysite.com/ with https://mysecuresite.com/.
See also: None
VerbosityLevel
Key value: 0, 1, 2, 3, 4 or 5
Description: Determines the amount of logging that is done to the Windows Application Event Log, according to the following:
• At level 0, no logging is done. • At level 1, most unhandled or significant errors are logged. • At level 2, application starts and stops are logged. • At level 4, informational entries on session starts and ends are made.
199

• At level 5, all calls to ww.dll and the responses are logged.
Example: VerbosityLevel = 5
See also: SSVerbosityLevel
warnJavascriptDisabled
Key value: 0 or 1
Description: Set warnJavascriptDisabled to 0 to display a global warning if javascript is not enabled in the user's browser. If warnJavascriptDisabled is set to 0 the message configured with JavascriptDisabledMessage displays above the header in the E-Commerce pages if javascript is not enabled in the user's browser. If warnJavascriptDisabled is set to 1 no message displays to the user.
See Also: JavascriptDisabledMessage
WebSiteID
Key value: "main" can be anything you want to call one of your sets of pages to differentiate it from your other sets of E-Commerce pages
Description: The following functionality applies to clients who run more than one set of E-Commerce pages, use Cart Rules and want to have some Cart Rules work for some page sets, but not for others.
To enable this functionality add the following setting to the siteconfig.config file. The WebSiteID key is used to uniquely identify each set of pages from any others as long as the value is unique for each page set that you run. Further configuration is required in the CartRule table in the SiriusSQL database in order for this functionality to work correctly. For each Cart Rule in the table, you need to enter the value of the WebSiteID, if you want that Cart Rule to execute for that set of pages. For a Cart Rule to run on multiple sets of pages you would enter each of the WebSiteIDs as a comma-separated list.
Note:
• Cart Rules that don’t have a site filter set in the CartRule table in the SiriusSQL database works for all sets of pages, even if the set of pages has a WebSiteID value set.
• Sets of pages that don’t have a WebSiteID value configured or are missing that setting altogether from their siteconfig.config file uses all Cart Rules.
200

Example: WebSiteID = main
See also: None
WTPDescrip
Key value: (WTP: {{wtp_no}})
Description: Set WTPDescrip to text to display in the cart with WTP number-enabled items. {{wtp_no}} is replaced with the actual number
Example: WTPDescrip = WTP: {{wtp_no}}
See also:
WTPRegex
WTPItemsText
WTPItemsText
Key value: Message that is displayed to user
Description: The WTPItemsText setting is what gets displayed to the user when they have reload items available. It needs to have a link to ItemList.aspx?node_type=WTP. The rest of the text can be whatever you choose. To merge with existing pages, add the new WTPReload.aspx file to your pages.
Example: WTPItemsText = Items are available. Click <a href="ItemList.aspx? node_type=WTP">here</a> to see them.
See also: WTPRegex
WTPDescrip
WTPRegex
Key value: A combination of characters and numbers
Description: A new WTP reload process was added that includes a new page, WTPReload.aspx. When items are configured to support a WTP reload, they can be looked up in the WTPReload.aspx page. If a product has valid Reload
201
Items Available, a link is displayed to see the items on the ItemList.aspx page. Once an item is selected, the user is taken to the ItemShow.aspx page and the quantity is forced to 1 regardless of min/max configuration of the item in SysManager.
Example: WTPRegex = ^([0-9a-zA-Z]{8})-([0-9a-zA-Z]{3})-([0-9a-zA-Z]{3})$
See also: WTPItemsText
WTPDescrip
202
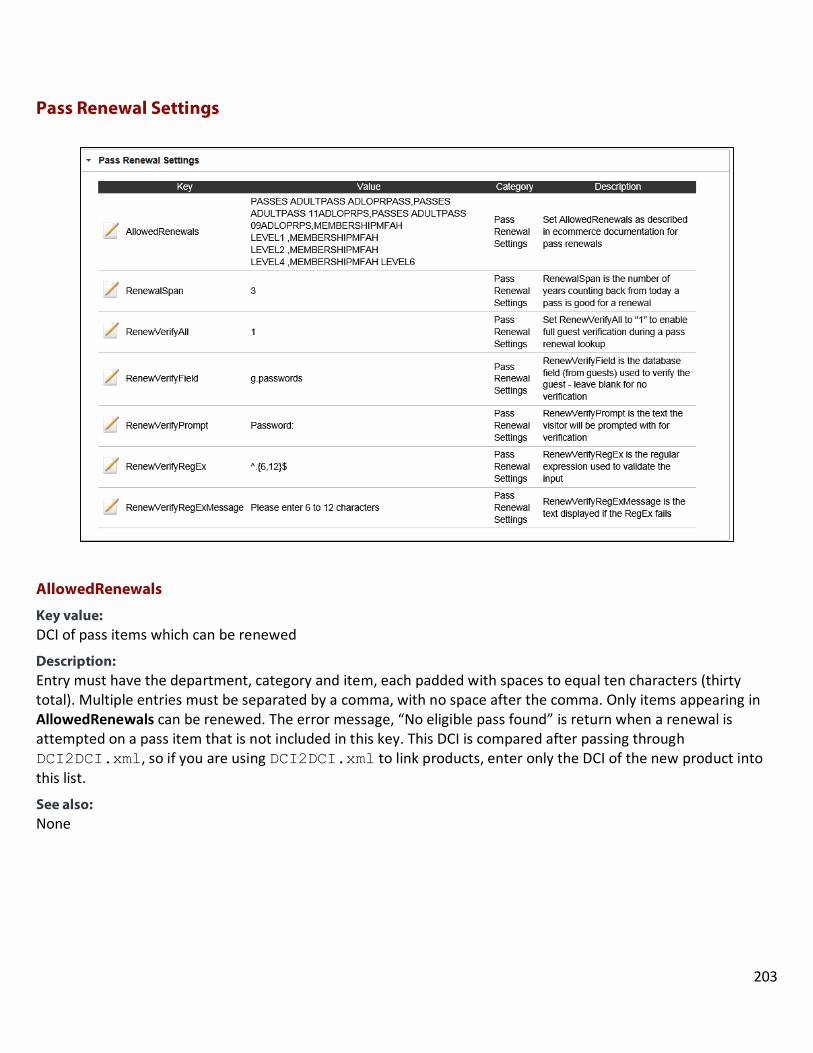
Pass Renewal Settings
AllowedRenewals
Key value: DCI of pass items which can be renewed
Description: Entry must have the department, category and item, each padded with spaces to equal ten characters (thirty total). Multiple entries must be separated by a comma, with no space after the comma. Only items appearing in AllowedRenewals can be renewed. The error message, “No eligible pass found” is return when a renewal is attempted on a pass item that is not included in this key. This DCI is compared after passing through DCI2DCI.xml, so if you are using DCI2DCI.xml to link products, enter only the DCI of the new product into this list.
See also: None
203
RenewalSpan
Key value: Any positive integer
Description: The number of years counting back from today that a pass is eligible for renewal. 1 would mean a pass would have to have expired after one year ago today to be eligible for renewal.
Example: RenewalSpan = 2
See also: None
RenewVerifyAll
Key value: 0 or 1
Description: Used for password verification for pass renewals. Sets whether the guest is considered “logged in” (as in a regular lookup/verification). Set RenewVerifyAll to 1 to enable full guest verification during a pass renewal lookup. If set to 1 and the guest passes verification, the state is the same as if the guest had looked himself up in Guest Lookup. Only works if RenewVerifyField is populated and verification passes.
See also: RenewVerifyField
RenewVerifyPrompt
RenewVerifyRegEx
RenewVerifyRegExMessage
MemberVerifyAll
RenewVerifyField
Key value: Any field name from the guests table
Description: Used for password verification for pass renewals. Used to verify the guest. RenewVerifyField specifies the database field (from guests) used to verify the guest. Leave blank for no verification. If left blank, then, only the pass number is required and the other “renew” siteconfig.config settings for pass renewal are ignored.
Example: RenewVerifyField = g.passwords
See also: RenewVerifyAll
204
RenewVerifyPrompt
RenewVerifyRegEx
RenewVerifyRegExMessage
MemberVerifyAll
RenewVerifyPrompt
Key value: Any text
Description: Used for password verification for pass renewals. Text in front of the text box - the text the visitor/guest is prompted with for verification.
Example: RenewVerifyPrompt = Password:
See also: RenewVerifyAll
RenewVerifyField
RenewVerifyRegEx
RenewVerifyRegExMessage
MemberVerifyAll
RenewVerifyRegEx
Key value: Any regular expression
Description: Used for password verification for pass renewals. Regular expression used to validate the input. For suggested regular expressions, see http://www.regexlib.com.
Example: RenewVerifyRegEx = ^.{6,12}$
(This regular expression makes the requirement six – twelve characters)
See also: RenewVerifyPrompt
MemberVerifyRegEx
RenewVerifyAll
RenewVerifyField
205
RenewVerifyRegExMessage
MemberVerifyAll
RenewVerifyRegExMessage
Key value: Any text
Description: Used for password verification for pass renewals. Message displayed if validation applied by RenewVerifyRegEx fails.
Example: RenewVerifyRegExMessage = Please enter 6 to 12 characters
See also: RenewVerifyRegEx
MemberVerifyRegExMessage
RenewVerifyPrompt
MemberVerifyRegEx
RenewVerifyAll
RenewVerifyField
MemberVerifyAll
206
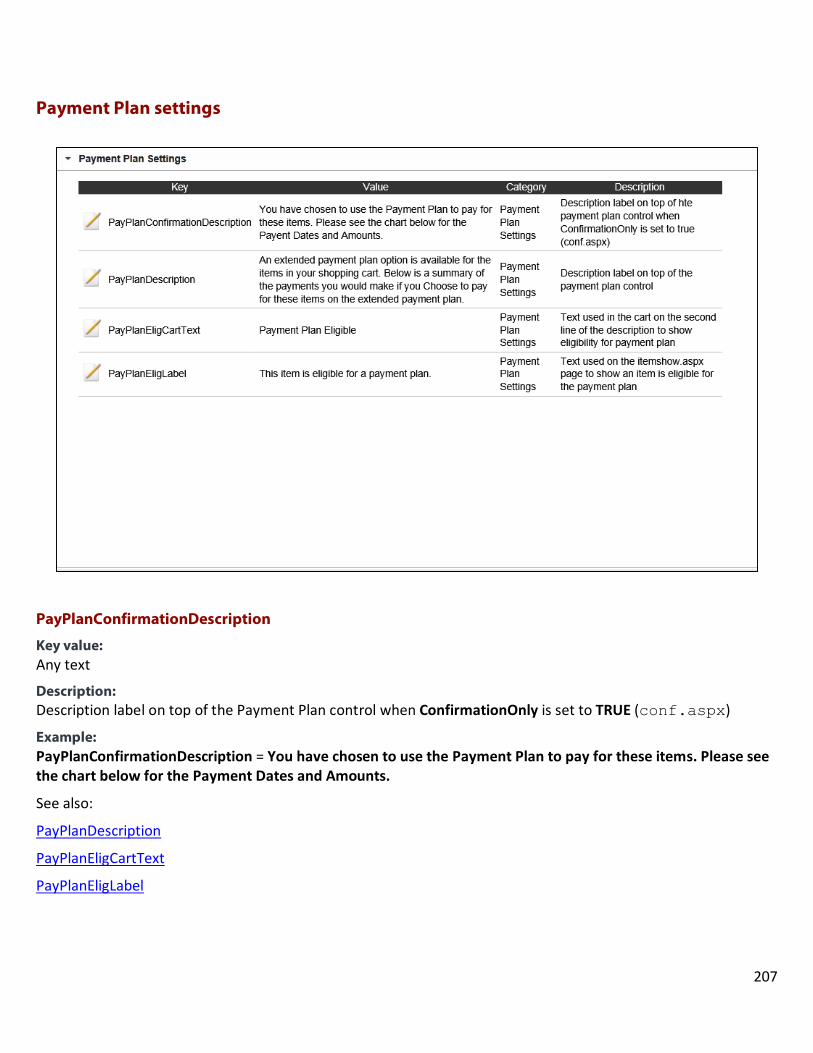
Payment Plan settings
PayPlanConfirmationDescription
Key value: Any text
Description: Description label on top of the Payment Plan control when ConfirmationOnly is set to TRUE (conf.aspx)
Example:PayPlanConfirmationDescription = You have chosen to use the Payment Plan to pay for these items. Please see the chart below for the Payment Dates and Amounts.
See also:
PayPlanDescription
PayPlanEligCartText
PayPlanEligLabel
207
PayPlanDescription
Key value: Any text
Description: Description label on top of the Payment Plan control
Example: PayPlanDescription = An extended payment plan option is available for the items in your shopping cart. Below is a summary of the payments you would make if you Choose to pay for these items on the extended payment plan.
See also: PayPlanConfirmationDescription
PayPlanEligCartText
PayPlanEligLabel
PayPlanEligCartText
Key value: Any text
Description: Text used in the cart on the second line of the description to show eligibility for Payment Plan
Example: PayPlanEligCartText = Payment Plan Eligible
See also: PayPlanConfirmationDescription
PayPlanDescription
PayPlanEligLabel
PayPlanEligLabel
Key value: Any text
Description: Text used on the itemshow.aspx page to show an item is eligible for the Payment Plan.
Example: PayPlanEligCartText = Payment Plan Eligible
See also: PayPlanConfirmationDescription
PayPlanDescription
208

PayPlanEligCartText
209

Print At Home Tickets Settings
AllowedPAH
Key value: DCI of ticket items which are set up for Print At Home Tickets application
Description: Entry must have the department, category and item, each padded with spaces to equal ten characters (thirty total). Multiple entries must be separated by a comma. If an item is not in this list, it can’t be delivered as a PDF file.
See also: None
210
ForcePAH
Key value: 1 or 0
Description: If 1, forces the Print At Home check box to be checked and disabled for Print At Home Tickets items. If 0, then, PAHDefault is used to set the default state of the Print At Home check box. Set ForcePAH to 1 to force the Print At Home check box to be checked and grayed-out by default on ItemShow.aspx.
See also: PAHDefault
PAHAttPDF
Key value: 1 or 0
Description: Enables (1) or disables (0) the attaching of the PDF(s) to the Print At Home Tickets e-mail. Set PAHAttPDF to 1 to enable the attaching of PDF(s) to the Print At Home Tickets e-mail. Recommended setting is 0. Attaching the PDFs can sometimes make the e-mail fail due to size.
See also: SeparatePDFs
PAHCartText
Key value: Any text
Description: Text that gets inserted next to the item description after it has been added to the cart.
Example: PAHCartText = (Print At Home)
See also: None
PAHConf
Key value: Any text
Description: Text that can appear in the confirmation e-mail and on-screen sale confirmation (conf.aspx) if any Print At Home Tickets items are present in the sale.
211

Example: PAHConf = One or more of your items is a Print At Home item. You will soon be receiving an email with a link to a PDF file containing your Print At Home items.{{CrLf}}Or you can <a href="{{tix_link}}">click here</a> to retrieve your tickets now.
See also: None
PAHDefault
Key value: 1 or 0
Description: Used to set the default state of the Print At Home check box. Setting PAHDefault to 1 defaults the check box to checked, 0 to unchecked.
Note: The ForcePAH setting can be used to override this setting.
See also: ForcePAH
PAHDisplayInConf
Key value: 1 or 0
Description: PAHDisplayInConf = 1 to display the PAH tickets online in the conf.aspx page. Set to 0 to only include links to the tickets
See also: PAHDisplayMaxQty
PAHDisplayMaxQty
Key value: Any valid integer
Description: The maximum quantity of images to embed in the conf.aspx or conf2.aspx page. If there are more than this number of tickets, only the link is shown to open the Print At Home Tickets page.
Example: PAHDisplayMaxQty = 10
212
See also: PAHDisplayInConf
PAHMailSubj
Key value: Any text
Description: Used to populate the Subject field of the Print At Home Tickets e-mail. The wwSale_id is appended to the end of the text used here.
Example: PAHMailSubj = Your Print At Home Tickets - Sale #
See also: None
PAHNoImagesMsg
Key value: Any text
Description: Message the user sees if they try to click on the Printer Friendly version link before Sales Host utility has processed the sale. This prompts the guest/visitor to refresh the page.
Example: PAHNoImagesMsg = Your tickets are being processed. Try clicking Refresh (or F5) in a couple minutes to view your tickets.
See also: None
PAHRealTime
Key value: 1 or 0
Description: Set PAHRealTime = 1 to use real-time PAH tickets, not tickets generated and stored as PDF's in the ww_tix table. This generates using a report template and return as a .png file.
See also: None
213
SeparatePDFs
Key value: 1 or 0
Description: Enables (1) or disables (0) the creation of an individual PDF file for each Print At Home Tickets item. Set SeparatePDFs to 1 to enable creation of one PDF file per Print At Home Tickets item. The recommended setting is 0. If set to 0, tickets are delivered as a single file even if there are multiple tickets. Not having the setting present defaults to a single PDF file, this is more efficient in terms of bandwidth.
Note: This setting has been deprecated with Real-Time PDFs (version 4.2).
See also: PAHAttPDF
214
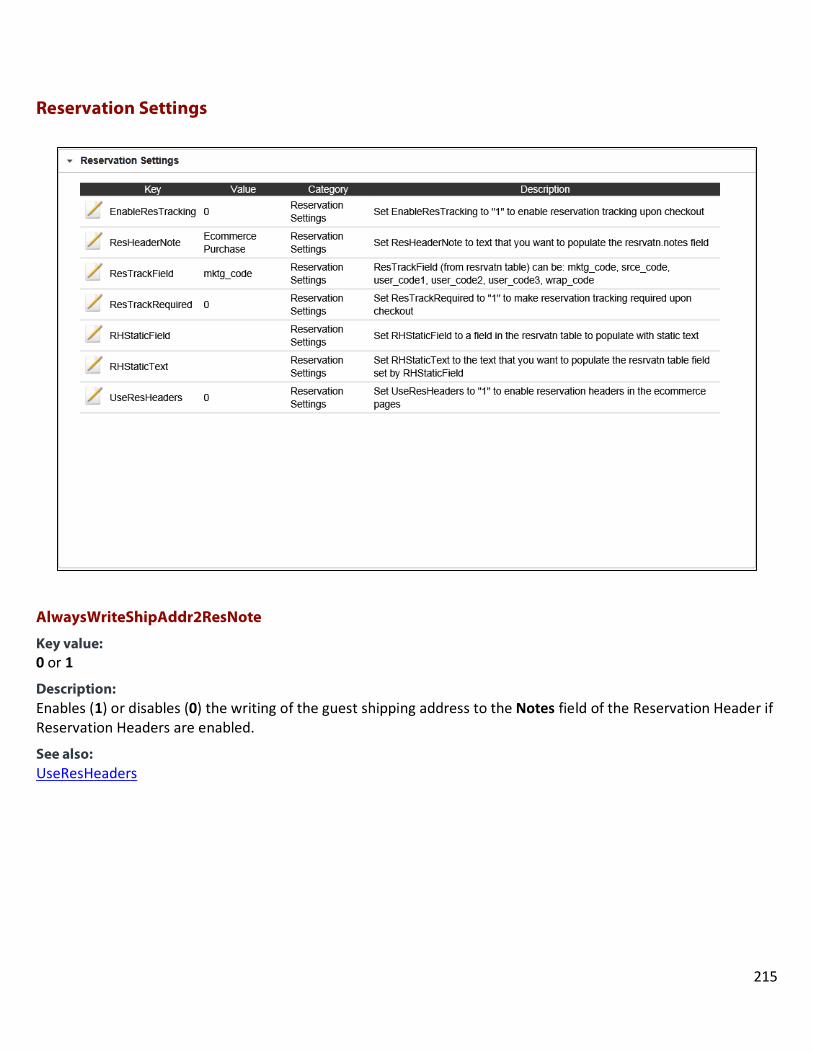
Reservation Settings
AlwaysWriteShipAddr2ResNote
Key value: 0 or 1
Description: Enables (1) or disables (0) the writing of the guest shipping address to the Notes field of the Reservation Header if Reservation Headers are enabled.
See also: UseResHeaders
215

EnableResTracking
Key value: 0 or 1
Description: Enables (1) or disables (0) reservation tracking. Set EnableResTracking to 1 to enable reservation tracking upon checkout. If active, a selection box is displayed on the Checkout.aspx page with a dropdown arrow to select one of the available values for the ResTrackField.
See also: ResTrackRequired
ResTrackField
ResHeaderNote
Key value: Any text
Description: Whatever text is in the value for this key is entered into the resrvatn.notes field when the visitor/guest uses Reservation Headers. If one is also using shipping address functionality on the Checkout.aspx page, the value for the ResHeaderNote key is written into resrvatn.notes along with the Ship To: information if the online shopper selects the This is a different person check box.
Example: ResHeaderNote = Ecommerce Purchase
NoPurchTracking = 0
ShowShippingAddr = 1
See also: NoPurchTracking
ShowShippingAddr
ResTrackField
Key value: Any valid field from the resrvatn table
Description: The value set for the ResTrackField key determines which field from the resrvatn table is used.
Possible choices are:
• mktg_code, • srce_code, • user_code1
216

• user_code2 • user_code3 • wrap_code
Any other field from the resrvatn table entered here de-activates the functionality.
Example: ResTrackField = mktg_code
See also: ResTrackRequired
EnableResTracking
ResTrackRequired
Key value: 0 or 1
Description: Enables (1) or disables (0) whether reservation tracking is required. If the value for ResTrackRequired is set to 1, the web purchaser must make a selection using the dropdown arrow for the ResTrackField before the sale can be finalized. If the value for the ResTrackRequired key is set to anything other than 1, the web purchaser has the option to make a selection using the dropdown selection box or leave it blank.
See also: ResTrackField
EnableResTracking
RHStaticField
Key value: Field in the reservatn table.
Description: Used to populate a field in the reservatn table with static text. This setting is used to designate the field in the resrvatn table you want populated. You must use a valid field name from the resrvatn table that isn’t already being populated by E-Commerce module. You can use this to distinguish reservations made from the web vs. reservations made from a salespoint for reporting and recall purposes.
See also: RHStaticText
217
RHStaticText
Key value: Any text
Description: Used to enter the text you want populated into the field set via RHStaticField.
See also: RHStaticField
UseResHeaders
Key value: 0 or 1
Description: Enables (1) or disables (0) Reservation Headers. Set UseResHeaders to 1 to enable Reservation Headers in the E-Commerce pages. Reservation Headers are enabled by default if the setting is not present, so this setting is primarily used to disable Reservation Headers. When enabled the, This is a different person check box is displayed in the Shipping Address Header on the Checkout.aspx page.
See also: ShowShippingAddr
218

Second Level Modifier Settings
ModOnModColLen
Key value: Numbers representing Columns
Description: ModOnModColLen is the max number of modifiers per column to display on ItemShow.aspx. Set to 0 to display single column.
The E-Commerce pages support second level modifiers. When you have ShowModOnMods = 1 set in the siteconfig.config file and you select an item that has first and second level modifiers, you get taken to the ItemShow.aspx page. Here, selection of a first level modifier that is configured with its own modifiers, automatically displays a popup window in which the second level modifiers are displayed. Once second level modifiers are selected on the popup dialog, the user needs to click on the Add Choice(s)/Verify Price button in order to update the price if needed and activate the Add to Cart button. If other first level modifiers that are configured with their own modifiers are selected, the second level modifiers are each displayed in the popup window. The popup window remains displayed on the page as long as there are first level modifiers selected that are configured with second level modifiers even after the Add Choice(s)/Verify Price button has been clicked. This allows the user to review the choices they've made before clicking the Add to Cart button.
219
Note: At this time, second level modifiers in E-Commerce module can only be configured as Regular Item, Item Type on the Action tab of the Item Edit Form in SysManager. In other words, second level modifiers cannot be configured to require a guest to be attached.
Support has been added to Sales Host utility to allow processing of multiple levels of modifiers.
Example: ModOnModColLen = 2
See also: ModOnModModifierSort
ShowModOnMods
ShowModOnModsError
ShowModOnModMinMaxMsg
ShowModOnModSelectionMSG
ModOnModModifierSort
Key value: Text indicating ascending or descending values of items
Description: Use ModOnModModifierSort to specify the field from the Items table and order (asc or desc) to order Level 2 modifiers on ItemShow.aspx.
The E-Commerce pages now support second level modifiers. When you have ShowModOnMods = 1 set in the siteconfig.config file and you select an item that has first and second level modifiers, you get taken to the ItemShow.aspx page. Here, selection of a first level modifier that is configured with its own modifiers, automatically displays a popup window on which the second level modifiers are displayed. Once second level modifiers are selected on the popup dialog, the user needs to click on the Add Choice(s)/Verify Price button in order to update the price if needed and activate the Add to Cart button. If other first level modifiers that are configured with their own modifiers are selected, the second level modifiers are each displayed in the popup window. The popup window remains displayed on the page as long as there are first level modifiers selected that are configured with second level modifiers even after the Add Choice(s)/Verify Price button has been clicked. This allows the user to review the choices they've made before clicking the Add to Cart button.
Note: At this time, second level modifiers in E-Commerce module can only be configured as Regular Item, Item Type on the Action tab of the Item Edit Form in SysManager. In other words, second level modifiers cannot be configured to require a guest to be attached.
Support has been added to Sales Host utility to allow processing of multiple levels of modifiers.
220

Example: ModOnModModifierSort = item asc
See also: ModOnModColLen
ShowModOnMods
ShowModOnModsError
ShowModOnModMinMaxMsg
ShowModOnModSelectionMSG
ShowModOnMods
Key value: 0 or 1
Description: Enables (1) or disables (0) the display of second level modifiers.
The E-Commerce pages now support second level modifiers. When you have ShowModOnMods = 1 set in the siteconfig.config file and you select an item that has first and second level modifiers, you get taken to the ItemShow.aspx page. Here, selection of a first level modifier that is configured with its own modifiers, automatically display a popup window in which the second level modifiers are displayed. Once second level modifiers are selected on the popup dialog, the user needs to click on the Add Choice(s)/Verify Price button in order to update the price if needed and activate the Add to Cart button. If other first level modifiers that are configured with their own modifiers are selected, the second level modifiers are each displayed in the popup window. The popup window remains displayed on the page as long as there are first level modifiers selected that are configured with second level modifiers even after the Add Choice(s)/Verify Price button has been clicked. This allows the user to review the choices they've made before clicking the Add to Cart button.
Note: At this time, second level modifiers in E-Commerce module can only be configured as Regular Item, Item Type on the Action tab of the Item Edit Form in SysManager. In other words, second level modifiers cannot be configured to require a guest to be attached.
Support has been added to Sales Host utility to allow processing of multiple levels of modifiers.
Note: ReverseModsDCIs do not work when ShowModOnMods is enabled.
See also: ModOnModColLen
ModOnModModifierSort
221
ShowModOnModsError
ShowModOnModMinMaxMsg
ShowModOnModSelectionMSG
ShowModOnModMinMaxMsg
Key value: Text displayed to specify minimum and maximum modifiers
Description: Set ShowModOnModMinMaxMsg to the text to display to specify the correct number of second level modifiers that need to be selected.
The E-Commerce pages support second level modifiers. When you have ShowModOnMods = 1 set in the siteconfig.config file and you select an item that has first and second level modifiers, you get taken to the ItemShow.aspx page. Here, selection of a first level modifier that is configured with its own modifiers, automatically displays a popup window in which the second level modifiers are displayed. Once second level modifiers are selected on the popup dialog, the user needs to click on the Add Choice(s)/Verify Price button in order to update the price if needed and activate the Add to Cart button. If other first level modifiers that are configured with their own modifiers are selected, the second level modifiers are each displayed in the popup window. The popup window remains displayed on the page as long as there are first level modifiers selected that are configured with second level modifiers even after the Add Choice(s)/Verify Price button has been clicked. This allows the user to review the choices they've made before clicking the Add to Cart button.
Note: At this time, second level modifiers in E-Commerce module can only be configured as Regular Item, Item Type on the Action tab of the Item Edit Form in SysManager. In other words, second level modifiers cannot be configured to require a guest to be attached.
Support has been added to Sales Host utility to allow processing of multiple levels of modifiers.
Example: ShowModOnModMinMaxMsg = Please select {{minModifier}} to {{maxModifer}} option(s).
See also: ModOnModColLen
ModOnModModifierSort
ShowModOnMods
ShowModOnModsError
ShowModOnModSelectionMSG
222
ShowModOnModSelectionMsg
Key value: Text to display optional modifiers
Description: Set ShowModOnModSelectionMsg to the text to display when modifier selection is optional.
The E-Commerce pages now support second level modifiers. When you have ShowModOnMods = 1 set in the siteconfig.config file and you select an item that has first and second level modifiers, you get taken to the ItemShow.aspx page. Here, selection of a first level modifier that is configured with its own modifiers, automatically displays a popup window on which the second level modifiers are displayed. Once second level modifiers are selected on the popup dialog, the user needs to click on the Add Choice(s)/Verify Price button in order to update the price if needed and activate the Add to Cart button. If other first level modifiers that are configured with their own modifiers are selected, the second level modifiers are each displayed in the popup window. The popup window remains displayed on the page as long as there are first level modifiers selected that are configured with second level modifiers even after the Add Choice(s)/Verify Price button has been clicked. This allows the user to review the choices they've made before clicking the Add to Cart button.
Note: At this time, second level modifiers in E-Commerce module can only be configured as Regular Item, Item Type on the Action tab of the Item Edit Form in SysManager. In other words, second level modifiers cannot be configured to require a guest to be attached.
Support has been added to Sales Host utility to allow processing of multiple levels of modifiers.
Example: ShowModOnModSelectionMsg = Please select from the list of modifiers
See also: ModOnModColLen
ModOnModModifierSort
ShowModOnMods
ShowModOnModsError
ShowModOnModsMinMaxMsg
ShowModOnModsError
Key value: Text indicating that additional modifiers must be selected for certain items
Description: Set ShowModOnModsError to text to display when the correct number of second level mods have not been set when trying to add to cart.
223
The E-Commerce pages now support second level modifiers. When you have ShowModOnMods = 1 set in the siteconfig.config file, and you select an item that has first and second level modifiers, you get taken to the ItemShow.aspx page. Here, selection of a first level modifier that is configured with its own modifiers, automatically displays a popup window in which the second level modifiers are displayed. Once second level modifiers are selected on the popup dialog, the user needs to click on the Add Choice(s)/Verify Price button in order to update the price if needed and activate the Add to Cart button. If other first level modifiers that are configured with their own modifiers are selected, the second level modifiers are each displayed on the popup window. The popup window remains displayed on the page as long as there are first level modifiers selected that are configured with second level modifiers even after the Add Choice(s)/Verify Price button has been clicked. This allows the user to review the choices they've made before clicking the Add to Cart button.
Note: At this time, second level modifiers in E-Commerce module can only be configured as Regular Item, Item Type on the Action tab of the Item Edit Form in SysManager. In other words, second level modifiers cannot be configured to require a guest to be attached.
Support has been added to Sales Host utility to allow processing of multiple levels of modifiers.
Example: ShowModOnModsError = Make the right modifier selections to get the item added to the cart.
See also: ModOnModColLen
ModOnModModifierSort
ShowModOnMods
ShowModOnModMinMaxMsg
ShowModOnModSelectionMSG
224
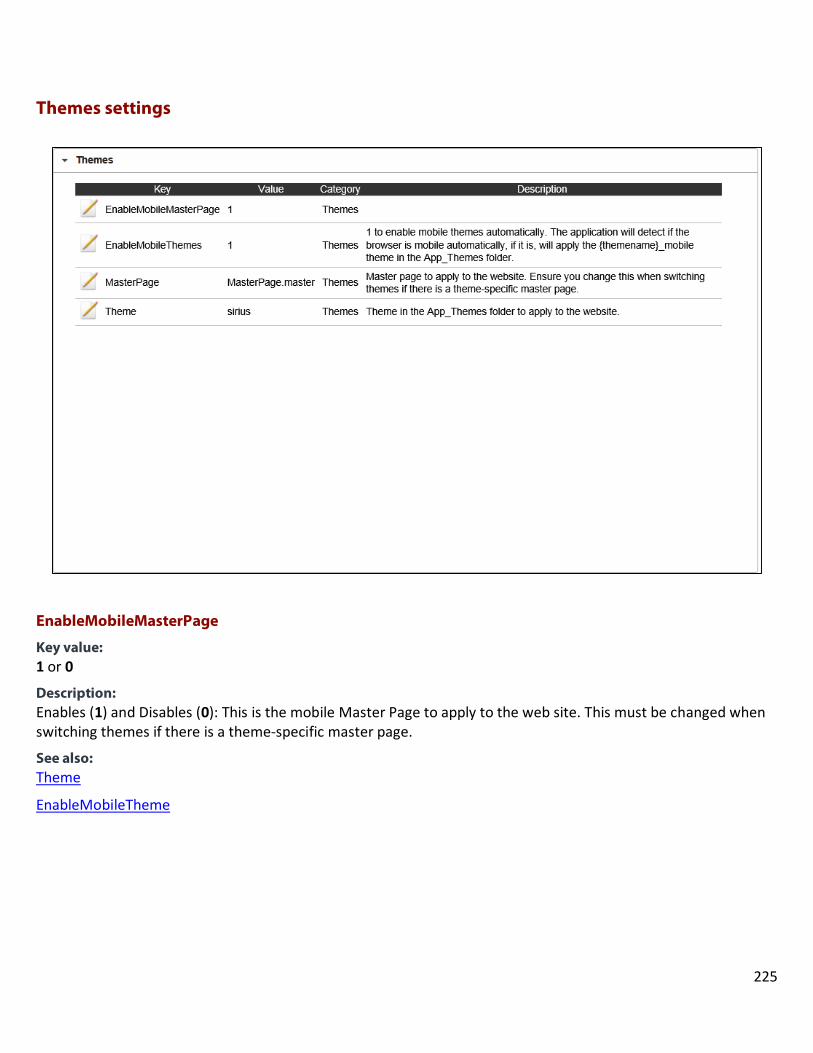
Themes settings
EnableMobileMasterPage
Key value: 1 or 0
Description: Enables (1) and Disables (0): This is the mobile Master Page to apply to the web site. This must be changed when switching themes if there is a theme-specific master page.
See also: Theme
EnableMobileTheme
225
EnableMobileThemes
Key value: 1 or 0
Description: 1 to enable Mobile Themes automatically. The application detects if the browser is mobile automatically, if it is, it applies the {themename}_mobile theme in the App_Themes folder.
See also: EnableMobileMasterPage
MasterPage
Key value: File name of the theme to be used
Description: The master page to apply to the web site. You must change this when switching themes if there is a theme-specific master page.
Example: MasterPage = MasterPage.master
See also: Theme
RSMasterPage
Key Value: MasterPageReservedSeating.master
Description: Master page to apply to the reserved seating portion of the E-Commerce web site. Ensure you change this when switching themes if there is a theme-specific master page.
See Also: None
Theme
Key value: The name of the theme for the Master Pages
Description: Theme in the App_Themes folder to apply to the web site.
Example: Theme = sirius
226

See also: MasterPage
227
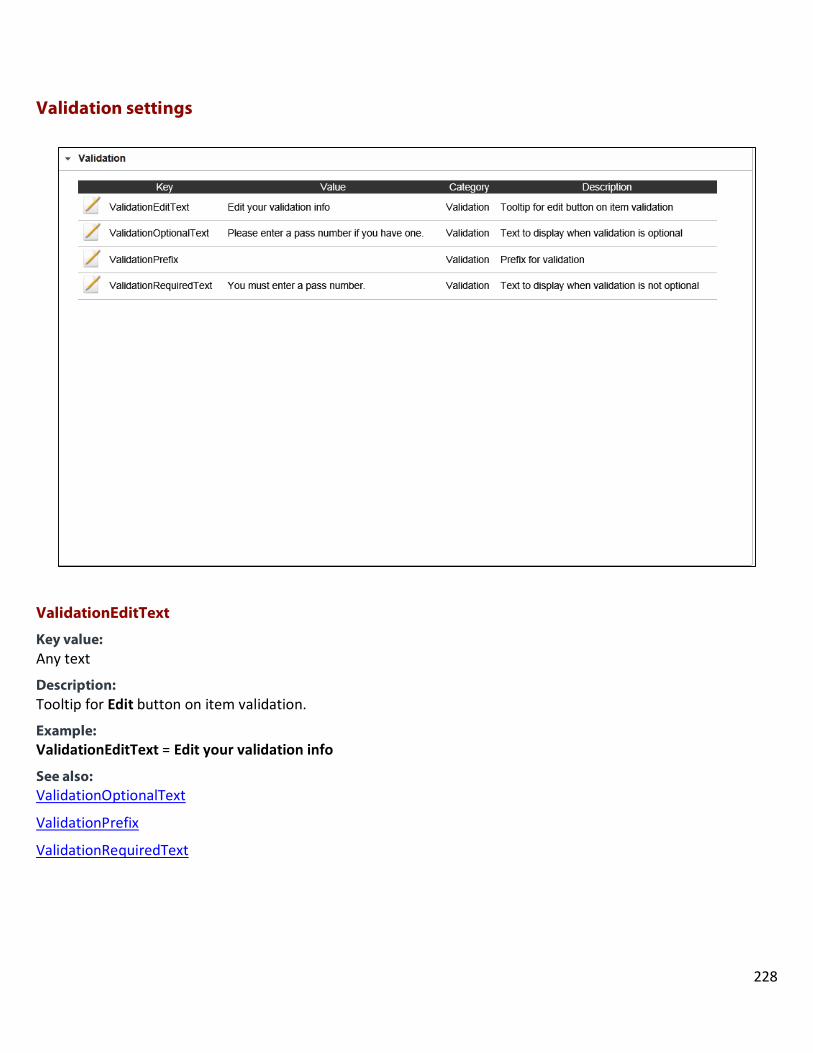
Validation settings
ValidationEditText
Key value: Any text
Description: Tooltip for Edit button on item validation.
Example: ValidationEditText = Edit your validation info
See also: ValidationOptionalText
ValidationPrefix
ValidationRequiredText
228
ValidationFailedText
Key Value: Any Text
Description: Text to display in the cart when validation fails for a line item.
Example: ValidationFailedText = Unsuccessful - please try another Membership number
ValidationOKText
Key Value: Any Text
Description: Text to display in the cart when hovering over the green checkmark image when validation passes for a line item.
Example: ValidationOKText = Membership number good
ValidationOptionalText
Key value: Any text
Description: Text to display when validation is optional
Example: ValidationOptionalText = Please enter a pass number if you have one.
See also: ValidationEditText
ValidationPrefix
ValidationRequiredText
ValidationPrefix
Key value: A, P or ""
Description:
Validation does work with Access numbers in the E-Commerce pages. It works with either pass or access numbers unless the online user also enters the pass/access prefix (then it can work with both simultaneously)
Example: • If you only want to allow validation in E-Commerce module with only access numbers, set the following:
229

ValidationPrefix = A
And, set the following in your ww.INI file:
[Validation] SalesEZ=127.0.0.1:4203 (substitute the ip address of the computer where SalesEZ is installed) Location=ecommerce NoDecryptPrefixes='A'
Then, have the user enter the access number with no prefix in the Validation text box on the E-Commerce pages to perform the validation.
• If you only want to allow validation in E-Commerce module with pass numbers, set the following: ValidationPrefix = P
And, set the following in your ww.INI file:
[Validation] SalesEZ=127.0.0.1:4203 (substitute the ip address of the computer where SalesEZ is installed) Location=ecommerce NoDecryptPrefixes='P'
Then, have the user enter the pass number with no prefix in the Validation text box on the E-Commerce pages to perform the validation.
• To allow validation using either access and pass numbers set the following: ValidationPrefix = ""
And set the following in your ww.INI file:
[Validation] SalesEZ=127.0.0.1:4203 (substitute the ip address of the computer where SalesEZ is installed) Location=ecommerce NoDecryptPrefixes='A,P'
Then, have the user enter either A####### or P####### in the Validation text box in the E-Commerce pages to perform the validation. Of course, it would be best to have the letter A or P printed on the actual access or pass item so that the online user doesn’t have to guess which one to enter with the number.
See also: ValidationRequiredText
230

ValidationRequiredText
Key value: Any Text
Description: Text to display when validation is not optional
Example: ValidationRequiredText = You must enter a pass number.
See also: ValidationEditText
ValidationOptionalText
ValidationPrefix
231
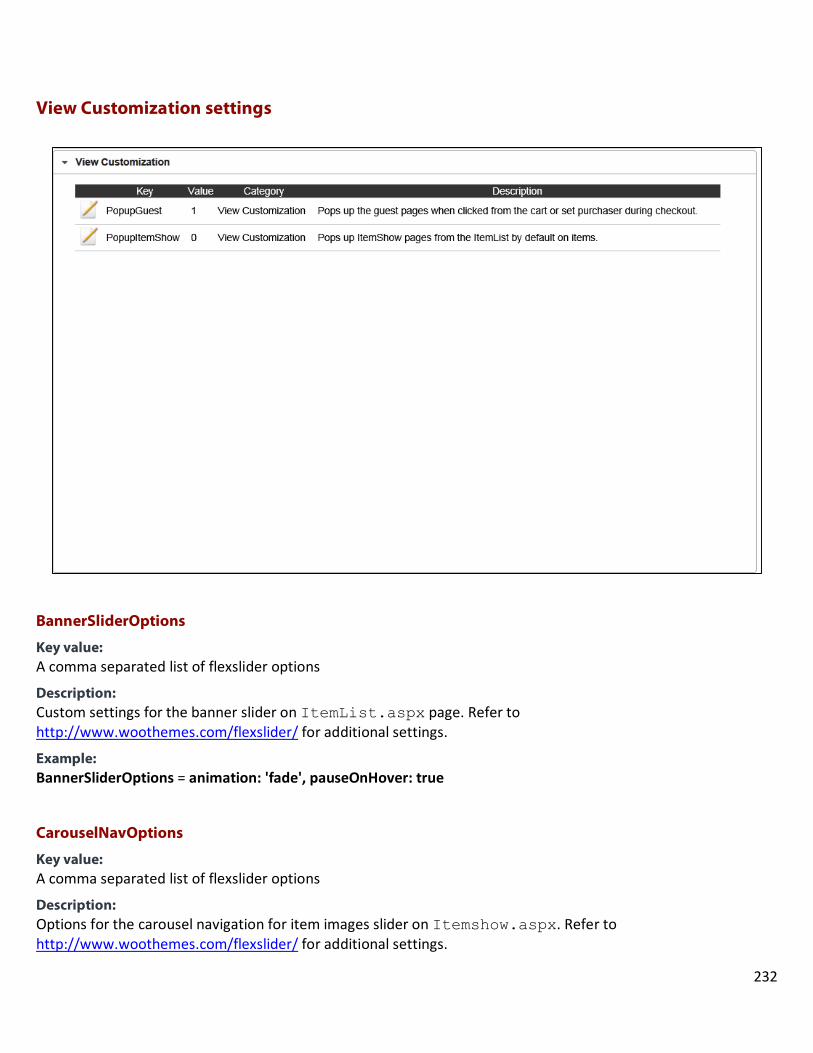
View Customization settings
BannerSliderOptions
Key value: A comma separated list of flexslider options
Description: Custom settings for the banner slider on ItemList.aspx page. Refer to http://www.woothemes.com/flexslider/ for additional settings.
Example: BannerSliderOptions = animation: 'fade', pauseOnHover: true
CarouselNavOptions
Key value: A comma separated list of flexslider options
Description: Options for the carousel navigation for item images slider on Itemshow.aspx. Refer to http://www.woothemes.com/flexslider/ for additional settings.
232
Example: CarouselNavOptions = animation: "slide", controlNav: false, animationLoop: false, slideshow: false, itemWidth: 75, itemMargin: 5
CarouselSliderOptions
Key value: A comma separated list of flexslider options
Description: Options for the carousel navigation for item images slider on ItemShow.aspx. Refer to http://www.woothemes.com/flexslider/ for additional settings.
Example:
CarouselSliderOptions = animation: 'fade', controlNav: false, animationLoop: false, slideshow: false
UpSellCarouselOptions
Key value: A comma separated list of flexslider options
Description: Options for the carousel navigation for item images slider on ItemShow.aspx. Refer to http://www.woothemes.com/flexslider/ for additional settings.
Example: UpSellCarouselOptions = animation: 'slide', animationLoop: true, slideshow: false, itemWidth: 125, itemMargin: 5
PopupGuest
Key value: 1 or 0
Description: Pops up the guest pages when clicked from the cart or set purchaser during checkout.
See also: PopupItemShow
PopupItemShow
Key value: 1 or 0
Description: Pops up ItemShow.aspx pages from the ItemList by default on items.
233

See also: PopupGuest
234
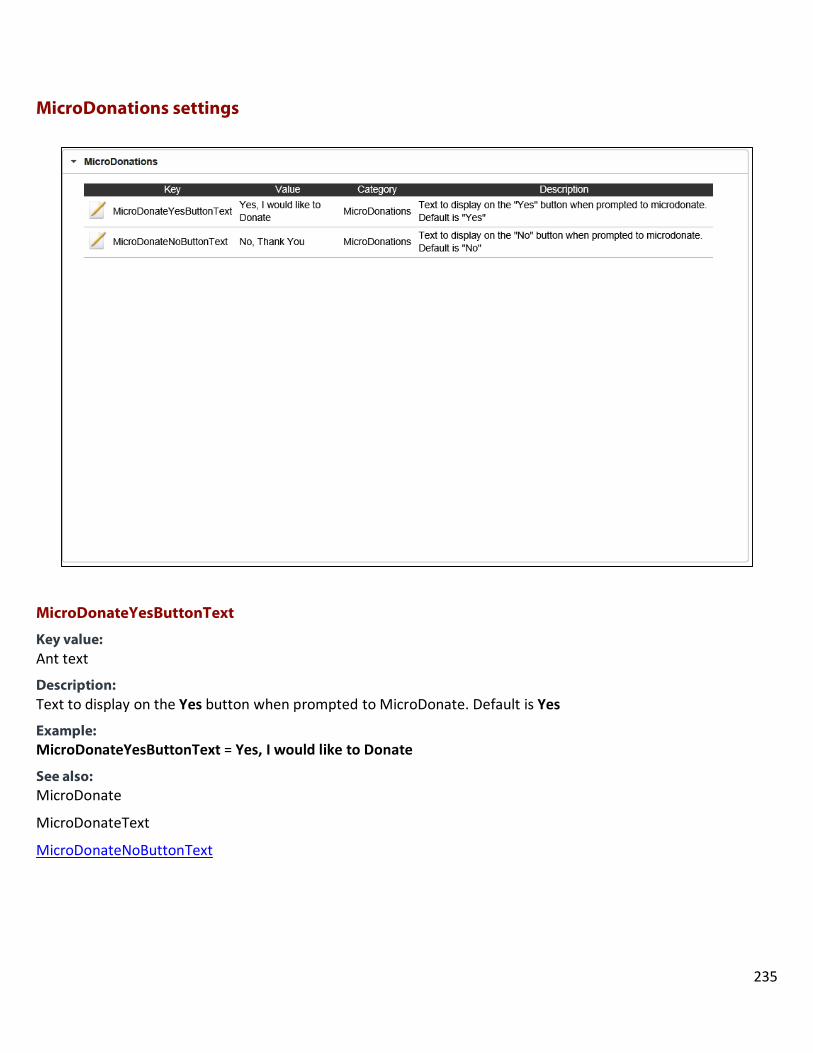
MicroDonations settings
MicroDonateYesButtonText
Key value: Ant text
Description: Text to display on the Yes button when prompted to MicroDonate. Default is Yes
Example: MicroDonateYesButtonText = Yes, I would like to Donate
See also: MicroDonate
MicroDonateText
MicroDonateNoButtonText
235
MicroDonateNoButtonText
Key value: Any Text
Description: Text to display on the No button when prompted to MicroDonate. Default is No
Example: MicroDonateNoButtonText = No, Thank You
See also: MicroDonate
MicroDonateText
MicroDonateYesButtonText
MicroDonate
Key value: 0 or 1
Description:
Enable (1) or disable (0) a popup window when the user proceeds to checkout that prompts the user to round up their sale total and apply that amount to a donation.
See also: MicroDonateText
MicroDonateNoButtonText
MicroDonateYesButtonText
MicroDonateText
Key value: Any Text
Description: Text to display on the popup that prompts the user to roundup the sale total and donate.
Example: MicroDonateText = Would you like to round up the current sale total to the next whole dollar amount and use that to make a donation? Please note: the Donation Round-Up amount may change as items are added to or deleted from the cart. The amount will be recalculated each time the cart contents change - the current sale total will be rounded up to the next whole dollar amount.
See also: MicroDonate
236
MicroDonateNoButtonText
MicroDonateYesButtonText
MicroDonationItemDCI
Key value: The padded DCI of the Micro Donation Item
Description: MicorDonationItemDCI is the DCI of the donation roundup item. Entry must have the department, category and item, each padded with spaces to equal ten characters (thirty characters total).
Example: MicroDonationItemDCI = DONATIONS DONATIONRUROUNDUP
See also: MicroDonateText
MicroDonateNoButtonText
MicroDonateYesButtonText
237