4.2 assembly instructions - skydive...
TRANSCRIPT

4.2 Assembly Instructions
4
After inspecting the Parachute and the Wings
Harness/Container System, hang or lay the
parachute out on the ground with the nose
section on the ground and the Wings Harness/
Container System oriented face down.
When using Rapide Links, check to see that
bumpers have been installed. See pg.5 for
instructions on bumper installation.
4.2.1 Assembly of Reserve Canopy.
Fold the ends of the risers to narrow the top
section. Place the link of the Right Front line-set
onto the end of the Right Front Riser. Be
careful not to twist the line sets.
Tighten the barrel finger tight and then an
additional ¼ turn with a small wrench until the
link is tight. Pull the Bumper down and secure
as per the instructions on page 5 of this chapter.
Begin the assembly process by ensuring that all
lines are connected to the links correctly with
the Outboard “A”-lines on the outside of the link
and the Center “A”-line towards the inside of the
link, the longer side of the link towards the riser.
Once the continuity of the lines is set, ensure
the slider is correctly oriented; the slider should
be longer span-wise than chord-wise, with the
reinforcing tape of the slider on the side facing
the reserve parachute.
Inboard “A” line
Outboard “A” line
Sunrise Manufacturing International, Inc. WINGS MANUAL
Right Front Riser Left Front Riser Inboard “A” line
Outboard “A” line
Repeat these steps for the two Rear Risers,
ensuring that the Outboard “C” line is on the link
first.
Assembly of Reserve Canopy using Rapide Links.

5
Installing the Slider Bumpers.
With the line group correctly assembled onto the link, run a short piece of line through the closed link and the center of the bumper.
Pull the link through the bumper without twisting or turning the link.
Fold the top of the riser and install the link. Tighten the barrel of the link. Ensure continuity of the line group.
Cinch the bumper over the link and tack into place. The tacking should go through both sides of the bumper and include a surgeon’s knot and locking knot. Once tight, cut the loose ends of the tacking thread.
Sunrise Manufacturing International, Inc. WINGS MANUAL
Follow these instructions when using Rapide links for the Reserve Parachute.

6
Always Read and Follow the Instructions
provided by the Soft Link manufacturer.
Assembly of Reserve Canopy using Soft Links.
Pass the Soft Link through the Reserve Riser.
Sunrise Manufacturing International, Inc. WINGS MANUAL
Pass the lead of the Soft Link through the
lines again.
Depending on the Soft Link Manufacturer you
may have to pass it through the Reserve
Riser and the lines once or twice again.
Follow the manufacturer’s instructions.
While keeping the continuity of the lines in
order pass the Soft Link through each line.
Fold the end of the Reserve Riser as shown.

7
Should look like this.
Sunrise Manufacturing International, Inc. WINGS MANUAL
Tuck the Loop and Lead ends under the
Reserve Riser.
A hand-tack may be used to secure it under
the Reserve Riser.
After passing the Soft Link through the lines
and the Reserve Riser the proper number of
times pass the Soft Link lead through the
loop of the other end of the Soft Link.
Pass the Loop end back through the Lead then
tighten the knot formed
LEAD
LOOP

8
4.2.2 Installing the Reserve Steering
Toggles onto the Control Lines.
Pass the loop of the Control Line over the bottom of the toggle.
Tighten the loop up to the grommet. Repeat for the other toggle. The parachute brakes are now ready to be stowed.
Feed the Control Line through the rear of the toggle.
Once the Reserve Parachute is assembled
onto the Reserve Risers, feed the Control
Line through the appropriate slider grommet
and guide ring on the reserve riser.
Sunrise Manufacturing International, Inc. WINGS MANUAL

4.2.3 Assemble the Reserve Static
Line. (RSL) Optional
Install the cable of the Reserve Ripcord Handle into the Reserve Ripcord Housing on the left side Main Lift Webbing. Install the Reserve Ripcord Handle into the Reserve Ripcord Pocket.
Mate the Pile Velcro of the RSL with the Hook Velcro under the RSL channel on the Left Side of the Yoke. Start at the lower end of the channel and proceed to the top. Close cover when Velcro has been mated and RSL has been installed.
Pass the Ripcord Cable through the guide ring on the Container. Installation is complete.
If using the “Reserve Boost” pass the Ripcord Cable through the guide ring in the middle of the RSL.
9
Sunrise Manufacturing International, Inc. WINGS MANUAL
Pass the Ripcord Cable through the guide ring of the RSL.
Sunrise Manufacturing International, Inc. WINGS MANUAL
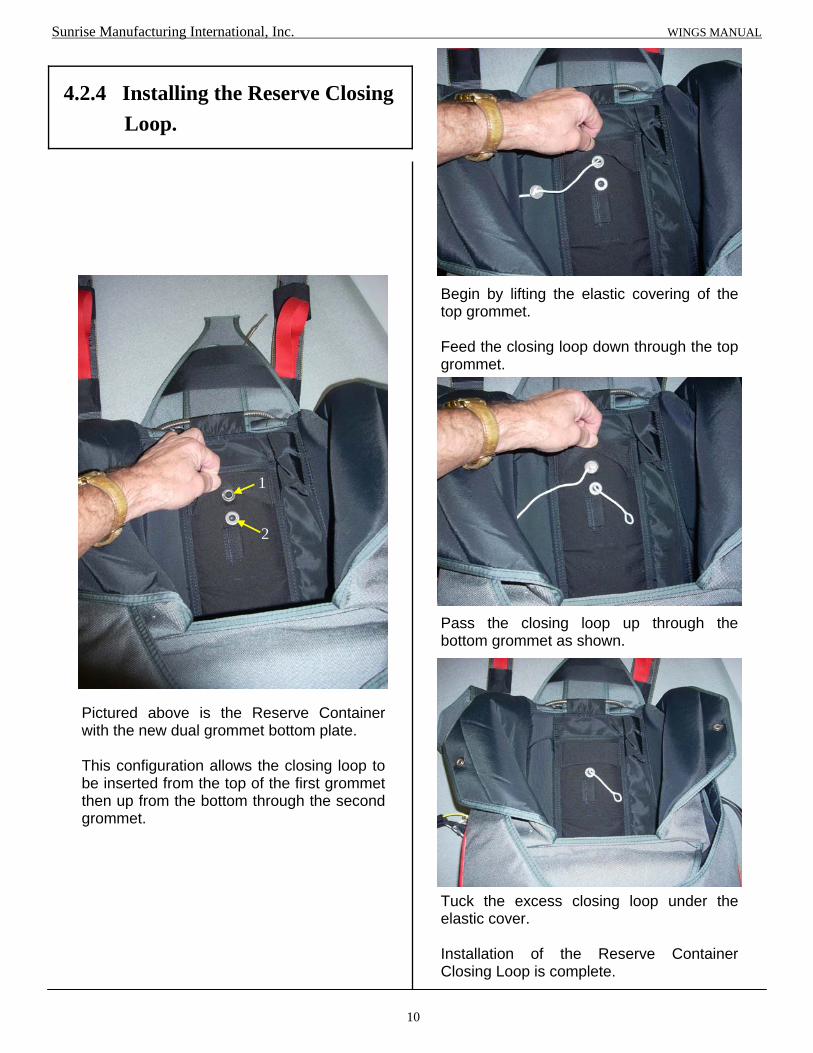
Pictured above is the Reserve Container with the new dual grommet bottom plate. This configuration allows the closing loop to be inserted from the top of the first grommet then up from the bottom through the second grommet.
10
1
2
Begin by lifting the elastic covering of the top grommet. Feed the closing loop down through the top grommet.
Pass the closing loop up through the bottom grommet as shown.
4.2.4 Installing the Reserve Closing
Loop.
Tuck the excess closing loop under the elastic cover. Installation of the Reserve Container Closing Loop is complete.

11
Read the AAD Owner’s Manual and become familiar with the different components of the unit and details of its use. Insert the Processing Unit into the spandex pocket located on the bottom wall of the reserve container. (fig. 1) Route the Release Unit under the reserve floor plate and through the slot and elastic housing. Stow the excess cable in the spandex pouch. (fig.2) Route the Control Unit through the channel next to the floor plate. Once threaded through this channel, insert the Control Unit into the Back Pad pocket or the Reserve Cover Flap. (fig. 3) Once secured in the spandex pocket, the display should be clearly visible through the clear plastic window of the back pad. Stow the excess cable in the channel or spandex pocket. Close the Velcro pocket on the spandex pouch. Installation is complete.
Processing Unit
Control Unit
Release Unit
4.2.5 Installing the Automatic
Activation Device (AAD)
Sunrise Manufacturing International, Inc. WINGS MANUAL
Installation complete.
Fig. 1
Fig. 2
Fig. 3

12
4.3.1 Setting the Reserve Canopy
Brakes.
After assembling the toggles correctly, pull
the control line so that the “cat’s eye” of the
control line is just below the guide ring
located on the riser.
Insert the toggle into the “cat’s eye”.
Tuck the bottom of the toggle into the
keeper.
“S”-fold the excess control line next to the toggle tip.
Wrap and secure the Velcro around the toggle tip. Repeat steps for the other brake.
Sunrise Manufacturing International, Inc. WINGS MANUAL
4.3. Reserve Packing Instructions

13
4.3.2 Flat Pack Method of the Reserve
Parachute.
Place the slider at the connector links. (NOT SHOWN for clarity of line groups)
Grasp the Rear Line and Control Line groups in the LEFT Hand and the Front Line groups in the RIGHT Hand. Walk towards the parachute, leaving the slider at the risers and separating the line groups as you go. Once at the stabilizer edge, shake the parachute from side to side.
Walk to the top of the canopy and: Count and flake out the cells leading edges. Count and flake out the B-line seams. Count and flake out the C-line seams. Count and flake out the D-line seams. Count and flake out the control lines and the remainder of the trailing edge of the canopy.
Fold the leading edge under the A-line group.
While maintaining control of the line groups, lay out the parachute in front of you and away from the Harness/Container. Maintaining line tension will help in later steps.
BEFORE PROCEEDING: NOTE THE MAXIMUM OPERATING WEIGHT OF THE RESERVE CANOPY AND MARK ON THE DATA CARD!
Sunrise Manufacturing International, Inc. WINGS MANUAL

14
Grasp the B-line group under slight tension and fold over the A-line group.
Grasp the C-line group under slight tension and fold over the B-line group.
Grasp the D-line group under slight tension and fold over the C-line group.
Pull out the left three (3) cells of the nose towards the left. Pull out the right three (3) cells of the nose towards the right. Flake the control lines onto the center of the canopy, splitting the groups and corresponding trailing edge into half. The Reserve Brakes may be stowed at this time. See page 12.
Flake the tail of the parachute on top of itself. This step will involve folding half cells between the control lines and whole cells on the remainder of the trailing edge.
Bring the slider up from the connector links until it is touching the slider stops and quarter the slider between the slider stops.
Sunrise Manufacturing International, Inc. WINGS MANUAL

15
Pull tail down carefully to just above slider and cocoon the parachute by wrapping the tail around the flaked cells. DO NOT include the nose in this cocoon. The cocoon should roughly be the same width as the free bag.
“S”-fold the three (3) nose cells under the corresponding side of the parachute.
Carefully squeeze out any trapped air.
“S” -fold the canopy on top of itself.
“S”-fold lower portion of canopy up to the trailing edge of the parachute and place under the trailing edge.
Place the Free-bag under the canopy.
Sunrise Manufacturing International, Inc. WINGS MANUAL

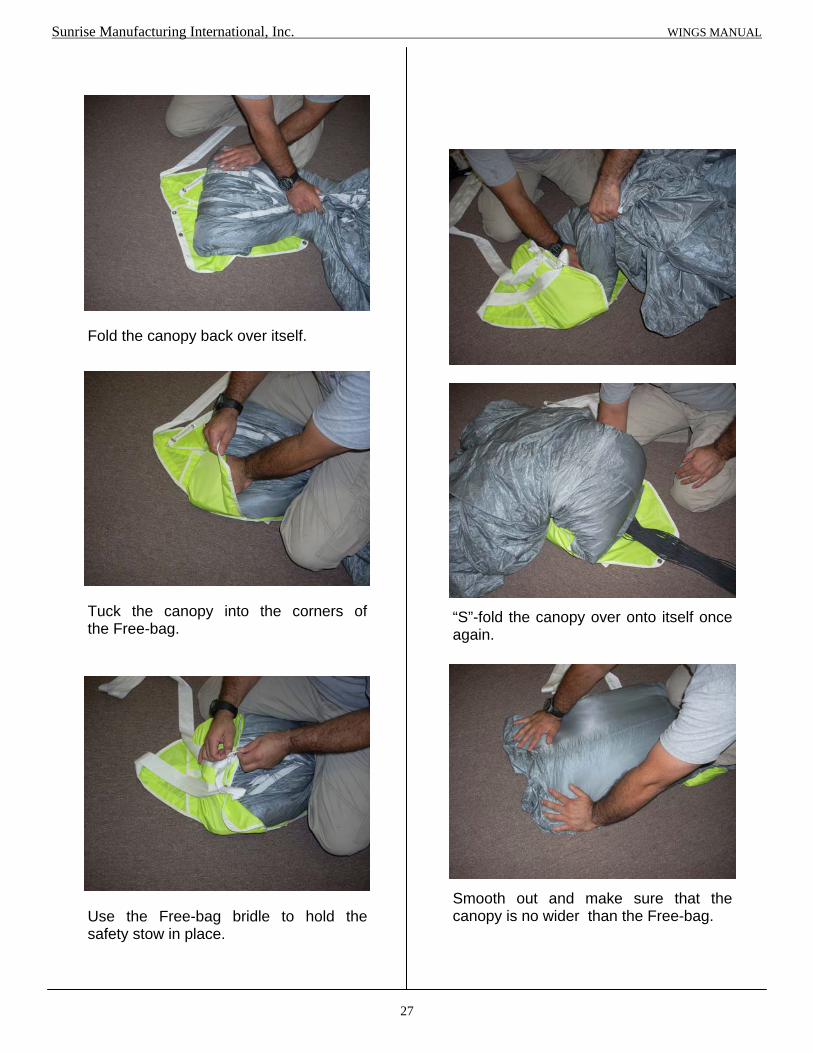
Fold the canopy back over itself.
Tuck the canopy into the corners of the Free-bag.
Use the Free-bag bridle to hold the safety stow in place.
“S”-fold the canopy over onto itself once again.
Smooth out and make sure that the canopy is no wider than the Free-bag.
16
Sunrise Manufacturing International, Inc. WINGS MANUAL

17
Grasp “ear” and “S”-fold it on top of itself.
Roll the center material to the depth of the Free-bag. Place your knee on to hold in place.
Place into the Free-bag. Repeat the other side “ear”. Straighten and smooth out the “ear”
formed after following the center seam.
Follow the center seam to the end.
Sunrise Manufacturing International, Inc. WINGS MANUAL

18
Fold the Free-bag over the canopy in order to close with the safety stow.
Use two (2) line bights @ 1 1/2” -2” to secure the Free-bag closed.
Begin to stow the rest of the reserve parachute lines into the pocket on the Free-bag.
Alternate back and forth until lines are into the pocket and Reserve Risers are to the Free-bag.
Sunrise Manufacturing International, Inc. WINGS MANUAL
Open up the Reserve Container. Check to be sure that the Reserve Ripcord is installed correctly.

19
Thread a pull-up cord through the closing loop and the center grommet of the Free-bag.
Carefully lift the Free-bag. Check to be sure that the AAD cutter is installed correctly and that the closing loop goes through the cutter.
Flip the Free-bag over to the bottom of the Reserve Container. Do NOT twist the lines.
Sunrise Manufacturing International, Inc. WINGS MANUAL
Use a knee to form a “nest” for the Reserve Pilot chute Spring.
If using the Reserve Static Line with or without the “Reserve Boost” check to be sure that it is installed correctly.
With RSL
With RSL and “Reserve Boost”

20
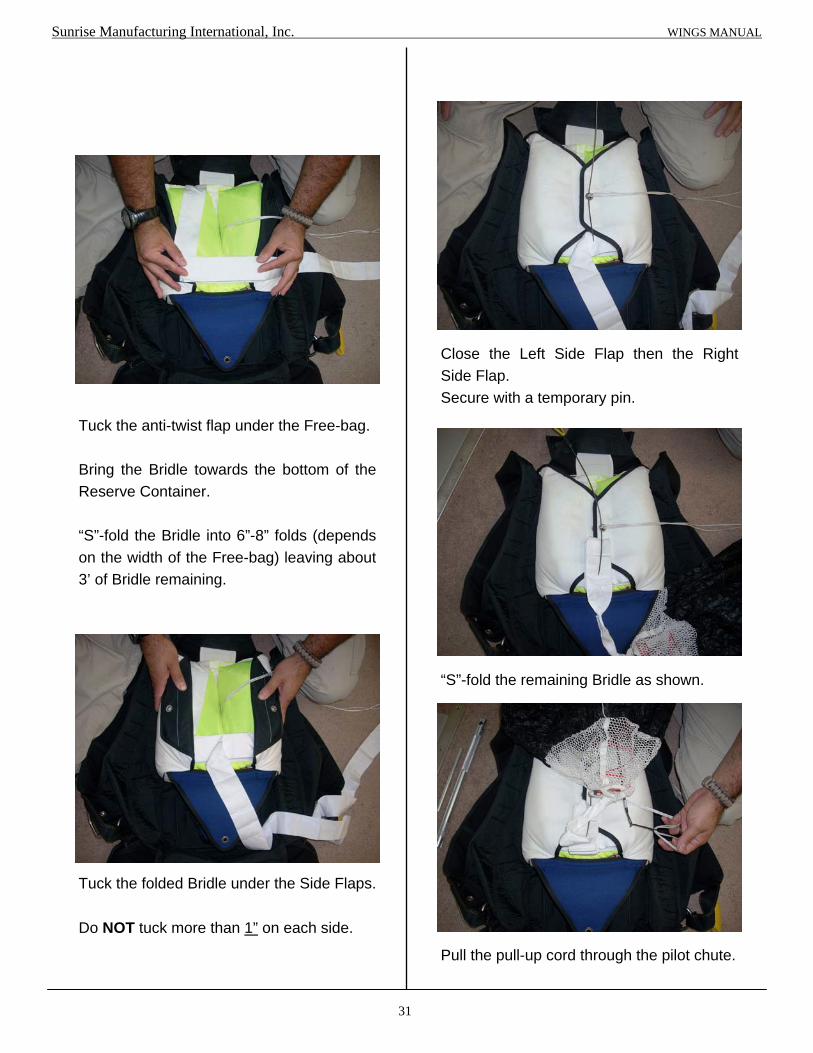
Tuck the anti-twist flap under the Free-bag.
Bring the Bridle towards the bottom of the
Reserve Container.
“S”-fold the Bridle into 6”-8” folds (depends
on the width of the Free-bag) leaving about
3’ of Bridle remaining.
Sunrise Manufacturing International, Inc. WINGS MANUAL
Tuck the folded Bridle under the Side Flaps.
Do NOT tuck more than 1” on each side.
Close the Left Side Flap then the Right
Side Flap.
Secure with a temporary pin.
“S”-fold the remaining Bridle as shown.
Pull the pull-up cord through the pilot chute.

21
While compressing the Pilot chute be sure
to keep all of the pilot-chute material folded
into the spring and secure with a temporary
pin.
Sunrise Manufacturing International, Inc. WINGS MANUAL
Be sure that the Top Closing Flap and the
Ripcord Pin are under the tape of the Top
Cover Flap as shown.
Close the Top Flap and secure with a
temporary pin.
Close the Bottom Flap and secure with the
Ripcord Pin.
Check that the RSL is properly installed. The Ripcord cable must be through the ring of the RSL and the guide ring of the Wings and be above the cutaway housing.

22
Follow all applicable rules for Documenting
and Sealing the Reserve Container.
RECOUNT THE TOOLS USED DURING
THE PACKING.
Tuck the Top Reserve Cover Flap into the
Bottom Reserve Flap pocket.
The Wings Harness/ Container ready for the Main Parachute to be packed.
Sunrise Manufacturing International, Inc. WINGS MANUAL

With no twists in the risers, place the left
front riser line group between the middle and
ring finger of the LEFT hand.
Place the left rear riser group between
the middle and fore finger of the same hand.
Place the control line between the fore
finger and the thumb.
Repeat for the opposite hand and line
groups.
The slider should be between your body
and the parachute.
Walk towards the parachute between the
line groups, moving the slider up the lines
with you and separate the line groups in
your hands.
Upon reaching the parachute, check that
the control lines are not twisted around
any other line groups.
If so, restart this step or perform another
continuity check.
4.3.3 PRO-Pack Method of the
Reserve Parachute.
Follow the instructions for stowing the Reserve
Brake Toggles on page 12.
Step outside of the lines, group the lines
together in one hand and place this group
over your shoulder.
For these instructions, the parachute is
over the left shoulder. Switch orientation if
using the right shoulder.
With the parachute in the correct
orientation (nose towards the container, tail
away from the container) start counting the
leading edge cells out.
Start by slightly turning the parachute
over your shoulder, resting the right outside
cell against your body.
Count each cell and grasp this group.
23
BEFORE PROCEEDING: NOTE THE MAXIMUM OPERATING WEIGHT OF THE RESERVE CANOPY AND MARK ON THE DATA CARD!
Sunrise Manufacturing International, Inc. WINGS MANUAL

24
Push the nose through the center of the parachute and pull it briskly back out. Place the tip of the leading edge between your knees and hold the material in place.
Count and flake the 3 right cells between the C- and D- lines.
Starting with the A-line group, count the 3 right cells between the A- and B- line attachment points and flake the material away from the center of the parachute.
Count the 3 right cells between the B- and C- line attachment points and flake the material away from the center of the parachute.
Count and flake the 3 right cells between the D- lines and the Control Lines / tail.
Repeat this process on the other side of the canopy. Separate the nose, one half on the side, center cell in the middle and second half on the other side.
Raise the canopy so that it is parallel to the floor and gently lay it on the floor.
Sunrise Manufacturing International, Inc. WINGS MANUAL

On the outside folds, smooth out the material between the A-B lines.
25
Pull the slider down and away from the slider stops. Flake the nose cells on one side of the canopy.
Flake the tail of the parachute on top of itself.
After one side is flaked and smoothed out, repeat the other side.
Fold the A-B panels in half to narrow the pack job for the free-bag. Do Not Include the Nose in these folds. Repeat for B-C, C-D panels.
Sunrise Manufacturing International, Inc. WINGS MANUAL

26
Pull tail down carefully to just above slider and cocoon the parachute by wrapping the tail around the flaked cells. DO NOT include the nose in this cocoon. The cocoon should roughly be the same width as the free bag.
“S”-fold the three (3) nose cells under the corresponding side of the parachute.
Carefully squeeze out any trapped air.
“S” -fold the canopy on top of itself.
“S”-fold lower portion of canopy up to the trailing edge of the parachute and place under the trailing edge.
Place the Free-bag under the canopy.
Sunrise Manufacturing International, Inc. WINGS MANUAL
Fold the canopy back over itself.
Tuck the canopy into the corners of the Free-bag.
Use the Free-bag bridle to hold the safety stow in place.
“S”-fold the canopy over onto itself once again.
Smooth out and make sure that the canopy is no wider than the Free-bag.
27
Sunrise Manufacturing International, Inc. WINGS MANUAL

28
Grasp “ear” and “S”-fold it on top of itself.
Roll the center material to the depth of the Free-bag. Place your knee on to hold in place.
Place into the Free-bag. Repeat the other side “ear”. Straighten and smooth out the “ear”
formed after following the center seam.
Follow the center seam to the end.
Sunrise Manufacturing International, Inc. WINGS MANUAL

29
Fold the Free-bag over the canopy in order to close with the safety stow.
Use two (2) line bights @ 1 1/2” -2” to secure the Free-bag closed.
Begin to stow the rest of the reserve parachute lines into the pocket on the Free-bag.
Open up the Reserve Container. Check to be sure that the Reserve Static Line is installed correctly. If using a M.A.R.D. “Reserve Boost” be sure that you are using a M.A.R.D. “Reserve Boost” RSL and that the Reserve Ripcord cable passes through the middle ring of the RSL.
Alternate back and forth until lines are into the pocket and Reserve Risers are to the Free-bag.
Sunrise Manufacturing International, Inc. WINGS MANUAL

30
Thread a pull-up cord through the closing loop and the center grommet of the Free-bag.
Carefully lift the Free-bag. Check to be sure that the AAD cutter is installed correctly and that the closing loop goes through the cutter.
Flip the Free-bag over to the bottom of the Reserve Container. Do NOT twist the lines.
Sunrise Manufacturing International, Inc. WINGS MANUAL
Use a knee to form a “nest” for the Reserve Pilot chute Spring.
31
Tuck the anti-twist flap under the Free-bag.
Bring the Bridle towards the bottom of the
Reserve Container.
“S”-fold the Bridle into 6”-8” folds (depends
on the width of the Free-bag) leaving about
3’ of Bridle remaining.
Sunrise Manufacturing International, Inc. WINGS MANUAL
Tuck the folded Bridle under the Side Flaps.
Do NOT tuck more than 1” on each side.
Close the Left Side Flap then the Right
Side Flap.
Secure with a temporary pin.
“S”-fold the remaining Bridle as shown.
Pull the pull-up cord through the pilot chute.

32
While compressing the Pilot chute be sure
to keep all of the pilot-chute material folded
into the spring and secure with a temporary
pin.
Sunrise Manufacturing International, Inc. WINGS MANUAL
Be sure that the Top Closing Flap and the
Ripcord Pin are under the tape of the Top
Cover Flap as shown.
Close the Top Flap and secure with a
temporary pin.
Close the Bottom Flap and secure with the
Ripcord Pin.
Check that the RSL is properly installed. The Ripcord cable must be through the ring of the RSL and the guide ring of the Wings and above the cutaway housing.

33
Follow all applicable Rules for Documenting
and Sealing the Reserve Container.
RECOUNT THE TOOLS USED DURING
THE PACKING.
The Wings ready for the Main Parachute to be packed.
Sunrise Manufacturing International, Inc. WINGS MANUAL

34
4.3.4 Closing with the M.A.R.D.
“Reserve Boost” RSL.
Sunrise Manufacturing International, Inc. WINGS MANUAL
Tuck the folded Bridle under the Side Flaps. Do NOT tuck more than 1” on each side. Keep the Bridle to the left side of the center of the Free-bag.
Bring the Bridle towards the bottom of the Reserve Container. “S”-fold the Bridle into 6”-8” folds (depends on the width of the Free-bag) to the “Reserve Boost” modification. Fold the Bridle back towards the top of the container.

35
“Arm” the M.A.R.D. “Reserve Boost” at this time by passing the Spectra Line Loop down through the #0 grommet.
Pass the Spectra Line through the mini ring of the M.A.R.D. “Reserve Boost” RSL.
Loop the Spectra Line back up through the #0 grommet of the Bridle.
Sunrise Manufacturing International, Inc. WINGS MANUAL
Slide the Long Pin through the loop then stow into the channel under the tuck tab channel. Be certain that it is in its own channel.
Tuck the stiffened T-III Tab into the tuck channel on top of the Long Pin Channel.

36
Stow the Spectra Line Loop into the looped polyester sleeve opposite the long pin channel.
Should look like this.
Sunrise Manufacturing International, Inc. WINGS MANUAL
Pull the pull-up cord through the Pilot chute.
Take up the slack of the Spectra Line Loop. Tuck any excess RSL into the channel pocket on the top left side of the free-bag. The M.A.R.D. “Reserve Boost” is armed. Continue to close the Reserve Container.
Close the side flaps. Secure with a temporary pin.

37
Sunrise Manufacturing International, Inc. WINGS MANUAL
Center the Pilot-chute over the Side Flap grommets.
While compressing the Pilot-chute be sure to keep all of the pilot-chute material folded into the spring and secure with a temporary pin.
Make sure the Top Closing Flap is under the retaining tape of the Top Pin Cover Flap. Close and secure with a temporary pin.
Close and secure the Bottom Closing Flap with the Reserve Ripcord Pin.
Tuck the Top Reserve Cover Flap into the Bottom Reserve Flap pocket. Follow all applicable rules for Documenting and Sealing the Reserve Container. COUNT THE TOOLS USED DURING PACKING.