4-h motto - prince edward · pdf file4-h motto. learn to do by doing. 4-h pledge . i pledge ....
TRANSCRIPT


4-H MOTTO Learn to do by doing.
4-H PLEDGE I pledge
My HEAD to clearer thinking,
My HEART to greater loyalty,
My HANDS to larger service,
My HEALTH to better living,
For my club, my community and my country.
4-H GRACE (Tune of Auld Lang Syne)
We thank thee, Lord, for blessings great
On this, our own fair land.
Teach us to serve thee joyfully,
With head, heart, health and hand.
This project was developed through funds provided by the Canadian Agricultural Adaptation Program (CAAP). No portion of this manual may be reproduced without written permission
from the Saskatchewan 4-H Council, phone 306-933-7727, email: [email protected]. Developed May 2013.
Writer: Pat Shier
Table of Contents
Introduction ..................................................................................................................................... 1
Overview of the Project ............................................................................................................. 2
Unit Three Requirements .................................................................................................... 2
At Achievement Day .............................................................................................................. 3
A Note to the Leader ............................................................................................................ 4
Supplies You Will Need ............................................................................................................. 5
Before You Bake and Decorate
Kitchen Safety ........................................................................................................................... 7
Metric or Imperial? ................................................................................................................. 7
A Few Reminders .................................................................................................................... 7
What about Allergies or Dietary Issues? ...................................................................... 8
Buttercream Icing Recipe .................................................................................................... 8
Icing Consistency .................................................................................................................... 9
Ganache ............................................................................................................................................. 10
Types of Ganache ................................................................................................................... 10
Different Recipes for Difference Chocolate ................................................................ 11
Ganache Recipe ....................................................................................................................... 12
Covering a Cake with Ganache ........................................................................................ 13
Planning the Cake Design ................................................................................................... 14
Look at the Whole Cake ...................................................................................................... 15
Looking for Ideas .................................................................................................................... 16
Activity 1: Finding Ideas for this Project ...................................................................... 17
Cake Boards ..................................................................................................................................... 18
How to Cover a Cake Board .............................................................................................. 18

Cake Storage ................................................................................................................................... 19
Colour
The Colour Wheel ................................................................................................................... 20
Colour Schemes ....................................................................................................................... 20
Colour and Cake Decorating .............................................................................................. 21
Fondant
Poured Fondant ....................................................................................................................... 23
Optional Activity: Poured Fondant .................................................................................. 24
Rolled Fondant ......................................................................................................................... 25
Kneading ..................................................................................................................................... 25
Rolled Fondant Recipes ........................................................................................................ 26
Marshmallow Rolled Fondant ............................................................................................ 27
Rolled Fondant Recipe .......................................................................................................... 28
Activity 2: Make Fondant ..................................................................................................... 30
Colouring Fondant and Gum Paste ...................................................................................... 31
Activity 3: Colouring Fondant ............................................................................................ 34
Rolling out Fondant ..................................................................................................................... 36
Preparing the Surface ............................................................................................................ 36
Dusting Pouch .......................................................................................................................... 36
Activity 4: Make a Dusting Pouch .................................................................................... 37
Rolling Mat ................................................................................................................................. 38
Rolling Pin ................................................................................................................................... 38
Spacer Rings and Bars .......................................................................................................... 38
Rolling out Fondant ............................................................................................................... 39
Covering a Cake Board with Fondant ............................................................................ 40
Activity 5: Roll out Fondant ................................................................................................ 41
Covering Cakes with Fondant ................................................................................................. 42
Shaped or Character Cakes ................................................................................................ 45
Fabric Ribbons ................................................................................................................................ 46
Fabric Ribbons on Cake Boards ....................................................................................... 47
Fondant Decorations ................................................................................................................... 48
Rope .............................................................................................................................................. 48
Activity 6: Making Ropes ..................................................................................................... 50
Twisted or Braided Edging ................................................................................................. 52
Activity 7: Twisting Ropes ................................................................................................... 53
How to Use Fondant Ropes ............................................................................................... 55
Activity 8: Making Curlicues ............................................................................................... 56
Swags or Garlands .................................................................................................................. 58
Activity 9: Fondant Swags ................................................................................................... 61
Fondant Balls ............................................................................................................................ 63
Activity 10: Rolling Balls ....................................................................................................... 64
Attaching Decorations .......................................................................................................... 66
Activity 11: Bake 12 Cupcakes, Make Buttercream Icing or Ganache
and Fondant to Cover it. Research Cupcake Designs ............................................ 67
Ribbons ........................................................................................................................................ 69
Ribbon Cutter ........................................................................................................................... 69
Ruffles ........................................................................................................................................... 70
Activity 12: Cut Ribbons and Ruffle Them .................................................................. 71
Ribbon Rose .............................................................................................................................. 73
Activity 13: Fondant Ribbon Rose Practice ................................................................. 74
Activity 14: Covering and Decorating Cupcakes with Fondant .......................... 76
Bows .............................................................................................................................................. 78
Activity 15: Three-dimensional Classic Bow ................................................................ 81
Curled Ribbon .......................................................................................................................... 82

Quilling ......................................................................................................................................... 83
Activity 16: Quilling Practice ............................................................................................... 84
Cut-outs and Overlaying ...................................................................................................... 86
Inserts or Inlays ........................................................................................................................ 87
Activity 17: Using Inlays and Overlays ........................................................................... 89
Embossing ................................................................................................................................... 90
Quilting ........................................................................................................................................ 90
Activity 18: Embossing Experimentation ....................................................................... 92
Crimping ...................................................................................................................................... 94
Activity 19: Crimping .............................................................................................................. 95
Covering Cookies with Fondant ....................................................................................... 96
Activity 20: Fondant-covered Cookies ........................................................................... 97
Royal Icing ........................................................................................................................................ 100
Royal Icing Recipe using Raw Eggs .................................................................................. 102
Royal Icing Recipe using Meringue Powder ............................................................... 103
Separating Eggs: Getting Egg Whites ............................................................................ 103
Activity 21: Separating Eggs ............................................................................................... 107
Activity 22: Making Royal Icing ......................................................................................... 109
Decorating with Royal Icing ............................................................................................... 109
Piping Techniques ................................................................................................................... 109
Activity 23: Make Parchment Paper Decorating Bags ............................................ 110
Flooding with Royal Icing .................................................................................................... 113
Toothpick and Flooding Techniques .............................................................................. 115
Looking for Ideas? .................................................................................................................. 117
Activity 24: Flooded Cookies Ideas ................................................................................. 117
Activity 25: Flooding Cookies ............................................................................................ 118
Royal Icing Runouts or Transfers ..................................................................................... 120
Activity 26: Lace Transfers and Bow Loops ................................................................. 122

Activity 27: Practice Piping and Flooding .................................................................... 124
Stippling with Royal Icing ................................................................................................... 125
Activity 28: Stippling Practice ............................................................................................ 126
Activity 29: Bake a Cake, Make Buttercream Icing or Ganache
and Fondant to Cover it. Research Cake Designs ................................................... 128
Activity 30: Decorating a Cake with Fondant and Fondant Decorations ...... 129
Modelling
Fondant, Gum Paste or a Mixture? ................................................................................. 132
A Bit More about Gum Paste ............................................................................................ 132
How to Make Gum Paste .................................................................................................... 134
Modelling and 3D Characters ........................................................................................... 134
Modelling Tools ....................................................................................................................... 135
Activity 31: Modelling People and Animals ................................................................ 137
Dowelling .......................................................................................................................................... 139
Activity 32: Plan a Tiered Fondant Cake ...................................................................... 142
Activity 33: Making a Tiered Fondant Cake ................................................................ 144
Activity 34: Creative Ideas, Baking and Making Decorations .............................. 146
Activity 35: Creative Designs with Sharing .................................................................. 148
Activity 36: Cake and Cookie Designs for Achievement Day ............................. 149
Activity 37: Optional Practice Cake and Cookies for Achievement Day ........ 151
Achievement Day Tips ................................................................................................................ 152
Resources You May Find Helpful ........................................................................................... 153
Bibliography .................................................................................................................................... 155


Cake Decorating Basics Reference and Activity Manual Unit Three: Fun with Fondant 1
Introduction
You have learned about baking cakes and cupcakes, and gradually developed
piping skills with buttercream icing to help you copy or adapt many different
cakes you saw. But there is one type of icing you probably saw used many
times and you are ready and excited to try. Fondant is a general term in
baking for an icing that is poured over or draped on cakes, cupcakes and
cookies. There are several kinds of fondant, and you will learn about some of
them like cooked poured fondant and ganache. The focus this year is rolled
fondant, or sugar paste, the popular icing choice on cake decorating shows.
Those unique towering cakes with moulded cartoon people and animals are
covered in fondant. They also weigh a ton. Fondant is much heavier than
buttercream icing. It is heavy enough that cakes covered in fondant need to
be firmer to hold their shape under the weight of the icing and decorations,
so besides experimenting with fondant, you may be finding new cake recipes.
Those tall cakes also need support structures to keep them from sagging or
tipping over and you will be introduced to dowelling, the strength added to
tall or tiered cakes.
This year your piping skills will be used with royal icing to add details on
fondant cakes. You will use royal icing in a variety of ways. Because royal
icing dries hard, intricate yet sturdy decorations can be piped ahead of time
and put on at angles to add another dimension. Royal icing is also used to
cement walls of a gingerbread house in place, glue on candies and pipe
architectural details. Not only is royal icing used full strength, it can be
thinned to flood large areas on flat decorator cookies. If royal icing stays dry,
it can last for months, unlike buttercream icing.
Fun with Fondant will challenge you to try new techniques, adapt skills you
already have and develop new ones. You will plan cakes, cupcakes, cookies,
modelling figures, and see new possibilities in what you can create. After Unit
Three you will be ready to try more advanced fondant and gum paste techniques.

2 Cake Decorating Basics Reference and Activity Manual Unit Three: Fun with Fondant
Overview of the Project
This Cake Decorating Reference and Activity Manual has a quick review or
reminder section about the skills you learned in Unit One and Two, but do
not let that discourage you. The skills you learned in those are needed in
Unit Three so additional practice with those will help you to find Unit Three
easier and less frustrating.
There is a lot of new information in this Manual and the activities will help
you learn new techniques and creative approaches to cake decorating.
Fondant techniques are very different from those using buttercream icing
and piping, but details are added to fondant cakes using royal icing and the
skills you learn in Unit One and Unit Two. You will still find the Unit Two skills
extremely useful when you begin Unit Three.
As you get better, and can do more, you will see the potential to try things in
a new way, combine decorating techniques, different icings, and let your
creativity and curiousity lead you to try more complicated things even now. It
all takes practice, so the more you bake and decorate, the more you will learn.
Unit Three Requirements
• Make and decorate four or more cakes, which include one cake with
buttercream under its fondant and one with ganache under the
fondant, including the one you display at Achievement Day.
• One cake with dowels.
• Make and decorate at least 24 cupcakes using fondant and/or ganache.
• Make and decorate at least 24 decorator cookies with flooding (glacé) icing.
• Decorate a cake, cupcakes or cookies as a community service.

Cake Decorating Basics Reference and Activity Manual Unit Three: Fun with Fondant 3
Fondant cake with farm animals
• Use rolled fondant and/or a 50/50
mixture of fondant and gum paste
to make ribbons, bows, model
three-dimensional decorations,
create inserts and overlays
with cut-outs and other
variations of simple
fondant techniques like
embossing and crimping to
fondant cakes.
• Add details to fondant cakes using royal icing and a variety of piping tips.
• Complete a journal of each cake or set of cupcakes or cookies made,
which includes photographs, a sketch or image showing the plan or
inspiration, list of icing tips, techniques, other decorations, colours and
recipes used. Comments about the decorating experience will be noted.
• Calculate the cost of one decorated cake or set of cupcakes or
decorator cookies.
• Collect cake, cookie and icing recipes, and images of ideas for fondant
cakes, cupcakes and rolled cookies.
• Complete a record book.
At Achievement Day
• Present a single or layer cake covered in fondant on a cake board. The
cake must be made by you, the member. The cake will be decorated
with fondant icing over either ganache or buttercream icing and use at
least three different decorating techniques. Using royal icing on the
cake is optional. Cake design can incorporate other edible decorations
and ribbon. The cake will be evaluated on smoothness of icing, quality
and cleanliness of workmanship, overall design (use of colour, balance,
spacing) and skill with the techniques used.
• Present six decorator cookies on a cake board. Cookies must be made
by you, the member, and be at least 2” across and decorated with

4 Cake Decorating Basics Reference and Activity Manual Unit Three: Fun with Fondant
royal icing and flooding (glacé icing). Cookies will be related in theme,
but not identical, and use at least two different techniques, though this
may not necessarily be on an individual cookie. Cookie design can
incorporate other edible decorations. Cookies will be evaluated on
quality and cleanliness of workmanship, overall design (use of colour,
balance, spacing) and skill with flooding and piping techniques.
• Display a completed Record Book.
A Note to the Leader
In Cake Decorating Unit Three, Fun with Fondant, a number of activities will
be done at home by members. Your group can do some of the activities out
of order for variety or to plan your year so that royal icing and flooding skills
are learned and practiced in fall before Halloween and Christmas when
members may be more inclined to find and make gingerbread houses (from
scratch or from kits) and holiday cookies.
Based on the skill level of your members, you may need to do a review of
Unit One and Two piping techniques when you practice with royal icing. Skills
develop with practice and they build on each other. Please encourage those
who are ready for more advanced skills to challenge themselves and try
them. Though advanced fondant and gum paste skills are not included in
Fun with Fondant, members can find tutorials or how-to descriptions with
images to learn and practice other techniques.
Encourage members to evaluate pictures of cakes to determine if they can
copy them or how they would change the cake design to be able to do it.
Have Fun with Fondant!

Cake Decorating Basics Reference and Activity Manual Unit Three: Fun with Fondant 5
Supplies You Will Need
• Rolling pin or fondant roller
• Knife
• Pizza cutter
• Straight ruler
• Fondant spacer rings for fondant roller or spacer bars (1/8” dowels or
skewers)
• Dusting Pouch containing cornstarch and icing sugar (will make this
year)
• Icing tips, couplers and icing bags
• Practice board
• Cutting mat (optional)
• Dowels
• Kitchen scale (recommended)
• Flat spatula or offset spatula
• Parchment paper
• Plastic film wrap
• Resealable zippered plastic bags
• Small paint brush
• Ribbon cutter
• Fondant smoother or flexible silicone cutting board
• Cake turntable
• Food colouring
• Toothpicks
• Large needle or corsage pin
• Ingredients to bake cakes, cookies, make fondant and icing at home
• Oven

6 Cake Decorating Basics Reference and Activity Manual Unit Three: Fun with Fondant
• Cake pans, muffin tins and cookie sheets
• Cupcake papers
• Electric mixer
• Spatula
• Large serrated knife
• Computer with internet access
• Printer
• Camera
• Pens and pencils
• Crayons
• Paper
• Tape
• Scissors
• Cake boards
• Crimper (exact shape does not matter)
Cake Decorating Basics Reference and Activity Manual Unit Three: Fun with Fondant 7
Before You Bake and Decorate
Kitchen Safety
You probably think you do not need to be told about safety in the kitchen.
Some of it will seem like common sense, but a few reminders are in order:
• Wash your hands with soap and water before you start.
• Make sure the counters are cleared off and clean so you have enough
space and a clean surface to work on. Rolling fondant takes more
space than decorating a cake.
• Read through the recipe and take everything out that you will need.
• Don’t double-dip.
• Clean up the kitchen immediately after your creation.
• If you are sharing the kitchen with others, keep your part tidy and be
respectful of others’ space. Communicate with them as you share the
space so you are not bumping into each other.
Metric or Imperial?
Because most of the cookbooks and recipes online are in imperial, this
manual will use imperial measures only. A chart of imperial and metric
conversions you will need for cake decorating is at the back of your manual.
You can convert recipes from one measurement system to the other.
A Few Reminders
• Make sure you measure ingredients accurately.
• Use liquid measures for liquids, and ones meant for dry ingredients for
dry stuff.
• Read the recipe!

8 Cake Decorating Basics Reference and Activity Manual Unit Three: Fun with Fondant
What about Allergies or Dietary Issues?
Read the list of ingredients on the box to be sure the item does not contain
any of the allergens you are avoiding. Surprisingly, a popular brand of cocoa
contains gluten, while the cheaper store brand does not, so it is the safe
choice for someone with celiac.
Buttercream Icing Recipe yields about 3 cups of stiff consistency icing
½ cup vegetable shortening
½ cup butter or margarine
1 tsp vanilla extract (or other flavouring)
4 cups sifted icing sugar
pinch of salt (add to the liquid)
2 tbsp milk or water
Use ingredients that are at room temperature (not straight out of the
fridge). Microwaving shortening or margarine to warm it up often
liquefies it and ruins your icing. Let them warm on the counter.
Cream butter and shortening. Add flavouring. Gradually add icing
sugar, keeping mixer speed low to avoid a cloud of icing sugar spraying
all over. Scrape sides and bottom of bowl. When it is all blended,
gradually add milk and beat at medium speed till fluffy. This amount of
milk makes stiff icing. Gradually add more liquid to thin icing.
Cover with a damp cloth if you are using the icing soon.

Cake Decorating Basics Reference and Activity Manual Unit Three: Fun with Fondant 9
Icing Consistency
One of the most important things about icing a cake is icing consistency at
room temperature.
• Stiff icing is used for roses and other shaped flowers whose petals
stand up.
• Medium icing is used for borders and things that lie flat on the cake
like stars and flowers whose petals don’t stand up. (Add about 1 tsp.
of liquid to every cup of stiff icing).
• Thin icing is used to ice a cake, for piped printing or writing and for
leaves. (Add about 2 tsp. of liquid to every cup of stiff icing.)

10 Cake Decorating Basics Reference and Activity Manual Unit Three: Fun with Fondant
Ganache
Ganache is a chocolate glaze or poured sauce used on pastries and cakes to
make truffles or for dipping fruit. It looks shiny and decadent, stays soft and
is richly flavoured. Ganache is made by heating cream and adding chopped
white or darker chocolate to it. More expensive chocolate makes better
ganache, and it is a better foundation under fondant.
Ganache storage recommendations vary a bit depending on how the
ganache was made and if you were in a sterile environment. In general,
ganache can be left unrefrigerated for the first two days if it is made
properly, but it has to be at the cool side of room temperature; then it
should be refrigerated.
In Unit Two you were introduced to ganache and the recipe included there was
one that could be used plain, as poured ganache as well as whipped to be
spread. Ganache recipes and use vary in the ratio of cream to the amount of
chocolate used, and if you are a chocolate lover, you can experiment with them.
Types of Ganache
Plain Ganache
This is the ganache you will use under fondant. Let the ganache cool to room
temperature with plastic wrap pressed against its surface so a film does not
form, then spread with a spatula. More detailed directions and tips for spreading
it are found in the next section. Ganache can be refrigerated but needs to be
brought back to room temperature before using by setting in a warm place in
the kitchen; it takes about an hour to soften. (Do not microwave it!)
Whipped Ganache
This is used for making truffles, piping, filling or making mousse. Ganache is cooled
to lukewarm and then whipped vigorously by hand or with an electric mixer till it is
lighter in colour and fluffy. (Do not over whip – it will become grainy.)

Cake Decorating Basics Reference and Activity Manual Unit Three: Fun with Fondant 11
Poured Ganache or Ganache Glaze
For a glaze, the chocolate and whipping cream
amounts are approximately equal. This ganache
can be poured on cakes and cupcakes and when
it sets it has a beautiful shine and smoothness. It
also seals in moisture.
Ganache Icing
This chocolate icing is a mixture of cooled ganache and buttercream icing.
In Fun with Fondant, the focus will be on using plain ganache under fondant.
Just like buttercream, the more smoothly you spread the ganache, the better
it is as a fondant base. Make sure it is smoothed before it sets. Ganache sets
firmer than buttercream does which makes the top edges of a cake crisper
than you will be able to create with a buttercream base under your fondant.
Different Recipes for Different Chocolate
You do not need to understand the science behind making ganache, but you
need to understand that the ratio of chocolate to liquid and fat is important.
As a general rule, the higher the fat content of the cream, the richer and
more stable the finished ganache will be.
Dark chocolate contains less sugar and less milk
fat than white, semi-sweet or milk chocolate does.
That means the ratio of chocolate to whipping
(heavy) cream in a recipe is different depending
on the type of good quality chocolate you use.
(Lower quality chocolate such as chocolate chips,
will not make as stable a base under your fondant
because of their varying fat and moisture levels.).
Most ganache recipes do not use dry measures but weigh the chocolate and
the cream. Use the ganache under fondant to get nice crisp corners, the key
is to let it set overnight.
Cupcake with poured ganache
Tip:
Use the 2:1 ratio for
dark and semi-sweet
chocolate and the 3:1
ratio for milk chocolate.

12 Cake Decorating Basics Reference and Activity Manual Unit Three: Fun with Fondant
If using milk or white chocolate note that they are more temperamental; they
contain milk or milk fat, unlike dark chocolate, making them more susceptible
to damage from heat. Because of the milk, they also make "softer" ganache,
so recipes should be adjusted so that the proportion of cream is lower than
a recipe for dark chocolate.
The recipe here uses a high quality dark chocolate.
Ganache Recipe yields 2 to 3 cups
16 ounces of dark chocolate
8 ounces of heavy whipping cream
Chop your chocolate into small pieces. You can use a food processor for
this. Heat the whipping cream in a saucepan just to the boiling point.
As soon as it starts to boil, take it off the heat. Do not let it continue
to boil.
Add the chopped chocolate pieces and stir until they are all melted.
Adding a flavouring at this time is optional. The ganache will be
smooth and glossy.
Cover the ganache with plastic wrap and set it aside to cool till it is room
temperature and you can spread it with a spatula.

Cake Decorating Basics Reference and Activity Manual Unit Three: Fun with Fondant 13
Covering a Cake with Ganache
1. Make your ganache a day before you will use it to cover your cake. It
will need to set once it is on the cake, which means ganache should
be made two days before you plan to cover your cake with fondant.
2. After the ganache has cooled, lay a film of plastic against its top
surface and let it sit overnight at room temperature to set to a thick
but smooth peanut butter consistency.
3. Level and layer the cake and glue it to the cake board just as if you
were using buttercream icing. If you are layering the cake, pipe your
dam around the bottom layer top edge and set it in the refrigerator
for five minutes to help it set before you finish icing the cake.
4. Set the cake board on a turntable.
5. Cover the top of the cake with a generous layer of ganache, smooth it
out a little, then place a piece of wax paper over it.
6. Use a scraper to smooth out any air bubbles.
7. Check to see if it is level; if not, gently
press down around the cake until it is.
(Thicker ganache makes this part easier.)
Lift the wax paper off.
8. Cover the sides of the cake with ganache.
Use a metal scraper or spatula to scrape
the excess off a little at a time, layer by
layer as you turn the turntable.
9. Always scrape the excess ganache off the
scraper before laying it back up against
the cake again. Heating the scraper helps
it glide smoothly over the ganache but be
sure to dry it really well; water and
chocolate just don’t do well together. Pop
Tip:
Have a glass of warm
water beside your cake.
Dip the spatula in the
water several seconds
to warm it so it glides
smoothly over the
ganache. Dry the
spatula well before
using it on the ganache.

14 Cake Decorating Basics Reference and Activity Manual Unit Three: Fun with Fondant
any air bubbles that form in the ganache. Be sure the ganache is very
smooth because bumps and ridges will show through the fondant.
10. Let the cake sit several hours or overnight at room temperature for the
ganache to completely set. It will have a chocolate shell on it that you
do not want to poke through.
Planning the Cake Design
Before you start to bake and decorate a cake there are several questions you
need to ask yourself. Some of the answers you may know immediately and
realize their impact on the size and design, while other questions may take
some extra thought and homework before you can answer them. Here are
some questions to think about before you begin baking:
• Is it for a special occasion?
• How many people will be eating the cake?
• What size of cake will be needed? Besides the number of people
eating it, consider if the cake is a layer cake or not, and the size of
pieces you think is appropriate. Remember it is better to have too
much cake than not enough. It is also better to cut pieces smaller and
those who want seconds can go back for it instead of having half-
eaten pieces thrown out.
• Websites and books suggest different answers, and you will need to
judge about how large you want the pieces to be. Here are some
websites that can help you with those calculations:
• http://www.ehow.com/how_5083348_determine-people-sheet-cake
-feed.html
• http://answers.yahoo.com/question/index?qid=20110327095737AAiaPad
• http://wiki.answers.com/Q/How_many_guests_does_a_sheet_cake_feed
• Does it matter if it is a cake or if it is cupcakes?
• Are there any allergies to consider when selecting recipes or decorations?
• What is the timing like? (how much time I have, if it needs to be done
ahead of time, etc.)

Cake Decorating Basics Reference and Activity Manual Unit Three: Fun with Fondant 15
• Will the cake need transporting or storing?
• What supplies are available?
You may think those are all the things you need to consider, but there are a
few more considerations which relate directly to the appearance of the cake,
for instance:
• Theme or inspiration
• Colours
• Words
• Shape of cake
• The place you want people to focus their attention
• Techniques you want to use
Look at the Whole Cake
When you plan a cake, remember that there are sides and a top to plan. If
you use a border, consider whether you want it to stand out or to blend in,
and how that colour will be used somewhere else on the cake. A cake needs
to look good from all angles.
Consider:
• Repetition
• Balance
• Colour
• Evenly-spaced designs
• Proportion
• Focal Point

16 Cake Decorating Basics Reference and Activity Manual Unit Three: Fun with Fondant
Looking for Ideas
Through this 4-H project you will be asked to make several cakes, batches of
cupcakes and flat rolled cookies. You can make them for whomever you
want, for whatever special or not-so-special occasion and in a great variety of
styles as you experiment and build your decorating skills.
Remember that as a community service, you will need to contact a group to
offer to make a cake, cupcakes or decorator cookies for them. It does not
matter which cake or set of cupcakes or cookies you give away, but you
should know ahead of time to properly plan the size, recipe and design.
Cake Decorating Basics Reference and Activity Manual Unit Three: Fun with Fondant 17
Activity 1: Finding Ideas for this Project (60 minutes including time online)
If you have a theme or idea in mind before you begin looking for ideas on
the Internet, it will help you in your search for ideas. Start by filling in the
chart before you go online. Search by looking for images of that item
specifically. As an example, if the person is a big Saskatchewan Roughriders
fan, some images to search would be Saskatchewan Roughriders cakes,
football cakes, football helmet cakes or watermelon cakes. You probably
won’t have much luck looking for Gainer the Gopher cakes or even gopher
cakes, but could find an image and make one as a frozen transfer when you
learn that skill.
Remember that just because someone put the picture on the internet it does
not mean that it is a great design.
Use your pencil to note what you like or do not like about each design. Are
they funny? Beautiful? Creative? Great colours? Good balance? Are they ugly…?
Do not expect to be a perfect cake or cookie decorator. Sometimes a cake
may seem a bit dry or your cookies get overdone. And sometimes your
piping is wobbly or you nick the side of your fondant cake with your
fingernail. You will get better with every thing you bake and decorate.

18 Cake Decorating Basics Reference and Activity Manual Unit Three: Fun with Fondant
Cake Boards
To display your cake at Achievement Day, or if you have a cake larger than
any plate, you will need a cake board. These help you transport the cake and
they are covered in aluminum foil or a decorative paper (either plasticized or
covered with plastic wrap).
Fondant cakes are heavier and need sturdy cake boards. Single layers of
corrugated cardboard will not be strong enough.
You can make your own cake boards. What board you use depends on the
cake size and weight. For light cakes, you may use thick corrugated
cardboard, but for larger or layered cakes, a plywood or pressed hardboard
base is best, or you can glue two or three layers of corrugated cardboard
together. You can also cover sturdy cutting boards, which may be a cheaper
option if you find one the right size and don’t have wood lying around, or
someone to cut it for you.
Cake boards do not have to be the same shape as the cake, but they often
are. They need to be approximately four inches wider than your cake or cake
pan dimensions.
How to Cover a Cake Board
Directions for how to cover a cake board are given in the next activity.
Videos or how-to websites you may find helpful include:
• http://www.wilton.com/decorating/cake-decorating/covering-cake
-board-with-fanci-foil.cfm
• http://www.thatreallyfrostsme.com/2010/04/cake-boards.html
• http://www.youtube.com/watch?v=KVIC0mnlhVk
• http://www.ehow.com/how_5127100_make-cake-board.html
Cake Decorating Basics Reference and Activity Manual Unit Three: Fun with Fondant 19
Cake Storage
How should you store your cake? That depends on the type of cake and icing
you have used. Cakes with buttercream icing and fondant can be stored at
room temperature (on the counter) for two to three days. Unlike buttercream
cakes that can be refrigerated, fondant may dry out and crack in a fridge.
However, fondant cakes should not be stored in air-tight containers or they
and their royal icing details will soften. Decorations may sag and colours may
run when humidity from the cake is trapped in an airtight container. Leave the
lid ajar on a plastic container to let air in and humidity out.

20 Cake Decorating Basics Reference and Activity Manual Unit Three: Fun with Fondant
Colour
The Colour Wheel
Refer to a colour wheel as you mix colours.
To make paler icing, use less colour (or more
icing) and to make more intense shades, add
more colour; to darken it, add black. To dull
a colour, add a small amount of its opposite
or complement on the colour wheel.
Colour schemes
Monochromatic
You can decorate a cake with shades of one
colour (for instance, a light blue base with
medium and dark blue accents). You need to
make an obvious contrast in shade for it to work.
Complementary
This colour scheme is when you use two colours opposite, or almost
opposite to each other on the colour wheel, like orange and blue, or red and
green. The two colours balance each other out.
Adjacent
There are a few different words for this colour scheme, but it is when you use
colours side-by-side on the colour wheel, such as yellow, green and blue. Use
the colours in different shades and as small touches or the cake will look gaudy.
Triad
Three colours equally spaced on the colour wheel are used for this scheme.
Green, purple and a yellowy orange would be an example of a triad, and you
Tip:
Print a colour wheel
for yourself from the
internet, slide it in a
plastic sleeve to keep it
clean and keep it with
your cake decorating
supplies to refer to
when you tint icing.
Cake Decorating Basics Reference and Activity Manual Unit Three: Fun with Fondant 21
may see this on a cake with purple flowers that have contrasting stamens
and green leaves.
Polychromatic
This means many colours are used together. Often this isn’t really a lot of
colours, but a small number of colours in a variety of shades (tints).
Colour and Cake Decorating
Keep in mind these points when you are tinting icing:
• It stains! Hands, clothes, counters, plastic bowls, wooden spoons…
(Magic Eraser works to remove it, as does bleach.)
• Save some white fondant or icing in case you need to lighten a colour
you have mixed.
• Add a small amount of food colouring at a time. Drop by drop. Mix
well before deciding if you need more.
• Colours are not created equal. Some colours are more powerful than
others. Red in particular, is a strong colour so add it slowly and mix it
in well before deciding if more is needed.
• Colours in fondant darken over a few hours. You may not need quite
as much food colouring as you thought, or discover that you made
your colour too dark. Ideally you would tint fondant several hours
before you use it to see if it is the shade you want before adding
more colour or using it.
• To lighten colours, add more white fondant or icing – that’s why you
saved some of it.
• Some colours fade in bright light (pinks, purples and blues).
How do I make different colours?
This is where your understanding of the colour wheel comes in! Think about
what colours would be used to make your new colour before you start.

22 Cake Decorating Basics Reference and Activity Manual Unit Three: Fun with Fondant
The most thorough selection of tips about mixing colours can be found at:
• http://www.sugarcraft.com/catalog/colouring/colourmixingchart.htm
These other websites have a lot of good food colouring information too:
• http://www.wilton.com/decorating/icing/icing-colour-chart.cfm
• http://www.candylandcrafts.com/colourchart.htm
Cake Decorating Basics Reference and Activity Manual Unit Three: Fun with Fondant 23
Fondant
Poured Fondant
Fondant is based on the French verb “fondre” meaning to melt. The verb
forms a basis for a few cooking terms such as fondues. You will have heard
of meat and vegetables being cooked in fondues, breads being dipped in
cheese fondues and cookies and fruit being dipped in melted chocolate
fondues. Another cooking term based on the same verb is fondant. Fondant
is cooked or uncooked, made of chocolate or special icing and it is poured
or spread on baking.
There is more than one kind of fondant and on your own you can try poured
fondant, which is a cooked fondant. It is kind of like ganache but made of
mostly icing sugar instead of chocolate. It is a sugary confection that is
warmed, forms a thick liquid that is poured over flat cookies or in which you
can dip other things such as cookies, cake pops or cupcake tops into it to
give them a shiny, smooth and soft coating. The fondant cools to have a
crust on it to keep the baking from sticking to everything.
If you are pouring fondant (or ganache) onto cookies or cupcakes or
overturned cupcakes, place the baking on a cooling rack over a cookie sheet
to allow the fondant to drip off the bottom edges of the baking, completely
covering the top and sides of flat cookies and mini cakes.
The cookie sheet catches drips and allows you to scrape up the excess,
rewarm and use it.

24 Cake Decorating Basics Reference and Activity Manual Unit Three: Fun with Fondant
Optional Activity: Poured Fondant
(60 minutes at home)
Fun with Fondant focuses on rolled fondant, but you can look up poured
fondant recipes and tips for pouring it on a variety of websites. The Wilton
website has recipes and directions for poured fondant icing and you can find
ideas and recipes on many baking websites.
• http://www.wilton.com
If you make a cooked fondant and pour it over baking, fill out a cake
journal about it, take pictures and make notes about your experience to
help you the next time you try it. Add tips for yourself to read over
before you try it again.
Cake Decorating Basics Reference and Activity Manual Unit Three: Fun with Fondant 25
Rolled Fondant
When you see cake competitions in television shows or edible modelled
decorations in bright colours, the cake decorators have used rolled fondant.
It is not really that hard on smaller cakes and as you build your skills and
learn techniques you will discover it is not really that difficult to make or use.
Advanced skills like those of ton the TV shows, took years of classes and
practice to be mastered.
Fondant icing has a beautiful satiny finish, can be coloured and have
flavouring added, similar to buttercream icing. There are many recipes for
fondant, and you will learn which ones you like to make, which ones are
more complicated to make or arenfinicky to work with. Some fondant recipes
are cooked and others are uncooked, some pour over a cake and others are
rolled out like play dough or pastry and draped over a cake.
Cakes that are covered with a fondant icing are first sealed with another
spread to keep the colour and flavours of the cake from seeping into your
icing and to smooth out or camouflage any uneven cake surfaces that would
show through your fondant.
Most cakes are first covered with a buttercream
icing, some are covered with ganache and some
bakers even use an apricot glaze or marzipan
depending on the cake they are decorating.
Leaving out the undercoat is not a shortcut. All
the natural texture of your cake will show
through and ruin the look of your fondant.
Kneading
One word used a lot in the directions for rolled
fondant recipes and decorating techniques is
knead. This means to use your hands to massage,
press, fold and stretch clay, dough or icing as
Tip:
When kneading fondant,
make sure the counter is
clean and does not have
icing sugar on it. Use
shortening to keep it
from sticking. Icing sugar
the counter only when
you roll out fondant.

26 Cake Decorating Basics Reference and Activity Manual Unit Three: Fun with Fondant
one blob or mass to make it all the same. For instance drops of colour can
be kneaded into fondant to gradually spread the colour evenly throughout
the fondant.
You can buy ready-to–use fondant but it still needs kneading to soften it
before rolling.
You can also buy ready-rolled marzipan and fondant. It is set on wax or
parchment paper before being rolled into its packaging. All you have to do is
unroll it to use it. It will cost more than making your own fondant and is not
a good idea if you plan to colour it. Colouring must be kneaded in!
Rolled Fondant Recipes
There are many recipes for uncooked fondant and one of the most popular is
made from ingredients you can buy in even small grocery stores. You will see
a few variations of this recipe and most are written using imperial measures
that are common in packaging and may not be exactly the same as metric
packages. These amounts are approximations because the humidity also
affects how much water or liquid needs to be added. The more shortening in
a recipe, the shinier it will be as the icing on your cake. As you work with the
fondant, you will learn to judge its consistency by feel.
Fondant icing is best if it is prepared in advance. It keeps in the refrigerator
for a couple weeks, but does not have to be kept in the fridge. It needs to
be room temperature for you to work with it though.

Cake Decorating Basics Reference and Activity Manual Unit Three: Fun with Fondant 27
Marshmallow Rolled Fondant makes about 2 pounds or 900 grams of fondant
16 ounces (about 450 grams) good quality white mini-marshmallows
2 to 5 tablespoons water
2 pounds (about 8 cups sifted) icing sugar
1/2 cup vegetable shortening in a small bowl
Flavouring
Directions for microwave, but can be made in double boiler instead.
1. Put marshmallows and 2 tbsp. of water in a microwaveable bowl.
2. Microwave on high for 30 seconds then stir the marshmallows.
3. Put the bowl back in microwave for 30 seconds and continue doing
this until all of the marshmallows are melted (usually about 2 1/2
minutes total).
4. Place about 6 cups of the icing sugar on the marshmallow mix.
5. On a clean, dry counter, spread a generous amount of shortening
where you will be working (about 40 cm in diameter) and set your
shortening bowl where you can reach it easily.
6. Grease both hands completely: palms, backs and between fingers.
7. Dump the bowl of sticky marshmallow/sugar mixture in the middle
of your greased counter.
8. Knead the icing sugar into the sticky mixture. Regrease your hands
and counter when the fondant starts sticking.
9. Add the rest of the powdered sugar and knead some more, till well
blended. Kneading blends it and helps make the fondant stretchy.
10. Do not add water until you are sure you need it and only add a
small amount before kneading it in well: You do not want it to be
sticky at all.
11. Keep kneading (about 8 minutes) till the fondant forms a firm,
smooth elastic ball that can stretch without tearing easily. If the
mix does tear easily, it is too dry, so add water (about ½
tablespoon at a time) and knead it in until it will stretch without
tearing when you apply it to the cake and will not stick to your
tools or counter.

28 Cake Decorating Basics Reference and Activity Manual Unit Three: Fun with Fondant
Rolled Fondant Recipe makes about 2 pounds or 900 grams of fondant
2 tablespoons unflavored gelatin (one small pouch)
1/4 cup cold water
1/2 cup glucose
2 tablespoons shortening
1 tablespoon glycerin
8 cups (about 2 pounds) confectioners’ sugar, sifted
Flavouring
Directions
1. Combine the gelatin and cold water in your liquid measuring cup.
2. Let that stand until it becomes thick, about 3 minutes.
3. Place your gelatin mixture in top of double boiler and heat and stir
until dissolved. Add glucose, mix well.
4. Stir in shortening; just before completely melted remove from heat.
5. Add glycerin and flavouring.
6. Cool your mixture until it is lukewarm.
7. In large bowl, place 4 cups of icing sugar; make a well.
8. Pour the lukewarm gelatin mixture into the well and stir with a
wooden spoon, mixing in sugar and adding more, a little at a time,
until stickiness disappears.
9. Grease your hands with shortening.
10. You can knead in the bowl or on the counter. (Less mess in the
bowl but remember to spread shortening on your clean counter if
you are kneading on the counter.)
11. Knead in all the remaining icing sugar.
12. Keep kneading until the fondant is smooth, pliable and does not
stick to your hands. If fondant is too soft, add more sugar; if too
stiff, add water (a drop at a time).
For any rolled fondant it is best if you can let the fondant rest or sit
overnight. (You can use it right away if there are no tiny bits of dry

Cake Decorating Basics Reference and Activity Manual Unit Three: Fun with Fondant 29
powdered sugar). If you do see them, you will need to knead and maybe add
a few more drops of water.
Prepare the fondant icing for storing by coating it with a
layer of shortening and then wrap in thin plastic. Fondant
becomes hard when it dries out, so it should be double
wrapped which means that it gets put in another plastic
bag and you need to squeeze out as much air as possible
before sealing the bag. This icing does not need to be
stored in the refrigerator if you are using it in the next day
or two. Fondant you need to keep longer should be kept in
the refrigerator, double wrapped, but warmed to room
temperature gradually before use.
Tip:
You can refrigerate
fondant and use it even
a month later if it has
been well wrapped. Do
NOT freeze fondant.

30 Cake Decorating Basics Reference and Activity Manual Unit Three: Fun with Fondant
Activity 2: Make Fondant (30 minutes at home)
You can use either recipe at this time, but over the course of the year, try a
few different recipes for fondant to learn which ones you like to make and
use. Humidity affects fondant and sometimes you may find that you have
had great success with a fondant recipe and another time it seems to be a
flop. Learn from your experiences and keep notes about what you did or any
changes you made to a recipe.
Supplies
• See recipe for rolled fondant
• Shortening for counter and hands
Directions
1. Follow recipe directions.
2. Cover fondant with a thin layer of shortening before you wrap it in
plastic film.
3. Double wrap it (put the plastic wrapped fondant ball in a sealed plastic bag).
4. Refrigerate the fondant.
5. Bring the fondant to the next meeting along with your fondant tools,
food colouring, extra icing sugar, a bit of shortening and a couple
tablespoons of cornstarch.
Cake Decorating Basics Reference and Activity Manual Unit Three: Fun with Fondant 31
Colouring Fondant and Gum Paste
You can colour any amount of fondant, from small blobs to the size that will
cover your cake. Remember that it is hard to re-create the same colour. If
you are covering a cake or layers of cake, make sure that you have coloured
enough of the fondant before you lift it and place it on the sealed cake. If
you realize you have not coloured enough at this point, add more fondant
and colour and continue kneading the colour till it is completely blended
again before you roll it out again.
If you are covering a cake with fondant, it is best to add the colour to the
fondant a day or two ahead of time, seal it with shortening, wrap it in thin
plastic and place it in another sealed plastic container to let the fondant rest
at room temperature. The colour may change slightly with time. When you
start to work with the rested fondant, knead it out again to soften it and
check the fondant consistency and colour.
Bright, vibrant colours are hard to make with
fondant because you have to use so much food
colouring to make the colour you want that it
can affect the fondant consistency and taste. You
can buy dark or brightly coloured fondant. You
can add white to them to soften their colours. If
you are colouring white fondant to be a dark or
brilliant colour, lecithin added to the fondant and
gel colouring helps to deepen the colours.
Gel colours work best because they contain less
moisture and more concentrated colour than liquid colours, but you can use
liquid, gels or powder food colouring.
Food colouring can stain your hands, clothes and countertop. How will you
prevent this? Wear clean plastic gloves to prevent stained hands and a piece
Tip:
For black, primary or
brilliant colours, you may
want to purchase
coloured fondant or use
edible candies the
colours you need.
32 Cake Decorating Basics Reference and Activity Manual Unit Three: Fun with Fondant
of parchment paper on the counter under your
kneading area if the size of fondant does not fit
easily in your hands. Once the food colouring is
partly blended in, you can work with bare hands
and a clean countertop.
1. Lightly dust the surface you will be using.
2. Select the amount of fondant you need to
colour and knead it. Check its consistency and add icing sugar or
moisture if needed.
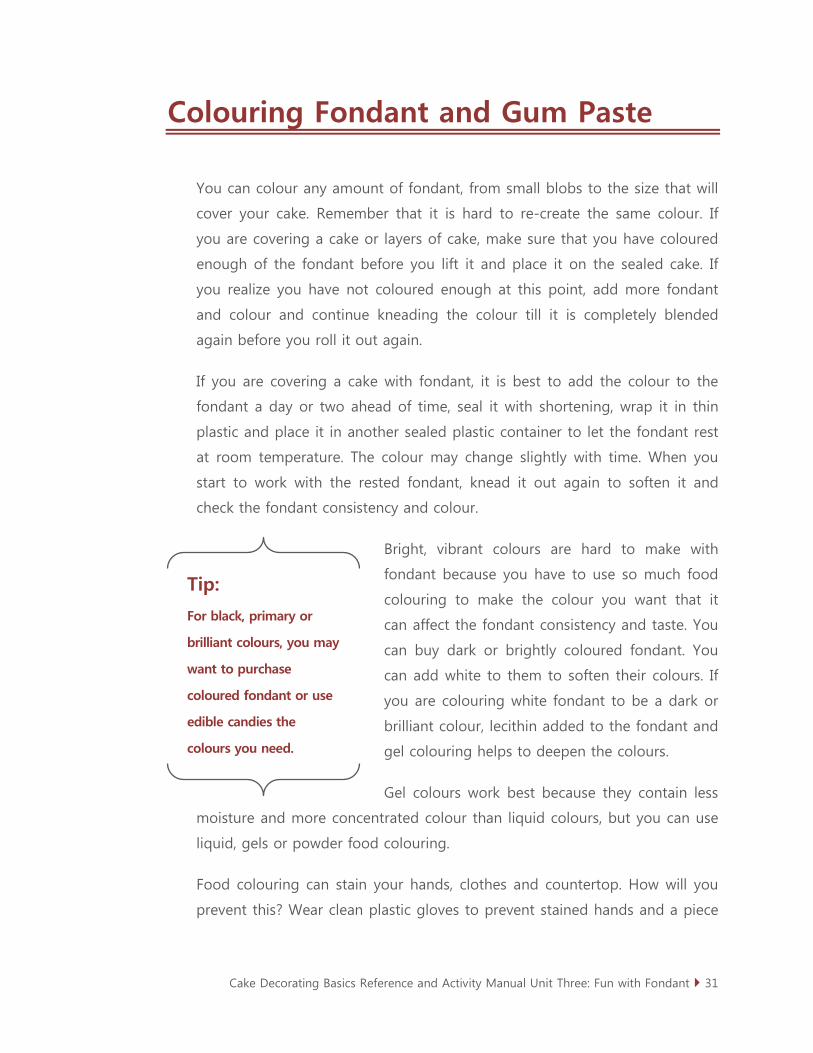
3. Use a toothpick if you are adding gel colour. Do not add too much to
start. You can always add more later and deepen the colour.
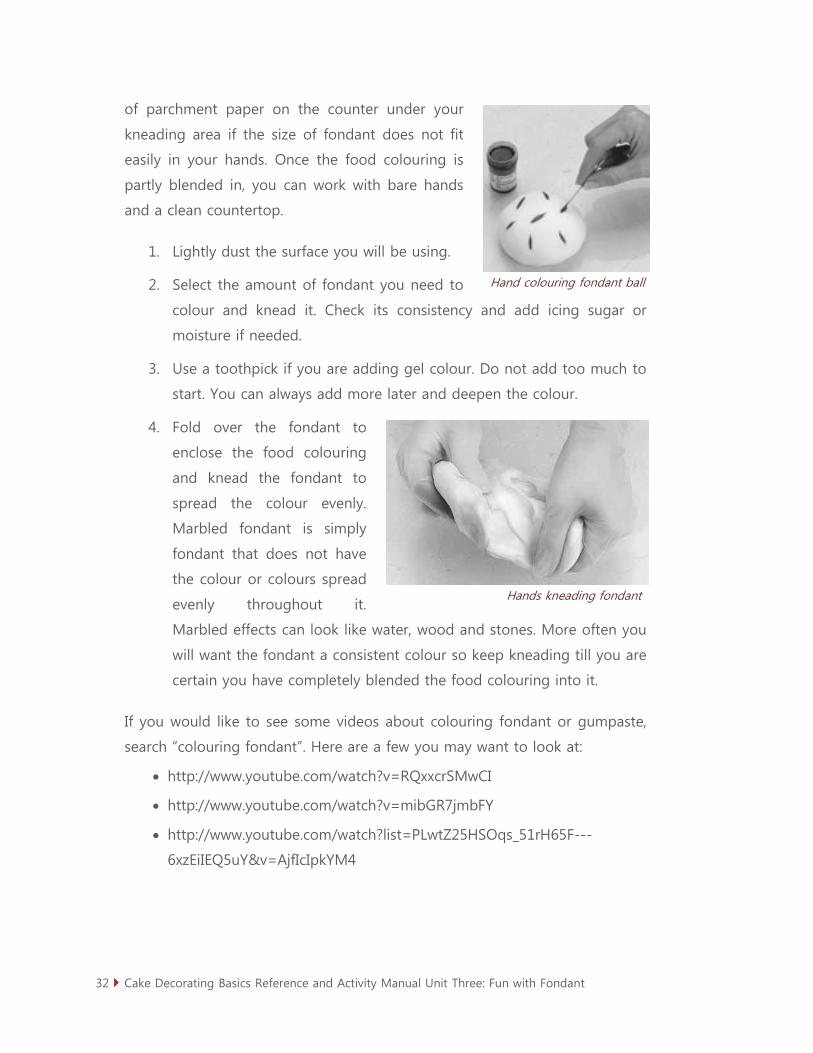
4. Fold over the fondant to
enclose the food colouring
and knead the fondant to
spread the colour evenly.
Marbled fondant is simply
fondant that does not have
the colour or colours spread
evenly throughout it.
Marbled effects can look like water, wood and stones. More often you
will want the fondant a consistent colour so keep kneading till you are
certain you have completely blended the food colouring into it.
If you would like to see some videos about colouring fondant or gumpaste,
search “colouring fondant”. Here are a few you may want to look at:
• http://www.youtube.com/watch?v=RQxxcrSMwCI
• http://www.youtube.com/watch?v=mibGR7jmbFY
• http://www.youtube.com/watch?list=PLwtZ25HSOqs_51rH65F---
6xzEiIEQ5uY&v=AjfIcIpkYM4
Hand colouring fondant ball
Hands kneading fondant

Cake Decorating Basics Reference and Activity Manual Unit Three: Fun with Fondant 33
If you want to colour fondant flower tips this needs to be done with dusting
powder or painted colour after the flowers or other decorations are made. If
you try to only tint part of the fondant another colour, the colours may
gradually blend together and not give you a dramatic effect.

34 Cake Decorating Basics Reference and Activity Manual Unit Three: Fun with Fondant
Activity 3: Colouring Fondant (10 minutes)
Working with a small piece of fondant will help you quickly review how to
work food colouring into white fondant. You will get an idea of how little
colouring is needed for a small piece of fondant. Not surprisingly, larger
pieces of fondant require more food colouring to make the same shade as
you are making with this small amount of fondant.
Supplies
• Clean disposable gloves
• Piece of white fondant that fits easily in your hand, about ¼ cup in
size
• Dusting bag of icing sugar and corn starch
• Food colouring
Directions
1. Lightly dust the surface you will be setting the fondant on while you
add food colouring to it.
2. Put on your gloves .
3. Set the fondant onto your dusted surface and flatten it or make it
slightly dish shaped.
4. Add a small amount of food colouring to the top of your fondant.
5. Knead the colour in until it is partly blended. You can take off your
gloves now.
6. Knead until the fondant looks marbled.
7. Stretch out the marbled fondant to see what it would look like if you
planned to use it this way.
8. Continue kneading the marbled fondant until the colour is the same
throughout it. Stretch it out to be sure that it is well blended.

Cake Decorating Basics Reference and Activity Manual Unit Three: Fun with Fondant 35
9. Form the coloured fondant into a ball and wrap it in thin plastic before
putting it in another sealed plastic bag or container.
Something to think about
What kind of food colouring did you use? (gel, liquid or powder)
How much would you say you used of it and what colour did it make: light,
dark, medium, bright or pale. Do you think it took more or less food
colouring than making the same amount of buttercream icing this colour?
How long did it take you to knead in the colour to make it marbled?
What are some things you think the marbling effect would be good to use?
How much longer did you have to knead your small amount of fondant to
spread the colour evenly throughout it?
Larger pieces of fondant will be kneaded on a lightly dusted surface and will
take longer to blend the colour as you knead the fondant like bread dough.
36 Cake Decorating Basics Reference and Activity Manual Unit Three: Fun with Fondant
Rolling out Fondant
Fondant is always kneaded before being rolled out. Kneading softens it and
makes it more pliable. This is a good time to check its consistency to see if it
is sticky or has dried out.
Fondant is rolled out flat to cover a cake and to make many decorations. The
same technique is used to roll out 50/50 fondant gum paste mixtures and
gum paste.
Preparing the Surface
When you make fondant, your working surface is covered with shortening,
but when you are rolling out fondant for decorating, you need to dust the
dry, clean surface with icing sugar, cornstarch or a mixture of the two.
Because icing sugar gets too sticky when it is moist, most cake decorators
prefer a mixture of icing sugar and cornstarch or just cornstarch in a dusting
pouch. Dusting the surface and tools you use will keep your fondant from
sticking to it. The natural oils in your skin and warmth of your hands means
you need to periodically dust the tools and surface as you work. (Note: when
you are covering a cake, you decide to use shortening to give the cake a
shinier finish.)
Dusting Pouch
A dusting pouch is a piece of fabric gathered up
and secured to form a pocket holding a
cornstarch and icing sugar mixture. It is
extremely easy to make your own dusting
pouch instead of buying one with drawstrings
dusting pouch

Cake Decorating Basics Reference and Activity Manual Unit Three: Fun with Fondant 37
Activity 4: Make a Dusting Pouch (10 minutes)
Use a new disposable cleaning cloth (J-cloth) or other loosely woven fabric to
make your dusting pouch. Finely woven fabric like pillow cases does not let
the icing sugar and cornstarch mix out as easily.
Supplies
• 10 inch (25 cm) or 12 inch (30 cm) square of loosely woven, clean fabric
• Clean elastic band
• 1 tablespoon icing sugar
• 1 tablespoon cornstarch
• Small zippered plastic bag
Directions
1. Cut a square or circle out of the fabric.
2. Put the cornstarch and icing sugar in the centre of your fabric.
3. Bring up the edges around the powders.
4. Wrap the elastic around the gathered fabric above the little pouch of
powders, leaving a large tuft of fabric for you to hold in your hand.
5. Leave some extra fabric above your powders too so they do not form
a tight wadded ball, but a loosely held pouch.
6. When you tap the dusting pouch on the counter, a fine mixture of
cornstarch and icing sugar should be released out the bottom of your
dusting pouch/bag. If you have to retap an area more than once to
get a fine dusty covering, you may need to move your elastic further
from the powders so it is floppy. If this still does not work, try a
different fabric with a looser weave.

38 Cake Decorating Basics Reference and Activity Manual Unit Three: Fun with Fondant
Rolling pin with spacer bars
Rolling Mat
People who decorate a lot of fondant cakes like to use a rolling mat set on
top of the counter. You do not need one. The mat is easily wiped clean, just
like a counter. The advantages to owning a bought mat are similar to those if
you were using a pastry board or mat. The purchased ones are large and
have printed circles and lines on them to make it easier for you to know if
you have rolled your fondant large enough. Rolling mats can be cut
accidentally with knives or pizza cutters, so be careful if you have a mat and
are using metal blades or cutters on them.
Rolling mats need to be clean, dry and dusted just like a countertop would
be prepared for rolling fondant. If you decorate a lot of cakes, you may find
it a useful addition to your tools, but you can make do with a measuring
tape, straight ruler and a counter.
Rolling Pin
You do not need a special rolling pin for fondant, though you will see that cake
manufacturers sell lightweight plastic ones. Your wooden or marble rolling pin
will also work if it is properly cleaned, dry and then dusted before use. The
longer your rolling pin, the easier it is to roll out larger pieces of fondant, so
buying a cute little fondant rolling pin may be a waste of your money.
Spacer Rings and Bars
How do you know how thinly fondant should be
rolled and how do you get it an even thickness?
Spacer rings and bars make this easy! Cake
decorating companies that sell fondant rolling pins
also sell a set of plastic coloured rings to slide over each end of the rolling
pin as spacers to keep your rolling pin a specific height off the counter. The
different colours show you different thicknesses that the fondant is normally
rolled to. You do not need these rings, but can use skewers, dowels, or other
flat/round sticks that are the same diameter as the spacer rings.

Cake Decorating Basics Reference and Activity Manual Unit Three: Fun with Fondant 39
Tip:
You can use either
shortening or a dusting
pouch when you roll
out fondant. Shortening
makes a shiny surface
while dusting creates a
flatter fondant finish.
Do not push down on the rolling pin with a lot of pressure to roll out your
fondant faster. This can stretch the fondant and it may shrink a bit when you
lay it on the cake.
When your fondant is the same thickness as your spacer rings or bars, the
ends of your rolling pin will roll across the spacer bars and your fondant
between the bars will be the same thickness as your bars.
Rolling out Fondant
1. Take off all your jewellery and roll up your sleeves.
2. Be sure the flat surface is large enough and clean (no crumbs).
3. Your flat surface must be dry.
4. Dust the surface generously with icing sugar or cornstarch or a
combination of them in your dusting pouch. This will be under your
fondant, and no one will see if there is extra icing sugar. Too little
icing sugar means your fondant sticks to the counter, making it
impossible to lift.
5. As you roll out the fondant, stop, lift, turn,
and add more icing sugar underneath to
keep it from sticking to the surface. If it
sticks, scrape the counter, dry it and add
more icing sugar before setting the
fondant back on it. Your fondant may be
too moist and need you to knead in more
icing sugar to make it the correct
consistency. It is better to knead in the
icing sugar than to continue working with
fondant that is too wet.
6. Use a rolling pin dusted with icing sugar.
7. Use measurement bars or rings to get fondant an even thickness.
8. Prick any air bubbles with a clean needle before transferring the fondant
to the cake.
40 Cake Decorating Basics Reference and Activity Manual Unit Three: Fun with Fondant
Covering a Cake Board with Fondant
A cake board can be covered with foil or with fondant. Consider the foil or
fondant colour to complement your cake design and colour scheme. If you
use fondant, it is important to consider the base colour: either white or a
colour planned to go with your cake.
The cake board fondant can be a separate piece that you set the cake on, or
it can be a continuation of the same fondant of your cake, and not have a
seam where the cake and cake board meet. This is your choice. It is harder to
cover a cake and the cake board at the same time because you will be lifting
a very large piece of fondant.
1. Brush the cake board with a bit of water or clear gel paste to be the
glue to hold your fondant on.
2. Roll out the fondant as you would for a cake.
3. Gently lift the fondant onto the cake board and trim it with a sharp knife.
4. If the fondant on the cake board looks uneven, you can texture it with
embossing or a frilling tool rolled gently and evenly spaced all around
the cake.
5. The cake board side can be covered with ribbon with double-sided
tape or a glue stick.
Ideally if you are separately covering the cake board with fondant, you would
set it aside to dry for a couple days before setting the cake on for decorating.
This helps to dry the cake board fondant out and makes it stronger (it does
not nick or scar as easily when you are setting the cake on top).

Cake Decorating Basics Reference and Activity Manual Unit Three: Fun with Fondant 41
Activity 5: Roll out Fondant (10 minutes)
Using the fondant you coloured in Activity 3, you will use your rolling pin
and spacer rings or guide rings or 1/8” sticks to roll it out to this most
common fondant thickness used to cover cakes and make decorations.
Supplies
• About 1 cup of fondant
• Rolling pin
• Spacer bars or 1/8” sticks or doweling (skewers)
• Dusting pouch of cornstarch and icing sugar
Directions
1. Use the dusting pouch you made in Activity 4 to lightly tap a clean
dry surface with your dusting mixture.
2. Use your rolling pin to roll out the kneaded fondant.
3. Lift the fondant and turn it to be sure it moves freely without sticking
to the counter. Continue rolling the fondant until the rolling pin rolls
on them instead of the fondant.
4. Lift your fondant one last time to be sure it is not stuck to the flat surface.
42 Cake Decorating Basics Reference and Activity Manual Unit Three: Fun with Fondant
Covering Cakes with Fondant
1. Measure your cake up one side,
across the top and over to the
bottom of the other side. If the cake
is unevenly shaped or is rectangular,
be sure to measure it in more than
one direction. If you plan to continue
the fondant to the edge of the cake
board, include the spaces around
these two cake sides too. Add a
couple inches to your measurement to give you some “wiggle room”
when you set the fondant on your cake.
2. Place the cake on your cake board, using a little buttercream icing as
glue to hold it in place.
3. Use buttercream icing to coat the cake. No, you cannot skip this step!
The buttercream icing seals the cake, prevents its colours from seeping
into your fondant, glues the fondant to the cake and also makes a
smooth surface under your fondant. Any bumps or imperfections will
show through the fondant. If the cake is crumbly or uneven, be sure to
crumb coat it before spreading another thin coating of buttercream icing
on the cake. Let the buttercream set while you roll out the fondant.
4. Decide how much fondant you will need to cover the cake. Some
books and websites include charts to give you an idea of the amount
of fondant you will need. There is a helpful chart at the Wilton website:
http://www.wilton.com/decorating/fondant/fondant-coverage-chart.cfm.
5. The chart uses imperial measures. One pound is 16 ounces or 454
grams of fondant.
Tip:
Use an icing smoother,
not your fingers or
hands to smooth the
fondant on your cake.

Cake Decorating Basics Reference and Activity Manual Unit Three: Fun with Fondant 43
6. Fondant is room temperature or body temperature when you work with
it. Knead the fondant till it is a workable consistency. If it is sticky, work
in a little icing sugar. Knead in colour, if you are tinting the fondant.
7. Lightly dust your clean work surface and your rolling pin with icing
sugar or cornstarch to keep the fondant from sticking. (You may use
shortening instead for a shinier finish.)
8. Roll out the fondant to be slightly larger than what you measured. If
your cake is round try to roll out a circle of fondant to the thickness
and size you need. If your cake is rectangular, roll the fondant out in a
rectangular shape.
9. Use dowelling or rings at the edges of your rolling pin to judge the
thickness of your rolled fondant. It needs to be approximately 3mm or
1/8 inch thick.
10. It is difficult to lift and move a very large
piece of fondant. If you have used too
much fondant, now is the time to cut off
a bit of the extra so you do not have to
lift it too. Be sure to refer to the
measurements and calculations you
made about the size of fondant you
need to cover your cake.
11. If your rolling pin is long enough, lift the widest side of rolled fondant.
12. Lift and move the rolling pin as you work to keep it from sticking to
the fondant.
13. Whatever surface is helping you lift the fondant needs to be lightly
dusted with icing sugar (or has a layer of shortening on it).
14. Gently lift the wide side of the fondant over your rolling pin or slip a
cake circle or thin flexible cutting board under it to help move it.
(Moving large pieces of fondant is best done with a cake circle or thin
cutting board.)
Transferring fondant
44 Cake Decorating Basics Reference and Activity Manual Unit Three: Fun with Fondant
15. Position the fondant on your cake and gently lower it to the cake. (Gently
shake the dusted cake board to release it where you want it to sit.)
Using your Rolling Mat to Move Fondant
If you are using shortening and a rolling mat, there is another, less
common method that you can use to lift and move the rolled
fondant onto your cake or cake board. This method does not work
if you have used a dusting pouch! When the fondant is rolled out
onto your rolling mat covered in shortening, the fondant
temporarily sticks to the rolling mat but the flexible mat can be
easily peeled off it.
Once your cake is set in place, lift the rolling mat with its layer of
rolled fondant. Slowly turn it over above your cake and line it up
where you would like to set it. Set it on the centre of your cake
and gently peel the mat off your rolled fondant. Start at the edges.
The fondant will drape onto your cake as it is peeled from its
backing. Roll out your fondant.
16. Smooth the fondant on with a fondant smoother or flexible silicone or
plastic cutting board, starting in the middle of the cake top and move
outwards and down to the sides to help remove any air bubbles.
17. To remove air bubbles, poke a pin in at an angle through the fondant
and release the air before you smooth that part again.
18. Use the smoother to press the fondant to the cake/cake board angle.
19. Try not to stretch the fondant. If your fondant is coloured and you see it
looking paler over corners, angles or edges, you have stretched it. Gently
adjust the draped fondant back up towards the top to take out the stretch.
20. Trim off the extra fondant using a spatula, sharp knife, pizza cutter or
fondant cutter.

Cake Decorating Basics Reference and Activity Manual Unit Three: Fun with Fondant 45
Star cake and fondant
Shaped or Character Cakes
1. Cover the cake with buttercream icing or ganache and rolled fondant.
2. Smooth the fondant over the cake details. Your fondant smoother
may not work well for this, and you may need to use your hands.
3. Cut off the extra fondant at the base of your cake.
4. If your cake pan has a lot of details you need to transfer to the fondant,
lightly dust with icing sugar the entire inside of the clean and dry shaped
pan you used for the cake mold. Shake off the extra icing sugar.
5. Carefully line up the dusted shaped pan with your cake and place it to
cover your fondant cake.
6. Press the pan onto the cake to imprint details from the pan onto the
fondant.
7. If you are creating fondant details, you can dust the pan inside with
icing sugar and press rolled fondant into the details you want. Lift
them out and trim them with a knife before setting them on the cake.
8. Brush water as a glue on the fondant details to stick them to the
fondant cake.
9. Fondant can be shaped around cake
corners and points with your hands.
Be sure to ease out any wrinkles.
10. It is tricky to cover a cake with a
hole (such as a number “4” shape)
with fondant, and you will have to cover the
top and sides as separate pieces and trim their
edges and blend them so the seams do not show.
Here are some video examples of covering cakes with fondant:
• http://www.youtube.com/watch?v=N5yrYZgIXr8
• http://www.youtube.com/watch?v=xgTurewJSKg
46 Cake Decorating Basics Reference and Activity Manual Unit Three: Fun with Fondant
Fabric Ribbons
Fabric ribbons are simple decorations that quickly add colour to a cake
covered in royal icing or fondant, or a cake board. Because fondant has far
less shortening in it than buttercream icing, fabric ribbon can be used
without absorbing it and looking greasy. For best results, use a good quality
ribbon that does not fray easily where it is cut.
If you have a turntable, putting a ribbon around a cake is easier because you
can rotate the cake or board with one hand while you attach the ribbon with
your other hand.
1. Measure the length of ribbon you will need around your cake with a
measuring tape or by loosely wrapping the ribbon on its roll around
the cake. Be careful not to gouge your fondant as you measure!
2. Cut the ribbon a bit longer than you need to go around the cake to
allow for the ribbon to overlap slightly. The ribbon looks neater if it
does not overlap more than 2.5 cm (1”).
3. Start at the back of your cake or at a pace where the ribbon seam will
not show much.
4. Ribbon is attached to the fondant with
a little warm water or royal icing. If the
ribbon is paler than the fondant you
are attaching it to, use royal icing
instead of water to keep the food
colouring from staining your ribbon. If
you are using royal icing to stick the
ribbon onto your cake, put a dot of
royal icing on the cake where the
ribbon will start and press the ribbon
end to it before wrapping the ribbon
Tip:
Never use a pin to hold
a ribbon on a cake. It
may accidentally be
lost in a piece of cake
or let bacteria into the
cake through the hole
you poked.
Cake Decorating Basics Reference and Activity Manual Unit Three: Fun with Fondant 47
around the cake. To the back of the loose end, pipe a few more dots
of royal icing across the width of the ribbon and gently press it onto
the other ribbon.
Fabric bows can be tied and glued onto fondant or royal icing cakes with a
few dots of royal icing on the back of the bow.
Fabric Ribbons on Cake Boards
If the board is covered with fondant, do any embossing or crimping before
you attach the ribbon edge.
Depending on the thickness of your cake board, you may be able to use
ribbon as wide as 12 mm (1/2”) or 15 mm (5/8”) to wrap around the edge of
your board. Measure around the board and allow for some overlap of ribbon
when you cut it to the size you need. Be careful not to gouge any fondant.
You can use a pin, glue dots, double-sided tape or a glue stick to attach the
ribbon to your fondant or foil cake board. Start at the back of your cake
board or a point that will not show much and use a little extra glue where
the ribbon ends overlap. You can also layer more than one ribbon around
the board.

48 Cake Decorating Basics Reference and Activity Manual Unit Three: Fun with Fondant
Fondant Decorations
When you work with fondant, you will need a little bit of shortening on your
hands to keep the fondant from sticking as you knead it before you use it. How
much shortening? Think of it as putting on shortening lotion. If the fondant
starts to stick to your hands, put a little more shortening on your hands.
Remember to lightly dust the flat surface and any tools you are using.
Fondant can be reused. Scraps and the main ball of fondant need to be kept
in or under plastic to keep them from drying out. Zippered sandwich or
freezer bags work well for this, and you can use the clear flap on your
practice board or plastic wrap. When fondant is put away for even a few
hours, be sure to grease it slightly with shortening, wrap it in plastic film and
then bag it.
Rope
Fondant ropes or sausages are used in a variety of ways in cake decorating,
such as completing the edge where your cake and cake board meet, to
drape as swags, hair and stems.
Making a rope will remind you of when you were little and making a play
dough snake. Roll a piece of fondant on the counter top or in your flattened
palms with gentle, constant pressure from
your fingers or palm to turn it into a long,
narrow rope. As the fondant rope thins, it
becomes longer. It takes practice to make
the rope an even thickness from one end to
the other. If you roll a part too thinly, simply
lift the rope and overlap the thin sections
and roll them together to blend into a
thicker rope.
Tip:
Wrap ropes with plastic
film if you are not using
them immediately.
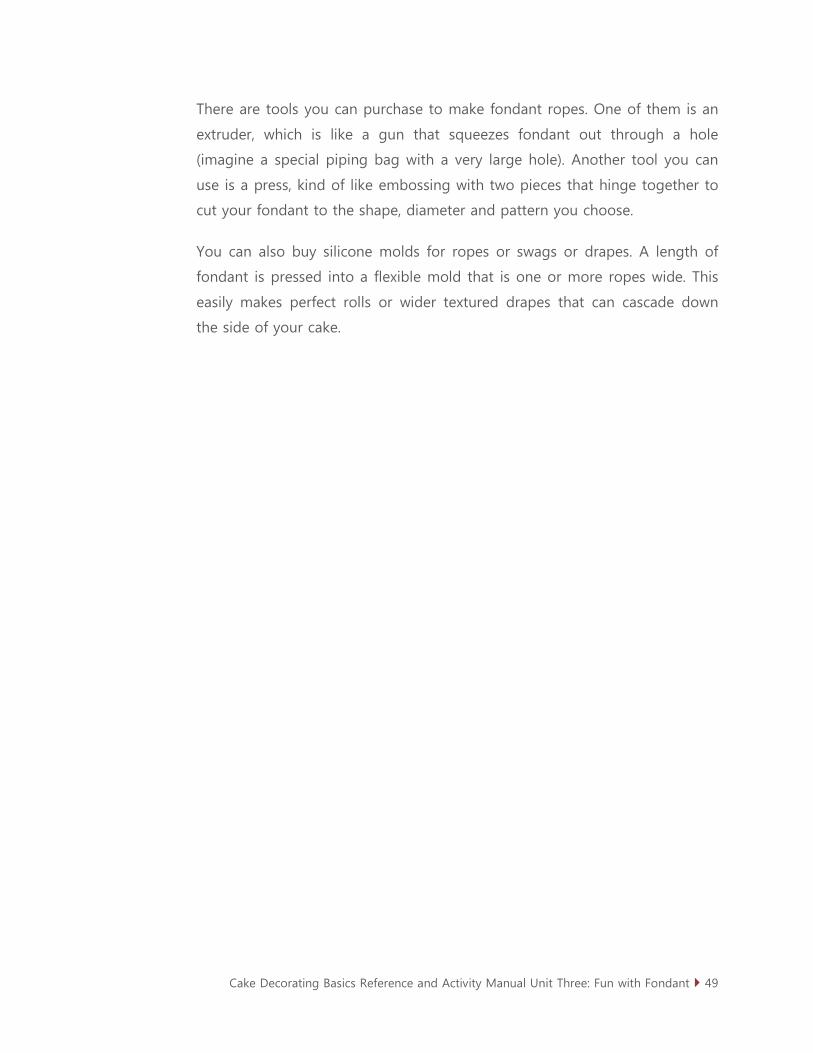
Cake Decorating Basics Reference and Activity Manual Unit Three: Fun with Fondant 49
There are tools you can purchase to make fondant ropes. One of them is an
extruder, which is like a gun that squeezes fondant out through a hole
(imagine a special piping bag with a very large hole). Another tool you can
use is a press, kind of like embossing with two pieces that hinge together to
cut your fondant to the shape, diameter and pattern you choose.
You can also buy silicone molds for ropes or swags or drapes. A length of
fondant is pressed into a flexible mold that is one or more ropes wide. This
easily makes perfect rolls or wider textured drapes that can cascade down
the side of your cake.
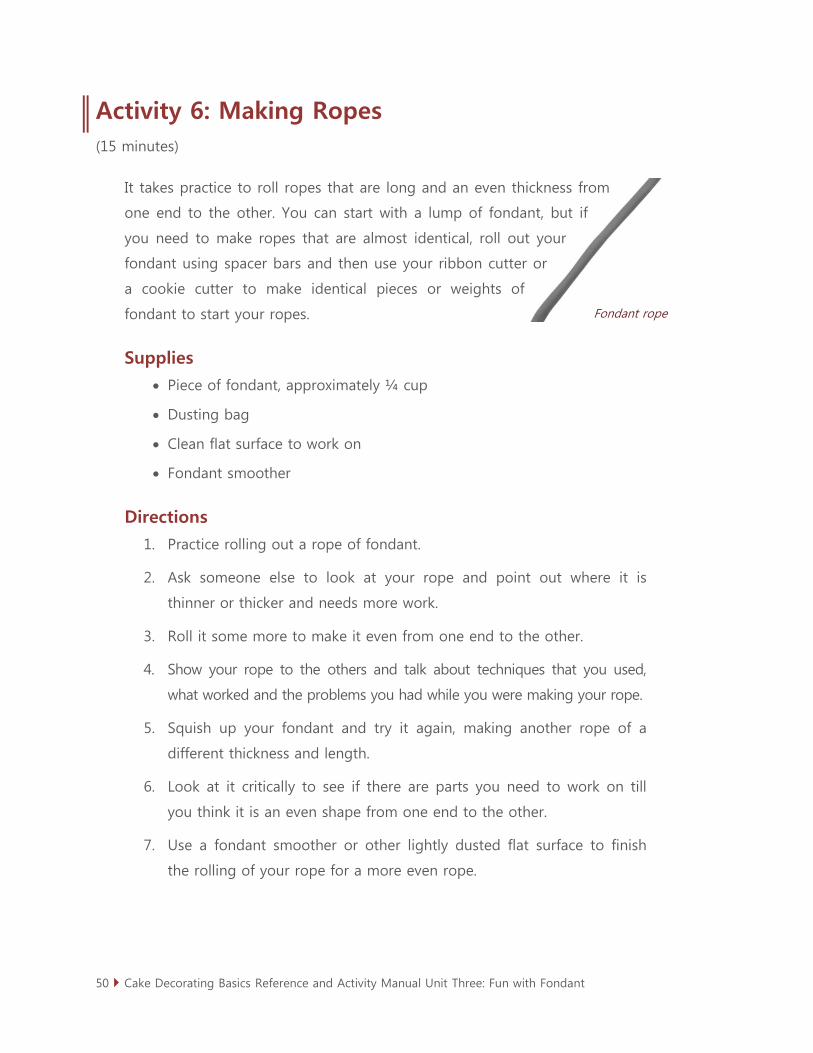
50 Cake Decorating Basics Reference and Activity Manual Unit Three: Fun with Fondant
Fondant rope
Activity 6: Making Ropes (15 minutes)
It takes practice to roll ropes that are long and an even thickness from
one end to the other. You can start with a lump of fondant, but if
you need to make ropes that are almost identical, roll out your
fondant using spacer bars and then use your ribbon cutter or
a cookie cutter to make identical pieces or weights of
fondant to start your ropes.
Supplies
• Piece of fondant, approximately ¼ cup
• Dusting bag
• Clean flat surface to work on
• Fondant smoother
Directions
1. Practice rolling out a rope of fondant.
2. Ask someone else to look at your rope and point out where it is
thinner or thicker and needs more work.
3. Roll it some more to make it even from one end to the other.
4. Show your rope to the others and talk about techniques that you used,
what worked and the problems you had while you were making your rope.
5. Squish up your fondant and try it again, making another rope of a
different thickness and length.
6. Look at it critically to see if there are parts you need to work on till
you think it is an even shape from one end to the other.
7. Use a fondant smoother or other lightly dusted flat surface to finish
the rolling of your rope for a more even rope.

Cake Decorating Basics Reference and Activity Manual Unit Three: Fun with Fondant 51
Something to think about
What techniques worked better? What were other techniques that members
used that worked well for them?

52 Cake Decorating Basics Reference and Activity Manual Unit Three: Fun with Fondant
Twisted or Braided Edging
Different colours and thicknesses of ropes can create a great variety of
edging for your cake and reflect the colour scheme. Thin or thick, or twisting
a thin and thick rope together, or braiding three strands can make a
surprising difference in effects.
Coloured ropes that are loosely twisted will look like rope where the textured
finish uses light and shadow to
add to the interest. If you take
the same twisted rope and gently
roll it till the ropes form one
round log, the effect is more like
a striped straw or candy cane.
The length of rope you make depends on where you plan to use it on your
cake, but the thickness you make it is up to you.
To attach two longer ropes together, use a bit of water or edible glue and
overlap them and roll them together to hide the seam. To twist or braid ropes
together, you need to first attach them to each other at one end. Use a little
bit of water to wet one rope tip where it will be gently pressed to the others.
Press them together but try not to flatten the ends you “glued” together.
• http://www.wilton.com/classes/wiltonschool/class.cfm?id=12AA8FD5
-475A-BAC0-5AC1C9F6272DDA13
Twisted ropes of fondant

Cake Decorating Basics Reference and Activity Manual Unit Three: Fun with Fondant 53
Activity 7: Twisting Ropes (15 minutes)
Using the coloured fondant from Activity 6 you can practice making ropes
and twisting them and braiding them to create different effects. You can use
a piece of white fondant or divide your coloured fondant and trade with
another person to experiment with colour variations.
Supplies
• Fondant from Activity 2
• Fondant similar in size, but a different colour
• Dusting pouch
• Clean dry surface
• Plastic wrap
• Water
• Paint brush
• Fondant smoother
Directions
1. Lightly dust the surface you will be rolling your ropes on.
2. Knead each of the coloured fondant pieces, adjusting its consistency if
necessary.
3. Use your hands to roll out one piece of fondant to a rope that has a
consistent thickness. Finish it with a fondant smoother.
4. Set the rope aside and cover it with plastic wrap to keep it from
drying out.
5. Consider if you want the next fondant rope to be the same thickness
or diameter as your first rope.
6. Use your hands to roll out the other coloured fondant the same
length as your first one.

54 Cake Decorating Basics Reference and Activity Manual Unit Three: Fun with Fondant
7. Brush a small amount of water on one end of a fondant roll.
8. Gently pinch the wet end to the other fondant roll and twist them
together. Try to make the twists the same tightness and length.
9. Use your paintbrush to cut your rope in half and set one piece aside
under plastic wrap.
10. Take the second piece and gently roll it against the counter till it is
smooth; finish it with a fondant smoother.
11. Compare the two ropes you have made.
12. Put both ropes in a sealed plastic bag and save them for the next
activity about curlicues.
Something to think about
Describe the difference in your striped ropes and what you think each one is
better for.
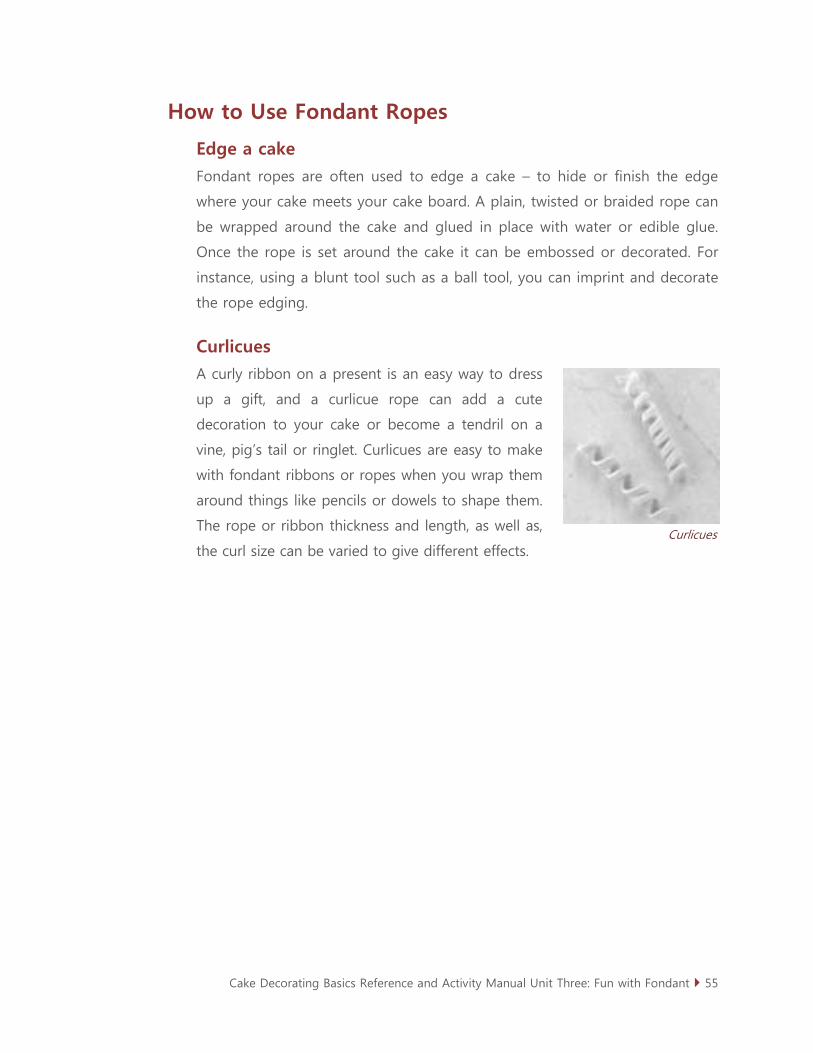
Cake Decorating Basics Reference and Activity Manual Unit Three: Fun with Fondant 55
How to Use Fondant Ropes
Edge a cake
Fondant ropes are often used to edge a cake – to hide or finish the edge
where your cake meets your cake board. A plain, twisted or braided rope can
be wrapped around the cake and glued in place with water or edible glue.
Once the rope is set around the cake it can be embossed or decorated. For
instance, using a blunt tool such as a ball tool, you can imprint and decorate
the rope edging.
Curlicues
A curly ribbon on a present is an easy way to dress
up a gift, and a curlicue rope can add a cute
decoration to your cake or become a tendril on a
vine, pig’s tail or ringlet. Curlicues are easy to make
with fondant ribbons or ropes when you wrap them
around things like pencils or dowels to shape them.
The rope or ribbon thickness and length, as well as,
the curl size can be varied to give different effects. Curlicues

56 Cake Decorating Basics Reference and Activity Manual Unit Three: Fun with Fondant
Activity 8: Making Curlicues (15 minutes)
You can practice making curlicues with the coloured fondant ropes from
Activity 7, and a few other items around the house.
Supplies
• Fondant ropes from Activity 6 or 7
• Dusting pouch
• Clean dry surface
• Clean pencil
• Clean skewer or marker (something a different thickness than your pencil)
Directions
1. Lightly dust the flat surface and whatever you will be wrapping the
fondant ropes around.
2. Roll your textured rope till it is smooth like the other one.
3. With one hand, lightly hold one end of the rope around your pencil.
4. Use your other hand to wrap the rope around the pencil in coils,
being careful not to overlap any of the loops.
5. Slide the pencil out one end of the fondant coils.
6. Use a different object to wrap your second fondant rope around, or
change how far apart the loops are.
7. Slide the second curlicue off and compare them.
8. Use your hands to gently pull on both ends of one of your curlicues
and watch what happens to it as it is stretched.
Cake Decorating Basics Reference and Activity Manual Unit Three: Fun with Fondant 57
Something to think about
Describe the curlicues you made and add notes in the margin that will help
you make them in the future.
What effect did stretching the curlicue have? How would this be helpful or
what problems could it make?

58 Cake Decorating Basics Reference and Activity Manual Unit Three: Fun with Fondant
Swags or Garlands
A swag or garland on the side of a cake or gingerbread house is a rope or
flat smile shape cut from rolled fondant that hangs down in a arc between
the two ends.
Royal Icing Swags
Swags are often made with drop lines of royal icing that are attached to the cake
and fall freely before they are reattached at the next marked point. You were
introduced to this technique in Unit Two as one of the advanced piping skills.
Select the tip you think you would like to use, and practice piping drop line
swags onto your practice board or parchment paper taped to a vertical
surface. Practice your technique and change tips if you think that a different
one will give you the effect you want on your cake. Be sure to practice with
the tip you will be using.
There are a few different ways to make fondant swags.
If a long swag is made from thick rolled fondant, it will gradually sag from its
own weight.
Swags can also be made with a blend of fondant and gum paste because it
is more elastic and stronger so it holds its shape while it dries.
You can make swags using thinly rolled fondant and a circle cutter to cut a
smile and trim its ends; the swag will be flat, thin and lightweight.
Measure your cake and mark the swag starting points with a pin poked into
a cake covered in fondant. Use a measuring tape and calculate how many
swags you need to make, how long each rope should be to make the arc of
your swag.

Cake Decorating Basics Reference and Activity Manual Unit Three: Fun with Fondant 59
Tiered cake with swags
Rope Fondant/Gum Paste Swags
1. Knead your fondant/gum paste mixture and check its consistency.
2. To help make consistently sized ropes, you can either weigh the
pieces of fondant or use a rolling pin and spacer bars to flatten a
larger piece of fondant. Cut identical pieces of this thin mixture with
your ribbon cutter or a cutter to make identical weight pieces to roll
into ropes.
3. With your hands and fondant smoother, roll out your fondant/gum
paste ropes as similar in thickness as possible and cut them to the
lengths you need for the swags.
4. Brush a bit of edible glue on the back of the fondant piece you will
attach or if you are using thin rolls, edible glue on the cake where you
will attach the ends of each rope.
http://www.youtube.com/watch?v=gpq_qMBIGds
Fondant Drape Molds
Silicone molds make perfect swags or drapes. You can also use guns or
extruders to make string work. The guns have a variety of disks to allow you
to make different shapes of string work.
Watch this video to see how the tool is used:
• http://www.youtube.com/watch?v=srqQyvZk3dc
Cut out Fondant Swags
1. Knead your fondant/gum paste mixture and
check its consistency.
2. Roll the fondant to 1/8” or 3 mm thick using
your rolling pin and spacer bars or rings.
3. You can imprint the fondant now or
emboss the swags once they are cut,
before you mount them on the cake.

60 Cake Decorating Basics Reference and Activity Manual Unit Three: Fun with Fondant
4. Cut a circle using a large round cutter.
5. Move the cutter up about 3/4 in. and cut again. (The depth
determines how wide your swag will be from top to bottom.)
6. Trim 1/4 inch off each tip to tidy up the ends and make the swag a
smile shape.
Cake Decorating Basics Reference and Activity Manual Unit Three: Fun with Fondant 61
Activity 9: Fondant Swags Only by experimentation will you understand the steps to make different
kinds of swags and judge for yourself which one you prefer or how they may
be used.
Supplies
• 1 cup of fondant
• Dusting pouch
• Shortening for your hands
• Rolling pin
• Spacer bars or rings
• Large circle cutter
• Knife
Directions
1. Make a series of five swags that you would use to fit on the side of a
cake if each marker on the cake was three inches apart. Note that you
will need to roll longer ropes to allow for their draping, but that you
will need a circle cutter about 3.5 inches in diameter because you will
be trimming the smile swag tips.
Something to think about
Describe your rope swags. How long did it take to make them? What do you
think of their appearance?
62 Cake Decorating Basics Reference and Activity Manual Unit Three: Fun with Fondant
Describe your rolled fondant smile swags. How long did it take to make
them? What do you think of their appearance?
Add other notes about “how to” ideas that may help you next time you make
either kind of fondant swag.

Cake Decorating Basics Reference and Activity Manual Unit Three: Fun with Fondant 63
Cake with circle and ball decorations and edge
Fondant Balls
It can seem pretty basic to roll a little ball of
fondant in your hands, but there is a trick to
rolling balls that are identical in size and
weight. If your cake design needs a series
of balls to cover the top of swags, as an
edge or border around the bottom, or as
the base for gum paste flowers, you need
to know how to make balls that are all the
same size.
Each ball must start with the same amount of fondant. This is easy to do if
you first roll out the fondant to a consistent thickness using your rolling pin
and spacer rings or bars, and then use the same cutter to cut out enough
pieces to roll a ball from each of them. Some of the most common sizes
used by cake decorators are made by rolling out the fondant either 1/8” (3
mm) or 1/4” (6 mm) thick, as measured by spacer bars or rings.

64 Cake Decorating Basics Reference and Activity Manual Unit Three: Fun with Fondant
Circle cutter set
Activity 10: Rolling Balls Here is your opportunity to experiment with cutters to
give you the correct amount of fondant for each ball
you want to make. Most people use circle cutters
but you can use any cutter you want that will give
you the size of ball you need. You can use your
piping tips as cutters. If you do not have a small
enough cutter or need an “in between size”, use a cutter
and then cut the circle in half to find the combination that works for you.
Supplies
• Fondant (1/4 to 1/2 cup approximately)
• Rolling pin
• Dusting pouch
• Flat surface or mat
• Guide rings or bars
• Circle cutters of various sizes, including piping tips
• Ruler or measuring tape
Directions
1. Knead the fondant and be sure it is soft and is the correct consistency.
2. Lightly dust your working surface.
3. Roll out the fondant to 1/8” (3mm) thick.
4. Cut out three circles of each different size (at least three different sizes).
5. Roll the circles in your hands to make them into balls.
6. Cut one of each circle in half and roll it into a ball to see the diameter
of ball it makes.
7. Squish up the leftover fondant and roll it out using your 1/4” (6 mm)
dowels. Use cutters and roll balls. Compare these sizes with the ones
you made using the 1/8” rolled fondant.

Cake Decorating Basics Reference and Activity Manual Unit Three: Fun with Fondant 65
Something to think about
Measure the diameter of each cutter and the ball that it becomes when
rolled, being sure to include if the fondant was rolled to 1/8” or 1/4”
thickness. Note that information here to refer to in the future. Do not forget
any half sizes you made.
Squish up your balls and put them and the unused fondant as one ball in a
plastic bag so it does not dry out.
66 Cake Decorating Basics Reference and Activity Manual Unit Three: Fun with Fondant
Attaching Decorations
Fondant pieces can be attached with a little
bit of water, royal icing or edible glue. Edible
glue can be bought or homemade. To make
edible glue, break a pea-size ball of gum
paste into about 1/4 cup of water. The gum
paste will begin to dissolve and make the
water into sticky, thin glue. Use a thin paint
brush to dampen the surface you are sticking
a fondant decoration to. Too much water or
glue and the decoration will slide around
instead of sticking.
Tip:
If you accidentally get
water droplets on your
fondant-covered cake,
blot it off right away
with paper towel. Rub a
little icing sugar over
the wet spot to help dry
out the fondant so it
does not leave a mark.

Cake Decorating Basics Reference and Activity Manual Unit Three: Fun with Fondant 67
Activity 11: Bake 12 Cupcakes, Make Buttercream Icing or Ganache and Fondant to Cover it. Research Cupcake Designs. (60 to 90 minutes at home)
Before the next group meeting, you have to do some homework to be able
to decorate your first cupcakes. Remember that fondant is heavy and the
cakes or cupcakes need to make a firm, heavier cake to support the
decorations. Freeze the cupcakes if you are making them ahead of time, and
be sure to double layer the fondant so it does not dry out. You can colour it
at the meeting. Ganache or buttercream icing can be made a day ahead of
time and stored properly.
Find something circular to cut fondant (like a glass, clean empty can or
cookie cutter) that is the same diameter as your baked cupcake tops. Bring it
to the next meeting.
Go online and search fondant cupcake ideas and images. Instead of picking a
theme for decorating, look through the decorating techniques of ropes, balls
and ribbons, ruffles and rolled roses. Look for images of cupcakes that use
these techniques. (You will not be making bows just yet.) Sketch them or
print them and bring them to the next meeting.
Supplies to bring to the next meeting (bring tools to all meetings)
• Container to hold 12 decorated cupcakes
• Dusting pouch
• 12 Cupcakes
• Circular cutter the same size as your cupcake tops
• Fondant
• Buttercream or ganache
• Spatula
• Shortening for your hands

68 Cake Decorating Basics Reference and Activity Manual Unit Three: Fun with Fondant
• Extra icing sugar
• Food colouring
• Rolling pin
• Spacer bars or rods
• Ribbon cutter
• Pizza cutter
• Ruler
• Resealable plastic bags
• Plastic wrap
• Small thin paint brush
• Small resealable container for water or edible glue
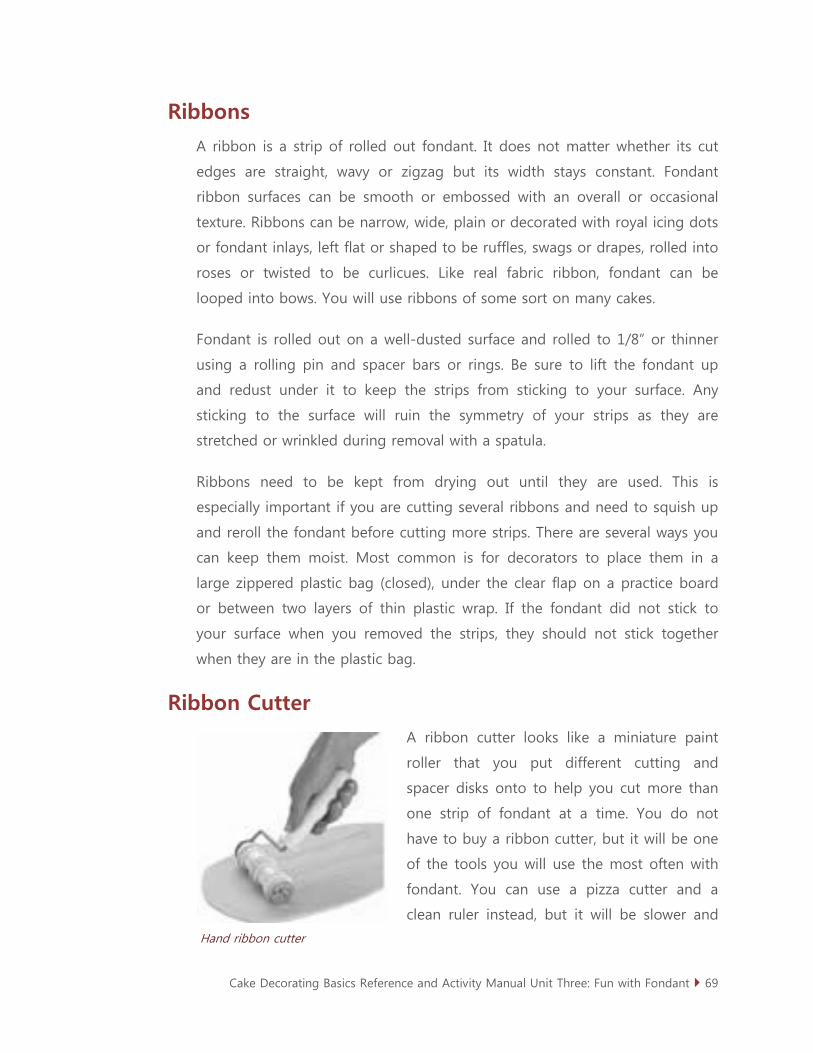
Cake Decorating Basics Reference and Activity Manual Unit Three: Fun with Fondant 69
Ribbons
A ribbon is a strip of rolled out fondant. It does not matter whether its cut
edges are straight, wavy or zigzag but its width stays constant. Fondant
ribbon surfaces can be smooth or embossed with an overall or occasional
texture. Ribbons can be narrow, wide, plain or decorated with royal icing dots
or fondant inlays, left flat or shaped to be ruffles, swags or drapes, rolled into
roses or twisted to be curlicues. Like real fabric ribbon, fondant can be
looped into bows. You will use ribbons of some sort on many cakes.
Fondant is rolled out on a well-dusted surface and rolled to 1/8” or thinner
using a rolling pin and spacer bars or rings. Be sure to lift the fondant up
and redust under it to keep the strips from sticking to your surface. Any
sticking to the surface will ruin the symmetry of your strips as they are
stretched or wrinkled during removal with a spatula.
Ribbons need to be kept from drying out until they are used. This is
especially important if you are cutting several ribbons and need to squish up
and reroll the fondant before cutting more strips. There are several ways you
can keep them moist. Most common is for decorators to place them in a
large zippered plastic bag (closed), under the clear flap on a practice board
or between two layers of thin plastic wrap. If the fondant did not stick to
your surface when you removed the strips, they should not stick together
when they are in the plastic bag.
Ribbon Cutter
A ribbon cutter looks like a miniature paint
roller that you put different cutting and
spacer disks onto to help you cut more than
one strip of fondant at a time. You do not
have to buy a ribbon cutter, but it will be one
of the tools you will use the most often with
fondant. You can use a pizza cutter and a
clean ruler instead, but it will be slower and
Hand ribbon cutter

70 Cake Decorating Basics Reference and Activity Manual Unit Three: Fun with Fondant
Ruffles
take more patience than using a ribbon cutter. A ribbon cutter also comes
with wavy cutting wheels.
Ribbon cutters are made to cut fondant or 50/50 fondant gum paste mixes
that are 1/8” (3 mm) or thinner. The metal disks that hold your cutting edges
and spacers in place sometimes roll against the flattened fondant and leave a
mark, which is frustrating if it appears on one of the ribbons you thought
you were going to use.
When you use a ribbon cutter, its blades need to roll easily to be able to cut
your fondant without pulling and stretching it. Once you put the straight or
wavy cutting blades on, roll the ribbon cutter back and forth a few times on
your clean counter to check if it rolls easily. If the blades are stiff to roll, do it
a few more times and the wing nuts should loosen a little and make the
rolling easier.
Ruffles
Flat ribbons can be gently pinched with
your fingers to make ripples or ruffles
that are added to a cake or to decorate
a fondant-covered cake board. As a general rule, ruffles take a strip or ribbon
of 1/8” (3 mm) fondant about two or three times the length you want the
finished ruffle to be. As you fold or gather one edge of the ribbon, you can
add strips by tucking the narrow, cut end of another ribbon under the ruffle
before it.
If you are right-handed, work from left to right, but if you are left-handed,
start on the right and work towards your left to keep your hand from
bumping the folds you just made. Fold small sections of the ribbon together
to form separate ruffles with the open folds closest to you.
Use a small amount of water or edible glue to attach the ruffle to your
fondant cake. Too much moisture will make your ruffle slip out of place
before it dries to the cake.
Cake Decorating Basics Reference and Activity Manual Unit Three: Fun with Fondant 71
Activity 12: Cut Ribbons and Ruffle Them Ruffles are ribbons of fondant that are pinched on one side to look like a
skirt. You can decide how wide they are and can use 1/8” (3 mm) fondant or
thinner to make them. Change the spacing and amount of pinching and you
will have very different looking ruffles.
Supplies
• Fondant
• Ribbon cutter or knife and ruler
• Dusting pouch
• Rolling pin
• Spacer rings or bars
Directions
• Take off your jewellery.
• Dust a clean flat surface with your dusting pouch.
• Knead your fondant to soften it and check its consistency.
• Roll out your fondant to 1/8” (3 mm) thick using your rolling pin and
spacer rings or bars.
• Remember to lift the fondant, turn and redust it as you roll it so it
does not stick to the counter.
• Use your ribbon cutter to make several strips of fondant.
• Lift ribbons out and store extras in a sealed plastic bag or under your
practice board clear sheet.
• Store extra fondant and scraps in a plastic bag so they do not dry out.
• Pinch ruffles as evenly as possible.
• Squish up the extra fondant, knead and reroll it, change the ribbon
width and make more ruffles.
72 Cake Decorating Basics Reference and Activity Manual Unit Three: Fun with Fondant
Something to think about
Did your ribbon cutter silver parts make any indentations on the fondant as
you rolled the cutter? Then your fondant was not quite thin enough.
What width of ribbon did you prefer for ruffles? What is the thinnest ruffle
you liked the look of?
Make any notes to help you in the future with your ribbon cutter and making
ruffles.

Cake Decorating Basics Reference and Activity Manual Unit Three: Fun with Fondant 73
Ribbon rose
Ribbon Rose
A ribbon rose from fondant will remind you in
appearance of the fabric rose you learned top
pipe using buttercream icing. It is a simple way to
add an elegant decoration to a cupcake or cake.
To make the ribbon rose, fondant is first rolled to
1/8” (3 mm) thick on a dusted surface and cut into
strips. When the bottom edge of the strip is dampened
and pinched as the strip is rolled to gradually be looser and
looser, the bottom edge forms the base of your rose while the top edge swirl
gradually opens to look like a rose. Use your fingers or a modelling tool to
slightly bend the top edge outwards. Use scissors or a sharp knife to trim the
bottom of your rose to stand the height you want.
Rolled ribbon roses can be made any size, but large ones are best made with
a 50/50 fondant gum paste mixture to help them hold their shape as they
dry. If you would like to make more delicate ribbon roses, a 50/50 mixture
will also hold its shape well when it is rolled to 1/16” thick.
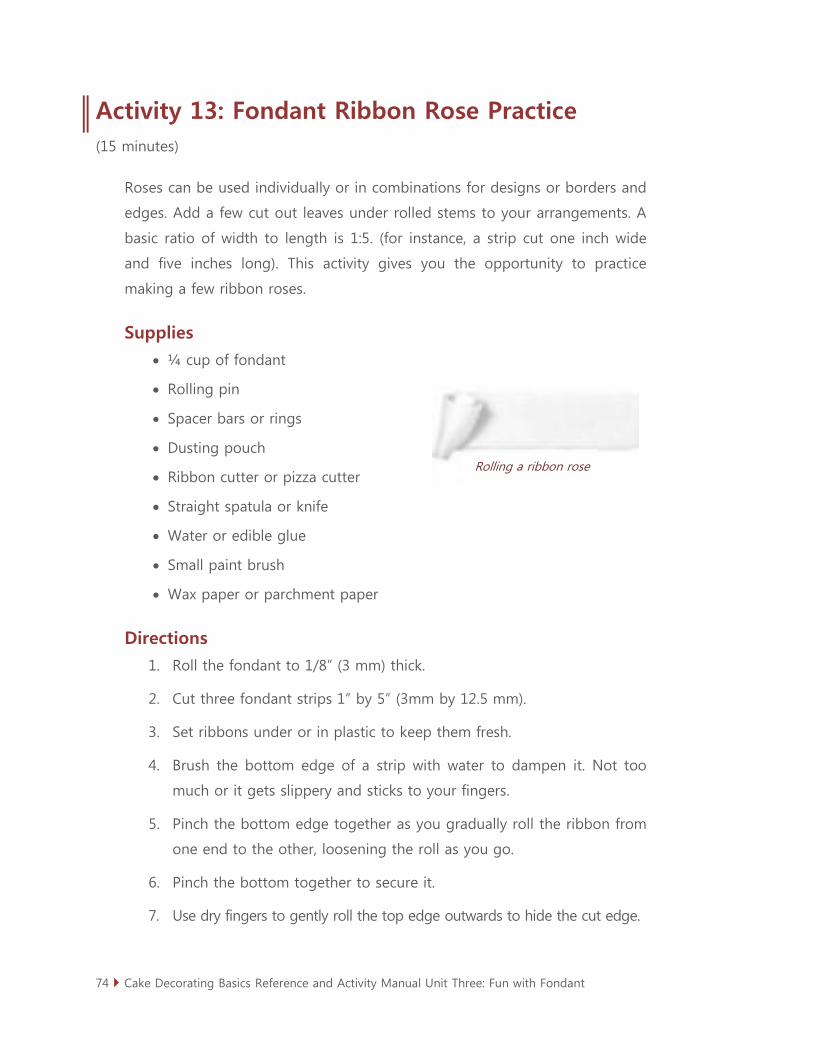
74 Cake Decorating Basics Reference and Activity Manual Unit Three: Fun with Fondant
Activity 13: Fondant Ribbon Rose Practice (15 minutes)
Roses can be used individually or in combinations for designs or borders and
edges. Add a few cut out leaves under rolled stems to your arrangements. A
basic ratio of width to length is 1:5. (for instance, a strip cut one inch wide
and five inches long). This activity gives you the opportunity to practice
making a few ribbon roses.
Supplies
• ¼ cup of fondant
• Rolling pin
• Spacer bars or rings
• Dusting pouch
• Ribbon cutter or pizza cutter
• Straight spatula or knife
• Water or edible glue
• Small paint brush
• Wax paper or parchment paper
Directions
1. Roll the fondant to 1/8” (3 mm) thick.
2. Cut three fondant strips 1” by 5” (3mm by 12.5 mm).
3. Set ribbons under or in plastic to keep them fresh.
4. Brush the bottom edge of a strip with water to dampen it. Not too
much or it gets slippery and sticks to your fingers.
5. Pinch the bottom edge together as you gradually roll the ribbon from
one end to the other, loosening the roll as you go.
6. Pinch the bottom together to secure it.
7. Use dry fingers to gently roll the top edge outwards to hide the cut edge.
Rolling a ribbon rose

Cake Decorating Basics Reference and Activity Manual Unit Three: Fun with Fondant 75
8. Make two more ribbon roses and set them aside on wax paper or
parchment paper to dry.
Something to think about
What do you think of the ribbon roses?
How did you change your technique as you practiced making the ribbon roses?
Note here any other tips for yourself about the technique.

76 Cake Decorating Basics Reference and Activity Manual Unit Three: Fun with Fondant
Activity 14: Covering and Decorating Cupcakes with Fondant (60 minutes)
Cupcakes are easy to cover with fondant once they are covered with a thin
layer of buttercream icing or ganache. Remember to keep your fondant away
from the air and place unused fondant or decorations you are making in
sealed plastic bags or covered with plastic wrap.
Supplies
• Container to hold 12 decorated cupcakes
• Dusting pouch
• 12 Cupcakes
• Circular cutter the same size as your cupcake tops.
• Fondant
• Buttercream or ganache
• Spatula
• Shortening for your hands
• Extra icing sugar
• Food colouring
• Rolling pin
• Spacer bars or rods
• Ribbon cutter
• Pizza cutter
• Ruler
• Dusting pouch
• Resealable plastic bags
• Plastic wrap
• Small thin paint brush
• Small resealable container for water or edible glue

Cake Decorating Basics Reference and Activity Manual Unit Three: Fun with Fondant 77
Directions
1. First cover all of your cupcakes with either a thin coat of ganache or
buttercream icing.
2. Let the undercoat set before you put the fondant on it.
3. Knead and colour fondant for your cupcakes and the decorations you
plan to use on them.
4. Cover and decorate your dozen cupcakes using the decorative
fondant techniques you have learned.
Something to think about
What did you think of your cupcake collection?
Take a picture of your cupcake collection and fill in your cake journal.
Bring a box about 20 cm square or a shoebox to your next meeting.

78 Cake Decorating Basics Reference and Activity Manual Unit Three: Fun with Fondant
Bow on cupcake
Bows
You can loop fondant ropes to shape bows, or you can
use ribbons of fondant to make ribbons that lie flat
against your cake. Water or edible glue is used to
attach the pieces and to hold the bow to your
cake. Three- dimensional bows can be made with
ribbons of fondant cut and looped. Then they are
cut and shaped into loops with their pinched ends
glued together and then they are set on their sides to
dry overnight.
Larger three-dimensional bows are made from a mixture of 50/50 fondant
and gum paste. (The gum paste helps the loops hold their shape while they
dry.) Do not try to make bows with straight gum paste because the ribbons
will dry and crack by the time you are shaping them into loops.
Make fondant bow loops a day ahead of time so they can dry before you put
them into a bow or they will crack and sag. If you are using a 50/50 mixture
of fondant and gum paste, the loops do not need to dry completely, but
should be firm before you assemble the bow.
Classic Bow
A bow can be made large and dramatic, with lots of loops or fewer, with one
colour of ribbon or a variety of them, textured, embossed, with wavy edges
or straight. If you are following the directions for a specific project, they
should tell you how wide and long to make each strip of fondant for your
loops and how many you will need to create the bow. If you are designing
your own cake, it may take a bit of practice to get the effect you want.
Because of this, it is a good idea to make notes about the measurements you
used for each bow loop, how many loops you needed and the final size of
bow that it made. Taking a picture of your assembled bow may help too.

Cake Decorating Basics Reference and Activity Manual Unit Three: Fun with Fondant 79
The classic bow can be made ahead of time if you assemble it on a flat circle
base of rolled fondant about 2” (5 cm) wide, or you can put the bow
together directly on your cake with water or edible glue under the central,
flat parts of your loops. (An assembled bow base is glued in the same way.)
Lightly dust your counter or mat and roll the fondant to 1/8” (3 mm) using
your spacer bars and rolling pin. Cut strips for bow loops using dimensions
listed in project instructions.
Fold the strips over to form loops but do not bend
them in a crease. Brush the ends lightly with a
damp brush or edible glue. Line up the ends of
each strip and gently pinch them together. If your
loops are ½” wide or more, you will need to trim
the pinched end corners off at 45 degrees to help
them fit together in the centre of your bow.
If you are making a large bow, you may prefer to have the one to three
central loops cut a little longer than the ones around the outside rings.
Set the individual loops on their sides to dry.
Cut out a circular flat base and brush it all over
with edible glue. Set six or seven bow loops in a
circle to make the bottom of the bow. (you can use
more, there is no rule but fewer than five looks
kind of sparse.) Brush the centre of this circle of
loops with a dampened paint brush or edible glue
before adding another circular layer of loops. Place
this next ring of loops on top of the others, having
them meet at the centre and trying to fill the visual gaps between the
bottom circle of loops. Press the tip of each loop to the wet loops below it.
Ribbon, formed loop
Bow bottom layer

80 Cake Decorating Basics Reference and Activity Manual Unit Three: Fun with Fondant
Brush edible glue on the centre again before
attaching your centre or central loops. Fill in centre
of the bow with one to three loops. “Fluff up” your
bow and let it dry.
Some cake decorators use a second small, flat
circle of rolled fondant between the bottom layer
of loops and the second ring above them. If you
use a second fondant disk, be sure to use edible glue on both sides of it.
Classic bow
Cake Decorating Basics Reference and Activity Manual Unit Three: Fun with Fondant 81
Activity 15: Three-dimensional Classic Bow Most bows on cakes will have other ribbons set under them or coming out
from under them. Those ribbons may be straight or curlicues, but they are
usually cut the same width and pattern as the bow, but they do not have to
be. Something in their design or the overall cake design should visually tie
them together. The bow you assemble in this activity can be saved in a
cardboard box and used sometime when you want it.
Supplies
• Fondant (about 1 cup)
• Dusting pouch
• Ribbon cutter (can use a pizza cutter instead)
• Ruler
• Straight spatula or knife
• Water or edible glue
• 2” circle cutter
• Rolling pin
• 1/8” measuring rings or dowels/skewers
Directions
1. First you need ribbons to make loops and a central base to build your
bow unless it is going to be assembled on a cake. For this activity,
you will need a circle. Roll your softened fondant 1/8 inch thick, using
your rolling pin, dusting pouch and spacer bars of rings.
2. Cut 15 strips 1/2 inch wide and 4 inches long. Put them in a plastic
bag, under your practice board plastic, or set plastic wrap on top of
them to keep them moist while you cut enough strips. Do not forget
to cut out a circle.
3. Form the ribbons into loops by brushing a small amount of water or edible
glue on one end of the underside of each strip and pressing its ends
together. Too much water or glue just makes them slippery and weaker.

82 Cake Decorating Basics Reference and Activity Manual Unit Three: Fun with Fondant
Curled ribbon cake
4. Set the loops on their sides to dry on parchment paper or waxed paper.
If you use fondant, let the loops dry overnight. If you use a 50/50
mixture of fondant and gum paste, the loops can be assembled as early
as 30 minutes after you make them. (They can rest much longer though
and will be strong and dry when you assemble your bow.)
5. To make the bow, dampen the cut out circle with water or edible
glue. Place six loops with their flattened ends together for the base
row. If they do not fit snugly together in the centre, trim their corners.
No one will see the centre. Check to be sure the loops are all the
same length to make a round bow. Add a bit of water or edible glue
on the bottom flat part of your next ring of six loops (five if they
don’t seem to fit well). Position them so that their loops are between
the bottom ones to fill in the spaces as you look from directly above
the bow. Trim the tips or corners or your loop ends as needed to get
them to fit well. Press them gently but firmly to the first ring to help
the glue set.
6. Your final centre can vary. You may want to use two or three loops
standing up for the middle. If you want your bow to be flatter, trim
off more of the pinched end of your loops before you wet them to
stick to the centre of the row below them.
Curled Ribbon
Just like curlicues, you can twist ribbon strips around
pencils or dowels to dry. Drying time depends
on whether you are using fondant or a 50/50
mixture of fondant and gum paste. Usually
the ribbons are cut to 1/8” (3 mm) and curled
ribbons are not usually more than 1/2” (12
mm) wide. The length, amount of twist and
ribbon width are up to you and your design.

Cake Decorating Basics Reference and Activity Manual Unit Three: Fun with Fondant 83
Quilled flower
Remember to place your curled ribbon ends tucked under or against the
base row of any bow or other decoration.
Curls that are completely dry before being attached to your cake or cupcake
can add a three-dimensional aspect to the design. They can stand up at an
angle or be suspended over the edges of your cake, or drape from one layer
to another.
Quilling
Quilling is a design technique that originally was made
with thin strips of paper mounted on their sides to
be three-dimensional lines. These lines drew
textured decorations. You can use thinly rolled
fondant or a 50/50 fondant gum paste mixture cut into
¼” (6 mm) strips to quill on a cake. Cut any wider, the
ribbons do not stand up vertically.
Brush one edge of each ribbon with water or edible glue before swirling it or
using it to form a line. Quilling looks best if the spaces between your
standing ribbons are even. Be sure the ribbons stand straight up as they dry.

84 Cake Decorating Basics Reference and Activity Manual Unit Three: Fun with Fondant
Activity 16: Quilling Practice (10 minutes)
Copying the quilling picture will give you a basic understanding of the
quilling technique. You will not need to wet any of the fondant ribbons
because you are just practicing the technique and not really gluing them to
each other or a cake. The fondant can be squished up and reused for
another activity.
Supplies
• Fondant (about ½ cup) can be one or two colours
• Dusting pouch
• Ribbon cutter (can use a pizza cutter instead)
• Ruler
• Straight spatula or knife
• Water or edible glue
• Rolling pin
• 1/8” measuring rings or dowels/skewers
• Practice board or another stiff surface
Directions
1. Roll out the fondant to 1/8”( 3 mm) thick using your rolling pin,
dusting pouch and spacer bars or rods. Lift the fondant periodically
and dust the counter surface as you work.
2. Using a ribbon cutter or pizza cutter and ruler, cut thin ribbons ¼”
wide the length of your fondant. Cut at least seven strips 4” long.
3. Use the ribbon strips to copy the picture of the quilled flower but
make it larger than the one in your book.
4. Start with the centre and build the rest of the flower around it.

Cake Decorating Basics Reference and Activity Manual Unit Three: Fun with Fondant 85
Something to think about
Describe your quilling experience in detail. What was easy? What was difficult
to do?
Do you like the look of quilling?
What are some other cake decorations you can think of that quilling could
be used to make?

86 Cake Decorating Basics Reference and Activity Manual Unit Three: Fun with Fondant
Star inserts and overlays
Cut-Outs and Overlaying
Cut-outs are easy to do and quickly add colourful,
impressive fondant designs. A cut-out can be as
simple as using a cookie cutter on fresh, thinly rolled
fondant and overlaying them on the fondant cake with
water or edible glue. Cut-outs layered one on top of
another or shaped with modelling tools can look
spectacular. A cut-out flower can be dried in a curved
form to add more depth to your designs.
One way of using cut-outs is with a double
coating of contrasting colours of fondant on
a cake. Let the first fondant layer dry to keep
your next one from sticking to it. The second
layer of fondant will be placed over the first
one and smoothed.
Use the extra pieces of the two layers of
fondant to make a practice area for yourself.
Layer them and while the top layer is still
fresh and moist, press the cutter into it,
being careful to cut through only the top
layer of fondant. Make sure your cutter
makes crisply cut edges so it is easier for you to pick out the pieces without
damaging them. Practice your technique of cutting and removing the cut-
outs. Do not jiggle the cutter when you place it on the fondant. This can
stretch, shrink or change the shape of your
cut-out. Be patient and when you are ready,
begin on your cake.
Cut and lift out the shapes. You can use
these cut outs on the cake if you would like
to by dampening the backs with water or
Six circle cut-outs
Tip:
Cut-outs must be
pressed into fresh,
moist fondant. If it dries
somewhat, the cutter
does not cut it easily
and the cut-out shape
can become distorted.

Cake Decorating Basics Reference and Activity Manual Unit Three: Fun with Fondant 87
Zebra cupcake
Circle cut from cake
edible glue and stick them to other parts of your cake. Other cut-outs can be
used on the cake too.
A word of caution: it is very difficult to cut out a shape going around a
corner. It is best to plan your design to use an overlay at that spot. It will
bend over or can sit at an angle where the sides meet.
Cut-outs can be shaped with modelling tools, pinched,
puckered or dried on a curved surface to give them
additional three-dimensional effects or details before
being glued to the cake. For instance, flower cut-
outs that are dried in egg cups or shallow dishes can
add some pizzazz to a cake. Overlays can be any shape
really, and added to be eyes, mouths, hearts, polka dots,
buttons, etc.
Inserts or Inlays
A cake that is covered in buttercream icing and a
single layer of fondant can be decorated with cut-
outs. However, the buttercream undercoat must be
thin; thicker icing becomes too flexible under your
pressing cutter and the fondant may stretch a bit before
it is cut. This distorts the shape of the hole.
Different coloured rolled fondant inlays or inserts can be cut with the same
cutter and pressed into the identical holes on your cake. It is especially
important not to jiggle the cutter when it is pressed onto the fondant.
Jiggling or wiggling to make sure it cut through the fondant will ruin your
inlay because the hole shape or inlay/cut-out shape will not match perfectly.
Press the cutter firmly but do not wiggle it.
The buttercream, water or edible glue can hold the inlay in place. Smooth
the inlay with a dusted finger or with your cake smoother. Some inlays are

88 Cake Decorating Basics Reference and Activity Manual Unit Three: Fun with Fondant
purposefully dried and decorated before being set into matching cut-outs
holes on the cake.
Cut-outs can be rolled extremely thin if they will be set on a cake. They do not
have to be cut out the same thickness as the draped fondant on your cake.
You may want to watch videos online if you have questions about cut-outs.
Here is a good one:
• http://www.youtube.com/watch?v=srqQyvZk3dc

Cake Decorating Basics Reference and Activity Manual Unit Three: Fun with Fondant 89
Activity 17: Using Inlays and Overlays (30 minutes)
With two different colours of fondant, you will practice overlays and inlays,
how to lift the cut-outs and set them in holes. When you use this technique
on a cake, be sure to practice right before you begin cutting the fresh fondant.
Supplies
• Two ¼ cup pieces of fondant in different colours
• Two differently shaped cutters (a circle, star, etc.)
• Rolling pin
• Dusting pouch
• Spacer bars or rods
• Water or edible glue
• Small paint brush
Directions
1. Roll out one piece of fondant 1/8” (3 mm) thick and press each cutter
into it to make two cut-outs. Leave the rest of it as a smooth, flat
piece of fondant and set it aside on parchment or wax paper.
2. Roll out the second piece of fondant 1/8” (3 mm) thick and while it is
fresh, press each cutter into it three times.
3. Practice lifting the cut-outs with a knife or spatula and setting them into
other matching holes, and gluing some on the other coloured fondant.
Something to think about
Note helpful tips you learned as your practiced.

90 Cake Decorating Basics Reference and Activity Manual Unit Three: Fun with Fondant
Embossing
Imprinting or pressing a pattern into the fondant. It does not need any special
tools (but lots are for sale) because you can use clean things you have at
home such as patterned buttons, jewellery or handles of utensils. Dust the
clean, dry tool you are using for embossing before pressing it to the fondant.
Press evenly to gently indent the pattern onto the surface of your fondant. If
you want to cover a large area, just repeat the indentation, trying to space it
evenly and pressing the same amount each time to make the patterns as
similar as possible. You can later paint the designs with food colouring.
Some common tools for embossing include washable things like wallpaper,
or thin, flexible textured sheets for cake decorating. You can emboss or
texture the fondant before your drape it on a cake or once it is already in
place on your cake. To evenly press the textured sheet, use your rolling pin
or fondant smoother. Gently peel off the embossing sheet to reveal your
design. Once the fondant is rolled out to the size needed to drape a cake, a
textured mat can be set on top and rolled over with a rolling pin to imprint
the texture on your fondant. You can use your ribbon cutter wheels to
emboss ridges or other patterns in a line.
Here are few videos about embossing fondant:
• http://www.youtube.com/watch?v=moxgPogqpwA
• http://www.youtube.com/watch?v=fB-GqdLWeIk
• http://www.youtube.com/watch?v=QAYildCjbwg
Quilting
A quilted or stitched effect can be embossed with a
roller cutter on fondant. Prepare the counter and
rolling pin and roll out your kneaded fondant to 1/8
inch thick.
Diagonal quilting

Cake Decorating Basics Reference and Activity Manual Unit Three: Fun with Fondant 91
1. If you are planning to quilt a cut-out, cut the shape first.
2. Use a ruler edge to guide your wheel to space the lines evenly.
3. Lightly roll the cutter/embosser wheel over your cut piece to create
diagonal lines.
4. Roll the wheel in the opposite direction to create a quilted diamond
pattern.
92 Cake Decorating Basics Reference and Activity Manual Unit Three: Fun with Fondant
Activity 18: Embossing Experimentation (30 minutes)
Find some interesting textures or patterns to emboss to practice applying
even pressure, spacing of designs and embossing effects you like.
Supplies
• 1 cup of fondant
• Shortening for your hands
• Dusting pouch
• Rolling pin
• Variety of clean, dry embossing tools including cookie cutters, buttons,
cutting wheels, kitchen utensil handles, etc.
Directions
1. Rub your hands with shortening.
2. Lightly dust the counter surface.
3. Knead your fondant to make sure it is the correct consistency.
4. Using a dusted rolling pin and spacer bars, roll your fondant to 1/8”
(3 mm) thick.
5. Lightly dust the embossing tool before using it.
6. Experiment with spacing and the tools you have.
7. Squish up the fondant into a ball and repeat using different
embossing tools.

Cake Decorating Basics Reference and Activity Manual Unit Three: Fun with Fondant 93
Something to think about
List the items you used to emboss the fondant. Note which ones you
thought worked well and things you want to remind yourself if you use them
again. Include which ones would be good for borders or all over patterns.
Note any other uses you thought of for the embossing tools.
94 Cake Decorating Basics Reference and Activity Manual Unit Three: Fun with Fondant
Crimping
Crimping is pinching fondant to create a three-dimensional design where
part of the fondant is puckered or pillowed up when the part around it is
squeezed together. It is a simple and effective border around the top of a
cake or a rope border at the base.
Crimpers look a bit like oversized, wide
tweezers or short tongs with curved points.
They are inexpensive tools and come in a
variety of shapes and sizes and designs. A
crimper will have an “O” ring on it that you
can adjust to set the distance between the
pinching ends to help your crimping be
consistent. The further apart the pinching
ends are, the wider they reach and make a
larger pucker.
You must crimp the fondant within about 15 minutes of rolling it out. It
needs to be fresh and supple. To get the effect you want, practice on a piece
of fondant before crimping a cake to learn how much pressure you need to
push the crimper in, and squeeze before gently releasing it and lifting it off
the fondant.
If you are crimping on a flat surface, hold the crimper at a 90 degree angle
(straight out) but if you are using it at the edge of a cake or board, hold it at a
45 degree angle to pinch a bit of fondant from each of the two different sides.
An excellent demonstration and how–to video to watch is:
• http://www.youtube.com/watch?v=XkIaVs08Eg0
Other videos that show you how to crimp the top corner and rope edging include:
• http://www.youtube.com/watch?v=yaAoBm-uEgo
• http://www.youtube.com/watch?v=wJS3jwKs0wg
Tip:
Do not dig the crimper
too far into the
fondant or you will cut
it and the cake will
show through.

Cake Decorating Basics Reference and Activity Manual Unit Three: Fun with Fondant 95
Activity 19: Crimping (15 minutes)
Share crimping tools if you do not own one. Roll out fondant and practice
crimping on a flat surface.
Supplies
• Fondant
• Rolling pin
• Spacer bars
• Dusting pouch
• Crimper tool
Directions
1. Roll out your fondant.
2. Experiment with your crimping tool and its “O” ring to set the spacing
that your teeth will grab into the fondant.
3. Practice making crimped lines to understand the amount of pressure
needed to press the tool into the fondant, and how to judge the
distance between the embossed pinch.
4. Squish up your fondant and trade crimpers with your friends to
experiment with theirs.
Something to think about
Make notes about your crimping experience and tips for yourself to refer to
when you use crimping on a cake.

96 Cake Decorating Basics Reference and Activity Manual Unit Three: Fun with Fondant
Covering Cookies with Fondant
Just as cupcakes are covered with rolled fondant, cookies can be decorated
with a layer of fondant and details can be added with fondant, royal icing or
edible decorations stuck on with fondant. The fondant can cover the entire
cookie if you use the same cut-out as you used for baking, or you can use
other sizes of cut-outs over buttercream icing.

Cake Decorating Basics Reference and Activity Manual Unit Three: Fun with Fondant 97
Four heart shaped cookies
Activity 20: Fondant-covered Cookies (Two hours including baking time)
Find a recipe for two dozen or more rolled cookies
that you would like to make and decorate, either to
match a holiday, the season or an upcoming
celebration. You can use a family recipe or try a new
one. Search online and print sources for ideas and
make some sketches of decorator cookies, keeping in
mind your decorating skills, budget and purpose or theme.
Make the decorations as simple or complicated as your
creativity and time determine. You can use the same
shape for the cookies but need to vary the details to
explore techniques and build your skills.
This may be an appropriate activity for you to consider as
your community service, and contact those involved who
may help you determine what would be appropriate.
Supplies
• Make a list of supplies you will need and include
that in your record book. Include colours of
fondant, approximate amounts, what they will
be used for.
• Include edible decorations.
• Do not forget that buttercream icing will be used to
“glue” the fondant to your cookies. Will the icing be coloured and how
much of it might show in your designs?
• Determine if you need a full batch or half batch of royal icing to add
edible decorations and details. Separate parts that need to be coloured
and cover them to keep it moist.
• List the piping tips and techniques you plan to use.

98 Cake Decorating Basics Reference and Activity Manual Unit Three: Fun with Fondant
Directions
1. Make and bake at least 24 rolled cookies that use cookie cutters to
create shapes, consider a theme for your activity.
2. Make fondant or warm leftover fondant to room temperature.
3. Refer to your sketches and colour appropriate amounts of fondant.
4. Make royal icing.
5. Make buttercream icing or thaw leftover buttercream to cover the
surface of each cookie with a thin layer.
6. Roll out fondant to 1/8” (3 mm) thick and cut cookie shapes using
identical cookie cutters you used when you baked the cookies. Be
sure to place any cut-outs in a plastic bag or cover with plastic wrap
to keep them from drying out if you are not setting them on your
cookies immediately.
7. Colour your royal icing and buttercream icing as needed.
8. Spread a thin layer of buttercream on each cookie.
9. Set the fondant cut out on the buttercream being careful to line it up
with the cookie outline and use a spreader to flatten the fondant to
your cookie base.
10. Use fondant cut-outs, edible decorations and royal icing to add
details and other colours to your cookies.
Something to think about
Take a picture of your entire cookie collection.
Select six of your “best” decorated cookies and take a detailed picture (closer
up) of them.
Complete your Cake Journal including sketches, the recipe, supply list and
directions.

Cake Decorating Basics Reference and Activity Manual Unit Three: Fun with Fondant 99
What theme did you use and how did you carry this out?
What made you select the six “best” cookies?
What techniques did you use that were challenging?
What skills do you need to continue to practice to become better at?
Would you use this recipe again? Add notes about any changes or tips you
recommend if you use this recipe again.
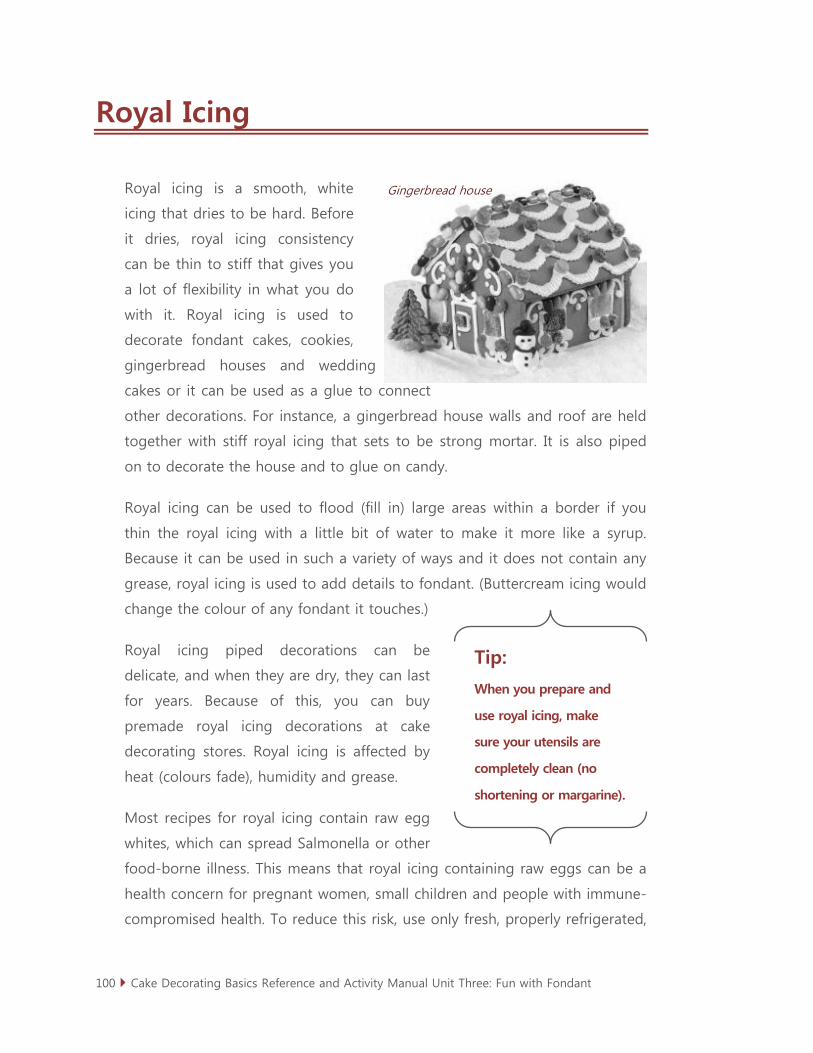
100 Cake Decorating Basics Reference and Activity Manual Unit Three: Fun with Fondant
Gingerbread house
Royal Icing
Royal icing is a smooth, white
icing that dries to be hard. Before
it dries, royal icing consistency
can be thin to stiff that gives you
a lot of flexibility in what you do
with it. Royal icing is used to
decorate fondant cakes, cookies,
gingerbread houses and wedding
cakes or it can be used as a glue to connect
other decorations. For instance, a gingerbread house walls and roof are held
together with stiff royal icing that sets to be strong mortar. It is also piped
on to decorate the house and to glue on candy.
Royal icing can be used to flood (fill in) large areas within a border if you
thin the royal icing with a little bit of water to make it more like a syrup.
Because it can be used in such a variety of ways and it does not contain any
grease, royal icing is used to add details to fondant. (Buttercream icing would
change the colour of any fondant it touches.)
Royal icing piped decorations can be
delicate, and when they are dry, they can last
for years. Because of this, you can buy
premade royal icing decorations at cake
decorating stores. Royal icing is affected by
heat (colours fade), humidity and grease.
Most recipes for royal icing contain raw egg
whites, which can spread Salmonella or other
food-borne illness. This means that royal icing containing raw eggs can be a
health concern for pregnant women, small children and people with immune-
compromised health. To reduce this risk, use only fresh, properly refrigerated,
Tip:
When you prepare and
use royal icing, make
sure your utensils are
completely clean (no
shortening or margarine).

Cake Decorating Basics Reference and Activity Manual Unit Three: Fun with Fondant 101
clean, grade A or AA eggs with intact shells, and avoid contact between the
yolks or whites and the shell. Use eggs in the shell that have been treated to
destroy Salmonella, by pasteurization or another approved method.
Some recipes for royal icing will call for meringue powder, a safe alternative
to the raw egg whites. Meringue powder can also be called dried egg whites
or egg white powder.
Cream of Tartar is a fine white powder that is added to icing to make it
creamier and to egg whites before they are beaten to add stability and
volume. It is often, though not always an ingredient in royal icing. If you live
in a humid climate, be sure to use a recipe that includes cream of tartar.
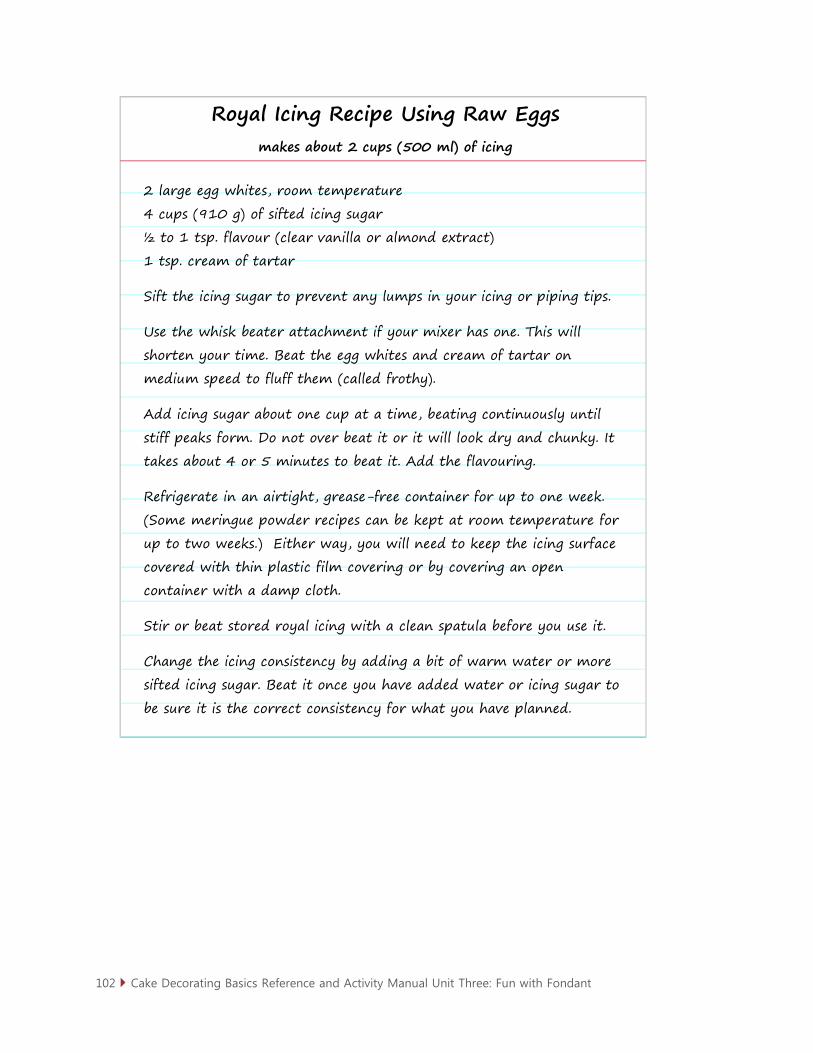
102 Cake Decorating Basics Reference and Activity Manual Unit Three: Fun with Fondant
Royal Icing Recipe Using Raw Eggs makes about 2 cups (500 ml) of icing
2 large egg whites, room temperature
4 cups (910 g) of sifted icing sugar
½ to 1 tsp. flavour (clear vanilla or almond extract)
1 tsp. cream of tartar
Sift the icing sugar to prevent any lumps in your icing or piping tips.
Use the whisk beater attachment if your mixer has one. This will
shorten your time. Beat the egg whites and cream of tartar on
medium speed to fluff them (called frothy).
Add icing sugar about one cup at a time, beating continuously until
stiff peaks form. Do not over beat it or it will look dry and chunky. It
takes about 4 or 5 minutes to beat it. Add the flavouring.
Refrigerate in an airtight, grease-free container for up to one week.
(Some meringue powder recipes can be kept at room temperature for
up to two weeks.) Either way, you will need to keep the icing surface
covered with thin plastic film covering or by covering an open
container with a damp cloth.
Stir or beat stored royal icing with a clean spatula before you use it.
Change the icing consistency by adding a bit of warm water or more
sifted icing sugar. Beat it once you have added water or icing sugar to
be sure it is the correct consistency for what you have planned.

Cake Decorating Basics Reference and Activity Manual Unit Three: Fun with Fondant 103
Royal Icing Recipe Using Meringue Powder makes about 3 cups (750 ml) of icing
4 cups sifted icing sugar
3 tbsp. meringue powder
6 tbsp. warm water (Ue 5 tbsp. if you want stiffer icing.)
½ tsp. clear flavouring
After you sift the icing sugar, combine it with the meringue powder
and stir.
Stir in the water and beat on low till it is moist.
Use low to medium speed for 6-10 minutes if you have a standing
electric mixer but use medium to high speed for 10-12 minutes if you
are using a hand-held mixer. Beat until the icing is glossy (shiny) and
forms medium peaks before adding the flavouring.
Beat until it is stiff.
If you use meringue powder, different brands
and changes in humidity may give you different
consistencies of icing.
If you use a recipe that asks for lemon juice or
use a flavouring that has a colour, remember
that the icing will not be perfectly white.
Separating Eggs: Getting Egg Whites
When people say the egg white, they mean the
slimy clear part of an egg between the shell and the yellow yolk ball. When it
is cooked it changes from clear to white and becomes a solid. When we talk
Tip:
Royal icing needs more
colour added than
buttercream icing would
use to make the same
colour intensity. Always
add colour gradually.

104 Cake Decorating Basics Reference and Activity Manual Unit Three: Fun with Fondant
about egg whites in baking, we are talking about the raw, clear and slimy
part of an egg.
You may wonder why someone would use only part of an egg. Raw egg
whites will whip up to be light, fluffy white and full of air, but any yolk in
the egg whites will keep them from fluffing up the same way. Some cooks
who try to limit cholesterol in their recipes will substitute extra egg whites
for whole eggs and do not use the egg yolks because it is the yolk that
contains cholesterol.
Egg whites are used in baking besides in making royal icing, so even if you
plan to make Royal Icing using meringue powder, you will eventually need to
know how to separate eggs. Separating an egg means cracking a raw egg
and keeping its clear slimy “white” separate from the unbroken ball of yolk.
Meringue cookies or the meringue on a lemon pie are made with egg whites,
as are angel food cakes and some sponge cakes. That’s why the egg white
powder is also called meringue powder. You will also come across recipes
that use only egg yolks, for instance, mayonnaise.
Chilled eggs are easier to separate because the yolk does not break as easily,
but you will find that most recipes call for eggs to be room temperature (not
straight out of the fridge.) You can let your eggs sit on the counter to warm
up before separating them or let the eggs
get to room temperature after you've
separated them (cover them in their bowl
with plastic wrap and use them as soon as
they get to room temperature.).
Always crack each individual egg over a
separate small bowl or plate. That way, if
your yolk breaks or you get any yolk in the
egg white, you do not ruin your entire batch
of egg whites with the yolk.
Tip:
If any eggshell falls
into the egg white, use
a clean utensil to scoop
it out. You will be
surprised how difficult
it is to get that little bit
of shell out!
Cake Decorating Basics Reference and Activity Manual Unit Three: Fun with Fondant 105
Wash your hands before and after handling raw eggs to avoid any
possible bacterial contamination. Remember to clean other surfaces that
come into contact with the raw eggs.
There is more than one way to separate eggs, and you may have learned one
from your parents or grandmas. Whichever way you separate eggs, it takes a
bit of practice to perfect. http://www.wikihow.com/Separate-an-Egg
1. Using the shell
Crack the egg gently on a flat surface or on the rim of a bowl, as close
to the middle of the egg as possible. If you crack it on the rim of a
bowl it might be easier to get the egg to crack right in the middle, but
you are more likely to get pieces of eggshell in the egg whites.
Working over a small bowl, use your thumbs to gently pry the egg
halves apart. Let the yolk settle in the lower half of the eggshell while
the egg whites run off the sides of the egg into the bowl.
Gently transfer the egg yolk back and forth between the eggshell halves,
letting as much egg white as you can drip into the bowl below. Be
careful not to break the egg yolk. Place the egg yolk in a separate bowl.
• http://www.youtube.com/watch?v=zWO0Ko4swQU
• http://www.youtube.com/watch?v=yAGX-54iR30
2. Using a plate and egg cup
Crack the egg on the edge of a small plate or on a flat surface. Hold
the cracked egg close to the top of a small plate and open the
eggshells to let the entire egg slip onto the plate.
Put an eggcup (or small juice glass) over the yolk, being careful to
cover it entirely. Hold the eggcup snuggly against the plate with one
hand and use your other hand to tip the plate over your small bowl.
The eggcup holds the yolk on the plate while the rest of the egg white
slides off it into your bowl.
Set the plate back down and lift your eggcup. Pour the yolk into its
separate container.
106 Cake Decorating Basics Reference and Activity Manual Unit Three: Fun with Fondant
3. Using a funnel
You can break the egg into a funnel and the yolk stays caught in the
funnel while the white slips through the smaller hole. Stand the funnel
up in a tall glass so that the funnel tip is not touching the bottom of
your glass. Use two hands to crack the eggs.
Crack the egg over the funnel. If the egg white is trapped above the
yolk, gently move the funnel around so that the yolk doesn't block the
small opening and the whites can slip past it.
Lift the funnel off and tip it to pour the yolk out.
4. Using a water or soft drink bottle
Crack an entire egg into a small bowl or onto a plate. Use a flexible
plastic water bottle or clean empty soft drink bottle to suck up the egg
yolk by first squeezing the bottle to squeeze out some of the air from
it. Gently touch the bottle opening to the top of your egg yolk. Stop
squeezing the bottle and the egg yolk should be sucked into it. Hold it
over the small bowl to let any extra egg white drip off.
Squeeze the bottle over a different bowl and the egg yolk will pop out
of the bottle.
• http://www.youtube.com/watch?v=B4E_9iAU3RI
• http://food-hacks.wonderhowto.com/how-to/easiest-most-practical
-way-separate-egg-yolks-from-egg-whites-without-getting-messy
-0146542/
You can also use the top bubble part of a turkey baster instead of a
pop bottle.
5. Using an egg separator
This is a kitchen gadget you will not use very often and will never use
if you practice separating eggs another way. The egg separator has a
small plastic cup with slits around it. When you crack an egg above it,
the yolk is caught in the small curved dish part while the slimy white
slips through the slits around it.
Cake Decorating Basics Reference and Activity Manual Unit Three: Fun with Fondant 107
Activity 21: Separating Eggs (10 minutes)
There is more than one way to separate eggs and it will take practice. Try the
first four methods. Be patient and crack the egg in its own bowl or plate in
case you have trouble separating it or the yolk breaks.
Supplies
• Several raw eggs
• Two or more clean, small bowls
• Small clean plate
• Eggcup or small juice glass
• Empty soft drink bottle
• Top of turkey baster
• Resealable container for egg yolks
• Resealable container for egg whites if you will not be using them
immediately
Directions
1. Try each of the methods for separating eggs.
Something to think about
Had you seen all of these methods before? Who showed you the ones you
had seen?
Add any notes to your book that will help you separate eggs in the future.

108 Cake Decorating Basics Reference and Activity Manual Unit Three: Fun with Fondant
Which method(s) do you find easiest to separate eggs? Which method(s) will
you probably use most often?
Refrigerate any unused egg whites and egg yolks.

Cake Decorating Basics Reference and Activity Manual Unit Three: Fun with Fondant 109
Gingerbread men
Activity 22: Making Royal Icing (10 minutes)
It does not matter which type of royal icing you make, whether it is with raw
eggs or with meringue powder. You can use the separated eggs from Activity
21 if you plan to use raw eggs.
You will need an electric mixer and the ingredients found in the Royal Icing
recipe you plan to use.
Decorating with Royal Icing
Anything that can be piped in
buttercream icing can be made
with royal icing. As with
buttercream icing, having the
right consistency of icing is
the key to your success.
Piping Techniques
Refer to your Unit One and Unit Two Reference Manual and Activity Guides
or websites and how to videos on YouTube or other websites and practice
piping techniques with royal icing.

110 Cake Decorating Basics Reference and Activity Manual Unit Three: Fun with Fondant
Activity 23: Make Parchment Paper Decorating Bags (10 minutes)
This activity will lead you step-by-step through the instructions on how to roll
your own parchment paper icing bag. After you make your first bag it is easy.
If the directions in the next activity seem difficult to understand or you want
a refresher before you make a parchment paper icing bag here are a couple
websites you may find helpful. There are other videos and diagrams if you
search it on the internet.
• http://www.youtube.com/watch?v=lHHv22G8ixo
• http://fantes.com/parchment-triangles.html
Supplies
• Parchment paper approximately 12 to 14 inches long.
• Scissors
• Tape
Directions
You can use a single piece of parchment to make two icing bags.
1. Fold one corner of your parchment paper diagonally across to the
other side of the paper, lining up the sides to make a right angle
triangle. Press along the fold to crease it well. Cut the excess paper off
so you have two identical triangles folded in a square of paper.
Carefully tear or cut along this fold and you will have two identical
triangles which can be used to make two parchment paper icing bags.
2. Place one triangle on a flat surface with the longest side away from
you. The centre of this long side will become the parchment paper
icing bag point. One point is facing you and the two narrowest points
are pointing at angles away from you.

Cake Decorating Basics Reference and Activity Manual Unit Three: Fun with Fondant 111
3. It does not matter which of these two narrow points you use first. Take
one of those points and curl it over so the back of that corner is on top
of your parchment paper, forming something that looks like a surfing
wave. Bring that point to sit on top of the point that is facing you.
4. With one hand, hold these two points together to make one point.
5. Use your other hand to bring the final point over and around your
tunnel to join the back of these points. You have formed a cone.
6. Adjust your points to bring the top of the cone into a tight sharp point.
7. Where the corners are all held together in a point, fold this point over,
crease it, and fold it a couple more times to hold the cone together.
8. Tape a small strip along the lower outside seam near the point of the
cone to hold it together.
9. If you are using an icing tip in the bag, you will need to cut off between
½” to ¾” of the tip. You want just over half of the icing tip to poke out
of your cut opening. The parchment bag does not need a coupler
because the tip sits inside the bag and the icing will hold it in place.
10. Without an icing tip, the parchment paper bag itself can be snipped
off and used as a round icing tip. The amount of the parchment tip
you cut off will determine the size of your tip opening and the
amount of icing that comes out when you apply pressure to your
filled bag.
11. Make two icing bags. Cut one to use with an icing tip.

112 Cake Decorating Basics Reference and Activity Manual Unit Three: Fun with Fondant
Something to think about
If you think it would be helpful in the future, add diagrams beside the
activity directions to help you understand them when you want to make a
parchment paper bag in the future.
What would you change about the directions to make them easier to
understand?

Cake Decorating Basics Reference and Activity Manual Unit Three: Fun with Fondant 113
Outlining a star
Flooding with Royal Icing
Flooding with royal icing creates a flat, satin finish that looks professional.
Flooding is often used to decorate holiday cookies. Sometimes it is referred
to as colour flow or glacé icing.
Flooding icing or glacé icing is simply royal icing thinned with a little bit of
water. Flooding is easy but it takes two steps to flood an area. A flat area
such as a sugar cookie, is outlined with regular royal icing as a dam and then
the surface is filled with thinner icing that flows to fill it. Once you have draw
the outline, it is a bit like colouring in a picture but using a piping bag
instead of crayons or markers.
Decide what colours you will use and if the outline will be one colour or be
the same colour as what fills that space.
Use parchment paper piping bags or disposable piping bags. When you
flood more than one or two colours, you would normally need many piping
tips the same size and several piping bags. Because the glacé icing is
squeezed out the end of a round tip, you can snip off the tip of your
parchment bag to make a tip opening whatever size you want. If you do a
lot of flooding, you may want to buy some squeeze bottles at dollar stores
or craft stores and wash them for reuse.
Flooding
1. Before you flood any cookies, be sure they are
completely cooled. Any warmth will make your
royal icing or flooding glacé icing runnier than
you want and the melted icing will
start to be absorbed by the baking.
2. To keep your piping tips from drying out, set
them against a damp paper towel.
3. Outline the area you want to flood by piping royal
icing with tip number 2, 3, 4 or 5. Be sure there are no gaps in the
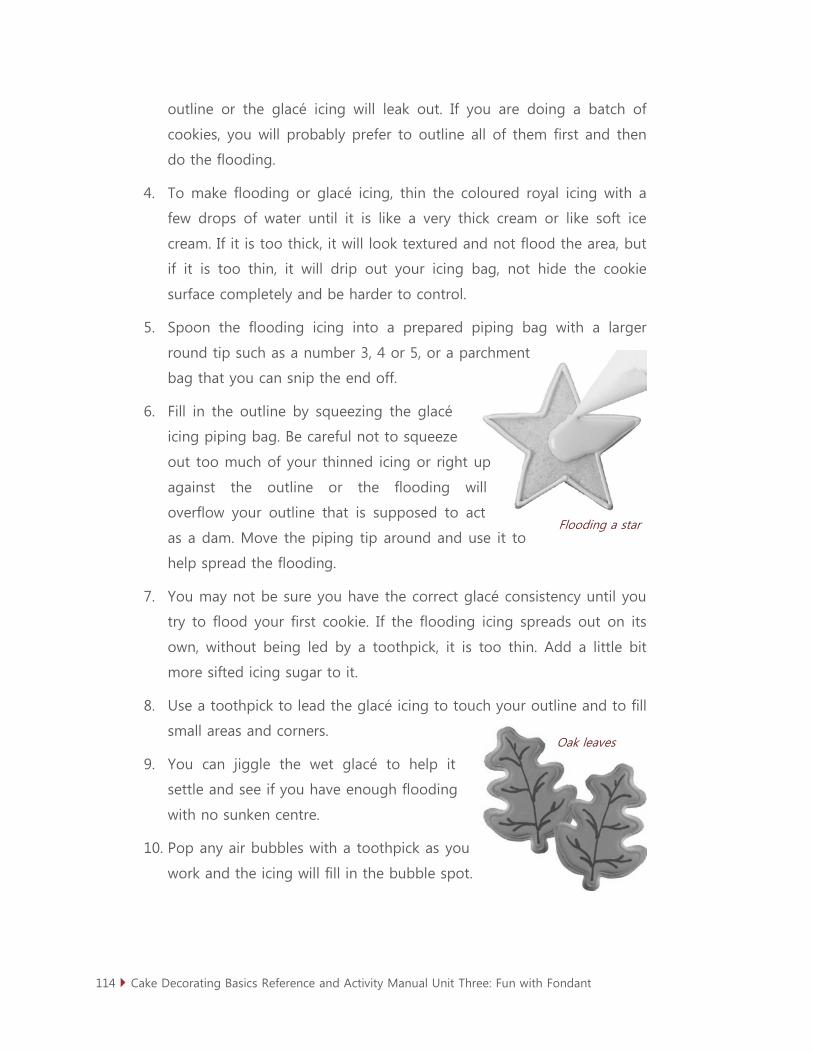
114 Cake Decorating Basics Reference and Activity Manual Unit Three: Fun with Fondant
Flooding a star
Oak leaves
outline or the glacé icing will leak out. If you are doing a batch of
cookies, you will probably prefer to outline all of them first and then
do the flooding.
4. To make flooding or glacé icing, thin the coloured royal icing with a
few drops of water until it is like a very thick cream or like soft ice
cream. If it is too thick, it will look textured and not flood the area, but
if it is too thin, it will drip out your icing bag, not hide the cookie
surface completely and be harder to control.
5. Spoon the flooding icing into a prepared piping bag with a larger
round tip such as a number 3, 4 or 5, or a parchment
bag that you can snip the end off.
6. Fill in the outline by squeezing the glacé
icing piping bag. Be careful not to squeeze
out too much of your thinned icing or right up
against the outline or the flooding will
overflow your outline that is supposed to act
as a dam. Move the piping tip around and use it to
help spread the flooding.
7. You may not be sure you have the correct glacé consistency until you
try to flood your first cookie. If the flooding icing spreads out on its
own, without being led by a toothpick, it is too thin. Add a little bit
more sifted icing sugar to it.
8. Use a toothpick to lead the glacé icing to touch your outline and to fill
small areas and corners.
9. You can jiggle the wet glacé to help it
settle and see if you have enough flooding
with no sunken centre.
10. Pop any air bubbles with a toothpick as you
work and the icing will fill in the bubble spot.

Cake Decorating Basics Reference and Activity Manual Unit Three: Fun with Fondant 115
Pumpkin cookie
11. If you want to add sprinkles or add another glacé colour such as dots
or swirls or patterns in the flooded area, do it while the flooding is
fresh and wet. Wet on wet techniques include scalloped lines, webs,
feathers and hearts.
12. To add other details on top of the flooded
area, wait overnight, or at least eight hours
for the icing to set. Royal icing details can
be piped on or candies can be glued on
with royal icing at that time.
Here are some videos about outlining and flooding:
• http://www.wilton.com/decorating/cookie-decorating/covering-cookies
-thinned-icing.cfm
• http://www.youtube.com/watch?v=PQ21qNqOzfk (this video is also
found at http://www.universityofcookie.com/2010/05/basic-outlining
-flooding-for-decorating.html
• http://www.youtube.com/watch?v=3J4u24NdiMg
• http://www.marthastewart.com/908433/flood-frosting-cookie-recipe
Toothpick and Flooding Techniques
With a couple different colours of wet glacé icing and a toothpick, it is easy
to make some fancy flooded designs that will impress your guests. For their
full effect, the cookie should be plain and simply shaped and be at least 2” (5
cm) in diameter. There are lots of great images online and a helpful video is:
• http://www.chatelaine.com/holiday/how-to-decorate-cookies-with-
royal-icing-2/
Scalloped lines, webs, feathers and hearts
You can make a web or scalloped lines that look like garlands if you drag a
toothpick through stripes or turn circles into swirls or hearts in wet glacé
icing. Flood an area and then immediately pipe stripes of another colour of
glacé icing over the wet icing.

116 Cake Decorating Basics Reference and Activity Manual Unit Three: Fun with Fondant
Drag a toothpick tip across the lines from one side to the other or from top
to bottom. Start at the same side each time. The toothpick pulls the colours
into a curved pattern. If you want wider stripes of colour, pipe stripes of
glacé icing about 1/8” to 1/4” (1.6 mm to 3 mm) wide, close to the outline
and all the way across to the other side and use a toothpick to spread them
up to each other and the outline before dragging your toothpick through.
To make a web, pipe thin lines as concentric circles and drag a toothpick
from the inside dot or smallest circle out through the lines to the edges.
Wider lines of colour look more like a starburst or exploding fireworks.
To make a heart, pipe a circle of lighter glacé icing in the flooded area and
drag your toothpick from the top to bottom of it. A thin dark line will appear
down its centre and the circle shape is dragged into the shape of a heart.
Designs that look like rows of whale tails or arrows can be created by
dragging your toothpick across the coloured lines from one side of the
flooding to the other and back again. This may look more like feathering if
you use wider lines.
You can also turn the cookie one-quarter turn (90 degrees) and drag the
toothpick across it from this other angle too.
Scalloped Flooding
Flood half a cookie with one colour and the
other half with a different colour of glacé
icing. Put your toothpick tip in the darkest
icing near the centre line and drag it at an
angle to pull the darker into the lighter area.
Lift the toothpick and repeat this as you
move along the joining line. You will often
see a little dot or stripe of paler colour in the
dark colour each place your toothpick tip
enters it.
Tip:
Always drag from the
darker colour into the
lighter one to scallop
edges of glacé icing.

Cake Decorating Basics Reference and Activity Manual Unit Three: Fun with Fondant 117
Looking for Ideas?
There are thousands of images of flooded cookies to inspire you if you
search online. Type in flooded cookies and pick a theme. There are also
many good books that explain cookie decorating. One is Creative Cookies by
Toba Garrett.
Start a collection of basic, flat, rolled cookie recipes like sugar cookies or
gingerbread cookies for your flooding. You can find recipes online, in books,
or ask family and friends if they have some they recommend. There is nothing
wrong with decorating bought cookies if they are flat and large enough.
Activity 24: Flooded Cookie Ideas (20 minutes online)
Search online and print at least 30 images of flooded cookies and make notes
beside the pictures to help you understand the technique or steps used to
make the designs. Save these pages and add them to your record book.

118 Cake Decorating Basics Reference and Activity Manual Unit Three: Fun with Fondant
Activity 25: Flooding Cookies (45 minutes)
Ahead of time you will need to make or buy a couple dozen flat cookies. If
there is some special occasion or holiday coming up, you may use that as
inspiration and even have seasonal cookie cutters to shape the cookies. Even
plainly shaped square or circular cookies that are flooded can look spectacular.
Supplies
• Pictures or ideas of flooded cookies from Activity 23 or new ideas
• Two dozen or more cooled, flat cookies, at least 2” (5 cm) across
• One batch of royal icing
• Food colouring
• Water
• Several small bowls
• Several parchment paper piping bags or other squeezable containers
• Piping tips 2, 3, 4 or 5 and couplers
• Teaspoon
• Several toothpicks
• Wet paper towel
Directions
1. Prepare two piping bags for each colour you will be flooding (one for
the outline icing and one for the glacé icing.) Roll them to have a
narrow point and secure them with a bit of tape.
2. Decide what colours you will use, and how much of each icing you will
need for each colour.
3. If you plan to outline with the same colour you use to flood, you will
need to first add the food colouring to a larger amount of royal icing,
and then put part of that icing in another small bowl to thin.

Cake Decorating Basics Reference and Activity Manual Unit Three: Fun with Fondant 119
4. Colour your royal icing and your thinned royal or glacé icing for
flooding and spoon it into piping bags.
5. Decorate your cookies, experimenting with techniques.
Something to think about
Take a picture of your cookies for your cake journal.
Complete the cake journal.
Describe the techniques you used, what tips you learned for yourself and
note those here in your book to refer to later.

120 Cake Decorating Basics Reference and Activity Manual Unit Three: Fun with Fondant
Royal Icing Runouts or Transfers
A runout or transfer is royal icing designs that are first piped on non-stick
paper like parchment paper and left to dry before being lifted and attached
to a cake. A runout is another word for making a transfer by flooding an
outlined area with royal icing.
The pattern is usually traced onto paper and repeated as many times as you
need, allowing for some extras in case any break or do not look as good as
you want. Leave a space between each pattern though to give you room for
lifting them off separately from the parchment paper. Crowding them
complicates the transfer when they are dry.
Icing is piped onto a non-stick paper set over the pattern and then left to air
dry completely before being lifted and moved to your cake. Small patterns
left to air dry take at least overnight and up to 24 hours to dry, and larger
ones take about 48 hours to dry. If you are in a rush, set them under a heat
lamp to speed up their drying. Large areas tend to sink in the centre. If you
use a heat lamp on larger pieces, this helps to lessen the sinking and gives
the flooded area a glossier look.
If you need or want to make raised areas to give the flooding a three-
dimensional look, you will need to pipe more than one layer.
Transfers are fragile. To transfer the flooded design, it must be completely
dry before you peel off the non-stick backing. Then slide a palette knife
under the transfer and move it to your cake. Do not flip the transfer over.
Pipe some fresh royal icing onto the cake and gently apply pressure to your
transfer to make sure it is in contact with the royal icing glue.
Royal icing can be outlined and flooded onto parchment paper, acetate or
wax paper and then when it is dried, transferred and glued onto a cake with
fresh royal icing. It is similar to buttercream transfers in this way, but does
not need to be frozen to become firm.

Cake Decorating Basics Reference and Activity Manual Unit Three: Fun with Fondant 121
Royal Icing Transfers
Because royal icing dries to be hard, many
decorations can be made ahead of time on
parchment paper and left to air dry before being
transferred to your cake and “glued” on with dots
of fresh royal icing. Flowers, lace work and
flooded designs can be set flat on the cake or
with part of the transfer standing away from the
cake to add a three-dimensional effect.
Most line work that is piped with royal icing will
dry overnight. It must be completely dry to be
transferred.
Bow Loops
A three-dimensional bow of open loops seems to defy gravity, but it is
simple to make with royal icing transfers that dry and are then positioned
into a piped circle of fresh royal icing. Select a tip size and loop length based
on the size of bow you want to assemble.
Pipe five longer loops and nine or 10 lightly
shorter loops that are about the same width, onto
parchment paper and leave them to dry on a flat
surface overnight. Using the same colour icing,
pipe a large ball/dot of icing either on the cake or
parchment paper, and set the loops into it. Start
with three larger loops at the centre and then
carefully place six to eight of the smaller loops
around them to make a bow. (Note that you have made a few extra open
loops in case you break any while you assemble your bow.) Let the bow dry.
Airy 3-D bow
Tip:
Transfers are fragile
and need to be handled
very carefully. Make
extras in case any crack
or break while you
move or attach them to
your cake.

122 Cake Decorating Basics Reference and Activity Manual Unit Three: Fun with Fondant
Activity 26: Lace Transfers and Bow Loops (10 minutes at least one day before being transferred to a cake. 10 minutes the
next day)
This same technique can be used for all kinds of royal icing transfers or designs
that you would like to attach at angles to your cake or cupcakes instead of
laying the designs flat. When it is completely dry, royal icing will be lightweight
and hold its own shape. Moisture will weaken it. Transfers are fragile!
Supplies
• Royal icing
• Round piping tip 3 (approximately)
• Piping bag, coupler
• Parchment paper
• Flat surface like a cookie sheet
Directions
1. Pipe onto parchment paper set on a flat surface such as a cookie sheet.
2. Follow the directions above and make a dozen small loops to
assemble into a bow after the loops are completely dry.
3. Try writing your name or creating other flat designs with royal icing,
being sure that the lines are all attached to support each other when
the dried decoration is held upright.
4. Set the decorations in a safe place to air dry overnight before using them.
5. The next day, assemble your bow with fresh royal icing on a piece of
parchment paper and let it dry.
Dried decorations like flowers and trellises can be kept for months and then
attached to fondant with fresh royal icing.

Cake Decorating Basics Reference and Activity Manual Unit Three: Fun with Fondant 123
Something to think about
How did you do?
Did you break any of the decorations? Remember in the future ot make
extras of transfers in case you do not like the look of some of them after
they are dried or in case you break one or two while you are attaching them
to the cake.

124 Cake Decorating Basics Reference and Activity Manual Unit Three: Fun with Fondant
Activity 27: Practice Piping and Flooding (45 minutes)
Use medium consistency royal icing.
Tracing flat designs
Royal icing can be used to make transfers or patterns if you pipe onto wax or
parchment paper that is set on a flat surface. If you need the icing pattern to
be specific, or to be able to repeat it, place a pattern under your parchment
paper and tape your tracing paper on top. Trace the royal icing design onto
your parchment paper. It will take 24 to 48 hours to dry and must be
completely dry to safely transfer without breaking. Because traced designs
are delicate and brittle, they are fragile. Make more than one of the design in
case you break it when you transfer it.
To transfer the flooded design, remove your tape and slide the parchment
paper with your icing design to the edge of your work surface and peel the
paper slowly from the dried icing, without bending or bumping the design.
Larger designs are harder to move. Release the icing design from the
parchment paper and glue it to your cake surface with a few dots of fresh
royal icing.
There are things you can do with royal icing because it air dries hard, that
you cannot do with buttercream.

Cake Decorating Basics Reference and Activity Manual Unit Three: Fun with Fondant 125
Stippling with Royal Icing
Stippling is adding an evenly textured layer over a smooth surface. Some
ceilings in homes are stippled instead of being completely smooth. The same
can be done with royal icing to stipple a fondant cake. After the cake is
draped in fondant and smoothed, the area to be stippled is marked off and
areas you do not want to be textured should be covered with parchment
paper or painters’ tape.
Before you stipple your cake, practice on parchment paper and then on a
piece of extra rolled fondant to get your technique figured out.
A layer of royal icing is spread over the fondant and then a piece of sponge,
plastic wrap, crumpled paper towel or a clean scouring pad is dabbed against
and lifted off the fresh icing to give it an bumpy texture all over.
If you are using this technique on a cake covered with fondant, you would
need to roll out some thin fondant to practice stippling on right before you
apply the royal icing to your cake.

126 Cake Decorating Basics Reference and Activity Manual Unit Three: Fun with Fondant
Activity 28: Stippling Practice (20 minutes)
Before you try royal icing stippling on your fondant, try it on your practice
board to experiment with how much icing may be needed, what blotting tool
you like the look of and to practice blotting techniques. White royal icing or
any other colour that will show up on your parchment paper can be used.
Supplies
• Approximately ¼ cup of royal icing
• Spatula or knife
• Practice board
• Plastic wrap
• Damp sponge
• Clean scouring pad
Directions
1. Spread a thin layer of royal icing on your practice board and
experiment with blotting it off using a variety of techniques. Learn the
effect of different blotters, and if you need to wipe off the blotter
periodically if you are stippling a large area.
2. Try the technique to also remove enough royal icing that you can see
the coloured practice board through the background. What do you
think of the effect that using coloured fondant under a stippling of a
contrasting colour or shade makes?

Cake Decorating Basics Reference and Activity Manual Unit Three: Fun with Fondant 127
Something to think about
Make notes about your experience, the tools you liked, how thinly the icing
had to be spread, if a different consistency of icing may work better, etc.
Take pictures of your stippling experiments and include those in your book
for reference.
128 Cake Decorating Basics Reference and Activity Manual Unit Three: Fun with Fondant
Activity 29: Bake a Cake, Make Buttercream Icing or Ganache and Fondant to Cover it. Research Cake Designs. (60 to 90 minutes at home)
Before the next group meeting, you have to do some homework to be able
to decorate your first cake. Remember that fondant is heavy and the cakes
need to be a firm, heavier cake to support the decorations. You may need to
try some new recipes. Freeze the cake if you are making it ahead of time,
and be sure to double layer the fondant so it does not dry out. You can
colour it at the meeting. Ganache or buttercream icing can be made a day
ahead of time and stored properly.
Go online and search fondant cake ideas and images. Instead of picking a
theme for decorating, look through the decorating techniques that you have
learned since you made your cupcakes. Look for images of cupcakes that use
these techniques. (You will not be making bows just yet.) Sketch them or
print them and bring them to the next meeting. How will you finish your
cake board – with foil or fondant?
To your next meeting take a strong cake board and box to carry your cake
and any additional decorations home.

Cake Decorating Basics Reference and Activity Manual Unit Three: Fun with Fondant 129
Activity 30: Decorating a Cake with Fondant and Fondant Decorations (60 minutes at a meeting)
You will decorate at the meeting in case you need help with any of the
techniques you will be using on this cake.
None of the decorations will be prepared ahead of time for this cake, so
some that you prepare at your meeting may need to be carried home in a
box and attached at home once they have set or dried. Wait till your cake is
completely assembled before you take a picture or series of pictures of it.
Supplies
• Containers to hold your decorated cake and any decorations that you
will attach later
• Dusting pouch
• Cake
• Fondant
• Buttercream or ganache
• Spatula
• Shortening for your hands
• Extra icing sugar
• Food colouring
• Rolling pin
• Spacer bars or rods
• Ribbon cutter
• Pizza cutter
• Ruler
• Dusting pouch
• Resealable plastic bags

130 Cake Decorating Basics Reference and Activity Manual Unit Three: Fun with Fondant
• Plastic wrap
• Small thin paint brush
• Small resealable container for water or edible glue
Directions
1. Glue your cake to your cake board with ganache or buttercream icing.
2. Ice your cake with either a thin coat of ganache or buttercream icing.
3. Let the undercoat set before you put the fondant on it.
4. Knead and colour fondant for your cake (and cake board: that’s up to
you) and the decorations you plan to use on them.
5. Cover and decorate your cake using the decorative fondant techniques
you have learned.
Something to think about
Take a picture of your cake and fill in the Cake Journal about it.
What colour scheme did you use?
What techniques did you do well and which ones do you need more practice with?

Cake Decorating Basics Reference and Activity Manual Unit Three: Fun with Fondant 131
Were you happy with the design of your cake (balance, use of space and
repetition)? What worked and what did not work so well?

132 Cake Decorating Basics Reference and Activity Manual Unit Three: Fun with Fondant
Monkey
Modelling
Fondant or Gum Paste or a Mixture?
Fondant stays soft, but gradually dries out. It is used to cover a cake and can
be cut with a knife even after many days.
Gum Paste is more elastic than fondant but it dries very quickly. If you tried
to roll it out and emboss it, it would begin drying and crack before you
could finish. Gum Paste becomes hard within a day and can provide a solid
base for flowers or other molded decorations.
Gum paste/fondant blend creates a mixture that gradually hardens
completely, is more elastic and holds its shape when formed. While fondant
swags would droop and sag, a gum paste/fondant blend will hold its
hanging shape on the side of a cake and gradually dry in the shape you
created. Flowers and other molded decorations are best made from a mixture
to give you a flexible, elastic and workable medium that can be pulled,
stretched and made so thin you can see through it.
A Bit More about Gum Paste
Modelling is made from different types of moldable
and edible products. Most three-dimensional
figures can be made with a mixture of fondant and
gum paste (also called modelling paste or flower
paste) and large ones without extended limbs
can be made from ordinary fondant. Gum paste
dries extremely quickly, is more elastic and can be
made so thin you can see through it. It is used for
extremely delicate work. In Fun with Fondant, you will be using a blend of
fondant and gum paste to give you the strength and elasticity of gum paste
and the slower drying time of fondant.
Cake Decorating Basics Reference and Activity Manual Unit Three: Fun with Fondant 133
Recipes for gum paste vary, but the important difference is that they contain
a special type of gum. The odourless and tasteless gum helps to solidify the
modelling paste when it dries, making it durable even if it is so thin you can
see through it. It takes colour and helps you create more delicate, finer
modelling paste decorations on your cakes than if you tried to just use
fondant. When you see molded flower petals and leaves, they are made from
gum paste (that is why it is known as flower paste.)
There is more than one type of gum and you can
use any of them. If your recipe calls for one type of
gum and you have a different gum, you can use
the exact same amount of the other gum instead.
They all make the gum paste more pliable, elastic,
easy to shape and strong when it is dry. Some
gums are easier to find in specialty cake decorating
stores and prices vary. If you cannot find one of
the gums in a store, you can order them online.
The Five Different “Gums”
• Tylose powder is not as readily available – may need to be ordered online.
• Gum Tragacanth (also called Gum Trag) (sounds a bit like tragedy).
• Gum-Tex (Wilton’s brand and it is probably the most available.).
• CMC powder or Super Gum or CMC Gum or Cellulose Gum (Sodium
Carboxymethyl Cellulose Gum) This one is man made but the others
are found naturally.
• Gum Arabic or Acacia gum (less commonly used).
Sugar paste can be made weeks ahead of time or just before you need it.
You can also buy it. To change a fondant into gumpaste, add 1-2 teaspoons
of it to 1 pound of fondant. It is best to knead it in and then let it rest
overnight, but you can use it immediately.
Tip:
If you live in a moist
climate, use more gum
in your gum paste
recipe than if you live
in a dry climate.

134 Cake Decorating Basics Reference and Activity Manual Unit Three: Fun with Fondant
How to Make Gum Paste
• http://www.ehow.com/video_4435785_make-gum-paste.html
If you want to learn to make flowers or very thin three-dimensional
decorations, you will use straight gum paste. Those are considered more
advanced fondant techniques and will not be covered here. You can look
online for detailed descriptions on how to make calla lilies, roses, carnations,
and other delicate decorations that are made from gum paste.
In Fun With Fondant, the modelling can all be made with fondant, but you
will find there is greater flexibility in your modelling if you use a mixture of
gum paste and fondant (50/50 fondant and gum paste mixture is a good
ratio). If you see edible decorating dough, it is like a blend of gum paste and
fondant, giving you the combined flexibility and durability of one and longer
drying time of the other, making it an ideal medium for modelling.
Good videos and gum glue recipe, etc.
• http://thesugarlane.com/2009/05/12/whats-the-difference-tylose-
powder-cmc-powder-trag-powder-gum-tex/
Modelling and 3-D Characters
With fondant or a 50/50 fondant gum
paste mixture, you can model cute
three-dimensional characters and amaze
your friends with your edible
decorations. Instead of looking for a
specific size of plastic cake topper or
decoration, you can make one that is
edible and any size, colour and style you
like. Let your creative side show as you
learn to copy and then design your own
animals, cartoon figures, and scenes.
Graduate on books

Cake Decorating Basics Reference and Activity Manual Unit Three: Fun with Fondant 135
Modelling Tools
To model, besides needing a modelling dough made from a mixture of
fondant and gum paste, you will need a few modelling tools. You can buy a
set of modelling tools that have a different shaped tool on each end to help
you add details and shape amazing three-dimensional characters. All of the
shapes you will need in tools can be found in other things in your kitchen.
For instance, use your dry index finger instead of a ball tool, a small spoon to
draw a smile, a large toothpick or small skewer as a pick and a flat edged
table knife to flatten objects or cut them. A serrated knife pressed into
fondant can look like stitching. Small pointed scissors and you can cut
toothpicks to be the same length as gum paste sticks are about (3 cm long).
If you like to do a lot of modelling and think that fondant modelling tools
may be helpful, they are usually sold in sets and can be used on fondant or
gum paste.
You will need some large round toothpicks or small wooden skewers to help
hold your figures together till they dry. (some use uncooked spaghetti to
help hold limbs in place but they are fragile.) Water or edible glue and a
small paintbrush help hold the modelling dough pieces together too.
You will also find that to be as creative as you want, modelling will require an
assortment of gel paste food colouring and that you may need to buy some
colours like black fondant and mix it with your own or bought gum paste.
As with fondant, modelling dough has to be kneaded before use, and it
should not be sticky.
Build your three-dimensional decoration on a piece of parchment paper
secured to a flat, sturdy board such as a cake board or large plate (secured
so it does not slide off when the base is moved!).
Most three-dimensional modelling can be transferred to the cake almost
immediately or once it has set and become stronger with time. Some designs
need to sit overnight to be strong enough to move. For instance, any

136 Cake Decorating Basics Reference and Activity Manual Unit Three: Fun with Fondant
character that has an extended limb should sit overnight before being
transferred to the cake. If you are following project directions, they will tell
you how long the figure should sit before being attached to a cake.
Figures can be attached to the fondant cake with fresh royal icing, edible
glue, and some will require additional support with cut pieces of wooden
skewers or lollipop sticks.
There are some very basic shapes and techniques that are used in a great
combination to make countless textures and figures. Pictures and video:
http://www.wilton.com/blog/?p=12154
The Wilton website has over 40 different character projects with step-by-step
directions, though the directions will refer to their special sizing tray. You do
not need to buy the tray if you want to use your own judgment about sizes
of balls of modelling dough that you need. Remember that you can bend or
shape or change almost any part of the character to make it look however
you imagine.
• http://www.wilton.com/3D/ideas
• http://www.howtocookthat.net
• http://www.youtube.com/watch?v=Qbf5dGZquBw
• http://www.youtube.com/watch?v=P_VtvjZsaOo (part one)
• http://www.youtube.com/watch?v=_lLPHcU0nIE (part two)
• How to make a face: http://www.youtube.com/watch?v=JKO5lGH6xP4
Cake Decorating Basics Reference and Activity Manual Unit Three: Fun with Fondant 137
Activity 31: Modelling People and Animals (60 minutes)
This activity is best done as a group where you can share your fondant, gum
paste and mixtures of it, trade colours, talk about techniques as you mold
figures and help each other as you work. You will feel like you are playing if
you relax and let yourself be creative and do not worry if your modelling
does not look exactly like the original you are copying.
Go online and look for modeled creatures, people, cartoons, animals, and
scenes that you think would be fun to create with a 50/50 mixture of fondant
and gum paste. Check the listed resources above for ideas and search for
others. Print pictures of the items you would like to copy or use for
inspiration and adapt. Bring them to the next meeting.
Additional Supplies
• Ideas
• Container to take home your creations
• Modelling tools as listed (toothpicks, skewers, small spoon, flat knife
• Small paintbrush
• Fondant
• Gum paste (can be homemade or bought)
Directions
1. Mix the fondant and gum paste together in approximately even
proportions (50/50 mixture).
2. Share coloured modelling dough with other members so you do not
have to blend as many colours.
3. Keep your mixtures in plastic containers, sealed bags or wrapped in plastic
film to keep them from drying out until you are done shaping them.
4. Follow step-by-step directions for modelling the items you have
decided to make.

138 Cake Decorating Basics Reference and Activity Manual Unit Three: Fun with Fondant
Something to think about
Take a picture of your creations from a couple different angles so you can
see the details.
Complete the cake journal and note the techniques you used and why.
Consider the techniques you used and ideas for other techniques or tools that
could have worked better or given a different effect but been good as well.
Cake Decorating Basics Reference and Activity Manual Unit Three: Fun with Fondant 139
Dowelling
Dowels are used to stack cakes one on top of another. The dowels support the
weight of the top layers of cake so they do not sink into the ones below them.
You may be thinking that you have layered cakes before and not needed
dowelling, so why would you need it now. There are a couple reasons: the
outside edges of a cake are firmer than the centre so if the top layer
completely covers the bottom one, its weight is spread out over a larger and
firmer base. Tiered cakes usually refer to cakes where the upper layer is
smaller than the lower one, which means it sits on the softer centre of the
cake and its weight is not spread over as large an area. Cakes covered in
fondant are heavier than cakes covered in a buttercream icing, both in the
cake itself and in the fondant icing you have covered the cake with. This
added weight in the centre of your cake will cause it to gradually sink into
the lower cake without additional supports. Dowelling provides the extra
support to keep your tiered cake standing tall.
The top layer of a cake does not need doweling, just all the ones below it.
Dowels can be wooden or plastic. You can use either. Some cake decorators
use cake circles or plastic plates between the layers, but that is not necessary.
Use the upper tier to figure out where the dowels
need to be placed. Cut a piece of parchment
paper the same size as the upper layer and set it
on the cake layer that will be directly below it.
Measure to be sure it is centred or placed exactly
where you want the upper layer to sit and then
trace an imprint around it to help you place
dowels and position the cake. How many dowels?
That depends on how large your upper layers are.
Dowels should be inserted about 1 ½ inches or 7.5 cm inside the outline you
traced and be spaced out evenly.
Tip:
All the dowels will be
inside your traced line;
they will be covered by
the next cake tier.
140 Cake Decorating Basics Reference and Activity Manual Unit Three: Fun with Fondant
If your cake is three or more tiers, put a dowel in the centre of your cake
through all the layers once the cake is stacked. This helps stabilize the cake
to keep the layers from sliding during transport. A pencil sharpener can be
used to make the bottom end of your wooden dowel pointed to push
through the cakes more easily. This central dowel should be carefully pushed
straight up and down till the point rests on the bottom cake board.
Use sandpaper to smooth out
any rough edges on the end of
cut dowels that are longer than
your cake layer height and
insert the dowels straight up
and down into the cake where
you marked it. With the longer
dowels sticking up from your
bottom cake layer, use a pen or marker with edible ink to mark each dowel
where it is in line with the top of your cake. Because your cake may not be
perfectly level, it is a good idea to also indicate which hole it came from or
only remove one dowel at a time for the next step.
Remove the first dowel and use a sharp flat bladed knife to cut along the
marking. Once you have scored, that is partly cut through the dowel, you can
snap it at the marking. Rub the sharp end with sandpaper.
Reinsert the dowel into its hole and push it till it touches the cake board. Do
the next dowel the same way.
About a tablespoon of royal icing is spread on the centre of the bottom cake
area you are covering with the next layer, and a dab of royal icing is put over
every dowel. This helps you to properly position the next layer by making the
cake surface slippery before the royal icing dries to glue them together.
Carefully set the next layer on your cake and move it into its final resting
place while the royal icing is still wet.
Dowel insertion

Cake Decorating Basics Reference and Activity Manual Unit Three: Fun with Fondant 141
Repeat this for each additional cake layer.
Because a layer cake will settle a little bit even with dowelling, let it rest for a
few hours before you add the finishing touches such as ribbon trim or piping
at the bases of the layers where cake edges rest on another cake. If you have
assembled the cake first and then are decorating it, decorate from the top
towards the bottom.

142 Cake Decorating Basics Reference and Activity Manual Unit Three: Fun with Fondant
Activity 32: Plan a Tiered Fondant Cake (1 hour)
Because a tiered cake is larger and feeds more people, this may be a good
project to consider as a community service. Are there organizations such as
seniors’ groups that may appreciate a cake?
Not all tiered cakes are fancy wedding cakes. Some are playful hats, towers,
castles or simple designs suitable for many occasions. Spend some time on
the internet looking at images of tiered cakes to find a few designs you think
you would like to make, that are suitable in size and that you can use as
inspiration to use the cake decorating skills you already have and want to
practice. Consider how much time you will have to make and decorate the
cake and be realistic about your expectations. This cake is to practice
dowelling and stacking tiers and your design does not have to be
complicated in design or decoration.
Directions
1. Print the images in colour and note beside them what techniques and
tools are used, approximate pan sizes and changes you would make to
the design.
2. How many people do you intend to feed? What sizes of pans do you
own or can borrow to make the cake? Will you need to carve the cake
to create the design? What recipe will you use for each layer? What
type of fondant will you use? Calculate how much fondant you will
need. Do you need to make any decorations ahead of time with
fondant, gum paste or royal icing? How much dowelling will you need?
3. What cake board will you use that is strong enough and the correct
size for this tiered cake? A cardboard cake board will not be strong
enough. Particle board is a good base.
Cake Decorating Basics Reference and Activity Manual Unit Three: Fun with Fondant 143
Something to think about
Use this next space to record notes, calculations and a description of the
steps you will follow. Start with noting the supplies you will need.
144 Cake Decorating Basics Reference and Activity Manual Unit Three: Fun with Fondant
Activity 33: Making a Tiered Fondant Cake (3 hours)
This is a big project and it will not be completed in one day. Be sure to leave
enough time for each step and work backwards from your deadline and give
yourself some extra time. Decide where you will leave the steps and stages of
your cake when you are not working on them to keep them safe,
undamaged and out of the way. Be sure to cover royal icing and fondant well
to keep them from drying out. If your cake board is being covered with
fondant, the order of these general directions may change.
Supplies
• Refer to the list you prepared in Activity 32.
Directions
1. Bake and cool the cakes you will be layering.
2. Buy dowelling and wash it with warm soapy water. Let it dry.
3. Prepare fondant and let it rest.
4. Make royal icing.
5. Prepare your cake board.
6. Colour fondant, gum paste and royal icing.
7. Make any decorations that need to be prepared ahead of time.
8. Cover the tiers with fondant.
9. Measure, cut and insert dowelling in the bottom layer.
10. Set the top layer over the dowelling and royal icing “glue”.
11. Decorate the tiers. (Note: you may prefer to decorate the tiers before
they are stacked, but need to be careful not to mark the fondant as
you stack the cakes.)
12. Add finishing touches.
Cake Decorating Basics Reference and Activity Manual Unit Three: Fun with Fondant 145
Something to think about
Take a few pictures of your cake to show the details and all-over design.
Complete your Cake Journal.
What colour scheme did you use? Was it effective?
What problems, if any, did you run into?
What techniques did you use?

146 Cake Decorating Basics Reference and Activity Manual Unit Three: Fun with Fondant
Activity 34: Creative Ideas, Baking and Making Decorations
(90 minutes at home)
Price out your cake.
Have some fun searching for creative ways to decorate cakes that use very
little piped icing. Cakes that use piping for small details are fine, but what you
really hope to find are some creative ways to decorate without much piping.
You will bake the cake(s) needed to make your design, make the icing and
purchase all the decorations you may need to decorate your cake at the next
group meeting. If you have not yet given a cake as a community service,
consider it for this cake.
Supplies
• Internet access
• Printer
• Paper
• Pencil
• Calculator
• Grocery bills or store flyers
Directions
1. Find cake ideas on the internet or in books or magazines that can be
decorated without tips. Search images of simple cakes, or pick a theme
to look at. Search sculpting cakes or cake sculpting and you will find
lots of websites and how-to videos to help you. You do not have to
sculpt a cake, but you can for this activity.
2. You can pick a theme such as birthday cakes, children’s cakes, cakes
for men, Halloween cakes… You may also find some at:
http://www.wilton.com/ideas/

Cake Decorating Basics Reference and Activity Manual Unit Three: Fun with Fondant 147
3. Sketch or copy and print at least three pictures of cakes you like which
can be made without using any tips or that the tips are used for small
details and list what could be used to create a similar effect. Find three
images of cupcakes or cakes that are sculpted somehow. It could be as
simple as making a heart from another shape of cake, or example. What
would you substitute or use? How could you get a similar effect without
using a tip? Would you build the shaped cake a different way? Use the
cakes you see as inspiration and improvise using your creativity.
4. Select one of the designs and find or purchase the items you will need
to decorate it at the next meeting.
5. Keep track of everything you spend on this cake and get your parents
to help you calculate how much the actual cake and icing cost to make.
6. Phone a bakery to see what a cake like this may cost to buy.
7. Make a cake at home from a recipe you like or would like to try, but
make sure it is the shape you will need. Freeze, refrigerate or make it
the day before your next meeting.
8. Bring to the next meeting the cake, ingredients to make and tint icing,
and everything you will need to decorate it.

148 Cake Decorating Basics Reference and Activity Manual Unit Three: Fun with Fondant
Activity 35: Creative Designs with Sharing (60 to 75 minutes)
Supplies
• Ideas from the internet and books
• Cake design and ingredients to make it
• List of expenses or cost to make the cake
Directions
1. Share the ideas you found on the internet and in books or magazines.
Which ones surprised you? Which ones did you think were too hard to
do? How could you change them?
2. Show the group what ingredients you brought and indicate which
ones you can share with others.
3. Go over what this cake cost to make.
4. Decorate your cake at the meeting, share icing, candies, etc.

Cake Decorating Basics Reference and Activity Manual Unit Three: Fun with Fondant 149
Activity 36: Cake and Cookie Designs for Achievement Day (30 minutes)
Go back to the page that talks about your Achievement Day requirements. You
will see that you have to bake and decorate one layer cake and also six
cupcakes that have a theme. The cake and cupcakes do not have to go
together as one theme, just the six cupcakes. You must use buttercream icing.
For your layer cake you must plan a design that will use at least two different
icing tips and at least four different decorating techniques that are from Unit
Two. For instance, you could use some of the flower designs created with a
petal tip or another tip, or use drop string or a basket weave to decorate
your cake. Your cake must also have a message on it. You can use other
edible decorations too if you want to.
The cake will be evaluated on smoothness of icing, quality and cleanliness of
workmanship, overall design (use of colour, balance and spacing) and skill
with decorating tips and techniques used. The judges are looking at your
decorating skill, and even though they may enjoy your creativity, it is not
necessarily what the judges are looking for.
Your six cupcakes must be related in theme, but not identical, and use at
least two different tips, though this may not necessarily be on an individual
cupcake. You have more leeway with the cupcake decorating and planning
because you only need to use two different tips and it does not say how
many techniques you use. So if you wanted to cover cupcakes with a variety
of flowers with leaves or stems, you could. You can make faces, monsters,
dogs, or a set of food based on some images you have seen. It is easy to use
a bunch of different tips if you are creative. If you plan to use orange as your
theme colour instead, how would you do that? Cupcake designs can also
include other edible decorations.
150 Cake Decorating Basics Reference and Activity Manual Unit Three: Fun with Fondant
Cupcakes will be evaluated on quality and cleanliness of workmanship, overall
design (use of colour, balance and spacing) skill with decorating tips.
Plan your Achievement Day cake and cupcakes. Start with the recipe(s) you
would like to use, and think about the size and shape of cake you want to
bake and decorate.
Sketch the cake and cupcakes, noting the tips you will use, their sizes, the
different techniques, if there are any other edible decorations you will use
and how.
Share your cake and cupcake plans with your group and ask for feedback
about your ideas. Make changes if you think they will improve the design or
help you better meet the Achievement Day requirements.

Cake Decorating Basics Reference and Activity Manual Unit Three: Fun with Fondant 151
Activity 37: Optional Practice Cake and Cookies for Achievement Day (2 or more hours)
You may want to practice your cake and cupcakes before Achievement Day.
You do not have to, but if you are not sure of the design, cake recipe or
need extra practice with any of the techniques you plan to use, take this
opportunity to make these before your final cake and cupcakes for
Achievement Day.
Supplies
• Refer to your cake sketches and notes (Activity 24)
Directions
1. Photograph your cake and cookies and prepare cake journals for them.
2. Ask family or friends for feedback about the designs and themes.
3. Look for ways you can improve before Achievement Day. Practice the
techniques you plan to use.

152 Cake Decorating Basics Reference and Activity Manual Unit Three: Fun with Fondant
Achievement Day Tips
Remember your Record Book needs to be complete. That means all your
cake journals must have photographs printed and included, and your notes
should be filled out and detailed. Cake, cupcake and cookie sketches can be
in pencil but you should use pen in the rest of your Record Book.
Include a page about your community involvement cake, cupcakes or
cookies. In your binder that has your record book, include recipes, websites
and images that you have collected over the project.
If you are making your cake or cookies ahead of time, freeze them so they
do not spoil before Achievement Day.
Be sure you have the correct size cake boards and cover them. Be sure the
cake board is clean and tidy.
Use your practice board before you start piping on the cake or cookies.
For your cookies, make a dozen or more and decorate them all using your theme.
Select the six cookies you think are best if you were the judge. Use those.
Keep extra fondant, your tips and tinted icing in case you need to do any
touchups after the cake and cookies are transported to Achievement Day.
Carefully transport your cake and cookies to Achievement Day. Check to see
if there were any accidents that need touch ups.

Cake Decorating Basics Reference and Activity Manual Unit Three: Fun with Fondant 153
Resources You May Find Helpful
(Most are in addition to those noted at the back of Unit One and Two
Manuals and Activity Guides. Refer to those guides for piping and basic cake
decorating techniques.)
Cake Decorating with the Kids: 30 modern cakes and bakes for all the family
to make, Jill Collins and Natalie Saville, A David and Charles Book, F & W
Media International, Ltd., Cincinnati, 2012.
The Complete Photo Guide to Cake Decorating, Autumn Carpenter, Creative
Publishing International, Inc., 2012.
The Contemporary Cake Decorating Bible: Over 150 Techniques and 80
stunning projects, Lindy Smith, A David and Charles Book, F & W Media
International, Ltd., Cincinnati, 2011.
my first cupcake decorating book., CICO kids, New York, 2012.
The Essential Guide to Cake Decorating, Jane Price editor, Murdoch Books, 2001.
Wedding Cakes You Can Make: Designing, Baking and Decorating the Perfect
Wedding Cake, Dede Wilson, Wiley Publishing Inc., New Jersey, 2005.
http://www.youtube.com/watch?v=xgTurewJSKg
http://www.craftsy.com/classes/cake-decorating
http://www.monkeysee.com/categories/46-baking-and-desserts
http://cakecentral.com
http://sugarsweetcakesandtreats.blogspot.ca
http://baking911.com

154 Cake Decorating Basics Reference and Activity Manual Unit Three: Fun with Fondant
Here are a few places to look for ideas:
http://www.thesweetlife.com
http://www.mcgreevycakes.com
Creative Cookies: Delicious Decorating for Any Occasion, Toba Garrett,
Sterling Publishing Co., Inc., 2001.
Cake Decorating Basics Reference and Activity Manual Unit Three: Fun with Fondant 155
Bibliography
Cake Decorating Basics: Techniques and tips for creating beautiful cakes,
Rachel Brown, New Holland Publishers (UK) LTD., London, 2007.
Cake decorating for the first time, Jaynie Maxfield, Sterling Publishing Co.,
Inc., New York, 2003.
Cake Decorating Tricks: Clever ideas for creating fantastic cakes, Sue
McMahon, New Holland Publishers (UK) Ltd., London, 2009.
Cake Decorating with the Kids: 30 modern cakes and bakes for all the family
to make, Jill Collins and Natalie Saville, A David and Charles Book, F & W
Media International, Ltd., Cincinnati, 2012.
The Complete Photo Guide to Cake Decorating, Autumn Carpenter, Creative
Publishing International, Inc., 2012.
The Contemporary Cake Decorating Bible: Over 150 Techniques and 80
stunning projects, Lindy Smith, A David and Charles Book, F & W Media
International, Ltd., Cincinnati, 2011.
Creative Cookies: Delicious Decorating for Any Occasion, Toba Garrett,
Sterling Publishing Co., Inc., 2001.
my first cupcake decorating book., CICO kids, New York, 2012.
http://whatscookingamerica.net/PegW/Fondant.htm
http://baking911.com/learn/baked-goods/chocolate/types/ganache
www.wilton.com
http://sugarsweetcakesandtreats.blogspot.ca/2010/05/covering-cake-in-
ganache.html


3830 Thatcher Avenue Saskatoon, Saskatchewan S7R 1A5
306-933-7727 • 306-933-7730 (fax) www.4-h.sk.ca • [email protected]