35004729 k 01000
TRANSCRIPT

3500
4729
.04
www.schneider-electric.com
PL7 Micro/Junior/ProInstallation manual 07/2008 eng

2
Document Set
Document Set
Document set Further details on installing the different tools (converters, communication drivers, etc.) are given on the documentation CD-ROM supplied with the software.
35004729.04 07/2008 3

Document Set
4 35004729.04 07/2008
Table of Contents
About the Book . . . . . . . . . . . . . . . . . . . . . . . . . . . . . . . . . . . . . . .7
Chapter 1 Software implementation . . . . . . . . . . . . . . . . . . . . . . . . . . . . . . .9Introduction . . . . . . . . . . . . . . . . . . . . . . . . . . . . . . . . . . . . . . . . . . . . . . . . . . . . . . 9Terminal configuration. . . . . . . . . . . . . . . . . . . . . . . . . . . . . . . . . . . . . . . . . . . . . 10How to perform a first installation of PL7. . . . . . . . . . . . . . . . . . . . . . . . . . . . . . . 12How to Register PL7 . . . . . . . . . . . . . . . . . . . . . . . . . . . . . . . . . . . . . . . . . . . . . . 14How to install PL7 updates and upgrades. . . . . . . . . . . . . . . . . . . . . . . . . . . . . . 16How to configure the Uni-telway driver with a modem in Windows XP and Windows VISTA . . . . . . . . . . . . . . . . . . . . . . . . . . . . . . . . . . . . . . . . . . . . . . . . . 18How to run PL7 . . . . . . . . . . . . . . . . . . . . . . . . . . . . . . . . . . . . . . . . . . . . . . . . . . 21How to uninstall PL7 . . . . . . . . . . . . . . . . . . . . . . . . . . . . . . . . . . . . . . . . . . . . . . 22How to Transfer PL7 User Rights from One Workstation to Another . . . . . . . . . 23
Chapter 2 Hardware implementation . . . . . . . . . . . . . . . . . . . . . . . . . . . . .25Connections . . . . . . . . . . . . . . . . . . . . . . . . . . . . . . . . . . . . . . . . . . . . . . . . . . . . 25
35004729.04 07/2008 5

6 35004729.04 07/2008

About the Book
At a Glance
Document Scope This manual is used to install the basic PL7 software.
Validity Note This document takes into account the changes implemented in PL7 V4.5.
User Comments We welcome your comments about this document. You can reach us by e-mail at [email protected]
35004729.04 07/2008 7

About the Book
8 35004729.04 07/2008

35004729.04 07/2008
1
Software implementationIntroduction
Aim of this chapter.
This chapter introduces implementation of PL7 operations.
What is in this Chapter?
This chapter contains the following topics:
Topic Page
Terminal configuration 10
How to perform a first installation of PL7 12
How to Register PL7 14
How to install PL7 updates and upgrades 16
How to configure the Uni-telway driver with a modem in Windows XP and Windows VISTA
18
How to run PL7 21
How to uninstall PL7 22
How to Transfer PL7 User Rights from One Workstation to Another 23
9

Software implementation
Terminal configuration
Definition The configuration type determines the level of expected performance. Performance of PL7 software can be affected by simultaneously opening several windows, accessing large quantities of animated data, or using a large application.
Required operating system
PL7 V4.5 software requires one of the following operating systems to be present on the terminal:
Windows XP ProfessionalWindows VISTA Professional Edition 32.
Minimum configuration
The following table provides the minimum terminal characteristics necessary to implement PL7 software, once Windows is installed on the terminal:
Note: Certain functions are unavailable using the Windows VISTA Professional Edition 32 system. For more details, refer to the relevant chapters.
Elements Characteristics
System Windows XP: Pentium 266 MHz processorWindows VISTA: 1 GHz 32-bit processor
RAM Windows XP: 128 MbWindows VISTA: 512 Mb
Drives Hard disk 80 Mb for the software25 Mb for temporary directories
CD-ROM
Ports COM serial port available for connection to the PLC (COM 1 to COM 4)Parallel port for printer (LPT1 to LPT4)
Peripheral A mouse or pointer compatible with Windows technology
Monitor 800*600 minimum
10 35004729.04 07/2008
Software implementation
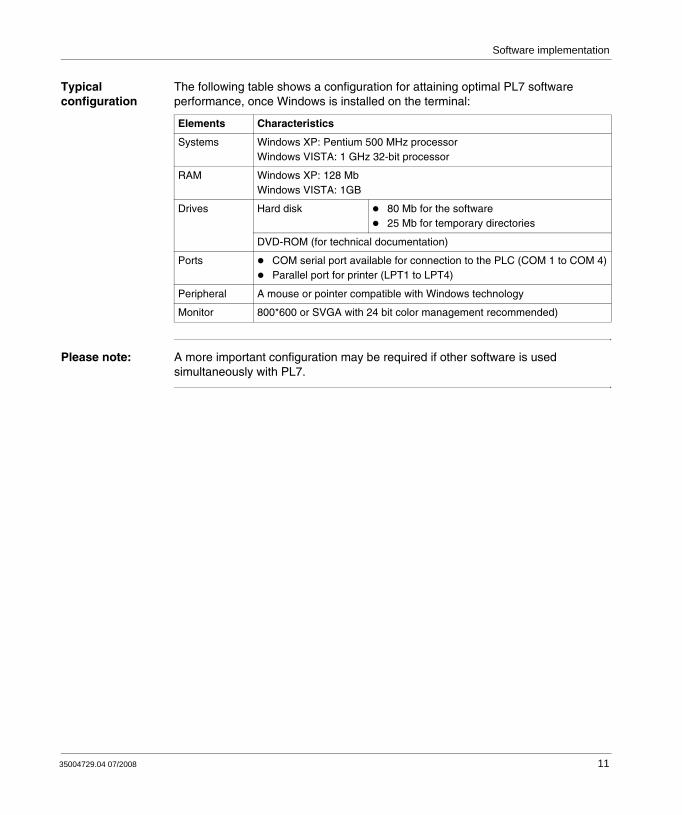
Typical configuration
The following table shows a configuration for attaining optimal PL7 software performance, once Windows is installed on the terminal:
Please note: A more important configuration may be required if other software is used simultaneously with PL7.
Elements Characteristics
Systems Windows XP: Pentium 500 MHz processorWindows VISTA: 1 GHz 32-bit processor
RAM Windows XP: 128 MbWindows VISTA: 1GB
Drives Hard disk 80 Mb for the software25 Mb for temporary directories
DVD-ROM (for technical documentation)
Ports COM serial port available for connection to the PLC (COM 1 to COM 4)Parallel port for printer (LPT1 to LPT4)
Peripheral A mouse or pointer compatible with Windows technology
Monitor 800*600 or SVGA with 24 bit color management recommended)
35004729.04 07/2008 11
Software implementation
How to perform a first installation of PL7
Introduction The procedure for a first-time installation simply involves installing PL7 without searching for a version already installed on the terminal.
12 35004729.04 07/2008

Software implementation
How to install PL7
This procedure describes the different steps for installing PL7 software.
Enter the product installation code (*)then confirm with Ok
(a maximum of 3 entry attempts are allowed)
Pos
sibi
lity
of m
odify
ing
info
rmat
ion
prov
ided
by
clic
king
Pre
vio
us
common to all installations
Standard
Customized
Insert CD-ROM
Open the Setup.exe file
Confirm at the welcome screenwith Next
Choose the software languagethen confirm with Next
Define an installation path then confirm with Next
Confirm the information provided by clicking Next
Select the components that you wish to install then confirm with Next
Define different installation paths then confirm with Next
Confirm the information provided by clicking Next
Exit the installation program by clickingReturn to Windows
Register your detailsthen confirm with Next
Selectthe type of installation
(*) The installation code is located on the adhesive label on the back of the PL7programming software CD-ROM.
35004729.04 07/2008 13

Software implementation
How to Register PL7
At a Glance To obtain permanent user rights for the software, you must register it with Schneider Electric. Once the software is installed, you have 21 days to register.
14 35004729.04 07/2008

Software implementation
Procedure This procedure describes the different steps in registering PL7.
Select Authorize this PC then confirm with Next
Telephone
Web
Start PL7 or the Registration Tool
Accept with Yes
Confirm at the welcome screen with Next
Enter the required fields, the serial number and the commercial reference (*) and
confirm with Next
Telephone Schneider Electric to obtain the activation code, then
click OK
Wait for the response from Schneider Electric and restart PL7 or the Registration tool
Enter the activation code and confirm with Next
Do you have theactivation code?
Select Enter the code received
then confirm with Next
Select a registration method: By telephone, by fax, by e-mail or via the Web then confirm with Next
Telephone, Fax, E-mail
Enter the required fields, the serial number and the commercial reference marked on the installation CD-ROM box, and confirm
with Register
Enter the fax number to which the response is to be sent and confirm with
Next.A fax containing your
data is generated in text format: Send this fax
Enter the e-mail address to which the response is to be sent, and confirm
with Next.An e-mail containing your data is sent automatically to the specified address.
Fax
Quit the procedure by clicking Finish
Yes
No
(*) These numbers are marked on the label inside the box containing the softwareCD-ROMs.
35004729.04 07/2008 15

Software implementation
How to install PL7 updates and upgrades
Introduction In order to install updates or upgrades of PL7 V4.5 packages, there must be a coherent earlier version already installed on the terminal.
Note: If this is not the case, reinstall the earlier version (the software package from the first installation).
16 35004729.04 07/2008

Software implementation
How to install PL7
This procedure describes the different steps for installing PL7 software.
Enter the product installation code (1)then confirm with Ok
(a maximum of 3 entry attempts are allowed)
No
Insert CD-ROM
Confirm at the welcome screen with Next
Insert CD ROM or the firstdisk of the previous version (2)
then confirm with Next
Reinsert CD-ROM for updating/upgrading
Continue installation procedure(see grayed-out part in the first installation)
Change inoperating system
Open the Setup.exe file
Choose the software languagethen confirm with Next
Yes
Old versionexists on the
terminal
Yes
Previousversion (2)
< V3.0
No Yes
Reinstall versionV3.x (2)
No
(2): First installation software package
(1) The installation code is located on the adhesive label on the back of the PL7 programmingsoftware CD-ROM.
35004729.04 07/2008 17
Software implementation
How to configure the Uni-telway driver with a modem in Windows XP and Windows VISTA
Introduction This procedure can configure the Uni-telway connection driver as a function of the characteristics of the final PLC takeover.
Note: For more information on the configuration dialog boxes of the Uni-telway driver, consult the Drivers manual available on the CD-ROM documentation provided with the PL7 software.
18 35004729.04 07/2008

Software implementation
How to configure the Uni-telway driver
The following table describes the procedure to configure the Uni-telway driver.
Step Action
1 Carry out the command Start up → Program.
2 Select the Modicon Telemecanique group.
3 Select XWAY Driver Manager.
4 Click on the Uni-telway tab.
5 Click on the Configuration button.Results: The dialog box below appears:
OK
UNITELWAY Configuration
Station ID
Target Station:
Cancel Apply
[Default]
Add Modify Suppress
Port Password Ph
Station List
[Default] COM 1
35004729.04 07/2008 19

Software implementation
6 Click on AddResult: The dialog box below appears:
7 From the Uni-telway tab, configure the communication port (COM Port) field.
8 Click on Ok
Step Action
Link Parameters
Station ID
COM Port
UNI-TELWAY Slave Address
Modem Communication
NumbersBase
HayesTel No.Password
AdvancedUni-telway
OK
Use Modem
Cancel
Station Parameters
[Default]
COM 1
1 3
20 35004729.04 07/2008

Software implementation
How to run PL7
Introduction This function allows the user to log on to PL7.
How to log on to PL7
The following table describes the procedure for logging on to PL7.
Step Action
1 Perform the Start → Programs command.
2 Select the Modicon Telemecanique group.
3 Select the software icon.
SET
FPWFPW
OS
Access Security ManagementOS_LOADER PL7 Pro V4.5PL7 Pro V4.5Readme PL7 Pro V4.5XWAY Driver Manager
35004729.04 07/2008 21

Software implementation
How to uninstall PL7
Introduction This operation deletes all PL7 software components from the terminal. However, it does not affect:
application files,Elements shared by other software (PL7 sys.ini, Config.sys, PL7user, PL7temp,…).
How to uninstall PL7
Uninstallation only deletes selected software. Carry out the following operations for each package to be deleted.
Step Action
1 Execute the command Start → Parameters → Configuration panel → Add/Delete Programs.ConCCcc
2 Select the Install/uninstall tab.
3 Select PL7•••V4.•.
4 Select Add/Delete.
5 Select the elements to be uninstalled (kernel and/or common components),
6 Select OK and confirm with Yes,
7 Confirm the information screen with OK.
22 35004729.04 07/2008

Software implementation
How to Transfer PL7 User Rights from One Workstation to Another
Introduction This function is used to transfer user rights from a source terminal to a new terminal (destination), thus enabling PL7 to be launched on it.
The transfer can be carried out using:
A 3 1/2" floppy disk,A removable disk (USB port),A network.
Note: Once the access rights have been transferred, the source terminal can no longer use PL7 unless you save again or make a reverse transfer.Following transfer of the rights to floppy or removable disk, if these rights are altered before being transferred to the destination terminal, contact Schneider Electric for a new registration.
35004729.04 07/2008 23

Software implementation
How to Perform a Transfer
This procedure describes the different steps for transferring user rights.
Start the Registration Tool
Confirm at the welcome screen with Next
Select Authorization Transfer and confirm with Next
Select the transfer method: Network, disk,(3 1/2" or removable disk with USB port) and confirm with Next
(for a disk transfer, insert a blank disk)
Enter the name of the target terminal and share the PL7
directory on this terminal (with read rights), then
confirm with OK
Using a disk Using a network
On the target terminal, run the Registration Tool
Confirm at the welcome screen with Next
Select Authorization Transfer and confirm with Next
On the target terminal, note the PC identifierOn the current terminal, enter the same identifier and confirm with
OK
On the target terminal, insert the disk containing the rights, and
select Transfer authorization to the terminal from disk
Using a disk Using a network
On the target and current terminals, quit the procedures by clicking Finish
Insert the removable disk into the USB
port
Using a removable disk
Choose drive (A: or the letter associated with the
removable disk)
24 35004729.04 07/2008

35004729.04 07/2008
2
Hardware implementationConnections
Introduction This module deals with the connection of the terminal to the PLC via a cable. A description of how to make other specific connections to the terminal (monitor, keyboard, mouse, printer, mains) is provided in the manufacturer documentation.
Other modes of connections are possible, such as connections via UNITELWAY bus or Modem (via the telephone network).
PC - PLC connection
To connect a PC, you will require the 2.5 m TSX PCX 1031 or TSX CUSB 485 and TSX CRJ MD25 cables, supplied with new software packages (not supplied with update or upgrade variants).
Note: The TSX PCX 1031 cable requires the use of the UNITELWAY driver of at least version:
V1.5 (for Windows XP Professionnel)V2.0 (for Windows VISTA Professionnel Edition 32).
Mains MainsMains
TSX PCX 1031 / TSX C USB 485 / TSX CRJ MD25
Serial linkconnector
TSX PCX 1031 / TSX C USB 485 / TSX CRJ MD25
25

Hardware implementation
26 35004729.04 07/2008